Embed Size (px)
Citation preview

Teaching AS Biology
Practical Skills
Teaching AS Biology Practical Skills in preparation for 9700 papers 31 and 32
Your attention is drawn to the section on Risk Assessment on page 17 of the Introduction to this booklet, and to the hazards indicated in Appendices 1 and 2. While all effort has been made to ensure that appropriate safety indications are given, CIE accepts no responsibility for the safety of these experiments and it is the responsibility of the teacher to carry out a full risk assessment for each experiment undertaken, in accordance with local rules and regulations. Hazard data sheets should be available from your suppliers.

Contents Introduction 1
Why should I read this booklet? 1 How much teaching time should I allocate to practical work? 1 Can I use the practicals in these booklets in a different order? 1 What resources will I need? 2 Is there a limit to the class size? 2
Why should I teach my students practical skills? 2 Points to consider 2
What are the practical skills required by this course? 4 Summary of each of the seven skills 5
Ways of doing practical work 9 Keeping records 12 How is a practical activity organised? 13 Risk assessment 15
Eye protection 17 AS Skills 18
Teaching students to manipulate, measure and observe 18 Teaching students to present data and record observations 18 Teaching students to analyse, draw conclusions and evaluate 19
Appendix 1 - Designing a practical course for AS 20 Syllabus section A – Cell Structure 21 Syllabus section B – Biological Molecules 21 Syllabus section C – Enzymes 22 Syllabus section D – Cell Membranes and Transport 23 Syllabus section E – Cell and nuclear division 24 Syllabus section F – Genetic Control 24 Syllabus section G – Transport 24 Syllabus section H – Gas Exchange 25 Syllabus Section I – Infectious disease 26 Syllabus Section J – Immunity 26 Syllabus Section K – Ecology 26
Appendix 2 – practicals for which full details are provided 27 Practical 1 - Investigation into size and scale of microscopic tissues 27 Practical 2 - Microscopic observation of cells and tissues 33 Practical 3 - The identification of biological chemicals present in solutions 40 Practical 4 - Investigation of the carbohydrates metabolised by yeast 45 Practical 5 - The effect of pH on enzymes 51 Practical 6 - The effect of inhibitors on enzyme activity 57 Practical 7 - The effect of temperature on membrane permeability in beetroot 62 Practical 8 - Broad bean root tip squash 67 Practical 9 - The extraction of DNA from onions 73 Practical 10 - The effect of wind speed on the rate of transpiration in a leafy shoot 78 Practical 11 - Investigating the role of carbon dioxide in living organisms. 86

1
Introduction
You may have been teaching AS and A level biology for many years or perhaps you are new to the game. Whatever the case may be, you will be keen to ensure that you prepare your students as effectively as possible for their examinations. The use of a well-structured scheme of practical work will certainly help in this ambition. However it can do so much more. Scientists who are thoroughly trained and experienced in practical skills, will have a ‘feel’ for the subject and a confidence in their own abilities that is far greater above those with a purely theoretical background. It is true that there are branches of biology that might be described as purely theoretical but they are in the minority. Essentially, biology is a practical subject and we owe it to our students to ensure that those who pursue science further have the necessary basic practical skills to take forward into their future careers. Furthermore, the basic skills of planning, analysis and evaluation will be of great value to those who pursue non-science careers.
Why should I read this booklet?
Some of you may be wondering why you should need a booklet like this. If your practical skills are of a high order and you feel confident teaching these skills to others, you probably don’t need it; but you might find some of the exercises described in the appendices useful. However, if you are like the majority of us, a little help and support is likely to be appreciated. This booklet aims to provide at least some of this support.
It is designed for the teacher rather than for the student. Its objective is to provide a framework within which the practical skills of teachers can develop and grow. Experience shows that as a teacher’s practical skills grow, so too do the confidence to teach such skills and the time that you will be prepared to spend on teaching practical work.
How much teaching time should I allocate to practical work?
The syllabus stipulates that at least 20% of teaching time should be allocated to practical work. This is in addition to any time the teacher chooses to use for practical demonstrations to illustrate the theory syllabus. This emphasis on practical work is not misplaced. Consider the weighting given to assessment objectives in the syllabus: 24% is allocated to experimental skills and investigations and 30% is allocated to handling, applying and evaluating information. Taken together, 55% of the total award is related to a students’ ability to interpret data, understand how this has been obtained, recognise limitations and suggest explanations; all of which lend themselves to investigative work involving practical experience. If the specific practical papers are considered in isolation, they still represent 23% of the AS and 24% of the A Level award.
In planning a curriculum, teachers should therefore expect to build in time for developing practical skills. If, for example, the time allowed is 5 hours per week over 35 weeks, then a minimum of 1 hour per week should be built into the plan, so that over the year, a minimum of 35 hours is made available. Bearing in mind the emphasis on assessment objectives that related to information handling and problem solving, a minimum of 2 hours per week might be more appropriate, which at 40% of the time is still less than the overall weighting for these assessment objectives.
Can I use the practicals in these booklets in a different order?
It is assumed in these booklets that for A level candidates, the AS work will be taught in the first year of the course, with the A2 work being covered in the second year. If the linear A Level assessment route is used, care should be taken with regard to in the

2
order in which practical exercises are used, as the skills practiced in these booklet are hierarchical in nature, i.e. the basic skills established in the AS booklet are extended and developed in the A2 Level booklet. Thus, students will need to have practiced basic skills using AS exercises before using these skills to tackle more demanding A Level exercises.
The exercises in these booklets are given in syllabus order. A teacher may well decide to use a different teaching sequence, but the point made above, regarding AS/A2 exercises, still applies.
What resources will I need?
For a practical course in A-level Biology to be successful, it is not necessary to provide sophisticated equipment. Some of the more advanced practicals in these booklets may require less easily obtainable equipment, but the vast majority can be performed using the basic equipment and materials in the lab. Alternative ‘low-tech’ exercises are also provided where possible.
A list of the basic resources required for assessment may be found in the syllabus. A more detailed list may be found in the booklet ‘CIE Planning For Practical Science in Secondary Schools’, Appendix B.
Is there a limit to the class size?
It is true that there is a limit to the class size that is manageable in a laboratory situation, particularly when students may be moving about. The actual size may be determined by the size of the room, but as a general guide, 15 - 20 students is the maximum that one person can reasonably manage, both for safety reasons and so that adequate support can be given to each student. Larger numbers can more easily and safely be accommodated with input from another person with appropriate qualifications / experience or splitting the class into two groups for practical lessons.
Why should I teach my students practical skills?
Although this section is likely to be read once only, it is arguably the most important; for, if it convinces readers that practical work is an essential part of biology as a science and underpins the whole teaching programme, the aim of publishing this booklet will have been achieved.
Points to consider
• It’s fun! The majority of students thoroughly enjoy practical work. The passion that many scientists have for their subject grew out of their experiences in the practical classes. Students who enjoy what they are doing are likely to carry this enthusiasm with them and so be better motivated.
• Learning is enhanced by participation as students tend to remember activities they have performed more easily, thus benefiting their long-term understanding of the subject. Students who simply memorise and recall facts find it difficult to apply their knowledge to an unfamiliar context. Experiencing and using practical skills helps develop the ability to use information in a variety of ways, thus enabling students to apply their knowledge and understanding more readily.
• The integration of practical work into the teaching programme quite simply brings the theory to life. Teachers often hear comments from students such as “I’m glad we did that practical because I can see what the book means now.” and “It’s much better doing it than talking about it.”.

3
• Chemistry, physics and biology are by their very nature, practical subjects – both historically and in the modern world. The majority of students who enter careers in science need to employ at least basic practical skills at some time in their career. For all students, whether they regard themselves as scientists or non-scientists, the skills that they develop by doing practical work, hand-eye coordination skills, communication, numeracy and problem solving skills, will prove to be useful transferable skills throughout their future life.
• A practical course develops many cross-curricular skills including literacy, numeracy, ICT and communication skills. It develops the ability to work both in groups and independently and with confidence. It enhances critical thinking skills and it requires students to make judgements and decisions based on evidence, some of which may well be incomplete or flawed. It helps to make students more self-reliant and less dependent on information provided by the teacher.
• The skills developed are of continued use in a changing scientific world. While technological advances have changed the nature of practical procedures, the investigative nature of practical science is unchanged. The processes of observation, hypothesis formation, testing, analysis of results and drawing conclusions will always be the processes of investigative science. The ability to keep an open mind in the interpretation of data and develop an appreciation of scientific integrity is of great value both in science and non-science careers.
• Practical work is not always easy and persistence is required for skills and confidence to grow. Students often relish this challenge and develop a certain pride in a job well done.
• The more experience students have of a variety of practical skills, the better equipped they will be to perform well in the practical exams, both in terms of skills and confidence. While it could be argued that the required skills could be developed for papers 31 and 32 simply by practising past-papers, the all-round confidence in practical ability will be greatly enhanced by a wider experience. Similarly for paper 5, while it might be argued that planning, analysis and evaluation could be taught theoretically, without hands-on experience of manipulating their own data, putting their plans into action and evaluating their own procedures and results, students will find this section difficult and will be at a distinct disadvantage in the examination. Those students who can draw on personal experience, and so are able to picture themselves performing the procedure they are describing, or recall analysing their own results from a similar experiment are much more likely to perform well than those with limited practical skills.

4
What are the practical skills required by this course?
This course addresses seven practical skills that contribute to the overall understanding of scientific methodology. In a scientific investigation these would be applied in the following sequence.
1 Planning the experiment
2 Setting up / manipulating apparatus
3 Making measurements and observations
4 Recording and presenting observations and data
5 Analysing data and drawing conclusions
6 Evaluating procedures
7 Evaluating conclusions
The syllabus shows how these seven skills are assessed and the structure is common to all three sciences. The emphasis of the AS syllabus is on developing an understanding and practice of scientific procedures, the collection of data, analysis and drawing conclusions. It also starts to develop critical evaluation of procedures by suggesting improvements to experimental procedures. In general students find the performance of practical procedures and the collection of data more accessible than analysis, whilst evaluation is least readily accessed. To enable access to these more demanding skills, students need to understand why an experimental procedure is carried out in a particular way so that they can recognise sources of error or limitations which could affect the reliability of their results. Students will not be able to evaluate until they can critically review a practical procedure.
The A2 syllabus builds upon the skills developed in AS and its emphasis is on the higher level skills of planning, analysis and evaluating. In order to plan effectively, students need to be able to evaluate procedures and critically assess results. This is best achieved by the performance of practical exercises starting in AS with relatively straightforward and familiar contexts and developed in A2 by the use of more complex procedures and less familiar contexts. Data analysis again develops from AS into more complex treatments so that students need to be given opportunities to gather suitable data and perform the appropriate manipulations. The evaluation of conclusions and assessing procedures are very high order skills. Students who have not had sufficient opportunity to plan and trial their own investigations will find these skills difficult. Students are not expected to be able to plan perfectly, but to recognise weaknesses and make reasonable suggestions for improvement. The best learning tool to develop these skills is to devise a plan, carry out the investigation and then assess how well the planned procedure worked. The syllabus gives detailed guidance on the expected skills and learning outcomes.
In summary, as the syllabus clearly shows, skills 2-6 listed above will be assessed at AS level in papers 31 and 32. Skills 1 and 7 will only be assessed at A level in paper 5, which will also take skills 5 and 6 to a higher level.
The above list shows the seven skills in the order in which they would be used in an extended investigation. It is not suggested, nor would it be wise, to teach these skills in this order. Students who are new to practical work will initially lack the basic manipulative skills, and the confidence to use them. It would seem sensible, therefore, to start practical training with skill 2, initially with very simple tasks and paying attention to the establishment of safe working practices.
Once a measure of confidence in their manual dexterity has been established, AS students can move on to exercises that require skills 3 and 4 to be included. Extensive

5
experience in carrying out practical procedures allows students to gain awareness of appropriate quantities and become more organised in time management and the recording of data as it is collected.
It is likely that skill 6, Evaluating Procedures, will be the most difficult to learn at AS level. Critical self-analysis does not come easily to many people. ‘My experiment worked well’ is a frequent and inappropriate response. If students are to master this skill, they need to develop an appreciation of reliability and accuracy inherent in the equipment and procedure they are using. Only then will they be able to identify anomalous results, or results which fall outside of the ‘range of uncertainty’ intrinsic in the choice of apparatus used and so are considered to be inaccurate. Exercises with less reliable/accurate outcomes can be used to provide more scope for the evaluation of procedural, technique or apparatus errors.
Planning is arguably the most demanding of the seven skills. For it to be effective, students need to be very well grounded in skills 2-6, so that they can anticipate the different stages involved in the task, and can provide the level of detail required. It is for this reason that planning skills are not assessed at AS level but form part of the A2 assessment in Paper 5. Unless students use apparatus they do not develop an understanding of how it works and the sort of measurements that can be made using particular sorts of apparatus. Candidates cannot be taught to plan experiments effectively unless, on a number of occasions, they are required:
• to plan an experiment;
• to perform the experiment according to their plan;
• to evaluate what they have done.
The evaluation of conclusions, skill 7, is done by comparison of the outcome of an exercise with the predicted outcome, and so is also an A2 skill. It should be taught and practised as part of the planning exercises.
Summary of each of the seven skills
Full details of the requirements for each of these skills may be found in the Practical Assessment section of the syllabus. What follows below is a brief summary of the skills involved.
1 Planning
• Defining the problem Students should be able to use information provided about the aims of the investigation, or experiment, to identify the key variables. They should use their knowledge and understanding of the topic under consideration to make a quantitative, testable, prediction of the likely outcome of the experiment.
• Methods The proposed experimental procedure should be workable. It should, given that the apparatus is assembled appropriately, allow data to be collected without undue difficulty. There should be a description, including diagrams, of how the experiment should be performed and how the key variables are to be controlled. Equipment, of a level of precision appropriate for the measurements to be made, and quantities to be used should be specified. The use of control experiments should be considered.
• Risk assessment Candidates should be able to carry out a simple risk assessment of their plan, identifying areas of risk and suggesting suitable safety precautions to be taken.

6
• Planning for analysis, conclusions and evaluation Students should be able to describe the main steps by which their results would be analysed in order that that valid conclusions might be drawn. This may well include the generation of a results table and the proposal of graphical methods to analyse data. Also, they should propose a scheme for the interpretation and evaluation of the results themselves, and of the experimental procedure employed in obtaining those results. There should be an indication of how the outcomes of the experiment would be compared with the original hypothesis.
2 Setting up / manipulating apparatus
It is important that students are allowed sufficient time and opportunity to develop their manipulative skills to the point where they are confident in their approach to experimental science. They must be able to follow instructions, whether given verbally, in writing or diagrammatically, and so be able to set up and use the apparatus for experiments correctly.
3 Making measurements and observations
• Measuring/observing Whilst successfully manipulating the experimental apparatus, it is crucial that students are able to make measurements with accuracy and/or to make observations with clarity and discrimination. Accurate readings of meters or burettes and precise descriptions of colour changes and precipitates will make it much easier for students to students to draw valid conclusions, as well as scoring more highly in the test.
• Deciding on what measurements/observations to make Time management is important, and so students should be able to make simple decisions on the number and the range of tests, measurements and observations that can be made in the time available. For example, if the results of the first two titrations are in good agreement, there is no need to carry out a third.
Students need to be able to make informed decisions regarding the appropriate distribution of measurements within the selected range, which may not always be uniform, and the timing of measurements made within the experimental cycle. They should also be able to identify when repeated measurements or observations are appropriate.
The strategies required for identifying and dealing with results which appear anomalous should be practised.
4 Recording and presenting observations and data
An essential, but frequently undervalued, aspect of any experimental procedure is the communicating of the results of the procedure to others in a manner that is clear, complete and unambiguous. It is vital that students are well practised in this area.
• The contents of the results table The layout and contents of a results table, whether it is for recording numerical data or observations, should be decided before the experiment is performed. ‘Making it up as you go along’ often results in tables that are difficult to follow and don’t make the best use of space. Space should be allocated within the table for any manipulation of the data that will be required.

7
• The column headings in a results table The heading of each column must be clear and unambiguous. In columns which are to contain numerical data, the heading must include both the quantity being measured and the units in which the measurement is made. The manner in which this information is given should conform to ‘accepted practice’.
• The level of precision of recorded data It is important that all data in a given column is recorded to the same level of precision, and that this level of precision is appropriate for the measuring instrument being used.
• Display of calculations and reasoning Where calculations are done as part of the analysis, all steps of the calculations must be displayed so that thought processes involved in reaching the conclusion are clear to a reader. Similarly, where conclusions are drawn from observational data, the key steps in reaching the conclusions should be reported and should be clear, sequential and easy to follow.
• Significant figures Students should be aware that the number of significant figures to which the answer is expressed shows the precision of a measured quantity. Therefore, great care should be taken with regard to the number of significant figures quoted in a calculated value. The general rule is to use the same number of significant figures as (or at most one more than) that of the least precisely measured quantity.
• Data layout Students should be able to make simple decisions concerning how best to present the data they have obtained, whether this is in the form of tabulated data or as a graph. When plotting graphs they should be able to follow best practice guidelines for choosing suitable axis scales, plotting points and drawing curves or lines of best fit. In drawing tables they should be able to construct a table to give adequate space for recording data or observations.
5 Analysing data and drawing conclusions
This skill requires students to apply their understanding of underlying theory to an experimental situation. It is a higher-level skill and so makes a greater demand on a student’s basic understanding of the biology involved. Even when that understanding is present, however, many students still struggle. The presentation of a clear, lucid, watertight argument does not come naturally to most people and so much practice in this area is recommended.
• Interpretation of data or observations Once data has been presented in the best form for analysis of the results of the experiment, the student should be able to describe and summarise any patterns or trends shown and the key points of a set of observations. Further values such as the gradient of a graph may be calculated or an unknown value found, for example from the intercept of a graph.
• Errors Students should be used to looking at an experiment, assessing the relative importance of errors and where appropriate, expressing these numerically. Students should be aware of two kinds of error.
i The ‘error’ that is intrinsic in the use of a particular piece of equipment. Although we refer to this as an equipment error, we really

8
mean that there is a ‘range of uncertainty’ associated with measurements made with that piece of equipment. This uncertainty will be present no matter how skilled the operator might be.
ii Experimental error, which is a direct consequence of the level of competence of the operator or of the effectiveness of the experimental procedure.
• Conclusions Students should learn to use evidence to support a given hypothesis, to draw conclusions from the interpretation of observations, data or calculated values and to make scientific explanations of their data, observations and conclusions. Whatever conclusions are drawn, they must be based firmly on the evidence obtained from the experiment. At the highest level, students should be able to make further predictions and ask appropriate questions based on their conclusions.
6 Evaluating procedures
Arguably, this is one of the most important, and probably one of the most difficult skills for a student to develop. In order for the evaluation to be effective, students must have a clear understanding of the aims and objectives of the exercise, otherwise they will not be able to judge the effectiveness of the procedures used. They must be able to evaluate whether the errors in the data obtained exceed those expected due to the equipment used. If this is the case, they then need to identify those parts of the procedure which have generated these excess errors, and suggest realistic changes to the procedure which will result in a more accurate outcome. Students should also be able to suggest modifications to a procedure to answer a new question.
The evaluation procedure may include: i the identification of anomalous values, deducing possible causes of these
anomalies and suggesting appropriate means of avoiding them,
ii an assessment of the adequacy of the range of data obtained,
iii an assessment of the effectiveness of the measures taken to control variables,
iv taking an informed judgement on the confidence with which conclusions may be drawn.
7 Evaluating conclusions
This is also a higher-level skill, which will demand of the student a thorough understanding of the basic theory that underpins the science involved.
The conclusions drawn from a set of data may be judged on the basis of the strength or weakness of any support for or against the original hypothesis. Students should be able to use the detailed scientific knowledge and understanding they have gained in theory classes in order to make judgements about the reliability of the investigation and the validity of the conclusions they have drawn.
Without practice in this area, students are likely to struggle. In order to increase the confidence in drawing conclusions, it is recommended that practical exercises, set within familiar contexts, be used to allow students the opportunity to draw conclusions, make evaluations of procedure and assess the validity of their conclusions.
In the examination, students may be required to demonstrate their scientific knowledge and understanding by using it to justify their conclusions.

9
Ways of doing practical work
Science teachers should expect to use practical experiences as a way to enhancing learning. Practical activities should form the basis on which to build knowledge and understanding. They should be integrated with the related theory, offering opportunities for concrete, hands-on learning rather than as stand-alone experiences. In planning a scheme of work it is important to consider a mosaic of approaches that include those that allow students to participate in their own learning.
• Some practical activities should follow the well established structure that includes a detailed protocol to follow. Such well-structured learning opportunities have a vital role to play in introducing new techniques, particularly in rapidly developing fields such as biotechnology. In these new areas of science, teachers will often find themselves leading practical work that they have not had the chance experience themselves as students.
• Other practical activities should offer the students the opportunity to devise their own methods or to apply to solving a problem the methods that they have been taught. The excitement generated by exposure to “new” and unfamiliar techniques provides a stimulus to engage a student’s interest and challenge their thinking.
Practical activities may be used as a tool to introduce new concepts – for example, introducing catalysis by experimentation, followed up by theoretical consideration of the reasons for the unexpected results obtained. On other occasions, practical work can be used to support and enhance the required knowledge and understanding – for example in building upon a theoretical consideration of the limiting factors of photosynthesis with a series of practicals investigating the effect of light intensity and hydrogen carbonate concentration on photosynthesis in water weed. In all cases, learning will be enhanced most effectively by practical work that encourages students to be involved, to think, to apply and use their knowledge, understanding and skills.
Practical work does not always have to be laboratory based. In classrooms, the use of models, role play and paper cut-outs to simulate processes can be equally valuable. Field studies also contribute greatly to a students’ appreciation of Biology and their motivation and enjoyment of the subject. No amount of reading or viewing videos can substitute for being exposed to an environment and the organisms living there. Even a carefully managed environment like a school lawn represents a challenge to recognise the species and to understand how they can survive.
There are a variety of strategies by which practical work can be integrated into a scheme of work. Teachers should use a variety of methods, enhancing a variety of subject specific skills and simultaneously developing a variety of transferable skills that will be useful throughout their future professional lives. Some of the ways of delivering practical work also enable the teacher to interact on a one-to-one basis with individual students. This allows a teacher to offer support at a more personal level and develop a greater awareness of an individual students needs.
Your choice of the specific strategy to use will depend on such issues as class size, laboratory availability, the availability of apparatus, the level of competence of your students, availability and expertise of technical support, the time available, your intended learning outcomes for the activity and safety considerations. The following are some possible strategies for delivery of practical work.

10
• Teacher demonstrations
These require less time than a full class practical, but give little opportunity for students to develop manipulative skills or gain familiarity with equipment. Careful planning can give opportunity for limited student participation. Teacher demonstrations are a valuable way of showing an unfamiliar procedure at the start of a practical session, during which students go on to use the method.
Considerations in choosing to do a demonstration might include:
i Safety – some exercises carry too high a risk factor to be performed in groups.
ii Apparatus – complicated procedures or those using limited resources
iii Time – demonstrations usually take less time
iv Outcome – some results are difficult to achieve and may be beyond the skill level of most of the students. A failed experiment may be seen as a waste of time.
v Students’ attention – a danger is that the attention of some students will drift.
vi Manipulative experience – the teacher gets experience, the students’ don’t.
There are many good reasons for the teacher performing a demonstration but do be aware that most students have a strong preference for hands-on experimentation. So, where possible, do let them do it!
• Group work
Whole class practical sessions. These have an advantage in terms of management as all the students are doing the same thing. Students may be working individually, in pairs or in small groups. Integrating this type of practical is straightforward as lessons beforehand can be used to introduce the context and following lessons can be used to draw any conclusions are develop evaluation. Where specialised equipment or expensive materials are in short supply this approach may not be feasible.
Small group work. This can provide a means of utilising limited resources or managing investigations that test a range of variables and collect a lot of measurements. Although the same procedure may be performed, each student group collects only one or a few sets of data which are then pooled. For example, if five concentrations of the independent variable are being tested, each of which need to be measured at two minute intervals for thirty minutes, then a group of five students can each test one concentration. In biology, field studies also lend themselves to group activities as a lot of data has to be collected in a short period of time. The individual student has the opportunity to develop their subject-specific skills. Part of the role of the teacher is to monitor and maintain safety and also to enable and persuade reluctant learners to take part. Group work aids personal development as students must interact and work co-operatively.
Considerations might include: i Learning – successful hands-on work will reinforce understanding; also,
students will learn from each other.
ii Confidence – this will grow with experience

11
iii Awareness/insight – should grow with experience
iv Team building – a most desirable outcome.
v Setting out – all students doing the same thing is easier for the technicians
vi Confusion – incomplete, ambiguous or confusing instruction by the teacher will waste time while the instructions are clarified but may also compromise safety and restrict learning.
vii Opting out – some students will leave it for others to do and so learn very little.
viii Safety – this could be a serious issue and constant vigilance is essential.
ix DIY – the urge to adapt their experiments, to ‘see what would happen if’, must be strictly dealt with.
x Discipline – practical time must not be allowed to become ‘play time’.
Working in groups, whether as part of a whole-class situation or where groups are working on parts of a whole, is probably the preferred option for many students. At A level, it is highly desirable to include opportunities for students to work on their own, developing their own skills and independence. In Papers 31 and 32, a student’s practical skills will be assessed on an individual basis, so an individual’s experience, competence and confidence are of considerable importance.
• Circus of experiments
A circus comprises of a number of different exercises that run alongside each other. Individual or groups of students work on the different exercises and, as each exercise is completed, move on to the next one. These are a means by which limited resources can be used effectively.
There are two basic approaches. Most commonly, during a lesson a number of short activities are targeted at a specific skill. Alternatively, over a series of lessons, a number of longer practical activities are used, addressing a variety of skills. The circus arrangement may be more difficult to manage as the students are not all doing the same activity. This puts more pressure on the teacher as they have to cope with advising and answering questions from a variety of investigations. With circuses spread over a number of sessions, careful planning is needed to enable the teacher to engage each group of students, to maintain a safe environment. In these situations it is useful to have at least two of the circus activities that involve no hands-on practical work - using data response based simulations or other activities. In this way the teacher can interact with groups that need a verbal introduction or short demonstration and can monitor their activities more effectively.
i Apparatus – if the amount of apparatus used in an exercise is limited, students are able to use it in rota.
ii Awareness – students by observing their peers will become more aware of the pitfalls of the exercise and so will learn from the experience of others.
iii Safety – different exercises may well carry different safety risks, all of which would need to be covered.
iv Setting out –students doing different exercises will make it more difficult for the technicians

12
v Opting out – some students ay be tempted to ‘borrow’ the results of earlier groups.
• Within theory lessons
This option should be considered whenever it is viable. It is likely that the practical work would be by demonstration, as this would take less time. Given the power of visual images, the inclusion of a short practical to illustrate a theoretical point will reinforce that point and so aid the learning process. It is critical, however, that the practical works correctly, otherwise the flow of the lesson is disrupted and confidence in the theory may be undermined. The exercise should therefore be practiced beforehand.
• Project work
Projects are a means by which a student’s interest in a particular topic, which is not always directly on the syllabus, can be used to develop investigative skills. It can also be used to access parts of the syllabus that have little laboratory based investigation. For example, in gene technology students might use internet based research to find examples of genetic modification and present a poster display showing the implications. This sort of investigative work can be individual, or a group activity. Once the project is underway, much of the work can be student-based, outside the class room. Care is needed in selecting the topics and setting a time scale, so that the relevance is maintained to the syllabus context. The work can be directed at the production of posters, presentations to give to the group or reports from the group or individual.
Extra-curricular clubs The role that these can play is in stimulating scientific enquiry methods. There are a number of ways of using clubs. One way is to hold the club session during the teaching day so that all students can attend. In effect this becomes additional lesson time in which students can practice investigative skills, including laboratory work. Such lab work involves materials that have a cost, which must be planned for beforehand. If however the club is held outside the teaching day it may be voluntary. Syllabus specific activities should be limited and the most made of the opportunities for exciting work unrelated to syllabuses. After school clubs could be vehicle for project work that is related to science and of social or economic importance, for example, endangered species or local mineral resources. Students who do attend the club could be used as a teacher resource by bringing back their finding to a class room session.
Keeping records
Students often find it a problem to integrate the practical work to the theory. This is particularly true when a series of experiments or a long term investigation or project is undertaken. Some potential issues include:
• Some students use odd scraps of paper in the laboratory, which are lost or become illegible as chemicals are spilled on them. One important criterion is that students are trained to record results immediately and accurately.
• Practical procedures may be provided, or students write their own notes from a teacher demonstration. These may be lost, so students end up with results but no procedure or context.
• When results take a period of time to collect, analysis becomes isolated from the context of the investigation and may not be completed.

13
The key to minimising these issues is to train students into good work practices. This is particularly important in colleges where students join at the start of their A levels from a variety of feeder schools. It is also vital for students with specific learning difficulties that affect their ability to organise their work such as dyslexia and Asperger’s syndrome.
Students may be encouraged to integrate the practical in the same file as the theory. Alternatively, students may be encouraged to keep an entirely separate practical book or file. Loose leaf files make it easy to add to the file, but may make it easier to lose items. Exercise books can be used but students should be encouraged to glue provided protocols and their laboratory records into the book so that they are not lost. Depending on how they learn, individuals may vary in their preferred method. Whichever option is chosen, students need to be encouraged to relate their investigations to the appropriate theory and to regard it as something that needs to be thoroughly assimilated.
• Integrating the materials generated by practical work with the notes from learning of theory can be achieved by interspersing the records of investigations with the relevant section of theory. This may still require cross-referencing where several learning outcomes and assessment objectives are targeted by work.
• Keeping a separate practical book enables records of all the practical investigations to be kept in one place. Students need training to manage practical files effectively, particularly in keeping the contexts and cross referencing to the theory. If care is not taken to develop and maintain these skills, students may perceive practical as something different from theory.
• An intermediate between these two extremes is having a separate section for practical investigations with each syllabus section in each student’s file and cross-referenced to the relevant theory.
How is a practical activity organised?
Preparing for practical work needs thought and organisation. The practical work may be an activity that forms part of a lesson, it may comprise an entire lesson, or it may be an investigation designed to last for several lessons, but in every case, thorough preparation is a key prerequisite to success.
Practical and investigative work should be integrated into the programme of study. The scheme of work should identify appropriate practical investigative experiences for use at the most suitable time. In designing the scheme of work,
• the resource implications should be considered in terms of equipment and materials in stock,
• thought should be given to the seasonal availability of materials such as organisms, and the sometimes short shelf-life of thermo-sensitive substances such as enzymes or hygroscopic substances such as some salts,
• the time taken from order to delivery, potential for damage during despatch and cost of materials to be obtained from local, national or international suppliers should be considered,
• careful scheduling may be needed in Centres with a large number of students. It may be possible to permit several groups to do the work simultaneously or in quick succession, or it may be essential to re-order the scheme of work for different groups so that scarce resources can be used effectively,

14
• note must be taken of national or local health and safety regulations relating to chemicals, electricity, growing microorganisms etc. There may also be regulations controlling use of controversial materials such as genetically modified organisms.
Once the scheme of work has been established, the next stage is to consider each practical activity or investigation. In an ideal course, each of the following stages would be gone through in developing each practical exercise in a course. This is not always realistically possible the first time through a course, which is one reason for the existence of this booklet. It is better to get going and to get some practical work done with students than to hold out for perfection before attempting anything. Obviously, all practical work should be subject to careful and rigorous risk assessment no matter how provisional the rest of the supporting thinking and documentation.
• Decide on the aims of the work – the broad educational goals, in terms of the broad skill areas involved (e.g. planning) and the key topic areas (e.g. animal transport systems or unfamiliar material).
• Consider the investigative skills being developed. Reference should be made to the syllabus, which in the practical skills section, includes learning outcomes relating to practical skill. For instance, if the practical work intended is to be a planning exercise, which of the specific skills identified in the learning outcomes will be developed?
• With reference to the topics included, decide on the intended learning outcomes of the practical activity or investigation, again referring to the syllabus. For instance, which of the transport learning outcomes will be achieved? In a few cases during the course, the material on which the practical is to be based may be unfamiliar, in which case there may be no topic-related intended learning outcomes. Thus, A2 contexts may be used for AS practicals, and topic areas not on the 9700 syllabus at all may be used for AS or A2 practicals.
• In addition, it may be useful to assess any other context of the practical work investigation. For instance, is it intended as part of the introduction of a concept, or to support a theory, or to demonstrate a process?
• Produce a provisional lesson plan, allocating approximate times to introduction, student activities and summarising.
• Produce and trial a student work sheet. Published procedures or those produced by other teachers can be used. Alternatively produce your own. As a rule schedules produced by others need modifying to suit individual groups of students or the equipment available. It helpful to ask students or another teacher to read work sheets before they are finalised as they can identify instructions that are ambiguous or use inaccessible terminology.
• Refine the lesson plan in relation to the number of students for which the investigation is intended (whole class or a small group), the available equipment (does some have to be shared?) and materials. There are examples of lesson plans and student work sheets in appendix 2.
• Carry out a detailed and careful risk assessment (see below) before any preparatory practical work is done, and certainly well before students do any of the practical work. You should consider
o the likelihood that any foreseeable accident might occur – for example, pupils putting glass tube through bungs are quite likely to break the tube and push it though their hand

15
o the potential severity of the consequences of any such accident – for example dropping onto a desk a plastic dropper bottle of 0.01 mol dm-3 hydrochloric acid will cause much less severe eye injuries than the same accident with a glass bottle containing 5.0 mol dm-3 hydrochloric acid.
o the means that can be taken to reduce the severity of the effect of any accident – for example, the teacher or technician preparing bungs with glass tubes before the lesson, or using eye protection such as safety spectacles during all practical work.
• Make an equipment and materials list. This may need to be in sections;
o materials and apparatus per student or per group (chemicals and glassware)
o shared equipment per laboratory (water baths, microscopes, pH meters) o any chemicals should include concentrations and quantities needed o any equipment should include number required o any hazard associated with specific chemicals or equipment should also
be noted and cross referenced to the risk assessment. Sources of information about safety may be listed in the syllabus (and are reproduced below).
o The location of storage areas for equipment and chemicals may be cross referenced to this equipment and materials list.
• Set up and maintain a filing system where master copies of the work sheets, lesson plans and equipment lists can be stored. It is helpful to have these organised, or at least indexed, by both their syllabus context and skills developed.
• Once an investigation has been used by a group of students it should be evaluated in relation to intended outcomes and the lesson plan. It is important to obtain feedback from the students about their perception of the work. For example,
o was the time allocation appropriate, o were the outcomes as expected, o did the students enjoy the work, o did the students understand the instructions, o was the point of the work clear to the students?
If necessary the work sheet and lesson plan should be revised.
Risk assessment
All practical work should be carried out in accordance with the health and safety legislation of the country in which it is done. No activities should be attempted if they conflict with such legislation.
Hands-on practical work can be carried out safely in schools. If it is to be safe, then the hazards need to be identified and any risks from them reduced to insignificant levels by the adoption of suitable control measures. These risk assessments should be done for all the activities involved in running practical science classes including storage of materials, preparatory work by the teacher and by any technical support staff and the practical activities that are carried on in the classroom, whether demonstrations by the teacher or practical activities for the students. Such risk assessments should be carried out in accordance with the health and safety legislation of the country in which they are done.
Risk assessment involves answering two basic questions:
1 how likely is it that something will go wrong? For example, pupils using a double sided razor blade to cut up carrots are quite likely to cut themselves.
16
2 how serious would it be if it did go wrong? For example the consequences of a spark from an experiment landing in an open bottle of magnesium powder are likely to be serious, including spraying burning magnesium all over the laboratory, burning many pupils and setting the laboratory ceiling on fire (based on a real accident).
With the answers to these questions it is now possible to plan the practical activity to minimise the risk of an accident and to minimise how severe any accident might be. In our examples, this might include cutting up the carrot before giving to young pupils, or providing older pupils with an appropriate sharp knife, it might include bringing in to the laboratory only the amount of magnesium powder required for the activity.
How likely it is that something will go wrong depends on who is doing it and what sort of training and experience they have had. You would obviously not ask 11 year old students to heat concentrated sulphuric acid with sodium bromide, or to transfer Bacillus subtilis cultures from one Petri dish to another, because their inexperience and lack of practical skills makes a serious accident all too likely. By the time they reach post-16 they should have acquired the skills and maturity to carry such activities out safely.
Decisions need to be made as to whether an activity should be a teacher demonstration only, or could be done by students of various ages. This means that some experiments should normally only be done as a teacher demonstration or by older students. Perhaps with well-motivated and able students it might be done earlier, but any deviation from the model risk assessment needs discussion and a written justification beforehand.
There are some activities that are intrinsically dangerous, and, if included in the suggested activities, should always be changed to more safe modes of practice, for example, there are no circumstances under which mouth pipetting is acceptable – pipette fillers of some sort should always be used.
Teachers tend to think of eye protection as the main control measure to prevent injury. In fact, personal protective equipment, such as goggles or safety spectacles, is meant to protect from the unexpected. If you expect a problem, more stringent controls are needed. A range of control measures may be adopted, the following being the most common. Use:
• a less hazardous (substitute) chemical;
• as small a quantity as possible;
• as low a concentration as possible;
• a fume cupboard; and
• safety screens (more than one is usually needed, to protect both teacher and students).
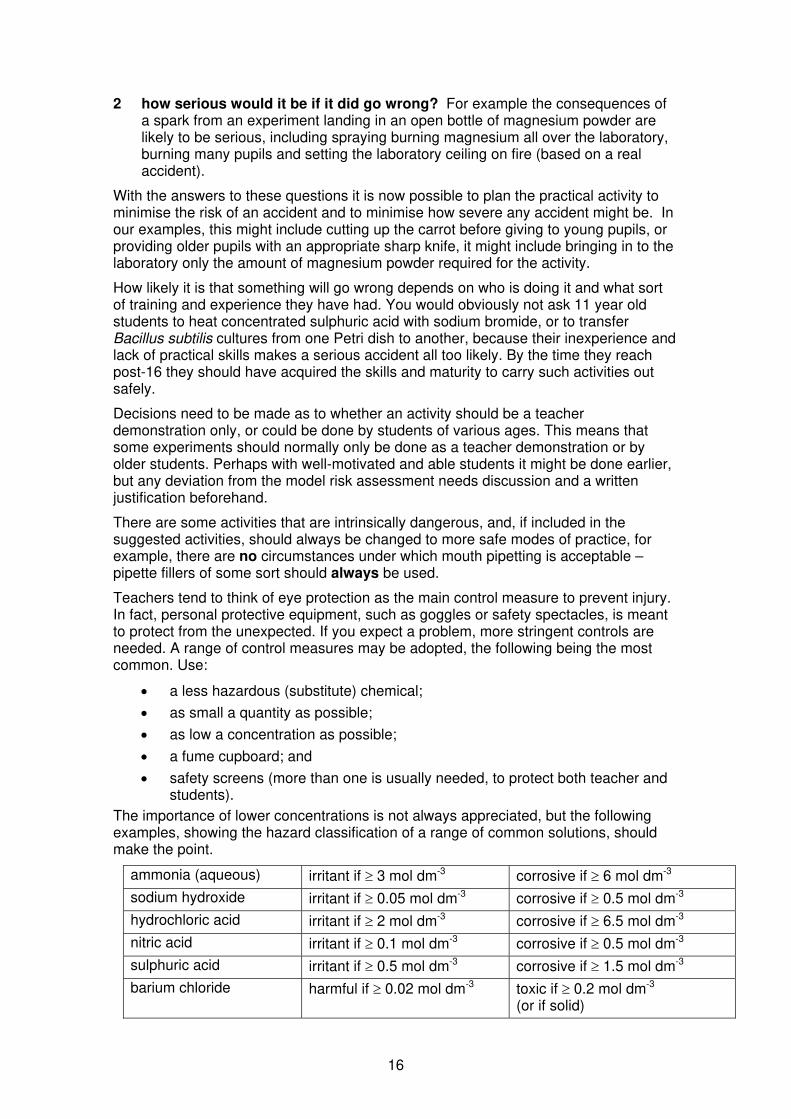
The importance of lower concentrations is not always appreciated, but the following examples, showing the hazard classification of a range of common solutions, should make the point.
ammonia (aqueous) irritant if ≥ 3 mol dm-3 corrosive if ≥ 6 mol dm-3
sodium hydroxide irritant if ≥ 0.05 mol dm-3 corrosive if ≥ 0.5 mol dm-3
hydrochloric acid irritant if ≥ 2 mol dm-3 corrosive if ≥ 6.5 mol dm-3
nitric acid irritant if ≥ 0.1 mol dm-3 corrosive if ≥ 0.5 mol dm-3
sulphuric acid irritant if ≥ 0.5 mol dm-3 corrosive if ≥ 1.5 mol dm-3
barium chloride harmful if ≥ 0.02 mol dm-3 toxic if ≥ 0.2 mol dm-3 (or if solid)

17
Reference to the above table will show, therefore, that if sodium hydroxide is in common use, it should be more dilute than 0.5 mol dm-3. The use of more concentrated solutions requires measures to be taken to reduce the potential risk.
Material Safety Data Sheets (MSDS) Your risk analysis should consider the hazards associated with the materials you propose to use. These risks are best assessed by reference to MSDS’s appropriate to the chemical(s) in use. These are generally supplied by the chemical manufacturer and supplied with the chemical. If this is not the case then there are many internet sites that have this information freely available. These sheets also provide useful information on the actions to take following an accident, including first aid measures, and should therefore be considered essential for all practical experiments involving chemicals, as part of the risk assessment process.
Hazard key The following key applies.
C = Corrosive substance F = Flammable substance
H = Harmful or irritating substance O = Oxidising substance
T = Toxic substance N = Harmful to environment
Eye protection
Clearly students will need to wear eye protection. Undoubtedly, chemical splash goggles give the best protection but students are often reluctant to wear goggles. Safety spectacles give less protection, but may be adequate if nothing which is classed as corrosive or toxic is in use.
Your risk assessment should not restrict itself simply to the materials, procedures and equipment being used, but should have a wider remit, covering the time from when the class enter the room until they leave it.
Practical science can be - and should be - fun. It must also be safe. The two are not incompatible.
Safeguards in the School Laboratory, 10th edition, ASE, 1996 Topics in Safety, 2nd edition, ASE, 1988 Hazcards, CLEAPSS, 1998 (or 1995) Laboratory Handbook, CLEAPSS , 1997 Safety in Science Education, DfEE, HMSO, 1996 Hazardous Chemicals Manual, SSERC2, 1997.

18
AS Skills
AS skills will form the foundation on which A2 skills will be developed. Students will become competent in these skills through practical experience. They should be expected, during the AS course, to carry out as much practical work as possible, since this with develop both key practical skills and enhance their motivation as well as their understanding of the theory part of the course. The specific investigations to which references are made can be found in appendices 1 and 2. The syllabus clearly describes the skills that are to be assessed, and should be used to ensure that activities are appropriately targeted.
Teaching students to manipulate, measure and observe
As part of their AS studies students will be expected to develop skills in manipulating and measuring using standard laboratory apparatus. These will form a basis on which more advanced manipulative skills will be developed in A2. During their AS course it is assumed that students will learn how to measure accurately and to manage their time effectively, so that they are confident in their use of apparatus.
• A good starting point to practice these skills is with microscope work (e.g. practicals 1 and 2). Students will be expected to be confident in the use of microscopes and be able to make temporary mounts of a variety of specimens. It is most important that they are capable of recording their observation by being able to make clear, well proportion, labelled drawings of what they observe. This is not an easy skill to acquire and time should be spent to ensure that students develop their capability in this skill.
• Various investigations (such as practicals 5 and 6) will also allow students to collect data and make observations. This will require that students are able to follow a set of instructions and set up apparatus appropriately. They should then be able to collect data using a wide variety of means.
• Students should be able to make informed decisions about the number of times a reading should be taken and the range of readings that is required to collect reliable and valid data. Students should also be able to replicate readings or observations as necessary. Many of the practical investigations here offer such opportunities, but particularly open-ended investigations such as practical 16.
Teaching students to present data and record observations
Many students do not find this an easy skill to master. It is important that students can record data so that it is capable of being understood by others. This requires skill in deciding how to present the data and what should be recorded.
• Students need to be able to present numerical data in tabular form and to decide on the structure of the table and what titles and units should be written in the column headers. They should produce the table so that readings from the investigation may be entered directly into the table as the readings are taken. Space should be allocated in tables as necessary for calculated values and deductions. Opportunities include practical 7 and 19.
• Students should ensure that all readings are taken with the same degree of accuracy and precision.
• Students often assume that everyone understands how they achieved their answers to questions or calculations without realising that this is not the case.

19
This is particularly true when answering examination questions. Examiners can only give credit for what they see and students may well receive credit for a correct method even if they reach the wrong answer or conclusion. However this requires that the students display their calculations and reasoning.
• Students should show the working in their calculations and the key steps in their reasoning.
• Students should also use the correct number of significant figures for calculated quantities.
Several of the practicals include such numerical work, for example practicals 2, 13, 14 and 20.
• Students should be able to choose a suitable method of presenting data obtained from an investigation for example quantitative data as graphs (e.g. practicals 6 and 7), qualitative data as tables (e.g. practicals 3 and 4) and cellular and histological data as drawings (e.g. practicals 1, 2, 13 and 14).
• When producing graphs, students should be able to select which variables to plot on the x and y axes. They should be able to plot with accuracy and follow the Institute of Biology recommendations for drawing lines on graphs.
• More information concerning the presentation of data and observations is provided in the syllabus.
Teaching students to analyse, draw conclusions and evaluate
These are the hardest skills that have to be mastered by students. Evaluation in particular is found very difficult by most students as they are having to think in the abstract rather than handle real apparatus and materials. It is most important that the basics in these skills are mastered so that they can be further developed in the A2 part of the course.
• Students need to be able to interpret data or observations by describing patterns and trends shown by tables and graphs. In data such as highly curved graphs, the key patterns should be described (e.g. practical 5) and in data producing simple curves or straight lines, the trend of the data observed and described (e.g. practical 6).
• Students should be able to determine unknown values by extrapolation and interpolation of lines on graphs and be able to calculate the mean from replicated observations.
• It is most important that students are able to explain the degree of confidence they have in their conclusion and identify and explain possible sources of error in the investigation.
• Students should be able to say whether the data obtained supports the original hypothesis and use this to make further predictions.
• The ability to make simple evaluations should be practiced so that this skill can be further developed in A2. This enables students to suggest improvements to procedures so as to improve the reliability of the data obtained and to extend investigations into new situations or solve related problems. The more practice students have of this skill, the better. Ideally every investigation could be evaluated using a simple check list until it becomes an automatic response by a student.

Appendix 1
20
Appendix 1 - Designing a practical course for AS
Outline List of Practical Experiments Full details are provided for practicals 1 - 11
Number and title type of syllabus practical reference
1 Size and scale obs A
2 Plant tissue observation obs A
3 The identification of biological chemicals present in solutions wet B
4 The metabolism of different carbohydrates by yeast wet B
5 Effect of pH on enzymes wet C
6 Effect of inhibitors on enzymes wet C
7 Using beetroot to investigate cell membrane permeability wet D
8 Root tip squash wet E
9 The extraction of DNA from onions wet F
10 Effect of wind-speed on transpiration rate using a potometer wet G
11 Investigating the role of carbon dioxide in living organisms wet H
12 Size and scale obs A
13 Plant tissue observation obs A
14 Animal tissue observation obs A
15 Food tests wet B
16 Effect of temperature on enzymes wet C
17 Effect of substrate concentration on enzymes wet C
18 Effect of enzyme concentration wet C
19 Osmosis wet D
20 Plasmolysis and water potential w&o D
21 Chromosome observation - prepared root tip squash obs E
22 Stomata obs G
23 Effect of temperature and light on transpiration rate wet G
24 Investigate transport of water using celery wet G
25 Investigate tidal and vital capacity wet H
26 Effect of nicotine on heart rate of daphnia wet H
27 Bacteria and viruses obs I
28 Blood cell smear w&o J
29 Food chains and food webs field K
30 Nutrient cycling wet K
The route which teachers take through the AS syllabus may vary. The practical course follows the sequence of the syllabus, although some learning outcomes may well be grouped differently. Teachers can adapt the investigations as they wish as they wish. All of the investigations that are supplied in detail are intended to be completed within a one hour time span.
CIE 9700/03 practical papers are not intended to be used for formative development of practical skills. The questions set for the previous syllabus are written to different assessment objectives, although some of the practical components could be used as practice exercises. Teachers who choose to use past papers as a student’s only learning experience are placing these students at a disadvantage.

Appendix 1
21
Syllabus section A – Cell Structure
Practical 1 – Size and scale 1
Learning outcomes (a) use a stage micrometer and graticule and (f) calculate linear magnification of drawings
Practical skills: Manipulation, measurement and calculation.
The practical uses a stage micrometer to calibrate an eyepiece graticule so that specimen size can be determined. The candidates can also determine the scale of drawings that are made of the specimens under observation. It is suggested that the eyepiece lenses be fitted with the graticules prior to the investigation.
Full details of this practical are provided.
Practical 12 – Size and scale 2 The investigation described in practical 1 uses a TS of Lamium stem, but the practical can and should be modified and form a template for a series of practicals to include other examples from a wide range of plant and animal tissues.
Practical 2 – Plant tissue observation
Learning outcomes (f) draw plan diagrams of tissues. The practical can be extended to also cover (b) (e) and (g) distinguish between resolution and magnification and compare and contrast structure of plant and animal and prokaryotic and eukaryotic cells.
Practical skills: Observation and recording and interpreting observations.
The practical emphasises and practices microscopic and drawing skills so that candidates are able to use a microscope and produce clear, well proportioned, labelled drawings in both low and high power. They also learn the difference between cellular and plan drawings and how best to represent the various tissues of a specimen under observation.
Full details of this practical are provided.
Practical 13 – Plant tissue observations Practical 14 – Animal tissue observations The investigation described in practical 2 should be modified and form a template for a series of practicals at appropriate points through the course, to include other examples from a wide range of plant and animal tissues.
Syllabus section B – Biological Molecules
Practical 15 – food tests – students may well have used food tests in their previous biology courses, but they should be given an opportunity to use Benedict’s test for reducing and non-reducing sugars, biuret test for protein, iodine in potassium iodide solution for starch and the ethanol emulsion test for lipid. They should be given prepared solutions / oils to try, as well as liquid food materials such as milk and food materials that need grinding up and suspending such as bread.
Appendix 1
22
Practical 3 – Identification of biological chemicals present in solutions
Learning outcomes (a) carry out tests for reducing and non-reducing sugars, starch, lipids and proteins.
Practical skills: Manipulation, measurement, observation, recording of data, interpreting and drawing conclusions.
The practical develops an understanding of the application of different biochemical tests to the problem of identification of unknown substances. The practical concentrates on developing skills of decision making, recording, drawing conclusions and identifying alternative strategies.
Full details of this practical are provided.
Practical 4 – the metabolism of different carbohydrates by yeast
Learning outcomes (a), (b) and (d) form the context for this practical, making use of unfamiliar methods and materials and thus (e) use the knowledge gained to solve related problems in a new situation.
Practical skills: Manipulation, measurement and observation, presentation of data and analysing and forming conclusions.
The practical investigates how efficient yeast is in metabolising different carbohydrates by observing the time taken for methylene blue to be discoloured. The ideas developed can include previous work done on cell membranes and the different ways that substances are transported into and out of cells.
Syllabus section C – Enzymes
Practical 5 – Effects of pH on enzymes
Learning outcomes (c) follow the course of an enzyme catalysed reaction and (d) investigate and explain the effect of pH on the rate of enzyme catalysed reactions.
Practical skills: Manipulation, measurement and observation, presentation of data and analysing and forming conclusions.
The practical investigates the effect of pH on enzymes and the effect on the hydrogen and ionic bonds that determine the shape of the active site. Candidates may determine the optimum pH and the point at which the enzyme has been denatured.
Full details of this practical are provided.
Practical 6 – Effect of inhibitors on enzymes
Learning outcomes (c) follow the course of an enzyme catalysed reaction and (e) explain the effects of a non-competitive inhibitor on the rate of enzyme activity.
Practical skills: Manipulation, measurement and observation, presentation of data and analysing and forming conclusions.
The practical investigates the effect of a non-competitive inhibitor, lead nitrate, on the hydrolysis of starch.
Full details of this practical are provided.

Appendix 1
23
Practical 16 – Effect of temperature on enzymes The effect of temperature on enzyme catalysed reactions should be investigated. Candidates can carry out a simple enzyme catalysed reaction at different temperatures using provided troughs / plastic bowls at different temperatures as water baths. This works well using protease such as trypsin or bacterial protease and exposed, developed black-and-white photographic film, or using amylase and starch. The data collected can then be displayed graphically to assist in drawing conclusions. Experiments of this type lend themselves to be critically analysed, evaluated and improved. Practical 17 – Effect of substrate concentration on enzymes Practical 18 effect of enzyme concentration These experiments can be further modified to investigate the enzyme concentration and the concentration of substrate on the rate of reaction. This would offer the opportunity to use other enzyme/substrate systems such as urea/urease (detect time taken for ammonia to be produced), yeast catalase/hydrogen peroxide (height of foam or count bubbles from delivery tube or collect gas over water and measure volume) or lipid emulsion/lipase (detect changes in pH). In addition this will also practice the skills of identifying and controlling variables. At this level, candidates should also be able to identify dependent and independent variables.
Syllabus section D – Cell Membranes and Transport
Practical 7 – Using beetroot to investigate cell membrane permeability
Learning outcomes (b) outline the role of membranes within cells, (c) describe the process of diffusion and (e) use the knowledge gained to solve related problems in a new situation.
Practical skills: Manipulation, measurement and observation, presentation of data and analysing and forming conclusions.
The practical investigates the effect of temperature on the permeability of cell membranes. Candidates will need access to a colorimeter for this experiment although it could be modified so that diluted solutions were compared against a standard colour chart. Paint manufactures produce a very wide range of standard colours for paints mixed ‘in store’ and a selected sample of these could be used for ‘standards’.
Full details of this practical are provided.
Practical 19 – Osmosis This can be investigated in a variety of ways such as determining the water potential of potato tissue by placing samples of potato in different concentrations of sucrose solution and noting the gain or loss in mass of the tissue. The data can be displayed graphically and the concentration determined by interpolation on the graph.
Practical 20 – Plasmolysis and water potential Plasmolysis can be investigated in epidermal onion tissue. The water potential can be determined by finding incipient plasmolysis in cells placed in different concentrations of solution. This extends the work done in the previous practical on osmosis by including the skills of microscope technique in the practical. Students may well need training in order to identify cells with incipient plasmolysis.
Appendix 1
24
Syllabus section E – Cell and nuclear division
Practical 8 – root tip squash
Learning outcomes (d) describe with the aid of diagrams, the behaviour of chromosomes during the mitotic cell cycle.
Practical skills: Manipulation, observation, interpretation and recording observations.
The practical involves preparing and staining cells from an active meristem in the roots of plants. The cell tissue is then ‘squashed’ and observed using standard microscopic techniques and different stages of mitotic cell division identified and drawn. It is advised that due to shortness of time within a one hour lesson, that candidates have previously done other microscope practicals so that they are familiar with and can use a microscope with skill and precision.
Full details of this practical are provided.
Practical 21 – chromosome observation – prepared root tip squash Practical 8 can be further extended and modified so that candidates are provided with ready made prepared cell tissue showing a full range of the different stages of cell division in order that they can become skilful in identifying and drawing them. This is good material for developing skills of measurement, observation and drawing as the structures are intra-cellular and therefore small.
Syllabus section F – Genetic Control
Practical 9 – Extraction of DNA from onions
Learning outcomes (a) describe the structure and importance of DNA
Practical skills: Manipulation and making observations.
The practical involves the extraction of DNA from living material such as onion and clearly and powerfully demonstrates to students the actual existence of DNA when it has probably been experienced by the student as a theoretical substance found only in textbooks.
Full details of this practical are provided.
Syllabus section G – Transport
Practical 10 – effect of wind-speed on transpiration rate.
Learning outcomes (c) describe how to investigate experimentally the factors that effect transpiration rate.
Practical skills: Manipulation, data collection and analysis and drawing conclusions.
The practical investigates transpiration in a leafy shoot using a potometer and the effect that wind speed has on the rate of transpiration. Wind-speed is determined by a fan that is set at different distances from the plant. Students come to realise that this does not involve the inverse square law but this idea can be developed to show how the inverse square law affects light and photosynthesis.
Full details of this practical are provided.

Appendix 1
25
Practical 23 – Effect of light and temperature on transpiration rate. The investigation in practical 10 can be modified so that others variables such as temperature and light can be investigated to see how they affect transpiration rate.
Practical 22 – Stomata The structure of stomata can be observed by coating the lower surface of a leaf with clear nail varnish, which is then pealed of and made into a temporary slide for viewing through a microscope. This practical not only investigates stomatal structure but also reinforces microscope skills learnt earlier in the course. Leaves of different plants can be compared so that xerophytic adaptations can be studied.
Practical 24 – Investigate transport of water using celery Transport of water through plant tissue can investigated using celery and broad bean seedlings. A stick of celery left to stand in a dilute solution coloured dye such as food colouring or ink can be used to show the presence of vascular bundles in roots, stems and petioles. Students can section the stem to show the distribution of the vascular bundles. The veins in the leaves of the celery and been seedling will also become stained and thus show what happens to the vascular bundles when they enter leaves. This enables students to build up a whole picture of how the water is transported throughout the plant.
Syllabus section H – Gas Exchange
Practical 25 – tidal and vital capacity Tidal and vital capacity can be investigated using spirometer. Schools that do not possess a spirometer can do a simplified version of this experiment by getting students to blow through rubber tubing placed in a 1000 ml measuring cylinder or larger, full of water and inverted into a large bowl. Measurements of expired air can be read of directly from the measuring cylinder.
Practical 26 – Effect of nicotine on heart rate of Daphnia The effect of nicotine on the heart rate in daphnia can be investigated to show how different drugs can affect metabolism.
To make the nicotine solution, remove tobacco from a pack of 20 cigarettes and mix it with a beaker of water. Cover and allow to stand for at least 12 hours. Drain the supernatant liquid and mix one part solution to eight parts water. Different concentrations may be used to investigate the effect of concentration on heart beat.
Practical 11 – Investigating the role of carbon dioxide in living organisms
Learning outcomes (k) use the knowledge gained in this section in new situations or to solve related problems
Practical skills: Manipulation, observation, interpretation and planning.
This practical investigates the carbon dioxide levels produced by living organisms using bicarbonate indicator solution. The students then use this information to plan an investigation to determine the unfamiliar interaction between respiration (producing carbon dioxide at a constant rate irrespective of light intensity) and photosynthesis (using carbon dioxide – dependent on light) in plants.
Full details of this practical are provided.

Appendix 1
26
Syllabus Section I – Infectious disease
Practical 27 – Bacteria and viruses There are various ways of making practical material on these accessible, but the most satisfactory will be to use electron micrographs (downloaded from the web or in books) to make observations and measurements.
Syllabus Section J – Immunity
Practical 28 – Blood cell smear – this must be done using prepared slides. This is an important practical as the cells are small and not very easy to see, so they make an excellent context for experienced students to finely tune their skills of using apparatus, observation and drawing.
Syllabus Section K – Ecology
Practical 29 – food chains and food webs – students should have the opportunity to go out into the school grounds or a suitable local environment in which are found plants, animals that feed on the plants and predators (this might include trees, aphids and carnivorous beetles, or herbaceous plants, snails and snail-eating birds). Students should be enabled to identify, count (per unit area) and estimate biomass, preparatory to making food webs and attempting to make a simple estimated pyramid of biomass.
Practical 30 – nutrient cycling – students should set up small, sealed jars containing a few grams of soil, pond water and a small amount of shredded paper. These should be left in the light and observed for a few weeks. There will be a succession of changes in the microorganisms growing in the jars, but eventually it will settle down to a constant population of various photosynthetic and other species, demonstrating that they are recycling the limited amount of nutrients present.

Appendix 2
27
Appendix 2 – practicals for which full details are provided
Practical 1 - Investigation into size and scale of microscopic tissues
This practical focuses on microscope technique and using graticules and stage micrometers to determine size and scale in biological cells and tissues.
Intended learning outcomes
By the end of this practical you should be able to:
• Use a microscope fitted with an eyepiece graticule and stage micrometer
• Calibrate the eyepiece graticule using the stage micrometer
• Use the calibrated graticule to determine the actual size of microscopic specimens
• estimate the accuracy of a measurement
• Use the graticule to determine scales
• Understand the importance of repeating or validating set of results.
Safety Information
There are no particular hazards in this practical, however you must follow your laboratory rules.
Background information
• The measurement of specimen size with a microscope, is made by using an eyepiece graticule. This is a glass or plastic disc with 8 divisions etched onto its surface, which is inserted into the eyepiece lens.
• The size of the eyepiece graticule remains constant, despite the fact that the image viewed will change its size depending upon whether high- or low-power objective lenses are used. For example a cell viewed with the x40 objective will appear much larger than when viewed with the x10 objective. However because the graticule is in the eyepiece it will not change its size. Therefore the value of each of the divisions in the eyepiece graticule varies with the magnification of the objective lens.
• A stage micrometer is a very accurately etched glass or plastic ruler that is placed on the microscope stage so that the eyepiece graticule scale is superimposed on the stage micrometer scale. The scale is usually 1mm divided into 100 separate divisions so that each division equals 10
micrometres (10µm).
• It is necessary to calibrate the eyepiece graticule with the stage micrometer placed on the microscope stage for each objective lens used.
You will observe a TS of plant tissues through a microscope and use an eyepiece graticule and a stage micrometer to determine the size of some of the structures.
• Read the information above.
• Ensure that you understand the principles of using an eyepiece graticule and a stage micrometer before you continue with the investigation.

Appendix 2
28
Method
Preparation
1. You have been provided with a compound light microscope with both low- and high-power objective lenses and an eyepiece lens that has been fitted with a graticule. You have also been provided with a stage micrometer.
2. You must now calibrate the eyepiece graticule. Place the stage micrometer onto the microscope stage and focus using the low-power objective lens so that the graticule scale becomes superimposed over the stage micrometer scale.
3. Move the stage micrometer until the start or zero line of each scale is coincident (lined up)
4. Look along the scale until another coincident point is found.
5. The relationship between the two scales can now be calculated
On the scale shown there are 17 divisions on the stage micrometer scale that line up with 7 divisions on the graticule scale.
Thus 17 / 7 = 2.42857 units.
Each unit on the stage micrometer scale is 10 micrometres (10µm).
Therefore each division on the graticule scale is 24.2857 micrometres
rounded to 24.3 µm.
6. Use the procedure described above to determine the size of each division on the eyepiece graticule using the low-power objective lens of your microscope.
7. Repeat the procedure to determine the size of each division when using the high-power objective lens.
0 2 4 6 8eyepiece graticule scale
points of coincidence on stage micrometer scale
stage
eyepiece lens fitted with graticule
objective lens

Appendix 2
29
Making observations
1. You are provided with a stained transverse section through part of a dicotyledonous plant root.
2. Examine the specimen using the low-power of your microscope.
3. Make a large, plan drawing to show the distribution of tissues, labelling the stele (vascular bundle).
4. Use the eyepiece graticule to measure the width of the vascular bundle at its widest point in graticule units and then calculate the actual width of the vascular bundle in millimetres and in micrometres.
5. Draw a straight line on your drawing across the vascular bundle to show where you took your measurement. Write the dimension on your drawing next to the line.
6. Make a high-power drawing to show a group of four xylem vessels from inside the vascular bundle.
7. Use the eyepiece graticule to measure the width of the xylem vessel at its widest point in graticule units and then calculate the actual width of the vessel in micrometres, remembering to use the appropriate calibration of the eyepiece graticule for the high-power objective lens.
8. Draw a straight line on your drawing across the xylem vessel to show where you took your measurement. Write the dimension on your drawing next to the line.
9. Look at your two measurements and check on their accuracy. The actual size of the xylem vessel should be smaller than the size of the vascular bundle even though it looked larger using the high power objective lens.
10. You are now going to determine the magnification of your drawing of the xylem vessels. Use a ruler to measure the length of the line that you drew across the xylem vessel.
Use your knowledge of the actual size of the vessel to calculate the magnification of your drawing. Write your answer x at the bottom right hand corner of your drawing.
Follow-up
• Compare your results with other members of the class and check for consistency of readings.
• Did any member of the class have anomalous results? What are the potential causes of such an anomalous result in this investigation?
• Write up your procedure including a discussion of the benefits of comparing your results with other students.

Appendix 2
30
Practical 1 - Lesson Plan
Investigation into size and scale of microscopic tissues.
Context
A practical investigation set in the context of 9700 syllabus – Assessment objective C 2 and 3 – Cell structure.
Key aims of the lesson
This practical is designed to develop the skills of using an eyepiece graticule and a stage micrometer with a microscope to determine size and scale of microscopic tissues.
Intended learning outcomes
By the end of the practical and the write-up the student should be able to
• Use a compound light microscope with an eyepiece graticule
• Use a compound microscope with a stage micrometer
• Calibrate an eyepiece graticule with a stage micrometer
• Use the calibrated graticule to determine the actual sizes of cells and tissues using both low- and high-power objective lenses.
Resources required
White board or flipchart and suitable pens or blackboard and chalk
Practical materials specified on the Technical Information Sheet.
Copies of the student worksheets.
Planned activities
Timings/ minutes
Teacher/ Student Activities
End of previous lesson
Preparation – Student worksheet given out for students to read in preparation for the practical lesson.
0 - 3 Introduction to the aims, intended outcomes and shape of the lesson – teacher led oral presentation
3 - 10 Context – review the method for setting up and using a microscope with an eyepiece graticule and stage micrometer and how to calibrate the eyepiece graticule.
10 - 15 Introduction to method – Teacher briefly outlines method and answers any student questions on procedure. Teacher emphasises safety concerns regarding breaking slide by focussing down with the objective lens.

Appendix 2
31
15 - 40 Carrying out the practical – students carry out the practical work.
40 - 50 Obtain results – Students compare their results with other students in the class
50 - 60 Drawing together the threads – Teacher led discussion on the skills that have been developed as well as discussion on results obtained.

Appendix 2
32
Practical 1 - Technical information
Investigation into size and scale of microscopic tissues.
The apparatus and materials required for this practical are listed below.
The amount of apparatus listed is for one student or one group of students if they are to work in groups.
1. 1 x prepared slide TS Ranunculus root
2. 1 x microscope with an eyepiece graticule fitted, suitable illumination and:
• high power objective lens e.g. x40 (equal to 4mm or 1/6”)
• low power objective lens e.g. x10 (equal to 16mm or 2/3”)
3. 1 x stage micrometer – a scale on a glass slide
4. suitable white paper, HB (medium-hard) pencil and rubber
Safety Precautions.
No specific hazards have been identified in this practical, however a risk assessment should be carried out as a matter of course.

Appendix 2
33
Practical 2 - Microscopic observation of cells and tissues
This practical focuses on microscope technique and making and recording observations in the form of biological drawings.
Intended learning outcomes
By the end of this practical you should be able to:
• Use a microscope with skill and precision
• Show all the structures that can be seen in the defined part of a specimen
• Make clear, accurate, labelled, scale drawings of specimens
Safety Information. There are no particular hazards in this practical, however you must follow your laboratory rules.

Appendix 2
34
Background information
• Drawings should be done with a sharp HB pencil making clear single lines. Examiners do not give credit for sketchy lined drawings. A soft rubber can be used to correct errors.
• Always draw what you see and not what you expect to see from memory or textbook diagrams.
• Candidates often draw diagrams too small but rarely draw them too large. Ensure that your drawing is large enough to show all the detail.
• All parts of the drawing should be kept in correct proportions. In poor quality drawings, proportions changes as the drawing progresses.
• Biological drawings can be both high-power and low-power.
• Low-power drawings are usually plan drawings that do not contain cellular detail but do show the distribution of various tissues. When a plan drawing is requested, examiners may give credit for not drawing cellular detail.
• If more than one drawing of the same or different specimens or parts of a specimen are made, examiners may ask that they are drawn to the same scale (which means the same magnification). Credit is then awarded for this skill.
• Look at the following two sets of drawings of a red and white blood cell, made by different students and how marks would be allocated by an examiner.
• Student A would be awarded 1 mark. Student B would be awarded 6 marks.
You will observe a TS of plant tissues through a microscope using both low and high power and draw appropriate structures.

Appendix 2
35
• Read the information above.
• Read your textbook and look carefully at any drawings that have been made or biological material. Take care however; the quality of drawings in some textbooks is not all that could be desired.
• Write down the key features that are found in good biological drawings.
Method
Preparation
1. You have been provided with a compound light microscope with both low- and high-power objective lenses and a slide of a TS of a plant stem.
2. Place the slide onto the stage of the microscope.
3. Adjust the light source so that you can see a bright light when looking through the eyepiece lens.
4. With some microscopes it is possible to rack the objective lens so far down that it will break the slide. In order to prevent this it is good microscope technique to:
• set the objective lens on low power.
• not look through the eyepiece but to look at the side of the microscope and carefully lower the objective lens until it is nearly, but not quite touching the slide.
• now look through the eyepiece and gradually raise the objective lens until the slide comes into focus.
5. You should now carefully move the slide around on the stage until you find the area that you wish to observe.
6. To change to high power, do not re-focus, but change the objective lens from low to high power. The slide should be almost in focus and only a fine adjustment to the focus should be necessary.
7. Practice focussing the slide on both low and high power until you are familiar with the technique.
stage
eyepiece lens
objective lens
light source

Appendix 2
36
Making observations
1. You are provided with a stained transverse section through part of a dicotyledonous plant.
Examine the specimen using the low-power of your microscope.
Make a large, labelled, plan drawing to show the distribution of tissues.
2. Make a high power drawing to show a group of four cells from the region nearest the centre of the specimen.
Follow-up
• State from which part of the plant the section was taken. Explain your answer
• Exchange your drawings with another student and mark their drawings using the following mark scheme.
Mark scheme
Plan drawing
Corner vascular bundles larger than other vascular bundles
No individual cells drawn
Four sided shape to plan
Both xylem and phloem correctly labelled
Parenchyma correctly labelled
Sclerenchyma on outer edge of vascular bundle labelled
Collenchyma in corners labelled
High power drawing
Good quality of drawing i.e. clear single lines
4 cells only drawn, similar in size and shape
between 5-8 sides to each cell
Air spaces shown between corners of cells
Thin cell walls shown either by a thin
single line or two lines close together
• Add up the marks out of 12 and return the drawings to the student.
• Write a list of all the reasons why you did not score full marks with your own drawings.

Appendix 2
37
Practical 2 - Lesson Plan
Microscopic observation of cells and tissues.
Context
A practical investigation set in the context of 9700 syllabus – Cell structure and transport
Key aims of the lesson
This practical is designed to develop the skills of using a microscope and the recording and interpretation of observations by producing biological drawings.
Intended learning outcomes
By the end of the practical and the write-up the student should be able to
• Use a compound light microscope
• Make clear and accurate plan and cellular drawings of biological tissue
• Be able to interpret structures seen through the microscope
Resources required
White board or flipchart and suitable pens or blackboard and chalk
Practical materials specified on the Technical Information Sheet.
Copies of the student worksheets.
Planned activities
Timings/ minutes
Teacher/ Student Activities
End of previous lesson
Preparation – Student worksheet given out for students to read in preparation for the practical lesson. Students to look at examples of drawings of cells and tissues in their textbooks.
0 - 3 Introduction to the aims, intended outcomes and shape of the lesson – teacher led oral presentation
3 - 5 Context – review the protocols for setting up and using a microscope to observe slides
5 - 10 Introduction to method – Teacher briefly outlines method and answers any student questions on procedure. Teacher emphasises safety concerns regarding breaking slide by focussing down with the objective lens.
10 - 25 Carrying out the practical – students carry out the practical work.

Appendix 2
38
25 - 50 Obtain results – Students observe the plant tissue and produce clear labelled diagrams as requested, then clear away apparatus as soon as they have finished
50 - 60 Drawing together the threads – Teacher led discussion on the manipulation and observational skills that have been developed as well as discussion on results obtained. Teacher to go through the mark scheme with the students and students compare their marks and understand why marks were not awarded.

Appendix 2
39
Practical 2 - Technical information
Microscopic observation of cells and tissues
The apparatus and materials required for this practical are listed below.
The amount of apparatus listed is for one student or one group of students if they are to work in groups.
1. 1 x prepared slide TS Lamium stem
2. 1 x microscope with suitable illumination and;
• high-power objective lens e.g. x40 (equal to 4mm or 1/6”)
• low-power objective lens e.g. x10 (equal to 16mm or 2/3”)
3. suitable white paper, HB (Medium hard) pencil and rubber
Safety Precautions.
No specific hazards have been identified in this practical, however a risk assessment should be carried out as a matter of course.

Appendix 2
40
Practical 3 - The identification of biological chemicals present in solutions
This practical focuses on making decisions about measurements and observations, recording and presenting data and observations, interpretation, drawing conclusions and suggesting improvements. You will also develop other assessed skills throughout the practical.
Intended learning outcomes By the end of this practical you should be able to:
• Decide what tests to carry out and what observations to make
• Use an appropriate means to record your observations, constructing any tables before you make the observations
• Describe and summarise the key points of your observations
• Draw conclusions in terms of the presence or absence of different chemicals in the solutions
• Suggest alternative strategies for identifying some of the materials
Safety information
You should wear eye protection throughout this practical.
Amylase is harmful, avoid contact with eyes and skin.
Benedict’s solution is harmful and dangerous to the environment.
1 mol dm–3 hydrochloric acid is harmful.
Background information
• Make sure that you know how to carry out Benedict’s test, what it is used for and what the positive and negative results should be.
• Make sure that you know how to carry out biuret test, what it is used for and what the positive and negative results should be.
• Think about how Benedict’s test and the enzyme amylase can be used to confirm the presence of a polysaccharide such as starch.
• Think about how acid hydrolysis, neutralisation and Benedict’s test can be used to confirm the presence of the non-reducing disaccharide, sucrose.

Appendix 2
41
You will use the materials provided to identify the unknown materials in the solutions A, B, C and D
• Read and think about the information above.
• The solutions A, B, C, D and E each contain only one of the following materials, but not necessarily in this order
o A reducing sugar
o A non-reducing sugar
o A polysaccharide that can be hydrolysed by amylase
o Proteins including amylase
o No dissolved material
• You are also provided with materials for biuret test and for Benedict’s test, as well as dilute hydrochloric acid, calcium hydrogen carbonate powder and a waterbath at 35°C
Method
Preparations and making observations
1. You need to decide what tests to do and in what order so that it is possible to use the amylase to test some of the other solutions.
2. Decide how you are going to record your observations so that it will be absolutely clear what you did to which solutions, what you observed and your interpretation of the observations.
3. Prepare a piece or pieces of paper in accordance with your decisions.
4. Make a risk assessment of your proposed methods and decide what precautions to take to reduce the likelihood of an accident and to reduce the damage any accidents might cause – ask your teacher to confirm that you may go ahead with the tests.
5. Carry out the tests with full regard to safety, recording your observations and interpretations.
6. Record the identity of the unknown solutions.
Write-up
• hand in your original laboratory records, including your methods, observations and interpretations.
• suggest improvements to the method including some of the following:
• a simpler way of testing for the presence of starch,
• starch would also be hydrolysed by acid. Suggest a better order to do your tests if this caused you difficulties, or a way of using amylase to confirm that it is non-reducing sugar rather than starch that is present,
• if a solution contained a small amount of reducing sugar and also non-reducing sugar, suggest how it might be possible to use repeated benedict’s tests, filtering the precipitate out after each, to remove the reducing sugar before testing for non-reducing sugar.

Appendix 2
42
Practical 3 - Lesson Plan
The identification of biological chemicals present in solutions
Context
A practical investigation set in the context of 9700 syllabus – The identification of biological chemicals present in solutions
Key aims of the lesson
This practical is designed to develop the skills of decision-making, observation, interpretation and evaluation.
Intended learning outcomes
By the end of this practical the student should be able to:
• Decide what tests to carry out and what observations to make
• Use an appropriate means to record your observations, constructing any tables before you make the observations
• Describe and summarise the key points of your observations
• Draw conclusions in terms of the presence or absence of different chemicals in the solutions
• Suggest alternative strategies for identifying some of the materials Resources required
White board or flipchart and suitable pens or blackboard and chalk
Practical materials specified on the Technical Information Sheet.
Copies of the student worksheets.
Planned activities
Timings/
minutes
Teacher/ Student Activities
End of previous lesson
Preparation – student worksheet given out for students to read in preparation for the practical lesson. To ensure understanding of methods and their use as well as to consider decisions about which observations to make and in what order, and the means of recording
0 - 3 Introduction to the aims, intended outcomes and shape of the lesson – teacher led oral presentation
3 - 5 Context – review of biochemicals and biochemical tests - key points written on board
5 - 8 Introduction to method – Teacher briefly reminds students of methods of tests, demonstrating as necessary. Teacher answers any student questions on procedure. Teacher emphasises safety concerns with acidic and harmful solutions and heating of solutions
8 - 45 Carrying out the practical – students carry out the practical work and record their observations and interpretations.
45 - 50 Clear up – Students clear away apparatus as soon as they have finished

Appendix 2
43
50 - 60 Drawing together the threads – Teacher led discussion on the skills that have been developed as well as discussion on results obtained. Teacher to emphasise importance of handing in original laboratory records – (these can be collected in at the end of the lesson, photocopied and given back to students if they are thought likely to ‘copy them up’). Practical write up to be completed in following lesson or as homework activity.
Useful information
The most effective methodology is likely to be
• Test a small sample of each of the solutions with biuret test to identify the protein including amylase – set aside solution B for later use (identified with this test)
• Carry out Benedict’s test, heating the tubes gently to 90°C until one gives a positive result, on small samples of each of solutions A, C, D and E to identify which contains reducing sugar – set aside solution A (identified with this test)
• Mix small samples from each of solutions C, D and E with equal volumes of solution B and incubate at 35°C for a few minutes. Test sample from each of the incubated tubes with benedict’s test to identify in which the polysaccharide has been hydrolysed to give a reducing sugar – set aside tube E (identified with this test)
• Mix small samples from tubes C and D with an equal volume of hydrochloric acid and boil carefully for two minutes. Add a small excess of calcium hydrogen carbonate (until it just stops effervescing) to neutralise the acid and test with Benedict’s test to identify which contains non-reducing sugar (C) and therefore which contains only water (D).
Summary of contents of the five solutions
solution material present in solution
A reducing sugar
B proteins including amylase
C non-reducing sugar
D no dissolved material
E polysaccharide that can be hydrolysed by amylase
• To improve the methodology, iodine solution would be a more elegant way of confirming the presence of the polysaccharide.
• To detect non-reducing sugar in the presence of reducing sugar – react the latter with excess Benedict’s and filter out the resulting precipitate. Re-test to confirm the absence of reducing sugar. Now hydrolyse with acid, neutralise and re-test.

Appendix 2
44
Practical 3 - Technical information
The identification of biological chemicals present in solutions
The apparatus and materials required for this practical are listed below.
The amount of apparatus listed is for one student or one group of students if they are to work in groups.
1 5 small beakers or other containers as follows
label on beaker
20 cm3 of solution in beaker
A 1 mol dm-3 glucose solution made by dissolving 18 g of glucose in 80 cm3 of distilled water and making up to 100 cm3
B 10% egg white and 1% amylase solution made up by dissolving 10 cm3 of fresh egg white (or 1 g of dried egg white) and 1 g of amylase in 80 cm3 of cold distilled water, mixing until dissolved and making up to 100 cm3
C 0.5 mol dm-3 sucrose solution made by dissolving 17 g of sucrose in 80 cm3 of distilled water and making up to 100 cm3
D no dissolved material
E polysaccharide that can be hydrolysed by amylase
2 5 test tubes in a rack and a means of washing the tubes such as a sink and running water
3 a glass marker, such as a wax pencil or a permanent OHP pen or small labels and pencil
4 the usual materials that the students are used to using for biuret test, labelled appropriately
5 the usual materials and heating arrangements that the students are used to using for Benedict’s text, labelled appropriately
6 1 mol dm-3 hydrochloric acid in a small dropper bottle, labelled hydrochloric acid
7 Sodium hydrogen carbonate powder in a small specimen tube with a stopper and a spatula that fits in the tube to dispense it
8 A thermostatic waterbath or plastic trough containing water at about 35°C for use as a waterbath
Safety Precautions/Risks
Amylase = H
Benedicts solution = H, N
Hydrochloric acid (1 mol dm–3) = H
A risk assessment should be carried out as a matter of course.

Appendix 2
45
Practical 4 - Investigation of the carbohydrates metabolised by yeast
This practical focuses on making measurements and observations, recording and presenting data, analysis, drawing conclusions and evaluating methods. You will also develop other assessed skills throughout the practical.
Intended learning outcomes
By the end of this practical you should be able to:
• Experience relevant methods, analysis and conclusion.
• Describe and explain the relationship between temperature and membrane permeability.
• Evaluate procedures
Safety Information
You should wear eye protection throughout this practical.
Methylene Blue is harmful. Avoid contact with eyes and skin. It will stain skin or clothes.
Background information
• Yeast can metabolise carbohydrates under two different conditions. When oxygen is present aerobic respiration occurs yielding a large amount of energy for the organism and producing carbon dioxide & water as waste products.
• However when oxygen is in short supply (anaerobic conditions) the yeast will break down the carbohydrate into ethanol & carbon dioxide with a much reduced energy output (alcoholic fermentation).
• Both of these forms of respiration in addition to most metabolic processes are catalysed by specific enzymes.
• The process of how efficient the yeast is in metabolising different carbohydrates can be monitored by observing the time taken for Methylene Blue to be discoloured
In this experiment you will investigate the relative efficiency with which different carbohydrates can be metabolised by yeast.
• Read the information above
• Identify and write down the dependent and independent variables
• Consider which type of carbohydrate (monosaccharide, disaccharide, polysaccharide) will be metabolised by the yeast and why. Explain your reasoning.
• Write down what you expect to happen as a hypothesis in which you make specific predictions about which carbohydrates you might expect yeast to metabolise.

Appendix 2
46
• Identify any variables that should be controlled and outline how this should be done
Method
Preparations and making observations
1. Label seven boiling tubes A - G.
2. In tube A place 5cm3 distilled water, in tube B 5cm3 glucose, in tube C 5cm3 fructose and continue with as many carbohydrates provided placing each tube in a rack.
3. Into each tube add 3 drops of Methylene blue.
4. Add 5cm3 yeast solution to each tube noting the time.
5. Shake each tube to mix the contents and place back into the rack.
6. Do not disturb the tubes again but note the time taken for the blue colour to disappear from each tube.
Write-up
• Record your results in a clear table ensuring units are put in headers where possible.
• Represent the results of the experiment in a suitable chart to show type of carbohydrate against the time taken for the blue colour to disappear.
• Explain your findings in terms of enzymes activity and carbohydrate structure.
• Assess the reliability of the results obtained and suggest any modifications you could make to improve the experiment

Appendix 2
47
Practical 4 - Lesson Plan
Investigation of the different carbohydrates metabolised by yeast.
Context
A practical investigation set in the context of 9700 syllabus – Enzymes, biological molecules, respiration.
Key aims of the lesson
This practical is designed to develop the skills of observation, analysis and evaluation.
Intended learning outcomes
By the end of the practical and the write-up the student should be able to
• Experience relevant methods, analysis, conclusions and evaluation.
• Describe and explain the relationship between temperature and the permeability of cell membranes.
Resources required
White board or flipchart and suitable pens or blackboard and chalk
Practical materials specified on the Technical Information Sheet.
Copies of the student worksheets.
Planned activities
Timings/ minutes
Teacher/ Student Activities
End of previous lesson
Preparation – Student worksheet given out for students to read in preparation for the practical lesson. To consider identification of the variables, formulate a hypothesis and review previous learning on cell membranes
0 - 3 Introduction to the aims, intended outcomes and shape of the lesson – teacher led oral presentation
3 - 5 Context – review of enzyme controlled reactions, biological molecules & respiration. Key points written on board
5 - 8 Introduction to method – Teacher briefly outlines method and answers any student questions on procedure. Teacher emphasises safety concerns with methylene blue
8 - 40 Carrying out the practical – students carry out the practical work. Whilst they are waiting for the colour change to occur they can write up the first part, identifying variables, hypothesis, results table.

Appendix 2
48
40 - 50 Obtain results – Students enter results into table and clear away apparatus as soon as they have finished
50 - 60 Drawing together the threads – Teacher led discussion on the skills that have been developed as well as discussion on results obtained. Practical write up to be completed in following lesson or as homework activity

Appendix 2
49
Useful information
Safety precautions:
• Methylene blue is harmful and can be a skin irritant. Safety glasses should be worn. Additionally as it is a protein stain it will stain any natural material. Please emphasise to students the importance of safety when pipetting the methylene blue.
Discussion / evaluation points should include:
• Why should the tubes remain still after the initial mixing?
• What is being measured by the methylene blue discolouration (i.e. removal of oxygen from the system by the aerobically respiring yeast) ?
• Suggest why some sugars are metabolised and others are not.
• Why was the yeast incubated for about 30 minutes before the experiment started?
• What was the purpose of the tube with distilled water and yeast solution?
• Ensure that the students are aware of what type of organism that yeast belongs to.
• Yeasts live in many different environments. Suggest why the following are suitable places for yeast growth
a) fruit skin
b) Human body
• What precautions could be undertaken to ensure that all the tubes remained at a constant temperature?
• for students unable to obtain a full set of results the following could be used for analysis. Please note that other students results may not agree with these ones.
Type of carbohydrate Time taken for blue colour to disappear (minute:secs)
Glucose 6:15
Fructose 24:45
Galactose No change
Lactose No change
Maltose 25:30
Sucrose 8:40
Starch 42:00

Appendix 2
50
Practical 4 - Technical information
The metabolism of different carbohydrates by yeast
The apparatus and materials required for this practical are listed below.
The amount of apparatus listed is for one student or one group of students if they are to work in groups.
1. 5cm3 of as many of the following carbohydrates as available. Each made up to 5% concentration – Fructose, Galactose, Glucose, Lactose, Maltose, Starch, Sucrose
2. 5cm3 distilled water
3. 7 boiling tubes (or as many as the number of carbohydrates available plus control)
4. Methylene blue, 3 drops per sample
5. 5cm3 yeast solution (prepared in advance) per sugar used
6. test tube rack
7. Timer
8. Safety glasses
Additionally each student will require access to a sink & running water.
The yeast should be prepared according to local conditions so that it is activated and ready for use.
Safety Precautions/Risks.
Methylene blue = H
A risk assessment should be carried out as a matter of course.

Appendix 2
51
Practical 5 - The effect of pH on enzymes
This practical focuses on making measurements and observations, recording and presenting data, analysis, drawing conclusions and evaluating methods. You will also develop other assessed skills throughout the practical.
Intended learning outcomes
By the end of this practical you should be able to:
• Identify dependent and independent variables
• Make a hypothesis and express this in words and graphically
• Experience relevant methods, analysis and conclusion.
• Describe and explain the relationship between ph and enzyme activity
• Evaluate procedures
Safety Information
You should wear eye protection throughout this practical.
Hydrogen peroxide is corrosive. Avoid contact with eyes or skin. It will bleach skin or clothes.
Citric acid is harmful.
Background information
• Most enzymes have an optimum pH near to 7 (the pH found inside most cells)
• pH is the measurement of the concentration of Hydrogen ions (H+)
• Hydrogen ions will affect the hydrogen and ionic bonds within the enzyme
• If these bonds are changed the three dimensional shape is changed altering the shape of the active site
• When an enzymes shape is altered it becomes denatured
• Potatoes are a good source of catalase
You will investigate the effect of pH on the enzyme catalase as it breaks down toxic Hydrogen peroxide, a by-product of some biochemical reactions, into water and oxygen.
• Read the information above
• Identify and write down the dependent and independent variables
• Write down a hypothesis
• Draw a sketch graph to show what you think will happen

Appendix 2
52
• Identify any variables that should be controlled and outline how this should be done
• What would be the best method for collecting the oxygen produced?
• A graph of pH against rate of activity will be produced after the practical. Make sure you know how to calculate rate.
• Know what a buffer solution is and what it does.
Method
Preparations and making observations
1. Use a cork borer to cut cylinders of fresh potato tissue. You will require a piece (pieces) between 6 – 7cm in length. Place on a tile and cut into at least 60 discs, each 1mm wide.
2. Place all the discs in a small beaker of water.
3. Set up the equipment as follows. Clamp a boiling tube to a stand and carefully insert the manometer (with fluid) into a rubber bung.
4. Using a syringe or small measuring cylinder place 5cm3 of buffer solution pH3 into the boiling tube.
5. Carefully add 10 of the potato discs followed by 5cm3 of hydrogen peroxide solution.
6. Place the bung back into the boiling tube as quickly as possible.
7. Start the stop watch and time how long it takes for the manometer fluid to rise by 5cm. (Mark start point on tube and measure 5cm)
8. Carefully agitate the tube to make sure that the potato discs do not stick together.
9. Wash out the boiling tube and repeat the experiment using a different pH buffer and ten new potato discs each time.
10. Make sure you use a clean syringe / measuring cylinder with each different buffer solution.
11. If time allows repeat the procedure for increased reliability.
Write-up
• Record your results in a clear table ensuring units are put in headers.
• If replicate results not done obtain a set of mean readings by using other class members results.
• Calculate the rate of reaction.
• Plot a graph of pH against rate.
• Explain your findings using your knowledge of enzymes.
• Assess the reliability of the results obtained and suggest any modifications you could make to improve the experiment
• How could you measure the volume of gas produced by this method and by altering the method

Appendix 2
53
Practical 5 - Lesson Plan
The effect of pH on enzyme activity
Context
A practical investigation set in the context of 9700 syllabus – The effect of pH on enzyme activity
Key aims of the lesson
This practical is designed to develop the skills of observation, analysis and evaluation.
Intended learning outcomes
By the end of the practical and the write-up the student should be able to
• Experience relevant methods, analysis, conclusions and evaluation.
• Describe and explain the relationship between pH and enzyme activity.
Resources required
White board or flipchart and suitable pens or blackboard and chalk
Practical materials specified on the Technical Information Sheet.
Copies of the student worksheets.
Planned activities
Timings/ minutes
Teacher/ Student Activities
End of previous lesson
Preparation – 2 page student worksheet given out for students to read in preparation for the practical lesson. To consider identification of the variables, formulate a hypothesis and review previous learning on cell membranes
0 - 3 Introduction to the aims, intended outcomes and shape of the lesson – teacher led oral presentation
3 - 5 Context – review of enzymes, key points written on board
5 - 8 Introduction to method – Teacher briefly outlines method and answers any student questions on procedure. Teacher emphasises safety concerns with cork borer (or sharp knife) and hydrogen peroxide
8 - 45 Carrying out the practical – students carry out the practical work..
45 - 50 Obtain results – Students enter results into table and clear away apparatus as soon as they have finished

Appendix 2
54
50 - 60 Drawing together the threads – Teacher led discussion on the skills that have been developed as well as discussion on results obtained. Practical write up to be completed in following lesson or as homework activity
Useful information
Discussion / evaluation points should include:
• explanation of the shape of the graph
• consistency of the enzyme within the potato, age of potato
• possible problems with the method e.g. Lack of temperature control in reaction tube, loss of gas before bung inserted
• for students unable to obtain a full set of results the following could be used for analysis
pH Time taken for manometer to move 5cm (minutes)
3 10
4 8
5 6
6 4
7 2
8 5
9 8
10 10

Appendix 2
55
Practical 5 - Technical information
The effect of pH on enzymes
The apparatus and materials required for this practical are listed below.
The amount of apparatus listed is for one student or one group of students if they are to work in groups.
1. fresh potato (each student requires a core (cores) approximately 10cm in length). (More if experiment is to be repeated)
2. 1 boiling tube
3. Single bore rubber bung
4. cork borer
5. white tile
6. scalpel
7. small beaker
8. 2 x 10cm3 graduated pipette or measuring cylinder or syringe
9. Manometer tube (3mm diameter)
10. Stop watch
11. Forceps
12. 20 volume Hydrogen peroxide
13. Range of buffers (pH 3 – 8).
Additionally each student will require access to a sink and running water.
Commercial buffer tablets are available from most chemical wholesalers, however it is possible to make up buffer solutions in the laboratory. (Details from, Laboratory Manual for Schools. Heinemann. 1977)
Sodium hydrogen phosphate/citric acid buffer – range pH 3.0 – 8.0.
To make up 100cm3 of buffer use 0.1M Citric Acid & 0.2M Sodium hydrogen phosphate in the following proportions:
pH Citric acid / cm3 Sodium hydrogen
phosphate / cm3
3.0 79.45 20.55
4.0 61.45 38.55
5.0 48.50 51.50
6.0 36.85 63.15
7.0 17.65 82.35
8.0 2.75 97.25

Appendix 2
56
Safety Precautions/Risks.
Hydrogen peroxide = C
Citric acid = H
A risk assessment should be carried out as a matter of course.

Appendix 2
57
Practical 6 - The effect of inhibitors on enzyme activity
This practical focuses on making measurements and observations, recording and presenting data, analysis, drawing conclusions and evaluating methods. You will also develop other assessed skills throughout the practical.
Intended learning outcomes
By the end of this practical you should be able to:
• Experience relevant methods, analysis and conclusion.
• Describe and explain the effect of a non competitive inhibitor on enzyme activity.
• Evaluate procedures.
Safety Information
You should wear eye protection throughout this practical.
Amylase is harmful. Avoid contact with eyes or skin.
Iodine solution is harmful. Avoid contact with eyes or skin. It will stain skin or clothes.
Background information
• A non competitive inhibitor binds to a part of the enzyme away from the active site
• The shape of the enzyme is changed, thus changing the shape of the active site
• No enzyme-substrate complexes can be formed, hence no product produced
• Increasing the amount of substrate does not overcome the effect of this type of inhibitor
You will investigate the effect of increasing the amount of Lead nitrate on the hydrolysis of starch by the enzyme amylase.
• Read the information above
• Identify and write down the dependent and independent variables
• Write down a hypothesis
• Draw a sketch graph to show what you think will happen
• Identify any variables that should be controlled and outline how this should be done

Appendix 2
58
A colorimeter should be used to compare the colours of the solutions obtained after a given time.
Method
Preparations and making observations
1. Set up a thermostatically controlled water bath set at 40°C
2. Label six boiling tubes A – F and place in a test tube rack
3. Add 10cm3 starch solution to each tube
4. Add the following quantities of Lead nitrate to 5cm3 distilled water in six test tubes labelled 1 – 6 : 0g, 0.1g, 0.2g, 0.3g, 0.4g, 0.5g and shake to ensure it dissolves
5. Pour contents of tube 1 into boiling tube A, tube 2 into boiling tube B etc.
6. Add 5cm3 amylase solution to each of the boiling tubes, agitate well and start the timer after placing the tubes into the water bath
7. Allow the reaction to proceed for 20 minutes
8. During this time adjust the colorimeter using a solution of 1cm3 iodine solution in a boiling tube containing 10cm3 starch solution and 5cm3 distilled water. Set the colorimeter to 0% transmission with this solution
9. After 20 minutes add 1cm3 iodine solution to each tube
10. Test each of the tubes A – F in the colorimeter noting down the absorbance for each tube and record in a table. (Note for centres without access to a colorimeter the method could be adapted to using a spotting tile with one drop of iodine in each well. At intervals of one minute a drop of the reaction mixture is placed on the tile and the time taken for the black colour to disappear noted.)
Write-up
• Record your results in a clear table ensuring units are put in headers where possible.
• Plot a graph of transmission against mass of lead nitrate added. (If experiment done using spotting tile method a graph of rate of reaction against mass of lead nitrate added should be drawn)
• Explain your findings using your knowledge of enzymes and inhibitors.
• Assess the reliability of the results obtained and suggest any modifications you could make to improve the experiment.
• Why was it necessary to control the temperature of the reaction?
• What further experiments could be done to investigate non-competitive inhibitors?
• What are the advantages of repeating an experiment?
• Suggest why the iodine solution was not added at the same time as the other solutions

Appendix 2
59
Practical 6 - Lesson Plan
The effect of inhibitors on enzyme activity
Context
A practical investigation set in the context of 9700 syllabus – Enzymes and enzyme inhibitors
Key aims of the lesson
This practical is designed to develop the skills of observation, analysis and evaluation.
Intended learning outcomes
By the end of the practical and the write-up the student should be able to
• Experience relevant methods, analysis, conclusions and evaluation.
• Describe and explain the effect of a non competitive inhibitor
Resources required
White board or flipchart and suitable pens or blackboard and chalk
Practical materials specified on the Technical Information Sheet.
Copies of the student worksheets.
Planned activities
Timings/ minutes
Teacher/ Student Activities
End of previous lesson
Preparation – Student worksheet given out for students to read in preparation for the practical lesson. To consider identification of the variables, formulate a hypothesis and review previous learning on enzymes.
0 - 3 Introduction to the aims, intended outcomes and shape of the lesson – teacher led oral presentation
3 - 5 Context – review of enzyme action,
5 - 8 Introduction to method – Teacher briefly outlines method and answers any student questions on procedure. Teacher emphasises safety concerns with the use of chemicals.
8 - 40 Carrying out the practical – students carry out the practical work. Whilst they are waiting for the 20 minute period they can write up the first part, identifying variables, hypothesis, results table. Teacher to demonstrate the use of colorimeter to those students unfamiliar with this piece of equipment.

Appendix 2
60
40 - 50 Obtain results – Students enter results into table and clear away apparatus as soon as they have finished
50 - 60 Drawing together the threads – Teacher led discussion on the skills that have been developed as well as discussion on results obtained. Practical write up to be completed in flowing lesson or as homework activity
Useful information
• For centres without access to a colorimeter the practical results will not be as accurate but will still be of an objective nature. The pupils could evaluate to suggest improvements to include a more objective measurement.
• If the centre does not have access to thermostatically controlled water baths, manually controlled ones could be substituted or left out altogether but the need for temperature control needs to be discussed in the evaluation.
Other Discussion / evaluation points should include:
• explanation of the shape of the graph
• the differences between competitive and non competitive inhibitors needs to be emphasised
• for students unable to obtain a full set of results the following could be used for analysis
Mass of Lead nitrate/ g
Transmission / arbitrary units
0.0 85
0.1 52
0.2 37
0.3 27
0.4 23
0.5 21
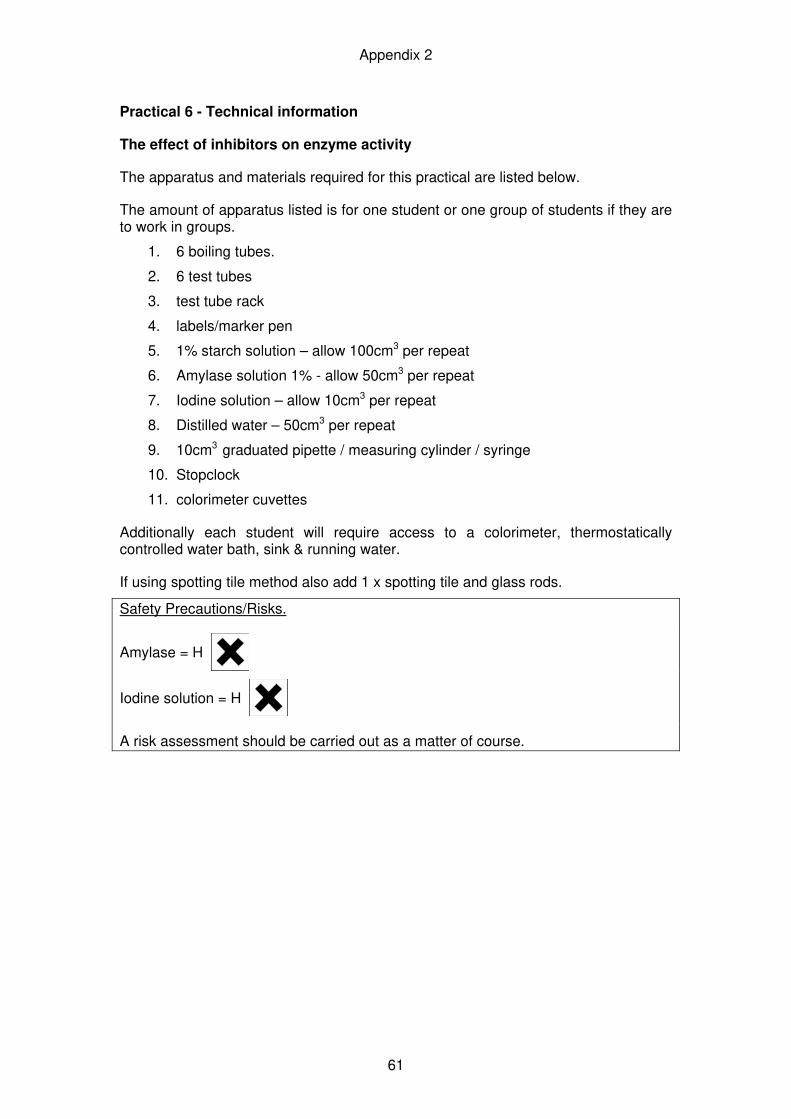
Appendix 2
61
Practical 6 - Technical information
The effect of inhibitors on enzyme activity
The apparatus and materials required for this practical are listed below.
The amount of apparatus listed is for one student or one group of students if they are to work in groups.
1. 6 boiling tubes.
2. 6 test tubes
3. test tube rack
4. labels/marker pen
5. 1% starch solution – allow 100cm3 per repeat
6. Amylase solution 1% - allow 50cm3 per repeat
7. Iodine solution – allow 10cm3 per repeat
8. Distilled water – 50cm3 per repeat
9. 10cm3 graduated pipette / measuring cylinder / syringe
10. Stopclock
11. colorimeter cuvettes
Additionally each student will require access to a colorimeter, thermostatically controlled water bath, sink & running water.
If using spotting tile method also add 1 x spotting tile and glass rods.
Safety Precautions/Risks.
Amylase = H
Iodine solution = H
A risk assessment should be carried out as a matter of course.

Appendix 2
62
Practical 7 - The effect of temperature on membrane permeability in beetroot
This practical focuses on making measurements and observations, recording and presenting data, analysis, drawing conclusions and evaluating methods. You will also develop other assessed skills throughout the practical.
Intended learning outcomes
By the end of this practical you should be able to:
• Experience relevant methods, analysis and conclusion.
• Describe and explain the relationship between temperature and membrane permeability.
• Evaluate procedures
Safety Information
You should wear eye protection throughout this practical.
There are no particular hazards in this practical, however you must follow your laboratory rules.
Background information
• The colour of beetroot is due to the presence of a red pigment called anthocyanin
• The cell membrane is mainly made up of two types of molecules, phospholipids and proteins scattered around in the membrane.
• The membrane is partially permeable
• Protein structure is denatured at high temperatures
You will investigate the effect of temperature on the permeability of the cell membrane in beetroot.
• Read the information above
• Identify and write down the dependent and independent variables
• Write down a hypothesis
• Draw a sketch graph to show what you think will happen
• Identify any variables that should be controlled and outline how this should be done
A colorimeter should be used to compare the colours of anthocyanin solutions obtained.

Appendix 2
63
Method
Preparations and making observations
1. Use a cork borer to cut cylinders of fresh beetroot tissue. Place on a tile and cut into 30 discs, each 3mm wide.
2. Place all the discs in a small beaker and wash under a running tap for at least five minutes.
3. Label six test tubes – 30°C, 40°C, 50°C, 60°C, 70°C, 80°C.
4. Add 10cm3 cold distilled / de-ionised water to each tube.
5. Set up a water bath using a large beaker, tripod, gauze and Bunsen burner.
6. Heat the water gently until a temperature of 80oc is reached then remove heat source.
7. Take five of the beetroot discs and impale on a mounted needle with space between each disc.
8. Immerse the discs in the water bath for exactly one minute, then remove and carefully push the discs into the test tube labelled 80°C and set aside.
9. Reduce the temperature of the water bath to 70°C and take a second set of five discs and repeat the process of immersion for one minute followed by putting them into the next tube.
10. Continue the process for each of the temperatures.
11. After the discs have stood for thirty minutes shake the tubes and pour this liquid into a cuvette.
12. Fill a second cuvette with distilled water.
13. Place a blue filter into the colorimeter and use the distilled water to zero the machine adjusting the pointer to zero absorbance.
14. Measure the colour density of the 70°C solution.
15. Wash out the cuvette and repeat the procedure to record the light absorbance for each of the temperatures.
Write-up
• Record your results in a clear table ensuring units are put in headers where possible.
• Plot a graph of relative concentration of pigment against temperature.
• Explain your findings using your knowledge of cell membranes.
• Assess the reliability of the results obtained and suggest any modifications you could make to improve the experiment

Appendix 2
64
Practical 7 - Lesson Plan
The effect of temperature on the permeability of cell membranes
Context
A practical investigation set in the context of 9700 syllabus – cell membranes and the effect of temperature.
Key aims of the lesson
This practical is designed to develop the skills of observation, analysis and evaluation.
Intended learning outcomes
By the end of the practical and the write-up the student should be able to
• Experience relevant methods, analysis, conclusions and evaluation.
• Describe and explain the relationship between temperature and the permeability of cell membranes.
Resources required
White board or flipchart and suitable pens or blackboard and chalk
Practical materials specified on the Technical Information Sheet.
Copies of the student worksheets.
Planned activities
Timings/ minutes
Teacher/ Student Activities
End of previous lesson
Preparation – 2 page student worksheet given out for students to read in preparation for the practical lesson. To consider identification of the variables, formulate a hypothesis and review previous learning on cell membranes
0 - 3 Introduction to the aims, intended outcomes and shape of the lesson – teacher led oral presentation
3 - 5 Context – review of cell membranes, key points written on board
5 - 8 Introduction to method – Teacher briefly outlines method and answers any student questions on procedure. Teacher emphasises safety concerns with cork borer (or sharp knife) and water baths
8 - 40 Carrying out the practical – students carry out the practical work. Whilst they are waiting for the 30 minute period they can write up the first part, identifying variables, hypothesis, results table. Teacher to demonstrate the use of colorimeter to those students unfamiliar with this piece of equipment.

Appendix 2
65
40 - 50 Obtain results – Students enter results into table and clear away apparatus as soon as they have finished
50 - 60 Drawing together the threads – Teacher led discussion on the skills that have been developed as well as discussion on results obtained. Practical write up to be completed in flowing lesson or as homework activity
Useful information
• For centres without access to a colorimeter the practical results will only be of a subjective nature. However the principles of denaturation of the proteins in the membrane can still be discussed and the pupils could evaluate to suggest improvements to include a more objective measurement.
• If the centre has access to a number of thermostatically controlled water baths these could be substituted for the individual ones suggested in the method.
Discussion / evaluation points should include:
• explanation of the shape of the graph
• consistency of the pigment within the beetroot
• why the discs were washed before heating
• possible problems with the method e.g. impaling onto a mounted needle
• for students unable to obtain a full set of results the following could be used for analysis
Temperature
/ °C
Absorbance
/ arbitrary units
30 0.12
40 0.16
50 0.29
60 0.83
70 1.62
80 1.41

Appendix 2
66
Practical 7 - Technical information
The permeability of beetroot cell membrane
The apparatus and materials required for this practical are listed below.
The amount of apparatus listed is for one student or one group of students if they are to work in groups.
1. fresh beetroot (each student requires a core approximately 10cm in length).
2. 6 test tubes
3. test tube rack
4. cork borer
5. white tile
6. scalpel
7. small beaker
8. 10cm3 graduated pipette or measuring cylinder
9. mounted needle
10. large beaker
11. thermometer
12. Bunsen burner
13. tripod
14. heat proof mat
15. gauze
16. colorimeter cuvettes (2)
Additionally each student will require access to a sink, running water and a colorimeter.
Safety Precautions/Risks.
No specific hazards identified.
A risk assessment should be carried out as a matter of course.

Appendix 2
67
Practical 8 - Broad bean root tip squash
This practical focuses on setting up and manipulating apparatus and making and recording observations. Further skills can be developed using additional information after the practical has been completed.
Intended learning outcomes
By the end of this practical you should be able to:
• Experience simple techniques to observe mitosis in cells in the root tip of broad beans
• Further your knowledge about mitosis
• Interpret and record observations
Safety Information
You should wear eye protection throughout this practical.
Acetic orcein is corrosive. Avoid contact with eyes or skin. It will stain skin and clothes.
Background information
• The role of chromosomes is to store information in the DNA coding and be able to replicate by cell division.
• Mitosis is a type of cell division found in somatic cells, that produces diploid cells.
• Chromosomes are only visible when the cell is dividing. They can be made more visible using appropriate staining techniques.
• During mitosis each chromosomes separates into two chromatids.
• Each chromatid is pulled to opposite ends of the spindle prior to the cell dividing into two.
• The different stages of cell division are called interphase, prophase, metaphase, anaphase, telophase and back to interphase and are characterised by the position of the chromatids.
• During interphase the DNA of the chromatids replicates so that at prophase, whole chromosomes are visible once more.
• Mitosis can be observed in the meristematic tissues found in the apical meristem of actively growing roots of plants such as broad bean.
You will investigate how root tip tissue can be prepared and stained so that chromosomes in cells undergoing mitosis can be viewed through a microscope. You will then identify the various stages of cell division.

Appendix 2
68
• Read the information above.
• Read your textbook and look carefully at the diagrams and photographs on the section concerning mitosis.
• Write down the key features that will enable you to identify root tip cells at each of the different stages of mitotic cell division.
Method
Preparation
1. You have been provided with a germinated seedling of a broad bean or similar.
2. Using a sharp knife or scalpel, carefully cut of 5mm from the apical tip of five lateral roots.
3. Place the root tips into a test-tube containing acetic orcein stain.
Warning! Acetic orcein is an acidic stain that turns protein purple. Any stain that gets on skin or natural clothing will stain the material purple.
4. Warm the acetic orcein and root tips in a hot water bath but do NOT allow the solution to boil. The stain should be kept so that it is gently steaming for at least five minutes.
5. Using a mounted needle or similar, carefully remove one of the root tips. The root tips will now be very soft and easily damaged so do not remove them with forceps.
6. Leave the remaining four root tips in the hot stain.
7. Place the root tip onto a clean microscope slide.
8. Using a sharp knife cut it in half transversely so that each length is approximately 2.5mm.
9. Discard the half that is furthest away from the root tip.
10. Using a pipette, carefully add two or three drops of acetic orcein stain to the root tip on the slide.
11. Using a mounted needle or similar gently break the tissue of the root tip apart.
12. Carefully lower a cover slip over the root tip and using the blunt end of your mounted needle or a pencil, gently push the cover slip down onto the slide so that the root tip is squashed. Care is needed to ensure that as few air bubbles are present as possible.
13. Gently blot any excess stain from the slide.
14. Examine the slide using a microscope for the different stages in mitosis.
15. If insufficient staining has taken place, the process may be repeated with the other four root tips that have been left in the hot stain.
Making observations
1. Initially observe the tissue using the low power of your microscope. This will enable you to find areas of cells where the nuclear material is clearly visible and undergoing mitosis.

Appendix 2
69
2. Using the high power of your microscope examine individual cells at various stages of division.
3. Using the high power of you microscope make large, labelled drawings of each of the stages of cell division.
Write-up
• Write up the method and answering the following questions
1. Suggest why the tissue was heated when placed in the acetic orcein stain.
2. Explain how you placed the coverslip on the slide in order to reduce the number of air bubbles.
3. What was the diploid number of chromosomes in the cells of the root tip that you examined?
4. Explain why the haploid number is always even.

Appendix 2
70
Practical 8 - Lesson Plan
Broad bean root tip squash
Context
A practical investigation set in the context of 9700 syllabus – Cell and nuclear division
Key aims of the lesson
This practical is designed to develop the skills of manipulation of apparatus and observation, and the recording and interpretation of observations.
Intended learning outcomes
By the end of the practical and the write-up the student should be able to
• Experience relevant methods.
• Describe and explain the reasons behind the methods.
• Extend knowledge on the structure and function of mitosis
Resources required
White board or flipchart and suitable pens or blackboard and chalk
Practical materials specified on the Technical Information Sheet.
Copies of the student worksheets.
Planned activities
Timings/ minutes
Teacher/ Student Activities
End of previous lesson
Preparation – Student worksheet given out for students to read in preparation for the practical lesson. Students to read and look at drawings and photographs of mitosis in their textbooks.
0 - 3 Introduction to the aims, intended outcomes and shape of the lesson – teacher led oral presentation
3 - 5 Context – review the sequence of mitosis and determine the key features of each of the stages with key points written on board
5 - 10 Introduction to method – Teacher briefly outlines method and answers any student questions on procedure. Teacher emphasises safety concerns when using hot acetic orcein stain
10 - 25 Carrying out the practical – students carry out the practical work.
25 - 50 Obtain results – Students observe mitosis and produce clear labelled diagrams of each stage, then clear away apparatus as soon as they have finished

Appendix 2
71
50 - 60 Drawing together the threads – Teacher led discussion on the manipulation and observational skills that have been developed as well as discussion on results obtained. Practical write up to be completed in following lesson or as homework activity
Useful information
• Other plant root tips can be substituted for broad bean, such as other types of bean, onions or sunflowers.
• The intensity of the stain depends upon how long the root tips are left in the hot acetic orcein stain.
Discussion / evaluation points should include:
• explanation of the methods used and how to successfully produce a mounted slide
• possible problems with the method such as the degree of staining, sufficient squashing of tissue and microscope technique

Appendix 2
72
Practical 8 - Technical information
Broad bean root tip squash
The apparatus and materials required for this practical are listed below.
The amount of apparatus listed is for one student or one group of students if they are to work in groups.
1. 1 x actively growing broad bean seedling such that at least five lateral roots have developed. Broad bean may be substituted with any other bean, or onion or sunflower.
2. sharp knife or scalpel
3. 1 x test-tube and hot water bath that can be maintained at approximately 90°C
4. 1 x microscope slide and cover slip
5. 1 x mounted needle or similar
6. 5cm3 of acetic orcein stain. If not previously prepared, the acetic orcein should be mixed with 1M HCl in the proportions of ten parts stain to one part acid.
7. Access to microscope with both low and high power objective lenses
Safety Precautions/Risks.
Acetic orcein = C
A risk assessment should be carried out as a matter of course.
NOTE
Acetic orcein is an acidic stain that turns protein purple. Any stain that gets on skin or natural clothing will stain the material purple.

Appendix 2
73
Practical 9 - The extraction of DNA from onions
This practical focuses on setting up and manipulating apparatus and making observations. Further skills can be developed using additional information after the practical has been completed.
Intended learning outcomes
By the end of this practical you should be able to:
• Experience simple techniques to extract DNA from living material.
• Further your knowledge about the structure of DNA
Safety Information
You should wear eye protection throughout this practical.
Protease is harmful. Avoid contact with eyes or skin.
Ethanol is highly flammable. There should be no flames in the same room.
Background information
• DNA is a polymer made up of monomers called nucleotides
• A gene is a set of coded instructions made up of a particular order of nucleotides
• A nucleotide consists of three parts:
i) a pentose sugar
ii) a nitrogen containing base
iii) a phosphate group
• DNA molecule is a double helix held together by hydrogen bonds between the complementary base pairs
You will investigate how DNA can be extracted from living material such as onion.
• Read the information above
• Read your text book and notes on DNA
Method
Preparations and making observations
1. Prepare the degrading mixture by adding 3g of sodium chloride (table salt) to 10cm3 liquid detergent (washing up liquid). Make this up to 100cm3 with distilled water and stir well to ensure the salt has dissolved.
2. The onion should be chopped into small pieces and added to the detergent

Appendix 2
74
solution and stir.
3. Place the beaker into a water bath maintained at 60oc for fifteen minutes.
4. Immediately cool down the onion mixture in an ice cold water bath for five minutes again stirring frequently.
5. Blend using a food blender for no more than five seconds.
6. Using coffee filter paper (laboratory filter paper not coarse enough) filter the mixture into a new beaker.
7. Once you have obtained enough liquid pour 10cm3 into a boiling tube and add 2 – 3 drops of a protease enzyme and shake the tube to mix the contents well.
8. Pour 10cm3 ice cold ethanol slowly into the boiling tube and place the tube into rack for about five minutes.
9. DNA should appear where the two liquids meet.
Write-up
• Write up the method and answering the following questions
1. What effect would the washing up liquid (detergent) have on the cell membranes?
2. Why was the beaker placed in a hot water bath for 15 minutes and then immediately cooled?
3. Why was the mixture blended, but only for 5 seconds?
4. What type of enzyme would now be needed to separate the DNA into smaller pieces?

Appendix 2
75
Practical 9 - Lesson Plan
The extraction of DNA from onions
Context
A practical investigation set in the context of 9700 syllabus –
Key aims of the lesson
This practical is designed to develop the skills of observation and manipulation of apparatus.
Intended learning outcomes
By the end of the practical and the write-up the student should be able to
• Experience relevant methods.
• Describe and explain the reasons behind the methods.
• Extend knowledge on the structure and function of DNA.
Resources required
White board or flipchart and suitable pens or blackboard and chalk
Practical materials specified on the Technical Information Sheet.
Copies of the student worksheets.
Planned activities
Timings/ minutes
Teacher/ Student Activities
End of previous lesson
Preparation – Student worksheet given out for students to read in preparation for the practical lesson. To consider the structure of DNA and reinforce previous learning
0 - 3 Introduction to the aims, intended outcomes and shape of the lesson – teacher led oral presentation
3 - 5 Context – review of DNA structure, key points written on board
5 - 8 Introduction to method – Teacher briefly outlines method and answers any student questions on procedure. Teacher emphasises safety concerns with sharp knives and use of ethanol
8 - 45 Carrying out the practical – students carry out the practical work. Whilst they are waiting for the 15 minute period they can write up the first part of the method and consider the questions.
40 - 50 Obtain results – Students observe DNA produced then clear away apparatus as soon as they have finished

Appendix 2
76
50 - 60 Drawing together the threads – Teacher led discussion on the skills that have been developed as well as discussion on results obtained. Practical write up to be completed in following lesson or as homework activity
Useful information
• Other vegetables/fruit can be substituted for onions, however mixed results are often obtained.
Discussion / evaluation points should include:
• explanation of the methods used
• possible problems with the method

Appendix 2
77
Practical 9 - Technical information
Extraction of DNA from onions
The apparatus and materials required for this practical are listed below.
The amount of apparatus listed is for one student or one group of students if they are to work in groups.
1. fresh onion, approximately tennis ball sized
2. sharp knife
3. chopping board
4. 2 x 250cm3 beakers
5. 1 x 400cm3 beaker or jug (for the ice)
6. 3g salt
7. 10cm3 washing up liquid
8. 90cm3 distilled water
9. (Thermostatically controlled) water bath at 60°C.
10. Supply of ice
11. Food blender (household domestic one is ideal)
12. Coffee filter paper
13. Funnel
14. Boiling tube
15. 2-3 drops of protease enzyme, such as neutrase ®
16. 10cm3 ice cold ethanol
SAFETY NOTE
The ethanol must be ice cold, this involves leaving it overnight in a freezer. It is essential that it is placed in a sealed, vapour tight plastic bottle. If this is not possible put the ethanol in a sealed container in an ice bath for several hours before the practical is due to start.
Safety Precautions/Risks.
Protease = H
Ethanol = F
A risk assessment should be carried out as a matter of course.

Appendix 2
78
Practical 10 - The effect of wind speed on the rate of transpiration in a leafy shoot
This practical focuses on making measurements and observations, recording and presenting data, analysis, drawing conclusions and evaluating methods. You will also develop other assessed skills throughout the practical.
Intended learning outcomes
By the end of this practical you should be able to:
• Identify dependent and independent variables
• Make a hypothesis and express this in words and graphically
• Identify the variables that should be controlled
• Experience relevant methods, analysis and conclusion.
• Describe and explain the relationship between transpiration and wind speed
• Evaluate procedures
Safety Information
You should wear eye protection throughout this practical.
There are no particular hazards in this practical, however you must follow your laboratory rules.
Background information
• Transpiration is the movement of water through plants, from the roots where it is absorbed by osmosis, to the leaves where it is lost by evaporation.
• Water leaves a plant’s leaves through stomata, the aperture of which is controlled by guard cells.
• Most plants open their stomata during the day and close them at night.
• Plants may close their stomata when stressed by losing too much water.
• The real purpose of stomata is to absorb carbon dioxide and release oxygen from photosynthesis without losing too much water.
• The evaporation of water is affected by wind speed, temperature, humidity and atmospheric pressure.
You will investigate how wind speed affects the rate of transpiration from a leafy shoot by using a potometer.
• Read the information above
• Identify and write down the dependent and independent variables
• Write down a hypothesis
• Draw a sketch graph to show what you think will happen

Appendix 2
79
• Identify any variables that should be controlled and outline how this should be done
• What would be the best method for setting up the potometer?
• Plot a graph of the distance of the fan from the shoot, against the rate of water movement in the potometer, after the practical. Make sure you know how to calculate rate.
Wind speed in this case is varied by moving the fan to fixed distances from the leafy shoot. Although the wind speed from the fan will not accurately follow the inverse -square law, you would be well advised to understand how increasing the distance of the fan from the shoot, may affect the wind speed.

Appendix 2
80
Method
Preparations
The apparatus should be assembled as shown in the following diagram.
1. Attach the rubber tubing, the capillary tube and the water reservoir to the T piece.
2. Fill the reservoir, capillary tube and rubber tubing with water. This can be done by placing them under water and gently squeezing the rubber tubing until all the air has been removed.
3. Leave the apparatus under water. 4. Cut a fresh leafy shoot with a sharp knife and immediately place the cut
end under water.
5. Carefully attach the cut end of the shoot to the rubber tubing. This should be done with the cut end only under water.
6. Close the tap on the water reservoir.
7. Remove the apparatus from the water and attached to a clamp stand or support.
8. Place a mm scale behind the capillary tube.
9. Place a fan at a set distance from the leafy shoot. Do NOT switch on.
Making observations
1. Note the position of the air bubble in the capillary tube. It may be very close to then end of the tube.
2. Record the time taken for the air bubble to move a set distance along the tube. You will have to determine this distance base on the speed of the bubble. If the bubble is moving quickly the distance will need to be larger than if it is moving slowly.
3. Reset the air bubble to then end of the capillary tube by carefully opening the tap on the water reservoir.

Appendix 2
81
4. Turn on the fan and repeat the procedure.
5. Reset the apparatus and move the fan to another distance.
6. Repeat the procedure with the fan at at least five differetn distances.
You are advised to start with the fan at the furthest distance and gradually move it towards the leafy shoot.
Calculations
1. Calculate the rate of movement using 1/time taken for the air bubble to travel a set distance.
2. Record the rate of travel for each distance in the class result table on the board or flip chart.
3. When all of the results have been recorded in the class results table, calculate the mean rate of movement for each distance.
4. (Optional) – calculate the standard error for each distance.
Write up
• Record your results in a clear table ensuring units are put in headers.
• Plot a graph to show the mean rate of movement for each distance.
• (Optional – add error bars to your graph)
• Make an evaluation considering:
• the limitations of the method used,
• anomalous values if any,
• replication and range of values of independent variable,
• the confidence with which the conclusions should be drawn.
• Draw conclusions considering:
• detailed description of the features of the results,
• whether your results agree or contradict your hypothesis,
• a scientific explanation of your results and conclusions,
• any modifications you could make to improve the experiment.

Appendix 2
82
Practical 10 - Lesson Plan
The effect of wind speed on the rate of transpiration in a leafy shoot.
Context
A practical investigation set in the context of 9700 syllabus – Investigate experimentally the factors that affect transpiration rate.
Key aims of the lesson
This practical is designed to develop the skills of planning, observation, analysis and evaluation.
Intended learning outcomes
By the end of the practical and the write-up the student should be able to:
• make a hypothesis and express this in words and graphically
• identify the dependant and independent variables
• identify the variables that should be controlled
• experience relevant methods, analysis, conclusions and evaluation
• describe and explain the relationship between wind speed and the rate of transpiration in a leafy shoot.
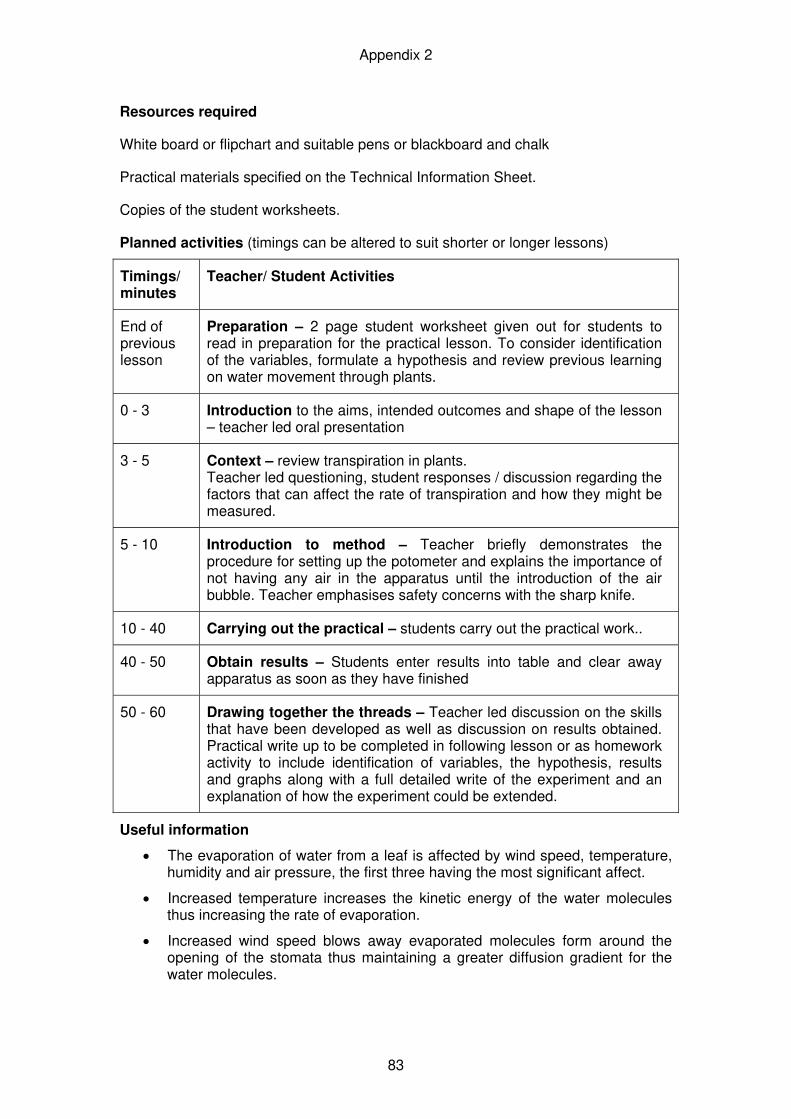
Appendix 2
83
Resources required
White board or flipchart and suitable pens or blackboard and chalk
Practical materials specified on the Technical Information Sheet.
Copies of the student worksheets.
Planned activities (timings can be altered to suit shorter or longer lessons)
Timings/ minutes
Teacher/ Student Activities
End of previous lesson
Preparation – 2 page student worksheet given out for students to read in preparation for the practical lesson. To consider identification of the variables, formulate a hypothesis and review previous learning on water movement through plants.
0 - 3 Introduction to the aims, intended outcomes and shape of the lesson – teacher led oral presentation
3 - 5 Context – review transpiration in plants. Teacher led questioning, student responses / discussion regarding the factors that can affect the rate of transpiration and how they might be measured.
5 - 10 Introduction to method – Teacher briefly demonstrates the procedure for setting up the potometer and explains the importance of not having any air in the apparatus until the introduction of the air bubble. Teacher emphasises safety concerns with the sharp knife.
10 - 40 Carrying out the practical – students carry out the practical work..
40 - 50 Obtain results – Students enter results into table and clear away apparatus as soon as they have finished
50 - 60 Drawing together the threads – Teacher led discussion on the skills that have been developed as well as discussion on results obtained. Practical write up to be completed in following lesson or as homework activity to include identification of variables, the hypothesis, results and graphs along with a full detailed write of the experiment and an explanation of how the experiment could be extended.
Useful information
• The evaporation of water from a leaf is affected by wind speed, temperature, humidity and air pressure, the first three having the most significant affect.
• Increased temperature increases the kinetic energy of the water molecules thus increasing the rate of evaporation.
• Increased wind speed blows away evaporated molecules form around the opening of the stomata thus maintaining a greater diffusion gradient for the water molecules.

Appendix 2
84
• Increased humidity lowers the concentration gradient and thus slows down the rate of evaporation.
• Reduced air pressure increases the rate of evaporation.
• Factors such as light are affected by the inverse square law where doubling the distance reduces the light intensity by a factor of four. Although this does not hold true for wind speed, you should be aware that doubling the distance of the fan from the leafy shoot, will not necessarily mean that the wind speed is reduced by half.
• Possible variables to control include temperature and humidity.
For students unable to obtain accurate data, the following table of results may be used.
rate of movement / 1/time in seconds
distance of fan from shoot / cm
0.016 200
0.018 175
0.023 150
0.034 125
0.055 100
0.071 75
0.092 50
0.11 25

Appendix 2
85
Practical 10 - Technical information
The effect of wind speed on transpiration in a leafy shoot
The apparatus and materials required for this practical are listed below.
The amount of apparatus listed is for one student or one group of students if they are to work in groups.
1. 1 freshly cut leafy shoot that has been put immediately into fresh water
2. 1 potometer set up as shown in the diagram below.
3. electric fan
4. meter rule
5. sight of a stop watch or clock
Additionally each student will require access to a sink and running water.
Safety Precautions/Risks.
No specific hazards identified.
A risk assessment should be carried out as a matter of course.

Appendix 2
86
Practical 11 - Investigating the role of carbon dioxide in living organisms.
This practical focuses on manipulation and observations, recording and presenting data, analysis, drawing conclusions and evaluating methods. The practical also develops skills of using material in new and unfamiliar situations.
Intended learning outcomes
By the end of this practical you should be able to:
• Identify dependent and independent variables
• Make a hypothesis and express this in words
• Experience relevant methods, analysis and conclusion.
• Describe and explain the relationship between different living organisms and the production of carbon dioxide
• Evaluate procedures
Safety Information
You should wear eye protection throughout this practical.
Ethanol is highly flammable. There should be no flames in the same room.
Bicarbonate indicator solution is flammable.
Background information
• Carbon dioxide is a gas found in the air at 0.04%
• Carbon dioxide dissolves in water to form carbonic acid thus reducing the pH
• When bicarbonate indicator solution is equilibriated with air it turns red/orange
• Bicarbonate indicator changes colour in different levels of pH
• You will remember from biology learnt in earlier courses that plants both respire and photosynthesise.
• Respiration glucose + oxygen carbon dioxide + water + energy
• Photosynthesis carbon dioxide + water glucose + oxygen
• The point at which the carbon dioxide released by plants from respiration, equals the carbon dioxide absorbed by plants for photosynthesis is called the plant’s compensation point.
You will investigate the effect of different living organisms on bicarbonate indicator and use this information to devise an experiment to determine the compensation point in plants.

Appendix 2
87
• Read the information above
• Identify and write down the dependent and independent variables
• Write down what you think will happen (do not worry about what the colour the indicator will be – you will discover that by doing the experiment)
• Identify any variables that should be controlled and outline how this should be done
• Write down a hypothesis to explain what will happen to the colour of the bicarbonate indicator when a plant is at its compensation point.
Method
Preparations and making observations
1. Rinse out three large test-tubes with distilled water and then with bicarbonate indicator solution.
2. Using a syringe or small measuring cylinder place 3 – 5 cm3 of bicarbonate indicator solution into each test-tube.
3. Carefully place a piece of perforated gauze in each test-tube so that it is just above the indicator solution.
4. Place a rubber bung or cork into the first test-tube.
5. Carefully place three green seedlings onto the gauze in the second test-tube and seal with a rubber bung or cork.
6. Carefully place three fly larvae onto the gauze in the third test-tube and seal with a rubber bung or cork.
7. Place the three test-tubes near a bright light source such as a lamp or window
8. Check that the colour of the bicarbonate indicator solution in each test-tube is red/orange at the start of the experiment.
9. Leave the tubes for at least 30 minutes, comparing the colour of each indicator solution every ten minutes.
10. When the colours look different in all three test-tubes, note the final colour of the indicator in each of the three test-tubes.
green seedlings
larvae
gauze
bicarbonate indicator

Appendix 2
88
Write-up
• Record your results in a clear table.
• Explain why one of the test-tubes contained no living material
• Explain your findings using your knowledge of respiration and photosynthesis
• Assess the reliability of the results obtained and suggest any modifications you could make to improve the experiment
• Plan and describe, but do not carry out an experiment using the same technique, to determine the compensation point in plants.

Appendix 2
89
Practical 11 - Lesson Plan
Investigating the role of carbon dioxide in living organisms.
Context
A practical investigation set in the context of 9700 syllabus – Gaseous exchange
Key aims of the lesson
This practical is designed to develop the skills of observation, analysis and evaluation and using knowledge gained in a new and different context
Intended learning outcomes
By the end of the practical and the write-up the student should be able to
• Experience relevant methods, analysis, conclusions and evaluation.
• Describe and explain how an experimental method can be adapted to discover when a plant is at its compensation point.
Resources required
White board or flipchart and suitable pens or blackboard and chalk
Practical materials specified on the Technical Information Sheet.
Copies of the student worksheets.
Planned activities
Timings/ minutes
Teacher/ Student Activities
End of previous lesson
Preparation – 2 page student worksheet given out for students to read in preparation for the practical lesson. To consider identification of the variables, formulate a hypothesis and review previous learning on cell membranes
0 - 3 Introduction to the aims, intended outcomes and shape of the lesson – teacher led oral presentation
3 - 5 Context – review of pH indicators such as litmus and universal indicator and that carbon dioxide dissolves to form an acidic solution.
5 - 8 Introduction to method – Teacher briefly outlines method and answers any student questions on procedure. Teacher emphasises safety concerns and ethics when handling living material such as fly larvae which must not suffer undue stress.
8 - 40 Carrying out the practical – students carry out the practical work..
40 - 50 Obtain results – Students enter results into table and clear away apparatus as soon as they have finished

Appendix 2
90
50 - 60 Drawing together the threads – Teacher led discussion on the skills that have been developed as well as discussion on results obtained. Practical write up to be completed in following lesson or as homework activity
Useful information
Discussion / evaluation points should include:
• what colour bicarbonate indicator tuned in different situation
• the cause of the colour change in the bicarbonate indicator
• what other variables could have affect the results and which variables should be controlled
• how the procedure could be improved to increase reliability
• how the procedure could be modified to determine the compensation point in plants
A numerical value of the compensation point can be determined by using a light metre. The light reading should be taken as close to the plant as possible at the time when the plant is at its compensation point.
For students unable to obtain accurate data, the following table of results may be used.
no living material seedlings fly larvae
start
red/orange
red/orange
red/orange
colour of
bicarbonate indicator
end
red/orange
purple
yellow

Appendix 2
91
Practical 11 - Technical information
Investigating the role of carbon dioxide in living organisms.
The apparatus and materials required for this practical are listed below.
The amount of apparatus listed is for one student or one group of students if they are to work in groups.
1. 3 large test-tubes each fitted with a rubber bung or cork
2. gauze or similar to support the specimens in the test-tubes whilst at the same time allowing the transfer of gases
3. supply of distilled water to rinse each test-tube.
4. 40 cm3 of bicarbonate indicator solution, sufficient to rinse each test-tube and have sufficient remaining to place 5cm3 into each test-tube.
The stock solution of indicator can be prepared by dissolving 0.2g of thymol blue and 0.1g of cresol red in 20cm3 of ethanol. Also prepare a solution by adding 0.84g of pure sodium bicarbonate to 900 cm3 of distilled water. Add the dyes to this solution and make up to 1 dm3. To prepare the indicator for use, pipette 25cm3 of stock solution into a graduated flask and make up to 250 cm3 with distilled water.
The solution should be equilibriated with air by aspirating atmospheric air through the solution until it is orange/red in colour.
5. 3 germinated seeds such that they have developed green leaves and are photosynthesising. Cress seeds that have been placed on moist cotton wool in a Petri dish will germinate and develop leaves in only a few days. Times will vary depending upon local conditions.
6. 3 large fly larvae that are active and not approaching pupation
7. 10cm3 graduated pipette or measuring cylinder or syringe
Additionally each student will require access to a sink and running water.
Commercial bicarbonate indicator solution is available from most chemical wholesalers, however it is possible to make up the solution in the laboratory as described above.
Safety Precautions/Risks.
Ethanol = F
Bicarbonate indicator solution = F
A risk assessment should be carried out as a matter of course.

University of Cambridge International Examinations
1 Hills Road, Cambridge, CB1 2EU, United Kingdom
Tel: +44 1223 553554 Fax: +44 1223 553558 E-mail: [email protected] Website: www.cie.org.uk
© University of Cambridge International Examinations 2005
PSAS9700 0501