Embed Size (px)
Citation preview
Technical paper
Camera Raw Workflow with Bridge, DNG Converter, Camera Raw plug-in, and Photoshop CS2In the old days, when photographers used the by-product of cow hooves, dealing with a lot of photographs meant long hours in a darkroom or standing over a light table sorting slides or sheet film. Not so much, anymore. These days, working with images captured with a digital camera entails the use of Adobe® Photoshop®, Adobe DNG Converter, Adobe Bridge, and the Photoshop Camera Raw plug-in. While some may lament the loss of fixer fumes emanating from the darkroom (not me), the digital age for photog-raphy is really just starting to get interesting, while having a profound impact on the ways photographers work.
But it’s not all sweetness and light in digital photography land. What the camera companies don’t tell you is that the time required after the shot has increased dramatically. The more you shoot—and why not, once you buy the camera and cards, pixels are free—the more time you need to spend dealing with all the gigabytes of images you accumulate. Hence, the new millennium photographic buzzword: workflow.
There are efficient workflows, and there are workflows that slow you down. I recom-mend that you avoid the slow workflows, assuming you want a life after shooting. The key to an efficient workflow is minimizing steps, becoming fast at performing the repetitive parts, automating as much as you can, and spending quality time only on the final edit selects.
At first glance, you might not think that a three-part mix of 1/3 Bridge, 1/3 Camera Raw, and 1/3 Photoshop could be a recipe for an efficient workflow, but it can be. The trick is to know what, how, and when to do the things required.
The following workflow discussion only covers the major points of an efficient work-flow. For an in-depth look, there are plenty of good books available—but you have to start somewhere.
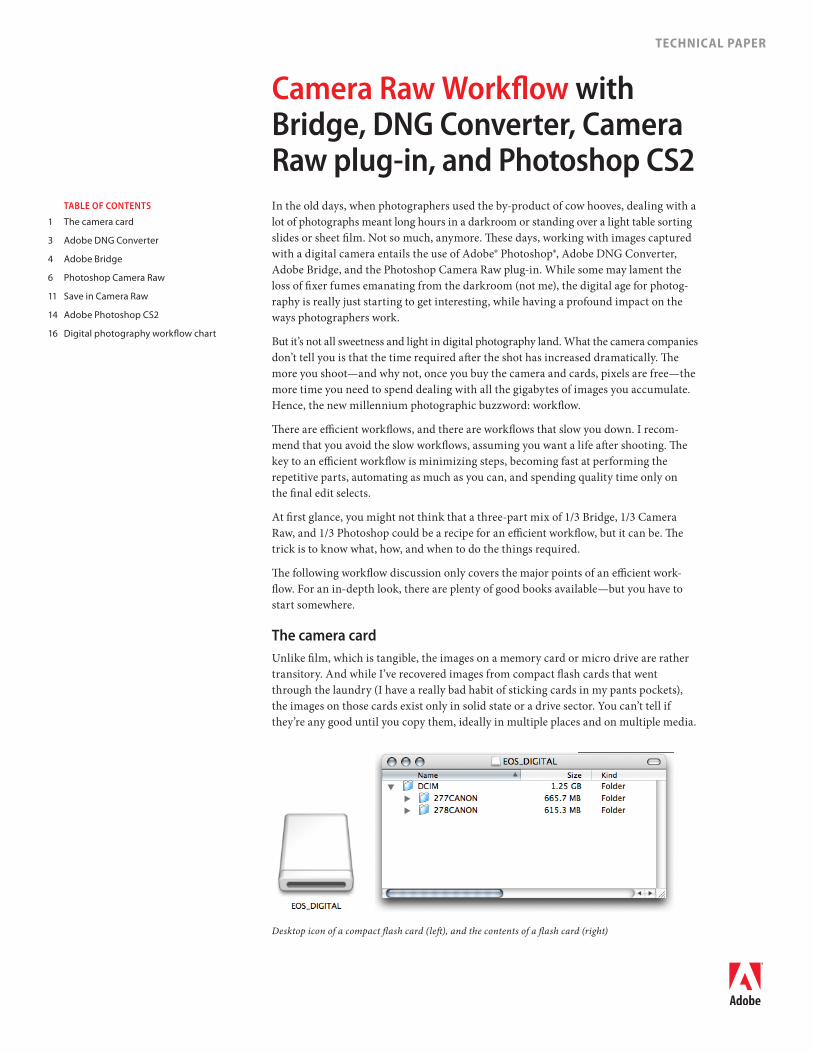
The camera cardUnlike film, which is tangible, the images on a memory card or micro drive are rather transitory. And while I’ve recovered images from compact flash cards that went through the laundry (I have a really bad habit of sticking cards in my pants pockets), the images on those cards exist only in solid state or a drive sector. You can’t tell if they’re any good until you copy them, ideally in multiple places and on multiple media.
Desktop icon of a compact flash card (left), and the contents of a flash card (right)
TaBle of CoNTeNTS
1 Thecameracard
3 AdobeDNGConverter
4 AdobeBridge
6 PhotoshopCameraRaw
11 SaveinCameraRaw
14 AdobePhotoshopCS2
16 Digitalphotographyworkflowchart
CameraRawWorkflowwithBridge,DNGConverter,CameraRawplug-in,andPhotoshopCS2
�
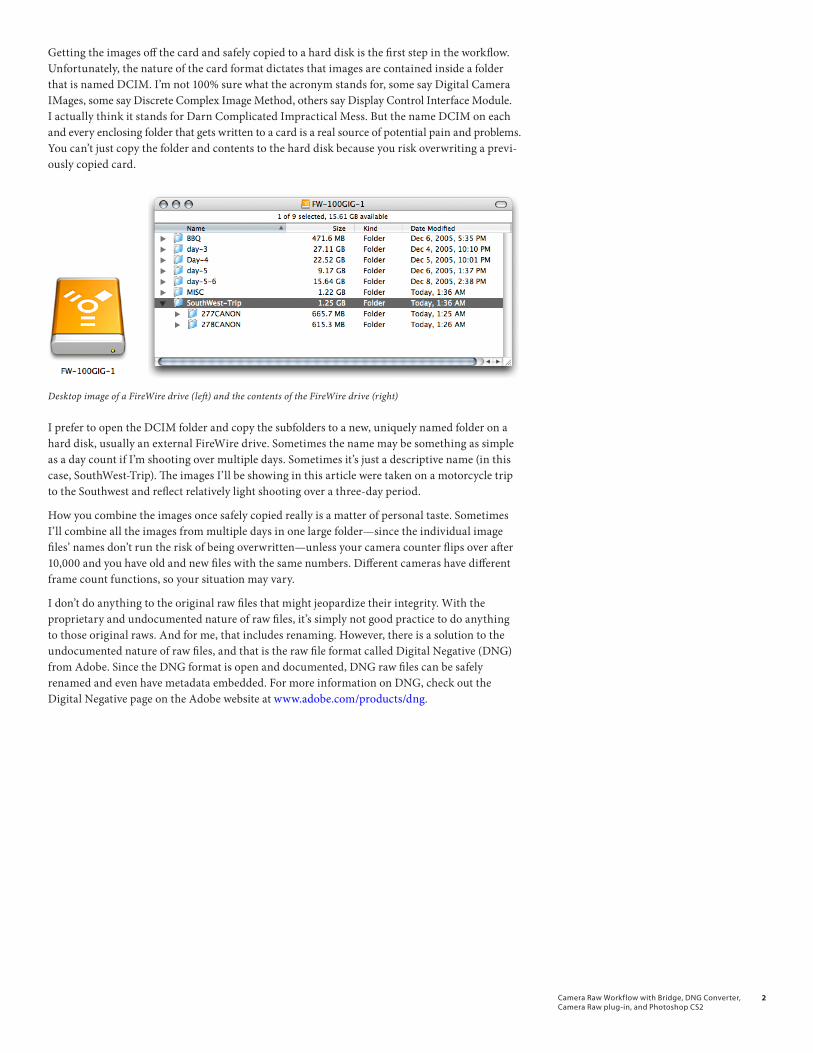
Getting the images off the card and safely copied to a hard disk is the first step in the workflow. Unfortunately, the nature of the card format dictates that images are contained inside a folder that is named DCIM. I’m not 100% sure what the acronym stands for, some say Digital Camera IMages, some say Discrete Complex Image Method, others say Display Control Interface Module. I actually think it stands for Darn Complicated Impractical Mess. But the name DCIM on each and every enclosing folder that gets written to a card is a real source of potential pain and problems. You can’t just copy the folder and contents to the hard disk because you risk overwriting a previ-ously copied card.
Desktop image of a FireWire drive (left) and the contents of the FireWire drive (right)
I prefer to open the DCIM folder and copy the subfolders to a new, uniquely named folder on a hard disk, usually an external FireWire drive. Sometimes the name may be something as simple as a day count if I’m shooting over multiple days. Sometimes it’s just a descriptive name (in this case, SouthWest-Trip). The images I’ll be showing in this article were taken on a motorcycle trip to the Southwest and reflect relatively light shooting over a three-day period.
How you combine the images once safely copied really is a matter of personal taste. Sometimes I’ll combine all the images from multiple days in one large folder—since the individual image files’ names don’t run the risk of being overwritten—unless your camera counter flips over after 10,000 and you have old and new files with the same numbers. Different cameras have different frame count functions, so your situation may vary.
I don’t do anything to the original raw files that might jeopardize their integrity. With the proprietary and undocumented nature of raw files, it’s simply not good practice to do anything to those original raws. And for me, that includes renaming. However, there is a solution to the undocumented nature of raw files, and that is the raw file format called Digital Negative (DNG) from Adobe. Since the DNG format is open and documented, DNG raw files can be safely renamed and even have metadata embedded. For more information on DNG, check out the Digital Negative page on the Adobe website at www.adobe.com/products/dng.
CameraRawWorkflowwithBridge,DNGConverter,CameraRawplug-in,andPhotoshopCS2
�
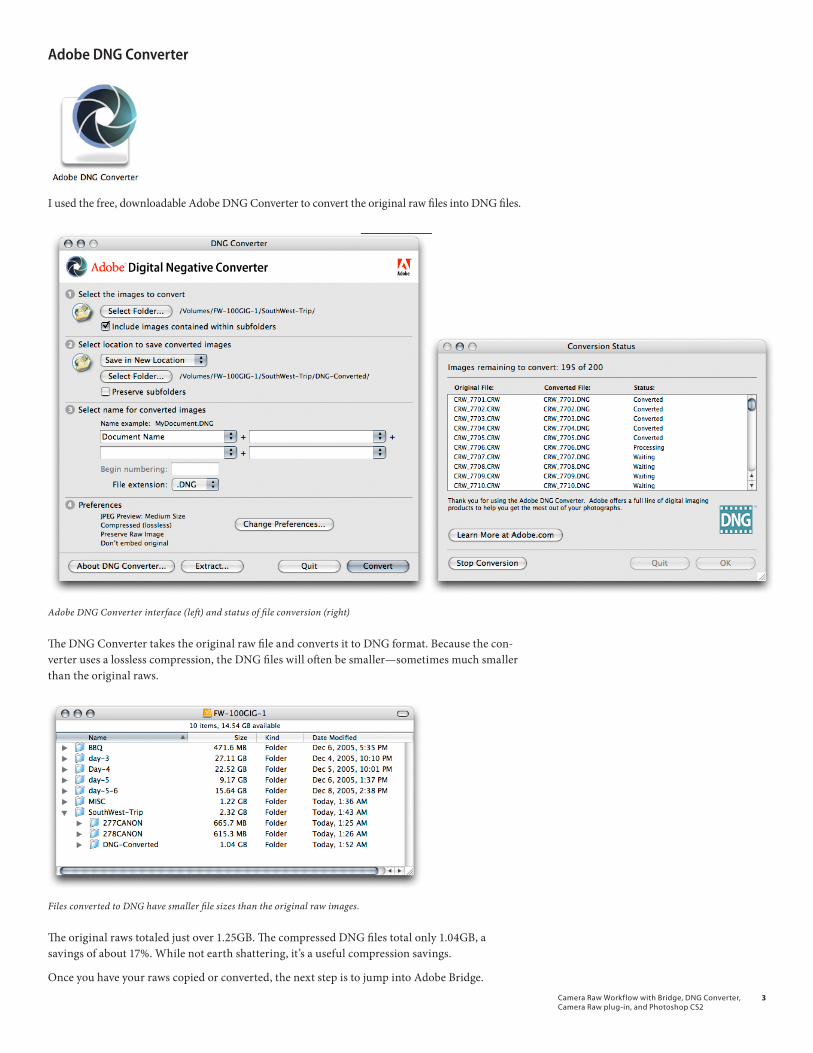
adobe DNG Converter
I used the free, downloadable Adobe DNG Converter to convert the original raw files into DNG files.
Adobe DNG Converter interface (left) and status of file conversion (right)
The DNG Converter takes the original raw file and converts it to DNG format. Because the con-verter uses a lossless compression, the DNG files will often be smaller—sometimes much smaller than the original raws.
Files converted to DNG have smaller file sizes than the original raw images.
The original raws totaled just over 1.25GB. The compressed DNG files total only 1.04GB, a savings of about 17%. While not earth shattering, it’s a useful compression savings.
Once you have your raws copied or converted, the next step is to jump into Adobe Bridge.
CameraRawWorkflowwithBridge,DNGConverter,CameraRawplug-in,andPhotoshopCS2
�
adobe Bridge
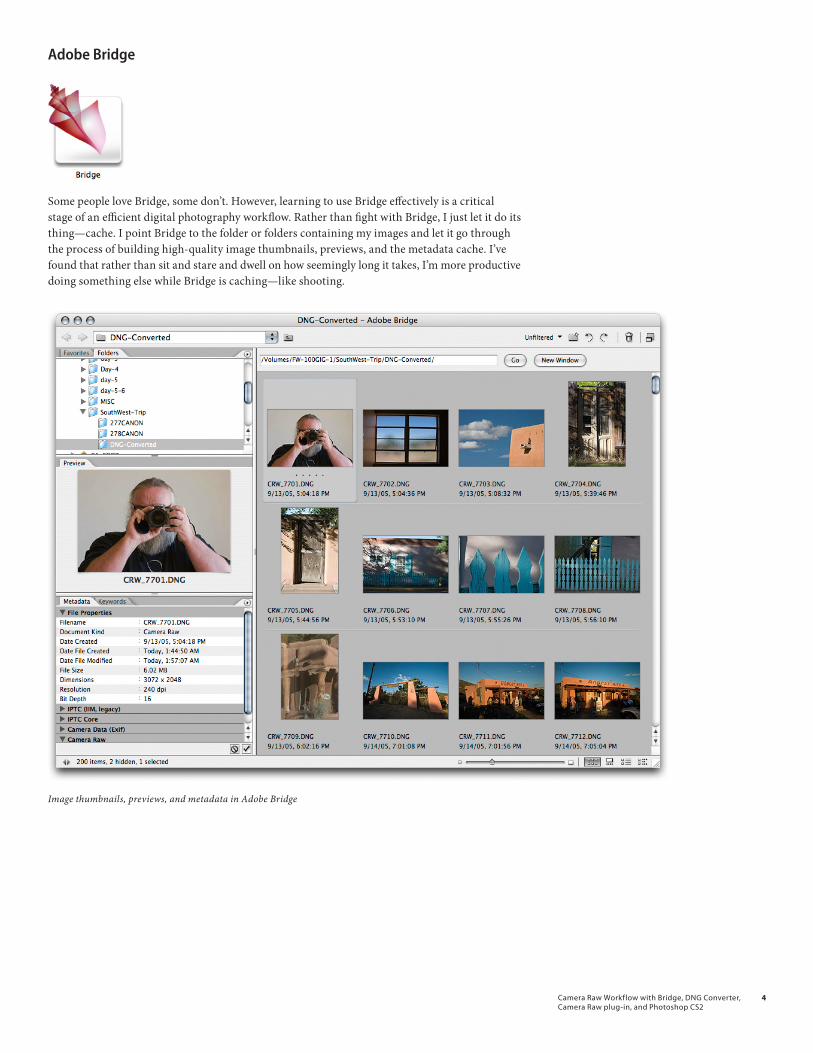
Some people love Bridge, some don’t. However, learning to use Bridge effectively is a critical stage of an efficient digital photography workflow. Rather than fight with Bridge, I just let it do its thing—cache. I point Bridge to the folder or folders containing my images and let it go through the process of building high-quality image thumbnails, previews, and the metadata cache. I’ve found that rather than sit and stare and dwell on how seemingly long it takes, I’m more productive doing something else while Bridge is caching—like shooting.
Image thumbnails, previews, and metadata in Adobe Bridge
CameraRawWorkflowwithBridge,DNGConverter,CameraRawplug-in,andPhotoshopCS2
�
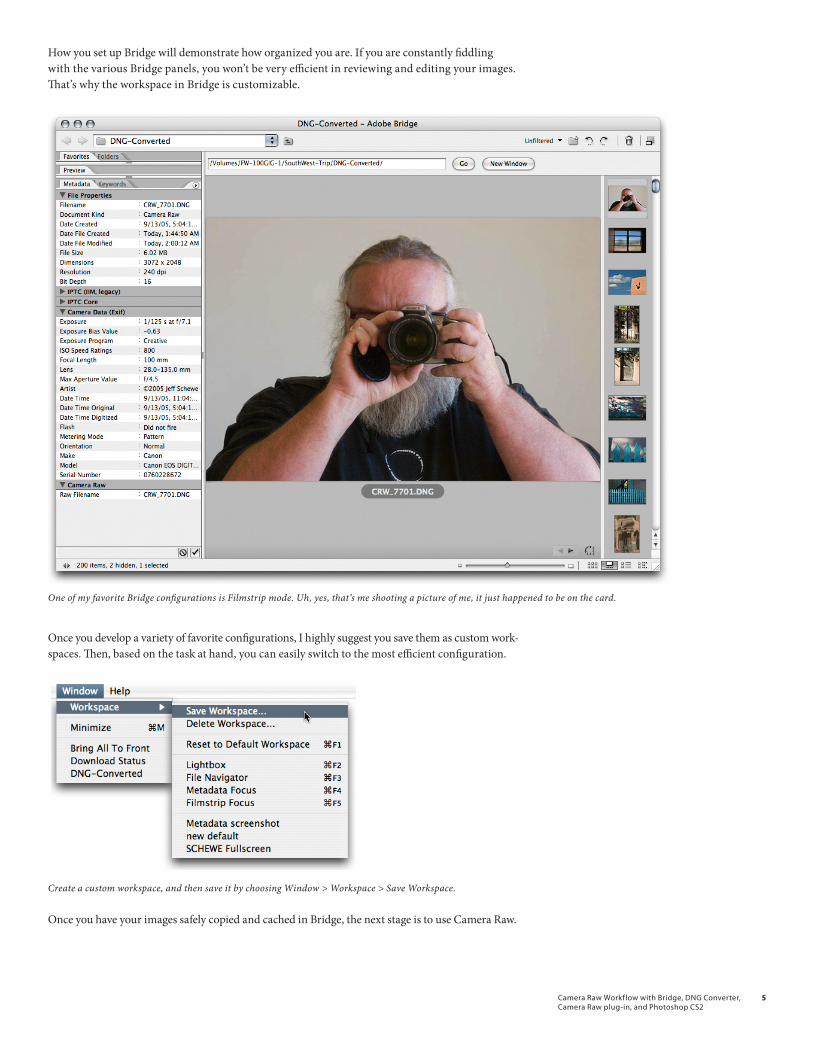
How you set up Bridge will demonstrate how organized you are. If you are constantly fiddling with the various Bridge panels, you won’t be very efficient in reviewing and editing your images. That’s why the workspace in Bridge is customizable.
One of my favorite Bridge configurations is Filmstrip mode. Uh, yes, that’s me shooting a picture of me, it just happened to be on the card.
Once you develop a variety of favorite configurations, I highly suggest you save them as custom work-spaces. Then, based on the task at hand, you can easily switch to the most efficient configuration.
Create a custom workspace, and then save it by choosing Window > Workspace > Save Workspace.
Once you have your images safely copied and cached in Bridge, the next stage is to use Camera Raw.
CameraRawWorkflowwithBridge,DNGConverter,CameraRawplug-in,andPhotoshopCS2
�
Photoshop Camera Raw
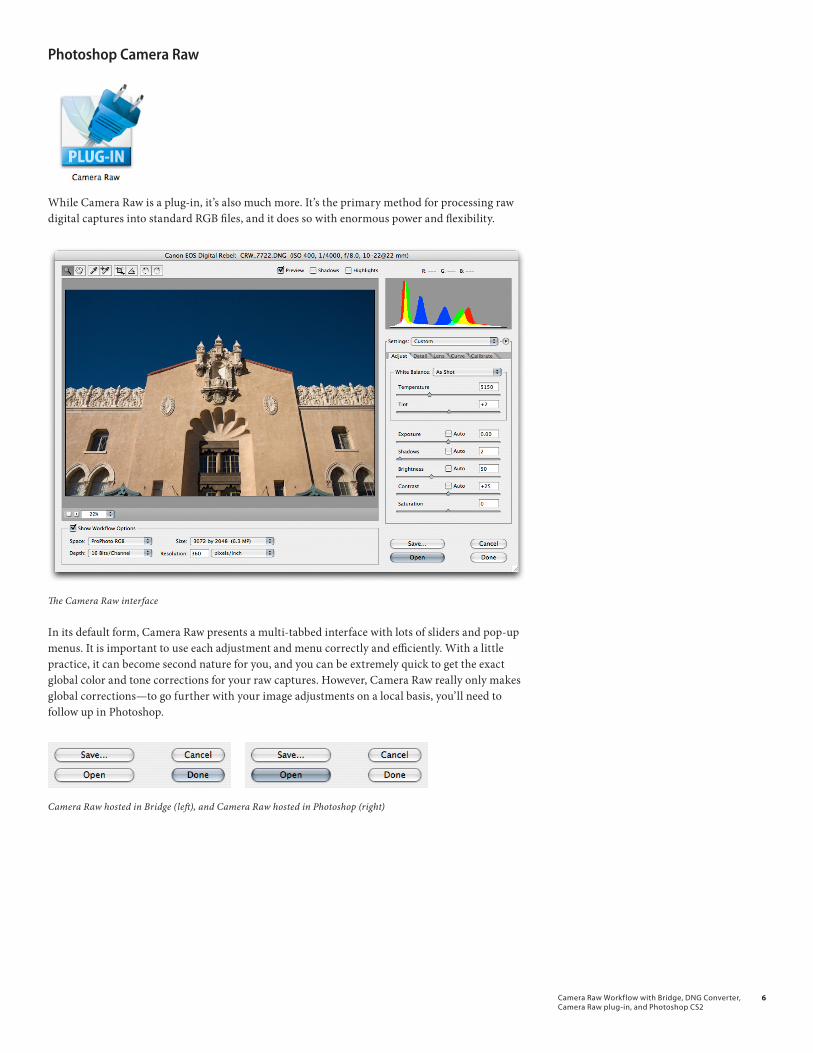
While Camera Raw is a plug-in, it’s also much more. It’s the primary method for processing raw digital captures into standard RGB files, and it does so with enormous power and flexibility.
The Camera Raw interface
In its default form, Camera Raw presents a multi-tabbed interface with lots of sliders and pop-up menus. It is important to use each adjustment and menu correctly and efficiently. With a little practice, it can become second nature for you, and you can be extremely quick to get the exact global color and tone corrections for your raw captures. However, Camera Raw really only makes global corrections—to go further with your image adjustments on a local basis, you’ll need to follow up in Photoshop.
Camera Raw hosted in Bridge (left), and Camera Raw hosted in Photoshop (right)
CameraRawWorkflowwithBridge,DNGConverter,CameraRawplug-in,andPhotoshopCS2
�
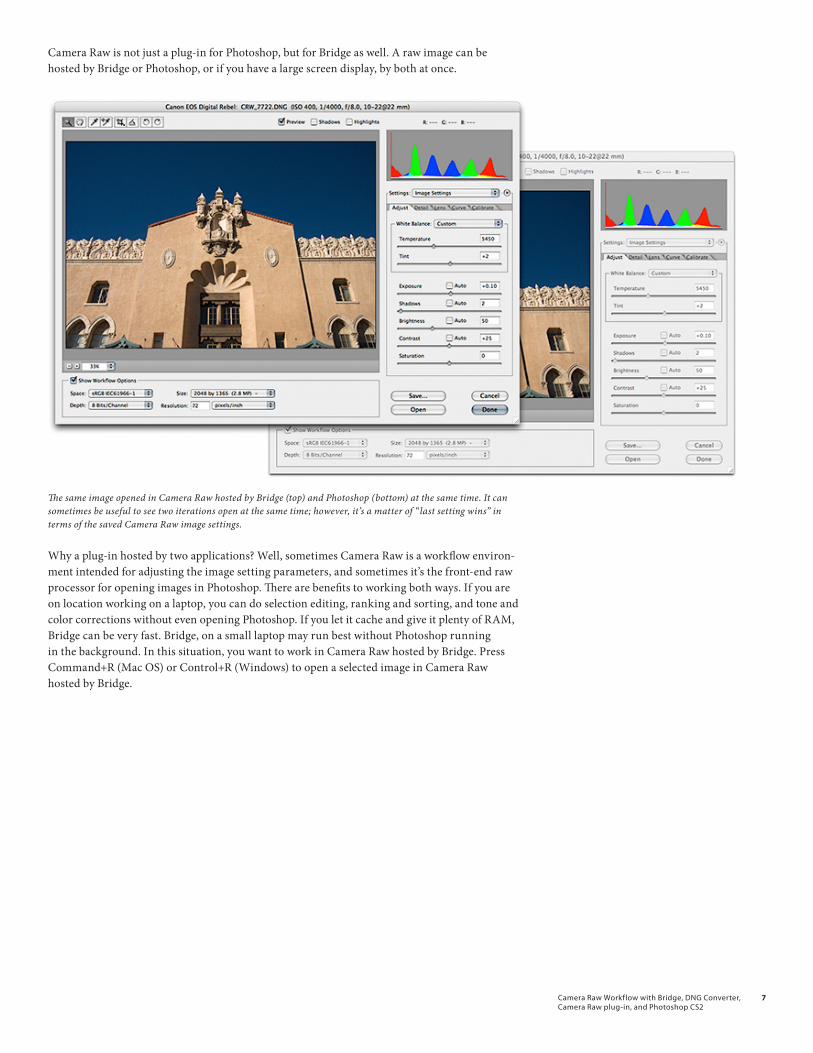
Camera Raw is not just a plug-in for Photoshop, but for Bridge as well. A raw image can be hosted by Bridge or Photoshop, or if you have a large screen display, by both at once.
The same image opened in Camera Raw hosted by Bridge (top) and Photoshop (bottom) at the same time. It can sometimes be useful to see two iterations open at the same time; however, it’s a matter of “last setting wins” in terms of the saved Camera Raw image settings.
Why a plug-in hosted by two applications? Well, sometimes Camera Raw is a workflow environ-ment intended for adjusting the image setting parameters, and sometimes it’s the front-end raw processor for opening images in Photoshop. There are benefits to working both ways. If you are on location working on a laptop, you can do selection editing, ranking and sorting, and tone and color corrections without even opening Photoshop. If you let it cache and give it plenty of RAM, Bridge can be very fast. Bridge, on a small laptop may run best without Photoshop running in the background. In this situation, you want to work in Camera Raw hosted by Bridge. Press Command+R (Mac OS) or Control+R (Windows) to open a selected image in Camera Raw hosted by Bridge.
CameraRawWorkflowwithBridge,DNGConverter,CameraRawplug-in,andPhotoshopCS2
�
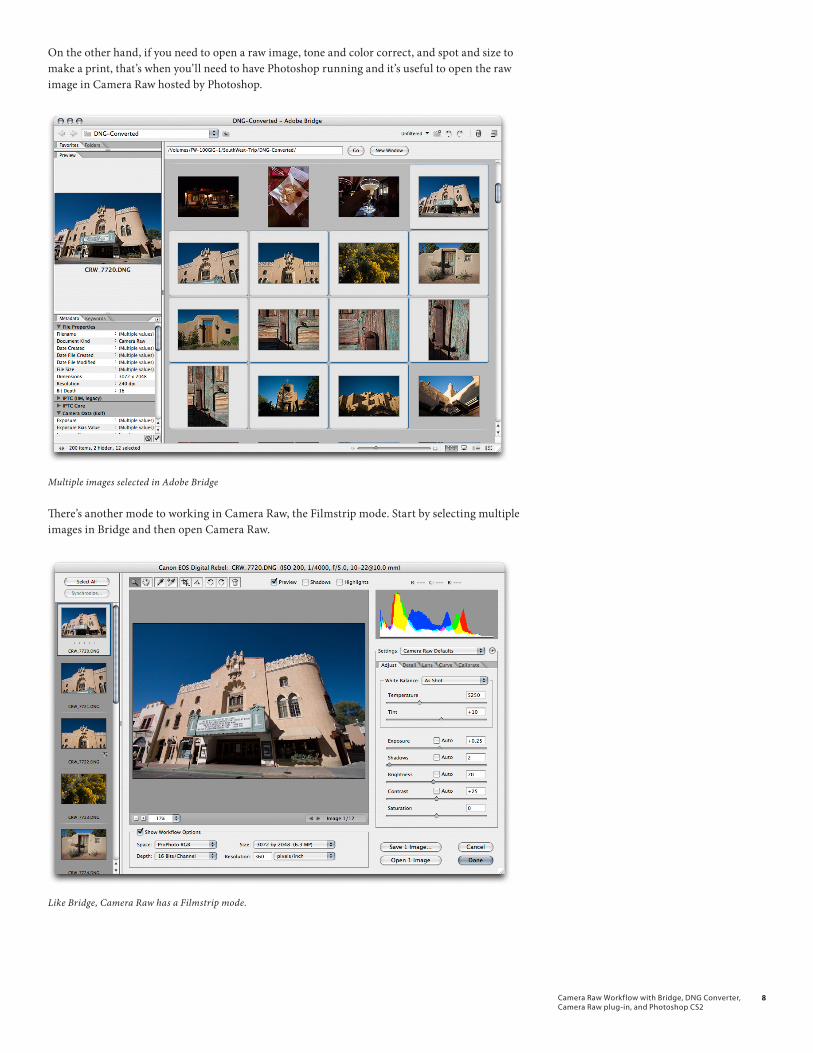
On the other hand, if you need to open a raw image, tone and color correct, and spot and size to make a print, that’s when you’ll need to have Photoshop running and it’s useful to open the raw image in Camera Raw hosted by Photoshop.
Multiple images selected in Adobe Bridge
There’s another mode to working in Camera Raw, the Filmstrip mode. Start by selecting multiple images in Bridge and then open Camera Raw.
Like Bridge, Camera Raw has a Filmstrip mode.
CameraRawWorkflowwithBridge,DNGConverter,CameraRawplug-in,andPhotoshopCS2
�
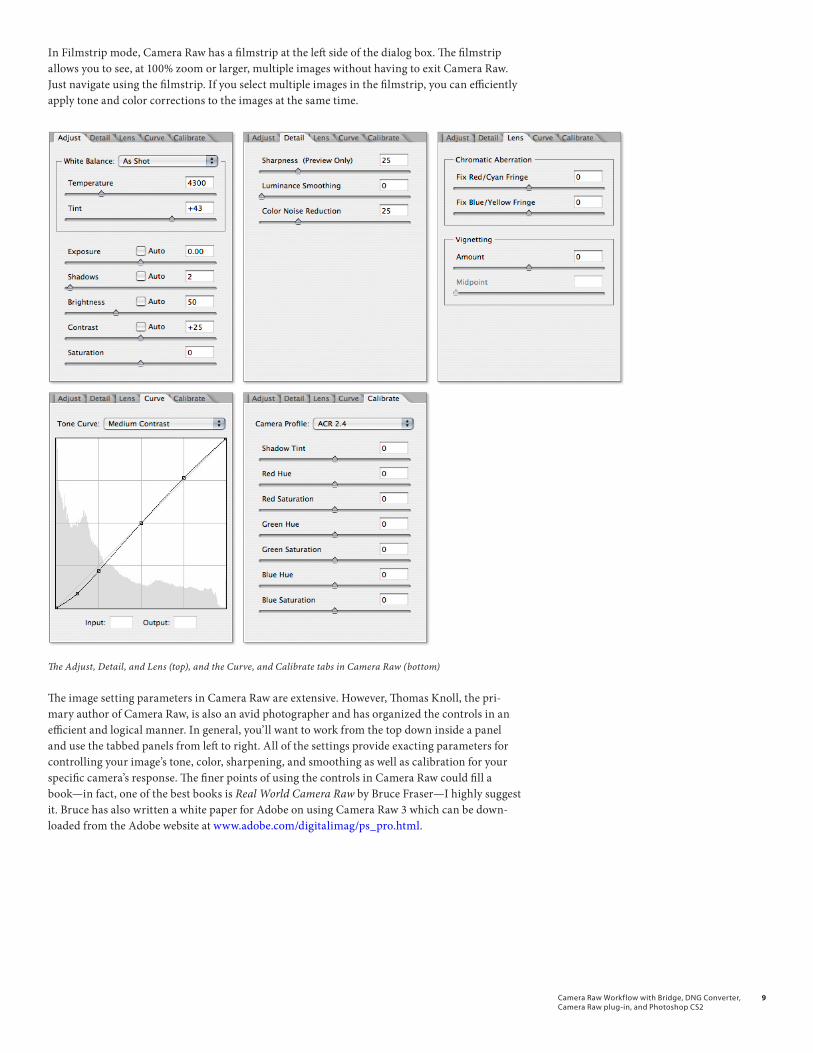
In Filmstrip mode, Camera Raw has a filmstrip at the left side of the dialog box. The filmstrip allows you to see, at 100% zoom or larger, multiple images without having to exit Camera Raw. Just navigate using the filmstrip. If you select multiple images in the filmstrip, you can efficiently apply tone and color corrections to the images at the same time.
The Adjust, Detail, and Lens (top), and the Curve, and Calibrate tabs in Camera Raw (bottom)
The image setting parameters in Camera Raw are extensive. However, Thomas Knoll, the pri-mary author of Camera Raw, is also an avid photographer and has organized the controls in an efficient and logical manner. In general, you’ll want to work from the top down inside a panel and use the tabbed panels from left to right. All of the settings provide exacting parameters for controlling your image’s tone, color, sharpening, and smoothing as well as calibration for your specific camera’s response. The finer points of using the controls in Camera Raw could fill a book—in fact, one of the best books is Real World Camera Raw by Bruce Fraser—I highly suggest it. Bruce has also written a white paper for Adobe on using Camera Raw 3 which can be down-loaded from the Adobe website at www.adobe.com/digitalimag/ps_pro.html.
CameraRawWorkflowwithBridge,DNGConverter,CameraRawplug-in,andPhotoshopCS2
10
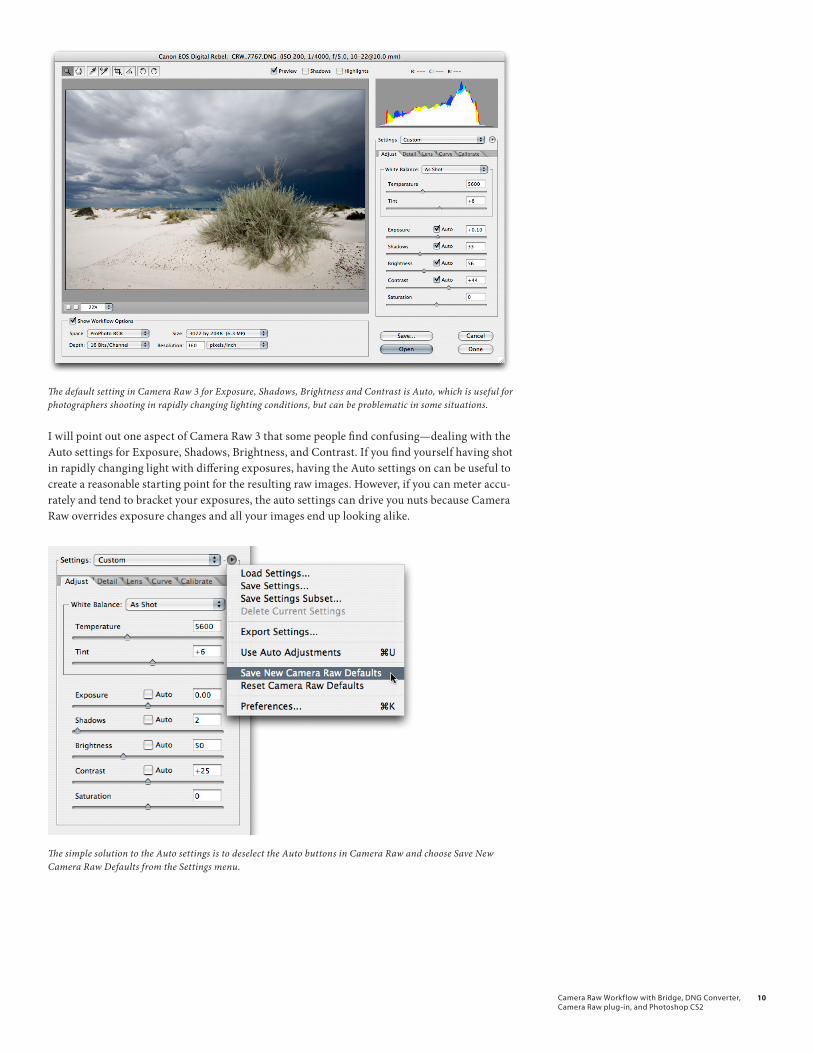
The default setting in Camera Raw 3 for Exposure, Shadows, Brightness and Contrast is Auto, which is useful for photographers shooting in rapidly changing lighting conditions, but can be problematic in some situations.
I will point out one aspect of Camera Raw 3 that some people find confusing—dealing with the Auto settings for Exposure, Shadows, Brightness, and Contrast. If you find yourself having shot in rapidly changing light with differing exposures, having the Auto settings on can be useful to create a reasonable starting point for the resulting raw images. However, if you can meter accu-rately and tend to bracket your exposures, the auto settings can drive you nuts because Camera Raw overrides exposure changes and all your images end up looking alike.
The simple solution to the Auto settings is to deselect the Auto buttons in Camera Raw and choose Save New Camera Raw Defaults from the Settings menu.

CameraRawWorkflowwithBridge,DNGConverter,CameraRawplug-in,andPhotoshopCS2
11
All you need to do to alter the defaults in Camera Raw for your camera model is to select the settings you want to have on, off, or adjusted for the way you want to work. I generally turn off the Auto settings and adjust the Shadow setting to 2 or 3 instead of the default of 5. Once you select the settings, choose Save New Camera Raw Defaults from the pop-up menu. From then on, Camera Raw will honor your settings as the default, including building the original Bridge thumbnails and previews. I will admit that many times, when I’m looking at an image to analyze what I need to do with the tone, I will select the Auto options to see what Camera Raw thinks a setting should be; it’s a bit like having Thomas Knoll sitting over your shoulder tone-correcting your images. He may not always be right, but the Auto settings can be a very good starting point from which to fine-tune your own adjustments.
One of the confusing aspects of working with Bridge, Camera Raw, and Photoshop is that there are many alternative methods of doing what may seem like very similar functions.
Save in Camera RawCamera Raw can save images. Some people never discover the power of this feature. Say you’ve opened a bunch of images inside the Filmstrip mode in Camera Raw. Once you get the settings the way you like on an image, you can click Save and have Photoshop processing the image in the background while you continue to adjust more images in Camera Raw.
Save options in Camera Raw
The Save feature in Camera Raw can make very quick work of processing relatively small volumes of images, while allowing you to continue being productive inside of Camera Raw. Multitasking is the hallmark of an efficient workflow.
CameraRawWorkflowwithBridge,DNGConverter,CameraRawplug-in,andPhotoshopCS2
1�
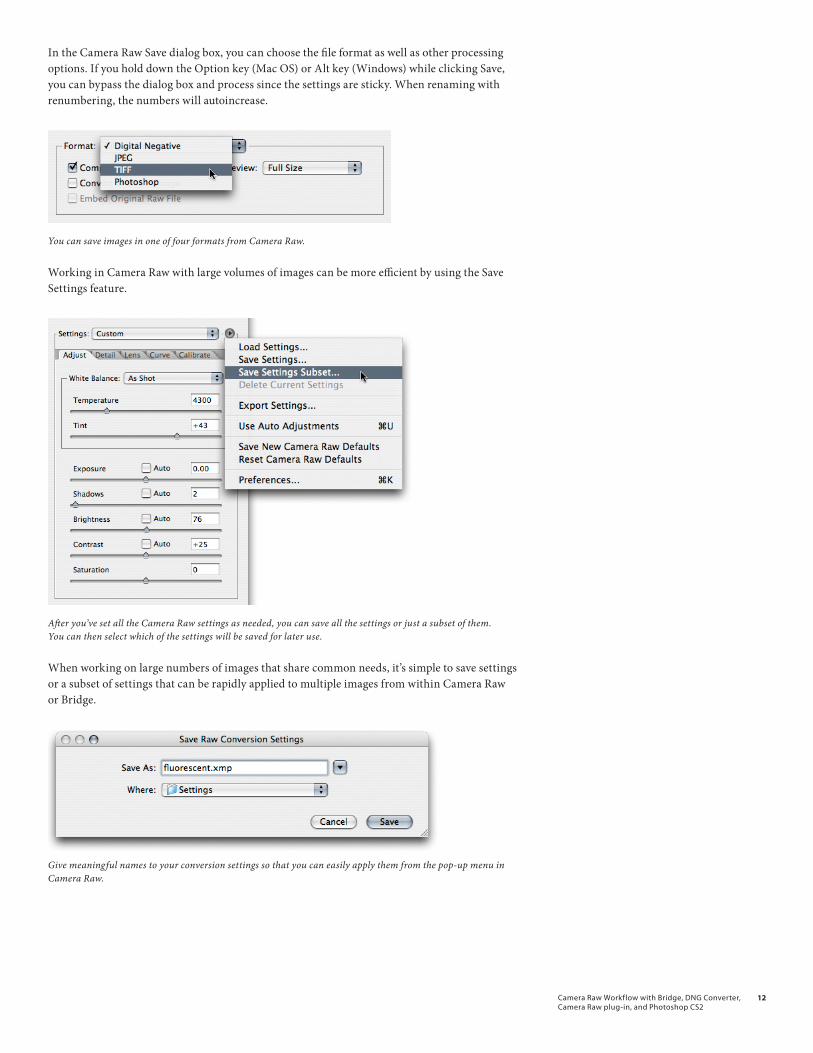
In the Camera Raw Save dialog box, you can choose the file format as well as other processing options. If you hold down the Option key (Mac OS) or Alt key (Windows) while clicking Save, you can bypass the dialog box and process since the settings are sticky. When renaming with renumbering, the numbers will autoincrease.
You can save images in one of four formats from Camera Raw.
Working in Camera Raw with large volumes of images can be more efficient by using the Save Settings feature.
After you’ve set all the Camera Raw settings as needed, you can save all the settings or just a subset of them. You can then select which of the settings will be saved for later use.
When working on large numbers of images that share common needs, it’s simple to save settings or a subset of settings that can be rapidly applied to multiple images from within Camera Raw or Bridge.
Give meaningful names to your conversion settings so that you can easily apply them from the pop-up menu in Camera Raw.

CameraRawWorkflowwithBridge,DNGConverter,CameraRawplug-in,andPhotoshopCS2
1�
Saved settings in Camera Raw
You can also apply saved settings by choosing them from the Apply Camera Raw Settings menu in Bridge.
Reusing saved settings greatly aids in your efficiency and reduces the amount of time you spend tweaking the settings for similar images.
CameraRawWorkflowwithBridge,DNGConverter,CameraRawplug-in,andPhotoshopCS2
1�
adobe Photoshop CS2
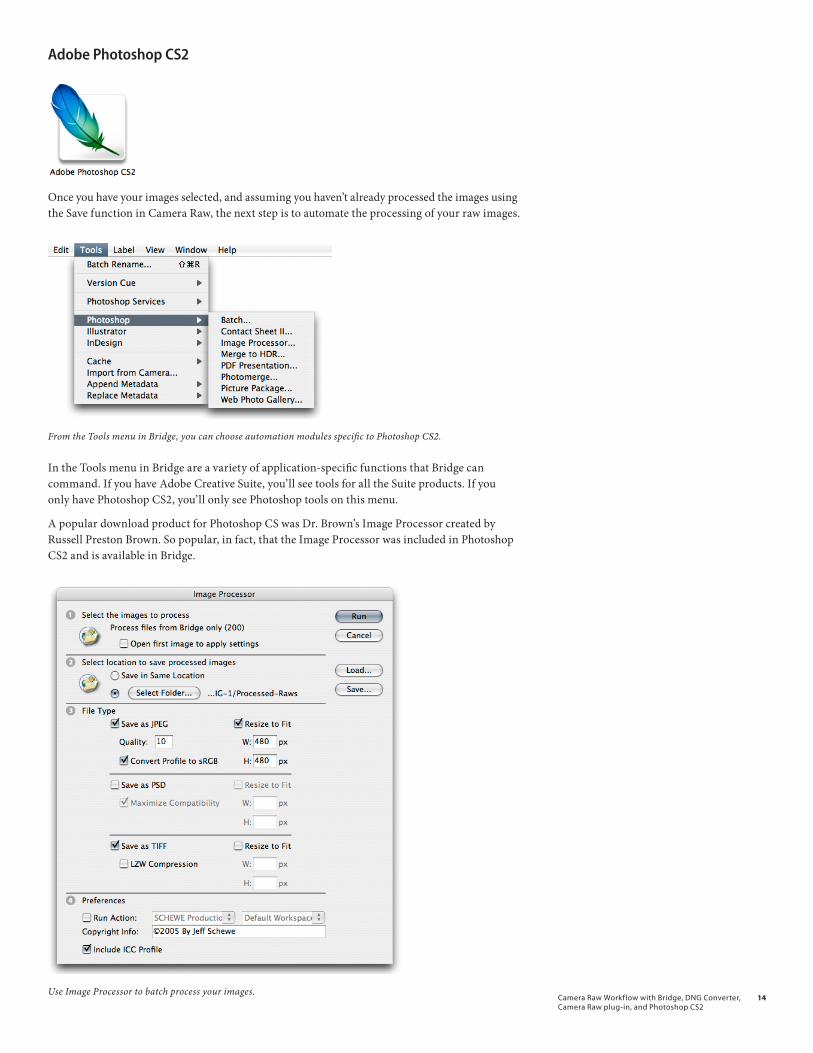
Once you have your images selected, and assuming you haven’t already processed the images using the Save function in Camera Raw, the next step is to automate the processing of your raw images.
From the Tools menu in Bridge, you can choose automation modules specific to Photoshop CS2.
In the Tools menu in Bridge are a variety of application-specific functions that Bridge can command. If you have Adobe Creative Suite, you’ll see tools for all the Suite products. If you only have Photoshop CS2, you’ll only see Photoshop tools on this menu.
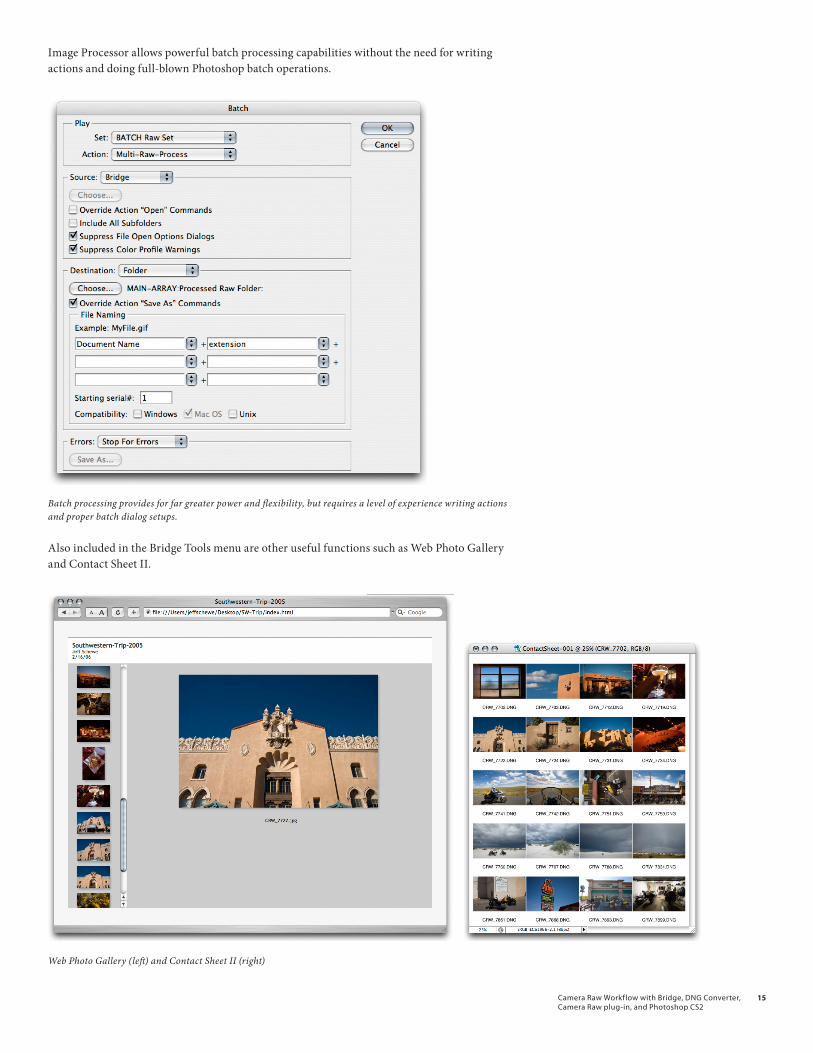
A popular download product for Photoshop CS was Dr. Brown’s Image Processor created by Russell Preston Brown. So popular, in fact, that the Image Processor was included in Photoshop CS2 and is available in Bridge.
Use Image Processor to batch process your images.
CameraRawWorkflowwithBridge,DNGConverter,CameraRawplug-in,andPhotoshopCS2
1�
Image Processor allows powerful batch processing capabilities without the need for writing actions and doing full-blown Photoshop batch operations.
Batch processing provides for far greater power and flexibility, but requires a level of experience writing actions and proper batch dialog setups.
Also included in the Bridge Tools menu are other useful functions such as Web Photo Gallery and Contact Sheet II.
Web Photo Gallery (left) and Contact Sheet II (right)
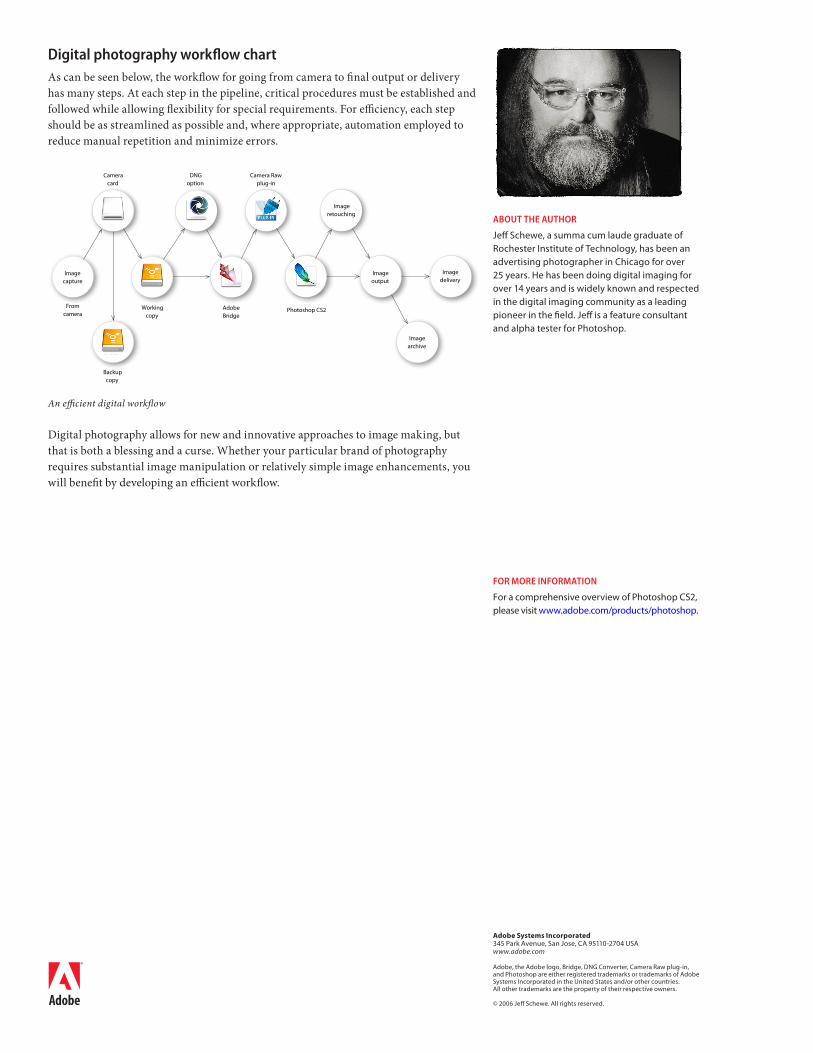
Digital photography workflow chartAs can be seen below, the workflow for going from camera to final output or delivery has many steps. At each step in the pipeline, critical procedures must be established and followed while allowing flexibility for special requirements. For efficiency, each step should be as streamlined as possible and, where appropriate, automation employed to reduce manual repetition and minimize errors.
Imageretouching
Imageoutput
Imagedelivery
Imagecapture
Fromcamera
Backupcopy
Workingcopy
Cameracard
DNGoption
AdobeBridge
Camera Rawplug-in
Photoshop CS2
Imagearchive
An efficient digital workflow
Digital photography allows for new and innovative approaches to image making, but that is both a blessing and a curse. Whether your particular brand of photography requires substantial image manipulation or relatively simple image enhancements, you will benefit by developing an efficient workflow.
aBouT The auThoR
JeffSchewe,asummacumlaudegraduateofRochesterInstituteofTechnology,hasbeenanadvertisingphotographerinChicagoforover25years.Hehasbeendoingdigitalimagingforover14yearsandiswidelyknownandrespectedinthedigitalimagingcommunityasaleadingpioneerinthefield.JeffisafeatureconsultantandalphatesterforPhotoshop.
foR MoRe INfoRMaTIoN
ForacomprehensiveoverviewofPhotoshopCS2,pleasevisitwww.adobe.com/products/photoshop.
Adobe Systems Incorporated345ParkAvenue,SanJose,CA95110-2704USAwww.adobe.com
Adobe,theAdobelogo,Bridge,DNGConverter,CameraRawplug-in,andPhotoshopareeitherregisteredtrademarksortrademarksofAdobeSystemsIncorporatedintheUnitedStatesand/orothercountries.Allothertrademarksarethepropertyoftheirrespectiveowners.
©2006JeffSchewe.Allrightsreserved.
![[DNG] Magazine Photo · 2020. 8. 10. · [DNG] Contenidos Photo Magazine • Editorial 5 • DNG recomienda 6 • Click DNG: Cristina Abad 43 • Retratos Invisibles: Julieta 46 •](https://img.pdfslide.net/doc/110x75/5fc7a04560e7f6114b2e7209/dng-magazine-photo-2020-8-10-dng-contenidos-photo-magazine-a-editorial.jpg)


![[DNG] Magazine Photo · 2020-06-10 · [DNG] Photo Magazine Contenidos • Editorial 5 • DNG recomienda 6 • Click DNG: Alberto Velasco 27 • Retratos Invisibles: Simón 30 •](https://img.pdfslide.net/doc/110x75/5f630020c9f51e26d3088496/dng-magazine-photo-2020-06-10-dng-photo-magazine-contenidos-a-editorial.jpg)


![[DNG] Magazine Photo - DNG Photo Magazine](https://img.pdfslide.net/doc/110x75/62b983fa9655715a603dbb02/dng-magazine-photo-dng-photo-magazine.jpg)