Embed Size (px)
Citation preview
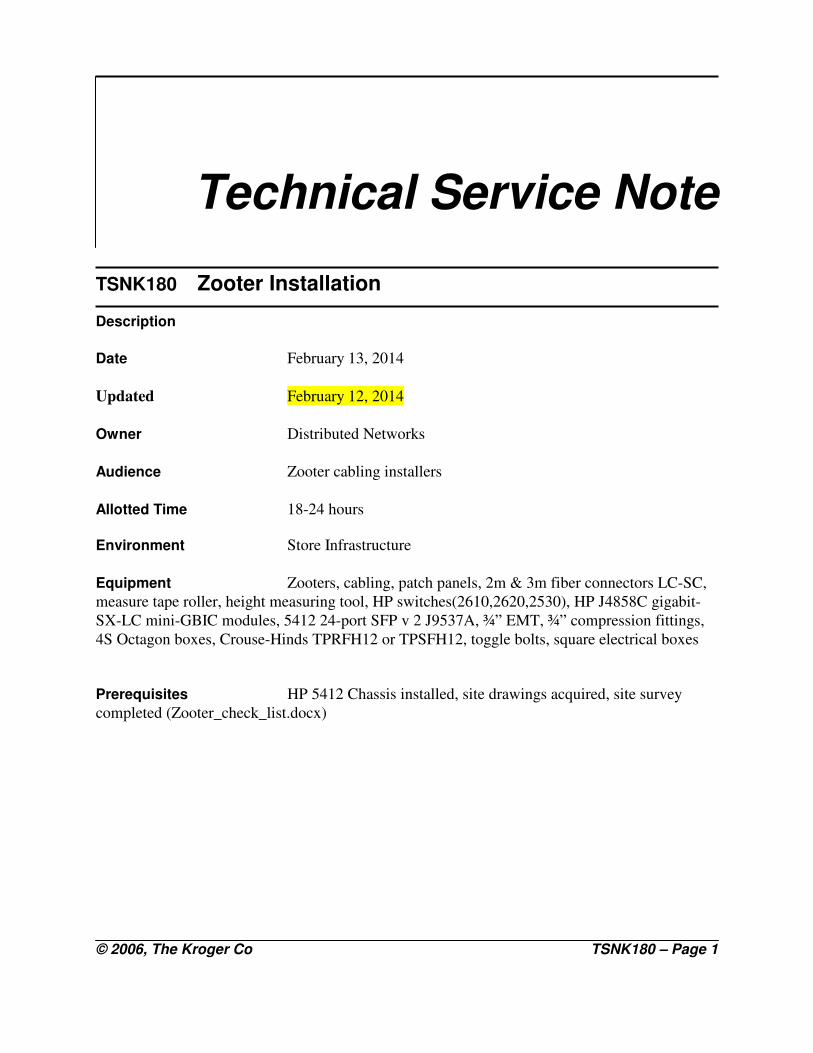
© 2006, The Kroger Co TSNK180 – Page 1
Technical Service Note
TSNK180 Zooter Installation
Description
Date February 13, 2014
Updated February 12, 2014
Owner Distributed Networks
Audience Zooter cabling installers
Allotted Time 18-24 hours
Environment Store Infrastructure
Equipment Zooters, cabling, patch panels, 2m & 3m fiber connectors LC-SC,
measure tape roller, height measuring tool, HP switches(2610,2620,2530), HP J4858C gigabit-
SX-LC mini-GBIC modules, 5412 24-port SFP v 2 J9537A, ¾” EMT, ¾” compression fittings,
4S Octagon boxes, Crouse-Hinds TPRFH12 or TPSFH12, toggle bolts, square electrical boxes
Prerequisites HP 5412 Chassis installed, site drawings acquired, site survey
completed (Zooter_check_list.docx)
TSNK180 Zooter Installation February 13, 2014
© 2006, The Kroger Co TSNK180 – Page 2
In this Document
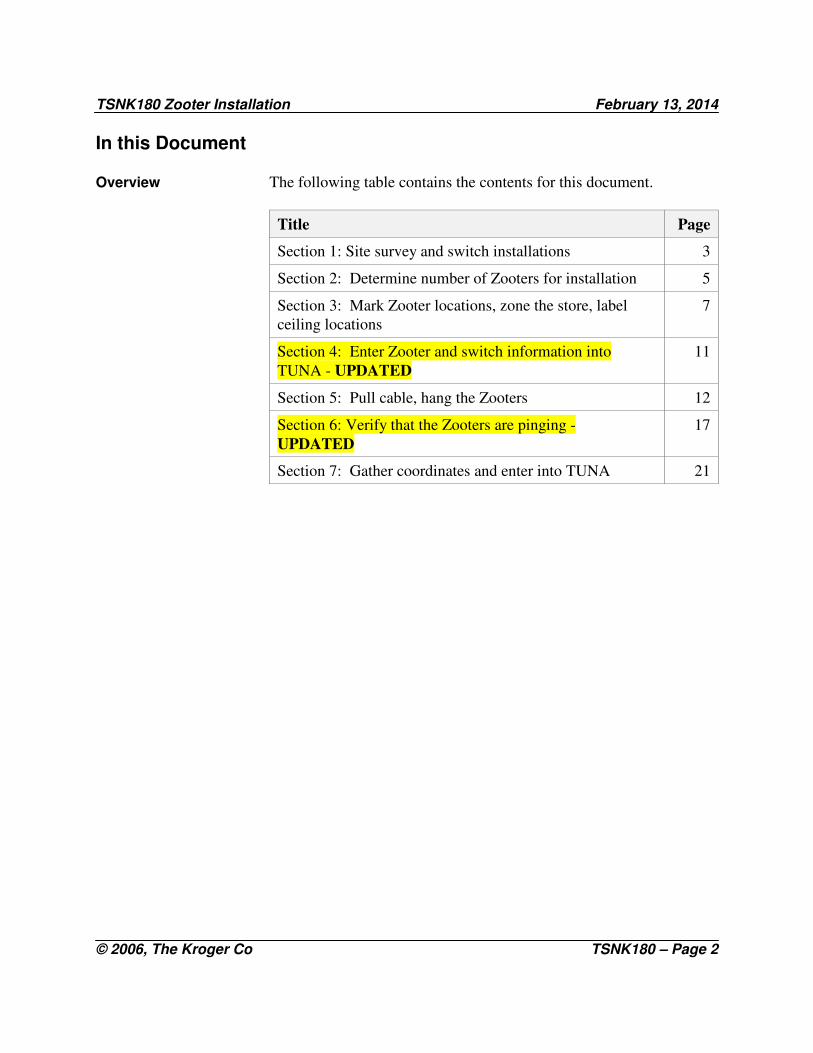
Overview The following table contains the contents for this document.
Title Page
Section 1: Site survey and switch installations 3
Section 2: Determine number of Zooters for installation 5
Section 3: Mark Zooter locations, zone the store, label
ceiling locations
7
Section 4: Enter Zooter and switch information into
TUNA - UPDATED
11
Section 5: Pull cable, hang the Zooters 12
Section 6: Verify that the Zooters are pinging -
UPDATED
17
Section 7: Gather coordinates and enter into TUNA 21
TSNK180 Zooter Installation February 13, 2014
© 2006, The Kroger Co TSNK### – Page 3
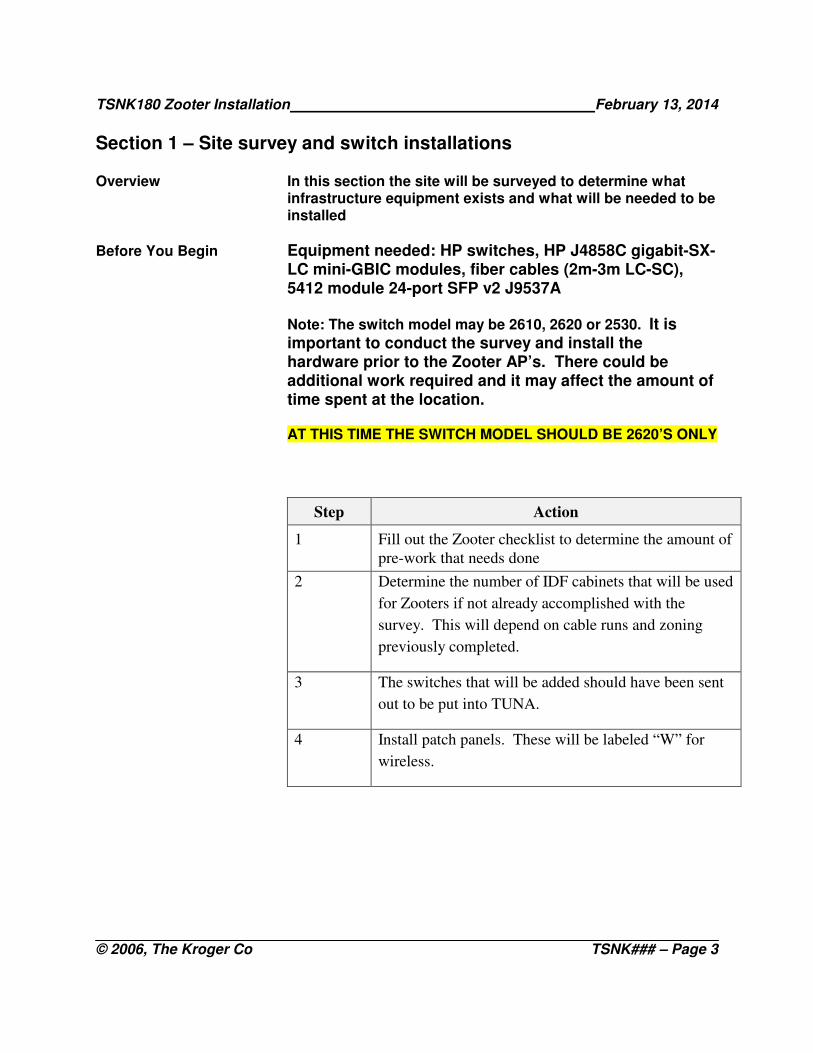
Section 1 – Site survey and switch installations Overview In this section the site will be surveyed to determine what
infrastructure equipment exists and what will be needed to be installed
Before You Begin Equipment needed: HP switches, HP J4858C gigabit-SX-LC mini-GBIC modules, fiber cables (2m-3m LC-SC), 5412 module 24-port SFP v2 J9537A
Note: The switch model may be 2610, 2620 or 2530. It is important to conduct the survey and install the hardware prior to the Zooter AP’s. There could be additional work required and it may affect the amount of time spent at the location.
AT THIS TIME THE SWITCH MODEL SHOULD BE 2620’S ONLY
Step Action
1 Fill out the Zooter checklist to determine the amount of
pre-work that needs done
2 Determine the number of IDF cabinets that will be used
for Zooters if not already accomplished with the
survey. This will depend on cable runs and zoning
previously completed.
3 The switches that will be added should have been sent
out to be put into TUNA.
4 Install patch panels. These will be labeled “W” for
wireless.
TSNK180 Zooter Installation February 13, 2014
© 2006, The Kroger Co TSNK### – Page 4
Step Action
5 Installing the switches:
o Switches will be added to the IDF cabinets, do
not combine with currently installed switches.
o If dark fiber is available, it should be used.
o Where additional fiber is not available, the
Zooter switch will become the primary switch
and the existing switch will become the
secondary switch.
o Use the fiber and connect the Zooter switch.
The second switch will be patched over via
copper using the Kroger standard uplink ports.
6 In the MDF (ECR room) 5412 blade module will need
to be installed if not currently present. These are hot
swappable/installable. This should be installed in the L
slot. If it exists, use the empty ports.
o If the L module needs added, please contact the
support center at 1-800-952-8889
o The 5412 should NEVER be rebooted during
this process
Note The current IDF switches will not be used for Zooters.
New switches will always be added.
Note Any IDF with more than 12 Zooters going to it, a 2530
switch will need to put in.
TSNK180 Zooter Installation February 13, 2014
© 2006, The Kroger Co TSNK### – Page 5
Section 2 – Determine number of Zooters for installation Overview In this section Zooter installation drops will be determined
based on the width and depth of the sales floor.
Before You Begin Drawings will be provided electronically. Scaled drawings should be used during the installation process.
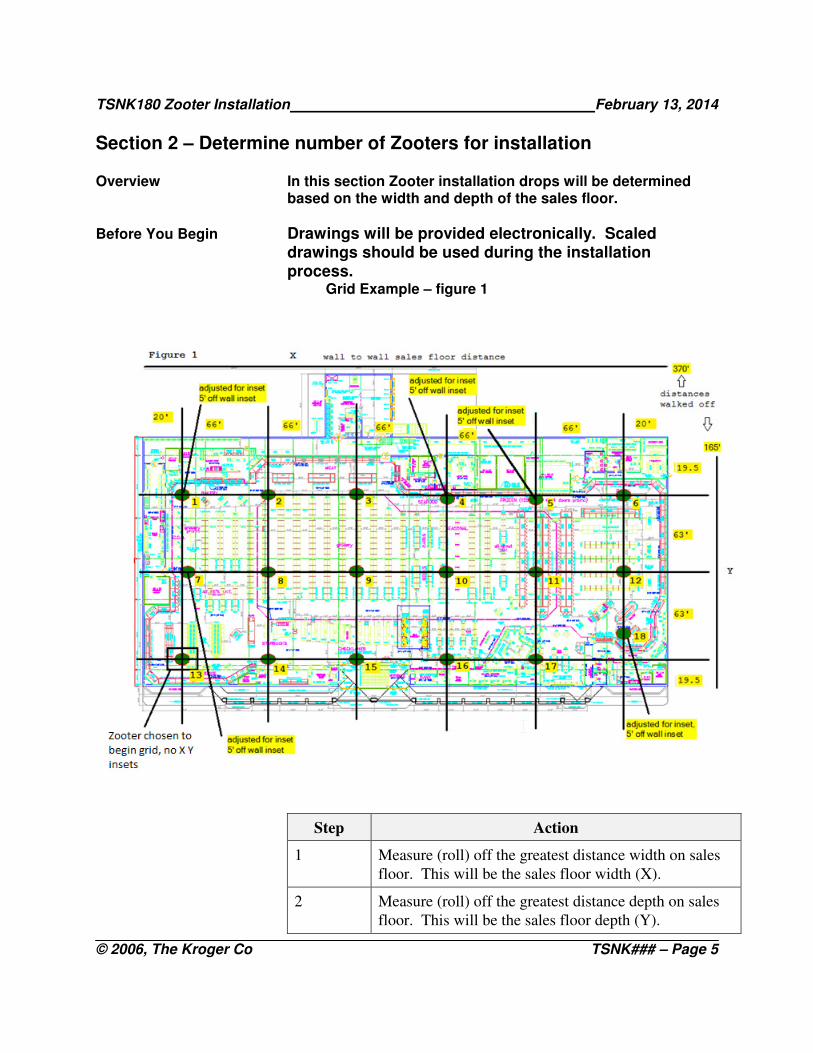
Grid Example – figure 1
Step Action
1 Measure (roll) off the greatest distance width on sales
floor. This will be the sales floor width (X).
2 Measure (roll) off the greatest distance depth on sales
floor. This will be the sales floor depth (Y).
TSNK180 Zooter Installation February 13, 2014
© 2006, The Kroger Co TSNK### – Page 6
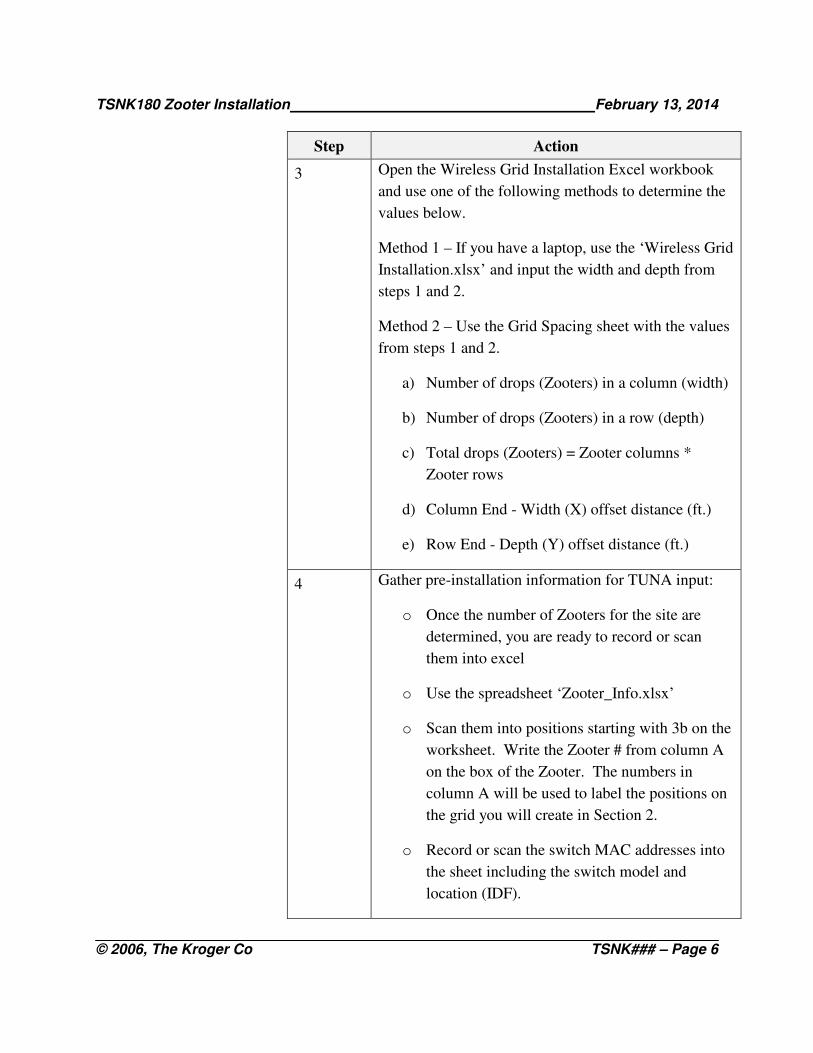
Step Action
3 Open the Wireless Grid Installation Excel workbook
and use one of the following methods to determine the
values below.
Method 1 – If you have a laptop, use the ‘Wireless Grid
Installation.xlsx’ and input the width and depth from
steps 1 and 2.
Method 2 – Use the Grid Spacing sheet with the values
from steps 1 and 2.
a) Number of drops (Zooters) in a column (width)
b) Number of drops (Zooters) in a row (depth)
c) Total drops (Zooters) = Zooter columns *
Zooter rows
d) Column End - Width (X) offset distance (ft.)
e) Row End - Depth (Y) offset distance (ft.)
4 Gather pre-installation information for TUNA input:
o Once the number of Zooters for the site are
determined, you are ready to record or scan
them into excel
o Use the spreadsheet ‘Zooter_Info.xlsx’
o Scan them into positions starting with 3b on the
worksheet. Write the Zooter # from column A
on the box of the Zooter. The numbers in
column A will be used to label the positions on
the grid you will create in Section 2.
o Record or scan the switch MAC addresses into
the sheet including the switch model and
location (IDF).
TSNK180 Zooter Installation February 13, 2014
© 2006, The Kroger Co TSNK### – Page 7
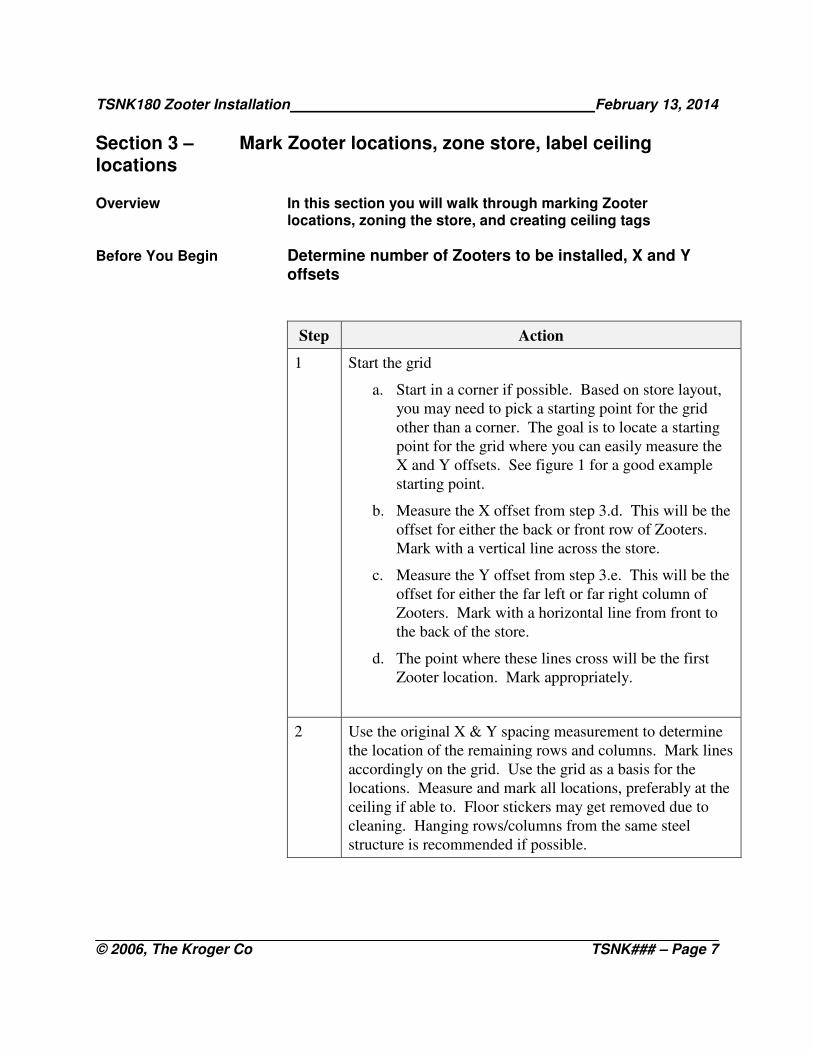
Section 3 – Mark Zooter locations, zone store, label ceiling locations Overview In this section you will walk through marking Zooter
locations, zoning the store, and creating ceiling tags
Before You Begin Determine number of Zooters to be installed, X and Y offsets
Step Action
1 Start the grid
a. Start in a corner if possible. Based on store layout,
you may need to pick a starting point for the grid
other than a corner. The goal is to locate a starting
point for the grid where you can easily measure the
X and Y offsets. See figure 1 for a good example
starting point.
b. Measure the X offset from step 3.d. This will be the
offset for either the back or front row of Zooters.
Mark with a vertical line across the store.
c. Measure the Y offset from step 3.e. This will be the
offset for either the far left or far right column of
Zooters. Mark with a horizontal line from front to
the back of the store.
d. The point where these lines cross will be the first
Zooter location. Mark appropriately.
2 Use the original X & Y spacing measurement to determine
the location of the remaining rows and columns. Mark lines
accordingly on the grid. Use the grid as a basis for the
locations. Measure and mark all locations, preferably at the
ceiling if able to. Floor stickers may get removed due to
cleaning. Hanging rows/columns from the same steel
structure is recommended if possible.
TSNK180 Zooter Installation February 13, 2014
© 2006, The Kroger Co TSNK### – Page 8
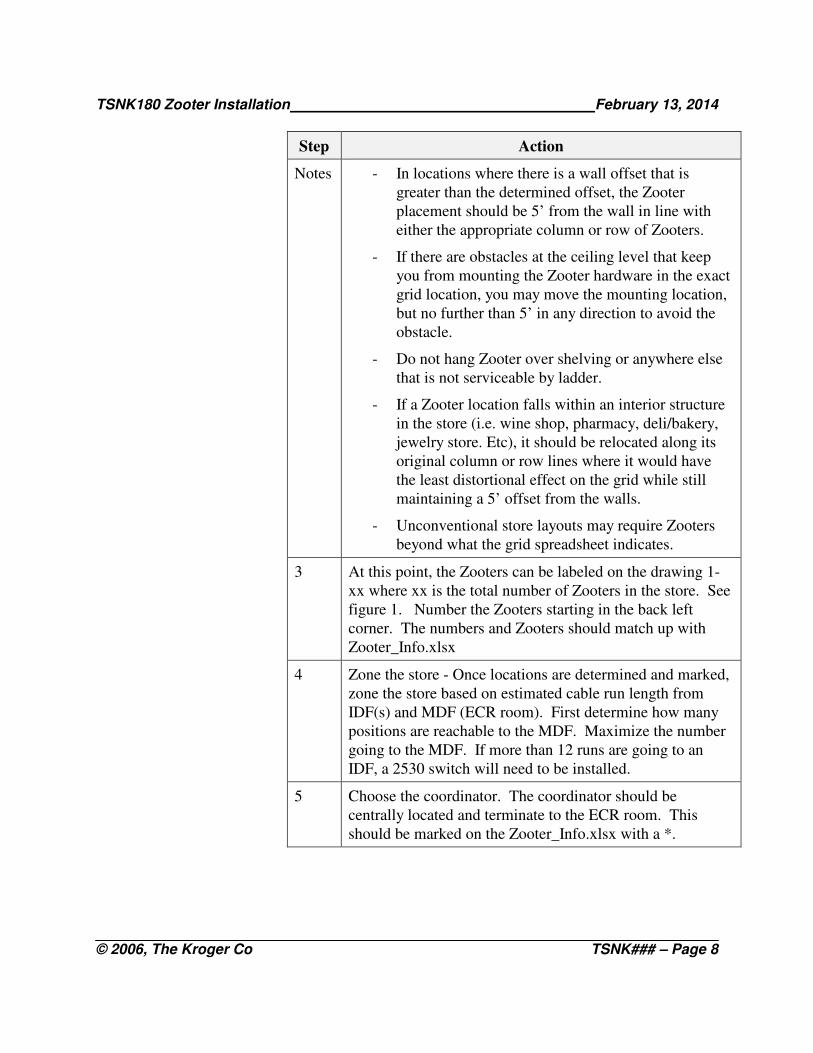
Step Action
Notes - In locations where there is a wall offset that is
greater than the determined offset, the Zooter
placement should be 5’ from the wall in line with
either the appropriate column or row of Zooters.
- If there are obstacles at the ceiling level that keep
you from mounting the Zooter hardware in the exact
grid location, you may move the mounting location,
but no further than 5’ in any direction to avoid the
obstacle.
- Do not hang Zooter over shelving or anywhere else
that is not serviceable by ladder.
- If a Zooter location falls within an interior structure
in the store (i.e. wine shop, pharmacy, deli/bakery,
jewelry store. Etc), it should be relocated along its
original column or row lines where it would have
the least distortional effect on the grid while still
maintaining a 5’ offset from the walls.
- Unconventional store layouts may require Zooters
beyond what the grid spreadsheet indicates.
3 At this point, the Zooters can be labeled on the drawing 1-
xx where xx is the total number of Zooters in the store. See
figure 1. Number the Zooters starting in the back left
corner. The numbers and Zooters should match up with
Zooter_Info.xlsx
4 Zone the store - Once locations are determined and marked,
zone the store based on estimated cable run length from
IDF(s) and MDF (ECR room). First determine how many
positions are reachable to the MDF. Maximize the number
going to the MDF. If more than 12 runs are going to an
IDF, a 2530 switch will need to be installed.
5 Choose the coordinator. The coordinator should be
centrally located and terminate to the ECR room. This
should be marked on the Zooter_Info.xlsx with a *.
TSNK180 Zooter Installation February 13, 2014
© 2006, The Kroger Co TSNK### – Page 9
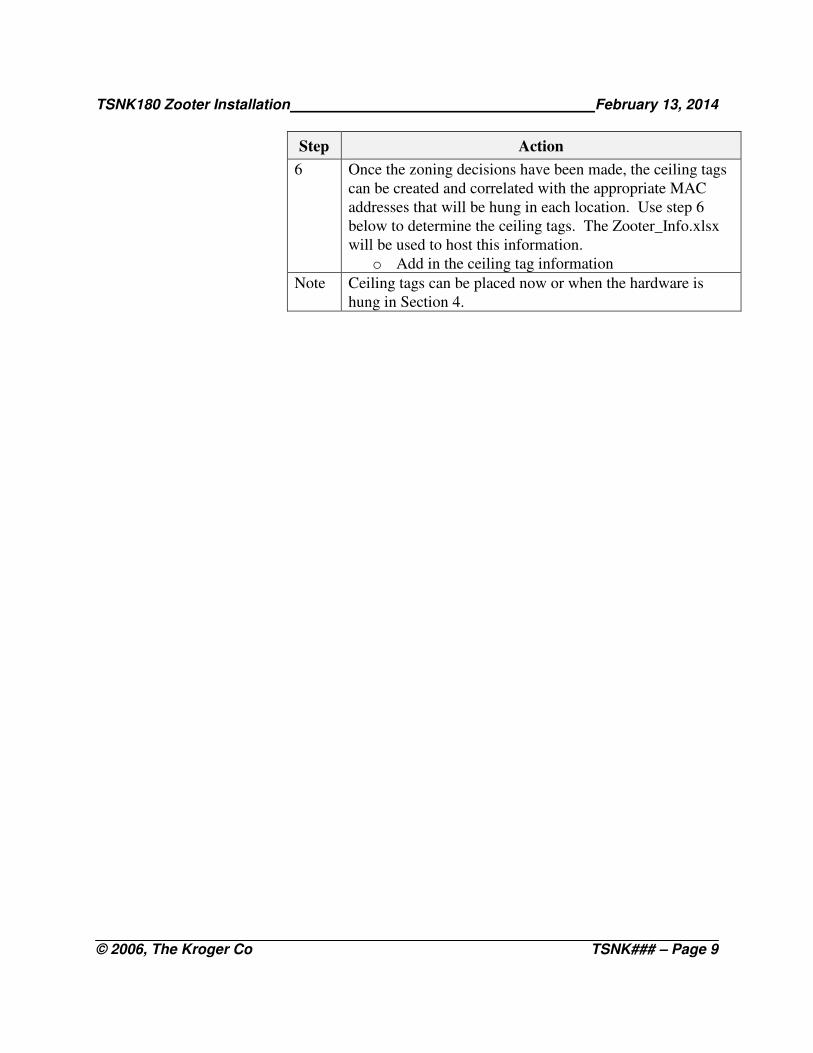
Step Action
6 Once the zoning decisions have been made, the ceiling tags
can be created and correlated with the appropriate MAC
addresses that will be hung in each location. Use step 6
below to determine the ceiling tags. The Zooter_Info.xlsx
will be used to host this information.
o Add in the ceiling tag information
Note Ceiling tags can be placed now or when the hardware is
hung in Section 4.
TSNK180 Zooter Installation February 13, 2014
© 2006, The Kroger Co TSNK### – Page 10
Step Action
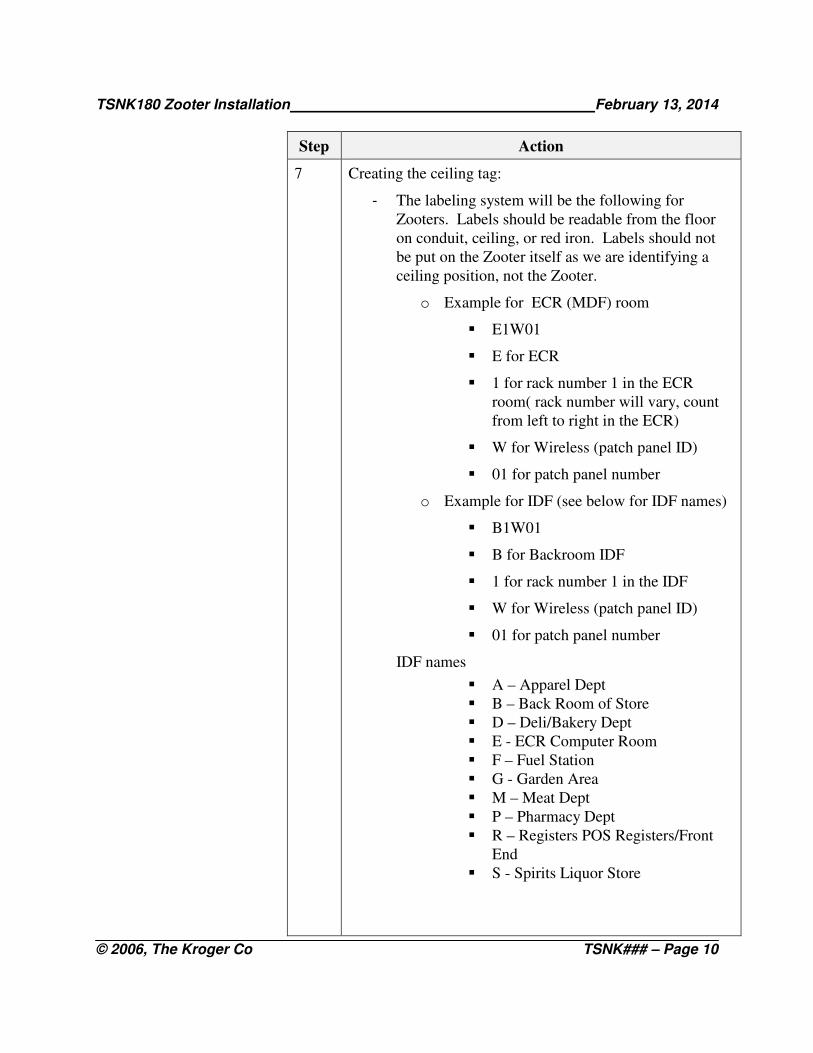
7 Creating the ceiling tag:
- The labeling system will be the following for
Zooters. Labels should be readable from the floor
on conduit, ceiling, or red iron. Labels should not
be put on the Zooter itself as we are identifying a
ceiling position, not the Zooter.
o Example for ECR (MDF) room
� E1W01
� E for ECR
� 1 for rack number 1 in the ECR
room( rack number will vary, count
from left to right in the ECR)
� W for Wireless (patch panel ID)
� 01 for patch panel number
o Example for IDF (see below for IDF names)
� B1W01
� B for Backroom IDF
� 1 for rack number 1 in the IDF
� W for Wireless (patch panel ID)
� 01 for patch panel number
IDF names
� A – Apparel Dept
� B – Back Room of Store
� D – Deli/Bakery Dept
� E - ECR Computer Room
� F – Fuel Station
� G - Garden Area
� M – Meat Dept
� P – Pharmacy Dept
� R – Registers POS Registers/Front
End
� S - Spirits Liquor Store
TSNK180 Zooter Installation February 13, 2014
© 2006, The Kroger Co TSNK### – Page 11
Section 4 – Enter Zooter and switches information into TUNA Overview THE ZOOTER_INFO SHEETS SHOULD BE UPLOADED TO
THE APPROPRIATE LOCATION ON SHAREPOINT PRIOR TO THE INSTALLATION START. THAT WAY THE STORE CAN BE STAGED ACCORDINGLY
Before You Begin At the very least the Zooter MAC addresses will need to be on the Zooter_info spreadsheet. You will also need the switch MAC addresses and IDF locations.
Step Action
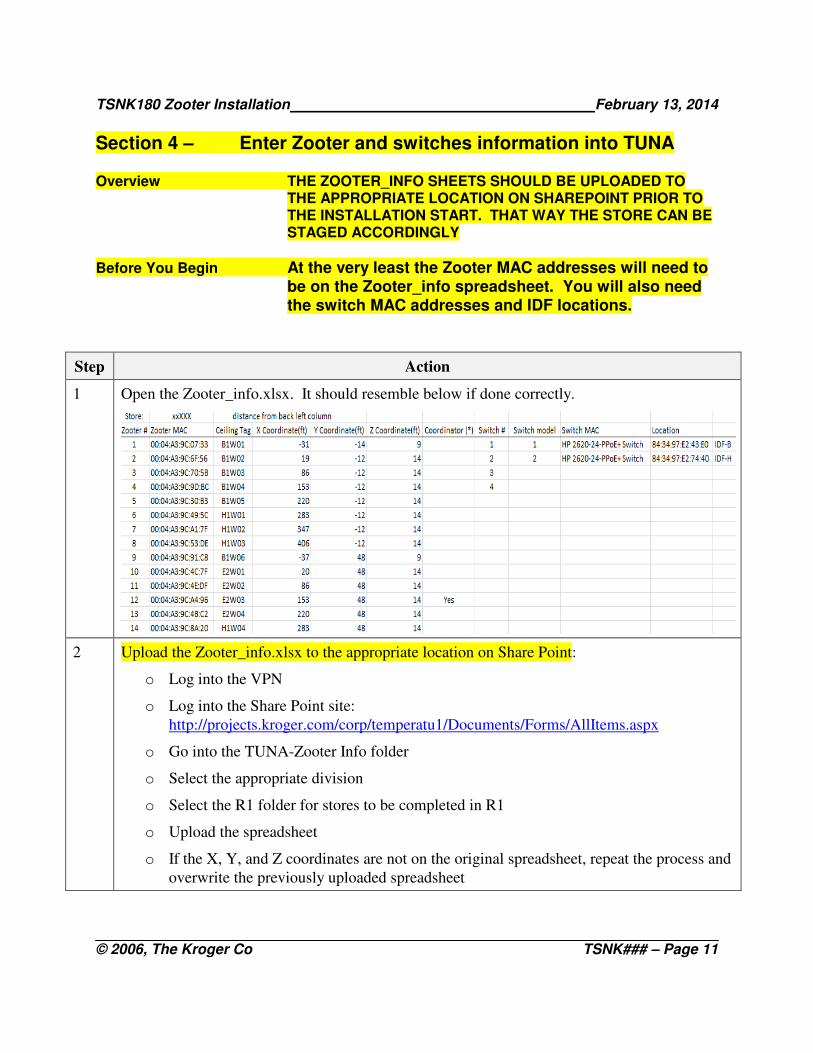
1 Open the Zooter_info.xlsx. It should resemble below if done correctly.
2 Upload the Zooter_info.xlsx to the appropriate location on Share Point:
o Log into the VPN
o Log into the Share Point site:
http://projects.kroger.com/corp/temperatu1/Documents/Forms/AllItems.aspx
o Go into the TUNA-Zooter Info folder
o Select the appropriate division
o Select the R1 folder for stores to be completed in R1
o Upload the spreadsheet
o If the X, Y, and Z coordinates are not on the original spreadsheet, repeat the process and
overwrite the previously uploaded spreadsheet

TSNK180 Zooter Installation February 13, 2014
© 2006, The Kroger Co TSNK### – Page 12
Section 5 – Pull cable, hang the Zooters Overview In this section the cable will be pulled the Zooters will be
hung from the ceiling
Before You Begin Have your Zooter locations marked appropriately and zoning completed
IMPORTANT NOTE: Below are steps for mounting a single position, organize your
work accordingly in the most efficient manner Equipment required per Zooter: ¾” EMT, 2 ¾” compression
fittings, paint matching ceiling, 4S octagonal outlet box, Crouse-Hinds TPSFH12 or TPRFH12
Step Action
1 Cabling will be completed using Beldin 3632 category 6 bonded-pair cable only
2 Pull single run of cable to each location
3 In an open ceiling format, Zooters will be installed 14’ AFF.
a. Step 5b shows this installation method
In a drop ceiling format, Zooters can be mounted to the T-bar structure if the drop ceiling
is no higher than 16’ AFF.
a. Step 5a shows this installation method
If a drop ceiling is above 16’ AFF, then the mounting system for the open ceiling format
will be employed to achieve 14’ AFF.
4 Assemble mounting hardware, cut conduit appropriately for each location, and paint to
match ceiling.
TSNK180 Zooter Installation February 13, 2014
© 2006, The Kroger Co TSNK### – Page 13
Step Action
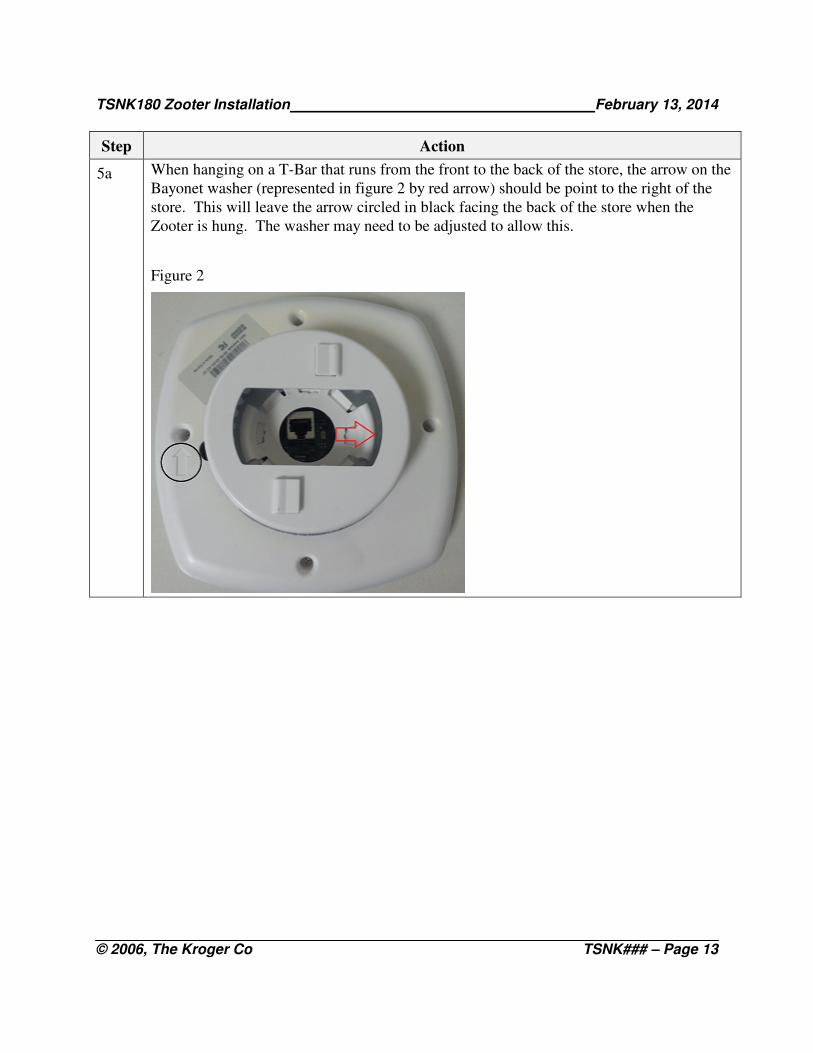
5a When hanging on a T-Bar that runs from the front to the back of the store, the arrow on the
Bayonet washer (represented in figure 2 by red arrow) should be point to the right of the
store. This will leave the arrow circled in black facing the back of the store when the
Zooter is hung. The washer may need to be adjusted to allow this.
Figure 2
TSNK180 Zooter Installation February 13, 2014
© 2006, The Kroger Co TSNK### – Page 14
Step Action
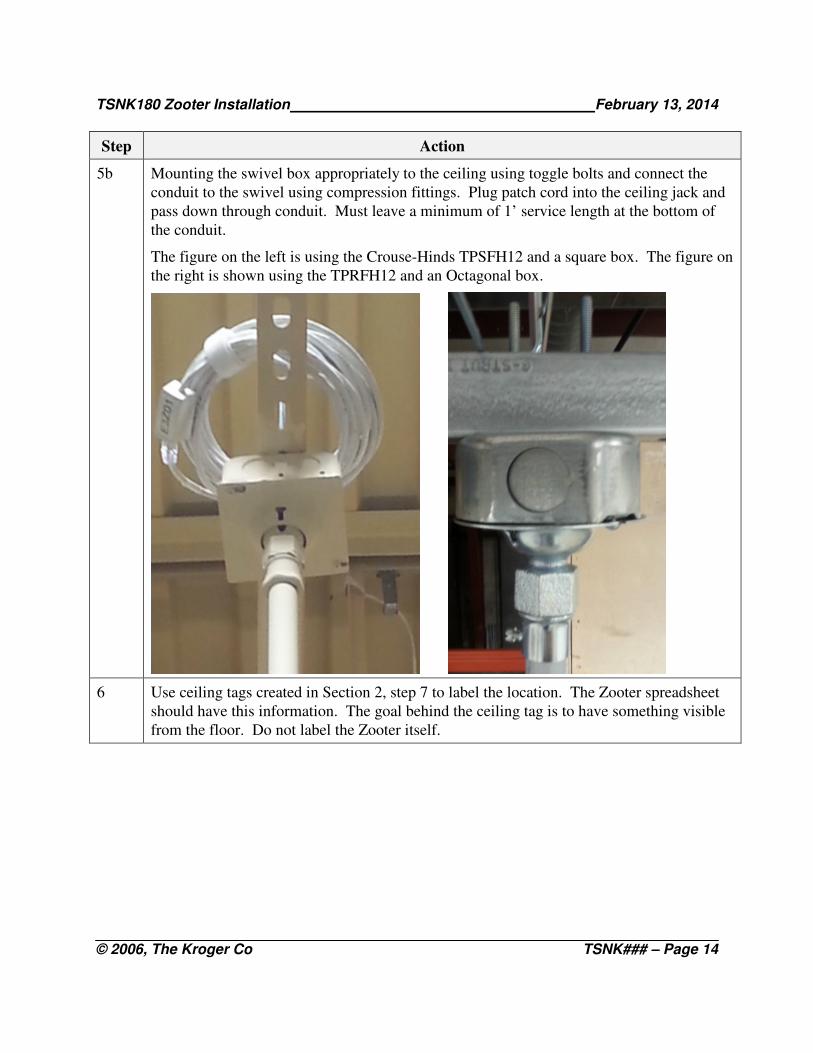
5b Mounting the swivel box appropriately to the ceiling using toggle bolts and connect the
conduit to the swivel using compression fittings. Plug patch cord into the ceiling jack and
pass down through conduit. Must leave a minimum of 1’ service length at the bottom of
the conduit.
The figure on the left is using the Crouse-Hinds TPSFH12 and a square box. The figure on
the right is shown using the TPRFH12 and an Octagonal box.
6 Use ceiling tags created in Section 2, step 7 to label the location. The Zooter spreadsheet
should have this information. The goal behind the ceiling tag is to have something visible
from the floor. Do not label the Zooter itself.
TSNK180 Zooter Installation February 13, 2014
© 2006, The Kroger Co TSNK### – Page 15
Step Action
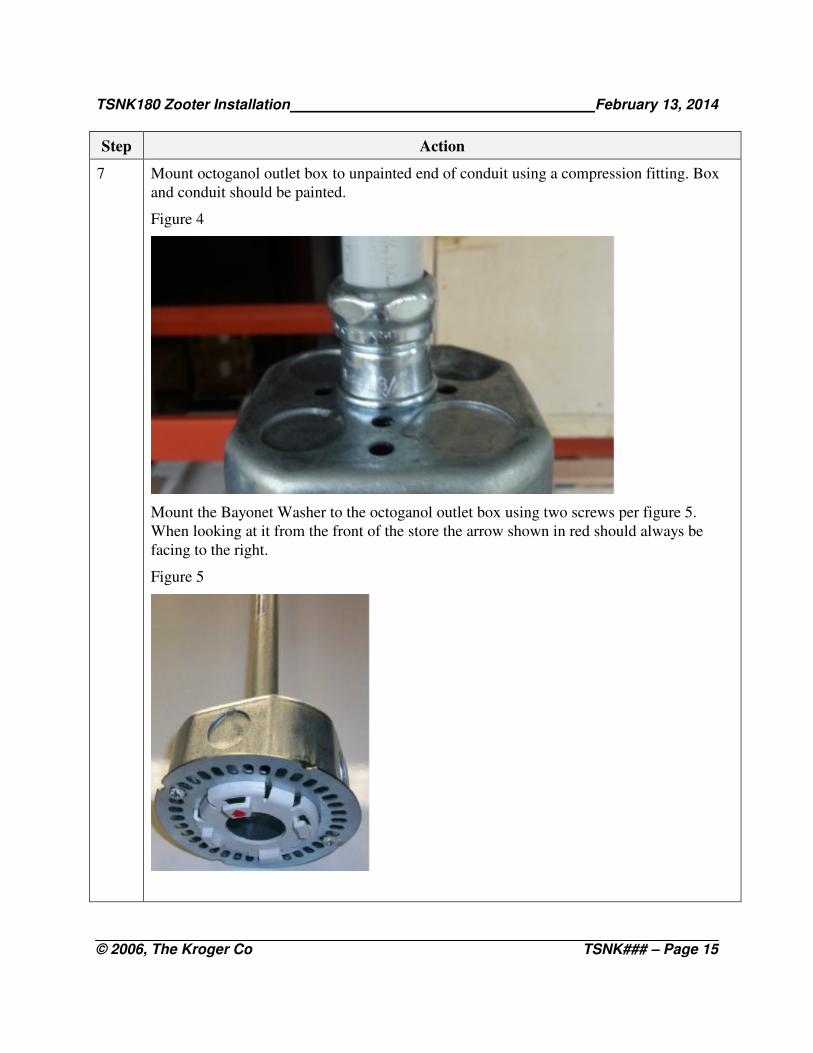
7 Mount octoganol outlet box to unpainted end of conduit using a compression fitting. Box
and conduit should be painted.
Figure 4
Mount the Bayonet Washer to the octoganol outlet box using two screws per figure 5.
When looking at it from the front of the store the arrow shown in red should always be
facing to the right.
Figure 5
TSNK180 Zooter Installation February 13, 2014
© 2006, The Kroger Co TSNK### – Page 16
Step Action
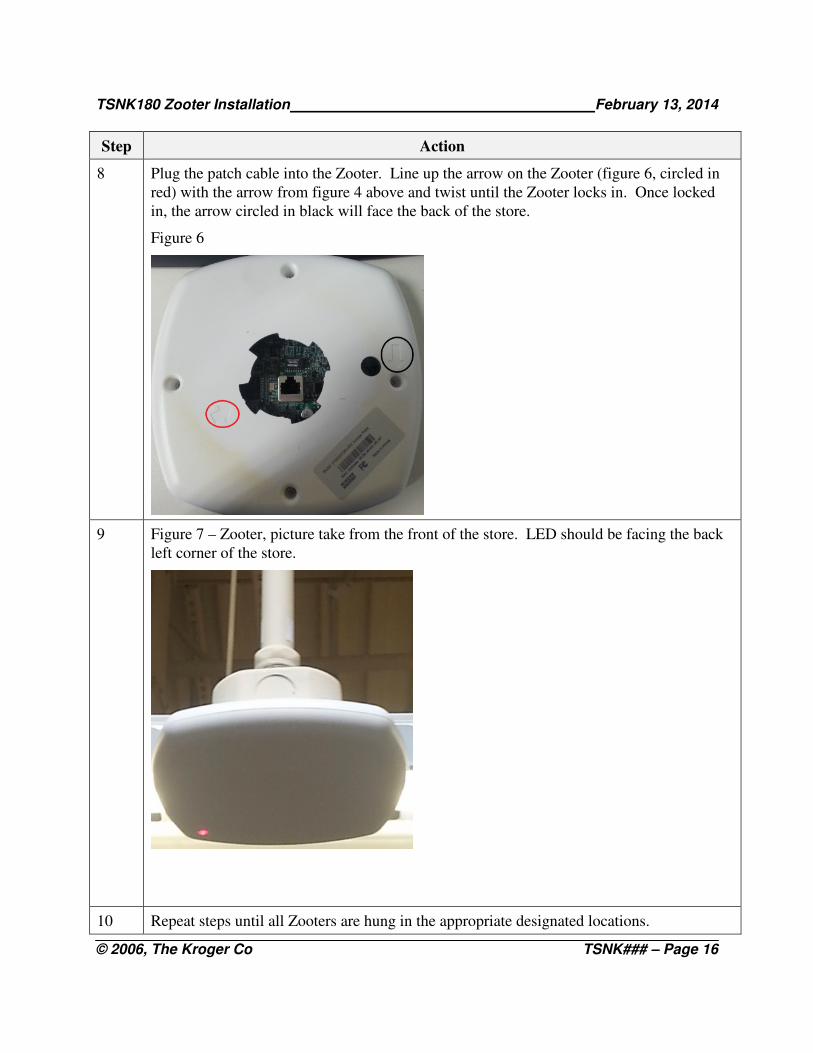
8 Plug the patch cable into the Zooter. Line up the arrow on the Zooter (figure 6, circled in
red) with the arrow from figure 4 above and twist until the Zooter locks in. Once locked
in, the arrow circled in black will face the back of the store.
Figure 6
9 Figure 7 – Zooter, picture take from the front of the store. LED should be facing the back
left corner of the store.
10 Repeat steps until all Zooters are hung in the appropriate designated locations.
TSNK180 Zooter Installation February 13, 2014
© 2006, The Kroger Co TSNK### – Page 17
Section 6 – Verify that the Zooters are pinging Overview In this section you will verify that the Zooters are up and
pinging on the network.
Before You Begin All Zooters should be hung and patched through at the switches. The Zooter MAC addresses and new switch MAC addresses should have been already sent to Kroger for input. Do not proceed if this has not been done.
TSNK180 Zooter Installation February 13, 2014
© 2006, The Kroger Co TSNK### – Page 18
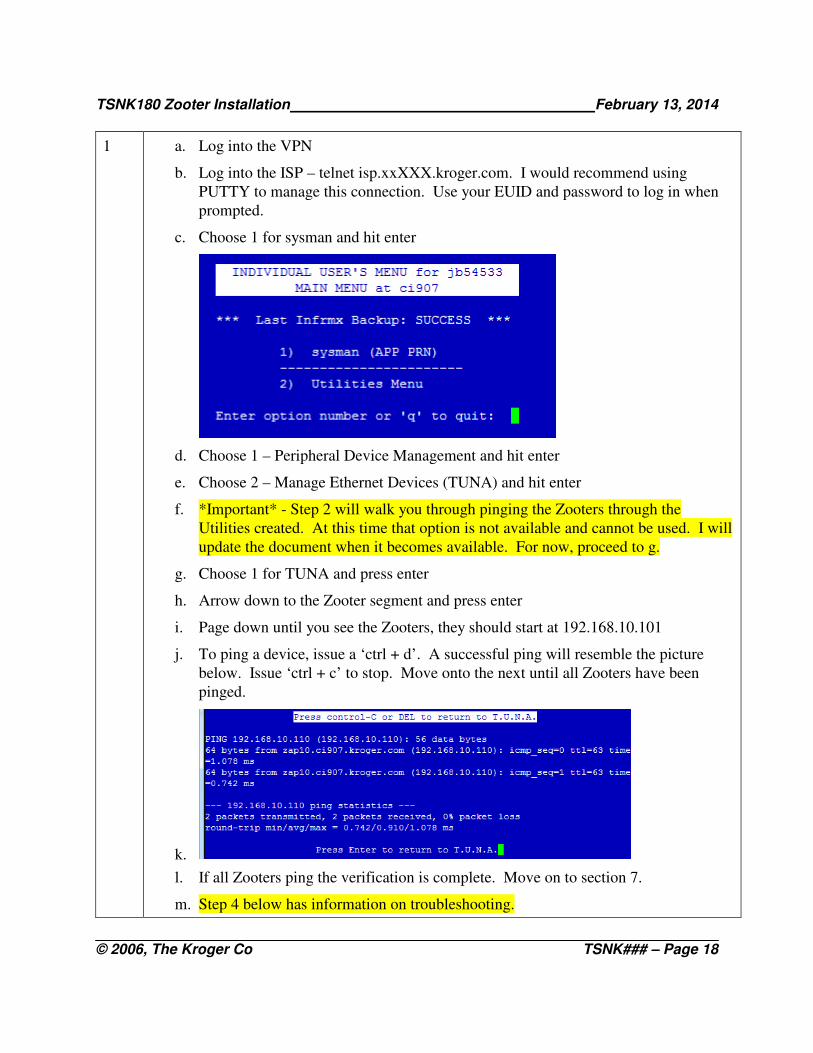
1 a. Log into the VPN
b. Log into the ISP – telnet isp.xxXXX.kroger.com. I would recommend using
PUTTY to manage this connection. Use your EUID and password to log in when
prompted.
c. Choose 1 for sysman and hit enter
d. Choose 1 – Peripheral Device Management and hit enter
e. Choose 2 – Manage Ethernet Devices (TUNA) and hit enter
f. *Important* - Step 2 will walk you through pinging the Zooters through the
Utilities created. At this time that option is not available and cannot be used. I will
update the document when it becomes available. For now, proceed to g.
g. Choose 1 for TUNA and press enter
h. Arrow down to the Zooter segment and press enter
i. Page down until you see the Zooters, they should start at 192.168.10.101
j. To ping a device, issue a ‘ctrl + d’. A successful ping will resemble the picture
below. Issue ‘ctrl + c’ to stop. Move onto the next until all Zooters have been
pinged.
k.
l. If all Zooters ping the verification is complete. Move on to section 7.
m. Step 4 below has information on troubleshooting.
TSNK180 Zooter Installation February 13, 2014
© 2006, The Kroger Co TSNK### – Page 19
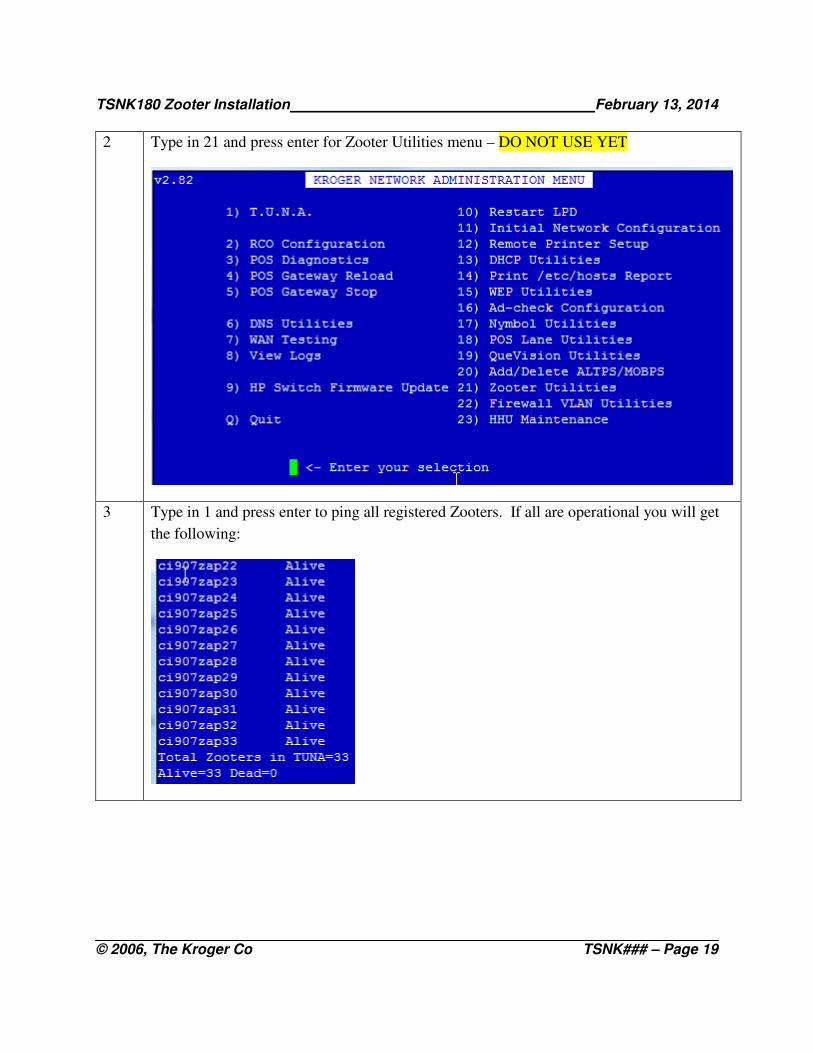
2 Type in 21 and press enter for Zooter Utilities menu – DO NOT USE YET
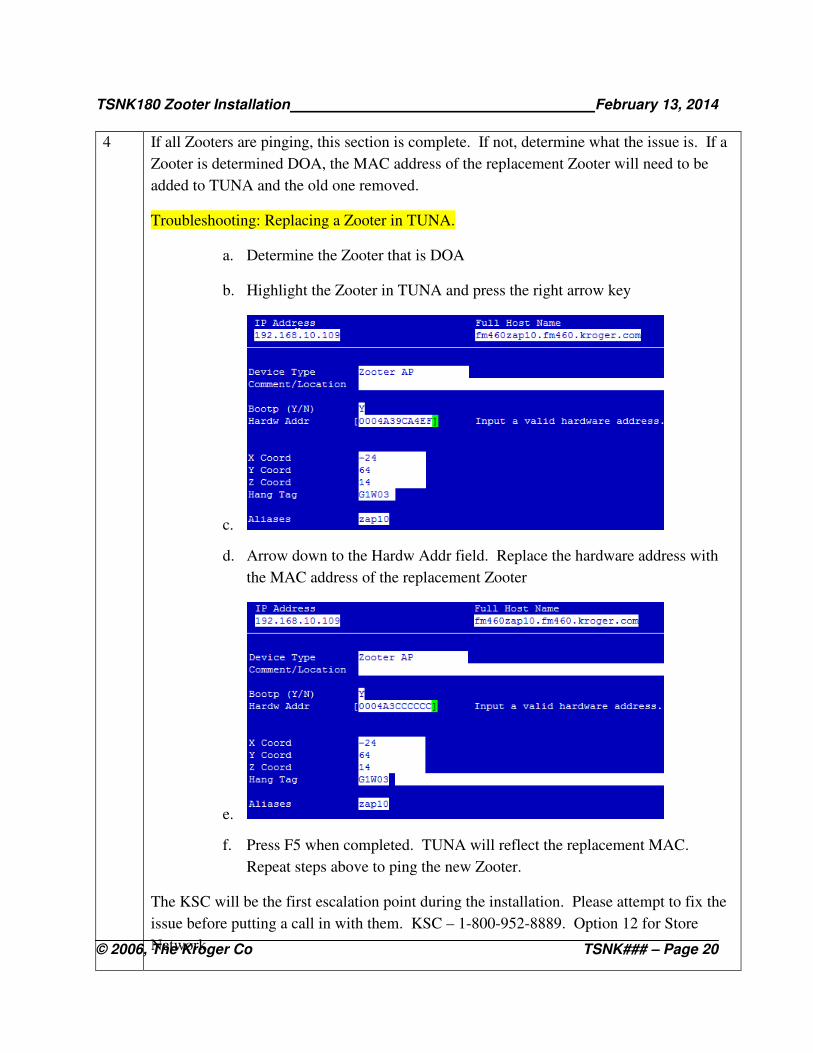
3 Type in 1 and press enter to ping all registered Zooters. If all are operational you will get
the following:
TSNK180 Zooter Installation February 13, 2014
© 2006, The Kroger Co TSNK### – Page 20
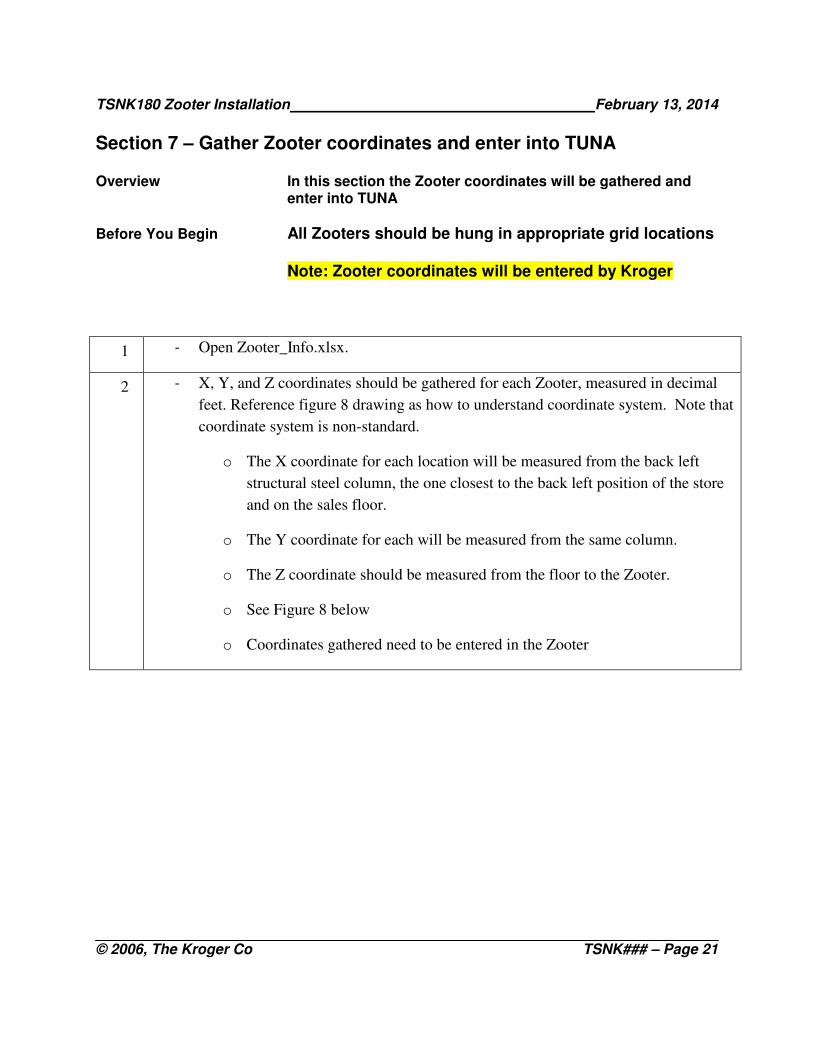
4 If all Zooters are pinging, this section is complete. If not, determine what the issue is. If a
Zooter is determined DOA, the MAC address of the replacement Zooter will need to be
added to TUNA and the old one removed.
Troubleshooting: Replacing a Zooter in TUNA.
a. Determine the Zooter that is DOA
b. Highlight the Zooter in TUNA and press the right arrow key
c.
d. Arrow down to the Hardw Addr field. Replace the hardware address with
the MAC address of the replacement Zooter
e.
f. Press F5 when completed. TUNA will reflect the replacement MAC.
Repeat steps above to ping the new Zooter.
The KSC will be the first escalation point during the installation. Please attempt to fix the
issue before putting a call in with them. KSC – 1-800-952-8889. Option 12 for Store
Network.
TSNK180 Zooter Installation February 13, 2014
© 2006, The Kroger Co TSNK### – Page 21
Section 7 – Gather Zooter coordinates and enter into TUNA Overview In this section the Zooter coordinates will be gathered and
enter into TUNA
Before You Begin All Zooters should be hung in appropriate grid locations Note: Zooter coordinates will be entered by Kroger
1 - Open Zooter_Info.xlsx.
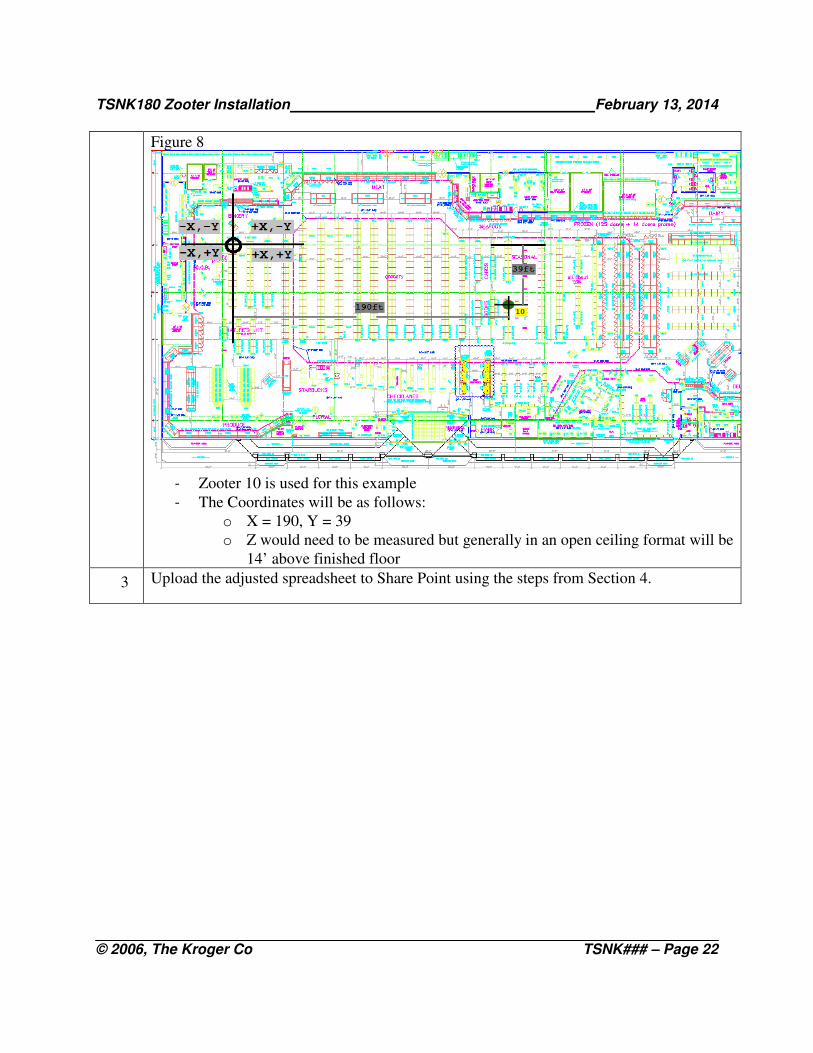
2 - X, Y, and Z coordinates should be gathered for each Zooter, measured in decimal
feet. Reference figure 8 drawing as how to understand coordinate system. Note that
coordinate system is non-standard.
o The X coordinate for each location will be measured from the back left
structural steel column, the one closest to the back left position of the store
and on the sales floor.
o The Y coordinate for each will be measured from the same column.
o The Z coordinate should be measured from the floor to the Zooter.
o See Figure 8 below
o Coordinates gathered need to be entered in the Zooter
TSNK180 Zooter Installation February 13, 2014
© 2006, The Kroger Co TSNK### – Page 22
Figure 8
- Zooter 10 is used for this example
- The Coordinates will be as follows:
o X = 190, Y = 39
o Z would need to be measured but generally in an open ceiling format will be
14’ above finished floor
3 Upload the adjusted spreadsheet to Share Point using the steps from Section 4.