Embed Size (px)
Citation preview

Technical white paper
HP Business Notebook and Desktop PC F10 setup overview 2014 Business PC models
Table of Contents CONTENTS
EXECUTIVE SUMMARY ................................................................................................................................ 3
SUPPORTED MODELS ................................................................................................................................. 3
MOST RECENT ENHANCEMENTS .................................................................................................................. 3
TOUCH AND TOUCH KEYBOARD SUPPORT .................................................................................................................................................................... 3 ALWAYS ON REMOTE MANAGEMENT .......................................................................................................................................................................... 3 VIRTUAL KEYBOARD ............................................................................................................................................................................................... 3 FIRMWARE UPDATES .............................................................................................................................................................................................. 3 SECURITY HARD DRIVE TOOLS ................................................................................................................................................................................. 3 SECURITY DEVICE ID .............................................................................................................................................................................................. 3 INDEPENDENT CAMERA CONTROL.............................................................................................................................................................................. 4 NFC DISABLE BY DEFAULT ...................................................................................................................................................................................... 4
IMPORTANT FEATURES .............................................................................................................................. 4
UPDATING BIOS OVER A NETWORK ........................................................................................................................................................................... 4 HP TOUCHPOINT MANAGER ALWAYS ON REMOTE MANAGEMENT .................................................................................................................................... 4 HP SURE START .................................................................................................................................................................................................... 4 ADDITIONAL ENHANCEMENTS ................................................................................................................................................................................... 4
F10 SETUP FOR HP BUSINESS NOTEBOOKS ................................................................................................... 4
MAIN MENU .......................................................................................................................................................................................................... 4 SECURITY MENU .................................................................................................................................................................................................... 5 ADVANCED MENU ................................................................................................................................................................................................... 5 LANGUAGE SUPPORT .............................................................................................................................................................................................. 5 OVERVIEW OF BUSINESS NOTEBOOK OPTIONS ............................................................................................................................................................. 6
F10 SETUP FOR HP BUSINESS DESKTOPS ................................................................................................... 15
FILE MENU .......................................................................................................................................................................................................... 15 STORAGE MENU ................................................................................................................................................................................................... 15 SECURITY MENU .................................................................................................................................................................................................. 15 POWER MENU ..................................................................................................................................................................................................... 16 ADVANCED MENU ................................................................................................................................................................................................. 16 OVERVIEW FOR HP BUSINESS DESKTOPS ................................................................................................................................................................. 17
APPENDIX A: HP SURE START ................................................................................................................... 23
VERIFY BOOT BLOCK ON EVERY BOOT ...................................................................................................................................................................... 23 BIOS DATA RECOVERY POLICY ................................................................................................................................................................................ 23 RESTORE NETWORK CONTROLLER CONFIGURATION TO THE FACTORY DEFAULTS ............................................................................................................... 23 LOCK BIOS VERSION ............................................................................................................................................................................................ 23 SURE START POLICY CONTROLS .............................................................................................................................................................................. 23
Identifying BIOS corruption ............................................................................................................................... 23

2
Recovering from BIOS corruption ...................................................................................................................... 23
APPENDIX B: BIOS OVERVIEW FOR HP ELITEPAD 1000 ................................................................................. 25
APPENDIX C: CREATING AN IN-HOUSE REPOSITORY TO SUPPORT BIOS UPDATES ........................................... 28
INTRODUCTION ....................................................................................................................................... 28
TERMINOLOGY .................................................................................................................................................................................................... 28
FINDING A PARTICULAR BIOS FILE ............................................................................................................. 28
ORGANIZING THE CATALOG ....................................................................................................................... 28
CATALOG FILE SCHEMA .......................................................................................................................................................................................... 28 SAMPLE FILE ....................................................................................................................................................................................................... 29 NAMING CONVENTIONS ......................................................................................................................................................................................... 30
SETTING UP A REPOSITORY ...................................................................................................................... 30
INSTRUCTIONS .................................................................................................................................................................................................... 30 Sample catalog file ............................................................................................................................................ 30
FINAL CAVEAT ......................................................................................................................................... 31
APPENDIX D: ENABLING HP TOUCHPOINT MANAGER ALWAYS ON REMOTE MANAGEMENT ............................... 32
SUPPORTED PLATFORMS ...................................................................................................................................................................................... 32 Activation ........................................................................................................................................................... 32 HP Touchpoint Manager after Activation .......................................................................................................... 33
APPENDIX E: BOOT ERROR CODES ............................................................................................................. 34
CPU NOT EXECUTING CODE .................................................................................................................................................................................... 34 BIOS RECOVERY CODE UNABLE TO FIND VALID BIOS RECOVERY IMAGE ............................................................................................................................ 34 FAILURE - MEMORY MODULE ERROR ....................................................................................................................................................................... 34 GRAPHICS CONTROLLER ERROR (NO CONTROLLER) .................................................................................................................................................... 35 FAILURE - SYSTEM BOARD ERROR........................................................................................................................................................................... 35 INTEL TRUSTED EXECUTION TECHNOLOGY (TXT) ERROR ............................................................................................................................................. 35 SURE START UNABLE TO FIND VALID BIOS BOOT BLOCK IMAGE ..................................................................................................................................... 35 SURE START HAS IDENTIFIED A PROBLEM (MANUAL RECOVERY POLICY SET) .................................................................................................................... 35
FOR MORE INFORMATION ......................................................................................................................... 36
DISCLAIMER ............................................................................................................................................ 36
3
Executive summary
For decades, HP has provided unique customer value through an internally developed Read Only Memory Basic Input/Output System (ROM BIOS), a set of routines that enable a PC to load the operating system and communicate with various devices such as storage drives, keyboard, display, slots, and ports. The BIOS ensures that there is a high degree of integration between firmware and HP professional innovations such as HP Client Security Software Suite, HP Power Assistant, and HP Client Management Solutions.
HP F10 Setup, the BIOS configuration user interface provided with HP PCs, provides easy access to an impressive set of features.
Supported models
The F10 Setup described in this white paper is available on select models introduced in 2014. There are separate sections for HP notebook, desktop and tablet models.
• HP EliteBook Revolve 810 G3
• HP ZBook 14 Mobile Workstation
• HP ZBook 15u Mobile Workstation
• HP ZBook 17 Mobile Workstation
• HP Pro x2 612 G1
• HP Elite x2 1011 G1
• HP ElitePad 1000 G2
• HP EliteBook 1000 G2 series
• HP EliteBook 800 G2 series
• HP EliteBook Revolve 810 G3
• HP EliteBook 700 G1 and G2 series
• HP ProBook 400 G2 series
Most recent enhancements
HP has added several options to the 2014 version of the F10 Setup, including those outlined below.
Touch and Touch Keyboard support On supported devices, you may choose to use the touchscreen and on-screen touch keyboard capabilities, or you may choose to disable both from the BIOS.
Always On Remote Management On supported devices, you may enroll your HP PC to protect your device and data upon loss or theft. This advanced level of security is active even in low power computer states (sleep, hibernate and soft off). This feature requires a subscription to the HP Touchpoint Manager cloud service. Visit www.hp.com/touchpoint for more information.
Virtual Keyboard On select devices you can change how your keyboard functions, so that it conforms with one of eighteen different keyboard languages.
Firmware updates On select devices, you can control whether or not you wish to accept automatic firmware updates.
Security Hard Drive Tools A wide variety of HP security tools, including DriveLock, Secure Erase and Disk Sanitizer, are now available in one place.
Security Device ID The Asset Tracking Number and Ownership Tag have been consolidated under a single policy setting.
4
Independent Camera Control The HP Pro x2 612 G1 includes the ability to separately manage each camera included in this device, via ”enable” and “disable” settings found in the F10 Setup menu.
NFC Disable by Default On HP ElitePad 1000 devices, the default setting for NFC is now disabled.
Important Features
Updating BIOS over a network BIOS Update via Network is the BIOS option that allows BIOS updates to be downloaded over a network from hp.com or a customer-created repository.
This feature is available on select HP notebooks, desktops, and workstations. For more information on creating a custom repository, refer to Appendix C.
HP Touchpoint Manager Always On Remote Management Enrolling the PC in the HP Touchpoint Manager cloud service allows the owner to manage the device via the HP Touchpoint Manager console from a phone, tablet or PC using a standard web browser. After enrollment, when the machine is running Windows, the HP Touchpoint Manager agent on the platform forwards service commands to the system BIOS to execute security and management tasks including a machine lock and a hard drive wipe. If the machine is placed into a Sleep, Hibernate, or Off state the device will then periodically “call home” to the HP Touchpoint Manager server to report its status and retrieve/execute any pending commands. This feature also reports boot error codes to the Touchpoint Manager server to assist in problem resolution and decrease the number of returned systems.
For more information on setting up and using HP Touchpoint Manager Always On Remote Management, refer to Appendix D. For more information on boot error codes refer to Appendix E.
HP Sure Start Select EliteBook PCs offer HP Sure Start, which provides hardware-based assurance of the following:
• HP-approved firmware is running on the HP Embedded Controller (EC) – EC Options in BIOS found under “BIOS Integrity Checking” and in some systems as “HP Sure Start.”
• An HP-approved BIOS is running on the host processor
HP Sure Start verifies the integrity of HP BIOS code residing in the main flash and provides self-healing mechanisms to restore any code that has been corrupted within the flash.
For more information, see the Sure Start section of this document (Appendix A).
Additional enhancements For select PCs without HP Sure Start, HP has enhanced its protection against attacks at the BIOS level. This added security is a part of HP BIOSphere and includes:
• Inspection of the system BIOS prior to each boot of the host processor, ensuring only HP approved code executes at start-up
• Delivery of an enhanced core root of trust, based on hardware, not software, and not easily circumvented via physical replacement
• Support across multiple chipsets
• Platform support for HP 400 series ProBooks
F10 Setup for HP Business Notebooks
HP F10 Setup features for business notebooks include file, security, and system configuration categories.
Main menu The Main menu provides access to general options such as:
• System Information

5
• System Diagnostics
• Update System BIOS
• Restore Defaults
• Reset BIOS security to factory default
• Ignore Changes and Exit
• Save Changes and Exit
Security menu The Security menu provides access to security-related options such as:
• Create an Administrator password for BIOS F10 Setup
• Password Policy
• Change Password
• Fingerprint Reset on Reboot (if Present)
• HP SpareKey
• HP SpareKey Enrollment
• User Management
• Set Security Level
• Restore Security Level Defaults
• BIOS Integrity Checking (Embedded Controller)
• TPM Embedded Security
• System Management Command (SMC)
• Anti-Theft Tools
• Hard Drive Tools
• System IDs
Advanced menu The Advanced menu allows you to set System Date and Time and Language. Other options include:
• Language
• Set System Date and Time
• Boot options
• BIOS Power-On
• Device Configuration
• Built-In Device OptionsPort Options
• AMT options1 (on select models)
• HP Touchpoint Manager Options
Language support HP F10 Setup for business notebooks has extensive language support. You can display the GUI in English, French, German, Spanish, Italian, Dutch, Danish, Japanese, Norwegian, Portuguese, Swedish, Finnish, Chinese Traditional, or Chinese Simplified.
1 Intel® Active Management Technology (AMT) requires an Intel AMT-enabled chipset, network hardware and software, as well as connection with a power source
and a corporate network connection. Setup requires configuration by the purchaser and may require scripting with the management console or further integration into existing security frameworks to enable certain functionality. It may also require modifications of implementation of new business processes.
6
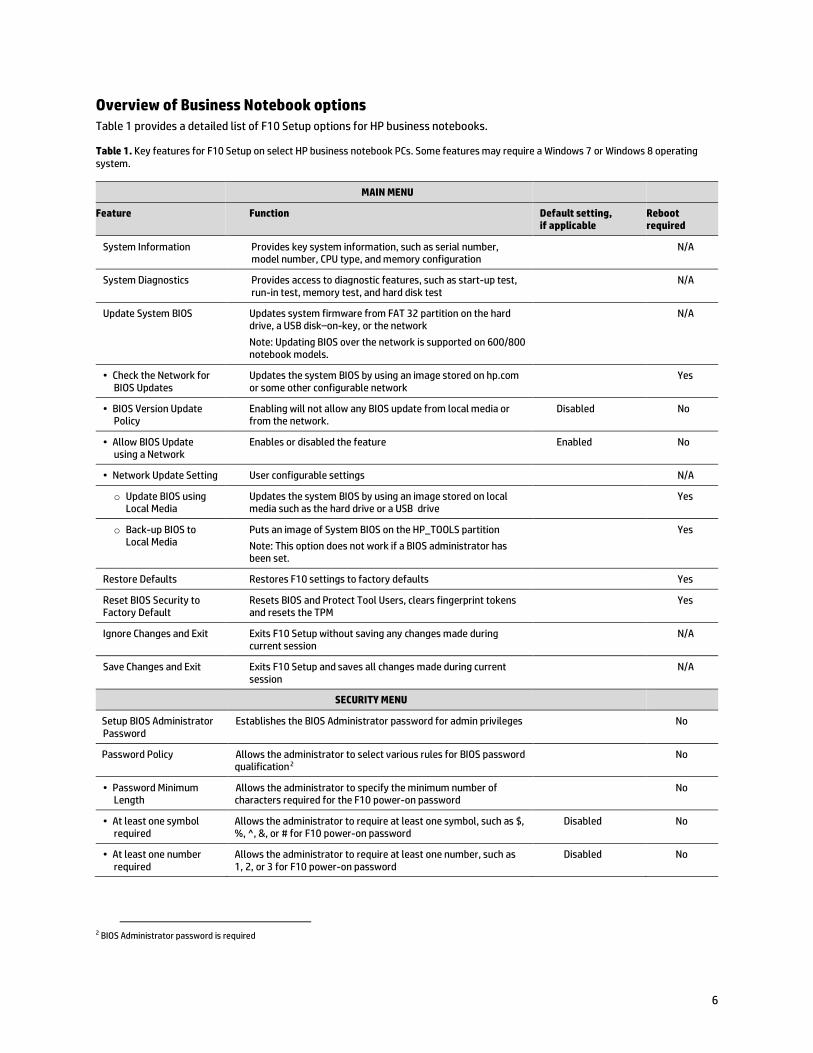
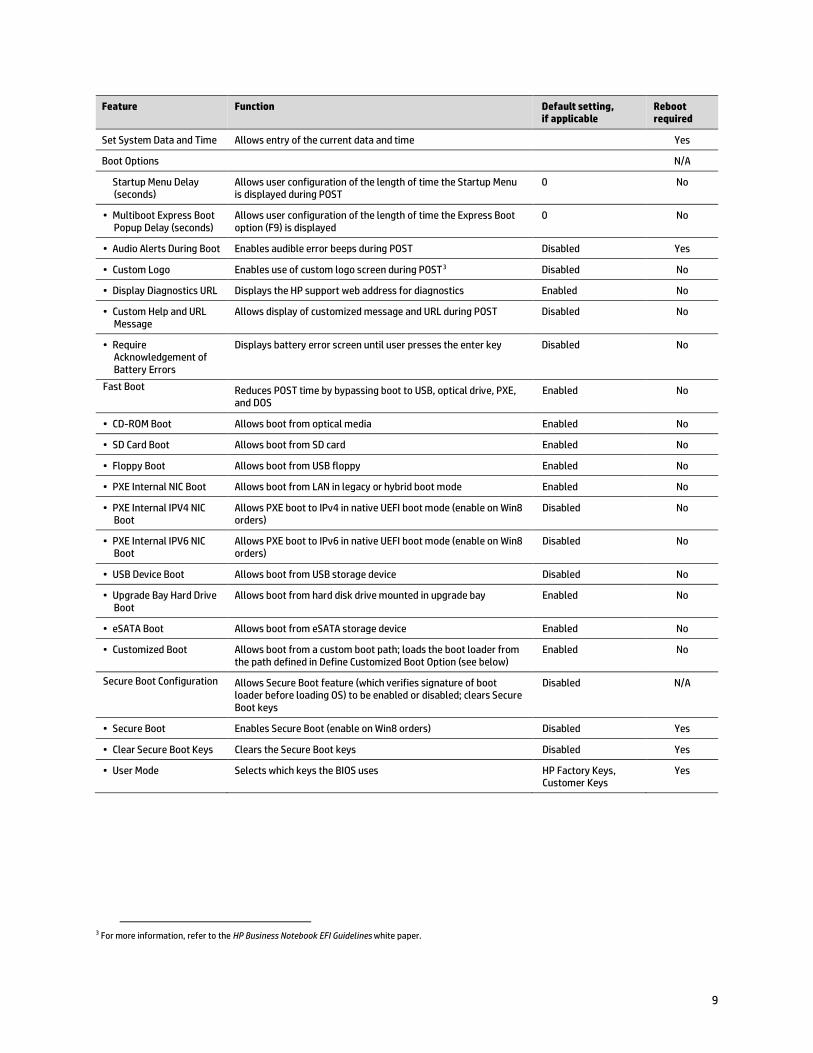
Overview of Business Notebook options Table 1 provides a detailed list of F10 Setup options for HP business notebooks.
Table 1. Key features for F10 Setup on select HP business notebook PCs. Some features may require a Windows 7 or Windows 8 operating system.
MAIN MENU
Feature Function Default setting, if applicable
Reboot required
System Information Provides key system information, such as serial number, model number, CPU type, and memory configuration
N/A
System Diagnostics Provides access to diagnostic features, such as start-up test, run-in test, memory test, and hard disk test
N/A
Update System BIOS Updates system firmware from FAT 32 partition on the hard drive, a USB disk–on-key, or the network
Note: Updating BIOS over the network is supported on 600/800 notebook models.
N/A
• Check the Network for BIOS Updates
Updates the system BIOS by using an image stored on hp.com or some other configurable network
Yes
• BIOS Version Update Policy
Enabling will not allow any BIOS update from local media or from the network.
Disabled No
• Allow BIOS Update using a Network
Enables or disabled the feature Enabled No
• Network Update Setting User configurable settings N/A
o Update BIOS using Local Media
Updates the system BIOS by using an image stored on local media such as the hard drive or a USB drive
Yes
o Back-up BIOS to Local Media
Puts an image of System BIOS on the HP_TOOLS partition
Note: This option does not work if a BIOS administrator has been set.
Yes
Restore Defaults Restores F10 settings to factory defaults Yes
Reset BIOS Security to Factory Default
Resets BIOS and Protect Tool Users, clears fingerprint tokens and resets the TPM
Yes
Ignore Changes and Exit Exits F10 Setup without saving any changes made during current session
N/A
Save Changes and Exit Exits F10 Setup and saves all changes made during current session
N/A
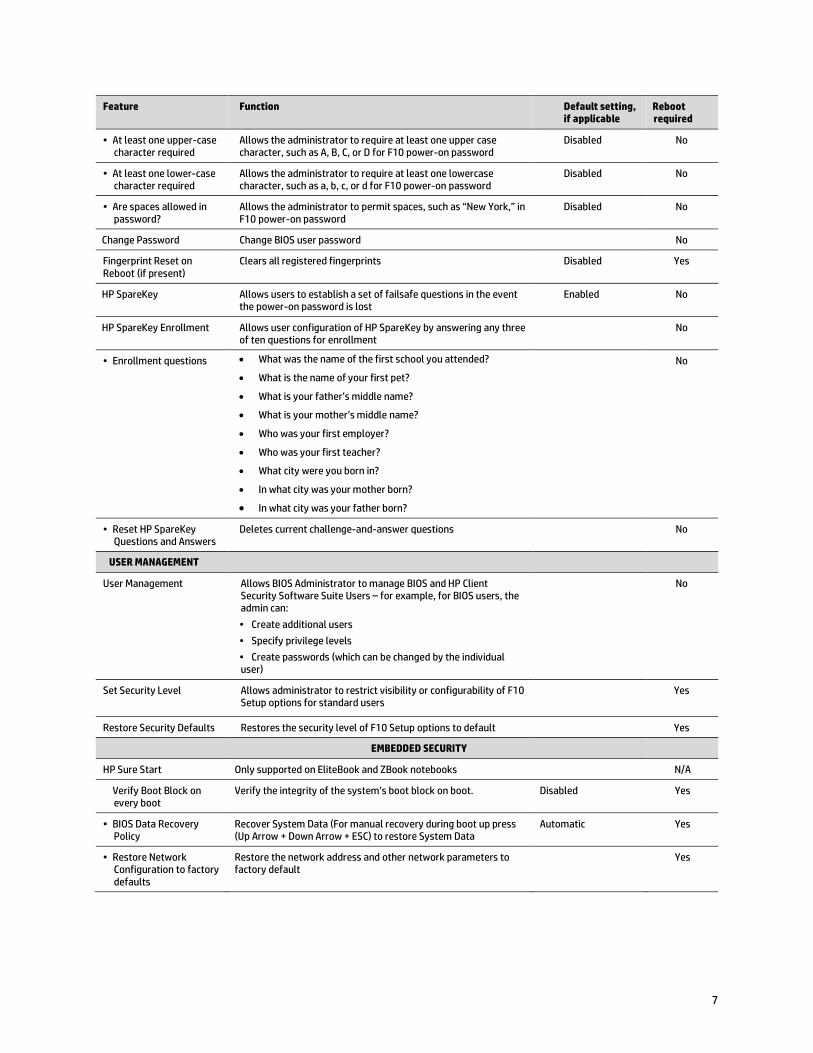
SECURITY MENU
Setup BIOS Administrator Password
Establishes the BIOS Administrator password for admin privileges No
Password Policy Allows the administrator to select various rules for BIOS password qualification2
No
• Password Minimum Length
Allows the administrator to specify the minimum number of characters required for the F10 power-on password
No
• At least one symbol required
Allows the administrator to require at least one symbol, such as $, %, ^, &, or # for F10 power-on password
Disabled No
• At least one number required
Allows the administrator to require at least one number, such as 1, 2, or 3 for F10 power-on password
Disabled No
2 BIOS Administrator password is required
7
Feature Function Default setting, if applicable
Reboot required
• At least one upper-case character required
Allows the administrator to require at least one upper case character, such as A, B, C, or D for F10 power-on password
Disabled No
• At least one lower-case character required
Allows the administrator to require at least one lowercase character, such as a, b, c, or d for F10 power-on password
Disabled No
• Are spaces allowed in password?
Allows the administrator to permit spaces, such as “New York,” in F10 power-on password
Disabled No
Change Password Change BIOS user password No
Fingerprint Reset on Reboot (if present)
Clears all registered fingerprints Disabled Yes
HP SpareKey Allows users to establish a set of failsafe questions in the event the power-on password is lost
Enabled No
HP SpareKey Enrollment Allows user configuration of HP SpareKey by answering any three of ten questions for enrollment
No
• Enrollment questions • What was the name of the first school you attended?
• What is the name of your first pet?
• What is your father’s middle name?
• What is your mother’s middle name?
• Who was your first employer?
• Who was your first teacher?
• What city were you born in?
• In what city was your mother born?
• In what city was your father born?
No
• Reset HP SpareKey Questions and Answers
Deletes current challenge-and-answer questions No
USER MANAGEMENT
User Management Allows BIOS Administrator to manage BIOS and HP Client Security Software Suite Users – for example, for BIOS users, the admin can:
• Create additional users
• Specify privilege levels
• Create passwords (which can be changed by the individual user)
No
Set Security Level
Allows administrator to restrict visibility or configurability of F10 Setup options for standard users
Yes
Restore Security Defaults Restores the security level of F10 Setup options to default Yes
EMBEDDED SECURITY
HP Sure Start Only supported on EliteBook and ZBook notebooks N/A
Verify Boot Block on every boot
Verify the integrity of the system’s boot block on boot. Disabled Yes
• BIOS Data Recovery Policy
Recover System Data (For manual recovery during boot up press (Up Arrow + Down Arrow + ESC) to restore System Data
Automatic Yes
• Restore Network Configuration to factory defaults
Restore the network address and other network parameters to factory default
Yes
8
Feature Function Default setting, if applicable
Reboot required
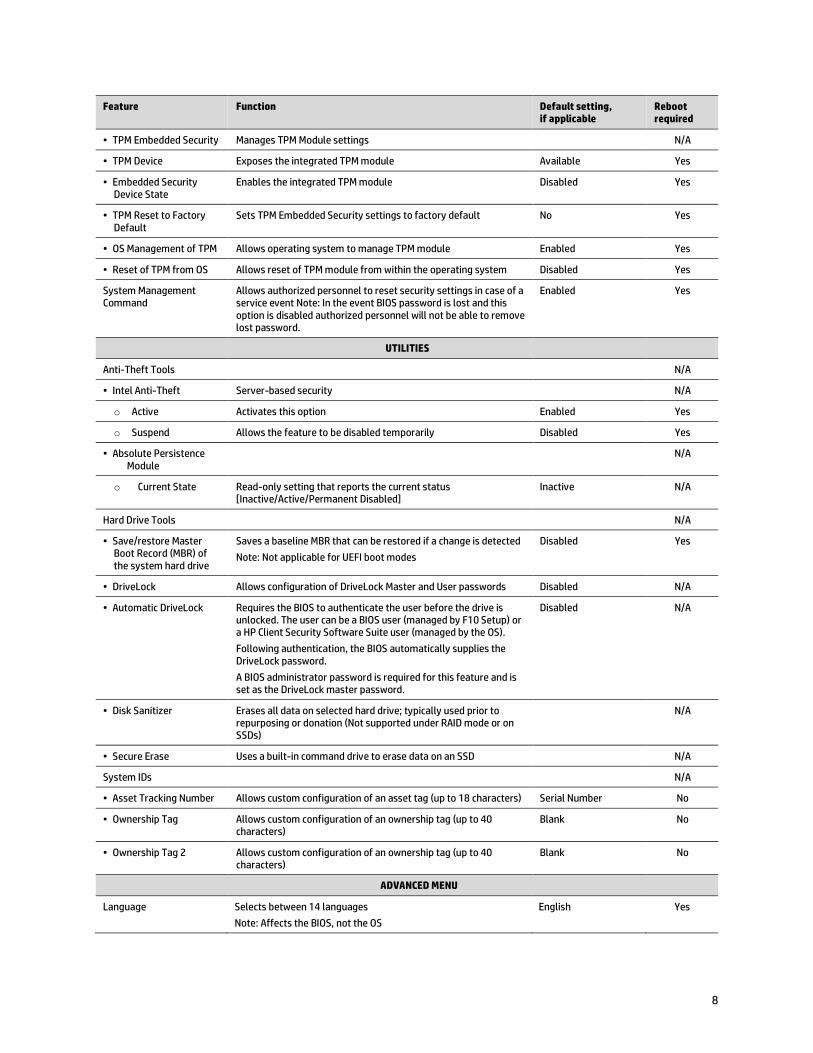
• TPM Embedded Security Manages TPM Module settings N/A
• TPM Device Exposes the integrated TPM module Available Yes
• Embedded Security Device State
Enables the integrated TPM module Disabled Yes
• TPM Reset to Factory Default
Sets TPM Embedded Security settings to factory default No Yes
• OS Management of TPM Allows operating system to manage TPM module Enabled Yes
• Reset of TPM from OS Allows reset of TPM module from within the operating system Disabled Yes
System Management Command
Allows authorized personnel to reset security settings in case of a service event Note: In the event BIOS password is lost and this option is disabled authorized personnel will not be able to remove lost password.
Enabled Yes
UTILITIES
Anti-Theft Tools N/A
• Intel Anti-Theft Server-based security N/A
o Active Activates this option Enabled Yes
o Suspend Allows the feature to be disabled temporarily Disabled Yes
• Absolute Persistence Module
N/A
o Current State Read-only setting that reports the current status [Inactive/Active/Permanent Disabled]
Inactive N/A
Hard Drive Tools N/A
• Save/restore Master Boot Record (MBR) of the system hard drive
Saves a baseline MBR that can be restored if a change is detected
Note: Not applicable for UEFI boot modes
Disabled Yes
• DriveLock Allows configuration of DriveLock Master and User passwords Disabled N/A
• Automatic DriveLock Requires the BIOS to authenticate the user before the drive is unlocked. The user can be a BIOS user (managed by F10 Setup) or a HP Client Security Software Suite user (managed by the OS).
Following authentication, the BIOS automatically supplies the DriveLock password.
A BIOS administrator password is required for this feature and is set as the DriveLock master password.
Disabled N/A
• Disk Sanitizer Erases all data on selected hard drive; typically used prior to repurposing or donation (Not supported under RAID mode or on SSDs)
N/A
• Secure Erase Uses a built-in command drive to erase data on an SSD N/A
System IDs N/A
• Asset Tracking Number Allows custom configuration of an asset tag (up to 18 characters) Serial Number No
• Ownership Tag Allows custom configuration of an ownership tag (up to 40 characters)
Blank No
• Ownership Tag 2 Allows custom configuration of an ownership tag (up to 40 characters)
Blank No
ADVANCED MENU
Language Selects between 14 languages
Note: Affects the BIOS, not the OS
English Yes
9
Feature Function Default setting, if applicable
Reboot required
Set System Data and Time Allows entry of the current data and time Yes
Boot Options N/A
Startup Menu Delay (seconds)
Allows user configuration of the length of time the Startup Menu is displayed during POST
0 No
• Multiboot Express Boot Popup Delay (seconds)
Allows user configuration of the length of time the Express Boot option (F9) is displayed
0 No
• Audio Alerts During Boot Enables audible error beeps during POST Disabled Yes
• Custom Logo Enables use of custom logo screen during POST3 Disabled No
• Display Diagnostics URL Displays the HP support web address for diagnostics Enabled No
• Custom Help and URL Message
Allows display of customized message and URL during POST Disabled No
• Require Acknowledgement of Battery Errors
Displays battery error screen until user presses the enter key Disabled No
Fast Boot Reduces POST time by bypassing boot to USB, optical drive, PXE, and DOS
Enabled No
• CD-ROM Boot Allows boot from optical media Enabled No
• SD Card Boot Allows boot from SD card Enabled No
• Floppy Boot Allows boot from USB floppy Enabled No
• PXE Internal NIC Boot Allows boot from LAN in legacy or hybrid boot mode Enabled No
• PXE Internal IPV4 NIC Boot
Allows PXE boot to IPv4 in native UEFI boot mode (enable on Win8 orders)
Disabled No
• PXE Internal IPV6 NIC Boot
Allows PXE boot to IPv6 in native UEFI boot mode (enable on Win8 orders)
Disabled No
• USB Device Boot Allows boot from USB storage device Disabled No
• Upgrade Bay Hard Drive Boot
Allows boot from hard disk drive mounted in upgrade bay Enabled No
• eSATA Boot Allows boot from eSATA storage device Enabled No
• Customized Boot Allows boot from a custom boot path; loads the boot loader from the path defined in Define Customized Boot Option (see below)
Enabled No
Secure Boot Configuration Allows Secure Boot feature (which verifies signature of boot loader before loading OS) to be enabled or disabled; clears Secure Boot keys
Disabled N/A
• Secure Boot Enables Secure Boot (enable on Win8 orders) Disabled Yes
• Clear Secure Boot Keys Clears the Secure Boot keys Disabled Yes
• User Mode Selects which keys the BIOS uses HP Factory Keys, Customer Keys
Yes
3 For more information, refer to the HP Business Notebook EFI Guidelines white paper.
10
Feature Function Default setting, if applicable
Reboot required
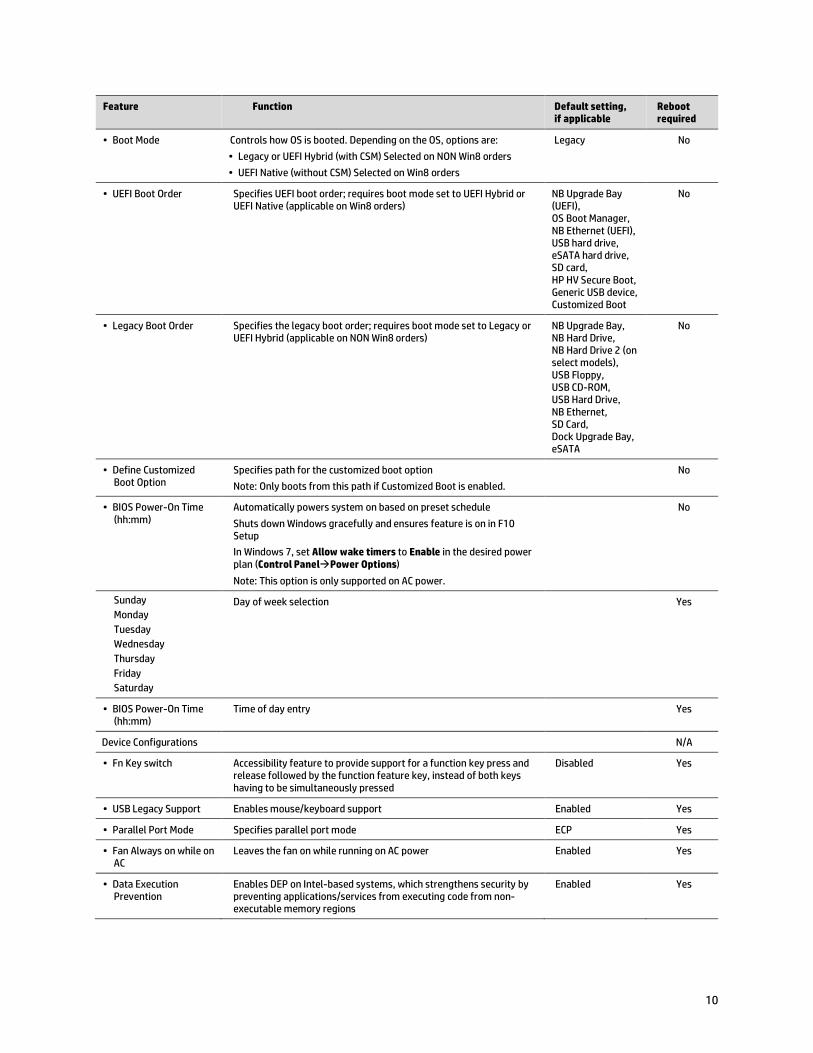
• Boot Mode Controls how OS is booted. Depending on the OS, options are:
• Legacy or UEFI Hybrid (with CSM) Selected on NON Win8 orders
• UEFI Native (without CSM) Selected on Win8 orders
Legacy No
• UEFI Boot Order Specifies UEFI boot order; requires boot mode set to UEFI Hybrid or UEFI Native (applicable on Win8 orders)
NB Upgrade Bay (UEFI), OS Boot Manager, NB Ethernet (UEFI), USB hard drive, eSATA hard drive, SD card, HP HV Secure Boot, Generic USB device, Customized Boot
No
• Legacy Boot Order Specifies the legacy boot order; requires boot mode set to Legacy or UEFI Hybrid (applicable on NON Win8 orders)
NB Upgrade Bay, NB Hard Drive, NB Hard Drive 2 (on select models), USB Floppy, USB CD-ROM, USB Hard Drive, NB Ethernet, SD Card, Dock Upgrade Bay, eSATA
No
• Define Customized Boot Option
Specifies path for the customized boot option
Note: Only boots from this path if Customized Boot is enabled.
No
• BIOS Power-On Time (hh:mm)
Automatically powers system on based on preset schedule
Shuts down Windows gracefully and ensures feature is on in F10 Setup
In Windows 7, set Allow wake timers to Enable in the desired power plan (Control PanelPower Options)
Note: This option is only supported on AC power.
No
Sunday Monday Tuesday Wednesday Thursday Friday Saturday
Day of week selection Yes
• BIOS Power-On Time (hh:mm)
Time of day entry Yes
Device Configurations N/A
• Fn Key switch Accessibility feature to provide support for a function key press and release followed by the function feature key, instead of both keys having to be simultaneously pressed
Disabled Yes
• USB Legacy Support Enables mouse/keyboard support Enabled Yes
• Parallel Port Mode Specifies parallel port mode ECP Yes
• Fan Always on while on AC
Leaves the fan on while running on AC power Enabled Yes
• Data Execution Prevention
Enables DEP on Intel-based systems, which strengthens security by preventing applications/services from executing code from non-executable memory regions
Enabled Yes
11
Feature Function Default setting, if applicable
Reboot required
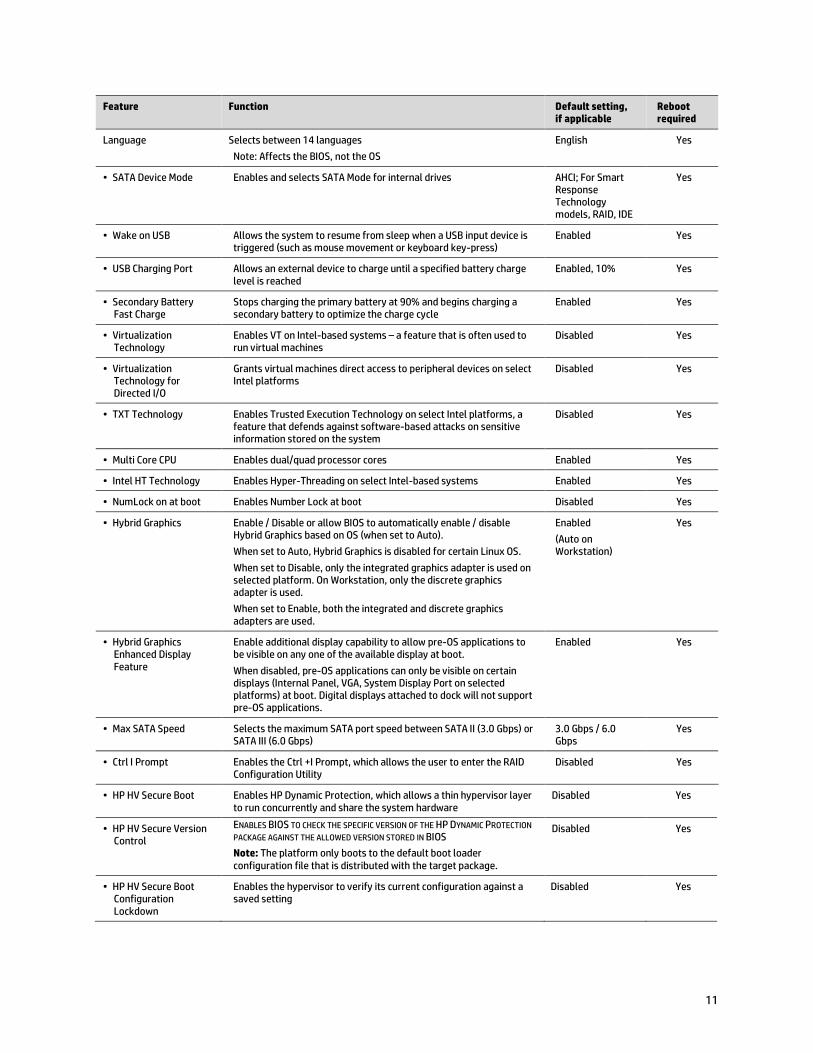
Language Selects between 14 languages
Note: Affects the BIOS, not the OS
English Yes
• SATA Device Mode Enables and selects SATA Mode for internal drives AHCI; For Smart Response Technology models, RAID, IDE
Yes
• Wake on USB Allows the system to resume from sleep when a USB input device is triggered (such as mouse movement or keyboard key-press)
Enabled Yes
• USB Charging Port Allows an external device to charge until a specified battery charge level is reached
Enabled, 10% Yes
• Secondary Battery Fast Charge
Stops charging the primary battery at 90% and begins charging a secondary battery to optimize the charge cycle
Enabled Yes
• Virtualization Technology
Enables VT on Intel-based systems – a feature that is often used to run virtual machines
Disabled Yes
• Virtualization Technology for Directed I/O
Grants virtual machines direct access to peripheral devices on select Intel platforms
Disabled Yes
• TXT Technology Enables Trusted Execution Technology on select Intel platforms, a feature that defends against software-based attacks on sensitive information stored on the system
Disabled Yes
• Multi Core CPU Enables dual/quad processor cores Enabled Yes
• Intel HT Technology Enables Hyper-Threading on select Intel-based systems Enabled Yes
• NumLock on at boot Enables Number Lock at boot Disabled Yes
• Hybrid Graphics Enable / Disable or allow BIOS to automatically enable / disable Hybrid Graphics based on OS (when set to Auto).
When set to Auto, Hybrid Graphics is disabled for certain Linux OS.
When set to Disable, only the integrated graphics adapter is used on selected platform. On Workstation, only the discrete graphics adapter is used.
When set to Enable, both the integrated and discrete graphics adapters are used.
Enabled
(Auto on Workstation)
Yes
• Hybrid Graphics Enhanced Display Feature
Enable additional display capability to allow pre-OS applications to be visible on any one of the available display at boot.
When disabled, pre-OS applications can only be visible on certain displays (Internal Panel, VGA, System Display Port on selected platforms) at boot. Digital displays attached to dock will not support pre-OS applications.
Enabled Yes
• Max SATA Speed Selects the maximum SATA port speed between SATA II (3.0 Gbps) or SATA III (6.0 Gbps)
3.0 Gbps / 6.0 Gbps
Yes
• Ctrl I Prompt Enables the Ctrl +I Prompt, which allows the user to enter the RAID Configuration Utility
Disabled Yes
• HP HV Secure Boot Enables HP Dynamic Protection, which allows a thin hypervisor layer to run concurrently and share the system hardware
Disabled Yes
• HP HV Secure Version Control
ENABLES BIOS TO CHECK THE SPECIFIC VERSION OF THE HP DYNAMIC PROTECTION
PACKAGE AGAINST THE ALLOWED VERSION STORED IN BIOS
Note: The platform only boots to the default boot loader configuration file that is distributed with the target package.
Disabled Yes
• HP HV Secure Boot Configuration Lockdown
Enables the hypervisor to verify its current configuration against a saved setting
Disabled Yes
12
Feature FUNCTION Default setting, if applicable
Reboot required
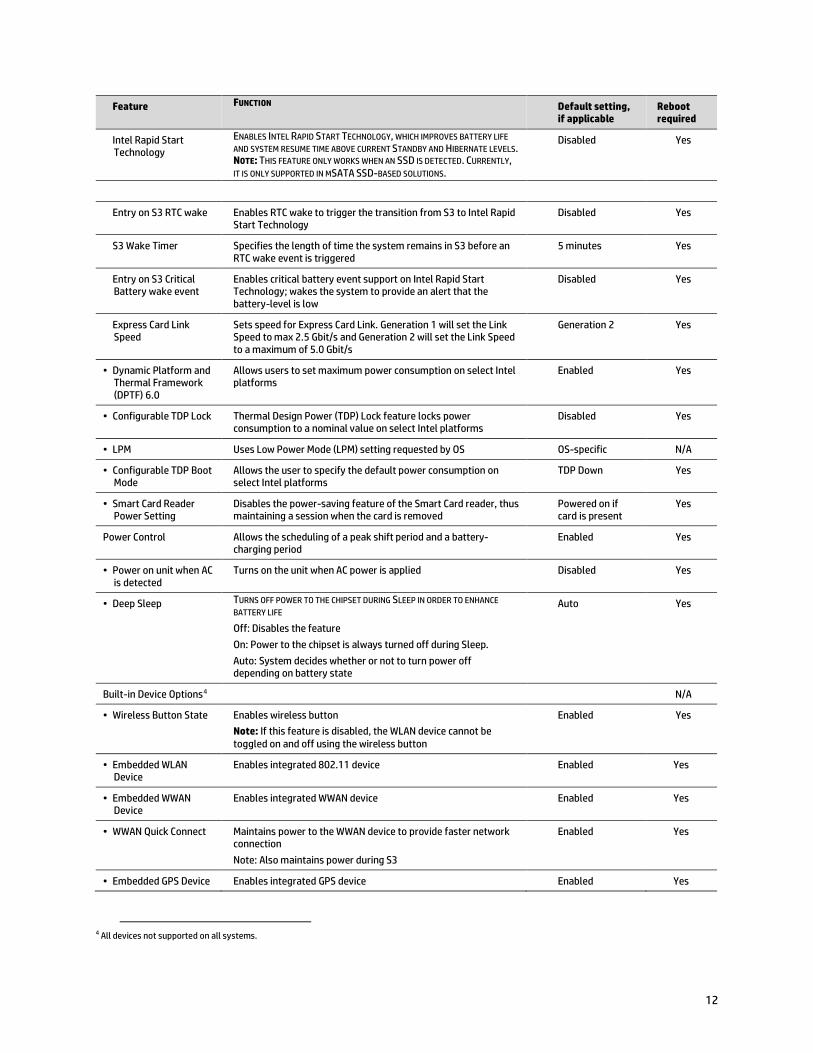
Intel Rapid Start Technology
ENABLES INTEL RAPID START TECHNOLOGY, WHICH IMPROVES BATTERY LIFE
AND SYSTEM RESUME TIME ABOVE CURRENT STANDBY AND HIBERNATE LEVELS. NOTE: THIS FEATURE ONLY WORKS WHEN AN SSD IS DETECTED. CURRENTLY, IT IS ONLY SUPPORTED IN MSATA SSD-BASED SOLUTIONS.
Disabled Yes
Entry on S3 RTC wake Enables RTC wake to trigger the transition from S3 to Intel Rapid Start Technology
Disabled Yes
S3 Wake Timer Specifies the length of time the system remains in S3 before an RTC wake event is triggered
5 minutes Yes
Entry on S3 Critical Battery wake event
Enables critical battery event support on Intel Rapid Start Technology; wakes the system to provide an alert that the battery-level is low
Disabled Yes
Express Card Link Speed
Sets speed for Express Card Link. Generation 1 will set the Link Speed to max 2.5 Gbit/s and Generation 2 will set the Link Speed to a maximum of 5.0 Gbit/s
Generation 2 Yes
• Dynamic Platform and Thermal Framework (DPTF) 6.0
Allows users to set maximum power consumption on select Intel platforms
Enabled Yes
• Configurable TDP Lock Thermal Design Power (TDP) Lock feature locks power consumption to a nominal value on select Intel platforms
Disabled Yes
• LPM Uses Low Power Mode (LPM) setting requested by OS OS-specific N/A
• Configurable TDP Boot Mode
Allows the user to specify the default power consumption on select Intel platforms
TDP Down Yes
• Smart Card Reader Power Setting
Disables the power-saving feature of the Smart Card reader, thus maintaining a session when the card is removed
Powered on if card is present
Yes
Power Control Allows the scheduling of a peak shift period and a battery-charging period
Enabled Yes
• Power on unit when AC is detected
Turns on the unit when AC power is applied Disabled Yes
• Deep Sleep TURNS OFF POWER TO THE CHIPSET DURING SLEEP IN ORDER TO ENHANCE
BATTERY LIFE
Off: Disables the feature
On: Power to the chipset is always turned off during Sleep.
Auto: System decides whether or not to turn power off depending on battery state
Auto Yes
Built-in Device Options4 N/A
• Wireless Button State Enables wireless button
Note: If this feature is disabled, the WLAN device cannot be toggled on and off using the wireless button
Enabled Yes
• Embedded WLAN Device
Enables integrated 802.11 device Enabled Yes
• Embedded WWAN Device
Enables integrated WWAN device Enabled Yes
• WWAN Quick Connect Maintains power to the WWAN device to provide faster network connection
Note: Also maintains power during S3
Enabled Yes
• Embedded GPS Device Enables integrated GPS device Enabled Yes
4 All devices not supported on all systems.
13
Feature Function Default setting, if applicable
Reboot required
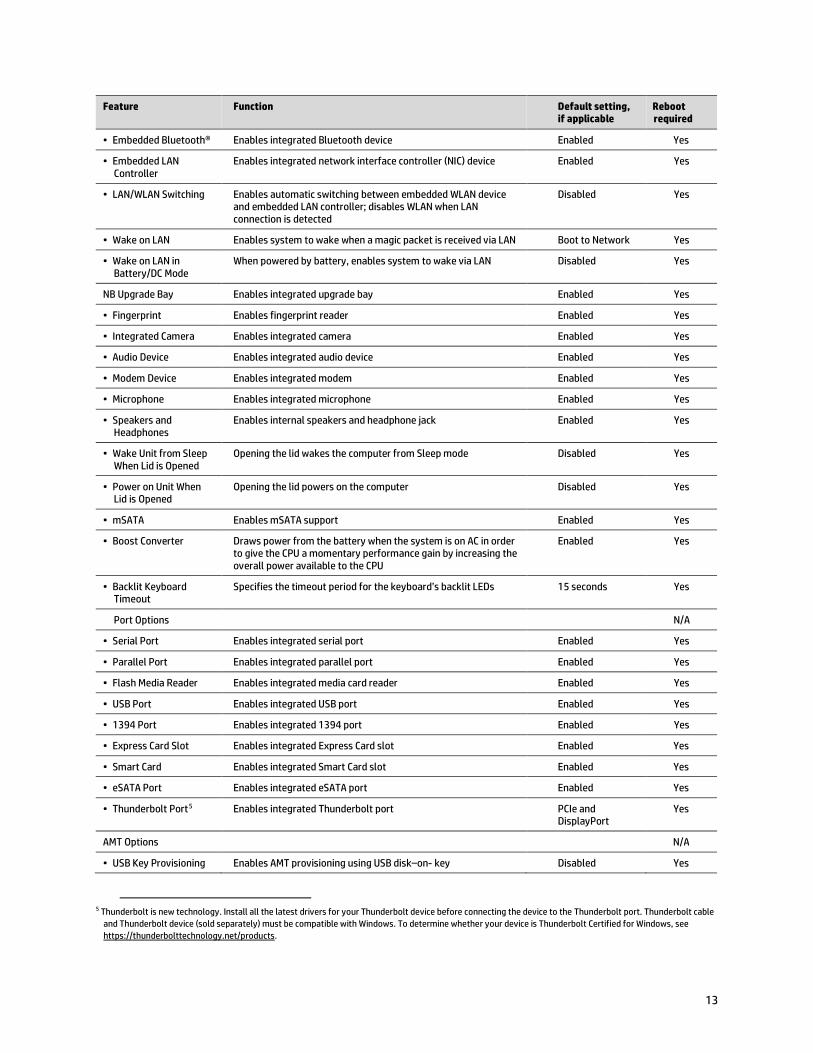
• Embedded Bluetooth® Enables integrated Bluetooth device Enabled Yes
• Embedded LAN Controller
Enables integrated network interface controller (NIC) device Enabled Yes
• LAN/WLAN Switching Enables automatic switching between embedded WLAN device and embedded LAN controller; disables WLAN when LAN connection is detected
Disabled Yes
• Wake on LAN Enables system to wake when a magic packet is received via LAN Boot to Network Yes
• Wake on LAN in Battery/DC Mode
When powered by battery, enables system to wake via LAN Disabled Yes
NB Upgrade Bay Enables integrated upgrade bay Enabled Yes
• Fingerprint Enables fingerprint reader Enabled Yes
• Integrated Camera Enables integrated camera Enabled Yes
• Audio Device Enables integrated audio device Enabled Yes
• Modem Device Enables integrated modem Enabled Yes
• Microphone Enables integrated microphone Enabled Yes
• Speakers and Headphones
Enables internal speakers and headphone jack Enabled Yes
• Wake Unit from Sleep When Lid is Opened
Opening the lid wakes the computer from Sleep mode Disabled Yes
• Power on Unit When Lid is Opened
Opening the lid powers on the computer Disabled Yes
• mSATA Enables mSATA support Enabled Yes
• Boost Converter Draws power from the battery when the system is on AC in order to give the CPU a momentary performance gain by increasing the overall power available to the CPU
Enabled Yes
• Backlit Keyboard Timeout
Specifies the timeout period for the keyboard’s backlit LEDs 15 seconds Yes
Port Options N/A
• Serial Port Enables integrated serial port Enabled Yes
• Parallel Port Enables integrated parallel port Enabled Yes
• Flash Media Reader Enables integrated media card reader Enabled Yes
• USB Port Enables integrated USB port Enabled Yes
• 1394 Port Enables integrated 1394 port Enabled Yes
• Express Card Slot Enables integrated Express Card slot Enabled Yes
• Smart Card Enables integrated Smart Card slot Enabled Yes
• eSATA Port Enables integrated eSATA port Enabled Yes
• Thunderbolt Port5 Enables integrated Thunderbolt port PCIe and DisplayPort
Yes
AMT Options N/A
• USB Key Provisioning Enables AMT provisioning using USB disk–on- key Disabled Yes
5 Thunderbolt is new technology. Install all the latest drivers for your Thunderbolt device before connecting the device to the Thunderbolt port. Thunderbolt cable
and Thunderbolt device (sold separately) must be compatible with Windows. To determine whether your device is Thunderbolt Certified for Windows, see https://thunderbolttechnology.net/products.
14
Feature Function Default setting, if applicable
Reboot required
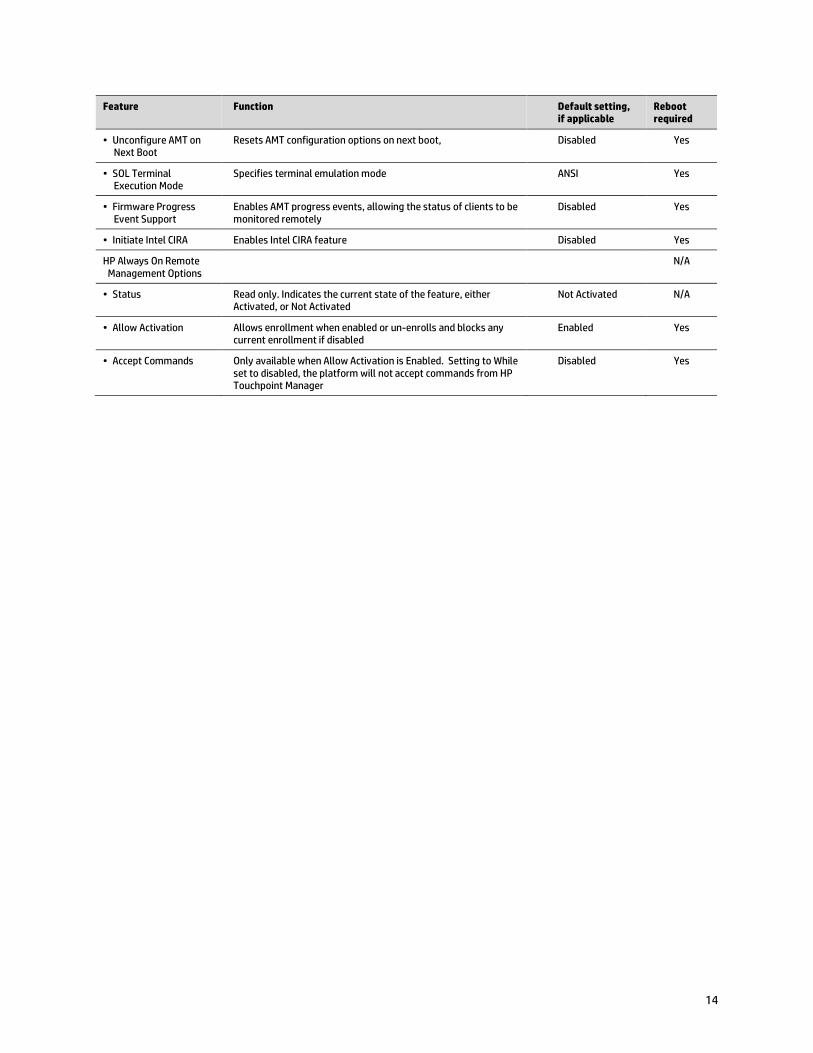
• Unconfigure AMT on Next Boot
Resets AMT configuration options on next boot, Disabled Yes
• SOL Terminal Execution Mode
Specifies terminal emulation mode ANSI Yes
• Firmware Progress Event Support
Enables AMT progress events, allowing the status of clients to be monitored remotely
Disabled Yes
• Initiate Intel CIRA Enables Intel CIRA feature Disabled Yes
HP Always On Remote Management Options
N/A
• Status Read only. Indicates the current state of the feature, either Activated, or Not Activated
Not Activated N/A
• Allow Activation Allows enrollment when enabled or un-enrolls and blocks any current enrollment if disabled
Enabled Yes
• Accept Commands Only available when Allow Activation is Enabled. Setting to While set to disabled, the platform will not accept commands from HP Touchpoint Manager
Disabled Yes
15
F10 Setup for HP Business Desktops
File menu The File menu provides access to general options such as:
• View system information
• Set date and time
• Exit F10 Setup with or without saving changes to settings
• Update system ROM
Storage menu The Storage menu provides access to mass storage device configuration, general options, and boot order.
Security menu The Security menu provides access to security-related options such as:
• Power-on and DriveLock passwords
• Secure boot configuration
• Asset tag configuration
• Integrated security device configuration
16
Power menu The power menu provides access to OS and hardware power management configuration and system thermal controls.
Advanced menu The advanced menu provides access to:
• Power-on options
• Integrated device configuration
• Port options
• Update via Network options
• AMT options (on select models)
Table 2. Key features for F10 Setup on select HP Business Desktop PCs .
Feature Function Default setting, if applicable
Reboot required
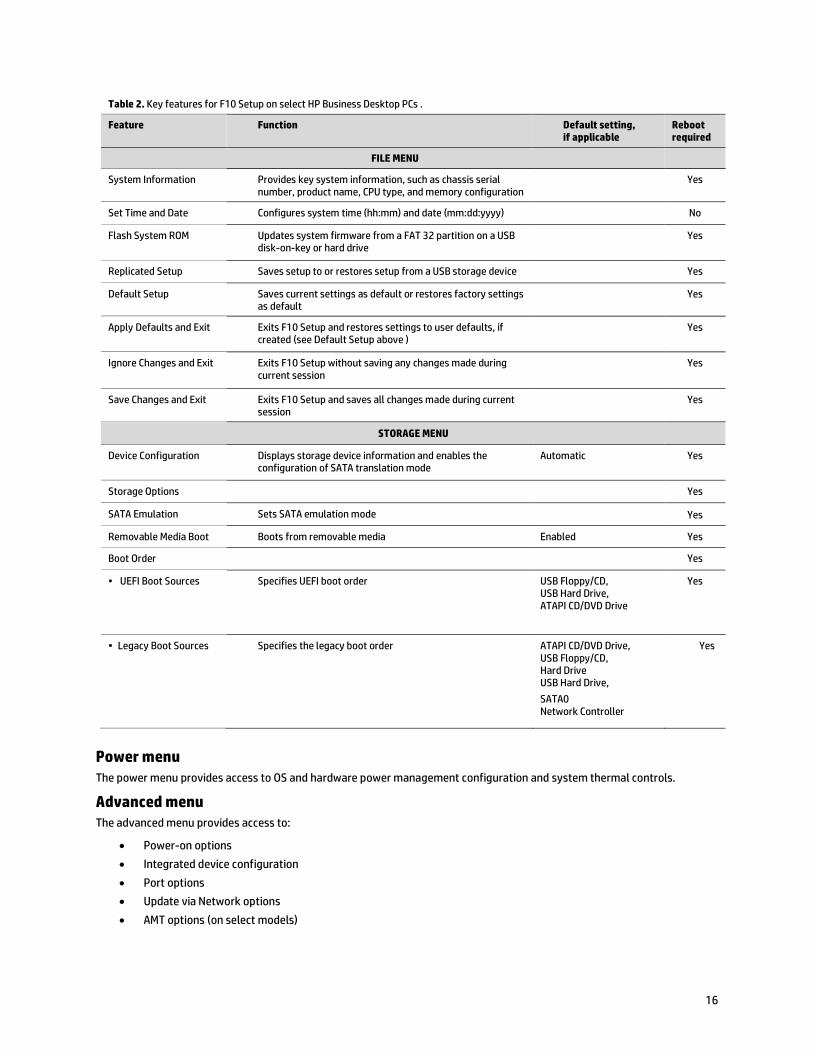
FILE MENU
System Information Provides key system information, such as chassis serial number, product name, CPU type, and memory configuration
Yes
Set Time and Date Configures system time (hh:mm) and date (mm:dd:yyyy) No
Flash System ROM Updates system firmware from a FAT 32 partition on a USB disk-on-key or hard drive
Yes
Replicated Setup Saves setup to or restores setup from a USB storage device Yes
Default Setup Saves current settings as default or restores factory settings as default
Yes
Apply Defaults and Exit Exits F10 Setup and restores settings to user defaults, if created (see Default Setup above )
Yes
Ignore Changes and Exit Exits F10 Setup without saving any changes made during current session
Yes
Save Changes and Exit Exits F10 Setup and saves all changes made during current session
Yes
STORAGE MENU
Device Configuration Displays storage device information and enables the configuration of SATA translation mode
Automatic Yes
Storage Options Yes
SATA Emulation Sets SATA emulation mode Yes
Removable Media Boot Boots from removable media Enabled Yes
Boot Order Yes
• UEFI Boot Sources Specifies UEFI boot order USB Floppy/CD, USB Hard Drive, ATAPI CD/DVD Drive
Yes
• Legacy Boot Sources Specifies the legacy boot order ATAPI CD/DVD Drive, USB Floppy/CD, Hard Drive USB Hard Drive,
SATA0 Network Controller
Yes
17
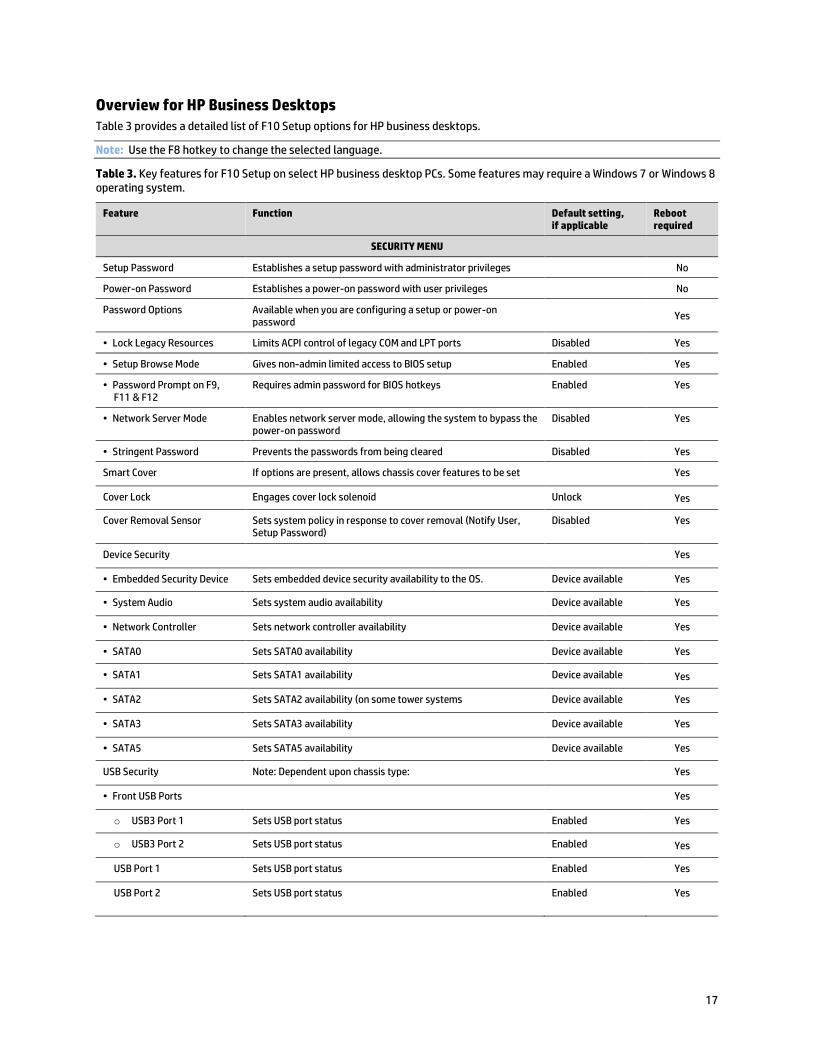
Overview for HP Business Desktops Table 3 provides a detailed list of F10 Setup options for HP business desktops.
Note: Use the F8 hotkey to change the selected language.
Table 3. Key features for F10 Setup on select HP business desktop PCs. Some features may require a Windows 7 or Windows 8 operating system.
Feature Function Default setting, if applicable
Reboot required
SECURITY MENU
Setup Password Establishes a setup password with administrator privileges No
Power-on Password Establishes a power-on password with user privileges No
Password Options Available when you are configuring a setup or power-on password
Yes
• Lock Legacy Resources Limits ACPI control of legacy COM and LPT ports Disabled Yes
• Setup Browse Mode Gives non-admin limited access to BIOS setup Enabled Yes
• Password Prompt on F9, F11 & F12
Requires admin password for BIOS hotkeys Enabled Yes
• Network Server Mode Enables network server mode, allowing the system to bypass the power-on password
Disabled Yes
• Stringent Password Prevents the passwords from being cleared Disabled Yes
Smart Cover If options are present, allows chassis cover features to be set Yes
Cover Lock Engages cover lock solenoid Unlock Yes
Cover Removal Sensor Sets system policy in response to cover removal (Notify User, Setup Password)
Disabled Yes
Device Security Yes
• Embedded Security Device Sets embedded device security availability to the OS. Device available Yes
• System Audio Sets system audio availability Device available Yes
• Network Controller Sets network controller availability Device available Yes
• SATA0 Sets SATA0 availability Device available Yes
• SATA1 Sets SATA1 availability Device available Yes
• SATA2 Sets SATA2 availability (on some tower systems Device available Yes
• SATA3 Sets SATA3 availability Device available Yes
• SATA5 Sets SATA5 availability Device available Yes
USB Security Note: Dependent upon chassis type: Yes
• Front USB Ports Yes
o USB3 Port 1 Sets USB port status Enabled Yes
o USB3 Port 2 Sets USB port status Enabled Yes
USB Port 1 Sets USB port status Enabled Yes
USB Port 2 Sets USB port status Enabled Yes

18
Feature Function Default setting, if applicable
Reboot required
• Rear USB Ports Yes
o USB3 Port 1 Sets USB port status Enabled Yes
o USB3 Port 2 Sets USB port status Enabled Yes
o USB Port 1 Sets USB port status Enabled Yes
o USB Port 2 Sets USB port status Enabled Yes
o USB Port 3 Sets USB port status Enabled Yes
o USB Port 4 Sets USB port status Enabled Yes
• Accessory USB Ports Yes
o USB Port 1 Sets USB port status Enabled Yes
o USB Port 2 Sets USB port status Enabled Yes
o USB Port 3 Sets USB port status Enabled Yes
o USB Port 4 Sets USB port status Enabled Yes
o USB Port 5 Sets USB port status Enabled Yes
o USB3 Port 1 Sets USB port status Enabled Yes
Slot Security Note: Information displayed may vary with form factor Yes
• PCI Express x16 Slot 1 Sets PCI Express x16 slot availability Enabled Yes
• PCI Express x4 Slot 1 Sets PCI Express x4 slot availability Enabled Yes
• PCI Express x1 Slot 1 Sets PCI Express x1 slot availability Enabled Yes
• PCI Express x1 Slot 2 Sets PCI Express x1 slot availability Enabled Yes
• PCI Express x1 Slot 3 Sets PCI Express x1 slot availability Enabled Yes
Network Boot Sets network boot status Enabled Yes
System IDs Sets Asset Tag, Ownership Tag, Keyboard Layout, and UUID No
Master Boot Record Security Protects MBR from corruption Disabled Yes
System Security Yes
• Data Execution Prevention Enables DEP to protect against certain OS security breaches on Intel-based systems
Enabled Yes
• Virtualization Technology (VTx)
Enables VT on Intel-based systems
Disabled Yes
• Virtualization Technology Directed I/O (VTd)
Grants virtual machines direct access to peripheral devices on select Intel-based systems
Disabled Yes
• Trusted Execution Technology
Enables Trusted Execution Technology on select Intel-based systems
Note: Enabling this feature disables OS management of Embedded Security Device, prevents a reset of the Embedded Security Device, and prevents the configuration of VTx, VTd, and Embedded Security Device.
Disabled Yes
• Embedded Security Device Enables Trusted Platform Module (TPM)
Note: Configuring the Embedded Security Device requires a setup password.
Enabled Yes
19
Feature Function Default setting, if applicable
Reboot required
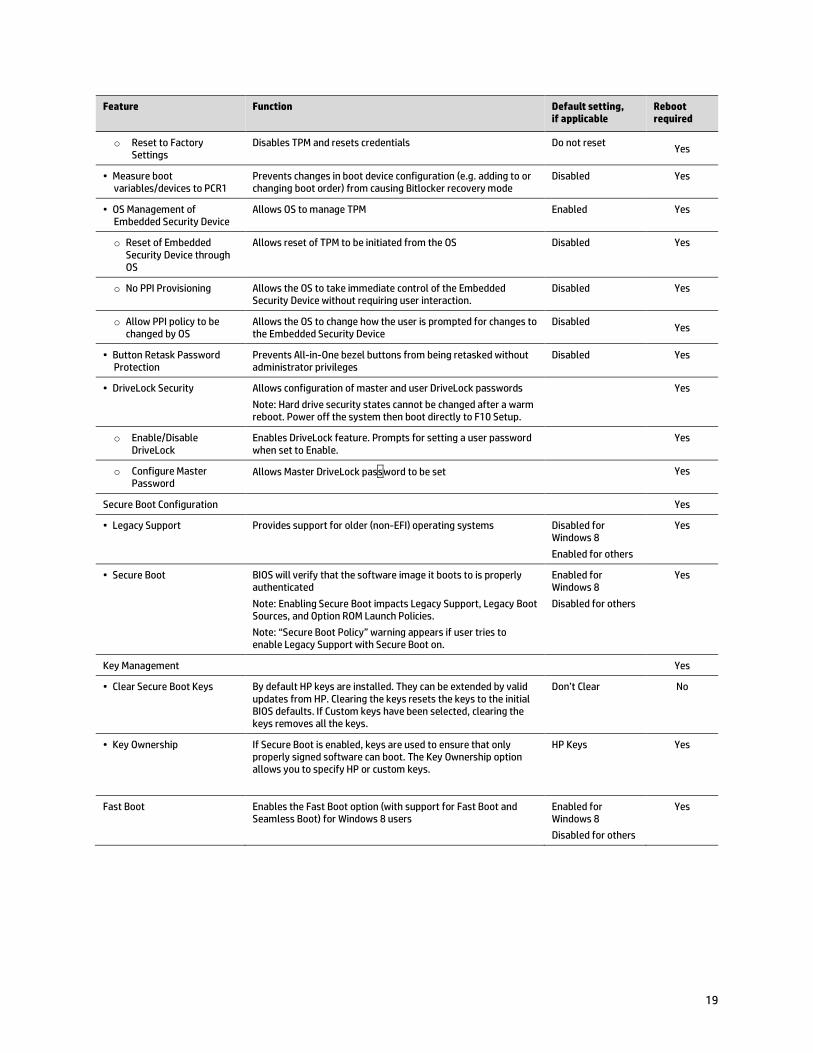
o Reset to Factory Settings
Disables TPM and resets credentials Do not reset Yes
• Measure boot variables/devices to PCR1
Prevents changes in boot device configuration (e.g. adding to or changing boot order) from causing Bitlocker recovery mode
Disabled Yes
• OS Management of Embedded Security Device
Allows OS to manage TPM Enabled Yes
o Reset of Embedded Security Device through OS
Allows reset of TPM to be initiated from the OS Disabled Yes
o No PPI Provisioning Allows the OS to take immediate control of the Embedded Security Device without requiring user interaction.
Disabled Yes
o Allow PPI policy to be changed by OS
Allows the OS to change how the user is prompted for changes to the Embedded Security Device
Disabled Yes
• Button Retask Password Protection
Prevents All-in-One bezel buttons from being retasked without administrator privileges
Disabled Yes
• DriveLock Security Allows configuration of master and user DriveLock passwords
Note: Hard drive security states cannot be changed after a warm reboot. Power off the system then boot directly to F10 Setup.
Yes
o Enable/Disable DriveLock
Enables DriveLock feature. Prompts for setting a user password when set to Enable.
Yes
o Configure Master Password
Allows Master DriveLock password to be set Yes
Secure Boot Configuration Yes
• Legacy Support Provides support for older (non-EFI) operating systems Disabled for Windows 8
Enabled for others
Yes
• Secure Boot BIOS will verify that the software image it boots to is properly authenticated
Note: Enabling Secure Boot impacts Legacy Support, Legacy Boot Sources, and Option ROM Launch Policies.
Note: “Secure Boot Policy” warning appears if user tries to enable Legacy Support with Secure Boot on.
Enabled for Windows 8
Disabled for others
Yes
Key Management Yes
• Clear Secure Boot Keys By default HP keys are installed. They can be extended by valid updates from HP. Clearing the keys resets the keys to the initial BIOS defaults. If Custom keys have been selected, clearing the keys removes all the keys.
Don’t Clear No
• Key Ownership If Secure Boot is enabled, keys are used to ensure that only properly signed software can boot. The Key Ownership option allows you to specify HP or custom keys.
HP Keys Yes
Fast Boot Enables the Fast Boot option (with support for Fast Boot and Seamless Boot) for Windows 8 users
Enabled for Windows 8
Disabled for others
Yes
20
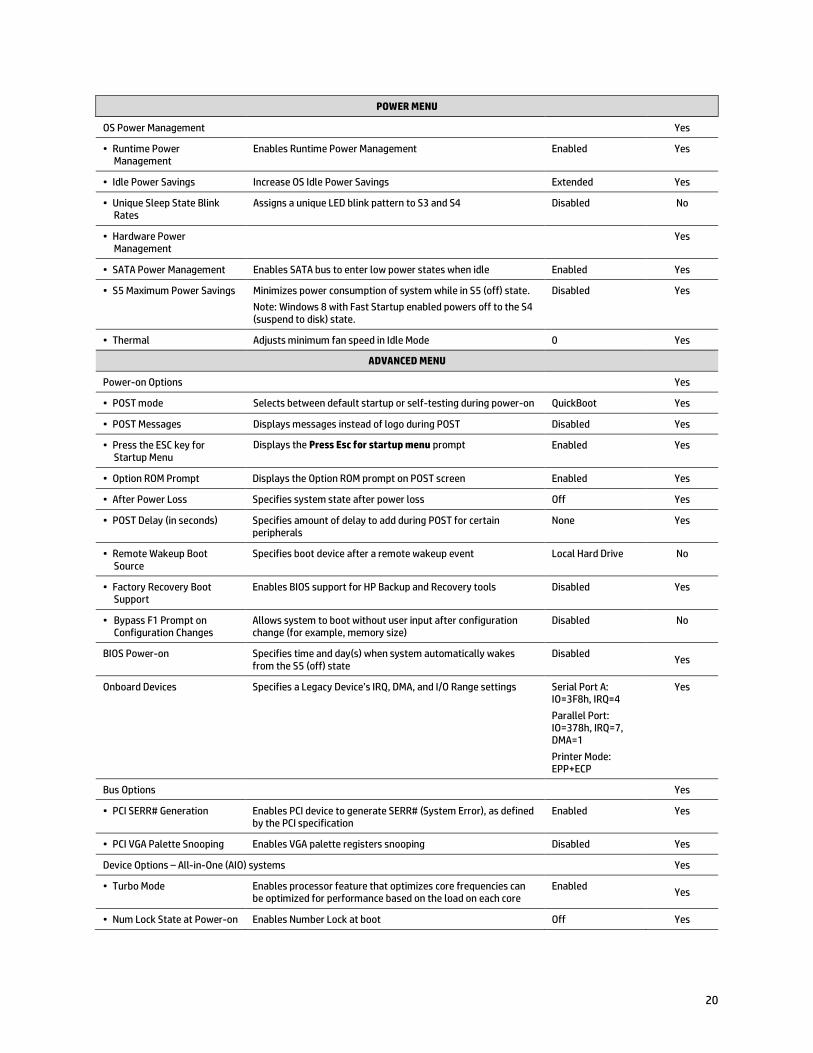
POWER MENU
OS Power Management Yes
• Runtime Power Management
Enables Runtime Power Management Enabled Yes
• Idle Power Savings Increase OS Idle Power Savings Extended Yes
• Unique Sleep State Blink Rates
Assigns a unique LED blink pattern to S3 and S4 Disabled No
• Hardware Power Management
Yes
• SATA Power Management Enables SATA bus to enter low power states when idle Enabled Yes
• S5 Maximum Power Savings Minimizes power consumption of system while in S5 (off) state.
Note: Windows 8 with Fast Startup enabled powers off to the S4 (suspend to disk) state.
Disabled Yes
• Thermal Adjusts minimum fan speed in Idle Mode 0 Yes
ADVANCED MENU
Power-on Options Yes
• POST mode Selects between default startup or self-testing during power-on QuickBoot Yes
• POST Messages Displays messages instead of logo during POST Disabled Yes
• Press the ESC key for Startup Menu
Displays the Press Esc for startup menu prompt Enabled Yes
• Option ROM Prompt Displays the Option ROM prompt on POST screen Enabled Yes
• After Power Loss Specifies system state after power loss Off Yes
• POST Delay (in seconds) Specifies amount of delay to add during POST for certain peripherals
None Yes
• Remote Wakeup Boot Source
Specifies boot device after a remote wakeup event Local Hard Drive No
• Factory Recovery Boot Support
Enables BIOS support for HP Backup and Recovery tools Disabled Yes
• Bypass F1 Prompt on Configuration Changes
Allows system to boot without user input after configuration change (for example, memory size)
Disabled No
BIOS Power-on Specifies time and day(s) when system automatically wakes from the S5 (off) state
Disabled Yes
Onboard Devices Specifies a Legacy Device’s IRQ, DMA, and I/O Range settings
Serial Port A: IO=3F8h, IRQ=4
Parallel Port: IO=378h, IRQ=7, DMA=1
Printer Mode: EPP+ECP
Yes
Bus Options Yes
• PCI SERR# Generation Enables PCI device to generate SERR# (System Error), as defined by the PCI specification
Enabled Yes
• PCI VGA Palette Snooping Enables VGA palette registers snooping Disabled Yes
Device Options – All-in-One (AIO) systems Yes
• Turbo Mode Enables processor feature that optimizes core frequencies can be optimized for performance based on the load on each core
Enabled Yes
• Num Lock State at Power-on Enables Number Lock at boot Off Yes
21
Feature Function Default setting, if applicable
Reboot required
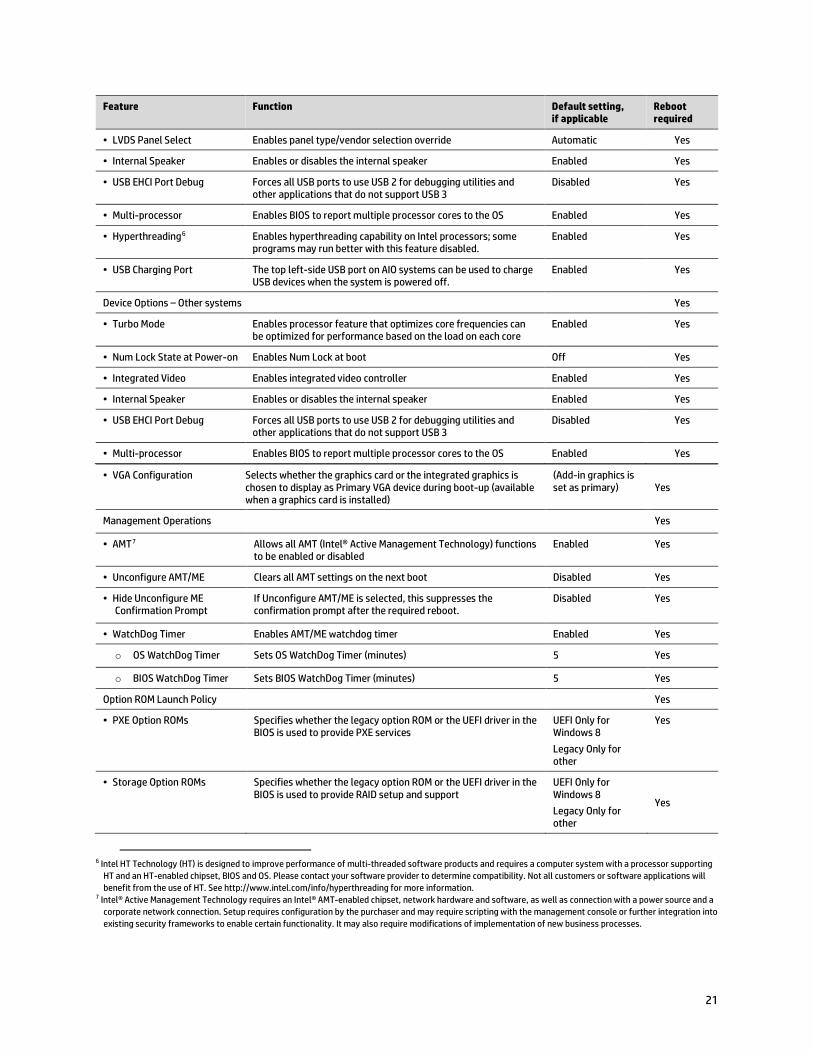
• LVDS Panel Select Enables panel type/vendor selection override Automatic Yes
• Internal Speaker Enables or disables the internal speaker Enabled Yes
• USB EHCI Port Debug Forces all USB ports to use USB 2 for debugging utilities and other applications that do not support USB 3
Disabled Yes
• Multi-processor Enables BIOS to report multiple processor cores to the OS Enabled Yes
• Hyperthreading6 Enables hyperthreading capability on Intel processors; some programs may run better with this feature disabled.
Enabled Yes
• USB Charging Port The top left-side USB port on AIO systems can be used to charge USB devices when the system is powered off.
Enabled Yes
Device Options – Other systems Yes
• Turbo Mode Enables processor feature that optimizes core frequencies can be optimized for performance based on the load on each core
Enabled Yes
• Num Lock State at Power-on Enables Num Lock at boot Off Yes
• Integrated Video Enables integrated video controller Enabled Yes
• Internal Speaker Enables or disables the internal speaker Enabled Yes
• USB EHCI Port Debug Forces all USB ports to use USB 2 for debugging utilities and other applications that do not support USB 3
Disabled Yes
• Multi-processor Enables BIOS to report multiple processor cores to the OS Enabled Yes
6 Intel HT Technology (HT) is designed to improve performance of multi-threaded software products and requires a computer system with a processor supporting
HT and an HT-enabled chipset, BIOS and OS. Please contact your software provider to determine compatibility. Not all customers or software applications will benefit from the use of HT. See http://www.intel.com/info/hyperthreading for more information.
7 Intel® Active Management Technology requires an Intel® AMT-enabled chipset, network hardware and software, as well as connection with a power source and a corporate network connection. Setup requires configuration by the purchaser and may require scripting with the management console or further integration into existing security frameworks to enable certain functionality. It may also require modifications of implementation of new business processes.
• VGA Configuration Selects whether the graphics card or the integrated graphics is chosen to display as Primary VGA device during boot-up (available when a graphics card is installed)
(Add-in graphics is set as primary) Yes
Management Operations Yes
• AMT7 Allows all AMT (Intel® Active Management Technology) functions to be enabled or disabled
Enabled Yes
• Unconfigure AMT/ME Clears all AMT settings on the next boot Disabled Yes
• Hide Unconfigure ME Confirmation Prompt
If Unconfigure AMT/ME is selected, this suppresses the confirmation prompt after the required reboot.
Disabled Yes
• WatchDog Timer Enables AMT/ME watchdog timer Enabled Yes
o OS WatchDog Timer Sets OS WatchDog Timer (minutes) 5 Yes
o BIOS WatchDog Timer Sets BIOS WatchDog Timer (minutes) 5 Yes
Option ROM Launch Policy Yes
• PXE Option ROMs Specifies whether the legacy option ROM or the UEFI driver in the BIOS is used to provide PXE services
UEFI Only for Windows 8
Legacy Only for other
Yes
• Storage Option ROMs Specifies whether the legacy option ROM or the UEFI driver in the BIOS is used to provide RAID setup and support
UEFI Only for Windows 8
Legacy Only for other
Yes

22
Feature Function Default setting, if applicable
Reboot required
• Video Option ROMs Specifies whether the legacy VBIOS or the UEFI driver in the BIOS is used to provide graphics setup and support
Legacy Only Yes
• Netclone Option ROMs Enables or disables Netclone support Do Not Launch Yes
• Connected BIOS Enables or disables BIOS network support Enabled Yes
• Use Proxy When enabled, displays Proxy Address field to configure the URL of the proxy server.
Disabled No
• Update BIOS via Network Enables or disables the BIOS update via network feature
Note: Updating BIOS over the network is supported on 600/800 desktop models.
Enabled Yes
• Update Source Selects hp.com or a locally managed custom address to serve BIOS updates
HP No
o Update Address For custom source, URL of the locally managed server, if custom source is selected
No
• Automatic BIOS Update Setting
Enables or disables the network BIOS update scheduler Disabled No
o Automatic Update Frequency
Sets the frequency of checks to the BIOS update server. If a newer version of BIOS has been made available on the network server, the system will prompt to update the BIOS.
Monthly No
o Force Check on Next Reboot
Independent of the scheduled frequency, check if an updated BIOS has been made available during the next boot.
Disabled Yes
23
Appendix A: HP Sure Start
Sure Start verifies that the BIOS and other critical firmware are intact at startup. If there any problems are found, Sure Start will repair the problem automatically.
Verify Boot Block on every boot Disabled (Default): When set to the default, HP Sure Start will verify the integrity of the BIOS in system flash each time the system is in a sleep, hibernate, or off state such that assurance is provided that it has not been tampered with before the host CPU executes that code as part of the process of resuming from the low power state.
Enabled: When this box is checked, HP Sure Start will continue to verify the integrity of the BIOS in system flash each time the system is in a sleep, hibernate, or off state. Additionally, HP Sure Start will verify the integrity of the BIOS in system flash on each warm boot (Windows restart).
BIOS data recovery policy Automatic (Default): Any problems that are found by HP Sure Start will be automatically repaired without any user action required.
Manual (For Advanced Users only): Any problems found by HP Sure Start will not be repaired automatically and will require a special key sequence input by the local user to proceed with the repair. This mode is only intended for scenarios where the machine owner would prefer to perform forensics on system flash content before it is repaired. This is not recommended for the typical user. In the case of HP Sure Start finding an issue with the initial BIOS code, the system will refuse to boot and will flash a special LED sequence until the special key sequence is pressed on the internal keyboard.
Restore Network Controller configuration to the factory defaults This manual control will restore the network parameters (used by the Intel integrated network controller) stored in system flash to their factory defaults.
Lock BIOS version Disabled (Default): When set to default, the BIOS can be updated using any one of the supported processes. The HP Sure Start Recovery image will also be updated by default when this setting is disabled.
Enabled: When this box is checked, all HP BIOS update tools will refuse to update the BIOS. The HP Sure Start recovery image is fixed when this setting is enabled.
Sure Start policy controls Although HP Sure Start is enabled out of the box with default settings that are optimized for the typical user, HP provides policy setting within BIOS setup that may be appropriate for advanced users.
Note: If you change the Sure Start recovery option from Automatic (Default) to Manual, the automatic verification and repair process will not take place on startup.
On rare occasions, the system may experience BIOS corruption when Sure Start has been set to Manual.
Identifying BIOS corruption 1. Attach AC adapter and turn on unit.
2. If the unit fails to start up, and the Caps Lock or Num Lock light blinks eight times, this indicates BIOS corruption.
3. Turn off the unit and follow the directions for Recovering from BIOS corruption.
Recovering from BIOS corruption 1. Attach AC adapter and press the power button.
2. Hold Up Arrow + Down Arrow + esc for one second during system startup.
3. The power LED turns to white, then amber, and then starts blinking while the system runs HP Sure Start recovery.
4. Wait up to 30 seconds to complete HP Sure Start recovery. Watch for a brief prompt message to press Esc.
5. Press Esc after recovery is complete.
6. Press F10 to enter the setup menu.

24
7. Set BIOS Data Recovery Policy back to Automatic (default setting).
8. Save change and exit F10 setup menu.
9. Allow automatic repair process to run.

25
Appendix B: BIOS overview for HP ElitePad 1000
Category BIOS setting name Default setting Read -only setting Physical presence required for setting changes
Main/System Information
Manufacturer Hewlett-Packard Y N
Product Name NA N N
System Board CT NA N N
System Configuration ID NA N N
Enter Feature Byte NA N N
Enter Build ID NA N N
System Board ID 2157 Y N
Universally Unique Identifier (UUID)
NA Y N
Processor Type NA Y N
SKU Number NA N N
Born on Date NA N N
Processor Speed NA Y N
SKU Number NA N N
Born on Date NA N N
Processor Speed NA Y N
Memory Size NA Y N
BIOS Date NA Y N
System BIOS Version NA Y N
Serial Number NA N N
Video BIOS Revision NA Y N
Embedded Controller Version NA Y N
Primary Battery Serial Number
NA Y N
Secondary Battery Serial Number
NA Y N
Product Family 103C_5336AN G=N N N
System FCC ID NA Y N
Main
Restore Defaults
Reset BIOS Security to factory default
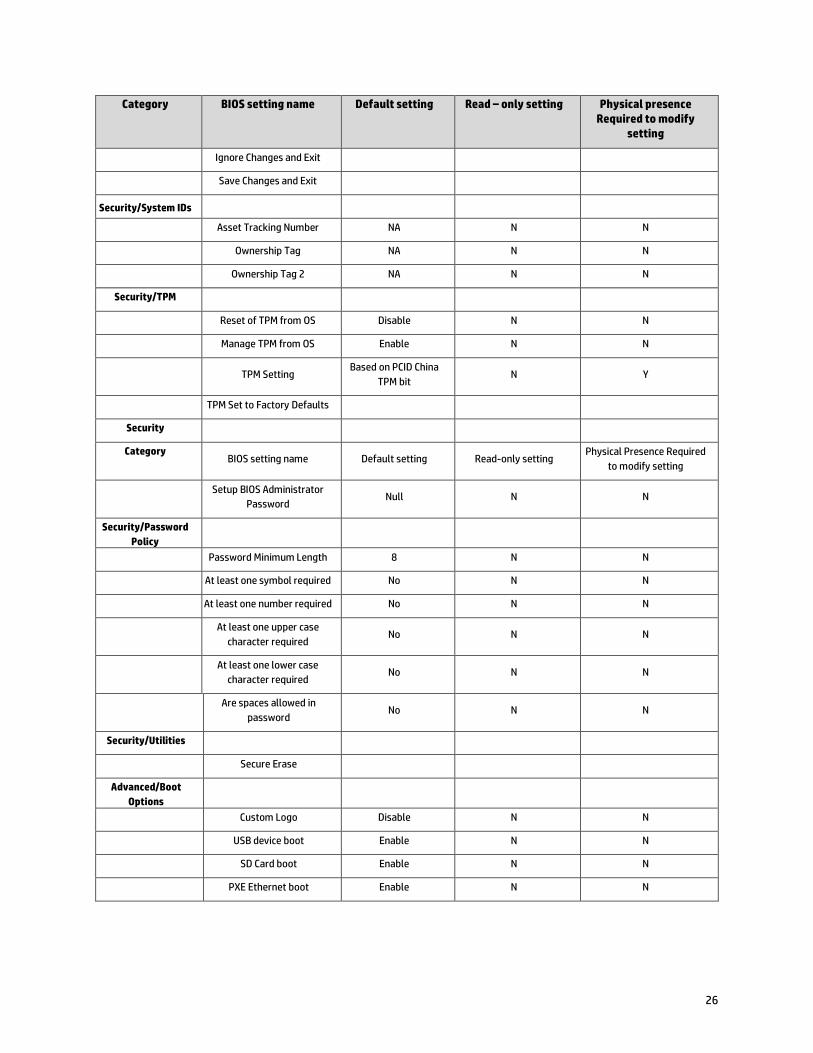
26
Category BIOS setting name Default setting Read – only setting Physical presence Required to modify
setting
Ignore Changes and Exit
Save Changes and Exit
Security/System IDs
Asset Tracking Number NA N N
Ownership Tag NA N N
Ownership Tag 2 NA N N
Security/TPM
Reset of TPM from OS Disable N N
Manage TPM from OS Enable N N
TPM Setting
Based on PCID China TPM bit
N Y
TPM Set to Factory Defaults
Security
Category BIOS setting name Default setting Read-only setting
Physical Presence Required to modify setting
Setup BIOS Administrator Password
Null N N
Security/Password Policy
Password Minimum Length 8 N N
At least one symbol required No N N
At least one number required No N N
At least one upper case character required
No N N
At least one lower case character required
No N N
Are spaces allowed in password
No N N
Security/Utilities
Secure Erase
Advanced/Boot Options
Custom Logo Disable N N
USB device boot Enable N N
SD Card boot Enable N N
PXE Ethernet boot Enable N N
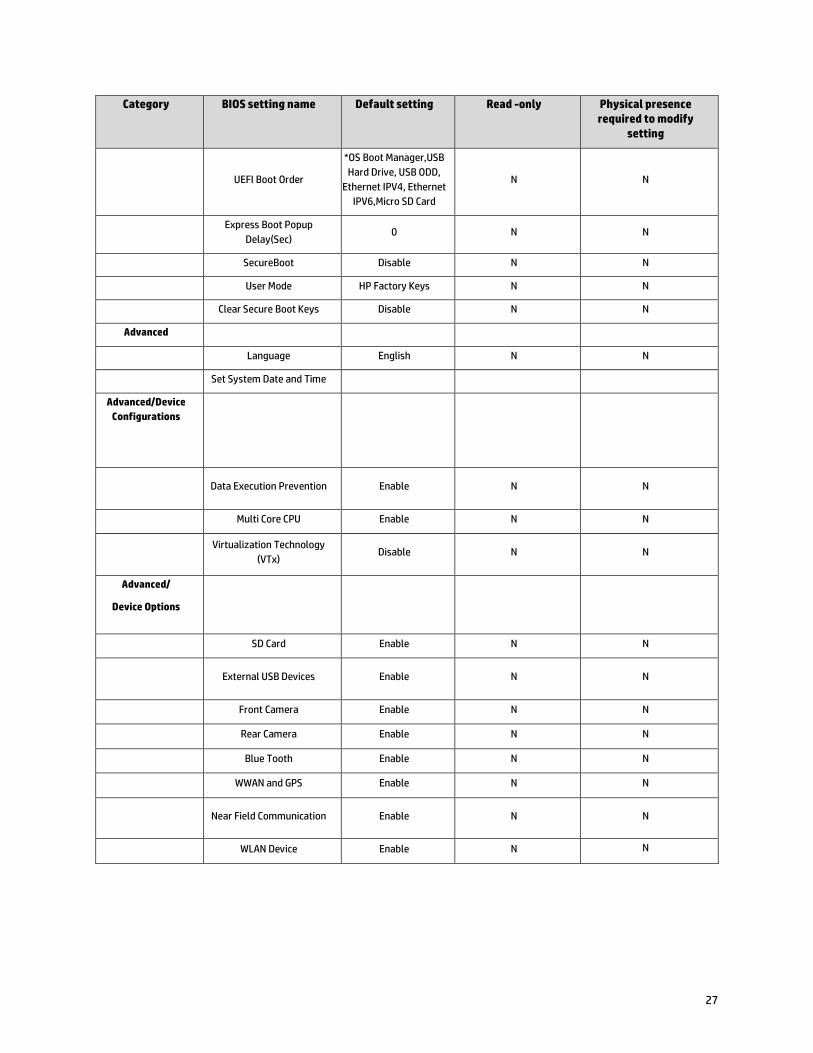
27
Category BIOS setting name Default setting Read -only Physical presence required to modify
setting
UEFI Boot Order
*OS Boot Manager,USB Hard Drive, USB ODD,
Ethernet IPV4, Ethernet IPV6,Micro SD Card
N N
Express Boot Popup Delay(Sec)
0 N N
SecureBoot Disable N N
User Mode HP Factory Keys N N
Clear Secure Boot Keys Disable N N
Advanced
Language English N N
Set System Date and Time
Advanced/Device Configurations
Data Execution Prevention Enable N N
Multi Core CPU Enable N N
Virtualization Technology (VTx)
Disable N N
Advanced/
Device Options
SD Card Enable N N
External USB Devices Enable N N
Front Camera Enable N N
Rear Camera Enable N N
Blue Tooth Enable N N
WWAN and GPS Enable N N
Near Field Communication Enable N N
WLAN Device Enable N N
28
Appendix C: Creating an in-house repository to support BIOS updates
Introduction
HP notebooks, desktops, or workstations can receive BIOS updates over a network from a repository on a pre-defined HP HTTP /FTP site. Alternatively, the BIOS Update via Network option also supports updates from an in-house server.
This appendix describes how to configure a repository on an in-house HTTP/ FTP server8 in order to store approved BIOS files for HP platforms.
Terminology HTTP server – Uses HTTP protocol to interact with clients such as web browsers; common implementations include Microsoft Internet Information Server (IIS) and Apache.
FTP server – Uses FTP protocol to interact with FTP client such as web browsers, as well as applications such as WS-FTP and FileZilla; common implementations include Microsoft IIS and Apache.
SysID – System ID: four hexadecimal characters that uniquely identify a particular HP platform. This is reported through the SMBIOS.
BIOS Update via Network – HP feature designed to allow manual or automatic BIOS updates to be performed directly through cloud delivery.
Finding a particular BIOS file
The HP repository (an HTTP/FTP file store) has a different folder for each SysID, each containing the following:
• A catalog (.xml file) that lists supported BIOS files for the particular platform
• Individual BIOS updates (.bin files)
Note: A custom implementation of an HTTP or FTP server requires a catalog and one or more BIOS files. Even if you are only providing a single BIOS update, a catalog file is required.
When using the BIOS Update via Network feature, the BIOS computes the address of the custom repository using a base address (update_url).The format of the repository address becomes:
update_url/sysid/sysid.xml
For example, if the repository address is http://example.com/files/pcbios and the SysID is 1909, the BIOS would attempt to download the catalog from http://example.com/files/pcbios/1909/1909.xml.
The domain portion of the URL is not case-sensitive; thus http://example.com and HTTP://EXAMPLE.COM are treated as the same.
The path portion of the URL is generally case-sensitive on UNIX or Linux platforms. Conversely, the path is generally not case-sensitive on Windows platforms. These statements are true regardless of the web server deployed. For example, if running Apache on Linux, http://example.com/bios and http://example.com/BIOS are generally not treated as being the same. If running IIS on Windows, http://example.com/bios and http://example.com/BIOS are generally treated as the same. Any case-sensitivity is determined by the HTTP or FTP server, not by the HP system running the BIOS Update via Network feature.
Organizing the catalog
The BIOS builds download URLs for the catalog and the update file using the same mechanism, ensuring that the update is downloaded from the appropriate repository folder.
Note: In order to prevent buffer overflow attacks during the download process, the BIOS sets a hard-coded limit of 100 KB before downloading the catalog. Thus, custom catalog files should never be allowed to grow larger than 100 KB in size.
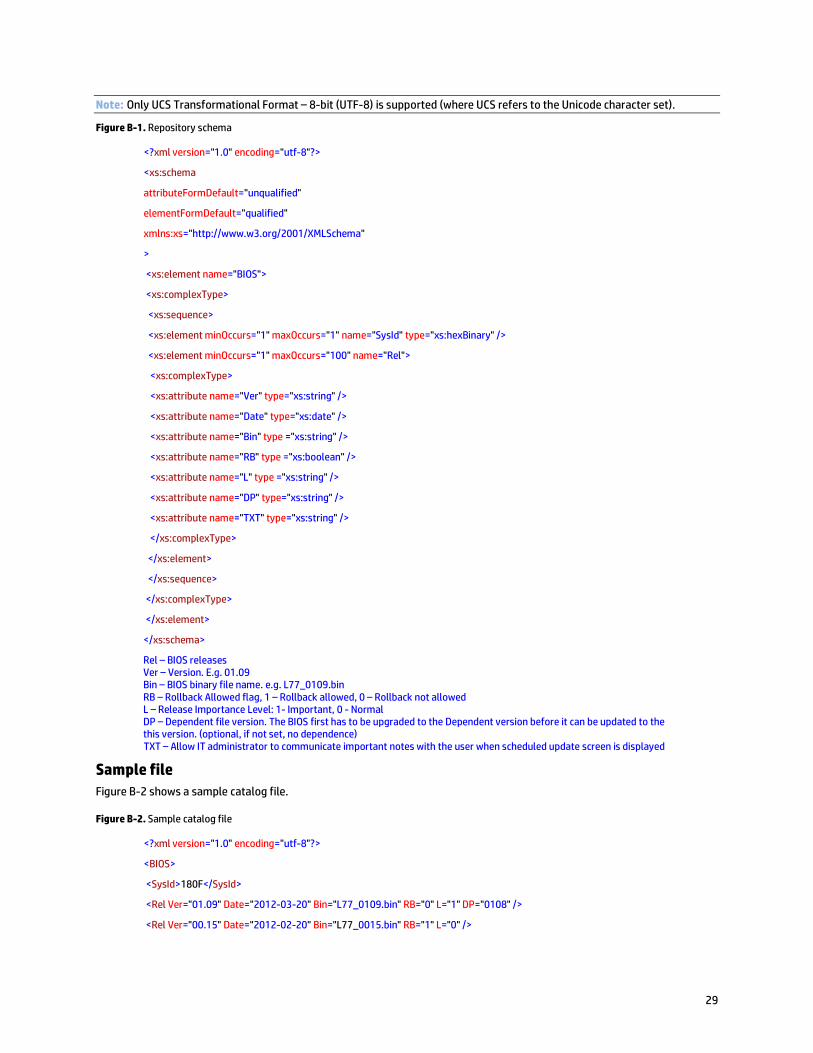
Catalog file schema The schema shown in Figure B-1 is common to HP and customer repositories.
8 Setting up the server is beyond the scope of this appendix.
29
Note: Only UCS Transformational Format – 8-bit (UTF-8) is supported (where UCS refers to the Unicode character set).
Figure B-1. Repository schema
<?xml version="1.0" encoding="utf-8"?>
<xs:schema
attributeFormDefault="unqualified"
elementFormDefault="qualified"
xmlns:xs="http://www.w3.org/2001/XMLSchema"
>
<xs:element name="BIOS">
<xs:complexType>
<xs:sequence>
<xs:element minOccurs="1" maxOccurs="1" name="SysId" type="xs:hexBinary" />
<xs:element minOccurs="1" maxOccurs="100" name="Rel">
<xs:complexType>
<xs:attribute name="Ver" type="xs:string" />
<xs:attribute name="Date" type="xs:date" />
<xs:attribute name="Bin" type ="xs:string" />
<xs:attribute name="RB" type ="xs:boolean" />
<xs:attribute name="L" type ="xs:string" />
<xs:attribute name="DP" type="xs:string" />
<xs:attribute name="TXT" type="xs:string" />
</xs:complexType>
</xs:element>
</xs:sequence>
</xs:complexType>
</xs:element>
</xs:schema>
Rel – BIOS releases Ver – Version. E.g. 01.09 Bin – BIOS binary file name. e.g. L77_0109.bin RB – Rollback Allowed flag, 1 – Rollback allowed, 0 – Rollback not allowed L – Release Importance Level: 1- Important, 0 - Normal DP – Dependent file version. The BIOS first has to be upgraded to the Dependent version before it can be updated to the this version. (optional, if not set, no dependence) TXT – Allow IT administrator to communicate important notes with the user when scheduled update screen is displayed
Sample file Figure B-2 shows a sample catalog file.
Figure B-2. Sample catalog file
<?xml version="1.0" encoding="utf-8"?>
<BIOS>
<SysId>180F</SysId>
<Rel Ver="01.09" Date="2012-03-20" Bin="L77_0109.bin" RB="0" L="1" DP="0108" />
<Rel Ver="00.15" Date="2012-02-20" Bin="L77_0015.bin" RB="1" L="0" />
30
<Rel Ver="01.08" Date="2012-01-20" Bin="L77_0108.bin" RB="1" L="0" />
</BIOS>
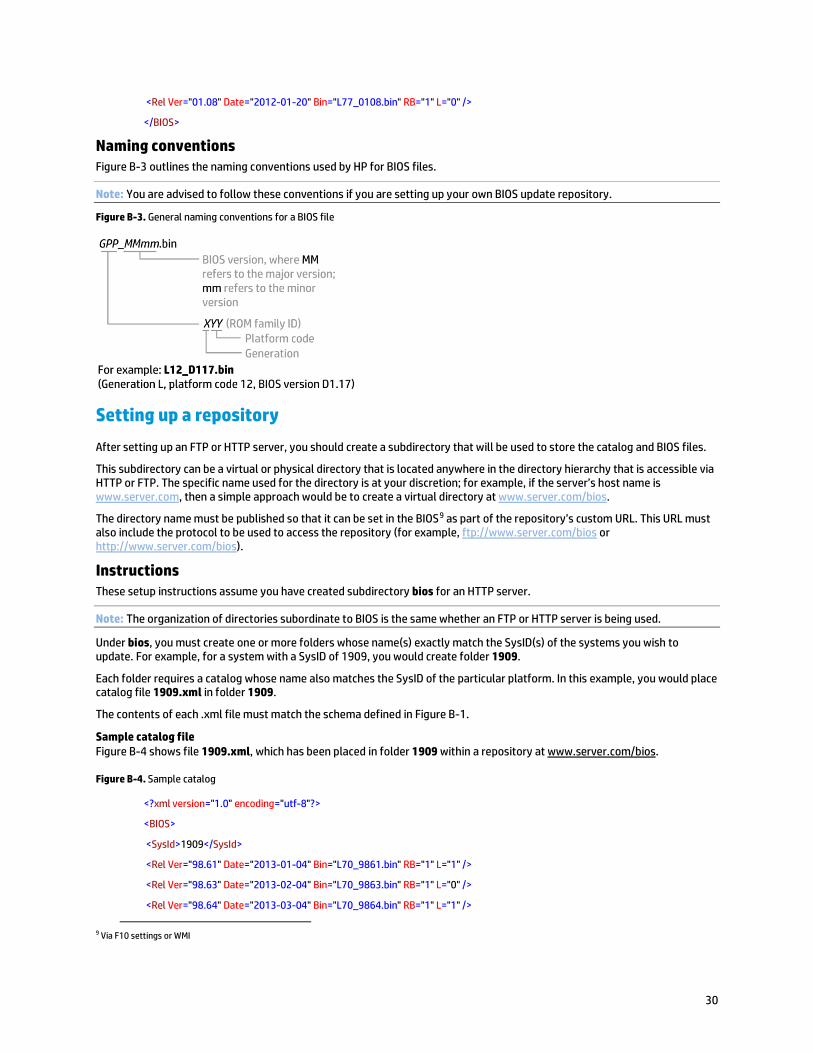
Naming conventions Figure B-3 outlines the naming conventions used by HP for BIOS files.
Note: You are advised to follow these conventions if you are setting up your own BIOS update repository.
Figure B-3. General naming conventions for a BIOS file
Setting up a repository
After setting up an FTP or HTTP server, you should create a subdirectory that will be used to store the catalog and BIOS files.
This subdirectory can be a virtual or physical directory that is located anywhere in the directory hierarchy that is accessible via HTTP or FTP. The specific name used for the directory is at your discretion; for example, if the server’s host name is www.server.com, then a simple approach would be to create a virtual directory at www.server.com/bios.
The directory name must be published so that it can be set in the BIOS9 as part of the repository’s custom URL. This URL must also include the protocol to be used to access the repository (for example, ftp://www.server.com/bios or http://www.server.com/bios).
Instructions These setup instructions assume you have created subdirectory bios for an HTTP server.
Note: The organization of directories subordinate to BIOS is the same whether an FTP or HTTP server is being used.
Under bios, you must create one or more folders whose name(s) exactly match the SysID(s) of the systems you wish to update. For example, for a system with a SysID of 1909, you would create folder 1909.
Each folder requires a catalog whose name also matches the SysID of the particular platform. In this example, you would place catalog file 1909.xml in folder 1909.
The contents of each .xml file must match the schema defined in Figure B-1.
Sample catalog file Figure B-4 shows file 1909.xml, which has been placed in folder 1909 within a repository at www.server.com/bios.
Figure B-4. Sample catalog
<?xml version="1.0" encoding="utf-8"?>
<BIOS>
<SysId>1909</SysId>
<Rel Ver="98.61" Date="2013-01-04" Bin="L70_9861.bin" RB="1" L="1" />
<Rel Ver="98.63" Date="2013-02-04" Bin="L70_9863.bin" RB="1" L="0" />
<Rel Ver="98.64" Date="2013-03-04" Bin="L70_9864.bin" RB="1" L="1" />
9 Via F10 settings or WMI

31
</BIOS>
This sample catalog lists the following BIOS versions:
• 98.61
• 98.63
• 98.64
The respective file names and release dates of these versions are:
• L70_9861.bin – released January 4, 2013
• L70_9863.bin – released February 4, 2013
• L70_9864.bin – released March 4, 2013
All three versions support rollback to previous versions (RB=”1”)10
98.61 and 98.64 are considered important updates (L=”1”), while 98.63 is a normal update (L=”0”).
Note: There must be no more than one entry in the catalog for a particular BIOS version. If the HTTP/FTP server is running on Linux, the filename is typically case-sensitive; if the server is running on Windows, the filename is not typically case-sensitive.
Final caveat
The catalog should accurately reflect the version, date, and other metadata associated with a particular BIOS version, thus allowing a BIOS to locate, download, and enforce the intended update. If the catalog were to provide an incorrect filename, for example, the BIOS would attempt to download and enforce an incorrect update.
Consider the following:
• If the BIOS referenced by the catalog entry for version 98.61 is actually version 99.53, then version 99.53 is installed and enforced.
• If the catalog indicates that a particular .bin file contains BIOS version 98.61 but the file actually contains version 98.60, the update process would report an error indicating a mismatch.
• If the catalog indicates that a particular BIOS version allows rollbacks, while the BIOS itself does not, then the rollback requirement from the catalog is ignored.
To summarize, the logic contained in a newly-updated BIOS is enforced, which may lead to unintended consequences if information contained in the catalog is incorrect.
10 Quotation marks are required.
32
Appendix D: Enabling HP Touchpoint Manager Always On Remote Management
Supported Platforms The 2014 platforms listed below support HP Touchpoint Manager Always On Remote Management, when Intel vPro processors are included
• HP Elite x2 1011 G1 Tablet
• HP Elitebook 1040 G2
• HP Elitebook Folio 1020 G1
• HP Elitebook 850 G2
• HP Elitebook 840 G2
• HP Elitebook 820 G2
• HP Zbook 14 G2
• HP Zbook 15u G2
The Always On Remote Management feature is enabled on select HP devices and is automatically activated when the HP Touchpoint Manager software is installed on an enrolled device.
With Always On Remote Management, HP Touchpoint Manager can communicate with a device while the device is in a low power mode, such as sleep (S3), hibernation (S4), or soft off (S5).
The following features are available when the IT administrator accesses the device through the HP Touchpoint Manager server using Always On Remote Management:
Remote Lock—Securely locks a lost or stolen device remotely. This lock requires a PIN number to unlock the computer. The IT administrator can view the unlock PIN number on the Device Details page. The PIN must be entered locally to unlock the device.
Remote Erase—Securely erases a device that has been lost, stolen, or reassigned.
Unlock—The IT administrator can view the unlock PIN number on the Device Details page. The PIN must be entered locally to unlock the device.
Boot Error Reporting—If the device cannot boot, it will report an error to the HP Touchpoint Manager server if communication can be established. The server sends an alert to the IT administrator with a brief description of the error.
To prevent or disable Always On Remote Management:
1. When the device restarts, access F10 BIOS Setup.
2. Select Advanced, and then select HP Touchpoint Manager Options.
3. Clear the Allow Activation check box.
Removing the check mark after a device has been enrolled and provisioned causes the device to be reprovisioned and prevents HP Touchpoint Manager from reprovisioning it. The device can be reprovisioned if Allow Activation is checked, and the settings are saved.
Note: HP recommends setting a BIOS administrator password to prevent unauthorized deprovisioning. Failure to implement a password allows anyone in physical possession of the device to inactivate or disable the Always On Remote management feature, including removal of the lock and erase features.
Activation Go to www.hptouchpointmanager.com, sign up for an account and enroll your device. Reboot your system when prompted.

33
HP Touchpoint Manager after Activation • The BIOS F10 setup menu will clearly display activation; two additional policy controls become available (Allow Activation
and Accept Commands).
• While activated, the HP Touchpoint Manager agent can securely send platform management commands while the system is running Windows. Additionally, the device will periodically retrieve any commands for a platform lock or wipe directly from HP Touchpoint Manager while in the sleep, hibernate, or soft off states.
• While activated, the owner can modify the following settings via UI or WMI (Windows Management Instrumentation):
o Allow Activation: Unchecking will cause the platform to immediately return to the default Not Activated state and will prevent subsequent enrollment until this setting is re-enabled.
o Accept Commands: Unchecking this setting will result in the platform refusing to accept Always On Remote Management commands from the HP Touchpoint Manager server. . The PC will resume accepting commands from HP Touchpoint Manager when this setting is re-enabled. Note re-enrollment in the Touchpoint Manager service is not required.
34
Appendix E: Boot error codes
In some cases when the host processor is not executing or does not have the necessary code to drive the display, LED blink codes inform the user of a problem. When HP Always On Remote Management is activated, boot error codes are sent to the HP Touchpoint Manager administrator to assist in problem resolution and advising the user on appropriate next steps.
LED Sequence Error
Amber Battery LED: blinks 1Hz continuously
Embedded Controller unable to load Firmware
CAPS / NUMLOCK LED’s = 1 Blink CPU not executing code
CAPS / NUMLOCK LED’s = 2 Blinks BIOS recovery code unable to find valid BIOS recovery image
CAPS / NUMLOCK LED’s =3 Blinks Memory Module error
CAPS / NUMLOCK LED’s = 4 Blinks Graphics Controller error
CAPS / NUMLOCK LED’s = 5 Blinks System Board Error
CAPS / NUMLOCK LED’s = 6 Blinks Intel Trusted Execution Technology (TXT) Error
CAPS / NUMLOCK LED’s = 7 Blinks Sure Start unable to find valid BIOS Boot Block image
CAPS / NUMLOCK LED’s = 8 Blinks Sure Start has identified a problem
(Manual Recovery Policy Set)
CPU not executing code This computer has experienced a problem due to the failure of certain code to execute, resulting in a failed start-up of the CPU. The issue could be related to the CPU or the system board in the machine. If the CPU is socketed, please ensure the CPU is seated correctly in the socket. If this error reoccurs, a service event is required to identify the source of the error and take the appropriate corrective action.
NOTE: The computer will attempt to notify the user of this problem through a series of blinking LEDs. When the user attempts to turn on the computer from an “Off” or “Hibernated” state, LEDs associated with the CAPS and NUMLOCK keys will both blink once followed by a pause, then continue in a repeating pattern.
BIOS recovery code unable to find valid BIOS recovery image This computer has experienced a problem in locating a valid BIOS image, resulting in a failed start-up. This problem may be resolved by placing a clean copy of the system BIOS on a USB key or in the appropriate hard drive directory and performing a reboot. If you continue to experience this error and are unable to correct it using the process described in the link, a service event is required to identify the source of the error and take the appropriate corrective action.
NOTE: The computer will attempt to notify the user of this problem through a series of blinking LEDs. When the user attempts to turn on the computer from an “Off” or “Hibernated” state, LEDs associated with the CAPS and NUMLOCK keys will both blink twice followed by a pause, then continue in a repeating pattern.
Failure - Memory Module Error This computer has experienced a memory initialization problem resulting in a failed start-up. This issue may be related to the memory modules in the computer. This problem may be resolved by ensuring that memory modules are correctly inserted and seated. If this error reoccurs, a service event is required to determine the source of the error (memory modules or system board) and take the appropriate corrective action.
NOTE: The computer will attempt to notify the user of this problem through a series of blinking LEDs. When the user attempts to turn on the computer from an “Off” or “Hibernated” state, LEDs associated with the CAPS and NUMLOCK keys will both blink three times followed by a pause, then continue in a repeating pattern.
35
Graphics Controller Error (No Controller) This computer has experienced a graphics controller initialization problem resulting in a failed start-up. This issue may be related to the graphics controller in your machine. This problem may be resolved by ensuring that the graphics controller module is seated correctly on machines with modular graphics. If this error reoccurs, a service event is required to identify the source of the error and take the appropriate corrective action.
NOTE: The computer will attempt to notify the user of this problem through a series of blinking LEDs. When the user attempts to turn on the computer from an “Off” or “Hibernated” state, LEDs associated with the CAPS and NUMLOCK keys will both blink four times followed by a pause, then continue in a repeating pattern.
Failure - System Board Error This computer has experienced a system board initialization problem resulting in a failed start-up. This issue may be related to the system board in the computer. A service event is required to identify the source of the error and take the appropriate corrective action.
NOTE: The computer will attempt to notify the user of this problem through a series of blinking LEDs. When the user attempts to turn on the computer from an “Off” or “Hibernated” state, LEDs associated with the CAPS and NUMLOCK keys will both blink five times followed by a pause, then continue in a repeating pattern.
Intel Trusted Execution Technology (TXT) Error This computer has experienced a problem related to the Intel Trusted Execution Technology resulting in a failed start-up. The error occurs when: 1) the Intel Trusted Execution Technology (TXT) has been enabled on the computer, 2) policies have been set to prevent start-up if the BIOS measurement has changed, and 3) the BIOS measurement has changed. For more information about Intel TXT, click the following link: http://www.intel.com/content/dam/www/public/us/en/documents/white-papers/trusted-execution-technology-security-paper.pdf
A service event is required to resolve this issue. NOTE: The computer will attempt to notify the user of this problem through a series of blinking LEDs. When the user attempts to turn on the computer from an “Off” or “Hibernated” state, LEDs associated with the CAPS and NUMLOCK keys will both blink six times followed by a pause, then continue in a repeating pattern.
Sure Start unable to find valid BIOS Boot Block image This computer has experienced a problem in locating a valid BIOS image, resulting in a failed start-up. A service event is required to identify the source of the error and take appropriate corrective action.
NOTE: The computer will attempt to notify the user of this problem through a series of blinking LEDs. When the user attempts to turn on the computer from an “Off” or “Hibernated” state, LEDs associated with the CAPS and NUMLOCK keys will both blink seven times followed by a pause, then continue in a repeating pattern.
Sure Start has identified a problem (Manual Recovery Policy Set) This computer has experienced a problem in locating a valid BIOS image, resulting in a failed start-up. HP Sure Start will normally repair this type of issue, however, on this computer HP Sure Start has been configured to operate in manual mode key sequence. To proceed with the repair, press and hold the following keys:<ESC>+<UP arrow>+<DOWN arrow> . It is recommended the HP Sure Start recovery policy be set to automatic to avoid the need for this manual recovery step. If this error reoccurs, a service event is required to identify the source of the error and take appropriate corrective action.
NOTE: The computer will attempt to notify the user of this problem through a series of blinking LEDs. When the user attempts to turn on the computer from an “Off” or “Hibernated” state, LEDs associated with the CAPS and NUMLOCK keys will both blink eight times followed by a pause, then continue in a repeating pattern.
Sign up for updates hp.com/go/getupdated
Share with colleagues
Rate this document
© Copyright, 2015 Hewlett-Packard Development Company, L.P. The information contained herein is subject to change without notice. The only warranties fo products and services are set forth in the express warranty statements accompanying such products and services. Nothing herein should be construed as constituting an additional warranty. HP not be liable for technical or editorial errors or omissions contained herein.
Microsoft and Windows are U.S. registered trademarks of Microsoft Corporation. . Intel, Active Management Technology (Intel AMT), and Hyper Threading (HT trademarks or trademarks of Intel Corporation in the U.S. and/or other countries. All other product names mentioned herein may be trademarks of their resp
742410-004, August 2013, Updated January 2015
For more information
Contact HP hp.com/country/us/en/contact_us.html
HP Business Notebook Innovations http://www.hp.com/go/professionalinnovations
HP Professional Innovations Quick Reference Guide http://www.hp.com/sbso/solutions/pc_expertise/professional_innovations/hp-professional-innovations-quick-reference-guide.pdf
To help us improve our documents, please provide feedback at hp.com/solutions/feedback.
Disclaimer
The information contained within all sections of this document, including URLs, web site references and other specified documents are subject to change without notice and are provided for informational purposes only. No licenses with respect to any intellectual property are being granted, expressly or impliedly, by the disclosure of the information contained in this document. Furthermore, neither Hewlett Packard nor any of its subsidiaries makes any warranties of any nature regarding the use of the information contained within this document, and thus the entire risk, if any, resulting from the use of information within this document is the sole responsibility of the user. In addition, the names of the technologies, actual companies, and products mentioned within this document may be trademarks of their respective owners. Complying with all applicable copyright and trademark laws is the sole responsibility of the user of this document.
Hewlett Packard or its subsidiaries may have patents, patent applications, trademarks, copyrights, or other intellectual property rights covering the subject matter in this document. Except where expressly provided in any written license from Hewlett Packard or its subsidiaries, the furnishing of this document, or any ideas contained within, does not grant any license to these ideas, patents, trademarks, copyrights, or other intellectual property.