Embed Size (px)
Citation preview
13
STAR LOUNGEASSEMBLY INSTRUCTIONS
14
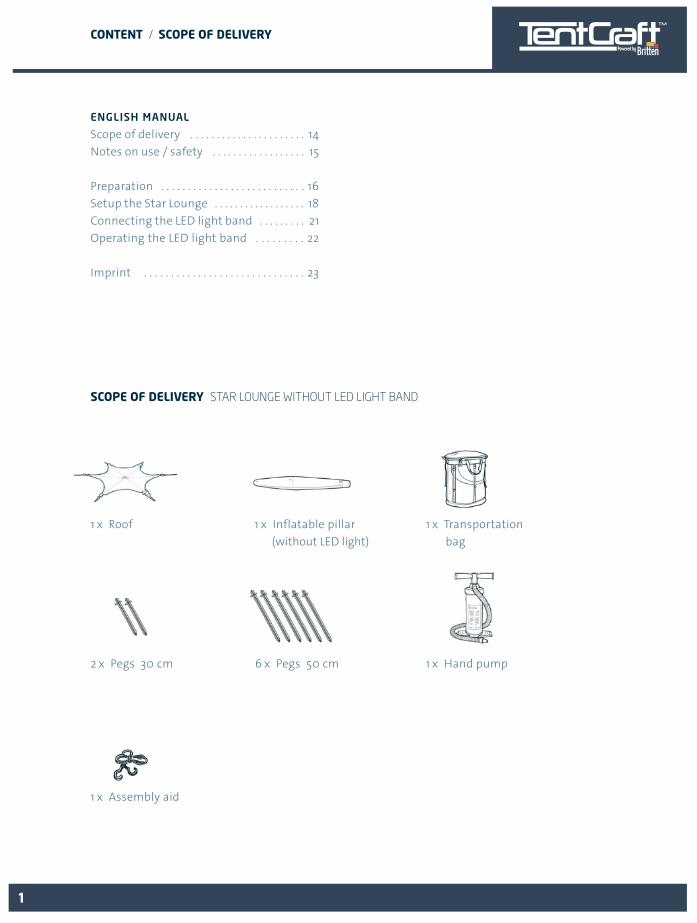
SCOPE OF DELIVERY STAR LOUNGE WITHOUT LED LIGHT BAND
ENGLISH MANUAL
Scope of delivery . . . . . . . . . . . . . . . . . . . . . . 14Notes on use / safety . . . . . . . . . . . . . . . . . . 15
Preparation . . . . . . . . . . . . . . . . . . . . . . . . . . . 16Setup the Star Lounge . . . . . . . . . . . . . . . . . . 18Connecting the LED light band . . . . . . . . . 21Operating the LED light band . . . . . . . . . 22
Imprint . . . . . . . . . . . . . . . . . . . . . . . . . . . . . . 23
1 x Roof
2 x Pegs 30 cm 1 x Hand pump6 x Pegs 50 cm
1 x Assembly aid
1 x Inflatable pillar (without LED light)
1 x Transportation bag
EN CONTENT / SCOPE OF DELIVERY
1
15
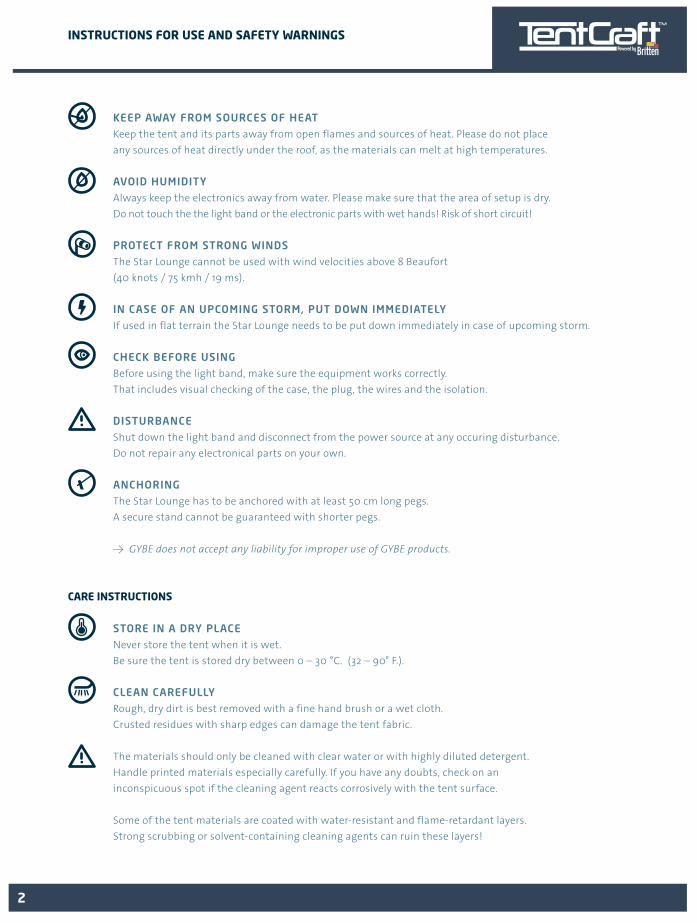
KEEP AWAY FROM SOURCES OF HEATKeep the tent and its parts away from open flames and sources of heat. Please do not place any sources of heat directly under the roof, as the materials can melt at high temperatures.
AVOID HUMIDITYAlways keep the electronics away from water. Please make sure that the area of setup is dry. Do not touch the the light band or the electronic parts with wet hands! Risk of short circuit!
PROTECT FROM STRONG WINDSThe Star Lounge cannot be used with wind velocities above 8 Beaufort (40 knots / 75 kmh / 19 ms).
IN CASE OF AN UPCOMING STORM, PUT DOWN IMMEDIATELYIf used in flat terrain the Star Lounge needs to be put down immediately in case of upcoming storm.
CHECK BEFORE USINGBefore using the light band, make sure the equipment works correctly. That includes visual checking of the case, the plug, the wires and the isolation.
DISTURBANCEShut down the light band and disconnect from the power source at any occuring disturbance.Do not repair any electronical parts on your own.
ANCHORINGThe Star Lounge has to be anchored with at least 50 cm long pegs. A secure stand cannot be guaranteed with shorter pegs.
→ GYBE does not accept any liability for improper use of GYBE products.
CARE INSTRUCTIONS
STORE IN A DRY PLACENever store the tent when it is wet. Be sure the tent is stored dry between 0 – 30 °C. (32 – 90° F.).
CLEAN CAREFULLYRough, dry dirt is best removed with a fine hand brush or a wet cloth. Crusted residues with sharp edges can damage the tent fabric.
The materials should only be cleaned with clear water or with highly diluted detergent. Handle printed materials especially carefully. If you have any doubts, check on an inconspicuous spot if the cleaning agent reacts corrosively with the tent surface.
Some of the tent materials are coated with water-resistant and flame-retardant layers. Strong scrubbing or solvent-containing cleaning agents can ruin these layers!
ENINSTRUCTIONS FOR USE AND SAFETY WARNINGS
2
16
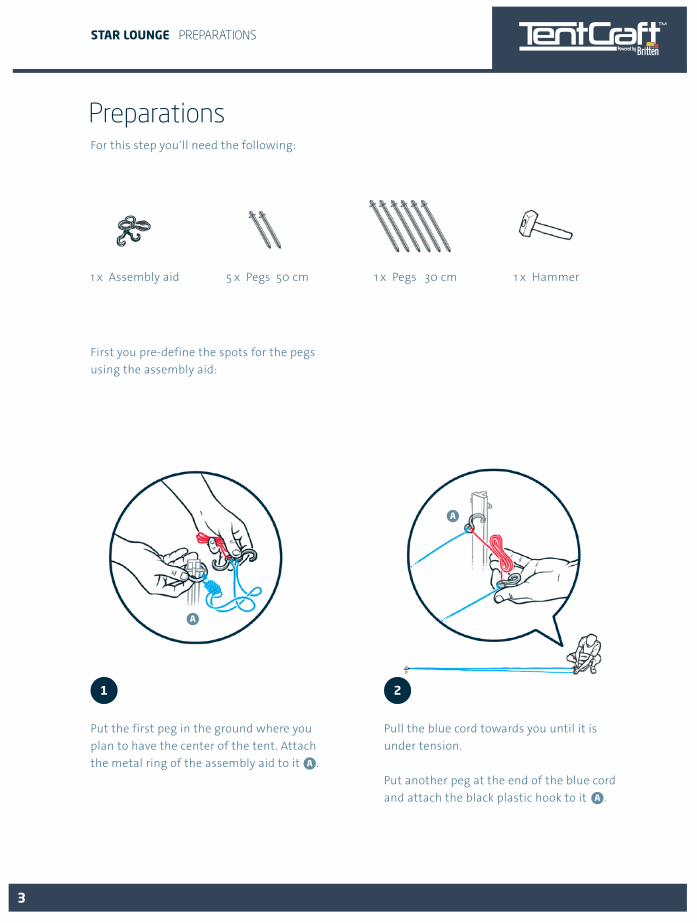
Put the first peg in the ground where you plan to have the center of the tent. Attach the metal ring of the assembly aid to it A .
Pull the blue cord towards you until it is under tension.
Put another peg at the end of the blue cord and attach the black plastic hook to it A .
1 2
A
A
Preparations
1 x Assembly aid
For this step you‘ll need the following:
First you pre-define the spots for the pegs using the assembly aid:
5 x Pegs 50 cm 1 x Pegs 30 cm
STAR LOUNGE PREPARATIONS
1 x Hammer
EN
3
17
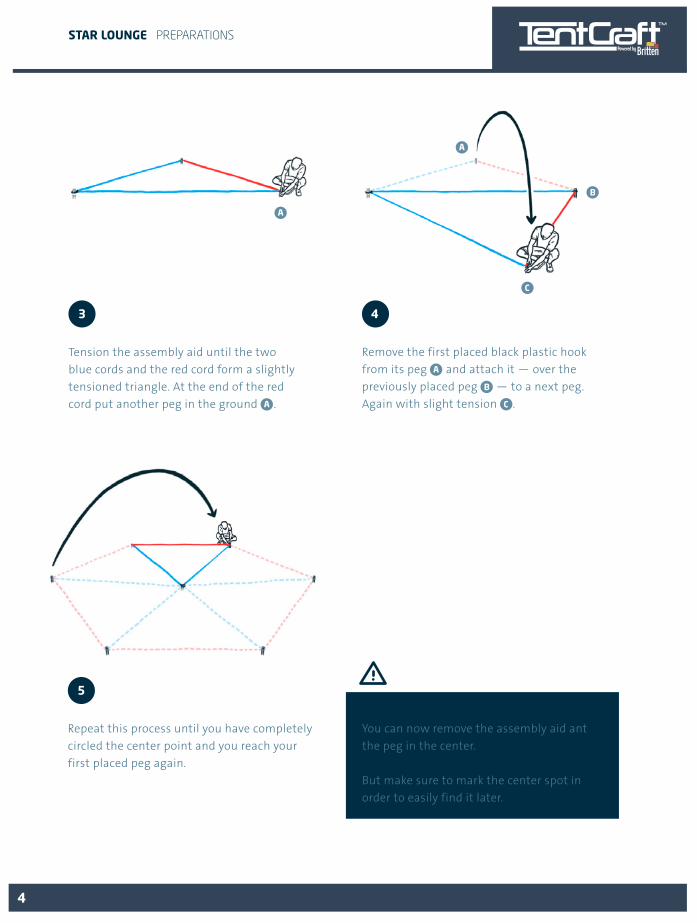
Remove the first placed black plastic hook from its peg A and attach it — over the previously placed peg B — to a next peg. Again with slight tension C .
Repeat this process until you have completely circled the center point and you reach your first placed peg again.
Tension the assembly aid until the two blue cords and the red cord form a slightly tensioned triangle. At the end of the red cord put another peg in the ground A .
3
ATTENTIONYou can now remove the assembly aid ant the peg in the center.
But make sure to mark the center spot in order to easily find it later.
4
5
A
A
B
C
STAR LOUNGE PREPARATIONS EN
4
18
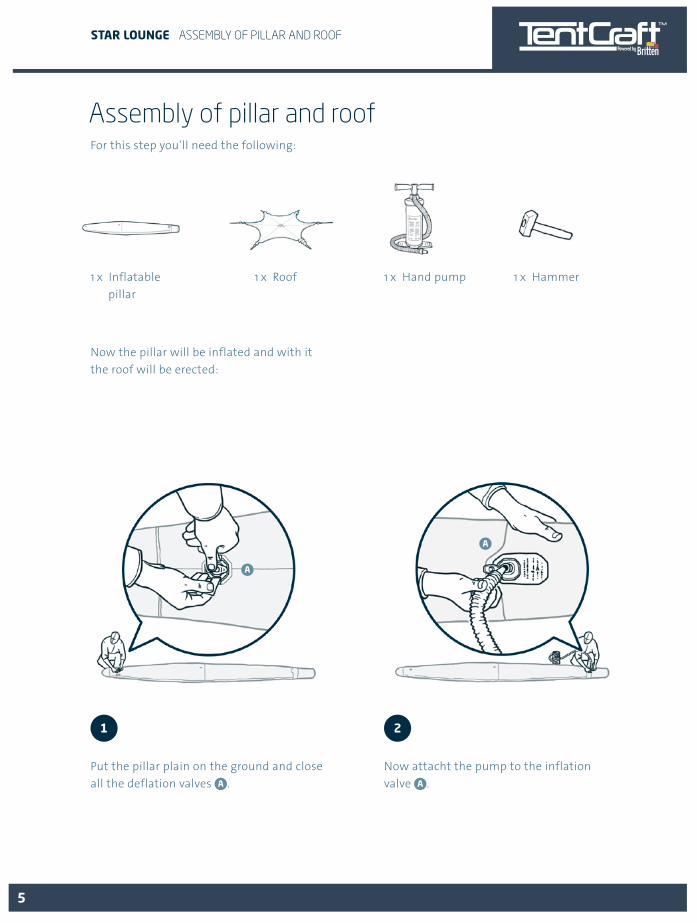
Put the pillar plain on the ground and closeall the deflation valves A .
Now attacht the pump to the inflation valve A .
1 2
A
A
Assembly of pillar and roof
1 x Inflatable pillar
For this step you‘ll need the following:
Now the pillar will be inflated and with it the roof will be erected:
1 x Roof 1 x Hand pump 1 x Hammer
STAR LOUNGE ASSEMBLY OF PILLAR AND ROOFEN
5
19
6
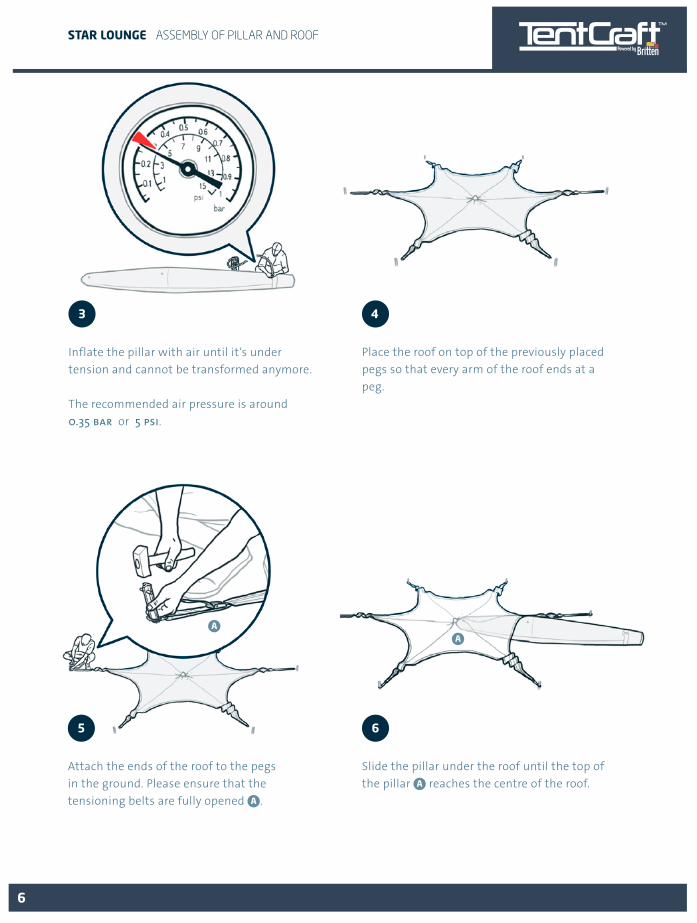
Place the roof on top of the previously placed pegs so that every arm of the roof ends at a peg.
Slide the pillar under the roof until the top of the pillar A reaches the centre of the roof.
Attach the ends of the roof to the pegs in the ground. Please ensure that the tensioning belts are fully opened A .
Inflate the pillar with air until it‘s under tension and cannot be transformed anymore.
The recommended air pressure is around 0.35 BAR or 5 PSI.
3 4
5
STAR LOUNGE ASSEMBLY OF PILLAR AND ROOF EN
AA
6
20
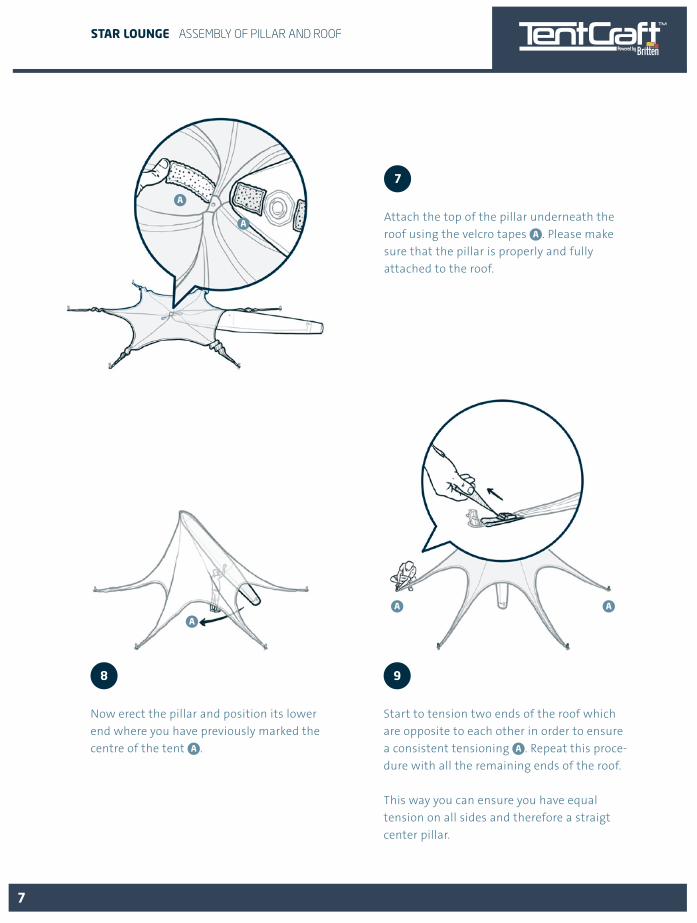
Attach the top of the pillar underneath the roof using the velcro tapes A . Please make sure that the pillar is properly and fully attached to the roof.
Now erect the pillar and position its lower end where you have previously marked the centre of the tent A .
Start to tension two ends of the roof which are opposite to each other in order to ensure a consistent tensioning A . Repeat this proce-dure with all the remaining ends of the roof.
This way you can ensure you have equal tension on all sides and therefore a straigt center pillar.
STAR LOUNGE ASSEMBLY OF PILLAR AND ROOF
7
8 9
A
A
A
A A
EN
7

21
Now you can put the power supply in the neoprene pouch A at the pillar.
Afterwards you can connect the power cable with the power supply system.
STAR LOUNGE CONNECTING THE LED LIGHT BAND
Attach the power supply A with the plug of the LED light band B .
BA
A
1 2
Connecting the LED light band
1 x Power supply
For this step you‘ll need the following:
After the tent has been set up, we can now connect the LED light band:
1 x Extension cable
EN
8
22
STAR LOUNGE OPERATING THE LED LIGHT BAND
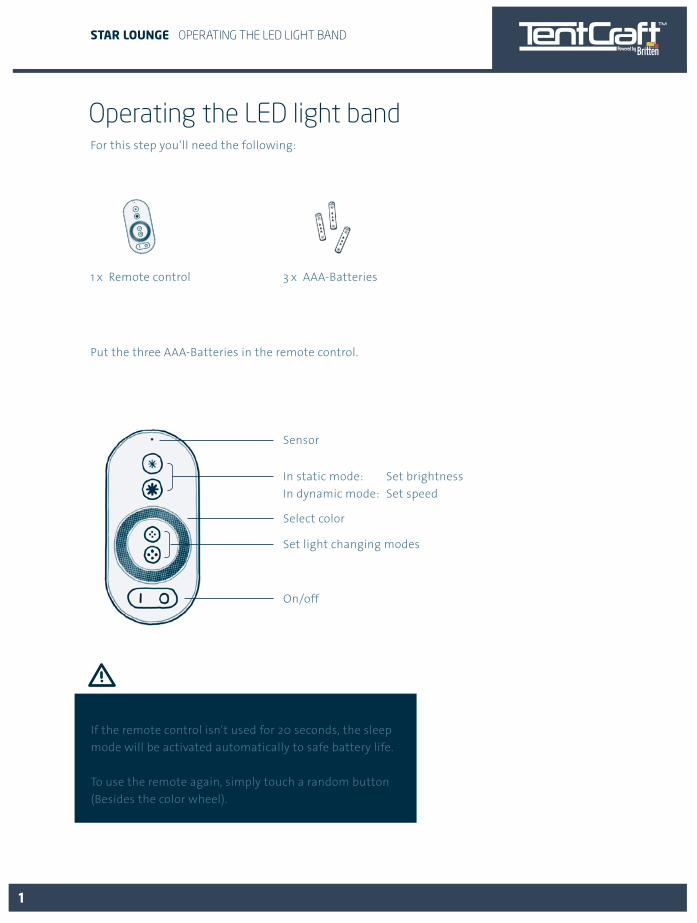
Operating the LED light band
1 x Remote control 3 x AAA-Batteries
For this step you‘ll need the following:
Put the three AAA-Batteries in the remote control.
Sensor
In static mode: Set brightnessIn dynamic mode: Set speed
On/off
Set light changing modes
Select color
ATTENTIONIf the remote control isn‘t used for 20 seconds, the sleep mode will be activated automatically to safe battery life.
To use the remote again, simply touch a random button (Besides the color wheel).
EN
1
23
STAR LOUNGE OPERATING THE LED LIGHT BAND
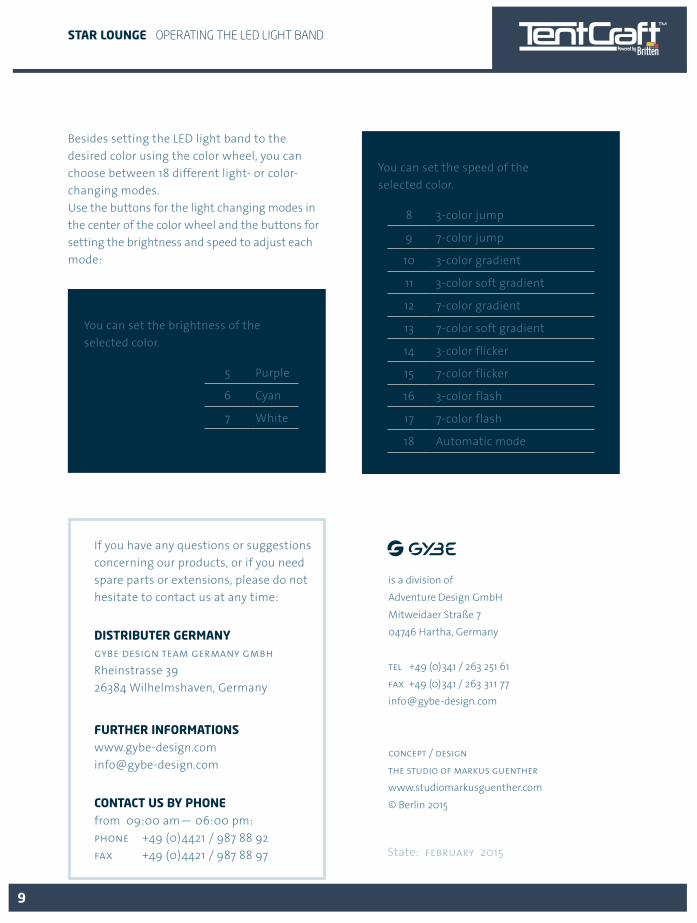
Besides setting the LED light band to the desired color using the color wheel, you can choose between 18 different light- or color-changing modes.Use the buttons for the light changing modes in the center of the color wheel and the buttons for setting the brightness and speed to adjust each mode:
8 3-color jump
9 7-color jump
10 3-color gradient
11 3-color soft gradient
12 7-color gradient
13 7-color soft gradient
14 3-color flicker
15 7-color flicker
16 3-color flash
17 7-color flash
18 Automatic mode
1 Red
2 Green
3 Blue
4 Yellow
DYNAMIC MODEYou can set the speed of the selected color.
STATIC MODEYou can set the brightness of the selected color.
5 Purple
6 Cyan
7 White
State: FEBRUARY 2015
If you have any questions or suggestions concerning our products, or if you need spare parts or extensions, please do not hesitate to contact us at any time:
DISTRIBUTER GERMANYGYBE DESIGN TEAM GERMANY GMBHRheinstrasse 3926384 Wilhelmshaven, Germany
FURTHER [email protected]
CONTACT US BY PHONEfrom 09:00 am— 06:00 pm:PHONE +49 (0)4421 / 987 88 92FAX +49 (0)4421 / 987 88 97
is a division of Adventure Design GmbH Mitweidaer Straße 704746 Hartha, Germany
TEL +49 (0)341 / 263 251 61FAX +49 (0)341 / 263 311 [email protected]
CONCEPT / DESIGNTHE STUDIO OF MARKUS GUENTHERwww.studiomarkusguenther.com © Berlin 2015
EN
9
24
WWW.GYBE-DESIGN.COM
10