Embed Size (px)
Citation preview
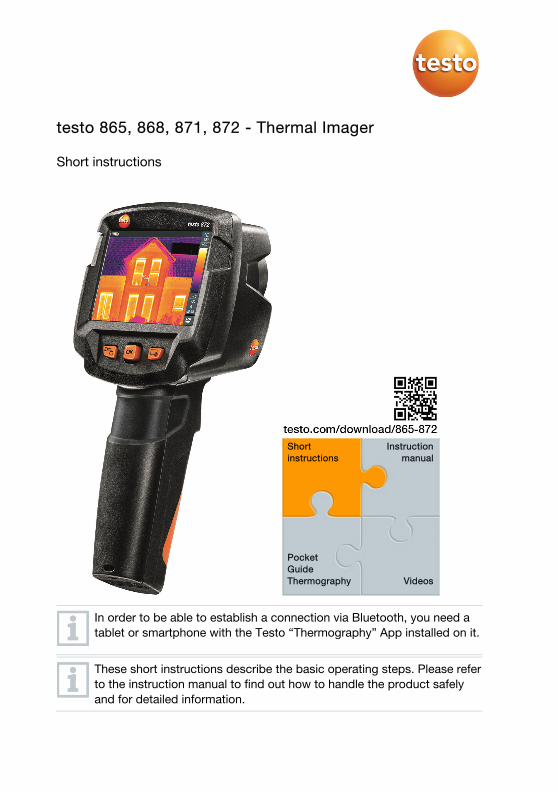
testo 865, 868, 871, 872 - Thermal Imager
Short instructions
In order to be able to establish a connection via Bluetooth, you need a tablet or smartphone with the Testo “Thermography” App installed on it.
These short instructions describe the basic operating steps. Please refer to the instruction manual to find out how to handle the product safely and for detailed information.
Short instructions
Instruction manual
Pocket Guide Thermography Videos

Element Function
1 Display Displays infrared and real images (except testo 865), menus and functions
2 Interface terminal Contains micro USB interface for power supply and connection to the computer
3 - key - Esc key
- Switch camera on and off - Cancel action
4 - OK key - Joystick
- Open menu, select function, confirm setting - Navigate within the menu, highlight function,
select colour palette
5 Quick select key
Opens the function assigned to the quick select key; the icon for the selected function is displayed bottom right
6 Infrared camera lens; protective cap
Takes infrared images; protects the lens
7 Digital camera (except testo 865)
Takes real images
8 Laser Marking the measuring point (only testo 872) 9 Trigger Saves the displayed image
10 Battery compartment Contains the rechargeable battery
Switching the camera on/off
1 - Remove the protective cap from the lens (6).
2 - Switching on: press (3).
- Switching off: press and hold down (3).
To ensure measuring accuracy, the camera performs automatic zeroing approx. every 60 s. You will hear a “click” and the image freezes briefly.
Getting to know the menu
1 - Press OK (4) to open the menu.
2 - Move joystick (4) up/down to highlight a function (an orange box appears around it).
3 - Press OK (4) to select the function.
3.1 - Move the joystick (4) right to open the sub-menu (indicated with ►).
Saving an image
1 - Press the trigger (8).
The infrared image is saved automatically.
testo 868, 871 and 872: irrespective of the selected image type, an infrared image is always saved with the attached real image.
If a higher resolution is required: In the menu, select the SuperResolution function under configuration (optional function). @ More information can be found in the instruction manual.
Displaying and deleting images
1 - Select image gallery function. To do this, see Getting to know the menu.
2 - Display image: Move joystick (4) left/right/up/down to select the image, then press OK (4).
3 - Press (5) to delete the image.
Setting emissivity
Function is only available if the infrared image type has been selected.
The emissivity describes the capability of a body to emit thermal radiation. For correct measurement results, the emissivity can be set according to the specific material. With ε-Assist, the emissivity and reflected temperature are automatically detected. RTC (Reflected Temperature Compensation) is a correction value for thermal radiation through other objects.
@ More information can be found in the instruction manual and the pocket guide.
1 - Select the emissivity function. To do this, see Getting to know the menu.
2 - Move joystick (4) up/down to highlight the required material, then press OK (4).
Setting measurement
Function is only available if the infrared image type has been selected.
1 - Open the measurement submenu. To do this, see Getting to know the menu.
The submenu with measurement opens:
• Pixel mark:
o Single point measurement: the temperature measuring point in the centre of the image is marked with white crosshairs and the value is displayed. In saved images, the crosshairs can be moved using the joystick in order to read the value of other measuring points.
o Coldspot, hotspot: the lowest or highest temperature measuring point is marked with blue or red crosshairs and the value is displayed.
• Min/Max on Area (testo 872): the minimum, maximum and mean values for a selected area are displayed.
• Measurement range: temperature range in which measuring values are displayed (for information).
• Differential temperature: identifies the difference between two temperatures.
2 - Move joystick (4) up/down to highlight the required function, then press OK (4).
Selecting the colour palette
Function is only available if the infrared image type has been selected.
1 - Move joystick (4) up/down to toggle between the colour palettes.
Selecting image type (infrared image, real image) (testo 868, 871 and 872)
1 - Select image type function. To do this, see Getting to know the menu.
The image type switches automatically from infrared image to real image and vice versa.
Setting the scale
Function is only available if the infrared image type has been selected.
Automatic scaling continuously adjusts the scale to the relevant measuring values and the colour assigned to a measuring value changes. With manual scaling, fixed limit values are defined and the colour assigned to a measuring value is fixed (important for visual image comparisons). Scaling influences the way the infrared image is shown on the display but does not affect the recorded measuring values. A standardized scale is set via ScaleAssist depending on the inside and outside temperature.
1 - Select the scale function. To do this, see Getting to know the menu.
2 - Move joystick (4) up/down to select auto, manual or ScaleAssist and then press OK (4).
Automatic scaling is activated. A is displayed bottom right.
Manual scaling
1 - Move joystick (4) left/right until min. temperature (lower limit value) is highlighted.
- Move joystick (4) up/down to set the value and then press OK (4).
2 - Move joystick (4) left/right until min. temperature (lower limit value) and max. temperature (upper limit value) are highlighted.
- Move joystick (4) up/down to set the values and then press OK (4).
3 - Move joystick (4) left/right until max. temperature (upper limit value) is highlighted.
- Move joystick (4) up/down to set the value and then press OK (4).
Manual scaling is activated. M is displayed bottom right.
Configuring the quick select key
- The quick select key (5) is an additional navigation option, which
you can use to call up functions simply by pressing a key.
1 - Move joystick (4) right to select the configure key function.
2 - Move joystick (4) up/down to highlight the required function, then press OK (4).
The icon for the selected function is displayed bottom right.
3 - Press (5) to call up the function.

0970 8721 en 01