Embed Size (px)
Citation preview
Module Two
Texas Driver EducationClassroom and In-car Instruction
Model Curriculum
Driving ThroughA New Century
Texas Education Agency
Texas Education Agency
Texas Department of Public Safety
Texas Department of Transportation
Texas Driver Responsibilities:
Preparing to Operate a Vehicle
· DRIVER PREPARATION PROCEDURES
· IDENTIFYING VEHICLE CONTROL DEVICES
· OPERATING VEHICLE CONTROL DEVICES
· VEHICLE BALANCE CONSIDERATIONS
· STANDARD VEHICLE REFERENCE POINTS
GRADE HS
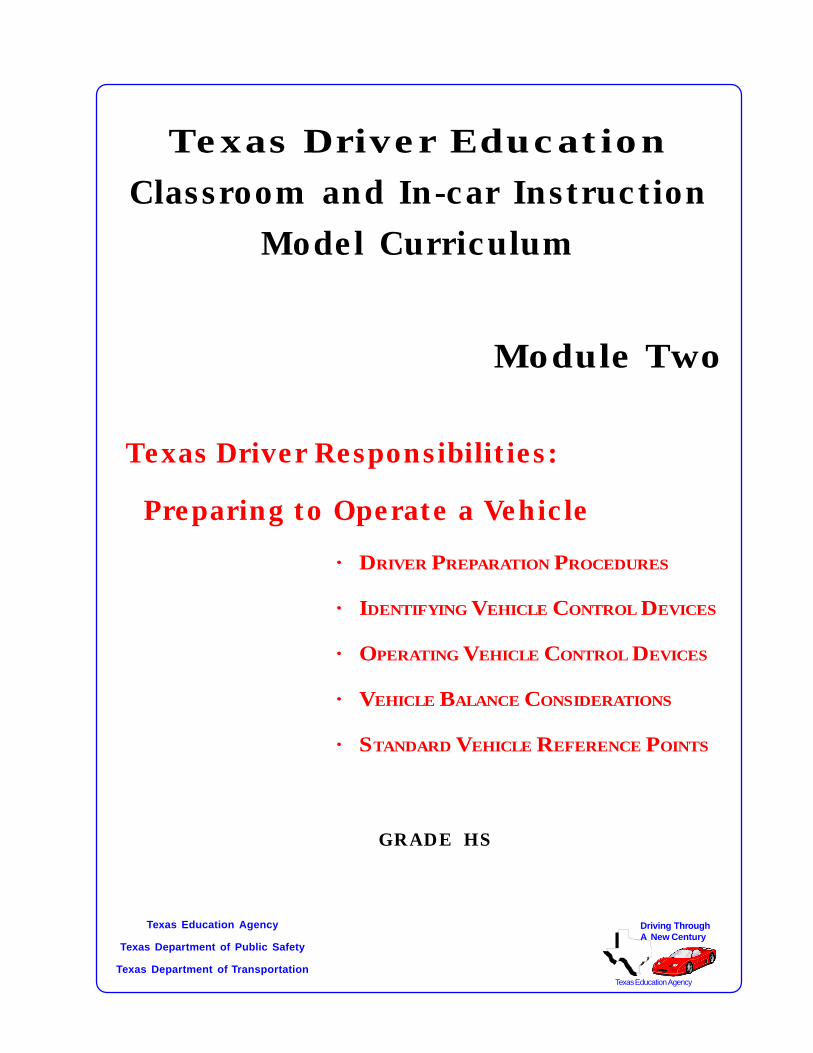
Page 2 Driver Education Classroom and In-car Instruction
Module Two Topical Outline
Module Two Introduction
Module Two—Texas Driving Responsibilities: Preparing to Operate a Vehicle. The studentrecognizes the necessity of making routine vehicle checks and adjustments prior to and afterentering the vehicle; identifies and responds appropriately to alert symbols, warning symbols,vehicle control devices, and safety devices; understands and controls vehicle balance andvehicle operating space; and appropriately applies the techniques of vehicle reference pointsto establish roadway position and vehicle placement.NOTE: TEA rules require that students without a valid driver’s license or instruction permit in his/herpossession shall not receive behind-the-wheel instruction no matter where the instruction is provided.
Topic 1 - Driver Preparation Procedures. The student utilizes basic procedures and readinesstechniques to enter, start, or secure the vehicle and performs basic vehicle maintenance checks.Topic 2 - Identifying Vehicle Control Devices. The student recognizes and understands thefunction and operation of each vehicular alert or warning symbol, control device, information device,and comfort system.Topic 3 - Operating Vehicle Control Devices. The student demonstrates proper steering, braking,and acceleration techniques and is capable of operating the vehicular systems and devices whileseated in the driver seat.Topic 4 - Vehicle Balance Considerations. The student recognizes the effects of steering, braking,and acceleration inputs on the balance of a vehicle and demonstrates vehicular control utilizingvehicle balance techniques.Topic 5 - Standard Vehicle Reference Points. The student utilizes standard vehicle referencepoints to determine and execute lane placement, stopping position, and turning maneuvers.
In-car Activities. The student utilizes a controlled risk environment to view vehicle information andsafety, comfort, communication, and convenience devices. The student uses vehicle controls anddemonstrates vehicle placement techniques using standard vehicle reference points. The studentutilizes simulation techniques to support classroom and in-car activities.
Minimum Time FramesModule Two–3 Hours (Non-required)
Recommended Recommended
Module Two Instructional Time Frames (Min)Objective Noncredit Multi-phase Credit
CLASSROOM INSTRUCTION
TOPIC 1–DRIVER PREPARATION PROCEDURES YES 25 25 25
TOPIC 2–IDENTIFYING VEHICLE CONTROL DEVICES YES 30 30 30
TOPIC 3–OPERATING VEHICLE CONTROL DEVICES YES 55 55 55
TOPIC 4–VEHICLE BALANCE CONSIDERATIONS YES 25 25 25
TOPIC 5–STANDARD VEHICLE REFERENCE POINTS YES 30 30 30
INSTRUCTIONAL BREAKS NO 15 15 15
SUPPLEMENT–PARENT PARTICIPATION ACTIVITIES NO 55 55 55
IN-CAR INSTRUCTION (OPTION 1)BEHIND THE WHEEL INSTRUCTION/BREAK (2) YES 60 60 60OBSERVATION (TWICE) YES 60 60 60IN-CAR INSTRUCTION MULTIPHASE (OPTION 2)BEHIND THE WHEEL INSTRUCTION/BREAK (2) YES 40 40 40OBSERVATION (TWICE) YES 80 80 80SIMULATION/BREAK (2) YES 120 120 120
PARENTAL INVOLVEMENT NO 60 60 60
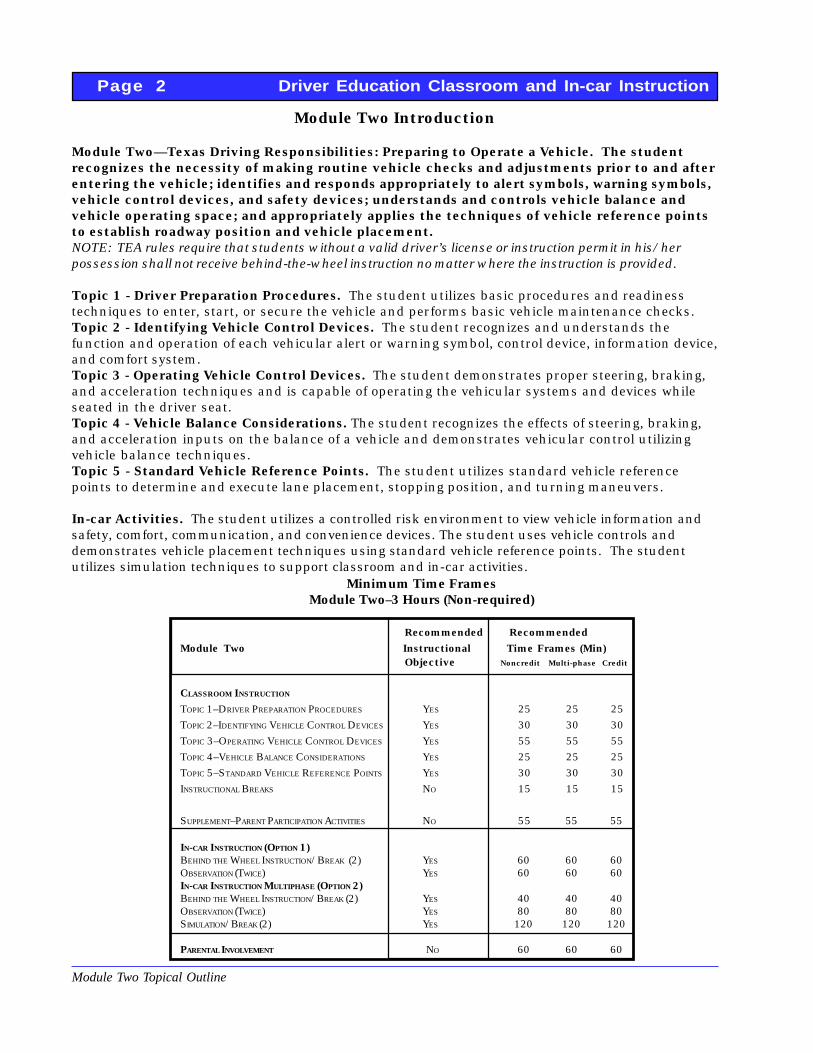
Preparing to Operate a Vehicle Page 3
Module Two Topical Outline
Needed Resources Instructor Activities Time Frame
Module Two Prerequisites: Topic Title:
Topic Time Frame: Non-credit course (32 hrs) minutes instructional time Multiphase course (40 hrs) minutes discretional break time Credit course (56 hrs/semester)
Transparencies T-2.0, T-2.1, T-2.2, T-2.3, T-2.4, T-2.5, T-2.6,T-2.7, T-2.8, T-2.9, and T-2.10.
Fact Sheets F-2.1
Student Worksheets W-2.1 andW-2.2
Optional Video:“Teaching Your Teens to Drive”Lesson One: Developing BasicVehicle Control”
“Teaching Your Teens to Drive”Lesson One: Developing BasicVehicle Control” Parent/TeenHandbook
Module Assessment MA-2.1 Test
Textbook Resources “Drive Right” Ch. 3 “Empower Yourself” pp. 1-15 “How to Drive” Ch. 5 “Handbook Plus” Ch. 2 “License to Drive” Ch. 5 “Responsible Driving” Ch. 6
Driver Preparation Procedures• Qualifies for Texas Driver Learner’s Permit
Module Two, Topic 1 is not a required program element.
15 minute (prior to lesson)
10 minutes (prior to lesson)
20 minutes
(1-2 minutes)(2-3 minutes)(2-3 minutes)(2-3 minutes)(2-5 minutes)(2-3 minutes)(2-3 minutes)(2-3 minutes)(2-3 minutes)(2-3 minutes)(1-2 minutes)
(2-5 minutes)
(2-5 minutes)
5-10 minutes
For instructor useor additionalinformation
10-15 minutes
. Review recommended Module TwoLesson Plans
. Review Introductory Video Segment
. Use Topic 1 Transparencies
T-2.0, “Introductory Transparency” T-2.1, “Pre-Drive Tasks” T-2.2, “Pre-Drive Tasks” T-2.3, “Pre-Drive Tasks” T-2.4, “Under the Hood Checks” T-2.5, “Driver Readiness Tasks” T-2.6, “Driver Readiness Tasks” T-2.7, “Starting Tasks” T-2.8, “Starting Tasks” T-2.9, “Securing Tasks” T-2.10, “Securing Tasks”
. Review Student Worksheet
W-2.1, “Your License to Drive” W-2.2, “Under the Hood Checks”
. Review Fact Sheets
F-1.1, “Preventive Maintenance Checks”
. Review Assessment
MA-2.1 “Preparing to Drive”
1 6.5 25 6.5 0 6.5
Page 4 Driver Education Classroom and In-car Instruction
GRADE: HS MODULE: TWO TOPIC: 1 TOPIC ACTIVITIES TOPIC RESOURCES
Texas Education Agency
Driving ThroughA New Century
Knowledge and Skills The Instructor:
Module Two—Texas Driving Responsibilities: Preparing to Operate a Vehicle. The studentrecognizes the necessity of making routine vehicle checks and adjustments prior to and afterentering the vehicle; identifies and responds appropriately to alert symbols, warning symbols,vehicle control devices, and safety devices; understands and controls vehicle balance and vehicleoperating space; and appropriately applies the techniques of vehicle reference points to establishroadway position and vehicle placement.
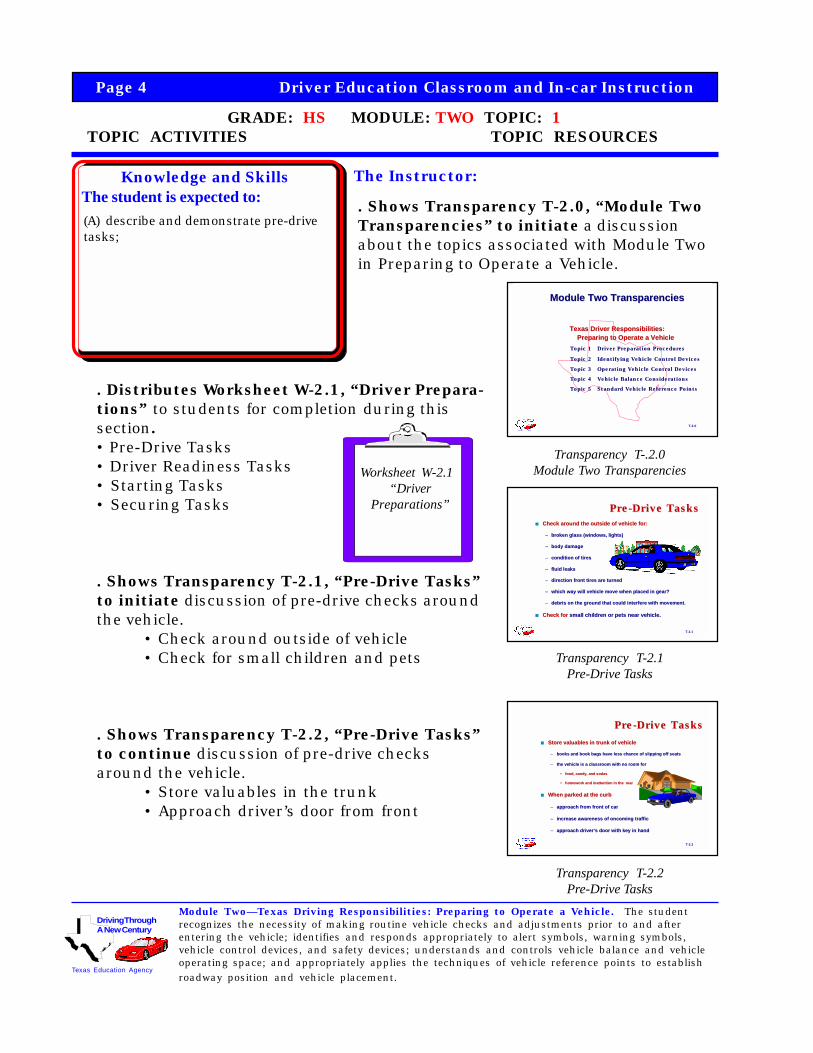
The student is expected to: . Shows Transparency T-2.0, “Module TwoTransparencies” to initiate a discussionabout the topics associated with Module Twoin Preparing to Operate a Vehicle.
Transparency T-2.1Pre-Drive Tasks
Transparency T-2.2Pre-Drive Tasks
Transparency T-.2.0Module Two Transparencies
. Distributes Worksheet W-2.1, “Driver Prepara-tions” to students for completion during thissection.• Pre-Drive Tasks• Driver Readiness Tasks• Starting Tasks• Securing Tasks
. Shows Transparency T-2.1, “Pre-Drive Tasks”to initiate discussion of pre-drive checks aroundthe vehicle.
• Check around outside of vehicle• Check for small children and pets
. Shows Transparency T-2.2, “Pre-Drive Tasks”to continue discussion of pre-drive checksaround the vehicle.
• Store valuables in the trunk• Approach driver’s door from front
Worksheet W-2.1“Driver
Preparations”
(A) describe and demonstrate pre-drivetasks;
T-2.0
Module Two TransparenciesModule Two Transparencies
Texas Driver Responsibilities:Texas Driver Responsibilities:Preparing to Operate a Vehicle Preparing to Operate a Vehicle
Topic 1 Driver Preparation ProceduresTopic 1 Driver Preparation Procedures
Topic 2 Identifying Vehicle Control DevicesTopic 2 Identifying Vehicle Control Devices
Topic 3 Operating Vehicle Control DevicesTopic 3 Operating Vehicle Control Devices
Topic 4 Vehicle Balance ConsiderationsTopic 4 Vehicle Balance Considerations
Topic 5 Standard Vehicle Reference PointsTopic 5 Standard Vehicle Reference Points
T-2.1
Pre-Drive TasksPre-Drive Tasks■■ Check around the outside of vehicle for:Check around the outside of vehicle for:
–– broken glass (windows, lights)broken glass (windows, lights)
–– body damagebody damage
–– condition of tirescondition of tires
–– fluid leaksfluid leaks
–– direction front tires are turneddirection front tires are turned
–– which way will vehicle move when placed in gear?which way will vehicle move when placed in gear?
–– debris on the ground that could interfere with movement.debris on the ground that could interfere with movement.
■■ Check forCheck for small children or pets near vehicle. small children or pets near vehicle.
T-2.2
Pre-Drive TasksPre-Drive Tasks
■■ Store valuables in trunk of vehicleStore valuables in trunk of vehicle
–– books and book bags have less chance of slipping off seatsbooks and book bags have less chance of slipping off seats
–– the vehicle is a classroom with no room forthe vehicle is a classroom with no room for
•• food, candy, and sodasfood, candy, and sodas
•• homework and inattention in the rearhomework and inattention in the rear
■■ When parked at the curbWhen parked at the curb
–– approach from front of carapproach from front of car
–– increase awareness of oncoming trafficincrease awareness of oncoming traffic
–– approach driver’s door with key in handapproach driver’s door with key in hand
Driver Preparation ProceduresLESSON CONTENT (Instructor Support Information)
Module Two Texas Driver Responsibilities: Preparing to Operate a Vehicle Page 5
Texas Essential Knowledge and Skills: § 110.42. English I (b) (4) The student useswriting as a tool for learning. (B) to discover, organize, and support what is knownand what needs to be learned. (14) The student listens attentively for a variety ofpurposes. (A) focus attention on speaker’s message. Texas Education Agency
Driving ThroughA New Century
The driver preparation section involves all the tasks which lead up to puttingthe car in motion and securing the vehicle. The topics will review pre-drive, driverreadiness, starting, and securing tasks. The novice will be introduced to thepreventive maintenance responsibilities associated with using a vehicle. Thedriver will review the meaning of vehicle controls, locations, and appropriate useof each are described. The module concludes with a discussion of targeting skillsand the relationship of the vehicle operating space to standard vehicle referencepoints. A mirroring technique is introduced that will eliminate mirror blind spotsand reduce night glare in the side view mirrors.
Module Two, Topic 1 starts with pre-drive tasks and concludes with developingstandard reference points. This topic prepares the novice for the first in-carlesson.
Pre-Drive Tasks. The driver will become familiar with the specific tasks ofapproaching the vehicle in a safe manner. The tasks are not numbered for se-quence or importance. The student will develop a sequence or procedure onWorksheet W-2.1 with the guidance of the instructor.
Tasks include:
• check outside of vehicle;• check for small children and pets;• storing valuables;• when parked at curb, approach driver’s door from front;• when parked in a parking lot, approach from rear;• look into vehicle and check traffic flow;• unlock and enter quickly.
“Teaching Your Teens To Drive” (1998) AAA Association Commu-nication provides a video, student guide, and parent guide that hasthree lesson segments devoted to driver preparation, starting, andmoving the vehicle. This resource adds to the information presentedin this segment.
“Teaching YourTeens to Drive”
AAA Video, latest ed.
Page 6 Driver Education Classroom and In-car Instruction
GRADE: HS MODULE: TWO TOPIC: 1 TOPIC ACTIVITIES TOPIC RESOURCES
Texas Education Agency
Driving ThroughA New Century
Knowledge and Skills The Instructor:
Module Two—Texas Driving Responsibilities: Preparing to Operate a Vehicle. The studentrecognizes the necessity of making routine vehicle checks and adjustments prior to and afterentering the vehicle; identifies and responds appropriately to alert symbols, warning symbols,vehicle control devices, and safety devices; understands and controls vehicle balance and vehicleoperating space; and appropriately applies the techniques of vehicle reference points to establishroadway position and vehicle placement.
The student is expected to:
Transparency T-2.4Under the Hood Checks
Transparency T-.2.3Pre-Drive Checks
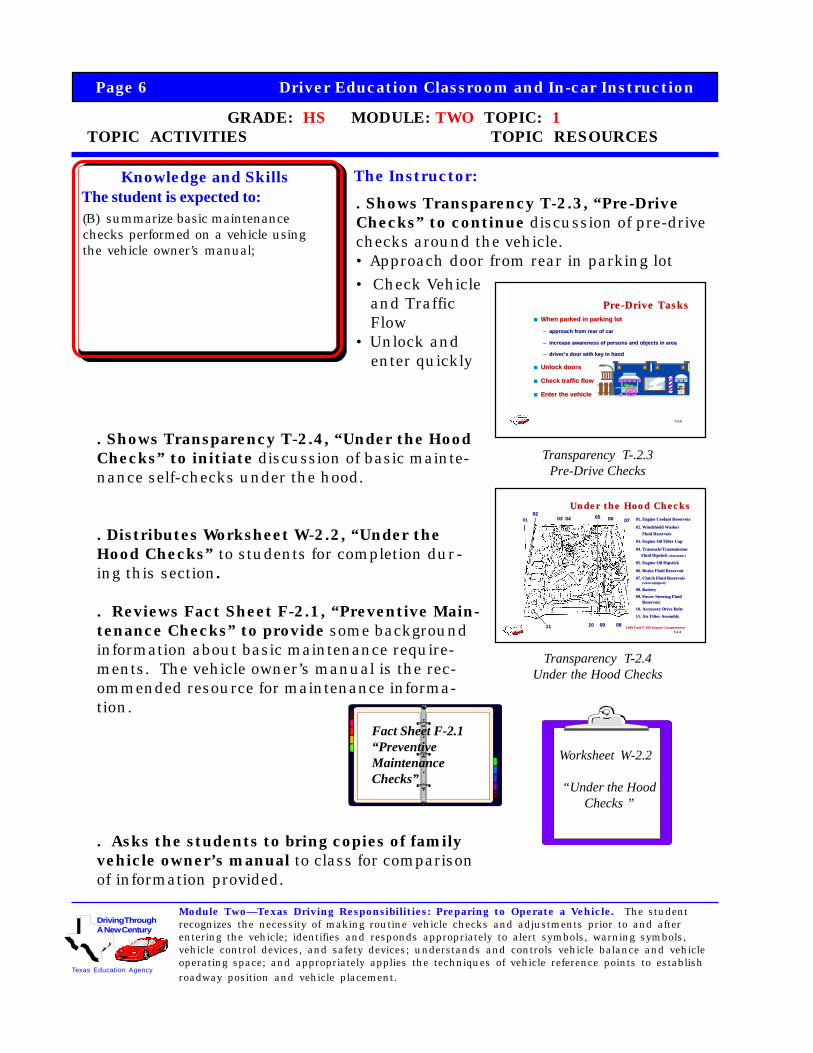
. Shows Transparency T-2.3, “Pre-DriveChecks” to continue discussion of pre-drivechecks around the vehicle.• Approach door from rear in parking lot
• Check Vehicle and Traffic Flow• Unlock and enter quickly
. Shows Transparency T-2.4, “Under the HoodChecks” to initiate discussion of basic mainte-nance self-checks under the hood.
. Distributes Worksheet W-2.2, “Under theHood Checks” to students for completion dur-ing this section.
. Reviews Fact Sheet F-2.1, “Preventive Main-tenance Checks” to provide some backgroundinformation about basic maintenance require-ments. The vehicle owner’s manual is the rec-ommended resource for maintenance informa-tion.
. Asks the students to bring copies of familyvehicle owner’s manual to class for comparisonof information provided.
Fact Sheet F-2.1“PreventiveMaintenanceChecks”
Worksheet W-2.2
“Under the HoodChecks ”
(B) summarize basic maintenancechecks performed on a vehicle usingthe vehicle owner’s manual;
T-2.4
Under the Hood ChecksUnder the Hood Checks0101
020203 0403 04 0505 0606 0707
1111 1010 0909 0808
01. Engine Coolant Reservoir01. Engine Coolant Reservoir
02. Windshield Washer02. Windshield Washer Fluid Reservoir Fluid Reservoir
03. Engine Oil Filler Cap03. Engine Oil Filler Cap
04. Transaxle/Transmission04. Transaxle/Transmission Fluid Dipstick Fluid Dipstick (Automatic)(Automatic)
05. Engine Oil Dipstick05. Engine Oil Dipstick
06. Brake Fluid Reservoir06. Brake Fluid Reservoir
07. Clutch Fluid Reservoir07. Clutch Fluid Reservoir (when equipped)(when equipped)
08. Battery08. Battery09. Power Steering Fluid09. Power Steering Fluid Reservoir Reservoir10. Accessory Drive Belts10. Accessory Drive Belts
11. Air Filter Assembly11. Air Filter Assembly
1999 Ford F-150 Engine Compartment
T-2.3
Pre-Drive TasksPre-Drive Tasks■■ When parked in parking lotWhen parked in parking lot
–– approach from rear of carapproach from rear of car
–– increase awareness of persons and objects in areaincrease awareness of persons and objects in area
–– driver’s door with key in handdriver’s door with key in hand
■■ Unlock doorsUnlock doors
■■ Check traffic flowCheck traffic flow
■■ Enter the vehicleEnter the vehicle
Driver Preparation ProceduresLESSON CONTENT (Instructor Support Information)
Module Two Texas Driver Responsibilities: Preparing to Operate a Vehicle Page 7
Texas Essential Knowledge and Skills: § 110.42. English I (b) (4) The student useswriting as a tool for learning. (B) to discover, organize, and support what is knownand what needs to be learned. (14) The student listens attentively for a variety ofpurposes. (A) focus attention on speaker’s message. Texas Education Agency
Driving ThroughA New Century
Under the Hood Checks. Each driver should have an idea of his/her responsibility for vehiclemaintenance. The owner’s manual of any vehicle will provide information about periodic mainte-nance. Emphasize need for periodic maintenance to be completed by qualified service personnel.Many vehicles can be driven 100,000 miles before the first scheduled engine tune-up. However, itis important to remember that certain items require service on a more frequent schedule. Forinstance, Ford and General Motor Companies 1999 maintenance schedules for most of the passen-ger cars, minivans, light trucks, sport utilities, vans, and 4x4s extend over 150,000 miles andinclude the following examples:
Weekly self-checks:
Tire pressure options• Maximum pressure listed on tire side-wall• Vehicle manufacturer’s recommendation for smooth ride
Tire tread wear or damage• Tread wear bars showing• Bald spots• Cuffing (uneven wear on inside or outside tread areas)• Bald center or side treads• Cuts, stones or metal fragments
Safety and Communication Accessories• Headlights, tail lights, and turn signals• Emergency lights and markers• Emergency kit• Windshield wipers
Heating Ventilation and Air Conditioner (HVAC)• Air flow• Temperature
Fact Sheet F-2.1 provides additional information on periodic maintenance checks as does anynew vehicle owner’s manual. Use the owner’s manual for the driver education vehicle available andask students to bring in copies of their family vehicle owner’s manual for comparisons.
Page 8 Driver Education Classroom and In-car Instruction
GRADE: HS MODULE: TWO TOPIC: 1 TOPIC ACTIVITIES TOPIC RESOURCES
Texas Education Agency
Driving ThroughA New Century
Knowledge and Skills The Instructor:
Module Two—Texas Driving Responsibilities: Preparing to Operate a Vehicle. The studentrecognizes the necessity of making routine vehicle checks and adjustments prior to and afterentering the vehicle; identifies and responds appropriately to alert symbols, warning symbols,vehicle control devices, and safety devices; understands and controls vehicle balance and vehicleoperating space; and appropriately applies the techniques of vehicle reference points to establishroadway position and vehicle placement.
The student is expected to:
Transparency T-2.6Driver Readiness Tasks
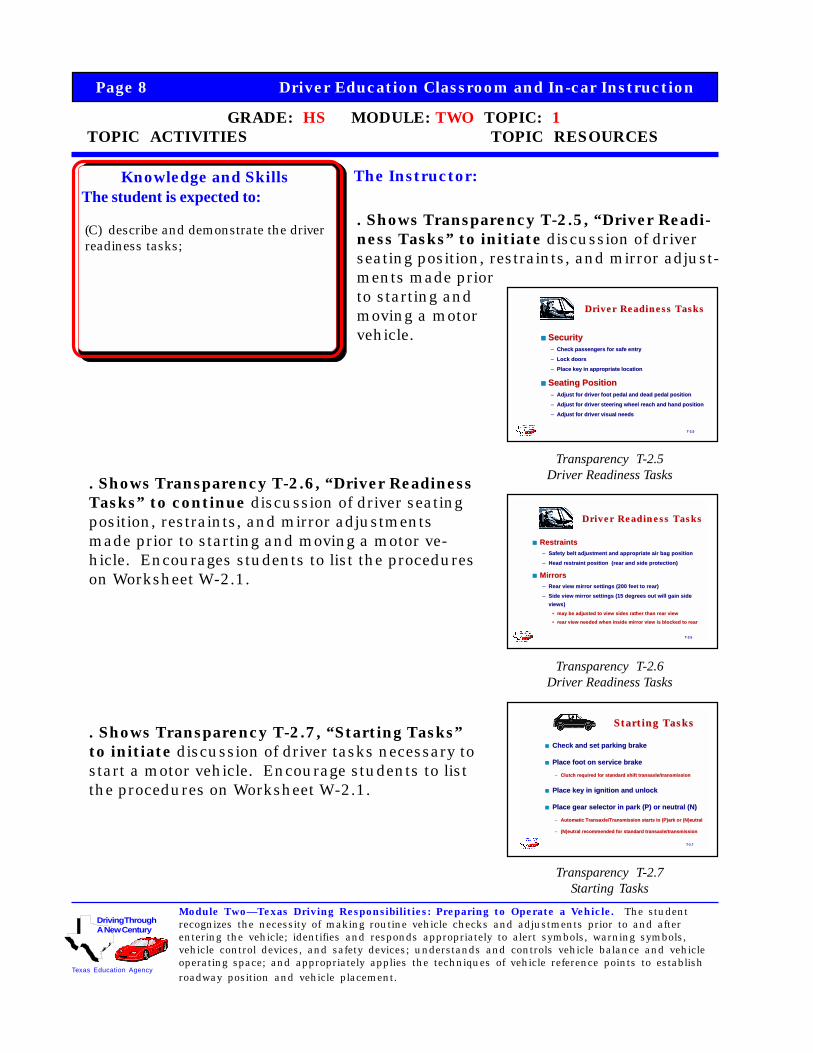
. Shows Transparency T-2.5, “Driver Readi-ness Tasks” to initiate discussion of driverseating position, restraints, and mirror adjust-ments made priorto starting andmoving a motorvehicle.
Transparency T-2.5Driver Readiness Tasks. Shows Transparency T-2.6, “Driver Readiness
Tasks” to continue discussion of driver seatingposition, restraints, and mirror adjustmentsmade prior to starting and moving a motor ve-hicle. Encourages students to list the procedureson Worksheet W-2.1.
. Shows Transparency T-2.7, “Starting Tasks”to initiate discussion of driver tasks necessary tostart a motor vehicle. Encourage students to listthe procedures on Worksheet W-2.1.
Transparency T-2.7Starting Tasks
(C) describe and demonstrate the driverreadiness tasks;
T-2.5
Driver Readiness TasksDriver Readiness Tasks
■■ SecuritySecurity–– Check passengers for safe entryCheck passengers for safe entry
–– Lock doorsLock doors
–– Place key in appropriate locationPlace key in appropriate location
■■ Seating PositionSeating Position–– Adjust for driver foot pedal and dead pedal positionAdjust for driver foot pedal and dead pedal position
–– Adjust for driver steering wheel reach and hand positionAdjust for driver steering wheel reach and hand position
–– Adjust for driver visual needsAdjust for driver visual needs
T-2.6
Driver Readiness TasksDriver Readiness Tasks
■■ RestraintsRestraints–– Safety belt adjustment and appropriate air bag positionSafety belt adjustment and appropriate air bag position
–– Head restraint position (rear and side protection)Head restraint position (rear and side protection)
■■ MirrorsMirrors–– Rear view mirror settings (200 feet to rear)Rear view mirror settings (200 feet to rear)
–– Side view mirror settings (15 degrees out will gain sideSide view mirror settings (15 degrees out will gain sideviews)views)
•• may be adjusted to view sides rather than rear viewmay be adjusted to view sides rather than rear view
•• rear view needed when inside mirror view is blocked to rearrear view needed when inside mirror view is blocked to rear
T-2.7
Starting TasksStarting Tasks
■■ Check and set parking brakeCheck and set parking brake
■■ Place foot on service brakePlace foot on service brake
–– Clutch required for standard shift transaxle/transmissionClutch required for standard shift transaxle/transmission
■■ Place key in ignition and unlockPlace key in ignition and unlock
■■ Place gear selector in park (P) or neutral (N)Place gear selector in park (P) or neutral (N)
–– Automatic Transaxle/Transmission starts in (P)ark or (N)eutralAutomatic Transaxle/Transmission starts in (P)ark or (N)eutral
–– (N)eutral recommended for standard transaxle/transmission(N)eutral recommended for standard transaxle/transmission
Driver Preparation ProceduresLESSON CONTENT (Instructor Support Information)
Module Two Texas Driver Responsibilities: Preparing to Operate a Vehicle Page 9
Texas Essential Knowledge and Skills: § 110.42. English I (b) (4) The student useswriting as a tool for learning. (B) to discover, organize, and support what is knownand what needs to be learned. (14) The student listens attentively for a variety ofpurposes. (A) focus attention on speaker’s message. Texas Education Agency
Driving ThroughA New Century
Driver Readiness Tasks (recommended for use in-car)
• Security needs- entry checks- locking doors
• Seating Position- feet position- arm position- hand position- visual needs
• Active Restraints- safety belts- head restraints
• Mirror Settings- rear mirror setting position- side mirror setting to reduce mirror blind zone and glare elimination (BGE)
Starting Tasks (recommended for use in-car)
• Check parking brake• Foot on brake• Key in ignition• Gear in “Park or Neutral”• Check for fuel injection or automatic choke• Turn key to “on” position• Check alert lights and gauges• Turn key to start engine• Adjust Heating, Ventilation, and Air Conditioning (HVAC)• Set accessories (headlights or daylight running lights are recommended)• Check for warning lights and gauges
It is recommended that the “Owner’s Manual” for the driver education vehicle beused as supplemental text materials in this session. The owner’s manual often hasstarting and securing procedures as an integral part of the getting to know yourvehicle section.
Page 10 Driver Education Classroom and In-car Instruction
GRADE: HS MODULE: TWO TOPIC: 1 TOPIC ACTIVITIES TOPIC RESOURCES
Texas Education Agency
Driving ThroughA New Century
Knowledge and Skills The Instructor:
Module Two—Texas Driving Responsibilities: Preparing to Operate a Vehicle. The studentrecognizes the necessity of making routine vehicle checks and adjustments prior to and afterentering the vehicle; identifies and responds appropriately to alert symbols, warning symbols,vehicle control devices, and safety devices; understands and controls vehicle balance and vehicleoperating space; and appropriately applies the techniques of vehicle reference points to establishroadway position and vehicle placement.
The student is expected to:
Transparency T-2.8Starting Tasks
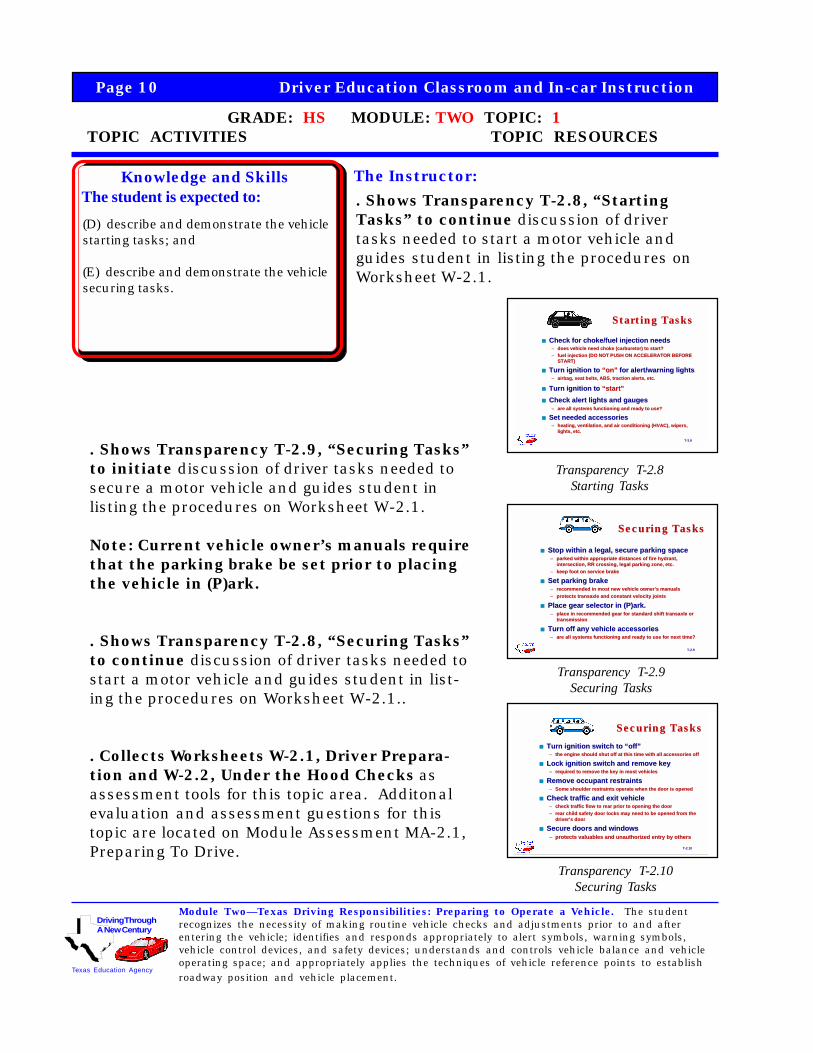
. Shows Transparency T-2.8, “StartingTasks” to continue discussion of drivertasks needed to start a motor vehicle andguides student in listing the procedures onWorksheet W-2.1.
Transparency T-2.9Securing Tasks
Transparency T-2.10Securing Tasks
. Shows Transparency T-2.9, “Securing Tasks”to initiate discussion of driver tasks needed tosecure a motor vehicle and guides student inlisting the procedures on Worksheet W-2.1.
Note: Current vehicle owner’s manuals requirethat the parking brake be set prior to placingthe vehicle in (P)ark.
. Shows Transparency T-2.8, “Securing Tasks”to continue discussion of driver tasks needed tostart a motor vehicle and guides student in list-ing the procedures on Worksheet W-2.1..
. Collects Worksheets W-2.1, Driver Prepara-tion and W-2.2, Under the Hood Checks asassessment tools for this topic area. Additonalevaluation and assessment guestions for thistopic are located on Module Assessment MA-2.1,Preparing To Drive.
(D) describe and demonstrate the vehiclestarting tasks; and
(E) describe and demonstrate the vehiclesecuring tasks.
T-2.8
Starting TasksStarting Tasks
■■ Check for choke/fuel injection needsCheck for choke/fuel injection needs–– does vehicle need choke (carburetor) to start?does vehicle need choke (carburetor) to start?–– fuel injection (DO NOT PUSH ON ACCELERATOR BEFOREfuel injection (DO NOT PUSH ON ACCELERATOR BEFORE
START)START)
■■ Turn ignition to Turn ignition to “on”“on” for alert/warning lights for alert/warning lights–– airbag, seat belts, ABS, traction alerts, etc.airbag, seat belts, ABS, traction alerts, etc.
■■ Turn ignition to Turn ignition to “start”“start”■■ Check alert lights and gaugesCheck alert lights and gauges
–– are all systems functioning and ready to use?are all systems functioning and ready to use?
■■ Set needed accessoriesSet needed accessories–– heating, ventilation, and air conditioning (HVAC), wipers,heating, ventilation, and air conditioning (HVAC), wipers,
lights, etclights, etc..
T-2.9
Securing TasksSecuring Tasks
■■ Stop within a legal, secure parking spaceStop within a legal, secure parking space–– parked within appropriate distances of fire hydrant,parked within appropriate distances of fire hydrant,
intersection, RR crossing, legal parking zone, etc.intersection, RR crossing, legal parking zone, etc.–– keep foot on service brakekeep foot on service brake
■■ Set parking brakeSet parking brake–– recommended in most new vehicle owner’s manualsrecommended in most new vehicle owner’s manuals–– protects transaxle and constant velocity jointsprotects transaxle and constant velocity joints
■■ Place gear selector in (P)ark.Place gear selector in (P)ark.–– place in recommended gear for standard shift transaxle orplace in recommended gear for standard shift transaxle or
transmissiontransmission
■■ Turn off any vehicle accessoriesTurn off any vehicle accessories–– are all systems functioning and ready to use for next time?are all systems functioning and ready to use for next time?
T-2.10
Securing TasksSecuring Tasks
■■ Turn ignition switch to “off”Turn ignition switch to “off”–– the engine should shut off at this time with all accessories offthe engine should shut off at this time with all accessories off
■■ Lock ignition switch and remove keyLock ignition switch and remove key–– required to remove the key in most vehiclesrequired to remove the key in most vehicles
■■ Remove occupant restraintsRemove occupant restraints–– Some shoulder restraints operate when the door is openedSome shoulder restraints operate when the door is opened
■■ Check traffic and exit vehicleCheck traffic and exit vehicle–– check traffic flow to rear prior to opening the doorcheck traffic flow to rear prior to opening the door–– rear child safety door locks may need to be opened from therear child safety door locks may need to be opened from the
driver’s doordriver’s door
■■ Secure doors and windowsSecure doors and windows–– protects valuables and unauthorized entry by othersprotects valuables and unauthorized entry by others
Driver Preparation ProceduresLESSON CONTENT (Instructor Support Information)
Module Two Texas Driver Responsibilities: Preparing to Operate a Vehicle Page 11
Texas Essential Knowledge and Skills: § 110.42. English I (b) (4) The student useswriting as a tool for learning. (B) to discover, organize, and support what is knownand what needs to be learned. (14) The student listens attentively for a variety ofpurposes. (A) focus attention on speaker’s message. Texas Education Agency
Driving ThroughA New Century
Starting Tasks (recommended for use in-car)
• Check parking brake• Foot on brake• Key in ignition• Gear in “Park or Neutral”• Check for fuel injection or automatic choke• Turn key to “on” position• Check alert lights and gauges• Turn key to start engine• Adjust Heating, Ventilation, and Air Conditioning (HVAC)• Set accessories• Check for warning lights and gauges
It is recommended that the “Owner’s Manual” for the driver education vehiclebe used as supplemental text materials in this session. The owner’s manualoften has starting and securing procedures as an integral part of the getting toknow your vehicle section.
Securing Tasks (recommended for use in-car)
• Stop within legal, secure parking space• Set parking brake• Place shift selector in (P)ark• Turn off any accessories used• Turn ignition switch to “off”• “Lock” ignition and remove key• Remove occupant restraints• Check traffic prior to exiting vehicle• Secure doors and windows
“Teaching Your Teens To Drive” (1998) AAA Association Communica-tion provides a video, student guide, and parent guide that hasthree lesson segments devoted to driver preparation, starting, andmoving the vehicle. This resource adds to the information presentedin this segment.
“Teaching YourTeens to Drive”
AAA Video, latest ed.
Page 12 Driver Education Classroom and In-car Instruction
Module Two Topical Outline
Module Two Topic 1 Resources
Module Two, Topic 1 Transparencies:T-2.0, Module Two TransparenciesT-2.1, Pre-Drive TasksT-2.2, Pre-Drive TasksT-2.3, Pre-Drive TasksT-2.4, Under the Hood ChecksT-2.5, Driver Readiness TasksT-2.6, Driver Readiness TasksT-2.7, Starting TasksT-2.8, Starting TasksT-2.9, Securing TasksT-2.10, Securing Tasks
WorksheetsW-2.1, Driver PreparationsW-2.2, Under the Hood Checks
Fact SheetsF-2.1, Preventive Maintenance Checks
AssessmentW-2.1, Driver PreparationsW-2.2, Under the Hood ChecksMA-2.1, Preparing To Drive
Optional Resources“Teaching Your Teens To Drive.” (1996). AAA Association Communication,1000 AAA Drive, Heathrow, FL 32746-5063, or your local AAA office,provides a video, student guide, and parent guide.
“Owners Manual” for the driver education vehicle.
Approved textbooks, videos, and laboratory manuals“Drive Right, Latest Edition”“Empower Yourself with Zone Control Driving, Latest Edition”“Handbook Plus, Texas Edition”“How to Drive, Latest Edition”“License To Drive, Latest Edition”“Responsible Driving, Latest Edition”
Preparing to Operate a Vehicle Page 13
Module Two Topical Outline
Needed Resources Instructor Activities Time Frame
Module Two Prerequisites: Topic Title:
Topic Time Frame: Non-credit course (32 hrs) minutes instructional time Multiphase course (40 hrs) minutes discretional break time Credit course (56 hrs/semester)
Identifying Vehicle Control• Qualifies for Texas Driver’s Permit Devices
Texas Curriculum Guide
Transparencies T-2.11, T-2.12,T-2.13, T-2.14, T-2.15, T-2.16,and T-2.17
Fact Sheets F-2.2
Student Worksheets W-2.3, W-2.4, and W-2.5.
Optional Video:“Teaching Your Teens to Drive”Lesson One: Developing BasicVehicle Control”
“Teaching Your Teens to Drive”Lesson One: Developing BasicVehicle Control” Parent/TeenHandbook
Module Assessment MA-2.1 Test
Textbook Resources “Drive Right” Ch. 3 “Empower Yourself” pp. 1-15 “How to Drive” Ch. 5 “Handbook Plus” Ch. 2 “License to Drive” Ch. 5 “Responsible Driving” Ch. 6
. Review recommended Module Two, Topic2 Lesson Plans
. Review Module Two Topic 2 Transparen-ciesT-2.11, “Alert/Warning Symbols andControls”T-2.12, “Alert/Warning Symbols andControls”T-2.13, “Control, Information, Comfort, andSafety Devices”T-2.14, “Control, Information, Comfort, andSafety Devices”T-2.15, “Control, Information, Comfort, andSafety Devices”T-2.16, “Control, Information, Comfort, andSafety Devices”T-2.17, “Control, Information, Comfort, andSafety Devices”
. Review Student WorksheetW-2.3, “Control and Information De-vices”W-2.4, “Control, Information, Comfort,and Safety Devices”W-2.5, “Family Vehicle InstrumentCluster”
. Review Fact SheetsF-2.2, “Instrument Cluster of 1999 FordF-150 Truck”
. Review AssessmentW-2.3, “Control and Information De-vices”W-2.4, “Control, Information, Comfort,and Safety Devices”W-2.5, “Family Vehicle InstrumentCluster”
MA-2.1 “ Preparing to Drive”
15 minute (prior to lesson)
25 minutes
(2-5 minutes)
(2-5 minutes)
(2-5 minutes)
(2-5 minutes)
(2-5 minutes)
(2-5 minutes)
(2-5 minutes)
Module Two Topic
3 Assessments
2-5 minutes to
collect
For instructor useor additionalinformation
10-15 minutes atthe end of ModuleTwo
2 7.5 30 (60) 8.0 0 (5) 8.0Module Two, Topic 2 is not a required program element.
Page 14 Driver Education Classroom and In-car Instruction
GRADE: HS MODULE: TWO TOPIC: 2 TOPIC ACTIVITIES TOPIC RESOURCES
Texas Education Agency
Driving ThroughA New Century
Knowledge and Skills The Instructor:
Module Two—Texas Driving Responsibilities: Preparing to Operate a Vehicle. The studentrecognizes the necessity of making routine vehicle checks and adjustments prior to and afterentering the vehicle; identifies and responds appropriately to alert symbols, warning symbols,vehicle control devices, and safety devices; understands and controls vehicle balance and vehicleoperating space; and appropriately applies the techniques of vehicle reference points to establishroadway position and vehicle placement.
The student is expected to: . Shows Transparencies T-2.11 “Alert/Warning Symbols and Controls” to identifyand initiate a class discussion concerningthe alert and warning symbols found inmotor vehiclesthat provideinformation onvehicular con-trol, conve-
Transparency T-2.11Alert/Warning Symbols and Controls
Transparency T-2.12Alert/Warning Symbols and Controls
nience, safety and communication devices withattention to their safe and proper use.
. Shows Transparencies T-2.12 “Alert/WarningSymbols and Controls” to identify and continue aclass discussion concerning the alert and warningsymbols.
. Uses Worksheet W-2.3, “Control and Informa-tion Devices” during classroom discussion toillustrate the various operational controls.
. Provides W-2.5, “Family Vehicle InstrumentCluster” for use as a parent involvement activityutilizing the owner’s manual for the family vehicle(or that of a friend) to compare the control andinformation devices and symbols included in thedashboard of the vehicle with the one illustrated onthe worksheet.
Note: W-2.5, “Family Vehicle Instrument Clus-ter” may be used as a Topic 3 assessment tool,which gives students a longer time period tocomplete the exercise.
Worksheet W-2.5
“Family VehicleInstrument
Cluster”
Worksheet W-2.3
“Control andInformation,
Devices”
(A) recognize each vehicular alert orwarning symbol and explain thesymbol’s function and operation;
Alert/Warning Symbols and ControlsAlert/Warning Symbols and Controls
A.A.
B.B.
C.C.
D.D.
E.E.
F.F.
G.G.
H.H.
I.I.
J.J.
K.K.
L.L.
M.M.
N.N.
O.O.
P.P.
Q.Q.
R.R.
S.S.
T.T.
T-2.11
Alert/Warning Symbols and ControlsAlert/Warning Symbols and Controls
Z.Z.
AA.AA.
BB.BB.
CC.CC.
DD.DD.
EE.EE.
FF.FF.
GG.GG.
HH.HH.
II II.
JJ.JJ.
KK.KK.
LL.LL.
MM.MM.
NN.NN.
U.U.
V.V.
W.W.
X.X.
Y.Y.
T-2.12
Identifying Vehicle Control DevicesLESSON CONTENT (Instructor Support Information)
Module Two Texas Driver Responsibilities: Preparing to Operate a Vehicle Page 15
Texas Essential Knowledge and Skills: § 110.42. English I (b) (4) The student useswriting as a tool for learning. (B) to discover, organize, and support what is knownand what needs to be learned. (14) The student listens attentively for a variety ofpurposes. (A) focus attention on speaker’s message. Texas Education Agency
Driving ThroughA New Century
The purpose of this lesson is to:
• Assist students in recognizing the symbols used to identify the operation, safety,communication, and control devices found in motor vehicles
• Assist students to correctly respond to and operate the various safety, communi-cation, and control devices found in motor vehicles
Transparency answers include:
A. Air Bag On/Off Switch B. Air Bag ActivationC. Antilock Brake System Activation D. Theft Deterrent System ActivationE. 12 Volt Extension Outlet F. Battery Warning LightG. Brake Warning Light H. Safety Alert SymbolI. Vent and Air Flow Control J. Door LocksK. Low Oil Pressure Warning Light L. Temperature IndicatorM. Seat Belt Reminder N. Fog LampsO. Drive Wheel Selector P. Fuel IndicatorQ. Fuse / Fuse Box R. Emergency FlashersS. Turn Signal/Wipers Stalk T. Daytime Running Lights
U. Headlights/High Beam Indicator V. Hood ReleaseW. Horn X. Fan Speed IndicatorY. Interior Light Adjustment Z. Lighter IndicatorAA. Exterior Lights BB. Overdrive On/Off switchCC. Parking Lamp Indicator DD. Adjust Left/Right Side MirrorEE. Power Window Controls FF. Rear Defroster IndicatorGG. Electronic Traction System Control HH. Steering Wheel Height AdjustmentII. Trunk Release JJ. Left/Right Signal IndicatorKK. Front Windshield Defroster LL. Windshield WasherMM. Windshield Wipers NN. Cruise Control Device
Use of the driver education vehicle owner’s manual to illustrate specific differencesrecommended for this lesson activity.
““Teaching Your Teens To Drive” (1998) AAA AssociationCommunication provides a video, student guide, andparent guide that have three lesson segments devoted todriver preparation, starting, and moving the vehicle. Thisresource adds to the information presented in this seg-ment.
“Teaching YourTeens to Drive”
AAA Video, latest ed.
Page 16 Driver Education Classroom and In-car Instruction
GRADE: HS MODULE: TWO TOPIC: 2 TOPIC ACTIVITIES TOPIC RESOURCES
Texas Education Agency
Driving ThroughA New Century
Knowledge and Skills The Instructor:
Module Two—Texas Driving Responsibilities: Preparing to Operate a Vehicle. The studentrecognizes the necessity of making routine vehicle checks and adjustments prior to and afterentering the vehicle; identifies and responds appropriately to alert symbols, warning symbols,vehicle control devices, and safety devices; understands and controls vehicle balance and vehicleoperating space; and appropriately applies the techniques of vehicle reference points to establishroadway position and vehicle placement.
The student is expected to:
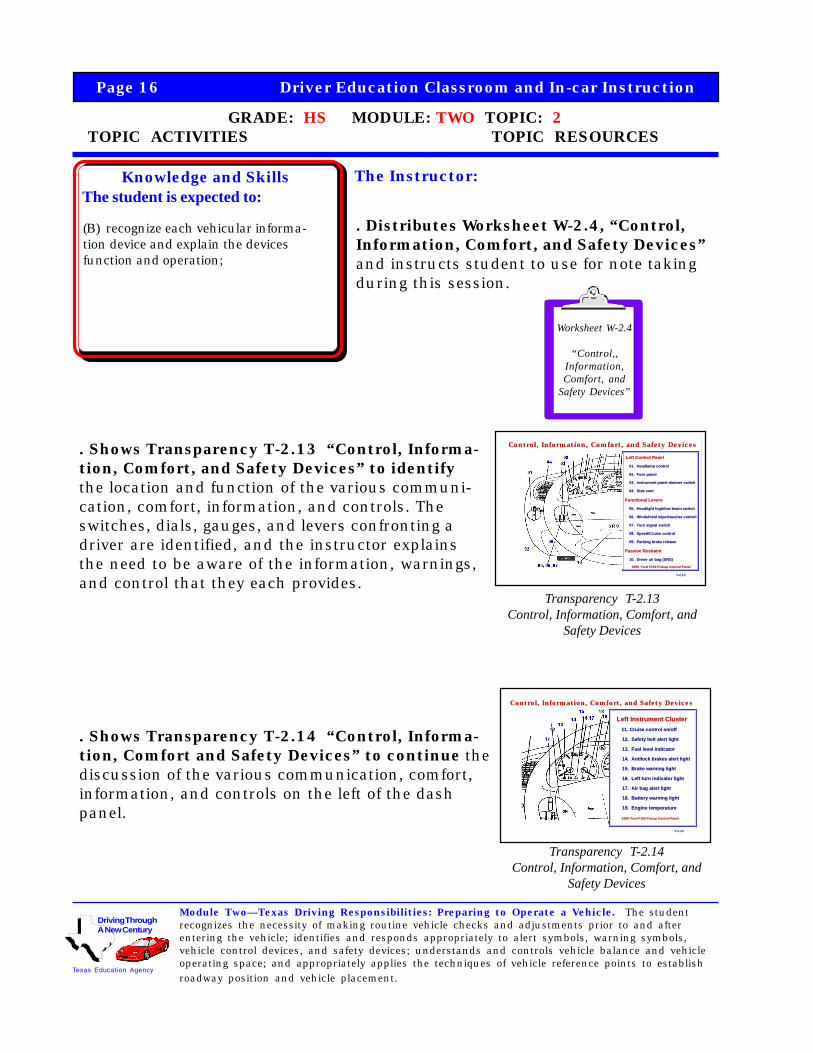
. Distributes Worksheet W-2.4, “Control,Information, Comfort, and Safety Devices”and instructs student to use for note takingduring this session.
. Shows Transparency T-2.13 “Control, Informa-tion, Comfort, and Safety Devices” to identifythe location and function of the various communi-cation, comfort, information, and controls. Theswitches, dials, gauges, and levers confronting adriver are identified, and the instructor explainsthe need to be aware of the information, warnings,and control that they each provides.
. Shows Transparency T-2.14 “Control, Informa-tion, Comfort and Safety Devices” to continue thediscussion of the various communication, comfort,information, and controls on the left of the dashpanel.
Transparency T-2.13Control, Information, Comfort, and
Safety Devices
Transparency T-2.14Control, Information, Comfort, and
Safety Devices
Worksheet W-2.4
“Control,,Information,Comfort, and
Safety Devices”
(B) recognize each vehicular informa-tion device and explain the devicesfunction and operation;
Left Control PanelLeft Control Panel
01. Headlamp control01. Headlamp control
02. Fuse panel 02. Fuse panel
03. Instrument panel dimmer switch 03. Instrument panel dimmer switch
04. Side vent 04. Side vent
Functional LeversFunctional Levers
05. Headlight high/low beam switch 05. Headlight high/low beam switch
06. Windshield wiper/washer control 06. Windshield wiper/washer control
07. Turn signal switch 07. Turn signal switch
08. Speed/Cruise control 08. Speed/Cruise control
09. Parking brake release 09. Parking brake release
Passive RestraintPassive Restraint
10. Driver air bag (SRS) 10. Driver air bag (SRS)
Control, Information, Comfort, and Safety DevicesControl, Information, Comfort, and Safety Devices
1999 Ford F150 Pickup Control Panel1999 Ford F150 Pickup Control Panel
T-2.13
Left Instrument ClusterLeft Instrument Cluster 11. Cruise control on/off11. Cruise control on/off
12. Safety belt alert light 12. Safety belt alert light
13. Fuel level indicator 13. Fuel level indicator
14. Antilock brakes alert light 14. Antilock brakes alert light
15. Brake warning light 15. Brake warning light
16. Left turn indicator light 16. Left turn indicator light
17. Air bag alert light 17. Air bag alert light
18. Battery warning light 18. Battery warning light
19. Engine temperature 19. Engine temperature
1999 Ford F150 Pickup Control Panel1999 Ford F150 Pickup Control Panel
Control, Information, Comfort, and Safety DevicesControl, Information, Comfort, and Safety Devices
T-2.14
Identifying Vehicle Control DevicesLESSON CONTENT (Instructor Support Information)
Module Two Texas Driver Responsibilities: Preparing to Operate a Vehicle Page 17
Texas Essential Knowledge and Skills: § 110.42. English I (b) (4) The student useswriting as a tool for learning. (B) to discover, organize, and support what is knownand what needs to be learned. (14) The student listens attentively for a variety ofpurposes. (A) focus attention on speaker’s message. Texas Education Agency
Driving ThroughA New Century
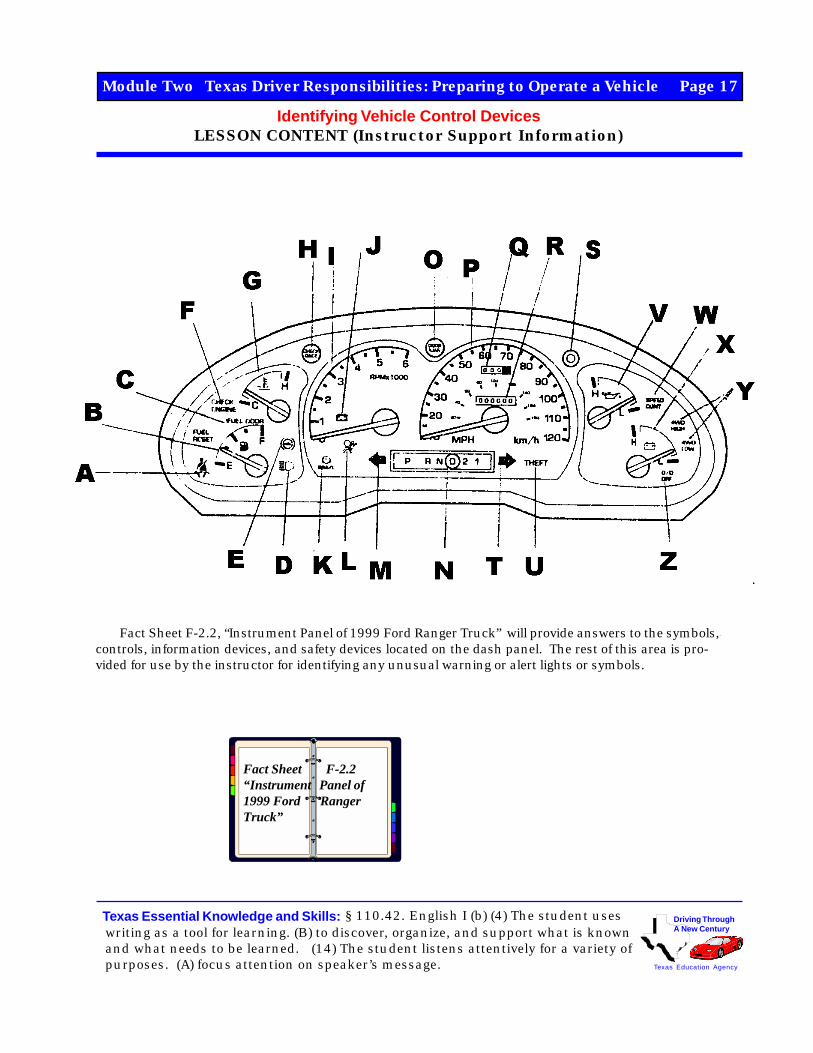
Fact Sheet F-2.2, “Instrument Panel of 1999 Ford Ranger Truck” will provide answers to the symbols,controls, information devices, and safety devices located on the dash panel. The rest of this area is pro-vided for use by the instructor for identifying any unusual warning or alert lights or symbols.
Fact Sheet F-2.2“Instrument Panel of1999 Ford RangerTruck”
Page 18 Driver Education Classroom and In-car Instruction
GRADE: HS MODULE: TWO TOPIC: 2 TOPIC ACTIVITIES TOPIC RESOURCES
Texas Education Agency
Driving ThroughA New Century
Knowledge and Skills The Instructor:
Module Two—Texas Driving Responsibilities: Preparing to Operate a Vehicle. The studentrecognizes the necessity of making routine vehicle checks and adjustments prior to and afterentering the vehicle; identifies and responds appropriately to alert symbols, warning symbols,vehicle control devices, and safety devices; understands and controls vehicle balance and vehicleoperating space; and appropriately applies the techniques of vehicle reference points to establishroadway position and vehicle placement.
The student is expected to:
Transparency T-2.16Control, Information, Comfort, and
Safety Devices
Transparency T-2.17Control, Information, Comfort, and
Safety Devices
Transparency T-2.15Control, Information, Comfort, and
Safety Devices
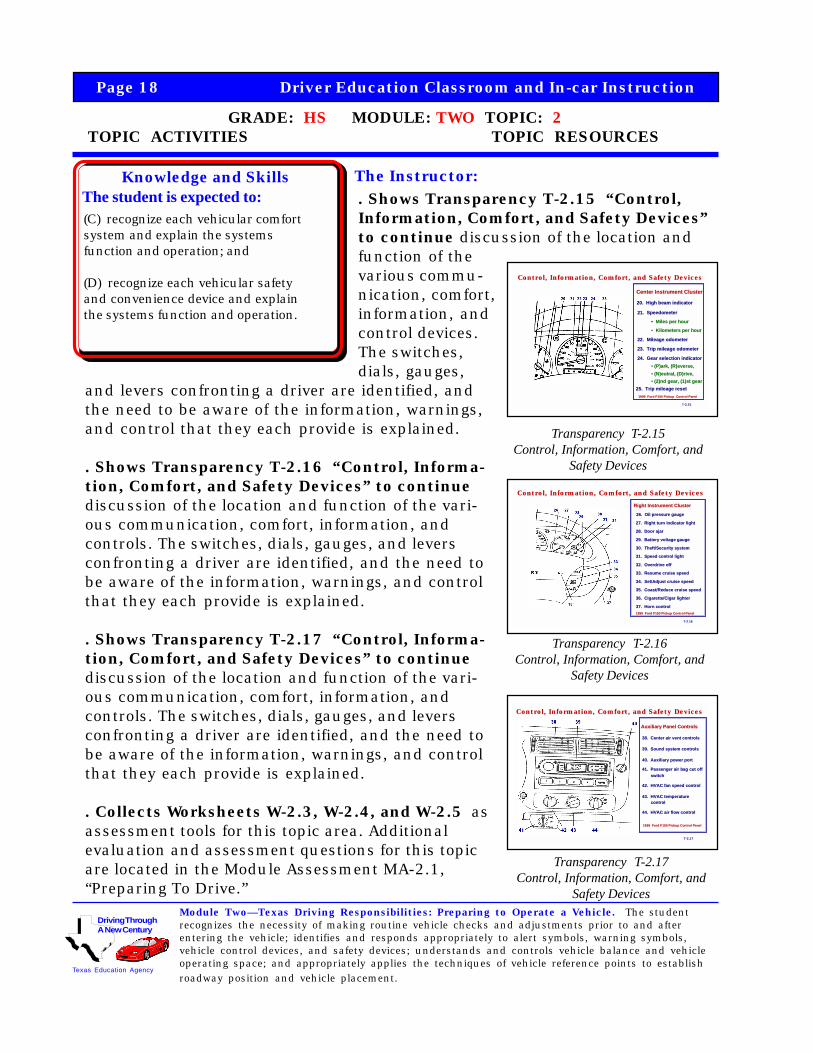
. Shows Transparency T-2.15 “Control,Information, Comfort, and Safety Devices”to continue discussion of the location andfunction of thevarious commu-nication, comfort,information, andcontrol devices.The switches,dials, gauges,
(C) recognize each vehicular comfortsystem and explain the systemsfunction and operation; and
(D) recognize each vehicular safetyand convenience device and explainthe systems function and operation.
and levers confronting a driver are identified, andthe need to be aware of the information, warnings,and control that they each provide is explained.
. Shows Transparency T-2.16 “Control, Informa-tion, Comfort, and Safety Devices” to continuediscussion of the location and function of the vari-ous communication, comfort, information, andcontrols. The switches, dials, gauges, and leversconfronting a driver are identified, and the need tobe aware of the information, warnings, and controlthat they each provide is explained.
. Shows Transparency T-2.17 “Control, Informa-tion, Comfort, and Safety Devices” to continuediscussion of the location and function of the vari-ous communication, comfort, information, andcontrols. The switches, dials, gauges, and leversconfronting a driver are identified, and the need tobe aware of the information, warnings, and controlthat they each provide is explained.
. Collects Worksheets W-2.3, W-2.4, and W-2.5 asassessment tools for this topic area. Additionalevaluation and assessment questions for this topicare located in the Module Assessment MA-2.1,“Preparing To Drive.”
Center Instrument Cluster Center Instrument Cluster
20. High beam indicator20. High beam indicator
21. Speedometer 21. Speedometer
•• Miles per hourMiles per hour
•• Kilometers per hour Kilometers per hour
22. Mileage odometer 22. Mileage odometer
23. Trip mileage odometer 23. Trip mileage odometer
24. Gear selection indicator 24. Gear selection indicator•• (P)ark, (R) (P)ark, (R)everseeverse,,•• (N) (N)eutraleutral, (D)rive,, (D)rive,•• (2) (2)nd nd gear, (1)gear, (1)st st geargear
25. Trip mileage reset 25. Trip mileage reset1999 Ford F150 Pickup Control Panel1999 Ford F150 Pickup Control Panel
Control, Information, Comfort, and Safety DevicesControl, Information, Comfort, and Safety Devices
T-2.15
Right Instrument Cluster Right Instrument Cluster
26. Oil pressure gauge26. Oil pressure gauge
27. Right turn indicator light 27. Right turn indicator light
28. Door ajar 28. Door ajar
29. Battery voltage gauge 29. Battery voltage gauge
30. Theft/Security system 30. Theft/Security system
31. Speed control light 31. Speed control light
32. Overdrive off 32. Overdrive off
33. Resume cruise speed 33. Resume cruise speed
34. Set/Adjust cruise speed 34. Set/Adjust cruise speed
35. Coast/Reduce cruise speed 35. Coast/Reduce cruise speed
36. Cigarette/Cigar lighter 36. Cigarette/Cigar lighter
37. Horn control 37. Horn control1999 Ford F150 Pickup Control Panel1999 Ford F150 Pickup Control Panel
Control, Information, Comfort, and Safety DevicesControl, Information, Comfort, and Safety Devices
T-2.16
Auxiliary Panel Controls Auxiliary Panel Controls
38. Center air vent controls 38. Center air vent controls
39. Sound system controls 39. Sound system controls
40. Auxiliary power port 40. Auxiliary power port
41. Passenger air bag cut off 41. Passenger air bag cut off switch switch
42. HVAC fan speed control 42. HVAC fan speed control
43. HVAC temperature 43. HVAC temperature control control
44. HVAC air flow control 44. HVAC air flow control
1999 Ford F150 Pickup Control Panel1999 Ford F150 Pickup Control Panel
Control, Information, Comfort, and Safety DevicesControl, Information, Comfort, and Safety Devices
T-2.17
Identifying Vehicle Control DevicesLESSON CONTENT (Instructor Support Information)
Module Two Texas Driver Responsibilities: Preparing to Operate a Vehicle Page 19
Texas Essential Knowledge and Skills: § 110.42. English I (b) (4) The student useswriting as a tool for learning. (B) to discover, organize, and support what is knownand what needs to be learned. (14) The student listens attentively for a variety ofpurposes. (A) focus attention on speaker’s message. Texas Education Agency
Driving ThroughA New Century
Worksheet W-2.3
“Control andInformation Devices”
Worksheet W-2.5
“Family VehicleInstrument Cluster”
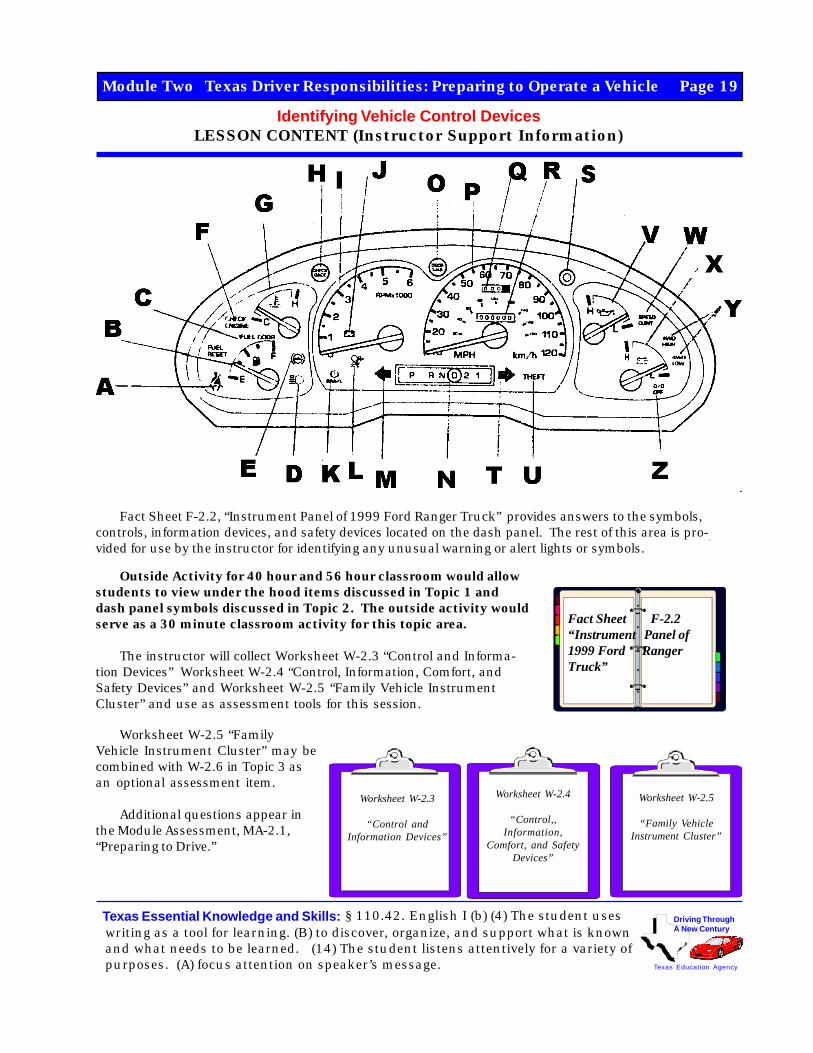
Fact Sheet F-2.2, “Instrument Panel of 1999 Ford Ranger Truck” provides answers to the symbols,controls, information devices, and safety devices located on the dash panel. The rest of this area is pro-vided for use by the instructor for identifying any unusual warning or alert lights or symbols.
Fact Sheet F-2.2“Instrument Panel of1999 Ford RangerTruck”
Worksheet W-2.4
“Control,,Information,
Comfort, and SafetyDevices”
Outside Activity for 40 hour and 56 hour classroom would allowstudents to view under the hood items discussed in Topic 1 anddash panel symbols discussed in Topic 2. The outside activity wouldserve as a 30 minute classroom activity for this topic area.
The instructor will collect Worksheet W-2.3 “Control and Informa-tion Devices” Worksheet W-2.4 “Control, Information, Comfort, andSafety Devices” and Worksheet W-2.5 “Family Vehicle InstrumentCluster” and use as assessment tools for this session.
Worksheet W-2.5 “FamilyVehicle Instrument Cluster” may becombined with W-2.6 in Topic 3 asan optional assessment item.
Additional questions appear inthe Module Assessment, MA-2.1,“Preparing to Drive.”
Page 20 Driver Education Classroom and In-car Instruction
Module Two Topical Outline
Module Two Topic 2 Resources
Module Two, Topic 2 Transparencies:T-2.11, “Alert/Warning Symbols and Controls”T-2.12, “Alert/Warning Symbols and Controls”T-2.13, “Control, Information, Comfort, and Safety Devices”T-2.14, “Control, Information, Comfort, and Safety Devices”T-2.15, “Control, Information, Comfort, and Safety Devices”T-2.16, “Control, Information, Comfort, and Safety Devices”T-2.17, “Control, Information, Comfort, and Safety Devices”
WorksheetsW-2.3, “Control and Information Devices”W-2.4, “Control, Information, Comfort, and Safety Devices”W-2.5, “Family Vehicle Instrument Cluster”
Fact Sheets F-2.2, “Instrument Cluster of 1999 Ford F-150 Truck”
AssessmentW-2.3, “Control and Information Devices”W-2.4, “Control, Information, Comfort, and Safety Devices”W-2.5, “Family Vehicle Instrument Cluster”MA-2.1 “ Preparing to Drive”
Suggested Resources“Teaching Your Teens To Drive.” (1996). AAA Association Communication,1000 AAA Drive, Heathrow, FL 32746-5063, or your local AAA office,provides a video, student guide, and parent guide.
“Owner’s Manual” for the driver education vehicle.
Approved textbooks, videos, and laboratory manuals“Drive Right, Latest Edition”“Empower Yourself with Zone Control Driving, Latest Edition”“Handbook Plus, Texas Edition”“How to Drive, Latest Edition”“License To Drive, Latest Edition”“Responsible Driving, Latest Edition”
Preparing to Operate a Vehicle Page 21
Module Two Topical Outline
Needed Resources Instructor Activities Time Frame
Module Two Prerequisites: Topic Title:
Topic Time Frame: Non-credit course (32 hrs) minutes instructional time Multiphase course (40 hrs) minutes discretional break time Credit course (56 hrs/semester)
Operating Vehicle Control • Qualifies for Texas Driver’s Permit Devices
3 8.5 55 9.0 5 9.0
Textbook
Transparencies T-2.18, T-2.19,T-2.20, T-2.21, T-2.22, and T-2.23
Fact Sheet F-2.3
Student Worksheets W-2.5 andW-2.6
Module Assessment MA-2.1 Test
Optional Video:“Teaching Your Teens to Drive”Lesson One: Developing BasicVehicle Control”
“Teaching Your Teens to Drive”Lesson One: Developing BasicVehicle Control” Parent/TeenHandbook
Textbook Resources “Drive Right” Ch. 3 “Empower Yourself” pp. 1-15 “How to Drive” Ch. 5 “Handbook Plus” Ch. 2 “License to Drive” Ch. 5 “Responsible Driving” Ch. 6
. Review recommended Module Two, Topic3 Lesson Plans
. Review Module Two Topic 2 Transparen-ciesT-2.18, “Operating Vehicle ControlDevices”T-2.19, “Operating Vehicle ControlDevices”T-2.20, “Operating Vehicle ControlDevices”T-2.21, “Safety , Communication, andConvenience Devices”T-2.22, “Safety , Communication, andConvenience Devices”T-2.23, “Safety , Communication, andConvenience Devices”
. Review Student Worksheet W-2.5, “Family Vehicle Instrument Cluster” W-2.6, “Family Vehicle Equipment”
. Review Fact Sheets F-2.3, “Operating Vehicle Control Devices”
. Review Assessment W-2.5, “Family Vehicle Instrument Cluster” W-2.6, “Family Vehicle Equipment”
MA-2.1 “ Preparing to Drive”
15 minute (prior to lesson)
50 minutes
(5-8 minutes)
(5-8 minutes)
(5-8 minutes)
(5-8 minutes)
(5-8 minutes)
(5-8 minutes)
Module Two Topic
2 Assessments
2-5 minutes to
collect
For instructor useor additionalinformation
10-15 minutes atthe end of ModuleTwo
Module Two, Topic 3 is not a required program element.
Page 22 Driver Education Classroom and In-car Instruction
GRADE: HS MODULE: TWO TOPIC: 3 TOPIC ACTIVITIES TOPIC RESOURCES
Texas Education Agency
Driving ThroughA New Century
Knowledge and Skills The Instructor:
Module Two—Texas Driving Responsibilities: Preparing to Operate a Vehicle. The studentrecognizes the necessity of making routine vehicle checks and adjustments prior to and afterentering the vehicle; identifies and responds appropriately to alert symbols, warning symbols,vehicle control devices, and safety devices; understands and controls vehicle balance and vehicleoperating space; and appropriately applies the techniques of vehicle reference points to establishroadway position and vehicle placement.
The student is expected to:
Transparency T-2.19Operating Vehicle Control Devices
Transparency T-2.18Operating Vehicle Control Devices
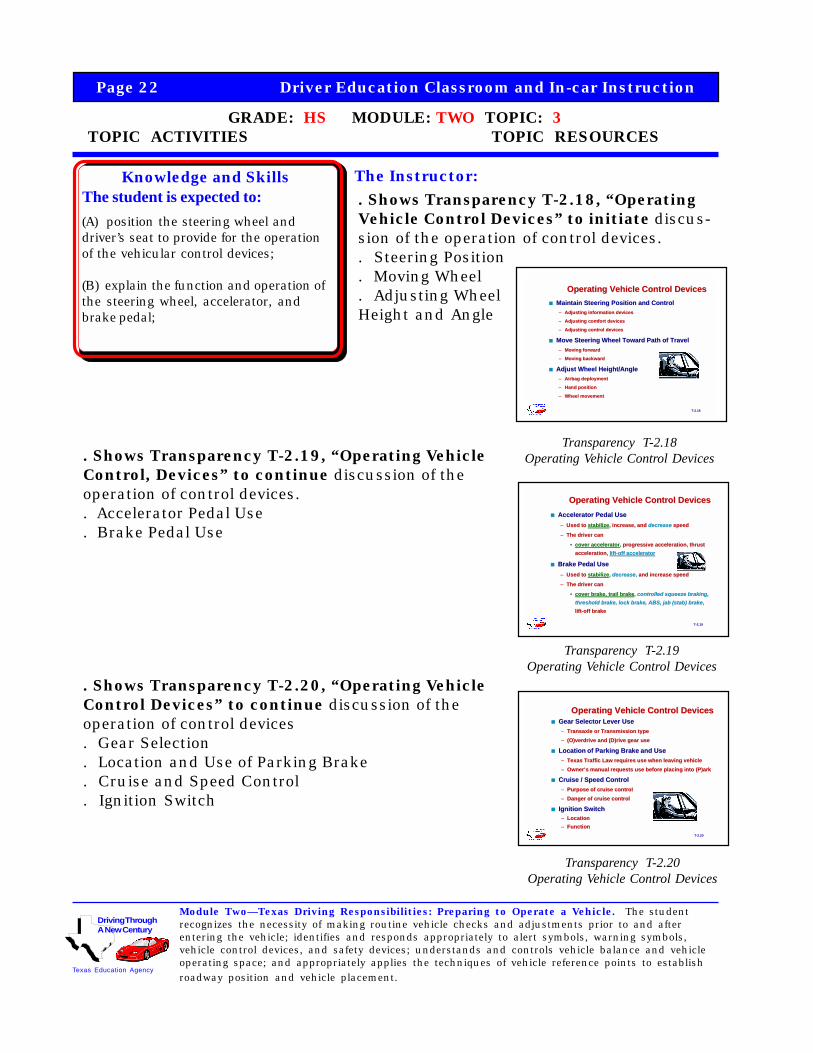
. Shows Transparency T-2.18, “OperatingVehicle Control Devices” to initiate discus-sion of the operation of control devices.. Steering Position. Moving Wheel. Adjusting WheelHeight and Angle
. Shows Transparency T-2.19, “Operating VehicleControl, Devices” to continue discussion of theoperation of control devices.. Accelerator Pedal Use. Brake Pedal Use
. Shows Transparency T-2.20, “Operating VehicleControl Devices” to continue discussion of theoperation of control devices. Gear Selection. Location and Use of Parking Brake. Cruise and Speed Control. Ignition Switch
Transparency T-2.20Operating Vehicle Control Devices
(A) position the steering wheel anddriver’s seat to provide for the operationof the vehicular control devices;
(B) explain the function and operation ofthe steering wheel, accelerator, andbrake pedal;
T-2.18
Operating Vehicle Control DevicesOperating Vehicle Control Devices■■ Maintain Steering Position and ControlMaintain Steering Position and Control
–– Adjusting information devicesAdjusting information devices
–– Adjusting comfort devicesAdjusting comfort devices
–– Adjusting control devicesAdjusting control devices
■■ Move Steering Wheel Toward Path of TravelMove Steering Wheel Toward Path of Travel–– Moving forwardMoving forward
–– Moving backwardMoving backward
■■ Adjust Wheel Height/AngleAdjust Wheel Height/Angle–– Airbag deploymentAirbag deployment
–– Hand positionHand position
–– Wheel movementWheel movement
T-2.19
Operating Vehicle Control DevicesOperating Vehicle Control Devices■■ Accelerator Pedal UseAccelerator Pedal Use
–– Used to Used to stabilizestabilize,, increase, and increase, and decreasedecrease speed speed
–– The driver canThe driver can
•• cover acceleratorcover accelerator,, progressive acceleration, thrust progressive acceleration, thrustacceleration, acceleration, lift-off acceleratorlift-off accelerator
■■ Brake Pedal UseBrake Pedal Use–– Used to Used to stabilizestabilize,, decreasedecrease,, and increase speed and increase speed
–– The driver canThe driver can
•• cover brake, trail brakecover brake, trail brake,, controlled squeeze braking,controlled squeeze braking,threshold brake, lock brake, ABS, jab (stab) brakethreshold brake, lock brake, ABS, jab (stab) brake,,lift-off brakelift-off brake
T-2.20
Operating Vehicle Control DevicesOperating Vehicle Control Devices■■ Gear Selector Lever UseGear Selector Lever Use
–– Transaxle or Transmission typeTransaxle or Transmission type–– (O)(O)verdrive verdrive and (D)rive gear useand (D)rive gear use
■■ LocationLocation of Parking Brakeof Parking Brake and Useand Use–– Texas Traffic Law requires use when leaving vehicleTexas Traffic Law requires use when leaving vehicle–– Owner’s manual requests use before placing into (P)arkOwner’s manual requests use before placing into (P)ark
■■ Cruise / Speed ControlCruise / Speed Control–– Purpose of cruise controlPurpose of cruise control–– Danger of cruise controlDanger of cruise control
■■ Ignition SwitchIgnition Switch–– LocationLocation–– FunctionFunction
Operating Vehicle Control DevicesLESSON CONTENT (Instructor Support Information)
Module Two Texas Driver Responsibilities: Preparing to Operate a Vehicle Page 23
Texas Essential Knowledge and Skills: § 110.42. English I (b) (4) The student useswriting as a tool for learning. (B) to discover, organize, and support what is knownand what needs to be learned. (14) The student listens attentively for a variety ofpurposes. (A) focus attention on speaker’s message. Texas Education Agency
Driving ThroughA New Century
It is important that students know the location, purpose, and operation of thevarious controls, safety, comfort, and convenience devices when driving a motorvehicle. However, it is essential that they understand the increased risk associ-ated with directing their attention to a task other than driving, i.e., talking on acell phone, talking to friends in the car, or tuning a radio. Any of these activitiestend to lower one’s level of alertness directed to driving and, typically, has anadverse effect on steering.
Operating Vehicle Control Devices• Steering• Steering Wheel Adjustment• Gear Selector Lever• Parking Brake• Cruise/Speed Control• Ignition Switch• Accelerator Pedal• Brake Pedal
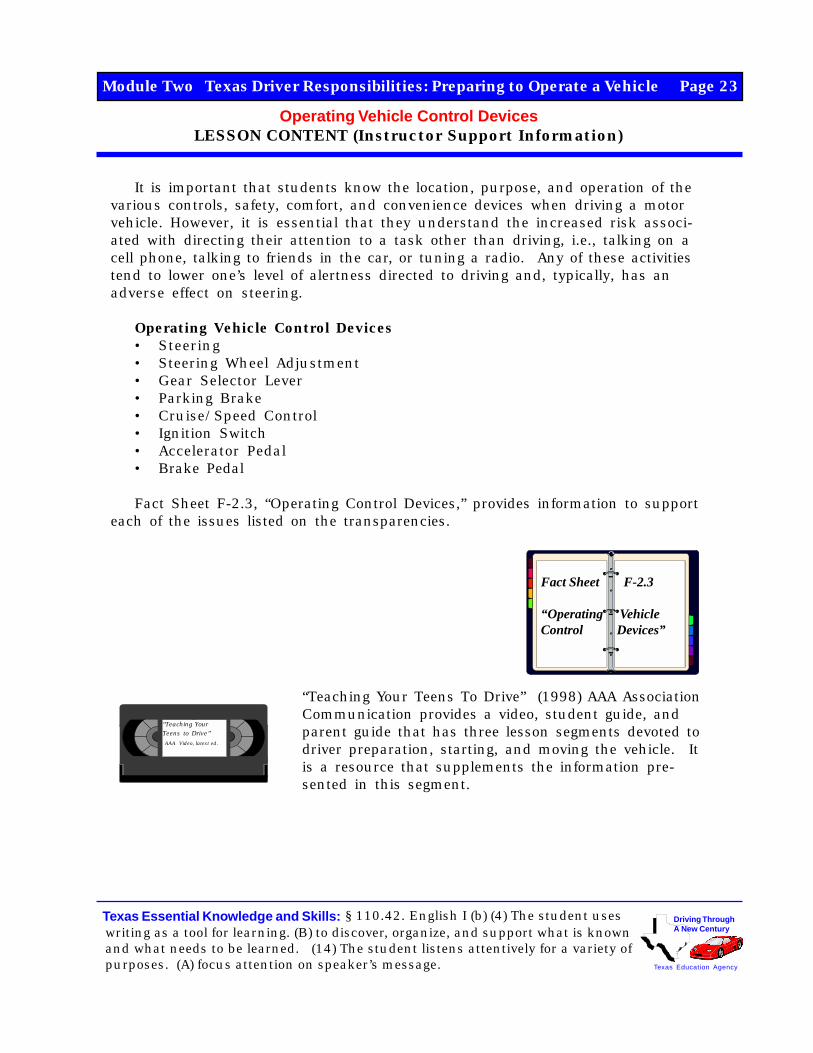
Fact Sheet F-2.3, “Operating Control Devices,” provides information to supporteach of the issues listed on the transparencies.
“Teaching Your Teens To Drive” (1998) AAA AssociationCommunication provides a video, student guide, andparent guide that has three lesson segments devoted todriver preparation, starting, and moving the vehicle. Itis a resource that supplements the information pre-sented in this segment.
“Teaching YourTeens to Drive”
AAA Video, latest ed.
Fact Sheet F-2.3
“Operating VehicleControl Devices”
Page 24 Driver Education Classroom and In-car Instruction
GRADE: HS MODULE: TWO TOPIC: 3 TOPIC ACTIVITIES TOPIC RESOURCES
Texas Education Agency
Driving ThroughA New Century
Knowledge and Skills The Instructor:
Module Two—Texas Driving Responsibilities: Preparing to Operate a Vehicle. The studentrecognizes the necessity of making routine vehicle checks and adjustments prior to and afterentering the vehicle; identifies and responds appropriately to alert symbols, warning symbols,vehicle control devices, and safety devices; understands and controls vehicle balance and vehicleoperating space; and appropriately applies the techniques of vehicle reference points to establishroadway position and vehicle placement.
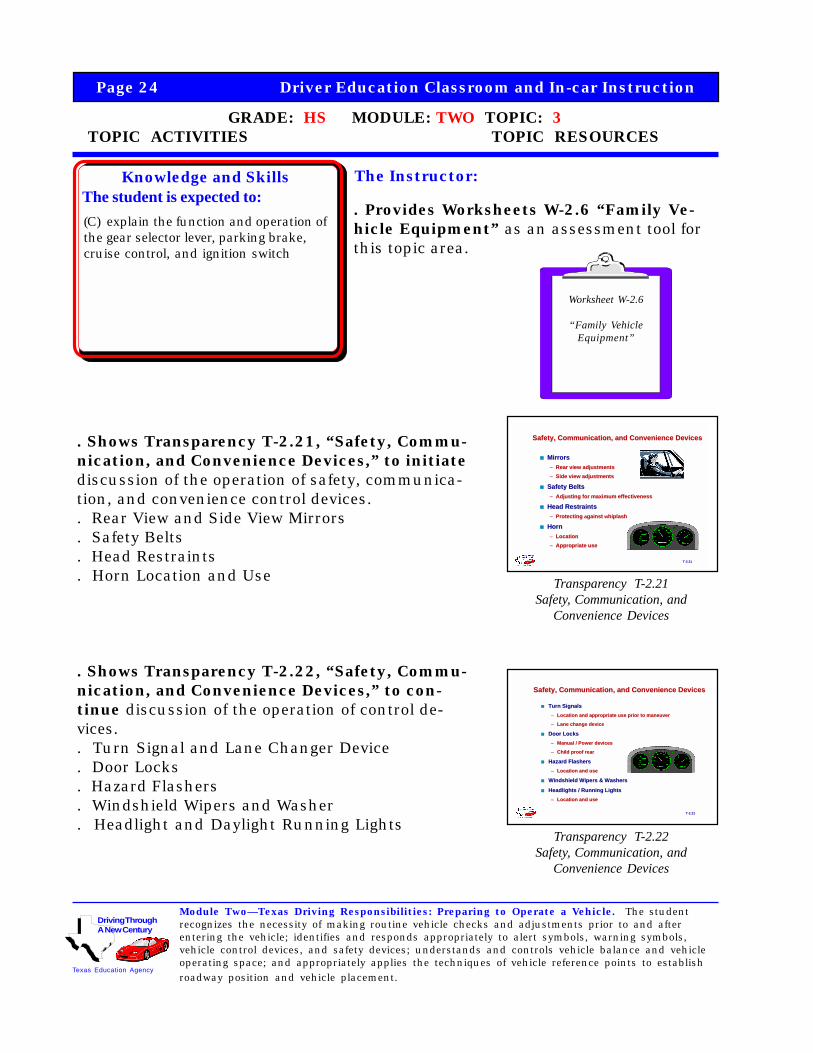
The student is expected to:. Provides Worksheets W-2.6 “Family Ve-hicle Equipment” as an assessment tool forthis topic area.
Transparency T-2.21Safety, Communication, and
Convenience Devices
. Shows Transparency T-2.21, “Safety, Commu-nication, and Convenience Devices,” to initiatediscussion of the operation of safety, communica-tion, and convenience control devices.. Rear View and Side View Mirrors. Safety Belts. Head Restraints. Horn Location and Use
. Shows Transparency T-2.22, “Safety, Commu-nication, and Convenience Devices,” to con-tinue discussion of the operation of control de-vices.. Turn Signal and Lane Changer Device. Door Locks. Hazard Flashers. Windshield Wipers and Washer. Headlight and Daylight Running Lights
Transparency T-2.22Safety, Communication, and
Convenience Devices
Worksheet W-2.6
“Family VehicleEquipment”
(C) explain the function and operation ofthe gear selector lever, parking brake,cruise control, and ignition switch
T-2.21
Safety, Communication, and Convenience DevicesSafety, Communication, and Convenience Devices
■■ MirrorsMirrors–– Rear view adjustmentsRear view adjustments–– Side view adjustmentsSide view adjustments
■■ Safety BeltsSafety Belts–– Adjusting for maximum effectivenessAdjusting for maximum effectiveness
■■ Head RestraintsHead Restraints–– Protecting Protecting aagainst gainst wwhiplashhiplash
■■ HornHorn–– LocationLocation–– Appropriate useAppropriate use
T-2.22
Safety, Communication, and Convenience DevicesSafety, Communication, and Convenience Devices
■■ Turn SignalsTurn Signals–– Location and appropriate use prior to maneuverLocation and appropriate use prior to maneuver
–– Lane change deviceLane change device
■■ Door LocksDoor Locks–– Manual / Power devicesManual / Power devices
–– Child proof rearChild proof rear
■■ Hazard FlashersHazard Flashers–– Location and useLocation and use
■■ Windshield Wipers & WashersWindshield Wipers & Washers
■■ Headlights / Running LightsHeadlights / Running Lights–– Location and useLocation and use

Operating Vehicle Control DevicesLESSON CONTENT (Instructor Support Information)
Module Two Texas Driver Responsibilities: Preparing to Operate a Vehicle Page 25
Texas Essential Knowledge and Skills: § 110.42. English I (b) (4) The student useswriting as a tool for learning. (B) to discover, organize, and support what is knownand what needs to be learned. (14) The student listens attentively for a variety ofpurposes. (A) focus attention on speaker’s message. Texas Education Agency
Driving ThroughA New Century
Safety, Communication, Comfort, and Convenience Devices
• Mirrors
• Safety Belts
• Head Restraint
• Horn
• Turn Signal Lever
• Door Locks
• Hazard Flasher
• Windshield Wipers and Washers
• Headlights
Fact Sheet F-2.3, “Operating Control Devices,” provides information to support eachof the issues listed on the transparencies.
“Teaching Your Teens To Drive” (1998) AAA Association Com-munication provides a video, student guide, and parent guidethat has three lesson segments devoted to driver preparation,starting, and moving the vehicle. It is a resource that supple-ments the information presented in this segment.
Fact Sheet F-2.3
“Operating VehicleControl Devices”
“Teaching YourTeens to Drive”
AAA Video, latest ed.

Page 26 Driver Education Classroom and In-car Instruction
GRADE: HS MODULE: TWO TOPIC: 3 TOPIC ACTIVITIES TOPIC RESOURCES
Texas Education Agency
Driving ThroughA New Century
Knowledge and Skills The Instructor:
Module Two—Texas Driving Responsibilities: Preparing to Operate a Vehicle. The studentrecognizes the necessity of making routine vehicle checks and adjustments prior to and afterentering the vehicle; identifies and responds appropriately to alert symbols, warning symbols,vehicle control devices, and safety devices; understands and controls vehicle balance and vehicleoperating space; and appropriately applies the techniques of vehicle reference points to establishroadway position and vehicle placement.
The student is expected to: . Shows Transparency T-2.23, “Safety,Communications, and Convenience De-vices” to continue discussion of the opera-tion of control devices. Hood Release. Trunk Release. Heater, Ventilation, and Air Conditioner (HVAC). Seat Adjustments
Transparency T-2.23Safety, Communication, and
Convenience Devices
Worksheet W-2.6
“Family VehicleEquipment”
. Collects optional Worksheet W-2.5,“Family Vehicle Instrument Cluster”and Worksheet W-2.6, “Family VehicleEquipment” as assessment tools for thistopic area. Additional evaluation andassessment questions for this topic arelocated in the Module Assessment MA-2.1,“Preparing To Drive.”
Worksheet W-2.5
“Family VehicleInstrument Cluster”
(D) operate the safety, communicationand convenience devices while seatedin the driver’s seat.
T-2.23
Safety, Communication, and Convenience DevicesSafety, Communication, and Convenience Devices
■■ Hood ReleaseHood Release–– Location and useLocation and use
■■ Trunk ReleaseTrunk Release–– Location and useLocation and use
■■ Fuel Door ReleaseFuel Door Release–– Location and alternate opening deviceLocation and alternate opening device
■■ Heat, Ventilation, and Air Conditioner (HVAC) ControlsHeat, Ventilation, and Air Conditioner (HVAC) Controls–– Fan, temperature, and ventilation locationFan, temperature, and ventilation location
–– Defroster/Defogger operates air conditioning systemDefroster/Defogger operates air conditioning system
■■ Seat AdjustmentSeat Adjustment–– Power / Manual controlsPower / Manual controls
Operating Vehicle Control DevicesLESSON CONTENT (Instructor Support Information)
Module Two Texas Driver Responsibilities: Preparing to Operate a Vehicle Page 27
Texas Essential Knowledge and Skills: § 110.42. English I (b) (4) The student useswriting as a tool for learning. (B) to discover, organize, and support what is knownand what needs to be learned. (14) The student listens attentively for a variety ofpurposes. (A) focus attention on speaker’s message. Texas Education Agency
Driving ThroughA New Century
Safety, Communication, Comfort, and Convenience Devices
• Hood Release
• Trunk Release
• Heater, Ventilation, and Air Conditioner (HVAC)
• Seat Adjustment Controls
Fact Sheet F-2.3, “Operating Control Devices,” provides information to support eachof the issues listed on the transparencies.
“Teaching Your Teens To Drive” (1998) AAA Association Com-munication provides a video, student guide, and parent guidethat has three lesson segments devoted to driver preparation,starting, and moving the vehicle. It is a resource that supple-ments the information presented in this segment.
The instructor is reminded to collect optional Worksheet W-2.5, “Family VehicleInstrument Cluster” and Worksheet W-2.6, “Family Vehicle Equipment” as assessmenttools for this topic area. Questions concerning this topic are located in the ModuleAssessment MA-2.1, “Preparing To Drive.”
Fact Sheet F-2.3
“Operating VehicleControl Devices”
“Teaching YourTeens to Drive”
AAA Video, latest ed.
Page 28 Driver Education Classroom and In-car Instruction
Module Two Topical Outline
Module Two Topic 3 Resources
Module Two, Topic 3 Transparencies:T-2.18, “Operating Vehicle Control Devices”T-2.19, “Operating Vehicle Control Devices”T-2.20, “Operating Vehicle Control Devices”T-2.21, “Safety, Communication, and Convenience Devices”T-2.22, “Safety, Communication, and Convenience Devices”T-2.23, “Safety, Communication, and Convenience Devices”
WorksheetsW-2.5, “Family Vehicle Instrument Cluster”W-2.6, “Family Vehicle Equipment”
Fact SheetsF-2.3, “Operating Vehicle Control Devices”
AssessmentsW-2.5, “Family Vehicle Instrument Cluster” (Optional use)W-2.6, “Family Vehicle Equipment”
MA-2.1 “ Preparing to Drive”
Suggested Resources“Teaching Your Teens To Drive.” (1996). AAA Association Communication,1000 AAA Drive, Heathrow, FL 32746-5063, or your local AAA office,provides a video, student guide, and parent guide.
“Owner’s Manual” for the driver education vehicle.
Approved textbooks, videos, and laboratory manuals“Drive Right, Latest Edition”“Empower Yourself with Zone Control Driving, Latest Edition”“Handbook Plus, Texas Edition”“How to Drive, Latest Edition”“License To Drive, Latest Edition”“Responsible Driving, Latest Edition”

Preparing to Operate a Vehicle Page 29
Module Two Topical Outline
Needed Resources Instructor Activities Time Frame
Module Two Prerequisites: Topic Title:
Topic Time Frame: Non-credit course (32 hrs) minutes instructional time Multiphase course (40 hrs) minutes discretional break time Credit course (56 hrs/semester)
Vehicle Balance • Qualifies for Texas Driver’s Permit Considerations
4 9.0 25 9.5 5 9.5
Textbook
Transparencies T-2.24, T-2.25,T-2.26, T-2.27, T-2.28, T-2.29,T-2.30, and T-2.31
Fact Sheet F-2.4
Worksheet W-2.7
Module Assessment MA-2.1 Test
Optional Videos:
“In Control: Technical Aspectsof the Vehicle ”
“Teaching Your Teens to Drive”Lesson One: Developing BasicVehicle Control”
“Teaching Your Teens to Drive”Lesson One: Developing BasicVehicle Control” Parent/TeenHandbook
Textbook Resources “Drive To Survive” “Survival Behind the Wheel” “How to Drive” “Handbook Plus” “Going Faster” “Bondurant Behind the Wheel”
. Review recommended Module Two, Topic4 Lesson Plans
. Review Module Two Topic 2 Transparen-ciesT-2.24, “Controlling Vehicle Balance”T-2.25, “Controlling Vehicle Balance”T-2.26, “Controlling Vehicle Balance”T-2.27, “Vehicle Control”T-2.28, “Vehicle Control”T-2.29, “Vehicle Control”T-2.30, “Vehicle Control”T-2.31, “Vehicle Control”
. Review Fact Sheets F-2.4, “Understanding Vehicle Balance Concepts”
. Review Worksheet W-2.7 “ Vehicle Balance Basics”
. Review Assessment W-2.7 “ Vehicle Balance Basics”
MA-2.1 “ Preparing to Drive”
. Review Optional Video
“In Control: Technical Aspects of the Vehicle ”
15 minute (prior to lesson)
25 minutes
(3-5 minutes)(3-5 minutes)(3-5 minutes)(3-5 minutes)(3-5 minutes)(3-5 minutes)(3-5 minutes)(3-5 minutes)
For instructor useor additionalinformation
Worksheet duringsession
10-15 minutes atthe end of ModuleTwo
10-15 minutes (prior to lesson)
Module Two, Topic 4 is not a required program element.
Page 30 Driver Education Classroom and In-car Instruction
GRADE: HS MODULE: TWO TOPIC: 4 TOPIC ACTIVITIES TOPIC RESOURCES
Texas Education Agency
Driving ThroughA New Century
Knowledge and Skills The Instructor:
Module Two—Texas Driving Responsibilities: Preparing to Operate a Vehicle. The studentrecognizes the necessity of making routine vehicle checks and adjustments prior to and afterentering the vehicle; identifies and responds appropriately to alert symbols, warning symbols,vehicle control devices, and safety devices; understands and controls vehicle balance and vehicleoperating space; and appropriately applies the techniques of vehicle reference points to establishroadway position and vehicle placement.
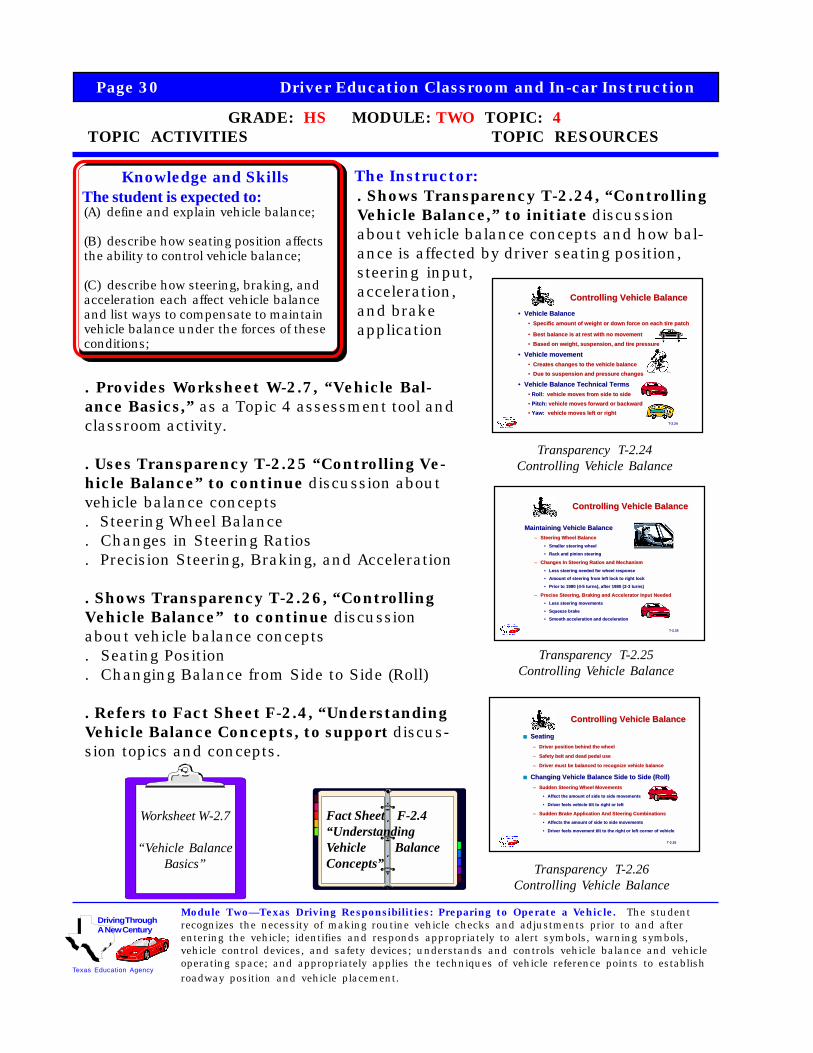
The student is expected to: . Shows Transparency T-2.24, “ControllingVehicle Balance,” to initiate discussionabout vehicle balance concepts and how bal-ance is affected by driver seating position,steering input,acceleration,and brakeapplication
. Provides Worksheet W-2.7, “Vehicle Bal-ance Basics,” as a Topic 4 assessment tool andclassroom activity.
. Uses Transparency T-2.25 “Controlling Ve-hicle Balance” to continue discussion aboutvehicle balance concepts. Steering Wheel Balance. Changes in Steering Ratios. Precision Steering, Braking, and Acceleration
. Shows Transparency T-2.26, “ControllingVehicle Balance” to continue discussionabout vehicle balance concepts. Seating Position. Changing Balance from Side to Side (Roll)
. Refers to Fact Sheet F-2.4, “UnderstandingVehicle Balance Concepts, to support discus-sion topics and concepts.
Fact Sheet F-2.4“UnderstandingVehicle BalanceConcepts”
Transparency T-2.24Controlling Vehicle Balance
Transparency T-2.25Controlling Vehicle Balance
Transparency T-2.26Controlling Vehicle Balance
Worksheet W-2.7
“Vehicle BalanceBasics”
(A) define and explain vehicle balance;
(B) describe how seating position affectsthe ability to control vehicle balance;
(C) describe how steering, braking, andacceleration each affect vehicle balanceand list ways to compensate to maintainvehicle balance under the forces of theseconditions;
T-2.24
Controlling Vehicle BalanceControlling Vehicle Balance•• Vehicle Balance Vehicle Balance
•• Specific amount of weight or down force on each tire patch Specific amount of weight or down force on each tire patch
•• Best Best balance is at rest with no movementbalance is at rest with no movement•• Based on weight, suspension, and tire pressure Based on weight, suspension, and tire pressure
•• Vehicle movement Vehicle movement•• Creates changes to the vehicle balance Creates changes to the vehicle balance•• Due to suspension and pressure changes Due to suspension and pressure changes
•• Vehicle Balance Technical Terms Vehicle Balance Technical Terms•• Roll:Roll: vehicle moves from side to side vehicle moves from side to side•• Pitch:Pitch: vehicle moves forward or backward vehicle moves forward or backward•• Yaw:Yaw: vehicle moves left or right vehicle moves left or right
T-2.25
Maintaining Vehicle BalanceMaintaining Vehicle Balance–– Steering Wheel BalanceSteering Wheel Balance
•• Smaller steering wheelSmaller steering wheel
•• Rack and pinion steeringRack and pinion steering
–– Changes In Steering Ratios and MechanismChanges In Steering Ratios and Mechanism•• Less steering needed for wheel responseLess steering needed for wheel response
•• Amount of steering from left lock to right lockAmount of steering from left lock to right lock
•• Prior to 1980 (4-5 turns), after 1980 (2-3 turns)Prior to 1980 (4-5 turns), after 1980 (2-3 turns)
–– Precise Steering, Braking and Accelerator Input NeededPrecise Steering, Braking and Accelerator Input Needed•• Less steering movementsLess steering movements
•• Squeeze brakeSqueeze brake
•• Smooth acceleration and decelerationSmooth acceleration and deceleration
Controlling Vehicle BalanceControlling Vehicle Balance
T-2.26
■■ SeatingSeating–– Driver position behind the wheelDriver position behind the wheel
–– Safety belt and dead pedal useSafety belt and dead pedal use
–– Driver must be balanced to recognize vehicle balanceDriver must be balanced to recognize vehicle balance
■■ Changing Vehicle Balance Side to Side (Roll)Changing Vehicle Balance Side to Side (Roll)–– Sudden Steering Wheel MovementsSudden Steering Wheel Movements
•• Affect the amount of side to side movementsAffect the amount of side to side movements
•• Driver feels vehicle tilt to right or leftDriver feels vehicle tilt to right or left
–– Sudden Brake Application And Steering CombinationsSudden Brake Application And Steering Combinations
•• Affects the amount of side to side movementsAffects the amount of side to side movements
•• Driver feels movement tilt to the right or left corner of vehicleDriver feels movement tilt to the right or left corner of vehicle
Controlling Vehicle BalanceControlling Vehicle Balance
Vehicle Balance ConsiderationsLESSON CONTENT (Instructor Support Information)
Module Two Texas Driver Responsibilities: Preparing to Operate a Vehicle Page 31
Texas Essential Knowledge and Skills: § 110.42. English I (b) (4) The student useswriting as a tool for learning. (B) to discover, organize, and support what is knownand what needs to be learned. (14) The student listens attentively for a variety ofpurposes. (A) focus attention on speaker’s message. Texas Education Agency
Driving ThroughA New Century
Over 50 percent of occupant fatalities occur as a result of single vehiclecrashes. Basically the vehicle runs off the roadway and strikes a fixed object oroverturns. Almost without exception, these crashes involve improper steering orbraking or a combination of the two actions.
The purpose of this section is to introduce students to the concept of vehiclebalance as it relates to vehicle control and how balance is achieved and main-tained.
Vehicle Balance
Vehicle suspension balance refers to the distribution of the weight of thevehicle on the chassis or frame. A transfer of weight from one point of the ve-hicle to another is caused by acceleration, deceleration, cornering, or a combina-tion of these actions.
Maintaining Vehicle Balance• Seating Position - in order to establish vehicle balance and improve ability
to see, drivers will sit in a comfortable, erect position squarely behind thesteering wheel.
• Changing Vehicle Load - Side to Side• Changing Vehicle Load - Front to Rear• Changing Vehicle Load - Rear to Front
Steering Wheel Control• Hand Position• Steering Techniques• Hand To Hand Steering• Hand Over Hand Steering• Limited Evasive Steering• One Hand SteeringFact Sheet F-2.4, “Understanding Vehicle Balance Concepts,” provides infor-
mation to support each of the issues listed on the transparencies.
“In Control: Vehicle Technical Aspects.” (1995). J.B.Heimann Production provides information from SamPosey and Sandy Stevens about seating position, as-pects of pitch, roll, vehicle understeer, vehicle over-steer, and antilock brakes. It is a resource that supple-ments the information presented in this segment.
“In Control-TechnicalAspects”
J.B. Heimann ProductionsVideo, latest ed.

Page 32 Driver Education Classroom and In-car Instruction
GRADE: HS MODULE: TWO TOPIC: 4 TOPIC ACTIVITIES TOPIC RESOURCES
Texas Education Agency
Driving ThroughA New Century
Knowledge and Skills The Instructor:
Module Two—Texas Driving Responsibilities: Preparing to Operate a Vehicle. The studentrecognizes the necessity of making routine vehicle checks and adjustments prior to and afterentering the vehicle; identifies and responds appropriately to alert symbols, warning symbols,vehicle control devices, and safety devices; understands and controls vehicle balance and vehicleoperating space; and appropriately applies the techniques of vehicle reference points to establishroadway position and vehicle placement.
The student is expected to: . Uses Transparency T-2.27 “Vehicle Con-trol” to illustrate and discuss how suddensteering or improper combinations of brakingand steering af-fects vehicle bal-ance at any speed.
Transparency T-2.27Vehicle Control
Transparency T-2.28Vehicle Control
. Shows Transparency T-2.28 “Vehicle Con-trol” to discuss load transfer during brakingand cornering and steering at dangerouslyhigh speeds or improper combination of brak-ing and steering.
. Shows Transparency T-2.29 “Vehicle Con-trol” to discuss load transfer during rear endswings to the right or left causing a yaw (spin-ning) condition.
Transparency T-2.29Vehicle Control
(D) describe how changes in vehiclebalance from side to side, front to rear,and rear to front affect vehicle balance;
(E) describe the correct hand positionsand steering techniques recommendedwhen performing driving maneuvers;
T-2.27
VEHICLE CONTROLVEHICLE CONTROL
■■ Changing Vehicle Balance Front to Rear (Pitch)Changing Vehicle Balance Front to Rear (Pitch)–– Releasing brakeReleasing brake–– Covering acceleratorCovering accelerator–– Light accelerator pressureLight accelerator pressure–– Progressive accelerator pressureProgressive accelerator pressure–– Thrust accelerator pressureThrust accelerator pressure
■■ Changing Vehicle Balance Rear to Front (Pitch)Changing Vehicle Balance Rear to Front (Pitch)–– Differences between vehiclesDifferences between vehicles–– Driver position for best brake pedal controlDriver position for best brake pedal control–– Releasing the acceleratorReleasing the accelerator–– Covering the brakeCovering the brake–– Controlled brake (Squeeze on)Controlled brake (Squeeze on)–– Threshold brakeThreshold brake–– Trail braking (Squeeze off)Trail braking (Squeeze off)
T-2.28
RearRear
LiftsLiftsFrontFront
DropsDrops
Balance Change During Sudden Braking andBalance Change During Sudden Braking andExcessive SteeringExcessive Steering
VEHICLE CONTROLVEHICLE CONTROL
T-2.29
VEHICLE CONTROLVEHICLE CONTROL■■ Changing Vehicle Balance Left to Right (Yaw)Changing Vehicle Balance Left to Right (Yaw)
–– Sudden brakeSudden brake–– Sudden or excessive accelerationSudden or excessive acceleration–– Sudden or excessive steeringSudden or excessive steering–– Road tilted to rightRoad tilted to right–– Traction loss to right rearTraction loss to right rear
■■ Changing Vehicle Balance Right to Left (Yaw)Changing Vehicle Balance Right to Left (Yaw)–– Sudden brakeSudden brake–– Sudden or excessive accelerationSudden or excessive acceleration–– Sudden or excessive steeringSudden or excessive steering–– Road tilted to leftRoad tilted to left–– Traction loss to left rearTraction loss to left rear
Vehicle Balance ConsiderationsLESSON CONTENT (Instructor Support Information)
Module Two Texas Driver Responsibilities: Preparing to Operate a Vehicle Page 33
Texas Essential Knowledge and Skills: § 110.42. English I (b) (4) The student useswriting as a tool for learning. (B) to discover, organize, and support what is knownand what needs to be learned. (14) The student listens attentively for a variety ofpurposes. (A) focus attention on speaker’s message. Texas Education Agency
Driving ThroughA New Century
Maintaining Vehicle Balance• Seating Position - in order to establish vehicle balance and improve ability to
see, drivers will sit in a comfortable, erect position squarely behind the steer-ing wheel.
• Changing Vehicle Load - Side to Side• Changing Vehicle Load - Front to Rear• Changing Vehicle Load - Rear to Front
Steering Wheel Control• Hand Position• Steering Techniques• Hand To Hand Steering• Hand Over Hand Steering• Limited Evasive Steering• One Hand Steering
Vehicle Movement and Rotation• Pitch... vehicle movement to the front or to the rear
- braking drops the front and lifts the rear- acceleration lifts the front and drops the rear
• Roll... vehicle movement to the left or right side- steering to the left makes vehicle roll to the right- steering to the right makes vehicle roll to the left
• Yaw... vehicle movement to the left or right around the center of gravity- loss of traction to rear tires causes vehicle to spin- sudden steering, sudden braking, or sudden acceleration maycause vehicle top spin around its center of gravity due to tractionloss in rear
Modern Vehicle Technology Relates to Balance• Sudden Braking Traction Loss is enhanced by Antilock Braking Systems.• Sudden Accleration Traction Loss is enhanced by Traction Control Systems.• Sudden Steering Traction Loss is enhanced by Vehicle Stability Systems.• The three vehicle balance (stability) control systems are designed to work tocompliment driver behavior and aid when driver exceeds limitations of balance.
“In Control: Vehicle Technical Aspects.” (1995). J.B.Heimann Production provides information from Sam Poseyand Sandy Stevens about seating position, aspects ofpitch, roll, vehicle understeer, vehicle oversteer, andantilock brakes. It is a resource that provides supplemen-tal information presented in this segment.
“In Control-TechnicalAspects”
J.B. Heimann ProductionsVideo, latest ed.
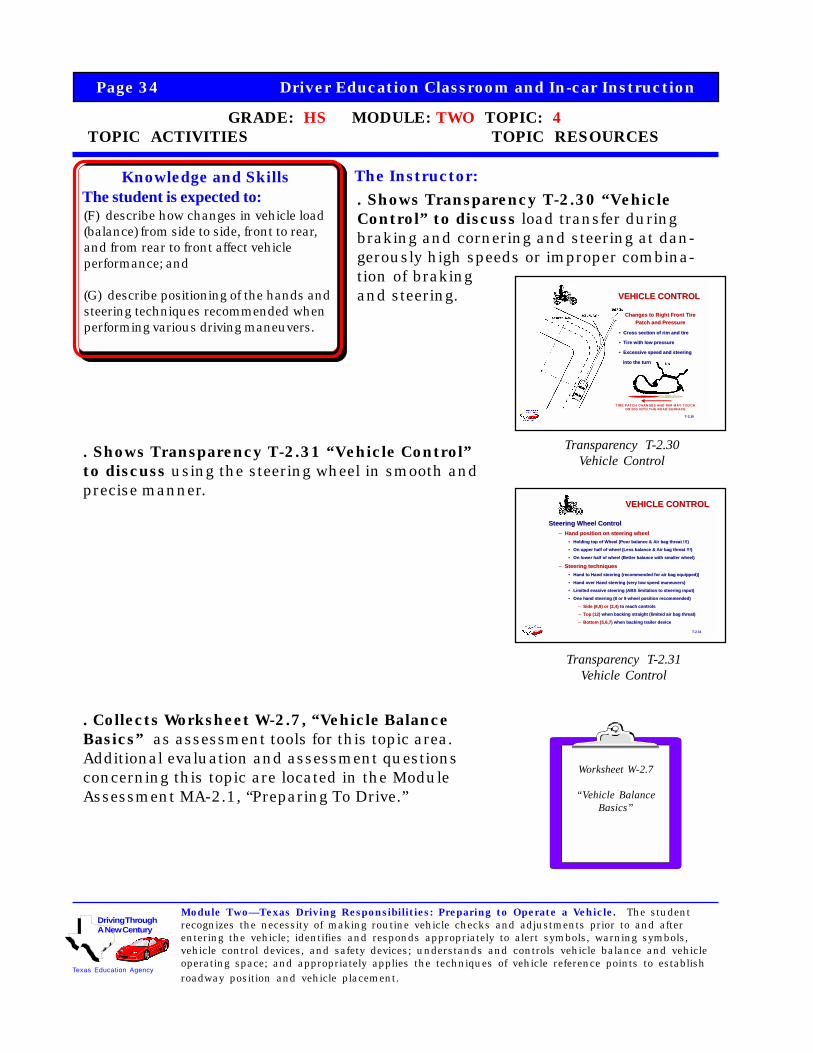
Page 34 Driver Education Classroom and In-car Instruction
GRADE: HS MODULE: TWO TOPIC: 4 TOPIC ACTIVITIES TOPIC RESOURCES
Texas Education Agency
Driving ThroughA New Century
Knowledge and Skills The Instructor:
Module Two—Texas Driving Responsibilities: Preparing to Operate a Vehicle. The studentrecognizes the necessity of making routine vehicle checks and adjustments prior to and afterentering the vehicle; identifies and responds appropriately to alert symbols, warning symbols,vehicle control devices, and safety devices; understands and controls vehicle balance and vehicleoperating space; and appropriately applies the techniques of vehicle reference points to establishroadway position and vehicle placement.
The student is expected to:
Transparency T-2.30Vehicle Control
Transparency T-2.31Vehicle Control
. Shows Transparency T-2.30 “VehicleControl” to discuss load transfer duringbraking and cornering and steering at dan-gerously high speeds or improper combina-tion of brakingand steering.
. Shows Transparency T-2.31 “Vehicle Control”to discuss using the steering wheel in smooth andprecise manner.
. Collects Worksheet W-2.7, “Vehicle BalanceBasics” as assessment tools for this topic area.Additional evaluation and assessment questionsconcerning this topic are located in the ModuleAssessment MA-2.1, “Preparing To Drive.”
Worksheet W-2.7
“Vehicle BalanceBasics”
(F) describe how changes in vehicle load(balance) from side to side, front to rear,and from rear to front affect vehicleperformance; and
(G) describe positioning of the hands andsteering techniques recommended whenperforming various driving maneuvers.
T-2.30
VEHICLE CONTROLVEHICLE CONTROL
Changes to Right Front TireChanges to Right Front TirePatch and PressurePatch and Pressure
•• Cross section of rim and tire Cross section of rim and tire
•• Tire with low pressure Tire with low pressure
•• Excessive speed and steering Excessive speed and steering
into the turn into the turn
TIRE PATCH CHANGES AND RIM MAY TOUCHOR DIG INTO THE ROAD SURFACE
T-2.31
VEHICLE CONTROLVEHICLE CONTROL
Steering Wheel ControlSteering Wheel Control–– Hand position on steering wheelHand position on steering wheel
•• Holding top of Wheel (Poor balance & Air bag threat !!!)Holding top of Wheel (Poor balance & Air bag threat !!!)
•• On upper half of wheel (Less balance & Air bag threat !!!)On upper half of wheel (Less balance & Air bag threat !!!)
•• On lower half of wheel (Better balance with smaller wheel)On lower half of wheel (Better balance with smaller wheel)
–– Steering techniquesSteering techniques•• Hand to Hand steering (recommended for air bag equipped))Hand to Hand steering (recommended for air bag equipped))
•• Hand over Hand steering (very low speed maneuvers)Hand over Hand steering (very low speed maneuvers)
•• Limited evasive steering (ABS limitation to steering input)Limited evasive steering (ABS limitation to steering input)
•• One hand steering (8 or 9 wheel position recommended)One hand steering (8 or 9 wheel position recommended)
–– Side (8,9) or (3,4)Side (8,9) or (3,4) to reach controls to reach controls
–– Top (12)Top (12) when backing straight (limited air bag threat) when backing straight (limited air bag threat)
–– Bottom (5,6,7)Bottom (5,6,7) when backing trailer device when backing trailer device
Vehicle Balance ConsiderationsLESSON CONTENT (Instructor Support Information)
Module Two Texas Driver Responsibilities: Preparing to Operate a Vehicle Page 35
Texas Essential Knowledge and Skills: § 110.42. English I (b) (4) The student useswriting as a tool for learning. (B) to discover, organize, and support what is knownand what needs to be learned. (14) The student listens attentively for a variety ofpurposes. (A) focus attention on speaker’s message. Texas Education Agency
Driving ThroughA New Century
Maintaining Vehicle Balance• Seating Position - in order to establish vehicle balance and improve ability
to see, drivers will sit in a comfortable, erect position squarely behind thesteering wheel.
• Changing Vehicle Load - Side to Side• Changing Vehicle Load - Front to Rear• Changing Vehicle Load - Rear to Front
Steering Wheel Control• Hand Position• Steering Techniques• Hand To Hand Steering• Hand Over Hand Steering• Limited Evasive Steering• One Hand Steering
Fact Sheet F-2.4, “Understanding Vehicle Balance Concepts,” provides infor-mation to support each of the issues listed on the transparencies.
“In Control: Vehicle Technical Aspects.” (1995). J.B.Heimann Production provides information from SamPosey and Sandy Stevens about seating position, as-pects of pitch, roll, vehicle understeer, vehicle oversteer,and antilock brakes. It is a resource that supplementsthe information presented in this segment.
The instructor is reminded to collect optional Worksheet W-2.7, “VehicleBalance Basics” as assessment tools for this topic area. Additional evaluationand assessment questions concerning this topic are located in the Module As-sessment MA-2.1, “Preparing To Drive.”
“In Control-TechnicalAspects”J.B. Heimann ProductionsVideo, latest ed.
Page 36 Driver Education Classroom and In-car Instruction
Module Two Topical Outline
Module Two Topic 4 Resources
Module Two, Topic 4 Transparencies:T-2.24, “Controlling Vehicle Balance”T-2.25, “Controlling Vehicle Balance”T-2.26, “Controlling Vehicle Balance”T-2.27, “Vehicle Control”T-2.28, “Vehicle Control”T-2.29, “Vehicle Control”T-2.30, “Vehicle Control”T-2.31, “Vehicle Control”
WorksheetsW-2.7 “ Vehicle Balance Basics”
Fact SheetsF-2.4, “Understanding Vehicle Balance Concepts”
AssessmentW-2.7 “ Vehicle Balance Basics”MA-2.1 “ Preparing to Drive”
Suggested Resources
“In Control: America’s Driving Reference ” (1995) video from J. B.Heimann Productions (Technical Aspects of Vehicle)
“Teaching Your Teens to Drive” Lesson One: Developing Basic VehicleControl”“Teaching Your Teens to Drive” Lesson One: Developing Basic VehicleControl” Parent/Teen Handbook
Textbook Resources“Drive To Survive”“Survival Behind the Wheel”“How to Drive”“Handbook Plus”“Going Faster”“Bondurant Behind the Wheel”
Preparing to Operate a Vehicle Page 37
Module Two Topical Outline
Needed Resources Instructor Activities Time Frame
Module Two Prerequisites: Topic Title:
Topic Time Frame: Non-credit course (32 hrs) minutes instructional time Multiphase course (40 hrs) minutes discretional break time Credit course (56 hrs/semester)
Standard Vehicle• Qualifies for Texas Driver Instructional Permit Refererence Points
5 9.0 30 (60) 10.0 5 10.0
Textbook
Transparencies T-2.32, T-2.33,T-2.34, T-2.35, T-2.36, T-2.37,T-2.38, T-2.39, T-2.40, T-2.41,T-2.42, T-2.43, T-2.44, T-2.45,T-2.46, T-2.47, T-2.48, T-2.49,T-2.50, T-2.52, T-2.53, T-2.54,T-2.55, T-2.56, T-2.57, and T-2.58
Fact Sheet F-2.5, F-2.6
Student Worksheet W-2.8
Module MA-2.1 Test
Optional Videos:
“Targeting,” IDS # 2
“Reference Points” IDS # 1
“Teaching Your Teens to Drive” Lessons One to Three: Developing Basic Vehicle Control”
Textbook Resources “Drive Right” Ch. 3 “Empower Yourself” pp. 1-15 “How to Drive” Ch. 5 “Handbook Plus” Ch. 2 “License to Drive” Ch. 5 “Responsible Driving” Ch. 6
. Review recommended Module Two, Topic 5Lesson Plans
. Review Mod. Two Topic 5 TransparenciesT-2.32, “Targeting&Visual Requirements”T-2.33, “Determining Vehicle OperatingSpace”T-2.34, “Traditional Mirror Views andBlind Spots”T-2.35, “Blind Spot & Glare Elimination”T-2.36, “Standard Reference Points”T-2.37, “Front Limitation”T-2.38, “Front Limitation”T-2.39, “Front Limitation”T-2.40, “Rear Limitation”T-2.41, “Rear Limitation”T-2.42, “Rear Limitation”T-2.43, “Right Side Limitation”T-2.44, “Right Side Limitation”T-2.45, “Left Side Limitation”T-2.46, “Left Side Limitation”T-2.47, “Lane Position # 1”T-2.48, “Lane Position # 1”T-2.49, “Lane Position # 2”T-2.50, “Lane Position # 2”T-2.51, “Lane Position # 3”T-2.52, “Lane Position # 3”T-2.53, “Lane Positions”T-2.54, “Lane Positions”T-2.55, “Lane Positions”T-2.56, “Possible Lane Positions”T-2.57, “Angle Parking”T-2.58, “Standard Reference Points”
. Review Student Worksheet W-2.8, “Standard Vehicle Ref. Points”
. Review Fact Sheets F-2.5, “Preventing Blind Spot Crashes” F-2.6. “Standard Vehicle References”
. Review Assessment MA-2.1 “ Preparing to Drive”
15 minute (prior to lesson)30 minutes (3-5 minutes) (3-5 minutes) (2-3 minutes) (2-3 minutes)
(2-3 minutes) (2-3 minutes) (2-3 minutes) (1-2 minutes) (1-2 minutes) (2-3 minutes) (1-2 minutes) (1-2 minutes) (2-3 minutes) (1-2 minutes) (1-2 minutes) (1-2 minutes) (2-3 minutes) (1-2 minutes) (2-3 minutes) (1-2 minutes) (2-3 minutes) (1-2 minutes) (2-3 minutes) (1-2 minutes) (1-2 minutes) (1-2 minutes) (2-3 minutes) (1-2 minutes)
Module Two Topic(2-5 minutes tocollect)
For instructor use orinformation
10-15 minutes at theend of Module Two
Module Two, Topic 5 is not a required program element.
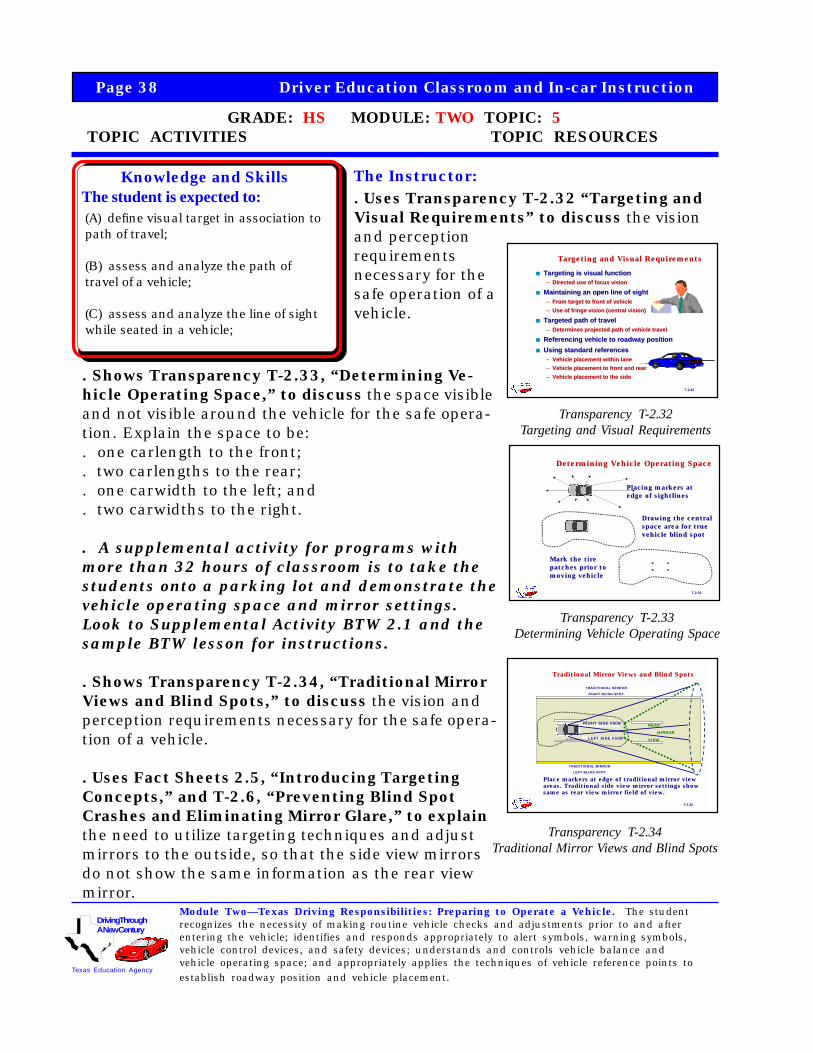
Page 38 Driver Education Classroom and In-car Instruction
GRADE: HS MODULE: TWO TOPIC: 5 TOPIC ACTIVITIES TOPIC RESOURCES
Texas Education Agency
Driving ThroughA New Century
Knowledge and Skills The Instructor:
Module Two—Texas Driving Responsibilities: Preparing to Operate a Vehicle. The studentrecognizes the necessity of making routine vehicle checks and adjustments prior to and afterentering the vehicle; identifies and responds appropriately to alert symbols, warning symbols,vehicle control devices, and safety devices; understands and controls vehicle balance andvehicle operating space; and appropriately applies the techniques of vehicle reference points toestablish roadway position and vehicle placement.
The student is expected to: . Uses Transparency T-2.32 “Targeting andVisual Requirements” to discuss the visionand perceptionrequirementsnecessary for thesafe operation of avehicle.
Transparency T-2.32Targeting and Visual Requirements
Transparency T-2.33Determining Vehicle Operating Space
Transparency T-2.34Traditional Mirror Views and Blind Spots
. Shows Transparency T-2.33, “Determining Ve-hicle Operating Space,” to discuss the space visibleand not visible around the vehicle for the safe opera-tion. Explain the space to be:. one carlength to the front;. two carlengths to the rear;. one carwidth to the left; and. two carwidths to the right.
. A supplemental activity for programs withmore than 32 hours of classroom is to take thestudents onto a parking lot and demonstrate thevehicle operating space and mirror settings.Look to Supplemental Activity BTW 2.1 and thesample BTW lesson for instructions.
. Shows Transparency T-2.34, “Traditional MirrorViews and Blind Spots,” to discuss the vision andperception requirements necessary for the safe opera-tion of a vehicle.
. Uses Fact Sheets 2.5, “Introducing TargetingConcepts,” and T-2.6, “Preventing Blind SpotCrashes and Eliminating Mirror Glare,” to explainthe need to utilize targeting techniques and adjustmirrors to the outside, so that the side view mirrorsdo not show the same information as the rear viewmirror.
(A) define visual target in association topath of travel;
(B) assess and analyze the path oftravel of a vehicle;
(C) assess and analyze the line of sightwhile seated in a vehicle;
T-2.32
Targeting and Visual RequirementsTargeting and Visual Requirements
■■ Targeting is visual functionTargeting is visual function–– Directed use of focus visionDirected use of focus vision
■■ Maintaining an open line of sightMaintaining an open line of sight–– From target to front of vehicleFrom target to front of vehicle–– Use of fringe vision (central vision)Use of fringe vision (central vision)
■■ Targeted path of travelTargeted path of travel–– Determines projected path of vehicle travelDetermines projected path of vehicle travel
■■ Referencing vehicle to roadway positionReferencing vehicle to roadway position■■ Using standard referencesUsing standard references
–– Vehicle placement within laneVehicle placement within lane–– Vehicle placement to front and rearVehicle placement to front and rear–– Vehicle placement to the sideVehicle placement to the side
T-2.34
Traditional Mirror Views and Blind SpotsTraditional Mirror Views and Blind Spots
LEFT SIDE VIEW
RIGHT SIDE VIEW
TRADITIONAL MIRROR
LEFT BLIND SPOT
TRADITIONAL MIRROR
RIGHT BLIND SPOT
Place markers at edge of traditional mirror viewPlace markers at edge of traditional mirror viewareas. Traditional side view mirror settings showareas. Traditional side view mirror settings showsame as rear view mirror field of view.same as rear view mirror field of view.
REAR
MIRROR
VIEW
T-2.33
Determining Vehicle Operating SpaceDetermining Vehicle Operating Space
Placing markers atPlacing markers atedge of sightlinesedge of sightlines
Drawing the centralDrawing the centralspace area for truespace area for truevehicle blind spotvehicle blind spot
Mark the tireMark the tirepatches prior topatches prior tomoving vehiclemoving vehicle
Standard Vehicle Reference PointsLESSON CONTENT (Instructor Support Information)
Module Two Texas Driver Responsibilities: Preparing to Operate a Vehicle Page 39
Texas Essential Knowledge and Skills: § 110.42. English I (b) (4) The student useswriting as a tool for learning. (B) to discover, organize, and support what is knownand what needs to be learned. (14) The student listens attentively for a variety ofpurposes. (A) focus attention on speaker’s message. Texas Education Agency
Driving ThroughA New Century
Vision and Perception RequirementsIn this module, the instructor emphasizes the importance of directed attention,
maintaining an open line of sight, searching skills, and targeting a line to main-tain a safe path of travel. It is critical that students understand how an inad-equate or improper visual search, lack of understanding of vehicle dynamics,failure to respond or a delayed response to a threatening object or condition con-tributes to driver crash involvement.
Referencing Vehicle to Path of TravelVisual Functions• Central (Focal) Vision is used to read and identify distinct objects and
covers about three percent of one’s visual field.• Fringe Vision is used to judge depth and position.• Peripheral Vision is conical in shape around the other vision fields.Maintaining an Open Line of SightSearching Skills• Using visual references and turn points to make turns.• Forward visual turning point.• Rear visual turning point.• Targeted line of sight, paths of travel.• Referencing vehicle to paths of travel.
Fact Sheets F-2.5, “Introducing Targeting Concepts” and F-2.6, “PreventingBlind Spot Crashes and Eliminating Mirror Glare” provide information to supporteach of the issues listed on the transparencies.
“Targeting” (1997). by Interactive Driving Systems, Inc.,Chesire, CT 06410 (203) 272-9391 may be used as avisual technique to introduce or review targeting skills.The video is a resource that supplements the informa-tion presented in this segment.
Fact Sheet F-2.6“Preventing Blind SpotCrashes and EliminatingMirror Glare”
“Targeting..# 2”
IDS Video, latest ed.
Fact Sheet F-2.5
“Introducing TargetingConcepts

Page 40 Driver Education Classroom and In-car Instruction
GRADE: HS MODULE: TWO TOPIC: 5 TOPIC ACTIVITIES TOPIC RESOURCES
Texas Education Agency
Driving ThroughA New Century
Knowledge and Skills The Instructor:
Module Two—Texas Driving Responsibilities: Preparing to Operate a Vehicle. The studentrecognizes the necessity of making routine vehicle checks and adjustments prior to and afterentering the vehicle; identifies and responds appropriately to alert symbols, warning symbols,vehicle control devices, and safety devices; understands and controls vehicle balance andvehicle operating space; and appropriately applies the techniques of vehicle reference points toestablish roadway position and vehicle placement.
The student is expected to: . Uses Transparency T-2.35 “Mirror BlindSpot and Glare Elimination” to lead adiscussion of the vision and perceptionrequirementsnecessary inregard to mirrorsettings thateliminate blindspots and reduce
Transparency T-2.35Mirror Blind Spot and Glare Elimination
Transparency T-2.36Standard Vehicle Reference Points
Transparency T-2.37Front Limitation
headlight glare when driving at night.
. Provides Worksheet W-2.8,“Standard Vehicle ReferencePoints,” as a class activityand topic assessment.
. Uses Transparency T-2.36 “Standard VehicleReference Points” to lead a discussion of thevision and perception requirements necessary forestablishing reference points from the roadway tothe vehicle.
. Uses Transparency T-2.37 “Front Limitations”to lead a discussion of the vision and perceptionrequirements necessary to establish front referencepoints for. intersections;. stopping position;. perpendicular parking.
Worksheet W-2.8
“Standard VehicleReference Points”
(D) demonstrate a side view mirrorsetting and describe how the settingreduces mirror blind spots and elimi-nates glare;
(E) describe how to place the frontbumper of the vehicle at a line or curbutilizing visual reference points;
T-2.35
The BGE side mirror settings (15 degrees toThe BGE side mirror settings (15 degrees tooutside) will allow for view to the side in additionoutside) will allow for view to the side in additionto the rear view.to the rear view.
Mirror Blind Spot and Glare Elimination (BGE)Mirror Blind Spot and Glare Elimination (BGE)
BGE LEFT SIDE MIRROR VIEW
BGE RIGHT SIDE MIRROR VIEW
REAR MIRROR
VIEW
Reference: Reference: BlindzoneBlindzone & Glare Elimination (BGE) Mirror Settings (G. & Glare Elimination (BGE) Mirror Settings (G. PlatzerPlatzer, 1996), 1996)
T-2.36
Standard Reference PointsStandard Reference Points■■ Relates part of the vehicle to some part ofRelates part of the vehicle to some part of
the roadway.the roadway.■■ Helpful visual relationship of your vehicleHelpful visual relationship of your vehicle
within the operating space.within the operating space.■■ Will know your vehicle placement within aWill know your vehicle placement within a
lane at all times.lane at all times.■■ Will allow for reduced-risk lane placementsWill allow for reduced-risk lane placements
Reference: Reference: MottolaMottola, F. R. (1997). “Empower Yourself with Zone Control Driving”, F. R. (1997). “Empower Yourself with Zone Control Driving”
T-2.37
FRONT LIMITATIONFRONT LIMITATION
■■ AT INTERSECTIONSAT INTERSECTIONS■■ IN A STOPPING POSITIONIN A STOPPING POSITION■■ PERPENDICULAR PARKINGPERPENDICULAR PARKING
Knowing where the front end of your vehicle is Knowing where the front end of your vehicle is when you are:when you are:
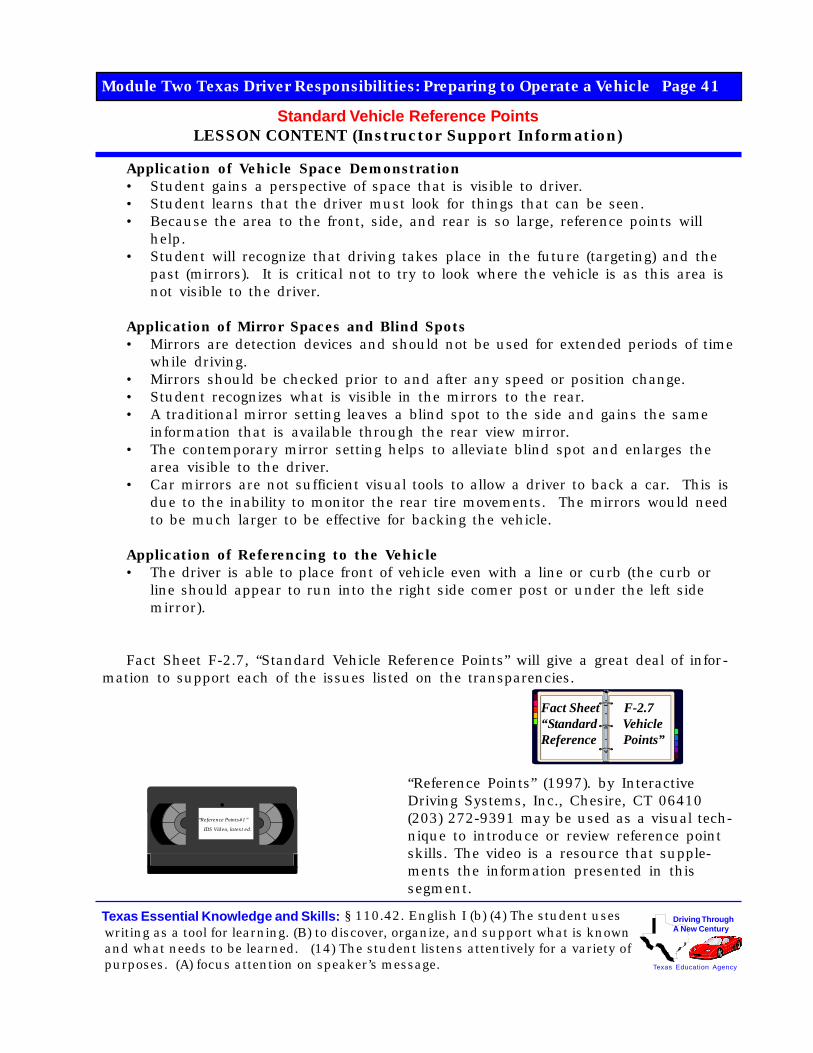
Standard Vehicle Reference PointsLESSON CONTENT (Instructor Support Information)
Module Two Texas Driver Responsibilities: Preparing to Operate a Vehicle Page 41
Texas Essential Knowledge and Skills: § 110.42. English I (b) (4) The student useswriting as a tool for learning. (B) to discover, organize, and support what is knownand what needs to be learned. (14) The student listens attentively for a variety ofpurposes. (A) focus attention on speaker’s message. Texas Education Agency
Driving ThroughA New Century
Application of Vehicle Space Demonstration• Student gains a perspective of space that is visible to driver.• Student learns that the driver must look for things that can be seen.• Because the area to the front, side, and rear is so large, reference points will
help.• Student will recognize that driving takes place in the future (targeting) and the
past (mirrors). It is critical not to try to look where the vehicle is as this area isnot visible to the driver.
Application of Mirror Spaces and Blind Spots• Mirrors are detection devices and should not be used for extended periods of time
while driving.• Mirrors should be checked prior to and after any speed or position change.• Student recognizes what is visible in the mirrors to the rear.• A traditional mirror setting leaves a blind spot to the side and gains the same
information that is available through the rear view mirror.• The contemporary mirror setting helps to alleviate blind spot and enlarges the
area visible to the driver.• Car mirrors are not sufficient visual tools to allow a driver to back a car. This is
due to the inability to monitor the rear tire movements. The mirrors would needto be much larger to be effective for backing the vehicle.
Application of Referencing to the Vehicle• The driver is able to place front of vehicle even with a line or curb (the curb or
line should appear to run into the right side comer post or under the left sidemirror).
Fact Sheet F-2.7, “Standard Vehicle Reference Points” will give a great deal of infor-mation to support each of the issues listed on the transparencies.
“Reference Points” (1997). by InteractiveDriving Systems, Inc., Chesire, CT 06410(203) 272-9391 may be used as a visual tech-nique to introduce or review reference pointskills. The video is a resource that supple-ments the information presented in thissegment.
“Reference Points#1”
IDS Video, latest ed.
Fact Sheet F-2.7“Standard VehicleReference Points”

Page 42 Driver Education Classroom and In-car Instruction
GRADE: HS MODULE: TWO TOPIC: 5 TOPIC ACTIVITIES TOPIC RESOURCES
Texas Education Agency
Driving ThroughA New Century
Knowledge and Skills The Instructor:
Module Two—Texas Driving Responsibilities: Preparing to Operate a Vehicle. The studentrecognizes the necessity of making routine vehicle checks and adjustments prior to and afterentering the vehicle; identifies and responds appropriately to alert symbols, warning symbols,vehicle control devices, and safety devices; understands and controls vehicle balance andvehicle operating space; and appropriately applies the techniques of vehicle reference points toestablish roadway position and vehicle placement.
The student is expected to: . Uses Transparency T-2.38 “Front Limita-tions” to lead a discussion of the vision andperception re-quirements re-garding establish-ing front referencepoints for a frontlimitation.
Transparency T-2.38Front Limitation
Transparency T-2.39Front Limitation
Transparency T-2.40Rear Limitation
. Provides Worksheet W-2.8,“Standard Vehicle ReferencePoints” as a class activityand topic assessment.
. Uses Transparency T-2.39, “Front Limitation,”to continue a discussion of the vision and percep-tion requirements necessary for establishing refer-ence points from the roadway to the vehicle for thefront limitation.
. Uses Transparency T-2.40, “Rear Limitations,”to lead a discussion of the vision and perceptionrequirements necessary to establish rear referencepoints.. Backing Position. Perpendicular Parking
Worksheet W-2.8
“Standard VehicleReference Points”
(E) describe how to place the frontbumper of the vehicle at a line or curbutilizing visual reference points;
(F) describe how to place the rearbumper of the vehicle at a line or curbutilizing visual reference points;
T-2.38
WHERE ARE YOUR VISUAL REFERENCEWHERE ARE YOUR VISUAL REFERENCEPOINTS FOR FRONT LIMITATION?POINTS FOR FRONT LIMITATION?
FRONT LIMITATION
T-2.39
■■ Target the Target the line to the side of the vehicleline to the side of the vehicle and andlook from the line under the side viewlook from the line under the side viewmirrors to the curb.mirrors to the curb.
■■ Together they will help you determine whereTogether they will help you determine wherethe front limitation of your vehicle is.the front limitation of your vehicle is.
FRONT LIMITATIONFRONT LIMITATION
T-2.40
REAR LIMITATIONREAR LIMITATION
■■ BACKING POSITIONBACKING POSITION■■ PERPENDICULAR PARKINGPERPENDICULAR PARKING
Knowing where the rear end of your vehicle isKnowing where the rear end of your vehicle iswhen you are:when you are:

Standard Vehicle Reference PointsLESSON CONTENT (Instructor Support Information)
Module Two Texas Driver Responsibilities: Preparing to Operate a Vehicle Page 43
Texas Essential Knowledge and Skills: § 110.42. English I (b) (4) The student useswriting as a tool for learning. (B) to discover, organize, and support what is knownand what needs to be learned. (14) The student listens attentively for a variety ofpurposes. (A) focus attention on speaker’s message. Texas Education Agency
Driving ThroughA New Century
Application of Referencing to the Vehicle
• The driver is able to place front of vehicle even with a line or curb (the curb orline should appear to run into the right side comer post or under the left sidemirror).
• The driver is able to place back bumper of vehicle so it is lined up with anyrear line or curb.
Fact Sheet F-2.7, “Standard Vehicle Referenc Points” will give a great deal ofinformation to support each of the issues listed on the transparencies.
“Reference Points” (1997). by InteractiveDriving Systems, Inc., Chesire, CT 06410(203) 272-9391 may be used as a visualtechnique to introduce or review referencepoint skills. The video is a resource thatsupplements the information presented inthis segment.
“Reference Points#1”
IDS Video, latest ed.
Fact Sheet F-2.7
“Standard VehicleReference Points”
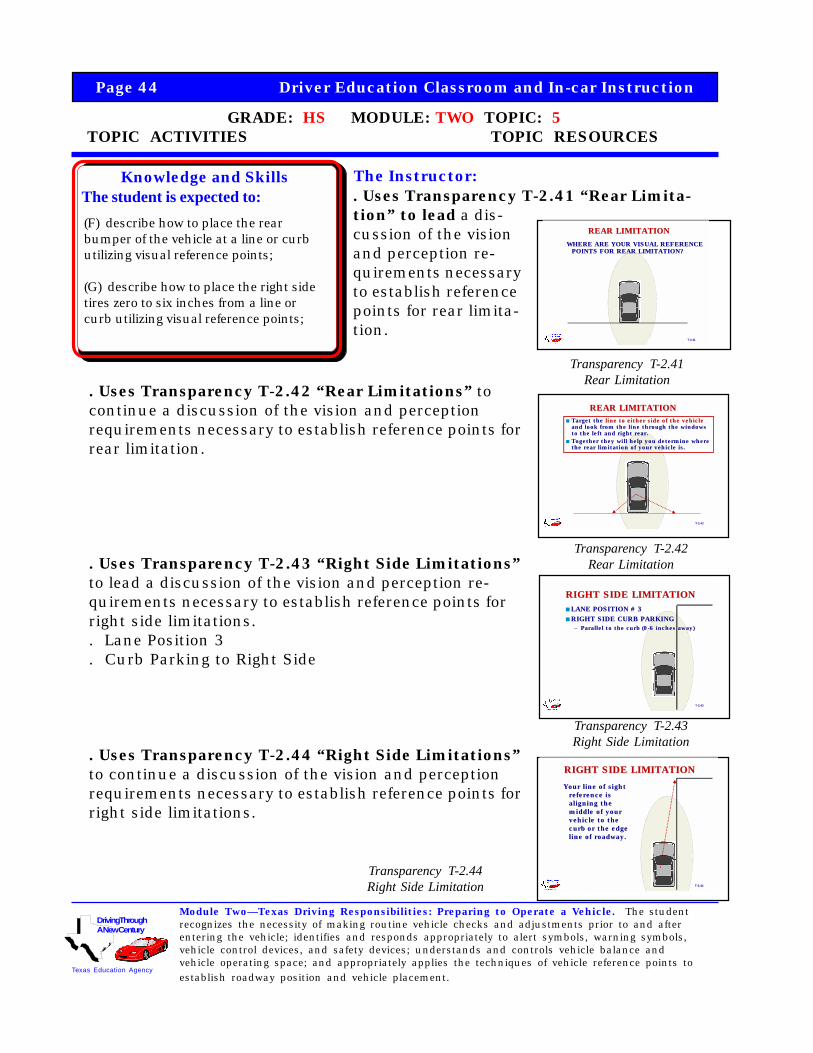
Page 44 Driver Education Classroom and In-car Instruction
GRADE: HS MODULE: TWO TOPIC: 5 TOPIC ACTIVITIES TOPIC RESOURCES
Texas Education Agency
Driving ThroughA New Century
Knowledge and Skills The Instructor:
Module Two—Texas Driving Responsibilities: Preparing to Operate a Vehicle. The studentrecognizes the necessity of making routine vehicle checks and adjustments prior to and afterentering the vehicle; identifies and responds appropriately to alert symbols, warning symbols,vehicle control devices, and safety devices; understands and controls vehicle balance andvehicle operating space; and appropriately applies the techniques of vehicle reference points toestablish roadway position and vehicle placement.
The student is expected to:
Transparency T-2.41Rear Limitation
Transparency T-2.42Rear Limitation
. Uses Transparency T-2.41 “Rear Limita-tion” to lead a dis-cussion of the visionand perception re-quirements necessaryto establish referencepoints for rear limita-tion.
. Uses Transparency T-2.42 “Rear Limitations” tocontinue a discussion of the vision and perceptionrequirements necessary to establish reference points forrear limitation.
. Uses Transparency T-2.43 “Right Side Limitations”to lead a discussion of the vision and perception re-quirements necessary to establish reference points forright side limitations.. Lane Position 3. Curb Parking to Right Side
. Uses Transparency T-2.44 “Right Side Limitations”to continue a discussion of the vision and perceptionrequirements necessary to establish reference points forright side limitations.
Transparency T-2.43Right Side Limitation
Transparency T-2.44Right Side Limitation
(F) describe how to place the rearbumper of the vehicle at a line or curbutilizing visual reference points;
(G) describe how to place the right sidetires zero to six inches from a line orcurb utilizing visual reference points;
T-2.41
REAR LIMITATIONREAR LIMITATION
WHERE ARE YOUR VISUAL REFERENCEWHERE ARE YOUR VISUAL REFERENCEPOINTS FOR REAR LIMITATION?POINTS FOR REAR LIMITATION?
T-2.42
REAR LIMITATIONREAR LIMITATION■■ Target the Target the line to either side of the vehicleline to either side of the vehicle
and look from the line through the windowsand look from the line through the windowsto the left and right rear.to the left and right rear.
■■ Together they will help you determine whereTogether they will help you determine wherethe rear limitation of your vehicle is.the rear limitation of your vehicle is.
T-2.43
RIGHT SIDE LIMITATIONRIGHT SIDE LIMITATION■■ LANE POSITION # 3LANE POSITION # 3■■ RIGHT SIDE CURB PARKINGRIGHT SIDE CURB PARKING
–– Parallel to the curb (0-6 inches away)Parallel to the curb (0-6 inches away)
T-2.44
RIGHT SIDE LIMITATIONRIGHT SIDE LIMITATION
Your line of sightYour line of sightreference isreference isaligning thealigning themiddle of yourmiddle of yourvehicle to thevehicle to thecurb or the edgecurb or the edgeline of roadway.line of roadway.
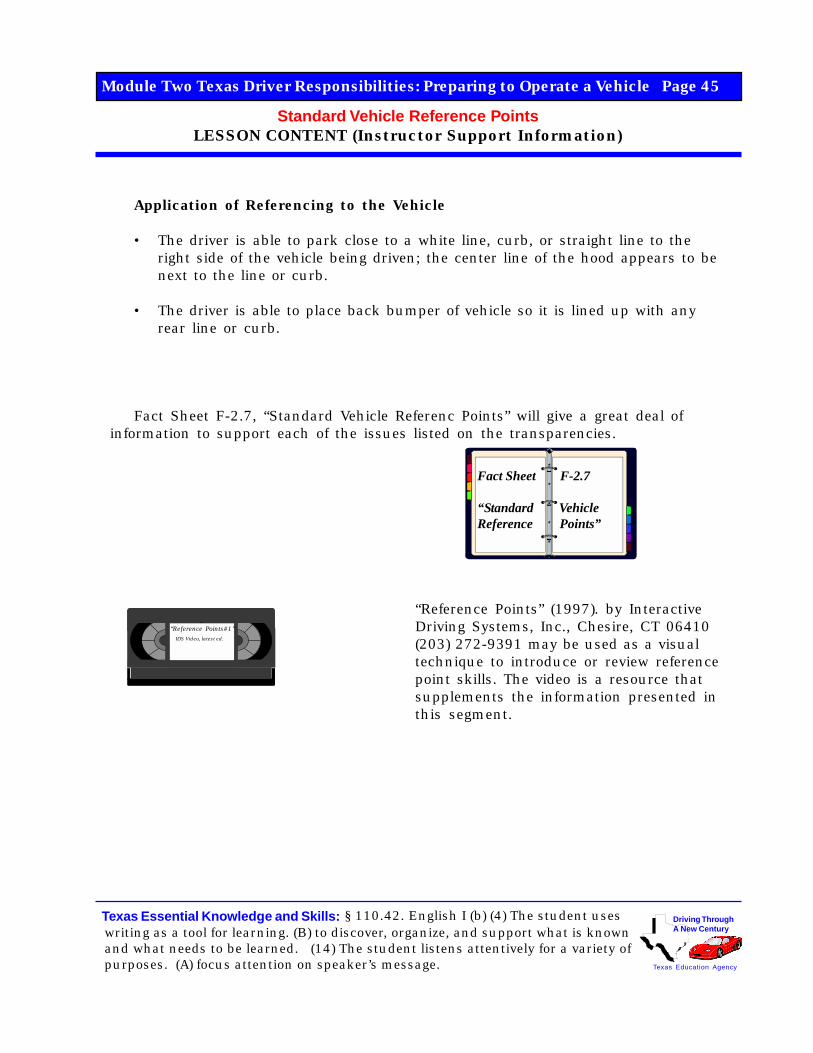
Standard Vehicle Reference PointsLESSON CONTENT (Instructor Support Information)
Module Two Texas Driver Responsibilities: Preparing to Operate a Vehicle Page 45
Texas Essential Knowledge and Skills: § 110.42. English I (b) (4) The student useswriting as a tool for learning. (B) to discover, organize, and support what is knownand what needs to be learned. (14) The student listens attentively for a variety ofpurposes. (A) focus attention on speaker’s message. Texas Education Agency
Driving ThroughA New Century
Application of Referencing to the Vehicle
• The driver is able to park close to a white line, curb, or straight line to theright side of the vehicle being driven; the center line of the hood appears to benext to the line or curb.
• The driver is able to place back bumper of vehicle so it is lined up with anyrear line or curb.
Fact Sheet F-2.7, “Standard Vehicle Referenc Points” will give a great deal ofinformation to support each of the issues listed on the transparencies.
“Reference Points” (1997). by InteractiveDriving Systems, Inc., Chesire, CT 06410(203) 272-9391 may be used as a visualtechnique to introduce or review referencepoint skills. The video is a resource thatsupplements the information presented inthis segment.
“Reference Points#1”
IDS Video, latest ed.
Fact Sheet F-2.7
“Standard VehicleReference Points”
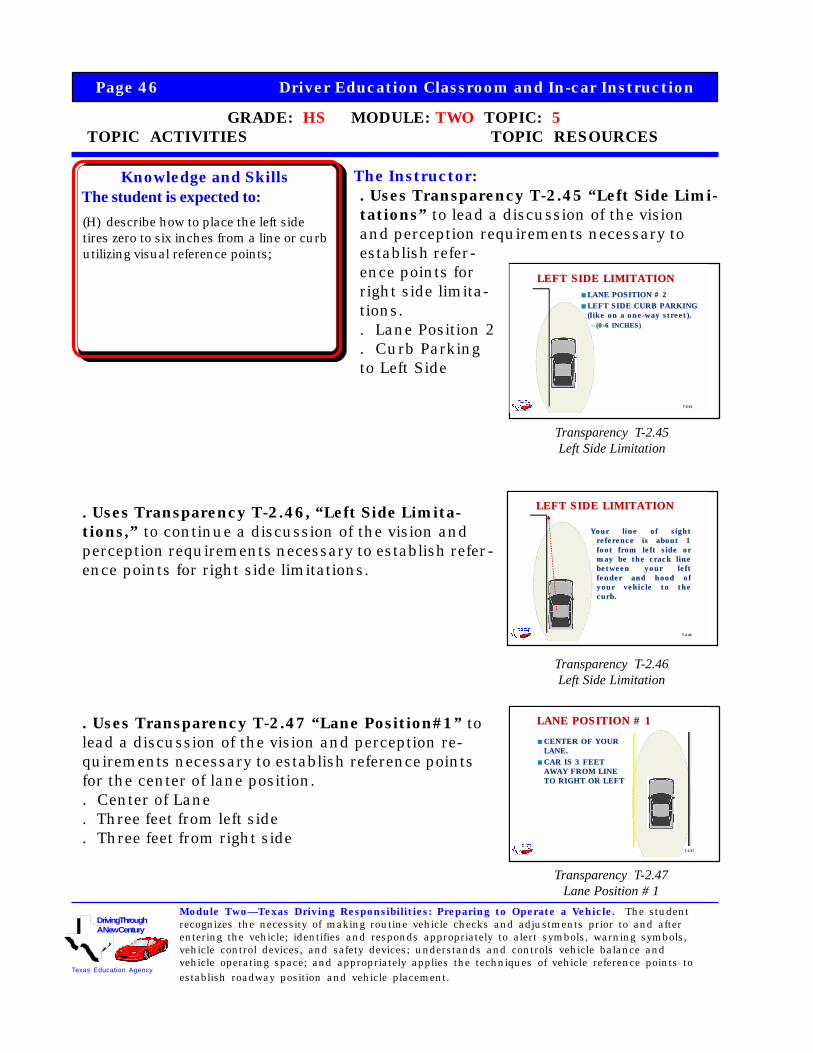
Page 46 Driver Education Classroom and In-car Instruction
GRADE: HS MODULE: TWO TOPIC: 5 TOPIC ACTIVITIES TOPIC RESOURCES
Texas Education Agency
Driving ThroughA New Century
Knowledge and Skills The Instructor:
Module Two—Texas Driving Responsibilities: Preparing to Operate a Vehicle. The studentrecognizes the necessity of making routine vehicle checks and adjustments prior to and afterentering the vehicle; identifies and responds appropriately to alert symbols, warning symbols,vehicle control devices, and safety devices; understands and controls vehicle balance andvehicle operating space; and appropriately applies the techniques of vehicle reference points toestablish roadway position and vehicle placement.
The student is expected to:
Transparency T-2.45Left Side Limitation
Transparency T-2.46Left Side Limitation
Transparency T-2.47Lane Position # 1
. Uses Transparency T-2.45 “Left Side Limi-tations” to lead a discussion of the visionand perception requirements necessary toestablish refer-ence points forright side limita-tions.. Lane Position 2. Curb Parkingto Left Side
. Uses Transparency T-2.46, “Left Side Limita-tions,” to continue a discussion of the vision andperception requirements necessary to establish refer-ence points for right side limitations.
. Uses Transparency T-2.47 “Lane Position#1” tolead a discussion of the vision and perception re-quirements necessary to establish reference pointsfor the center of lane position.. Center of Lane. Three feet from left side. Three feet from right side
(H) describe how to place the left sidetires zero to six inches from a line or curbutilizing visual reference points;
T-2.45
LEFT SIDE LIMITATIONLEFT SIDE LIMITATION■■ LANE POSITION # 2LANE POSITION # 2
■■ LEFT SIDE CURB PARKINGLEFT SIDE CURB PARKING(like on a one-way street).(like on a one-way street).–– (0-6 INCHES)(0-6 INCHES)
T-2.46
LEFT SIDE LIMITATIONLEFT SIDE LIMITATION
Your line of sightYour line of sightreference is about 1reference is about 1foot from left side orfoot from left side ormay be the crack linemay be the crack linebetween your leftbetween your leftfender and hood offender and hood ofyour vehicle to theyour vehicle to thecurb.curb.
T-2.47
LANE POSITION # 1LANE POSITION # 1
■■ CENTER OF YOURCENTER OF YOURLANE.LANE.
■■ CAR IS 3 FEETCAR IS 3 FEETAWAY FROM LINEAWAY FROM LINETO RIGHT OR LEFTTO RIGHT OR LEFT
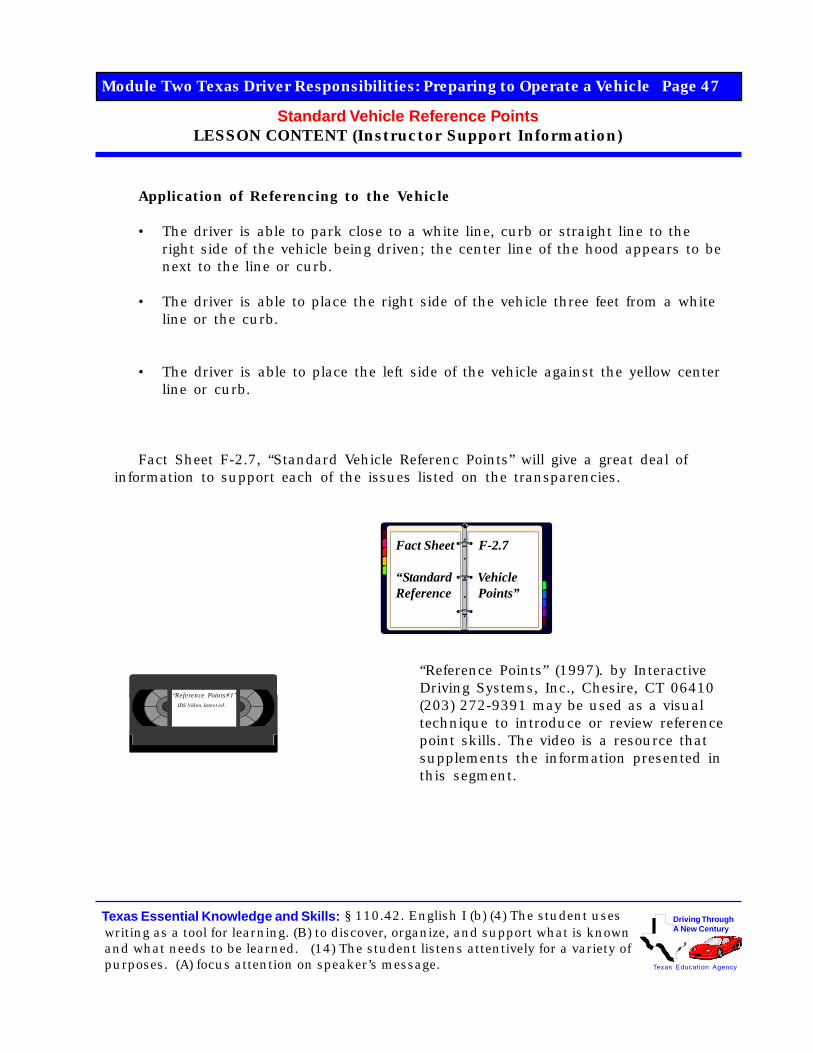
Standard Vehicle Reference PointsLESSON CONTENT (Instructor Support Information)
Module Two Texas Driver Responsibilities: Preparing to Operate a Vehicle Page 47
Texas Essential Knowledge and Skills: § 110.42. English I (b) (4) The student useswriting as a tool for learning. (B) to discover, organize, and support what is knownand what needs to be learned. (14) The student listens attentively for a variety ofpurposes. (A) focus attention on speaker’s message. Texas Education Agency
Driving ThroughA New Century
Application of Referencing to the Vehicle
• The driver is able to park close to a white line, curb or straight line to theright side of the vehicle being driven; the center line of the hood appears to benext to the line or curb.
• The driver is able to place the right side of the vehicle three feet from a whiteline or the curb.
• The driver is able to place the left side of the vehicle against the yellow centerline or curb.
Fact Sheet F-2.7, “Standard Vehicle Referenc Points” will give a great deal ofinformation to support each of the issues listed on the transparencies.
“Reference Points” (1997). by InteractiveDriving Systems, Inc., Chesire, CT 06410(203) 272-9391 may be used as a visualtechnique to introduce or review referencepoint skills. The video is a resource thatsupplements the information presented inthis segment.
“Reference Points#1”
IDS Video, latest ed.
Fact Sheet F-2.7
“Standard VehicleReference Points”
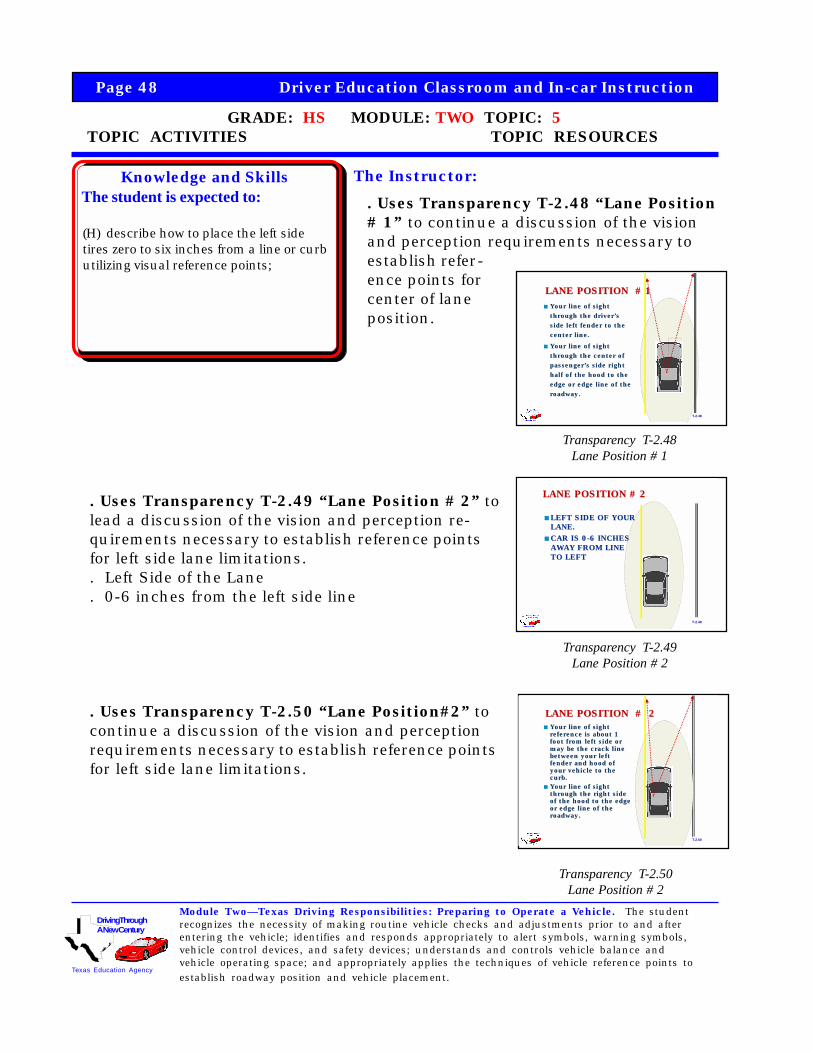
Page 48 Driver Education Classroom and In-car Instruction
GRADE: HS MODULE: TWO TOPIC: 5 TOPIC ACTIVITIES TOPIC RESOURCES
Texas Education Agency
Driving ThroughA New Century
Knowledge and Skills The Instructor:
Module Two—Texas Driving Responsibilities: Preparing to Operate a Vehicle. The studentrecognizes the necessity of making routine vehicle checks and adjustments prior to and afterentering the vehicle; identifies and responds appropriately to alert symbols, warning symbols,vehicle control devices, and safety devices; understands and controls vehicle balance andvehicle operating space; and appropriately applies the techniques of vehicle reference points toestablish roadway position and vehicle placement.
The student is expected to:
Transparency T-2.48Lane Position # 1
Transparency T-2.49Lane Position # 2
Transparency T-2.50Lane Position # 2
. Uses Transparency T-2.48 “Lane Position# 1” to continue a discussion of the visionand perception requirements necessary toestablish refer-ence points forcenter of laneposition.
. Uses Transparency T-2.49 “Lane Position # 2” tolead a discussion of the vision and perception re-quirements necessary to establish reference pointsfor left side lane limitations.. Left Side of the Lane. 0-6 inches from the left side line
. Uses Transparency T-2.50 “Lane Position#2” tocontinue a discussion of the vision and perceptionrequirements necessary to establish reference pointsfor left side lane limitations.
(H) describe how to place the left sidetires zero to six inches from a line or curbutilizing visual reference points;
T-2.48
LANE POSITION # 1LANE POSITION # 1■■ Your line of sightYour line of sight
through the driver’sthrough the driver’sside left fender to theside left fender to thecenter line.center line.
■■ Your line of sightYour line of sightthrough the center ofthrough the center ofpassenger’s side rightpassenger’s side righthalf of the hood to thehalf of the hood to theedge or edge line of theedge or edge line of theroadway.roadway.
T-2.49
LANE POSITION # 2LANE POSITION # 2
■■ LEFT SIDE OF YOURLEFT SIDE OF YOURLANE.LANE.
■■ CAR IS 0-6 INCHESCAR IS 0-6 INCHESAWAY FROM LINEAWAY FROM LINETO LEFTTO LEFT
T-2.50
LANE POSITION # 2LANE POSITION # 2■■ Your line of sightYour line of sight
reference is about 1reference is about 1foot from left side orfoot from left side ormay be the crack linemay be the crack linebetween your leftbetween your leftfender and hood offender and hood ofyour vehicle to theyour vehicle to thecurb.curb.
■■ Your line of sightYour line of sightthrough the right sidethrough the right sideof the hood to the edgeof the hood to the edgeor edge line of theor edge line of theroadway.roadway.

Standard Vehicle Reference PointsLESSON CONTENT (Instructor Support Information)
Module Two Texas Driver Responsibilities: Preparing to Operate a Vehicle Page 49
Texas Essential Knowledge and Skills: § 110.42. English I (b) (4) The student useswriting as a tool for learning. (B) to discover, organize, and support what is knownand what needs to be learned. (14) The student listens attentively for a variety ofpurposes. (A) focus attention on speaker’s message. Texas Education Agency
Driving ThroughA New Century
Application of Referencing to the Vehicle
• The driver is able to place the right side of the vehicle three feet from a whiteline or the curb.
• The driver is able to place the right side of the vehicle six feet away from a lineor curb.
• The driver is able to place the left side of the vehicle against the yellow centerline or curb.
Fact Sheet F-2.7, “Standard Vehicle Referenc Points” will give a great deal ofinformation to support each of the issues listed on the transparencies.
“Reference Points” (1997). by InteractiveDriving Systems, Inc., Chesire, CT 06410(203) 272-9391 may be used as a visualtechnique to introduce or review referencepoint skills. The video is a resource thatsupplements the information presented inthis segment.
“Reference Points#1”
IDS Video, latest ed.
Fact Sheet F-2.7
“Standard VehicleReference Points”
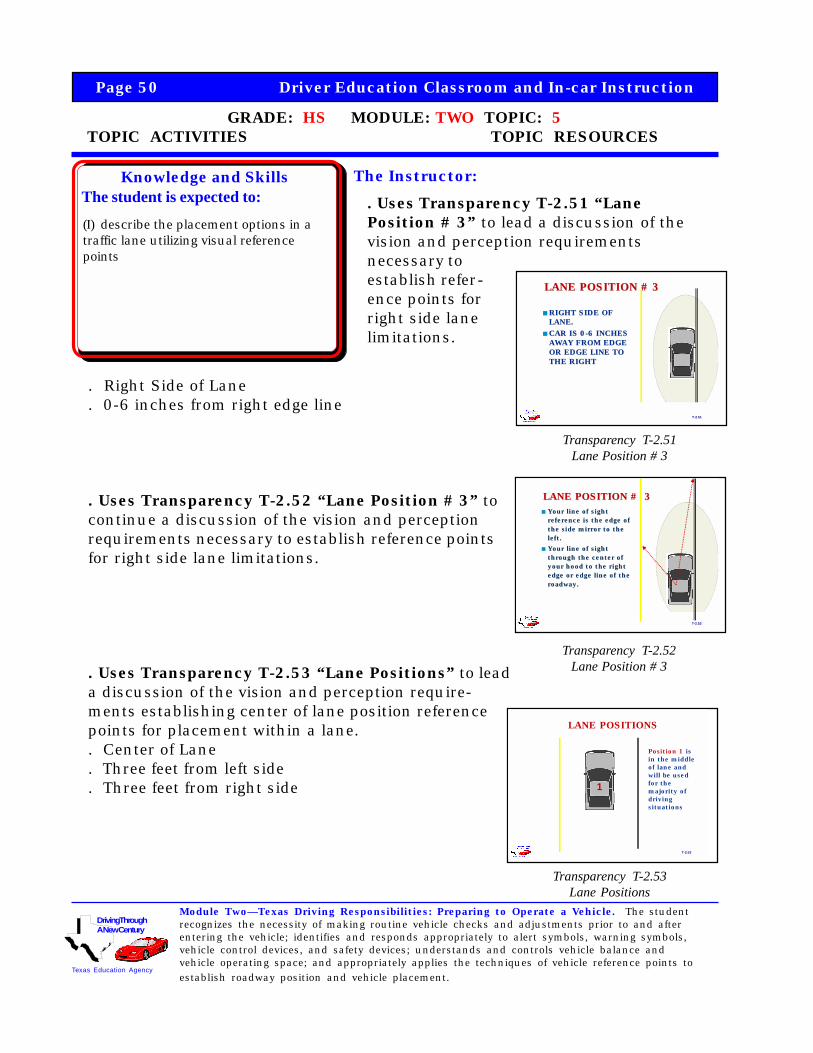
Page 50 Driver Education Classroom and In-car Instruction
GRADE: HS MODULE: TWO TOPIC: 5 TOPIC ACTIVITIES TOPIC RESOURCES
Texas Education Agency
Driving ThroughA New Century
Knowledge and Skills The Instructor:
Module Two—Texas Driving Responsibilities: Preparing to Operate a Vehicle. The studentrecognizes the necessity of making routine vehicle checks and adjustments prior to and afterentering the vehicle; identifies and responds appropriately to alert symbols, warning symbols,vehicle control devices, and safety devices; understands and controls vehicle balance andvehicle operating space; and appropriately applies the techniques of vehicle reference points toestablish roadway position and vehicle placement.
The student is expected to:
Transparency T-2.51Lane Position # 3
Transparency T-2.52Lane Position # 3
Transparency T-2.53Lane Positions
. Uses Transparency T-2.51 “LanePosition # 3” to lead a discussion of thevision and perception requirementsnecessary toestablish refer-ence points forright side lanelimitations.
. Right Side of Lane
. 0-6 inches from right edge line
. Uses Transparency T-2.52 “Lane Position # 3” tocontinue a discussion of the vision and perceptionrequirements necessary to establish reference pointsfor right side lane limitations.
. Uses Transparency T-2.53 “Lane Positions” to leada discussion of the vision and perception require-ments establishing center of lane position referencepoints for placement within a lane.. Center of Lane. Three feet from left side. Three feet from right side
(I) describe the placement options in atraffic lane utilizing visual referencepoints
T-2.51
■■ RIGHT SIDE OFRIGHT SIDE OFLANE.LANE.
■■ CAR IS 0-6 INCHESCAR IS 0-6 INCHESAWAY FROM EDGEAWAY FROM EDGEOR EDGE LINE TOOR EDGE LINE TOTHE RIGHTTHE RIGHT
LANE POSITION # 3LANE POSITION # 3
T-2.52
LANE POSITION # 3LANE POSITION # 3■■ Your line of sightYour line of sight
reference is the edge ofreference is the edge ofthe side mirror to thethe side mirror to theleft.left.
■■ Your line of sightYour line of sightthrough the center ofthrough the center ofyour hood to the rightyour hood to the rightedge or edge line of theedge or edge line of theroadway.roadway.
T-2.53
LANE POSITIONS
1
Position 1 isin the middleof lane andwill be usedfor themajority ofdrivingsituations
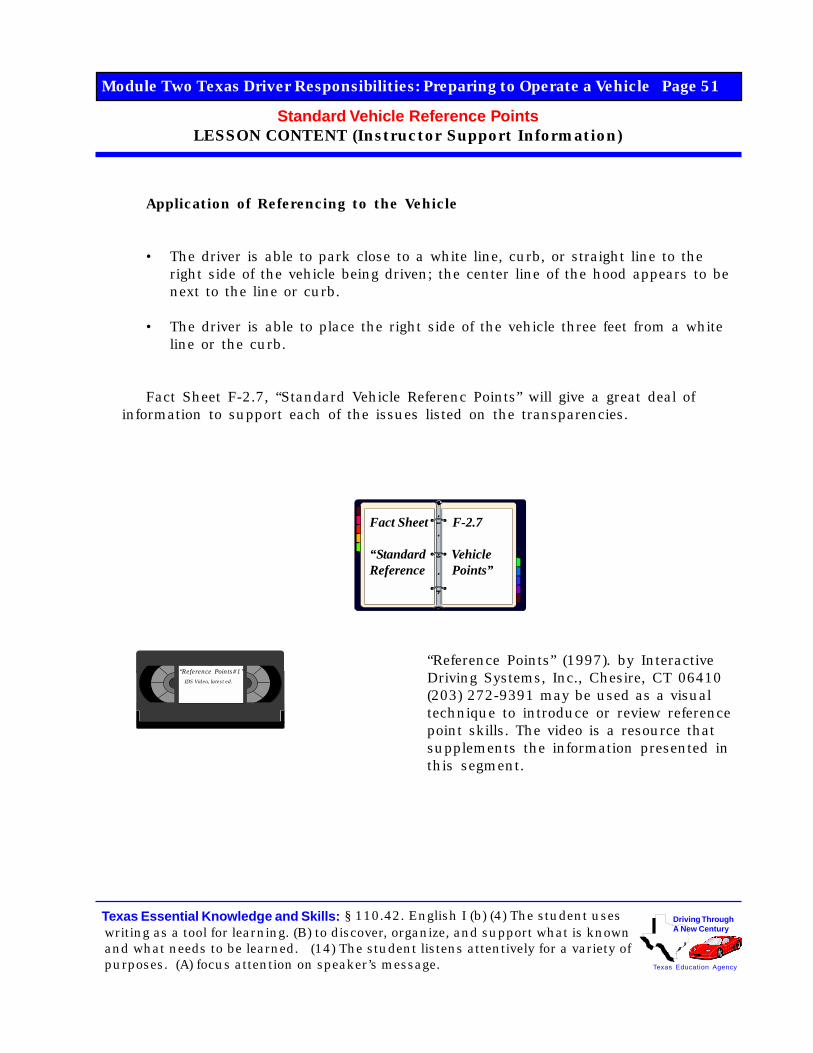
Standard Vehicle Reference PointsLESSON CONTENT (Instructor Support Information)
Module Two Texas Driver Responsibilities: Preparing to Operate a Vehicle Page 51
Texas Essential Knowledge and Skills: § 110.42. English I (b) (4) The student useswriting as a tool for learning. (B) to discover, organize, and support what is knownand what needs to be learned. (14) The student listens attentively for a variety ofpurposes. (A) focus attention on speaker’s message. Texas Education Agency
Driving ThroughA New Century
Application of Referencing to the Vehicle
• The driver is able to park close to a white line, curb, or straight line to theright side of the vehicle being driven; the center line of the hood appears to benext to the line or curb.
• The driver is able to place the right side of the vehicle three feet from a whiteline or the curb.
Fact Sheet F-2.7, “Standard Vehicle Referenc Points” will give a great deal ofinformation to support each of the issues listed on the transparencies.
“Reference Points” (1997). by InteractiveDriving Systems, Inc., Chesire, CT 06410(203) 272-9391 may be used as a visualtechnique to introduce or review referencepoint skills. The video is a resource thatsupplements the information presented inthis segment.
“Reference Points#1”
IDS Video, latest ed.
Fact Sheet F-2.7
“Standard VehicleReference Points”
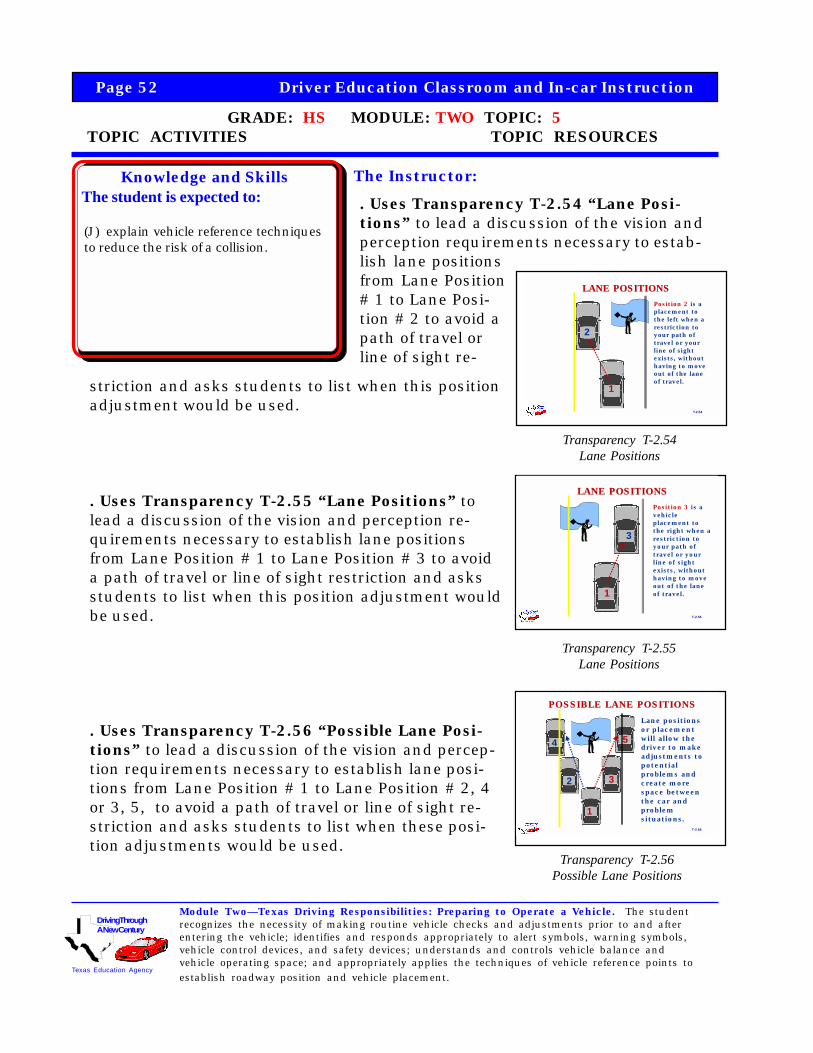
Page 52 Driver Education Classroom and In-car Instruction
GRADE: HS MODULE: TWO TOPIC: 5 TOPIC ACTIVITIES TOPIC RESOURCES
Texas Education Agency
Driving ThroughA New Century
Knowledge and Skills The Instructor:
Module Two—Texas Driving Responsibilities: Preparing to Operate a Vehicle. The studentrecognizes the necessity of making routine vehicle checks and adjustments prior to and afterentering the vehicle; identifies and responds appropriately to alert symbols, warning symbols,vehicle control devices, and safety devices; understands and controls vehicle balance andvehicle operating space; and appropriately applies the techniques of vehicle reference points toestablish roadway position and vehicle placement.
The student is expected to:
Transparency T-2.54Lane Positions
Transparency T-2.55Lane Positions
Transparency T-2.56Possible Lane Positions
. Uses Transparency T-2.54 “Lane Posi-tions” to lead a discussion of the vision andperception requirements necessary to estab-lish lane positionsfrom Lane Position# 1 to Lane Posi-tion # 2 to avoid apath of travel orline of sight re-
striction and asks students to list when this positionadjustment would be used.
. Uses Transparency T-2.55 “Lane Positions” tolead a discussion of the vision and perception re-quirements necessary to establish lane positionsfrom Lane Position # 1 to Lane Position # 3 to avoida path of travel or line of sight restriction and asksstudents to list when this position adjustment wouldbe used.
. Uses Transparency T-2.56 “Possible Lane Posi-tions” to lead a discussion of the vision and percep-tion requirements necessary to establish lane posi-tions from Lane Position # 1 to Lane Position # 2, 4or 3, 5, to avoid a path of travel or line of sight re-striction and asks students to list when these posi-tion adjustments would be used.
(J) explain vehicle reference techniquesto reduce the risk of a collision.
T-2.54
LANE POSITIONSLANE POSITIONS
1
2
Position 2 is aplacement tothe left when arestriction toyour path oftravel or yourline of sightexists, withouthaving to moveout of the laneof travel.
T-2.55
LANE POSITIONSLANE POSITIONS
1
3
Position 3 is avehicleplacement tothe right when arestriction toyour path oftravel or yourline of sightexists, withouthaving to moveout of the laneof travel.
T-2.56
POSSIBLE LANE POSITIONSPOSSIBLE LANE POSITIONS
1
3
5
2
4
Lane positionsor placementwill allow thedriver to makeadjustments topotentialproblems andcreate morespace betweenthe car andproblemsituations.

Standard Vehicle Reference PointsLESSON CONTENT (Instructor Support Information)
Module Two Texas Driver Responsibilities: Preparing to Operate a Vehicle Page 53
Texas Essential Knowledge and Skills: § 110.42. English I (b) (4) The student useswriting as a tool for learning. (B) to discover, organize, and support what is knownand what needs to be learned. (14) The student listens attentively for a variety ofpurposes. (A) focus attention on speaker’s message. Texas Education Agency
Driving ThroughA New Century
Application of Referencing to the Vehicle
• The driver is able to avoid a path of travel (POT) or a line of sight (LOS) restric-tion or problem to the left side of lane.
• The driver is able to avoid a path of travel (POT) or a line of sight (LOS) restric-tion or problem to the right side of lane.
• The driver is able to avoid a path of travel (POT) or a line of sight (LOS) restric-tion or problem by positioning over the yellow or white line to the left.
• The driver is able to avoid a path of travel (POT) or a line of sight (LOS) restric-tion or problem by positioning over the white line to the right.
Fact Sheet F-2.7, “Standard Vehicle Referenc Points” will give a great deal ofinformation to support each of the issues listed on the transparencies.
“Reference Points” (1997). by InteractiveDriving Systems, Inc., Chesire, CT 06410(203) 272-9391 may be used as a visualtechnique to introduce or review referencepoint skills. The video is a resource thatsupplements the information presented inthis segment.
“Reference Points#1”
IDS Video, latest ed.
Fact Sheet F-2.7
“Standard VehicleReference Points”
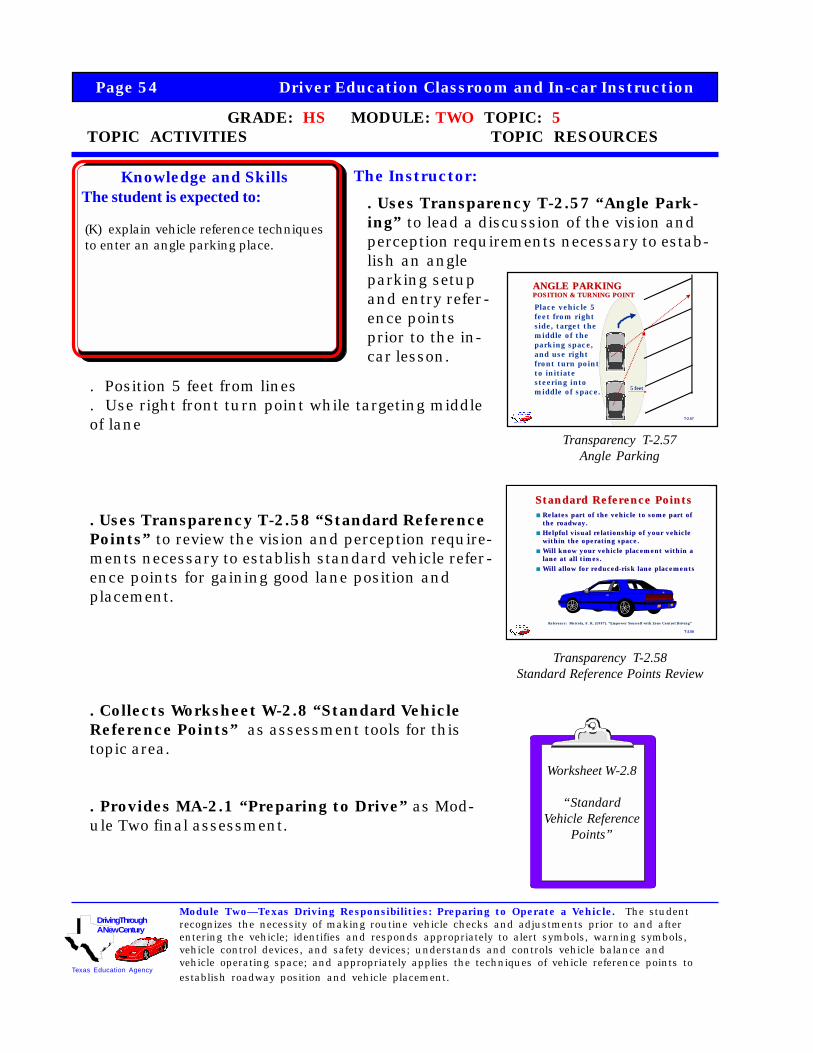
Page 54 Driver Education Classroom and In-car Instruction
GRADE: HS MODULE: TWO TOPIC: 5 TOPIC ACTIVITIES TOPIC RESOURCES
Texas Education Agency
Driving ThroughA New Century
Knowledge and Skills The Instructor:
Module Two—Texas Driving Responsibilities: Preparing to Operate a Vehicle. The studentrecognizes the necessity of making routine vehicle checks and adjustments prior to and afterentering the vehicle; identifies and responds appropriately to alert symbols, warning symbols,vehicle control devices, and safety devices; understands and controls vehicle balance andvehicle operating space; and appropriately applies the techniques of vehicle reference points toestablish roadway position and vehicle placement.
The student is expected to:
Transparency T-2.57Angle Parking
Transparency T-2.58Standard Reference Points Review
. Uses Transparency T-2.57 “Angle Park-ing” to lead a discussion of the vision andperception requirements necessary to estab-lish an angleparking setupand entry refer-ence pointsprior to the in-car lesson.
. Position 5 feet from lines
. Use right front turn point while targeting middleof lane
. Uses Transparency T-2.58 “Standard ReferencePoints” to review the vision and perception require-ments necessary to establish standard vehicle refer-ence points for gaining good lane position andplacement.
. Collects Worksheet W-2.8 “Standard VehicleReference Points” as assessment tools for thistopic area.
. Provides MA-2.1 “Preparing to Drive” as Mod-ule Two final assessment.
Worksheet W-2.8
“StandardVehicle Reference
Points”
(K) explain vehicle reference techniquesto enter an angle parking place.
T-2.57
ANGLE PARKINGANGLE PARKINGPOSITION & TURNING POINTPOSITION & TURNING POINT
Place vehicle 5feet from rightside, target themiddle of theparking space,and use rightfront turn pointto initiatesteering intomiddle of space. 5 feet
T-2.58
Standard Reference PointsStandard Reference Points■■ Relates part of the vehicle to some part ofRelates part of the vehicle to some part of
the roadway.the roadway.
■■ Helpful visual relationship of your vehicleHelpful visual relationship of your vehiclewithin the operating space.within the operating space.
■■ Will know your vehicle placement within aWill know your vehicle placement within alane at all times.lane at all times.
■■ Will allow for reduced-risk lane placementsWill allow for reduced-risk lane placements
Reference: Reference: MottolaMottola, F. R. (1997). “Empower Yourself with Zone Control Driving”, F. R. (1997). “Empower Yourself with Zone Control Driving”
Standard Vehicle Reference PointsLESSON CONTENT (Instructor Support Information)
Module Two Texas Driver Responsibilities: Preparing to Operate a Vehicle Page 55
Texas Essential Knowledge and Skills: § 110.42. English I (b) (4) The student useswriting as a tool for learning. (B) to discover, organize, and support what is knownand what needs to be learned. (14) The student listens attentively for a variety ofpurposes. (A) focus attention on speaker’s message. Texas Education Agency
Driving ThroughA New Century
Fact Sheets F-2.7, “Standard Vehicle Reference Points” provides information to
support each of the issues listed on the transparencies.
“Reference Points” (1997). by Interactive Driving Systems, Inc., Chesire, CT 06410
(203) 272-9391 may be used as a visual technique to introduce or review reference
point skills. The video is a resource that supplements the information presented in
this segment.
The instructor should collect optional Worksheet W-2.8, “Standard Vehicle Refer-ence Points” as an assessment tool for this topic area. Questions concerning thistopic are located in the Module Assessment MA-2.1, Preparing To Drive.
T-2.59
Driving ThroughA New Century
Texas Education Agency
Module Two TransparenciesModule Two Transparencies
Texas Driver Responsibilities: Texas Driver Responsibilities:Preparing to Operate a Vehicle Preparing to Operate a Vehicle
Topic 1 Driver Preparation ProceduresTopic 1 Driver Preparation Procedures
Topic 2 Identifying Vehicle Control DevicesTopic 2 Identifying Vehicle Control Devices
Topic 3 Operating Vehicle Control DevicesTopic 3 Operating Vehicle Control Devices
Topic 4 Vehicle Balance ConsiderationsTopic 4 Vehicle Balance Considerations
Topic 5 Standard Vehicle Reference PointsTopic 5 Standard Vehicle Reference Points
Page 56 Driver Education Classroom and In-car Instruction
Module Two Topical Outline
Module Two Topic 5 Resources
Module Two, Topic 5 Transparencies:T-2.32, “Targeting & Visual Requirements”T-2.33, “Determining Vehicle Operating Space”T-2.34, “Traditional Mirror Views and Blind Spots”T-2.35, “Blind Spot & Glare Elimination”T-2.36, “Standard Reference Points”T-2.37, “Front Limitation”T-2.38, “Front Limitation”T-2.39, “Front Limitation”T-2.40, “Rear Limitation”T-2.41, “Rear Limitation”T-2.42, “Rear Limitation”T-2.43, “Right Side Limitation”T-2.44, “Right Side Limitation”T-2.45, “Left Side Limitation”T-2.46, “Left Side Limitation”T-2.47, “Lane Position # 1”T-2.48, “Lane Position # 1”T-2.49, “Lane Position # 2”T-2.50, “Lane Position # 2”T-2.51, “Lane Position # 3”T-2.52, “Lane Position # 3”T-2.53, “Lane Positions”T-2.54, “Lane Positions”T-2.55, “Lane Positions”T-2.56, “Possible Lane Positions”T-2.57, “Angle Parking”T-2.58, “Standard Reference Points”
WorksheetsW-2.8, “Standard Vehicle Reference Points”
Fact Sheets F-2.5, “Introduction to Targeting Concepts”F-2.6, “Preventing Blind Spot Crashes”F-2.7. “Standard Vehicle References”
AssessmentMA-2.1, “Preparing to Drive”
Suggested ResourcesMottola, F. R. 1997. “Empower Yourself with Zone Control Driving,”“Targeting,” and “Reference Points,” (1997).Interactive Driving Systems, Inc., P.O. Box 98, Cheshire, CT 06410.203/272-9391 Office 203/250-0896 FAX
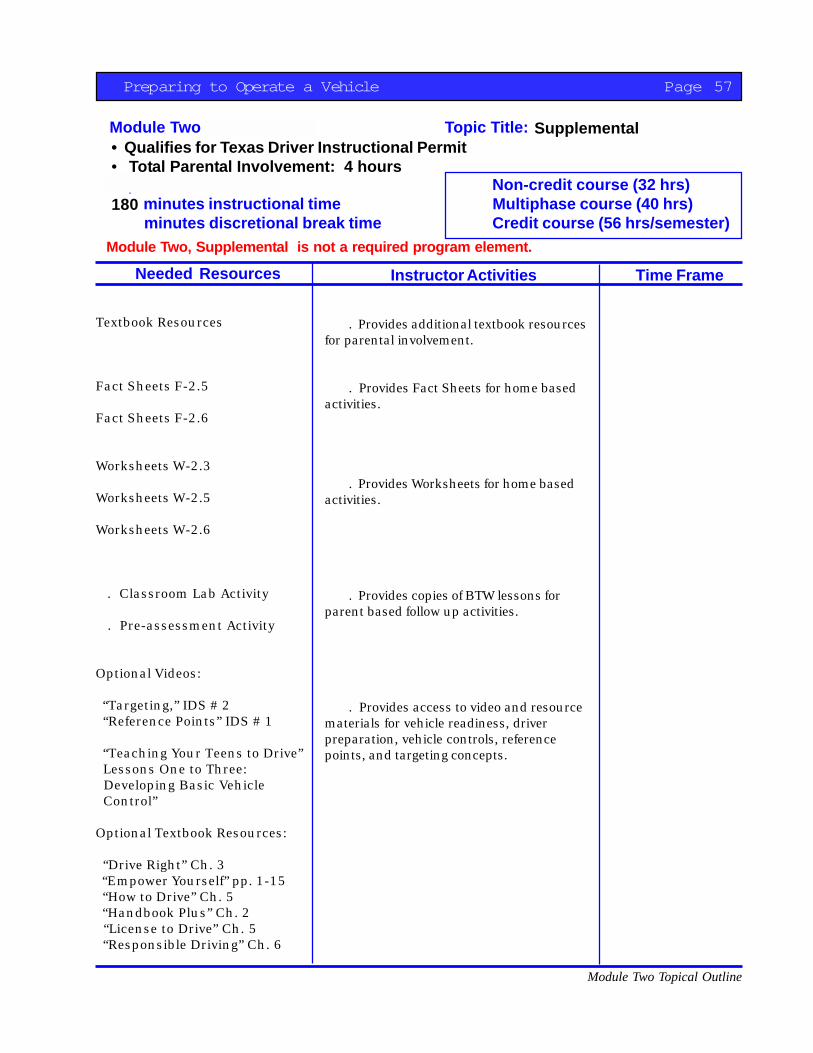
Preparing to Operate a Vehicle Page 57
Module Two Topical Outline
Needed Resources Instructor Activities Time Frame
Module Two Prerequisites: Topic Title:
Topic Time Frame: Non-credit course (32 hrs) minutes instructional time Multiphase course (40 hrs) minutes discretional break time Credit course (56 hrs/semester)
Textbook Resources
Fact Sheets F-2.5
Fact Sheets F-2.6
Worksheets W-2.3
Worksheets W-2.5
Worksheets W-2.6
. Classroom Lab Activity
. Pre-assessment Activity
Optional Videos:
“Targeting,” IDS # 2 “Reference Points” IDS # 1
“Teaching Your Teens to Drive” Lessons One to Three: Developing Basic Vehicle Control”
Optional Textbook Resources:
“Drive Right” Ch. 3 “Empower Yourself” pp. 1-15 “How to Drive” Ch. 5 “Handbook Plus” Ch. 2 “License to Drive” Ch. 5 “Responsible Driving” Ch. 6
Supplemental• Qualifies for Texas Driver Instructional Permit• Total Parental Involvement: 4 hours
180
Module Two, Supplemental is not a required program element.
. Provides additional textbook resourcesfor parental involvement.
. Provides Fact Sheets for home basedactivities.
. Provides Worksheets for home basedactivities.
. Provides copies of BTW lessons forparent based follow up activities.
. Provides access to video and resourcematerials for vehicle readiness, driverpreparation, vehicle controls, referencepoints, and targeting concepts.
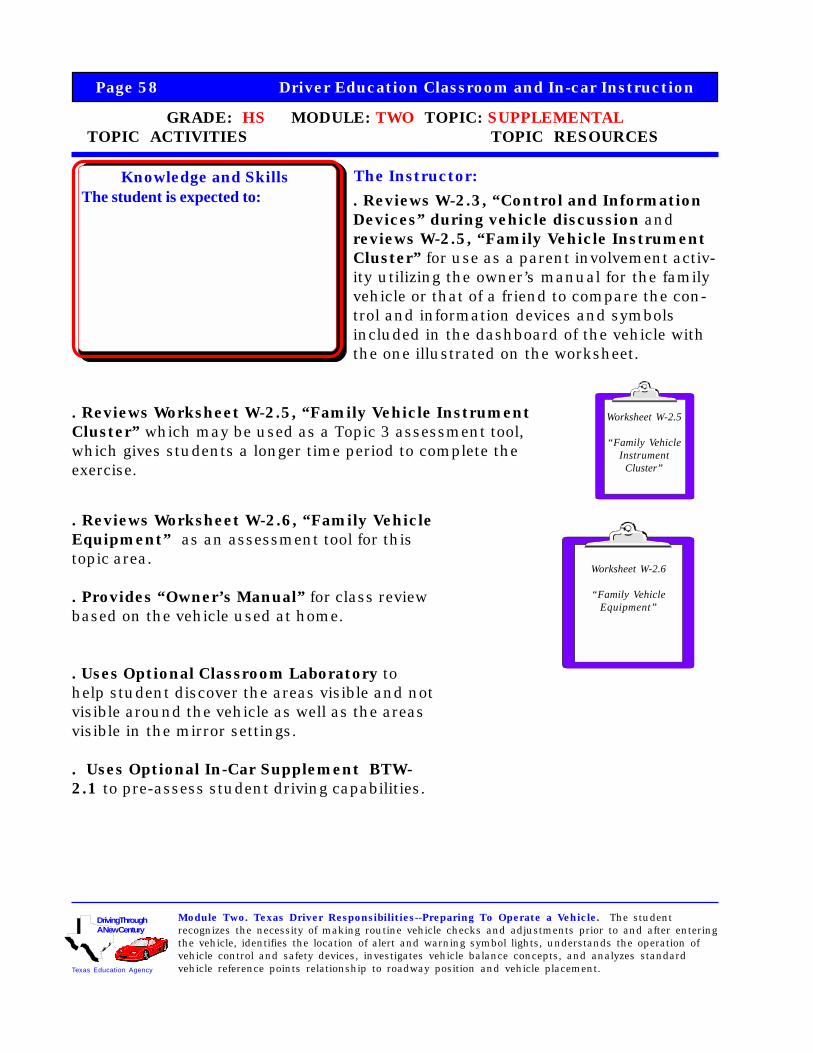
Page 58 Driver Education Classroom and In-car Instruction
GRADE: HS MODULE: TWO TOPIC: SUPPLEMENTAL TOPIC ACTIVITIES TOPIC RESOURCES
Texas Education Agency
Driving ThroughA New Century
Knowledge and Skills The Instructor:
Module Two. Texas Driver Responsibilities--Preparing To Operate a Vehicle. The studentrecognizes the necessity of making routine vehicle checks and adjustments prior to and after enteringthe vehicle, identifies the location of alert and warning symbol lights, understands the operation ofvehicle control and safety devices, investigates vehicle balance concepts, and analyzes standardvehicle reference points relationship to roadway position and vehicle placement.
The student is expected to: . Reviews W-2.3, “Control and InformationDevices” during vehicle discussion andreviews W-2.5, “Family Vehicle InstrumentCluster” for use as a parent involvement activ-ity utilizing the owner’s manual for the familyvehicle or that of a friend to compare the con-trol and information devices and symbolsincluded in the dashboard of the vehicle withthe one illustrated on the worksheet.
Worksheet W-2.5
“Family VehicleInstrument
Cluster”
. Reviews Worksheet W-2.5, “Family Vehicle InstrumentCluster” which may be used as a Topic 3 assessment tool,which gives students a longer time period to complete theexercise.
. Reviews Worksheet W-2.6, “Family VehicleEquipment” as an assessment tool for thistopic area.
. Provides “Owner’s Manual” for class reviewbased on the vehicle used at home.
. Uses Optional Classroom Laboratory tohelp student discover the areas visible and notvisible around the vehicle as well as the areasvisible in the mirror settings.
. Uses Optional In-Car Supplement BTW-2.1 to pre-assess student driving capabilities.
Worksheet W-2.6
“Family VehicleEquipment”
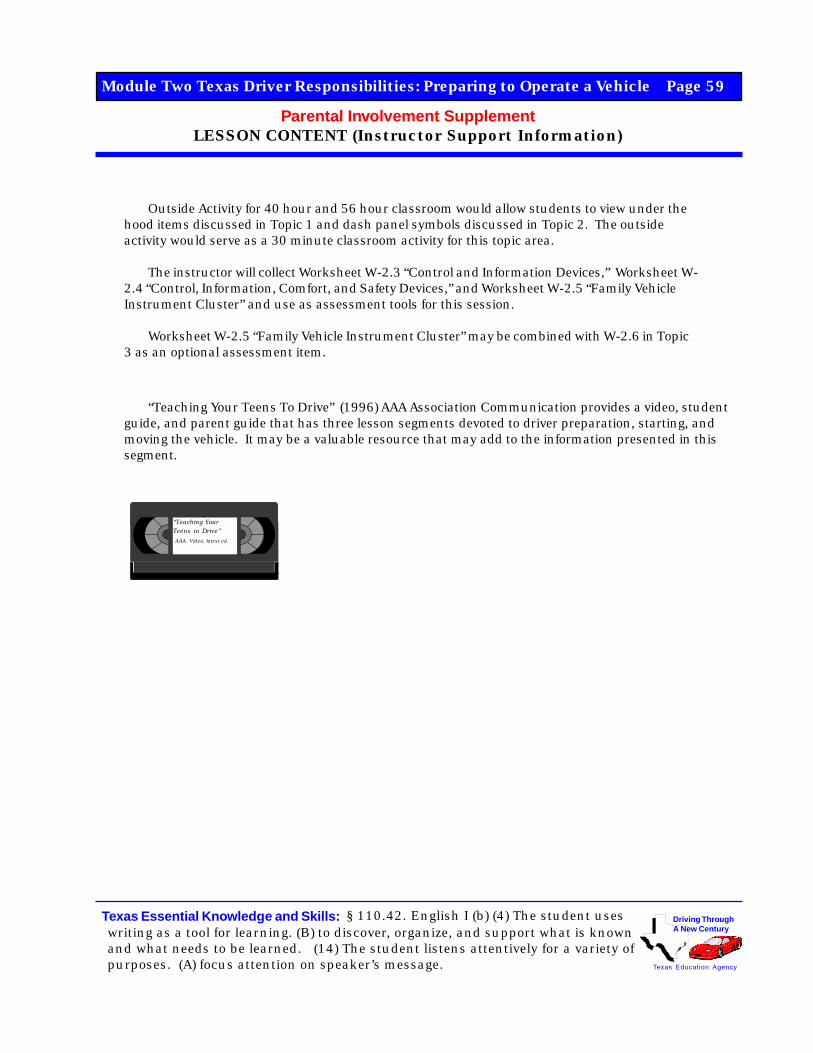
Parental Involvement SupplementLESSON CONTENT (Instructor Support Information)
Module Two Texas Driver Responsibilities: Preparing to Operate a Vehicle Page 59
Texas Essential Knowledge and Skills: § 110.42. English I (b) (4) The student useswriting as a tool for learning. (B) to discover, organize, and support what is knownand what needs to be learned. (14) The student listens attentively for a variety ofpurposes. (A) focus attention on speaker’s message. Texas Education Agency
Driving ThroughA New Century
Outside Activity for 40 hour and 56 hour classroom would allow students to view under thehood items discussed in Topic 1 and dash panel symbols discussed in Topic 2. The outsideactivity would serve as a 30 minute classroom activity for this topic area.
The instructor will collect Worksheet W-2.3 “Control and Information Devices,” Worksheet W-2.4 “Control, Information, Comfort, and Safety Devices,” and Worksheet W-2.5 “Family VehicleInstrument Cluster” and use as assessment tools for this session.
Worksheet W-2.5 “Family Vehicle Instrument Cluster” may be combined with W-2.6 in Topic3 as an optional assessment item.
“Teaching YourTeens to Drive”
AAA Video, latest ed.
“Teaching Your Teens To Drive” (1996) AAA Association Communication provides a video, studentguide, and parent guide that has three lesson segments devoted to driver preparation, starting, andmoving the vehicle. It may be a valuable resource that may add to the information presented in thissegment.
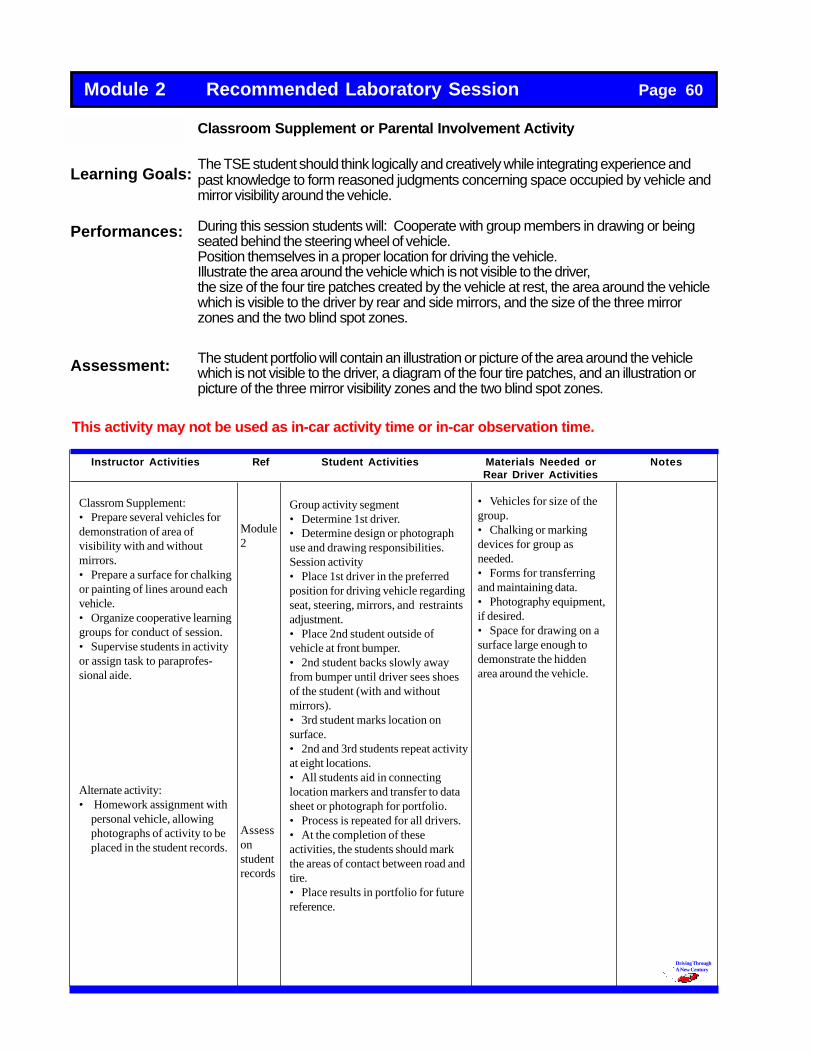
Module 2 Recommended Laboratory Session Page 60
Prerequisites:
Learning Goals:
Performances:
Assessment:
Instructor Activities Ref Student Activities Materials Needed or NotesRear Driver Activities
Driving ThroughA New Century
Classroom Supplement or Parental Involvement Activity
The TSE student should think logically and creatively while integrating experience andpast knowledge to form reasoned judgments concerning space occupied by vehicle andmirror visibility around the vehicle.
During this session students will: Cooperate with group members in drawing or beingseated behind the steering wheel of vehicle.Position themselves in a proper location for driving the vehicle.Illustrate the area around the vehicle which is not visible to the driver,the size of the four tire patches created by the vehicle at rest, the area around the vehiclewhich is visible to the driver by rear and side mirrors, and the size of the three mirrorzones and the two blind spot zones.
The student portfolio will contain an illustration or picture of the area around the vehiclewhich is not visible to the driver, a diagram of the four tire patches, and an illustration orpicture of the three mirror visibility zones and the two blind spot zones.
Group activity segment• Determine 1st driver.• Determine design or photographuse and drawing responsibilities.Session activity• Place 1st driver in the preferredposition for driving vehicle regardingseat, steering, mirrors, and restraintsadjustment.• Place 2nd student outside ofvehicle at front bumper.• 2nd student backs slowly awayfrom bumper until driver sees shoesof the student (with and withoutmirrors).• 3rd student marks location onsurface.• 2nd and 3rd students repeat activityat eight locations.• All students aid in connectinglocation markers and transfer to datasheet or photograph for portfolio.• Process is repeated for all drivers.• At the completion of theseactivities, the students should markthe areas of contact between road andtire.• Place results in portfolio for futurereference.
Classrom Supplement:• Prepare several vehicles fordemonstration of area ofvisibility with and withoutmirrors.• Prepare a surface for chalkingor painting of lines around eachvehicle.• Organize cooperative learninggroups for conduct of session.• Supervise students in activityor assign task to paraprofes-sional aide.
Alternate activity:• Homework assignment with
personal vehicle, allowingphotographs of activity to beplaced in the student records.
Module2
Assessonstudentrecords
• Vehicles for size of thegroup.• Chalking or markingdevices for group asneeded.• Forms for transferringand maintaining data.• Photography equipment,if desired.• Space for drawing on asurface large enough todemonstrate the hiddenarea around the vehicle.
This activity may not be used as in-car activity time or in-car observation time.
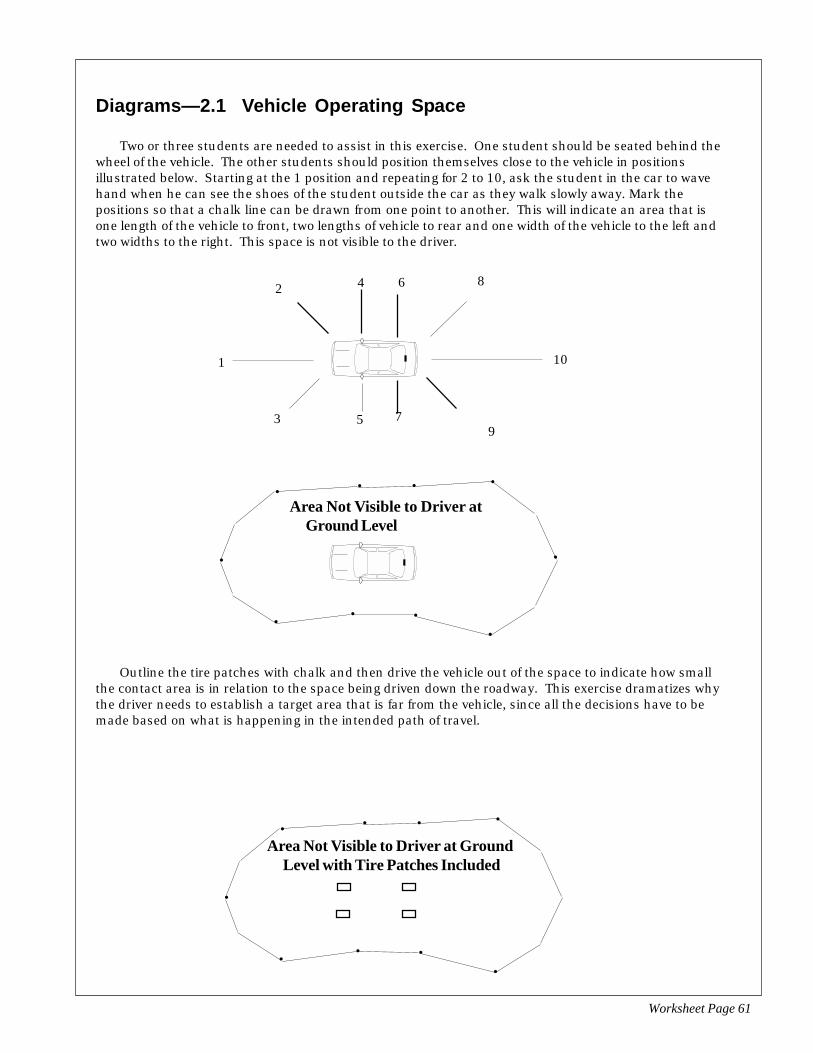
Worksheet Page 61
Diagrams—2.1 Vehicle Operating Space
••
•
••
•
•
•
•
•
Area Not Visible to Driver atGround Level
3
28
95
4
101
7
6
•
•
••
•
•
•
•
•
Area Not Visible to Driver at GroundLevel with Tire Patches Included
Two or three students are needed to assist in this exercise. One student should be seated behind thewheel of the vehicle. The other students should position themselves close to the vehicle in positionsillustrated below. Starting at the 1 position and repeating for 2 to 10, ask the student in the car to wavehand when he can see the shoes of the student outside the car as they walk slowly away. Mark thepositions so that a chalk line can be drawn from one point to another. This will indicate an area that isone length of the vehicle to front, two lengths of vehicle to rear and one width of the vehicle to the left andtwo widths to the right. This space is not visible to the driver.
Outline the tire patches with chalk and then drive the vehicle out of the space to indicate how smallthe contact area is in relation to the space being driven down the roadway. This exercise dramatizes whythe driver needs to establish a target area that is far from the vehicle, since all the decisions have to bemade based on what is happening in the intended path of travel.
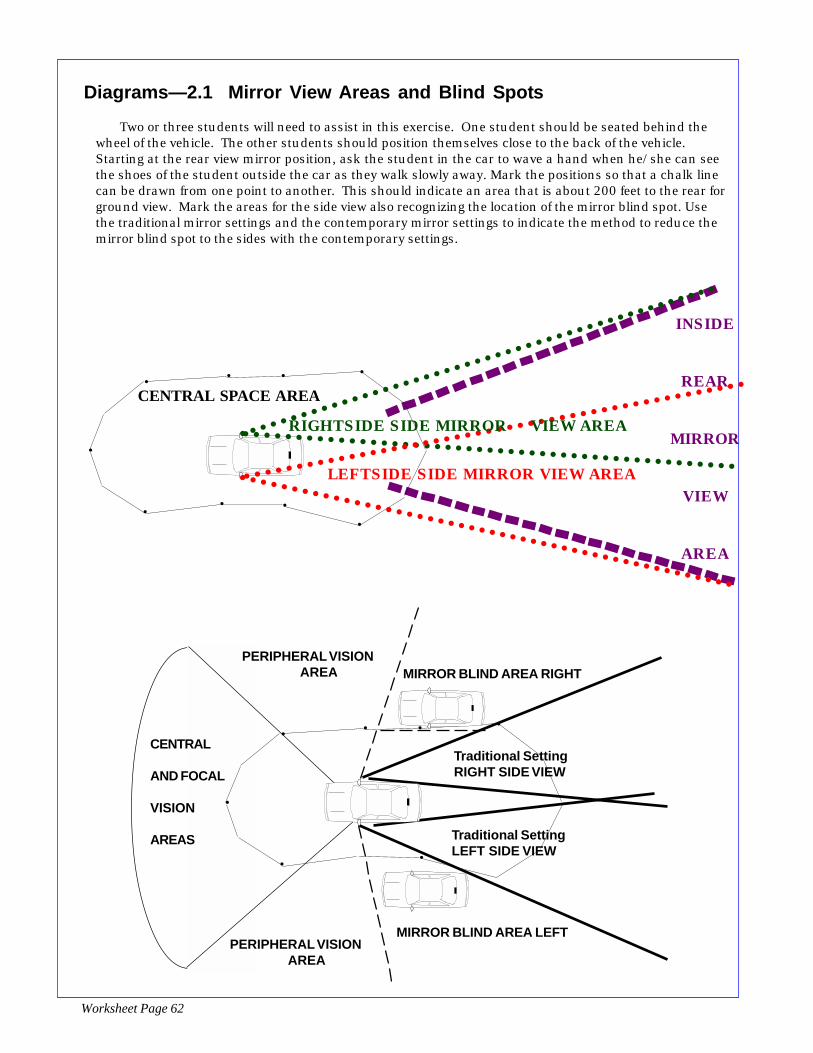
Worksheet Page 62
Diagrams—2.1 Mirror View Areas and Blind SpotsTwo or three students will need to assist in this exercise. One student should be seated behind the
wheel of the vehicle. The other students should position themselves close to the back of the vehicle.Starting at the rear view mirror position, ask the student in the car to wave a hand when he/she can seethe shoes of the student outside the car as they walk slowly away. Mark the positions so that a chalk linecan be drawn from one point to another. This should indicate an area that is about 200 feet to the rear forground view. Mark the areas for the side view also recognizing the location of the mirror blind spot. Usethe traditional mirror settings and the contemporary mirror settings to indicate the method to reduce themirror blind spot to the sides with the contemporary settings.
CENTRAL SPACE AREA
•
•
••
•
•
•
•
•
INSIDE
REAR
MIRROR
VIEW
AREA
○○○○○○○○○○○○○○○○○○○○○○○○○○○○○○○○○○○○○○○○○○○○○○○
○ ○ ○ ○ ○ ○ ○ ○ ○ ○ ○ ○ ○ ○ ○ ○ ○ ○ ○ ○ ○ ○ ○ ○ ○ ○ ○ ○ ○ ○ ○ ○ ○ ○ ○ ○ ○ ○ ○ ○ ○ ○ ○ ○ ○ ○ ○
○ ○ ○ ○ ○ ○ ○ ○ ○ ○ ○ ○ ○ ○ ○ ○ ○ ○ ○ ○ ○ ○ ○ ○ ○ ○ ○ ○ ○ ○ ○ ○ ○ ○ ○ ○ ○ ○ ○ ○ ○ ○ ○ ○ ○ ○ ○ ○
Traditional SettingRIGHT SIDE VIEW
CENTRAL
AND FOCAL
VISION
AREAS
MIRROR BLIND AREA LEFT
MIRROR BLIND AREA RIGHTPERIPHERAL VISION AREA
PERIPHERAL VISION AREA
Traditional SettingLEFT SIDE VIEW
•
•
•••
•
•
○ ○ ○ ○ ○ ○ ○ ○ ○ ○ ○ ○ ○ ○ ○ ○ ○ ○ ○ ○ ○ ○ ○ ○ ○ ○ ○ ○ ○ ○ ○ ○ ○ ○ ○ ○ ○ ○ ○ ○ ○ ○ ○ ○ ○ ○ ○ ○
LEFTSIDE SIDE MIRROR VIEW AREA
RIGHTSIDE SIDE MIRROR VIEW AREA
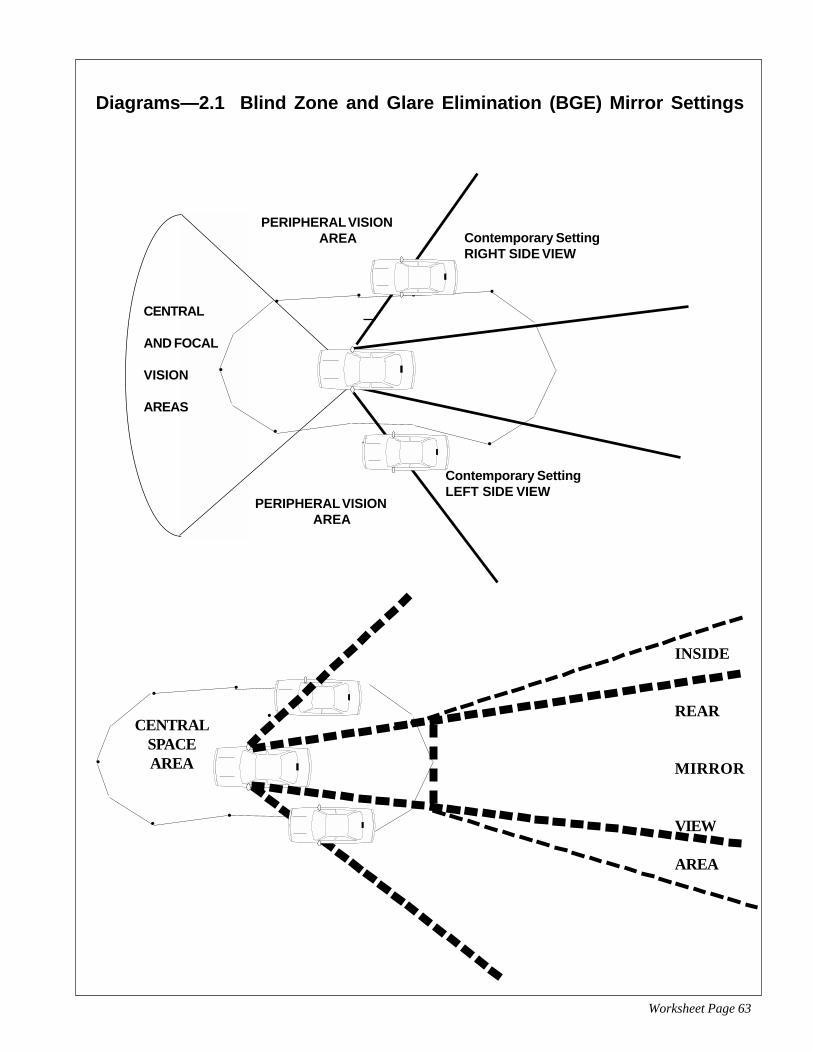
Worksheet Page 63
Diagrams—2.1 Blind Zone and Glare Elimination (BGE) Mirror Settings
Contemporary SettingRIGHT SIDE VIEW
CENTRAL
AND FOCAL
VISION
AREAS
PERIPHERAL VISION AREA
PERIPHERAL VISION AREA
CENTRALSPACEAREA
Contemporary SettingLEFT SIDE VIEW
•
•
••
•
• •
•
•
•
•
•
•
•
INSIDE
REAR
MIRROR
VIEW
AREA
•

Module 2 Recommended Laboratory Session Page 64
Prerequisites:
Learning Goals:
Performances:
Assessment:
Instructor Activities Ref Student Activities Materials Needed or NotesRear Driver Activities
Driving ThroughA New Century
• TSE vehicle prepared foron-street use• Cones/markers forexercises; plastic trash cansof different sizes may besubstituted for conemarkers• Chalked or paintedexercise area is recom-mended for preassessmentconsistency• Space for surface largeenough to accommodate theexercises
Valid Texas Driver Instructional Permit
The novice driver should be assessed for prior skill and knowledge level, foradjusting entry into in-car skill areas.
During this in-car lesson the student will demonstrate program entry skill levelsby:• performing forward and reverse movements in the offset alley exercise• performing forward and backward movements in the tracking exercise• performing forward maneuvers in the constant curvature exercise
The student portfolio will contain a preassessment of tracking, steering, brak-ing, acceleration, lane position and vision skills in three exercises used todetermine entry level performance and placement in the in-car lessons.
• Prepare assessment site fordemonstration of skills as listedin guide• Allow a fifty foot spacecushion around the exercises forerror control• Organize learning groups forconduct of session• Demonstrate activities to beassessed with limited instructionon task performance• Assess students in activity orassign task to certified on-streetinstructor• Constant curvature exercisemay be combined with thetracking exercise to conservespace on surface used• Provide the assessmentdocument for the studentportfolio
PlaceAssess-mentontheStudentRecordForm
Group activity segment• Observe instructor demonstra-tion of preassessment activity• Ask questions pertaining tounderstanding of tasks
Session activity• Place 1st driver in the preferredposition for driving vehicleregarding seat, steering, mirrorsand restraints adjustment• 1st driver performs off-set alley• Succeeding students performmaneuvers• 1st driver performs trackingexercise• Succeeding students performmaneuvers• 1st driver performs constantcurvature• Succeeding students performmaneuvers• At the completion of theseactivities, the students shouldassess their abilities to performmaneuvers• Place results in portfolio forfuture reference
Worksheet Page 65
Diagrams—In-Car Laboratory BTW-2.1 Optional Skills Assessment
25 feet
8 fe
et
Stop MarkersTargetingCones
TargetingCones
10 -12 feetLanes
Stop Markers
One drive forward and reverse at each of the following speeds:10 mph and 20 mph
Points are lost for striking cones, stopping alignment,lane positioning.
Exercise value 30 points
Direction of Travel May Be Switched
Note: Park Avenue/Crown Victoria/Concorde/Pickup truck use 9.5 feet and 27 feet as guides
Assessment Skill Exercise Two TRACKING
Assessment Skill Exercise Three CONSTANT CURVATURE
One drive forward at each of the following speeds: 10 mph, 20 mph and 30 mph.
One drive in reverse at each of the following speeds: 5 mph, 10 mph and 20 mph.
Points are lost when cones are struck or vehicle is slowed or stopped.
Exercise value 40 points
Assessment Skill Exercise One OFF-SET ALLEY
TrailBraking
LightAcceleration
Acceleration
SteerPoint
12 feet lane
Minimum90 feet radius
Curvature
○
○
○
○
○
○
○
○
○
○
○ ○ ○ ○ ○ ○
Hard Braking Area 45 feet
Brake toAccelerationSwitch
One forward drive through with entry at each of the following speeds:20 mph, 30 mph, 40 mph turning to the right and turning to the left.
Points are lost for improper use of brake, steering, acceleration,and lane position.
Exercise Value 30 points
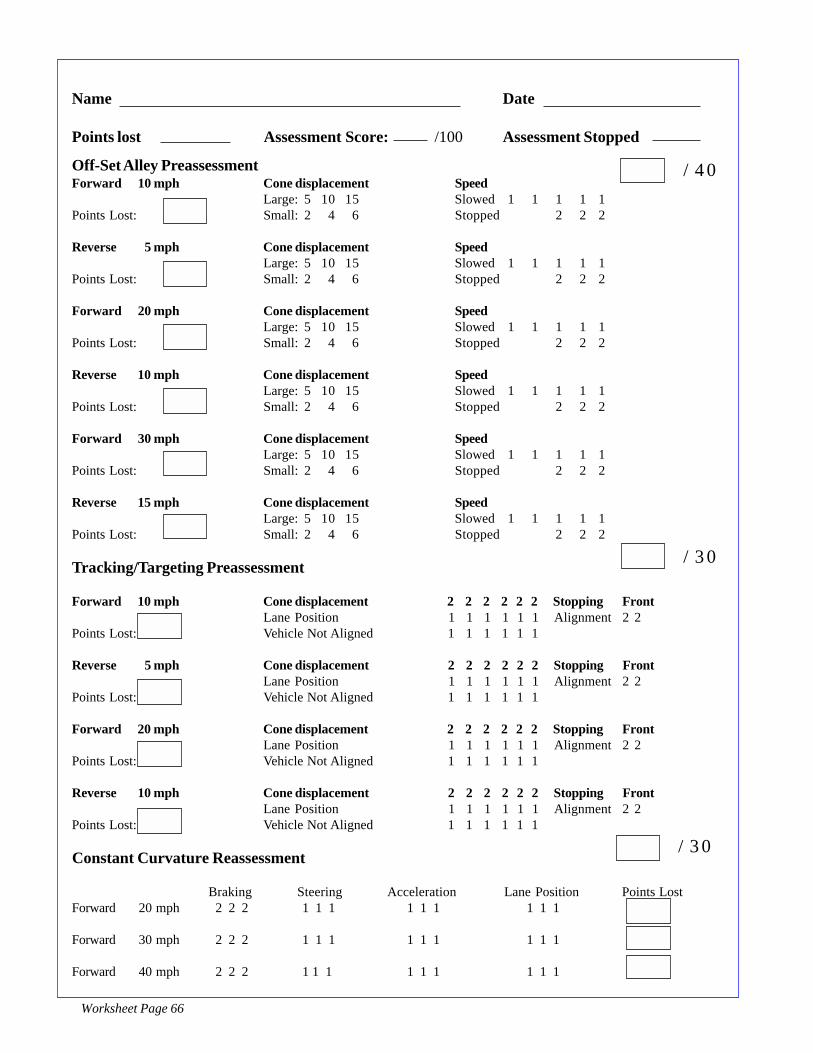
Worksheet Page 66
Off-Set Alley PreassessmentForward 10 mph Cone displacement Speed
Large: 5 10 15 Slowed 1 1 1 1 1Points Lost: Small: 2 4 6 Stopped 2 2 2
Reverse 5 mph Cone displacement SpeedLarge: 5 10 15 Slowed 1 1 1 1 1
Points Lost: Small: 2 4 6 Stopped 2 2 2
Forward 20 mph Cone displacement SpeedLarge: 5 10 15 Slowed 1 1 1 1 1
Points Lost: Small: 2 4 6 Stopped 2 2 2
Reverse 10 mph Cone displacement SpeedLarge: 5 10 15 Slowed 1 1 1 1 1
Points Lost: Small: 2 4 6 Stopped 2 2 2
Forward 30 mph Cone displacement SpeedLarge: 5 10 15 Slowed 1 1 1 1 1
Points Lost: Small: 2 4 6 Stopped 2 2 2
Reverse 15 mph Cone displacement SpeedLarge: 5 10 15 Slowed 1 1 1 1 1
Points Lost: Small: 2 4 6 Stopped 2 2 2
Tracking/Targeting Preassessment
Forward 10 mph Cone displacement 2 2 2 2 2 2 Stopping FrontLane Position 1 1 1 1 1 1 Alignment 2 2
Points Lost: Vehicle Not Aligned 1 1 1 1 1 1
Reverse 5 mph Cone displacement 2 2 2 2 2 2 Stopping FrontLane Position 1 1 1 1 1 1 Alignment 2 2
Points Lost: Vehicle Not Aligned 1 1 1 1 1 1
Forward 20 mph Cone displacement 2 2 2 2 2 2 Stopping FrontLane Position 1 1 1 1 1 1 Alignment 2 2
Points Lost: Vehicle Not Aligned 1 1 1 1 1 1
Reverse 10 mph Cone displacement 2 2 2 2 2 2 Stopping FrontLane Position 1 1 1 1 1 1 Alignment 2 2
Points Lost: Vehicle Not Aligned 1 1 1 1 1 1
Constant Curvature Reassessment
Braking Steering Acceleration Lane Position Points LostForward 20 mph 2 2 2 1 1 1 1 1 1 1 1 1
Forward 30 mph 2 2 2 1 1 1 1 1 1 1 1 1
Forward 40 mph 2 2 2 1 1 1 1 1 1 1 1 1
/40
/30
/30
Name Date
Points lost Assessment Score: /100 Assessment Stopped
Module 2 Recommended Laboratory Session Page 67
Prerequisites:
Learning Goals:
Performances:
Assessment:
Driving ThroughA New Century
Instructor Activities Ref Student Activities Materials Needed or NotesRear Driver Activities
Valid Texas Driver Instructional Permit
The novice driver should demonstrate comprehension of targeting, basicbraking, smooth acceleration, and basic steering skills in a controlled riskenvironment.
During this in-car lesson, the student will demonstrate the ability to performtargeting skills using the Auto Control Monster Device attached to the rear of afront wheel drive vehicle or a standard equipped driver education vehicle. Thestudent will demonstrate smooth braking and acceleration skills while movingforward. The student will perform hand to hand steering and hand over handsteering techniques while moving the vehicle.
Instructor assessment using the Mottola Auto Control Monster Lesson PlanGuide or mark introductory skills on district in-car student record form.
• Review facility for changes orobstructions.
• Review objectives for lessonwith drivers.
•. Prepare vehicle and surfacesfor lesson.
• Introduce driver readinesstasks.
• Introduce targeting concepts.• Introduce controlled braking
concepts.• Introduce progressive
acceleration techniques.• Introduce hand to hand
steering techniques.• Introduce hand over hand
steering techniques.• Practice targeting concepts.• Practice controlled braking
concepts.• Practice progressive accelera-
tion techniques.• Practice hand to hand steering
techniques.• Practice hand over hand
steering techniques.• Practices securing tasks.• Evaluate student progress in
activities for record andportfolio.
Repeat tasks with next driver.
Group activity segment• Review objectives, show permit,
ask questions regarding lessonactivities.
Session activity• Introduce driver readiness tasks to
first driver.• Performs targeting drills.• Performs controlled braking with
minimal assist.• Performs progressive acceleration
with minimal assist.• Performs hand to hand steering
with minimal assistance.• Performs hand over hand steering
with minimal assistance.• Practices targeting skills with
minimal assistance.• Practices controlled braking with
minimal assistance.• Practices hand to hand steering
with minimal assistance.• Practices hand over hand steering
with minimal assistance.• Practices securing with minimal
assistance.• Review and assess tasks performed
in lesson.
Mod 2Mod 2
Mod 2
Mod 2
Mod 2
Assesson
StudentRecordCard
• Shows permit at the startof lesson.
• Listens to review ofprocedures.
• Watches and asksquestions regardingprocedures.
• Watches demonstrationof each activity bystudent or instructor.
• Verbally reviewsprocedures while driveris performing techniquesin each area.
• Prepares for drivingsequence.
Module 2 Recommended Laboratory Session Page 68
Prerequisites:
Learning Goals:
Performances:
Assessment:
Instructor Activities Ref Student Activities Materials Needed or NotesRear Driver Activities
Driving ThroughA New Century
Valid Texas Driver Learner’s Permit
The novice driver should demonstrate comprehension of pre-drive, basicmaintenance, driver readiness, starting, pull from curb, visual referencing, and securingfor listed vehicle positions which will increase student's ability to position vehicle forbasic vehicle maneuvers.
During this in-car lesson, the students will demonstrate the ability to perform pre-startand maintenance checks and prepare themselves and the vehicle to starting thevehicle. Using reference points, they will be able to demonstrate positioning the vehicleto its front and rear limits, in positioning the vehicle in curb alignments, vehicle lanepositions, parking maneuvers, and their set up positions; and be able to position the carwith turning points for the basic vehicle maneuvers.
Instructor assessment of pre-drive, maintenance, readiness, starting, pulling fromcurb, lane positions, backing techniques, and securing on the district in-car recordsform. Student assessment of positions drawn on worksheet for portfolio.
• Review facility for changes orobstructions.
• Review objectives for lessonwith drivers.
•. Prepare vehicle and surfacesfor lesson.
• Evaluate pre-drive, mainte-nance, and start procedures.
• Review, guide, and supervisefront limitations technique.
• Review, guide, and superviserear limitation technique.
• Review, guide, and supervisecurb alignment techniques.
• Review, guide, and superviselane position techniques.
• Review, guide, and superviseparking techniques.
• Review, guide, and supervisesecuring techniques.
• Evaluate student progress inactivities for record andportfolio.
Repeat tasks with next driver.
Group activity segment• Review objectives, show permit,
ask questions regarding lessonactivities.
Session activity• 1st driver performs pre-drive,
maintenance, readiness, andstarting procedures.
• Performs a front limitation withminimal assist.
• Performs rear limitation withminimal assist.
• Performs curb alignments withminimal assistance.
• Performs vehicle lane positionswith minimal assistance.
• Performs parking turn points withminimal assistance.
• Performs parking maneuvers withminimal assistance.
• Performs stopping, securingprocedures.
• Review and assess tasks performedin lesson.
Mod 2
Mod 2
Mod 2
Mod 2
Mod 2
Mod 2
Mod 2
PlacePre-
Assesson
StudentRecordCard
• Shows permit at the startof lesson.
• Listens to review ofprocedures.
• Watches and asksquestions regardingprocedures.
• Watches demonstrationof each activity bystudent or instructor.
• Verbally reviewsprocedures while driveris performing techniquesin each area.
• Prepares for drivingsequence.
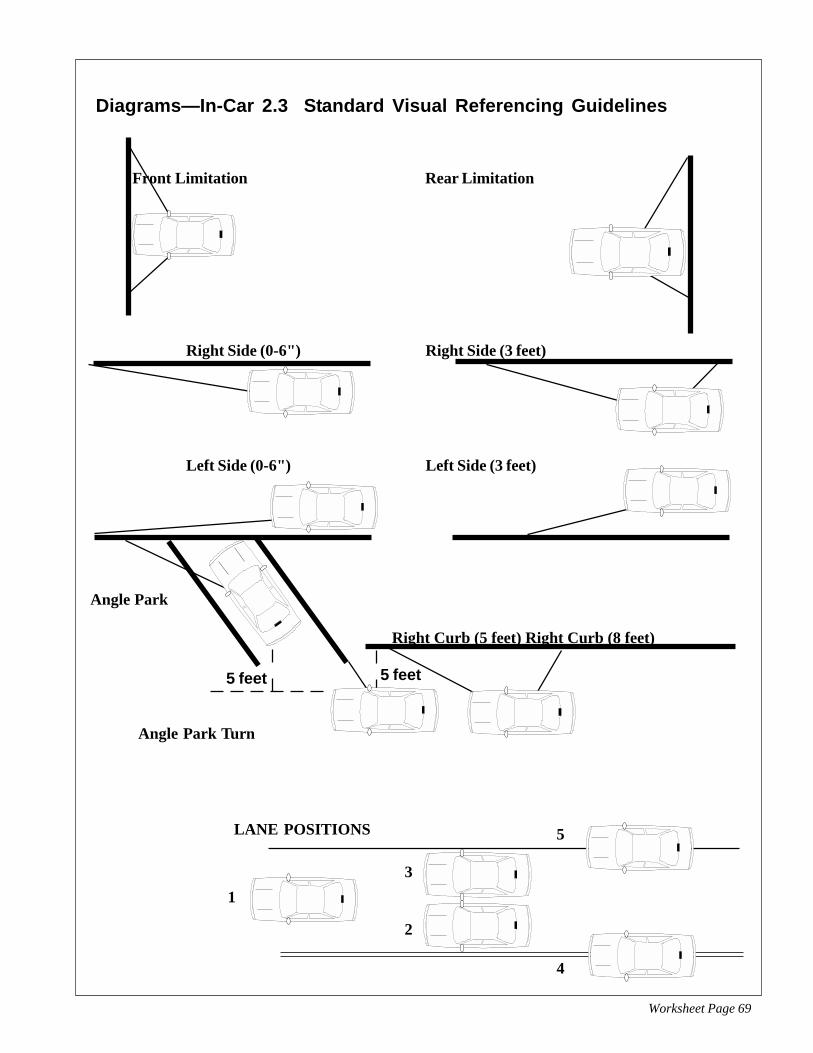
Worksheet Page 69
Front Limitation Rear Limitation
Right Side (0-6") Right Side (3 feet)
Left Side (0-6") Left Side (3 feet)
Angle Park
Right Curb (5 feet) Right Curb (8 feet)
Angle Park Turn
LANE POSITIONS
3
2
Diagrams—In-Car 2.3 Standard Visual Referencing Guidelines
5
4
1
5 feet 5 feet
Module 2 Recommended Laboratory Session Page 70
Optional Titles:
Learning Goals:
Performances:
Assessment:
Instructor Activities Student Activities Materials Needed and Notes
Driving ThroughA New Century
“Starting Out Right” ... DORON Video or Laserdisc“Ins and Outs of Turns” ... DORON Video or Laserdisc“Controlling Your Vehicle” ... SSI Safe Driver Training Series“Turning and Parking Manuevers” ... SSI Safe Driver Training Series
The simulation student should demonstrate comprehension of pre-drive, driverreadiness, start, securing, and vehicle positioning in lane which will increase student'sability to position vehicle for basic vehicle maneuvers.
Performances are based on simulation video used for this section. It is recommendedto start with a session that demonstrates the use of the simulator and establishes theneed for procedures and good seating position. Explain the need for holding the wheelat a position that is below the center of the wheel due to airbag displacement.Demonstrate the correct seating and steering positions for vehicle control
Instructor assessment of procedures, lane positions, and techniques on the district on-street records form. Student assessment of simulation activities may be added to thestudent portfolio.