Embed Size (px)
Citation preview
The Aerial Rope ManualVolume 1
A step-by-step reference guide for teachers and students of any aerial arts program
Rebekah Leachwith Rain Anya and Allie Cooper
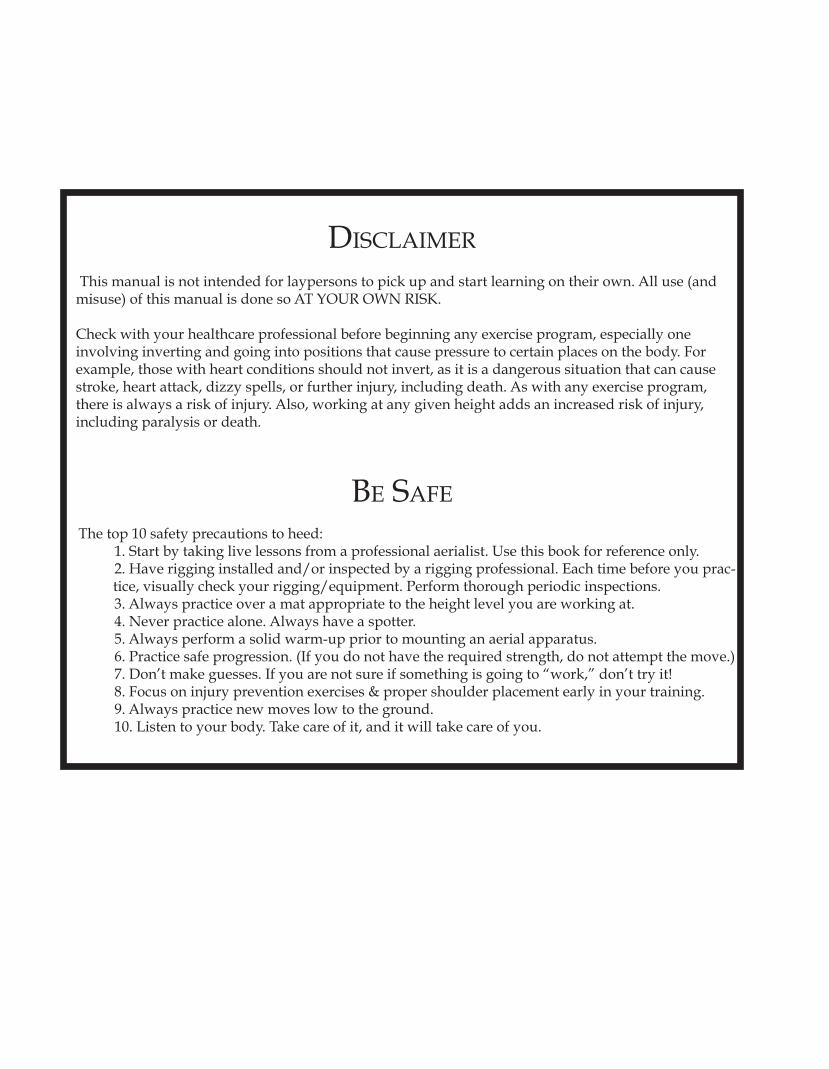
Disclaimer
This manual is not intended for laypersons to pick up and start learning on their own. All use (and misuse) of this manual is done so AT YOUR OWN RISK.
Check with your healthcare professional before beginning any exercise program, especially one involving inverting and going into positions that cause pressure to certain places on the body. For example, those with heart conditions should not invert, as it is a dangerous situation that can cause stroke, heart attack, dizzy spells, or further injury, including death. As with any exercise program, there is always a risk of injury. Also, working at any given height adds an increased risk of injury, including paralysis or death.
Be safe
The top 10 safety precautions to heed: 1. Start by taking live lessons from a professional aerialist. Use this book for reference only.
2. Have rigging installed and/or inspected by a rigging professional. Each time before you prac-tice, visually check your rigging/equipment. Perform thorough periodic inspections.
3. Always practice over a mat appropriate to the height level you are working at. 4. Never practice alone. Always have a spotter. 5. Always perform a solid warm-up prior to mounting an aerial apparatus. 6. Practice safe progression. (If you do not have the required strength, do not attempt the move.) 7. Don’t make guesses. If you are not sure if something is going to “work,” don’t try it! 8. Focus on injury prevention exercises & proper shoulder placement early in your training. 9. Always practice new moves low to the ground. 10. Listen to your body. Take care of it, and it will take care of you.

All rights reserved.
No part of this publication may be reproduced, stored in a retrieval system, or transmitted in any way or by any means, electronic, mechanical, photocopying, recording or otherwise, without the prior written permission of
Rebekah Leach.
This book may be purchased with bulk discounts. For information, send an e-mail to: [email protected]. Corresponding video content is available on AerialDancing.com.
When practicing aerial rope, always perform warm-up exercises before attempting any individual exercises. Also, when practicing aerial rope, always do so in the presence of a trained professional, with load-tested aerial equip-ment hanging from load-tested rigging, which has been set up and inspected frequently by rigging professionals, along with crash pads underneath the rope. It is recommended that you check with your doctor or healthcare pro-
vider before commencing any exercise program, especially one as rigorous as aerial rope.
Whilst every care has been taken in the preparation of this material, there is a real chance of injury in execution of the movements described in this book. The Publisher and all persons involved in the making of this manual will not accept responsibility for injury to any degree, including death, to any person as a result of participation in the activ-ities described in this manual. Purchase or use of this document constitutes agreement to this effect. Furthermore, rigging of aerial equipment is not discussed in this manual. Consult a professional rigger when it comes to using
any hanging equipment.
Published by Rebekah Leach
United States of America
First Edition
© 2015 Rebekah Leach
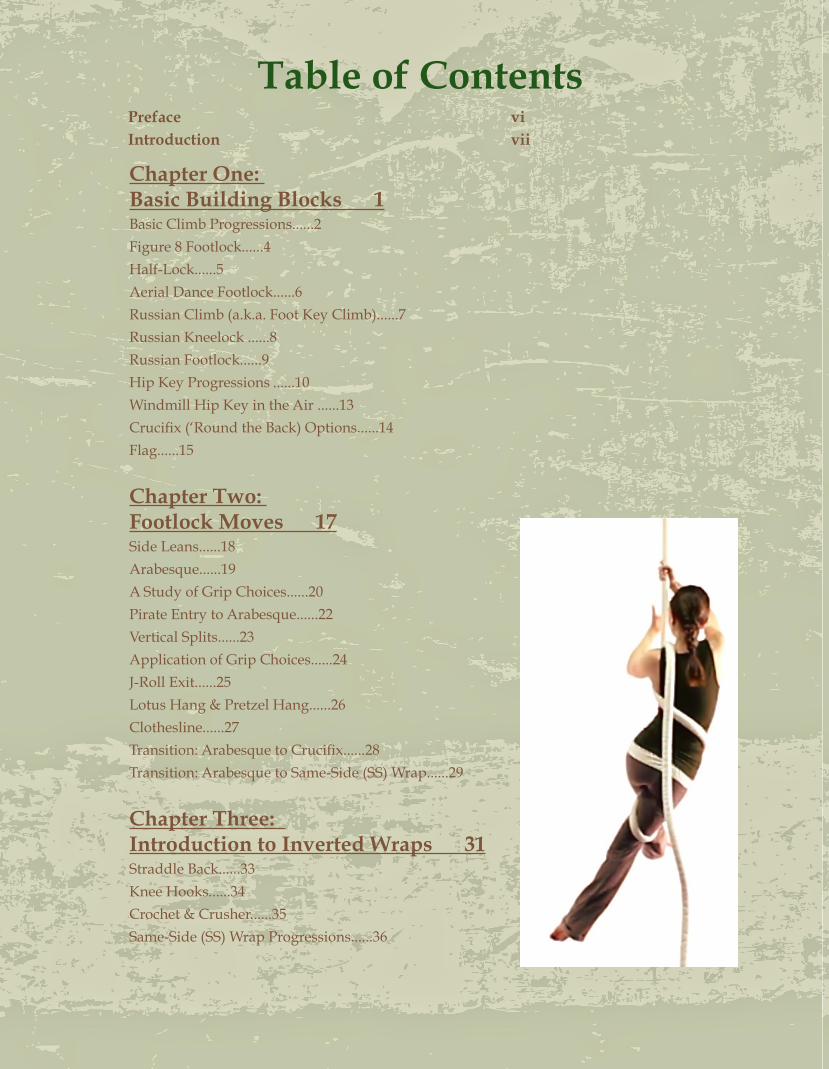
Table of Contents
Chapter One: Basic Building Blocks 1Basic Climb Progressions......2Figure 8 Footlock......4Half-Lock......5Aerial Dance Footlock......6 Russian Climb (a.k.a. Foot Key Climb)......7 Russian Kneelock ......8Russian Footlock......9Hip Key Progressions ......10Windmill Hip Key in the Air ......13Crucifix (‘Round the Back) Options......14Flag......15
Chapter Two: Footlock Moves 17 Side Leans......18Arabesque......19A Study of Grip Choices......20Pirate Entry to Arabesque......22Vertical Splits......23Application of Grip Choices......24J-Roll Exit......25Lotus Hang & Pretzel Hang......26Clothesline......27Transition: Arabesque to Crucifix......28Transition: Arabesque to Same-Side (SS) Wrap......29
Chapter Three: Introduction to Inverted Wraps 31Straddle Back......33Knee Hooks......34Crochet & Crusher......35Same-Side (SS) Wrap Progressions......36
Preface viIntroduction vii
Same-Side (SS) Wrap Exit to Crucifix ......40Opposite-Side (OS) Wrap Progressions......42Introduction to S-Wrap......45Same-Side (SS) Wrap into S-Wrap......46Flamenco into S-Wrap ......48Step Through to S-Wrap......49Double Leg Wrap into S-Wrap......50Center Straddle Hook into S-Wrap......51
Chapter Four: Climbs 53Basic Climb with Heel Wrap......54Corkscrew......55Russian Corkscrew......56Big Russian......57Standing Russian......58Opposite-Side (OS) Knee Climb ......58 Same-Side (SS) Knee Climb......59Step Climb with Foot Turned Out......60Step Climb with Foot Turned In......61Hip Key Step Climb......62Lotus Step Climb......63Castle Step Climb......64Bicycle Climb......66Bicycle Climb Minus the Roll Up......67Thigh Squeeze Climb - No Inversion......68Center Straddle Climbs - With Inversions......69 Monkey Climb......70Toe Climb & Retrograde......71Spiral Toe Climb #1 (Basic Wrap)......72Spiral Toe Climb #2 (Reverse Wrap)......73
Chapter Five: 4 Hangs & A Drop 75Double Knee Hang Progressions......76Clothesline into Double Knee Hang......77 Thigh Hitch Hang......80
Knee Hitch Drop......81Ankle Hang......82Single Ankle Hang......83
Chapter Six: Hip Key Moves 86 Hip Key Croissant......86Sumo Wrap......87Mobile Progressions......88Hip Key In & Out Exercise......89Hip Key Thread Through......90Hip Key Thread Through Dive......91Hip Key Dive Plus Scorpion......92Hip Key Dive Plus Salto......93
Chapter Seven: OS, SS & S-Wrap Moves 95SS Triple Wrap to Various Poses......96S-Wrap Splits......98Tension Splits......99OS Wrap Back Arch Hang......100OS Wrap Dive ......101Single Star Roll......102Single Star Plus Dive......103Adding More Rolls (Double, Triple, etc)......104Star J-Roll & Thread Through......106Starmill......107
Index......109About the Authors......110Acknowledgments......112
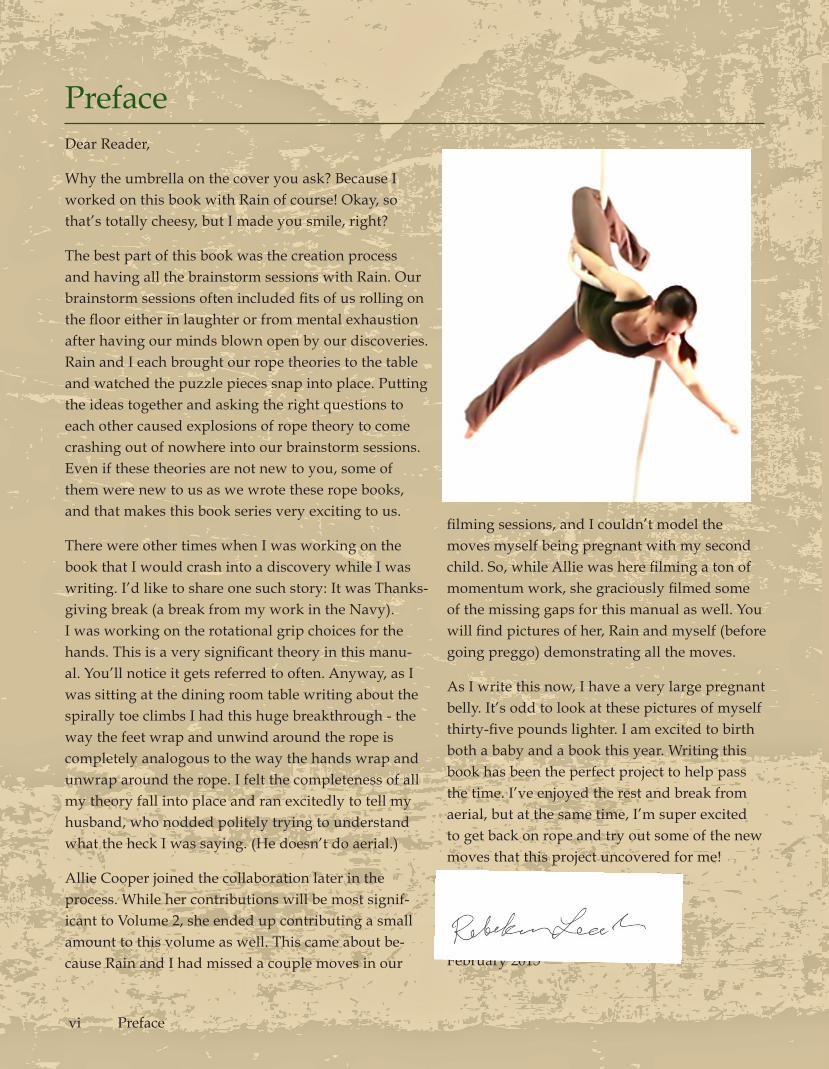
PrefaceDear Reader,
Why the umbrella on the cover you ask? Because I worked on this book with Rain of course! Okay, so that’s totally cheesy, but I made you smile, right?
The best part of this book was the creation process and having all the brainstorm sessions with Rain. Our brainstorm sessions often included fits of us rolling on the floor either in laughter or from mental exhaustion after having our minds blown open by our discoveries. Rain and I each brought our rope theories to the table and watched the puzzle pieces snap into place. Putting the ideas together and asking the right questions to each other caused explosions of rope theory to come crashing out of nowhere into our brainstorm sessions. Even if these theories are not new to you, some of them were new to us as we wrote these rope books, and that makes this book series very exciting to us.
There were other times when I was working on the book that I would crash into a discovery while I was writing. I’d like to share one such story: It was Thanks-giving break (a break from my work in the Navy). I was working on the rotational grip choices for the hands. This is a very significant theory in this manu-al. You’ll notice it gets referred to often. Anyway, as I was sitting at the dining room table writing about the spirally toe climbs I had this huge breakthrough - the way the feet wrap and unwind around the rope is completely analogous to the way the hands wrap and unwrap around the rope. I felt the completeness of all my theory fall into place and ran excitedly to tell my husband, who nodded politely trying to understand what the heck I was saying. (He doesn’t do aerial.)
Allie Cooper joined the collaboration later in the process. While her contributions will be most signif-icant to Volume 2, she ended up contributing a small amount to this volume as well. This came about be-cause Rain and I had missed a couple moves in our
vi Preface
filming sessions, and I couldn’t model the moves myself being pregnant with my second child. So, while Allie was here filming a ton of momentum work, she graciously filmed some of the missing gaps for this manual as well. You will find pictures of her, Rain and myself (before going preggo) demonstrating all the moves.
As I write this now, I have a very large pregnant belly. It’s odd to look at these pictures of myself thirty-five pounds lighter. I am excited to birth both a baby and a book this year. Writing this book has been the perfect project to help pass the time. I’ve enjoyed the rest and break from aerial, but at the same time, I’m super excited to get back on rope and try out some of the new moves that this project uncovered for me!
Happy Flying,
February 2015

Introduction vii
IntroductionWelcome to another grand adventure in the aerial arts. There are a few things you should know be-fore you dive into this manual. For one, I like to be personal. Instead of writing this manual in the third person, you’ll hear my voice pop up often with my personal preferences and other ramblings. Also, I’m obsessed with teaching theory, (I mean that as in theories of teaching, theory itself, and teaching the-ory to other people) so you will notice some themes pop up again and again throughout the text. This text is written for both teachers and students, but you will notice I speak more to teachers than I have in past manuals.
About This BookThe chapters have been organized mostly by sim-ilar concepts/theory (such as climbs), while the moves within each chapter are mostly organized by progressions. The major exception to these rules is chapter one. Considering you need some founda-tion before beginning your rope work, that’s exactly what is covered in chapter one.
In chapter two we highlight moves done with a footlock. Chapter four covers climbs. Before you can learn some of the climbs, you need inversion strength and stamina, so back in chapter three, that’s exactly what we cover.
Chapter five, covering a few hitches, would go best theory-wise in Volume 2, but the moves are so clas-sic we thought it appropriate to put these in Volume 1. Chapters six and seven, respectively, cover the moves that can be done from a hip key and moves that can be done from all the inversion wrappings that were introduced in chapter three.
In the block below the title for each move, you will find prerequisites as well as information about that move. Other supplemental information you’ll find includes training tips, theory information, brown boxes highlighting variations, and dark green boxes
that cover exit methods for the move. For exits, we generally recommend the retrograde in training. To retrograde means to rewind or reverse a phrase of movement. In some moves, performing the retro-grade with precision is a challenging exercise for both the brain and the body.
Throughout the book, you will find sections en-titled “Teaching Methodology.” While the target audience is teachers, advanced students will find useful information here as well. These cover a variety of topics including concepts specific to the move at hand, or zoom out to look at the broader picture of a rope curriculum.
Resource: AerialDancing.com for Videos of MovesA resource available right from the comfort of your own home is AerialDancing.com. With a paying subscription you can access all of the moves in this book demonstrated through video by industry experts. If you’re a visual learner like me, you will appreciate seeing the move in live action. Watching clean technique demonstrated makes it more likely your body will output clean technique.
Train Live!Writing these aerial dance manuals over the past five years has been a time of research and reflec-tion for me. I have a much better understanding of what I know, how it all fits together, and how it can all be broken down. While the books and videos do present the moves, they cannot tell the whole story. Only a live training can really do that.
Therefore, my first recommendation is to seek out coaches with whom you can study this material if you are a student. If you are interested in teaching, then I want to invite you to look into Born to Fly™ Teacher Trainings. Find workshops and more infor-mation on the website: www.BorntoFlyAerial.com.
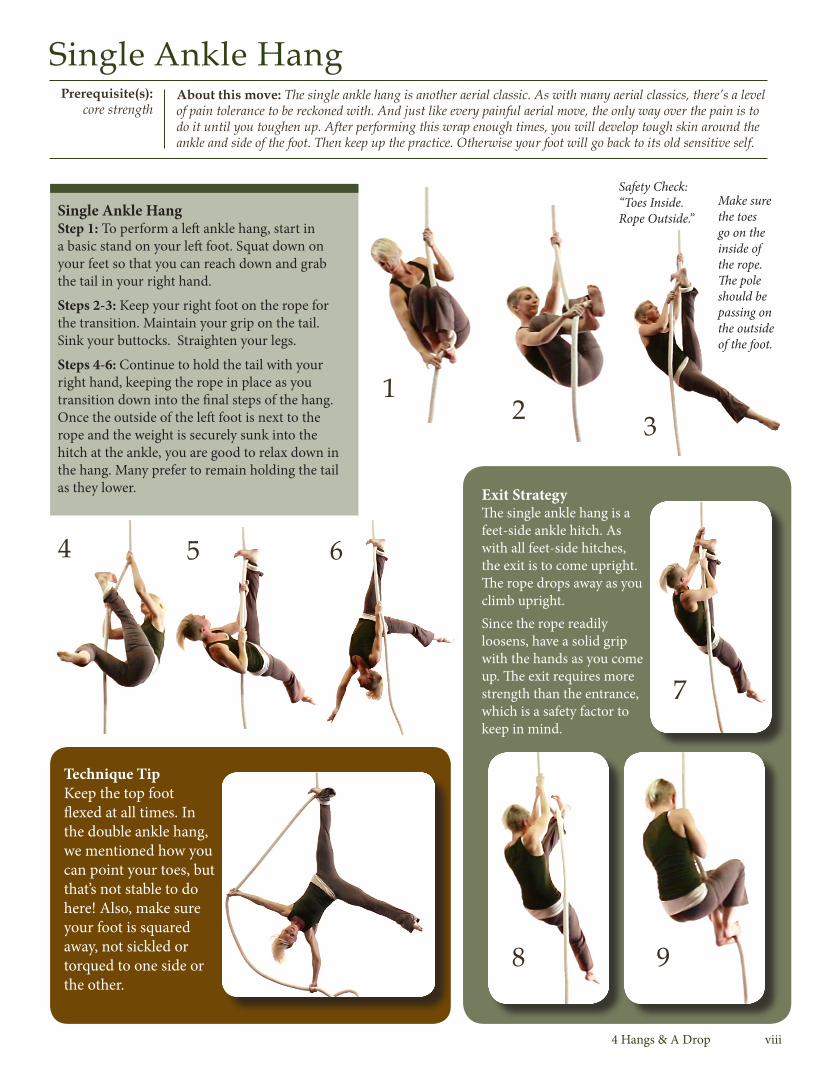
Technique TipKeep the top foot flexed at all times. In the double ankle hang, we mentioned how you can point your toes, but that’s not stable to do here! Also, make sure your foot is squared away, not sickled or torqued to one side or the other.
Single Ankle HangAbout this move: The single ankle hang is another aerial classic. As with many aerial classics, there’s a level of pain tolerance to be reckoned with. And just like every painful aerial move, the only way over the pain is to do it until you toughen up. After performing this wrap enough times, you will develop tough skin around the ankle and side of the foot. Then keep up the practice. Otherwise your foot will go back to its old sensitive self.
Prerequisite(s): core strength
Make sure the toes go on the inside of the rope. The pole should be passing on the outside of the foot.
12 3
4 5 6
7
8
Exit StrategyThe single ankle hang is a feet-side ankle hitch. As with all feet-side hitches, the exit is to come upright. The rope drops away as you climb upright. Since the rope readily loosens, have a solid grip with the hands as you come up. The exit requires more strength than the entrance, which is a safety factor to keep in mind.
Single Ankle HangStep 1: To perform a left ankle hang, start in a basic stand on your left foot. Squat down on your feet so that you can reach down and grab the tail in your right hand.
Steps 2-3: Keep your right foot on the rope for the transition. Maintain your grip on the tail. Sink your buttocks. Straighten your legs.
Steps 4-6: Continue to hold the tail with your right hand, keeping the rope in place as you transition down into the final steps of the hang. Once the outside of the left foot is next to the rope and the weight is securely sunk into the hitch at the ankle, you are good to relax down in the hang. Many prefer to remain holding the tail as they lower.
9
4 Hangs & A Drop viii
Safety Check:“Toes Inside. Rope Outside.”
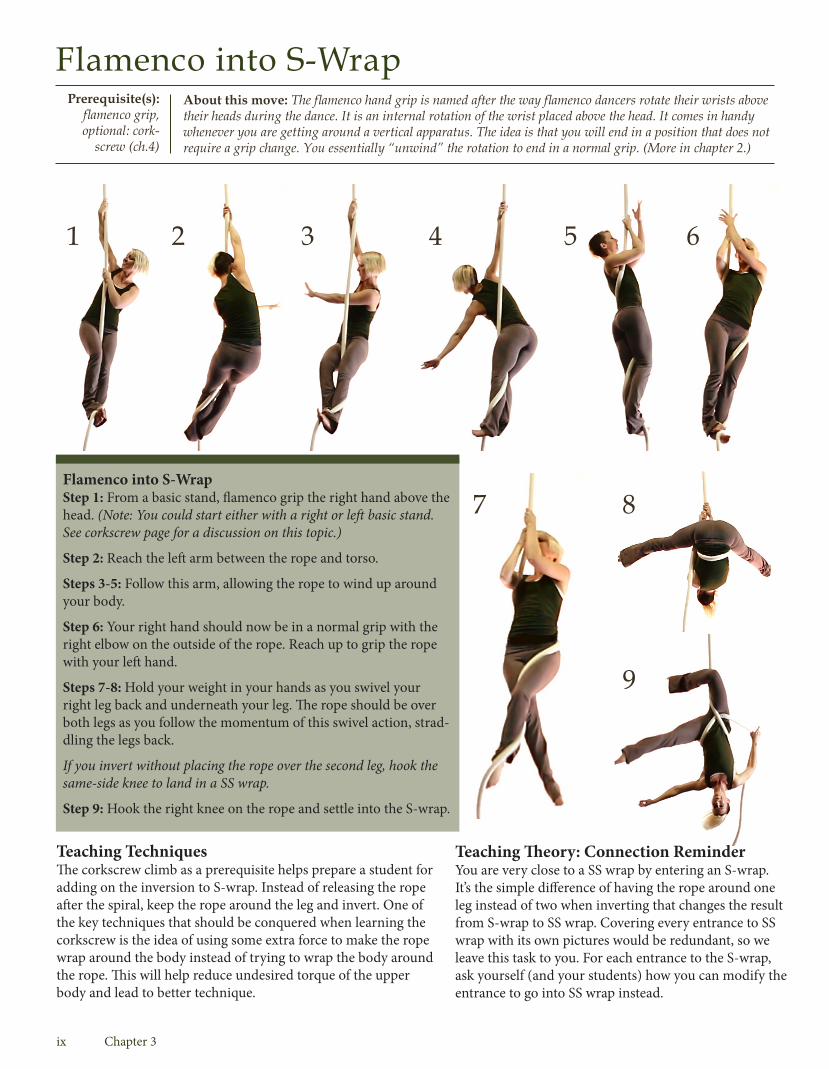
Flamenco into S-WrapAbout this move: The flamenco hand grip is named after the way flamenco dancers rotate their wrists above their heads during the dance. It is an internal rotation of the wrist placed above the head. It comes in handy whenever you are getting around a vertical apparatus. The idea is that you will end in a position that does not require a grip change. You essentially “unwind” the rotation to end in a normal grip. (More in chapter 2.)
Prerequisite(s): flamenco grip, optional: cork-
screw (ch.4)
1 2 3 4 5 6
7 8Flamenco into S-WrapStep 1: From a basic stand, flamenco grip the right hand above the head. (Note: You could start either with a right or left basic stand. See corkscrew page for a discussion on this topic.)
Step 2: Reach the left arm between the rope and torso.
Steps 3-5: Follow this arm, allowing the rope to wind up around your body.
Step 6: Your right hand should now be in a normal grip with the right elbow on the outside of the rope. Reach up to grip the rope with your left hand.
Steps 7-8: Hold your weight in your hands as you swivel your right leg back and underneath your leg. The rope should be over both legs as you follow the momentum of this swivel action, strad-dling the legs back.
If you invert without placing the rope over the second leg, hook the same-side knee to land in a SS wrap.
Step 9: Hook the right knee on the rope and settle into the S-wrap.
Teaching TechniquesThe corkscrew climb as a prerequisite helps prepare a student for adding on the inversion to S-wrap. Instead of releasing the rope after the spiral, keep the rope around the leg and invert. One of the key techniques that should be conquered when learning the corkscrew is the idea of using some extra force to make the rope wrap around the body instead of trying to wrap the body around the rope. This will help reduce undesired torque of the upper body and lead to better technique.
Teaching Theory: Connection ReminderYou are very close to a SS wrap by entering an S-wrap. It’s the simple difference of having the rope around one leg instead of two when inverting that changes the result from S-wrap to SS wrap. Covering every entrance to SS wrap with its own pictures would be redundant, so we leave this task to you. For each entrance to the S-wrap, ask yourself (and your students) how you can modify the entrance to go into SS wrap instead.
9
ix Chapter 3
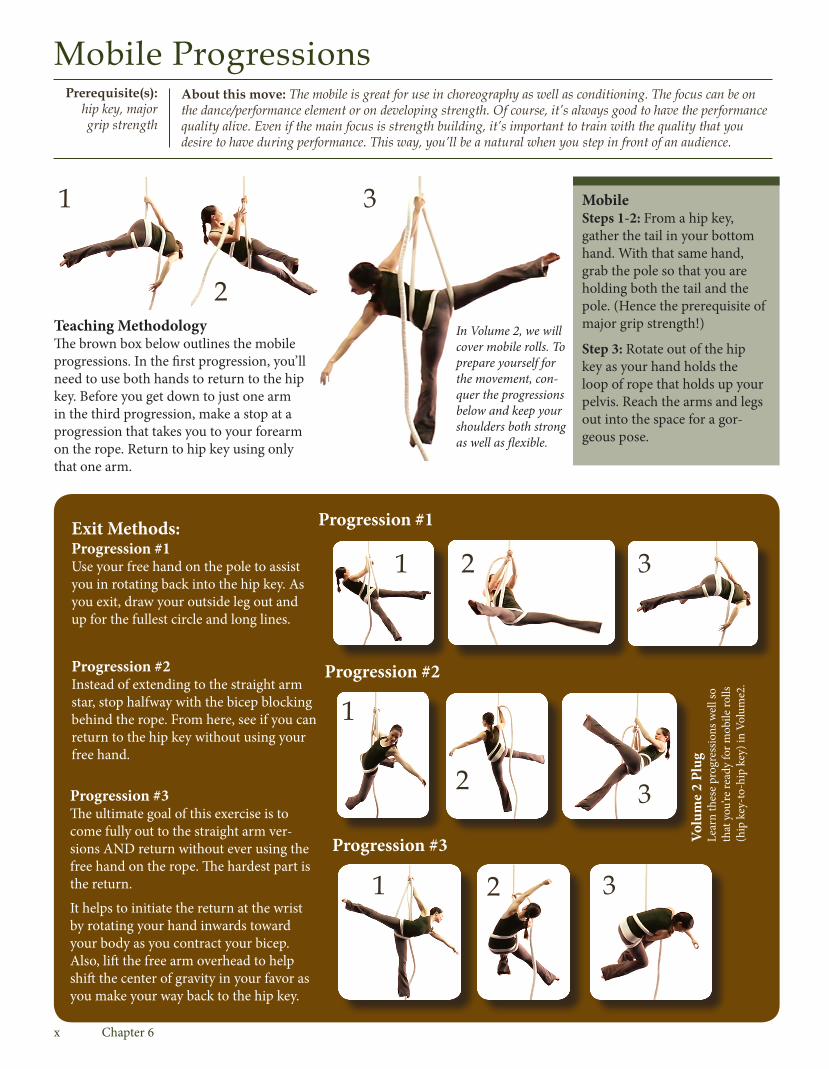
Exit Methods: Progression #1Use your free hand on the pole to assist you in rotating back into the hip key. As you exit, draw your outside leg out and up for the fullest circle and long lines.
Mobile ProgressionsAbout this move: The mobile is great for use in choreography as well as conditioning. The focus can be on the dance/performance element or on developing strength. Of course, it’s always good to have the performance quality alive. Even if the main focus is strength building, it’s important to train with the quality that you desire to have during performance. This way, you’ll be a natural when you step in front of an audience.
Prerequisite(s): hip key, major grip strength
1
2
3 MobileSteps 1-2: From a hip key, gather the tail in your bottom hand. With that same hand, grab the pole so that you are holding both the tail and the pole. (Hence the prerequisite of major grip strength!)
Step 3: Rotate out of the hip key as your hand holds the loop of rope that holds up your pelvis. Reach the arms and legs out into the space for a gor-geous pose.
Progression #2Instead of extending to the straight arm star, stop halfway with the bicep blocking behind the rope. From here, see if you can return to the hip key without using your free hand.
Progression #1
Progression #3The ultimate goal of this exercise is to come fully out to the straight arm ver-sions AND return without ever using the free hand on the rope. The hardest part is the return.
It helps to initiate the return at the wrist by rotating your hand inwards toward your body as you contract your bicep. Also, lift the free arm overhead to help shift the center of gravity in your favor as you make your way back to the hip key.
Progression #2
Progression #3
1 2 3
1
2 3
1 2 3
x Chapter 6
Teaching MethodologyThe brown box below outlines the mobile progressions. In the first progression, you’ll need to use both hands to return to the hip key. Before you get down to just one arm in the third progression, make a stop at a progression that takes you to your forearm on the rope. Return to hip key using only that one arm.
In Volume 2, we will cover mobile rolls. To prepare yourself for the movement, con-quer the progressions below and keep your shoulders both strong as well as flexible.
Volu
me
2 Pl
ugLe
arn
thes
e pr
ogre
ssio
ns w
ell s
o th
at y
ou’re
read
y fo
r mob
ile ro
lls
(hip
key
-to-
hip
key)
in V
olum
e2.
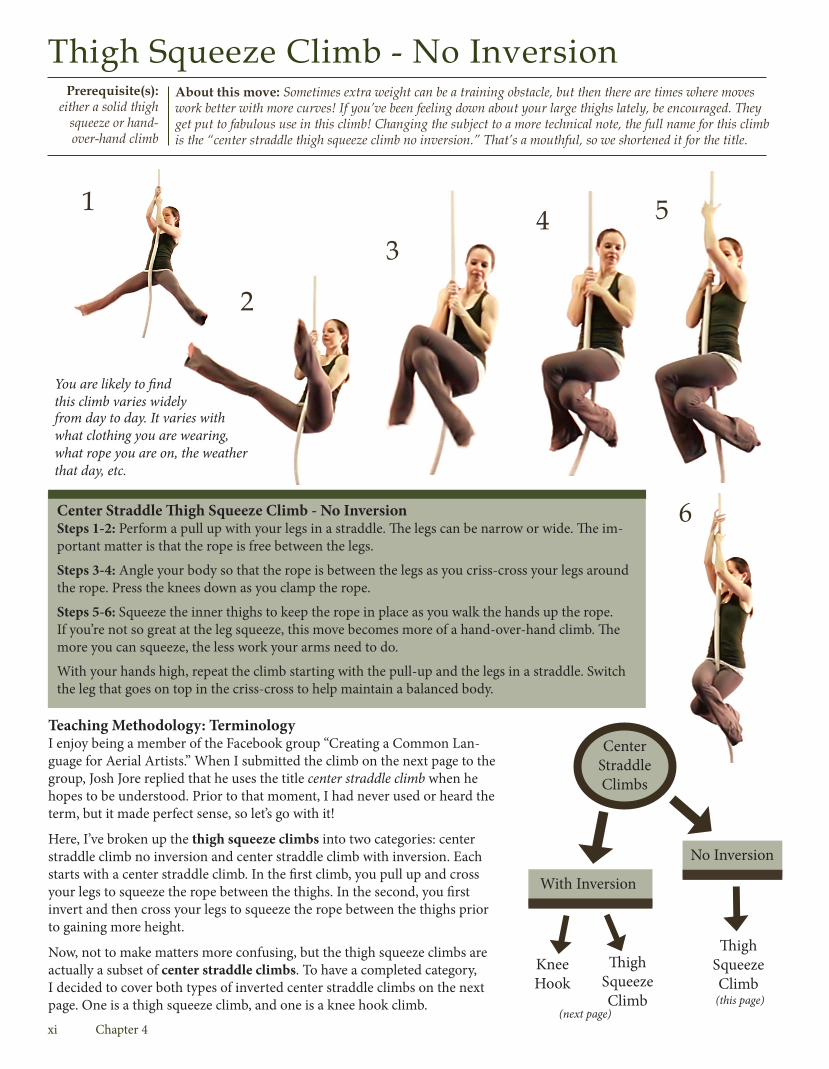
Thigh Squeeze Climb - No InversionAbout this move: Sometimes extra weight can be a training obstacle, but then there are times where moves work better with more curves! If you’ve been feeling down about your large thighs lately, be encouraged. They get put to fabulous use in this climb! Changing the subject to a more technical note, the full name for this climb is the “center straddle thigh squeeze climb no inversion.” That’s a mouthful, so we shortened it for the title.
Prerequisite(s): either a solid thigh
squeeze or hand-over-hand climb
Center Straddle Thigh Squeeze Climb - No InversionSteps 1-2: Perform a pull up with your legs in a straddle. The legs can be narrow or wide. The im-portant matter is that the rope is free between the legs.
Steps 3-4: Angle your body so that the rope is between the legs as you criss-cross your legs around the rope. Press the knees down as you clamp the rope.
Steps 5-6: Squeeze the inner thighs to keep the rope in place as you walk the hands up the rope. If you’re not so great at the leg squeeze, this move becomes more of a hand-over-hand climb. The more you can squeeze, the less work your arms need to do.
With your hands high, repeat the climb starting with the pull-up and the legs in a straddle. Switch the leg that goes on top in the criss-cross to help maintain a balanced body.
Teaching Methodology: TerminologyI enjoy being a member of the Facebook group “Creating a Common Lan-guage for Aerial Artists.” When I submitted the climb on the next page to the group, Josh Jore replied that he uses the title center straddle climb when he hopes to be understood. Prior to that moment, I had never used or heard the term, but it made perfect sense, so let’s go with it!
Here, I’ve broken up the thigh squeeze climbs into two categories: center straddle climb no inversion and center straddle climb with inversion. Each starts with a center straddle climb. In the first climb, you pull up and cross your legs to squeeze the rope between the thighs. In the second, you first invert and then cross your legs to squeeze the rope between the thighs prior to gaining more height.
Now, not to make matters more confusing, but the thigh squeeze climbs are actually a subset of center straddle climbs. To have a completed category, I decided to cover both types of inverted center straddle climbs on the next page. One is a thigh squeeze climb, and one is a knee hook climb.
1
2
34 5
6
xi Chapter 4
You are likely to find this climb varies widely from day to day. It varies with what clothing you are wearing, what rope you are on, the weather that day, etc.
Center Straddle Climbs
No Inversion
Thigh Squeeze Climb
Knee Hook
Thigh Squeeze Climb
With Inversion
(this page)(next page)
About the AuthorRebekah Jean Leach is an aerial dancer who is very passionate about creating aerial dance art, as well as teaching and promoting creativ-ity in others. She has been teaching ever since she knew something to teach, and has been dancing ever since she could walk. Rebekah has a background in many traditional dance styles, as well as some not-so-traditional, which come together in a unique blend to influence the way in which she approaches the aerial arts. Here’s a small taste of the movement forms she has enjoyed studying at some point in her life: modern dance, ballet, tap, hip hop, breakdancing, yoga, ballet, Pilates, salsa, baton twirling, rhythmic gymnastics (specialty: ribbon), hula hooping, stunt-focused cheerleading, and even some pop ‘n lock learned from some amazing street artists.
Rebekah has performed aerial dance everywhere from benefits with Grammy winners to symphony orchestras, to mega-church celebra-tions. She has also enjoyed many a tour with Aerial Experience Pro-ductions. She has also enjoyed working with the Daughter of Zion Ae-rial Dance Company in Santa Ynez, California, where she fell in love with the creative, collaborative process involved in putting together works of art in black box theaters.
In 2008, Rebekah and Matthew Leach opened an aerial dance studio in Ojai, CA. Rebekah combined her background in education and love of dance to teach and create aerial work. When the recession hit and the studio had to close, Rebekah started making books at the request of her students in order to keep in touch remotely. Rebekah is writing an entire aerial manual series which so far includes books on aerial yoga, aerial hoop, aerial fabric, and now aerial rope. Founder of Aerial-Dancing.com, she stays busy creating videos that are released monthly. Another project recently launched is the Born to Fly™ Teacher Training Program. Her dream is to one day build an aerial dance retreat in the mountains of Colorado to continue aerial training of all kinds. All of Rebekah’s profits from the sales of these manuals are going towards that end. Thank you for helping dreams come true.
Rebekah is currently completing her commitment to the Navy in Charleston, SC with husband, daughter, and son.
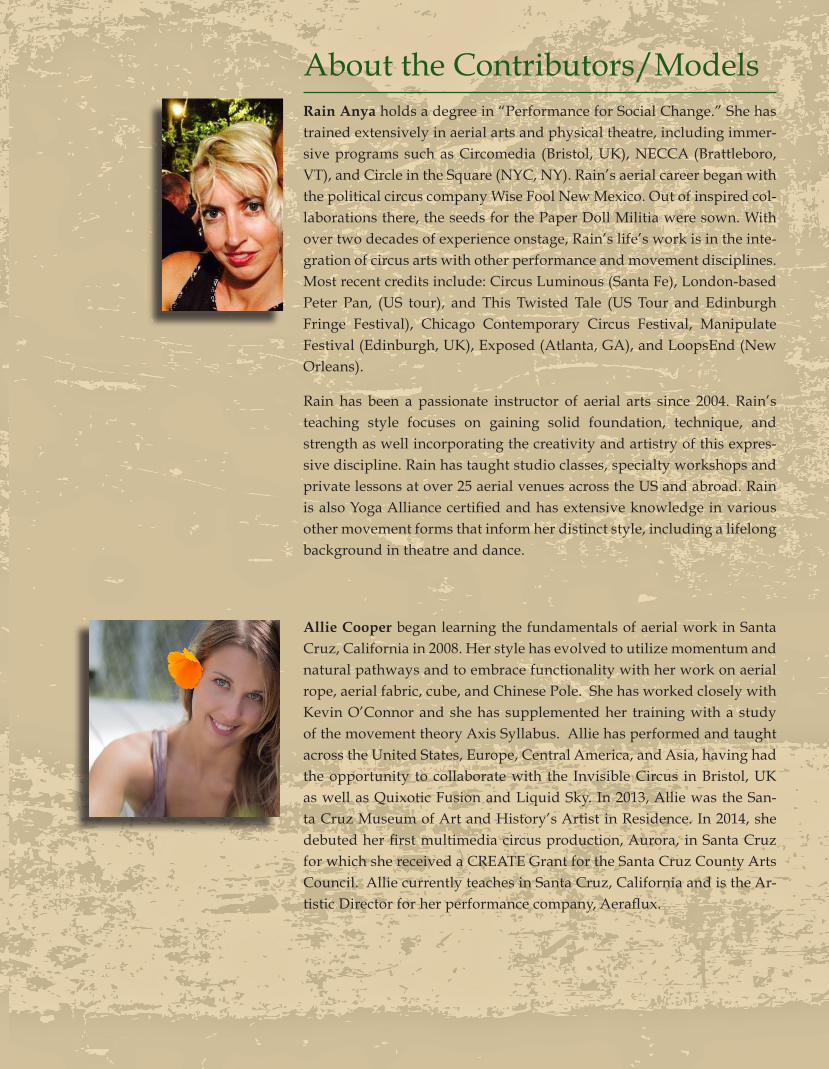
About the Contributors/ModelsRain Anya holds a degree in “Performance for Social Change.” She has trained extensively in aerial arts and physical theatre, including immer-sive programs such as Circomedia (Bristol, UK), NECCA (Brattleboro, VT), and Circle in the Square (NYC, NY). Rain’s aerial career began with the political circus company Wise Fool New Mexico. Out of inspired col-laborations there, the seeds for the Paper Doll Militia were sown. With over two decades of experience onstage, Rain’s life’s work is in the inte-gration of circus arts with other performance and movement disciplines. Most recent credits include: Circus Luminous (Santa Fe), London-based Peter Pan, (US tour), and This Twisted Tale (US Tour and Edinburgh Fringe Festival), Chicago Contemporary Circus Festival, Manipulate Festival (Edinburgh, UK), Exposed (Atlanta, GA), and LoopsEnd (New Orleans).
Rain has been a passionate instructor of aerial arts since 2004. Rain’s teaching style focuses on gaining solid foundation, technique, and strength as well incorporating the creativity and artistry of this expres-sive discipline. Rain has taught studio classes, specialty workshops and private lessons at over 25 aerial venues across the US and abroad. Rain is also Yoga Alliance certified and has extensive knowledge in various other movement forms that inform her distinct style, including a lifelong background in theatre and dance.
Allie Cooper began learning the fundamentals of aerial work in Santa Cruz, California in 2008. Her style has evolved to utilize momentum and natural pathways and to embrace functionality with her work on aerial rope, aerial fabric, cube, and Chinese Pole. She has worked closely with Kevin O’Connor and she has supplemented her training with a study of the movement theory Axis Syllabus. Allie has performed and taught across the United States, Europe, Central America, and Asia, having had the opportunity to collaborate with the Invisible Circus in Bristol, UK as well as Quixotic Fusion and Liquid Sky. In 2013, Allie was the San-ta Cruz Museum of Art and History’s Artist in Residence. In 2014, she debuted her first multimedia circus production, Aurora, in Santa Cruz for which she received a CREATE Grant for the Santa Cruz County Arts Council. Allie currently teaches in Santa Cruz, California and is the Ar-tistic Director for her performance company, Aeraflux.