Embed Size (px)
Citation preview
The Biotechnology Education Company ®
EDVOTEK, Inc. • 1-800-EDVOTEK • www.edvotek.com
EVT 2010-04-12K
EDVO-Kit #
331Cloning ofa PCR Amplified Gene
Storage: See Page 3 for specific storage instructions
EXPERIMENT OBJECTIVE:
The objective of this experiment is to amplify a DNA fragment by Polymerase Chain Reaction (PCR)
and to clone the amplified DNA by using the blue/white cloning system.
This experiment is designed for DNA staining with InstaStain® Ethidium Bromide.
ATTENTION!
This experiment includes either
BactoBeads™ or LyphoCells™.
If you have received LyphoCells™ ,
please refer to the addendum
posted on the last page of this
literature. If you have received the
BactoBeads™, refer to the Pre-Lab
Preparations on page 31.
Cloning of a PCR Amplified Gene2
xxx331EDVO-Kit #
EDVOTEK - The Biotechnology Education Company® • 1-800-EDVOTEK • www.edvotek.com
EDVOTEK, The Biotechnology Education Company, and InstaStain are registered trademarks of EDVOTEK, Inc.. Ready-to-Load and UltraSpec-Agarose are trademarks of EDVOTEK, Inc.
Experiment Components 3
Experiment Requirements 4
Background Information 5
Experiment Procedures
Experiment Overview and General Instructions 12
Laboratory Safety 13
Module I: Amplification of a 270 bp DNA Fragment by
PCR and Separation by Electrophoresis 14
Module II: Preparation of Insert for Ligation 17
Module III: Ligation of the PCR Amplified 270 bp DNA
into pUC19 19
Module IV: Transformation 20
Study Questions 22
Instructor's Guidelines
Notes to the Instructor 24
Pre-Lab Preparations 27
Experiment Results and Analysis 32
Study Questions and Answers 33
Appendices
A PCR Experimental Success Guidelines 36
B Polymerase Chain Reaction Using Three Waterbaths 37
C Preparation and Handling of PCR Samples With Wax 38
D 1.0% Agarose Gel Preparation 39
E 1.0% Agarose Gels - Quantity Preparations 40
F Staining and Visualization of DNA with
InstaStain® Ethidium Bromide Cards 41
MaterialSafetyDataSheets can be found on our website:www.edvotek.com
Table of Contents
Cloning of a PCR Amplified Gene
EVT 2010-04-12K
3
EDVOTEK - The Biotechnology Education Company® 1-800-EDVOTEK • www.edvotek.com
FAX: (301) 340-0582 • email: [email protected]
331EDVO-Kit #
All components are intended for educational research only. They are not to be used for diagnostic or drug purposes, nor admin-istered to or consumed by humans or animals.
THIS EXPERIMENT DOES NOT CONTAIN HUMAN DNA. None of the experi-ment components are de-rived from human sources.
Reagents for PCR Storage
P1 DNA Template for Amplification -20°CP2 Primer Set (two primers) -20°CP3 Tubes with PCR Reaction Pellets™ Room temp. (Each PCR reaction pellet™ contains dNTP Mixture, Taq DNA Polymerase Buffer, Taq DNA Polymerase and MgCl2)P4 Enzyme Grade UltraPure Water -20°CP5 200 bp DNA ladder -20°C• Wax Beads (for thermal cyclers without a heated lid) Room temp.• 10x Gel Loading Solution Room temp.
Reagents to Clean and Prepare DNA for Ligation
C1 Purification Buffer Room temp.C2 Wash Buffer Room temp.C3 Restriction Enzyme Reaction Buffer -20°CC4 Enzyme Grade UltraPure Water -20°CC5 Eco RI -20°CC6 Hind III -20°CC7 Restriction Enzyme Dilution Buffer -20°C• Spin Columns and Reservoirs Room temp.
Reagents for Ligation
L1 pUC19 Plasmid Vector cut with Eco RI and Hind III -20°CL2 DNA Ligase -20°CL3 Ligation buffer -20°C
Reagents for Transformation
T1 Ampicillin -20°CT2 IPTG -20°CT3 X-Gal in Solvent -20°CT4 CaCl2 -20°C
• Recovery Broth Room temp.• BactoBeads™ or LyphoCells™ Refrigerator• Ready Pour Agar Room temp.
Other Components:
• UltraSpec-Agarose™• Electrophoresis Buffer (50x)• InstaStain® Ethidium Bromide• Microcentrifuge Tubes• PCR tubes (0.2 ml - for thermal cyclers with 0.2 ml template)• Petri plates• Sterile loops
This experiment contains reagents to perform five PCR reactions and five cloning ex-periments.
Sample volumes are very small. For liquid samples, it is impor-tant to quick spin the tube contents in a microcentrifuge to obtain sufficient volume for pipeting. Spin samples for 10-20 seconds at maximum speed.
Components & Requirements
ATTENTION!This experiment includes either BactoBeads™ or LyphoCells™.
If you have received LyphoCells™, please refer to the addendum posted on the last page of this
literature. If you have received the BactoBeads™, refer to the Pre-Lab
Preparations on page 31.
Cloning of a PCR Amplified Gene4
xxx331EDVO-Kit #
EDVOTEK - The Biotechnology Education Company® • 1-800-EDVOTEK • www.edvotek.com
Mon - Fri 9 am - 6 p
m E
T
(1-800-338-6835)
EDVO-TECH SERVICE
1-800-EDVOTEK
Mon - Fri9:00 am to 6:00 pm ET
FAX: (301) 340-0582Web: www.edvotek.comemail: [email protected]
Please have the following information ready:
• Experiment number and title• Kit lot number on box or tube• Literature version number (in lower right corner)• Approximate purchase date
Technical ServiceDepartment
Requirements
• Thermalcycler(EDVOTEKCat.#541highlyrecommended)
or three waterbaths*
•Horizontalgelelectrophoresisapparatus
•D.C.powersupply
• Balance
• Microcentrifuge
• Waterbath(37°C&65°C)
• Incubationoven(37°C)
• UVTransilluminatororUVPhotodocumentationsystem
• UVsafetygoggles
•Automaticmicropipets(5-50µl&0.5-10µl)withtips
•Microwave,hotplateorburner
•Pipetpump
•250mlflasksorbeakers
•Hotgloves
• Disposablevinylorlatexlaboratorygloves
• Icebucketsandice
•Distilledordeionizedwater
• Isopropanol
Online Orderingnow available
Visit our web site for information about EDVOTEK’s complete line of “hands-on” experiments forbiotechnology and biology education.
*If you do not have a thermal cycler, PCR experiments can be conducted, with proper care, using three waterbaths. However, a thermal cycler assures a significantly higher rate of success.
5Cloning of a PCR Amplified Gene
331EDVO-Kit #
The Biotechnology Education Company® • 1-800-EDVOTEK • www.edvotek.com
Duplication of this document, in conjunction with use of accompanying reagents, is permitted for classroom/labora-tory use only. This document, or any part, may not be reproduced or distributed for any other purpose without the written consent of EDVOTEK, Inc. Copyright © 1996, 1997, 1998, 2000, 2001, 2002, 2005, 2007, 2008, 2010 EDVOTEK, Inc., all rights reserved EVT 2010-04-12K
Backg
rou
nd
Info
rmatio
n
The Polymerase Chain Reaction (PCR) has made an extraordinary impact on various aspects of biotechnology. The success of utilizing PCR is due to the specificity endowed in the hybridization of nucleic acid and simplicity of the reaction. PCR has also made amplification of genes an alternate approach to traditional cloning experiments. It is currently being used in genome projects,inDNAmappingandsequencing.PCRisalsoappliedinDNAbasedforensics,paternityanddeterminationofevolutionaryrelationships.
InatypicalPCRreaction,thefirststepisthepreparationoftheDNAsamplethat is extracted from various biological sources. Segments of DNA or genes to be amplified are referred to as the targets and the two synthetic oligo-nucleotides required for the PCR reaction are referred to as primers. Because PCRisverysensitive,onlyafewcopiesofthegeneisrequired.Freshlyisolat-ed DNA will give the best amplification results compared to DNA extracted fromolderspecimensthatmaybedegraded.Thesetoftwoprimers,usuallyintherangebetween15and30nucleotides,arechemicallysynthesizedtocorrespond to the two ends of the gene or DNA to be amplified. The primer concentrations are always in excess of the DNA target. The nucleotide primer sequences for the DNA amplification reaction are determined to yield the best hybridization.
ABOuT DnA POLymERASES
DNA Polymerase I is the best studied DNA polymerase. With some excep-tions,themechanismofDNApolymerizationisessentiallyidenticalforallpolymerases. This DNA polymerase is a single polypeptide with a molecular weightof109,000(approximately1000aminoacids).LikeotherDNApoly-merasesitrequiresaprimedtemplate,thefourdeoxynucleotidetriphos-phates and magnesium for DNA synthesis. Polymerization of the nucleotides occurs in the 5’ to 3’ direction by the addition of a 5’ phosphorylated nucleo-tide to the free 3’ hydroxyl group of the growing DNA chain with the con-comitant production of pyrophosphate. The primer is antiparallel and is base pairedtothetemplatestrand.Invivo,RNAfragmentscontainingabout10nucleotides serve to prime DNA synthesis. RNA primers are synthesized by the enzyme primase which is a specialized DNA dependent RNA polymerase.
DNA polymerase I also has a 3’-5’ exonucleolytic activity that cleaves DNA starting with a free terminal 3’ hydroxyl group on the growing chain to yields 5’-deoxynucleotide monophosphates. This activity serves as a proof-reading function during DNA synthesis. It recognizes distortions in the 3’ ends of the growing DNA chain caused by mismatched bases between the template and the growing chain. The enzyme also possesses a 5’ to 3’ nuclease activity. This activity is part of a repair enzyme system that removes damaged DNA bases.
Polymerase Chain Reaction, Ligation and Cloning

Duplication of this document, in conjunction with use of accompanying reagents, is permitted for classroom/labora-tory use only. This document, or any part, may not be reproduced or distributed for any other purpose without the written consent of EDVOTEK, Inc. Copyright © 1996, 1997, 1998, 2000, 2001, 2002, 2005, 2007, 2008, 2010 EDVOTEK, Inc., all rights reserved EVT 2010-04-12K
6
331Cloning of a PCR Amplified Gene
The Biotechnology Education Company® • 1-800-EDVOTEK • www.edvotek.com
EDVO-Kit #B
ackg
rou
nd
Info
rmat
ion
Limited proteolysis of DNA polymerase I by subtilisin or trypsin produces two polypeptidefragmentshavingmolecularweightsof76,000and36,000.Thelargerpolypeptide,knownastheKlenowfragmentcontainsthepolymeriza-tion and 3’ to 5’ exonuclease activities while the smaller fragment contains the5’to3’nucleaseactivity.TheKlenowfragmentwasusedintheinitialPCR experiments and was subsequently replaced by Taq DNA polymerase that is thermally stable. The source of Taq DNA polymerase is Thermus aquaticus. Severall other thermo-stable polymerases have also been purified fromotherthermophilicbacteria.Becauseofitsthermalstability,Taq DNA polymerase will not be denatured during the high temperature PCR steps describedbelow.Intheinitialexperiments,theKlenowfragmenthadtobereplenished after each DNA denaturation step (94°C). The thermostability of TaqDNApolymeraseeliminatesreplenishment,therebysimplifyingPCR.
ABOuT ThE POLymERASE ChAin REACTiOn
AtypicalPCRreactionmixturecontainsDNA,thefourdeoxynucleotidetriphosphates,Mg+2Taq DNA polymerase and the reaction buffer. The total incubationreactionisusuallysmall(10to25µl)involume.Ifwaterbathsorathermalcyclerwithoutaheatedlidisused,theincubationreactionmixtureis layered with mineral oil to minimize evaporation. With thermal cyclers that have heated lids layering with mineral oil is not required.
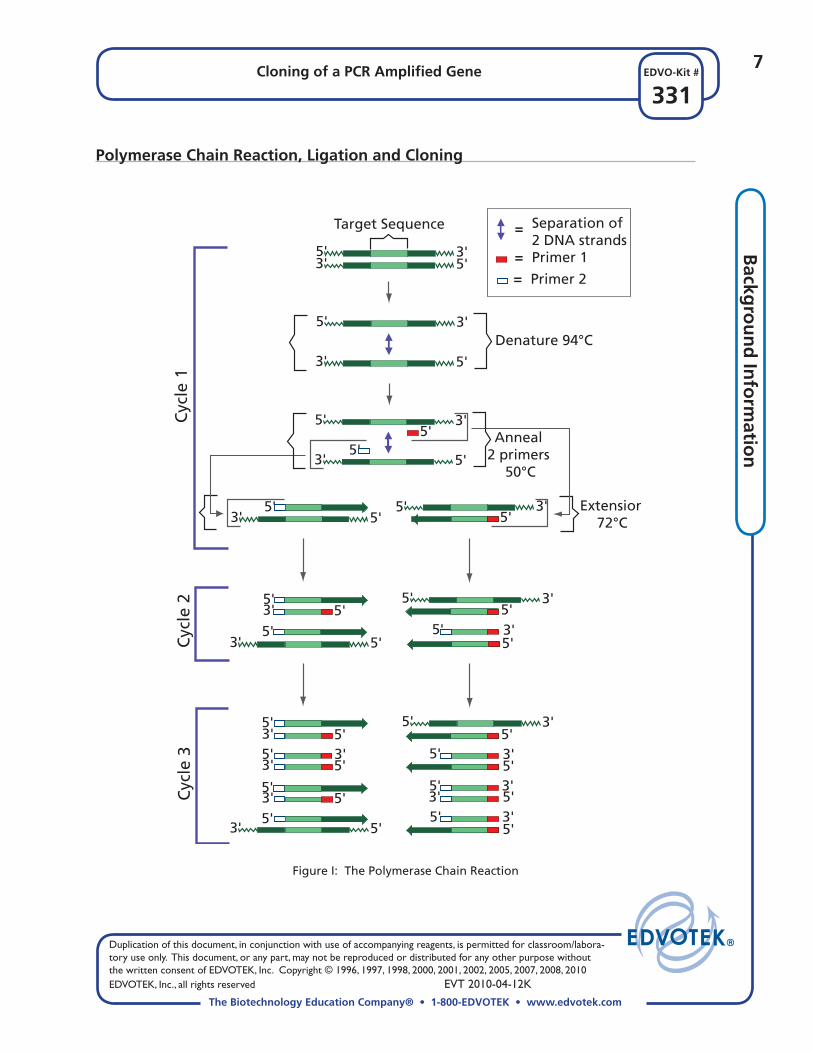
The PCR reaction mixture is then exposed to sets of three step temperature cycles. The first temperature 94°C melts the hydrogen bonds between the two DNA strands . The temperature is then reduced between 45°C to 60°C to hybridize the two primers to each of target DNA strands. The tempera-tureisthenincreasedto72°C,theoptimumforTaq DNA polymerase. Dur-ing this step DNA is synthesized. The three temperature steps of a cycle are usually repeated 20 to 30 times (Figure1). This process is made efficient by placing the reaction tubes in thermal cyclers that are programmed to alter-nate and maintain temperatures. Amplified DNA products are detected by gel electrophoresis analysis.
It should be noted that PCR amplification can introduce a small number of mutations in the amplified DNA product. Mutations introduced can be controlled by the use of low nucleotide concentrations. Various undesired amplification products such as short DNA fragments are also synthesized. Forbestresultsinsubsequentstepssuchasligationinplasmids,theampli-fiedDNAispurifiedfromunuseddNTPs,primersandTaq DNA polymerase prior to further use.
The correct PCR product will be in three forms. These products are due to an intrinsic property of the Taq DNA polymerase that appends an extra nucleotideusuallyadA,atthe3’endsofbluntdouble-strandedDNA.Thiswill yield three forms where the first form will be double-stranded with no dA appended at either 3’ end. The second form will have a dA on one of the
Polymerase Chain Reaction, Ligation and Cloning
7Cloning of a PCR Amplified Gene
331EDVO-Kit #
The Biotechnology Education Company® • 1-800-EDVOTEK • www.edvotek.com
Duplication of this document, in conjunction with use of accompanying reagents, is permitted for classroom/labora-tory use only. This document, or any part, may not be reproduced or distributed for any other purpose without the written consent of EDVOTEK, Inc. Copyright © 1996, 1997, 1998, 2000, 2001, 2002, 2005, 2007, 2008, 2010 EDVOTEK, Inc., all rights reserved EVT 2010-04-12K
Backg
rou
nd
Info
rmatio
n
Polymerase Chain Reaction, Ligation and Cloning
3'5'
3'5'
5'3'
5'3'
5'
5'3'3'5'
5'3'
5'5'
Denature 94°C
5'
Extension72°C
3'5'
Separation of 2 DNA strands
=
Primer 1=
Primer 2=
5'3'5'
Anneal 2 primers
50°C
3'5'5'
5'5'
3'5'5'
5'
5'3'
5'
5'5'
5'3'
5' 3'
5' 3'
5'3'
5'3'
5'3'
5'
5' 3'
Cyc
le 1
Cyc
le 2
Cyc
le 3
Target Sequence
5'3'
5' 3'
5' 3'
Figure I: The Polymerase Chain Reaction
Duplication of this document, in conjunction with use of accompanying reagents, is permitted for classroom/labora-tory use only. This document, or any part, may not be reproduced or distributed for any other purpose without the written consent of EDVOTEK, Inc. Copyright © 1996, 1997, 1998, 2000, 2001, 2002, 2005, 2007, 2008, 2010 EDVOTEK, Inc., all rights reserved EVT 2010-04-12K
8
331Cloning of a PCR Amplified Gene
The Biotechnology Education Company® • 1-800-EDVOTEK • www.edvotek.com
EDVO-Kit #B
ackg
rou
nd
Info
rmat
ion
EcoO 109l 2674
AatII 2617
SspI 2501
BstAPI 179
NdeI 183
EheI 235XmnI 2294
BcgI 2215ScaI 2177
SapI 683
GstrI 1784
Cfr10I 1779
Eco31I 1766
Eam1105I 1694
AflIII, BspLu11 806
AlwNI 1217
pUC192686 bp
rep (pMB1)
bla
(A
pR )
lacZ
agtgAATTCGAGCTCGGTACCCGGGGATCCTCTAGAGTCGACCTGCAGGCATGCAAGCTTGGcgtaatcatggtcat
400 410 420 430 440 450 460
EcoRI KpnI BamHI SalI PstI SphI HindIII SacI SmaI XbaI SbfI
...S N S S P V R P D E L T S R C A H L S P T I M T M
lacZα translational start
MCR
MCR:
two DNA strands and the third form will have a dA residues on both DNA strands. This single nucleotide addition is referred to as “template indepen-dent polymerization”. The presence of this nucleotide will have a negative impact on a subsequent cloning step. When overhanging end cloning (sticky ends)isdesired,thebeststrategywouldbetouseprimersthatflankrestric-tion enzyme sites present at the two ends of the target DNA that can be amplified. The amplified product is then digested by a restriction enzyme.
ABOuT PLASmiDS
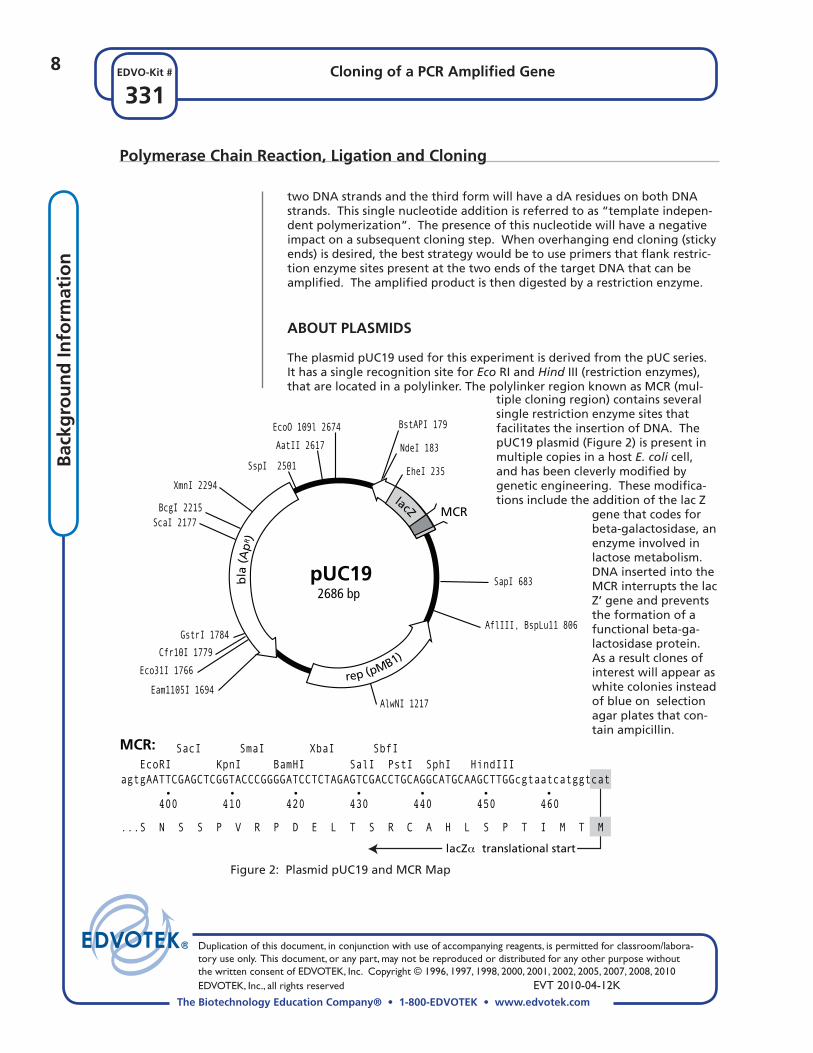
The plasmid pUC19 used for this experiment is derived from the pUC series. It has a single recognition site for Eco RI and HindIII(restrictionenzymes),that are located in a polylinker. The polylinker region known as MCR (mul-
Polymerase Chain Reaction, Ligation and Cloning
tiple cloning region) contains several single restriction enzyme sites that facilitates the insertion of DNA. The pUC19 plasmid (Figure 2) is present in multiple copies in a host E. colicell,and has been cleverly modified by genetic engineering. These modifica-tions include the addition of the lac Z
gene that codes for beta-galactosidase,anenzyme involved in lactose metabolism. DNA inserted into the MCR interrupts the lac Z’ gene and prevents the formation of a functional beta-ga-lactosidase protein. As a result clones of interest will appear as white colonies instead of blue on selection agar plates that con-tain ampicillin.
Figure 2: Plasmid pUC19 and MCR Map
9Cloning of a PCR Amplified Gene
331EDVO-Kit #
The Biotechnology Education Company® • 1-800-EDVOTEK • www.edvotek.com
Duplication of this document, in conjunction with use of accompanying reagents, is permitted for classroom/labora-tory use only. This document, or any part, may not be reproduced or distributed for any other purpose without the written consent of EDVOTEK, Inc. Copyright © 1996, 1997, 1998, 2000, 2001, 2002, 2005, 2007, 2008, 2010 EDVOTEK, Inc., all rights reserved EVT 2010-04-12K
Backg
rou
nd
Info
rmatio
n
COnSTRuCTiOn Of A RECOmBinAnT PLASmiD
Ligation of the PCR amplified DNA to the linearized plasmid is catalyzed by T4 DNA ligase. The enzyme catalyzes the formation of phosphodiester bonds by the condensation of a 5’ phosphate and 3’ hydroxyl group of adja-cent nucleotides. Each phosphodiester bond formation results in the hydro-lysis of ATP to AMP and pyrophosphate. Ligation of DNA fragments having cohesive termini is usually achieved at temperatures between 4°C to 22°C. These temperatures will allow for annealing between complementary DNA ends that serves as a prerequisite for ligation.
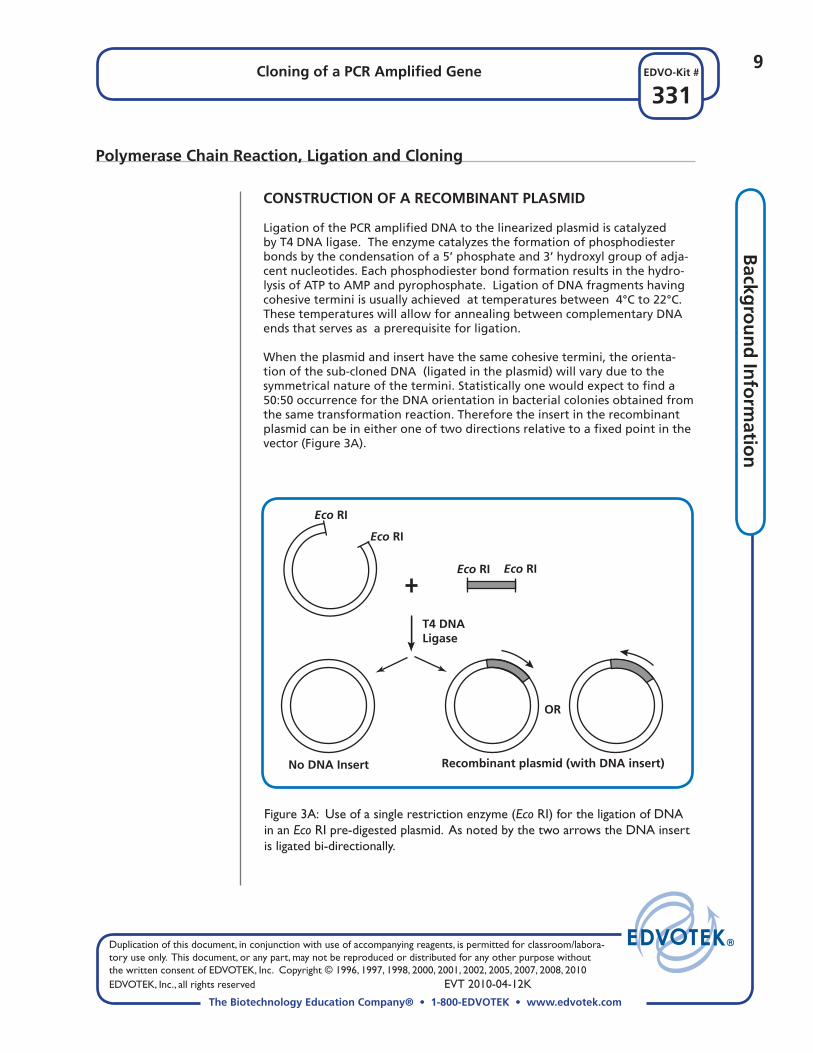
Whentheplasmidandinserthavethesamecohesivetermini,theorienta-tion of the sub-cloned DNA (ligated in the plasmid) will vary due to the symmetrical nature of the termini. Statistically one would expect to find a 50:50 occurrence for the DNA orientation in bacterial colonies obtained from the same transformation reaction. Therefore the insert in the recombinant plasmid can be in either one of two directions relative to a fixed point in the vector (Figure 3A).
Polymerase Chain Reaction, Ligation and Cloning
Eco RI
No DNA Insert
OR
Eco RI
Eco RI Eco RI
T4 DNALigase
Recombinant plasmid (with DNA insert)
Figure 3A: Use of a single restriction enzyme (Eco RI) for the ligation of DNA in an Eco RI pre-digested plasmid. As noted by the two arrows the DNA insert is ligated bi-directionally.
Duplication of this document, in conjunction with use of accompanying reagents, is permitted for classroom/labora-tory use only. This document, or any part, may not be reproduced or distributed for any other purpose without the written consent of EDVOTEK, Inc. Copyright © 1996, 1997, 1998, 2000, 2001, 2002, 2005, 2007, 2008, 2010 EDVOTEK, Inc., all rights reserved EVT 2010-04-12K
10
331Cloning of a PCR Amplified Gene
The Biotechnology Education Company® • 1-800-EDVOTEK • www.edvotek.com
EDVO-Kit #B
ackg
rou
nd
Info
rmat
ion
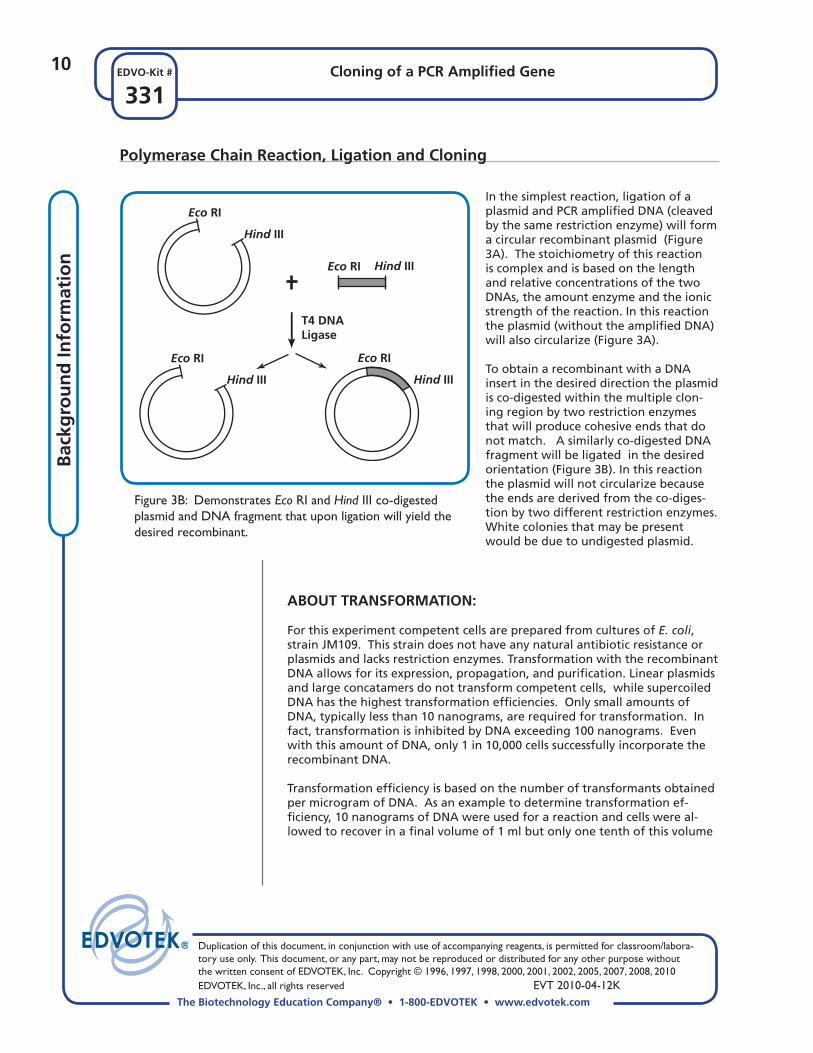
Inthesimplestreaction,ligationofaplasmid and PCR amplified DNA (cleaved by the same restriction enzyme) will form a circular recombinant plasmid (Figure 3A). The stoichiometry of this reaction is complex and is based on the length and relative concentrations of the two DNAs,theamountenzymeandtheionicstrength of the reaction. In this reaction the plasmid (without the amplified DNA) will also circularize (Figure 3A).
To obtain a recombinant with a DNA insert in the desired direction the plasmid is co-digested within the multiple clon-ing region by two restriction enzymes that will produce cohesive ends that do not match. A similarly co-digested DNA fragment will be ligated in the desired orientation (Figure 3B). In this reaction the plasmid will not circularize because the ends are derived from the co-diges-tion by two different restriction enzymes. White colonies that may be present would be due to undigested plasmid.
Eco RI
Hind III
Eco RI Hind III
T4 DNALigase
Eco RI
Hind III
Eco RI
Hind III
Polymerase Chain Reaction, Ligation and Cloning
Figure 3B: Demonstrates Eco RI and Hind III co-digested plasmid and DNA fragment that upon ligation will yield the desired recombinant.
ABOuT TRAnSfORmATiOn:
For this experiment competent cells are prepared from cultures of E. coli,strain JM109. This strain does not have any natural antibiotic resistance or plasmids and lacks restriction enzymes. Transformation with the recombinant DNAallowsforitsexpression,propagation,andpurification.Linearplasmidsandlargeconcatamersdonottransformcompetentcells,whilesupercoiledDNA has the highest transformation efficiencies. Only small amounts of DNA,typicallylessthan10nanograms,arerequiredfortransformation.Infact,transformationisinhibitedbyDNAexceeding100nanograms.EvenwiththisamountofDNA,only1in10,000cellssuccessfullyincorporatetherecombinant DNA.
Transformation efficiency is based on the number of transformants obtained per microgram of DNA. As an example to determine transformation ef-ficiency,10nanogramsofDNAwereusedforareactionandcellswereal-lowed to recover in a final volume of 1 ml but only one tenth of this volume
11Cloning of a PCR Amplified Gene
331EDVO-Kit #
The Biotechnology Education Company® • 1-800-EDVOTEK • www.edvotek.com
Duplication of this document, in conjunction with use of accompanying reagents, is permitted for classroom/labora-tory use only. This document, or any part, may not be reproduced or distributed for any other purpose without the written consent of EDVOTEK, Inc. Copyright © 1996, 1997, 1998, 2000, 2001, 2002, 2005, 2007, 2008, 2010 EDVOTEK, Inc., all rights reserved EVT 2010-04-12K
Backg
rou
nd
Info
rmatio
n
Polymerase Chain Reaction, Ligation and Cloning
was plated and produced 100 colonies on a selective agar medium. There-fore,1000transformantsarepresentperml.Keepinginmindthateachcolonygrewfromonetransformedcell,theefficiencywouldbe1000/0.01ug= 1 x 10⁵. Transformation efficiencies of 105 to 106 are sufficient for most classroom cloning experiments. When cloning of single copy genes from genomicDNAisdone,requiredefficienciesare107 to 108.
This experiment has four modules with the following objectives:
1. To amplify a DNA fragment using the PCR reaction. 2. To prepare PCR amplified DNA for ligation.3. To ligate the PCR amplified DNA in pUC19 4. To transform E. coli host cells and determine the number of white colo-
nies (recombinant plasmid).
Duplication of this document, in conjunction with use of accompanying reagents, is permitted for classroom/labora-tory use only. This document, or any part, may not be reproduced or distributed for any other purpose without the written consent of EDVOTEK, Inc. Copyright © 1996, 1997, 1998, 2000, 2001, 2002, 2005, 2007, 2008, 2010 EDVOTEK, Inc., all rights reserved EVT 2010-04-12K
12
331Cloning of a PCR Amplified Gene
The Biotechnology Education Company® • 1-800-EDVOTEK • www.edvotek.com
EDVO-Kit #Th
e Ex
per
imen
t
BEfORE yOu START ThE ExPERimEnT
1. Read all instructions before starting the experiment.
2. If you will be conducting PCR using a thermal cycler without a heated lid,alsoreadtheAppendixentitled"PreparationandHandlingPCRSampleswithWax".
3. IfyouwillbeusingthreewaterbathstoconductPCR,readthetwoap-pendicesentitled"PolymeraseChainReactionUsingThreeWaterbaths"and"Handlingsampleswithwaxoverlays".
4. Writeahypothesisthatreflectstheexperimentandpredictexperimen-tal outcomes.
ExPERimEnT OBjECTivE:
The objective of this experiment is to amplify a DNA fragment by Polymerase Chain Reaction (PCR) and to clone the amplified DNA by using the blue/white cloning system.
BRiEf DESCRiPTiOn Of ExPERimEnT:
This experiment has four modules with the following objectives:
1. To amplify a DNA fragment using the PCR reaction. 2. To prepare PCR amplified DNA for ligation. 3. To ligate the PCR amplified DNA in pUC19. 4. To transform E. coli host cells and to quantitate the number of
white colonies.
GEL SPECifiCATiOnS
This experiment requires a gel with the following specifications:
• Recommendedgelsize: 7x7cmor7x14cm
• Numberofsamplewellsrequired 6
• Placementofwell-formertemplate: firstsetofnotches
• Agarosegelconcentration: 1.0%
Experiment Overview and General Instructions
13Cloning of a PCR Amplified Gene
331EDVO-Kit #
The Biotechnology Education Company® • 1-800-EDVOTEK • www.edvotek.com
Duplication of this document, in conjunction with use of accompanying reagents, is permitted for classroom/labora-tory use only. This document, or any part, may not be reproduced or distributed for any other purpose without the written consent of EDVOTEK, Inc. Copyright © 1996, 1997, 1998, 2000, 2001, 2002, 2005, 2007, 2008, 2010 EDVOTEK, Inc., all rights reserved EVT 2010-04-12K
The Exp
erimen
t
Laboratory Safety
1. Gloves and goggles should be worn routinely as good laboratory prac-tice.
2. Exercise extreme caution when working with equipment that is used in conjunc-tion with the heating and/or melting of reagents.
3. DO NOT MOUTH PIPET REAGENTS - USE PIPET PUMPS.
4. Exercise caution when using any electrical equipment in the laboratory.
• Althoughelectricalcurrentfromthepowersourceisautomaticallydisruptedwhenthecoverisremovedfromtheapparatus,firstturnoffthepower,thenunplugthepowersourcebeforedisconnectingthe leads and removing the cover.
• Turnoffpowerandunplugtheequipmentwhennotinuse.
5. EDVOTEKinjection-moldedelectrophoresisunitsdonothavegluedjunc-tionsthatcandeveloppotentialleaks.However,intheunlikelyeventthataleakdevelopsinanyelectrophoresisapparatusyouareusing,IM-MEDIATELY SHUT OFF POWER. Do not use the apparatus.
6. Always wash hands thoroughly with soap and water after handling re-agents or biological materials in the laboratory.
Wear gloves and safety goggles
Duplication of this document, in conjunction with use of accompanying reagents, is permitted for classroom/labora-tory use only. This document, or any part, may not be reproduced or distributed for any other purpose without the written consent of EDVOTEK, Inc. Copyright © 1996, 1997, 1998, 2000, 2001, 2002, 2005, 2007, 2008, 2010 EDVOTEK, Inc., all rights reserved EVT 2010-04-12K
14
331Cloning of a PCR Amplified Gene
The Biotechnology Education Company® • 1-800-EDVOTEK • www.edvotek.com
EDVO-Kit #Th
e Ex
per
imen
t
The PCR reaction pel-let™ contains Taq DNA polymerase, the four deoxytriphosphates, Mg+2
and buffer.
Sample volumes are very small. For liquid samples, it is important to quick spin the tube contents in a microcentrifuge to ob-tain sufficient volume for pipeting. Spin samples for 10-20 seconds at maxi-mum speed.
module i: Amplification by PCR and Separation by Electrophoresis
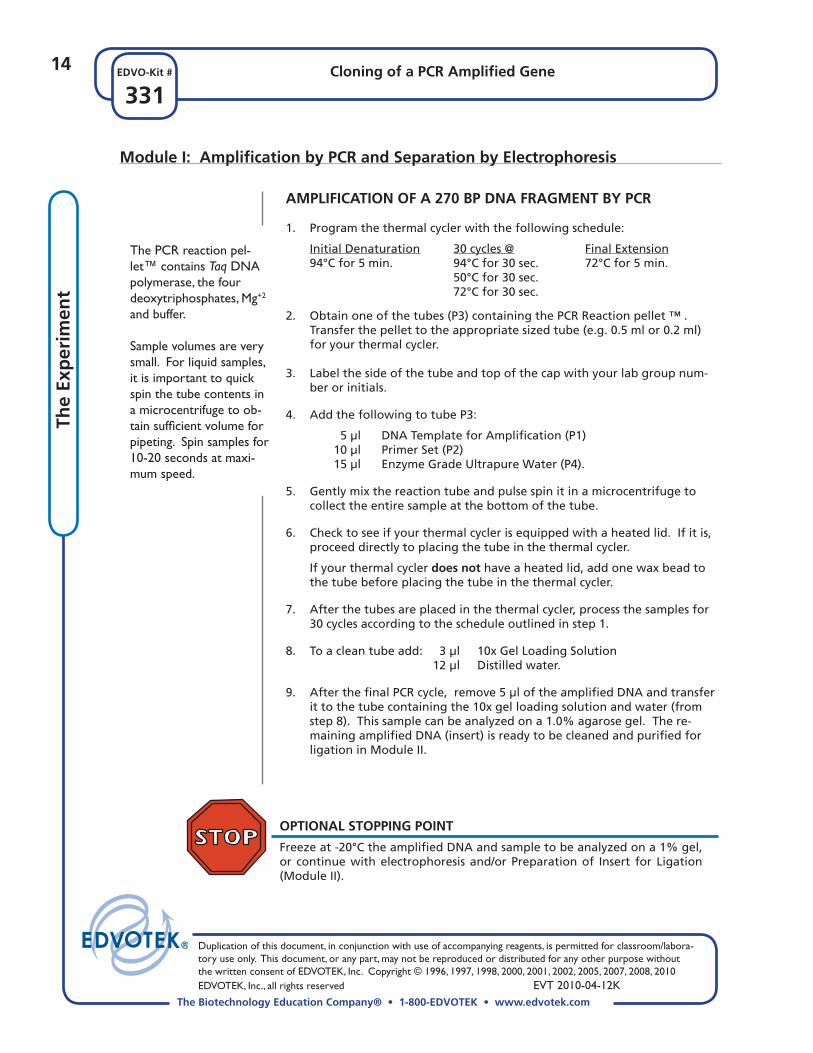
AmplIFICATIOn OF A 270 Bp DnA FrAGmEnT By pCr
1. Program the thermal cycler with the following schedule:
Initial Denaturation 30 cycles @ Final Extension 94°C for 5 min. 94°C for 30 sec. 72°C for 5 min. 50°C for 30 sec. 72°C for 30 sec.
2. Obtain one of the tubes (P3) containing the PCR Reaction pellet ™ . Transfer the pellet to the appropriate sized tube (e.g. 0.5 ml or 0.2 ml) for your thermal cycler.
3. Label the side of the tube and top of the cap with your lab group num-ber or initials.
4. Add the following to tube P3:
5µl DNATemplateforAmplification(P1) 10µl PrimerSet(P2) 15µl EnzymeGradeUltrapureWater(P4).
5. Gently mix the reaction tube and pulse spin it in a microcentrifuge to collect the entire sample at the bottom of the tube.
6. Checktoseeifyourthermalcyclerisequippedwithaheatedlid.Ifitis,proceed directly to placing the tube in the thermal cycler.
If your thermal cycler does nothaveaheatedlid,addonewaxbeadtothe tube before placing the tube in the thermal cycler.
7. Afterthetubesareplacedinthethermalcycler,processthesamplesfor30 cycles according to the schedule outlined in step 1.
8. Toacleantubeadd: 3µl 10xGelLoadingSolution 12µl Distilledwater.
9. AfterthefinalPCRcycle,remove5µloftheamplifiedDNAandtransferit to the tube containing the 10x gel loading solution and water (from step 8). This sample can be analyzed on a 1.0% agarose gel. The re-maining amplified DNA (insert) is ready to be cleaned and purified for ligation in Module II.
OPTiOnAL STOPPinG POinT
Freezeat-20°CtheamplifiedDNAandsampletobeanalyzedona1%gel,or continue with electrophoresis and/or Preparation of Insert for Ligation (Module II).
15Cloning of a PCR Amplified Gene
331EDVO-Kit #
The Biotechnology Education Company® • 1-800-EDVOTEK • www.edvotek.com
Duplication of this document, in conjunction with use of accompanying reagents, is permitted for classroom/labora-tory use only. This document, or any part, may not be reproduced or distributed for any other purpose without the written consent of EDVOTEK, Inc. Copyright © 1996, 1997, 1998, 2000, 2001, 2002, 2005, 2007, 2008, 2010 EDVOTEK, Inc., all rights reserved EVT 2010-04-12K
The Exp
erimen
t
module i: Amplification by PCR and Separation by Electrophoresis
AGAROSE GEL REquiREmEnTS
• Recommendedgelsize: 7x7cmor7x14cm
• Placementofwell-formertemplate: firstsetofnotches
• Agarosegelconcentration: 1.0%
PREPARinG ThE AGAROSE GEL
1. Close off the open ends of a clean and dry gel bed (casting tray) by using rubber dams or tape.
2. Place a well-former template (comb) in the first set of notches at the end of the bed. Make sure the comb sits firmly and evenly across the bed.
3. Toa250mlflaskorbeaker,addagarosepowderandbufferasindicatedin the Reference Tables (Appendix A) provided by your instructor. Swirl the mixture to disperse clumps of agarose powder.
4. Withamarkingpen,indicatethelevelofthesolutionvolumeontheoutsideoftheflask.
5. Heat the mixture using a microwave oven or burner to dissolve the aga-rose powder.
6. Cool the agarose solution to 60°C with careful swirling to promote even dissipationofheat.Ifdetectableevaporationhasoccurred,adddistilledwater to bring the solution up to the original volume marked in step 4.
After the gel is cooled to 60°C:
7. Place the bed on a level surface and pour the cooled agarose solution into the bed.
8. Allow the gel to completely solidify. It will become firm and cool to the touch after approximately 20 minutes.
9. Afterthegelissolidified,becarefulnottodamageortearthewellswhile removing the rubber dams or tape and comb(s) from the gel bed.
10. Placethegel(onitsbed)intotheelectrophoresischamber,properlyoriented,centeredandlevelontheplatform.
11. Fill the electrophoresis apparatus chamber with the appropriate amount of diluted (1x) electrophoresis buffer (refer to Table B on the instruction Appendix provided by your instructor).
If you are unfamiliar with agarose gel preparation and electrophoresis, detailed instructions and helpful resources are available at www.edvotek.com
Important Note
Continue heating until the final solution appears clear (like water) without any un-dissolved particles. Check the solution carefully. If you see "crystal" particles, the agarose is not completely dissolved.
Duplication of this document, in conjunction with use of accompanying reagents, is permitted for classroom/labora-tory use only. This document, or any part, may not be reproduced or distributed for any other purpose without the written consent of EDVOTEK, Inc. Copyright © 1996, 1997, 1998, 2000, 2001, 2002, 2005, 2007, 2008, 2010 EDVOTEK, Inc., all rights reserved EVT 2010-04-12K
16
331Cloning of a PCR Amplified Gene
The Biotechnology Education Company® • 1-800-EDVOTEK • www.edvotek.com
EDVO-Kit #Th
e Ex
per
imen
t
module i: Amplification by PCR and Separation by Electrophoresis
BEfORE LOADinG ThE SAmPLES
This experiment requires a 1.0% agarose gel and is designed for staining with InstaStain® Ethidium Bromide.
LOADinG DnA SAmPLES
1. Make sure the gel is completely submerged under buffer before loading thesamples.Load20µlofthePCRsample.
Lane 1 200 bp DNA Ladder (P5) 2 Reaction sample after 30 cycles
2. Record the position of your sample in the gel for easy identification after staining.
RunninG ThE GEL
3. AftertheDNAsamplesareloaded,properlyorientthecoverandcare-fully snap it onto the electrode terminals.
4. Insert the plugs of the black and red leads into the corresponding inputs of the power source.
5. Set the power source at the required voltage and conduct electrophore-sis for the length of time determined by your instructor.
6. Checktoseethatcurrentisflowingproperly-youshouldseebubblesforming on the two platinum electrodes.
7. Aftertheelectrophoresisiscompleted,disconnectthepowerandre-move the gel from the bed for staining.
STAininG AnD viSuALizATiOn Of DnA Afterelectrophoresis,agarosegelsrequirestainingtovisualizetheseparatedDNA samples. Your instructor will provide instructions for DNA staining with InstaStain® Ethidium Bromide.
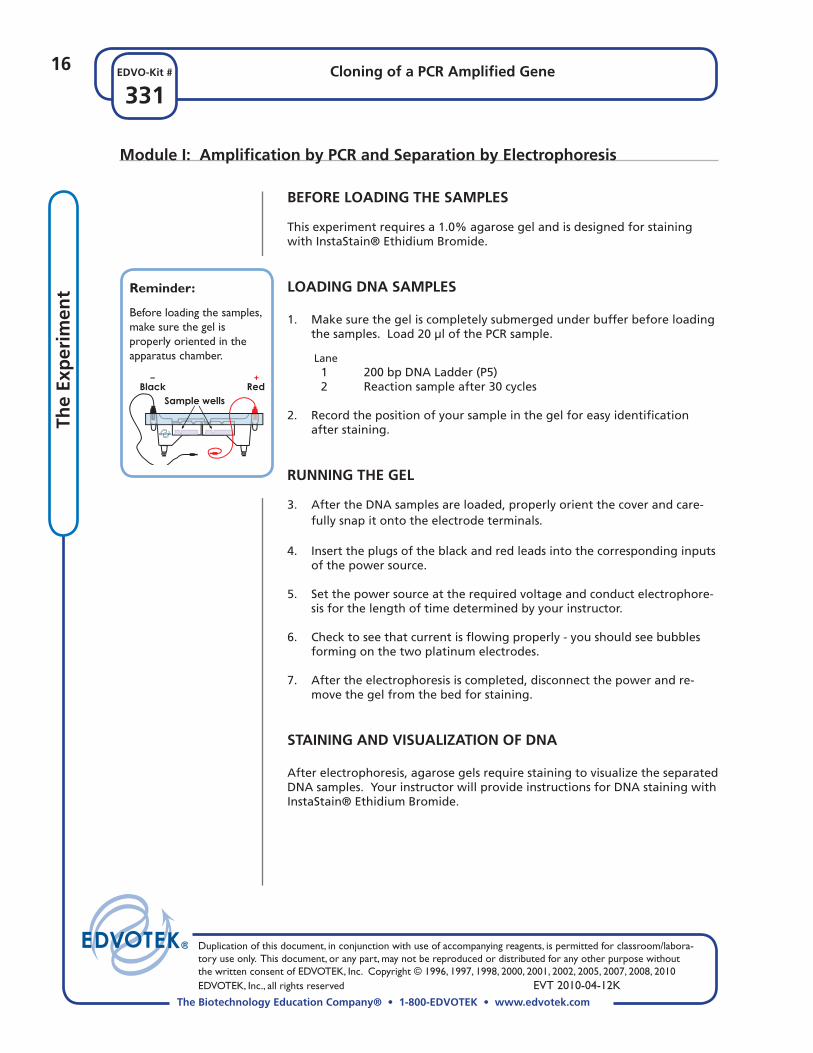
Reminder:
Before loading the samples, make sure the gel is properly oriented in the apparatus chamber.
+Black Red
Sample wells
–

17Cloning of a PCR Amplified Gene
331EDVO-Kit #
The Biotechnology Education Company® • 1-800-EDVOTEK • www.edvotek.com
Duplication of this document, in conjunction with use of accompanying reagents, is permitted for classroom/labora-tory use only. This document, or any part, may not be reproduced or distributed for any other purpose without the written consent of EDVOTEK, Inc. Copyright © 1996, 1997, 1998, 2000, 2001, 2002, 2005, 2007, 2008, 2010 EDVOTEK, Inc., all rights reserved EVT 2010-04-12K
The Exp
erimen
t
module ii: Preparation of insert for Ligation
1. TransfertheamplifiedDNA(~25µl)toaclean1.5mlmicrocentrifugetube and label it with your group number or initials.
2. Add300µlofthePurificationBuffer(C1)tothetubecontainingtheamplified DNA insert. Mix by inversion several times.
3. Place a spin column into a reservoir tube and transfer all of the mixture from step 2 to the column. Close the cap on the column.
4. Balance the tubes in a microcentrifuge and spin at maximum speed for 1minute.Atthispoint,theDNAproductisboundtothemembraneinthe column.
5. Empty the reservoir tube and replace the spin column to the empty res-ervoir tube.
6. Wash the column. • Add750µlwashbuffertothespincolumn. • Closethecaponthecolumn. • Spinbalancedtubesinamicrocentrifugeatmaximumspeedfor1
minute.
7. Empty the contents of the reservoir tube and replace the spin column to the empty reservoir tube. Close the cap on the column and spin bal-anced tubes in a microcentrifuge at maximum speed for 1 minute.
8. Recover the DNA insert from the column: • Placethecolumnintoaclean1.5mlsnap-toptube. • Add12µlofEnzymeGradeUltrapureWatertothecenterofthe
column (directly onto the white membrane). • Closethecaponthecolumnandletthetubestandfor1minute.
9. Balance and carefully position the tubes in the microcentrifuge so that the open caps of the snap-top tubes do not interfere with operation of the centrifuge.
10. Spin the tubes for 1 minute at maximum speed. The DNA insert will be recoveredinavolumeslightlylessthan12µl.
11. Label the tube “PCR insert” and discard the used spin column.
The amplified DNA (insert) must be cleaned (the Taq DNA polymerase must be re-moved),thencutwithEco RI and Hind III before proceeding to the ligation step.
OPTiOnAL STOPPinG POinT
Freeze the samples at -20°C or continue with restriction enzyme digestion
IMPORTANT!
Make sure that the Enzyme Grade Ultrapure Water (C4) is added directly onto the white membrane of the column (avoid touching the membrane with the pipet tip) for complete elution of the DNA.
Duplication of this document, in conjunction with use of accompanying reagents, is permitted for classroom/labora-tory use only. This document, or any part, may not be reproduced or distributed for any other purpose without the written consent of EDVOTEK, Inc. Copyright © 1996, 1997, 1998, 2000, 2001, 2002, 2005, 2007, 2008, 2010 EDVOTEK, Inc., all rights reserved EVT 2010-04-12K
18
331Cloning of a PCR Amplified Gene
The Biotechnology Education Company® • 1-800-EDVOTEK • www.edvotek.com
EDVO-Kit #Th
e Ex
per
imen
t
RESTRiCTiOn EnzymE DiGESTiOn
1. Tothetubelabeled“PCRinsert”containing10-12µlthepurifiedPCRmixture,addthefollowing:
• 5µl RestrictionEnzymeReactionBuffer • 10µl EnzymeGradeUltrapureWater • 10µl Eco RI enzyme • 10µl Hind III enzyme
2. Mix the solution by gently pipeting up and down several times.
3. Incubateat37°Cfor60minutes.Neartheendoftheincubation,pre-pare a separate 65°C waterbath.
Afterthe60minuterestrictionenzymedigestion,theDNAdigestionrequiresan incubation at 65°C to heat-inactivate the enzymes prior to being ligated into the vector.
4. Heat-inactivate the restriction enzymes by incubating the completely digested DNA at 65°C for 20 minutes.
5. Labelthetube“CutPCRInsert”.Afterthisstep,theDNAinsertisnowready to be ligated into the vector.
module ii: Preparation of insert for Ligation
OPTiOnAL STOPPinG POinT
Freeze the samples at -20°C or continue with the ligation.
19Cloning of a PCR Amplified Gene
331EDVO-Kit #
The Biotechnology Education Company® • 1-800-EDVOTEK • www.edvotek.com
Duplication of this document, in conjunction with use of accompanying reagents, is permitted for classroom/labora-tory use only. This document, or any part, may not be reproduced or distributed for any other purpose without the written consent of EDVOTEK, Inc. Copyright © 1996, 1997, 1998, 2000, 2001, 2002, 2005, 2007, 2008, 2010 EDVOTEK, Inc., all rights reserved EVT 2010-04-12K
The Exp
erimen
t
module III: ligation of the pCr Amplified 270 bp DnA into pUC19
1. Equilibrate an ice water bath at 16°C for Step 4.
2. Inacleanmicrocentrifugetube,carefullymixtogether:
• 21µl “CutPCRInsert”DNA • 3µl pUC19PlasmidVectorcutwithEco RI and Hind III • 3µl Ligationbuffer • 3µl DNALigase
30µlTotal
Labelthistube“PCRInsert+Vector/Lig”.
3. Inanothercleanmicrocentrifugetube,carefullymixtogether:
• 3µl pUC19PlasmidVectorcutwithEco RI and Hind III • 3µl Ligationbuffer • 21µl EnzymeGradeUltrapureWater • 3µl DNALigase
30µlTotal
Label this tube “Vector Control/Lig”.
4. Incubate the reaction tubes in a 16°C ice-water bath for 30 minutes.
Alternatively,thereactiontubescanbeincubatedfor2hoursatroomtemperature.
OPTiOnAL STOPPinG POinT
Freeze the samples at -20°C or continue with the transformation.
Duplication of this document, in conjunction with use of accompanying reagents, is permitted for classroom/labora-tory use only. This document, or any part, may not be reproduced or distributed for any other purpose without the written consent of EDVOTEK, Inc. Copyright © 1996, 1997, 1998, 2000, 2001, 2002, 2005, 2007, 2008, 2010 EDVOTEK, Inc., all rights reserved EVT 2010-04-12K
20
331Cloning of a PCR Amplified Gene
The Biotechnology Education Company® • 1-800-EDVOTEK • www.edvotek.com
EDVO-Kit #Th
e Ex
per
imen
t
1. Labelonemicrocentrifugetube"PCR+Vector/Transf". (This will be the transformation tube with the PCR amplified Gene.)
2. Labelasecondmicrocentrifugetube"VectorControl/Transf". (This will be the transformation tube with the vector control.)
3. Usingasterilepipet,add500µl(0.5ml)oficecoldCaCl2 solution to one of the tubes from step 1 or 2.
4. Pick colonies from the source plate of E. coli cells. • Useasteriletoothpicktotransfer5colonies(2-4mm)fromthe
source plate to the tube containing the CaCl2. • Betweenyourfingers,twistthetoothpickvigorouslyintheCaCl2
solution to dislodge the cells.
5. Suspend the cells in the tube by tapping or vortexing (preferred).
At this point, the CaCl2 cell suspension should look cloudy and slightly turbid. If it does not, add a few additional colonies and/or make sure the cells are completely suspended by mixing and vortexing.
6. Afterthecellsarecompletelyresuspended,transferhalf(0.25ml)ofthecell suspension to the other labeled tube.
7. Add10µl"PCR+Vector/Lig"DNAtothetubelabeled"PCR+Vector/Transf"andvortex.
8. Add10µl"VectorControl/Lig"DNAtothetubelabeled"VectorControl/Transf".
9. Incubate the two tubes on ice for 20 minutes.
10. Brieflyvortexthetubes,thenfloatbothtubesat42°Cfor90secondsforthe heat shock step. This facilitates the entry of DNA in bacterial cells.
11. Return both tubes immediately to ice and incubate for 2 minutes.
12. Withasterilepipet,add250µlofRecoveryBrothtoeachtube&vortex.
13. Incubate cells for 30 minutes in a 37°C waterbath for a recovery period.
14. Whilethetubesareincubating,label2agarplatesasfollows:
• "PCRinsert+Vector" • "VectorControl" • Putyourinitialsorgroupnumberonbothplates.
15. Aftertherecoveryperiod,removethetubesfromthewaterbathandplace them on the lab bench.
module iv: Transformation
Note:Sufficient colonies that have been completely suspended in CaCl2 are critical to the success of the transformation portion of the experiment.
21Cloning of a PCR Amplified Gene
331EDVO-Kit #
The Biotechnology Education Company® • 1-800-EDVOTEK • www.edvotek.com
Duplication of this document, in conjunction with use of accompanying reagents, is permitted for classroom/labora-tory use only. This document, or any part, may not be reproduced or distributed for any other purpose without the written consent of EDVOTEK, Inc. Copyright © 1996, 1997, 1998, 2000, 2001, 2002, 2005, 2007, 2008, 2010 EDVOTEK, Inc., all rights reserved EVT 2010-04-12K
The Exp
erimen
t
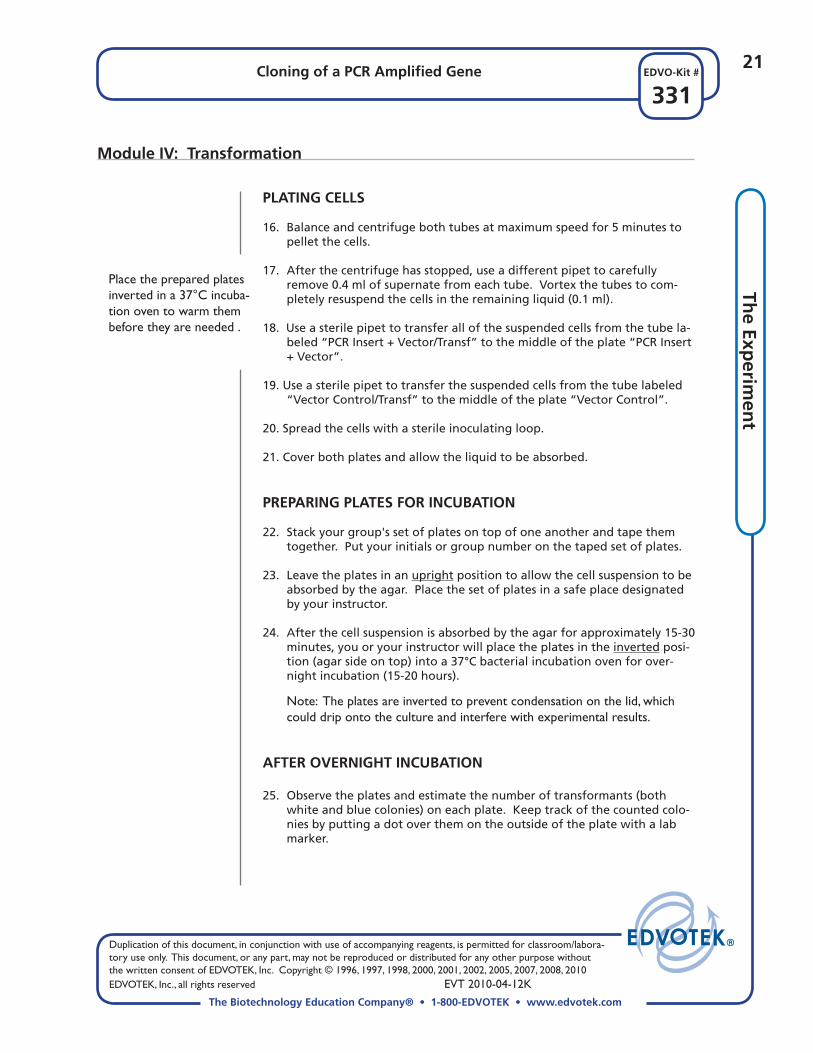
PLATinG CELLS
16. Balance and centrifuge both tubes at maximum speed for 5 minutes to pellet the cells.
17. Afterthecentrifugehasstopped,useadifferentpipettocarefullyremove 0.4 ml of supernate from each tube. Vortex the tubes to com-pletely resuspend the cells in the remaining liquid (0.1 ml).
18. Use a sterile pipet to transfer all of the suspended cells from the tube la-beled“PCRInsert+Vector/Transf”tothemiddleoftheplate“PCRInsert+Vector”.
19. Use a sterile pipet to transfer the suspended cells from the tube labeled “Vector Control/Transf” to the middle of the plate “Vector Control”.
20. Spread the cells with a sterile inoculating loop.
21. Cover both plates and allow the liquid to be absorbed.
PREPARinG PLATES fOR inCuBATiOn
22. Stack your group's set of plates on top of one another and tape them together. Put your initials or group number on the taped set of plates.
23. Leave the plates in an upright position to allow the cell suspension to be absorbed by the agar. Place the set of plates in a safe place designated by your instructor.
24. After the cell suspension is absorbed by the agar for approximately 15-30 minutes,youoryourinstructorwillplacetheplatesintheinverted posi-tion (agar side on top) into a 37°C bacterial incubation oven for over-night incubation (15-20 hours).
Note: The plates are inverted to prevent condensation on the lid, which could drip onto the culture and interfere with experimental results.
AfTER OvERniGhT inCuBATiOn
25. Observe the plates and estimate the number of transformants (both whiteandbluecolonies)oneachplate.Keeptrackofthecountedcolo-nies by putting a dot over them on the outside of the plate with a lab marker.
module iv: Transformation
Place the prepared plates inverted in a 37°C incuba-tion oven to warm them before they are needed .
Duplication of this document, in conjunction with use of accompanying reagents, is permitted for classroom/labora-tory use only. This document, or any part, may not be reproduced or distributed for any other purpose without the written consent of EDVOTEK, Inc. Copyright © 1996, 1997, 1998, 2000, 2001, 2002, 2005, 2007, 2008, 2010 EDVOTEK, Inc., all rights reserved EVT 2010-04-12K
22
331Cloning of a PCR Amplified Gene
The Biotechnology Education Company® • 1-800-EDVOTEK • www.edvotek.com
EDVO-Kit #Th
e Ex
per
imen
t
module iv: Transformation
26. Calculate the transformation efficiencies for total transformants and for colonies that contain vectors with inserts (white colonies). The final volumeofcellswas50µlandthevolumeplatedwas50µl.
Number of Final volume Number of transformants x of cells (ml) = transformants µg of DNA volume plated (ml) per µg
The quantity of DNA plasmid used for the vector control was approxi-mately0.012µg.EstimatethePCR+VectorDNAtobeapproximately0.05µg.
Answer the following study questions in your laboratory notebook or on a separate worksheet.
1. Why does this cloning experiment yield both blue and white colonies?
2. Do all the white and blue colonies contain a plasmid?
3. Why is there a purification step prior to the restriction enzyme diges-tion step?
4. Why are there two different sticky ends on the PCR amplified DNA?
5. What is a diagnostic step to analyze the success of the various steps in this experiment?
Study questions
Cloning of a PCR Amplified Gene
EVT 2010-04-12K
23
EDVOTEK - The Biotechnology Education Company® 1-800-EDVOTEK • www.edvotek.com
FAX: (301) 340-0582 • email: [email protected]
331EDVO-Kit #
instructor’s Guide
Classsize,lengthoflaboratorysessions,andavailabilityofequipmentarefactors which must be considered in the planning and the implementation of this experiment with your students. These guidelines can be adapted to fit your specific set of circumstances. If you do not find the answers to your questionsinthissection,avarietyofresourcesarecontinuouslybeingaddedtotheEDVOTEKwebsite.Inaddition,TechnicalServiceisavailablefrom9:00amto6:00pm,Easterntimezone.Callforhelpfromourknowledge-abletechnicalstaffat1-800-EDVOTEK(1-800-338-6835).
nATiOnAL COnTEnT AnD SkiLL STAnDARDS
Byperformingthisexperiment,studentswilllearntoloadsamplesandrun agarose gel electrophoresis. Analysis of the experiments will provide students the means to transform an abstract concept into a concrete expla-nation. Please visit our website for specific content and skill standards for various experiments.
EDuCATiOnAL RESOuRCES
Electrophoresis hints, help and Frequently Asked Questions
EDVOTEKexperimentsareeasytoperformanddesigned for maximum success in the classroom setting.However,eventhemostexperiencedstudents and teachers occasionally encounter experimental problems or difficulties. The ED-VOTEKwebsiteprovidesseveralsuggestionsandremindersforconductingelectrophoresis,aswellas answers to frequently asked electrophoresis questions.
Online Orderingnow available
Visit our web site for information about EDVOTEK’s complete line of “hands-on” experiments forbiotechnology and biology education.
Mon - Fri 9 am - 6 p
m E
T
(1-800-338-6835)
EDVO-TECH SERVICE
1-800-EDVOTEK
Mon - Fri9:00 am to 6:00 pm ET
FAX: (301) 340-0582Web: www.edvotek.comemail: [email protected]
Please have the following information ready:
• Experiment number and title• Kit lot number on box or tube• Literature version number (in lower right corner)• Approximate purchase date
Technical ServiceDepartment
Duplication of this document, in conjunction with use of accompanying reagents, is permitted for classroom/labora-tory use only. This document, or any part, may not be reproduced or distributed for any other purpose without the written consent of EDVOTEK, Inc. Copyright © 1996, 1997, 1998, 2000, 2001, 2002, 2005, 2007, 2008, 2010 EDVOTEK, Inc., all rights reserved EVT 2010-04-12K
24
331Cloning of a PCR Amplified Gene
The Biotechnology Education Company® • 1-800-EDVOTEK • www.edvotek.com
EDVO-Kit #Th
e Ex
per
imen
t
notes to the instructor:
PCR ExPERimEnTAL SuCCESS GuiDELinES
Please refer to the Appendices section for a summary of important hints and reminders which will help maximize successful implementation of this experi-ment. This experiment has four modules:
I. Amplification of a 270 bp DNA Fragment (from pBR322 plasmid) by PCR and Separation by Electrophoresis
II. Preparation of PCR Amplified DNA for Ligation III. Ligation of the PCR Amplified 270 bp DNA into pUC19 IV. Transformation
miCROPiPETTinG BASiCS AnD PRACTiCE GEL LOADinG
Accurate pipeting is critical for maximizing successful experiment results. EDVOTEKSeries300experimentsaredesignedforstudentswhohavehadprevious experience with agarose gel electrophoresis and micropipeting techniques.Ifyourstudentsareunfamiliarwithusingmicropipets,EDVOTEKhighlyrecommendsthatstudentsperformExperiment#S-44,MicropipettingBasics,orotherSeries100or200electrophoresisexperimentpriortocon-ducting this advanced level experiment.
APPROximATE TimE REquiREmEnTS
1. The PCR step (30 cycles) will take about 2 hours or can be processed overnight and held at 4°C.
2. The experiment can be temporarily stopped after the completion of Module I and/or Module II and later resumed. Experimental results will not be compromised if instructions are followed as noted under the heading “Optional Stopping Point” at the end of each module.
3. Aftersettinguptheligation,ModuleIIIrequiresa30minuteincubation.
4. JM109 colonies from the LyphoCells™ require an overnight incubation the night before the lab.
5. Module IV includes a 30 minute incubation in a 37°C waterbath. There is also an overnight incubation of plates in an incubation oven at 37°C before students can obtain the final results.
6. Whether you choose to prepare the gel(s) in advance or have the stu-dentspreparetheirown,allowapproximately30-40minutesforthisprocedure.Generally,20minutesofthistimeisrequiredforgelsolidi-fication. See section “Options for Preparing Agarose Gels” on the next page.
25Cloning of a PCR Amplified Gene
331EDVO-Kit #
The Biotechnology Education Company® • 1-800-EDVOTEK • www.edvotek.com
Duplication of this document, in conjunction with use of accompanying reagents, is permitted for classroom/labora-tory use only. This document, or any part, may not be reproduced or distributed for any other purpose without the written consent of EDVOTEK, Inc. Copyright © 1996, 1997, 1998, 2000, 2001, 2002, 2005, 2007, 2008, 2010 EDVOTEK, Inc., all rights reserved EVT 2010-04-12K
instru
ctor’s G
uid
e
notes to the instructor:
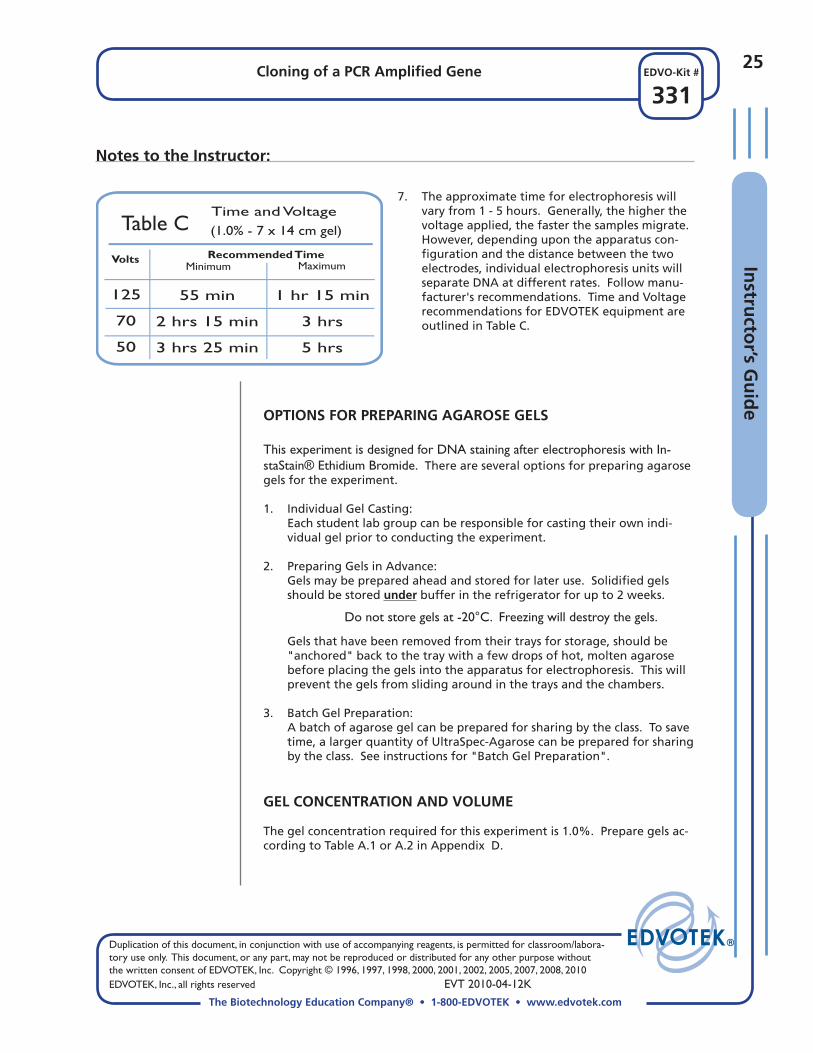
7. The approximate time for electrophoresis will varyfrom1-5hours.Generally,thehigherthevoltageapplied,thefasterthesamplesmigrate.However,dependingupontheapparatuscon-figuration and the distance between the two electrodes,individualelectrophoresisunitswillseparate DNA at different rates. Follow manu-facturer's recommendations. Time and Voltage recommendationsforEDVOTEKequipmentareoutlined in Table C.
OPTiOnS fOR PREPARinG AGAROSE GELS
This experiment is designed for DNA staining after electrophoresis with In-staStain® Ethidium Bromide. There are several options for preparing agarose gels for the experiment.
1. Individual Gel Casting: Each student lab group can be responsible for casting their own indi-
vidual gel prior to conducting the experiment.
2. Preparing Gels in Advance: Gels may be prepared ahead and stored for later use. Solidified gels
should be stored under buffer in the refrigerator for up to 2 weeks.
Do not store gels at -20°C. Freezing will destroy the gels.
Gelsthathavebeenremovedfromtheirtraysforstorage,shouldbe"anchored"backtothetraywithafewdropsofhot,moltenagarosebefore placing the gels into the apparatus for electrophoresis. This will prevent the gels from sliding around in the trays and the chambers.
3. Batch Gel Preparation: A batch of agarose gel can be prepared for sharing by the class. To save
time,alargerquantityofUltraSpec-Agarosecanbepreparedforsharingbytheclass.Seeinstructionsfor"BatchGelPreparation".
GEL COnCEnTRATiOn AnD vOLumE
The gel concentration required for this experiment is 1.0%. Prepare gels ac-cording to Table A.1 or A.2 in Appendix D.
Table C Time and Voltage
Recommended Time Minimum Maximum
Volts
125
70
50
55 min
2 hrs 15 min
3 hrs 25 min
1 hr 15 min
3 hrs
5 hrs
(1.0% - 7 x 14 cm gel)

Duplication of this document, in conjunction with use of accompanying reagents, is permitted for classroom/labora-tory use only. This document, or any part, may not be reproduced or distributed for any other purpose without the written consent of EDVOTEK, Inc. Copyright © 1996, 1997, 1998, 2000, 2001, 2002, 2005, 2007, 2008, 2010 EDVOTEK, Inc., all rights reserved EVT 2010-04-12K
26
331Cloning of a PCR Amplified Gene
The Biotechnology Education Company® • 1-800-EDVOTEK • www.edvotek.com
EDVO-Kit #in
stru
cto
r’s
Gu
ide
notes to the instructor:
GEL STAininG AnD DESTAininG AfTER ELECTROPhORESiS Afterelectrophoresis,theagarosegelsrequirestaininginordertovisualizethe separated DNA samples. This experiment features a proprietary stain called InstaStain®.
InstaStain® EtBr (Appendix F)
Optimal visualization of PCR products on gels of 1.0% or higher concentra-tion is obtained by staining with InstaStain® Ethidium Bromide (InstaStain® EtBr)cards.ExercisecautionwhenusingEthidiumBromide,whichisalistedmutagen.DisposaloftheInstaStain®EtBrcards,whichcontainonlyafewmicrogramsofethidiumbromide,isminimalcomparedtothelargevolumeof liquid waste generated by traditional ethidium bromide staining pro-cedures. Disposal of InstaStain® cards and gels should follow institutional guidelines for chemical waste.
phOTODOCUmEnTATIOn OF DnA (OpTIOnAl)
Therearemanydifferentphotodocumentationsystemsavailable,includingdigital systems that are interfaced directly with computers. Specific instruc-tions will vary depending upon the type of photodocumentation system you are using.
27Cloning of a PCR Amplified Gene
331EDVO-Kit #
The Biotechnology Education Company® • 1-800-EDVOTEK • www.edvotek.com
Duplication of this document, in conjunction with use of accompanying reagents, is permitted for classroom/labora-tory use only. This document, or any part, may not be reproduced or distributed for any other purpose without the written consent of EDVOTEK, Inc. Copyright © 1996, 1997, 1998, 2000, 2001, 2002, 2005, 2007, 2008, 2010 EDVOTEK, Inc., all rights reserved EVT 2010-04-12K
instru
ctor’s G
uid
e
pre-lab preparations
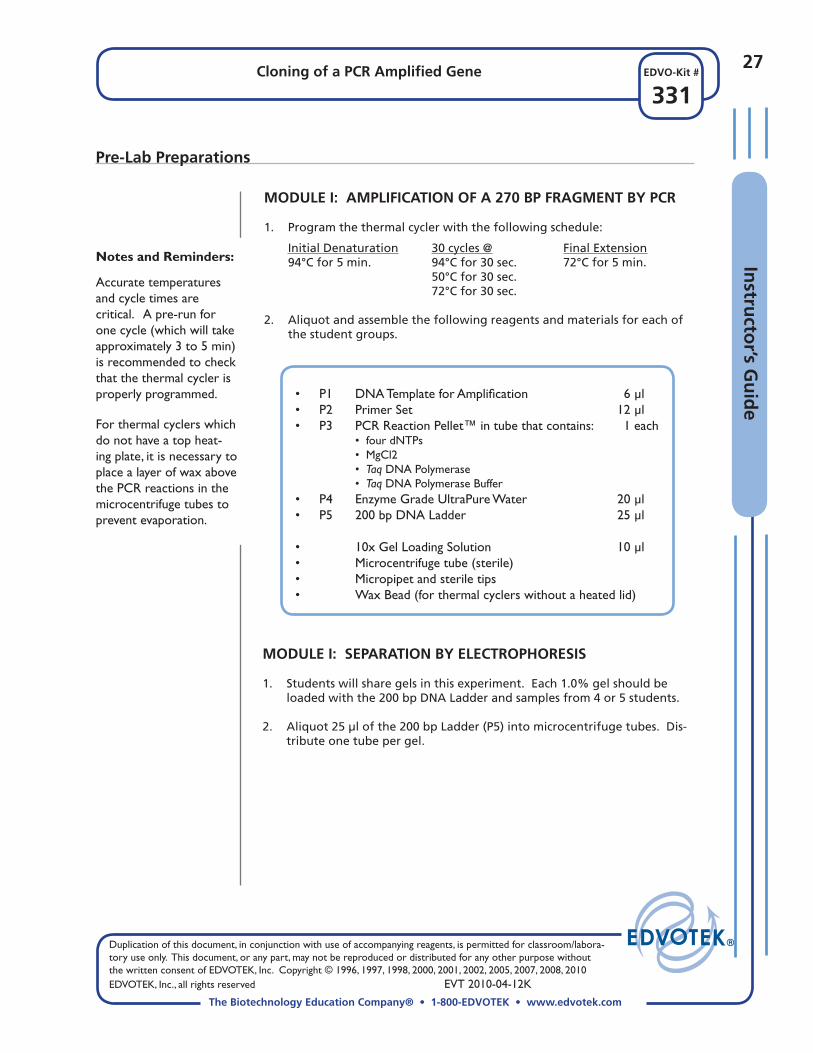
mODUlE I: AmplIFICATIOn OF A 270 Bp FrAGmEnT By pCr
1. Program the thermal cycler with the following schedule:
Initial Denaturation 30 cycles @ Final Extension 94°C for 5 min. 94°C for 30 sec. 72°C for 5 min. 50°C for 30 sec. 72°C for 30 sec.
2. Aliquot and assemble the following reagents and materials for each of the student groups.
Notes and Reminders:
Accurate temperatures and cycle times are critical. A pre-run for one cycle (which will take approximately 3 to 5 min) is recommended to check that the thermal cycler is properly programmed.
For thermal cyclers which do not have a top heat-ing plate, it is necessary to place a layer of wax above the PCR reactions in the microcentrifuge tubes to prevent evaporation.
• P1 DNA Template for Amplification 6 µl• P2 Primer Set 12 µl• P3 PCR Reaction Pellet™ in tube that contains: 1 each • four dNTPs • MgCl2 • Taq DNA Polymerase • Taq DNA Polymerase Buffer• P4 Enzyme Grade UltraPure Water 20 µl• P5 200 bp DNA Ladder 25 µl
• 10x Gel Loading Solution 10 µl• Microcentrifuge tube (sterile)• Micropipet and sterile tips• Wax Bead (for thermal cyclers without a heated lid)
mODuLE i: SEPARATiOn By ELECTROPhORESiS
1. Students will share gels in this experiment. Each 1.0% gel should be loaded with the 200 bp DNA Ladder and samples from 4 or 5 students.
2. Aliquot25µlofthe200bpLadder(P5)intomicrocentrifugetubes.Dis-tribute one tube per gel.
Duplication of this document, in conjunction with use of accompanying reagents, is permitted for classroom/labora-tory use only. This document, or any part, may not be reproduced or distributed for any other purpose without the written consent of EDVOTEK, Inc. Copyright © 1996, 1997, 1998, 2000, 2001, 2002, 2005, 2007, 2008, 2010 EDVOTEK, Inc., all rights reserved EVT 2010-04-12K
28
331Cloning of a PCR Amplified Gene
The Biotechnology Education Company® • 1-800-EDVOTEK • www.edvotek.com
EDVO-Kit #in
stru
cto
r’s
Gu
ide
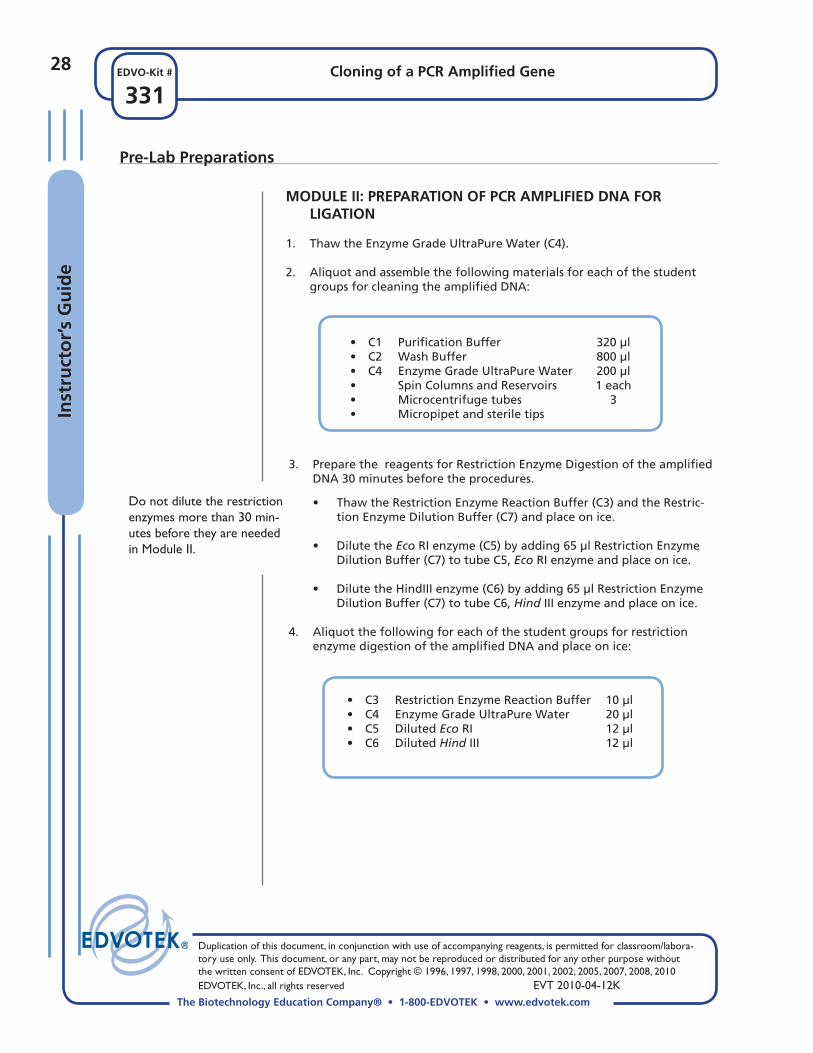
mODuLE ii: PREPARATiOn Of PCR AmPLifiED DnA fOR LiGATiOn
1. Thaw the Enzyme Grade UltraPure Water (C4).
2. Aliquot and assemble the following materials for each of the student groups for cleaning the amplified DNA:
3. Prepare the reagents for Restriction Enzyme Digestion of the amplified DNA 30 minutes before the procedures.
• ThawtheRestrictionEnzymeReactionBuffer(C3)andtheRestric-tion Enzyme Dilution Buffer (C7) and place on ice.
• DilutetheEcoRIenzyme(C5)byadding65µlRestrictionEnzymeDilutionBuffer(C7)totubeC5,Eco RI enzyme and place on ice.
• DilutetheHindIIIenzyme(C6)byadding65µlRestrictionEnzymeDilutionBuffer(C7)totubeC6,Hind III enzyme and place on ice.
4. Aliquot the following for each of the student groups for restriction enzyme digestion of the amplified DNA and place on ice:
• C1 PurificationBuffer 320µl• C2 WashBuffer 800µl• C4 EnzymeGradeUltraPureWater 200µl• SpinColumnsandReservoirs 1each• Microcentrifugetubes 3• Micropipetandsteriletips
• C3 RestrictionEnzymeReactionBuffer 10µl• C4 EnzymeGradeUltraPureWater 20µl• C5 DilutedEco RI 12µl• C6 DilutedHind III 12µl
Do not dilute the restriction enzymes more than 30 min-utes before they are needed in Module II.
pre-lab preparations
29Cloning of a PCR Amplified Gene
331EDVO-Kit #
The Biotechnology Education Company® • 1-800-EDVOTEK • www.edvotek.com
Duplication of this document, in conjunction with use of accompanying reagents, is permitted for classroom/labora-tory use only. This document, or any part, may not be reproduced or distributed for any other purpose without the written consent of EDVOTEK, Inc. Copyright © 1996, 1997, 1998, 2000, 2001, 2002, 2005, 2007, 2008, 2010 EDVOTEK, Inc., all rights reserved EVT 2010-04-12K
instru
ctor’s G
uid
e
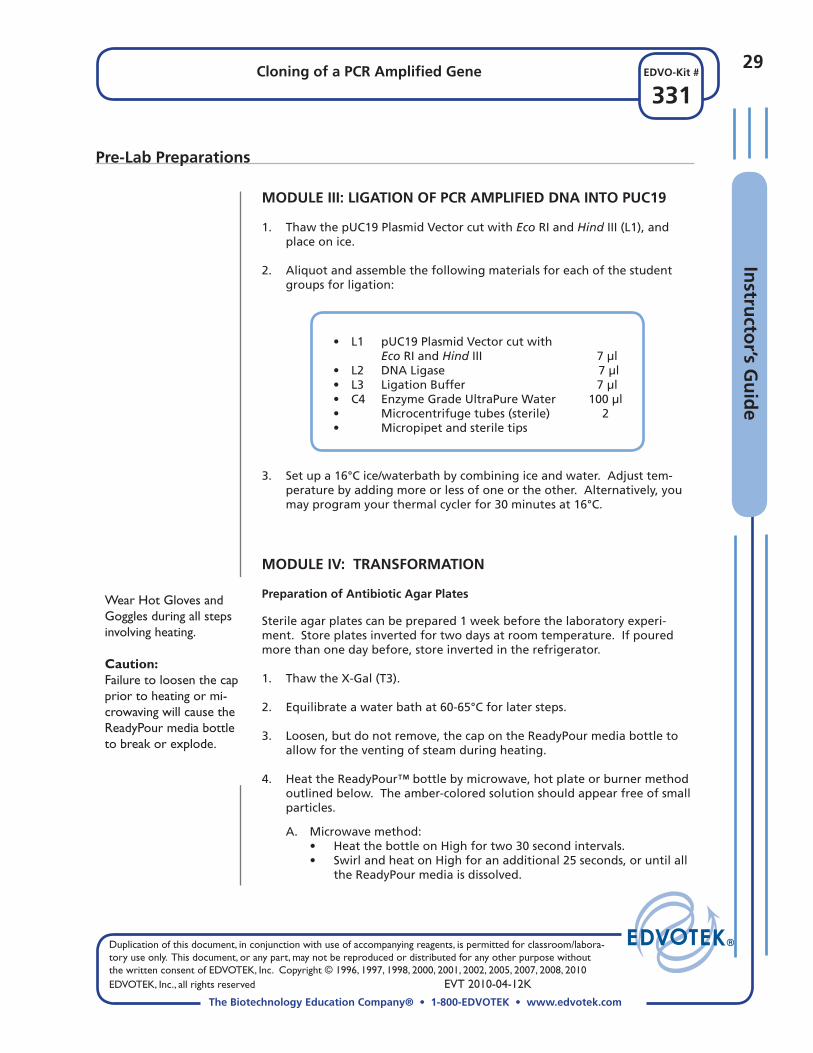
mODUlE III: lIGATIOn OF pCr AmplIFIED DnA InTO pUC19
1. Thaw the pUC19 Plasmid Vector cut with Eco RI and Hind III(L1),andplace on ice.
2. Aliquot and assemble the following materials for each of the student groups for ligation:
3. Set up a 16°C ice/waterbath by combining ice and water. Adjust tem-peraturebyaddingmoreorlessofoneortheother.Alternatively,youmay program your thermal cycler for 30 minutes at 16°C.
mODuLE iv: TRAnSfORmATiOn
Preparation of Antibiotic Agar Plates
Sterile agar plates can be prepared 1 week before the laboratory experi-ment. Store plates inverted for two days at room temperature. If poured morethanonedaybefore,storeinvertedintherefrigerator.
1. Thaw the X-Gal (T3).
2. Equilibrate a water bath at 60-65°C for later steps.
3. Loosen,butdonotremove,thecapontheReadyPourmediabottletoallow for the venting of steam during heating.
4. HeattheReadyPour™bottlebymicrowave,hotplateorburnermethodoutlined below. The amber-colored solution should appear free of small particles.
A. Microwave method: • HeatthebottleonHighfortwo30secondintervals. • SwirlandheatonHighforanadditional25seconds,oruntilall
the ReadyPour media is dissolved.
• L1 pUC19PlasmidVectorcutwith Eco RI and Hind III 7µl• L2 DNALigase 7µl• L3 LigationBuffer 7µl• C4 EnzymeGradeUltraPureWater 100µl• Microcentrifugetubes(sterile) 2• Micropipetandsteriletips
Wear Hot Gloves and Goggles during all steps involving heating.
Caution:Failure to loosen the cap prior to heating or mi-crowaving will cause the ReadyPour media bottle to break or explode.
pre-lab preparations
Duplication of this document, in conjunction with use of accompanying reagents, is permitted for classroom/labora-tory use only. This document, or any part, may not be reproduced or distributed for any other purpose without the written consent of EDVOTEK, Inc. Copyright © 1996, 1997, 1998, 2000, 2001, 2002, 2005, 2007, 2008, 2010 EDVOTEK, Inc., all rights reserved EVT 2010-04-12K
30
331Cloning of a PCR Amplified Gene
The Biotechnology Education Company® • 1-800-EDVOTEK • www.edvotek.com
EDVO-Kit #in
stru
cto
r’s
Gu
ide
B. Hot plate or burner method: • Placethebottleinabeakerpartiallyfilledwithwater. • Heatthebeakertoboilingoverahotplateorburner. • Usingahotglove,occasionallyswirltoexpeditemelting.
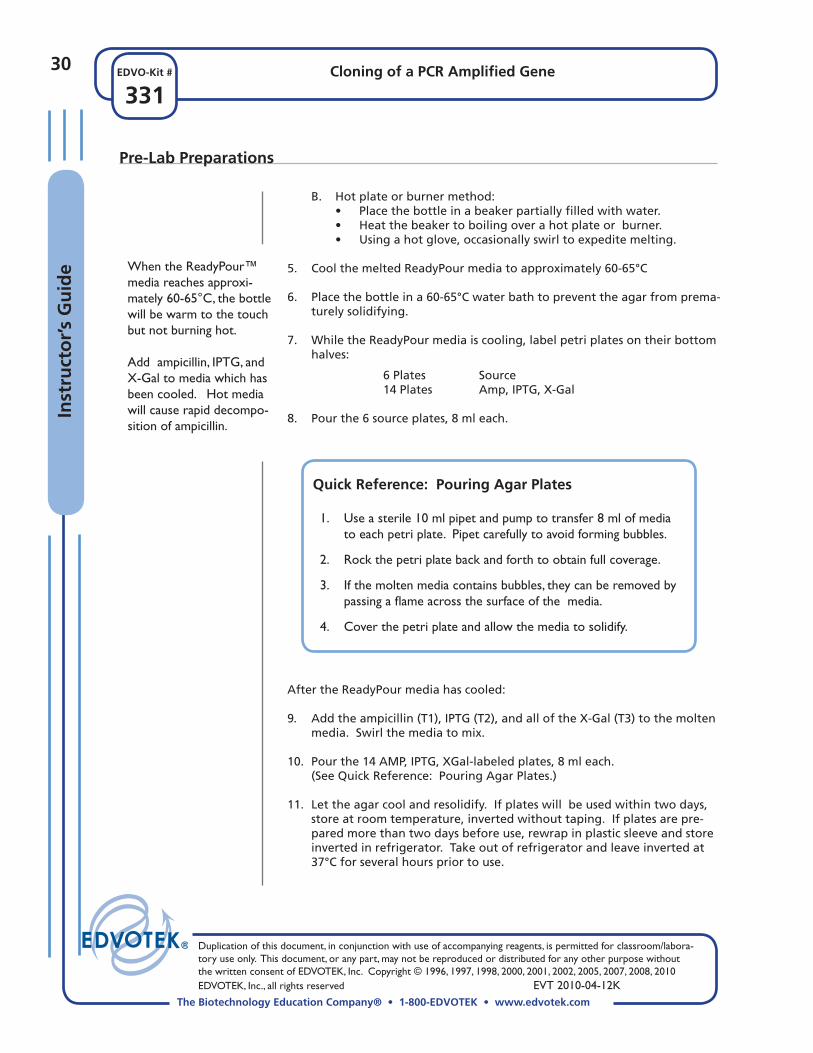
5. Cool the melted ReadyPour media to approximately 60-65°C
6. Place the bottle in a 60-65°C water bath to prevent the agar from prema-turely solidifying.
7. WhiletheReadyPourmediaiscooling,labelpetriplatesontheirbottomhalves:
6 Plates Source 14Plates Amp,IPTG,X-Gal
8. Pourthe6sourceplates,8mleach.
pre-lab preparations
When the ReadyPour™ media reaches approxi-mately 60-65°C, the bottle will be warm to the touch but not burning hot.
Add ampicillin, IPTG, and X-Gal to media which has been cooled. Hot media will cause rapid decompo-sition of ampicillin.
After the ReadyPour media has cooled:
9. Addtheampicillin(T1),IPTG(T2),andalloftheX-Gal(T3)tothemoltenmedia. Swirl the media to mix.
10. Pourthe14AMP,IPTG,XGal-labeledplates,8mleach. (See Quick Reference: Pouring Agar Plates.)
11. Lettheagarcoolandresolidify.Ifplateswillbeusedwithintwodays,storeatroomtemperature,invertedwithouttaping.Ifplatesarepre-paredmorethantwodaysbeforeuse,rewrapinplasticsleeveandstoreinverted in refrigerator. Take out of refrigerator and leave inverted at 37°C for several hours prior to use.
Quick reference: pouring Agar plates
1. Use a sterile 10 ml pipet and pump to transfer 8 ml of media to each petri plate. Pipet carefully to avoid forming bubbles.
2. Rock the petri plate back and forth to obtain full coverage.
3. If the molten media contains bubbles, they can be removed by passing a flame across the surface of the media.
4. Cover the petri plate and allow the media to solidify.
31Cloning of a PCR Amplified Gene
331EDVO-Kit #
The Biotechnology Education Company® • 1-800-EDVOTEK • www.edvotek.com
Duplication of this document, in conjunction with use of accompanying reagents, is permitted for classroom/labora-tory use only. This document, or any part, may not be reproduced or distributed for any other purpose without the written consent of EDVOTEK, Inc. Copyright © 1996, 1997, 1998, 2000, 2001, 2002, 2005, 2007, 2008, 2010 EDVOTEK, Inc., all rights reserved EVT 2010-04-12K
Instru
ctor’s G
uid
e
PreLab Preparations
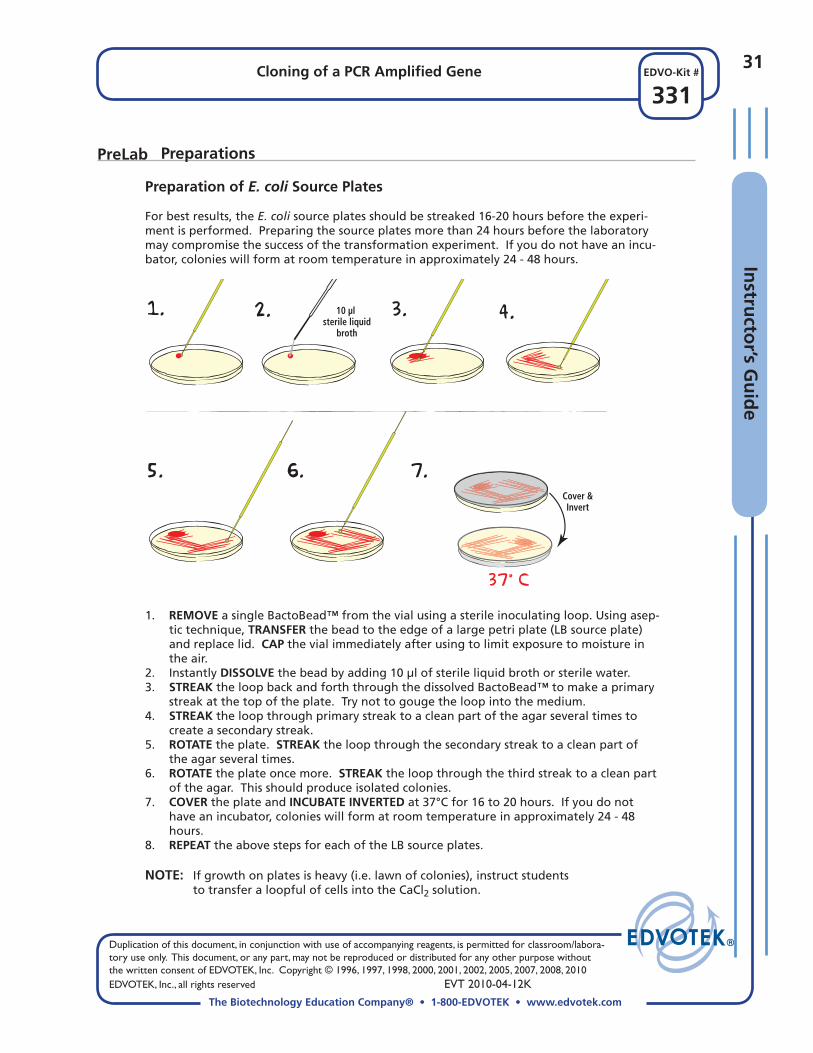
Preparation of E. coli Source Plates
For best results, the E. coli source plates should be streaked 16-20 hours before the experi-ment is performed. Preparing the source plates more than 24 hours before the laboratory may compromise the success of the transformation experiment. If you do not have an incu-bator, colonies will form at room temperature in approximately 24 - 48 hours.
1. 2. 3.
5.
4.10 µl sterile liquid
broth
37° C
6. 7.Cover &Invert
1. REMOVE a single BactoBead™ from the vial using a sterile inoculating loop. Using asep-tic technique, TRANSFER the bead to the edge of a large petri plate (LB source plate) and replace lid. CAP the vial immediately after using to limit exposure to moisture in the air.
2. Instantly DISSOLVE the bead by adding 10 µl of sterile liquid broth or sterile water.3. STREAK the loop back and forth through the dissolved BactoBead™ to make a primary
streak at the top of the plate. Try not to gouge the loop into the medium. 4. STREAK the loop through primary streak to a clean part of the agar several times to
create a secondary streak.5. ROTATE the plate. STREAK the loop through the secondary streak to a clean part of
the agar several times. 6. ROTATE the plate once more. STREAK the loop through the third streak to a clean part
of the agar. This should produce isolated colonies.7. COVER the plate and INCUBATE INVERTED at 37°C for 16 to 20 hours. If you do not
have an incubator, colonies will form at room temperature in approximately 24 - 48 hours.
8. REPEAT the above steps for each of the LB source plates.
NOTE: If growth on plates is heavy (i.e. lawn of colonies), instruct students to transfer a loopful of cells into the CaCl2 solution.
Duplication of this document, in conjunction with use of accompanying reagents, is permitted for classroom/labora-tory use only. This document, or any part, may not be reproduced or distributed for any other purpose without the written consent of EDVOTEK, Inc. Copyright © 1996, 1997, 1998, 2000, 2001, 2002, 2005, 2007, 2008, 2010 EDVOTEK, Inc., all rights reserved EVT 2010-04-12K
32
331Cloning of a PCR Amplified Gene
The Biotechnology Education Company® • 1-800-EDVOTEK • www.edvotek.com
EDVO-Kit #in
stru
cto
r’s
Gu
ide
Experiment Results and Analysis
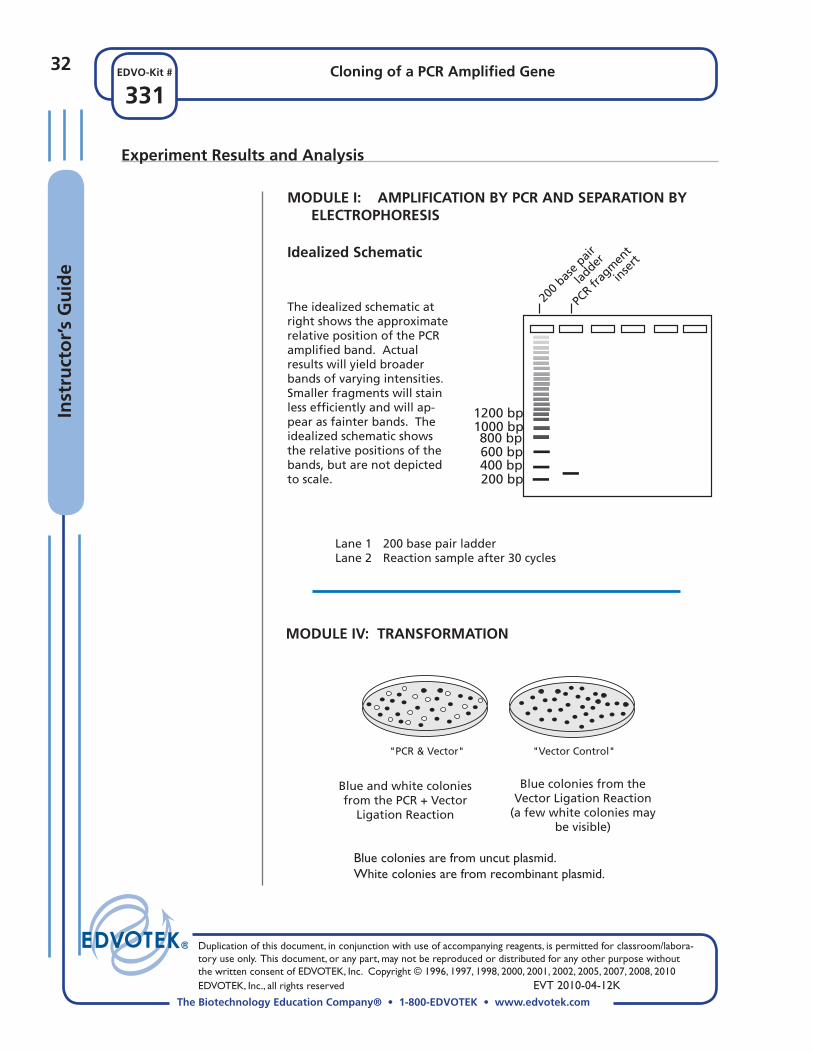
idealized Schematic
The idealized schematic at right shows the approximate relative position of the PCR amplified band. Actual results will yield broader bands of varying intensities. Smaller fragments will stain less efficiently and will ap-pear as fainter bands. The idealized schematic shows the relative positions of the bands,butarenotdepictedto scale.
mODuLE i: AmPLifiCATiOn By PCR AnD SEPARATiOn By ELECTROPhORESiS
mODuLE iv: TRAnSfORmATiOn
Blue and white colonies fromthePCR+Vector
Ligation Reaction
Blue colonies from the Vector Ligation Reaction
(a few white colonies may be visible)
"PCR & Vector" "Vector Control"
Lane 1 200 base pair ladder Lane 2 Reaction sample after 30 cycles
200
base
pair
ladder
PCR fr
agm
ent
inse
rt
1200 bp1000 bp800 bp600 bp400 bp200 bp
Blue colonies are from uncut plasmid. White colonies are from recombinant plasmid.

Please refer to the kit insert for the Answers to
Study Questions

Cloning of a PCR Amplified Gene34
xxx331EDVO-Kit #
EDVOTEK - The Biotechnology Education Company® • 1-800-EDVOTEK • www.edvotek.com
Cloning of a PCR Amplified Gene
EVT 2010-04-12K
35
EDVOTEK - The Biotechnology Education Company® 1-800-EDVOTEK • www.edvotek.com
FAX: (301) 340-0582 • email: [email protected]
331EDVO-Kit #
A PCR Experimental Success Guidelines
B Polymerase Chain Reaction Using Three Waterbaths
C Preparation and Handling of PCR Samples With Wax
D 1.0% Agarose Gel Preparation
E 1.0% Agarose Gels - Quantity Preparations
F Staining and Visualization of DNA with
InstaStain® Ethidium Bromide Cards
Material Safety Data Sheets
Appendices
Duplication of this document, in conjunction with use of accompanying reagents, is permitted for classroom/labora-tory use only. This document, or any part, may not be reproduced or distributed for any other purpose without the written consent of EDVOTEK, Inc. Copyright © 1996, 1997, 1998, 2000, 2001, 2002, 2005, 2007, 2008, 2010 EDVOTEK, Inc., all rights reserved EVT 2010-04-12K
36
The Biotechnology Education Company® • 1-800-EDVOTEK • www.edvotek.com
331EDVO-Kit #
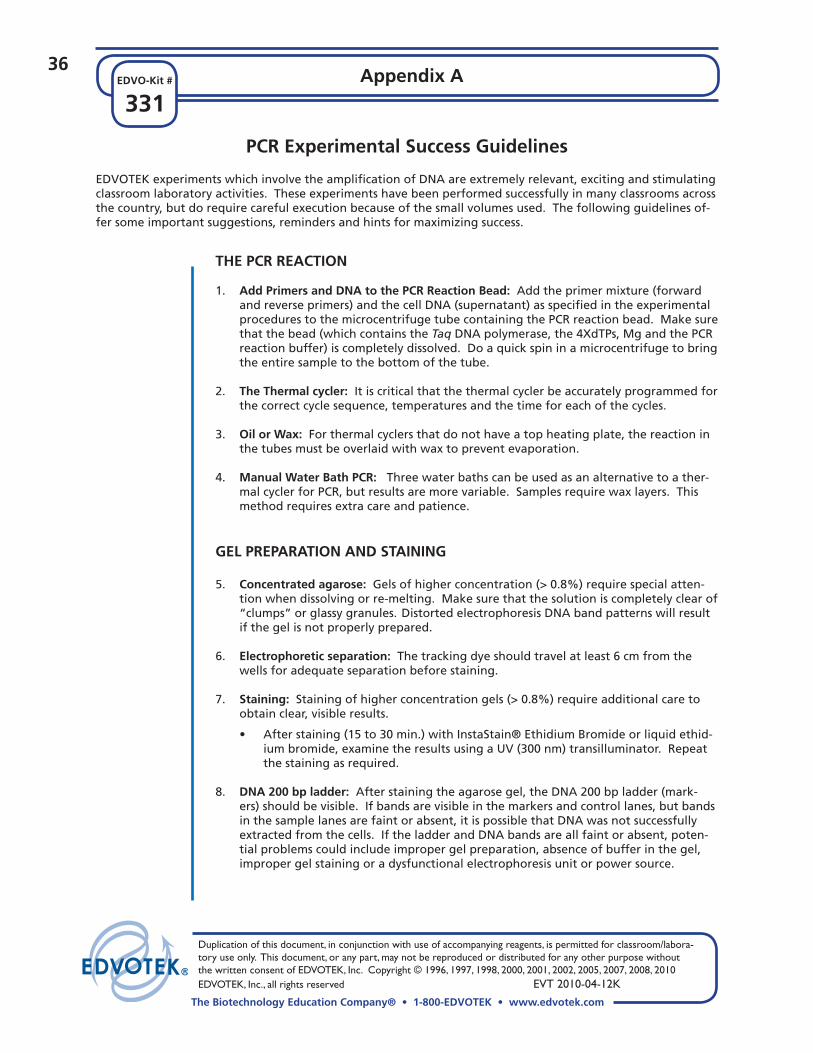
PCR Experimental Success Guidelines
EDVOTEKexperimentswhichinvolvetheamplificationofDNAareextremelyrelevant,excitingandstimulatingclassroom laboratory activities. These experiments have been performed successfully in many classrooms across thecountry,butdorequirecarefulexecutionbecauseofthesmallvolumesused.Thefollowingguidelinesof-fersomeimportantsuggestions,remindersandhintsformaximizingsuccess.
ThE PCR REACTiOn
1. Add Primers and DnA to the PCR Reaction Bead: Add the primer mixture (forward and reverse primers) and the cell DNA (supernatant) as specified in the experimental procedures to the microcentrifuge tube containing the PCR reaction bead. Make sure that the bead (which contains the Taq DNApolymerase,the4XdTPs,MgandthePCRreaction buffer) is completely dissolved. Do a quick spin in a microcentrifuge to bring the entire sample to the bottom of the tube.
2. The Thermal cycler: It is critical that the thermal cycler be accurately programmed for thecorrectcyclesequence,temperaturesandthetimeforeachofthecycles.
3. Oil or Wax: Forthermalcyclersthatdonothaveatopheatingplate,thereactioninthe tubes must be overlaid with wax to prevent evaporation.
4. manual Water Bath pCr: Three water baths can be used as an alternative to a ther-malcyclerforPCR,butresultsaremorevariable.Samplesrequirewaxlayers.Thismethod requires extra care and patience.
GEL PREPARATiOn AnD STAininG
5. Concentrated agarose: Gels of higher concentration (> 0.8%) require special atten-tion when dissolving or re-melting. Make sure that the solution is completely clear of “clumps” or glassy granules. Distorted electrophoresis DNA band patterns will result if the gel is not properly prepared.
6. Electrophoretic separation: The tracking dye should travel at least 6 cm from the wells for adequate separation before staining.
7. Staining: Staining of higher concentration gels (> 0.8%) require additional care to obtainclear,visibleresults.
• Afterstaining(15to30min.)withInstaStain®EthidiumBromideorliquidethid-iumbromide,examinetheresultsusingaUV(300nm)transilluminator.Repeatthe staining as required.
8. DnA 200 bp ladder: Afterstainingtheagarosegel,theDNA200bpladder(mark-
ers)shouldbevisible.Ifbandsarevisibleinthemarkersandcontrollanes,butbandsinthesamplelanesarefaintorabsent,itispossiblethatDNAwasnotsuccessfullyextractedfromthecells.IftheladderandDNAbandsareallfaintorabsent,poten-tialproblemscouldincludeimpropergelpreparation,absenceofbufferinthegel,improper gel staining or a dysfunctional electrophoresis unit or power source.
Appendix A
The Biotechnology Education Company® • 1-800-EDVOTEK • www.edvotek.com
Duplication of this document, in conjunction with use of accompanying reagents, is permitted for classroom/labora-tory use only. This document, or any part, may not be reproduced or distributed for any other purpose without the written consent of EDVOTEK, Inc. Copyright © 1996, 1997, 1998, 2000, 2001, 2002, 2005, 2007, 2008, 2010 EDVOTEK, Inc., all rights reserved EVT 2010-04-12K
37
331EDVO-Kit #
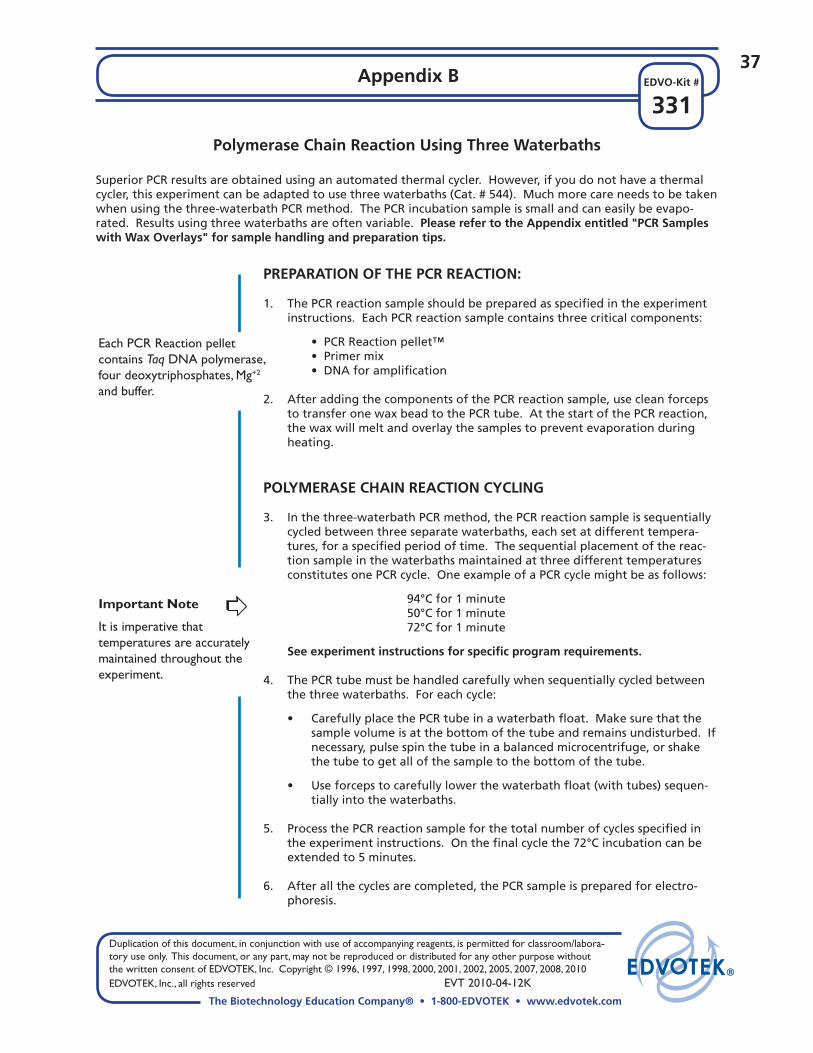
PREPARATiOn Of ThE PCR REACTiOn:
1. The PCR reaction sample should be prepared as specified in the experiment instructions. Each PCR reaction sample contains three critical components:
•PCRReactionpellet™ •Primermix •DNAforamplification
2. AfteraddingthecomponentsofthePCRreactionsample,usecleanforcepstotransferonewaxbeadtothePCRtube.AtthestartofthePCRreaction,the wax will melt and overlay the samples to prevent evaporation during heating.
POLymERASE ChAin REACTiOn CyCLinG
3. Inthethree-waterbathPCRmethod,thePCRreactionsampleissequentiallycycledbetweenthreeseparatewaterbaths,eachsetatdifferenttempera-tures,foraspecifiedperiodoftime.Thesequentialplacementofthereac-tion sample in the waterbaths maintained at three different temperatures constitutes one PCR cycle. One example of a PCR cycle might be as follows:
94°C for 1 minute 50°C for 1 minute 72°C for 1 minute
See experiment instructions for specific program requirements.
4. The PCR tube must be handled carefully when sequentially cycled between the three waterbaths. For each cycle:
• CarefullyplacethePCRtubeinawaterbathfloat.Makesurethatthesample volume is at the bottom of the tube and remains undisturbed. If necessary,pulsespinthetubeinabalancedmicrocentrifuge,orshakethe tube to get all of the sample to the bottom of the tube.
• Useforcepstocarefullylowerthewaterbathfloat(withtubes)sequen-tially into the waterbaths.
5. Process the PCR reaction sample for the total number of cycles specified in the experiment instructions. On the final cycle the 72°C incubation can be extended to 5 minutes.
6. Afterallthecyclesarecompleted,thePCRsampleispreparedforelectro-phoresis.
Appendix B
polymerase Chain reaction Using Three Waterbaths
SuperiorPCRresultsareobtainedusinganautomatedthermalcycler.However,ifyoudonothaveathermalcycler,thisexperimentcanbeadaptedtousethreewaterbaths(Cat.#544).Muchmorecareneedstobetakenwhen using the three-waterbath PCR method. The PCR incubation sample is small and can easily be evapo-rated. Results using three waterbaths are often variable. Please refer to the Appendix entitled "PCR Samples with Wax Overlays" for sample handling and preparation tips.
Each PCR Reaction pellet contains Taq DNA polymerase, four deoxytriphosphates, Mg+2
and buffer.
It is imperative that the temperatures are accurately maintained throughout the experiment.
Important Note
Duplication of this document, in conjunction with use of accompanying reagents, is permitted for classroom/labora-tory use only. This document, or any part, may not be reproduced or distributed for any other purpose without the written consent of EDVOTEK, Inc. Copyright © 1996, 1997, 1998, 2000, 2001, 2002, 2005, 2007, 2008, 2010 EDVOTEK, Inc., all rights reserved EVT 2010-04-12K
38
The Biotechnology Education Company® • 1-800-EDVOTEK • www.edvotek.com
331EDVO-Kit #
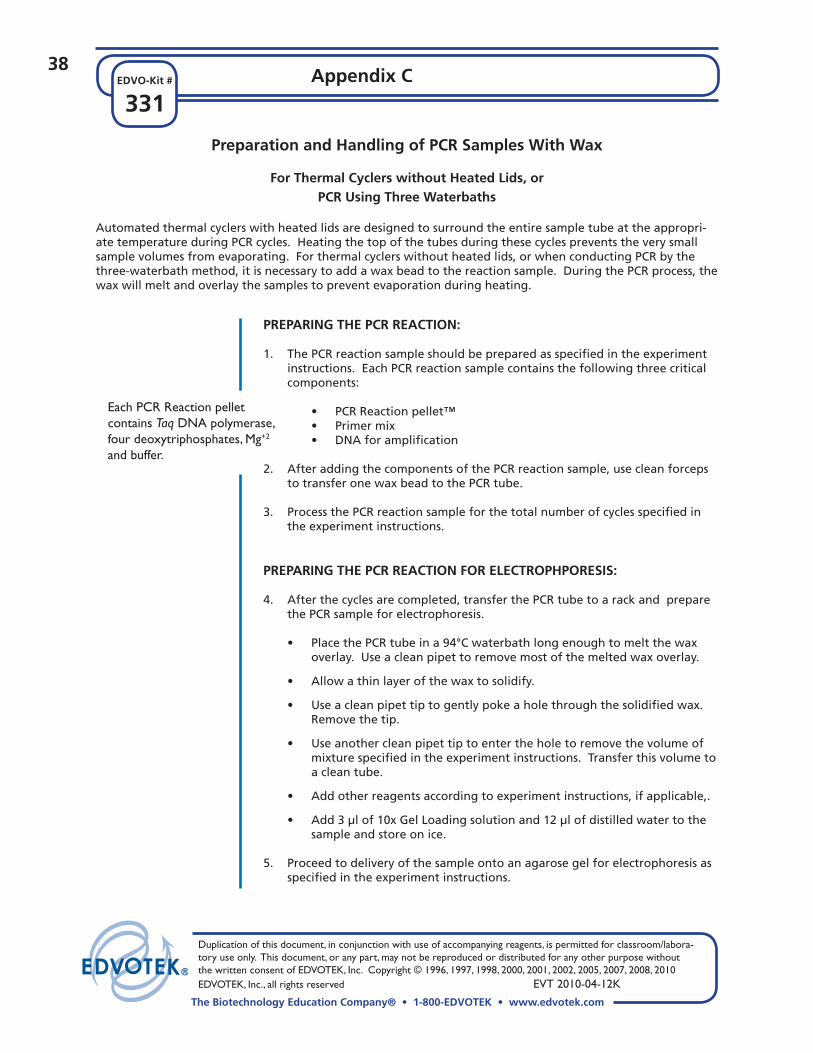
preparation and handling of pCr Samples With Wax
For Thermal Cyclers without heated lids, or pCr Using Three Waterbaths
Automated thermal cyclers with heated lids are designed to surround the entire sample tube at the appropri-ate temperature during PCR cycles. Heating the top of the tubes during these cycles prevents the very small samplevolumesfromevaporating.Forthermalcyclerswithoutheatedlids,orwhenconductingPCRbythethree-waterbathmethod,itisnecessarytoaddawaxbeadtothereactionsample.DuringthePCRprocess,thewax will melt and overlay the samples to prevent evaporation during heating.
PREPARinG ThE PCR REACTiOn:
1. The PCR reaction sample should be prepared as specified in the experiment instructions. Each PCR reaction sample contains the following three critical components:
• PCRReactionpellet™ • Primermix • DNAforamplification
2. AfteraddingthecomponentsofthePCRreactionsample,usecleanforcepsto transfer one wax bead to the PCR tube.
3. Process the PCR reaction sample for the total number of cycles specified in the experiment instructions.
PREPARinG ThE PCR REACTiOn fOR ELECTROPhPORESiS:
4. Afterthecyclesarecompleted,transferthePCRtubetoarackandpreparethe PCR sample for electrophoresis.
• PlacethePCRtubeina94°Cwaterbathlongenoughtomeltthewaxoverlay. Use a clean pipet to remove most of the melted wax overlay.
• Allowathinlayerofthewaxtosolidify.
• Useacleanpipettiptogentlypokeaholethroughthesolidifiedwax.Remove the tip.
• Useanothercleanpipettiptoentertheholetoremovethevolumeofmixture specified in the experiment instructions. Transfer this volume to a clean tube.
• Addotherreagentsaccordingtoexperimentinstructions,ifapplicable,.
• Add3µlof10xGelLoadingsolutionand12µlofdistilledwatertothesample and store on ice.
5. Proceed to delivery of the sample onto an agarose gel for electrophoresis as specified in the experiment instructions.
Appendix C
Each PCR Reaction pellet contains Taq DNA polymerase, four deoxytriphosphates, Mg+2
and buffer.
The Biotechnology Education Company® • 1-800-EDVOTEK • www.edvotek.com
Duplication of this document, in conjunction with use of accompanying reagents, is permitted for classroom/labora-tory use only. This document, or any part, may not be reproduced or distributed for any other purpose without the written consent of EDVOTEK, Inc. Copyright © 1996, 1997, 1998, 2000, 2001, 2002, 2005, 2007, 2008, 2010 EDVOTEK, Inc., all rights reserved EVT 2010-04-12K
39
331EDVO-Kit #
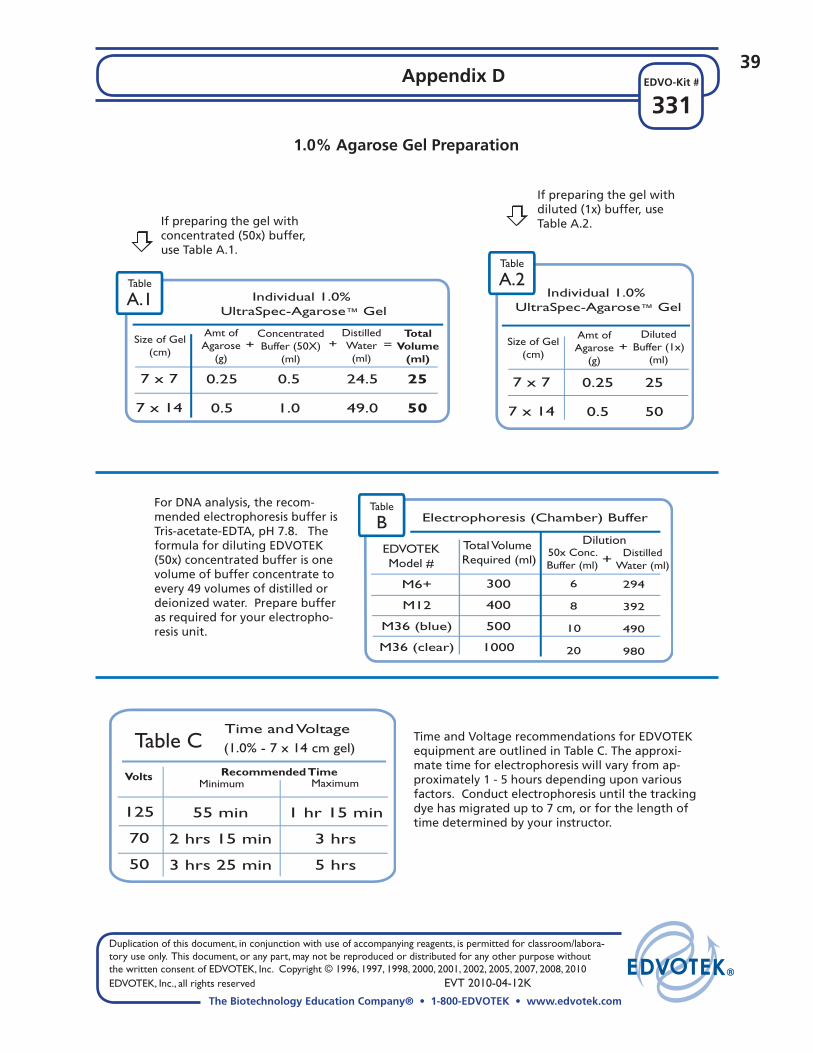
ForDNAanalysis,therecom-mended electrophoresis buffer is Tris-acetate-EDTA,pH7.8.TheformulafordilutingEDVOTEK(50x) concentrated buffer is one volume of buffer concentrate to every 49 volumes of distilled or deionized water. Prepare buffer as required for your electropho-resis unit.
If preparing the gel with concentrated(50x)buffer,use Table A.1.
1.0% Agarose Gel preparation
If preparing the gel with diluted(1x)buffer,useTable A.2.
TimeandVoltagerecommendationsforEDVOTEKequipment are outlined in Table C. The approxi-mate time for electrophoresis will vary from ap-proximately 1 - 5 hours depending upon various factors. Conduct electrophoresis until the tracking dyehasmigratedupto7cm,orforthelengthoftime determined by your instructor.
50x Conc.Buffer (ml)
DistilledWater (ml)
6
8
10
20
294
392
490
980
+EDVOTEKModel #
Total Volume Required (ml)
Electrophoresis (Chamber) Buffer
M6+
M12
M36 (blue)
M36 (clear)
300
400
500
1000
Dilution
Table
B
Appendix D
Amt ofAgarose
(g)
ConcentratedBuffer (50X)
(ml)
Size of Gel(cm)
7 x 7
7 x 14
0.25
0.5
0.5
1.0
+
Table
A.1 Individual 1.0% UltraSpec-Agarose™ Gel
DistilledWater(ml)
TotalVolume
(ml)
24.5
49.0
25
50
=+Amt ofAgarose
(g)
DilutedBuffer (1x)
(ml)
Size of Gel(cm)
7 x 7
7 x 14
0.25
0.5
25
50
+
Individual 1.0% UltraSpec-Agarose™ Gel
Table
A.2
Table C Time and Voltage
Recommended Time Minimum Maximum
Volts
125
70
50
55 min
2 hrs 15 min
3 hrs 25 min
1 hr 15 min
3 hrs
5 hrs
(1.0% - 7 x 14 cm gel)
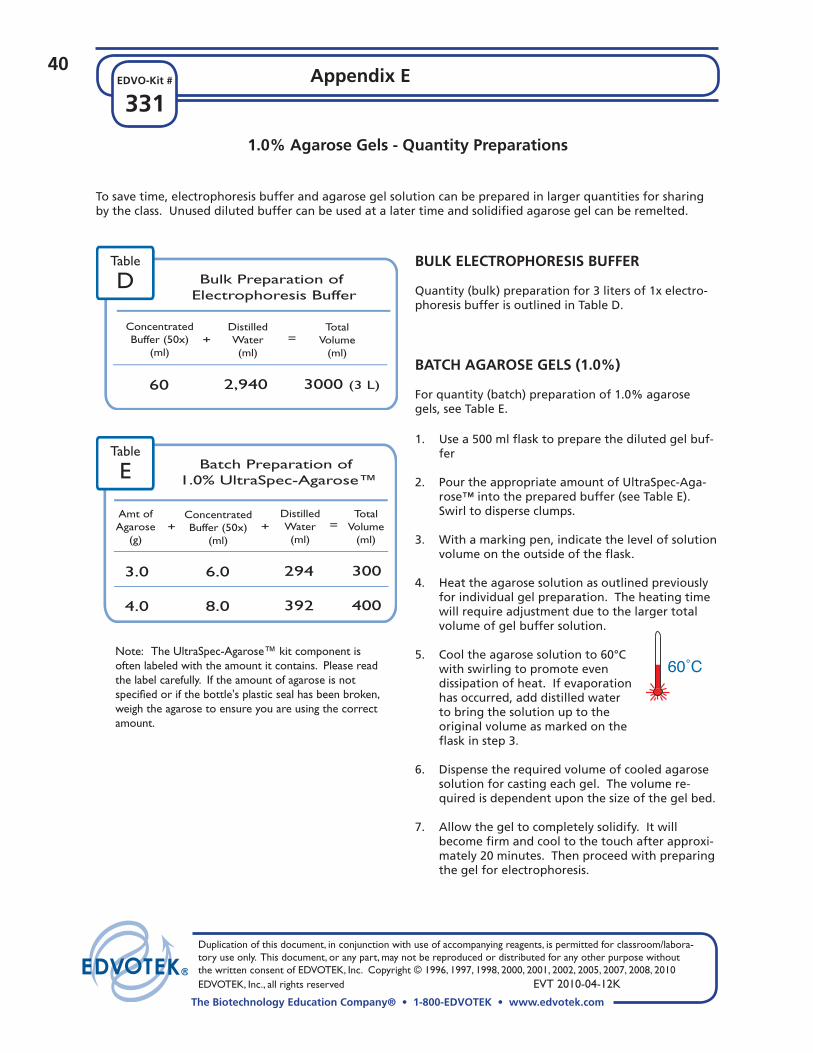
Duplication of this document, in conjunction with use of accompanying reagents, is permitted for classroom/labora-tory use only. This document, or any part, may not be reproduced or distributed for any other purpose without the written consent of EDVOTEK, Inc. Copyright © 1996, 1997, 1998, 2000, 2001, 2002, 2005, 2007, 2008, 2010 EDVOTEK, Inc., all rights reserved EVT 2010-04-12K
40
The Biotechnology Education Company® • 1-800-EDVOTEK • www.edvotek.com
331EDVO-Kit #
Tosavetime,electrophoresisbufferandagarosegelsolutioncanbepreparedinlargerquantitiesforsharingby the class. Unused diluted buffer can be used at a later time and solidified agarose gel can be remelted.
1.0% Agarose Gels - Quantity preparations
BuLk ELECTROPhORESiS BuffER
Quantity (bulk) preparation for 3 liters of 1x electro-phoresis buffer is outlined in Table D.
BATCh AGArOSE GElS (1.0%)
For quantity (batch) preparation of 1.0% agarose gels,seeTableE.
1. Usea500mlflasktopreparethedilutedgelbuf-fer
2. Pour the appropriate amount of UltraSpec-Aga-rose™ into the prepared buffer (see Table E). Swirl to disperse clumps.
3. Withamarkingpen,indicatethelevelofsolutionvolumeontheoutsideoftheflask.
4. Heat the agarose solution as outlined previously for individual gel preparation. The heating time will require adjustment due to the larger total volume of gel buffer solution.
5. Cool the agarose solution to 60°C with swirling to promote even dissipation of heat. If evaporation hasoccurred,adddistilledwaterto bring the solution up to the original volume as marked on the flaskinstep3.
6. Dispense the required volume of cooled agarose solution for casting each gel. The volume re-quired is dependent upon the size of the gel bed.
7. Allow the gel to completely solidify. It will become firm and cool to the touch after approxi-mately 20 minutes. Then proceed with preparing the gel for electrophoresis.
60˚CNote: The UltraSpec-Agarose™ kit component is often labeled with the amount it contains. Please read the label carefully. If the amount of agarose is not specified or if the bottle's plastic seal has been broken, weigh the agarose to ensure you are using the correct amount.
Appendix E
Table
D
ConcentratedBuffer (50x)
(ml)
DistilledWater(ml)
TotalVolume
(ml)
60 2,940 3000 (3 L)
=+
Bulk Preparation of Electrophoresis Buffer
Table
E
Amt ofAgarose
(g)
ConcentratedBuffer (50x)
(ml)
DistilledWater(ml)
TotalVolume
(ml)
3.0
4.0
6.0
8.0
294
392
300
400
+ =+
Batch Preparation of 1.0% UltraSpec-Agarose™
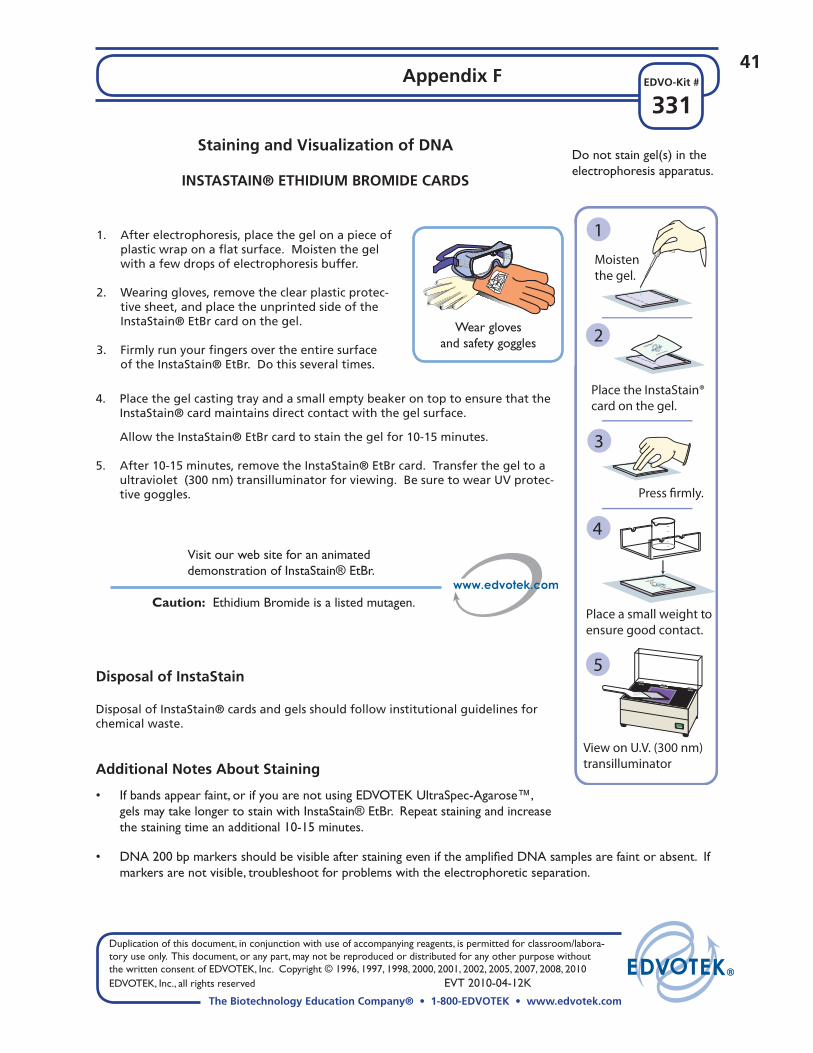
The Biotechnology Education Company® • 1-800-EDVOTEK • www.edvotek.com
Duplication of this document, in conjunction with use of accompanying reagents, is permitted for classroom/labora-tory use only. This document, or any part, may not be reproduced or distributed for any other purpose without the written consent of EDVOTEK, Inc. Copyright © 1996, 1997, 1998, 2000, 2001, 2002, 2005, 2007, 2008, 2010 EDVOTEK, Inc., all rights reserved EVT 2010-04-12K
41
331EDVO-Kit #
1
2
3
4
5
Press firmly.
Moistenthe gel.
Place the InstaStain®card on the gel.
Place a small weight toensure good contact.
View on U.V. (300 nm) transilluminator
InstaStain™
Patents Pending
Patents Pending
InstaStain™
-----
Wear gloves and safety goggles
Do not stain gel(s) in the electrophoresis apparatus.
1. Afterelectrophoresis,placethegelonapieceofplasticwraponaflatsurface.Moistenthegelwith a few drops of electrophoresis buffer.
2. Wearinggloves,removetheclearplasticprotec-tivesheet,andplacetheunprintedsideoftheInstaStain® EtBr card on the gel.
3. Firmly run your fingers over the entire surface of the InstaStain® EtBr. Do this several times.
Visit our web site for an animated demonstration of InstaStain® EtBr.
Disposal of instaStain
Disposal of InstaStain® cards and gels should follow institutional guidelines for chemical waste.
Additional notes About Staining
• If bands appear faint, or if you are not using EDVOTEK UltraSpec-Agarose™, gels may take longer to stain with InstaStain® EtBr. Repeat staining and increase the staining time an additional 10-15 minutes.
Caution: Ethidium Bromide is a listed mutagen.
Staining and visualization of DnA
inSTASTAin® EThiDium BROmiDE CARDS
• DNA 200 bp markers should be visible after staining even if the amplified DNA samples are faint or absent. If markers are not visible, troubleshoot for problems with the electrophoretic separation.
4. Place the gel casting tray and a small empty beaker on top to ensure that the InstaStain® card maintains direct contact with the gel surface.
Allow the InstaStain® EtBr card to stain the gel for 10-15 minutes.
5. After10-15minutes,removetheInstaStain®EtBrcard.Transferthegeltoaultraviolet (300 nm) transilluminator for viewing. Be sure to wear UV protec-tive goggles.
Appendix f
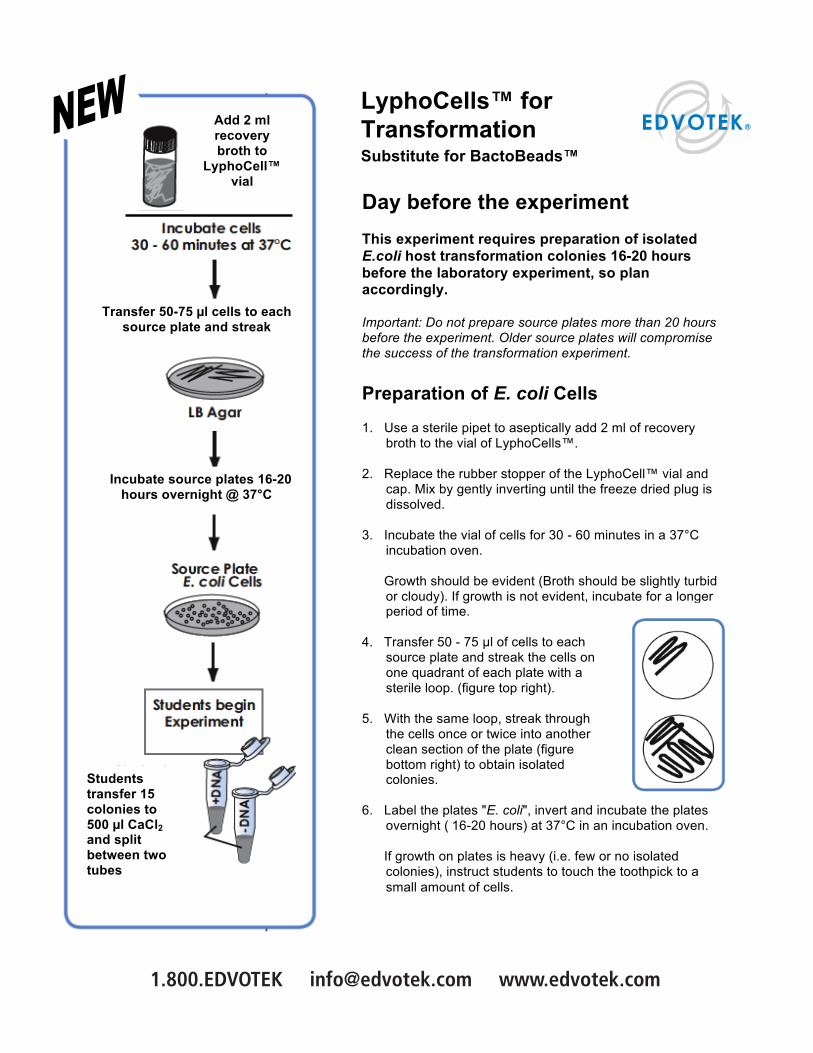
LyphoCells™ for TransformationSubstitute for BactoBeads™
Day before the experiment This experiment requires preparation of isolated E.coli host transformation colonies 16-20 hours before the laboratory experiment, so plan accordingly. Important: Do not prepare source plates more than 20 hours before the experiment. Older source plates will compromise the success of the transformation experiment. Preparation of E. coli Cells 1. Use a sterile pipet to aseptically add 2 ml of recovery
broth to the vial of LyphoCells™. 2. Replace the rubber stopper of the LyphoCell™ vial and
and
cap. Mix by gently inverting until the freeze dried plug is dissolved.
3. Incubate the vial of cells for 30 - 60 minutes in a 37°C
incubation oven. Growth should be evident (Broth should be slightly turbid
or cloudy). If growth is not evident, incubate for a longer period of time.
4. Transfer 50 - 75 l of cells to each
source plate and streak the cells on one quadrant of each plate with a sterile loop. (figure top right).
5. With the same loop, streak through
the cells once or twice into another clean section of the plate (figure bottom right) to obtain isolated colonies.
6. Label the plates "E. coli", invert and incubate the plates
overnight ( 16-20 hours) at 37°C in an incubation oven. If growth on plates is heavy (i.e. few or no isolated
colonies), instruct students to touch the toothpick to a small amount of cells.
2 ml
Transfer 50-75 l cells to each source plate and streak
Add 2 ml recovery broth to
LyphoCell™ vial
Incubate source plates 16-20 hours overnight @ 37°C
Students transfer 15 colonies to 500 l CaCl2 and split between two tubes
1.800.EDVOTEK [email protected] www.edvotek.com