Embed Size (px)
Citation preview
The CW Machine
© 2016 Ulrich H. Steinberg
Contents Introduction ...........................................................................................................4 Morse Timing and Speed......................................................................................5 The CW Machine Hardware Configurations..........................................................6 Where is the Power Switch? .................................................................................7 Serial Communication...........................................................................................7 Loading the Firmware ...........................................................................................8 Using the CW Machine with Logging Programs....................................................9 The Menu System...............................................................................................10 Adjusting the LCD Contrast ................................................................................11 Getting Started....................................................................................................12 Configuration Settings Using the Menu System..................................................13
Setting the Call, Operator, Name, and QTH [ . , *, Enter, +] ............................13 Setting the Serial Communication Speed / COMKEY Mode ...........................13 Adjusting the Time...........................................................................................14 Adjusting the Date ...........................................................................................15 Setting the Keying Mode .................................................................................15 Displaying and Decoding the Keyer Output.....................................................16 Enabling/Disabling the Dash/Dot Memory (-/. MEM) .......................................17 Adjusting the Morse Speed Range..................................................................18 Switching the Log Search On or Off (SEARCH)..............................................18 Switching Automatic Logging On or Off (A-LOG) ............................................19
Understanding the Parser............................................................................19 Switching the Tone On or Off (TONE).............................................................21 Changing Volume and Pitch of the Sidetone (SOUND)...................................21 Toggling Automatic Character Spacing (AUTOCS).........................................22 Toggling Automatic Word Spacing (AUTOWS) ...............................................22 T/R Compensation and Weighting (COMP) ....................................................22 The Contest Option (CONTST) .......................................................................23 Serial Numbers................................................................................................24 Loading the Users File ....................................................................................24 Exporting your Log to the PC ..........................................................................25 Importing Log Data from the PC......................................................................25 Displaying and Resetting the Record Count....................................................26
Settings using the Pseudo Prosign <dm> or Esc...............................................27 Selecting the Band ..........................................................................................27 Toggling the Paddle Orientation......................................................................27 Selecting CW or SSB Mode ............................................................................27 Toggling Hand-Keying and Automatic Keying .................................................28 Toggling Keying Always On ............................................................................28 Activating Key-Down or Pulse Tuning .............................................................28 Selecting the Operational Mode Display .........................................................28 Scrolling, Deleting, and Undeleting QSOs.......................................................29 Starting Message 0 .........................................................................................30 Clearing the QSO Buffer and Enabling Keying................................................30
The CW Machine V. 4.2 1
Toggling Keying (“On the Air”) Status..............................................................30 Resetting the Keyer ............................................................................................31 The Log...............................................................................................................32
The Internal Log Records................................................................................32 Entering CALL, NAME, QTH, COMMENT and QSL_VIA................................33 Characters With Special Behavior...................................................................34 Duplicate QSOs...............................................................................................35 Checking or Editing a QSO: The <do> Pseudo Prosign and Scroll Key..........36 About Deleted QSOs.......................................................................................37
The Users File.....................................................................................................38 National Language Characters........................................................................40 Prosigns and Commands in Messages ...........................................................41
- = ...........................................................................................................41 - > ...........................................................................................................41 - + ...........................................................................................................41 - ( ............................................................................................................41 - & ...........................................................................................................41 - % ..........................................................................................................41 - ^............................................................................................................41 - # ...........................................................................................................41 - \+ ..........................................................................................................42 - \_ ..........................................................................................................42 - \# ..........................................................................................................42 - \A ..........................................................................................................42 - \B ..........................................................................................................42 - \C..........................................................................................................43 - \D..........................................................................................................43 - \E ..........................................................................................................43 - \Gn........................................................................................................43 - \Hn........................................................................................................43 - \I ...........................................................................................................43 - \Jn.........................................................................................................44 - \Knnn ....................................................................................................44 - \L ..........................................................................................................44 - \M .........................................................................................................44 - \N..........................................................................................................44 - \O..........................................................................................................44 - \P[s] ......................................................................................................44 - \Q[s][%].................................................................................................45 - \R[nnn] ..................................................................................................45 - \S ..........................................................................................................45 - \T ..........................................................................................................45 - \U..........................................................................................................45 - \Wnnn ...................................................................................................45 - \X ..........................................................................................................46 - \Y[s][%|&|^|~] ........................................................................................46
The CW Machine V. 4.2 2
- \Z ..........................................................................................................46 Keypad and Keyboard Functions........................................................................47
Switching the Keying Function On or Off [ NumLock ]....................................48 Entering the Name or Other Information [ + ] and [*][+] ..................................48 Entering the Sent Signal Report for SSB [ NumLock ]....................................50 Toggling the User [ / ] ......................................................................................50 Entering the Received (Serial) Number [ / ] ....................................................50 Entering the Received Signal Report [ * ] and more .......................................51 Entering Command Mode and Changing the Band [ * ]...................................52 Starting or Queuing a Message [ 0 … 9 ] .......................................................52 Interrupting and Resuming a Message [ . ].....................................................52 Sending Your Own Station Call [ . ] ................................................................53 Starting the 10 Minute Id Timer [ . ] ................................................................53 Cancelling Messages and Clearing the Log [ -, ESC, NumLock]....................53 Entering and Checking the Call of the Other Station [ Enter ] .........................54 Toggling Automatic Word Space Insertion [Backspace]..................................55 Those Multi-Function Keypad Keys … ............................................................55 Embedding of Messages.................................................................................56
On the Air............................................................................................................58 Non-Contest Usage.........................................................................................58
QSO with You Calling CQ............................................................................58 QSO with You Responding to a CQ.............................................................60 Jumping into a Pile-Up.................................................................................61
Contest Usage.................................................................................................63 You Sit on a Frequency ...............................................................................63 You Hunt......................................................................................................64 Non-Numeric Contest Exchanges................................................................66
Appendix A: Error Codes ....................................................................................67 Appendix B: The Export / Import File Format......................................................68 Appendix C: The Menu Structure........................................................................70
The CW Machine V. 4.2 3
Introduction The CW Machine is firmware designed exclusively for the CW Machine Hardware platform. It combines the functions of a full featured CW memory keyer and a QSO logger with scanning for duplicate QSOs. Some features of this keyer are:
Calibrated speed range from 5wpm to 75wpm Iambic A / B and Ultimatic modes, emulation of a mechanical bug, straight
key support Comfortable keyboard keyer functions using a PS/2 keyboard More than 12,600 bytes of memory for 30 standard messages without a
limitation on the length of an individual message. Special commands in messages to control message repetition, local
speed-up, insertion of names and calls, insertion of serial numbers, programmed breaks with resume, and more
Memory for 12,000 QSOs with automatic detection of a previous QSO. Automatic serial numbering up to 999,999 Real time clock / calendar function Pulse or key-down tuning function Special commands for beacon and measurement purposes Logging of SSB QSOs using a keyboard or a key for data entry 10 minute id timer for SSB
All settings, messages, and the log are kept in non-volatile memory and will be retained even if power, including the backup battery, is completely removed. The selection of various features and functions is accomplished in an intuitive way with a joystick and through messages and values displayed on the LCD display of the CW Machine Hardware. An even simpler interface is provided by the CW Machine Manager program for Windows which come with the device. CW characters can be created using a PS/2 keyboard or a dual lever paddle or a straight key. A dual lever paddle can use iambic modes A or B or Ultimatic mode, or it can simulate a mechanical bug with manual creation of dashes. A numeric keypad or a standard 101-key PC keyboard is required for many functions. Also, a PC with a serial interface is required to load various settings and to convert the log to ADIF or another readable format. (The CW Machine Manager has conversion options for ADIF or a QSO list.) The features of the keyer are designed to allow operation in various hardware configurations with or without a paddle, numeric keypad, or keyboard, as explained below.
The CW Machine V. 4.2 4
Morse Timing and Speed The CW Machine uses the speed potentiometer of the CW Machine Hardware to adjust the speed. It has no provisions to alter the timing characteristics of Morse signals, except to compensate for keying deficiencies of your transmitter, and, quite intentionally, it uses the purist’s definition of Morse code when sending predefined messages. Morse code consists of short and long elements separated by an elementary space. Elements and elementary spaces are strung together to form characters separated by character spaces. Characters and character spaces are strung together to form words separated by word spaces. There is a precise definition of the timing relationships between all of these, and only signals that conform to these timing specifications are truly Morse code – everything else that deviates from these specifications may sound like Morse, but it really isn’t from a purist’s point of view. For training purposes some of these timing relationships are often adjusted, but at the end of the day you should strive to come as close as possible to the theoretical ideal, and the often heard argument that some other timing characteristics “sound better” is just a euphemism for sending a signal that “kinda sounds like Morse” when it really isn’t. The time is measured in an elementary unit that we will call tick here (this is not a standard term). So this is the precise definition of Morse code:
A dot is a sound of one tick in duration, followed by a silence of one tick. A dash is a sound of three ticks in duration, followed by a silence of one
tick A character space is an additional silence of two ticks after the preceding
dash or dot. Since the dash or dot already ends with one tick of silence, as defined above, the silence between the sounds of two successive characters has a duration of three ticks.
A word space is an additional silence of four ticks in duration after the preceding character. Since a character already ends with three ticks of silence, as defined above, the silence between the sounds of two successive words has a duration of seven ticks.
Morse speed is often measured in words per minute (wpm). The accepted standard is that a “word” has a length of 50 ticks, including the trailing word space. If you add the duration of the letters, the character spaces, and the trailing word space as defined above, you will see that the word PARIS takes 50 ticks, and it is often used as the “standard” word for calibration purposes. The speed potentiometer on the CW Machine Hardware is used to adjust the speed, and it is calculated and displayed many times per second using various settings of the CW Machine as input.
The CW Machine V. 4.2 5
The CW Machine Hardware Configurations The CW Machine is designed to be operated in several configurations that let you choose the amount of “baggage” that you want to attach to the CW Machine Hardware. Please refer to the documentation of the CW Machine Hardware for a detailed description of the hardware and the various connectors that are used to attach keyboards / keypads, paddles, transmitters, PCs, and other devices to it. When we refer to the “CW Machine” here, we are talking about the features and functions of the firmware that runs on the CW Machine Hardware. You can operate with just a paddle or straight key attached to the CW
Machine Hardware. In this case the CW Machine is just a regular keyer, and you cannot invoke the messages stored in memory. In an extreme case you could even operate without a key because the joystick acts like a paddle, although by moving it up/down rather than sideways – this obviously is not suitable for QRQ operation.
You should attach the numeric keypad that comes with the device. This gives you the full functionality in a compact configuration. All text that has to be entered, e.g., the call of the other station or the name of the other operator, has to be entered with the paddle or straight key. There is a “silent mode” switch that lets you turn off the keyer output while you are entering text that should not go out on the air. (In SSB mode the keying function is always off, and you can use a paddle to enter information without explicitly switching to “silent mode”.)
You can attach a PS/2 keyboard with a numeric keypad instead of just the numeric keypad. In this case you don’t need a paddle. The CW Machine will work as a comfortable keyboard keyer with a 100-character type-ahead buffer and sophisticated message chaining functions. You can, of course, attach a paddle at the same time and use just part of the functionality provided by the keyboard.
You can attach the CW Machine Hardware with a serial cable to a Windows PC running our CW Machine Manager program. It provides keyboard keyer functionality that is similar to a directly attached keyboard, it also lets you perform all the configuration and adjustment functions from a convenient graphical interface, and it gives you a running display of your transmission and the status of the CW Machine.
The CW Machine V. 4.2 6
Where is the Power Switch? That’s an easy one: The CW Machine device does not have a dedicated power switch. It is usually powered by an external power supply that can deliver 150mA or more at 9-15V DC, or through a pin on the serial port as described in the hardware documentation. It also has a CR2450 lithium knob cell which can be used to keep the clock running for a few days in case of a power outage. You can also invoke all menu functions and even communicate via the serial port with only that knob cell. All other keyer functions, however, will not work when it is powered only by the knob cell. In normal operation the CW Machine draws less than 20mA. The lowest current drain is achieved when you push the Reset button and the LCD screen goes blank; in this state the current drain, although not zero, is below 10mA. When you first connect a power supply or a battery, the LCD display will be blank. You start the firmware application by touching the left side of your paddle (or by moving the joystick up).
Serial Communication If your PC does not have a serial port, you can use a high-quality USB-serial adapter. It should be mapped to COM1 … COM4. Many inexpensive adapters have proven problematic, and the only types that have worked consistently at full speed without problems are the adapter that we are offering and adapters made by Keyspan, e.g. the Keyspan USA-19HS. The serial connector on the CW Machine Hardware is used for two purposes:
It lets you load firmware into the keyer. This is typically done using the boot loader that comes with the AVR Butterfly board and the AVRprog program for Windows. (similar programs are available for other PC operating systems) This function automatically adjusts the settings of the serial port and the settings described below are not relevant for it.
It lets the CW Machine exchange data with programs running on a PC. A
typical example is the log file that you can download into a PC. All of our firmware programs will support communication with a terminal program on a PC, although more convenient Windows programs are available to complement the functions of a particular firmware. A typical example is our CW Machine Manager program, which simplifies and extends the operation of the CW Machine if you are running a Windows PC; if you are using it the communications settings automatically established.
The CW Machine V. 4.2 7
If you are using a terminal program, however, it has to understand XON/XOFF flow control, and it has to support one of the communication speeds that you can select in the firmware. The speed is normally set to 38,400 baud. You have to set the communication parameters in your terminal program as follows:
8 data bits, no parity, 1 stop bit XON/XOFF flow control Uncheck (disable) these options in the ASCII Sending section:
o Send line ends with line feeds o Echo characters locally
Set the line delay and the character delay both to 0 milliseconds Make sure to set the ASCII Receiving parameters to:
o Enable Append line feeds to incoming line ends (check the box) o Disable Force incoming 7-bit ASCII (uncheck the box) o Enable Wrap lines that exceed terminal width (check the box)
Loading the Firmware The CW Machine Hardware comes loaded with the firmware for the CW Machine keyer. So, normally you won’t have to do anything to start using the CW Machine. If you have loaded some other firmware into the CW Machine Hardware, however, you will have to reload the CW Machine firmware. It is contained in a file called KeyLargo.hex, and the procedure to load it is described in the documentation for the CW Machine Hardware. The communication settings described above are not relevant for this process. However, the port has to be COM1 … COM4. The AVRprog program that is used to update the firmware will not work with ports above COM4. When you first connect a power supply or a battery, the LCD display will be blank. To start the firmware application, touch the left side of your paddle (or move the joystick up). If you have wired your key in reverse to “standard” practices, you have to touch the right paddle to turn the CW Machine on.
The CW Machine V. 4.2 8
Using the CW Machine with Logging Programs Although the logging functions of the CW Machine are quite powerful and do not require a computer connection, you may want to use your favorite logging program to provide statistics or label printing. Normally this is done by uploading the log from the CW Machine into the logging program every now and then. However, the CW Machine is also able to function as a keying device that leaves specialized functions to another computer program. This is possible if your logging program can send ASCII characters to the serial port that the CW Machine is connected to, and the communication parameters are set 1200,8,2,N. You have to select the COMKEY mode of the CW Machine as described further down. In this mode the CW Machine acts as a keying device with a 100-character type-ahead buffer that translates characters that come in on the serial link into Morse code. In COMKEY mode all of the paddle and keypad / keyboard functions described in this document are still available.
The CW Machine V. 4.2 9
The Menu System You navigate the menus of the CW Machine by moving the joystick in one of five directions, left, right, away from you (called up), towards you (called down), or pressing it down like a button (called push). The CW Machine has two basic modes called adjustment mode and operational mode. In adjustment mode you make the various settings that establish the operational characteristics of the keyer, but you cannot create Morse signals. In operational mode you can create Morse signals and display certain information, but you cannot change settings except for the LCD contrast. When it is first switched on, or after a reset, the keyer starts in operational mode as an iambic Mode B keyer – so you could start using it right away. But you should probably switch to adjustment mode to familiarize yourself with the many features and functions before using it. However, if you use the CW Machine Manager program, all of these functions are available through a graphical interface and you don’t have to use the joystick menu. The menu system of the keyer is organized into several rows and columns. Items in one row form a group of related functions – e.g. there is a row that contains all the items related to managing the memory contents of the keyer. One of the rows, the one that displays time, date, speed, etc., will be referred to as the Home row in this documentation. The last item that you select in the Home row will be remembered, and when you return from another row back to the Home row, that item will be displayed. One of the columns, the one that shows Option, Memory, etc., is referred to as the Home column in this documentation. The menu choices in operational mode form a single row, which is similar to the Home row of adjustment mode. In operational mode the up and down joystick movements act like a Morse paddle. Moving the joystick up is equivalent to pressing the left paddle of a key, and moving the joystick down is equivalent to pressing the right paddle of a key – so, if you rotate the keyer by 90 degrees you could use the joystick as a paddle in an emergency situation. In operational mode you can switch to adjustment mode by pushing the joystick down for more than 0.25 seconds until you hear a beep. Operational mode is indicated by a down-arrow in the fifth position of the display – so you should push the joystick and see the arrow disappear.
The CW Machine V. 4.2 10

You can switch back from adjustment mode to operational mode in several ways:
Push the joystick down on any display in the Home column that is not in the Home row. (i.e. Option, or Memory)
Press the left paddle of your key for about 0.5 seconds Move the joystick up and hold it for about 0.5 seconds
You’ll find a pictorial description of the whole menu system in the Appendix C. If you are using the CW Machine Manager program, all of the adjustment functions that are described in the following chapters are conveniently handled from Windows screens.
Adjusting the LCD Contrast The LCD contrast is set to the maximum after a device reset or when the CW Machine is started for the first time. If you are viewing the display from an oblique angle, it may be clearer if you adjust the contrast to a lower value. In operational mode, pushing in the joystick (like a button) briefly for less than 0.25 seconds cycles through the 16 possible settings for the LCD contrast with each push. (If you push for too long, the keyer will beep and enter adjustment mode, as described above.) The new contrast value is persistent – pushing the hardware Reset button or removing the power supply will not change the last contrast setting. A reset of the firmware, however, as explained in “Resetting the Keyer”, will restore the LCD contrast to the maximum value.
The CW Machine V. 4.2 11
Getting Started When it is first switched on, the keyer starts with a scrolling version display. If you move the joystick or tap your paddle it switches to operational mode showing the time. (If you push the joystick down for more than 0.5 sec while the version is being displayed it will perform a reset to recover from a corrupted EEPROM.) Operational mode is indicated by a down-arrow in the fifth character position of the display. You’ll also see an up-arrow in the second character position, which indicates that the keying function for your transmitter is enabled. You should hook up a numeric keypad or a keyboard and verify that it works by pressing the NumLock key a couple of times: you should see the up-arrow in position 2 of the display go on and off, indicating that keying your transmitter is enabled or disabled. (The other keys on the keypad are meaningless at this stage – if you pressed them and ended up with a blank display, press the Enter key) It usually is not a good idea to “hot plug” the keyboard or keypad – so remove the power before plugging it in. If the keypad does not respond, move the joystick to reset it. Toggle the keying function off by pressing the NumLock – the up-arrow in the second position of the display should disappear. Move and hold the joystick up, and you should hear a string of dots from the speaker, move and hold the joystick down, and you should hear a string of dashes. At this early stage of experimentation it is probably not a good idea to connect a live transmitter or transceiver :-). Move the joystick left, and you should see the date display. Move it left again, and you’ll see either an empty screen or some decoded Morse characters that you created with the joystick. .Move it left again, and you should see the speed in wpm displayed. Move it left again, and you’ll see the number of log records, or, in contest mode, the contest serial number. Move it left one more time, and you should be back to the time display. You could have gone through the same displays in reverse order by moving the joystick right. You see this depicted on page of the Menu Structure at the end of this document. In operational mode you have a choice of various display options, some of which we just cycled through, but you cannot change a setting. The keyer will remember your last display selection for operational mode and return to it if you switch power off and back on. If you are using the keyer a lot for keying practice, you probably want the decoder screen in sight most of the time. If you have already hooked up a paddle, see that it produces dots and dashes. Depending on how you wired it, it may be reversed from what you expected – but you can correct that as described above. After this first excursion let’s get serious and adjust a few things. So, navigate to the time display, push the joystick down briefly to make the down-arrow in position five of the LCD disappear, and you are in adjustment mode.
The CW Machine V. 4.2 12
Configuration Settings Using the Menu System
Setting the Call, Operator, Name, and QTH [ . , *, Enter, +] Letting the keyer know your own station call is important for many functions, and it is one of the first things that you should do. The station call, operator call, name, and QTH for both users are normally established by parameters in a Users file, as described further down, or by loading a profile from the CW Machine Manager program. However, there is a way to program this information for both users that does not require a computer connection. To enter or change the station call, select the corresponding user with the ‘/’ key on the keypad (you’ll see a small 1 or 2 alternating in the LCD display, indicating the current user), send the new call sign with your paddle or the keyboard, enter adjustment mode by pushing the joystick down (the down arrow in the LCD display disappears), then press the ‘.’ (decimal point) on the keypad. The keyer will respond with a beep and return to operational mode. To enter or change your operator call, follow the same procedure, except that you press the * (asterisk) key on the keypad instead of the decimal point key. To enter or change your name, follow the same procedure, except that you press the Enter key on the keypad instead of the decimal point key. To enter or change your QTH, follow the same procedure, except that you press the ‘+’ (plus) key on the keypad instead of the decimal point key. The station call, operator call, name, and QTH are limited to 20 characters each. .A space in your name or QTH must be entered as a ‘_’ (underscore, ..--.-).
Setting the Serial Communication Speed / COMKEY Mode Initially the speed of the serial port is set to 38,400 baud, which can be sustained by most modern PC’s. However, if you experience a loss of data or corrupted data in serial communication, you should try a slower speed. If you are using a terminal program it has to be adjusted to the same speed. Our CW Machine Manager program will detect the speed automatically. One of the speed selections is COMKEY. COMKEY mode is for situations where you want to use a logging program or keyboard keyer program that is able to send text to the serial port of the CW Machine. The CW Machine acts as a keying device with a 100-character type-ahead buffer that translates
The CW Machine V. 4.2 13
characters that come in on the serial link into Morse code. In this mode the CW Machine Manager for Windows will not be able to connect to the device! COMKEY mode operates at a speed of 1200 baud, using 8 bits, no parity, and two stop bits. Move the joystick up or down until you see the OPTION row. Move the joystick left until you see 38.4 K (or 19.2 K, or 9.6 K, or 4.8 K, or COMKEY). Move the joystick up or down or use your paddle to select the communication speed.
Adjusting the Time You can set the time with either your paddle or the directly attached keypad. To use the keypad, make sure that you see the time displayed, then press the joystick until you hear a beep to get into adjustment mode. Enter the time in HHMM 24-hour format (hours/minutes with two digits, seconds cannot be entered) with your keypad. Press the joystick again to return to operational mode. To use your paddle or key, make sure you are in operational mode and see the time displayed. Send the time in HHMM format (hours/minutes with two digits, seconds cannot be entered). Since this is a 24-hour clock, normally showing UTC, you can send a valid time from 0000 to 2359. Press the joystick until you hear a beep to get into adjustment mode. Press the joystick again to return to operational mode. The time that you have entered with your key is now set and will continue counting up, and you are put back into operational mode. If the time that you have entered was incorrect your attempted entry is ignored. Make sure that you send the HHMM string without intervening spaces.
The CW Machine V. 4.2 14
Adjusting the Date You can set the date with either your paddle or the directly attached keypad. To use the keypad, make sure that you see the date displayed, then press the joystick until you hear a beep to get into adjustment mode. Enter the date in DDMMYY format (day/month/year with two digits) with your keypad. Press the joystick again to return to operational mode. To use your paddle or key, make sure you are in operational mode and see the date displayed. With your paddle or key send the date in DDMMYY format (day/month/year with two digits); June 26, 2015, e.g., would be entered as 260615. Press the joystick until you hear a beep to get into adjustment mode. Press the joystick again. The date that you have entered with you key is now set and you are put back into operational mode. If the date that you have entered was incorrect your attempted entry is ignored. Make sure that you send the DDMMYY string without intervening spaces.
Setting the Keying Mode Move the joystick up or down until you see the OPTION row. Move the joystick right or left until you see IAM B1 (or IAM B2, or IAM B3, or IAMB A, or BUG, or UMATIC). Move the joystick up or down or use your paddle to cycle through all keying modes Iambic modes A and B are used with single-lever and dual-lever paddles, and for single-lever paddles you can select either one. They differ in the way the final element of a Morse character is generated after you have squeezed both paddles together and then release them both. Typically this is a matter of personal preference determined by the mode you used when you initially started out with “squeeze” keys. The CW Machine implements three variations of Iambic B with different timing characteristics to accommodate different keying styles; just try out which one is best for your “fist”. A related feature is the dash/dot memory function described further down. Ultimatic (UMATIC) is a “squeeze” mode which historically preceded the Iambic modes. When you squeeze the paddles, dits and dahs will not be alternated like in Iambic modes, but the last element (dit/dah) that you activated will be repeated.
The CW Machine V. 4.2 15
The BUG choice allows you to use a dual lever paddle to simulate a mechanical bug. The dots are generated automatically, but the dashes have to be formed manually. (Since the reverse function works for BUG, too, you even have a left-handed bug !) If keying is enabled (this is toggled with the NumLock key on the keypad), and you are activating a key, there is an up arrow in position 1 of the LCD that will flicker in sync with your signal.
Displaying and Decoding the Keyer Output The CW Machine keeps the characters that you are creating with a paddle or a straight key in an internal buffer, the decoder buffer, which is shown as a “ticker tape” on the LCD display, and simultaneously in the Terminal window of the CW Machine Manager. The keyer logic uses this buffer to detect words in your outgoing transmission which are significant for the logging process. To display the “ticker tape” on the LCD display in operational mode, navigate to the right of the speed display (or left of the date display) in the Home Row. Create a character with your paddle, or enter one on the keyboard if you have it attached, and it will appear as the rightmost character in the LCD display and simultaneously be sent to the PC through the serial cable. The decoder logic that transforms the dits and dahs made with a dual-lever paddle into characters uses an algorithm that allows slight deviations from perfect timing. The specification of Morse code defines the space between elements within a character as 1 bit (= the length of a dit). The keyer logic will allow you to use up to 1.5 bits; this makes it easier to keep a character “together” at higher speeds. The standard space between words is defined as 7 bits, but many operators use a shorter word space, especially at slower speeds. Therefore the decoder algorithm accepts any pause of at least 5 bits as a word space. If you are using a straight key in HAND mode (HAND mode is toggled with the <dm>H command as described further down) , you still have to use the speed potentiometer to let the decoder logic know the approximate maximum speed that you will be sending at. Since the messages stored in the keyer can still be activated with the keypad keys, it makes sense anyway to set the speed potentiometer to your approximate speed, so that they are not sent at a speed that is vastly different from your manually created signal. The decoder logic uses the setting of the speed potentiometer to distinguish between dits and dahs, and to decide whether a word space or character space should be inserted. Your actual transmission speed can vary significantly from the speed potentiometer setting, and your character formation can be quite “individual”, but if it deviates
The CW Machine V. 4.2 16
too much from the standard, you are going to see “garbage”. Just experiment a bit with the speed potentiometer until you see that your signal is properly decoded. These relaxed timing requirements are a feature of the decoder logic only. The keyer itself does not alter your timing to enforce character or word spaces when you are sending unless you use the AUTOCS and AUTOWS options – you can be a little sloppy, and the decoder will still recognize what you are sending within reasonable margins. If you are sending a recorded message, however, the keyer will use the standard timing of the Morse code specification.
Enabling/Disabling the Dash/Dot Memory (-/. MEM) Most modern keyers implement a dash and dot memory, and this feature is enabled in the CW Machine unless you switch it off. This function lets the keyer “remember” if you close a paddle contact while an element (dash/dot) is still in progress, and it will insert the corresponding element after the current one is finished. This lets you move your fingers a little bit “ahead of time” and improves the keying tolerance at higher speeds. This should not be confused with Iambic A/B modes, which determine how a character is ended. If you select Iambic A mode and disable the dash/dot memory you have in essence the keying characteristic of the early electronic keyers with little assisting logic to compensate for variations in your timing. Move the joystick up or down until you see the OPTION row. Move the joystick right until you see -/. MEM. Move the joystick up (ON) or down (OFF) to enable or disable the dash/dot memory. Since all choices in the OPTION row form a logical circle, you could also move the joystick left several times to get to the -/. MEM option.
The CW Machine V. 4.2 17
Adjusting the Morse Speed Range The keyer speed is determined by the position of the speed potentiometer and two settings that define the speed range that the potentiometer covers. While in adjustment mode, with the current speed being displayed in the Home row, push the joystick down. You get a “Speed Range” message, and then the LOW value of the speed potentiometer. Using left or right joystick movements cycles through the HI and LOW options. You can adjust either value up or down using joystick movements – but, of course, the LOW value cannot exceed the HI value, and the HI value cannot drop below the LOW value. Once you are satisfied push the joystick, which sets these speed values as the upper and lower boundaries for the potentiometer. The extreme values for the speed in this keyer are 5wpm at the lower end, and 75wpm at the high end. If you change the HI or LOW setting, the actual speed is normally changed, too, because it reflects the relative position of the potentiometer between the two boundary values. The actual speed of the keyer is determined with digital precision in increments of 1wpm as shown in the display, and it is calculated by reading the potentiometer position many times per second. Occasionally you may find the potentiometer in a position that leads to flickering between two adjacent speed values, because the conversion of the analog potentiometer position to a digital value can fluctuate a bit between successive measurements. The actual speed would also jump around exactly as shown on the display, although this is may not be noticeable because 1wpm is a small change and the jump may happen between characters. To avoid this effect, however, you should move the potentiometer a bit until the display, and the actual speed, is stable.
Switching the Log Search On or Off (SEARCH) If this feature is on, the CW Machine will search the log for a previous QSO when a new log record is created. This happens automatically if automatic logging is enabled (see next section) or when you hit the Enter key or use the \C command in a message. Searching the log may cause a brief delay of less than a second, depending on the size of your log, and during this time the paddle is “dead”. If this disrupts your normal pace too much you can turn this feature off. When keying is disabled (in SSB mode or via the NumLock key), the Enter key will always cause a log search, even if this option is disabled. Move the joystick up or down until you see the OPTION row. Move the joystick right until you see SEARCH. Move the joystick up (ON) or down (OFF) to enable or disable this feature.
The CW Machine V. 4.2 18
Switching Automatic Logging On or Off (A-LOG) This controls the parser of the CW Machine which scans your outgoing transmission and detects the call sign and other information for a log entry. (see below for details about the parser) When a call sign is initially detected, the CW Machine creates a new log record. If the SEARCH option is enabled, it also scans the log for a previous QSO with that station. Move the joystick up or down until you see the OPTION row. Move the joystick right until you see A-LOG. Move the joystick up (ON) or down (OFF) to enable or disable this feature. Understanding the Parser The parser is a firmware routine in the CW Machine which “looks at” the text you are sending to detect keywords and patterns which are relevant for the log. It is only active in CW mode. If Automatic Logging is OFF, the parser only detects the RST patterns for outgoing and incoming reports; if Automatic Logging is ON, the parser can detect everything that goes into a log record if you follow specific common conventions A “word” is considered a RST signal report if it has exactly three characters, where the first character is a digit from 1 through 5, and the other two characters are either the letter N or a digit from 1 through 9, e.g. 57N. However, be careful because the word 123 would also be considered a signal report, although you would probably never give a report like that. So, if you are sending 3-digit numbers for some other purpose modify them in some way so that they are not mistaken for a signal report. (The contest serial numbers that the CW Machine can send will not be mistaken for a signal report even if they have the RST pattern.) This detection of a RST happens regardless of the setting for the Automatic Logging option. If the parser detects a RST pattern, it will also “look” at the word that precedes it. If that word is FR, the RST is considered the incoming RST that you received. (the example further down will illustrate this). If that word is ALSO, the RST will be considered both, the sent and the received RST. If the parser detects the keyword FROM the word after it will be considered the QTH of the other station. If the parser detects the keyword DR the word after it will be considered the name of the other operator. (OM is not considered a name!) The parser functions explained so far are only active after you have started a QSO, i.e., a call has been detected or has been entered using one of the
The CW Machine V. 4.2 19
methods described in this document. So, we need a call-detection function which is valid only if you have not yet started a QSO: If the parser detects the keyword DE followed by your own call, it “looks” at the word before the DE to determine if it is a call sign. A call sign can contain numbers, letters, and the ‘/’ (forward slash), it has to have at least 4 characters, and it has to look like a “typical” call sign. (For “odd” call signs use the Enter key on your keypad or the \C command in a message if the parser does not detect them.) .If the parser detects a call sign, the CW Machine will start a new log record and search the log for a prior QSO with that station in the log (you can disable this automatic search with a menu function). Please take a look at the sections describing the Enter key and the \C command, which perform similar functions, and the description of what constitutes a QSO match. If a prior QSO is found the CW Machine emits a special “match” beep, and the name and the QTH of the other operator are immediately available and can be inserted into your outgoing messages by special commands. Putting everything together and assuming that you have enabled Automatic Logging and your call is N2DE, look at the following partial transmission (keywords and patterns are bold and capitalized): dk2kr DE N2DE = tu DR gerald FR 56N FROM stuttgart = ur rst 57N ... The CW Machine will create a QSO with DK2KR, record the name Gerald, the QTH Stuttgart, his RST of 579, and your RST of 569 – and, of course, the CW Machine knows the date, time, and band. So, this collects everything for a complete log entry without requiring any special action on your part. If the signal reports are identical on both sides, you can use the keyword ALSO to set both, the sent and the received RST and avoid the (unusual) repetition of your own report: dk2kr DE N2DE = tu DR gerald fr rprt FROM stuttgart = ur rst ALSO 57N ... Of course, you don’t have to use those keywords at all and can enter the log information using keypad keys. You can “assist” the CW Machine in detecting the name and QTH using the keypad “in flight”, and collect the log record information even if you are communicating in a language that is not English.
The CW Machine V. 4.2 20
Switching the Tone On or Off (TONE) This setting controls the generation of a sidetone for Morse signals if keying is enabled (on). If keying is off, i.e., when you have no side tone from your transmitter, the keyer will always create a tone. (You toggle keying on/off with the NumLock key on the keypad). The tone is available on a connector, and you may want to patch it into the audio of your receiver. By default this setting is off, i.e., no sidetone is created when keying is on. The beep that the keyer uses to signal some events is always audible and not affected by this setting. Move the joystick up or down until you see the OPTION row. Move the joystick right until you see TONE. Move the joystick up (ON) or down (OFF) to enable or disable the Morse tone. Since all choices in the OPTION row form a logical circle, you could also move the joystick left several times to get to the TONE option.
Changing Volume and Pitch of the Sidetone (SOUND) You can change the volume and the pitch of the sound that is used for the Morse sidetone. The volume setting also controls the volume of the beep that is used to signal some events. Move the joystick up or down until you see the OPTION row. Move the joystick right until you see SOUND. Move the joystick up or down or use your paddle to go to the VOLUME or PITCH option. With either one, moving the joystick left or right alternates between VOLUME and PITCH, moving the joystick up or down changes the volume or pitch and you’ll briefly hear the new sound. It you move the VOLUME adjustment all the way up, the CW Machine will change from the sine wave to a buzzer sound; going one notch back down changes it back to the sine wave. Sine tones, unlike the buzzer tone, cannot be reproduced by the small piezo transducer in the device. When you are satisfied with the volume and pitch settings, push the joystick, which will return you to SOUND. Since all choices in the OPTION row form a logical circle, you could also move the joystick left several times to get to the SOUND option.
The CW Machine V. 4.2 21
Toggling Automatic Character Spacing (AUTOCS) Enabling this option ensures that the space between two successive characters is at least 3 ticks. Move the joystick up or down until you see the OPTION row. Move the joystick right or left until you see AUTOCS. Move the joystick up (ON) to enable automatic character spacing, or down (OFF) to disable it.
Toggling Automatic Word Spacing (AUTOWS) Enabling this option ensures that the space between two successive words is at least 7 ticks. The CW Machine inserts a space 6 ticks after the last dit or dah, in keeping with typical operational habits. If you enable this option, the “standard” will be enforced by blocking your paddle until 7 ticks have expired. Move the joystick up or down until you see the OPTION row. Move the joystick right or left until you see AUTOWS. Move the joystick up (ON) to enable automatic word spacing, or down (OFF) to disable it.
T/R Compensation and Weighting (COMP) The purpose of the COMP feature is to compensate for latencies in your transmitter’s keying, NOT to change the sound of Morse characters. There are two typical issues which can both be compensated by the CW Machine. The first, sometimes found in transceivers or transmitter/receiver combinations that do not offer true QSK, is the shortening of the first element of the first character after your transceiver switches from receive to transmit mode. The CW Machine compensates for this by adding EXTra time (in milliseconds) to the length of the first element. The keyer needs to know what the “first character” is, i.e., you have to tell it how long your transceiver stays in transmit mode after the last character before it goes to receive; you set this DLY value in seconds. Characters that are started while the transceiver is still (assumed to be) in transmit mode will not be altered. The second issue is that some transmitters create “light” characters by not transmitting for the full key-down duration, reducing the time of every dit and dah and extending the space between the elements of a character. The CW Machine compensates for this by adding EXTra time (in milliseconds) to every dit and dah and reducing the space between them by that same amount. You enable this type of weighting by setting the DLY time to 0.0. As an example: the Elecraft K3 sounds most “natural” with an Extension of 6-7msec, for the Elecraft KX3 12msec is a good starting point for experiments. Without this compensation the Morse characters from these rigs may sound “choppy”
The CW Machine V. 4.2 22
When compensation is enabled, the sidetone of the keyer will sound the “normal” character timing and not reflect the altered timing – just like the signal should sound that comes out of your transmitter. Move the joystick up or down until you see the OPTION row. Move the joystick right or left until you see COMP. As with several other options described above, you can disable the COMP option by setting it OFF (joystick down). If you move the joystick up you can cycle through the settings for EXT and DLY and adjust them up and down. To make entering the EXT values easier over a large range, the adjustment counts up in 10 millisecond steps, and down in 1 millisecond steps. The delay is shown in tenths of a second and can be a maximum of 3.0 seconds. When you enable this option by moving the joystick up after it was disabled (that’s the default), the initial EXT is 10 milliseconds, and the DLY is 0.0 seconds. You’ll have to experiment a bit to find the best settings for your transceiver.
The Contest Option (CONTST) Move the joystick up or down until you see the OPTION row. Move the joystick left until you see CONTST. Move the joystick up (ON) or down (OFF) to enable or disable the contest option. Contest mode is indicated by an up arrow in position 5 of the LCD display. The contest option affects the way the log is searched for duplicate QSOs, and it enables the display and adjustment of serial numbers. The rules for determining if a QSO is considered a duplicate are explained in the log section. If the contest option is on, one of the display options in the Home row shows the next serial number. If the contest option is off, serial numbers are not displayed or incremented when a log record is stored. Since all choices in the OPTION row form a logical circle, you could also move the joystick right several times to get to the CONTST option.
The CW Machine V. 4.2 23
Serial Numbers Serial numbers are only displayed if the keyer is in contest mode as explained above. In this case there is a display in the Home row, just to the right of the time display, that shows the next serial number. In operational mode this number is incremented and the display updated as log records are stored. So, two of the most important pieces of information in a contest, the serial number and the time, are directly adjacent in operational mode. However, if you set the starting value for the serial number to 0, it will not be incremented. This is useful for contests where no serial numbers are used. The serial number is initially displayed as “N. 1” or “N. 0”. Once it exceeds 9999 the position of the ‘.’ after the N will be used for the fifth digit, and once it exceeds 99999, even the N will no longer be shown. So the maximum serial number is 999999, which should be enough even for a major DX expedition :-). Of course, the keyer can store only 12,000 QSOs in the log, but the serial numbering can keep counting up even though the log starts with its first record again. So you could fill up the built-in log many times, upload it to a PC, delete the log in the keyer without affecting the serial number, and keep going all the way to a million QSOs. You can reset a serial number other than 1 at any time to 1 by pushing the joystick down in adjustment mode while the serial number is displayed. It will display “RESET?”. If you confirm with another joystick push, the serial number will be set to 1, any other movement of the joystick leaves the serial number as it is. If you reset a number 1, it will be reset to 0. This allows you to reset to 1 or 0, and 0 would remain unchanged and not be incremented.
Loading the Users File The Users file, described in detail further down, is a regular ASCII file that can be created on your PC with an ASCII editor like Notepad or Wordpad. Make sure that you have your terminal program running with the settings described in the “Serial Communication” section. To load your Users file, you navigate to the MEMORY row and move the joystick right until you see LOAD USERS. Push the joystick down, and you’ll see COMM (for communication) – the keyer is now waiting for a file from the PC, and you have about 30 seconds to get your terminal program to start the transmission. If you are using HyperTerminal, this is the “Send Textfile” option in the “Transfer” menu. When all records have been received, the LCD display will return to operational mode.
The CW Machine V. 4.2 24
Exporting your Log to the PC You will probably want to export your log to a PC for potential restoration later on. It is good practice to make that backup every now and then, although the CW Machine Hardware retains the data even when the battery is removed, and you would have to physically damage it to lose the data. Another situation is before a contest, where you probably want to “clean out” all your regular QSOs and just have the contest data in the keyer. After the contest you can restore your “regular” log using the Import function. Make sure that you have your terminal program running with the settings described in the “Serial Communication” section and waiting to receive an ASCII file. If you are using HyperTerminal, this is the “Capture Text” option in the “Transfer” menu. To export your log you navigate to the MEMORY row and move the joystick left until you see EXPORT. You push the joystick down, the display will change to COMM, and the data will be sent to your PC and also be displayed on the PC screen. When all records have been transmitted, the LCD display will return to operational mode. In HyperTerminal you would select the “Stop” function of “Capture Text” to actually write the file to your hard disk. During the transfer you can abort the transmission at any time by moving the joystick or touching the paddle.
Importing Log Data from the PC A log file that has been exported to the PC, or any other file that has the exact layout described in Appendix B, can be imported to (re-) create your log. If you are using a logging program and would like to import that log into the CW Machine, you will have to convert its data to the format described in Appendix B. This requires programming experience and knowledge of the data structure used by that logging program. The CW Machine Manager program can convert and import the ADIF files provided by most logging programs. Make sure that you have your terminal program running with the settings described in the “Serial Communication” section. To import your log you navigate to the MEMORY row and move the joystick left until you see IMPORT. Push the joystick down, and you’ll see COMM (for communication) – the keyer is now waiting for a file from the PC, and you have about 30 seconds to get your
The CW Machine V. 4.2 25
terminal program to start the transmission. If you are using HyperTerminal, this is the “Send Textfile” option in the “Transfer” menu. When all records have been received, the LCD display will return to operational mode. If any discrepancies, i.e. deviations to the file format described in Appendix B, are discovered, you’ll get an ERR 05, and the record count will be reset to 0. At the maximum communication speed of 38,400 baud importing or exporting 12,000 records takes about 5 minutes.
Displaying and Resetting the Record Count The keyer stores up to 12,000 log records in non-volatile memory (the contents of these records and how they are stored is described further down). You can display the number of records in the log to see if you are running out of capacity, and you can erase the log by resetting the number to 0. Navigate to the MEMORY row and move the joystick left until you see Rxxxxx (where xxxxx is a number between 0 and 12000). This is the number of records currently in the log. If you push the joystick down it will display “ERASE LOG?”. If you confirm with another push of the joystick the number of records will be set to 0, which means the log is permanently erased – so be careful! Any other movement of the joystick leaves the log unchanged. Resetting the log does not affect the serial number count.
The CW Machine V. 4.2 26
Settings using the Pseudo Prosign <dm> or Esc Some configuration settings can be made without going through the menu functions or using the joystick. If you enter the pseudo prosign <dm> (-..-- sent as one character) with your paddle or press the Esc key on a directly attached keyboard the next one or two characters that you enter with your paddle or the keyboard will be interpreted as a command to change a configuration setting.
Selecting the Band The following characters will change the band setting: 2M = 2m 4M = 4m 6M = 6m 10 = 10m 12 = 12m 15 = 15m 17 = 17m 20 = 20m 30 = 30m 40 = 40m 60 = 60m 80 = 80m 16 = 160m The 0 in 10/20/30/40/60/80 can also be sent or entered as a T. You can also change the band using the ‘*’ (asterisk) and number keys on the numeric keypad as described further down.
Toggling the Paddle Orientation The letter R will reverse the paddle orientation that is currently in effect. The new setting will be persistent, i.e. it will stay in effect even after you restart the device.
Selecting CW or SSB Mode The letters S and C will toggle between SSB and CW keying modes: S = switch to SSB C =switch to CW If SSB mode is selected, the keying output will be disabled and the sidetone is always on. You can use your key or keyboard to enter the usual information for a QSO, and the resulting log record will identify it as a SSB QSO. The band and the mode cannot be changed while the CW Machine is controlled by a radio connected to the CW Machine Manager.
The CW Machine V. 4.2 27
Toggling Hand-Keying and Automatic Keying The Letter H will switch to Hand Keying mode and back to the originally configured mode. This way you can connect a dual-lever paddle and a hand key with a Y-cable to the CW Machine and switch between the two without going through a configuration process with the joystick or the Configuration screen of the CW Machine Manager. Toggling Keying Always On The letter K toggles the keying-always-on feature. When this feature is active, keying is always enabled, even in SSB mode or in edit mode when the CW Machine usually goes into quiet mode – there is no quiet mode and you are always “on the air”. This is useful in situations where you can’t mix the CW Machine sound with your transceiver audio and you can manually disable transmitter output when the transmitter is keyed (thus getting the side tone although no output is produced)
Activating Key-Down or Pulse Tuning The letters T and P activate the tuning functions: T = key down tuning P = pulse tuning The tuning modes are ended when you touch your paddle or press the Esc key on the directly attached keyboard again.
Selecting the Operational Mode Display The letter D will rotate through the various LCD Display options (time, date, speed, etc.) in operational mode. It is equivalent to moving the joystick left.
The CW Machine V. 4.2 28
Scrolling, Deleting, and Undeleting QSOs
The Error signal (7 or more dots) after a <dm> has three different functions:
- If a call has been entered for a station that was already in the log, i.e., a QSO is in progress or you have searched for a call with the <Enter> key, then <dm>Error will scroll back in the log to previous QSOs with this station. This is only useful if you are in quiet mode, where the QSO information is shown on the LCD, or if you are using the CW Machine Manager program for Windows which shows the QSO information even if you are on the air (= not in quiet mode)
- If no call has been entered <dm>Error will delete the last QSO in the QSO log – so be careful when you send this combination! However, if you made a mistake, you can undelete the last record by sending <dm>U.
- If you are in Edit mode and are looking at information for a QSO which may be the last QSO in your log or any QSO further back in your log, this QSO will be flagged as deleted. If you scroll back again in Edit mode to that QSO, you will still see it, but the first letter of the call will be shown as a “-“ (minus) sign, indicating that it is deleted. You can then also use the <dm>U sequence to remove the deleted flag.
The CW Machine V. 4.2 29
Three additional commands have been added for situations where you want to use the automatic logging capability of the CW Machine but have no keypad, e.g., in mobile operation. These commands have no equivalent menu function, but they emulate keys on the keypad:
Starting Message 0 0 (zero) = send message number 0. Typically you would probably assign a
CQ-loop to this message.
Clearing the QSO Buffer and Enabling Keying Z = this command is equivalent to pressing the minus key on the
keypad or the \Z command in messages (see p.46). It will clear any QSO information that you do not want to log. In mobile operation, if you are using automatic logging, a call sign may have been detected and stored in the QSO buffer although the QSO then never takes place. The automatic detection of calls automatically resets previous uncompleted QSO information, so this will not always be required, but you can make sure with this command that no incorrect log entry is stored. In addition, unlike the keypad key, this command also puts you back “on the air” if you were in quiet mode.
Toggling Keying (“On the Air”) Status O = this command is equivalent to pressing the NumLock key to toggle
the “on the air” status The keyer will confirm a new setting with a beep. Any other character after the pseudo prosign <dm> or the Esc key will be ignored and cancels this special command mode. If you have entered <dm> by mistake with your paddle, it’s probably easiest to hit the dot paddle for E to cancel command mode. If you have pressed the Esc key by mistake, use any letter that has no assigned function.
The CW Machine V. 4.2 30
Resetting the Keyer Pushing the reset button (a hardware reset) of the keyer puts it into “deep sleep” with almost all functions disabled, and you can only wake it up by moving the joystick up. When it wakes up, however, the keyer firmware essentially resumes in the same state that it was in before. In other words, a hardware reset does not result in a firmware reset. (however, the clock / calendar is reset to to January 1st, 2015, 12:00:00 !) Occasionally it may be necessary to reset the keyer and its internal variables to the default configuration, and there are two types of reset operation that you can initiate by pushing the joystick (like a button) while the version display scrolls across the screen after the keyer has been started. You can always get to the scrolling version display by pressing the (hardware) reset button on the keyer, and then moving the joystick up. If you push the joystick briefly, you will see RESET on the screen, and then you are returned to the scrolling version display. This has reset the internal variables to their default settings. However, any information that was loaded by a Users file (messages, calls, names, QTHs) remains intact. If you keep the joystick pushed for more than 0.5 seconds while the version display scrolls across the screen, you will see ERASE followed by RESET. This erases all user information (messages, calls, names, QTHs) and then resets the internal variables. This full reset is done automatically every time a new major firmware version is loaded. Either type of reset does not erase the QSO log. If you want to put the keyer back into original factory condition, you would have to use the ERASE / RESET and reset the log record count to 0 as described above.
The CW Machine V. 4.2 31
The Log
The Internal Log Records The log contains up to 12,000 entries recording the following information. The actual internal storage format is shown in Appendix B:
The Date of the QSO as established by the \C or \T commands in recorded messages, or the date that the log entry was started by entering the call with the Enter key. Only two digits are actually stored in the log. If the high-bit of the month is set, i.e., the first digit of the month is hex 8 or hex 9, then the year will be assumed to be 19xx.
The Start Time of the QSO as established by the \C or \T commands in recorded messages, or the time that the log entry was started by entering the call with the Enter key.
The End Time of the QSO - actually the time that the log entry was written at the end of the QSO. This is only recorded if you are not in contest mode. Contest QSOs are usually very short, so that the start time is sufficient. (internally this uses the same storage location as the serial numbers – so these are mutually exclusive alternatives)
The other station’s Call up to 13 characters. The other operators Name or <QSL_VIA>/<COMMENT> information.
See explanation further below. the other operators QTH or <QSL_VIA>/<COMMENT> information. See
explanation further below. The Band The Mode, CW or SSB. The CW Machine has no provision for other
modes, and anything that is not SSB will be stored as SSB. The Received Signal Report, defaults to 599 (59 for SSB) The word MY
followed by a word containing 3 digits with a first digit between 1 and 5, followed by two digits between 1 and 9 or the letter N, in your signal will be interpreted as the signal report that you received.
The Sent Signal Report, defaults to 599 (59 for SSB). Any 3 digits with a first digit between 1 and 5, followed by two digits between 1 and 9 or the letter N, in your signal will be interpreted as the signal report for the other station. (there is logic that prevents your outgoing serial number to be misinterpreted this way …)
Received Serial Number, up to 6 digits, only in contest mode Sent Serial Number, automatically incremented when a record is stored,
only in contest mode An indicator for User 1 or 2. An indicator for a Duplicate QSO.
The CW Machine V. 4.2 32
A log record is stored if a call has been entered and the prosign <sk> is sent with your paddle, or the character # is detected in a message. If you have a full size keyboard, pressing the right shift key will store the log record, too – this allows you to log SSB contacts without touching a paddle. When the record has been stored, the keyer will sound a beep, and there is logic that prevents it from being stored for a second time. Once you exceed 11990 records, the keyer will beep twice when it stores the record to warn you that you are reaching the capacity limit. Trying to store more than 12,000 records results in a fatal error ERR 03.
Entering CALL, NAME, QTH, COMMENT and QSL_VIA If Automatic Logging is enabled the name and QTH can be detected automatically by the CW Machine, but you can also enter information into the log by sending it with your paddle or entering it with the keyboard, and then hitting a keypad key as described further down. This information entry can happen “in flight’, while your transmission actually goes out on the air, or it can be done in quiet mode (toggled with the NumLock key) When you hit the keypad key, the last word that you have sent is stored in the log record, and the whole log record is finally saved when you send <sk> or enter #. The log record contains one field of 27 characters that may contain up to three items of variable length. The first item is always the CALL of the other station, which is entered with the Enter key on the numeric keypad or keyboard. A call can have a maximum of 13 characters. If you have not ended the QSO yet or cleared the QSO information with the ‘-’ (minus) key on the keypad, successive Enter keys will change the call for the current QSO. The remainder of this field can be used to store NAME, QTH, COMMENT, and QSL_VIA information by hitting the ‘+’ (plus) key, possibly preceded by the ‘*’ key, on the numeric keypad. The maximum length of this information is determined by the length of the call. You have to imagine that there is a single field of 27 bytes which contains the call at the beginning, then a separator character, and the remainder is available for the words stored with the “+” key. So, if the CALL has, e.g., a length of 6 characters, (27-6-1) = 20 characters would be available for the two words stored with the “+” key, and any excess would be cut off. The bytes after the CALL can store two information items which are entered in round-robin fashion by successively hitting the ‘+’ (plus) key. Normally, unless you use special prefix characters (see below), the first item will be the NAME (or COMMENT for contest QSOs), and the second item the QTH. After entering the CALL with the Enter key, the NAME/COMMENT would be stored if you hit the ‘+’ (plus) key for the first time, and the QTH if you hit the ‘+’ (plus) key for the second time. If you hit the ‘+’ (plus) key for a third time, the NAME/COMMENT would be
The CW Machine V. 4.2 33
changed, if you hit it the fourth time, the QTH would be changed, and so on. Whenever you enter or change the CALL with the Enter key, the ‘+’ (plus) key will be reset to enter the NAME next; you can also reset to the NAME position by pressing the ‘*’ key twice in succession. The length of the combined NAME and QTH information is, again, limited by the fact that all three items, CALL, NAME, and QTH must fit into 27 bytes with a separator character between them – so the combined length of CALL+NAME+QTH is limited to 25 characters. This “round robin” approach of letting the ‘+’ key enter the NAME and the QTH leads to one issue: what if you want to correct the NAME without entering a QTH, or what if you already have the NAME from a previous QSO in the log and want to just enter or correct the QTH? If the last character that you enter before you hit the ‘+’ (plus) key is the prosign <bt>, represented by the character “=”, then nothing is stored or changed, but the internal “round robin” toggles from storing the name to storing the QTH and vice versa. (as a mnemonic: “=” means “leave the same”) If you have entered a NAME or a QTH and decide that you just want to delete it, enter a “?” (question mark) with your paddle or the keyboard and hit ‘+’. The “?“ as a last character removes the corresponding item from the log record. (as a mnemonic: “?” means “unknown”) In order to store information other than NAME and QTH for non-contest QSOs, special prefix characters are defined which will be interpreted by the ADIF conversion function of the CW Machine Manager program. If a word starts with a letter, it will be considered the NAME (first item) or the QTH (second item), if it starts with a ‘/’ (forward slash) or if it is preceded by the word VIA, it will be considered QSL_VIA information, if it starts with a “:” (colon) it will be considered a COMMENT. For contest QSOs the two fields are always considered COMMENT and QTH, and the first character has no significance.
Characters With Special Behavior Several characters have special behavior that makes information entry even more versatile. The “,” (comma), the ‘.’ (period), the ‘-’ (hyphen, -….-), the ‘_’ (underscore, ..--.-), and the “@” (at-sign) will never be preceded or followed by a space in the internal buffer even if you pause for longer than a word space before or after entering them, i.e., they will never break a string of characters into two words. In addition, only in non-contest QSOs, the underscore (..--.-) will be displayed as a space rather than a ‘_’. This allows you to store a QTH like SANTA FE,NM by entering SANTA_FE,NM, and even if you pause before or after the underscore or the comma, this whole string will not be broken up into several words, and it will be considered one word that can be stored with the ‘+’ (plus) key. When the QTH is shown in the QSO information display, the QTH will be properly shown as SANTA FE, NM without the underscore. (using the ‘*’ and
The CW Machine V. 4.2 34
‘+’ in succession to store the QTH achieves the same effect.) The behavior of the @ and the period is useful when you enter email an address. In effect these four characters allow you to store even more than three information items by acting as a separator. But remember that the total number of characters for CALL, NAME, and QTH including the separators is limited to 27. If you exceed that limit the “tail” will be cut off. The “ ` ” (apostrophe .----.) will never be preceded by a space, i.e., it can never be at the beginning of a word. To reduce mistakes when entering QSL_VIA or COMMENT into a non-contest QSO the leading ‘/’ (forward slash) that indicates QSL_VIA information and the leading “:” (colon) that indicates a COMMENT will never be followed by a space, even if you pause for longer. To correct mistakes when you are entering information, you can use the Back Space key on a keyboard (some numeric keypads also have a Back Space key). It will erase the last character in the internal buffer. If you are using a paddle for data entry, the same function can be accomplished by sending a string of seven or more dits.
Duplicate QSOs Whenever a call is recognized, either automatically or by the \C command or the Enter key (explained further down), the log is scanned for a previous QSO with that station. In non-contest mode only the call is considered, and if a duplicate is found the name, QTH, and date of the most recent QSO can be displayed (this information is also sent to the CW Machine Manager if you are attached to a PC). If the call contains a ‘/’ (forward slash) character, and the log contains a record with a call that is identical up to the ‘/’ and not longer, then the calls are considered identical. The same applies if you entered a call and the log contains a record that has an identical call with a ‘/’ suffix. Put simply: N2DE and N2DE/P will be considered a match, but N2DE/4 and N2DE/6 would not match. The part before the ‘/’ has to be at least 4 characters. This logic works only for call suffixes like /P or /MM; calls like W2/DJ8GO and DJ8GO will not be considered identical because the difference is in the prefix. In contest mode, in addition to the call, the following must also match to consider a QSO a duplicate: it must be a contest QSO, and the band, the mode (CW/SSB), and the user must be the same. This allows correct matching for multi-mode contests where a station may be contacted once per band and mode. In technical terms: in contest mode the first byte of the log record explained in Appendix B must match in addition to the call for a QSO to be considered a duplicate.
The CW Machine V. 4.2 35
Checking or Editing a QSO: The <do> Pseudo Prosign and Scroll Key QSOs are stored in the log by the <sk> prosign and equivalent options in messages, as explained further down, or by the right Shift key on a directly attached full size keyboard. In some situations you may realize after the fact that information in the log was incorrect and needs to be edited. (Typical situations: you catch that rare one in a pile up, and you go through the brief exchange that stores the QSO – only to realize too late that you recorded the wrong call.) In operational mode, and without leaving operational mode, you can check or modify QSOs in the log. EDIT mode is entered by by sending the pseudo prosign <do> ( -..--- as one character) with your paddle or by pressing the Scroll key on a keyboard. This will copy the last record in the log into the internal record buffer and put you into quiet mode (keying off). You can now change the call, the name, the QTH, the received serial number in contest QSOs, the received and sent signal reports as described above, and the band by using the <dm> pseudo prosign as described above. Changing the band with <dm> in EDIT mode will only affect the the record that is being edited. You have to end your modifications with <sk> or the right shift key or the ‘-‘ (minus) key on the keypad, which stores the modified record back. The previously recorded time stamps, the SSB/CW mode, and the user remain unchanged by this operation. During EDIT mode the QSO information will scroll across the LCD, so you can see the contents of the log record including any changes that you may make. To prevent a loss of data you cannot leave EDIT mode without storing the QSO back with one of the keys mentioned above. If you enter the <do> pseudo prosign or press the Scroll key while you are in EDIT mode, the process is repeated, and the information from the preceding record is now in the record buffer for inspection or modification. You can scroll back as many records as you like, until you find the one that you want to modify. If you enter the <do> pseudo prosign or press the Scroll key after a QSO match has occurred, i.e., you have searched the log for a particular call sign using the Enter key (explained further down), and a previous QSO with that station was found, then this previous QSO will be edited. This function lets you edit QSOs by call sign without repeated use of <do> or the Scroll key. Records will not be deleted by the <do> prosign or the scroll key – when you exit EDIT mode with <sk> or the operations described above, you will be repositioned at the end of the log for new records. To erase a record from the log you would use the <dm>Error character combination as described above.
The CW Machine V. 4.2 36
About Deleted QSOs QSOs can be deleted from the log with the <dm>Error sequence as described above. If you are not in Edit mode, the QSO counter will just be reduced by 1 – the last QSO is still in memory, and it can be undeleted with <dm>U, which just increases the QSO counter by 1. But the next QSO that you save will overwrite it, and it will be lost forever. The situation is different in Edit mode, where you may have scrolled back in the log. If you use the <dm>Error sequence to delete this QSO, it will be flagged as deleted by altering the first character in the call. That first character of a deleted QSO will be shown as a “-“ minus sign when you scroll back to that QSO again (it is not actually a “-“ sign in memory but a special “deleted” flag). You can reset this deleted flag with the <dm>U sequence. QSOs which are flagged as deleted are still in memory, and the QSO counter will not be reduced. However, these QSOs will not be exported from the keyer – so they will not appear in ADIF files or lists that you can produce with the CW Machine Manager program. If you have flagged many QSOs for deletion, you should probably save the log as raw data in the CW Machine Manager and then restore that saved log. Since the QSOs with the deleted flag are not contained in the exported data, they will not be restored, and your QSO count will reflect the actual number of non-deleted QSOs.
The CW Machine V. 4.2 37
The Users File The Users file is an ASCII file that you create with a text editor like Notepad or Wordpad on your PC. You load it into the keyer by using a function in the MEMORY row as described above. You should read this section even if you are using our CW Machine Manager program. Although it provides this function in a more convenient way, it is important to understand the underlying concepts. The Users file defines the name, the calls, the QTH, and the messages for each user by using keyword parameters. These keywords are enclosed in angle brackets <> and can be anywhere in a line. The parameter value starts with the first character after the closing ‘>’. Anything before the first valid keyword tag in a file is treated as a comment. The name, call, and QTH keyword parameters have to be specified on one line. The message parameters can span multiple lines. The keyer echoes each character from the file before it is stored into internal memory. If you don’t see that echo, then the communication has failed - make sure that you have set your terminal program to the values given in the “Serial Communication” section. The “<” character itself can only be used as a keyword delimiter and will never be stored in memory. The following keyword parameters are recognized. Upper and lower case characters are treated the same and can be mixed. The parameters can be specified in any order in the file.
<call1>xxxxxxxxxxxxx The station call of user 1 with a maximum of 19 characters.
<oper1>xxxxxxxxxxxxx The operator call of user 1 with a maximum of 19 characters.
<name1>xxxxxxxxxxxxx The name of user 1 with a maximum of 19 characters.
<qth_1>xxxxxxxxxxxxx The QTH of user 1 with a maximum of 19 characters.
<call2>xxxxxxxxxxxxx The station call of user 2 with a maximum of 19 characters
<oper2>xxxxxxxxxxxxx The operator call of user 2 with a maximum of 19 characters.
The CW Machine V. 4.2 38
<name2>xxxxxxxxxxxxx The name of user 2 with a maximum of 19 characters.
<qth_2>xxxxxxxxxxxxx The QTH of user 2 with a maximum of 19 characters.
<msg1n>mmmmmmmmmm where n is a number between 0 and 9. One of the 10 possible messages for user 1, numbered from 0 to 9. A message can be any length as long as the combined length of all messages does not exceed 12,672 bytes including the invisible end character that is appended to every message.
<msg2n>mmmmmmmmmm where n is a number between 0 and 9. One of the 10 possible messages for user 2, numbered from 0 to 9. A message can be any length as long as the combined length of all messages does not exceed 12,672 bytes including the invisible end character that is appended to every message.
<msg3n>mmmmmmmmmm where n is a number between 0 and 9. One of the 10 possible messages, numbered from 0 to 9, that is used as a branch target with the \C and \H commands explained further down. A message can be any length as long as the combined length of all messages does not exceed 12,672 bytes including the invisible end character that is appended to every message.
The special messages for branch targets, msg3n, are not attached to a specific user so that buttons on the keypad are not being used up for message fragments that, by themselves, would not be meaningful. These messages cannot be reached directly through a button on the keypad but only through commands in other messages, and they will be referred to as hidden messages. When you load a Users file, the first tag erases all messages, calls, names, and QTHs that may have been stored in the keyer. So it is not possible to load single element of a Users file without erasing everything else. The call, names, and QTHs can also be set through keypad functions, as described under the menu functions. Messages, however, can only be stored by loading a Users file or by loading a profile from the CW Machine Manager.
The CW Machine V. 4.2 39
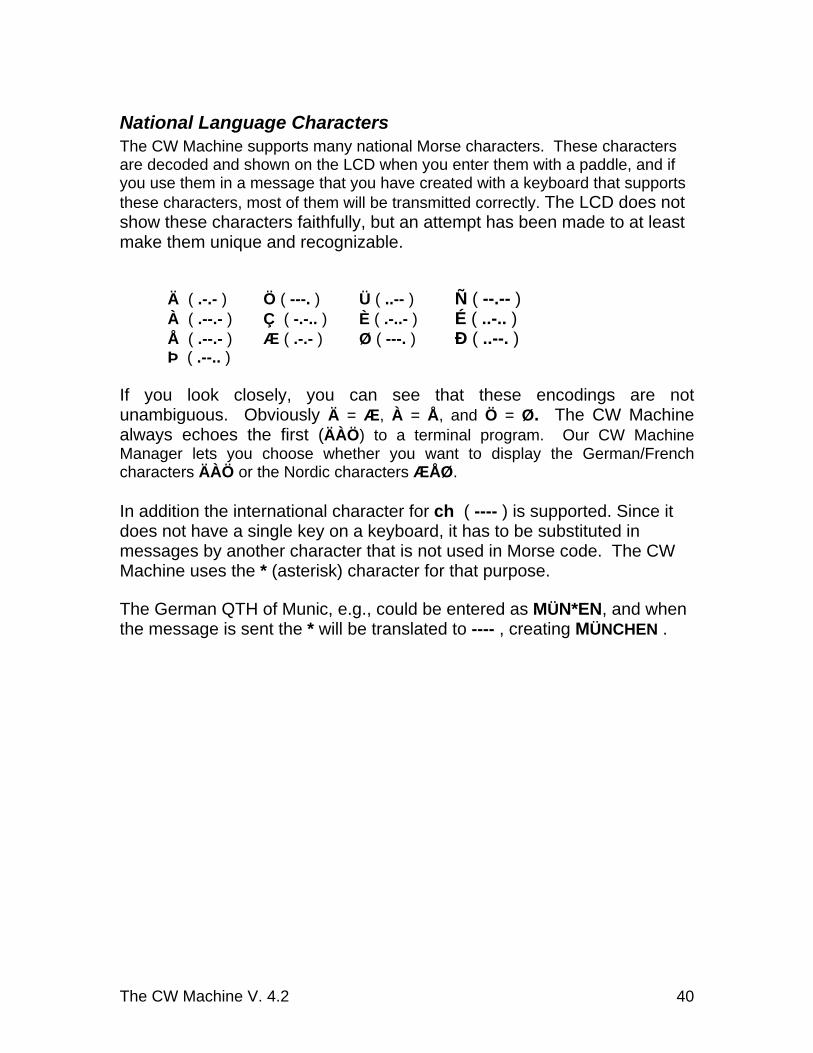
National Language Characters The CW Machine supports many national Morse characters. These characters are decoded and shown on the LCD when you enter them with a paddle, and if you use them in a message that you have created with a keyboard that supports these characters, most of them will be transmitted correctly. The LCD does not show these characters faithfully, but an attempt has been made to at least make them unique and recognizable.
Ä ( .-.- ) Ö ( ---. ) Ü ( ..-- ) Ñ ( --.-- ) À ( .--.- ) Ç ( -.-.. ) È ( .-..- ) É ( ..-.. ) Å ( .--.- ) Æ ( .-.- ) Ø ( ---. ) Ð ( ..--. ) Þ ( .--.. )
If you look closely, you can see that these encodings are not unambiguous. Obviously Ä = Æ, À = Å, and Ö = Ø. The CW Machine always echoes the first (ÄÀÖ) to a terminal program. Our CW Machine Manager lets you choose whether you want to display the German/French characters ÄÀÖ or the Nordic characters ÆÅØ. In addition the international character for ch ( ---- ) is supported. Since it does not have a single key on a keyboard, it has to be substituted in messages by another character that is not used in Morse code. The CW Machine uses the * (asterisk) character for that purpose. The German QTH of Munic, e.g., could be entered as MÜN*EN, and when the message is sent the * will be translated to ---- , creating MÜNCHEN .
The CW Machine V. 4.2 40
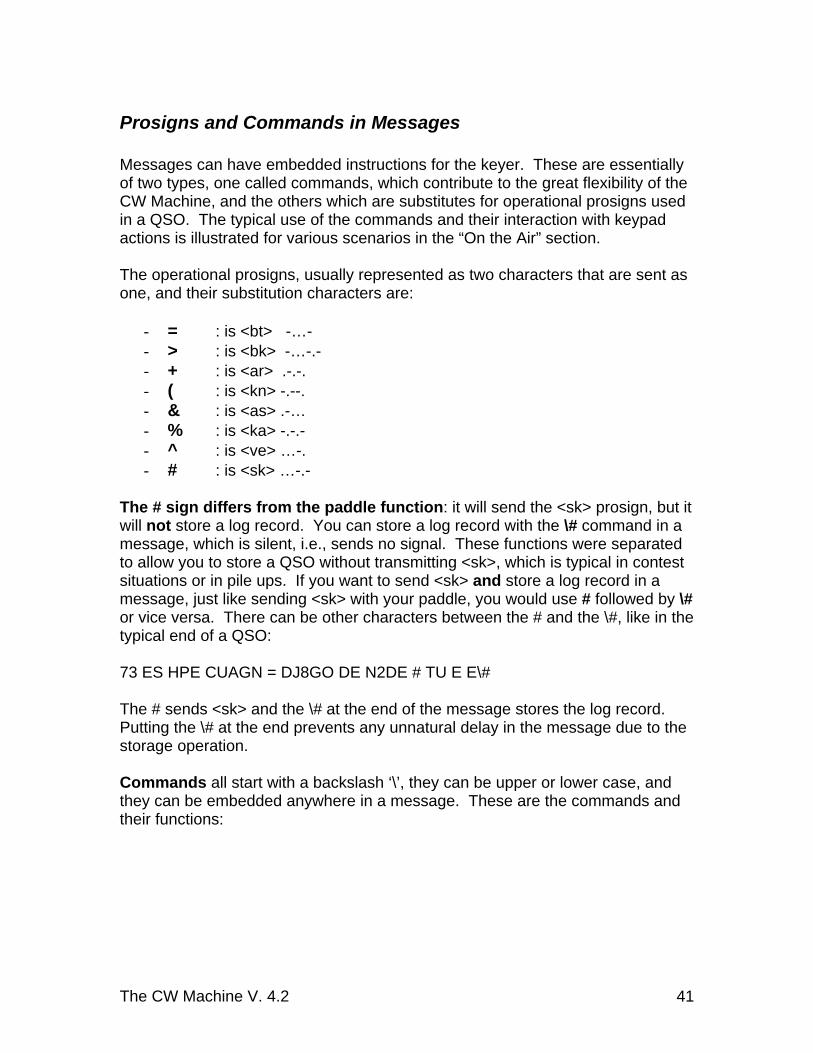
Prosigns and Commands in Messages Messages can have embedded instructions for the keyer. These are essentially of two types, one called commands, which contribute to the great flexibility of the CW Machine, and the others which are substitutes for operational prosigns used in a QSO. The typical use of the commands and their interaction with keypad actions is illustrated for various scenarios in the “On the Air” section. The operational prosigns, usually represented as two characters that are sent as one, and their substitution characters are:
- = : is <bt> -…- - > : is <bk> -…-.- - + : is <ar> .-.-. - ( : is <kn> -.--. - & : is <as> .-… - % : is <ka> -.-.- - ^ : is <ve> …-. - # : is <sk> …-.-
The # sign differs from the paddle function: it will send the <sk> prosign, but it will not store a log record. You can store a log record with the \# command in a message, which is silent, i.e., sends no signal. These functions were separated to allow you to store a QSO without transmitting <sk>, which is typical in contest situations or in pile ups. If you want to send <sk> and store a log record in a message, just like sending <sk> with your paddle, you would use # followed by \# or vice versa. There can be other characters between the # and the \#, like in the typical end of a QSO: 73 ES HPE CUAGN = DJ8GO DE N2DE # TU E E\# The # sends <sk> and the \# at the end of the message stores the log record. Putting the \# at the end prevents any unnatural delay in the message due to the storage operation. Commands all start with a backslash ‘\’, they can be upper or lower case, and they can be embedded anywhere in a message. These are the commands and their functions:
The CW Machine V. 4.2 41
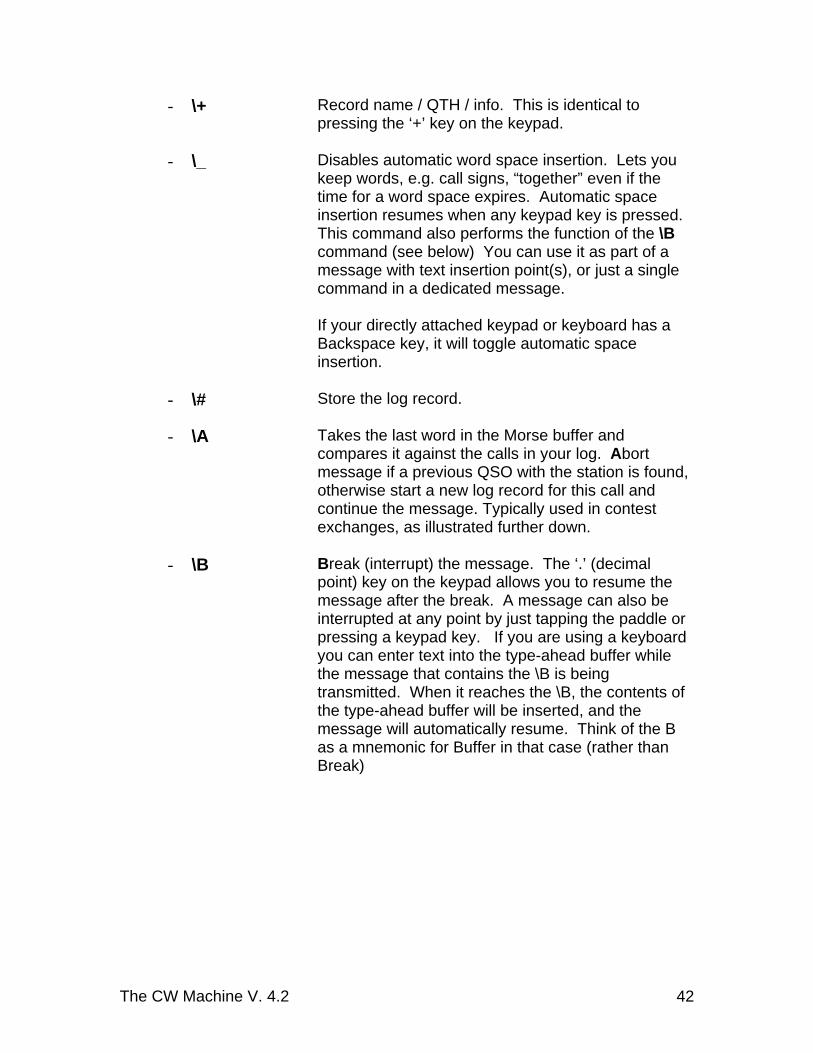
- \+ Record name / QTH / info. This is identical to pressing the ‘+’ key on the keypad.
- \_ Disables automatic word space insertion. Lets you keep words, e.g. call signs, “together” even if the time for a word space expires. Automatic space insertion resumes when any keypad key is pressed. This command also performs the function of the \B command (see below) You can use it as part of a message with text insertion point(s), or just a single command in a dedicated message. If your directly attached keypad or keyboard has a Backspace key, it will toggle automatic space insertion.
- \# Store the log record.
- \A Takes the last word in the Morse buffer and compares it against the calls in your log. Abort message if a previous QSO with the station is found, otherwise start a new log record for this call and continue the message. Typically used in contest exchanges, as illustrated further down.
- \B Break (interrupt) the message. The ‘.’ (decimal point) key on the keypad allows you to resume the message after the break. A message can also be interrupted at any point by just tapping the paddle or pressing a keypad key. If you are using a keyboard you can enter text into the type-ahead buffer while the message that contains the \B is being transmitted. When it reaches the \B, the contents of the type-ahead buffer will be inserted, and the message will automatically resume. Think of the B as a mnemonic for Buffer in that case (rather than Break)
The CW Machine V. 4.2 42
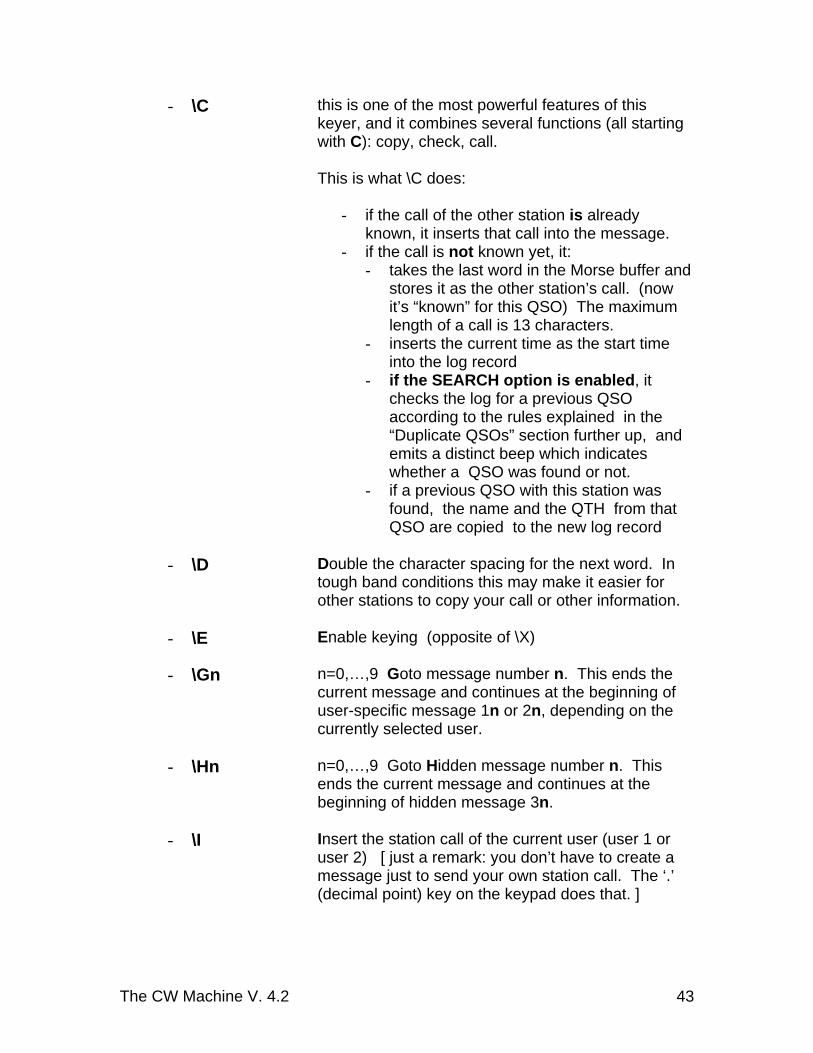
- \C this is one of the most powerful features of this keyer, and it combines several functions (all starting with C): copy, check, call. This is what \C does:
- if the call of the other station is already known, it inserts that call into the message.
- if the call is not known yet, it: - takes the last word in the Morse buffer and
stores it as the other station’s call. (now it’s “known” for this QSO) The maximum length of a call is 13 characters.
- inserts the current time as the start time into the log record
- if the SEARCH option is enabled, it checks the log for a previous QSO according to the rules explained in the “Duplicate QSOs” section further up, and emits a distinct beep which indicates whether a QSO was found or not.
- if a previous QSO with this station was found, the name and the QTH from that QSO are copied to the new log record
- \D Double the character spacing for the next word. In
tough band conditions this may make it easier for other stations to copy your call or other information.
- \E Enable keying (opposite of \X)
- \Gn n=0,…,9 Goto message number n. This ends the current message and continues at the beginning of user-specific message 1n or 2n, depending on the currently selected user.
- \Hn n=0,…,9 Goto Hidden message number n. This ends the current message and continues at the beginning of hidden message 3n.
- \I Insert the station call of the current user (user 1 or user 2) [ just a remark: you don’t have to create a message just to send your own station call. The ‘.’ (decimal point) key on the keypad does that. ]
The CW Machine V. 4.2 43
- \Jn n=0,…,9 Jump to hidden message number n if a previous QSO is in the log. If a previous QSO is found this ends the current message and continues at the beginning of hidden message 3n, otherwise the command is ignored.
- \Knnn Keydown for nnn seconds up to a maximum of 255 seconds. The real time clock is used to count the seconds. The actual keydown time may be up to one second shorter and will never exceed nnn seconds. This command can be used for beacon operations or measurement sequences which require a keydown period. In combination with the \W command it could also be used to create really slow QRSS signals. The character C, e.g., with a speed of 5 mpw (minutes per word = 0.2 wpm) would be created by:
\W1\K18\W6\K6\W6\K18\W6\K6\W18
(the leading \W1 makes sure that the keydown starts at the next full second of the real time clock and is the full 18 seconds)
- \L insert the QTH (Location) of the current user
- \M insert the name (My name) of the current user
- \N insert the Name of the other operator. It could be known from a previous QSO with this station or have been entered during the current QSO using the + (plus) key on the keypad. If no name is known, or the internal name field does not start with a letter, the word OM will be sent. .
- \O Insert the call of the current Operator (operator 1 or operator 2)
- \P[s] Insert the text string s into the message if a previous QSO is in the log. A ‘_’(underscore) in the string is replaced with a space when it is sent, so that it can contain several words. For example \PGLD_TO_HEAR_U_AGN would send GLD TO HEAR U AGN if you have a previous QSO with the current station in the log.
The CW Machine V. 4.2 44
- \Q[s][%] insert the QTH of the other station, embedded in the optional string s if the QTH is known; otherwise the command is ignored. A ‘_’(underscore) in the string is replaced with a space when it is sent; so that it can contain several words. A “%” in the string marks the place where the QTH should be inserted; if no “%” is found, the QTH is appended to the end of the string. For example, \QHW_IS_WX_IN%TODAY? would send HW IS WX IN DALLAS TODAY? if the QTH of the other station is DALLAS.
- \R[nnn] Repeat message after a delay of nnn seconds up to a maximum of 255 seconds. The actual delay may be up to one second shorter and will never exceed nnn seconds. If 255 seconds is not long enough, you can precede the \Rn with one or more \W commands to create very long delays. If \Rn is used in a hidden message, it will start the repetition at the beginning of the hidden message. A repeated message can be interrupted with the keyboard. If nnn is not specified or 0, the last word that was sent is repeated once. This is often used for a dedicated “repeat word” key on the keypad.
- \S insert current Serial number. Serial numbers are sent with at least 3 digits. 0 (zero) is sent as T. (9 is not sent as a N)
- \T set current Time as the start time into the log record. This is identical to pressing ‘*’ and ‘.’ on the keypad in succession.
- \U speed the next word Up by about 30% (typically used in contest exchanges for 5NN and TEST)
- \Wnnn Wait for nnn seconds up to a maximum of 255 seconds. The actual wait time may be up to one second shorter and will never exceed nnn seconds. This can be used for beacon operations or measurement sequences. (see also explanation of the \K command) Using several \W commands in a row can create message delays of any required length.
The CW Machine V. 4.2 45

- \X quiet mode (switch keying off) You use this when you know that your typical next action requires keying to be off. Keying can be turned back on by keypad actions, as explained below, or with \E .
- \Y[s][%|&|^|~] insert the Year or date of a previous QSO with the other station, embedded in the optional string s. If no previous QSO was found in the log, the command is ignored. A ‘_’(underscore) in the string is replaced with a space when it is sent; so that it can contain several words. Four different place holder characters, each representing a particular date format, “%”, “&”, “^”, or “~”, mark the place where the date or year should be inserted. A “~” formats the date as YYYY-MM-DD, a “&” formats the date as DD.MM.YYYY, a “^” formats the date as MM/DD/YYYY, and a “%” inserts only the year as YYYY. If no place holder character is found in the string, then the year is appended to the end of the string as YYYY. For example, if the last QSO was on May 14, 2007, the command \YOUR_LAST_QSO_WAS_IN would send OUR LAST QSO WAS IN 2007, and the command \YON^WE_HAD_A_QSO would send ON 05/14/2007 WE HAD A QSO.
- \Z ZAP – reset log record; similar to ‘-‘ (minus) key on the keypad
These commands may look a little intimidating if you are not a programmer. They constitute a “programming language” that let’s you customize the response of the CW Machine in a way that minimizes actions with the paddle or keypad. Of course, you don’t have to use commands in messages at all. You can build your messages step by step, adding commands later as you become more familiar with their use.
The CW Machine V. 4.2 46
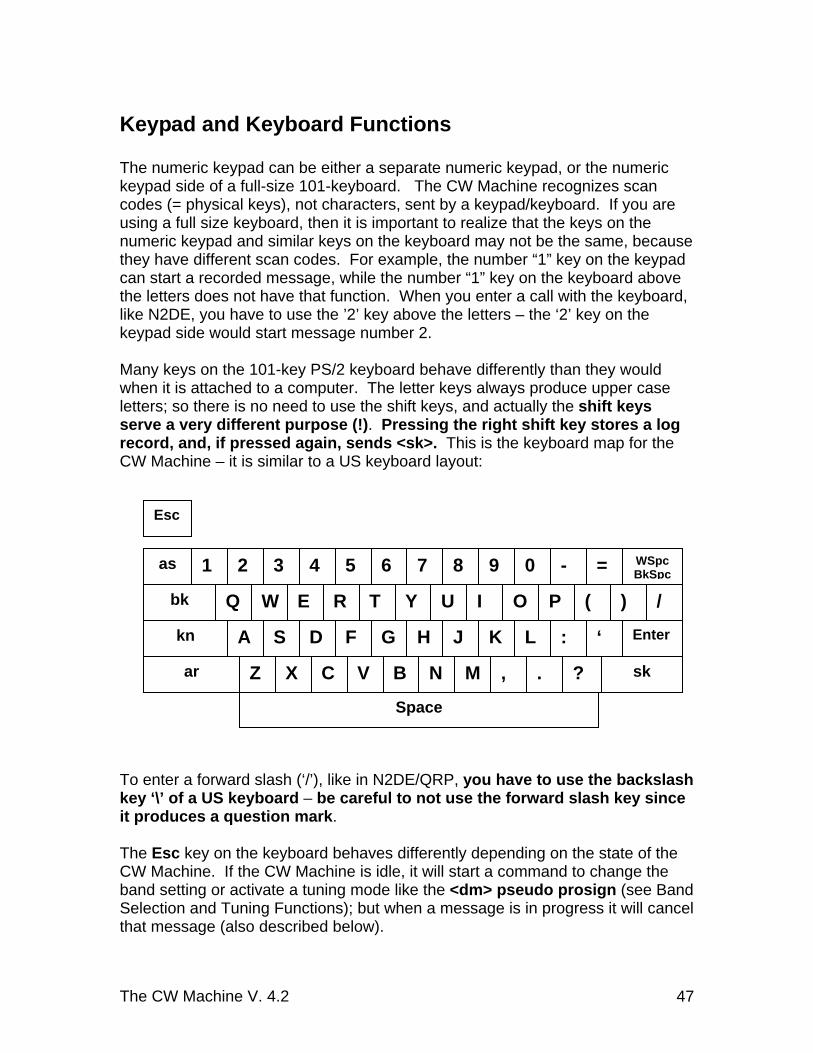
Keypad and Keyboard Functions The numeric keypad can be either a separate numeric keypad, or the numeric keypad side of a full-size 101-keyboard. The CW Machine recognizes scan codes (= physical keys), not characters, sent by a keypad/keyboard. If you are using a full size keyboard, then it is important to realize that the keys on the numeric keypad and similar keys on the keyboard may not be the same, because they have different scan codes. For example, the number “1” key on the keypad can start a recorded message, while the number “1” key on the keyboard above the letters does not have that function. When you enter a call with the keyboard, like N2DE, you have to use the ’2’ key above the letters – the ‘2’ key on the keypad side would start message number 2. Many keys on the 101-key PS/2 keyboard behave differently than they would when it is attached to a computer. The letter keys always produce upper case letters; so there is no need to use the shift keys, and actually the shift keys serve a very different purpose (!). Pressing the right shift key stores a log record, and, if pressed again, sends <sk>. This is the keyboard map for the CW Machine – it is similar to a US keyboard layout:
Esc
To enter a forward slash (‘/’), like in N2DE/QRP, you have to use the backslash key ‘\’ of a US keyboard – be careful to not use the forward slash key since it produces a question mark. The Esc key on the keyboard behaves differently depending on the state of the CW Machine. If the CW Machine is idle, it will start a command to change the band setting or activate a tuning mode like the <dm> pseudo prosign (see Band Selection and Tuning Functions); but when a message is in progress it will cancel that message (also described below).
1 2 3 4 5 6 7 8 9 0 - =
Q W E R T Y U I O P ( ) /
WSpcas BkSpc
bk
A S D F G H J K L : ‘ kn Enter
Z X C V B N M , . ? ar sk
Space
The CW Machine V. 4.2 47
When you start typing on a keyboard and you are not in silent mode (see the description of the NumLock key below) the CW Machine will start transmitting. Your keystrokes will be entered into a 100-character type-ahead buffer; so if you are not typing much faster than the actual transmission speed you will never exhaust that buffer (if you do, there is a beep and the keystroke is not accepted), and you will send perfectly timed CW even if your typing speed is uneven. When you type on the keyboard in silent mode (keying off), the key strokes are entered into the Morse buffer without being sent. You can use this feature, e.g., to check the log for a call without sending that call and several other functions. The Backspace has two functions. If you use a paddle to send text it toggles the automatic insertion of word spaces, allowing you to keep words together even if you hesitate a bit. Some numeric keypads also have a backspace key, giving you a convenient way to toggle space insertion. The insertion of word spaces can also be disabled with the \_ message command. If you use the keyboard to send text, the Backspace key will send the error signal (8 dits) and erase the last character that you sent from the internal buffer.
Switching the Keying Function On or Off [ NumLock ] This function of the NumLock key is only available in CW mode while the CW Machine is idle. Use the NumLock key of the numeric keypad to toggle the transmitter keying function (toggle quiet mode). When keying is enabled, there is an up-arrow in position 2 of the display. During an ongoing message this key cancels the message as explained further below. You can disable the keying of your transmitter for silent keying practice and other functions that we’ll discuss further down. Since you’ll probably do this frequently while in operational mode, it is done with a dedicated key, and there is no corresponding menu function.
Entering the Name or Other Information [ + ] and [*][+] Pressing the joystick for about 0.25 seconds during a QSO is equivalent to the ‘+’ key. In contest mode, if you are not in a QSO, the ‘+’ key will increment the serial number. This is for situations where you don’t want to use the logger in the CW Machine for your contest log, but you still want to send messages that contain a serial number. If you press the ‘+’ key on the numeric keypad, the last word in the Morse decoder buffer will be stored as the name or QTH in the log record. (Please read the section on the Log again for a more detailed explanation of the logic) You can
The CW Machine V. 4.2 48
do this, without interrupting your flow, while sending a response with the paddle that contains the name or QTH you want to store. As with the call, you can also enter the name or QTH into the Morse decoder buffer in quiet mode or with the keyboard before you press ‘+’. The information immediately stored after the call may not always be the name of the other operator. If it starts with something that is not a letter [A…Z], the \N command in messages will treat it like an empty field and substitute OM for it. You could, for example, store “/EA9AC” in a QSO with EA9EU, and this would be shorthand for “via EA9AC”. As explained above in the section describing the logging logic, pressing the ‘+’ several times during a QSO allows you to store two pieces of information in “round” robin fashion. In contests, where a name is usually not exchanged, you can use both words in the log record to store any two pieces of information that are not just a serial number. Therefore, when a log record that was stored in contest mode, the contents of the first word will always be considered a COMMENT . In non-contest mode the word will be considered as the NAME. The second field in both, contest and non-contest exchanges, will be considered the QTH. In non-contest exchanges the first character of either word can change the tag: if it starts with a ‘/’ (forward slash) it will be shown as QSL_VIA, if it starts with “:” it will be shown as a COMMENT. If the last character that you enter before you hit the ‘+’ (plus) key is the prosign <bt>, represented by the character “=”, then nothing is stored or changed, but the internal “round robin” toggles from storing the name to storing the QTH and vice versa. (as a mnemonic: “=” means “leave the same”) If you have entered a NAME or a QTH and decide that you just want to delete it, enter a question mark (?) with your paddle or the keyboard and hit ‘+’. The “?“ as a last character removes the corresponding item from the log record. An ‘_‘ (underscore ..--.-) will be rendered as a space when the information is exported in ADIF, or the name or QTH are inserted into messages with the \N or \Q commands. This allows you to store information that contains more than one word, separating the individual words by underscores. For example, if you enter RIO_DE_JANEIRO as the QTH with the ‘+’ key, this will be treated as RIO DE JANEIRO. “In flight” it is often impractical to actually send the underscores to keep the words together, and that’s where the ‘*’ prefix key comes in: if you press the ‘*’ (asterisk) key on the keypad immediately before the ‘+’ key, the last two words will be treated as one, just if they were joined by an underscore. If you send LOS ANGELES and then press the ‘*’ key immediately followed by the ‘+’ key, the QTH will be recorded properly. (had you only pressed ‘+’, the QTH would be recorded as ANGELES). This logic works for names, too, so you could store the name JEAN PIERRE either by inserting an undersore and using the ‘+’ key, or without the underscore and pressing ‘*’ and ‘+’ in succession.
The CW Machine V. 4.2 49
Entering the Sent Signal Report for SSB [ NumLock ] This function of the NumLock key is available only in SSB mode. (In CW mode the NumLock key toggles the keying function, which is always off in SSB mode.) Press the NumLock key on the numeric keypad. The screen will go blank, and you can enter the sent RS with the number keys on the numeric pad or the keyboard. It expects 2 digits larger than 0, and the first digit cannot exceed 5. After the last digit, press the Enter key to store the RS. If you press Enter with an empty screen, nothing will be stored. You can clear the screen by pressing the ‘-’ (minus) key on the keypad or keyboard. The log record always defaults to 59 for SSB if you don’t enter a signal report. The sent RST for CW is taken from the data that you send with your paddle – there is no need, or possibility, to enter it with the keypad. In CW mode you don’t have to enter the outgoing signal report since the CW Machine will automatically detect it in your transmission.
Toggling the User [ / ] The keyer supports two “users”. A user has a call, a name, a QTH, and a set of up to 10 stored messages that can be loaded with the Users file as described further up. Often the second user is not really another operator. You could establish yourself as a second user with a set of messages suitable for contest operation, or you could have yourself as a second user with a /QRP suffix and messages for QRP operation, or, maybe, you want a complete set of messages in another language. The current user is shown by a small number in the top-row of the LCD display. If you are not in contest mode you can change the user instantaneously with the ‘/’ (forward slash) key on the keypad. If you want to change the user in contest mode, the log buffer has to be empty, otherwise this key enters the received serial number.
Entering the Received (Serial) Number [ / ] This function of the ‘/’ (forward slash) key is only available in contest mode if the log buffer contains a call, i.e., you have started to log a QSO. If you are between QSOs or you are not using the CW Machine as your logger, it works like in
The CW Machine V. 4.2 50
non-contest mode and toggles between user 1 and 2. Press the ‘/’ (forward slash) key on the numeric keypad. The screen will go blank, and you can enter the received serial number or some other numeric information that you received with the number keys on the numeric pad or keyboard. You can enter up to 6 digits. After the last digit press the Enter key to store the number. If you press Enter with an empty screen, nothing will be stored. If you made a mistake, you can clear the screen by pressing the ‘-’ (minus) key on the keypad or keyboard.
Entering the Received Signal Report [ * ] and more These functions will work if a call sign has been entered, i.e., when you are in a QSO or in edit mode. Press the ‘*’ (asterisk) key on the numeric keypad. The screen will go blank, and you can enter the received RS(T) with the number keys on the numeric pad or keyboard. It expects 3 digits for CW QSOs or 2 digits for SSB QSOs, and the first digit cannot exceed 5. After the last digit press the Enter key to store the RS(T) . If you press Enter with an empty screen, nothing will be stored. The received report for a CW QSO can also be entered into the log by sending the word FR followed by the RST. If you made a mistake, you can clear the screen by pressing the ‘-’ (minus) key on the keypad or keyboard. The log record always defaults to 599 for CW and 59 for SSB if you don’t enter a signal report. In addition to the function of entering the received RS(T), the ‘*’ key has additional functions to control the log record if it is succeeded by other keys:
if you press the ‘*’ key twice in succession, this will reset the round robin pointer which determines whether information entered with the ‘+’ key is treated as the name or the QTH. (see description of the ‘+’ key) After the ‘*’ ‘*’ key combination the round robin will be repositioned on the name. This is for situations where you used the ‘+’ key several times during a QSO and lost track of the round robin position.
if you follow the ‘*’ key with the ‘/’ key, i.e., you enter ‘*’ ‘/’ in succession, the round robin for information entry will be positioned on the QTH.
if you follow the ‘*’ key with the ‘+’ key, i.e., you enter ‘*’ ‘+’ in succession, the last two words in the Morse buffer will be entered as one piece of information. (see description of the ‘+’ key)
if you follow the ‘*’ key with the ‘.’ Key, i.e., you enter ‘*’ ‘.’ In succession, the current time will be inserted into the log record as the QSO start time. This is identical to the \T command in messages. This is for situations where you may have entered the call of the other station, e.g. that rare DX, long before you actually had a chance to start the QSO.
The CW Machine V. 4.2 51
Entering Command Mode and Changing the Band [ * ] If no call sign has been entered, i.e., you are not in a QSO and not in edit mode, then pressing the ‘*’ (asterisk) key is identical to sending the <dm> pseudo-prosign with your paddle. This is mainly useful if you prefer changing the band with the keypad instead of the paddle. In command mode the number keys on the numeric keypad do not start messages but are interpreted as numbers, and the Enter key on the keypad is treated as the letter M. So, to change to the 17m band you would press *17, and to change to the 6m band you would press *6<Enter>. For the 160m band you enter just the first two digits *16. These operations are fully described further up in the section on the <dm> pseudo prosign.
Starting or Queuing a Message [ 0 … 9 ] This function is only available in CW mode. Pressing a number key on the numeric keypad starts the corresponding message. If no message corresponding to that number was loaded with a Users file or with the CW Machine Manager program, nothing will happen. In (mobile) operation without a keypad message 0 can also be started by the <dm> 0 paddle command. If you press one or several number keys while a message is still in progress, or you type text on the keyboard, the corresponding text will be appended after the current message ends or at the point of a break (\B) command in the current message. A message will automatically resume after a \B when all inserted text has been sent. An exception are messages with a repeat (\R) command which can be interrupted by the keypad or keyboard.
Interrupting and Resuming a Message [ . ] A message can be interrupted by tapping either side of the paddle or by pressing the ‘.’ (decimal point) key on the keypad. These two types of interruption allow you to resume the message by pressing the ‘.’ (decimal point) key on the keypad again. You can also interrupt a message by pressing the ‘-’ (minus) or NumLock key on the keypad, or the ESC key on the keyboard, but you will not be able to resume at the point of interruption in that case. This function is only available in CW mode.
The CW Machine V. 4.2 52
A “message” in this context means either a stored message that was started with one of the number keys on the keypad, or some text that was sent from the type ahead buffer. If you start another message after a message has been interrupted, e.g., by a \B command, the first message cannot be resumed; messages cannot be nested.
Sending Your Own Station Call [ . ] In addition to interrupting and resuming messages, the ‘.’ key on the keypad has a third function: if you’re not in a state where a message has been interrupted, it will send your station call. This is handy in pileups where you just want to inject your call and in other instances where you want to send your call. This function is only available in CW mode.
Starting the 10 Minute Id Timer [ . ] In SSB mode the Morse functions of the ‘.’ (decimal point) key are not enabled. Instead it is used to start a 10 minute id timer. The countdown is started when you hit the ‘.’ (decimal point) key, and it will ring an alarm every 10 minutes from then on. If you hit the ‘.’ key during a countdown period, it starts again with 10 minutes on the clock. The countdown is cancelled if you use the keypad/keyboard or the paddle, and you will have to restart it with the ‘.’ (decimal point) in that case.
Cancelling Messages and Clearing the Log [ -, ESC, NumLock] The ‘-‘ (minus) key or the NumLock key on the keypad, or the ESC key on the keyboard will stop an ongoing message. Unlike the ‘.’ (decimal point) key these keys will not allow you to resume the message at the point of interruption. The ‘-‘ (minus) key will also clear the current log record. Think of it as the “C” key that you have on calculators. It is important to use the ‘-’ (minus) key if you have entered information for a QSO, say the call and the name/QTH, and decide to abort that QSO without storing it. If you just enter a new call with the Enter key, the old QSO information would still be in the log record and only the call would be replaced, and the previous name/QTH could be stored with the wrong call. In (mobile) operation without a keypad the <dm> Z paddle command performs the same function as the minus key on the keypad.
The CW Machine V. 4.2 53
The Numlock key or the ESC key just stop an ongoing message and erase the checkpoint for messages in progress; so you cannot resume the message with the ‘.’ (decimal point) key on the keypad, but they leave the log record intact. Pressing the ‘.’ (decimal point) key on the keypad will send your call after you have pressed ESC or NumLock to stop a message. When entering signal reports or serial numbers, pressing the ‘-’ (minus) key will only clear the screen and not affect the other entries. In QSO edit mode the ‘-‘ (minus) key has a special function: it stores the (modified) QSO information back into the log, just like <sk> or pressing a Shift key on a full keyboard would.
Entering and Checking the Call of the Other Station [ Enter ] When you press the Enter key (either on the numeric pad or the keyboard), the last word in the Morse decoder buffer will be taken as the call of the other station and, if the SEARCH option is enabled or keying is off, it is checked against the log. In addition, this moment will be recorded as the QSO start time in the log record. If a non-contest QSO is already in progress, the Enter key just changes the call without affecting anything else in the log record that is not yet stored. The maximum length of a call is 13 characters, and the first 13 characters of the last word will be used if it is longer. This is similar to the function of the \C command in messages, and to the function that is automatically performed when automatic logging is enabled (A-LOG). You can do this, without interrupting your flow, while sending a response with the paddle that contains the call. At the end of the search a specific beep sound will indicate whether a QSO was found or not. If a previous QSO was found, the operator’s name and QTH of the most recent QSO are copied into the current log record. (i.e., the log is searched backwards for a previous QSO) Usually you would use this function to check a call that you are hearing on the air to determine if you already had a QSO with her/him. Since you don’t want to send out the call while you are entering it, you switch to quiet mode (keying off) with the NumLock key, enter the call with your paddle, and press Enter. You could also enter the call using the letter and number keys on the keyboard side of a full-size keyboard. If you are in quiet mode with keying off and you hit Enter, and a match is found, the other operator’s name, QTH, and the date of the previous QSO will be displayed. Pressing any message key will turn quiet mode off (keying on) – so you don’t have to press NumLock again if you want to respond with a recorded message. Since the call is now “known”, it will be inserted in place of the \C in messages from now on.
The CW Machine V. 4.2 54
Toggling Automatic Word Space Insertion [Backspace] The Backspace key which is available on many, but not all, numeric keypads lets you toggle the automatic insertion of word spaces, allowing you to keep words “together” even if you hesitate a bit while sending them, so that the parser for the logger can properly detect them. If your keypad does not have a Backspace key, you can create a messages that contains just the \_ command to create a very similar function. Automatic word space insertion is always turned back on by any keypad key.
Those Multi-Function Keypad Keys … The number keys on the keypad are disabled in SSB mode since they only provide Morse code functions. All but three of the other keys on the numeric keypad have the same function regardless of the operational mode of the keyer. Since there are not quite enough keys to support all necessary functions, four of the keys, the two top left keys on the keypad, NumLock and ‘/’ (forward slash), the ‘.’ (decimal point), and the ‘+’ (plus) change roles with the operational mode. In CW mode, the sent RST is recognized automatically in your outgoing transmission. That obviously cannot be done in SSB, and therefore we have to use a key to enter the report. Since the keying on/off function is meaningless in SSB – it’s always off – the key that toggles it in CW mode, NumLock, is used in SSB mode to enter the RS signal report of the other station. The functions of the ‘.’ (decimal point) to send your call or to stop and restart messages are not meaningful in SSB mode. In SSB Mode it starts the 10 minute id timer instead, as explained above. In contest mode a received serial number must often be entered. The key that normally toggles the user, ‘/’ (forward slash), is used for that purpose. If the QSO buffer is empty in contest mode, i.e., you are between QSOs or you are not using the CW Machine as a logger, then this key will toggle the user just like in non-contest mode. If you are not using the CW Machine as a contest logger, but you still want to embed automatic serial numbers into your messages, you need a way to increment the serial number. This is done with the ‘+’ (plus) key. The log buffer has to be empty, otherwise this would add information to the log record.
The CW Machine V. 4.2 55
Embedding of Messages When you type some text on the keyboard into the type-ahead buffer, and you hit one of the number keys on the numeric keypad that start a message, or the [Enter] key or the [+] key which have other functions described above, the corresponding action will be performed when that point in your outgoing message has been reached. In other words, you can embed a recorded message into a message that you are typing in by using a number key on the numeric pad. After that embedded message has ended, the transmission will continue with more text from the type-ahead buffer. Conversely, the \B command in recorded messages allows you to insert typed text into a recorded message. If you start a message that has a \B in it by hitting a number key on the numeric keypad, and you then proceed by typing text into the type ahead buffer while the first part of the message (before the \B) is being sent, your typed text will be inserted at the point of the \B, and the transmission will then continue with the remainder of the recorded message after the \B. Two typical examples illustrate this:
1. Assume you have the following recorded message assigned to the [2] on the numeric keypad: T U FR QSO = UR RST \B = SO HW? You hit [2] and the CW Machine starts sending T U FR QSO … While the first part of the message is being transmitted you enter 579 579 on your keyboard, which will be automatically inserted at the point of the \B before the message continues. So the combined result will be: T U FR QSO = UR RST 579 579 = SO HW?
2. Assume you have the following recorded message assigned to the [8] on the numeric keypad: \N It contains just one command as explained further up, and hitting the [8] will send the name of the other operator if it is known, or the letters OM. Assume that you are in a QSO with Fred, KT5X, and his name is already recorded (either in the log or with the [+] as explained above) You then start typing the following message: ([8] means the 8-key on the numeric keypad) HELLO [8] = T U FR QSO The action defined by the [8] will be performed at the appropriate point in the typed message, so the combined result would be: HELLO FRED = T U FR QSO
The CW Machine V. 4.2 56
At any point these messages can be interrupted by the [.] (decimal point) on the keypad or by tapping your paddle, and they can be resumed with the [.] (decimal point) on the keypad. You can easily see that the combination of all these functions lets you create templates for QSOs which can be filled “in flight” to result in a truly customized QSO with the minimum number of keystrokes.
The CW Machine V. 4.2 57
On the Air This keyer has many functions, and in all probability you’ll discover ways to use it that I haven’t thought about. The following examples are meant to give you an idea of the possibilities. Without a doubt, you can develop messages that let you minimize and customize your actions in a way that suits your style. What we are really doing with a Users file is programming the keyer. In most cases there are several solutions, and in some cases probably even better solutions than what I am suggesting here. Actions on the keypad are denoted by enclosing the key(s) in [] - so [1] means that you press the ‘1’ on the keypad (don’t enter the square brackets!), and [/ 569 Enter] means that you enter the sequence ‘/569’ followed by the Enter key on the keypad. Characters that you enter with your paddle or keyboard are capitalized.
Non-Contest Usage This is a fragment of a Users file that could be used for non-contest style QSOs. It is used in the following examples to illustrate the operation of the keyer. <Call1>n2de <Name1>Ulrich <QTH_1>Lagrange,-NY <Msg10>\zcq cq cq dx de \i \i cq cq cq dx de \i \i + dx k \r8 <Msg11>\c\t de \i = t u fr qso dr \n \j0 = \h1 <Msg14>> de \i \b \c de \i ( <Msg15>\c de \i = t u fr nice qso dr \n = 73 gl es hpe to cuagn = \c de \i + #\# <Msg16>> de \i t u ur 5nn in ny qsl? > \x\b\# <Msg17>\c de \i \i k \x <Msg30> es gld to meet u agn = \h1 <Msg31>ur rst \b= my name is \m \m es qth is \L \L = so hw? \c de \i ( QSO with You Calling CQ You start by pressing [0], which invokes Msg10 and sends CQ DX in a continuous loop with 8 second breaks to listen for responses. Let’s assume EA2BQ, Tony, responds to your call, and you have met Tony before (i.e., he is in the log already). You interrupt the CQ loop by tapping your paddle and respond: EA2BQ [1]
The CW Machine V. 4.2 58

Which results in a “match” beep (because a match is found in the log) followed by the first part of Msg11, which then transfers to Msg30 because of the match, and Msg30 chains to Msg31: (you could also have used the \p command …) ea2bq de n2de = t u fr qso dr tony es gld to meet u agn = ur rst You fill in the RST with your paddle and resume Msg31 which was interrupted by \b: 579 579 [.] Which results in: 579 579 = my name is ulrich ulrich es qth is lagrange, ny lagrange, ny = so hw? ea2bq de n2de <kn> The logic in the keyer recognizes the 579 that you entered as the outgoing signal report. (… if it is one word without intervening blanks !) Tony responds and gives you a report of 589, which you enter into your log: [* 589 Enter] At this stage all the information for the log has been collected. You respond to him: [4] Which results in: <bk> de n2de You now continue with whatever you want to tell Tony, ending each round: [.] Which results in: ea2bq de n2de <kn> and eventually you reach the final exchange: [5] Which results in:
The CW Machine V. 4.2 59
ea2bq de n2de = t u fr nice qso dr tony = 73 gl es hpe to cuagn = ea2bq de n2de <ar> <sk> The # in the message sends <sk> and the \# stores the QSO. As you can see, the typical framework of a casual QSO and a log entry are created with very little effort on your part. QSO with You Responding to a CQ Let’s use the same Users file that we used for the previous example and see how we would respond to a CQ of a station that we contact for the first time. You hear DJ8GN calling CQ. At this stage you have two possibilities to proceed:
if you aren’t sure whether you have met him before you could check the log by entering his call in silent mode with the paddle, or with the keyboard: [NumLock] DJ8GN [Enter] This enters his call for subsequent messages and searches the log. We assume the search comes up empty since we haven’t met him before. If we had met him before, his name and the date of the most recent QSO would be displayed.
or you could answer his call right away: DJ8GN [7] Which results in: dj8gn de n2de n2de k This enters his call for subsequent messages and searches the log. If we had met him before, the keyer would emit a “match” beep, however, in our scenario, just a single beep. Also, the current time is recorded as the start time for the QSO (this is a bit premature and will be overwritten later on). If he never responds to you, you’ll have to clear this information: [-]
Let’s assume that DJ8GN responds and gives you a report of 579 and tells you that his name is Peter and his QTH is Hamburg. You enter that information for the log:
The CW Machine V. 4.2 60
[* 579 Enter] PETER[+] HAMBURG[+] The final \x in Msg17 has put you into quiet mode. So the PETER and HAMBURG that you enter with your paddle will not go out on the air but just be entered into the Morse decoder buffer, so that the [+] can pick it up and put it into the log as the name and QTH. An alternative approach would be to not use quiet mode but respond to him with a transmission that contains his name, QTH, and your RST, and, at the very moment you have sent the name/QTH, hit [+] “in flight” – this would also record his name and QTH and your RST in the in the log: t u fr qso dr peter[+] and my 57n from hamburg[+] Let’s assume, however, you have entered the information in quiet mode and respond with: [1] Which results in: dj8gn de n2de = t u fr qso dr peter = ur rst Activating a message terminates quiet mode, so this actually goes out. The actual QSO start time has now been recorded by the \t in Msg11, and it’s waiting for you to enter the signal report, say 579: 579 [.] Which results in: 579 = my name is ulrich ulrich es qth is lagrange, ny lagrange, ny = so hw? dj8gn de n2de <kn> Again, the keyer has collected all information for the log at this point, and you can proceed as in the previous example. Jumping into a Pile-Up Again, let’s assume we have the same Users file used in the first example, and we hear A61Q on the air with the predictable pile-up. We inject our call at strategic points into the noise: [.]
The CW Machine V. 4.2 61
(Having been on the other end of a pile-up of that sort, I usually didn’t like the guys who tried to dump over everyone else and gave their calls half a dozen times in a row, possibly prefixing it with my call – it’s quite clear whom they are calling, so my call was hardly necessary :-)) Eventually he comes back and gives us a 599. We don’t have to enter that into the log because it’s the default for a new entry. So we just respond: [6] Which results in: <bk> de n2de t u ur 599 in ny qsl? <bk> After he confirms we still have to enter his call into the log and store the log record. He also has said that he accepts QSLs only direct, and we want to store that in the log, too. The \x in message Msg16 has put us into quiet mode, so our entering the call and other information will not be transmitted. Let’s enter the call first – this also establishes the current time as the start time for the QSO: A61Q [Enter] Now let’s enter the QSL information and then resume the interrupted Msg16. It just uses \# to quietly store the log record without sending <sk>. /DIRECT[+ .] This information is entered into the log with [+]. We start it with a ‘/‘ so that this will be shown in the ADIF log as QSL_VIA and not as NAME. If we meet him again at a later time, the \N command in our messages will substitute OM for his name, and not /DIRECT, which would be unintentionally funny. The ‘/’ has logic that prevents that there is a space after it, even if you pause longer after the ‘/’, to make sure that /DIRECT stays a single word in the buffer. During this QSO we have not entered a name. The consequence is that, if we meet A61Q again some time later and use the \n parameter in our opening message, it would be substituted by OM, and the display of the previous QSO would show /DIRECT. In such a situation, if OM were not appropriate, or we actually had his name, we could also store XYL or AMIGO or FRD or his actual name in the name field with a first [+], and the /DIRECT with a second [+].
The CW Machine V. 4.2 62
Contest Usage Contests consist of short, formalized exchanges that can be highly automated with this keyer. The exchange, of course, differs with the contest, and you’ll have to create a specific Users file (or profile in the CW Machine Manager) for most occasions. You may also want to export your current (non-contest) log to your PC for later restoration and reset the record count, i.e., delete the log, and reset the serial number to 1. And, of course, you must switch the CONTST option on. Let’s load a Users file that is suitable for a generic contest where a report and serial number are exchanged, and every station may be contacted once on every band. If we make this for user 2, then the following lines could be in the same Users file as the lines for non-contest usage above: <Call2>n2de <Msg20>\z\utest \i \r3 <Msg21>\c\j0 ur \u5nn \s qsl? >\b> cfm 73 \#\g0 <Msg23>\a \i <Msg24>> ur \u5nn \s qsl? >\b\#\x <Msg30>\z dup + \g0 You Sit on a Frequency If you switched the keyer to user 2 and are sitting on a frequency waiting for callers, your actions with the above Users file would start with Msg20: [0] Which results in an endless loop with 2-3 second breaks to listen: (as explained in the description of \r, the break may actually be 2 seconds, but it is no more than 3 seconds) test n2de You’ll notice that ‘test’ is speeded up by 30% Let’s assume that NØSS is answering, and he has a smart logger that made sure that this is no duplicate call. He is your number 78. So you answer to his call: N0SS [1] Which results in: n0ss ur 5nn t78 qsl? <bk>
The CW Machine V. 4.2 63
Again, 5nn is speeded up. Assume he confirms, and you were his number 91: [/91 Enter .] Which stores 91 as the serial number in your log record, and then responds: <bk> cfm 73 The \# in Msg21 stores the log record, and \g0 resumes your test loop. Actually, for this type of standardized exchange without variation you don’t need a paddle at all. The only thing you entered with the paddle in the above exchange is the call of NØSS. Since the keys on a keyboard also enter letters and numbers into the Morse decoder buffer, you could just enter N0SS on your keyboard, and the results would be the same. Let’s assume that DJ8GO responds to your test call, and somehow he doesn’t have a smart logger that detects that you have worked him before. Again, you would enter his call with the paddle or keyboard: DJ8GO [1] But the response would be: dj8go dup <ar> The \z in Msg30 clears the log record, and the \g0 resumes your test loop. Pretty simple, isn’t it? You Hunt When you are not sitting on a frequency but are hunting, the actions are a little different. You are hearing KT5X and you think that you have not logged him yet. So, enter his call in quiet mode (“off the air”), then press [3]: [NumLock] KT5X [3] The keyer will issue a “match” beep if this is a duplicate, otherwise a single beep will sound, a log entry for KT5X is started, and your call is sent (by the \i in message 23) The \a at the beginning of the message makes sure that your call is not sent if KT5X is a duplicate. You can inject your call until he responds:
The CW Machine V. 4.2 64
[3] Using [3] instead of [.] to inject your call, more specifically the \a in Msg23, makes sure that nothing happens if he’s a duplicate – so your call will not go out and result in a rejection, or, worse, a duplicate that has to be resolved later on. Assume he gives you a serial number of 321, and he is your number 288: [/321 Enter 4] Which results in: <bk> ur 5nn 288 qsl? <bk> If he couldn’t copy that and wants you to repeat, you just hit: [4] It repeats the previous transmission. The serial number is still the same since the log record has not been stored yet. Once he confirms you hit: [.] which stores the log record and puts you back into quiet mode for further hunting. His call was recorded in the log record by the initial search action that confirmed that he’s not a duplicate. If he had been a duplicate, neither your call (Msg23) nor your response (Msg24) would have gone out because they are blocked by the leading \a in both messages. So the initial check for a duplicate is really quite important, but it’s not wasted effort since you would have to enter his call anyway at some time during the exchange. Again, all you really enter with a paddle is the call, and you could do that with the keyboard as well. If you never get a confirmation, and this exchange is not successfully concluded, you’ll have to clear the QSO status with [-]
The CW Machine V. 4.2 65

Non-Numeric Contest Exchanges If the contest does not require the exchange of a serial number, but of some other (non-numeric) information, like a grid locator, e.g., you would use the comment field of the internal log record to store the received information. Remember, you enter something into the comment field by putting it into the decoder buffer with the paddle or the keyboard and then hitting the [+] key on the keypad.
The CW Machine V. 4.2 66
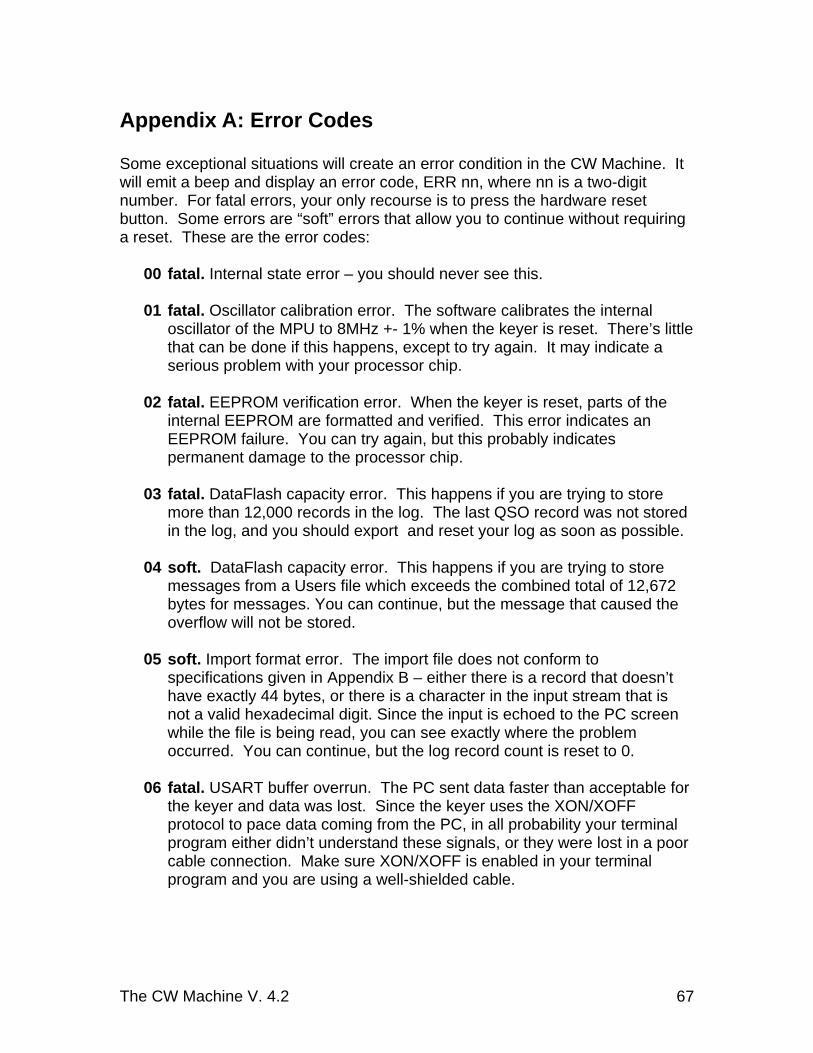
Appendix A: Error Codes Some exceptional situations will create an error condition in the CW Machine. It will emit a beep and display an error code, ERR nn, where nn is a two-digit number. For fatal errors, your only recourse is to press the hardware reset button. Some errors are “soft” errors that allow you to continue without requiring a reset. These are the error codes:
00 fatal. Internal state error – you should never see this.
01 fatal. Oscillator calibration error. The software calibrates the internal oscillator of the MPU to 8MHz +- 1% when the keyer is reset. There’s little that can be done if this happens, except to try again. It may indicate a serious problem with your processor chip.
02 fatal. EEPROM verification error. When the keyer is reset, parts of the internal EEPROM are formatted and verified. This error indicates an EEPROM failure. You can try again, but this probably indicates permanent damage to the processor chip.
03 fatal. DataFlash capacity error. This happens if you are trying to store more than 12,000 records in the log. The last QSO record was not stored in the log, and you should export and reset your log as soon as possible.
04 soft. DataFlash capacity error. This happens if you are trying to store messages from a Users file which exceeds the combined total of 12,672 bytes for messages. You can continue, but the message that caused the overflow will not be stored.
05 soft. Import format error. The import file does not conform to specifications given in Appendix B – either there is a record that doesn’t have exactly 44 bytes, or there is a character in the input stream that is not a valid hexadecimal digit. Since the input is echoed to the PC screen while the file is being read, you can see exactly where the problem occurred. You can continue, but the log record count is reset to 0.
06 fatal. USART buffer overrun. The PC sent data faster than acceptable for the keyer and data was lost. Since the keyer uses the XON/XOFF protocol to pace data coming from the PC, in all probability your terminal program either didn’t understand these signals, or they were lost in a poor cable connection. Make sure XON/XOFF is enabled in your terminal program and you are using a well-shielded cable.
The CW Machine V. 4.2 67
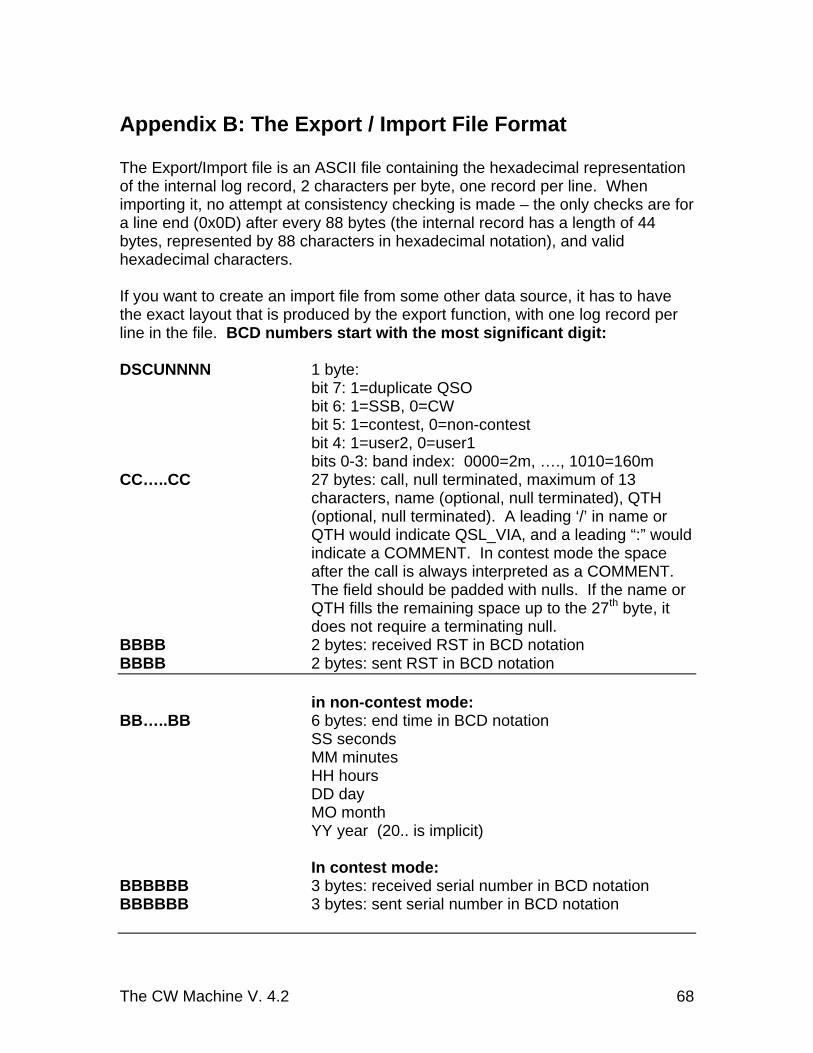
Appendix B: The Export / Import File Format The Export/Import file is an ASCII file containing the hexadecimal representation of the internal log record, 2 characters per byte, one record per line. When importing it, no attempt at consistency checking is made – the only checks are for a line end (0x0D) after every 88 bytes (the internal record has a length of 44 bytes, represented by 88 characters in hexadecimal notation), and valid hexadecimal characters. If you want to create an import file from some other data source, it has to have the exact layout that is produced by the export function, with one log record per line in the file. BCD numbers start with the most significant digit: DSCUNNNN 1 byte: bit 7: 1=duplicate QSO bit 6: 1=SSB, 0=CW bit 5: 1=contest, 0=non-contest bit 4: 1=user2, 0=user1 bits 0-3: band index: 0000=2m, …., 1010=160m CC…..CC 27 bytes: call, null terminated, maximum of 13
characters, name (optional, null terminated), QTH (optional, null terminated). A leading ‘/’ in name or QTH would indicate QSL_VIA, and a leading “:” would indicate a COMMENT. In contest mode the space after the call is always interpreted as a COMMENT. The field should be padded with nulls. If the name or QTH fills the remaining space up to the 27th byte, it does not require a terminating null.
BBBB 2 bytes: received RST in BCD notation BBBB 2 bytes: sent RST in BCD notation in non-contest mode: BB…..BB 6 bytes: end time in BCD notation SS seconds MM minutes HH hours DD day MO month YY year (20.. is implicit) In contest mode: BBBBBB 3 bytes: received serial number in BCD notation BBBBBB 3 bytes: sent serial number in BCD notation
The CW Machine V. 4.2 68

BB…..BB 6 bytes: start time in BCD notation SS seconds MM minutes HH hours DD day MO month YY year (20.. is implicit) For SSB QSOs the reports are only two digits (RS), and they are stored in BCD notation in the second byte. For dates from 1901 to 1999 the high bit in the first digit of the month is set.
The CW Machine V. 4.2 69
The CW Machine V. 4.2 70
Appendix C: The Menu Structure The following pages show a pictorial representation of all menus and functions that you can navigate using the joystick. The rectangular boxes represent a particular state that is shown on the display, the four lines leaving a rectangle correspond to the left – right – up – down movements of the joystick, and the circle on the rectangle represents the push-down action of the joystick.
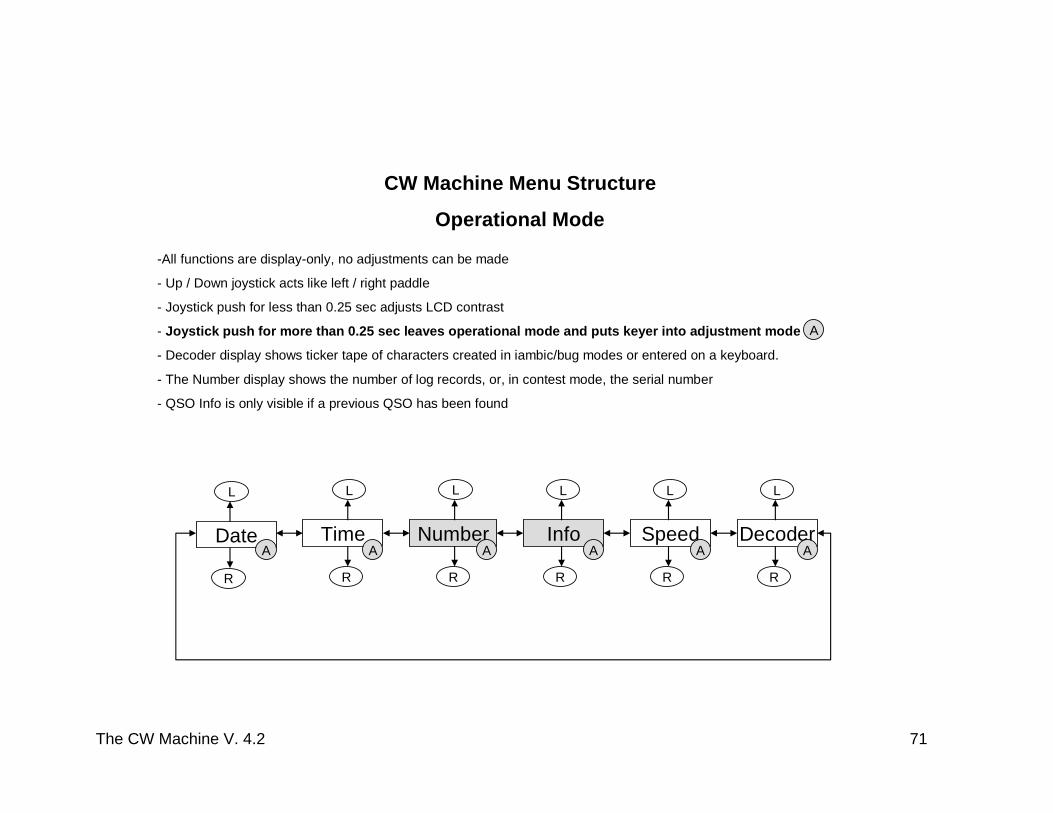
TimeDate Number SpeedAA A A
DecoderA
InfoA
CW Machine Menu Structure
Operational Mode
L
R
L
R
L
R
L
R
L
R
L
R
-All functions are display-only, no adjustments can be made
- Up / Down joystick acts like left / right paddle
- Joystick push for less than 0.25 sec adjusts LCD contrast
- Joystick push for more than 0.25 sec leaves operational mode and puts keyer into adjustment mode
- Decoder display shows ticker tape of characters created in iambic/bug modes or entered on a keyboard.
- The Number display shows the number of log records, or, in contest mode, the serial number
- QSO Info is only visible if a previous QSO has been found
A
The CW Machine V. 4.2 71
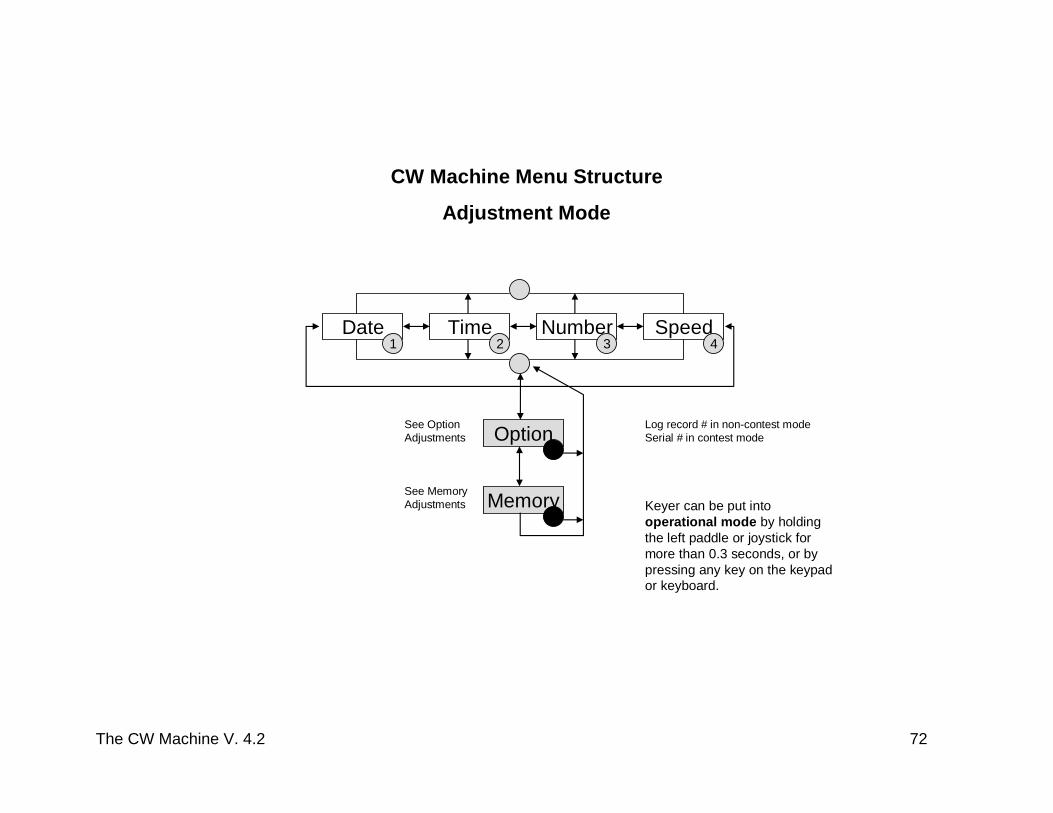
CW Machine Menu Structure
Adjustment Mode
TimeDate Number Speed21 3 4
OptionSee Option Adjustments
MemorySee Memory Adjustments Keyer can be put into
operational mode by holding the left paddle or joystick for more than 0.3 seconds, or by pressing any key on the keypad or keyboard.
Log record # in non-contest modeSerial # in contest mode
The CW Machine V. 4.2 72
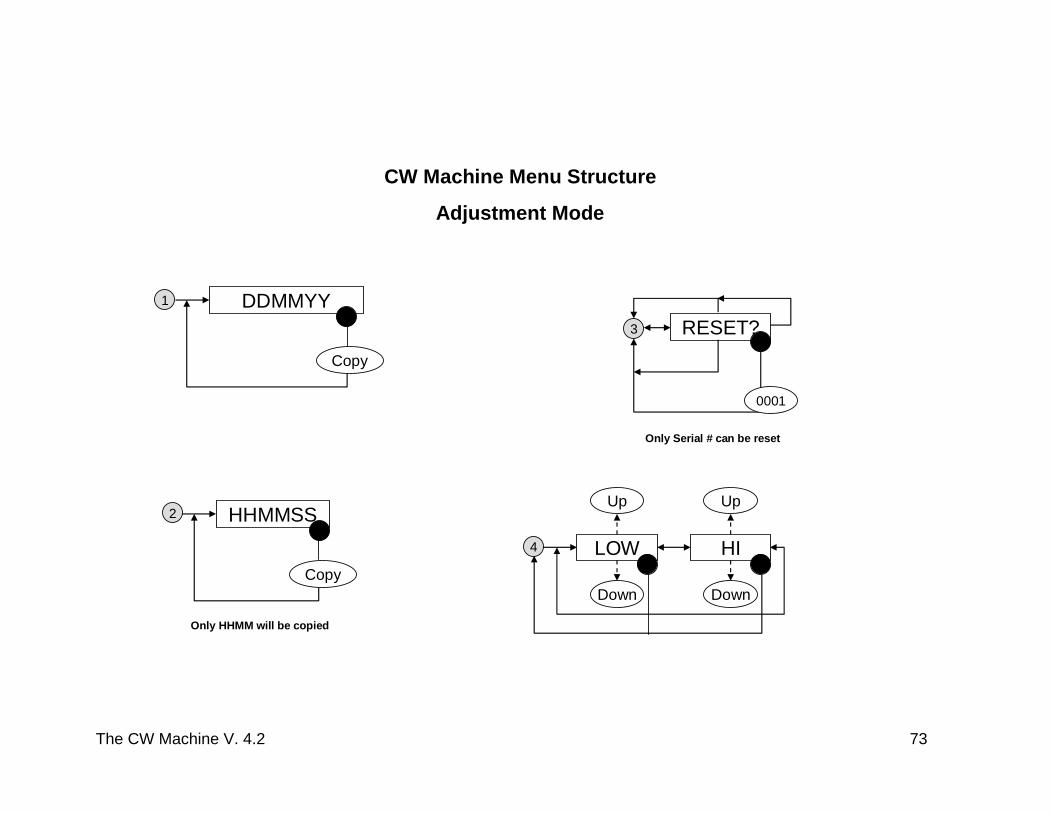
CW Machine Menu Structure
Adjustment Mode
2 HHMMSS
1 DDMMYY3 RESET?
0001
4 LOW HI
UpUp
DownDown
Only Serial # can be reset
Copy
Copy
Only HHMM will be copied
The CW Machine V. 4.2 73
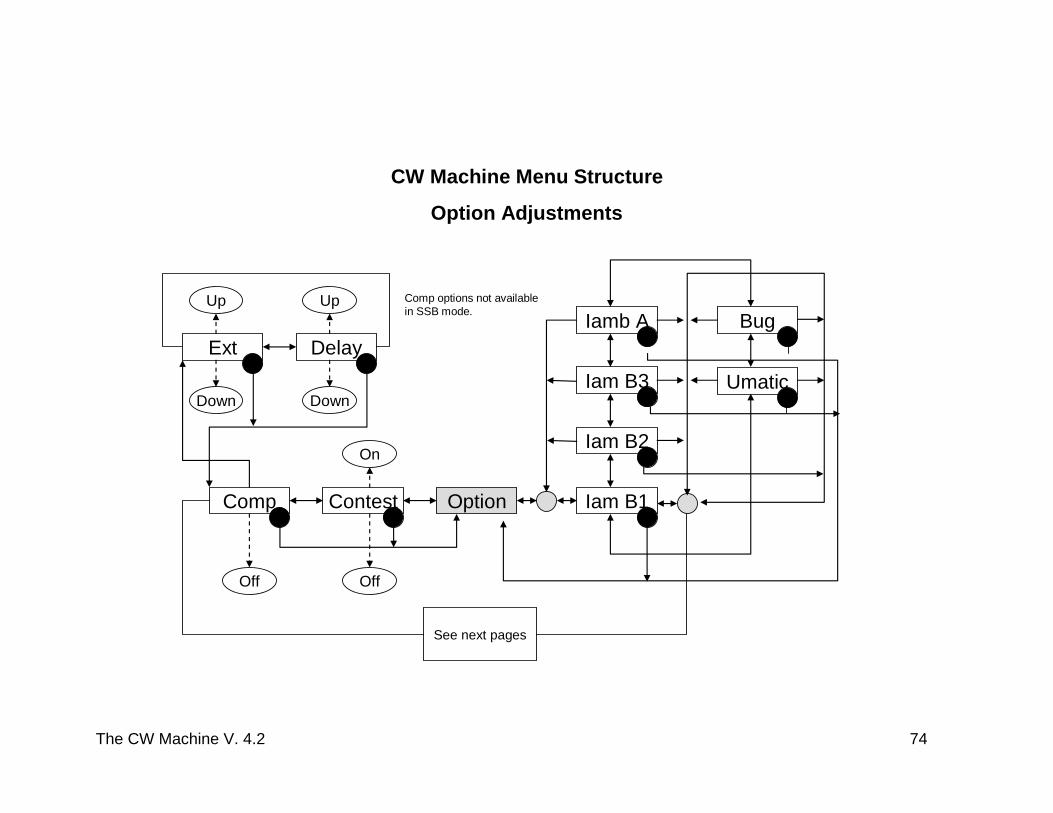
OptionContestComp
CW Machine Menu Structure
Option Adjustments
On
OffOff
Iam B1
See next pages
Ext
Up
Down
Delay
Up
Down
Iam B2
Iam B3
Comp options not available in SSB mode.
Iamb A
Umatic
Bug
The CW Machine V. 4.2 74
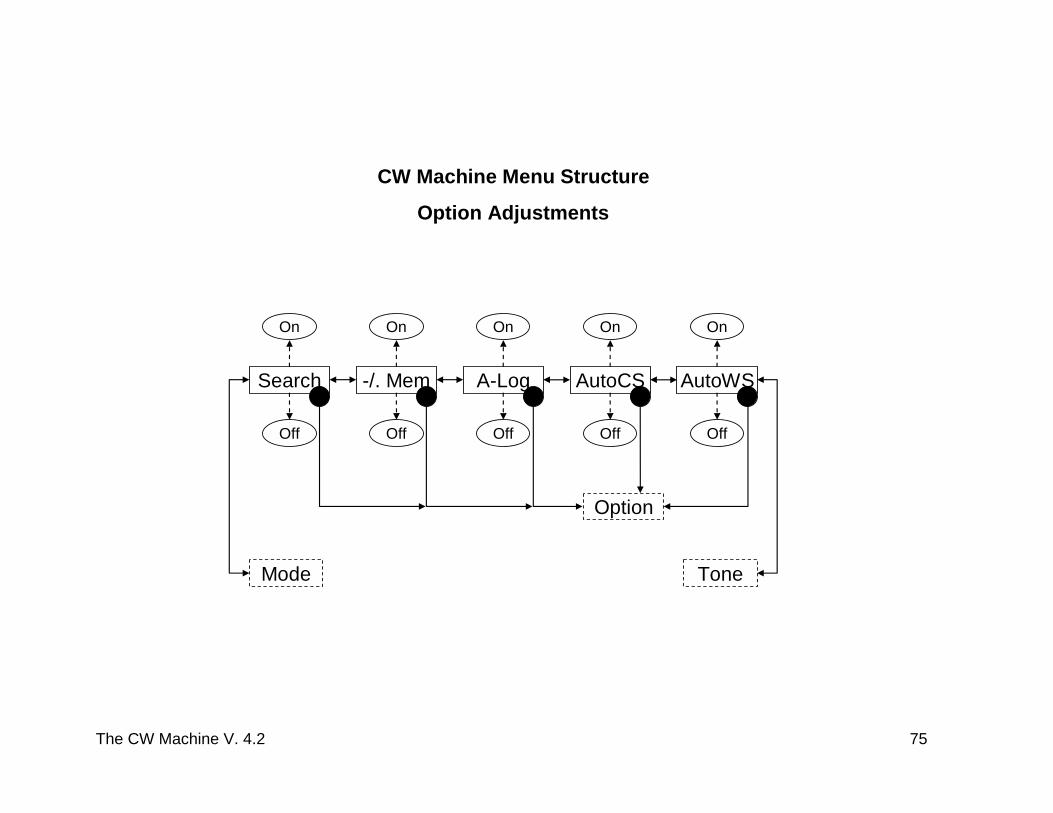
CW Machine Menu Structure
Option Adjustments
A-Log
On
Off
Mode
AutoCS
On
Off
Tone
Option
-/. Mem
On
Off
Search
On
Off
AutoWS
On
Off
The CW Machine V. 4.2 75
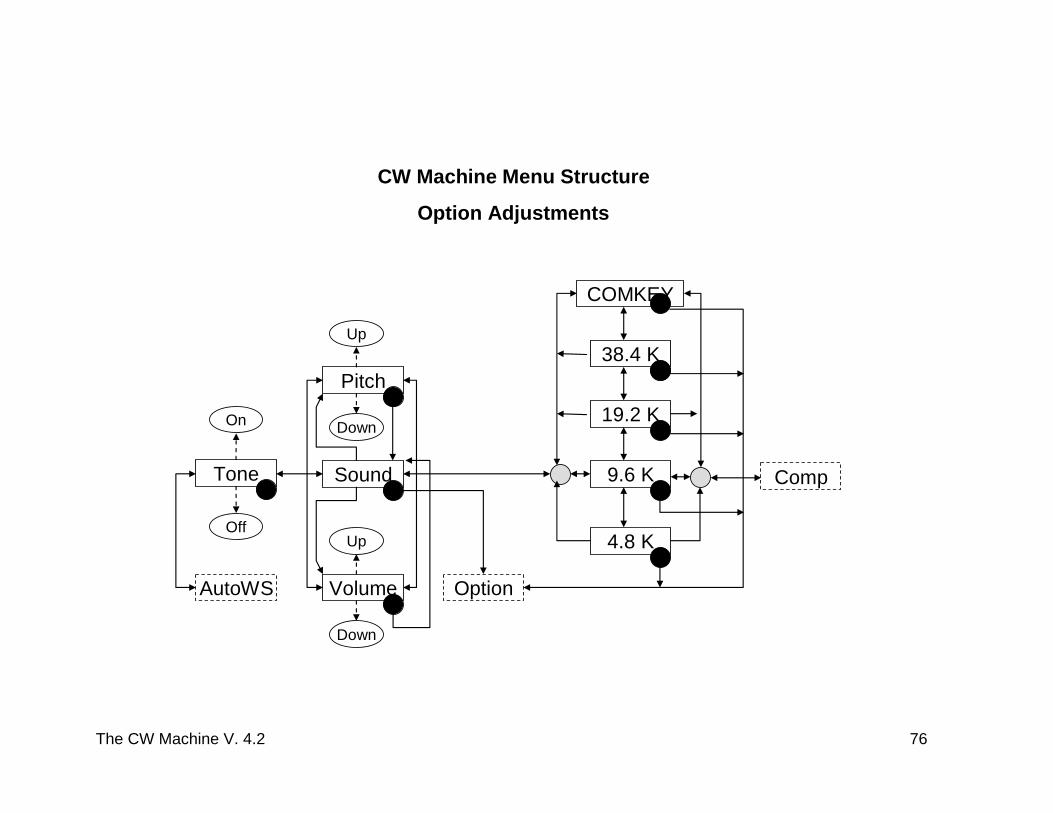
CW Machine Menu Structure
Option Adjustments
AutoWS
Comp9.6 K
4.8 K
19.2 K
38.4 K
OptionVolume
Up
Down
Pitch
Up
Down
SoundTone
On
Off
38.4 K
COMKEY
The CW Machine V. 4.2 76
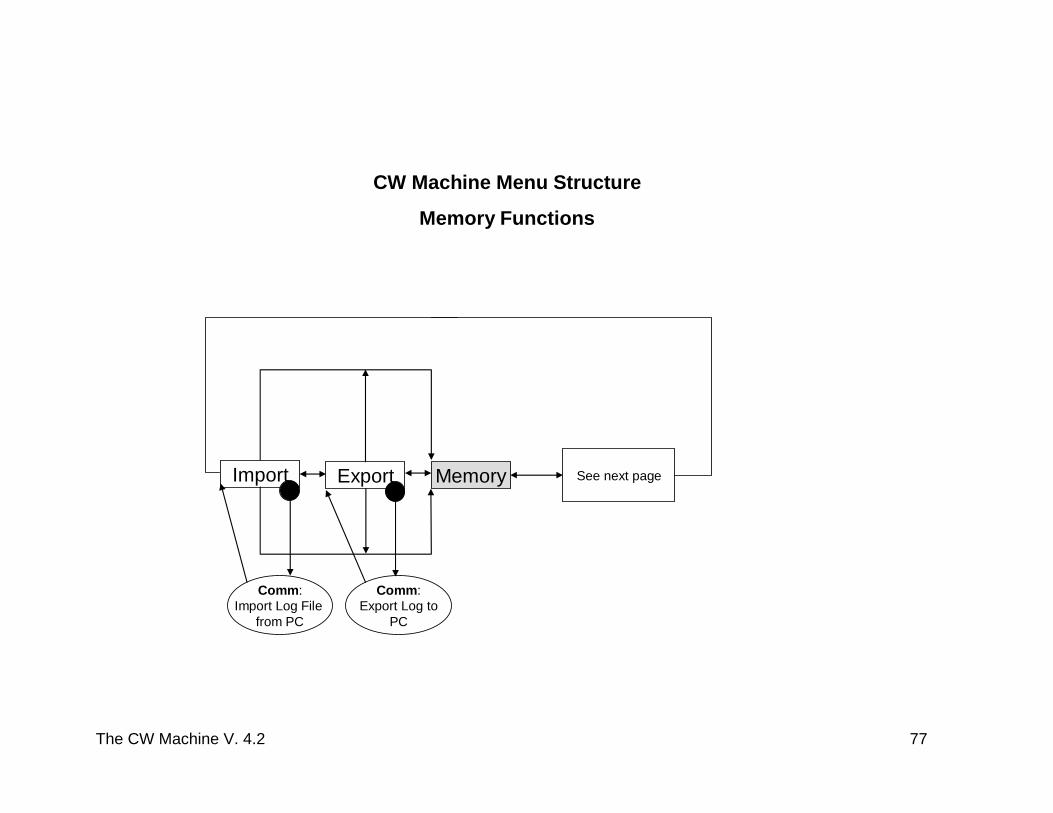
MemoryExportImport
Comm:Import Log File
from PC
Comm:Export Log to
PC
CW Machine Menu Structure
Memory Functions
See next page
The CW Machine V. 4.2 77

The CW Machine V. 4.2 78
Users
Comm:Get User Info
from PC
Records
Erase?
0000
CW Machine Menu Structure
Memory Functions
ImportMemory
Memory