Embed Size (px)
Citation preview
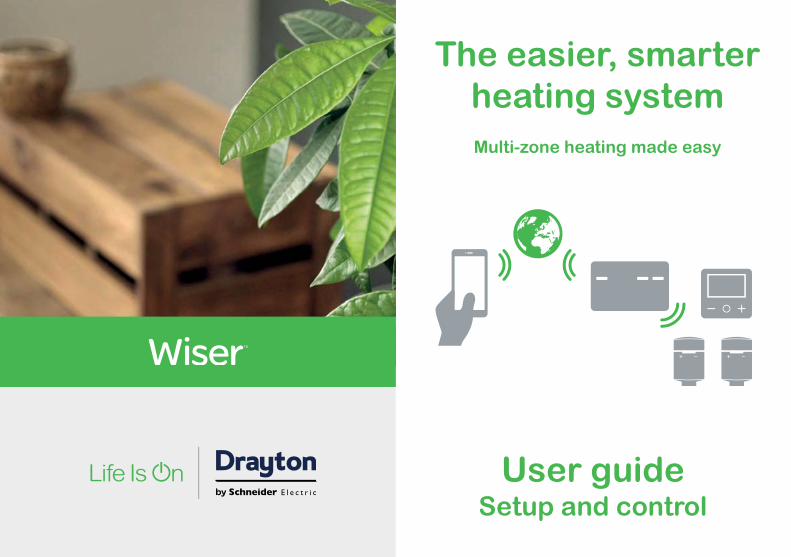
The easier, smarter heating systemMulti-zone heating made easy
User guideSetup and control
2/44
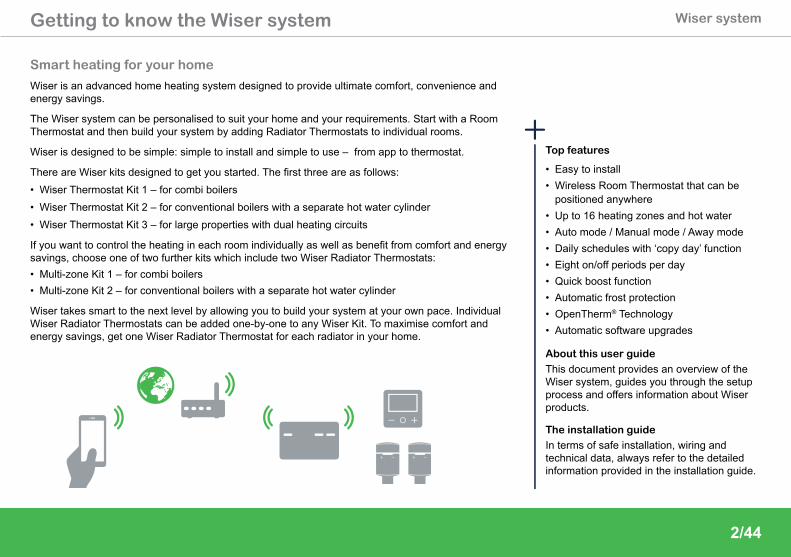
Wiser systemGetting to know the Wiser system
Smart heating for your home
Wiser is an advanced home heating system designed to provide ultimate comfort, convenience and energy savings.
The Wiser system can be personalised to suit your home and your requirements. Start with a Room Thermostat and then build your system by adding Radiator Thermostats to individual rooms.
Wiser is designed to be simple: simple to install and simple to use – from app to thermostat.
There are Wiser kits designed to get you started. The first three are as follows:• Wiser Thermostat Kit 1 – for combi boilers• Wiser Thermostat Kit 2 – for conventional boilers with a separate hot water cylinder • Wiser Thermostat Kit 3 – for large properties with dual heating circuits
If you want to control the heating in each room individually as well as benefit from comfort and energy savings, choose one of two further kits which include two Wiser Radiator Thermostats:• Multi-zone Kit 1 – for combi boilers• Multi-zone Kit 2 – for conventional boilers with a separate hot water cylinder
Wiser takes smart to the next level by allowing you to build your system at your own pace. Individual Wiser Radiator Thermostats can be added one-by-one to any Wiser Kit. To maximise comfort and energy savings, get one Wiser Radiator Thermostat for each radiator in your home.
Top features
• Easy to install• Wireless Room Thermostat that can be
positioned anywhere• Up to 16 heating zones and hot water• Auto mode / Manual mode / Away mode• Daily schedules with ‘copy day’ function• Eight on/off periods per day• Quick boost function• Automatic frost protection• OpenTherm® Technology• Automatic software upgrades
About this user guide
This document provides an overview of the Wiser system, guides you through the setup process and offers information about Wiser products.
The installation guide
In terms of safe installation, wiring and technical data, always refer to the detailed information provided in the installation guide.
3/44
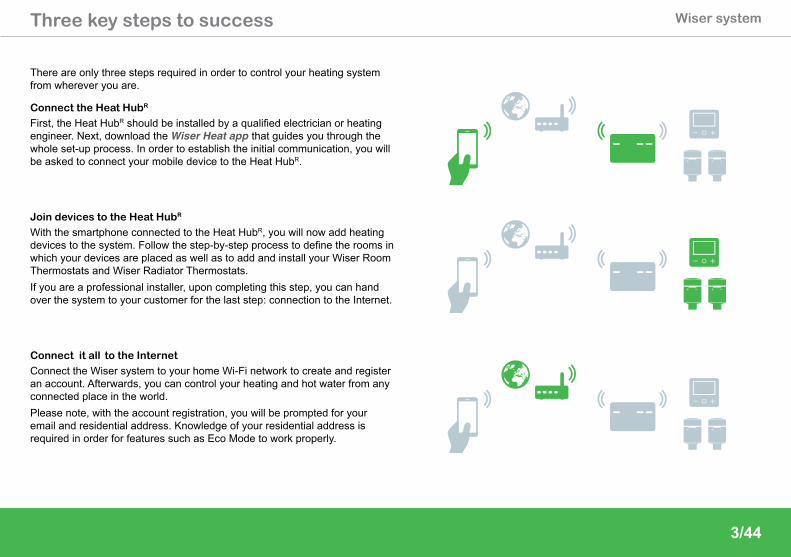
Three key steps to success Wiser system
There are only three steps required in order to control your heating system from wherever you are.
Connect the Heat HubR
First, the Heat HubR should be installed by a qualified electrician or heating engineer. Next, download the Wiser Heat app that guides you through the whole set-up process. In order to establish the initial communication, you will be asked to connect your mobile device to the Heat HubR.
Join devices to the Heat HubR
With the smartphone connected to the Heat HubR, you will now add heating devices to the system. Follow the step-by-step process to define the rooms in which your devices are placed as well as to add and install your Wiser Room Thermostats and Wiser Radiator Thermostats.If you are a professional installer, upon completing this step, you can hand over the system to your customer for the last step: connection to the Internet.
Connect it all to the Internet
Connect the Wiser system to your home Wi-Fi network to create and register an account. Afterwards, you can control your heating and hot water from any connected place in the world. Please note, with the account registration, you will be prompted for your email and residential address. Knowledge of your residential address is required in order for features such as Eco Mode to work properly.
4/44
Wiser systemI need to know how to ...
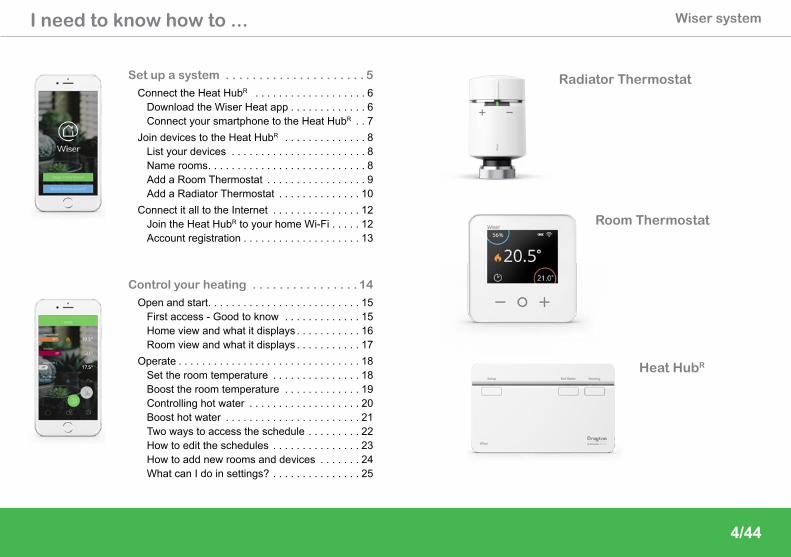
Heat HubR
Room Thermostat
Radiator ThermostatSet up a system . . . . . . . . . . . . . . . . . . . . . 5
Connect the Heat HubR . . . . . . . . . . . . . . . . . . . 6Download the Wiser Heat app . . . . . . . . . . . . . 6Connect your smartphone to the Heat HubR . . 7
Join devices to the Heat HubR . . . . . . . . . . . . . . 8List your devices . . . . . . . . . . . . . . . . . . . . . . . 8Name rooms. . . . . . . . . . . . . . . . . . . . . . . . . . . 8Add a Room Thermostat . . . . . . . . . . . . . . . . . 9Add a Radiator Thermostat . . . . . . . . . . . . . . 10
Connect it all to the Internet . . . . . . . . . . . . . . . 12Join the Heat HubR to your home Wi-Fi . . . . . 12Account registration . . . . . . . . . . . . . . . . . . . . 13
Control your heating . . . . . . . . . . . . . . . . 14
Open and start. . . . . . . . . . . . . . . . . . . . . . . . . . 15First access - Good to know . . . . . . . . . . . . . 15Home view and what it displays . . . . . . . . . . . 16Room view and what it displays . . . . . . . . . . . 17
Operate . . . . . . . . . . . . . . . . . . . . . . . . . . . . . . . 18Set the room temperature . . . . . . . . . . . . . . . 18Boost the room temperature . . . . . . . . . . . . . 19Controlling hot water . . . . . . . . . . . . . . . . . . . 20Boost hot water . . . . . . . . . . . . . . . . . . . . . . . 21Two ways to access the schedule . . . . . . . . . 22How to edit the schedules . . . . . . . . . . . . . . . 23How to add new rooms and devices . . . . . . . 24What can I do in settings? . . . . . . . . . . . . . . . 25
5/44
Set up a system
6/44
Set up a systemConnect the Heat HubR
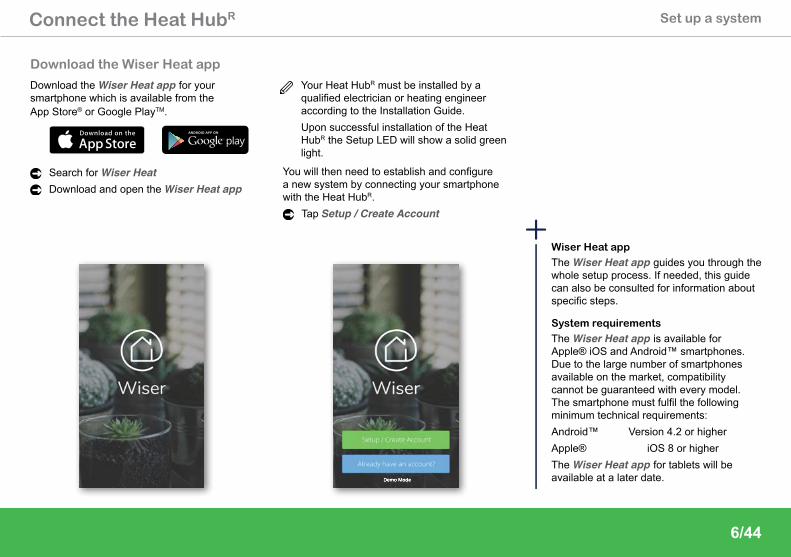
Download the Wiser Heat app
Download the Wiser Heat app for your smartphone which is available from the App Store® or Google PlayTM.
Search for Wiser HeatDownload and open the Wiser Heat app
Your Heat HubR must be installed by a qualified electrician or heating engineer according to the Installation Guide.Upon successful installation of the Heat HubR the Setup LED will show a solid green light.
You will then need to establish and configure a new system by connecting your smartphone with the Heat HubR.
Tap Setup / Create Account
Wiser Heat app
The Wiser Heat app guides you through the whole setup process. If needed, this guide can also be consulted for information about specific steps.
System requirements
The Wiser Heat app is available for Apple® iOS and Android™ smartphones. Due to the large number of smartphones available on the market, compatibility cannot be guaranteed with every model. The smartphone must fulfil the following minimum technical requirements:Android™ Version 4.2 or higherApple® iOS 8 or higherThe Wiser Heat app for tablets will be available at a later date.
Open Wi-Fi Settings
You will now connect yoursmartphone to a temporary wireless
network created by your HubR.
Navigate to the Wi-Fi setting and selectthe network called Wiser Heat then return
to the Wiser Heat App and select Next.
7/44
Set up a systemConnect the Heat HubR
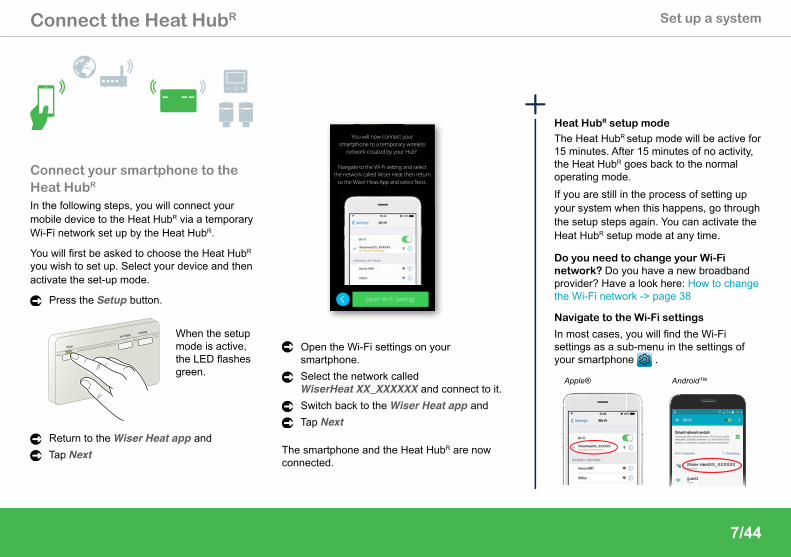
Connect your smartphone to the Heat HubR In the following steps, you will connect your mobile device to the Heat HubR via a temporary Wi-Fi network set up by the Heat HubR.
You will first be asked to choose the Heat HubR you wish to set up. Select your device and then activate the set-up mode.
Press the Setup button.
Setup
Hot Water Heating When the setup mode is active, the LED flashes green.
Return to the Wiser Heat app and Tap Next
Heat HubR setup mode
The Heat HubR setup mode will be active for 15 minutes. After 15 minutes of no activity, the Heat HubR goes back to the normal operating mode. If you are still in the process of setting up your system when this happens, go through the setup steps again. You can activate the Heat HubR setup mode at any time.
Do you need to change your Wi-Fi network? Do you have a new broadband provider? Have a look here: How to change the Wi-Fi network -> page 38
Navigate to the Wi-Fi settings
In most cases, you will find the Wi-Fi settings as a sub-menu in the settings of your smartphone .
Apple® Android™
Wiser HeatXX_XXXXXXSecured
guestOpen
Open the Wi-Fi settings on your smartphone. Select the network called WiserHeat XX_XXXXXX and connect to it.Switch back to the Wiser Heat app andTap Next
The smartphone and the Heat HubR are now connected.
Now we need to add your new devices to the system. How many devices do you have?
RoomThermostat 1
RadiatorThermostat 0
Next
Great! Now we need to adddevices to your rooms.
What room would you like toput the Thermostat in?
Next
Enter a new room name
Next
Now let’s setup your heatingsystem.
Skip?
Step 2 of 4
8/44
Set Up a systemJoin devices to the Heat HubR
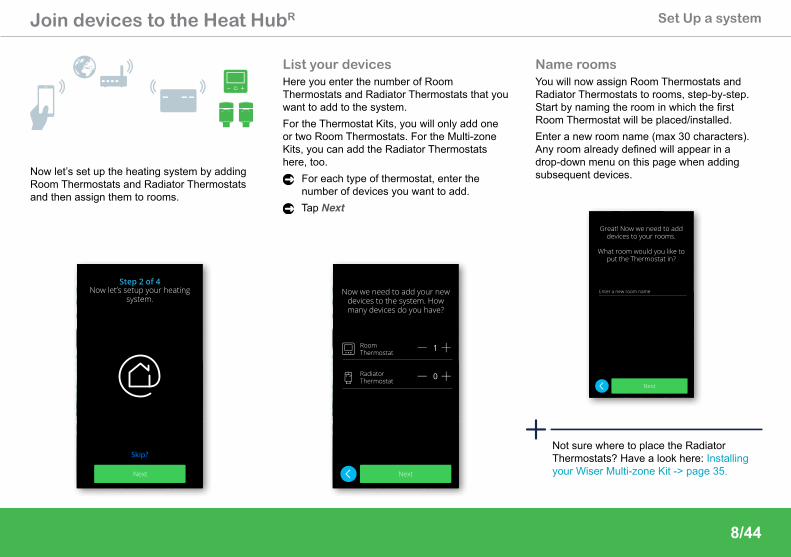
List your devicesHere you enter the number of Room Thermostats and Radiator Thermostats that you want to add to the system. For the Thermostat Kits, you will only add one or two Room Thermostats. For the Multi-zone Kits, you can add the Radiator Thermostats here, too.
For each type of thermostat, enter the number of devices you want to add.Tap Next
Name roomsYou will now assign Room Thermostats and Radiator Thermostats to rooms, step-by-step. Start by naming the room in which the first Room Thermostat will be placed/installed.Enter a new room name (max 30 characters). Any room already defined will appear in a drop-down menu on this page when adding subsequent devices.
Not sure where to place the Radiator Thermostats? Have a look here: Installing your Wiser Multi-zone Kit -> page 35.
Now let’s set up the heating system by adding Room Thermostats and Radiator Thermostats and then assign them to rooms.
9/44
Set up a systemJoin devices to the Heat HubR
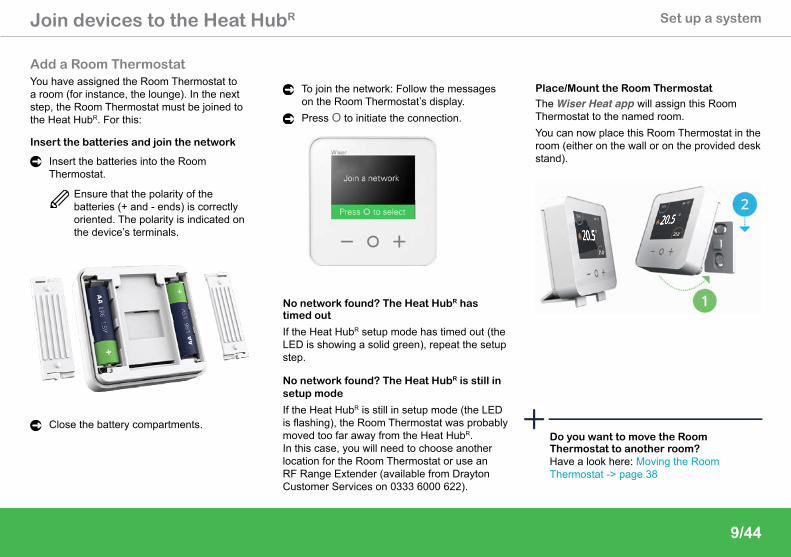
Add a Room ThermostatYou have assigned the Room Thermostat to a room (for instance, the lounge). In the next step, the Room Thermostat must be joined to the Heat HubR. For this:
Insert the batteries and join the network
Insert the batteries into the Room Thermostat.
Ensure that the polarity of the batteries (+ and - ends) is correctly oriented. The polarity is indicated on the device’s terminals.
Close the battery compartments.
Place/Mount the Room Thermostat
The Wiser Heat app will assign this Room Thermostat to the named room. You can now place this Room Thermostat in the room (either on the wall or on the provided desk stand).
To join the network: Follow the messages on the Room Thermostat’s display.Press O to initiate the connection.
No network found? The Heat HubR has timed out
If the Heat HubR setup mode has timed out (the LED is showing a solid green), repeat the setup step.
No network found? The Heat HubR is still in setup mode
If the Heat HubR is still in setup mode (the LED is flashing), the Room Thermostat was probably moved too far away from the Heat HubR.In this case, you will need to choose anotherlocation for the Room Thermostat or use anRF Range Extender (available from Drayton Customer Services on 0333 6000 622).
Do you want to move the Room Thermostat to another room?Have a look here: Moving the Room Thermostat -> page 38
10/44
Set up a systemJoin devices to the Heat HubR
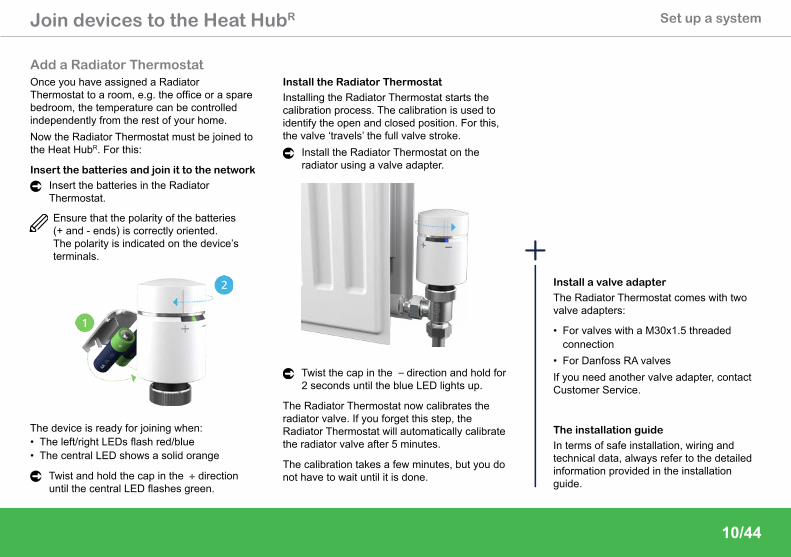
Add a Radiator ThermostatOnce you have assigned a Radiator Thermostat to a room, e.g. the office or a spare bedroom, the temperature can be controlled independently from the rest of your home.Now the Radiator Thermostat must be joined to the Heat HubR. For this:
Insert the batteries and join it to the network
Insert the batteries in the Radiator Thermostat.
Ensure that the polarity of the batteries (+ and - ends) is correctly oriented. The polarity is indicated on the device’s terminals.
The device is ready for joining when:• The left/right LEDs flash red/blue• The central LED shows a solid orange
Twist and hold the cap in the + direction until the central LED flashes green.
Install the Radiator Thermostat
Installing the Radiator Thermostat starts the calibration process. The calibration is used to identify the open and closed position. For this, the valve ‘travels’ the full valve stroke.
Install the Radiator Thermostat on the radiator using a valve adapter.
Twist the cap in the – direction and hold for 2 seconds until the blue LED lights up.
The Radiator Thermostat now calibrates the radiator valve. If you forget this step, the Radiator Thermostat will automatically calibrate the radiator valve after 5 minutes.
The calibration takes a few minutes, but you do not have to wait until it is done.
Install a valve adapter
The Radiator Thermostat comes with two valve adapters:
• For valves with a M30x1.5 threaded connection
• For Danfoss RA valvesIf you need another valve adapter, contact Customer Service.
The installation guide
In terms of safe installation, wiring and technical data, always refer to the detailed information provided in the installation guide.
We have detected that you are using an OpenTherm
compatible boiler
Next
DHW temperature
Hot water should be stored at a minimum of 60ºCto prevent legionella.
60ºC
11/44
Set up a systemJoin devices to the Heat HubR
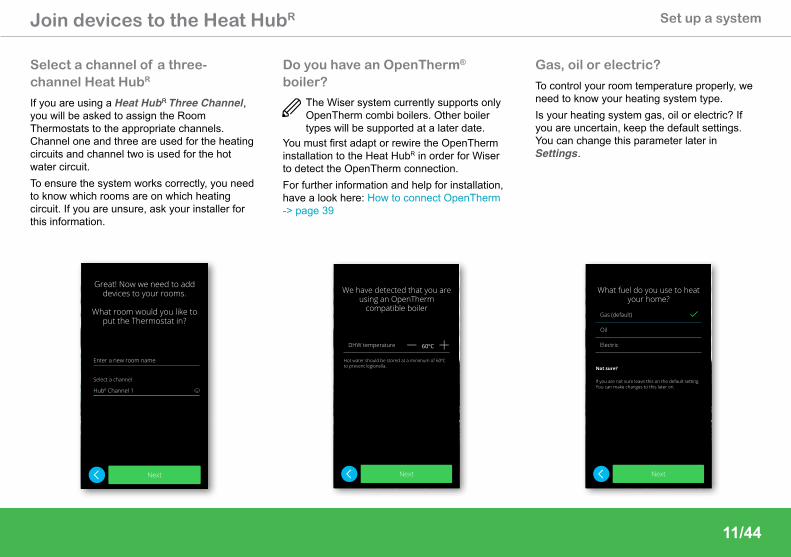
Do you have an OpenTherm® boiler?
The Wiser system currently supports only OpenTherm combi boilers. Other boiler types will be supported at a later date.
You must first adapt or rewire the OpenTherm installation to the Heat HubR in order for Wiser to detect the OpenTherm connection.For further information and help for installation, have a look here: How to connect OpenTherm -> page 39
What fuel do you use to heat your home?
Next
Gas (default)
Oil
Electric
Not sure?
If you are not sure leave this on the default setting.You can make changes to this later on.
Gas, oil or electric?
To control your room temperature properly, we need to know your heating system type. Is your heating system gas, oil or electric? If you are uncertain, keep the default settings. You can change this parameter later in Settings.
Great! Now we need to adddevices to your rooms.
What room would you like toput the Thermostat in?
Next
Enter a new room name
HubR Channel 1
Select a channel
Select a channel of a three-channel Heat HubR
If you are using a Heat HubR Three Channel, you will be asked to assign the Room Thermostats to the appropriate channels. Channel one and three are used for the heating circuits and channel two is used for the hot water circuit. To ensure the system works correctly, you need to know which rooms are on which heating circuit. If you are unsure, ask your installer for this information.
Enter the name of your network
Join
Network name
Security typeOpen
Select your Wi-Fi network
Can’t see your network?
Home Wi-Fi Network
Other Network 1
Other Network 2
Other Network 3
Select your Wi-Fi network
Can’t see your network?
Home Wi-Fi Network
Other Network 1
Other Network 2
Other Network 3
returnspace123
MNBVCXZ
LKJHGFDSA
POIUYTREWQ
Cancel Join
Password
Enter the password for [WIFI NETWORK]
12/44
Connect it all to the Internet Set up a system
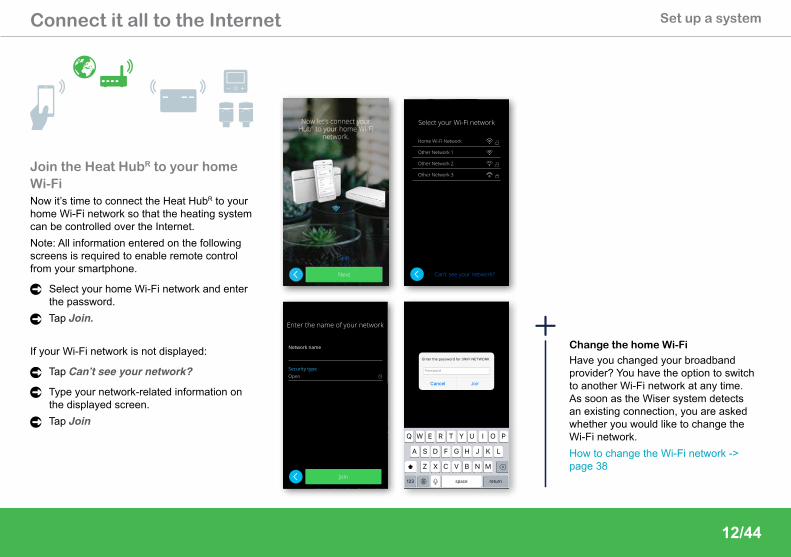
Join the Heat HubR to your home Wi-FiNow it’s time to connect the Heat HubR to your home Wi-Fi network so that the heating system can be controlled over the Internet.Note: All information entered on the following screens is required to enable remote control from your smartphone.
Select your home Wi-Fi network and enter the password.Tap Join.
If your Wi-Fi network is not displayed:
Tap Can’t see your network?
Type your network-related information on the displayed screen.Tap Join
Change the home Wi-Fi
Have you changed your broadband provider? You have the option to switch to another Wi-Fi network at any time. As soon as the Wiser system detects an existing connection, you are asked whether you would like to change the Wi-Fi network. How to change the Wi-Fi network -> page 38
Create an account
First name
Last name
Email address
Password
Repeat password
Please ensure your password is at least six characters and it includes at least one captial and
one number
Next Re-send email
Verification
A verification email has been sent to[INSERT EMAIL ADDRESS].
Please click the link in the email to verify your account and return to this app.
If you can’t see this email please check your junk folder.
By pressing Next you accept allterms and conditions
Home details
Address 1
Address 2
Town/City
Postcode
United Kingdom
Next
13/44
Connect it all to the Internet Set up a system
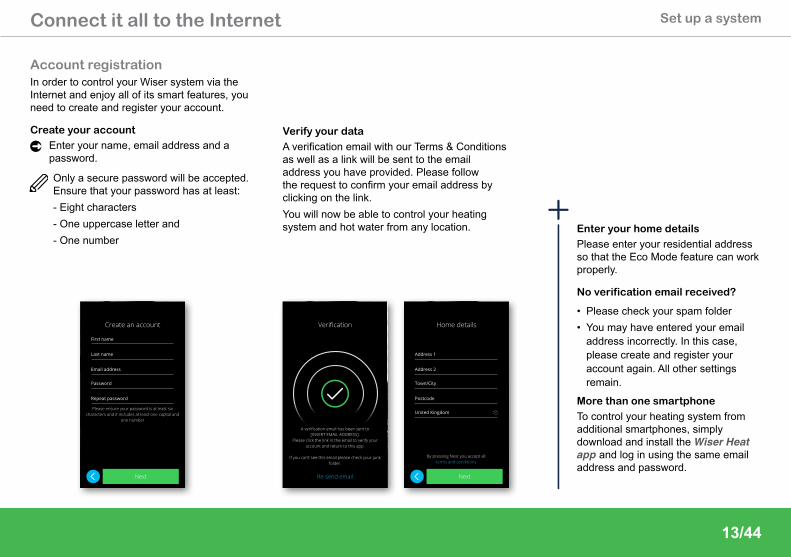
Account registrationIn order to control your Wiser system via the Internet and enjoy all of its smart features, you need to create and register your account.
Create your account
Enter your name, email address and a password.
Only a secure password will be accepted. Ensure that your password has at least: - Eight characters- One uppercase letter and- One number
Verify your data
A verification email with our Terms & Conditions as well as a link will be sent to the email address you have provided. Please follow the request to confirm your email address by clicking on the link. You will now be able to control your heating system and hot water from any location. Enter your home details
Please enter your residential address so that the Eco Mode feature can work properly.
No verification email received?
• Please check your spam folder• You may have entered your email
address incorrectly. In this case, please create and register your account again. All other settings remain.
More than one smartphone
To control your heating system from additional smartphones, simply download and install the Wiser Heat app and log in using the same email address and password.
14/44
Control your heating
Already have an account?
Setup / Create Account
Wiser
15/44
Control your heatingOpen and start
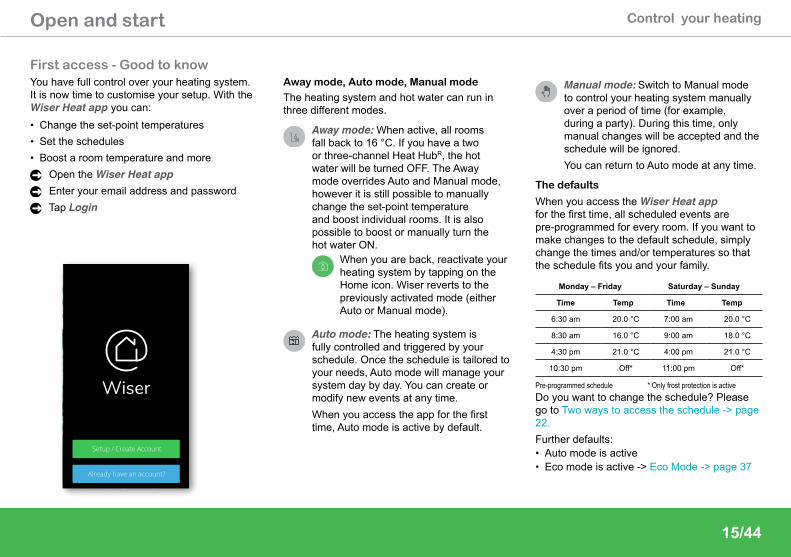
First access - Good to know You have full control over your heating system. It is now time to customise your setup. With the Wiser Heat app you can:• Change the set-point temperatures • Set the schedules • Boost a room temperature and more
Open the Wiser Heat appEnter your email address and passwordTap Login
Away mode, Auto mode, Manual mode
The heating system and hot water can run in three different modes.
Away mode: When active, all rooms fall back to 16 °C. If you have a two or three-channel Heat HubR, the hot water will be turned OFF. The Away mode overrides Auto and Manual mode, however it is still possible to manually change the set-point temperature and boost individual rooms. It is also possible to boost or manually turn the hot water ON.
When you are back, reactivate your heating system by tapping on the Home icon. Wiser reverts to the previously activated mode (either Auto or Manual mode).
Auto mode: The heating system is fully controlled and triggered by your schedule. Once the schedule is tailored to your needs, Auto mode will manage your system day by day. You can create or modify new events at any time. When you access the app for the first time, Auto mode is active by default.
Manual mode: Switch to Manual mode to control your heating system manually over a period of time (for example, during a party). During this time, only manual changes will be accepted and the schedule will be ignored.You can return to Auto mode at any time.
The defaults
When you access the Wiser Heat app for the first time, all scheduled events are pre-programmed for every room. If you want to make changes to the default schedule, simply change the times and/or temperatures so that the schedule fits you and your family.
Monday – Friday Saturday – Sunday
Time Temp Time Temp
6:30 am 20.0 °C 7:00 am 20.0 °C
8:30 am 16.0 °C 9:00 am 18.0 °C
4:30 pm 21.0 °C 4:00 pm 21.0 °C
10:30 pm Off* 11:00 pm Off*
Pre-programmed schedule * Only frost protection is activeDo you want to change the schedule? Please go to Two ways to access the schedule -> page 22.Further defaults:• Auto mode is active• Eco mode is active -> Eco Mode -> page 37
16/44
Control your heatingOpen and start
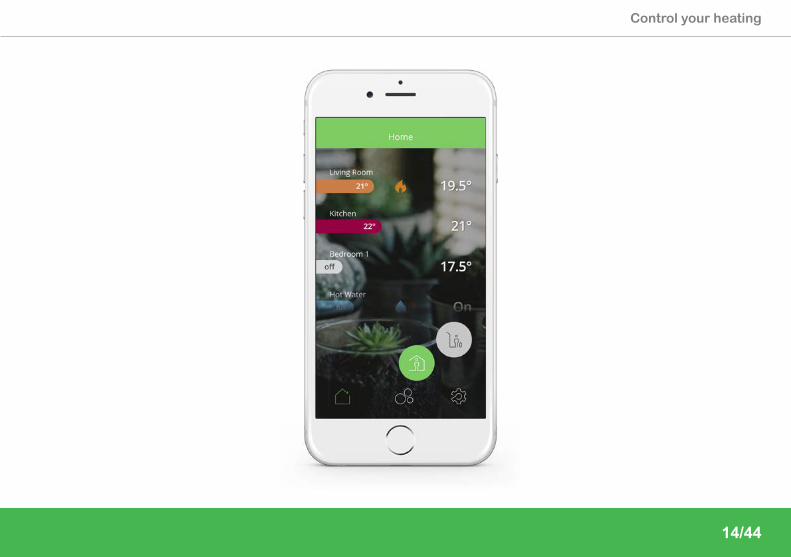
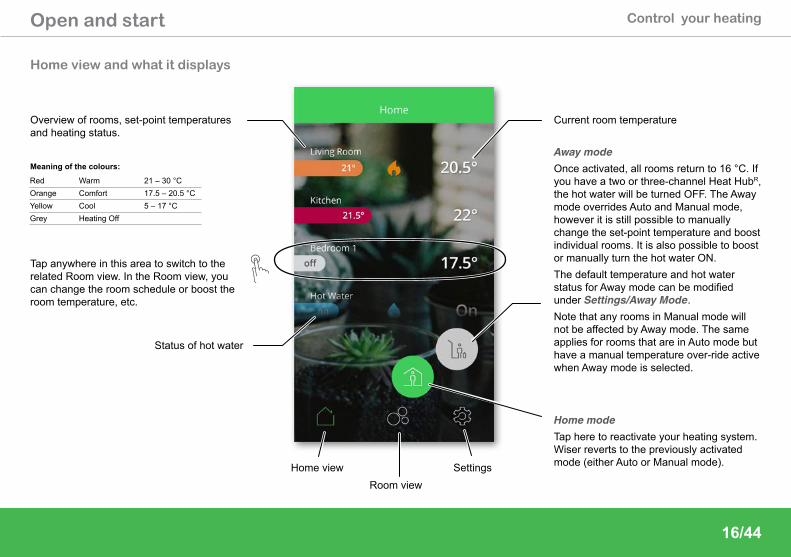
Home view and what it displays
Tap anywhere in this area to switch to the related Room view. In the Room view, you can change the room schedule or boost the room temperature, etc.
Current room temperature
Status of hot water
Overview of rooms, set-point temperatures and heating status.
SettingsHome viewRoom view
Away modeOnce activated, all rooms return to 16 °C. If you have a two or three-channel Heat HubR, the hot water will be turned OFF. The Away mode overrides Auto and Manual mode, however it is still possible to manually change the set-point temperature and boost individual rooms. It is also possible to boost or manually turn the hot water ON.The default temperature and hot water status for Away mode can be modified under Settings/Away Mode.Note that any rooms in Manual mode will not be affected by Away mode. The same applies for rooms that are in Auto mode but have a manual temperature over-ride active when Away mode is selected.
Home modeTap here to reactivate your heating system. Wiser reverts to the previously activated mode (either Auto or Manual mode).
Meaning of the colours:
Red Warm 21 – 30 °COrange Comfort 17.5 – 20.5 °CYellow Cool 5 – 17 °CGrey Heating Off
21º20.5º 21.5º
20.5º
Living Room
30mins
1 hr
2 hr3 hr
17/44
Open and start Control your heating
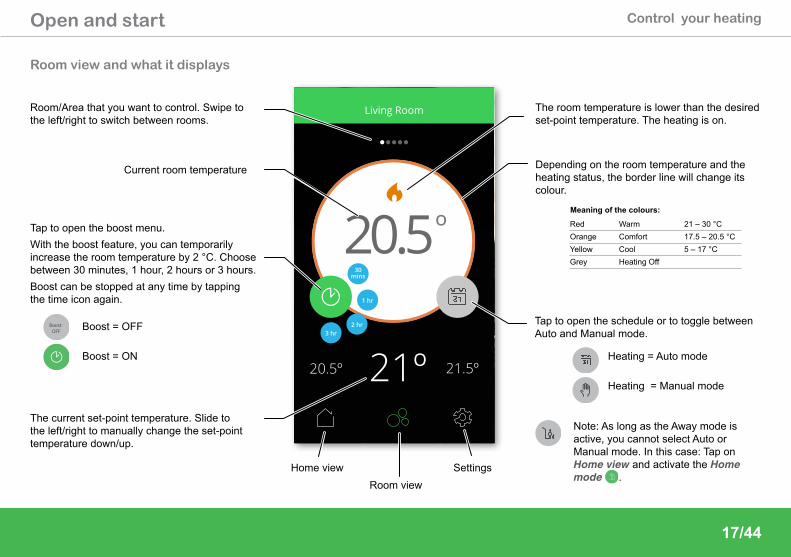
Room view and what it displays
Current room temperature
Tap to open the boost menu.With the boost feature, you can temporarily increase the room temperature by 2 °C. Choose between 30 minutes, 1 hour, 2 hours or 3 hours. Boost can be stopped at any time by tapping the time icon again.
The current set-point temperature. Slide to the left/right to manually change the set-point temperature down/up.
BoostOFF Boost = OFF
Boost = ON
SettingsHome view
Room/Area that you want to control. Swipe to the left/right to switch between rooms.
Tap to open the schedule or to toggle between Auto and Manual mode.
The room temperature is lower than the desired set-point temperature. The heating is on.
Depending on the room temperature and the heating status, the border line will change its colour.
Heating = Auto mode
Heating = Manual mode
Room view
Meaning of the colours:
Red Warm 21 – 30 °COrange Comfort 17.5 – 20.5 °CYellow Cool 5 – 17 °CGrey Heating Off
Note: As long as the Away mode is active, you cannot select Auto or Manual mode. In this case: Tap on Home view and activate the Home mode .
BoostOFF
21º20.5º 21.5º
20.5º
Living Room
18/44
Control your heatingOperate
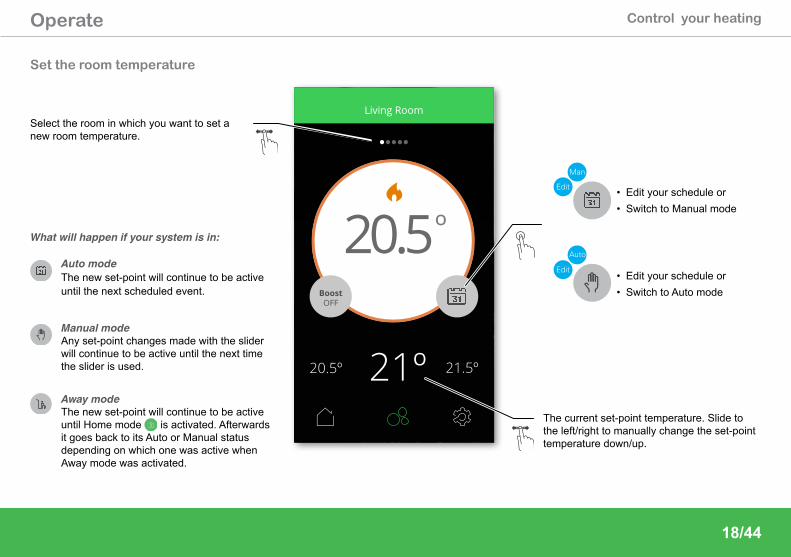
Set the room temperature
Auto mode The new set-point will continue to be active until the next scheduled event.
Manual mode Any set-point changes made with the slider will continue to be active until the next time the slider is used.
Select the room in which you want to set a new room temperature.
• Edit your schedule or • Switch to Manual mode
Auto
Edit• Edit your schedule or • Switch to Auto mode
Man
Edit
What will happen if your system is in:
Away mode The new set-point will continue to be active until Home mode is activated. Afterwards it goes back to its Auto or Manual status depending on which one was active when Away mode was activated.
The current set-point temperature. Slide to the left/right to manually change the set-point temperature down/up.
21º20.5º 21.5º
20.5º
Living Room
30mins
1 hr
2 hr3 hr
19/44
Control your heatingOperate
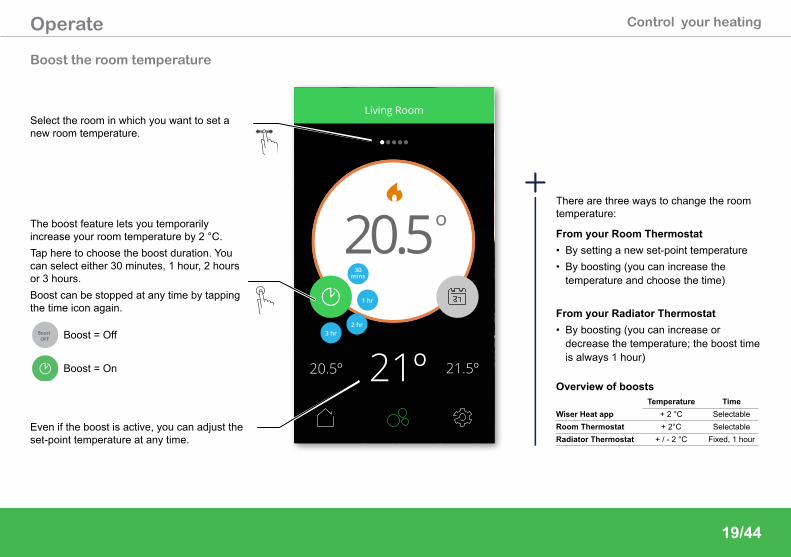
Boost the room temperature
There are three ways to change the room temperature:
From your Room Thermostat• By setting a new set-point temperature• By boosting (you can increase the
temperature and choose the time)
From your Radiator Thermostat• By boosting (you can increase or
decrease the temperature; the boost time is always 1 hour)
Overview of boostsTemperature Time
Wiser Heat app + 2 °C SelectableRoom Thermostat + 2°C SelectableRadiator Thermostat + / - 2 °C Fixed, 1 hour
The boost feature lets you temporarily increase your room temperature by 2 °C. Tap here to choose the boost duration. You can select either 30 minutes, 1 hour, 2 hours or 3 hours. Boost can be stopped at any time by tapping the time icon again.
BoostOFF Boost = Off
Boost = On
Select the room in which you want to set a new room temperature.
Even if the boost is active, you can adjust the set-point temperature at any time.
BoostOFF
OnOff
On
Hot Water
20/44
Control your hot waterOperate
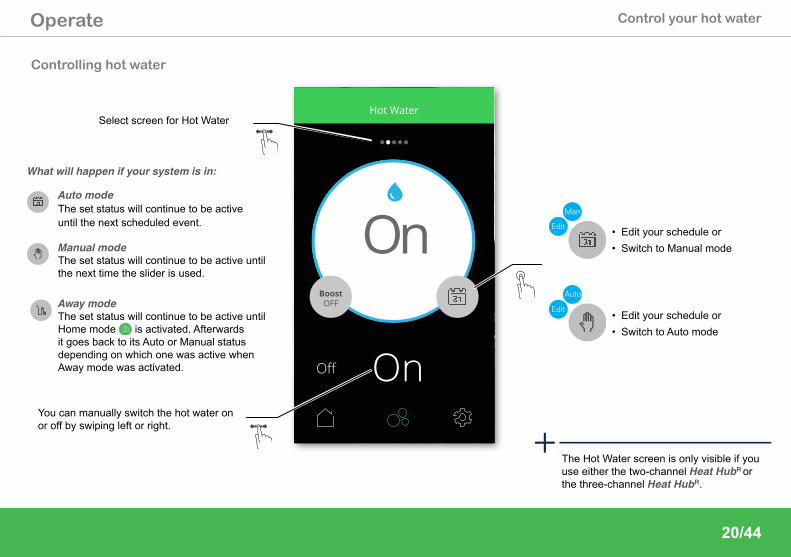
Controlling hot water
• Edit your schedule or • Switch to Manual mode
Auto
Edit• Edit your schedule or • Switch to Auto mode
Man
Edit
You can manually switch the hot water on or off by swiping left or right.
Auto mode The set status will continue to be active until the next scheduled event.
Manual mode The set status will continue to be active until the next time the slider is used.
What will happen if your system is in:
The Hot Water screen is only visible if you use either the two-channel Heat HubR or the three-channel Heat HubR.
Select screen for Hot Water
Away mode The set status will continue to be active until Home mode is activated. Afterwards it goes back to its Auto or Manual status depending on which one was active when Away mode was activated.
BoostOFF
OnOff
On
Hot Water
30mins
1 hr
2 hr3 hr
21/44
Operate Control your hot water
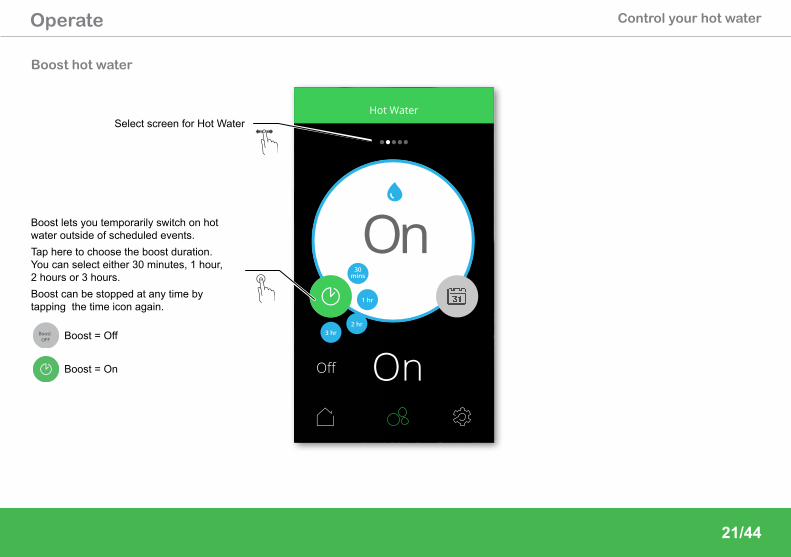
Boost hot water
Boost lets you temporarily switch on hot water outside of scheduled events. Tap here to choose the boost duration. You can select either 30 minutes, 1 hour, 2 hours or 3 hours. Boost can be stopped at any time by tapping the time icon again.
BoostOFF Boost = Off
Boost = On
Select screen for Hot Water
BoostOFF
21º20.5º 21.5º
20.5º
Living Room
BoostOFF
21º20.5º 21.5º
20.5º
Living Room
Schedule - Living Room
off
off
16°
22°
M T W T F S S
10:00 – 13:3010:00 – 13:30
13:30 – 14:3013:30 – 14:30
14:30 – 17:1514:30 – 17:15
17:15 – 22:3017:15 – 22:30
06:00 – 10:0006:00 – 10:00
22:3022:30
Copy Save
off
21°
Add
Schedule - Living Room
off
off
16°
22°
M T W T F S S
10:00 – 13:3010:00 – 13:30
13:30 – 14:3013:30 – 14:30
14:30 – 17:1514:30 – 17:15
17:15 – 22:3017:15 – 22:30
06:00 – 10:0006:00 – 10:00
22:3022:30
Copy Save
off
21°
Add
Living Room
Hot Water
Bedroom
View the schedule for the following room
Schedules
22/44
Control your heatingOperate
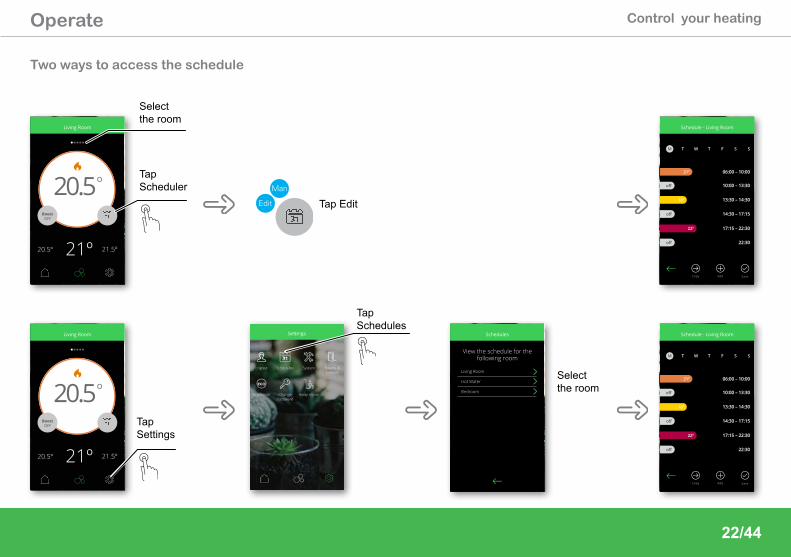
Two ways to access the schedule
Tap Scheduler
Tap Edit
Tap Settings
Tap Schedules
Man
Edit
Select the room
Select the room
Schedule - Living Room
off
off
16°
22°
M T W T F S S
10:00 – 13:3010:00 – 13:30
13:30 – 14:3013:30 – 14:30
14:30 – 17:1514:30 – 17:15
17:15 – 22:3017:15 – 22:30
06:00 – 10:0006:00 – 10:00
22:3022:30
Copy Save
off
21°
Add
22.5°
Set Delete Cancel
Edit Event
11 05
23/44
Operate Control your heating
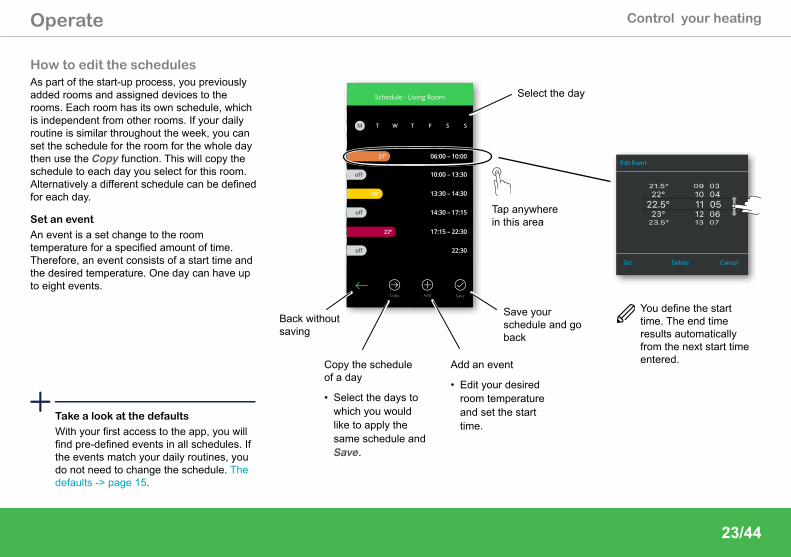
Add an event
• Edit your desired room temperature and set the start time.
Copy the schedule of a day
• Select the days to which you would like to apply the same schedule and Save.
Back without saving
Save your schedule and go back
Select the day
How to edit the schedulesAs part of the start-up process, you previously added rooms and assigned devices to the rooms. Each room has its own schedule, which is independent from other rooms. If your daily routine is similar throughout the week, you can set the schedule for the room for the whole day then use the Copy function. This will copy the schedule to each day you select for this room. Alternatively a different schedule can be defined for each day.
Set an event
An event is a set change to the room temperature for a specified amount of time. Therefore, an event consists of a start time and the desired temperature. One day can have up to eight events.
Take a look at the defaults
With your first access to the app, you will find pre-defined events in all schedules. If the events match your daily routines, you do not need to change the schedule. The defaults -> page 15.
Tap anywhere in this area
You define the start time. The end time results automatically from the next start time entered.

Rooms & Devices
Living Room
Other
Add device
Addroom
Now we need to add your new devices to the system. How many devices do you have?
RoomThermostat 1
RadiatorThermostat 0
Next
Great! Now we need to adddevices to your rooms.
What room would you like toput the Thermostat in?
Next
Enter a new room name
BoostOFF
21º20.5º 21.5º
20.5º
Living Room
24/44
Control your heatingOperate
How to add new rooms and devicesRoom Thermostats and Radiator Thermostats can be added at any time in order to enhance your Wiser system. To do this:
Select SettingsTap Rooms & DevicesTap Add devices / Add rooms
Now enter the number of Room Thermostats and Radiator Thermostats that you want to add to the system.
Enter the number of devices to be added.Tap NextFollow the on-screen instructions, while naming rooms and assigning new devices.
25/44
Control your heatingOperate
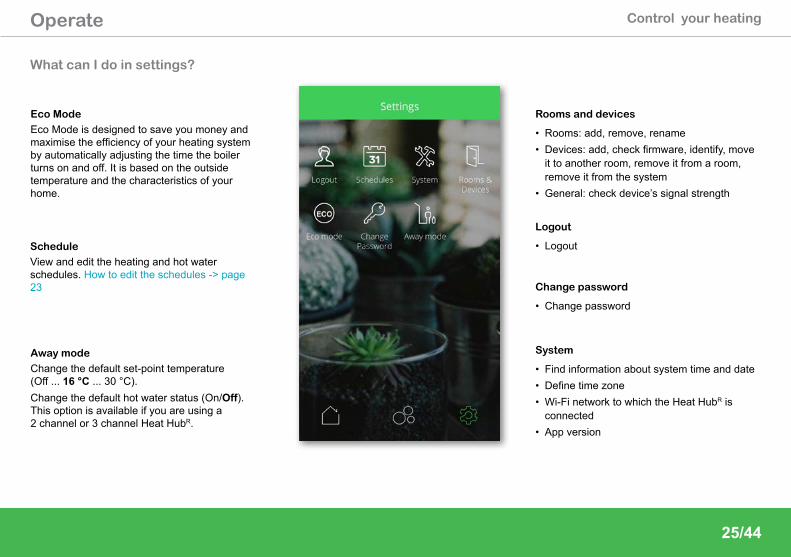
What can I do in settings?
System
• Find information about system time and date• Define time zone • Wi-Fi network to which the Heat HubR is
connected• App version
Logout
• Logout
Eco Mode
Eco Mode is designed to save you money and maximise the efficiency of your heating system by automatically adjusting the time the boiler turns on and off. It is based on the outside temperature and the characteristics of your home.
Schedule
View and edit the heating and hot water schedules. How to edit the schedules -> page 23
Rooms and devices
• Rooms: add, remove, rename• Devices: add, check firmware, identify, move
it to another room, remove it from a room, remove it from the system
• General: check device’s signal strength
Away mode
Change the default set-point temperature (Off ... 16 °C ... 30 °C).Change the default hot water status (On/Off). This option is available if you are using a 2 channel or 3 channel Heat HubR.
Change password
• Change password
26/44
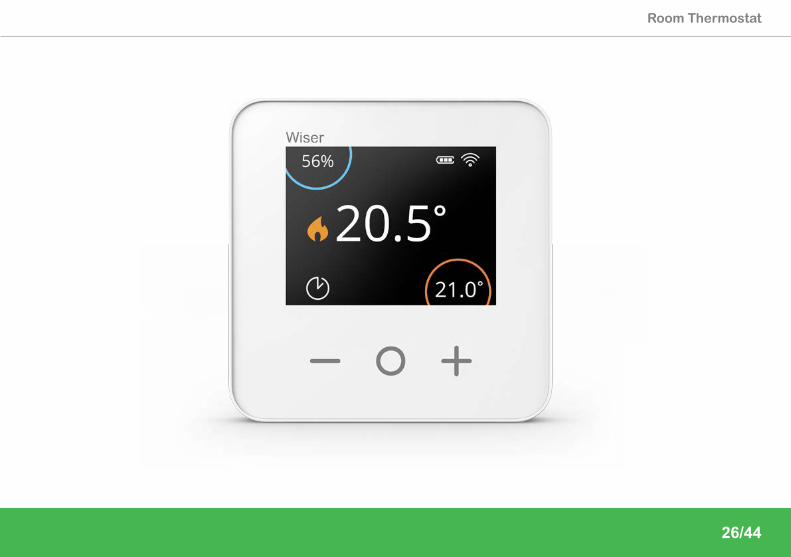
Room Thermostat
27/44
Room ThermostatOperate
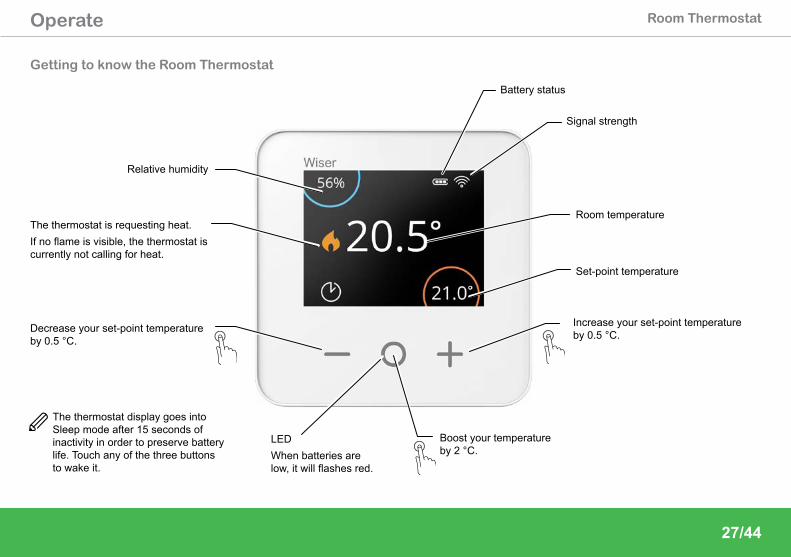
Getting to know the Room Thermostat
Relative humidity
Room temperature
Set-point temperature
Battery status
Signal strength
Increase your set-point temperature by 0.5 °C. Decrease your set-point temperature
by 0.5 °C.
Boost your temperature by 2 °C.
The thermostat is requesting heat. If no flame is visible, the thermostat is currently not calling for heat.
LEDWhen batteries are low, it will flashes red.
The thermostat display goes into Sleep mode after 15 seconds of inactivity in order to preserve battery life. Touch any of the three buttons to wake it.
28/44
Operate Room Thermostat
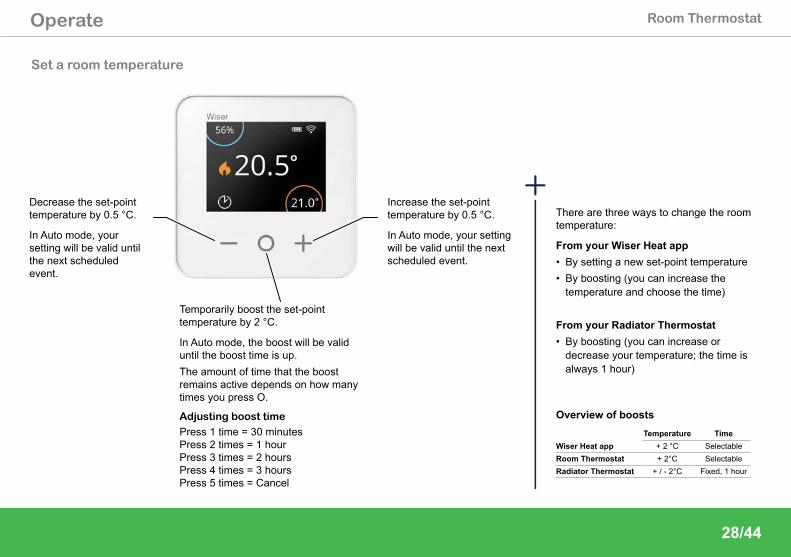
Decrease the set-point temperature by 0.5 °C.
In Auto mode, your setting will be valid until the next scheduled event.
Increase the set-point temperature by 0.5 °C.
In Auto mode, your setting will be valid until the next scheduled event.
Adjusting boost time
Press 1 time = 30 minutes Press 2 times = 1 hour Press 3 times = 2 hours Press 4 times = 3 hours Press 5 times = Cancel
There are three ways to change the room temperature:
From your Wiser Heat app• By setting a new set-point temperature• By boosting (you can increase the
temperature and choose the time)
From your Radiator Thermostat• By boosting (you can increase or
decrease your temperature; the time is always 1 hour)
Overview of boostsTemperature Time
Wiser Heat app + 2 °C SelectableRoom Thermostat + 2°C SelectableRadiator Thermostat + / - 2°C Fixed, 1 hour
Set a room temperature
Temporarily boost the set-point temperature by 2 °C.
In Auto mode, the boost will be valid until the boost time is up. The amount of time that the boost remains active depends on how many times you press O.
29/44
Room ThermostatOperate
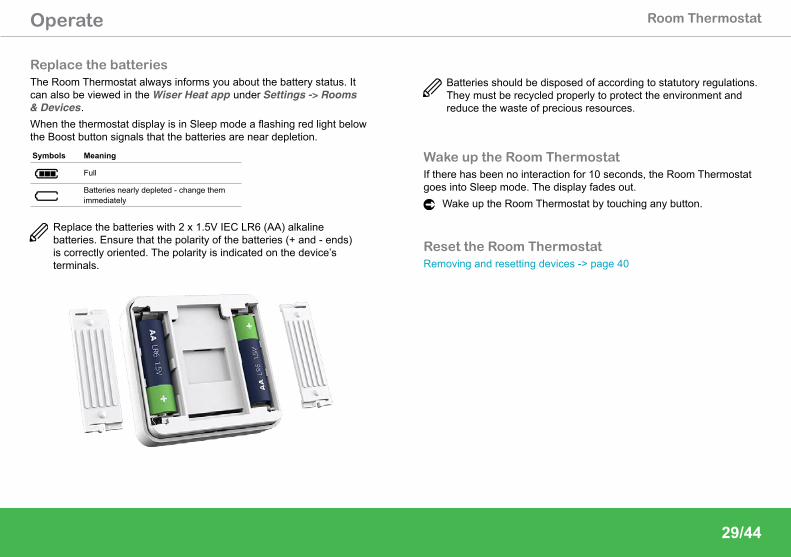
Replace the batteriesThe Room Thermostat always informs you about the battery status. It can also be viewed in the Wiser Heat app under Settings -> Rooms & Devices.When the thermostat display is in Sleep mode a flashing red light below the Boost button signals that the batteries are near depletion.
Symbols Meaning
Full
Batteries nearly depleted - change them immediately
Replace the batteries with 2 x 1.5V IEC LR6 (AA) alkaline batteries. Ensure that the polarity of the batteries (+ and - ends) is correctly oriented. The polarity is indicated on the device’s terminals.
Batteries should be disposed of according to statutory regulations. They must be recycled properly to protect the environment and reduce the waste of precious resources.
Wake up the Room ThermostatIf there has been no interaction for 10 seconds, the Room Thermostat goes into Sleep mode. The display fades out.
Wake up the Room Thermostat by touching any button.
Reset the Room ThermostatRemoving and resetting devices -> page 40
30/44
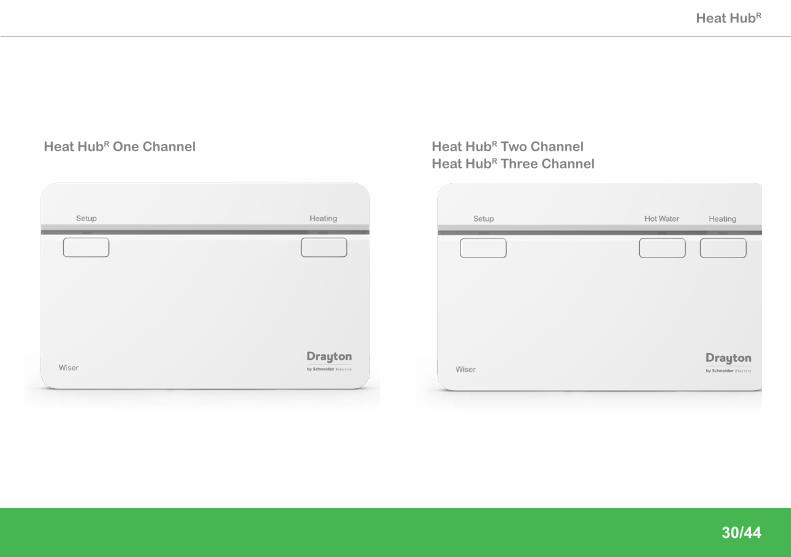
Heat HubR
Heat HubR One Channel Heat HubR Two Channel Heat HubR Three Channel
31/44
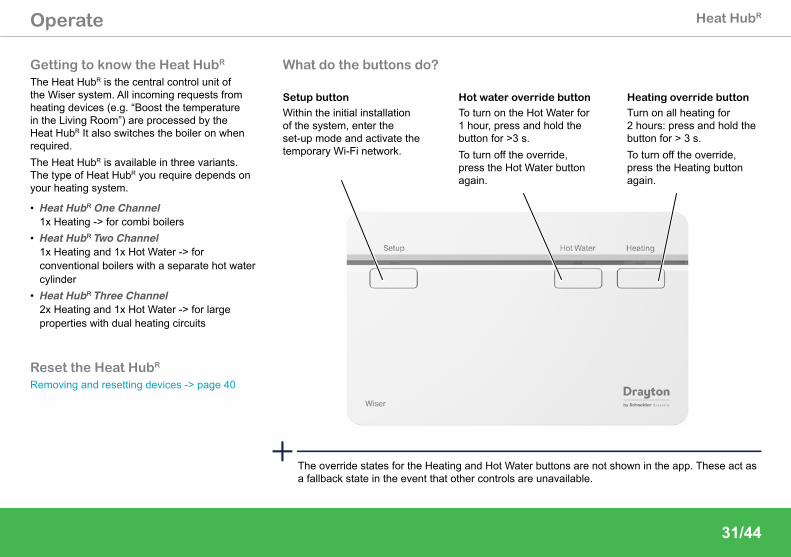
Heat HubROperate
What do the buttons do?Getting to know the Heat HubR The Heat HubR is the central control unit of the Wiser system. All incoming requests from heating devices (e.g. “Boost the temperature in the Living Room”) are processed by the Heat HubR It also switches the boiler on when required. The Heat HubR is available in three variants. The type of Heat HubR you require depends on your heating system.
• Heat HubR One Channel 1x Heating -> for combi boilers
• Heat HubR Two Channel 1x Heating and 1x Hot Water -> for conventional boilers with a separate hot water cylinder
• Heat HubR Three Channel 2x Heating and 1x Hot Water -> for large properties with dual heating circuits
Reset the Heat HubR Removing and resetting devices -> page 40
Setup button
Within the initial installation of the system, enter the set-up mode and activate the temporary Wi-Fi network.
Hot water override button
To turn on the Hot Water for 1 hour, press and hold the button for >3 s.To turn off the override, press the Hot Water button again.
Heating override button
Turn on all heating for 2 hours: press and hold the button for > 3 s.To turn off the override, press the Heating button again.
The override states for the Heating and Hot Water buttons are not shown in the app. These act as a fallback state in the event that other controls are unavailable.
32/44
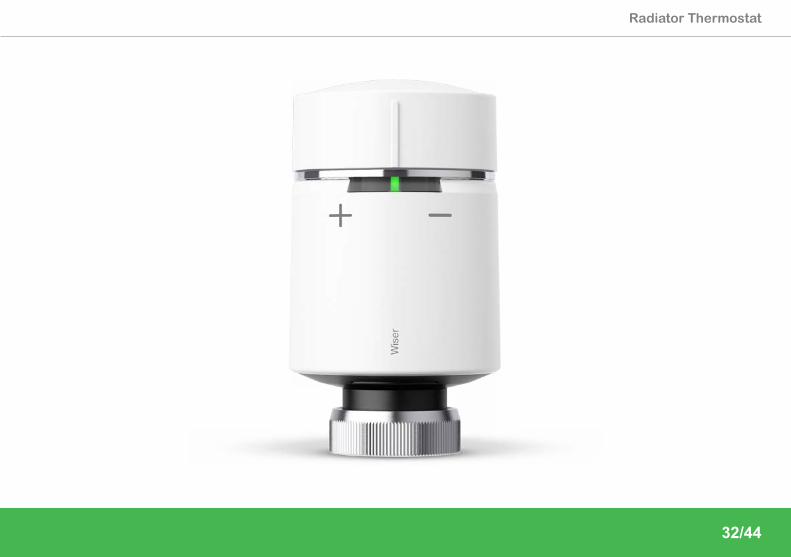
Radiator Thermostat
33/44
Radiator ThermostatOperate
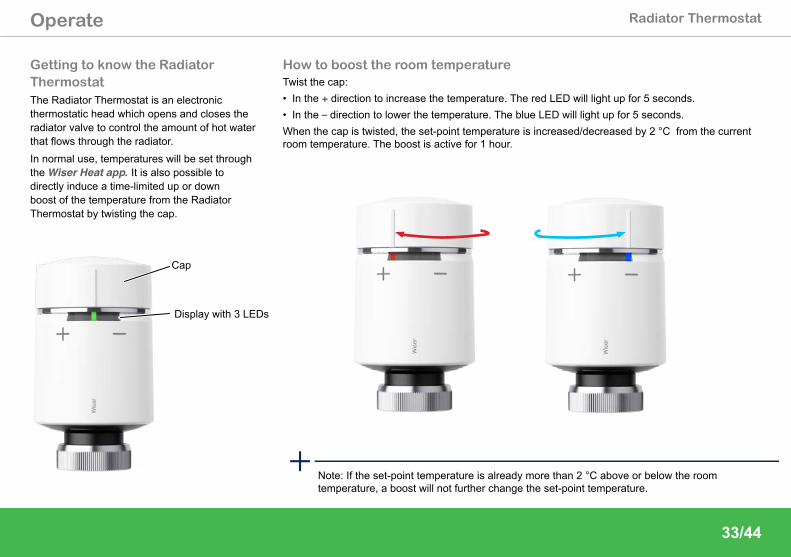
Getting to know the Radiator ThermostatThe Radiator Thermostat is an electronic thermostatic head which opens and closes the radiator valve to control the amount of hot water that flows through the radiator.In normal use, temperatures will be set through the Wiser Heat app. It is also possible to directly induce a time-limited up or down boost of the temperature from the Radiator Thermostat by twisting the cap.
Cap
Display with 3 LEDs
How to boost the room temperatureTwist the cap: • In the + direction to increase the temperature. The red LED will light up for 5 seconds.• In the – direction to lower the temperature. The blue LED will light up for 5 seconds.When the cap is twisted, the set-point temperature is increased/decreased by 2 °C from the current room temperature. The boost is active for 1 hour.
Note: If the set-point temperature is already more than 2 °C above or below the room temperature, a boost will not further change the set-point temperature.
34/44
Radiator ThermostatOperate
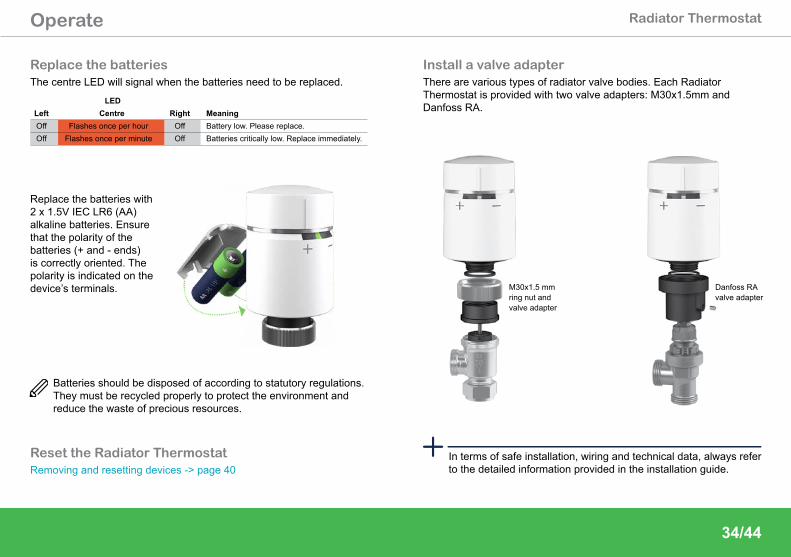
Replace the batteriesThe centre LED will signal when the batteries need to be replaced.
LEDLeft Centre Right MeaningOff Flashes once per hour Off Battery low. Please replace.Off Flashes once per minute Off Batteries critically low. Replace immediately.
Replace the batteries with 2 x 1.5V IEC LR6 (AA) alkaline batteries. Ensure that the polarity of the batteries (+ and - ends) is correctly oriented. The polarity is indicated on the device’s terminals.
Batteries should be disposed of according to statutory regulations. They must be recycled properly to protect the environment and reduce the waste of precious resources.
Reset the Radiator ThermostatRemoving and resetting devices -> page 40
Install a valve adapterThere are various types of radiator valve bodies. Each Radiator Thermostat is provided with two valve adapters: M30x1.5mm and Danfoss RA.
In terms of safe installation, wiring and technical data, always refer to the detailed information provided in the installation guide.
M30x1.5 mm ring nut and valve adapter
Danfoss RA valve adapter
35/44
Glossary
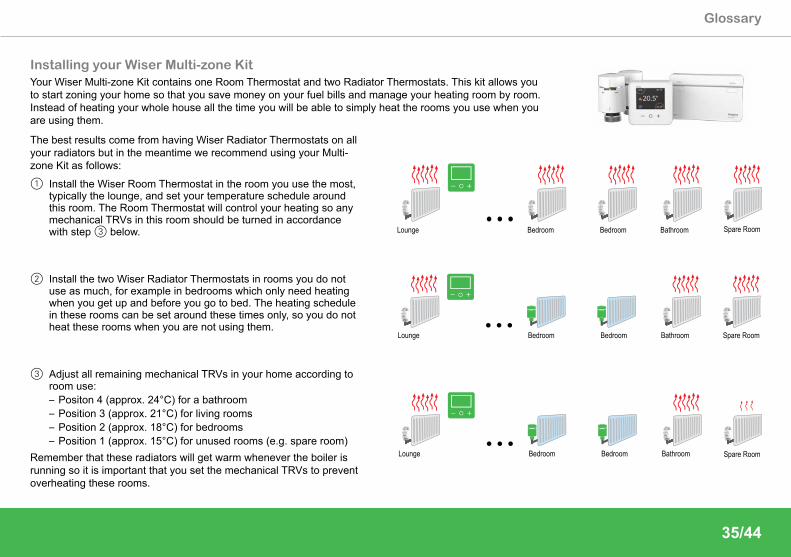
Installing your Wiser Multi-zone KitYour Wiser Multi-zone Kit contains one Room Thermostat and two Radiator Thermostats. This kit allows you to start zoning your home so that you save money on your fuel bills and manage your heating room by room. Instead of heating your whole house all the time you will be able to simply heat the rooms you use when you are using them.
The best results come from having Wiser Radiator Thermostats on all your radiators but in the meantime we recommend using your Multi-zone Kit as follows:
1 Install the Wiser Room Thermostat in the room you use the most, typically the lounge, and set your temperature schedule around this room. The Room Thermostat will control your heating so any mechanical TRVs in this room should be turned in accordance with step 3 below.
2 Install the two Wiser Radiator Thermostats in rooms you do not use as much, for example in bedrooms which only need heating when you get up and before you go to bed. The heating schedule in these rooms can be set around these times only, so you do not heat these rooms when you are not using them.
3 Adjust all remaining mechanical TRVs in your home according to room use: – Positon 4 (approx. 24°C) for a bathroom – Position 3 (approx. 21°C) for living rooms – Position 2 (approx. 18°C) for bedrooms – Position 1 (approx. 15°C) for unused rooms (e.g. spare room)
Remember that these radiators will get warm whenever the boiler is running so it is important that you set the mechanical TRVs to prevent overheating these rooms.
Lounge Bedroom Bedroom Bathroom Spare Room
Lounge Bedroom Bedroom Bathroom Spare Room
Lounge Bedroom Bedroom Bathroom Spare Room
36/44
Glossary
Installing your Wiser Multi-zone Kit (cont.)
Example
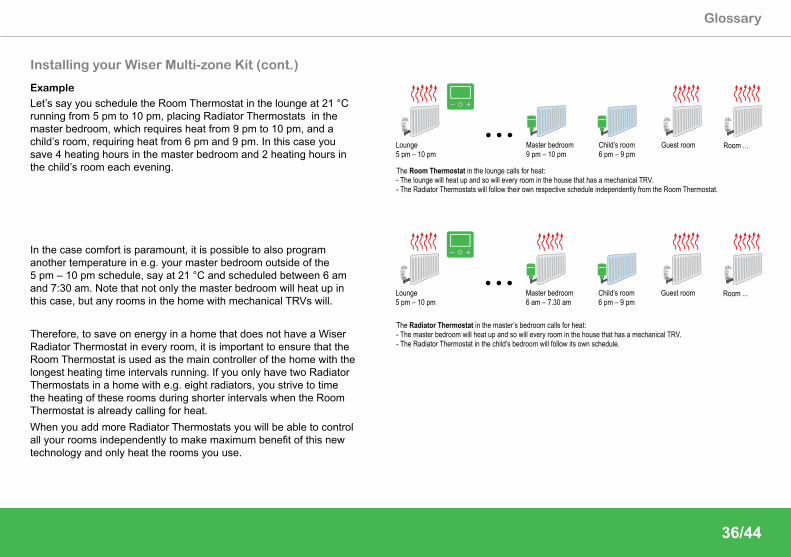
Let’s say you schedule the Room Thermostat in the lounge at 21 °C running from 5 pm to 10 pm, placing Radiator Thermostats in the master bedroom, which requires heat from 9 pm to 10 pm, and a child’s room, requiring heat from 6 pm and 9 pm. In this case you save 4 heating hours in the master bedroom and 2 heating hours in the child’s room each evening.
In the case comfort is paramount, it is possible to also program another temperature in e.g. your master bedroom outside of the 5 pm – 10 pm schedule, say at 21 °C and scheduled between 6 am and 7:30 am. Note that not only the master bedroom will heat up in this case, but any rooms in the home with mechanical TRVs will. Therefore, to save on energy in a home that does not have a Wiser Radiator Thermostat in every room, it is important to ensure that the Room Thermostat is used as the main controller of the home with the longest heating time intervals running. If you only have two Radiator Thermostats in a home with e.g. eight radiators, you strive to time the heating of these rooms during shorter intervals when the Room Thermostat is already calling for heat.When you add more Radiator Thermostats you will be able to control all your rooms independently to make maximum benefit of this new technology and only heat the rooms you use.
Lounge 5 pm – 10 pm
Master bedroom9 pm – 10 pm
Child’s room6 pm – 9 pm
Guest room Room ...
The Room Thermostat in the lounge calls for heat: - The lounge will heat up and so will every room in the house that has a mechanical TRV. - The Radiator Thermostats will follow their own respective schedule independently from the Room Thermostat.
Lounge 5 pm – 10 pm
Master bedroom6 am – 7.30 am
Child’s room6 pm – 9 pm
Guest room Room ...
The Radiator Thermostat in the master’s bedroom calls for heat: - The master bedroom will heat up and so will every room in the house that has a mechanical TRV.- The Radiator Thermostat in the child’s bedroom will follow its own schedule.
37/44
Glossary
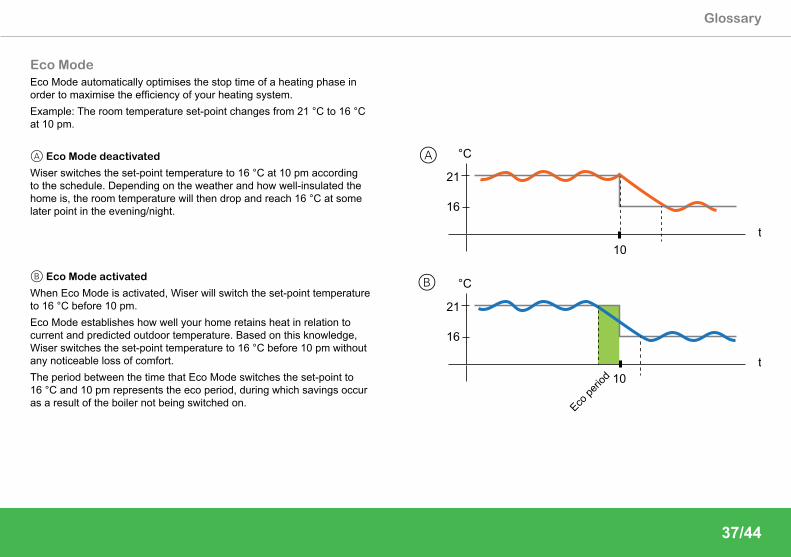
Eco ModeEco Mode automatically optimises the stop time of a heating phase in order to maximise the efficiency of your heating system.Example: The room temperature set-point changes from 21 °C to 16 °C at 10 pm.
A Eco Mode deactivated
Wiser switches the set-point temperature to 16 °C at 10 pm according to the schedule. Depending on the weather and how well-insulated the home is, the room temperature will then drop and reach 16 °C at some later point in the evening/night.
B Eco Mode activated
When Eco Mode is activated, Wiser will switch the set-point temperature to 16 °C before 10 pm.Eco Mode establishes how well your home retains heat in relation to current and predicted outdoor temperature. Based on this knowledge, Wiser switches the set-point temperature to 16 °C before 10 pm without any noticeable loss of comfort. The period between the time that Eco Mode switches the set-point to 16 °C and 10 pm represents the eco period, during which savings occur as a result of the boiler not being switched on.
21
16
°C
t
21
16
°C
t10
10
A
B
Eco pe
riod
38/44
Glossary
Moving the Room Thermostat
You want to move the Room Thermostat to another room?
If your system only has a single Room Thermostat, it can be moved around freely in the house.
If your system has two Room Thermostats controlling one heating circuit respectively (e.g., one circuit downstairs and one upstairs), ensure that each Room Thermostat stays in a room within the circuit to which it was originally assigned. This avoids conflicts between the two Room Thermostats. Each Room Thermostat can only call for heat from the heating circuit it has been originally assigned.
If your system has a combination of Room Thermostats and Radiator Thermostats, then typically each room has its own schedule which is independent of other rooms. Placing your Room Thermostat in rooms other than those originally assigned to will cause conflicts (since each heating device will follow its own schedule).
How to change the Wi-Fi networkIf you need to change the Wi-Fi network (for example, due to a move or due to a new broadband provider), follow the steps below:
Launch the Wiser Heat app.If you’re logged in, make sure to log off first. After logging off, tap the back button on the login screen of the app to go to the start screen.
Tap Setup / Create Account (even though your system has already been set up).Select your Heat Hub type.
Press the Setup button on the Heat HubR
Setup
Hot Water Heating
Follow the on-screen instructions to connect your smartphone to the Heat HubR.Tap Skip when prompted to set up your heating system.Follow the on-screen instructions to connect your Heat HubR to the Internet by selecting your new Wi-Fi network.Tap Skip when prompted to register an account.
You have now changed to a new Wi-Fi network. You will see the home screen and can proceed to control your heating as normal.
39/44
Glossary
How to connect OpenTherm
The Wiser system currently supports OpenTherm only in conjunction with a combi boiler.
If your boiler supports OpenTherm, follow the instructions below.
Existing OpenTherm Installation
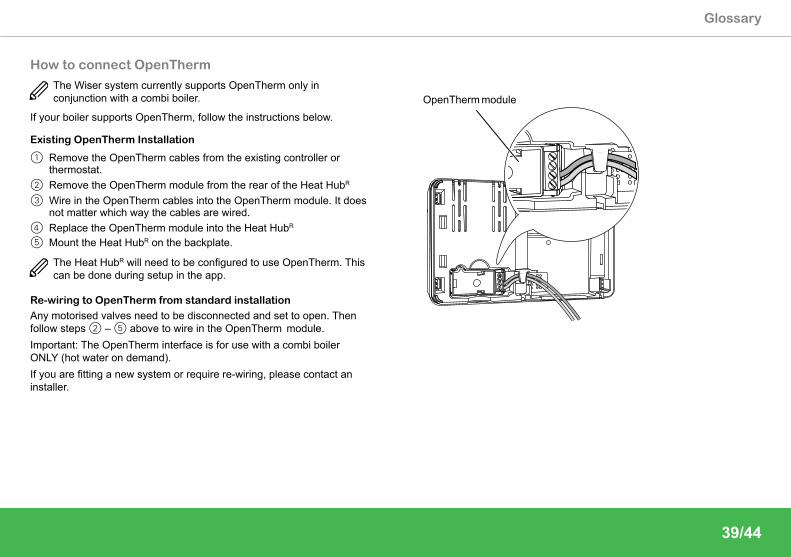
1 Remove the OpenTherm cables from the existing controller or thermostat.
2 Remove the OpenTherm module from the rear of the Heat HubR
3 Wire in the OpenTherm cables into the OpenTherm module. It does not matter which way the cables are wired.
4 Replace the OpenTherm module into the Heat HubR
5 Mount the Heat HubR on the backplate.
The Heat HubR will need to be configured to use OpenTherm. This can be done during setup in the app.
Re-wiring to OpenTherm from standard installation
Any motorised valves need to be disconnected and set to open. Then follow steps 2 – 5 above to wire in the OpenTherm module.Important: The OpenTherm interface is for use with a combi boiler ONLY (hot water on demand).If you are fitting a new system or require re-wiring, please contact an installer.
OpenTherm module
40/44
Glossary
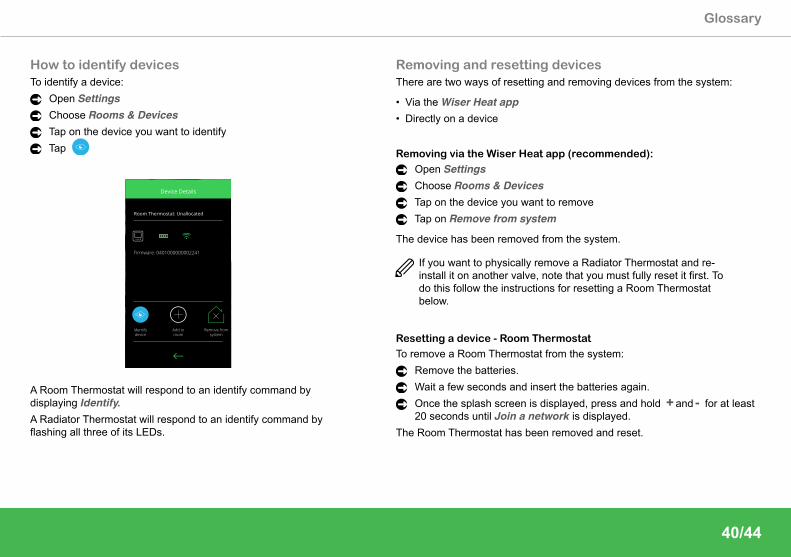
How to identify devicesTo identify a device:
Open SettingsChoose Rooms & DevicesTap on the device you want to identifyTap
Device Details
Room Thermostat: Unallocated
Firmware: 0401000000002241
Identifydevice
Add toroom
Remove fromsystem
A Room Thermostat will respond to an identify command by displaying Identify.A Radiator Thermostat will respond to an identify command by flashing all three of its LEDs.
Removing and resetting devicesThere are two ways of resetting and removing devices from the system:
• Via the Wiser Heat app • Directly on a device
Removing via the Wiser Heat app (recommended):
Open SettingsChoose Rooms & DevicesTap on the device you want to removeTap on Remove from system
The device has been removed from the system.
If you want to physically remove a Radiator Thermostat and re-install it on another valve, note that you must fully reset it first. To do this follow the instructions for resetting a Room Thermostat below.
Resetting a device - Room Thermostat
To remove a Room Thermostat from the system:Remove the batteries.Wait a few seconds and insert the batteries again.Once the splash screen is displayed, press and hold + and - for at least 20 seconds until Join a network is displayed.
The Room Thermostat has been removed and reset.

41/44
Glossary
Resetting a device - Radiator Thermostat
To remove a Radiator Thermostat from the system:Twist and hold the cap in the – direction until the centre LED flashes red 8 times.
After releasing, all LEDs will flash once. The valve will open and the left and right LEDs will flash red and blue respectively for up to 5 minutes while the centre LED will show solid orange.
Resetting a device - The Heat HubR
It is also possible to return the Heat HubR to factory settings and thereby remove all devices from the system instantly.
Press and hold the Setup button (> 20 seconds) until the setup LED lights up red.
All LEDs fwill flash once.
To reuse the devices, a device reset must also be performed on each unit.
42/44
Glossary
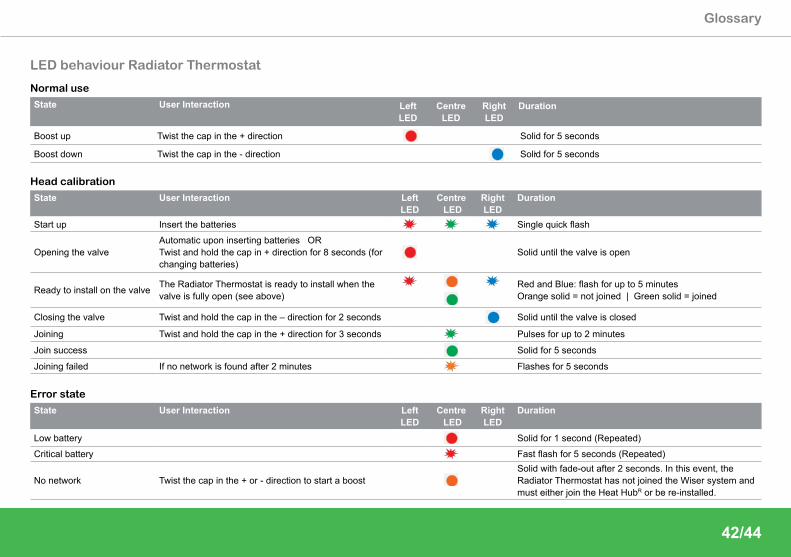
LED behaviour Radiator Thermostat
Normal use
State User Interaction Left LED
Centre LED
Right LED
Duration
Boost up Twist the cap in the + direction Solid for 5 seconds
Boost down Twist the cap in the - direction Solid for 5 seconds
Head calibration
State User Interaction Left LED
Centre LED
Right LED
Duration
Start up Insert the batteries Single quick flash
Opening the valveAutomatic upon inserting batteries OR Twist and hold the cap in + direction for 8 seconds (for changing batteries)
Solid until the valve is open
Ready to install on the valve The Radiator Thermostat is ready to install when the valve is fully open (see above)
Red and Blue: flash for up to 5 minutesOrange solid = not joined | Green solid = joined
Closing the valve Twist and hold the cap in the – direction for 2 seconds Solid until the valve is closed
Joining Twist and hold the cap in the + direction for 3 seconds Pulses for up to 2 minutes
Join success Solid for 5 seconds
Joining failed If no network is found after 2 minutes Flashes for 5 seconds
Error state
State User Interaction Left LED
Centre LED
Right LED
Duration
Low battery Solid for 1 second (Repeated)
Critical battery Fast flash for 5 seconds (Repeated)
No network Twist the cap in the + or - direction to start a boostSolid with fade-out after 2 seconds. In this event, the Radiator Thermostat has not joined the Wiser system and must either join the Heat HubR or be re-installed.
43/44
Glossary
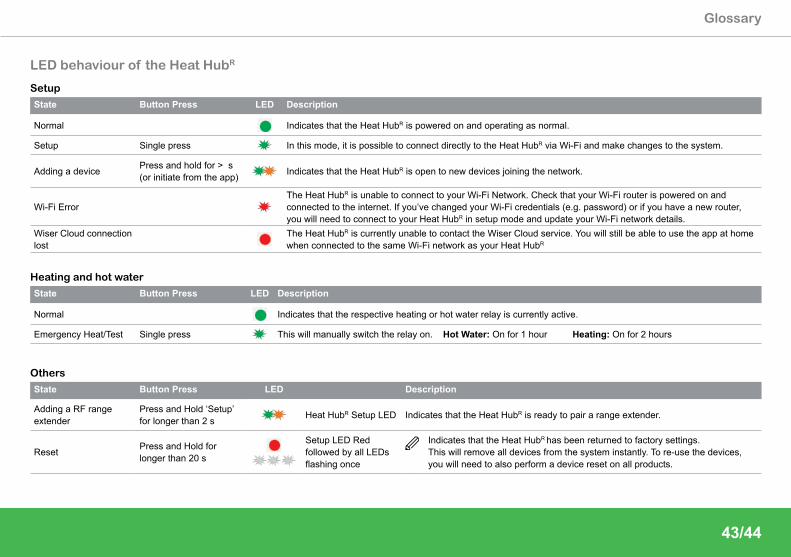
LED behaviour of the Heat HubR
Setup
State Button Press LED Description
Normal Indicates that the Heat HubR is powered on and operating as normal.
Setup Single press In this mode, it is possible to connect directly to the Heat HubR via Wi-Fi and make changes to the system.
Adding a device Press and hold for > s (or initiate from the app) Indicates that the Heat HubR is open to new devices joining the network.
Wi-Fi ErrorThe Heat HubR is unable to connect to your Wi-Fi Network. Check that your Wi-Fi router is powered on and connected to the internet. If you’ve changed your Wi-Fi credentials (e.g. password) or if you have a new router, you will need to connect to your Heat HubR in setup mode and update your Wi-Fi network details.
Wiser Cloud connection lost
The Heat HubR is currently unable to contact the Wiser Cloud service. You will still be able to use the app at home when connected to the same Wi-Fi network as your Heat HubR
Heating and hot water
State Button Press LED Description
Normal Indicates that the respective heating or hot water relay is currently active.
Emergency Heat/Test Single press This will manually switch the relay on. Hot Water: On for 1 hour Heating: On for 2 hours
Others
State Button Press LED Description
Adding a RF range extender
Press and Hold ‘Setup’ for longer than 2 s Heat HubR Setup LED Indicates that the Heat HubR is ready to pair a range extender.
Reset Press and Hold for longer than 20 s
Setup LED Red followed by all LEDs flashing once
Indicates that the Heat HubR has been returned to factory settings. This will remove all devices from the system instantly. To re-use the devices, you will need to also perform a device reset on all products.
44/44
06490245001-00
Trademarks
• Apple®, iTunes®, App Store®, iPhone®, iPod®, iPad® and MAC OS® are brand names or registered trademarks of Apple Inc.
• Google PlayTM, Google Play StoreTM and AndroidTM are brand names or registered trademarks of Google Inc.
• Wi-Fi® is a registered trademark of the Wi-Fi Alliance.• OpenTherm® is a registered trademark of The Open Therm
Association.Other brands and registered trademarks are the property of the relevant owner.
Cyber Security
The Wiser solution has been validated by Schneider Electric’s Global Security Lab which is an independent entity that ensures vigilance against the latest threats and enables the defence of Wiser systems against cyber-attack. The advanced security systems, which operate between Wiser in-home products, app and cloud services, use the same encryption technology as banks to protect end user data.
The Wiser Heat app and all software are continually updated to stay ahead of any potential threats to security.
Customer Service Tel: 0333 6000 622Technical Helpline: 0333 7000 622
Website: wiser.draytoncontrols.co.ukE-mail: [email protected]
@DraytonHome
/DraytonControls
/DraytonHome
/DraytonHome


![A Mobile App for Smarter, Easier Grocery Shopping grocer[E]z Brandon Whitehead, Alex Brand, Aaron Eppinger, Britney Luckey](https://img.pdfslide.net/doc/110x75/56649ea45503460f94ba8501/a-mobile-app-for-smarter-easier-grocery-shopping-grocerez-brandon-whitehead.jpg)