Embed Size (px)
Citation preview

The Edmodo Teacher Guide
The Social Learning Network for the Classroom
http://susd.edmodo.com
1
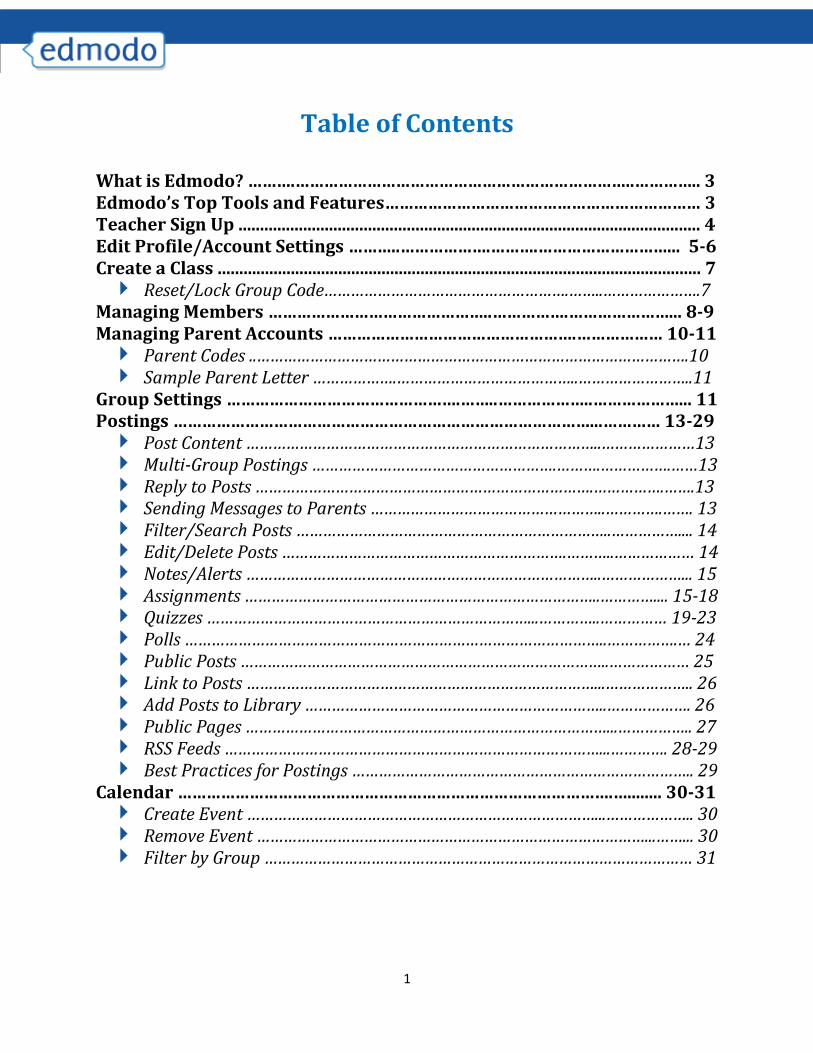
Table of Contents
What is Edmodo? ……….……………………………………………………………..………….. 3 Edmodo’s Top Tools and Features………………………………………………………… 3 Teacher Sign Up ........................................................................................................... 4 Edit Profile/Account Settings ………..……………….……….………………………... 5-6 Create a Class ................................................................................................................ 7
Reset/Lock Group Code……………………………………………….……..………………….7 Managing Members ………………………………………..…………….…………………... 8-9 Managing Parent Accounts …………………………………………….……………… 10-11
Parent Codes ..…………………………………………………………………………………….10 Sample Parent Letter ……………….…………………………………..……………………..11
Group Settings ………………………………………….……..………………..………………... 11 Postings ……………………………………………………………………………...………… 13-29
Post Content ……………………………………………………………………..…………………13 Multi-Group Postings ……………………………………………….……….…………….……13 Reply to Posts ………………………………………………………………….…………….…….13 Sending Messages to Parents ……………………………………………..………….……. 13 Filter/Search Posts ……………………………………………………………..…………….... 14 Edit/Delete Posts ……………………………………………………….………..……………… 14 Notes/Alerts ……………………………………………………………………..………………... 15 Assignments ……………………………………………………………………..………….... 15-18 Quizzes ………………………………………………………………...…………..…………… 19-23 Polls …………………………………………………………………………………..…………….… 24 Public Posts ………………………………………………………………………..……………… 25 Link to Posts ……………………………………………………………………...……………….. 26 Add Posts to Library …………………………………………………………..………………. 26 Public Pages ………………………………………………………………………...…………….. 27 RSS Feeds …………………………………………………………………………...…………. 28-29 Best Practices for Postings ………………………………………………………………….. 29
Calendar ……………………………………………………………………………….…........ 30-31 Create Event ……………………………………………………………………...……………….. 30 Remove Event ……………………………………………………………………………...……... 30 Filter by Group …………………………………………………………………………………… 31
2
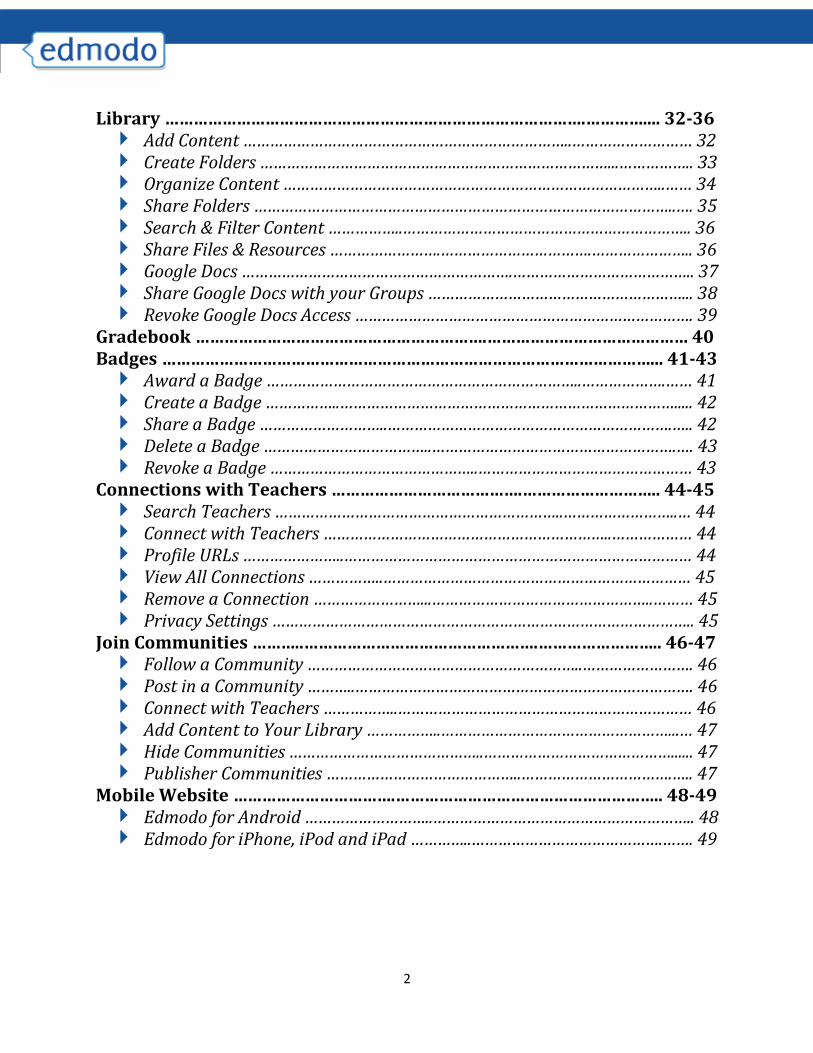
Library …………………………………………………………………………….………….... 32-36 Add Content ………………………………………………………………..……………………… 32 Create Folders ……………………………………………………………………...…………….. 33 Organize Content …………………………………………………………………………..…… 34 Share Folders …………………………………………………………………………………..…. 35 Search & Filter Content ……………..……………………………………………………….. 36 Share Files & Resources …………………….…………………………….………………….. 36 Google Docs …………………………………………………….………………………………….. 37 Share Google Docs with your Groups …………………………………………………... 38 Revoke Google Docs Access …………………………………………………………………. 39
Gradebook …………………………………………………….…………………………………… 40 Badges …………………………………………………………………………………………... 41-43
Award a Badge ……………………………………………………………..……………….…… 41 Create a Badge ……………..…………………………………………………………………..... 42 Share a Badge ………………………..……………………………………………………….….. 42 Delete a Badge ………………………………..……………………………………………….…. 43 Revoke a Badge ………………………………………..………………………………………… 43
Connections with Teachers ………………………………….……………………….. 44-45 Search Teachers ………………………………………………………..……………………..… 44 Connect with Teachers ………………………………………………………..……………… 44 Profile URLs …………………..…………………………………………………………………… 44 View All Connections ……………..…………………………………………………………… 45 Remove a Connection ……………………...…………………………………………..……… 45 Privacy Settings ………………………………………………………………………………….. 45
Join Communities ………..………………………………………….…………………….. 46-47 Follow a Community ……………………………………………………..……………………. 46 Post in a Community ………..…………………………………………………………………. 46 Connect with Teachers ……………..………………………………………………………… 46 Add Content to Your Library ……………..……………………………………………...… 47 Hide Communities ……………………………………..……………………………………...... 47 Publisher Communities ……………………………………..…………………………….….. 47
Mobile Website …………………………….……………………………………………….. 48-49 Edmodo for Android ………………………..………………………………………………….. 48 Edmodo for iPhone, iPod and iPad …………..…………………………………….……. 49
3
What is Edmodo? Edmodo is a social media platform often described as a Facebook for schools. It is that and much more. Edmodo attracts teachers and students with a social element that resembles Facebook, but there’s even greater value in the educational applications. Edmodo (designed by educators) enables exceptionally secure cloud-based collaboration. A teacher, school, or district easily can manage a system that provides the best features of the cloud while practically eliminating the anxiety that we associate with students on the internet.
Edmodo’s Top Tools & Features
Teachers and students can collaborate in a secure, closed environment.
A message board allows secure and open communication that can be monitored and controlled by the teacher.
It is easy to monitor student interaction.
Teachers can post assignments and assessments that are electronically submitted and automatically graded.
A built-in survey tool can be used to check for understanding (no clickers required).
Teachers and other school personnel can create professional groups, subject area communities, and other networks to extend professional development.
Teachers and students can store and share documents and files in a wide variety of formats in a cloud-based environment.
Teachers can maintain a personal content library and share content with members.
Students can instantly access their files 24/7 through their cloud-based ‘Library’.
Folder-sharing allows teachers to share all content for particular units of study with select groups or all students.
Parents can create a parent account to connect with their child’s groups.
You get cloud capabilities and convenience with airtight security.
A brilliantly simple user interface – little or no formal training required
Edmodo is free – and free of ads
4
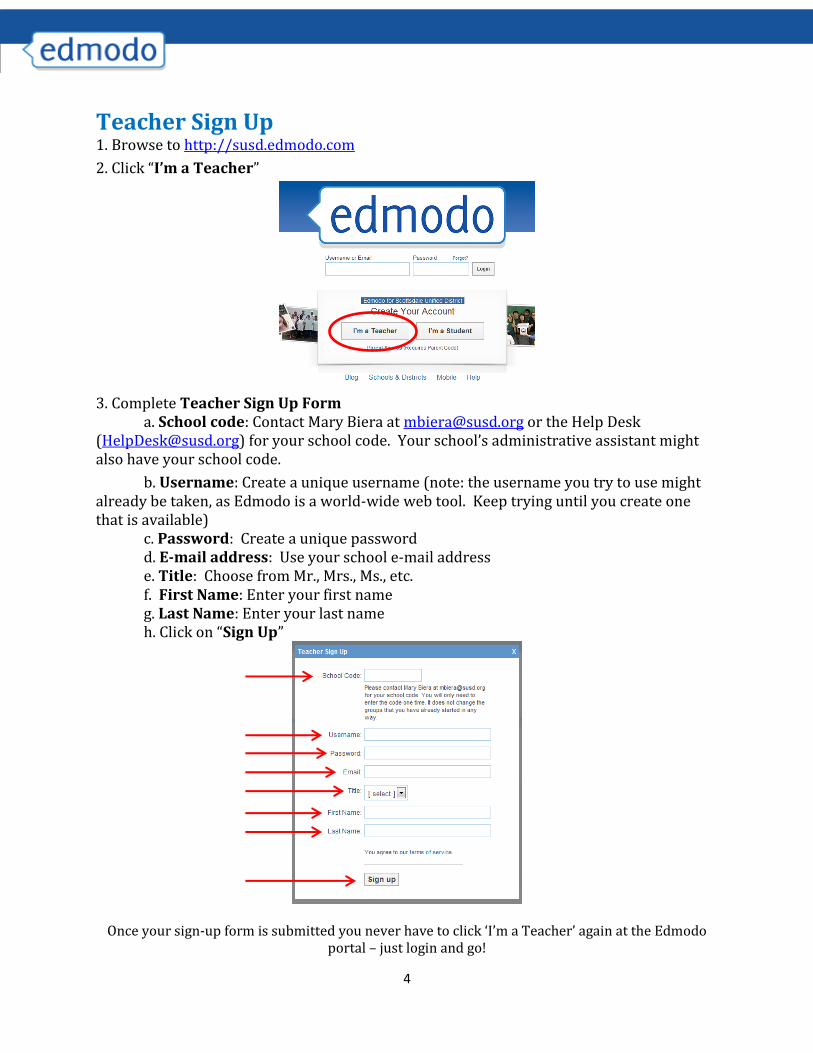
Teacher Sign Up 1. Browse to http://susd.edmodo.com
2. Click “I’m a Teacher”
3. Complete Teacher Sign Up Form a. School code: Contact Mary Biera at [email protected] or the Help Desk
([email protected]) for your school code. Your school’s administrative assistant might also have your school code.
b. Username: Create a unique username (note: the username you try to use might already be taken, as Edmodo is a world-wide web tool. Keep trying until you create one that is available)
c. Password: Create a unique password d. E-mail address: Use your school e-mail address e. Title: Choose from Mr., Mrs., Ms., etc. f. First Name: Enter your first name g. Last Name: Enter your last name h. Click on “Sign Up”
Once your sign-up form is submitted you never have to click ‘I’m a Teacher’ again at the Edmodo portal – just login and go!
5
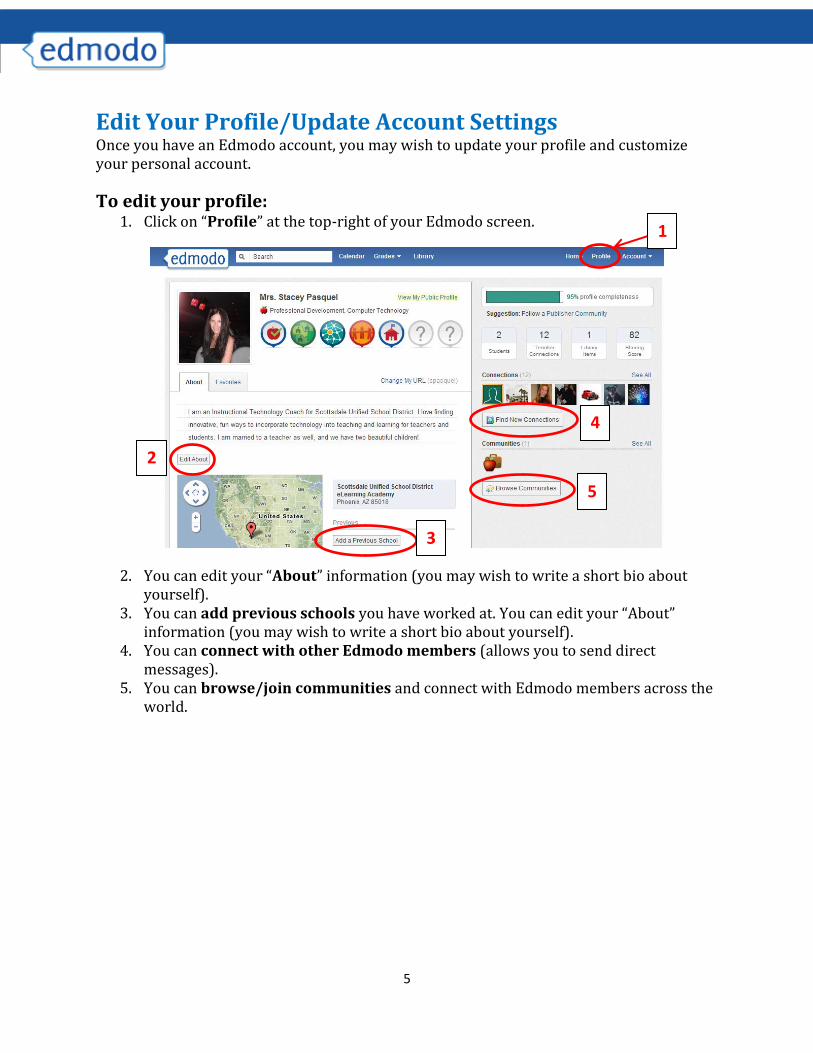
Edit Your Profile/Update Account Settings
Once you have an Edmodo account, you may wish to update your profile and customize your personal account.
To edit your profile: 1. Click on “Profile” at the top-right of your Edmodo screen.
2. You can edit your “About” information (you may wish to write a short bio about yourself).
3. You can add previous schools you have worked at. You can edit your “About” information (you may wish to write a short bio about yourself).
4. You can connect with other Edmodo members (allows you to send direct messages).
5. You can browse/join communities and connect with Edmodo members across the world.
1
5
4
3
2
6
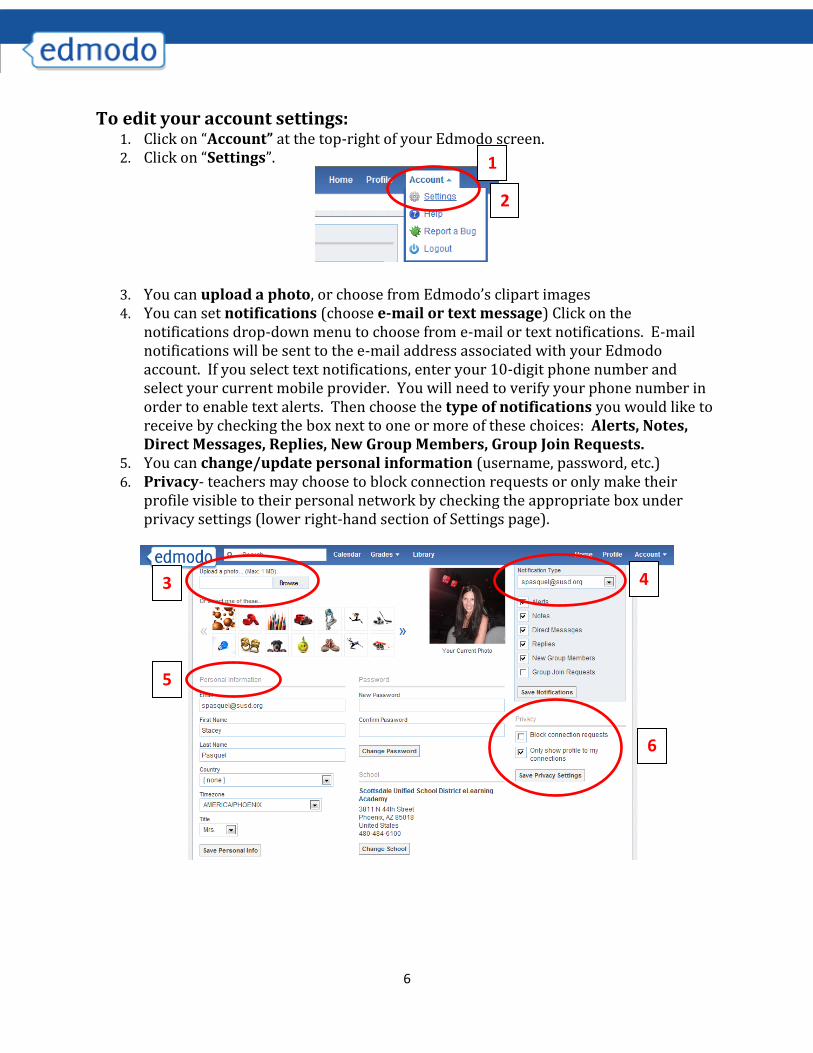
To edit your account settings: 1. Click on “Account” at the top-right of your Edmodo screen. 2. Click on “Settings”.
3. You can upload a photo, or choose from Edmodo’s clipart images 4. You can set notifications (choose e-mail or text message) Click on the
notifications drop-down menu to choose from e-mail or text notifications. E-mail notifications will be sent to the e-mail address associated with your Edmodo account. If you select text notifications, enter your 10-digit phone number and select your current mobile provider. You will need to verify your phone number in order to enable text alerts. Then choose the type of notifications you would like to receive by checking the box next to one or more of these choices: Alerts, Notes, Direct Messages, Replies, New Group Members, Group Join Requests.
5. You can change/update personal information (username, password, etc.) 6. Privacy- teachers may choose to block connection requests or only make their
profile visible to their personal network by checking the appropriate box under privacy settings (lower right-hand section of Settings page).
4 3
5
2
1
6
7
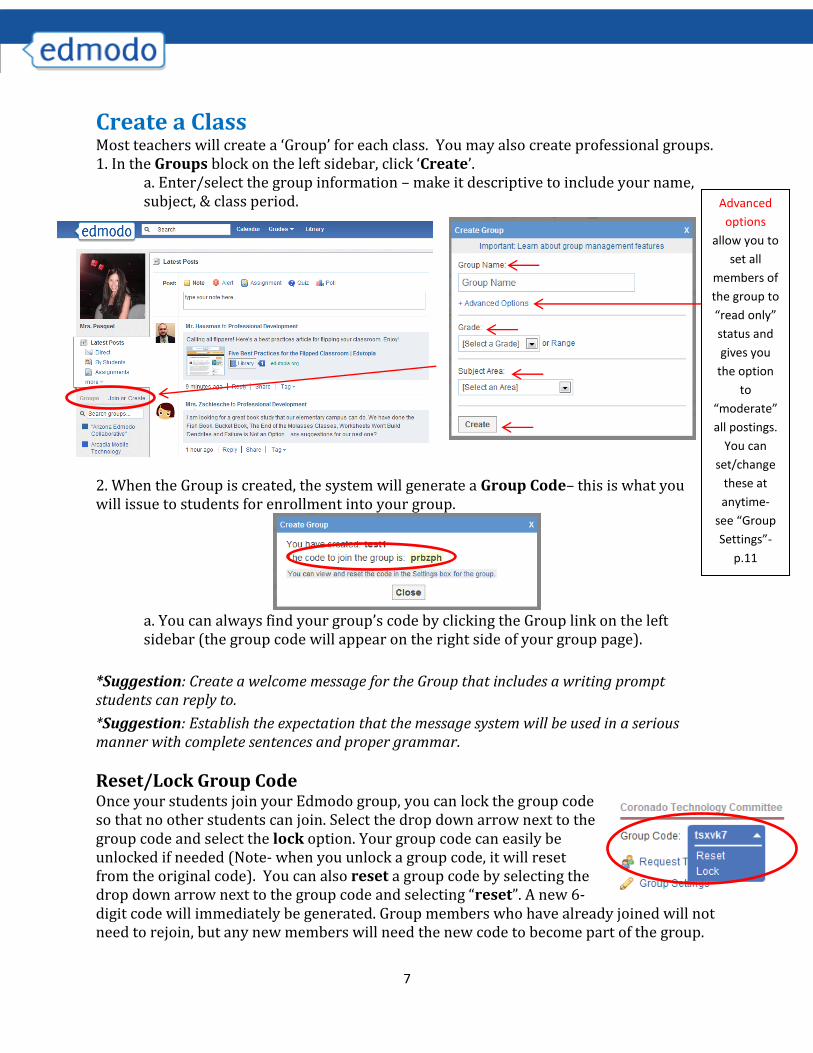
Create a Class Most teachers will create a ‘Group’ for each class. You may also create professional groups. 1. In the Groups block on the left sidebar, click ‘Create’.
a. Enter/select the group information – make it descriptive to include your name, subject, & class period.
2. When the Group is created, the system will generate a Group Code– this is what you will issue to students for enrollment into your group.
a. You can always find your group’s code by clicking the Group link on the left sidebar (the group code will appear on the right side of your group page).
*Suggestion: Create a welcome message for the Group that includes a writing prompt students can reply to.
*Suggestion: Establish the expectation that the message system will be used in a serious manner with complete sentences and proper grammar.
Reset/Lock Group Code Once your students join your Edmodo group, you can lock the group code so that no other students can join. Select the drop down arrow next to the group code and select the lock option. Your group code can easily be unlocked if needed (Note- when you unlock a group code, it will reset from the original code). You can also reset a group code by selecting the drop down arrow next to the group code and selecting “reset”. A new 6-digit code will immediately be generated. Group members who have already joined will not need to rejoin, but any new members will need the new code to become part of the group.
Advanced
options
allow you to
set all
members of
the group to
“read only”
status and
gives you
the option
to
“moderate”
all postings.
You can
set/change
these at
anytime-
see “Group
Settings”-
p.11
8
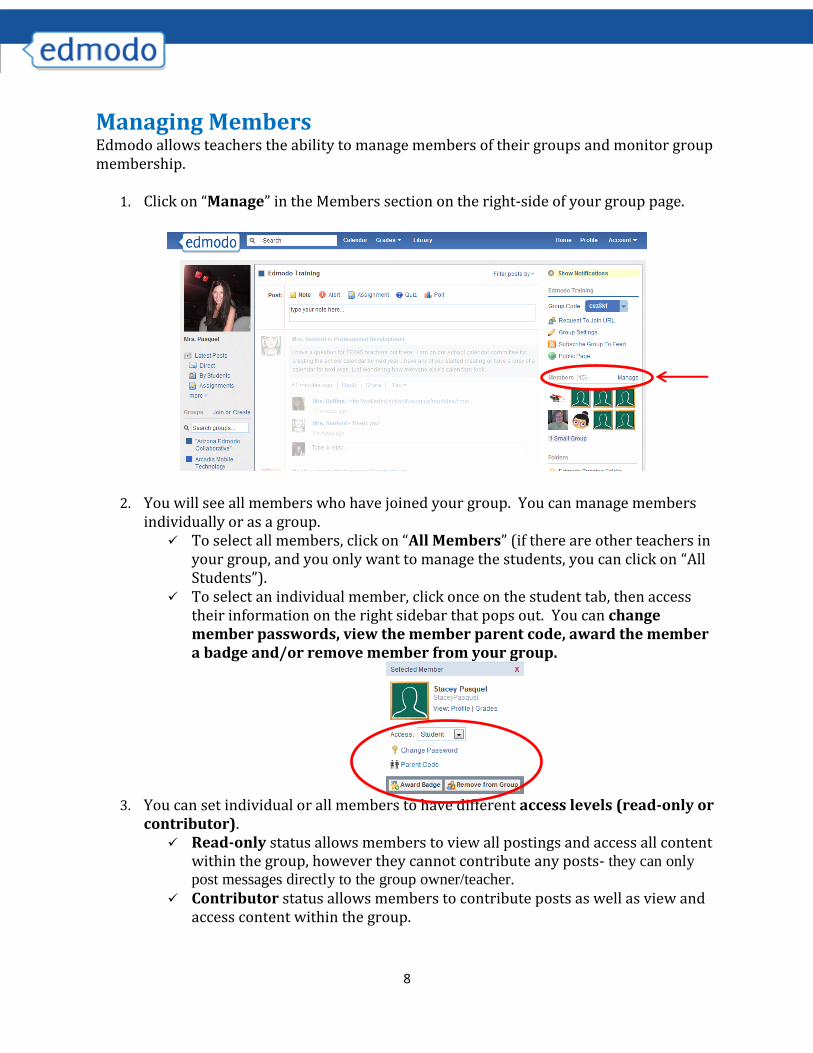
Managing Members
Edmodo allows teachers the ability to manage members of their groups and monitor group membership.
1. Click on “Manage” in the Members section on the right-side of your group page.
2. You will see all members who have joined your group. You can manage members individually or as a group.
To select all members, click on “All Members” (if there are other teachers in your group, and you only want to manage the students, you can click on “All Students”).
To select an individual member, click once on the student tab, then access their information on the right sidebar that pops out. You can change member passwords, view the member parent code, award the member a badge and/or remove member from your group.
3. You can set individual or all members to have different access levels (read-only or
contributor). Read-only status allows members to view all postings and access all content
within the group, however they cannot contribute any posts- they can only
post messages directly to the group owner/teacher. Contributor status allows members to contribute posts as well as view and
access content within the group.
9
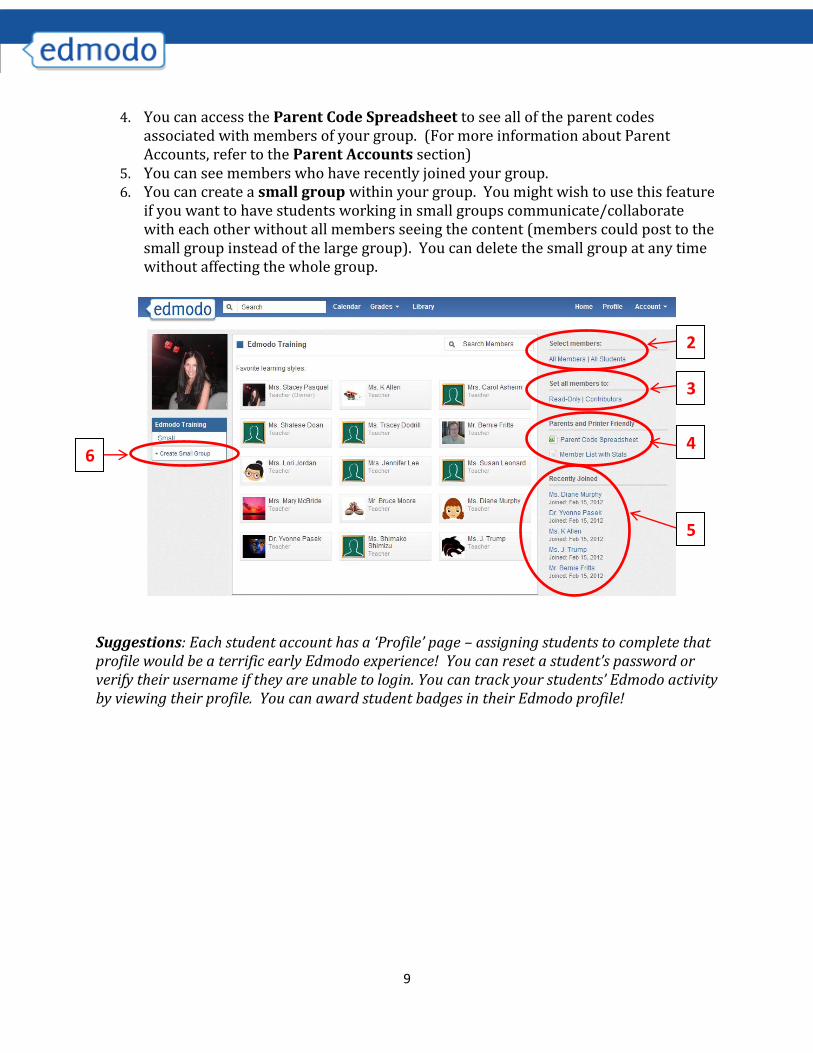
4. You can access the Parent Code Spreadsheet to see all of the parent codes associated with members of your group. (For more information about Parent Accounts, refer to the Parent Accounts section)
5. You can see members who have recently joined your group. 6. You can create a small group within your group. You might wish to use this feature
if you want to have students working in small groups communicate/collaborate with each other without all members seeing the content (members could post to the small group instead of the large group). You can delete the small group at any time without affecting the whole group.
Suggestions: Each student account has a ‘Profile’ page – assigning students to complete that profile would be a terrific early Edmodo experience! You can reset a student’s password or verify their username if they are unable to login. You can track your students’ Edmodo activity by viewing their profile. You can award student badges in their Edmodo profile!
2
3
4
5
6
10
Managing Parent Accounts: Parent accounts are a great way to keep parents informed of classroom activities, assignments, grades and school events. The registration process for parents is similar to student registration, with one additional security measure – each parent will need their own unique parent code to register. This is to ensure that parents can view their child’s school activities.
How to Retrieve Parent Codes
From the student account.
1. Student will log in to his/her Edmodo account.
2. The parent code will be located on the right panel,
below the notifications section.
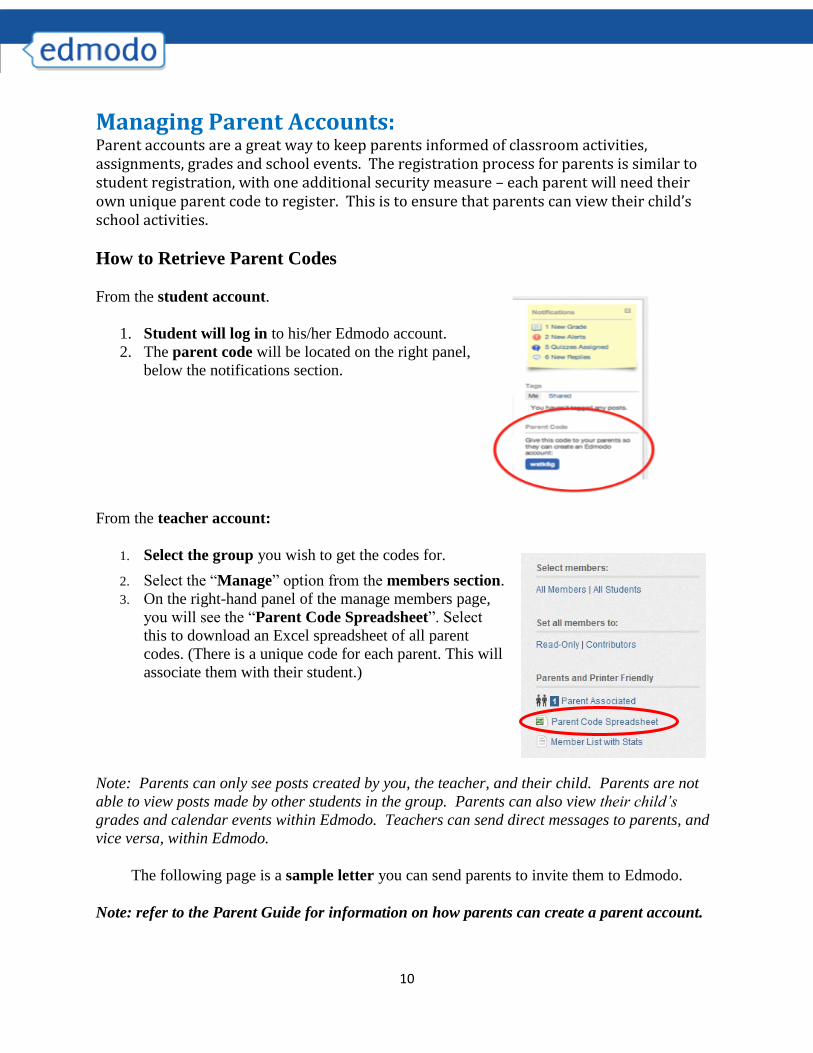
From the teacher account:
1. Select the group you wish to get the codes for.
2. Select the “Manage” option from the members section.
3. On the right-hand panel of the manage members page,
you will see the “Parent Code Spreadsheet”. Select
this to download an Excel spreadsheet of all parent
codes. (There is a unique code for each parent. This will
associate them with their student.)
Note: Parents can only see posts created by you, the teacher, and their child. Parents are not
able to view posts made by other students in the group. Parents can also view their child’s
grades and calendar events within Edmodo. Teachers can send direct messages to parents, and
vice versa, within Edmodo.
The following page is a sample letter you can send parents to invite them to Edmodo.
Note: refer to the Parent Guide for information on how parents can create a parent account.
11
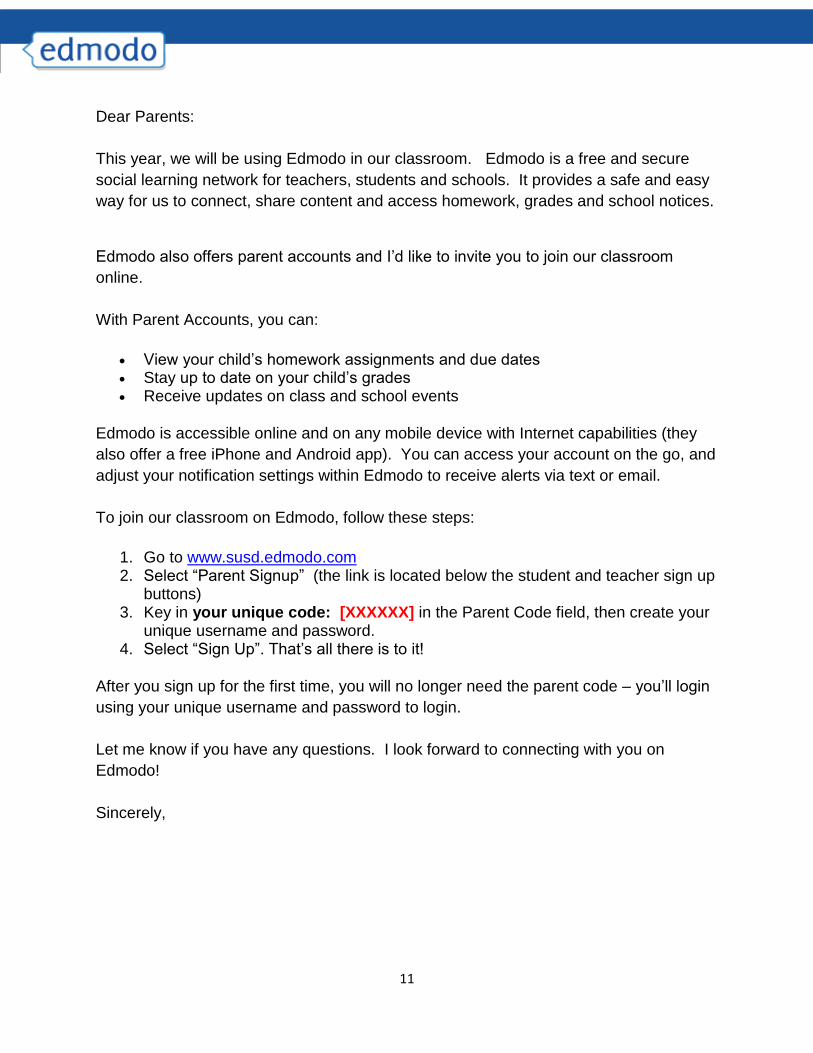
Dear Parents:
This year, we will be using Edmodo in our classroom. Edmodo is a free and secure
social learning network for teachers, students and schools. It provides a safe and easy
way for us to connect, share content and access homework, grades and school notices.
Edmodo also offers parent accounts and I’d like to invite you to join our classroom
online.
With Parent Accounts, you can:
View your child’s homework assignments and due dates Stay up to date on your child’s grades Receive updates on class and school events
Edmodo is accessible online and on any mobile device with Internet capabilities (they
also offer a free iPhone and Android app). You can access your account on the go, and
adjust your notification settings within Edmodo to receive alerts via text or email.
To join our classroom on Edmodo, follow these steps:
1. Go to www.susd.edmodo.com 2. Select “Parent Signup” (the link is located below the student and teacher sign up
buttons) 3. Key in your unique code: [XXXXXX] in the Parent Code field, then create your
unique username and password. 4. Select “Sign Up”. That’s all there is to it!
After you sign up for the first time, you will no longer need the parent code – you’ll login
using your unique username and password to login.
Let me know if you have any questions. I look forward to connecting with you on
Edmodo!
Sincerely,
12
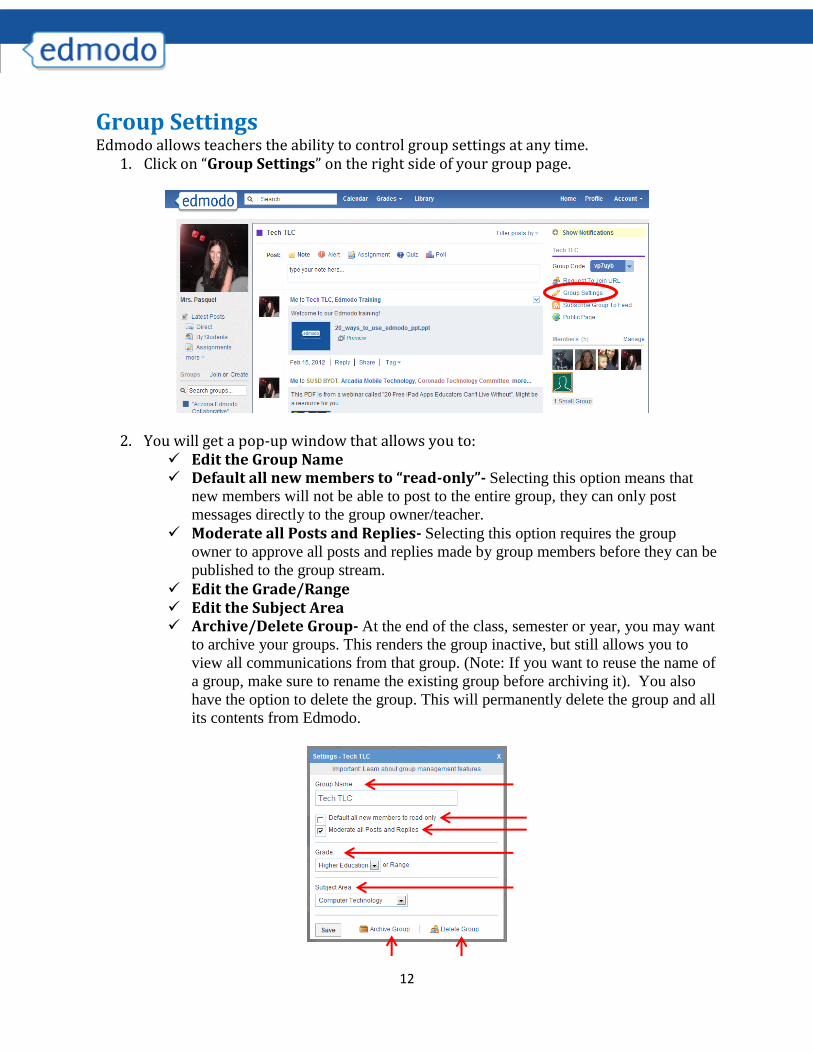
Group Settings Edmodo allows teachers the ability to control group settings at any time.
1. Click on “Group Settings” on the right side of your group page.
2. You will get a pop-up window that allows you to: Edit the Group Name Default all new members to “read-only”- Selecting this option means that
new members will not be able to post to the entire group, they can only post
messages directly to the group owner/teacher. Moderate all Posts and Replies- Selecting this option requires the group
owner to approve all posts and replies made by group members before they can be
published to the group stream. Edit the Grade/Range Edit the Subject Area Archive/Delete Group- At the end of the class, semester or year, you may want
to archive your groups. This renders the group inactive, but still allows you to
view all communications from that group. (Note: If you want to reuse the name of
a group, make sure to rename the existing group before archiving it). You also
have the option to delete the group. This will permanently delete the group and all
its contents from Edmodo.
13
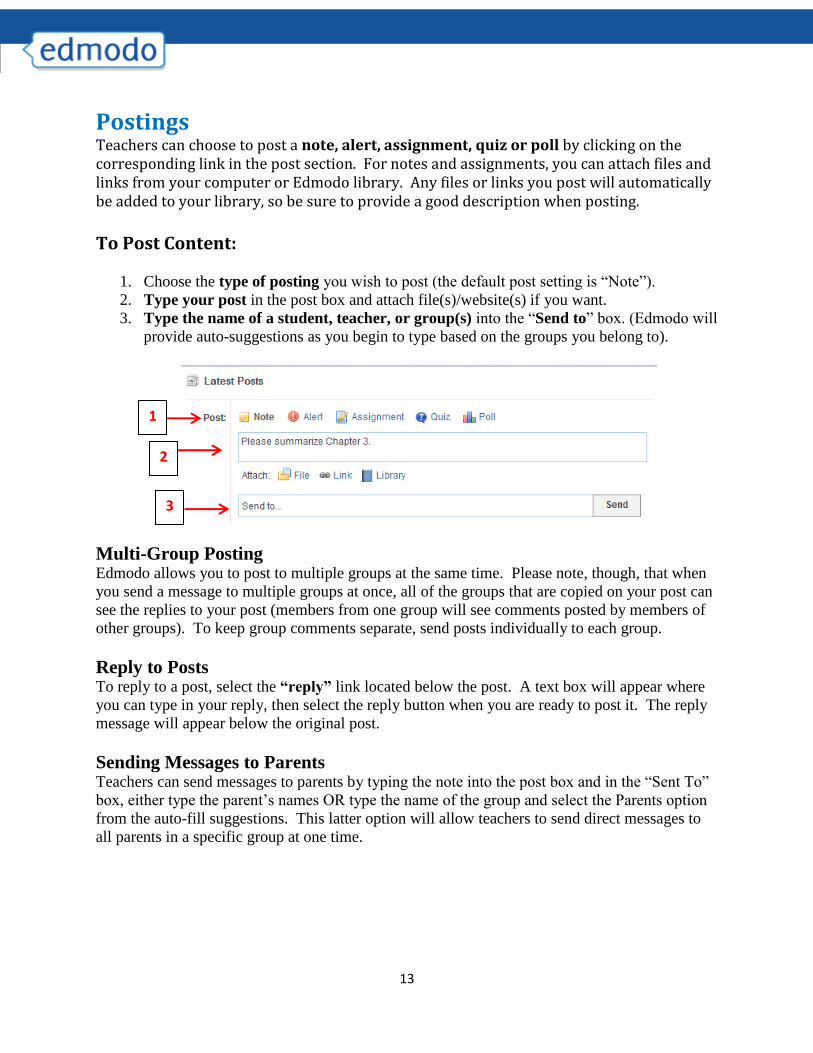
Postings
Teachers can choose to post a note, alert, assignment, quiz or poll by clicking on the corresponding link in the post section. For notes and assignments, you can attach files and links from your computer or Edmodo library. Any files or links you post will automatically be added to your library, so be sure to provide a good description when posting.
To Post Content:
1. Choose the type of posting you wish to post (the default post setting is “Note”).
2. Type your post in the post box and attach file(s)/website(s) if you want.
3. Type the name of a student, teacher, or group(s) into the “Send to” box. (Edmodo will
provide auto-suggestions as you begin to type based on the groups you belong to).
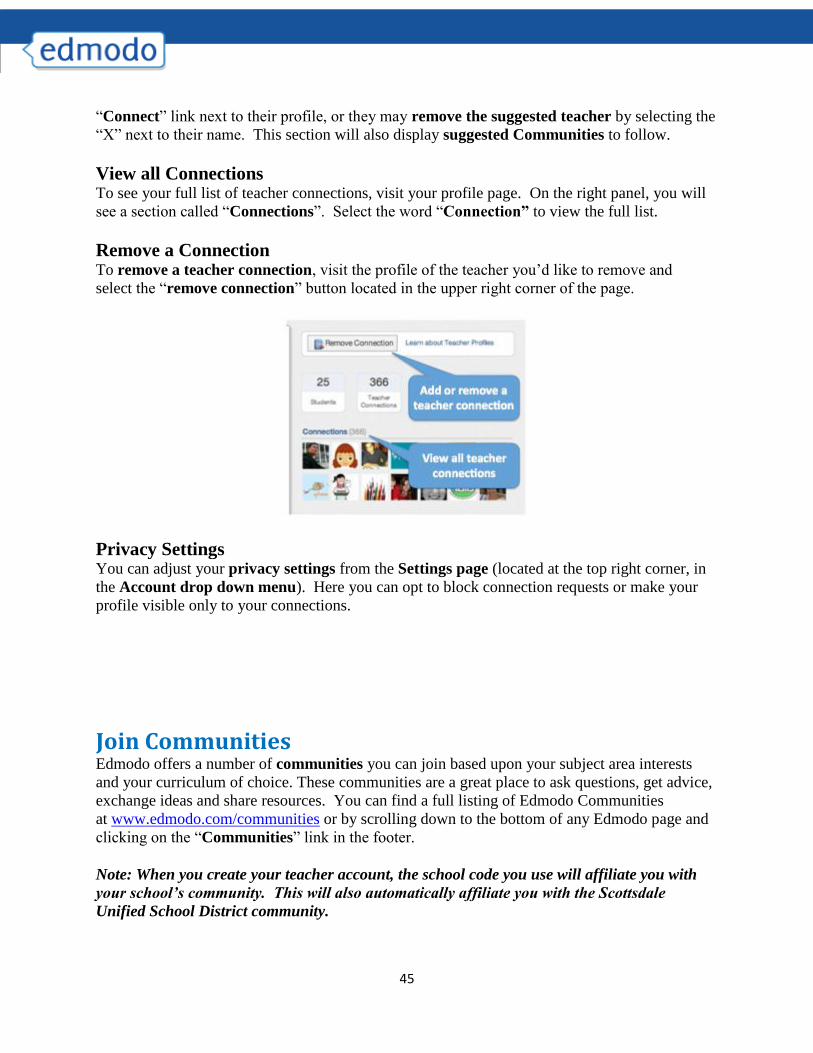
Multi-Group Posting Edmodo allows you to post to multiple groups at the same time. Please note, though, that when
you send a message to multiple groups at once, all of the groups that are copied on your post can
see the replies to your post (members from one group will see comments posted by members of
other groups). To keep group comments separate, send posts individually to each group.
Reply to Posts To reply to a post, select the “reply” link located below the post. A text box will appear where
you can type in your reply, then select the reply button when you are ready to post it. The reply
message will appear below the original post.
Sending Messages to Parents Teachers can send messages to parents by typing the note into the post box and in the “Sent To”
box, either type the parent’s names OR type the name of the group and select the Parents option
from the auto-fill suggestions. This latter option will allow teachers to send direct messages to
all parents in a specific group at one time.
1
2
3
14
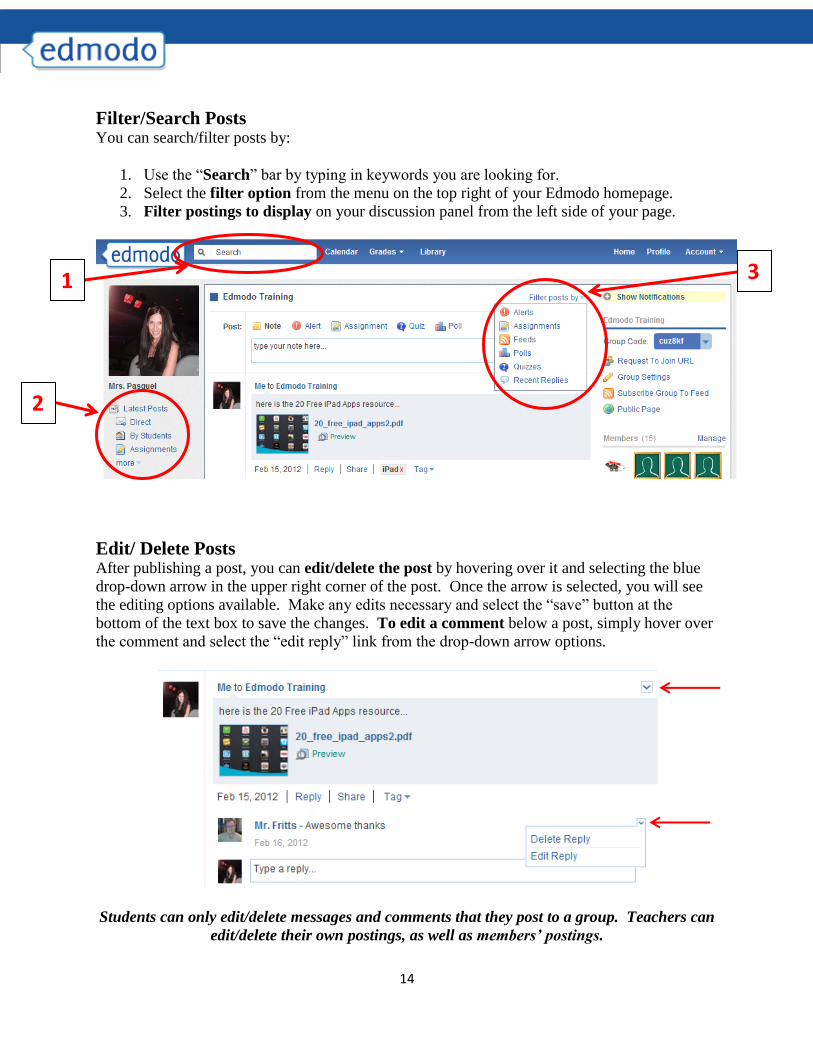
Filter/Search Posts You can search/filter posts by:
1. Use the “Search” bar by typing in keywords you are looking for.
2. Select the filter option from the menu on the top right of your Edmodo homepage.
3. Filter postings to display on your discussion panel from the left side of your page.
Edit/ Delete Posts
After publishing a post, you can edit/delete the post by hovering over it and selecting the blue
drop-down arrow in the upper right corner of the post. Once the arrow is selected, you will see
the editing options available. Make any edits necessary and select the “save” button at the
bottom of the text box to save the changes. To edit a comment below a post, simply hover over
the comment and select the “edit reply” link from the drop-down arrow options.
Students can only edit/delete messages and comments that they post to a group. Teachers can
edit/delete their own postings, as well as members’ postings.
1 3
2
15
Posting Notes/Alerts: Post notes and/or alerts to the discussion panel as messages,
reminders, writing/discussion prompts, etc. Alerts are similar to a note, but an alert is intended
for urgent messages. Alerts are limited to 140 characters, sends an immediate notification to
members, and posts the message in big, black font on the Edmodo page.
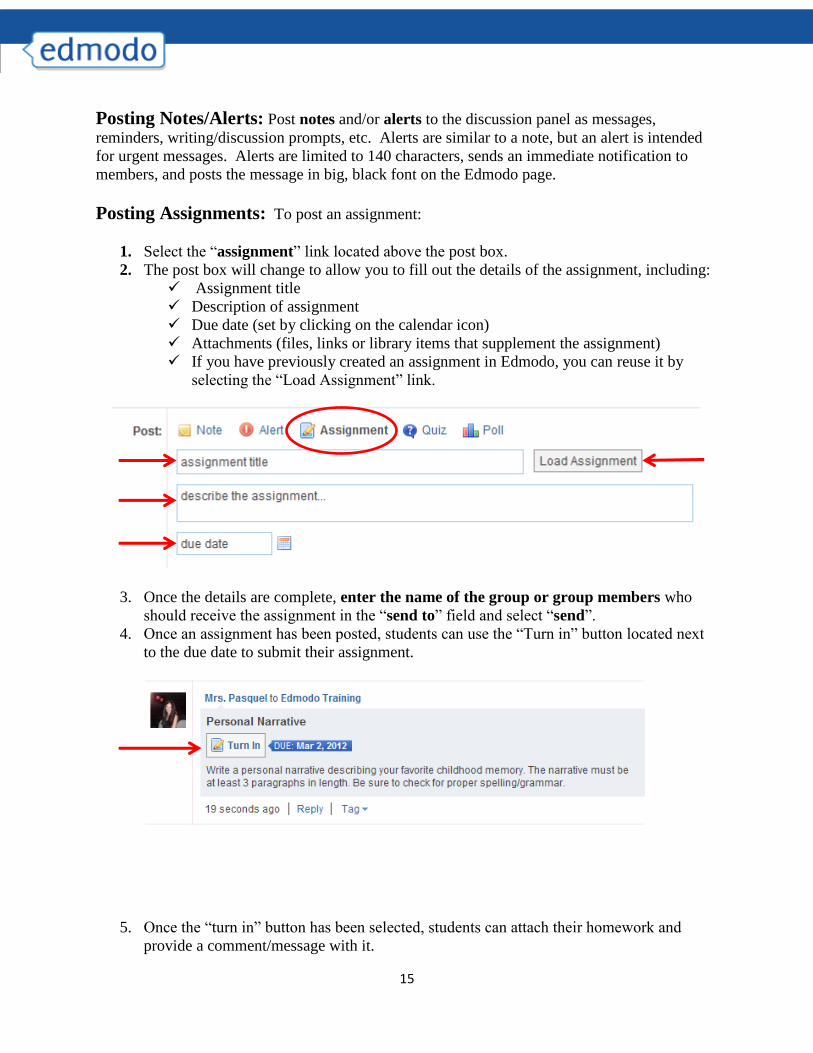
Posting Assignments: To post an assignment:
1. Select the “assignment” link located above the post box.
2. The post box will change to allow you to fill out the details of the assignment, including:
Assignment title
Description of assignment
Due date (set by clicking on the calendar icon)
Attachments (files, links or library items that supplement the assignment)
If you have previously created an assignment in Edmodo, you can reuse it by
selecting the “Load Assignment” link.
3. Once the details are complete, enter the name of the group or group members who
should receive the assignment in the “send to” field and select “send”.
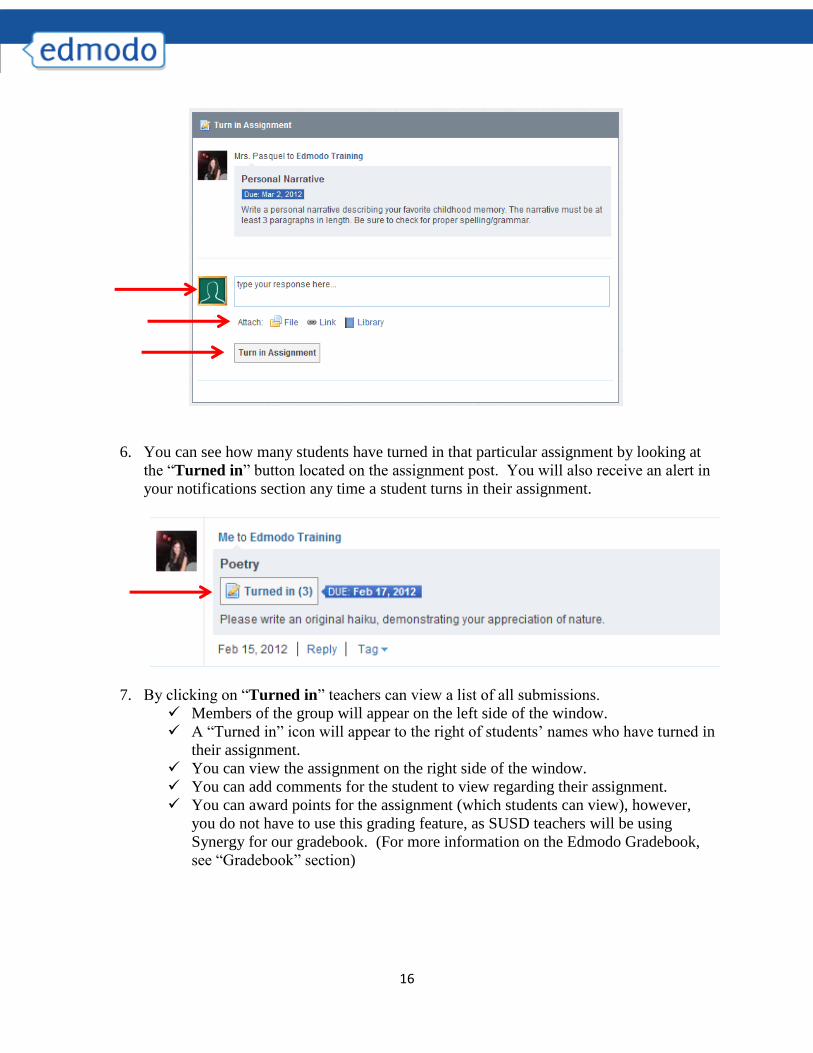
4. Once an assignment has been posted, students can use the “Turn in” button located next
to the due date to submit their assignment.
5. Once the “turn in” button has been selected, students can attach their homework and
provide a comment/message with it.
16
6. You can see how many students have turned in that particular assignment by looking at
the “Turned in” button located on the assignment post. You will also receive an alert in
your notifications section any time a student turns in their assignment.
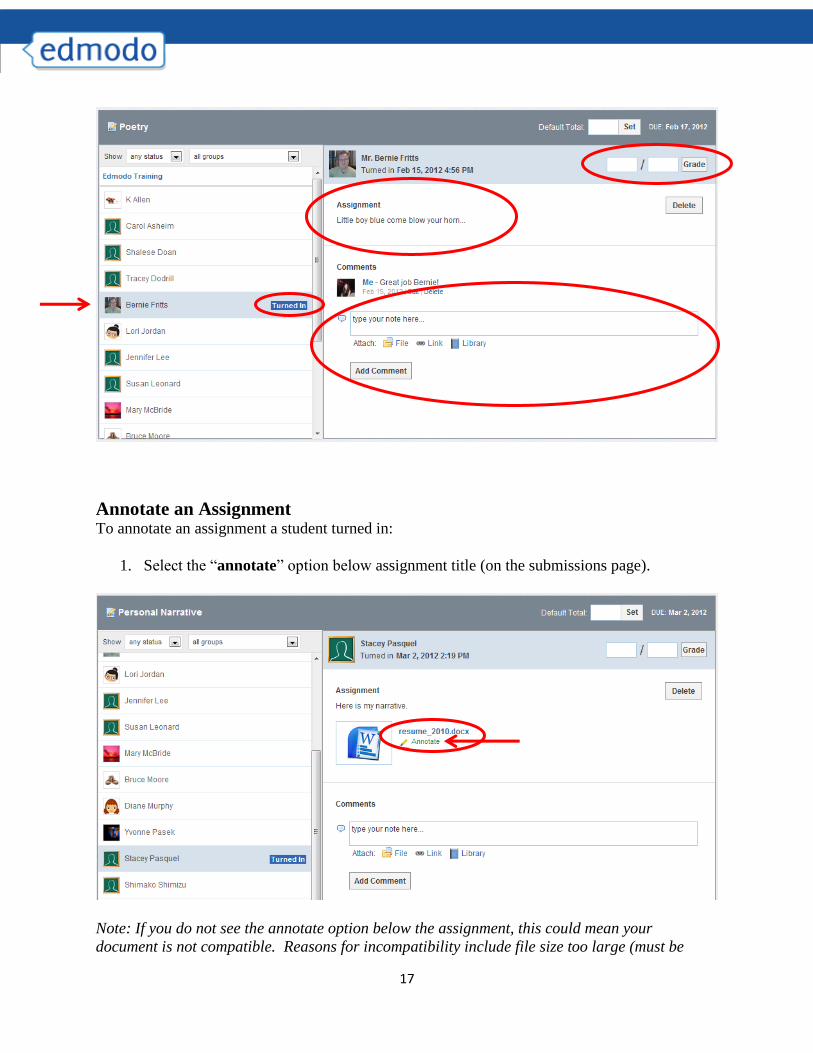
7. By clicking on “Turned in” teachers can view a list of all submissions.
Members of the group will appear on the left side of the window.
A “Turned in” icon will appear to the right of students’ names who have turned in
their assignment.
You can view the assignment on the right side of the window.
You can add comments for the student to view regarding their assignment.
You can award points for the assignment (which students can view), however,
you do not have to use this grading feature, as SUSD teachers will be using
Synergy for our gradebook. (For more information on the Edmodo Gradebook,
see “Gradebook” section)
17
Annotate an Assignment To annotate an assignment a student turned in:
1. Select the “annotate” option below assignment title (on the submissions page).
Note: If you do not see the annotate option below the assignment, this could mean your
document is not compatible. Reasons for incompatibility include file size too large (must be
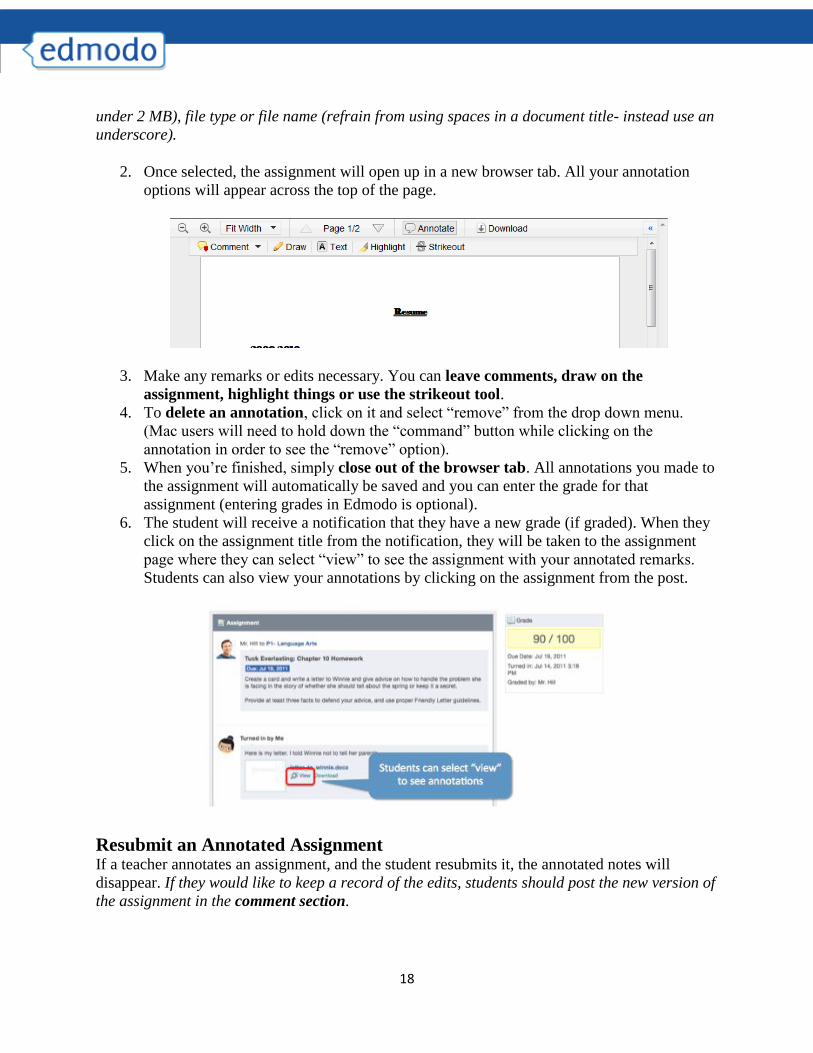
18
under 2 MB), file type or file name (refrain from using spaces in a document title- instead use an
underscore).
2. Once selected, the assignment will open up in a new browser tab. All your annotation
options will appear across the top of the page.
3. Make any remarks or edits necessary. You can leave comments, draw on the
assignment, highlight things or use the strikeout tool.
4. To delete an annotation, click on it and select “remove” from the drop down menu.
(Mac users will need to hold down the “command” button while clicking on the
annotation in order to see the “remove” option).
5. When you’re finished, simply close out of the browser tab. All annotations you made to
the assignment will automatically be saved and you can enter the grade for that
assignment (entering grades in Edmodo is optional).
6. The student will receive a notification that they have a new grade (if graded). When they
click on the assignment title from the notification, they will be taken to the assignment
page where they can select “view” to see the assignment with your annotated remarks.
Students can also view your annotations by clicking on the assignment from the post.
Resubmit an Annotated Assignment If a teacher annotates an assignment, and the student resubmits it, the annotated notes will
disappear. If they would like to keep a record of the edits, students should post the new version of
the assignment in the comment section.
19
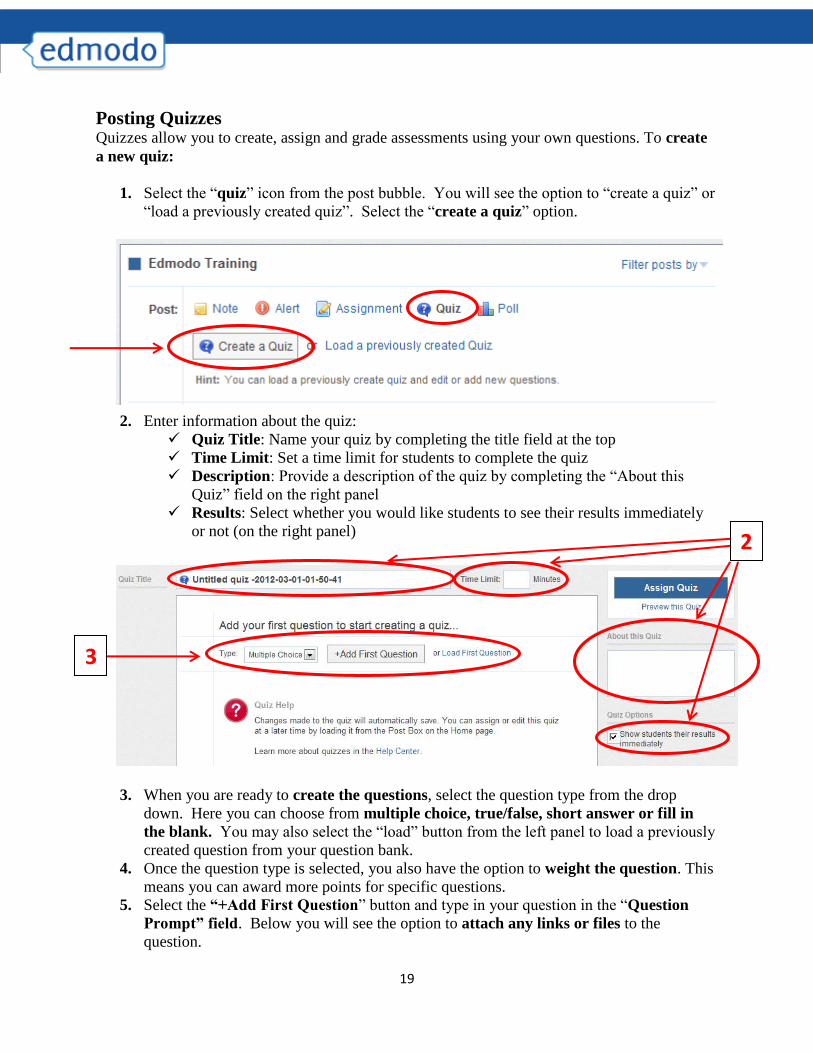
Posting Quizzes
Quizzes allow you to create, assign and grade assessments using your own questions. To create
a new quiz:
1. Select the “quiz” icon from the post bubble. You will see the option to “create a quiz” or
“load a previously created quiz”. Select the “create a quiz” option.
2. Enter information about the quiz:
Quiz Title: Name your quiz by completing the title field at the top
Time Limit: Set a time limit for students to complete the quiz
Description: Provide a description of the quiz by completing the “About this
Quiz” field on the right panel
Results: Select whether you would like students to see their results immediately
or not (on the right panel)
3. When you are ready to create the questions, select the question type from the drop
down. Here you can choose from multiple choice, true/false, short answer or fill in
the blank. You may also select the “load” button from the left panel to load a previously
created question from your question bank.
4. Once the question type is selected, you also have the option to weight the question. This
means you can award more points for specific questions.
5. Select the “+Add First Question” button and type in your question in the “Question
Prompt” field. Below you will see the option to attach any links or files to the
question.
2
3

20
6. Once the prompt is complete you can add responses. Complete the response options and
mark the correct one by selecting the “Set As Correct Answer” link.
7. To add a new question, select the “+Add” button on the left panel. You can go back
and edit questions, by selecting the question number from the left panel.
8. To remove a question, select the question number on the left panel and click the
“Remove Question” button from the top right corner.
9. When you’re done, you can preview the quiz (and see it just as a student would see it)
by selecting the “preview quiz” link under the Assign Quiz button. If the quiz is ready to
be posted, select the “Assign Quiz” button at the top right corner of the page.
10. You will be taken back to the group page, where you can specify the due date and
choose your recipients. Select send to post the quiz.
Load Previously Created Quiz
Once you have created a quiz it will be stored in Edmodo and you can re-use it at any time by
5
6
6
7 8
9
21
selecting the “Load a previously created Quiz” link, located next the “Create a Quiz”
button. A list of quizzes you have created in the past will appear. Choose the appropriate one
and it will automatically load. You will have the option to edit the quiz (edit or add new
questions) and select a new due date.
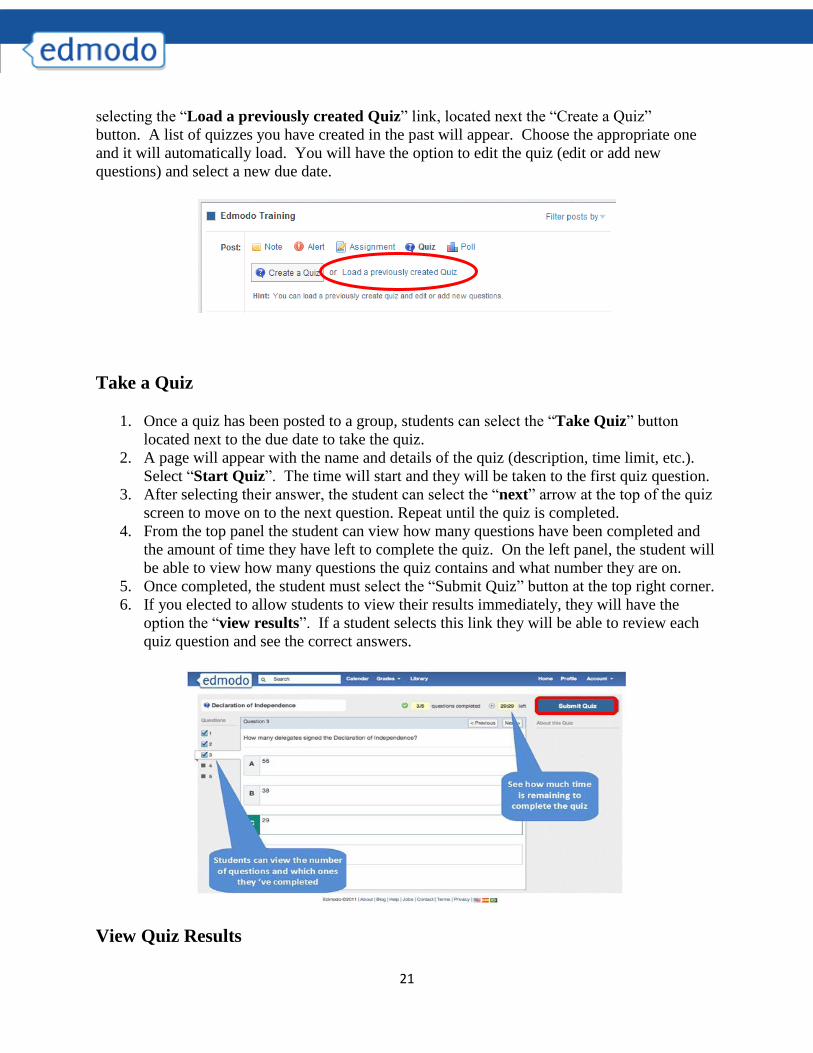
Take a Quiz
1. Once a quiz has been posted to a group, students can select the “Take Quiz” button
located next to the due date to take the quiz.
2. A page will appear with the name and details of the quiz (description, time limit, etc.).
Select “Start Quiz”. The time will start and they will be taken to the first quiz question.
3. After selecting their answer, the student can select the “next” arrow at the top of the quiz
screen to move on to the next question. Repeat until the quiz is completed.
4. From the top panel the student can view how many questions have been completed and
the amount of time they have left to complete the quiz. On the left panel, the student will
be able to view how many questions the quiz contains and what number they are on.
5. Once completed, the student must select the “Submit Quiz” button at the top right corner.
6. If you elected to allow students to view their results immediately, they will have the
option the “view results”. If a student selects this link they will be able to review each
quiz question and see the correct answers.
View Quiz Results
22
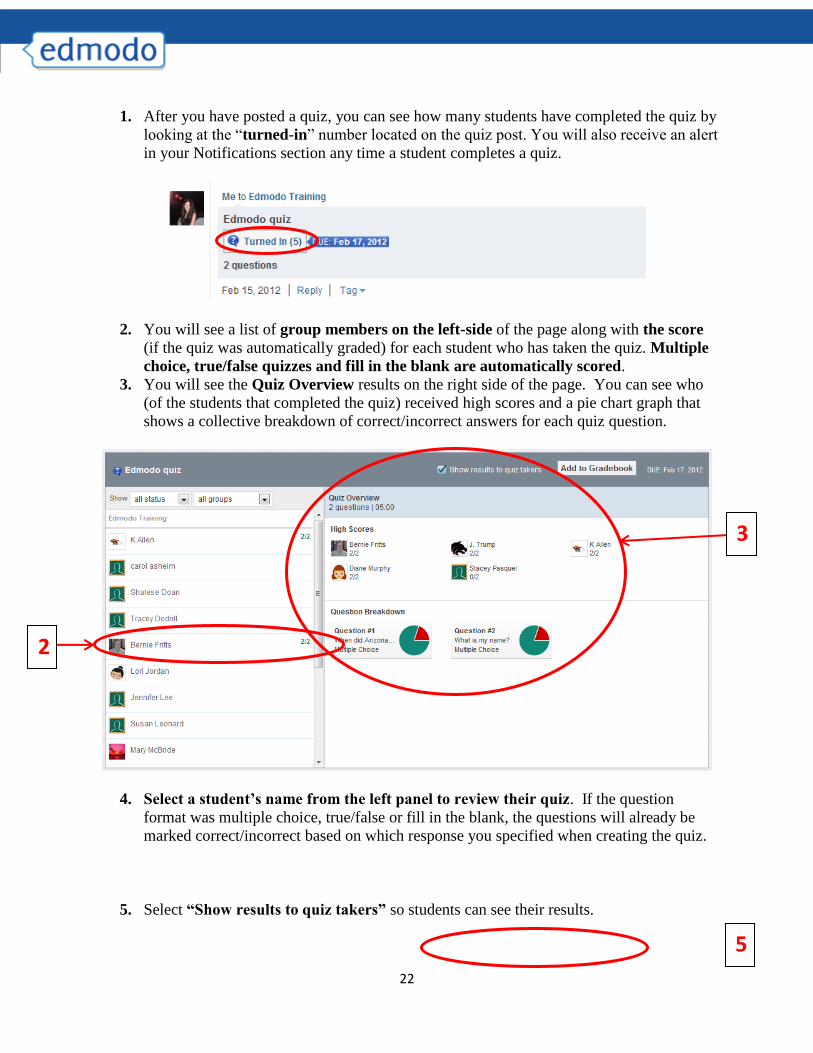
1. After you have posted a quiz, you can see how many students have completed the quiz by
looking at the “turned-in” number located on the quiz post. You will also receive an alert
in your Notifications section any time a student completes a quiz.
2. You will see a list of group members on the left-side of the page along with the score
(if the quiz was automatically graded) for each student who has taken the quiz. Multiple
choice, true/false quizzes and fill in the blank are automatically scored.
3. You will see the Quiz Overview results on the right side of the page. You can see who
(of the students that completed the quiz) received high scores and a pie chart graph that
shows a collective breakdown of correct/incorrect answers for each quiz question.
4. Select a student’s name from the left panel to review their quiz. If the question
format was multiple choice, true/false or fill in the blank, the questions will already be
marked correct/incorrect based on which response you specified when creating the quiz.
5. Select “Show results to quiz takers” so students can see their results.
2
3
5
23
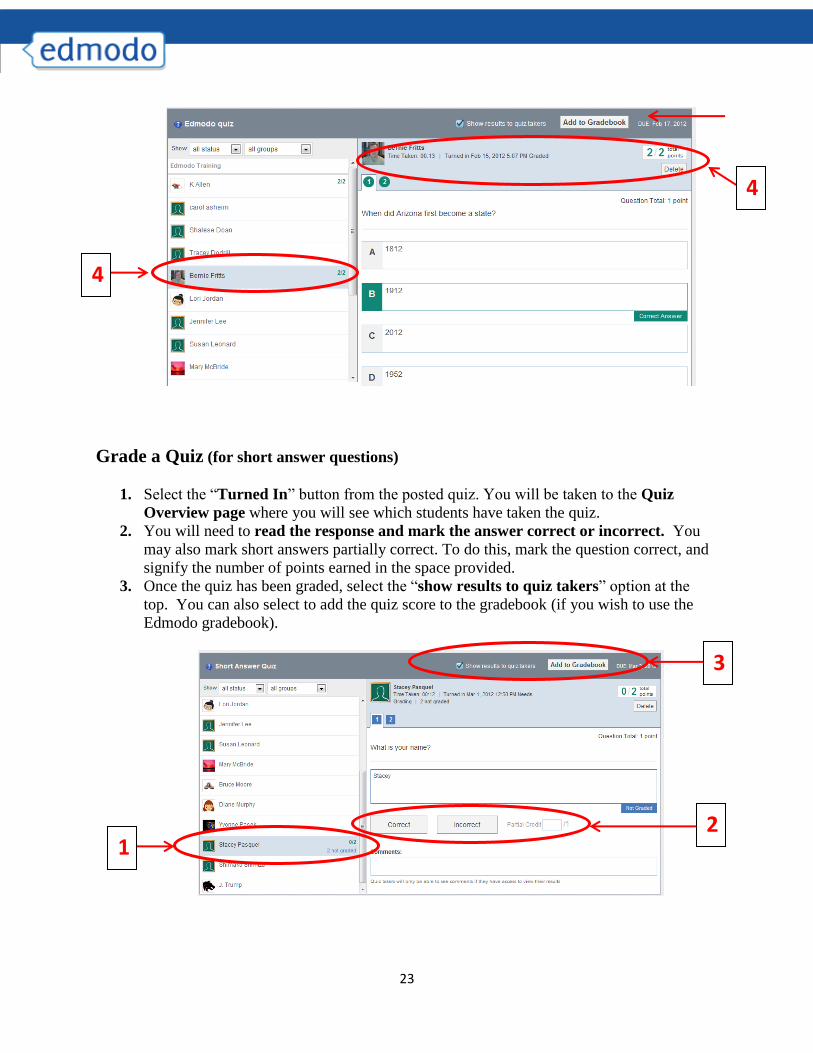
Grade a Quiz (for short answer questions)
1. Select the “Turned In” button from the posted quiz. You will be taken to the Quiz
Overview page where you will see which students have taken the quiz.
2. You will need to read the response and mark the answer correct or incorrect. You
may also mark short answers partially correct. To do this, mark the question correct, and
signify the number of points earned in the space provided.
3. Once the quiz has been graded, select the “show results to quiz takers” option at the
top. You can also select to add the quiz score to the gradebook (if you wish to use the
Edmodo gradebook).
4
4
1 2
3
24
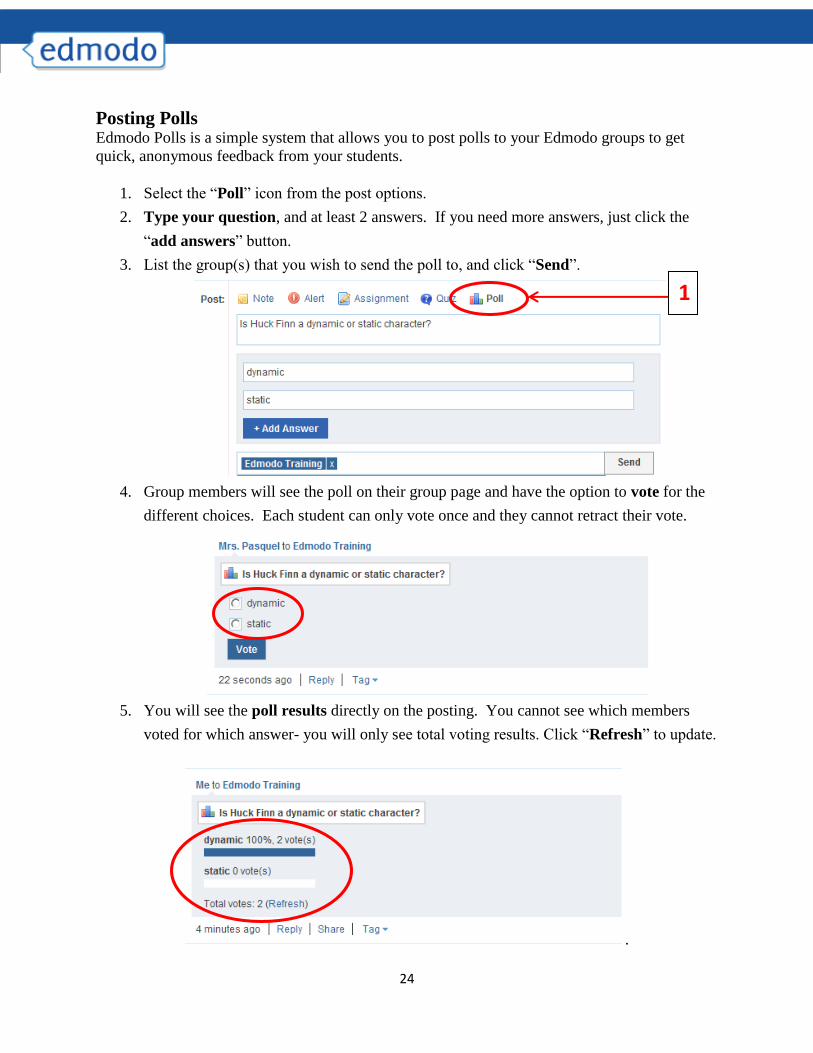
Posting Polls Edmodo Polls is a simple system that allows you to post polls to your Edmodo groups to get
quick, anonymous feedback from your students.
1. Select the “Poll” icon from the post options.
2. Type your question, and at least 2 answers. If you need more answers, just click the
“add answers” button.
3. List the group(s) that you wish to send the poll to, and click “Send”.
4. Group members will see the poll on their group page and have the option to vote for the
different choices. Each student can only vote once and they cannot retract their vote.
5. You will see the poll results directly on the posting. You cannot see which members
voted for which answer- you will only see total voting results. Click “Refresh” to update.
.
1
25
Make a Post Public
By default, every post is private and only visible to the group’s members. However, you
can mark a post public by selecting the “public” link from the drop-down arrow options for the
post. This will make the post visible from the group’s public page. (Learn more in the Public
Pages section)
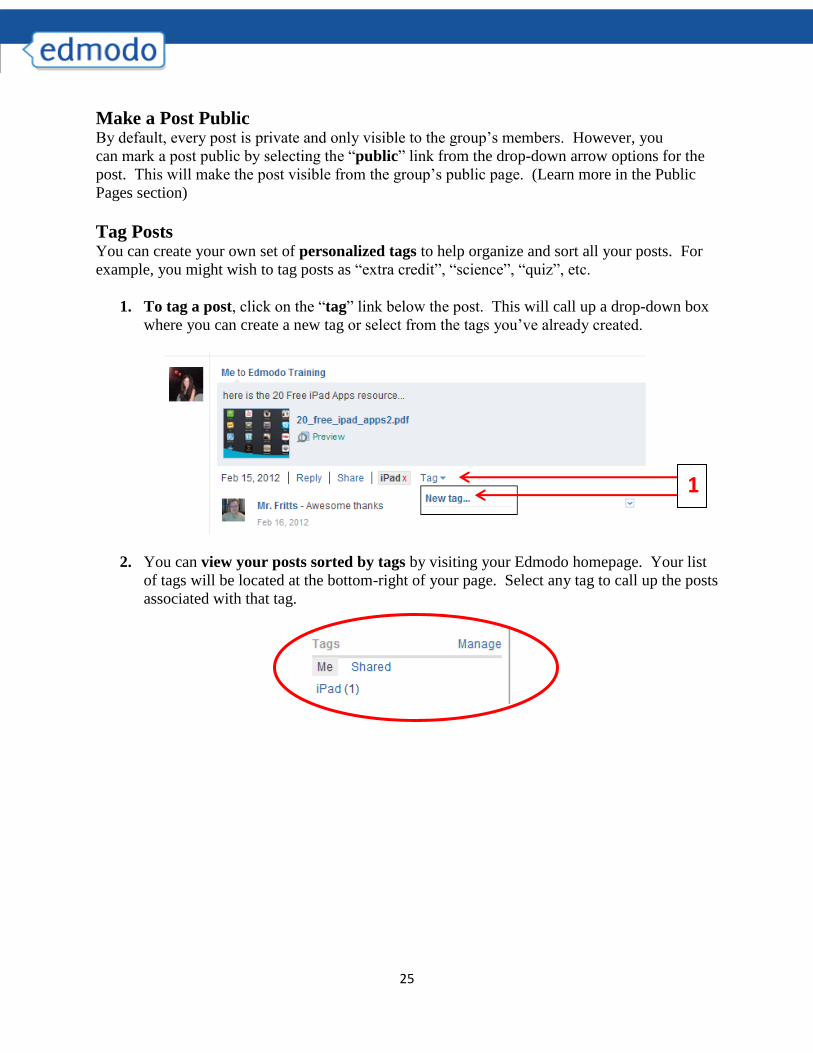
Tag Posts
You can create your own set of personalized tags to help organize and sort all your posts. For
example, you might wish to tag posts as “extra credit”, “science”, “quiz”, etc.
1. To tag a post, click on the “tag” link below the post. This will call up a drop-down box
where you can create a new tag or select from the tags you’ve already created.
2. You can view your posts sorted by tags by visiting your Edmodo homepage. Your list
of tags will be located at the bottom-right of your page. Select any tag to call up the posts
associated with that tag.
1
26
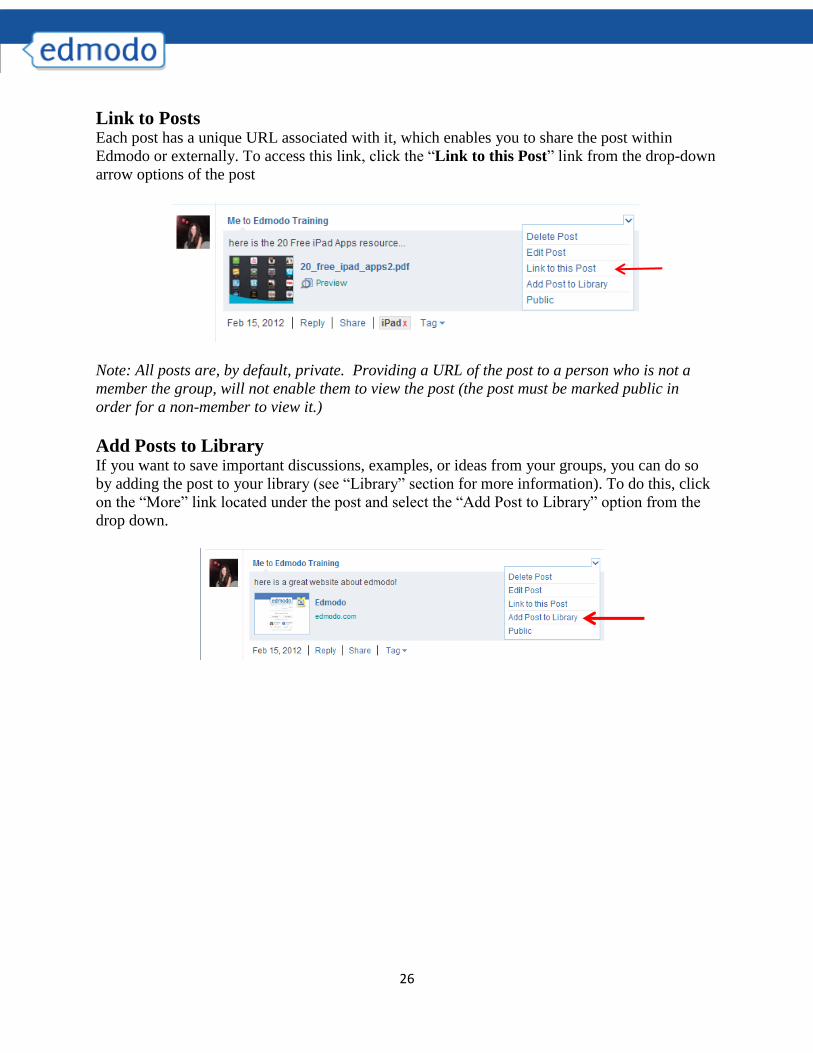
Link to Posts
Each post has a unique URL associated with it, which enables you to share the post within
Edmodo or externally. To access this link, click the “Link to this Post” link from the drop-down
arrow options of the post
Note: All posts are, by default, private. Providing a URL of the post to a person who is not a
member the group, will not enable them to view the post (the post must be marked public in
order for a non-member to view it.)
Add Posts to Library
If you want to save important discussions, examples, or ideas from your groups, you can do so
by adding the post to your library (see “Library” section for more information). To do this, click
on the “More” link located under the post and select the “Add Post to Library” option from the
drop down.
27
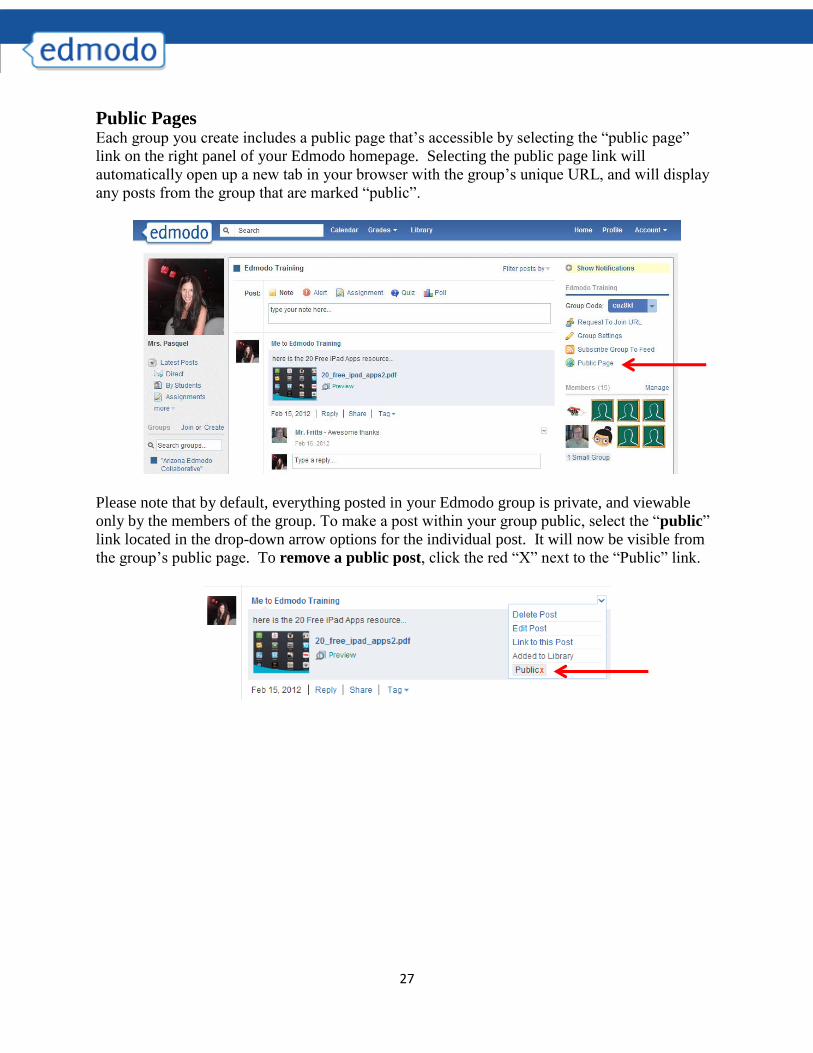
Public Pages
Each group you create includes a public page that’s accessible by selecting the “public page”
link on the right panel of your Edmodo homepage. Selecting the public page link will
automatically open up a new tab in your browser with the group’s unique URL, and will display
any posts from the group that are marked “public”.
Please note that by default, everything posted in your Edmodo group is private, and viewable
only by the members of the group. To make a post within your group public, select the “public”
link located in the drop-down arrow options for the individual post. It will now be visible from
the group’s public page. To remove a public post, click the red “X” next to the “Public” link.
28
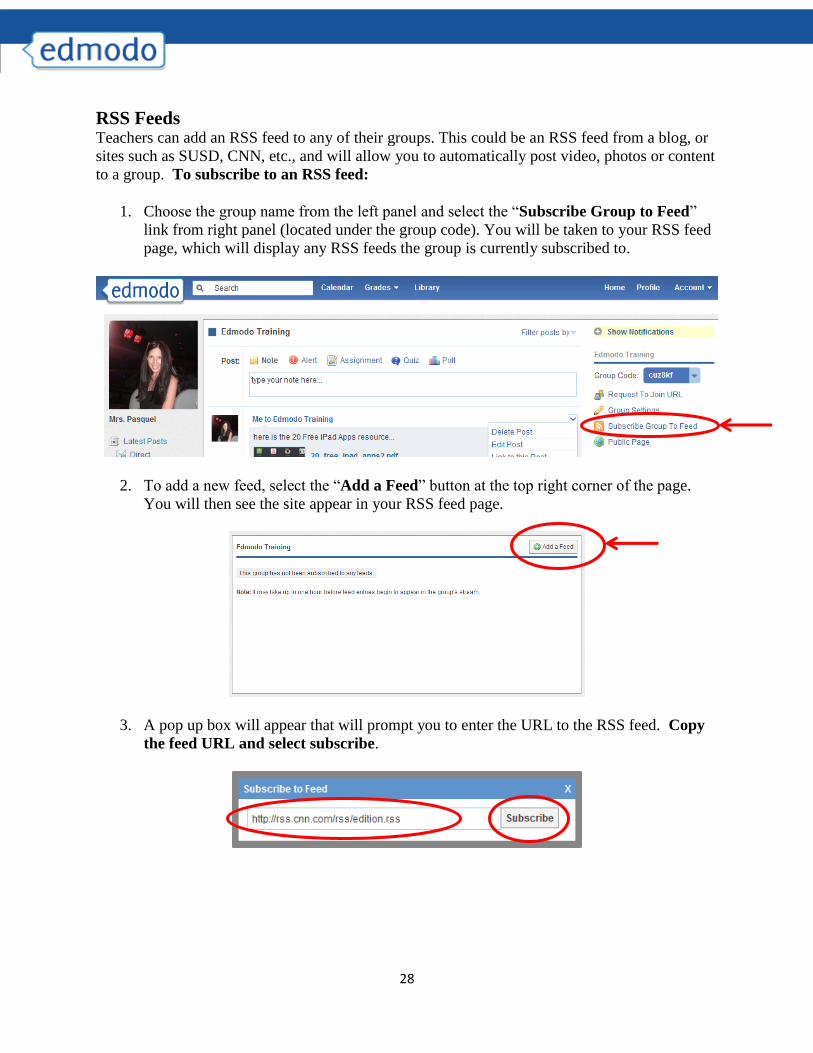
RSS Feeds Teachers can add an RSS feed to any of their groups. This could be an RSS feed from a blog, or
sites such as SUSD, CNN, etc., and will allow you to automatically post video, photos or content
to a group. To subscribe to an RSS feed:
1. Choose the group name from the left panel and select the “Subscribe Group to Feed”
link from right panel (located under the group code). You will be taken to your RSS feed
page, which will display any RSS feeds the group is currently subscribed to.
2. To add a new feed, select the “Add a Feed” button at the top right corner of the page.
You will then see the site appear in your RSS feed page.
3. A pop up box will appear that will prompt you to enter the URL to the RSS feed. Copy
the feed URL and select subscribe.
29
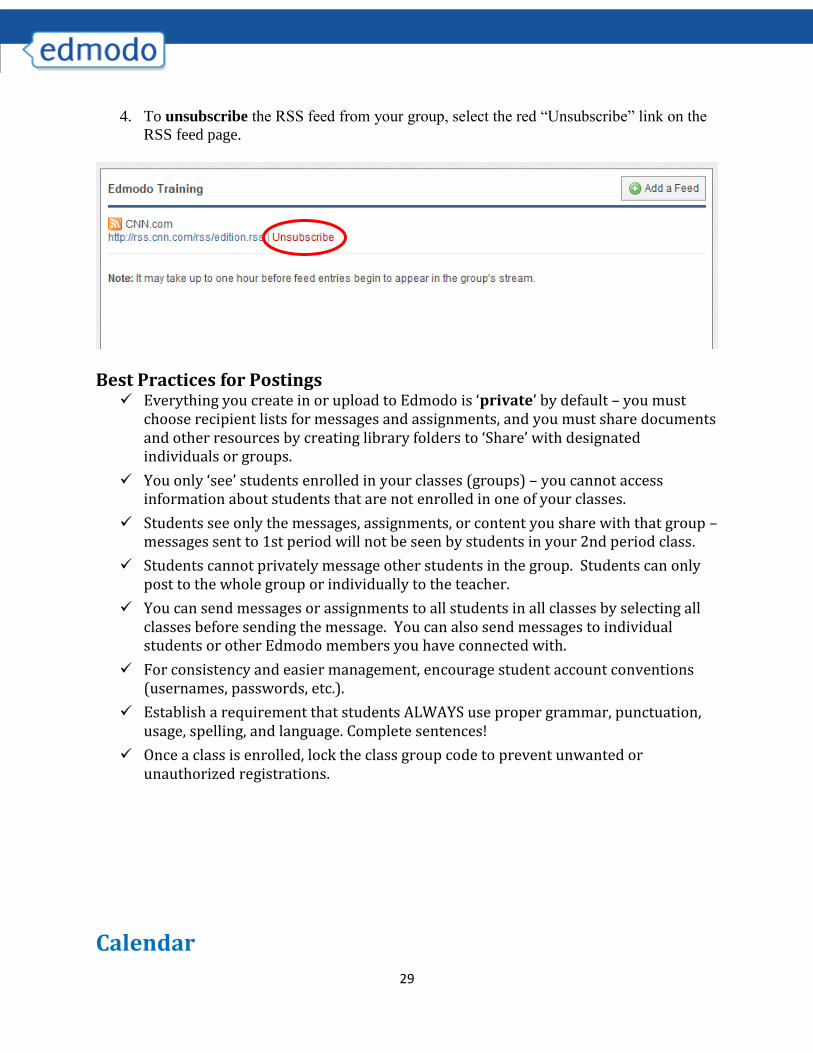
4. To unsubscribe the RSS feed from your group, select the red “Unsubscribe” link on the
RSS feed page.
Best Practices for Postings Everything you create in or upload to Edmodo is ‘private’ by default – you must
choose recipient lists for messages and assignments, and you must share documents and other resources by creating library folders to ‘Share’ with designated individuals or groups.
You only ‘see’ students enrolled in your classes (groups) – you cannot access information about students that are not enrolled in one of your classes.
Students see only the messages, assignments, or content you share with that group – messages sent to 1st period will not be seen by students in your 2nd period class.
Students cannot privately message other students in the group. Students can only post to the whole group or individually to the teacher.
You can send messages or assignments to all students in all classes by selecting all classes before sending the message. You can also send messages to individual students or other Edmodo members you have connected with.
For consistency and easier management, encourage student account conventions (usernames, passwords, etc.).
Establish a requirement that students ALWAYS use proper grammar, punctuation, usage, spelling, and language. Complete sentences!
Once a class is enrolled, lock the class group code to prevent unwanted or unauthorized registrations.
Calendar
30
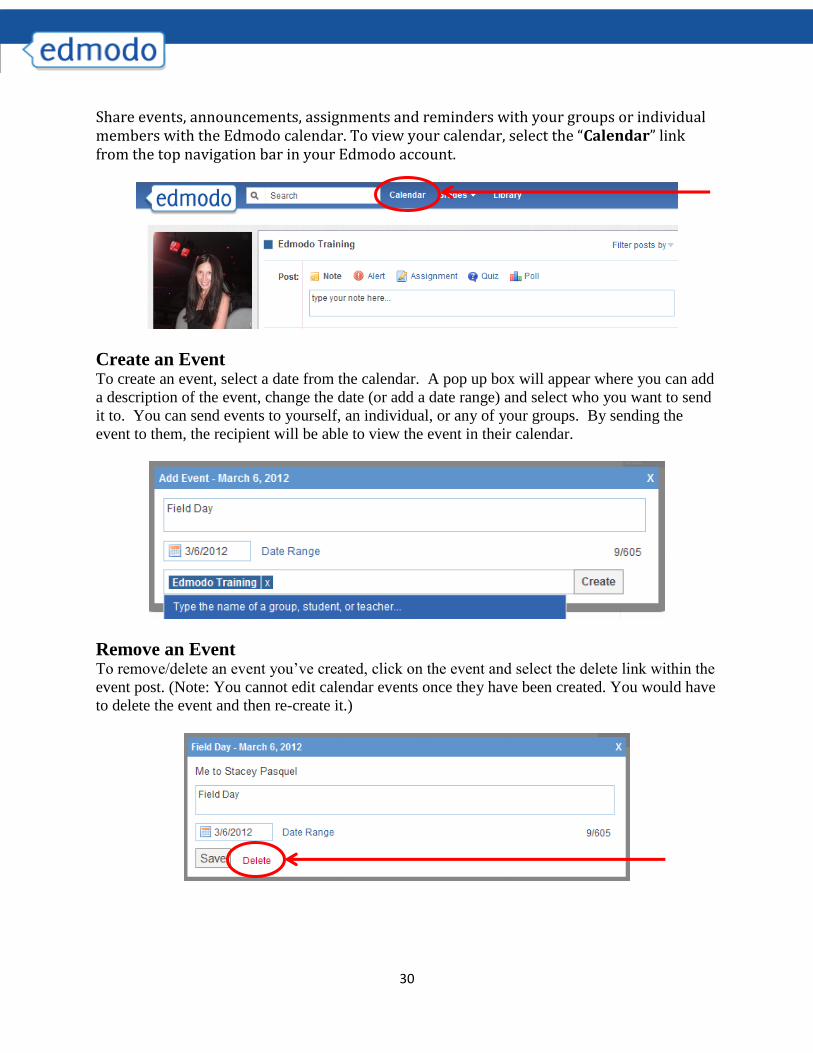
Share events, announcements, assignments and reminders with your groups or individual members with the Edmodo calendar. To view your calendar, select the “Calendar” link from the top navigation bar in your Edmodo account.
Create an Event To create an event, select a date from the calendar. A pop up box will appear where you can add
a description of the event, change the date (or add a date range) and select who you want to send
it to. You can send events to yourself, an individual, or any of your groups. By sending the
event to them, the recipient will be able to view the event in their calendar.
Remove an Event To remove/delete an event you’ve created, click on the event and select the delete link within the
event post. (Note: You cannot edit calendar events once they have been created. You would have
to delete the event and then re-create it.)
31
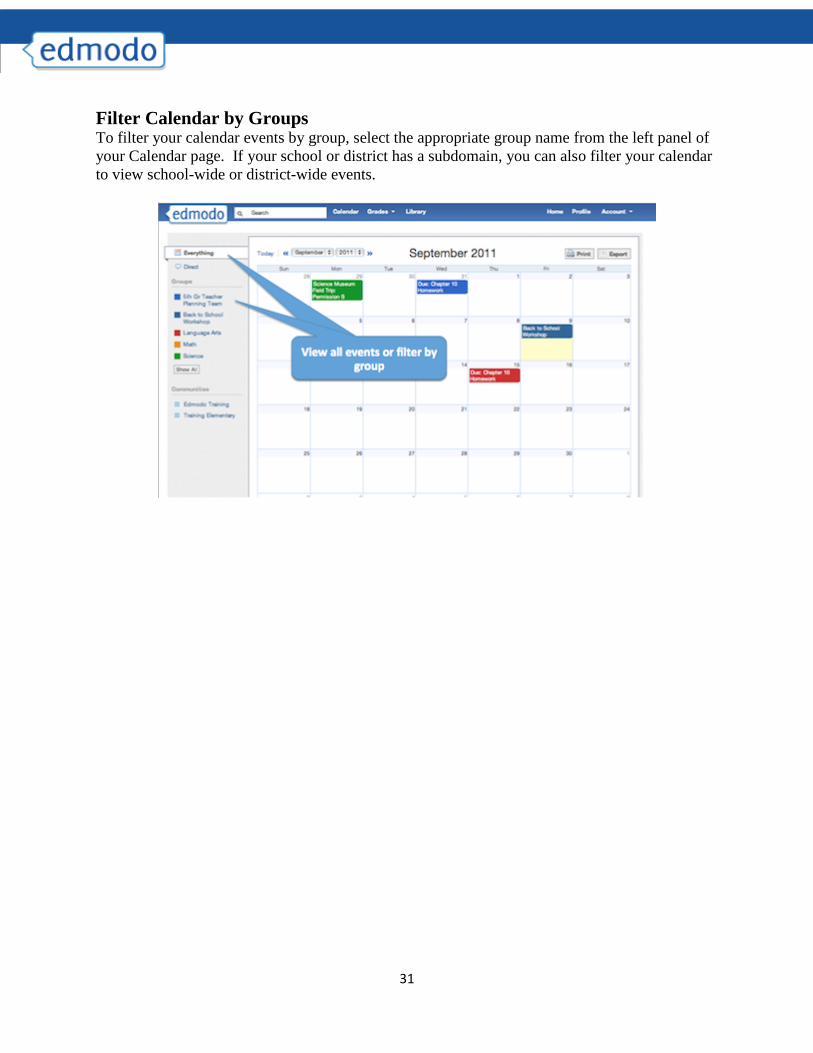
Filter Calendar by Groups
To filter your calendar events by group, select the appropriate group name from the left panel of
your Calendar page. If your school or district has a subdomain, you can also filter your calendar
to view school-wide or district-wide events.
32
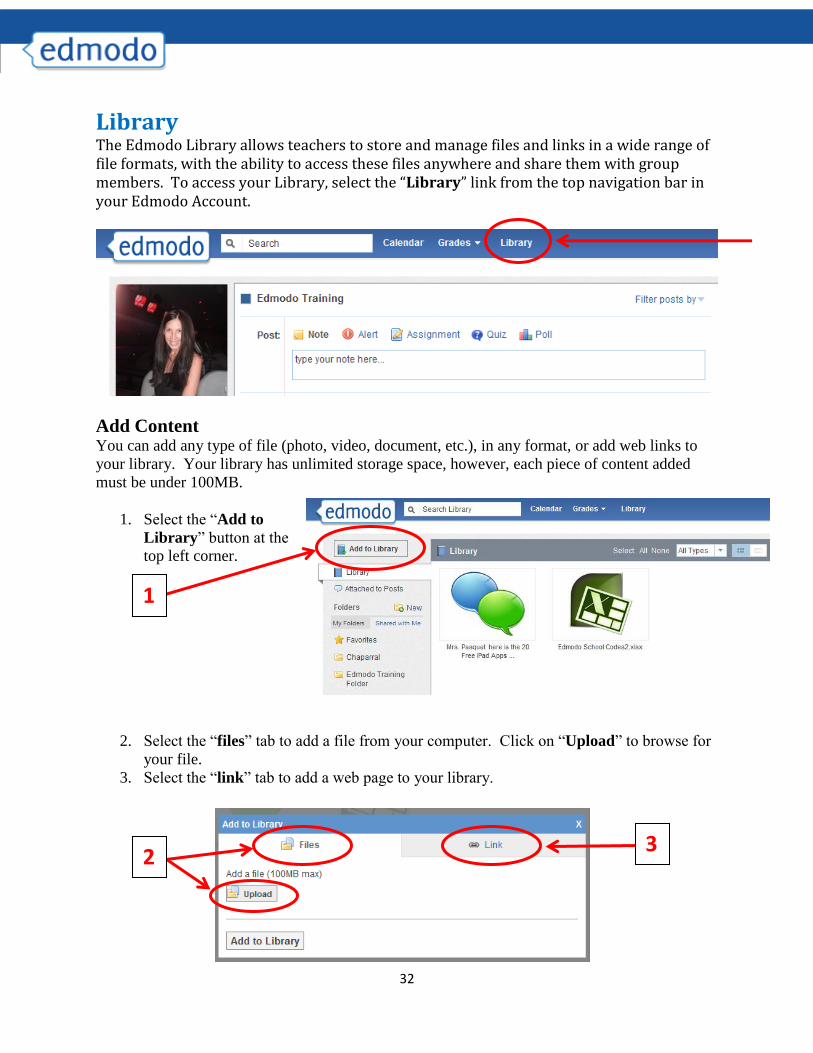
Library The Edmodo Library allows teachers to store and manage files and links in a wide range of file formats, with the ability to access these files anywhere and share them with group members. To access your Library, select the “Library” link from the top navigation bar in your Edmodo Account.
Add Content You can add any type of file (photo, video, document, etc.), in any format, or add web links to
your library. Your library has unlimited storage space, however, each piece of content added
must be under 100MB.
1. Select the “Add to
Library” button at the
top left corner.
2. Select the “files” tab to add a file from your computer. Click on “Upload” to browse for
your file.
3. Select the “link” tab to add a web page to your library.
2 3
1
33
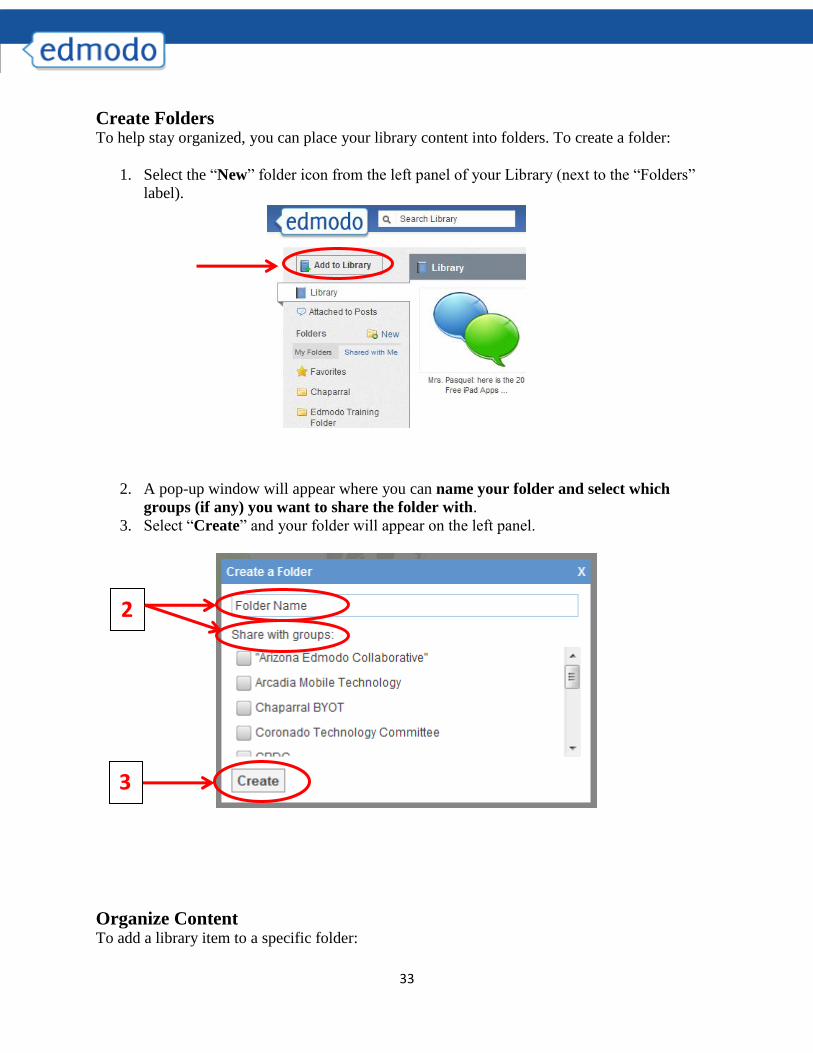
Create Folders
To help stay organized, you can place your library content into folders. To create a folder:
1. Select the “New” folder icon from the left panel of your Library (next to the “Folders”
label).
2. A pop-up window will appear where you can name your folder and select which
groups (if any) you want to share the folder with.
3. Select “Create” and your folder will appear on the left panel.
Organize Content To add a library item to a specific folder:
1
2
3
34
1. Select the item (once selected, it will be highlighted) and on the right panel you will see
a preview of the item, as well as the option to add it to a folder or delete it. Select the
folder option
2. A drop down menu will appear where you can select the folders you want to add that
item to.
3. Click apply to save your changes. Note: You can select multiple library items to move
them at the same time.
4. Once the items have been added to the folder, you can select the
folder from the left panel and drag and drop library items to
organize them within the folder.
5. Mark any library items as favorite by adding it to your
“Favorites” folder. Any item saved to the Favorites folder, will
also appear in the “Favorites” tab of your Teacher Profile page.
Share Folders
Once you’ve created your folders, you can also share them with any of your groups.
1
1
2
3
5

35
1. Select the folder you want to share and on the right panel you will see the “folder
sharing” option.
2. Select the group(s) you want to share with and the folder will immediately be shared.
3. When a folder has been shared with a specific group, it will
appear on the right panel of the group’s page under the
Members section. Note: Only the creator of the folder
can add to/edit the contents of the folder. Group
members can view and download any files, but not edit or
contribute.
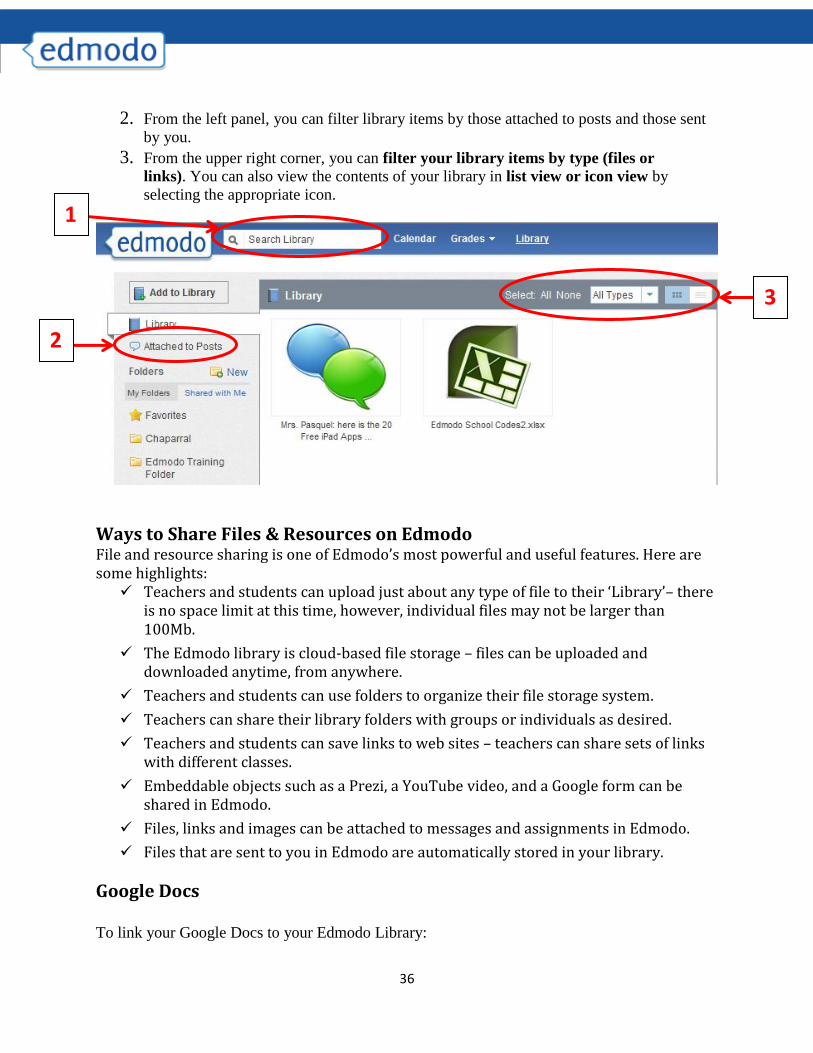
Search & Filter Library Contents
1. Search your library contents by title or key words via the
search box, located on the top navigation bar.
1 2
3
36
2. From the left panel, you can filter library items by those attached to posts and those sent
by you.
3. From the upper right corner, you can filter your library items by type (files or
links). You can also view the contents of your library in list view or icon view by
selecting the appropriate icon.
Ways to Share Files & Resources on Edmodo File and resource sharing is one of Edmodo’s most powerful and useful features. Here are some highlights:
Teachers and students can upload just about any type of file to their ‘Library’– there is no space limit at this time, however, individual files may not be larger than 100Mb.
The Edmodo library is cloud-based file storage – files can be uploaded and downloaded anytime, from anywhere.
Teachers and students can use folders to organize their file storage system.
Teachers can share their library folders with groups or individuals as desired.
Teachers and students can save links to web sites – teachers can share sets of links with different classes.
Embeddable objects such as a Prezi, a YouTube video, and a Google form can be shared in Edmodo.
Files, links and images can be attached to messages and assignments in Edmodo.
Files that are sent to you in Edmodo are automatically stored in your library.
Google Docs
To link your Google Docs to your Edmodo Library:
1
2
3
37
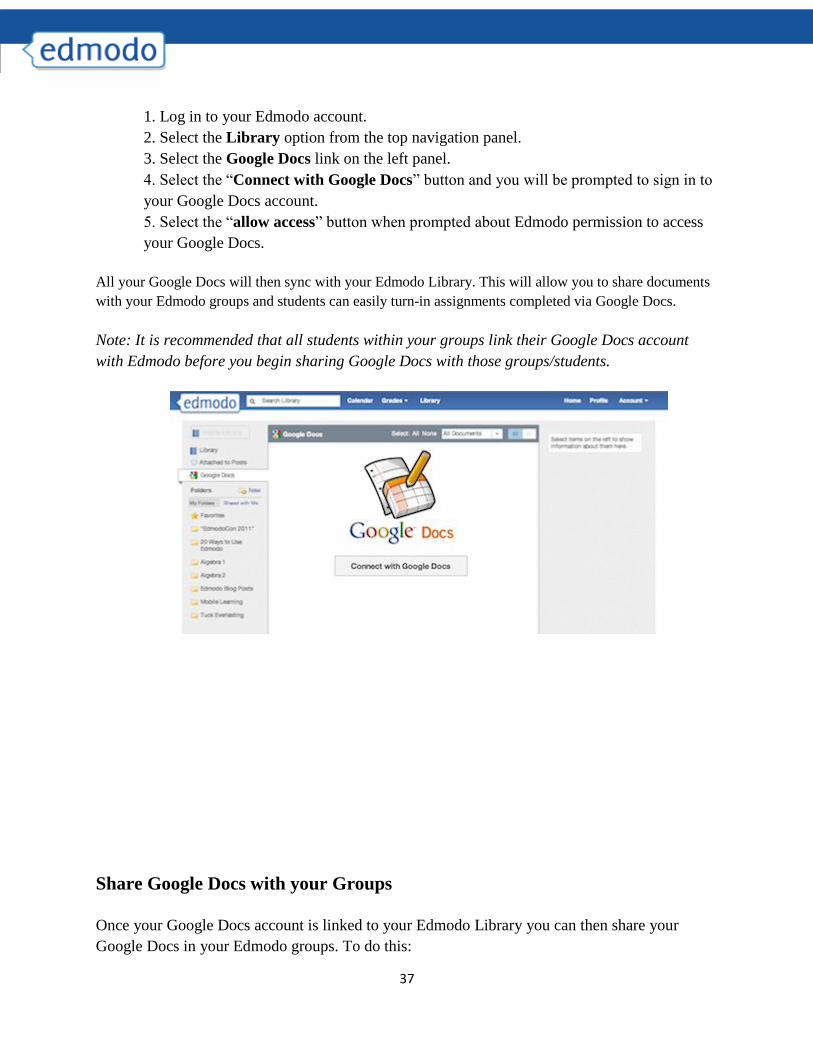
1. Log in to your Edmodo account.
2. Select the Library option from the top navigation panel.
3. Select the Google Docs link on the left panel.
4. Select the “Connect with Google Docs” button and you will be prompted to sign in to
your Google Docs account.
5. Select the “allow access” button when prompted about Edmodo permission to access
your Google Docs.
All your Google Docs will then sync with your Edmodo Library. This will allow you to share documents
with your Edmodo groups and students can easily turn-in assignments completed via Google Docs.
Note: It is recommended that all students within your groups link their Google Docs account
with Edmodo before you begin sharing Google Docs with those groups/students.
Share Google Docs with your Groups
Once your Google Docs account is linked to your Edmodo Library you can then share your
Google Docs in your Edmodo groups. To do this:
38
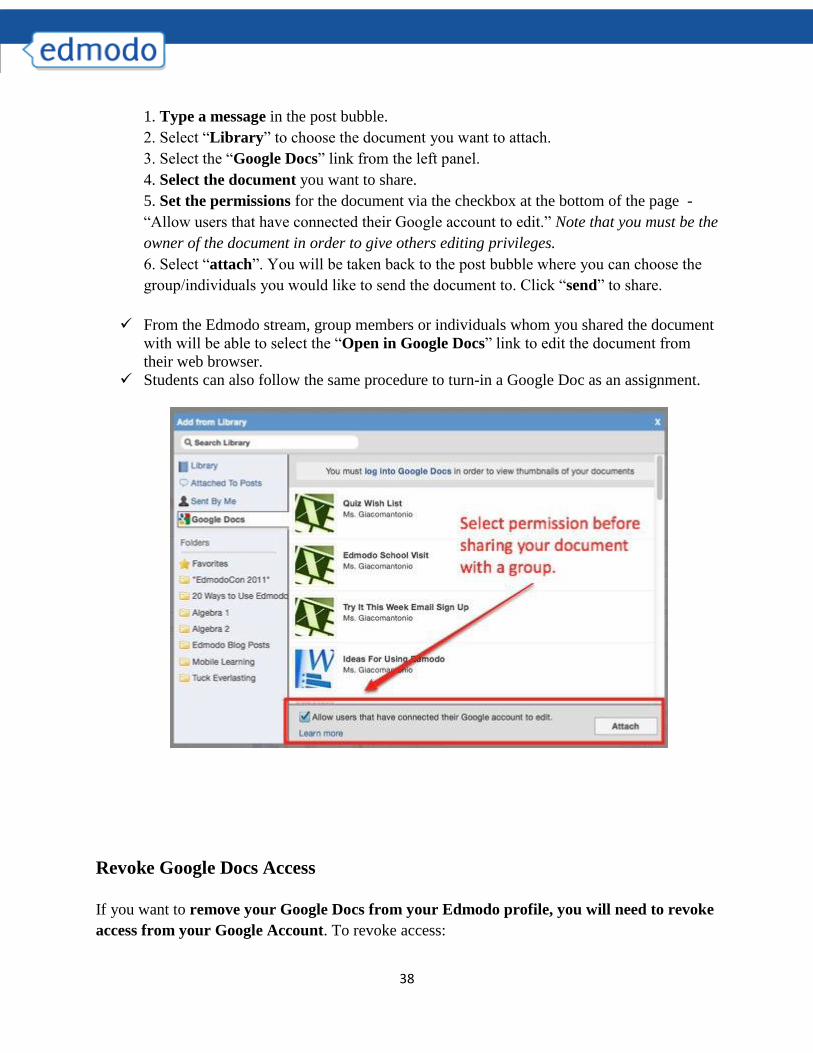
1. Type a message in the post bubble.
2. Select “Library” to choose the document you want to attach.
3. Select the “Google Docs” link from the left panel.
4. Select the document you want to share.
5. Set the permissions for the document via the checkbox at the bottom of the page -
“Allow users that have connected their Google account to edit.” Note that you must be the
owner of the document in order to give others editing privileges.
6. Select “attach”. You will be taken back to the post bubble where you can choose the
group/individuals you would like to send the document to. Click “send” to share.
From the Edmodo stream, group members or individuals whom you shared the document
with will be able to select the “Open in Google Docs” link to edit the document from
their web browser.
Students can also follow the same procedure to turn-in a Google Doc as an assignment.
Revoke Google Docs Access
If you want to remove your Google Docs from your Edmodo profile, you will need to revoke
access from your Google Account. To revoke access:
39
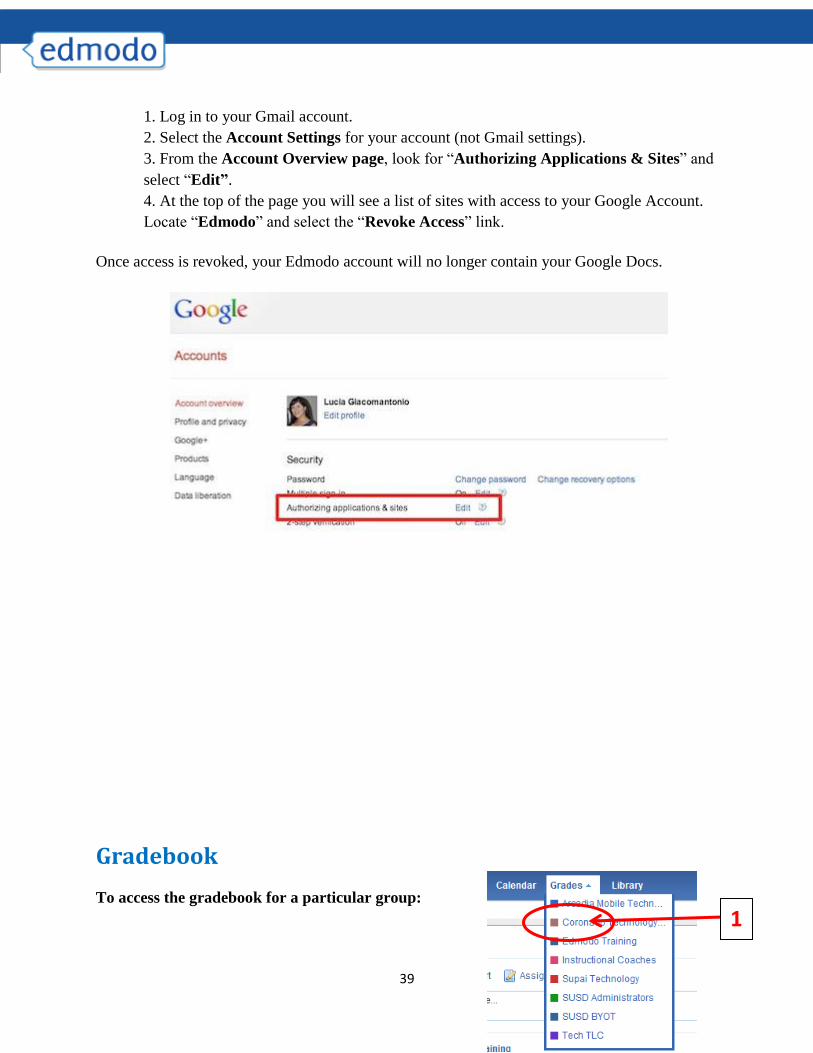
1. Log in to your Gmail account.
2. Select the Account Settings for your account (not Gmail settings).
3. From the Account Overview page, look for “Authorizing Applications & Sites” and
select “Edit”.
4. At the top of the page you will see a list of sites with access to your Google Account.
Locate “Edmodo” and select the “Revoke Access” link.
Once access is revoked, your Edmodo account will no longer contain your Google Docs.
Gradebook
To access the gradebook for a particular group:
1
40
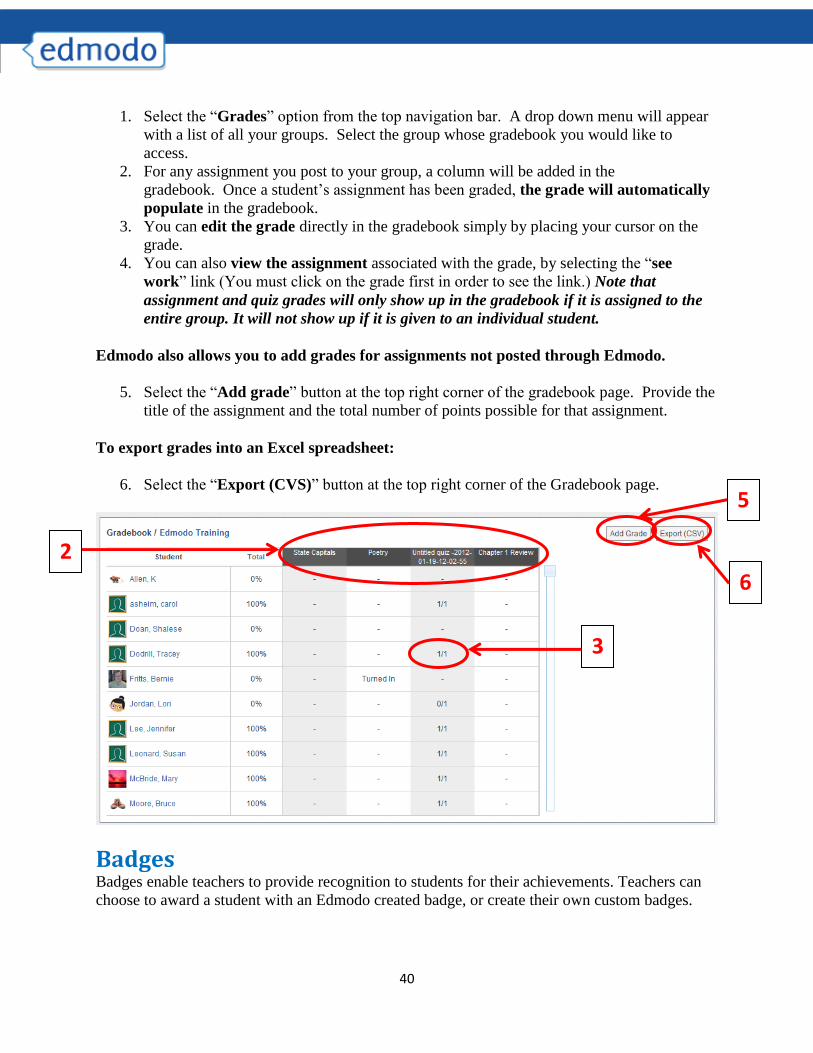
1. Select the “Grades” option from the top navigation bar. A drop down menu will appear
with a list of all your groups. Select the group whose gradebook you would like to
access.
2. For any assignment you post to your group, a column will be added in the
gradebook. Once a student’s assignment has been graded, the grade will automatically
populate in the gradebook.
3. You can edit the grade directly in the gradebook simply by placing your cursor on the
grade.
4. You can also view the assignment associated with the grade, by selecting the “see
work” link (You must click on the grade first in order to see the link.) Note that
assignment and quiz grades will only show up in the gradebook if it is assigned to the
entire group. It will not show up if it is given to an individual student.
Edmodo also allows you to add grades for assignments not posted through Edmodo.
5. Select the “Add grade” button at the top right corner of the gradebook page. Provide the
title of the assignment and the total number of points possible for that assignment.
To export grades into an Excel spreadsheet:
6. Select the “Export (CVS)” button at the top right corner of the Gradebook page.
Badges Badges enable teachers to provide recognition to students for their achievements. Teachers can
choose to award a student with an Edmodo created badge, or create their own custom badges.
5
6
3
2
41
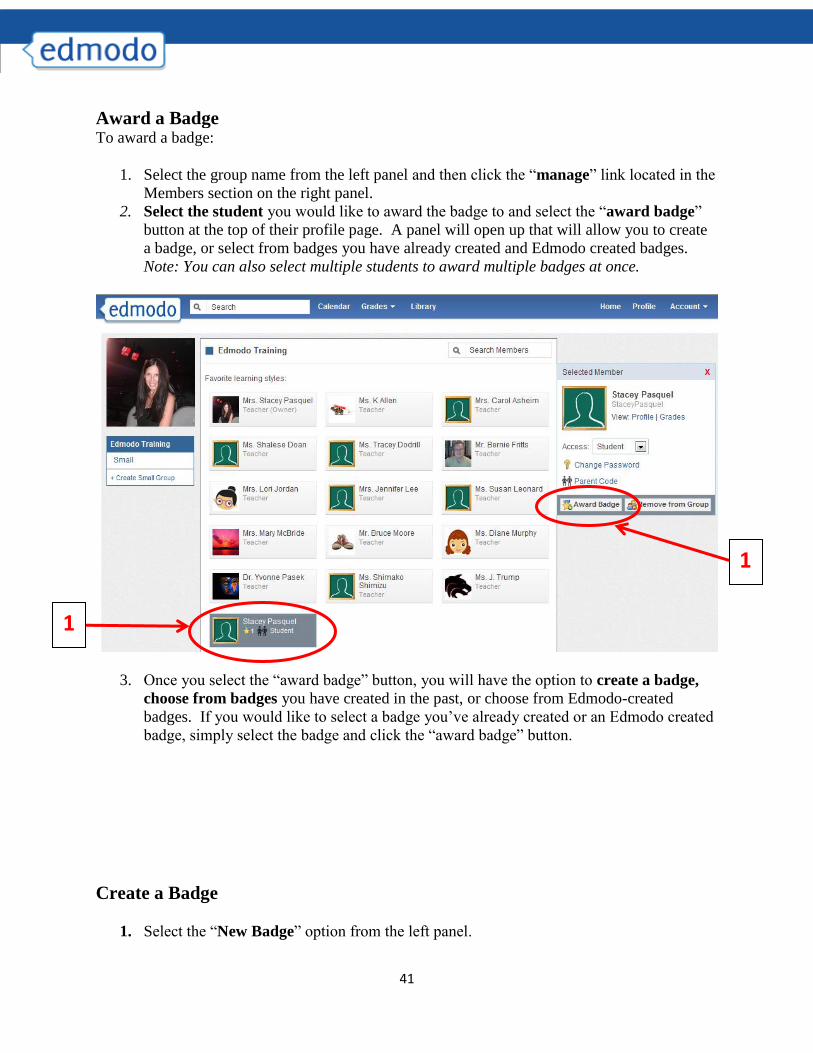
Award a Badge
To award a badge:
1. Select the group name from the left panel and then click the “manage” link located in the
Members section on the right panel.
2. Select the student you would like to award the badge to and select the “award badge”
button at the top of their profile page. A panel will open up that will allow you to create
a badge, or select from badges you have already created and Edmodo created badges.
Note: You can also select multiple students to award multiple badges at once.
3. Once you select the “award badge” button, you will have the option to create a badge,
choose from badges you have created in the past, or choose from Edmodo-created
badges. If you would like to select a badge you’ve already created or an Edmodo created
badge, simply select the badge and click the “award badge” button.
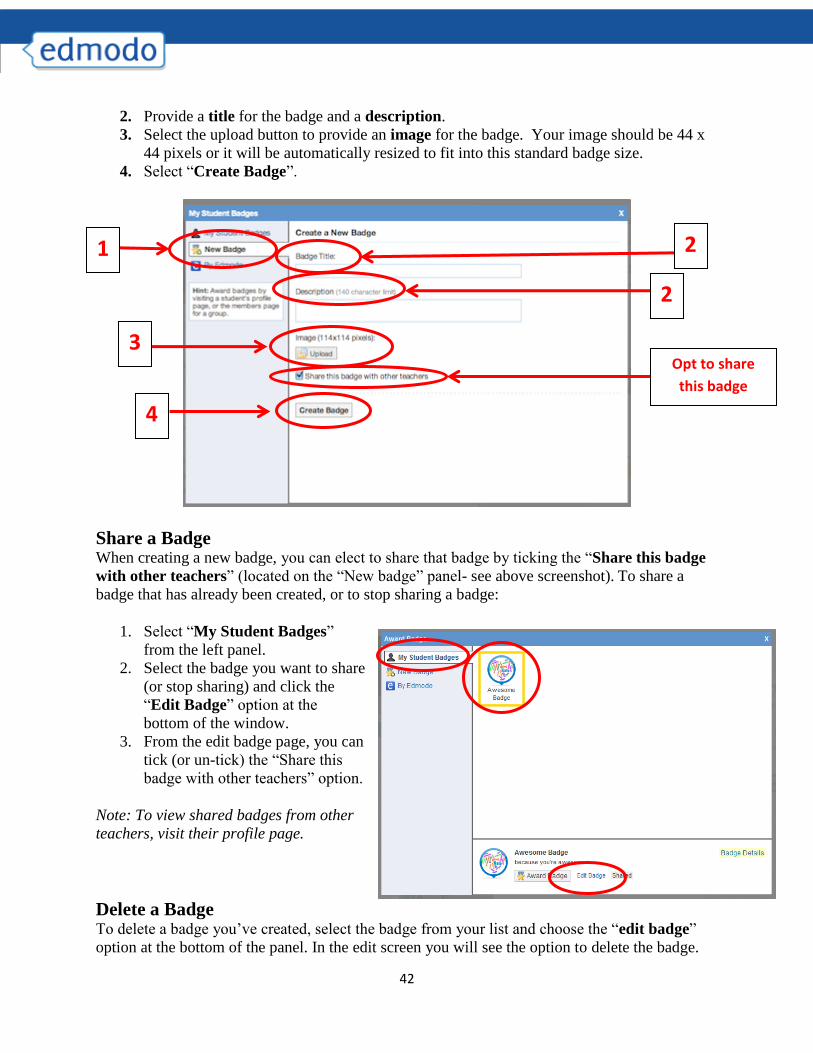
Create a Badge
1. Select the “New Badge” option from the left panel.
1
1
42
2. Provide a title for the badge and a description.
3. Select the upload button to provide an image for the badge. Your image should be 44 x
44 pixels or it will be automatically resized to fit into this standard badge size.
4. Select “Create Badge”.
Share a Badge
When creating a new badge, you can elect to share that badge by ticking the “Share this badge
with other teachers” (located on the “New badge” panel- see above screenshot). To share a
badge that has already been created, or to stop sharing a badge:
1. Select “My Student Badges”
from the left panel.
2. Select the badge you want to share
(or stop sharing) and click the
“Edit Badge” option at the
bottom of the window.
3. From the edit badge page, you can
tick (or un-tick) the “Share this
badge with other teachers” option.
Note: To view shared badges from other
teachers, visit their profile page.
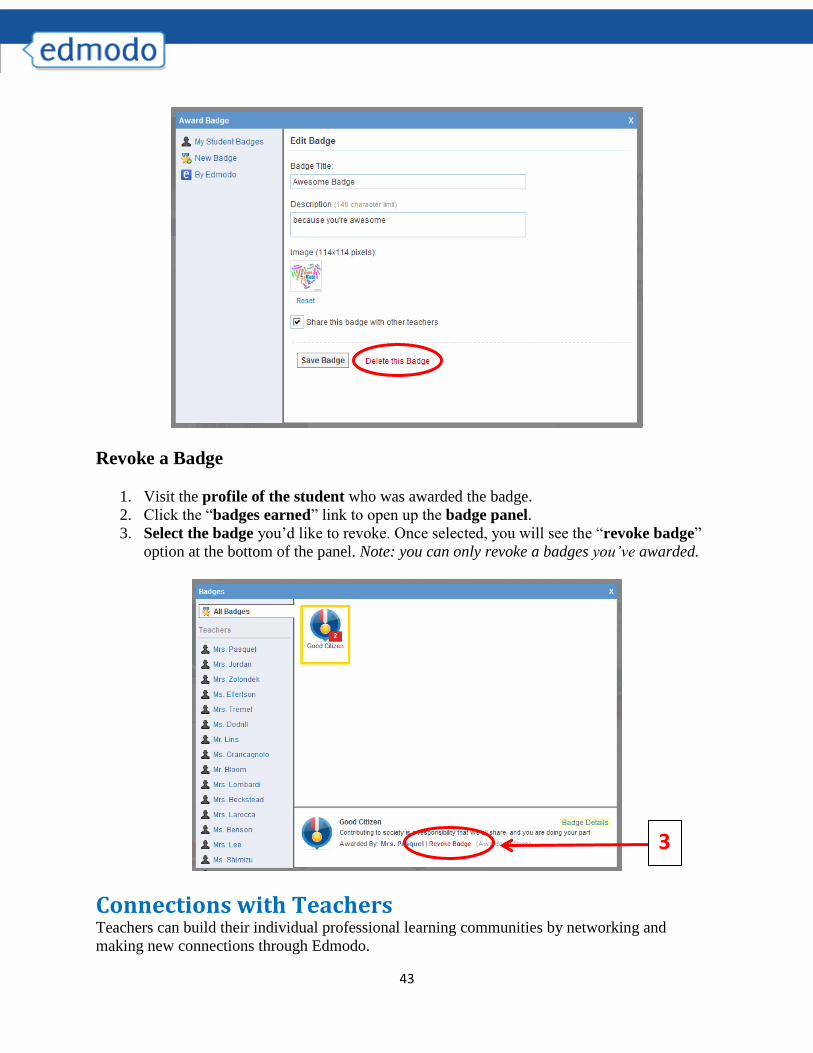
Delete a Badge
To delete a badge you’ve created, select the badge from your list and choose the “edit badge”
option at the bottom of the panel. In the edit screen you will see the option to delete the badge.
1
3
4
2
2
Opt to share
this badge
43
Revoke a Badge
1. Visit the profile of the student who was awarded the badge.
2. Click the “badges earned” link to open up the badge panel.
3. Select the badge you’d like to revoke. Once selected, you will see the “revoke badge”
option at the bottom of the panel. Note: you can only revoke a badges you’ve awarded.
Connections with Teachers Teachers can build their individual professional learning communities by networking and
making new connections through Edmodo.
3
44
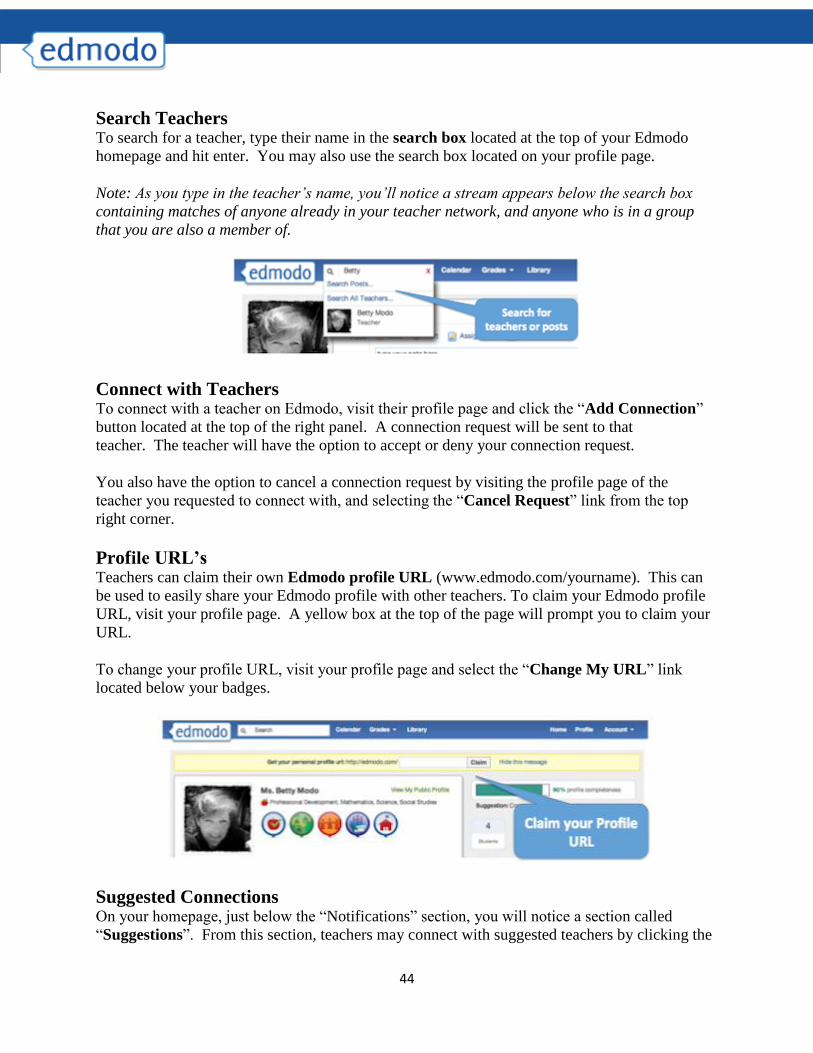
Search Teachers
To search for a teacher, type their name in the search box located at the top of your Edmodo
homepage and hit enter. You may also use the search box located on your profile page.
Note: As you type in the teacher’s name, you’ll notice a stream appears below the search box
containing matches of anyone already in your teacher network, and anyone who is in a group
that you are also a member of.
Connect with Teachers
To connect with a teacher on Edmodo, visit their profile page and click the “Add Connection”
button located at the top of the right panel. A connection request will be sent to that
teacher. The teacher will have the option to accept or deny your connection request.
You also have the option to cancel a connection request by visiting the profile page of the
teacher you requested to connect with, and selecting the “Cancel Request” link from the top
right corner.
Profile URL’s
Teachers can claim their own Edmodo profile URL (www.edmodo.com/yourname). This can
be used to easily share your Edmodo profile with other teachers. To claim your Edmodo profile
URL, visit your profile page. A yellow box at the top of the page will prompt you to claim your
URL.
To change your profile URL, visit your profile page and select the “Change My URL” link
located below your badges.
Suggested Connections
On your homepage, just below the “Notifications” section, you will notice a section called
“Suggestions”. From this section, teachers may connect with suggested teachers by clicking the
45
“Connect” link next to their profile, or they may remove the suggested teacher by selecting the
“X” next to their name. This section will also display suggested Communities to follow.
View all Connections To see your full list of teacher connections, visit your profile page. On the right panel, you will
see a section called “Connections”. Select the word “Connection” to view the full list.
Remove a Connection
To remove a teacher connection, visit the profile of the teacher you’d like to remove and
select the “remove connection” button located in the upper right corner of the page.
Privacy Settings
You can adjust your privacy settings from the Settings page (located at the top right corner, in
the Account drop down menu). Here you can opt to block connection requests or make your
profile visible only to your connections.
Join Communities
Edmodo offers a number of communities you can join based upon your subject area interests
and your curriculum of choice. These communities are a great place to ask questions, get advice,
exchange ideas and share resources. You can find a full listing of Edmodo Communities
at www.edmodo.com/communities or by scrolling down to the bottom of any Edmodo page and
clicking on the “Communities” link in the footer.
Note: When you create your teacher account, the school code you use will affiliate you with
your school’s community. This will also automatically affiliate you with the Scottsdale
Unified School District community.
46
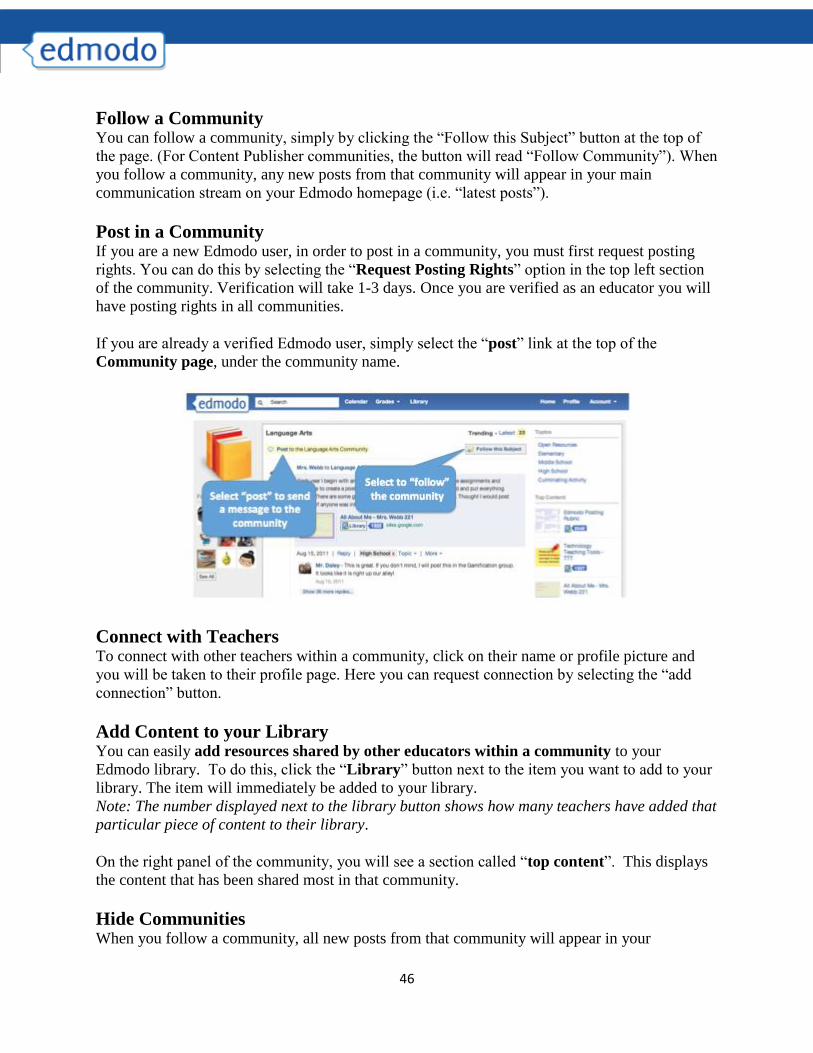
Follow a Community
You can follow a community, simply by clicking the “Follow this Subject” button at the top of
the page. (For Content Publisher communities, the button will read “Follow Community”). When
you follow a community, any new posts from that community will appear in your main
communication stream on your Edmodo homepage (i.e. “latest posts”).
Post in a Community
If you are a new Edmodo user, in order to post in a community, you must first request posting
rights. You can do this by selecting the “Request Posting Rights” option in the top left section
of the community. Verification will take 1-3 days. Once you are verified as an educator you will
have posting rights in all communities.
If you are already a verified Edmodo user, simply select the “post” link at the top of the
Community page, under the community name.
Connect with Teachers
To connect with other teachers within a community, click on their name or profile picture and
you will be taken to their profile page. Here you can request connection by selecting the “add
connection” button.
Add Content to your Library
You can easily add resources shared by other educators within a community to your
Edmodo library. To do this, click the “Library” button next to the item you want to add to your
library. The item will immediately be added to your library.
Note: The number displayed next to the library button shows how many teachers have added that
particular piece of content to their library.
On the right panel of the community, you will see a section called “top content”. This displays
the content that has been shared most in that community.
Hide Communities
When you follow a community, all new posts from that community will appear in your
47
communication stream on your Edmodo homepage. You have the option to hide these posts
from your communication stream. To do this, find the most recent post from that community and
select the X in the corner of that post. A small window will open, and there will be an option to
hide that community from the stream. If you would like to unhide the community from the
stream, you can do so from your settings page.
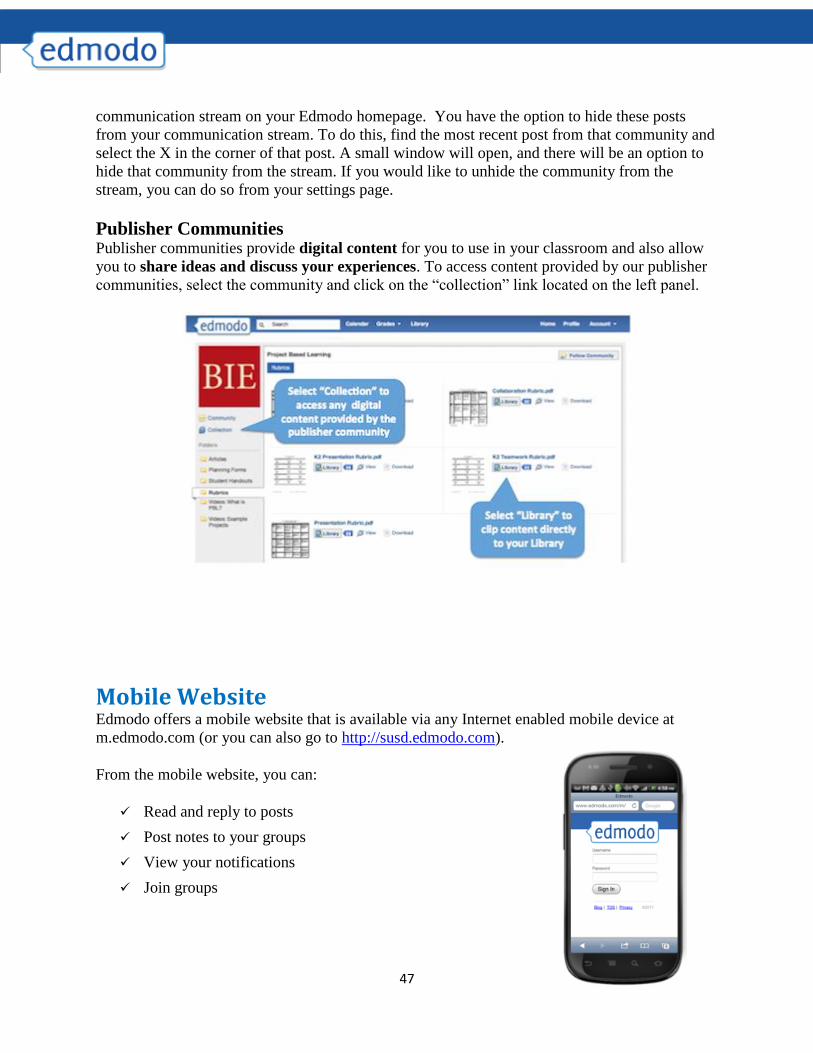
Publisher Communities
Publisher communities provide digital content for you to use in your classroom and also allow
you to share ideas and discuss your experiences. To access content provided by our publisher
communities, select the community and click on the “collection” link located on the left panel.
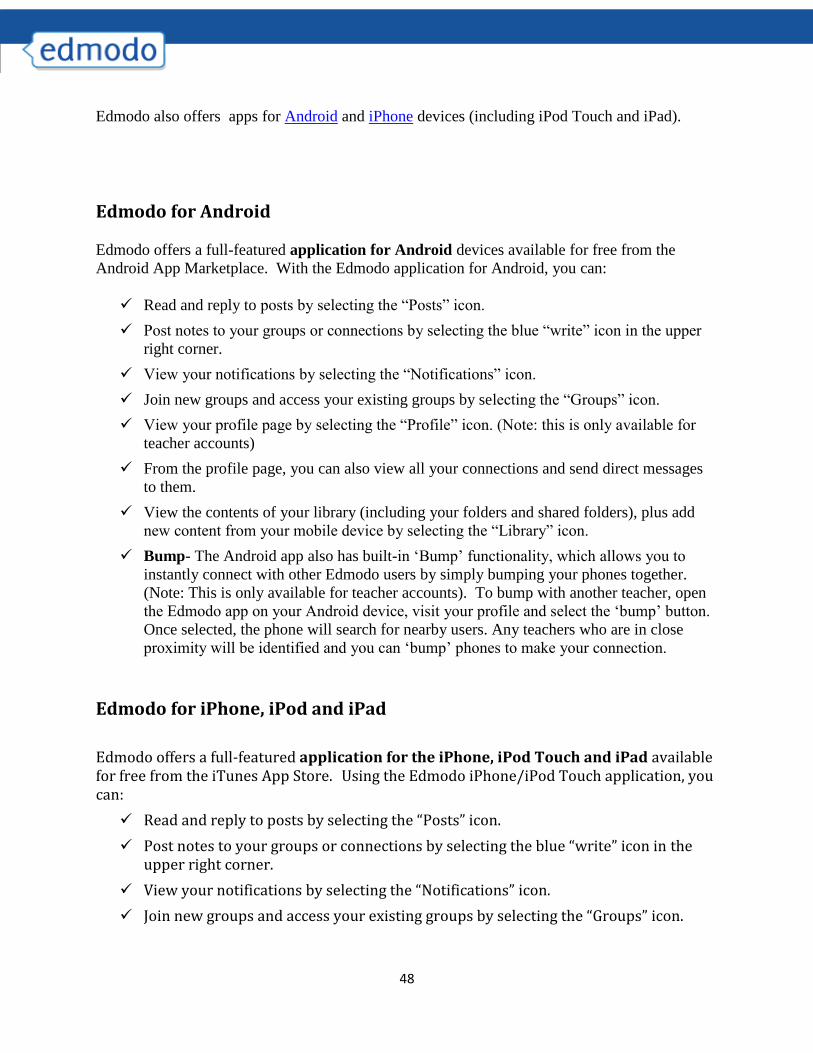
Mobile Website
Edmodo offers a mobile website that is available via any Internet enabled mobile device at
m.edmodo.com (or you can also go to http://susd.edmodo.com).
From the mobile website, you can:
Read and reply to posts
Post notes to your groups
View your notifications
Join groups
48
Edmodo also offers apps for Android and iPhone devices (including iPod Touch and iPad).
Edmodo for Android
Edmodo offers a full-featured application for Android devices available for free from the
Android App Marketplace. With the Edmodo application for Android, you can:
Read and reply to posts by selecting the “Posts” icon.
Post notes to your groups or connections by selecting the blue “write” icon in the upper
right corner.
View your notifications by selecting the “Notifications” icon.
Join new groups and access your existing groups by selecting the “Groups” icon.
View your profile page by selecting the “Profile” icon. (Note: this is only available for
teacher accounts)
From the profile page, you can also view all your connections and send direct messages
to them.
View the contents of your library (including your folders and shared folders), plus add
new content from your mobile device by selecting the “Library” icon.
Bump- The Android app also has built-in ‘Bump’ functionality, which allows you to
instantly connect with other Edmodo users by simply bumping your phones together.
(Note: This is only available for teacher accounts). To bump with another teacher, open
the Edmodo app on your Android device, visit your profile and select the ‘bump’ button.
Once selected, the phone will search for nearby users. Any teachers who are in close
proximity will be identified and you can ‘bump’ phones to make your connection.
Edmodo for iPhone, iPod and iPad
Edmodo offers a full-featured application for the iPhone, iPod Touch and iPad available for free from the iTunes App Store. Using the Edmodo iPhone/iPod Touch application, you can:
Read and reply to posts by selecting the “Posts” icon.
Post notes to your groups or connections by selecting the blue “write” icon in the upper right corner.
View your notifications by selecting the “Notifications” icon.
Join new groups and access your existing groups by selecting the “Groups” icon.
49
View your profile page by selecting the “Profile” icon. (Note: this is only available for teacher accounts)
From the profile page, you can also view all your connections and send direct messages to them.
View the contents of your library (including your folders and shared folders), plus add new content from your mobile device by selecting the “Library” icon.
Teachers have full access to their gradebook, allowing them to view and grade assignments directly from their mobile device. For students, the app provides the ability to turn in assignments and view all their grades.
Bump- The Android app also has built-in ‘Bump’ functionality, which allows you to
instantly connect with other Edmodo users by simply bumping your phones together.
(Note: This is only available for teacher accounts). To bump with another teacher, open
the Edmodo app on your Android device, visit your profile and select the ‘bump’ button.
Once selected, the phone will search for nearby users. Any teachers who are in close
proximity will be identified and you can ‘bump’ phones to make your connection.
Note to iPad users:
Turn the iPad to landscape mode for optimal viewing.
Files cannot be uploaded from the iPad.
Subdomains: If a teacher or student is connected to a subdomain, a message will appear that says you are using an “institutionalized version”. If this is the case, please contact your school administrator for the special teacher code.