Embed Size (px)
Citation preview
Products for better dentistry
Enigma Colour TonesPart of the Enigma Denture System
A professional guide to custom shade matching of gingival tissue
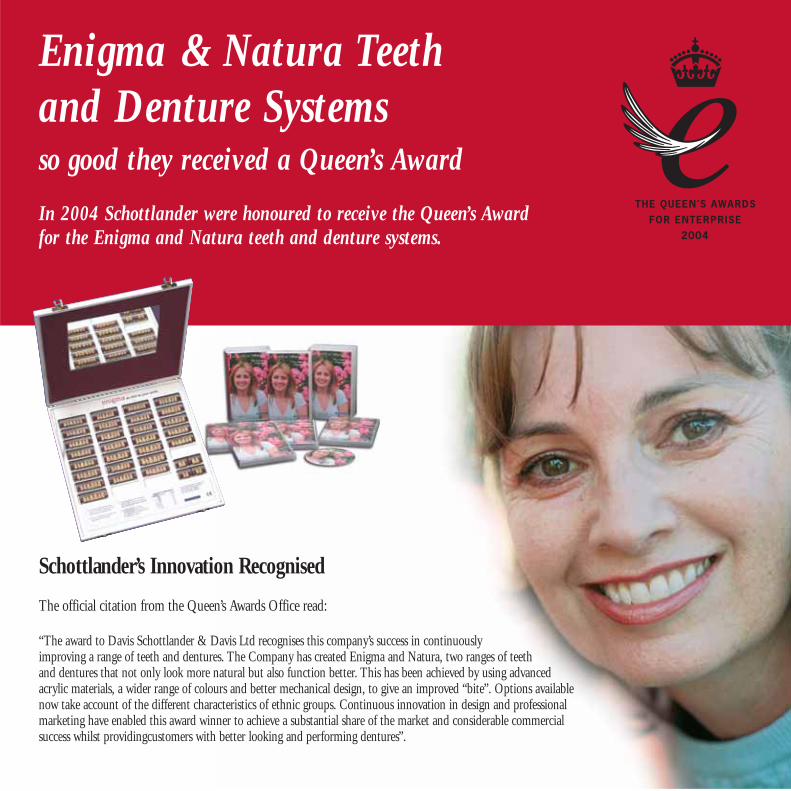
Enigma & Natura Teethand Denture Systemsso good they received a Queen’s Award
In 2004 Schottlander were honoured to receive the Queen’s Award for the Enigma and Natura teeth and denture systems.
Schottlander’s Innovation Recognised
The official citation from the Queen’s Awards Office read:
“The award to Davis Schottlander & Davis Ltd recognises this company’s success in continuously improving a range of teeth and dentures. The Company has created Enigma and Natura, two ranges of teeth and dentures that not only look more natural but also function better. This has been achieved by using advanced acrylic materials, a wider range of colours and better mechanical design, to give an improved “bite”. Options availablenow take account of the different characteristics of ethnic groups. Continuous innovation in design and professionalmarketing have enabled this award winner to achieve a substantial share of the market and considerable commercial success whilst providingcustomers with better looking and performing dentures”.
Custom Shade Matching of Gingival Tissue, Part 1In this first part, Ruth Bourke uses a case study to demonstrate Custom Shade Matchingof natural gingiva using the application of Enigma Colour Tones on complete and partialdentures.
Introduction 2
The Reproduction of Living Tissues in Dentures 2
Clinical Case Study 3
Conclusions 7
Custom Shade Matching of Gingival Tissue, Part 2In this second part, Ruth Bourke describes matching and making custom shade guidesfor gingival tissue and suggested formulas for a generic set of guides as well as demonstrating techniques for the application of Enigma Colour Tones.
Introduction 8
Colour Mapping of Intra-oral Tissues 8
Custom Shade Tabs 8
Procedure 8
The Enigma Colour Tones 11
Sequence of Applications 12
Demonstration Cases 13
Conclusions 17
The Enigma System
Materials and Equipment 18
Enigma Colour Tones 19
Enigma Colour Tone Chart 20
Enigma Teeth 21
Enigma Colour Tones Custom Shade Matching of Gingival Tissue
1
Contents
Articles originally published in Dental Technologies, issues 43 and 44, 2003
It is impossible to underestimate the importance of dentures to thewearer yet they remain one of the most challenging aspects of modern dentistry.
It was in response to this need and challenge that Schottlander developed the Enigma Denture System, to put into the hands of thedental professional the materials and systems needed by them.
The Enigma Denture System has been so successful that it’s innovative programme has been officially recognised by the receipt ofa Queen’s Award – a unique occurrence in dentistry.
The Enigma Denture System comprises of Enigma Denture Teeth,Enigma High-Base impact resistant acrylic, Enigma Colour Tones(the subject of these articles), measuring instruments, World ofDifference Training Seminars and Programmes and a growing rangeof support products, presenting you with a range of aesthetic possibilities which is almost endless.
To find out more about the innovative Enigma Denture System - see pages 18-21 or contact Schottlander on 0800 97 000 79
Introduction
The success of complete dentures can be interpreted by thepatient from two distinct view points: function andappearance. Most often the dentist’s primary concern iswith the function in the oral environment (e.g. stability,fit, retention and mastication), and aesthetic considerationssuch as the size, shade, and shape of the teeth, tooth position, denture base contours and colour become secondary. The patient, however, may view their relativeimportance quite differently, and in recent years a more‘patient-centred’ treatment regime has evolved.
Today, Dr. John Besford, a specialist in dental aesthetics isperhaps the most well-known advocate of patient-centred
treatment in England and Europe and believes that denture aesthetics play a larger role in the patient’s perceived needs. Dr. Besford’s philosophy of treatment canbe summarised in the concept of ‘prosthodontic privacy’,which he defines as follows: “A denture wearer should havethe option of keeping secret from other people the fact ofhaving to wear a denture.”
The Reproduction of Living Tissuesin Dentures
The Emergence of Colour Pigments for Dentures
In the 1950’s the American Dr. Earl Pound innovatedmany techniques for creating natural looking dentures.
Adopting Frank Lloyd Wright’s working philosophythat “form and function are one”, Pound advanced theconcept that function in the oral environment shouldnot exist without aesthetic form, as is often seen in dentures. Personalised Denture Procedures, the manualPound wrote to document his techniques, is still used asa reference today. Dr. Pound cited three distinct characteristics of his ‘newlook dentures’:(1) The natural setting of teeth,(2) The development of an entirely new concept
of denture form, and (3) The reproduction of the natural colour of
living tissues. (ref; 1)
Notes on Gingival Pigmentation
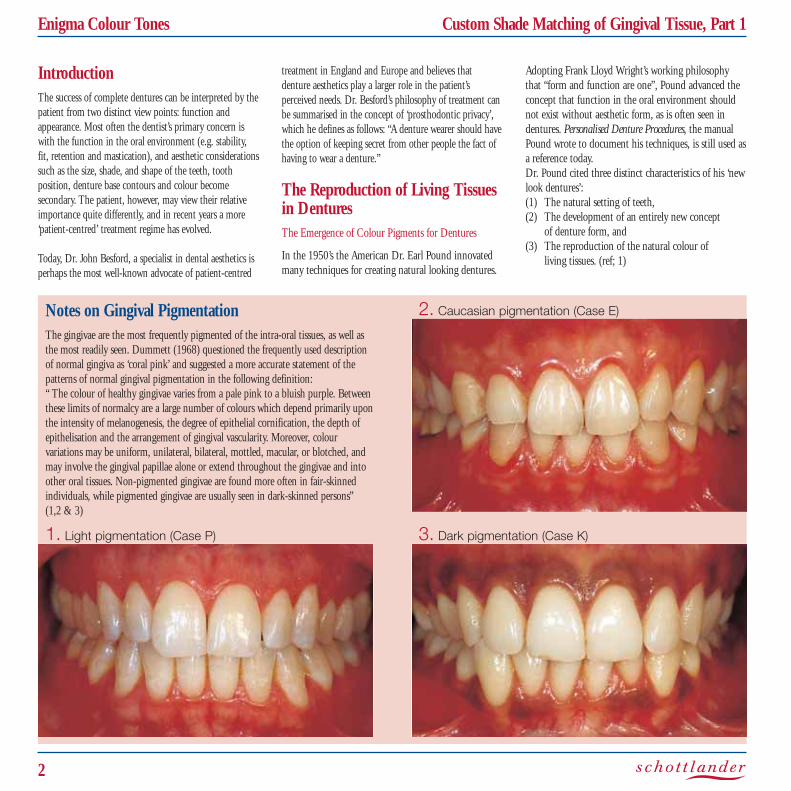
The gingivae are the most frequently pigmented of the intra-oral tissues, as well asthe most readily seen. Dummett (1968) questioned the frequently used descriptionof normal gingiva as ‘coral pink’ and suggested a more accurate statement of the patterns of normal gingival pigmentation in the following definition:“ The colour of healthy gingivae varies from a pale pink to a bluish purple. Betweenthese limits of normalcy are a large number of colours which depend primarily uponthe intensity of melanogenesis, the degree of epithelial cornification, the depth ofepithelisation and the arrangement of gingival vascularity. Moreover, colour variations may be uniform, unilateral, bilateral, mottled, macular, or blotched, andmay involve the gingival papillae alone or extend throughout the gingivae and intoother oral tissues. Non-pigmented gingivae are found more often in fair-skinnedindividuals, while pigmented gingivae are usually seen in dark-skinned persons”(1,2 & 3)
2
Enigma Colour Tones Custom Shade Matching of Gingival Tissue, Part 1
3. Dark pigmentation (Case K)1. Light pigmentation (Case P)
2. Caucasian pigmentation (Case E)
With the renewed interest in providing custom stainedgingiva, this article discusses Dr. Pound’s third phase,assuming that phases 1 and 2 have been completed andthat a denture with the correct tooth positions has beenanatomically waxed.
Surface Layer Stains
Dr. Pound introduced Replident stains along with astaining technique that applied the pigmentation ontothe surface layer of the denture base and was processedas an integral part of the denture. This became one ofthe most widely used of all the documented systemsand later became known universally as Dr. Earl Pound’sKayon Staining Kit (consisting of 5 colours and namedafter Kay See Dental, the company that produced them commercially). Kayon stains are quality products stillavailable today.
Employment of Rare-Earth Pigments for a GreaterRange of Shades
Various other techniques were developed that frequentlyincorporated or modified Pound’s original technique: Winker et al., Gerhard, Choudhary et al., Johnson, andKemnitzer. Though the system Pound described was themost universally accepted, its colour range was inadequate for rendering darker pigmentations. Theresult was that doctors and technicians supplemented
the Kayon system using complicated recipes of rare-earth pigments, as described more recently byZimmerman et al. (1982). Because the techniques forproducing such pigmentations are somewhat complex,only a small number of patients have received denturesthat match their unique gingival pigmentation.
Enigma Colour Tones
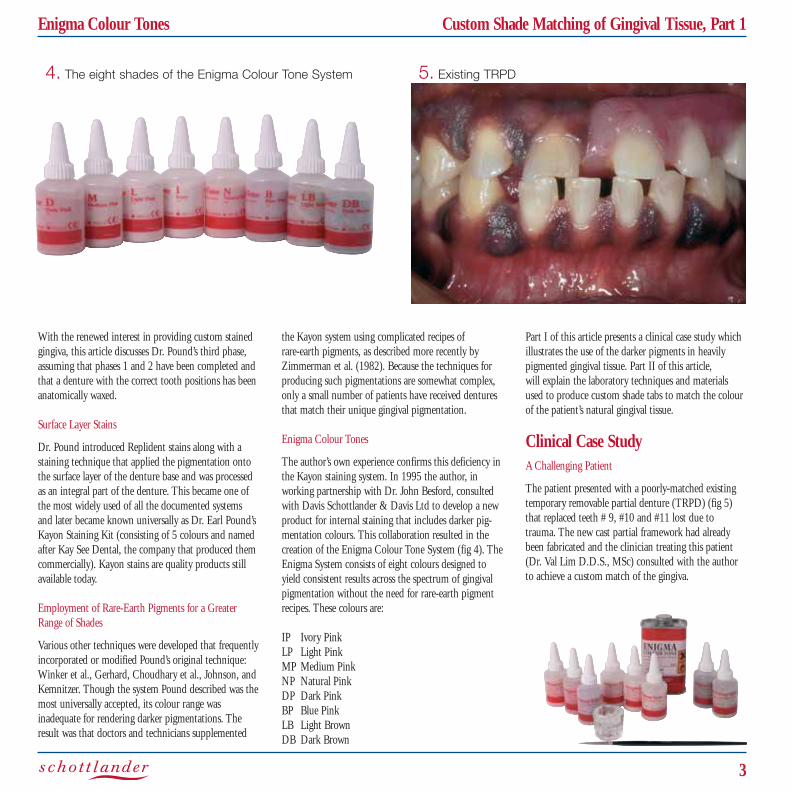
The author’s own experience confirms this deficiency inthe Kayon staining system. In 1995 the author, inworking partnership with Dr. John Besford, consultedwith Davis Schottlander & Davis Ltd to develop a newproduct for internal staining that includes darker pig-mentation colours. This collaboration resulted in thecreation of the Enigma Colour Tone System (fig 4). TheEnigma System consists of eight colours designed toyield consistent results across the spectrum of gingival pigmentation without the need for rare-earth pigmentrecipes. These colours are:
IP Ivory PinkLP Light PinkMP Medium PinkNP Natural PinkDP Dark PinkBP Blue PinkLB Light BrownDB Dark Brown
Part I of this article presents a clinical case study whichillustrates the use of the darker pigments in heavily pigmented gingival tissue. Part II of this article, will explain the laboratory techniques and materialsused to produce custom shade tabs to match the colourof the patient’s natural gingival tissue.
Clinical Case Study
A Challenging Patient
The patient presented with a poorly-matched existingtemporary removable partial denture (TRPD) (fig 5)that replaced teeth # 9, #10 and #11 lost due to trauma. The new cast partial framework had alreadybeen fabricated and the clinician treating this patient(Dr. Val Lim D.D.S., MSc) consulted with the authorto achieve a custom match of the gingiva.
Enigma Colour Tones Custom Shade Matching of Gingival Tissue, Part 1
3
4. The eight shades of the Enigma Colour Tone System 5. Existing TRPD
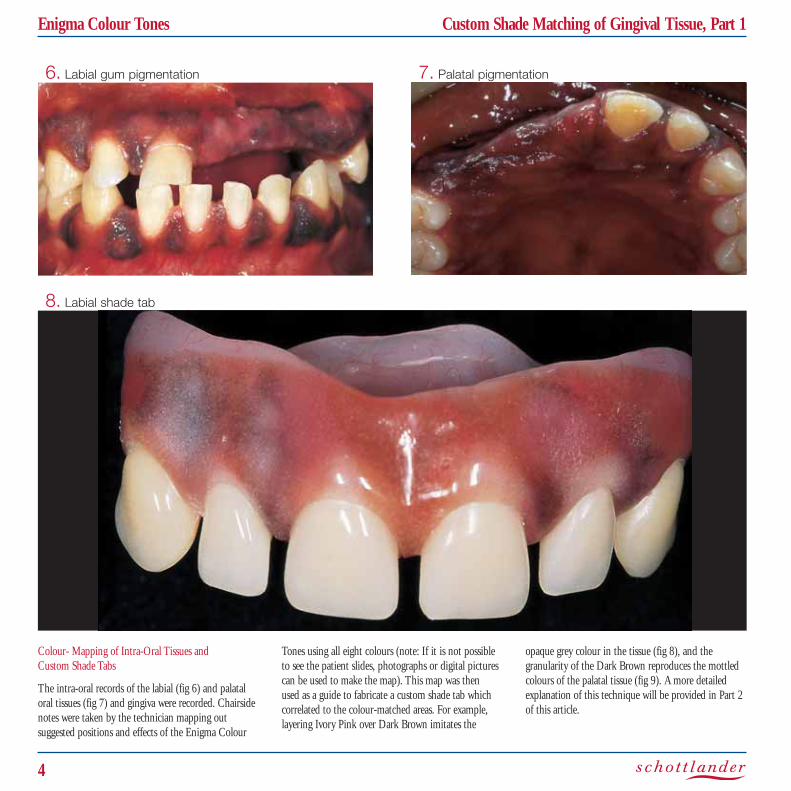
Colour- Mapping of Intra-Oral Tissues and Custom Shade Tabs
The intra-oral records of the labial (fig 6) and palataloral tissues (fig 7) and gingiva were recorded. Chairsidenotes were taken by the technician mapping out suggested positions and effects of the Enigma Colour
Tones using all eight colours (note: If it is not possibleto see the patient slides, photographs or digital picturescan be used to make the map). This map was then used as a guide to fabricate a custom shade tab whichcorrelated to the colour-matched areas. For example, layering Ivory Pink over Dark Brown imitates the
opaque grey colour in the tissue (fig 8), and the granularity of the Dark Brown reproduces the mottledcolours of the palatal tissue (fig 9). A more detailedexplanation of this technique will be provided in Part 2of this article.
4
Enigma Colour Tones Custom Shade Matching of Gingival Tissue, Part 1
8. Labial shade tab
6. Labial gum pigmentation 7. Palatal pigmentation
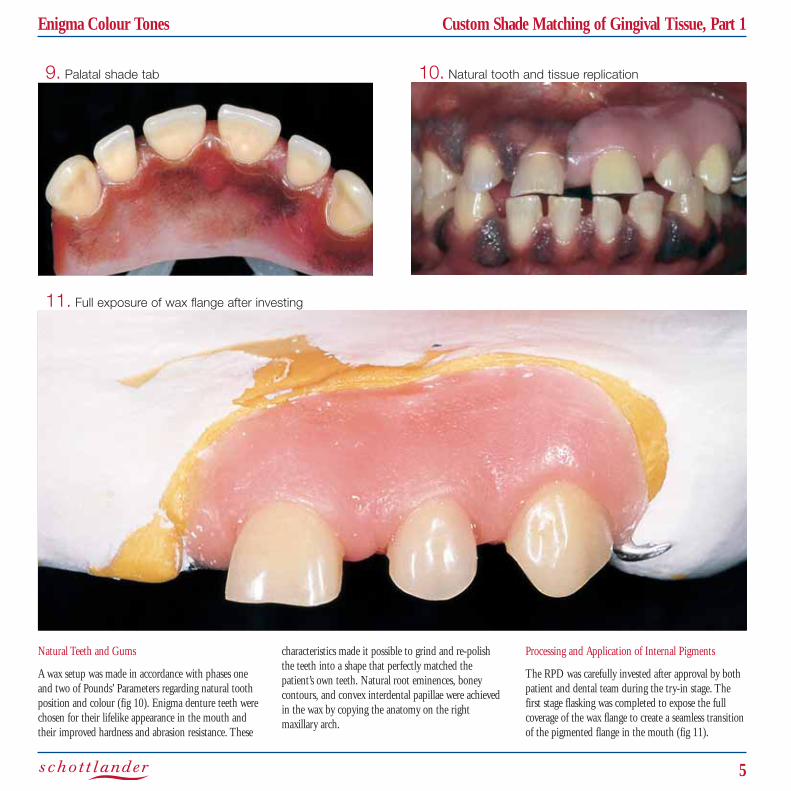
Natural Teeth and Gums
A wax setup was made in accordance with phases oneand two of Pounds’ Parameters regarding natural toothposition and colour (fig 10). Enigma denture teeth werechosen for their lifelike appearance in the mouth andtheir improved hardness and abrasion resistance. These
characteristics made it possible to grind and re-polishthe teeth into a shape that perfectly matched thepatient’s own teeth. Natural root eminences, boney contours, and convex interdental papillae were achievedin the wax by copying the anatomy on the right maxillary arch.
Processing and Application of Internal Pigments
The RPD was carefully invested after approval by bothpatient and dental team during the try-in stage. Thefirst stage flasking was completed to expose the full coverage of the wax flange to create a seamless transitionof the pigmented flange in the mouth (fig 11).
Enigma Colour Tones Custom Shade Matching of Gingival Tissue, Part 1
5
11. Full exposure of wax flange after investing
9. Palatal shade tab 10. Natural tooth and tissue replication
6
Enigma Colour Tones Custom Shade Matching of Gingival Tissue, Part 1
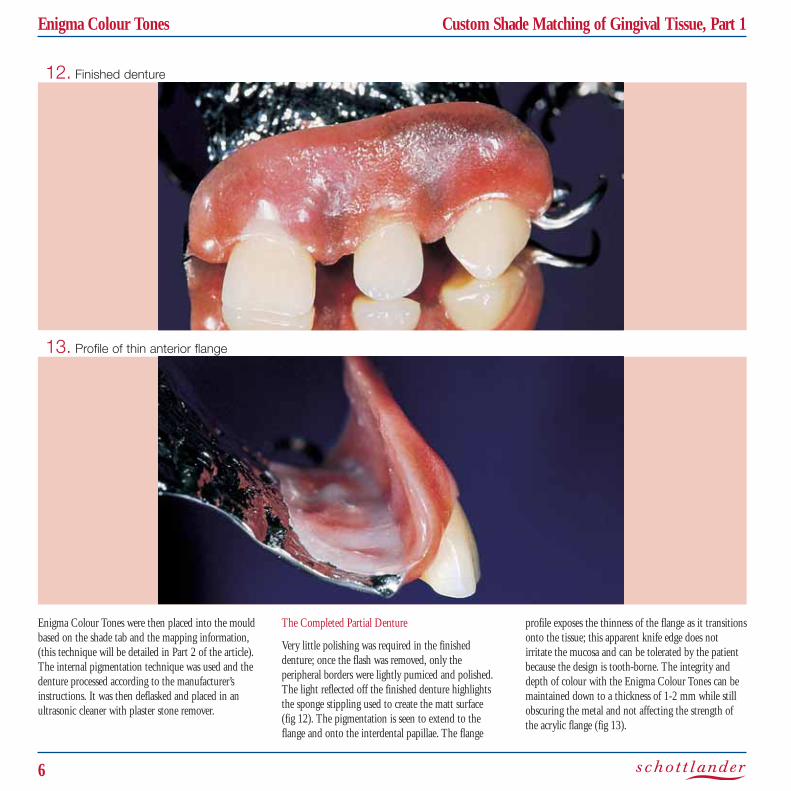
Enigma Colour Tones were then placed into the mouldbased on the shade tab and the mapping information,(this technique will be detailed in Part 2 of the article).The internal pigmentation technique was used and the denture processed according to the manufacturer’sinstructions. It was then deflasked and placed in anultrasonic cleaner with plaster stone remover.
The Completed Partial Denture
Very little polishing was required in the finished denture; once the flash was removed, only the peripheral borders were lightly pumiced and polished.The light reflected off the finished denture highlightsthe sponge stippling used to create the matt surface (fig 12). The pigmentation is seen to extend to theflange and onto the interdental papillae. The flange
profile exposes the thinness of the flange as it transitionsonto the tissue; this apparent knife edge does not irritate the mucosa and can be tolerated by the patientbecause the design is tooth-borne. The integrity anddepth of colour with the Enigma Colour Tones can bemaintained down to a thickness of 1-2 mm while stillobscuring the metal and not affecting the strength ofthe acrylic flange (fig 13).
12. Finished denture
13. Profile of thin anterior flange
Enigma Colour Tones Custom Shade Matching of Gingival Tissue, Part 1
7
15. Patient’s denture teeth, left profile
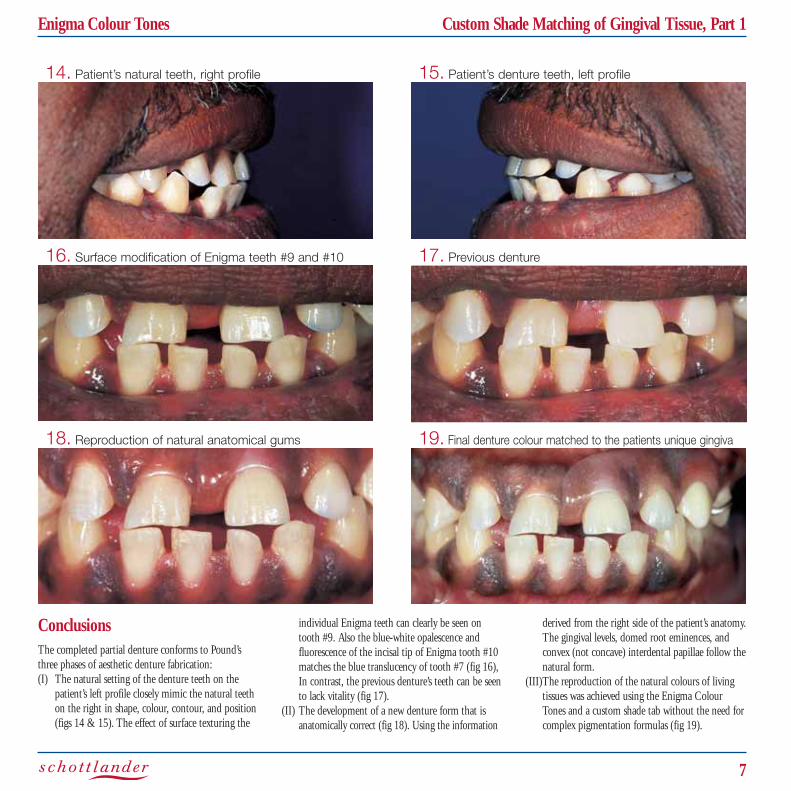
Conclusions
The completed partial denture conforms to Pound’sthree phases of aesthetic denture fabrication:(I) The natural setting of the denture teeth on the
patient’s left profile closely mimic the natural teeth on the right in shape, colour, contour, and position (figs 14 & 15). The effect of surface texturing the
individual Enigma teeth can clearly be seen on tooth #9. Also the blue-white opalescence and fluorescence of the incisal tip of Enigma tooth #10 matches the blue translucency of tooth #7 (fig 16), In contrast, the previous denture’s teeth can be seen to lack vitality (fig 17).
(II) The development of a new denture form that is anatomically correct (fig 18). Using the information
derived from the right side of the patient’s anatomy.The gingival levels, domed root eminences, and convex (not concave) interdental papillae follow thenatural form.
(III)The reproduction of the natural colours of living tissues was achieved using the Enigma Colour Tones and a custom shade tab without the need forcomplex pigmentation formulas (fig 19).
14. Patient’s natural teeth, right profile
17. Previous denture16. Surface modification of Enigma teeth #9 and #10
19. Final denture colour matched to the patients unique gingiva18. Reproduction of natural anatomical gums
Introduction
Part 1 of this article introduced the concept ofProsthodontic Privacy and underscored the importanceof patient-centred treatment emphasising the role ofdenture aesthetics. The article also discussed the threedistinct characteristics of personalised or ‘biographical’dentures outlined by Dr. Earl Pound, namely:
(I) The natural setting of teeth;(II) The development of an entirely new concept of
denture form; and (III) The reproduction of the natural colour of living
tissues.
To illustrate the third characteristic of Pound’s personalised dentures, the author presented a clinicalcase study of a denture that used dark pigments tocolour match heavily pigmented gingival tissue. Part 2of this article explains the laboratory techniques andmaterials used to produce dentures that match thecolour of the patient’s natural gingival tissue.
Colour Mapping of Intra-OralTissues
Visual Aids
To master the art of seeing and translating gingival pigmentation to the denture base, it is useful to study
cases where the patient’s gingiva is healthy. To aid inthis, keep a file that has example pictures taken fromjournal articles and books. Take pictures of yourpatient’s mouths and even your own. Having pictures ofthe gums of edentulous patients is not particularly helpful, if not also a rare occurrence! Partial denturesare easier to fabricate because you can match to thepatient’s existing natural tissue.
Correlation between Gingival and ExternalPigmentation
As discussed in Part 1, Dummett not only expanded thedefinition of gingival pigmentations, but also reporteddefinite correlations that exist between colour tonewithin the oral cavity and the individual’s external pigmentation. For example, fair and light-skinned individuals typically have pale-coloured oral mucosa. InAsians, light brown pigmentation with some blue/redand violet tones tend to predominate, while in Africansand Indians, the oral mucosa varies from light to darkbrown/purple and even black. This general rule can behelpful in determining colour tones for the edentulouspatient.
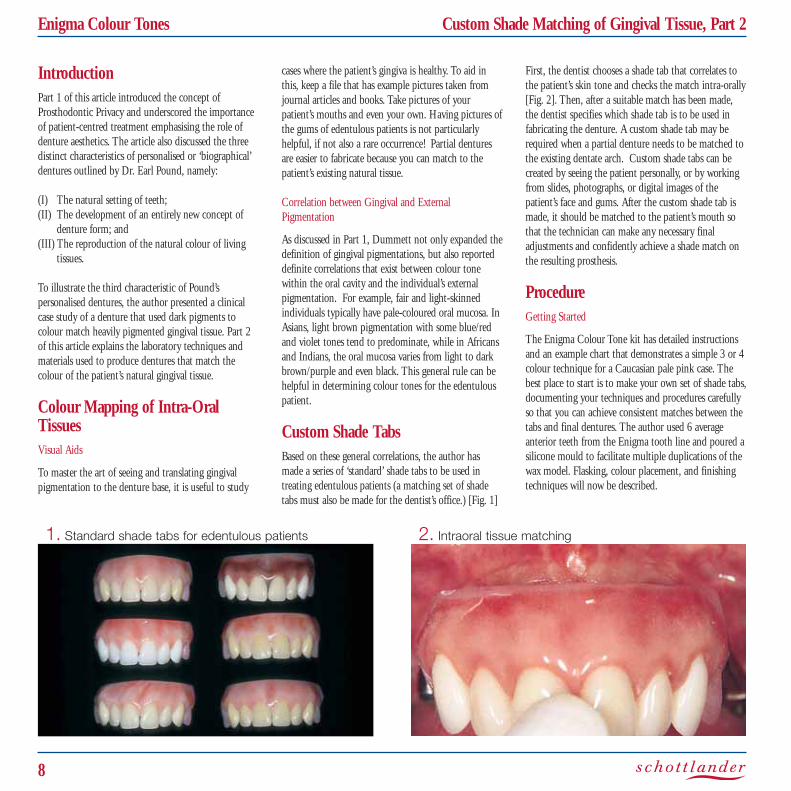
Custom Shade Tabs
Based on these general correlations, the author hasmade a series of ‘standard’ shade tabs to be used intreating edentulous patients (a matching set of shadetabs must also be made for the dentist’s office.) [Fig. 1]
First, the dentist chooses a shade tab that correlates tothe patient’s skin tone and checks the match intra-orally[Fig. 2]. Then, after a suitable match has been made,the dentist specifies which shade tab is to be used infabricating the denture. A custom shade tab may berequired when a partial denture needs to be matched tothe existing dentate arch. Custom shade tabs can becreated by seeing the patient personally, or by workingfrom slides, photographs, or digital images of thepatient’s face and gums. After the custom shade tab ismade, it should be matched to the patient’s mouth sothat the technician can make any necessary final adjustments and confidently achieve a shade match onthe resulting prosthesis.
Procedure
Getting Started
The Enigma Colour Tone kit has detailed instructionsand an example chart that demonstrates a simple 3 or 4colour technique for a Caucasian pale pink case. Thebest place to start is to make your own set of shade tabs,documenting your techniques and procedures carefullyso that you can achieve consistent matches between thetabs and final dentures. The author used 6 average anterior teeth from the Enigma tooth line and poured asilicone mould to facilitate multiple duplications of thewax model. Flasking, colour placement, and finishingtechniques will now be described.
8
Enigma Colour Tones Custom Shade Matching of Gingival Tissue, Part 2
2. Intraoral tissue matching1. Standard shade tabs for edentulous patients
Investing the Denture
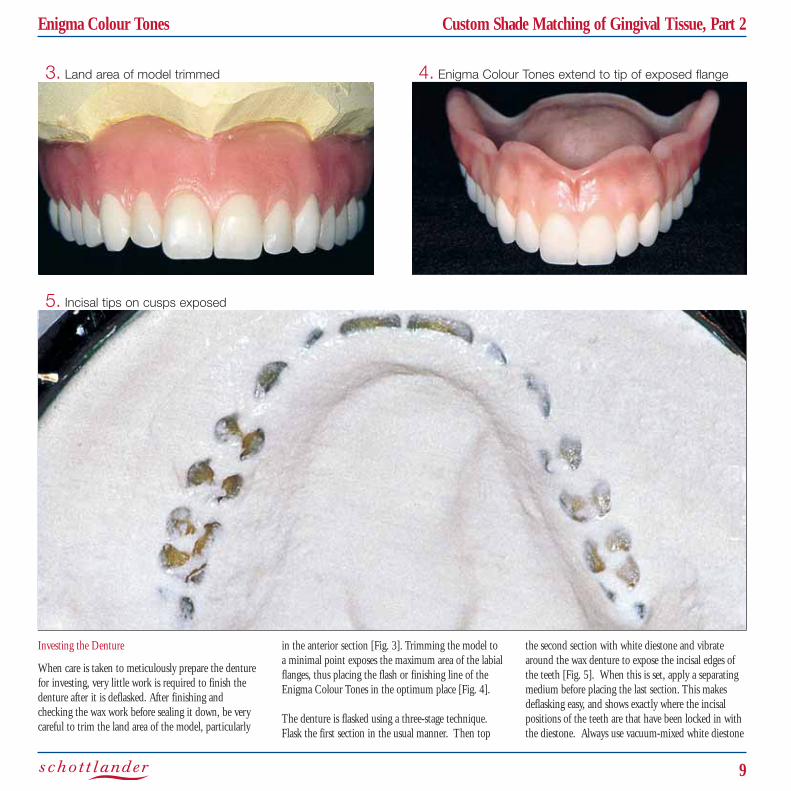
When care is taken to meticulously prepare the denturefor investing, very little work is required to finish thedenture after it is deflasked. After finishing and checking the wax work before sealing it down, be verycareful to trim the land area of the model, particularly
in the anterior section [Fig. 3]. Trimming the model toa minimal point exposes the maximum area of the labialflanges, thus placing the flash or finishing line of theEnigma Colour Tones in the optimum place [Fig. 4].
The denture is flasked using a three-stage technique.Flask the first section in the usual manner. Then top
the second section with white diestone and vibratearound the wax denture to expose the incisal edges ofthe teeth [Fig. 5]. When this is set, apply a separatingmedium before placing the last section. This makesdeflasking easy, and shows exactly where the incisalpositions of the teeth are that have been locked in withthe diestone. Always use vacuum-mixed white diestone
Enigma Colour Tones Custom Shade Matching of Gingival Tissue, Part 2
9
5. Incisal tips on cusps exposed
3. Land area of model trimmed 4. Enigma Colour Tones extend to tip of exposed flange
when flasking the denture. This both adds strength tothe mould and accurately reproduces all of the carvingdetail. Also, it is easier to see the applied Colour Tonesagainst the white diestone than against yellow stone.
Boil the wax out in the conventional manner, takingcare not to leave the flasks in the boil-out tank too long.
Allow the moulds to cool, but do not apply separator atthis stage.
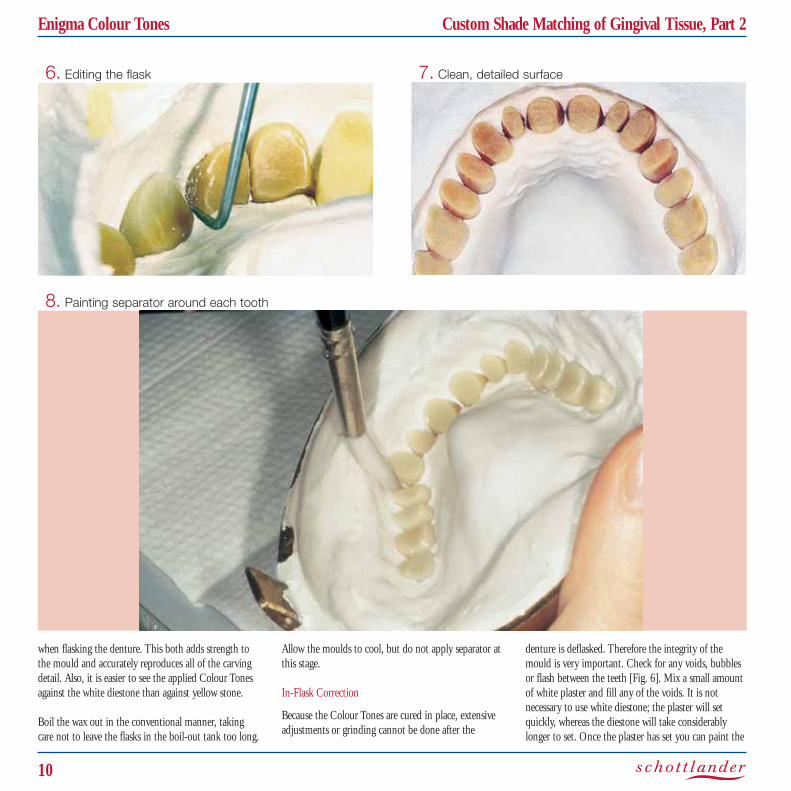
In-Flask Correction
Because the Colour Tones are cured in place, extensiveadjustments or grinding cannot be done after the
denture is deflasked. Therefore the integrity of themould is very important. Check for any voids, bubblesor flash between the teeth [Fig. 6]. Mix a small amountof white plaster and fill any of the voids. It is not necessary to use white diestone; the plaster will setquickly, whereas the diestone will take considerablylonger to set. Once the plaster has set you can paint the
10
Enigma Colour Tones Custom Shade Matching of Gingival Tissue, Part 2
6. Editing the flask 7. Clean, detailed surface
8. Painting separator around each tooth
mould with separating solution [Fig. 7]. Use a mediumpaintbrush to paint around each individual tooth, taking care not to apply excess separator [Fig. 8]. Thecompletely cooled mould is now ready for the application of Colour Tones.
Colour Tone Placement
To achieve the greatest effect, study the mould andapply the Colour Tones as indicated by the anatomy.For example, root eminences being concave depressionsin the negative mould require light colours, whilst
convex protrusions imply darker red colours. In the oralcavity the labial and buccal alveolar areas contain twobasic colour zones:
(I) In caucasians the attached and marginal gingival tissues surrounding the teeth and extending over the alveolar root prominences generally require a light pink colour with stippled orange-peel texturing. In ethnic cases this area can also have patches of pigment.
(II) The alveolar mucosa consists of smooth and shiny non-keratinised tissue with a translucent screen
revealing the deeper investing tissue. This tissue is a darker red/blue in most caucasians, with some blue or brown also intermixed throughout the mucosa in more heavily pigmented individuals.
A ‘gingival halo’ of colour that mimics the free andattached gingival junction can commonly be seenaround the gingival roll. Your ‘portfolio’ of pictures willhelp you decide whether to colour this halo using alight pink (to blend with the overall attached gingiva)or a darker colour.
Enigma Colour Tones Custom Shade Matching of Gingival Tissue, Part 2
11
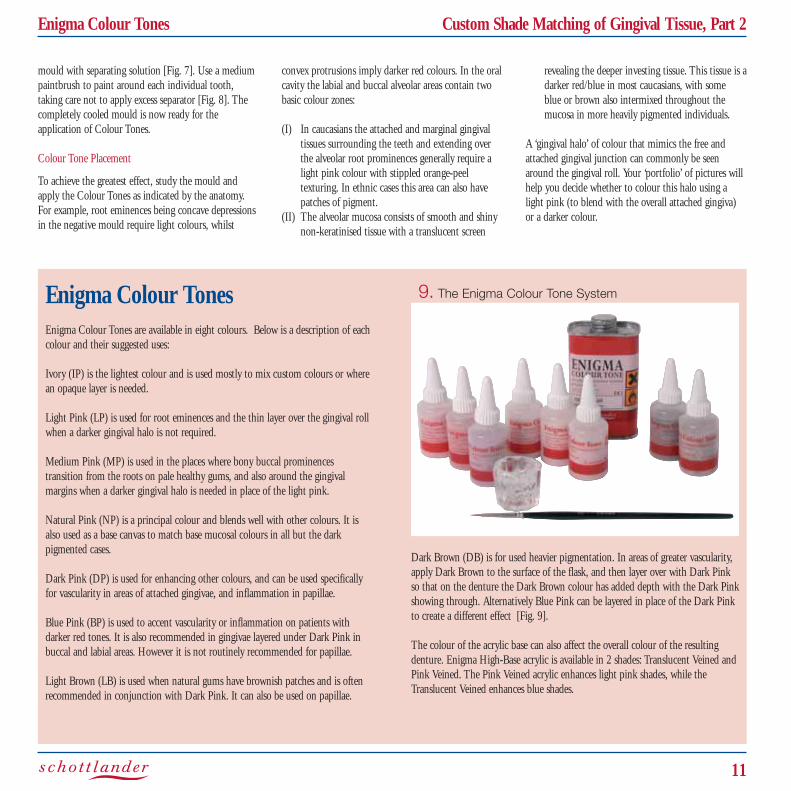
Enigma Colour TonesEnigma Colour Tones are available in eight colours. Below is a description of eachcolour and their suggested uses:
Ivory (IP) is the lightest colour and is used mostly to mix custom colours or wherean opaque layer is needed.
Light Pink (LP) is used for root eminences and the thin layer over the gingival rollwhen a darker gingival halo is not required.
Medium Pink (MP) is used in the places where bony buccal prominences transition from the roots on pale healthy gums, and also around the gingival margins when a darker gingival halo is needed in place of the light pink.
Natural Pink (NP) is a principal colour and blends well with other colours. It isalso used as a base canvas to match base mucosal colours in all but the dark pigmented cases.
Dark Pink (DP) is used for enhancing other colours, and can be used specificallyfor vascularity in areas of attached gingivae, and inflammation in papillae.
Blue Pink (BP) is used to accent vascularity or inflammation on patients with darker red tones. It is also recommended in gingivae layered under Dark Pink inbuccal and labial areas. However it is not routinely recommended for papillae.
Light Brown (LB) is used when natural gums have brownish patches and is oftenrecommended in conjunction with Dark Pink. It can also be used on papillae.
Dark Brown (DB) is for used heavier pigmentation. In areas of greater vascularity,apply Dark Brown to the surface of the flask, and then layer over with Dark Pinkso that on the denture the Dark Brown colour has added depth with the Dark Pinkshowing through. Alternatively Blue Pink can be layered in place of the Dark Pinkto create a different effect [Fig. 9].
The colour of the acrylic base can also affect the overall colour of the resulting denture. Enigma High-Base acrylic is available in 2 shades: Translucent Veined andPink Veined. The Pink Veined acrylic enhances light pink shades, while theTranslucent Veined enhances blue shades.
9. The Enigma Colour Tone System
Sequence of Applications
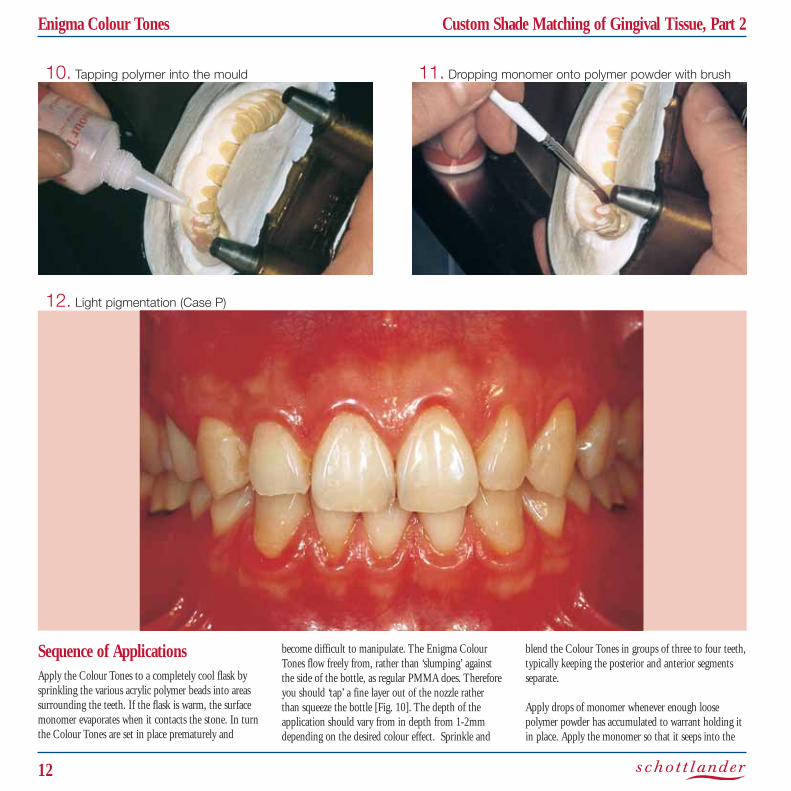
Apply the Colour Tones to a completely cool flask bysprinkling the various acrylic polymer beads into areassurrounding the teeth. If the flask is warm, the surfacemonomer evaporates when it contacts the stone. In turnthe Colour Tones are set in place prematurely and
become difficult to manipulate. The Enigma ColourTones flow freely from, rather than ‘slumping’ againstthe side of the bottle, as regular PMMA does. Thereforeyou should ‘tap’ a fine layer out of the nozzle ratherthan squeeze the bottle [Fig. 10]. The depth of theapplication should vary from in depth from 1-2mmdepending on the desired colour effect. Sprinkle and
blend the Colour Tones in groups of three to four teeth,typically keeping the posterior and anterior segmentsseparate.
Apply drops of monomer whenever enough loose polymer powder has accumulated to warrant holding itin place. Apply the monomer so that it seeps into the
12
Enigma Colour Tones Custom Shade Matching of Gingival Tissue, Part 2
10. Tapping polymer into the mould 11. Dropping monomer onto polymer powder with brush
12. Light pigmentation (Case P)

polymer from the peripheral edge of the mould towardsthe teeth. Excessive flooding with monomer can displace and muddle the Colour Tones. To prevent this,add the monomer drop-by-drop using the end of apaintbrush [Fig. 11]. This usually gives good control.
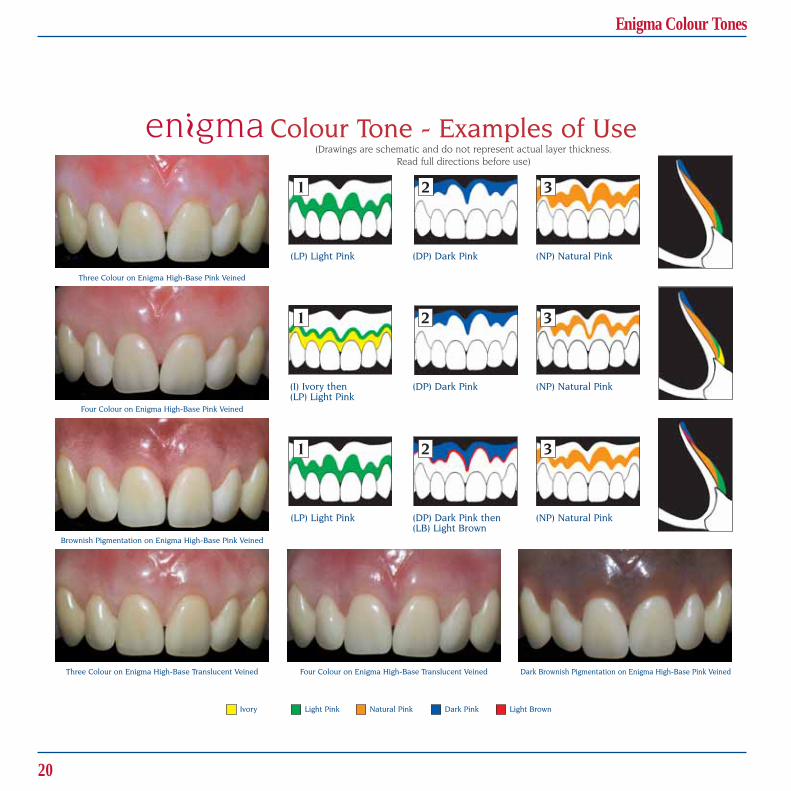
Demonstration Cases(explanation of the cases demonstrated in Part 1)
Light Pigmentation Case P(4 colour layers, base acrylic of Enigma High-Base PinkVeined)[Fig. 12]• A wax denture is made to copy the dentate
anatomy and teeth.• A colour map is constructed using a custom shade
tab [Fig. 13] and is adjusted for the final match [Fig. 14].
• NP is applied as a gingival halo around the necks of the teeth and the fraenum attachment.
• LP is then placed in the depressions of the root eminences [Figs. 15, 16].
• LB is sprinkled on the mucosal borders of the denture as well as the interstitial and bony transition areas, as indicated on the colour map and shade tab [Figs. 17, 18]
Enigma Colour Tones Custom Shade Matching of Gingival Tissue, Part 2
13
14. Reproduction of colour map using shade tab13. Custom shade tab P
16. Close-up of Light Pink15. Light Pink in root eminences
18. Close-up of Light Brown Enigma Colour Tone showing polymer beads17. Placing Light Brown
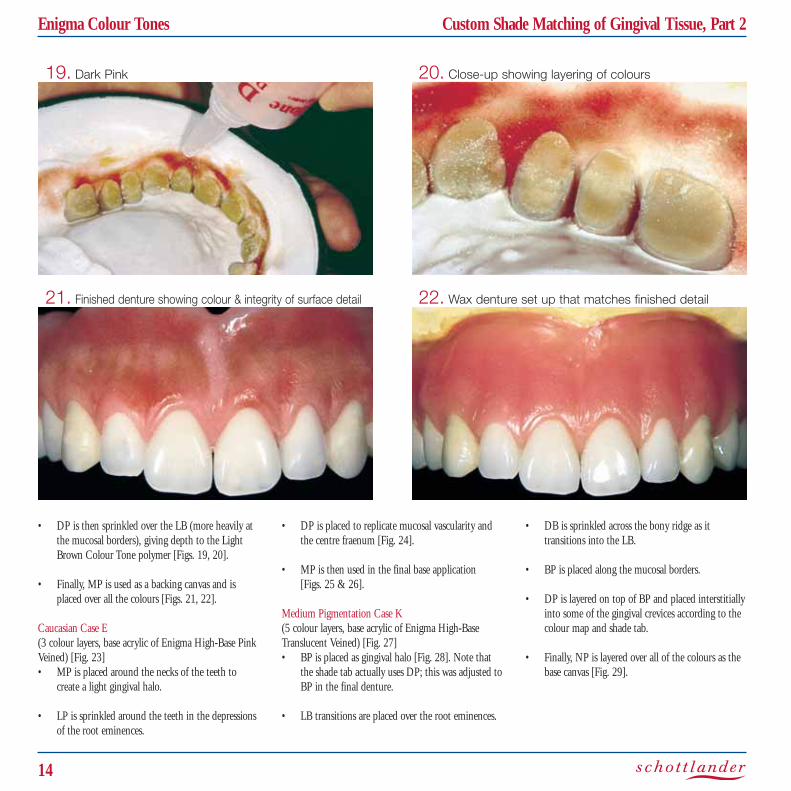
• DP is then sprinkled over the LB (more heavily at the mucosal borders), giving depth to the Light Brown Colour Tone polymer [Figs. 19, 20].
• Finally, MP is used as a backing canvas and is placed over all the colours [Figs. 21, 22].
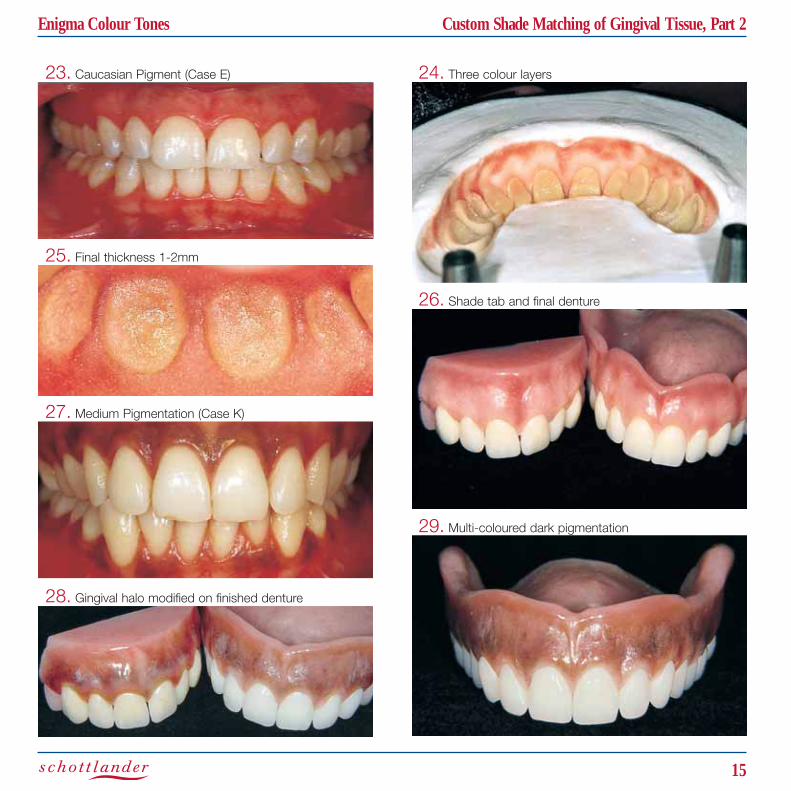
Caucasian Case E(3 colour layers, base acrylic of Enigma High-Base PinkVeined) [Fig. 23]• MP is placed around the necks of the teeth to
create a light gingival halo.
• LP is sprinkled around the teeth in the depressions of the root eminences.
• DP is placed to replicate mucosal vascularity and the centre fraenum [Fig. 24].
• MP is then used in the final base application [Figs. 25 & 26].
Medium Pigmentation Case K(5 colour layers, base acrylic of Enigma High-BaseTranslucent Veined) [Fig. 27]• BP is placed as gingival halo [Fig. 28]. Note that
the shade tab actually uses DP; this was adjusted to BP in the final denture.
• LB transitions are placed over the root eminences.
• DB is sprinkled across the bony ridge as it transitions into the LB.
• BP is placed along the mucosal borders.
• DP is layered on top of BP and placed interstitiallyinto some of the gingival crevices according to the colour map and shade tab.
• Finally, NP is layered over all of the colours as the base canvas [Fig. 29].
14
Enigma Colour Tones Custom Shade Matching of Gingival Tissue, Part 2
22. Wax denture set up that matches finished detail21. Finished denture showing colour & integrity of surface detail
20. Close-up showing layering of colours19. Dark Pink
Enigma Colour Tones Custom Shade Matching of Gingival Tissue, Part 2
15
23. Caucasian Pigment (Case E)
25. Final thickness 1-2mm
27. Medium Pigmentation (Case K)
24. Three colour layers
26. Shade tab and final denture
29. Multi-coloured dark pigmentation
28. Gingival halo modified on finished denture
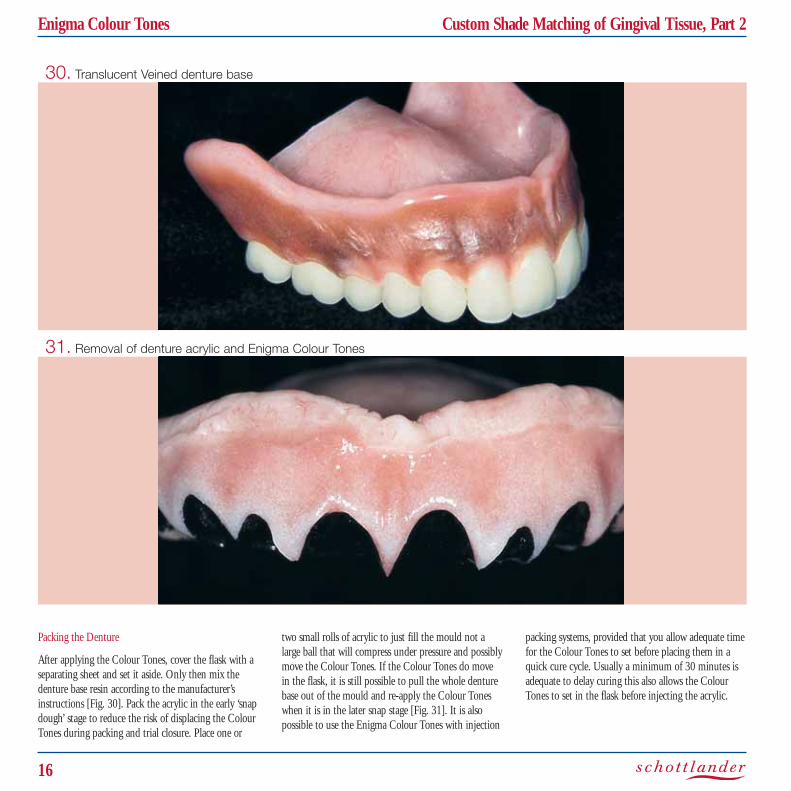
Packing the Denture
After applying the Colour Tones, cover the flask with aseparating sheet and set it aside. Only then mix thedenture base resin according to the manufacturer’sinstructions [Fig. 30]. Pack the acrylic in the early ‘snapdough’ stage to reduce the risk of displacing the ColourTones during packing and trial closure. Place one or
two small rolls of acrylic to just fill the mould not alarge ball that will compress under pressure and possiblymove the Colour Tones. If the Colour Tones do movein the flask, it is still possible to pull the whole denturebase out of the mould and re-apply the Colour Toneswhen it is in the later snap stage [Fig. 31]. It is also possible to use the Enigma Colour Tones with injection
packing systems, provided that you allow adequate timefor the Colour Tones to set before placing them in aquick cure cycle. Usually a minimum of 30 minutes isadequate to delay curing this also allows the ColourTones to set in the flask before injecting the acrylic.
16
Enigma Colour Tones Custom Shade Matching of Gingival Tissue, Part 2
30. Translucent Veined denture base
31. Removal of denture acrylic and Enigma Colour Tones
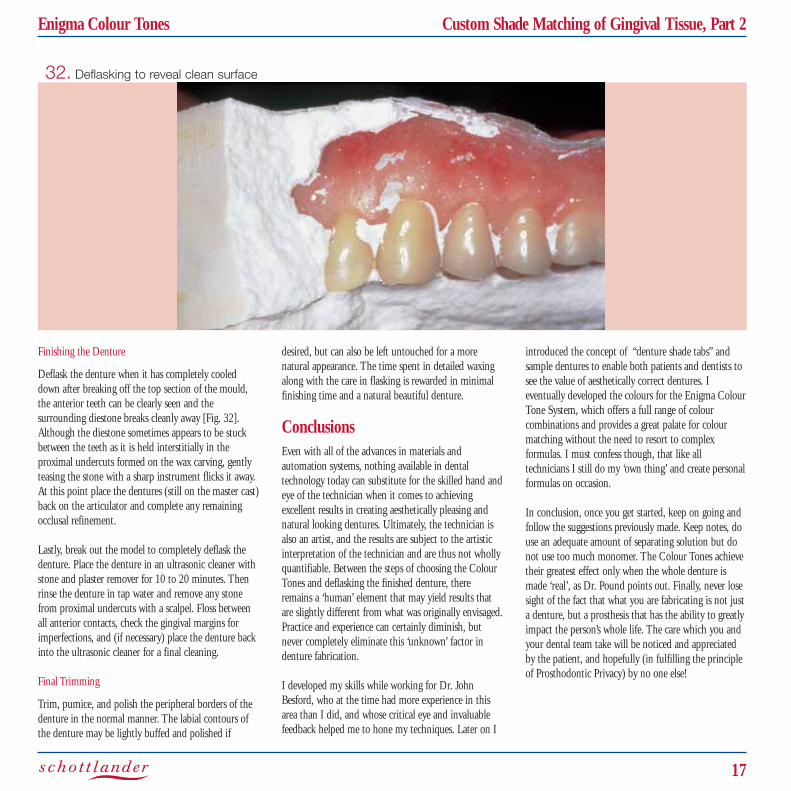
Finishing the Denture
Deflask the denture when it has completely cooleddown after breaking off the top section of the mould,the anterior teeth can be clearly seen and the surrounding diestone breaks cleanly away [Fig. 32].Although the diestone sometimes appears to be stuckbetween the teeth as it is held interstitially in the proximal undercuts formed on the wax carving, gentlyteasing the stone with a sharp instrument flicks it away.At this point place the dentures (still on the master cast)back on the articulator and complete any remainingocclusal refinement.
Lastly, break out the model to completely deflask thedenture. Place the denture in an ultrasonic cleaner withstone and plaster remover for 10 to 20 minutes. Thenrinse the denture in tap water and remove any stonefrom proximal undercuts with a scalpel. Floss betweenall anterior contacts, check the gingival margins forimperfections, and (if necessary) place the denture backinto the ultrasonic cleaner for a final cleaning.
Final Trimming
Trim, pumice, and polish the peripheral borders of thedenture in the normal manner. The labial contours ofthe denture may be lightly buffed and polished if
desired, but can also be left untouched for a more natural appearance. The time spent in detailed waxingalong with the care in flasking is rewarded in minimalfinishing time and a natural beautiful denture.
Conclusions
Even with all of the advances in materials and automation systems, nothing available in dental technology today can substitute for the skilled hand andeye of the technician when it comes to achieving excellent results in creating aesthetically pleasing andnatural looking dentures. Ultimately, the technician isalso an artist, and the results are subject to the artisticinterpretation of the technician and are thus not whollyquantifiable. Between the steps of choosing the ColourTones and deflasking the finished denture, thereremains a ‘human’ element that may yield results thatare slightly different from what was originally envisaged.Practice and experience can certainly diminish, butnever completely eliminate this ‘unknown’ factor indenture fabrication.
I developed my skills while working for Dr. JohnBesford, who at the time had more experience in thisarea than I did, and whose critical eye and invaluablefeedback helped me to hone my techniques. Later on I
introduced the concept of “denture shade tabs” andsample dentures to enable both patients and dentists tosee the value of aesthetically correct dentures. I eventually developed the colours for the Enigma ColourTone System, which offers a full range of colour combinations and provides a great palate for colourmatching without the need to resort to complex formulas. I must confess though, that like all technicians I still do my ‘own thing’ and create personalformulas on occasion.
In conclusion, once you get started, keep on going andfollow the suggestions previously made. Keep notes, douse an adequate amount of separating solution but donot use too much monomer. The Colour Tones achievetheir greatest effect only when the whole denture ismade ‘real’, as Dr. Pound points out. Finally, never losesight of the fact that what you are fabricating is not justa denture, but a prosthesis that has the ability to greatlyimpact the person’s whole life. The care which you andyour dental team take will be noticed and appreciatedby the patient, and hopefully (in fulfilling the principleof Prosthodontic Privacy) by no one else!
Enigma Colour Tones Custom Shade Matching of Gingival Tissue, Part 2
17
32. Deflasking to reveal clean surface
18
Enigma Colour Tones Materials and Equipment
Materials and Equipment
Application of Enigma Colour Tones requires the following equipment andmaterials:
1. White diestone for investing.2. Vacuum pot and mixer.3. Plaster for flask editing.4. Two or three small mixing pots or dapens glass.5. Sodium alginate separating solution (cold mould seal)6. Medium brush for applying separating solution 7. Small brush for applying acrylic monomer.8. Enigma Colour Tone kit.9. Special monomer (included with Enigma kit).10. Polyethelyene separating sheets.11. Colour map or diagram, and/or custom shade tab.12. Denture base polymer and monomer of appropriate colour.13. Mixing pot with lid.
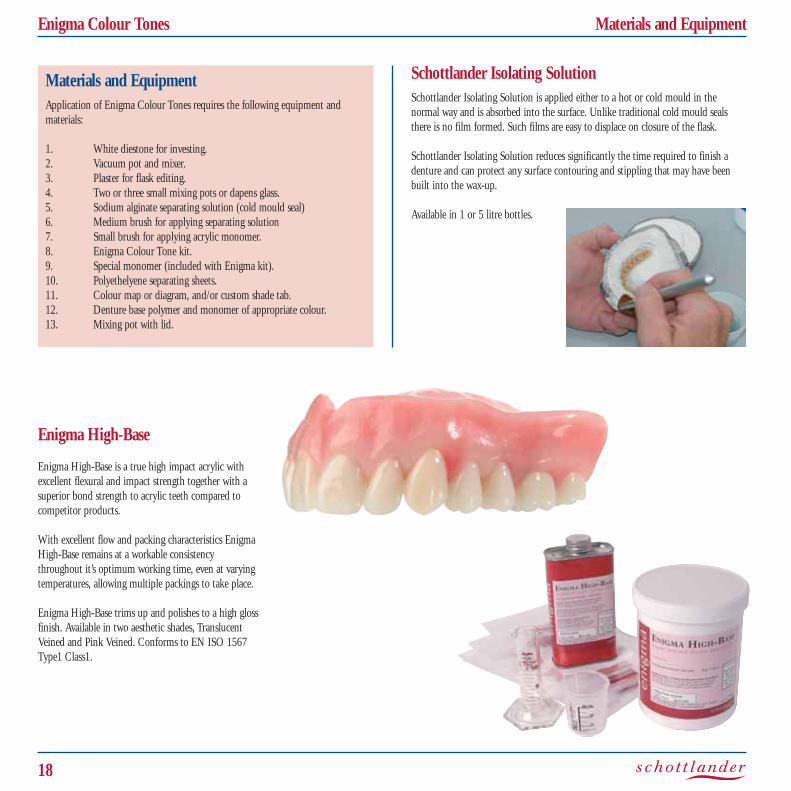
Enigma High-Base
Enigma High-Base is a true high impact acrylic withexcellent flexural and impact strength together with asuperior bond strength to acrylic teeth compared tocompetitor products.
With excellent flow and packing characteristics EnigmaHigh-Base remains at a workable consistency throughout it’s optimum working time, even at varyingtemperatures, allowing multiple packings to take place.
Enigma High-Base trims up and polishes to a high glossfinish. Available in two aesthetic shades, TranslucentVeined and Pink Veined. Conforms to EN ISO 1567Type1 Class1.
Schottlander Isolating Solution
Schottlander Isolating Solution is applied either to a hot or cold mould in the normal way and is absorbed into the surface. Unlike traditional cold mould sealsthere is no film formed. Such films are easy to displace on closure of the flask.
Schottlander Isolating Solution reduces significantly the time required to finish adenture and can protect any surface contouring and stippling that may have beenbuilt into the wax-up.
Available in 1 or 5 litre bottles.
Enigma Colour Tones
19
Enigma Colour Tones
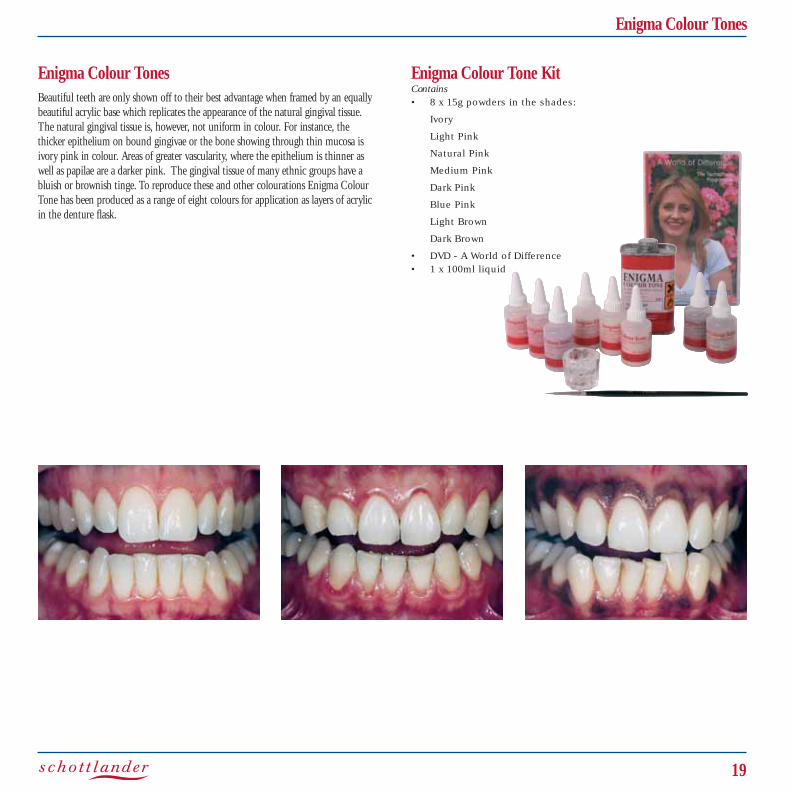
Beautiful teeth are only shown off to their best advantage when framed by an equallybeautiful acrylic base which replicates the appearance of the natural gingival tissue.The natural gingival tissue is, however, not uniform in colour. For instance, the thicker epithelium on bound gingivae or the bone showing through thin mucosa isivory pink in colour. Areas of greater vascularity, where the epithelium is thinner aswell as papilae are a darker pink. The gingival tissue of many ethnic groups have abluish or brownish tinge. To reproduce these and other colourations Enigma ColourTone has been produced as a range of eight colours for application as layers of acrylicin the denture flask.
Enigma Colour Tone KitContains
• 8 x 15g powders in the shades:
Ivory
Light Pink
Natural Pink
Medium Pink
Dark Pink
Blue Pink
Light Brown
Dark Brown
• DVD - A World of Difference
• 1 x 100ml liquid
20
Enigma Colour Tones
Enigma Teeth
21
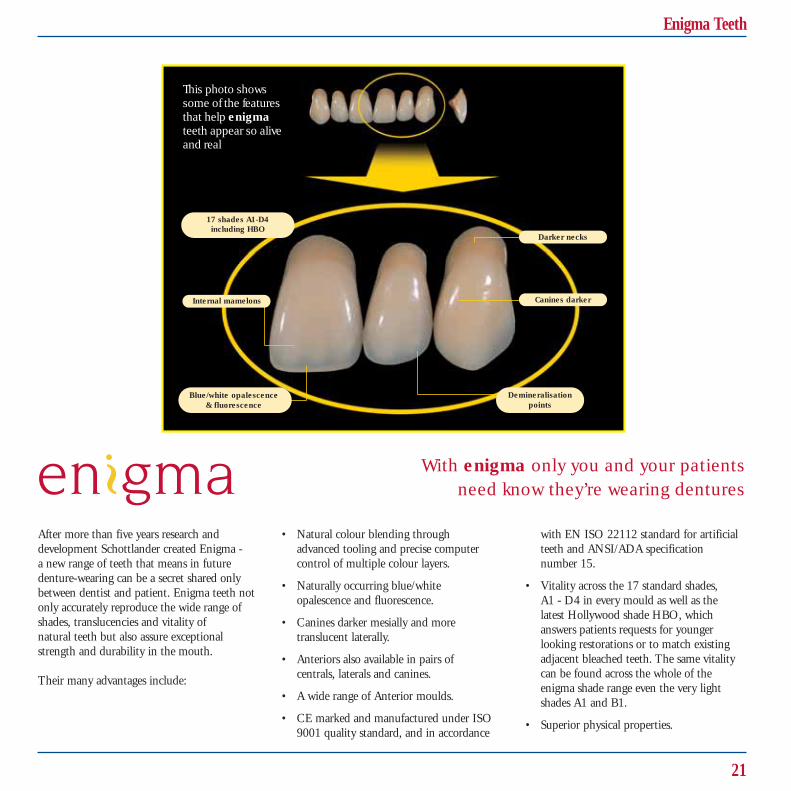
Internal mamelons
Blue/white opalescence
& fluorescence
Demineralisation
points
Canines darker
Darker necks
This photo showssome of the featuresthat help enigmateeth appear so aliveand real
17 shades A1-D4 including HBO
With enigma only you and your patientsneed know they’re wearing dentures
After more than five years research and development Schottlander created Enigma - a new range of teeth that means in future denture-wearing can be a secret shared onlybetween dentist and patient. Enigma teeth notonly accurately reproduce the wide range ofshades, translucencies and vitality of natural teeth but also assure exceptionalstrength and durability in the mouth.
Their many advantages include:
• Natural colour blending through advanced tooling and precise computercontrol of multiple colour layers.
• Naturally occurring blue/white opalescence and fluorescence.
• Canines darker mesially and more translucent laterally.
• Anteriors also available in pairs of centrals, laterals and canines.
• A wide range of Anterior moulds.
• CE marked and manufactured under ISO9001 quality standard, and in accordance
with EN ISO 22112 standard for artificialteeth and ANSI/ADA specification number 15.
• Vitality across the 17 standard shades,A1 - D4 in every mould as well as the latest Hollywood shade HBO, which answers patients requests for younger looking restorations or to match existing adjacent bleached teeth. The same vitalitycan be found across the whole of the enigma shade range even the very light shades A1 and B1.
• Superior physical properties.
Davis Schottlander & Davis LtdFifth Avenue
Letchworth Garden City Herts, SG6 2WD England
Tel +44 (0)1462 480848 Fax +44 (0)1462 482802Freephone 0800 97 000 79 Freefax 0800 97 000 78e-mail: [email protected]@schottlander.co.uk
www.schottlander.comW
3195
/110
7
References
Dummet, Oral Pigmentation, Journal of Periodontology, Vol. 31, 1960, pp. 356-60.
Pound, E., Personalised Denture Procedures, Dentists Manual, Kay See Dental 2nd Edition, 1973.
Pound, E., Personalised Denture Procedures, Laboratory Manual, Kay See Dental 2nd Edition, 1973.
Winkler, S.V. et al., Characterisation of Denture Bases for People of Colour, Journal of the American Dental Association, Vol. 81, 1970, pp 1349-1352.
Gerhard, R., and Sawyer, N. et al., Dentures to Harmonise with Heavily Pigmented Tissues, Journal of the American Dental Association, Vol. 73, 1966, pp. 94-5.
Choudhary, S.C. et al., Characterising the Denture Base for Non-Caucasian Patients, Journal of Prosthetic Dentistry, Vol. 33 1975, pt. 1, pp. 73-79.
Johnson, H.B., Technique for Packing and Staining Complete or Partial Denture Bases, Journal of Prosthetic Dentistry, Vol. 6, 1956, pp. 154-159.
Kemnitzer, D.F., Aesthetics and the Denture Base, Journal of Prosthetic Dentistry, Vol. 6, 1956, pt.5, pp. 603-615.
Pound, E., Personalised Denture Procedures, Laboratory Manual, Kay See Dental 2nd Edition, 1973.
Zimmerman, D. E., Denture Aesthetics III, Qunitessence International, 7/1982, Report 2100, p. 20-24
Besford, J , Chapter 9, “Authentic Gums,” in unpublished manuscript.
Besford, J. and Bourke, R., Enigma Course Manual, 2001
About the Author
Ruth E. Bourke B.Sc
Ruth has over 25 years of experience and knowledge as adental technician. Her career began in England whereshe has held positions at Guy's Hospital, Eastman Post-graduate Institute, the Royal London Hospital andManchester Metropolitan University. Ruth moved to the United States in 1996 to accept thepost of prosthetic and oral maxillofacial technician at theUniversity of Washington Dental School. From 2002until 2004, Ruth managed the removables department at Protea Dental Studio, and now owns andoperates her own dental laboratory in Redmond,Washington that specialises in removable denture aesthetics and implants. Ruth's interest in removable
prosthodontics began under the guidance of Dr. JohnBesford of London with whom she continues to lectureand teach "hands-on" seminars in England and Europe.In conjunction with Dr. Besford, Ruth provided consultation for Davis Schottlander and Davis UK, inthe development of the Colour Tones for the EnigmaDenture System.
Ruth Bourke RE Bourke, LLC 14630 NE 95th Street Redmond, WA 98052 Tel: +001 425 881 2553 Fax: +001 425 881 2581 [email protected]
Ruth Bourke regularly presents courses at the Schottlander Training Centre with Dr John Besford on the techniques demonstrated in this brochure. Please contact her directly forinformation on upcoming Enigma System lectures and hands-on training seminars in North America.