Embed Size (px)
Citation preview
The Evil Wizard Reference Guide Book
Supplemental: Volume Two
The Evil Wizard Reference Guide Book Supplemental: Volume Two
By Peter Karsten
CCoonntteennttss
A Word from Morcar ................................................................................................................................ 5
Section One: Gaming Aids Traps and Other devices................................................................................................................................ 7
Section Two: Monsters & Special Characters Skaven Background........................................................................................................................................ 16 Monster and Special Character Descriptions................................................................................... 24 Monster and Special Character Cards .................................................................................................30 Skaven Spells .................................................................................................................................................33 Monster and Special Character Spells.................................................................................................34
Section Three: Heroes Troll Slayer Background .......................................................................................................................... 36 Kili Thekkrsson............................................................................................................................................ 40
Section Four: Allies & Special Characters Allies & Special Characters Descriptions ......................................................................................... 45 Allies & Special Characters Cards.........................................................................................................49
Section Five: Appendices Gragor’s Armour......................................................................................................................................... 52 Sognirstane ..................................................................................................................................................... 52 Sword of Zalmir ........................................................................................................................................... 52 Talisman of Raise Dead........................................................................................................................... 52 Vestment of Chaos ...................................................................................................................................... 52 Ogredd’s Sword............................................................................................................................................... 52 Eyes of Chaos Table ................................................................................................................................... 53 Heroquest Main Character & Monster Tables ............................................................................. 54 Acknowledgements .......................................................................................................................................57
AA WWoorrdd ffrroomm MMoorrccaarr
Greetings to you all, it seems that my tome has been a success; so much so that there were those who complained that certain information was missing–there’s just no pleasing anybody these days. So due to my minion’s various requests, I have added this Supplement to allay any fears that defeating the forces of Good would–shall we say, are incomplete. I hope the information added will help many Evil Wizards and the like, defeat those who in their pitiful attempts to overthrow the forces of Chaos, be forever doomed a painful death. Enough talk! Read on, and prepare yourselves to better the forces of Good in our never-ending fight to dominate the world.
Morcar
Gaming Aids
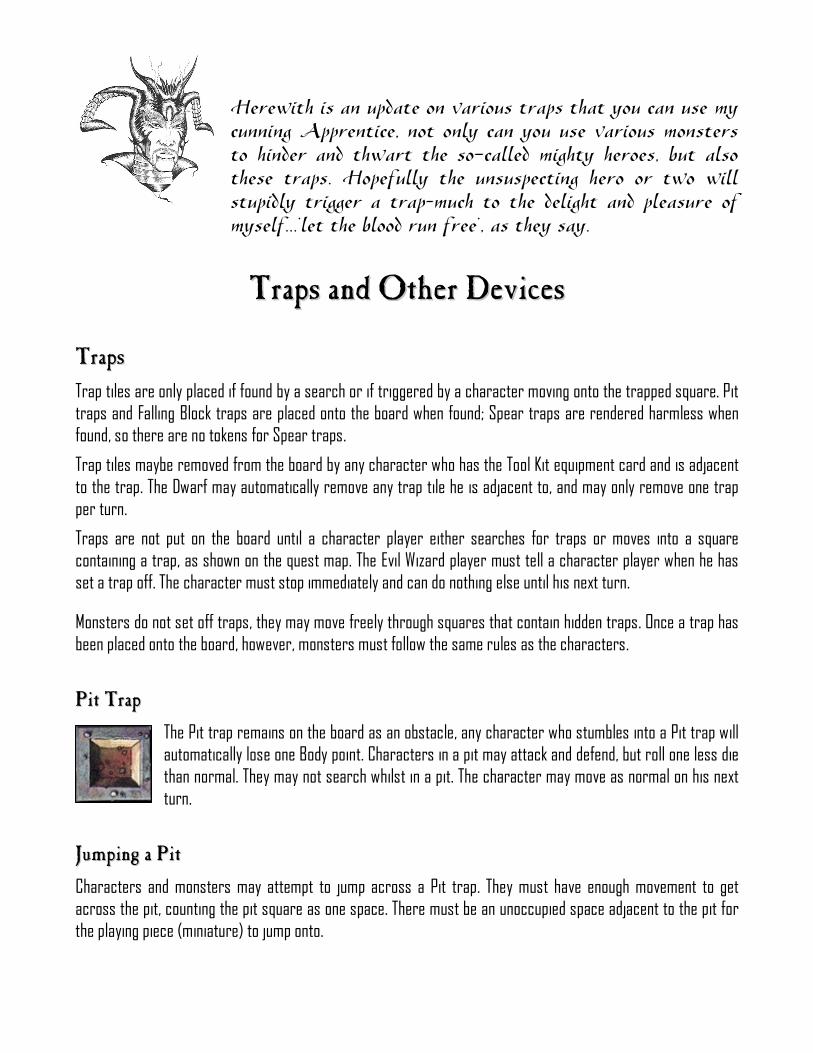
Herewith is an update on various traps that you can use my cunning Apprentice, not only can you use various monsters to hinder and thwart the so-called mighty heroes, but also these traps. Hopefully the unsuspecting hero or two will stupidly trigger a trap–much to the delight and pleasure of myself...’let the blood run free’, as they say.
TTrraappss aanndd OOtthheerr DDeevviicceess
TTrraappss
Trap tiles are only placed if found by a search or if triggered by a character moving onto the trapped square. Pit traps and Falling Block traps are placed onto the board when found; Spear traps are rendered harmless when found, so there are no tokens for Spear traps.
Trap tiles maybe removed from the board by any character who has the Tool Kit equipment card and is adjacent to the trap. The Dwarf may automatically remove any trap tile he is adjacent to, and may only remove one trap per turn.
Traps are not put on the board until a character player either searches for traps or moves into a square containing a trap, as shown on the quest map. The Evil Wizard player must tell a character player when he has set a trap off. The character must stop immediately and can do nothing else until his next turn.
Monsters do not set off traps, they may move freely through squares that contain hidden traps. Once a trap has been placed onto the board, however, monsters must follow the same rules as the characters. PPiitt TTrraapp
The Pit trap remains on the board as an obstacle, any character who stumbles into a Pit trap will automatically lose one Body point. Characters in a pit may attack and defend, but roll one less die than normal. They may not search whilst in a pit. The character may move as normal on his next turn.
JJuummppiinngg aa PPiitt
Characters and monsters may attempt to jump across a Pit trap. They must have enough movement to get across the pit, counting the pit square as one space. There must be an unoccupied space adjacent to the pit for the playing piece (miniature) to jump onto.
Any playing piece (miniature) that attempts to jump across must roll one combat die; if the player rolls a skull his playing piece (miniature) falls into the pit and loses one Body point, and may do nothing else until the next turn. Otherwise, the playing piece (miniature) may continue its move. FFaalllliinngg BBlloocckk
When a character player moves through a square containing a falling block symbol, a block will fall. It will land into the adjacent square marked with the arrow on the Quest map, blocking the way. Any character or monster in the square into which the block falls must roll three combat dice. The victim must lose one Body point for each skull rolled,
and then move to an adjacent unoccupied square. If the victim cannot move to an adjacent square, he is eliminated by the falling block. (Use the above wall marker to place the fallen block on the Quest map)
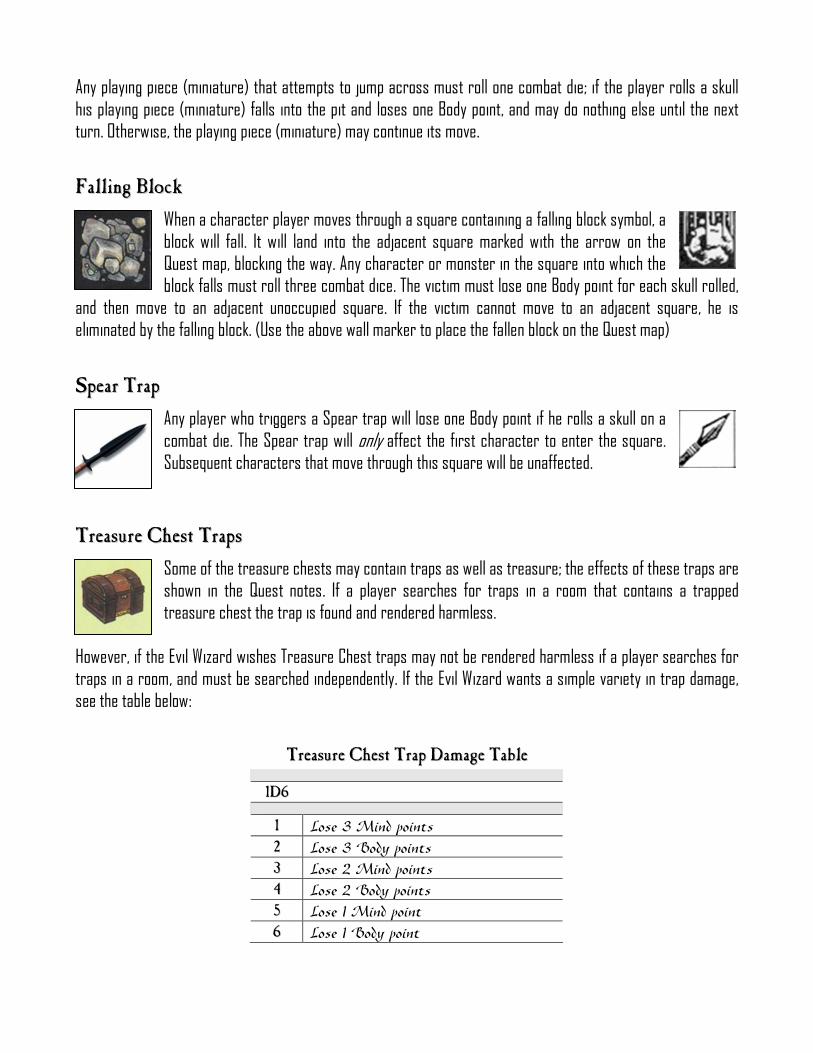
SSppeeaarr TTrraapp
Any player who triggers a Spear trap will lose one Body point if he rolls a skull on a combat die. The Spear trap will only affect the first character to enter the square. Subsequent characters that move through this square will be unaffected.
TTrreeaassuurree CChheesstt TTrraappss
Some of the treasure chests may contain traps as well as treasure; the effects of these traps are shown in the Quest notes. If a player searches for traps in a room that contains a trapped treasure chest the trap is found and rendered harmless.
However, if the Evil Wizard wishes Treasure Chest traps may not be rendered harmless if a player searches for traps in a room, and must be searched independently. If the Evil Wizard wants a simple variety in trap damage, see the table below:
TTrreeaassuurree CChheesstt TTrraapp DDaammaaggee TTaabbllee
11DD66
11
Lose 3 Mind points
22
Lose 3 Body points
33
Lose 2 Mind points
44
Lose 2 Body points
55
Lose 1 Mind point
66
Lose 1 Body point
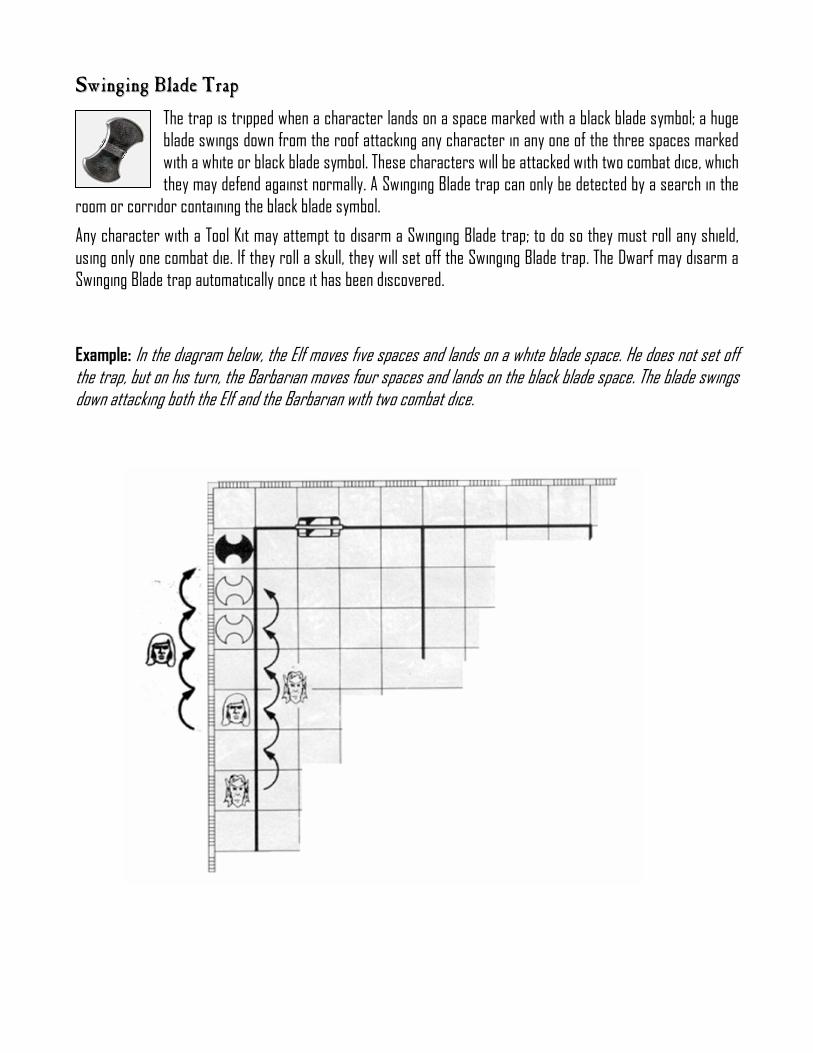
SSwwiinnggiinngg BBllaaddee TTrraapp
The trap is tripped when a character lands on a space marked with a black blade symbol; a huge blade swings down from the roof attacking any character in any one of the three spaces marked with a white or black blade symbol. These characters will be attacked with two combat dice, which they may defend against normally. A Swinging Blade trap can only be detected by a search in the
room or corridor containing the black blade symbol.
Any character with a Tool Kit may attempt to disarm a Swinging Blade trap; to do so they must roll any shield, using only one combat die. If they roll a skull, they will set off the Swinging Blade trap. The Dwarf may disarm a Swinging Blade trap automatically once it has been discovered.
Example: In the diagram below, the Elf moves five spaces and lands on a white blade space. He does not set off the trap, but on his turn, the Barbarian moves four spaces and lands on the black blade space. The blade swings down attacking both the Elf and the Barbarian with two combat dice.
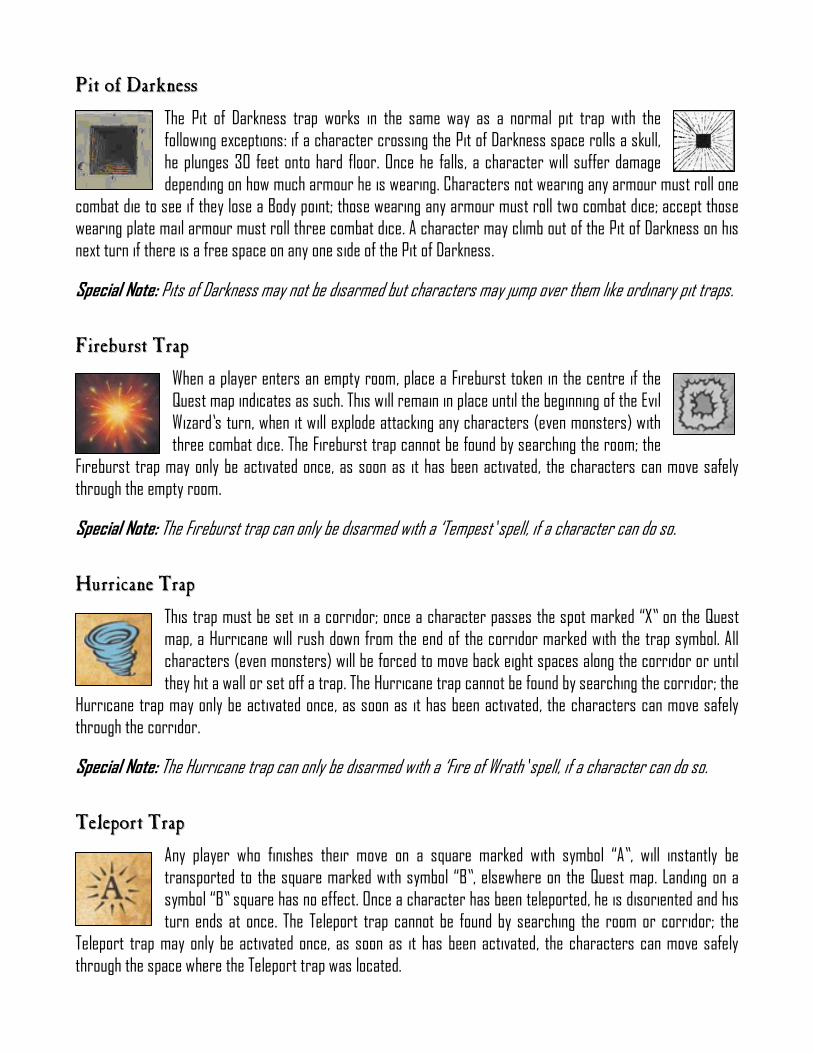
PPiitt ooff DDaarrkknneessss
The Pit of Darkness trap works in the same way as a normal pit trap with the following exceptions: if a character crossing the Pit of Darkness space rolls a skull, he plunges 30 feet onto hard floor. Once he falls, a character will suffer damage depending on how much armour he is wearing. Characters not wearing any armour must roll one
combat die to see if they lose a Body point; those wearing any armour must roll two combat dice; accept those wearing plate mail armour must roll three combat dice. A character may climb out of the Pit of Darkness on his next turn if there is a free space on any one side of the Pit of Darkness.
Special Note: Pits of Darkness may not be disarmed but characters may jump over them like ordinary pit traps. FFiirreebbuurrsstt TTrraapp
When a player enters an empty room, place a Fireburst token in the centre if the Quest map indicates as such. This will remain in place until the beginning of the Evil Wizard’s turn, when it will explode attacking any characters (even monsters) with three combat dice. The Fireburst trap cannot be found by searching the room; the
Fireburst trap may only be activated once, as soon as it has been activated, the characters can move safely through the empty room.
Special Note: The Fireburst trap can only be disarmed with a ‘Tempest’ spell, if a character can do so. HHuurrrriiccaannee TTrraapp
This trap must be set in a corridor; once a character passes the spot marked “X” on the Quest map, a Hurricane will rush down from the end of the corridor marked with the trap symbol. All characters (even monsters) will be forced to move back eight spaces along the corridor or until they hit a wall or set off a trap. The Hurricane trap cannot be found by searching the corridor; the
Hurricane trap may only be activated once, as soon as it has been activated, the characters can move safely through the corridor.
Special Note: The Hurricane trap can only be disarmed with a ‘Fire of Wrath’ spell, if a character can do so. TTeelleeppoorrtt TTrraapp
Any player who finishes their move on a square marked with symbol “A”, will instantly be transported to the square marked with symbol “B”, elsewhere on the Quest map. Landing on a symbol “B” square has no effect. Once a character has been teleported, he is disoriented and his turn ends at once. The Teleport trap cannot be found by searching the room or corridor; the
Teleport trap may only be activated once, as soon as it has been activated, the characters can move safely through the space where the Teleport trap was located.
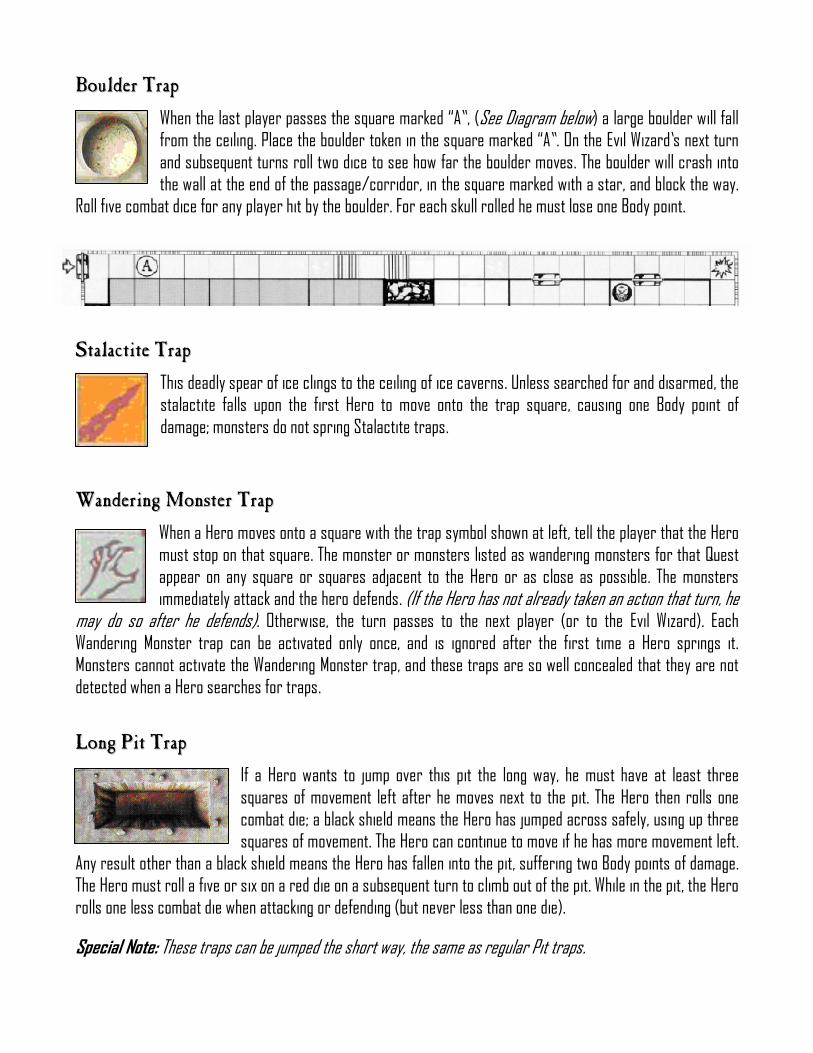
BBoouullddeerr TTrraapp
When the last player passes the square marked “A”, (See Diagram below) a large boulder will fall from the ceiling. Place the boulder token in the square marked “A”. On the Evil Wizard’s next turn and subsequent turns roll two dice to see how far the boulder moves. The boulder will crash into the wall at the end of the passage/corridor, in the square marked with a star, and block the way.
Roll five combat dice for any player hit by the boulder. For each skull rolled he must lose one Body point. SSttaallaaccttiittee TTrraapp
This deadly spear of ice clings to the ceiling of ice caverns. Unless searched for and disarmed, the stalactite falls upon the first Hero to move onto the trap square, causing one Body point of damage; monsters do not spring Stalactite traps.
WWaannddeerriinngg MMoonnsstteerr TTrraapp
When a Hero moves onto a square with the trap symbol shown at left, tell the player that the Hero must stop on that square. The monster or monsters listed as wandering monsters for that Quest appear on any square or squares adjacent to the Hero or as close as possible. The monsters immediately attack and the hero defends. (If the Hero has not already taken an action that turn, he
may do so after he defends). Otherwise, the turn passes to the next player (or to the Evil Wizard). Each Wandering Monster trap can be activated only once, and is ignored after the first time a Hero springs it. Monsters cannot activate the Wandering Monster trap, and these traps are so well concealed that they are not detected when a Hero searches for traps. LLoonngg PPiitt TTrraapp
If a Hero wants to jump over this pit the long way, he must have at least three squares of movement left after he moves next to the pit. The Hero then rolls one combat die; a black shield means the Hero has jumped across safely, using up three squares of movement. The Hero can continue to move if he has more movement left.
Any result other than a black shield means the Hero has fallen into the pit, suffering two Body points of damage. The Hero must roll a five or six on a red die on a subsequent turn to climb out of the pit. While in the pit, the Hero rolls one less combat die when attacking or defending (but never less than one die).
Special Note: These traps can be jumped the short way, the same as regular Pit traps.
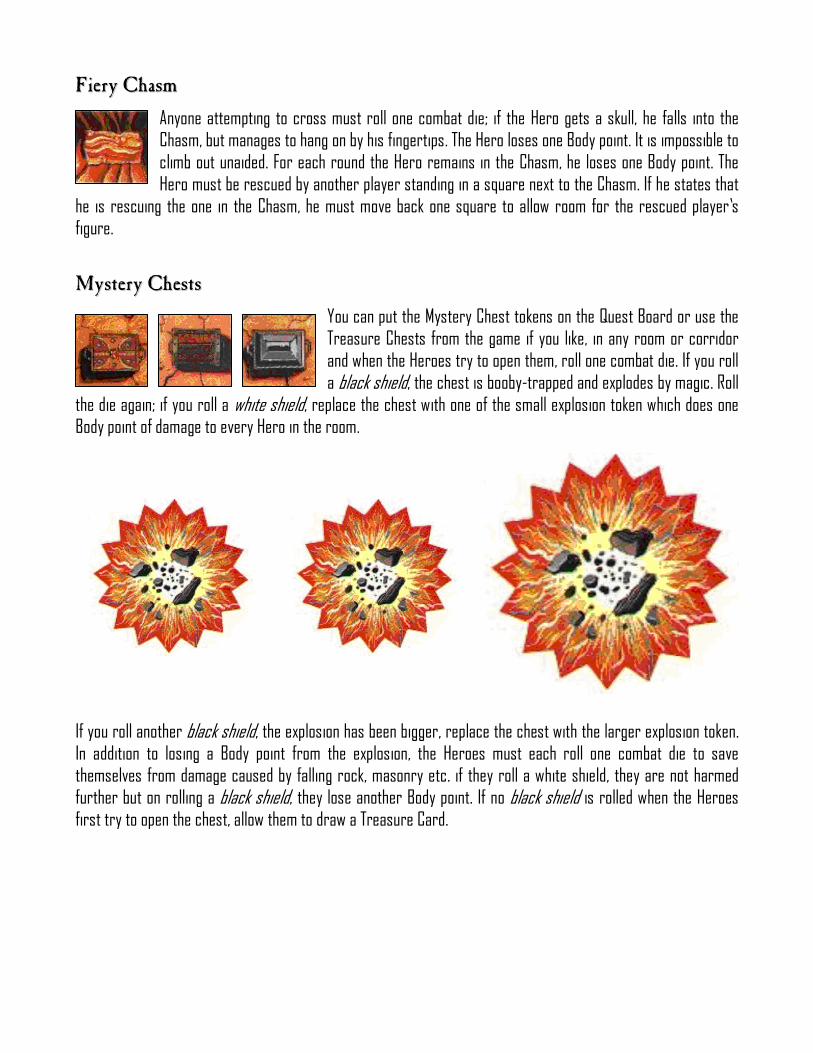
FFiieerryy CChhaassmm
Anyone attempting to cross must roll one combat die; if the Hero gets a skull, he falls into the Chasm, but manages to hang on by his fingertips. The Hero loses one Body point. It is impossible to climb out unaided. For each round the Hero remains in the Chasm, he loses one Body point. The Hero must be rescued by another player standing in a square next to the Chasm. If he states that
he is rescuing the one in the Chasm, he must move back one square to allow room for the rescued player’s figure. MMyysstteerryy CChheessttss
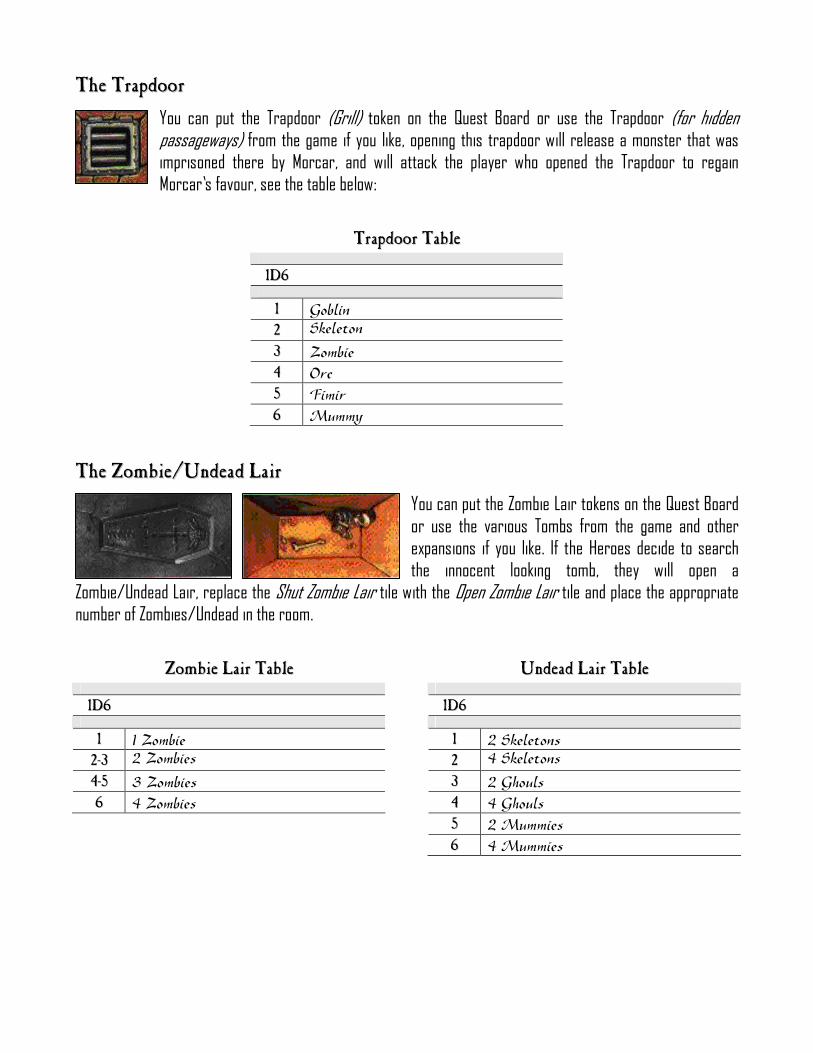
You can put the Mystery Chest tokens on the Quest Board or use the Treasure Chests from the game if you like, in any room or corridor and when the Heroes try to open them, roll one combat die. If you roll a black shield, the chest is booby-trapped and explodes by magic. Roll
the die again; if you roll a white shield, replace the chest with one of the small explosion token which does one Body point of damage to every Hero in the room.
If you roll another black shield, the explosion has been bigger, replace the chest with the larger explosion token. In addition to losing a Body point from the explosion, the Heroes must each roll one combat die to save themselves from damage caused by falling rock, masonry etc. if they roll a white shield, they are not harmed further but on rolling a black shield, they lose another Body point. If no black shield is rolled when the Heroes first try to open the chest, allow them to draw a Treasure Card.
TThhee TTrraappddoooorr
You can put the Trapdoor (Grill) token on the Quest Board or use the Trapdoor (for hidden passageways) from the game if you like, opening this trapdoor will release a monster that was imprisoned there by Morcar, and will attack the player who opened the Trapdoor to regain Morcar’s favour, see the table below:
TTrraappddoooorr TTaabbllee
11DD66
11
Goblin
22 Skeleton
33
Zombie
44
Orc
55
Fimir
66
Mummy TThhee ZZoommbbiiee//UUnnddeeaadd LLaaiirr
You can put the Zombie Lair tokens on the Quest Board or use the various Tombs from the game and other expansions if you like. If the Heroes decide to search the innocent looking tomb, they will open a
Zombie/Undead Lair, replace the Shut Zombie Lair tile with the Open Zombie Lair tile and place the appropriate number of Zombies/Undead in the room.
ZZoommbbiiee LLaaiirr TTaabbllee
11DD66
11
1 Zombie
22--33 2 Zombies
44--55
3 Zombies
66
4 Zombies
UUnnddeeaadd LLaaiirr TTaabbllee
11DD66
11
2 Skeletons
22 4 Skeletons
33
2 Ghouls
44
4 Ghouls
55
2 Mummies
66
4 Mummies
TThhee MMyyssttiicc CClloouudd
Place this in any room, when the Heroes enter the room, the Mystic Cloud will attack them, draining the Heroes of one Body point for every round they are in the room. If a Hero falls unconscious, the cloud will steal all their magic weapons and spells and then disappear. The weapons (not the spells) will be returned only if the Mystic Cloud is destroyed or if the Heroes complete their Quest.
Special Note: The Mystic Cloud can be destroyed by using the ‘Ball of Flame’ or ‘Tempest’ spells. LLiigghhttnniinngg BBoolltt TTrraapp
The Lightning Bolt cannot be found when searching for traps. When a Hero steps on a square containing a Lightning Bolt, place the Lightning Bolt tile under the figure, the Hero must stop what he is doing and the Evil Wizard must roll, as many combat dice as there are Body points that the Hero has currently. If any skulls are rolled, that Hero loses that many Body points, and moves one
square back. If the Hero loses all Body points then he is dead.
Special Note: Only the ‘Tempest’ spell can disarm the Lightning Bolt trap, and if a Hero casts “Rock Skin’ on himself, he can pass through the Lightning Bolt square without causing any damage to himself as many times as he likes until the “Rock Skin’ spell is broken. FFlloooorr TTrraapp
The Floor trap is triggered when a Hero steps onto it; place the Floor trap tile under the figure. The Hero loses two Body points and falls through the floor. The Hero cannot attack or defend, as the hole in the floor is too deep. On his next turn, the Hero can attempt to climb back out. See the table below:
FFlloooorr TTrraapp TTaabbllee
11DD66
11--44
Stay where you are
55--66 Have climbed out of the Floor trap
Special Note: Once the Floor trap has been triggered it stays on the Quest board, it cannot be disarmed; you can jump the Floor trap, just follow the rules for ‘Jumping a Pit’, good luck.
Monsters &
Special Characters
Herewith from my personal library is some information about the various monsters and special characters that you can and may use in your heroquest quest adventures my fair Apprentice. Here are some more to choose from, and I think you will be pleased with these additions to your ever growing selection. Moreover, a new kind of creature known as Skaven, enjoy.
SSkkaavveenn BBaacckkggrroouunndd
AAppppeeaarraannccee aanndd CCuullttuurree
Skaven are the rat-men of the Under-Empire, and secret shapers of the world. Skaven live in a phenomenally vast and intricate network of underground tunnels called the Under-Empire, which extends all throughout the Old World and beyond. They hide themselves away from the eyes of surface-dwellers, emerging only to carry out their secret schemes and to gather the massive amounts of Warpstone needed to sustain their magic users and the arcane machines of their warlocks. On rare occasions, the Skaven clans gather in vast swarm armies to wage sudden war on other races in the name of their evil God: the Horned Rat.
Skaven are usually fairly cunning and always malicious, but prone to cowardice (It is a common insult among Skaven to claim that another has "squirted the musk of fear" - this presumably means that Skaven squirt various musks and pheromones depending on their emotional or mental state) - confident only in large numbers (when greatly outnumbering their opponents) and won’t hesitate to stab an opponent (or ally) in the back if the opportunity presents itself.
Skaven are a bit shorter than men, between four and five feet tall on average. Most have brown fur, although this can vary. White and grey-furred ratlings are prized among Skaven litters, as they often become Grey Seers (the Skaven equivalent of priests and wizards). Black fur is looked upon as the sign of a true killer, so the elite Stormvermin corps draw their members from back furred ratlings (it is also common for lighter coloured Skaven to dye their fur, especially if they happen to be a member of the Stormvermin. Albino Skaven are rare but not unheard of. The Stormvermin in charge of protecting the Council of Thirteen (the Skaven ruling body) are all albinos.
An average Skaven has a lifespan of about 20 years, but higher members of the Skaven society can live much longer, even hundreds of years (possibly due to drugs, magic or Warpstone). Male Skaven are workers and warriors, while females are docile and barely intelligent. They spend much of their lives hidden away as breeders producing three to five litters a year, 20 or so young per litter.
By far the most popular item among Skaven is the chaotic and volatile Warpstone. The substance is corrosive to mind and body, highly addictive, and can cause mutation, death, or amplified powers. In fact, Warpstone is so popular that it is often considered to be currency among the rat-men - there is talk of them dealing in "warp-tokens". Skaven speak a language called Queekish, which includes lots of screeching, spoken very rapidly and hence is almost incomprehensible. When Queekish is represented in English, Skaven will often add two synonymous verbs together in a sentence (for the most part, in place of one active verb) - for instance, "The man-things hunt-seek something in the stink-bog". Occasionally this is done with active nouns as well.
Skaven refer to surface cities, which they dwell under as the "over-burrow" and humans as "man-things", which they often abduct as infants and raise in slavery using drug addiction to control them - then using them to perform tasks above ground that the Skaven deem to dangerous or that would call too much attention. In the Empire, and likely other nations, the Skaven are a myth to the common populace, and only the educated or those with power know of their existence.
CCoouunncciill ooff TThhiirrtteeeenn
The Skaven are ruled by the Council of Thirteen, also known as the Thirteen Lords of Decay, who make decisions for the Skaven race as a whole and keep (relative) peace among the masses. The council is formed of eleven warlords of major Skaven clans (including four members from the four greater clans), a high-ranking and mysterious Grey Seer, and a symbolic seat for the Horned Rat. The closer one is to the Horned Rat (who has incidentally never shown himself at a meeting - it is assumed he watches on) in seating arrangement, the higher the rank, and thus, the more power they wield; Lord Kritislik occupies seat number 1 on the Council, Morskittar seat 12, as they are the two most powerful. The current Council has remained the same for over 200 years.
The current Council members include:
Seat 1 - Lord Kritislik (Seerlord) Seat 2 - Greylord Skrisnik Seat 3 - Lord Sneek (Nightlord of Clan Eshin) Seat 4 - Lord Paskrit ("Warlord-General of all Skavendom") Seat 5 - Lord Kratch Doomclaw (Clan Rictus) Seat 6 - Lord Gnawdwell (Clan Mors) Seat 7 - Seat 8 - Arch Plaguelord Nurglitch VII (Arch-Plaguelord of Clan Pestilens) Seat 9 - Lord Verminkin (Packlord of Clan Moulder) Seat 10 - Seat 11 - Seat 12 - Lord Morskittar (Lord-Warlock of Clan Skryre) Seat 13 - Reserved for the Horned Rat
SSkkaavveenn CCllaannss
Over the many centuries in which the Under-Empire has spread and the rat-men have thrived, Skaven society has become split into many different "clans". The Clans constantly vie for power (particularly seats on the Council of Thirteen) and some say this vicious tendency towards backstabbing and infighting is the only reason the Skaven have not yet conquered all opposition. The four most powerful and notable Clans are:
CCllaann SSkkrryyrree
Currently, the most powerful Clan is Clan Skryre. These Skaven have devoted themselves to the study of magic and blending it with insane science and engineering. Thus far, their engineers have created many deadly machines of which the most popular are: the Ratling Gun (a Warpstone-based Gatling gun, an obvious pun on the word "rat"), the Warpfire thrower (a Warpstone-based flamethrower), the Jezzail (a extremely long-ranged Warpstone rifle which is so large that it has to be carried by two Skaven), and the fearsome Warp-Lightning Cannon (Which fires the same kind of spells the Skryre Warlocks can cast). Skyre was also responsible for the creation of the infamous "Doom Hemisphere", a device very much like an atomic bomb, which was placed underneath the Imperial city of Middelheim. The intention of the device was to destroy the city and the mountain that it was built on. However, when the time to detonate the device came, it only partially went off. This killed countless Skaven and men who were in the tunnels at the time, and completely changed the tunnels as well, but more or less left the city in tact. The Doom Hemisphere is reputed to still be dormant, waiting for someone to fully activate it and destroy the city.
Skryre maintains its strength by selling their services and war machines to all of the Skaven clans. By doing so, they further weaken and divide their political rivals, and ensure their continued place of honour among the rat-men by becoming indispensable via their vast armada of war machines. Their shining stars are the Warlock Engineers. These creatures harness the winds of magic to devastating effect, by wearing a special harness that allows them to see the ebb and flow of the Winds of Magic. This harness enables the rats to then anticipate and read the winds, allowing for full use in their destructive spells.
CCllaann PPeessttiilleennss
Clan Pestilens is based in the southern part of the world, and has been the cause for both of the two Skaven civil wars. Long ago, a Skaven expedition into Lustria found itself being slowly eaten away by the myriad of diseases in the jungles, as well as the Lizardmen they came into contact with, the expedition was considered lost, but when it resurfaced, it was changed. The rats of the clan had become completely devoted to The Horned Rat in his role as the harbinger of disease and plague. Immediately, in their new religious fervour, they struck out against the Lizardmen who besieged them, wiping out many cities with virulent plagues they had concocted. Pestilens was finally pushed back by the ancient magic of the Slann Mage-Priests and the aid of the Lizardmen god Sotek.
The clan were forced to escape to the Southlands. There they pushed north, and across the southern continent, until they once again reached the Old World. Upon their return to Skavenblight, Pestilens was refused a seat on the Council of Thirteen, which sparked the First Skaven Civil War. Eventually, the disease unleashed by Pestilens ravaged so much of the city's population that the Council agreed they had earned a seat among them.
The rats of Clan Pestilens are immune to most diseases and use the very plagues they worship as deadly biological weapons against the other races, although these can turn and decimate regular Skaven, who do not possess Pestilens immunity. Due to their diseased bulk, their plague monk troops are extremely tough, and deliriously fanatical in combat. They also use rats infected with various foul contagions, and the deadly plague censers, flails laden with burning Warpstone, that emit lethal poison gas. Their own leaders are subject to the diseases and include the Plague Lord and the plague Pontifex.
CCllaann MMoouullddeerr
Clan Moulder is based in a city the far north of Praag, where Kislev crashes hard against the Chaos Wastes. The strange home of Moulder is known as "Hell Pit", which greatly resembles the city of Dis from Dante's Inferno. It consists of nine levels of laboratories, a barracks, a giant colosseum hanging from chains, and a level where their most powerful creatures are kept in pitch darkness. Here, Master Moulders use Warpstone, from the huge mines found in the area, in a mad combination of alchemy and genetic engineering to breed all sorts of monstrous beasts for war. To replenish their stock of mutable flesh, the Moulder will strike out into the Chaos Wastes and into Troll Country, to kidnap northmen and Chaos Spawn already mutated by the ruinous powers. They are a very wealthy clan, and rent out their beasts for other Skaven to use in battle. Their most common war-beasts are the wolf-sized Giant Rats and the enormous Rat Ogres, anthropoid vermin four times the size of a man whose massive, filthy claws can take down even a heavily armoured knight.
CCllaann EEsshhiinn
Clan Eshin is amongst the greatest of the Skaven Clans. Clan Eshin was, for a long period of Skaven history, lost in the lands of Cathay and Nippon to the east of the Old World and the Dark Lands. When they returned to Skavenblight, they had mastered the arts of stealth and murder. Young recruits of Eshin are called night runners, formed into large units of lightly equipped skirmishers who attempt to disrupt the enemy. The night runners are famed for their invariably huge casualties, but this is the Eshin way of ensuring only the fastest, smartest, and most vicious remain to become the elite gutter runners, who are well equipped and excellently trained infiltrators who make use of multiple knives, throwing blades and deadly poisons. The greatest Eshin are the assassins, stealthy warriors who are expert fighters trained and equipped to slay the mightiest hero.

SSkkaavveenn AArrmmyy LLiisstt
Skaven forces are currently comprised of the following units (for the standard army list)
Lords and Heroes: Grey Seer
Warlord
Chieftan
Assassin
Master Moulder
Warlock Engineer
Plague Priest
Core Units: Clanrats
Clanrat Slaves
Giant Rats
Night Runners
Poisoned Wind Globadiers
Rat Swarms
Stormvermin
Special Units Gutter Runners
Plague Monks
Rat Ogres
Warplock Jezzails
Rare Units Plague Censer Bearers
Warp-Lightning Cannon
Chariots Screaming Bell
Special Characters Grey Seer Thanquol & Boneripper
Throt the Unclean
Warlord Queek Head-Taker
Deathmaster Snikch
Ikit Klaw
HHoorrnneedd RRaatt –– GGnnaawweerr ooff tthhee WWoorrlldd
Description: The Horned Rat is the Chaos God of the Skaven, a race of bipedal Ratmen who infest the underground world beneath a large portion of the Known World. It is not certain when the Horned Rat came through the collapsed Warp gate, but he made his presence known in spectacular fashion.
In –1700 I.C., a meteor storm rained down on the city of Tylos north of the Tilean Sea. The falling debris was Warpstone which originated from the Chaos moon, Mórrslieb. The resulting catastrophe destroyed the land and all its inhabitants except the rats that infested the town and surrounding fields. Constant exposure to the Warpstone in the newly formed marshes mutated the rodents into the children of the Horned Rat.
In a relatively short amount of time, the Skaven dug many tunnels underneath the surrounding mountains and beyond. This poised them to carry forth the Horned Rat’s schemes. At first, these plans were simply to overwhelm their opponents with sheer number. Initial success bore these assumptions out, but subsequent events forced the Skaven to redirect their efforts towards a more subtle nature. The growth of Human towns and cities provided the ideal environment for the Skaven to menace the surface dwellers from the shadowy fringes. In addition, there were always Human dupes who were more than willing to sell out their fellows for promises of riches and power.
The Horned Rat is depicted as a Skaven the size of a giant, holding the world in his hand and gnawing at it. Two sets of horns sprout from its head. The central set are long and straight while the other set curls around its temples. The Horned Rat has long fangs and each hand ends in razor-sharp claws.
Alignment: Chaos
Symbol: The symbol (and Chaos Rune) of the Horned Rat is essentially three lines that form a rough, upside down triangle (apex pointing downward). Other, lesser used symbols include a rat standing upright and a rat’s head or skull with horns growing from it. Only his Skaven followers wear these symbols openly. The Horned Rat’s Human cultists generally have a medallion with any of these symbols hidden underneath their clothing, if they carry any at all. These same Humans dress in the same manner as anyone from their same social class, which makes them virtually indistinguishable from the general populace. Human Priests of the Horned Rat may wear dark grey or brown clothing and/or robes.
Area of Worship: The Horned Rat is the god of the Skaven, but there are also cults of the Horned Rat among the Human population of the Old World. Human followers of the Horned Rat are usually those who have encountered the Skaven and believe them to be very powerful. These Human agents attempt to ingratiate themselves with the Ratmen in hopes of gaining power at the expense, as well as avoiding the fate, of their fellow Humans. Not surprisingly, the Skaven do not tell their pawns that they and their god cannot tell one Human from another (not that it really matters).
Temples: Skaven temples of the Horned Rat are always underground in Skaven tunnels and catacombs. They always have a great statue of the Horned Rat and an altar for sacrifice which is often imbedded with chunks of Warpstone. The verminous congregation stand or lie flat on the stone floor during the ceremonies.
Human shrines dedicated to the Horned Rat are well hidden in secret cellars and concealed alcoves in the sewers. A foot tall figurine of an upright rat with two straight horns dominates the altar. Foul rituals and sacrifices are committed before the altars and the bodies of the victims dumped elsewhere.
Friends and Enemies: Among the Skaven, the cult of the Horned Rat hates all humanity and their gods. The Human cultists of the Horned Rat know little of this animosity towards them (which make them the perfect dupes), but share in the mistrust of the Human cults. The cult of the Horned Rat also hates all other races and their cults. They will join other Chaos cults if it suits their purpose, although the cult of Slaanesh is very alien to the Skaven mindset. Cults of Tzeentch and Khorne are viewed with suspicions as their goals often conflict with the schemes of the Horned Rat. The only cult in which the followers of the Horned Rat (specifically, the Plague Monks and Priests in their worship of the Horned Rat as the “Harbinger of Disease”) have some common ground are of Nurgle.
Holy Days: To the Skaven deep underground every day is like every other. In contrast, Human cultists of the Horned Rat honour him whenever Mórrslieb is full (which is a challenge to plan given the Chaos Moon’s erratic orbit).
Cult Requirements: Among Skaven, only those who wield magic (Grey Seers, Warlock Engineers and few Plague Priests) may serve as clerics of the Horned Rat. They do not generally proselytise among humans, but will recruit anyone foolhardy to join a cult of like-minded Humans. Thus, most large cities have a small cult of the Horned Rat among Humans who seek to gain power and wealth from their association with the Skaven. These may include sewer workers, night watchmen, officials who have some reason to go underground, fools looking for an easy path to influence and power, and friends and relatives of such people.
Strictures: The following tenets only apply to Human cultists:
Always obey Skaven leaders.
Never reveal the existence of the Skaven or the cult to anyone outside the cult.
Sabotage all underground work on sewers or anywhere in cities, which threaten to expose the Skaven.
Thwart all investigations into the clandestine activities of the Skaven and Human agents.
Eliminate any witness do such activities.
Members must seek Warpstone and deliver any that they find into the hands of the cult or their Skaven masters.
Spell Use: Grey Seers and Warlock Engineers are able to use any Skaven and Dark Magic spells of the appropriate level, while Plague Priests can only use Skaven spells involving disease.
Human Sorcerer-Priests of Horned Rat are limited to the following spells:
1st: Shadow’s Companion, Summon Children of the Horned Rat, Vermintide, Warp Lightning.
2nd: Infecting Gaze, Scorch, Summon Daemon Rat.
3rd: Gnaw, Plague Source.
Note: Unlike Skaven spellcasters, Human Sorcerer-Priests are limited to third level and may regain Magic Points by using the Meditation skill in the same manner as Human priests. In addition, Human Sorcerer-Priests may use a Warpstone solution created by Warlock Engineers. The solution allows the imbiber to gain d10 Magic Points (not to exceed the Sorcerer-Priest’s limit) at the risk of a 5% chance of receiving a mutation. This chance of mutation is cumulative with each solution drunk.
Skills: The Horned Rat does not grant any additional skills to his Skaven servants. He does grant one of the following skills to his Human Sorcerer-Priests for each level achieved: Concealment Urban, Night Vision, Orientation (underground), Silent Move Urban, Speak Additional Language (Queekish), Spot Traps.
Trials: Trials of the Horned Rat usually involves some act of sabotage on behalf of the Skaven. Examples include collapsing a sewer line that threatens to uncover a Skaven tunnel or removing evidence of Skaven presence in a city or town.
Blessings: Favourable skills include Concealment Urban, Silent Move Urban, and Spot Traps. Moreover, the Horned Rat favours Disease, Fear, Hide, and Poison tests. In some cases, he may grant a temporary increase to Cool and Initiative. The Horned Rat may also grant other “gifts” to those who have excelled in his service. Others may be cursed with random mutations.
WWaarrppssttoonnee
‘Warpstone’ is named after an element found in the Warhammer world; the hard black stone is pure warp power condensed into a solid form. It originates from the Warp, a void in space and time where chaotic forces whirl in an endless wind of change. However, some of these chaotic forces do not stay in the void and have found bridges to the Old World. Some have become Gods, others the creatures that inhabit the world, some have transmuted into the element called Warpstone. The Skaven, a race of rat-like beings have been created from their proximity to this dark element. Over the centuries, they have learned how to harness its energy and use it to power their magic.
RReeffiinniinngg WWaarrppssttoonnee
The process of refining Warpstone is both gruesome and deadly. In fact, the most effective method of refining Warpstone is through the use of unwilling victims.
For every pound of raw Warpstone force fed to a Skaven subject, half a pound of partially refined Warpstone can be retrieved. Unfortunately, the Grey Seer refining the Warpstone must first wait for the eruption of mutations to subside before searching the bloody remains to find the partially-refined Warpstone. Since the Skaven used in refining the Warpstone can only handle one pound of Warpstone, a large number of Skaven need to be used to refine a substantial quantity. Thankfully, the ability of the Skaven to breed in large numbers ensures that there is never a shortage of Warpstone-refining vessels.
Should the Grey Seer wish to take the final refining step, then a new Skaven “volunteer” must be used. As with the first refining step, half the weight of the Warpstone will be lost in the second process. While the outbreak of mutations will also occur the second time, it is only 70% fatal. Thus, in 30% of the cases, the Grey Seer will have to wait for the refined Warpstone to pass through whatever is left of the victim’s digestive tract. Even though the surviving “volunteer” has been reduced to a Chaos Spawn, they have further uses as experimentation subjects by either Clan Moulder or Clan Skryre.
In a pinch, either Beastmen (including mutants) or humans can be used to refine Warpstone. Members of these races are inferior refining vessels, however, and have a lesser chance for converting Warpstone to less dangerous states. Beastmen have a base 30% chance of using their digestive tract to refine Warpstone with a modifier of +5% of each mutation. Of course, the effects of refining Warpstone are just as deadly for them as it is for Skaven and humans.
Humans only have a 5% chance of converting Warpstone to any of its refined states. It should be noted that this small chance does not deter determined Grey Seers if they have great need of the refined Warpstone.
MMoonnsstteerrss && SSppeecciiaall CChhaarraacctteerrss DDeessccrriippttiioonnss
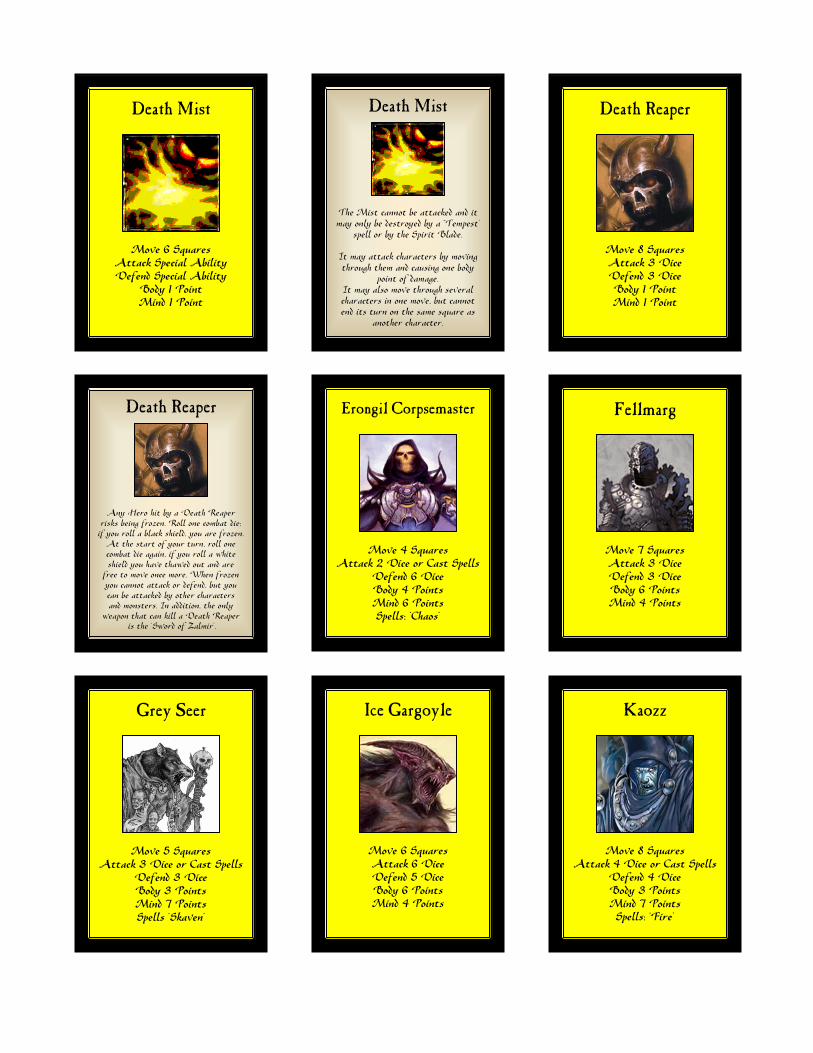
DDeeaatthh MMiisstt
The Death Mist, a dark foreboding emanation of Chaos, which on the command of Morcar destroys all who are not loyal to him. The Death Mist cannot be attacked and it may only be destroyed by a Tempest spell or by the Spirit Blade. The Death Mist may attack Heroes by moving through them and causing one Body point of damage. The Death Mist may move through several Heroes in one move. It will not affect monsters. The Death Mist may never leave its assigned area (patrolling corridors). The Death Mist may not end its turn on the same square as another Hero or Monster.
DDeeaatthh RReeaappeerr
When the Death Reaper appears from the depths of Chaos, the air around it goes cold in frozen fright at its appearance, Any Hero hit by a Death Reaper risks being frozen, roll one combat die; if you roll a black shield, you are frozen. At the start of your turn, roll one combat die again; if you roll a white shield you have thawed out and are free to move once more. The Death Reaper is immune to all spells and can only be destroyed by the Sword of Zalmir.
EErroonnggiill CCoorrppsseemmaasstteerr
Erongil on the orders of Morcar tried to persuade Gwynt, the Weather-Wizard to join Chaos, but was refused. Therefore, Erongil killed him. Erongil is a loyal agent of Morcar and goes throughout the realm trying to enlist followers to the cause of Chaos; some join with the promise of wealth and glory while others refuse. If this is the case Erongil kills them to make sure these unbelievers will not trouble Morcar in the future. Erongil can cast three 1st level Chaos spells and three 2nd level Chaos spells, which ‘Summon Undead’ must be one of them.
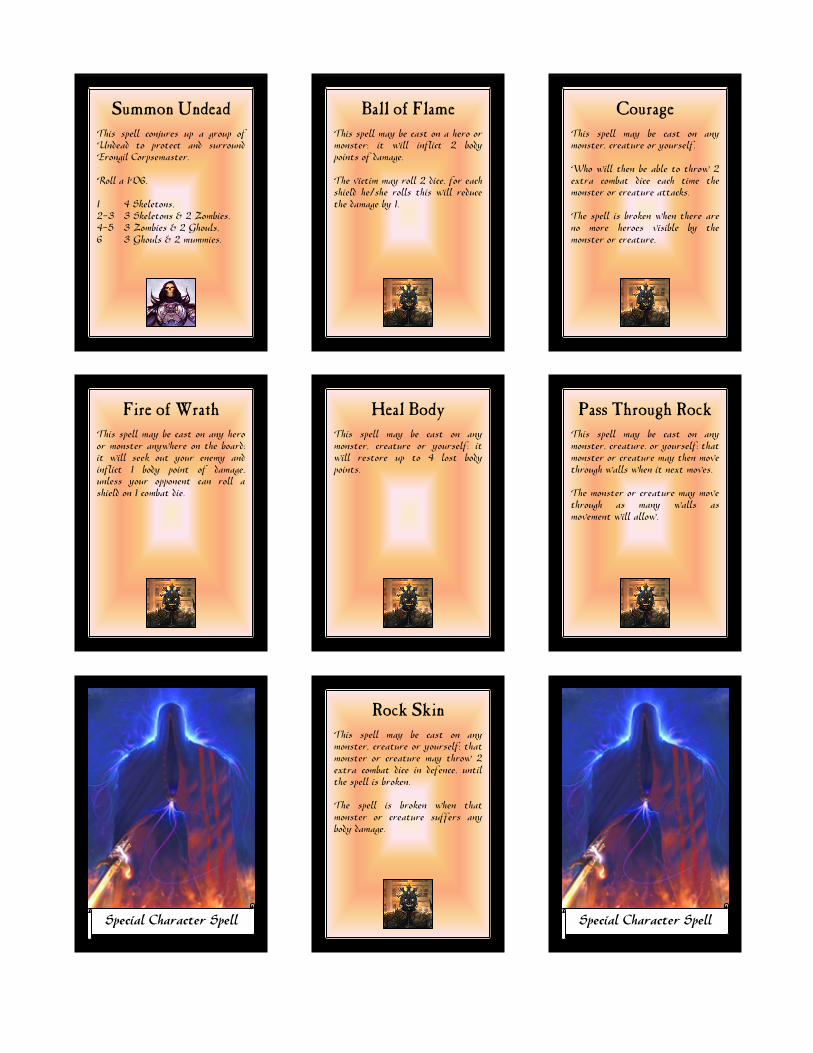
SSuummmmoonn UUnnddeeaadd
This spell conjures up a group of Undead to protect and surround the Chaos Sorcerer. Roll a 1D6, 1 = four Skeletons, 2-3 = three Skeletons & two Zombies, 4-5 = three Zombies & two Ghouls, and 6 = three Ghouls & two mummies.
FFeellllmmaarrgg
Fellmarg was once a mighty warrior from ages past; his great strength and prowess earned him respect from his peers–even his enemies. Nevertheless, like all warriors he fell in battle defending the innocent from the onslaught of Chaos. Fellmarg now rests in a tomb on the eastern frontier on the empire guarded by a foul gargoyle named Verag.
GGrreeyy SSeeeerr
The Grey Seers are Skaven prophets that make up a religious order dedicated to the Horned Rat. The Grey Seers hold a very important position in the Skaven hierarchy. They rank just below the Council, and are above the Warlords of the Warlord clans. Grey Seers often have white or grey coloured fur. They interpret the Horned Rat's will and desires to the rest of the Skaven. They advise and coerce the Warlord clans, in accordance to their own interpretations, and act as intermediates to relay decrees of the Council to the Skaven clans. Their leader, the Seerlord, sits on the Council of Thirteen, as one of the most powerful Lords of Decay.
Some Skaven jealously say that the Seerlord's seat on the Council compromises the intended role of the Grey Seers. The Seers preach of the time when the Great Ascendancy will occur, in which the whole Skaven race will rise as one, and conquer the Upper World, overwhelming the races above. The Grey Seers are also very powerful, as anyone who argues against them would be denounced as heretics and be ultimately destroyed by the rest of the clans, who would wage a holy war against that clan. This, of course, does not stop the resentment against them by many important Skavens, and it is a very foolish Grey Seer who does not watch his back when separated from his brethren.
The Grey Seers, as stated, interpret the will of the Horned Rat as his living prophets. However, they are also seen in battle as generals, and are the most proficient sorcerers of the Skaven. They also relay messages from the council to the clans. The Grey Seers are the most proficient magic-users of the Skaven race. The only other known magic users on the Skaven army list in the Skaven race are Warlock Engineers. Unlike Warlock Engineers, however, Grey Seers utilize the winds of magic, not machines, to use magic, as they are natural born wizards, unlike the Warlocks. The Grey Seers in combat are always the generals of the Skaven army, unless another hero or lord is present and wrests the honour from their paws. They are the most common magic users for the Skaven. The Seers are sometimes seen riding on a Screaming Bell, an engine of horror and that brings certain doom to an opposing army. Its bell has high magic capabilities also. They, like most Skaven leaders, have a relatively low leadership.
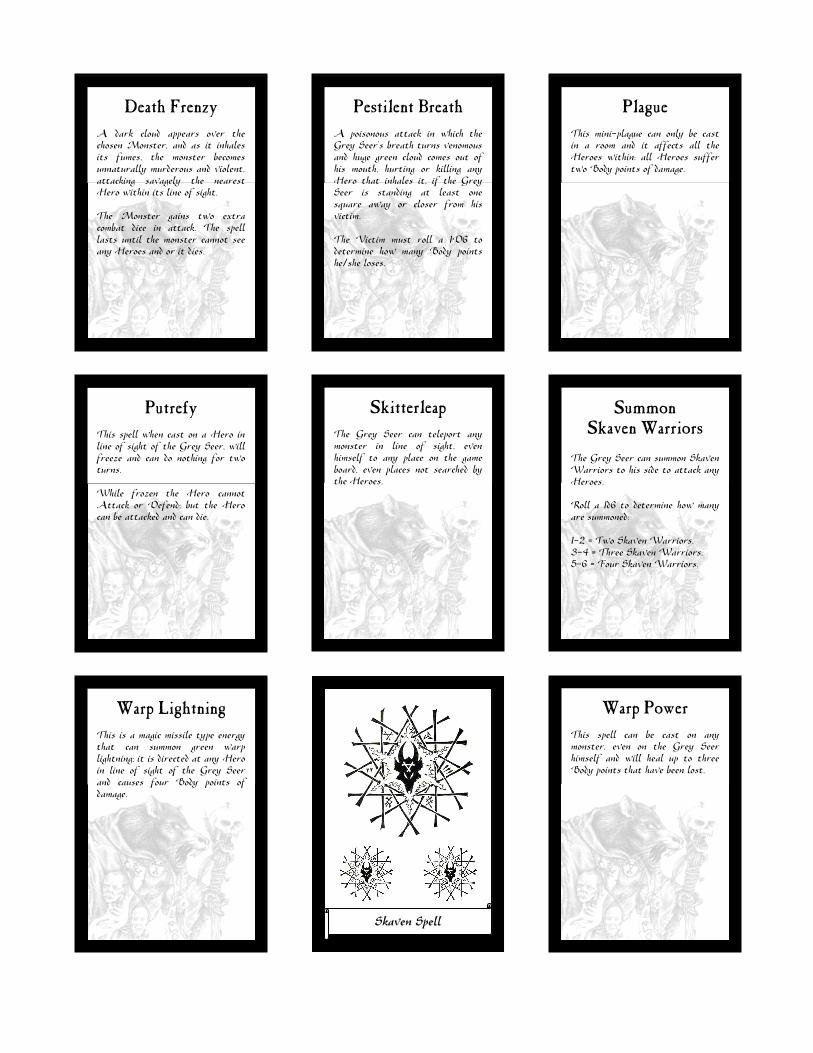
DDeeaatthh FFrreennzzyy
A dark cloud appears over the chosen Monster, and as it inhales its fumes, the monster becomes unnaturally murderous and violent, attacking savagely the nearest Hero within its line of sight. The Monster gains two extra combat dice in attack. The spell lasts until the monster cannot see any Heroes and or it dies.
PPeessttiilleenntt BBrreeaatthh
A poisonous attack in which the Grey Seer’s breath turns venomous and huge green cloud comes out of his mouth, hurting or killing any Hero that inhales it, if the Grey Seer is standing at least one square away or closer from his victim. The Victim must roll a 1d6 to determine how many Body points he/she loses.
PPllaagguuee
This mini-plague can only be cast in a room and it affects all the Heroes within; all Heroes suffer two Body points of damage.
PPuuttrreeffyy
This spell when cast on a Hero in line of sight of the Grey Seer, will freeze and can do nothing for two turns. While frozen the Hero cannot Attack or Defend; but the Hero can be attacked and can die.
SSkkiitttteerrlleeaapp
The Grey Seer can teleport any monster in line of sight, even himself to any place on the game board, even places not searched by the Heroes.
SSuummmmoonn SSkkaavveenn WWaarrrriioorrss
The Grey Seer can summon Skaven Warriors to his side to attack any Heroes. Roll a 1d6 to determine how many are summoned: 1-2 = Two Skaven Warriors, 3-4 = Three Skaven Warriors, 5-6 = Four Skaven Warriors.
WWaarrpp LLiigghhttnniinngg
This is a magic missile type energy that can summon green warp lightning; it is directed at any Hero in line of sight of the Grey Seer and causes four Body points of damage.
WWaarrpp PPoowweerr
This spell can be cast on any monster, even on the Grey Seer himself and will heal up to three Body points that have been lost.
IIccee GGaarrggooyyllee
The Ice Gargoyle is of course a cousin to the gargoyles we know and love-hate; these Ice Gargoyles are found in icy regions especially in caves and mountains where they can establish their lair in peace from intruders. The Ice Gargoyles can make relatively good sentries, but can be unpredictable at times, so treat them well or they might turn on you. One good way to instil loyalty and peace of mind is to reward them with food and various trinkets, which they can hoard in their lairs for safekeeping. The Ice Gargoyle in immune to all spells except ‘Fire’. “Fire’ spells do double their normal damage against this creature.
KKaaoozzzz
Kaozz the Chaos Sorcerer is in command of a band of Ogres that terrorize the border between the empire and the western land of Bretonnia to no end; recently he and his followers killed some mourners on their way to the ‘Tombs of the Phalanx’. Kaozz has made his base at this place where the tombs of the fallen warriors of Bretonnia lay. From here, Kaozz can plan his attack on the innocent and help Morcar achieve his ultimate goal. Each time a spell is cast against Kaozz, roll two combat dice. If Kaozz rolls a shield on either dice, the spell does not affect him. Kaozz has a six ‘Fire’ Elemental spells chosen from the 1st level. Kaozz also has a bottle of a magical green liquid, which he can drink, instead of attacking, at any time. Drinking this allows him to recover three Body points. Although they are magical, the ‘Eyes of Chaos’ do not cast spells.
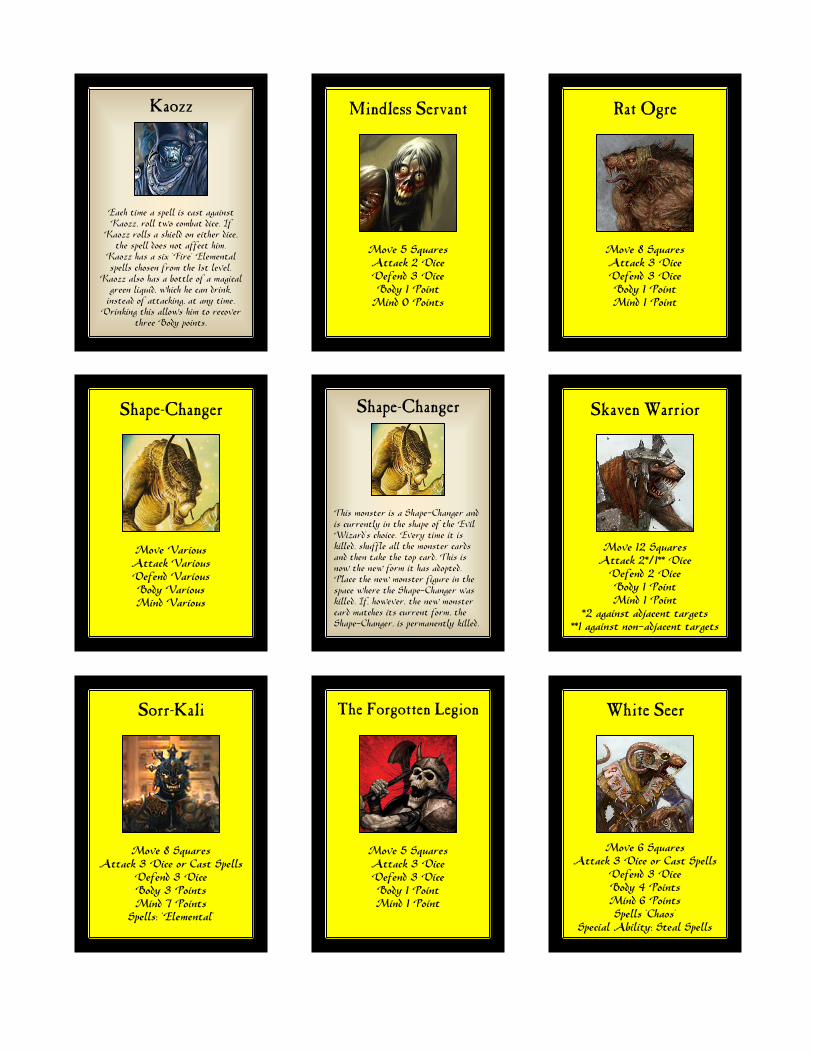
MMiinnddlleessss SSeerrvvaanntt
If you ever displease Morcar, better to die than become one of his walking dead-a Mindless Servant of Morcar. Wandering abandoned castles, cities, catacombs and the like, many have failed Morcar and so he turns them into the walking dead. These Mindless Servants are doomed to patrol, protect and guard places that may be a benefit to the forces of good.
RRaatt OOggrree
Rat Ogres are massive creatures standing 12 feet in height. Some are covered with fur just as normal Skaven, while others lack any hair whatsoever. A Few Rat Ogres have other mutations which betray the manner in which they were bred. Generally, these manifest as an extra arm or prehensile tail (both offering one extra combat die in attack). Other types of mutations are left to Morcar’s discretion. Rat Ogres cause Fear in all living creatures under 10 feet tall. Any Hero or Heroes that come into contact, must roll a 1d6, on a roll between 1-4 the hero/es must run away twice their movement dice roll (if possible) on a roll of 5-6 the Hero/es stand their ground. Rat Ogres also generally use claw attacks, but some are able to use clubs and chains as weapons.
SShhaappee--CChhaannggeerr
Shape-Changers are the creation of Morcar; the ability to change into different creatures at a whim has proven effective against the unexpected, which has resulted in their deaths. Shape-Changers are rare because it takes a lot of dark magic to produce them, so in one way you are quite safe not to encounter them pretty soon–but then again?
This monster is a Shape-Changer and is currently in the shape of the Evil Wizard’s choice. Every time it is killed, shuffle all the monster cards and then take the top card. This is now the new form it has adopted; place the new monster figure in the space where the Shape-Changer was killed. If, however, the new monster card matches its current form, the Shape-Changer, is permanently killed.
SSkkaavveenn WWaarrrriioorr
This race of cruel and evil Chaos Ratmen live deep below the World in an uncharted night realm. They occasionally come to higher passages, or even the surface world, in search of slaves or conquest. To the Skaven, life has no value, and neither does bravery, honour, forgiveness or mercy.
Skaven Warriors are armed with Slings; slings allow you to roll one combat die in attack. Slings are ranged weapons and cannot be fired at targets in the next square. They can be fired at any targets further away. Slings are specialist weapons, which may not be used by any Heroes.

SSoorrrr--KKaallii
Sorr-Kali has long been a thorn in the empire’s neck–so to speak, throughout the empire; Sorr-Kali has been building an Undead army to rival that of the empire’s forces for a massive battle to control its eastern realms. Sorr-Kali has a special ability granted by Morcar to raise the dead and the newly killed to turn them into Undead for this purpose. Sorr-Kali shows no mercy in battle, for his bloodlust is forever wanting. Sorr-Kali has the ‘Fire of Wrath’, ‘Ball of Flame and ‘Courage’ Fire spells and ‘Heal Body’, ‘Rock Skin’ and ‘Pass Through Rock’ Earth spells at his command. Also, choose one ‘Fire’ and “Earth’ spell from the 1st level elements to make eight in total. The Talisman of Raise Dead turns any character that has just died into zombies under Sorr-Kali’s command. The Vestment of Chaos gives Sorr-Kali one extra combat die in attack and defence.
TThhee FFoorrggootttteenn LLeeggiioonn
The Forgotten Legion is the elite army of the Witch Lord; they are the most feared warriors of Chaos after the Doom Guard. This Legion is under the command of Skulmar, promoted from captain to general of the Dead Host. Under the Black Banner of Death and Chaos, General Skulmar has led the Forgotten Legion to victory after victory. The very word ‘The Forgotten Legion’ sends shivers down the spines of the fearful, even to whisper their name could bring death and destruction.
WWhhiittee SSeeeerr
The White Seer is an albino Skaven Wizard with wild and unpredictable sorcerous powers derived from eating refined Warpstone. The White Seer can cast six level 1 Chaos spells, of the Evil Wizard’s choice. Also at the beginning of the Evil Wizard’s turn, the White Seer may take one spell at random from an Elf, Wizard or any other spell-caster in clear line of sight. He may use that spell immediately or save it for later use. With this in mind, the White Seer is able also to cast higher-level spells as well.
Death Mist
Death Mist
Death Reaper
Death Reaper
Erongil Corpsemaster
Fellmarg
Grey Seer
Ice Gargoyle
Kaozz
Move 6 Squares Attack Special Ability Defend Special Ability
Body 1 Point Mind 1 Point
The Mist cannot be attacked and it may only be destroyed by a “Tempest’
spell or by the Spirit Blade.
It may attack characters by moving through them and causing one body
point of damage. It may also move through several characters in one move, but cannot end its turn on the same square as
another character.
Move 8 Squares Attack 3 Dice Defend 3 Dice Body 1 Point Mind 1 Point
Any Hero hit by a Death Reaper risks being frozen. Roll one combat die;
if you roll a black shield, you are frozen. At the start of your turn, roll one combat die again, if you roll a white shield you have thawed out and are
free to move once more. When frozen you cannot attack or defend, but you can be attacked by other characters and monsters. In addition, the only
weapon that can kill a Death Reaper is the ‘Sword of Zalmir’.
Move 4 Squares Attack 2 Dice or Cast Spells
Defend 6 Dice Body 4 Points Mind 6 Points Spells: ‘Chaos’
Move 7 Squares Attack 3 Dice Defend 3 Dice Body 6 Points Mind 4 Points
Move 5 Squares Attack 3 Dice or Cast Spells
Defend 3 Dice Body 3 Points Mind 7 Points Spells ‘Skaven’
Move 6 Squares Attack 6 Dice Defend 5 Dice Body 6 Points Mind 4 Points
Move 8 Squares Attack 4 Dice or Cast Spells
Defend 4 Dice Body 3 Points Mind 7 Points Spells: ‘Fire’
Kaozz
Mindless Servant
Rat Ogre
Shape-Changer
Shape-Changer
Skaven Warrior
Sorr-Kali
The Forgotten Legion
White Seer
Each time a spell is cast against Kaozz, roll two combat dice. If
Kaozz rolls a shield on either dice, the spell does not affect him.
Kaozz has a six ‘Fire’ Elemental spells chosen from the 1st level.
Kaozz also has a bottle of a magical green liquid, which he can drink,
instead of attacking, at any time. Drinking this allows him to recover
three Body points.
Move 5 Squares Attack 2 Dice Defend 3 Dice Body 1 Point
Mind 0 Points
Move 8 Squares Attack 3 Dice Defend 3 Dice Body 1 Point Mind 1 Point
Move Various Attack Various Defend Various Body Various Mind Various
This monster is a Shape-Changer and is currently in the shape of the Evil Wizard’s choice. Every time it is killed, shuffle all the monster cards and then take the top card. This is now the new form it has adopted. Place the new monster figure in the space where the Shape-Changer was killed. If, however, the new monster card matches its current form, the Shape-Changer, is permanently killed.
Move 12 Squares Attack 2*/1** Dice
Defend 2 Dice Body 1 Point Mind 1 Point
*2 against adjacent targets **1 against non-adjacent targets
Move 8 Squares Attack 3 Dice or Cast Spells
Defend 3 Dice Body 3 Points Mind 7 Points
Spells: ‘Elemental’
Move 5 Squares Attack 3 Dice Defend 3 Dice Body 1 Point Mind 1 Point
Move 6 Squares Attack 3 Dice or Cast Spells
Defend 3 Dice Body 4 Points Mind 6 Points Spells ‘Chaos’
Special Ability: Steal Spells
White Seer
Move 6 Squares Attack 3 Dice or Cast Spells
Defend 3 Dice Body 4 Points Mind 6 Points Spells ‘Skaven’
Special Ability: Steal Spells
The Enchanter can use the same spell twice.
The Enchanter can use the same spell twice.
Death Frenzy A dark cloud appears over the chosen Monster, and as it inhales its fumes, the monster becomes unnaturally murderous and violent, attacking savagely the nearest Hero within its line of sight. The Monster gains two extra combat dice in attack. The spell lasts until the monster cannot see any Heroes and or it dies.
Pestilent Breath A poisonous attack in which the Grey Seer’s breath turns venomous and huge green cloud comes out of his mouth, hurting or killing any Hero that inhales it, if the Grey Seer is standing at least one square away or closer from his victim. The Victim must roll a 1D6 to determine how many Body points he/she loses.
Plague This mini-plague can only be cast in a room and it affects all the Heroes within; all Heroes suffer two Body points of damage.
Putrefy This spell when cast on a Hero in line of sight of the Grey Seer, will freeze and can do nothing for two turns. While frozen the Hero cannot Attack or Defend; but the Hero can be attacked and can die.
Skitterleap The Grey Seer can teleport any monster in line of sight, even himself to any place on the game board, even places not searched by the Heroes.
Summon Skaven Warriors
The Grey Seer can summon Skaven Warriors to his side to attack any Heroes. Roll a 1d6 to determine how many are summoned: 1-2 = Two Skaven Warriors. 3-4 = Three Skaven Warriors. 5-6 = Four Skaven Warriors.
Warp Lightning This is a magic missile type energy that can summon green warp lightning; it is directed at any Hero in line of sight of the Grey Seer and causes four Body points of damage.
Warp Power This spell can be cast on any monster, even on the Grey Seer himself and will heal up to three Body points that have been lost.
Skaven Spell
Summon Undead
Ball of Flame
Courage
Fire of Wrath
Heal Body
Pass Through Rock
Rock Skin
This spell conjures up a group of Undead to protect and surround Erongil Corpsemaster. Roll a 1D6, 1 4 Skeletons, 2-3 3 Skeletons & 2 Zombies, 4-5 3 Zombies & 2 Ghouls, 6 3 Ghouls & 2 mummies.
This spell may be cast on a hero or monster; it will inflict 2 body points of damage. The victim may roll 2 dice, for each shield he/she rolls this will reduce the damage by 1.
This spell may be cast on any monster, creature or yourself. Who will then be able to throw 2 extra combat dice each time the monster or creature attacks. The spell is broken when there are no more heroes visible by the monster or creature.
This spell may be cast on any hero or monster anywhere on the board; it will seek out your enemy and inflict 1 body point of damage, unless your opponent can roll a shield on 1 combat die.
This spell may be cast on any monster, creature or yourself; it will restore up to 4 lost body points.
This spell may be cast on any monster, creature, or yourself; that monster or creature may then move through walls when it next moves. The monster or creature may move through as many walls as movement will allow.
Special Character Spell Special Character Spell
This spell may be cast on any monster, creature or yourself; that monster or creature may throw 2 extra combat dice in defence, until the spell is broken. The spell is broken when that monster or creature suffers any body damage.
Heroes
I guess when all is said and done one must address the strengths and weaknesses of your enemy my fair Apprentice. There is a saying ‘Know your enemy’ and this is one of those times where this is true. Before you is information about a new kind of Hero known as a Troll Slayer, damn! I really hate Dwarves, annoying little things.
TTrroollll SSllaayyeerr BBaacckkggrroouunndd
TTrroollll SSllaayyeerrss iinn DDwwaarrvveenn SSoocciieettyy
Dwarfs are very proud individuals and do not cope easily with failure and personal loss. More often than not due to family tragedies, unkempt promises, or cowardly behaviour a Dwarf could loose all sense of purpose and take the binding vows of the Slayer Cult. By becoming a Troll Slayer, a Dwarf agrees to abandon all earthly values and battle powerful (and usually large) opponents in order to find an honourable death at the hands of a worthy foe. Some Troll Slayers dye their hair orange and stiffen it so that it sticks out at alarming angles, giving them a frightening appearance indeed. They are exceptional warriors, for although they seek death, Dwarfs are incapable of deliberately fighting to loose so always enter the fray to win.
Thus these young Dwarves, who have been disgraced, crossed in love, or in some other way humiliated, or his clan disowns him and the only redemption is an honourable death against overwhelming odds. Such acts might include, but would not be limited to, failing on watch at an outpost (allowing a murderous enemy to slip through undetected), committing a serious crime (burglary, murder, etc.) against one's own clan, and continued cowardly acts when faced with an enemy of the clan. Shamed in the eyes of Grungni and the clan's ancestors, dishonoured Dwarves join the ancient cult of Throrin the Slayer.
A Slayer will never discuss his dark secret -- about which it is neither polite nor wise to inquire -- but will attempt to atone for his past by following the path of the Troll Slayer, determined to meet his end in heroic battle against a powerful opponent. Indeed, the irony of an accomplished Troll Slayer is that he is, in a manner of speaking, unsuccessful at accomplishing his ultimate goal.
In some cases, new Troll Slayers leave their clan to wander to embattled and besieged Dwarfholds. There they redeem themselves by joining other Troll Slayers to form battle units for the hold's army (such as the Troll Slayer warrior castes of Karaz-a-Karak). Most, however, wander alone or with groups of adventurers seeking honour by hunting the most ferocious of beasts. The prey of choice–naturally, are Trolls due to the near certainty of death for the Dwarf. Of course, Troll Slayers would never pass up combat with other foes, especially when the odds are greater than seven to one.
As exiles from their clan, Troll Slayers suffer from periodic bouts of severe depression. The result is a tendency for Troll Slayers to indulge in frequent bouts of overeating, fasting, alcohol and stimulants. They also spend a great deal of time boasting of their exploits and showing off their numerous scars. Troll Slayers wear exotic jewellery such as earrings and nose plugs. Inquiries into their past (especially regarding the circumstance that brought them to Slaying) usually result in an uncontrollable rage which could erupt into a bloodlust.
Dwarves, even those who live in Human settlements instead of the mountain Dwarfholds, respect the clanless Troll Slayers' drive to redeem their honour. In contrast, Troll Slayers avoid other Dwarves; it reminds them too much of their clanless state, their disgrace and dishonour. Dwarven adventurers and Troll Slayers interact with a level of deference and will travel together so long as there are others (i.e., Humans) in the group to provide some separation between the two types of Dwarves. After all, wherever Dwarven adventurers or Troll Slayers travel, danger is sure to rear its head.
Should a Troll Slayer have the misfortune of surviving combat, they may become a Giant Slayer (Slaying Giants, giant monsters and or creatures). At this point, the Giant Slayer may journey into the Dwarfholds to join combat units of like Dwarves (such as the Giant Slayer warrior castes of Karaz-a-Karak), but many continue their quest, alone or with groups of adventurers. Unable to meet a dignified death, the now Giant Slayer's shame is increased. They suffer more mood swings, bouts of depression and melancholy than Troll Slayers. This makes the Giant Slayer more vulnerable to dependency upon alcohol and stimulants.
Giant Slayers have set their sights on larger, more dangerous prey. Hence, their appellation; of course, these clanless Dwarves never pass up an opportunity to find a death against overwhelming odds that would redeem their honour and reputation. Dwarves in this career rarely survive their death quest. Survivors find that their tenuous hold on sanity is now stretched beyond their ability to cope.
EEqquuiippmmeenntt
The Troll Slayer may use any close combat weapon and wear any body armour (no Shields, no Helms and no Plate Armour) that does not decrease his efficacy that would cramp his extravagant battle style. No bows, crossbows or gunfire weapons maybe used, only thrown ranged weapons.
TTrroollll SSllaayyeerrss aass MMeerrcceennaarriieess
A Troll Slayer will offer his services to a Dwarf Hero only; if the Hero declines this offer of service, the Troll Slayer will add this further insult to his catalogue of suffering, pick up his axe and head off once more in search of his destiny. A Dwarf Troll Slayer must be paid 100 gold coins in advance per Quest Adventure, and will not leave any gold or equipment to any Heroes in his will.
Due to the Troll Slayer's near-suicidal nature, if a Troll Slayer dies due to a blow received from a Troll or a more powerful monster in hand-to-hand combat, he has died an honourable death and therefore the Troll Slayer's Dwarven Hero can at least have this small bittersweet consolation. Special Note: A player can become a Troll Slayer Mercenary and can hire himself out to a Dwarf if he wishes, instead of becoming a Hero himself to play in the game. If this is the case the Troll Slayer Mercenary must obey the Dwarf’s (Player’s) commands (Within reason, within the game, the Evil Wizard must monitor this and can override the Dwarf’s commands to made new ones for the troll Slayer to follow to progress the Quest adventure).
SSttaattiissttiiccss
This is self-explanatory; this section denotes a hero’s stats at the beginning of a quest adventure; but these will obviously change if a campaign of more than one quest/level adventure is being planned for.
SSttaattuuss
This section denotes a hero’s level after completing a three-level quest adventure. So if a campaign is being planned, for every three-level quest adventure that is completed a hero is promoted.
If there is denoted ‘Level 1’ and ‘Level 2’, for example: when Kili Thekkrsson reaches Legend status, he has to complete another three-level quest adventure to gain/access its ‘Level 1’ Personal Skills; but his status is still Legend if Kili Thekkrsson does not gain/complete ‘Level 1’.
PPeerrssoonnaall SSkkiillllss
This section denotes a hero's Personal Skills that he/she gains/obtains when a Status level has been reached. The hero can use his/her Personal Skills from previous levels including the current one within the quest adventure as described.
GGoolldd
This section denotes a heroes gold that he/she receives after completing a quest level; for example in a three-level quest adventure the Amazon will receive 5 gold coins for each level, thus 15 gold coins will be gained at the end of a quest adventure.
Remember: the gold coins gained at the end of the quest level can be spent as the hero wishes along with any other gold coins found.
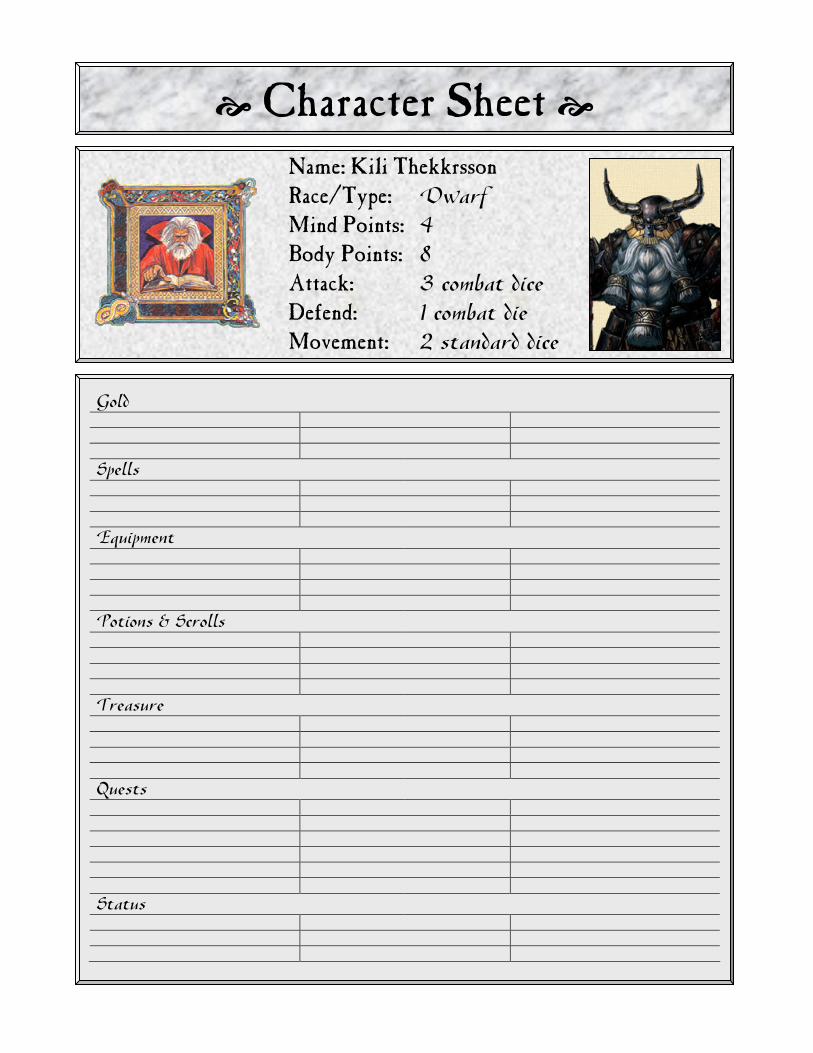
CChhaarraacctteerr SShheeeett
This is self-explanatory; the Character Sheet maybe photocopied and given to each hero to record their progress within a quest adventure.
CChhaarraacctteerr CCaarrddss
This is self-explanatory; give the player a Character Card-of Kili Thekkrsson.
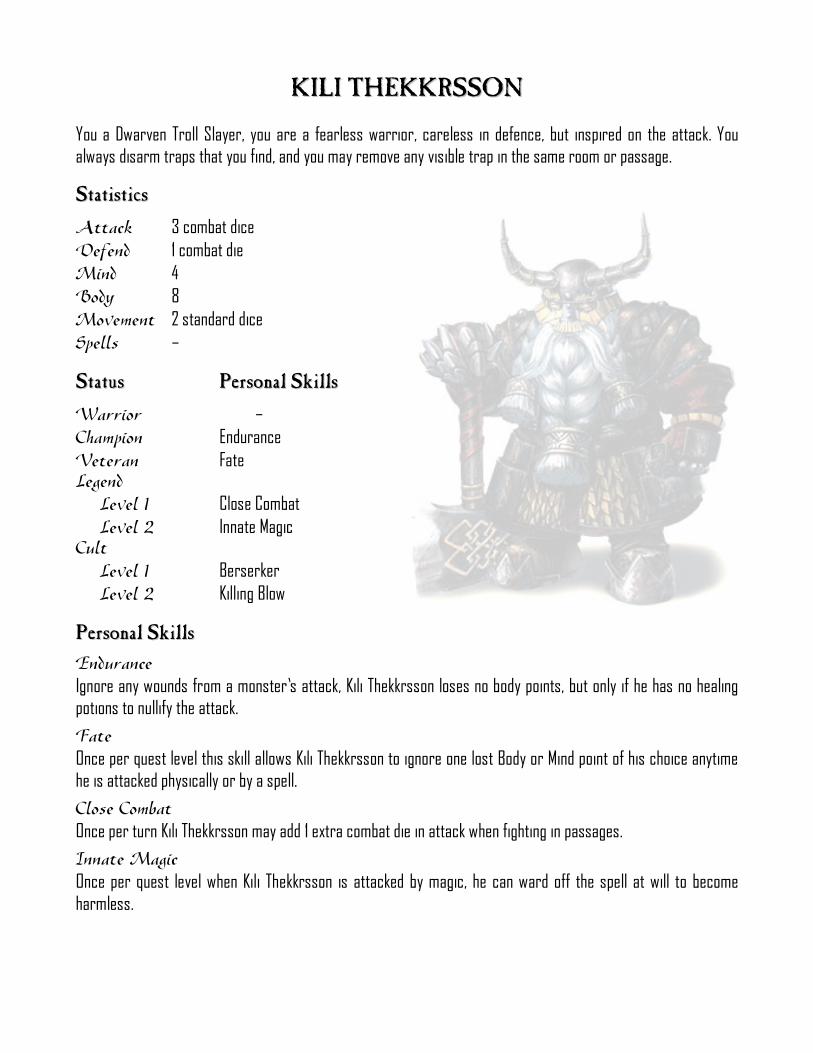
KKIILLII TTHHEEKKKKRRSSSSOONN
You a Dwarven Troll Slayer, you are a fearless warrior, careless in defence, but inspired on the attack. You always disarm traps that you find, and you may remove any visible trap in the same room or passage.
SSttaattiissttiiccss
Attack 3 combat dice
Defend 1 combat die
Mind 4 Body 8 Movement 2 standard dice Spells –
SSttaattuuss PPeerrssoonnaall SSkkiillllss
Warrior –
Champion Endurance
Veteran Fate Legend Level 1 Close Combat Level 2 Innate Magic Cult Level 1 Berserker Level 2 Killing Blow
PPeerrssoonnaall SSkkiillllss
Endurance Ignore any wounds from a monster’s attack, Kili Thekkrsson loses no body points, but only if he has no healing potions to nullify the attack.
Fate Once per quest level this skill allows Kili Thekkrsson to ignore one lost Body or Mind point of his choice anytime he is attacked physically or by a spell.
Close Combat Once per turn Kili Thekkrsson may add 1 extra combat die in attack when fighting in passages.
Innate Magic Once per quest level when Kili Thekkrsson is attacked by magic, he can ward off the spell at will to become harmless.
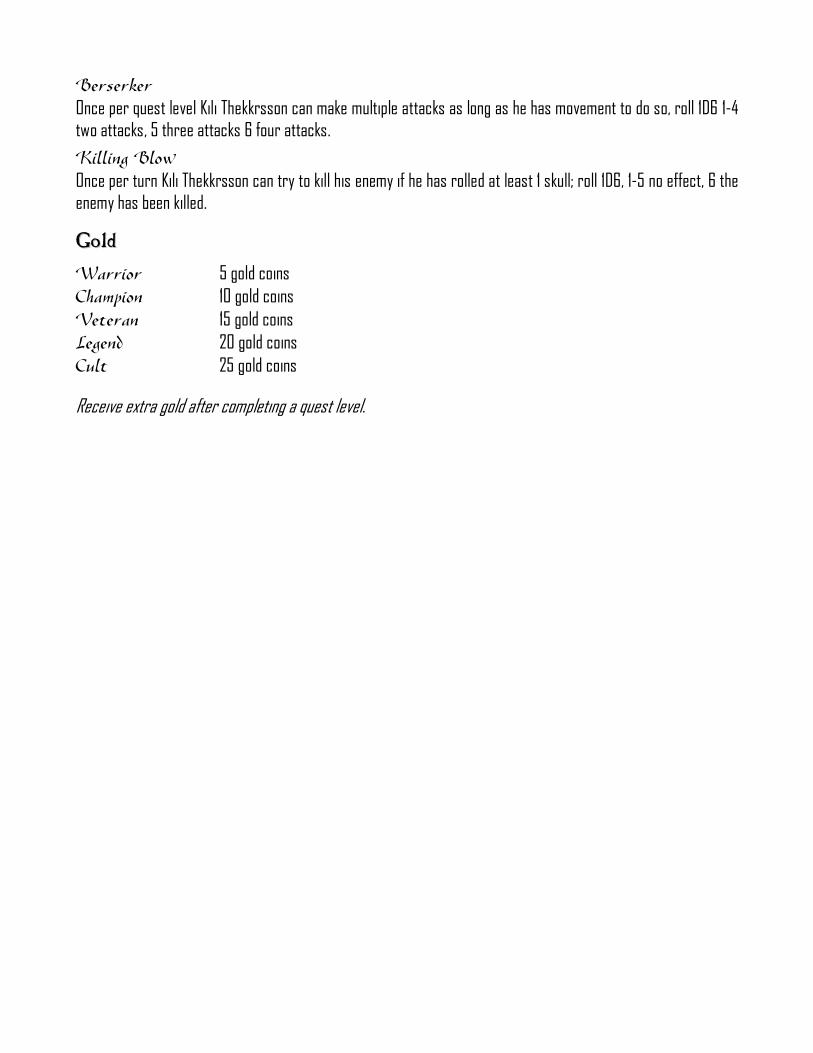
Berserker Once per quest level Kili Thekkrsson can make multiple attacks as long as he has movement to do so, roll 1D6 1-4 two attacks, 5 three attacks 6 four attacks.
Killing Blow Once per turn Kili Thekkrsson can try to kill his enemy if he has rolled at least 1 skull; roll 1D6, 1-5 no effect, 6 the enemy has been killed.
GGoolldd
Warrior 5 gold coins Champion 10 gold coins
Veteran 15 gold coins
Legend 20 gold coins Cult 25 gold coins
Receive extra gold after completing a quest level.
� Character Sheet �
Name: Kili Thekkrsson
Race/Type: Dwarf
Mind Points: 4
Body Points: 8
Attack: 3 combat dice
Defend: 1 combat die 2
Movement: 2 standard dice
Gold
Spells
Equipment
Potions & Scrolls
Treasure
Quests
Status

� Troll Slayer�
Attack. throw 3 Combat dice
Defend. throw 1 Combat dice
Move. throw 2 Standard dice
Mind 4 Points Body 8 Points
You a Dwarven Troll Slayer, you are a fearless warrior, careless in defence, but inspired on the attack. You always disarm traps that you find, and you may remove any visible trap in the same room or passage.
Attack. throw 3 Combat dice
Defend. throw 1 Combat dice
Move. throw 2 Standard dice
Mind 4 Points Body 8 Points
� Troll Slayer �
Allies &
Special Characters
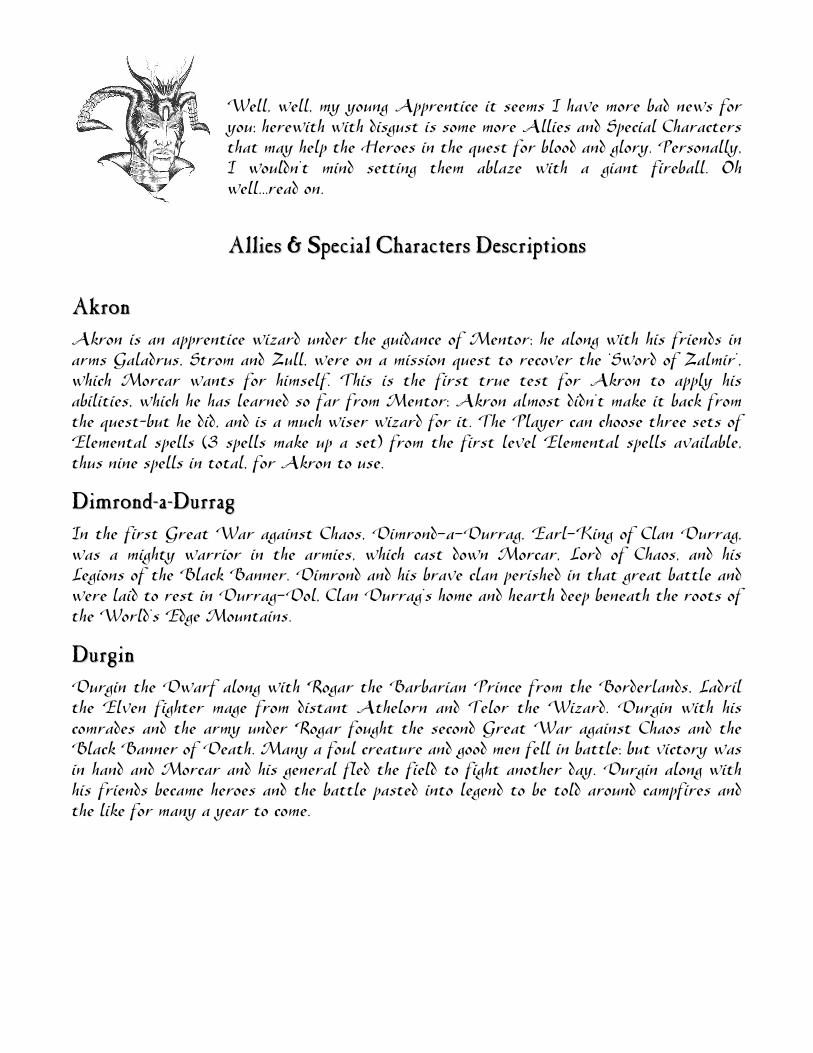
Well, well, my young Apprentice it seems I have more bad news for you; herewith with disgust is some more Allies and Special Characters that may help the Heroes in the quest for blood and glory. Personally, I wouldn’t mind setting them ablaze with a giant fireball. Oh well…read on.
AAlllliieess && SSppeecciiaall CChhaarraacctteerrss DDeessccrriippttiioonnss
AAkkrroonn
Akron is an apprentice wizard under the guidance of Mentor; he along with his friends in arms Galadrus, Strom and Zull, were on a mission quest to recover the ‘Sword of Zalmir’, which Morcar wants for himself. This is the first true test for Akron to apply his abilities, which he has learned so far from Mentor; Akron almost didn’t make it back from the quest–but he did, and is a much wiser wizard for it. The Player can choose three sets of Elemental spells (3 spells make up a set) from the first level Elemental spells available, thus nine spells in total, for Akron to use.
DDiimmrroonndd--aa--DDuurrrraagg
In the first Great War against Chaos, Dimrond-a-Durrag, Earl-King of Clan Durrag, was a mighty warrior in the armies, which cast down Morcar, Lord of Chaos, and his Legions of the Black Banner. Dimrond and his brave clan perished in that great battle and were laid to rest in Durrag-Dol, Clan Durrag’s home and hearth deep beneath the roots of the World’s Edge Mountains.
DDuurrggiinn
Durgin the Dwarf along with Rogar the Barbarian Prince from the Borderlands, Ladril the Elven fighter mage from distant Athelorn and Telor the Wizard. Durgin with his comrades and the army under Rogar fought the second Great War against Chaos and the Black Banner of Death. Many a foul creature and good men fell in battle; but victory was in hand and Morcar and his general fled the field to fight another day. Durgin along with his friends became heroes and the battle pasted into legend to be told around campfires and the like for many a year to come.
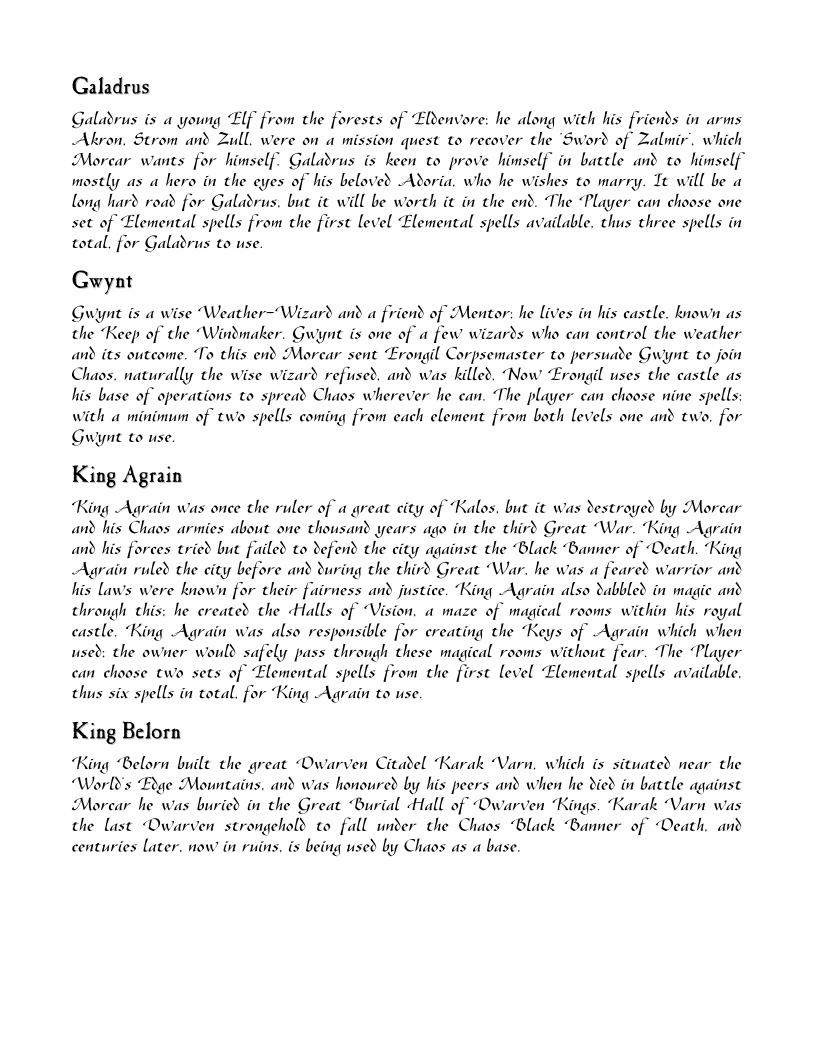
GGaallaaddrruuss
Galadrus is a young Elf from the forests of Eldenvore; he along with his friends in arms Akron, Strom and Zull, were on a mission quest to recover the ‘Sword of Zalmir’, which Morcar wants for himself. Galadrus is keen to prove himself in battle and to himself mostly as a hero in the eyes of his beloved Adoria, who he wishes to marry. It will be a long hard road for Galadrus, but it will be worth it in the end. The Player can choose one set of Elemental spells from the first level Elemental spells available, thus three spells in total, for Galadrus to use.
GGwwyynntt
Gwynt is a wise Weather-Wizard and a friend of Mentor; he lives in his castle, known as the Keep of the Windmaker. Gwynt is one of a few wizards who can control the weather and its outcome. To this end Morcar sent Erongil Corpsemaster to persuade Gwynt to join Chaos, naturally the wise wizard refused, and was killed, Now Erongil uses the castle as his base of operations to spread Chaos wherever he can. The player can choose nine spells; with a minimum of two spells coming from each element from both levels one and two, for Gwynt to use.
KKiinngg AAggrraaiinn
King Agrain was once the ruler of a great city of Kalos, but it was destroyed by Morcar and his Chaos armies about one thousand years ago in the third Great War. King Agrain and his forces tried but failed to defend the city against the Black Banner of Death. King Agrain ruled the city before and during the third Great War, he was a feared warrior and his laws were known for their fairness and justice. King Agrain also dabbled in magic and through this; he created the Halls of Vision, a maze of magical rooms within his royal castle. King Agrain was also responsible for creating the Keys of Agrain which when used; the owner would safely pass through these magical rooms without fear. The Player can choose two sets of Elemental spells from the first level Elemental spells available, thus six spells in total, for King Agrain to use.
KKiinngg BBeelloorrnn
King Belorn built the great Dwarven Citadel Karak Varn, which is situated near the World’s Edge Mountains, and was honoured by his peers and when he died in battle against Morcar he was buried in the Great Burial Hall of Dwarven Kings. Karak Varn was the last Dwarven strongehold to fall under the Chaos Black Banner of Death, and centuries later, now in ruins, is being used by Chaos as a base.
KKiinngg GGaarriinn
In the dying days of the third Great War, King Garin who succeeded King Belorn briefly, helped to defend and protect the city of Karak Varn. However, this was not to last, the city was breached and the last dwarven pockets were being mopped up by the Chaos army. King Garin and what remained of his forces died to the last man in defending the Halls of Karak Varn.
KKiinngg HHoollggaarr
King Holgar was the last great Dwarven king of Karak Varn, with the news that the city was taken, and King Garin dead, he marched his remaining dwarven army to Karak Varn. However, as the army neared its goal, they were ambushed. King Holgar made his last stand at Keloth’s Hill, but he and his army all died in an onslaught of fiery magical arrows unleashed by Morcar’s Death Archers.
LLaaddrriill
Ladril the Elven fighter mage from distant Athelorn along with Rogar the Barbarian Prince from the Borderlands, Durgin the Dwarf and Telor the Wizard. Ladril joined Rogar’s army along with his comrades and under Rogar fought the second Great War against Chaos, The Black Host under their Black Banner of Death. With Ladril’s keen eyesight, Rogar was able to lay an ambush against the Black Host, which turned the tide of battle in Rogar’s favour. Many a foul creature and good men fell in battle though, but victory was in hand and Morcar and his general fled the field to fight another day. The Player can choose one set of Elemental spells from the first level Elemental spells available, thus three spells in total, for Ladril to use.
PPiieerrrree CChhaanncciieerr
Those who fell battling the forces of Chaos in the mountains bordering the Empire and the western land of Bretonnia are celebrated with a memorial service at the tombs, known as the Tombs of the Phalanx, each year. Pierre Chancier was one of many mourners who travelled to the tombs to pay homage. However, a band of Ogres attacked the pilgrims on their way to the tombs; Pierre was the only survivor, he has sworn revenge, and is now known as an Ogre killer.
SSttrroomm
Strom the Courageous, as the Dwarf is known, hates evil in all it’s forms, and personally wants Morcar’s head on a silver platter; he along with his friends in arms Galadrus, Akron and Zull, were on a mission quest to recover the ‘Sword of Zalmir’, which Morcar wants for himself. Strom has a very personal score to settle with the Lord of Chaos, as Morcar was responsible for killing Strom’s family; it is a blood debt that must be paid so Strom’s family can rest their spirits in peace.
TTeelloorr
Telor the wizard, along with Rogar the Barbarian Prince from the Borderlands, Durgin the Dwarf and Ladril the Elven fighter mage from distant Athelorn. Telor joined Rogar’s army along with his comrades and under Rogar fought the second Great War against Chaos, The Black Host under their Black Banner of Death. During the battle that followed, Telor was able to save Rogar’s life as he had done so many times before. Many a foul creature and good men fell under the sword, as victory was in hand with Chaos losses in great number Morcar and his general fled the field and escaped beyond the Sea of Claws to lick their wounds to fight another day. The Player can choose three sets of Elemental spells (3 spells make up a set) from the first level Elemental spells available, thus nine spells in total, for Telor to use.
ZZuullll
Zull the barbarian, is an excellent warrior, but has a temper at times especially when things get a little heated in battle–with his fellow heroes. Getting along with them can be pain, but Zull is used to that, for he wouldn’t want anyone else covering his back. Zull along with his friends in arms Galadrus, Akron and Strom, were on a mission quest to recover the ‘Sword of Zalmir’, which Morcar wants for himself.

Akron
Dimrond-a-Durrag
Durgin
Galadrus
Gwynt
Gwynt
King Agrain
King Agrain
King Belorn
Move 6 Squares Attack 1 Die or Cast Spells
Defend 2 Dice Body 4 Points Mind 6 Points
Spells ‘Elemental’
Move 6 Squares Attack 2 Dice Defend 2 Dice Body 3 Points Mind 7 Points
Move 6 Squares Attack 2 Dice Defend 2 Dice Body 3 Points Mind 7 Points
Move 8 Squares Attack 2 Dice or Cast Spells
Defend 2 Dice Body 4 Points Mind 6 Points
Spells ‘Elemental’
Move 6 Squares Attack 1 Die or Cast Spells
Defend 2 Dice Body 4 Points Mind 6 Points
Spells: ‘Elemental’
Gwynt the Wise Weather-Wizard knows all the Elemental
spells from the first and second levels.
Choose nine spells; with a minimum of two coming from each element
from both levels one and two.
Move 6 Squares Attack 3 Dice or Cast Spells
Defend 3 Dice Body 4 Points Mind 6 Points
Spells ‘Elemental’
King Agrain knows all level one Elemental spells.
Choose six spells; with a minimum of one coming from each element
from level one.
Move 6 Squares Attack 2 Dice Defend 2 Dice Body 3 Points Mind 7 Points
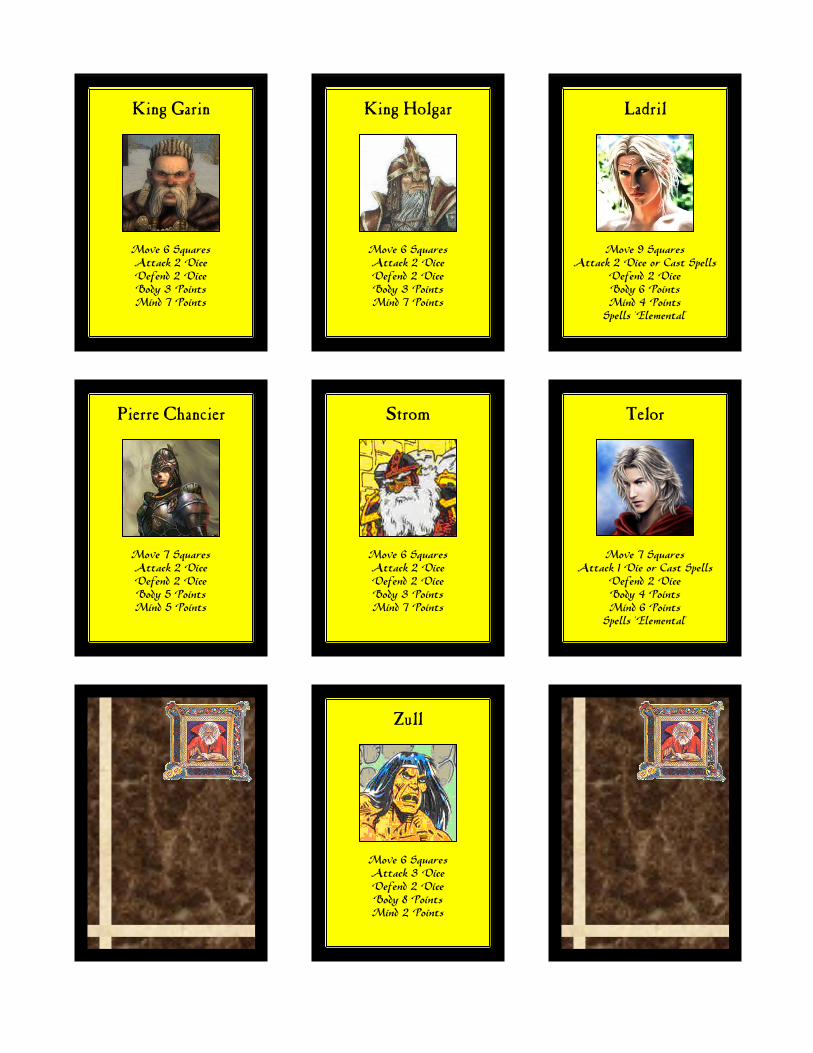
King Garin
King Holgar
Ladril
Pierre Chancier
Strom
Telor
Zull
Move 6 Squares Attack 2 Dice Defend 2 Dice Body 3 Points Mind 7 Points
Move 6 Squares Attack 2 Dice Defend 2 Dice Body 3 Points Mind 7 Points
Move 9 Squares Attack 2 Dice or Cast Spells
Defend 2 Dice Body 6 Points Mind 4 Points
Spells ‘Elemental’
Move 7 Squares Attack 2 Dice Defend 2 Dice Body 5 Points Mind 5 Points
Move 6 Squares Attack 2 Dice Defend 2 Dice Body 3 Points Mind 7 Points
Move 7 Squares Attack 1 Die or Cast Spells
Defend 2 Dice Body 4 Points Mind 6 Points
Spells ‘Elemental’
Move 6 Squares Attack 3 Dice Defend 2 Dice Body 8 Points Mind 2 Points
Appendices
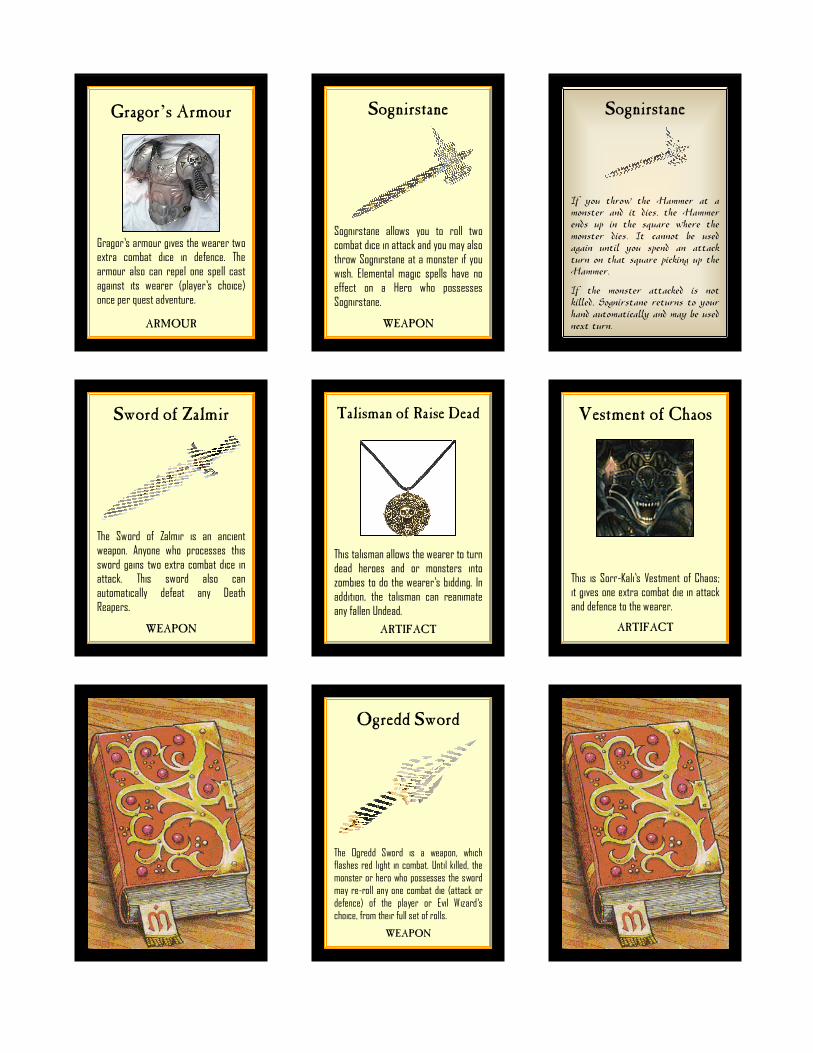
Gragor’s Armour
Sognirstane
Sognirstane
Sword of Zalmir
Talisman of Raise Dead
Vestment of Chaos
Ogredd Sword
Gragor’s armour gives the wearer two extra combat dice in defence. The armour also can repel one spell cast against its wearer (player’s choice) once per quest adventure.
ARMOUR
Sognirstane allows you to roll two combat dice in attack and you may also throw Sognirstane at a monster if you wish. Elemental magic spells have no effect on a Hero who possesses Sognirstane.
WEAPON
If you throw the Hammer at a monster and it dies, the Hammer ends up in the square where the monster dies. It cannot be used again until you spend an attack turn on that square picking up the Hammer.
If the monster attacked is not killed, Sognirstane returns to your hand automatically and may be used next turn.
The Sword of Zalmir is an ancient weapon. Anyone who processes this sword gains two extra combat dice in attack. This sword also can automatically defeat any Death Reapers.
WEAPON
This talisman allows the wearer to turn dead heroes and or monsters into zombies to do the wearer’s bidding. In addition, the talisman can reanimate any fallen Undead.
ARTIFACT
This is Sorr-Kali’s Vestment of Chaos; it gives one extra combat die in attack and defence to the wearer.
ARTIFACT
The Ogredd Sword is a weapon, which flashes red light in combat. Until killed, the monster or hero who possesses the sword may re-roll any one combat die (attack or defence) of the player or Evil Wizard’s choice, from their full set of rolls.
WEAPON
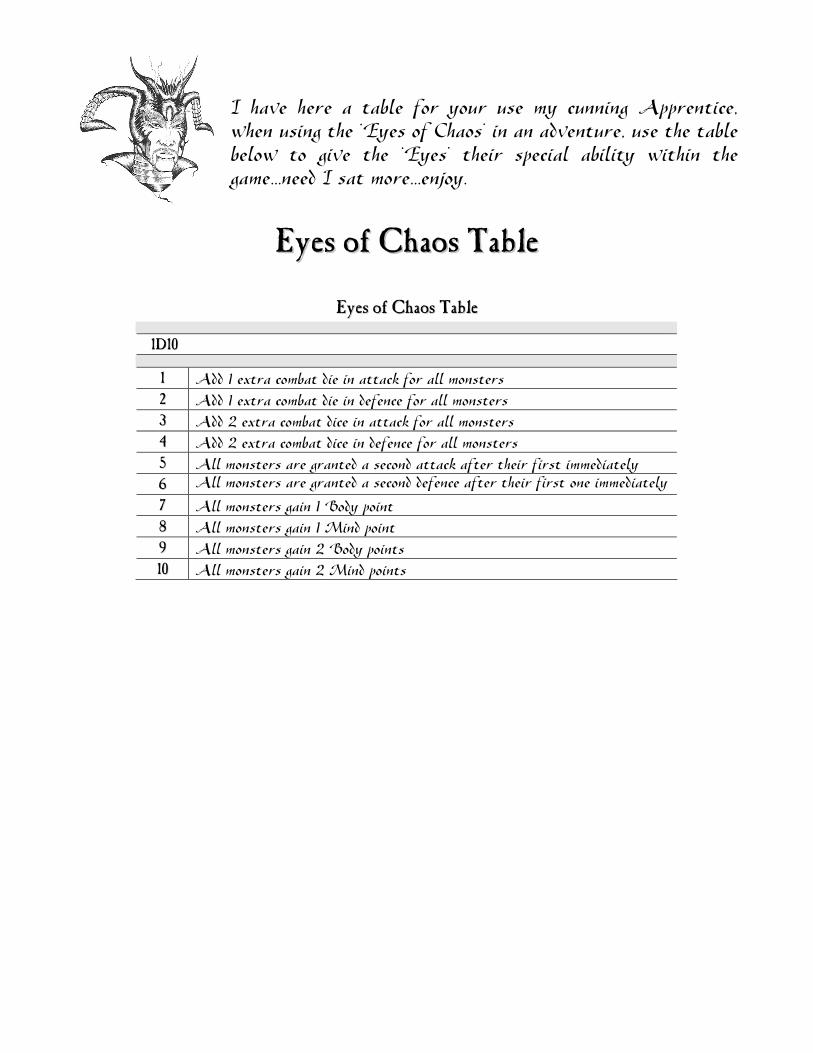
I have here a table for your use my cunning Apprentice, when using the ‘Eyes of Chaos’ in an adventure, use the table below to give the ‘Eyes’ their special ability within the game…need I sat more…enjoy.
EEyyeess ooff CChhaaooss TTaabbllee
EEyyeess ooff CChhaaooss TTaabbllee
11DD1100
11
Add 1 extra combat die in attack for all monsters
22
Add 1 extra combat die in defence for all monsters
33
Add 2 extra combat dice in attack for all monsters
44
Add 2 extra combat dice in defence for all monsters
55
All monsters are granted a second attack after their first immediately
66 All monsters are granted a second defence after their first one immediately
77
All monsters gain 1 Body point
88
All monsters gain 1 Mind point
99
All monsters gain 2 Body points
1100
All monsters gain 2 Mind points

Nam
e Exp
erienc
e W
alk
Offen
ce
Defen
ce
Life
Mind
Mag
ic
Alig
nmen
t Typ
e Que
st
Rev
enge
of th
e W
eath
er-M
an
Death
Reaper
1
20
8
3
3
1
1
No
Evil
Undead
–
Ero
ngil
Corp
sem
aste
r 2
80
4
2
6
3(4
) 4(6
) Y
es
Evil
Chaos
Sorc
ere
r –
Gw
ynt (W
ise W
eath
er-W
izard
) 3
40
6
1
2
4
6
Yes
Good
Hum
an
–
Ice G
arg
oyle
4
50
6
6
5
6
4
No
Evil
Garg
oyle
–
Pos
sess
ions
Spe
cial
Abi
litie
s
1 - N
one
When a
Death
Reaper appears
, th
e a
ir g
oes c
old
aro
und it. A
ny H
ero
hit b
y a
Death
Reaper risks b
ein
g fro
zen. R
oll
one c
om
bat die
; if y
ou roll
a b
lack
shie
ld, you a
re fro
zen. A
t th
e s
tart o
f your
turn
, ro
ll one c
om
bat die
again
, if y
ou r
oll
a w
hite s
hie
ld y
ou h
ave thaw
ed o
ut and a
re fre
e to m
ove o
nce
more
. W
hen fro
zen y
ou c
annot attack o
r defe
nd, but you c
an b
e a
ttacked b
y o
ther chara
cte
rs a
nd m
onste
rs. In
additio
n, th
e o
nly
weapon that can k
ill a
D
eath
Reaper is
the ‘S
word
of Zalm
ir’.
2 –
Chaos S
pells
Magic
Arm
our
Ero
ngil
can c
ast th
ree 1
st le
vel C
haos s
pells
and thre
e 2
nd level C
haos s
pells
, w
hic
h ‘S
um
mon U
ndead’ m
ust be o
ne o
f th
em
. E
rongil
als
o w
ears
m
agic
arm
our, w
hic
h p
rote
cts
him
fro
m a
ny s
pells
cast again
st him
for 1d6 turn
s, w
hen E
rongil
die
s the m
agic
arm
our dis
inte
gra
tes into
bla
ck a
sh a
nd
dust.
3 –
Ele
menta
l S
pells
C
hoose o
ne s
pell
from
the 1
st le
vel of all
four Ele
ments
, and c
hoose o
ne s
pell
from
the 2
nd level of all
four E
lem
ents
, th
us e
ight in
tota
l.
4 –
None
The Ice G
arg
oyle
in im
mune to a
ll spells
except ‘F
ire’. “Fire’ spells
do d
ouble
their n
orm
al dam
age a
gain
st th
is c
reatu
re.
Nam
e Exp
erienc
e W
alk
Offen
ce
Defen
ce
Life
Mind
Mag
ic
Alig
nmen
t Typ
e Que
st
The
Halls of D
urra
g-D
ol
Rat O
gre
20
8
3
3
1
1
No
Evil
Cre
atu
re
–
Skaven W
arrio
r 1
30
12
2
2
1
1
No
Evil
Skaven
–
Tro
ll 30
6
3
4
1
1
No
Evil
Cre
atu
re
–
White S
eer
2
50
6
3
3
4
1(6
) Y
es
Evil
Skaven
–
Pos
sess
ions
Spe
cial
Abi
litie
s
1 - S
ling
Skaven W
arrio
rs a
re a
rmed w
ith S
lings; slin
gs a
llow
you to roll
one c
om
bat die
in a
ttack. Slin
gs a
re ranged w
eapons a
nd c
annot be fired a
t ta
rgets
in the
next square
. They c
an b
e fired a
t any targ
ets
further aw
ay. S
lings a
re s
pecia
list w
eapons, w
hic
h m
ay n
ot be u
sed b
y H
ero
es.
2 –
Chaos S
pells
The W
hite S
eer can c
ast six
level 1 C
haos s
pells
, of th
e E
vil
Wiz
ard
’s c
hoic
e. A
lso a
t th
e b
egin
nin
g o
f th
e E
vil
Wiz
ard
’s turn
, th
e W
hite S
eer m
ay take
one s
pell
at ra
ndom
fro
m a
n E
lf, W
izard
or any o
ther spell-
caste
r in
cle
ar lin
e o
f sig
ht. H
e m
ay u
se that spell
imm
edia
tely
or save it fo
r la
ter use. W
ith this
in
min
d, th
e W
hite S
eer is
able
als
o to c
ast hig
her-le
vel spells
as w
ell.
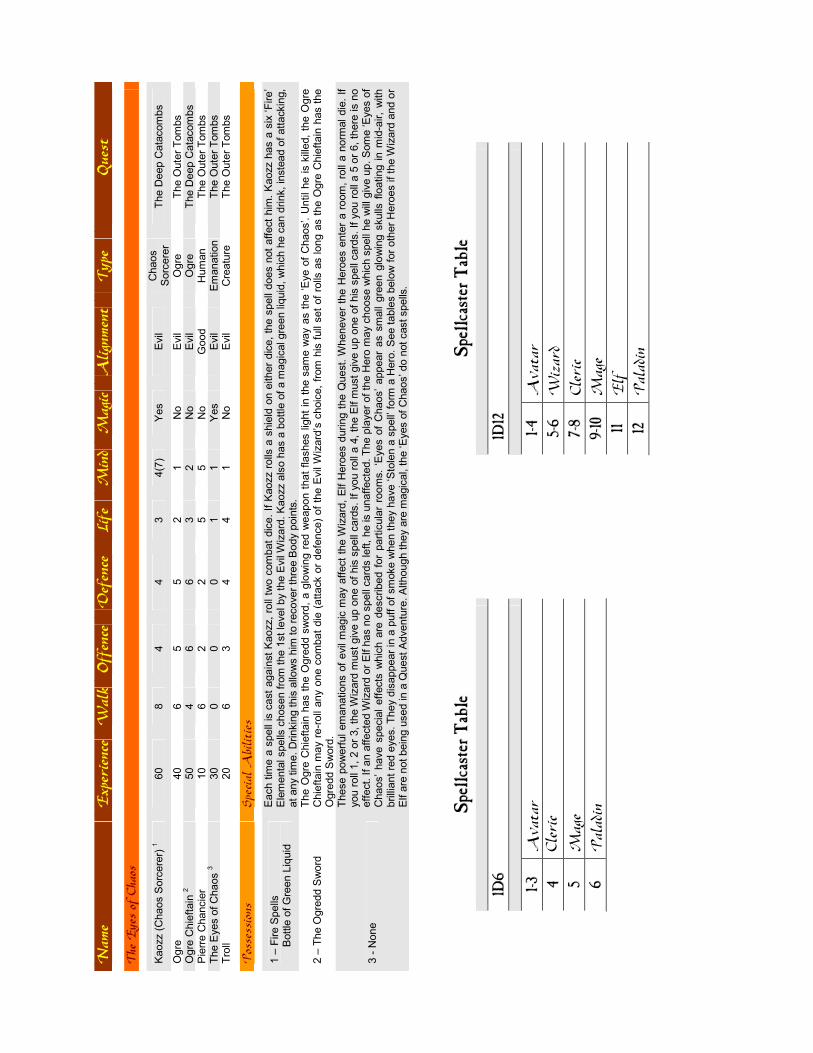
Nam
e Exp
erienc
e W
alk
Offen
ce
Defen
ce
Life
Mind
Mag
ic
Alig
nmen
t Typ
e Que
st
The
Eye
s of
Cha
os
Kaozz (C
haos S
orc
ere
r) 1
60
8
4
4
3
4(7
) Y
es
Evil
Chaos
Sorc
ere
r The D
eep C
ata
com
bs
Ogre
40
6
5
5
2
1
No
Evil
Ogre
The O
ute
r Tom
bs
Ogre
Chie
ftain
2
50
4
6
6
3
2
No
Evil
Ogre
The D
eep C
ata
com
bs
Pie
rre C
hancie
r 10
6
2
2
5
5
No
Good
Hum
an
The O
ute
r Tom
bs
The E
yes o
f C
haos 3
30
0
0
0
1
1
Yes
Evil
Em
anation
The O
ute
r Tom
bs
Tro
ll 20
6
3
4
4
1
No
Evil
Cre
atu
re
The O
ute
r Tom
bs
Pos
sess
ions
Spe
cial
Abi
litie
s
1 –
Fire S
pells
B
ottle
of G
reen L
iquid
Each tim
e a
spell
is c
ast again
st K
aozz, ro
ll tw
o c
om
bat dic
e. If K
aozz rolls
a s
hie
ld o
n e
ither dic
e, th
e s
pell
does n
ot affect him
. K
aozz h
as a
six
‘Fire’
Ele
menta
l spells
chosen fro
m the 1
st le
vel by the E
vil
Wiz
ard
. K
aozz a
lso h
as a
bottle
of a m
agic
al gre
en liq
uid
, w
hic
h h
e c
an d
rink, in
ste
ad o
f attackin
g,
at any tim
e. D
rinkin
g this
allo
ws h
im to recover th
ree B
ody p
oin
ts.
2 –
The O
gre
dd S
word
The O
gre
Chie
ftain
has the O
gre
dd s
word
, a g
low
ing r
ed w
eapon that flashes lig
ht in
the s
am
e w
ay a
s the ‘E
ye o
f C
haos’. U
ntil he is k
illed, th
e O
gre
C
hie
ftain
may r
e-roll
any o
ne c
om
bat die
(attack o
r defe
nce) of th
e E
vil
Wiz
ard
’s c
hoic
e, from
his
full
set of ro
lls a
s long a
s the O
gre
Chie
ftain
has the
Ogre
dd S
word
.
3 - N
one
These p
ow
erful em
anations o
f evil
magic
may a
ffect th
e W
izard
, Elf H
ero
es d
uring the Q
uest. W
henever
the H
ero
es e
nte
r a r
oom
, ro
ll a n
orm
al die
. If
you roll
1, 2 o
r 3, th
e W
izard
must giv
e u
p o
ne o
f his
spell
card
s. If y
ou roll
a 4
, th
e E
lf m
ust giv
e u
p o
ne o
f his
spell
card
s. If y
ou roll
a 5
or 6, th
ere
is n
o
effect. If an a
ffecte
d W
izard
or E
lf h
as n
o s
pell
card
s left, he is u
naffecte
d. The p
layer of th
e H
ero
may c
hoose w
hic
h s
pell
he w
ill g
ive u
p. S
om
e ‘E
yes o
f C
haos’ have s
pecia
l effects
whic
h a
re d
escribed f
or
partic
ula
r ro
om
s.
‘Eyes o
f C
haos’ appear
as s
mall
gre
en g
low
ing s
kulls
flo
ating in m
id-a
ir,
with
brilli
ant re
d e
yes. They d
isappear in
a p
uff o
f sm
oke w
hen they h
ave ‘S
tole
n a
spell’
form
a H
ero
. S
ee table
s b
elo
w for oth
er H
ero
es if th
e W
izard
and o
r E
lf a
re n
ot bein
g u
sed in a
Quest A
dventu
re. A
lthough they a
re m
agic
al, the ‘E
yes o
f C
haos’ do n
ot cast spells
.
SSpp eell llcc aass ttee rr TTaa bbll ee
11DD66
11 --33
Ava
tar
44 Cle
ric
55 M
age
66 P
alad
in
SSpp eell llcc aass ttee rr TTaa bbll ee
11DD11 22
11 --44
Ava
tar
55 --66
Wiz
ard
77 --88
Cle
ric
99 --11 00
Mag
e 11 11
Elf
11 22
Pal
adin

Nam
e Exp
erienc
e W
alk
Offen
ce
Defen
ce
Life
Mind
Mag
ic
Alig
nmen
t Typ
e Que
st
Inn of C
haos
Magic
al Skull
1
40
6
2
2
1
0
Yes
Evil
Em
anation
Upper Flo
or
Sorr-K
ali
(Chaos S
orc
ere
r) 2
50(6
0)
8
3(4
) 3(4
) 3
4(7
) Y
es
Evil
Chaos
Sorc
ere
r U
pper Flo
or
Pos
sess
ions
Spe
cial
Abi
litie
s
1 - N
one
These M
agic
al
Skulls
are
an e
manation f
rom
anoth
er
dim
ensio
n,
but
do n
ot
cast
spells
. These M
agic
al
Skulls
make g
ood g
uard
s i
n p
rote
cting
are
as/room
s that are
im
portant and o
r m
ake g
ood e
arly w
arn
ing s
entrie
s. If found in a
room
they d
o n
ot le
ave it. R
oll
a 1
D6 to found o
ut how
many
are
in the room
and that attack a
ny h
ero
es. W
hen the M
agic
al S
kulls
die
, th
ey just dis
appear in
a p
uff o
f purp
le s
moke.
2 –
Fire &
Earth s
pells
The T
alis
man o
f R
ais
e D
ead
V
estm
ent of C
haos
Sorr-K
ali
has the ‘Fire o
f W
rath
’, ‘B
all
of Fla
me a
nd ‘C
oura
ge’ Fire s
pells
and ‘H
eal B
ody’, ‘R
ock S
kin
’ and ‘P
ass T
hro
ugh R
ock’ E
arth s
pells
at his
com
mand.
Als
o, choose o
ne ‘Fire’ and “
Earth’ spell
from
the 1
st
level ele
ments
to m
ake e
ight
in t
ota
l. T
he E
vil
Wiz
ard
may a
lso c
hoose d
iffe
rent
‘Earth a
nd ‘Fire’ spells
if he w
ishes. The T
alis
man o
f R
ais
e D
ead turn
s a
ny c
hara
cte
r th
at has just die
d into
zom
bie
s u
nder S
orr-K
ali’s c
om
mand. The
Vestm
ent of C
haos g
ives S
orr-K
ali
one e
xtra c
om
bat die
in a
ttack a
nd d
efe
nce.
AAcckknnoowwlleeddggeemmeennttss
Section One: Gaming Aids
Morcar image taken from the following website: www.jrients.tripod.com All Traps pictures and descriptions come from the Heroquest board game and its expansions. The Fiery Chasm, Mystery Chests, The Trapdoor, The Zombie/Undead Lair and The Mystic Cloud pictures and descriptions come from HeroQuest – A Marvel Winter Special. The Lightning Bolt Trap and the Floor Trap pictures come from the Wizards of Morcar, but their descriptions are the author’s own.
Section Two: Monsters & Special Characters
Morcar image taken from the following website: www.jrients.tripod.com
Skaven Background from warhammeronline.wikia.com/wiki/Skaven
Skaven Army List from en.wikipedia.org/wiki/Skaven
Horned Rat – Gnawer of the World, Refining Warpstone and Rat Ogre from www.madalfred.darcore.net/articles/Rattus_Mutatus.rtf
Warpstone from www.elfwood.com
Grey Seer description from http://en.wikipedia.org/wiki/Grey_Seer
Skaven Warrior description from www.freewebs.com/heroquestrevised and White Dwarf 134# ‘The Halls of Durrag-Dol’.
White Seer description from White Dwarf 134# ‘The Halls of Durrag-Dol’.
Monster Card Pictures
All Monster Card Pictures come from the website www.drakonis.org except the following:
Death Mist from ‘Return of the Witch Lord’.
Grey Seer from www.elfwood.com
Rat Ogre and the White Seer from www.lucas.hardi.org
Skaven Warrior from www.warhammervault.ign.com

Skaven Spells
Skaven Spell Descriptions: ‘Death Frenzy’, ‘Pestilent Breath’, ‘Plague’, ‘Skitterleap’ and ‘Warp Lightning’ come from http://en.wikipedia.org/wiki/Grey_Seer
‘Putrefy’ and ‘Warp, Power’ come from wquest.free.fr/warrior_view.php?guerriers_id=203
‘Summon Skaven Warriors’ is the author’s invention.
Skaven Spell Card Back Picture from White Dwarf ‘The Halls of Durrag-Dol’.
Special Character Spell Card Back Picture from the website www.drakonis.org
Section Three: Heroes
Information on Troll Slayer Background comes from the website www.kabay.arc.net.au/trollsla.htm , “Spiked, Tattooed, and Downright Mean A Warhammer Fantasy Roleplay Look at Troll, Giant, Dragon, and Daemon Slayers in Dwarven Society” by Alfred Nunez 1993, User.cs.tu-berlin.de/~rossi/Wfrp/slayers.html
Kili Thekkrsson Picture from www.shadowoflegend.com
Section Four: Allies & Special Characters
Akron, Galadrus, Strom and Zull Pictures are from the comic ‘United We Stand’, from the Marvel Winter Special ‘Heroquest’ magazine.
Dimrond-a-Durrag Picture is from the website www.maps4heroes.com
Durgin Picture is from the website www.freakygaming.com
King Garin Picture is from the website www.guildwars.incgames.com
King Holgar Picture is from the website www.ldsknights.org
Ladril Picture is by HVRHS_Gurl
All other Pictures are from the website www.drakonis.org
Information on the Allies and Special Characters is from the Heroquest expansions including the Heroquest Rulebook, The Hall of Durrag-Dol, The Eyes of Chaos, Revenge of the Weather-Man and everything else made up by the author.

Section Five: Appendices
Gragor’s Armour picture from the website www.thak.ca Sognirstane picture from the website www.christianteenforums.com The Sword of Zalmir picture from the website www.tlcwholesale.com Talisman of Raise Dead picture from the website www.community.sigames.com Vestment of Chaos picture from the website www.drakonis.org Ogredd’s Sword picture from the website www.freewebs.com


![Necromantic Channeller Necromantic Authority Corruption Effects …fantasy.hardpoints.de/downloads/necromancy.pdf · 2003. 12. 28. · Necromancy [Evil] Level: Wizard 3 Components:](https://img.pdfslide.net/doc/110x75/606bd2dc5cf0483329281dfe/necromantic-channeller-necromantic-authority-corruption-effects-2003-12-28.jpg)