Embed Size (px)
Citation preview
The FARRELL BENT WIRE System™
1
PROCEDURES MANUAL
CONTENTS PAGE
Introduction 2
Fabrication 4
Inserting the BWS™ 6
Patient Instructions 8
Check TRAINER Use 9
Adjustment Visits 10
Important 12
Arch Referenes for Auxiliaries 13
Tips When Using The BWS™ 14
Internet References 14
BWS™ Order Form 15
Arch development combined with
simultaneous myofunctional
training in the late mixed or
permanent dentition.
All enquiries to:
MYOFUNCTIONAL RESEARCH CO.PO Box 14 Helensvale Qld 4212 AUSTRALIATel: +61 7 55735 999 Fax: +61 7 55736 [email protected]

2
Introduction
The Farrell BENT WIRE System™ (BWS™) was developed in response to the need for combined myofunctional treatment and arch development. The BWS™ was also designed for use with the TRAINER System™.
Although there are numerous appliances, fixed and removable, that can be used for arch expansion, few are suitable to use with the TRAINER System™.
The Pre-Orthodontic TRAINER™ (T4K™) is effective in obtaining arch development - particularly in the early mixed dentition by correcting tongue position, function and mode of breathing. This can be insufficient, particularly if treatment has not commenced until the late mixed or early permanent dentition with the TRAINER for Alignment™ (T4A™). There is a need to more rapidly and actively expand the maxilla and restore the lower anterior arch form.
A study of the appliances used for this purpose reveals they are mostly detrimental to correct function and encroach on tongue space. This is just one reason why poor results have been documented with arch expansion/non-extraction techniques in the past. Multi-banded appliances are also poor tools in obtaining significant arch development. Extraction of permanent teeth is often, therefore, the only consideration, although research shows the results are actually no more stable.
The TRAINER philosophy is to detect and treat soft tissue dysfunction as the first priority and to align the dentition as a final consideration of underlying myofunctional habits that are the cause of many orthodontic problems. The BWS™ allows arch development and anterior dental alignment to be combined without encroaching on the natural position of the tongue. Therefore the force of the tongue can be used in the treatment allowing the BWS™ to use very light forces.
The additional requirement was being able to easily and cost effectively fabricate the BWS™ in the clinic without the need for laboratory construction, special skills, materials or equipment.
THE BWS™ combines arch development with simultaneous myofunctional training in the late mixed or permanent dentition.
BWS™ PROCEDURES MANUAL
BWS™ - UPPER
The Farrell BENT WIRE System™ (BWS™) was developed in response to the need for combined myofunctional treatment and arch development
BWS™ - LOWER

3
The TRAINER System™ combined with the Farrell BENT WIRE System™ are used for simultaneous arch development and treatment of myofunctional habits. It can totally replace existing Phase I treatment. This dual treatment approach gives substantial arch development with very light forces from a simple and inexpensive fixed appliance.
No palatal bar is needed, eliminating the speech and functional problems of the common acrylic and quad helix appliances. The aesthetic appeal of a completely lingual appliance and no speech problems makes the BWS™ an easy favourite with patients. Because the BWS™ is a fixed appliance, the compliance problems of phase one-type appliances are eliminated. The patient enjoys normal speech and no visible appliance during the day. As the BWS™ can also be integrated with multi-banded appliances, it is a cost effective solution to phase I treatment.
Stability is greatly improved due to the use of the TRAINER to correct tongue position and function, plus mode of breathing. In fact the technique depends on the use of the TRAINER System™ for its effectiveness.
There’s no need for laboratory construction of the BWS™ - it can be performed entirely “in office” without need for a laboratory technician. Each appliance takes less than five minutes to make and the components are inexpensive and readily available. Breakages can be rapidly repaired at the same visit.
The BENT WIRE System™ can be combined with fixed brackets and the T4B™ (TRAINER for BRACES™) or T4CII™ allowing a seamless integration from arch development, class II correction full fixed brackets, while continuing the all important myofunctional training.
Seamless Integration with Multi-banded appliances
BWS™ PROCEDURES MANUAL
MYOBRACE™ STARTER APPLIANCE: REAR
BRYANT FF2
BWS™ AND BRACKETS - UPPER
BWS™ UPPER - FF1
BWS™ LOWER - FF2
T4B™
4
Fabrication
BWS™ PROCEDURES MANUAL
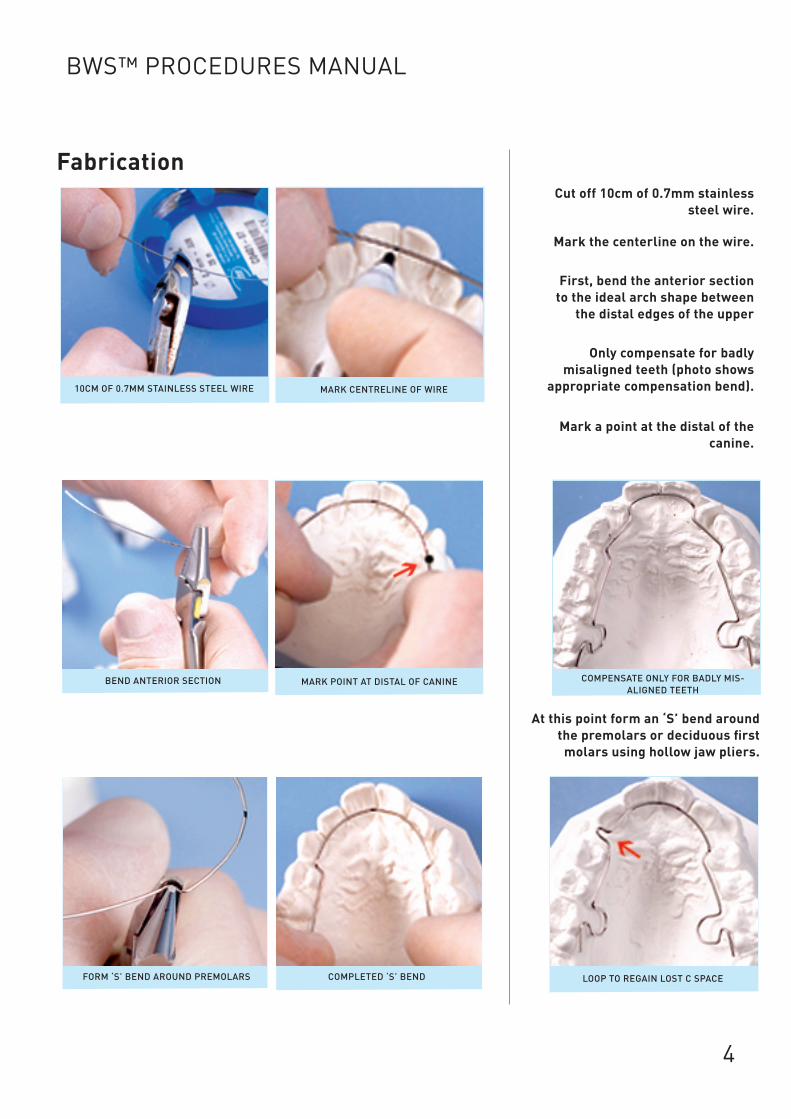
Cut off 10cm of 0.7mm stainless steel wire.
Mark the centerline on the wire.
First, bend the anterior section to the ideal arch shape between
the distal edges of the upper
At this point form an ‘S’ bend around the premolars or deciduous first
molars using hollow jaw pliers.
Mark a point at the distal of the canine.
Only compensate for badly misaligned teeth (photo shows
appropriate compensation bend).
COMPLETED ‘S’ BEND
MARK POINT AT DISTAL OF CANINE
FORM ‘S’ BEND AROUND PREMOLARS
BEND ANTERIOR SECTION
MARK CENTRELINE OF WIRE10CM OF 0.7MM STAINLESS STEEL WIRE
COMPENSATE ONLY FOR BADLY MIS-ALIGNED TEETH
LOOP TO REGAIN LOST C SPACE

5
BWS™ PROCEDURES MANUAL
Cut off the ends exactly to the length of the molar tube - that is
6mm.
The distal end that engages the tube in the molar band should
be stepped up 1-2mm from the mesial part of the loop.
Using three-jaw pliers make a near 90° bend forward, then
using bird-beak pliers create a tight 180°-degree reverse bend back to the distal. This makes a
loop to attach a ligature.
Mark a point 2-3 mm from the top of the distal part of the loop.
All bends should be single plane.
Angle the loop to clear soft tissue - 25° upper, 10° degrees for the
lower.
Using loop-bending pliers, form a loop of 5-7mm wide.
Mark a point between second premolar or second deciduous molar and the first permanent
molar.
MARK BETWEEN SECOND PREMOLAR AND FIRST PERMANENT MOLAR
CUT OFF ENDS TO LENGTH OF MOLAR TUBE - 6MM
COMPLETED BWS-FF1 ON MODEL
ANGLE LOOP TO CLEAR SOFT TISSUE MAKE LOOP TO ATTACH A LIGATURE
FORM LOOP 5-7MM WIDE
6
BWS™ PROCEDURES MANUAL
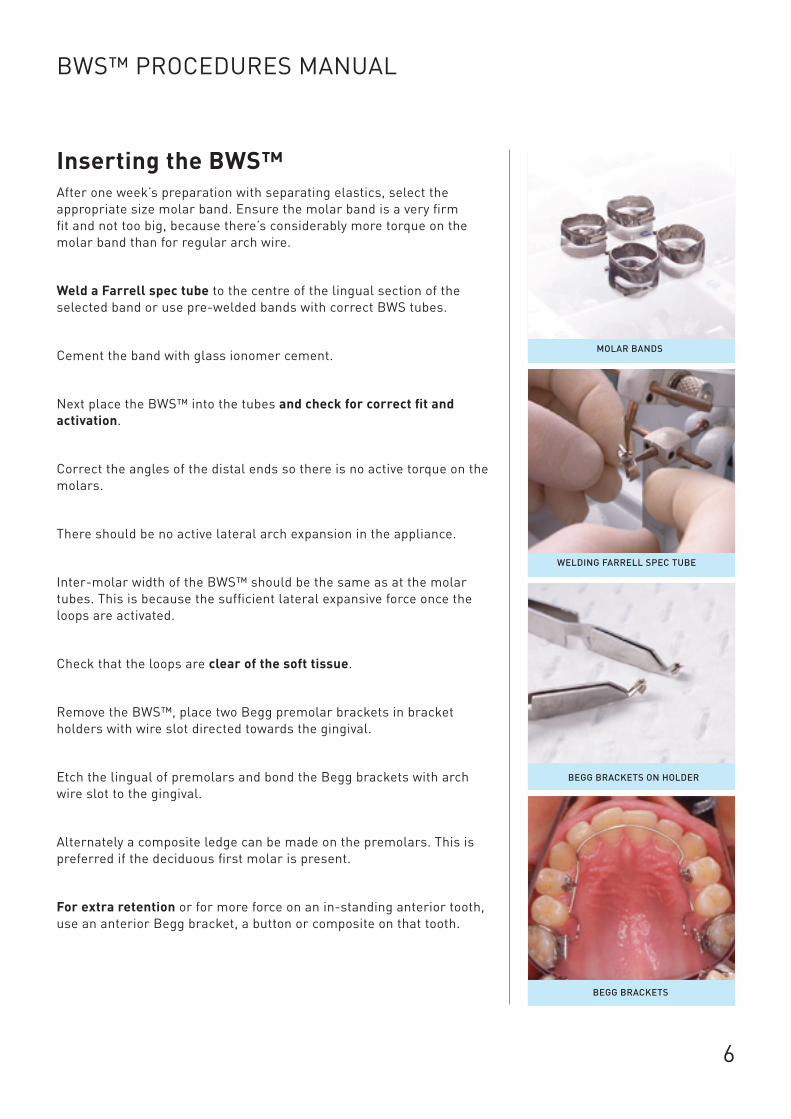
Inserting the BWS™After one week’s preparation with separating elastics, select the appropriate size molar band. Ensure the molar band is a very firm fit and not too big, because there’s considerably more torque on the molar band than for regular arch wire.
Weld a Farrell spec tube to the centre of the lingual section of the selected band or use pre-welded bands with correct BWS tubes.
Cement the band with glass ionomer cement.
Next place the BWS™ into the tubes and check for correct fit and activation.
Correct the angles of the distal ends so there is no active torque on the molars.
There should be no active lateral arch expansion in the appliance.
Inter-molar width of the BWS™ should be the same as at the molar tubes. This is because the sufficient lateral expansive force once the loops are activated.
Check that the loops are clear of the soft tissue.
Remove the BWS™, place two Begg premolar brackets in bracket holders with wire slot directed towards the gingival.
Etch the lingual of premolars and bond the Begg brackets with arch wire slot to the gingival.
Alternately a composite ledge can be made on the premolars. This is preferred if the deciduous first molar is present.
For extra retention or for more force on an in-standing anterior tooth, use an anterior Begg bracket, a button or composite on that tooth.
MOLAR BANDS
WELDING FARRELL SPEC TUBE
BEGG BRACKETS
BEGG BRACKETS ON HOLDER

7
The BWS™ is held in place using a ligature from the distal of the tube to the ligature loop of the wire. This is put in place using mosquito forceps. The larger 1.3mm ligatures are best.
Follow Up Visits Every 2 - 3 Weeks
Activation Activation at the loops should be no more than one millimeter initially then subsequently 1–2mm every three to four weeks.
Open the loops bilaterally with Adams pliers at the base of the loop and place a compensating bend at the start of the loop to keep the distal end in line with the BWS™ body. Adjust the distal end angle to obtain some intrusive force on the upper anterior only.
Fit the upper BWS™ - FF1 on this visit and the lower one in four to eight weeks.
This interval will minimise discomfort for the patient.
Check again for any irritation and particularly anywhere the BWS™ encroaches on the soft tissue. It’s important to be aware that any part of the BWS™ 0.7mm wire can potentially ulcerate the gingiva and can become submerged in a few weeks as the gingiva grows over the BWS™.
Activation at the loops should be no more
than one millimeters initially then
subsequently 1-2mm every three to four weeks.
CHECK FOR IRRITATION
1.3MM LIGATURE
BWS™ PROCEDURES MANUAL
LIGATURE RETAINS BW
ACTIVATION OF LOOP

8
Patient InstructionsUsing the appropriate TRAINER, issue one soft T4K™ (mixed dentition) T4A™ Phase I (permanent dentition) or T4B™ or T4CII™ instructing the patient that the TRAINER is an essential part of the treatment for it to be successful.
Inform the patient they will experience irritation around the molar bands and sensitivity of the anterior teeth during the first few days after fitting the BWS™. This discomfort will normally subside after the first week.
Remind the patient that the TRAINER must be used one hour a day plus overnight while sleeping. Direct the patient to begin using the issued TRAINER immediately.
The first adjustment appointment takes place after two weeks. At this appointment check that the BWS™ is not encroaching on the gingival areas anywhere before removing. (See previous page)
Remove the ligatures with a probe. Remove the BWS™ with pliers. Check for tooth movement and arch development.
Activate loops 1-2mm per side using Adams pliers and decompensate the bend.
This is the only adjustment. Do not activate laterally. Straighten out anterior compensating bends progressively if present.
Replace the BWS™.
T4K™
T4A™
T4B™
T4CII™
BWS™ PROCEDURES MANUAL
9
Check TRAINER UseReinforce its importance. The concept of the BWS™ is to progressively regain arch size and train the tongue to its correct position.
The effect of correction of tongue position assists in the skeletal development of the upper arch. Stopping tongue thrust and reverse swallowing with The TRAINER assists correction of the lower anterior arch form.
Subsequent visits should be scheduled for every three to four weeks. At these visits, question the patient about the previous adjustment and how long the teeth were sensitive if at all.
This will guide you regarding the degree of activation. Always make the mistake to under-adjust rather than over adjust.
The teeth should remain sensitive for no more than two days after each adjustment visit. Continue the adjustment process as described, but if sensitivity persists for more than two days after adjustments, decrease the amount of adjustment.
You will notice that for the first few weeks of treatment there isn’t a lot of movement. After the first few weeks tooth movement tends to move more rapidly, so don’t be tempted to increase the adjustment amount by more than 1-2 mm per side.
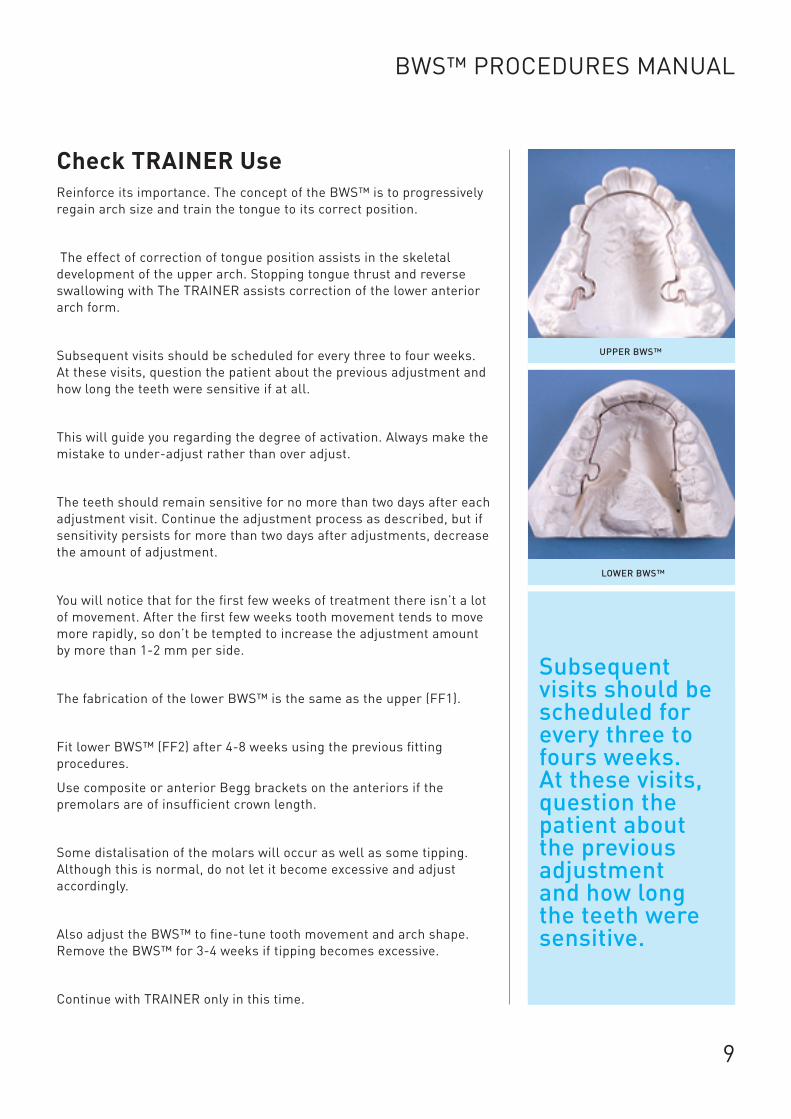
The fabrication of the lower BWS™ is the same as the upper (FF1).
Fit lower BWS™ (FF2) after 4-8 weeks using the previous fitting procedures.
Use composite or anterior Begg brackets on the anteriors if the premolars are of insufficient crown length.
Some distalisation of the molars will occur as well as some tipping. Although this is normal, do not let it become excessive and adjust accordingly.
Also adjust the BWS™ to fine-tune tooth movement and arch shape. Remove the BWS™ for 3-4 weeks if tipping becomes excessive.
Continue with TRAINER only in this time.
Subsequent visits should be scheduled for every three to fours weeks. At these visits, question the patient about the previous adjustment and how long the teeth were sensitive.
BWS™ PROCEDURES MANUAL
UPPER BWS™
LOWER BWS™
10
Adjustment VisitsAt each visit check for improvement in myofunctional habits and always reinforce TRAINER use. (See the TRAINER video for the information on this aspect).
Compare pre-treatment photos with the current appearance to maintain patient and parent motivation.
During visits, always remind the patient and their parent that daily use of the TRAINER is essential for the system to work effectively.
If the patient is not using the TRAINER as directed do not activate the BWS™, and inform the patient/parent the directions must be followed or as a consequence, treatment time will increase and an unsuccessful outcome is increased. The TRAINER manual has more information on this.
Excessive molar distalisation and poor stability will be the result of lack of compliance with the TRAINER. Remove the BWS™ if TRAINER compliance is a problem and re-evaluate the patients treatment plan.
Do Not Overactivate
Don’t be tempted to try to expand the molars using the BWS™. Inter-molar distance will widen due to the reciprocal forces on the anterior dentition. Straightening out the ‘S’ bend bilaterally half-to one-millimeter per adjustment with an Adams plier can actively expand the premolar area. Again, this arch widening tends
to occur as a reciprocal action of the BWS™ adjustments.
Always ensure BWS™ is clear of soft tissue to prevent submerging before requirement for surgical removal.
Treatment Progress
Each visit should show progressive improvement in arch form, anterior dental alignment and myofunctional correction. Usually treatment is no more than 6 months. It is advisable to use progressive arch development and remove the BWS™ after 4-6 months while continuing with the TRAINER. This prevents excessive molar distalisation and allows the bone development to “catch up”. Leaving the BWS™ out of treatment over 2 month intervals can allow you to evaluate stability. Leave the molar bands and Begg brackets in place during this period. Do not leave the BWS™ in as a retainer as it is ALWAYS active and will continue to move the teeth. Use the TRAINER as a retainer while waiting for permanent teeth to erupt.
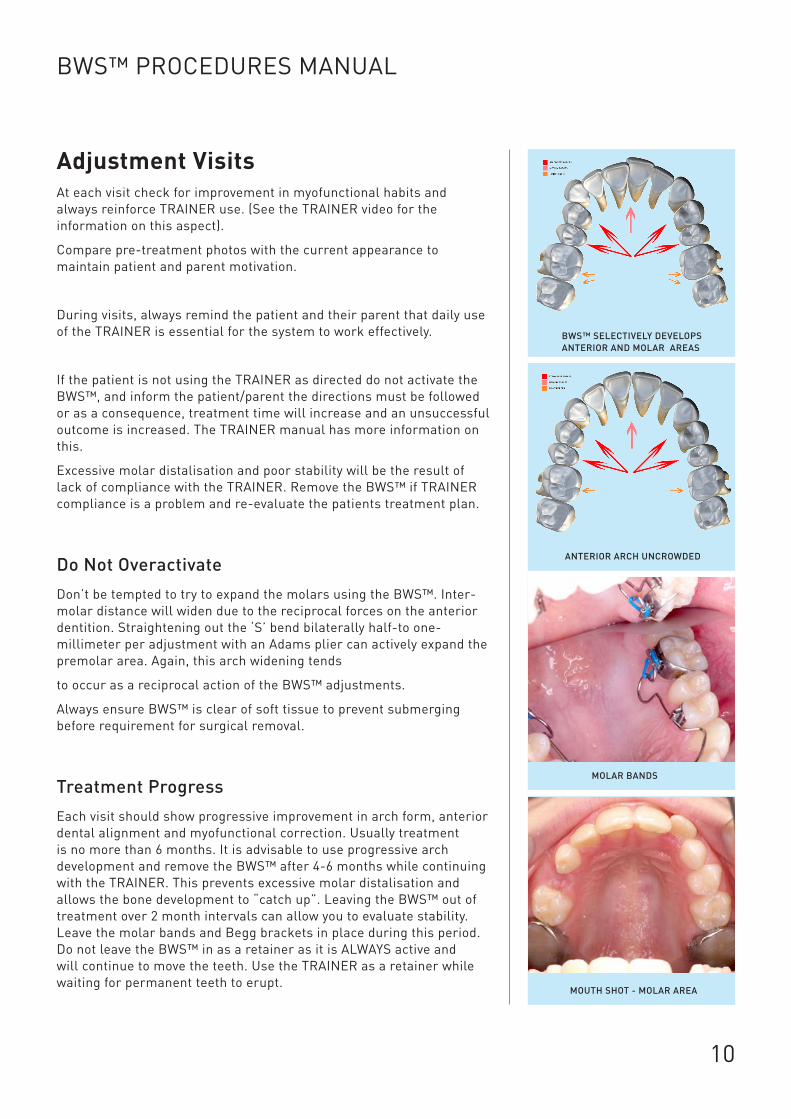
MOLAR BANDS
MOUTH SHOT - MOLAR AREA
ANTERIOR ARCH UNCROWDED
BWS™ SELECTIVELY DEVELOPS ANTERIOR AND MOLAR AREAS
BWS™ PROCEDURES MANUAL
11
Further Anterior Alignment
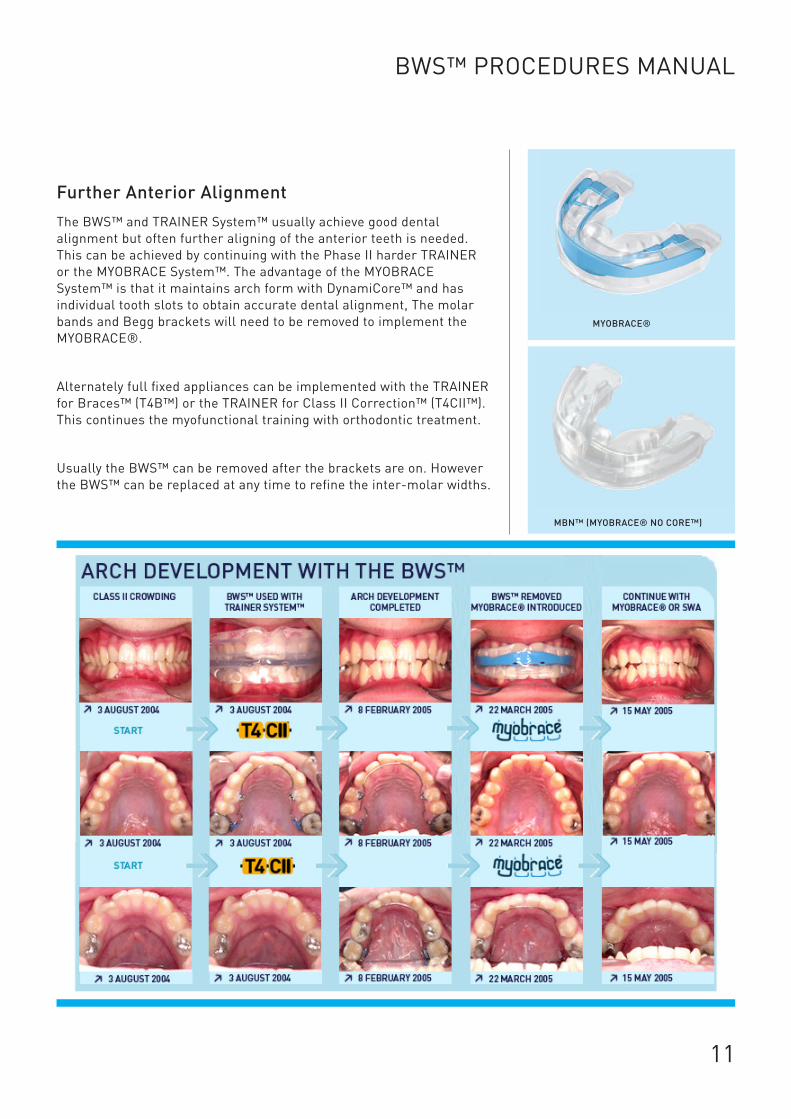
The BWS™ and TRAINER System™ usually achieve good dental alignment but often further aligning of the anterior teeth is needed. This can be achieved by continuing with the Phase II harder TRAINER or the MYOBRACE System™. The advantage of the MYOBRACE System™ is that it maintains arch form with DynamiCore™ and has individual tooth slots to obtain accurate dental alignment, The molar bands and Begg brackets will need to be removed to implement the MYOBRACE®.
Alternately full fixed appliances can be implemented with the TRAINER for Braces™ (T4B™) or the TRAINER for Class II Correction™ (T4CII™). This continues the myofunctional training with orthodontic treatment.
Usually the BWS™ can be removed after the brackets are on. However the BWS™ can be replaced at any time to refine the inter-molar widths.
BWS™ PROCEDURES MANUAL
MYOBRACE®
MBN™ (MYOBRACE® NO CORE™)
12
BWS™ PROCEDURES MANUAL
ImportantAlways ensure that the TRAINER is worn daily in conjunction with the BWS™ program. The tongue is used to assist arch development. This is how bone development is achieved without the use of acrylic and expansion screws. If the TRAINERS the patient does not use the TRAINER for a minimum of one hour daily plus overnight, decrease or stop adjustment at each visit or remove BWS™ for a period of time. Review the treatment if the TRAINER becomes used again as directed.
Remember that the purpose of the Farrell BENT WIRE System™ is to achieve both arch development and myofunctional training, simultaneously. This dual treatment effect allows the use of very light forces and superior non-extraction results.
This dual effect provides a powerful tool in correcting many difficult malocclusions, with less treatment time, less requirement for extractions, with decreased tendency to adversely open the bite.
The BWS™ is particularly good for regaining lost C space to avoid premolar extractions.
Because it has no visual and speech problems, patient acceptance of this system is great. It is a most user-friendly appliance.
Look at use of the MYOBRACE® after treatment with the BWS™. An alternate “no braces” system for treatment of many malocclusions. Simple and effective. Another MRC system that integrates well with the BWS™.
To be effective, orthodontic treatment must do 2 things.
1. Treat the malocclusion.
2. Treat the underlying causes of the malocclusion – the myofunctional problems causing the orthodontic disorder.
That is why Farrell BENT WIRE System™ and the TRAINER System™ were developed - to meet the need for combined myofunctional and orthodontic or orthopaedic treatment. The fundamentals as described by Graber.
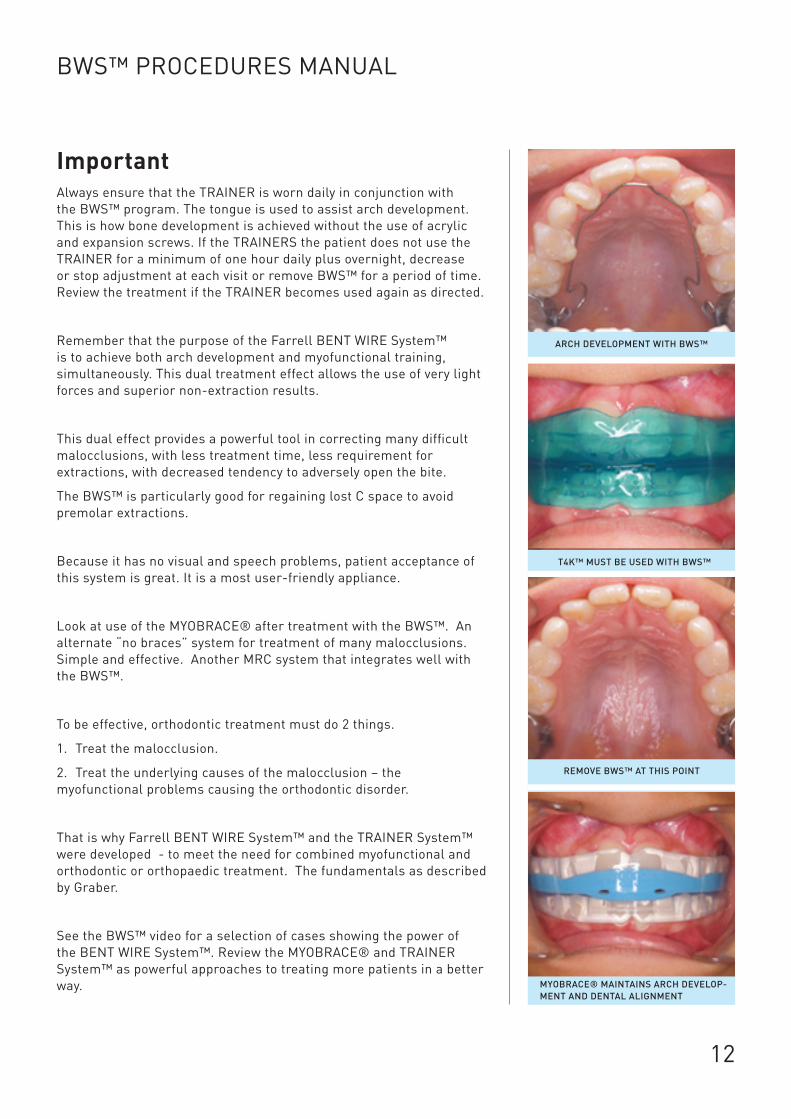
See the BWS™ video for a selection of cases showing the power of the BENT WIRE System™. Review the MYOBRACE® and TRAINER System™ as powerful approaches to treating more patients in a better way. MYOBRACE® MAINTAINS ARCH DEVELOP-
MENT AND DENTAL ALIGNMENT
REMOVE BWS™ AT THIS POINT
T4K™ MUST BE USED WITH BWS™
ARCH DEVELOPMENT WITH BWS™
13
BWS™ PROCEDURES MANUAL
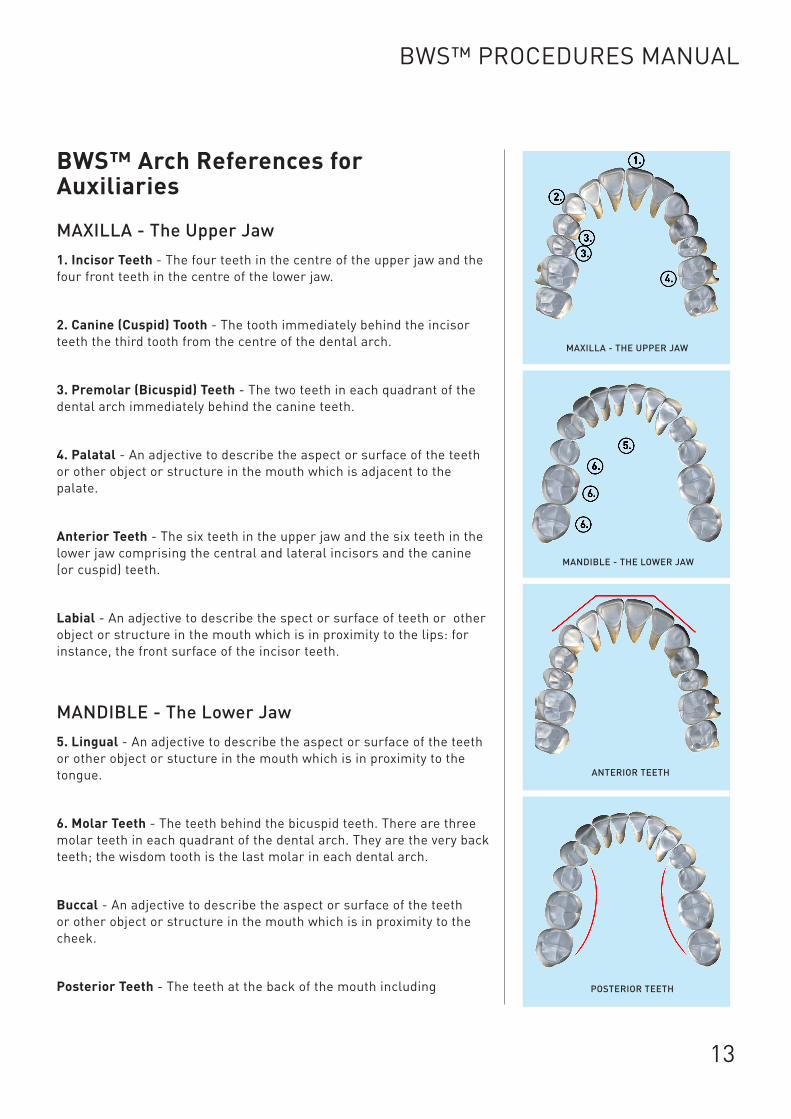
BWS™ Arch References for Auxiliaries
MAXILLA - The Upper Jaw
1. Incisor Teeth - The four teeth in the centre of the upper jaw and the four front teeth in the centre of the lower jaw.
2. Canine (Cuspid) Tooth - The tooth immediately behind the incisor teeth the third tooth from the centre of the dental arch.
3. Premolar (Bicuspid) Teeth - The two teeth in each quadrant of the dental arch immediately behind the canine teeth.
4. Palatal - An adjective to describe the aspect or surface of the teeth or other object or structure in the mouth which is adjacent to the palate.
Anterior Teeth - The six teeth in the upper jaw and the six teeth in the lower jaw comprising the central and lateral incisors and the canine (or cuspid) teeth.
Labial - An adjective to describe the spect or surface of teeth or other object or structure in the mouth which is in proximity to the lips: for instance, the front surface of the incisor teeth.
MANDIBLE - The Lower Jaw
5. Lingual - An adjective to describe the aspect or surface of the teeth or other object or stucture in the mouth which is in proximity to the tongue.
6. Molar Teeth - The teeth behind the bicuspid teeth. There are three molar teeth in each quadrant of the dental arch. They are the very back teeth; the wisdom tooth is the last molar in each dental arch.
Buccal - An adjective to describe the aspect or surface of the teeth or other object or structure in the mouth which is in proximity to the cheek.
Posterior Teeth - The teeth at the back of the mouth including
MAXILLA - THE UPPER JAW
MANDIBLE - THE LOWER JAW
POSTERIOR TEETH
ANTERIOR TEETH
14
MYOFUNCTIONAL RESEARCH CO.PO Box 14 Helensvale Qld 4212 AUSTRALIATel: +61 7 55735 999 Fax: +61 7 55736 [email protected]
Tips When Using the BWS™
Avoid excessive adjustment, as the BWS™ appears to move teeth slightly exponentially and you’ll be surprised how easy it is to gain space without opening the bite.
Do not adjust the BWS™ laterally, only at the loops and “S”bend. Resist the concept that crowding is associated with lack of arch width as arch form is the most important.
Remember that most crowding cases are due to a combination of myofunctional problems and flattening or vee-ing of anterior arch form. The BWS™ is ideal to correct this.
Internet References
The MYOBRACE® The TRAINER System™
- The MYOBRACE® - T4K™
- www.myobrace.com - T4B™
- T4CII™
- T4A™
The BWS™ Videos
- BWS™ Overview - Making the BWS™
- Fitting the BWS™ - Patient Instructions
- Adjustment Visits - Advanced Information
- Cases
BWS™ PROCEDURES MANUAL

15
BWS™ PROCEDURES MANUAL
What is Needed to Make the BWS™Most of the BWS™ is composed of generic, easily available components. This page acts as a guide for selecting materials and pliers. The Farrell BWS Tube* is unique and must be obtained from MRC. All other items can be obtained from your local supplier.
Materials
0.7mm low nickel wire Leone Biosteel 0.7mm - .028” wire (C0401-07)
Molar band set - Leone or any preferred
Kit of assorted sizes prewelded with Leone Farrell Spec tubes and brackets
0.8mm x 6.0mm Leone Farrell Spec tubes*
Begg brackets (premolar) wide base. TP (256-354)
Instruments
Hollow Jaw Pliers - Leone P1155-00
Loop Bending Pliers - Leone P1165-00
Weingart Pliers - Leone P1823-00 / Ortho Organisers 200-303
Elastic Separating Pliers - Leone P1141-00
Wire Cutters - Leone P1099-00
Adams Pliers - Leone P1174-00
Bird Beak Pliers - Leone P1815-00
Band Seating Instrument - Ortho Organisers 200-319
Band Removing Pliers - Leone P1836-00
Bracket Holder - Ortho Oganisers 200-319
Bracket Removing Pliers (Straight) - Leone P18329-00
Mosquito Forceps - Leone P1088-00
Ligatures - Leone 1.3mm K6360-13
Fuji IX Glass Ionomer Cement
Light cured flowable composite or any bracket bonding kit
Rocky Mountain Welder
Other __________________________________________________________________________
__________________________________________________________________________
Dr / Name _________________________________________________________________________
Address __________________________________________________________________________
_____________________________________ Country _____________________________
Tel _____________________________________ Fax _________________________________
Email ___________________________________________________________________________
* For 2007 prefabricated BWS™ will be available in multiple sizes. Contact MRC for more information.


![ZZ - fiqhulhadith.com ki kunjyan.pdf69 ----- *****™™*™™ÒÃÃÃÅÅÅÃÅääää™™™™]]]!!!!***hZZZå 71 -----*****™™™*™ÀÀÀÀÂÂÂÂ6666,,,vvvvZZZ{{{Z{ŠŠŠŠcc**c](https://img.pdfslide.net/doc/110x75/5e5e26f29bdb1829b545ee7d/zz-ki-kunjyanpdf-69-aaaaffffaaaahzzz.jpg)