Embed Size (px)
Citation preview

The First Major Change in the Gold pan in 4,000 years

2
Congratulations on your purchase of the Gold Magic® Spiral Gold Recov-ery System. Your new Gold Magic® will allow you to work more material faster and recover more gold than ever before. This machine will work dry to highly concentrate material. It will work wet in a tub to separate black sand and gold. And can work right down in a stream to process material and take home clean gold.
Please be sure to read all of the owner’s manual and watch the DVD all the way through. This will instruct you in the proper use and care of your Gold Magic®. Remember there is only one Gold Magic®, and it is so unique, so revolutionary that nothing else works like it.
SAFETY PRECAUTIONS
MAKE SURE TO COMPLETELY READ AND UNDERSTAND ALL OF THE FOL-LOWING SAFETY INSTRUCTIONS AND WARNINGS IN THIS BOOKLET, ON THE BACK OF THE POWER PACK AND ON THE BATTERY, PRIOR TO USING YOUR GOLD MAGIC®
Read the Owner’s ManualWatch the DVDThe battery in new machines is fully-charged.Never connect to 110 volt while processing material.Never connect to 110 volt while in or near water.When charging, make sure the toggle switch is in the down or charge position.Keep finger, hair, all other body parts and clothing away from pulleys and belts.
Gold Magic IncPO Box 13769
Las Vegas, NV 89120www.GoldMagic.com
800-458-8889
Gold Magic® is protected under the following patents:US Pat. 5,273,165;5,275,294;5,788,293;5,285,587;5,957,303;6,102,211Canada pat. 2086727; Australia Pat. 650381
3
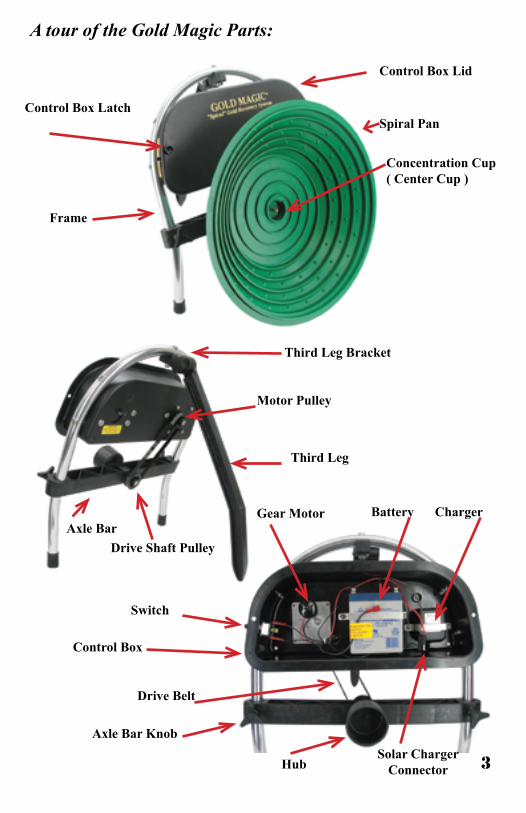
A tour of the Gold Magic Parts:
Control Box Lid
Control Box
Spiral Pan
Concentration Cup( Center Cup )
Third Leg Bracket
Third Leg
Axle Bar
Axle Bar Knob
Hub
Motor Pulley
Drive Shaft Pulley
Drive Belt
Frame
ChargerBatteryGear Motor
Switch
Control Box Latch
Solar ChargerConnector

4
How your Gold Magic Works
The 17-inch Gold Magic® pan is computer designed for maximum gold recovery. As the wheel turns and you deposit material into the wheel, some of that material will im-mediately move up the wheel into the concentration cup. As gold and other more dense material arrives at the concentration cup, it replaces less dense material in the cup so that the center cup is continually filling with the most dense material in the pan. This process starts as soon as you introduce material into the pan and is complete within a matter of minutes. There are 69 agitator knobs, (1B), in the primary processing area of the Gold Magic pan. These agitator knobs move through the material in rapid succession causing it to mix and tumble, all designed to quickly get the gold into area (1-C). The larger, low density materials will be expelled from the pan while the heavier, smaller materials (black sand, gold, platinum, and gemstones) will be carried up the spiral riffle into the removable concentration cup.
( Area 1) This is the primary clas-sification area - all materials, sand, gravel, etc. (wet or dry) is shoveled into this area. Large size and most low specific gravity materials roll out of the pan as it rotates. Heavy weight materials (gold) sink to the lowest point at the joining of riffle and the pan (1-C) and commence rotating toward areas (2,3,4).
( Area 2) This is the riffle transition and large nugget recovery area. Nuggets too large to spiral up the riffle in area (3) into concentrate cup (4) will remain in area (2) until visually sighted and removed.
( Area 3)This is the secondary classification area. The heavy material, (high specific gravity) like gold, platinum, flour gold and black sand, will continue to travel at the low point where the riffle joins the pan (1-C), to area (4). Most light (low specific gravity) material falls from the riffle in area (3) and it’s ultimately ejected from the pan.
( Area 4) Final classification area. Here you immediately see the results. The gold settles in the removable cup (4). As it continues to tumble wet, it is “cleaned up” with a gentle splash of water and is ready for removal. Dry gold concentrate is removed from here for final wet cleanup.

SET-UPGOLD MAGIC® Model 10M, 12E, 12-10 1-HOOKING UP THE BATTERY:Your GOLD MAGIC was shipped with one of the power wires disconnected from the switch. This is to prevent the unit from accidentally being turned on during shipping and arriving with the battery discharged. This wire is attached to the battery with a sticker instructing you how to connect it. Remove the cover of the Control Box by gently pulling back on the two NY-Latches. You need to pull the wire free of the battery and push the terminal onto the center termi-nal of the switch.
2- BELT DRIVE TENSION ADJUSTMENT:The drive belt tension is adjust-ed by loosening the two knobs on the front of the axle bar and moving the bar up or down. The belt should be just tight enough to prevent slipping. Over-tightening will reduce mo-tor life and operating time. The toothed timing belt was chosen for its ability to function, with light tension, in wet conditions without slipping.
3- PAN CLEANING & PREPARATION:Before the first use, (wet) we suggest that you clean the inside of the pan with alcohol or liquid detergent to remove any mold release compound or oil that might be in the pan. The molding production process and handling can result in a fine film of oil on the sur-face of a new pan. In water this oil will tend to impair the recovery of fine gold and acts like a “life jacket” for that piece of gold and reduces its specific gravity and thus makes it hard or impossible to recover. Do not use any abrasives in the process. You only want to remove the surface film of oil. You do not want to “rough up” the surface as this will impair the recovery of fine gold.
4- INSERT THE PAN INTO THE HUB:After you have cleaned your new pan and adjusted the belt tension, the last step is to insert the knob on the back of the pan into the Hub. You do not need to push the pan all the way in. Keep in mind that you will probably be frequently removing and reinserting the pan.
5- INSERT THE CENTER CUP:Push the removable center cup into the center of the pan and the setup is complete.
Drive Belt Tension Adjustment
5

Working The Gold Magic
Set the Operating Angle of the Spiral Pan:Loosen the black adjustment knob on the third leg. Adjust the third leg to achieve and angle of about 45 degrees to the horizontal for gold recovery. For gem stones set the angle at about 30 degrees. An easy way to tell you are at the 45° angle is put your first scoop of dirt into the unit at the 3 o’clock position, it should rotate up to approximately the 9 o’clock position on the face of the pan.
If you are setting up your Gold Magic in a tub, fill the tub up with water until the water level is at the center of the concentration cup as illustrated above. If you are setting the pan up in a creek, pond, lake, etc find a spot so that the water level will be at the correct height. When working in a tub, we suggest that you add a few drops of dish washing de-tergent or Jet Dry to the water in the tub to help recover fine gold by breaking the surface tension of the water. It also helps to presoak dry material before you feed it into the Gold Magic, as very fine gold that is dry is more likely to try and float on the surface tension of the water.
Turn the power switch to the “On” position and the spiral wheel should start to rotate clockwise. Use a large scoop or small shovel to feed the material into the pan at the 3 to 5 o’clock position. Make sure to pour your material into the outer three riffles where the agitation knobs are. The even flow of material gives the gold a chance to classify and get behind the riffle rather than flow out of the pan on the top of the lightweight material being ejected at the 7 to 8 o’clock position. After shoveling into the pan for several minutes, you will want to determine if you have recovered any gold. You will note that the concentration
cup has filled with many kinds of foreign material. With your shovel or small container, splash water into the center cup with a light rinsing motion while the pan is running. The lightweight material will quickly rinse out of the concentration cup and the heavier gold will remain in the cup. Should you splash some of the gold out of the cup, it will quickly return during the next few revolutions of the pan. Keep rinsing until the gold is entirely clean of any sand and then stop the pan immediately, remove the center cup and pour your gold directly into a vial. Also check your black sand with a 30x power scope. The gold may be smaller than what is visible to the naked eye.
6
Third Leg Adjustment Knob
45 degrees

7
Using The Gold Magic Dry:
If possible you should always use your Gold Magic in water. Gold has about a 5 to 1 specific gravity advantage over most material in water. However the Gold Magic works very well with dry material. Keep in mind that the material must be dry to run it dry. If you have damp material you need to run it in a wet process.
Place your Gold Magic® as near as possible to the material you want to process. Set the pan at approximately a 45 degree angle and leave some area below the pan for remov-ing the material falling from the pan. With a shovel/scoop, feed the pan with a steady flow of material into the outside riffles at the 3 to 5 o’clock position on the face of the pan. The gold quickly passes through the tumbling sand and gravel to settle against the riffle. The gold begins moving towards the concentration cup. When working dry, feed your Gold Magic® a little slower to allow time for the fine gold to process through the pan. If the gravel balls up in your hand, it is too damp to process dry. The material must tumble freely. You should be able to process 5 gal. of material in 30 minutes. After 5 to 10 minutes, remove the concentration cup and dump the contents into a small gold pan or tray. Check the concentrates with a 30X power scope set directly on top of the sand. If you see some gold, dump the concentrate into your collection container and continue to process. If you do not see any gold, move to the next location. Your chances of finding gold improve greatly if you move frequently.

8
ELECTRICAL SYSTEMSGold Magic® Model 12E and 12-10
ELECTRICAL (This does not apply to 10M unit)The motor, battery & charger operate on a 12 volt DC system. To remove the control cov-er, gently pull on the Ny-latch fasteners on either side of the lid of the control box. The battery wire is removed from the switch prior to shipping to avoid the unit being turned on during transit. This wire is taped to the front of the battery. (The new battery is fully charged). Attach the wire to the center spade of the switch. Leave the switch in the “off” (center) position when not in use. Mover the switch up for “on” and down for “charge”.
BATTERY & CHARGERThe Gold Magic® has a built-in 110 volt AC/12 volt DC charger inside the control box. Your battery should be fully charged when you receive it. To use the charger, attach any extension cord to the prongs on the back of the control box and plug into 110 volt outlet. Flip the toggle switch, on the outside of the control box, down to the charge position. Eight to 12 hours will bring the battery back to full charge depending on how far the battery has been discharged. Unlike Ni-cad batteries, our sealed gel-cell will reach full charge from any point in its cycle.
WARNING! NEVER ATTACH A 110 VOLT AC CORD TO THEGOLD MAGIC® WHILE THE UNIT IS IN WATER!!
Do Not Fully Discharge Battery.DO NOT ATTEMPT TO CHARGE THE BATTERY WITH
YOUR AUTO ALTERNATOR.
SOLAR / DC CHARGER (optional)Item # GM-6181To connect the solar charger to the Gold Magic® remove the “hole plug” that is located on the back of the control box.
Bring the pre-wired connector from inside the control box through this hole and connect it to the solar charger.
The Gold Magic solar charger is always charging. The 7 watt charger will add up to 10 hours per day of running time to the Gold Magic®. The amount of charge will depend on the amount of sun light, your latitude, longitude, the time of the year and whether or not you keep the cell aimed at the sun. This solar cell will produce some charge even under artificial light or cloudy days.
You can also use this connector to attach other 12 volt DC sources to charge the battery when AC is not available for the built-in charger. If you use this feature with a source providing more than 750 mA do not leave it connected for prolonged periods of time as this may result in the battery being overcharged.

9
GOLD MAGIC ® MODEL 10M and MODEL 12-10Hand Crank Set Up and Operating Instructions
The Gold Magic ® 10M is set up and operated just like the other Gold Magic® units.Follow the directions for the set up as listed previously. The only difference is that withthe Model 10M you will be manually turning the pan. If you purchased the MODEL 12-10, with both electric and hand crank power, you received two drive belts. The longer belt is to be used with the hand crank. You can store the belt that is not being utilized inside the Control Box. The way to change operating modes is to change the belts. This is done by unscrewing the two Axle Bar Knobs on the front of the axle bar. Push up on the bar to release the pressure on the belt. Remove the current belt. Attach the new belt, push down on the Axle Bar to set the correct pressure on the new belt and tighten the adjustment knobs. Do not put too much pressure on the belt. Overtightened belts will increase wear on the motor and bushings.
Turn the hand crank in a counter clockwise direction. There are arrows molded into the face of your pan to show the proper direction. For best results rotate the pan at approxi-mately 19 to 23 RPM.
Upgrading to a 12-10 Electric Powered :To upgrade your Model 10M to a Model 12-10 you need to purchase the Gold Magic ®Power Pack. Item number GM-9176. Everything is included to convert your Model 10M to a Model 12-10.
CONVERT MODEL 12E TO 12-10You can add the hand crank feature to any gold magic machine with the Hank Crank Kit, item number GM-9170. This is the Hand Crank assembly, which bolts onto any Gold Magic without the necessity of drilling or the need of special tools. The longer belt needed for the hand powered operation is also included.
10
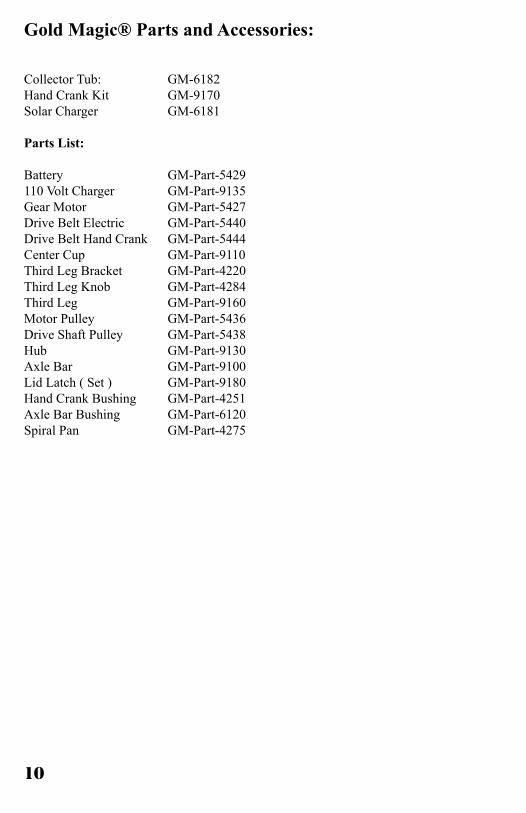
Gold Magic® Parts and Accessories:
Collector Tub: GM-6182Hand Crank Kit GM-9170Solar Charger GM-6181 Parts List:
Battery GM-Part-5429110 Volt Charger GM-Part-9135Gear Motor GM-Part-5427Drive Belt Electric GM-Part-5440Drive Belt Hand Crank GM-Part-5444Center Cup GM-Part-9110Third Leg Bracket GM-Part-4220Third Leg Knob GM-Part-4284Third Leg GM-Part-9160Motor Pulley GM-Part-5436Drive Shaft Pulley GM-Part-5438Hub GM-Part-9130Axle Bar GM-Part-9100Lid Latch ( Set ) GM-Part-9180Hand Crank Bushing GM-Part-4251Axle Bar Bushing GM-Part-6120Spiral Pan GM-Part-4275
11
Gold Magic IncPO Box 13769
Las Vegas, NV 89120www.GoldMagic.com
800-458-8889
Gold Magic Limited WarrantyThe Gold Magic® Spiral Panning Machines are warranted by Gold Magic Inc against de-fect in workmanship or materials under normal use for one year after the date of purchase from Gold Magic Inc or to the final consumer when purchased from an authorized Gold Magic® dealer.
Any part which is determined by Gold Magic Inc to be defective in material or work-manship and returned to Gold Magic Inc shipping cost prepaid, will be, as the exclusive remedy, repaired or replaced at Gold Magic Inc’s option.
WARRANTY DISCLAIMER: Gold Magic Inc has made a diligent effort to illustrate and describe the product Gold Magic® accurately. However, such illustrations and descriptions are for the sole pur-pose of identification, and do not express or imply a warranty that the Gold Magic ® is merchantable, or fit for a particular purpose, or that the product will necessarily conform to the illustrations or descriptions. No warranty or affirmation of fact, express or implied other than as set forth in the limited warranty statement above is made or authorized by Gold Magic Inc.
LIMITATION OF LIABILITY: Any liability for consequential and incidental damage is expressly disclaimed. Gold Magic Inc liability in all events is limited to, and shall not exceed the purchase price paid.
PROMPT DISPOSITION:Gold Magic Inc will make a good faith effort for prompt correction or other adjustment within warranty period. Before returning any product, write or call Gold Magic Inc giving date of original invoice, and describing defect.
FREIGHT POLICY: If product is damaged in transit, recipient must file claim with carrier.

RProspect WetR Prospect DryR Fine Gold Recovery from Black SandRLight Weight, Can Carry in One Hand
Model 10MManual Operation
Model 12E12 Volt Electric
Manual Operation
Model 12-1012 Volt Electric
and Manual Operation


![RECOV RY FORUM 8/26 27...RECOV RY FORUM 6 8/26 27 [金] [土] 主催 認定特定非営利 地域精神保健福祉機構(コンボ) 活 動 法 人 帝京平成大学 池袋キャンパス](https://img.pdfslide.net/doc/110x75/5ec3fe0b4c2a08537c4d014b/recov-ry-forum-826-27-recov-ry-forum-6-826-27-e-oe-ece.jpg)