Embed Size (px)
Citation preview

1
The Greenshades Center
SUTA Electronic Filing Guide
Greenshades Software Support Team
1-888-255-3815
2
The Greenshades Center ................................................................................................................................ 3
Filing your Quarterly Unemployment or Wage Report (SUTA) ...................................................................... 3
Step 1 – Starting the E-File Wizard........................................................................................................ 3
Step 2 – Company Name and Period Selection ..................................................................................... 4
Step 3 – Choosing your File Type and Reporting Period ....................................................................... 4
Step 4 – Verify SUTA Report Information ............................................................................................. 5
Step 5 – Verify Unemployment Tax IDs ................................................................................................ 6
Step 5a – Set Advanced SUTA Options (Optional) ................................................................................ 8
Step 5b – Additional Special Information (Optional) ............................................................................ 9
Step 6 – Build Data .............................................................................................................................. 10
Step 7 – Employee Verification ........................................................................................................... 11
Step 8 – Select Files to Build ............................................................................................................... 12
Step 8a – Advanced Editor (optional) ................................................................................................. 14
Step 9 – Review Built Files .................................................................................................................. 15
Step 10 – View Totals .......................................................................................................................... 16
Step 11 (Internet Submission) – Manual Filing Instructions ............................................................... 17
Step 11 (Media Submission) – Save E-File........................................................................................... 18
Step 12 (Media Submission) – Print Labels ......................................................................................... 19
Step 13 (Media Submission) – Transmittal Forms .............................................................................. 20
Step 14 (Media Submission) – Submission Completed ....................................................................... 21
3
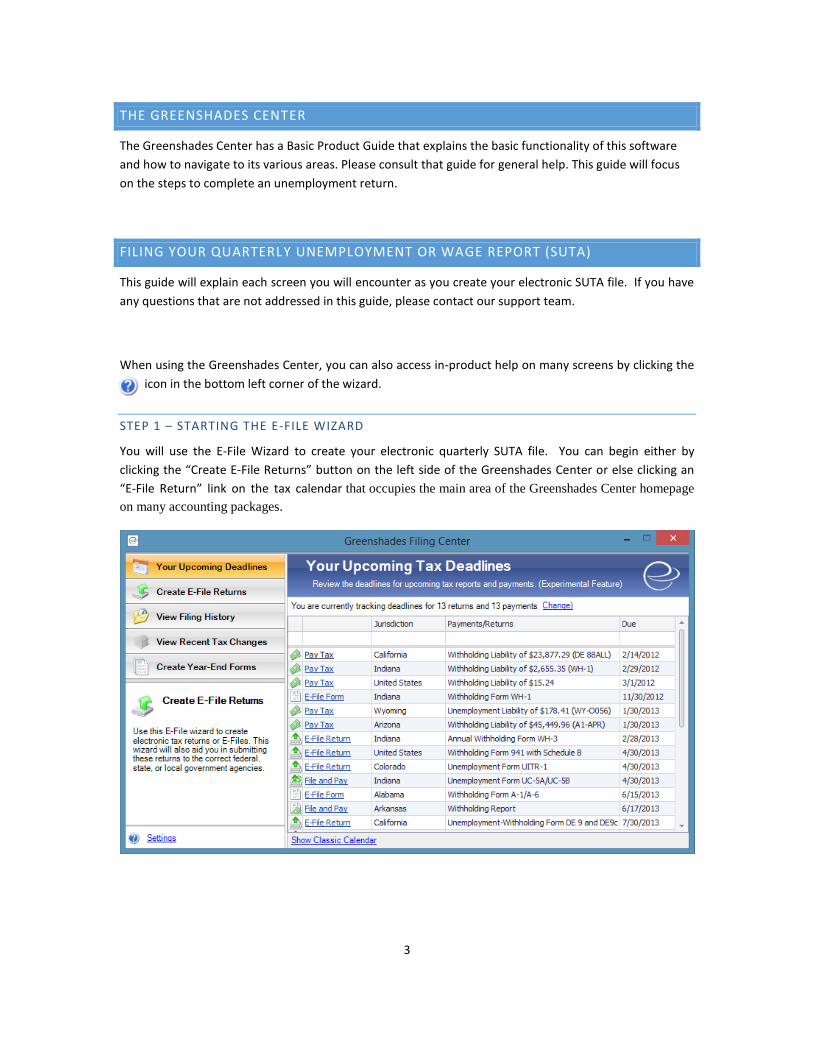
THE GREENSHADES CENTER
The Greenshades Center has a Basic Product Guide that explains the basic functionality of this software
and how to navigate to its various areas. Please consult that guide for general help. This guide will focus
on the steps to complete an unemployment return.
FILING YOUR QUARTERLY UNEMPLOYMENT OR WAGE REPORT (SUTA)
This guide will explain each screen you will encounter as you create your electronic SUTA file. If you have
any questions that are not addressed in this guide, please contact our support team.
When using the Greenshades Center, you can also access in-product help on many screens by clicking the
icon in the bottom left corner of the wizard.
STEP 1 – STARTING THE E-FILE WIZARD
You will use the E-File Wizard to create your electronic quarterly SUTA file. You can begin either by
clicking the “Create E-File Returns” button on the left side of the Greenshades Center or else clicking an
“E-File Return” link on the tax calendar that occupies the main area of the Greenshades Center homepage
on many accounting packages.
4
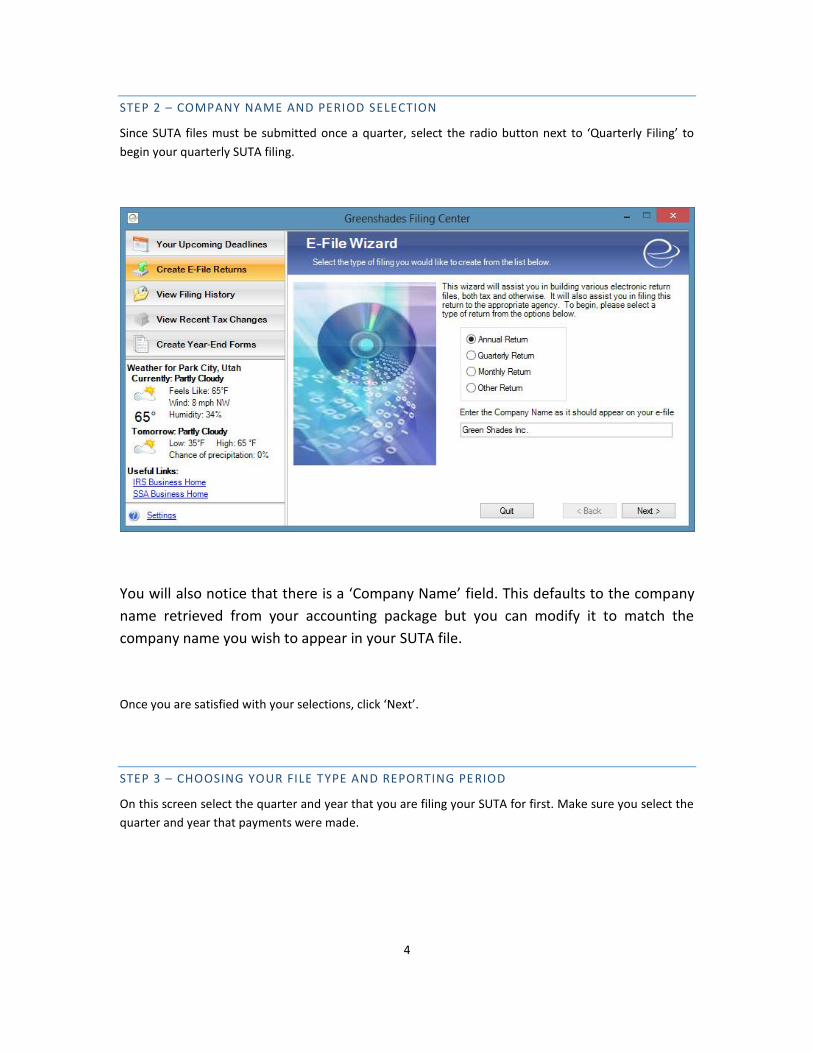
STEP 2 – COMPANY NAME AND PERIOD SELECTION
Since SUTA files must be submitted once a quarter, select the radio button next to ‘Quarterly Filing’ to
begin your quarterly SUTA filing.
You will also notice that there is a ‘Company Name’ field. This defaults to the company
name retrieved from your accounting package but you can modify it to match the
company name you wish to appear in your SUTA file.
Once you are satisfied with your selections, click ‘Next’.
STEP 3 – CHOOSING YOUR FILE TYPE AND REPORTING PE RIOD
On this screen select the quarter and year that you are filing your SUTA for first. Make sure you select the
quarter and year that payments were made.
5
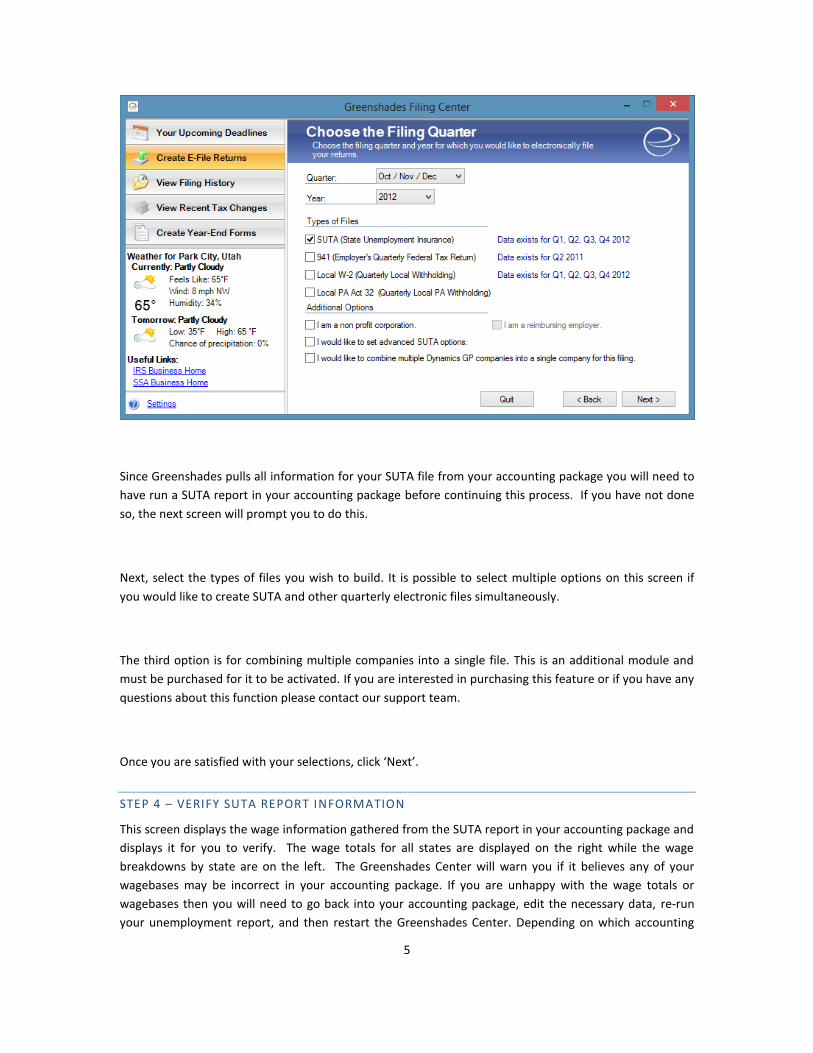
Since Greenshades pulls all information for your SUTA file from your accounting package you will need to
have run a SUTA report in your accounting package before continuing this process. If you have not done
so, the next screen will prompt you to do this.
Next, select the types of files you wish to build. It is possible to select multiple options on this screen if
you would like to create SUTA and other quarterly electronic files simultaneously.
The third option is for combining multiple companies into a single file. This is an additional module and
must be purchased for it to be activated. If you are interested in purchasing this feature or if you have any
questions about this function please contact our support team.
Once you are satisfied with your selections, click ‘Next’.
STEP 4 – VERIFY SUTA REPORT INFORMATION
This screen displays the wage information gathered from the SUTA report in your accounting package and
displays it for you to verify. The wage totals for all states are displayed on the right while the wage
breakdowns by state are on the left. The Greenshades Center will warn you if it believes any of your
wagebases may be incorrect in your accounting package. If you are unhappy with the wage totals or
wagebases then you will need to go back into your accounting package, edit the necessary data, re-run
your unemployment report, and then restart the Greenshades Center. Depending on which accounting
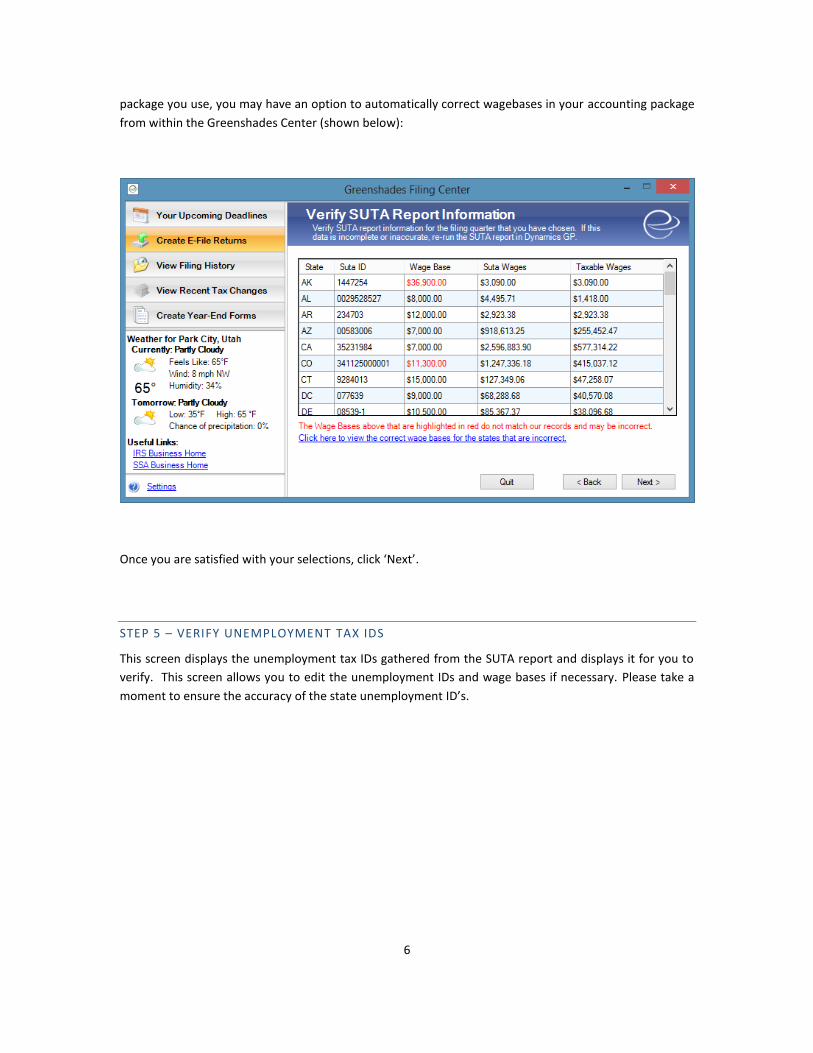
6
package you use, you may have an option to automatically correct wagebases in your accounting package
from within the Greenshades Center (shown below):
Once you are satisfied with your selections, click ‘Next’.
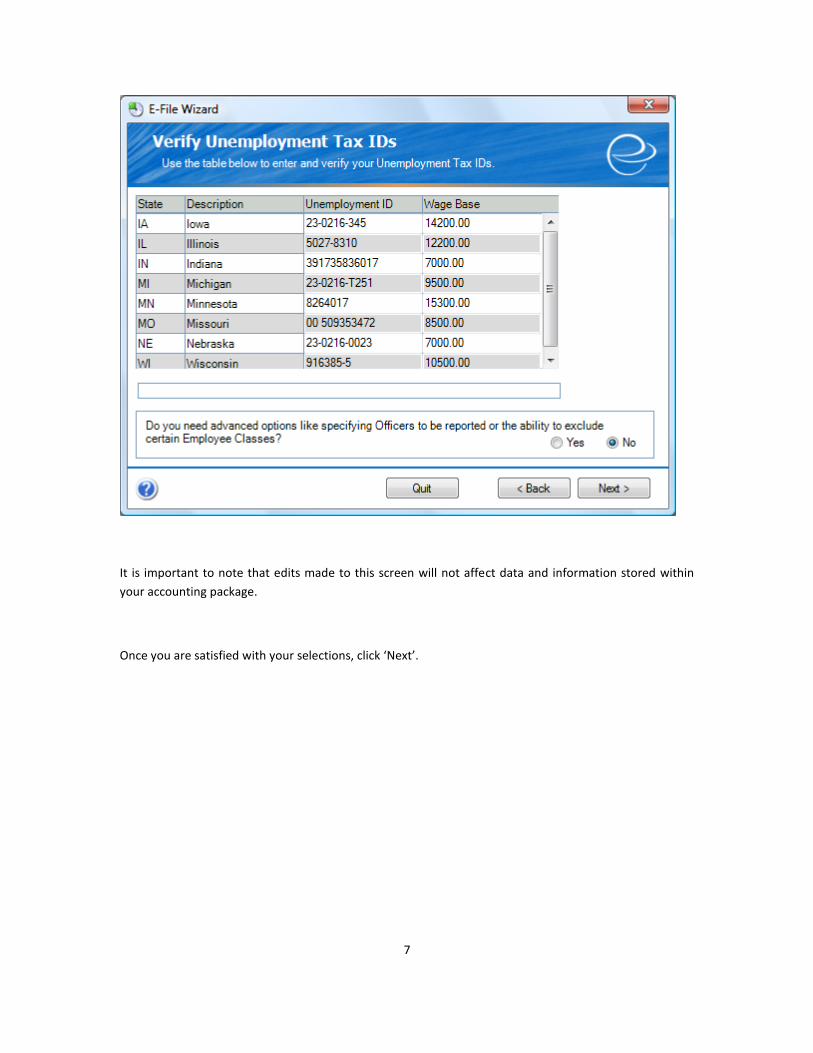
STEP 5 – VERIFY UNEMPLOYMENT TAX IDS
This screen displays the unemployment tax IDs gathered from the SUTA report and displays it for you to
verify. This screen allows you to edit the unemployment IDs and wage bases if necessary. Please take a
moment to ensure the accuracy of the state unemployment ID’s.
7
It is important to note that edits made to this screen will not affect data and information stored within
your accounting package.
Once you are satisfied with your selections, click ‘Next’.
8
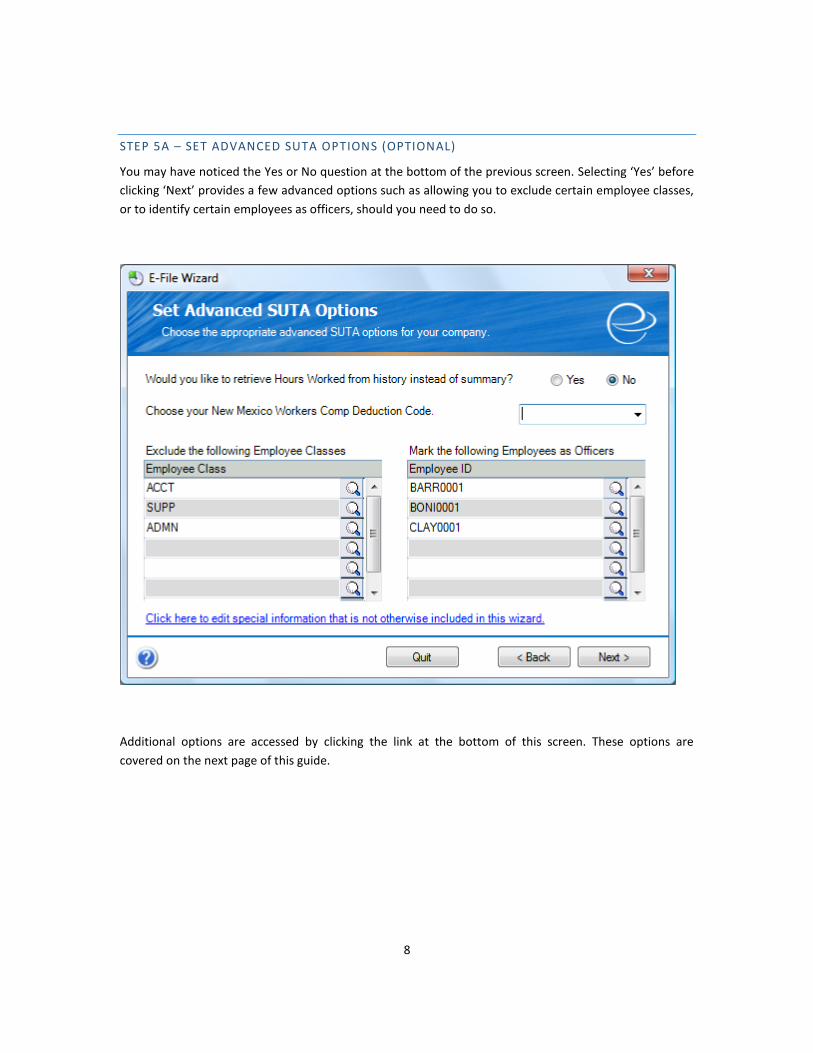
STEP 5A – SET ADVANCED SUTA OPTIONS (OPTIONAL)
You may have noticed the Yes or No question at the bottom of the previous screen. Selecting ‘Yes’ before
clicking ‘Next’ provides a few advanced options such as allowing you to exclude certain employee classes,
or to identify certain employees as officers, should you need to do so.
Additional options are accessed by clicking the link at the bottom of this screen. These options are
covered on the next page of this guide.

9
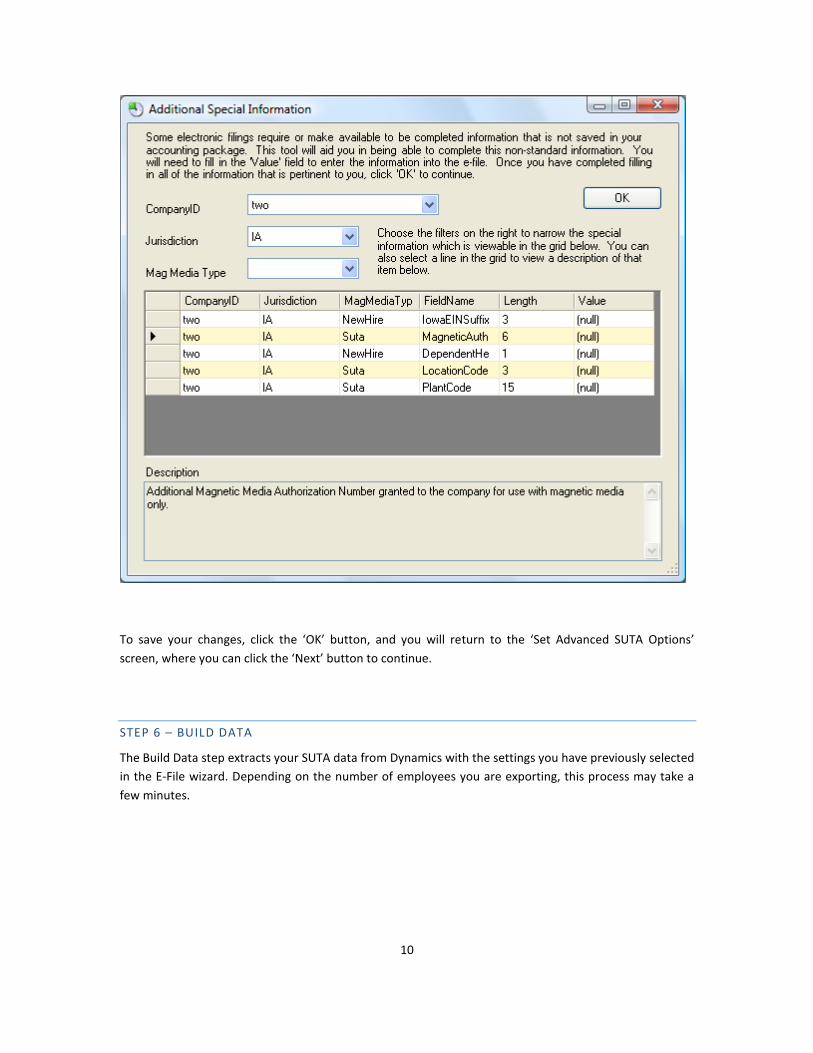
STEP 5B – ADDITIONAL SPECIAL INFORMATION (OPTIONAL)
Clicking the ‘Click here to edit special information that is not otherwise included in this wizard’ link
located at the bottom of the previous window will bring you to the following screen and provides you
with the ability to edit non-standard fields, should you need to. Depending on the number of states or
types of files you are creating, this screen could have many entries listed. The three drop-down menus
shown will allow you to filter the entries displayed to only those you need to work with. It is worth noting
that some states require you to specify a location code with your filing. This screen provides that ability,
where you would simply type in the code, next to the ‘LocationCode’ field, under the ‘Value’ column.
10
To save your changes, click the ‘OK’ button, and you will return to the ‘Set Advanced SUTA Options’
screen, where you can click the ‘Next’ button to continue.
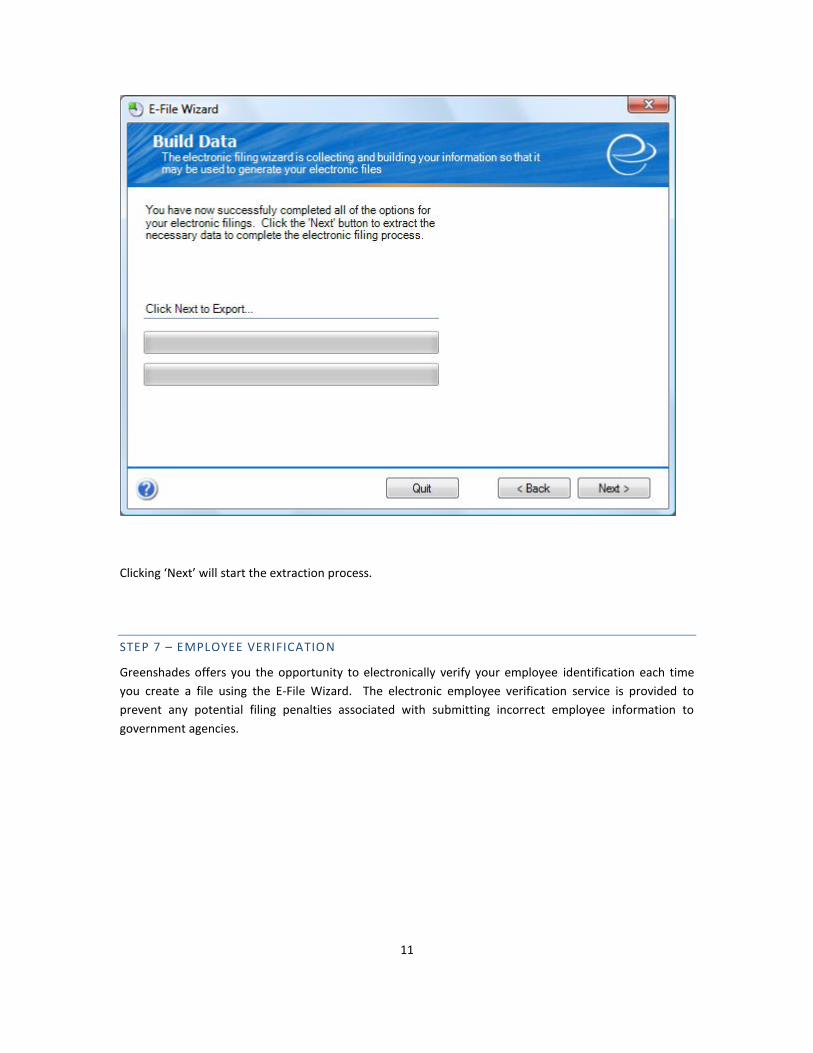
STEP 6 – BUILD DATA
The Build Data step extracts your SUTA data from Dynamics with the settings you have previously selected
in the E-File wizard. Depending on the number of employees you are exporting, this process may take a
few minutes.
11
Clicking ‘Next’ will start the extraction process.
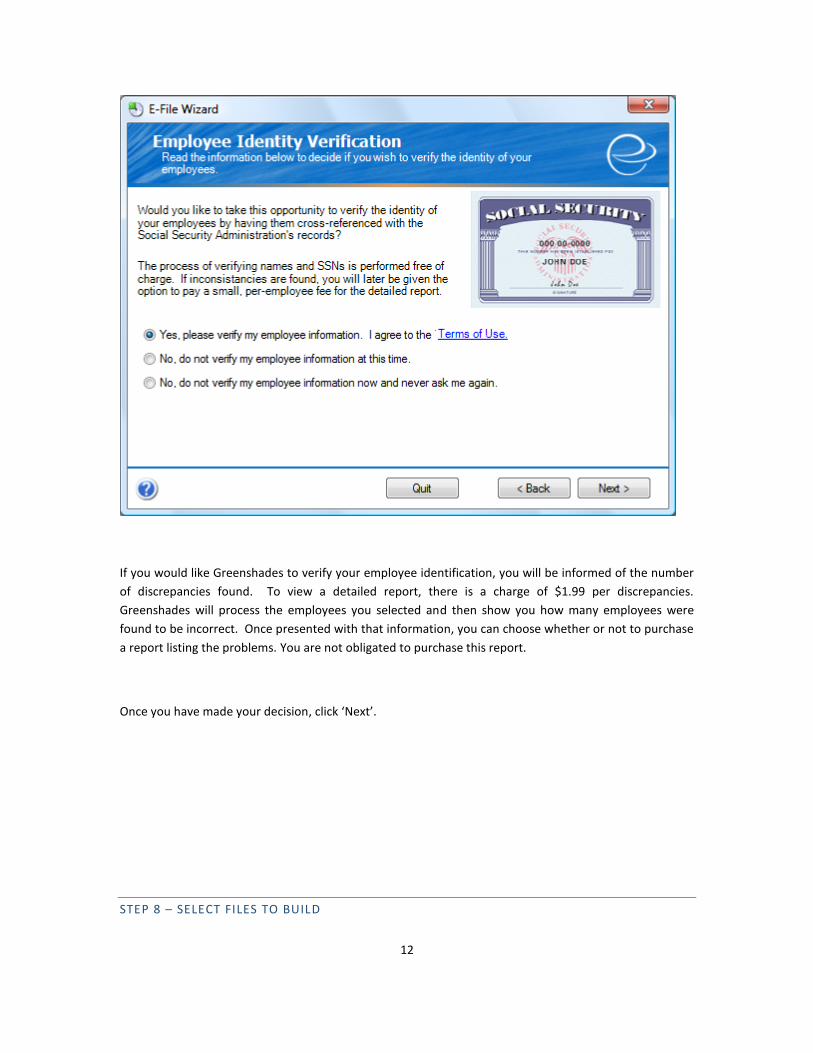
STEP 7 – EMPLOYEE VERIFICATION
Greenshades offers you the opportunity to electronically verify your employee identification each time
you create a file using the E-File Wizard. The electronic employee verification service is provided to
prevent any potential filing penalties associated with submitting incorrect employee information to
government agencies.
12
If you would like Greenshades to verify your employee identification, you will be informed of the number
of discrepancies found. To view a detailed report, there is a charge of $1.99 per discrepancies.
Greenshades will process the employees you selected and then show you how many employees were
found to be incorrect. Once presented with that information, you can choose whether or not to purchase
a report listing the problems. You are not obligated to purchase this report.
Once you have made your decision, click ‘Next’.
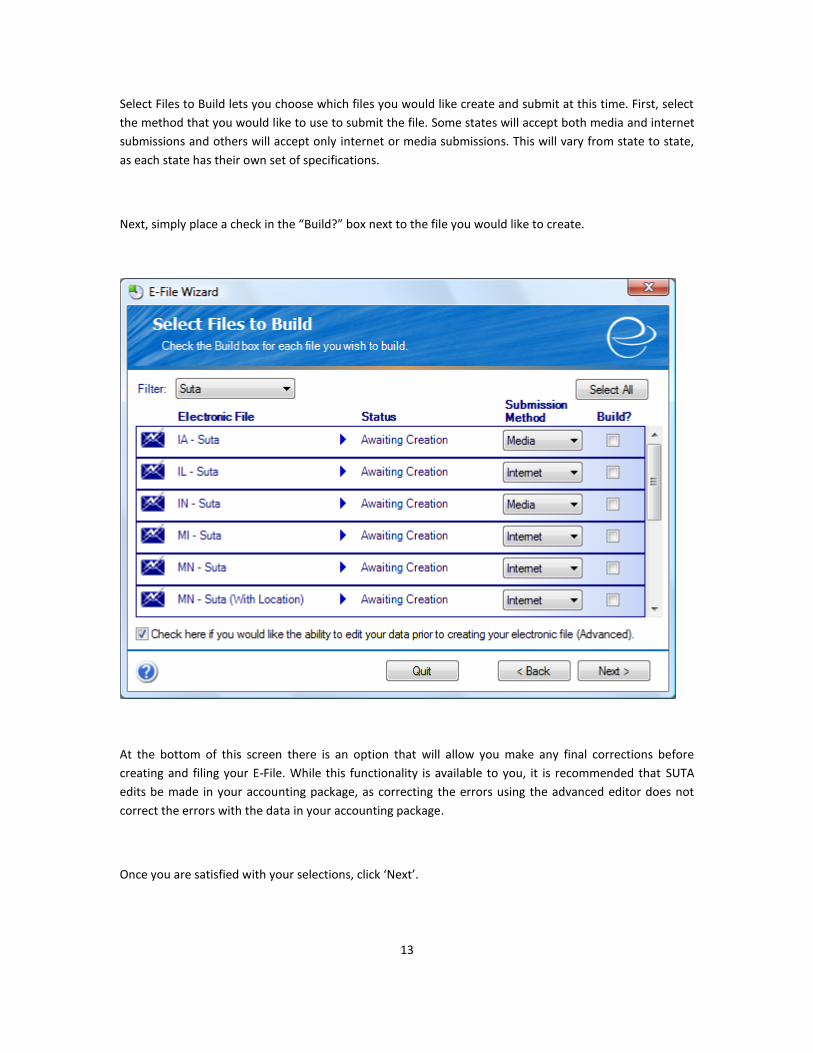
STEP 8 – SELECT FILES TO BUILD
13
Select Files to Build lets you choose which files you would like create and submit at this time. First, select
the method that you would like to use to submit the file. Some states will accept both media and internet
submissions and others will accept only internet or media submissions. This will vary from state to state,
as each state has their own set of specifications.
Next, simply place a check in the “Build?” box next to the file you would like to create.
At the bottom of this screen there is an option that will allow you make any final corrections before
creating and filing your E-File. While this functionality is available to you, it is recommended that SUTA
edits be made in your accounting package, as correcting the errors using the advanced editor does not
correct the errors with the data in your accounting package.
Once you are satisfied with your selections, click ‘Next’.
14
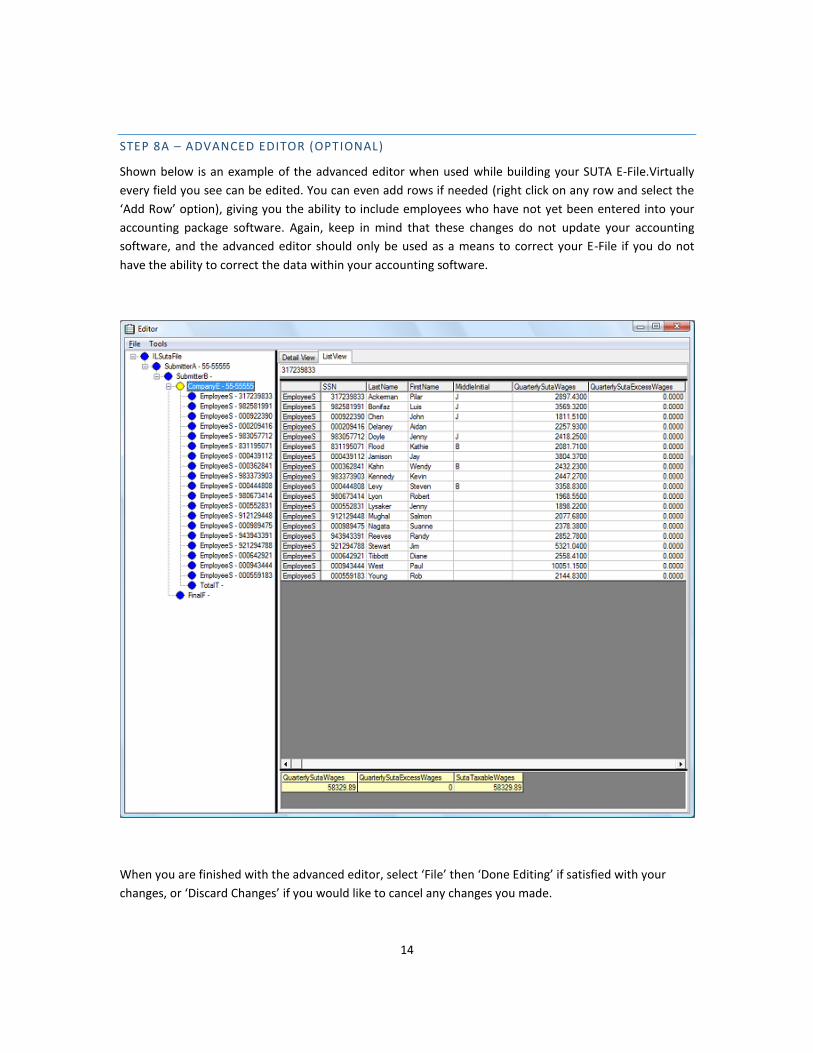
STEP 8A – ADVANCED EDITOR (OPTIONAL)
Shown below is an example of the advanced editor when used while building your SUTA E-File.Virtually
every field you see can be edited. You can even add rows if needed (right click on any row and select the
‘Add Row’ option), giving you the ability to include employees who have not yet been entered into your
accounting package software. Again, keep in mind that these changes do not update your accounting
software, and the advanced editor should only be used as a means to correct your E-File if you do not
have the ability to correct the data within your accounting software.
When you are finished with the advanced editor, select ‘File’ then ‘Done Editing’ if satisfied with your
changes, or ‘Discard Changes’ if you would like to cancel any changes you made.
15
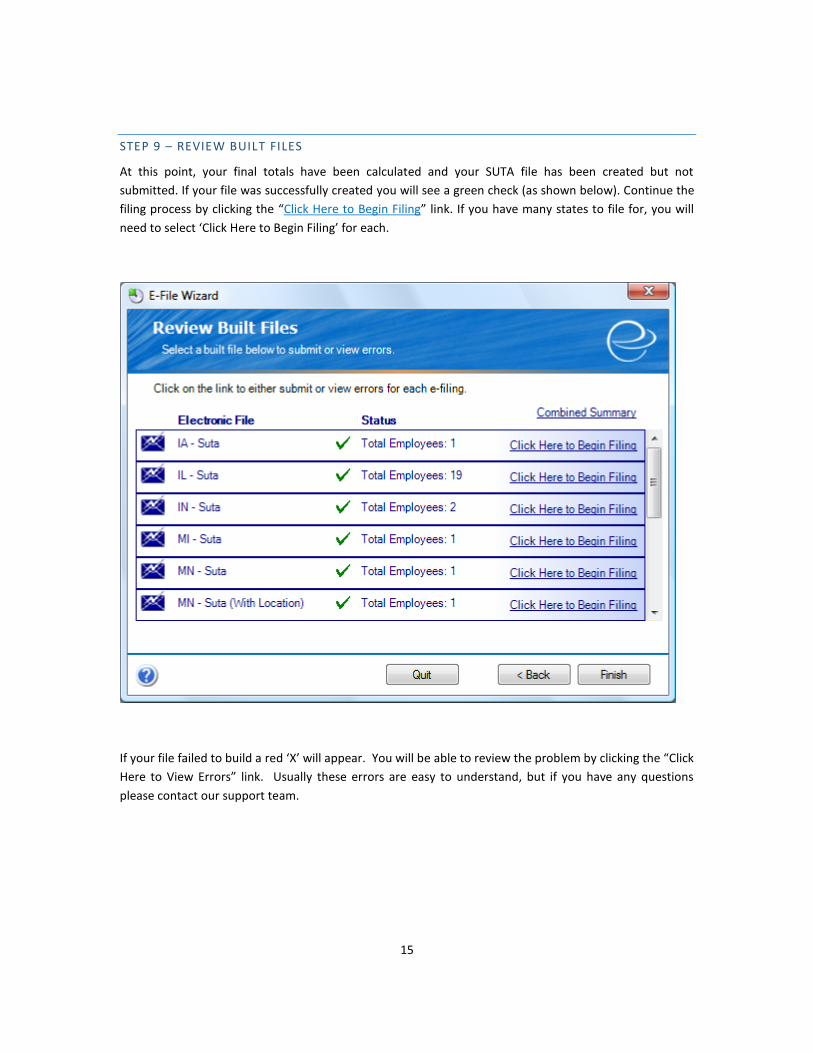
STEP 9 – REVIEW BUILT FILES
At this point, your final totals have been calculated and your SUTA file has been created but not
submitted. If your file was successfully created you will see a green check (as shown below). Continue the
filing process by clicking the “Click Here to Begin Filing” link. If you have many states to file for, you will
need to select ‘Click Here to Begin Filing’ for each.
If your file failed to build a red ‘X’ will appear. You will be able to review the problem by clicking the “Click
Here to View Errors” link. Usually these errors are easy to understand, but if you have any questions
please contact our support team.
16
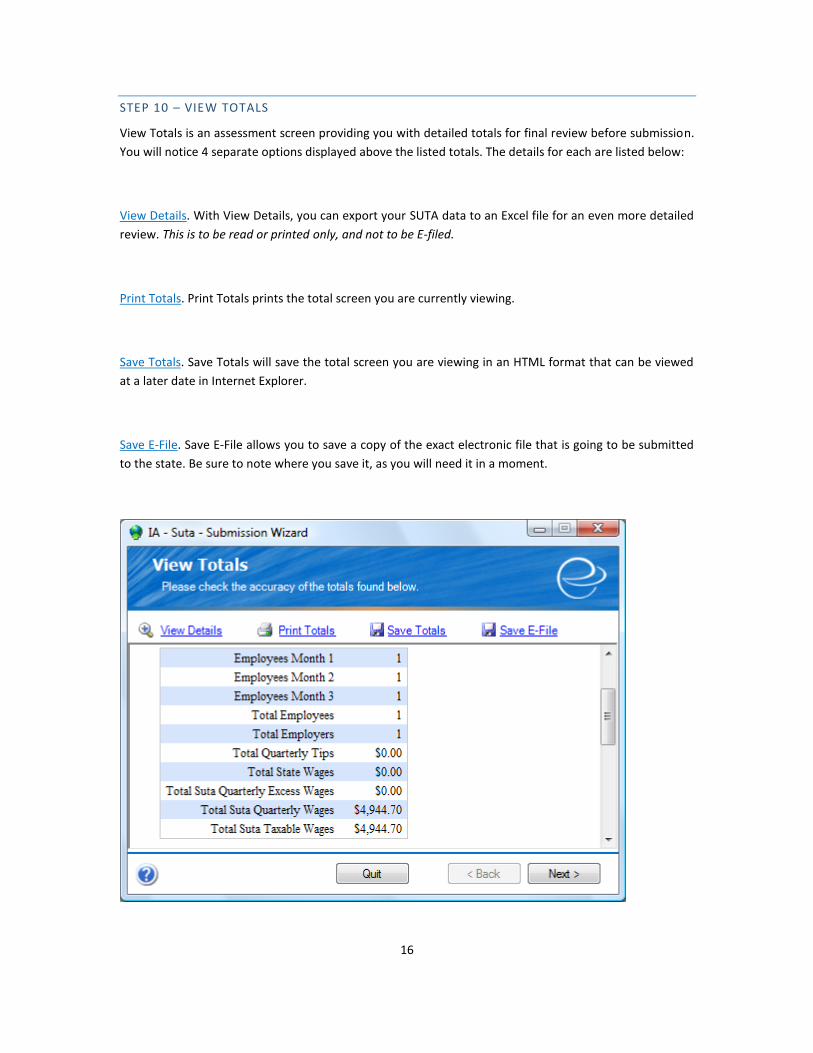
STEP 10 – VIEW TOTALS
View Totals is an assessment screen providing you with detailed totals for final review before submission.
You will notice 4 separate options displayed above the listed totals. The details for each are listed below:
View Details. With View Details, you can export your SUTA data to an Excel file for an even more detailed
review. This is to be read or printed only, and not to be E-filed.
Print Totals. Print Totals prints the total screen you are currently viewing.
Save Totals. Save Totals will save the total screen you are viewing in an HTML format that can be viewed
at a later date in Internet Explorer.
Save E-File. Save E-File allows you to save a copy of the exact electronic file that is going to be submitted
to the state. Be sure to note where you save it, as you will need it in a moment.
17
Once you’ve reviewed your totals, click ‘Next’.
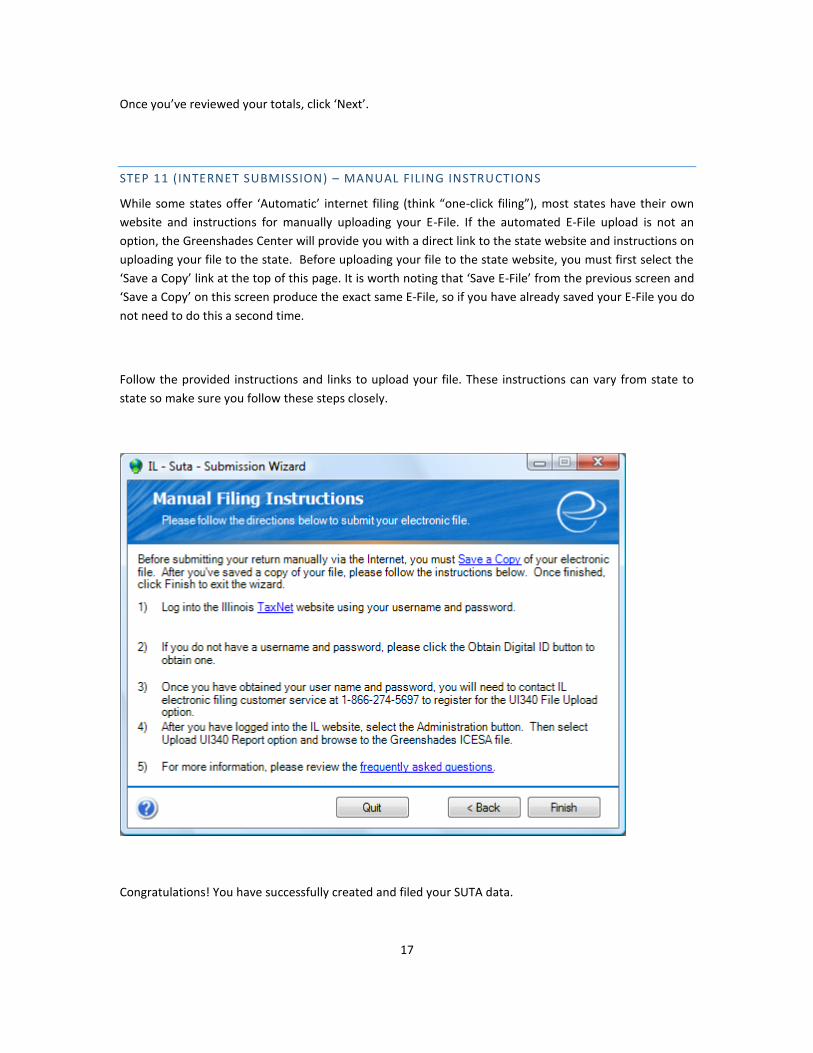
STEP 11 (INTERNET SUBMISSION) – MANUAL FILING INSTRUCTIONS
While some states offer ‘Automatic’ internet filing (think “one-click filing”), most states have their own
website and instructions for manually uploading your E-File. If the automated E-File upload is not an
option, the Greenshades Center will provide you with a direct link to the state website and instructions on
uploading your file to the state. Before uploading your file to the state website, you must first select the
‘Save a Copy’ link at the top of this page. It is worth noting that ‘Save E-File’ from the previous screen and
‘Save a Copy’ on this screen produce the exact same E-File, so if you have already saved your E-File you do
not need to do this a second time.
Follow the provided instructions and links to upload your file. These instructions can vary from state to
state so make sure you follow these steps closely.
Congratulations! You have successfully created and filed your SUTA data.
18
Click ‘Finish’ here, and once more from the ‘Review Built Files’ screen, and you are done. If additional
states remain, return to Step 8 until all states have been completed.
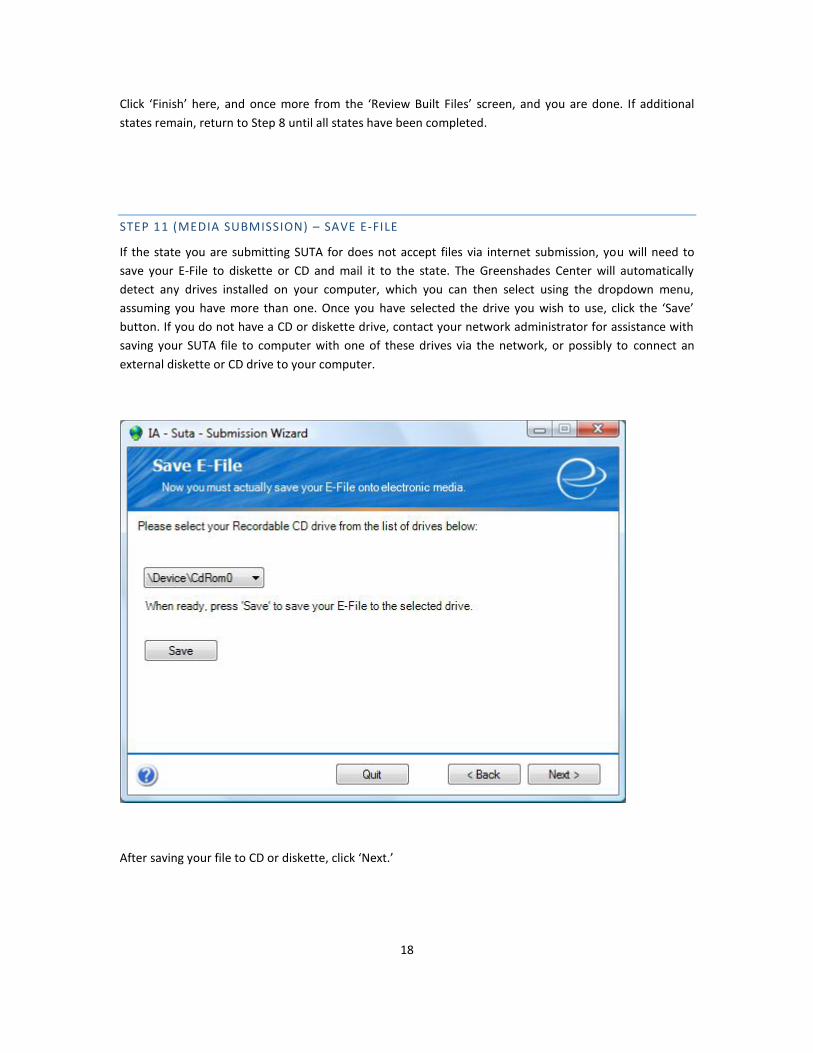
STEP 11 (MEDIA SUBMISSION) – SAVE E-FILE
If the state you are submitting SUTA for does not accept files via internet submission, you will need to
save your E-File to diskette or CD and mail it to the state. The Greenshades Center will automatically
detect any drives installed on your computer, which you can then select using the dropdown menu,
assuming you have more than one. Once you have selected the drive you wish to use, click the ‘Save’
button. If you do not have a CD or diskette drive, contact your network administrator for assistance with
saving your SUTA file to computer with one of these drives via the network, or possibly to connect an
external diskette or CD drive to your computer.
After saving your file to CD or diskette, click ‘Next.’
19
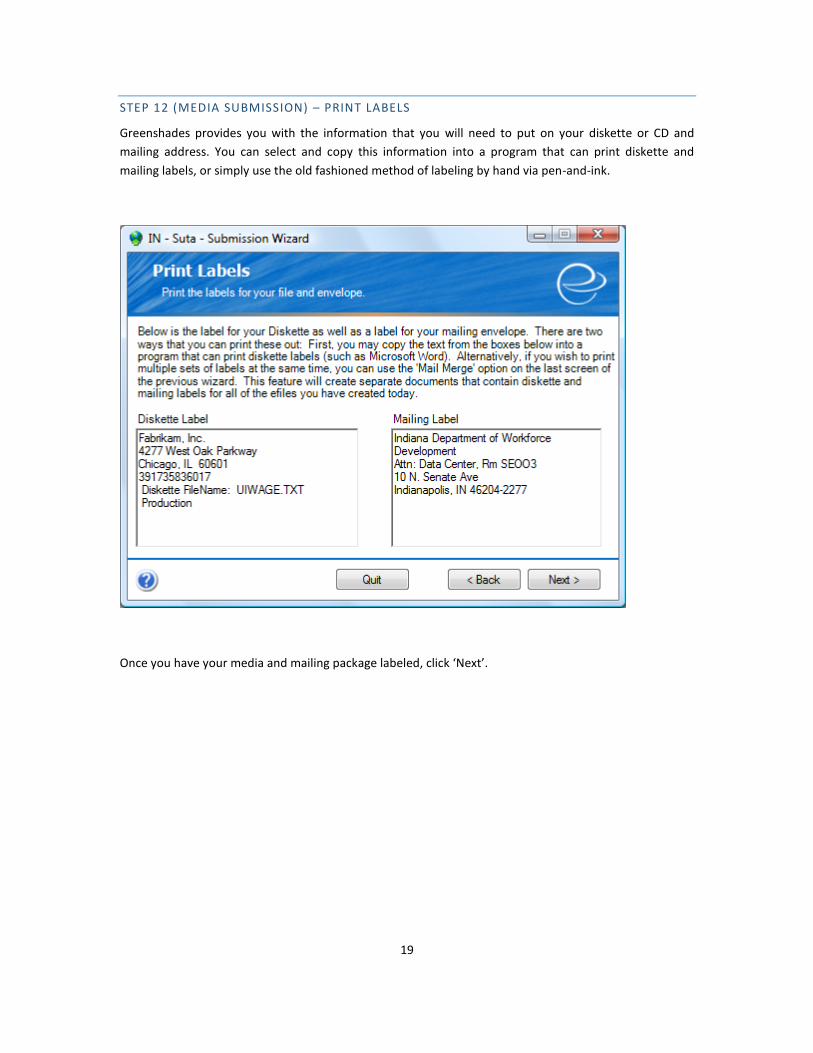
STEP 12 (MEDIA SUBMISSION) – PRINT LABELS
Greenshades provides you with the information that you will need to put on your diskette or CD and
mailing address. You can select and copy this information into a program that can print diskette and
mailing labels, or simply use the old fashioned method of labeling by hand via pen-and-ink.
Once you have your media and mailing package labeled, click ‘Next’.
20
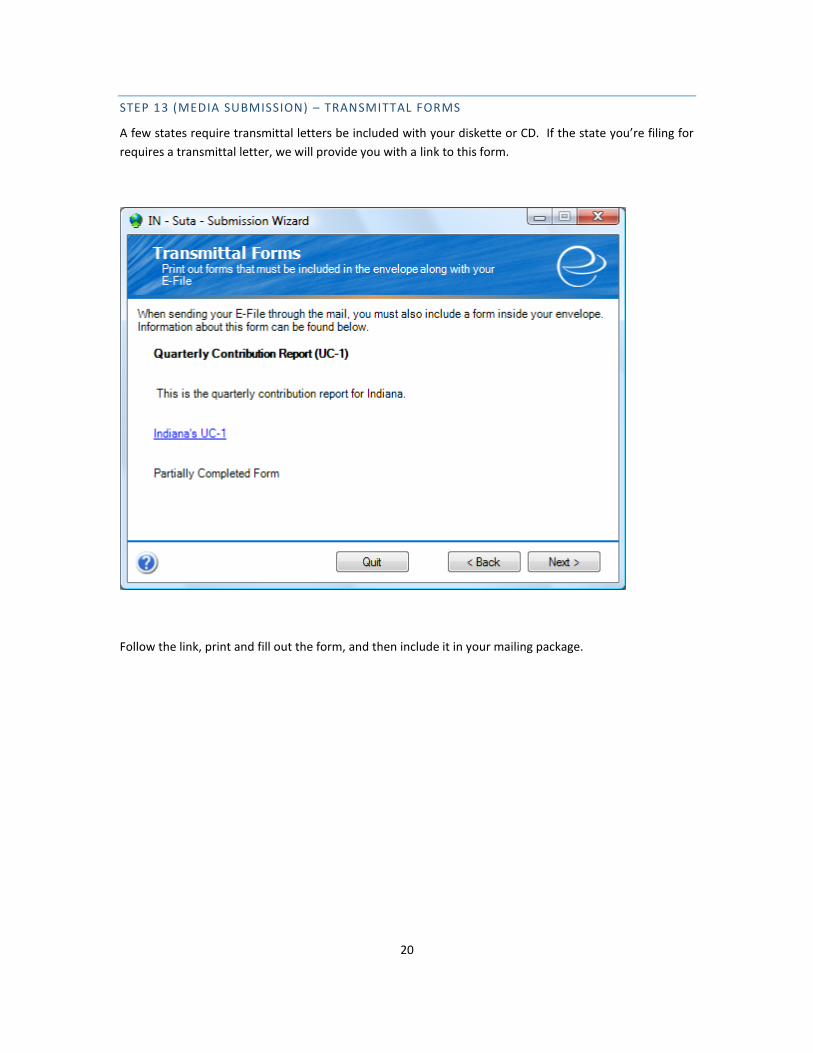
STEP 13 (MEDIA SUBMISSION) – TRANSMITTAL FORMS
A few states require transmittal letters be included with your diskette or CD. If the state you’re filing for
requires a transmittal letter, we will provide you with a link to this form.
Follow the link, print and fill out the form, and then include it in your mailing package.
21
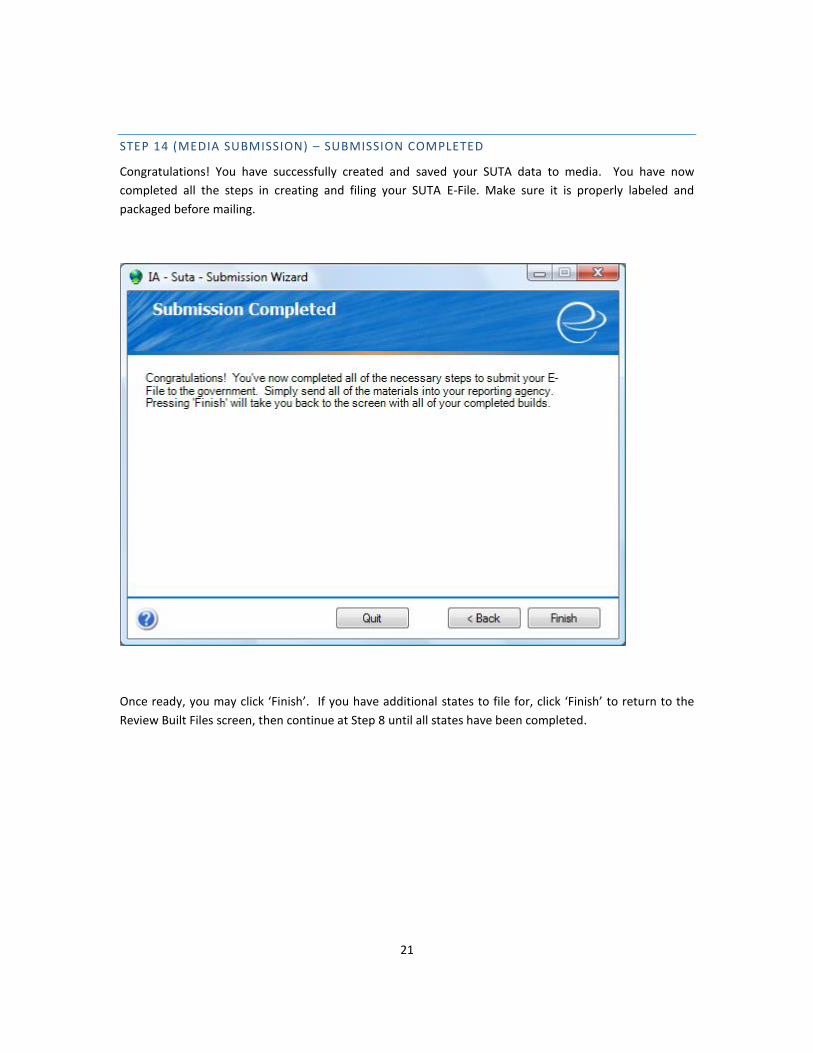
STEP 14 (MEDIA SUBMISSION) – SUBMISSION COMPLETED
Congratulations! You have successfully created and saved your SUTA data to media. You have now
completed all the steps in creating and filing your SUTA E-File. Make sure it is properly labeled and
packaged before mailing.
Once ready, you may click ‘Finish’. If you have additional states to file for, click ‘Finish’ to return to the
Review Built Files screen, then continue at Step 8 until all states have been completed.


![The [?] center](https://img.pdfslide.net/doc/110x75/58ef1a431a28ab54138b4663/the-center-58fe5f90618cd.jpg)