Embed Size (px)
Citation preview

� Integrate your CSP Direct Agreement
Overview: - The information needed to integrate your CSP Direct tenant is contained in
this PDF Guide. You will be asked to create and access various authentication keys and
which you need to do in the Microsoft Partner Centre and Azure Portal for which you will
be required to have the appropriate permissions.
Important - CSP template file.
As you go through this process, capture the inputted information, along with the screen
prints, in the CSP template file (click to open)
This completed document will be required by Cloudmore support if you have any
problems.
© Cloudmore of 1 24 v5 2017 06

� Integrate your CSP Direct Agreement
Follow these steps instructions below to integrate your CSP Direct Tenant.
1. Add the 0365 CSP direct service from your marketplace
2. Find your partner tenant ID
3. Create your partner centre application ID
4. Create a user for Cloudmore SDK
5. Create your graph application
6. Set your permissions (Azure graph API)
7. Create your graph application secret
8. Find your graph application ID URL
9. Set your permissions (Partner centre native App)
10. Enter the information in Cloudmore
11. Run the PowerShell scripts
Do not enter the information in the Cloudmore platform until you have completed step 9. Save the information in the CSP template file until it is needed.
© Cloudmore of 2 24 v5 2017 06
You must use a Global Admin account when
completing each step in this guide.

� Integrate your CSP Direct Agreement
Step 1: Add the 0365 CSP direct service from your marketplace
Log in to Cloudmore. Navigate to your reseller menu, then click on marketplace.
Locate the Microsoft 0365 CSP direct service.
Click on service to add and follow on screen instructions.
© Cloudmore of 3 24 v5 2017 06

� Integrate your CSP Direct Agreement
Step 2: Find your partner tenant ID
With your Global Admin Account - Login to your partner center, https://partnercenter.microsoft.com.
Navigate to account settings, then select
organizational profile.
Copy the Microsoft ID (Partner Tenant ID)
to the CSP template file.
Screen print the page and save in theCSP template file under the correct
heading.
© Cloudmore of 4 24 v5 2017 06
xxxxxxx-xxxx-xxxx-xxxx-xxxxxxxxx

� Integrate your CSP Direct Agreement
Step 3(a): Create your partner centre application ID
Navigate to account settings, then select app management.
© Cloudmore of 5 24 v5 2017 06
Click add new native app.

� Integrate your CSP Direct Agreement
Step 3 (b): Create your partner centre application ID
© Cloudmore of 6 24 v5 2017 06
Copy the app name to the
CSP template file.
Copy the app ID to the CSP
template file.
Screen print this page and savein the CSP template file under the correct heading.
xxxxxxx-xxxx-xxxx-xxxx-xxxxxx

� Integrate your CSP Direct Agreement
Step 4(a): Create a user for Cloudmore SDK
Navigate to account settings.
Select user management.
Click add new native app.
© Cloudmore of 7 24 v5 2017 06

� Integrate your CSP Direct Agreement
1
Name the account
Cloudmore SDK account. Note: Do not use an existing
account.
2
Select admin agent in the
“Assists your customers as”
Select not an admin in the
“Manages your company
as”.
3
Click add. A temporary
password will be displayed.
Login immediately using this
account and reset the
password.
4
Copy the PC user name
(email address) and the new
PC password to the CSP
template file.
© Cloudmore of 8 24 v5 2017 06
Step 4(b): Create a user for Cloudmore SDK

� Integrate your CSP Direct Agreement
Step 5(a): Create your graph application
Using your Global Admin Account
Login to your azure portal
https://portal.azure.com.
Navigate to azure active directory.
© Cloudmore of 9 24 v5 2017 06
Navigate to app registrations.

� Integrate your CSP Direct Agreement
Step 5(b): Create your graph application
Click + add.
Enter the name azure graph API
production.
Select web app / API under Application
type.
Enter http://localhost under Sign-On URL.
You need to click outside of the box to
make the Create button turn blue. Then
you can click on create.
Once the app is created and you see a
successful message in the top right corner.
Click on the app you just created.
© Cloudmore of 10 24 v5 2017 06

� Integrate your CSP Direct Agreement
Step 6: Set your permissions (Azure graph API)
Copy the application IDto the CSP template file.
Click requiredpermissions.
© Cloudmore of 11 24 v5 2017 06

� Integrate your CSP Direct Agreement
1
Click + add
Select an API, select window
azure service management
API.
2
Check the delegated
permission (access azure
service management…), click
select > done to save the API.
3
Screen print the page and save
in the CSP template file under
the correct heading.
4
Click windows azure active
directory. Set the permissions
as highlighted below. Click
save.
© Cloudmore of 12 24 v5 2017 06
Step 6(a): Set your permissions (Azure graph API)

� Integrate your CSP Direct Agreement
Step 6(b): Set your permissions (Azure graph API)
Tick the 4 permissions
boxes that are marked.
After saving, ensure the
number of permissions
allocated is showing 1
and 3.
Screen print the page
and save in the CSP
template file under the
correct heading.
© Cloudmore of 13 24 v5 2017 06

� Integrate your CSP Direct Agreement
Step 7: Create your graph application secret
Click Keys. Enter a description, for instance “graph API Key”.
Select “never expires”
under Expires. Then click save.
A value will be displayed.
You won’t be able to view it again.
© Cloudmore of 14 24 v5 2017 06
Copy the value immediately (Graph Application Secret) to the CSP template file.
xxxxxxx-xxxx-xxxx-xxxx-xxxxxx

� Integrate your CSP Direct Agreement
Step 8: Find your graph application ID URL
Click properties.
Under properties set multi-tenanted to yes.
Copy the app ID URI to the
template document.
Screen print the page and
save in the CSP template
file under the correct
heading.
© Cloudmore of 15 24 v5 2017 06

� Integrate your CSP Direct Agreement
Step 9(a): Set your permissions (Partner Centre Native App)
Navigate to app registrations.
Then select partner center native app.
© Cloudmore of 16 24 v5 2017 06

� Integrate your CSP Direct Agreement
Step 9(b): Set your permissions (Partner Centre Native App)
Click required permissions
Click windows azure active
directory…”.
Tick the 3 permissions boxes
that are marked. Click save.
After you save make sure the
number of permissions
allocated is 3.
Screen print the page and
save in the CSP template file
under the correct heading.
© Cloudmore of 17 24 v5 2017 06

� Integrate your CSP Direct Agreement
Step 9(c): Set your permissions (Partner Centre Native App)
Click + add.
Click select an API, Select azure graph API
production (that was created
in step 5), click select.
Add the permission called
access azure graph API, click
select and then done to save
the API.
Screen print the page and
save in the CSP template file
under the correct heading.
© Cloudmore of 18 24 v5 2017 06

� Integrate your CSP Direct Agreement
Step 10(a): Enter the details into Cloudmore
Log in to Cloudmore. Navigate to
your reseller menu.
Click on my services, Microsoft 0365 CSP direct.
Click on authentication keys.
© Cloudmore of 19 24 v5 2017 06

� Integrate your CSP Direct Agreement
Step 10(b): Enter the details into Cloudmore
© Cloudmore of 20 24 v5 2017 06
Copy the keys from the template
document and paste into
Cloudmore.

� Integrate your CSP Direct Agreement
Step 11(a): Run the PowerShell Scripts
Requirements
You need to use a 64-bit version of Windows and any of the following are
supported:
• Windows 10 • Windows 8.1 or Windows 8 • Windows 2012 R2 or Windows Server 2012 • Windows 7 Service Pack 1 (SP1) • Windows Server 2008 R2 SP1
(a)
Install Microsoft Online Services Sign-in
Assistant (64-bit version).
From https://www.microsoft.com/en-
us/download/details.aspx?id=41950 Then follow the on-screen installation
instructions.
(b)
Install Windows Azure Active Directory
Module for Windows PowerShell.
From http://go.microsoft.com/fwlink/
p/?linkid=236297
Then follow the on-screen installation
instructions.
Choose to place an icon on the desktop
during installation so you easily can find
the application in next step.
(c)
Start the Windows Azure Active
Directory Module for Windows
PowerShell from the icon you placed on
the desktop (otherwise you find it on
the start menu).This will start a Windows PowerShell
window with Azure.
© Cloudmore of 21 24 v5 2017 06
� Integrate your CSP Direct Agreement
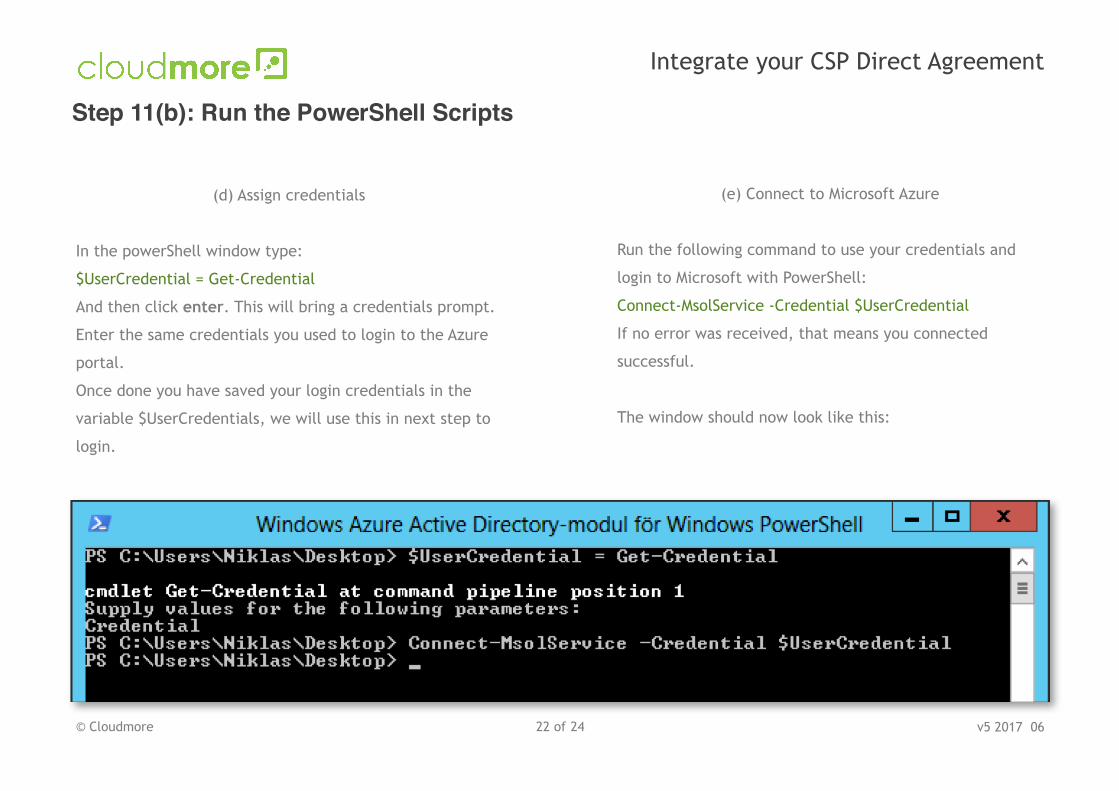
(d) Assign credentials
In the powerShell window type:
$UserCredential = Get-Credential
And then click enter. This will bring a credentials prompt.
Enter the same credentials you used to login to the Azure
portal.
Once done you have saved your login credentials in the
variable $UserCredentials, we will use this in next step to
login.
(e) Connect to Microsoft Azure
Run the following command to use your credentials and
login to Microsoft with PowerShell:
Connect-MsolService -Credential $UserCredentialIf no error was received, that means you connected
successful.
The window should now look like this:
© Cloudmore of 22 24 v5 2017 06
Step 11(b): Run the PowerShell Scripts

� Integrate your CSP Direct Agreement
(f) Save your "Azure Graph App" ID to variable.
Run the following command to save your "Azure Graph App” ID to a PowerShell variable: $AppID = “<enter-your-Azure Graph App-id-here>”
(g) Run the following command one by one.
$group = Get-MsolGroup | ? {$_.DisplayName -eq 'AdminAgents'}
$principal = Get-MsolServicePrincipal | ? {$_.AppPrincipalId -eq $AppID}
Add-MsolGroupMember -GroupObjectId $group.ObjectId -GroupMemberType ServicePrincipal -GroupMemberObjectId $principal.ObjectId
(h) Finished
Now you are done. Close the PowerShell window to disconnect from Microsoft.
© Cloudmore of 23 24 v5 2017 06
Step 11(c): Run the PowerShell Scripts

� Integrate your CSP Direct Agreement
Step 12: Completing your setup
1. Import organizations/customers - Do this now if you have not already done so.
2. Link your CSP customer tenants - Enables data processing in Cloudmore.
3. Test CSP setup - Do this after you have linked your customer tenants.
Click the links to access the relevant setup guides.
END.
© Cloudmore of 24 24 v5 2017 06


![[ Module 2] How to integrate CSP into urban development?](https://img.pdfslide.net/doc/110x75/568163c1550346895dd4e38b/-module-2-how-to-integrate-csp-into-urban-development.jpg)