Embed Size (px)
Citation preview
- 1 -
THE METAMORPHOSIS OF THE GOD OF WAR:
The Changing Face of Australian Field Artillery in World War One
******************************************************************************
Then let us bring light artillery,
Minions, falc'nets, and sakers, to the trench,
Filling the ditches with the walls' wide breach,
And enter in to seize upon the hold.
Christopher Marlowe, Tamburlaine the Great, Part 2, III, iii
In 1914, the Royal Australian Artillery (RAA) was thrust into a war it was not wholly designed
for. It was forced to expand rapidly, and to embrace new tactical and technical procedures in
order to best provide effective fire support - in the form of the Australian Field Artillery (AFA) -
to the Australian Imperial Force (AIF) and its allies. The echoes of those resultant changes
within the structure of the AFA are still heard today.
The AFA which arrived in France in March 1916 was in many ways a fledgling entity. Artillery
itself had recently undergone some of the most drastic changes to its employment and to the
equipment in service since its advent, the most important of these being the ability to fire
indirectly. These changes were simultaneously facing artillery forces throughout the world, and
each attempted to apply the innovations. The Western Front was the crucible from which
modern artillery and its usage emerged.
Peculiar to the AFA, but just as important a change, was the extensive reorganisation and re-
equipment that followed the AIF's withdrawal from the Gallipoli campaign. Artillery
involvement in the campaign had been limited, but lessons had nevertheless been learned, and
the restructuring was necessary to prepare for the commitment of firepower on a much larger
scale. This article seeks to describe, explain and evaluate the changing organisation, equipment
and employment of the AFA on the Western Front during World War I.
Firepower is unilaterally considered a fundamental factor of a force's combat power, together
with manoeuvre and morale. It is not surprising, then, that the evolution of modern warfare has
been punctuated with the milestones passed in the development of firepower, and artillery and
artillery tactics in particular. The article therefore first discusses the evolution of modern
artillery, in particular as it pertained to the development of artillery in Australia. It then
describes the formation of the RAA, and the AFA's involvement in the Great War prior to
deployment to the Western Front, and the changes in artillery technology and its employment
which had already occurred during the course of the war. Finally, it traces the progression of the
AFA, and examines case studies of three battles in which its evolution can be demonstrated. In
particular, the concept of neutralisation as an aim of artillery fire, the reorganising of the Field
Artillery Brigades, and the growing cognisance of, and employment of breakthroughs in barrage
fireplan construction, fuse technology and communications are identified as key areas of
evolution that changed the face of Australian artillery, and ultimately shaped the War's outcome.
- 2 -
I - Prologue
The onset of the twentieth century saw the British Empire - and Australia with it - at war in
South Africa. Despite superior training, equipment and élan, the Royal Artillery faced severe
reversals as it initially attempted to support the infantry in the manner it had for hundreds of
years. In the face of rapid, long-range rifle and Maxim machine-gun fire from Boers in dispersed
and concealed positions, serving the guns in a direct fire role alongside the infantry became
untenable.1
As a result of lessons such as these, the ability to fire indirectly – i.e. when gun and target are not
intervisible - was developed. The recently-introduced field telephone allowed the Forward
Observer (FO) to communicate with the now distant gun position, but this meant individual
control of the fire of the gun by its detachment was relinquished, as they could not lay the gun
sight on the target. Instead, the accurate orientation of the guns and the "parallelism" of their fire
were eventually achieved - after cumbersome attempts with such things as wooden gun arcs and
dial plates - through the use of what is known as a director.2 This principle of orientation is still
used today.
A director was - and still is - in effect a simple theodolite that can be oriented with a compass
and then used to orientate or "pass line to" the gun sights through a simple trigonometric process.
When coming into action, a gun battery would orientate the guns in the following manner. The
gun sights were laid on the director, the angles to achieve a certain bearing (known then as an
"azimuth of fire") were reported, and correspondingly set on each gun to bring them into
sympathy with the director. This information was recorded, and bearings to aiming posts set up
as future reference points. During a subsequent fire mission, bearings to targets were then
ordered to the guns and determined as a deviation from the original-recorded bearing.3 As the
South African War continued, this process was slowly adopted, but it was in no way universal, in
some instances old practices surviving even to the opening battles of World War I.4
This innovation naturally resulted in radical challenges to the method of employment of artillery
in all modern armies, and the newly formed RAA endeavoured with its counterparts to keep
abreast of such doctrinal change. Through the dogged survival of a nucleus of regular Gunners,
1914 saw the RAA at least on a technical par with the Europeans. Even so, it would take much
experience and many painful lessons over the next five years to marry technical knowledge with
practical application, and to culminate in the balanced, effective delivery of fire support.
1S. Bidwell, Gunners at War: a Tactical Study of the Royal Artillery in the 20th Century, p 15
2R. Cubis, A History of 'A' Battery, p 107
3S.N. Gower, Guns of the Regiment, p 47
4Bidwell, op. cit., p 15
- 3 -
II – Federation to ANZAC
Despite the fact that the RAA is the oldest formed Commonwealth body in Australia, the breadth
and rate of change from its inception to embarkation in December 1914 was still remarkable.
Although there were a number of militia artillery units in existence at the turn of the century,5 the
Permanent Military Forces (PMF) artillery strength was confined to a single regular battery in
Sydney ('A' Battery RAA, later known as 'A' Instructional Cadre, but originally titled 'A' Battery,
NSW Artillery), and a section each of a regular battery in Melbourne ('B' Instructional Cadre
RAA) and in Brisbane ('C' Instructional Cadre RAA).6
The creation of the AIF saw these units form the nucleus of the 1st Australian Field Artillery
Brigade (1st AFA Brigade), one of three field artillery brigades of the 1st Division. Originally,
the Divisional Artillery of the AIF (and later, the Australian and New Zealand Army Corps
(ANZAC)) comprised three field artillery brigades, each comprising a headquarters, three field
batteries and an ammunition column.7 Of these, elements of the 1st, 2nd and 3rd AFA Brigades
all saw limited service at Gallipoli.8 Their employment at the ANZAC beach-head was curtailed
by the lack of suitable, secure gun positions, and the difficulties met engaging many of the
Turkish positions. The latter problem resulted from the lack of well-sited, qualified FOs, and
problems associated with crests interrupting the trajectory of the guns' fire.9 The 1st AFA
Brigade was also deployed to the Cape Helles beach-head, augmenting the 29th (UK) Divisional
Artillery there.10
The Gallipoli campaign brought home the shortcomings of the 18-pounder guns that the
Australian field batteries were equipped with, and the organisational anomalies between the
RAA and other Allied armies' artillery. While still an adequate piece, the 18-pounder's low, flat
trajectory and single charge system restricted its engagement of targets located behind crests. It
also accentuated the "zone of fire" created by the fall of shot of the gun, and thus reduced the
gun's relative effectiveness in engaging troops in narrow, deep trenches.11
The RAA, therefore, needed a field piece that could effectively engage targets that the 18-
pounders could not. For these reasons, and for the sake of commonality with Allied artillery
units, it was decided, upon withdrawal from Gallipoli, to re-structure each artillery brigade,
including increasing the number of field batteries from three to four, and raising a 4.5 in howitzer
brigade of three batteries in each Divisional Artillery (howitzers having the ability to fire a high-
angle trajectory, negating crest clearance problems).12
5D. Brook, Roundshot to Rapier: Artillery in South Australia 1880-1984, p 40
6Cubis, op. cit., p 144
7Bean, The Official History of Australia in the War of 1914-1918, Vol 1, p 39; see also Table I of Appendix A
8Gower, op. cit., p 40; Cubis op. cit., p 128; Bean, The Official History of Australia in the War of 1914-1918, Vol 2,
p 281 9Bean, The Official History of Australia in the War of 1914-1918, Vol 1, pp 314, 392, 393; T. Wilson, The Myriad
Faces of War, p 133 10
Cubis, op. cit., p 129; Bean, The Official History of Australia in the War of 1914-1918, Vol 1, p 605 11
R. Prior and T. Wilson, Command on the Western Front, p 36; Bidwell, op. cit., p 35; I.V. Hogg, The Guns 1914-
1918, p 19; Brook, op. cit., p 58 12
Bean, Anzac to Amiens, pp 192, 193
- 4 -
As can be imagined, this restructuring placed great demands on manning replacement - despite
the recruitment of many militia artillerymen - with each newly-formed howitzer battery requiring
a nucleus of experienced personnel from the original field artillery brigades. This was in
addition to the cadres needed for the formation of entire divisional artilleries for the newly
arrived 2nd Australian Division (in Egypt from December 1915), the 3rd Australian Division
(which was sent directly to England and Salisbury Plain), and the 4th and 5th Australian
Divisions (which were formed in Egypt in February and March 1916 around the veterans of the
4th and 8th independent Infantry Brigades).13
As it turned out, the original field artillery
brigades were brought up to strength initially at the expense of the newer divisions. The raising
of two siege batteries in Australia from Royal Australian Garrison Artillery (RAGA) personnel
as a corps level asset also occurred at this time, and upon formation sailed for England to await
issue of their heavy howitzers.14
With the embarkation of the AIF - bar the 3rd Division - for France, came the full-scale
involvement of Australian artillery in the war. Upon arrival at Armentières, the restructuring of
the AFA continued, with the howitzer batteries of the dedicated howitzer brigades being re-
posted, one to each of the Field Artillery Brigades (FAB), with the old howitzer brigade
becoming a field brigade also.15
13
See Table II of Appendix B 14
Bean, The Official History of Australia in the War of 1914-1918, Vol 3, pp 63, 64; R.K. Peacock, Achievements
of Australian Artillery in British Campaigns, pp 14, 15; see also Table II of Appendix A 15
See Table III of Appendix A
- 5 -
III – The Gunnery Problem
At the outset of the Great War, the testing of the new theories of artillery employment began on a
scale hitherto unforseen. The quantum leap in firing technique from direct to indirect fire had
resulted in the necessity to centrally compute the firing information for all the guns, along with
this procedure's consequent advantages and disadvantages. Once the location of the target was
known, it could be engaged using "predicted fire" (mathematically computing the location) as
opposed to "ranging fire" (physically adjusting the fire on the ground), which understandably
enhanced surprise but also reduced accuracy.16
Attempts to solve what is known as the
"Gunnery Problem" were in progress by the start of World War I and continue to this day.
The first condition of the Gunnery Problem that was accounted for was the determining of the
location of the guns. With accurate maps and trigonometric survey methods this could be
achieved slowly, but the state of mapping of the area and altered terrain contested on the Western
Front was such that accurate locations were difficult to ascertain. Nevertheless, the static nature
of this type of warfare enabled the slow process of surveying the gun positions to occur,
especially before major fireplans were constructed.17
The same problems arose when
determining the location of the targets, and thus the displacement between gun and target.
Geographic locations could be ascertained, but only slowly and with great difficulty. The effects
of meteorology on "the waye of the pellete"18
were also taken into account for the first time with
field artillery in World War I. British coastal artillery units had earlier appreciated the effects of
"met", and therefore the effects of such conditions as wind, barometric pressure and temperature
became part of the gunnery prediction process. With the transfer of many Garrison Artillery
personnel to Field Artillery (in both British and Australian artilleries), these processes were
slowly adopted, although many of the older, traditionalist artillery commanders refused at first to
consider what became known as the "correction of the moment".19
The advent of central computation of fire allowed data of previously engaged targets to be
recorded. From this stemmed the technique known as registration, or the application of the
quantifiable fired data that effectively engaged a known point from a surveyed gun position to
obtain a "registration correction” which could be applied to engage other targets in the vicinity of
the first. During this process, the ballistic characteristics of individual guns became apparent. It
was soon realised that the muzzle velocity - and therefore the accuracy - of the piece depended
upon the state of wear of the equipment, and each gun had to be calibrated in order that all the
guns of the battery fell within certain limits. This was initially achieved by firing the battery and
determining individual corrections for each gun, but it was later superseded by the production of
theoretical firing tables that related to specific equipments, and corrections for specific wear
measurements that could be applied to them.20
16
Hogg, op. cit., p 53; A.L. Pemberton, Development of Artillery Tactics and Equipment, in Second World
War 1939-1945: Army, p 5; Prior and Wilson, op. cit., p 37 17
Pemberton, op. cit., p 4; Bidwell, Firepower: British Army Weapons and Theories of the War 1900-45,
pp 105-108 18
Medieval artillery handbook, quoted in A.W. Wilson, Story of the Gun, p 27 19
Bidwell, Gunners at War, pp 32, 33 20
Pemberton, op. cit., p 5; Bidwell, Firepower, p 108; J.B.A. Bailey, Field Artillery and Firepower, pp 142,150
- 6 -
Besides solving the Gunnery Problem, the other major concern facing the Allies at this stage was
the shortage of artillery ammunition. With no precedent for such a vast appetite, the ordnance
factories initially failed to cope. Despite this, the demand for and consumption of artillery
ammunition increased dramatically, trebling during the first two years of war.21
This
phenomenon resulted from commanders attempting to break the deadlock of trench warfare, with
its obstacles and well-protected defenders, by "reducing" enemy defences through continuous
bombardment; in effect, they attempted to apply siege warfare tactics to a defender who was not
restricted in resupply, reinforcement or redeployment of forces. The result was a protracted
bloodbath.
The problem of ammunition shortage was compounded by shortfalls in the quality of
construction of the fuses and shells themselves, causing misfires, premature explosions and
unexploded shells. At the outset of the war, shrapnel ammunition was the predominant
ammunition fired by British and Australian field guns, and the ballistic characteristics of the 18-
pounders combined to compound the problem of faulty ammunition by causing casualties in the
assault. Shrapnel is a round filled with lead/antimony balls, detonated by a time fuse set to burst
just prior to the shell striking the ground at the other end. The flatness of the trajectory often
meant shrapnel burst over the heads of assaulting friendly infantry, causing casualties. This
problem was rectified only after an instantaneous-fused High Explosive (HE) shell was
developed, and it was used to replace shrapnel in its role for covering fire.22
One benefit from the enormous quantities of ammunition consumed during the Great War was
the introduction of mass-produced ammunition; its advent meant that the common
inconsistencies inherent in the characteristics of gun ammunition that had been produced at the
same time, known as a batch, could also be taken into account for the first time. As the war
progressed, these batch corrections were derived by measuring the deviation from a standard
performance that each particular ammunition batch delivered.23
In 1914, all Allied artillery weapons were outclassed by the German 5.9 inch howitzer. As the
majority of these were guns, their flat trajectories severely curtailed their deployment in reverse
slope positions. This resulted in the Allied gun positions being placed either on forward slopes
in view of the enemy, or well to the rear, which hampered communication between observer and
gun position and the range to which targets could be engaged.24
The lack of instant, direct communication between gun position and observer led to the later
development of "SOS" mission (the antecedent of what is now known as Defensive Fire [DF]
task) procedures, during which after an agreed-upon signal, the supporting battery(ies) closest to
the unit requiring urgent assistance fired twenty rounds fire for effect, followed by two rounds
per gun per minute at the most likely enemy approach until further information could be
obtained.25
However, in this early stage of the war, many of the novel aspects of fire prediction technique
had either been ignored by the gunners of the time, or the equipment and/or expertise required
21
Bailey, op. cit., pp 128, 129 22
Wilson, op. cit. p 320; Bailey, op. cit., p 150 23
Bailey, op. cit., p 142; Pemberton, op. cit., p 5; Prior and Wilson, op. cit., pp 40, 293 24
Bailey, op. cit., pp 128, 129 25
Cubis, op. cit., pp 140, 150
- 7 -
for the successful application of these techniques were not available. The propensity of artillery
employment was towards observed indirect fire only, with predicted fire at a rudimentary stage.
Counter-Battery Fire (CBF) was rarely practised due to the ineffectiveness of current methods of
acquiring locations of hostile batteries, and a lack of emphasis placed upon winning what
became known as the depth battle, or the engagement of targets located deep inside enemy
territory, as a means of affecting the battle at the front-line.26
At this time, the techniques of
flash-spotting (using an intersection of bearings taken to the flash of enemy artillery fire to fix its
position) and sound-ranging (which employed the same principles, instead using ground
microphones to measure the distance travelled by the sound from the guns that had fired - known
as a primary detonation) were little more than theories, and not regarded as viable doctrine.27
By the end of the war, however, artillery was proving the decisive factor in the close quarter
battle, the exploitation phase, in depth fire, and in the suppression of defensive fire and the
interdiction of enemy resupply. The reason for this was not only improvements in fire
prediction, but more importantly the new methods of application of fire. Four phases are
identifiable in this transformation: the acceptance in 1914 of the inadequacies of the current
artillery doctrine, the subsequent period in 1915 of experimentation and massing of ordnance and
resources, the adoption of mass destruction tactics in 1916-17, and finally its replacement with
neutralisation from mid 1917 onwards.28
The concept of neutralisation29
(along with destruction)
as an aim of artillery fire is still relevant today.
26
Bailey, op. cit., p 127 27
Prior and Wilson, op. cit., pp 293-295; Wilson, op. cit. p 585,586 28
Bailey, op. cit., p 127 29
Neutralisation of the enemy can be described as that fire which prevents the enemy from taking effective action,
or at least severely impedes his operations.

- 8 -
IV – A Failed Precursor
The following vignette of the British experience at Neuve Chapelle is important, as the lessons of
its outcome formed the basis of the artillery tactics in vogue at the time of the AFA's arrival in
France. The irony of the similarity between the tactics employed at Neuve Chapelle, and those
that had evolved by the end of the war, is also noteworthy.
In 1915, the British Army made a three-brigade assault at Neuve Chapelle from 10-12 March, in
an attempt to pierce the German line. A number of innovations in the employment of artillery
were used; in particular, the short length of preparatory bombardment (35 minutes) was at odds
with the general trend. This, combined with the registration of howitzers over a period of weeks,
and the use of especially produced aerial-photograph maps for those howitzers to fire onto
trenches and depth targets using predicted fire, was at the cutting edge in artillery doctrine. In a
return to earlier tactics, field guns were also used in direct fire roles against the wire obstacles.30
This made best use of the characteristics of shrapnel, in a role where its fuse could be accurately
and swiftly set, and of the 18-pounder, and its flat, fast trajectory.
The attack failed for a number of reasons. Firstly, although the wire was cut successfully, the
howitzers firing on the trenches fell ineffectively during the assault, due to problems such as
ammunition inconsistency, poor calibration and inaccuracies in the fire prediction process.
Nevertheless, the preliminary bombardment neutralised the defence for long enough, and initial
objectives were achieved. The British were soon forced back, however, due to the narrowness of
the front they had attacked on (leaving themselves open to fire and counterattack from three
sides) and a lack of defensive fire for their new positions.31
The lessons learned from the battle were misguided. The experiment was deemed to have failed,
and there emerged a belief that total destruction of the defences was essential, rather than
correcting the faults in execution of the new doctrine. Consequently, the path towards such
destruction was taken instead, a process often conducted over weeks before an attack began,
regardless of surprise and of the fact that total neutralisation was not being achieved.
30
Bailey, op. cit., p 131; Prior and Wilson, op. cit., p38, 39; Wilson, op. cit. pp 123-125 31
Bailey, op. cit., p 131
- 9 -
V – Inklings of Success amongst Carnage
It has long been recognised that one of the most critical stages in any attack is the assault, and
thus, the effectiveness of the covering fire that supports the assault is also crucial. As the form of
the attack itself evolved through the Great War, so too did the assault barrage. What is of
interest is when one influenced the other, and vice versa.
The method of application of fire in the assault which was initially used, and known as a straight
barrage, consisted of engagement of a series of progressively distant targets at arbitrary intervals.
It was soon replaced by the lifting barrage, which engaged the length of the trench with parallel
belts of fire, concentrating upon areas of concern. Though more complex than its predecessor,
this method of barrage was still hampered by inaccuracies in fire direction, both predicted, prior
to the assault, and observed, during the assault.32
By 1916, changes had become apparent in a host of aspects. The creation of a corps-level
artillery commander aided in the orchestration of burgeoning artillery resources (both in number
and in calibre), which occurred contemporaneous with the growth of employment of aircraft for
observation of fire and for artillery intelligence. Preliminary bombardments stretched for days
(even weeks in the case of the Battle of the Somme) in an attempt to ensure destruction of enemy
soldiers and field defences. Such was the situation when the Field Artillery of the AIF arrived in
France.
The Australians' experience at Pozières shed an entirely new light upon their involvement in the
Great War. For the first time, the Australian Digger, alongside his British and French comrades,
was pitted against an adversary possessing a far greater destructive capability than the valiant
Turks had ever possessed. In this environment the Australian Gunners first truly tested their
mettle.
POZIÈRES
The battle for Pozières took place during the third stage of the great British offensive along the
Somme which lasted from July to September 1916, and was designed to reduce the pressure that
the Germans were placing on the French at Verdun. The greater part of Australian involvement
at Pozières took place between 23 July and 8 August 1916, during which the 1st, 2nd and 4th
Divisions - and their respective divisional artilleries - were committed. Previously, divisions of
the British Fourth Army under General Sir Hubert Gough had failed to take Pozières village
despite repeated attempts, thanks to the depth and brilliant siting of the German defences.
The defenders of Pozières took advantage of the gently sloping ground to the east of the village,
and created interlocking fields of fire for their machine-guns. The defences were also sited in
such a way as to interfere with the Allies' positioning of their artillery. All suitable, nearby gun
positions were in full view of the German defences, and thus the attacking artillery had to be
sited well to the rear, creating communication problems with the infantry. This also caused them
to fire at close to maximum range, thus requiring the guns to be redeployed to support the
advancing troops, if a major breach was made in the German defences.33
32
Bailey, op. cit., p 132; Keegan, J and Holmes, R. Soldiers: A History of Men in Battle , p 114 33
P. Charlton, Pozières : Australians on the Somme 1916, p 124

- 10 -
The FABs of the 1st Divisional Artillery took up positions in the line in Sausage Valley, east of
Albert from 17 July 1916, relieving 19th (UK) Division. 19th (UK), 25th (UK) and 34th (UK)
Divisional Artillery, along with the 45th Heavy Artillery Group, would support the Australian
assault on Pozières.34
The 1st Divisional Artillery remained in action there until 30 July, when it
was relieved by the 2nd Divisional Artillery, which had begun deploying there from 27 July.35
Under direct command of General Gough, General H.B. Walker's 1st Division, with the 48th
British Division on its left flank, was first into the fray at Pozières. Originally scheduled for 19
July (24 hours after Walker was given orders!), the attack was subjected to successive
postponements. The last one was brought about after an error was found by General Brudenell
White, Birdwood's Chief of Staff, in the supporting fireplan schedule. The attack was held for a
further twenty-four hours, and finally set for 23 June 1916.36
The inexperience of the Australian
artillery staff officers at such a task was blamed, but in fact, staff of the Reserve Army HQ had
planned that aspect, and the remainder of the fire plan was considered well planned and
effective.37
At 0100, the advance started for the first wave. The 1st Divisional Artillery had been firing at
the highest rate possible for 32 minutes, but the remainder of the guns of the 4th and Reserve
Armies had been firing along the front for some hours. Instinctively sensing the need to come to
grips with the enemy as soon as possible after the bombardment lifted, the men of the 3rd and 1st
Brigades crept towards the shellfire before the assault began, pre-empting an eventually standard
doctrine of providing "jumping-off trenches", and having fireplans constructed in such a way as
to have the assaulting troops as close as possible to the advancing bombardment.38
During the first assault, Lieutenant Thurnhill, of the 6th Battery AFA, had one of his 18 pounder
guns manhandled to within metres of the German positions, from where it engaged the defences
with over 115 rounds of direct fire.39
In this way, many obstacles and enemy positions were
destroyed which would otherwise have been left intact, with potentially dire consequences. The
only other way in which such results could be duplicated would be through well aimed, observed
indirect fire. It will be remembered that such tactics were also used to great effect by the British,
at Neuve Chapelle in 1915, but as with many of the lessons from this earlier battle, it was not
adopted as an accepted practice.
The Pozières Trench, and the village of Pozières itself were taken with comparatively few
casualties by dusk on 23 July, the only successful assault during the entire third offensive.
However, the savagery of the retaliatory fire and counterattacks faced by the men of both the 1st
and the relieving 2nd Divisions gave evidence of the value of the positions they had won. The
Germans still held the heights to the north of Pozières, and from their positions along the Old
German (OG) lines could command the battlefield by fire and by view.40
34
Cubis, op. cit., p 139; E.T. Dean, The War Service Record of the First Australian Field Artillery Brigade 1914-
1919, p 7; Bean, Official History of Australia in the War of 1914-1918, Vol 3, pp 479, 485, 491 35
Brook, op. cit., p 50; Dean, op. cit., p 7 36
Charlton, op. cit., p 132, 167; Cubis, op. cit., p 139; Bean, Official History of Australia in the War of 1914-1918,
Vol 3, p 485 37
Charlton, op. cit., p 132, 167 38
Bean, Official History of Australia in the War of 1914-1918, Vol 3, p 495; Laffin, ANZACS at War, p 65 39
Bean, Official History of Australia in the War of 1914-1918, Vol 3, p 497 40
Bean, Anzac to Amiens, p 243; Laffin, ANZACS at War., p 67; Charlton, op. cit., pp 139,142, 144, 164
- 11 -
At this stage, the remainder of the front had become static, and the Germans were free to
concentrate their artillery upon Pozières. Despite this, little Allied artillery was seen to reply.
General Haig's personal visit to the I ANZAC HQ left him in no doubt where the fault lay, and
the removal of Birdwood's Commander Royal Artillery (CRA), Brigadier-General Cunliffe-
Owen and his staff followed. This was a futile gesture, considering Gough had placed the 1st
Australian Division directly under his command for the assault, and Corps HQ had nothing to do
with the staffing of the artillery plan. Nevertheless after this assault, the Reserve Army's control
of the artillery for the Pozières salient was relinquished, and reverted to I ANZAC Corps.
Besides, with the techniques for accurate CBF still in their infancy, its effectiveness (along with
the effectiveness of the current standard of "SOS" fire missions) was frustrated by the lines of
communication to the guns being continually cut, and the lack of accurate intelligence of the
German gun and frontline positions. The ground around Pozières was a featureless desert
confounding all attempts at fixing own and enemy positions.41
The subsequent assault by the 7th Brigade of the 2nd Division (commanded by General J.G.
Legge) on Pozières Heights on 29 July was doomed to failure from the outset. With the assault
originally planned with no covering artillery fire at all,42
the hurriedly planned supporting
bombardment cut very little of the massive wire defences of the OG Lines, as the field guns of
the 1st and 2nd Divisional Artilleries were used, firing shrapnel, as opposed to higher calibre
weapons firing high explosive, which was slowly being recognised as a better means of
engagement of such obstacles.43
Although an effective destroyer of wire if accurately set,
shrapnel fuses - as discussed earlier - were very difficult to set to an exact length, and if fired
indirectly, could not be corrected if there were no observer in direct communication with the
guns.
Meanwhile, the bombardment was proving ineffective. It failed to neutralise the defenders, and
churned the surrounding ground into a powdered wasteland; as a result, it was not possible for
jumping-off trenches to be dug, and navigation was made impossible. Surprise was lost, the
assaulting troops were shelled heavily as they waited in their forming-up positions (FUPs) for the
attack to begin, and encountered devastating fire from machine guns as soon as the advance
began.44
The majority of objectives were not achieved, and Pozières Heights was again assaulted by
troops of the 6th and 7th Brigades on 4 August, but this time with greater success. Although the
artillery resources were the same as those of the last assault, (the heavy artillery of the Fourth
Army, I ANZAC, II, and III Corps, and the field artilleries of the 25th (UK) and 34th (UK)
Divisions, part of the 1st Australian and Legge's own 2nd Divisional Artillery) the supporting
fireplan was better prepared and the new artillery commander, Brigadier-General Napier, used
his guns wisely. "Milk-runs" - a series of short saturation bombardments - of objectives were
conducted in reverse order to the order of assault. CB targets were fired upon throughout, with
additional heavy artillery resources ready to add their weight of fire onto any German battery
that opened up. 45
41
Charlton, op. cit., p 152; Bean, Official History of Australia in the War 1914-1918, Vol 3, pp 615-617 42
Charlton, op. cit., p180, 188 43
Charlton, op. cit., p 177; Bean, Official History of Australia in the War of 1914-1918, Vol 3, pp 619, 620 44
Excerpts of General Legge's report on the second assault on Pozières , in Charlton, op. cit., pp 178-181 45
Charlton, op. cit., pp 200, 201

- 12 -
Learning from their earlier success in the first assault, the Australian soldiers crept to within 25
metres of the barrage. As soon as the barrage lifted, the Australians fell upon the Germans as
they emerged from their dug-outs, finally capturing the Heights. Despite their exposed position
on the Pozières Salient, the Australians grimly held off counterattacks, and weathered an
immense bombardment from three sides.46
The I ANZAC Corps artillery was still being
required to fire continuous CBF missions until well after 5 August.47
The exhausted 2nd Division was relieved by the 4th Australian Division between 5 and 6
August, but the battle for Pozières continued until 8 August 1916, with the 4th remaining to
defend this area, and to continue the advance towards Mouquet Farm for some weeks more
before it was relieved. However, during this, their first major assault, the Australian artillery
staff and their Divisional and Corps commanders learnt much about the requirements of
fireplanning on such a scale.
A new method of arranging the assault barrage was devised and adopted by the end of 1916, the
"piled-up barrage". This constituted parallel lines of fire advancing, as in its predecessor, but
upon reaching the enemy lines would be concentrated, thus "piling up" as it became effective.
Its shortfalls lay in its inability to treat unseen targets, and the longer duration it required to treat
the same objective. Depth targets were still not effectively engaged, although improvements
were made in other areas, such as providing superimposition of fire-units within the fireplan.
This practise allowed guns to respond to an unexpected call for fire without creating a "hole" in
the barrage.48
The benefit of these innovations would soon be seen. More importantly for the Australians, they
would see how effective these and other lessons learned in artillery staff planning could be, in
the coming battles.
46
Bean, Anzac to Amiens, p 244; Charlton, op. cit., p 203, 206-209 47
Charlton, op. cit., p 218 48
Bailey, op. cit., p 133, 136, 137

- 13 -
VI – A Bloody Debut for All-Arms Cooperation
In 1917, destruction remained the predominant aim of all supporting fireplans. The "creeping
barrage" evolved from the "piled-up" barrage. Its improvements lay in the successive barrage
lines remaining parallel, but now shaped so as to engage the German line simultaneously.49
The Australian artillery continued its metamorphosis in structure as well as in technical
procedure. Additional howitzer batteries were formulated to complete those FABs that remained
under-strength,50
but the increasing degree of allotment of artillery outside corps theatres pointed
towards formation of independent FABs held at corps level, to a division that could swiftly be
allotted without interference to other divisional artillery resources.51
The eventual structure of
the AFA assets of the AIF was reached upon formation of the Australian Corps on 1 November
1917,52
and thus it ended the war as a virtually integral entity within the Australian Corps
Artillery.
In artillery tactics, surprise was attempted with the use of feints and of deception barrages, but
the lengthy preliminary bombardments remained. The Germans countered by adopting mobile
defence and defence in depth, and the massive Allied bombardments often flailed at empty soil.
At continuing cost to mobility during exploitation and even during the assault, notwithstanding
the spiralling expenditure in ammunition, the offensives of 1917 were clumsy bludgeons that
succeeded, if at all, through brute force alone.
BULLECOURT
The 1st and 2nd battles of Bullecourt took place between 10-11 April and 3-17 May 1917
respectively. The 4th and 12th Brigades of 4th Australian Division were involved initially, with
the 5th and 6th Brigades of 2nd Australian Division committed during the subsequent battle.
These attacks were part of the 5th Army's attempt to breach the Hindenburg Line, in support of
the British offensive at Arras. The Hindenburg Line had been constructed in many layers of
defence. The Germans had learnt that this style of defence blunted the forms of Allied attacks,
and dissipated the effects of their supporting artillery fire, nullifying the barrages which could
not be concentrated onto such dispersed targets.53
The first assault on Bullecourt was precipitated by a suggestion that the new weapon - tanks -
could spearhead a breakthrough into the Line. Although artillery from the 1st and 2nd Divisional
Artillery were also allotted to support the attack, Gough had dictated that there was no need for a
barrage to cut the wire, leaving this task to the tanks.54
The snap decision to approve of this plan
left I ANZAC Corps unprepared, to the extent that supporting artillery was still moving into
position after the attack had started.55
After an abortive start on the night of 10 April, due to a
49
Bailey, op. cit., p 135 50
See Table IV of Appendix A 51
See Table V of Appendix A 52
P.A. Pedersen, The AIF on the Western Front, in Australia: Two Centuries of War and Peace, p183; see also Table
II of Appendix B 53
Laffin, Western Front 1916-1917 in Australians at War, p 102 54
J. Dyer Tusmore, The Story of the 18th Battery 6th Brigade Field Artillery 1st AIF 1915-1919, p 17; Pedersen, op.
cit., p 178 55
E. Andrews, and B.G. Jordan, Second Bullecourt Revisited, in Journal of the Australian War Memorial No.15,
- 14 -
no-show by the tanks, the attack went ahead on 11 April. The few tanks that managed to arrive
this time were soon halted in the mud, quickly disabled by German gunfire, and failed to cut any
wire. Despite this, the soldiers of the 12th Brigade, on the left, had reached the first line, and
meanwhile, the 4th Brigade somehow managed to gain the second line of trenches. The breaches
were narrow, however, and the only way the infantry could hold their ground was for effective
defensive fire to support them. By this stage, both brigades desperately required massive artillery
support, but the artillery commander responsible for that sector, Lieutenant-Colonel R.L. Rabett,
5th Army Artillery, refused to fire, stating his artillery observers had sighted British troops where
the Australians were calling for fire. In response to the Brigade Commanders' pleas, however,
Major J.C. Selmes, Battery Commander of 101st Howitzer Battery (part of the 1st Divisional
Artillery assets providing the flank barrage and SOS tasks) fired his guns in defiance of his
superior's order,56
but it was to no avail. (A week later, the 101st were to distinguish themselves
again through their singularity and resolve, during their refusal to abandon their guns during the
subsequent German counter attack at Lagnicourt.57
)
With little or no artillery support, the Australians were left with no choice but to withdraw,
during which the sector's artillery was finally given clearance to fire - onto the retiring
Australians. The attack had been a debacle, costing 3 000 casualties, with 1 500 prisoners -
mostly from 12th Brigade. Poor communication, especially coordination between infantry and
their supporting artillery, was a major problem. There was very little time for adequate
preparation; some batteries were either not in position or had very little ammunition, and the CB
fireplan was ineffective, presumably due to the lack of time for Artillery Intelligence to acquire
information. The Germans claimed that not a single gun was put out of action due to CBF.58
Despite personally admitting the attack had been launched on too narrow a front, Gough was
undaunted and ordered a renewed attack.59
This time, 2nd Division, under Major-General N.M. Smyth was to attack the German positions
known as OG1 and OG2, over the same ground as the previous battle. Despite heavy casualties,
the attack was an eventual success, but while all sources agree that the volume of preparation for
the attack by the staffs of both Birdwood and Smyth was great, the attack remains an example of
misplanning and lack of attention to important detail.60
While roads and light rail were being
built for artillery ammunition resupply, the Intelligence assessment of key German positions at
Queant, along the Australian right flank, went unheeded. This resulted in no artillery fire being
directed by Army, Corps or even Divisional Artillery Headquarters onto this crucial area. I
ANZAC Corps, allotted the bulk of heavy artillery resources, should have been the Headquarters
responsible for dealing with such a target.61
Instead, only vague generalisations were made, with
no clear direction.
During the preparatory bombardment, German CB fire was very effective and hampered the
stockpiling of ammunition close to gun positions. Ammunition was nevertheless plentiful, but
p34 56
Laffin, Western Front 1916-1917 in Australians at War, p 104; Cubis, op. cit., p 142 57
Dean, The War Service Record of the First Australian Field Artillery Brigade 1914-1919, p 9; PA. Pedersen, The
AIF on the Western Front, in Australia: Two Centuries of War and Peace, p179; Cubis, op. cit., p 143; G. Mant,
Soldier Boy: The Letters of Gunner W.J. Duffell, 1915-18, p 82 58
Laffin, Western Front 1916-1917 in Australians at War, p 112 59
Pedersen, op. cit., p 179 60
Laffin, Western Front 1916-1917 in Australians at War, p 123; Andrews and Jordan, op. cit., p 34 61
Andrews and Jordan, op. cit., p 39
- 15 -
there were comparatively few artillery units that could be allotted to support the attack.
Consequently, the volume of fire from the supporting batteries was remarkably heavy, a tribute
to the equipment and their serving gunners alike. The overriding problem remained, however,
that the southernmost part of the Queant salient on the right flank was not engaged, as the central
barrage - placed in front of the assaulting troops - had been constructed poorly and with little
imagination. Smoke was not used either, to compensate for the relative paucity of guns to
support the attack.
Finally, the remaining error in judgement that seriously affected the attack was Haig's dictation
of the Zero-Hour time. Incredibly, with no apparent thought to its effect upon varying times of
first light along the Front, and tactical aspects such as the FUP chosen and the length of the
assault, General Haig personally decided that all assaults on 3 May would step off
simultaneously. Consequently, the Australians were perfectly silhouetted by the dawn, from the
moment they left the FUP, and were cut to pieces. Indeed, the only admirable aspect of this
battle appears to be the dogged determination of the infantry to ultimately succeed after 14
hellish days. The battles of Bullecourt in April 1917 produced bitter legacy for the AIF. Besides
a lack of trust in the new tank as an effective weapon, faith was shaken in the capability of the
British and Australian staff planners to conduct and win battles.
Despite the experiences at Bullecourt, later battles such as Cambrai later in November 1917
made it clear that the advent of the tank would eventually revolutionise artillery employment.
With the task of destruction of obstacles left to the tanks, artillery commanders could concentrate
upon the depth battle, and in so doing, perhaps unconsciously, began migration towards the aim
of neutralising rather than destroying the enemy. Progress had been made in meteorology,
survey, and calibration; and thus, also in the computation of predicted fire. The quality and
quantity of smoke and gas shells had risen rapidly, allowing their effective employment as a
neutralising asset. It would remain to be seen how prudently the Australian staff and artillery
commanders could apply these improvements.
- 16 -
VII –Perfecting the Breakthrough
The winter of 1917 saw the demise of "destruction" as an effective artillery tactic. This was
brought about not only by the experiences of the Allies in the year's battles, but also with the
appearance of a champion for neutralisation. Colonel Georg Bruchmuller, artillery commander
to General von Hutier on the Eastern Front, was transferred to Ludendorff's Headquarters in the
west, following the Russian Army's collapse after the battle of Riga, in which Bruchmuller's
recently-perfected artillery tactics figured prominently.62
His technique consisted of grouping
artillery into four divisions; the IKA, primarily used for support to the infantry, which accounted
for one-fifth of the artillery assets; the AKA, employed in CB operations, three-quarters; the
FEKA, for harassing fire and the SCHEWFLA for interdiction tasks comprised the remainder.63
The emphasis on CB and depth targets is obvious in the proportions allotted to each of these
divisions. Together, these resources were employed in the production of an unexpected hurricane
bombardment at Zero-Hour, with no preliminary fire, and all ranging shots to adjust targets
hidden in the normal, daily exchange of artillery fire. The tactic was imported with devastating
success, and was the basis for all artillery support to the German Spring Offensive in March
1918.64
The Allies, and in particular the Australians, were quick to appreciate this style of warfare, and
indeed, Monash had been lecturing his troops on von Hutier's and Bruchmuller's tactics as early
as 1917, before his arrival in France!65
With his assumption as Corps Commander of the
Australian Corps in May 1918, Monash would soon have the opportunity to demonstrate his
interpretation of this new style of warfare.
HAMEL
The battle of Hamel has often been described as the model from which the procedures for all-
arms cooperation stem. While the interaction and integration of air, armoured, infantry and fire
support resources were arguably orchestrated successfully for the first time at Hamel, the actual
detailed planning and control of the artillery alone was a decisive aspect that was repeated and
improved upon in the subsequent battles. In particular, the choice of targets for the preparatory
bombardment, the coordination of the barrage with the assault, and the cunning use of a variety
of ammunition types throughout the entire attack brought together a host of lessons learnt during
the war on both sides of No-Man's Land.
The 4th Australian Division, supported by the 5th British Tank Brigade newly equipped with
Mark V tanks, were the assaulting troops.66
They were supported by the recently formed
Australian Corps Artillery, which for this battle was allotted the following resources: thirteen
brigades of heavy artillery, four allotted specifically, and twenty-nine brigades of field artillery
from the 17th (UK), and 47th (UK) Division, as well as the elements of every Divisional
Artillery within the Corps. The Australian Brigades supporting the attack itself comprised the
following: 10th, 11th, 13th, and 14th Brigades, AFA. In total, 302 heavy and 326 field guns
62
Keegan and Holmes, op. cit., p115 63
Bailey, op. cit., p143 64
Keegan and Holmes, Ibid. 65
Pedersen, op. cit., p 185; Monash, op. cit., p 3 66
E. Andrews, Hamel: Winning a Battle, in Journal of the Australian War Memorial No. 18, p 8
- 17 -
supported the attack, either directly or indirectly.67
Despite this relatively large allocation, at the behest of the Tank Commander, Brigadier-General
Courage, it was originally planned to conduct a shock tank attack at dawn, with no preparatory
bombardment. However, Monash's Chief of Staff, Brigadier-General Blamey, his CRA,
Brigadier-General W.A. Coxen, and the 4th Division's Commander, General Sinclair-McLagan,
expressed reservations over this plan. Together, they pointed out that such a late Zero-Hour -
asked for by Courage so his crews could see - had had disastrous results during the 2nd
Bullecourt. Intimate infantry-tank co-operation was also brought out as a crucial lesson from
Bullecourt. These aspects, together with a request for reassessment of the objectives, and a need
to allocate time to re-confirm the Australian soldier's trust in the tanks, were all raised: the plan
was amended,68
and Monash's staff began planning an intricate and detailed fireplan.
In contrast to earlier battle preparations - especially those for the 2nd Bullecourt - the entire fire
support for the Battle of Hamel was contained in one single fireplan. It not only included heavy
and field artillery, but also the trench mortars of all calibres, the heavy machine guns, the tanks
and the air support. As Monash himself said, this ensured that "everyone would follow the same
sheet of music".69
Also learning from Bullecourt, an optimum Zero-Hour time was discussed,
and fixed at 0310 am.70
The fireplan itself bore only a passing resemblance to the ones hurriedly staffed by Generals
Walker and Legge at Pozières. The preparatory fire for the assault would be limited to four
minutes71
, and include a deadly cocktail of gas and smokeshell. Following this, smoke only
would be fired as part of the covering fire barrage, as it was predicted that the Germans would
anticipate a gas and smoke mixture again, and thus be hampered in their defence by wearing gas
masks and capes. This was a repeat of a ruse used by Monash earlier on 27 February 1917.72
The smoke screen itself was elaborately planned, in contrast to the screen in the second battle of
Bullecourt, with smoke screens laid at three different levels, to hamper observers at all
altitudes.73
The 15th Battery, and 103rd, 105th, 107th and 108th Howitzer Batteries AFA were
allocated to fire the smoke missions.74
Again in contrast to earlier battles, Monash demanded that the weight of fire of both the
preparatory and the covering fire bombardments for the assault should lie with depth targets. The
target acquisition processes of sound-ranging and flash-spotting were employed to their fullest
extent in the lead-up to Hamel, and detailed aerial-photographs, oblique and vertical, were
distributed. The German gun positions were to be engaged not only prior to the assault, but they
would also continue to be engaged throughout the attack by two-thirds of the heavy artillery at
Monash's disposal. 75
One battery of 9.2 inch howitzers was even tasked to fire delay-fused
67
Sir J. Monash, The Australian Victories in France, p xvii; Bean, Official History of Australia in the War of 1914-
1918, Vol 6 p 257; Andrews op. cit., p 10 68
Pedersen, op. cit., p 187; Monash, op. cit., p 142; Prior and Wilson op. cit., p 297 69
Monash, op. cit., p 38, Andrews, op. cit., p 11 70
Andrews, op. cit., p 6 71
T. Travers, The Evolution of British Strategy and Tactics on the Western Front in 1918:GHQ, Manpower and
Technology, in The Journal of Military History, p 191 72
Pedersen, op. cit., p 187; G. Serle, John Monash: A Biography, p 280; Monash, op. cit., p 39 73
Andrews, op. cit. p 7; Bean, Official History of Australia in the War 1914-1918, Vol 6, p 270 74
Bean, Official History of Australia in the War 1914-1918, Vol 6, p 284 75
Excerpt of Sheet No. 28: Operations of the Australian Corps against Hamel etc., July 1918, in Monash, op. cit.,

- 18 -
rounds across the assault area to provide sheltering shell-holes for the attacking infantry!76
Interdiction missions targeting German resupply routes and reinforcement positions were also a
priority, compared to the fire allocated to destroy enemy wire.77
(It can be argued, however, that
in comparison to previous defences breached by Australians, evidence suggests the wire
obstacles of the German positions around Hamel were both poorly constructed and few in
number).78
Percentage dispositions of shell fuses of the field-guns are of comparative interest:
for the first ten minutes - 10% smoke, 40% HE (of which three-quarters were instantaneous), and
50 % shrapnel; for the remainder of the fireplan - 10% smoke, 15 % HE (delayed action) and
75% shrapnel. All howitzers fired 10% smoke throughout.79
The communications between FOs and gun positions for Hamel were arguably the best prepared
to that time. For the first time recorded, FO parties at Hamel and Vaire Wood made use of
wireless communications, in a major advance in the passage of orders to the guns (a fundamental
condition of the Gunnery Problem mentioned earlier) while the supporting Australian Flying
Corps and Royal Flying Corps pilots - whose noise would help drown the sound of the battle
preparations - were used for machine-gun ammunition resupply, and as airborne artillery
observers. They had been painstakingly briefed on objectives and, as observers, to which
batteries they would address their fire orders.80
The preparations made for ammunition dumping were no less detailed and comprehensive.
Learning from the horrific CB fire endured by the supporting artillery in their gun positions and
at their ammunition dumps during Pozières and Bullecourt,81
Monash ensured all gun positions
for the fireplan would be occupied temporarily, and in secrecy. Some gun positions were
prepared forward of the infantry positions. Further, all dumping of ammunition at the temporary
gun positions was to be at night, prior to their occupation.82
The positions themselves were not
occupied until the night of 2 July, although the majority of fire units left a section of guns at the
previous position, for security reasons.83
Monash also understood the necessity for predicted-fire targets to be engaged accurately, and
thus allowed Brigadier-General Coxen time for registration of predicted targets, which was
disguised by firing registration missions during targets of opportunity engaged by FOs, and the
everyday "search-and-sweep missions".84
This technique involves minor alterations to range
(search) and bearing (sweep) which allowed guns to cover a greater area than their normal "lines-
of-fire-parallel" gun lay would permit.85
As a further aspect to the inveigling of the German
defenders, Harassment and Interdiction (H & I) tasks, engaging rest areas, railheads and resupply
dumps, continued until Zero-Hour, thus giving no indication of the impending assault. Secrecy
p39; Bean, Official History of Australia in the War 1914-1918, Vol 6, pp 246, 257; Andrews, op. cit., pp 10, 11 76
Bean, Official History of Australia in the War 1914-1918, Vol 6, p 270 77
Andrews, op. cit., p 10 78
Australian Corps Intelligence Summary 10-11/6/18 & 15-16/6/18, AWM 26/12/362/8 & 9, in Prior and Wilson,
op. cit., p 290, 298 79
Bean, Official History of Australia in the War 1914-1918, Vol 6 p 286 80
Andrews, op. cit., p 7 81
Andrews and Jordan, Second Bullecourt Revisited, in Journal of the Australian War Memorial No.15, p 29 82
Brook, op. cit., p 54; Monash, Communiqué to General Rawlinson, 21 June 1918 in op. cit., p 39 83
Bean, Official History of Australia in the War 1914-1918, Vol 6, p 272 84
Monash, op. cit., p 39; Andrews, op. cit., p 11 85
Cubis, op. cit., p151
- 19 -
was applied to all preparations. Besides all movement being carried out at night, and the
movements masked by droning aeroplanes, every effort was made to camouflage and maintain
the security of the battle positions.86
Despite every effort to ensure the accuracy of the artillery fire, there were instances of inaccurate
fire, and due to the closeness with which the infantry was following the barrage, a number of
friendly casualties resulted. Nevertheless, this was the exception, with the remainder falling
remarkably accurately.87
The smoke screen was particularly effective, because the screen was
placed right along the whole of the front, hiding even where the axis of the assault lay. The
screen blinded the defenders until the last minute, and many of the defenders were killed still
wearing their masks.88
The assault was completed in 93 minutes, and was a complete success. One of the most notable
aspects of the assault, and of the exploitation afterwards was the lack of German artillery fire.
The CBF plan had been most successful, silencing the German batteries for over six hours.89
86
Andrews, op. cit., pp 10, 11; Bean, Official History of Australia in the War 1914-1918, Vol 6, p 272 87
Bean, Official History of Australia in the War 1914-1918, Vol 6, p 284 88
Bean, Official History of Australia in the War 1914-1918, Vol 6, p 297 89
Bean, Official History of Australia in the War 1914-1918, Vol 6, p 310
- 20 -
VIII – Retrospect
Of particular note of the battle of Hamel, is its uncanny resemblance to the ill-fated battle of
Neuve Chapelle, over three years earlier: both were small-scale, limited objective, set piece
battles; both fireplans used short preparatory bombardments, and both concentrated on depth
targets, using predicted fire.
The differences between defeat and victory are perhaps as clear. Firstly, the objectives at Hamel
were tactically sound, achievable and feasibly defensible. The assault at Neuve Chapelle did not
effectively pierce the defensive lines, and the flanks of the salient were difficult to defend. The
coordination and cooperation of all resources was of a higher standard at Hamel, with each arm
clear in its role and requirement for support. Naturally, the tanks were an important addition to
the overall combat power of the force.90
At Hamel, the artillery employment was clearly superior throughout. The use of smoke, and
smoke and gas was instrumental. So too was the structure and composition of the barrage. The
use of the new, instantaneous fuse allowed it to be effective against surface targets. In addition,
accurate fixation and effective engagement of the German artillery's positions precluded its part
in the battle, and allowed the infantry the breathing space required for consolidation, a luxury not
enjoyed at Neuve Chapelle. The improvements in the fields of artillery survey and artillery
intelligence, coupled with a greater proficiency in target prediction (including Correction of the
Moment) also aided considerably.
CONCLUSION
The experience of three years of war had brought artillery doctrine full-circle, and the precursor
to the modern employment of artillery could be applied effectively, with the full and melancholy
benefit of hindsight.
By 1918, the strength of Australian artillery had swelled from its pre-war RAA strength of one
battery and two cadre staffs, to a total of over 1200 guns, including 13 field artillery brigades,
two heavy siege batteries, five divisional ammunition columns and a host of light, medium and
heavy trench mortar companies and brigades.91
However, it was the AFA's participation in the
Great War that irrevocably changed the perspective of artillery's role. Its predominant position
in the provision of firepower arguably remained unchallenged until the Vietnam War, and
continues to be fundamental to the generation of combat power.
Besides the enormous growth of the AFA, the adoption and development of war-proven doctrine
and practise was vital to the RAA's continuing ability to provide effective and timely fire
support, to the present day. The importance of all-arms cooperation, the theories of sound-
ranging, survey, calibration and met, and the concept of neutralisation as an effective application
of artillery, are some of the lessons learnt on the Western Front that still apply.
90
Travers, op. cit., p193 91
Monash, op. cit., p xxi

A-1
APPENDIX A
EXPANSION OF ARTILLERY UNITS OF THE AIF
TABLE I
STRUCTURE OF AIF ARTILLERY UNITS UPON FORMATION - AUG 191492
1st Divisional
Artillery
2nd Divisional
Artillery
3rd Divisional
Artillery
4th Divisional
Artillery
5th Divisional
Artillery
1st FA Bde (1st,
2nd & 3rd Fd
Btys)
Not formed Not formed Not formed Not formed
2nd FA Bde (4th,
5th & 6th Fd Btys)
3rd FA Bde (7th,
8th, & 9th Fd
Btys)
Note: At Gallipoli, the ANZAC artillery was augmented by the following units:93
New Zealand and Australian Division - 1st New Zealand Battery
- 2nd New Zealand Battery
- 3rd New Zealand Battery
- New Zealand Howitzer Battery
7th Indian Mountain Brigade - 21st Battery
- 26th Battery
92
Bean, Official History of Australia in the War of 1914-1918, Vol 1, p 39; Cubis, op. cit., p 127 93
Bean, Official History of Australia in the War of 1914-1918, Vol 2, pp 57-59

A-2
TABLE II
STRUCTURE OF AIF ARTILLERY UNITS - JAN/FEB 1916
[First Restructure (in Egypt)]
1st Divisional
Artillery
2nd Divisional
Artillery
3rd Divisional
Artillery
4th Divisional
Artillery
5th Divisional
Artillery
1st FA Bde (1st,
2nd, 3rd & 22nd
Fd Btys)
4th FA Bde (10th,
11th, 12th & 19
Fd Btys)
7th FA Bde (25th,
26th, 27th & 28th
Fd Btys)
10th FA Bde
(37th, 38th, 39th
& 40th Fd Btys)
13th FA Bde
(49th, 50th, 51st
& 52nd Fd Btys)
2nd FA Bde (4th,
5th, 6th & 23rd Fd
Btys)
5th FA Bde (13th,
14th, 15th & 20th
Fd Btys)
8th FA Bde (29th,
30th, 31st & 32nd
Fd Btys)
11th FA Bde
(41st, 42nd, 43rd
& 44th Fd Btys)
14th FA Bde
(53rd, 54th, 55th
& 56th Fd Btys)
3rd FA Bde (7th,
8th, 9th & 24th Fd
Btys)
6th FA Bde (16th,
17th, 18th & 21st
Fd Btys)
9th FA Bde (33rd,
34th, 35th & 36th
Fd Btys)
12th FA Bde
(45th, 46th, 47th
& 48th Fd Btys)
15th FA Bde
(57th, 58th, 59th
& 60th Fd Btys)
21st How Bde
(101st, 102nd &
103rd How Btys)
22nd How Bde
(104th, 105th &
106th How Btys)
23rd How Bde
(107th, 108th &
109th How Btys)
24th How Bde
(110th, 111th &
112th How Btys)
25th How Bde
(113th, 114th &
115th How Btys)
Cubis, op. cit., p 135
CAPT A.D. Ellis, MC, The Story of the Fifth Australian Division, p 29
E.T. Dean, The War Service Record of the First Australian Field Artillery Brigade, p 6
Note 1: An Australian Siege Artillery Brigade [36th (Australian) Heavy Artillery], comprising 54th
(Australian) and 55th (Australian) Siege Batteries was raised, minus its guns, from May 1915, and
departed for training to Lydd, Kent in July 1915.94
Note 2: The 2nd Divisional artillery, comprising the 4th Brigade (10th, 11th & 12th Btys) 5th Brigade (13th, 14th &
15th Batteries) and 6th Brigade (16th, 17th & 18th Batteries) had been created in January 1915, upon return to Egypt
after the evacuation of Gallipoli.95
94
Peacock, op. cit., pp 15, 16 95
Bean, Official History of Australia in the War of 1914-1918, Vol 3, pp 9,10,14

A-3
TABLE III
STRUCTURE OF AIF ARTILLERY UNITS - MAR-MAY 191696
[Second Restructure (After Arrival in France)]
1st Divisional
Artillery
2nd Divisional
Artillery
3rd Divisional
Artillery
4th Divisional
Artillery
5th Divisional
Artillery
1st FA Bde
(1st, 2nd & 3rd Fd
Btys,
101st How Bty)
4th FA Bde
(10th, 11th &
12th Fd Btys,
104th How Bty)
7th FA Bde
(25th, 26th &
27th Fd Btys,
107th How Bty)
10th FA Bde
(37th, 38th &
39th Fd Btys,
110th How Bty)
13th FA Bde
(49th, 50th & 51st
Fd Btys,
113th How Bty)
2nd FA Bde
(4th, 5th & 6th Fd
Btys,
102nd How Bty)
5th FA Bde
(13th, 14th &
15th Fd Btys,
105th How Bty)
8th FA Bde
(29th, 30th & 31st
Fd Btys,
108th How Bty)
11th FA Bde
(41st, 42nd &
43th Fd Btys,
111th How Bty)
14th FA Bde
(53rd, 54th &
55th Fd Btys,
114th How Bty)
3rd FA Bde
(7th, 8th & 9th Fd
Btys,
103rd How Bty)
6th FA Bde
(16th, 17th &
18th Fd Btys,
106th How Bty)
9th FA Bde
(33rd, 34th &
35th Fd Btys)
12th FA Bde
(45th, 46th &
47th Fd Btys)
15th FA Bde
(57th, 58th &
59th Fd Btys)
21st FA Bde
(22nd, 23rd &
24th Fd Btys)
22nd FA Bde
(19th, 20th & 21st
Fd Btys)
23rd FA Bde
(28th, 32nd &
36th Fd Btys,
109th How Bty)
24th FA Bde
(40th, 44th &
48th Fd Btys,
112th How Bty)
25th FA Bde
(52nd, 56th &
60th Fd Btys,
115th How Bty)
Dean, op.cit., p 7
Brook, op. cit., p50
Note: The Siege Batteries were at this stage renamed 1st and 2nd Australian Siege Batteries
respectively.97
96
Bean, The Official History of Australia in the War of 1914-1918, Vol 3, pp 37, 64 97
Peacock, op. cit, pp 15, 16

A-4
TABLE IV
PROPOSED STRUCTURE OF AIF ARTILLERY UNITS - JUL 191698
1st Divisional
Artillery
2nd Divisional
Artillery
3rd Divisional
Artillery
4th Divisional
Artillery
5th Divisional
Artillery
1st FA Bde
(1st, 2nd & 3rd
Fd Btys,
101st How Bty)
4th FA Bde
(10th, 11th &
12th Fd Btys,
104th How Bty)
7th FA Bde
(25th, 26th &
27th Fd Btys,
107th How Bty)
10th FA Bde
(37th, 38th &
39th Fd Btys,
110th How Bty)
13th FA Bde
(49th, 50th & 51st
Fd Btys,
113th How Bty)
2nd FA Bde
(4th, 5th & 6th Fd
Btys,
102nd How Bty)
5th FA Bde
(13th, 14th &
15th Fd Btys,
105th How Bty)
8th FA Bde
(29th, 30th & 31st
Fd Btys,
108th How Bty)
11th FA Bde
(41st, 42nd &
43rd Fd Btys,
111th How Bty)
14th FA Bde
(53rd, 54th &
55th Fd Btys,
114th How Bty)
3rd FA Bde
(7th, 8th & 9th Fd
Btys,
103rd How Bty)
6th FA Bde
(16th, 17th &
18th Fd Btys,
106th How Bty)
9th FA Bde
(33rd, 34th &
35th Fd Btys,
118th How Bty)
12th FA Bde
(45th, 46th &
47th Fd Btys,
119th How Bty)
15th FA Bde
(57th, 58th &
59th Fd Btys,
120th How Bty)
21st FA Bde
(22nd, 23rd &
24th Fd Btys,
116th How Bty)
22nd FA Bde
(19th, 20th & 21st
Fd Btys,
117th How Bty)
23rd FA Bde
(28th, 32nd &
36th Fd Btys,
109th How Bty)
24th FA Bde
(40th, 44th &
48th Fd Btys,
112th How Bty)
25th FA Bde
(52nd, 56th &
60th Fd Btys,
115th How Bty)
Note: In July 1916 the Army Council decided to standardise all artillery brigades, requiring the creation
of five new Howitzer Batteries [the italics show proposed new Howitzer Batteries]. However, this was
amended when the AFA was again reorganised in preparation for the spring offensive of 1917, and the
result appears in Table V. At this stage also, all artillery batteries were increased from four- to six-gun
batteries, as part of the restructuring.
98
Bean, The Official History of Australia in the War of 1914-1918, Vol. 5, pp 681, 682

A-5
TABLE V
EVENTUAL STRUCTURE OF AIF ARTILLERY UNITS - SPRING 191799
1st Divisional
Artillery
2nd Divisional
Artillery
3rd Divisional
Artillery
4th Divisional
Artillery
5th Divisional
Artillery
Army Brigade
Artillery
1st FA Bde
(1st, 2nd & 3rd
Fd Btys, 101st
How Bty)
4th FA Bde
(10th, 11th &
12th Fd Btys,
104th How
Bty)
7th FA Bde
(25th, 26th &
27th Fd Btys,
107th How
Bty)
10th FA Bde
(37th, 38th &
39th Fd Btys,
110th How
Bty)
13th FA Bde
(49th, 50th &
51st Fd Btys,
113th How
Bty)
3rd FA Bde
(7th, 8th & 9th
Fd Btys,
103rd How
Bty)
2nd FA Bde
(4th, 5th & 6th
Fd Btys,
102nd How
Bty)
5th FA Bde
(13th, 14th &
15th Fd Btys,
105th How
Bty)
8th FA Bde
(29th, 30th &
31st Fd Btys,
108th How
Bty)
11th FA Bde
(41st, 42nd &
43rd Fd Btys,
111st How
Bty)
14th FA Bde
(53rd, 54th &
55th Fd Btys,
114th How
Bty)
6th FA Bde
(16th, 17th &
18th Fd Btys,
106th How
Bty)
12th FA Bde
(45th, 46th &
47th Fd Btys,
112th How
Bty)
[absorbed 21st
FA Bde, 116th
How Bty]
[absorbed
22nd FA Bde,
117th How
Bty]
[absorbed 23rd
FA Bde, inc.
109th How
Bty]
[absorbed Fd
guns of 24th
FA Bde, 119th
How Bty]
[absorbed Fd
guns of 25th
FA Bde, 120th
How Bty]
[absorbed 15th
FA Bde, half
of 9th FA Bde,
115th & 118th
How Btys]
Cubis op. cit., p 141
Brook op. cit., p 51
Dean op. cit., p 8
Note 1: The unused part of 9th FA Bde and the proposed 118th How Bty were broken up and absorbed as
reinforcements.
Note 2: The creation of "Army" artillery brigades during the last restructuring allowed for greater
flexibility of allotment, and meant that extra artillery resources could be allotted to a divisional sector
along the front, without interfering with other divisions' Order of Battle (ORBAT).
99
Bean, The Official History of Australia in the War of 1914-1918, Vol 5, pp 681, 682

B-1
APPENDIX B
GROWTH OF THE AIF
TABLE I
FORMATION OF INFANTRY UNITS WITHIN THE AIF
[UPON REORGANIZATION IN EGYPT - DEC 1914]100
A & NZ ARMY CORPS
1st Australian Division New Zealand and Australian Division
1st Bde (1st, 2nd, 3rd & 4th Bns) New Zealand Bde
2nd Bde (5th, 6th, 7th & 8th Bns) 4th Australian Bde (13th, 14th, 15th & 16th Bns)
3rd Bde (9th, 10th, 11th & 12th Bns) 1st Australian Light Horse Bde
New Zealand Mounted Rifles Bde
Note: The 2nd Australian Division was raised mid-campaign at Gallipoli, comprising the following units:
5th Brigade (17th, 18th, 19th & 20th Battalions)
6th Brigade (21st, 22nd, 23rd & 24th Battalions)
7th Brigade (25th, 26th, 27th & 28th Battalions)
100
Bean, The Official History of Australia in the War of 1914-1918, Vol 1, pp 37-41; Bean, The Official
History of Australia in the War of 1914-1918, Vol 3, pp 41, 42; J. Laffin, Western Front 1916-1917 in
Australians at War, p 22
B-2
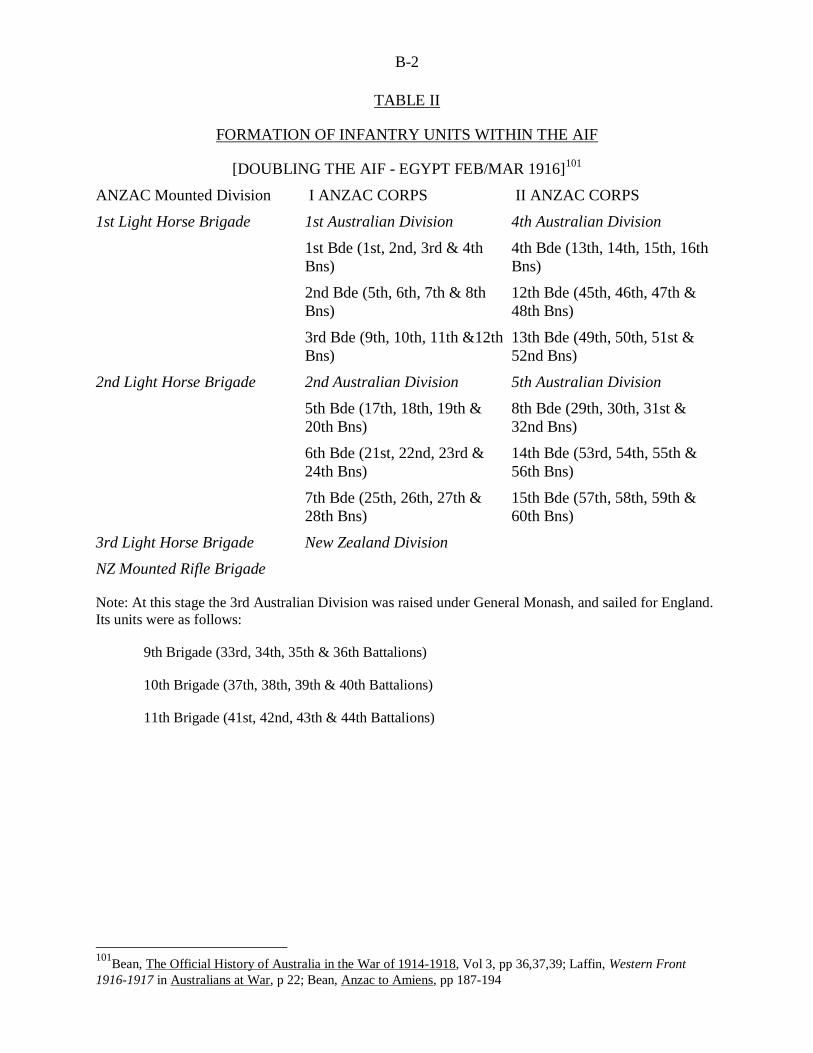
TABLE II
FORMATION OF INFANTRY UNITS WITHIN THE AIF
[DOUBLING THE AIF - EGYPT FEB/MAR 1916]101
ANZAC Mounted Division I ANZAC CORPS II ANZAC CORPS
1st Light Horse Brigade 1st Australian Division
1st Bde (1st, 2nd, 3rd & 4th
Bns)
2nd Bde (5th, 6th, 7th & 8th
Bns)
3rd Bde (9th, 10th, 11th &12th
Bns)
4th Australian Division
4th Bde (13th, 14th, 15th, 16th
Bns)
12th Bde (45th, 46th, 47th &
48th Bns)
13th Bde (49th, 50th, 51st &
52nd Bns)
2nd Light Horse Brigade 2nd Australian Division
5th Bde (17th, 18th, 19th &
20th Bns)
6th Bde (21st, 22nd, 23rd &
24th Bns)
7th Bde (25th, 26th, 27th &
28th Bns)
5th Australian Division
8th Bde (29th, 30th, 31st &
32nd Bns)
14th Bde (53rd, 54th, 55th &
56th Bns)
15th Bde (57th, 58th, 59th &
60th Bns)
3rd Light Horse Brigade New Zealand Division
NZ Mounted Rifle Brigade
Note: At this stage the 3rd Australian Division was raised under General Monash, and sailed for England.
Its units were as follows:
9th Brigade (33rd, 34th, 35th & 36th Battalions)
10th Brigade (37th, 38th, 39th & 40th Battalions)
11th Brigade (41st, 42nd, 43th & 44th Battalions)
101
Bean, The Official History of Australia in the War of 1914-1918, Vol 3, pp 36,37,39; Laffin, Western Front
1916-1917 in Australians at War, p 22; Bean, Anzac to Amiens, pp 187-194

B-3
TABLE III
FORMATION OF THE AUSTRALIAN CORPS, NOVEMBER 1917102
1st
Australian
Division
Artillery
Infantry
1st FA Bde: (1st,
2nd & 3rd Fd Btys,
101st How Bty)
1st Bde: (1st, 2nd, 3rd &
4th Bns)
2nd FA Bde: (5th,
6th & 7th Fd Btys,
102nd How Bty)
2nd Bde: (5th, 6th, 7th
& 8th Bns)
3rd Bde: (9th, 10th,
11th & 12th Bns)
2nd
Australian
Division
Artillery
Infantry
4th FA Bde: (10th,
11th & 12th Fd Btys,
104th How Bty)
5th Bde: (17th, 18th,
19th & 20th Bns)
5th FA Bde: (13th,
14th & 15th Fd Btys,
105th How Bty)
6th Bde: (21st, 22nd,
23rd & 24th Bns)
7th Bde: (25th, 26th,
27th & 28th Bns)
3rd
Australian
Division
Artillery
Infantry
7th FA Bde: (25th,
26th & 27th Fd Btys,
107th How Bty)
9th Bde: (33rd, 34th,
35th & 36th Bns)
8th FA Bde: (29th,
30th & 31st Fd Btys,
108th How Bty)
10th Bde: (37th, 38th,
39th & 40th Bns)
11th Bde: (41st, 42nd,
43rd & 44th Bns)
4th
Australian
Division
Artillery
Infantry
10th FA Bde: (37th,
38th & 39th Fd Btys,
110th How Bty)
4th Bde: (13th, 14th,
15th & 16th Bns)
11th FA Bde: (41st,
42nd & 43rd Fd Btys,
111th How Bty)
12th Bde: (45th, 46th,
47th & 48th Bns)
13th Bde: (49th, 50th,
51st & 52nd Bns)
5th
Australian
Division
Artillery
Infantry
13th FA Bde: (49th,
50th & 51st Fd Btys,
113th How Bty)
8th Bde: (29th, 30th,
31st & 32nd Bns)
14th FA Bde: (53rd,
54th & 55th Fd Btys,
114th How Bty)
14th Bde: (53rd, 54th,
55th & 56th Bns)
15th Bde: (57th, 58th,
59th & 60th Bns)
Corps
Artillery
Assets
3rd FA Bde: (7th,
8th & 9th Fd Btys,103rd
How Bty)
6th FA Bde: (16th,
17th & 18th Fd Btys,
106th How Bty)
12th FA Bde: (45th,
46th & 47th Fd Btys,
112th How Bty)
Brook, op.cit., p 51
Note: The 36th, 47th and 52nd Battalions (shown in the table in Italics) were disbanded after heavy losses
during the German Michael Offensive in the Spring of 1918.103
102
Monash, op. cit., Appendix 103
Bean, The Official History of Australia in the War of 1914-1918, Vol 5, pp 657-9
I
BIBLIOGRAPHY
Ashworth, T. Trench Warfare 1914-1918; the Live and Let Live System, MacMillan Press, Hong
Kong, 1980.
Andrews, E. Hamel: Winning a Battle, in Journal of the Australian War Memorial No. 18,
Australian War Memorial Publications, April 1991.
Andrews, E. and Jordan, B.G. Second Bullecourt revisited: the Australians in France, in Journal
of the Australian War Memorial No. 15, Australian War Memorial Publications, October 1989.
Australian Army, Field Artillery Brigade, 7th The 7th Field Artillery Brigade Yandoo, Yandoo
Management, periodical, Vol 1 pt 1 Jun 19 1916, Vol 2 pt 1 Aug 20 1916, Vol 2 pt 6 Dec 4
1916, Vol 3 pt 9 Dec 15 1918.
Bailey, J.B.A. Field Artillery and Firepower, The Military Press, Oxford, 1989.
Bean, C.E.W. Anzac to Amiens: A Shorter History of the Australian Fighting Services in the
First World War, Australian War Memorial, Canberra, 1946.
_______ , The Story of ANZAC: From the Outbreak of War to the End of the First Phase of the
Gallipoli Campaign, May 4, 1915, in Official History of Australia in the War of 1914-1918
Vol.1 Angus and Robertson, Sydney, 1935.
_______ , The Story of ANZAC: From 4 May, 1915, to the Evacuation of the Gallipoli Peninsula,
in Official History of Australia in the War of 1914-1918 Vol.2 Angus and Robertson, Sydney,
1935.
_______ , The Australian Imperial Force in France: 1916, in Official History of Australia in the
War of 1914-1918, Vol.3, Angus and Robertson, Sydney, 1940.
_______ , The Australian Imperial Force in France: 1917, in Official History of Australia in the
War of 1914-1918, Vol.4, Angus and Robertson, Sydney, 1939.
_______ , The Australian Imperial Force in France: During the Main German Offensive, 1918,
in Official History of Australia in the War of 1914-1918, Vol.5, Angus and Robertson, Sydney,
1941.
_______ , The Australian Imperial Force in France During the Allied Offensive, 1918, in
Official History of Australia in the War of 1914-1918, Vol.6, Angus and Robertson, Sydney,
1983.
Bidwell, S. Firepower: British Army Weapons and Theories of the War 1904-45, London, 1982.
_______ , Gunners at War: A Tactical Study of the Royal Artillery in the 20th Century, Arms
and Armour, London, 1970.
II
Bridger, T.D. With the 27th Battery in France: 7th Brigade, Australian Field Artillery, St.
Clements Press, London, 1919.
Brook, D. (ed.) Roundshot to Rapier: Artillery in South Australia 1840-1984, Investigator Press,
Hawthorndene, South Australia, 1986.
Cameron, H.N. War Diaries and Letters: 1917-19, Manuscript.
Charlton, P. Pozières: Australians on the Somme 1916, Methuen Hayes, North Ryde, 1986.
Cubis, R. A History of 'A' Battery: New South Wales Artillery (1871-1899), Royal Australian
Artillery (1899-1971), Elizabethan Press, Sydney, 1978.
Dawes, J.N. Citizen to Soldier: Australia Before the Great War: Recollections of Members of the
1st AIF, Melbourne University Press, Carlton, 1977.
Dean, E.T. The War Service Record of the First Australian Field Artillery Brigade 1914-1919,
W.H. Thomas & Co., Adelaide, 1919.
Dyer Tusmore, J. The Story of the 18th Battery 6th Brigade Field-Artillery 1st A-I-F 1915 -
1919, Australian War Memorial Printed Records, Canberra, 1965.
Ellis, M.C., CAPT A.D. The Story of the Fifth Australian Division, Hodder and Stoughton,
London, undated.
Fitzsimons, B. (ed.) The Big Guns: Artillery 1914-1918, in Purnell's History of the World Wars:
Special, Phoebus, London, 1973.
Fronsac Garrison Gunners, Tamworth NSW, 1929.
Gay, M.P. Then and Now - Fighting it Out at Operational Depths, in Field Artillery Journal,
Jan/Feb 86, 33-39.
Gower, S.N. Guns of the Regiment, Australian War Memorial, Canberra ACT, 1981.
Grose, F. A Rough Y.M. Bloke, The Speciality Press Pty. Ltd., Melbourne, undated.
Hogg, I.V. A History of Artillery, Hamlyn, London, 01/12/74.
_______ , The Guns: 1914-18, in Pan/Ballantine Illustrated History of the First World War,
Book No. 5, Pan/Ballantine, London, 1973.
Johnston, S. Experience of the Great War 1914-1918: a Documentary Resource Book for Senior
Students, Longman Cheshire, Melbourne, 1987.
Keegan, J. A History of Warfare, 1993.
Keegan, J. and Holmes, R. Soldiers; a History of Men in Battle, Guild, London, 1985.
III
Laffin, J. Western Front 1916-1917: The Price of Honour, in Australians at War, Time-Life
Books (Australia) Pty. Ltd., 1989.
_______ , Guide to Australian Battlefields of the Western Front 1916-1918, Kangaroo Press and
Australian War Memorial, Kenthurst, NSW, 1992.
_______ , ANZACS at War, Abelard - Schuman, London, 1965.
Macgill, P. The Diggers: The Australians in France, Jenkins, London, 1919.
Mant, G. (ed) Soldier Boy: The Letters of Gunner W.J. Duffell, 1915-18, Kangaroo Press and
Australian War Memorial, Kenthurst, NSW, dated unknown.
Marlowe, C. Tamburlaine the Great, Part 2, III, iii, [Ed. Rev. A. Dyce,]
http://worldebooklibrary.com/eBooks/WorldeBookLibrary.com/tmbn2.htm
Monash, Sir J. The Australian Victories in France in 1918, Lothian, Melbourne, 1923.
Norton, P.J. Command and Control of Artillery, in Army Journal, periodical review, Aug 76, pp
34-38.
Peacock, R.K. Achievements of Australian Artillery in British Campaigns, manuscript, located at
Defence Central Library, 1983.
Pedersen, P.A. Monash as Military Commander, Melbourne University Press, Melbourne, 1992.
_______ , The AIF on the Western Front, in Australia: Two Centuries of War and Peace,
Australian War Memorial in association with Allen and Unwin, Australia, 1988.
Pemberton, A.L. Development of Artillery Tactics and Equipment, in Second World War 1939-
1945: Army, War Office, London, 01/12/50.
Pope, D. Guns, Hamlyn, London, 1971
Prior, R. and Wilson, T. Command on the Western Front - The Military Career of Sir Henry
Rawlinson 1914-1918, Blackwell Publishers, Oxford, 1992.
Rawling, B. Surviving Trench Warfare - Technology and the Canadian Corps, 1914-1918,
University of Toronto, Toronto, 1992.
Robson, L.L. Australia and the Great War 1914-1918, Macmillan of Australia, South Melbourne,
1969.
Royal Artillery Association (Qld) Gun Line, Royal Australian Artillery Association (Qld),
Enoggera, Queensland, Periodical publication.
Royal Australian Army Standing Orders for RAFA, School of Artillery, 1914.
Serle, G. John Monash: A Biography, Melbourne University Press, Melbourne, 1982.

IV
Smithers, A.J. Sir John Monash, Angus and Robertson, 1973.
Travers, T. The Evolution of British Strategy and Tactics on the Western Front in 1918: GHQ,
Manpower, and Technology, in The Journal of Military History, Apr 90, 172-200.
_______ , How the War Was Won: Command and Technology in the British Army on the
Western Front, 1917-1918, Routledge, London, 1992.
_______ , The Killing Ground: The British Army, the Western Front & the Emergence of
Modern Warfare, 1900-1918, Routledge, London, 1993.
Wilson, A.W. Story of the Gun, Royal Artillery Institution, Woolwich, 4th Edition, 01/12/76.
Wilson, T. The Myriad Faces of War; Britain and the Great War 1914-1918, Polity Press,
Oxford, 1988.
Winter, D. Making the Legend: The War Writings of C.E.W. Bean, University of Queensland
Press, Brisbane, 1992.
_______ , 25 April 1915: The Inevitable Tragedy, University of Queensland Press, St. Lucia,
1994.
"Artillery" in International Military and Defence Encyclopaedia Vol 1, Brassey's (US) Inc.,
1993.