Embed Size (px)
Citation preview
advanced applied science: GCE A2 UNITS © The Nuffield Foundation 2008
The oral glucose tolerance test: page 1 of 17
ACTIVITY BRIEF
The oral glucose tolerance test
The science at work
Home blood glucose test kits are inexpensive and readily available. You may have seen them for sale at the pharmacy of your local supermarket or elsewhere. They are a valuable aid to diabetics who need to be able to control their blood glucose levels.
Normally, nearly all glucose is reabsorbed by the kidneys during urine formation. Blood levels have to rise quite high before it starts to be lost in the urine. Urine glucose therefore gives only a rough indication of high blood glucose levels.
Also, someone may show symptoms of, or be at a high risk of, contracting diabetes but have no detectable glucose in their urine. A blood test can reveal diabetes at lower glucose concentrations, even if there is none in the urine. Sadly, for unknown reasons, there has been an increase in type 1 diabetes in young people. Type 2 diabetes has been diagnosed in children in Europe and the USA for the first time, probably due to lifestyle changes involving diet and exercise.
Since blood glucose levels will rise after a meal, the standard diagnostic test to confirm diabetes involves raising blood sugar levels after a fast and testing a blood sample two hours later. If the body’s control mechanisms are working correctly, this is long enough for blood glucose levels to fall back to normal.
This test is the glucose tolerance test or GTT. As a sugary drink is taken, it is also known as the oral glucose tolerance test (OGTT).
To think about
One of the problems with diagnosing diabetes is the fact that there is quite a wide range for ‘normal’ blood glucose concentrations. Not only does blood glucose concentration vary due to uptake and use, but individuals also vary in what is normal for them.
Another issue concerns the difference between the use of urine samples and blood samples for the diagnosis and management of diabetes.
Your brief
Work in a small group to investigate oral glucose tolerance tests. There are two tasks. Your teacher will advise you on what to do. Whether you carry out task 1 or task 2, read the method all the way through before you begin. You will need to be methodical and well organised.
Task 1 Blood glucose meters
Use blood glucose meters to test glucose levels in blood samples. Instructions are given in Practical sheet: The oral glucose tolerance test: method 1.
advanced applied science: GCE A2 UNITS © The Nuffield Foundation 2008
The oral glucose tolerance test: page 2 of 17
Task 2 Chemical analysis
Use chemical analysis to measure the concentration of glucose in simulated blood samples. Instructions are given in Practical sheet: The oral glucose tolerance test: method 2.
Task 3 Looking back
In your group, discuss and make notes to explain the results that you have obtained. Use textbooks, websites or notes to help you. Give as full an explanation as you can of the recorded changes in blood glucose concentration, including the following key words and phrases:
homeostasis
negative feedback
norm or set point
rise in blood glucose
fall in blood glucose
islets of Langerhans
pancreas
insulin
glucagon
α-cells
β-cells
brain cells
small intestine
liver
muscle
glycogen
fat
respiration
amino acids
import
export
Brain stretcher
Suggest as many reasons as you can why urine samples are likely to give different results for blood glucose concentrations to blood samples.
advanced applied science: GCE A2 UNITS © The Nuffield Foundation 2008
The oral glucose tolerance test: page 3 of 17
PRACTICAL SHEET
The oral glucose tolerance test: method 1
You will need a volunteer who is prepared to:
fast for eight to ten hours (no food or drink, except tap or unflavoured bottled water)
provide tiny drops of blood using a painless method for blood sampling.
Health and safety
A risk assessment should be carried out before starting this investigation.
CARE: human blood [BIOHAZARD] can transmit disease. Lancets are sharp. Your teachers will tell you how to dispose of lancets and any blood on tissues etc.
Note: If this investigation gives you any cause for concern, you should consult your doctor. Unusual results can occur by chance.
Equipment and materials
394 ml of “Lucozade Energy Original”
access to hand washing facilities with soap and warm water
lancet disposal pot, e.g. sharps container or beaker of disinfectant such as VirKon
clean, dry tissues
access to plasters (not likely to be needed)
blood glucose testing kit or equivalent, containing: instructions; lancet and lancing device; meter; test strips.
You may also need a PC and interfacing cable if results are to be stored and manipulated using computer software.
Procedure
1 Choose your volunteer. Your teacher may allow two or more people in your group to try out the test. Check before you start.
2 Arrange a day and times for the test to be carried out.
Remember: there must be a two hour interval between the consumption of a sugary drink and the final blood test.
3 The volunteer(s) should not
alter their diet in any way before the test
eat or drink anything except clear water for eight to ten hours until the test is completed (i.e. from about midnight ).
smoke on the day of the test before it is completed.
4 On the day of the test, the volunteer(s) should:
provide a drop of blood for a blood glucose test
advanced applied science: GCE A2 UNITS © The Nuffield Foundation 2008
The oral glucose tolerance test: page 4 of 17
immediately drink the sugary drink
provide another drop of blood for a blood glucose test after two hours. If resources permit, you may also test after 30 minutes and/or one hour. Ask your teacher.
use the method described in the kit to carry out the blood sampling and blood glucose tests. Follow the instructions carefully or, in their absence, use the procedure which follows.
The volunteer may wish to carry out this procedure themselves, make sure that you have their permission if you wish to obtain a sample of their blood from them. It is a good idea to give as many people as possible a chance to try the technique. Ask your teacher how many tests your group is allowed to carry out.
You will need to obtain a small drop of blood using a lancet (very thin, sharp needle) and absorb it on to the end of a test strip placed in a meter.
Under no circumstances should a lancet be reused on another person. Dispose of lancets in a healthy and safe manner immediately after use, ideally in a suitable sharps container or in a beaker of disinfectant.
5 Setting up the lancing device
wash your hands with soap and water, and also the site from which the blood sample is to be taken – the arm is likely to be pain free (see ‘Getting the blood sample’ below)
always use a new lancet – check that the cap is fixed in place and has not been removed and replaced
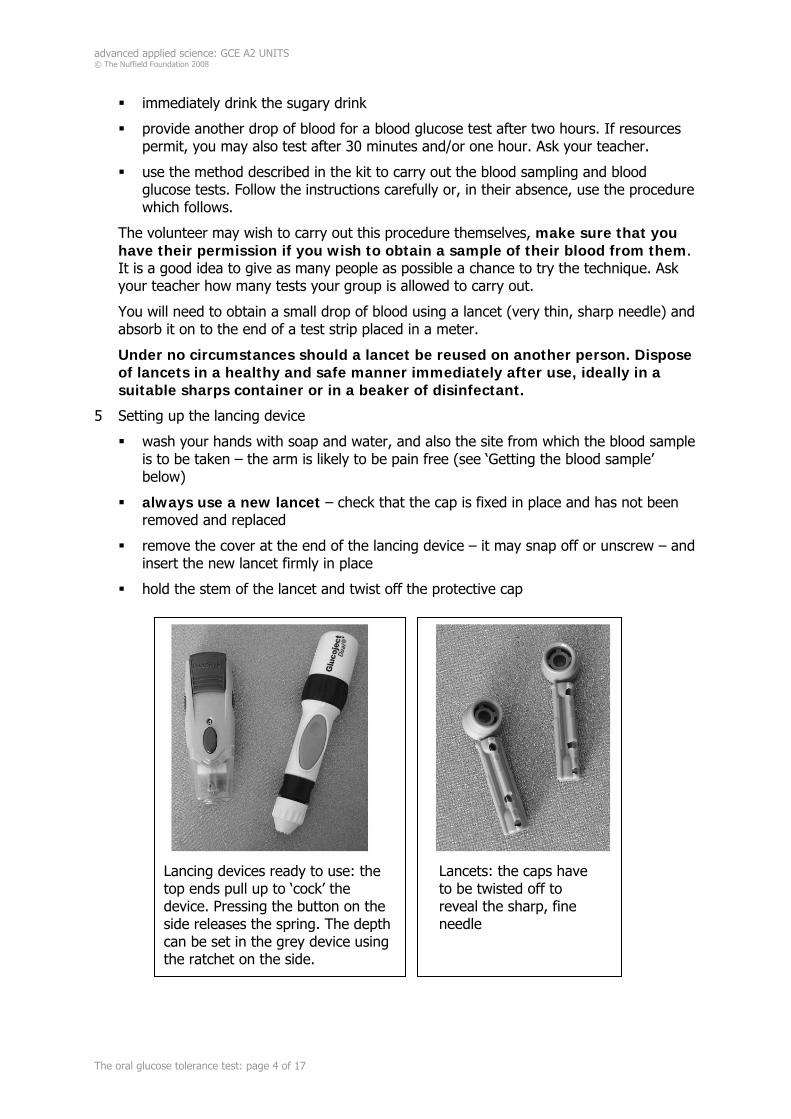
remove the cover at the end of the lancing device – it may snap off or unscrew – and insert the new lancet firmly in place
hold the stem of the lancet and twist off the protective cap
Lancing devices ready to use: the top ends pull up to ‘cock’ the device. Pressing the button on the side releases the spring. The depth can be set in the grey device using the ratchet on the side.
Lancets: the caps have to be twisted off to reveal the sharp, fine needle
advanced applied science: GCE A2 UNITS © The Nuffield Foundation 2008
The oral glucose tolerance test: page 5 of 17
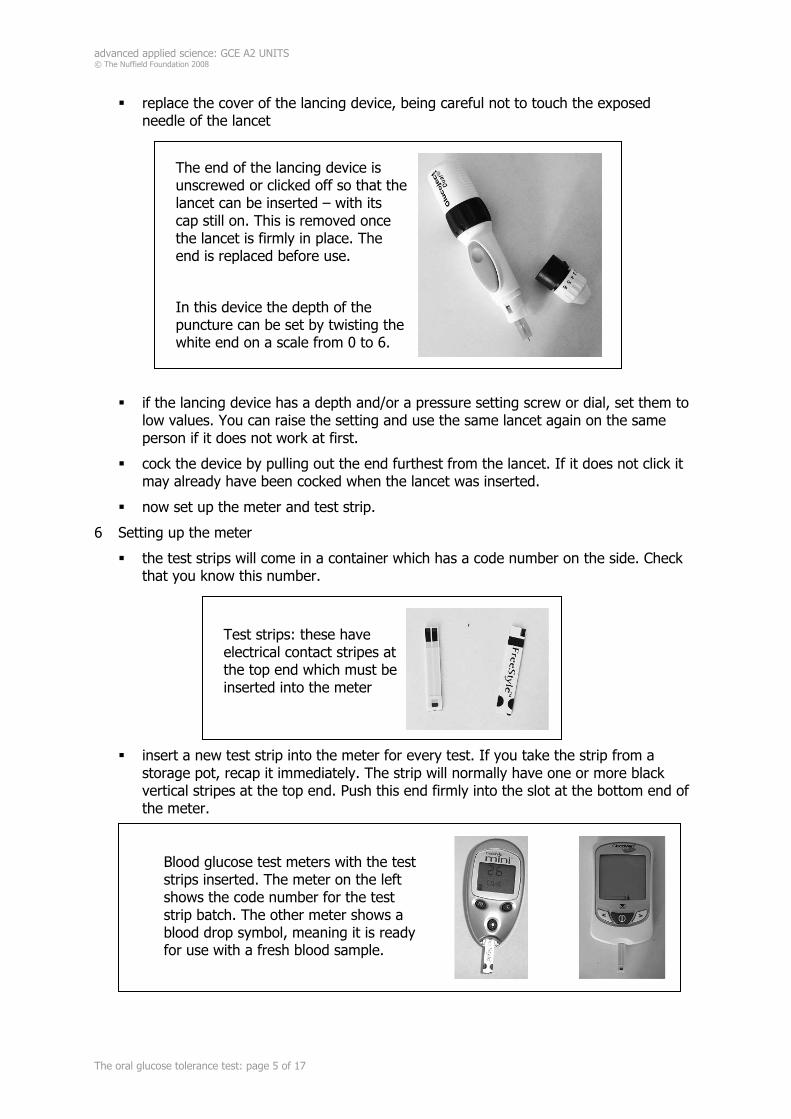
replace the cover of the lancing device, being careful not to touch the exposed needle of the lancet
if the lancing device has a depth and/or a pressure setting screw or dial, set them to low values. You can raise the setting and use the same lancet again on the same person if it does not work at first.
cock the device by pulling out the end furthest from the lancet. If it does not click it may already have been cocked when the lancet was inserted.
now set up the meter and test strip.
6 Setting up the meter
the test strips will come in a container which has a code number on the side. Check that you know this number.
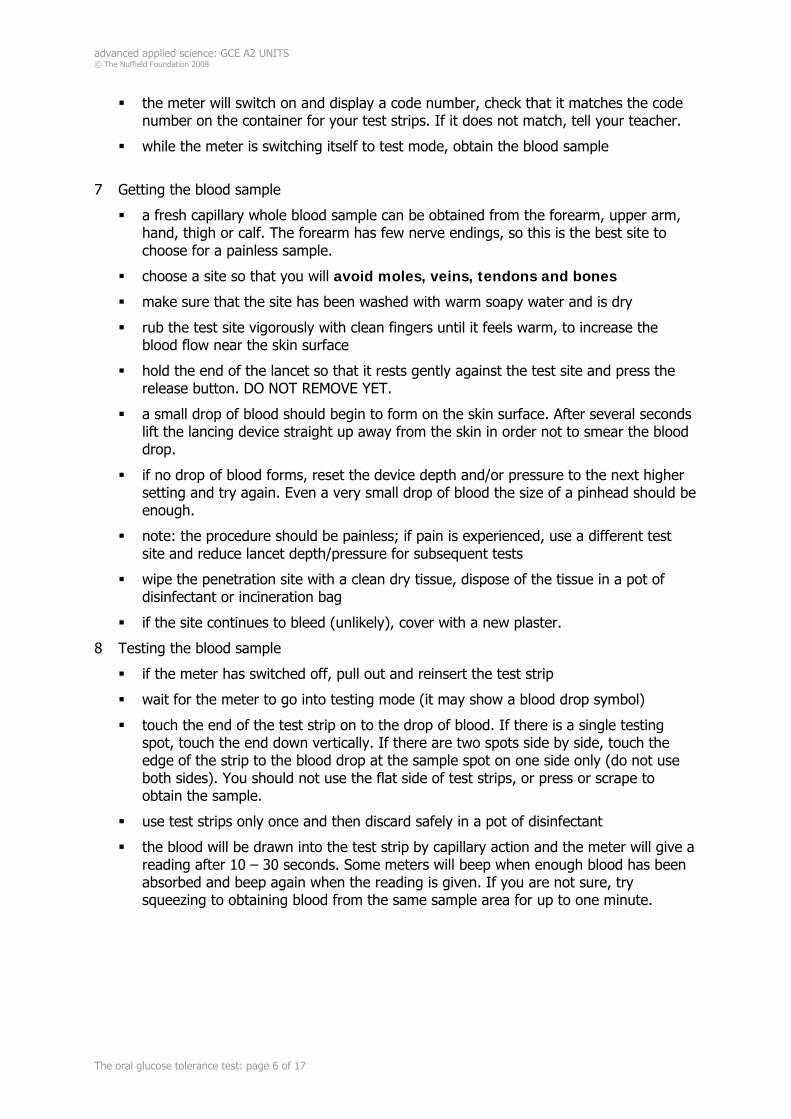
insert a new test strip into the meter for every test. If you take the strip from a storage pot, recap it immediately. The strip will normally have one or more black vertical stripes at the top end. Push this end firmly into the slot at the bottom end of the meter.
The end of the lancing device is unscrewed or clicked off so that the lancet can be inserted – with its cap still on. This is removed once the lancet is firmly in place. The end is replaced before use.
In this device the depth of the puncture can be set by twisting the white end on a scale from 0 to 6.
Test strips: these have electrical contact stripes at the top end which must be inserted into the meter
Blood glucose test meters with the test strips inserted. The meter on the left shows the code number for the test strip batch. The other meter shows a blood drop symbol, meaning it is ready for use with a fresh blood sample.
advanced applied science: GCE A2 UNITS © The Nuffield Foundation 2008
The oral glucose tolerance test: page 6 of 17
the meter will switch on and display a code number, check that it matches the code number on the container for your test strips. If it does not match, tell your teacher.
while the meter is switching itself to test mode, obtain the blood sample
7 Getting the blood sample
a fresh capillary whole blood sample can be obtained from the forearm, upper arm, hand, thigh or calf. The forearm has few nerve endings, so this is the best site to choose for a painless sample.
choose a site so that you will avoid moles, veins, tendons and bones
make sure that the site has been washed with warm soapy water and is dry
rub the test site vigorously with clean fingers until it feels warm, to increase the blood flow near the skin surface
hold the end of the lancet so that it rests gently against the test site and press the release button. DO NOT REMOVE YET.
a small drop of blood should begin to form on the skin surface. After several seconds lift the lancing device straight up away from the skin in order not to smear the blood drop.
if no drop of blood forms, reset the device depth and/or pressure to the next higher setting and try again. Even a very small drop of blood the size of a pinhead should be enough.
note: the procedure should be painless; if pain is experienced, use a different test site and reduce lancet depth/pressure for subsequent tests
wipe the penetration site with a clean dry tissue, dispose of the tissue in a pot of disinfectant or incineration bag
if the site continues to bleed (unlikely), cover with a new plaster.
8 Testing the blood sample
if the meter has switched off, pull out and reinsert the test strip
wait for the meter to go into testing mode (it may show a blood drop symbol)
touch the end of the test strip on to the drop of blood. If there is a single testing spot, touch the end down vertically. If there are two spots side by side, touch the edge of the strip to the blood drop at the sample spot on one side only (do not use both sides). You should not use the flat side of test strips, or press or scrape to obtain the sample.
use test strips only once and then discard safely in a pot of disinfectant
the blood will be drawn into the test strip by capillary action and the meter will give a reading after 10 – 30 seconds. Some meters will beep when enough blood has been absorbed and beep again when the reading is given. If you are not sure, try squeezing to obtaining blood from the same sample area for up to one minute.
advanced applied science: GCE A2 UNITS © The Nuffield Foundation 2008
The oral glucose tolerance test: page 7 of 17
record the reading with the name of the volunteer, date and time (usually given on the meter) as shown in “Results” below. The reading will normally be in mmol dL-1 (millimoles per decilitre). To convert this to mmol dm-3 (millimoles per cubic decimetre) multiply the reading by 10. Ask your teacher what to do if other units are given, such as mg dL-1 (milligrams per decilitre).
if values are extreme, even after a repeat, test the operation of the meter against someone else’s blood. If blood glucose concentrations are consistently:
(a) below 3.3 mmol dm-3, this is a sign of low blood glucose (hypoglaecaemia)
(b) above 13.3 mmol dm-3, this is a sign of high blood glucose (hyperglycaemia). Treatment should be undertaken following the advice of a health care professional. Some meters, such as the FreeStyle mini, record LO or HI outside concentrations below 1.1 mmol dm-3 or above 27.8 mmol dm-3. If this occurs with symptoms (weakness, sweating, nervousness, headache or confusion for very low blood glucose, or fatigue, thirst, excessive urination or blurred vision for high concentrations), immediate treatment as recommended by a doctor is necessary.
• note: on occasions some bruising may occur at the test site. This is rare but normal and will clear up. Use a different test site for subsequent tests. Note: the procedure should be painless; if pain is experienced, use a different test site and reduce lancet depth/pressure for subsequent tests
• repeat the tests as instructed by your teacher. (You should have at least one test just before the drink is taken and another two hours later.)
Note that home blood glucose monitoring devices are not appropriate for diagnosing glycaemic conditions. The meters do not necessarily give reliable or valid results and instructions normally contain a warning that they should not be used for the diagnosis of diabetes. For example:
o the meter may not be rigorously maintained and tested
o unusual conditions may cause blood glucose levels to temporarily vary outside the norm
o blood samples taken from different parts of the body will give different values (e.g. forearm versus fingertip)
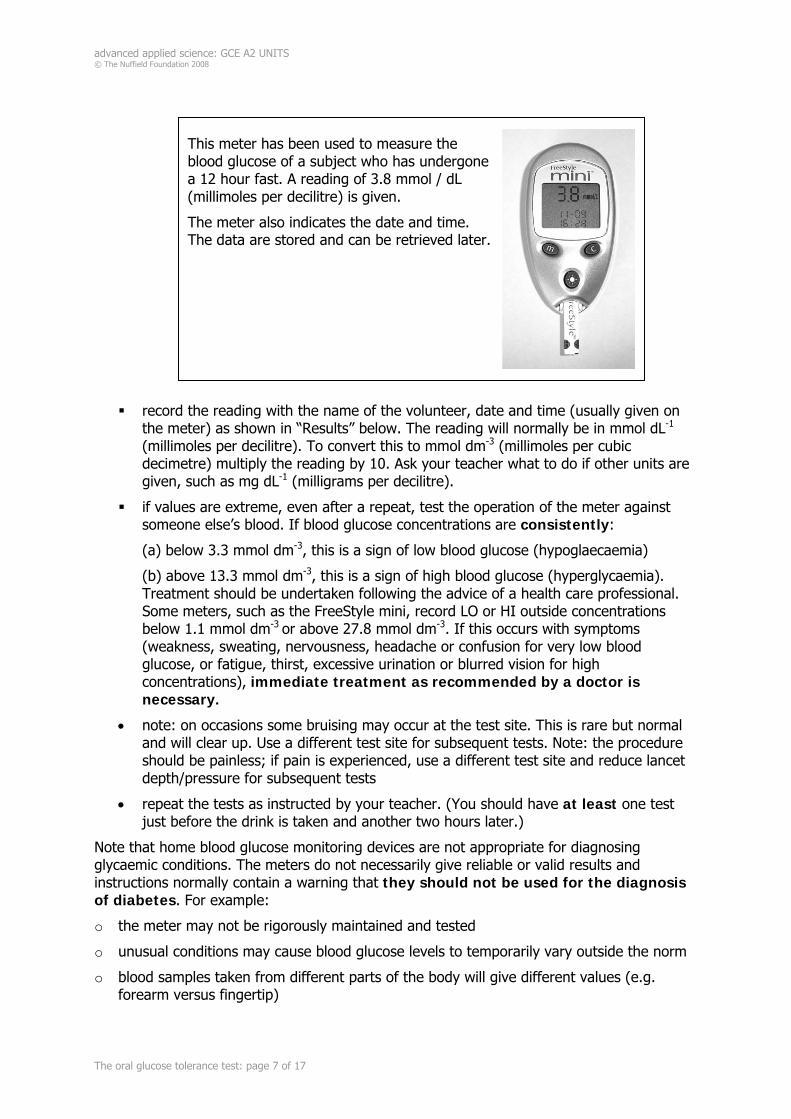
This meter has been used to measure the blood glucose of a subject who has undergone a 12 hour fast. A reading of 3.8 mmol / dL (millimoles per decilitre) is given.
The meter also indicates the date and time. The data are stored and can be retrieved later.

advanced applied science: GCE A2 UNITS © The Nuffield Foundation 2008
The oral glucose tolerance test: page 8 of 17
o glucose meters are manufactured by international companies and may operate according to slightly different criteria. For example the FreeStyle range is made by an American company and the GlucoMen range by an Italian company. The Italian meters are nonetheless tested in the USA and calibrated to the American NIST (National Institute of Science, Gaithersburg, Maryland) standard. Venous blood (withdrawn from a vein using a hypodermic syringe) rather than capillary blood (from using a lancet on the skin) is tested, so this may also cause variation in home readings from laboratory values.
Results
Make a copy of this table to record your results, or modify it to suit your investigation.
Name: Date:
Test number
Time Time after taking drink / minutes
Blood glucose concentration / mmol dm-3
Comments / observations
(if any)
1 0
2
3
4
If blood glucose concentrations fall outside the expected values it is important to repeat with a new blood sample and if the test is consistent, seek medical advice (see “ Testing the blood sample” above).
Conclusions
a Record your conclusions
Do you think any of your results indicate possible diabetes, impaired glucose tolerance or impaired fasting glucose?
Did anyone show extreme results?
State and explain what further action (if any) you would recommend.
b Discuss the significance of the result of 3.8 mmol dm-3 shown in the picture of a meter (see 8. Testing the blood sample).
Further investigations
If several groups are carrying out blood glucose tests, some could carry out the glucose tolerance test and others could try different investigations. Your class might wish to test the effects of eating or drinking (possibly different foods) and sleeping or exercise by testing blood glucose levels at suitable intervals. You might also compare blood samples taken at the same time from different sampling sites. Blood taken from the hand is said to change more rapidly due to the effects of eating or exercise, than blood taken from other potential sampling sites such as the forearm. If you are interested, talk about this with your teacher.
Do not carry out any investigations that you have not discussed with the teacher.
advanced applied science: GCE A2 UNITS © The Nuffield Foundation 2008
The oral glucose tolerance test: page 9 of 17
PRACTICAL SHEET
The oral glucose tolerance test: method 2
Testing for glucose in blood plasma
This method replicates the oral glucose tolerance test (OGTT) by using simulated blood plasma samples.
Your task is to use a procedure to carry out glucose tests on simulated blood plasma samples. You will be given four simulated plasma samples from patients A and B (who have fasted for 10 hours), taken immediately before drinking a glucose solution, after 30 minutes, one hour and two hours later.
You can find glucose concentration in blood plasma samples by timing how long it takes for the glucose to decolourise potassium manganate (VII) solution. Glucose reduces purple-pink manganate ions to colourless manganese ions and water.
MnO4-(aq) + 8H+(aq)+ 5e- Mn2+(aq) + 4H2O(l)
The higher the glucose concentration, the faster the reaction.
You will need to make your own calibration graph. You
time how long it takes known glucose solutions to decolourise the manganate
plot a graph of time against glucose concentration (calibration graph)
time how long it takes a plasma sample to decolourise the manganate
read the glucose concentration of the plasma off the calibration graph.
Health and safety
A risk assessment should be carried out before starting this investigation. Wear protective clothing and eye protection. Note: use dilute sulfuric acid only.
Equipment and materials
eye protection
stopclock or timer
glass stirring rod
boiling tubes and rack
10 cm3 measuring cylinders
dropping pipettes or syringes
glucose solutions: 4, 6, 8, 10, 12 and 14 mmol dm-3
simulated blood plasma samples A0, A0.5, A1, A2, B0, B0.5, B1, and B2 (special health and safety measures would be required for real body fluids)
1 mol dm-3 sulfuric acid [IRRITANT]
potassium manganate(VII) solution (0.4 g dm-3) [LOW HAZARD]
advanced applied science: GCE A2 UNITS © The Nuffield Foundation 2008
The oral glucose tolerance test: page 10 of 17
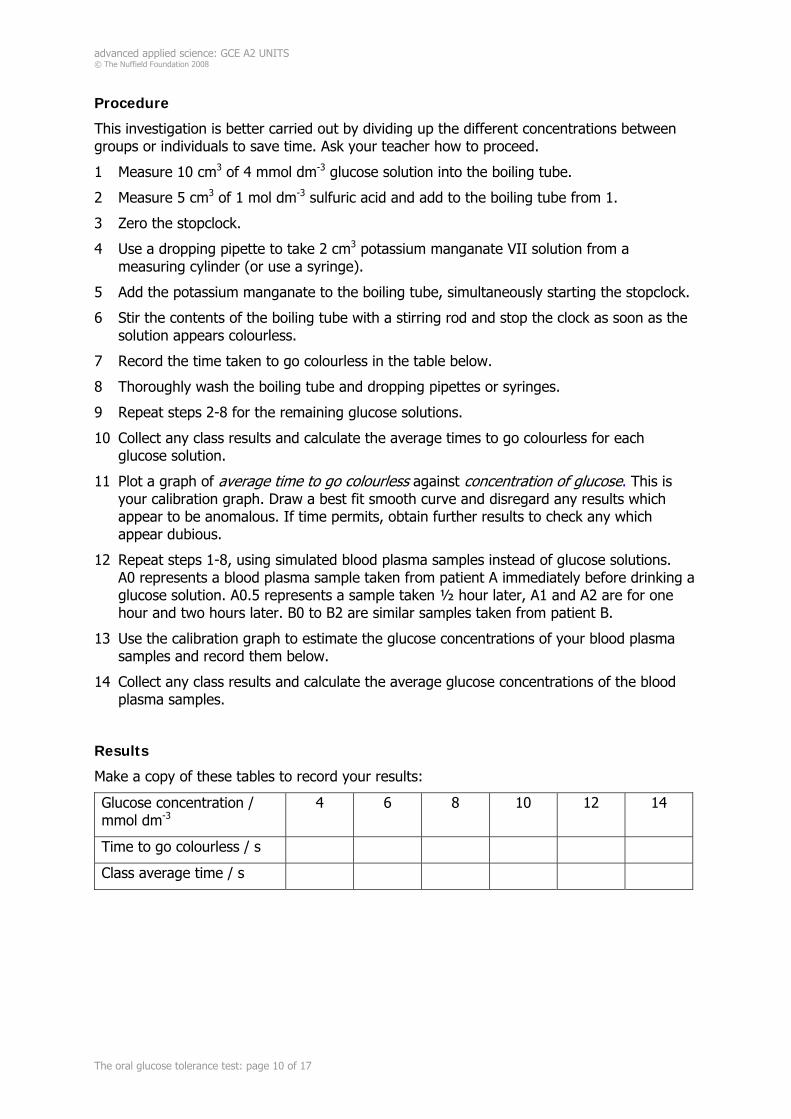
Procedure
This investigation is better carried out by dividing up the different concentrations between groups or individuals to save time. Ask your teacher how to proceed.
1 Measure 10 cm3 of 4 mmol dm-3 glucose solution into the boiling tube.
2 Measure 5 cm3 of 1 mol dm-3 sulfuric acid and add to the boiling tube from 1.
3 Zero the stopclock.
4 Use a dropping pipette to take 2 cm3 potassium manganate VII solution from a measuring cylinder (or use a syringe).
5 Add the potassium manganate to the boiling tube, simultaneously starting the stopclock.
6 Stir the contents of the boiling tube with a stirring rod and stop the clock as soon as the solution appears colourless.
7 Record the time taken to go colourless in the table below.
8 Thoroughly wash the boiling tube and dropping pipettes or syringes.
9 Repeat steps 2-8 for the remaining glucose solutions.
10 Collect any class results and calculate the average times to go colourless for each glucose solution.
11 Plot a graph of average time to go colourless against concentration of glucose. This is your calibration graph. Draw a best fit smooth curve and disregard any results which appear to be anomalous. If time permits, obtain further results to check any which appear dubious.
12 Repeat steps 1-8, using simulated blood plasma samples instead of glucose solutions. A0 represents a blood plasma sample taken from patient A immediately before drinking a glucose solution. A0.5 represents a sample taken ½ hour later, A1 and A2 are for one hour and two hours later. B0 to B2 are similar samples taken from patient B.
13 Use the calibration graph to estimate the glucose concentrations of your blood plasma samples and record them below.
14 Collect any class results and calculate the average glucose concentrations of the blood plasma samples.
Results
Make a copy of these tables to record your results:
Glucose concentration / mmol dm-3
4 6 8 10 12 14
Time to go colourless / s
Class average time / s
advanced applied science: GCE A2 UNITS © The Nuffield Foundation 2008
The oral glucose tolerance test: page 11 of 17
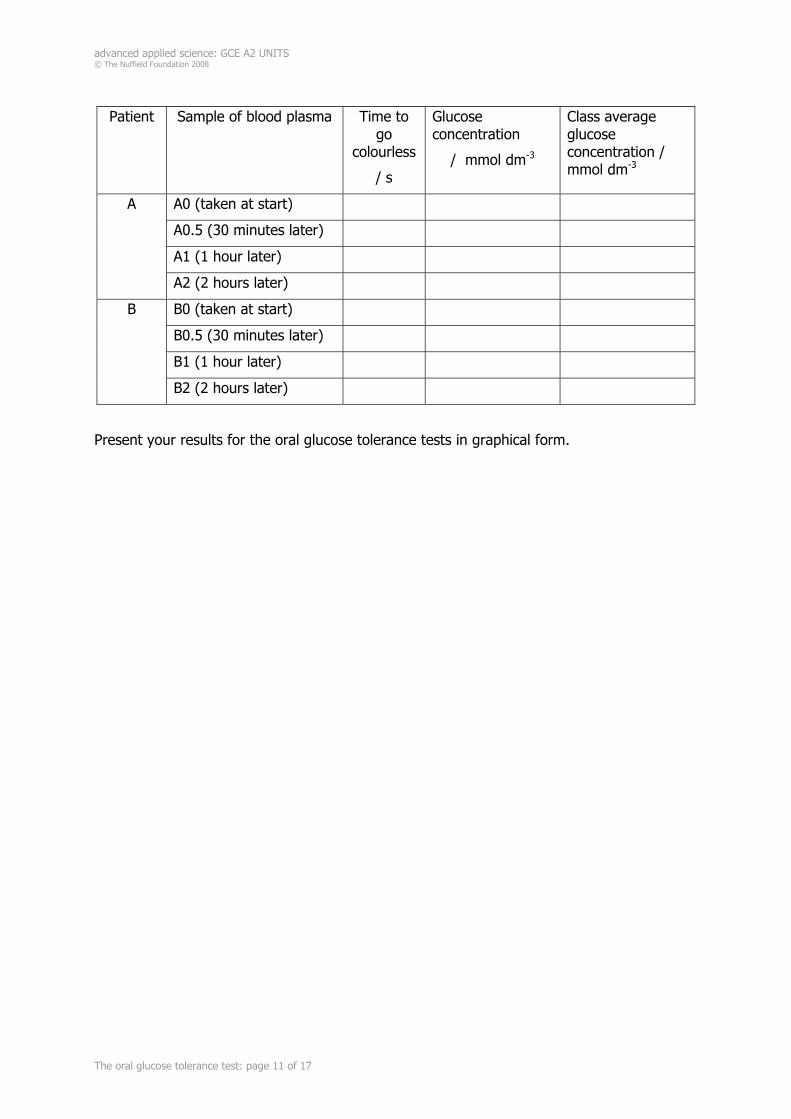
Present your results for the oral glucose tolerance tests in graphical form.
Patient Sample of blood plasma Time to go
colourless
/ s
Glucose concentration
/ mmol dm-3
Class average glucose concentration / mmol dm-3
A0 (taken at start)
A0.5 (30 minutes later)
A1 (1 hour later)
A
A2 (2 hours later)
B0 (taken at start)
B0.5 (30 minutes later)
B1 (1 hour later)
B
B2 (2 hours later)
advanced applied science: GCE A2 UNITS © The Nuffield Foundation 2008
The oral glucose tolerance test: page 12 of 17
FACT SHEET
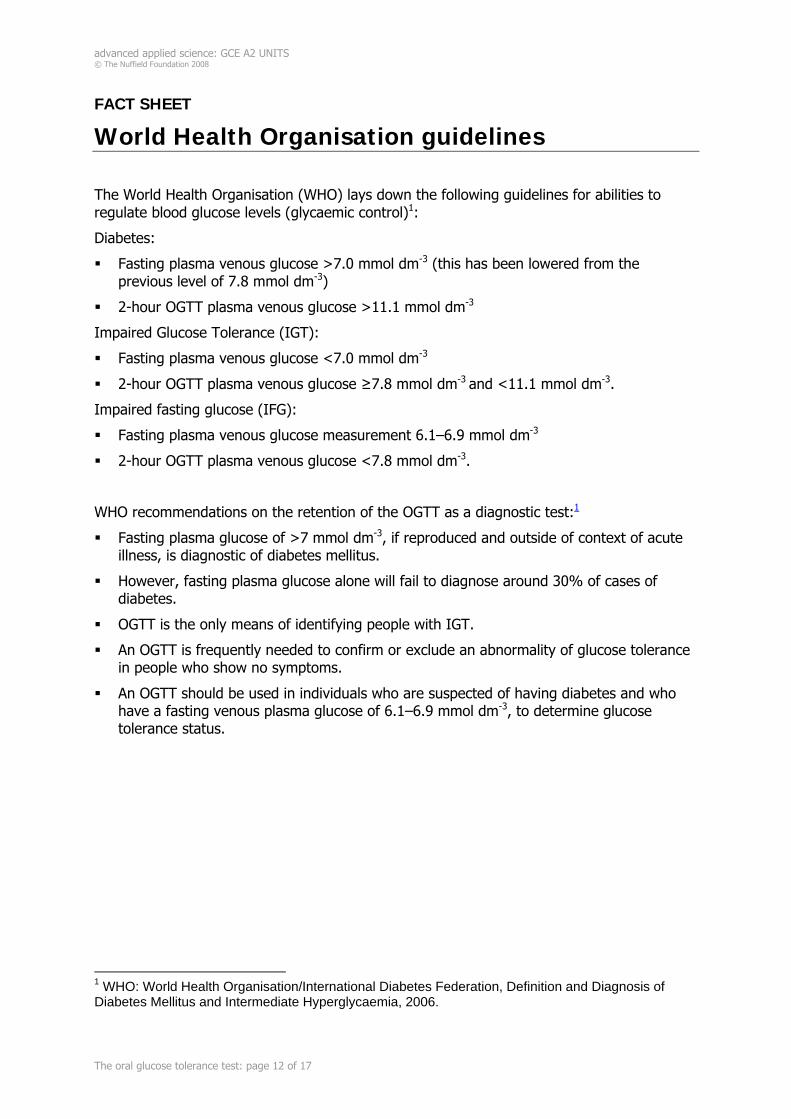
World Health Organisation guidelines
The World Health Organisation (WHO) lays down the following guidelines for abilities to regulate blood glucose levels (glycaemic control)1:
Diabetes:
Fasting plasma venous glucose >7.0 mmol dm-3 (this has been lowered from the previous level of 7.8 mmol dm-3)
2-hour OGTT plasma venous glucose >11.1 mmol dm-3
Impaired Glucose Tolerance (IGT):
Fasting plasma venous glucose <7.0 mmol dm-3
2-hour OGTT plasma venous glucose ≥7.8 mmol dm-3 and <11.1 mmol dm-3.
Impaired fasting glucose (IFG):
Fasting plasma venous glucose measurement 6.1–6.9 mmol dm-3
2-hour OGTT plasma venous glucose <7.8 mmol dm-3.
WHO recommendations on the retention of the OGTT as a diagnostic test:1
Fasting plasma glucose of >7 mmol dm-3, if reproduced and outside of context of acute illness, is diagnostic of diabetes mellitus.
However, fasting plasma glucose alone will fail to diagnose around 30% of cases of diabetes.
OGTT is the only means of identifying people with IGT.
An OGTT is frequently needed to confirm or exclude an abnormality of glucose tolerance in people who show no symptoms.
An OGTT should be used in individuals who are suspected of having diabetes and who have a fasting venous plasma glucose of 6.1–6.9 mmol dm-3, to determine glucose tolerance status.
1 WHO: World Health Organisation/International Diabetes Federation, Definition and Diagnosis of Diabetes Mellitus and Intermediate Hyperglycaemia, 2006.
advanced applied science: GCE A2 UNITS © The Nuffield Foundation 2008
The oral glucose tolerance test: page 13 of 17
Teacher notes
This activity links to AQA A2 Unit 14 The healthy body.
This unit is assessed by an externally set and marked examination. This activity relates to this part of the specification:
Blood glucose
You should know:
about the body.s normal system for regulating blood glucose levels . for example the cells and organs involved
how blood glucose is regulated by the antagonistic action of insulin and glucagon with particular reference to diabetes
about situations in which blood glucose levels need to be monitored
the normal range of values for blood glucose concentration (fasting glucose level is 3.5.7.5 mmol/litre)
why the presence of glucose in the urine can be an indicator that regulatory mechanisms are not working properly
how a simple glucose test can be carried out on urine samples in a healthcare setting - for example dipstick tests
how a glucose tolerance test can be used to monitor how glucose is handled in the blood, and how it can be used to assist diagnosis of diabetes.
Investigating the oral glucose tolerance test: Method 1
Some sensitivity is necessary when undertaking this activity. Classes may well include diabetics who have been able to keep their condition private and they should not feel pressure from this activity to disclose their condition if they do not wish to. Others may feel able to discuss their procedures and medication with the class. As with all potentially life-threatening conditions, there may be someone with a relative who has died or suffered ill health, possibly recently, due to diabetes. For these reasons, an approach in which only volunteers are used to give blood samples for testing is advised. Students may also be given the opportunity to discuss any issues in confidence with their teacher. You may wish to send a letter to parents seeking permission for their child to take part and indicating that the results cannot be used for diagnosis (positive or negative). Although the procedure is little different to obtaining blood for staining smears, results could imply ill health.
Health and safety
A risk assessment should be carried out before starting this investigation.
CARE: human blood [BIOHAZARD] can transmit disease. Lancets are sharp. Suitably dispose of lancets and any blood on tissues, etc.
The instructions that lancets should be safely disposed of immediately after use and that no lancet should be used by more than one person should be emphasised.
advanced applied science: GCE A2 UNITS © The Nuffield Foundation 2008
The oral glucose tolerance test: page 14 of 17
Pupils taking samples of their own blood No national ban (except, currently, in Northern Ireland). Was very strongly discouraged by DES in 1980s, but later modified.
See: CLEAPSS Laboratory Handbook section 14.4. Also on the CLEAPSS Science Publications CD-RPM (updated annually).
The student instructions include advice that:
If this investigation gives you any cause for concern, you should consult your doctor. Unusual results can occur by chance.
and
Note that home blood glucose monitoring devices are not appropriate for diagnosing glycaemic conditions. The meters do not necessarily give reliable or valid results and instructions normally contain a warning that they should not be used for the diagnosis of diabetes. For example:
o the meter may not be rigorously maintained and tested
o unusual conditions may cause blood glucose levels to temporarily vary outside the norm
o blood samples taken from different parts of the body will give different values (e.g. forearm versus fingertip)
o glucose meters are manufactured by international companies and may operate according to slightly different criteria. For example the FreeStyle range is made by an American company and the GlucoMen range by an Italian company. The Italian meters are nonetheless tested in the USA and calibrated to the American NIST (National Institute of Science, Gaithersburg, Maryland) standard. Venous blood (withdrawn from a vein using a hypodermic syringe) rather than capillary blood (from using a lancet on the skin) is tested, so this may also cause variation in home readings from laboratory values.
Equipment and materials
• 394 ml of “Lucozade Energy Original” (energy content stated on label as 73 kcal/100 ml)
• access to hand washing facilities with soap and warm water
• lancet disposal pot, e.g. sharps container or beaker of disinfectant such as VirKon
• clean, dry tissues
• access to plasters (not likely to be needed)
• blood glucose testing kit or equivalent, containing:
o instructions
o lancet and lancing device
o meter
o test strips
You may also need a PC and interfacing cable if results are to be stored and manipulated using computer software: details available from meter supply companies.
A sealed sharps container may be used, but use of a disinfectant pot allows lancets to be counted out and (used and unused) back in again to make sure they are all accounted for.
advanced applied science: GCE A2 UNITS © The Nuffield Foundation 2008
The oral glucose tolerance test: page 15 of 17
Blood glucose testing kits are available from about £4-£5 (e.g. Freestyle Mini £3.98 in ASDA 21/09/07) with lancets and test strips available at prices which make the cost of a test <10 p (for example from Chemist Direct).
Maintenance of meters requires matching test strips and meter settings and periodic testing using control solutions.
A class discussion of the results can be used to establish why the OGTT is preferable to urine testing or fasting blood glucose levels to diagnose diabetes.
Investigating the oral glucose tolerance test: Method 2
This investigation allows glucose concentrations to be estimated using the decolourisation of manganate(VII).
Students may work individually or in small groups according to their ability and the resources available.
Depending on the time available, the numbers and practical competence of students, the work could be divided so different individuals or groups obtain results for different glucose concentrations for both stock solutions and simulated blood plasma samples. If possible, results should be duplicated to check for reliability (though the construction of the calibration chart will give an indication of this). Some repeats may be necessary before an adequate calibration chart is obtained.
If possible, students should be allowed to organise themselves to obtain results as efficiently as possible. If this task is set, it may be advisable for their plan to be checked before they proceed.
Health and safety
A risk assessment should be carried out before starting this investigation.
Eye protection should be worn. Note: use dilute 1M sulfuric acid only.
Equipment and materials
eye protection
stopclock or timer
glass stirring rod
boiling tubes and rack
cm3 measuring cylinders
dropping pipettes or syringes
glucose solutions: 4, 6, 8, 10, 12 and 14 mmol dm-3
simulated blood plasma samples / mmol dm-3 as follows:
A0 5.0
A0.5 10.0
A1 8.5
A2 6.0
B0 6.5
B0.5 13.0
B1 12.0
B2 11.0
1 mol dm-3 sulfuric acid [IRRITANT]
advanced applied science: GCE A2 UNITS © The Nuffield Foundation 2008
The oral glucose tolerance test: page 16 of 17
potassium manganate VII solution (0.4 g dm-3) [LOW HAZARD], solid [OXIDISER].
Make up solution just before use.
Alternative method:
Students may be provided with 10 cm3 measuring pipettes and asked to make their own series of glucose solutions from a stock solution.
Results
You may wish to discuss plotting 1/t against glucose concentration.
Even with some inconsistencies in the results students should be able to establish a case in which patient B is diagnosed as diabetic due to the OGTT, even though their fasting blood glucose levels did not indicate this (level at IFG).
Web resources
There are many useful high quality websites: students may be set a variety of research tasks based on these. For example:
Diabetes UK
http://www.diabetes.org.uk/
http://www.diabetes.org.uk/templates/GenericContent.aspx?id=677&print=1
http://www.diabetes.org.uk/Documents/Professionals/nutrition_guidelines.pdf
http://www.diabetes.org.uk/measure-up
NHS Direct
http://www.nhsdirect.nhs.uk/articles/article.aspx?articleID=128
Lab Tests Online
http://labtestsonline.org/understanding/conditions/diabetes-4.html
Diabetes overview
http://www.netdoctor.co.uk/diseases/facts/diabetes.htm
Nursing standard quick reference guide to urine testing http://www.nursing-standard.co.uk/archives/ns/residentpdfs/quickrefPDFfiles/Quickref8.pdf
Lloyds Pharmacy
http://www.lloydspharmacy.com/ea/home-page/health_updates/diabetes_health.htm
Cuttting edge research on glucose testing
http://www.rsc.org/chemistryworld/News/2007/January/16010701.asp
Descriptions of type 1 and type 2 diabetes and all the statistics http://www.statistics.gov.uk/articles/hsq/HSQ14diabetes.pdf
Health of Wales Information Service (HOWIS)
http://howis.wales.nhs.uk/status/
Department of Health: http://www.dh.gov.uk/PolicyAndGuidance/HealthAndSocialCareTopics/Diabetes/fs/en
advanced applied science: GCE A2 UNITS © The Nuffield Foundation 2008
The oral glucose tolerance test: page 17 of 17
New GMS Contract QOF Implementation Logical Query Indicator Specification
http://www.dh.gov.uk/assetRoot/04/07/41/93/04074193.PDF
National Institute for Clinical Excellence (NICE)
http://www.nice.org.uk/
Scottish Intercollegiate Guidelines Network (SIGN)
http://www.sign.ac.uk/
Leicester Primary Care Audit Group
http://www.leicester-pcag.org.uk/
NHS Health and Social Care Information Centre
http://www.icservices.nhs.uk/
Diabetes Insight – An independent Web site put together by a commercial company. Contains plenty of useful information on diabetes
http://www.diabetic.org.uk/
ICT Foundation Programme for General Medical Practices
http://www.wales.nhs.uk/sites/home.cfm?ORGID=319
British Society for Paediatric Endocrinology and Diabetes
www.bsped.org.uk/
Warwick University
http://www2.warwick.ac.uk/fac/med/healthcom/diabetes/about/
MSD Informatics
MSDInformatics.com
The National Clinical Audit Support Programme (NCASP)
http://www.icservices.nhs.uk/ncasp/pages/audit_topics/diabetes/default-new.asp
Health Inspectorate Wales
http://www.hiw.org.uk/
Patient Information Advisory Group (PIAG)
http://www.advisorybodies.doh.gov.uk/piag/
Yorkshire & Humber Public Health Observatory
http://www.yhpho.org.uk/
University of Sheffield School of Health and Related Research; (ScHARR).
http://www.shef.ac.uk/scharr/


![Glucose Tolerance Test in Mice - Bio-protocol · Glucose Tolerance Test in Mice . ... [Abstract] Glucose tolerance test is a standard procedure that addresses how quickly exogenous](https://img.pdfslide.net/doc/110x75/5b8a408e7f8b9a50388bbc88/glucose-tolerance-test-in-mice-bio-protocol-glucose-tolerance-test-in-mice.jpg)