Embed Size (px)
Citation preview

1
Greetings,
The pages that follow are taken from
the complete “Pool Cover Reel, Do It
Yourself, Build Your Own” document.
I have uploaded these as a free sample
of the larger document. That way
you can get an idea of my writing
style and the degree of detail con-
tained in the document.
This will make it much easier for you
to decide whether you want to go
forward with the project or simply
purchase a complete reel.
Brennan R. Cook

2 DIY (Do It Yourself) POOL COVER REEL
BUILD YOUR OW. HEAVY DUTY POOL
COVER REEL FOR ABOUT $125 I.
MATERIALS PORTABLE, DURABLE, LIGHT WEIGHT, INEXPENSIVE HOLDS UP TO (approximately) 600 SQUARE FEET OF SOLAR POOL COVER (more with modifications).
This guide was written for someone with very basic fabrication skills. You do not need to be an expert at working with any of the tools or materials in this guide. You just need to have a fundamental ability to follow simple directions. More im-portantly, you should be someone who enjoys building things themselves. Very light duty reels are available for about the same price as the materials used to build this one. There are similar quality/strength reels available for two or three times the materials cost of this one.
.OTE: The order of assembly of components as listed in these plans is not critical.
However, the assembly order has been arranged for maximum simplicity and the avoid-
ance of mistakes. This material is copy written by Brennan R. Cook. It is for the use of the purchaser alone. Reproduction for other than personal use is prohibited.

3 Index Page 1 Cover DIY (Do It Yourself) POOL COVER REEL Page 2 Index
PART I TOOLS A.D MATERIALS
Page 3 Sizing: Pool, Pool Cover and Pool Cover Reel Page 4 Tool List Page 5 Materials List page 1 Page 6 Materials List page 2 Page 7 Materials Receipts
PART II MODIFICATIO. OF MATERIALS A.D TIPS
Page 8 Names for Various Components of Reel Page 9 Cutting Tubing: List of Cuts, How to Get a Straight Cut Page 10 Cutting Tubing: How to Get a Straight Cut Page 11 Cutting Tubing: Pre-assembly Cuts Page 12 Drilling Holes: Axle Holes Page 13 Drilling Holes: Crank Pass-Through Holes Page 14 Drilling Holes: Crank Pass-Through Holes Page 15 Dry-Fitting Pieces Page 16 Marking for Assembly—Alignment Lines, Joint ID Page 17 Marking for Assembly—Depth Lines Page 18 PVC Primer and Cement
PART III BASE, AXLE, I.VERTED V ASSEMBLIES
Page 19 Assembling the Base Lengths Page 20 What to Do if I Make a Mistake Page 21 Installing the Axle Page 22 Checking for “Square” Page 23 Installing Uprights and Legs Page 24 Assembling Inverted V Uprights – how to align Page 25 Installing Inverted V Uprights onto Base Lengths Page 26 Installing Lift Handle on Ends of Base Lengths Page 27 Installing Lift Handle on Ends of Base Lengths Page 28 Tightening Axle Nuts, Finishing Axle Page 29 Finishing Axle
PART IV CRA.K ASSEMBLY
Page 30 Assembling the Tie-off Tees Page 31 Measuring for Crank Length Page 32 Measuring for Crank Length Page 33 Assembling the Main Crank Assembly Page 34 Checking Fitment of Crank and Pass Through Pipes Page 35 Checking the Length of the Pass Through Pipes Page 36 Installing Second Pass Through Pipe Page 37 Finishing Non-Handle End Page 38 Assembling and Installing Crank Handle Arm Page 39 Assembling and Installing Spinning Handle Grip
PART V MODIFICATIO. OF COVER
Page 40 Installing Grommets in Cover Page 41 Installing Draw Rope into Grommets Page 42 Folding Cover and Positioning Reel Page 43 Rolling up Cover Page 44 Storing Reel and Cover Page 45 Contact and Additional Information, End

4 Sizing: Pool, Pool Cover and Pool Cover Reel
The pool we will use for our sizing example is of the “figure 8” style. The asymmetrical shape of this pool makes it challenging to fit a cover. Many of the covers available are actu-ally just strips of 6 foot wide material joined together at the edges until the desired width is
achieved. Length is virtually unlimited. Even though the pool in our example is only 32 feet long at the longest point and 15 feet wide at the widest point, we had to buy a 40 foot by 18 foot cover in order to completely cover the sur-face of the water. We also left an additional 12 inches of cover around the entire perimeter of what was needed to allow for cover shrinkage/aging and so it would fit tight against the sides and catch more of the debris that blows in.
In this case, if we were to construct a reel that would roll up the cover in a single layer (without folding it), that reel would be a ridiculous and unnecessary width. It would also be difficult to move around once it was rolled up. The obvious solution is: Fold the cover onto itself at the 6 foot seams before rolling it up.
By folding the cover at the seams we now only need a reel wide enough to accommodate a 6 foot wide cover that is two or three times thicker than a standard cover. That is why the instructions that follow are for the construction of a 6 foot reel. This reel easily accom-modates the (approximately) 400 square feet of cover material. Note: the cover shown is 11 mil thickness. If you have a rectangular pool, determining the square footage is obviously much easier – Length times Width.
What to do if you want a different size. “What if my pool is consid-erably larger?” In the photo to the right, you can see that the entire (approximate) 400 square foot cover only uses about 1/2 of the space on this reel. The amount of cover that can be stored increases as the distance from the crank increases. So, theoretically, you could fit close to 1200 square feet of cover on this reel. However, the weight of the cover would become an issue. If you are going to try use this reel design for much more than 600 square feet of cover, I suggest switching from schedule 40 PVC to schedule 80 PVC. (Particularly the shaft portion of the crank and 90 degree elbows through which the crank passes.) This will increase your costs slightly.
- 6 Feet -

5 Tool list The tools you will need for this project are as follows:
Hacksaw: If you don’t have one, buy a decent one. Skip the $10 one and spend $15 to $25. The cheap ones are much too frustrating and cut crooked unless you are very patient. Tape measure: 10 foot (or longer) Hacksaw blades: fine to medium Black marker: medium tip 12” piece of card stock – junk mail File – fine to medium – combo round and flat. If you don’t have one, the Kobalt 4 in 1 is a good inexpensive choice. Item #: 294692, Model #: SF681273 Electric drill Drill bit: Any bit between 1 /2 inch and 5/8 inch will work as long as it fits in your drill chuck 2” hole saw: The one I used was the Lenox 2” Carbide Grit Holesaw: Item # 239657, Model #: 12153 Two ¾” open end wrenches or equivalent Rubber Mallet Rags Flat cement area, like a garage floor, to lay out pieces and align joints Optional/Additional Tools needed to install pull ropes in cover
Small piece of 2x4 to use as an anvil Knife Hammer

6 Cutting Tubing: How to Get Straight Cut
Next, cut part way into the pipe sur-face all the way around the pipe fol-lowing your marker line. This helps guide the saw blade by providing a groove for it to follow.
Then continue cutting and rotating the pipe as you go. If you try to cut straight through the pipe from top to bottom without rotating, the blade has a tendency to stray off track. Also, by always finishing your cuts on the inside portion of the pipe, you reduce the chances of the “tooth” or “fang” that can appear when the two pieces of the pipe finally separate.
Once fully cut, rub down the cut with a rag. This will remove most of the debris. Then use your combo-file to clean up the edges completely.
When you are finished with a cut, this is what it should look like.

7 Dry-Fitting Pieces
It is important that certain fittings line up with one another. The fittings at oppo-site ends of the Base Lengths must align with one another. The three fittings of the Inverted V Uprights must align with one another. The Crank Handle fittings should align with one another. The Tie-Off Tees should align with one another. And the two elbows of the Lift Handle should align with one another. A flat ga-rage floor and a marker are all you need to achieve sufficient alignment of fittings. “Dry-fitting” is the process of partially assembling fittings and pipe without primer or adhesive. When you dry-fit a fitting onto a pipe, the pipe will usually not slide all the way into the fitting. This is not a problem. Once you apply primer and cement, the cement acts a lubricant and with little effort the two pieces will “seat” fully. We will be dry-fitting pieces so as to align them with one another. This will make later assembly MUCH easier. As an example, I will use one of the inverted V up-rights assemblies. You can assemble these now or just read through the process. Instructions for assembly of these appear again later in the document. First, lay out the components of the piece you are assembling. In this case, the Inverted V Upright consists of two 45 degree fittings, two sections of 2” PVC pipe and a modified 90 degree elbow.
Dry-fit the five components together. You don’t have to force them together. Just slide them together enough to form the general shape of the end compo-nent.
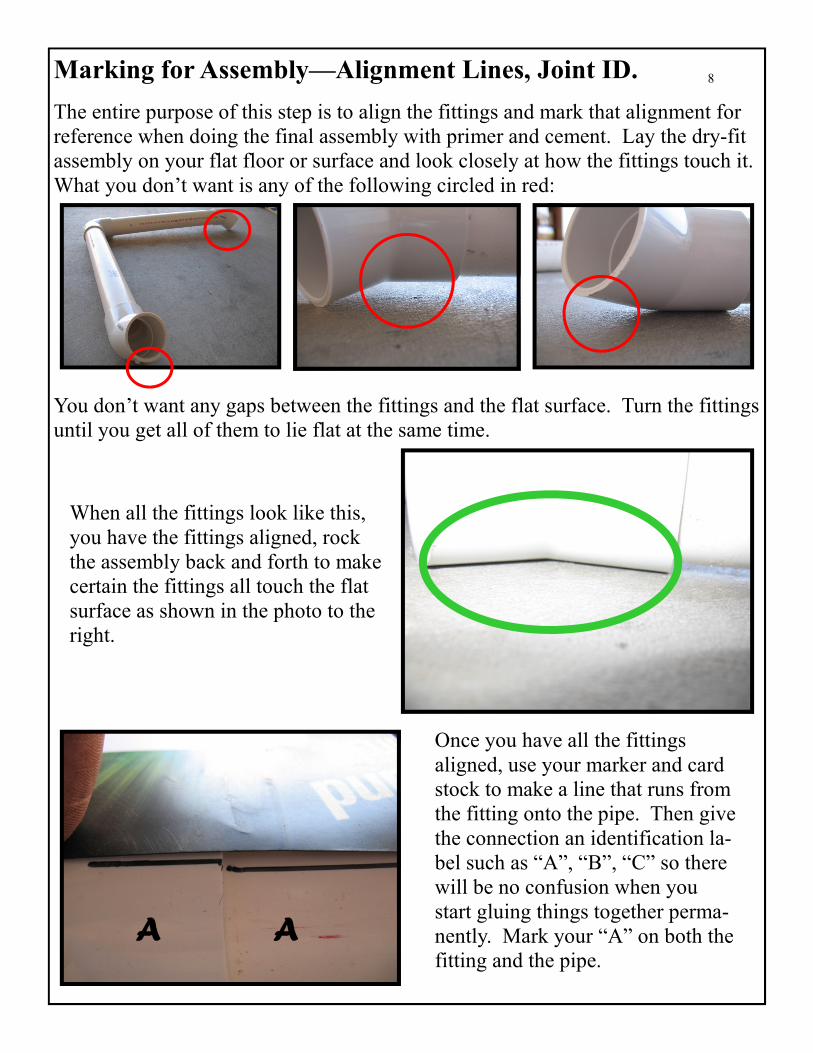
8 Marking for Assembly—Alignment Lines, Joint ID.
The entire purpose of this step is to align the fittings and mark that alignment for reference when doing the final assembly with primer and cement. Lay the dry-fit assembly on your flat floor or surface and look closely at how the fittings touch it. What you don’t want is any of the following circled in red:
You don’t want any gaps between the fittings and the flat surface. Turn the fittings until you get all of them to lie flat at the same time.
When all the fittings look like this, you have the fittings aligned, rock the assembly back and forth to make certain the fittings all touch the flat surface as shown in the photo to the right.
Once you have all the fittings aligned, use your marker and card stock to make a line that runs from the fitting onto the pipe. Then give the connection an identification la-bel such as “A”, “B”, “C” so there will be no confusion when you start gluing things together perma-nently. Mark your “A” on both the fitting and the pipe.
A A

9 Marking for Assembly—Depth Lines Once you have marked all fitting and pipe joints/connections with an align-ment line and a letter designation, take the assembly apart and make a fitting depth line on the pipe. This depth line will tell you when you have fully seated the connection.
First measure the depth of the fitting. Inside the fitting you will see a small ridge that will stop the pipe when it is fully installed. On the 2” diameter fit-tings I am using in this example, the depth is 1 and 3/8 inches.
When you make your depth line on the pipe, do so adjacent to the alignment line. That way when you are doing the final assembly with primer and cement you only have to look one place to see if both the alignment and depth are correct.

10 PVC Primer and Cement If you have never worked with PVC primer and ce-ment before, it is quite simple. All you do is swab the inside of the fitting and the end of the pipe with primer. Then swab the inside of the fitting and end of the pipe with cement and stick them together. NOTE: ONCE THE CEMENT IS APPLIED, YOU ONLY HAVE ABOUT 15 SECONDS TO DO THIS.
Once the cement is applied, join the two pieces by twisting them as you push them together. Line up your alignment lines on the fitting and pipe and check the depth mark to see that you have them pushed all the way together. Then place the assembly back on your level surface and give one last check to
see that the fittings line up with one another. You still have a few seconds to move the fittings slightly before the cement sets up. If things look good, hold pressure on the fittings for a few seconds to prevent “rebound” - the tendency for the glue to push the pieces apart while it is setting up. Since these bonds are not for the retention of a liquid, it is not imperative that the pieces be absolutely all the way seated together but they have to be close for the joint to have integrity. Also, by fully seating all the joints you improve the chances that your reel will be “squared up” and assembly will be easier. Do all of this quickly. Once bonded, they are stuck for good. If something is wrong, you have to start over on that piece. Fortunately PVC is quite inexpensive to replace if something doesn’t work out as planned. ALSO NOTE: The primer stains everything. It is supposed to. Part of the purpose of the colored primer is to serve as an indicator that the joint has been cemented. When a plumbing inspector sees the primer, he can be rea-sonably certain the joint was cemented. If stains are a con-cern, lay out a liberal supply of rags and work carefully.
.OTE: IF YOU HAVE .EVER WORKED WITH PVC
PRIMER A.D CEME.T, YOU MAY WA.T TO
PRACTICE BY COMPLETI.G PAGE 30 FIRST.

11 What to Do if I Make a Mistake
If you make a mistake, don’t panic. It may not be as big a deal as it first ap-pears to be. When I first assembled the Base Lengths I accidentally put the Lift Handle Extensions in the axle end rather than the Cross end. OOPS!
Now What? Well, first you take a
break. Then you come back later to the situation and look for solutions. In this case the solution was easy.
First cut off the extensions flush with the Tees. This particular part of the fitting doesn’t “do” anything anyway. It serves no purpose for the reel.
Then cut two new extensions. And install them as they should have been. No big deal.

12 Assembling the Tie-off Tees
The first parts of the Crank Assembly to be assembled are the Tie-off Tees. Each of these consists of two Tee fit-tings, one reducer and a piece of 3/4 PVC pipe.
When working with reducers, or any PVC
for that matter, watch for “Rebound” or
“Push Back” of the reducer or pipe as you
cement it. Sometimes the piece you cement in tries to slide back out under its own power. You may have to hold it in the fitting for a few seconds until the cement hardens slightly.
The Reducers do not have to be aligned so just prime and cement them in - one per large Tee fitting.
Next, measure the depth of the 3/4” fittings and make your depth marks on the pipe. Install a short piece of 3/4 pipe into each large T fitting.
Lastly, install the small T fitting onto the 3/4 pipe. This is to keep the rope from slipping off as you wrap up the cover. It doesn’t matter how they point. I prefer how it looks when they align with the larger Tee so I use the flat surface to make them parallel to one another.

13 Installing Grommets in Cover
The easiest way to get the cover to reel up is by using a rope to start the process. This rope has to be attached in some manner to the cover. I have found brass grommets to work very nicely for this.
The strongest part of the cover is the overlap seam. For the 400 square foot cover on our pool, six grommets (3 per seam per end of the cover) are sufficient to reel up the cover without tearing through the material.
Place the grommets at approximately three foot intervals starting a few feet back from the edge of the cover and following the seam. Use more grom-mets if your cover is very light mate-rial or substantially bigger.
The grommet kit comes with simple instructions. Follow them. Use a piece of scrap lumber as an anvil un-derneath the cover when installing the grommets.
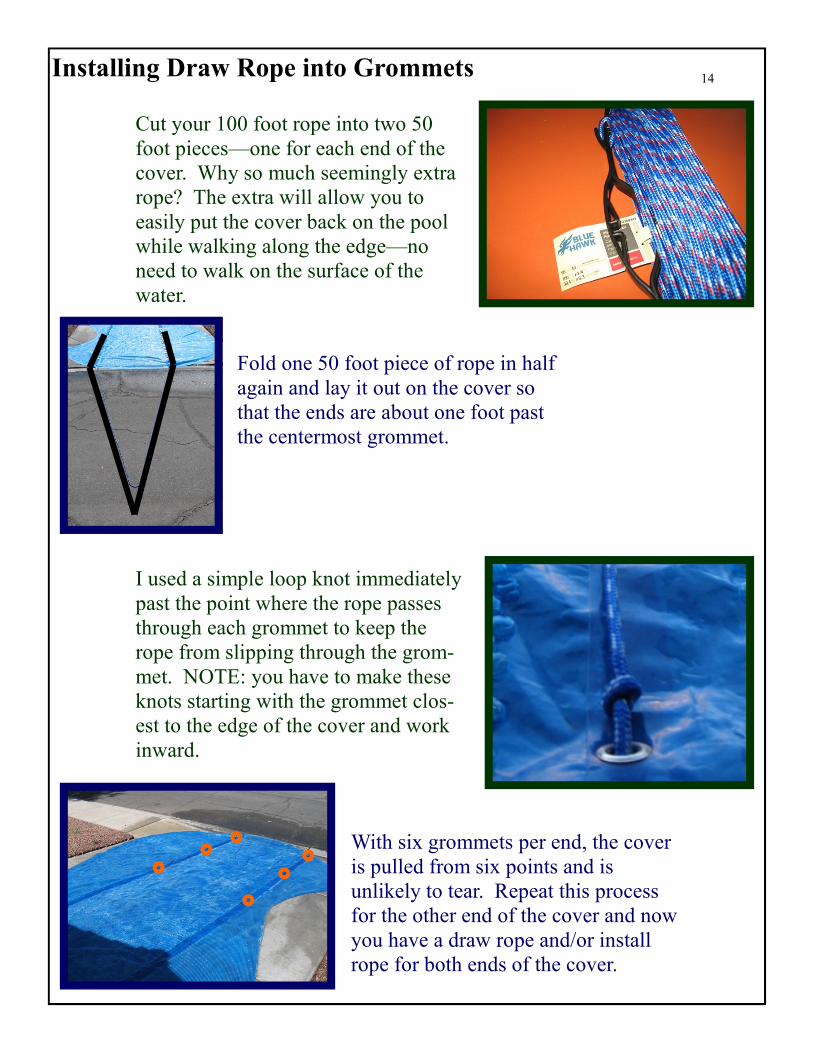
14 Installing Draw Rope into Grommets
Cut your 100 foot rope into two 50 foot pieces—one for each end of the cover. Why so much seemingly extra rope? The extra will allow you to easily put the cover back on the pool while walking along the edge—no need to walk on the surface of the water.
Fold one 50 foot piece of rope in half again and lay it out on the cover so that the ends are about one foot past the centermost grommet.
I used a simple loop knot immediately past the point where the rope passes through each grommet to keep the rope from slipping through the grom-met. NOTE: you have to make these knots starting with the grommet clos-est to the edge of the cover and work inward.
With six grommets per end, the cover is pulled from six points and is unlikely to tear. Repeat this process for the other end of the cover and now you have a draw rope and/or install rope for both ends of the cover.

15 Folding Cover and Positioning Reel
Take your time folding up the Cover. If your cover is less than 18 feet wide, folding it twice (in thirds) will be suf-ficient. If it is between 18 and 24 feet wide, you will be better off folding it three times (in quarters). Most impor-tant, regardless of how you fold it, is that you end up with a 6’ span with a draw rope on each side.
Position the reel so that it is a perpen-dicular to the cover as possible. If it is even slightly askew the cover will bunch up on one end of the reel.

16 Rolling up Cover
Secure the draw ropes to the Tie-off Tees with multiple turns or a half-hitch knot. Begin rolling up the cover. Watch to see that the material stays roughly in the center of the reel.
Stop and shift the material as needed so as to keep the cover perpendicular to the reel. You may have to shuffle it a bit to keep it folded at the seams.
The extra rope on the opposite end of the cover also serves for securing the cover once it is on the reel. The rope can be tied back on itself to keep the cover from unwinding when you move it.

17 Contact and Additional Information, End.
.ame of Plans: Pool Cover Reel, Do It Yourself, Build Your
Own
Payloadz user name: [email protected]
Price of Plans: $12.00
Preferred Email for questions and comments:
Regardless which email address you send correspondence to, please put the words “Pool Cover Reel” in the subject line. This gives your email a better chance of getting through the spam filters and catching my eye.