Embed Size (px)
Citation preview
324
15 The Purged Packed Inlet
Using a Purged Packed Inlet
Liners and insertsProcedure: Installing linersProcedure: Installing glass inserts
Columns and Traps
The control tablePacked columns or column not
definedDefined capillary columnsProcedure: Using packed and
undefined capillarycolumns
Procedure: Using defined capillary columns
Maintaining a Purged Packed InletProcedure: Changing septaProcedure: Changing the O-ringProcedure: Leak testing the gas
plumbingProcedure: Leak testing an EPC
purged packed inletProcedure: Leak testing a nonEPC
purged packed inletProcedure: Correcting leaksProcedure: Cleaning the inlet
325325
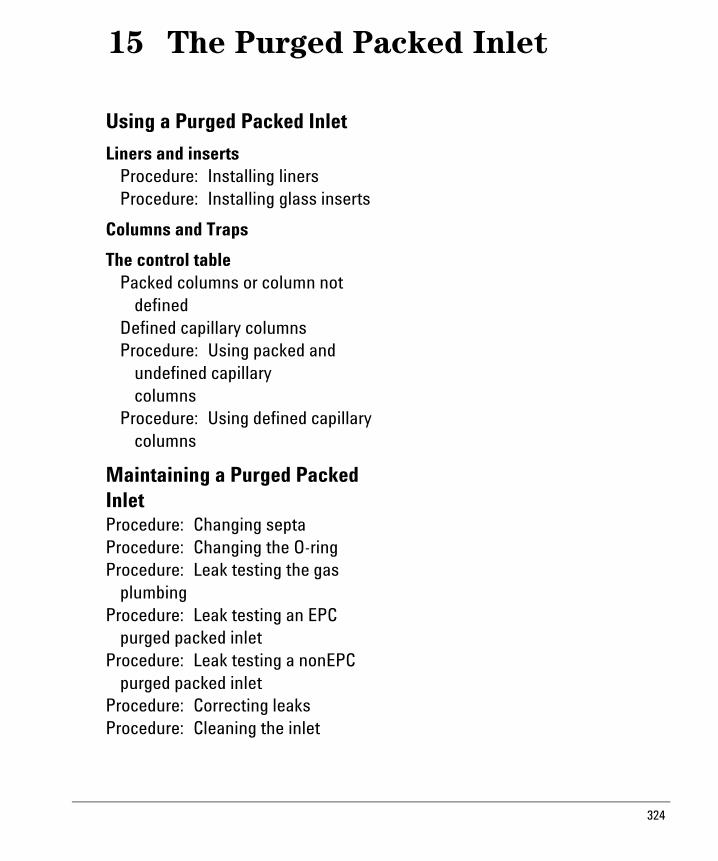
The Purged Packed Inlet
Using a Purged Packed Inlet
This inlet is used with packed columns when high-efficiency separations are not required. It can also be used with wide-bore capillary columns, provided that flows greater than 10 mL/min are acceptable.
If a capillary column is used and the column is defined, the inlet is pressure-controlled. If the column is not defined (packed columns and undefined capillary columns), the inlet is flow-controlled.
Figure 48 Packed column inlet with electronic pneumatics control
Flow
limitingfrit
Proportionalvalve
Flowsensor
Pressure sensor
Septum holderSeptum purgeregulator (not
adjustable
Flowlimiting
fritProportional
valveFlow
sensorPressure
sensorSeptum holder
Septum purgeregulator (not
adjustable
Purge VentFlow
Purge VentFlow
Flow-controlled mode (recommended for packed columns)
Pressure-controlled mode (recommended for capillary columns)
Total flowcontrol loop
Inlet pressurecontrol loop
To columnand detector
To columnand detector
FS PS SPR
FS PS SPR
326326
Using a Purged Packed Inlet The Purged Packed InletLiners and inserts
Liners and inserts
Liners. Your choice of liner depends on the type of column you are using. Liners are available for use with wide-bore capillary, 1/4-inch packed, or1/8-inch packed columns. The liner functions as an adapter so that columns can be connected to the inlet. Installation instructions are on page 327.
Inserts. Glass inserts are often used with metal liners to reduce reactivity and trap nonvolatile residues. They are always used with capillary columns. Inserts are installed from the top of the inlet and should be installed before the column. Installation instructions are on page 329.
The purged packed inlet is shipped with a liner and insert for use with capillary columns; see Table 36. Note that narrow-bore capillary columns are not recommended for use with this inlet. If you are using packed columns, consult Table 37.
Table 36. Liner and Insert for Wide-Bore Capillary Columns
Column type Liner Insert530 µm or320 µm
19244-80540
1/4-inchVespel ferrule
1/4-inch nut
Capillary liner
5080-8732 or5181-3382 (deactivated)
327327
Using a Purged Packed Inlet The Purged Packed InletLiners and inserts
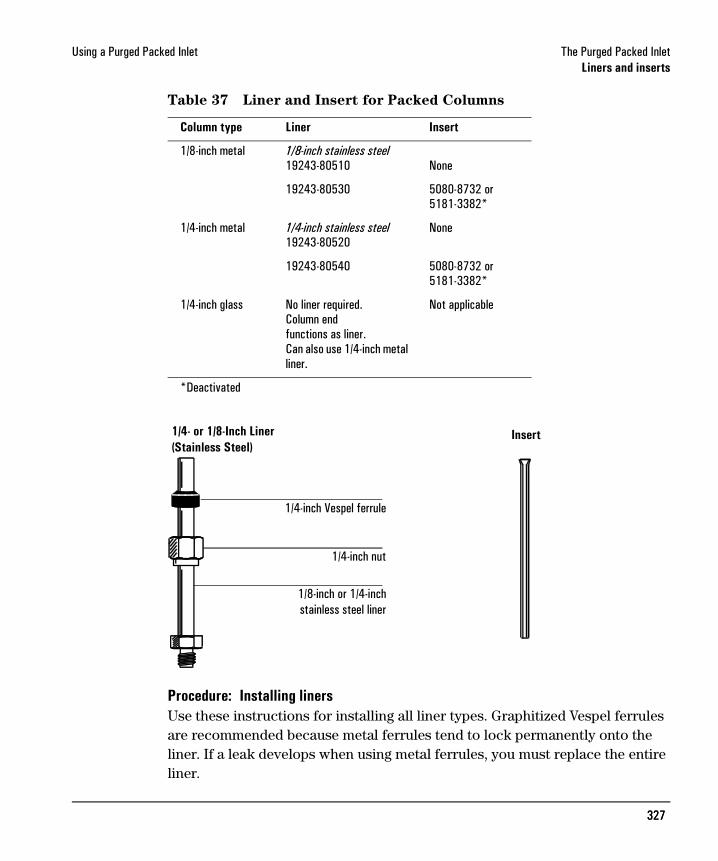
Table 37 Liner and Insert for Packed Columns
Procedure: Installing linersUse these instructions for installing all liner types. Graphitized Vespel ferrules are recommended because metal ferrules tend to lock permanently onto the liner. If a leak develops when using metal ferrules, you must replace the entire liner.
Column type Liner Insert
1/8-inch metal 1/8-inch stainless steel19243-80510 None
19243-80530 5080-8732 or 5181-3382*
1/4-inch metal 1/4-inch stainless steel19243-80520
None
19243-80540 5080-8732 or 5181-3382*
1/4-inch glass No liner required. Column end functions as liner.Can also use 1/4-inch metal liner.
Not applicable
*Deactivated
1/4- or 1/8-Inch Liner(Stainless Steel)
Insert
1/4-inch Vespel ferrule
1/4-inch nut
1/8-inch or 1/4-inchstainless steel liner
328328
Using a Purged Packed Inlet The Purged Packed InletLiners and inserts
Materials needed:
• Liner, brass nut, and ferrule (see Table 36 or Table 37)• Lint-free cloth• Methanol• 9/16-inch wrench
1. Press [Oven] and set the oven to 35°C. When the temperature reaches setpoint, turn the oven off. Press [Front Inlet] or [Back Inlet] and turn off the inlet temperature and pressure or flow.
WARNING Be careful. The oven and inlet fittings may be hot enough to cause burns.
2. Clean the end of the liner with a lint-free cloth to remove contamination such as fingerprints. Use methanol as a solvent.
3. Place a brass nut and graphitized Vespel ferrule on the liner.
4. Open the oven door and locate the inlet base. Insert the liner straight into the inlet base as far as possible.
5. Hold the liner in this position and tighten the nut finger tight.
6. Use a wrench to tighten the nut an additional 1/4 turn.
7. Install the column.
8. Establish a flow of carrier gas through the inlet, and heat the oven and inlet to operating temperatures. Allow these to cool, and then retighten the fittings.
329329
Using a Purged Packed Inlet The Purged Packed InletLiners and inserts
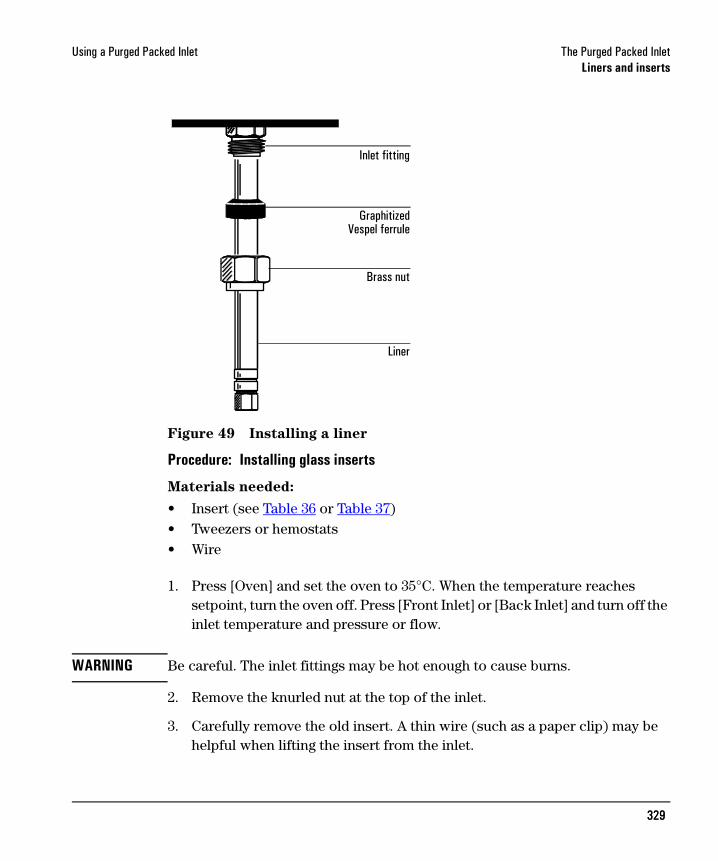
Figure 49 Installing a liner
Procedure: Installing glass inserts
Materials needed:
• Insert (see Table 36 or Table 37)• Tweezers or hemostats• Wire
1. Press [Oven] and set the oven to 35°C. When the temperature reaches setpoint, turn the oven off. Press [Front Inlet] or [Back Inlet] and turn off the inlet temperature and pressure or flow.
WARNING Be careful. The inlet fittings may be hot enough to cause burns.
2. Remove the knurled nut at the top of the inlet.
3. Carefully remove the old insert. A thin wire (such as a paper clip) may be helpful when lifting the insert from the inlet.
Inlet fitting
GraphitizedVespel ferrule
Brass nut
Liner
330330
Using a Purged Packed Inlet The Purged Packed InletLiners and inserts
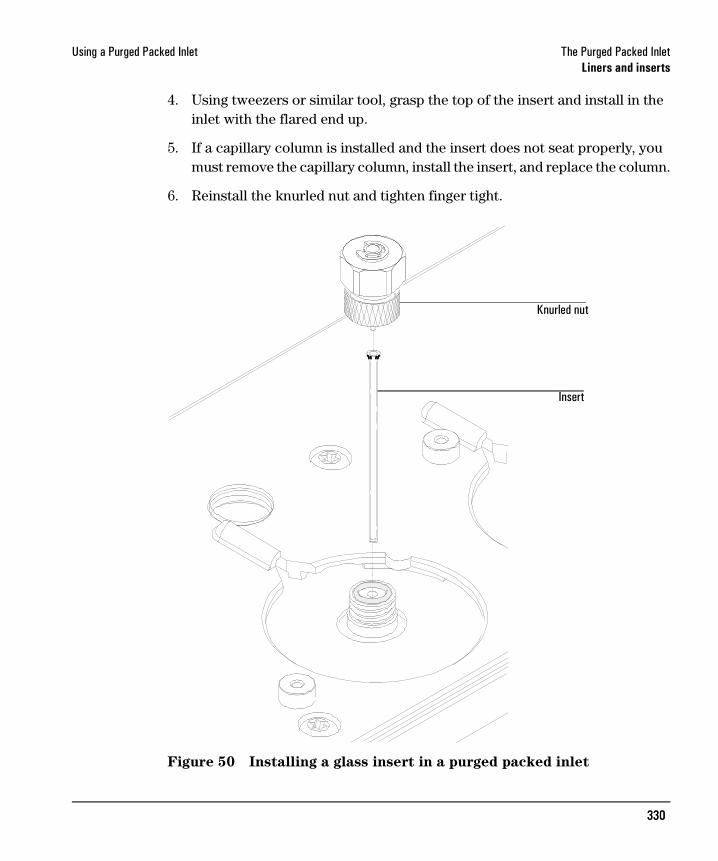
4. Using tweezers or similar tool, grasp the top of the insert and install in the inlet with the flared end up.
5. If a capillary column is installed and the insert does not seat properly, you must remove the capillary column, install the insert, and replace the column.
6. Reinstall the knurled nut and tighten finger tight.
Figure 50 Installing a glass insert in a purged packed inlet
Knurled nut
Insert
331331
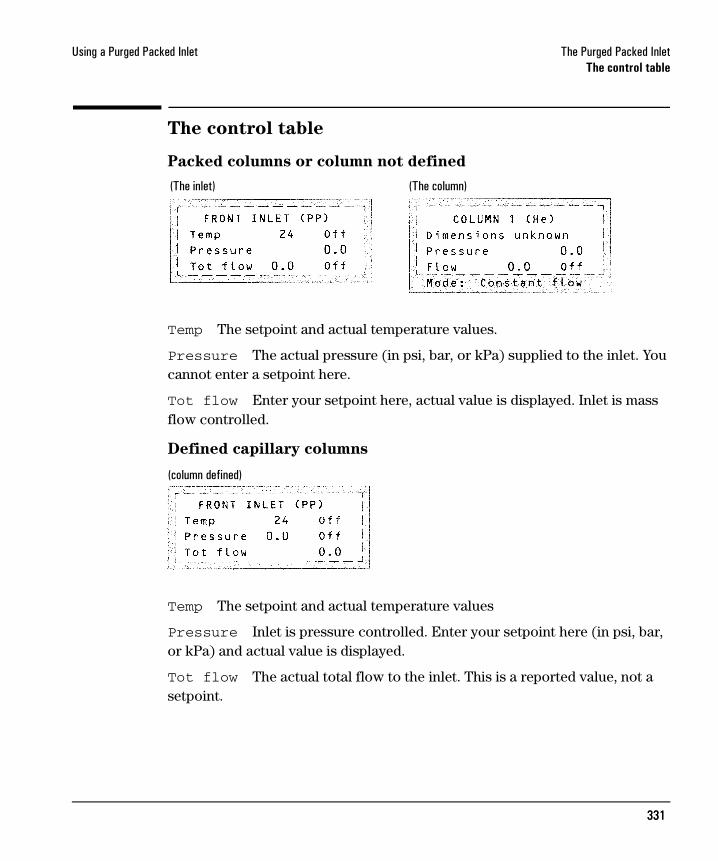
Using a Purged Packed Inlet The Purged Packed InletThe control table
The control table
Packed columns or column not defined
Temp The setpoint and actual temperature values.
Pressure The actual pressure (in psi, bar, or kPa) supplied to the inlet. You cannot enter a setpoint here.
Tot flow Enter your setpoint here, actual value is displayed. Inlet is mass flow controlled.
Defined capillary columns
Temp The setpoint and actual temperature values
Pressure Inlet is pressure controlled. Enter your setpoint here (in psi, bar, or kPa) and actual value is displayed.
Tot flow The actual total flow to the inlet. This is a reported value, not a setpoint.
(The inlet) (The column)
(column defined)
332332
Using a Purged Packed Inlet The Purged Packed InletThe control table
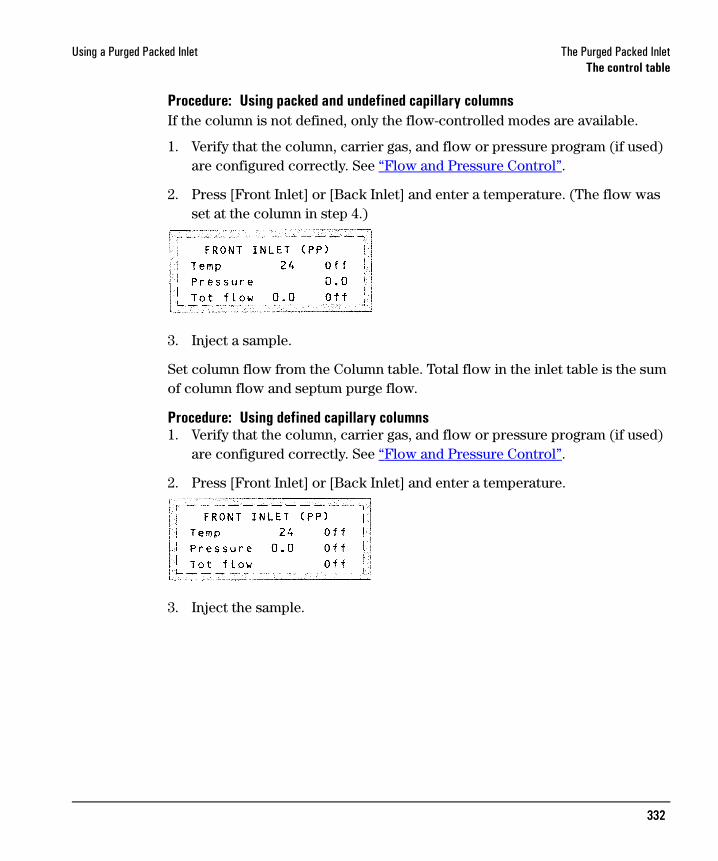
Procedure: Using packed and undefined capillary columnsIf the column is not defined, only the flow-controlled modes are available.
1. Verify that the column, carrier gas, and flow or pressure program (if used) are configured correctly. See “Flow and Pressure Control”.
2. Press [Front Inlet] or [Back Inlet] and enter a temperature. (The flow was set at the column in step 4.)
3. Inject a sample.
Set column flow from the Column table. Total flow in the inlet table is the sum of column flow and septum purge flow.
Procedure: Using defined capillary columns1. Verify that the column, carrier gas, and flow or pressure program (if used)
are configured correctly. See “Flow and Pressure Control”.
2. Press [Front Inlet] or [Back Inlet] and enter a temperature.
3. Inject the sample.
333333
Maintaining a Purged Packed Inlet The Purged Packed InletThe control table
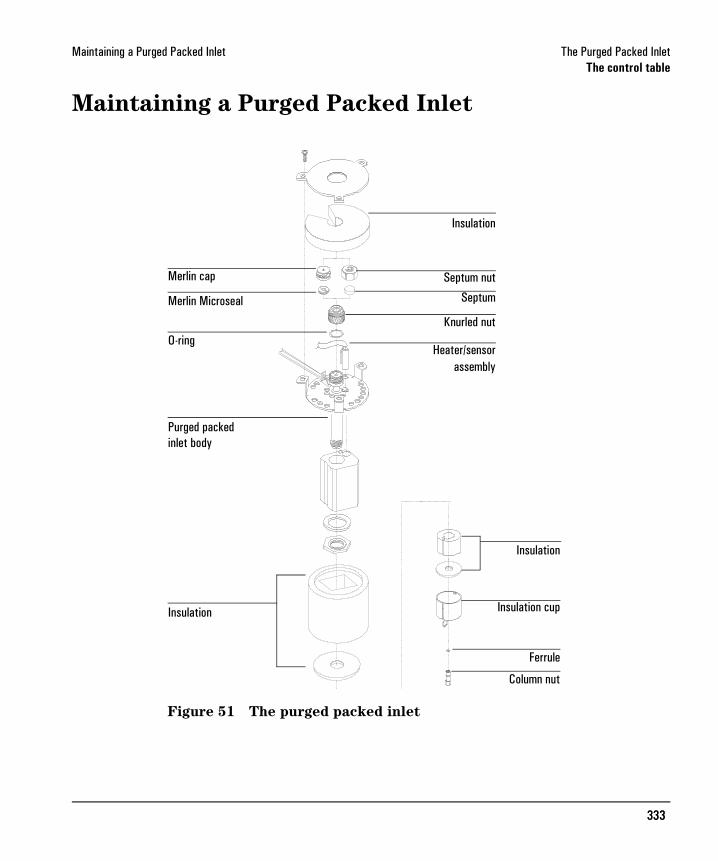
Maintaining a Purged Packed Inlet
Figure 51 The purged packed inlet
Insulation
Septum nut
Knurled nut
Heater/sensorassembly
Septum
O-ring
Purged packedinlet body
Insulation
Insulation
Insulation cup
Ferrule
Column nut
Merlin cap
Merlin Microseal
334
Maintaining a Purged Packed Inlet The Purged Packed Inlet
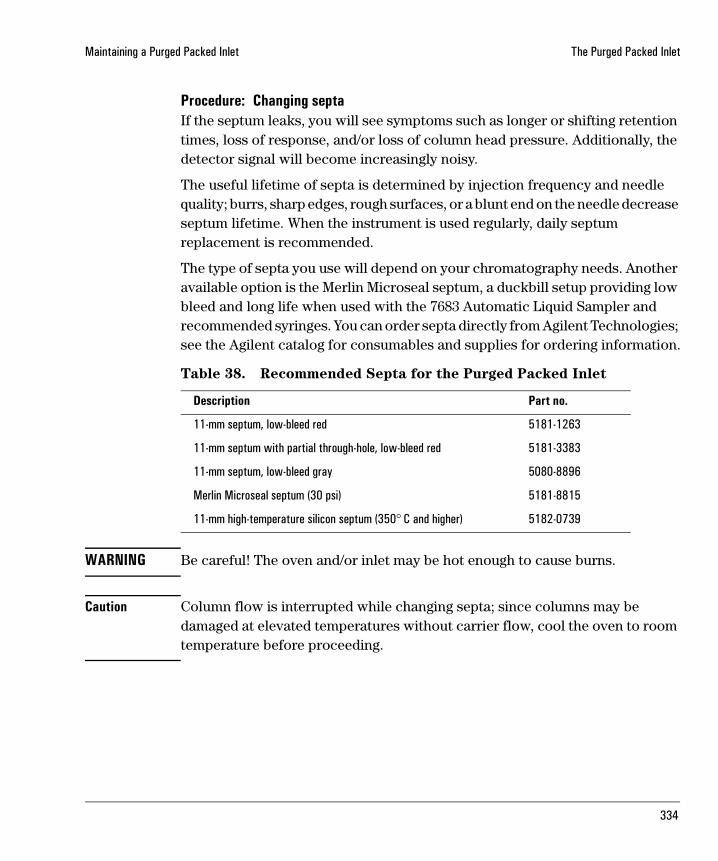
Procedure: Changing septaIf the septum leaks, you will see symptoms such as longer or shifting retention times, loss of response, and/or loss of column head pressure. Additionally, the detector signal will become increasingly noisy.
The useful lifetime of septa is determined by injection frequency and needle quality; burrs, sharp edges, rough surfaces, or a blunt end on the needle decrease septum lifetime. When the instrument is used regularly, daily septum replacement is recommended.
The type of septa you use will depend on your chromatography needs. Another available option is the Merlin Microseal septum, a duckbill setup providing low bleed and long life when used with the 7683 Automatic Liquid Sampler and recommended syringes. You can order septa directly from Agilent Technologies; see the Agilent catalog for consumables and supplies for ordering information.
Table 38. Recommended Septa for the Purged Packed Inlet
WARNING Be careful! The oven and/or inlet may be hot enough to cause burns.
Caution Column flow is interrupted while changing septa; since columns may be damaged at elevated temperatures without carrier flow, cool the oven to room temperature before proceeding.
Description Part no.
11-mm septum, low-bleed red 5181-1263
11-mm septum with partial through-hole, low-bleed red 5181-3383
11-mm septum, low-bleed gray 5080-8896
Merlin Microseal septum (30 psi) 5181-8815
11-mm high-temperature silicon septum (350° C and higher) 5182-0739
335
Maintaining a Purged Packed Inlet The Purged Packed Inlet
Materials needed:
• Gloves (if the inlet is hot)• New septum—see Table 38 for part numbers• Septum nut wrench (part no. 19251-00100)• A plastic or wood tool with a sharp tip to remove septum from inlet• 0- or 00-grade steel wool (optional)• Forceps or tweezers• Compressed, filtered, dry air or nitrogen (optional)
1. Complete the following preliminary steps:
• If you have entered parameters that you do not want to lose, store them as a method.
• Turn the oven off and let it cool to room temperature.
• Turn off the detector.
• Cool the inlet to room temperature.
• Turn the inlet pressure off.
336
Maintaining a Purged Packed Inlet The Purged Packed Inlet
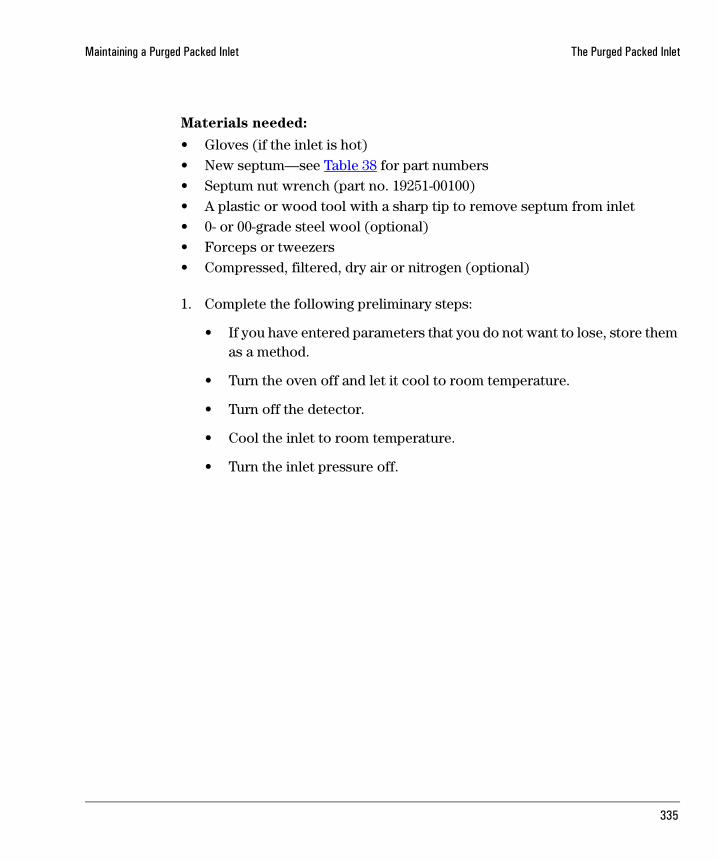
2. If the inlet is hot, wear gloves to protect your hands from burns. Remove the septum retainer nut or Merlin cap, using the wrench to loosen or remove the nut if it is hot or sticks. Remove the old septum or Merlin Microseal.
If the septum sticks, use the sharp-tipped tool to remove it. Take care not to gouge the metal around the septum and to remove all pieces of the old septum.
3. If pieces of the septum are sticking, grasp a small piece of steel wool with the forceps or tweezers and scrub the residue from the retainer nut and septum holder. Use compressed air or nitrogen to blow away the pieces of steel wool and septum.
Use the forceps to insert a new septum or Merlin Microseal. Press it into the fitting firmly.
4. If installing a Merlin Microseal, install it so that the side with the metal parts faces down (toward the oven).
5. Replace the septum retainer nut or Merlin cap.
Septum retainer nut
Septum
Merlin Microseal and cap
Standard septum and cap

337
Maintaining a Purged Packed Inlet The Purged Packed Inlet
• If using the standard septum retainer nut, tighten until until the C-ring is approximately 1 mm above the nut. Avoid overtightening.
• If using a Merlin cap, finger tighten until snug (not loose).
6. Restore normal operating conditions.
Procedure: Changing the O-ringYou will need to change the O-ring periodically because it wears out and becomes a source of leaks in the inlet. To determine if the O-ring leaks, perform the leak test presented in “Procedure: Leak testing an EPC purged packed inlet”.
O-rings contain plasticizers that give them elasticity. The O-ring seals the top of the inlet and the inlet base. However, at high temperatures the plasticizers bake out, and the O-rings become hard and are unable to create a seal. If you operate the inlet at high temperatures, you will probably need to replace the O-ring frequently.
WARNING Be careful! The oven and/or inlet may be hot enough to cause burns. If the inlet is hot, be sure to wear gloves to protect your hands.
C-ring
Septum retainer nut
1 mm betweennut and C-ring
Do not overtighten the nut.Over-tightening over-compresses the septum, whichcould cause premature failureand pieces of septum to contaminate the inlet.
338
Maintaining a Purged Packed Inlet The Purged Packed Inlet
Materials needed:
• Gloves (if the inlet is hot)• A new Viton O-ring (part no. 5080-8898)• Septum nut wrench (part no. 19251-00100)• Forceps or tweezers (optional)
1. Complete the following preliminary steps:
• If you have entered parameters that you do not want to lose, store them as a method.
• Turn the oven off and let it cool to room temperature.
• Turn off the detector.
• Cool the inlet to room temperature.
• Turn the inlet pressure off.
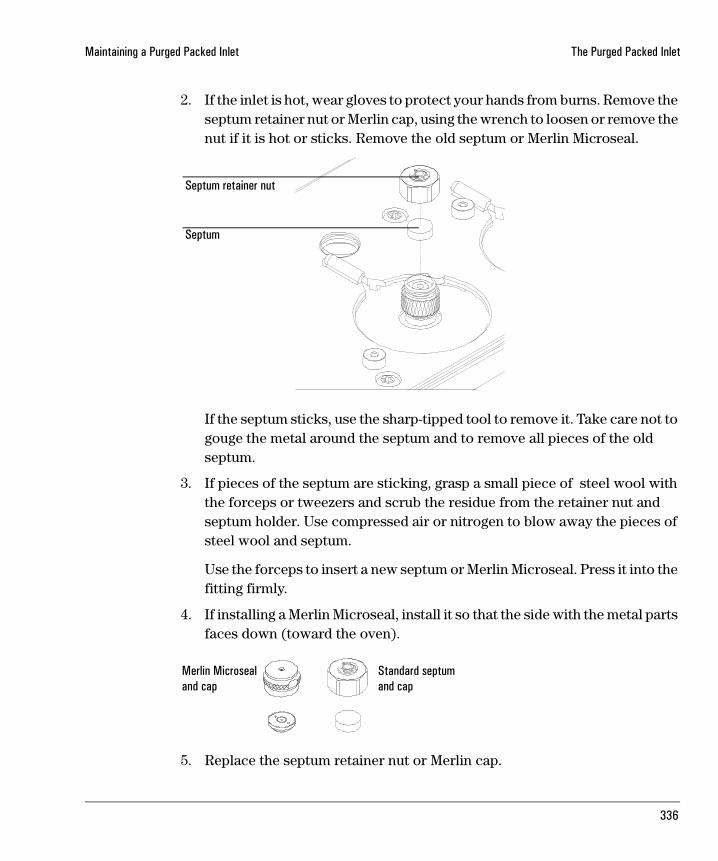
2. If the inlet is hot, use the septum nut wrench. Loosen the knurled nut completely. Pull up on the nut to remove the top portion of the inlet.
The O-ring will be visible. Remove the old O-ring. You may need to use forceps to grab it. Using the tweezers, insert the new O-ring.
3. Replace the top portion of the inlet and tighten the knurled nut until you cannot tighten it further. Restore the GC to normal operating conditions.
O-ring
Pulling up on the
entire top of inlet.knurled nut removes
339
Maintaining a Purged Packed Inlet The Purged Packed Inlet
Procedure: Leak testing the gas plumbingLeaks in the gas plumbing system can affect chromatographic results dramatically. The following procedure checks the flow system up to but not including the inlet flow manifold. If this portion of the system proves to be leak-free, refer to the next procedure to check the inlet and inlet manifold.
Liquid leak detectors are not recommended, especially in areas where cleanliness is very important.
If you do use leak detection fluid, immediately rinse the fluid off to remove the soapy film.
WARNING To avoid a potential shock hazard when using liquid detection fluid, turn the GC off and disconnect the main power cord. Be careful not to spill leak solution on electrical leads, especially the detector heater leads.
Materials needed:
• Electronic leak detector or liquid leak detection fluid. If you use leak detection fluid, wipe off excess fluid when you have completed the test.
• Two 7/16-inch wrenches
1. Using the leak detector, check each connection you have made for leaks.
2. Correct leaks by tightening the connections. Retest the connections; continue tightening until all connections are leak-free.
Procedure: Leak testing an EPC purged packed inletThis procedure allows you to determine if the inlet is leaking. It is recommended that you leak test the inlet at your normal operating temperature since the O-ring may leak if it is cooled to ambient.
Materials needed:
• Gloves (if the inlet is hot)• Septum nut wrench (part no. 19251-00100)• 1/8-inch SWAGELOK cap (part no. 5180-4120)
340
Maintaining a Purged Packed Inlet The Purged Packed Inlet
If you are using capillary columns:
• No-hole ferrule• 7/16-inch wrenchIf you are using packed columns:
• Solid Vespel plug• 9/16-inch wrench
1. Complete the following preliminary steps:
• If you have entered parameters that you do not want to lose, store them as a method.
• Turn the oven off and let it cool to room temperature. When the oven is cool, turn off the inlet pressure.
• Remove the column, if one is installed, and cap the column fitting. If you are using capillary columns, insert a no-hole ferrule in the column nut to create a plug. If you are using packed columns, use the Vespel plug.
• Remove the old septum and replace it with a new one. For instructions on changing septa, see “Procedure: Changing septa”.
• Inspect the O-ring and replace it if it is hard and brittle or cracked. See page 337 for instructions on changing the O-ring.
• Make sure that the pressure at the gas source is at least 35 psi.
• Cap the septum purge fitting with a 1/8-inch SWAGELOK cap.
• Define a capillary column to put the inlet into pressure control mode. Press [Column 1] or [Column 2], and enter any diameter (e.g., 320) and length 0. Press [enter].
341
Maintaining a Purged Packed Inlet The Purged Packed Inlet
2. Press [Front Inlet] or [Back Inlet] to open the control table.
3. Set the inlet to its normal operating temperature.
4. Set the inlet pressure to 25 psi. Wait a few minutes for the pressure to equilibrate. The pressure may exceed the setpoint briefly while it equilibrates. If it cannot reach setpoint, either there is a large leak or the gas supply pressure is too low.
5. Turn the inlet pressure Off. Because the column is capped, the pressure should remain fairly constant.
Monitor the pressure for 10 minutes. A pressure drop of 0.3 psi(0.03 psi/min or less) is acceptable. If the pressure drop is much greater than 0.7 psi, go to “Correcting Leaks” on page 343.
Procedure: Leak testing a nonEPC purged packed inletThis procedure allows you to determine if the inlet leaks. It is recommended that you leak test the inlet at your normal operating temperature since the O-ring is likely to leak if it is cooled to ambient.
Materials needed:
• Gloves (if the inlet is hot)• Septum nut wrench (part no. 19251-00100)• 1/8 inch SWAGELOK cap (part no. 5180-4120)
If you are using capillary columns:
• No-hole ferrule• 7/16-inch wrench
342
Maintaining a Purged Packed Inlet The Purged Packed Inlet
If you are using packed columns:
• Solid Vespel plug• 9/16-inch wrench
1. Complete the following preliminary steps:
• If you have entered parameters that you do not want to lose, store them as a method.
• Turn the oven off and let it cool to room temperature. When the oven is cool, turn off the inlet pressure.
• Remove the column, if present, and cap the column fitting. If you are using capillary columns, insert a no-hole ferrule in the column nut to create a plug. If you are using packed columns, use the Vespel plug.
• Remove the old septum and replace it with a new one. For instructions on changing septa, see “Changing septa”.
• Inspect the O-ring and replace it if it is hard and brittle or cracked. See “Changing the O-ring” for instructions on changing the O-ring.
• Make sure that the pressure at the gas source is at least 30 psi.
2. Set the inlet to its normal operating temperatures.
3. Cap the septum purge vent with a 1/8-inch SWAGELOK cap.
4. Turn on the gas to the inlet at its source and adjust the supply pressure to 30 psi. Completely open the mass flow controller by turning the knob counterclockwise as far as it can go. Wait 2 minutes to insure equilibrium. The gauge or the front panel should be stable.
5. Shut off the column head pressure by turning the flow controller full clockwise. Do not overtighten or you will damage the valve seat.
6. Turn off the gas to the inlet at its source. Monitor the pressure for 10 minutes. You can use the GC’s Stopwatch function. A pressure drop of 0.7 psig (0.07psi/min or less) is acceptable.
343
Maintaining a Purged Packed Inlet The Purged Packed Inlet
If the pressure drop is 0.7 psi (0.07 psi/min) or less, you can consider the inlet leak-free.
If the pressure drop is much greater than 0.7 psi (0.07 psi/min) go to “Procedure: Correcting leaks”.
Procedure: Correcting leaks
Materials needed:
• Electronic leak detector suitable for the gas type• Tools to tighten parts of the inlet that leak (if leaks are detected)1. Use the leak detector to check all areas of the inlet that are potential sources
of a leak. Potential leak areas are:
• The septum and/or septum nut
• The 1/4-inch ferrule (if a liner is being used)
• The O-ring
• The capped purge vent
• The plugged column connection
• The knurled nut
• The area where the gas line is plumbed to the inlet
If no liner is used, then column must be plugged with 1/4-inch SWAGELOK cap or equivalent.
2. Correct leaks using a wrench to tighten loose connections, if necessary. You may need to repeat the leak test.
If the pressure drop is now 0.03 psi/m inch or less, you can consider the inlet leak-free.
If the pressure drops faster than the acceptable rate, continue to search for leaks and repeat the pressure test. If all fittings appear to be leak free, but the inlet is still losing too much pressure, you may need to replace the inlet manifold. Contact your Agilent service representative.
344
Maintaining a Purged Packed Inlet The Purged Packed Inlet
Procedure: Cleaning the inletIt is unlikely that the inlet will frequently require cleaning as thoroughly as this procedure presents; however, deposits from injected samples occasionally build up inside the purged packed inlet. Before cleaning the inlet, replace dirty column liners and inserts with clean ones. See “Procedure: Installing liners”, “Procedure: Installing glass inserts” for instructions. If changing them does not correct the problems, then clean the inlet.
Materials needed:
• Cleaning brushes—The FID cleaning kit contains appropriate brushes (part no. 9301-0985)
• Solvent that will clean the type of deposits in your inlet• Compressed, filtered, dry air or nitrogen
1. Complete the following preliminary steps:
• If you have entered parameters that you do not want to lose, store them as a method.
• Allow the heated zones to cool.
• Turn off all flows to the inlet at the initial gas supply.
• Turn off the GC and unplug it.
• If the septum is worn out or dirty, replace it. See “Procedure: Changing septa” for instructions.
• Remove the column and the column liner and insert. See “Columns and Traps”.
345
Maintaining a Purged Packed Inlet The Purged Packed Inlet
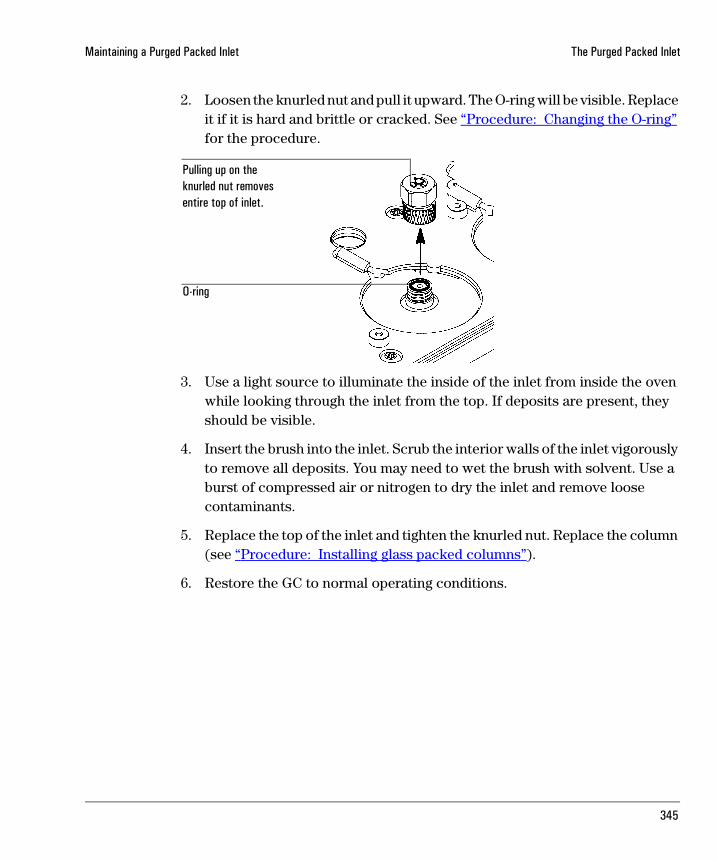
2. Loosen the knurled nut and pull it upward. The O-ring will be visible. Replace it if it is hard and brittle or cracked. See “Procedure: Changing the O-ring” for the procedure.
3. Use a light source to illuminate the inside of the inlet from inside the oven while looking through the inlet from the top. If deposits are present, they should be visible.
4. Insert the brush into the inlet. Scrub the interior walls of the inlet vigorously to remove all deposits. You may need to wet the brush with solvent. Use a burst of compressed air or nitrogen to dry the inlet and remove loose contaminants.
5. Replace the top of the inlet and tighten the knurled nut. Replace the column (see “Procedure: Installing glass packed columns”).
6. Restore the GC to normal operating conditions.
Pulling up on theknurled nut removesentire top of inlet.
O-ring


![Capillary thermostatting in capillary electrophoresis · Capillary thermostatting in capillary electrophoresis ... 75 µm BF 3 Injection: ... 25-µm id BF 5 capillary. Voltage [kV]](https://img.pdfslide.net/doc/110x75/5c176ff509d3f27a578bf33a/capillary-thermostatting-in-capillary-electrophoresis-capillary-thermostatting.jpg)