Embed Size (px)
Citation preview
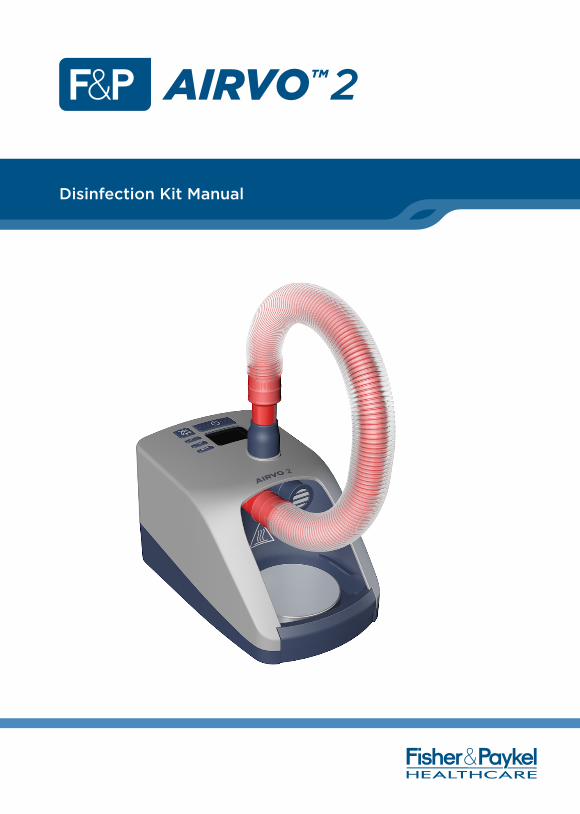
Disinfection Kit Manual
AIRVO™ 2

A – 1
BEFORE YOU STARTThis User Manual is intended for healthcare professionals.
Read this User Manual including all warnings. Failure to do so may result in injury or increased risk of infection. In addition, watch the AIRVO 2 Video Guide. Keep them both in a safe place for future reference.
For further assistance, please contact your Fisher & Paykel Healthcare representative.
TABLE OF CONTENTS1. Overview ................................................................................................................ A - 2
Warnings ........................................................................................................................................... A - 2
Package contents (900PT600) ............................................................................................... A - 2
2. Reprocessing procedures ................................................................................ A - 3
3. Cleaning .................................................................................................................. A - 4
4. High-level disinfection ....................................................................................... A - 6
5. Storage .................................................................................................................... A - 9
6. Disinfection history ............................................................................................ A - 10
7. Symbol definitions ............................................................................................. A - 10

A – 2 A – 3
1. OVERVIEWThe 900PT600 Disinfection Kit is used to achieve high-level disinfection of the AIRVO 2 / myAIRVO 2 humidifier outlet elbow. This manual itself describes the recommended reprocessing procedures to be carried out between patients, including cleaning, high-level disinfetion using the supplied disinfection tube and filter, and correct storage.
! WARNINGS• This disinfection kit should only be used with the Fisher & Paykel Healthcare
AIRVO 2 / myAIRVO 2 humidifier, hereafter referred to as “the unit”/”AIRVO 2”.
PACKAGE CONTENTS (900PT600)
AVAILABLE SEPARATELY900PT602 Cleaning sponge-stick (20-pack)900PT603 Clean storage cover (20-pack)
Disinfection tube
Disinfection filter
Disinfection kit manual
Cleaning sponge-stick (x 2)Clean Storage Cover (x 3)

A – 2 A – 3
2. REPROCESSING PROCEDURESThe AIRVO 2 humidifier must be cleaned and disinfected between patients. This should take place as soon as possible after use. It is particularly important that the outlet elbow at the heated breathing tube connection port is cleaned and disinfected properly.
The following steps must be carried out between patients:
Cleaning Clean outlet elbow and exterior surfaces with recommended cleaning agents, then wipe to remove any residue.
High-level Disinfection Carry out disinfection cycle with disinfection tube.
Storage Store AIRVO 2 appropriately.
Standard aseptic techniques to minimize contamination should be followed when handling the unit and accessories. This includes proper hand-washing, avoiding hand contact with connection ports, safe disposal of the used consumables and suitable storage of the unit after cleaning and disinfection.
Note: The use of protective gloves is strongly recommended.
Do not clean the left-hand chamber port.
Outlet elbow
A – 4 A – 5
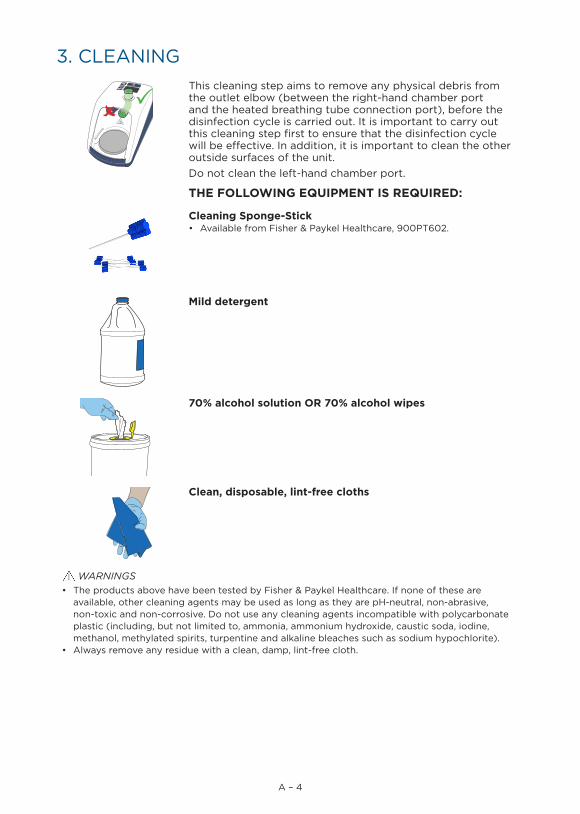
3. CLEANINGThis cleaning step aims to remove any physical debris from the outlet elbow (between the right-hand chamber port and the heated breathing tube connection port), before the disinfection cycle is carried out. It is important to carry out this cleaning step first to ensure that the disinfection cycle will be effective. In addition, it is important to clean the other outside surfaces of the unit.Do not clean the left-hand chamber port.
THE FOLLOWING EQUIPMENT IS REQUIRED:
Cleaning Sponge-Stick• Available from Fisher & Paykel Healthcare, 900PT602.
Mild detergent
70% alcohol solution OR 70% alcohol wipes
Clean, disposable, lint-free cloths
WARNINGS• The products above have been tested by Fisher & Paykel Healthcare. If none of these are
available, other cleaning agents may be used as long as they are pH-neutral, non-abrasive, non-toxic and non-corrosive. Do not use any cleaning agents incompatible with polycarbonate plastic (including, but not limited to, ammonia, ammonium hydroxide, caustic soda, iodine, methanol, methylated spirits, turpentine and alkaline bleaches such as sodium hypochlorite).
• Always remove any residue with a clean, damp, lint-free cloth.

A – 4 A – 5
PREPARE THE AIRVO 2 FOR CLEANINGSwitch off the unit and unplug from the power socket.Remove the water chamber and breathing tube and safely dispose of them.
CLEAN THE OUTLET ELBOWYou must physically clean the outlet elbow that connects the right-hand chamber port to the heated breathing tube connection port.There are two options for cleaning the elbow:• Using the cleaning sponge-stick (recommended),
with a solution of warm water and mild detergent,OR,
• Using a clean, damp, disposable lint-free cloth, with a solution of warm water and mild detergent.
USING THE CLEANING SPONGE-STICK• Dip the cleaning sponge-stick in a solution of
warm water and mild detergent.• Thoroughly clean the outlet elbow from both
ends, as far as possible, continuously rotating the sponge-stick.
• Ensure that all organic debris is removed.• Rinse the cleaning sponge-stick under running
water and, using the same rotating action, remove any residue from the outlet elbow.
• Discard the cleaning sponge-stick.
USING A DISPOSABLE CLOTH• Thoroughly clean the outlet elbow from both ends,
as far as possible, continuously rotating the cloth with your finger.
• Ensure that all organic debris is removed.• Repeat with a clean, damp, lint-free cloth to
remove any residue.
WIPE THE OUTSIDE SURFACES OF THE AIRVO 2• Use an alcohol wipe, or apply alcohol solution to a
clean, damp, disposable lint-free cloth, to wipe the outside surfaces of the unit. Let it air dry.
• If there is visible soiling (blood, mucus, etc), clean the outside surfaces of the unit with a cloth dipped in a solution of warm water and mild detergent. Use a clean, damp, disposable lint-free cloth to remove any residue, then complete the cleaning using the alcohol wipe or cloth.

A – 6 A – 7
4. HIGH-LEVEL DISINFECTIONThis step involves running the AIRVO 2 disinfection cycle, using the red disinfection tube and blue disinfection filter from the AIRVO 2 Disinfection Kit 900PT600. This cycle should be carried out at the recommended ambient temperature and humidity levels (see below).This cycle has been validated to achieve high-level disinfection, by heating the outlet elbow at the heated breathing tube connection port to at least 87 °C (189 °F) for at least 30 minutes.To ensure that these conditions are met for every disinfection cycle, the AIRVO 2 logs time and temperature (from two independent sensors) throughout the cycle. A successful disinfection cycle is assured only when the countdown reaches zero.
THE FOLLOWING EQUIPMENT IS REQUIRED:• Disinfection tube• Disinfection filter
OPERATING CONDITIONS:• Ambient temperature: 18 - 30 °C (64 - 86 °F)• Humidity: 60 - 95% RH
WARNINGS• Disconnect any oxygen supply from the unit before starting the disinfection cycle.• Do not operate the disinfection kit in a sterile room.• Ensure that the external surfaces of the unit are dry before operating the disinfection kit.• Do not modify the disinfection tube or filter in any way.• Always switch off the unit when connecting or removing the disinfection tube.• Never spray any sanitizing liquid or cleaning fluid into the disinfection tube.• Covering any part of the disinfection tube or blocking the filter could result in serious damage to
the unit.• If the disinfection tube becomes damaged, a new kit must be ordered. Replacement filters are
available separately.
1. CONNECT THE RED DISINFECTION TUBE TO THE AIRVO 2One end of the disinfection tube has a blue plastic connector. Lift the sleeve and slide the connector onto the unit. Push the sleeve down to lock.
Connect the red end of the disinfection tube to the left-hand chamber port as shown and push fully into position.

A – 6 A – 7
2. FIT THE BLUE FILTERFit the blue filter to the right hand chamber port as shown.Push it firmly into position.
3. START THE DISINFECTION CYCLEConnect the power cable to the mains power supply and start the disinfection cycle by holding the On/Off button for 3 seconds until the unit beeps.
WARNINGS• Disconnect any oxygen supply from the unit before starting
the disinfection cycle.
4. WARM-UP AND CALIBRATIONThe unit will first go through a series of calibration checks for approximately 2 minutes, during which a warm-up symbol will be displayed on screen.
5. DURING DISINFECTIONAfter a successful calibration, the disinfection cycle begins and runs for 55 minutes.
Press the Mode button at any time to view a graph of the current disinfection cycle. The graph shows:• Time (mins)• Temperature (°C)
If no button has been pushed for 5 minutes, a screensaver will be launched.
A – 8 A – 9
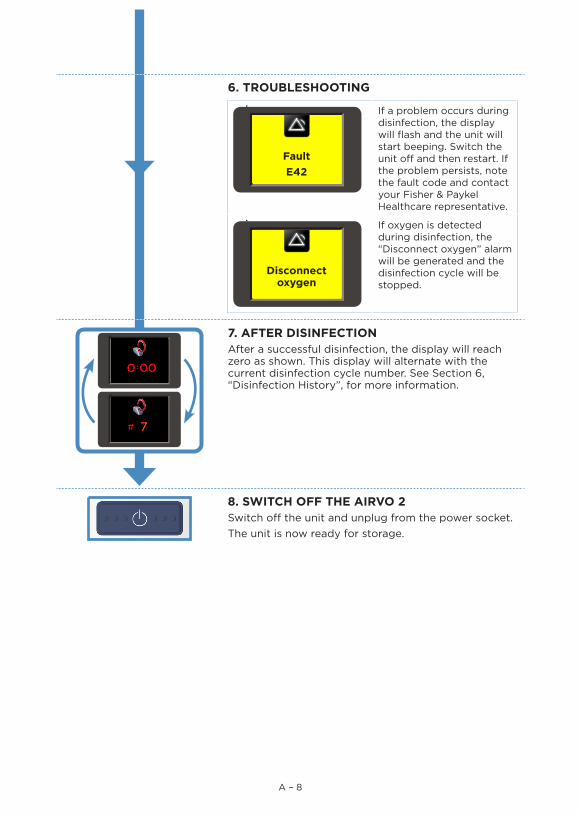
6. TROUBLESHOOTING
FaultE42
If a problem occurs during disinfection, the display will flash and the unit will start beeping. Switch the unit off and then restart. If the problem persists, note the fault code and contact your Fisher & Paykel Healthcare representative.
Disconnect oxygen
If oxygen is detected during disinfection, the “Disconnect oxygen” alarm will be generated and the disinfection cycle will be stopped.
7. AFTER DISINFECTIONAfter a successful disinfection, the display will reach zero as shown. This display will alternate with the current disinfection cycle number. See Section 6, “Disinfection History”, for more information.
8. SWITCH OFF THE AIRVO 2Switch off the unit and unplug from the power socket.The unit is now ready for storage.

A – 8 A – 9
5. STORAGEAfter the disinfection cycle, it is imperative that the unit is stored appropriately. This involves using the Clean Storage Cover (900PT603) or an alternative method which will keep the outlet elbow free from contamination while being stored between patients.
USING THE CLEAN STORAGE COVER (900PT603)
Remove the disinfection tube and filter from the AIRVO 2. To remove the disinfection tube, always push the sleeve up to avoid tube damage.
Wrap the AIRVO 2 in the Clean Storage Cover, such that the identification label sits prominently above the display and buttons of the AIRVO 2.
A
IRVO
Do not use if seal is broken
900PT603Clean Storage Cover
Name:
Date:
Cycle #:
Belongs to:
Susie Q3rd Feb21FPH hospital
To record the previous disinfection process:Fill in the details on the identification label.
Seal the Clean Storage Cover with the adhesive tabs.
After the unit is sealed:Store the unit and disinfection kit in an area suitable for medical devices, which is clean, dry and dust-free.
ALTERNATIVE STORAGE METHODIf the Clean Storage Cover is not used, the alternative storage method is to leave the disinfection tube and filter attached to the AIRVO 2. Store the unit (with disinfection tube and filter attached) in an area suitable for medical devices, which is clean, dry and dust-free.

A – 10
6. DISINFECTION HISTORYThe disinfection cycle number is a unique number that can be recorded for keeping a log of disinfection cycles.
AFTER EACH DISINFECTION CYCLEThe first time that the disinfection cycle is successfully completed, “#1” will be displayed. This number will increment by 1 after each successful disinfection cycle.
#7 indicates that seven successful disinfection cycles have been carried out on this AIRVO 2.
AT AIRVO 2 STARTUPWhen the AIRVO 2 is switched on for patient use, the following is displayed onscreen:• a traffic light symbol (explained below)• the disinfection cycle number from the last successful
disinfection cycle.• the time, in days and hours, since the last successful
disinfection cycle.
Last Disinfection:
#16
If this is the first switch-on after a successful disinfection cycle:A green traffic light will be displayed.This AIRVO 2 is safe for use on a new patient.
Last Disinfection:
#16
If this is NOT the first switch-on after a successful disinfection cycle:An orange traffic light will be displayed.This AIRVO 2 is NOT safe for use on a new patient.
7. SYMBOL DEFINITIONS
ATTENTIONConsult
accompanying documents
Do not throw away
93/42/EECClass IIa
RE
F 1
850
48
125
RE
V A
20
13-J
une
© 2
013
Fis
her
& P
ayke
l Hea
lthc
are
Lim
ited
0123
AustraliaFisher & Paykel Healthcare Pty Limited36-40 New Street, PO Box 167 Ringwood, Melbourne Victoria 3134, Australia Tel: +61 3 9879 5022Fax: +61 3 9879 5232
AustriaTel: 0800 29 31 23Fax: 0800 29 31 22
BeneluxTel: +31 40 216 3555Fax: +31 40 216 3554
ChinaTel: +86 20 3205 3486Fax: +86 20 3205 2132
FranceTel: +33 1 6446 5201 Fax: +33 1 6446 5221
GermanyTel: +49 7181 98599 0 Fax: +49 7181 98599 66
IndiaTel: +91 80 4284 4000 Fax: +91 80 4123 6044
Irish RepublicTel: 1800 409 011
ItalyTel: +39 06 7839 2939 Fax: +39 06 7814 7709
Spain Tel: +34 902 013 346 Fax: +34 902 013 379
Sweden Tel: +46 8 564 76 680 Fax: +46 8 36 63 10
Switzerland Tel: 0800 83 47 63 Fax: 0800 83 47 54
Taiwan Tel: +886 2 8751 1739 Fax: +886 2 8751 5625
Turkey Fisher Paykel Sağlık Ürünleri Ticaret Limited Şirketi, Alinteri Bulvari 1161/1 Sokak No. 12-14, P.O. Box 06371 Ostim, Ankara, Turkey Tel: +90 312 354 34 12 Fax: +90 312 354 31 01
UK Fisher & Paykel Healthcare Ltd Unit 16, Cordwallis Park Clivemont Road, Maidenhead Berkshire SL6 7BU, UK Tel: +44 1628 626 136 Fax: +44 1628 626 146
USA/CanadaTel: +1 800 446 3908 or +1 949 453 4000 Fax: +1 949 453 4001
Manufacturer Fisher & Paykel Healthcare Ltd 15 Maurice Paykel Place East Tamaki, Auckland 2013
PO Box 14 348, Panmure Auckland 1741 New Zealand
Tel: +64 9 574 0100 Fax: +64 9 574 0158 Email: [email protected] Web: www.fphcare.com
www.fphcare.com
For more information please contact your local Fisher & Paykel Healthcare representative