Embed Size (px)
Citation preview

The SandbagDAVE McCOMB
A guide to selecting and enjoyingthe International Tempest Class sailboat

II
In memory of Ian Proctor, who created a wonderful boat in 1965
and recreated it in 1990.

III
PREFACE
Many people contributed generously of their time in helping prepare this book. I am particularly indebted to Don Cooper for his fine artwork, which was the basis for the computer-generated drawings in this edition. Also to Bruce Kirby for his design perspective in the foreword to the first edition, a fine tribute from one journalist-designer to another.
Several others were good contributors precisely because they were not familiar with the Tempest. Rob MacArthur and Homer Hagedorn provided editorial help and questioned many points they found unclear, which led to the development of the glossary.
Tempest owners also provided input and encouragement. Dick Bleier, Dave Duke, Wally Respess, Malcolm Lawson, Ed Hoyt and Jim O’Hara were particularly helpful.
I extend my deep appreciation to these people and the many others who offered their encouragement and assistance.
Copyright 1986, 1987, 1992 and 1996 by David W. McComb

IV
INTRODUCTION
I discovered the Tempest in the late 60s through a photograph. I’d never before seen grace and power so well combined in a one-design sailboat. And, I found when I first sailed one, it has more than just good looks:
• It’s comfortable. The flat cockpit floor makes boat-handling a dream, and there’s no bruising centerboard trunk.
• It’s fast. It has finished first or second among keelboats at all four Yachting One-of-a-Kind regattas it has attended, and has dominated in heavy weather.
• It’s simple. One person can drive it off the highway, step its 20kg mast, and be sailing in about an hour. One person also can sail single-handed, even from the trapeze.
• It’s maneuverable. It can turn “within its own length.” • It’s stable. With more freeboard than other trapeze boats, crews find it comfortable “out on the wire.”
In fact, crewing can be more relaxing than helming! • It’s versatile. Heavy crews aren’t put at a disadvantage in light air, but husband-and-wife teams are
common. • It’s safe. The hull consists of watertight compartments, and internal flotation would keep it from
sinking even if one of these were breached. (In a particularly heavy squall some years ago, one crew took advantage of this feature by deliberately pushing on their mast until they turned their boat turtle, and lounged on the hull while the storm blew past. Then, when they leaned a little on their keel, the boat righted itself and they sailed away dry!)
• It’s a tight one design—not just the boat, but also its molded parts. This has kept construction costs down, and helped prevent old boats from becoming obsolete.
• It’s standardized. Recreational sailors and top competitors, alike, have been using standard rig and hardware layouts for more than 20 years.
• It’s durable. Ten-year-old boats have won world championships, and 15-year-old boats remain competitive.
• It’s light and easy to trailer. Most owners don’t bother with trailer brakes. • It’s easy to maintain—and easy to keep on a mooring. Its cockpit floor is above the waterline, so water
just drains out. • Finally, people of all ages can enjoy it. Two seventy-year-olds sailed in the 1984 North American
Championship—one was the winning crew. Here’s a boat that you can use both for cruising and weekend racing. We think the Tempest compares
favorably with other designs of its size. That’s why we’ve prepared this guide—to tell you about our boat and invite you to share with us a great experience.
Dave McComb May 1986

V
FOREWORD TO THE FIRST EDITION
Bruce Kirby is well known as a magazine editor and the designer of many successful boats, from International 14s, the Laser, and the Sonar to the 12-Meter Canada I.
He also has been a long-time “friend of the Tempest,” a frequent competitor in the 1970s and North American Champion with Dave McComb in 1978 and ’79.
Like Ian Proctor, I was a journalist
who turned to yacht design, perhaps somewhat more gradually than Ian, as he became a very successful sparmaker along the way, while I was paying the grocery bills and mortgage with a few words here and a displacement calculation there.
Neither of us really left the world of words, and I’m sure we’d agree that there is a relationship between a story that comes out well—that balances and flows and is accepted by its readers—and a sail-ing vessel that floats and feels right and is capable of making those aboard happy, even if the greatest happiness comes only after the wet, cold and fatigue have been forgotten.
When the IYRU announced the contest to choose a new two-man keel-boat for probable Olympic selection, I had designed only two boats—my Mark I and Mark II International 14s—and I was thinking about a third. But here was something most intriguing: a bigger two-man boat, with a spinnaker and trapeze allowed, and a keel mandatory. That could be one hell of a machine!
A few evenings were consumed with the only part of yacht design that is really exciting, and that is the conceptual sketches. Drawings of the two-man planing keelboat that began to emerge have been misplaced in the intervening years, which have seen one change of country, two changes of state, and six different houses. How the boat might have fared is not important now, as I did not have the wherewithal or sponsorship to bring it to three dimensions. But at least I was not discouraged from doing rough sketches of little sailboats in the hope that some day one of them would
catch on. What I do recall is that the concept was far more like Tempest than it was like any of the other designs that were produced for the IYRU trials.
It was obvious at the Medemblik trials that Ian had come to the 22-footer from smaller boats, whereas many of the competing designers were moving the other way—down from bigger boats. As a dinghy designer, he appreciated the power of the trapeze, and was inclined to let it do its job of keeping the boat upright, while making the hull fine and fast and the keel of minimum weight.
Jack Knights, who had little design experience but a great deal of time on the water, came close with his Cobra, which was a plywood chine boat, designed to be lower in cost than the other entries. There were times when she showed well, but there was no doubt she did not have the all-round performance of Tempest.
Having taken a close look at the design parameters in the beginning, and then having followed the fortunes of the class as editor of a sailing journal, it was exciting to get involved many years later as a Tempest owner in the very good Noroton Yacht Club (Connecticut) fleet.
Only then did I realize just how good a boat Ian Proctor had conceived. Industry scuttlebutt had it that the Tem-pest was good in heavy air, but weak in the light stuff. Yet I found that with the right treatment she would get to the weather mark ahead of boats much bigger. And with her high sail area/ displacement ratio she would fly off the wind. As with many sophisticated designs, it had taken some years for owners and sailmakers to come up with all the right combinations. By the mid 1970s, the
Tempest was a very fast boat in all conditions, and a ridiculously fast boat in heavy air.
During my Tempest career, I tried always to locate myself on the end of the tiller extension rather than the end of the trapeze wire. Glen Foster managed to have me suspended over the ocean for a few races, and he did quite well in spite of it. I suspect that for those younger and more agile, the end of the wire would be a thrilling perch, but I was quite turned on by the steering position.
Here was a boat that was very fast, while at the same time well-mannered. You could find yourself in trouble in heavy winds if you were careless. But a foolproof boat would surely be, as the British say, “a crashing bore.” It was great sport being on the thin edge of the other kind of crashing.
But the greatest thrill for me was, like all the best thrills, a bit more subtle, a little slower and more deliberate. And that was taking a Tempest to windward in 18 knots of wind and a lump of a sea. Unlike a dinghy, which stops too fast, the Tempest could be poked up over the steep ones, driven through the smooth patches and eased across the valleys. Gently, gently, low and fast, miss the lumps, then poke it up high and very upright, grabbing a free piece of ocean and shoving it off to leeward.
Here was the thrill of dinghy racing combined with incredible drive and force—not a force born of mass and volume, but more like the thrust of a well-tossed spear or of Robin Hood’s truest arrow.
VI
FOREWORD TO THE SECOND EDITION
It is now almost twenty-three years since I sharpened up a pencil to start work on the designing of Tempest.
When I say “start work” I do not really mean that. For one thing, I had been thinking about this boat for a long time before that, so the “start” was really much earlier. And secondly, it could not really be called “work” at all, because this was a boat I wanted very much to design and see sailing—it was a boat that I thought would be an ideal instrument on which helmsmen and crews could both show the skills of modern (1965) sailing. Looking at the Olympic sailboats of the day, I thought it was a boat that badly needed (I still do!). Designing Tempest gave me great pleasure.
There was another thing. All the racing sailboat designs I had produced up until then, about eighty of them, had been commissioned by boat builders or owners. But no one had commissioned Tempest. She was spontaneous. I could make her just as I wanted, without thought for anyone else’s requirements or ideas and the only restrictions were the parameters stipulated by the IYRU—length, sail area, and the strange (but aesthetically satisfying) requirement that the ends of the hull should appear balanced.
There was one more enjoyment factor. The IYRU had invited designers from all over the world to submit two-man keelboats to trials at Medemblik, Holland. It would be competitive, chal-lenging, intensely interesting to a design-er—especially satisfying to the one whose boat did best.
That is how it began when I started to draw the first few lines of Tempest. Then, as always seems to happen when I draw a boat, as the design grew I began to imagine the pencil lines on paper being sailed by people, in different conditions of wind and water, different places, and then these people getting together, sailing
races, national championships, world championships, maybe the Olympics. Most of all it was the people who would sail the boat who mattered.
The boat would, hopefully, be a good one, but boats on their own do not make classes and all that is meant by that. The boats have to attract the people to them and make them come alive and make them sail, and to organise them into a class and generate the spirit in that class.
What sort of spirit for Tempest? Ob-viously competitive—she was going to be that sort of boat, intended for racing, not picnics. But would competition be based on friendly but keen testing of sailing skills, or on bitter battles and everlasting expenditure on new boats, new gear, and exploiting loopholes in slack rules?
Class rules must matter. They can plot the way a class develops and that means they have a strong influence on the people who are attracted to the class and the character of the class itself. So the design and the rules should be co-ordinated and produced together, so that the structure of the boat is able to make the rules effective in carrying out their intention. Tempest was the only boat entered for the IYRU trials with the rules already drafted, though nobody actually took much notice of that.
Well, as things have turned out the Tempest Class certainly has the spirit hoped for when she was being designed. First to breathe life into Tempest was the great team of John Oakeley and Cliff Norbury sailing her to overwhelming suc-cess in the IYRU trials, but immediately after this Beecher Moore and Bengt Julin put their interest, influence and weight behind the project and it was wonderful to have their support, which has been given loyally ever since. There have been many others to whom the class—and my-self—owe an enormous debt of gratitude. There are too many to name individually, but one cannot let the opportunity pass
without mentioning Bruce Falconer, Cliff Norbury, Burkardt Wirz and Jack Sturton, all past Chairmen. Anna Templeton-Cotill must have special mention as a wonderful Class Secretary over many years, with tremendous powers of smooth and unobtrusive organisation.
Now to turn more specifically to The Sandbag, an oddly unbuoyant title for a book on sailing matters, but you see the reason more clearly as you read on. Though this is far from being a typical book on sailing, it is typical of the man who wrote it. Dave McComb, current Chairman of the Tempest Class and author of this book, is an extremely skilled helmsman and crew, with very special knowledge of the Tempest, yet with characteristic generosity and sports-manship he passes this knowledge, gained over many years of Tempest sailing, on to all. What is more, not only has he written this book, he has also been responsible for organising its illustrations, production and financing.
You cannot read The Sandbag with-out savouring the enthusiasm behind it and appreciating the meticulous care with which Dave prepares his boat and sails his races.
I believe this book will prove inter-esting to anyone sailing in the Tempest Class and especially those just joining it (it would be useful to those in many other classes too). It may be called The Sandbag, but it certainly is not heavy reading.
To those who may be new to the Tempest Class when reading this, may I say welcome and I hope you will enjoy the boat—I am sure you will enjoy the spirit of the class, of which this book is a good example.
Thank you, Dave, for writing it.
Ian Proctor Duncannon
September 1987

VII
CONTENTS
WHAT’S A TEMPEST? .................................................. 1 THE BOAT, THE BUILDER, AND THE ASSOCIATION ........................................................ 1 CLASS HISTORY ..................................................... 1
BUYING A TEMPEST .................................................... 3 CLASS RULES AND BUILDING SPECIFICATIONS ................................................... 3 THE 1990 REDESIGN ............................................. 3 BUYING A NEW TEMPEST ................................... 4 EVALUATING A USED TEMPEST ........................ 4
TAKING DELIVERY ...................................................... 6 YOUR FIRST SAIL .................................................. 6 LAUNCHING ........................................................... 7 STEPPING THE MAST ........................................... 7 UNSTEPPING THE MAST ..................................... 8 SECURING THE BOAT ON ITS TRAILER .......... 8 TOWING .................................................................. 9
PREPARATION ............................................................ 11 THE SIMPLE TEMPEST ........................................ 11 THE STANDARD TEMPEST................................ 12 THE COMPLETE TEMPEST ................................. 14 PREPARING THE RIG .......................................... 15 PREPARING NEW SAILS ..................................... 17
TUNING ........................................................................ 19 BENDING ON THE SAILS ................................... 20 ADJUSTMENTS UNDER WAY ............................ 20
BOAT HANDLING ..................................................... 22 SAIL HANDLING ................................................. 22 BASIC SEAMANSHIP .......................................... 24 SETTING THE SPINNAKER ............................... 25 GYBING ................................................................. 25 DROPPING THE SPINNAKER ........................... 26 ADVANCED SEAMANSHIP ............................... 26 SOME TRICKS ...................................................... 28
MAINTENANCE ......................................................... 29 PREVENTIVE RIG MAINTENANCE.................. 29 KEEL INSTALLATION......................................... 29 WATERTIGHTNESS ............................................ 29 KEEL REPAIR ........................................................ 30 WINTER STORAGE ............................................. 30 TRAILER MAINTENANCE ................................. 30 ATTENTION TO DETAIL ................................... 31
APPENDICES Appendix A, LOOK OUT FOR ... TEMPEST Appendix B, LAUNCHING THE
INTERNATIONAL TEMPEST CLASS Appendix C, THE CRUISING TEMPEST Appendix D, SOURCES OF INFORMATION Appendix E, BASIC DIMENSIONS AND
MEASUREMENTS
GLOSSARY
FIGURES
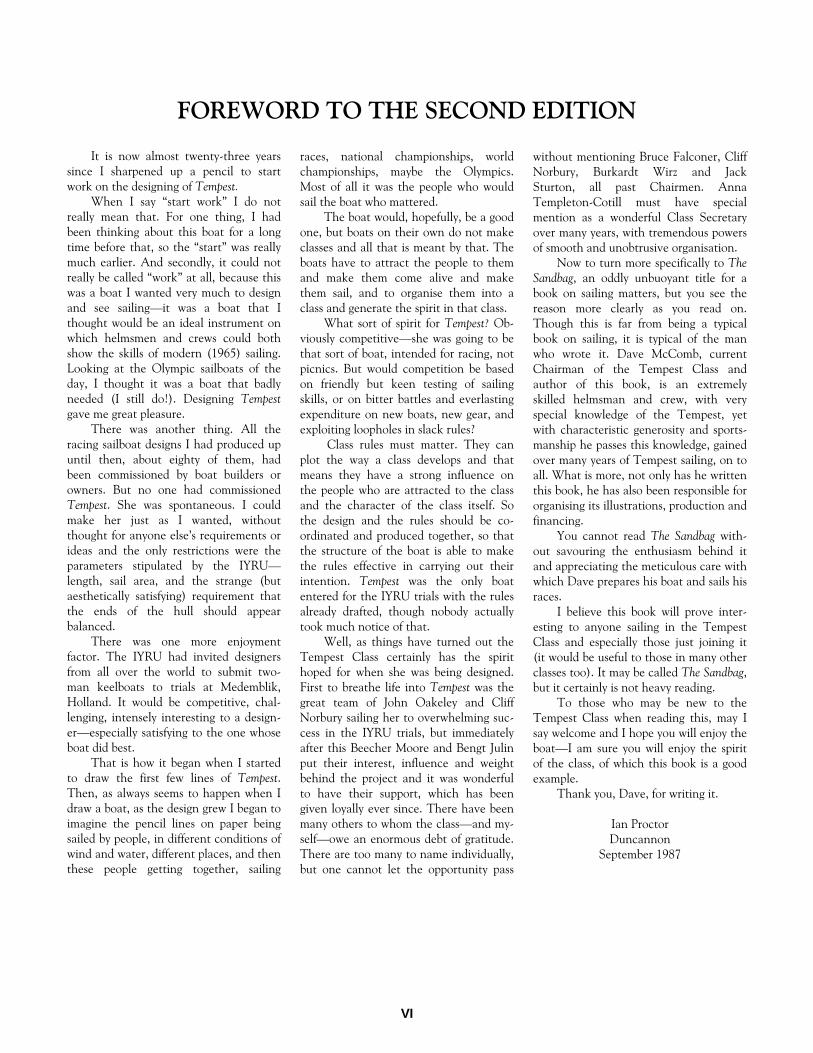
Figures 1A and 1B, LINE AND CONSTRUCTION DRAWINGS ................ Overleaf
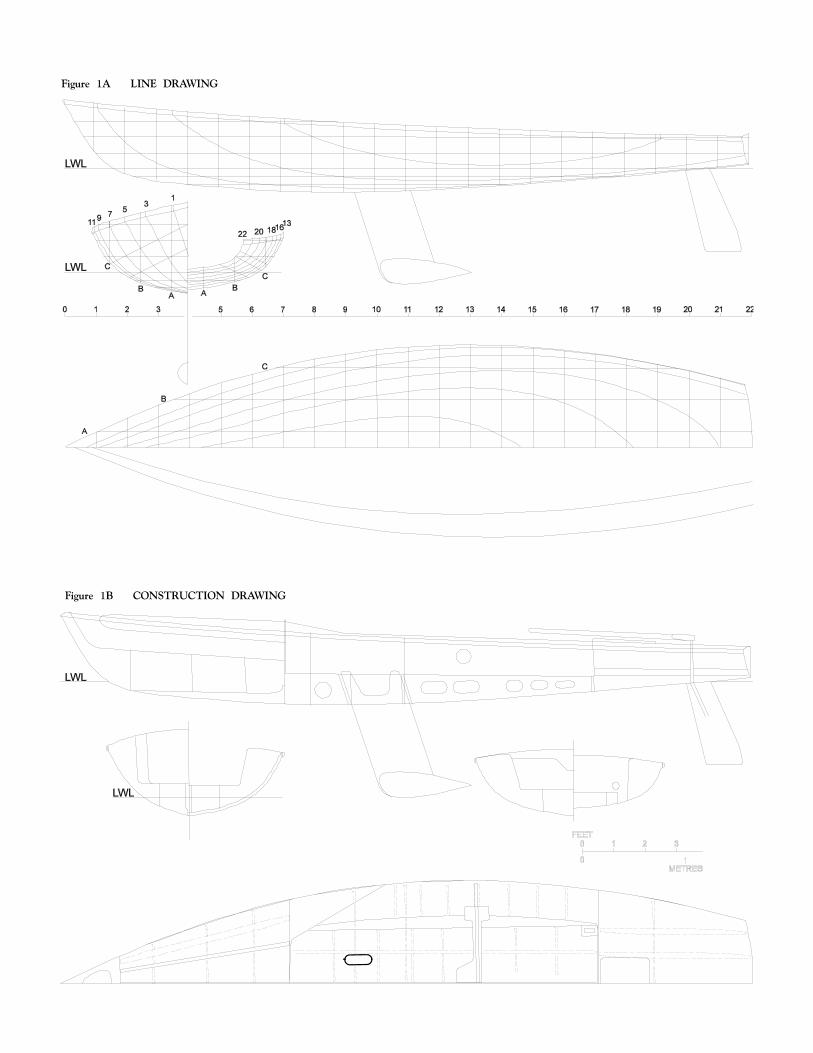
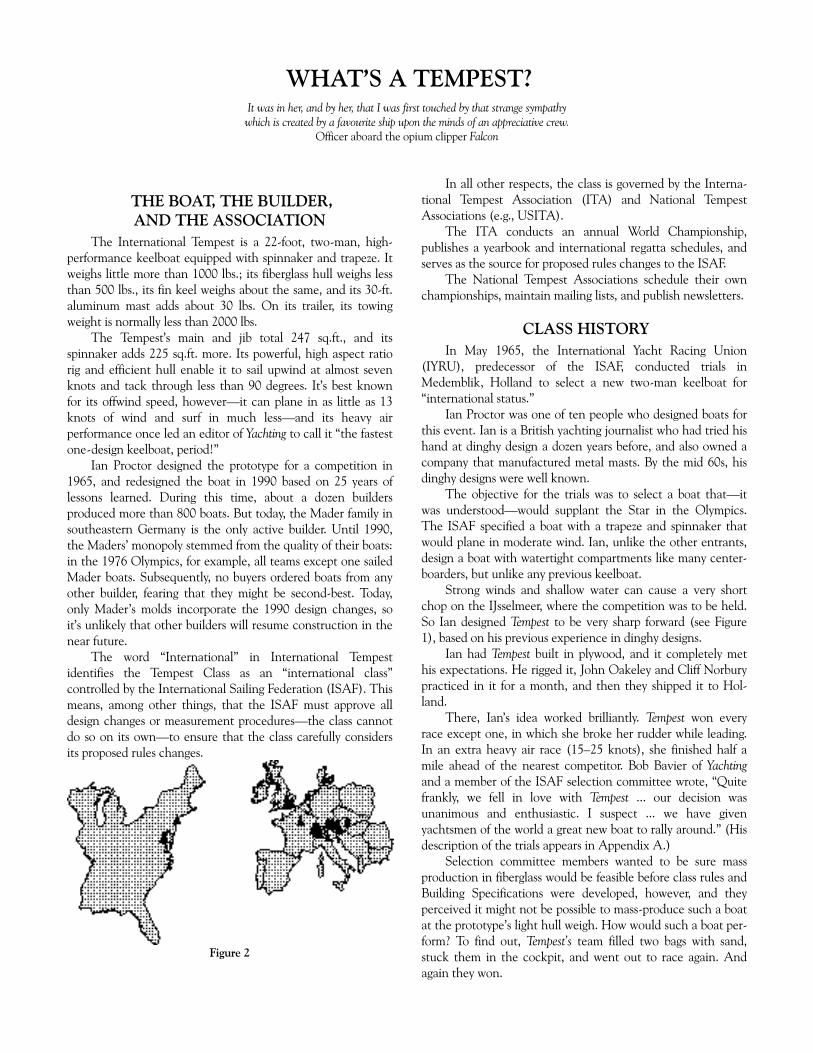
Figure 2, TEMPEST RACING IN 1990 .......................... 1 Figure 3, BUOYANCY COMPARTMENTS .................. 3 Figure 4, SPREADER ARRANGEMENTS ..................... 4 Figure 5, TRYING THE TRAPEZE................................. 6 Figure 6, BASIC UPWIND BODY POSITION .............. 6 Figure 7, FLAT MEANS FLAT ....................................... 7 Figure 8, STANDARD HARDWARE LAYOUT ......... 10 Figure 9, TOPPING LIFT DOWNHAUL ..................... 11 Figure 10, MAINSHEET SYSTEM ................................ 12
Figure 11, TWING LINES ............................................ 15 Figure 12, THE HOUNDS............................................ 16 Figure 13, INDEPENDENT TRAPEZE ........................ 17 Figure 14, MAINSAIL ARRANGEMENT ................... 17 Figure 15, BATTEN POCKET OPENINGS ................ 18 Figure 16, SETTING UP THE MAST .......................... 19 Figure 17, THE “BACKSTAY RULE” ......................... 22 Figure 18, RIG TENSION IMPLICATIONS ............... 22 Figure 19, THE “SPREADER RULE” .......................... 23 Figure 20, THE “FORESTAY RULE” .......................... 23
WHAT’S A TEMPEST? It was in her, and by her, that I was first touched by that strange sympathy which is created by a favourite ship upon the minds of an appreciative crew.
Officer aboard the opium clipper Falcon
THE BOAT, THE BUILDER, AND THE ASSOCIATION
The International Tempest is a 22-foot, two-man, high-performance keelboat equipped with spinnaker and trapeze. It weighs little more than 1000 lbs.; its fiberglass hull weighs less than 500 lbs., its fin keel weighs about the same, and its 30-ft. aluminum mast adds about 30 lbs. On its trailer, its towing weight is normally less than 2000 lbs.
The Tempest’s main and jib total 247 sq.ft., and its spinnaker adds 225 sq.ft. more. Its powerful, high aspect ratio rig and efficient hull enable it to sail upwind at almost seven knots and tack through less than 90 degrees. It’s best known for its offwind speed, however—it can plane in as little as 13 knots of wind and surf in much less—and its heavy air performance once led an editor of Yachting to call it “the fastest one-design keelboat, period!”
Ian Proctor designed the prototype for a competition in 1965, and redesigned the boat in 1990 based on 25 years of lessons learned. During this time, about a dozen builders produced more than 800 boats. But today, the Mader family in southeastern Germany is the only active builder. Until 1990, the Maders’ monopoly stemmed from the quality of their boats: in the 1976 Olympics, for example, all teams except one sailed Mader boats. Subsequently, no buyers ordered boats from any other builder, fearing that they might be second-best. Today, only Mader’s molds incorporate the 1990 design changes, so it’s unlikely that other builders will resume construction in the near future.
The word “International” in International Tempest identifies the Tempest Class as an “international class” controlled by the International Sailing Federation (ISAF). This means, among other things, that the ISAF must approve all design changes or measurement procedures—the class cannot do so on its own—to ensure that the class carefully considers its proposed rules changes.
Figure 2
In all other respects, the class is governed by the Interna-tional Tempest Association (ITA) and National Tempest Associations (e.g., USITA).
The ITA conducts an annual World Championship, publishes a yearbook and international regatta schedules, and serves as the source for proposed rules changes to the ISAF.
The National Tempest Associations schedule their own championships, maintain mailing lists, and publish newsletters.
CLASS HISTORY In May 1965, the International Yacht Racing Union
(IYRU), predecessor of the ISAF, conducted trials in Medemblik, Holland to select a new two-man keelboat for “international status.”
Ian Proctor was one of ten people who designed boats for this event. Ian is a British yachting journalist who had tried his hand at dinghy design a dozen years before, and also owned a company that manufactured metal masts. By the mid 60s, his dinghy designs were well known.
The objective for the trials was to select a boat that—it was understood—would supplant the Star in the Olympics. The ISAF specified a boat with a trapeze and spinnaker that would plane in moderate wind. Ian, unlike the other entrants, design a boat with watertight compartments like many center-boarders, but unlike any previous keelboat.
Strong winds and shallow water can cause a very short chop on the IJsselmeer, where the competition was to be held. So Ian designed Tempest to be very sharp forward (see Figure 1), based on his previous experience in dinghy designs.
Ian had Tempest built in plywood, and it completely met his expectations. He rigged it, John Oakeley and Cliff Norbury practiced in it for a month, and then they shipped it to Hol-land.
There, Ian’s idea worked brilliantly. Tempest won every race except one, in which she broke her rudder while leading. In an extra heavy air race (15–25 knots), she finished half a mile ahead of the nearest competitor. Bob Bavier of Yachting and a member of the ISAF selection committee wrote, “Quite frankly, we fell in love with Tempest ... our decision was unanimous and enthusiastic. I suspect ... we have given yachtsmen of the world a great new boat to rally around.” (His description of the trials appears in Appendix A.)
Selection committee members wanted to be sure mass production in fiberglass would be feasible before class rules and Building Specifications were developed, however, and they perceived it might not be possible to mass-produce such a boat at the prototype’s light hull weigh. How would such a boat per-form? To find out, Tempest’s team filled two bags with sand, stuck them in the cockpit, and went out to race again. And again they won.

2 WHAT’S A TEMPEST?
Tempest’s victory attracted immediate worldwide attention. The International Yacht Racing Union granted the Tempest Class international status, prompting boat shows in Europe and America to ask to put boats on display (see Ian’s story in Appendix B). There were teething problems, of course, and while Ian, Beecher Moore, and many others worked on into 1966 to resolve them, production couldn’t keep pace with demand. But that year, enough boats were already sailing for the class to hold a European Championship.
With growth seemingly assured, owners turned their attention from promotion to experimentation. In the U.S., for example, jib sheeting angles among top boats varied between eight and the “original” fourteen degrees, and there was little agreement on the correct rake angle for the mast. 1968 World Champion Billy Kelly remarked that he wasn’t “at all sure that we ... don’t have a lot of unnecessary gadgets.”
In November 1969, the IYRU selected Tempest to be used in the 1972 Olympics, prompting many people to buy new boats, and activity reached a peak during the next three years. But after the ’72 Olympics, many people stopped sailing their boats. The emphasis on competition had inhibited growth and the number of active fleets dropped. Magazine articles that featured some of the most gear-laden boats left an impression
that complexity and expense were necessary, and that only tall, heavy people could be competitive crews.
The 1976 Olympics temporarily spawned some fresh inter-est, but did not reverse the declining trend in worldwide popularity. In 1977, the IYRU decided to re-substitute the Star for the Tempest in the Olympics. By 1981, the class had become so weak in North America that it canceled a World Championship scheduled for Newport, Rhode Island.
But new boats now had simplified, standardized rig and hardware layouts that incorporated the lessons learned from the Olympic experience. So, for perhaps the first time, class leaders could begin to focus on promotion.
Today, people sail Tempests because they are remarkable boats, unsurpassed by many newer designs. Worldwide competition in the class isn’t as intense as in the Olympic years, but Mader continues to build new boats, Hyde and Vogel+Meier are developing new sails, and there is an active regatta schedule with events throughout Germany, Austria, Switzerland, Holland, and England, and in America at Annapolis and elsewhere. It seems that old boats don’t deterio-rate more quickly than the people who sail them. So while the average age of Tempest sailors is increasing, worldwide mem-bership is stable at more than 200 members.

BUYING A TEMPEST Fashion is always delighted with mystery
and suspects common sense of being ill-bred. Sir Donald Francis Tovey
CLASS RULES AND BUILDING SPECIFICATIONS
Standardization — All Tempests are “as nearly as possible the same as regards shape and weight of hull and decking, shape and weight of keel, shape of rudder, area and shape of sail plan and in some other items which affect performance,” according to the class rules, which are published in the ITA’s biennial yearbook. They and Building Specifications control design and measurement in several ways. For example, hulls must be constructed in moldings produced from a single plug, so they are as much the same as possible.
Safety — Figure 3 shows how the Tempest design incorporates two watertight buoyancy compartments and—for boats without spinnaker launchers—a third that’s “substan-tially” watertight, as follows:
1. Between the bow compartment bulkhead and the forward cockpit bulkhead.
2. Under the cockpit and side decks. 3. Aft of the after cockpit bulkhead, commonly
known as the “lazarette,” which is secured by the hatch cover.
The class rules prohibit “piercing ... the hull, deck, bulkheads, or cockpit” except by specific openings and by “holes for fastenings used to attach fittings” which must be “sealed to maintain the watertight integrity of the buoyancy compartments. No lines or controls shall pass through any surface of the hull, deck, bulkheads or cockpit ...” except through specifically permitted watertight tubes. You can, however, remove the rudder and keel without sacrificing the watertight integrity of these buoyancy compartments.
There’s another compartment forward of the bow bulkhead, but this one isn’t intended to be watertight. The class rules permit two drain holes of 7mm maximum diameter in this compartment. A boat with a spinnaker chute doesn’t
need these holes because water can’t get in. However, a boat without a spinnaker chute has an aperture in the foredeck for the forestay and jib tack fitting—and water—to pass through, so in this case you should leave at least one of them unplugged.
Early Rule Modifications — The class rules were changed over the years as design refinements became desirable. The most significant was adoption of a thicker mast section and optional backstay in 1968 to reduce the risk of mast failure. (At the time, replacement masts were sold at half price to those who requested them.) Concurrently, sailmakers began producing sails to match the new mast. Only minor changes in sail design have occurred since then, so any mint-condition post-1970 sail would likely be competitive in the 90s at anything less than world-level events.
Until 1990, the class avoided other changes that would have made older boats obsolete, but made some minor rule amendments. Some of these that may affect selection of a used boat include:
• permitting an integral spinnaker launcher (1975). All boats built after the 1976 Olympics incorporate this feature, except for those whose original owners asked for it to be deleted;
• dropping the requirement that the rudder be mounted in a removable box. While the keel and rudder originally had to be removable from the hull, virtually all trailers accommodate them in place;
• permitting two extra access ports (making a total of four) in the cockpit floor, giving access to through-bolted fittings near the bridge;
• permitting the use of stainless steel keel fins (1975), and fins up to 13mm thick (1984);
• and disallowing drain holes in the internal trans-verse bulkheads and transom (1984-5) to prevent the watertight integrity of the separate compart-ments from being accidentally jeopardized.
THE 1990 REDESIGN By 1989, Leonhard Mader and his uncle Adolf had built
about 300 Tempests. Not surprisingly, they had also developed several ideas about “improving the breed” over the years. When Leonhard realized he would need to replace his molds, he and Class Measurer Helmut Klug approached ITA Chairman Dave McComb with their suggestions.
The next year, in collaboration with designer Ian Proctor, the class developed these and other ideas into eight proposals to the International Yacht Racing Union, with the intention
Figure 3 BUOYANCY COMPARTMENTS
4 BUYING A TEMPEEST
that none of these changes would render older boats obsolete. The major proposal was to change the hull/deck joint to make assembly easier and cheaper, and improve strength and water-tightness. Proctor also developed new building specifications, so all new boats are constructed of sandwich foam, without ribs. Questioned at the 1990 ITA Annual Meeting, he was confident this would yield boats that were not faster, but that would last longer.
When the IYRU approved, Mader modified the original hull plug and built a new deck plug, from which they then produced new molds. Improvements in the deck mold include a covered trough in the cockpit sole for hiding control lines running aft from the mast, beveled side tanks that make hiking easier for the helmsman, and integral mast partners.
The new boats have been very successful, and it seems that Ian was right: most European observers believe this is not because the hulls are faster, but because of improvements in sails and the new mast rigs, which include “baby stays” running from the side decks to just above the boom for added bend control. They cite as evidence the success of Christian and Hans-Jörg Schäffer, who have become consistent top contenders, even in heavy air, despite the fact that Hans-Jörg weighs only about 160 lbs. and is not very tall.
BUYING A NEW TEMPEST With 300 boats’ experience, Mader takes only about
twenty man-days to complete one. Quality comes first: with mahogany or teak gunwales and superlative glasswork, a new Mader is a beautiful boat. Peter Harken has called Mader “the pre-eminent class boat builder in the world.”
In 1996, a new Mader Tempest costs about $20,000 ex works, a new trailer runs $1800, and a suit of sails about $1800.
EVALUATING A USED TEMPEST Value — Depending on age and maintenance history,
used Tempests are available at $500 to $5000 in the United States. Before you buy one, however, here are some guidelines for evaluating its condition.
Mast — As already mentioned, a thicker and stiffer mast became the only legal mast in 1972. Most of these masts have diamond spreaders only. Some boats still have the older section
(see Figure 4), which has both diamond spreaders and swept-back spreaders, which are attached to the main shrouds. Sails designed since 1970 fit the stiffer mast, so a boat with an old one isn’t competitive.
Boom — There are also “old” bendy booms. They’re not illegal, but they release power from the mainsail when they
flex in waves, so they aren’t competitive. You can cut down an “old” mast section to make a good, stiff boom. Otherwise, a Proctor six-sided boom or an equally stiff section is best for serious racing.
Rig tension — A Tempest needs proper rig tension under a very dynamic load to be competitive upwind. You can probably pre-stress the forestay of any boat to a static load of 350 lbs. (e.g., as measured with a Loos Tension Gauge) if you pull hard enough. But if the hull flexes too much (e.g., when sailing into waves), the chainplates will pinch upward and inward, allowing the shrouds to slacken and the forestay to sag. Such a boat cannot be made to point, so it won’t be competi-tive. (See Figure 18, page 22.)
The only way you can measure the hull’s resistance to this type of load is to see how far you must trim the forestay (or jib halyard) to increase tension from, say, 200 to 300 lbs. A new Mader boat’s 5/32 inch (metric equivalent) forestay needs to be tightened only about 5/8 inch to achieve this increase, including wire stretch. To be competitive, you probably want a boat whose forestay must be tightened no more than one inch for the corresponding measurement. Note: May not be measur-able on boats with “light” forestays—see page 15 for a description.
Hull stiffness — A Tempest hull is reinforced with stringers and ribs, but the bulkheads at the forward and aft ends of the cockpit (see Figure 1) are the major structural reinforcements. The hull is solid here, so here’s where the trailer should cradle it.
Elsewhere the hull may be soft. This is most harmful forward of the bow trailer support: a hull that absorbs wave energy is slower than a stiff one, especially upwind.
Check a hull’s stiffness by pounding on it with your fist. Pay particular attention to the area below the waterline, from the bow aft to the forward trailer support. Watch your reflection. A hull that feels rock-like when you pound on it hard, with no change in its reflection, may be a winner. A hull that feels merely stiff may be competitive, even when you can see it deflect. But a soft-feeling hull is suitable only for recre-ational sailing.
Ribs may loosen after years of sailing through waves, because of abuse, or because water has frozen and expanded
Figure 4 SPREADER ARRANGEMENTS

BUYING A TEMPEST 5
inside the hull during winter. Sometimes you can hear them rattle when you pound on the hull, but not always. A good hull doesn’t have any loose ribs. Check for them by looking inside all inspection ports in the forward and center compartments to see whether they’re still firmly attached to the hull. Use a flashlight and mirror for a thorough job.
Also, find out whether the boat has been kept dry during every winter, and whether it leaks and where. Learn as much as possible about how it was cared for throughout its lifetime.
Hull weight distribution — A boat with a slightly high pitching moment of inertia will not seem different from a “normal” boat, so hull weight distribution is not a concern if you plan to use a boat only for recreational sailing or if you never expect to encounter a “short chop.” For championship racing, however, a hull must be as light as possible at the ends, especially the bow. “Heavy”-ended boats plow into oncoming waves rather than pitching up over them.
Builders try to prevent “heavy” ends by using as little resin as possible. Unfortunately, this problem is almost impossible to detect. So the best you can do is to look for modifications or repairs that may increase weight in the ends. Otherwise, you can only rely on the builder’s reputation and the racing record of the individual boat. These not only provide clues that a boat may have been damaged or improperly stored during winter, but may be evidence that weight has been added. Here again, the best advice is simply to buy a Mader boat if you wish to be competitive.
Hull fairness — A good hull is fair. Sight along the hull for local distortions, especially near the forward cockpit bulkhead. Only minor ones suggest a hull may be competitive; avoid evident distortions if you want a championship hull.
Hull smoothness — A smooth hull isn’t important for recreational sailing, but is very important for racing. Most Tempests have been dry sailed, and therefore have had no need to be painted. The best hulls have been sanded with 400 or 600 grit sandpaper or not sanded at all. On a championship boat, any painted surface has probably been sprayed, not brushed, so that it’s as smooth as the original gelcoat.
Deck stiffness — Some builders produce decks as light as the Building Specifications allow to minimize weight in the ends of the boat. A soft deck normally doesn’t affect a boat’s competitiveness, but it may warn that the deck ribs will require future maintenance. Verify whether the deck is sound by walking entirely around the boat and checking inside with your flashlight and mirror.
Keel fin — Any smooth fin is competitive, despite what it looks like, if its leading edge is round, not sharp. The fin is made of mild steel, so corrosion may eventually cause cosmetic maintenance problems, but you can fix this when the time comes (see page 30). Feel the fairness of the fin, don’t just look at it, to find out whether it will need work.
Keel bulb — A good bulb meets the same fairness and smoothness criteria as the hull. Its aft tip is sharp or squared off with a maximum cross-sectional diameter of ¼ inch. (A squared-off tip is just as fast and easier to maintain.) An ugly
bulb, alone, doesn’t mean the boat is slow, and you can easily restore it with auto body filler or similar material. But inspect not only its top and sides, but also its bottom, to find out how much work you’ll have to do. While you’re checking, be sure its “equator” is parallel with the waterline.
Rudder and tiller — For recreational sailing, you need only to consider whether the rudderbox fits snugly in the hull and is easy to remove. For competitive sailing, however, the rudder must meet the same fairness and smoothness criteria as the hull and keel. Its shape also is important: the leading edge should be parabolic, the maximum thickness should be 30 to 35 per cent aft of the leading edge, and it should be flat or even concave within two to three inches of the trailing edge, which should be sharpened or squared-off. When installed, less than ¼ inch of the shaft should be visible; less is better, as long as the blade can turn at least 90 degrees without binding against the hull.
The tiller should fit the rudderpost fitting without play—shake it while someone holds the rudder to find out whether it does. It should also be able to turn the rudder easily, without friction or slop; either will eventually drive you “nuts.” Its extension should be in good condition, without play at the connection and with protection (such as a ball) at the end. If it telescopes, play with the mechanism to see whether it will lock reliably.
Partners — While early Tempests had fiberglass partners bolted through the forward cockpit bulkhead, metal partners secured to the deck have proved more rigid and less likely to break. You want rigid partners that fit the mast snugly and incorporate a means of controlling fore-and-aft mast bend: the mast on a championship boat will not move within either the step or the partners once it is set.
Fittings — The “standard” hardware layout (see page 10) has stood the test of time. If you’re interested in racing, be sure you can live with any departures from this standard, and see whether everything actually works. Don’t forget to check cleats for wear.
Trailer — A Tempest can suffer more wear and tear on the road than on the water, so a good trailer can be very important. In addition to cradling the boat under its bulkheads, such a trailer also prevents the keel from swinging laterally when the boat is being towed. Check for this by pulling hard on the keel when the boat’s on its trailer.
A good trailer also has 13-inch diameter or larger wheels (smaller ones usually aren’t intended for highway speeds) and fenders you can climb on. For safety, find out when the wheel bearings were last repacked, be sure the hitch size matches the size of the ball on your towing vehicle (see page 9), and check out the electrical system.
Finally, remember we class members want you to enjoy your boat, so don’t make a mistake because you weren’t sure what, whether, or whom to ask. Get a second opinion if you have any doubts.
TAKING DELIVERY Some luck lies in not getting what you thought you wanted
but getting what you have, which, once you have it, you may be smart enough to see is what you would have wanted had you known.
Garrison Keillor, Lake Wobegon Days
YOUR FIRST SAIL Basic boat handling — The Tempest is fast—deceptively
so because its easy motion through the water can disguise its speed. Many first-timers discover this phenomenon only when sea room unexpectedly disappears! Therefore, unless an experienced sailor accompanies you, it may be a good idea to take your first sail in light wind so that situations don’t develop too quickly.
Fortunately, you’ll find the Tempest “likes” tight quarters: its rudder can turn more than 90 degrees, so you can get out of trouble with moves you wouldn’t dare try in many other boats, provided you let out the sails if you’re heeling too much. This maneuverability is especially useful when landing: a Tempest has less momentum than most other keelboats, so you can stop at your target by spinning the boat hard into the wind and then backing the mainsail by pushing the boom out to windward. But warn the crew first so he or she won’t fall off the bow!
You’ll find getting under way is easiest under both mainsail and jib. The large main, alone, may overpower the rudder until you gain way enough to steer. While the jib, alone, will work unless you need to tack in high wind, you’re better off taking time to hoist them both and getting squared away before you cast off.
When you’re under way, practice using the tiller extension and sitting forward of the tiller arc. Relax and work on maintaining a constant angle of heel upwind (more about this below).
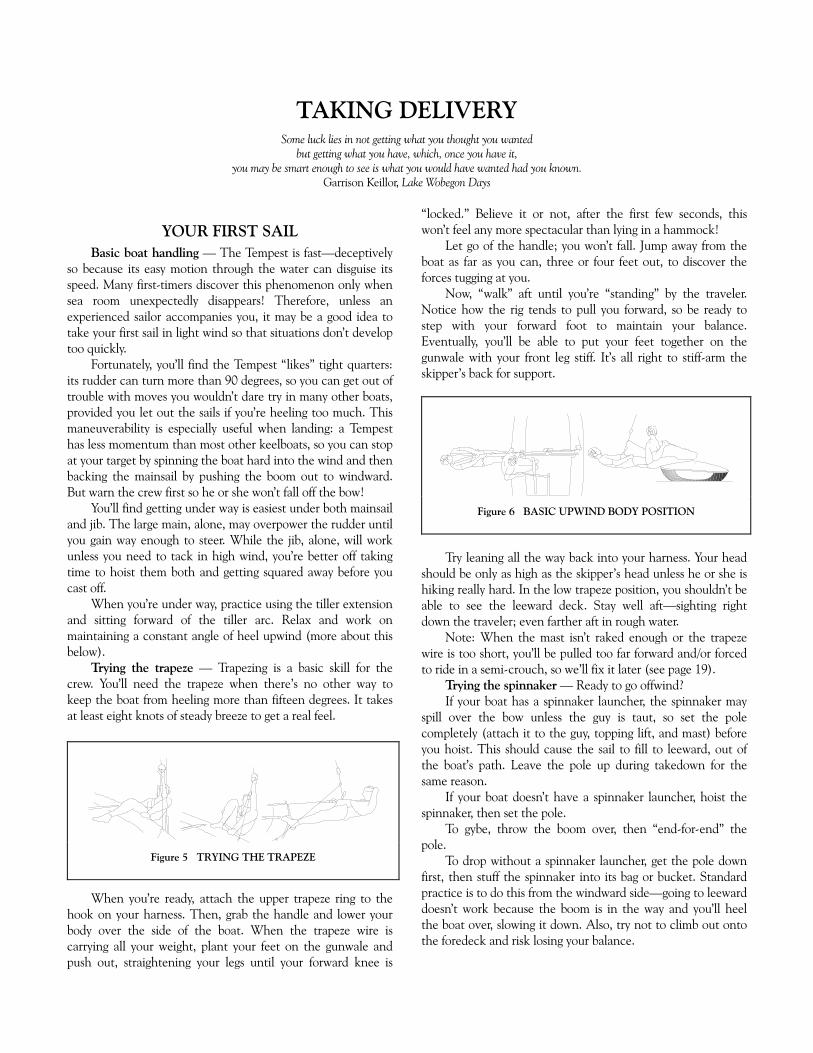
Trying the trapeze — Trapezing is a basic skill for the crew. You’ll need the trapeze when there’s no other way to keep the boat from heeling more than fifteen degrees. It takes at least eight knots of steady breeze to get a real feel.
When you’re ready, attach the upper trapeze ring to the hook on your harness. Then, grab the handle and lower your body over the side of the boat. When the trapeze wire is carrying all your weight, plant your feet on the gunwale and push out, straightening your legs until your forward knee is
“locked.” Believe it or not, after the first few seconds, this won’t feel any more spectacular than lying in a hammock!
Let go of the handle; you won’t fall. Jump away from the boat as far as you can, three or four feet out, to discover the forces tugging at you.
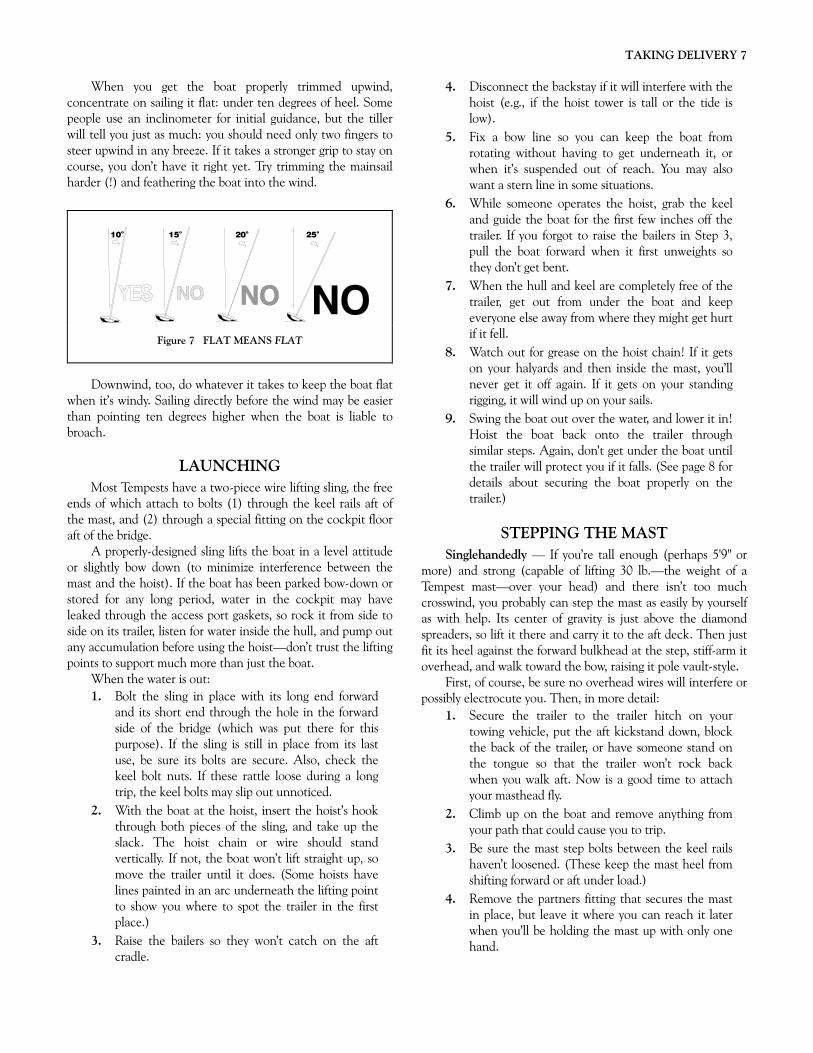
Now, “walk” aft until you’re “standing” by the traveler. Notice how the rig tends to pull you forward, so be ready to step with your forward foot to maintain your balance. Eventually, you’ll be able to put your feet together on the gunwale with your front leg stiff. It’s all right to stiff-arm the skipper’s back for support.
Try leaning all the way back into your harness. Your head should be only as high as the skipper’s head unless he or she is hiking really hard. In the low trapeze position, you shouldn’t be able to see the leeward deck. Stay well aft—sighting right down the traveler; even farther aft in rough water.
Note: When the mast isn’t raked enough or the trapeze wire is too short, you’ll be pulled too far forward and/or forced to ride in a semi-crouch, so we’ll fix it later (see page 19).
Trying the spinnaker — Ready to go offwind? If your boat has a spinnaker launcher, the spinnaker may
spill over the bow unless the guy is taut, so set the pole completely (attach it to the guy, topping lift, and mast) before you hoist. This should cause the sail to fill to leeward, out of the boat’s path. Leave the pole up during takedown for the same reason.
If your boat doesn’t have a spinnaker launcher, hoist the spinnaker, then set the pole.
To gybe, throw the boom over, then “end-for-end” the pole.
To drop without a spinnaker launcher, get the pole down first, then stuff the spinnaker into its bag or bucket. Standard practice is to do this from the windward side—going to leeward doesn’t work because the boom is in the way and you’ll heel the boat over, slowing it down. Also, try not to climb out onto the foredeck and risk losing your balance.
Figure 5 TRYING THE TRAPEZE
Figure 6 BASIC UPWIND BODY POSITION
TAKING DELIVERY 7
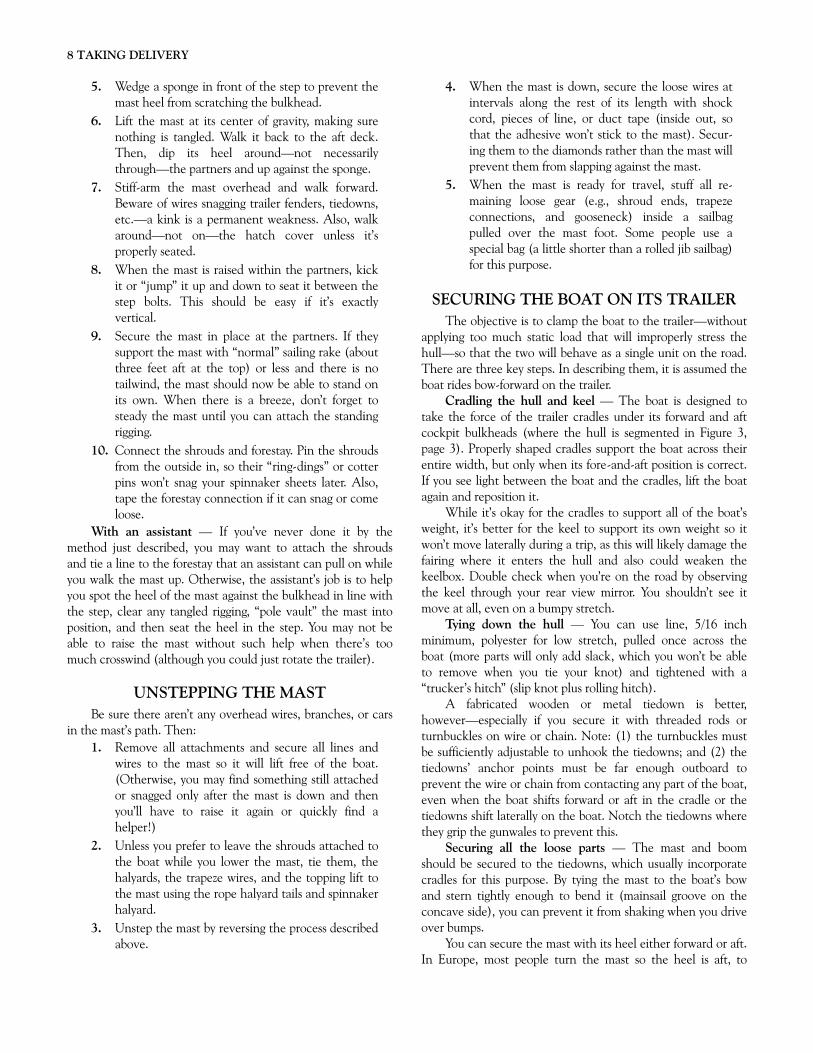
When you get the boat properly trimmed upwind, concentrate on sailing it flat: under ten degrees of heel. Some people use an inclinometer for initial guidance, but the tiller will tell you just as much: you should need only two fingers to steer upwind in any breeze. If it takes a stronger grip to stay on course, you don’t have it right yet. Try trimming the mainsail harder (!) and feathering the boat into the wind.
Downwind, too, do whatever it takes to keep the boat flat when it’s windy. Sailing directly before the wind may be easier than pointing ten degrees higher when the boat is liable to broach.
LAUNCHING
Most Tempests have a two-piece wire lifting sling, the free ends of which attach to bolts (1) through the keel rails aft of the mast, and (2) through a special fitting on the cockpit floor aft of the bridge.
A properly-designed sling lifts the boat in a level attitude or slightly bow down (to minimize interference between the mast and the hoist). If the boat has been parked bow-down or stored for any long period, water in the cockpit may have leaked through the access port gaskets, so rock it from side to side on its trailer, listen for water inside the hull, and pump out any accumulation before using the hoist—don’t trust the lifting points to support much more than just the boat.
When the water is out: 1. Bolt the sling in place with its long end forward
and its short end through the hole in the forward side of the bridge (which was put there for this purpose). If the sling is still in place from its last use, be sure its bolts are secure. Also, check the keel bolt nuts. If these rattle loose during a long trip, the keel bolts may slip out unnoticed.
2. With the boat at the hoist, insert the hoist’s hook through both pieces of the sling, and take up the slack. The hoist chain or wire should stand vertically. If not, the boat won’t lift straight up, so move the trailer until it does. (Some hoists have lines painted in an arc underneath the lifting point to show you where to spot the trailer in the first place.)
3. Raise the bailers so they won’t catch on the aft cradle.
4. Disconnect the backstay if it will interfere with the hoist (e.g., if the hoist tower is tall or the tide is low).
5. Fix a bow line so you can keep the boat from rotating without having to get underneath it, or when it’s suspended out of reach. You may also want a stern line in some situations.
6. While someone operates the hoist, grab the keel and guide the boat for the first few inches off the trailer. If you forgot to raise the bailers in Step 3, pull the boat forward when it first unweights so they don’t get bent.
7. When the hull and keel are completely free of the trailer, get out from under the boat and keep everyone else away from where they might get hurt if it fell.
8. Watch out for grease on the hoist chain! If it gets on your halyards and then inside the mast, you’ll never get it off again. If it gets on your standing rigging, it will wind up on your sails.
9. Swing the boat out over the water, and lower it in! Hoist the boat back onto the trailer through similar steps. Again, don’t get under the boat until the trailer will protect you if it falls. (See page 8 for details about securing the boat properly on the trailer.)
STEPPING THE MAST Singlehandedly — If you’re tall enough (perhaps 5'9" or
more) and strong (capable of lifting 30 lb.—the weight of a Tempest mast—over your head) and there isn’t too much crosswind, you probably can step the mast as easily by yourself as with help. Its center of gravity is just above the diamond spreaders, so lift it there and carry it to the aft deck. Then just fit its heel against the forward bulkhead at the step, stiff-arm it overhead, and walk toward the bow, raising it pole vault-style.
First, of course, be sure no overhead wires will interfere or possibly electrocute you. Then, in more detail:
1. Secure the trailer to the trailer hitch on your towing vehicle, put the aft kickstand down, block the back of the trailer, or have someone stand on the tongue so that the trailer won’t rock back when you walk aft. Now is a good time to attach your masthead fly.
2. Climb up on the boat and remove anything from your path that could cause you to trip.
3. Be sure the mast step bolts between the keel rails haven’t loosened. (These keep the mast heel from shifting forward or aft under load.)
4. Remove the partners fitting that secures the mast in place, but leave it where you can reach it later when you’ll be holding the mast up with only one hand.
Figure 7 FLAT MEANS FLAT
8 TAKING DELIVERY
5. Wedge a sponge in front of the step to prevent the mast heel from scratching the bulkhead.
6. Lift the mast at its center of gravity, making sure nothing is tangled. Walk it back to the aft deck. Then, dip its heel around—not necessarily through—the partners and up against the sponge.
7. Stiff-arm the mast overhead and walk forward. Beware of wires snagging trailer fenders, tiedowns, etc.—a kink is a permanent weakness. Also, walk around—not on—the hatch cover unless it’s properly seated.
8. When the mast is raised within the partners, kick it or “jump” it up and down to seat it between the step bolts. This should be easy if it’s exactly vertical.
9. Secure the mast in place at the partners. If they support the mast with “normal” sailing rake (about three feet aft at the top) or less and there is no tailwind, the mast should now be able to stand on its own. When there is a breeze, don’t forget to steady the mast until you can attach the standing rigging.
10. Connect the shrouds and forestay. Pin the shrouds from the outside in, so their “ring-dings” or cotter pins won’t snag your spinnaker sheets later. Also, tape the forestay connection if it can snag or come loose.
With an assistant — If you’ve never done it by the method just described, you may want to attach the shrouds and tie a line to the forestay that an assistant can pull on while you walk the mast up. Otherwise, the assistant’s job is to help you spot the heel of the mast against the bulkhead in line with the step, clear any tangled rigging, “pole vault” the mast into position, and then seat the heel in the step. You may not be able to raise the mast without such help when there’s too much crosswind (although you could just rotate the trailer).
UNSTEPPING THE MAST Be sure there aren’t any overhead wires, branches, or cars
in the mast’s path. Then: 1. Remove all attachments and secure all lines and
wires to the mast so it will lift free of the boat. (Otherwise, you may find something still attached or snagged only after the mast is down and then you’ll have to raise it again or quickly find a helper!)
2. Unless you prefer to leave the shrouds attached to the boat while you lower the mast, tie them, the halyards, the trapeze wires, and the topping lift to the mast using the rope halyard tails and spinnaker halyard.
3. Unstep the mast by reversing the process described above.
4. When the mast is down, secure the loose wires at intervals along the rest of its length with shock cord, pieces of line, or duct tape (inside out, so that the adhesive won’t stick to the mast). Secur-ing them to the diamonds rather than the mast will prevent them from slapping against the mast.
5. When the mast is ready for travel, stuff all re-maining loose gear (e.g., shroud ends, trapeze connections, and gooseneck) inside a sailbag pulled over the mast foot. Some people use a special bag (a little shorter than a rolled jib sailbag) for this purpose.
SECURING THE BOAT ON ITS TRAILER The objective is to clamp the boat to the trailer—without
applying too much static load that will improperly stress the hull—so that the two will behave as a single unit on the road. There are three key steps. In describing them, it is assumed the boat rides bow-forward on the trailer.
Cradling the hull and keel — The boat is designed to take the force of the trailer cradles under its forward and aft cockpit bulkheads (where the hull is segmented in Figure 3, page 3). Properly shaped cradles support the boat across their entire width, but only when its fore-and-aft position is correct. If you see light between the boat and the cradles, lift the boat again and reposition it.
While it’s okay for the cradles to support all of the boat’s weight, it’s better for the keel to support its own weight so it won’t move laterally during a trip, as this will likely damage the fairing where it enters the hull and also could weaken the keelbox. Double check when you’re on the road by observing the keel through your rear view mirror. You shouldn’t see it move at all, even on a bumpy stretch.
Tying down the hull — You can use line, 5/16 inch minimum, polyester for low stretch, pulled once across the boat (more parts will only add slack, which you won’t be able to remove when you tie your knot) and tightened with a “trucker’s hitch” (slip knot plus rolling hitch).
A fabricated wooden or metal tiedown is better, however—especially if you secure it with threaded rods or turnbuckles on wire or chain. Note: (1) the turnbuckles must be sufficiently adjustable to unhook the tiedowns; and (2) the tiedowns’ anchor points must be far enough outboard to prevent the wire or chain from contacting any part of the boat, even when the boat shifts forward or aft in the cradle or the tiedowns shift laterally on the boat. Notch the tiedowns where they grip the gunwales to prevent this.
Securing all the loose parts — The mast and boom should be secured to the tiedowns, which usually incorporate cradles for this purpose. By tying the mast to the boat’s bow and stern tightly enough to bend it (mainsail groove on the concave side), you can prevent it from shaking when you drive over bumps.
You can secure the mast with its heel either forward or aft. In Europe, most people turn the mast so the heel is aft, to

TAKING DELIVERY 9
conform to highway laws. Secure the heel directly over the transom, but remember to aim the backstay crane up to avoid interference with your car, and, contrary to the instruction in the previous paragraph, be sure the mast doesn’t bend up in the middle. You can wedge a styrofoam block between the mast and the foredeck to keep the mast from bouncing around.
If the heel is forward, position the spreaders just aft of the partners so the masthead won’t overhang the stern too far. You may need a flag at the masthead if the overhang is too great.
Secure the tiller and spinnaker pole inside the boat so they won’t bounce around, and secure the lazarette cover in place or stuff it inside the lazarette so it won’t blow away.
Stretch out the sailbags in the cockpit. They won’t blow away if they’re not up in the windstream, but you can tie them in place just to be sure.
Finally, when everything seems secure, rock the whole trailer vigorously and listen for loose pieces. The main sheet blocks dangling from the boom may rattle, but nothing else should.
TOWING You should take many special precautions when you’re
towing your trailer, of course. The need for moderate speed, extra braking room (especially if your trailer doesn’t have a surge brake), and wide clearances (e.g., at toll booths) and turns are just a few.
But what about the right equipment? The ideal towing vehicle weighs at least 50 per cent more
than the loaded trailer (e.g., 2000 lb.) and develops 100 horsepower or so at highway speeds. While you can manage
with less, the boat’s extra windage consumes much more horsepower than the vehicle alone (cutting your normal fuel mileage by 1/3 to 1/2), so you’ll be glad to have all this power. In addition, a vehicle this heavy and powerful will likely have a transmission and brakes that can handle towing’s extra demands without unduly shortening their life.
You need confidence in your trailer when you travel. You may even want to borrow a good one if you’re not sure about your own.
You don’t need surge brakes if you drive defensively, but if you have them, be sure they’ll release fully under driving conditions.
The trailer hitch must be bolted to the frame, not just the bumper, and the trailer hitch ball must be sized to fit your trailer properly (e.g., 2 inches).
On the road, it’s a good idea to check periodically to see that the tiedowns are tight. You can do this by looking in the rear view mirror for light between the boat and the cradle. You should only be able to see a little light, at most, over the worst bumps.
It’s not a bad idea to stop and check the rig periodically, especially early in a trip. You can’t see problems such as stray lines through the rear view mirror. If your trailer wheels have been immersed or the bearings haven’t been packed recently, feel the wheel hubs for heat. How much heat you feel depends on exactly where you feel, but they should not be too hot to touch.
Finally, of course, if you hear any unfamiliar noises, stop immediately and investigate them. If they’re loud enough to attract your attention, you may have serious trouble.

Figure 8 STANDARD HARDWARE LAYOUT

PREPARATION Observe the small facts
upon which large inferences may depend. Arthur Conan Doyle
THE SIMPLE TEMPEST To sail a Tempest effectively you need not only the basic
standing and running rigging but also a means of tensioning the standing rigging, controlling sail shape, and handling the spinnaker in all wind conditions.
You can buy a fully equipped new boat beautifully laid out (as in Figure 8), but if you’re starting with a bare hull or an older boat that hasn’t been kept up to date, you should examine its basic layout with the following points in mind.
NECESSARY EQUIPMENT
Assuming it has all the equipment the class rules require (including a compass and a traveler that extends “beyond the bridge deck moulding and onto the side decks”) plus standing rigging, trapeze, sheets, and halyards, you’ll need the following to make your boat competitive.
• A means of tensioning the forestay after the jib is hoisted. While you won’t need to adjust forestay tension under way, initially it must be sufficient to bend the mast through compression—about 350 lb. Alternately, you can use a heavy wire in the jib luff so that the jib halyard, not the forestay, tensions the rig (see page 15).
• A means of preventing the mast from bending too much under compression. A lever that pivots at the partners provides positive control. If this isn’t available, however, you can wedge wood blocks in the partner forward of the mast to achieve a similar effect.
• A mainsail outhaul and jib downhaul that you can tension in a “set it and forget it” fashion when you’re under way.
• Traveler, main cunningham, backstay, and vang that the helmsman can easily control, whether inside the boat or hiked out.
• A spinnaker pole topping lift that the helmsman can adjust from inside the boat (e.g., in light air).
• A means of retracting the topping lift when you take down the spinnaker pole. This system should incorporate a stop that keeps the pole from lifting too high in heavy air on a tight reach. As you won’t need to adjust it otherwise, you can simply attach the wire downhaul to a shock cord. Figure 9 shows such an arrangement.
DESIRABLE EQUIPMENT
There are many options that will make your boat more convenient for racing, although they’re not necessary for recreational sailing. These are described beginning on page 14.
UNNECESSARY EQUIPMENT
Finally, you may see the following additional items on some older boats, but you shouldn’t need them for racing.
• A means of tightening the forestay when the jib halyard (rather than the forestay) tensions the mast. The forestay is needed only to conform to the class rules in this situation, and can be shock cord loaded to remove any slack.
• A means of adjusting shroud length under way. Gear that performs this function goes back to the days when some Tempests carried so much rake upwind that they were slow downwind unless the mast could be straightened. Standard turnbuckles will do, provided you’ve raked the mast correctly in the first place (see page 19).
• Roller reefing for the jib. A Tempest is very slow when sailed dead downwind, and the jib won’t interfere with the spinnaker on any higher point of sail.
• A means of adjusting the jib sheet leads while you are hiking out. Jib sheet turning block location has become a “set it and forget it” item.
Figure 9 TOPPING LIFT DOWNHAUL

12 PREPARATION
THE STANDARD TEMPEST
BACKGROUND
Before the 1972 Olympics, adjustable hardware was common because optimal jib lead location, forestay tension, and mast rake settings weren’t known. By the 1976 Olympics, top sailors had discovered these settings, so simpler boats had begun to dominate world competition.
Since then, these settings have been publicized (see Appendix E). Hence, although the class rules allow extreme freedom in hardware selection and location, two “standard” layouts have evolved, one in Europe and the other in North America (described here). These layouts:
• enable people of all sizes and strengths to compete on equal terms at the championship level;
• make competitive sailing possible for inexperi-enced skippers or crews;
• utilize readily available standard fittings to minimize original hardware expense;
• and virtually eliminate failures and the need for maintenance: “everything works all the time.”
MAIN SHEET SYSTEM
Components include: • a 35–40 ft. (finished length) 3/8-inch diameter
sheet; • a double block with a becket for the traveler, three
single blocks for the boom, and a fourth single block for the cleat assembly. (While some boats have a 5:1 main sheet, this 6:1 arrangement requires much less strength, yet can be trimmed as quickly as needed); and
• a cam cleat assembly mounted on a pedestal aft of the bridge so that stray lines won’t catch in the turning block there (see Figure 10).
The main sheet should cleat conveniently enough to encourage relentless adjustment. You may not need a ratchet block after you learn to use the cleat without looking at it. The Harken cleat assembly is one that allows you to choose a cleat angle you like. If you still want a ratchet, mount it as the aft block on the boom, where it can’t “eat” other lines when you trim it.
Mount the boom blocks far enough aft so that the net force of the mainsheet when trimmed is perpendicular to the boom. This prevents the boom from transmitting unwanted fore-aft pressure to the mast. Also, cluster the blocks within 12–15 inches on the boom. Otherwise, you’ll lose much of the system’s mechanical advantage when you need it most—to trim hard.
Mark the sheet about 70 inches from the becket (see Figure 10) with an indelible mark or a colored whipping from an unused line (better because it won’t fade) so you can reproduce trim from one beat to the next. A double mark
about 55 inches from the becket will provide extra “visibility at a glance.”
From the becket, feed the sheet (1) forward-to-aft through
the middle boom block, (2) aft-to-forward through the double block, (3) through the forward boom block, then (4) forward-to-aft through the double block, etc. Otherwise (i.e. if both parts of the sheet travel through the double block in the same direction), the sheet may jam in the double block when trimmed while slack.
Tie down the main sheet’s aft end so it won’t knot or tangle.
JIB SHEET SYSTEM
Components include: • cleats mounted on the bridge “table”; • cheek ratchet turning blocks mounted on the side
tanks athwartships of the cleats; and • free-standing turning blocks that fix the fore and
aft sheeting angle. Offset each cleat to its own “weather” side so you can
differentiate it at a glance (look closely at Figure 8, page Error! Bookmark not defined.0). Bolt them through a 1½-inch thick support to elevate them above the bridge-table surface. With this arrangement:
• both the helmsman and crew can easily cleat and uncleat the sheet, independently or together, upwind and down, in light air (when both are huddled down in the boat) and heavy air (when both are hiked out in alignment with the sheet); and
• the crew can leave the jib cleated until he or she has come in from the trapeze, confident that it will easily release, even in heavy air.
Figure 10 MAINSHEET SYSTEM

PREPARATION 13
Commodore-sized “Jumbo” clam cleats in combination with a 35 ft. long 9/16 inch diameter one-piece sheet, with a figure-eight knot through the jib at each end, have become the most popular arrangement because:
• the large cleats provide good “targets”; • the sheet will hold reliably unless the cleats are
worn (aluminum cleats last much longer than plastic, incidentally);
• the sheet will release reliably, even when “ripped” out of the cleat under strain; and you can differentiate the sheet at a glance because it’s larger than any other line on the boat, and it can be of a color different from any nearby line.
Mount the ratchet blocks inboard-outboard to avoid interference with the spinnaker sheets. Through-bolt them to backing plates (e.g., phenolic) for strength. (Many manufacturers build in these plates.) Note: The ratchets in some brands engage only under load, allowing a released sheet to shoot out through the block against the pawl quickly and without unnecessary wear.
The exact locations of the free-standing blocks depend upon mast rake, jib tack position, and the length of the jib leech. (Most jibs are cut up to four inches shorter on the leech than the class rules allow to accommodate proper mast rake.) As proper positioning of these blocks may vary from sail to sail, you may need to provide initial adjustability by through-bolting one-foot-long tracks to the cockpit tanks. Mount their aft ends athwartships of the chainplates and use backing plates. Later, under sail, you can slide the blocks along these tracks until you find the best position (see page 21 for additional discussion).
SPINNAKER SHEET SYSTEM
Components include: • a 12 ft. long ¼-inch diameter twing line with bullet
blocks at each end, running through cleats and eyestraps mounted on deck just forward of the chainplates;
• turning blocks through-bolted to backing plates near the gunwales, athwartships of the aft edge of the hatch opening;
• outward-facing cheek clam cleats mounted on the aft deck at the corners of the cockpit;
• cheek ratchet turning blocks through-bolted to backing plates inboard and aft of the chainplates;
• cam cleats at the inboard edges of the tanks, aligned fore-and-aft to match the ratchet blocks, mounted on thin inserts to allow easy, but never accidental, cleating from the trapeze; and
• a one-piece ¼-inch diameter sheet long enough to allow a comfortable amount of slack when played from the trapeze. The length of a one piece sheet should be [74 feet] – [2 x the fore-and-aft distance between the forward turning blocks and the chain-plate] + [4 x the distance of the aft deck block aft
of the after edge of the hatch cover]. 72 feet is about right, depending on its path around the boat. Boats with spinnaker launchers need approximately six feet more.
The ratchet block locations enable the crew always to face forward when playing the spinnaker, even in light air, and keep the sheet from fouling when the crew is out on the trapeze. Mounting the ratchet blocks forward also enables the crew to turn the ratchets on and off, and the sheet will transmit more “feel” than it could if it had to turn 180 degrees through aft-mounted ratchets.
The aft cleats are so located that the helmsman can use them without looking (after hoisting and gybing when using his/her legs to steer. Also, he/she never sits on the sheet because of the “hiking pad.”) Later, the crew can simply pop the sheet out of the “skipper’s” cleats by trimming it normally.
TRAVELER SYSTEM
A self-contained “automatic” traveler incorporating cleats on the traveler car is now commercially available, e.g., from Harken. The leeward cleat in this system automatically releases the traveler line when the windward cleat grabs it. Most people who try it wonder how they ever managed without it.
“Normal” traveler systems typically consist of: • a 20–25 ft. long 5/16 inch line; • clam cleats mounted on the aft face of the bridge
approximately one foot inboard of the edge of the side “tank.” A metal or wood “bracket” provides flexibility in installation;
• a car mounted on a track extending to the side deck on both sides (as the class rules require);
• “guards” (e.g., wood carved to fit) that keep the main sheet from catching on the end of the track, and optional shims that elevate the ends of the track; and
• turning bullet blocks at the end of the track. You want the traveler to work as conveniently as the main
sheet. You can use your back muscles, not your arm muscles, when you trim the traveler if you mount the cleats inboard as described above. Most boats use a 2:1 traveler. You can also use 3:1, which requires much less strength.
CONTROL LINES
Key principles are: • make all lines “endless” or tie them down so they
can’t knot, suck through bailers, etc.; and • avoid gaining mechanical advantage where blocks
can catch and interfere with one another (e.g., along the cockpit floor).
Controls that the helmsman may want to adjust when hiked out should lead to the sides of the aft face of the bridge, e.g.:
• mast straightener (gains 2:1 at the bottom of the mast lever);
14 PREPARATION
• cunningham (gains 4:1 along the aft face of the mast); and
• vang (gains 2:1 at the bottom of a 3:1 lever vang, or 6:1 via turning blocks).
Controls that the helmsman doesn’t normally adjust when hiked out may lead to the center of the bridge, e.g.:
• mast bender (connected directly to the bottom of the mast lever);
• topping lift (connected directly to the pole hook); outhaul (4:1 gained internal to the boom);
• jib halyard fine adjustment (3:1 for luff tension); and
• forestay (16:1 via a magic box for rig tension). Select ¼-inch color-coded line for all controls, e.g., the
center controls on the bridge are (left to right) mast bender (orange), topping lift (green), outhaul (blue), jib halyard fine adjustment for luff tension (red), and forestay for rig tension (white); the outside controls are mast straightener (orange) and cunningham (blue); and the lower cleats on the aft face of the bridge are for the vang (blue).
THE COMPLETE TEMPEST On a poorly equipped Tempest, racing isn’t really fun. You
don’t get used to awkward fittings; they merely become more irritating with time. On a well-equipped Tempest, however, nothing wears out the crew or functions poorly. You don’t worry about endurance. Some of the details that make such a boat are listed below.
FOR THE HELMSMAN
A means of adjusting vang tension from a hiked out position, arranged to enable instant release to prevent broaching on windy reaches.
Backstay — The mast should be able to survive without one, and if your sails are cut properly, you may not need one for sail trim. However, a backstay gives an invaluable “reference in the sky” for sail trim when racing, and many people use a backstay for this one reason.
A clothesline reel for retracting the spinnaker halyard when it’s hoisted. If you don’t have one, tie the end of the halyard to any fitting in the boat so that the only knots that can form are slip knots.
A masthead fly — Some top boats don’t have them because their owners never look up that high. Other boats don’t use them because they get tangled in the hoist during launching. But they’re useful when you’re trying to select the proper trim for the spinnaker guy, and some have stationary rays that you can use to judge gybing angles.
A forward-mounted compass — While the Germans use a bracket aft of the partners, other boats have a surface-mounted compass—no recessed hole (it’s illegal)—on the foredeck just forward of the mast on the centerline. These arrangements (1) enable both skipper and crew to sight along the center lubber line and (2) keep the compass in the
skipper’s field of view. If you find these locations too distant to see clearly, however, you can mount a single compass at the bridge or twin compasses on the side decks. Beware, however, of misleading readings due to the proximity of the keel!
A non-slip tiller extension — There are many ways to eliminate “white knuckle steering” on cold wet days. Spiral-wrapped rubber tape (e.g., tennis racket handle tape) is an effective and durable solution. Wrap it starting at the universal joint, stretching it as you work your way out to the end and taping it at short intervals with electrical tape.
A means of keeping the tiller from scraping the lazarette cover — When this is a problem, a small piece of neoprene wedged between the tiller and rudderhead assembly can be a simple solution.
Padded hiking straps — Inserting the webbing through foam pipe insulation will keep your ankles from chafing. The insulation can abrade, however, so you may have to sew a cloth cover over it.
A centerline foot stop screwed through the deck between the mainsheet cleat and the aft bulkhead (see Figure 8, page Error! Bookmark not defined.0) can keep you from sliding down into the bilge when the boat heels over too much.
Hiking pads — 3/4-inch foam dipped in vinyl (a technique used to make athletic padding) secured by velcro to the tanks with their outside edges along the path of the spinnaker sheets as shown in Figure 8, page 10 will give the helmsman a luxurious feeling and prevent him from sitting on the sheet.
A means of opening the leeward bailer from the windward side can save you from having to dive into the leeward bilge after a wave has come over the bow. Lead a small line leading aft from the bailer, then across the aft cockpit bulkhead to a cleat the skipper can reach. Run a shock cord forward from the bailer for automatic closing.
A weed stick, e.g., a light fishing pole that the crew can stab into the water to scrape off weeds from the keel or rudder; not often needed, but vital when it is.
FOR THE CREW
A trapeze harness that’s comfortable all day, in any weather. Every brand of harness doesn’t fit every person. A good one will support your back, both down low and in the shoulders when you lean back into it, without binding in the crotch. If you have one that does bind, try loosening it. And in any case, don’t be content with an uncomfortable one.
Easy-to-hold trapeze handles — Good ones virtually grab you! Their diameter is easy to grip and they provide maximum friction. Poor handles such as smooth, small diameter tubes will cause you, as crew, to mistrust your grip: you won’t want to go out without hooking up or to unhook before coming in. Use twine, friction paint (such as Liquid Carpet) or grooves (made in plastic handles with a soldering iron), and wear gloves to maximize friction.
Trapeze rings at the proper height (see dimensions in Appendix E). As crew, you can balance best when you hang low over the side, out of the wind, nearly hitting the waves, as

PREPARATION 15
if in a hammock. A too-high trapeze ring will tempt you to move forward or try to support too much weight with your legs, which will be tiring.
Twing lines (see Figure 11), which most people find easier to use than reaching hooks. You’ll need one or the other to lead the guy low around the shroud so the crew can use the trapeze without interference and so the pole won’t “sky” on windy reaches. If you have reaching hooks, don’t change unless you decide you like twing lines better. But if you’re starting from scratch, these are as easy to install as reaching hooks. If you mount the twings forward of the shrouds, the crew can brace a wrist against, the shroud when holding the guy in trim (see also pages 25 and 30).
Spinnaker pole stowage on the boom (e.g., large hoops aft that make an easy “target,” and forward rings into which the crew can clip the end fitting), so you don’t have to shove the pole under the bridge before taking down the spinnaker.
Features that simplify spinnaker pole handling. There are a vide variety of devices in use, such as:
• a downward-opening topping lift hook that “pops” back into the pole’s eyestrap when pulled over the top of the pole;
• easy-opening end fittings with jaws that the crew can unhook from the mast ring by pulling down;
• diamond stays that lead through the spinnaker pole ring on the mast (rather than straight down from the spreader tip to their termination point on the mast) so the pole won’t spring inside the diamonds when the crew removes it from the mast under load;
• halyard cleats that grip automatically when the spinnaker is fully hoisted (by either the skipper or crew); and
• spinnaker sheet cleats that enable the skipper and crew to exchange control without distracting one another.
PREPARING THE RIG A new boat will be ready to race as delivered. When you
need to rerig yours, however, here are some points to consider.
THE MAST
Construction — The class rules control the mast’s total weight, tip weight, taper, flexibility, and placement in the boat, but not its construction. Virtually all masts, however, are a stock aluminum section from Ian Proctor Metal Masts, Ltd., and, while there are some superficial variations, all post-1970 masts are functionally identical.
The class rules are very permissive regarding rigging. They state only that standing rigging must be “of circular section” and that a standing forestay shall be rigged “... on the centerline of the hull ahead of the luff of the jib and capable of supporting the mast with the sails lowered.”
Forestay arrangements — Two forestay arrangements are popular. Before 1972, when many boats had roller reefing gear, a heavy wire inside the jib luff tensioned the rig under way, and a low windage (1/16 inch wire) forestay was led aft to a cleat or terminated in the bow compartment where a shock cord took up the slack.
This light forestay arrangement had two disadvantages, however. First, the jib halyard exerted a mechanical advantage of nearly 2:1 on the mast, causing unnecessary and disadvantageous compression bending that could be restrained only at the level of the partners. Second, when the jib was being hoisted in any breeze at all, it would sag back into the mast, which itself would be lurching around if the forestay wasn’t tight. There had to be a better way.
Olympic gold medalist Valentin Mankin of the Soviet Union found it. Ignoring the notion that windage must be minimized, he got rid of his heavy halyard and luff wire, hanked his jib onto a heavy wire forestay, and tensioned his rig with a control that pulled this forestay down. He used his light jib halyard to adjust luff tension.
Today, this heavy forestay arrangement has become universal on new boats, and sailors with older boats often convert to it when they replace their standing rigging, so it’s the one discussed in this guide.
Before you begin, depending on what you plan to accomplish, you’ll need a nicopress tool and sleeves, a coathook, a tape measure, a screwdriver, appropriate wrenches, a plumber’s “snake,” and a fid if you intend to splice the halyard tails in place.
You’ll also need a work space large enough to allow you to rotate the mast, which should be supported only near its ends. Supporting it near its ends on sawhorses will prevent the diamond spreaders and backstay crane from interfering when you try to roll the mast over.
Installing the standing rigging — Several feet down from the top of the mast is the place where the jib and spinnaker halyards enter the mast through sheaves, usually called the “hounds.” Older masts used external “tangs” to attach stays here. All masts made since about 1971, however, contain a heavy stainless steel pin that runs all the way through the mast from one side to the other (see Figure 12). This arrangement very effectively achieves its purpose of minimizing windage.
Figure 11 TWING LINES
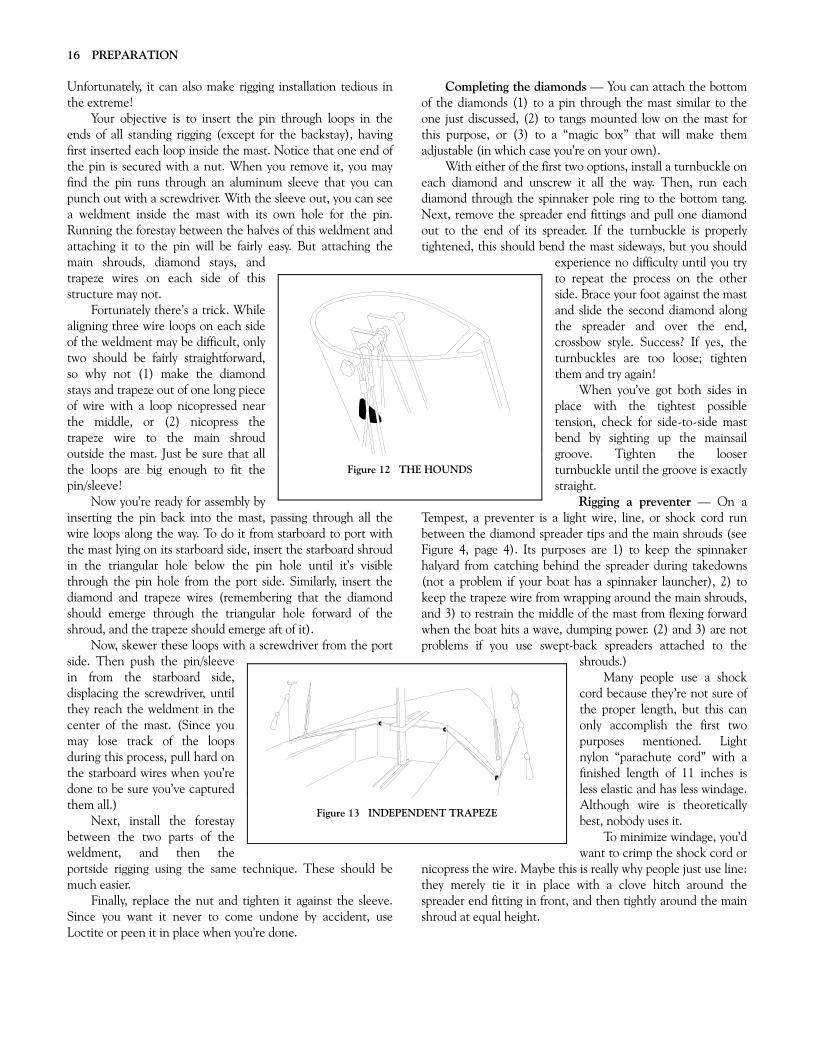
16 PREPARATION
Unfortunately, it can also make rigging installation tedious in the extreme!
Your objective is to insert the pin through loops in the ends of all standing rigging (except for the backstay), having first inserted each loop inside the mast. Notice that one end of the pin is secured with a nut. When you remove it, you may find the pin runs through an aluminum sleeve that you can punch out with a screwdriver. With the sleeve out, you can see a weldment inside the mast with its own hole for the pin. Running the forestay between the halves of this weldment and attaching it to the pin will be fairly easy. But attaching the main shrouds, diamond stays, and trapeze wires on each side of this structure may not.
Fortunately there’s a trick. While aligning three wire loops on each side of the weldment may be difficult, only two should be fairly straightforward, so why not (1) make the diamond stays and trapeze out of one long piece of wire with a loop nicopressed near the middle, or (2) nicopress the trapeze wire to the main shroud outside the mast. Just be sure that all the loops are big enough to fit the pin/sleeve!
Now you’re ready for assembly by inserting the pin back into the mast, passing through all the wire loops along the way. To do it from starboard to port with the mast lying on its starboard side, insert the starboard shroud in the triangular hole below the pin hole until it’s visible through the pin hole from the port side. Similarly, insert the diamond and trapeze wires (remembering that the diamond should emerge through the triangular hole forward of the shroud, and the trapeze should emerge aft of it).
Now, skewer these loops with a screwdriver from the port side. Then push the pin/sleeve in from the starboard side, displacing the screwdriver, until they reach the weldment in the center of the mast. (Since you may lose track of the loops during this process, pull hard on the starboard wires when you’re done to be sure you’ve captured them all.)
Next, install the forestay between the two parts of the weldment, and then the portside rigging using the same technique. These should be much easier.
Finally, replace the nut and tighten it against the sleeve. Since you want it never to come undone by accident, use Loctite or peen it in place when you’re done.
Completing the diamonds — You can attach the bottom of the diamonds (1) to a pin through the mast similar to the one just discussed, (2) to tangs mounted low on the mast for this purpose, or (3) to a “magic box” that will make them adjustable (in which case you’re on your own).
With either of the first two options, install a turnbuckle on each diamond and unscrew it all the way. Then, run each diamond through the spinnaker pole ring to the bottom tang. Next, remove the spreader end fittings and pull one diamond out to the end of its spreader. If the turnbuckle is properly tightened, this should bend the mast sideways, but you should
experience no difficulty until you try to repeat the process on the other side. Brace your foot against the mast and slide the second diamond along the spreader and over the end, crossbow style. Success? If yes, the turnbuckles are too loose; tighten them and try again!
When you’ve got both sides in place with the tightest possible tension, check for side-to-side mast bend by sighting up the mainsail groove. Tighten the looser turnbuckle until the groove is exactly straight.
Rigging a preventer — On a Tempest, a preventer is a light wire, line, or shock cord run between the diamond spreader tips and the main shrouds (see Figure 4, page 4). Its purposes are 1) to keep the spinnaker halyard from catching behind the spreader during takedowns (not a problem if your boat has a spinnaker launcher), 2) to keep the trapeze wire from wrapping around the main shrouds, and 3) to restrain the middle of the mast from flexing forward when the boat hits a wave, dumping power. (2) and 3) are not problems if you use swept-back spreaders attached to the
shrouds.) Many people use a shock
cord because they’re not sure of the proper length, but this can only accomplish the first two purposes mentioned. Light nylon “parachute cord” with a finished length of 11 inches is less elastic and has less windage. Although wire is theoretically best, nobody uses it.
To minimize windage, you’d want to crimp the shock cord or
nicopress the wire. Maybe this is really why people just use line: they merely tie it in place with a clove hitch around the spreader end fitting in front, and then tightly around the main shroud at equal height.
Figure 12 THE HOUNDS
Figure 13 INDEPENDENT TRAPEZE
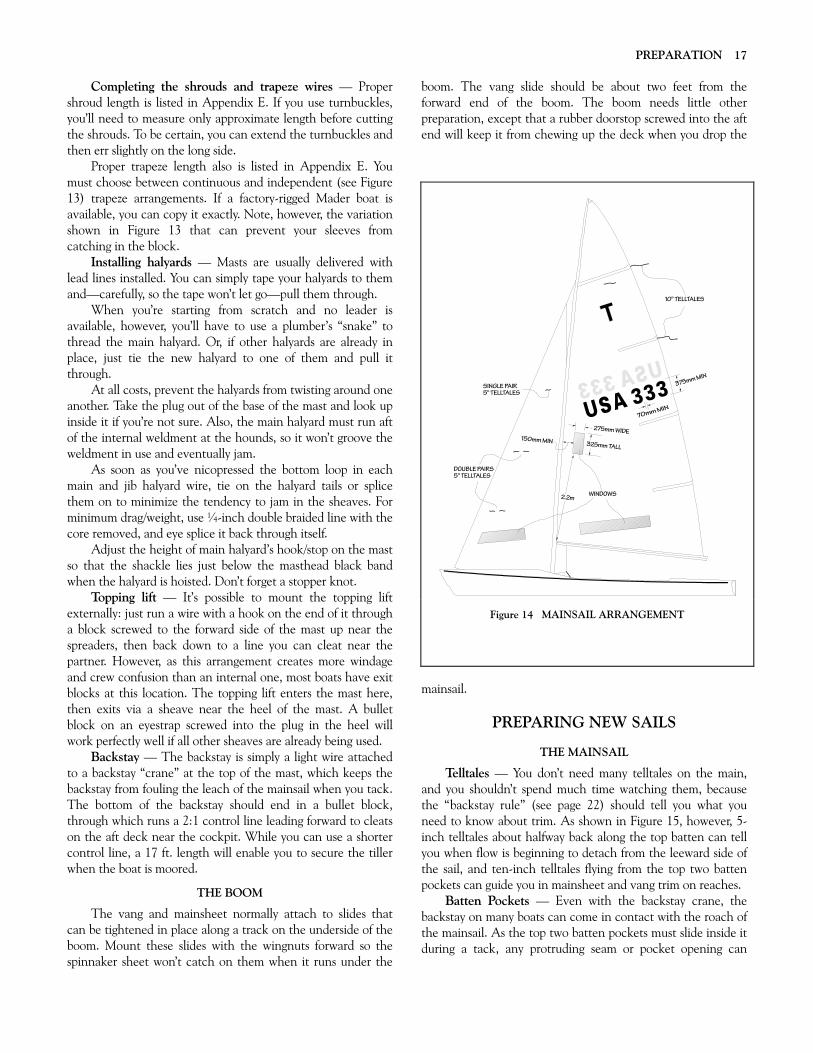
PREPARATION 17
Completing the shrouds and trapeze wires — Proper shroud length is listed in Appendix E. If you use turnbuckles, you’ll need to measure only approximate length before cutting the shrouds. To be certain, you can extend the turnbuckles and then err slightly on the long side.
Proper trapeze length also is listed in Appendix E. You must choose between continuous and independent (see Figure 13) trapeze arrangements. If a factory-rigged Mader boat is available, you can copy it exactly. Note, however, the variation shown in Figure 13 that can prevent your sleeves from catching in the block.
Installing halyards — Masts are usually delivered with lead lines installed. You can simply tape your halyards to them and—carefully, so the tape won’t let go—pull them through.
When you’re starting from scratch and no leader is available, however, you’ll have to use a plumber’s “snake” to thread the main halyard. Or, if other halyards are already in place, just tie the new halyard to one of them and pull it through.
At all costs, prevent the halyards from twisting around one another. Take the plug out of the base of the mast and look up inside it if you’re not sure. Also, the main halyard must run aft of the internal weldment at the hounds, so it won’t groove the weldment in use and eventually jam.
As soon as you’ve nicopressed the bottom loop in each main and jib halyard wire, tie on the halyard tails or splice them on to minimize the tendency to jam in the sheaves. For minimum drag/weight, use ¼-inch double braided line with the core removed, and eye splice it back through itself.
Adjust the height of main halyard’s hook/stop on the mast so that the shackle lies just below the masthead black band when the halyard is hoisted. Don’t forget a stopper knot.
Topping lift — It’s possible to mount the topping lift externally: just run a wire with a hook on the end of it through a block screwed to the forward side of the mast up near the spreaders, then back down to a line you can cleat near the partner. However, as this arrangement creates more windage and crew confusion than an internal one, most boats have exit blocks at this location. The topping lift enters the mast here, then exits via a sheave near the heel of the mast. A bullet block on an eyestrap screwed into the plug in the heel will work perfectly well if all other sheaves are already being used.
Backstay — The backstay is simply a light wire attached to a backstay “crane” at the top of the mast, which keeps the backstay from fouling the leach of the mainsail when you tack. The bottom of the backstay should end in a bullet block, through which runs a 2:1 control line leading forward to cleats on the aft deck near the cockpit. While you can use a shorter control line, a 17 ft. length will enable you to secure the tiller when the boat is moored.
THE BOOM
The vang and mainsheet normally attach to slides that can be tightened in place along a track on the underside of the boom. Mount these slides with the wingnuts forward so the spinnaker sheet won’t catch on them when it runs under the
boom. The vang slide should be about two feet from the forward end of the boom. The boom needs little other preparation, except that a rubber doorstop screwed into the aft end will keep it from chewing up the deck when you drop the
mainsail.
PREPARING NEW SAILS
THE MAINSAIL
Telltales — You don’t need many telltales on the main, and you shouldn’t spend much time watching them, because the “backstay rule” (see page 22) should tell you what you need to know about trim. As shown in Figure 15, however, 5-inch telltales about halfway back along the top batten can tell you when flow is beginning to detach from the leeward side of the sail, and ten-inch telltales flying from the top two batten pockets can guide you in mainsheet and vang trim on reaches.
Batten Pockets — Even with the backstay crane, the backstay on many boats can come in contact with the roach of the mainsail. As the top two batten pockets must slide inside it during a tack, any protruding seam or pocket opening can
Figure 14 MAINSAIL ARRANGEMENT

18 PREPARATION
cause a hangup, so you don’t want a “butt-joint” batten opening on the top two pockets. Instead, you want an overlapping opening, as shown in Figure 15.
Windows — The large mainsail and jib windows should be roughly at horizon level when the boat is sailing upwind in heavy air.
The size and position of the small window on the mainsail, however, are more critical. In heavy air, the crew must be able to see the spreader through the upper forward corner of this window while out on the trapeze. In light air, the skipper must be able to see it through the lower aft corner.
A good window will be just over 6 inches from the luff of the mainsail (less than 150mm is illegal) with its lower front corner 7 feet 2 inches from the center of the tack cringle. In size, 13 inches high by 11 inches wide is about right.
Sail numbers and letters — The class rules call for 38cm (i.e. 15-inch) numbers with a projected space between them at least three inches wide, which class measurers interpret to mean a clear strip from the top of the numbers to the bottom. Three inches is safe. The mainsail letters and numbers are usually placed midway between the middle two battens, and the class insignia is centered over them halfway to the head of the sail.
THE JIB
The jib leech on a Tempest is difficult to make so that it won’t flutter. Many sailors prefer a “hot-knifed” leech rather than a leech tape. If excessive flutter proves to be a problem, the sailmaker should be willing to install a leech line.
Telltales should be about 5 inches. Attach them where they won’t snag on any nearby seams. Mount a set in the window panel, another set two panels up, and a third set two panels farther up.
Double pairs in the two lower positions will be visible to the skipper under most conditions, and provide for more certain reading.
The spreader-to-leech distance is the key to jib trim. This is visible only through the mainsail window under most conditions, however, and can be extremely difficult to read, especially in flat light. You can solve this depth-perception problem by making five dissimilar black marks on the jib leech at two-inch intervals, with the bottom one where the jib touches the spreader (see page 22).
Common practice is to use a one-piece jib sheet with a figure-eight knot through the sail at each end. Hence, the jib clew cringle should be large enough for both ends of a 7/16 inch one-piece sheet to pass through, but small enough to hold the knots.
Most sailmakers cut the jib leech shorter than the class rules permit so the jib can be trimmed with the usual mast rake. But in the process, some are not careful to avoid making the jib foot round too deep! It must not extend more than 140mm below the line L1–C1 specified in the class rules. There are other tolerances to meet, too.
Unless one sailmaker made all your jibs, their luffs probably won’t be equally long. When there’s a significant difference between the longest and shortest, your jib halyard may not be adjustable enough to fit them all. Fix this by shortening the halyard a few inches and then attaching a permanent wire pennant to the head of all your jibs. The pennant length plus jib luff should, of course, be the same for each.
Figure 15 BATTEN POCKET OPENINGS
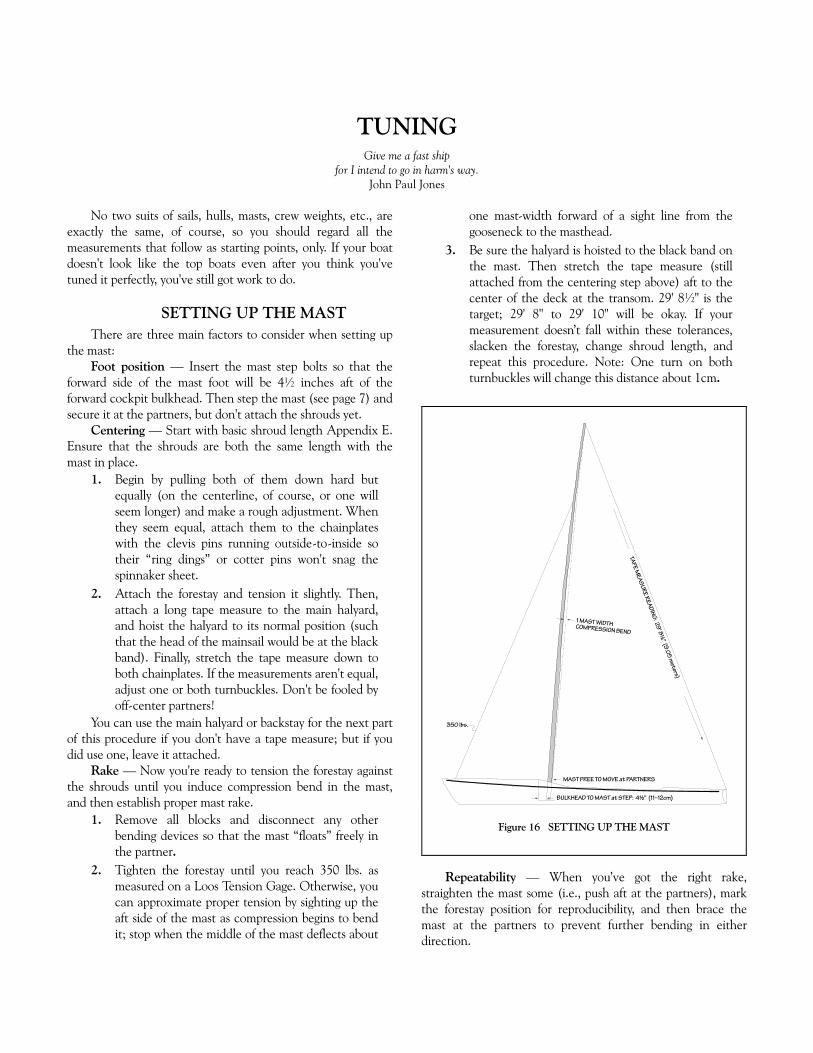
TUNING Give me a fast ship
for I intend to go in harm's way. John Paul Jones
No two suits of sails, hulls, masts, crew weights, etc., are exactly the same, of course, so you should regard all the measurements that follow as starting points, only. If your boat doesn't look like the top boats even after you think you've tuned it perfectly, you've still got work to do.
SETTING UP THE MAST There are three main factors to consider when setting up
the mast: Foot position — Insert the mast step bolts so that the
forward side of the mast foot will be 4½ inches aft of the forward cockpit bulkhead. Then step the mast (see page 7) and secure it at the partners, but don't attach the shrouds yet.
Centering — Start with basic shroud length Appendix E. Ensure that the shrouds are both the same length with the mast in place.
1. Begin by pulling both of them down hard but equally (on the centerline, of course, or one will seem longer) and make a rough adjustment. When they seem equal, attach them to the chainplates with the clevis pins running outside-to-inside so their “ring dings” or cotter pins won't snag the spinnaker sheet.
2. Attach the forestay and tension it slightly. Then, attach a long tape measure to the main halyard, and hoist the halyard to its normal position (such that the head of the mainsail would be at the black band). Finally, stretch the tape measure down to both chainplates. If the measurements aren't equal, adjust one or both turnbuckles. Don't be fooled by off-center partners!
You can use the main halyard or backstay for the next part of this procedure if you don't have a tape measure; but if you did use one, leave it attached.
Rake — Now you're ready to tension the forestay against the shrouds until you induce compression bend in the mast, and then establish proper mast rake.
1. Remove all blocks and disconnect any other bending devices so that the mast “floats” freely in the partner.
2. Tighten the forestay until you reach 350 lbs. as measured on a Loos Tension Gage. Otherwise, you can approximate proper tension by sighting up the aft side of the mast as compression begins to bend it; stop when the middle of the mast deflects about
one mast-width forward of a sight line from the gooseneck to the masthead.
3. Be sure the halyard is hoisted to the black band on the mast. Then stretch the tape measure (still attached from the centering step above) aft to the center of the deck at the transom. 29' 8½" is the target; 29' 8" to 29' 10" will be okay. If your measurement doesn’t fall within these tolerances, slacken the forestay, change shroud length, and repeat this procedure. Note: One turn on both turnbuckles will change this distance about 1cm.
Repeatability — When you’ve got the right rake, straighten the mast some (i.e., push aft at the partners), mark the forestay position for reproducibility, and then brace the mast at the partners to prevent further bending in either direction.
Figure 16 SETTING UP THE MAST

TUNING
20
Good boatspeed requires preventing the mast from bending too far forward in the middle, while safety requires that it be prevented from bending aft—commonly called “inverting”: it will fail if it bends too much in this manner and the mainsail groove opens up.
If you have a mast lever or other means of controlling mast bend at the partners, secure it so that the mast can’t bend in either direction.
If you have only mast blocks, you’ll want enough of them to wedge the mast in place from both directions. If you don’t have enough blocks for this purpose, wedge blocks forward of the mast, and be very careful to tension the backstay when the wind gets up to 20 knots.
BENDING ON THE SAILS The mainsail is easiest to rig with two people. One
threads the foot boltrope into the forward slot opening on the boom while the other pulls the clew aft. If the main was rolled up, leave it that way while you do this.
Next, insert the battens. The three short ones (one meter) go in the bottom three slots. If these battens are not equally stiff, insert the most flexible one at the top and the stiffest one at the bottom. Any tapered battens should be inserted flexible end first.
The longer top batten may or may not be tapered. If it is, the flexible end also goes in first. Depending on how the sail is cut, however, you may be fine if it isn’t because you don’t want to drive the maximum chord depth forward in light air, and in heavy air (e.g., 20 knots or more) you can tape a spare short batten to the aft end of the long one for greater stiffness near the leech of the sail.
You don’t use the full-length top batten to adjust chord depth, so you don’t need one that ties in place. If yours does, you may have to tape the knot to prevent it from shaking loose. If poor batten pocket design could cause the backstay to hang up (see page 18, you can “shingle” layers of duct tape over the pocket so the backstay will slide off, but the sail must be dry for the tape to stick.
Finally, attach the clew, tack, and cunningham, insert the head in the mast groove, and hoist away.
The jib requires only one person. Most jibs come bagged in a roll, so secure the tack and tie the sheets into the clew (to keep the sail from rolling overboard), and then hank the jib onto the forestay as you unroll it. Attach the halyard to the pennant or head cringle and hoist away.
The spinnaker is a bit tricky to insert into the spinnaker launcher on a boat so equipped.
1. The halyard’s loose end serves as the downhaul for the sail, so thread it through your cleats and blocks and insert it into the launcher tube from aft to forward. Tie it to the cringle in the center of the spinnaker with a figure-eight knot or bowline so it will be on the forward side of the sail when hoisted.
2. Tie the sheets in place with a stuns’l tack bend (two half hitches tied in reverse direction).
3. Tie on the halyard with a bowline. Allowing perhaps six inches between the knot and the sail will accomplish two things: (1) the line will be free to rotate, allowing the sail to untwist during hoisting, and (2) the top of the sail seems happier when it can float free of the mast a bit.
4. Lightly tension the halyard and sheets, retract the downhaul, and pull the sail into the tube.
It’s easier to rig on a boat without a spinnaker launcher. Tie on the halyard and sheets as described above. Then, just stuff the sail into the bag or bucket, “windward” clew first. Do not gather the two clews together before stuffing because the sail will be more likely to twist when you hoist it. Loop the halyard under the twing or appropriate cleat and tension it to remove any slack. Cleat the sheets to remove slack, too, but without pulling the sail out of the bucket.
On your first sail, verify that the spinnaker is fully hoisted and mark the halyard where it runs through the cleat.
ADJUSTMENTS UNDER WAY UPWIND
Mainsail — Aside from the forestay, shrouds, and diamonds, there are seven adjustments that can affect mainsail shape. Two of these, of course, are the mainsheet and traveler, which are discussed beginning on page 12. The other five are discussed below.
• The mast bender setting suggested above is, like all other adjustments described here, a point of departure. As different mainsails behave differently and mast bend is so sensitive, you’ll need to experiment to find optimal settings for each wind and wave condition. You need to be able to repro-duce what you’ve done, of course, but you can’t be content even with this. Come back and play with mast bend after you think you have sail trim down pat: an iterative approach can really pay off. A lever is perhaps the easiest type of bend controller to work with for this purpose because (1) you can feel the boat respond to even small adjustments and (2) its parallelism with respect to the mast is a good rough cut bend indicator. You can also use the fore-aft position of the jib leech to calibrate mast bend: from the helmsman’s position in hiking conditions, you’ll get used a normal align-ment of the jib leech with the spreader tip. If this changes someday, something’s wrong. Is the forestay too loose? Is the backstay too tight? If not, the mast bender is the culprit.
• The boom vang shouldn’t affect mainsail shape upwind at all. The risk is that it will come into play without your realizing it when the wind lightens. If the bottom of the vang is fixed aft of the mast heel,
TUNING
21
the vang will tend to tighten when you let the mainsheet out, and thus become an automatic adjustment. For starters, though, release it all the way when you’re sailing upwind.
• The outhaul affects camber depth near the foot of the sail. Most people set it and forget it by pulling until wrinkles parallel to the boom appear, and then releasing it just a bit. You’ll need to adjust it later only if the windspeed changes significantly.
• The cunningham controls cloth tension along the luff, and thus the location of maximum chord depth in the lower portion of the sail. You want to make the seams look like arcs of circles. While the right amount of cunningham tension will vary from sail to sail, you want to pull the wrinkles out of the luff but nothing more. If wrinkles run from the middle of the luff to the clew, straighten the mast with the bender—the cunningham isn’t the problem.
• The backstay, like the vang, doesn’t come into use upwind, but it’s a valuable “guide in the sky” for mainsail trim, and it will tend to keep the mast from “bucking” as you drive into waves. Keep it just tight enough to take out any slack without affecting trim.
Jib — Three key adjustments affect the jib. • Forestay tension, which must remain tight enough
even under the shock load produced by waves to keep the jib luff very near the centerline of the boat. The “point of departure” setting is described on page 18.
• Halyard tension, like the main cunningham, controls cloth tension along the jib luff, and it should be applied in the same way. Avoid too much tension.
• Lead position for the clew is critical to jib perfor-mance. While the track described on page 13 fixes the in-out position of the jib leads, the best fore-aft position may vary from sail to sail, depending on how the sailmaker has cut the clew.
You want the sail to luff evenly from top to bottom in light air, with the upper windward telltales showing detached airflow perhaps just before the lower ones. So set the sheet according to the “spreader rule” (see page 23) and watch the sail closely as you pinch the boat into the wind. Move the jib lead forward if the top telltales lift too soon; aft if the bottom of the sail luffs first. The sheet will “point” toward the middle of the luff when you’ve got it right, and you probably won’t need to move the lead again as long as you use the same jib, whatever the wind strength may be.
DOWNWIND
The backstay should be released so that the mast can straighten: a raked mast is slow off the wind because it reduces the mainsail’s projected area. Then you should recleat it to take out any slack, especially in heavy air, so that the mast won’t even think of bending the wrong way.
The cunningham should be off, exerting little or no tension.
The vang should be “on”—how much is hard to describe, so you’ll have to experiment. Many people tension it too much on reaches and too little on runs. One way to check is to compare the shape of the shadow on your mainsail with those on other boats.
The topping lift should be set so that the spinnaker pole angles up until it is approximately perpendicular to the forestay, except in light air when the sail won’t fly unless you lower it. When it retracts, the hook should rest against the mast ring.
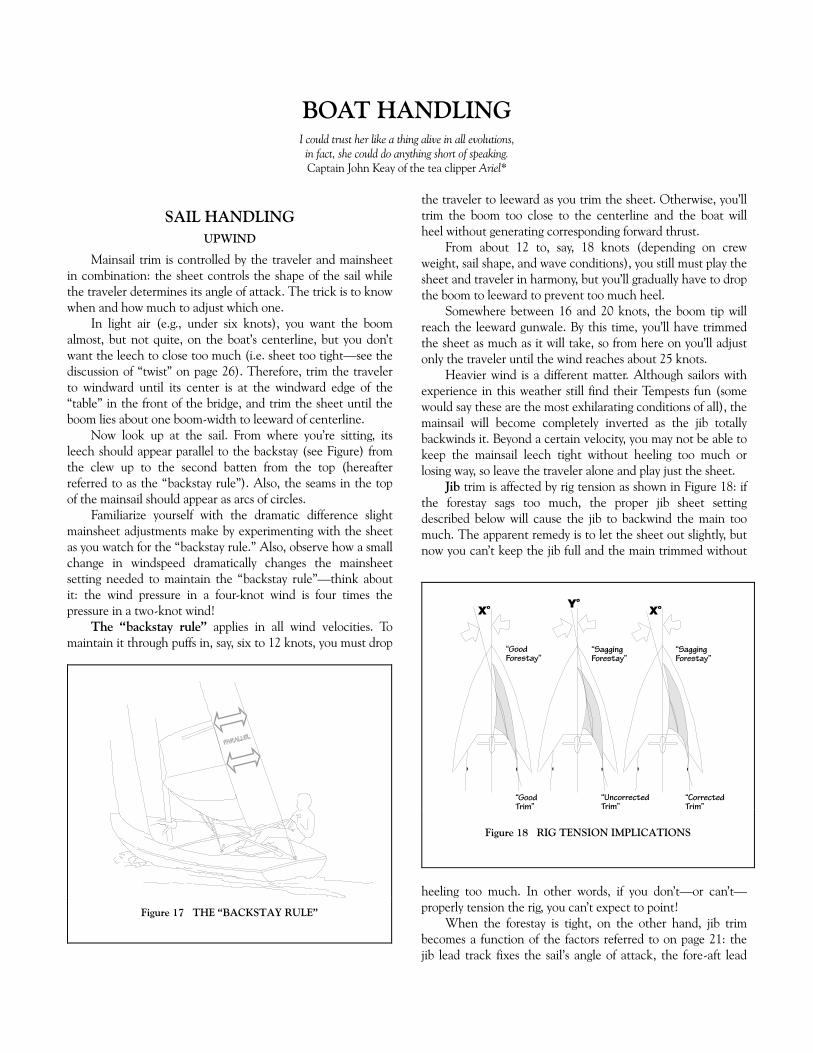
BOAT HANDLING I could trust her like a thing alive in all evolutions, in fact, she could do anything short of speaking. Captain John Keay of the tea clipper Ariel*
SAIL HANDLING UPWIND
Mainsail trim is controlled by the traveler and mainsheet in combination: the sheet controls the shape of the sail while the traveler determines its angle of attack. The trick is to know when and how much to adjust which one.
In light air (e.g., under six knots), you want the boom almost, but not quite, on the boat’s centerline, but you don’t want the leech to close too much (i.e. sheet too tight—see the discussion of “twist” on page 26). Therefore, trim the traveler to windward until its center is at the windward edge of the “table” in the front of the bridge, and trim the sheet until the boom lies about one boom-width to leeward of centerline.
Now look up at the sail. From where you’re sitting, its leech should appear parallel to the backstay (see Figure) from the clew up to the second batten from the top (hereafter referred to as the “backstay rule”). Also, the seams in the top of the mainsail should appear as arcs of circles.
Familiarize yourself with the dramatic difference slight mainsheet adjustments make by experimenting with the sheet as you watch for the “backstay rule.” Also, observe how a small change in windspeed dramatically changes the mainsheet setting needed to maintain the “backstay rule”—think about it: the wind pressure in a four-knot wind is four times the pressure in a two-knot wind!
The “backstay rule” applies in all wind velocities. To maintain it through puffs in, say, six to 12 knots, you must drop
the traveler to leeward as you trim the sheet. Otherwise, you’ll trim the boom too close to the centerline and the boat will heel without generating corresponding forward thrust.
From about 12 to, say, 18 knots (depending on crew weight, sail shape, and wave conditions), you still must play the sheet and traveler in harmony, but you’ll gradually have to drop the boom to leeward to prevent too much heel.
Somewhere between 16 and 20 knots, the boom tip will reach the leeward gunwale. By this time, you’ll have trimmed the sheet as much as it will take, so from here on you’ll adjust only the traveler until the wind reaches about 25 knots.
Heavier wind is a different matter. Although sailors with experience in this weather still find their Tempests fun (some would say these are the most exhilarating conditions of all), the mainsail will become completely inverted as the jib totally backwinds it. Beyond a certain velocity, you may not be able to keep the mainsail leech tight without heeling too much or losing way, so leave the traveler alone and play just the sheet.
Jib trim is affected by rig tension as shown in Figure 18: if the forestay sags too much, the proper jib sheet setting described below will cause the jib to backwind the main too much. The apparent remedy is to let the sheet out slightly, but now you can’t keep the jib full and the main trimmed without
heeling too much. In other words, if you don’t—or can’t—properly tension the rig, you can’t expect to point!
When the forestay is tight, on the other hand, jib trim becomes a function of the factors referred to on page 21: the jib lead track fixes the sail’s angle of attack, the fore-aft lead
Figure 17 THE “BACKSTAY RULE”
Figure 18 RIG TENSION IMPLICATIONS

BOAT HANDLING 23
position controls camber, and the sheet, like the mainsheet, controls the leech. But you need to know where the leech is!
Fortunately, you can observe the distance between the leech and the spreader tip through the mainsail window. Two inches is about right and, when both sails work in harmony, the jib may just barely backwind the mainsail down low. Let’s call this setting the “spreader rule”—like the “backstay rule” for the mainsail, it applies in all wind velocities.
Now, as you did with the main, familiarize yourself with the dramatic difference that jib sheet tension makes by adjusting it as you watch the “spreader rule.” From where you’re sitting, see how the marks on the leech (from page 18 appear to rise and fall against the spreader whenever you change sheet tension: perhaps ¼ inch on the sheet will move the leech two whole inches!
Also, see how dramatically a small change in windspeed affects the “spreader rule!” These tiny variations are critical, so you’ll have to adjust the sheet often to keep a setting you like. Many times, the helmsman will be first to sense that the jib isn’t right, and adjust it himself.
DOWNWIND
Spinnaker trim is key, of course. Proper trim is possible only when you remember that, unlike those on most other boats, a Tempest’s spinnaker pole normally angles up (see page 11 and Figure 20).
Spinnaker handling involves two principles. First, from the cockpit, the bottom four panels of the sail’s luff should appear parallel to the forestay (hereafter the “forestay rule”). Second, while a range of sheet and guy combinations can yield the “forestay rule,” you always want to expose as much of the sail as possible to the wind (maximum projected area).
When both of these principles are at work, the foot will be only two to three feet off the forestay and the luff will tend
to “curl” at the sail’s “shoulder.” While you must constantly adjust the sheet to keep the “curl,” its presence shows you’re flying the sail on the edge of collapse, which means best efficiency.
Flying the spinnaker is tough enough, even when you’re
not doing it from the trapeze, so basic sailhandling principles are very important.
• Keep the windward twing trimmed home at all times. Keep the guy cleated at all times. In light air, the crew can trim it directly from the twing. In moderate air, the crew can play it from the windward rail by reaching around the outside of the shroud and “sweating” it between the pole and the twing. From the trapeze, the crew won’t be able to play it, but shouldn’t need to.
Figure 20 THE “FORESTAY RULE ”
Figure 19 THE “SPREADER RULE”
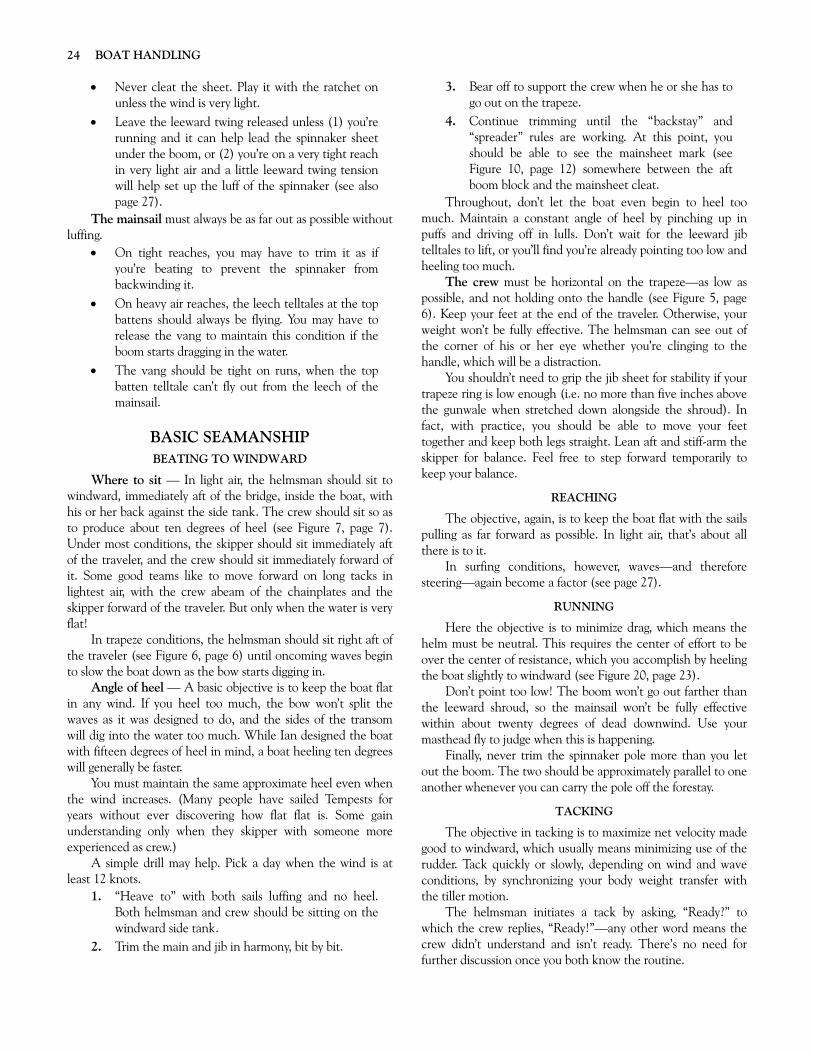
24 BOAT HANDLING
• Never cleat the sheet. Play it with the ratchet on unless the wind is very light.
• Leave the leeward twing released unless (1) you’re running and it can help lead the spinnaker sheet under the boom, or (2) you’re on a very tight reach in very light air and a little leeward twing tension will help set up the luff of the spinnaker (see also page 27).
The mainsail must always be as far out as possible without luffing.
• On tight reaches, you may have to trim it as if you’re beating to prevent the spinnaker from backwinding it.
• On heavy air reaches, the leech telltales at the top battens should always be flying. You may have to release the vang to maintain this condition if the boom starts dragging in the water.
• The vang should be tight on runs, when the top batten telltale can’t fly out from the leech of the mainsail.
BASIC SEAMANSHIP BEATING TO WINDWARD
Where to sit — In light air, the helmsman should sit to windward, immediately aft of the bridge, inside the boat, with his or her back against the side tank. The crew should sit so as to produce about ten degrees of heel (see Figure 7, page 7). Under most conditions, the skipper should sit immediately aft of the traveler, and the crew should sit immediately forward of it. Some good teams like to move forward on long tacks in lightest air, with the crew abeam of the chainplates and the skipper forward of the traveler. But only when the water is very flat!
In trapeze conditions, the helmsman should sit right aft of the traveler (see Figure 6, page 6) until oncoming waves begin to slow the boat down as the bow starts digging in.
Angle of heel — A basic objective is to keep the boat flat in any wind. If you heel too much, the bow won’t split the waves as it was designed to do, and the sides of the transom will dig into the water too much. While Ian designed the boat with fifteen degrees of heel in mind, a boat heeling ten degrees will generally be faster.
You must maintain the same approximate heel even when the wind increases. (Many people have sailed Tempests for years without ever discovering how flat flat is. Some gain understanding only when they skipper with someone more experienced as crew.)
A simple drill may help. Pick a day when the wind is at least 12 knots.
1. “Heave to” with both sails luffing and no heel. Both helmsman and crew should be sitting on the windward side tank.
2. Trim the main and jib in harmony, bit by bit.
3. Bear off to support the crew when he or she has to go out on the trapeze.
4. Continue trimming until the “backstay” and “spreader” rules are working. At this point, you should be able to see the mainsheet mark (see Figure 10, page 12) somewhere between the aft boom block and the mainsheet cleat.
Throughout, don’t let the boat even begin to heel too much. Maintain a constant angle of heel by pinching up in puffs and driving off in lulls. Don’t wait for the leeward jib telltales to lift, or you’ll find you’re already pointing too low and heeling too much.
The crew must be horizontal on the trapeze—as low as possible, and not holding onto the handle (see Figure 5, page 6). Keep your feet at the end of the traveler. Otherwise, your weight won’t be fully effective. The helmsman can see out of the corner of his or her eye whether you’re clinging to the handle, which will be a distraction.
You shouldn’t need to grip the jib sheet for stability if your trapeze ring is low enough (i.e. no more than five inches above the gunwale when stretched down alongside the shroud). In fact, with practice, you should be able to move your feet together and keep both legs straight. Lean aft and stiff-arm the skipper for balance. Feel free to step forward temporarily to keep your balance.
REACHING
The objective, again, is to keep the boat flat with the sails pulling as far forward as possible. In light air, that’s about all there is to it.
In surfing conditions, however, waves—and therefore steering—again become a factor (see page 27).
RUNNING
Here the objective is to minimize drag, which means the helm must be neutral. This requires the center of effort to be over the center of resistance, which you accomplish by heeling the boat slightly to windward (see Figure 20, page 23).
Don’t point too low! The boom won’t go out farther than the leeward shroud, so the mainsail won’t be fully effective within about twenty degrees of dead downwind. Use your masthead fly to judge when this is happening.
Finally, never trim the spinnaker pole more than you let out the boom. The two should be approximately parallel to one another whenever you can carry the pole off the forestay.
TACKING The objective in tacking is to maximize net velocity made
good to windward, which usually means minimizing use of the rudder. Tack quickly or slowly, depending on wind and wave conditions, by synchronizing your body weight transfer with the tiller motion.
The helmsman initiates a tack by asking, “Ready?” to which the crew replies, “Ready!”—any other word means the crew didn’t understand and isn’t ready. There’s no need for further discussion once you both know the routine.

BOAT HANDLING 25
The crew — The following steps apply when the jib sheet clam cleats are mounted on the “table” forward of the traveler.
1. Face aft and grip the sheet with one hand near the windward ratchet block and the other near the cleat being used, palms down as in playing a piano.
2. Release the old sheet when the jib “breaks,” then cross the boat, pulling the new sheet through the ratchet block.
3. Transfer the new sheet to your other (now aft) hand and lay it in the cleat.
The helmsman — Handling the main with an automatic traveler is a dream: all you have to do is move the traveler toward the new windward side as the mainsail fills. You want to achieve the same effect without an automatic traveler, of course, but you’ll need fast hands to release the “old” control when the main loses power and still trim the “new” control as the sail fills on the other side.
In light air, you must roll tack effectively. 1. The crew initiates the tack by moving his or her
center of gravity to windward in harmony with the skipper’s body and tiller movement, causing the stern of the boat to want to slide to leeward. All the helmsman has to do is let the tiller swing to leeward, with at most a little push.
2. These combined actions cause the rig to roll to windward as the boat comes head to wind, keeping the sails filled long after they’d ordinarily luff. You can even get them to pop from side to side without luffing at all with a vigorous tack, although this is not ordinarily as effective as a more “gliding” maneuver.
3. You want the mast to move once across the sky to its new angle of heel. Therefore, don’t move back to the new windward side until the boat heels over “on top of you.” In lightest air, don’t move to the new windward side at all, at least until the boat is back up to speed. Any weight adjustment will de-power the rig just when you need power most. You’ll know you’ve done it right when you leave virtually no wake at all.
In heavier air, roll tacking principles still apply. As crew, watch for the tiller to turn, then swing into the boat and handle the jib as described above. At the end of the tack, swipe for the trapeze handle with your forward hand while you’re cleating the sheet, then hook up and go out.
SETTING THE SPINNAKER The objective is to get the spinnaker filled and pulling
forward as quickly as possible while minimizing the time when the boat is sailing inefficiently. This would be simple—except that the helmsman is steering with his knees all the while. The steps, themselves, are straightforward, however. On a boat with a spinnaker launcher, the routine is as described on page 7: while the helmsman hoists, the crew inserts the guy in the
outside end of the pole, then attaches the topping lift, and finally attaches the inside end to the mast ring. On a boat without a spinnaker launcher, you normally hoist the spinnaker first. The helmsman usually flies the sail while the crew handles the halyard and the pole. Alternately, the helmsman can hoist while crew simultaneously sets the pole. Note: The crew must keep the pole’s outboard end up when handling it—otherwise, the skipper will have difficulty flying the sail. Also, remember to orient the spinnaker pole with its jaws opening up, so that you can easily pull its inside end down and away from the ring on the mast later on.
GYBING The objective in gybing is to maintain as much speed as
possible while you handle the spinnaker. The skipper must be able to concentrate on spinnaker trim and steering. Hence, the crew must perform all other tasks. Here’s the sequence. 1. The helmsman transfers steering to his or her knees,
and takes the sheet and guy. The crew must release both the sheet and guy from the forward cleats, because the helmsman can’t reach them.
2. While the crew releases the old windward twing and trims home the leeward one with a smooth motion, the helmsman bears off to a gybe heading, ducks low so the boom will pass overhead, and says “Now!”
3. The crew grabs the boom from underneath with both hands and throws it overhead.
4. While the helmsman tries to keep the spinnaker full, the crew lunges forward on the new windward side to release the pole from the mast. If the crew doesn’t do this immediately, (1) the spinnaker will collapse because the mainsail is blanketing it, and (2) the skipper, in his zeal to keep it trimmed, may pull the pole so far aft that it jams in the ring and can’t be released. If this happens, crew, say so immediately!
5. The crew attaches the now-free end of the pole to the new guy and slides it up to the spinnaker tack. The helmsman can fly the sail again, so the crew can complete the remaining steps more calmly.
6. The crew releases the sheet from the leeward end of the pole and attaches the pole to the ring on the mast.
7. The crew cleats the guy and then takes the sheet from the skipper.
Throughout this exercise, the crew faces forward, leeward foot aft. It should never be necessary to venture out on the foredeck.
DROPPING THE SPINNAKER The objective is to keep the spinnaker flying as long as
possible while still having everything squared away when it’s time to head upwind. Here’s the sequence on a boat without a spinnaker launcher:
26 BOAT HANDLING
1. The skipper ensures that the halyard won’t tangle or knot when released, recoiling it if necessary so that the top coils feed out first.
2. The skipper takes the sheet, the guy remaining cleated.
3. The skipper bears off to level the boat and says, “Go!”
4. While standing to windward of the mast, but not up on the foredeck, the crew removes the pole from the mast ring, topping lift, and guy in that order, and stows it.
5. The crew pulls on the guy until the spinnaker tack is in hand, and releases the halyard.
6. Still from the windward side, the crew gathers the spinnaker in the largest armfuls possible and stuffs it into the bag or bucket which, while the halyard and sheet are still flying, should keep the sail from twisting. You shouldn’t need to pack it.
7. The crew glances up to be sure the halyard isn’t caught on the leeward spreader, tensions it, clips it outboard or wraps it around the windward twing so it won’t interfere with the jib upwind, and then tightens it.
8. The crew squares away the twings and then the spinnaker sheets.
On a boat with a spinnaker launcher, you want to be sure not to sail over the spinnaker, so the crew must trim the guy and sheet hard while the helmsman releases the halyard and pulls in the spinnaker downhaul. When the downhaul starts pulling against the sheets, the crew lets them go and, finally, drops the spinnaker pole.
ADVANCED SEAMANSHIP UPWIND
There’s a very precise combination of sail trim and steering that makes a Tempest go fast upwind. This “groove” is very narrow: tolerance on the jib sheet is only about ¼-inch, and perhaps one inch on the main and traveler. Experienced Tempest sailors have memorized “point of departure” settings and can correlate them with the feel of the boat.
But you need more than proper trim. It takes good steering to keep the keel from stalling: “A boat that goes fast points high,” Glen Foster once said. So drive off and accelerate before you sheet the sails all the way home and start searching for the groove.
Finding the groove — In moderate or heavy air, the boat’s sensitivity makes the groove easy to recognize once you’ve found it: the leeward bow wave lands aft by the shroud, the rooster tail is visible beyond the transom, and the tiller transmits even subtle changes in feel. The backstay and spreader rules are working, the windward jib telltales flutter a bit, and the boat feels “sucked upwind,” as former champion Ken Cormier would say.
The groove is not so easy to feel in lighter air, but with the sails properly set, you know it’s near when the leeward mainsail telltale stalls most of the time. Unfortunately, you can’t both watch the telltale and keep your mind on the race, so you must learn to feel the groove through the tiller and the “seat of your pants.”
Pointing vs. footing — Even within the groove, there’s a tradeoff between pointing and footing, and you always want to know what your next adjustment will be in case you find you’re slow. Think it through: a sail’s “thrust” is approximately perpendicular to its chord at any height, so when the top of a sail “twists” in relation to the bottom, its thrust will be more forward. Sheet and traveler tension, in combination, control this twist within the narrow range of the “backstay” and “spreader rules.”
Hence, to point within the groove, trim the traveler a little and let out the sheet, twisting the mainsail so that its lower part provides extra lift without stalling the upper part. To foot within the groove, drop the traveler and trim the sheet so that the lower part of the sail provides maximum forward thrust. Don’t forget to free the sheet a bit to drive through an extra large wave or recover from a puff that heeled you over too much.
The jib stays about the same in either case, although you’re frequently adjusting it, of course. “Does it feel faster?” As the groove on a Tempest is so narrow, a practiced skipper can quickly tell by feel when an adjustment is needed. With the standard layout, he or she can even adjust the jib sheet without the crew’s help. The crew, on the other hand, may be first to realize, when alerted, whether an adjustment helped or hurt. So talk about it (e.g., “I’ve just dropped the traveler, does it feel faster?”)!
In waves, a Tempest’s sharp bow will knife right through, but compared with other Tempests, it’ll plunge too deeply unless both crew members move aft—up to a foot behind their normal positions. You can get too far aft, causing the stern to dig in, but experience in listening to the wake can tell you when this is happening.
Tiller technique also is important. The problem is not getting over a steep wave—it’s a matter of not plunging into the next one. You can prevent this by steering into the wind as the bow rises up the face of a wave. Then pull, perhaps sharply, on the tiller to bear off and track down the back side.
There’s a bonus from getting this right: your heading will actually remain constant because you won’t be letting the crests toss your bow off course, and the crew can balance much more easily out on the wire.
You’ll need to practice this technique, of course, so that you know how much to apply it each sea condition. In fact, all the techniques described here must become second nature, so pick a day when there’s a good wind and just sail upwind for as many hours as you can, as Dennis Conner used to do. Invite a better sailor to be your crew or pair up with another Tempest. You might learn more in 20 concentrated miles of upwind work than during all your previous sailing career!
BOAT HANDLING 27
TACKING
Ready to tack? — You always should be, with all preparations complete. In trapeze conditions, toss the jib sheet into the boat as soon as you’ve tacked and adjusted it, so you won’t have to think about it later. Remember to take any slack out of its windward side.
In light air, always try to keep your weight over your toes for instant mobility.
In trapeze conditions, as helmsman, pick a relatively flat spot and initiate the tack as the bow rises—an extension of the tiller technique in waves described above. As crew, leave the jib cleated until you’ve come into the boat: it will remain filled longer, you’ll be free to concentrate on the trapeze, and you won’t “telegraph” tacks to other boats waiting to react.
Completing the tack without losing speed takes practice. The crew must release the jib at the exact moment it collapses, and must lay the new sheet into its cleat just as the jib is ready to fill on the new tack. When your timing is right, you won’t need to trim the jib sheet until you fine tune it. You’ll know you’ve done it well when you look down after the tack and discover the sheet is within about two inches of its eventual trim. Count the stripes on the line between the clew and the nearby turning block to check: you don’t have to look for the “spreader rule” just yet.
In trapeze conditions, you need weight on the wire as soon as the jib is cleated. The crew grips the handle with his forward hand, grabs the ring with the aft hand, and launches out over the gunwale, hooking up afterward. You can tack the boat without extra heel if you do this smoothly.
The helmsman has a less athletic job, but also less space. He must find time to release the old windward traveler control at the last second, and grab the control on the other side in the next instant just as he’s crossing the boat. Most helmsmen turn forward, perhaps with this in mind, but too many cross the boat before returning the tiller to center, negating the roll-tack effect at just the most harmful moment.
An alternate technique is to face aft when tacking, swinging the tiller extension away from you over the tiller. True, you can’t play the traveler while you’re moving your body, but you can delay transferring your weight and hence get the most out of the roll. Your backside won’t conflict with the tiller and you avoid disorientation: your body actually turns only through ninety degrees.
DOWNWIND
Setting the pole — With a spinnaker launcher, you want the forward end of the pole to pull up on the guy so the boat won’t run over the spinnaker. Hence, you set the pole before hoisting.
Without a spinnaker launcher, however, you can fly the sail without the pole, so you hoist first. The one exception is in heavy air on a tight reach, when setting the pole first may prevent a “wipeout.” The helmsman can judge this best and indicates his choice with the words “pole first!”
In light air on a close reach, releasing the leeward twing line only about 18 inches and recleating it will (1) favorably change the sheeting angle so that the spinnaker will draw much more easily, and (2) lead the spinnaker sheet nicely under the boom.
In moderate wind, the Tempest rewards hard work. You can use every puff of wind and every small wave to make the boat go faster. The helmsman should be constantly working the mainsheet for best trim and to promote planing. The crew should do the same with the spinnaker. Either crew member can adjust the jib for mean wind direction.
Luff in the lulls and bear off in the puffs to make best use of the apparent wind and to keep the boat flat. Sometimes, on tight reaches, you can fetch an otherwise difficult mark by letting off the vang to spill wind from the top of the mainsail: you may find you can point higher than you thought you could without stalling. But, if you can, stay to windward on reaches in general: Tempests have big wind shadows, and trying to drive through to leeward rarely pays.
Surfing — The trick is to steer straight down the face of a wave to accelerate (much as a surfer paddles in the same direction as the wave is moving), and then, when the wave catches you, steer up again along its face to gain speed.
The basic technique is to pull the tiller to windward as the stern lifts, and then let the boat head up before the bow buries itself in the back of the wave in front of you.
While this requires a lot of practice, sail trim makes it possible to catch waves that steering alone can’t catch:
• As helmsman, center the traveler so you can readily grab a handful of mainsheet with a 1:1 purchase and trim it;
• As crew, trim the guy or, in some conditions, both the guy and the sheet.
Synchronizing these actions causes the boat to surge forward. How much and how quickly you should trim depends on how powerful the wind is, but getting it right can mean a quick 100 yards over the competition.
Spinnaker play is the crew’s job, but the helmsman can unwittingly make good spinnaker work impossible by wandering off course or not communicating changed intentions. Just as the crew watches the fleet upwind while the helmsman concentrates on tiller work, so the helmsman reports news downwind while the crew concentrates on looking up. The crew will know the moment the boat alters course and, if the helmsman doesn’t say something about it, should assume it is unintentional. “Hey, skipper, do you know we’re heading up?” (“Yes” is not a good answer.)
GYBING
Gybing presents an opportunity to gain distance on the competition, both in light and heavy air, if you slam the boom into the middle of the boat, shoveling wind aft. The crew does this by bracing one foot on the leeward tank and putting his whole body into the motion, as if trying to rip the boom off the boat.
28 BOAT HANDLING
The skipper, meanwhile, is struggling to keep the spinnaker full. While it will fly easily in heavy air, in light air you want it away from the rest of the sailplan. You can accomplish this by gently letting out both the sheet and the guy just before the gybe, floating the sail away from the boat.
DROPPING THE SPINNAKER
The timing of a takedown is critical, of course, because the penalty for bad judgment is severe.
Before turning into the wind, the crew must complete Step 6 (page 25). But the crew needs to know how much time he has and whether to attempt Steps 7 and 8—without taking time to look up from his work and scan the horizon for the turning mark. The helmsman can provide the needed input with a steady countdown plus encouraging phrases like “You’ve got plenty of time” or “Forget the rest and trapeze now!” A good crew can recover from a late drop by steering from the trapeze while the helmsman cleans up.
SOME TRICKS Man Overboard — Sooner or later you’ll find yourself
trying this drill. It’s not always easy: a waterlogged body can weigh 50 per cent more than a dry one. Bruce Kirby once wrote that trying to help your humble editor back aboard “was like grabbing firmly onto a fire hydrant and attempting to hoist it into your convertible.”
The trick is to bring the boat to a stop with the person in the water along the leeward side. Thanks to a Tempest’s low freeboard, he or she can almost swim aboard by grabbing the traveler and getting one foot inside the tank. The person in the boat can then do the rest.
Fixing the Main Halyard — A broken main halyard shouldn’t keep you from sailing, because it’s so easy to jury rig. At the dock, two people can pull the boat over on it beam ends by hanging from the trapeze wire and shroud. You can use a light line to lash the sail to the exit block in the mast, or even the backstay crane, to get you through the day.
Even out on the water, you can jury rig the main halyard. Just heel the boat over and climb hand over hand up the shroud (it gets easier as you go along) until you can reach the
mast. Then make your way to the top of the mast, which will be in the water when you get there.
Weeds and Lobster Pots — Before a race, you may not realize that you have weeds, so it’s a good idea to back the boat down to let them float free. Once you’re under way, you can use your weed stick to remove most debris from your rudder and keel. The technique will be intuitive.
Sometimes, however, weeds or a lobster pot line can hang up near the top of your rudder, where a weed stick can’t reach too well because of the shape of the hull. Fortunately, the rudder is so far aft that the helmsman can clear it by reaching over the transom, if he/she has long arms.
Towing — Sooner or later you’ll get towed home. When this happens during a competition, you’ll probably find yourself in a long line of other boats.
The principle here is to avoid straining your boat. Tie your tow line around the mast before you heave it to the boat ahead of you. Be sure it can’t chafe on anything sharp (e.g., the partners). Then tie the tow line from the boat behind you to your line where it loops around the mast. You can tow a long string of other boats this way without straining your own.
Landing — Good seamanship is perhaps no more apparent than when a crew brings its boat home. It takes a little practice to spin the boat at the dock and back the main while the crew, who’s been standing on the bow in front of the forestay, just steps off with the painter. But it can be worth-while in a crowded harbor when you only have one chance to moor under sail. Satisfying, too.
At a mooring — It takes just a little time to roll the jib up, disconnecting it from the forestay as you go, and stuff it back in the cockpit under the bridge. Roll up the mainsail, too and secure it with the mainsheet; no need to remove it from the boom as long as it can’t catch the wind. Tie the halyards to the trapeze handles so they won’t slap against the mast, and secure the tiller with the ends of the backstay control line so it can’t wiggle back and forth. Double check the knot you’ve used to tie the mooring line around the mast, and be sure you’ve led it so that it will always pull from the bow without chafing. Finally, don’t forget to open the bailers. If you take these precautions, your boat should be able to ride out even a hurricane without any fuss, as many did in Marblehead Harbor in 1972

MAINTENANCE Eventually you learn to do on purpose
what you used to do by mistake. Quentin Crisp
PREVENTIVE RIG MAINTENANCE A properly prepared rig should provide many trouble free
seasons if you take care of it. The mast, boom, and spinnaker pole should need only occasional lubrication (e.g., with Lubriplate or some other silicon—based lubricant) and checking to be sure everything that should be tight still is.
You can expect normal wear and tear in the form of fraying and kinking. These problems are easy to spot where wires subject to changing loads bear on sheaves (e.g., where the main halyard, jib halyard, and topping lift enter and exit the mast). Hidden fatigue points (e.g., where the forestay control turns aft inside the bow compartment) are harder to find. Lines will chafe where they turn through small radii or are repeatedly recleated (e.g., halyard tails tend to fray at the loop where they attach to their halyards, and jib sheets will eventually wear at the cleats).
Replacement is the usual solution to these problems, but initially you can cut lines a little longer than needed and just resplice or shorten them when the time comes, changing the areas where they chafe.
Some potential problems won’t be apparent to the naked eye: lines can lose strength through ultraviolet degradation and wires are subject to stress buildup at nicopress points, for example. Replacement is the only way to prevent these types of failure. How often depends on frequency and severity of use, of course, and on whether you’re sailing in a hostile (e.g., salty or sunny) environment, but eight years may be a good maximum in any case.
Unintended loads can cause accidental damage. There are two main types of failure: first, wires can snag (e.g., on trailer fenders) when you step or unstep the mast, or kink when you don’t tie them properly before trailering; second, you can pull too enthusiastically on components under load (e.g., the topping lift when the spinnaker pole is far off to one side) causing the wire to kink permanently.
Wires also lose strength when you “ding” them, so be very careful not to drag them along the ground.
KEEL INSTALLATION There are really only two reasons to remove your keel.
First, for maintenance that can’t be done with it in place, and second, for storage. Don’t do it if you don’t have to.
But if you do, you’ll need a hoist and a place (e.g., the water) to put the boat down while you’re lifting the keel (e.g.,
into the trunk of your car). A wrench and a stepladder may come in handy.
The top of the keel consists of two “ears” that bolt between the aluminum channel sections in the cockpit floor. The object of this exercise is to insert these ears far enough into the hull to push the keelbolts in place. Hence, the keel must sit high on the trailer, probably higher than normal.
You should have three people on hand: (1) a “hoist operator” who won’t push the down button when you want to go up (don’t laugh!), (2) a “boat rocker” who’ll guide the hull, and (3) a “keel inserter,” probably you.
The first step is to take down the mast (lest you suddenly find out where the boat’s center of gravity is without the keel in place!). Then, with the keel fin up:
1. the hoist operator lowers the hull to a position above, but not touching, the keel;
2. the boat rocker rocks the bow down while the inserter guides the forward keel ear into the slot;
3. the hoist operator again lowers the hull until it is just above the aft keel ear;
4. the boat rocker eases the hull back to horizontal as directed by the keel inserter until the aft keel ear is also inserted into the slot;
5. the hoist operator lowers the boat as directed by the keel inserter until, standing on the stepladder, he or she sees that the forward bolt is ap-proximately aligned with its holes, when someone climbs inside the boat and inserts it;
6. the hoist operator jogs the boat as directed by the person inside, or the keel inserter physically lifts the back of the keel bulb (caution: don’t strain yourself), until the rear bolt can be inserted;
7. Tighten the nuts on the keel bolts and you’re done ...
Buttering the keel in the slot — ... almost. If you stop now, the keel will still be able to “pendulum” from side to side in the slot, which will slow you down. So wedge it in place with popsicle sticks or tongue depressors fore and aft on both sides. These will swell when they get wet, achieving the desired effect.
Now you’re ready to butter the keel in place with auto body putty to minimize drag and keep the popsicle sticks from falling out (see below).
30 MAINTENANCE
WATERTIGHTNESS What the rules require — As mentioned on 3, the class
rules require the buoyancy compartments to be maintained in watertight condition. They do this by prohibiting piercing the hull “... except by ...” and list a few pages of exceptions “... which shall be sealed in a watertight manner when racing.”
Prevent leaks at screwholes with silicon sealant. Many people squeeze the silicon into the hole, but it just gets pushed through when they insert the screw. Mader, on the other hand, applies the sealant in a ring around each hole so it will be squeezed into place when the fitting is pressed down. When the silicon sets, they just carve any excess away with an exacto knife.
Leaks can occur in places other than where fittings are fastened, however. Under the gunwale moldings (where the hull and deck join), around the mast bucket or foredeck cover (where the seal can separate when the deck flexes), and around the floor access ports, unless your gasket is new and the cover is fastened tightly. Once found, these leaks, too, can be fixed with silicon sealant. The problem is in finding them.
Finding leaks requires a sponge, a vacuum cleaner that “exhales,” and soapy water. Wedge the sponge against the vacuum cleaner hose where it passes thorough an access port. This will provide enough compression to induce airflow through the leak points. Then, spray the soapy water wherever a leak can occur, being careful not to get the electric cord wet, turn the vacuum cleaner on “exhale,” and look for bubbles. It may take a little time and more soapy water, but you’ll eventually discover them.
KEEL REPAIR The fin will corrode if oxygen gets to it, and due to
electrolysis between it and the lead bulb. Smooth sanding any rough areas will solve any short term problems.
Preventive maintenance, however, means (1) removing all oxidation from the fin (e.g., by sandblasting) and then (2) immediately covering the surface to prevent future exposure. WEST epoxy (about the consistency of maple syrup) applied with a squeegee is one means of producing a durable surface. With this system, local repairs (e.g., divots out of the leading edge) are easier to make than when the fin is covered with fiberglass.
A little white paint (e.g., spray enamel) will not only enhance overall appearance, but will also help you see when you’ve picked up any weeds during a race. You can mix white pigment with the epoxy to get color, but the coats are so thin that you may tire of applying them before the blade darkens very much, and end up painting the surface after all.
The bulb can be fixed with auto body filler. Mix up small batches with catalyst and apply with a spatula. A wax paper cornucopia will help you shape the trailing tip of the keel—drive a screw into the bulb first if you need structural support. Do the rest by sight and touch. A sureform file can remove extra filler before the mix hardens fully—e.g., when the boat is
hanging from the hoist and other boat owners are getting impatient—but a belt sander is the best rough finishing tool.
The fin and the hull. Most old timers also “butter” the keel into its slot with auto body putty (some prefer silicon sealant). A finger may be the best tool, followed by a putty knife. (Note: The class rules state “Filling compound shall not ... form a radius or fillet between the fin and hull”.) Protect the hull and fin with masking tape first unless you want a lot of exasperating work later.
WINTER STORAGE Winter storage requires special care when you leave the
boat unattended and exposed to freezing temperatures. The best place, of course, is inside where it’s warm.
Otherwise, you must take precautions to prevent structural damage due to wind, water, ice, sun, or improper stress and cosmetic damage due to chafing. Also, the boat’s protective covering can come loose, the halyards’ noise may tempt someone to fix them for you, or wind might roll the trailer or even tip it over. Here are some good practices:
1. Open the bailers and hose down everything with fresh water: the hull, to prevent oxidation that will dull its appearance; the spars, metal fittings, and all moving parts, to wash away any corro-sion-producing salt; and of course the sails, which should then be dried to prevent mildew.
2. Chock the trailer so that the boat’s bow is up (the waterline is a good visual guide). This way, any water in the cockpit will flow aft and out through the open bailers. Otherwise, it will form a puddle in the cockpit and leak down inside the hull where it will expand if it freezes, possibly doing structural damage.
3. Bail out any water in the forward and middle compartments, and then open all access ports for ventilation. If there’s a chance someone will move the boat and leave it with the bow down, however, replace the gaskets under the floor access ports and then tightly screw them down.
If the mast is up, loosen the standing rigging to unbend it so the hull isn’t under stress. Hoist the halyards and topping lift up against their turning blocks or tie them off away from the mast (e.g., to the trapeze handles) so they won’t slap the mast all winter long.
Finally, stretch your cover over the boom or a frame so that puddles won’t form in it and freeze, and then tighten it around the hull to prevent it from slapping in the wind and disfiguring the gelcoat.
TRAILER MAINTENANCE Trailers don’t need—or usually get—much maintenance
except for their wheel bearings. These are especially important, of course, if the trailer has been immersed, although any water may boil away if you run the trailer for several miles.

MAINTENANCE 31
Two other problems have been known to occur. First, the hand brake or surge brake may not fully release if poorly lubricated, so if your trailer has brakes, check them at the beginning of each new season.
Second, corrosion. You can restore an older trailer if it hasn’t deteriorated too much. Sandblasting and a new coat of paint may be all you’ll need. But there may also be hidden problems. You won’t see whether water gets inside structural steel tubing (such as the frame of some Harbeck trailers), for example. There are two ideas here:
1. Drilling a hole at the lowest point should, at least, let any water drain out.
2. Squirting used motor oil inside, ideally when the trailer is new, will coat the tubing and retard any corrosion.
Your trailer should provide long service if you take these measures; many twenty-year-old trailers are still as good as new.
ATTENTION TO DETAIL There are many little practices that can enhance the
appearance and reliability of a Tempest. Most people realize it is much better to take the time to mask the hull and deck when varnishing the rubrail, for example. But boatbuilders and careful owners do a few things that aren’t so obvious.
One interesting practice is to turn all screwheads until their slots are aligned with one another. This precaution will
give your boat a finished appearance, but more importantly, you can tell at a glance when any screw is beginning to back out, which it particularly reassuring when you’re checking the boat after a long highway trip.
A similarly useful trick is to get in the habit of installing all shackles, lifting sling bolts, clevis pins, etc., in the same direction (e.g., starboard-to-port). Sooner or later, darkness will catch up with you while you’re rigging or unrigging your boat, and it will be comforting to know that you haven’t twisted anything by accident.
When you’re purchasing your hardware, try to choose shackles with equal-sized pins, and keep a spare on board. Shackles with captive pins may be better, but be careful: they may not have as much internal clearance as the normal variety, and you can find yourself with a carefully nicopressed halyard or outhaul that doesn’t fit around your clew cringle or headboard.
Screws with common thread pitches are also worthwhile. Don’t mix 10-24 screws with 10-32s, for example: they may be easy to tell apart but their nuts certainly are not, especially when you’re rushed or it’s getting dark.
Finally, make yourself a small pouch that you can hang from the aft face of the bridge. If it’s big enough, you can use it not only to store control lines, but also spare fittings, your protest flag, and even your lunch.


APPENDICES


Appendix A
LOOK OUT FOR ... TEMPEST The full account, by Bob Bavier, Jr., of the IYRU Two-man Keelboat Trials in 1965, as a result of which Tempest was ultimately chosen as the new International Class.
Reprinted from Yachting, July 1965, copyright 1965, with the kind permission of CBS Magazines.
I didn’t really think it was possi-ble—to create a small keelboat with the sprightliness of a planing centreboarder and at the same time the security, stability, and self-righting qualities of a keelboat. It seemed more likely that such an attempt would result in a boat that was neither fish nor fowl—far too tame for those who want to go really fast yet too demanding and cranky for those who prefer keelboats. I’m happy to report that Ian Proctor’s Tempest proved me dead wrong. She captures the best of two worlds and can best be described as a design breakthrough. Proctor is the well-known British boat designer and builder, mast builder and dinghy sailor.
Her unveiling came at IYRU Selec-tion Trials at Medemblik, Holland, 16th–19th May. Several years ago the International Yacht Racing Union an-nounced an opening in its recognised classes for a new two-man keelboat, and in the fall of 1963 winners of a design competition were revealed. No class, of course, can be adopted from a set of lines and hence sea trials were set up for new boats built expressly for the pur-pose. I was at them as the American representative on the Selection Com-mittee. Other members were Jan Loeff of Holland (Chairman), Jacques LeBrun of France, Beecher Moore of England, Bruno Bianchi of Italy and A. E. Duddok van Heel, Jr. of Holland—all experienced sailors and none hampered by having personal axes to grind. Our intention was for these to be the first of a series of selection trials to continue through the summer in different nations. For my part, I was prepared to recommend that no boat be selected even by summer’s end unless she seemed to be a truly fine type. Tempest was selected by our committee at the end of nine races over a four-day period simply because every conceivable kind
of weather and sea conditions were encountered and in each race Tempest cleaned house. More important, her dominance was over a fine fleet of at-tractive boats. Quite frankly we fell really in love with Tempest, so much so that further trials seemed completely superfluous. Our decision was unani-mous and enthusiastic. If we were wrong, we were wrong together, but I suspect instead of being wrong, we have given yachtsmen of the world a great new boat to rally around.
All boats entered were built up to the limits of 22 ft. overall length and sail area of 247 ft. plus spinnaker. All had keels weighing 495 lb. Actually most of the boats when measured proved to have exceeded the sail area limit. We made note of this but let them sail anyway. Tempest’s area was exactly as specified.
Hull weight of the ten new designs entered varied considerably from under 300 lb. for Jack Knights’ home-built sharpie type Cobra to 797 lb. for Starlet, designed by H. E. Glacer. Tempest’s bare hull was second lightest at 440 lb. Other entrants were H. E. Glacer’s Champion, winner of the 1963 design competition of the IYRU; John Westell’s CVP43, looking very much like an overgrown 5-0-5; Flying Senior, a lovely looking boat by U. Van Essen, designer of the Flying Dutchman; Rapikee, designed by E. G. vander Stadt, and second in the design competition; J. M. Hannay’s Satellite, a variation on the hard chine Cobra; C. & B. Silvant’s Telstar which was more of a day-sailing than racing type, and P. Budde’s Flying Fish. Most of them were fine looking boats.
To serve as a yardstick a fine Flying 15 was entered. Several modern specta-ting Dragons gave a further speed com-parison.
The first race was sailed in a light fluky wind. Tempest called it all wrong
on the first leg to round the first mark in the ruck. One the ensuing run, beat and reach she sailed through the fleet and through some Dragons to win by 30 seconds from Rapikee. It was ultra clear already which was the best light weath-er boat.
The next six races were sailed in 12-20 knot winds. Some were triangles, some windward-leeward, some a combi-nation. Some provided planing condi-tions, some did not. Tempest won them all except the third race of the series when she broke her rudder while lead-ing and planing under spinnaker. A simple design modification can prevent recurrence of this one definite weak-ness.
Up wind, Starlet and Champion were almost matches for Tempest, but both died from inability to plane readily on reaches. Rapikee and Flying Senior were also very close to Tempest up wind, and, while they did plane, they couldn’t begin to hold the British boat under planing conditions. Jack Knights’ Cobra finally emerged as the second fastest boat. She went as well up wind as any but Tempest, and on the planing reaches could almost hold her. It was remark-able in a way that Cobra, despite weigh-ing 165 lb. less and despite long flat planing surfaces, could still not plane quite as readily or as fast as the fabulous Tempest. CVP43 showed fair bursts of speed, but never quite up to the other better boats. All the others were badly outclassed. The very well-sailed Flying 15 managed to beat some of the tailend-ers, but was 5-10 minutes behind the leader in other starts, despite conditions which were generally to her liking.
It was evident after seven races that in all sorts of normal going Tempest was quite a boat, but we decided that selection was impossible without a fur-ther test in very heavy winds and sea. There was much discussion as to where
and when such trials would be held later in the year, but all were agreed that no selection was possible until such a test had been made.
All races had thus far been sailed with an offshore wind, but on the third day the weather bureau forecast a new front would move in at 5:00 p.m. accompanied by 25-knot winds blowing on shore. With a hope and a prayer we postponed going out until 5:00. Almost miraculously the front moved in exactly on schedule and the seas started build-ing at a rapid rate. The course chosen provided a one-mile reach, two-mile run, two-mile direct beat and one-mile reach home. Wind was only 15 knots for the first two legs on which Tempest led by a wide margin. At the start of the beat, as if by prearrangement, it picked up to 20 and the seas were steep and wicked. By the end of the leg it was a good 25, yet there was the Tempest, eat-ing it up and with an awesome lead. She planed home at an average of 12 knots, simply loving it. The six-mile course was covered in just over 50 minutes. Cobra had done surprisingly well in the rugged going, but was still over three minutes and over half a mile back. Starlet did very well up wind (about equal to Tempest) but was outclassed reaching and running to finish 3:45 behind. The others simply were not in the ball game. Rapikee, ably sailed by George O’Day in the last six races, capsized when her jibsheet jammed while tacking. George never got wet. He merely stood on the leeward side of the cockpit while his crew stood on the fin keel. In a moment she snapped back upright and contin-ued—an amazing testimonial to the type of boats entered.
That evening our committee was virtually satisfied that a selection should be made. Our one remaining desire was to sail not only Tempest but the other attractive contenders to learn if she felt as good as she looked. In addition to Tempest we sailed Starlet, Cobra, and Rapikee. Starlet seemed very nice up wind but a bit unmanageable on reach-es. Cobra was exciting to sail but not quite the boat one could fall in love with. Rapikee struck us as a fine all-round boat, but a bit unexciting. But
Tempest was a joy throughout. I was fortunate in starting my sail in her in 10 knots of wind and ending up in over 20. She was lively in the lighter wind and a bomb in the heavy going. With her crew riding the trapeze she was easy to hold down. She developed no un-pleasant helm on any point of sailing, was a cinch to handle, never came close to capsizing even when punished. And how she planed, both easily and very fast. It felt like 15 knots but more likely was 12.
Self bailers in wells in the self bail-ing cockpit sucked the spray out up wind as fast as it came in. She always was completely dry. Had we taken in solid water (we never did) the two self bailers would have been assisted by two transom drains. At the mooring her bailers are kept open and rain water finds its way into their wells.
She was perfectly laid out and equipped. The main and jib were easy to trim to cam jams. A full width traveller amidships made for most efficient trimming on all points of sailing. Her aluminum spar bent aft under the strain of the sheet so that her main assumed an ideal shape under varying wind strengths. It was impossible for any of us to fault a single detail.
I could not help but wonder why it is that a nation which can show such advanced and practical thinking in a small boat remains so relatively back-ward in 12-Metre development. I sus-pect that if the America’s Cup effort were entrusted to England’s small boat sailors and designers, with a free hand, an open purse and no unwanted advice from the money men, the America’s Cup might well tremble on its pedestal. On a small scale, Tempest was easily as advanced as Constellation and it is hard to realize that she emanates from Sover-eign territory.
By now you’ve got the idea that I feel Tempest is quite a boat. The entire committee did, but we wanted her to pass one more test. While her stripped hull weight of 440 lb. was probably heavy enough for strong fiberglass con-struction we wanted to be sure she would still perform well if it was discov-
ered later that more weight was required. Therefore we planned one more race with the Tempest handicapped by carrying 40 kilos (88 lb.) of weight above the waterline. Two bags of sand were put onboard, and a course calling for three miles of beating, four miles of reaching and one of running was laid out. Wind was approximately 18 knots. I can make the description short. Tempest led by two seconds at the first windward mark, added a few seconds on the reaches, went still farther ahead on the second beat, and widened a bit more on the run home. She beat Cobra by 35 seconds and the first conventional looking boat (Starlet) by 2:15. The weight, all or perhaps some of which will doubtless be unnecessary in a production fiberglass model (the prototype was made of wood), hurt her performance a bit but not appreciably.
One more point, and I feel an im-portant one. Tempest looks as well as she performs. John Oakeley and Cliff Norbury sailed her as well or better than any boat there but all contending boats were sailed by helmsmen and crew of Olympic caliber.
Whether or not Tempest’s selection will result in a real contribution to the advance of sailing—as I now feel it will—only time will tell.

Appendix B
LAUNCHING THE INTERNATIONAL TEMPEST CLASS The following article by Ian Proctor appeared in the International Tempest Association’s first (1967) yearbook.
A particularly interesting problem
was presented in designing to the Inter-national Yacht Racing Union’s basic specification for the proposed Two-man Keelboat. The length, sail area, draft and keel weight, with the pointed reminder that a trapeze could be used, indicated the opportunity of a boat that, to us in England at any rate, would be something entirely new; a boat in fact which would plane almost as easily as a top performing centreboarder, but at the same time would have the stabilising factor and security of a keel.
Such a boat was likely to prove the answer to those used to racing dinghies, who find that when they turn their thoughts to keel boats there is nothing which gives a sufficiently satisfying performance, particularly off the wind.
The need for a Two-man Keelboat had been hinted at IYRU Conferences since 1960, but nothing definite had been done before 1963 towards insti-tuting such a new class.
The specific requirements were finally announced by the IYRU in 1963. A design competition was held in Hol-land, but ten years previously I had en-tered a boat for the Two-man Centre-boarder Trials, from which the Flying Dutchman class was ultimately chosen, and experience indicated it might be best to delay producing and publishing a design until as late as possible to avoid the inevitable tendency towards pooling ideas. It was, after all, my Osprey which introduced the modern technique of trapezing to the Flying Dutchman and 5-0-5 prior to the 1954 Trials, though this was a revival of a less highly developed technique from the 1930s.
In Britain we are fortunate to have three active classes of high performance racing dinghies, in which design is free within the limitations of a rule frame-work. These classes, the National 14 ft., Merlin Rocket, National 12 footers and International 14 footers, are officially
termed “restricted classes,” but they are better called “development classes.” Many years of continuous development in these classes have produced extreme-ly advanced boats, which both in hull shape and gear bear very little resem-blance to their forebears of twenty years ago. Much of my designing experience has been in these classes, which provide an endless source of interest.
One of the most valuable things learned from the long experience of designing for the restricted classes is the effect of each characteristic in the shape of the hull or the design of sail plan and its relation to the lateral plane. In fact there exists the benefit of almost con-stant tank testing of the most reliable kind, as new hulls and sail plans are evolved, and then sailed competitively. The design of a racing sail boat is inevi-tably a compromise seeking to achieve a wide range of performance characteris-tics. Sometimes that compromise is more successful than at others, but at least an experienced designer should know what sort of dish he will produce from the ingredients thrown in the cooking pot. Designers lacking the com-petitive performance data on fairly closely related designs, such as is found in the restricted classes, are almost inevitably at a disadvantage when it co-mes to producing a completely new type of boat aiming to achieve a very positive kind of performance. The Tempest was designed against this background.
Obviously, all the contestants in the Trials would use the sail area limit set by the IYRU and it seemed clear also that almost everyone would design to the maximum waterline length that could be contrived, always bearing in mind the official stipulation that “the ends of the boat must appear balanced.” It seemed probable also that everyone would choose the minimum permitted keel weight, and this was the case, but there was wide variation in hull weights
and general conception, the British boats being lighter than the others and obviously paying more regard to planing performance. Tempest was not the light-est, but was designed for a long racing life in reinforced plastic construction. With the keel and trapezing crew help-ing the keep the hull upright, it seemed to me that the optimum angle at which the boat should sail would be about 15 degrees, when both keel and trapeze would really be working. Tempests's hull is, therefore, designed to sail efficiently at this angle.
A 22 ft. planing keelboat with 240 square feet of sail could obviously be quite a hair-raising machine in fresh winds when sailed in confined spaces by two people unless the handling characteristics were good. Great atten-tion was paid, therefore, to the manners of this boat to ensure that she had no shrewish vices or wild habits. One of the characteristics of the Tempest which is always remarked upon is her extreme controllability.
It was highly desirable that the new boat should be self-righting after a knockdown in extreme conditions, and entirely self-draining. A fair amount of spray was likely to blow into the cockpit in a boat sailing as fast as this in heavy weather, and to keep the sailing weight as low as possible the cockpit was made to self-drain at all angles of heel and at all speeds. This proved also extremely useful when the boat is left on moor-ings, as all rain water drains out.
I started designing Tempest in De-cember 1964. W. Richardson and Co. Ltd. of Darlington began building her in February and everything went very smoothly. The boat was delivered in March, without any fittings and un-rigged. Fittings were made by Ian Proc-tor Metal Masts Ltd. and I did most of the fitting out myself, screwing the bits and pieces on personally. My firm also, of course, made the spars and rigging.
She was ready for launching in April and we immediately got down to the job of tuning her. I was very fortu-nate that John Oakeley who, of course, sails Flying Dutchmen and ocean racers, and Cliff Norbury, who mainly sails National 12s, leapt at the chance of being helmsman and crew. The had both owned many boats of my design and we have done a great deal of sailing together, so it was great fun as well as being a good working team. We were limited to sailing at weekends, but concentrated hard on tuning up when-ever possible and Tempest was taken out whatever the weather. Most of the time it blew hard and it soon sorted out any weaknesses. Having such a new type of boat we found that a few of the first ideas of gear needed changing; sometimes we had to toughen up and sometimes to pare down.
Although Ian Proctor Metal Masts Ltd. had some thirty-three different mast sections available, there was not one which was ideally suited to this boat and I designed a new section. The extrusion could not be produced until after we had started to sail her, but as soon as it arrived a new mast was made to give us a bendy rig, which proved highly efficient. The sail plan had been designed with a high foretriangle leaving just enough topmast to produce the right bending characteristics farther down the mast. A bending boom con-trolled by centre mainsheet traveller was used.
All the equipment was evolved from experience in the Flying Dutch-man and other centreboarder classes. We had a very high degree of control over every aspect of the sail plan including, of course, underdeck jib furling devices, internal mainsail clew outhaul, cunningham hole controls, and so on. We also spent a great deal of time getting the sails as we thought they should be.
Division of work between helms-man and crew in a boat like this, which may often be sailed in top competition and make heavy demands on both, is important. Many of the controls normally left to the crew are taken over by the helmsman, who has at his fingertips the spinnaker halyard, spinna-
ker boom vang and jib furling gear. The spinnaker sheets can be handled by either helmsman or crew, the con-trolling point being at the bridge deck. The crew can, therefore, concentrate on setting the spinnaker pole and attaching its vang and lift while the helmsman makes other necessary adjustments.
One problem with such a prototype is finding a trial horse against which to tune. We had nothing more suitable on our water than a good fleet of Flying Dutchmen, which was perhaps fortunate as we had to set our sights high and work hard. We had some rapid surprises; the first was that under nearly all conditions Tempest had a comparable performance with the best of the Flying Dutchmen. I expected this to windward, but never hoped for it off the wind in planing conditions, yet we found that Tempest would tear along just about as fast in a plane. We also found that Tempest was faster in light airs. As was anticipated she showed up a little less favourably under the conditions in which the lighter Flying Dutchman would just plane and Tem-pest, with her 500-lb. keel, just would not.
This planing ability was well be-yond my expectations. Certainly the design was intended to produce a boat which would plane fairly readily, but the main objective was that Tempest should best the other boats in the Trails, and I felt certain that some of those would almost ignore planing ability and would aim at speed to windward and light weather performance, both of which are characteristics which conflict with the design of fast planing boats. In any case, it was obvious that a keelboat, carrying 500 lb. of ballast, could not expect to plane as often as a centreboarder and, therefore, to sacrifice windward ability and light weather performance by putting too much emphasis on planing performance would have been a dangerous chance to take. The hull shape was, therefore, a compromise type and certain features which make for out and out planing were not used. For this reason mainly, the transition between the normal displacement sailing of the Tempest into planing is more gradual
than for high performance centreboarder types. She does not accelerate and lift in the same way, nor is she intended to.
John and Cliff, being very per-ceptive sailors, soon evolved a tech-nique for getting the best out of Tempest. This, together with the fact that they never failed to take her out even in the worst weather, produce supreme confidence in the boat and in themselves. They felt that Tempest was invincible, and no doubt this helps.
We tried to think of everything, but I made one stupid mistake in using an untested rudder of a slightly modified shape for the IYRU Trials and it broke in the third race, forcing her to retire when leading. Otherwise our feeling that Tempest was invincible would have been fully justified, for it was the only one of the nine races she did not win. We returned to the original rudder for the rest of the Trials.
During the Trials, Tempest had won under every condition from very light airs to a really strong blow. She had also sailed with 40 kilos (88 lb.) of sand ballast in the cockpit to prove that her performance was not solely due to light-ness, and that if subsequent building in plastics made her a little heavier, she would not be inferior to the other trial-ists.
At the end of the Trials, which were conducted very efficiently, it was announced that no further Trials would be required and that the Selection Committee would recommend to the IYRU Permanent Committee Meetings in November the adoption of the Tempest class as the new International Two-man Keelboat. Some members of the Selection Committee, including the Chairman Jan Loeff, were in favor of granting immediate International status, so that the impetus derived from the Trials would be maintained in estab-lishing the new class. However, the main body of opinion in the IYRU was against this.
Naturally, there is much pleasure to be gained from producing a design which ultimately is successful, but in the case of the Tempest it went much further than this. Throughout the whole campaign there was wonderful

co-operation from the builder, sailmakers and everyone else connected with the preparation of the boat. Also, we all hoped that perhaps the Tempest would introduce all over the world a really new and intriguing facet of sailing—the high performance planing keelboat.
Draft rules and measurement plans were submitted by me at the Trials to the Selection Committee, as I had thought that this would be a require-ment from every competitor, for only with such rules could the development and future of the classes be assessed. However, I think that Tempest was the only boat to go to the Trials with com-prehensive rules. I believe that in future all entries at similar Trials should sub-mit draft rules.
At the end of the Trials Beecher Moore, who was one of the Selection Committee, was asked to work with me to develop the rules further before final submission to the IYRU. Beecher and I, though to some extent business rivals in as much as he is a director of Jack Holt Limited, have been friends for a great many years, and I have crewed for him in Merlin Rocket and Hornet Championships and he has crewed for me in National 12 Championships. He has, of course, been closely associated with the development of Jack Holt’s very successful classes. Working on the Tempest rules was stimulating, and we quickly had the rules ready for presentation to the IYRU Conference. One of the principles was that all molds for plastic boats should come from one source and be derived from a master “plug” or pattern.
Although the original stipulation by the IYRU had been that the class should be for construction in one material only, and it was generally as-sumed that this would be plastic, representatives from both Holland and Sweden had asked at the Trials that timber construction should also be permitted. The rules that we prepared, therefore, allowed for both forms of construction and to some extent influenced the way in which the rules were drawn up, and the final form of the plastic boat.
Meantime, my prototype Tempest had gone off on demonstrations and boats had been built for Sweden and the U.S.A. Enthusiastic reports began to be received. More than sixty builders ap-plied for licences. The plans and specifi-cations for timber construction and the plans for plastic construction were sub-mitted to Lloyds very soon after the Trials and its opinion eagerly awaited. Meanwhile investigations on suitable production of the plastic boat were made. I hope it will be thought natural that, as Richardsons had supported the project so well prior to the Trials, I wished them to maintain an interest in the production of the boat, provided of course that this did not conflict with the future welfare of the class. Richardsons themselves had no experience in plastic building but were keen to find a subcontractor for the mouldings and assemble and finish the boats themselves, ultimately aiming to produce their own mouldings as experience was gained.
Time was ticking away and I thought it essential to have a plastic boat available at the IYRU November Meetings. Lloyds’ comments had not come through, and after several at-tempts to get its report it was declared that, if a plastic boat was to be produced by November, it was essential to go ahead without further delay. It was fortunate that we did, as the report eventually came through on 1st October, exactly a month before the IYRU Meetings at which the boat had to be shown. Had we waited for the report it would have been impossible to have produced a boat in time.
Having finished to our satisfaction the Class Measurement Rules, Beecher shook me to the core one day by saying, “Now you must produce the Class Con-stitution and we will form a Caretaker Committee.” The Constitution was drafted and I invited various people to serve on the Committee. Beecher was elected Chairman and under his leadership this Committee has been indefatigable and quite first class, and Dinah White has done a tremendous amount of work as Class Secretary. We held a meeting before the IYRU
Conferences and made a few amend-ments to the class rules, which were circulated to IYRU Delegated in October.
We had hoped that the plastic prototype would be ready for sailing before the IYRU Conference, but in fact she was only finished in time for us to rig her outside the Royal Thames Yacht Club, where the meetings were held, at 2 o’clock at night after the first day of the Conference. The Wraysbury Sailing Club had kindly given us facilities for the wooden prototype to be sailed there if any IYRU Delegates wished to try her.
Various IYRU Sub-committees worked very hard to go through the Tempest rules and constitution during the Conference, and it was a most inter-esting and exciting time. At the end of it the Class was given official International status.
Immediately, Richardsons were under pressure from many directions to produce official molds to the ratified rules and to send boats to Boat Shows at New York, California, Zurich, Hamburg, Genoa, Paris, Amsterdam, Toronto, and, of course, London. The boat for California had to be shipped within about three weeks. The molds were rushed through and the boats were produced and shipped in time.
The result of this attempt to satisfy the demand to have the Tempest at the major boat shows was very nearly disas-trous. The molds did not have time to cure properly and the stiffeners and framework in which they were support-ed caused distortions. The hulls were shoddy and of a low standard of finish. Deep was the gloom.
There was only one course to take—to start again and build new pat-terns, pre-production molds, “plugs” and production molds. It was necessary to go right back to the beginning, as the original pattern for the hull had been damaged beyond repair during the making of the first plastic deck mould.
I went to Paris, New York and Am-sterdam, as well as, of course, London, and there faced the embarrassment of hearing the criticism of many disappoin-ted potential Tempest owners.

Meantime, the IYRU itself met complications. Arrangements were being made for the IYRU to license boat builders to produce Tempests, but it was found that the IYRU did not exist as a legal body. Now it was necessary to form holding companies to administer licences properly. This all took time.
Richardsons had by now formed a new company specialising in plastics and were employing plastics experts. They were making all the molds them-selves, and great care was taken. As the rules of the class stipulated that all building would normally be in the hands of a limited number of selected builders in each country, and that normally there would only be one where the territory could be adequately served by that number, and because these builders would be approved by Lloyds and known to be amongst the best, it was essential that the molds should be of a very high standard indeed. Also, it was intended that all molds had to come from the same “plug” and as boats would be produced from these molds for perhaps the next twenty years or more, only the best was good enough.
Experts came from the U.S.A. and many others offered advice from several parts of the world. Each one had differ-ent ideas on how the molds should be constructed, but the molds were ready by March and immediately boats were produced from them.
During all these tribulations, when it sometimes seemed to me that the Tempest Class would never get going as it had promised so well to do, there was a cheering event which revived us. We entered a Tempest in Yachting’s impor-tant One-of-a-Kind Races in Florida, U.S.A. at the request of the organisers. Richardsons had sent over one of the early plastic boats, which we knew to be overweight and not up to the quality for which we aimed. We had sails made by Jack Holt Limited and Musto and Hyde, and used these on the plastic prototype on the Hamble to assess them. John Oakeley agreed to go out and take the helm and Ernie Dean, an excellent A-merican Flying Dutchman crew, took on the job as trapeze man.
It was not an easy operation. The Star class made an all out effort against the Tempest and chose Dick Stearns, former World Champion and 1964 O-lympic Silver Medalist, as helmsman. The Tempest, apart from being over-weight, was taken straight from her shipping crate and had to be sailed immediately, without any real opportu-nity for tuning. Certainly at least one important tuning modification should have been carried out—the moving in-board of her jib fairleads—but this could not be done to this plastic boat in the time available.
The races were in predominantly very light to light airs. The Tempest won three of the five races and the Star won two in very light going indeed. The conclusion was that in wind speeds of 3 knots and under the Star was faster than the Tempest, but at wind speeds above this Tempest became increasingly superior, and the indication was that at moderate speeds she would really have trounced the Star. She received very favourable reports from the yachting magazines.
Lloyds had required certain modifi-cations to be made to the original con-struction; mainly these concerned addi-tional stiffeners. Lloyds had also made some helpful recommendations on the laminate specifications to make it suit-able for building throughout the world.
As soon as the boats were again in production, another snag arose. I had fixed the minimum weight rule at what I thought was reasonable for the plastic boat as originally specified. Now, pro-ducing to the amended specification, Richardsons found they could not get the weight down to the minimum, and boats were coming out between 50 and 70 lb. overweight. Keen racing owners were refusing to take them at this weight. Only by disregarding the rules or the specification could Richardsons build boats which they could sell.
It was suggested that the minimum weight should be raised, but I dug my toes in to resist this and the Class Com-mittee backed me up. Instead, the specification was re-amended and Lloyds’ approval given for construction
with fewer stiffeners (as originally de-signed) and a lighter deck laminate.
Lloyds had, some weeks earlier, made various tests on a Tempest, the results of which they found impressive. A boat was suspended with the bottom of the keel 7 ft. 6 in. from the water and she was dropped from that height. No signs whatever of damage were found. She was then supported under each end and 300 lb. weight applied amidships. The hull deflected only 7/32 in. and, ten minutes after removal of the weight, had completely regained its original shape, though still supported at the ends only.
It was now May. At last everything was set to go. Boats had been proved very strong, yet were down to the target weight. Molds were being shipped to licensed builders at the rate of one every fortnight. Production was up to three or four boats a week in England.
A keel hoisting device was then in production and improved trailers and launching trollies were also produced. The keel hoisting gear works on the screw jack principle and can be posi-tioned and the keel released and raised within four minutes, with little effort. This undoubtedly is an important fea-ture for many parts of the world.
In spite of annoying delays it is now, as I write this, only eighteen months since the IYRU Trials took place and yet we now have an Inter-national Class and have successfully held European Championships this year and are organising World Champion-ships in 1967. Tempests are being built in the U.S.A., Canada, France, Italy, Holland, and licenses are being negotiated for Australia, West Germany, Austria, Sweden, Argentina, South Africa, and New Zealand. Probably no International Class has previously made such rapid progress since its debut, or been formed on firmer foundations. I hope that we can look forward to twenty or more years in which the Tempest will give sport and pleasure to people all over the world.

Appendix C
THE CRUISING TEMPEST In the early 70s, Roger and Marty Gilbert’s US-44 was one of about 20 Tempests at the Noroton Yacht Club on Long Island Sound.
In 1975, Roger wrote the following account of one of their adventures.
22’ INTERNATIONAL TEMPEST • Self Bailing Cockpit • Sleeps 2 in luxurious 8 foot bunks (slightly
obstructed) • Unlimited headroom (in dry weather) • Substantial storage (hanging locker some-
what limited) • Flexible galley • Unique Drop® Head (no worry about anti-
flushing laws) • Excellent speed under sail • Regulation size 4 foot auxiliary
Ridiculous, isn’t it! Well, we’re not sure you’d ever sell a Tempest with an ad like that, but it is all truth! The Tempest is a great cruising boat!
In July, my wife Marty and I spent one of the most enjoyable long week-ends ever aboard our “Cruising Tem-pest.” A “Cruising Tempest,” by the way, is a Tempest with several pieces of non-regulation gear: • Ice Chest: A large foam-insulated
picnic-type lashed down starboard side forward while sailing and placed in the rear cockpit while at anchor.
• Stove: Two-burner fold up sterno placed on a wood board for insula-tion.
• Boom Tent: A standard 9’ by 12’ gro-mmetted tarpaulin is an excellent tent. The tarp is placed over the boom and lashed down to the spinnaker sheets. The boom is then raised as far as possible on both ends. Complete sitting room results.
• Sleeping bags.
• Anchor: 8 lb. Danforth with chain, placed forward of the mast.
• Running lights: Red and green bat-tery-operated lights lashed forward of the headstay and a single white light tied onto the rear end of the tiller. These are modified bicycle lights and available at J. Bliss and other fine stores.
• Box of batteries: The batteries don’t last too long.
• Safety lights and whistles: Attached to life jackets for night sailing. These were single battery lights with switches ... not too reliable so we added the whistles.
• Life lines: A 7' long ½" line with a heavy hook on end, tied around waist and then hooked to some line on the boat. Note: These last two items are es-
sential for me for night sailing as I have developed a great propensity and several excellent techniques for falling out of the Tempest. • Charts, Parallel Rule, Pencil, etc.
• Cruising Guide to the New England Coast by Duncan and Waite. Publ-ished by Dodd, Mead, and Co., Inc.
• First Aid Kit: 1 Quart Mount Gay Rum.
After assembling this equipment plus food, clothing, and miscellaneous reading matter, including a useful Sears catalog, we said, “It’ll never go aboard.” Wrong! The lazarette has an amazing amount of storage space and just keeps gobbling up more and more. (Of course, it may take half an hour to retrieve a toothbrush unwittingly stowed first.)
We had planned to leave after work Thursday but were slightly delayed due to YMCA camp graduation. Finally, complete with life jackets, lights, and whistles, we pulled away from the Nor-oton Yacht Club at 1 a.m. Friday.
It was a truly beautiful, clear, moonlit night with a 10–12 knot northerly; no sea, no power boat chop. A little cool, but we were dressed for it. We sailed east with no particular destination in mind. After three hours of idyllic sailing, the “Great Sleep” came upon us and we headed north up into Black Rock Harbor (just west of Bridgeport). At 5 a.m. we anchored (without tent), moved the ice chest, and slept. We had covered 17 miles in 4
hours (averaging 4.25 knots) against the tide.
At 9 a.m. the sun was bathing our sleeping bags and took away any re-maining chill from the night before. A healthy swig from the Mount Gay bottle took the place of toothbrushing (re-member the toothbrush was somewhat inaccessible) and orange juice. Marty had made “instant” breakfast consisting of hard boiled eggs, roast beef sandwich-es, and hot black coffee (from a ther-mos). Our fold up stove stayed folded up.
The northerly held and varied be-tween 8 and 12 knots. We continued our eastward sail on a fair tide across the mouth of Bridgeport Harbor toward Stratford Point. On the west side of Stratford Point (“Point No Point”) we became too interested in some beach houses and ran aground. As the tide was ebbing, this was a small panic. However, my jumping overboard light-ened the load enough so we could push it off. (You’ll never do that on your 40--footer!!)
With the wind abeam and a fair tide we made 24 miles in 4 hours (6 knots average) and reached Pine Orchard Harbor at 2 p.m. This is just east of Branford and inside the Thimble Islands. The Cruising Guide described the Pine Orchard Club as “the only club on Long Island Sound that has every-thing” ... an apt description! After some difficulty in persuading the authorities that this was a legitimate cruising yacht from the Noroton Yacht Club, they were very hospitable, gave us a mooring and use of the club facilities, and allowed us dinner ashore. (Our sterno cans are still intact.) We spent an uneventful night under our tent, awoke, had another instant breakfast complete with Mount Gay (we never did find the toothbrushes) and coffee (we refilled the thermos the night before).

We left the mooring at 10 a.m. Sat-urday to begin our 40-mile sail home. The wind was northerly, had lightened to 5–8 knots. We had a pleasant morning sail under spinnaker until it died altogether outside New Haven Harbor about noontime. The hot sun eventually kicked up a thermal south-westerly which pulled us along to the entrance to Southport Harbor at 3 p.m. There, we “hove to” for a swim and continued into the harbor. The Pequot Y.C. launchman put us on a fore-aft mooring in this beautiful river harbor. Having been so successful with leaving our sterno stove unused, we walked a
couple of miles to the Westport Steak and Brew for dinner, then retired to listen to the Pequot River traffic all night.
On Sunday, we tacked out of this narrow river, running aground again in the process, sailed the remaining 13 miles home against a light southwest-erly, and arrived in time to see (but not quite reach) the start of the Sunday Tempest Race.
Conclusion — We had a great time! More fun than we would have had on a larger, more luxurious cruiser. The Tempest is an excellent boat for cruising. It is fast. We covered 81 miles
in 17 hours: an average of 4.8 knots overall in a variety of wind and tide conditions. Our guess is that the 22-foot Tempest will sail with the average 36–38 foot cruising boat.
There is no engine aboard, of course, but the boat will move in the slightest breeze and you always have the paddle. To get around the auxiliary, do not plan definite itineraries and try to have an alternate plan in case the wind dies and you can’t get home Sunday night. (Such as: leave the boat and take the train home or call the boss and take a week off, etc.) As for the drop® head, we’ll leave that to your imagination.

Appendix D
SOURCES OF INFORMATION
ISAF (UK) Ltd Ariadne House Town Quay, Southampton Hampshire SO14 2AQ United Kingdom http://www.sailing.org/ +44 (0)2380 635111
International Tempest Association David W. McComb, President Post Office Box 1695 Bolton Landing, New York 12814 (H) 518-644-3268

Appendix E
BASIC DIMENSIONS AND MEASUREMENTS
Reference Measurements Length Bow to forestay at deck 10" minimum Forestay at deck to jib lead 8' 5" approximate Jib lead to chainplate 15" approximate Mast heel to forward bulkhead 4½" Masthead to transom 29' 8" to 29' 10" Standing Rigging Length Material Forestay1 23' 1/8" 1x19 wire To mast heel2 15" Shroud1 22' 3-3/8" 1/8" 1x19 wire To mast heel2 13¼" Diamond stay1 18' 1" 3/32" 1x19 wire Preventer3 11" 1/16" braided nylon Backstay3 28' 10" 3/32" 1x19 wire To mast heel1 10" Backstay control line 17' approximate 5/16" braided polyester Trapeze wire 3/32" 1x19 wire To handle grip2 30" To bottom ring2 7" Trapeze shock cord4 8' relaxed 3/16" shockcord Main halyard4 28' 3/32" 7x19 wire Main halyard tail 28' approximate 1/4" spliceable line Jib halyard4 24' 3/32" 7x19 wire Jib halyard tail 25' approximate 1/4" spliceable line Spinnaker halyard 55' approximate 1/4" braided polyester Topping lift 3/32" 7x19 wire Topping lift downhaul 3/32" 7x19 wire Mast foot to hook3 7' 9½" Running Rigging Length Material Mainsheet 35' to 40' 3/8" braided polyester Traveler control 20' to 25' 5/16" braided polyester Jib sheet 35' 7/16" braided polyester Spinnaker sheet 72' to 78' 1/4" braided polyester Twing line3 12' 1/4" braided polyester
Notes 1. Finished dimension with fittings, measured from black band at hounds. 2. Distance measured from mast heel with rigging stretched along the mast. 3. Finished dimension, not including end fittings. 4. Unfinished dimension, long enough to cut to fit.

GLOSSARY
Becket — A fitting on a turning block for attaching the end of a line. Tempest application: mainsheet block on the traveler car.
Bridge — Fiberglass molding in the cockpit for supporting the traveler.
Bullet block — A small block for ¼” line maximum.
Cam cleat — Cleat with moving cams. Tempest applications: mainsheet, spinnaker halyard and sheet, twing line, control lines.
Chainplate — Fitting at the gunwale for attaching the shrouds.
Clam cleat — Cleat with no moving parts. Wedges line between “V”-shaped ribs.
Clew — Lower aft corner of the mainsail and jib. Lower corners of the spinnaker.
Cunningham — Control line for tensioning the luff of a sail.
Foot — Bottom edge of a sail. Gelcoat — Pigmented
substance forming the surface of most fiberglass parts.
Guy — Sheet attached to the windward spinnaker clew.
Head — Top corner of a sail. Also, top of the mast.
Heel — Bottom of the mast. Hounds — Fitting on the mast
for attaching the shrouds and forestay.
Lazarette — Hatch under the tiller aft of the cockpit.
Leech — Aft edge of the mainsail and jib. Sides of the spinnaker.
Luff — Forward edge of the mainsail and jib. Also, windward leech of the spinnaker when it is flying.
Masthead fly — Wind indicator.
Partners — Fitting attached to the forward cockpit bulkhead for bracing the mast.
Preventer — Light wire, line, or shock cord between diamond spreader tips and main shrouds.
Ratchet block — Block that turns in only one direction, enabling sheets to be held under load.
Roller reefing — Means of furling the jib by rotating its luff.
Running rigging — Lines for controlling sails, e.g., sheets, traveler, twing lines, and vang.
Spinnaker launcher — Tube between foredeck and cockpit for
retracting the spinnaker. Also called “spinnaker chute.”
Spreader — Metal strut attached to the mast for holding shrouds apart.
Standing rigging — Rigging for supporting the mast, e.g., forestay, shrouds, diamond shrouds, and backstay.
Step — Frame formed by keel braces and bolts for supporting the mast foot.
Tack — Lower forward corner of the jib and mainsail. Also, windward clew of the spinnaker when it is flying.
Tank — Deck and bulkheads that form the cockpit sides.
Twing — Control line running freely along the spinnaker sheet. When trimmed, leads the sheet to the deck near the chainplates.
Topping lift — Line for controlling spinnaker pole height.
Transom — Aft-facing surface of the hull.
Vang — Arrangement for preventing the boom from lifting under wind pressure.

INDEX
Backstay 3, 8, 10, 12, 15, 17-19, 21-24, 26, 28-31, 43, 44 “Backstay Rule” 19, 24 Bailers 8, 14, 31, 33, 37 Blocks 10, 12-15, 18, 21, 22, 34 Boom 4, 5, 7, 8, 10, 13, 15, 16, 18, 19, 22-24, 26-28, 30-32, 34, 38, 41, 44 Buoyancy Compartments 3, 33 Cleats 6, 13-16, 18, 22, 27, 28, 32 Control Lines 4, 14, 34, 44 Diamond Stays 16, 17 Forestay 3, 5, 9, 12, 13, 15-17, 21-25, 27, 31, 32, 43, 44 “Forestay Rule” 25 Hull IV, V, VI, 1-6, 8-10, 12, 16, 31-34, 36-41, 44 Jib 1-3, 5, 7, 9, 12-20, 22-32, 37, 38, 40, 43, 44 Jib Halyard 5, 12, 15-18, 20, 32, 43 Jib Sheet 12, 13, 20, 24, 26-29, 43 Keel IV, V, 1, 3, 5, 6, 8-10, 15, 28, 31-33, 37-39, 41, 44 Main Halyard 18, 21, 30-32, 43 Main Sheet 10, 13, 14 Mainsail 4, 7, 8, 10, 12, 18-24, 26-31, 38, 44 Mast IV, 1-4, 6, 8-10, 12-18, 20-23, 27, 28, 30-34, 36, 38, 41, 43, 44 Partners 4, 6, 9, 10, 12, 15, 16, 21, 22, 31, 44 Reaching 16, 26, 31, 37 Rudder 2, 3, 6, 7, 15, 27, 31, 36, 39 Running 4, 12, 14, 17, 21, 26, 37, 41-44 Sandbag 2, 37, 39 Shrouds 4, 5, 9, 16-18, 21, 22, 44 Spinnaker V, 1-3, 8-10, 12, 14-19, 21-23, 25-30, 32, 36, 38, 41-44 Spinnaker Halyard 9, 15, 18, 38, 43, 44 Spinnaker Launcher 3, 8, 18, 22, 27-29, 44 Spinnaker Pole 10, 12, 16, 17, 23, 25, 27, 28, 32, 38, 44 Spinnaker Sheet 14, 16, 19, 21, 26, 30, 43, 44 Spreader 4, 16-20, 23-26, 28, 29, 44 “Spreader Rule” 23-25, 29 Tiller V, 6-8, 10, 15, 18, 27-31, 41, 44 Trailer IV, 1, 4-6, 8-10, 32-34 Trapeze IV, V, 1, 2, 7-9, 12-14, 16-19, 25-27, 29-31, 34, 37, 38, 40, 43 Traveler 7, 8, 12-14, 22, 24, 26-30, 43, 44 Twing 14, 16, 22, 25, 26, 28, 30, 43, 44 Vang 12, 15, 18, 19, 23, 26, 30, 38, 44 Waves 4, 5, 16, 23, 26, 29, 30


![complex 1: sandbag - Men's Fitness Magazine€¦ · sandbag is resting on your shins [B]. Now, explosively drive up the sandbag — as it reaches chin level, roll it back towards](https://img.pdfslide.net/doc/110x75/606aa7f87509f94d48110b4b/complex-1-sandbag-mens-fitness-magazine-sandbag-is-resting-on-your-shins-b.jpg)