Embed Size (px)
DESCRIPTION
The Sicilian Scheveningen: Move by Move
Citation preview
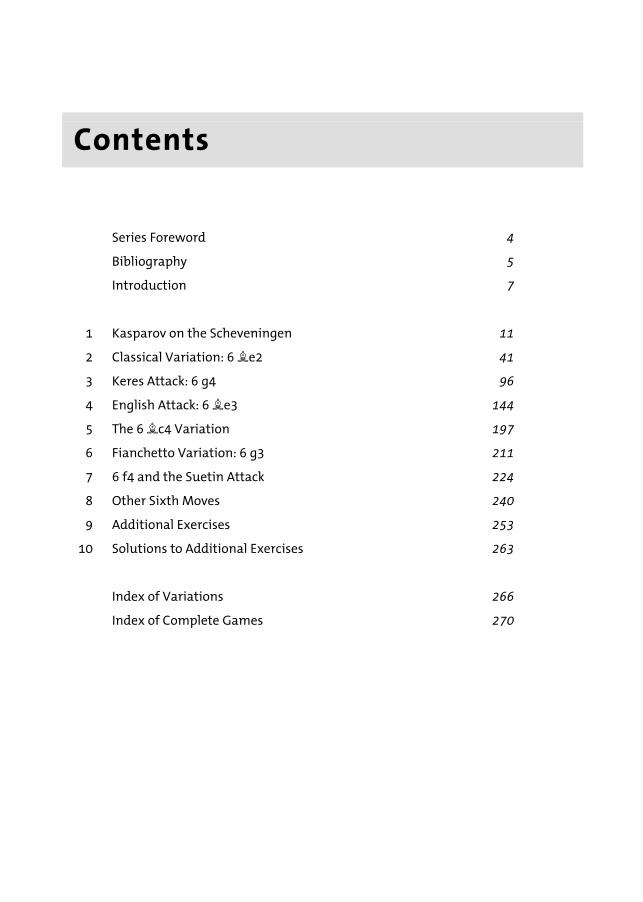
Contents
Series Foreword 4
Bibliography 5
Introduction 7
1 Kasparov on the Scheveningen 11
2 Classical Variation: 6 Íe2 41
3 Keres Attack: 6 g4 96
4 English Attack: 6 Íe3 144
5 The 6 Íc4 Variation 197
6 Fianchetto Variation: 6 g3 211
7 6 f4 and the Suetin Attack 224
8 Other Sixth Moves 240
9 Additional Exercises 253
10 Solutions to Additional Exercises 263
Index of Variations 266
Index of Complete Games 270

4
Series Foreword
Move by Move is a series of opening books which uses a question-and-answer format. One of our main aims of the series is to replicate – as much as possible – lessons between chess teachers and students.
All the way through, readers will be challenged to answer searching questions and to complete exercises, to test their skills in chess openings and indeed in other key aspects of the game. It’s our firm belief that practising your skills like this is an excellent way to study chess openings, and to study chess in general.
Many thanks go to all those who have been kind enough to offer inspiration, advice and assistance in the creation of Move by Move. We’re really excited by this series and hope that readers will share our enthusiasm.
John Emms,
Everyman Chess

7
Introduction
Welcome dear reader! You’ve started by opening the book at the start (unless you’ve first skipped to later chapters, and are referring back to the beginning to wonder what on earth is going on), so there is no better time than the present to introduce the Sicilian Scheveningen: 1 e4 c5 2 Ìf3 e6 3 d4 cxd4 4 Ìxd4 Ìf6 5 Ìc3 d6
W________W [rhb1kgW4] [0pDWDp0p] [WDW0phWD] [DWDWDWDW] [WDWHPDWD] [DWHWDWDW] [P)PDW)P)] [$WGQIBDR] W--------W
So why is it called the ‘Sicilian Scheveningen’? Well, it was first played by Max Euwe in the Scheveningen tournament of 1923 in his home country of the Netherlands, against two of the best players of that era, Maroczy and Spielmann. As with many chess openings, it was named after the place where it was first played, but it could just have easily been called the ‘Euwe Sicilian’ or something similar. However, we will let Max Euwe off, for he was later to get his glory by winning the World Championship title from Alexander Alekhine in 1935.
Now we come to the critical part: why should you pick the Scheveningen Variation, in-
stead of one of the other supposedly more popular Sicilians such as the Najdorf or Dragon? Few of us are interested in spending good time and money travelling to a tournament
or league match, only to lose a few games because we weren’t up to date with the latest theory that the young whippersnapper across the table has had time to study. Sounds fa-miliar?

The S ic i l ian Scheveningen: Move by Move
8
A lot is made of the theory and remembering of variations, but with the computer gen-eration dominating nowadays, the advantage to be had is from understanding the posi-tions that arise from your openings. Let me quote the strong American/Estonian Grand-master Jaan Ehlvest here: ‘Without understanding the Scheveningen, you cannot play the Sicilian’. Sure, he may be biased (and you’ll see some of his games in this book), but I’m go-ing to have to say that I agree with him!
The advantage of the Scheveningen is that it is much more of a system, rather than just an opening where lots of moves need to be remembered by rote. Therefore general under-standing is likely to get you further than in other openings – perfect against that young whippersnapper playing White sitting on the other side of the board! (This sentence holds true even if you are a very young player yourself!)
Note the more or less constant pawn structure in the Scheveningen.
W________W [WDWDWDWD] [0pDWDp0p] [WDW0pDWD] [DWDWDWDW] [WDWDPDWD] [DWDWDWDW] [P)PDW)P)] [DWDWDWDW] W--------W
Black often gets the queenside action going with ...a6 and ...b5, and sees how White de-velops before deciding on what to do next. This is where knowing the different plans really helps! Sometimes White will castle queenside, in which case a potential counterattack down the c-file is possible; sometimes they castle kingside, but still try and attack with a pawn storm on the same side.
The black set-up is extremely solid. Those central ‘beasts’ on d6 and e6 do a good job covering the central squares. You may be thinking the d6-pawn is slightly backward and therefore weak, but you can allay those fears right now, because this pawn is heavily de-fended and White can’t really get at it (unless Black were to make a mistake). Moreover, sometimes it advances to d5 at an opportune moment and becomes a formidable asset.
Theory-wise, there is also far less to learn in the Scheveningen than in the Najdorf or Dragon. Forgetting a move isn’t likely to land you in as much hot water as it would in those particular variations, so long as you are aware of the key ideas. 6 Íg5 causes many Najdorf players to lose sleep, while 6 Íe3 can lead to reams of theory against the Dragon. Those moves are playable against the Scheveningen too, but are not of the same forcing nature. Basically you shouldn’t be wiped off the board in double quick time! However, that doesn’t

Introduct ion
9
mean that you don’t need to learn some theory – whatever opening you choose to play you will have to learn theory, but for those who seek a more ideas-based opening with chances to play for a win, the Scheveningen is ideal.
There is also a problem for your opponents if they wish to avoid the Scheveningen. After 1 e4 c5 2 Ìf3 Najdorf players must play 2...d6 to reach their beloved opening, but we Schevy players can play 2...d6 or 2...e6 to reach our variation, making it harder for our op-ponents to prepare an anti-Sicilian line. Just another reason why I like this opening!
Finally, although I am aiming this book primarily at those who wish to play the black side of the Scheveningen, there are a lot of useful white plans and variations mentioned too, meaning that those who play the Open Sicilian should also find it useful.
What This Book Covers The lines I’ve decided to go for involve a quick ...a6, which leads play into Najdorf-style posi-tions. This can be said to be the ‘Classical Scheveningen’, whereas Scheveningen lines without an early ...a6 are known as the ‘Modern Scheveningen’. As you will see, this move order avoids many of the theoretical lines that White has at his disposal in the main lines of the Najdorf. Indeed, some of the games in this book started with a Najdorf move order, but I have changed them so they all start with a Scheveningen move order. The variations I have covered are also many of the most common in practice, so they are fairly theoretical. I have talked about why understanding the ideas behind the opening is very important, but let’s not be too much of a chicken!
The Format This book will follow a question-and-answer method, leading the reader through the open-ing and its variations while encouraging them to think. I believe this is suited perfectly to the Sicilian Scheveningen, because it is ideas-based and therefore it is the understanding of the resulting middlegame positions that arise which will be most useful to the reader.
Sometimes you will be asked to solve calculations, ‘choose a move’ (i.e. pick a move from an option of three), or think about what plan to choose in a certain position. So this book is very versatile in nature, and it should kill any boredom that may occur (not that that will be happening in the Scheveningen!).
Finally, as a recommendation for further study, you should look at the games of the players who crop up often in this book. Players such as Loek Van Wely, Sergei Movsesian and Garry Kasparov (of course!) show many nice middlegame ideas in their Scheveningen games which you can use too – and you may learn some new variations within the Sicilian Scheveningen along the way!
Acknowledgements Obviously it goes without saying that many thanks go to John Emms who has helped me throughout this, my second chess book for Everyman Chess. Thanks also to my students who have contributed questions that have ended up in this book – you are my perfect target au-dience! To my dad and family, for supporting me on my chess road, and finally to you, the

The S ic i l ian Scheveningen: Move by Move
10
reader – may your chess lives be enriched with this interesting and exciting opening!
Lorin D’Costa Golders Green, London
February 2012
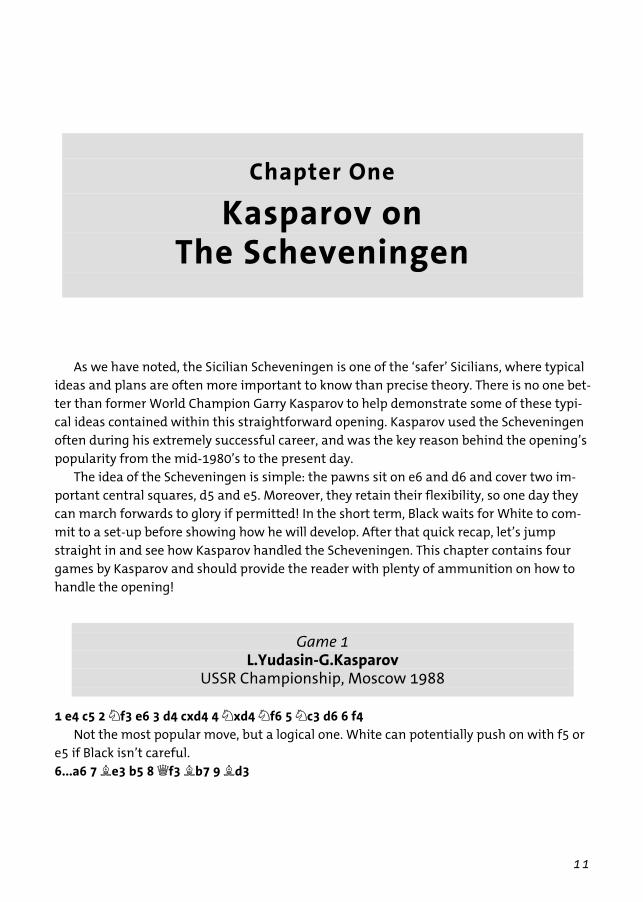
11
Chapter One
Kasparov on The Scheveningen
As we have noted, the Sicilian Scheveningen is one of the ‘safer’ Sicilians, where typical
ideas and plans are often more important to know than precise theory. There is no one bet-ter than former World Champion Garry Kasparov to help demonstrate some of these typi-cal ideas contained within this straightforward opening. Kasparov used the Scheveningen often during his extremely successful career, and was the key reason behind the opening’s popularity from the mid-1980’s to the present day.
The idea of the Scheveningen is simple: the pawns sit on e6 and d6 and cover two im-portant central squares, d5 and e5. Moreover, they retain their flexibility, so one day they can march forwards to glory if permitted! In the short term, Black waits for White to com-mit to a set-up before showing how he will develop. After that quick recap, let’s jump straight in and see how Kasparov handled the Scheveningen. This chapter contains four games by Kasparov and should provide the reader with plenty of ammunition on how to handle the opening!
Game 1
L.Yudasin-G.Kasparov USSR Championship, Moscow 1988
1 e4 c5 2 Ìf3 e6 3 d4 cxd4 4 Ìxd4 Ìf6 5 Ìc3 d6 6 f4 Not the most popular move, but a logical one. White can potentially push on with f5 or
e5 if Black isn’t careful. 6...a6 7 Íe3 b5 8 Ëf3 Íb7 9 Íd3
The S ic i l ian Scheveningen: Move by Move
12
W________W [rhW1kgW4] [DbDWDp0p] [pDW0phWD] [DpDWDWDW] [WDWHP)WD] [DWHBGQDW] [P)PDWDP)] [$WDWIWDR] W--------W
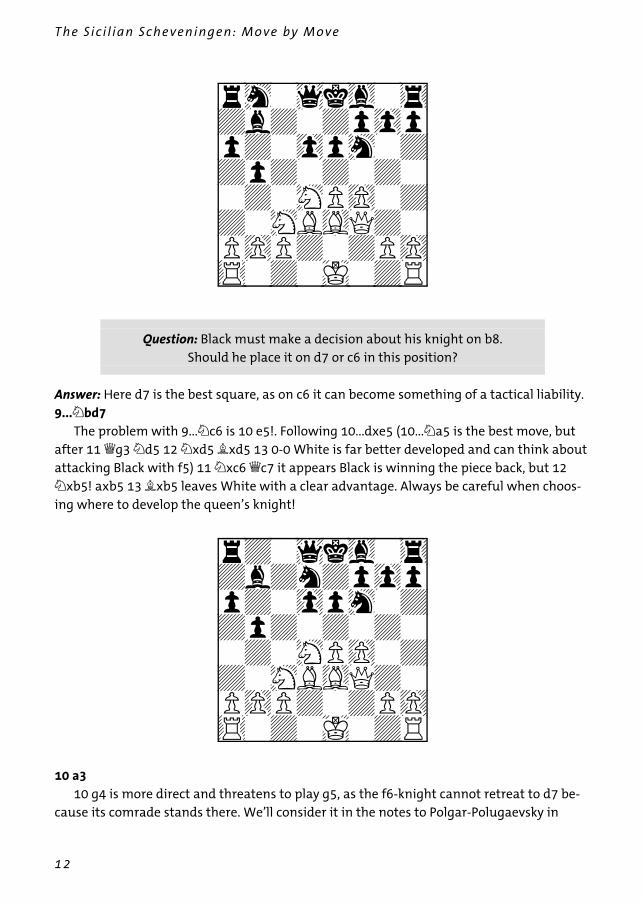
Question: Black must make a decision about his knight on b8. Should he place it on d7 or c6 in this position?
Answer: Here d7 is the best square, as on c6 it can become something of a tactical liability. 9...Ìbd7
The problem with 9...Ìc6 is 10 e5!. Following 10...dxe5 (10...Ìa5 is the best move, but after 11 Ëg3 Ìd5 12 Ìxd5 Íxd5 13 0-0 White is far better developed and can think about attacking Black with f5) 11 Ìxc6 Ëc7 it appears Black is winning the piece back, but 12 Ìxb5! axb5 13 Íxb5 leaves White with a clear advantage. Always be careful when choos-ing where to develop the queen’s knight!
W________W [rdW1kgW4] [DbDnDp0p] [pDW0phWD] [DpDWDWDW] [WDWHP)WD] [DWHBGQDW] [P)PDWDP)] [$WDWIWDR] W--------W
10 a3 10 g4 is more direct and threatens to play g5, as the f6-knight cannot retreat to d7 be-
cause its comrade stands there. We’ll consider it in the notes to Polgar-Polugaevsky in

Kasparov on the Scheveningen
13
Chapter Seven. With 10 a3 White tries to stop the threat of ...b4, but it does allow Black an extra move
to develop. 10...Îc8 11 0-0
W________W [WDr1kgW4] [DbDnDp0p] [pDW0phWD] [DpDWDWDW] [WDWHP)WD] [)WHBGQDW] [W)PDWDP)] [$WDWDRIW] W--------W
Question: How should Black develop the bishop on f8?
Answer: It is possible for Black to play it to e7 (the normal move), but also to fianchetto it on g7. Although this takes slightly longer to carry out, the pawn on g6 does nullify White’s light-squared bishop on the b1-h7 diagonal. 11...Íe7
As noted, 11...g6 and a kingside fianchetto is another way to play. This is an attempt to save some tempi over the game continuation, as Kasparov ends up playing ...Íe7-f6-g7 anyway. Here 12 Ëh3 Ìc5 13 e5 Ìd5 14 Ìe4 Ìxe4 15 Íxe4 Ìxe3 16 Ëxe3 Íxe4 17 Ëxe4 dxe5 18 Ëxe5 Ëxd4+ 19 Ëxd4 Íc5 20 Ëxc5 Îxc5 21 Îf2 Êe7 left Black a touch better in the double rook endgame in M.Llaneza Vega-A.Giri, European Championship, Rijeka 2010. 12 Îae1 0-0 13 Ëh3
With this move White gets his queen off the h1-a8 diagonal and hopes to threaten mate on h7 after a subsequent e5 push. Another idea is to play g4-g5 and kick the f6-knight away. 13...Ìc5!
As expected Kasparov shows impeccable understanding of the position. Rather than be-ing afraid of the e5 push, he counterattacks against e4 and at a stroke is able to exchange off the potentially dangerous piece on d3 that bears down towards his king on h7. The text also allows Black a square on d7 for his other knight, should he so need it. 14 Íf2

The S ic i l ian Scheveningen: Move by Move
14
W________W [WDr1W4kD] [DbDWgp0p] [pDW0phWD] [DphWDWDW] [WDWHP)WD] [)WHBDWDQ] [W)PDWGP)] [DWDW$RIW] W--------W
Question: Is it good for Black to play ...h6 in this position to prevent White’s potential attack down towards h7?
14...Ìfd7 Answer: Although 14...h6 is a move Black should certainly consider, especially as there is no bishop on e3 that can sacrifice itself on h6 any time soon, Black often goes for ...g6 in these Sicilian positions. This is because the h7-g6-f7-e6 structure is still extremely solid and the pawn on g6 blocks the bishop on d3 stone dead. The dark squares can also be covered with ...Îe8 and ...Íf8, which is an important defensive idea in the Scheveningen.
Indeed, as well as the text, 14...g6 15 f5 e5 16 Ìf3 Ìh5, threatening to come to f4, was also playable. 15 Êh1
Question: Why did White play Êh1?
Answer: Such moves are generally classified as ‘waiting’ moves. White tucks his king away in the corner and awaits developments. He wants to avoid any potential tricks on the g1-a7 diagonal, although now it walks into the line of the b7-bishop which could be potentially hazardous for White.
If White doesn’t feel like hanging around, he might lunge forward with 15 f5, but then Black has a nice counterattack in the centre with 15...e5 16 Ìde2 Ìf6 17 Ìg3 d5!. 15...Íf6

Kasparov on the Scheveningen
15
W________W [WDr1rdkD] [DbDnDp0p] [pDW0pgWD] [DphWDWDW] [WDWHP)WD] [)WHBDWDQ] [W)PDWdP)] [DWDRdRGK] W--------W
Exercise: Can White now go for 16 e5, attacking the f6-bishop and unleashing an attack on the pawn on h7?
16 Îd1 Answer: No! After 16 e5 Black has the shot 16...Ìxd3! when all the tactics work in his fa-vour: 17 exf6 Ìxf4 (17...Ìxf2+ 18 Îxf2 Ìxf6 also nets Black a clear pawn for nothing) 18 Ëg4 Íxg2+ 19 Êg1 Ëxf6 20 Íe3 Íxf1 21 Îxf1 e5 22 Íxf4 Ëg6 23 Ëxg6 fxg6 and White will emerge an exchange down for no compensation. 16...Îe8 17 Íg1
17 e5 Ìxd3 transposes to the note to the previous move.
W________W [WDr1W4kD] [DbDnDp0p] [pDW0pgWD] [DphWDWDW] [WDWHP)WD] [)WHBDWDQ] [W)PDWGP)] [DWDW$RDK] W--------W
17...g6 Again 17...h6 was playable, but here Black fianchettoes his king’s bishop before deciding

The S ic i l ian Scheveningen: Move by Move
16
how to strike back in the centre. In the Scheveningen it is all about flexibility. Black waits for the right time to strike back with an ...e5 or ...d5 break. 18 Ìde2 Íg7 19 f5
This is a typical move that White plays to try to launch an attack. Here, though, it seems rather loose, as now Black has a lovely square on e5 for his knight to hop into. A knight on e5 would be a wonderful piece, as it cannot be attacked (it is on an outpost), and defends the g6-square, as well as counterattacking against the c4- and d3-squares. 19...Ëe7 20 Íd4
W________W [WDrDrDkD] [DbDn1pgp] [pDW0pDpD] [DphWDPDW] [WDWGPDWD] [)WHBDWDQ] [W)PDNDP)] [DWDRDRDK] W--------W
Question: Should Black exchange the dark-squared bishops? If not, what should he do?
Answer: Although it wouldn’t be immediately disastrous for Black to do this, it would allow White to push on with f6 more easily. Black should generally not allow White to get a pawn to f6 as this can become a major thorn in his side. To prevent the exchange of bishops, Black can play 20...Ìf6, which attacks e4 and retains the flexibility to play e5 at some point, or 20...Ìe5, which places the knight on a secure square and also nullifies the scope of the bishop on d4. 20...Ìf6
20...Ìe5 was also playable to keep the dark-squared bishops on: 21 Ìg3 Ìcxd3 22 cxd3 Íc6 23 Ìge2 a5 (Black expands on the queenside, as he has everything in order on the kingside) 24 Ìf4 b4 25 axb4 axb4 26 Ìce2 exf5 27 exf5 Ëb7 and Black has a pleasant posi-tion.
However, 20...Íxd4 21 Ìxd4 Ìe5 22 f6 Ëf8 23 Ìf3! is one sample line showing the dangers of a white pawn emerging on f6. 21 Ëg3
Kasparov on the Scheveningen
17
W________W [WDrDrDkD] [DbDW1pgp] [pDW0phpD] [DphWDPDW] [WDWGPDWD] [)WHBDW!W] [W)PDNDP)] [DWDRDRDK] W--------W
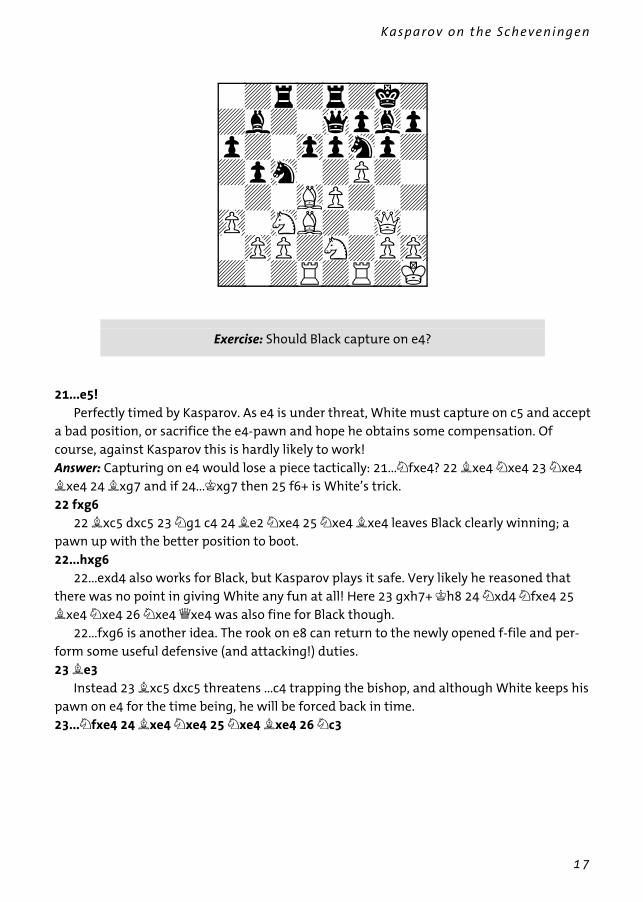
Exercise: Should Black capture on e4?
21...e5! Perfectly timed by Kasparov. As e4 is under threat, White must capture on c5 and accept
a bad position, or sacrifice the e4-pawn and hope he obtains some compensation. Of course, against Kasparov this is hardly likely to work! Answer: Capturing on e4 would lose a piece tactically: 21...Ìfxe4? 22 Íxe4 Ìxe4 23 Ìxe4 Íxe4 24 Íxg7 and if 24...Êxg7 then 25 f6+ is White’s trick. 22 fxg6
22 Íxc5 dxc5 23 Ìg1 c4 24 Íe2 Ìxe4 25 Ìxe4 Íxe4 leaves Black clearly winning; a pawn up with the better position to boot. 22...hxg6
22...exd4 also works for Black, but Kasparov plays it safe. Very likely he reasoned that there was no point in giving White any fun at all! Here 23 gxh7+ Êh8 24 Ìxd4 Ìfxe4 25 Íxe4 Ìxe4 26 Ìxe4 Ëxe4 was also fine for Black though.
22...fxg6 is another idea. The rook on e8 can return to the newly opened f-file and per-form some useful defensive (and attacking!) duties. 23 Íe3
Instead 23 Íxc5 dxc5 threatens ...c4 trapping the bishop, and although White keeps his pawn on e4 for the time being, he will be forced back in time. 23...Ìfxe4 24 Íxe4 Ìxe4 25 Ìxe4 Íxe4 26 Ìc3

The S ic i l ian Scheveningen: Move by Move
18
W________W [WDrDrDkD] [DWDW1pgW] [pDW0WDpD] [DpDW0WDW] [WDWDbDWD] [)WHWGW!W] [W)PDWDP)] [DWDRDRDK] W--------W
Exercise: Should Black capture on c2?
26...Íb7! Covering the d5-square. Now Black is just a safe pawn up.
Answer: Although 26...Íxc2 nets a second pawn, from a practical point of view this move would allow White some counterchances starting with Ìd5 ideas. After 27 Îd2 Íf5 28 Ìd5 Ëe6 Black is better, but there’s still work to be done. Here 28 Îxf5 gxf5 29 Íh6 Ëf6 30 Îxd6 Îe6 also wins for Black, but again why give the opponent any play?
The safest course of action is to play the position safely. The bishop on b7 covers the d5-square and prevents the knight from jumping into this nice square. 27 h4
White wants to play h5 to try and prise open the g-file towards Black’s king.
W________W [WDrDrDkD] [DbDW1pgW] [pDW0WDpD] [DpDW0WDW] [WDWDwDW)] [)WHWGW!W] [W)PDWDPd] [DWDRDRDK] W--------W

Kasparov on the Scheveningen
19
27...Îc4! Now the counterattack comes.
28 Íg5 28 h5 Îh4+ 29 Êg1 Îxh5 stops White’s counterplay dead.
28...Ëe6
W________W [WDWDrDkD] [DbDWDpgW] [pDW0qDpD] [DpDW0WGW] [WDrDWDW)] [)WHWDW!W] [W)PDWDPD] [DWDRDRDK] W--------W
29 Îd2 29 h5 Îg4 30 Ëe3 Îxg2 is crushing too.
29...Îg4 30 Ëd3 f6 0-1 White resigned as he is losing to the neat tactic 31 Íe3 Îxg2! 32 Îxg2 Ëh3+ and mate
on the following move. Kasparov made it all look so easy. He timed his centre pawn breaks perfectly and effi-
ciently dealt with any attacking ideas his opponent tried to generate.
Game 2
S.Movsesian-G.Kasparov Sarajevo 2000
1 e4 c5 2 Ìf3 d6 3 d4 cxd4 4 Ìxd4 Ìf6 5 Ìc3 a6 6 Íe3 This is the English Attack, which will be analysed in Chapter Four.
6...e6 7 f3 b5 8 Ëd2 Ìbd7 9 0-0-0 Íb7 10 g4 Ìb6 11 Ëf2 As will be discussed later in Korneev-Sasikiran, this Ëf2 idea is quite popular. Hopefully
Black will have had his morning cup of coffee and will realize there is a threat of Ìxe6 fol-lowed by Íxb6, but in reality White’s main idea is to move the queen out of the way of a ...Ìc4 fork. However, as we shall see, moving the queen away from the defence of the king has its drawbacks... 11...Ìfd7 12 Êb1?!
12 Íd3 Îc8 13 Ìce2 is nowadays a fairly main line, as we’ll see in the aforementioned

The S ic i l ian Scheveningen: Move by Move
20
Korneev-Sasikiran game. Why White needs to play like this will be shown by Kasparov. 12...Îc8 13 Íd3
W________W [WDr1kgW4] [DbDnDp0p] [phW0pDWD] [DpDWDWDW] [WDWHPDPD] [DWHBGPDW] [P)PDW!W)] [DKDRDWDR] W--------W
13...Îxc3! This sacrifice changes the balance of the game.
Question: Why can Black get away with such a move?
Answer: Black’s compensation is the fractured pawn shield in front of the white king and the fact that he can normally pick up the c3-pawn, meaning he is only one point down in the material stakes. Also, Black can attack quite fluently after the sacrifice – ...Îc8 and ...Ìa4 are coming fast and White is forced on to the defensive. If you still need convincing, just play through this game! 14 bxc3 Ëc7
14...Ìa4!? 15 Ìe2 Íe7 was also playable, but the knight can delay going to a4 as on b6 it stops White playing c4, trying to undouble the pawns.
A similar approach to Kasparov’s is 14...Íe7 15 h4 Ëc7 and after 16 Ìe2 Ìa4 (this use-ful attacking move is the cornerstone of Black’s attacking ideas in this line) 17 g5 d5 18 Îhf1 0-0 19 Íd4 e5 20 Íe3 b4 21 cxb4 Íxb4 22 exd5 Íxd5 23 c4 Íxc4 24 Íxc4 Ëxc4 25 Îxd7 Ëb5 26 Êa1 White had to resign in E.Llobel Cortell-R.Ponomariov, San Sebastian 2006, as 26...Ía3 would have been curtains for him. 15 Ìe2
White probably has to defend the c3-pawn at some point anyway. 15...Íe7 16 g5 0-0! 17 h4
Kasparov on the Scheveningen
21
W________W [WDWDW4kD] [Db1ngp0p] [phW0pDWD] [DpDWDW)W] [WDWDPDW)] [DW)BGPDW] [PDPDN!WD] [DKDRDWDR] W--------W
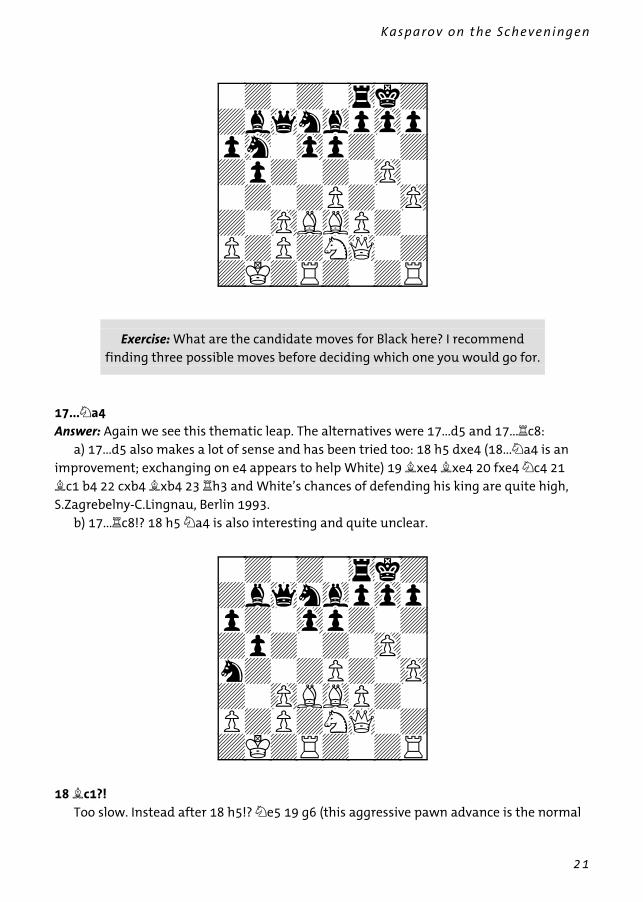
Exercise: What are the candidate moves for Black here? I recommend finding three possible moves before deciding which one you would go for.
17...Ìa4 Answer: Again we see this thematic leap. The alternatives were 17...d5 and 17...Îc8:
a) 17...d5 also makes a lot of sense and has been tried too: 18 h5 dxe4 (18...Ìa4 is an improvement; exchanging on e4 appears to help White) 19 Íxe4 Íxe4 20 fxe4 Ìc4 21 Íc1 b4 22 cxb4 Íxb4 23 Îh3 and White’s chances of defending his king are quite high, S.Zagrebelny-C.Lingnau, Berlin 1993.
b) 17...Îc8!? 18 h5 Ìa4 is also interesting and quite unclear.
W________W [WDWDW4kD] [Db1ngp0p] [pDW0pDWD] [DpDWDW)W] [nDWDPDW)] [DW)BGPDW] [PDPDN!WD] [DKDRDWDR] W--------W
18 Íc1?! Too slow. Instead after 18 h5!? Ìe5 19 g6 (this aggressive pawn advance is the normal

The S ic i l ian Scheveningen: Move by Move
22
way to attack; 19 h6 g6 blocks up the kingside, although the g7-square could be useful for White one day) 19...fxg6 20 hxg6 h6! (this is a common method of dealing with the g6 thrust – remember this one if you want to be a successful Scheveningen player!) 21 Íxh6 gxh6 22 Îxh6 Ìxf3 Black has a draughty king, but White’s king is fairly open too. More-over, Black has some serious threats here like ...Ìd2+ and ...Ìxc3+. 18...Ìe5 19 h5
19 f4? looks sensible to kick away the dangerous knight, but this only serves to help Black as the bishop on b7 can start to become involved: 19...Ìxd3 20 cxd3 d5! and if 21 e5 then 21...d4 attacks c3 and h1.
W________W [WDWDW4kD] [Db1wgp0p] [pDW0pDWD] [DpDWhW)P] [nDWDPDWd] [DW)BdPDW] [PDPDN!WD] [DKGRDWDR] W--------W
19...d5! 20 Ëh2 20 h6 can be played to which the reply 20...g6!, closing lines, should be selected. Nor-
mally h6 isn’t as good a try as g6 to open up the black king, but here Black must be wary of Ëg7 mating threats. That said, after something like 21 Ëg3 Íd6 22 Ëg2 Îc8 the initiative is still with Black. 20...Íd6!
Not just any move will do here: for example, 20...b4? 21 exd5 Íxd5 22 Íxh7+ Êxh7 23 g6+ Êg8 24 h6! when suddenly it’s White who has all the fun! After 24...Ëc4 25 Îxd5 (forced to stop mate on a2) 25...Ëxe2! 26 Îxe5! Ìxc3+ 27 Êa1 Ëxh2 (if 27...Ëc4 28 Îa5) 28 Îxh2 Íd6 29 hxg7 Êxg7 30 Íh6+ Êg8 31 gxf7+ Êxf7 32 Íxf8 Íxe5 33 f4! White stays material ahead. A long variation, but Black does need to watch for such counter-threats. 21 Ëh3?!
Again this is too slow. 21 Íf4! (Kasparov) was better, giving greater chances to defend. Following 21...b4! 22 cxb4 Îc8 23 Îc1 d4! 24 g6 it’s a bit of a mess. Such a position would certainly be difficult to play over the board! 21...Ìxd3! 22 cxd3

Kasparov on the Scheveningen
23
W________W [WDWDW4kD] [Db1WDp0p] [pDWgpDWD] [DpDpDW)P] [nDWDPDWD] [DW)PDPDQ] [PDWDNDWD] [DKGRDWDR] W--------W
Exercise: How should Black proceed? White is angling to play g6 and he is an exchange up after all. Black must certainly act quickly here.
Instead if 22 Îxd3? dxe4 23 Îxd6 Ëxd6 24 h6 g6 and with no threats to Black on the
kingside, he can look to the queenside with confidence. 22...b4! Answer: Do as Garry does!
22...Ìxc3+ is the obvious move, but this allows the bishop to come to b2 when White both defends and attacks. Keeping the initiative is very important after such an exchange sacrifice – it is not always all about material! Following 23 Ìxc3 Ëxc3 24 Íb2 Ëb4 25 g6 Íe5 (not 25...dxe4? 26 h6! Íe5 27 d4 when the threats on h7 and g7 are going to cause big problems) 26 d4 Íf4 27 gxf7+ Êxf7 28 Ëg4 Íh6 the position is still unclear, but Black can do better than give White chances like this. 23 cxb4?
White cracks under the pressure. It’s not surprising, though, as his king’s pawn cover is being stripped and to make things worse, Garry Kasparov is sitting on the other side of the board!
23 h6 g6 doesn’t really help White, who can’t get the queen to g7 anytime soon, but 23 c4! was the best defence, trying to close down lines towards the king: 23...dxc4 24 g6 (24 h6 g6 25 dxc4 Îc8 is still extremely dangerous for White) 24...cxd3 (if 24...Íe5? 25 d4! c3 26 Êa1 and fire has broken out on the board!) 25 Îxd3 Îc8 26 Îd2 Íe5 27 Îhd1 Íc6! and if White does nothing, then ...Íb5 and ...Íd3+ will decide.
The S ic i l ian Scheveningen: Move by Move
24
W________W [WDWDW4kD] [Db1WDp0p] [pDWgpDWD] [DWDpDW)P] [n)WDPDWD] [DWDPDPDQ] [PDWDNDWD] [DKGRDWDR] W--------W
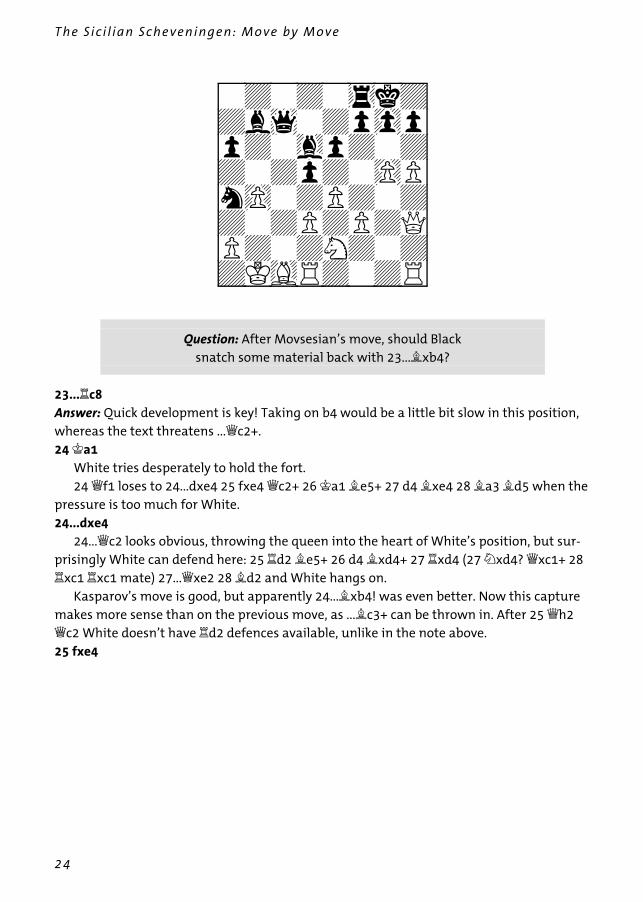
Question: After Movsesian’s move, should Black snatch some material back with 23...Íxb4?
23...Îc8 Answer: Quick development is key! Taking on b4 would be a little bit slow in this position, whereas the text threatens ...Ëc2+. 24 Êa1
White tries desperately to hold the fort. 24 Ëf1 loses to 24...dxe4 25 fxe4 Ëc2+ 26 Êa1 Íe5+ 27 d4 Íxe4 28 Ía3 Íd5 when the
pressure is too much for White. 24...dxe4
24...Ëc2 looks obvious, throwing the queen into the heart of White’s position, but sur-prisingly White can defend here: 25 Îd2 Íe5+ 26 d4 Íxd4+ 27 Îxd4 (27 Ìxd4? Ëxc1+ 28 Îxc1 Îxc1 mate) 27...Ëxe2 28 Íd2 and White hangs on.
Kasparov’s move is good, but apparently 24...Íxb4! was even better. Now this capture makes more sense than on the previous move, as ...Íc3+ can be thrown in. After 25 Ëh2 Ëc2 White doesn’t have Îd2 defences available, unlike in the note above. 25 fxe4

Kasparov on the Scheveningen
25
W________W [WDrDWDkD] [Db1WDp0p] [pDWgpDWD] [DWDWDW)P] [n)WDPDWD] [DWDPDWDQ] [PDWDNDWD] [IWGRDWDR] W--------W
Question: Does Black have a killer blow here?
Instead if 25 dxe4? Íe5+ 26 Ìd4 Íxd4+ 27 Îxd4 Ëxc1+! with mate to follow. 25...Íxe4! Answer: Yes! With White’s king so open, such a move looked on the cards. I will quote Grandmaster Lubomir Ftacnik here: ‘Even to an untrained eye it becomes clear that Black is achieving success in the attack with much higher speed than his opponent.’ 26 g6!
White doesn’t give up and makes one last throw to complicate things. That is to be ex-pected when playing someone as strong as Movsesian.
26 dxe4 Íe5+ ends the game there and then, in view of 27 Ìd4 Íxd4+ 28 Îxd4 Ëxc1+! and mates, while after 26 Îhg1 Ëc2 27 Ìd4 Íe5 28 Ëe3 Íd5 once those bishops come in, there will be no stopping Black! 26...Íxh1 27 Ëxh1 Íxb4
W________W [WDrDWDkD] [DW1WDp0p] [pDWDpDPD] [DWDWDWDP] [ngWDWDWD] [DWDPDWDW] [PDWDNDWD] [IWGRDWDQ] W--------W
The S ic i l ian Scheveningen: Move by Move
26
28 gxf7+
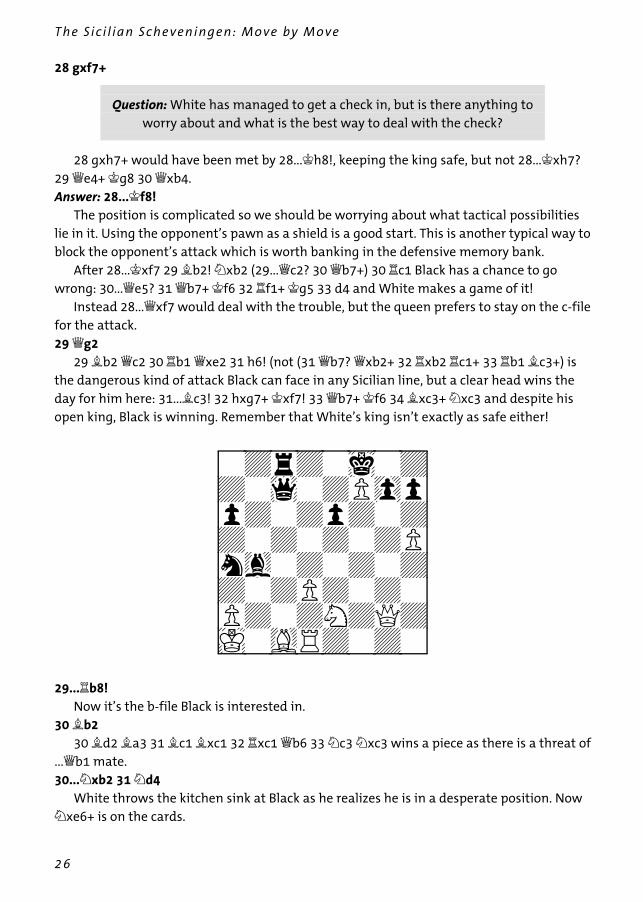
Question: White has managed to get a check in, but is there anything to
worry about and what is the best way to deal with the check?
28 gxh7+ would have been met by 28...Êh8!, keeping the king safe, but not 28...Êxh7?
29 Ëe4+ Êg8 30 Ëxb4. Answer: 28...Êf8!
The position is complicated so we should be worrying about what tactical possibilities lie in it. Using the opponent’s pawn as a shield is a good start. This is another typical way to block the opponent’s attack which is worth banking in the defensive memory bank.
After 28...Êxf7 29 Íb2! Ìxb2 (29...Ëc2? 30 Ëb7+) 30 Îc1 Black has a chance to go wrong: 30...Ëe5? 31 Ëb7+ Êf6 32 Îf1+ Êg5 33 d4 and White makes a game of it!
Instead 28...Ëxf7 would deal with the trouble, but the queen prefers to stay on the c-file for the attack. 29 Ëg2
29 Íb2 Ëc2 30 Îb1 Ëxe2 31 h6! (not (31 Ëb7? Ëxb2+ 32 Îxb2 Îc1+ 33 Îb1 Íc3+) is the dangerous kind of attack Black can face in any Sicilian line, but a clear head wins the day for him here: 31...Íc3! 32 hxg7+ Êxf7! 33 Ëb7+ Êf6 34 Íxc3+ Ìxc3 and despite his open king, Black is winning. Remember that White’s king isn’t exactly as safe either!
W________W [WDrDWiwd] [DW1WDP0p] [pDWDpDwD] [DWDWDWDP] [ngWDWDWD] [DWDPDWDW] [PDWDNDQD] [IWGRDWDw] W--------W
29...Îb8! Now it’s the b-file Black is interested in.
30 Íb2 30 Íd2 Ía3 31 Íc1 Íxc1 32 Îxc1 Ëb6 33 Ìc3 Ìxc3 wins a piece as there is a threat of
...Ëb1 mate. 30...Ìxb2 31 Ìd4
White throws the kitchen sink at Black as he realizes he is in a desperate position. Now Ìxe6+ is on the cards.
Kasparov on the Scheveningen
27
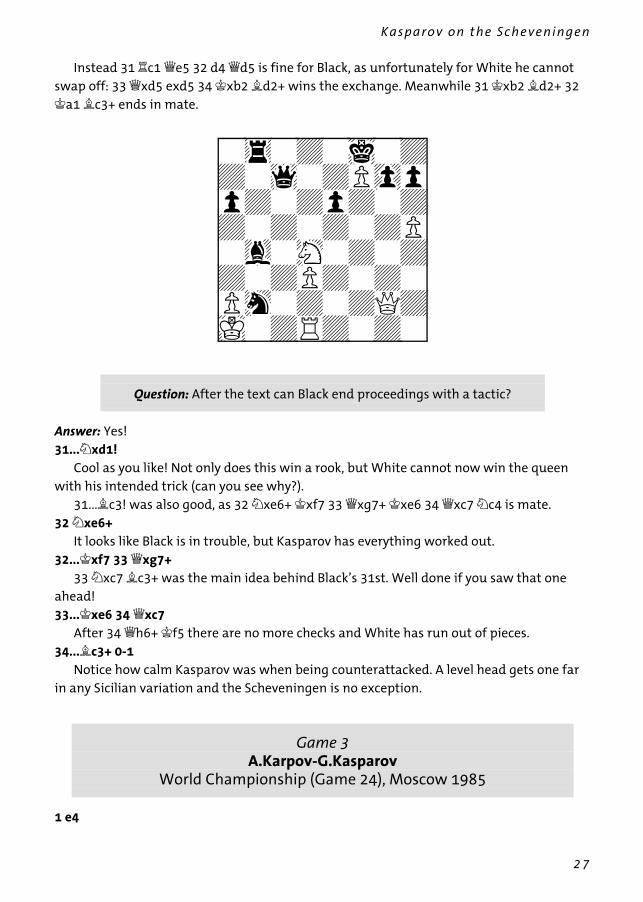
Instead 31 Îc1 Ëe5 32 d4 Ëd5 is fine for Black, as unfortunately for White he cannot swap off: 33 Ëxd5 exd5 34 Êxb2 Íd2+ wins the exchange. Meanwhile 31 Êxb2 Íd2+ 32 Êa1 Íc3+ ends in mate.
W________W [W4WDWiWD] [DW1WDP0p] [pDWDpDWD] [DWDWDWDP] [WgWHWDWD] [DWDPDWDW] [PhWDWDQD] [IWDRDWDW] W--------W
Question: After the text can Black end proceedings with a tactic?
Answer: Yes! 31...Ìxd1!
Cool as you like! Not only does this win a rook, but White cannot now win the queen with his intended trick (can you see why?).
31...Íc3! was also good, as 32 Ìxe6+ Êxf7 33 Ëxg7+ Êxe6 34 Ëxc7 Ìc4 is mate. 32 Ìxe6+
It looks like Black is in trouble, but Kasparov has everything worked out. 32...Êxf7 33 Ëxg7+
33 Ìxc7 Íc3+ was the main idea behind Black’s 31st. Well done if you saw that one ahead! 33...Êxe6 34 Ëxc7
After 34 Ëh6+ Êf5 there are no more checks and White has run out of pieces. 34...Íc3+ 0-1
Notice how calm Kasparov was when being counterattacked. A level head gets one far in any Sicilian variation and the Scheveningen is no exception.
Game 3
A.Karpov-G.Kasparov World Championship (Game 24), Moscow 1985
1 e4