Embed Size (px)
Citation preview

1 The WordPress Chick

2 The WordPress Chick
Copyright
All rights reserved. Reproduction and distribution are forbidden. No
part of this publication shall be reproduced, stored in a retrieval
system, or transmitted by any other means, electronic, mechanical,
photocopying, recording, or otherwise, without written permission
from the publisher.
This publication is designed to provide accurate and authoritative
information with regard to the subject matter covered. It is given
away with the understanding that the author and the publisher are
not engaged in rendering legal, intellectual property, accounting or
other professional advice. If legal advice or other professional
assistance is required, the services of a competent professional
should be sought.
The WordPress Chick, individually or corporately, does not accept
any responsibility for any liabilities resulting from the actions of any
parties involved.
Kim Doyal, (aka The WordPress Chick) is not associated with
WordPress or Auttomatic Inc. in any way other than being a huge
fan!

3 The WordPress Chick
About
My name is Kim Doyal, aka, The WordPress Chick! My journey with WordPress and online
marketing began about five years ago. I spent most of my adult working career in retail
management – and while I met a ton of great people, if any of you have worked retail,
you know it's NO way to have a life. I had tried multiple different 'entrepreneurial things'
(opened and owned a scrapbook store, independent retail recruiter, real estate,
insurance, network marketing.....you get the picture).
I decided to give this a go five years ago after having survived the MOST difficult time in
my life – I was widowed in 2003 with a two year old and six year old. One of those things
that you think only happens to other people.
I continued working in retail management for a couple of years- then followed that with
the real estate(we know how that turned out) and insurance (WAY to dry....). I had
gone to a 'Wealth Expo' in San Francisco with a friend and in one of the side classes you
could take we attended an Internet Marketing course.
I was HOOKED!
But....I still didn't get started for 'real'.
Between that time and my full time go of this five years ago I went back to retail mgmt.
(the LONGEST 6 months of my life) and then had a little bit of a cushion to give this an
earnest shot.
I can honestly say I've NEVER been happier with what I'm doing! Am I making 6 figures?
No, not yet...but it's getting closer. I fell in love with WordPress, Online Marketing and
Digital Publishing because of opportunity it provided – freedom, connection and a
quality of life that I LOVE! (and it's fun....who knew I was such a geek?).
I like to think of myself as someone who makes WordPress and digital publishing easier
for the everyday user! (I can guarantee you won't be getting anything about codex
from me).
I do WordPress customizations for clients but my heart is really in the teaching and
training.
Here's to your success!
All the Best,
Kim Doyal
The WordPress Chick

4 The WordPress Chick
Table of Contents
Mistake #1
Not Changing Your Favicon and Copyright pages 5 - 19
Mistake #2
Not Using an SEO Plugin (WordPress SEO) pages 20 - 37
Mistake #3
Not Optimizing Your Content with your SEO Plugin Pages 38 - 47
BONUS!
Optimizing Your Content for conversation and conversion
Pages 48 - 52

5 The WordPress Chick
Mistake #1
Not changing your favicon and copyright.
Seriously, I know this seems simple and maybe a little nit picky (we're
going to build on these from least important to most important, but
know that they're ALL important and need to be done).
What the bucket is a favicon you ask?
It's that little image that appears in your browser bar and tab
(depending on which browser you're using). Let's look at my favicon
and a few others to get the picture.
This first screenshot is in Firefox and I'm just on the homepage of my
site.
See the little 'W' that appears in the tab (you can also see my site
title tags here as well), that's the favicon. It used to appear in the
browser bar as well (up where it says 'thewpchick.com) but now it's
just in the tabs.
Let's take a look at Chrome.

6 The WordPress Chick
See the branding? And it's especially helpful when you have multiple
tabs open.
It's much easier to go back to a tab that is branded and has an
image that you can identify with instead of having to read each tab,
especially if you're like a friend of mine who has a zillion tabs open at
once and you can't see the full name!
O.K., so you see what it looks like when it's done correctly.
This next screenshot is incorrect (and I've left the site name off
because I'm not one to call people out publicly, but I will email them
a heads up!).
WRONG
That's the default "G" for Genesis. This site is using Genesis (kudos to
them for that), but that's not the name of the site.
I'm guessing some of you may be thinking this isn't really a big deal,
but actually, it is. I've heard & read things that imply that Google is
placing importance on favicons, I'm not sure how this would work
but suffice it to say it is one of THE first things that loads when
someone lands on your site.
Why not make the BEST first impression you can?
Don't let someone new to your site make the assumption that your
site is still a work in progress.
How do you fix it?
Super easy, truly.
You do need to be able to create a .ico (for icon) extension, but I'm
going to show you a free tool that does it for you.
(Cause I'm nice like that).
7 The WordPress Chick
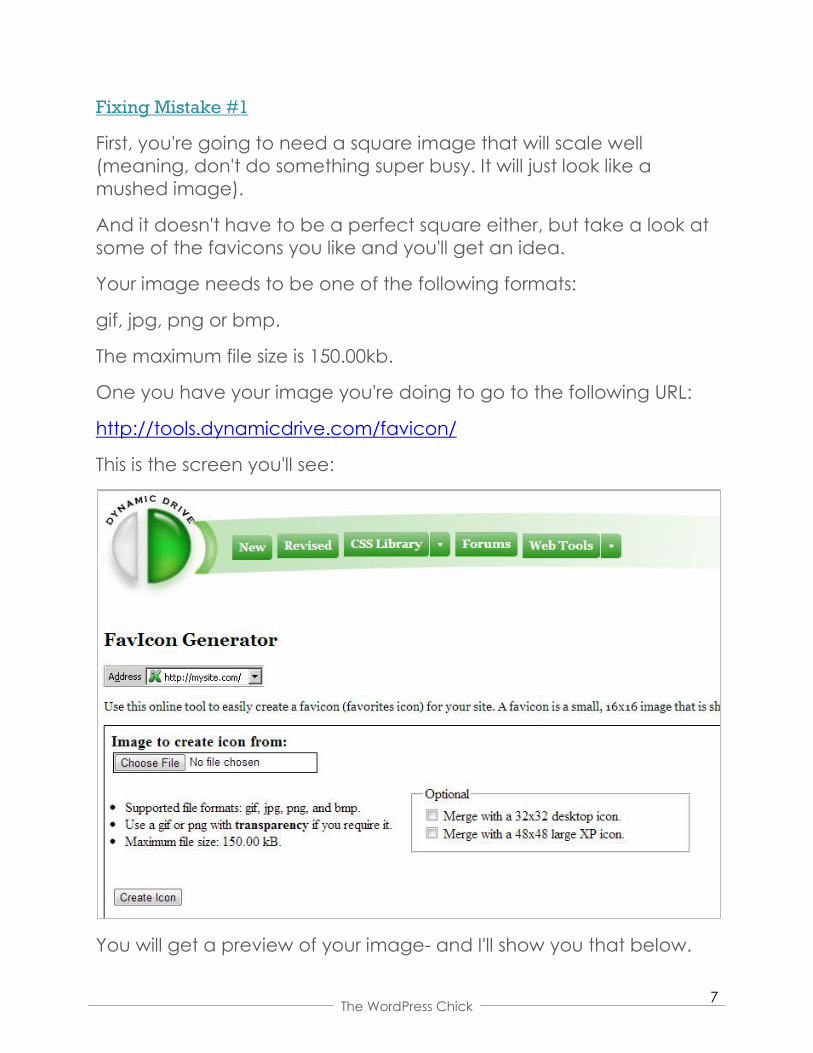
Fixing Mistake #1
First, you're going to need a square image that will scale well
(meaning, don't do something super busy. It will just look like a
mushed image).
And it doesn't have to be a perfect square either, but take a look at
some of the favicons you like and you'll get an idea.
Your image needs to be one of the following formats:
gif, jpg, png or bmp.
The maximum file size is 150.00kb.
One you have your image you're doing to go to the following URL:
http://tools.dynamicdrive.com/favicon/
This is the screen you'll see:
You will get a preview of your image- and I'll show you that below.

8 The WordPress Chick
I'm going to use a new site of mine that is already complete so you
can see how it looks (it can sometimes take up to a day to show up
on the site, depending on the browser).
The site I'm using for this demonstration is (so you can see the logo on
the site and the favicon):
http://digitalpublisherspodcast.com
Here's what my favicon will look like:
Cool, huh?
Now click the 'Download FavIcon' button. Now you will have a file
on your computer called favicon.ico, which is what you'll need to
9 The WordPress Chick
upload to your server and into your theme files (also easier than it
sounds).
Uploading to your server and theme files
For this example we're going to use my hosting company which is
hostgator.
Hostgator has something called 'cpanel' (which is short for control
panel). Many hosts have this (bluehost) but if you don't have cpanel
you can FTP your favicon into the appropriate theme file or use your
hosting company's file manager.
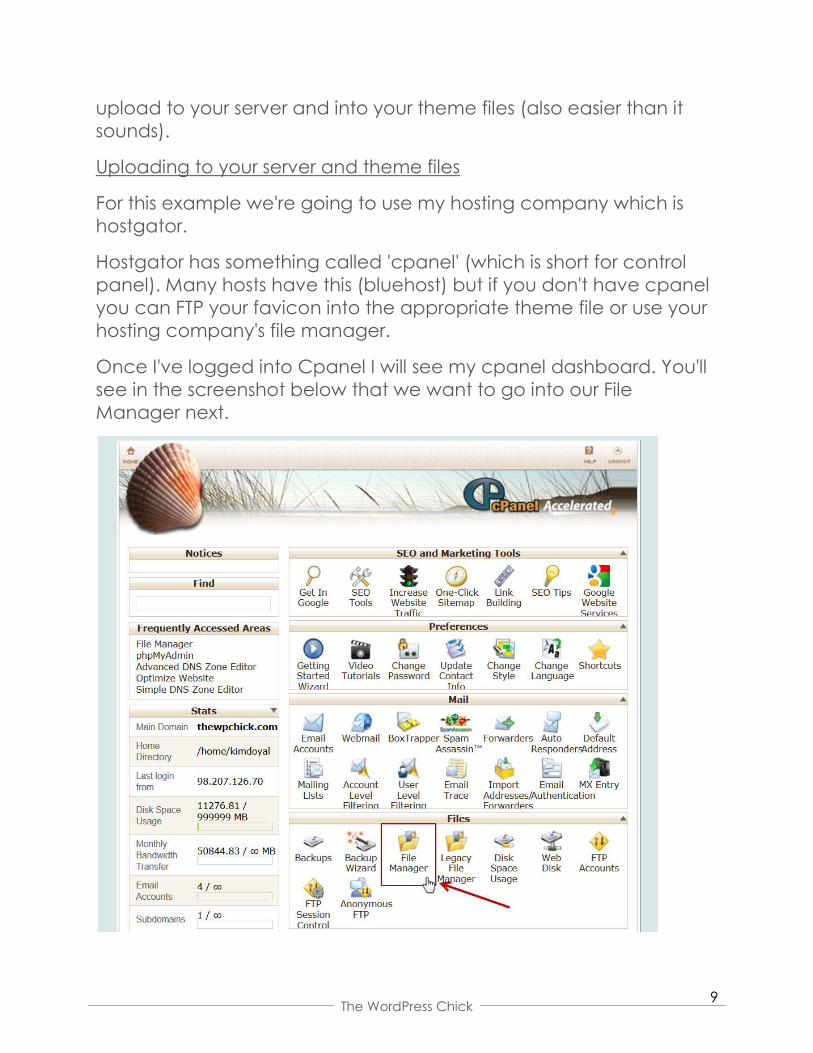
Once I've logged into Cpanel I will see my cpanel dashboard. You'll
see in the screenshot below that we want to go into our File
Manager next.

10 The WordPress Chick
Now we're going to go a few folders deeper to our theme images
folder and overwrite the favicon (by simply uploading the image to
the images folder it will ask us if we want to overwrite the current file).
Depending on your settings you may need to first go into your public
html folder.
Once you've gone into the public_html folder (I know it doesn't look
like a folder- just double click it and you're in. ;-) ) you'll see your
WordPress files.
Click on wp-content.

11 The WordPress Chick
wp-content
We're getting closer.
Now we want to go into themes, then select our theme and go into
images.
In this case I'm using the Scribble child theme for the Genesis
Framework by StudioPress.

12 The WordPress Chick
Once you double click on the 'scribble' folder you'll see your images
folder. Double click that and now it's time to upload!
In the screenshot below I've scrolled up through images to find the
favicon so I can highlight it as well as show you where to upload the
new image.
Now all you have to do is upload the favicon.ico image that you
downloaded from Dynamic Drive!
When you click the upload button you'll get the upload screen.

13 The WordPress Chick
Browse your computer for the new favicon.ico and select it. Once
you select it you'll see this message:
You want to select 'Yes' to overwrite.
You can also choose to overwrite the image prior to uploading:
I've just stopped doing that because sometimes I'll save the image
as the wrong file type (not for favicons, but other graphic elements
of the site. It should be a png but I've saved it as a jpg so it won't
actually overwrite it).
And that's it!
Depending on the browser it can take a while for your favicon to
show up. Don't worry though, it's perfectly normal and you should
see it in a day or so at the latest.
Now let's move onto the copyright!
(Hard to believe we're still only on Mistake #1!)

14 The WordPress Chick
Changing your Copyright
You may not decide to change your footer copyright.
And that's fine, but if this is for your business you're
going to look much more professional by changing the
copyright to the name of the site or your business.
Here's my copyright (and this may look a little different if you visit the
site because I'm changing themes next week):
I'm going to show you in a WordPress install (default theme) where to
change the copyright and I'm going to show you how to change it
in a StudioPress Genesis Child theme.
This is a development url (meaning not a live site).
I've done my WordPress install and have activated the 2012 theme.
You'll see in the image on the next page that I've highlighted the text
that says "Proudly Powered by WordPress."
This is what we want to change.

15 The WordPress Chick
Now we're going to go into our theme files through the dashboard.
16 The WordPress Chick
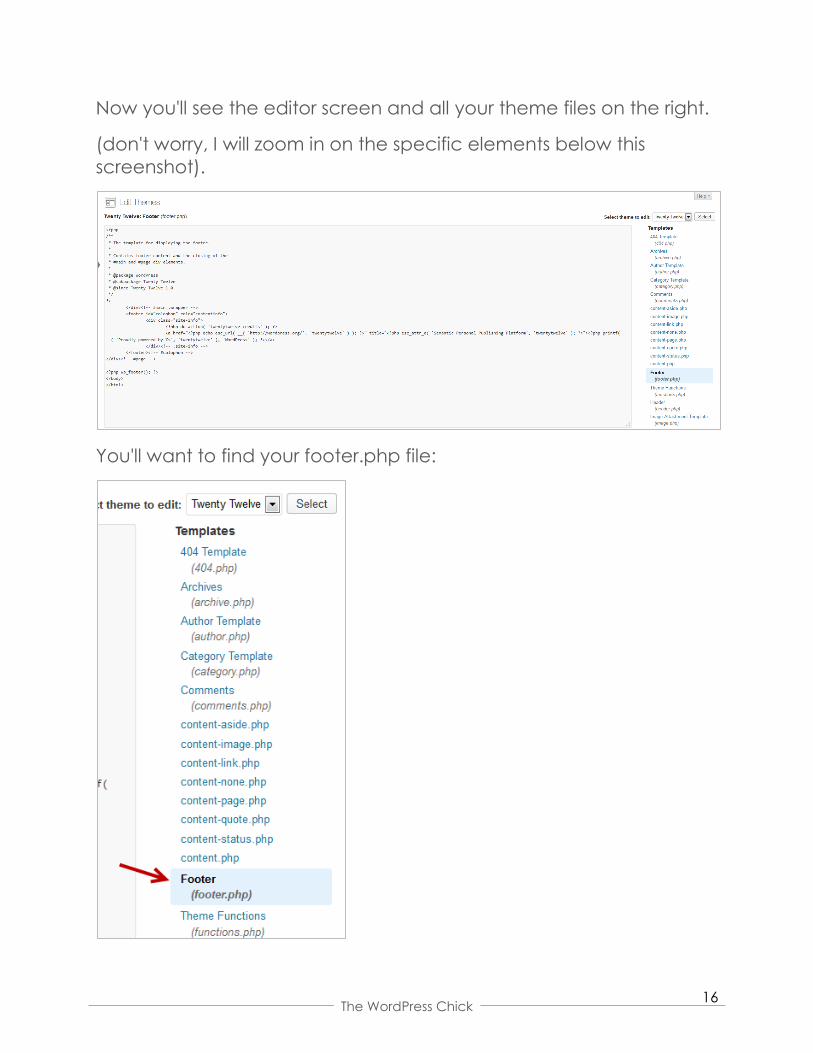
Now you'll see the editor screen and all your theme files on the right.
(don't worry, I will zoom in on the specific elements below this
screenshot).
You'll want to find your footer.php file:

17 The WordPress Chick
Once you select that you'll see the file in the window to the left of
that column:
I've highlighted the few sections in the middle that I'm going to
change. Here's a closer look:
So I'm going to change the link to my site and the Proudly Powered
by WordPress.
I've changed it to read "Site Customized by The WordPress Chick"
Now let's see what it looks like on the site:
And it is hyperlinked to my site.
It looks harder than it is.
*NOTE* I would copy and paste the footer.php into a text editor in
case you make a mistake!

18 The WordPress Chick
Now I'll show you how to change it if you're a Genesis user! ;-)
First, install the Genesis Simple Edits Plugin (you can just search the
plugin directory through your dashboard to find it. And this plugin will
NOT work if you're not using Genesis):
Once you've installed the plugin go to your Genesis settings in the
sidebar of your dashboard and select 'Simple Edits'.
The screen on the next page is what you'll see when you select
Simple Edits under Genesis.

19 The WordPress Chick
We're simply going to remove all the text from the "Footer Credits
Text" line and enter the copyright information we want to show in its
place. First let's look at what the above looks like on the actual site.
Here's what I've changed it to:
And now here's what it looks like on the site:
And that's it! ;-)
Pretty easy, huh?
Now let's move on to Mistake #2

20 The WordPress Chick
Mistake #2
Not installing and setting up a GOOD SEO plugin.
In this case, WordPress SEO by Yoast.
Before you start reaching for the aspirin because you think your
head is going to explode at the mention of SEO, take a DEEP breath
and relax. I'm going to show you step by step how to configure this
plugin so your site wide settings are correct and you can easily move
on to Mistake #3 (not optimizing your content correctly).
Here's what I suggest you do.
Have this PDF guide open or print it and go through section by
section to set your site up as you go through this. DO NOT decide
you'll come back to it later! Just 'gitter done!
Let's get to it.
Go to Plugins in your WP Dashboard and select 'Add New'. From
there you want to type 'WordPress SEO' into the search box.

21 The WordPress Chick
Once you've installed and activated the plugin you'll see this little
box pop up:
I always select 'Allow tracking'. It's just a way for
them to get stats to help improve the plugin (the
FREE plugin) that you're using. It's a little thing
that goes a long way.
Once you do that let's go to the sidebar and
start with the Dashboard of the plugin.

22 The WordPress Chick
When you first go to the Dashboard you're going to see another
pop-up where you can subscribe to Yoast's newsletter. It's ALWAYS
got great content and is definitely worth subscribing to.
You can also click through the 'Next' buttons for a tour of the plugin if
you want, or just follow this guide and I'll explain how to set
everything up (OR.. be wild and crazy and do both! geek humor. I
know).
Let's get to it.
Here's the General page of the dashboard.

23 The WordPress Chick
There's really not much to do on this page if your site has been
verified. If it hasn't, click through the links and enter the meta values.
Now we're going to start on the 'Titles & Meta'. I'll highlight what you
want to add to your site.

24 The WordPress Chick
General
You can read through each of these sections if you want, but if
you're not familiar with SEO you might not have a great time doing
that. Just select the same settings and put in the relevant information
as it pertains to YOUR site when applicable (see the next screenshot
for the Home settings).

25 The WordPress Chick
The title template will show up in the title bar when people come to
your site. It's also the first thing that the search engines see, so it's
REALLY important that you put your best keywords here.
The screenshot below shows my title bar in firefox (I know it's a little
hard to read, but you can see my keywords are what is showing in
my title template above).

26 The WordPress Chick
You want to type what you see in the highlighted boxes into the
same field in your plugin.
Exactly as you see it here, percentage sign and all!
As an example, the Pages will read:
Page Title | Sitename (to the search engines)

27 The WordPress Chick

28 The WordPress Chick

29 The WordPress Chick
If you click on the 'Help' tab under General Settings you're going to
see the list of variables you can use when a page is displayed.
There's quite a bit there and it might be a bit overwhelming. Just a
heads up! (I only did the screenshot of the first 3).
Next we’ll move onto the Social settings (on the next page).

30 The WordPress Chick
Social
The screenshot below is what will appear prior to connecting your
Facebook account:

31 The WordPress Chick
Social (continued)
Next up is the XML Sitemap.

32 The WordPress Chick
XML Sitemap
33 The WordPress Chick
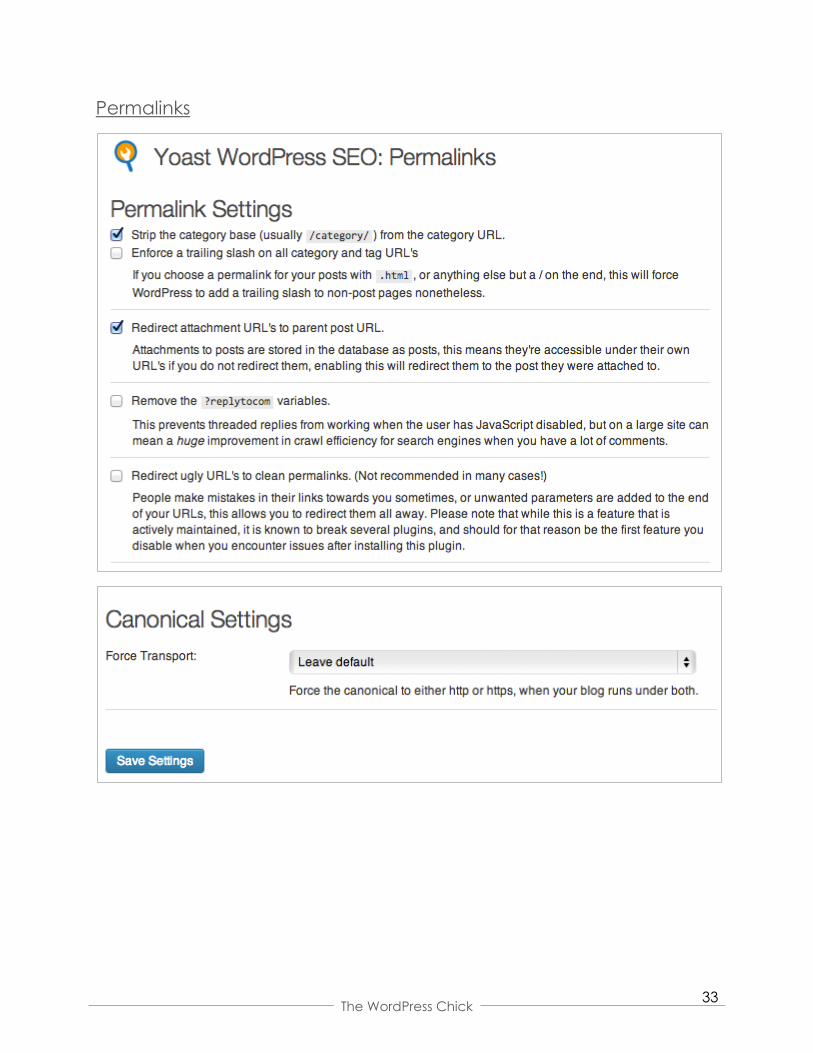
Permalinks

34 The WordPress Chick
Internal Links
If you’re not sure what breadcrumbs are, the screenshot below is an
example from my site (it’s the text on the current page your visitor is
on under the navigation but before the content):
The last internal links screenshot is on the next page.

35 The WordPress Chick
Internal Links (continued)
The next setting is your RSS feed, which you can leave as the default
if you want.

36 The WordPress Chick
RSS Feed

37 The WordPress Chick
The last two sections are the Import/Export and Edit Files. The
Import/Export is only needed if you have been using a different SEO
plugin and want to import the settings into the WordPress SEO Plugin.
The Edit Files section is if you have a robots.txt file but more than likely
you don’t need to do anything with this section.
And that’s it for Mistake #2!
Now let’s move onto Mistake #3, which is not optimizing your
content (and is also going to utilize the WordPress SEO plugin for your
individual posts and pages).

38 The WordPress Chick
Mistake #3
Not optimizing your content with your SEO Plugin.
The following instructions will show you how to optimize your content
with the WordPress SEO plugin.
When writing /editing a page or post in WordPress, you need to
optimize your content for the search engines.
Using the WordPress SEO plugin you can easily see how well you've
optimized your content.
First, let's take a look at the Plugin settings that appear under your
post or page editor (this may appear a few widgets below your
editor. You can drag and drop these widgets to place them in
whatever order you prefer. I keep the WordPress SEO widget right
below my editor because I use it every time I write a post).

39 The WordPress Chick
1) Snippet Preview: This is how your post will appear in the search
engines. You can see the title, permalink and the description.
2) Focus Keyword: You can select a single word OR a phrase, but I
wouldn't do more than two or three words.
3) SEO Title: You may or may not copy your post title exactly as it is,
but it helps your optimization if your SEO title starts with your keyword
(we'll get more into best practices in a bit).
4) Meta Description: This is where you type in the description that
shows up in the search engines (if you don't enter a description here
the search engines will automatically pull the first few lines of text,
which probably won't help you much in terms of SEO).
Once you have entered this information, click 'Save Draft' (don't
publish yet). Once you click 'save draft' you'll have a colored button
next to the SEO title in your 'Publish' widget (I've already published
this post which is why you don't see the 'save draft' option).

40 The WordPress Chick
You can click the blue hyperlink that says 'Check' OR you can click
the 'Page Analysis' in the WordPress SEO box (see the next image).
The page analysis will tell you how you can improve your SEO (the
goal is a 'green' circle like you see above, yellow is ok and red
means you have some work to do!). I'll go through each point after
the screenshot.
Before I get into each point I want to make sure you understand that
it's VERY important to write for people, NOT the search engines.
Which is why this is titled "Optimize Your Content", not trick the search
engines. ;-)
In looking at this post, I can easily see where I could have added the
word "Kindle" in the first paragraph (and who knows, I may change
it), but you can see that I still received a 'Green' ranking for the post
so I wasn't too worried about going back in and re-writing the initial
paragraph.
41 The WordPress Chick
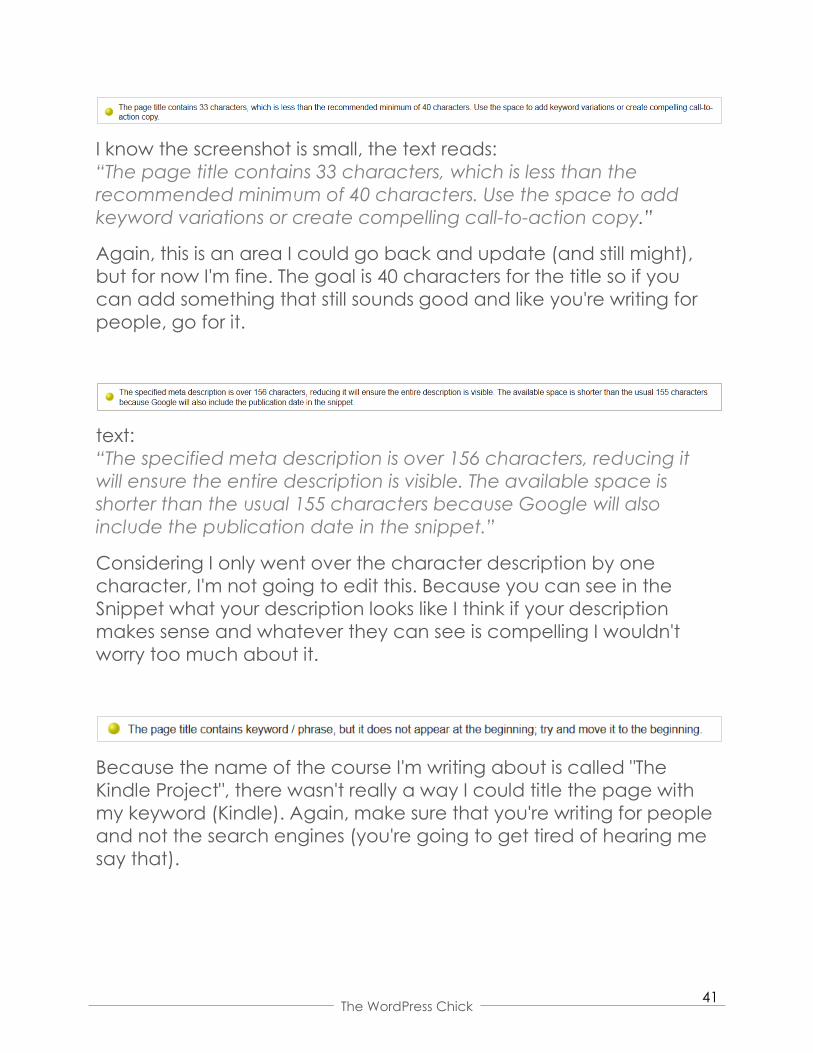
I know the screenshot is small, the text reads:
“The page title contains 33 characters, which is less than the
recommended minimum of 40 characters. Use the space to add
keyword variations or create compelling call-to-action copy.”
Again, this is an area I could go back and update (and still might),
but for now I'm fine. The goal is 40 characters for the title so if you
can add something that still sounds good and like you're writing for
people, go for it.
text:
“The specified meta description is over 156 characters, reducing it
will ensure the entire description is visible. The available space is
shorter than the usual 155 characters because Google will also
include the publication date in the snippet.”
Considering I only went over the character description by one
character, I'm not going to edit this. Because you can see in the
Snippet what your description looks like I think if your description
makes sense and whatever they can see is compelling I wouldn't
worry too much about it.
Because the name of the course I'm writing about is called "The
Kindle Project", there wasn't really a way I could title the page with
my keyword (Kindle). Again, make sure that you're writing for people
and not the search engines (you're going to get tired of hearing me
say that).

42 The WordPress Chick
All of my 'Green' rankings are listed in one screenshot below. They're
somewhat self-explanatory but I will go into more detail on the
following pages.
Outbound links:
Linking is an important part of ANY SEO strategy.
You want to have outbound links AND internal links. The only internal
links I have on this post are the related posts at the end of the page.
Depending on the topic of the post, I may or may not have internal
links within the body of the post. Because the goal of this post is to
talk about "The Kindle Project" and send people to an opt-in page I
didn't want to have internal links within the post. However, if
someone doesn't want to click through and opt-in for this I still want
them to stay on my site for as long as possible, which is where the
related posts come in.

43 The WordPress Chick
All of the outbound links go directly to the squeeze page for "The
Kindle Project" (and open in a new window).
You also want to use relevant keywords for your anchor text (anchor
text is simply the word or phrase that you use for your link). Example
in this post:
Good use of anchor text: my first Kindle book (this is hyperlinked to
the squeeze page)
Bad use of anchor text: Click here
The search engines look at the words you have chosen for your link,
so use a relevant keyword or phrase for your link.
Images & SEO:
Adding images to your posts with relevant titles and alt tags is also
an important content optimization element.
When you upload an image to WordPress you'll notice there are four
places to put text in. The title, caption, description and alt text. I
never fill in the caption because that would then show up under the
image. I just want the title and alt text.
The title is what shows up if someone hovers over the image on your
site. The Alt Text is what the search engines read since they can't
images, so it's very important to put a relevant keyword in this
position.
This screenshot on the next page is what the image looks like when
it's uploaded.

44 The WordPress Chick
The image below shows an optimized Title and Alt Text.

45 The WordPress Chick
If you haven't done this with your images prior to now, it's smart to go
back and optimize your images. To do this you want to go into your
posts and pages, click on the image and click the little picture icon
that appears over your image:
When you click the image icon you'll get the image editor to appear
(see the next image).
In the last WordPress update the title doesn't always stay when you
add it directly through the editor, so you may need to enter it here
again.

46 The WordPress Chick
I also remove the link to the image unless it's linking directly to
something specific (affiliate link, free plugin in WP, external link or
internal link). You just don't want people to click on your images and
have them open in a new window.
In the next image we're going talk about the Advanced settings. For
the most part you can leave these as the default, but we'll go over
them.
I've included the notes for the "Advanced" section on the screenshot
below.

47 The WordPress Chick
The social side of WordPress SEO for your posts and pages.
This is a new update to the plugin and I haven't tested this yet, but if
you leave this blank it will automatically pull in the description you
entered under the "General" tab.
ONE more little bonus for you…
Keep reading.

48 The WordPress Chick
Optimizing your content for conversion & conversation
Now that you understand how to optimize your content in terms of
SEO, now let’s talk about optimizing it for your readers!
People don’t read web pages the way they read print, and you
don’t have to worry about your English teacher correcting your
grammar or using the dreaded ‘red pen’. Many people tend to
‘skim’ web pages and if your content is easy to read and broken up
in a way that there makes a few bold statements you’ll grab the
readers attention.
Here are a few ways to optimize your content:
Font sizes
Font colors
Bold, Underline, Italics (these can be used for SEO as well)
Images
Colored boxes
Links
Bullet points
Highlighting
Lists
White space
On the next page I’ll show you a few things I’ve done in a post titled:
“How to Find Your Voice in A Crowded Niche”

49 The WordPress Chick
This first screenshot is the first part of the post:
The text in parenthesis in the first paragraph that is also in italics was
just a side note. I purposely used a different size font and color for
the “But here’s the deal” sentence to make a point.
This is the same reason I wrote the competition sentence as a single
sentence instead of in a paragraph. I wanted to make a point.
The next few screenshots show the rest of the post. There aren’t any
notes on the rest of the post so you can see how I’ve laid it out
without the red notes (haha… I just realized I did that after making a
point about the teachers ‘red pen’… kinda funny, huh?).

50 The WordPress Chick

51 The WordPress Chick

52 The WordPress Chick
Most importantly, when it comes to writing your content:
Have Fun
Provide Value
And write often
Thanks so much for opting in and subscribing to The WordPress Chick!
My goal is always to provide value, share my journey and have fun!
I love supporting my subscribers and many of my tutorials have
come from questions I’ve received from readers, so if you’re stuck be
sure to drop me an email at [email protected] and I’ll do my
best to help you.
Thanks!
Kim

53 The WordPress Chick