Embed Size (px)
Citation preview
THERMAFIBER, INC. ONE OWENS CORNING PARKWAY
TOLEDO, OHIO, USA 43659
1-800-GET-PINK® www.thermafiber.com
1Verified by ICC-ES to contain a minimum of 70% recycled content. See ICC-ES Evaluation Report VAR-1025 at icc-es.org.
2ASTM C 1138.
Pub. No. 10022787. Printed in U.S.A. March 2018. THE PINK PANTHER™ & © 1964–2018 Metro-Goldwyn-Mayer Studios Inc. All Rights Reserved. The color PINK is a registered trademark of Owens Corning. © 2018 Owens Corning. All Rights Reserved. © 2018 Thermafiber, Inc. All Rights Reserved.
28D
Mineral Wool Insulation
www.thermafiber.com
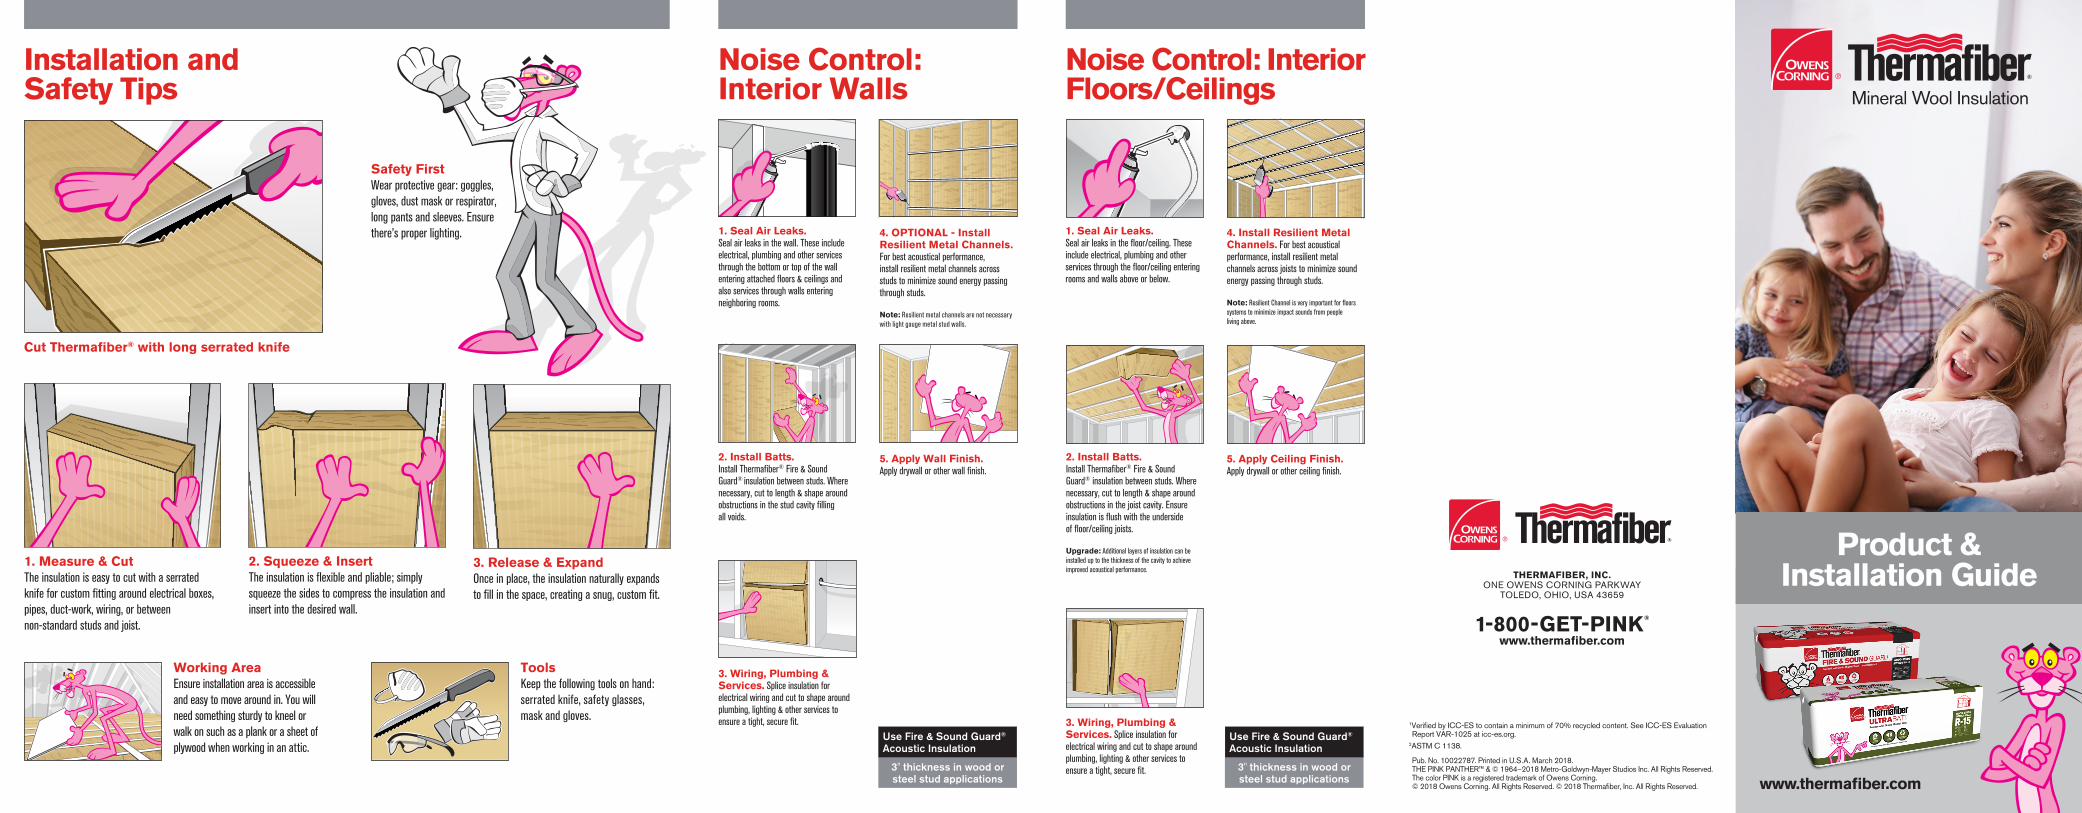
Noise Control:Interior Walls
1. Seal Air Leaks. Seal air leaks in the wall. These include electrical, plumbing and other services through the bottom or top of the wall entering attached floors & ceilings and also services through walls entering neighboring rooms.
1. Seal Air Leaks. Seal air leaks in the floor/ceiling. These include electrical, plumbing and other services through the floor/ceiling entering rooms and walls above or below.
2. Install Batts. Install Thermafiber® Fire & Sound Guard® insulation between studs. Where necessary, cut to length & shape around obstructions in the stud cavity filling all voids.
2. Install Batts. Install Thermafiber® Fire & Sound Guard® insulation between studs. Where necessary, cut to length & shape around obstructions in the joist cavity. Ensure insulation is flush with the underside of floor/ceiling joists.
Upgrade: Additional layers of insulation can be installed up to the thickness of the cavity to achieve improved acoustical performance.
3. Wiring, Plumbing & Services. Splice insulation for electrical wiring and cut to shape around plumbing, lighting & other services to ensure a tight, secure fit.
5. Apply Wall Finish. Apply drywall or other wall finish.
3. Wiring, Plumbing & Services. Splice insulation for electrical wiring and cut to shape around plumbing, lighting & other services to ensure a tight, secure fit.
5. Apply Ceiling Finish. Apply drywall or other ceiling finish.
4. OPTIONAL - Install Resilient Metal Channels. For best acoustical performance, install resilient metal channels across studs to minimize sound energy passing through studs.
Note: Resilient metal channels are not necessary with light gauge metal stud walls.
4. Install Resilient Metal Channels. For best acoustical performance, install resilient metal channels across joists to minimize sound energy passing through studs.
Note: Resilient Channel is very important for floors systems to minimize impact sounds from people living above.
22BNoise Control: Interior Floors/Ceilings
3" thickness in wood or steel stud applications
Use Fire & Sound Guard® Acoustic Insulation
3" thickness in wood or steel stud applications
Use Fire & Sound Guard® Acoustic Insulation
Installation and Safety Tips
Cut Thermafiber® with long serrated knife
Working Area Ensure installation area is accessible and easy to move around in. You will need something sturdy to kneel or walk on such as a plank or a sheet of plywood when working in an attic.
Tools Keep the following tools on hand: serrated knife, safety glasses, mask and gloves.
Safety First Wear protective gear: goggles, gloves, dust mask or respirator, long pants and sleeves. Ensure there’s proper lighting.
1. Measure & Cut The insulation is easy to cut with a serrated knife for custom fitting around electrical boxes, pipes, duct-work, wiring, or between non-standard studs and joist.
2. Squeeze & Insert The insulation is flexible and pliable; simply squeeze the sides to compress the insulation and insert into the desired wall.
3. Release & Expand Once in place, the insulation naturally expands to fill in the space, creating a snug, custom fit.
28A 28B 28C28A 28B 28C28A 28B 28C
Product & Installation Guide
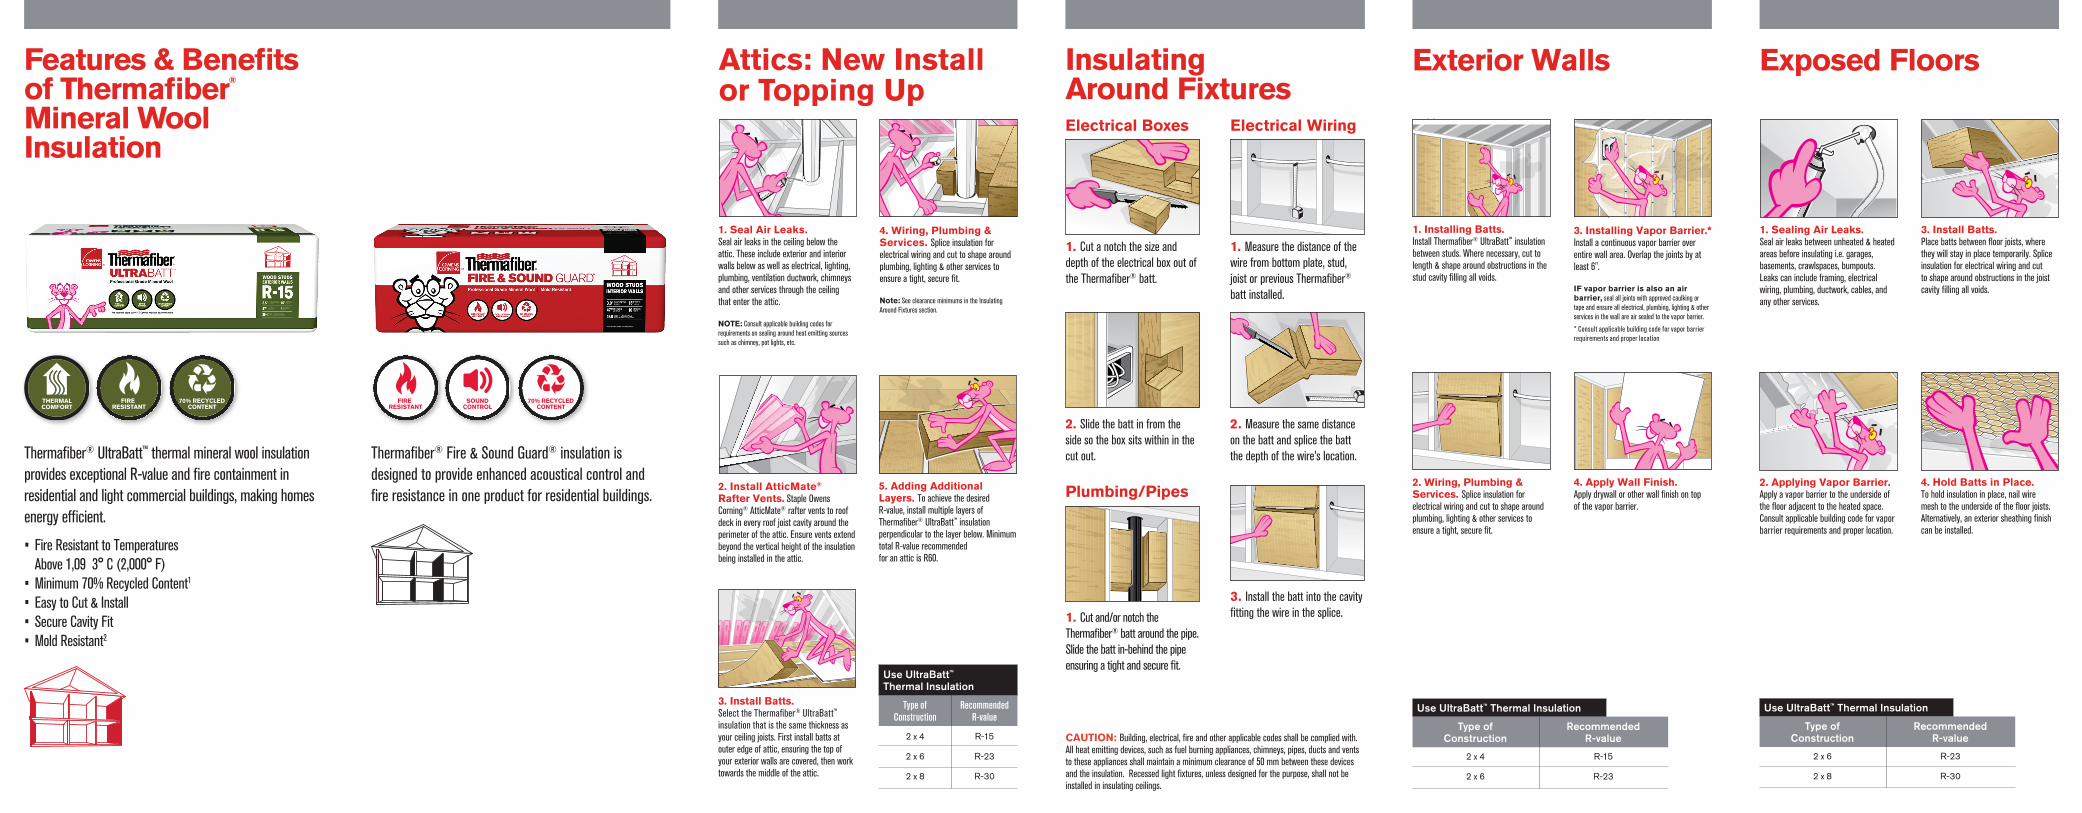
Features & Benefits of Thermafiber® Mineral Wool Insulation
Attics: New Installor Topping Up
1. Seal Air Leaks. Seal air leaks in the ceiling below the attic. These include exterior and interior walls below as well as electrical, lighting, plumbing, ventilation ductwork, chimneys and other services through the ceiling that enter the attic.
NOTE: Consult applicable building codes for requirements on sealing around heat emitting sources such as chimney, pot lights, etc.
2. Install AtticMate® Rafter Vents. Staple Owens Corning® AtticMate® rafter vents to roof deck in every roof joist cavity around the perimeter of the attic. Ensure vents extend beyond the vertical height of the insulation being installed in the attic.
4. Wiring, Plumbing & Services. Splice insulation for electrical wiring and cut to shape around plumbing, lighting & other services to ensure a tight, secure fit.
Note: See clearance minimums in the Insulating Around Fixtures section.
3. Install Batts. Select the Thermafiber® UltraBatt™ insulation that is the same thickness as your ceiling joists. First install batts at outer edge of attic, ensuring the top of your exterior walls are covered, then work towards the middle of the attic.
1. Installing Batts. Install Thermafiber® UltraBatt™ insulation between studs. Where necessary, cut to length & shape around obstructions in the stud cavity filling all voids.
1. Sealing Air Leaks. Seal air leaks between unheated & heated areas before insulating i.e. garages, basements, crawlspaces, bumpouts. Leaks can include framing, electrical wiring, plumbing, ductwork, cables, and any other services.
2. Wiring, Plumbing & Services. Splice insulation for electrical wiring and cut to shape around plumbing, lighting & other services to ensure a tight, secure fit.
2. Applying Vapor Barrier. Apply a vapor barrier to the underside of the floor adjacent to the heated space. Consult applicable building code for vapor barrier requirements and proper location.
3. Installing Vapor Barrier.* Install a continuous vapor barrier over entire wall area. Overlap the joints by at least 6".
IF vapor barrier is also an air barrier, seal all joints with approved caulking or tape and ensure all electrical, plumbing, lighting & other services in the wall are air sealed to the vapor barrier.* Consult applicable building code for vapor barrier requirements and proper location
3. Install Batts. Place batts between floor joists, where they will stay in place temporarily. Splice insulation for electrical wiring and cut to shape around obstructions in the joist cavity filling all voids.
4. Apply Wall Finish. Apply drywall or other wall finish on top of the vapor barrier.
4. Hold Batts in Place. To hold insulation in place, nail wire mesh to the underside of the floor joists. Alternatively, an exterior sheathing finish can be installed.
5. Adding Additional Layers. To achieve the desired R-value, install multiple layers of Thermafiber® UltraBatt™ insulation perpendicular to the layer below. Minimum total R-value recommended for an attic is R60.
Exterior Walls28D
Exposed Floors
17
• Fire Resistant to Temperatures Above 1,09 3° C (2,000° F)• Minimum 70% Recycled Content1
• Easy to Cut & Install• Secure Cavity Fit• Mold Resistant2
Thermafiber® UltraBatt™ thermal mineral wool insulation provides exceptional R-value and fire containment in residential and light commercial buildings, making homes energy efficient.
Thermafiber® Fire & Sound Guard® insulation is designed to provide enhanced acoustical control and fire resistance in one product for residential buildings.
Type of
ConstructionRecommended
R-value
2 x 4
2 x 6
R-15
R-23
Use UltraBatt™ Thermal Insulation Type of
ConstructionRecommended
R-value
2 x 6
2 x 8
R-23
R-30
Use UltraBatt™ Thermal Insulation
Type of
ConstructionRecommended
R-value
Use UltraBatt™ Thermal Insulation
2 x 4
2 x 6
2 x 8
R-15
R-23
R-30
1. Cut a notch the size and depth of the electrical box out of the Thermafiber® batt.
1. Measure the distance of the wire from bottom plate, stud, joist or previous Thermafiber® batt installed.
2. Slide the batt in from the side so the box sits within in the cut out.
2. Measure the same distance on the batt and splice the batt the depth of the wire’s location.
1. Cut and/or notch the Thermafiber® batt around the pipe. Slide the batt in-behind the pipe ensuring a tight and secure fit.
3. Install the batt into the cavity fitting the wire in the splice.
InsulatingAround FixturesElectrical Boxes
Plumbing/Pipes
Electrical Wiring
CAUTION: Building, electrical, fire and other applicable codes shall be complied with. All heat emitting devices, such as fuel burning appliances, chimneys, pipes, ducts and vents to these appliances shall maintain a minimum clearance of 50 mm between these devices and the insulation. Recessed light fixtures, unless designed for the purpose, shall not be installed in insulating ceilings.