Embed Size (px)
Citation preview
Building suggestions from Pilerud’s Cosplay Version 2015-09-08
1
This is NOT a complete
tutorial.
This is just me, sharing my process. In whatever way it might help you. Don’t expect it to answer all your questions. The following pages gives you some suggestions based on what I have learned. Remember to look the actual miniatures for reference (and official artwork).
Introduction I scratchbuilt this Warhammer 40,000 Space Marine Power Armor as a fan. It was my first pepakura+foam build. It was first shown at The Scandinavian Sci-fi, Game & Film Convention 2012 in Stockholm, Sweden.
About 300 hours in making, spread over 4 months from start to first use. After that more than 100
hours has been used making improvements and modifications.
Weight: The current weight is 25 kg.
Height: About 210-215 cm/7' (I am about 183 cm/6' without armor). (To be able to move around
easier and be able to use my own hands, the size is a compromise between proper SM size and a
normal human.)
Method: Pepakura (foam+hot glue) and some modifications to make it look more like the miniatures.
And some aliminum rods, and screws and electronics. I used 935 as scale on the pepakura files.
(Some exceptions. See the pepakura files in that folder for details.)
Cost of materials: At the present more than 2700€. (And then I have tried to make it cheap.) The cost
of the foam is only about 400-500€. The rest is all the other small things you need, and paint. (See
separate document for more details.)
Getting dressed takes about 15 minutes, and requires a servitor (and a short ladder). First I put on
the waist+thighs piece like pants with a belt and shoulder straps inside. Then step up on a short
ladder and steps inside the shins and feet. The servitor puts in the pins so the knees connect. The top
part with chest, arms, shoulders, and backpack, goes over the head like a sweater. (The bolter has a
sling that goes behind the “collar”). Gloves on, and the servitor puts the helmet on. I can’t reach the
helmet myself. Off to fight xenos! (AKA “Pose for pictures”.)
No comissions.
Look through ALL folders with pictures before you start a build. Since several
things has been remade or modified since the first build, and a new version is
in a specific folder.
Introduction 1
Pepakura 2
Material suggestions 3
Reinforcement 6
Gluing foam 7
Hiding the seams 7
Paint 7
Weathering 8
Joints 9
Walking sounds 9
Helmet electronics 10
Reinforced Styrofoam 11
Worblas Finest Art 11
Worbla priming and painting 15
More stuff 16
Building suggestions from Pilerud’s Cosplay Version 2015-09-08
2
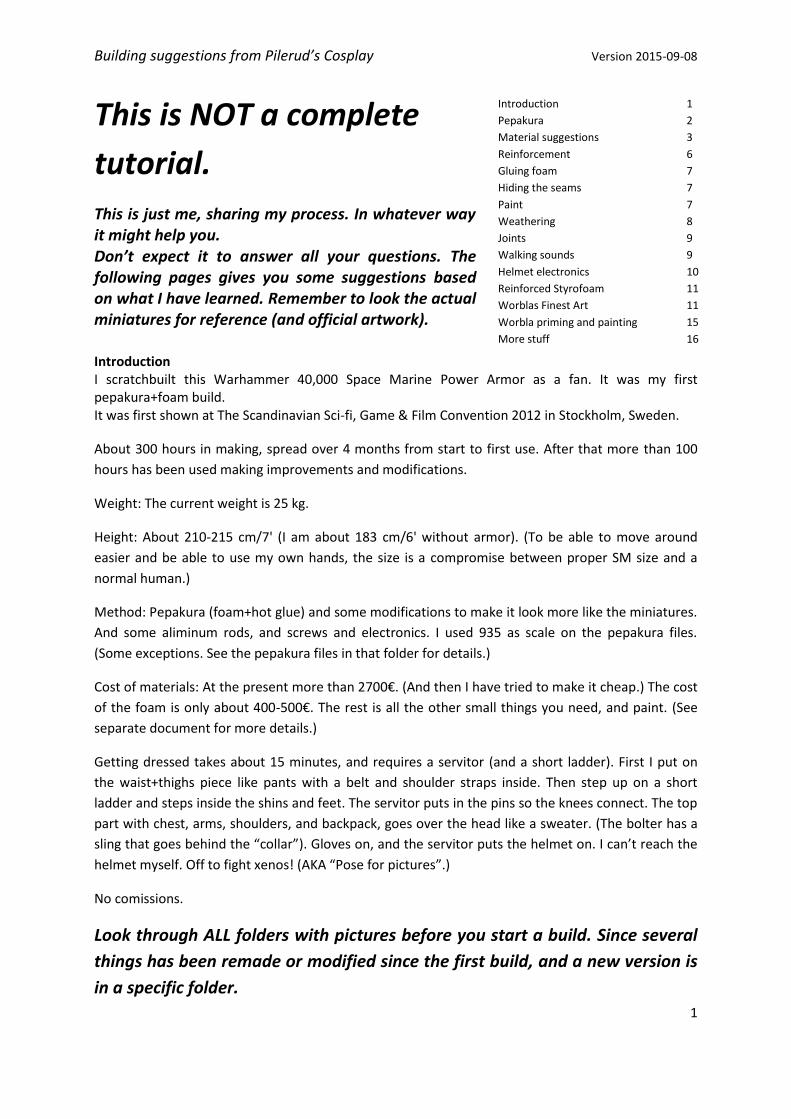
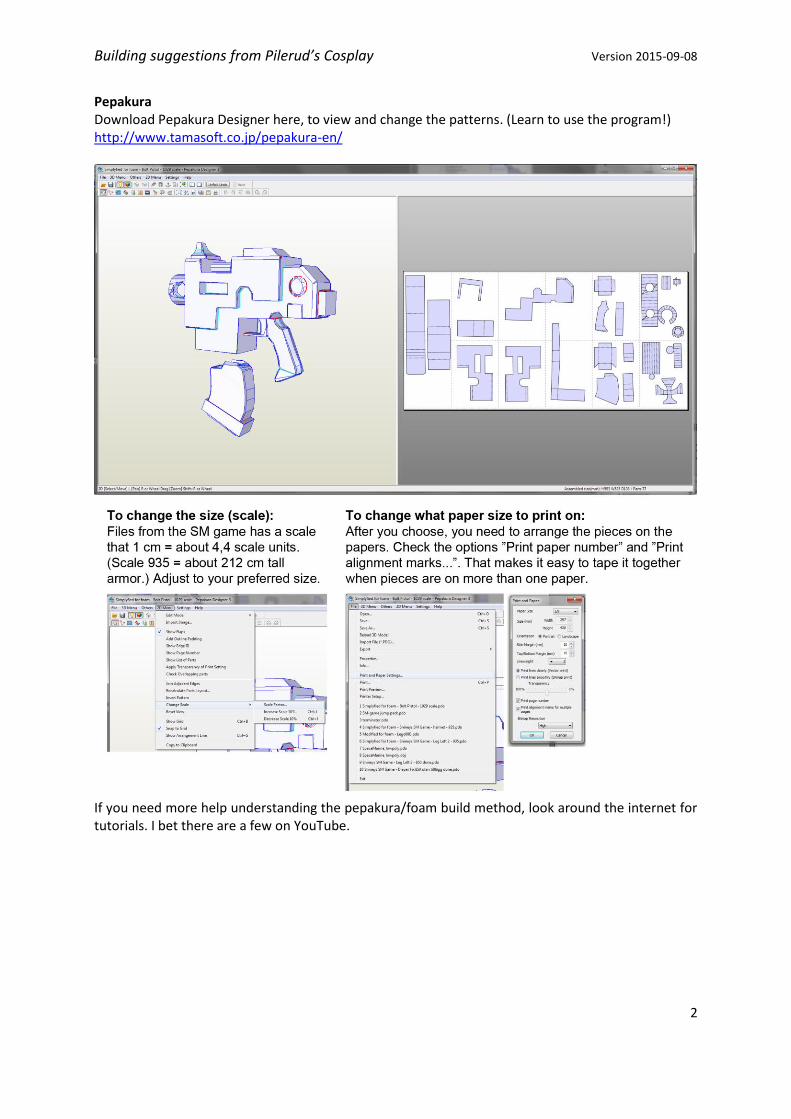
Pepakura Download Pepakura Designer here, to view and change the patterns. (Learn to use the program!) http://www.tamasoft.co.jp/pepakura-en/
If you need more help understanding the pepakura/foam build method, look around the internet for tutorials. I bet there are a few on YouTube.
Building suggestions from Pilerud’s Cosplay Version 2015-09-08
3
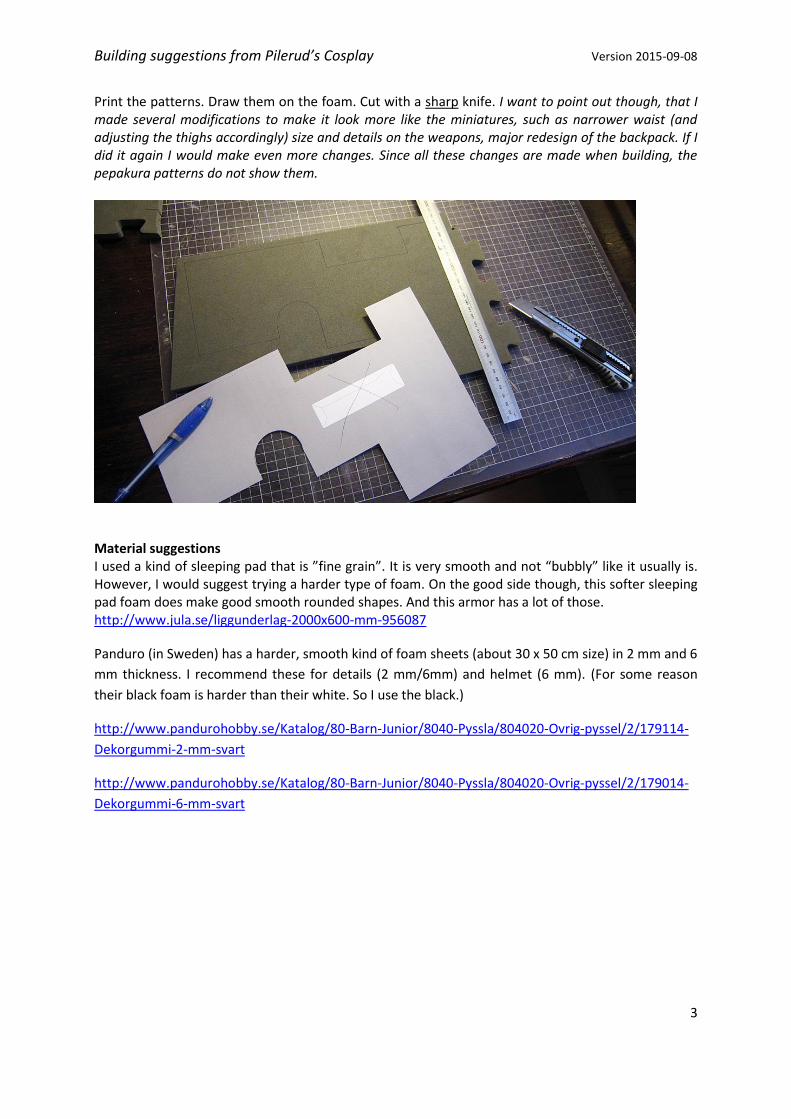
Print the patterns. Draw them on the foam. Cut with a sharp knife. I want to point out though, that I made several modifications to make it look more like the miniatures, such as narrower waist (and adjusting the thighs accordingly) size and details on the weapons, major redesign of the backpack. If I did it again I would make even more changes. Since all these changes are made when building, the pepakura patterns do not show them.
Material suggestions I used a kind of sleeping pad that is ”fine grain”. It is very smooth and not “bubbly” like it usually is. However, I would suggest trying a harder type of foam. On the good side though, this softer sleeping pad foam does make good smooth rounded shapes. And this armor has a lot of those. http://www.jula.se/liggunderlag-2000x600-mm-956087
Panduro (in Sweden) has a harder, smooth kind of foam sheets (about 30 x 50 cm size) in 2 mm and 6
mm thickness. I recommend these for details (2 mm/6mm) and helmet (6 mm). (For some reason
their black foam is harder than their white. So I use the black.)
http://www.pandurohobby.se/Katalog/80-Barn-Junior/8040-Pyssla/804020-Ovrig-pyssel/2/179114-
Dekorgummi-2-mm-svart
http://www.pandurohobby.se/Katalog/80-Barn-Junior/8040-Pyssla/804020-Ovrig-pyssel/2/179014-
Dekorgummi-6-mm-svart
Building suggestions from Pilerud’s Cosplay Version 2015-09-08
4
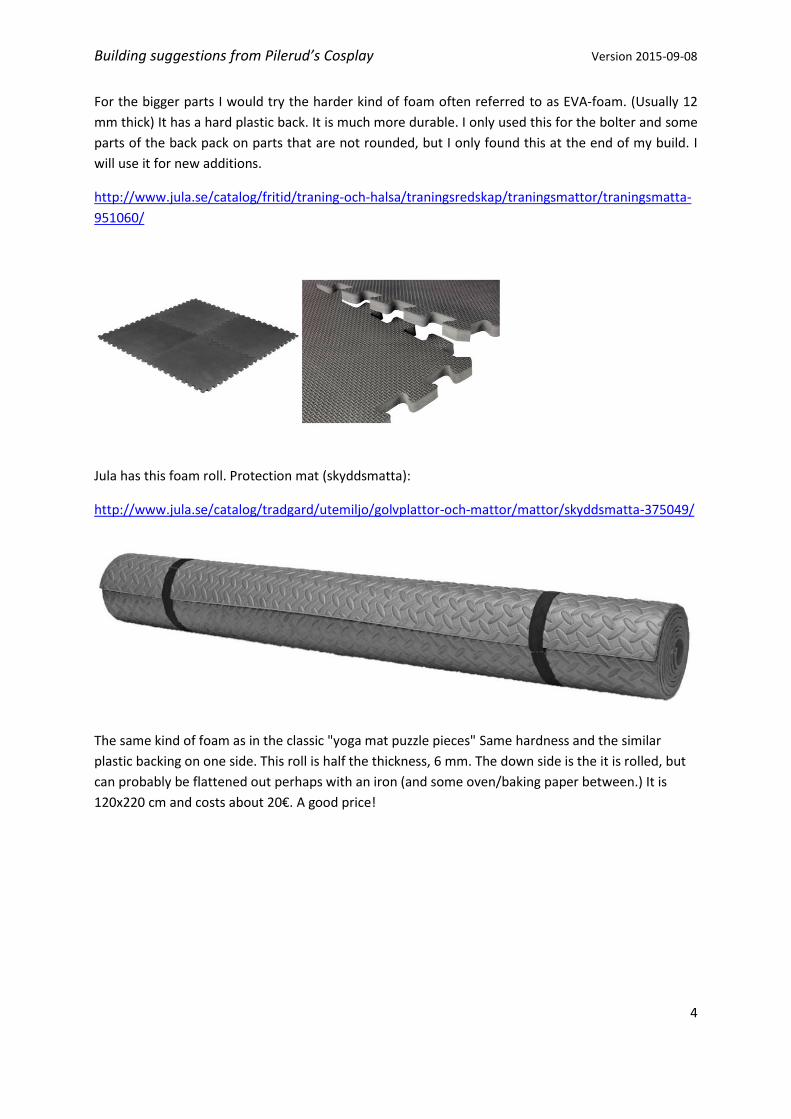
For the bigger parts I would try the harder kind of foam often referred to as EVA-foam. (Usually 12
mm thick) It has a hard plastic back. It is much more durable. I only used this for the bolter and some
parts of the back pack on parts that are not rounded, but I only found this at the end of my build. I
will use it for new additions.
http://www.jula.se/catalog/fritid/traning-och-halsa/traningsredskap/traningsmattor/traningsmatta-
951060/
Jula has this foam roll. Protection mat (skyddsmatta):
http://www.jula.se/catalog/tradgard/utemiljo/golvplattor-och-mattor/mattor/skyddsmatta-375049/
The same kind of foam as in the classic "yoga mat puzzle pieces" Same hardness and the similar
plastic backing on one side. This roll is half the thickness, 6 mm. The down side is the it is rolled, but
can probably be flattened out perhaps with an iron (and some oven/baking paper between.) It is
120x220 cm and costs about 20€. A good price!
Building suggestions from Pilerud’s Cosplay Version 2015-09-08
5
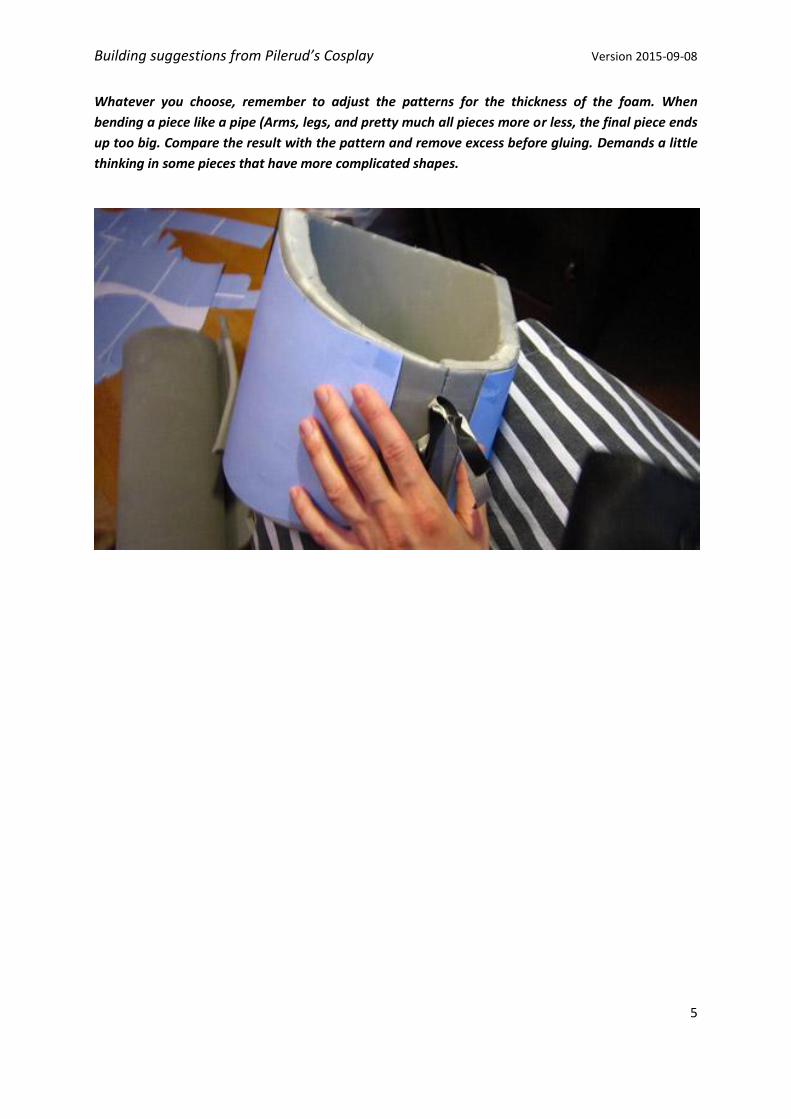
Whatever you choose, remember to adjust the patterns for the thickness of the foam. When
bending a piece like a pipe (Arms, legs, and pretty much all pieces more or less, the final piece ends
up too big. Compare the result with the pattern and remove excess before gluing. Demands a little
thinking in some pieces that have more complicated shapes.
Building suggestions from Pilerud’s Cosplay Version 2015-09-08
6
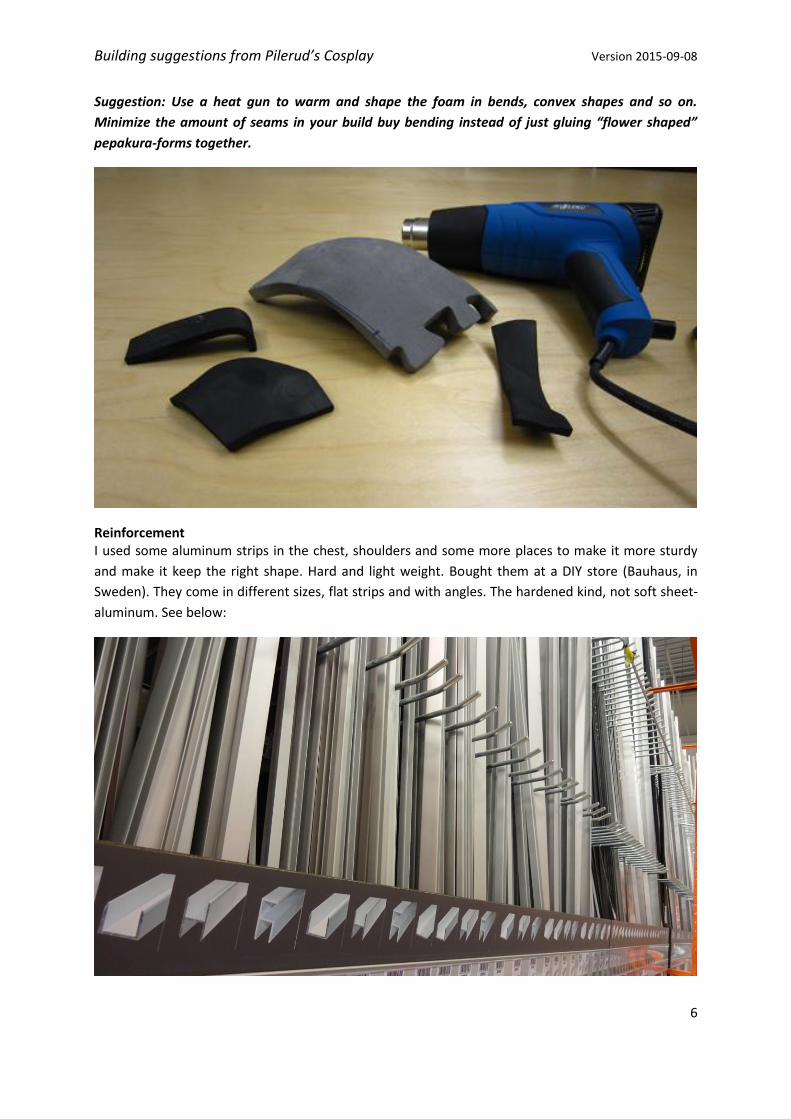
Suggestion: Use a heat gun to warm and shape the foam in bends, convex shapes and so on.
Minimize the amount of seams in your build buy bending instead of just gluing “flower shaped”
pepakura-forms together.
Reinforcement I used some aluminum strips in the chest, shoulders and some more places to make it more sturdy
and make it keep the right shape. Hard and light weight. Bought them at a DIY store (Bauhaus, in
Sweden). They come in different sizes, flat strips and with angles. The hardened kind, not soft sheet-
aluminum. See below:
Building suggestions from Pilerud’s Cosplay Version 2015-09-08
7
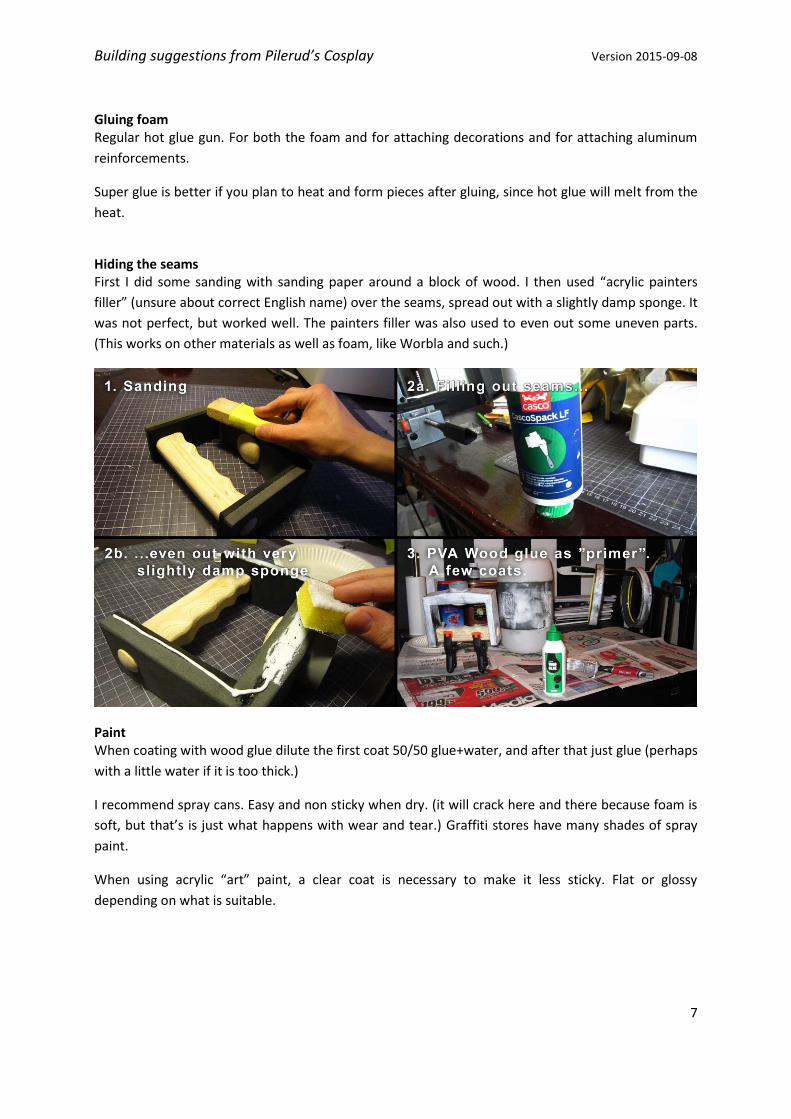
Gluing foam Regular hot glue gun. For both the foam and for attaching decorations and for attaching aluminum
reinforcements.
Super glue is better if you plan to heat and form pieces after gluing, since hot glue will melt from the
heat.
Hiding the seams First I did some sanding with sanding paper around a block of wood. I then used “acrylic painters
filler” (unsure about correct English name) over the seams, spread out with a slightly damp sponge. It
was not perfect, but worked well. The painters filler was also used to even out some uneven parts.
(This works on other materials as well as foam, like Worbla and such.)
Paint When coating with wood glue dilute the first coat 50/50 glue+water, and after that just glue (perhaps
with a little water if it is too thick.)
I recommend spray cans. Easy and non sticky when dry. (it will crack here and there because foam is
soft, but that’s is just what happens with wear and tear.) Graffiti stores have many shades of spray
paint.
When using acrylic “art” paint, a clear coat is necessary to make it less sticky. Flat or glossy
depending on what is suitable.
Building suggestions from Pilerud’s Cosplay Version 2015-09-08
8
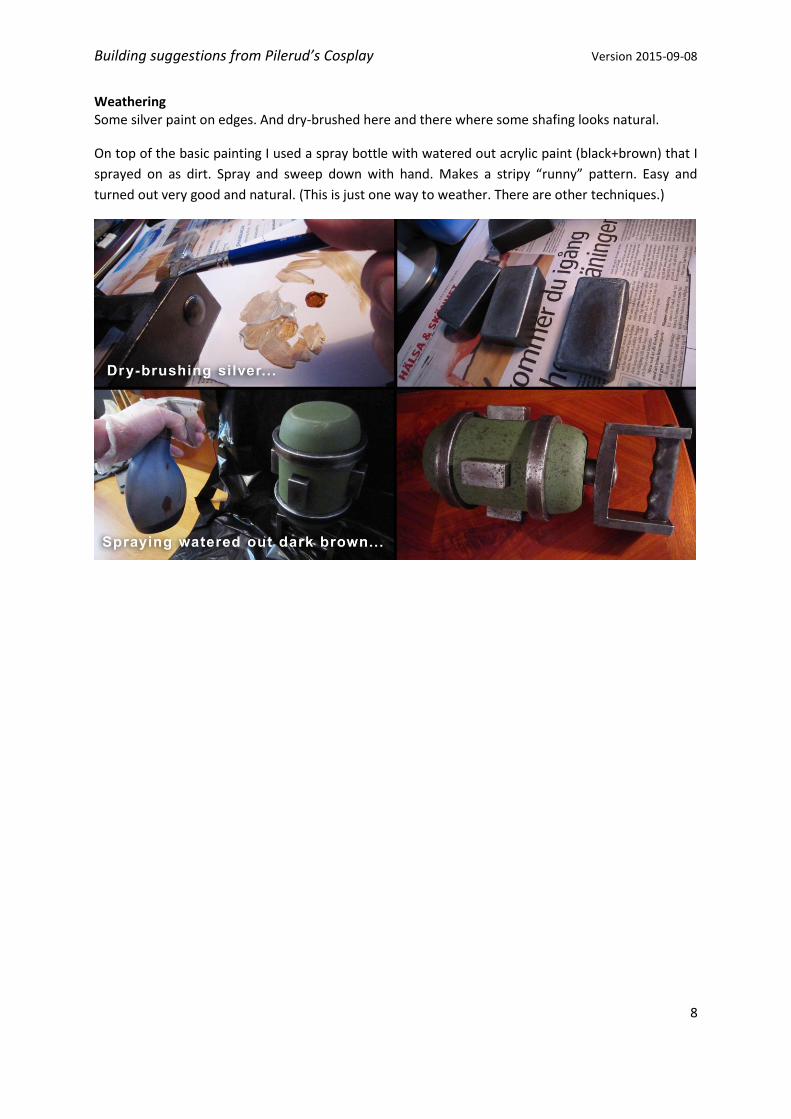
Weathering Some silver paint on edges. And dry-brushed here and there where some shafing looks natural.
On top of the basic painting I used a spray bottle with watered out acrylic paint (black+brown) that I
sprayed on as dirt. Spray and sweep down with hand. Makes a stripy “runny” pattern. Easy and
turned out very good and natural. (This is just one way to weather. There are other techniques.)
Building suggestions from Pilerud’s Cosplay Version 2015-09-08
9
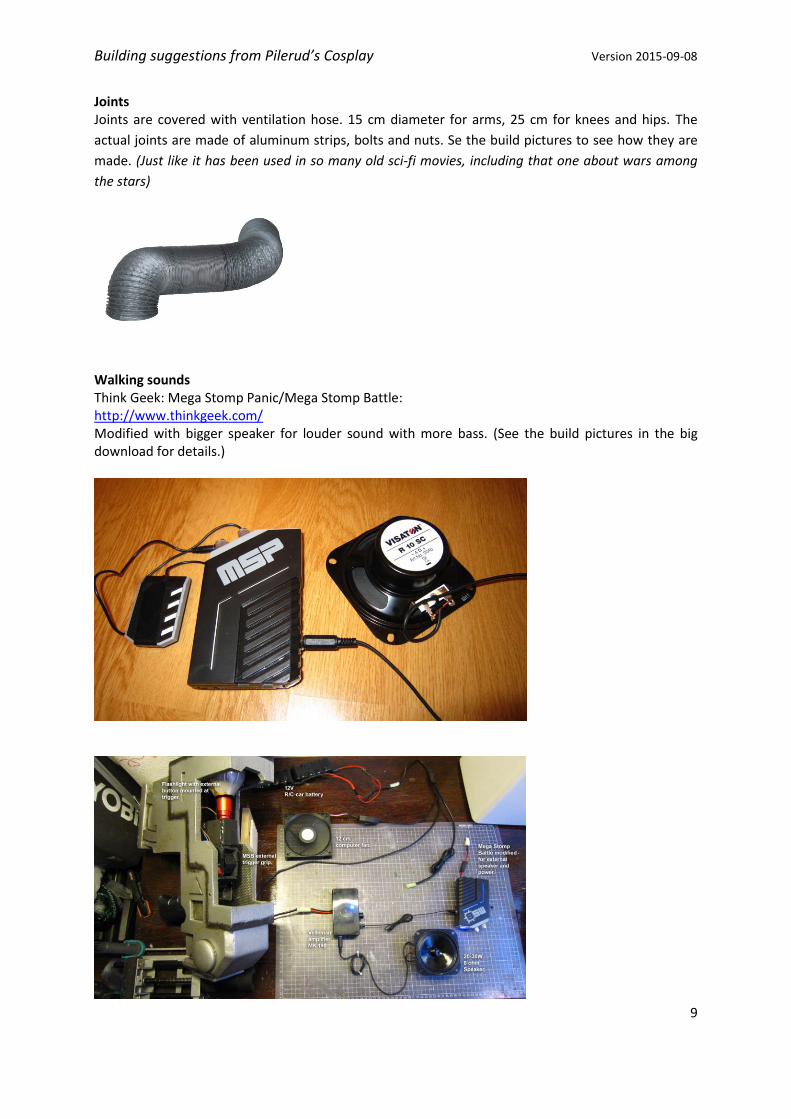
Joints Joints are covered with ventilation hose. 15 cm diameter for arms, 25 cm for knees and hips. The
actual joints are made of aluminum strips, bolts and nuts. Se the build pictures to see how they are
made. (Just like it has been used in so many old sci-fi movies, including that one about wars among
the stars)
Walking sounds Think Geek: Mega Stomp Panic/Mega Stomp Battle: http://www.thinkgeek.com/ Modified with bigger speaker for louder sound with more bass. (See the build pictures in the big download for details.)
Building suggestions from Pilerud’s Cosplay Version 2015-09-08
10
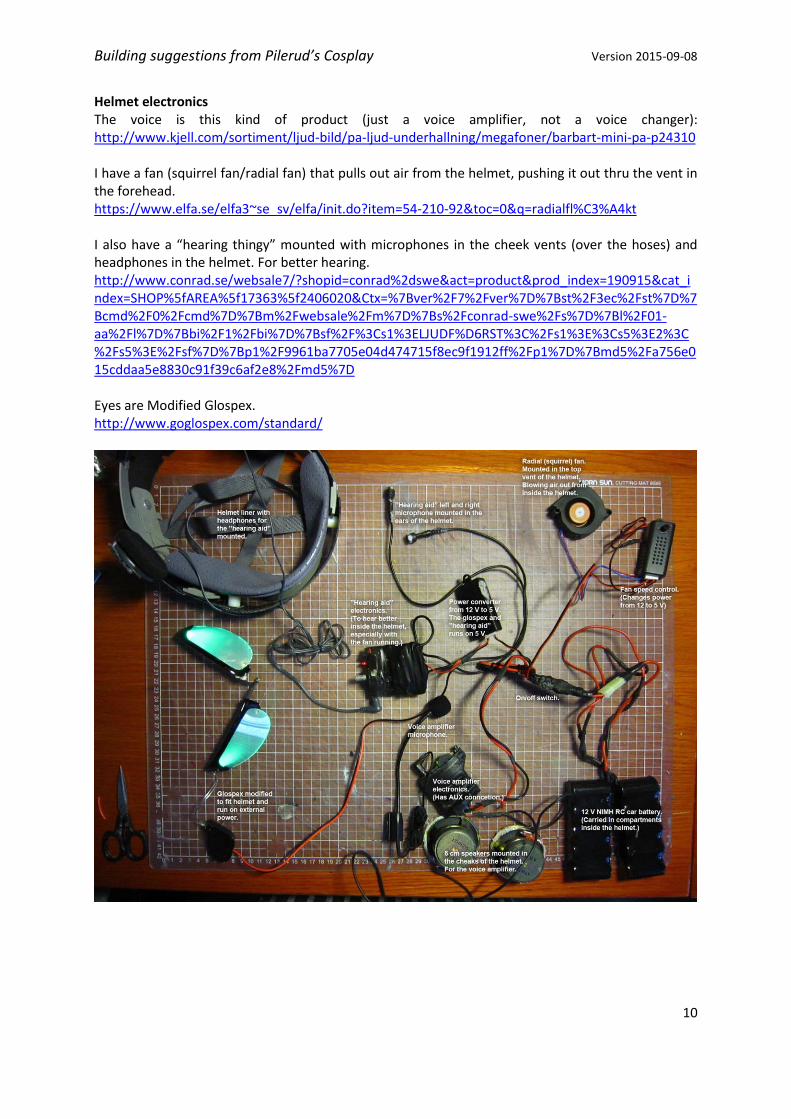
Helmet electronics The voice is this kind of product (just a voice amplifier, not a voice changer): http://www.kjell.com/sortiment/ljud-bild/pa-ljud-underhallning/megafoner/barbart-mini-pa-p24310 I have a fan (squirrel fan/radial fan) that pulls out air from the helmet, pushing it out thru the vent in the forehead. https://www.elfa.se/elfa3~se_sv/elfa/init.do?item=54-210-92&toc=0&q=radialfl%C3%A4kt I also have a “hearing thingy” mounted with microphones in the cheek vents (over the hoses) and headphones in the helmet. For better hearing. http://www.conrad.se/websale7/?shopid=conrad%2dswe&act=product&prod_index=190915&cat_index=SHOP%5fAREA%5f17363%5f2406020&Ctx=%7Bver%2F7%2Fver%7D%7Bst%2F3ec%2Fst%7D%7Bcmd%2F0%2Fcmd%7D%7Bm%2Fwebsale%2Fm%7D%7Bs%2Fconrad-swe%2Fs%7D%7Bl%2F01-aa%2Fl%7D%7Bbi%2F1%2Fbi%7D%7Bsf%2F%3Cs1%3ELJUDF%D6RST%3C%2Fs1%3E%3Cs5%3E2%3C%2Fs5%3E%2Fsf%7D%7Bp1%2F9961ba7705e04d474715f8ec9f1912ff%2Fp1%7D%7Bmd5%2Fa756e015cddaa5e8830c91f39c6af2e8%2Fmd5%7D Eyes are Modified Glospex. http://www.goglospex.com/standard/
Building suggestions from Pilerud’s Cosplay Version 2015-09-08
11
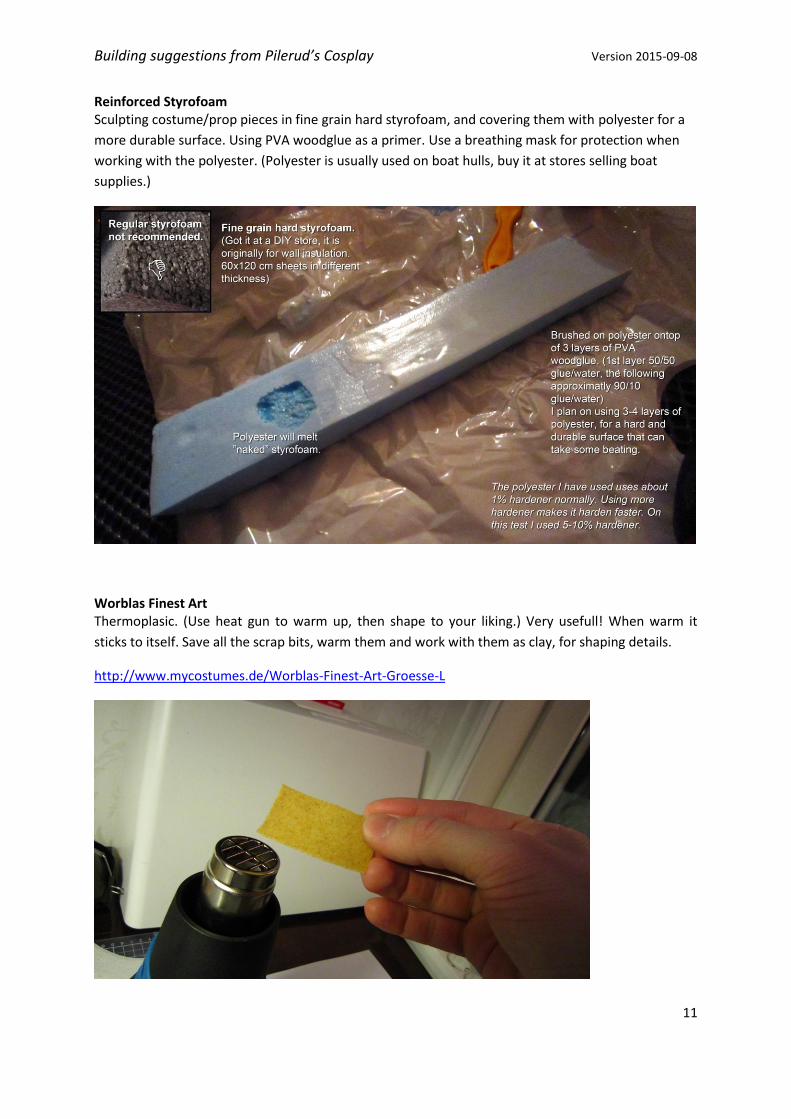
Reinforced Styrofoam Sculpting costume/prop pieces in fine grain hard styrofoam, and covering them with polyester for a
more durable surface. Using PVA woodglue as a primer. Use a breathing mask for protection when
working with the polyester. (Polyester is usually used on boat hulls, buy it at stores selling boat
supplies.)
Worblas Finest Art Thermoplasic. (Use heat gun to warm up, then shape to your liking.) Very usefull! When warm it
sticks to itself. Save all the scrap bits, warm them and work with them as clay, for shaping details.
http://www.mycostumes.de/Worblas-Finest-Art-Groesse-L

Building suggestions from Pilerud’s Cosplay Version 2015-09-08
12
You can use a round metal bowl and shape the Worbla over it to make round shapes. Or use
something sculpted and shape it over that. Like as manual form of vacuum forming, of sorts.
For a more durable Worbla. Fuse two (or more) sheets together by heating them up and pressing on
them. Make sure they are properly heated or it wont stick!
Building suggestions from Pilerud’s Cosplay Version 2015-09-08
13
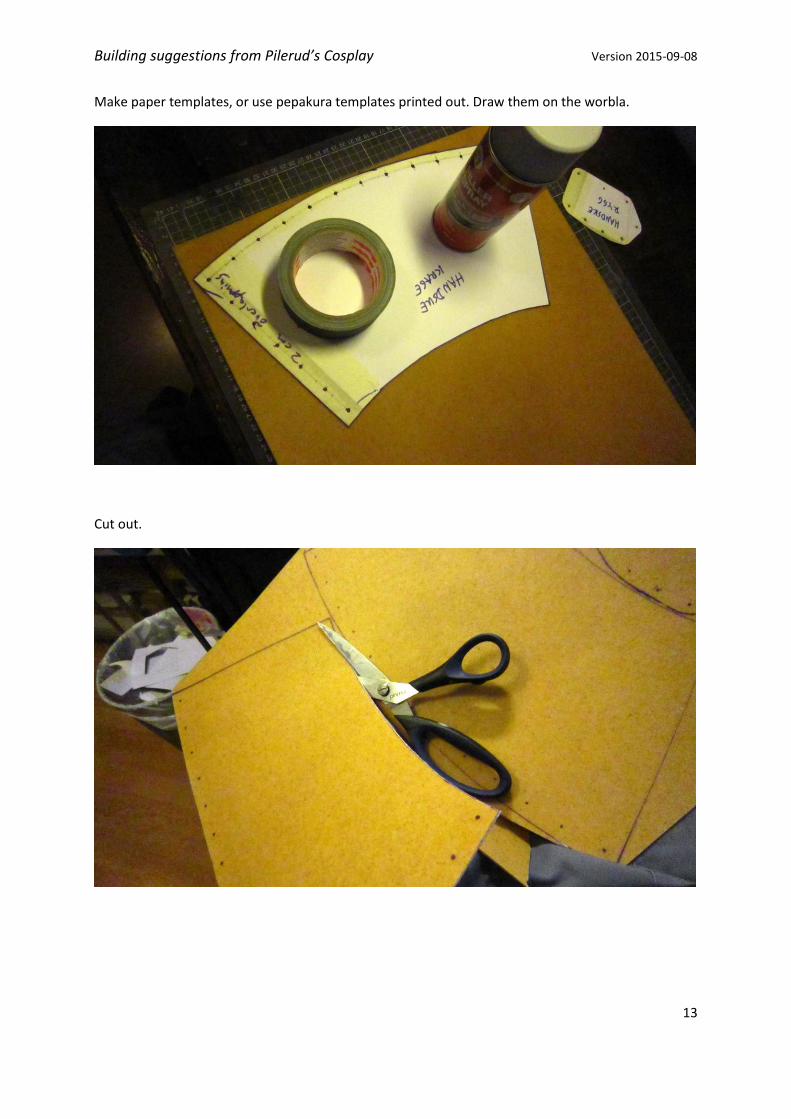
Make paper templates, or use pepakura templates printed out. Draw them on the worbla.
Cut out.
Building suggestions from Pilerud’s Cosplay Version 2015-09-08
14
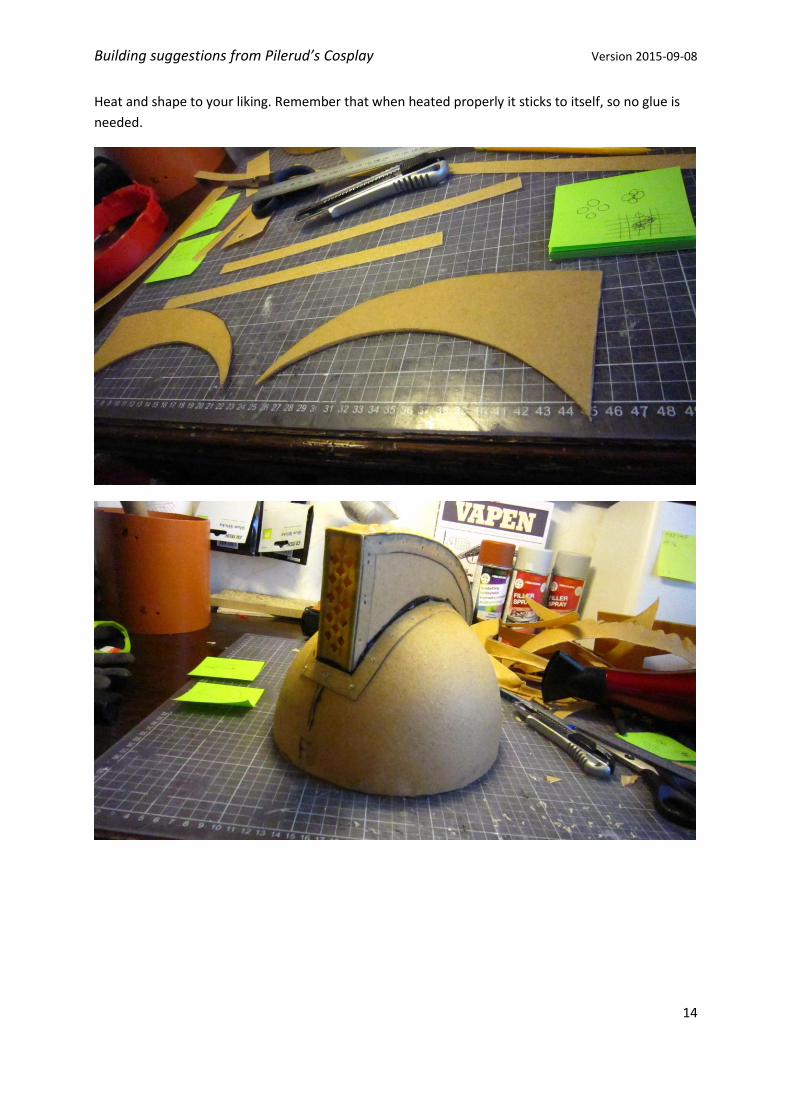
Heat and shape to your liking. Remember that when heated properly it sticks to itself, so no glue is
needed.
Building suggestions from Pilerud’s Cosplay Version 2015-09-08
15
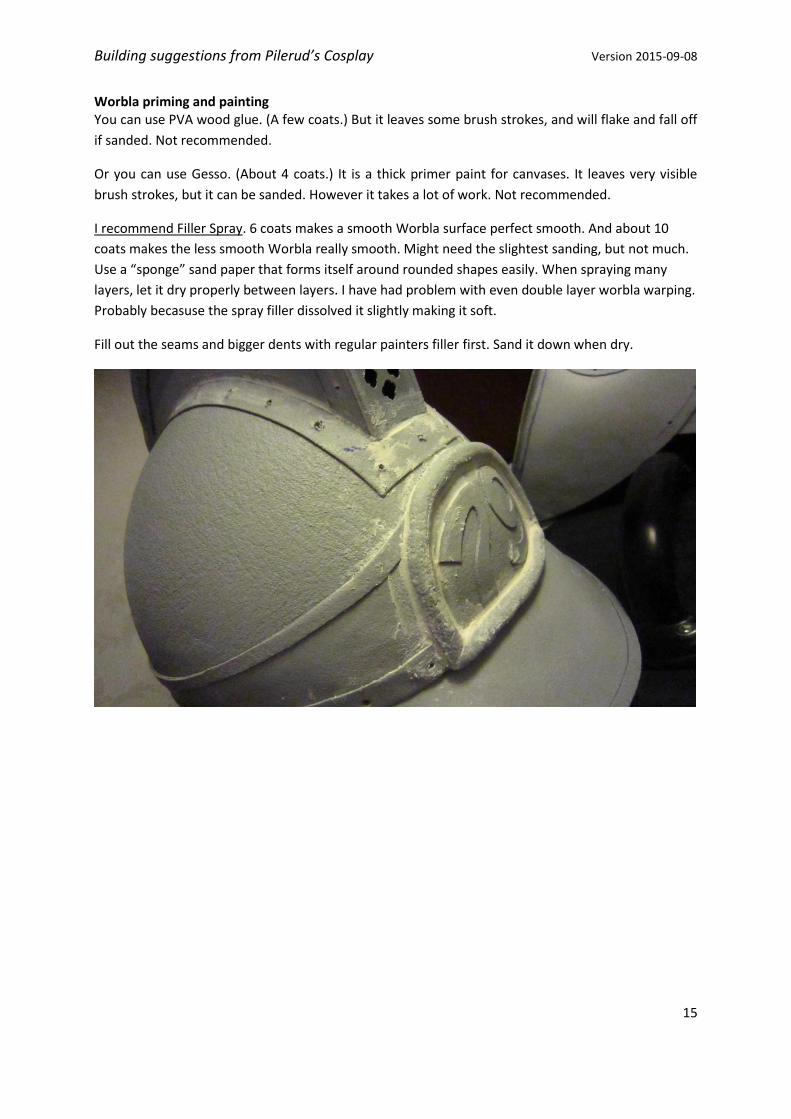
Worbla priming and painting You can use PVA wood glue. (A few coats.) But it leaves some brush strokes, and will flake and fall off
if sanded. Not recommended.
Or you can use Gesso. (About 4 coats.) It is a thick primer paint for canvases. It leaves very visible
brush strokes, but it can be sanded. However it takes a lot of work. Not recommended.
I recommend Filler Spray. 6 coats makes a smooth Worbla surface perfect smooth. And about 10
coats makes the less smooth Worbla really smooth. Might need the slightest sanding, but not much.
Use a “sponge” sand paper that forms itself around rounded shapes easily. When spraying many
layers, let it dry properly between layers. I have had problem with even double layer worbla warping.
Probably becasuse the spray filler dissolved it slightly making it soft.
Fill out the seams and bigger dents with regular painters filler first. Sand it down when dry.
Building suggestions from Pilerud’s Cosplay Version 2015-09-08
16
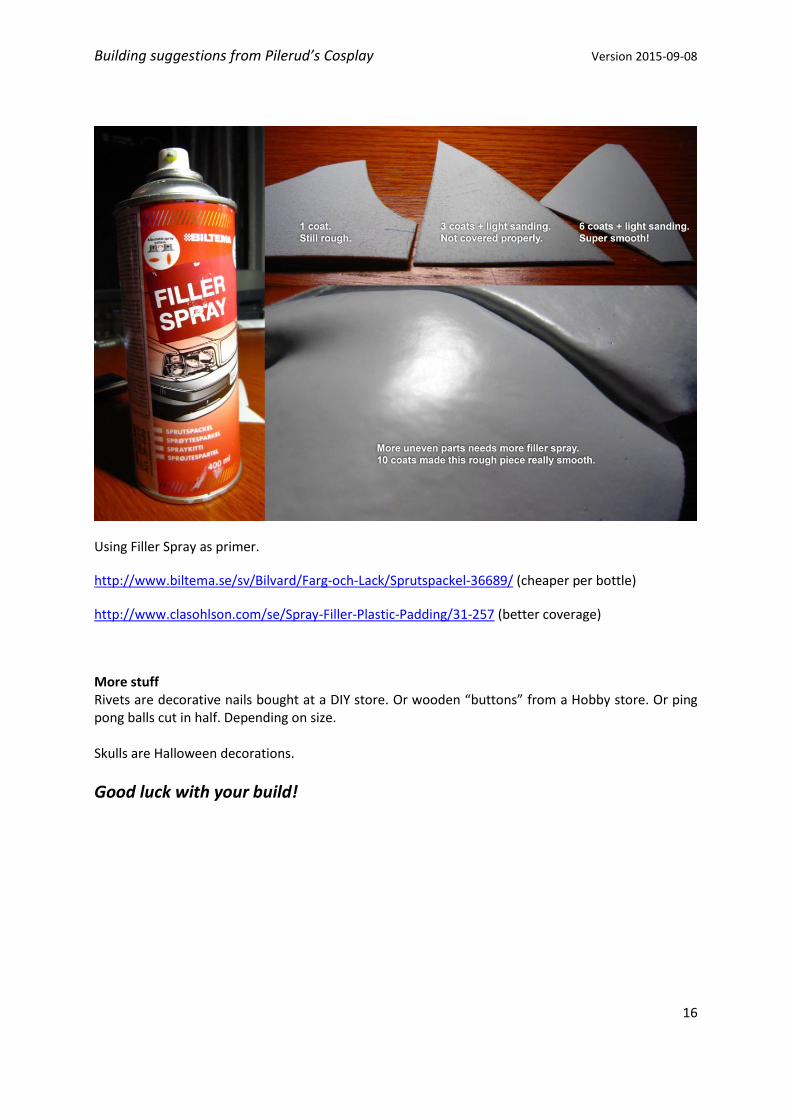
Using Filler Spray as primer.
http://www.biltema.se/sv/Bilvard/Farg-och-Lack/Sprutspackel-36689/ (cheaper per bottle)
http://www.clasohlson.com/se/Spray-Filler-Plastic-Padding/31-257 (better coverage)
More stuff Rivets are decorative nails bought at a DIY store. Or wooden “buttons” from a Hobby store. Or ping pong balls cut in half. Depending on size. Skulls are Halloween decorations.
Good luck with your build!