Embed Size (px)
Citation preview

This page left intentionally blank
This commodity is controlled under the Export Administration Regulations (EAR), ECCN 0A987, and may not be exported to a foreign person, either U.S. or abroad, without a license or exception from the U.S. Department of Commerce.
Contents
Features.................................................................4Magnification Adjustments................................5Reticle Focus Adjustments..................................6Image Focus and Parallax....................................7Elevation and Windage Adjustments................8-9Re-Indexing the Turret Dials..............................10-11Riflescope Mounting............................................12Setting Eye Relief..................................................13Installing Quick Throw Lever.............................14Zeroing Procedure...............................................15Maintenance.........................................................16Warranty...............................................................17Service and Repair...............................................18
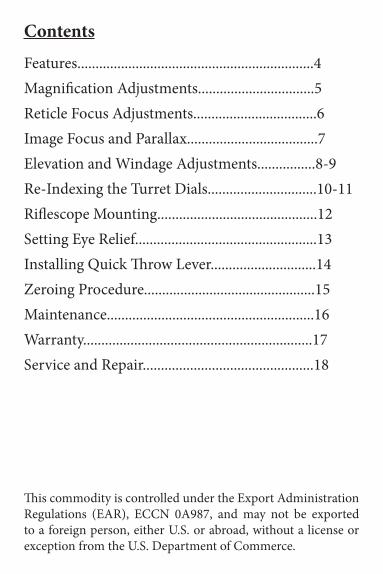
Vudu 8-32x Second Focal Plane (SFP) Riflescope Features
At EOTECH, our riflescopes are engineered and constructed to meet the rugged demands of the serious precision shooter and hunter. The Vudu 8-32x provides a robust 34mm tube, XCTM
High-Density glass, and side mounted parallax adjustment. It is loaded with all of the high performance features required to take that precise long-range shot.
4
5
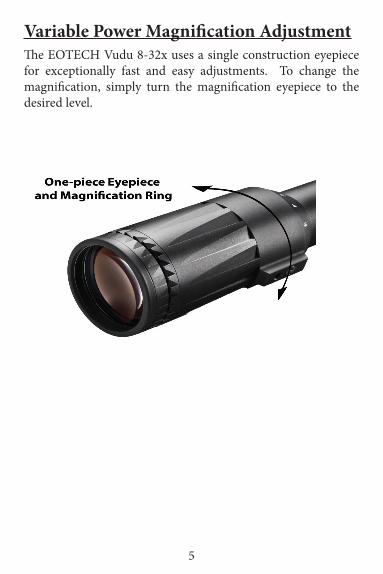
Variable Power Magnification AdjustmentThe EOTECH Vudu 8-32x uses a single construction eyepiece for exceptionally fast and easy adjustments. To change the magnification, simply turn the magnification eyepiece to the desired level.
6
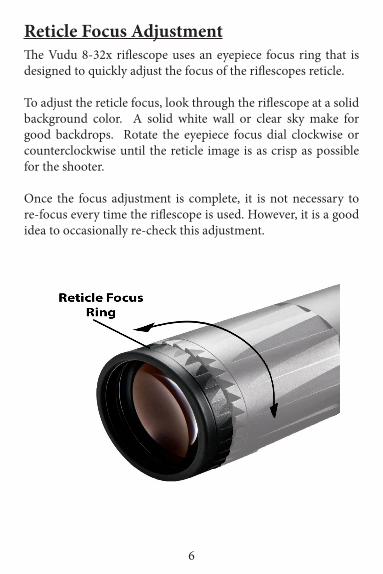
Reticle Focus AdjustmentThe Vudu 8-32x riflescope uses an eyepiece focus ring that is designed to quickly adjust the focus of the riflescopes reticle.
To adjust the reticle focus, look through the riflescope at a solid background color. A solid white wall or clear sky make for good backdrops. Rotate the eyepiece focus dial clockwise or counterclockwise until the reticle image is as crisp as possible for the shooter.
Once the focus adjustment is complete, it is not necessary to re-focus every time the riflescope is used. However, it is a good idea to occasionally re-check this adjustment.
7
Image Focus and Parallax Adjustment
ParallaxParallax is a condition that occurs when a target does not fall on the same optical plane as the reticle within the scope. If the shooters eye is off-center in the viewing window this can cause an apparent change in the position of the reticle relative to the target. For optimal performance, properly focus the target image to place it onto the same optical plane as the reticle.
Additionally, when shooting at long-range, using good form and a consistent cheek weld will optimize your body position and help minimize parallax error.
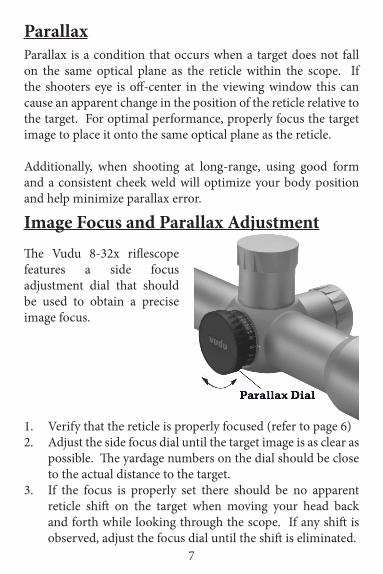
1. Verify that the reticle is properly focused (refer to page 6)2. Adjust the side focus dial until the target image is as clear as
possible. The yardage numbers on the dial should be close to the actual distance to the target.
3. If the focus is properly set there should be no apparent reticle shift on the target when moving your head back and forth while looking through the scope. If any shift is observed, adjust the focus dial until the shift is eliminated.
The Vudu 8-32x riflescope features a side focus adjustment dial that should be used to obtain a precise image focus.
8
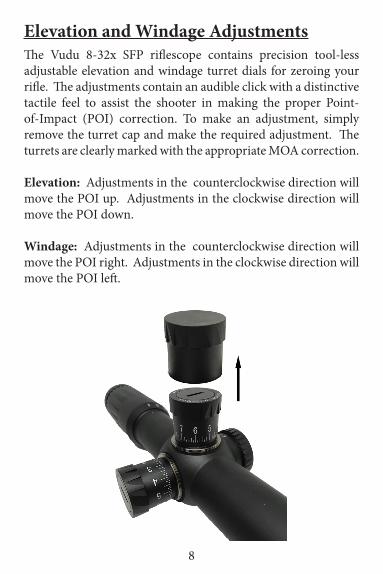
Elevation and Windage AdjustmentsThe Vudu 8-32x SFP riflescope contains precision tool-less adjustable elevation and windage turret dials for zeroing your rifle. The adjustments contain an audible click with a distinctive tactile feel to assist the shooter in making the proper Point-of-Impact (POI) correction. To make an adjustment, simply remove the turret cap and make the required adjustment. The turrets are clearly marked with the appropriate MOA correction.
Elevation: Adjustments in the counterclockwise direction will move the POI up. Adjustments in the clockwise direction will move the POI down.
Windage: Adjustments in the counterclockwise direction will move the POI right. Adjustments in the clockwise direction will move the POI left.

9
Elevation and Windage Adjustments (cont.)The Vudu 8-32x SFP riflescope turrets use clicks calibrated for minutes of angle (MOA).
Each click of the turret will adjust the POI 0.125 MOA:
0.125 MOA• Equals 0.13 inches at 100 yards• Equals 0.26 inches at 200 yards• Equals 0.52 inches at 400 yards• Equals 0.78 inches at 600 yards
Example: At 200 yards, 4 clicks will move the POI 1.04 inches
10
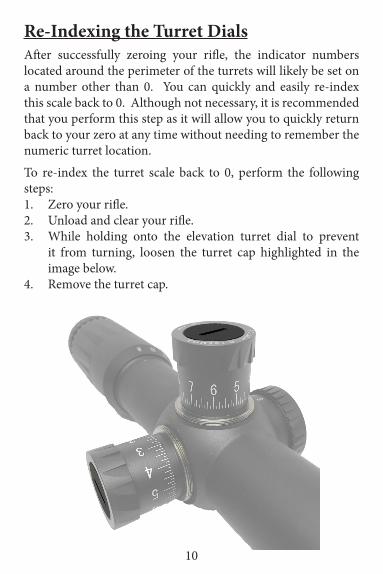
Re-Indexing the Turret DialsAfter successfully zeroing your rifle, the indicator numbers located around the perimeter of the turrets will likely be set on a number other than 0. You can quickly and easily re-index this scale back to 0. Although not necessary, it is recommended that you perform this step as it will allow you to quickly return back to your zero at any time without needing to remember the numeric turret location.
To re-index the turret scale back to 0, perform the following steps:1. Zero your rifle.2. Unload and clear your rifle.3. While holding onto the elevation turret dial to prevent
it from turning, loosen the turret cap highlighted in the image below.
4. Remove the turret cap.
11
Re-Indexing the Turret Dials (Cont.)
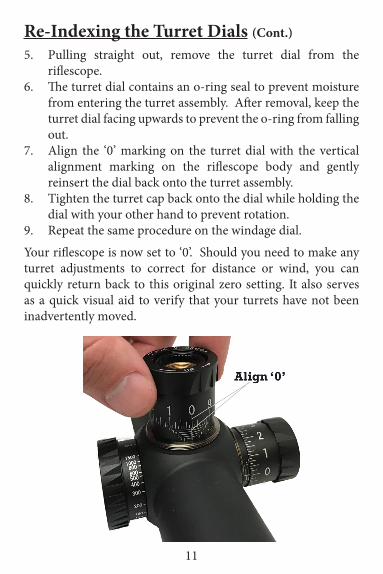
5. Pulling straight out, remove the turret dial from the riflescope.
6. The turret dial contains an o-ring seal to prevent moisture from entering the turret assembly. After removal, keep the turret dial facing upwards to prevent the o-ring from falling out.
7. Align the ‘0’ marking on the turret dial with the vertical alignment marking on the riflescope body and gently reinsert the dial back onto the turret assembly.
8. Tighten the turret cap back onto the dial while holding the dial with your other hand to prevent rotation.
9. Repeat the same procedure on the windage dial.
Your riflescope is now set to ‘0’. Should you need to make any turret adjustments to correct for distance or wind, you can quickly return back to this original zero setting. It also serves as a quick visual aid to verify that your turrets have not been inadvertently moved.
12
Riflescope MountingTo obtain the optimal performance from your EOTECH riflescope, proper mounting is required. Although not overly difficult, if you are unsure of your scope mounting abilities, the use of a qualified gunsmith is recommended.
Only mount your riflescope on a cleared and empty rifle while always observing safe gun handling.
Ring MountsFollowing the manufacturer’s installation instructions, attach high quality ring mounts to your firearm. The Vudu 8-32x riflescope requires 34mm rings.
Different firearms will require specific ring heights. Always use the lowest rings possible to keep the optical center of the riflescope as close as possible to the bore line of the barrel. If you are unsure, consult the ring mount manufacturer for recommendations.
13
Eye ReliefBefore fully tightening the ring screws, adjust the position of the riflescope for optimum eye relief. Proper eye relief will make for a more comfortable shooting position and help prevent injury from recoil.
To adjust for eye relief:
• Place the scope as far forward in the mounting rings as possible.
• While holding the rifle in a normal shooting position, slowly move the riflescope towards your eye until you have a full field of view. For the Vudu 8-32x, this will be approximately between 3-1/2 and 4 inches. Keep the riflescope in this position.
• Rotate the riflescope so that the elevation dial is at the top.• Ensure that the vertical crosshair of the riflescope aligns
with the vertical axis of the rifle.
Note: The use of a leveling tool or set of feeler gauges placed between the mount and the flat bottom of the riflescope can assist in this step.
• After aligning the reticle, tighten and torque the ring screws down to the manufacturer’s recommendation.

14
Quick Throw LeverA quick throw lever is supplied with your Vudu riflescope. It is designed to allow for rapid magnification changes. You can install the throw lever by screwing it into the threaded hole on the eye-piece. The lever should be installed finger tight. A drop of medium loctite (blue) on the threads will help prevent the lever from backing out under recoil. Should you wish to remove the throw lever, store it in a secure place for future use.
15
Bore SightingBore sighting of the riflescope saves time and ammunition at the range. This can be done using a laser bore sighter per the manufacturer’s instructions or by removing the bolt on a bolt action rifle, or the bolt carrier assembly on an AR style rifle, and visually sighting through the barrel.
To visually bore sight your riflescope:
• Remove the rifle’s bolt and place the rifle on a stable platform.
• Look through the barrel at a target approximately 100 yards away.
• With the target in the center of the barrel, make elevation and windage adjustments until the reticle crosshair of the riflescope is also centered on the target.
• The riflescope is now bore-sighted. Move on to range sight-in to confirm and fine tune your zero.
Live Fire Range Sight-In• Using the same ammunition that you plan to shoot or hunt
with, fire a 3-shot group at your preferred zero distance.• Keeping the gun barrel steady, adjust your windage and
elevation so that the reticle aligns with the approximate center of the 3-shot group.
• Fire another 3-shot group to see if it now groups on the center of the bullseye.
• Repeat this process as many times as necessary to achieve a perfect zero.
After achieving an accurate zero, the windage and elevation dials should be re-indexed as described in the Re-Indexing the Turret Dials section on page 11.

16
For a list of frequently asked questions, product instructional videos and information on service and accessories, visit our website at www.eotechinc.com
Maintenance1. The Vudu riflescope lenses are coated with an anti-reflective
material. When cleaning the glass surfaces, first blow or brush away any dirt and dust. Fingerprints and water spots can be wiped off with lens tissue or a soft cotton cloth, moistened with lens cleaning fluid. Never clean the glass surfaces with a dry cloth or paper towel. Always dampen the glass surfaces prior to cleaning.
2. No maintenance is needed on the exterior surfaces of the riflescope except to occasionally wipe off with a soft cloth. A mild water-based cleaner is all that is required.
3. All moving parts of the riflescope are permanently lubricated. Do not try to lubricate them.
4. Other than the turret caps and quick throw lever, do not attempt to disassemble any component of the riflescope. Disassembly will void the warranty.
EOTECH reserves the right to change the product specifications at any time without notice. All brand names and product names referenced are trademarks, registered trademarks or trade names of their respective holders.
Specifications provided in this user manual are nominal values only. Tolerance ranges consistent with industry best practices apply.
17
The EOTECH Advantage WarrantyThank you for choosing EOTECH for your new Vudu riflescope purchase. We understand your passion for the sport and your reliance on products that will provide years of dependable use. Should you experience a problem with your new Vudu riflescope, we will do the following to make it right for you.
With this limited lifetime EOTECH Advantage Warranty, we warrant that the manufacture and use of your Vudu riflescope will be free of defects in materials and workmanship, regardless of whether you are the original owner. Should your Vudu riflescope ever experience any defects in materials or workmanship, we will repair or replace it, as determined by EOTECH, with a comparable product, free of charge (except for electronic components of an illuminated riflescope, which are addressed below). We do this because we want you to be as confident in your purchase as we are in the quality of our product.
The electronic components of a Vudu illuminated riflescope have a full two year warranty from the date of purchase (proof of purchase required). If, during the two year warranty period, these components are found to have any defects in materials or workmanship, EOTECH will repair or replace it, as determined by EOTECH, with a comparable product, free of charge.
This warranty does not apply to the following:1) Theft, loss, neglect, or vandalism.2) Abuse, misuse, improper installation and modification, alterations, abnormal use, or accidents.3) Cosmetic damage that does not affect the product’s use, operation or performance, as determined by EOTECH.4) Any defect or damage caused by repairs or services not performed by EOTECH.5) EOTECH products not in the Vudu line of riflescopes.
THE WARRANTY PROVIDED HEREIN SHALL BE THE SOLE AND EXCLUSIVE WARRANTY. THERE SHALL BE NO OTHER WARRANTIES EXPRESS OR IMPLIED INCLUDING ANY IMPLIED WARRANTY OF MERCHANTABILITY OR FITNESS FOR A PARTICULAR PURPOSE OR ANY OTHER OBLIGATION ON THE PART OF EOTECH WITH RESPECT TO VUDU RIFLESCOPES COVERED BY THIS WARRANTY. EOTECH SHALL HAVE NO LIABILITY FOR ANY INCIDENTAL, CONSEQUENTIAL, OR SPECIAL DAMAGES.
18
For prompt, professional and friendly service contact EOTECH at the following location.
EOTECH Inc.1201 E. Ellsworth Road - Ann Arbor, MI 48108
888.EOTHOLO (888.368.4656)www.eotechinc.com
EOTECH Inc.Warranty and Service Department
1201 E. Ellsworth RoadAnn Arbor, Michigan, 48108
U.S.A.Reference RA#
Contacting EOTECH for repair:1. Visit the manufacturer’s website at www.eotechinc.com2. Click on the customer service & support tab in the menu
bar and then click the Return Authorization Request Form.3. Call or email L-3 EOTECH’s customer service department
at the following: 888.EOTHOLO (888.368.4656),[email protected]
4. Be sure to leave a name, contact number, return shipping address and failure description in the email or voice mail. This will allow the manufacturer to generate a Return Authorization Number (RA#) to include with the riflescope. DO NOT SHIP THE SCOPE WITHOUT A RETURN AUTHORIZATION NUMBER (this will severely delay the turn-around time on repair or replacement).
5. Send the unit postage prepaid to the address below. Please include your name, address, phone number, RA# and a written description of the problem. Whenever possible, ship the product in its original box.

19
This page left intentionally blank

VD1908 Rev A