Embed Size (px)
Citation preview
157
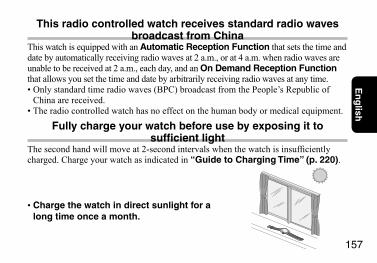
This radio controlled watch receives standard radio waves broadcast from China
This watch is equipped with an Automatic Reception Function that sets the time and date by automatically receiving radio waves at 2 a.m., or at 4 a.m. when radio waves are unable to be received at 2 a.m., each day, and an On Demand Reception Function that allows you set the time and date by arbitrarily receiving radio waves at any time.
Only standard time radio waves (BPC) broadcast from the People’s Republic of China are received.The radio controlled watch has no effect on the human body or medical equipment.
Fully charge your watch before use by exposing it to suffi cient light
The second hand will move at 2-second intervals when the watch is insuffi ciently charged. Charge your watch as indicated in “Guide to Charging Time” (p. 220).
Charge the watch in direct sunlight for a long time once a month.
•
•
•
En
glish
158 159
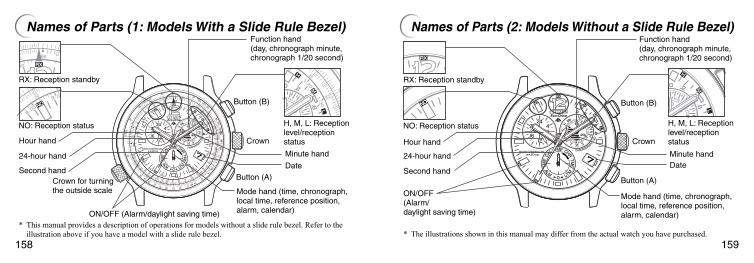
Names of Parts (1: Models With a Slide Rule Bezel)
* This manual provides a description of operations for models without a slide rule bezel. Refer to the illustration above if you have a model with a slide rule bezel.
Names of Parts (2: Models Without a Slide Rule Bezel)
ON/OFF (Alarm/daylight saving time)
Hour hand
Second hand
24-hour hand
NO: Reception status
RX: Reception standby
Function hand(day, chronograph minute, chronograph 1/20 second)
Date
Mode hand (time, chronograph, local time, reference position, alarm, calendar)
H, M, L: Reception level/reception status
Minute hand
Crown
Button (B)
Button (A)
ON/OFF(Alarm/daylight saving time)
Hour hand
Second hand
24-hour hand
NO: Reception status
RX: Reception standby
Function hand(day, chronograph minute, chronograph 1/20 second)
Date
Mode hand (time, chronograph, local time, reference position, alarm, calendar)
H, M, L: Reception level/reception status
Minute hand
Crown
Button (B)
Button (A)
* The illustrations shown in this manual may differ from the actual watch you have purchased.
Crown for turning the outside scale
160 161
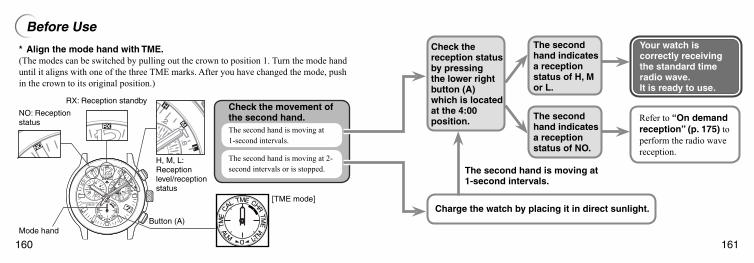
* Align the mode hand with TME.(The modes can be switched by pulling out the crown to position 1. Turn the mode hand until it aligns with one of the three TME marks. After you have changed the mode, push in the crown to its original position.)
Before UseCheck the reception status by pressing the lower right button (A) which is located at the 4:00 position.
The second hand indicates a reception status of H, M or L.
The second hand indicates a reception status of NO.
Refer to “On demand reception” (p. 175) to perform the radio wave reception.
Your watch is correctly receiving the standard time radio wave.It is ready to use.
Check the movement of the second hand.
RX: Reception standby
NO: Reception status
Mode hand
H, M, L:Reception level/reception status
Charge the watch by placing it in direct sunlight.
The second hand is moving at 1-second intervals.
The second hand is moving at 1-second intervals.
The second hand is moving at 2-second intervals or is stopped.
Button (A)
[TME mode]
162 163
The watch can receive radio waves in time mode (TME, three positions) and local time mode (L-TM). It cannot receive radio waves in the other modes.
Automatic receptionIt is not necessary to operate buttons to perform automatic reception.The watch will receive the radio waves at 2 a.m. every day. If a radio wave cannot be received at 2 a.m., it will try again automatically at 4 a.m. and the time and date will be adjusted.
On demand reception (manual reception)Radio waves can be received at any time.Use this function when automatic reception is impossible due to changes in the reception environment. Do not move the watch during on demand reception to ensure proper reception of the radio waves. (This may take up to approx. 13 minutes.)
•
•
•
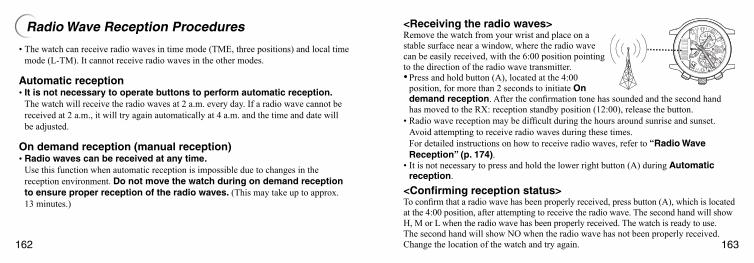
<Receiving the radio waves>Remove the watch from your wrist and place on a stable surface near a window, where the radio wave can be easily received, with the 6:00 position pointing to the direction of the radio wave transmitter.
Press and hold button (A), located at the 4:00 position, for more than 2 seconds to initiate On demand reception. After the confi rmation tone has sounded and the second hand has moved to the RX: reception standby position (12:00), release the button.Radio wave reception may be diffi cult during the hours around sunrise and sunset.Avoid attempting to receive radio waves during these times. For detailed instructions on how to receive radio waves, refer to “Radio Wave Reception” (p. 174).It is not necessary to press and hold the lower right button (A) during Automatic reception.
<Confi rming reception status>To confi rm that a radio wave has been properly received, press button (A), which is located at the 4:00 position, after attempting to receive the radio wave. The second hand will show H, M or L when the radio wave has been properly received. The watch is ready to use.The second hand will show NO when the radio wave has not been properly received.Change the location of the watch and try again.
•
•
•
Radio Wave Reception Procedures
164 165
The second hand will stop at the 12:00 position to save power when the watch has not been exposed to light for 30 minutes or more because it has been put away or is covered by clothing.
The other hands will continue to move normally.As soon as the watch is exposed to light again, the power saving function will be cancelled and the second hand will begin to move normally.
* Refer to “Power saving function” (p. 218) for more details.
••
Table of Contents1. Your Watch .................................................................................168
2. Operating the Crown .................................................................169
3. Before Use .................................................................................170A. Radio wave reception function ..........................................................170<For best reception> ..............................................................................170<Time required for reception> ...............................................................171<Poor reception areas> ...........................................................................172
Radio Wave Reception4. Radio Wave Reception ..............................................................174
A. Position of the second hand during reception ...................................177B. Confi rming the reception status .........................................................178C. Reception level and reception status .................................................179D. Reception area guidelines ..................................................................180
Power Saving Function
166 167
Operations in Each Mode5. Switching the Mode ..................................................................182
6. Using the Chronograph ............................................................184
7. Setting the Local Time/Daylight Saving Time .........................186
8. Using the Alarm .........................................................................190
9. Setting the Time and Date Manually ........................................192A. Setting the time ..................................................................................192B. Setting the date ..........................................................................194
10. Checking and Correcting the Reference Position ..................198A. Checking the reference position ........................................................198B. Correcting the reference position ......................................................200
Using the Slide Rule Bezel .............................................................203
Solar Power11. Solar Power Function ...............................................................215
<Ensuring best operation of the watch> .................................................215<Regularly charge the watch> ................................................................215
12. Characteristics of the Solar Powered Watch ..........................216A. Power saving function .......................................................................218<Power saving function> .......................................................................218<Cancelling the power saving function> ...............................................218B. Insuffi cient charge warning function .................................................219C. Overcharging prevention function .....................................................219
13. Guide to Charging Time for the Solar Powered Watch ...........220
14. Handling Your Solar Powered Watch .......................................222Charging precautions ..............................................................................222Handling the secondary battery ..............................................................223Changing the secondary battery .............................................................223
15. Troubleshooting ........................................................................224<Radio wave reception function> ..........................................................224<Eco-Drive> ...........................................................................................225
16. Precautions ................................................................................226
17. Specifi cations ............................................................................232
168 169
1. Your WatchThis watch can receive radio waves (BPC) broadcast from the People’s Republic of China that contain information that automatically corrects the time and the date of your watch. In addition, this solar powered Eco-Drive watch is powered by photo energy converted into electrical energy.This watch also provides the following functions:Chronograph function
Chronograph can measure up to 59 minutes and 59 seconds 95 in 1/20-second units.Local time function
This function allows the watch to be set to the time in another time zone.Local time can be adjusted in 1-hour units.Daylight saving time can be switched on or off.
Alarm functionThe alarm can be set based on the 24-hour clock.The alarm will sound for 15 seconds when the designated time is reached.
Perpetual calendar functionThe date (elapsed years, month, date and day of week) will maintain its accuracy until February 28, 2100, even without receiving the radio wave.
•
•••
••
•
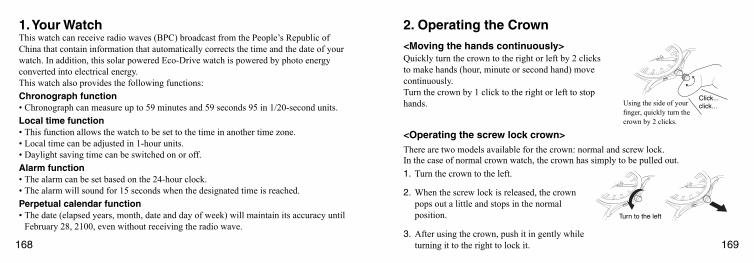
2. Operating the Crown
<Moving the hands continuously>
Click... click...Using the side of your
fi nger, quickly turn the crown by 2 clicks.
Quickly turn the crown to the right or left by 2 clicks to make hands (hour, minute or second hand) move continuously.Turn the crown by 1 click to the right or left to stop hands.
<Operating the screw lock crown>There are two models available for the crown: normal and screw lock.In the case of normal crown watch, the crown has simply to be pulled out.
Turn the crown to the left.
When the screw lock is released, the crown pops out a little and stops in the normal position.
After using the crown, push it in gently while turning it to the right to lock it.
1.
2.
3.
Turn to the left

170 171
3. Before UseA. Radio wave reception function<For best reception>
An antenna for receiving the radio waves is located inside the watch at the 6:00 position.For best reception, it is recommended to point the 6:00 position of the watch to the direction of the radio wave transmitter. The reception level may be affected by the surroundings in which the watch is being used. Place the watch in different locations and directions while paying attention to the reception level (H, M or L) to fi nd the most receptive location or orientation to give a reception level of H or M.[NOTE] The watch can receive radio waves in the
time mode (TME, three positions) and local time mode (L-TM). The watch cannot receive radio waves in any other mode.
Remove the watch from your wrist and place on a stable surface near a window where the radio wave can be easily received. Do not move the watch during reception.Reception may be diffi cult due to the surroundings or metal shielding. When inside a building and so on, place the watch as close to a window as possible for good reception.
<Time required for reception>
Reception takes about 2 to 13 minutes. If reception has failed due to environmental factors, the watch might return to the normal indication after about 60 seconds.
•
•
Time mode (TME)
Local time mode (L-TM)
172 173
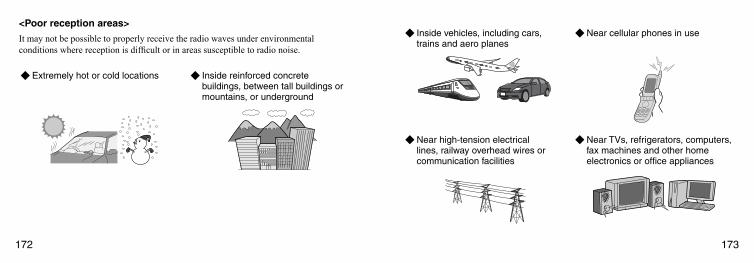
<Poor reception areas>
It may not be possible to properly receive the radio waves under environmental conditions where reception is diffi cult or in areas susceptible to radio noise.
Extremely hot or cold locations Inside reinforced concrete buildings, between tall buildings or mountains, or underground
Inside vehicles, including cars, trains and aero planes
Near cellular phones in use
Near high-tension electrical lines, railway overhead wires or communication facilities
Near TVs, refrigerators, computers, fax machines and other home electronics or offi ce appliances
174 175
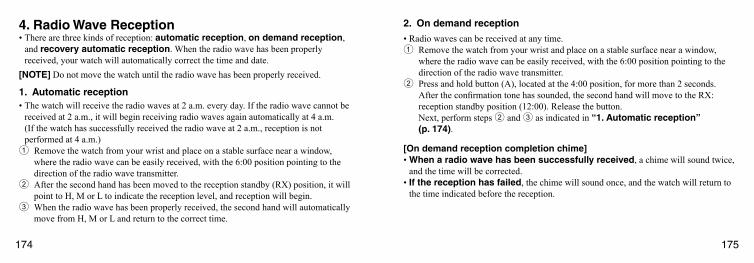
4. Radio Wave ReceptionThere are three kinds of reception: automatic reception, on demand reception, and recovery automatic reception. When the radio wave has been properly received, your watch will automatically correct the time and date.
[NOTE] Do not move the watch until the radio wave has been properly received.
1. Automatic receptionThe watch will receive the radio waves at 2 a.m. every day. If the radio wave cannot be received at 2 a.m., it will begin receiving radio waves again automatically at 4 a.m.(If the watch has successfully received the radio wave at 2 a.m., reception is not performed at 4 a.m.)
1 Remove the watch from your wrist and place on a stable surface near a window, where the radio wave can be easily received, with the 6:00 position pointing to the direction of the radio wave transmitter.
2 After the second hand has been moved to the reception standby (RX) position, it will point to H, M or L to indicate the reception level, and reception will begin.
3 When the radio wave has been properly received, the second hand will automatically move from H, M or L and return to the correct time.
•
•
2. On demand reception
Radio waves can be received at any time.1 Remove the watch from your wrist and place on a stable surface near a window,
where the radio wave can be easily received, with the 6:00 position pointing to the direction of the radio wave transmitter.
2 Press and hold button (A), located at the 4:00 position, for more than 2 seconds. After the confi rmation tone has sounded, the second hand will move to the RX: reception standby position (12:00). Release the button.Next, perform steps 2 and 3 as indicated in “1. Automatic reception” (p. 174).
[On demand reception completion chime]When a radio wave has been successfully received, a chime will sound twice, and the time will be corrected.If the reception has failed, the chime will sound once, and the watch will return to the time indicated before the reception.
•
•
•
176 177
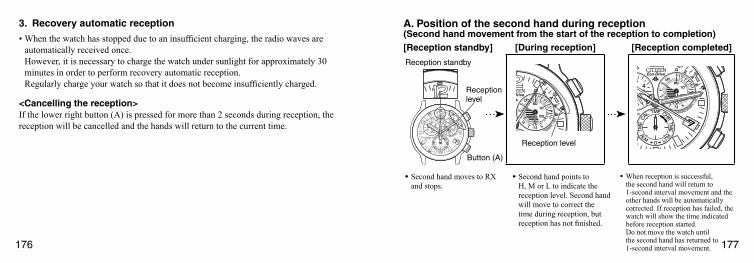
3. Recovery automatic reception
When the watch has stopped due to an insuffi cient charging, the radio waves are automatically received once.However, it is necessary to charge the watch under sunlight for approximately 30 minutes in order to perform recovery automatic reception.Regularly charge your watch so that it does not become insuffi ciently charged.
<Cancelling the reception>If the lower right button (A) is pressed for more than 2 seconds during reception, the reception will be cancelled and the hands will return to the current time.
•A. Position of the second hand during reception(Second hand movement from the start of the reception to completion)[Reception standby] [During reception] [Reception completed]
Button (A)
Reception standby
Reception level
Reception level
Second hand moves to RX and stops.
• Second hand points to H, M or L to indicate the reception level. Second hand will move to correct the time during reception, but reception has not fi nished.
• When reception is successful, the second hand will return to 1-second interval movement and the other hands will be automatically corrected. If reception has failed, the watch will show the time indicated before reception started.Do not move the watch until the second hand has returned to 1-second interval movement.
•
178 179
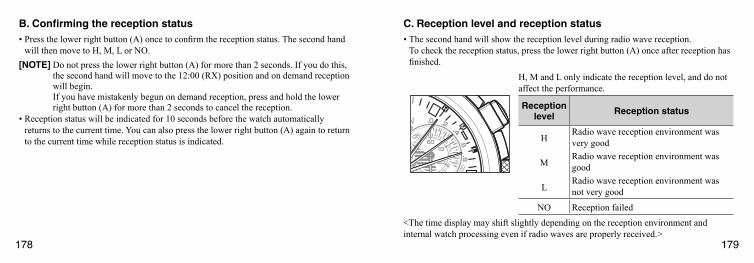
B. Confi rming the reception statusPress the lower right button (A) once to confi rm the reception status. The second hand will then move to H, M, L or NO.
[NOTE] Do not press the lower right button (A) for more than 2 seconds. If you do this, the second hand will move to the 12:00 (RX) position and on demand reception will begin.If you have mistakenly begun on demand reception, press and hold the lower right button (A) for more than 2 seconds to cancel the reception.
Reception status will be indicated for 10 seconds before the watch automatically returns to the current time. You can also press the lower right button (A) again to return to the current time while reception status is indicated.
•
•
C. Reception level and reception statusThe second hand will show the reception level during radio wave reception.To check the reception status, press the lower right button (A) once after reception has fi nished.
H, M and L only indicate the reception level, and do not affect the performance.
Reception level Reception status
HRadio wave reception environment was very good
MRadio wave reception environment was good
LRadio wave reception environment was not very good
NO Reception failed<The time display may shift slightly depending on the reception environment and internal watch processing even if radio waves are properly received.>
•
180 181
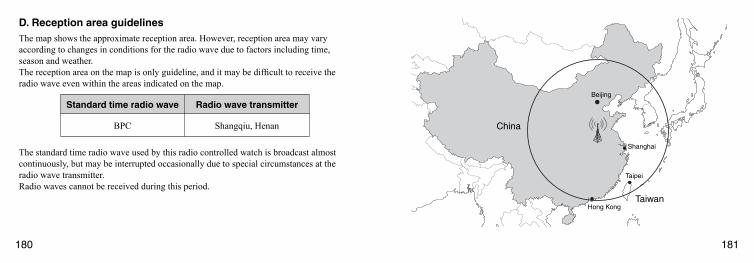
D. Reception area guidelinesThe map shows the approximate reception area. However, reception area may vary according to changes in conditions for the radio wave due to factors including time, season and weather.The reception area on the map is only guideline, and it may be diffi cult to receive the radio wave even within the areas indicated on the map.
Standard time radio wave Radio wave transmitter
BPC Shangqiu, Henan
The standard time radio wave used by this radio controlled watch is broadcast almost continuously, but may be interrupted occasionally due to special circumstances at the radio wave transmitter.Radio waves cannot be received during this period.
China
Taiwan
Beijing
Shanghai
Hong Kong
Taipei
182 183
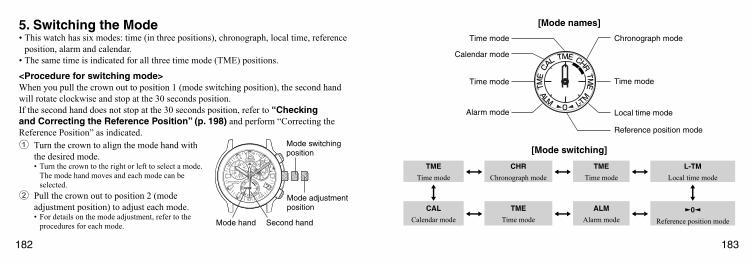
5. Switching the ModeThis watch has six modes: time (in three positions), chronograph, local time, reference position, alarm and calendar.The same time is indicated for all three time mode (TME) positions.
<Procedure for switching mode>When you pull the crown out to position 1 (mode switching position), the second hand will rotate clockwise and stop at the 30 seconds position.If the second hand does not stop at the 30 seconds position, refer to “Checking and Correcting the Reference Position” (p. 198) and perform “Correcting the Reference Position” as indicated.1 Turn the crown to align the mode hand with
the desired mode.Turn the crown to the right or left to select a mode. The mode hand moves and each mode can be selected.
2 Pull the crown out to position 2 (mode adjustment position) to adjust each mode.
For details on the mode adjustment, refer to the procedures for each mode.
•
•
Mode switching position
Mode adjustment position
Second handMode hand
•
•
[Mode names]
Time mode
Calendar mode
Time mode
Alarm mode
Reference position mode
Chronograph mode
Time mode
Local time mode
[Mode switching]
TME
Time modeCHR
Chronograph modeTME
Time modeL-TM
Local time mode
CAL
Calendar modeTME
Time modeALM
Alarm mode0
Reference position mode
184 185
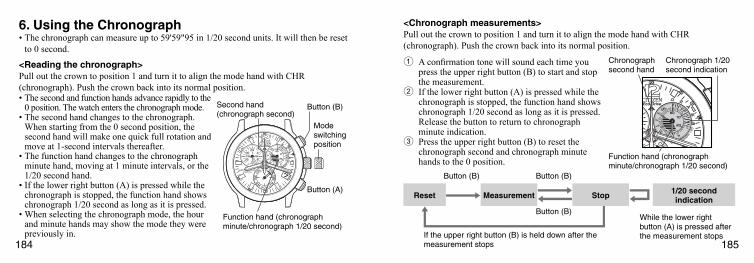
6. Using the ChronographThe chronograph can measure up to 59'59"95 in 1/20 second units. It will then be reset to 0 second.
<Reading the chronograph>Pull out the crown to position 1 and turn it to align the mode hand with CHR (chronograph). Push the crown back into its normal position.
The second and function hands advance rapidly to the 0 position. The watch enters the chronograph mode.The second hand changes to the chronograph. When starting from the 0 second position, the second hand will make one quick full rotation and move at 1-second intervals thereafter.The function hand changes to the chronograph minute hand, moving at 1 minute intervals, or the 1/20 second hand.If the lower right button (A) is pressed while the chronograph is stopped, the function hand shows chronograph 1/20 second as long as it is pressed.When selecting the chronograph mode, the hour and minute hands may show the mode they were previously in.
•
•
•
•
•
Mode switching position
Button (A)
Second hand (chronograph second)
Function hand (chronograph minute/chronograph 1/20 second)
Button (B)
•<Chronograph measurements>Pull out the crown to position 1 and turn it to align the mode hand with CHR (chronograph). Push the crown back into its normal position.
1 A confi rmation tone will sound each time you press the upper right button (B) to start and stop the measurement.
2 If the lower right button (A) is pressed while the chronograph is stopped, the function hand shows chronograph 1/20 second as long as it is pressed.Release the button to return to chronograph minute indication.
3 Press the upper right button (B) to reset the chronograph second and chronograph minute hands to the 0 position.
Chronograph 1/20 second indication
Function hand (chronograph minute/chronograph 1/20 second)
Chronograph second hand
If the upper right button (B) is held down after the measurement stops
Reset Measurement Stop 1/20 second indication
Button (B) Button (B)
Button (B)While the lower right button (A) is pressed after the measurement stops
186 187
7. Setting the Local Time/Daylight Saving TimeLocal time is a function that allows you to set the time in a zone different from that of the time mode (TME).The time difference can be corrected in 1-hour units.The time can be set to within ±26 hours of time set in time mode (TME).It is possible to change the daylight saving time setting.The setting range is from −25 hours to +27 hours.
[NOTE] Time cannot be set beyond this range.
•
•••
<Procedures for local time correction>Pull out the crown to position 1 and turn it to align the mode hand with L-TM (local time).1 Pull out the crown to position 2 (local time correcting position).
The second hand will begin to rotate. It will stop at daylight saving time ON or OFF position.
2 Turn the crown to align the hour and minute hands with the correct local time.Turn the crown to the right by 1 click to move the hour, minute and 24-hour hands ahead by 1 hour. Turn the crown to the left by 1 click to move the hour, minute and 24-hour hands back by 1 hour.
Quickly turning the crown by 2 or more clicks will make the hour, minute and 24-hour hands move continuously.Turn the crown to the left or right to stop the continuous movement of the hands.The date and day can also be changed to correspond to the local time.
[NOTE] Pay close attention to a.m. and p.m. as indicated by the 24-hour hand when setting the local time.
3 Return the crown to the normal position. Correction is now complete.
•
•
••
Local time correcting position
Button (B)
Mode switching position
Mode handDaylight saving time ON/OFF
188 189
<Procedure for setting the daylight saving time>When local time is indicated1 Pull out the crown to position 2 (local time correcting position).
The second hand will begin to rotate. It will stop at daylight saving time ON or OFF position.
2 Press the upper right button (B) to change the daylight saving time setting.A confi rmation tone will sound each time you press the upper right button (B), and you can turn the daylight saving time ON or OFF. When daylight saving is on, the time will move ahead by 1 hour.
3 Return the crown to the normal position. Setting is now complete.[Turning daylight saving time ON or OFF]
•
•
<Confirming whether daylight saving time is ON or OFF>The watch will indicate whether the daylight saving time setting is ON or OFF for about 10 seconds when the upper right button (B) is pressed with the crown in its normal position or position 1 in local time mode (L-TM).
The second hand will indicate ON when the daylight saving time has been set.The second hand will indicate OFF when the daylight saving time has not been set.
••
ON
Second hand
OFF
190 191
8. Using the AlarmThe alarm can be set based on the 24-hour clock. Once the alarm has been set, it will sound for 15 seconds once a day at the set time.The alarm can be used in the time, local time and calendar modes. The alarm will not sound in the other modes.Press button (A) or (B) to stop the alarm before it has sounded for its full 15 seconds.
<Setting the alarm>Pull out the crown to position 1 and turn it to align the mode hand with ALM (alarm).
The hour and minute hands will indicate the previously set alarm time.
•
Button (A)
Alarm time setting position
Button (B)
Mode switching position
Mode handAlarm ON/OFF
•
•
1 Pull out the crown to position 2 (alarm time setting position). Then, the second hand will stop at the ON or OFF position.
Press the upper right button (B) to turn the alarm on.A confi rmation tone will sound each time you press the upper right button (B), and the alarm setting is switched between ON and OFF.The alarm can be also switched when the crown is in its normal position or position 1.
2 Turn the crown to set the alarm. Pay close attention to a.m. and p.m. indicated by the 24-hour hand when setting the alarm.Turn the crown to the right by 1 click to move the hour and minute hands ahead by 1 minute.Turn the crown to the left by 1 click to move the hour and minute hands back by 1 minute.
Quickly turn the crown by 2 or more clicks to make the hour and minute hands move continuously.Turn the crown to the left or right to stop the continuous movement of the hands.
3 Push crown to position 1 and return the mode hand to the previous mode.4 Return the crown to the normal position. Setting is now complete.
••
•
•
192 193
9. Setting the Time and Date ManuallyThe time can be set manually when the watch is unable to receive radio waves. Remove the watch from your wrist to set the time correctly.
A. Setting the time(The same time is indicated for all three time mode (TME) positions. Select one.)
Mode switching position
[Normal hand movement]Crown in its normal position
[Mode adjustment]Crown in position 1
[Time correction]Crown in position 2
Button (B)
Button (A)
Time correcting position
•<Procedure for correcting the time>Pull out the crown to position 1 and turn it to align the mode hand to align with TME (time).1 Pull out the crown to position 2 (time correcting position).
The second hand rotates continuously and the watch shows the current time.2 Press button (A) or (B) once while the second hand is moving.
When pressed once, the second hand moves forward (clockwise) to the 0 second position and stops.
3 Turn the crown to set the hour, minute and 24-hour hands to the current time.Turn the crown to the right by 1 click to move the hour, minute and 24-hour hands ahead by 1 minute.Turn the crown to the left by 1 click to move the hour, minute and 24-hour hands back by 1 minute.
Quickly turn the crown by 2 or more clicks to move the hour, minute or 24-hour hands continuously.Turn the crown to the left or right to stop the continuous movement of the hands.Pay close attention to a.m. and p.m. indicated by the 24-hour hand when setting the time.
4 Set the time by using a time signal, and then press the crown back into its normal position.Correction is now complete.
•
•
•
••
194 195
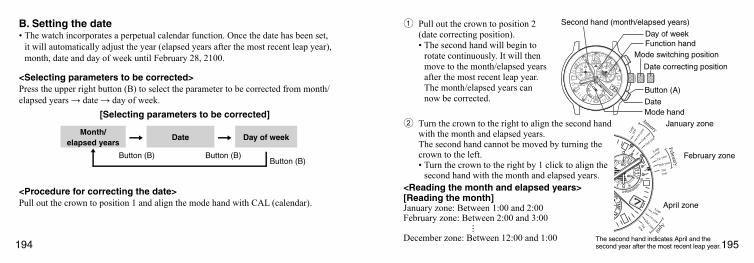
B. Setting the dateThe watch incorporates a perpetual calendar function. Once the date has been set, it will automatically adjust the year (elapsed years after the most recent leap year), month, date and day of week until February 28, 2100.
<Selecting parameters to be corrected>Press the upper right button (B) to select the parameter to be corrected from month/elapsed years → date → day of week.
[Selecting parameters to be corrected]
Month/elapsed years
Date Day of week
Button (B) Button (B)Button (B)
<Procedure for correcting the date>Pull out the crown to position 1 and align the mode hand with CAL (calendar).
•1 Pull out the crown to position 2
(date correcting position).The second hand will begin to rotate continuously. It will then move to the month/elapsed years after the most recent leap year. The month/elapsed years can now be corrected.
•
Second hand (month/elapsed years)
Function handDay of week
Date
Button (A)
Date correcting position
Mode switching position
Mode hand
2 Turn the crown to the right to align the second hand with the month and elapsed years.The second hand cannot be moved by turning the crown to the left.
Turn the crown to the right by 1 click to align the second hand with the month and elapsed years.
<Reading the month and elapsed years>[Reading the month]January zone: Between 1:00 and 2:00February zone: Between 2:00 and 3:00 December zone: Between 12:00 and 1:00
•
January
Leap
ye
ar1s
t yea
r2n
d year
3rd year
February
Leap
year
1st year
2nd year
3rd year
April
Leap year1st year2nd year
3rd year
January zone
The second hand indicates April and the second year after the most recent leap year.
February zone
April zone
196 197
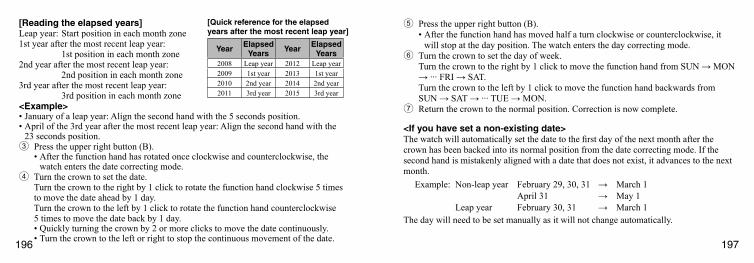
[Reading the elapsed years]Leap year: Start position in each month zone1st year after the most recent leap year: 1st position in each month zone2nd year after the most recent leap year: 2nd position in each month zone3rd year after the most recent leap year: 3rd position in each month zone
[Quick reference for the elapsed years after the most recent leap year]
Year Elapsed Years Year Elapsed
Years2008 Leap year 2012 Leap year2009 1st year 2013 1st year2010 2nd year 2014 2nd year2011 3rd year 2015 3rd year
<Example>January of a leap year: Align the second hand with the 5 seconds position.April of the 3rd year after the most recent leap year: Align the second hand with the 23 seconds position.
3 Press the upper right button (B).After the function hand has rotated once clockwise and counterclockwise, the watch enters the date correcting mode.
4 Turn the crown to set the date.Turn the crown to the right by 1 click to rotate the function hand clockwise 5 times to move the date ahead by 1 day.Turn the crown to the left by 1 click to rotate the function hand counterclockwise 5 times to move the date back by 1 day.
Quickly turning the crown by 2 or more clicks to move the date continuously.Turn the crown to the left or right to stop the continuous movement of the date.
••
•
••
5 Press the upper right button (B).After the function hand has moved half a turn clockwise or counterclockwise, it will stop at the day position. The watch enters the day correcting mode.
6 Turn the crown to set the day of week.Turn the crown to the right by 1 click to move the function hand from SUN → MON → ··· FRI → SAT.Turn the crown to the left by 1 click to move the function hand backwards from SUN → SAT → ··· TUE → MON.
7 Return the crown to the normal position. Correction is now complete.
<If you have set a non-existing date>The watch will automatically set the date to the fi rst day of the next month after the crown has been backed into its normal position from the date correcting mode. If the second hand is mistakenly aligned with a date that does not exist, it advances to the next month.
Example: Non-leap year February 29, 30, 31 → March 1April 31 → May 1
Leap year February 30, 31 → March 1The day will need to be set manually as it will not change automatically.
•
198 199
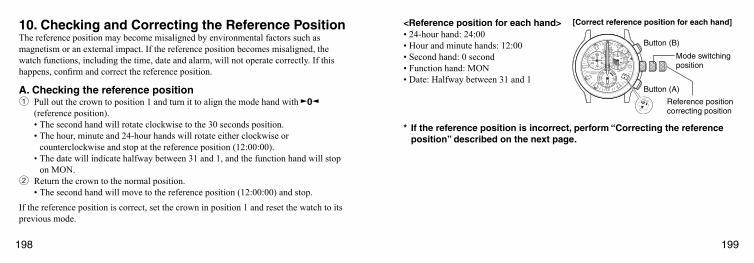
10. Checking and Correcting the Reference PositionThe reference position may become misaligned by environmental factors such as magnetism or an external impact. If the reference position becomes misaligned, the watch functions, including the time, date and alarm, will not operate correctly. If this happens, confi rm and correct the reference position.
A. Checking the reference position1 Pull out the crown to position 1 and turn it to align the mode hand with 0
(reference position).The second hand will rotate clockwise to the 30 seconds position.The hour, minute and 24-hour hands will rotate either clockwise or counterclockwise and stop at the reference position (12:00:00).The date will indicate halfway between 31 and 1, and the function hand will stop on MON.
2 Return the crown to the normal position.The second hand will move to the reference position (12:00:00) and stop.
If the reference position is correct, set the crown in position 1 and reset the watch to its previous mode.
••
•
•
<Reference position for each hand>24-hour hand: 24:00Hour and minute hands: 12:00Second hand: 0 secondFunction hand: MONDate: Halfway between 31 and 1
•••••
Mode switching position
Reference position correcting position
[Correct reference position for each hand]
Button (A)
Button (B)
* If the reference position is incorrect, perform “Correcting the reference position” described on the next page.
200 201
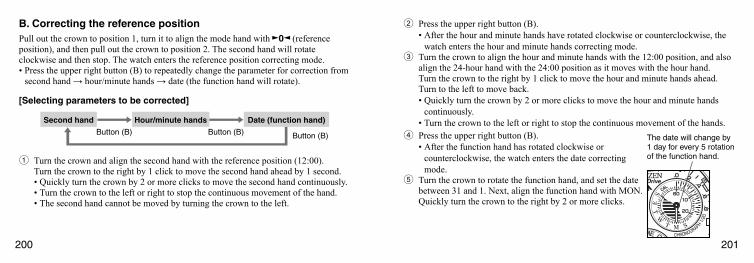
B. Correcting the reference positionPull out the crown to position 1, turn it to align the mode hand with 0 (reference position), and then pull out the crown to position 2. The second hand will rotate clockwise and then stop. The watch enters the reference position correcting mode.
Press the upper right button (B) to repeatedly change the parameter for correction from second hand → hour/minute hands → date (the function hand will rotate).
[Selecting parameters to be corrected]
Second hand Hour/minute hands Date (function hand)
Button (B)Button (B)Button (B)
1 Turn the crown and align the second hand with the reference position (12:00).Turn the crown to the right by 1 click to move the second hand ahead by 1 second.
Quickly turn the crown by 2 or more clicks to move the second hand continuously.Turn the crown to the left or right to stop the continuous movement of the hand.The second hand cannot be moved by turning the crown to the left.
•
•••
2 Press the upper right button (B).After the hour and minute hands have rotated clockwise or counterclockwise, the watch enters the hour and minute hands correcting mode.
3 Turn the crown to align the hour and minute hands with the 12:00 position, and also align the 24-hour hand with the 24:00 position as it moves with the hour hand.Turn the crown to the right by 1 click to move the hour and minute hands ahead.Turn to the left to move back.
Quickly turn the crown by 2 or more clicks to move the hour and minute hands continuously.Turn the crown to the left or right to stop the continuous movement of the hands.
4 Press the upper right button (B).After the function hand has rotated clockwise or counterclockwise, the watch enters the date correcting mode.
5 Turn the crown to rotate the function hand, and set the date between 31 and 1. Next, align the function hand with MON.Quickly turn the crown to the right by 2 or more clicks.
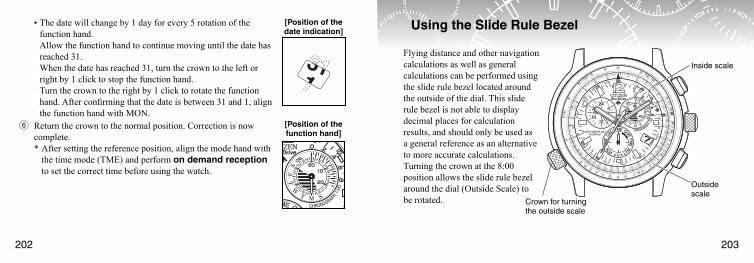
•The date will change by 1 day for every 5 rotation of the function hand.
•
•
•
202 203
The date will change by 1 day for every 5 rotation of the function hand.Allow the function hand to continue moving until the date has reached 31.When the date has reached 31, turn the crown to the left or right by 1 click to stop the function hand.Turn the crown to the right by 1 click to rotate the function hand. After confi rming that the date is between 31 and 1, align the function hand with MON.
• [Position of the date indication]
6 Return the crown to the normal position. Correction is now complete.* After setting the reference position, align the mode hand with
the time mode (TME) and perform on demand reception to set the correct time before using the watch.
[Position of the function hand]
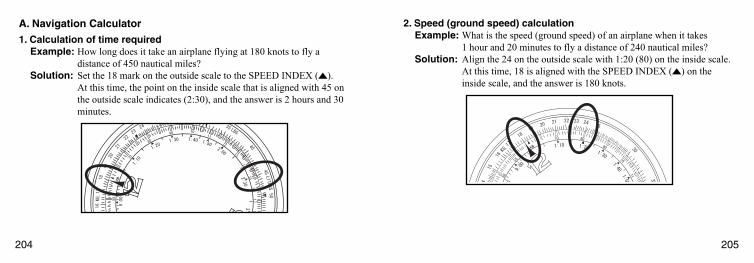
Using the Slide Rule Bezel
Flying distance and other navigation calculations as well as general calculations can be performed using the slide rule bezel located around the outside of the dial. This slide rule bezel is not able to display decimal places for calculation results, and should only be used as a general reference as an alternative to more accurate calculations.Turning the crown at the 8:00 position allows the slide rule bezel around the dial (Outside Scale) to be rotated. Crown for turning
the outside scale
Outside scale
Inside scale
204 205
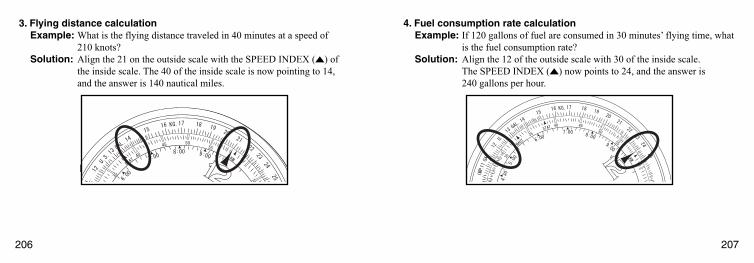
A. Navigation Calculator1. Calculation of time required
Example: How long does it take an airplane flying at 180 knots to fly a distance of 450 nautical miles?
Solution: Set the 18 mark on the outside scale to the SPEED INDEX ( ). At this time, the point on the inside scale that is aligned with 45 on the outside scale indicates (2:30), and the answer is 2 hours and 30 minutes.
2. Speed (ground speed) calculationExample: What is the speed (ground speed) of an airplane when it takes
1 hour and 20 minutes to fly a distance of 240 nautical miles?Solution: Align the 24 on the outside scale with 1:20 (80) on the inside scale.
At this time, 18 is aligned with the SPEED INDEX ( ) on the inside scale, and the answer is 180 knots.
206 207
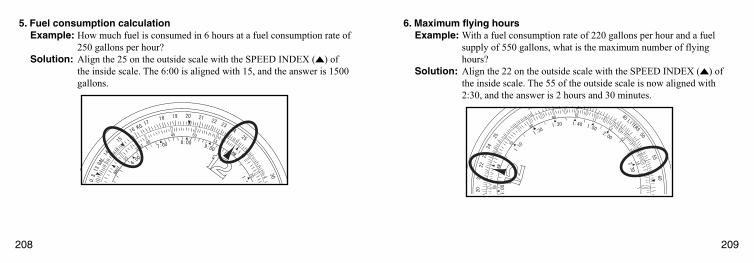
3. Flying distance calculationExample: What is the flying distance traveled in 40 minutes at a speed of
210 knots?Solution: Align the 21 on the outside scale with the SPEED INDEX ( ) of
the inside scale. The 40 of the inside scale is now pointing to 14, and the answer is 140 nautical miles.
4. Fuel consumption rate calculationExample: If 120 gallons of fuel are consumed in 30 minutes’ flying time, what
is the fuel consumption rate?Solution: Align the 12 of the outside scale with 30 of the inside scale.
The SPEED INDEX ( ) now points to 24, and the answer is 240 gallons per hour.
208 209
5. Fuel consumption calculationExample: How much fuel is consumed in 6 hours at a fuel consumption rate of
250 gallons per hour?Solution: Align the 25 on the outside scale with the SPEED INDEX ( ) of
the inside scale. The 6:00 is aligned with 15, and the answer is 1500 gallons.
6. Maximum flying hoursExample: With a fuel consumption rate of 220 gallons per hour and a fuel
supply of 550 gallons, what is the maximum number of flying hours?
Solution: Align the 22 on the outside scale with the SPEED INDEX ( ) of the inside scale. The 55 of the outside scale is now aligned with 2:30, and the answer is 2 hours and 30 minutes.
210 211
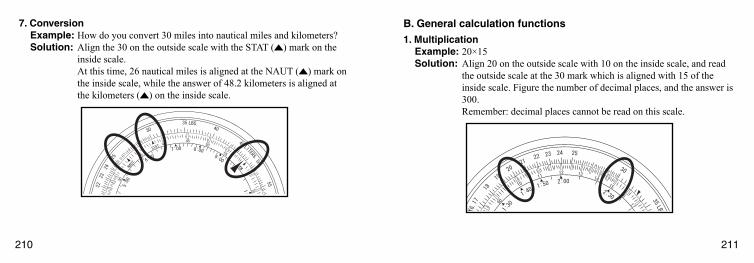
7. ConversionExample: How do you convert 30 miles into nautical miles and kilometers?Solution: Align the 30 on the outside scale with the STAT ( ) mark on the
inside scale.At this time, 26 nautical miles is aligned at the NAUT ( ) mark on the inside scale, while the answer of 48.2 kilometers is aligned at the kilometers ( ) on the inside scale.
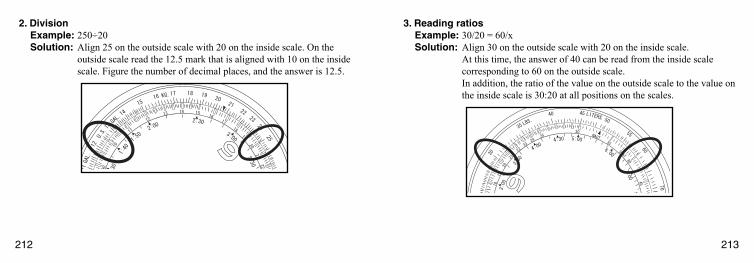
B. General calculation functions1. Multiplication
Example: 20×15Solution: Align 20 on the outside scale with 10 on the inside scale, and read
the outside scale at the 30 mark which is aligned with 15 of the inside scale. Figure the number of decimal places, and the answer is 300.
Remember: decimal places cannot be read on this scale.
212 213
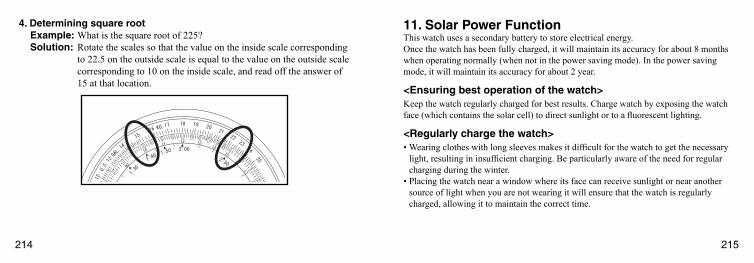
2. DivisionExample: 250÷20Solution: Align 25 on the outside scale with 20 on the inside scale. On the
outside scale read the 12.5 mark that is aligned with 10 on the inside scale. Figure the number of decimal places, and the answer is 12.5.
3. Reading ratiosExample: 30/20 = 60/xSolution: Align 30 on the outside scale with 20 on the inside scale. At this time, the answer of 40 can be read from the inside scale
corresponding to 60 on the outside scale. In addition, the ratio of the value on the outside scale to the value on
the inside scale is 30:20 at all positions on the scales.
214 215
11. Solar Power FunctionThis watch uses a secondary battery to store electrical energy.Once the watch has been fully charged, it will maintain its accuracy for about 8 months when operating normally (when not in the power saving mode). In the power saving mode, it will maintain its accuracy for about 2 year.
<Ensuring best operation of the watch>Keep the watch regularly charged for best results. Charge watch by exposing the watch face (which contains the solar cell) to direct sunlight or to a fl uorescent lighting.
<Regularly charge the watch>Wearing clothes with long sleeves makes it diffi cult for the watch to get the necessary light, resulting in insuffi cient charging. Be particularly aware of the need for regular charging during the winter.Placing the watch near a window where its face can receive sunlight or near another source of light when you are not wearing it will ensure that the watch is regularly charged, allowing it to maintain the correct time.
•
•
4. Determining square rootExample: What is the square root of 225?Solution: Rotate the scales so that the value on the inside scale corresponding
to 22.5 on the outside scale is equal to the value on the outside scale corresponding to 10 on the inside scale, and read off the answer of 15 at that location.
216 217
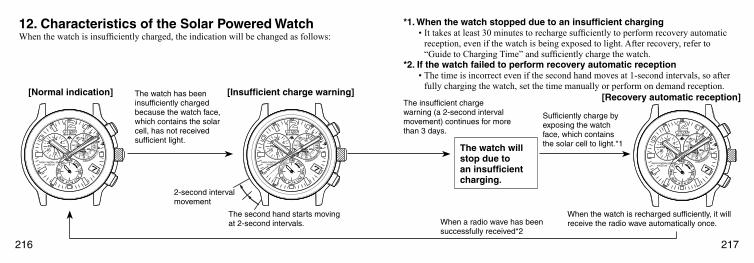
12. Characteristics of the Solar Powered WatchWhen the watch is insuffi ciently charged, the indication will be changed as follows:
*1. When the watch stopped due to an insuffi cient chargingIt takes at least 30 minutes to recharge suffi ciently to perform recovery automatic reception, even if the watch is being exposed to light. After recovery, refer to “Guide to Charging Time” and suffi ciently charge the watch.
*2. If the watch failed to perform recovery automatic receptionThe time is incorrect even if the second hand moves at 1-second intervals, so after fully charging the watch, set the time manually or perform on demand reception.
•
•
[Normal indication] [Insuffi cient charge warning] [Recovery automatic reception]The watch has been insufficiently charged because the watch face, which contains the solar cell, has not received sufficient light.
The second hand starts moving at 2-second intervals. When a radio wave has been
successfully received*2
The watch will stop due to an insuffi cient charging.
Sufficiently charge by exposing the watch face, which contains the solar cell to light.*1
2-second interval movement
When the watch is recharged sufficiently, it will receive the radio wave automatically once.
The insufficient charge warning (a 2-second interval movement) continues for more than 3 days.
218 219
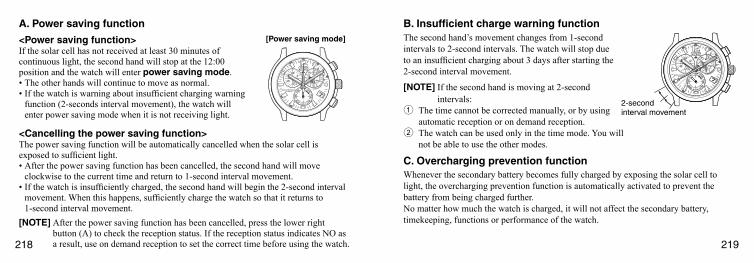
A. Power saving function
<Power saving function>If the solar cell has not received at least 30 minutes of continuous light, the second hand will stop at the 12:00 position and the watch will enter power saving mode.
The other hands will continue to move as normal.If the watch is warning about insuffi cient charging warning function (2-seconds interval movement), the watch will enter power saving mode when it is not receiving light.
••
[Power saving mode]
<Cancelling the power saving function>The power saving function will be automatically cancelled when the solar cell is exposed to suffi cient light.
After the power saving function has been cancelled, the second hand will move clockwise to the current time and return to 1-second interval movement.If the watch is insuffi ciently charged, the second hand will begin the 2-second interval movement. When this happens, suffi ciently charge the watch so that it returns to 1-second interval movement.
[NOTE] After the power saving function has been cancelled, press the lower right button (A) to check the reception status. If the reception status indicates NO as a result, use on demand reception to set the correct time before using the watch.
•
•
B. Insuffi cient charge warning functionThe second hand’s movement changes from 1-second intervals to 2-second intervals. The watch will stop due to an insuffi cient charging about 3 days after starting the 2-second interval movement.
[NOTE] If the second hand is moving at 2-second intervals:
1 The time cannot be corrected manually, or by using automatic reception or on demand reception.
2 The watch can be used only in the time mode. You will not be able to use the other modes.
2-second interval movement
C. Overcharging prevention functionWhenever the secondary battery becomes fully charged by exposing the solar cell to light, the overcharging prevention function is automatically activated to prevent the battery from being charged further.No matter how much the watch is charged, it will not affect the secondary battery, timekeeping, functions or performance of the watch.
220 221
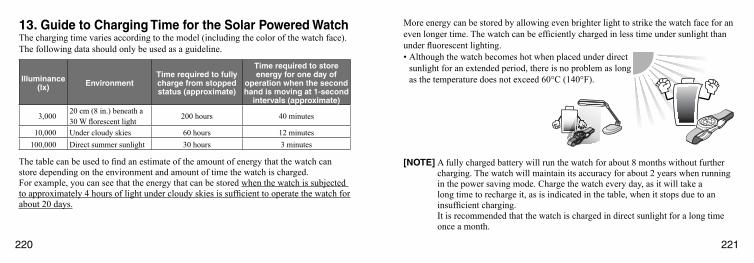
13. Guide to Charging Time for the Solar Powered WatchThe charging time varies according to the model (including the color of the watch face).The following data should only be used as a guideline.
Illuminance(lx) Environment
Time required to fully charge from stopped status (approximate)
Time required to store energy for one day of
operation when the second hand is moving at 1-second
intervals (approximate)
3,00020 cm (8 in.) beneath a 30 W fl orescent light
200 hours 40 minutes
10,000 Under cloudy skies 60 hours 12 minutes100,000 Direct summer sunlight 30 hours 3 minutes
The table can be used to fi nd an estimate of the amount of energy that the watch can store depending on the environment and amount of time the watch is charged.For example, you can see that the energy that can be stored when the watch is subjected to approximately 4 hours of light under cloudy skies is suffi cient to operate the watch for about 20 days.
More energy can be stored by allowing even brighter light to strike the watch face for an even longer time. The watch can be effi ciently charged in less time under sunlight than under fl uorescent lighting.
Although the watch becomes hot when placed under direct sunlight for an extended period, there is no problem as long as the temperature does not exceed 60°C (140°F).
•
[NOTE] A fully charged battery will run the watch for about 8 months without further charging. The watch will maintain its accuracy for about 2 years when running in the power saving mode. Charge the watch every day, as it will take a long time to recharge it, as is indicated in the table, when it stops due to an insuffi cient charging.It is recommended that the watch is charged in direct sunlight for a long time once a month.
222 223
14. Handling Your Solar Powered WatchCAUTION Charging precautions
Overheating while charging can cause the watch exterior to become discolored, the watch to deform or the movement to be damaged.Do not charge the watch in a high-temperature environment (about 60°C/140°F or more).Example) Charging close to incandescent lighting, halogen lamps, or other lighting
sources that easily become hot.Charging on surfaces that can easily become hot, such as a car dashboard.
When charging with incandescent lighting, halogen lamps, or other lighting sources that easily become hot, place the watch at least 50 cm (20 in.) away from the source to avoid overheating.
•
•
•
WARNING Handling the secondary batteryDo not remove the secondary battery from the watch yourself, unless unavoidable.If you must remove the battery, store it out of reach of children to avoid accidental ingestion. If the secondary battery is ingested, consult a doctor immediately.
WARNING Changing the secondary batteryAlthough the secondary battery should never need to be changed, in rare instances, the watch may be unable to be charged due to a problem with the battery. If a problem occurs, have the watch repaired as soon as possible.
•
•
224 225
15. Troubleshooting<Radio wave reception function>
If you believe your watch may be inoperative, consult the following chart:Problem Check Remedy
Radio waves cannot be received.
• Is the watch in the time mode (TME) or local time mode (L-TM)?Does the second hand move to the RX (reception standby) position?
•
•
Pull out the crown to position 1 and turn to select the time mode (TME) or local time mode (L-TM).Press and hold the lower right button (A) until the second hand has reached the RX position.
•
•
Radio wave cannot be received (where reception is possible).
• Are there objects nearby that could block radio waves or generate noise?Are you attempting to receive the radio wave in a location far from a window?
•
•
Avoid objects that block radio waves or generate noise. Try to receive radio waves by pointing the 6:00 position in the direction of the radio wave transmitter.Find a location conducive to radio wave reception by paying close attention to the reception level showed by the second hand as you change the watch location, direction and angle. (p. 172)
•
Problem Check Remedy
The second hand is indicating the RX position, but the watch does not receive radio waves.
• Is the watch still receiving the radio wave, and is the second hand indicating the reception level (H, M or L)?
• Wait until reception has been completed (until the second hand has returned to the 1-second interval movement).
•
The watch can receive the radio wave, but it does not show the correct time.
• Is the reference position set correctly?
• Confi rm the reference position. (p. 198)
•
<Eco-Drive>Problem Check Remedy
The second hand is moving at 2-second intervals.
• Did you charge the watch suffi ciently in sunlight?
• Charge the watch suffi ciently, as indicated in “Guide to Charging Time”. (p. 220)
•
The watch has stopped.
•
The watch does not work even after charging.
• If the watch does not work even after charging, contact the Citizen Service Center.
•
226 227
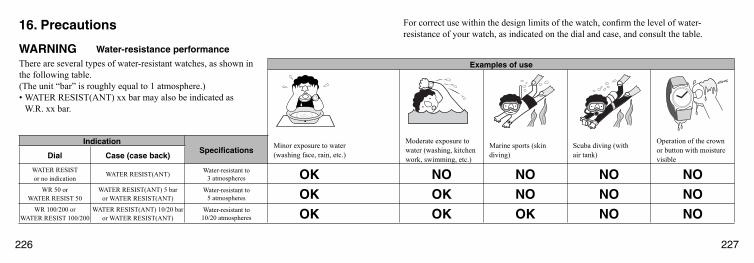
16. Precautions
WARNING Water-resistance performance
There are several types of water-resistant watches, as shown in the following table.(The unit “bar” is roughly equal to 1 atmosphere.)
WATER RESIST(ANT) xx bar may also be indicated as W.R. xx bar.
•
Examples of use
IndicationSpecifi cations
Minor exposure to water (washing face, rain, etc.)
Moderate exposure to water (washing, kitchen work, swimming, etc.)
Marine sports (skin diving)
Scuba diving (with air tank)
Operation of the crown or button with moisture visibleDial Case (case back)
WATER RESIST or no indication WATER RESIST(ANT) Water-resistant to
3 atmospheres OK NO NO NO NOWR 50 or
WATER RESIST 50WATER RESIST(ANT) 5 bar
or WATER RESIST(ANT)Water-resistant to
5 atmospheres OK OK NO NO NOWR 100/200 or
WATER RESIST 100/200WATER RESIST(ANT) 10/20 bar
or WATER RESIST(ANT)Water-resistant to 10/20 atmospheres OK OK OK NO NO
For correct use within the design limits of the watch, confi rm the level of water-resistance of your watch, as indicated on the dial and case, and consult the table.
228 229
WARNING Water-resistance performance
Water-resistance for daily use (to 3 atmospheres): This type of watch is water-resistant to minor exposure to water. For example, you may wear the watch while washing your face; however, do not use while swimming.Upgraded water-resistance for daily use (to 5 atmospheres): This type of watch is water-resistant to moderate exposure to water. You may wear the watch while swimming; however, do not use while skin diving or scuba diving.Upgraded water-resistance for daily use (to 10/20 atmospheres): You may wear the watch while skin diving; however, do not use while scuba or saturated diving using helium gas.
CAUTIONBe sure to use the watch with the crown pressed in (normal position). If your watch has a screw-lock type crown, be sure that the crown is locked securely.Do not operate the crown or button when the watch is wet. Water may enter the watch and compromise water-resistance.The durability of a leather band may be affected when wet, owing to the properties of the material. In the case of a watch of upgraded water resistance for daily use that is frequently used in water, fading, peeling of adhesive or other problems may occur. It is therefore recommended to use another type of band (metal or rubber band).
•
•
•
•
•
•
If the watch is used in seawater, rinse with fresh water afterward and wipe with a dry cloth.If moisture has entered the watch, or if the inside of the crystal is fogged up and does not become clear within a day, take the watch to your nearest Citizen Service Center for repair. Leaving the watch in such a state will allow corrosion to form inside.If seawater enters the watch, place the watch in a box or plastic bag and immediately take it in for repair. Otherwise, pressure inside the watch will increase, and parts (crystal, crown, buttons, etc.) may come off.
CAUTION Keep your watch clean
Leaving dust and dirt deposited between the case and crown may result in diffi culty in pulling the crown out. Turn the crown while in its normal position, from time to time, to loosen dust and dirt and then brush it off.Dust and dirt tend to be deposited in gaps in the back of the case or band. Deposited dust and dirt may cause corrosion and soil your clothing. Clean the watch occasionally.
•
•
•
•
•
230 231
Cleaning the watchUse a soft cloth to wipe off dirt, perspiration and water from the case and crystal.Use a soft, dry cloth to wipe off perspiration and dirt from the leather band.To clean a metal, plastic, or rubber band, wash away dirt with mild soap and water. Use a soft brush to remove dust and dirt jammed in the gaps in the metal band.
CAUTION: Avoid using solvents (thinner, benzine, etc.), as they may damage the fi nish.
CAUTION Operating environment
Use the watch within the operating-temperature range specifi ed in the instruction manual. Using the watch where temperatures are outside the specifi ed range, may result in deterioration of functions or even stoppage of the watch.Do not use the watch in places where it is exposed to high temperature, such as in a sauna. Doing so may result in a skin burn.Do not leave the watch in a place where it is exposed to high temperature, such as the car dashboard. Doing so may result in deterioration of the watch, such as deformation of plastic parts.Do not place the watch close to a magnet. Timekeeping will become inaccurate if you place the watch close to magnetic health equipment such as a magnetic necklace or a magnetic latch of a refrigerator door or handbag clasp or the speaker of a cellular phone. If this has occurred, move the watch away from the magnet and reset the time.
•••
•
•
•
•
Do not place the watch close to household appliances that generate static electricity.Timekeeping may become inaccurate if the watch is exposed to strong static electricity, such as is emitted from a TV screen.Do not subject the watch to a strong shock such as dropping it onto a hard fl oor.Avoid using the watch in an environment where it may be exposed to chemicals or corrosive gases. If solvents, such as thinner and benzine, or substances containing such solvents come in contact with the watch, discoloration, melting, cracking, etc. may result. If the watch comes in contact with mercury used in thermometers, the case, band or other parts may become discolored.
<Periodical inspections>Your watch needs inspection once in every two or three years for safety and long use.Because the ability to resist water degrades as the years pass in the case of a water-resistant watch, part replacement is required in order to maintain water-resistance.Replace the packing and spring as necessary.Ask for Citizen genuine parts upon replacement. In addition to replacement, other parts may require inspection and repair. For details on replacement and repair charges, please contact the store where you purchased your watch or a Citizen Service Center.
•
••
••
•
232 233
17. Specifi cations1. Cal. No.: E69*2. Type: Analogue solar powered watch3. Time accuracy: Without reception (when watch is not receiving a radio wave)
±15 seconds per month on average when used in normal temperature (+5°C to +35°C/41°F to 95°F)
4. Acceptable temperature range: –10°C to +60°C/14°F to 140°F5. Display functions: • Time: Hour, minute and second
• Calendar: Elapsed years after the most recent leap year, month, date, day of week
6. Additional functions: • Radio wave reception function (automatic reception, on demand reception, recovery automatic reception)
• Reception standby indication function (RX)• Reception level indication function (H, M, L)• Reception status confi rmation function (H, M, L, NO)• Chronograph function (Measures up to 60 minutes in
1/20 second units)• Local time function (time difference correction in 1-hour units,
daylight saving time ON or OFF function)
• Reference position checking function• Alarm function (24-hour clock alarm)• Solar power function• Power saving function• Insuffi cient charge warning function• Overcharging prevention function
7. Operation time: • Time from a full charge until the watch stops without charging: About 2 years (when in the power saving mode) About 8 months (when not in the power saving mode)• Time from insuffi cient charge warning to watch stopping:
About 3 days(The amount of continuous operation differs depending on the conditions of operation.)
8. Battery: Secondary battery 1
* Specifi cations may change without notice.