Embed Size (px)
Citation preview
TIBCO BusinessConnect™ Installation and ConfigurationSoftware Release 6.0November 2011

Important Information
SOME TIBCO SOFTWARE EMBEDS OR BUNDLES OTHER TIBCO SOFTWARE. USE OF SUCH EMBEDDED OR BUNDLED TIBCO SOFTWARE IS SOLELY TO ENABLE THE FUNCTIONALITY (OR PROVIDE LIMITED ADD-ON FUNCTIONALITY) OF THE LICENSED TIBCO SOFTWARE. THE EMBEDDED OR BUNDLED SOFTWARE IS NOT LICENSED TO BE USED OR ACCESSED BY ANY OTHER TIBCO SOFTWARE OR FOR ANY OTHER PURPOSE.
USE OF TIBCO SOFTWARE AND THIS DOCUMENT IS SUBJECT TO THE TERMS AND CONDITIONS OF A LICENSE AGREEMENT FOUND IN EITHER A SEPARATELY EXECUTED SOFTWARE LICENSE AGREEMENT, OR, IF THERE IS NO SUCH SEPARATE AGREEMENT, THE CLICKWRAP END USER LICENSE AGREEMENT WHICH IS DISPLAYED DURING DOWNLOAD OR INSTALLATION OF THE SOFTWARE (AND WHICH IS DUPLICATED IN THE LICENSE FILE) OR IF THERE IS NO SUCH SOFTWARE LICENSE AGREEMENT OR CLICKWRAP END USER LICENSE AGREEMENT, THE LICENSE(S) LOCATED IN THE “LICENSE” FILE(S) OF THE SOFTWARE. USE OF THIS DOCUMENT IS SUBJECT TO THOSE TERMS AND CONDITIONS, AND YOUR USE HEREOF SHALL CONSTITUTE ACCEPTANCE OF AND AN AGREEMENT TO BE BOUND BY THE SAME.
This document contains confidential information that is subject to U.S. and international copyright laws and treaties. No part of this document may be reproduced in any form without the written authorization of TIBCO Software Inc.
TIBCO, The Power of Now, TIBCO Hawk, TIBCO Rendezvous, TIBCO Runtime Agent, TIBCO ActiveMatrix BusinessWorks, TIBCO Administrator, and TIBCO Designer are either registered trademarks or trademarks of TIBCO Software Inc. in the United States and/or other countries.
EJB, J2EE, JMS and all Java-based trademarks and logos are trademarks or registered trademarks of Sun Microsystems, Inc. in the U.S. and other countries.
All other product and company names and marks mentioned in this document are the property of their respective owners and are mentioned for identification purposes only.
THIS SOFTWARE MAY BE AVAILABLE ON MULTIPLE OPERATING SYSTEMS. HOWEVER, NOT ALL OPERATING SYSTEM PLATFORMS FOR A SPECIFIC SOFTWARE VERSION ARE RELEASED AT THE SAME TIME. SEE THE README FILE FOR THE AVAILABILITY OF THIS SOFTWARE VERSION ON A SPECIFIC OPERATING SYSTEM PLATFORM.
THIS DOCUMENT IS PROVIDED “AS IS” WITHOUT WARRANTY OF ANY KIND, EITHER EXPRESS OR IMPLIED, INCLUDING, BUT NOT LIMITED TO, THE IMPLIED WARRANTIES OF MERCHANTABILITY, FITNESS FOR A PARTICULAR PURPOSE, OR NON-INFRINGEMENT.
THIS DOCUMENT COULD INCLUDE TECHNICAL INACCURACIES OR TYPOGRAPHICAL ERRORS. CHANGES ARE PERIODICALLY ADDED TO THE INFORMATION HEREIN; THESE CHANGES WILL BE INCORPORATED IN NEW EDITIONS OF THIS DOCUMENT. TIBCO SOFTWARE INC. MAY MAKE IMPROVEMENTS AND/OR CHANGES IN THE PRODUCT(S) AND/OR THE PROGRAM(S) DESCRIBED IN THIS DOCUMENT AT ANY TIME.
THE CONTENTS OF THIS DOCUMENT MAY BE MODIFIED AND/OR QUALIFIED, DIRECTLY OR INDIRECTLY, BY OTHER DOCUMENTATION WHICH ACCOMPANIES THIS SOFTWARE, INCLUDING BUT NOT LIMITED TO ANY RELEASE NOTES AND "READ ME" FILES..
Copyright © 1999-2011 TIBCO Software Inc. ALL RIGHTS RESERVED.
TIBCO Software Inc. Confidential Information
| iii
Contents
Preface . . . . . . . . . . . . . . . . . . . . . . . . . . . . . . . . . . . . . . . . . . . . . . . . . . . . . . . . . . . . . . . . . . . . . . . . .v
Related Documentation . . . . . . . . . . . . . . . . . . . . . . . . . . . . . . . . . . . . . . . . . . . . . . . . . . . . . . . . . . . . . . . . . . . . . viOther TIBCO Product Documentation . . . . . . . . . . . . . . . . . . . . . . . . . . . . . . . . . . . . . . . . . . . . . . . . . . . . . . vi
Typographical Conventions . . . . . . . . . . . . . . . . . . . . . . . . . . . . . . . . . . . . . . . . . . . . . . . . . . . . . . . . . . . . . . . . . .viii
Connecting with TIBCO Resources . . . . . . . . . . . . . . . . . . . . . . . . . . . . . . . . . . . . . . . . . . . . . . . . . . . . . . . . . . . . . xHow to Join TIBCOmmunity . . . . . . . . . . . . . . . . . . . . . . . . . . . . . . . . . . . . . . . . . . . . . . . . . . . . . . . . . . . . . . . xHow to Access All TIBCO Documentation . . . . . . . . . . . . . . . . . . . . . . . . . . . . . . . . . . . . . . . . . . . . . . . . . . . . xHow to Contact TIBCO Support . . . . . . . . . . . . . . . . . . . . . . . . . . . . . . . . . . . . . . . . . . . . . . . . . . . . . . . . . . . . x
Chapter 1 Introduction . . . . . . . . . . . . . . . . . . . . . . . . . . . . . . . . . . . . . . . . . . . . . . . . . . . . . . . . . . .1
Installation Overview . . . . . . . . . . . . . . . . . . . . . . . . . . . . . . . . . . . . . . . . . . . . . . . . . . . . . . . . . . . . . . . . . . . . . . . . 2Installation Modes. . . . . . . . . . . . . . . . . . . . . . . . . . . . . . . . . . . . . . . . . . . . . . . . . . . . . . . . . . . . . . . . . . . . . . . 2Installation Types . . . . . . . . . . . . . . . . . . . . . . . . . . . . . . . . . . . . . . . . . . . . . . . . . . . . . . . . . . . . . . . . . . . . . . . 2Installer Account . . . . . . . . . . . . . . . . . . . . . . . . . . . . . . . . . . . . . . . . . . . . . . . . . . . . . . . . . . . . . . . . . . . . . . . . 2Installer Log File . . . . . . . . . . . . . . . . . . . . . . . . . . . . . . . . . . . . . . . . . . . . . . . . . . . . . . . . . . . . . . . . . . . . . . . . 3
Installation Requirements . . . . . . . . . . . . . . . . . . . . . . . . . . . . . . . . . . . . . . . . . . . . . . . . . . . . . . . . . . . . . . . . . . . . 4Disk Space Requirements . . . . . . . . . . . . . . . . . . . . . . . . . . . . . . . . . . . . . . . . . . . . . . . . . . . . . . . . . . . . . . . . 4System Memory Requirements . . . . . . . . . . . . . . . . . . . . . . . . . . . . . . . . . . . . . . . . . . . . . . . . . . . . . . . . . . . . 4Supported Platforms . . . . . . . . . . . . . . . . . . . . . . . . . . . . . . . . . . . . . . . . . . . . . . . . . . . . . . . . . . . . . . . . . . . . . 5Software Requirements . . . . . . . . . . . . . . . . . . . . . . . . . . . . . . . . . . . . . . . . . . . . . . . . . . . . . . . . . . . . . . . . . . 5
Chapter 2 Installation. . . . . . . . . . . . . . . . . . . . . . . . . . . . . . . . . . . . . . . . . . . . . . . . . . . . . . . . . . . . .7
Pre-Installation Tasks. . . . . . . . . . . . . . . . . . . . . . . . . . . . . . . . . . . . . . . . . . . . . . . . . . . . . . . . . . . . . . . . . . . . . . . . 8Install Unlimited Strength JCE Policy Files . . . . . . . . . . . . . . . . . . . . . . . . . . . . . . . . . . . . . . . . . . . . . . . . . . . . 8Install FESI EcmaScript Interpreter to Support Custom Scripts . . . . . . . . . . . . . . . . . . . . . . . . . . . . . . . . . . . . 8Set Up Database Information . . . . . . . . . . . . . . . . . . . . . . . . . . . . . . . . . . . . . . . . . . . . . . . . . . . . . . . . . . . . . . 9
Installation . . . . . . . . . . . . . . . . . . . . . . . . . . . . . . . . . . . . . . . . . . . . . . . . . . . . . . . . . . . . . . . . . . . . . . . . . . . . . . . 11GUI Mode . . . . . . . . . . . . . . . . . . . . . . . . . . . . . . . . . . . . . . . . . . . . . . . . . . . . . . . . . . . . . . . . . . . . . . . . . . . . 11Console Mode . . . . . . . . . . . . . . . . . . . . . . . . . . . . . . . . . . . . . . . . . . . . . . . . . . . . . . . . . . . . . . . . . . . . . . . . 13Silent Mode. . . . . . . . . . . . . . . . . . . . . . . . . . . . . . . . . . . . . . . . . . . . . . . . . . . . . . . . . . . . . . . . . . . . . . . . . . . 13
Uninstallation . . . . . . . . . . . . . . . . . . . . . . . . . . . . . . . . . . . . . . . . . . . . . . . . . . . . . . . . . . . . . . . . . . . . . . . . . . . . . 15Uninstall Using the GUI . . . . . . . . . . . . . . . . . . . . . . . . . . . . . . . . . . . . . . . . . . . . . . . . . . . . . . . . . . . . . . . . . 15Uninstall Using the Console Mode . . . . . . . . . . . . . . . . . . . . . . . . . . . . . . . . . . . . . . . . . . . . . . . . . . . . . . . . . 15
TIBCO BusinessConnect Installation and Configuration
iv | Contents
Chapter 3 Configuration . . . . . . . . . . . . . . . . . . . . . . . . . . . . . . . . . . . . . . . . . . . . . . . . . . . . . . . . 17
Overview . . . . . . . . . . . . . . . . . . . . . . . . . . . . . . . . . . . . . . . . . . . . . . . . . . . . . . . . . . . . . . . . . . . . . . . . . . . . . . . . 18
Manage Permissions for the Installation . . . . . . . . . . . . . . . . . . . . . . . . . . . . . . . . . . . . . . . . . . . . . . . . . . . . . . . . 19
Create a New Installation . . . . . . . . . . . . . . . . . . . . . . . . . . . . . . . . . . . . . . . . . . . . . . . . . . . . . . . . . . . . . . . . . . . 20Configuration Repository . . . . . . . . . . . . . . . . . . . . . . . . . . . . . . . . . . . . . . . . . . . . . . . . . . . . . . . . . . . . . . . . 20Import and Export . . . . . . . . . . . . . . . . . . . . . . . . . . . . . . . . . . . . . . . . . . . . . . . . . . . . . . . . . . . . . . . . . . . . . 22
Manage an Existing Installation . . . . . . . . . . . . . . . . . . . . . . . . . . . . . . . . . . . . . . . . . . . . . . . . . . . . . . . . . . . . . . 27Protocol Plug-In Activation. . . . . . . . . . . . . . . . . . . . . . . . . . . . . . . . . . . . . . . . . . . . . . . . . . . . . . . . . . . . . . . 27
Audit, Non-Repudiation and Runtime Database Configuration. . . . . . . . . . . . . . . . . . . . . . . . . . . . . . . . . . . . . . . 28Add a Database Connection . . . . . . . . . . . . . . . . . . . . . . . . . . . . . . . . . . . . . . . . . . . . . . . . . . . . . . . . . . . . . 28Edit a Database Connection . . . . . . . . . . . . . . . . . . . . . . . . . . . . . . . . . . . . . . . . . . . . . . . . . . . . . . . . . . . . . 31
Index . . . . . . . . . . . . . . . . . . . . . . . . . . . . . . . . . . . . . . . . . . . . . . . . . . . . . . . . . . . . . . . . . . . . . . . . . 33
TIBCO BusinessConnect Installation and Configuration
| v
Preface
TIBCO BusinessConnect™ software is a B2B (business-to-business) gateway that allows your company to engage in electronic commerce with your business partners.
Topics
• Related Documentation, page vi
• Typographical Conventions, page viii
• Connecting with TIBCO Resources, page x
This software may be available on multiple operating systems. However, not all operating system platforms for a specific software version are released at the same time. Please see the readme file for the availability of this software version on a specific operating system platform.
TIBCO BusinessConnect Installation and Configuration
vi | Related Documentation
Related Documentation
The following documents form the BusinessConnect documentation set:
• TIBCO BusinessConnect™ Installation and Configuration. Read this guide to learn how to install and configure TIBCO BusinessConnect.
• TIBCO BusinessConnect™ Concepts: Read this guide to learn about TIBCO BusinessConnect architecture, deployment modes, protocols, and security.
• TIBCO BusinessConnect Interior Server™ Administration: Read this guide in order to administer, operate, and manage TIBCO BusinessConnect Interior Server.
• TIBCO BusinessConnect Gateway Server™ Administration: Read this guide in order to administer, operate, and manage TIBCO BusinessConnect Gateway Server.
• TIBCO BusinessConnect™ Trading Partner Administration: Read this guide to configure and manage trading partners.
• TIBCO BusinessConnect™ Scripting Deployment User’s Guide: Read this guide to configure and manage TIBCO BusinessConnect using the command line interface.
• TIBCO BusinessConnect™ Release Notes: Read this document to learn about new features, changes in functionality, deprecated features, known issues, and closed issues for each release. This document is supplied for each release and is available only in PDF format.
Other TIBCO Product DocumentationYou may find it useful to read the documentation for the following TIBCO products, which may be used or integrated with BusinessConnect:
• TIBCO Administrator™ software: The software allows you to manage users, machines and applications defined in a TIBCO Administration Domain. The TIBCO Administrator graphical user interface enables users to deploy, monitor, and start and stop TIBCO applications.
TIBCO BusinessConnect Installation and Configuration
Preface | vii
• TIBCO ActiveMatrix BusinessWorks™ software: This software is a scalable, extensible, and easy to use integration platform that allows you to develop integration projects. TIBCO BusinessWorks includes a graphical user interface (GUI) for defining business processes and an engine that executes the process. •TIBCO Designer™ software: This graphical user interface is used for designing and creating integration project configurations and building an Enterprise Archive (EAR) for the project. The EAR can then be used by TIBCO Administrator for deploying and running the application.
• TIBCO Runtime Agent™ software: This software suite is a prerequisite for other TIBCO software products. In addition to TIBCO Runtime Agent components, the software suite includes the third-party libraries used by other TIBCO products such as TIBCO Designer, Java Runtime Environment (JRE), TIBCO Hawk®, and TIBCO Rendezvous®.
• TIBCO Rendezvous®: This software enables programs running on many different kinds of computers on a network to communicate seamlessly. It includes two main components: the Rendezvous programming language interface (API) in several languages, and the Rendezvous daemon.
• TIBCO Enterprise Message Service ™ software: This software provides a message service that enables integration of applications within an enterprise based on the Java Message Service (JMS) specifications.
TIBCO BusinessConnect Installation and Configuration
viii | Typographical Conventions
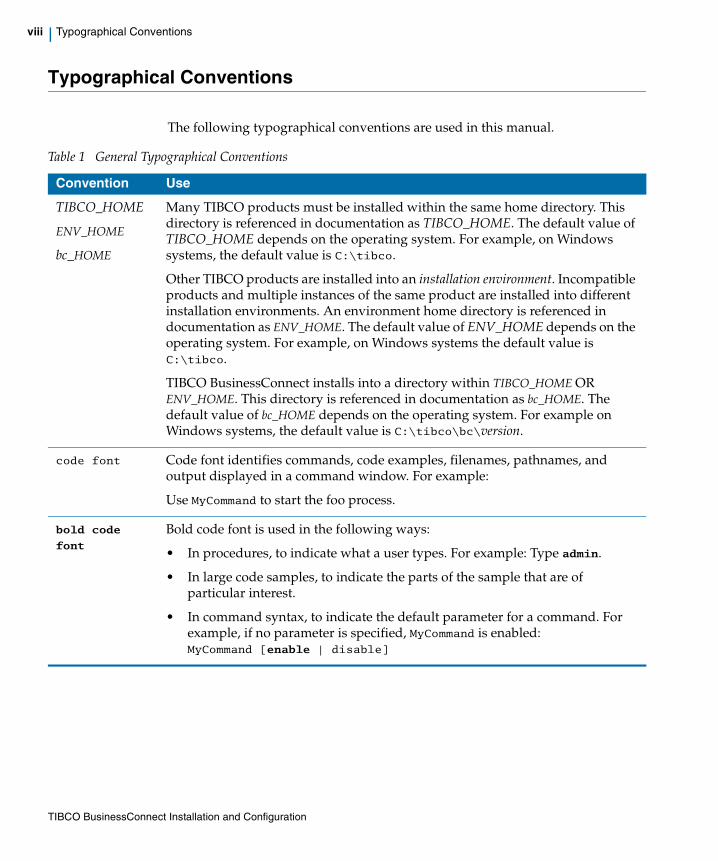
Typographical Conventions
The following typographical conventions are used in this manual.
Table 1 General Typographical Conventions
Convention Use
TIBCO_HOME
ENV_HOME
bc_HOME
Many TIBCO products must be installed within the same home directory. This directory is referenced in documentation as TIBCO_HOME. The default value of TIBCO_HOME depends on the operating system. For example, on Windows systems, the default value is C:\tibco.
Other TIBCO products are installed into an installation environment. Incompatible products and multiple instances of the same product are installed into different installation environments. An environment home directory is referenced in documentation as ENV_HOME. The default value of ENV_HOME depends on the operating system. For example, on Windows systems the default value is C:\tibco.
TIBCO BusinessConnect installs into a directory within TIBCO_HOME OR ENV_HOME. This directory is referenced in documentation as bc_HOME. The default value of bc_HOME depends on the operating system. For example on Windows systems, the default value is C:\tibco\bc\version.
code font Code font identifies commands, code examples, filenames, pathnames, and output displayed in a command window. For example:
Use MyCommand to start the foo process.
bold code
font Bold code font is used in the following ways:
• In procedures, to indicate what a user types. For example: Type admin.
• In large code samples, to indicate the parts of the sample that are of particular interest.
• In command syntax, to indicate the default parameter for a command. For example, if no parameter is specified, MyCommand is enabled: MyCommand [enable | disable]
TIBCO BusinessConnect Installation and Configuration
Preface | ix
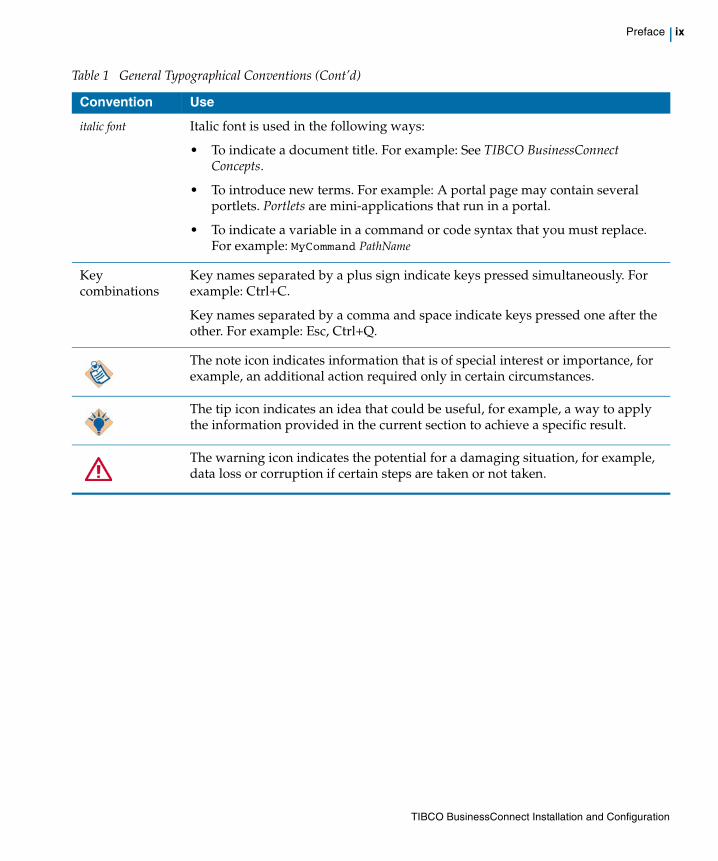
italic font Italic font is used in the following ways:
• To indicate a document title. For example: See TIBCO BusinessConnect Concepts.
• To introduce new terms. For example: A portal page may contain several portlets. Portlets are mini-applications that run in a portal.
• To indicate a variable in a command or code syntax that you must replace. For example: MyCommand PathName
Key combinations
Key names separated by a plus sign indicate keys pressed simultaneously. For example: Ctrl+C.
Key names separated by a comma and space indicate keys pressed one after the other. For example: Esc, Ctrl+Q.
The note icon indicates information that is of special interest or importance, for example, an additional action required only in certain circumstances.
The tip icon indicates an idea that could be useful, for example, a way to apply the information provided in the current section to achieve a specific result.
The warning icon indicates the potential for a damaging situation, for example, data loss or corruption if certain steps are taken or not taken.
Table 1 General Typographical Conventions (Cont’d)
Convention Use
TIBCO BusinessConnect Installation and Configuration
x | Connecting with TIBCO Resources
Connecting with TIBCO Resources
How to Join TIBCOmmunityTIBCOmmunity is an online destination for TIBCO customers, partners, and resident experts; a place to share and access the collective experience of the TIBCO community. TIBCOmmunity offers forums, blogs, and access to a variety of resources. To register, go to http://www.tibcommunity.com.
How to Access All TIBCO DocumentationAfter you join TIBCOmmunity, you can access the documentation for all supported product versions here:
http://docs.tibco.com/TibcoDoc
How to Contact TIBCO SupportFor comments or problems with this manual or the software it addresses, please contact TIBCO Support as follows:
• For an overview of TIBCO Support, and information about getting started with TIBCO Support, visit this site:
http://www.tibco.com/services/support
• If you already have a valid maintenance or support contract, visit this site:
https://support.tibco.com
Entry to this site requires a username and password. If you do not have a username, you can request one.
TIBCO BusinessConnect Installation and Configuration
| 1
Chapter 1 Introduction
This chapter provides an overview of the installer, the software requirement, and other options you should be aware of before starting the installation.
Topics
• Installation Overview, page 2
• Installation Requirements, page 4
TIBCO BusinessConnect Installation and Configuration
2 | Chapter 1 Introduction
Installation Overview
This section gives an overview of the installer.
Installation ModesThree installation modes are available: GUI, console, and silent.
GUI Mode
In the GUI mode, the installer presents panels that allow you to make choices about product selection, product location, and so on. To invoke the installer in GUI mode, double-click the executable.
Console Mode
Console mode allows you to run the installer from the command prompt or terminal window. This is useful if your machine does not have a GUI environment.
Silent Mode
Silent mode installs the product using either default or custom settings that are saved in a response file. Silent mode installs the product without prompting you for information.
Installation TypesTwo installation types are available: Profile or Custom.
• The Profile installation type installs all the software for a specific profile.
• The Custom installation type allows you to select components.
Installer Account
Microsoft Windows
You must have administrator privileges for the machine on which this product is installed. If you do not have administrator privileges, the installer exits. You must then log out of the system and log in as a user with the required privileges, or request your system administrator to assign the privileges to your account.
TIBCO BusinessConnect Installation and Configuration
Installation Overview | 3
If you intend to install the product on a network drive, ensure that the account used for installation has permission to access the network drive.
UNIX
Any user can install this product.
• Regular (non-root) user
• Super-user (root).
While installing this product on UNIX platforms, ensure that the same installer account is used to install all TIBCO <Family> products.
A graphic environment such as CDE or X Windows is required to run the installer in GUI mode.
Installer Log FileThe installer log file, tibco_universal_installer.username_install.log, is written to the .TIBCO/install_timestamp folder of the user’s home directory. To change the location of the installer log file, specify the option -V logFile="myLogFile" when you run the installer.
TIBCO BusinessConnect Installation and Configuration
4 | Chapter 1 Introduction
Installation Requirements
This section describes the disk space requirements, system memory requirements, software requirements, and supported platforms for this product.
Disk Space RequirementsBefore installing this product, extract the contents of the installation archive to a temporary directory. The installer files consume up to 460 MB of disk space.
Temporary Disk Space Required by the Installer
The installer requires at least 115 MB of free space in the temporary directory. On Microsoft Windows, the temporary directory typically is:
%SystemDrive%:\Documents and Settings\user_name\Local Settings\Temp.
If your system does not have sufficient disk space in the default temporary area, you can run the installer with a different temporary directory by using the following option when starting the installer:-is:tempdir /new_temp
where /new_temp has sufficient free disk space.
The installer calculates the disk space required in the product home location for the selected components. The calculation is done before the actual installation (copying of files to the system) begins. The installer will proceed only if sufficient free disk space is available in the product home location.
However, if disk space is consumed by another process while the installer is copying the files, and if the required disk space is thereby reduced, the installer may fail and will then give a failure message.
While performing installation, avoid running other processes that consume disk space in the product home location.
Disk Space After Installation
This product can consume 150 MB of free space under bc_HOME.
System Memory RequirementsA minimum of 512 MB of physical memory is required.
TIBCO BusinessConnect Installation and Configuration
Installation Requirements | 5
Supported PlatformsRefer to the readme file for the supported platforms, versions, and required patches.
Software RequirementsTable 2 lists the required and optional software products..
Table 2 Software Requirements
Software Description
TIBCO Software The software products below are distributed and installed separately from this product.
See the readme file for the supported versions.
TIBCO Runtime Agent (required) Required by TIBCO BusinessConnect. TIBCO Runtime Agent includes TIBCO Designer along with a number of TIBCO and third-party libraries used by TIBCO BusinessConnect and other TIBCO products. This includes, for example, TIBCO Rendezvous software.
You must install TIBCO Runtime Agent on each machine that hosts TIBCO BusinessConnect. And TIBCO Runtime Agent must be installed before you install TIBCO BusinessConnect.
TIBCO Administrator (required only for administration and for migration)
Required for administration and migration. TIBCO Administrator includes the following modules:
User Management Management of authentication, roles and users, that is, connecting roles (groups) and users to access control lists (ACLs). This includes security for server-based projects at design-time and for deployed applications at runtime.
Resource Management Monitoring of machines and of all running applications in a TIBCO administration domain. Alerts can be created, for example, to notify an administrator if the number of processes or disk usage exceeds a certain number.
Application Management Uploading of Enterprise Archive (EAR) files, creation, configuration, deployment, and monitoring of applications. This console is also used to start and stop applications.
Installation One installation of TIBCO Administrator is required per domain. Other runtime machine in the same domain do not require this software to be installed.
TIBCO ActiveMatrix BusinessWorks™ (optional)
Required only for use of the TIBCO BusinessConnect palette.TIBCO ActiveMatrix BusinessWorks is a scalable, extensible, and easy to use integration platform that allows you to develop integration projects. It is available as a separate installation.
TIBCO BusinessConnect Installation and Configuration
6 | Chapter 1 Introduction
TIBCO Enterprise Message Service™ Optional (required only if JMS is used for private process communication)
TIBCO Enterprise Message Service is used as the notification and messaging backbone for TIBCO BusinessConnect. TIBCO BusinessConnect is not necessarily installed on the machine on which TIBCO Enterprise Message Service is installed.
The TIBCO BusinessConnect license does not cover this usage of the included TIBCO Enterprise Message Service software. You must separately license TIBCO Enterprise Message Service or another supported JMS product for this usage.
Java Virtual Machine (required) Required. JDK 1.6.0 is packaged with TIBCO BusinessConnect as a convenience.
Third-party Software
You need a database to run TIBCO BusinessConnect. For the updated list of supported databases and version numbers, see the file TIB_bc_version_readme.txt for the specific release.
Table 2 Software Requirements
Software Description
TIBCO BusinessConnect Installation and Configuration
| 7
Chapter 2 Installation
This chapter explains how to install and uninstall this product.
Topics
• Pre-Installation Tasks, page 8
• Installation, page 11
• Uninstallation, page 15
TIBCO BusinessConnect Installation and Configuration
8 | Chapter 2 Installation
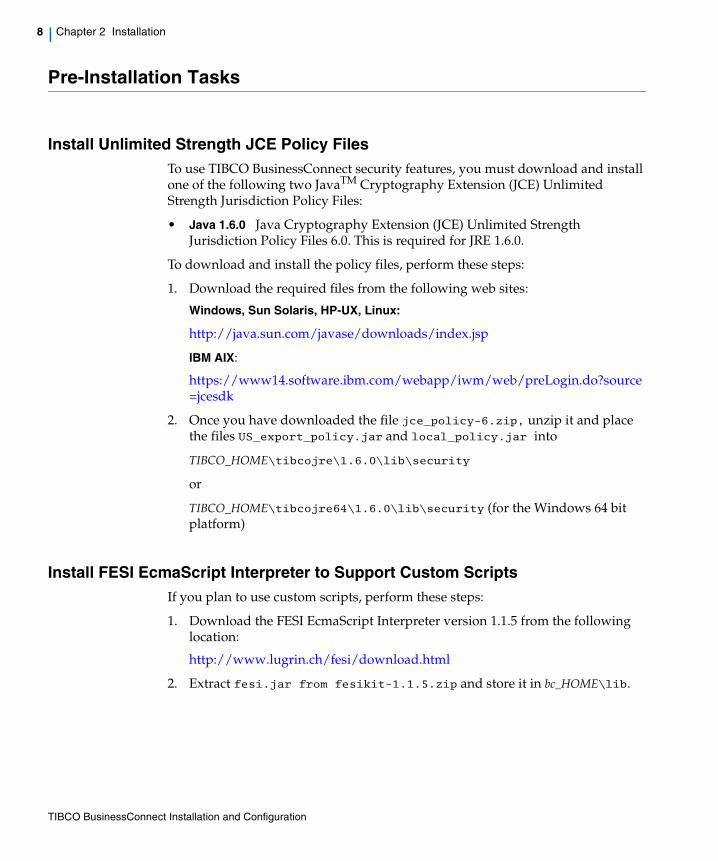
Pre-Installation Tasks
Install Unlimited Strength JCE Policy FilesTo use TIBCO BusinessConnect security features, you must download and install one of the following two JavaTM Cryptography Extension (JCE) Unlimited Strength Jurisdiction Policy Files:
• Java 1.6.0 Java Cryptography Extension (JCE) Unlimited Strength Jurisdiction Policy Files 6.0. This is required for JRE 1.6.0.
To download and install the policy files, perform these steps:
1. Download the required files from the following web sites:
Windows, Sun Solaris, HP-UX, Linux:
http://java.sun.com/javase/downloads/index.jsp
IBM AIX:
https://www14.software.ibm.com/webapp/iwm/web/preLogin.do?source=jcesdk
2. Once you have downloaded the file jce_policy-6.zip, unzip it and place the files US_export_policy.jar and local_policy.jar into
TIBCO_HOME\tibcojre\1.6.0\lib\security
or
TIBCO_HOME\tibcojre64\1.6.0\lib\security (for the Windows 64 bit platform)
Install FESI EcmaScript Interpreter to Support Custom ScriptsIf you plan to use custom scripts, perform these steps:
1. Download the FESI EcmaScript Interpreter version 1.1.5 from the following location:
http://www.lugrin.ch/fesi/download.html
2. Extract fesi.jar from fesikit-1.1.5.zip and store it in bc_HOME\lib.
TIBCO BusinessConnect Installation and Configuration
Pre-Installation Tasks | 9
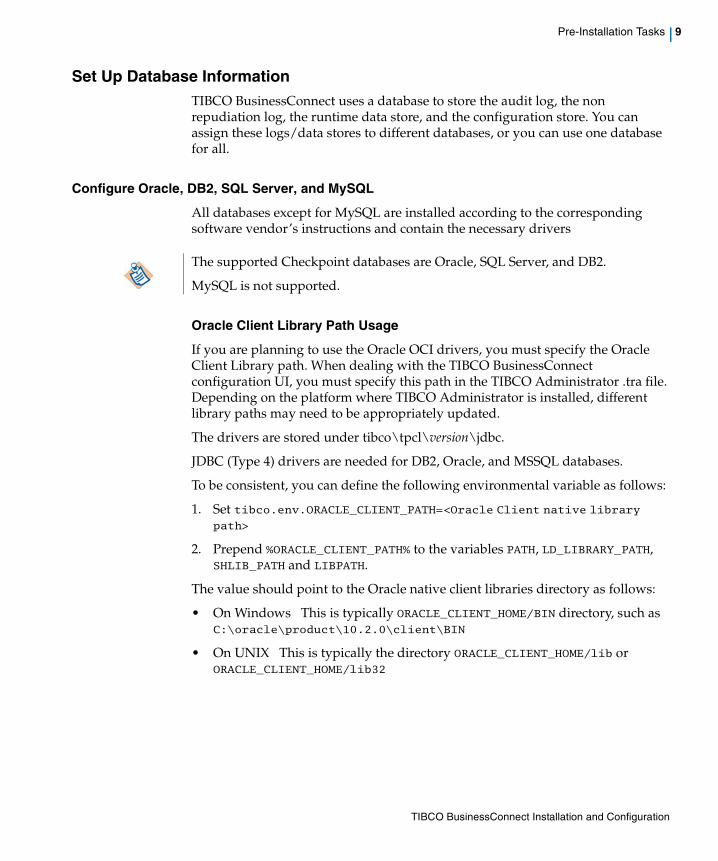
Set Up Database InformationTIBCO BusinessConnect uses a database to store the audit log, the non repudiation log, the runtime data store, and the configuration store. You can assign these logs/data stores to different databases, or you can use one database for all.
Configure Oracle, DB2, SQL Server, and MySQL
All databases except for MySQL are installed according to the corresponding software vendor’s instructions and contain the necessary drivers
Oracle Client Library Path Usage
If you are planning to use the Oracle OCI drivers, you must specify the Oracle Client Library path. When dealing with the TIBCO BusinessConnect configuration UI, you must specify this path in the TIBCO Administrator .tra file. Depending on the platform where TIBCO Administrator is installed, different library paths may need to be appropriately updated.
The drivers are stored under tibco\tpcl\version\jdbc.
JDBC (Type 4) drivers are needed for DB2, Oracle, and MSSQL databases.
To be consistent, you can define the following environmental variable as follows:
1. Set tibco.env.ORACLE_CLIENT_PATH=<Oracle Client native library path>
2. Prepend %ORACLE_CLIENT_PATH% to the variables PATH, LD_LIBRARY_PATH, SHLIB_PATH and LIBPATH.
The value should point to the Oracle native client libraries directory as follows:
• On Windows This is typically ORACLE_CLIENT_HOME/BIN directory, such as C:\oracle\product\10.2.0\client\BIN
• On UNIX This is typically the directory ORACLE_CLIENT_HOME/lib or ORACLE_CLIENT_HOME/lib32
The supported Checkpoint databases are Oracle, SQL Server, and DB2.
MySQL is not supported.
TIBCO BusinessConnect Installation and Configuration
10 | Chapter 2 Installation
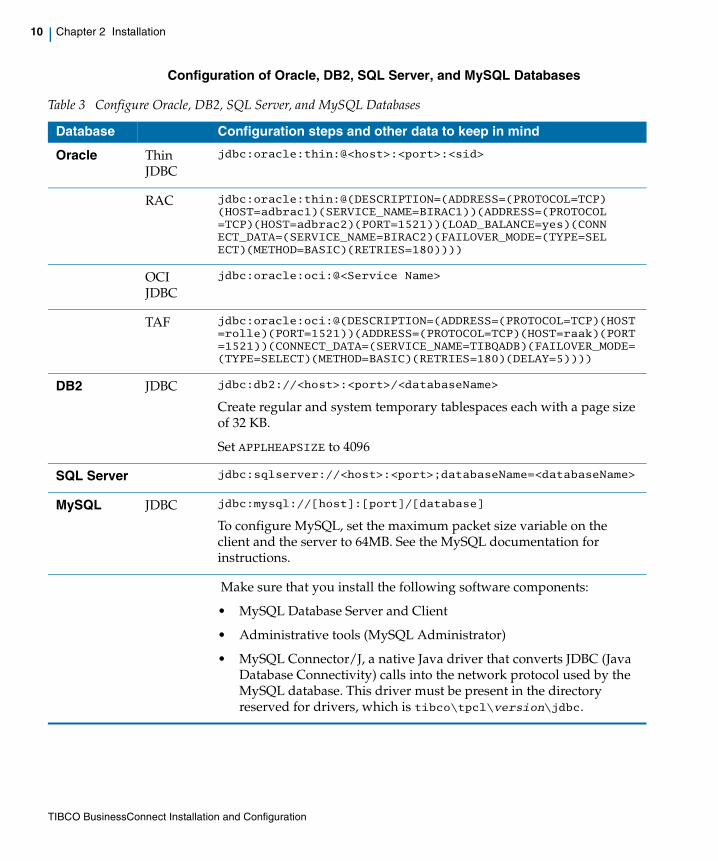
Configuration of Oracle, DB2, SQL Server, and MySQL Databases
Table 3 Configure Oracle, DB2, SQL Server, and MySQL Databases
Database Configuration steps and other data to keep in mind
Oracle Thin JDBC
jdbc:oracle:thin:@<host>:<port>:<sid>
RAC jdbc:oracle:thin:@(DESCRIPTION=(ADDRESS=(PROTOCOL=TCP)(HOST=adbrac1)(SERVICE_NAME=BIRAC1))(ADDRESS=(PROTOCOL=TCP)(HOST=adbrac2)(PORT=1521))(LOAD_BALANCE=yes)(CONNECT_DATA=(SERVICE_NAME=BIRAC2)(FAILOVER_MODE=(TYPE=SELECT)(METHOD=BASIC)(RETRIES=180))))
OCI JDBC
jdbc:oracle:oci:@<Service Name>
TAF jdbc:oracle:oci:@(DESCRIPTION=(ADDRESS=(PROTOCOL=TCP)(HOST=rolle)(PORT=1521))(ADDRESS=(PROTOCOL=TCP)(HOST=raak)(PORT=1521))(CONNECT_DATA=(SERVICE_NAME=TIBQADB)(FAILOVER_MODE=(TYPE=SELECT)(METHOD=BASIC)(RETRIES=180)(DELAY=5))))
DB2 JDBC jdbc:db2://<host>:<port>/<databaseName>
Create regular and system temporary tablespaces each with a page size of 32 KB.
Set APPLHEAPSIZE to 4096
SQL Server jdbc:sqlserver://<host>:<port>;databaseName=<databaseName>
MySQL JDBC jdbc:mysql://[host]:[port]/[database]
To configure MySQL, set the maximum packet size variable on the client and the server to 64MB. See the MySQL documentation for instructions.
Make sure that you install the following software components:
• MySQL Database Server and Client
• Administrative tools (MySQL Administrator)
• MySQL Connector/J, a native Java driver that converts JDBC (Java Database Connectivity) calls into the network protocol used by the MySQL database. This driver must be present in the directory reserved for drivers, which is tibco\tpcl\version\jdbc.
TIBCO BusinessConnect Installation and Configuration
Installation | 11
Installation
The following sections describe the installation process in the available installation modes:
• GUI Mode, page 14
• Console Mode, page 16
• Silent Mode, page 17
GUI ModeTo install this product in GUI mode:
1. Open the physical media or download the package.
2. Extract the contents of the package to a temporary directory.
3. Navigate to the temporary directory.
4. Run TIBCOUniversalInstaller. You can do so in one of the following ways:— Double-click the installer icon.— On the command prompt, provide the absolute path of the installer file on
without specifying any options. The installer defaults to GUI mode.
5. Click the Next button on the Welcome dialog.
6. Read through the license text when the License Agreement dialog appears, select the I Accept the Terms of the License Agreement radio button and then click the Next button.
7. Select an installation profile from the list on the left. TIBCO Universal Installer provides the following installation profiles:
Gateway Only
This profile is intended for installation on the Gateway machine, which is located in the DMZ zone outside the company’s firewall. With this profile, the following pre-selected components will be installed:— Gateway Documentation— BusinessConnect Runtime: Gateway
Interior Server Only
This profile is intended for the BusinessConnect administrator. With this profile, the following pre-selected components will be installed:— Interior Server Documentation— BusinessConnect Runtime: Interior Server — BusinessConnect Tools: Interior Server Tools
TIBCO BusinessConnect Installation and Configuration
12 | Chapter 2 Installation
Typical
This profile is intended for the BusinessConnect administrator, same as the option Interior Server Only. However, in some cases a user would want to have all components on the same machine, such as for testing.
If you choose this installation profile, all components will be installed:
— Interior Server Documentation, Gateway Documentation
— BusinessConnect Runtime: Interior Server, Gateway
— Interior Server Tools
8. Click the Next button. The TIBCO Installation Home dialog displays.
An installation environment isolates product installations. A product installed into an installation environment does not access components in other installation environments. An installation environment consists of a name and path. You can choose a new environment or an existing environment.
— Create a new TIBCO_HOME To install the product into a new installation environment, specify the following properties:
Directory The directory into which the product is installed. Type a path or click Browse to specify the path or accept the default location.
The path cannot contain special characters such as "*", "#", "?", ">", "<", "%", "&", "$", "`", or "|". The path cannot be the same as the path of an existing environment.
Name Identifies the installation environment. The name cannot contain special characters such as "*", "?", ">", "<", ":", "|", "/", "\", or quotation marks("). The name is appended to the name of Windows services created by the installer and is a component of the path to the product in the Windows Start > All Programs menu.
— Use an existing TIBCO_HOME To install the product into an existing installation environment, select the environment from the drop-down list.
9. Click the Next button.
10. Verify the list of products selected for install in the Pre-Install Summary dialog.
11. Click the Install button to start the installation process.
12. Review the information listed in the Post-Install Summary dialog.
13. Click the Finish button to complete the installation process and exit the universal installer.
To customize the profile feature settings, check the Customize Installation checkbox and use the feature tree on the right.
TIBCO BusinessConnect Installation and Configuration
Installation | 13
Console ModeTo install this product in console mode:
1. Open the physical media or download the package.
2. Extract the contents of the package to a temporary directory.
3. Using a console window, navigate to the temporary directory.
4. Run the following commands:
Windows:TIBCOUniversalInstaller.exe -console
AIX:TIBCOUniversalInstaller-aix.bin -console
HP UX: TIBCOUniversalInstaller-hpux-ia64.bin -console
Linux: TIBCOUniversalInstaller-lnx-x86.bin -console
Solaris Sparc: TIBCOUniversalInstaller-sol-sparc.bin -console
Solaris X86 64:TIBCOUniversalInstaller-sol-x86.bin -console
5. Complete the installation by responding to the console window prompts.
Silent ModeIn silent mode, the universal installer does not prompt for any inputs during installation. Instead, the inputs are read from a response file that can be provided as a command-line parameter. If no value is specified, the installer uses the default TIBCOUniversalInstaller-bc.silent file.
The TIBCOUniversalInstaller.silent file is packaged in the directory that contains the universal installer. Edit the file with information for your environment before launching the silent installation. The file includes comments that describe the installation properties you can set. While you can use the TIBCOUniversalInstaller-bc.silent file, it’s good practice to copy the file to a different name and use that file for the silent install.
If errors occur during installation, they will be listed in the installation log file located in the User_Home/.TIBCO directory.
1. Open the physical media or download the package.
2. Extract the contents of the package to a temporary directory.
TIBCO BusinessConnect Installation and Configuration
14 | Chapter 2 Installation
3. Using a console window, navigate to the temporary directory.
4. Make a copy of the TIBCOUniversalInstaller-bc.silent file and rename the file.
5. Using a text editor, open the copied file and update the install location and features to install.
6. Run the following:
WindowsTIBCOUniversalInstaller.cmd -silent -V
responseFile="myfilename.silent"
UNIXTIBCOUniversalInstaller.bin -silent -V
responseFile="myfilename.silent"
TIBCO BusinessConnect Installation and Configuration
Uninstallation | 15
Uninstallation
Uninstall Using the GUITo uninstall this product on Windows:
1. Shut down all running TIBCO BusinessConnect applications.
2. Navigate to TIBCO_HOME\tools\universal_installer and run TIBCOUniversalInstaller.exe
or
select Start>All Programs>TIBCO>Uninstall.
3. Follow the steps as required by the Universal Installer Wizard.
4. Review the Post-Uninstall Summary and click the Finish button to exit the wizard.
Uninstall Using the Console ModeTo uninstall this product in Console mode::
1. Using a command window, navigate to the directory TIBCO_HOME\tools\universal_installer .
2. Type the following command at the command prompt:
Windows:IBCOUniversalInstaller.exe -is:javaconsole -console
AIX:TIBCOUniversalInstaller-aix.bin -is:javaconsole -console
HP UX: TIBCOUniversalInstaller-hpux-ia64.bin -is:javaconsole -console
Linux: TIBCOUniversalInstaller-lnx-x86.bin -is:javaconsole -console
Solaris Sparc: TIBCOUniversalInstaller-sol-sparc.bin -is:javaconsole -console
Solaris X86 64:TIBCOUniversalInstaller-sol-x86.bin -is:javaconsole -console
3. Complete the uninstallation by responding to the console window prompts.
TIBCO BusinessConnect Installation and Configuration

16 | Chapter 2 Installation
TIBCO BusinessConnect Installation and Configuration

| 17
Chapter 3 Configuration
This chapter explains how to configure TIBCO BusinessConnect after the installation.
Topics
• Overview, page 18
• Manage Permissions for the Installation, page 19
• Create a New Installation, page 20
• Audit, Non-Repudiation and Runtime Database Configuration, page 28
TIBCO BusinessConnect Installation and Configuration
18 | Chapter 3 Configuration
Overview
Perform these tasks after installing TIBCO BusinessConnect:
• Manage Permissions
In order to establish permissions for the TIBCO BusinessConnect Super user and other users, you need to set up permissions. See Manage Permissions for the Installation on page 19.
• Create a new installation.
This procedure is explained in Create a New Installation on page 20.
• Manage an existing installation
Once the installation is configured, you can edit its parameters. One additional tab for protocol activation becomes available: Protocol Plug-In Activation, page 27.
• Configure a database
A database must be set up before TIBCO BusinessConnect is installed, and afterwards the connection to this database is configured as a part of the new installation configuration.
However, you can later change connection defaults for the installed database, as well as install additional databases for the system. To do so, see Audit, Non-Repudiation and Runtime Database Configuration, page 28.
TIBCO BusinessConnect Installation and Configuration
Manage Permissions for the Installation | 19
Manage Permissions for the Installation
After installing TIBCO BusinessConnect and before deploying the application, you need define user permissions for the installation.
BusinessConnect Super User
TIBCO BusinessConnect User Management provides the ability to manage access restrictions on users of the BusinessConnect administration console. The BusinessConnect Super User is the only user who can see the User Management configuration items in the BusinessConnect configuration GUI. There must always be one BusinessConnect Super User.
To read the overview of the TIBCO BusinessConnect User Management feature, see TIBCO BusinessConnect Concepts, Chapter 4, TIBCO BusinessConnect User Management, section BusinessConnect Super User.
Set Up Other User Permissions
All TIBCO BusinessConnect users must have read, write, and execute permissions for the following directories:
$TIBCO_HOME/bc/n.n/bin $TIBCO_HOME/logs$TIBCO_HOME/tra/n.n/logs$TIBCO_HOME/bc/n.n/gs
For example, if TIBCO BusinessConnect has been installed in /opt/tibco, the user who installed TIBCO BusinessConnect should execute the following commands:
% chmod 777 /opt/tibco/bc/n.n/bin/% chmod 777 /opt/tibco/log% chmod 777 /opt/tibco/tra/n.n/logs% chmod 777 /opt/tibco/bc/n.n/gs
In addition, the palettes directory ($TIBCO_HOME/bw/version/lib/palettes) must be writable by all users who will use TIBCO Designer.
The TIBCO Administrator user who creates the BusinessConnect installation is automatically the BusinessConnect Super User.
TIBCO BusinessConnect Installation and Configuration
20 | Chapter 3 Configuration
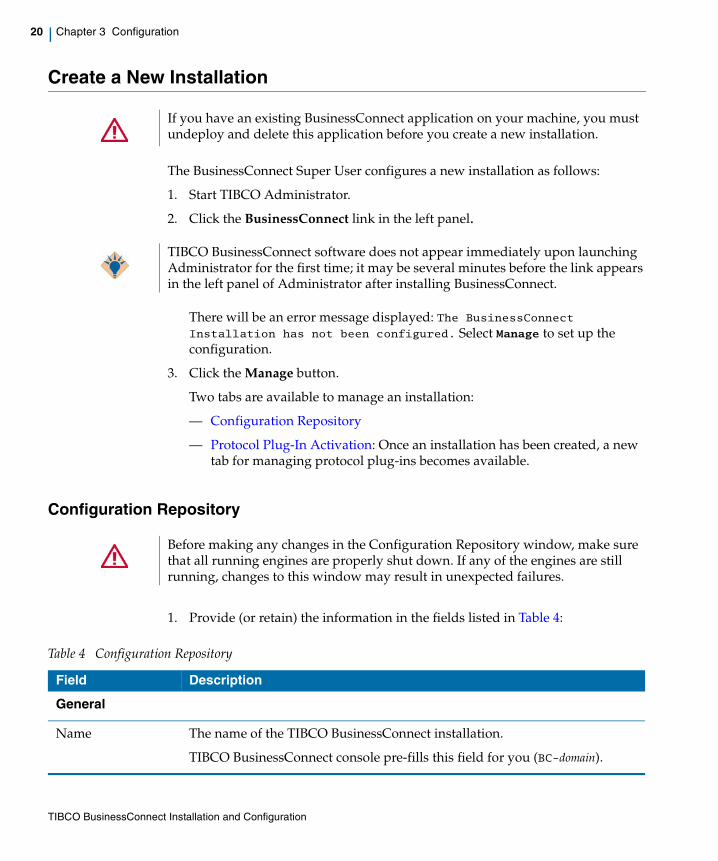
Create a New Installation
The BusinessConnect Super User configures a new installation as follows:
1. Start TIBCO Administrator.
2. Click the BusinessConnect link in the left panel.
There will be an error message displayed: The BusinessConnect Installation has not been configured. Select Manage to set up the configuration.
3. Click the Manage button.
Two tabs are available to manage an installation:
— Configuration Repository
— Protocol Plug-In Activation: Once an installation has been created, a new tab for managing protocol plug-ins becomes available.
Configuration Repository
1. Provide (or retain) the information in the fields listed in Table 4:
If you have an existing BusinessConnect application on your machine, you must undeploy and delete this application before you create a new installation.
TIBCO BusinessConnect software does not appear immediately upon launching Administrator for the first time; it may be several minutes before the link appears in the left panel of Administrator after installing BusinessConnect.
Before making any changes in the Configuration Repository window, make sure that all running engines are properly shut down. If any of the engines are still running, changes to this window may result in unexpected failures.
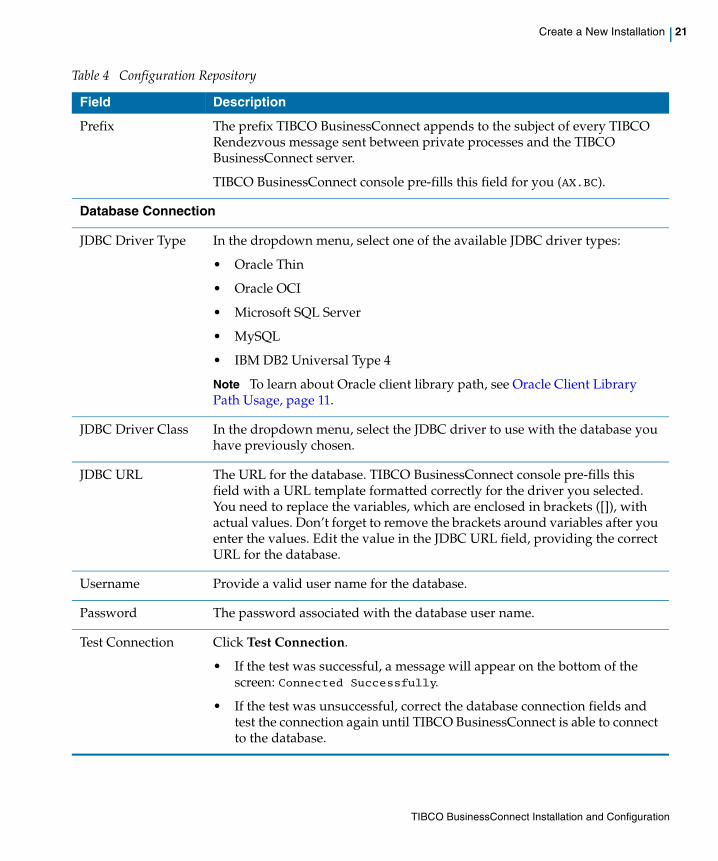
Table 4 Configuration Repository
Field Description
General
Name The name of the TIBCO BusinessConnect installation.
TIBCO BusinessConnect console pre-fills this field for you (BC-domain).
TIBCO BusinessConnect Installation and Configuration
Create a New Installation | 21
Prefix The prefix TIBCO BusinessConnect appends to the subject of every TIBCO Rendezvous message sent between private processes and the TIBCO BusinessConnect server.
TIBCO BusinessConnect console pre-fills this field for you (AX.BC).
Database Connection
JDBC Driver Type In the dropdown menu, select one of the available JDBC driver types:
• Oracle Thin
• Oracle OCI
• Microsoft SQL Server
• MySQL
• IBM DB2 Universal Type 4
Note To learn about Oracle client library path, see Oracle Client Library Path Usage, page 11.
JDBC Driver Class In the dropdown menu, select the JDBC driver to use with the database you have previously chosen.
JDBC URL The URL for the database. TIBCO BusinessConnect console pre-fills this field with a URL template formatted correctly for the driver you selected. You need to replace the variables, which are enclosed in brackets ([]), with actual values. Don’t forget to remove the brackets around variables after you enter the values. Edit the value in the JDBC URL field, providing the correct URL for the database.
Username Provide a valid user name for the database.
Password The password associated with the database user name.
Test Connection Click Test Connection.
• If the test was successful, a message will appear on the bottom of the screen: Connected Successfully.
• If the test was unsuccessful, correct the database connection fields and test the connection again until TIBCO BusinessConnect is able to connect to the database.
Table 4 Configuration Repository
Field Description
TIBCO BusinessConnect Installation and Configuration
22 | Chapter 3 Configuration
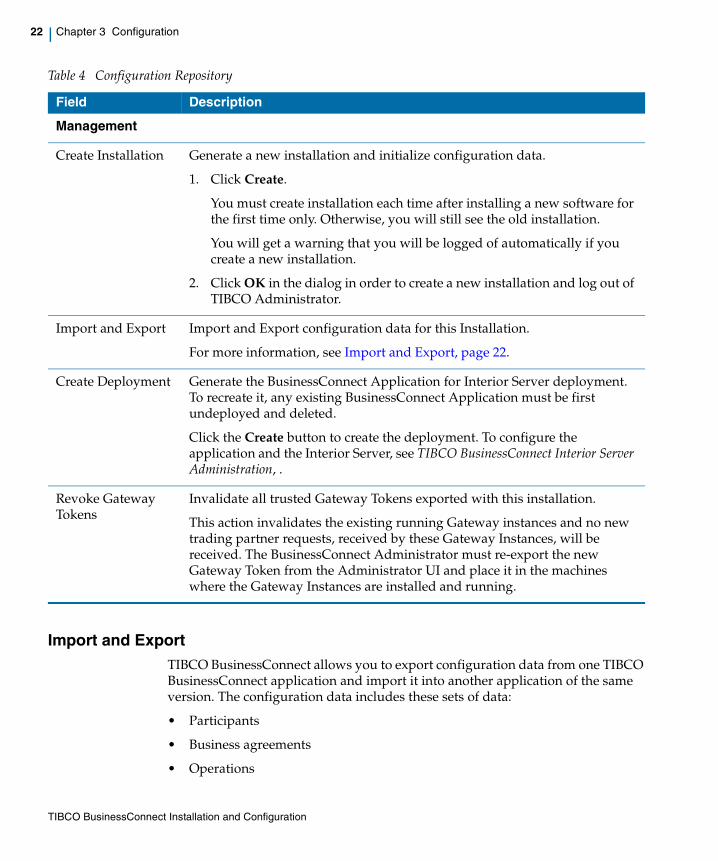
Import and ExportTIBCO BusinessConnect allows you to export configuration data from one TIBCO BusinessConnect application and import it into another application of the same version. The configuration data includes these sets of data:
• Participants
• Business agreements
• Operations
Management
Create Installation Generate a new installation and initialize configuration data.
1. Click Create.
You must create installation each time after installing a new software for the first time only. Otherwise, you will still see the old installation.
You will get a warning that you will be logged of automatically if you create a new installation.
2. Click OK in the dialog in order to create a new installation and log out of TIBCO Administrator.
Import and Export Import and Export configuration data for this Installation.
For more information, see Import and Export, page 22.
Create Deployment Generate the BusinessConnect Application for Interior Server deployment. To recreate it, any existing BusinessConnect Application must be first undeployed and deleted.
Click the Create button to create the deployment. To configure the application and the Interior Server, see TIBCO BusinessConnect Interior Server Administration, .
Revoke Gateway Tokens
Invalidate all trusted Gateway Tokens exported with this installation.
This action invalidates the existing running Gateway instances and no new trading partner requests, received by these Gateway Instances, will be received. The BusinessConnect Administrator must re-export the new Gateway Token from the Administrator UI and place it in the machines where the Gateway Instances are installed and running.
Table 4 Configuration Repository
Field Description
TIBCO BusinessConnect Installation and Configuration
Create a New Installation | 23
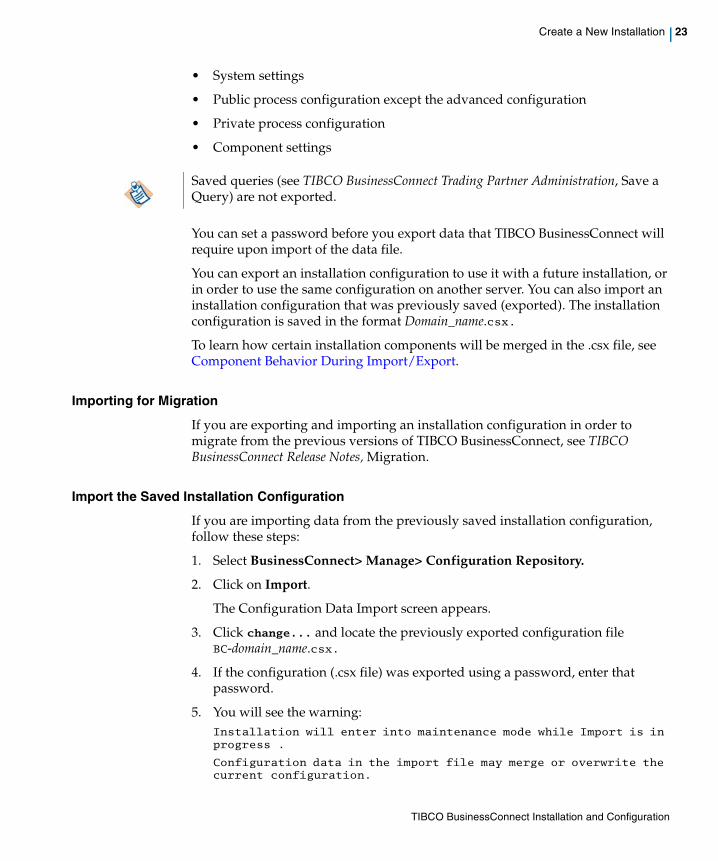
• System settings
• Public process configuration except the advanced configuration
• Private process configuration
• Component settings
You can set a password before you export data that TIBCO BusinessConnect will require upon import of the data file.
You can export an installation configuration to use it with a future installation, or in order to use the same configuration on another server. You can also import an installation configuration that was previously saved (exported). The installation configuration is saved in the format Domain_name.csx.
To learn how certain installation components will be merged in the .csx file, see Component Behavior During Import/Export.
Importing for Migration
If you are exporting and importing an installation configuration in order to migrate from the previous versions of TIBCO BusinessConnect, see TIBCO BusinessConnect Release Notes, Migration.
Import the Saved Installation Configuration
If you are importing data from the previously saved installation configuration, follow these steps:
1. Select BusinessConnect> Manage> Configuration Repository.
2. Click on Import.
The Configuration Data Import screen appears.
3. Click change... and locate the previously exported configuration file BC-domain_name.csx.
4. If the configuration (.csx file) was exported using a password, enter that password.
5. You will see the warning:Installation will enter into maintenance mode while Import is in progress .
Configuration data in the import file may merge or overwrite the current configuration.
Saved queries (see TIBCO BusinessConnect Trading Partner Administration, Save a Query) are not exported.
TIBCO BusinessConnect Installation and Configuration
24 | Chapter 3 Configuration
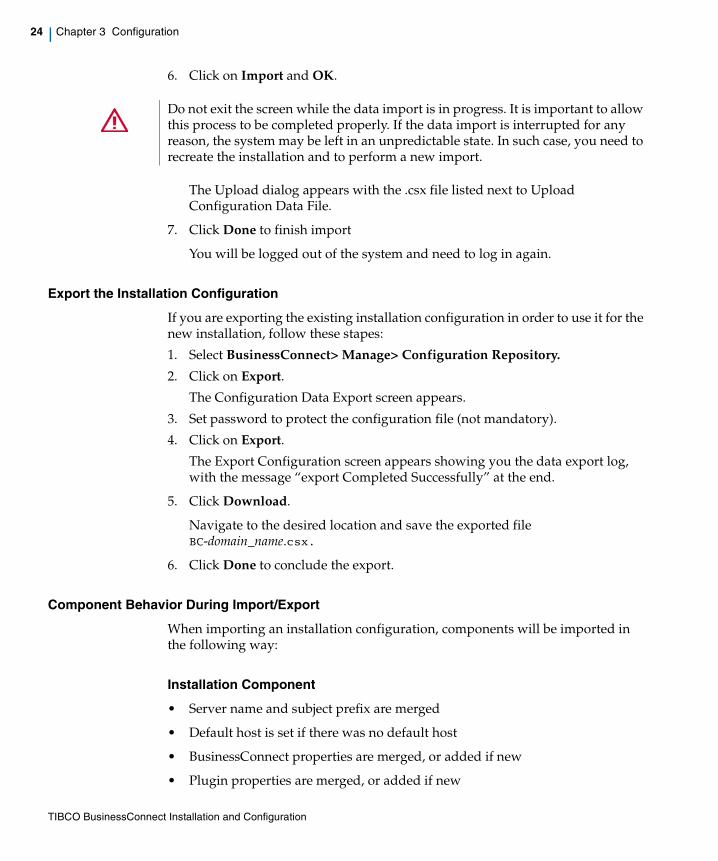
6. Click on Import and OK.
The Upload dialog appears with the .csx file listed next to Upload Configuration Data File.
7. Click Done to finish import
You will be logged out of the system and need to log in again.
Export the Installation Configuration
If you are exporting the existing installation configuration in order to use it for the new installation, follow these stapes:
1. Select BusinessConnect> Manage> Configuration Repository.
2. Click on Export.
The Configuration Data Export screen appears.
3. Set password to protect the configuration file (not mandatory).
4. Click on Export.
The Export Configuration screen appears showing you the data export log, with the message “export Completed Successfully” at the end.
5. Click Download.
Navigate to the desired location and save the exported file BC-domain_name.csx.
6. Click Done to conclude the export.
Component Behavior During Import/Export
When importing an installation configuration, components will be imported in the following way:
Installation Component
• Server name and subject prefix are merged
• Default host is set if there was no default host
• BusinessConnect properties are merged, or added if new
• Plugin properties are merged, or added if new
Do not exit the screen while the data import is in progress. It is important to allow this process to be completed properly. If the data import is interrupted for any reason, the system may be left in an unpredictable state. In such case, you need to recreate the installation and to perform a new import.
TIBCO BusinessConnect Installation and Configuration
Create a New Installation | 25
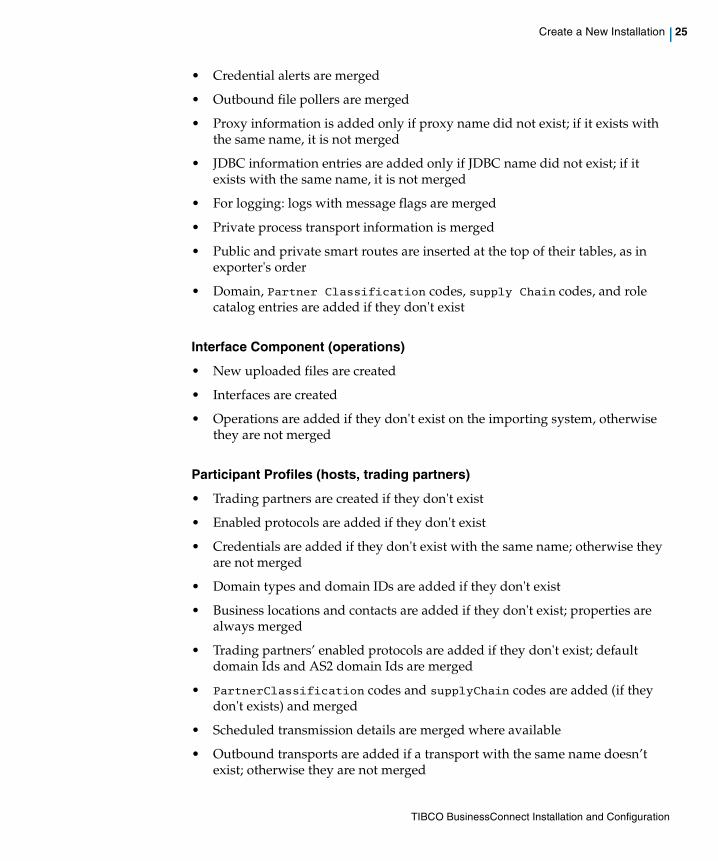
• Credential alerts are merged
• Outbound file pollers are merged
• Proxy information is added only if proxy name did not exist; if it exists with the same name, it is not merged
• JDBC information entries are added only if JDBC name did not exist; if it exists with the same name, it is not merged
• For logging: logs with message flags are merged
• Private process transport information is merged
• Public and private smart routes are inserted at the top of their tables, as in exporter's order
• Domain, Partner Classification codes, supply Chain codes, and role catalog entries are added if they don't exist
Interface Component (operations)
• New uploaded files are created
• Interfaces are created
• Operations are added if they don't exist on the importing system, otherwise they are not merged
Participant Profiles (hosts, trading partners)
• Trading partners are created if they don't exist
• Enabled protocols are added if they don't exist
• Credentials are added if they don't exist with the same name; otherwise they are not merged
• Domain types and domain IDs are added if they don't exist
• Business locations and contacts are added if they don't exist; properties are always merged
• Trading partners’ enabled protocols are added if they don't exist; default domain Ids and AS2 domain Ids are merged
• PartnerClassification codes and supplyChain codes are added (if they don't exists) and merged
• Scheduled transmission details are merged where available
• Outbound transports are added if a transport with the same name doesn’t exist; otherwise they are not merged
TIBCO BusinessConnect Installation and Configuration

26 | Chapter 3 Configuration
Business Agreements
• If an agreement doesn't exist between the given participants, it is created
• If protocol bindings don't exist for a given protocol, the binding is added
• Document security properties, primary, backup, error transports are merged
• Inbound transport properties (certificates, keys, passwords, URLs, and so on) are merged and enabled as per import configuration
TIBCO BusinessConnect Installation and Configuration
Manage an Existing Installation | 27
Manage an Existing Installation
Once an installation has been created, a new Protocol Plug-In Activation tab becomes available.
Protocol Plug-In ActivationSelect this tab to activate protocols for the installation.
If you have installed any business protocols you will notice that those protocols are listed in the Protocol Plug-In list.
• Activate Select the checkbox next to the protocol and click on the Activate button.
• Deactivate Select the checkbox next to the protocol and click on the Deactivate button.
Each time you activate or deactivate a protocol, you will be logged out of the system and will have to log in again. For more information on protocol activation, see the installation guide for the specific protocol.
Once the protocol(s) are activated, they will appear in this window with the status "Activated".
During activation, TIBCO BusinessConnect performs the following activities:
• Installs the protocol grammar in the configuration store.
• Creates protocol-specific tables in the configuration store.
• Updates protocol-specific resources.
• Activates the protocol-specific online help.
• Activates protocol checker integration.
• Performs protocol-specific custom actions.
TIBCO BusinessConnect Installation and Configuration
28 | Chapter 3 Configuration
Audit, Non-Repudiation and Runtime Database Configuration
When you initially set up TIBCO BusinessConnect, you provide connection information for a database.
Add a Database ConnectionTo add and configure a new database connection, select BusinessConnect> System Settings> Audit, Non-Repudiation and Runtime Database Configuration, and enter information as explained in Table 5.
Table 5 Non-Repudiation and Runtime Database Configuration
Field Description
Database Connections
Add The New Database Connection screen will open.
Alias Enter the Alias that will be used for this new database connection.
bc-check-point-db This is the default checkpoint database. Like any database, it can be edited as explained in Table 6.
bc-db This is the default database for the following data stores:
• Runtime data store
• Configuration store
Note: After making any configuration changes to the database used for the configuration stores, redeploy the TIBCO BusinessConnect application.
To edit this database, see Table 6.
TIBCO BusinessConnect Installation and Configuration
Audit, Non-Repudiation and Runtime Database Configuration | 29
Connection Settings
General
Include Message in Log Select or clear the checkbox to enable/disable inclusion of log messages.
You can request that TIBCO BusinessConnect not only log information about the transaction state but also include the actual message in the log. To include the message, select the Include Message in Log checkbox in the BusinessConnect>System Settings>Audit, Non-Repudiation and Runtime Database Configuration area. The message will now be included in all entries where that is possible.
Note If you change the value of the Include Message in Log Entries checkbox, you must restart the BusinessConnect server to pick up the change.
Note Messages can only be included for log entries going to or coming from the trading partner. If you want information about the message coming from and going to the private process, implement the logging as part of that process. Including the message substantially increases the size of your log file.
Connection Defaults
Audit Logs, Select which alias database connection is used for various Connection Stores.
Select from the dropdown list to manage any of the following: bc-db (the initial database connection), None, or any other configured database connection.
Non Repudiation Log
Runtime Data Store
Table 5 Non-Repudiation and Runtime Database Configuration
Field Description
TIBCO BusinessConnect Installation and Configuration
30 | Chapter 3 Configuration
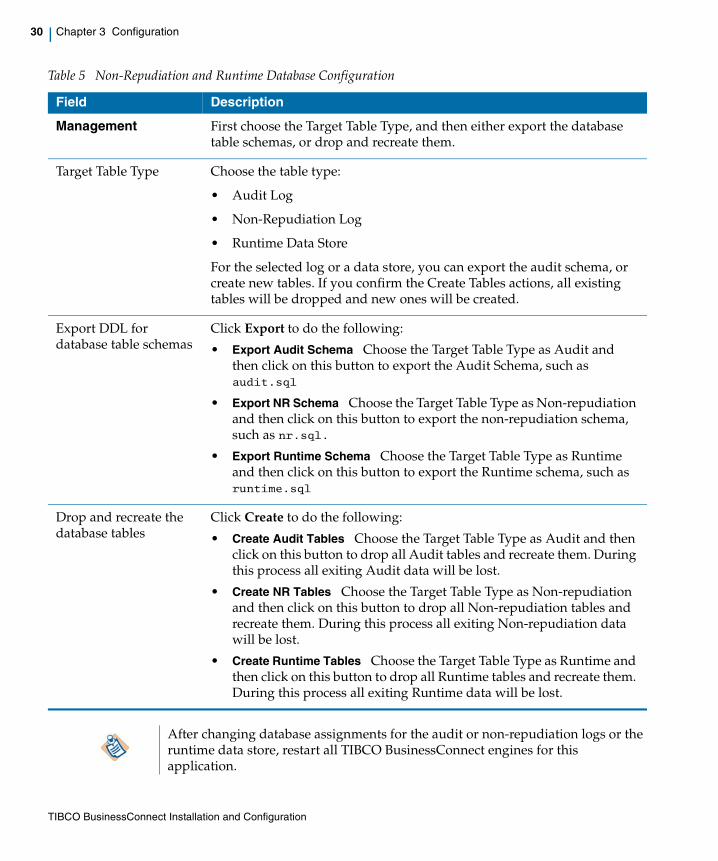
Management First choose the Target Table Type, and then either export the database table schemas, or drop and recreate them.
Target Table Type Choose the table type:
• Audit Log
• Non-Repudiation Log
• Runtime Data Store
For the selected log or a data store, you can export the audit schema, or create new tables. If you confirm the Create Tables actions, all existing tables will be dropped and new ones will be created.
Export DDL for database table schemas
Click Export to do the following:
• Export Audit Schema Choose the Target Table Type as Audit and then click on this button to export the Audit Schema, such as audit.sql
• Export NR Schema Choose the Target Table Type as Non-repudiation and then click on this button to export the non-repudiation schema, such as nr.sql.
• Export Runtime Schema Choose the Target Table Type as Runtime and then click on this button to export the Runtime schema, such as runtime.sql
Drop and recreate the database tables
Click Create to do the following:
• Create Audit Tables Choose the Target Table Type as Audit and then click on this button to drop all Audit tables and recreate them. During this process all exiting Audit data will be lost.
• Create NR Tables Choose the Target Table Type as Non-repudiation and then click on this button to drop all Non-repudiation tables and recreate them. During this process all exiting Non-repudiation data will be lost.
• Create Runtime Tables Choose the Target Table Type as Runtime and then click on this button to drop all Runtime tables and recreate them. During this process all exiting Runtime data will be lost.
After changing database assignments for the audit or non-repudiation logs or the runtime data store, restart all TIBCO BusinessConnect engines for this application.
Table 5 Non-Repudiation and Runtime Database Configuration
Field Description
TIBCO BusinessConnect Installation and Configuration
Audit, Non-Repudiation and Runtime Database Configuration | 31
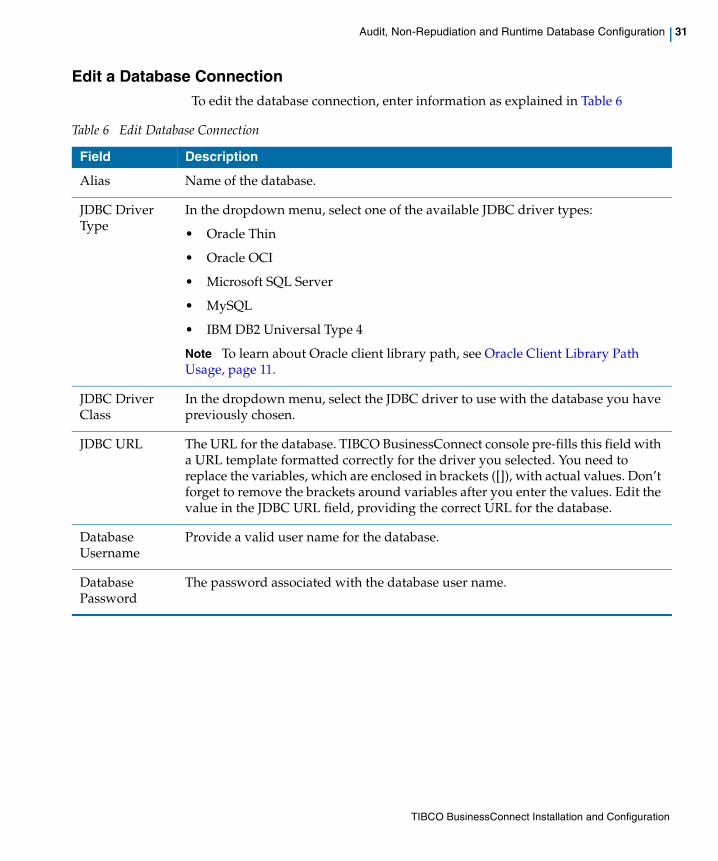
Edit a Database ConnectionTo edit the database connection, enter information as explained in Table 6
Table 6 Edit Database Connection
Field Description
Alias Name of the database.
JDBC Driver Type
In the dropdown menu, select one of the available JDBC driver types:
• Oracle Thin
• Oracle OCI
• Microsoft SQL Server
• MySQL
• IBM DB2 Universal Type 4
Note To learn about Oracle client library path, see Oracle Client Library Path Usage, page 11.
JDBC Driver Class
In the dropdown menu, select the JDBC driver to use with the database you have previously chosen.
JDBC URL The URL for the database. TIBCO BusinessConnect console pre-fills this field with a URL template formatted correctly for the driver you selected. You need to replace the variables, which are enclosed in brackets ([]), with actual values. Don’t forget to remove the brackets around variables after you enter the values. Edit the value in the JDBC URL field, providing the correct URL for the database.
Database Username
Provide a valid user name for the database.
Database Password
The password associated with the database user name.
TIBCO BusinessConnect Installation and Configuration
32 | Chapter 3 Configuration
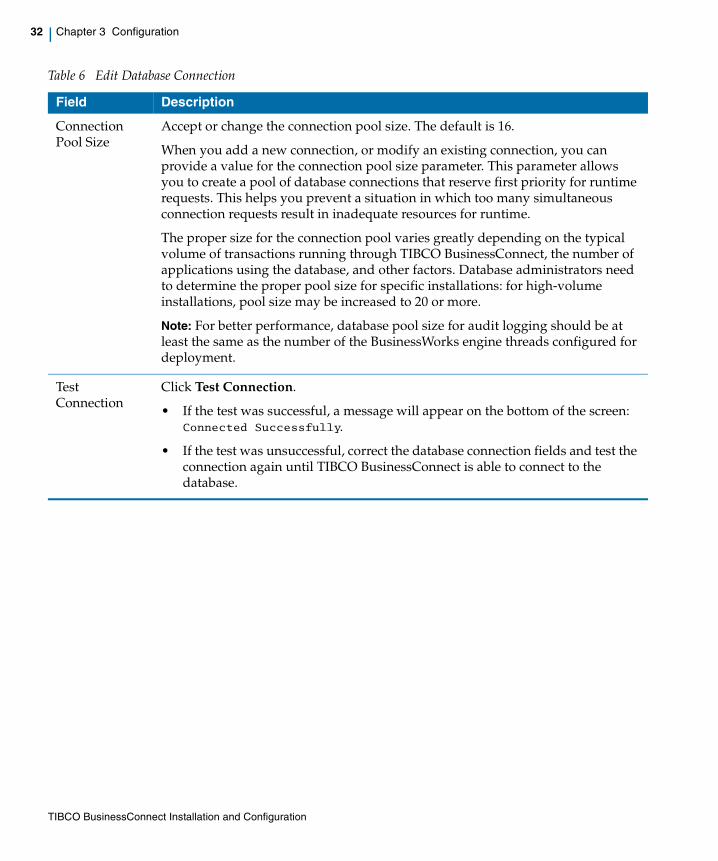
Connection Pool Size
Accept or change the connection pool size. The default is 16.
When you add a new connection, or modify an existing connection, you can provide a value for the connection pool size parameter. This parameter allows you to create a pool of database connections that reserve first priority for runtime requests. This helps you prevent a situation in which too many simultaneous connection requests result in inadequate resources for runtime.
The proper size for the connection pool varies greatly depending on the typical volume of transactions running through TIBCO BusinessConnect, the number of applications using the database, and other factors. Database administrators need to determine the proper pool size for specific installations: for high-volume installations, pool size may be increased to 20 or more.
Note: For better performance, database pool size for audit logging should be at least the same as the number of the BusinessWorks engine threads configured for deployment.
Test Connection
Click Test Connection.
• If the test was successful, a message will appear on the bottom of the screen: Connected Successfully.
• If the test was unsuccessful, correct the database connection fields and test the connection again until TIBCO BusinessConnect is able to connect to the database.
Table 6 Edit Database Connection
Field Description
TIBCO BusinessConnect Installation and Configuration
TIBCO BusinessConnect Installation and Configuration
| 33
Index
B
BusinessConnect Super User 19
C
configuration of Oracle, DB2, SQL Server, and MySQL databases 10
create new installation 20customer support x
E
ENV_HOME viiiexport installation configuration 24
I
import installation configuration 23install FESI EcmaScript Interpreter 8install unlimited strength JCE policy files 8Installation Modes
Console Mode 2GUI Mode 2Silent Mode 2
Installation ProcedureConsole Mode 13GUI Mode 11Silent Mode 13
Installation RequirementsDisk Space Requirements 4Supported Platforms 5System Memory Requirements 4
Installer Account 2Installer Log File 3
M
manage permissions 19
O
Oracle client library path usage 9
S
set up database Information 7set up other user permissions 19support, contacting x
T
technical support xTIBCO_HOME viii
U
uninstall on Windows 15uninstall using the Console Mode 15Uninstallation 15