Embed Size (px)
Citation preview
M7
Internet, DAB/DAB+ and FM Receiver
I n s t r u c t i o n M a n u a l
2
Safety Precautions
To achieve the utmost in enjoyment and performance, and in order to become familiar with its
features, please read this manual carefully before attempting to operate the unit, this will assure you
years of faithful, trouble free performance and listening pleasure.
Important Notes
• This safety and operating instruction should be retained for future reference.
• The apparatus shall not be exposed to dripping or splashing and that no objects filled with
liquids, such as vases, shall be placed on apparatus.
• Avoid installing the unit in locations described below:
o Places exposed to direct sunlight or close to heat radiating appliances such as
electric heaters.
o On top of other stereo equipment that radiate too much heat.
o Places blocking ventilation or dusty places.
o Places subject to constant vibration.
o Humid or moist places.
• No naked flame sources such as lighted candles should be placed on or near the unit;
• The use of apparatus in moderate climates.
• Operate turning controls and switches as instructed in the manual.
• Before turning on the power for the first time, make sure the power cord is properly installed.
For safety reasons, do not remove any covers or attempt to gain access to the inside of the product.
Refer any servicing to qualified personnel.
Do not attempt to remove any screws, or open the casing of the unit; there are no user serviceable
parts inside, refer all servicing to qualified service personnel.
CAUTION: TO REDUCE THE RISK OF ELECTRIC SHOCK DO NOT REMOVE COVER (OR
BACK), NO USER SERVICEABLE PARTS INSIDE, REFER SERVICING TO QUALIFIED SERVICE
PERSONNEL.
DANGEROUS VOLTAGE
Dangerous Voltages, that may be of sufficient magnitude to constitute a risk of
electric shock to persons is present within this product’s enclosure.
ATTENTION
The owner’s manual contains important operating and maintenance instructions,
for your safety, it is necessary to refer to the manual.
WARNING: TO PREVENT FIRE OR SHOCK HAZARD, DO NOT EXPOSE THIS APPLIANCE TO
DRIPPING OR SPLASHING.
Note: This unit will become warm when used for a long period of time. This is normal and does not
indicate a problem with the unit.
3
Safety Information
Some Do’s and Don’ts on the safe use of equipment This equipment has been designed and manufactured to meet international safety standards but, like
any electrical equipment, care must be taken if you are to obtain the best results and safety is to be
assured.
DO read the operating instructions before you attempt to use the equipment.
DO ensure that all electrical connections (including the mains plug, extension leads and inter-
connections between the pieces of equipment) are properly made and in accordance with the
manufacturer’s instructions. Switch off and withdraw the mains plug before making or changing
connections.
DO consult your dealer if you are ever in doubt about the installation, operation or safety of your
equipment.
DON’T remove any fixed cover as this may expose dangerous voltages.
Overheating will cause damage and shorten the life of the equipment.
DON’T allow electrical equipment to be exposed to dripping or splashing, or objects filled with liquids,
such as vases, to be placed on the equipment.
DON’T place hot objects or naked flame sources such as lighted candles or nightlights on, or close to
equipment. High temperatures can melt plastic and lead to fires.
DON’T use equipment such as personal stereos or radios so that you are distracted from the
requirements of traffic safety.
DON’T listen to headphones at high volume, as such use can permanently damage your hearing.
DON’T leave equipment switched on when it is unattended unless it is specifically stated that it is
designed for unattended operation. Switch off using the switch on the equipment and make sure that
your family knows how to do this. Special arrangements may need to be made for infirm or
handicapped people.
DON’T continue to operate the equipment if you are in any doubt about if it’s working normally or if it’s
damaged in any way. Switch it off and withdraw the mains plug and consult your dealer.
ESD Remark: In case of malfunction due to electrostatic discharge just reset the product
(reconnection of power source may be required) to resume normal operation.
NOTE: In the unlikely event of a problem with your product please return to the store where your
purchase was made.
Table of Contents
Safety Precautions ................................................................................................................ 2
Safety Information ................................................................................................................. 3
Table of Contents .................................................................................................................. 4
Package Content .................................................................................................................. 6
Unit Overview .................................................................................................................... 6
Remote Control Overview ................................................................................................. 7
Getting Started ...................................................................................................................... 8
Internet Radio Quick Start Guide .......................................................................................... 9
Internet Radio Mode ........................................................................................................... 10
Access Internet Radio Mode ........................................................................................... 11
Local Stations ................................................................................................................. 11
Choose a Station ............................................................................................................. 11
Select a Station through Podcasts .................................................................................. 12
Get Access Code and FAQ Solutions .............................................................................. 12
Add Station to ‘My Favourites’ ......................................................................................... 12
Add Station to ‘My Added Stations’ ................................................................................. 13
View Station Information ................................................................................................. 13
Music Player Mode ............................................................................................................. 14
Setting up a Music Server ............................................................................................... 14
Sharing Media with Windows Media Player ..................................................................... 14
Play Shared Media .......................................................................................................... 15
My Playlist ....................................................................................................................... 15
Repeat Play Mode ........................................................................................................... 15
Shuffle Play Mode ........................................................................................................... 15
Clear My Playlist ............................................................................................................. 16
Prune Servers ................................................................................................................. 16
Now Playing Information ................................................................................................. 16
DAB Mode .......................................................................................................................... 17
Select DAB Mode ............................................................................................................ 17
Select another DAB/DAB+ Station .................................................................................. 17
Scan Stations .................................................................................................................. 17
Prune Invalid ................................................................................................................... 17
DRC (Dynamic Range Control) value .............................................................................. 17
Change Station Order ..................................................................................................... 18
5
View Station Information ................................................................................................. 18
FM Mode ............................................................................................................................. 19
Select FM Mode .............................................................................................................. 19
Scan setting .................................................................................................................... 19
Audio Setting ................................................................................................................... 19
Presets Setting.................................................................................................................... 20
Store Preset Stations ...................................................................................................... 20
Recall a Preset Station .................................................................................................... 20
Remote Control via iPhone/iPod Touch .............................................................................. 21
App store operation ......................................................................................................... 21
Wireless Device Remote Control ..................................................................................... 21
Setting up the connection ................................................................................................ 22
Starting the Navigation .................................................................................................... 22
General Operation .............................................................................................................. 23
Set Sleep ........................................................................................................................ 23
Set Alarm ........................................................................................................................ 23
Network Setup ................................................................................................................ 23
Set Time/Date ................................................................................................................. 24
Set Language .................................................................................................................. 24
Factory Reset .................................................................................................................. 24
Software Update ............................................................................................................. 24
Setup Wizard .................................................................................................................. 25
View System Info ............................................................................................................ 25
Set Backlight ................................................................................................................... 25
Specification ....................................................................................................................... 26
6
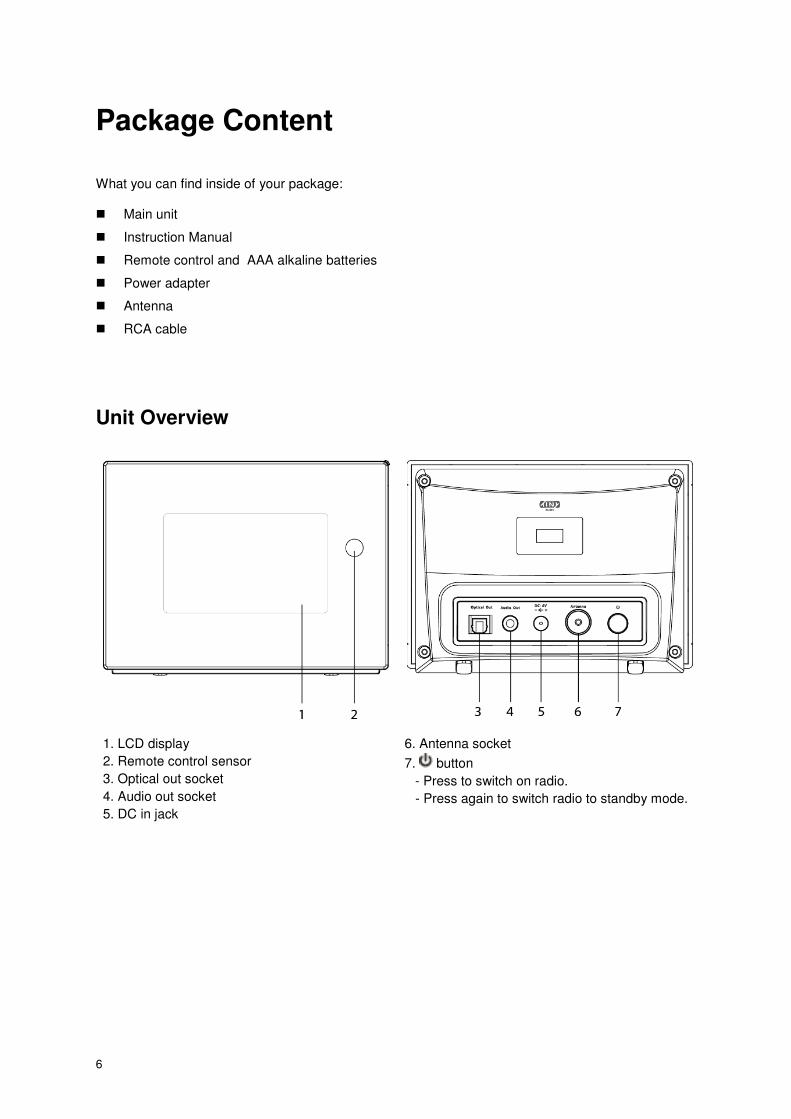
Package Content
What you can find inside of your package: � Main unit
� Instruction Manual
� Remote control and AAA alkaline batteries
� Power adapter
� Antenna
� RCA cable
Unit Overview
1. LCD display
2. Remote control sensor
3. Optical out socket
4. Audio out socket
5. DC in jack
6. Antenna socket
7. button
- Press to switch on radio.
- Press again to switch radio to standby mode.
7
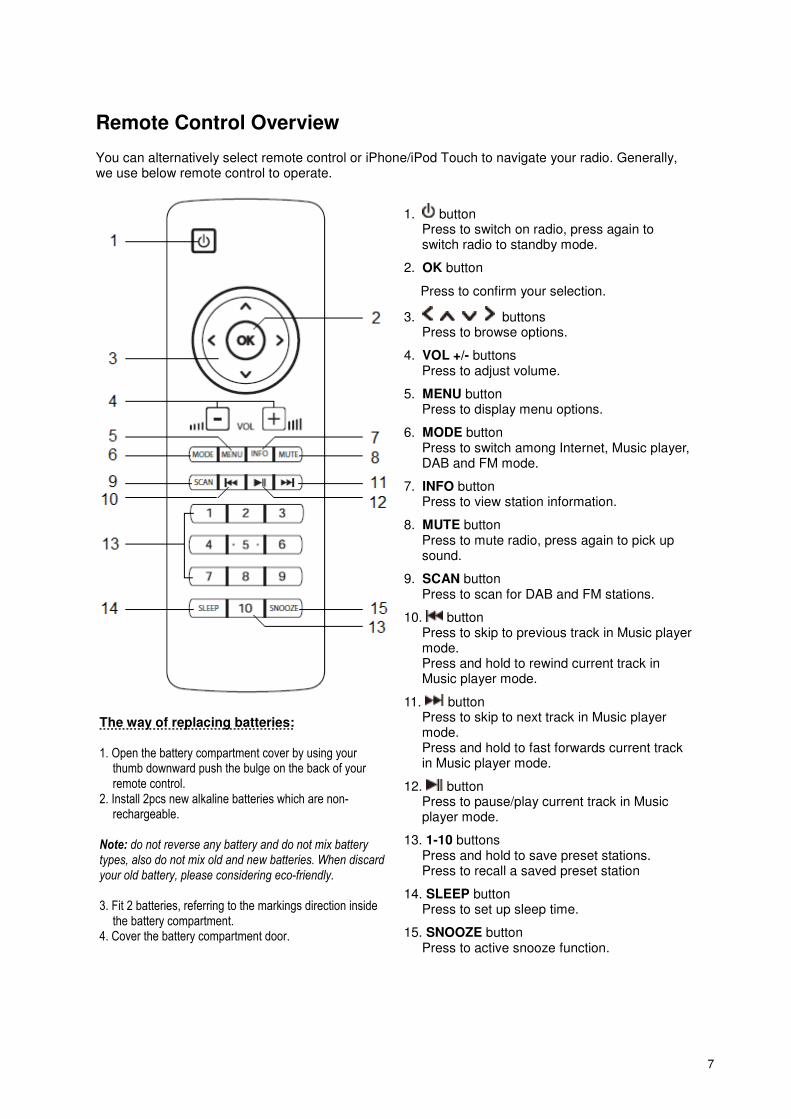
Remote Control Overview
You can alternatively select remote control or iPhone/iPod Touch to navigate your radio. Generally, we use below remote control to operate.
The way of replacing batteries: 1. Open the battery compartment cover by using your
thumb downward push the bulge on the back of your remote control.
2. Install 2pcs new alkaline batteries which are non-rechargeable.
Note: do not reverse any battery and do not mix battery types, also do not mix old and new batteries. When discard your old battery, please considering eco-friendly. 3. Fit 2 batteries, referring to the markings direction inside
the battery compartment. 4. Cover the battery compartment door.
1. button Press to switch on radio, press again to switch radio to standby mode.
2. OK button
Press to confirm your selection.
3. buttons Press to browse options.
4. VOL +/- buttons Press to adjust volume.
5. MENU button Press to display menu options.
6. MODE button Press to switch among Internet, Music player, DAB and FM mode.
7. INFO button Press to view station information.
8. MUTE button Press to mute radio, press again to pick up sound.
9. SCAN button Press to scan for DAB and FM stations.
10. button Press to skip to previous track in Music player mode. Press and hold to rewind current track in Music player mode.
11. button Press to skip to next track in Music player mode. Press and hold to fast forwards current track in Music player mode.
12. button Press to pause/play current track in Music player mode.
13. 1-10 buttons Press and hold to save preset stations. Press to recall a saved preset station
14. SLEEP button Press to set up sleep time.
15. SNOOZE button Press to active snooze function.
8
Getting Started
Carefully remove your radio from the box. You may wish to store the packaging for future use.
Positioning your Radio Receiver
Place your radio receiver on a flat / stable surface that is not subject to vibrations.
Avoid the following locations:
� Where the receiver will be exposed to direct sunlight.
� Where the receiver will be close to heat radiating sources.
� Where the humidity is high and ventilation is poor.
� Where it is dusty.
� Where it is damp or there is a possibility of water dripping or splashing onto unit.
Assembling and adjusting the Antenna
Connect the provided antenna to Antenna socket on the back of receiver firstly. Then unwind the
antenna to ensure you receive the best reception possible in both DAB and FM radio modes. It may
be necessary to alter the position of the receiver and /or antenna to achieve the best signal.
Using Headphones
You will require headphones fitted with a 3.5 mm diameter stereo plug. The Audio Out socket is
located on the back of this unit. Headphones are not supplied with this receiver.
Using RCA cable
Connect the 3.5 mm plug at the end of your RCA cable to the Audio Out socket is located on the back
of this unit. Then insert the Red and Black plugs at the other end of the RCA cable to your audio
device.
Turning the Unit On/Off
Connect the plug at the end of power adapter cable to the DC in jack on the back of the unit. Then
insert the power adapter into the mains socket. Press the button to turn on the unit, press the
button again to switch the unit to standby mode. To switch the unit off completely, unplug the power
adapter from the mains socket.
9
Internet Radio Quick Start Guide
Before use your radio receiver, you need to know followings: Wireless LAN Setting: � A broadband Internet connection.
� A wireless access point (Wi-Fi) connected to your broadband Internet, preferably via a router.
� If your wireless network is configured to use Wired Equivalent Privacy (WEP) or Wi-Fi Protected
Access (WPA) data encryption then you need to know the WEP or WPA code so you can get the
Internet Radio to communicate with the network.
� If your wireless network is configured for trusted stations you will need to enter the Radio’s MAC
address into your wireless access point. To find the Radio’s MAC address use menu items as
follows:
Press MENU button > Main Menu > System settings > Network > View settings > MAC
address.
� To enter the MAC address into your wireless access point, you must read the instructions
supplied with the wireless access point.
Before you continue, make sure that your wireless access point is powered up and connected to your
broadband Internet. To get this part of the system working, read the instructions supplied with the
wireless access point is highly recommending!
10
Internet Radio Mode
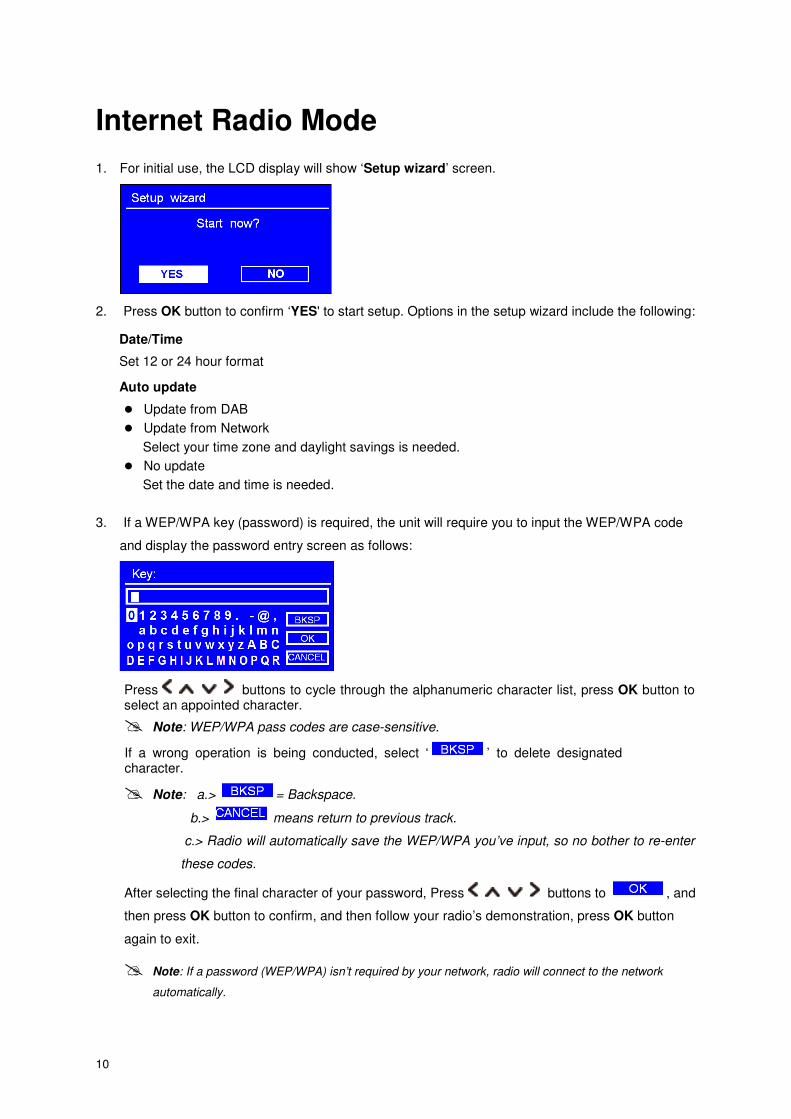
1. For initial use, the LCD display will show ‘Setup wizard’ screen.
2. Press OK button to confirm ‘YES' to start setup. Options in the setup wizard include the following:
Date/Time
Set 12 or 24 hour format
Auto update
� Update from DAB
� Update from Network
Select your time zone and daylight savings is needed.
� No update
Set the date and time is needed.
3. If a WEP/WPA key (password) is required, the unit will require you to input the WEP/WPA code
and display the password entry screen as follows:
Press buttons to cycle through the alphanumeric character list, press OK button to select an appointed character.
� Note: WEP/WPA pass codes are case-sensitive.
If a wrong operation is being conducted, select ‘ ’ to delete designated character.
� Note: a.> = Backspace.
b.> means return to previous track.
c.> Radio will automatically save the WEP/WPA you’ve input, so no bother to re-enter
these codes.
After selecting the final character of your password, Press buttons to , and
then press OK button to confirm, and then follow your radio’s demonstration, press OK button
again to exit.
� Note: If a password (WEP/WPA) isn’t required by your network, radio will connect to the network
automatically.
11
Access Internet Radio Mode
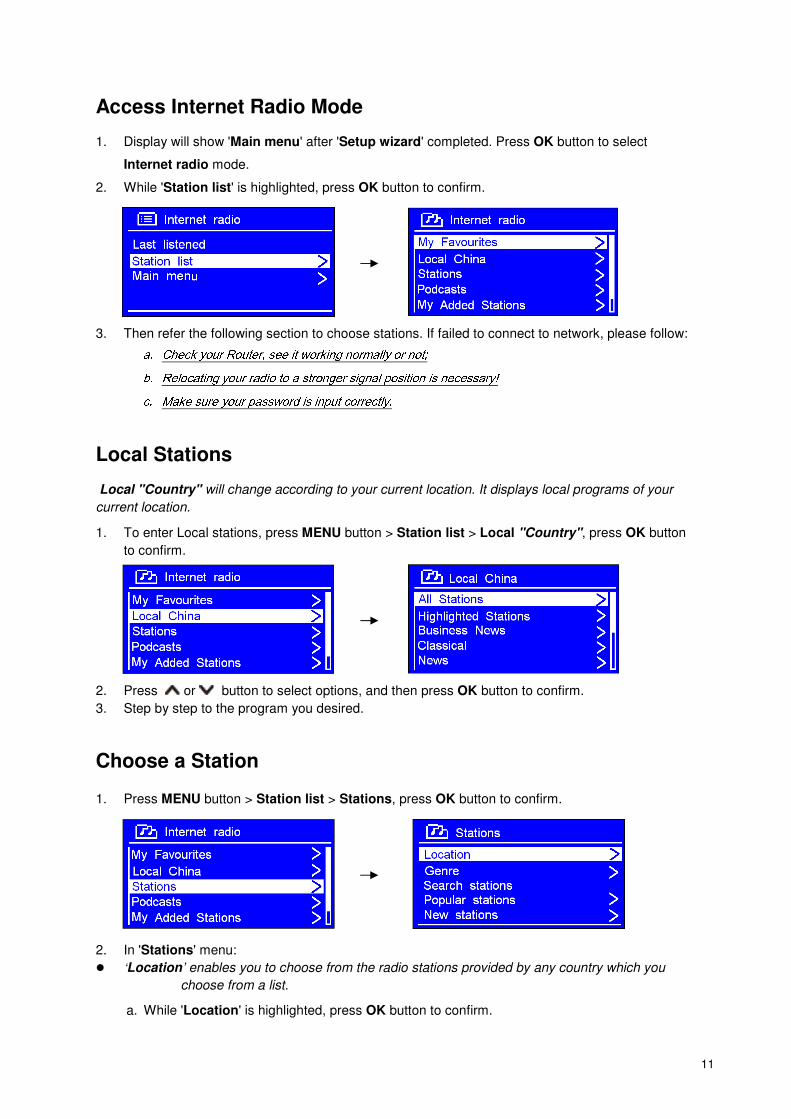
1. Display will show 'Main menu' after 'Setup wizard' completed. Press OK button to select
Internet radio mode.
2. While 'Station list' is highlighted, press OK button to confirm.
3. Then refer the following section to choose stations. If failed to connect to network, please follow: a. Check your Router, see it working normally or not; b. Relocating your radio to a stronger signal position is necessary! c. Make sure your password is input correctly.
Local Stations
Local "Country" will change according to your current location. It displays local programs of your
current location.
1. To enter Local stations, press MENU button > Station list > Local "Country", press OK button
to confirm.
2. Press or button to select options, and then press OK button to confirm.
3. Step by step to the program you desired.
Choose a Station
1. Press MENU button > Station list > Stations, press OK button to confirm.
2. In 'Stations' menu:
� ‘Location’ enables you to choose from the radio stations provided by any country which you
choose from a list.
a. While 'Location' is highlighted, press OK button to confirm.
12
b. Press or button to select the region you wanted, and then press OK button to confirm.
c. Using the same method to choose country, station in turn, radio receiver will perform loading.
� ‘Genre’ enables you to choose radio stations according to their content, for example Classic Rock, Sport, News, etc.
� Note: Some radio stations do not broadcast 24 hours a day, and some stations are not always on-line.
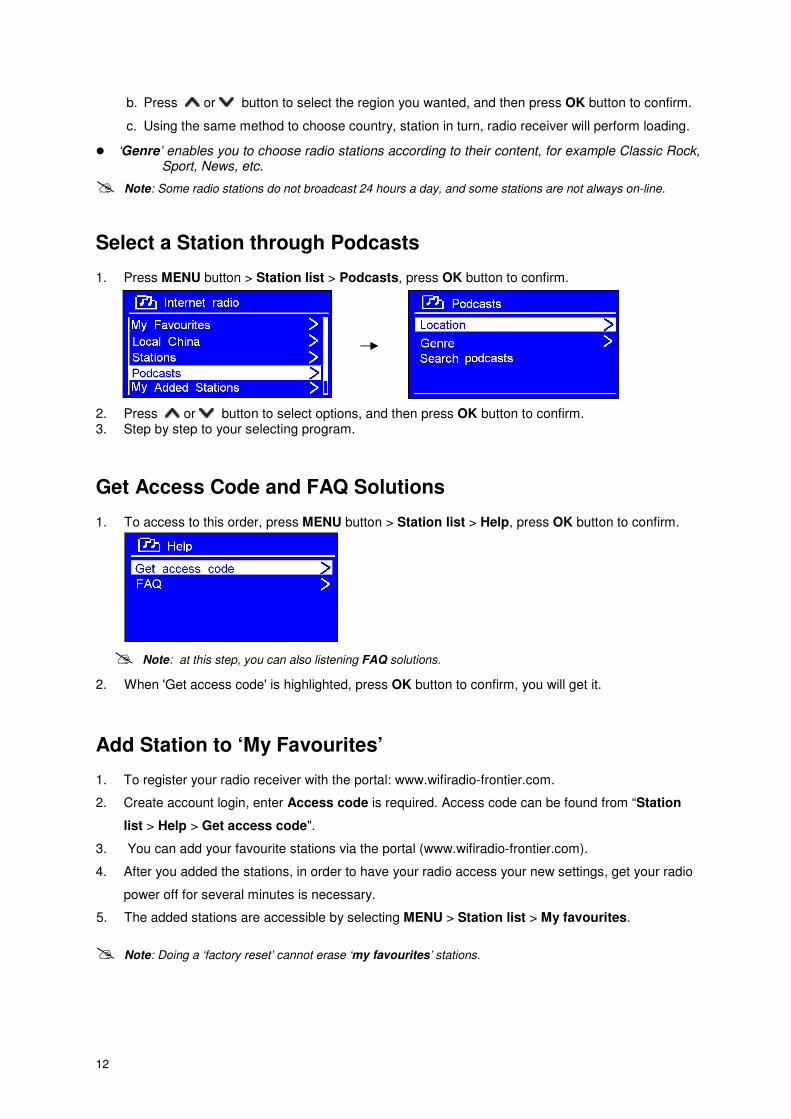
Select a Station through Podcasts
1. Press MENU button > Station list > Podcasts, press OK button to confirm.
2. Press or button to select options, and then press OK button to confirm. 3. Step by step to your selecting program.
Get Access Code and FAQ Solutions
1. To access to this order, press MENU button > Station list > Help, press OK button to confirm.
� Note: at this step, you can also listening FAQ solutions.
2. When 'Get access code' is highlighted, press OK button to confirm, you will get it.
Add Station to ‘My Favourites’
1. To register your radio receiver with the portal: www.wifiradio-frontier.com.
2. Create account login, enter Access code is required. Access code can be found from “Station
list > Help > Get access code".
3. You can add your favourite stations via the portal (www.wifiradio-frontier.com).
4. After you added the stations, in order to have your radio access your new settings, get your radio
power off for several minutes is necessary.
5. The added stations are accessible by selecting MENU > Station list > My favourites.
� Note: Doing a ‘factory reset’ cannot erase ‘my favourites’ stations.
13
Add Station to ‘My Added Stations’
1. Even though the Internet radio portal contains thousands of stations, you may want to listen to
stations not listed. You can add your own stations via the portal (www.wifiradio-frontier.com).
2. After you added the stations, in order to have your radio access your new settings, get your radio
power off for several minutes is necessary.
3. The added stations are accessible by selecting MENU > Station list > My added stations.
� Note: Doing a ‘factory reset’ cannot erase ‘my added stations’’.
View Station Information
It is possible to view the information that is displaying on the second line of the display when listening
Internet program. To view more information, you can press INFO button repeatedly, the display will
show the information through Station Description, Program Type, Reliability, Signal Info, Playback
Buffer and Date Info.
14
Music Player Mode
Setting up a Music Server
� In order for your radio play music files from a computer, the computer must be set up to share
files or media.
� UPnP media sharing allows devices like this radio to play music from a shared media library,
navigating through tag menus such as Artist, Album or Genre.
� If you are running a suitable server system such as a PC with Windows Media Player 10 or later
(WMP), and your music library is well-tagged, then it is recommended to use media sharing.
� Only the UPnP server needs to be set up.
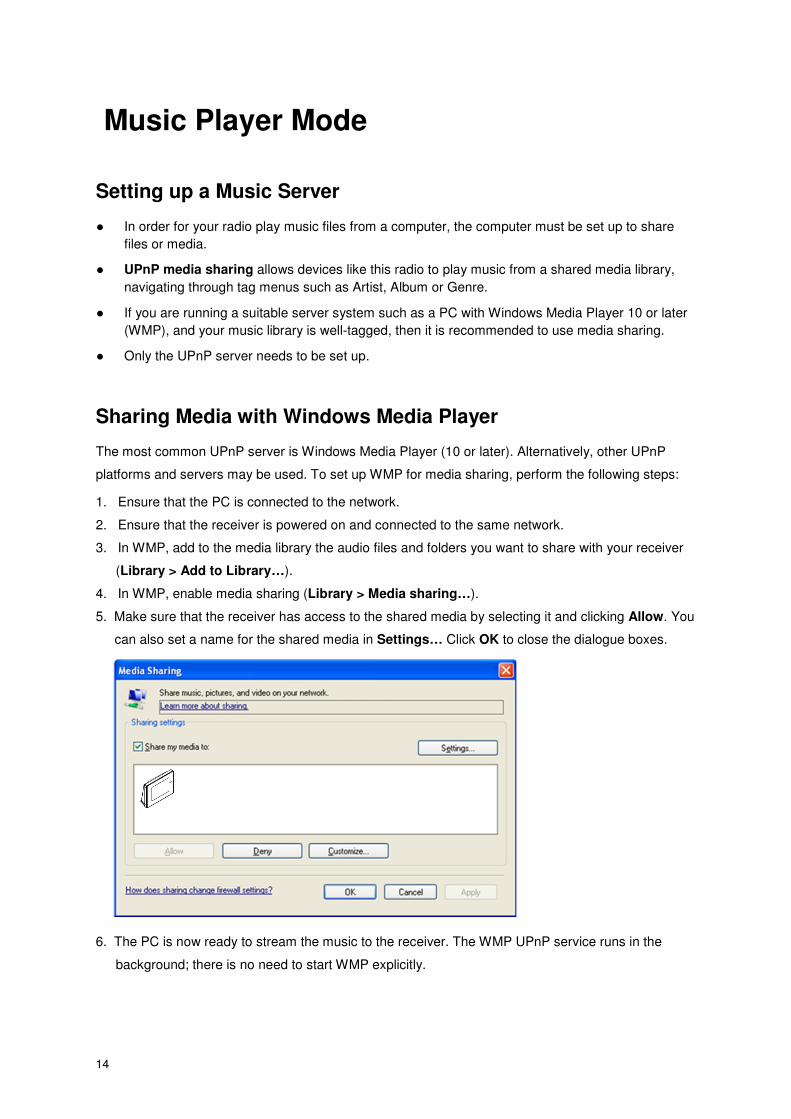
Sharing Media with Windows Media Player
The most common UPnP server is Windows Media Player (10 or later). Alternatively, other UPnP
platforms and servers may be used. To set up WMP for media sharing, perform the following steps:
1. Ensure that the PC is connected to the network.
2. Ensure that the receiver is powered on and connected to the same network.
3. In WMP, add to the media library the audio files and folders you want to share with your receiver
(Library > Add to Library…).
4. In WMP, enable media sharing (Library > Media sharing…).
5. Make sure that the receiver has access to the shared media by selecting it and clicking Allow. You
can also set a name for the shared media in Settings… Click OK to close the dialogue boxes.
6. The PC is now ready to stream the music to the receiver. The WMP UPnP service runs in the
background; there is no need to start WMP explicitly.
15
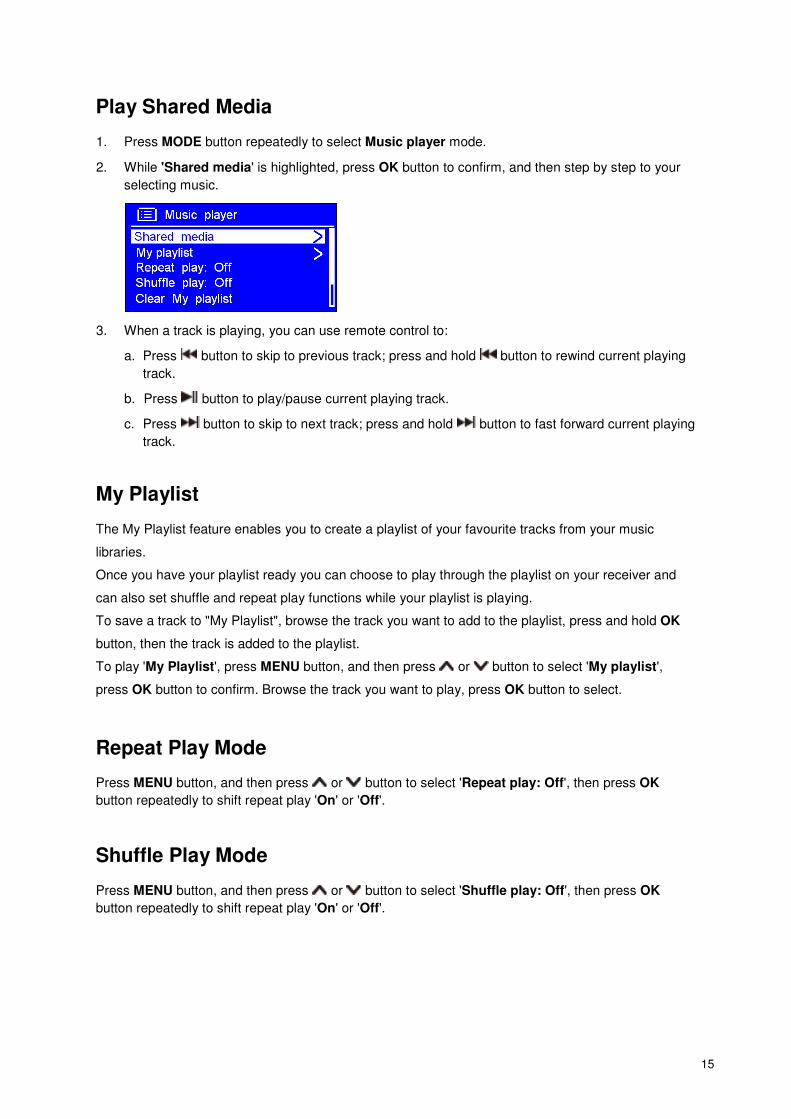
Play Shared Media
1. Press MODE button repeatedly to select Music player mode.
2. While 'Shared media' is highlighted, press OK button to confirm, and then step by step to your
selecting music.
3. When a track is playing, you can use remote control to:
a. Press button to skip to previous track; press and hold button to rewind current playing
track.
b. Press button to play/pause current playing track.
c. Press button to skip to next track; press and hold button to fast forward current playing
track.
My Playlist
The My Playlist feature enables you to create a playlist of your favourite tracks from your music
libraries.
Once you have your playlist ready you can choose to play through the playlist on your receiver and
can also set shuffle and repeat play functions while your playlist is playing.
To save a track to "My Playlist", browse the track you want to add to the playlist, press and hold OK
button, then the track is added to the playlist.
To play 'My Playlist', press MENU button, and then press or button to select 'My playlist',
press OK button to confirm. Browse the track you want to play, press OK button to select.
Repeat Play Mode
Press MENU button, and then press or button to select 'Repeat play: Off', then press OK
button repeatedly to shift repeat play 'On' or 'Off'.
Shuffle Play Mode
Press MENU button, and then press or button to select 'Shuffle play: Off', then press OK
button repeatedly to shift repeat play 'On' or 'Off'.
16
Clear My Playlist
You can use this feature to clear the contents of your playlist.
1. Press MENU button, press or button to select 'Clear My playlist' and then press OK
button to confirm.
2. Select 'YES' to clear my playlist.
Prune Servers
The Prune Servers feature enables you to remove music servers that are no longer available to you to
browse for music.
1. Press MENU button, press or button to select 'Prune servers' and then press OK button to
confirm.
2. Select ‘Yes’ to ‘Prune shared media wake on LAN servers’.
Now Playing Information
While a track is playing, the screen shows its track, artist and album if provided. There is also a
progressing bar with figures for elapsed and total track time.
To view further information, press INFO button repeatedly to display more information about the track.
17
DAB Mode
Select DAB mode
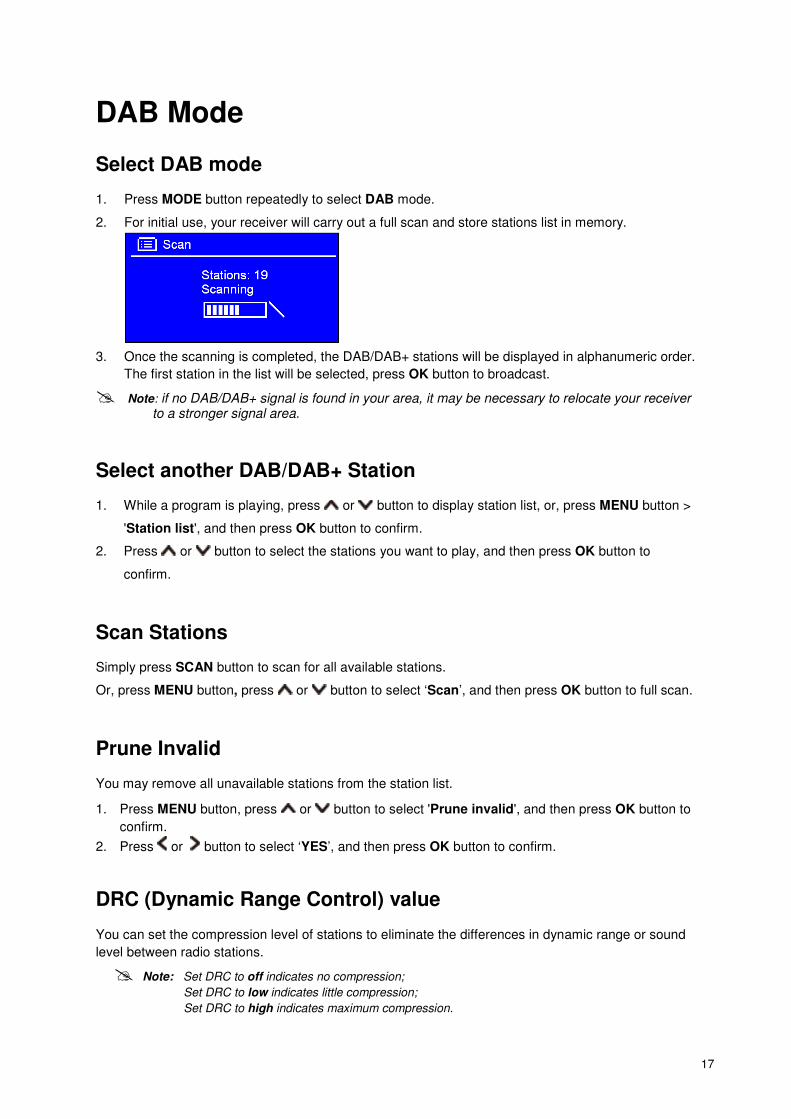
1. Press MODE button repeatedly to select DAB mode.
2. For initial use, your receiver will carry out a full scan and store stations list in memory.
3. Once the scanning is completed, the DAB/DAB+ stations will be displayed in alphanumeric order.
The first station in the list will be selected, press OK button to broadcast.
� Note: if no DAB/DAB+ signal is found in your area, it may be necessary to relocate your receiver to a stronger signal area.
Select another DAB/DAB+ Station
1. While a program is playing, press or button to display station list, or, press MENU button >
'Station list', and then press OK button to confirm.
2. Press or button to select the stations you want to play, and then press OK button to
confirm.
Scan Stations
Simply press SCAN button to scan for all available stations.
Or, press MENU button, press or button to select ‘Scan’, and then press OK button to full scan.
Prune Invalid
You may remove all unavailable stations from the station list.
1. Press MENU button, press or button to select 'Prune invalid', and then press OK button to
confirm.
2. Press or button to select ‘YES’, and then press OK button to confirm.
DRC (Dynamic Range Control) value
You can set the compression level of stations to eliminate the differences in dynamic range or sound
level between radio stations.
� Note: Set DRC to off indicates no compression;
Set DRC to low indicates little compression;
Set DRC to high indicates maximum compression.
18
1. Press MENU button, press or button to select 'DRC', and then press OK button to confirm.
2. Press or button to select option, press OK button to confirm.
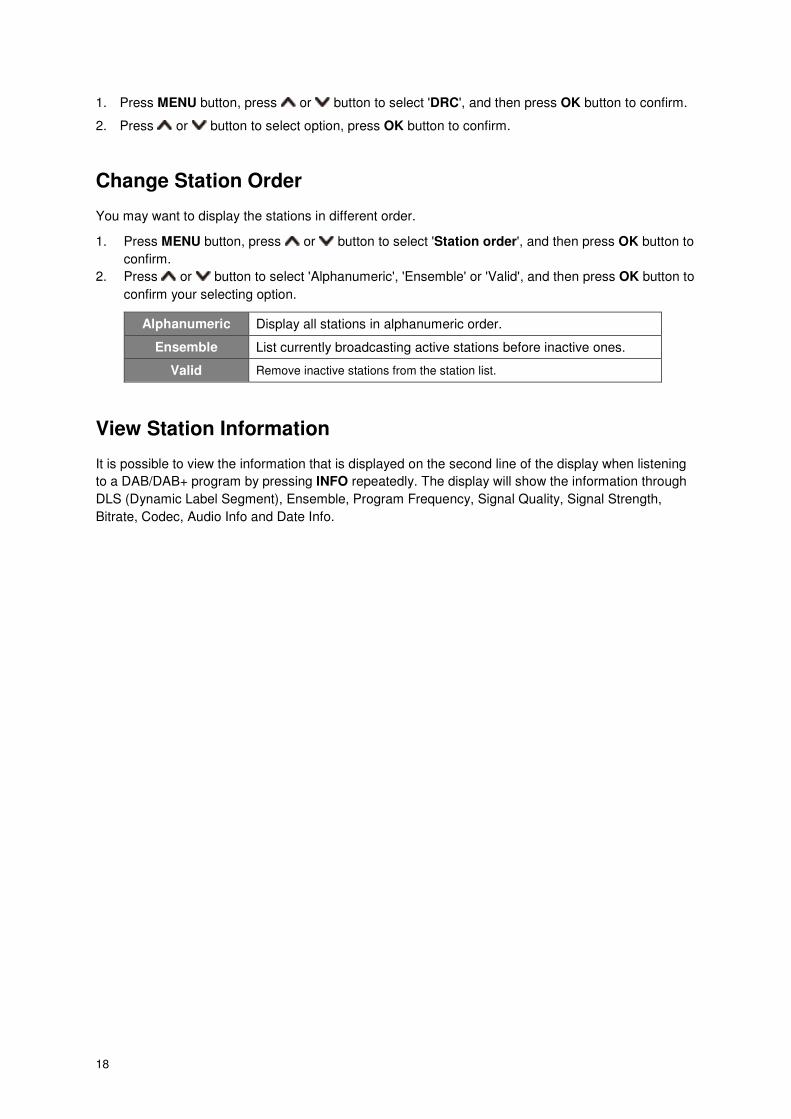
Change Station Order
You may want to display the stations in different order.
1. Press MENU button, press or button to select 'Station order', and then press OK button to
confirm.
2. Press or button to select 'Alphanumeric', 'Ensemble' or 'Valid', and then press OK button to
confirm your selecting option.
Alphanumeric Display all stations in alphanumeric order.
Ensemble List currently broadcasting active stations before inactive ones.
Valid Remove inactive stations from the station list.
View Station Information
It is possible to view the information that is displayed on the second line of the display when listening
to a DAB/DAB+ program by pressing INFO repeatedly. The display will show the information through
DLS (Dynamic Label Segment), Ensemble, Program Frequency, Signal Quality, Signal Strength,
Bitrate, Codec, Audio Info and Date Info.
19
FM Mode
Select FM Mode
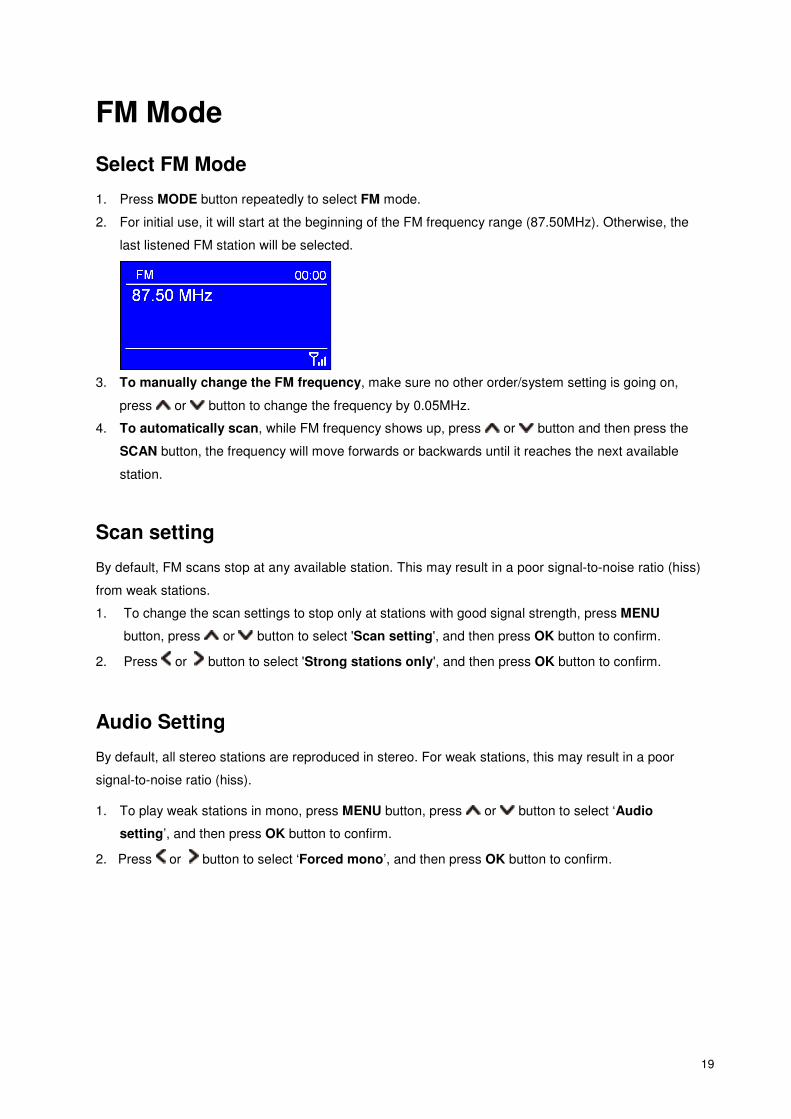
1. Press MODE button repeatedly to select FM mode.
2. For initial use, it will start at the beginning of the FM frequency range (87.50MHz). Otherwise, the
last listened FM station will be selected.
3. To manually change the FM frequency, make sure no other order/system setting is going on,
press or button to change the frequency by 0.05MHz.
4. To automatically scan, while FM frequency shows up, press or button and then press the
SCAN button, the frequency will move forwards or backwards until it reaches the next available
station.
Scan setting
By default, FM scans stop at any available station. This may result in a poor signal-to-noise ratio (hiss)
from weak stations.
1. To change the scan settings to stop only at stations with good signal strength, press MENU
button, press or button to select 'Scan setting', and then press OK button to confirm.
2. Press or button to select 'Strong stations only', and then press OK button to confirm.
Audio Setting
By default, all stereo stations are reproduced in stereo. For weak stations, this may result in a poor
signal-to-noise ratio (hiss).
1. To play weak stations in mono, press MENU button, press or button to select ‘Audio
setting’, and then press OK button to confirm.
2. Press or button to select ‘Forced mono’, and then press OK button to confirm.
20
Presets Setting
� Note: This is the same for Internet, DAB/DAB+ and FM Radio stations.
Store Preset Stations
Your receiver can store up to 10 of your favourite Internet, DAB/DAB+ and FM stations.
While playing your favourite station, press and hold one of 1- 10 button to store current station, then
display will show “Preset stored”.
Recall a Preset Station
1. Press the MODE button to select the mode you wish to play.
2. Press one of 1- 10 button to play the station you have stored.
21
Remote Control via iPhone/iPod Touch
This feature enables you to navigate the receiver via iPhone/iPod Touch.
Any iPhone/iPod running iOS 3.1.3 or later allows users to control your receiver as long as you install
it properly.
First and foremost, we need to make sure App Store has already installed on your device properly, if
it isn’t, please follow:
App store operation
Getting apps onto your iPhone/iPod Touch couldn’t be simpler. Just find the ones you want, then tap
to download them.
The way to download apps:
1. First, create an account on the Apple Store website:
http://www.ehow.com/how_4822341_download-apps-iphone.html#ixzz1Y508MZs8
2. You will need a credit card or payment information when sign up, even if you only plan on
downloading free apps, it will still require this information. After you are done with this process,
you should have a user name (email address) and a password. You will need these to download
the apps.
3. From your iPhone, click on the App store button and scroll through to find the app that you want
to install.
4. Select the app, you want and tap the "free" icon (if it's a free app), it will then change the "free" to
"install". Tap again to install. Here is where you will enter your user name and password. You
should only have to enter your username once and your iPhone will remember it, but you will
need to always enter a password to prevent just anyone from downloading apps to your iPhone.
5. Once your iPhone has started downloading the app, a status bar will show up to indicate how
long it will take to download. Once it is complete, you can access your new app.
Wireless Device Remote Control
To install the wireless Device remote control application on the iPhone/iPod Touch:
22
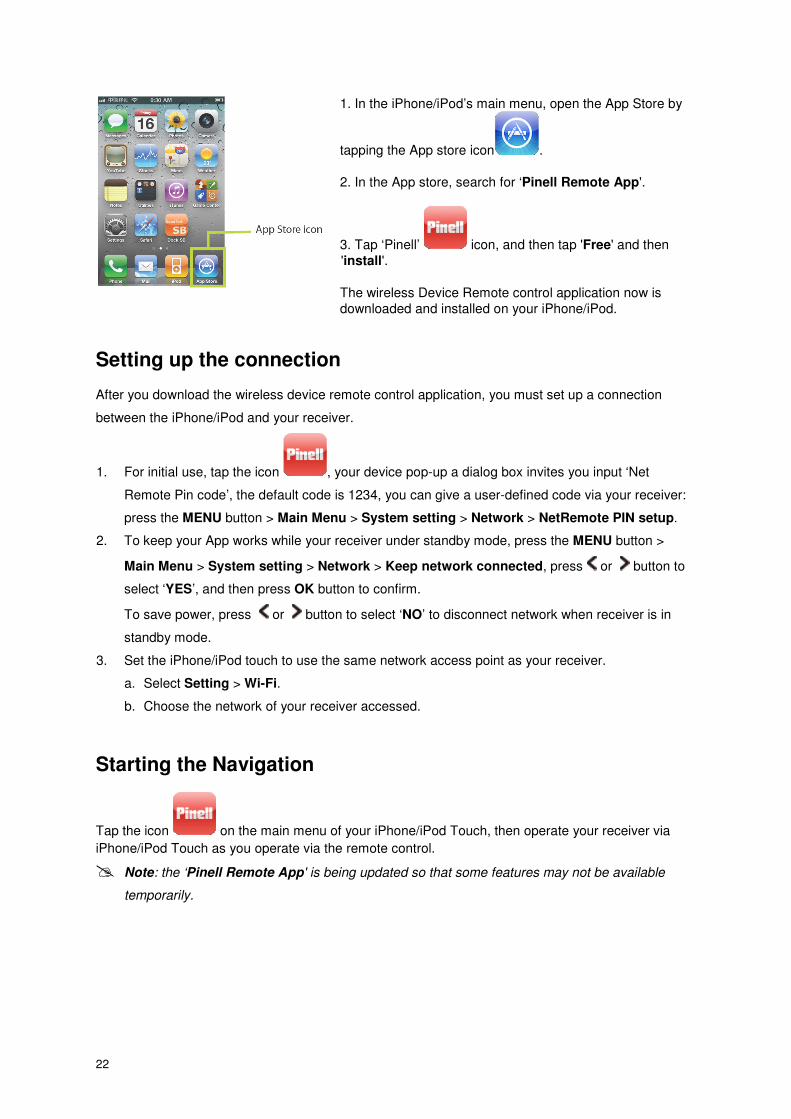
1. In the iPhone/iPod’s main menu, open the App Store by
tapping the App store icon .
2. In the App store, search for ‘Pinell Remote App'.
3. Tap ‘Pinell’ icon, and then tap 'Free' and then
'install'.
The wireless Device Remote control application now is
downloaded and installed on your iPhone/iPod.
Setting up the connection
After you download the wireless device remote control application, you must set up a connection
between the iPhone/iPod and your receiver.
1. For initial use, tap the icon , your device pop-up a dialog box invites you input ‘Net
Remote Pin code’, the default code is 1234, you can give a user-defined code via your receiver:
press the MENU button > Main Menu > System setting > Network > NetRemote PIN setup.
2. To keep your App works while your receiver under standby mode, press the MENU button >
Main Menu > System setting > Network > Keep network connected, press or button to
select ‘YES’, and then press OK button to confirm.
To save power, press or button to select ‘NO’ to disconnect network when receiver is in
standby mode.
3. Set the iPhone/iPod touch to use the same network access point as your receiver.
a. Select Setting > Wi-Fi.
b. Choose the network of your receiver accessed.
Starting the Navigation
Tap the icon on the main menu of your iPhone/iPod Touch, then operate your receiver via
iPhone/iPod Touch as you operate via the remote control.
� Note: the ‘Pinell Remote App' is being updated so that some features may not be available
temporarily.
23
General Operation
Set Sleep
1. To set sleep, press SLEEP button directly, or press MENU button > Main menu > Sleep, and
then press OK button to confirm.
2. Press or button to view options Sleep OFF, 15, 30, 45 or 60 minutes, press the OK button
to confirm.
3. To view the set sleep time, redo above step 1.
4. To turn the sleep function off while the sleep timer is still counting down, select 'Sleep' option,
press or button to select 'Sleep OFF'.
Set Alarm
Your receiver includes dual alarms. To set Alarm, make sure setting time at first as well as your
receiver is connecting with output speaker.
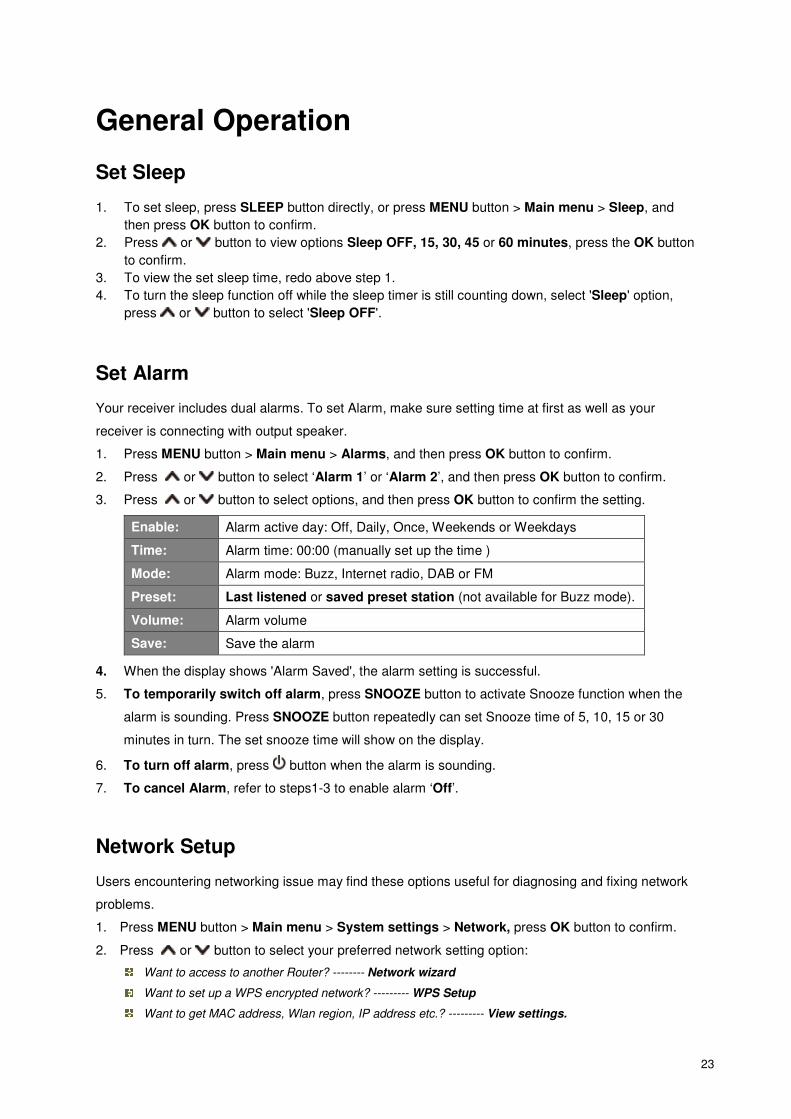
1. Press MENU button > Main menu > Alarms, and then press OK button to confirm.
2. Press or button to select ‘Alarm 1’ or ‘Alarm 2’, and then press OK button to confirm.
3. Press or button to select options, and then press OK button to confirm the setting.
Enable: Alarm active day: Off, Daily, Once, Weekends or Weekdays
Time: Alarm time: 00:00 (manually set up the time )
Mode: Alarm mode: Buzz, Internet radio, DAB or FM
Preset: Last listened or saved preset station (not available for Buzz mode).
Volume: Alarm volume
Save: Save the alarm
4. When the display shows 'Alarm Saved', the alarm setting is successful.
5. To temporarily switch off alarm, press SNOOZE button to activate Snooze function when the
alarm is sounding. Press SNOOZE button repeatedly can set Snooze time of 5, 10, 15 or 30
minutes in turn. The set snooze time will show on the display.
6. To turn off alarm, press button when the alarm is sounding.
7. To cancel Alarm, refer to steps1-3 to enable alarm ‘Off’.
Network Setup
Users encountering networking issue may find these options useful for diagnosing and fixing network
problems.
1. Press MENU button > Main menu > System settings > Network, press OK button to confirm.
2. Press or button to select your preferred network setting option:
Want to access to another Router? -------- Network wizard
Want to set up a WPS encrypted network? --------- WPS Setup
Want to get MAC address, Wlan region, IP address etc.? --------- View settings.
24
Want to set DHCP enable or disable? --------- Manual settings
Want to set a Net Remote Pin code? --------- NetRemote PIN Setup
Want to see the list of registered networks or delete some of unwanted networks? --------- Network
profile
Want to keep network connected when radio in standby mode? --------- Keep network connected
3. Press OK button to confirm your setting.
Set Time/Date
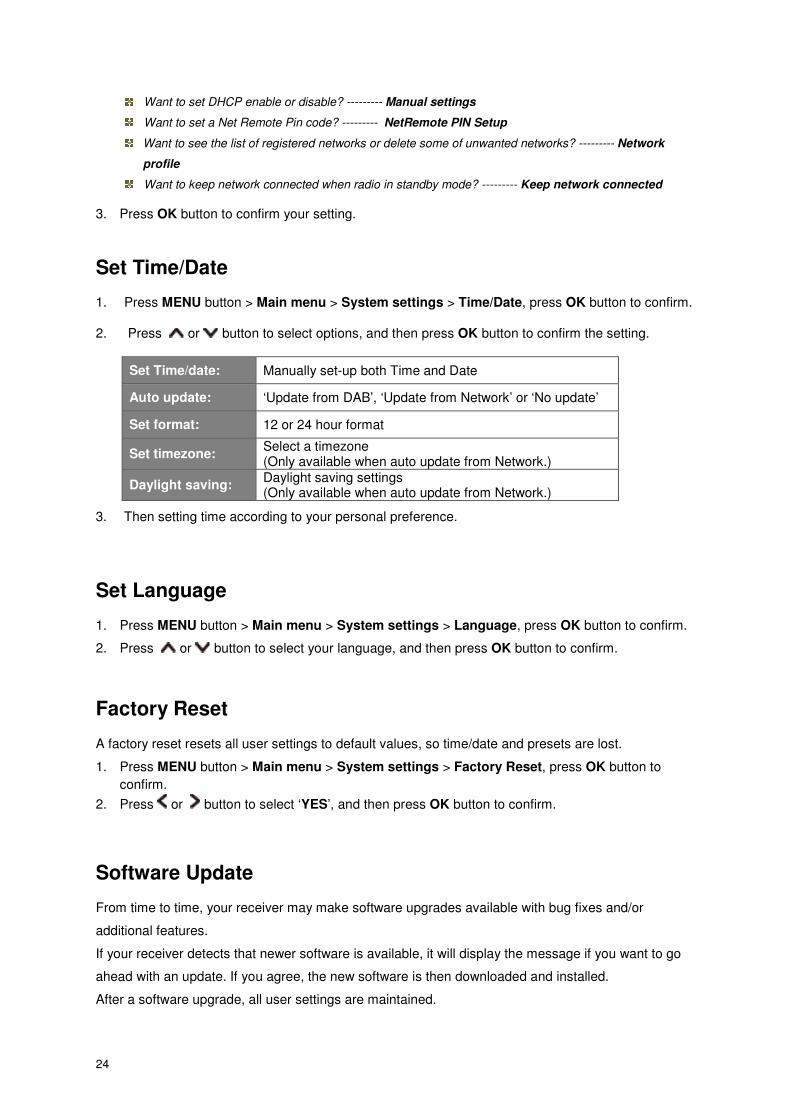
1. Press MENU button > Main menu > System settings > Time/Date, press OK button to confirm.
2. Press or button to select options, and then press OK button to confirm the setting.
Set Time/date: Manually set-up both Time and Date
Auto update: ‘Update from DAB’, ‘Update from Network’ or ‘No update’
Set format: 12 or 24 hour format
Set timezone: Select a timezone (Only available when auto update from Network.)
Daylight saving: Daylight saving settings (Only available when auto update from Network.)
3. Then setting time according to your personal preference.
Set Language
1. Press MENU button > Main menu > System settings > Language, press OK button to confirm.
2. Press or button to select your language, and then press OK button to confirm.
Factory Reset
A factory reset resets all user settings to default values, so time/date and presets are lost.
1. Press MENU button > Main menu > System settings > Factory Reset, press OK button to
confirm.
2. Press or button to select ‘YES’, and then press OK button to confirm.
Software Update
From time to time, your receiver may make software upgrades available with bug fixes and/or
additional features.
If your receiver detects that newer software is available, it will display the message if you want to go
ahead with an update. If you agree, the new software is then downloaded and installed.
After a software upgrade, all user settings are maintained.
25
C A U T I O N
Before starting a software upgrade, ensure that your radio is plugged into a stable mains power
connection. Disconnecting power during a software update may permanently damage the unit.
1. Press MENU button > Main menu > System settings > Software update, press OK button to
confirm.
2. Press or button to select 'Auto-check setting', your receiver will check periodically for new
version software.
3. Press or button to select 'Check now', your radio will go to check any new version software
available and enable you to upgrade the detected new version software.
Setup Wizard
When this unit is started for the first time, it runs through a setup wizard to configure settings for
date/time and network. Once this has been finished, the system is ready to use in most modes.
1. Press MENU button > Main menu > System settings > Setup wizard, press OK button to confirm.
2. Press or button to select 'YES', and then press OK button to confirm.
View System Info
This information may be requested when dealing with technical support issues.
1. Press MENU button > Main menu > System settings > Info, press OK button to confirm.
2. Press or button to view 'SW version', 'Radio ID' and 'Friendly Name'.
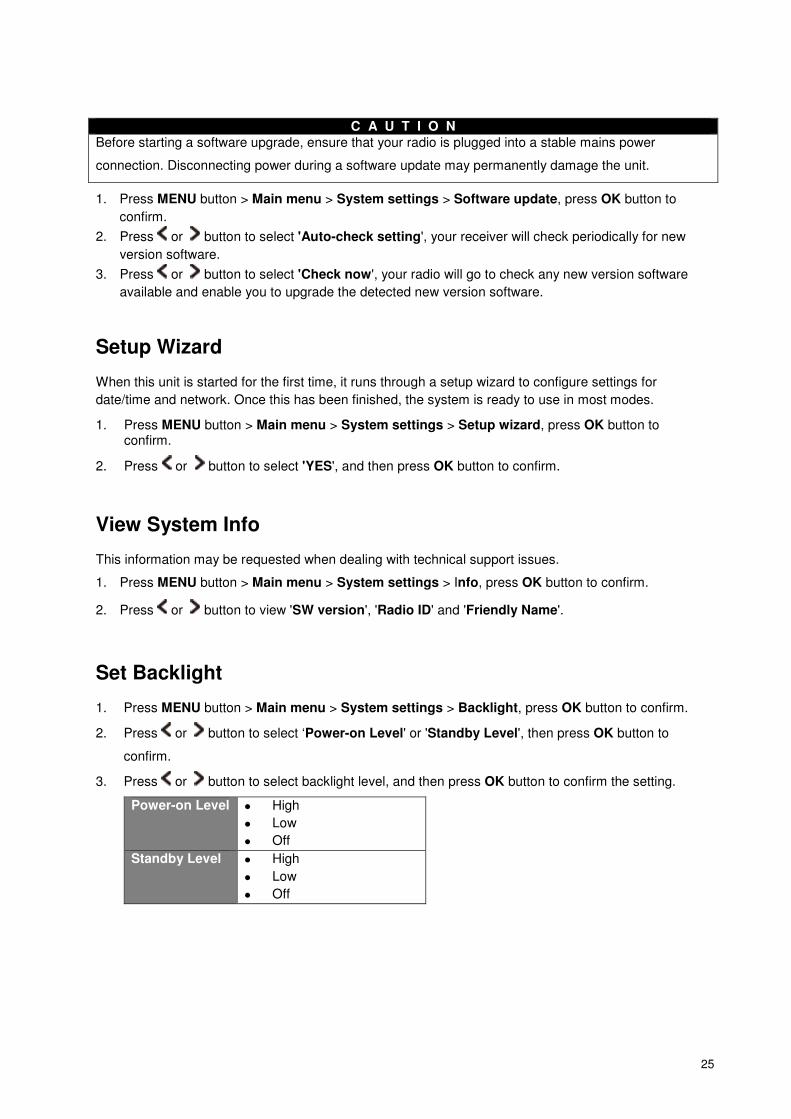
Set Backlight
1. Press MENU button > Main menu > System settings > Backlight, press OK button to confirm.
2. Press or button to select ‘Power-on Level' or 'Standby Level', then press OK button to
confirm.
3. Press or button to select backlight level, and then press OK button to confirm the setting.
Power-on Level � High
� Low
� Off
Standby Level � High
� Low
� Off
26
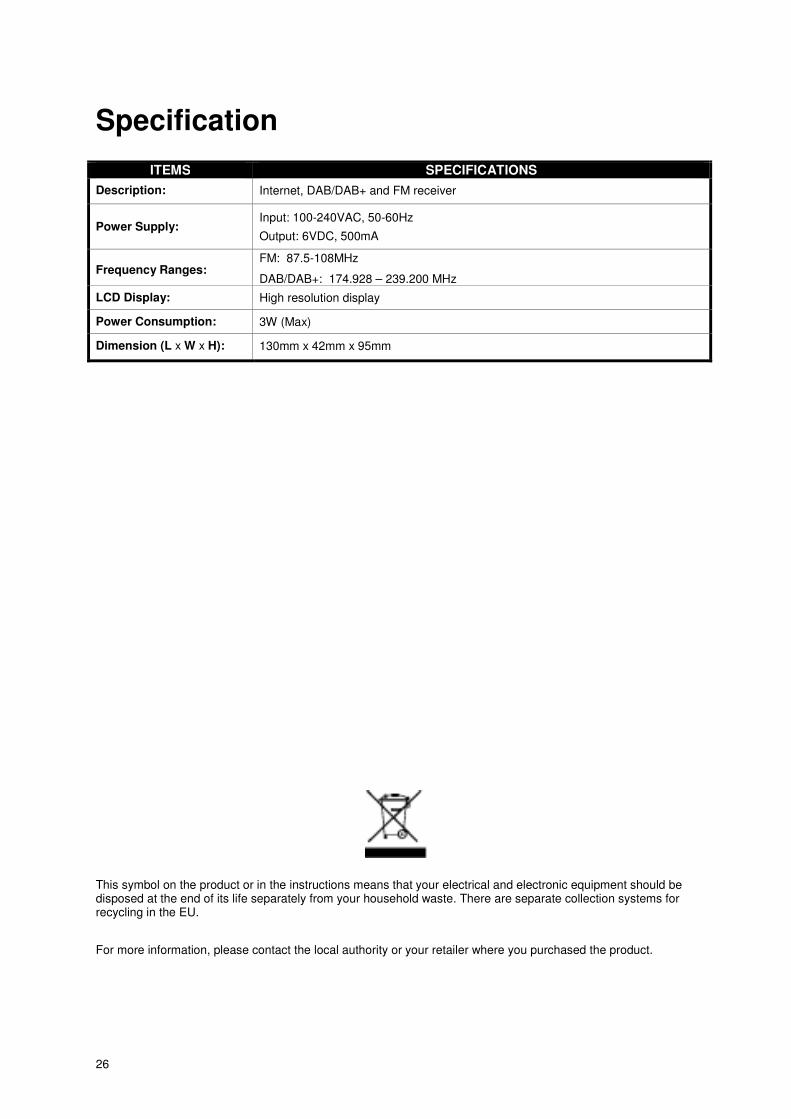
Specification
ITEMS SPECIFICATIONS
Description: Internet, DAB/DAB+ and FM receiver
Power Supply:
Input: 100-240VAC, 50-60Hz
Output: 6VDC, 500mA
Frequency Ranges:
FM: 87.5-108MHz
DAB/DAB+: 174.928 – 239.200 MHz
LCD Display: High resolution display
Power Consumption: 3W (Max)
Dimension (L x W x H): 130mm x 42mm x 95mm
This symbol on the product or in the instructions means that your electrical and electronic equipment should be disposed at the end of its life separately from your household waste. There are separate collection systems for recycling in the EU.
For more information, please contact the local authority or your retailer where you purchased the product.


![Algorithms in Signal Processors Audio Applications · PDF fileAlgorithms in Signal Processors Audio Applications 2005 ... autocorrelation[lag] = XN n=0 signal[n] ... maximum lag of](https://img.pdfslide.net/doc/110x75/5a9d9e777f8b9a28388c5ccd/algorithms-in-signal-processors-audio-applications-in-signal-processors-audio-applications.jpg)