Embed Size (px)
Citation preview

Town of Lakeshore
Guide to Accessible Documents
March 2018
1

Table of ContentsIntroduction__________________________________________________________4
Corporate Statement of Commitment______________________________________4
Accessible communication______________________________________________5
What does it mean to make information accessible?_________________________5
Assistive Technology_________________________________________________5
Use a Descriptive File Name___________________________________________6
Small changes, big rewards: Making all documents more accessible____________6
Plain Language_______________________________________________________7
Aim for a Clear, Organized, Readable document____________________________8
Alternate formats and Communication Supports____________________________8
How to make accessible documents in Microsoft Word: A step by step guide_______9
Start with a new template______________________________________________9
Design elements____________________________________________________9
Design guidelines___________________________________________________10
Make white space your friend_________________________________________10
Margins and columns________________________________________________11
Font, Design and Accessible Formats_____________________________________11
Use appropriate Font Family__________________________________________11
Use appropriate Font Size____________________________________________12
Avoid sentences in all UPPER CASE letters______________________________13
Use appropriate Text Alignment________________________________________14
Clean design and simplicity___________________________________________15
Use Alt Tags for graphics_____________________________________________15
Alternative text for pictures____________________________________________15
Use Page Numbering________________________________________________17
Use Real Lists_____________________________________________________17
Bullets___________________________________________________________18
Add a document title________________________________________________20
Duplicate Vital Information in Headers, Footers & Watermarks________________212
Use a table of contents______________________________________________22
Use appropriate Leaders_____________________________________________24
Accessible Tables and Charts___________________________________________24
Use tables only when necessary_______________________________________24
Styles______________________________________________________________30
Use heading styles__________________________________________________31
Town of Lakeshore default heading styles________________________________33
Exclude Flashing Objects_____________________________________________33
Use Colour (And Other Sensory Characteristics) Plus Text to Convey Meaning___33
Use High Contrast__________________________________________________34
Accessibility Checker in Microsoft Word___________________________________34
Save your document in the correct format________________________________35
Running the Word Accessibility Checker_________________________________35
Fixing accessibility issues____________________________________________37
Use Accessible Forms_______________________________________________38
Use standard Navigational Aids________________________________________38
User Settings—Microsoft Word__________________________________________40
Readability statistics_________________________________________________40
Accessibility Checklist_________________________________________________42
Microsoft Quick References_____________________________________________44
Format your document using Styles_____________________________________44
3

Introduction The Accessibility for Ontarians with Disabilities Act (A.O.D.A.) passed in 2005. This Act is meant to create accessibility for all Ontarians with disabilities by January 1, 2025.
The Integrated Accessibility Standards, Ontario Regulation 191/11 establishes the accessibility standards for Information and Communications, Employment and Transportation. This Regulation will remove barriers in the areas of Information and Communications, giving people with disabilities access to more of the information we all depend on.
Corporate Statement of Commitment The Corporation of the Town of Lakeshore is committed to providing an accessible environment in which residents, visitors and employees have equitable access to municipal programs, services and facilities in a way that respects the dignity and independence of each individual. The municipality is dedicated to ensuring that all legislated obligations under the A.O.D.A. are met and that compliance with these standards is maintained.
Accessibility is not just a matter of legal compliance. The A.O.D.A. requires the Town to provide accessible formats for people with disabilities, upon request. With little effort, we are in a position to do even better.
Implementing Accessibility Standards will facilitate inclusiveness and enhance access to municipal goods, services and facilities in a way that respects the dignity and independence of people with disabilities.
This Guide to Accessible Documents aims to produce website ready, user-friendly documents for all customers and staff, including people with disabilities.
Readability should be the first step in making administrative documents accessible to everyone.
4

Accessible communication Many people worry that providing accessible communication will change the way we do things. It will.
By making small but important changes in how we produce communications materials, we can make them accessible to people with disabilities with little effort. The following sections will outline changes to be incorporated into Town communications, increasing readability for all customers.
What does it mean to make information accessible? Making information accessible means considering the needs of persons with disabilities;
• When you create new information, think about what might help someone who has low vision, hearing loss or a learning disability to understand it;
• To make your existing information more accessible, recreate it in an accessible format; for example, use large print for someone with vision loss;
• You can also help someone to understand the information; for example, reading a menu to someone who is dyslexic or using written notes to communicate with someone who is Deaf. This is called “communication support.”
• There are many ways to make accessible formats. Some examples are: Braille, accessible electronic formats, accessible audio formats, large print, or reading information aloud to the person directly.
Assistive Technology
Some people with disabilities use assistive technology, such as screen readers, braille displays, or a modified keyboard or mouse to access information in documents using their computers. Screen readers help a person who may be blind, low vision, or have a developmental or learning disability to navigate a computer screen. The screen reader reads the information on the screen out loud to the person using it.
5

Use a Descriptive File NameA descriptive filename that identifies the document or its purpose helps everyone (including people with disabilities) locate, open, and switch between documents. In addition, the document must be in a “.docx” format.
Go to File>Save As
1) Save as a Word Document (.docx).2) Save your document with a descriptive filename.
Small changes, big rewards: Making all documents more accessible
When developing written communications, decisions on things like font style, colour and size are often done mostly for an aesthetic perspective. All too often authors and designers concern themselves with what looks best, instead of what will be easiest to read.
There are several items to consider when creating written communications, which will make it easier for people to read and understand the content.
6

Plain Language Plain language is text that the reader can understand the first time they read it. It sounds easy enough, but text is often cluttered with acronyms, jargon and complex sentence structure.
Written material is in plain language if your audience can:
• find what they need;
• understand what they find; and,
• use what they find to meet their needs.
Text that is clear and easy to read benefits customers with learning disabilities and low literacy skills. It improves comprehension for all users and allows for easy adaption to other formats.
When writing in plain language, remember to:
• keep your intended audience in mind,
• use an active voice,
• shorten sentences,
• use common everyday words,
• eliminate jargon and unnecessary words,
• use simple sentence structure and grammar.
Example: Before
When the process of freeing a vehicle that has been stuck results in ruts or holes, the operator will fill the rut or hole created by such activity before removing the vehicle from the immediate area.
After (Plain Language)
If you make a hole while freeing a stuck vehicle, you must fill the hole before you drive away.
7

Aim for a Clear, Organized, Readable document Clear print that is organized will be readable to a broader audience.
Use the following guidelines to make documents more accessible:
Clarity:
• Do not provide too much information.
• Use bullet point summaries, rather than dense text.
Organization:
• Do not place text over cluttered backgrounds. • Use wide margins (minimum 0.5 inches) • Use larger line spacing.
• Leave larger spaces between sections than between paragraphs.
Readability:
Printed Material should have a matte finish, not glossy.
Alternate formats and Communication Supports Alternate formats are other ways of publishing information besides regular print (e.g. braille). Always, include the statement “Accessible formats and communication supports available upon request.”
For more information contact, the Manager of Communications and Strategic Initiatives.
8

How to make accessible documents in Microsoft Word: A step by step guide In order to be accessible, documents should be created using a well-structured Microsoft Word document then converted into an Adobe PDF document.
Your document must have a defined structure, i.e. title, headings, sub-headings. During the conversion to PDF, Adobe creates tags from these style elements. These tags then become bookmarks describing the layout of a document enabling a screen reader to navigate and read it correctly in Adobe.
Of these features, some need to be set once and some need to be done for every document created.
Start with a new template Every office document starts with a template, even if it is a blank page.
All Town of Lakeshore templates will be updated to ensure accessibility, so it is imperative to always create a document from a new template.
Using a new template will also ensure you are using the most up-to-date version, meaning you’ll get other changes made to the template.
Design elements When creating documents, organize your information using the following design elements:
1. Section headings
2. Subsection headings
3. Paragraph headings
4. General text
9
Using the above design elements in your document creates a document structure (hierarchy) that is easier for everyone to understand, and enables assistive technology to easily navigate through the document.
Design guidelines • Divide your information into short sections.
• Make a table of contents for a large or long document.
• Use lots of headings.
• Structure your writing by putting the main message first.
• Use Arial 12 font for the body text in your document.
• Avoid using all upper case letters.
• Graphics such as diagrams, tables or charts should be used in explaining text. Make sure they have informative headings.
• Use tables sparingly, refer to page 25.
• Margins should be 1” all around.
• Make sure the text in the document is left justified, with ragged text on the right.
• The majority of your document should be black and white; use colour sparingly as it distracts from the main focus of your document.
• Make sure you use headings in a logical order. (i.e. without skipping heading levels) with the title of the document using Heading 1.
Make white space your friend As important as the right font and size is in achieving an accessible document, so, too, is the amount of white space on a page. An adequate amount of space between lines of text and the amount of space between individual characters will increase its readability. Additionally, leaving a space between paragraphs is helpful for individuals with low vision.
10

Margins and columns For accessibility, keep your margins wide. Word has been preformatted to be 8.5” x 11” with a 1” margin on all sides. This promotes readability and is most convenient for people using magnifiers.
Separate text into columns to make it easier to read. Columns require less eye movement and less peripheral vision.
Font, Design and Accessible Formats
Use appropriate Font Family Avoid complicated, decorative or handwriting fonts. Choose “Sans-Serif” fonts such as Arial. These fonts have easily recognizable upper, lower-case and numerical characters. Narrow versions of these fonts should be avoided. Arial This font is accessible
Garamond This font is not accessible
Monotype Corsiva This font is not accessible
The Town’s standard font family is Arial.
If you wish to use another font beyond Arial in marketing materials, please check with the Manager of Communications & Strategic Initiatives.
11

Use appropriate Font Size Make text large, preferably between 12 and 18 points.
The size of the font is a fundamental factor in legibility. Font size 12 is the Town standard for main body text. A minimum font of size 16 is the Town standard for presentation documents. A font size of 10 point and smaller is not accessible and should be avoided where possible.
Font Size 10 Size 10 or less is not accessible
Font Size 12 Town standard for main body text
Font Size 14 Town standard for main headings
Font Size 16 Town standard for large print
Note: Font size varies between font families. This guide is based on the Arial font. If using sans-serif fonts other than Arial, use Arial as the base for determining appropriate font size. For example:
Arial, font size 12 Town standard for main body text
Calibri, font size 14 Calibri 14 is similar in size to Arial 12
Verdana, font size 11 Verdana 11 is similar in size to Arial
12
Use Bold for emphasis, not italics or underlining
Avoid italics and underlining, to improve readability.
Italic fonts are more difficult to read than regular fonts, mainly due to the output of angled characters on a digital screen that has poor resolution. There may be exceptions to using italics, such as when required to meet standard formatting (for example, citation in legal documents). Keep in mind, if the font is very large, italics may be more legible, but as a general rule, avoid italics where possible.
12

Underlining interferes with lower case letters and should be avoided for emphasis. Only use underlining when describing links, such as email addresses and web pages. In this application, use the international standard of a blue font. For example, www.Lakeshore.ca Microsoft Office products typically recognize email addresses and web page links and automatically apply this format.
When following these simple rules, we not only comply with the requirements of the Accessibility for Ontarians with Disabilities Act, 2005, we make documents easier to read.
Avoid sentences in all UPPER CASE letters A sentence written with a combination of upper and lower case letters is easier to read.
The ascenders and descenders found in lower-case letters provide word shape, causing mental reading clues to speed up the process of reading. Sentences written in all upper case do not benefit from these clues and are more difficult to read.
It may make sense to use all upper case in some instances, such as short headings, titles with a maximum of two words or when text is used as a graphic image and not intended to be read. In these examples, there is no benefit to having the mental reading clues. However, upper case can give the impression of shouting at the reader and therefore should be avoided where possible.
If the intent is to convey a shout, an exclamation point may be better. Screen readers generally do not read text differently if it is in all upper case letters, so listeners will not know that the author is shouting. Screen readers do change the voice inflection with exclamation points.
Also, upper case acronyms should have periods to allow screen readers to properly interpret the text as an acronym and not a word. For example, A.O.D.A. is more accessible than AODA.
13

Use appropriate Text Alignment Align text to the left margin.
Aligning text to the left margin makes it easier to find the start of the next line and keeps spacing between the words even.
Centre alignment is not accessible.
Left and right alignment (justified) is not accessible. It causes uneven spaces between words. It is more difficult to read because the human eye cannot move smoothly along the sentence and has to search and jump to the start of each word.
Where images are used with text, align the image to the left of the page with the text directly above or below. Alternatively, align the image to the right of the page with the “Square” text wrapping option and keep the text aligned left.
14

Clean design and simplicity Use distinctive colours, sizes and shapes on the covers of materials to make them easier to tell apart. Don’t overlap too many images and/or text elements. Reduce distractions by not using watermarks, clipart graphics, WordArt or complicated background designs.
The Do Not’s of Paragraph Formatting
• Do not press Enter to create a space between paragraphs as this creates an empty paragraph. Instead modify the style’s paragraph formatting to add space above or below paragraphs.
• Do not use the Spacebar or Tab key to create a first line indent.
• Do not press Enter repeatedly to force a block of text onto a new page. (Use Ctrl+Enter to force a page break.)
Use Alt Tags for graphics Add a short description to all graphics inserted into a document. An “Alt tag”, or alternative text, is a brief description of any graphic, logo, chart, etc. inserted into a document. It can be read by a screen reader to allow someone with a vision disability to understand what the graphic is.
It is also displayed in place of the image when software does not support the display of images or when the user has chosen not to view images. As an added bonus, it can be read by search engines.
If reading this document on your computer, place your cursor over the image and see for yourself!
Alternative text for pictures Adding alternative text to an image
1. Select the image. 15

2. Right click on the image and choose ‘Format.’
3. Then select ‘Alt Text’ in the left column and Insert the Alt text title and description for the picture. (Note: If your document is saved as a .doc the ‘Alt Text’ tab is to the far right.)
Guidelines for Alt-Text • Use a concise description for the ‘alternative text’ of simple graphics.
• Insert a short ‘alternative text’ plus a longer description of complex images in the main text or as a footnote in your document.
• If the picture is a link to another document or a website, indicate the target link in the ‘alt text’ field.
16

• Try to answer the question ‘What information is the image conveying?’
• If the image contains meaningful text, make sure that all of the text is conveyed in the alternative text.
Use Page Numbering Add automatic page numbering using the Header and Footer tool
Numbering the pages of your document helps to navigate the document effectively and reference its content. For assistive technologies, it provides a valuable point of reference within the document.
Microsoft Office products have a variety of page numbering templates that can be automatically inserted into documents.
To Insert page numbers:
1. Go to the ‘Insert’ tab in Word.
2. In the Header & Footer section, select ‘Page Number.’
3. Select ‘Format Page Numbers.’
4. Select the page number format characteristics that you would like in your document.
Use Real Lists Format lists as “real lists” by using automatically generated bullets or numbering systems.
When creating lists, it is important to format them as a “real list”. Otherwise, assistive technologies such as screen readers will interpret the list as a series of short separate paragraphs instead of a coherent list of related items. Microsoft Office products have a variety of automatically generated list options.
17

Use numbered lists if the information is sequential and use bulleted lists if the information is a related set of points. A screen reader will announce the information as a list.
Bullets Use bullets to distinguish important individual points. Non-ordered lists should use the standard round bullet. Use a numbered list to describe the proper order for a series of steps in a sequence.
You can also create a list style to suit the needs of your document. For instance, if the sequence of your numbered list matters then you can modify the numbering that is used in that style. You would choose to create a new style and then when you click on the ‘Format’ button you choose ‘Numbering… You can then modify the new style to what you want as seen in the following screen shots.
18

To insert a Next Page Break: 1. Position the insertion point before your content.
2. From the Page Layout tab, in the Page Setup group, click on the Breaks button.
3. Under Section Breaks, select Next Page.
Formatting pictures For accessibility, any images you insert into a document must be formatted to be ‘In Line with Text.’
19

Add a document title A document title is not the same as a document name. Descriptive and meaningful titles are important in case the document is converted to HTML.
To change the title of the current document:
• From the File tab choose Info.
• On the right side, for Title; enter an appropriate title.
20

Duplicate Vital Information in Headers, Footers & WatermarksScreen readers do not automatically read information in headers/footers and watermarks. Therefore, vital information (such as Respond by X Date, CONFIDENTIAL, or Do Not Distribute) must also be duplicated at or near the start of the main content area.
Duplicate vital information in the Header/Footer or Watermark at or near the start of the related information (such as the beginning of your document or the start of a section).
21

Use a table of contents A table of contents is necessary to navigate large documents for everyone, not just persons with a disability. As the author, you have to decide on what headings to include then apply an appropriate heading style to it. You will need to do the following:
• Insert a page break before your content to ensure the table of contents does not include the page number 1
• Add page numbers
• Insert a table of contents
Insert a table of content 1. Position the insertion point where you would like to insert the table of contents.
2. From the References tab in the Table of Contents group, click on the Table of Contents icon.
3. Select Insert Table of Contents.
For Tab leader from the drop-down menu select None.
4. For Show levels, specify the number of levels (headings) in your document – 3 is
the default.
22

5. Click on the OK button.
Update a table of contents You will need to update your table of contents as you add and remove content. It will not update automatically.
To update a table of contents:
1. Right click on the existing table of contents, select Update Field.
2. Select either Update Page Numbers only if you add text or Update Entire Table if you added new headings to your document.
3. Click on the OK button.
4. Once you have completed entering your title and description you can close this window.
23

Use appropriate Leaders Avoid Dot leaders that are often used in a Table of Contents.
What is acceptable?
Dot leader ………………………………………………………. No
Solid line leader __________________________________ Yes
No leader Yes
Note: a table of contents with no leaders is only acceptable when there is generous spacing between lines.
Accessible Tables and Charts
Use tables only when necessary There are times when using tables and charts are the most efficient way to express a large amount of information, making the information more understandable for most readers. When using tables and charts, ensure they are formatted to be as accessible as possible to all readers.
All of the basic accessibility considerations that are applied to documents must also be applied to tables and charts. For example:
• Use appropriate font size
• Add alternative text
• Use appropriate text alignment
Additionally, ensure tables include column headings and where possible, just one row of headings. Keep tables simple by avoiding merged cells. If tables split across pages, set the header to show at the top of each page.
Screen readers may not read tables that are not formatted properly or are too large and complex. Tables are read by screen readers row by row across the columns. Even if some tables are properly formatted they may be too complex for people to understand. You should describe the contents of the table used and what it is conveying within the body of your document.
24

For this reason, tables should be used sparingly. However, if a table is required it is important that it be set up correctly.
Ensure table headers are formatted to repeat or you will get an error when you check for accessibility.
Guidelines for tables • Only use simple tables.
• Make sure that your table structure makes sense when you read the information from left to right, row by row.
Creating accessible tables 1. Use the ‘Insert’ Tab.
2. Click on Table.
3. Define your table structure, either by selecting the boxes, or by clicking on Insert Table.
4. Once your table has been created, click on the Design Tab, in the Table Style Options group, make sure that the ‘Header Row’ check box is selected.
25

For accessibility, Table Header Rows need to be defined in every table.
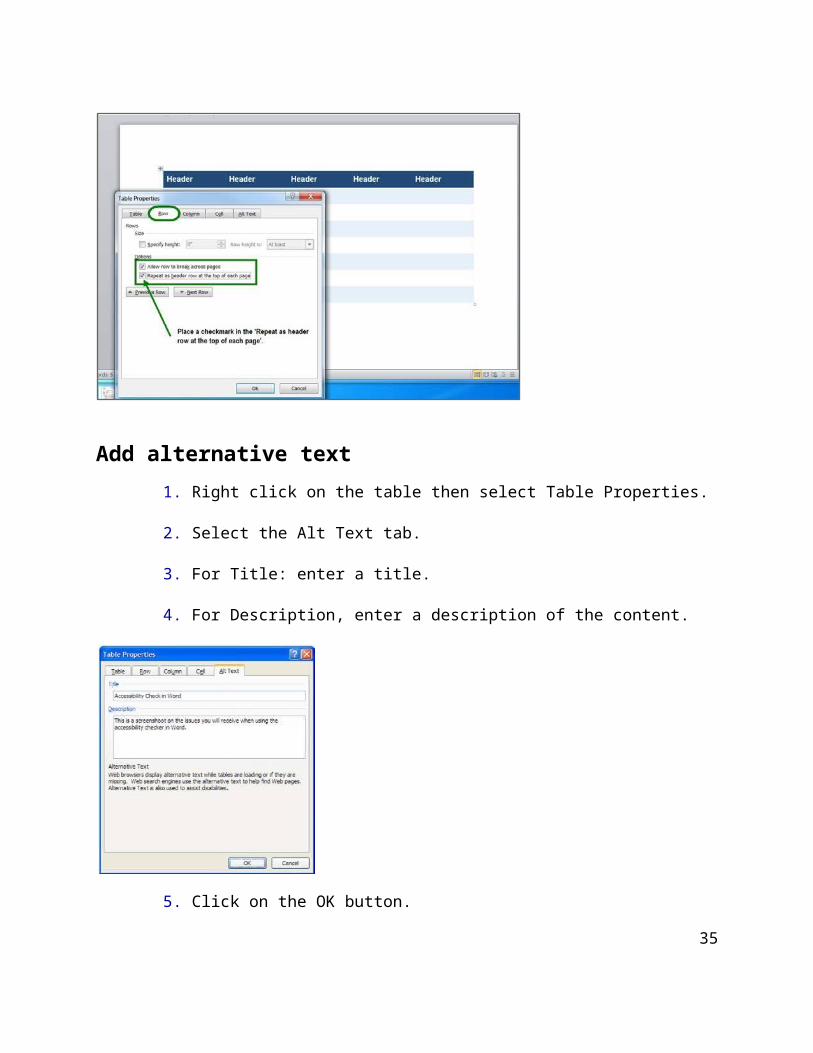
If a table does not fit onto one page, make sure that you carry the headers of the table to the second page by turning on the ‘Repeat as header row at the top each of page’ option.
1. Select the cells in your header row.
2. Right Click on the Table and select ‘Table Properties...
26
Repeat Table Header Rows

3. Place check mark in the ‘Repeat as header row at top of each page’.
4. Click on OK.
Tables breaking across pages To prevent content in one row from breaking across a page, turn off the ‘Allow row to break across pages’ option for that row only. This option is available by right-mouse clicking over the table, and then choosing the Row tab in Table Properties.
27

Add alternative text 1. Right click on the table then select Table Properties.
2. Select the Alt Text tab.
3. For Title: enter a title.
4. For Description, enter a description of the content.
5. Click on the OK button.
Create a caption for a table 1. Once you have created your Table select the entire table and go into ‘Table
Properties.’
28

2. Then type in your caption text beside the table name. You can then position the caption above the table by selecting the position option as shown in the screen shot below.
When creating charts, use formatting options to create different types of lines or apply textures rather than colours to differentiate information for users who are colour blind.
Of course, there are times, such as preparing budget documents, when charts and tables are the most efficient and best way to express a large amount of information.
29

In these cases, staff should be prepared to provide an accessible format of this information if requested.
Explain graphics, tables, charts and maps using text All graphic elements that contain information relevant to the document require a text explanation. The explanation needs to be written by the same person responsible for writing the document. Having someone else describe the graphic elements may provide an incorrect interpretation.
When explaining complicated visuals, be sure to identify the type of visual (chart, graph, map, etc.) along with the title, purpose and the meaning of the data.
It is not necessary to provide a separate text explanation if one already exists in the text of the document. In this case, refer to the visual in the text of the document.
It is also unnecessary to provide text explanations for graphics used for visual appeal, such as designer lines, borders etc. Photographs also used for visual appeal and not having a great deal of relevance can be given very short descriptions.
Styles Styles are formatting instructions, such as ‘Heading 1’ for the title of your document, ‘Heading 2’ to indicate the top-level heading. ‘Heading 3’ to indicate a sub-heading and the ‘Body Text’ style for the body text in your document. It is best to use the built-in styles in Word as opposed to creating your own, as not all assistive technologies will be able to understand custom styles.
30

Use heading styles When working with large documents, headings are a useful way to organize information and make the document easier to understand. Styles are formatting instructions, such as ‘Heading 1’ for the title of your document, ‘Heading 2’ to indicate the top-level heading. ‘Heading 3’ to indicate a sub-heading and the ‘Body Text’ style for the body text of the document.
Default ‘Headings and Styles’ in Word have been created as Town of Lakeshore Corporate Standards, Do not modify them.
Remember to apply Heading Styles in descending order, or you will get an error when checking the accessibility.
You can view the styles available to you in the ‘Styles Gallery’ in the Home Tab Toolbar or by opening the ‘Styles Pane’ by clicking on the arrow at the bottom right of the Styles Gallery.
31

Styles Gallery:
To format text using a style, select the text you want to apply the style to, then click on the style you want to use from the ‘Styles Pane’ or ‘Styles Gallery.’
32
Styles pane:

Town of Lakeshore default heading styles The following fonts, font sizes and font colours have been chosen as the Town of Lakeshore Corporate Standard:
Heading 1 (Arial, 25 pt, bold, blue) Heading 2 (Arial, 18 pt, bold, blue) Heading 3 (Arial, 15 pt, bold, black) Heading 4 (Arial, 13 pt, bold, black) Normal (Arial, Arial 12 pt, normal, black)
Default ‘Headings and Styles’ in Word have been created as Town of Lakeshore Corporate Standards, do not modify them.
If you have any questions regarding these preformatted settings, please contact the Manager of Information Technology.
Exclude Flashing ObjectsSince flashing objects may be a public safety issue for individuals with photosensitive epilepsy and there is not typically a compelling business need, flashing objects should be excluded. If a flashing object must be included, ensure the object flashes below 3Hz.
Use Colour (And Other Sensory Characteristics) Plus Text to Convey MeaningIn order to use colour and other sensory characteristics (such as size, shape, and location) accessibly, ensure that you do not use colour alone to convey meaning. If you do, then individuals with disabilities who are blind, have low vision or are colour blind will not have access to comparable information.
To use colour accessibly:
1) Use colour and other sensory characteristics (such as size, shape, and location) to convey meaning.
2) Create text that duplicates the meaning of the colour (or other sensory characteristic).
33

Table 1: Example of a Status Layout Table Using Colour and Text
Project A ONTIME
Project B ATRISK
Project C LATE
Use High Contrast The better the contrast between the background and the foreground, the more legible the document will be. Black text on a white background provides the best contrast, but is not the only option.
A good way to check contrast is to print in black and white and check if the document is legible. Create content with text or images of text that use colour or shading with sufficient colour contrast.
Note: fonts larger than size 18 and fonts formatted to be bold have lesser requirements than a 7:1 contrast ratio. Adequate contrast is required for only objects that are intended to be read.
Note: Don’t use background stationery (i.e. colours, images) in emails.
Accessibility Checker in Microsoft Word The Accessibility Checker helps users create more accessible content. By identifying areas that might be challenging for users with disabilities, you can fix potential problems within your content.
This feature is available in Word and will only work on documents saved as a .docx file.
Save your document in the correct format 1. Before using the checker, you need to save your document from within Word in
the .docx format. 34
2. When you save your document, the option ‘Maintain compatibility with previous version of Word’ may be shown. If shown, make sure that it remains unchecked.
If you do not follow steps 1 and 2 above, the following will show when you try to run the checker:
Note: If you must have a .doc file format for an external party, save the file in the .docx format first, run the accessibility checker; make any necessary fixes, then save the checked/fixed document in the old format.
Running the Word Accessibility Checker 1. Click on Info under the File tab.
2. Click on ‘Check for Issues’, then select ‘Check Accessibility’ from the drop down list.
35

The Accessibility Checker checks your document against a set of possible issues. Each Issue that the Accessibility checker finds is classified as an Error, Warning or Tip.
An Error is for content that makes a file very difficult or impossible for people with disabilities to understand.
A warning is for content that in most but not all cases makes a file difficult for people with disabilities to understand.
A tip is for content that people with disabilities can understand, but that might be better organized or presented in a way that would improve their experience.
36
The Accessibility Checker pane opens. . 3

Fixing accessibility issues Whenever the Accessibility Checker finds an issue, the task pane shows information about why the content might be inaccessible. When you select an issue, it shows you how to repair or revise it.
37

Use Accessible Forms All forms placed on the Town website should be fillable.
All forms placed online should be fillable – meaning a user can fill out the information without having to print the form and fill it out by hand. Except in situations where an applicant must attend city hall in person, forms should be able to be submitted via email.
Tips when creating forms:
• Organize the fields chronologically.
• Ensure forms are keyboard accessible.
• Make sure label and field locations are easy to use.
• Make sure the information asked is short and basic.
• Avoid using asterisks (*) to indicate required fields.
• Offer standard entry fields for phone numbers.
• Where signature is required, ensure there is sufficient space.
Caution: Word cannot create an accessible form, suitable for publishing on a website.
Use standard Navigational Aids Use navigational aids to organize information and make documents easier to understand.
When using Microsoft Office, use the “Styles” tool to quickly apply a set of formatting choices to document headings and body. Benefits include:
• Increased readability
• Screen readers can identify and navigate sections
• A table of contents with links to document sections can be automatically generated, as formatted in this document.
• Formatting is consistent throughout the document.
38

Navigational Pane
The Navigational Pane allows you to navigate through the document by headings, by page or by searching for text or objects.
To turn on the navigational pane, go to the view tab and check the navigational pane box.
39

User Settings—Microsoft Word
Readability statistics Microsoft Word can determine the grade level at which documents are written. It is not a perfect measure, but it is a good guideline. Aim for a Grade 8–10 level and a reading ease around 65.
If you don’t see the grade/reading level when you use ‘Spelling & Grammar’ in your Word documents, follow these simple steps:
1. Click the File tab. 2. Select Options. 3. On the left hand side select Proofing. 4. Under the When Correcting Spelling and Grammar in Word, enable Show
readability statistics.
40
Click the OK button. . 5

After you enable this feature, open a file that you want to check, and check the spelling.
41

Accessibility Checklist Making documents accessible benefits all users so it’s a good practice to follow in general. The following is a checklist of steps to ensure accessibility.
Font Size
Font Family
Bold (no italics or underlining for emphasis)
Upper Case letters (no sentences with all upper case)
Text alignment (align to the left)
Contrast
Alt Tags
Clarity, Organization, Readability
Table of Contents Leader
Date Format
Plain Language
Page Numbering
Tables and Charts
Lists
Accessible Forms
Use styles when formatting Word documents rather than character formatting.
Avoid using text boxes, tables and charts in Word documents.
Add alternative text to graphics in your files.
Advance Accessibility Features
Navigational Aids
42

Form fields should be interactive.
Use navigational aids such as links, bookmarks, headings and a table of contents because these can be accessed using a keyboard without relying on a mouse.
Ensure the security settings don’t interfere with a screen reader’s ability to convert the on-screen text to speech.
Generate the PDF file with tags.
Contact the Manager of Communications & Strategic Initiatives if you require more information on any accessibility feature.
Check the results after generating a PDF and fix any errors as required.
43

Microsoft Quick References
Create Accessible Word Documents Microsoft Quick Reference for Creating an Accessible document
Format your document using Styles Microsoft Quick Reference for Formatting your document Using Style
44
![[XLS]unitedbreweries.comunitedbreweries.com/pdf/investorinfodividend/Financial year 2009... · Web viewSave the Excel file ... Investment Type INDIA Andaman Islands Anantapur Anjaw](https://img.pdfslide.net/doc/110x75/5aa352ff7f8b9ac67a8e3cd0/xls-year-2009web-viewsave-the-excel-file-investment-type-india-andaman.jpg)