Embed Size (px)
Citation preview
Title Page
Account UpdaterUser Guide
March 2018
CyberSource Corporation HQ | P.O. Box 8999 | San Francisco, CA 94128-8999 | Phone: 800-530-9095
CyberSource Contact InformationFor general information about our company, products, and services, go to http://www.cybersource.com.
For sales questions about any CyberSource Service, email [email protected] or call 650-432-7350 or 888-330-2300 (toll free in the United States).
For support information about any CyberSource Service, visit the Support Center: http://www.cybersource.com/support
Copyright© 2018 CyberSource Corporation. All rights reserved. CyberSource Corporation ("CyberSource") furnishes this document and the software described in this document under the applicable agreement between the reader of this document ("You") and CyberSource ("Agreement"). You may use this document and/or software only in accordance with the terms of the Agreement. Except as expressly set forth in the Agreement, the information contained in this document is subject to change without notice and therefore should not be interpreted in any way as a guarantee or warranty by CyberSource. CyberSource assumes no responsibility or liability for any errors that may appear in this document. The copyrighted software that accompanies this document is licensed to You for use only in strict accordance with the Agreement. You should read the Agreement carefully before using the software. Except as permitted by the Agreement, You may not reproduce any part of this document, store this document in a retrieval system, or transmit this document, in any form or by any means, electronic, mechanical, recording, or otherwise, without the prior written consent of CyberSource.
Restricted Rights LegendsFor Government or defense agencies. Use, duplication, or disclosure by the Government or defense agencies is subject to restrictions as set forth the Rights in Technical Data and Computer Software clause at DFARS 252.227-7013 and in similar clauses in the FAR and NASA FAR Supplement.
For civilian agencies. Use, reproduction, or disclosure is subject to restrictions set forth in subparagraphs (a) through (d) of the Commercial Computer Software Restricted Rights clause at 52.227-19 and the limitations set forth in CyberSource Corporation's standard commercial agreement for this software. Unpublished rights reserved under the copyright laws of the United States.
TrademarksAuthorize.Net, eCheck.Net, and The Power of Payment are registered trademarks of CyberSource Corporation.
CyberSource, CyberSource Payment Manager, CyberSource Risk Manager, CyberSource Decision Manager, and CyberSource Connect are trademarks and/or service marks of CyberSource Corporation.
All other brands and product names are trademarks or registered trademarks of their respective owners.
2
CO
NTE
NTS
Contents
Recent Revisions to This Document 6
About This Guide 7Audience 7Purpose 7Conventions 7
Text and Command Conventions 8Related Documents 8Customer Support 8
Chapter 1 Introduction 9Options 9
REST API Batch Updates 9Harvest Updates 9PAN Upload Updates 9
Enrollment 10Business Center Permissions 10
Terms of Use 11
Chapter 2 REST API Batch Updates 12Retrieve OAuth Token 12
Endpoints 13POST Authentication Payload 13
URL Encoded POST Example 13Response Example 14
POST Batch Payload 14Endpoints 14Batch Payload 15
Headers 15Batch Payload 15Batch Payload Examples 16
Successful Response Data 16
Account Updater | March 2018 3
Contents
Successful Response Example 18Unsuccessful Response Codes 18
Error Response Example 19Error Message Codes 20Field Validation Messages 21
GET Batch Status 21Endpoint 21Status Responses 21Response Example 22
GET Batch Report 22Endpoint 23Report Fields 23Report Examples 25
Testing 26Profile Update Report 26
Chapter 3 Harvest Updates 27Profile Update Report 28
Profile Update Report Records 29Header Records 29Details Records 30Footer Records 31
Chapter 4 PAN Upload Updates 32Creating Security Keys 32
Transaction Security Key 32PGP Public/Private Key Pair 33
Formatting a Request File 33Header Record 33Detail Record 34Footer Record 35Request File Examples 35
Uploading a Request File 36Email Notification 36Viewing the Batch File Status 37Downloading a Response File 38Response File Records 40
Header Record 41Detail Record 41Footer Record 42File Examples 43
Account Updater | March 2018 4
Contents
Chapter 5 Response Codes and Reason Codes 44Record Level 44Request File Level 46
Chapter 6 Testing 47Visa Card Numbers 47Mastercard Card Numbers 48
Chapter 7 Sample Java Code for Uploading Files 50Requirements 50Using the Sample Code 50
Account Updater | March 2018 5
REV
ISIO
NS
Recent Revisions to This Document
Release ChangesMarch 2018 Updated the tokens field. See Table 3, "Batch Payload," on page 15.
Updated maximum file size value for Account Updater request files. See "Formatting a Request File," page 33.
August 2017 Added customer ID and payment instrument information to the “Batch Payload” section. See Table 9, "Batch Report Fields," on page 23.
May 2017 Updated the “Retrieve OAuth Token” section. See "Response Example," page 14.
Added instrument identifier information to the “Batch Payload” section. See "Batch Payload," page 15.
Updated the Batch Report fields. See Table 3, "Batch Payload," on page 15.
January 2017 Removed the note from the CCH entry in Table 22, "Response Codes and Reason Codes," on page 44.
October 2016 Added the 852 reason code. See Table 22, "Response Codes and Reason Codes," on page 44.
September 2016 Updated the card_expiry_year field. See Table 9, "Batch Report Fields," on page 23.
Account Updater | March 2018 6
ABO
UT
GU
IDE
About This Guide
AudienceThis guide is written for merchants who want to decrease the cost of manually updating customer account information. Account Updater enables merchants to manually or automatically incorporate changes made to a customer’s payment card data: expiration date, new card number, account closures, and brand migrations between Visa and Mastercard.
PurposeThis guide describes tasks that a merchant must complete in order to submit a batch of tokens using the REST API (see "REST API Batch Updates," page 12), automatically update customer subscriptions or profiles with the latest credit card data (see "Harvest Updates," page 27), or upload request files with new customer PANs (see "PAN Upload Updates," page 32). It is intended to help the merchant reduce the number of authorization declines to retain revenue and reduce the cost of manually updating payment data.
Conventions
Note
A Note contains helpful suggestions or references to material not contained in the document.
Important
An Important statement contains information essential to successfully completing a task or learning a concept.
Account Updater | March 2018 7
About This Guide
Text and Command Conventions
Related Documents Getting Started with CyberSource Advanced for the SCMP API (PDF | HTML) or
Getting Started with CyberSource Advanced for the Simple Order API (PDF | HTML) describes how to get started using your CyberSource account.
Business Center Overview (PDF | HTML) describes the features and options available with your CyberSource account using the Business Center.
Payment Tokenization Using the Business Center (PDF | HTML) describes how to create and use on-demand customer profiles.
Recurring Billing Using the Business Center (PDF | HTML) describes how to create and use customer recurring subscriptions.
Refer to the Support Center for complete CyberSource technical documentation:
http://www.cybersource.com/support_center/support_documentation
Customer SupportFor support information about any CyberSource service, visit the Support Center:
http://www.cybersource.com/support
Convention Usagebold Items that you are instructed to act upon; for example:
Click Certificates.
monospace Code examples and samples.
Account Updater | March 2018 8
Account Updater | March 2018
HAP
TER
C
1
IntroductionAccount Updater notifies you of changes to stored customer credit card data. Such changes could affect expiration date, credit card number, or a brand. If you use CyberSource Recurring Billing, Payment Tokenization, or Token Management Services (TMS), Account Updater automatically updates the stored card data on your behalf. Account Updater obtains credit card information from both the Visa INC’s Account Updater Service and the Mastercard’s Automatic Billing Updater Service.
Options
REST API Batch UpdatesIf you use CyberSource Recurring Billing, Payment Tokenization, or Token Management Services (TMS), you can submit a batch of tokens using the REST API to be processed by the Account Updater service. See "REST API Batch Updates," page 12.
Harvest Updates If you use CyberSource Recurring Billing or Payment Tokenization services, you can configure Account Updater to automatically update all your customer subscriptions or profiles with the latest credit card data. CyberSource creates a report detailing the updates made, including new expiry dates, masked primary account numbers (PANs), and card brands. See "Harvest Updates," page 27.
PAN Upload UpdatesIf you directly manage your customer's card data, you can create a file containing PANs, which CyberSource updates. Create a request file containing new PANs and POST it to the Account Updater URL. Download the response file using the Business Center or a client application. See "PAN Upload Updates," page 32.
9
Chapter 1 Introduction
EnrollmentContact your account representative to enroll in Account Updater. CyberSource submits enrollment forms on your behalf to both Mastercard and Visa. The enrollment process can take up to 10 business days.
Billing aggregators can participate in Account Updater (see "PAN Upload Updates," page 32), but they must indicate in the Account Updater request files the merchant for whom the request is made. If you are a billing aggregator and fail to include the proper data in a record, CyberSource rejects the record and does not process your Account Updater requests.
Business Center PermissionsAs part of the enrollment process, an administrator must grant you permission in the Business Center to perform the actions below. If you are an administrator, you already have these permissions. View the status of a request file.
Add and activate a PGP Security Key for PAN upload updates (see Chapter 4, "PAN Upload Updates," on page 32).
Create OAuth credentials for REST API batch updates (see Chapter 2, "REST API Batch Updates," on page 12).
Access downloadable response files.
Important
If you are going to process Account Updater requests on behalf of merchants for whom you are not the merchant of record, you must enroll in Account Updater as a billing aggregator.
Account Updater | March 2018 10
Chapter 1 Introduction
Terms of UseBy using the CyberSource Account Updater service, you agree to comply with the Visa U.S.A. Operating Regulations, Visa Account Updater Terms of Use, Mastercard rules and regulations, and all other applicable rules and regulations issued by any card association.
In addition, you must:
Request an update for every participating Visa account in your customer database at least:
Once every 180 calendar days if you bill daily, weekly, monthly, quarterly, or bi-annually.
Once every 365 calendar days if you bill annually.
Submit inquiries only for those accounts with which you have an ongoing customer relationship.
Update your customer account database within 5 business days of receiving an update.
Ensure that all update information you receive is properly, completely, and accurately incorporated into your data store for use in future transactions.
Correct erroneous account information within 5 business days of receipt of error notification from CyberSource.
You may not:
Request updates on accounts that have returned a response of Contact Card Holder. You must check your response file for CCH responses and take appropriate action such as removing the customer record from your billing cycle until you have contacted the cardholder.
Submit update inquiries on behalf of any other entity unless you have enrolled in Account Updater as a billing aggregator.
Note
If you are receiving Harvest updates (see Chapter 3, "Harvest Updates," on page 27), your subscription is updated once every 30 days to ensure that you meet this requirement.
Account Updater | March 2018 11
Account Updater | March 2018
HAP
TER
C
2
REST API Batch UpdatesThe Account Updater REST API enables you to POST a batch of tokens or instrument identifiers (subscription IDs) to the Account Updater service to be processed and updated. You must retrieve an OAuth token before creating the batch of tokens to be updated.
Retrieve OAuth TokenThe AU REST API uses OAuth 2.0 for authentication. The client ID and client secret credentials are required in order to create the access token that is used to authenticate each Account Updater REST API request.
To create OAuth client credentials:
Step 1 Log in to the Business Center:
Live transactions: https://ebc.cybersource.com Test transactions: https://ebctest.cybersource.com
Step 2 In the left navigation panel, choose Tools & Settings > Credit Card Account Updater > OAuth Credentials.
Step 3 Click Create.
Important
Make note of the generated values; the OAuth client credentials are displayed only once.
12
Chapter 2 REST API Batch Updates
EndpointsTo access endpoints, use an HTTP POST request with valid x-www-form-urlencoded authentication data: Test endpoint: https://authtest.ic3.com/apiauth/v1/oauth/token Live endpoint: https://auth.ic3.com/apiauth/v1/oauth/token
POST Authentication Payload
URL Encoded POST ExampleExample 1 Header
Note
Generate the OAuth client credentials to create the access token that is used to authenticate each Account Updater REST API request. See "To create OAuth client credentials:," page 12.
Table 1 Required Authentication Payload
Variable Descriptionplatform Defines the Visa merchant platform.
Value: 1.
client_id A merchant reference assigned to your account.
Created in the CyberSource Business Center. See "To create OAuth client credentials:," page 12.
grant_type Method by which the OAuth token is granted.
Value: client_credentialsclient_secret Secret assigned to your account.
Created in the CyberSource Business Center. See "To create OAuth client credentials:," page 12.
merchant_id Your CyberSource Merchant ID (MID)
client_type Defines the client connection type.
Value: confidentialcontent-Encoding Indicates to the server that you are sending a zipped request for
a large payload.
Value: gzip
POST /apiauth/v1/oauth/token HTTP/1.1Host: authtest.ic3.comCache-Control: no-cacheContent-Type: application/x-www-form-urlencoded
Account Updater | March 2018 13
Chapter 2 REST API Batch Updates
Example 2 Body
Response ExampleParse the access_token value from the response and use it within five minutes of being generated. CyberSource recommends generating a new OAuth token for each AU REST API request.
The access token expires in two ways after it is generated:1 It expires when it is not used every five minutes.
2 The value of the expire_in parameter represents in seconds when the access token expires after it is generated. The value defaults to 28799 seconds. If you use the access token every five minutes it eventually expires after 28799 seconds.
Example 3 Response
POST Batch PayloadCreate a batch of tokens (subscription IDs) and POST it to the Account Updater service to be processed and updated.
EndpointsTo access endpoints, use an HTTP POST request with a valid JSON payload: Test endpoint: https://api.accountupdatertest.cybersource.com/v1/batch Live endpoint: https://api.accountupdater.cybersource.com/v1/batch
platform=1&client_id=gfK2f0d552&grant_type=client_credentials&client_secret=d2dfdc225891fa719abe589b25afc2&merchant_id=myMID&client_type=confidential
{ "access_token":"00add7ee-9523-45b6-ac52-90f3e86962dd","token_type":"bearer","expires_in":28799,"scope":"<comma_separated_list_of_scopes>","client_status":"active"
}
Account Updater | March 2018 14
Chapter 2 REST API Batch Updates
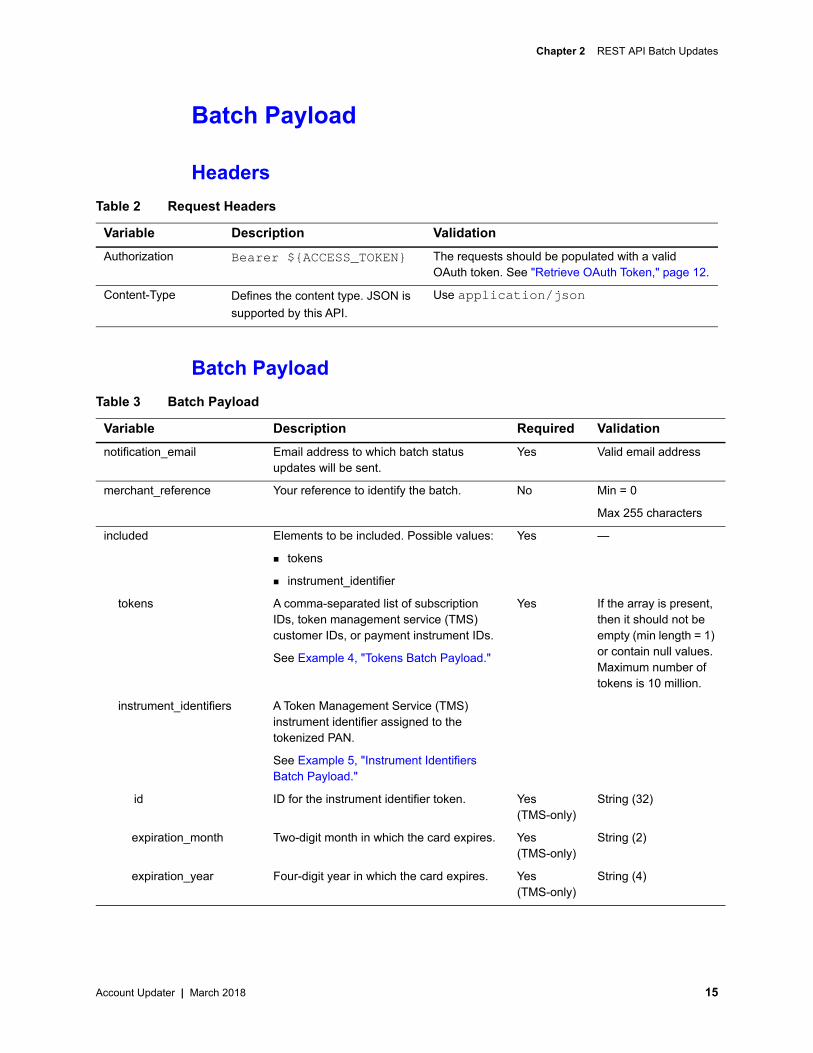
Batch Payload
Headers
Batch Payload
Table 2 Request Headers
Variable Description ValidationAuthorization Bearer ${ACCESS_TOKEN} The requests should be populated with a valid
OAuth token. See "Retrieve OAuth Token," page 12.
Content-Type Defines the content type. JSON is supported by this API.
Use application/json
Table 3 Batch Payload
Variable Description Required Validationnotification_email Email address to which batch status
updates will be sent.Yes Valid email address
merchant_reference Your reference to identify the batch. No Min = 0
Max 255 characters
included Elements to be included. Possible values:
tokens
instrument_identifier
Yes —
tokens A comma-separated list of subscription IDs, token management service (TMS) customer IDs, or payment instrument IDs.
See Example 4, "Tokens Batch Payload."
Yes If the array is present, then it should not be empty (min length = 1) or contain null values. Maximum number of tokens is 10 million.
instrument_identifiers A Token Management Service (TMS) instrument identifier assigned to the tokenized PAN.
See Example 5, "Instrument Identifiers Batch Payload."
id ID for the instrument identifier token. Yes (TMS-only)
String (32)
expiration_month Two-digit month in which the card expires. Yes (TMS-only)
String (2)
expiration_year Four-digit year in which the card expires. Yes (TMS-only)
String (4)
Account Updater | March 2018 15
Chapter 2 REST API Batch Updates
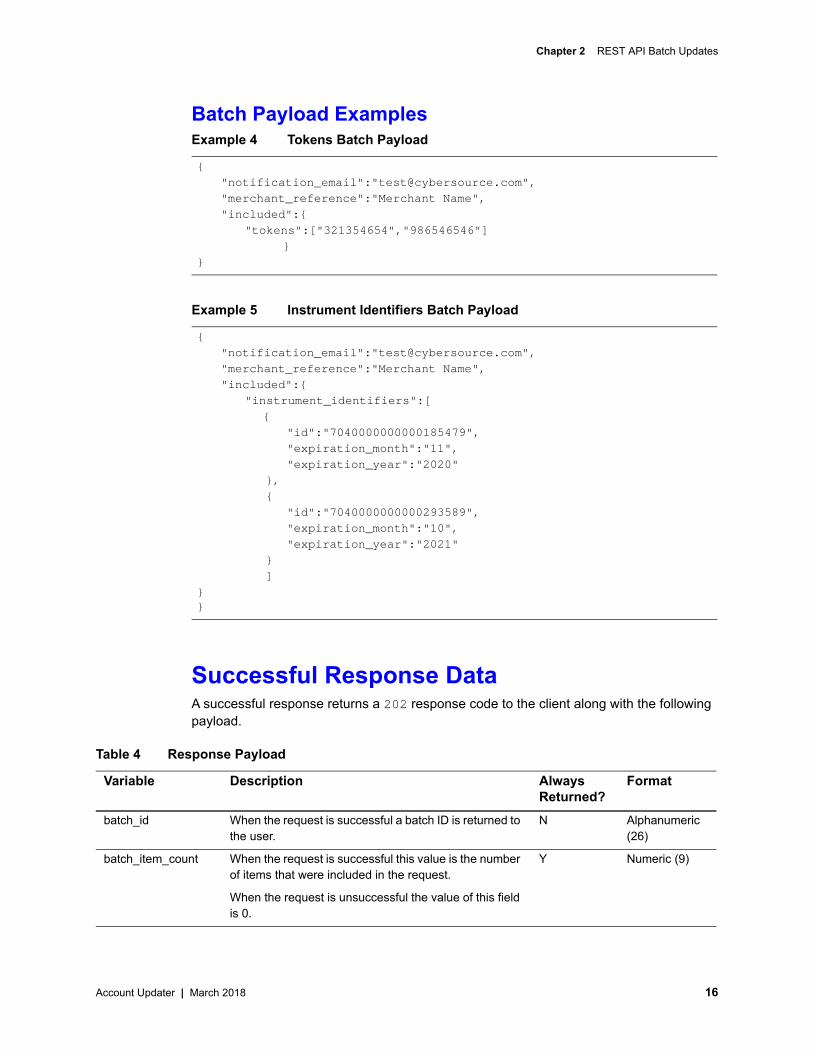
Batch Payload ExamplesExample 4 Tokens Batch Payload
Example 5 Instrument Identifiers Batch Payload
Successful Response DataA successful response returns a 202 response code to the client along with the following payload.
{"notification_email":"[email protected]","merchant_reference":"Merchant Name","included":{
"tokens":["321354654","986546546"] }}
{"notification_email":"[email protected]","merchant_reference":"Merchant Name","included":{
"instrument_identifiers":[{
"id":"7040000000000185479","expiration_month":"11","expiration_year":"2020"
},{
"id":"7040000000000293589","expiration_month":"10","expiration_year":"2021"
}]
}}
Table 4 Response Payload
Variable Description Always Returned?
Format
batch_id When the request is successful a batch ID is returned to the user.
N Alphanumeric (26)
batch_item_count When the request is successful this value is the number of items that were included in the request.
When the request is unsuccessful the value of this field is 0.
Y Numeric (9)
Account Updater | March 2018 16
Chapter 2 REST API Batch Updates
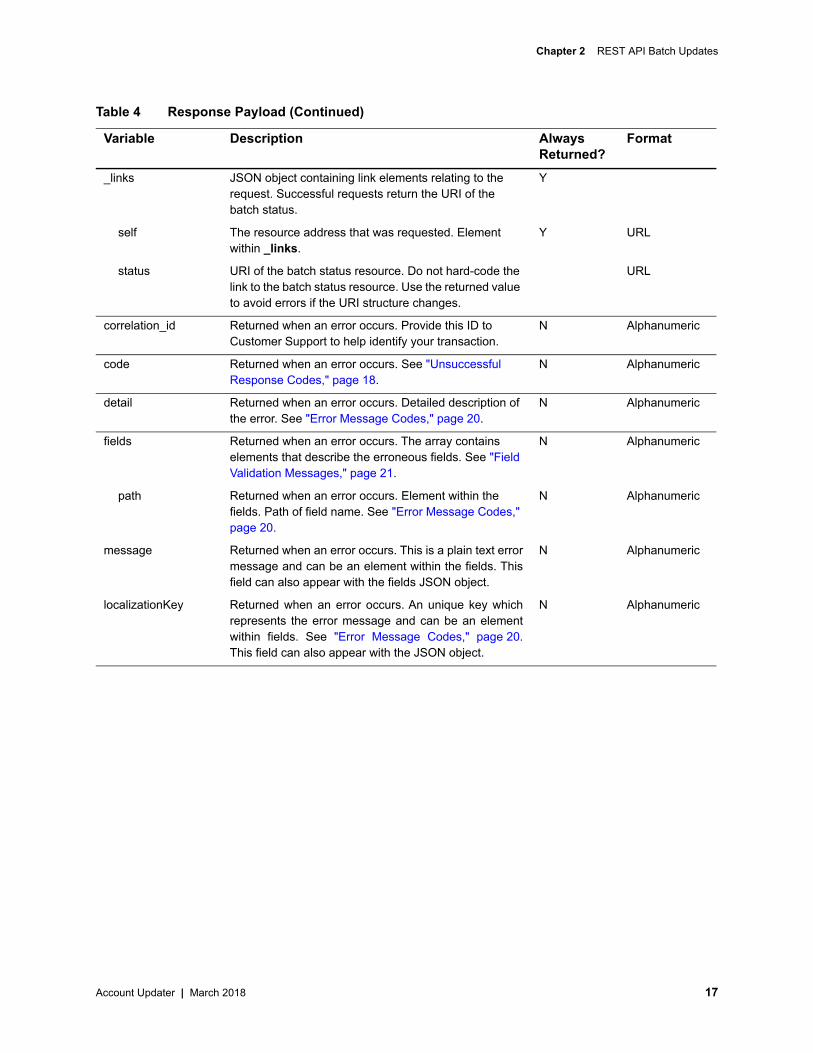
_links JSON object containing link elements relating to the request. Successful requests return the URI of the batch status.
Y
self The resource address that was requested. Element within _links.
Y URL
status URI of the batch status resource. Do not hard-code the link to the batch status resource. Use the returned value to avoid errors if the URI structure changes.
URL
correlation_id Returned when an error occurs. Provide this ID to Customer Support to help identify your transaction.
N Alphanumeric
code Returned when an error occurs. See "Unsuccessful Response Codes," page 18.
N Alphanumeric
detail Returned when an error occurs. Detailed description of the error. See "Error Message Codes," page 20.
N Alphanumeric
fields Returned when an error occurs. The array contains elements that describe the erroneous fields. See "Field Validation Messages," page 21.
N Alphanumeric
path Returned when an error occurs. Element within the fields. Path of field name. See "Error Message Codes," page 20.
N Alphanumeric
message Returned when an error occurs. This is a plain text errormessage and can be an element within the fields. Thisfield can also appear with the fields JSON object.
N Alphanumeric
localizationKey Returned when an error occurs. An unique key whichrepresents the error message and can be an elementwithin fields. See "Error Message Codes," page 20.This field can also appear with the JSON object.
N Alphanumeric
Table 4 Response Payload (Continued)
Variable Description Always Returned?
Format
Account Updater | March 2018 17
Chapter 2 REST API Batch Updates
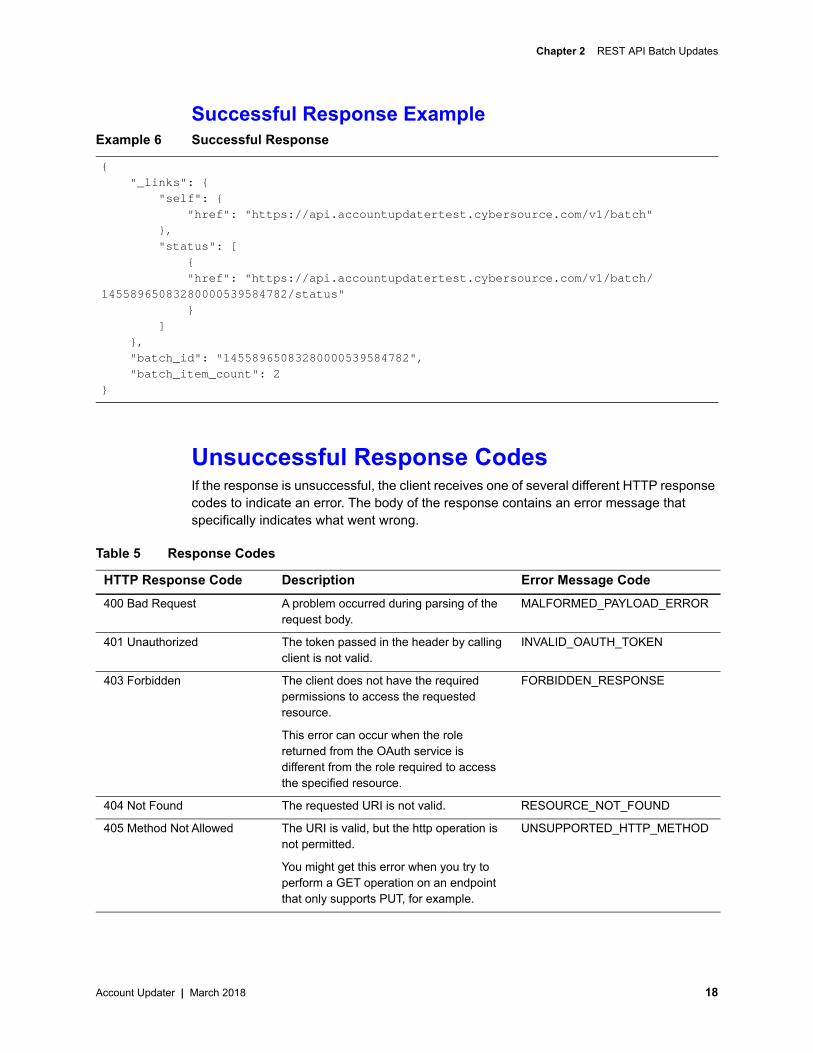
Successful Response ExampleExample 6 Successful Response
Unsuccessful Response CodesIf the response is unsuccessful, the client receives one of several different HTTP response codes to indicate an error. The body of the response contains an error message that specifically indicates what went wrong.
{ "_links": { "self": { "href": "https://api.accountupdatertest.cybersource.com/v1/batch" }, "status": [ { "href": "https://api.accountupdatertest.cybersource.com/v1/batch/ 14558965083280000539584782/status" } ] }, "batch_id": "14558965083280000539584782", "batch_item_count": 2}
Table 5 Response Codes
HTTP Response Code Description Error Message Code400 Bad Request A problem occurred during parsing of the
request body.MALFORMED_PAYLOAD_ERROR
401 Unauthorized The token passed in the header by calling client is not valid.
INVALID_OAUTH_TOKEN
403 Forbidden The client does not have the required permissions to access the requested resource.
This error can occur when the role returned from the OAuth service is different from the role required to access the specified resource.
FORBIDDEN_RESPONSE
404 Not Found The requested URI is not valid. RESOURCE_NOT_FOUND
405 Method Not Allowed The URI is valid, but the http operation is not permitted.
You might get this error when you try to perform a GET operation on an endpoint that only supports PUT, for example.
UNSUPPORTED_HTTP_METHOD
Account Updater | March 2018 18
Chapter 2 REST API Batch Updates
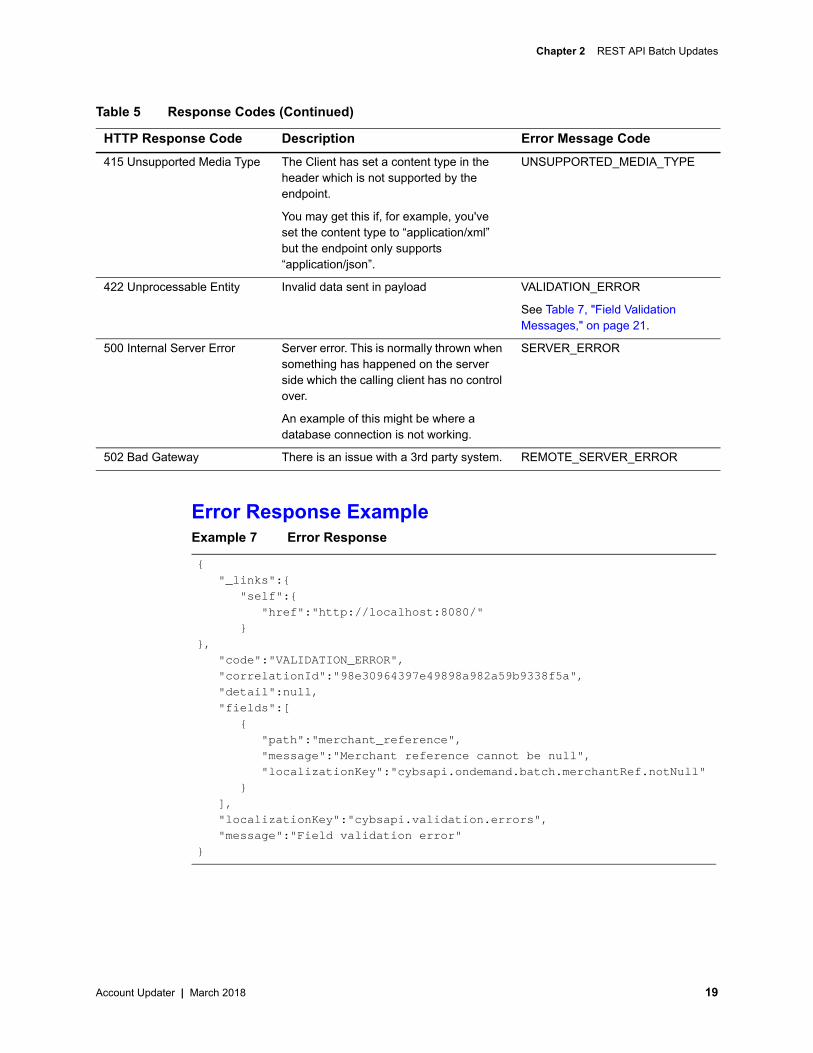
Error Response ExampleExample 7 Error Response
415 Unsupported Media Type The Client has set a content type in the header which is not supported by the endpoint.
You may get this if, for example, you've set the content type to “application/xml” but the endpoint only supports “application/json”.
UNSUPPORTED_MEDIA_TYPE
422 Unprocessable Entity Invalid data sent in payload VALIDATION_ERROR
See Table 7, "Field Validation Messages," on page 21.
500 Internal Server Error Server error. This is normally thrown when something has happened on the server side which the calling client has no control over.
An example of this might be where a database connection is not working.
SERVER_ERROR
502 Bad Gateway There is an issue with a 3rd party system. REMOTE_SERVER_ERROR
Table 5 Response Codes (Continued)
HTTP Response Code Description Error Message Code
{ "_links":{ "self":{ "href":"http://localhost:8080/" }}, "code":"VALIDATION_ERROR", "correlationId":"98e30964397e49898a982a59b9338f5a", "detail":null, "fields":[ { "path":"merchant_reference", "message":"Merchant reference cannot be null", "localizationKey":"cybsapi.ondemand.batch.merchantRef.notNull" } ], "localizationKey":"cybsapi.validation.errors", "message":"Field validation error"}
Account Updater | March 2018 19
Chapter 2 REST API Batch Updates
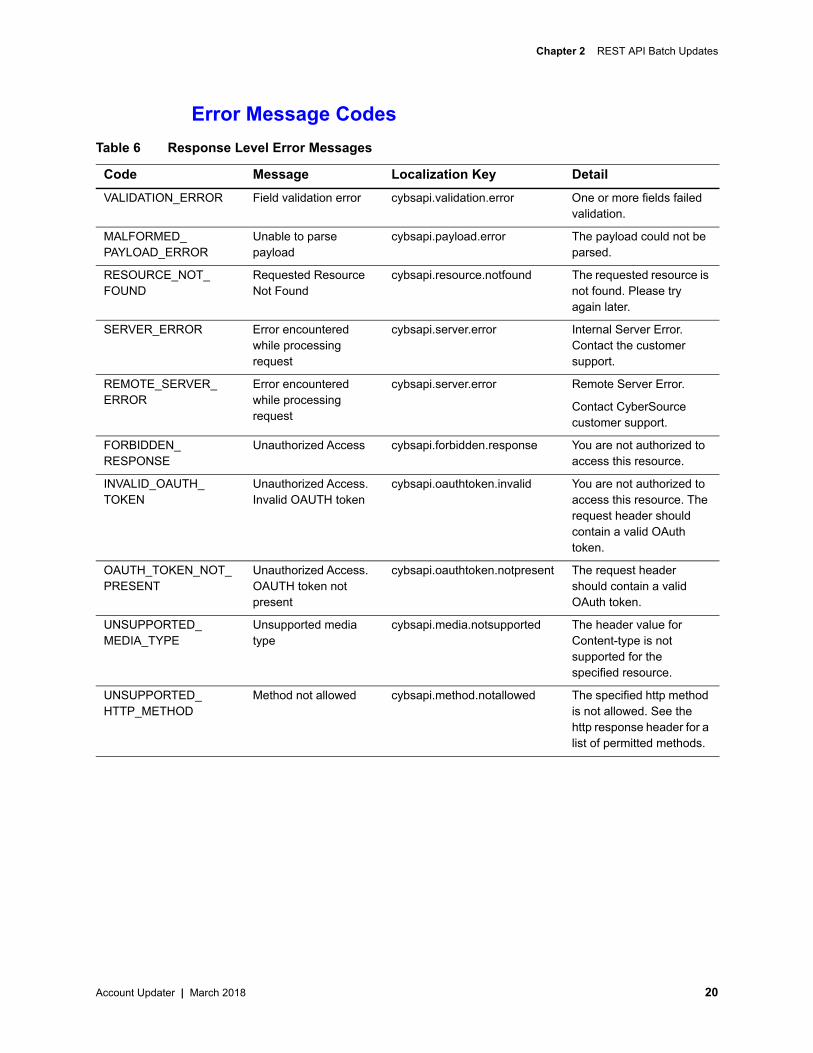
Error Message CodesTable 6 Response Level Error Messages
Code Message Localization Key DetailVALIDATION_ERROR Field validation error cybsapi.validation.error One or more fields failed
validation.
MALFORMED_PAYLOAD_ERROR
Unable to parse payload
cybsapi.payload.error The payload could not be parsed.
RESOURCE_NOT_FOUND
Requested Resource Not Found
cybsapi.resource.notfound The requested resource is not found. Please try again later.
SERVER_ERROR Error encountered while processing request
cybsapi.server.error Internal Server Error. Contact the customer support.
REMOTE_SERVER_ERROR
Error encountered while processing request
cybsapi.server.error Remote Server Error.
Contact CyberSource customer support.
FORBIDDEN_RESPONSE
Unauthorized Access cybsapi.forbidden.response You are not authorized to access this resource.
INVALID_OAUTH_TOKEN
Unauthorized Access. Invalid OAUTH token
cybsapi.oauthtoken.invalid You are not authorized to access this resource. The request header should contain a valid OAuth token.
OAUTH_TOKEN_NOT_PRESENT
Unauthorized Access. OAUTH token not present
cybsapi.oauthtoken.notpresent The request header should contain a valid OAuth token.
UNSUPPORTED_MEDIA_TYPE
Unsupported media type
cybsapi.media.notsupported The header value for Content-type is not supported for the specified resource.
UNSUPPORTED_HTTP_METHOD
Method not allowed cybsapi.method.notallowed The specified http method is not allowed. See the http response header for a list of permitted methods.
Account Updater | March 2018 20
Chapter 2 REST API Batch Updates
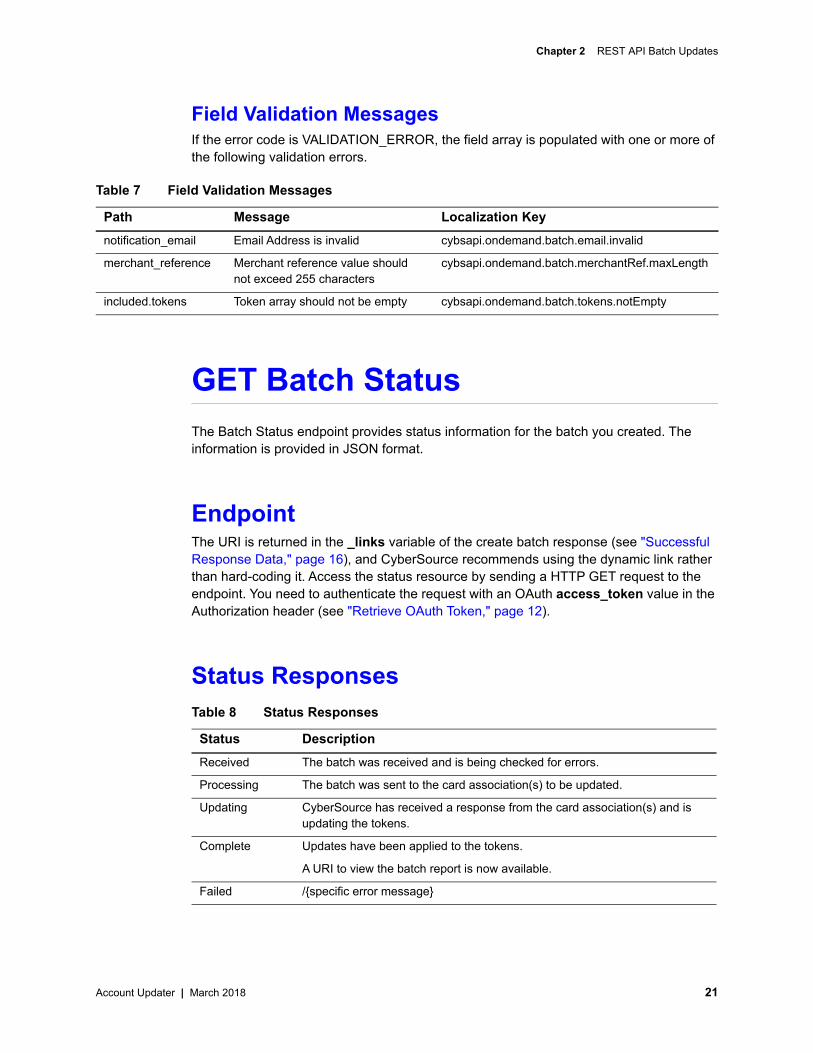
Field Validation MessagesIf the error code is VALIDATION_ERROR, the field array is populated with one or more of the following validation errors.
GET Batch StatusThe Batch Status endpoint provides status information for the batch you created. The information is provided in JSON format.
EndpointThe URI is returned in the _links variable of the create batch response (see "Successful Response Data," page 16), and CyberSource recommends using the dynamic link rather than hard-coding it. Access the status resource by sending a HTTP GET request to the endpoint. You need to authenticate the request with an OAuth access_token value in the Authorization header (see "Retrieve OAuth Token," page 12).
Status Responses
Table 7 Field Validation Messages
Path Message Localization Keynotification_email Email Address is invalid cybsapi.ondemand.batch.email.invalid
merchant_reference Merchant reference value should not exceed 255 characters
cybsapi.ondemand.batch.merchantRef.maxLength
included.tokens Token array should not be empty cybsapi.ondemand.batch.tokens.notEmpty
Table 8 Status Responses
Status DescriptionReceived The batch was received and is being checked for errors.
Processing The batch was sent to the card association(s) to be updated.
Updating CyberSource has received a response from the card association(s) and is updating the tokens.
Complete Updates have been applied to the tokens.
A URI to view the batch report is now available.
Failed /{specific error message}
Account Updater | March 2018 21
Chapter 2 REST API Batch Updates
t"
",
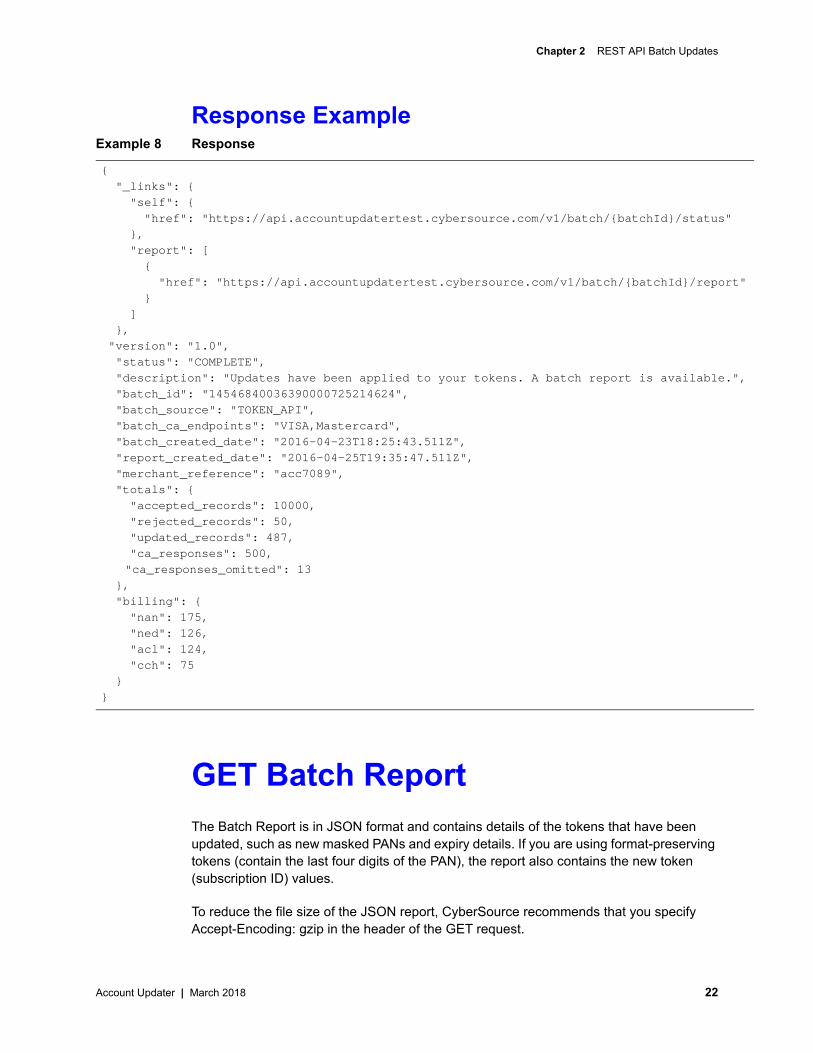
Response ExampleExample 8 Response
GET Batch ReportThe Batch Report is in JSON format and contains details of the tokens that have been updated, such as new masked PANs and expiry details. If you are using format-preserving tokens (contain the last four digits of the PAN), the report also contains the new token (subscription ID) values.
To reduce the file size of the JSON report, CyberSource recommends that you specify Accept-Encoding: gzip in the header of the GET request.
{ "_links": { "self": { "href": "https://api.accountupdatertest.cybersource.com/v1/batch/{batchId}/status" }, "report": [ { "href": "https://api.accountupdatertest.cybersource.com/v1/batch/{batchId}/repor } ] }, "version": "1.0", "status": "COMPLETE", "description": "Updates have been applied to your tokens. A batch report is available. "batch_id": "14546840036390000725214624", "batch_source": "TOKEN_API", "batch_ca_endpoints": "VISA,Mastercard", "batch_created_date": "2016-04-23T18:25:43.511Z", "report_created_date": "2016-04-25T19:35:47.511Z", "merchant_reference": "acc7089", "totals": { "accepted_records": 10000, "rejected_records": 50, "updated_records": 487, "ca_responses": 500,
"ca_responses_omitted": 13 }, "billing": { "nan": 175, "ned": 126, "acl": 124, "cch": 75 }}
Account Updater | March 2018 22
Chapter 2 REST API Batch Updates
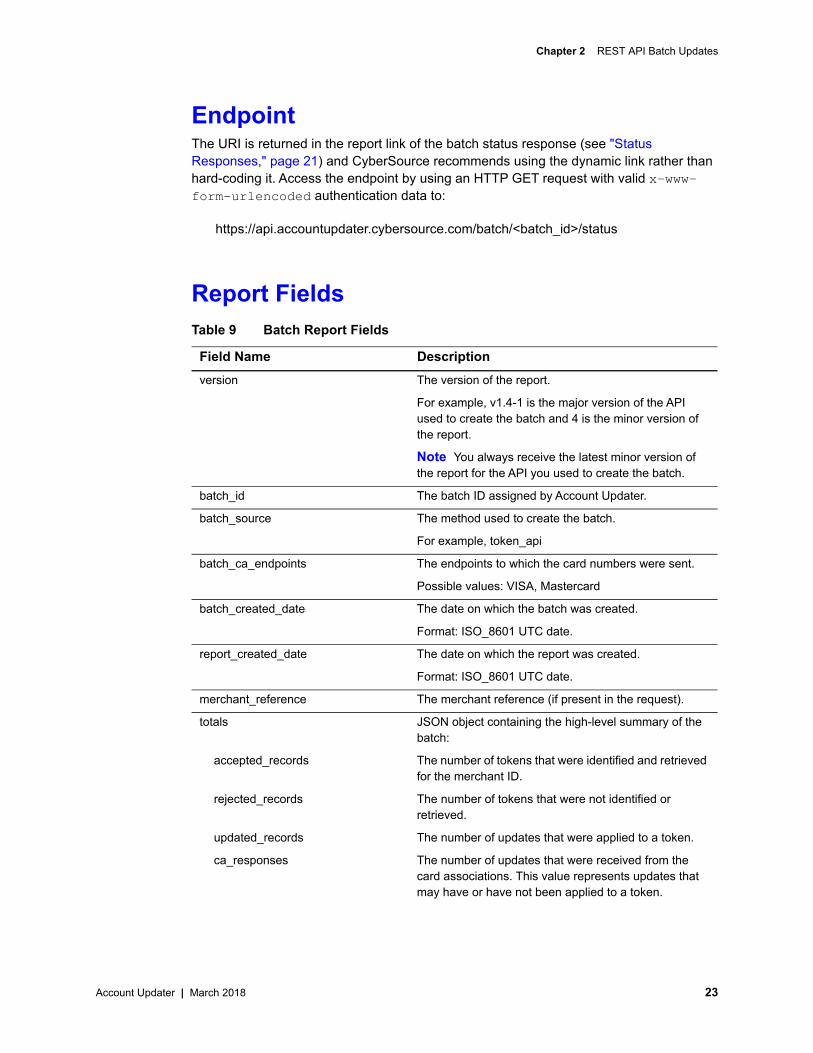
EndpointThe URI is returned in the report link of the batch status response (see "Status Responses," page 21) and CyberSource recommends using the dynamic link rather than hard-coding it. Access the endpoint by using an HTTP GET request with valid x-www-form-urlencoded authentication data to:
https://api.accountupdater.cybersource.com/batch/<batch_id>/status
Report FieldsTable 9 Batch Report Fields
Field Name Descriptionversion The version of the report.
For example, v1.4-1 is the major version of the API used to create the batch and 4 is the minor version of the report.
Note You always receive the latest minor version of the report for the API you used to create the batch.
batch_id The batch ID assigned by Account Updater.
batch_source The method used to create the batch.
For example, token_api
batch_ca_endpoints The endpoints to which the card numbers were sent.
Possible values: VISA, Mastercard
batch_created_date The date on which the batch was created.
Format: ISO_8601 UTC date.
report_created_date The date on which the report was created.
Format: ISO_8601 UTC date.
merchant_reference The merchant reference (if present in the request).
totals JSON object containing the high-level summary of the batch:
accepted_records The number of tokens that were identified and retrieved for the merchant ID.
rejected_records The number of tokens that were not identified or retrieved.
updated_records The number of updates that were applied to a token.
ca_responses The number of updates that were received from the card associations. This value represents updates that may have or have not been applied to a token.
Account Updater | March 2018 23
Chapter 2 REST API Batch Updates
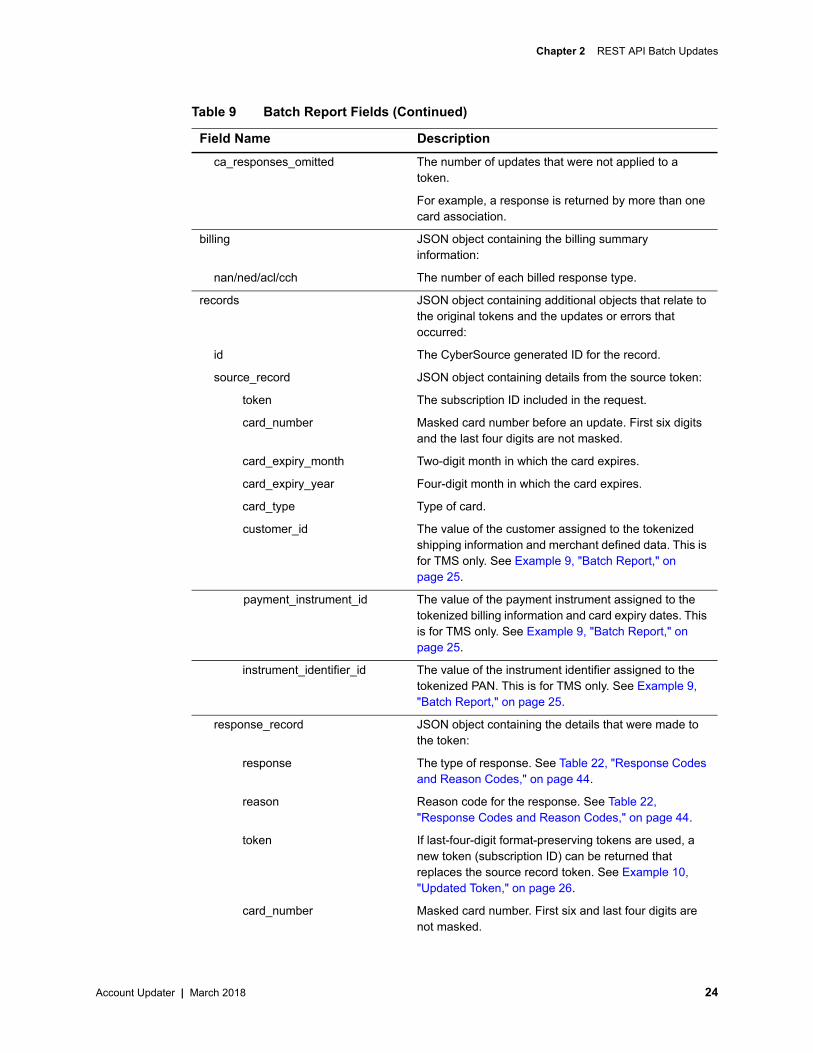
ca_responses_omitted The number of updates that were not applied to a token.
For example, a response is returned by more than one card association.
billing JSON object containing the billing summary information:
nan/ned/acl/cch The number of each billed response type.
records JSON object containing additional objects that relate to the original tokens and the updates or errors that occurred:
id The CyberSource generated ID for the record.
source_record JSON object containing details from the source token:
token The subscription ID included in the request.
card_number Masked card number before an update. First six digits and the last four digits are not masked.
card_expiry_month Two-digit month in which the card expires.
card_expiry_year Four-digit month in which the card expires.
card_type Type of card.
customer_id The value of the customer assigned to the tokenized shipping information and merchant defined data. This is for TMS only. See Example 9, "Batch Report," on page 25.
payment_instrument_id The value of the payment instrument assigned to the tokenized billing information and card expiry dates. This is for TMS only. See Example 9, "Batch Report," on page 25.
instrument_identifier_id The value of the instrument identifier assigned to the tokenized PAN. This is for TMS only. See Example 9, "Batch Report," on page 25.
response_record JSON object containing the details that were made to the token:
response The type of response. See Table 22, "Response Codes and Reason Codes," on page 44.
reason Reason code for the response. See Table 22, "Response Codes and Reason Codes," on page 44.
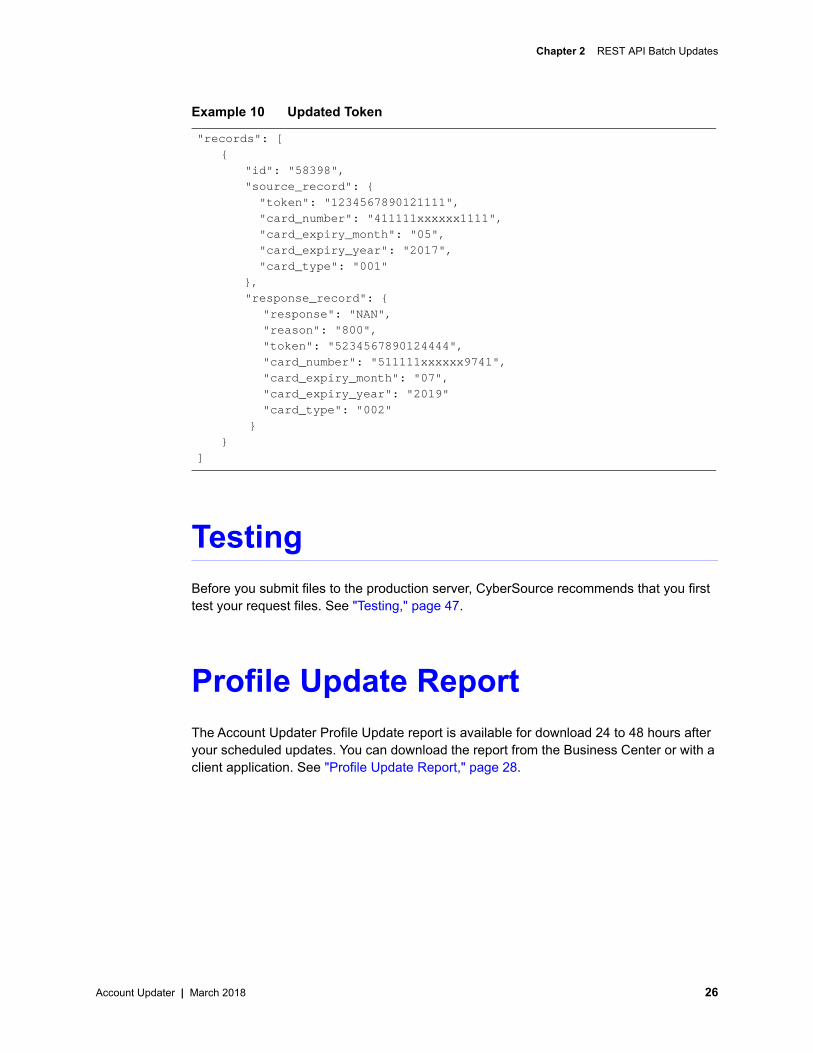
token If last-four-digit format-preserving tokens are used, a new token (subscription ID) can be returned that replaces the source record token. See Example 10, "Updated Token," on page 26.
card_number Masked card number. First six and last four digits are not masked.
Table 9 Batch Report Fields (Continued)
Field Name Description
Account Updater | March 2018 24
Chapter 2 REST API Batch Updates
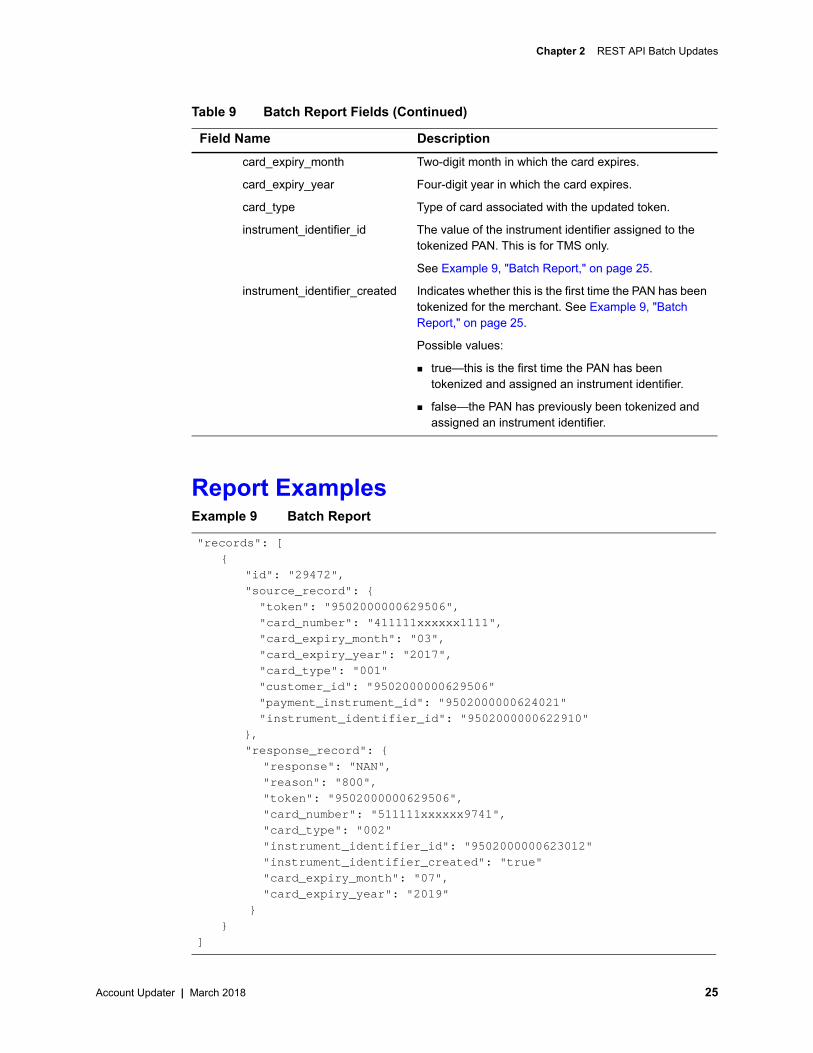
Report ExamplesExample 9 Batch Report
card_expiry_month Two-digit month in which the card expires.
card_expiry_year Four-digit year in which the card expires.
card_type Type of card associated with the updated token.
instrument_identifier_id The value of the instrument identifier assigned to the tokenized PAN. This is for TMS only.
See Example 9, "Batch Report," on page 25.
instrument_identifier_created Indicates whether this is the first time the PAN has been tokenized for the merchant. See Example 9, "Batch Report," on page 25.
Possible values:
true—this is the first time the PAN has been tokenized and assigned an instrument identifier.
false—the PAN has previously been tokenized and assigned an instrument identifier.
"records": [{
"id": "29472","source_record": {
"token": "9502000000629506","card_number": "411111xxxxxx1111","card_expiry_month": "03","card_expiry_year": "2017","card_type": "001""customer_id": "9502000000629506""payment_instrument_id": "9502000000624021""instrument_identifier_id": "9502000000622910"
},"response_record": {
"response": "NAN","reason": "800","token": "9502000000629506","card_number": "511111xxxxxx9741","card_type": "002""instrument_identifier_id": "9502000000623012""instrument_identifier_created": "true""card_expiry_month": "07","card_expiry_year": "2019"
}}
]
Table 9 Batch Report Fields (Continued)
Field Name Description
Account Updater | March 2018 25
Chapter 2 REST API Batch Updates
Example 10 Updated Token
TestingBefore you submit files to the production server, CyberSource recommends that you first test your request files. See "Testing," page 47.
Profile Update ReportThe Account Updater Profile Update report is available for download 24 to 48 hours after your scheduled updates. You can download the report from the Business Center or with a client application. See "Profile Update Report," page 28.
"records": [{
"id": "58398","source_record": {
"token": "1234567890121111","card_number": "411111xxxxxx1111","card_expiry_month": "05","card_expiry_year": "2017","card_type": "001"
},"response_record": {
"response": "NAN","reason": "800","token": "5234567890124444","card_number": "511111xxxxxx9741","card_expiry_month": "07","card_expiry_year": "2019""card_type": "002"
}}
]
Account Updater | March 2018 26

Account Updater | March 2018
HAP
TER
C
3
Harvest UpdatesCyberSource Account Updater is integrated with the Recurring Billing and Payment Tokenization functionality so that your customer subscriptions or profiles are automatically kept up to date with the latest credit card data changes.
After your enrollment forms are processed, CyberSource:
1 Configures your account to automatically update your customer subscriptions or profiles once per month with updated credit card data. These updates can include a new expiration date, a new credit card number, or a brand change such as a change from Visa to Mastercard.
2 Requests updates only for customer subscriptions or profiles with a status of active or on-hold. Updates for customer subscriptions or profiles with a status of completed or cancelled are not requested.
3 Generates the Profile Update Report (see "Profile Update Report," page 28), which can be downloaded by logging in to the Business Center or by using a client application.
To have your customer subscriptions or profiles updated on a particular day of the month to coincide with your billing cycle, contact Customer Support.
Important
You must enroll in Account Updater and comply with the Terms of Use (see "Terms of Use," page 11).
Note
It is best practice to request updates for your customer subscriptions or profiles 3 to 5 days before your billing cycle begins. You can choose any calendar day, 1 through 28.
27
Chapter 3 Harvest Updates
Profile Update ReportThe Account Updater Profile Update report is available for download 24 to 48 hours after your scheduled updates. You can download the report from the Business Center or with a client application.
To download the Profile Update report:
Step 1 Log in to the Business Center:
Live transactions: https://ebc.cybersource.com Test transactions: https://ebctest.cybersource.com
Step 2 In the left navigation panel, choose Reports > Report Search. The Report Search window appears.
Step 3 From the Report drop-down list, choose All.
Step 4 From the Frequency drop-down list, choose Daily.
Step 5 Choose the day that your reports were processed.
Step 6 Click Submit. The report is listed in the Downloadable Reports table.
Step 7 Click the Download link next to the report name.
To connect to the report server, your client application must support HTTPS connections:
HTTP/1.0 or HTTP/1.1 TLS 1.2 or later
Your client application must use Basic Access Authentication to send the username and password. Many HTTPS client libraries implement this authentication method. For more information about Basic Access Authentication, see:
http://www.ietf.org/rfc/rfc2617.txt
To request a report, your client application must send an HTTP GET message to the report server. Use this URL format for the request:https://<server_name>/DownloadReport/YYYY/MM/DD/<merchant_ID>/<report_name>.<report_format>
Account Updater | March 2018 28
Chapter 3 Harvest Updates
Profile Update Report Records
Header Records
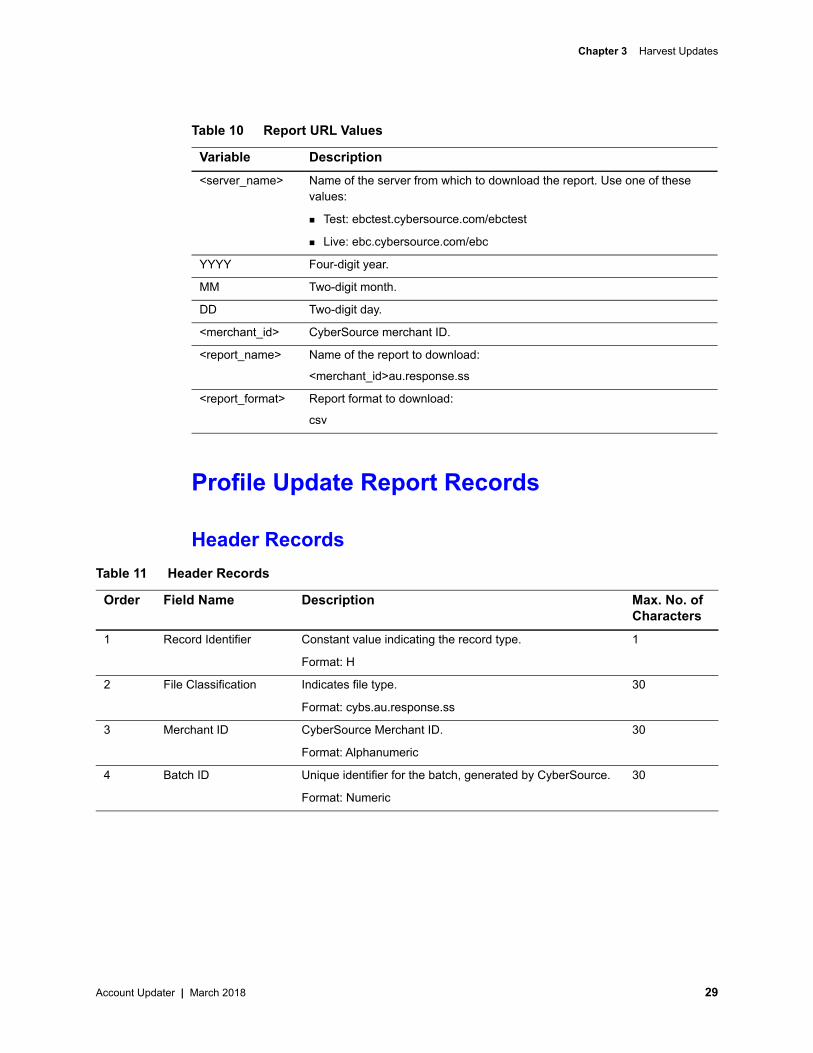
Table 10 Report URL Values
Variable Description<server_name> Name of the server from which to download the report. Use one of these
values:
Test: ebctest.cybersource.com/ebctest
Live: ebc.cybersource.com/ebc
YYYY Four-digit year.
MM Two-digit month.
DD Two-digit day.
<merchant_id> CyberSource merchant ID.
<report_name> Name of the report to download:
<merchant_id>au.response.ss
<report_format> Report format to download:
csv
Table 11 Header Records
Order Field Name Description Max. No. of Characters
1 Record Identifier Constant value indicating the record type.
Format: H
1
2 File Classification Indicates file type.
Format: cybs.au.response.ss
30
3 Merchant ID CyberSource Merchant ID.
Format: Alphanumeric
30
4 Batch ID Unique identifier for the batch, generated by CyberSource.
Format: Numeric
30
Account Updater | March 2018 29
Chapter 3 Harvest Updates
Details Records
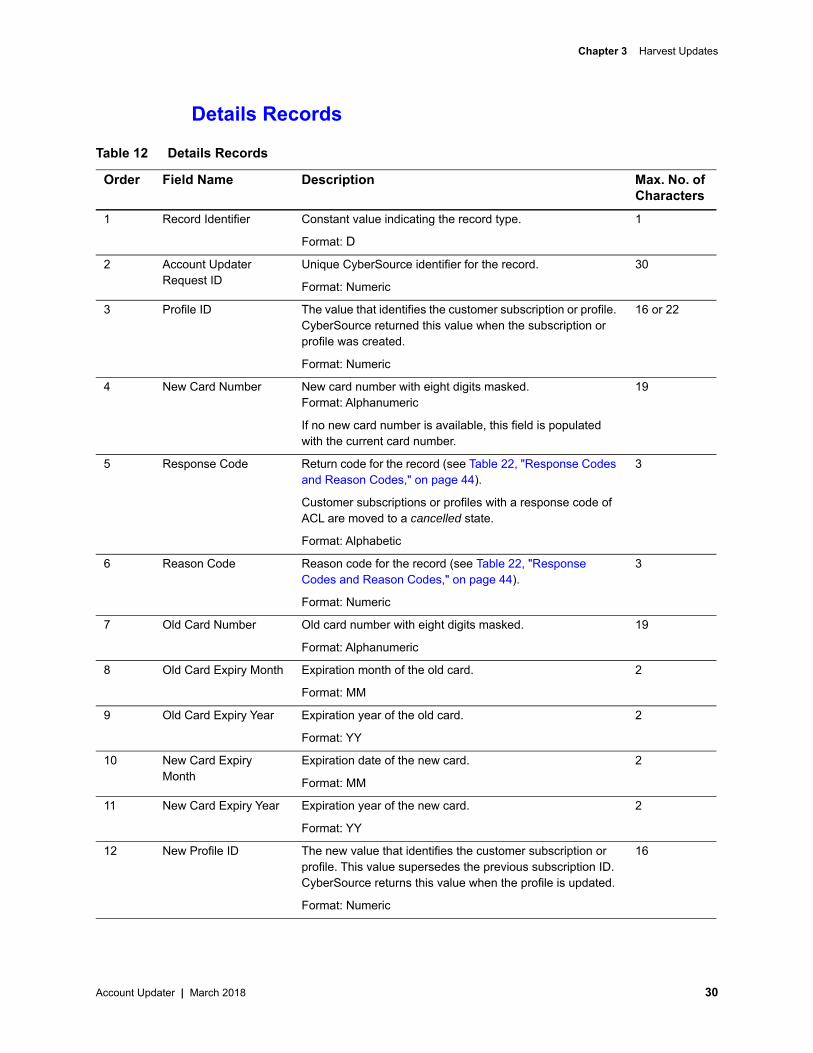
Table 12 Details Records
Order Field Name Description Max. No. of Characters
1 Record Identifier Constant value indicating the record type.
Format: D
1
2 Account Updater Request ID
Unique CyberSource identifier for the record.
Format: Numeric
30
3 Profile ID The value that identifies the customer subscription or profile. CyberSource returned this value when the subscription or profile was created.
Format: Numeric
16 or 22
4 New Card Number New card number with eight digits masked.Format: Alphanumeric
If no new card number is available, this field is populated with the current card number.
19
5 Response Code Return code for the record (see Table 22, "Response Codes and Reason Codes," on page 44).
Customer subscriptions or profiles with a response code of ACL are moved to a cancelled state.
Format: Alphabetic
3
6 Reason Code Reason code for the record (see Table 22, "Response Codes and Reason Codes," on page 44).
Format: Numeric
3
7 Old Card Number Old card number with eight digits masked.
Format: Alphanumeric
19
8 Old Card Expiry Month Expiration month of the old card.
Format: MM
2
9 Old Card Expiry Year Expiration year of the old card.
Format: YY
2
10 New Card Expiry Month
Expiration date of the new card.
Format: MM
2
11 New Card Expiry Year Expiration year of the new card.
Format: YY
2
12 New Profile ID The new value that identifies the customer subscription or profile. This value supersedes the previous subscription ID. CyberSource returns this value when the profile is updated.
Format: Numeric
16
Account Updater | March 2018 30

Chapter 3 Harvest Updates
Footer Records
Table 13 Footer Records
Order Field Name Description Max. No. of Characters
1 Record Identifier Constant value indicating the record type.
Format: F
1
2 Record Count The number of detail records in the file.
Format: Numeric
—
3 Response Code Indicates the overall response (see Table 23, "Response Codes and Reason Codes," on page 46).
Format: Alphabetic
Possible value:
COM: Completed
3
4 Reason Code Indicates the overall reason for the response code (see Table 23, "Response Codes and Reason Codes," on page 46).
Format: Numeric
3
Account Updater | March 2018 31
Account Updater | March 2018
HAP
TER
C
4
PAN Upload UpdatesAfter the syntax of the request file is validated, CyberSource begins processing the file.
Account Updater files are processed once per day. You can expect your response file to be available 24-48 hours after you submit your request file. CyberSource recommends sending your Account Updater request file 3 to 5 days before your billing cycle starts to ensure that your file completes processing and that you have enough time to update your data store.
Responses from Visa and Mastercard are consolidated and returned in an encrypted response file. See "Response File Records," page 40.
Creating Security KeysTo upload PAN updates you must create two types of security keys: a transaction security key and a PGP public/private key pair.
Transaction Security KeyYou must use the transaction security key to programmatically connect to CyberSource and upload request files.
If you use the Simple Order API to process transactions, you can use the same key for Account Updater.
If you have been using the SCMP API to process transactions, you must create a transaction security key that works with the Simple Order API. See “Simple Order API Security Keys” in Creating and Using Security Keys.
Important
You must enroll in Account Updater and comply with the Terms of Use. See "Terms of Use," page 11.
32
Chapter 4 PAN Upload Updates
PGP Public/Private Key PairPGP public/private key pair is used to protect, by encryption, credit card data contained in the response files. The key pair contains both a public and a private key. You exchange the public part of this key pair with CyberSource, who uses it to encrypt the response files. You maintain the private part of the key pair to decrypt the response file.
To create a PGP key pair for encrypting and decrypting credit card data, see “PGP Security Keys” in Creating and Using Security Keys.
Formatting a Request FileAccount Updater request files must be in CSV format with a maximum file size of 10 MB.
The format for a request file consists of: A header record. A detail record with one or more data records, each on a separate line.
A footer record, which indicates the end of the file.
Header RecordThe header record consists of comma-separated values and uses the fields listed in the following table:
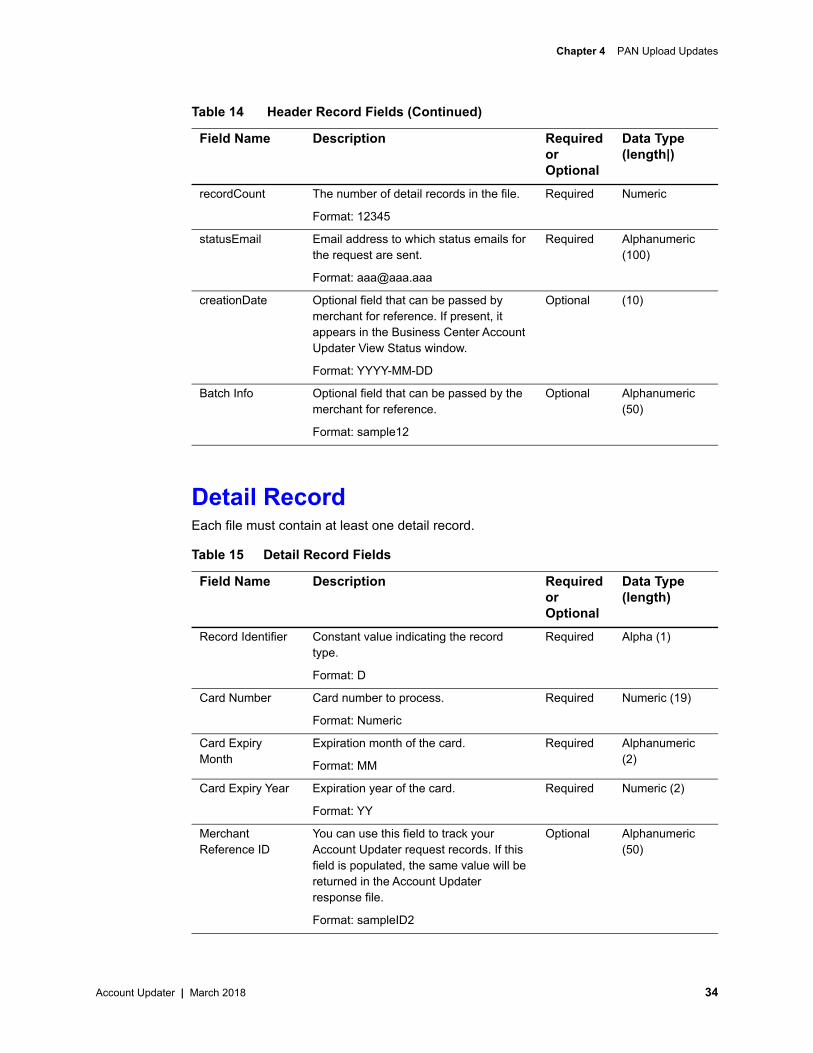
Table 14 Header Record Fields
Field Name Description Required or Optional
Data Type (length|)
Record Identifier Constant value indicating the record type.
Format: H
Required Alpha (1)
File Classification Indicates whether this is a request or response file.
Format: cybs.au.request.pan
Required Alpha (30)
merchantID Your CyberSource merchant ID.
Format: sampleID2
Required Alphanumeric (30)
batchID File (batch) identifier that you assign. The batch ID must be unique. If you send a file that contains a previously submitted batch ID, the file is rejected.
Format: 12345
Required Numeric (30)
Account Updater | March 2018 33
Chapter 4 PAN Upload Updates
Detail RecordEach file must contain at least one detail record.
recordCount The number of detail records in the file.
Format: 12345
Required Numeric
statusEmail Email address to which status emails for the request are sent.
Format: [email protected]
Required Alphanumeric (100)
creationDate Optional field that can be passed by merchant for reference. If present, it appears in the Business Center Account Updater View Status window.
Format: YYYY-MM-DD
Optional (10)
Batch Info Optional field that can be passed by the merchant for reference.
Format: sample12
Optional Alphanumeric (50)
Table 15 Detail Record Fields
Field Name Description Required or Optional
Data Type (length)
Record Identifier Constant value indicating the record type.
Format: D
Required Alpha (1)
Card Number Card number to process.
Format: Numeric
Required Numeric (19)
Card Expiry Month
Expiration month of the card.
Format: MM
Required Alphanumeric (2)
Card Expiry Year Expiration year of the card.
Format: YY
Required Numeric (2)
Merchant Reference ID
You can use this field to track your Account Updater request records. If this field is populated, the same value will be returned in the Account Updater response file.
Format: sampleID2
Optional Alphanumeric (50)
Table 14 Header Record Fields (Continued)
Field Name Description Required or Optional
Data Type (length|)
Account Updater | March 2018 34

Chapter 4 PAN Upload Updates
Footer RecordEach file should contain only one footer record.
Request File Examples
BA Sub Merchant ID*
This field is required for billing aggregator merchants only.
Format: sampleID2
Optional Alphanumeric (10)
Table 16 Footer Record Field
Field Name Description Required or Optional
Data Type (length)
Record Identifier Constant value indicating the record type.
Format: F
Required Alpha (1)
Table 15 Detail Record Fields (Continued)
Field Name Description Required or Optional
Data Type (length)
Example 11 Request File for Non-Billing Aggregator Merchants
H,cybs.au.request.pan,merchant1,001,2,[email protected],2009-03-23,My Jan BatchD,1111222233334444,11,09,0001D,2222333344445555,11,09,0002F
Example 12 Request File for Billing Aggregator Merchants
H,cybs.au.request.pan,merchant1,001,2,[email protected],2009-03-23,My Jan BatchD,1111222233334444,11,09,0001,subId01D,2222333344445555,11,09,0002,subId02F
Account Updater | March 2018 35
Chapter 4 PAN Upload Updates
Uploading a Request File
To upload the request file, use HTTPS. Your client application must support HTTP/1.0 or HTTP/1.1 and TLS 1.2 or later.
To access the Account Updater URL, you must provide the same Simple Order API client certificate that you use to request regular individual ICS Simple Order API transactions. The client certificate is stored in a PKCS12 file named <merchantID>.p12 and is protected by a single password.
Before you submit files to the production server, CyberSource recommends that you first test your request files. Follow the instructions in "Testing," page 47.
Use the following URLs for submitting test and live Account Updater request files:
Testing:
https://accountupdatertest.cybersource.com/upload/UploadAccountUpdaterFile
Live:
https://accountupdater.cybersource.com/upload/UploadAccountUpdaterFile
See "Sample Java Code for Uploading Files," page 50, for more information on creating a client certificate to upload request files.
Email NotificationAfter you upload the request file, CyberSource validates the syntax and sends you a confirmation email indicating whether the file passed this stage of validation. You must specify an email address in the statusEmail header field in order to receive this confirmation email. If this field is left blank, you do not receive an email confirmation and you must go to the Business Center to view the status (see "Viewing the Batch File Status," page 37). CyberSource sends the email notification within 30 minutes of receipt of the request file. However, actual timing depends on the system load at the time of file submission.
Important
For each PAN you upload, you can receive multiple responses. For example, if you upload one Visa card for an update, you can receive both a Mastercard and Visa response, or two Visa responses.
Account Updater | March 2018 36
Chapter 4 PAN Upload Updates
The table below lists possible subject lines of the email notifications.
Viewing the Batch File Status
To view the status of a batch file in the Business Center:
Step 1 Log in to the Business Center: Live transactions: https://ebc.cybersource.com
Test transactions: https://ebctest.cybersource.com
Step 2 In the navigation pane, choose Tools & Settings > Credit Card Account Updater > Status. The Account Updater Status Search window appears.
Step 3 Choose the type of search: batch ID or date.
Table 17 Email Notifications
Subject Line ReasonReceived The Account Updater request file was received.
CyberSource processes the requests in the file. No action is required.
You can view the status of this request file in the Business Center. See "Viewing the Batch File Status," page 37.
Rejected The file was rejected.
Read the contents of the email and follow the suggested remedy.
You cannot view the status of this request file in the Business Center.
Validated The file passed validation.
You can view the status of this request file in the Business Center. See "Viewing the Batch File Status," page 37.
Declined The file did not pass validation checks. All records are declined.
Read the contents of the email and follow the suggested remedy.
You can view the status of this request file in the Business Center. See "Viewing the Batch File Status," page 37.
Processing The request file is being processed by Account Updater.
You can view the status of this request file in the Business Center. See "Viewing the Batch File Status," page 37.
Completed The response file has been generated and is ready for download.
You can view the status of this request file in the Business Center. See "Viewing the Batch File Status," page 37.
Account Updater | March 2018 37
Chapter 4 PAN Upload Updates
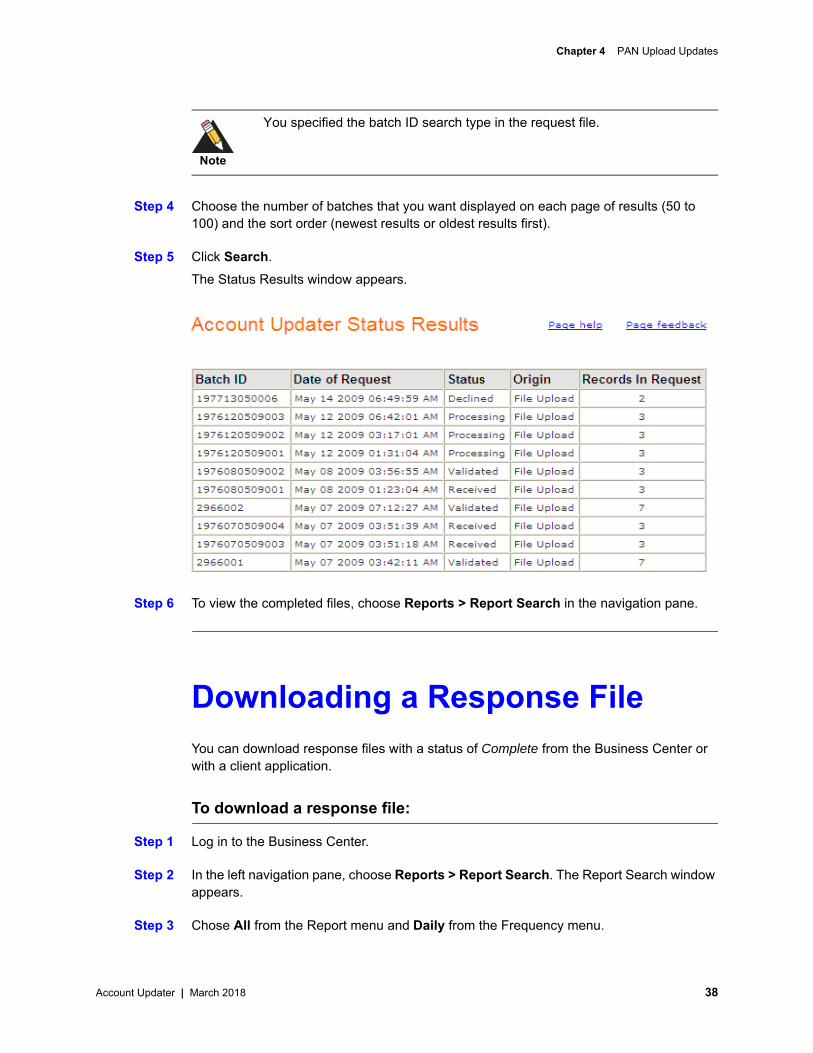
Step 4 Choose the number of batches that you want displayed on each page of results (50 to 100) and the sort order (newest results or oldest results first).
Step 5 Click Search.The Status Results window appears.
Step 6 To view the completed files, choose Reports > Report Search in the navigation pane.
Downloading a Response FileYou can download response files with a status of Complete from the Business Center or with a client application.
To download a response file:
Step 1 Log in to the Business Center.
Step 2 In the left navigation pane, choose Reports > Report Search. The Report Search window appears.
Step 3 Chose All from the Report menu and Daily from the Frequency menu.
Note
You specified the batch ID search type in the request file.
Account Updater | March 2018 38
Chapter 4 PAN Upload Updates
Step 4 Choose the day that your files were processed.
Step 5 Click Submit.The file appears in the Downloadable Reports table.
Step 6 Click the download link next to your file.Depending on your browser settings, the file either opens in your browser window, or you are prompted to save the file.
Step 7 You must use the private PGP key to decrypt files. You can do it using the same third-party software you used to create the keys.
To connect to the report server, your client application must support HTTPS connections:
HTTP/1.0 or HTTP/1.1 TLS 1.2 or later
Your client application must use Basic Access Authentication to send the username and password. Many HTTPS client libraries implement this authentication method. For more information about Basic Access Authentication, see:
http://www.ietf.org/rfc/rfc2617.txt
To send an API request with an HTML form or any script, include this endpoint: https://ebc.cybersource.com/ebc/DownloadReports
To request a response file, your client application must send an HTTP GET message to the report server. The URL that you specify in your message indicates which report you want to download.
Use the following format for the URL:https://<server_name>/DownloadReport/YYYY/MM/DD/<merchant_ID>/<report_name>.<report_format>
For example, if your merchant ID is sample, you would use the following URL to download the February 1, 2010 response file from the production system:
https://ebc.cybersource.com/ebc/DownloadReport/2010/02/01/sample/sample.1234.au.response.pan.csv
Note
If you do not activate the PGP public key in your CyberSource merchant account profile, the response file is not generated. See Creating and Using Security Keys (PDF | HTML).
Account Updater | March 2018 39
Chapter 4 PAN Upload Updates
The following table describes each value in the URL.
Response File RecordsThe response file is encrypted with the public part of the PGP Key that you generated and uploaded to CyberSource. To read a response file, you must decrypt it using the private part of the PGP key pair. You can do so with the same third-party software you used to create the keys.
The format for a request file consists of: A header record. A detail record with one or more data records, each on a separate line.
A footer record, which indicates the end of the file.
Table 18 Report URL Values
Value Description<server_name> Name of the server from which to download the report.
Use one of these values:
Test server: ebctest.cybersource.com/ebctest
Production server: ebc.cybersource.com/ebc
Test reports server: downloadreportstest.cybersource.com
Production reports server: downloadreports.cybersource.com
YYYY Four-digit year
MM Two-digit month
DD Two-digit day
<merchant_id> CyberSource merchant ID
<report_name> Name of the report to download: merchantID.batchID.au.response.pan
<report_format> Report format: csv
Account Updater | March 2018 40
Chapter 4 PAN Upload Updates
Header RecordThe header record consists of comma-separated values and uses the fields listed in the following table:
Detail RecordEach file contains at least one detail record.
Table 19 Header Record Fields
Field Name Description Required or Optional
Data Type (length)
Record Identifier Constant value indicating the record type.
Format: H
Required Alpha (1)
File Classification Indicates whether this is a request or response file, and the type of service.
Formats: cybs.au.response.pan
Required Alphanumeric (30)
MerchantID Your CyberSource merchant ID.
Format: Alphanumeric
Required Alphanumeric (30)
BatchID File (batch) identifier sent in the request file.
Format: Numeric
Required Numeric (30)
Table 20 Detail Record Fields
Field Name Description Data Type (length)
Record Identifier Constant value indicating the record type.
Format: D
Alpha (1)
Request ID Unique CyberSource identifier for the record.
Format: Numeric
Numeric (30)
Old Card Number Old card number with eight digits masked.
Format: Numeric
Numeric (19)
Old Card Expiration Month
Old expiration month.
Format: MM
Numeric (2)
Old Card Expiration Year
Old expiration year.
Format: YY
Numeric (2)
New Card Number New card number with eight digits masked.
Format: Numeric
Numeric (19)
New Card Expiration Month
New expiration month.
Format: MM
Numeric (2)
Account Updater | March 2018 41
Chapter 4 PAN Upload Updates
Footer RecordEach file contains only one footer record.
New Card Expiration Year
New expiration year.
Format: YY
Numeric (2)
Merchant Reference ID
This field is optional and is returned in the response if present in the request file.
Format: Alphanumeric
Alphanumeric
(50)
BA Sub Merchant ID This field is returned in the response if sent in the request file.
Format: Alphanumeric
Alphanumeric
(10)
Response Code Response code for the record. See Table 22, "Response Codes and Reason Codes," on page 44.
Format: Alpha
Alpha (3)
Reason Code Reason code for the record. See Table 22, "Response Codes and Reason Codes," on page 44.Format: Numeric
Numeric (3)
Table 21 Footer Record Fields
Field Name Description Data Type (length)
Record Identifier Constant value indicating the record type.
Format: F
Alpha (1)
Record Count The number of detail records in the file.
Format: Numeric
Numeric (10)
Response Code Response code for the file. See Table 23, "Response Codes and Reason Codes," on page 46.
Format: Alpha
Alpha (3)
Reason Code Reason code for the file. See Table 23, "Response Codes and Reason Codes," on page 46.
Format: Numeric
Numeric (3)
Table 20 Detail Record Fields (Continued)
Field Name Description Data Type (length)
Account Updater | March 2018 42
Chapter 4 PAN Upload Updates
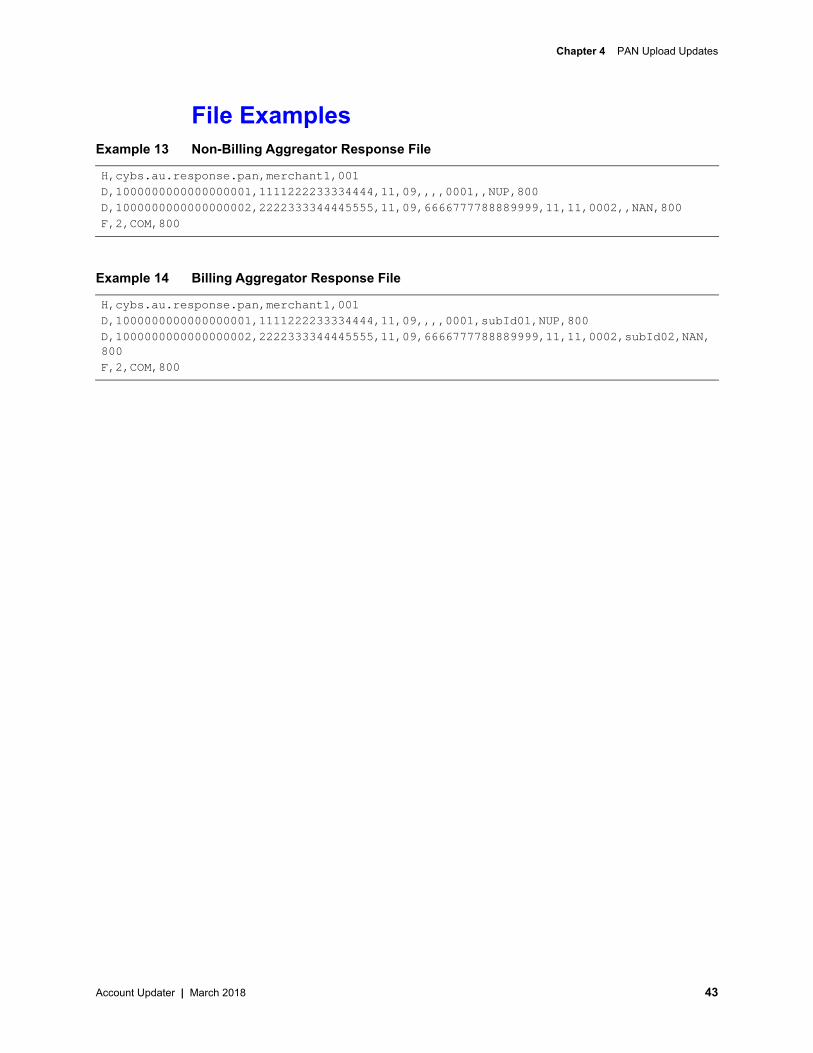
File ExamplesExample 13 Non-Billing Aggregator Response File
H,cybs.au.response.pan,merchant1,001D,1000000000000000001,1111222233334444,11,09,,,,0001,,NUP,800D,1000000000000000002,2222333344445555,11,09,6666777788889999,11,11,0002,,NAN,800F,2,COM,800
Example 14 Billing Aggregator Response File
H,cybs.au.response.pan,merchant1,001D,1000000000000000001,1111222233334444,11,09,,,,0001,subId01,NUP,800D,1000000000000000002,2222333344445555,11,09,6666777788889999,11,11,0002,subId02,NAN,800F,2,COM,800
Account Updater | March 2018 43
Account Updater | March 2018
HAP
TER
C
5
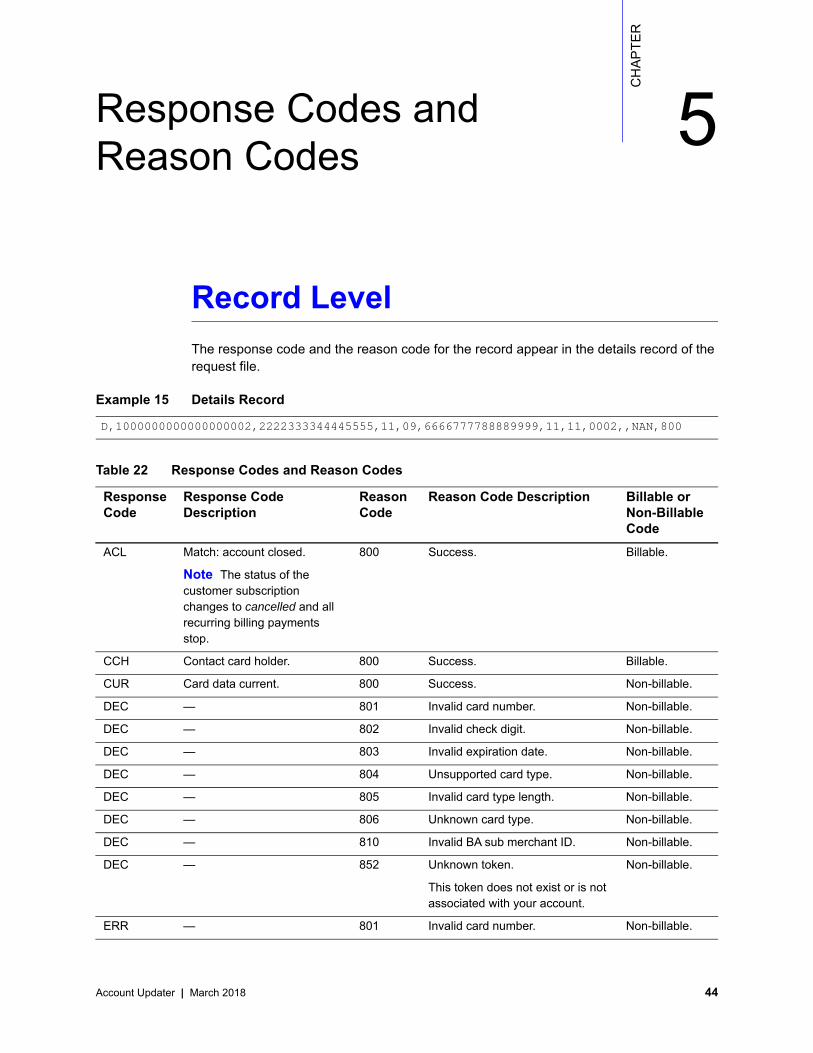
Response Codes and Reason CodesRecord LevelThe response code and the reason code for the record appear in the details record of the request file.
Example 15 Details Record
D,1000000000000000002,2222333344445555,11,09,6666777788889999,11,11,0002,,NAN,800
Table 22 Response Codes and Reason Codes
Response Code
Response Code Description
Reason Code
Reason Code Description Billable or Non-Billable Code
ACL Match: account closed.
Note The status of the customer subscription changes to cancelled and all recurring billing payments stop.
800 Success. Billable.
CCH Contact card holder. 800 Success. Billable.
CUR Card data current. 800 Success. Non-billable.
DEC — 801 Invalid card number. Non-billable.
DEC — 802 Invalid check digit. Non-billable.
DEC — 803 Invalid expiration date. Non-billable.
DEC — 804 Unsupported card type. Non-billable.
DEC — 805 Invalid card type length. Non-billable.
DEC — 806 Unknown card type. Non-billable.
DEC — 810 Invalid BA sub merchant ID. Non-billable.
DEC — 852 Unknown token.
This token does not exist or is not associated with your account.
Non-billable.
ERR — 801 Invalid card number. Non-billable.
44
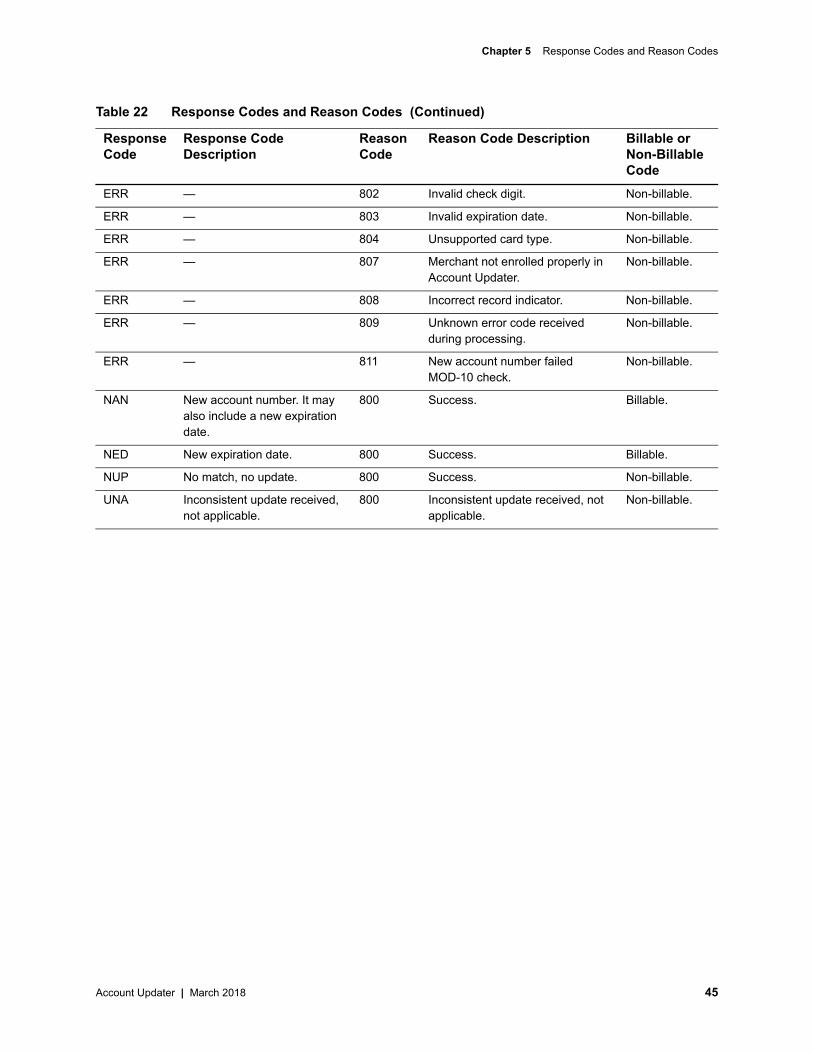
Chapter 5 Response Codes and Reason Codes
ERR — 802 Invalid check digit. Non-billable.
ERR — 803 Invalid expiration date. Non-billable.
ERR — 804 Unsupported card type. Non-billable.
ERR — 807 Merchant not enrolled properly in Account Updater.
Non-billable.
ERR — 808 Incorrect record indicator. Non-billable.
ERR — 809 Unknown error code received during processing.
Non-billable.
ERR — 811 New account number failed MOD-10 check.
Non-billable.
NAN New account number. It may also include a new expiration date.
800 Success. Billable.
NED New expiration date. 800 Success. Billable.
NUP No match, no update. 800 Success. Non-billable.
UNA Inconsistent update received, not applicable.
800 Inconsistent update received, not applicable.
Non-billable.
Table 22 Response Codes and Reason Codes (Continued)
Response Code
Response Code Description
Reason Code
Reason Code Description Billable or Non-Billable Code
Account Updater | March 2018 45
Chapter 5 Response Codes and Reason Codes
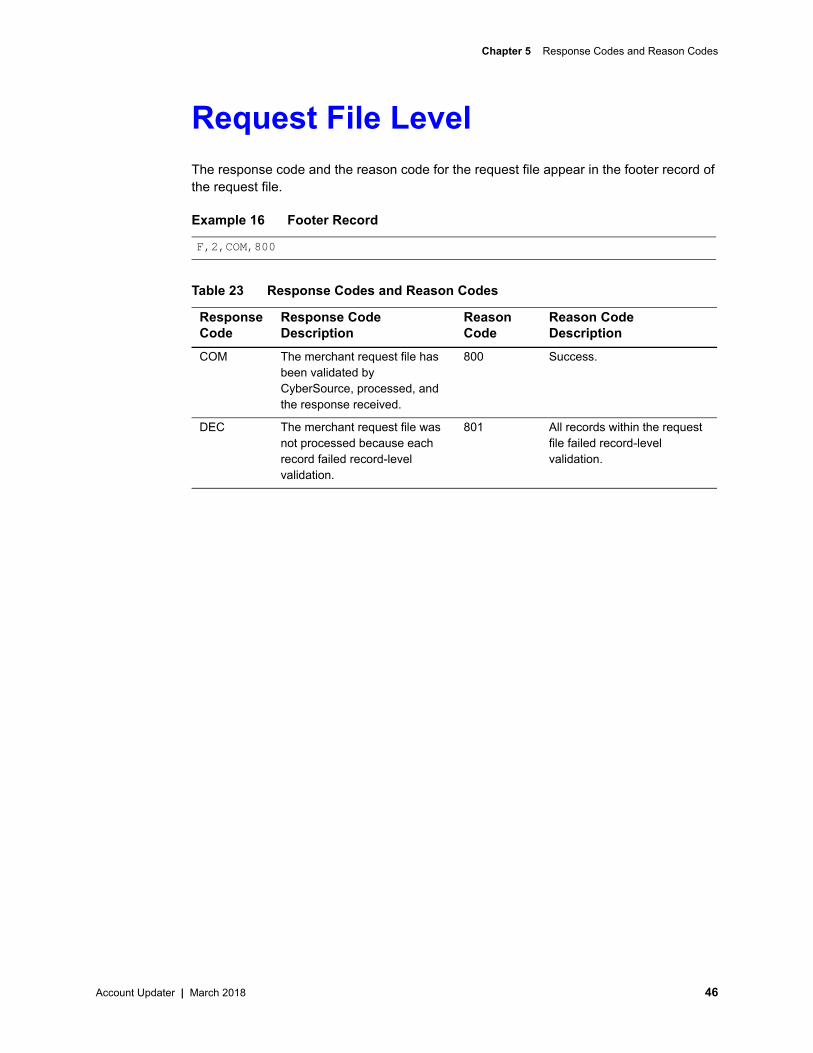
Request File LevelThe response code and the reason code for the request file appear in the footer record of the request file.
Example 16 Footer Record
F,2,COM,800
Table 23 Response Codes and Reason Codes
Response Code
Response Code Description
Reason Code
Reason Code Description
COM The merchant request file has been validated by CyberSource, processed, and the response received.
800 Success.
DEC The merchant request file was not processed because each record failed record-level validation.
801 All records within the request file failed record-level validation.
Account Updater | March 2018 46
Account Updater | March 2018
HAP
TER
C
6
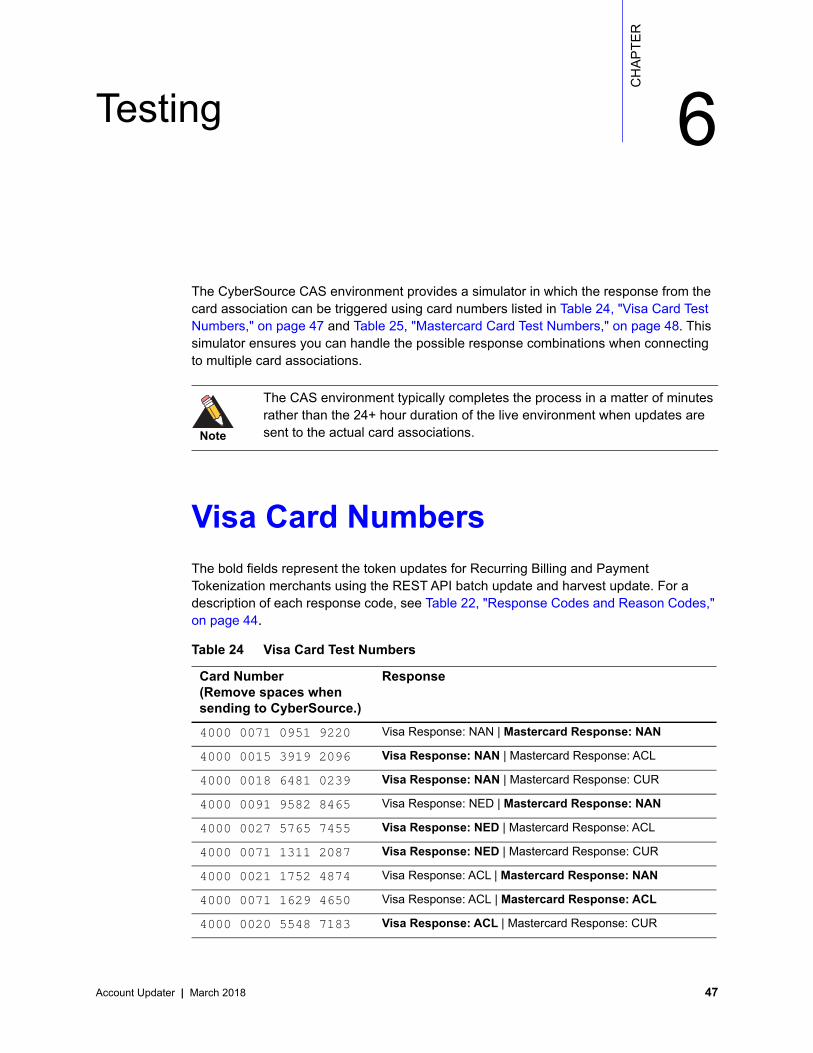
TestingThe CyberSource CAS environment provides a simulator in which the response from the card association can be triggered using card numbers listed in Table 24, "Visa Card Test Numbers," on page 47 and Table 25, "Mastercard Card Test Numbers," on page 48. This simulator ensures you can handle the possible response combinations when connecting to multiple card associations.
Visa Card NumbersThe bold fields represent the token updates for Recurring Billing and Payment Tokenization merchants using the REST API batch update and harvest update. For a description of each response code, see Table 22, "Response Codes and Reason Codes," on page 44.
Note
The CAS environment typically completes the process in a matter of minutes rather than the 24+ hour duration of the live environment when updates are sent to the actual card associations.
Table 24 Visa Card Test Numbers
Card Number(Remove spaces when sending to CyberSource.)
Response
4000 0071 0951 9220 Visa Response: NAN | Mastercard Response: NAN
4000 0015 3919 2096 Visa Response: NAN | Mastercard Response: ACL
4000 0018 6481 0239 Visa Response: NAN | Mastercard Response: CUR
4000 0091 9582 8465 Visa Response: NED | Mastercard Response: NAN
4000 0027 5765 7455 Visa Response: NED | Mastercard Response: ACL
4000 0071 1311 2087 Visa Response: NED | Mastercard Response: CUR
4000 0021 1752 4874 Visa Response: ACL | Mastercard Response: NAN
4000 0071 1629 4650 Visa Response: ACL | Mastercard Response: ACL
4000 0020 5548 7183 Visa Response: ACL | Mastercard Response: CUR
47
Chapter 6 Testing
Mastercard Card NumbersThe bold fields represent the token updates for Recurring Billing and Payment Tokenization merchants using the REST API batch update and harvest update. For a description of each response code, see Table 22, "Response Codes and Reason Codes," on page 44.
4000 0052 8063 4792 Visa Response: CUR | Mastercard Response: NAN
4000 0024 0631 2635 Visa Response: CUR | Mastercard Response: ACL
4000 0089 2339 9344 Visa Response: CUR | Mastercard Response: CUR
4000 0055 7908 8940 Visa Response: NUP | Mastercard Response: NAN
4000 0057 9875 5634 Visa Response: NUP | Mastercard Response: ACL
4000 0080 9110 0706 Visa Response: CCH | Mastercard Response: NAN
4000 0026 9567 5155 Visa Response: CCH | Mastercard Response: ACL
4000 0035 8627 6236 Visa Response: CCH | Mastercard Response: CUR
Table 25 Mastercard Card Test Numbers
Card Number(Remove spaces when sending to CyberSource.)
Response
5111 1110 4714 3086 Visa Response: NAN | Mastercard Response: NAN
5111 1110 2999 7178 Visa Response: ACL | Mastercard Response: NAN
5111 1110 1548 6814 Visa Response: CUR | Mastercard Response: NAN
5111 1110 5459 2548 Visa Response: NUP | Mastercard Response: NAN
5111 1110 4871 8571 Visa Response: CCH | Mastercard Response: NAN
5111 1110 5798 7356 Visa Response: NAN | Mastercard Response: NED
5111 1110 7450 2964 Visa Response: ACL | Mastercard Response: NED
5111 1110 6971 3154 Visa Response: CUR | Mastercard Response: NED
5111 1110 2030 4416 Visa Response: NUP | Mastercard Response: NED
5111 1110 4733 5823 Visa Response: CCH | Mastercard Response: NED
5111 1110 3135 3600 Visa Response: NAN | Mastercard Response: ACL
5111 1110 4816 3604 Visa Response: ACL | Mastercard Response: ACL
5111 1110 1867 3020 Visa Response: CUR | Mastercard Response: ACL
Table 24 Visa Card Test Numbers (Continued)
Card Number(Remove spaces when sending to CyberSource.)
Response
Account Updater | March 2018 48
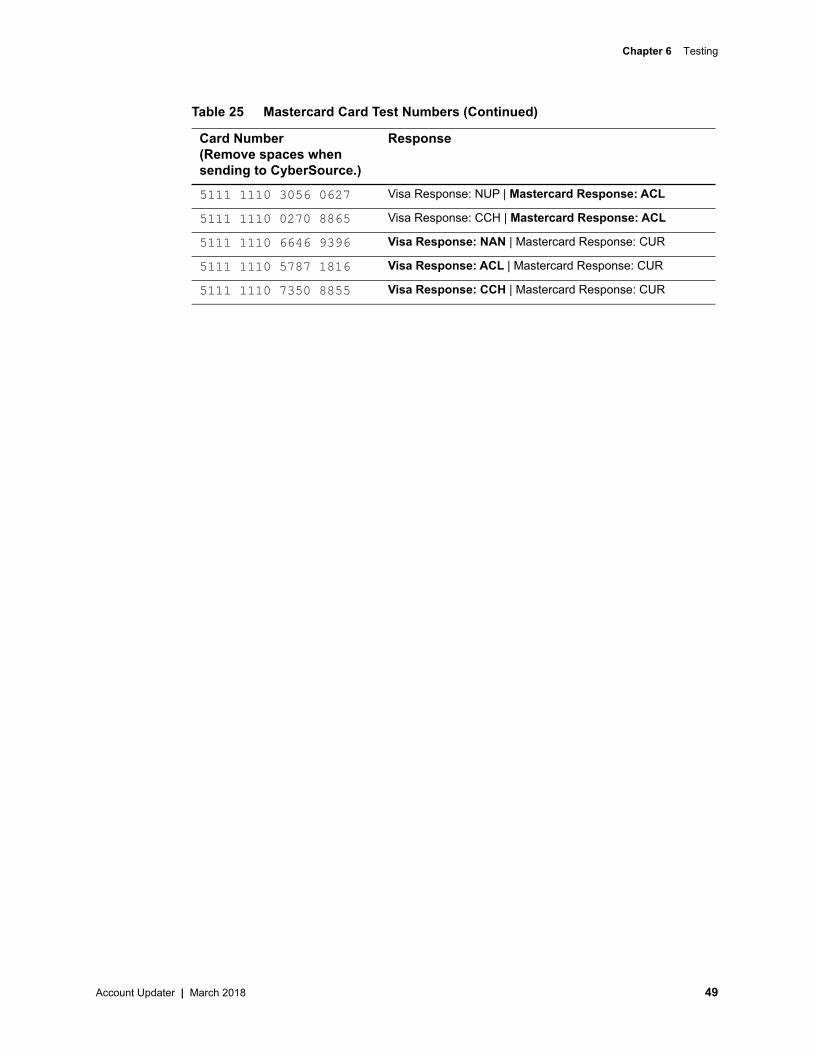
Chapter 6 Testing
5111 1110 3056 0627 Visa Response: NUP | Mastercard Response: ACL
5111 1110 0270 8865 Visa Response: CCH | Mastercard Response: ACL
5111 1110 6646 9396 Visa Response: NAN | Mastercard Response: CUR
5111 1110 5787 1816 Visa Response: ACL | Mastercard Response: CUR
5111 1110 7350 8855 Visa Response: CCH | Mastercard Response: CUR
Table 25 Mastercard Card Test Numbers (Continued)
Card Number(Remove spaces when sending to CyberSource.)
Response
Account Updater | March 2018 49

Account Updater | March 2018
HAP
TER
C
7
Sample Java Code for Uploading FilesRequirements J2SE 1.5 or later.
Unlimited Strength Jurisdiction Policy files from Oracle (US_export_policy.jar and local_policy.jar): http://www.oracle.com/technetwork/java/javase/documentation/index.html
Bouncy Castle, which includes bcmail*.jar, bcpg*.jar, bcprov*.jar, and bctest*.jar:www.bouncycastle.org
Click here to view Cybersource’s sample code package.
Using the Sample Code
Step 1 Replace your Java installation’s existing security policy files with the new ones you downloaded from Oracle’s site:
a Find your existing US_export_policy.jar and local_policy.jar files in the $JAVA_HOME/jre/lib/security directory.
b Rename or move your existing files to another directory.
c Copy the new US_export_policy.jar and local_policy.jar files that you downloaded from Oracle to the $JAVA_HOME/jre/lib/security directory.
Step 2 Copy the Bouncy Castle *.jar files to the $JAVA_HOME/jre/lib/ext directory.
Note
The sample code was developed and tested on a Solaris platform.
50
Chapter 7 Sample Java Code for Uploading Files
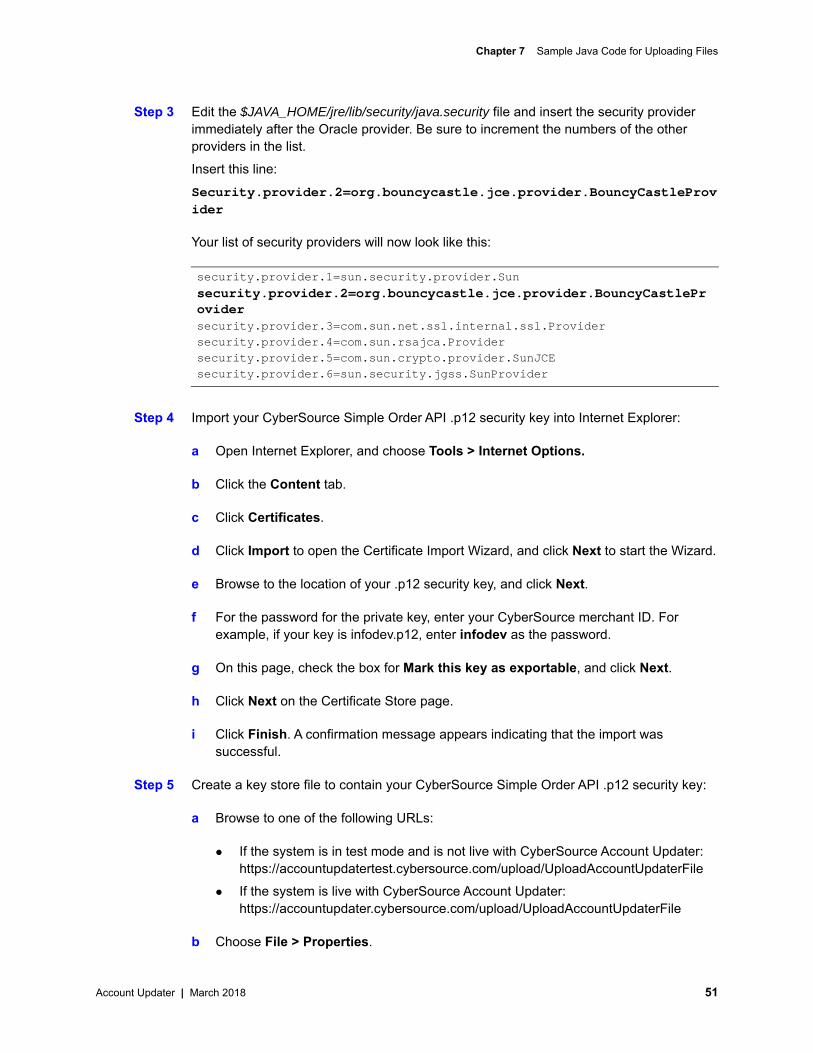
Step 3 Edit the $JAVA_HOME/jre/lib/security/java.security file and insert the security provider immediately after the Oracle provider. Be sure to increment the numbers of the other providers in the list.
Insert this line:Security.provider.2=org.bouncycastle.jce.provider.BouncyCastleProvider
Your list of security providers will now look like this:
Step 4 Import your CyberSource Simple Order API .p12 security key into Internet Explorer:
a Open Internet Explorer, and choose Tools > Internet Options.
b Click the Content tab.
c Click Certificates.
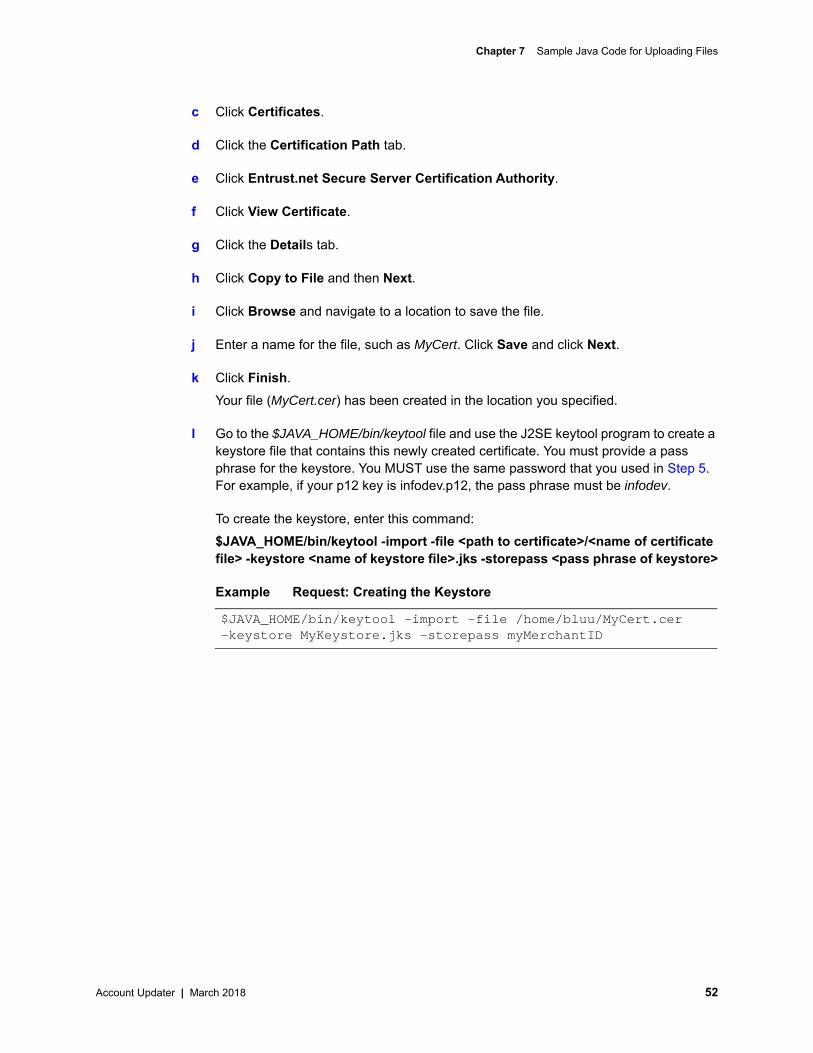
d Click Import to open the Certificate Import Wizard, and click Next to start the Wizard.
e Browse to the location of your .p12 security key, and click Next.
f For the password for the private key, enter your CyberSource merchant ID. For example, if your key is infodev.p12, enter infodev as the password.
g On this page, check the box for Mark this key as exportable, and click Next.
h Click Next on the Certificate Store page.
i Click Finish. A confirmation message appears indicating that the import was successful.
Step 5 Create a key store file to contain your CyberSource Simple Order API .p12 security key:
a Browse to one of the following URLs:
If the system is in test mode and is not live with CyberSource Account Updater: https://accountupdatertest.cybersource.com/upload/UploadAccountUpdaterFile
If the system is live with CyberSource Account Updater: https://accountupdater.cybersource.com/upload/UploadAccountUpdaterFile
b Choose File > Properties.
security.provider.1=sun.security.provider.Sunsecurity.provider.2=org.bouncycastle.jce.provider.BouncyCastleProvidersecurity.provider.3=com.sun.net.ssl.internal.ssl.Providersecurity.provider.4=com.sun.rsajca.Providersecurity.provider.5=com.sun.crypto.provider.SunJCEsecurity.provider.6=sun.security.jgss.SunProvider
Account Updater | March 2018 51
Chapter 7 Sample Java Code for Uploading Files
c Click Certificates.
d Click the Certification Path tab.
e Click Entrust.net Secure Server Certification Authority.
f Click View Certificate.
g Click the Details tab.
h Click Copy to File and then Next.
i Click Browse and navigate to a location to save the file.
j Enter a name for the file, such as MyCert. Click Save and click Next.
k Click Finish.
Your file (MyCert.cer) has been created in the location you specified.
l Go to the $JAVA_HOME/bin/keytool file and use the J2SE keytool program to create a keystore file that contains this newly created certificate. You must provide a pass phrase for the keystore. You MUST use the same password that you used in Step 5. For example, if your p12 key is infodev.p12, the pass phrase must be infodev.
To create the keystore, enter this command:$JAVA_HOME/bin/keytool -import -file <path to certificate>/<name of certificate file> -keystore <name of keystore file>.jks -storepass <pass phrase of keystore>
Example Request: Creating the Keystore
$JAVA_HOME/bin/keytool -import -file /home/bluu/MyCert.cer -keystore MyKeystore.jks -storepass myMerchantID
Account Updater | March 2018 52
Chapter 7 Sample Java Code for Uploading Files
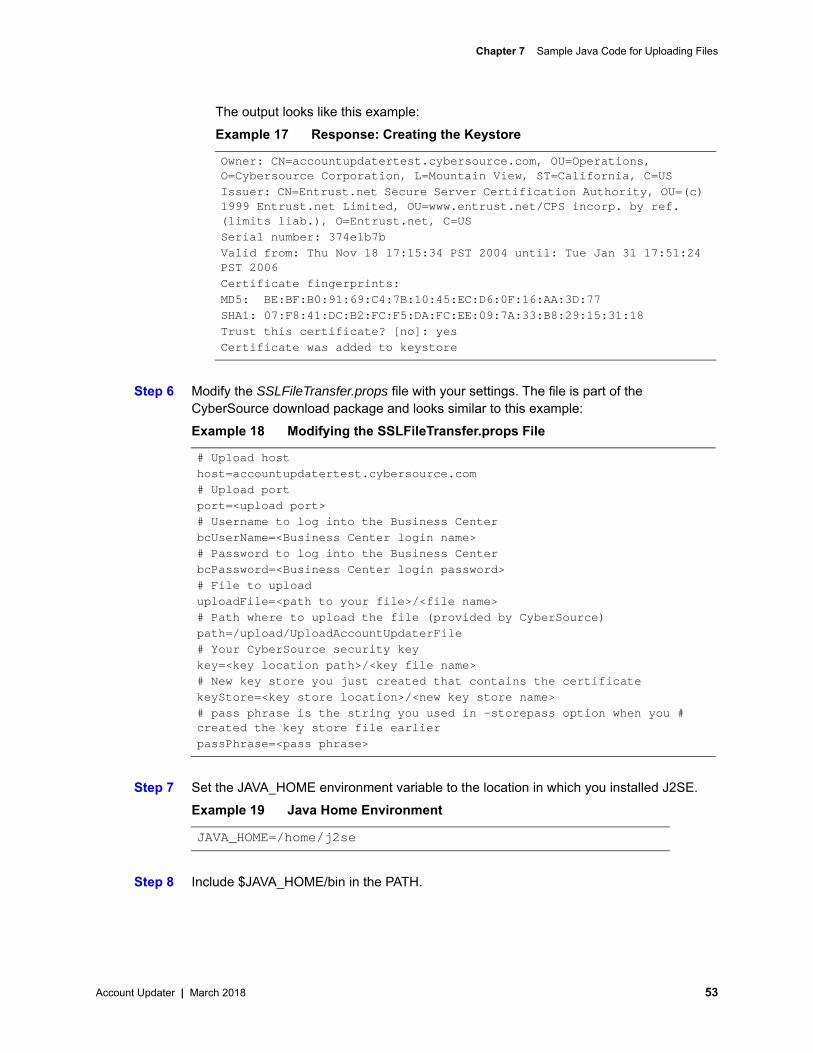
The output looks like this example:Example 17 Response: Creating the Keystore
Step 6 Modify the SSLFileTransfer.props file with your settings. The file is part of the CyberSource download package and looks similar to this example:Example 18 Modifying the SSLFileTransfer.props File
Step 7 Set the JAVA_HOME environment variable to the location in which you installed J2SE.Example 19 Java Home Environment
Step 8 Include $JAVA_HOME/bin in the PATH.
Owner: CN=accountupdatertest.cybersource.com, OU=Operations, O=Cybersource Corporation, L=Mountain View, ST=California, C=USIssuer: CN=Entrust.net Secure Server Certification Authority, OU=(c) 1999 Entrust.net Limited, OU=www.entrust.net/CPS incorp. by ref. (limits liab.), O=Entrust.net, C=USSerial number: 374e1b7bValid from: Thu Nov 18 17:15:34 PST 2004 until: Tue Jan 31 17:51:24 PST 2006Certificate fingerprints:MD5: BE:BF:B0:91:69:C4:7B:10:45:EC:D6:0F:16:AA:3D:77SHA1: 07:F8:41:DC:B2:FC:F5:DA:FC:EE:09:7A:33:B8:29:15:31:18Trust this certificate? [no]: yesCertificate was added to keystore
# Upload hosthost=accountupdatertest.cybersource.com# Upload portport=<upload port># Username to log into the Business CenterbcUserName=<Business Center login name># Password to log into the Business CenterbcPassword=<Business Center login password># File to upload uploadFile=<path to your file>/<file name># Path where to upload the file (provided by CyberSource)path=/upload/UploadAccountUpdaterFile# Your CyberSource security keykey=<key location path>/<key file name># New key store you just created that contains the certificatekeyStore=<key store location>/<new key store name># pass phrase is the string you used in -storepass option when you # created the key store file earlier passPhrase=<pass phrase>
JAVA_HOME=/home/j2se
Account Updater | March 2018 53
Chapter 7 Sample Java Code for Uploading Files
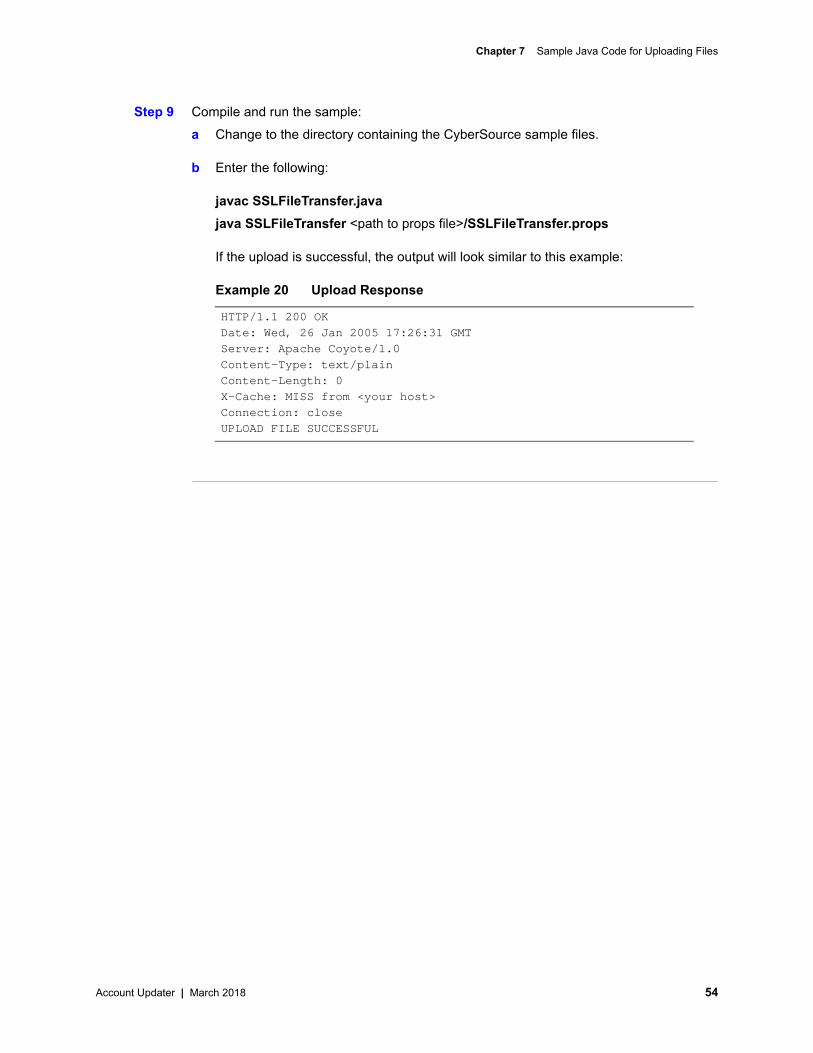
Step 9 Compile and run the sample:a Change to the directory containing the CyberSource sample files.
b Enter the following:
javac SSLFileTransfer.javajava SSLFileTransfer <path to props file>/SSLFileTransfer.props
If the upload is successful, the output will look similar to this example:
Example 20 Upload Response
HTTP/1.1 200 OKDate: Wed, 26 Jan 2005 17:26:31 GMTServer: Apache Coyote/1.0Content-Type: text/plainContent-Length: 0X-Cache: MISS from <your host>Connection: closeUPLOAD FILE SUCCESSFUL
Account Updater | March 2018 54