Embed Size (px)
Citation preview

IBMNetcool Performance Manager 1.3.1Tivoli
Wireline ComponentDocument Revision R2E1
DataMart Configuration Guide

Note
Before using this information and the product it supports, read the information in “Notices” on page -225.
Copyright IBM Corp. 1997, 2011
US Government Users Restricted Rights - Use, duplication or disclosure restricted by GSA ADP Schedule Contract with IBM Corp.

Contents
Preface . . . . . . . . . . . . . . . . . . . . . . . . . . . . . . . . . . . . . . . . . . . . . . . . . . . . . . . . . . . . . . . . . . . . . . . . . . . . . . . . . . . . . . . . ix
Audience . . . . . . . . . . . . . . . . . . . . . . . . . . . . . . . . . . . . . . . . . . . . . . . . . . . . . . . . . . . . . . . . . . . . . . . . . . ix
Organization . . . . . . . . . . . . . . . . . . . . . . . . . . . . . . . . . . . . . . . . . . . . . . . . . . . . . . . . . . . . . . . . . . . . . . . ix
The Tivoli Netcool Performance Manager Product Suite . . . . . . . . . . . . . . . . . . . . . . . . . . . . . . . . . . . ix
Tivoli Netcool Performance Manager Documentation . . . . . . . . . . . . . . . . . . . . . . . . . . . . . . . . . . . . . x
Chapter 1:Introduction . . . . . . . . . . . . . . . . . . . . . . . . . . . . . . . . . . . . . . . . . . . . . . . . . . . . . . . . . . . . . . . . . . . . . 1
Overview . . . . . . . . . . . . . . . . . . . . . . . . . . . . . . . . . . . . . . . . . . . . . . . . . . . . . . . . . . . . . . . . . . . . . . . . . . 1
Configuring DataMart GUI . . . . . . . . . . . . . . . . . . . . . . . . . . . . . . . . . . . . . . . . . . . . . . . . . . . . . . . . . . . 1
Opening DataMart GUI. . . . . . . . . . . . . . . . . . . . . . . . . . . . . . . . . . . . . . . . . . . . . . . . . . . . . . . . . . . . . . 6
The Tivoli Netcool Performance Manager DataMart Tabs and Utilities. . . . . . . . . . . . . . . . . . . . . . . . 7
Configuration Tab. . . . . . . . . . . . . . . . . . . . . . . . . . . . . . . . . . . . . . . . . . . . . . . . . . . . . . . . . . . . . . . . 7Data Manager Tab . . . . . . . . . . . . . . . . . . . . . . . . . . . . . . . . . . . . . . . . . . . . . . . . . . . . . . . . . . . . . . . 7Metric Tab. . . . . . . . . . . . . . . . . . . . . . . . . . . . . . . . . . . . . . . . . . . . . . . . . . . . . . . . . . . . . . . . . . . . . . 7Monitor Tab . . . . . . . . . . . . . . . . . . . . . . . . . . . . . . . . . . . . . . . . . . . . . . . . . . . . . . . . . . . . . . . . . . . . 8Resource Tab. . . . . . . . . . . . . . . . . . . . . . . . . . . . . . . . . . . . . . . . . . . . . . . . . . . . . . . . . . . . . . . . . . . . 8
Where to Go From Here . . . . . . . . . . . . . . . . . . . . . . . . . . . . . . . . . . . . . . . . . . . . . . . . . . . . . . . . . . . . . 8
Chapter 2:Configuring Users and Groups. . . . . . . . . . . . . . . . . . . . . . . . . . . . . . . . . . . . . . . . . . . . . . . . 11
Creating a User . . . . . . . . . . . . . . . . . . . . . . . . . . . . . . . . . . . . . . . . . . . . . . . . . . . . . . . . . . . . . . . . . . . . 11
Deleting a User . . . . . . . . . . . . . . . . . . . . . . . . . . . . . . . . . . . . . . . . . . . . . . . . . . . . . . . . . . . . . . . . . 13
Creating a Group of Users . . . . . . . . . . . . . . . . . . . . . . . . . . . . . . . . . . . . . . . . . . . . . . . . . . . . . . . . . . . 14
Deleting a Group . . . . . . . . . . . . . . . . . . . . . . . . . . . . . . . . . . . . . . . . . . . . . . . . . . . . . . . . . . . . . . . 16
Granting Rights to Groups . . . . . . . . . . . . . . . . . . . . . . . . . . . . . . . . . . . . . . . . . . . . . . . . . . . . . . . . . . 17
Understanding the Tivoli Netcool Performance Manager DataMart Modules . . . . . . . . . . . . . . . 18
Chapter 3:Configuring Inventory . . . . . . . . . . . . . . . . . . . . . . . . . . . . . . . . . . . . . . . . . . . . . . . . . . . . . . . . . 21
Before You Begin . . . . . . . . . . . . . . . . . . . . . . . . . . . . . . . . . . . . . . . . . . . . . . . . . . . . . . . . . . . . . . . . . . 21
Configuring Your Network Inventory . . . . . . . . . . . . . . . . . . . . . . . . . . . . . . . . . . . . . . . . . . . . . . . . . . 22
Using the Inventory Tool . . . . . . . . . . . . . . . . . . . . . . . . . . . . . . . . . . . . . . . . . . . . . . . . . . . . . . . . . 22
Creating an Inventory Profile. . . . . . . . . . . . . . . . . . . . . . . . . . . . . . . . . . . . . . . . . . . . . . . . . . . . . . . . . 23
Configuring Your Discovery . . . . . . . . . . . . . . . . . . . . . . . . . . . . . . . . . . . . . . . . . . . . . . . . . . . . . . . . . 25
Selecting Your Network Discovery Method . . . . . . . . . . . . . . . . . . . . . . . . . . . . . . . . . . . . . . . . . . 26
IBM Tivoli Netcool Performance Manager: DataMart Configuration Guide, iii
Contents
Specifying IP Addresses . . . . . . . . . . . . . . . . . . . . . . . . . . . . . . . . . . . . . . . . . . . . . . . . . . . . . . . . . . 28Defining an SNMP Configuration . . . . . . . . . . . . . . . . . . . . . . . . . . . . . . . . . . . . . . . . . . . . . . . . . . 29Specifying SNMP Community Names. . . . . . . . . . . . . . . . . . . . . . . . . . . . . . . . . . . . . . . . . . . . . . . 32Specifying an ICMP Configuration . . . . . . . . . . . . . . . . . . . . . . . . . . . . . . . . . . . . . . . . . . . . . . . . . 35Configuring Labels for Sub-Elements . . . . . . . . . . . . . . . . . . . . . . . . . . . . . . . . . . . . . . . . . . . . . . . 36Specifying Synchronization. . . . . . . . . . . . . . . . . . . . . . . . . . . . . . . . . . . . . . . . . . . . . . . . . . . . . . . . 37Inserting Resources. . . . . . . . . . . . . . . . . . . . . . . . . . . . . . . . . . . . . . . . . . . . . . . . . . . . . . . . . . . . . . 38Specifying Automatic Grouping. . . . . . . . . . . . . . . . . . . . . . . . . . . . . . . . . . . . . . . . . . . . . . . . . . . . 39Specifying Repository Group Rules . . . . . . . . . . . . . . . . . . . . . . . . . . . . . . . . . . . . . . . . . . . . . . . . . 40Selecting Modules . . . . . . . . . . . . . . . . . . . . . . . . . . . . . . . . . . . . . . . . . . . . . . . . . . . . . . . . . . . . . . . 41
Running an Inventory Profile . . . . . . . . . . . . . . . . . . . . . . . . . . . . . . . . . . . . . . . . . . . . . . . . . . . . . . . . . 42
Viewing the Log File. . . . . . . . . . . . . . . . . . . . . . . . . . . . . . . . . . . . . . . . . . . . . . . . . . . . . . . . . . . . . 43Reloading Collectors . . . . . . . . . . . . . . . . . . . . . . . . . . . . . . . . . . . . . . . . . . . . . . . . . . . . . . . . . . . . . 44Deleting a Profile . . . . . . . . . . . . . . . . . . . . . . . . . . . . . . . . . . . . . . . . . . . . . . . . . . . . . . . . . . . . . . . 44
SNMP Bandwidth Control and Collection Smoothing. . . . . . . . . . . . . . . . . . . . . . . . . . . . . . . . . . . . . 44
Bandwidth Control . . . . . . . . . . . . . . . . . . . . . . . . . . . . . . . . . . . . . . . . . . . . . . . . . . . . . . . . . . . . . . 44Collection Smoothing . . . . . . . . . . . . . . . . . . . . . . . . . . . . . . . . . . . . . . . . . . . . . . . . . . . . . . . . . . . . 45
Understanding File Formats . . . . . . . . . . . . . . . . . . . . . . . . . . . . . . . . . . . . . . . . . . . . . . . . . . . . . . . . . . 47
Element File . . . . . . . . . . . . . . . . . . . . . . . . . . . . . . . . . . . . . . . . . . . . . . . . . . . . . . . . . . . . . . . . . . . 48Sub-element File . . . . . . . . . . . . . . . . . . . . . . . . . . . . . . . . . . . . . . . . . . . . . . . . . . . . . . . . . . . . . . . . 48
Managing Dynamic Changes . . . . . . . . . . . . . . . . . . . . . . . . . . . . . . . . . . . . . . . . . . . . . . . . . . . . . . . . . 49
Guidelines . . . . . . . . . . . . . . . . . . . . . . . . . . . . . . . . . . . . . . . . . . . . . . . . . . . . . . . . . . . . . . . . . . . . . 50CME Formula Command Template . . . . . . . . . . . . . . . . . . . . . . . . . . . . . . . . . . . . . . . . . . . . . . . . 51Example Based On Process Illustration . . . . . . . . . . . . . . . . . . . . . . . . . . . . . . . . . . . . . . . . . . . . . 51Example for 2233_IF Family . . . . . . . . . . . . . . . . . . . . . . . . . . . . . . . . . . . . . . . . . . . . . . . . . . . . . . 52CME Processing . . . . . . . . . . . . . . . . . . . . . . . . . . . . . . . . . . . . . . . . . . . . . . . . . . . . . . . . . . . . . . . . 53Discovery Server Responsibilities . . . . . . . . . . . . . . . . . . . . . . . . . . . . . . . . . . . . . . . . . . . . . . . . . . 54Logging Policy. . . . . . . . . . . . . . . . . . . . . . . . . . . . . . . . . . . . . . . . . . . . . . . . . . . . . . . . . . . . . . . . . . 54
Configuring a Bulk Collector Inventory . . . . . . . . . . . . . . . . . . . . . . . . . . . . . . . . . . . . . . . . . . . . . . . . 55
Understanding a Bulk Collector Inventory . . . . . . . . . . . . . . . . . . . . . . . . . . . . . . . . . . . . . . . . . . . . . . 58
Importing Bulk Files . . . . . . . . . . . . . . . . . . . . . . . . . . . . . . . . . . . . . . . . . . . . . . . . . . . . . . . . . . . . . 59Bulk Collector Inventory File Sets . . . . . . . . . . . . . . . . . . . . . . . . . . . . . . . . . . . . . . . . . . . . . . . . . . 59pollinv and pollprofile Commands. . . . . . . . . . . . . . . . . . . . . . . . . . . . . . . . . . . . . . . . . . . . . . . . . . 60Inventory Polling and the cron Table . . . . . . . . . . . . . . . . . . . . . . . . . . . . . . . . . . . . . . . . . . . . . . . 60Directories and Files (Location, Naming, and Format) . . . . . . . . . . . . . . . . . . . . . . . . . . . . . . . . . 61
Bulk File Format Examples . . . . . . . . . . . . . . . . . . . . . . . . . . . . . . . . . . . . . . . . . . . . . . . . . . . . . . . . . . 62
Element Resources . . . . . . . . . . . . . . . . . . . . . . . . . . . . . . . . . . . . . . . . . . . . . . . . . . . . . . . . . . . . . . 62Sub-element Resources . . . . . . . . . . . . . . . . . . . . . . . . . . . . . . . . . . . . . . . . . . . . . . . . . . . . . . . . . . . 62Inventory Arguments . . . . . . . . . . . . . . . . . . . . . . . . . . . . . . . . . . . . . . . . . . . . . . . . . . . . . . . . . . . . 62
iv IBM Tivoli Netcool Performance Manager: DataMart Configuration Guide

Contents
Chapter 4:Creating Grouping Rules . . . . . . . . . . . . . . . . . . . . . . . . . . . . . . . . . . . . . . . . . . . . . . . . . . . . . . 65
Before You Begin . . . . . . . . . . . . . . . . . . . . . . . . . . . . . . . . . . . . . . . . . . . . . . . . . . . . . . . . . . . . . . . . . . 65
Creating Grouping Rules . . . . . . . . . . . . . . . . . . . . . . . . . . . . . . . . . . . . . . . . . . . . . . . . . . . . . . . . . . . . 66
Using Operators and Functions. . . . . . . . . . . . . . . . . . . . . . . . . . . . . . . . . . . . . . . . . . . . . . . . . . . . 67Using Conditions . . . . . . . . . . . . . . . . . . . . . . . . . . . . . . . . . . . . . . . . . . . . . . . . . . . . . . . . . . . . . . . 70
Using Grouping Rules . . . . . . . . . . . . . . . . . . . . . . . . . . . . . . . . . . . . . . . . . . . . . . . . . . . . . . . . . . . . . . 71
Testing Grouping Rules . . . . . . . . . . . . . . . . . . . . . . . . . . . . . . . . . . . . . . . . . . . . . . . . . . . . . . . . . . . . . 71
Saving Test Results . . . . . . . . . . . . . . . . . . . . . . . . . . . . . . . . . . . . . . . . . . . . . . . . . . . . . . . . . . . . . . 72Copying Grouping Rules . . . . . . . . . . . . . . . . . . . . . . . . . . . . . . . . . . . . . . . . . . . . . . . . . . . . . . . . . 73Moving Grouping Rules . . . . . . . . . . . . . . . . . . . . . . . . . . . . . . . . . . . . . . . . . . . . . . . . . . . . . . . . . . 73Deleting Grouping Rules . . . . . . . . . . . . . . . . . . . . . . . . . . . . . . . . . . . . . . . . . . . . . . . . . . . . . . . . . 74Understanding the File Format . . . . . . . . . . . . . . . . . . . . . . . . . . . . . . . . . . . . . . . . . . . . . . . . . . . . 74
Viewing Rule Database Information . . . . . . . . . . . . . . . . . . . . . . . . . . . . . . . . . . . . . . . . . . . . . . . . . . . 75
Viewing Properties . . . . . . . . . . . . . . . . . . . . . . . . . . . . . . . . . . . . . . . . . . . . . . . . . . . . . . . . . . . . . . . . . 76
Using Syntax for Grouping Rules . . . . . . . . . . . . . . . . . . . . . . . . . . . . . . . . . . . . . . . . . . . . . . . . . . . . . 77
Using Static Text . . . . . . . . . . . . . . . . . . . . . . . . . . . . . . . . . . . . . . . . . . . . . . . . . . . . . . . . . . . . . . . . 77Creating Variables . . . . . . . . . . . . . . . . . . . . . . . . . . . . . . . . . . . . . . . . . . . . . . . . . . . . . . . . . . . . . . . 77
Using a Text Editor to Create Grouping Rules . . . . . . . . . . . . . . . . . . . . . . . . . . . . . . . . . . . . . . . . . . . 78
Exporting Grouping Rules. . . . . . . . . . . . . . . . . . . . . . . . . . . . . . . . . . . . . . . . . . . . . . . . . . . . . . . . 78Importing Grouping Rules. . . . . . . . . . . . . . . . . . . . . . . . . . . . . . . . . . . . . . . . . . . . . . . . . . . . . . . . 78
Understanding the File Format . . . . . . . . . . . . . . . . . . . . . . . . . . . . . . . . . . . . . . . . . . . . . . . . . . . . . . . 79
Grouping Rule Example. . . . . . . . . . . . . . . . . . . . . . . . . . . . . . . . . . . . . . . . . . . . . . . . . . . . . . . . . . . . . 80
Name with Static Text . . . . . . . . . . . . . . . . . . . . . . . . . . . . . . . . . . . . . . . . . . . . . . . . . . . . . . . . . . . 80Name with a Variable . . . . . . . . . . . . . . . . . . . . . . . . . . . . . . . . . . . . . . . . . . . . . . . . . . . . . . . . . . . . 81Nested Variable. . . . . . . . . . . . . . . . . . . . . . . . . . . . . . . . . . . . . . . . . . . . . . . . . . . . . . . . . . . . . . . . . 82Condition . . . . . . . . . . . . . . . . . . . . . . . . . . . . . . . . . . . . . . . . . . . . . . . . . . . . . . . . . . . . . . . . . . . . . 82
Example of Nested Conditions . . . . . . . . . . . . . . . . . . . . . . . . . . . . . . . . . . . . . . . . . . . . . . . . . . . . . . . 83
Condition . . . . . . . . . . . . . . . . . . . . . . . . . . . . . . . . . . . . . . . . . . . . . . . . . . . . . . . . . . . . . . . . . . . . . 84Nested Condition . . . . . . . . . . . . . . . . . . . . . . . . . . . . . . . . . . . . . . . . . . . . . . . . . . . . . . . . . . . . . . . 84Second Nested Condition . . . . . . . . . . . . . . . . . . . . . . . . . . . . . . . . . . . . . . . . . . . . . . . . . . . . . . . . 85Variable . . . . . . . . . . . . . . . . . . . . . . . . . . . . . . . . . . . . . . . . . . . . . . . . . . . . . . . . . . . . . . . . . . . . . . . 86
Example of Combining Text, a Variable, and a Condition . . . . . . . . . . . . . . . . . . . . . . . . . . . . . . . . . . 87
Chapter 5: Collection and Aggregation . . . . . . . . . . . . . . . . . . . . . . . . . . . . . . . . . . . . . . . . . . . . . . . . . . 91
Overview . . . . . . . . . . . . . . . . . . . . . . . . . . . . . . . . . . . . . . . . . . . . . . . . . . . . . . . . . . . . . . . . . . . . . . . . . 91
Before You Begin . . . . . . . . . . . . . . . . . . . . . . . . . . . . . . . . . . . . . . . . . . . . . . . . . . . . . . . . . . . . . . . . . . 91
Configuring Data Collection Requests . . . . . . . . . . . . . . . . . . . . . . . . . . . . . . . . . . . . . . . . . . . . . . . . . 92
Setting the Collection Period . . . . . . . . . . . . . . . . . . . . . . . . . . . . . . . . . . . . . . . . . . . . . . . . . . . . . . 95
IBM Tivoli Netcool Performance Manager: DataMart Configuration Guide v

Contents
Configuring Aggregation Requests . . . . . . . . . . . . . . . . . . . . . . . . . . . . . . . . . . . . . . . . . . . . . . . . . . . . 96
Configuring a Percentile Value . . . . . . . . . . . . . . . . . . . . . . . . . . . . . . . . . . . . . . . . . . . . . . . . . . . . 100
Filtering Requests . . . . . . . . . . . . . . . . . . . . . . . . . . . . . . . . . . . . . . . . . . . . . . . . . . . . . . . . . . . . . . . . . 101
Sorting Columns . . . . . . . . . . . . . . . . . . . . . . . . . . . . . . . . . . . . . . . . . . . . . . . . . . . . . . . . . . . . . . . 101
Validating the Requests . . . . . . . . . . . . . . . . . . . . . . . . . . . . . . . . . . . . . . . . . . . . . . . . . . . . . . . . . . . . . 101
Chapter 6:Configuring Calendars. . . . . . . . . . . . . . . . . . . . . . . . . . . . . . . . . . . . . . . . . . . . . . . . . . . . . . . . 103
Overview . . . . . . . . . . . . . . . . . . . . . . . . . . . . . . . . . . . . . . . . . . . . . . . . . . . . . . . . . . . . . . . . . . . . . . . . 103
Using the Calendar Configuration Tool . . . . . . . . . . . . . . . . . . . . . . . . . . . . . . . . . . . . . . . . . . . . . . . . 103
Creating Customized Calendars . . . . . . . . . . . . . . . . . . . . . . . . . . . . . . . . . . . . . . . . . . . . . . . . . . . . . . 105
Creating a One-Time Calendar. . . . . . . . . . . . . . . . . . . . . . . . . . . . . . . . . . . . . . . . . . . . . . . . . . . . 106Creating a Daily Calendar . . . . . . . . . . . . . . . . . . . . . . . . . . . . . . . . . . . . . . . . . . . . . . . . . . . . . . . . 108Creating a Weekly Calendar . . . . . . . . . . . . . . . . . . . . . . . . . . . . . . . . . . . . . . . . . . . . . . . . . . . . . . 108Creating a Monthly Calendar . . . . . . . . . . . . . . . . . . . . . . . . . . . . . . . . . . . . . . . . . . . . . . . . . . . . . 110
Deleting a Calendar. . . . . . . . . . . . . . . . . . . . . . . . . . . . . . . . . . . . . . . . . . . . . . . . . . . . . . . . . . . . . . . . 111
Using the Calendar Selector . . . . . . . . . . . . . . . . . . . . . . . . . . . . . . . . . . . . . . . . . . . . . . . . . . . . . . . . . 111
Chapter 7:Writing Custom Formulas . . . . . . . . . . . . . . . . . . . . . . . . . . . . . . . . . . . . . . . . . . . . . . . . . . . . 113
Overview . . . . . . . . . . . . . . . . . . . . . . . . . . . . . . . . . . . . . . . . . . . . . . . . . . . . . . . . . . . . . . . . . . . . . . . . 113
Before You Begin . . . . . . . . . . . . . . . . . . . . . . . . . . . . . . . . . . . . . . . . . . . . . . . . . . . . . . . . . . . . . . . . . 113
What is a Formula? . . . . . . . . . . . . . . . . . . . . . . . . . . . . . . . . . . . . . . . . . . . . . . . . . . . . . . . . . . . . . . . . 114
Merging Discovery Results . . . . . . . . . . . . . . . . . . . . . . . . . . . . . . . . . . . . . . . . . . . . . . . . . . . . . . . 114
Creating Formulas . . . . . . . . . . . . . . . . . . . . . . . . . . . . . . . . . . . . . . . . . . . . . . . . . . . . . . . . . . . . . . . . . 115
Editing the Inventory_subelement.txt File . . . . . . . . . . . . . . . . . . . . . . . . . . . . . . . . . . . . . . . . . . 115Testing Formulas. . . . . . . . . . . . . . . . . . . . . . . . . . . . . . . . . . . . . . . . . . . . . . . . . . . . . . . . . . . . . . . 118Saving Formulas . . . . . . . . . . . . . . . . . . . . . . . . . . . . . . . . . . . . . . . . . . . . . . . . . . . . . . . . . . . . . . . 119Modifying a Custom Formula . . . . . . . . . . . . . . . . . . . . . . . . . . . . . . . . . . . . . . . . . . . . . . . . . . . . 120
Standard Rules for Writing Formulas. . . . . . . . . . . . . . . . . . . . . . . . . . . . . . . . . . . . . . . . . . . . . . . . . . 122
Dim Declaration . . . . . . . . . . . . . . . . . . . . . . . . . . . . . . . . . . . . . . . . . . . . . . . . . . . . . . . . . . . . . . . 122OIDVAL Expression Line . . . . . . . . . . . . . . . . . . . . . . . . . . . . . . . . . . . . . . . . . . . . . . . . . . . . . . . 124OIDINST Instruction . . . . . . . . . . . . . . . . . . . . . . . . . . . . . . . . . . . . . . . . . . . . . . . . . . . . . . . . . . 125Types of Variables . . . . . . . . . . . . . . . . . . . . . . . . . . . . . . . . . . . . . . . . . . . . . . . . . . . . . . . . . . . . . . 129Returning a Result . . . . . . . . . . . . . . . . . . . . . . . . . . . . . . . . . . . . . . . . . . . . . . . . . . . . . . . . . . . . . . 130Comments in Formulas . . . . . . . . . . . . . . . . . . . . . . . . . . . . . . . . . . . . . . . . . . . . . . . . . . . . . . . . . 130Syntax for Functions. . . . . . . . . . . . . . . . . . . . . . . . . . . . . . . . . . . . . . . . . . . . . . . . . . . . . . . . . . . . 131AddForMissing() Operator. . . . . . . . . . . . . . . . . . . . . . . . . . . . . . . . . . . . . . . . . . . . . . . . . . . . . . . 134
Using the Formula Selector . . . . . . . . . . . . . . . . . . . . . . . . . . . . . . . . . . . . . . . . . . . . . . . . . . . . . . . . . 137
Creating a Formula Group . . . . . . . . . . . . . . . . . . . . . . . . . . . . . . . . . . . . . . . . . . . . . . . . . . . . . . . 137
vi IBM Tivoli Netcool Performance Manager: DataMart Configuration Guide

Contents
Finding a Formula . . . . . . . . . . . . . . . . . . . . . . . . . . . . . . . . . . . . . . . . . . . . . . . . . . . . . . . . . . . . . 138Copying Formulas. . . . . . . . . . . . . . . . . . . . . . . . . . . . . . . . . . . . . . . . . . . . . . . . . . . . . . . . . . . . . . 139Deleting a Formula . . . . . . . . . . . . . . . . . . . . . . . . . . . . . . . . . . . . . . . . . . . . . . . . . . . . . . . . . . . . . 139Renaming a Formula. . . . . . . . . . . . . . . . . . . . . . . . . . . . . . . . . . . . . . . . . . . . . . . . . . . . . . . . . . . . 139Discovery Formula for a Redback Ethernet Interface . . . . . . . . . . . . . . . . . . . . . . . . . . . . . . . . . 140Collection Formula Example . . . . . . . . . . . . . . . . . . . . . . . . . . . . . . . . . . . . . . . . . . . . . . . . . . . . . 147Merge Formulas Example . . . . . . . . . . . . . . . . . . . . . . . . . . . . . . . . . . . . . . . . . . . . . . . . . . . . . . . 150Inventory_sub-element.txt . . . . . . . . . . . . . . . . . . . . . . . . . . . . . . . . . . . . . . . . . . . . . . . . . . . . . . . 1501213_IF . . . . . . . . . . . . . . . . . . . . . . . . . . . . . . . . . . . . . . . . . . . . . . . . . . . . . . . . . . . . . . . . . . . . . . 1512233_IF . . . . . . . . . . . . . . . . . . . . . . . . . . . . . . . . . . . . . . . . . . . . . . . . . . . . . . . . . . . . . . . . . . . . . . 1512233_HCOctets_Support. . . . . . . . . . . . . . . . . . . . . . . . . . . . . . . . . . . . . . . . . . . . . . . . . . . . . . . . 1512233_HCPackets_Support . . . . . . . . . . . . . . . . . . . . . . . . . . . . . . . . . . . . . . . . . . . . . . . . . . . . . . . 1521213_IF_Invariant . . . . . . . . . . . . . . . . . . . . . . . . . . . . . . . . . . . . . . . . . . . . . . . . . . . . . . . . . . . . . 1522233_IF_Invariant . . . . . . . . . . . . . . . . . . . . . . . . . . . . . . . . . . . . . . . . . . . . . . . . . . . . . . . . . . . . . 152<CustomerSpecific>_KEY . . . . . . . . . . . . . . . . . . . . . . . . . . . . . . . . . . . . . . . . . . . . . . . . . . . . . . 152
Formula Error Messages . . . . . . . . . . . . . . . . . . . . . . . . . . . . . . . . . . . . . . . . . . . . . . . . . . . . . . . . . . . 153
Understanding the inventory_subelements.txt File. . . . . . . . . . . . . . . . . . . . . . . . . . . . . . . . . . . . . . . 154
SysObjId . . . . . . . . . . . . . . . . . . . . . . . . . . . . . . . . . . . . . . . . . . . . . . . . . . . . . . . . . . . . . . . . . . . . . 155FilterFormulaName . . . . . . . . . . . . . . . . . . . . . . . . . . . . . . . . . . . . . . . . . . . . . . . . . . . . . . . . . . . . 155SubElementFamilyName to Cancel . . . . . . . . . . . . . . . . . . . . . . . . . . . . . . . . . . . . . . . . . . . . . . . . 155
Chapter 8:Configuring Thresholds. . . . . . . . . . . . . . . . . . . . . . . . . . . . . . . . . . . . . . . . . . . . . . . . . . . . . . . 159
Overview . . . . . . . . . . . . . . . . . . . . . . . . . . . . . . . . . . . . . . . . . . . . . . . . . . . . . . . . . . . . . . . . . . . . . . . . 160
About Thresholds. . . . . . . . . . . . . . . . . . . . . . . . . . . . . . . . . . . . . . . . . . . . . . . . . . . . . . . . . . . . . . 160Threshold Types . . . . . . . . . . . . . . . . . . . . . . . . . . . . . . . . . . . . . . . . . . . . . . . . . . . . . . . . . . . . . . . 160
Threshold Deployment . . . . . . . . . . . . . . . . . . . . . . . . . . . . . . . . . . . . . . . . . . . . . . . . . . . . . . . . . . . . 162
Examples. . . . . . . . . . . . . . . . . . . . . . . . . . . . . . . . . . . . . . . . . . . . . . . . . . . . . . . . . . . . . . . . . . . . . 163
TRAP Generation Rules. . . . . . . . . . . . . . . . . . . . . . . . . . . . . . . . . . . . . . . . . . . . . . . . . . . . . . . . . . . . 167
Using the Threshold Definition Period Setting. . . . . . . . . . . . . . . . . . . . . . . . . . . . . . . . . . . . . . . . . . 167
Processing Traps . . . . . . . . . . . . . . . . . . . . . . . . . . . . . . . . . . . . . . . . . . . . . . . . . . . . . . . . . . . . . . . 167
Launching the Threshold Tool. . . . . . . . . . . . . . . . . . . . . . . . . . . . . . . . . . . . . . . . . . . . . . . . . . . . . . . 168
Adding a Threshold . . . . . . . . . . . . . . . . . . . . . . . . . . . . . . . . . . . . . . . . . . . . . . . . . . . . . . . . . . . . . . . 171
Choosing Metrics . . . . . . . . . . . . . . . . . . . . . . . . . . . . . . . . . . . . . . . . . . . . . . . . . . . . . . . . . . . . . . 172Applying Thresholds to a Group of Subelements . . . . . . . . . . . . . . . . . . . . . . . . . . . . . . . . . . . . 175Specifying Subelements . . . . . . . . . . . . . . . . . . . . . . . . . . . . . . . . . . . . . . . . . . . . . . . . . . . . . . . . . 178
Configuring Burst or Period Thresholds . . . . . . . . . . . . . . . . . . . . . . . . . . . . . . . . . . . . . . . . . . . . . . . 181
Configuring Thresholds . . . . . . . . . . . . . . . . . . . . . . . . . . . . . . . . . . . . . . . . . . . . . . . . . . . . . . . . . 181Configuring Mode . . . . . . . . . . . . . . . . . . . . . . . . . . . . . . . . . . . . . . . . . . . . . . . . . . . . . . . . . . . . . 182Configuring Maximum Percent Over for Burst and Period Thresholds . . . . . . . . . . . . . . . . . . . 183Configuring Burst Values . . . . . . . . . . . . . . . . . . . . . . . . . . . . . . . . . . . . . . . . . . . . . . . . . . . . . . . . 183
IBM Tivoli Netcool Performance Manager: DataMart Configuration Guide vii

Contents
Configuring Period Values . . . . . . . . . . . . . . . . . . . . . . . . . . . . . . . . . . . . . . . . . . . . . . . . . . . . . . . 185
Configuring Baseline Thresholds . . . . . . . . . . . . . . . . . . . . . . . . . . . . . . . . . . . . . . . . . . . . . . . . . . . . . 187
Trapping Threshold Violations . . . . . . . . . . . . . . . . . . . . . . . . . . . . . . . . . . . . . . . . . . . . . . . . . . . . . . 189
Trapping Threshold Violations to the Log File. . . . . . . . . . . . . . . . . . . . . . . . . . . . . . . . . . . . . . . 189Sending Trapped Threshold Violations To Specified Hosts . . . . . . . . . . . . . . . . . . . . . . . . . . . . 190
Chapter 9:Managing MIBs . . . . . . . . . . . . . . . . . . . . . . . . . . . . . . . . . . . . . . . . . . . . . . . . . . . . . . . . . . . . . . . . 193
Overview . . . . . . . . . . . . . . . . . . . . . . . . . . . . . . . . . . . . . . . . . . . . . . . . . . . . . . . . . . . . . . . . . . . . . . . . 193
MIB Groups . . . . . . . . . . . . . . . . . . . . . . . . . . . . . . . . . . . . . . . . . . . . . . . . . . . . . . . . . . . . . . . . . . 193
Compiling a MIB. . . . . . . . . . . . . . . . . . . . . . . . . . . . . . . . . . . . . . . . . . . . . . . . . . . . . . . . . . . . . . . . . . 194
Printing or Saving Trace Information . . . . . . . . . . . . . . . . . . . . . . . . . . . . . . . . . . . . . . . . . . . . . . 197Deleting a MIB . . . . . . . . . . . . . . . . . . . . . . . . . . . . . . . . . . . . . . . . . . . . . . . . . . . . . . . . . . . . . . . . 198Viewing MIB File Source . . . . . . . . . . . . . . . . . . . . . . . . . . . . . . . . . . . . . . . . . . . . . . . . . . . . . . . . 200Browsing MIB Files . . . . . . . . . . . . . . . . . . . . . . . . . . . . . . . . . . . . . . . . . . . . . . . . . . . . . . . . . . . . 201
Viewing Compiled MIB Files . . . . . . . . . . . . . . . . . . . . . . . . . . . . . . . . . . . . . . . . . . . . . . . . . . . . . . . . 202
Finding MIB Files . . . . . . . . . . . . . . . . . . . . . . . . . . . . . . . . . . . . . . . . . . . . . . . . . . . . . . . . . . . . . . 204Loading MIB Files . . . . . . . . . . . . . . . . . . . . . . . . . . . . . . . . . . . . . . . . . . . . . . . . . . . . . . . . . . . . . 205Viewing Element Information . . . . . . . . . . . . . . . . . . . . . . . . . . . . . . . . . . . . . . . . . . . . . . . . . . . . 205Verifying Object Values . . . . . . . . . . . . . . . . . . . . . . . . . . . . . . . . . . . . . . . . . . . . . . . . . . . . . . . . . 207
Glossary . . . . . . . . . . . . . . . . . . . . . . . . . . . . . . . . . . . . . . . . . . . . . . . . . . . . . . . . . . . . . . . . . . . . . . . . . . . . . . . . . . . . 211
Index. . . . . . . . . . . . . . . . . . . . . . . . . . . . . . . . . . . . . . . . . . . . . . . . . . . . . . . . . . . . . . . . . . . . . . . . . . . . . . . . . . . . . . . . 221
Notices . . . . . . . . . . . . . . . . . . . . . . . . . . . . . . . . . . . . . . . . . . . . . . . . . . . . . . . . . . . . . . . . . . . . . 225
Trademarks . . . . . . . . . . . . . . . . . . . . . . . . . . . . . . . . . . . . . . . . . . . . . . . . . . . . . . . . . . . . . . . . . . . 226
Additional Copyright Information . . . . . . . . . . . . . . . . . . . . . . . . . . . . . . . . . . . . . . . . . . . . . . . . . . . . 229
Tcl 8.3.3, Combat/TCL 0.7.3, Combat/TCL 0.7.5, TclX 8.3, TK 8.3.3 . . . . . . . . . . . . . . . . . . . 229SCOTTY Stack . . . . . . . . . . . . . . . . . . . . . . . . . . . . . . . . . . . . . . . . . . . . . . . . . . . . . . . . . . . . . . . . 229BLT 2.4u . . . . . . . . . . . . . . . . . . . . . . . . . . . . . . . . . . . . . . . . . . . . . . . . . . . . . . . . . . . . . . . . . . . . . 231CMU-SNMP 1.14 . . . . . . . . . . . . . . . . . . . . . . . . . . . . . . . . . . . . . . . . . . . . . . . . . . . . . . . . . . . . . . 231Scotty 2.8, incrTCL 3.0, [incr TCL] 3.2 . . . . . . . . . . . . . . . . . . . . . . . . . . . . . . . . . . . . . . . . . . . . . 231UCD SNMP 4.2.5 . . . . . . . . . . . . . . . . . . . . . . . . . . . . . . . . . . . . . . . . . . . . . . . . . . . . . . . . . . . . . . 232JDOM 1.0 . . . . . . . . . . . . . . . . . . . . . . . . . . . . . . . . . . . . . . . . . . . . . . . . . . . . . . . . . . . . . . . . . . . . 233Regex 1.1a . . . . . . . . . . . . . . . . . . . . . . . . . . . . . . . . . . . . . . . . . . . . . . . . . . . . . . . . . . . . . . . . . . . . 233
viii IBM Tivoli Netcool Performance Manager: DataMart Configuration Guide

Preface
IBM® Tivoli® Netcool® Performance Manager 1.3.1 is a bundled product consisting of a wireline component (formerly Tivoli Netcool/Proviso) and a wireless component (formerly Tivoli Netcool Performance Manager for Wireless).
The purpose of this guide is to help you work with Tivoli Netcool Performance Manager.
Audience
The audience for this guide is the Tivoli Netcool Performance Manager administrators who assign permissions, create groups, associate users with reports, and manage Tivoli Netcool Performance Manager DataMart.
Organization
This guide is organized as follows:
• Chapter 1, Introduction on page 1 – Provides overview of Tivoli Netcool Performance Manager DataMart.
• Chapter 2, Configuring Users and Groups on page 11 – Explains how to configure users and groups of users.
• Chapter 3, Configuring Inventory on page 21 – Explains how to configure and perform discovery and inventory operations.
• Chapter 4, Creating Grouping Rules on page 65 – Explains how to create grouping rules.
• Chapter 5, Collection and Aggregation on page 91 – Explains how to configure and manage collection and aggregation.
• Chapter 6, Configuring Calendars on page 103 – Explains how to configure calendars.
• Chapter 7, Writing Custom Formulas on page 113 – Explains how to write discovery and collection formulas.
• Chapter 8, Configuring Thresholds on page 159 – Explains how to configure thresholds.
• Chapter 9, Managing MIBs on page 193 – Explains how to work with and manage MIBs.
• Appendix A on page 219 – Explains how to view your Tivoli Netcool Performance Manager license.
• Glossary, on page 211 – Lists and defines key terms.
The Tivoli Netcool Performance Manager Product Suite
Tivoli Netcool Performance Manager is made up of the following components:
• Tivoli Netcool Performance Manager DataMart is a set of management, configuration and troubleshooting GUIs that the Tivoli Netcool Performance Manager System Administrator uses to define policies and configuration, as well as verify and troubleshoot operations.
• Tivoli Netcool Performance Manager DataLoad provides flexible, distributed data collection and data import of SNMP and non-SNMP data to a centralized database.
IBM Tivoli Netcool Performance Manager: DataMart Configuration Guide ix

Preface
• Tivoli Netcool Performance Manager DataChannel aggregates the data collected through Tivoli Netcool Performance Manager DataLoad for use by the Tivoli Netcool Performance Manager DataView reporting functions. It also processes on-line calculations and detects real-time threshold violations.
• Tivoli Netcool Performance Manager DataView is a reliable application server for on-demand, web-based network reports.
• Tivoli Netcool Performance Manager Technology Packs extend the Tivoli Netcool Performance Manager system with service-ready reports for network operations, business development, and customer viewing.
The following figure shows the different Tivoli Netcool Performance Manager modules.
Figure 1: Tivoli Netcool Performance Manager Modules
Tivoli Netcool Performance Manager Documentation
Tivoli Netcool Performance Manager documentation consists of the following:
• release notes
• configuration recommendations
• user guides
• technical notes
• online help
The documentation is available for viewing and downloading on the infocenter at:
http://publib.boulder.ibm.com/infocenter/tivihelp/v8r1/topic/com.ibm.netcool_pm.doc/welcome_tnpm.html
x IBM Tivoli Netcool Performance Manager: DataMart Configuration Guide

Chapter 1: Introduction
This chapter introduces Tivoli Netcool Performance Manager DataMart, and is made up of the following topics:
Overview
Tivoli Netcool Performance Manager DataMart supports a graphical user interface that lets you perform a variety of administrative tasks, as well as manage and review information on the resources and metrics being collected and stored in the Oracle database.
The initial start up steps vary depending on whether you installed a minimal deployment or a distributed environment deployment. For a distributed environment deployment, the $PVHOME variable is defined as /opt/datamart by default. For a minimal deployment, the default is /opt/proviso/datamart.
The following sections explain how to start and use Tivoli Netcool Performance Manager DataMart.
Configuring DataMart GUI
This section explains how to configure DataMart GUI after a Tivoli Netcool Performance Manager installation.
Note: The $PVMHOME variable is defined as /opt/datamart by default. For minimal deployment, the default is /opt/proviso/datamart.
To configure Datamart GUI, follow these steps:
1. Log in as pvuser (or the user name that you specified during installation) on the system where DataMart is installed.
Important: When you run the pvm command to access the DataMart for the first time, you must login as pvuser.
2. Ensure that the Oracle database and Listener are running. For more information, see the IBM Tivoli Netcool Performance Manager: Installation Guide.
3. Source the DataMart environment using the following command:
. /opt/datamart/dataMart.env
4. Execute the following command:
Topic Page
Overview 1
Configuring DataMart GUI 1
Opening DataMart GUI 6
The Tivoli Netcool Performance Manager DataMart Tabs and Utilities 7
Where to Go From Here 8
IBM Tivoli Netcool Performance Manager: DataMart Configuration Guide 1

Chapter 1: Introduction
pvm
The following information and prompt is displayed:
------------------------------------------------------
Tivoli Netcool/Proviso - Wed Apr 7 09:34:34 IST 2010
Licensed Materials - Property of IBM
5724-P55, 5724-P57, 5724-P58, 5724-P59
Copyright IBM Corporation 2007. All Rights Reserved.
US Government Users Restricted Rights- Use,
duplication or disclosure restricted by GSA ADP
Schedule Contract with IBM Corp.
Script revision 30.20
DataMart configuration
- Default Association
------------------------------------------------------
Enter password for PV_ADMIN :
Note: The DB_USER_ROOT password is required to connect to the database using SQL*Plus.
5. Enter the password for DB_USER_ROOT (in this example, PV_ADMIN) and press Enter.
6. Confirm the password.
7. The setup prompt for the Time Zone in the Database appears.
==> Press <Enter> to continue ....
_________________________________________________________________________________________
The following Time Zones are defined into the Database :
_________________________________________________________________________________________
id | Date (in GMT) | offset in | Name | Aggset status
| | seconds | |
_________________________________________________________________________________________
0 | 1970/01/01 00:00:00 | 0 | Greenwich Mean Time | Aggset created
==> Press <Enter> to continue ....
8. Press Enter to continue.
9. The list of available Time Zones appears.
_________________________________________________________________________________________
Num | OffSet | Time zone Name | Short | Long
2 IBM Tivoli Netcool Performance Manager: DataMart Configuration Guide

Chapter 1: Introduction
| Hours | | Description | Description
_________________________________________________________________________________________
[ 1] : 0:00 | Europe/London | BST |Greenwich Mean Time
[ 2] : -10:00 | America/Adak | HADT |Hawaii-Aleutian Standard Time
[ 3] : -10:00 | Pacific/Rarotonga | CKT |Cook Is. Time
[ 4] : -9:00 | AST | AKDT |Alaska Standard Time
[ 5] : -9:00 | America/Anchorage | AKDT |Alaska Standard Time
[ 6] : -8:00 | PST8PDT | PDT |Pacific Standard Time
[ 7] : -7:00 | MST7MDT | MDT |Mountain Standard Time
[ 8] : -6:00 | America/Mexico_City | CDT |Central Standard Time
[ 9] : -6:00 | CST6CDT | CDT |Central Standard Time
[10] : -5:00 | EST5EDT | EDT |Eastern Standard Time
[11] : -4:00 | America/Santiago | CLST |Chile Time
[12] : -3:00 | America/Sao_Paulo | BRST |Brasilia Time
[13] : -1:00 | Atlantic/Azores | AZOST |Azores Time
[14] : 1:00 | ECT | CEST |Central European Time
[15] : 1:00 | Europe/Paris | CEST |Central European Time
[16] : 2:00 | Africa/Cairo | EEST |Eastern European Time
[17] : 2:00 | Europe/Bucharest | EEST |Eastern European Time
[18] : 2:00 | Europe/Helsinki | EEST |Eastern European Time
[19] : 3:00 | Asia/Baghdad | ADT |Arabia Standard Time
[20] : 3:00 | Europe/Moscow | MSD |Moscow Standard Time
[21] : 4:00 | Asia/Baku | AZST |Azerbaijan Time
[22] : 5:00 | Asia/Yekaterinburg | YEKST |Yekaterinburg Time
[23] : 6:00 | Asia/Novosibirsk | NOVST |Novosibirsk Time
[24] : 7:00 | Asia/Krasnoyarsk | KRAST |Krasnoyarsk Time
[25] : 8:00 | Asia/Irkutsk | IRKST |Irkutsk Time
[26] : 9:00 | Asia/Yakutsk | YAKST |Yakutsk Time
[27] : 10:00 | Australia/Sydney | EST |Eastern Standard Time (New South Wales)
[28] : 11:00 | Pacific/Noumea | NCT |New Caledonia Time
[29] : 12:00 | Asia/Anadyr | ANAST |Anadyr Time
[30] : 12:00 | Pacific/Auckland | NZDT |New Zealand Standard Time
==> Select Time Zone number [1-30 ] (E : Exit) : 1
==> Select an Aggset ID to add/modify (E: Exit) : 1
==> Does your Time Zone manage DST [Y/N] : Y
9-a. Select and enter your Time Zone number. For example, 1, for Greenwich Mean Time.
9-b. Select and enter your Time Zone number 1 again to confirm the Aggregation set (the offset hours in your GMT timezone) is associated with GMT 0:00.
IBM Tivoli Netcool Performance Manager: DataMart Configuration Guide 3

Chapter 1: Introduction
9-c. Enter Y if the Time Zone you have selected manages Daylight Saving.
10. The following output shows that the process to start up the DataMart has completed successfully.
Complete with Success ...
_______________________________________________________________________________________________
The following Time Zone has been modified :
_________________________________________________________________________________________
id | Date (in GMT) | offset in | Name | Aggset status
| | seconds | |
_________________________________________________________________________________________
1 | 2010/04/07 08:42:06 | 3600 | Greenwich Mean Time_2010_DST | Aggset not created
1 | 2010/10/31 01:00:00 | 0 | Greenwich Mean Time_2010 | Aggset not created
1 | 2011/03/27 01:00:00 | 3600 | Greenwich Mean Time_2011_DST | Aggset not created
1 | 2011/10/30 01:00:00 | 0 | Greenwich Mean Time_2011 | Aggset not created
1 | 2012/03/25 01:00:00 | 3600 | Greenwich Mean Time_2012_DST | Aggset not created
1 | 2012/10/28 01:00:00 | 0 | Greenwich Mean Time_2012 | Aggset not created
1 | 2013/03/31 01:00:00 | 3600 | Greenwich Mean Time_2013_DST | Aggset not created
1 | 2013/10/27 01:00:00 | 0 | Greenwich Mean Time_2013 | Aggset not created
1 | 2014/03/30 01:00:00 | 3600 | Greenwich Mean Time_2014_DST | Aggset not created
1 | 2014/10/26 01:00:00 | 0 | Greenwich Mean Time_2014 | Aggset not created
1 | 2015/03/29 01:00:00 | 3600 | Greenwich Mean Time_2015_DST | Aggset not created
1 | 2015/10/25 01:00:00 | 0 | Greenwich Mean Time_2015 | Aggset not created
1 | 2016/03/27 01:00:00 | 3600 | Greenwich Mean Time_2016_DST | Aggset not created
1 | 2016/10/30 01:00:00 | 0 | Greenwich Mean Time_2016 | Aggset not created
1 | 2017/03/26 01:00:00 | 3600 | Greenwich Mean Time_2017_DST | Aggset not created
1 | 2017/10/29 01:00:00 | 0 | Greenwich Mean Time_2017 | Aggset not created
4 IBM Tivoli Netcool Performance Manager: DataMart Configuration Guide

Chapter 1: Introduction
1 | 2018/03/25 01:00:00 | 3600 | Greenwich Mean Time_2018_DST | Aggset not created
1 | 2018/10/28 01:00:00 | 0 | Greenwich Mean Time_2018 | Aggset not created
1 | 2019/03/31 01:00:00 | 3600 | Greenwich Mean Time_2019_DST | Aggset not created
1 | 2019/10/27 01:00:00 | 0 | Greenwich Mean Time_2019 | Aggset not created
1 | 2020/03/29 01:00:00 | 3600 | Greenwich Mean Time_2020_DST | Aggset not created
1 | 2020/10/25 01:00:00 | 0 | Greenwich Mean Time_2020 | Aggset not created
1 | 2021/03/28 01:00:00 | 3600 | Greenwich Mean Time_2021_DST | Aggset not created
1 | 2021/10/31 01:00:00 | 0 | Greenwich Mean Time_2021 | Aggset not created
1 | 2022/03/27 01:00:00 | 3600 | Greenwich Mean Time_2022_DST | Aggset not created
1 | 2022/10/30 01:00:00 | 0 | Greenwich Mean Time_2022 | Aggset not created
1 | 2023/03/26 01:00:00 | 3600 | Greenwich Mean Time_2023_DST | Aggset not created
1 | 2023/10/29 01:00:00 | 0 | Greenwich Mean Time_2023 | Aggset not created
1 | 2024/03/31 01:00:00 | 3600 | Greenwich Mean Time_2024_DST | Aggset not created
1 | 2024/10/27 01:00:00 | 0 | Greenwich Mean Time_2024 | Aggset not created
1 | 2025/03/30 01:00:00 | 3600 | Greenwich Mean Time_2025_DST | Aggset not created
1 | 2025/10/26 01:00:00 | 0 | Greenwich Mean Time_2025 | Aggset not created
1 | 2026/03/29 01:00:00 | 3600 | Greenwich Mean Time_2026_DST | Aggset not created
1 | 2026/10/25 01:00:00 | 0 | Greenwich Mean Time_2026 | Aggset not created
1 | 2027/03/28 01:00:00 | 3600 | Greenwich Mean Time_2027_DST | Aggset not created
1 | 2027/10/31 01:00:00 | 0 | Greenwich Mean Time_2027 | Aggset not created
1 | 2028/03/26 01:00:00 | 3600 | Greenwich Mean Time_2028_DST | Aggset not created
1 | 2028/10/29 01:00:00 | 0 | Greenwich Mean Time_2028 | Aggset not created
1 | 2029/03/25 01:00:00 | 3600 | Greenwich Mean Time_2029_DST | Aggset not created
1 | 2029/10/28 01:00:00 | 0 | Greenwich Mean Time_2029 | Aggset not created
IBM Tivoli Netcool Performance Manager: DataMart Configuration Guide 5

Chapter 1: Introduction
1 | 2030/03/31 01:00:00 | 3600 | Greenwich Mean Time_2030_DST | Aggset not created
1 | 2030/10/27 01:00:00 | 0 | Greenwich Mean Time_2030 | Aggset not created
==> Press <Enter> to continue ....
11. Press Enter. The DataMart GUI appears.
Opening DataMart GUI
This section explains how to start and open DataMart GUI after it has been configured.
Figure 2: DataMart GUI.
Name of the system where Tivoli Netcool Performance
Name of the system where the database is installed.
Note: If the main toolbar appears gray, the database is not running.
To start Datamart GUI after it has been configured, follow these steps:
Note: The $PVMHOME variable is defined as /opt/datamart by default. For minimal deployment, the default is /opt/proviso/datamart.
1. Log in as pvuser (or the user name that you specified during installation) on the system where DataMart is installed.
2. Ensure that the Oracle database and Listener are running. For more information, see the IBM Tivoli Netcool Performance Manager: Installation Guide.
3. Source the DataMart environment using the following command:
. /opt/datamart/dataMart.env
4. Enter the following command:
$PVMHOME/bin/pvm
The DataMart GUI appears, as shown in Figure 2 on page 6.
6 IBM Tivoli Netcool Performance Manager: DataMart Configuration Guide

Chapter 1: Introduction
The Tivoli Netcool Performance Manager DataMart Tabs and Utilities
The Tivoli Netcool Performance Manager DataMart GUI supports the following tabs:
• Configuration
• Metric
• Resource
• Monitor
• Data Manager
Each tab contains a variety of graphical utilities that allow you to perform administrative tasks.
Note: Tivoli Netcool Performance Manager DataMart supports an Adobe Acrobat PDF help system. You can access the online help system by selecting Tivoli Netcool Performance Manager DataMart Help... from the Help menu.
Configuration Tab
The Configuration tab supports the following utilities:
• Import-Export Configuration - lets you import and export meta-data (configuration data), such as requests, elements, and formulas between two Tivoli Netcool Performance Manager DataMart systems. For example, you can share information with other Tivoli Netcool Performance Manager DataMart end-users in different locations.
• Users Configuration - lets you create, modify, or delete user and group accounts and assign access privileges.
• Calendar Configuration - lets you define time ranges for data collection.
• Request Editor - lets you manage data collection parameters such as frequency and storage.
Data Manager Tab
The Data Manager tab supports the following utility:
• Data Viewer - lets you view and verify collected data in the database in graphical charts.
Metric Tab
The Metric tab supports the following utilities:
• Formula Editor - lets you create, modify, or delete formulas, which are a series of operations applied to one or more MIB objects.
• MIB Browser - lets you browse a MIB-tree structure. You can test a specific OID before using it in a new formula or a request. You can also drag and drop an OID to another application where you want it to be used (such as Formula Editor, Request Editor, or Dashboard Editor).
• MIB Compiler - lets you convert a management information base (MIB) file in Structure of Management Information (SMI) format to the Tivoli Netcool Performance Manager DataMart internal format. You can also add new MIBs in addition to those provided with Tivoli Netcool Performance Manager DataMart.
IBM Tivoli Netcool Performance Manager: DataMart Configuration Guide 7

Chapter 1: Introduction
Monitor Tab
The Monitor tab supports the following utilities:
• Collector Information - provides information about collector parameters and activities.
• DataMart Status - lets you browse through a list of Tivoli Netcool Performance Manager DataMart modules that are registered in the current database, and those that are locked. Lets you unlock modules when necessary.
• Database Information - provides detailed statistical and graphical information about the Tivoli Netcool Performance Manager DataMart database.
Resource Tab
The Resource tab supports the following utilities:
• Inventory Tool - lets you import, analyze, and discover elements and sub-elements in your network.
• Rule Editor - lets you create and edit grouping rules.
• SNMP Configuration - lets you define and maintain Simple Network Management Protocol (SNMP) parameters such as community names, port number, timeout value, and retries values.
• Resource Editor - lets you add, modify, export, and import elements, sub-elements, element groups, sub-element groups, reports, and thresholds.
Where to Go From Here
The following chapters explain how to use the various DataMart utilities to administer Tivoli Netcool Performance Manager.
8 IBM Tivoli Netcool Performance Manager: DataMart Configuration Guide

Chapter 1: Introduction
NOTES
IBM Tivoli Netcool Performance Manager: DataMart Configuration Guide 9

Chapter 1: Introduction
10 IBM Tivoli Netcool Performance Manager: DataMart Configuration Guide

Chapter 2: Configuring Users and Groups
This chapter explains how to create users and groups so that customers can access Tivoli Netcool Performance Manager DataMart. It also explains how to grant access rights, and is made up of the following topics:
Creating a User
This section explains how to create one or more user accounts for end-users that need access to Tivoli Netcool Performance Manager DataMart. You can specify whether a user account has read-only or full access rights to the Tivoli Netcool Performance Manager DataMart modules.
To create a user, follow these steps:
1. Click Users Configuration in the Configuration tab. The User Configuration Tool window appears, as follows:
Topic Page
Creating a User 11
Creating a Group of Users 14
Granting Rights to Groups 17
IBM Tivoli Netcool Performance Manager: DataMart Configuration Guide 11

Chapter 2: Configuring Users and Groups
Exit
NewView InformationEdit Delete Refresh
By default, the following users appears in the Users tab:
— pvuser - an anonymous user account that you can provide to any authorized person for access to Tivoli Netcool Performance Manager DataMart. By default, the “pvuser” user account belongs to the “admin” group and has read and write access rights to all modules. You can modify the pvuser user account.
Note: You can choose the name for this user account during installation. For example, instead of pvuser, you could choose “Jerry” or “operations.” See the IBM Tivoli Netcool Performance Manager: Installation Guide for more details.
— root - the user account for the person(s) responsible for managing the Tivoli Netcool Performance Manager DataMart system on a network. By default, the “root” user account belongs to the “admin” group and has read and write access rights to all modules. You cannot modify the root user account.
Note: The daemon user is a special account used by Oracle. You cannot modify this account.
2. Click New from the File menu. The New User window appears., as follows
12 IBM Tivoli Netcool Performance Manager: DataMart Configuration Guide

Chapter 2: Configuring Users and Groups
3. Enter the end user’s operating system login name (in alphanumeric characters only) in the Login name box.
4. Optionally, enter the end user’s full name in the Full Name box.
5. Click on a group name in the Not member of box. For example, “admin.”
6. Click the left arrow button to add the user to that group. The group name you selected appears in the Member of box.
7. Click OK to accept your selections.
8. Repeat steps 2 through 6 to create as many user accounts as needed.
9. See the section entitled Granting Rights to Groups on page 17 for instructions on granting user access rights to Tivoli Netcool Performance Manager DataMart modules.
Deleting a User
This section explains how to delete a user.
To delete a user, follow these steps:
IBM Tivoli Netcool Performance Manager: DataMart Configuration Guide 13

Chapter 2: Configuring Users and Groups
1. Select the user name from the Users tab.
2. Click Delete from the Edit menu. A message box appears, asking you to confirm your choice.
3. Click Yes to confirm the deletion. The user is removed.
Creating a Group of Users
This section explains how to create a group for end-users that need access to Tivoli Netcool Performance Manager DataMart. When you add users to a group, the users belonging to that group automatically inherit the group’s rights.
To create a group, follow these steps:
1. Click Users Configuration in the Configuration tab.
14 IBM Tivoli Netcool Performance Manager: DataMart Configuration Guide

Chapter 2: Configuring Users and Groups
2. Click the Groups tab.
The following groups appear in the Groups tab by default:
— admin - this group has write access privileges to all Tivoli Netcool Performance Manager DataMart modules. At least one user account needs to be a member of this group. You cannot modify or delete this group.
— default - this group has read-only access to the Data Viewer module (by default), which can be used to view data that has been collected for verification purposes.
— pvUsers - this group has read-only access to all Tivoli Netcool Performance Manager DataMart modules (by default).
3. Click New from the File menu. The New Group window appears.
4. Enter the name of the group in the Group name box. For example, “Operations.”
Important: The group name must consist of only alpha-numeric characters.
IBM Tivoli Netcool Performance Manager: DataMart Configuration Guide 15

Chapter 2: Configuring Users and Groups
5. Optionally, enter a unique description for the group in the Description box.
6. Click on a user name(s) in the Are not members box. You can make multiple selections.
7. Click the left arrow button to add a user(s) to the group. The user name appears in the Are members box.
8. Click OK to accept your selections.
9. Repeat steps 3 through 7 to add as many users to the group as needed.
10. See the section entitled Granting Rights to Groups on page 17 for instructions on granting access rights to Tivoli Netcool Performance Manager DataMart modules.
Deleting a Group
This section explains how to delete a group.
You must ensure that you do not delete the following DataMart user groups:
To delete a group, follow these steps:
1. Select the group name from the Group tab.
2. Click Delete from the Edit menu. The following message box appears, asking you to confirm your choice.
3. Click Yes to confirm the deletion. The group is removed.
Group Name Description
default Default Users.
admin Tivoli Netcool Performance Manager DataMart Administrators.
pvUsers Tivoli Netcool Performance Manager DataMart Users.
16 IBM Tivoli Netcool Performance Manager: DataMart Configuration Guide
Chapter 2: Configuring Users and Groups
Granting Rights to Groups
After you create groups as detailed on page 14, you can assign rights to specific Tivoli Netcool Performance Manager DataMart modules for that group.
To grant rights to groups, follow these steps:
1. Create a group as detailed in the section entitled Creating a Group of Users on page 14.
- or -
Edit an existing group by double-clicking it.
2. Click the Permissions at the bottom of the dialog box. The dialog box expands and displays the Permissions group.
Permissions group
3. Click once in the Read or Write column to grant access for the desired module. An “X” appears signifying that the module is selected. If you select “Write” access for a module, “Read” access is automatically included.
For example, you might want to give full access rights for all modules to network operators and read-only rights to corporate executives.
See the next section entitled “Understanding the Tivoli Netcool Performance Manager DataMart Modules” for descriptions of each module.
Note: Click again in a column if you need to remove an “X.”
4. Click OK when you are finished.
5. Repeat steps 2 through 4 until you have granted all necessary rights to all groups.
IBM Tivoli Netcool Performance Manager: DataMart Configuration Guide 17

Chapter 2: Configuring Users and Groups
Understanding the Tivoli Netcool Performance Manager DataMart Modules
The following tables list the Tivoli Netcool Performance Manager DataMart modules for which you can grant access rights.
Table 1: Configuration Tools
Table 2: Metric Tools
Table 3: Resource Tools
Module Description
Import/ExportConfiguration
Lets you transfer hosts, sub-elements, dashboards, requests, formulas, calendars, and thresholds between two Tivoli Netcool Performance Manager DataMart systems.
Users Configuration Lets you create user and group accounts and assign access privileges.
Calendar Configuration Lets you define and modify time ranges for data collection.
Request Editor Lets you manage data collection parameters such as frequency and storage.
Module Description
Formula Editor Lets you create formulas, which are a series of operations applied to one or more MIB objects.
MIB Browser Lets you browse a MIB tree structure.
MIB Compiler Lets you convert a management information base (MIB) file in Structure of Management Information (SMI) format to the Tivoli Netcool Performance Manager DataMart internal format.
Module Description
Inventory Tool Lets you search for all SNMP hosts located on a network and discover elements and sub-elements.
Rule Editor Lets you create and edit grouping rules.
SNMP Configuration Lets you define and maintain Simple Network Management Protocol (SNMP) community names.
18 IBM Tivoli Netcool Performance Manager: DataMart Configuration Guide

Chapter 2: Configuring Users and Groups
Table 4: Monitor Tools
Table 5: Data Manager Tools
Table 6: Selector Tools
Table 7: Command Line Interfaces
Resource Editor Lets view resource information, import resources, export resources, and to delete resources.
Module Description
Collector Information Provides information about collector activity.
Tivoli Netcool Performance Manager DataMart Status Tool
Lists all modules that are currently active. Lets you unlock modules when necessary.
Dashboard Manager Lets you launch dashboards requests.
Dashboard Editor Lets you create dashboard requests in real- time.
Module Description
Data Viewer Lets you use view and verify collected data in the database.
Module Description
Formula Selector Lets you select a formula from the formula library.
Dashboard Selector Displays a list of configured dashboards requests.
Calendar Selector Lets you designate a time to automatically launch one or more requests.
Module Description
Resource Manager (resmgr)
Lets you import, export, modify, and delete objects in the database. These objects include elements, sub-elements, element and sub-element groups, properties, thresholds, inventory profiles, Tivoli Netcool Performance Manager DataMart users and groups, Web users, Web reports, and Web access.
Database Manager (dbMgr)
A utility that lets you create a database channel.
IBM Tivoli Netcool Performance Manager: DataMart Configuration Guide 19

Chapter 2: Configuring Users and Groups
NOTES
20 IBM Tivoli Netcool Performance Manager: DataMart Configuration Guide
Chapter 3: Configuring Inventory
This chapter explains how to import, analyze, and discover elements and sub-elements in your network using Resource Manager or the Inventory Tool, and is made up of the following topics:
Before You Begin
Before configuring your network inventory, ensure that:
• Your computer is connected to a TCP/IP network and has a valid IP address.
• The default collector is running. For more information, see the IBM Tivoli Netcool Performance Manager: DataMart Operation Guide.
• You have installed Tivoli Netcool Performance Manager Technology Packs if you want to use default grouping rules. For instructions on installing Tivoli Netcool Performance Manager Technology Packs, see the IBM Tivoli Netcool Performance Manager: Installation Guide.
Topic Page
Configuring Your Network Inventory 22
Creating an Inventory Profile 23
Configuring Your Discovery 25
Running an Inventory Profile 42
SNMP Bandwidth Control and Collection Smoothing 44
Understanding File Formats 47
Managing Dynamic Changes 49
Configuring a Bulk Collector Inventory 55
Understanding a Bulk Collector Inventory 58
Bulk File Format Examples 62
IBM Tivoli Netcool Performance Manager: DataMart Configuration Guide 21
Chapter 3: Configuring Inventory
Configuring Your Network Inventory
This section explains how to gather information about elements and sub-elements in your network using the Inventory Tool.
When you execute an inventory, the “discovery” phase searches for SNMP and non-SNMP elements and sub-elements (known as resources). As these resources respond, their addresses are stored in the database for use in the “analysis” phase. The analysis phase stores the addresses of associated sub-elements.
You can also configure an inventory using the inventory and resmgr commands. For more information, see the IBM Tivoli Netcool Performance Manager: Command Line Interface Guide.
Note: The Inventory Tool can only find operational elements. If an element is down, it is not detected.
Using the Inventory Tool
To configure a network inventory using the Inventory Tool, follow these steps:
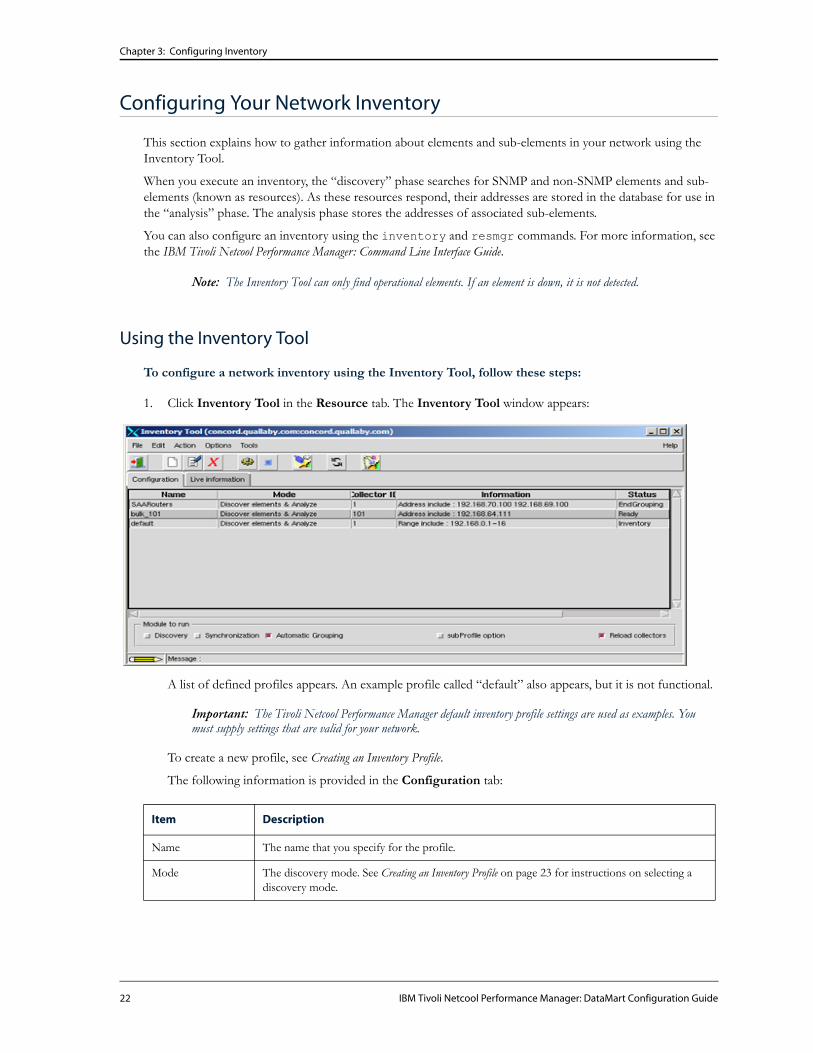
1. Click Inventory Tool in the Resource tab. The Inventory Tool window appears:
A list of defined profiles appears. An example profile called “default” also appears, but it is not functional.
Important: The Tivoli Netcool Performance Manager default inventory profile settings are used as examples. You must supply settings that are valid for your network.
To create a new profile, see Creating an Inventory Profile.
The following information is provided in the Configuration tab:
Item Description
Name The name that you specify for the profile.
Mode The discovery mode. See Creating an Inventory Profile on page 23 for instructions on selecting a discovery mode.
22 IBM Tivoli Netcool Performance Manager: DataMart Configuration Guide

Chapter 3: Configuring Inventory
Note: The “inventory” command line interface (CLI) command launches the Inventory Tool from the command line. See the IBM Tivoli Netcool Performance Manager: Command Line Interface Guide for instructions on using this CLI.
Creating an Inventory Profile
The Inventory Tool Wizard lets you create and modify one or more profiles. A profile lets you define your network inventory. You can create different profiles for different resources in your network.
You can create a profile to do the following:
• Divide your network between different SNMP community names. Grouping resources using alternative SNMP community names improves performance by providing collectors with multiple community names that limit the number of time-outs.
• Separate resources with invariants that require editing during synchronization from those that require no editing.
• Separate requests that you want to run at different times or different intervals.
• Have one profile for each collector.
CAUTION: If you include the same resource in two profiles, running the second profile overwrites the results of the first profile.
To use the Inventory Tool Wizard, follow these steps:
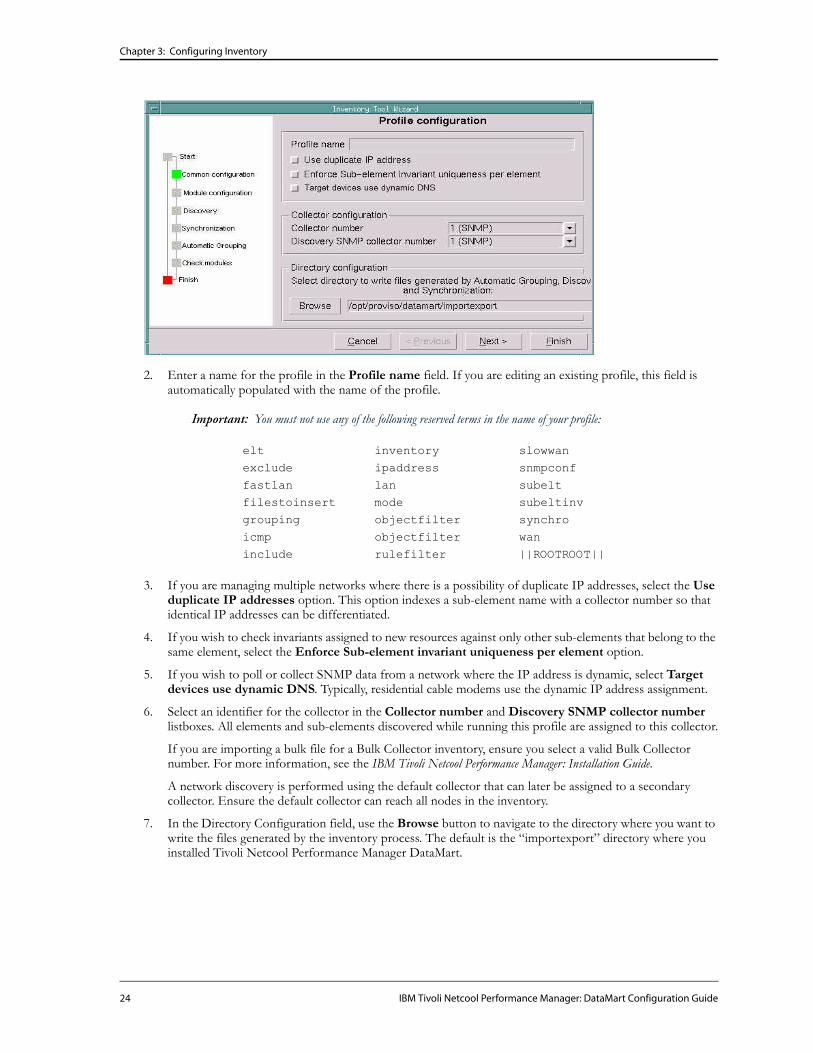
1. Select New profile from the Edit menu. The following window appears:
Note: Select Edit profile from the Edit menu if you want to edit an existing profile.
Collector ID The collector identifier. Elements and sub-elements discovered while running the profile are assigned to this collector. To view the status on collectors, see Chapter 3, Viewing Collector Information in the IBM Tivoli Netcool Performance Manager: DataMart Operation Guide.
Information Additional information about the profile, such as the IP addresses you are including or excluding. If you are importing data from a file, the filename is displayed.
Status Provides the following information:
• Ready appears after you create or edit a profile.
• EndDiscovery appears after you complete a discovery.
• SynchroReady appears after pre-synchronization when you run the profile from the command line (see note).
• EndSynchro appears after synchronization.
• GroupingReady appears after pre-grouping when you run the profile from the command line (see note).
• EndGrouping appears after grouping.
Module to Run Indicates the modules that are enabled within the selected profile. A module can be enabled or disabled by clicking on its name.
IBM Tivoli Netcool Performance Manager: DataMart Configuration Guide 23
Chapter 3: Configuring Inventory
2. Enter a name for the profile in the Profile name field. If you are editing an existing profile, this field is automatically populated with the name of the profile.
Important: You must not use any of the following reserved terms in the name of your profile:
3. If you are managing multiple networks where there is a possibility of duplicate IP addresses, select the Use duplicate IP addresses option. This option indexes a sub-element name with a collector number so that identical IP addresses can be differentiated.
4. If you wish to check invariants assigned to new resources against only other sub-elements that belong to the same element, select the Enforce Sub-element invariant uniqueness per element option.
5. If you wish to poll or collect SNMP data from a network where the IP address is dynamic, select Target devices use dynamic DNS. Typically, residential cable modems use the dynamic IP address assignment.
6. Select an identifier for the collector in the Collector number and Discovery SNMP collector number listboxes. All elements and sub-elements discovered while running this profile are assigned to this collector.
If you are importing a bulk file for a Bulk Collector inventory, ensure you select a valid Bulk Collector number. For more information, see the IBM Tivoli Netcool Performance Manager: Installation Guide.
A network discovery is performed using the default collector that can later be assigned to a secondary collector. Ensure the default collector can reach all nodes in the inventory.
7. In the Directory Configuration field, use the Browse button to navigate to the directory where you want to write the files generated by the inventory process. The default is the “importexport” directory where you installed Tivoli Netcool Performance Manager DataMart.
elt inventory slowwan
exclude ipaddress snmpconf
fastlan lan subeltfilestoinsert mode subeltinv
grouping objectfilter synchro
icmp objectfilter waninclude rulefilter ||ROOTROOT||
24 IBM Tivoli Netcool Performance Manager: DataMart Configuration Guide

Chapter 3: Configuring Inventory
8. Click the Next button to proceed. The following window appears:
9. Select the modules that you want to configure for this profile. By default, all modules are selected.
If you are editing an existing profile, modules that you do not configure retain the existing values. If you are creating a new profile, modules that you do not configure retain the default values.
The following table lists the supported modules:
10. Click the Next button. To complete the configuration, see Configuring Your Discovery.
Note: This chapter assumes you select all three modules. If you disable one or more of the modules, the window sequence will differ.
Configuring Your Discovery
This section explains how to use the Discovery Tool Wizard to specify what resources are included in your network inventory profile. To fully configure your profile, you must complete the tasks detailed in the following sections:
• Selecting Your Network Discovery Method
• Specifying IP Addresses
• Defining an SNMP Configuration
• Specifying SNMP Community Names
• Specifying an ICMP Configuration
• Configuring Labels for Sub-Elements
Module Description
Discovery Lets you specify the parts of your network to include in the profile.
Synchronization Lets you synchronize new data for your profile with existing data.
Automatic Grouping Lets you specify grouping rules for this profile (default or custom).
See “Chapter 4, Creating Grouping Rules” for step-by-step instructions on creating custom grouping rules.
IBM Tivoli Netcool Performance Manager: DataMart Configuration Guide 25
Chapter 3: Configuring Inventory
• Specifying Synchronization
• Inserting Resources
• Specifying Automatic Grouping
• Selecting Modules
Note: The window sequences displayed in the Discovery Tool Wizard may differ according to the selections you have made.
Selecting Your Network Discovery Method
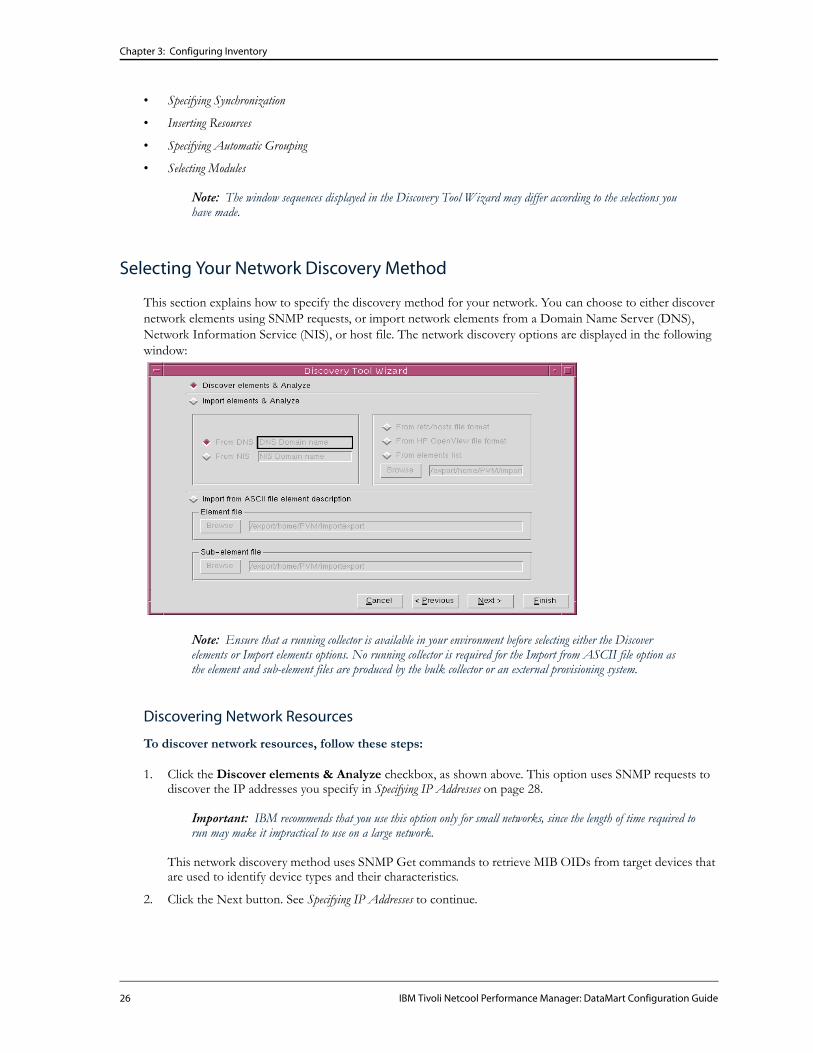
This section explains how to specify the discovery method for your network. You can choose to either discover network elements using SNMP requests, or import network elements from a Domain Name Server (DNS), Network Information Service (NIS), or host file. The network discovery options are displayed in the following window:
Note: Ensure that a running collector is available in your environment before selecting either the Discover elements or Import elements options. No running collector is required for the Import from ASCII file option as the element and sub-element files are produced by the bulk collector or an external provisioning system.
Discovering Network Resources
To discover network resources, follow these steps:
1. Click the Discover elements & Analyze checkbox, as shown above. This option uses SNMP requests to discover the IP addresses you specify in Specifying IP Addresses on page 28.
Important: IBM recommends that you use this option only for small networks, since the length of time required to run may make it impractical to use on a large network.
This network discovery method uses SNMP Get commands to retrieve MIB OIDs from target devices that are used to identify device types and their characteristics.
2. Click the Next button. See Specifying IP Addresses to continue.
26 IBM Tivoli Netcool Performance Manager: DataMart Configuration Guide

Chapter 3: Configuring Inventory
Importing Network Resources
To import network resources, follow these steps:
1. Click the Import elements & Analyze checkbox, as shown above. This option allows you to import resources from a domain-based (for example, DNS or NIS) or file-based (for example, /etc/host, HP OpenView, or elements list) source. This mode is recommended for large networks.
If you import network resources and also list specific IP addresses (as explained in Specifying IP Addresses on page 28), Tivoli Netcool Performance Manager will only discover elements that appear in both the imported list and the list of specific IP addresses.
Note: The “Import elements & Analyze” mode must be used if you plan to run the inventory profile using the subprofile option.
2. To import resources from a domain-based source, select one of the following options:
— From DNS lets you import elements by specifying a valid Domain Name Server (DNS). Specify the DNS in the box to the right. The Inventory Tool displays the DNS in /etc/resolv.conf.
— From NIS lets you import elements by specifying a valid Network Information Service (NIS) domain name. Specify the NIS domain name in the box to the right. The Inventory Tool displays the result of the UNIX command “domainname” if it is valid.
3. To import resources from a file-based source, select one of the following options:
— From /etc/hosts file format lets you import elements by specifying a file in the same format as the /etc/hosts file. For example:
Use the Browse button to specify the path and filename of the input file.
— From HP OpenView file format lets you import elements by specifying a file in the HPOpenView format. This file can be created by the command:
$OV_BIN/ovtopodump -r
Redirect the output to a file, then use the Browse button to specify the path and filename of the input file.
— From elements list lets you import elements by specifying a file. The file contains a list of IP addresses with one address on each line. This file can be a .txt file.
Note: The “From elements list” option must be used if you plan to run the inventory profile using the subprofile option.
IP Address HostName UNIX Alias
195.2.53.9 Cisco24 Cisco2500_BOSTON
195.2.53.15 Cisco25 Cisco2500_NEWYORK
IBM Tivoli Netcool Performance Manager: DataMart Configuration Guide 27

Chapter 3: Configuring Inventory
For example:
Use the Browse button to specify the path and filename of the input file.
4. Click the Next button. See Specifying IP Addresses to continue.
Specifying IP Addresses
This section explains how to include or exclude IP addresses from your network inventory profile. The IP address options are displayed in the following window:
To specify IP addresses, follow these steps:
1. Enter the IP addresses you want to include or exclude from your network discovery in the IP address entry box. The Discovery Tool Wizard supports both IPv4 and IPv6 address formats.
2. Click the <<Add button to add it to the list of IP addresses to include in the discovery, or click the Add>> button to add it to the list of IP addresses to exclude from the discovery.
3. To modify an existing IP address: highlight the entry, so that it appears in the IP address entry box. Modify the entry in the IP address entry box, then click the Modify button.
4. To delete an IP address: highlight it and click the Delete button. To delete all the entries in the IP address include area, click the <<Clear button. To delete all the entries in the IP address exclude area, click the Clear>> button.
28 IBM Tivoli Netcool Performance Manager: DataMart Configuration Guide

Chapter 3: Configuring Inventory
5. Click the ARP Query (Address Resolution Protocol) option if you want to use ARP tables to discover the elements specified in the IP address include area.
6. Click the Next button. See Specifying SNMP Community Names to continue.
Defining an SNMP Configuration
This section explains how to use the SNMP Configuration Tool to define general parameters for SNMP requests. The SNMP Configuration Tool is launched from the following window:
To define an SNMP configuration, follow these steps:
1. Click the Open button for the SNMP Configuration Tool.
Note: You can also launch the SNMP Configuration tool from the command line using the “snmpconf ” command line interface (CLI) command. See the IBM Tivoli Netcool Performance Manager: Command Line Interface Guide for instructions on using this CLI.
2. Click the Apply Filter button to list all of the elements currently in the SNMP configuration database. The following information is displayed for each entry:
Item Description
Name Specifies the name of the device associated with this SNMP configuration.
IP Address Specifies the IP address, mask, subnets, or address list for the device. Both IPv4 or IPv6 address formats are acceptable.
Type Specifies the type of the device.
Read community Specifies the name of the SNMP read community.
Collector ID Identifies the collector associated with this SNMP configuration. A setting of 0 applies the SNMP configuration to all collectors.
Write Community Specifies the name of the SNMP write community.
Timeout Specifies the length of time (in seconds) to wait for a response from a request.
IBM Tivoli Netcool Performance Manager: DataMart Configuration Guide 29
Chapter 3: Configuring Inventory
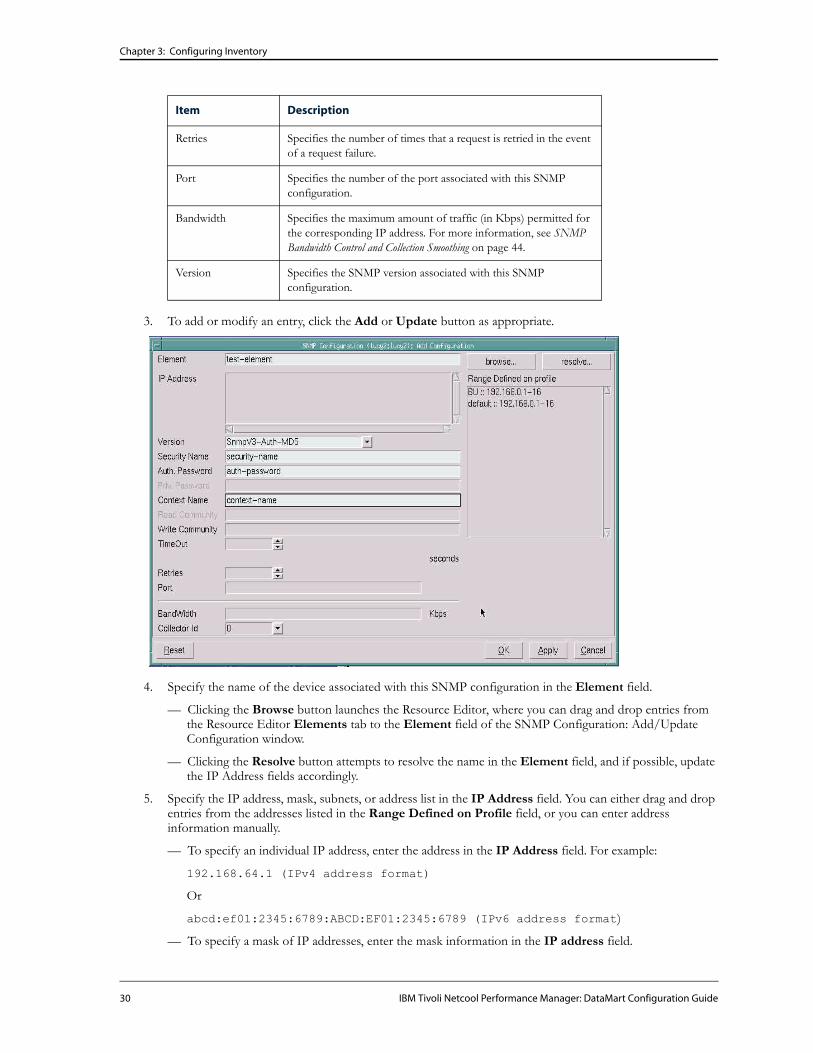
3. To add or modify an entry, click the Add or Update button as appropriate.
4. Specify the name of the device associated with this SNMP configuration in the Element field.
— Clicking the Browse button launches the Resource Editor, where you can drag and drop entries from the Resource Editor Elements tab to the Element field of the SNMP Configuration: Add/Update Configuration window.
— Clicking the Resolve button attempts to resolve the name in the Element field, and if possible, update the IP Address fields accordingly.
5. Specify the IP address, mask, subnets, or address list in the IP Address field. You can either drag and drop entries from the addresses listed in the Range Defined on Profile field, or you can enter address information manually.
— To specify an individual IP address, enter the address in the IP Address field. For example:
192.168.64.1 (IPv4 address format)
Or
abcd:ef01:2345:6789:ABCD:EF01:2345:6789 (IPv6 address format)
— To specify a mask of IP addresses, enter the mask information in the IP address field.
Retries Specifies the number of times that a request is retried in the event of a request failure.
Port Specifies the number of the port associated with this SNMP configuration.
Bandwidth Specifies the maximum amount of traffic (in Kbps) permitted for the corresponding IP address. For more information, see SNMP Bandwidth Control and Collection Smoothing on page 44.
Version Specifies the SNMP version associated with this SNMP configuration.
Item Description
30 IBM Tivoli Netcool Performance Manager: DataMart Configuration Guide

Chapter 3: Configuring Inventory
Entering a range in IPv4 format:
192.168.1-3.1 : Indicates an address list of 192.168.1.1, 192.168.2.1, and 192.168.3.1.
192.168.64.* : Indicates an address range of 192.168.64.0 to 192.168.64.255.
192.168.10,16.* : Indicates two address ranges, one from 192.168.10.0 to 192.168.10.255, and another from 192.168.16.0 to 192.168.16.255.
Entering a range in IPv6 format:
Note: IPv6 ranges can be specified only using the CIDR notation. The characters '*' and '-' are not accepted.
— To specify a CIDR subnet, enter the subnet information in the IP address field. For example:
192.168.1.0/24 : Indicates an address range of 192.168.1.0 to 192.168.1.255.
192.168.1.0/25 : Indicates an address range of 192.168.1.0 to 192.168.1.127.
2620:0:860:2::/64: Indicates an address range of 2620:0:860:2:: to 2620:0:860:2:FFFF:FFFF:FFFF:FFFF
— To specify several IP entries for the same SNMP configuration, enter the address information in the IP Address field with each entry separated by semi-colon characters. For example:
192.168.64.1;192.168.1-4.1;192.168.64.*;192.168.1.0/24
6. Specify the SNMP version used for this configuration from the Version list. Selecting a specific SNMP version inserts a corresponding version prefix at the beginning of the Read Community field, while selecting Auto omits the version prefix..
Note: The ReadCommunity field is automatically populated for the following Version options and does not need updating: SnmpV3-No-Auth SnmpV3-Auth-MD5 SnmpV3-Auth-SHA SnmpV3-Auth-MD5-Priv-DES SnmpV3-Auth-SHA-Priv-DES SnmpV3-Auth-MD5-Priv-AES, SnmpV3-Auth-SHA-Priv-AES
7. .Specify the name of the SNMP read community in the Read Community field. If you selected a specific SNMP version from the Version pull-down box, the corresponding version prefix must be used in the SNMP read community name. The Read Community field takes the parameters from the following controls and uses them to build the Read Community string:
— Security Name: Specifies the user name to be used for this SNMP V3 element
— Auth. Paddword: Specifies the password to be used for authentication (MD5) for this SNMP V3 element.
— Priv. Password: Specifies the private password to be used with the following Version options:
SnmpV3-Auth-MD5-Priv-DES
SnmpV3-Auth-SHA-Priv-DES
SnmpV3-Auth-MD5-Priv-AES
SnmpV3-Auth-SHA-Priv-AES
— Context Name: Specifies the context name to be used for this SNMP V3 element.
8. Specify the name of the SNMP write community in the Write Community field.
9. Specify the length of time (in seconds) to wait for a response from a request in the TimeOut field.
10. Specify the number of times that a request should be retried in the event of a request failure in the Retries field.
IBM Tivoli Netcool Performance Manager: DataMart Configuration Guide 31

Chapter 3: Configuring Inventory
11. Specify the number of the port associated with this SNMP configuration in the Port field. A setting of 0 indicates that this SNMP configuration applies to all ports.
12. Specify the bandwidth limit for traffic (in Kbps) permitted for this SNMP configuration’s IP addresses in the Bandwidth field. For more information, see SNMP Bandwidth Control and Collection Smoothing on page 44.
13. Specify the collector associated with this SNMP configuration from the Collector ID pull-down box. A setting of 0 indicates that this SNMP configuration is applicable to all collectors.
14. After specifying the SNMP configuration, click the OK button.
Specifying SNMP Community Names
This section explains how to specify alternative community names, and determine if the SNMP configuration database should be updated if alternative community names are used. The SNMP community name options are displayed in the following window:
To specify an SNMP community name, follow these steps:
1. To add a community name, type the name in the Alternative community names box, then click the Add button. You also use the Alternative community names box to specify an SNMP V3 community name, using the following syntax:
&V3[{separator}{option}={value}...]
where:
— &V3 — Specifies a required string that indicates that this entry is an SNMP V3 community name.
— separator — Specifies a character used to separate options specified in the community name. The separator can be any character, but the same separator character must be used to separate all of the options specified in the community name. Typically, you use a , (comma) character as the separator. However, if the , (comma) character is used in any of the passwords, you can substitute the comma with any other separator character (for example, /, @, -, and so forth).
— option — Specifies one or more option keywords that define an SNMP V3 community string. Each option keyword is followed by an = (equals sign).
32 IBM Tivoli Netcool Performance Manager: DataMart Configuration Guide

Chapter 3: Configuring Inventory
— value — Specifies a valid value for the specified option. The following table lists the option keywords along with their associated valid values:
• No-Auth — Indicates that this SNMP V3 community name is no more secure than the community string provided in SNMP V1 or SNMP V2c.
• Auth-MD5 — Indicates that this SNMP V3 community name’s security level corresponds to an unencrypted traffic, authenticated with MD5 hash. Specifying this value means that you must also specify the SecurityName, ContextName, and AuthPasswd options.
The following example specifies an SNMP V3 community name that uses an MD5 authentication:
&V3,AccessMode=Auth-MD5
,SecurityName=user2
,ContextName=context2
,AuthPasswd=1234567890abcdef
2. To modify an existing entry, highlight the entry so that it appears in the Alternative community names box. Modify the entry in the Alternative community names box, then click the Modify button.
3. To delete an entry, highlight the entry and click the Delete button. To delete all the entries, click the Clear button.
4. Click Update SNMP configuration tool with new matching community name to update the community names in the SNMP configuration database with the alternative community name for elements queried.
5. Click the Next button to proceed. The following window appears:
Option Values
SecurityName Specifies the user name to be used for this SNMP V3 community name.
ContextName Specifies the context name to be used for this SNMP V3 community name.
AuthPasswd Specifies the password to be used for authentication (MD5) for this SNMP V3 community name.
EngineId Specifies the value for the engine ID for this SNMP V3 community name. This option keyword is optional.
AccessMode Specifies the level of security required for this SNMP V3 community name. The following are the valid values for this option:
IBM Tivoli Netcool Performance Manager: DataMart Configuration Guide 33

Chapter 3: Configuring Inventory
.
You can specify which types of elements to include in the discovery. The left pane displays all the known element types. The right pane displays the element types currently included in the discovery.
Note: By default all known element types are included in the discovery.
Important: Ensure that you have installed Tivoli Netcool Performance Manager Technology Packs; otherwise the Groups folder will not display any element type subfolders. See the IBM Tivoli Netcool Performance Manager: Installation Guide and individual Technology Pack User Guides for instructions on installing Tivoli Netcool Performance Manager Technology Packs.
To filter the objects included in the discovery do the following:
5-a. To exclude a specific type of object, drag and drop the object type from the right pane to the left pane.
5-b. To add a specific type of object, click the Unselect All button, then drag and drop a specific object type from the left pane to the right pane.
Important: You can include only those objects that you want to run discovery against and not the entire tree, as shown in Figure 5.
5-c. Uncheck the Insert unknown elements option so that unknown element types are excluded from the inventory. If you select this option, unknown elements are included in the discovery and are added to a folder called “NONE.”
6. Click the Next button to proceed. See Specifying an ICMP Configuration to continue.
34 IBM Tivoli Netcool Performance Manager: DataMart Configuration Guide

Chapter 3: Configuring Inventory
Specifying an ICMP Configuration
This section explains how to specify Internet Control Message Protocol (ICMP) parameters for your inventory profile. The ICMP options are displayed in the following window:
To specify an ICMP configuration, follow these steps:
1. Choose a network type from the Network type group. Each network type has different defaults.
2. Specify the ICMP parameters, either by accepting the defaults or by modifying them. The following options are available:
• After the first ping, wait 5 seconds.
• After the second ping, wait 10 seconds.
• After the third ping, wait 20 seconds.
• Window interval: Length of time (in seconds) to pause in sending pings. Your entry can be from 0.1 to 100 seconds.
• Window size: Number of pings to send before pausing. Your entry can be from 2 to 65,000 pings. It can also be 0, which disables the window. Using 0 is the same as unselecting Ping Window Configuration option.
3. Click the Next button to proceed. See Configuring Labels for Sub-Elements to continue.
Option Description
Message data size Data size of the ICMP packet. The entry can be between 1 and 64,000 bytes.
Tries Number of times to ping a specific IP addresses if no response is received from the ping. Your entry can be between 1 and 10.
Time out Length of time (in seconds) to wait for a response to a ping before sending another ping. The length doubles for each additional ping.
For example, if the Timeout value is 5 seconds:
Ping interval Length of time (in milliseconds) between pings.
Ping Window Configuration
Lets you configure a pause when sending pings to avoid congestion on the network. If you do not select this option, pings are sent equally spaced, without pause, as specified by the Ping Interval.
IBM Tivoli Netcool Performance Manager: DataMart Configuration Guide 35

Chapter 3: Configuring Inventory
Configuring Labels for Sub-Elements
This section explains how to configure labels (naming conventions) for sub-elements in your inventory profile. The sub-label configuration options are displayed in the following window:
To configure labels for sub-elements, follow these steps:
1. Choose the type of element name you want to use. The following options are available
:
2. Click the Next button to proceed. See Specifying Synchronization to continue.
Option Description Example
Sub-element file and formulas configuration
Specifies which discovery file and formulas are used to perform the inventory process.
/opt/datamart/conf/ inventory_subelements.txt
Do not use element names Name of the sub-element is used alone.
Dlci 10 (Cir 0 b/s)
Use element names Name of the element is concatenated with the name of the sub-element. This option is enabled by default.
bost_Dlci 10 (Cir 0 b/s)
Use DNS element names Full DNS name of the element is concatenated with the name of the sub-element. If a DNS name is not found then the IP address is used.
bost.forxh001.sample.fr_Dlci 10 (Cir 0 b/s)
36 IBM Tivoli Netcool Performance Manager: DataMart Configuration Guide

Chapter 3: Configuring Inventory
Specifying Synchronization
This section explains how to specify the data source for the synchronization of your inventory profile. The synchronization options are displayed in the following window:
To specify synchronization, follow these steps:
1. In the Select Datasource area, select the source of the data to be synchronized with the results of this discovery from one of the following options:
— From database (default) - Tivoli Netcool Performance Manager DataMart synchronizes the results of this discovery with the data currently in the database.
— From file - Tivoli Netcool Performance Manager DataMart synchronizes the results of this discovery with the data in the files you specify. Use the Browse button to specify the path and filename for each of the files.
See Specifying IP Addresses on page 28 for details on file formats.
2. Click the Next button to proceed. See Inserting Resources to continue.
IBM Tivoli Netcool Performance Manager: DataMart Configuration Guide 37

Chapter 3: Configuring Inventory
Inserting Resources
This section explains how to add, remove, or update resources in your network inventory that have been created or changed since the last network discovery operation. The insert resources options are displayed in the following window:
To insert resources, follow these steps:
1. In the Resources table, select the resources you want to add, update, or delete. You can select each type of resource and action separately by clicking the appropriate columns. The following actions are supported:
The grouping files for your profile are created in the $PVMHOME/importexport/profilename/grouping directory.
2. In the Specify the retry count... area of the window, specify the number of times previously existing resources that have not been discovered are retried before they are deleted from the network inventory.
3. In the Specify the age for resources... area of the window, specify how long previously existing resources that have not been discovered are retained before they are deleted from the network inventory.
Note: If the creation date or date of the last update for this resource is older than the date specified, the resource is deleted. If the creation date or date of the last update for this resource is more recent than the date specified, the resource is not deleted.
4. Click the Next button to proceed. See Specifying Automatic Grouping to continue.
Selection Description
New Add resources found during the discovery that do not exist in the current data.
Update Update the existing resource data with data found during the discovery.
Delete Delete the existing resource data that is not found during the discovery.
38 IBM Tivoli Netcool Performance Manager: DataMart Configuration Guide
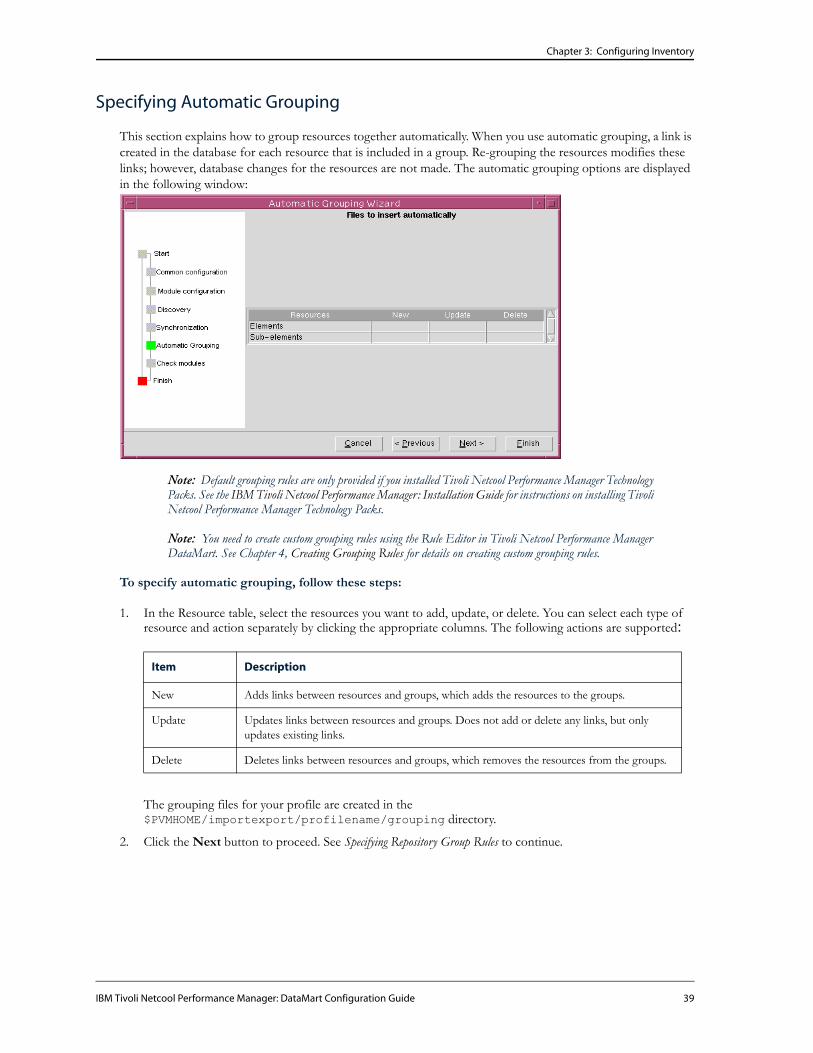
Chapter 3: Configuring Inventory
Specifying Automatic Grouping
This section explains how to group resources together automatically. When you use automatic grouping, a link is created in the database for each resource that is included in a group. Re-grouping the resources modifies these links; however, database changes for the resources are not made. The automatic grouping options are displayed in the following window:
Note: Default grouping rules are only provided if you installed Tivoli Netcool Performance Manager Technology Packs. See the IBM Tivoli Netcool Performance Manager: Installation Guide for instructions on installing Tivoli Netcool Performance Manager Technology Packs.
Note: You need to create custom grouping rules using the Rule Editor in Tivoli Netcool Performance Manager DataMart. See Chapter 4, Creating Grouping Rules for details on creating custom grouping rules.
To specify automatic grouping, follow these steps:
1. In the Resource table, select the resources you want to add, update, or delete. You can select each type of resource and action separately by clicking the appropriate columns. The following actions are supported:
The grouping files for your profile are created in the $PVMHOME/importexport/profilename/grouping directory.
2. Click the Next button to proceed. See Specifying Repository Group Rules to continue.
Item Description
New Adds links between resources and groups, which adds the resources to the groups.
Update Updates links between resources and groups. Does not add or delete any links, but only updates existing links.
Delete Deletes links between resources and groups, which removes the resources from the groups.
IBM Tivoli Netcool Performance Manager: DataMart Configuration Guide 39

Chapter 3: Configuring Inventory
Specifying Repository Group Rules
This section explains how to set rules for groups in your network inventory. The repository group rules options are displayed in the following window:
The Repository group rules side of the window displays all of the grouping rules that can be applied during the grouping operation. The Rules to be used for this profile side of the window displays the grouping rules selected for the specified profile. By default, Tivoli Netcool Performance Manager DataMart executes all of the grouping rules during the grouping operation.
To specify repository group rules, follow these steps:
1. Under the Repository group rules side of the window, click the Unselect All button. Tivoli Netcool Performance Manager DataMart removes all of the grouping rules from the Rules to be used for this profile side of the window.
2. To apply selected grouping rules to your inventory profile, drag and drop the grouping rules you want to apply from the Repository group rules side of the window to the Rules to be used for this profile side of the window. Tivoli Netcool Performance Manager DataMart refreshes the window to display the grouping rules you selected.
3. To apply all grouping rules to your inventory profile, under the Repository group rules side of the window, click the Select All button. Tivoli Netcool Performance Manager DataMart refreshes the window to display all of the grouping rules for the specified profile.
4. Click the Next button to proceed. See Selecting Modules to continue.
40 IBM Tivoli Netcool Performance Manager: DataMart Configuration Guide

Chapter 3: Configuring Inventory
Selecting Modules
This section explains how to specify the modules that are run with your inventory profile. The module options are displayed in the following window:
To select modules that you want to run for this profile, follow these steps:
1. Select one or all of the following:
— Discovery - gathers information about your network as specified in the profile.
— Synchronization - synchronizes the new data for this profile with the existing information.
— Automatic Grouping - applies default or custom grouping rules for this profile. To apply custom grouping rules, you need to create them and set their status to “active.” See Creating Grouping Rules on page 66 in Chapter 4 for details.
2. Click the Next button to proceed. The following window appears:
This window displays a summary of the profile that you created. Ensure that the profile contains the proper values. If you want to change any of the values, click the Previous button to return to the appropriate window.
3. Click the Finish button to complete your profile. See Running an Inventory Profile for instructions on running your profile, or you can also run a profile from the command line.
IBM Tivoli Netcool Performance Manager: DataMart Configuration Guide 41

Chapter 3: Configuring Inventory
Running an Inventory Profile
After you configure an inventory profile, you need to run it to perform a discovery.
To run an inventory profile, follow these steps:
1. Open the Inventory Tool window, as explained in Configuring Your Network Inventory on page 22.
Run the profile
Reload the collectors without running the profile
Open the Rules Editor
You can select or deselect these checkboxes to make immediate and permanent changes to the database. For example, you might want to run just a discovery for a bulk inventory. These options are also available when you create a profile in the Inventory Tool Wizard.
Refresh
2. Click the name of the inventory profile to be run to select it.
3. Specify which modules are to be used with the inventory profile by clicking on the appropriate check-boxes in the Module to run field. The module options include the following:
— Discovery - Gathers information about your network as specified in the profile.
— Synchronization - Synchronizes the new data for this profile with the existing information.
— Automatic Grouping - Applies default or custom grouping rules for this profile. To apply custom grouping rules, you need to create them and set their status to “active.” See Creating Grouping Rules on page 66 in Chapter 4 for details.
Note: If you plan to use custom grouping rules, they must be created before running the profile.
— subProfile option - Gathers information on listed network resources that are imported from a file. The subProfile option is typically used to run a discovery on a subset of the entire profile. This option can only be used with inventory profiles configured as described in Importing Network Resources on page 27.
— Reload Collectors - Reloads the collectors at the same time that the inventory profile is run.
Important: The Tivoli Netcool Performance Manager default inventory profile settings are used as examples. You must supply settings that are valid for your network.
42 IBM Tivoli Netcool Performance Manager: DataMart Configuration Guide

Chapter 3: Configuring Inventory
4. Select Run profile from the Actions menu. The following window appears:
The Live information tab displays messages about the status of the profile. The messages are color coded as follows:
— Red - Error messages
— Blue - Warning messages
— Black - Informational messages
Viewing the Log File
The last line in the Live Information tab provides the path to the TraceInventory.log file, which you can view and print with a text editor.
Note: This file can be very long depending on the size of your network discovery
.
IBM Tivoli Netcool Performance Manager: DataMart Configuration Guide 43

Chapter 3: Configuring Inventory
Reloading Collectors
Each profile is assigned to a collector. If the resources included in the profile change, you need to reload the collector, which updates the collector with the changes.
For optimal performance, you should always reload the collector after you modify a profile.
To reload a collector, follow these steps:
1. Select a profile.
2. Select Reload collectors at the bottom of the window, along with the modules you want to run for this profile.
3. Select Run profile from the Actions menu. The profile runs and the collector is reloaded.
- or -
4. Click the Reload collector button at the top of the window. The collector is reloaded but profile is not run.
Deleting a Profile
To delete a profile, follow these steps:
1. Open the Inventory Tool dialog box, as explained in Configuring Your Network Inventory on page 22.
2. Highlight the profile you want to delete. To delete more than one profile simultaneously, hold down the Control key while selecting the profiles.
3. Select Delete profile from the Edit menu. A confirmation dialog box appears.
4. Click the Yes button.
SNMP Bandwidth Control and Collection Smoothing
The Bandwidth Control and Collection Smoothing features are used to optimize the performance of SNMP collectors in your environment. Before using Bandwidth Control and Collection Smoothing, you must consider how these features function and how that may impact the operation of your network.
Bandwidth Control
SNMP Bandwidth Control is used to prevent SNMP collectors from consuming excessive bandwidth during periods of heavy network activity. The SNMP bandwidth control feature defines a bandwidth limitation that allows you to maximize the performance of the collectors without requiring an overly cautious approach to collection management.
Bandwidth Control is configured by defining an SNMP configuration in Tivoli Netcool Performance Manager DataMart. An SNMP configuration primarily consists of a bandwidth limitation that is imposed on the specified collector for the target IP addresses listed within the definition. Once defined, SNMP configurations are propagated to the collectors during the Tivoli Netcool Performance Manager processing cycle.
After the SNMP configurations have been loaded, Bandwidth Control monitors outbound traffic originating from the specified target IP addresses. Any collection request destined for these target IP addresses is queried to determine if there is sufficient bandwidth available to allow the collection to take place without exceeding the
44 IBM Tivoli Netcool Performance Manager: DataMart Configuration Guide

Chapter 3: Configuring Inventory
defined bandwidth limit. If sufficient bandwidth is available, the collection request, along with any similarly grouped requests, is permitted to take place. While permitting grouped collection activity can cause a spike that exceeds the bandwidth limitation for a short period of time (for example, 5 - 30 seconds), the bandwidth limitation is enforced based on the average traffic monitored at the collector. Once the bandwidth limit has been reached, no collections are permitted to take place on that portion of the network until the bandwidth utilization falls below the defined threshold. If collection activity is suspended on any portion of the network due to excessive bandwidth consumption, Bandwidth Control attempts to begin collection on the next portion of the network.
Note: If several SNMP configurations and bandwidth limits apply to a set of IP addresses, the lowest defined limit is used to control collection activity for the collector. For example, if a bandwidth limit of 256 Kbps applies to the IP address range 10.64.*.*, but another limit of 64 Kbps is defined for 10.64.1.*, then collection activity on the collector is suspended if the network bandwidth exceeds 64 Kbps.
Configuring SNMP Bandwidth Control in DataMart
You can configure bandwidth control in DataMart using the SNMP Configuration Tool as described in Defining an SNMP Configuration on page 29.
Note: You can also configure SNMP Bandwidth Control using the CLI Utility. See the IBM Tivoli Netcool Performance Manager: Command Line Interface Guide for instructions on using this CLI.
Collection Smoothing
Collection Smoothing is used to prevent spikes in collector activity that occur at the beginning of the polling period. Typically, the collector attempts to execute as many collection requests as it can in the shortest time possible, which leads to a pattern of a brief period of intense activity followed by an extended period of sparse collection activity.
When enabled, Collection Smoothing imposes a bandwidth limit on the collector that is based on monitored network activity. This bandwidth limit is dynamically adjusted and serves to constrain the collector so that collection activity is performed throughout the polling interval.
Defining a Collection Smoothing period directs the collector to distribute collection activity across a percentage of the polling period, which leaves the remaining time available for other network tasks such as discovery activity, etc. Care must be exercised in defining this value as specifying too long of a Collection Smoothing period may leave insufficient time to recover from unexpected issues and ultimately result in lost collections. Similarly, as Collection Smoothing essentially delays collector activity, you must consider that any network issues such as unexpected latency, high traffic volume, or heavy CPU bandwidth utilization may result in slips in the collection schedule.
Note: If you intend on using Collection Smoothing in conjunction with Bandwidth Control, the lowest bandwidth limitation is used to control collection activity for the collector. For example, if the Bandwidth Control limit is 64 Kbps and the dynamically calculated Collection Smoothing limit is 100 Kbps, then collection activity on the collector is suspended if network bandwidth exceeds 64 Kbps. To avoid collection loss, ensure that Bandwidth Collection limits are not significantly lower than the range of bandwidth limits that are expected for Collection Smoothing activity.
Configuring Collection Smoothing in DataLoad
To configure Collection Smoothing in DataLoad, follow these steps:
1. Log in as root on the server where the Topology Editor is installed.
IBM Tivoli Netcool Performance Manager: DataMart Configuration Guide 45

Chapter 3: Configuring Inventory
2. Set and export your DISPLAY variable.
3. Change your working directory to the directory where the Topology Editor is installed. For example:
# cd /opt/IBM/proviso/topologyEditor
4. Start the Topology Editor using the following command:
# ./topologyEditor
5. In the Topology Editor, select Topology > Open existing topology. The Open Topology window is displayed.
6. For the topology source, select From database (v. 443) and click Next.
7. Verify that all of the fields for the database connection are filled in with the correct values:
* Database hostname — The name of the database host. The default value is localhost.
* Port — The port number used for communication with the database. The default value is 1521.
* Database user — The username used to access the database. The default value is pv_admin.
* Database Password — The password for the database user account. For example, pv.
* SID — The SID for the database. The default value is PV.
Click Finish.
8. In the Logical View, click the DataChannels folder.
9. Click the Global DataChannel properties component, then click the Advanced Properties tab.
10. Search for the following parameters:
SNMP.BANDWIDTHCONTROL.parameter=value
where:
Parameter/Value DescriptionRecommended Value
AUTOSMOOTHING=false The AUTOSMOOTHING parameter enables Collection Smoothing on SNMP collectors. The parameter must be set to true to activate the feature.
true
SMOOTHINGSAFETYRATIO=75
The SMOOTHINGSAFETYRATIO parameter determines how collection activity is distributed (in percentage of time) throughout the polling interval.
The default, and recommended, value of 75 specifies that collection activity occurs over 75% of the polling interval, leaving 25% of the time available for other network tasks, unexpected network problems, etc.
Using too high a setting (for example, 95), may not leave sufficient time for other network events and may result in lost collections.
75
46 IBM Tivoli Netcool Performance Manager: DataMart Configuration Guide

Chapter 3: Configuring Inventory
11. When you are satisfied with your settings, select Topology > Save topology to save the topology.
12. Select Run > Run Installer and pass it the newly configured topology.
13. After the updated configuration has been stored in the database, you must restart the SNMP DataLoad server to initialize the SNMP collectors by issuing the dccmd from a command line. Refer to the IBM Tivoli Netcool Performance Manager: Command Line Interface Guide for more information.
Understanding File Formats
This section explains the formats required for the discovery files and the synchronization files. See Specifying Synchronization on page 37 for details about the synchronization files.
The following files are required for a discovery:
• element file - contains information about the elements that are imported and then analyzed.
• sub-element file - contains information about the sub-elements that are imported and then analyzed.
The following files are required for synchronization:
• element file - contains information about the elements that are synchronized with the results of the current discovery.
• sub-element file with invariants - contains information about the sub-elements that are synchronized with the results of the current discovery. It contains only sub-elements that have invariants. An invariant is a constant; it does not change.
• sub-element file without invariants - contains information about the sub-elements that are synchronized with the results of the current discovery. It contains only sub-elements that do not have invariants. An invariant is a constant; it does not change.
SMOOTHINGCHECKFREQUENCY=60
The SMOOTHINGCHECKFREQUENCY parameter determines how often (in seconds) dynamic Collection Smoothing requirements are recalculated.
The default, and recommended, value of 60 specifies that the dynamic Collection Smoothing requirements are recalculated every 60 seconds. This value is used to achieve the greatest precision in the calculation.
If less precision in dynamic bandwidth control values is required or CPU usage is too high, adjust the value to a higher setting (for example, 90 seconds).
60
DISCINITIALQUOTA=512 The DISCINITIALQUOTA parameter determines the initial value (in Kbps) for the dynamic bandwidth control limitation (in Kbps) for discovery activity.
The default, and recommended, value of 512 specifies that the initial bandwidth limitation for discovery is 512 Kbps. If collections proceed smoothly and there is a high level of discovery activity, the discovery limit is automatically increased. If collections are blocked, the discovery limit is automatically decreased or put on hold until collection activity is improved.
512
Parameter/Value DescriptionRecommended Value
IBM Tivoli Netcool Performance Manager: DataMart Configuration Guide 47

Chapter 3: Configuring Inventory
Element File
The fields for each element are separated by |_|. If a field has no value it should be left empty: |_||_|. An example of the correct format:
Note: The width of this page forces this example to wrap onto several lines. The information for each element should be on one line in the file.
The fields to be included for each element are listed in the following table:
Sub-element File
The fields for each sub-element are separated by |_|. If a field has no value it should be left empty: |_| |_|. An example of the correct format:
Note: The width of this page forces this example to wrap onto several lines. The information for each element should be on one line in the file.
The fields to be included for each sub-element are listed in the following table:
Field Value in Example
Smallest IP address of any interface for the element. 127.0.0.1
Resolution of the largest IP address of any interface for the element. intranet.sample.fr
sysName for the element. intranet
Name of the element. intranet.sample.fr
Date of discovery, as the number of seconds since 1 January 1970. 950170809
State of the element. on
sysObjectID of the element. 1.3.6.1.4.1.4.1.2.5
IP address of the element. 10.2.4.2
Community name of the element. public
sysDescr of the element. 4BSD/ISODE SNMP
Identifier of the collector. 1
Name of the profile. example
Field Value in Example
Invariant of the sub-element. If the sub-element does not have an invariant, this field is the instance of the sub-element.
Interface<1>DLCI<0>CIR<0>
48 IBM Tivoli Netcool Performance Manager: DataMart Configuration Guide

Chapter 3: Configuring Inventory
Managing Dynamic Changes
This section explains how to ensure that Tivoli Netcool Performance Manager detects dynamic changes, such as index shifting, and updates its state in real time. Doing so prevents unreliable and/or incorrect information from being stored and minimizes data loss.
Tivoli Netcool Performance Manager provides a method to automatically detect and reconcile processing when resource invariants change in near real-time. This method, implemented in the CME, includes triggering inventory for the element and updating a running system after information on that element has been refreshed.
You can enable/disable collection on a subelement using a CME formula. You can also invoke the Inventory for the element, to which the subelement belongs, when that subelement becomes disabled. You do so by invoking a CME formula designed as an ‘invariant check’ formula. This formula is based on the SNMP-collected invariant for the subelement. When the invariant formula determines that a property has changed (the index for example,) it disables the subelement. The CME then determines to which element the subelement belongs and passes the element to the appropriate Discovery server. This Discover server is co-located with the Inventory process running the element’s Inventory profile. The Discovery server requests the Inventory to do a full re-inventory for the specified element.
After the re-inventory of the element is complete and the database is updated, the SNMP Collector is reloaded and the subsequent flow of data to the CME corrects itself. From this point on, invariant properties will stop triggering re-inventory requests.
Name of the sub-element. forxh001.sample.fr_Interface<1>DLCI<0>CIR<0>
Date of discovery, as the number of seconds since 1 January 1970.
950170809
Instance of the sub-element. Interface<1>DLCI<0>CIR<0>
Label of the sub-element. Dlci 10 (Cir 0 b/s)
Name of the element to which the sub-element is attached.
forxh001.sample.fr
State of the sub-element. on
Name of the family of the sub-element. Generic_PVC_FrameRelay
The properties of the sub-element are after these fields. The properties form a list of the form “name|_|value”.
Name of the property of the sub-element. State
Value of the property with the name in the previous field. active
Name of the property of the sub-element. Interface
Value of the property with the name in the previous field. 1
Name of the property of the sub-element. DLCI
Value of the property with the name in the previous field. 0
Name of the property of the sub-element. CIR
Value of the property with the name in the previous field. 0
Field Value in Example
IBM Tivoli Netcool Performance Manager: DataMart Configuration Guide 49

Chapter 3: Configuring Inventory
Guidelines
You can associate a CME formula with an invariant property to create a formula with two inputs:
• SNMP-collected invariant metric
• Invariant property
The formula only needs to compare its two input arguments.
About the Process
The following example illustrates the process by which the invariant management occurs:
• As a result of Inventory, the subelement is assigned instance IF<1> and invariant property ‘foo’.
• Inventory stores the Invariant property for the subelement in the database.
• SNMP Collector is reloaded and starts collecting for the subelement using instance IF<1>. collectedInvariant metric is also ‘foo’.
• InventoryCheck formula compares collectedInventory metric and Inventory property. If they don’t match, ‘gate’ for all other formulas is closed.
• Re-inventory request is sent to the proper Discovery server.
• Discovery server starts re-inventory for the element.
50 IBM Tivoli Netcool Performance Manager: DataMart Configuration Guide

Chapter 3: Configuring Inventory
• Inventory updates subelement and replaces instance with IF<3>.
• Inventory reloads SNMP Collector.
• SNMP Collector starts using IF<3> for data collection for the subelement.
• collectedInventory becomes ‘foo’ again.
• InventoryCheck formula succeeds.
• Gates for all the subelement’s formulas are open again.
CME Formula Command Template
The following template:
^self
checkInvariant: (collectedInvariant ~= invariant)
old: <anOldValue>
new: <aNewValue>
Example Based On Process Illustration
The following example includes a formula called InvariantCheck that takes the following two arguments:
• SNMP collectedInvariant metric (for example, value of ifName)
• Invariant property
The Invariant property is set by the inventory and is not changed by the CME. The CME uses this value to check for invariant shift (change) condition. The formula returns a number (0 or 1). If output is 1, the invariant is valid, otherwise it is invalid.
The built-in method checkInvariant: has an argument which is either true or false. If the argument is true, the subelement’s invariant is valid, otherwise it is invalid.
When an index shifts, the stored value of the Invariant property for a given resource was ‘foo’. Until this value is updated in the database, the value of the Invariant argument for the formula for this subelement will remain ‘foo’. At the same time the SNMP Collector keeps collecting collectedInvariant metric for this resource and gets ‘foo’ every time. When the CME processes this string record, the Invariant formula compares its first and second arguments and uses the result of this comparison to call checkInvariant. Until the collected invariant changes, this argument remains true.
When an index shift occurs, the SNMP Collector (still using the old index) collects a different value for the invariant (for example, ‘bar’.) When this string metric record is processed by the CME, the first argument is now ‘bar’ and the second (stored invariant) will still be ‘foo’. When checkInvariant: is called, the argument is false.
A sequence of corrective actions occurs. First, the CME marks this subelement’s internal state as DISABLED. While disabled, no deployed CME formulas for this subelement is evaluated and the metrics are dropped. The subelement ‘locks out’ all its formulas. Also, no thresholding activity occurs and metrics are not produced. All delta formulas are reset and their stored values are erased. To turn it back to ENABLED and to unlock the formulas, checkInvariant: with true has to be called; which only occurs when either the Invariant property is changed in the database to ‘bar’, or if the collectedInvariant property becomes ‘foo’ once more.
The CME requests the inventory for this subelement’s element to be performed immediately (only when the subelement’s internal state changes from ENABLED to DISABLED.) The CME locates the appropriate
IBM Tivoli Netcool Performance Manager: DataMart Configuration Guide 51

Chapter 3: Configuring Inventory
Discovery server and requests a re-inventory of the element. It also marks the internal status of element as DISABLED.
Once re-inventory of the element is complete and the database has been updated, the SNMP Collector is reloaded. It now uses the correct instance to collect data from the device, and the value of collected invariant metric will once again become ‘foo’. When invariantCheck is evaluated, both collectedInvariant and Invariant arguments will be ‘foo’, so checkInvariant: is invoked with true. This switches the internal subelement’s state to ENABLED, thus unlocking all the subelement’s formulas. This also switches the internal state of the element to ENABLED. From that point on, if a subelement of this element is disabled, it triggers another re-inventory request.
Example for 2233_IF Family
The following example is based on a profile called invTest, a property named ifAlias, an SNMP Collection formula ifAlias, and a change in the value of the ifAlias property.
Discovery Formula
The Discovery formula is for the 2233_IF family, standard (Extended MIB-II) interfaces:
Dim I1 AS Integer Default * NAME If;
V1 = OIDVAL(ifType.%I1 format clean, once);
V2 = OIDVAL(sysLocation.0, once);
V3 = OIDVAL(ifSpeed.%I1, once);
V4 = OIDVAL(int(%V3/1000000), once);
V5 = OIDVAL(ifName.%I1 format clean, once);
V6 = OIDVAL(ifAdminStatus.%I1 format clean, once);
V7= OIDVAL(ifAlias.%I1 format clean, once);
%V1 index "If<%I1>||IF: %I1 (%V5) (%V4Mbps)||type<%V1>location<%V2>physicalCapacity<%V3>name<%V5>status<%V6>siteID<IP:%H1ifIndex:%I1>ifAlias<%V7>||%V7";
SNMP Formula
SNMP formula:
Name: ifAlias
Source:
ifAlias.%I1
SNMP collection requests:
Formula Group Interval in Minutes Storage
ifAlias Sub-Element Collect~RFC-2233~Frequent 5 No
ifAlias Sub-Element Collect~RFC-2233~Normal 15 No
52 IBM Tivoli Netcool Performance Manager: DataMart Configuration Guide

Chapter 3: Configuring Inventory
CME Formula
Use the CME invariant metric as the CME invariant formula input argument. The formula should be associated with subelement’s invariant property and return either 0 or 1. The formula code must include the following statement:
self checkInvariant: <true or false>
The formula uses the current input argument. If the argument is false, the subelement’s invariant has changed and it should be re-inventoried. If the value is true, the subelement has not changed.
CME formula for invariant check:
Name: invCheck
Input bindings:
collectedInvariant – String bound to ifAlias formula
invariantProperty – Property bound to ifAlias property
Source:
^self
checkInvariant: (collectedInvariant = invariantProperty)
old: invariantProperty
new: collectedInvariant
XML Source:
<formula genericId="100010591"><inputBinding localName="collectedInvariant" metricId="100010506" type="String"></inputBinding><inputBinding localName="invariantProperty" metricId="100004697" type="Property"></inputBinding><source> 	^self checkInvariant: (collectedInvariant = invariantProperty) old: invariantProperty new: collectedInvariant</source></formula>
Requests for invariant check:
CME Processing
The results of invoking checkInvariant include:
• Disables subelement if enabled
• Obtains subelement’s element
• Acts according to the following table
Formula Group Interval in Minutes Storage
invCheck Sub-Element Collect~RFC-2233~Frequent 5 No
invCheck Sub-Element Collect~RFC-2233~Normal 15 No
IBM Tivoli Netcool Performance Manager: DataMart Configuration Guide 53

Chapter 3: Configuring Inventory
The following table lists the supported arguments:
In addition, the CME uses a timeout to periodically re-send re-inventory requests to the Discovery Server. This allows the Discovery Server to be relatively lax with the requests. If a request was missed for any reason and re-inventory did not happen (for example, Discovery Server restarted,) the request is repeated a few minutes later.
Discovery Server Responsibilities
When the Discovery server receives re-inventory request, it has to run inventory processing for that element. The processing occurs as follows:
• Runs discovery for this address(es)
• Runs synchronization
• Returns result to the sender.
No persistent state is needed.
Logging Policy
The logging messages perform the following functions:
• Documents the flow or re-inventory requests, including origination, any failures and retries, arrival at Discovery server, attempts to start inventory and outcome of every attempt. Change in the element internal state (between ENABLED and DISABLED) are also logged. Target element is listed with each of these messages.
• Sends a log message for each element’s re-inventory with the following information:
– Date, time, element’s name, following ENABLED log message conventions
– Success or delay/ retry/ failure due to other Inventory lock
– Identification of the subelement that triggered the re-inventory, with the last property and new property
– Time/date of last re-inventory triggered by shift
– Time and date of Inventory finished
– Confirmation the sublelemt was put back in collection with reconciled property
Argument Value Internal Element State Action
false ENABLED Obtain remote reference to associated discovery serverRequest re-inventory of specified elementSet element’s internal state to DISABLED
false DISABLED No action
true DISABLED Set element’s internal state to ENABLED
true ENABLED No action
54 IBM Tivoli Netcool Performance Manager: DataMart Configuration Guide

Chapter 3: Configuring Inventory
Configuring a Bulk Collector Inventory
This section explains how to configure a Bulk Collector inventory. Bulk Collector inventory profiles run automatically by default using the pollinv command; however, profiles can be edited and default parameters can be changed.
See Understanding a Bulk Collector Inventory on page 58 for details on importing files to a Bulk Collector, inventory file sets, polling commands, and directories and file locations.
Important: IBM does not recommend changing the profile name or file names and locations.
To configure a Bulk Collector inventory, follow these steps:
1. Click Inventory Tool in the Resource tab. The following window appears:
Important: The Tivoli Netcool Performance Manager default inventory profile settings are used as examples. You must supply settings that are valid for your network.
2. Select New Profile... from the Edit menu. The following window appears:
3. Click Next to proceed. The following window appears:
IBM Tivoli Netcool Performance Manager: DataMart Configuration Guide 55

Chapter 3: Configuring Inventory
Discovery of files, synchronization of the database, and automatic (out-of-the-box) grouping is selected by default.
If you want to make changes, deselect a box. For example, you might want to discover files only and insert new sub-element from the bulk files into the Tivoli Netcool Performance Manager database.
4. Click Next to proceed. The following window appears:
56 IBM Tivoli Netcool Performance Manager: DataMart Configuration Guide

Chapter 3: Configuring Inventory
5. Click Next to proceed. The following window appears:
6. Click Next to proceed. The following window appears:
Make modifications as needed. For example, you can choose not to delete any elements from the database during the inventory by clearing all the “X” symbols from the Delete column.
7. Click Next to proceed. The following window appears:
IBM Tivoli Netcool Performance Manager: DataMart Configuration Guide 57

Chapter 3: Configuring Inventory
Make modifications as needed. For example, you can choose not to update any existing grouping links by clearing all the “X” symbols from the Update column.
8. Click Next to proceed. The following window appears:
9. Click Next to proceed. The following window appears:
10. Click Finish. See Running an Inventory Profile on page 42 for instructions on running an inventory profile.
Understanding a Bulk Collector Inventory
This section explains the following:
• Importing files to a Bulk Collector
• Bulk Collector inventory file sets
• pollinv and pollprofile commands
• Inventory polling and the cron table
• Directories and files
58 IBM Tivoli Netcool Performance Manager: DataMart Configuration Guide

Chapter 3: Configuring Inventory
Importing Bulk Files
When bulk files are imported to the bulk collector, the collector creates resource files that are sent to the $PVMHOME/importExportBulk/bulk_N/Do directory on the DataMart machine, where N indicates the bulk collector number. Once the resource files arrive in the directory, DataMart starts an inventory based on the gathered data and transfers the resource files to the $PVMHOME/importExportBulk/bulk_N/Done directory when processing is complete.
To import files to the Bulk Collector, follow these steps:
1. Log in as pvuser to the server where the DataChannel is installed.
2. Change your working directory to the DataChannel bin directory (/opt/datachannel/bin by default), as follows:
cd /opt/datachannel/bin
3. Enter the following command to start the Bulk Collector:
./dccmd -action start -channel N -application BCOL -collector N
For more information on using the dccmd command, see the IBM Tivoli Netcool Performance Manager: Command Line Interface Guide.
4. Copy the bulk files to a valid poll directory path. For example:
$DCHOME/bcolN/do
where N equals the collector number you specified during Bulk Collector installation, and $DC_HOME is equal to the path where you installed Data Channel.
Resource files related to a given Bulk Collector profile are stored into the same profile directory on the DataMart machine. The name of the directory is the name of the profile, for example, “bulk_65.”
Discovered resources are assigned to a profile of bulk_N and are FTP’d to a subdirectory of the same name. The pollinv command automatically creates a profile with the same name.
Bulk Collector Inventory File Sets
For each inventory session, a Bulk Collector creates one or multiple resource file sets. Each file set contains a file containing the following files:
Note: The files belonging to the same file set have a filename with a common <suffix> string.
• element.<suffix>.dat - file containing the elements resources.
• subelement.<suffix>.dat - file containing the sub_elements resources.
• args.<suffix>.dat - file containing the special inventory arguments. This file contains a single line (no comments allowed). The content of the line is the options string to append in the inventory command.
where <suffix> equals a timestamp identifier with the format:
<YYYYMMDD_H24mmSS>.[FileType]
where:
— YYYYMMDD is the year, month, and day
— H24mmSS is the time (hour, minutes, and seconds)
— [FileType] is either: full or delta
IBM Tivoli Netcool Performance Manager: DataMart Configuration Guide 59

Chapter 3: Configuring Inventory
Inside the bulk_N directory, a Bulk Collector creates two sub-directories called “Do” and “Done.” During transfer staging, a Bulk Collector first copies the files into the do directory. When the transfer is complete, the files are then moved from the do directory into the done directory.
The following diagram illustrates the directory structure and data flow:
pollinv and pollprofile Commands
The inventory polling process uses the “pollinv” command, which is configured in the machine's cron and runs once an hour on the DataMart machine. The pollinv command browses the importExportBulk directory for profiles, and launches the pollprofile command, one per profile. The inventory command then inserts the resources (metadata) from the file set into the Tivoli Netcool Performance Manager database.
Each time the pollprofile command is run, it does the following:
• Creates the corresponding inventory profile.
• Browses all the file sets in the profile directory
• Reduces the number of inventory processes to launch by reducing the number of file sets (one inventory command is launched for each file set). To reduce the number of file sets, all file sets that have the same arguments string are merged together. This makes the pollprofile run faster. The files that do not have special arguments files are assumed to have default arguments and are merged together.
Log files for the pollinv command are located in $PVMHOME/log/logFile.POLLINVENTORY.
Inventory Polling and the cron Table
The Tivoli Netcool Performance Manager DataMart setup program inserts the following line into the DataMart user (for example, pvuser) crontab during setup.
0 * * * * [ -f /opt/datamart/dataMart.env ] && [ -x /opt/datamart/bin/pollinv ] && . /opt/datamart/dataMart.env && pollinv -noX
where /opt/datamart is the path where Tivoli Netcool Performance Manager DataMart is installed
< 0 * * * * > is where you can change the frequency.
At every period configured, the system cron launches the pollinv command to implement the inventory polling. The default period string is “0 * * * * “ (this specifies that pollinv is launched every hour).
60 IBM Tivoli Netcool Performance Manager: DataMart Configuration Guide
Chapter 3: Configuring Inventory
You can change the pollinv period in the cron table:
1. Ensure you are logged in a pvuser as pollinv is configured in pvuser's cron table.
2. Get the current content of the pvuser cron table (except the pollinv line) and save it into a temporary file (for example, tempCronFile):
su pvuser -c crontab -l | grep pollinv > tempCronFile
3. Edit the file tempCronFile and insert a new line containing the modified pollinv cron command with the suitable period.
4. Replace the current cron table of pvuser by the content of the file $tempCronFile:
su pvuser -c " crontab tempCronFile "
Directories and Files (Location, Naming, and Format)
The DataMart bulk resources directory has the following structure:
• $PVM_BULK_HOME - (for example, this inventory FTP directory could be /opt/datamart/importExportBulk) root directory for the Bulk Collector file sets, which is created when you install Tivoli Netcool Performance Manager DataMart. It is the location where the Bulk Collector pushes its profile directories (and file sets inside the profile directories). This is also the source profile directory for the pollinv command. It defaults to $PVM_HOME/importExportBulk.
• bulk_N - all files related to a profile are stored in this directory (where N = the bulk collector number (ID) that you specified during Bulk Collector installation). All sub-elements created into the database using the current inventory profile are assigned to this collector.
• Do - temporary directory used by the Bulk Collector when transferring files to Tivoli Netcool Performance Manager DataMart. When the transfer is complete, the Bulk Collector moves the files from this directory to the done directory. This directory is created by the Bulk Collector.
• Done - source file sets directory for the inventory polling process (pollprofile command). Each resources file set is composed of two types of files (element and sub-element). An optional file containing the inventory command arguments (args) can be appended to the file set. After each successful inventory command is run by the pollprofile command, the associated file set is deleted from this directory. This directory and its file sets are created by the Bulk Collector.
IBM Tivoli Netcool Performance Manager: DataMart Configuration Guide 61

Chapter 3: Configuring Inventory
• Dm - source file set directory for the inventory process (launched by the pollprofile command). Each inventory launched using this profile get its source files from this directory, and uses this directory as its working space. This is the case whether the inventory is launched automatically (pollprofile) or manually (by using the Inventory Tool or CLI). After each inventory (manual or automatic), the last file set used is not deleted. Since this directory is the inventory command's working directory, it creates its working files and working directories at <profilename>/grouping, <profilename>/ groupingWait, <profilename>/inventory, <profilename>/synchro, profilename>/synchroWait. These directories are created by the pollinv command.
Bulk File Format Examples
Element Resources
The following is an example of an element.<suffix>.dat file:
# col = eprp.ipAddressMin:value eprp.ipName:value eprp.sysName:value name date state encl.oid eprp.ipAddress:value scf.rcommunity eprp.sysDescr:value
collector profile
# filter =
# type = elt
10.5.1.1|_|10.5.1.1|_|10.5.1.1|_|10.5.1.1|_|1004036438|_|on|_|1.3.6.1.4.1.2929|_|<NULL>|_||_|<NULL>|_|2|_|bulk_2|_|
Sub-element Resources
The following is an example of a subelement.<suffix>.dat file:
# col = invariant elt.name name date instance label state fam.name seprp.name:name seprp.value:name# filter = # type = seLPort<66>|_|10.5.1.1|_|10.5.1.1_LPort<66>|_|1004036885|_|LPort<66>|_|<NULL>|_|on|_|Cascade_ATM_LPort|_|ifSpeed|_|1544000|_|portIndex|_|4|_|slotIndex|_|16|_|portType|_|UNI|_|privateNetID|_|0|_|ifOperStatus|_|1|_|ifIndex|_|66|_|hostIPAddr|_|10.5.1.1|_|msrmtPeriod|_|900|_|customerID|_|0|_|
Inventory Arguments
The following is an example of an args.<suffix>.dat. This file contains a single line (no comments allowed). The content of the line is the options string to append in the inventory command.
Example:
-reload 1 -action synchro
This means that the inventory will reload the collectors and perform only the synchronization (no discovery or grouping).
62 IBM Tivoli Netcool Performance Manager: DataMart Configuration Guide

Chapter 3: Configuring Inventory
NOTES
IBM Tivoli Netcool Performance Manager: DataMart Configuration Guide 63

Chapter 3: Configuring Inventory
64 IBM Tivoli Netcool Performance Manager: DataMart Configuration Guide

Chapter 4: Creating Grouping Rules
This chapter explains how to create custom grouping rules to group and edit resources on your network to use with your network inventory, data collection, and reporting, and is made up of the following topics:
Note: You can also import resources from the command line. For more information, see the IBM Tivoli Netcool Performance Manager: Command Line Interface Guide.
Note: For instructions on creating grouping rules for composite sub-elements (CSEs), see the IBM Tivoli Netcool Performance Manager: Composite Subelement Configuration Guide.
Before You Begin
Before creating and testing grouping rules, you need to configure a network inventory to add elements and sub-elements to the database, as detailed in “Chapter 3, Configuring Inventory.”
Grouping acts like a taxonomy. The intent of grouping is to identify objects that have a common set of attribute and property values, and to organize the objects in a common place (by creating a group membership relation) expressing the circumstance of satisfying the criteria for selection.
Grouping rules are organized hierarchically. Each level in the hierarchy is intended to represent an incremental refinement in categorization. The first rule in a grouping branch, which we call a root, will typically select a broad range of objects, for example: all active objects (that is, state = on). The next level of refinement in a branch intended to organize technologically would perhaps have rules to discriminate by type of device. For example, router or switch. And the next level may further classify in terms of device capacity, or capability.
A grouping rule is evaluated by the conjunction of all rule conditions defined along a branch in the grouping hierarchy. Group membership will only be granted at the leaf level, the most precise taxonomical location, when the complete condition of a grouping rule (the aggregate of all conditions from root to leaf) are met.
Topic Page
Creating Grouping Rules 66
Using Grouping Rules 71
Testing Grouping Rules 71
Viewing Rule Database Information 75
Viewing Properties 76
Using Syntax for Grouping Rules 77
Using a Text Editor to Create Grouping Rules 78
Grouping Rule Example 80
Example of Nested Conditions 83
Example of Combining Text, a Variable, and a Condition 87
IBM Tivoli Netcool Performance Manager: DataMart Configuration Guide 65

Chapter 4: Creating Grouping Rules
Creating Grouping Rules
This section explains how to create rules.
Note: The “ruleconf ” command line interface (CLI) command launches the Rule Editor from the command line. For more information, see the IBM Tivoli Netcool Performance Manager: Command Line Interface Guide.
To create rules, follow these steps:
1. Click Rule Editor in the Resource tab. The Rule Editor window is displayed.
2. Click the Rule Sub-Element tab to create a rule for a sub-element.
Note: For instructions on creating grouping rules for composite sub-elements (CSEs), see the IBM Tivoli Netcool Performance Manager: Composite Subelement Configuration Guide.
3. Expand the tree in the left pane and click the name of a rule to select it. This rule should be at the level of the tree just above where you want to insert the new rule.
4. Right-click and select New. Tivoli Netcool Performance Manager DataMart inserts a new rule with a temporary name. For example, “NEW_GROUP_1.”
5. Name the rule by entering up to 50 characters in the Name box. The name can be either static text or a variable.
You can drag and drop the properties from the Properties listbox to the Name box.
Note: Conditions are not allowed in the Name box. See Using Syntax for Grouping Rules on page 77 for more information.
6. (Optional) In the Label text box, assign a label to the group. Labels are used as an alias for group names, providing another level of abstraction. Note that when creating reports, Tivoli Netcool Performance Manager DataView first looks for a label, and if one is not defined it displays the group name. The following figure illustrates the Label text box:
7. If the rule requires a condition, enter the condition in the Condition box. See Using Conditions on page 70 for more information about conditions.
You can drag and drop properties from the Properties listbox and operators from the Operator listbox to the Condition box.
See Using Operators and Functions on page 67 for details on operators and function available in the Operator listbox.
8. Click on an option in the Status group:
66 IBM Tivoli Netcool Performance Manager: DataMart Configuration Guide

Chapter 4: Creating Grouping Rules
— Idle - the rule remains in the database, but it is not used by the Inventory Tool during autogrouping. The rule appears in “red” within the tree. This rule (and each rule below it within the tree) is ignored by the Inventory Tool during autogrouping.
— Active - the rule is used by the Inventory Tool during grouping. See Specifying Automatic Grouping on page 39 in Chapter 3 for more information.
9. Click the Apply button. The temporary name changes to the name of one or more of the properties you selected.
Type, Updated On, and Origin are filled in automatically by Tivoli Netcool Performance Manager ataMart.
10. See Testing Grouping Rules on page 71 to test your grouping rules.
Using Operators and Functions
This section explains how to use operators and functions.
Operator or Function Description
AND Joins two conditions. Resources are included in the results if they match both conditions. This operator has the same effect as creating nested conditions.
For example:
%(Element.PROFIL) = ‘public’ AND %(ifType) = ‘ethernetCsmacd’
Resources are included in the results if the profile name is “public” and the ifType is “ethernetCsmacd.”
OR Joins two conditions. Resources are included in the results if they match either condition.
For example:
%(Element.PROFIL) = ‘public’ OR %(ifType) = ‘ethernetCsmacd’
Resources are included in the results if either the profile name is “public” or the ifType is “ethernetCsmacd.”
= Tests if the variable is equal to a value. Use this operator to test against only one value.
For example:
%(VENDOR) = ‘Cisco’
Resources with the vendor “Cisco” are included in the results.
Use IN to test against a list of values. Use LIKE to test against a value with a wildcard (%).
IBM Tivoli Netcool Performance Manager: DataMart Configuration Guide 67

Chapter 4: Creating Grouping Rules
!= Tests if the variable is not equal to a value. Use this operator to test against only one value.
For example:
%(VENDOR) != ‘Cisco’
Resources with any vendor except “Cisco” are included in the results.
Use NOT IN to test against a list of values. Use NOT LIKE to test against a value with a wildcard (%).
< Tests if the variable is less than the value. Use this operator to test against only one value. It does a comparison based on an ASCII sort, if the value is enclosed in quotes. It does a comparison based on a numeric sort, if the value is not enclosed in quotes. For example:
%(Element.COLLECTOR) < 3
Resources with a collector number less than “3” are included in the results.
Note: Do not use quotes for the collector number. The collector number is an Int column in the database and should use a numeric comparison.
It is also possible to use <=.
> Tests if the variable is greater than the value. Use this operator to test against only one value. It does a comparison based on an ASCII sort, if the value is enclosed in quotes. It does a comparison based on a numeric sort, if the value is not enclosed in quotes. For example:
%(Element.COLLECTOR) > 3
Resources with a collector number greater than “3” are included in the results.
Note: Do not use quotes for the collector number. The collector number is an Int column in the database and should use a numeric comparison.
It is also possible to use >=.
IS NULL Tests if the variable is NULL. For example:
%(FAMILY) IS NULL
Resources with the FAMILY property “NULL” are included in the results.
IS NOT NULL Tests if the variable is not NULL. For example:
%(FAMILY) IS NOT NULL
Resources with the FAMILY property “not NULL” are included in the results.
LIKE Tests if the variable is equal to a value containing a wildcard (%). For example:
%(ipAddress) LIKE ‘182.168.%’
Resources with IP address that begin with 182.168 are included in the result.
Use IN to test against a list of values.
68 IBM Tivoli Netcool Performance Manager: DataMart Configuration Guide

Chapter 4: Creating Grouping Rules
NOT LIKE Tests if the variable is equal to a value containing a wildcard (%). For example:
%(ipAddress) NOT LIKE ‘182.168.%’
Resources with IP address that begin with anything other than 182.168 are included in the result.
Use NOT IN to test against a list of values.
IN Tests if the variable is equal to the value. Use this operator to test against one value, or a list of values. For example:
%(ifType) IN (‘ppp’,’slip’)
Resources with ifType PPP or SLIP are included in the result.
Use LIKE to test against a value with a wildcard (%).
NOT IN Tests if the variable is not equal to the value. Use this operator to test against one value, or a list of values. For example:
%(ifType) NOT IN (‘ppp’,’slip’)
Resources with any ifType other than PPP or SLIP are included in the result.
Use NOT LIKE to test against a value with a wildcard (%).
pub.PVM_TO_NUMBER Casts a string to a number. Use this function with operators such as < and > to perform a numeric comparison rather than a string comparison. Place the function before the variable.
For example:
pub.PVM_TO_NUMBER(%(ifSpeed)) >= 100000000
pub.FormatIP Reformats an IP address so that each set of numbers in the address contains three digits. This is necessary to do an accurate comparison. It converts this IP address:
194.68.211.8
to this IP address:
194.068.211.008
For example, this is not correct:
%(ipAddress) < ‘182.168.78.5’ AND %(ipAddress) > ‘182.168.78.3’
It is not correct, because this rule includes both the IP addresses 182.168.78.4 and 182.168.78.48.
This is correct:
pub.FormatIP(%(ipAddress)) < ‘182.168.078.005’ AND pub.FormatIP((%(ipAddress)) > ‘182.168.078.003’
This rule includes the IP address 182.168.78.4, but not 182.168.78.48.
IBM Tivoli Netcool Performance Manager: DataMart Configuration Guide 69
Chapter 4: Creating Grouping Rules
Using Conditions
You can use any property in the database as a variable in a condition. A condition can test against any value that is valid for the property.
To test against multiple values use the OR, IN, and LIKE operators. See Using Operators and Functions on page 67 for more information.
The syntax for conditions is similar to SQL syntax. A condition has the following format:
%(property) operator‘value’
• Single quotes are required around each value for a string comparison.
• Quotes around the values are not allowed for a numeric comparison.
• If the condition tests against a list of values, parentheses are required around the list.
• If the condition tests against a list of values, each value needs to be separated by a comma. Spaces before and after the comma are optional.
• The value in the condition needs to match the value in the database. Capitalization and punctuation should be the same.
You can nest conditions. For example:
A resource has to match all of the conditions to be included in the results. See Example of Nested Conditions on page 83 for details. Only the result of the lowest level of the tree is used by the Inventory Tool to create groups.
Part of Condition Description Syntax Requirements
% Creates a variable from a property. No space between % and the property.
property Specifies the property to be tested. Parenthesis are required.
operator Defines the relationship between the variable and the value. See Using Operators and Functions on page 67 for more information.
Spaces before and after the operator are recommended, but not always required.
value Specifies the test.
Note: Do not use quotes for the collector number. The collector number is an Int column in the database and should use a numeric comparison.
70 IBM Tivoli Netcool Performance Manager: DataMart Configuration Guide

Chapter 4: Creating Grouping Rules
Using Grouping Rules
This section explains how to use custom grouping rules after you create them.
To use grouping rules, follow these steps:
1. Ensure you have performed an inventory of your network or have imported resources from the command line.
See “Chapter 3, Configuring Your Network Inventory” for instructions.
See “Chapter 6, Managing Resources” in the IBM Tivoli Netcool Performance Manager: Command Line Interface Guide for information on importing resources.
2. If you want to use properties that are not included with Tivoli Netcool Performance Manager DataMart, create the new properties and add them to the database.
See “Chapter 6, Managing Resources” in the IBM Tivoli Netcool Performance Manager: Command Line Interface Guide for more information about adding properties to the database.
Note: After you create properties, you need to exit the Rule Editor and re-open it for the new properties to appear.
3. Create grouping rules. See Creating Grouping Rules on page 66 for details.
4. Run the Autogrouping option in the Inventory Tool Wizard to execute the grouping rules.
See “Configuring Your Network Inventory on page 22” for instructions. Profiles created with the Inventory Tool Wizard use the grouping rules that you create with the Rule Editor.
5. Use the groups to create collection requests. See “Configuring Data Collection Requests on page 92” for information on using the Request Editor to create requests.
Testing Grouping Rules
After you create custom grouping rules, you can test them using database information. To obtain database information configure an inventory to add elements and sub-elements to the database, as detailed in Configuring Your Network Inventory on page 22 You can also import resources. See “Chapter 6, Managing Resources” in the IBM Tivoli Netcool Performance Manager: Command Line Interface Guide for details.
When you test a grouping rule, the results are displayed in a tree structure in the Test Result tab.
Grouping rules can contain the following:
• Static text - provides another level to the tree, but does not sort or filter the results. It lets you create meaningful names for your rules. See Using Static Text on page 77 for details.
• Variables - used alone, sort the results according to the variable, but do not filter the results. If you use a variable to sort according to “ifSpeed,” all the resources are included in the result and are grouped according to the different “ifSpeeds” of the resources.
You can also nest variables. The results of nested variables are sorted according to each variable. See Creating Variables on page 77 for details. Only the result of the lowest level of the tree is used by the Inventory Tool to create groups.
• Conditions - use variables to filter the results. Only resources that match the condition are included in the result. A condition does not sort the results. All the resources that match the condition are grouped together.
If you use a condition to filter according to “:ifSpeed,” only the resources that match the condition are included in the result. Unlike with variables, all the resources that match the condition are grouped together. They are not sorted according to the different “ifSpeeds.”
IBM Tivoli Netcool Performance Manager: DataMart Configuration Guide 71

Chapter 4: Creating Grouping Rules
Conditions can also be nested. A nested condition filters the results again. Only resources that match all the conditions are included in the result. See Example of Nested Conditions on page 83 for details. Only the result of the lowest level of the tree is used by the Inventory Tool to create groups.
See Using Syntax for Grouping Rules on page 77 for details on the syntax for creating variables and conditions. Examples are provided on pages 80, 83, and 87.
To test a grouping rule:
1. Open the Rule Editor as explained in Creating Grouping Rules on page 66.
2. Expand the tree in the left pane to display the rule that you want to test.
3. Select the rule by clicking the name of the rule.
To select multiple rules, hold down the Shift key and click the names of the rules you want to select.
Note: You need to expand the tree to display all the rules you want to select. If the branch of the tree is not completely expanded, only the rule that is visible is selected. The rules below it in the tree are not selected and are not tested.
4. Right-click and select Test from the pop-up menu. The Test Result tab is displayed.
5. Display every resource included in the group by clicking the plus sign or the folder icon to expand the tree.
- or -
Display only the number of resources included in the group by clicking the name of the group to select it, then holding down the Control key and clicking the right mouse button
.
Click here to expand the tree Click here to select the name
If a group is not created, check the syntax of the rule. See Using Syntax for Grouping Rules on page 77 for details.
Each property should have a default value. If an element has no value for a property, and there is no default value for the property, then the element is not included in the results for grouping rules that use that property.
Saving Test Results
This section explains how to save test results for grouping rules.
To save test results:
1. Test the rule as explained in Testing Grouping Rules on page 71.
72 IBM Tivoli Netcool Performance Manager: DataMart Configuration Guide
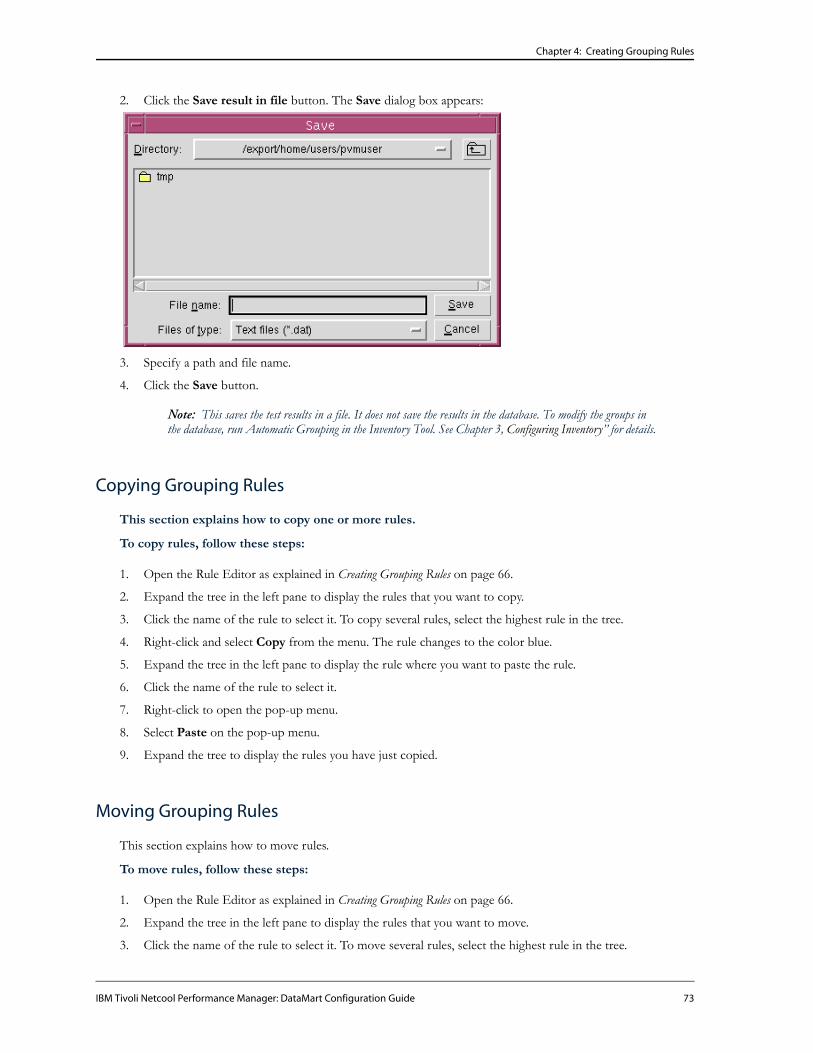
Chapter 4: Creating Grouping Rules
2. Click the Save result in file button. The Save dialog box appears:
3. Specify a path and file name.
4. Click the Save button.
Note: This saves the test results in a file. It does not save the results in the database. To modify the groups in the database, run Automatic Grouping in the Inventory Tool. See Chapter 3, Configuring Inventory” for details.
Copying Grouping Rules
This section explains how to copy one or more rules.
To copy rules, follow these steps:
1. Open the Rule Editor as explained in Creating Grouping Rules on page 66.
2. Expand the tree in the left pane to display the rules that you want to copy.
3. Click the name of the rule to select it. To copy several rules, select the highest rule in the tree.
4. Right-click and select Copy from the menu. The rule changes to the color blue.
5. Expand the tree in the left pane to display the rule where you want to paste the rule.
6. Click the name of the rule to select it.
7. Right-click to open the pop-up menu.
8. Select Paste on the pop-up menu.
9. Expand the tree to display the rules you have just copied.
Moving Grouping Rules
This section explains how to move rules.
To move rules, follow these steps:
1. Open the Rule Editor as explained in Creating Grouping Rules on page 66.
2. Expand the tree in the left pane to display the rules that you want to move.
3. Click the name of the rule to select it. To move several rules, select the highest rule in the tree.
IBM Tivoli Netcool Performance Manager: DataMart Configuration Guide 73
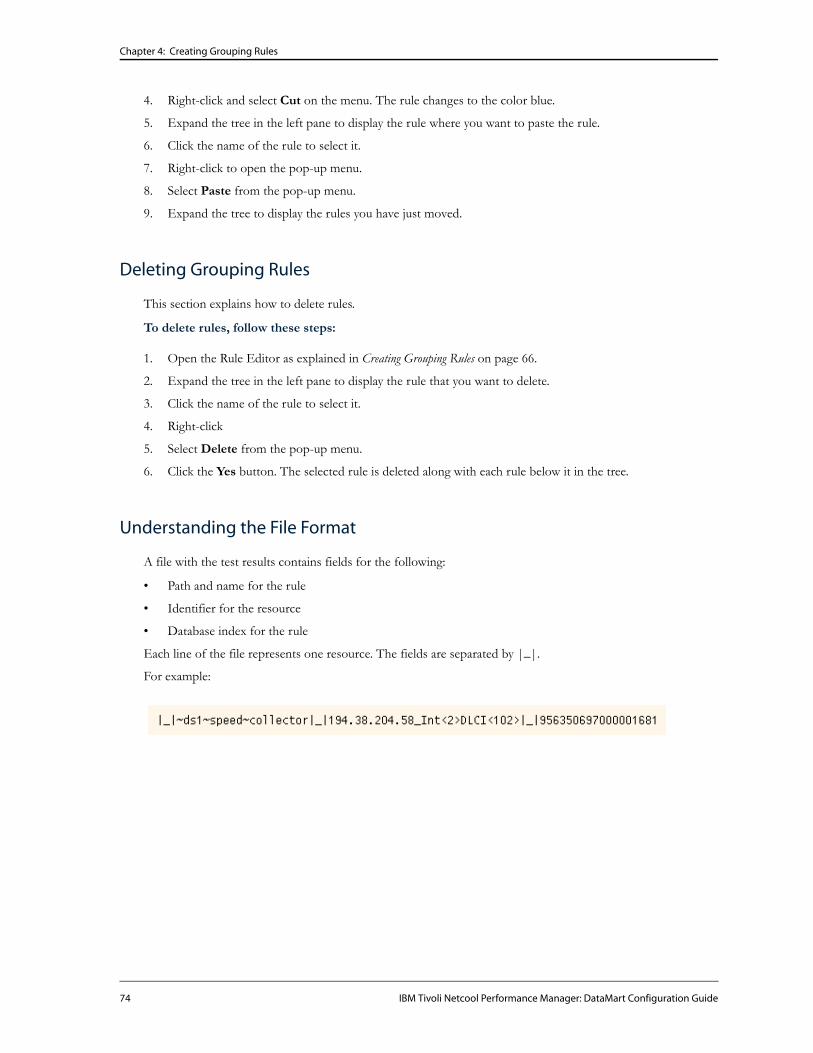
Chapter 4: Creating Grouping Rules
4. Right-click and select Cut on the menu. The rule changes to the color blue.
5. Expand the tree in the left pane to display the rule where you want to paste the rule.
6. Click the name of the rule to select it.
7. Right-click to open the pop-up menu.
8. Select Paste from the pop-up menu.
9. Expand the tree to display the rules you have just moved.
Deleting Grouping Rules
This section explains how to delete rules.
To delete rules, follow these steps:
1. Open the Rule Editor as explained in Creating Grouping Rules on page 66.
2. Expand the tree in the left pane to display the rule that you want to delete.
3. Click the name of the rule to select it.
4. Right-click
5. Select Delete from the pop-up menu.
6. Click the Yes button. The selected rule is deleted along with each rule below it in the tree.
Understanding the File Format
A file with the test results contains fields for the following:
• Path and name for the rule
• Identifier for the resource
• Database index for the rule
Each line of the file represents one resource. The fields are separated by |_|.
For example:
74 IBM Tivoli Netcool Performance Manager: DataMart Configuration Guide

Chapter 4: Creating Grouping Rules
Viewing Rule Database Information
To view rule database information, follow these steps:
1. Open the Rule Editor as explained in Creating Grouping Rules on page 66.
2. Expand the tree in the left pane to display the rule you want.
3. Click the name of the rule to select it.
4. Hold down the Control key and click the right mouse button. A pop-up window containing the database information appears.
The parameters in the pop-up window are as follows:
• on - indicates the rule will be used. This corresponds to the Status: active in the graphical user interface.
• off - indicates the rule will not be used. This corresponds to the Status: idle in the graphical user interface.
Parameter Description
Heading Path and name for the rule. The path separator is a tilde (~).
dbIndex Database index for the rule.
Name Name of the rule.
type Type of rule (static or rule).
cond Condition for the rule. This is blank if the rule does not have a condition.
Parameter Description
state Indicates whether or not the rule will be used by the Inventory Tool during grouping.
date Modification date as the number of seconds since 1 January 1970.
origin How the rule was created.
IBM Tivoli Netcool Performance Manager: DataMart Configuration Guide 75
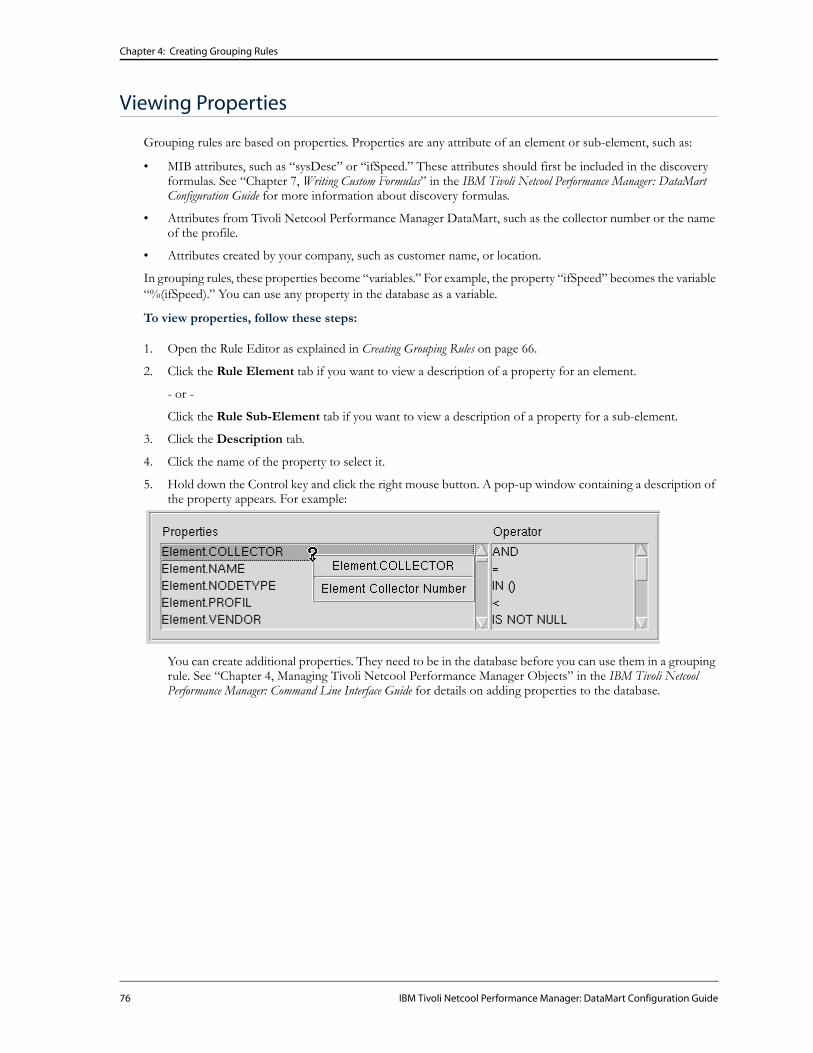
Chapter 4: Creating Grouping Rules
Viewing Properties
Grouping rules are based on properties. Properties are any attribute of an element or sub-element, such as:
• MIB attributes, such as “sysDesc” or “ifSpeed.” These attributes should first be included in the discovery formulas. See “Chapter 7, Writing Custom Formulas” in the IBM Tivoli Netcool Performance Manager: DataMart Configuration Guide for more information about discovery formulas.
• Attributes from Tivoli Netcool Performance Manager DataMart, such as the collector number or the name of the profile.
• Attributes created by your company, such as customer name, or location.
In grouping rules, these properties become “variables.” For example, the property “ifSpeed” becomes the variable “%(ifSpeed).” You can use any property in the database as a variable.
To view properties, follow these steps:
1. Open the Rule Editor as explained in Creating Grouping Rules on page 66.
2. Click the Rule Element tab if you want to view a description of a property for an element.
- or -
Click the Rule Sub-Element tab if you want to view a description of a property for a sub-element.
3. Click the Description tab.
4. Click the name of the property to select it.
5. Hold down the Control key and click the right mouse button. A pop-up window containing a description of the property appears. For example:
You can create additional properties. They need to be in the database before you can use them in a grouping rule. See “Chapter 4, Managing Tivoli Netcool Performance Manager Objects” in the IBM Tivoli Netcool Performance Manager: Command Line Interface Guide for details on adding properties to the database.
76 IBM Tivoli Netcool Performance Manager: DataMart Configuration Guide

Chapter 4: Creating Grouping Rules
Using Syntax for Grouping Rules
This section explains the syntax to use when creating rules. See Creating Grouping Rules on page 66 for a description of grouping rules. See pages Grouping Rule Example on page 80, Example of Nested Conditions on page 83, and Example of Combining Text, a Variable, and a Condition on page 87 for examples.
Using Static Text
Do not use the percent sign (%) in static text. It is reserved for creating variables. You can use operators, which are treated as text.
Creating Variables
You can create variables by using the percent sign (%) with the name of a property. For example: %(COLLECTOR)
Note: Parenthesis around the name of the property are recommended, but not required.
You can create variables by dragging a property from the properties listbox and dropping it in the Name box or the Condition box.
You can use variables without conditions in the Name box, but not in the Condition box. This is allowed:
CAUTION: The following is not allowed:
You can nest variables. For example:
The results of nested variables are sorted according to each variable. See Grouping Rule Example on page 80 for details. Only the result of the lowest level of the tree is used by the Inventory Tool to create groups. See Specifying Automatic Grouping on page 39 in Chapter 3 for more information.
IBM Tivoli Netcool Performance Manager: DataMart Configuration Guide 77
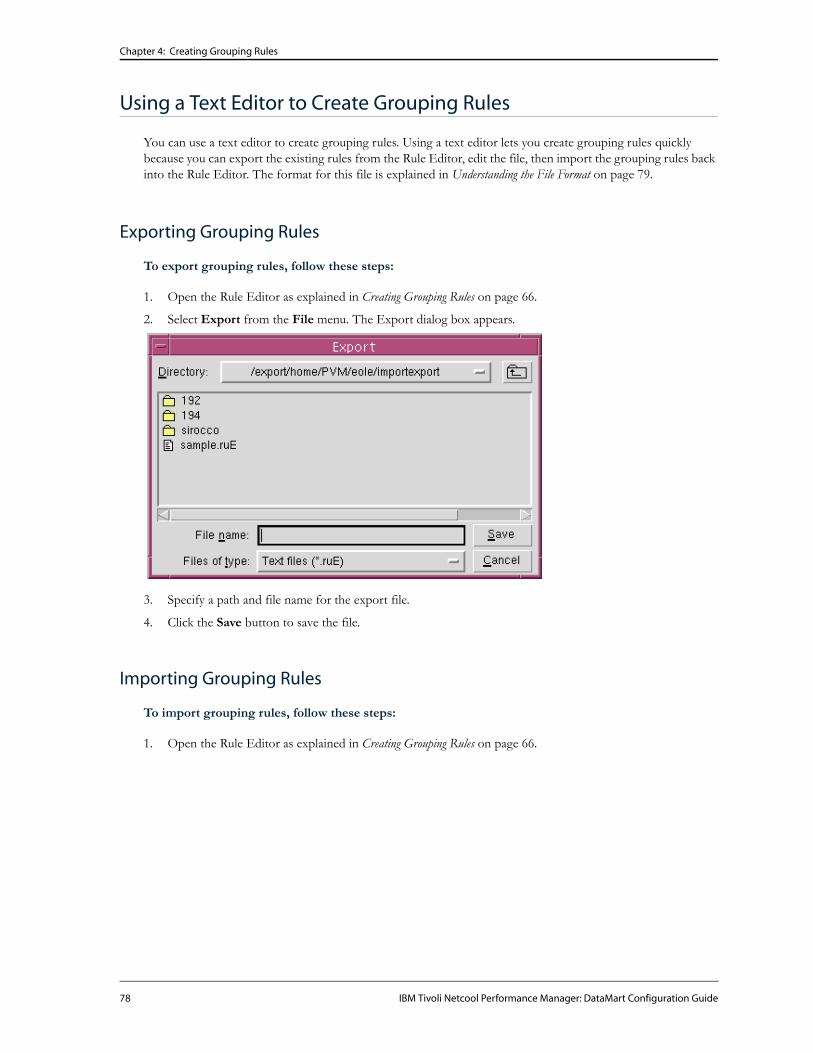
Chapter 4: Creating Grouping Rules
Using a Text Editor to Create Grouping Rules
You can use a text editor to create grouping rules. Using a text editor lets you create grouping rules quickly because you can export the existing rules from the Rule Editor, edit the file, then import the grouping rules back into the Rule Editor. The format for this file is explained in Understanding the File Format on page 79.
Exporting Grouping Rules
To export grouping rules, follow these steps:
1. Open the Rule Editor as explained in Creating Grouping Rules on page 66.
2. Select Export from the File menu. The Export dialog box appears.
3. Specify a path and file name for the export file.
4. Click the Save button to save the file.
Importing Grouping Rules
To import grouping rules, follow these steps:
1. Open the Rule Editor as explained in Creating Grouping Rules on page 66.
78 IBM Tivoli Netcool Performance Manager: DataMart Configuration Guide
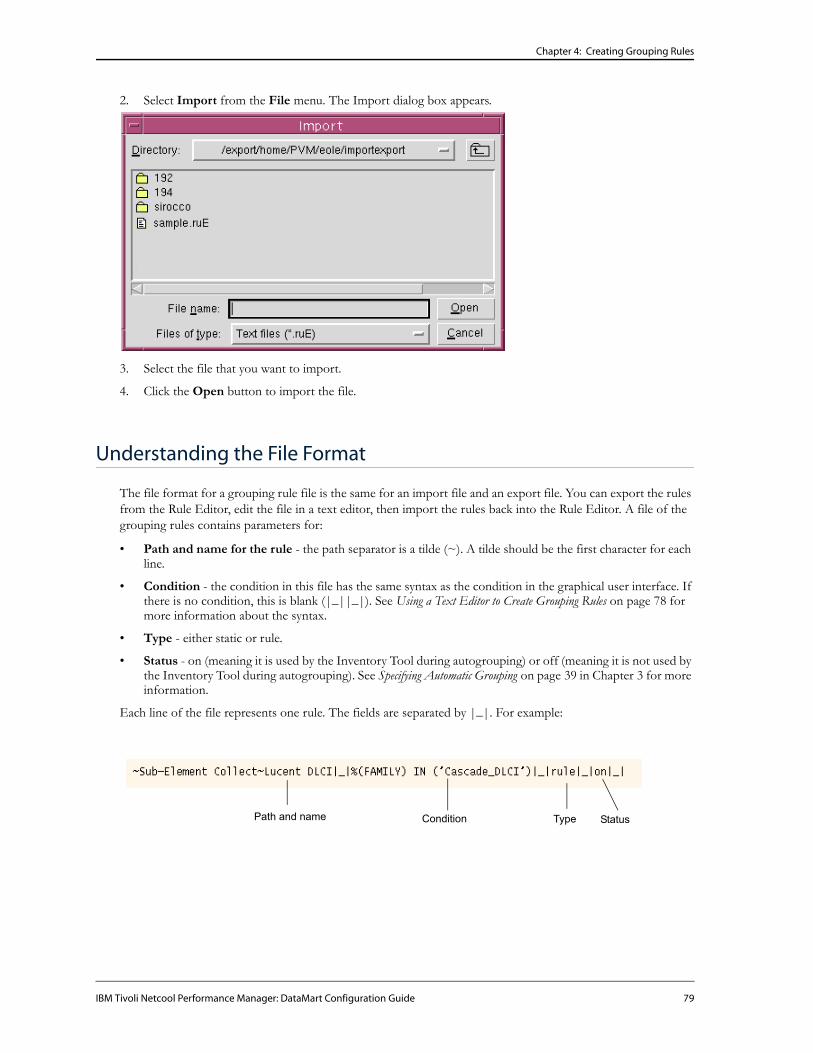
Chapter 4: Creating Grouping Rules
2. Select Import from the File menu. The Import dialog box appears.
3. Select the file that you want to import.
4. Click the Open button to import the file.
Understanding the File Format
The file format for a grouping rule file is the same for an import file and an export file. You can export the rules from the Rule Editor, edit the file in a text editor, then import the rules back into the Rule Editor. A file of the grouping rules contains parameters for:
• Path and name for the rule - the path separator is a tilde (~). A tilde should be the first character for each line.
• Condition - the condition in this file has the same syntax as the condition in the graphical user interface. If there is no condition, this is blank (|_||_|). See Using a Text Editor to Create Grouping Rules on page 78 for more information about the syntax.
• Type - either static or rule.
• Status - on (meaning it is used by the Inventory Tool during autogrouping) or off (meaning it is not used by the Inventory Tool during autogrouping). See Specifying Automatic Grouping on page 39 in Chapter 3 for more information.
Each line of the file represents one rule. The fields are separated by |_|. For example:
Path and name Condition Type Status
IBM Tivoli Netcool Performance Manager: DataMart Configuration Guide 79

Chapter 4: Creating Grouping Rules
Grouping Rule Example
This example illustrates grouping rules containing:
• Name with static text
• Name with a variable
• Nested variable
• Condition
Name with static text Name with a variable
Nested variable Condition
Name with Static Text
To create this name with static text, the entry in the Name box is: An Example
There is no entry in the Condition box.
80 IBM Tivoli Netcool Performance Manager: DataMart Configuration Guide

Chapter 4: Creating Grouping Rules
The test results for static text are based on the previous level of the tree. The results for this example are the ROOT.
Name with a Variable
To create this name with a variable, the entry in the Name box is: %(Element.COLLECTOR)
There is no entry in the Condition box.
The test results are sorted according to the collector, but are not filtered.
IBM Tivoli Netcool Performance Manager: DataMart Configuration Guide 81
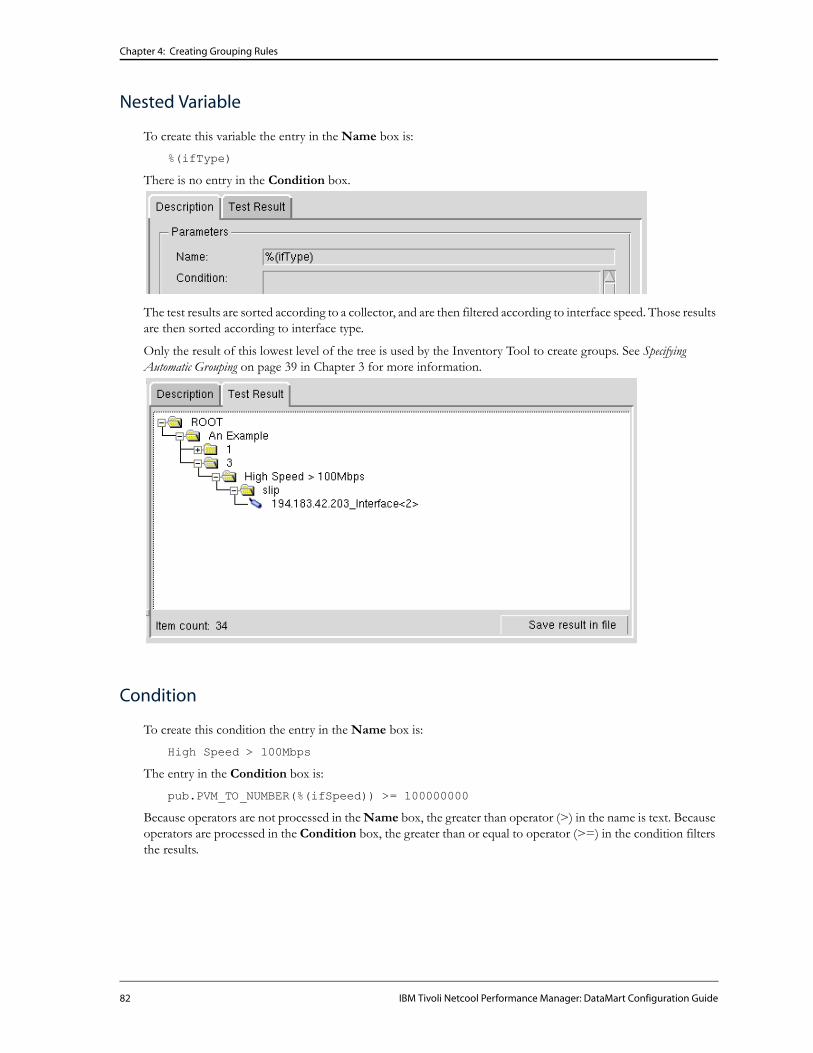
Chapter 4: Creating Grouping Rules
Nested Variable
To create this variable the entry in the Name box is:
%(ifType)
There is no entry in the Condition box.
The test results are sorted according to a collector, and are then filtered according to interface speed. Those results are then sorted according to interface type.
Only the result of this lowest level of the tree is used by the Inventory Tool to create groups. See Specifying Automatic Grouping on page 39 in Chapter 3 for more information.
Condition
To create this condition the entry in the Name box is:
High Speed > 100Mbps
The entry in the Condition box is:
pub.PVM_TO_NUMBER(%(ifSpeed)) >= 100000000
Because operators are not processed in the Name box, the greater than operator (>) in the name is text. Because operators are processed in the Condition box, the greater than or equal to operator (>=) in the condition filters the results.
82 IBM Tivoli Netcool Performance Manager: DataMart Configuration Guide

Chapter 4: Creating Grouping Rules
The function “pub.PVM_TO_NUMBER” casts the string to a number to perform a numeric comparison rather than an ASCII comparison.
The test results are sorted according to a collector and are then filtered according to interface speed. Resources are only included in the test results if the interface speed is more than 100Mbps. Resources with a slower interface speed are ignored.
Example of Nested Conditions
This example illustrates nested conditions.
Conditions
IBM Tivoli Netcool Performance Manager: DataMart Configuration Guide 83

Chapter 4: Creating Grouping Rules
Condition
To create this condition the entry in the Name box is:
Active state
The entry in the Condition box is:
%(State) = ‘active’
The test results are filtered according to the state of the sub-element. Sub-elements are only included in the test results if they are active. Inactive sub-elements are ignored.
Nested Condition
To create a nested condition, the entry in the Name box is:
Speed
The entry in the Condition box is:
pub.PVM_TO_NUMBER(%(ifSpeed)) <= 100000000
The function pub.PVM_TO_NUMBER casts the string to a number to perform a numeric comparison rather than an ASCII comparison.
84 IBM Tivoli Netcool Performance Manager: DataMart Configuration Guide

Chapter 4: Creating Grouping Rules
The test results are filtered according to the state, and are then filtered according to interface speed. Resources are only included in the test results if they are active, and the interface speed is less than 100Mbps.
Inactive resources are ignored. Resources with faster interface speeds are ignored.
Second Nested Condition
To create this condition, the entry in the Name box is:
Type
The entry in the Condition box is:
%(ifType) IN (‘ppp’,’frame-relay’)
The test results are filtered according to the state, then filtered according to interface speed, and then filtered according to interface type. Resources are only included in the test results if they are active, and the interface speed is less than 100Mbps, and the interface is either PPP or Frame Relay. Inactive resources are ignored. Resources with faster interface speeds are ignored. Resources with other types of interfaces are ignored.
IBM Tivoli Netcool Performance Manager: DataMart Configuration Guide 85

Chapter 4: Creating Grouping Rules
The results include resources that are either PPP or Frame Relay. The results do not specify the interface for each resource.
Variable
To create this variable, the entry in the Name box is:
%(ifType)
There is no entry in the Condition box.
The test results are filtered according to the state, then filtered according to interface speed, then filtered according to interface type, and finally sorted according to interface type.
The list of resources is the same as before, but are sorted according to interface type.
86 IBM Tivoli Netcool Performance Manager: DataMart Configuration Guide

Chapter 4: Creating Grouping Rules
Only the result of this lowest level of the tree is used by the Inventory Tool to create groups. See Specifying Automatic Grouping on page 39 in Chapter 3 for more information.
Example of Combining Text, a Variable, and a Condition
This example illustrates using text, a name with a variable, and a condition.
To create this rule, the entry in the Name box is:
Ethernet for Collector no.: %(Element.COLLECTOR)
The entry in the Condition box is:
%(ifType) = ‘ethernet-csmacd’
IBM Tivoli Netcool Performance Manager: DataMart Configuration Guide 87

Chapter 4: Creating Grouping Rules
The test results are sorted according to the collector, then filtered according to interface type. The text is included in the display of the results.
88 IBM Tivoli Netcool Performance Manager: DataMart Configuration Guide

Chapter 4: Creating Grouping Rules
NOTES
IBM Tivoli Netcool Performance Manager: DataMart Configuration Guide 89

Chapter 4: Creating Grouping Rules
90 IBM Tivoli Netcool Performance Manager: DataMart Configuration Guide

Chapter 5: Collection and Aggregation
This chapter covers the following topics:
Overview
This chapter explains how to collect and store network performance and service analysis data for monitoring subelements on your network using SNMP, Bulk, and Complex Metric formulas. It also explains how to configure aggregation requests and percentile information for presentation in reports.
After collection, and possibly aggregation, this data can be integrated into Tivoli Netcool Performance Manager DataView or the reporting tool of your choice.
Before You Begin
Before you request data collection, you need to:
• Configure an inventory of elements and sub-elements in your network, as detailed in “Chapter 3, Configuring Inventory”
• Group the elements and sub-elements automatically or manually, as detailed in “Chapter 4, Creating Grouping Rules.”
Topic Page
Overview 91
Configuring Data Collection Requests 92
Configuring Data Collection Requests 92
Configuring Aggregation Requests 96
Filtering Requests 101
Validating the Requests 101
IBM Tivoli Netcool Performance Manager: DataMart Configuration Guide 91

Chapter 5: Collection and Aggregation
Configuring Data Collection Requests
This section explains how to configure data collection requests for the sub-elements in your network. Results of the data collection are stored in the Tivoli Netcool Performance Manager database for use in reporting.
In addition to the Request Editor, you use the following Tivoli Netcool Performance Manager DataLoad modules to configure data collection:
• Formula Selector to select a formula for collecting data.
• Resource Editor to select resources, such as sub-elements and sub-element groups.
To configure a data collection request, follow these steps:
1. Click Request Editor in the Configuration tab. The Request Editor window appears.
92 IBM Tivoli Netcool Performance Manager: DataMart Configuration Guide

Chapter 5: Collection and Aggregation
2. Click the + sign next to Sub-Element Collect in the Sub-Element Groups pane to expand it and display the collection groups. These groups do not have timezones attached to them. For example:
3. Navigate to the collection group you want by expanding the top level folders to locate the group. For example:
4. Click the + sign next to AP in the Formulas pane to expand it and display the formula groups. For example:
IBM Tivoli Netcool Performance Manager: DataMart Configuration Guide 93

Chapter 5: Collection and Aggregation
5. Navigate to the formulas you want to apply to the data collection, for example:
6. Select the formulas pressing Ctrl or Shift while clicking to select non-contiguous or a continuous block or formulas.
The following example shows the group and formulas are selected:.
94 IBM Tivoli Netcool Performance Manager: DataMart Configuration Guide

Chapter 5: Collection and Aggregation
7. Click New. The newly created requests appear in the list.
8. You can click Cancel to undo the requests just created or click Save to save your requests. If you want to create additional requests, repeat steps 3 through 7 before clicking Save.
Setting the Collection Period
You can set the period of time you want data collection to run in the Details area of the Collection tab. For example:
To set the collection period, follow these steps:
1. Select an existing request or create a new one. The selected request is highlighted in blue. For example:
2. Enter a value in the Hours text box and press Enter or use the up and down arrows to increase or decrease the value.
3. Enter a value in the Minutes text box and press Enter or use the up and down arrows to increase or decrease the value.
IBM Tivoli Netcool Performance Manager: DataMart Configuration Guide 95

Chapter 5: Collection and Aggregation
4. You can click Cancel to undo the changes you made to the data collection period or click Save to save your edits. If you want to create additional requests, repeat steps 1 through 3 before clicking Save.
Configuring Aggregation Requests
This section describes how to configure aggregation requests and percentile values.
To configure aggregation requests, follow these steps:
1. From the Request Editor, click the Aggregation tab. The following window appears:
96 IBM Tivoli Netcool Performance Manager: DataMart Configuration Guide

Chapter 5: Collection and Aggregation
2. Click the + sign next to NOC Reporting to expand it and display a list of report groups for aggregation. These groups have Calendars and timezones associated with them. For example:
3. Navigate to the report group you want by expanding the top level folders to locate the group. For example:
4. Click the + sign next to AP in the Formulas pane to expand it and display the formula groups. For example:
IBM Tivoli Netcool Performance Manager: DataMart Configuration Guide 97

Chapter 5: Collection and Aggregation
5. Navigate to the formulas you want to apply to the data collection. Aggregation is usually against generic formulas. The following example shows the Universal folder selected under Generic:
When you expand Universal, you can select the formulas located under Utilization:
6. Select the formulas pressing Ctrl or Shift while clicking to select non-contiguous or a continuous block or formulas.
The following example shows the group and formulas selected for aggregation:
98 IBM Tivoli Netcool Performance Manager: DataMart Configuration Guide

Chapter 5: Collection and Aggregation
7. Click New. The newly created requests appear in the list.
8. You can click Cancel to undo the requests just created or click Save to save your requests. If you want to create additional requests, repeat steps 3 through 7 before clicking Save.
IBM Tivoli Netcool Performance Manager: DataMart Configuration Guide 99

Chapter 5: Collection and Aggregation
Configuring a Percentile Value
You can use a percentile value instead of the average or max statistics to better represent a metric that includes the occasional burst or spike. Occasional bursts or spikes will render a min or max value meaningless, and throw off average and mean calculations. In these cases, using a percentile calculation allows you to see more accurately how the metric is performing over time.
Note: Percentile values are applied to raw data.
To configure the percentile, follow these steps:
1. Select the requests to which you want to apply the percentile.
2. Enter the percentile value in the Percentile text box and press Enter or use the up and down arrows to increase and decrease the value.
The percentile value you enter appears in the Percentile column in the request table. For example:
3. You can click Cancel to undo the requests just created or click Save to save your requests. If you want to create additional requests, repeat steps 3 through 7 before clicking Save.
100 IBM Tivoli Netcool Performance Manager: DataMart Configuration Guide

Chapter 5: Collection and Aggregation
Filtering Requests
This section explains how to filter the requests displayed in both the Collection and Aggregation tabs. The Request Editor displays a filtering toolbar that’s the same on both tabs. For example:
The filter expressions are applied to the requests displayed in the table. The column heads effected by the expressions change to reflect the filter applied.
Sorting Columns
You can click column headings to sort the contents. A single click to a column head changes the order which the line items in the request table are displayed. A second click reverses the order.
Validating the Requests
This section explains how to validate all the Collection and Aggregation requests. Clicking Save after creating or modifying a request causes the system to validate all requests, even those populated by other tools.
Enter text and wildcardsas filter expressions.
Click to apply filterexpression to requests.
Click to clear filtersfrom request list.
Click any of thesecriteria to filter requests.For example, to filter therequests by which are New,click New.
IBM Tivoli Netcool Performance Manager: DataMart Configuration Guide 101

Chapter 5: Collection and Aggregation
NOTES
102 IBM Tivoli Netcool Performance Manager: DataMart Configuration Guide

Chapter 6: Configuring Calendars
This chapter explains how to configure calendars, and is made up of the following topics:
Overview
This chapter explains how to configure calendars using the Calendar Configuration Tool. You use this tool exclusively for SNMP collector data requests to restrict the SNMP collection time period.
IBM recommends that you collect data on a 24 x 7 basis, which is the default collection period in the Request Editor. See Chapter 6, “Configuring a Data Collection Request” for more information.
You use a calendar to define periods for SNMP data collection. For example, you can stop SNMP data collection times for a customer site that is closed for business and the network is not being used (no data collection before 8:00 a.m. or after 8 p.m.). This is known as planned outage for Service Level Agreement purposes. The SP has no obligation to the customer during a planned outage.
Using the Calendar Configuration Tool
The Calendar Configuration Tool provides calendars to use with Tivoli Netcool Performance Manager DataMart data collection requests.
Note: The “calsel” command line interface (CLI) command launches the Calendar Selector from the command line. The “calconf ” CLI command launches the Calendar Selector from the command line. For more information, see the IBM Tivoli Netcool Performance Manager: Command Line Interface Guide.
To launch the Calendar Configuration Tool, follow these steps:
Click Calendar Configuration in the Configuration tab. The Calendar Configuration Tool dialog box appears
Topic Page
Overview 103
Using the Calendar Configuration Tool 103
Creating Customized Calendars 105
Deleting a Calendar 111
Using the Calendar Selector 111
IBM Tivoli Netcool Performance Manager: DataMart Configuration Guide 103

Chapter 6: Configuring Calendars
Exit
Create new calendar
Open calendar
Save changes
Add one time item
Add daily item
Delete
Update item
Add monthly item
Add weekly item
The Calendar Configuration Tool lets you create your own calendar from scratch. See Creating Customized Calendars on page 105 for details.
104 IBM Tivoli Netcool Performance Manager: DataMart Configuration Guide

Chapter 6: Configuring Calendars
Creating Customized Calendars
This section explains how to create customized calendars for scheduling data collection.
When creating a custom calendar for a SNMP data collection request, be aware that if you apply to a CME formula data collection request using Resource Manager, it has the opposite affect.
For example, if you create a calendar for a planned outage that will only collect data from 8 a.m. to 8 p.m. on Tuesday, if applied to the CME, it will not collect data from 8 a.m. to 8 p.m. on Tuesday. The CME expresses outages in this way.
IBM recommends that you use the CME Permanent calendar for all Bulk file/CME formula data requests. The CME Permanent calendar is a 24 x 7 calendar that collects data every hour on a daily basis from 0:00 to 23:59 (12:00 a.m. to 11:59 p.m.)
To create a custom calendar, follow these steps:
1. Select Add item from the Action menu.
2. Select one of the following options from the pop-up menu:
— Once item - to configure a one-time schedule.
— Daily item - to configure daily schedules.
— Weekly item - to configure weekly schedules.
— Monthly item - to configure monthly schedules.
These options are explained in the next sections.
Tivoli Netcool Performance Manager DataMart supports Greenwich Mean Time (GMT). When creating a calendar using GMT timezones, use as a guide.
Value Location
-12 Eniwetok, Kwajalein
-11 Midway Island, Samao
-10 Hawaii
-9 Alaska
-8 Pacific Time (U.S. and Canada); Tijuana
-7 Mountain Time (U.S. and Canada)
-6 Central Time (U.S. and Canada)
-5 Eastern Time (U.S. and Canada)
-4 Atlantic Time (U.S. and Canada)
-3 Buenos Aires, Georgetown, Brasilia
-2 Mid-Atlantic
-1 Azores, Cape Verde
+1 Amsterdam, Copenhagen, Madrid, Paris, Belgrade, Brussels, Berlin, Rome, Stockholm, Vienna and so on.
+2 Athens, Istanbul, Cairo, Israel and so on.
IBM Tivoli Netcool Performance Manager: DataMart Configuration Guide 105
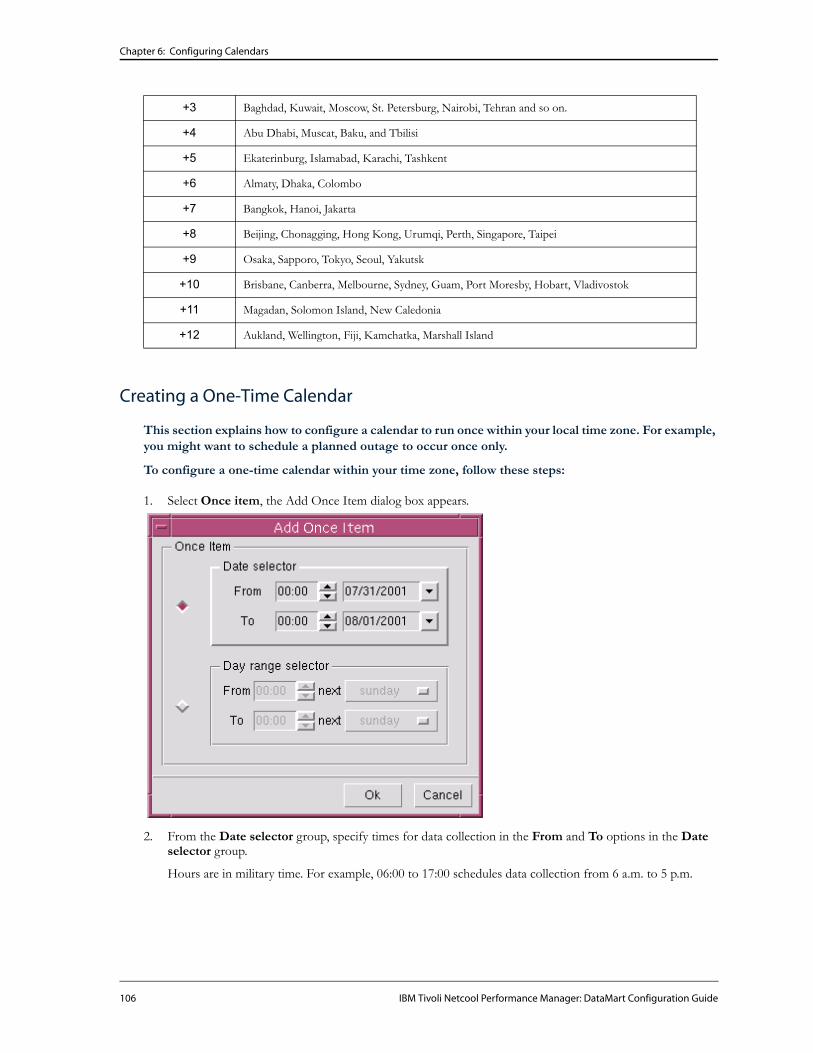
Chapter 6: Configuring Calendars
Creating a One-Time Calendar
This section explains how to configure a calendar to run once within your local time zone. For example, you might want to schedule a planned outage to occur once only.
To configure a one-time calendar within your time zone, follow these steps:
1. Select Once item, the Add Once Item dialog box appears.
2. From the Date selector group, specify times for data collection in the From and To options in the Date selector group.
Hours are in military time. For example, 06:00 to 17:00 schedules data collection from 6 a.m. to 5 p.m.
+3 Baghdad, Kuwait, Moscow, St. Petersburg, Nairobi, Tehran and so on.
+4 Abu Dhabi, Muscat, Baku, and Tbilisi
+5 Ekaterinburg, Islamabad, Karachi, Tashkent
+6 Almaty, Dhaka, Colombo
+7 Bangkok, Hanoi, Jakarta
+8 Beijing, Chonagging, Hong Kong, Urumqi, Perth, Singapore, Taipei
+9 Osaka, Sapporo, Tokyo, Seoul, Yakutsk
+10 Brisbane, Canberra, Melbourne, Sydney, Guam, Port Moresby, Hobart, Vladivostok
+11 Magadan, Solomon Island, New Caledonia
+12 Aukland, Wellington, Fiji, Kamchatka, Marshall Island
106 IBM Tivoli Netcool Performance Manager: DataMart Configuration Guide

Chapter 6: Configuring Calendars
3. Click a date listbox to specify dates for the collection (day-month-year format). A calendar pop-up window appears.
4. Double-click on a specific day.
Note: The time and date are based on the date and time properties of your computer.
5. Click OK to accept your selections and close the Add Once Item dialog box.
6. Select Save from the File menu to save your calendar configuration. The following dialog box appears.
7. Enter a unique name for your calendar in the Name box. You can also override the name of a pre-set calendar if you modified that calendar type.
IBM Tivoli Netcool Performance Manager: DataMart Configuration Guide 107
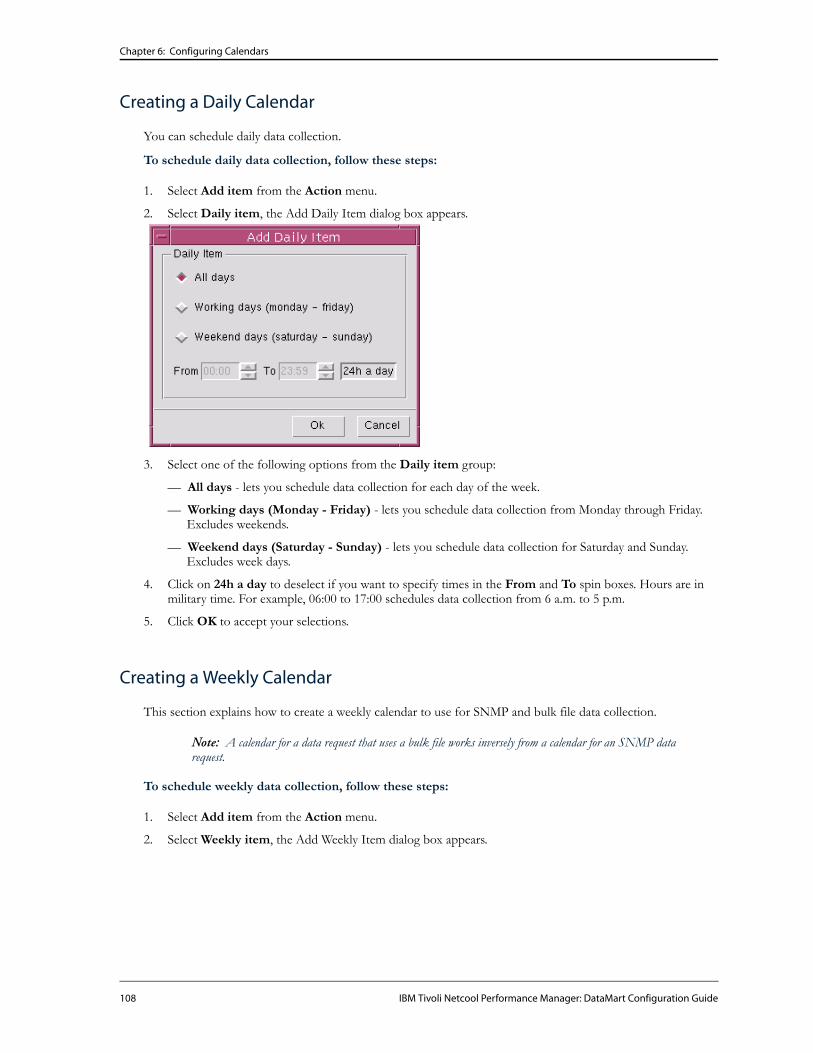
Chapter 6: Configuring Calendars
Creating a Daily Calendar
You can schedule daily data collection.
To schedule daily data collection, follow these steps:
1. Select Add item from the Action menu.
2. Select Daily item, the Add Daily Item dialog box appears.
3. Select one of the following options from the Daily item group:
— All days - lets you schedule data collection for each day of the week.
— Working days (Monday - Friday) - lets you schedule data collection from Monday through Friday. Excludes weekends.
— Weekend days (Saturday - Sunday) - lets you schedule data collection for Saturday and Sunday. Excludes week days.
4. Click on 24h a day to deselect if you want to specify times in the From and To spin boxes. Hours are in military time. For example, 06:00 to 17:00 schedules data collection from 6 a.m. to 5 p.m.
5. Click OK to accept your selections.
Creating a Weekly Calendar
This section explains how to create a weekly calendar to use for SNMP and bulk file data collection.
Note: A calendar for a data request that uses a bulk file works inversely from a calendar for an SNMP data request.
To schedule weekly data collection, follow these steps:
1. Select Add item from the Action menu.
2. Select Weekly item, the Add Weekly Item dialog box appears.
108 IBM Tivoli Netcool Performance Manager: DataMart Configuration Guide

Chapter 6: Configuring Calendars
The default setting collects data every day of the week from 00:00 to 23:59 (12:00 a.m. to 11:59 p.m.)
3. From the Days selector group, select which days you want to collect data (on a weekly basis). For example, you could select Monday, Tuesday, and Thursday, and exclude Wednesday and Friday.
4. Specify a time range in the listboxes by clicking the 24h a day button. Clicking this button disables the default setting, which is to collect data every hour (12:00 a.m. to 11:59 a.m.) For example, you can choose to collect data from 8:00 a.m. to 8 p.m. (08:00 to 20:00).
- or -
4-a. Select the starting day from the Range day selector to select a range of days. For example, Monday to Friday.
4-b. Specify a time range in the listboxes. For example, from 8:00 a.m. to 8 p.m. (08:00 to 20:00).
5. Click OK to accept your selections.
Example of a weekly calendar for a SNMP data collection request:
If you apply this calendar to an SNMP data collection request, it will collect data every hour on Monday, Wednesday, and Friday (includes - ON).
If you apply it to a bulk file/CME formula data collection request, it will collect data on Tuesday, Thursday, Saturday, and Sunday. It will NOT collect data on Monday, Wednesday, and Friday (excludes - OFF).
IBM Tivoli Netcool Performance Manager: DataMart Configuration Guide 109

Chapter 6: Configuring Calendars
Creating a Monthly Calendar
You can schedule monthly data collection.
To schedule monthly data collection, follow these steps:
1. Select Add item from the Action menu.
2. Select Monthly item, the Add Monthly Item dialog box appears.
3. From the Day range selector group, select the time and day of the month in which you want to start data collection, and the time and day of the month in which you want to end data collection. For example, from the 1st day of the month at 8:00 a.m. to the 15th day of the month at 8 p.m.
- or -
4. From the Week range selector, selector the time in the From listbox.
5. Select the first, 2nd, 3rd, 4th or last week from the next listbox.
6. Select a day from the next listbox.
7. Click OK to accept your selections.
110 IBM Tivoli Netcool Performance Manager: DataMart Configuration Guide

Chapter 6: Configuring Calendars
Deleting a Calendar
To delete a calendar, follow these steps:
1. Ensure the calendar is not being used for any data collection requests.
2. Select Load from the File menu to access available calendars.
3. Click Delete from the File menu. The calendar is deleted.
Using the Calendar Selector
You can load a calendar that already exists in the database from the Calendar Selector.
To select a calendar, follow these steps:
1. Click Calendar Selector from the Selector menu under the File menu. The Calendar Selector window appears.
2. Select one or more calendars to use in the Request Editor.
3. Click Close to exit the Calendar Selector window.
IBM Tivoli Netcool Performance Manager: DataMart Configuration Guide 111

Chapter 6: Configuring Calendars
NOTES
112 IBM Tivoli Netcool Performance Manager: DataMart Configuration Guide

Chapter 7: Writing Custom Formulas
This chapter covers the following topics:
Overview
This chapter explains how to create and modify custom formulas. You use the following Tivoli Netcool Performance Manager DataMart modules to create or modify formulas:
• Formula Selector to select a formula for editing.
• Formula Editor to edit and test formulas.
• MIB Browser to display a compiled MIB.
• MIB Compiler (optional) to add a new MIB.
Before You Begin
Ensure the collector is running. See Chapter 3, Viewing Collected Data in the IBM Tivoli Netcool Performance Manager: DataMart Operation Guide for more information.
Topic Page
Overview 113
Before You Begin 113
What is a Formula? 114
Creating Formulas 115
Using the Formula Selector 137
Collection Formula Example 147
Formula Error Messages 153
Understanding the inventory_subelements.txt File 154
IBM Tivoli Netcool Performance Manager: DataMart Configuration Guide 113
Chapter 7: Writing Custom Formulas
What is a Formula?
A formula (sometimes called a metric) is a script, written in a proprietary language developed by IBM Corporation. A formula is a collection of object identifiers (OIDs,) functions, and standard mathematical operations applied to a subelement to perform a computation. A formula lets you customize the information gathered by Tivoli Netcool Performance Manager DataMart. There are two types of formulas:
• Discovery formulas are used by the Inventory Tool during the process of discovering and analyzing the network. Discovery formulas are used against hosts only (not against subelements) and are designed to return a list of results. Discovery formulas collect information using OIDVAL() functions and store the values into Vxx vectors. The last lines in the Discovery formula are the ones that send results to the Inventory.
Discovery formulas for most interfaces are already included with Tivoli Netcool Performance Manager DataMart. You can write a new discovery formula to include a device that is new to the market.
• Collection formulas are used by the Request Editor to collect information about the status of various devices in the network. Collection formulas are applied against a subelement to produce a result (string or numeric) that is saved in the database. There are numerous collection formulas included with Tivoli Netcool Performance Manager DataMart; however, you can write additional formulas for a customized collection process.
Merging Discovery Results
You can create Discovery formulas that merge results to create a unique subelement. Instead of creating one large Discovery formula, you can create multiple smaller Discovery formulas that can run sequentially with the results being merged if a common key (formed by the pair of element name and subelement instance field) is detected.
The process of creating multiple Discovery formulas that can be used for the merge process includes creating one base formula and multiple expansion formulas to use with the base.
• base formula: the main formula that discovers the subelement along with basic properties
• expansion formula: additional formulas that define and populate additional properties for the subelement
The merge process applies to the following three fields:
• SubElement Label
• Properties
• Invariant
The merge occurs between the version of a subelement produced by a Discovery formula (the base formula) and already stored in memory and the more current version of that subelement returned by a subsequent Discovery formula (expansion formula.)
You add the merge capability to Discovery formulas by including one of the following characters as the initial character in the SubElement Label, Property, and Invariant fields.
• * (asterisk) value of current version of the subelement always overwrites previous value
• + (plus sign) value of the current version of the subelement only overwrites previous value if the previous value was empty or missing
• - value of the current version of the subelement only overwrites the previous value if it is missing.
See Standard Rules for Writing Formulas on page 122 for information about using these characters when creating formulas.
Note: Do not use any of these characters as the initial character when naming a SubElement Label, Property, or Invariant.
114 IBM Tivoli Netcool Performance Manager: DataMart Configuration Guide

Chapter 7: Writing Custom Formulas
The character is removed by the Discovery server before the production of the file for the Inventory process.
Creating Formulas
You can create custom formulas to use for discovery and data collection in addition to the formula library included with Tivoli Netcool Performance Manager DataMart.
For example, if you want to know the number of IP packets discarded on a host from MIB II, you would use this formula:
ipInDiscards.0 + ipOutDiscards.0
where ipInDiscards.0 is the number of incoming discarded IP packets and iPOutDiscards.0 is the number of outgoing discarded IP packets.
A valid formula needs to have a MIB that is compiled in Tivoli Netcool Performance Manager DataMart. Without a valid MIB, the formula returns an error message to the request.
Editing the Inventory_subelement.txt File
When you create a new Discovery formula, you need to edit the Inventory_sublement.txt file to include the formula so it can be used by the Inventory tool. The Inventory_sublement.txt file lists the rules that Discovery uses and you need to create rules for any Discovery formulas you create.
To create a formula, follow these steps:
1. Click the Formula Editor from the Metric tab. The Formula Editor window appears.
IBM Tivoli Netcool Performance Manager: DataMart Configuration Guide 115

Chapter 7: Writing Custom Formulas
Exit
Edit new formula
Open a formula
Save
Calculator
Launch Sub-Element and Element Selector
Launch MIB Browser
2. Select the following formula type from the Options menu:
— SNMP (Simple Network Management Protocol) - a network management protocol that is used to monitor routers and attached networks. SNMP is an application layer protocol. Information on devices managed is defined and stored in the application's Management Information Base (MIB). Operates on several OIDs.
3. Click a function button in the calculator. Your choices are as follows:
Function Description
ABS Takes the absolute value of an expression or an object.
MOD Takes the modulus of an expression (remainder from the full division) or of an object. This function is typically used with the INT function.
LN Takes the Naperian logarithm of an expression or an object.
LOG Takes the decimal logarithm of an expression or an object.
e* Takes the exponential of an expression or an object.
10* Takes 10 to the power of an expression or an object.
116 IBM Tivoli Netcool Performance Manager: DataMart Configuration Guide

Chapter 7: Writing Custom Formulas
4. Alternatively, you can drag and drop a function from the Functions listbox into the Data of Formula box to create a formula. Many of these functions are also available as buttons in the calculator.
- or -
5. Drag and drop an object from the MIB Browser into the Data of Formula box. See “Chapter 9, Managing MIBs” in this guide for more details about the MIB Browser.
6. Select a data type from the Type listbox. Your choices are:
— float - a numerical value (floating point).
— string - a character string.
7. Enter a comment in the Comment box. The maximum character length is 4000.
8. Select Save from the File menu to save your formula in the database.
INT Converts the value of an expression or an object into an integer value.
LAST Displays the previous measurement value.
Δ (delta) Displays the difference between the last measurement and the previous one (x - last(x)). Results are always positive. This function is used for data whose value increases after having reached a maximum peak. This function is typically used for “counter” type MIB data.
DIFF Displays the difference between the last measurement and the previous one (x - last (x)). Results can be negative. This function is typically run on gauge type objects.
Ô Deletes the last operation.
C Clears the Data of Formula box.
( Open parenthesis.
) Closed parenthesis.
Function Description
IBM Tivoli Netcool Performance Manager: DataMart Configuration Guide 117

Chapter 7: Writing Custom Formulas
Testing Formulas
You can test a formula after you create it. This step is important to ensure that the formula is valid.
Note: The Resource field accepts both IPv4 and IPv6 IP address formats.
To test a formula, follow these steps:
1. Ensure the default collector is started.
2. Click the Test tab.
Refresh
Exit
Edit new formula
Open a formula Save
3. Specify an element, subelements, or group of subelements for which to test the formula from the Target listbox.
You must specify an appropriate target to test against. For example, an Ethernet formula requires a target with an ethernet interface. A token ring formula requires a target with a token ring interface.
4. Click the refresh button to update this listbox with available resources.
5. Specify an instance from the Instance box. For example, a single instance such as 1, or multiple instances such as 1,3,5-4.1.2,7.*,8.1.*,9-10.
You can override the default instances specified in the formula by using the Instance field. For example, if the formula specifies all instances:
Dim I1 AS Integer Default * NAME Interface
118 IBM Tivoli Netcool Performance Manager: DataMart Configuration Guide

Chapter 7: Writing Custom Formulas
You can use the Instance field to specify only instances 2 through 5:
Interface<2-5>
If you do not specify any instances, Tivoli Netcool Performance Manager DataMart uses the default instances specified in the formula, and inserts them into the Instance field when testing the formula.
6. Enter a community name in the Community box.
7. Optionally, you can select an SNMP Collector for the formula test from the SNMP Collector listbox. When you selected resources in step 3, the associated collector appears by default.
8. Click the Test button to test the validity of the formula. The selected target and community name are also tested.
In a few moments the results are displayed in the Trace box.
If the test passed, the formula is correct and the element or sub-element is active. The numerical results of the test are displayed. For example:
If the test failed, an error message is displayed. For example, the message might tell you that no data was found.
9. Right click in the Trace box and select Reset to clear the Trace box or select Save to print the results or save them to a file.
Saving Formulas
When you save a formula, Tivoli Netcool Performance Manager DataMart searches all the MIBs that have been compiled. It creates a link from the formula to the compiled MIB containing the MIB objects used in the formula.
If a MIB object occurs in only one compiled MIB, the link is created automatically. However, if the MIB object occurs in more than one compiled MIB, you must specify which MIB should be used. Tivoli Netcool Performance Manager DataMart automatically displays a list of MIBs in the MIB Selection window. Click on the desired MIB, then click OK.
You can view the details of any of the MIBs by using the MIB Browser. More information about the MIB Browser, see “Chapter 9, Managing MIBs.”
When you save a discovery formula, you must save it under the “Alias Instance and Label Inventory” branch of the formula tree. Before the formula can used automatically by the Inventory Tool, the path to the formula must be specified in the inventory_subelements.txt file. This file can only recognize a location within the “Alias Instance and Label Inventory” branch of the formula tree.
IBM Tivoli Netcool Performance Manager: DataMart Configuration Guide 119

Chapter 7: Writing Custom Formulas
Modifying a Custom Formula
You can modify an existing formula using the Formula Selector.
To modify an existing formula, follow these steps:
1. Select Load from the File menu. The Formula Selector dialog box appears.
2. Expand the branches and select the formula you want to modify and click OK.
- or -
3. Drag and drop a formula into the Data of Formula box. The contents of the formula are inserted rather than the name of the formula. For example
120 IBM Tivoli Netcool Performance Manager: DataMart Configuration Guide
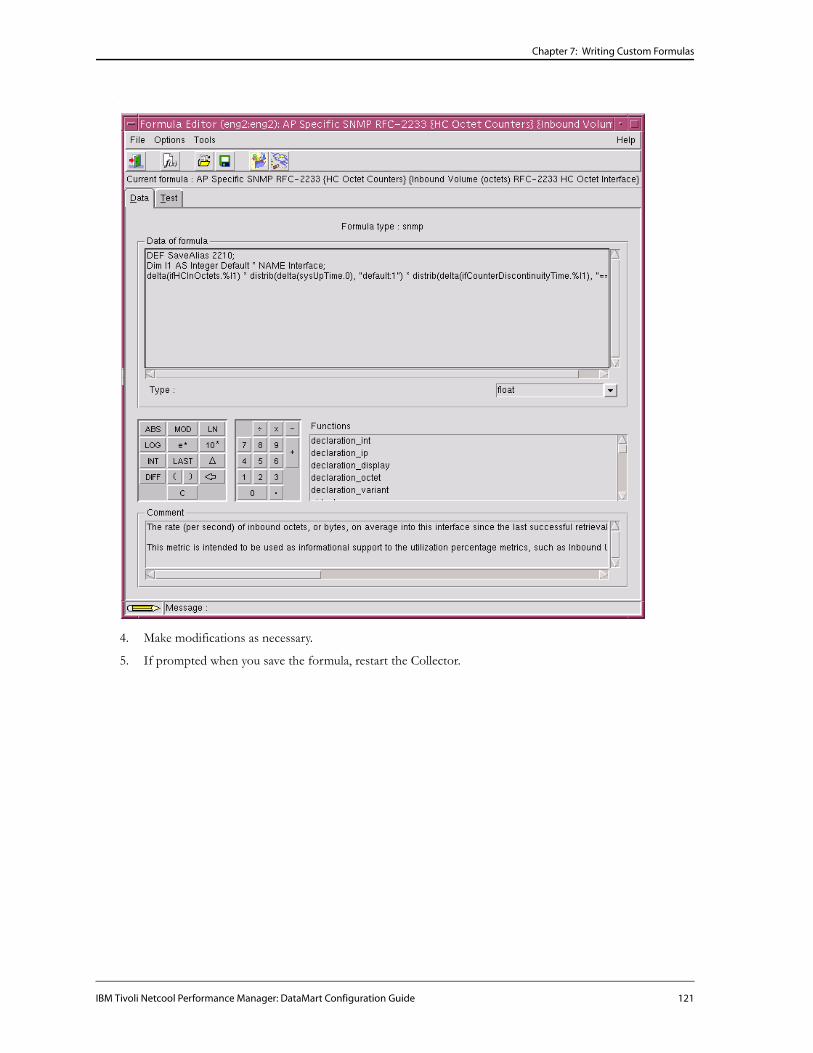
Chapter 7: Writing Custom Formulas
:
4. Make modifications as necessary.
5. If prompted when you save the formula, restart the Collector.
IBM Tivoli Netcool Performance Manager: DataMart Configuration Guide 121
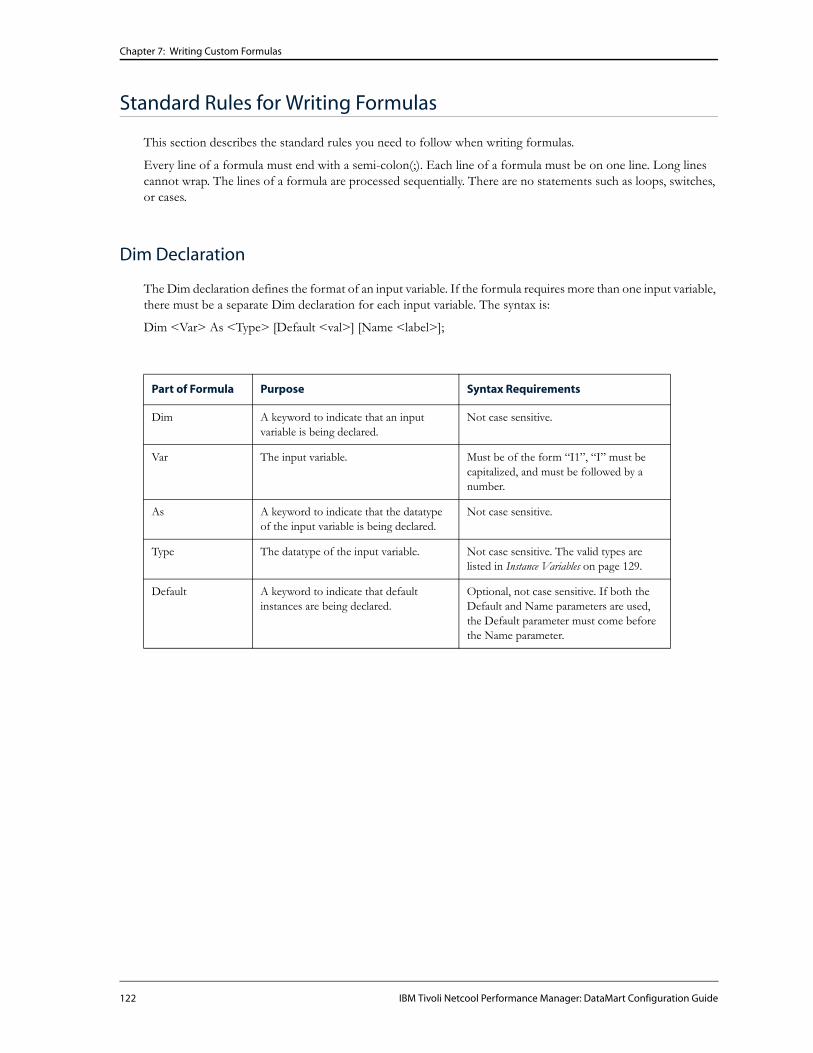
Chapter 7: Writing Custom Formulas
Standard Rules for Writing Formulas
This section describes the standard rules you need to follow when writing formulas.
Every line of a formula must end with a semi-colon(;). Each line of a formula must be on one line. Long lines cannot wrap. The lines of a formula are processed sequentially. There are no statements such as loops, switches, or cases.
Dim Declaration
The Dim declaration defines the format of an input variable. If the formula requires more than one input variable, there must be a separate Dim declaration for each input variable. The syntax is:
Dim <Var> As <Type> [Default <val>] [Name <label>];
Part of Formula Purpose Syntax Requirements
Dim A keyword to indicate that an input variable is being declared.
Not case sensitive.
Var The input variable. Must be of the form “I1”, “I” must be capitalized, and must be followed by a number.
As A keyword to indicate that the datatype of the input variable is being declared.
Not case sensitive.
Type The datatype of the input variable. Not case sensitive. The valid types are listed in Instance Variables on page 129.
Default A keyword to indicate that default instances are being declared.
Optional, not case sensitive. If both the Default and Name parameters are used, the Default parameter must come before the Name parameter.
122 IBM Tivoli Netcool Performance Manager: DataMart Configuration Guide

Chapter 7: Writing Custom Formulas
Every formula should begin with a Dim declaration. This allows the formula be used with sub-elements.
A correct example:
Dim I1 As Integer Default *;
ifInOctets.%I1;
An obsolete example:
ifInOctets.*;
Although the second example works in most cases, IBM Corporation recommends that you use the first method.
There is only one type of formula that does not require a Dim declaration. If the formula is applied to a scalar object (which therefore has only one instance), the Dim declaration can be omitted. In this case, the instance is specified as “0”.
For example:
sysName.0
Part of Formula Purpose Syntax Requirements
val The instances to use if no other instances are specified.
Default instances can be a list of values
- or -
* to indicate that all instances should be used.
See Instance Variables on page 129 for more information about the format for default instances.
Name A keyword to indicate that a name for the input variable is being declared.
Optional, not case sensitive. If both the Default and Name parameters are used, the Default parameter must come before the Name parameter.
label The name to use for this input variable in the instance field of the Formula Editor.
Can contain only letters and numbers; spaces are not allowed.
; Indicates the end of the line. Required for every line of the formula, including comments.
IBM Tivoli Netcool Performance Manager: DataMart Configuration Guide 123

Chapter 7: Writing Custom Formulas
OIDVAL Expression Line
The OIDVAL expression line executes an expression based on OIDs or statistics variables and stores the results to temporary variables. The syntax is:
Vn = OIDVAL(<Expression> [, Validity]);
The OIDVAL expression evaluates the expression by retrieving a list of all the OIDs required for the execution of the <Expression.> It retrieves the list by replacing all variables contained in the <Expression> with their substitution values. All substitutions have to be resolved in order for the <Expression> to be obtained.
Depending on the Validity settings, the different OIDs and stats variables are either restored from preceding executions or are queried from target devices.
The following table lists the syntax requirements:
Part of Formula Purpose Syntax Requirements
Vn A temporary variable. Must be of the form “V1”, “V” must be capitalized, and must be followed by a number.
= Indicates that the result of the expression on the right should be assigned to the temporary variable on the left.
Spaces before and after are optional.
OIDVAL A keyword that indicates that the value of an expression is being assigned to a temporary variable.
Not case sensitive.
Expression The expression; the calculation to be done.
Contains at least one OID (MIB object with a fixed instance or MIB object with a variable instance) stat variable, or mathematical operation.
The expression can be simple or complex, and can include more than one OID. The expression must be enclosed in parenthesis.
124 IBM Tivoli Netcool Performance Manager: DataMart Configuration Guide

Chapter 7: Writing Custom Formulas
Example
Dim I1 as integer default *
V1=OIDVAL (ifInOctets.%I1 / ifSpeed.%I1 * 100.0, every) ;
When executed with instance string = 2 and the list of required OID includes: ifInOctets.%I1 ; ifSpeed.%I1 ; with I1 in { 2 } forces the execution of SNMPGet : ifInOctets.2 ; ifSpeed.2
Results from SNMPGet include:
This produces the following result:
Stored in V1, for future use.
OIDINST Instruction
The OIDINST expression line stores the values of a key for which the expression is true (different from zero.) The instruction is primarily used for Discovery formulas to filter a sub-set of indexes from a large set, based on properties. If the filter is unsuccessful, the row is skipped. If the filter is successful, the value of the index for the row is assigned to the temporary variable, and processing continues with the next line of the formula.
The syntax is:
Vn = OIDINST(<Boolean Expression> [, Validity]);
Part of Formula Purpose Syntax Requirements
Validity Specifies how often to reevaluate the expression.
The choices include:
• Once, evaluate the expression only at the first polling.
• Every, evaluate the expression at each polling. This is the default.
• xxP, evaluate the expression at a specified number of pollings. For example, 10P means reevaluate the expression on each tenth polling.
• ssss, a specific period, in seconds. For example, 3600 means reevaluate the expression once each hour.
; Indicates the end of the line. Required for every line of the formula, including comments.
ifInOctets [I1 = (int) 2] Æ (int) 1000
ifSpeed [I1 = (int) 2] Æ (int) 512
result [I1 = (int) 2] Æ (int) 195.31
IBM Tivoli Netcool Performance Manager: DataMart Configuration Guide 125

Chapter 7: Writing Custom Formulas
Part of Formula Purpose Syntax Requirements
Vn A temporary variable. Must be of the form “V1”, “V” must be capitalized, and must be followed by a number.
= Indicates that the result of the expression on the right should be assigned to the temporary variable on the left.
Spaces before and after are optional.
OIDINST A keyword to indicate that a conditional filter is being used.
Not case sensitive.
Expression The expression to be filtered. OID, stat variable, or mathematical operations with a Boolean result.
Valid operators for filtering are:like, <, >, <=, >=, ==, !=More information about these operators can be found in Syntax for Functions on page 131.
126 IBM Tivoli Netcool Performance Manager: DataMart Configuration Guide

Chapter 7: Writing Custom Formulas
Example
V1=OIDINST (ifStatus.%1 like ‘up’)
Based on substitutions of I1 and SNMP query, the SNMP stack returns the following:
The Boolean expression that compares the result of ifStatus to up produces following result:
OIDINST stores all keys of a result that point to a result different from 0 in the V1 vector, in the value field.
Two keys (I1=1, and I1=3) are selected.
V1 is constructed with no dimension and multiple values.
Such a V1 variable can be used in another expression line, exactly in the same way as an Ix variable, because it has no dimension and that supports multiple possible substitutions.
This OIDINST operator only works when the index is composed of only one dimension. If the index comprises more than one dimension, all substitutions values are concatenated and separated by character dot. Types of each dimension are lost and the resulting type of V1 variables is string (this is default type, when no explicit type is
Part of Formula Purpose Syntax Requirements
Validity specifies how often to reevaluate the expression
The choices include:
• Once, evaluate the expression only at the first polling.
• Every, evaluate the expression at each polling. This is the default.
• P, evaluate the expression at a specified number of pollings. For example, 10P means reevaluate the expression on each tenth polling.
• A specific period, in seconds. For example, 3600 means reevaluate the expression once each hour.
; Indicates the end of the line. Required for every line of the formula, including comments.
ifStatus [I1 = (int) 1] Æ (string) “up”
[I1 = (int) 2] Æ (string) “down”
[I1 = (int) 3] Æ (string) “up”
result [I1 = (int) 1] Æ (int) 1
[I1 = (int) 2] Æ (int) 0
[I1 = (int) 3] Æ (int) 1
V1 []
Æ { (int) 1 ; (int) 3 }
IBM Tivoli Netcool Performance Manager: DataMart Configuration Guide 127

Chapter 7: Writing Custom Formulas
declared). Not using explicit types has more side effects than benefits. Do not use this OIDINST operator when there is more than one dimension.
The following illustrates a dlci status example:
V1=OIDINST( dlciStatus.%I1.%I2 like “up” )
Two keys ( I1=1,I2=101 and I1=2,I2=103 ) are selected because more than one dimension involved, keys are transformed to 1.101 and 2.103 and V1 is set to:
On the next substitution using V1 values, the <interface>.<dlci> information is lost.
dlciStatus [I1 = (int) 1]; [I2 = (int) 101] Æ (string) “up”
[I1 = (int) 1]; [I2 = (int) 102] Æ (string) “down”
[I1 = (int) 2]; [I2 = (int) 103] Æ (string) “up”
V1 []
Æ { (string) “1.101” ; (string) “2.103” }
128 IBM Tivoli Netcool Performance Manager: DataMart Configuration Guide
Chapter 7: Writing Custom Formulas
Types of Variables
Formulas can include the following three classes of variables:
• instance
• temporary
• host
In most cases, these variables are actually vectors.
Instance Variables
Instance variables represent the input values for a formula. They are declared as a capital I, followed by a number (single digit) between 1 and 9. For example:
I1, I2, I3, and so on.
You can use the following two methods to set values for the instance variables:
• Setting values in the Instance field of the Formula Editor
• Assigning a subelement to a request using the Request Editor
The instance field is an ASCII string, which must be constructed as the following sequence:
[name]<values>
The name is only used as a comment, for clarification of the formula syntax, expectations of the values. Values are exact strings that will be used for replacement of
To use the value of the instance variable in a formula, add %:
%I1, %I2, %I3, and so on.
Only values whose responses do not return errors are retained for interpreting the remaining lines of the formula.
The valid types for an instance variable correspond to SNMP types. They are:
• Integer
• IPAddress
• Gauge
• Counter
• MacAddress
• OctetString
• DisplayString
• Timeticks
These names are not case sensitive when used in a formula.
Default instances can include a list of values or * to indicate that all instances should be used. Spaces are not allowed within a list of values for an instance variable. These are valid:
• integer, for example: 3
• list of integers, for example: 1,3,6,9,8,109
• interval, for example: 4-59
• list of integers and intervals, for example: 1,3,6,9,8-96,109,200-250
• character string, enclosed in double quotes, for example: “this is a STRING”
IBM Tivoli Netcool Performance Manager: DataMart Configuration Guide 129

Chapter 7: Writing Custom Formulas
• pointer to a string, for example: 128.3.56.7
• wildcard: *
Temporary Variables
Temporary variables hold an intermediate SNMP result or a partial result. You do not need to use temporary variables in a formula. Only use temporary variables in a collection formula when strictly required, because of the possible performance impact.
These temporary variables can be used as parameters for subsequent queries. They are created with the OIDINST instruction or the OIDVAL instruction.
The type of the result of the function on the right side of the equation is assigned automatically as the type of the variable. The previous contents of the variable are overwritten at each assignment.
Temporary variables are declared as a capital V, followed by a number:
• If fewer than 9 variables are defined, numbering is between 1 and 9. For example, V1, V2, V3, and so on.
• If up to 99 variables are defined (even if less than 10 are used,) numbering is between 01 and 99. You must use two digits. For example, V09, V11, V34 and so on.
To use the value of the variable in a formula, add %:
%V1, %V2, %V3, and so on.
Host Variable
The host variable (Hx) represents the current host name. Because multihost formulas are not supported, the only instance of this variable is H1. You can set the value using the Formula Editor, by setting a target element or subelement for test, or by defining a target in the Request Editor table.
Returning a Result
Only the result of the last line of a formula is returned. This was illustrated in the example formulas. Prior lines made calculations, and manipulated variables, but only the last line returned a result.
The MIB objects returned by the last line of a discovery formula become properties in the database, and can be used to create grouping rules with the Rule Editor. See “Chapter 4, Creating Grouping Rules” for more information about the Rule Editor.
Comments in Formulas
To add comments to a formula:
• put each comment on a line by itself
• start each line with the pound sign (#)
• end each line with a semi-colon (;)
# This is a comment;
Do not include a commas (,) or semi-colon (;) within the body of the comment.
130 IBM Tivoli Netcool Performance Manager: DataMart Configuration Guide
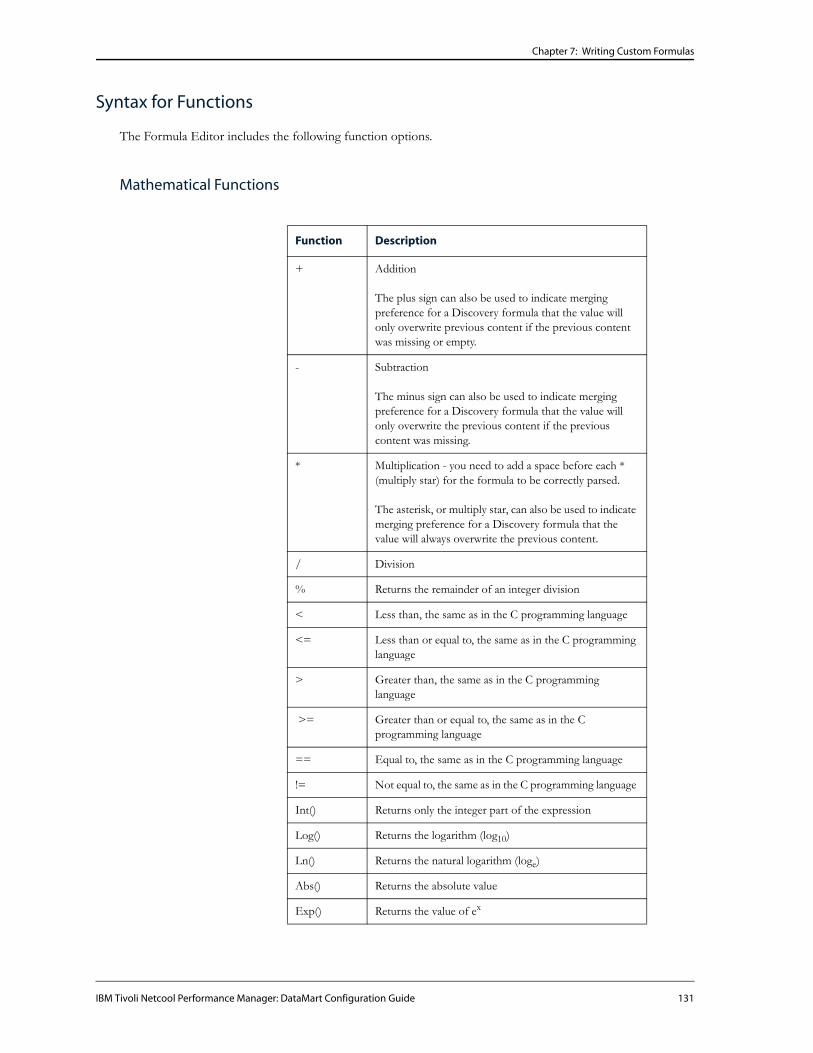
Chapter 7: Writing Custom Formulas
Syntax for Functions
The Formula Editor includes the following function options.
Mathematical Functions
Function Description
+ Addition
The plus sign can also be used to indicate merging preference for a Discovery formula that the value will only overwrite previous content if the previous content was missing or empty.
- Subtraction
The minus sign can also be used to indicate merging preference for a Discovery formula that the value will only overwrite the previous content if the previous content was missing.
* Multiplication - you need to add a space before each * (multiply star) for the formula to be correctly parsed.
The asterisk, or multiply star, can also be used to indicate merging preference for a Discovery formula that the value will always overwrite the previous content.
/ Division
% Returns the remainder of an integer division
< Less than, the same as in the C programming language
<= Less than or equal to, the same as in the C programming language
> Greater than, the same as in the C programming language
>= Greater than or equal to, the same as in the C programming language
== Equal to, the same as in the C programming language
!= Not equal to, the same as in the C programming language
Int() Returns only the integer part of the expression
Log() Returns the logarithm (log10)
Ln() Returns the natural logarithm (loge)
Abs() Returns the absolute value
Exp() Returns the value of ex
IBM Tivoli Netcool Performance Manager: DataMart Configuration Guide 131

Chapter 7: Writing Custom Formulas
Other Functions
SNMP-Specific Functions
These functions cannot be nested.
Round() Returns number rounded to the nearest multiple of significance
Function Description
&& Logical AND
|| Logical OR
like Performs an ASCII comparison of two arguments. Wildcards can be used in the right-hand argument. For example, to test the start of a sysObjectID compared to a vendor, without going into the model details.
Not() Negates the expression; provides the opposite.
Function Description
delta() Calculates the difference between the value retrieved during this polling and the value retrieved during the previous polling for a single SNMP variable. This difference can only be positive because these variables must be counter variables. This function manages counter overflows and resets.
Last() Returns the value assigned to this expression during the previous polling.
Diff() Returns the difference between the current value of this expression and its value for the previous polling. This value can be positive or negative.
Function Description
132 IBM Tivoli Netcool Performance Manager: DataMart Configuration Guide

Chapter 7: Writing Custom Formulas
Aggregate Functions
For these functions, the expression defines an operation. The dimension specifies the variable used as an index for that operation.
Filter Functions
Distribution Function
This function specifies the distribution of results within a formula. It provides a quantified, non-linear numerical result. For example, you can assign values such as:
5 for a load between 1% and 5%
4 for a load between 5% and 10%
1 for a load > 30%, etc.
Function Description
Sum (Dimension, Expression) Returns the total of all values. For example: Sum (*, ifInOctets.%I1)provides all octets entered on all the interfaces.
Max (Dimension, Expression) Returns the highest value encountered. For example: Max (*, ifInOctets.%I1)provides the number of octets entered on the interface with the highest number of incoming octets.
Min (Dimension, Expression) Returns the lowest value encountered. For example: Min (*, ifInOctets.%I1)provides the number of octets entered on the interface with the lowest number of incoming octets.
Count (Dimension, Expression) Returns a count.
Ave (Dimension, Expression) Calculates the average.
Function Description
FirstN (Number of items, Expression)
Retains only the N lines with the highest result.
LastN (Number of items, Expression)
Retains the N lines with the lowest results.
Filter (Expression) Retains only the lines with a true result. In normal use, the expression is a Boolean that returns 1 (true) or 0 (false).
IBM Tivoli Netcool Performance Manager: DataMart Configuration Guide 133

Chapter 7: Writing Custom Formulas
The syntax is:
distrib (Expression, Definition)
The Definition string contains the list of tests to be performed, and the value of the result to be used if the comparison is positive. The Definition is a series of “condition: value” fields separated by commas. These are allowed in the condition: <, <=, >, >=, ==. They are compared to a numerical value, and the result is either the specified value, or * to keep the initial value.
The Definition string must be enclosed in double quotes. It is evaluated from left to right. As soon as a condition is true, the corresponding value is returned. If no conditions are true at the end of the string, then no value is returned. Therefore, the distribution function can filter for specified values.
For example:
Dim I1 as Integer ;
V1=OIDVAL(Distrib( (8*delta(ifInOctets.%I1)) /(delta(sysUpTime.0)/100),’<100:1,<1000:2,<100000:3, <1000000:4,<5000000:5,default:6’), every);
Note: Although the width of the page forces the second line of the formula to wrap onto three lines in this example, when using the Formula Editor each line of a formula must be on one line. Long lines cannot wrap.
AddForMissing() Operator
This operator allows extending the size of a result set and adding news results entries by using entries and dimensions from a reference vector. The only prerequisite is that both the expression, and the reference vector have the same dimensions set.
addForMissing ( Expression , reference Vector [, default replacement ] )
The result of the operator is an extension of Expression. For each dimension entry that is present in reference Vector only, a new dimension entry is added to Expression, using either the result in the reference vector, or the default replacement submitted
Example
Expression alone would result in the following results.
The reference vector, obtained with an OIDVAL operation (in a precedent line,) has the same Dimension set (I1), but with more replacement values (1, 2, 3, 4, 5, 6)
Expression [I1 = (int) 1] Æ (int) 10
[I1 = (int) 3] Æ (int) 30
[I1 = (int) 4] Æ (int) 40
Reference vector [I1 = (int) 1] Æ (int) 11
[I1 = (int) 2] Æ (int) 21
[I1 = (int) 3] Æ (int) 31
[I1 = (int) 4] Æ (int) 41
[I1 = (int) 5] Æ (int) 51
134 IBM Tivoli Netcool Performance Manager: DataMart Configuration Guide
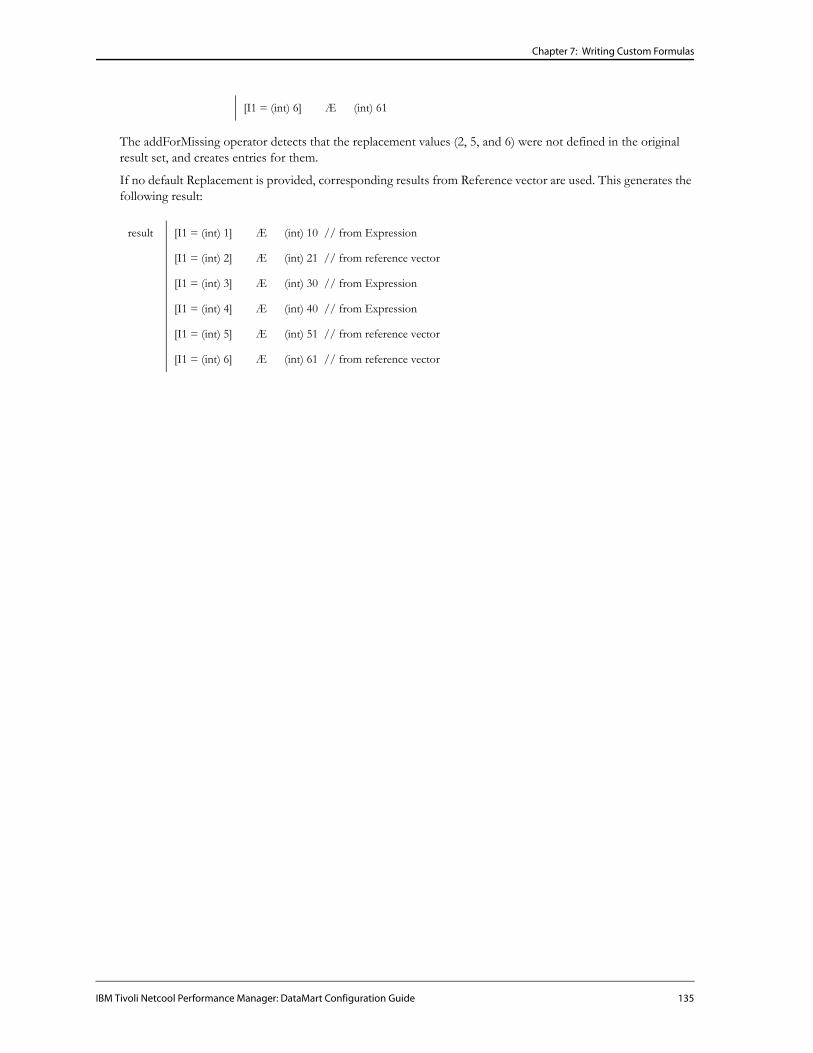
Chapter 7: Writing Custom Formulas
The addForMissing operator detects that the replacement values (2, 5, and 6) were not defined in the original result set, and creates entries for them.
If no default Replacement is provided, corresponding results from Reference vector are used. This generates the following result:
[I1 = (int) 6] Æ (int) 61
result [I1 = (int) 1] Æ (int) 10 // from Expression
[I1 = (int) 2] Æ (int) 21 // from reference vector
[I1 = (int) 3] Æ (int) 30 // from Expression
[I1 = (int) 4] Æ (int) 40 // from Expression
[I1 = (int) 5] Æ (int) 51 // from reference vector
[I1 = (int) 6] Æ (int) 61 // from reference vector
IBM Tivoli Netcool Performance Manager: DataMart Configuration Guide 135

Chapter 7: Writing Custom Formulas
If a default Replacement is provided, this default value is inserted for all new entries. This generates the following result:
result [I1 = (int) 1] Æ (int) 10 // from Expression
[I1 = (int) 2] Æ (int) default value
[I1 = (int) 3] Æ (int) 30 // from Expression
[I1 = (int) 4] Æ (int) 40 // from Expression
[I1 = (int) 5] Æ (int) default value
[I1 = (int) 6] Æ (int) default value
136 IBM Tivoli Netcool Performance Manager: DataMart Configuration Guide

Chapter 7: Writing Custom Formulas
Using the Formula Selector
You can load an existing formula from the Formula Selector window.
To open the Formula Selector, follow these steps:
1. Select Formula Selector from the Selectors menu in the File menu. The Formula Selector dialog box appears.
Note: You can also use the “formsel” command line interface (CLI) command to launch the Formulas Selector from the command line.
Creating a Formula Group
To create a new formula group, follow these steps:
1. Follow steps 1 in Using the Formula Selector on page 137.
2. Click your right mouse button and select New then Group.
IBM Tivoli Netcool Performance Manager: DataMart Configuration Guide 137

Chapter 7: Writing Custom Formulas
3. Enter a unique name for the group and press the Return key. The new group is created.
Finding a Formula
To find a formula, follow these steps:
1. Follow step 1 in Using the Formula Selector on page 137.
2. Select a group or sub-group from the Formula branch.
3. Select Find from the pop-up menu.
The Find box appears.
4. Enter the group or formula name you want to find and click OK.
To expand the search, you can use a “*” wildcard at the beginning, in the middle, or at the end of a character string.
For example:
CIS* - search for all the names beginning with CIS.
*SCO - search for all the names ending with SCO.
C*O - search for all the names beginning with C and ending with O.
*MIB* - search for all the names containing MIB.
138 IBM Tivoli Netcool Performance Manager: DataMart Configuration Guide
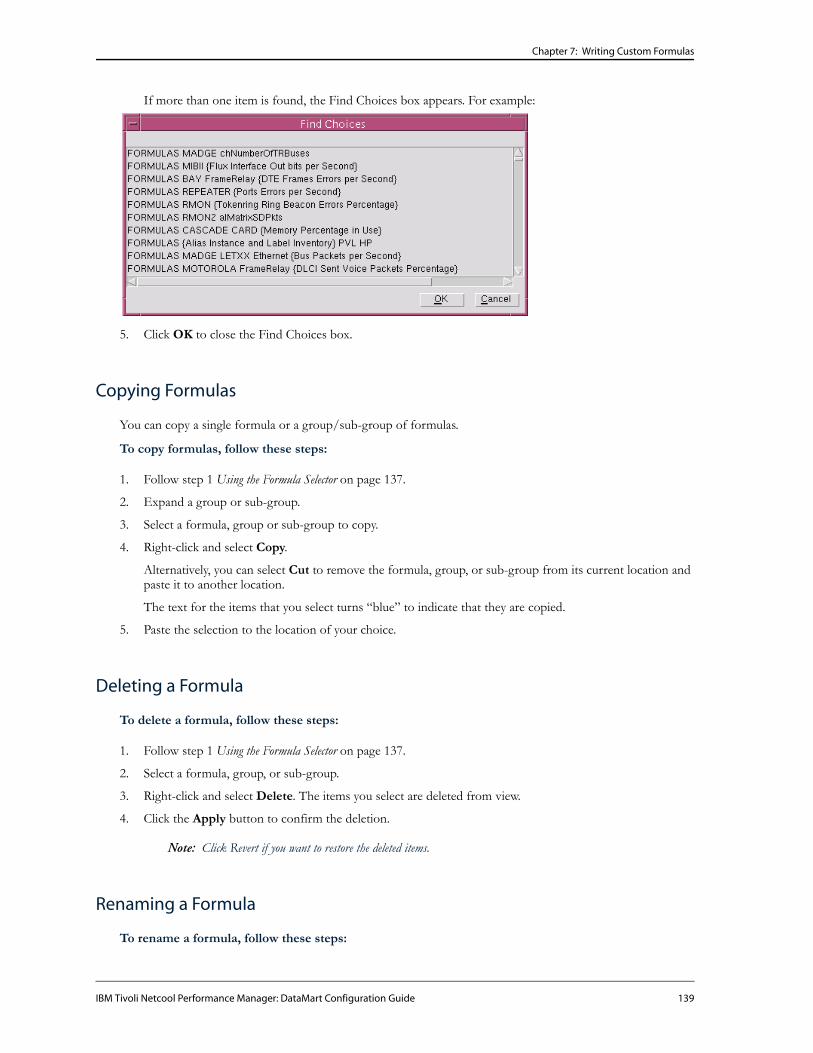
Chapter 7: Writing Custom Formulas
If more than one item is found, the Find Choices box appears. For example:
5. Click OK to close the Find Choices box.
Copying Formulas
You can copy a single formula or a group/sub-group of formulas.
To copy formulas, follow these steps:
1. Follow step 1 Using the Formula Selector on page 137.
2. Expand a group or sub-group.
3. Select a formula, group or sub-group to copy.
4. Right-click and select Copy.
Alternatively, you can select Cut to remove the formula, group, or sub-group from its current location and paste it to another location.
The text for the items that you select turns “blue” to indicate that they are copied.
5. Paste the selection to the location of your choice.
Deleting a Formula
To delete a formula, follow these steps:
1. Follow step 1 Using the Formula Selector on page 137.
2. Select a formula, group, or sub-group.
3. Right-click and select Delete. The items you select are deleted from view.
4. Click the Apply button to confirm the deletion.
Note: Click Revert if you want to restore the deleted items.
Renaming a Formula
To rename a formula, follow these steps:
IBM Tivoli Netcool Performance Manager: DataMart Configuration Guide 139

Chapter 7: Writing Custom Formulas
1. Follow step 1 in Using the Formula Selector on page 137.
2. Expand one of the directories.
3. Select a formula from the tree.
4. Select Rename from the pop-up menu
5. Enter the new name.
6. Click Apply to accept your change.
Formula Examples
This section contains three examples of formulas:
• Discovery
• Collection
• Discovery merge
Discovery Formula for a Redback Ethernet Interface
The following example shows a Discovery formula that discovers all Redback Ethernet interfaces. For each interface, it reports the type, description, and speed.
To use this formula automatically with the Inventory Tool, it must have an associated entry in the inventory_subelements.txt file. See Understanding the inventory_subelements.txt File on page 154 for information about how to create the associated entry.
Dim I1 AS Integer Default * NAME Interface;
V1=OIDINST(ifType.%I1 == 6, once);
V2=OIDVAL(ifDescr.%V1, once);
140 IBM Tivoli Netcool Performance Manager: DataMart Configuration Guide

Chapter 7: Writing Custom Formulas
V3=OIDVAL(int(ifSpeed.%V1/1000000), once);
%V2 index "RedbackEthernet<%V1>||%V2 %V3mbps Inst %V1 ||ifSpeed<%V3mbps>ifDescr<%V2>";
Line-by-Line Explanation
Dim I1 AS Integer Default * NAME Interface
This line declares the input variable I1. It specifies that it is an integer, that the default is all instances, and it is called “Interface.”
IBM Tivoli Netcool Performance Manager: DataMart Configuration Guide 141

Chapter 7: Writing Custom Formulas
Further information on the Dim statement is available in Dim Declaration on page 122.
V1=OIDINST(ifType.%I1 == 6, once);
This line restricts the type of row to which the formula is applied. It checks whether or not the value of ifType for each row is 6, which has been defined in RFC1213 to mean ethernet-csmacd. If the value is not equal to 6, the row is skipped. If the value is equal to 6, the value of ifIndex for this row is assigned to V1, and processing continues with the next line of the formula.
Further information on the OIDINST instruction is available in OIDINST Instruction on page 125.
Part of Formula
Purpose Syntax Requirements
Dim A keyword to indicate that an input variable is being declared.
Not case sensitive.
I1 The input variable. “I” must be capitalized, and must be followed by a number.
AS A keyword to indicate that the datatype of the input variable is being declared.
Not case sensitive.
Integer The datatype of the input variable. Not case sensitive. The valid types are listed in Instance Variables on page 129.
Default A keyword to indicate that default instances are being declared.
Optional, not case sensitive. If both the Default and Name parameters are used, the Default parameter must come before the Name parameter.
* The instances to use if no other instances are specified. In this case, * specifies that all instances should be used.
Default instances can be a list of values
-or-
* to indicate that all instances should be used.
See Instance Variables on page 129 for more information about the format for default instances.
Name A keyword to indicate that a name for the input variable is being declared.
Optional, not case sensitive. If both the Default and Name parameters are used, the Default parameter must come before the Name parameter.
Interface The name to use for this input variable in the instance field of the Formula Editor.
Must contain only letters and numbers; underscores and spaces are not allowed.
; Indicates the end of the line. Required for every line of the formula, including comments.
Part of Formula
Purpose Syntax Requirements
V1 A temporary variable. “V” must be capitalized, and must be followed by a number.
142 IBM Tivoli Netcool Performance Manager: DataMart Configuration Guide

Chapter 7: Writing Custom Formulas
V2=OIDVAL(ifDescr.%V1, once);
This line retrieves the value of ifDescr for each value for V1 of the previous line. It assigns the value of ifDescr.%V1 to V2.
= Indicates that the result of the expression on the right should be assigned to the temporary variable on the left.
Spaces before and after are optional.
OIDINST A keyword to indicate that a conditional filter is being used/
Not case sensitive.
ifType A MIB object to which the filter will be applied. In this case, ifType indicates the ifType column of the ifTable.
Case sensitive, must be a MIB object in a MIB compiled in Tivoli Netcool Performance Manager.
See “Chapter 9, Managing MIBs” for information on how to use the MIB Browser and the MIB Compiler.
. Separates the MIB object from the instance.
Spaces are not allowed before or after.
%I1 The instance of the MIB object. In this case, the values of the previously defined input variable will be substituted.
Must begin with %, and must:
• match a previously defined input variable
-or -
• be a constant
- or -
• be the * wildcard
== “equal to” the same as in the C programming language.
Spaces before and after are optional. Valid operators for filtering are:like, <, >, <=, >=, ==, !=
See Syntax for Functions on page 131 for more information about these operators.
6 The value to be filtered. In this case 6, which has been defined in RFC1213 to mean ethernet-csmacd.
Can be any value that is valid for the MIB object being used
once A keyword to indicate that the data should be retrieved only once, not polled repeatedly.
Preceded by a comma; spaces before and after the comma are optional.
; Indicates the end of the line. Required for every line of the formula, including comments.
Part of Formula
Purpose Syntax Requirements
IBM Tivoli Netcool Performance Manager: DataMart Configuration Guide 143

Chapter 7: Writing Custom Formulas
Further information on the OIDVAL instruction is available in OIDVAL Expression Line on page 124.
V3=OIDVAL(int(ifSpeed.%V1/1000000), once);
This line retrieves the value of ifSpeed for each value for V1 from the second line of the formula. It divides this value by 1,000,000, to convert from bits/second to megabits/second. It applies the int function to convert the result to an integer. It assigns that integer to V3.
Further information on the OIDVAL instruction is available in OIDVAL Expression Line on page 124.
Part of Formula
Purpose Syntax Requirements
V2 A temporary variable. “V” must be capitalized, and must be followed by a number.
= Indicates that the result of the expression on the right should be assigned to the temporary variable on the left.
Spaces before and after are optional.
OIDVAL A keyword that indicates that the value of an expression is being assigned to a temporary variable.
Not case sensitive, the expression must be enclosed in parenthesis.
ifDescr A MIB object, the value of which is assigned to the temporary variable. In this case, ifDescr indicates the ifDescr column of the ifTable.
Case sensitive, must be a MIB object in a MIB compiled in Tivoli Netcool Performance Manager.
See “Chapter 9, Managing MIBs” for information on how to use the MIB Browser and the MIB Compiler.
. Separates the MIB object from the instance.
Spaces are not allowed before or after.
%V1 The instance of the MIB object. In this case, the values of the previously defined temporary variable will be substituted.
Must begin with %, and must match a previously defined temporary variable.
once A keyword to indicate that the data should be retrieved only once, not polled repeatedly.
Preceded by a comma; spaces before and after the comma are optional.
; Indicates the end of the line. Required for every line of the formula, including comments.
Part of Formula Purpose Syntax Requirements
V3 A temporary variable. “V” must be capitalized and followed by a number.
= Indicates that the result of the expression on the right should be assigned to the temporary variable on the left.
Spaces before and after are optional.
OIDVAL A keyword that indicates that the value of an expression is being assigned to a temporary variable.
Not case sensitive. The expression must be enclosed in parenthesis.
144 IBM Tivoli Netcool Performance Manager: DataMart Configuration Guide

Chapter 7: Writing Custom Formulas
The result of a Discovery formula contains four parts:
• first part has to be a variable (%Vxxx) or an expression. The number of values of the variable or the number of returns of the expression drives how many results can be produced by the Discovery formula.
• second part is the instance of the sub-element.
• third part is prefaced with the host name and “_” to become the label field in both the Sub-element and Host Selector, and in the Sub-element Editor.
• fourth part (ifSpeed<%V3mbps>ifDescr<%V2>) contains details about the interface. The MIB objects returned by the last line of the formula (ifSpeed, ifDescr) become properties in the database, and can be used to create grouping rules with the Rule Editor.
See “Chapter 4, Creating Grouping Rules” for more information about the Rule Editor.T
Part of Formula Purpose Syntax Requirements
int A function that returns only the integer part of an expression.
Not case sensitive. The list of all available functions can be found in Syntax for Functions on page 131.
ifSpeed A MIB object, the value of which is used in the calculation. In this case, ifSpeed indicates the ifSpeed column of the ifTable.
Case sensitive, must be a MIB object in a MIB compiled in Tivoli Netcool Performance Manager. See “Chapter 9, Managing MIBs” for information on how to use the MIB Browser and the MIB Compiler.
. Separates the MIB object from the instance.
Spaces are not allowed before or after.
%V1 The instance of the MIB object. In this case, the values of the previously defined temporary variable will be substituted.
Must begin with %, and must match a previously defined temporary variable.
/ Division Spaces before and after are optional. See Syntax for Functions on page 131 for a list of operations.
1000000 Used to calculate megabits/second from ifSpeed, which is in bits/second.
once A keyword to indicate that the data should be retrieved only once, not polled repeatedly.
Preceded by a comma; spaces before and after the comma are optional.
; Indicates the end of the line. Required for every line of the formula, including comments.
Part of Formula Purpose Syntax Requirements
%V2 A temporary variable that indicates a result is being returned. The value of this variable will be appended to the end of the return string. In this case, ifDescr for each instance has been assigned to it in the third line of the formula. The entire formula appears on page 140
Must begin with %, and must match a temporary variable from the left side of a previous OIDVAL instruction. A temporary variable from a previous OIDINST instruction will cause an error.
IBM Tivoli Netcool Performance Manager: DataMart Configuration Guide 145
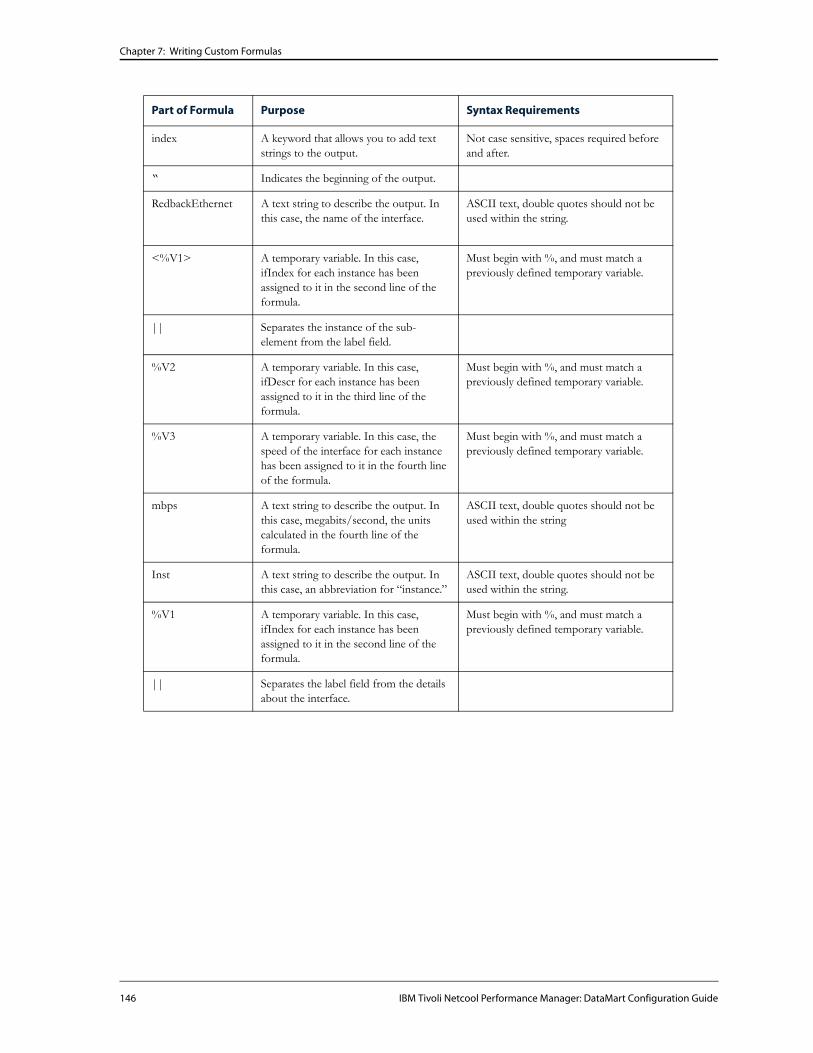
Chapter 7: Writing Custom Formulas
Part of Formula Purpose Syntax Requirements
index A keyword that allows you to add text strings to the output.
Not case sensitive, spaces required before and after.
“ Indicates the beginning of the output.
RedbackEthernet A text string to describe the output. In this case, the name of the interface.
ASCII text, double quotes should not be used within the string.
<%V1> A temporary variable. In this case, ifIndex for each instance has been assigned to it in the second line of the formula.
Must begin with %, and must match a previously defined temporary variable.
|| Separates the instance of the sub-element from the label field.
%V2 A temporary variable. In this case, ifDescr for each instance has been assigned to it in the third line of the formula.
Must begin with %, and must match a previously defined temporary variable.
%V3 A temporary variable. In this case, the speed of the interface for each instance has been assigned to it in the fourth line of the formula.
Must begin with %, and must match a previously defined temporary variable.
mbps A text string to describe the output. In this case, megabits/second, the units calculated in the fourth line of the formula.
ASCII text, double quotes should not be used within the string
Inst A text string to describe the output. In this case, an abbreviation for “instance.”
ASCII text, double quotes should not be used within the string.
%V1 A temporary variable. In this case, ifIndex for each instance has been assigned to it in the second line of the formula.
Must begin with %, and must match a previously defined temporary variable.
|| Separates the label field from the details about the interface.
146 IBM Tivoli Netcool Performance Manager: DataMart Configuration Guide

Chapter 7: Writing Custom Formulas
Collection Formula Example
The following example shows a Collection formula for inbound bandwidth. To use this formula automatically with the Inventory Tool, it must have an associated entry in the inventory_subelements.txt file. See Understanding the inventory_subelements.txt File on page 154 for information about how to create the associated entry.
Dim I1 AS Integer Default * Name Interface;
delta(ifInOctets.%If)/delta(sysUpTime.0/100);
Line-by-Line Explanation
Dim I1 AS Integer Default * Name Interface;
Part of Formula Purpose Syntax Requirements
ifSpeed A text string to describe the output. In this case, the name of a MIB object.
MIB objects returned by the last line of a discovery formula become properties in the database, and can be used to create grouping rules with the Rule Editor. See “Chapter 4, Creating Grouping Rules” for details about Rule Editor.
ASCII text, double quotes should not be used within the string.
<%V3> A temporary variable. In this case, the speed of the interface for each instance has been assigned to it in the fourth line of the formula.
Must begin with %, and must match a previously defined temporary variable.
mbps> A text string to describe the output. In this case, megabits/second, the units calculated in the fourth line of the formula.
ASCII text, double quotes should not be used within the string.
ifDescr A text string to describe the output. In this case, the name of a MIB object.
MIB objects returned by the last line of a discovery formula become properties in the database, and can be used to create grouping rules with the Rule Editor. See “Chapter 4, Creating Grouping Rules” for details about Rule Editor.
ASCII text, double quotes should not be used within the string.
<%V2> A temporary variable. In this case, ifDescr for each instance has been assigned to it in the third line of the formula.
Must begin with %, and must match a previously defined temporary variable.
” Indicates the end of the output.
; Indicates the end of the line. Required for every line of the formula, including comments.
IBM Tivoli Netcool Performance Manager: DataMart Configuration Guide 147

Chapter 7: Writing Custom Formulas
This line declares the input variable I1. It specifies that it is an integer, that the default is all instances, and it is called “Interface.”
Further information on the Dim statement is available in Dim Declaration on page 122.
delta(ifInOctets.%If)/delta(sysUpTime.0/100);
Part of Formula
Purpose Syntax Requirements
Dim A keyword to indicate that an input variable is being declared.
Not case sensitive.
I1 The input variable. “I” must be capitalized, and must be followed by a number.
AS A keyword to indicate that the datatype of the input variable is being declared.
Not case sensitive.
Integer The datatype of the input variable. Not case sensitive. The valid types are listed in Instance Variables on page 129.
Default A keyword to indicate that default instances are being declared.
Optional, not case sensitive. If both the Default and Name parameters are used, the Default parameter must come before the Name parameter.
* The instances to use if no other instances are specified. In this case, * specifies that all instances should be used.
Default instances can be a list of values
- or -
* to indicate that all instances should be used.
See Instance Variables on page 129 for more information about the format for default instances.
Name A keyword to indicate that a name for the input variable is being declared.
Optional, not case sensitive. If both the Default and Name parameters are used, the Default parameter must come before the Name parameter.
Interface The name to use for this input variable in the instance field of the Formula Editor. (This name will also appear in the Request Editor.)
Can contain only letters and numbers; spaces are not allowed.
; Indicates the end of the line. Required for every line of the formula, including comments.
148 IBM Tivoli Netcool Performance Manager: DataMart Configuration Guide

Chapter 7: Writing Custom Formulas
This line returns the final result. It calculates the number of incoming cells, as the number of octets divided by 53. It then divides this by the time period over which the collection was done.
Part of Formula
Purpose Syntax Requirements
delta A function that calculates the difference between the value retrieved during this polling and the value retrieved during the previous polling for a single SNMP variable.
Must be lower case. Further information is available in SNMP-Specific Functions on page 132.
ifInOctets A MIB object on which the calculation will be done. In this case, ifInOctets indicates the ifInOctets column of the ifTable.
Case sensitive, must be a MIB object in a MIB compiled in Tivoli Netcool Performance Manager.
See “Chapter 9, Managing MIBs” for information on how to use the MIB Browser and the MIB Compiler.
. Separates the MIB object from the instance.
Spaces are not allowed before or after.
%If The instance of the MIB object. In this case, inbound bandwidth
Must begin with %, and must match a previously defined temporary variable.
/ Division Spaces before and after are optional. The list of possible operations is in Syntax for Functions on page 131.
53 Used to calculate the number of cells from the number of octets.
Spaces before and after are optional. The list of possible operations is in Syntax for Functions on page 131.
delta A function that calculates the difference between the value retrieved during this polling and the value retrieved during the previous polling for a single SNMP variable.
Must be lower case. See SNMP-Specific Functions on page 132 for more information.
sysUpTime A MIB object on which the calculation will be done. In this case, sysUpTime indicates the time since the system was re-initialized.
Case sensitive, must be a MIB object in a MIB compiled in Tivoli Netcool Performance Manager.
See “Chapter 9, Managing MIBs” for information on how to use the MIB Browser and the MIB Compiler.
. Separates the MIB object from the instance.
Spaces are not allowed before or after.
0 The instance of the MIB object. In this case, sysUpTime is scalar, so “0” is used as the only instance.
Spaces before and after are optional. The list of possible operations is in Syntax for Functions on page 131.
/ Division
100 Used to calculate the number of seconds from the value of sysUpTime, which is in hundredths of a second.
IBM Tivoli Netcool Performance Manager: DataMart Configuration Guide 149

Chapter 7: Writing Custom Formulas
Merge Formulas Example
The following example implements the following on top of standard MIB II formula (1213_IF and 2233_IF):
• Octet capability detection: inbound and outbound, 64, 32, or undefined.
• Packets capability detection: 64 or 32 or undefined
• Custom invariant, either from MIB II ifDescr, or RFC2233 ifName
• Customer specific key and properties
Inventory_sub-element.txt
# File format:
#{FAMILY} |{Elem. FAMILY}|{sysObjId Mask} |{Match Formula} |{I}|{Discovery Formula} |{I}|{cancel FAMILY};[{...};]|
1213_Device |Generic~Agent |1.3.6.1 |NULL |<*>|AP~1213_Device |<*>| |
1213_IF |Generic~Agent |1.3.6.1 |NULL |<*>|AP~1213_IF |<*>| |
2233_IF |Generic~Agent |1.3.6.1 |AP~2233_IF_match |<*>|AP~2233_IF |<*>| 1213_IF;|
2233_IF(Exp) |Generic~Agent |1.3.6.1 |AP~2233_IF_match |<*>|AP~2233_HCOctets_Support |<*>| |
2233_IF(Exp) |Generic~Agent |1.3.6.1 |AP~2233_IF_match |<*>|AP~2233_HCPackets_Support |<*>| |
1213_IF(Exp) |Generic~Agent |1.3.6.1 |NULL |<*>|AP~1213_IF_Invariant |<*>| |
2233_IF(Exp) |Generic~Agent |1.3.6.1 |AP~2233_IF_match |<*>|AP~2233_IF_Invariant |<*>| |
1213_IF(Exp)|Generic~Agent |1.3.6.1 |NULL |<*>|AP~TELUS_KEY |<*>| |
; Indicates the end of the line. Required for every line of the formula, including comments.
Part of Formula
Purpose Syntax Requirements
150 IBM Tivoli Netcool Performance Manager: DataMart Configuration Guide

Chapter 7: Writing Custom Formulas
1213_IF
Dim I1 AS Integer Default * NAME If;
V1 = OIDVAL(ifType.%I1 format clean, once);
V2 = OIDVAL(sysLocation.0, once);
V3 = OIDVAL(ifSpeed.%I1, once);
V4 = OIDVAL(int(%V3/1000000), once);
V5 = OIDVAL(ifAdminStatus.%I1 format clean, once);
V6 = OIDVAL(ifDescr.%I1, once);
%V1 index "If<%I1>||IF %I1 (%V4Mbps)||type<%V1>location<%V2>physicalCapacity<%V3>status<%V5>||";
2233_IF
Dim I1 AS Integer Default * NAME If;
V1 = OIDVAL(ifType.%I1 format clean, once);
V2 = OIDVAL(sysLocation.0, once);
V3 = OIDVAL(ifSpeed.%I1, once);
V4 = OIDVAL(int(%V3/1000000), once);
V5 = OIDVAL(ifName.%I1 format clean, once);
V6 = OIDVAL(ifAdminStatus.%I1 format clean, once);
V7 = OIDVAL(ifAlias.%I1 format clean, once);
V8 = OIDVAL(ifDescr.%I1, once);
%V1 index "If<%I1>||IF: %I1 (%V5) (%V4Mbps)||type<%V1>location<%V2>physicalCapacity<%V3>name<%V5>status<%V6>||";
2233_HCOctets_Support
Dim I1 AS Integer Default * NAME If;
V1 = OIDVAL( ifIndex.%I1 );
V2 = OIDVAL( filter( ifHCInOctets.%I1 >0) );
V3 = OIDVAL( filter( ifInOctets.%I1 >0) );
V5 = OIDVAL( filter( ifHCOutOctets.%I1 > 0 ) );
V6 = OIDVAL( filter( ifOutOctets.%I1 > 0) );
%V2+%V5 index "If<%I1>||-UNSPECIFIED_LABEL||Octets<in64.out64>||";
%V2+%V6 index "If<%I1>||-UNSPECIFIED_LABEL||Octets<in64.out32>||";
%V3+%V5 index "If<%I1>||-UNSPECIFIED_LABEL||Octets<in32.out64>||";
%V3+%V6 index "If<%I1>||-UNSPECIFIED_LABEL||Octets<in32.out32>||";
%V2 index "If<%I1>||-UNSPECIFIED_LABEL||Octets<in64.out0>||";
%V3 index "If<%I1>||-UNSPECIFIED_LABEL||Octets<in32.out0>||";
%V5 index "If<%I1>||-UNSPECIFIED_LABEL||Octets<in0.out64>||";
%V6 index "If<%I1>||-UNSPECIFIED_LABEL||Octets<in0.out32>||";
IBM Tivoli Netcool Performance Manager: DataMart Configuration Guide 151

Chapter 7: Writing Custom Formulas
%V1 index "If<%I1>||-UNSPECIFIED_LABEL||Octets<in0.out0>||";
2233_HCPackets_Support
Dim I1 AS Integer Default * NAME If;
V1 = OIDVAL( ifSpeed.%I1 );
V2 = OIDVAL( filter (( ifHCInUcastPkts.%If + ifHCInMulticastPkts.%If + ifHCInBroadcastPkts.%If ) > 0) );
V3 = OIDVAL( filter (( ifInUcastPkts.%If+ ifOutUcastPkts.%If + ifInNUcastPkts.%If + ifOutNUcastPkts.%If ) > 0) );
%V2 index "If<%I1>||-UNSPECIFIED_LABEL||Packets<64>||";
%V3 index "If<%I1>||-UNSPECIFIED_LABEL||Packets<32>||";
%V1 index "If<%I1>||-UNSPECIFIED_LABEL||Packets<no>||";
1213_IF_Invariant
# provide ifDescr and ifType as default invariant
Dim I1 AS Integer Default * NAME If;
V1 = OIDVAL(ifType.%I1 format clean, once);
V2 = OIDVAL(ifDescr.%I1, once);
%V1 index "If<%I1>||-UNSPECIFIED_LABEL||||%V1-%V2";
2233_IF_Invariant
# provide invariant based on ifName, when non empty
Dim I1 AS Integer Default * NAME If;
V1 = OIDVAL( filter ( not (ifName.%I1 like "") ), once);
V2 = OIDVAL( ifName.%I1 , once);
%V1 index "If<%I1>||-UNSPECIFIED_LABEL||||*%V2";
<CustomerSpecific>_KEY
The following example shows the <CustomerSpecific> key titled OurCustomer.
Dim I1 AS IPAddress Default * NAME I1;
V01=OIDVAL( ipAdEntAddr.%I1 );
V02=OIDVAL( ipAdEntIfIndex.%I1 );
V09=OIDVAL(expand(V02, ifDescr.%V02) );
%V09 index "If<%V02>||-UNSPECIFIED_LABEL||OurCustomerKEY<%V09>HPKEY<%V09>IP@<%V01>||";
152 IBM Tivoli Netcool Performance Manager: DataMart Configuration Guide

Chapter 7: Writing Custom Formulas
Formula Error Messages
You might encounter one or more of the following error messages when editing and testing formulas.
Error Message Description
Initialization is not properly achieved.
Error in formula.
NO DATA Error in formula
- or -
The formula is fine; however, there is nothing to collect
- or -
The device does not respond as expected
- or -
The formula timed out. This can happen if the formula includes more than one delta function and is launched against a target with a large number of sub-elements. Try launching the formula against a more specific target.
Error while casting variable Incorrect input variable. “I” (letter I) must be capitalized, and must be followed by a number.
Object identifier was not found in any of the compiled MIBs
The MIB object used is invalid. Check that the name is correct. Names are case sensitive.
Use the MIB Browser to check that the MIB has been compiled in Tivoli Netcool Performance Manager. If necessary, use the MIB Compiler to compile the MIB in Tivoli Netcool Performance Manager.
See “Chapter 9, Managing MIBs” for information on how to use the MIB Browser and the MIB Compiler.
ClientServices open Unable to connect to server at localhost
Check that the collector is running.
See Chapter 3, Viewing Collector Information in the IBM Tivoli Netcool Performance Manager: DataMart Operation Guide for information about the collector.
Error Message Description
"DATA at" with the date & time, but next line is "End" with no data
Inappropriate target
- or -
Error in formula
IBM Tivoli Netcool Performance Manager: DataMart Configuration Guide 153

Chapter 7: Writing Custom Formulas
Understanding the inventory_subelements.txt File
The inventory_subelements.txt file contains the list of rules the Discovery uses. It is located in the conf directory under the PVM directory.
When you create new discovery formulas, you need to edit this file to create new rules. You must edit the file before the new Discovery formula can be used by the Inventory Tool. (You do not need to edit this file before a new collection formula can be used.)
Discovery formulas are used only against elements, not against subelements. During Discovery, the Inventory Tool uses the sysObjectID field in the inventory_subelements.txt file to determine the correct formula to use for each element it encounters. The file already includes generic formulas that match any sysObjectID, and numerous formulas for specific vendors and specific interfaces. The file only needs to be edited to add a new formula.
provides the fields of the inventory_ subelements.txt file, along with the entries within the file for the discovery formula for a Redback ethernet interface (used as an example on page 140).
Field Example Purpose
SubElementFamilyName Redback_SMS_Ethernet Determines how sub-elements are grouped in the Sub-element and Host Selector.
FamilyName Router~Redback
SysObjId 1.3.6.1.4.1.2352.1. The sysObjectID, or a part of the sysObjectID. For further information, see SysObjId on page 155.
FilterFormulaName NULL The path to the formula that is used to distinguish between different elements with the same sysObjectID. For further information, see FilterFormulaName on page 155.
Instance <*> The instances to which the formula should be applied. This should correspond to the input variables in the formula listed under FilterFormulaName.
If the formula contains more than one DIM declaration, there should be more than one Instance entry. If the formula only retrieves scalar objects, the instance can be empty.
SubElementFormulaName PVL~Redback~Ethernet The path to the discovery formula for this sub-element. The path is a location within the “Alias Instance and Label Inventory” directory, and is specified with tilde (~) as the path separator.
Instance <*> The instances to which the formula should be applied. This should correspond to the input variables in the filter listed under SubElementFormulaName.
If the formula contains more than one DIM declaration, there should be more than one Instance entry. If the formula only retrieves scalar objects, the instance can be empty.
154 IBM Tivoli Netcool Performance Manager: DataMart Configuration Guide

Chapter 7: Writing Custom Formulas
SysObjId
This field is the sysObjectID. The Inventory Tool checks to see if the sysObjectID of each element matches the sysObjectID listed here. If they match, it checks to see if there is an entry for FilterFormulaName. If the element matches both entries, the Inventory Tool runs the formula specified under SubElementFormulaName.
Only a partial match for the sysObjectID is required. There are generic formulas included with Tivoli Netcool Performance Manager DataMart that specify 1.3.6.1 as the sysObjectID. This is not an exact match for anything, but it is a partial match for everything. Since only a partial match for the sysObjectID is required, these generic formulas will be used against every element encountered by the Inventory Tool. Any vendor-specific formula will contain a more specific sysObjectID that will match only that vendor’s sysObjectID.
FilterFormulaName
This field specifies the path to the formula that is used to distinguish between different elements with the same sysObjectID.
The path is a location within the “Alias Instance and Label Inventory” directory, and is specified with tilde (~) as the path separator.
For the Redback example, there is no such formula, so the entry is “NULL.”
Devices such as the Cisco Catalyst 3000 and Catalyst 5000 would have an entry in this field. They both have the same sysObjectID; however they can have different sub-element types; therefore, they require different discovery formulas.
For example, the FilterFormulaName for the Cisco Catalyst 3000 is PVL~Cisco~Catalyst~C3000~Match. Its discovery formula is PVL~Cisco~Catalyst~C3000~Port_HalfDuplex_10Mb.
The FilterFormulaName for the Cisco Catalyst 5000 is PVL~Cisco~Catalyst~C5000~Match. Its discovery formula is PVL~Cisco~Catalyst~C5000~Port_HalfDuplex_10Mb.
If the Inventory Tool finds a match on the sysObjectID, it checks for a FilterFormulaName. If a formula is specified, the element must match both the sysObjectID and the FilterFormulaName before the inventory tool runs the formula under SubElementFormulaName.
SubElementFamilyName to Cancel
This field contains a list of any SubElementFamilyNames that should not be used with this sysObjectID.
For the Redback example, the SubElementFamilyNames to be ignored are: Generic_Lan_Ethernet10, Generic_Lan_Ethernet100, and Generic_Lan_Ethernet1000.
If you leave this blank, the same sub-element can appear under two different groups, the vendor specific group and a generic group. If you add information, the Inventory Tool ignores the cancelled formulas not only for this type of sub-element but for all sub-elements found on the element being processed.
SubElementFamilyName to cancel
Generic_Lan_Ethernet10;Generic_Lan_Ethernet100;Generic_Lan_Ethernet1000
A list of SubElementFamilyNames that should not be used with this sysObjectID. For more information, see SubElementFamilyName to Cancel on page 155.
IBM Tivoli Netcool Performance Manager: DataMart Configuration Guide 155

Chapter 7: Writing Custom Formulas
If you cancel a generic rule that can be applied to more than one type of interface, and the Inventory Tool finds a sub-element that does not match any of your device-specific rules but would have matched the cancelled generic rule, that sub-element will not be discovered.
For example, if Generic_Node is included in the SubElementFamilyName to cancel field for the Redback example, the Inventory Tool will only discover Redback ethernet interfaces. If the element contains other types of sub-elements, such as ATM, none of the other sub-elements will be discovered.
156 IBM Tivoli Netcool Performance Manager: DataMart Configuration Guide

Chapter 7: Writing Custom Formulas
NOTES
IBM Tivoli Netcool Performance Manager: DataMart Configuration Guide 157

Chapter 7: Writing Custom Formulas
158 IBM Tivoli Netcool Performance Manager: DataMart Configuration Guide

Chapter 8: Configuring Thresholds
This chapter explains how to configure thresholds, and is made up of the following topics:
Topic Page
Overview 160
Threshold Deployment 162
TRAP Generation Rules 167
Using the Threshold Definition Period Setting 167
Launching the Threshold Tool 168
Adding a Threshold 181
Configuring Burst or Period Thresholds 181
Configuring Baseline Thresholds 187
Trapping Threshold Violations 189
IBM Tivoli Netcool Performance Manager: DataMart Configuration Guide 159

Chapter 8: Configuring Thresholds
Overview
This chapter explains how to configure thresholds using the Resource Editor. Thresholds are values that are compared against metrics to determine if the metrics exceed or drop below a specific limit. Using thresholds as the measure against which data is evaluated lets you report on only those resources with pertinent data.
About Thresholds
A threshold is a value that is compared against metrics to determine if the metrics have violated a specific constraint. Using thresholds as the measure against which data is evaluated lets you report on only those resources with pertinent data.
Threshold report capabilities exist at both the resource and group levels. The CME uses these threshold values to determine threshold violations and to generate SNMP traps. The information is stored in the database and is used by Tivoli Netcool Performance Manager DataView for on-demand and scheduled reports.
Group thresholds are specified on a per formula basis within the Group Summary Table (GST) reporter parameters. The user specifies values for the critical or warning thresholds, the duration for which the threshold is in violation, the metrics and statistics for which the threshold values apply, which user profile can view the thresholds in the report, and the reporter to drilldown to if the threshold is violated.
Threshold Types
Tivoli Netcool Performance Manager provides the following types of thresholds to supply report viewers with the information they want. You configure most of these thresholds (group threshold is the exception) using either the Resource Editor GUI or the resmgr command.
• burst: ignores the natural network bursts by evaluating how long in a row the violations occurred per resource. Burst thresholds can be set and reset multiple times.
• period: involves the concept of accumulated duration for which the threshold is violated. This duration is accumulated per resource until the end of the SLA period. The threshold is violated as soon as a data spike’s accumulated duration by period exceeds a certain duration of time. Period thresholds, once violated are not reset until the end of the period.
• risk: a proactive threshold that detects resources that are at risk of violating a period threshold before the end of the SLA period.
• baseline: provides a view into resource behavior outside the normal range. It uses a profiled deviation function to compare the current daily behavior with the baseline as data flows throughout the system (in real-time.) What is normal is defined and what is not normal is flagged.
Unlike burst, there is not a single threshold level to consider when determining duration. The duration determination scheme considers varying threshold levels. And unlike burst, period, and risk thresholds, you do not statically define the baseline, it dynamically adapts to historical data.
User Profiles and Threshold Types
You need to decide what kind of threshold information your report viewer needs to see, if any. You then grant access privileges to the threshold information to report viewers based on their user profile.
For example, you might want report viewers with the NOC profile to have access to baseline threshold information to monitor the following:
160 IBM Tivoli Netcool Performance Manager: DataMart Configuration Guide

Chapter 8: Configuring Thresholds
• unusually high volumes at what is normally a “quiet” time (for example, night time) that might indicate a security issue
• unusually high volumes at “peak” time that could indicate a new application has been deployed across the network and network capacity needs resizing
• unusually low volume at “peak” time that could indicate a potential issue with a router’s forwarding mechanism, which continuously transmits data at a low level; impacting user perceived latency
The following matrix shows the threshold information each type of audience probably wants to see.
Basic Computation
The arrival of a metric record drives threshold computations. If a metric record does not arrive, no threshold computation occurs. Each incoming metric value is compared against a deployed threshold definition as part of the overall processing of the threshold record. All threshold statistics in the RA record are then updated appropriately.
Statistic used for Processing
Threshold definition specifies the actual statistic to be used in the comparison (for example, raw or sum.) As each metric value arrives, the statistic specified by this field is computed and this value is used for the subsequent threshold computations.
Exceeding a Threshold Level
Determining whether or not a threshold is violated involves determining whether or not the metric exceeds a specified level. The actual comparison order depends on the type of metric (Over, Under, or Band.)
For example, the metric is considered to have exceeded the threshold level when the following occurs:
• threshold Level is 10
• metric value is 15
• Over metric type
However, the metric would not be considered to have exceeded the threshold level if it was an Under. Determining whether the threshold is violated also involves the duration.
Interpolation
In order to determine how much time is spent ‘exceeding’ a level, the system ‘interpolates’ from the current value back to the previous one. If a previous value does not exist (at the very start of a metric stream) no interpolation is carried out, and a duration of zero is assumed.
Violation Type
Report Consumer Burst Period Risk Baseline User Profile for Reports
Service Provider’s NOC Yes Yes No Yes NOC
Customer No Yes No No SLA
Decision-maker No Yes Yes Yes PSLA
IBM Tivoli Netcool Performance Manager: DataMart Configuration Guide 161

Chapter 8: Configuring Thresholds
The following examples illustrates the linear interpolation process.
Threshold Deployment
This section explains the basics of threshold deployment. To understand threshold deployment, you need a basic knowledge of how thresholds are processed. Processing thresholds involves working with a metric, group and resource (m/g/r) combination. (This m/g/r combination directly maps to Resource Aggregations (RAs) m/g/r combination.)
Threshold deployment is the evaluation of thresholds to determine which threshold applies to which m/g/r combination. To make the determination, Tivoli Netcool Performance Manager examines each m/g/r combination and tries to find a matching threshold definition.
Each threshold definition contains three key fields (Metric, Group, Resource) that are used to determine deployment. The examination involves comparing the m/g/r combination key values with the threshold key values.
Note: Only one threshold definition can apply to a specific m/g/r combination.
Tivoli Netcool Performance Manager looks for matches in the order defined in the following table:
Priority indicates which configuration takes precedence when multiple threshold definitions are available for a single resource. Also, multiple group-specific thresholds can be specified for a single branch of the subelement hierarchy. In this case the definition closest to the resource (farthest from the root) takes precedence.
Configuration Metric Group Resource Priority
group- and subelement-specific Defined Defined Defined 1
subelement-specific Defined No Defined 2
group-specific Defined Defined No 3
global Defined No No 4
162 IBM Tivoli Netcool Performance Manager: DataMart Configuration Guide

Chapter 8: Configuring Thresholds
Examples
The following examples illustrate the different configurations. They use the groups, G0, G1, G2, G3 and G4 and the resources, R1, R2, R3.
The runtime context (identified by m/g/r combination) is shown below each resource. The specific metric, ‘m’ is considered, other metrics have their own runtime contexts.
Group- and Subelement-Specific Example
The threshold definition T1(m/G3/R0) means the key fields have values for metric, group and resource set to ‘m’, G3 and R0 respectively. Tivoli Netcool Performance Manager can match the m/G3/R0 combination with T1(m/G3/R0) – Group and Subelement specific.
The threshold definition T1 is the only one in the system and it does not match either of the other m/g/r/ combinations.
IBM Tivoli Netcool Performance Manager: DataMart Configuration Guide 163

Chapter 8: Configuring Thresholds
Group-Specific Example
A new threshold definition is defined, T2(m/G3/-.) This threshold differs from T1 because the resource is undefined. Tivoli Netcool Performance Manager cannot match the group- and subelement-specific or subelement-specific configurations, but can find a match for a group-specific configuration. The system determines that T2 is deployed against both m/G3/R0 and m/G3/R1.
164 IBM Tivoli Netcool Performance Manager: DataMart Configuration Guide

Chapter 8: Configuring Thresholds
Group- and Subelement-Specific Combined with Group- Specific
Thresholds T1(m, G3, R0) and T2(m, G3, -) are defined in the system. Both thresholds specify group G3; in addition T1 specifies the resource. The priority table is used to determine which threshold actually applies.
The system deploys T1 against the m/G3/R0 combination (based on the group- and subelement-specific rule which is examined first) and T2 against the m/G3/R1 combination (based on the group-specific rule.)
Now a third threshold T3(m, G1, -) is added.
Because T1 and T2 have higher precedence, the runtime deployment state remains the same.
IBM Tivoli Netcool Performance Manager: DataMart Configuration Guide 165

Chapter 8: Configuring Thresholds
The threshold T4(m, G0, -) is also added. Again, T1 and T2 are higher priority for the m/G3/R0 and m/G3/R1 groups respectively. The threshold deployments against those m/g/r groups remain the same. However, T4 does get deployed against m/G4/R2.
Resource in Two Groups Example
The following example shows R1 as a member of G3 and G4. A single threshold definition exists, T4 (m/G0/-.) Because R1 is a member of two groups, it belongs to two combinations, m/G3/R1 and m/G4/R1. Therefore, T4 is deployed against both these contexts.
166 IBM Tivoli Netcool Performance Manager: DataMart Configuration Guide

Chapter 8: Configuring Thresholds
TRAP Generation Rules
This section provides a brief overview of trap generation rules. If Tivoli Netcool Performance Manager has been configured to generate traps, trap generation input to a specific threshold occur when there is a change in the violation state.
• burst, period (and proactive) thresholds
Non-Violation <-> Warning Violation <-> Critical Violation
• baseline thresholds
Non-Violation <-> Violation
The traps generated reflect the nature of the state transition. For example, when the system goes from burst non-violation to burst Warning violation for a particular m/g/r-threshold; a ‘provisoCMEWarningViolationBurstThr’ (see proviso.mib) is generated.
The example illustrated in Resource in Two Groups Example on page 166 shows resource R1 as a member of two groups. A threshold is deployed against the m/g/r combinations that result from that group membership. Therefore, it is possible for multiple traps to be generated (one for each m/g/r combination) when a single metric value is processed.
Using the Threshold Definition Period Setting
This section provides a brief overview of the use of the period setting in the calculation of a period threshold. Threshold definitions have a period setting (different from a period threshold) that can have the following values:
• Day
• Week
• Month
• All (which means Day and Week and Month)
In each m/g/r combination, threshold statistics can be calculated for Days, Weeks and/or Months. The period setting determines which of these time periods the threshold statistics will be calculated for, when processing the type of threshold call a period threshold.
Note: Statistics in these m/g/r combinations map directly to Daily, Weekly and Monthly Aggregation records.
Processing Traps
When processing a m/g/r combination, it is possible that a period threshold can be violated for each of the configured periods. If that occurs, the system can send three traps, one corresponding to each of the configured periods (one trap for the Day, one for the Week and one for the Month.)
However, when processing burst thresholds, a similar violation would lead to a single trap.
IBM Tivoli Netcool Performance Manager: DataMart Configuration Guide 167
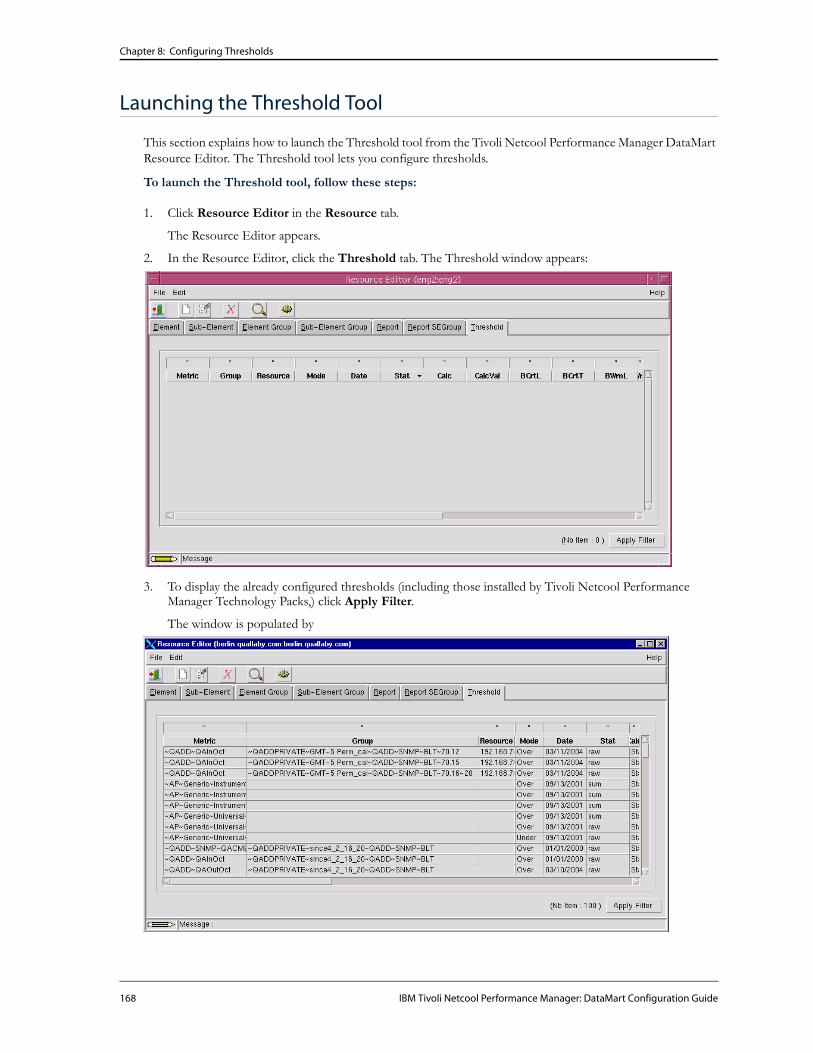
Chapter 8: Configuring Thresholds
Launching the Threshold Tool
This section explains how to launch the Threshold tool from the Tivoli Netcool Performance Manager DataMart Resource Editor. The Threshold tool lets you configure thresholds.
To launch the Threshold tool, follow these steps:
1. Click Resource Editor in the Resource tab.
The Resource Editor appears.
2. In the Resource Editor, click the Threshold tab. The Threshold window appears:
3. To display the already configured thresholds (including those installed by Tivoli Netcool Performance Manager Technology Packs,) click Apply Filter.
The window is populated by
168 IBM Tivoli Netcool Performance Manager: DataMart Configuration Guide

Chapter 8: Configuring Thresholds
4. You can filter the listings by entering a filter value and clicking Apply Filter. The following table lists the possible columns that can appear in the window:
Column Description
Metric Name of the metric
Group Name of the subelement group
Resource Name of the resource
Mode Threshold mode
Date Date and time the action takes effect. Actions cannot be applied to the past and take effect on the hour.
Stat Statistic the CME uses to calculate threshold information:
• raw (default)
• min
• max
• avg
• sum
• count
Calc Calculation used to determine the value of the following:
• standard
• normalized
• scale
CalcVal Value used for calculating the percentage over or under the threshold.
BCrtL Level of the critical threshold for burst thresholds. Zero implies the threshold is not defined. The metric must be greater than this level to trigger a violation.
BCrtT Time limit for the burst critical threshold.
BWrnL Level of the warning threshold for burst thresholds. Zero implies the threshold is not defined.
BwrnT Duration of the burst critical threshold in seconds.
BEvent Indicates whether Tivoli Netcool Performance Manager generates SNMP traps for the burst threshold.
PCrtL Level of the period critical threshold for period thresholds. Zero implies the threshold is not defined.
PCrtT Duration the period critical period threshold in seconds.
PWrnL Level of the warning threshold for period thresholds. Zero implies the threshold is not defined.
PWrnT Duration of the warning period threshold in seconds. Zero (0) indicates an immediate threshold violation.
IBM Tivoli Netcool Performance Manager: DataMart Configuration Guide 169

Chapter 8: Configuring Thresholds
PEvent Indicates whether Tivoli Netcool Performance Manager generates SNMP traps for the period threshold.
PDef Defines the period for period and burst thresholds:
• all
• day
• week
• month
If the period is day, week, or month, the GST and RST reports for the other periods do not show a violation. If the field is set to all, violations are reported for all periods.
MaxNbDay Number of days used as the maximum value for the computation of the upper control limit. The upper control limit is the top of what is considered the normal range and is used for the baseline threshold.
minNbDay Number of days used as the minimum value for the computation of the lower control limit. The lower control limit is the bottom of what is considered the normal range and is used for the baseline threshold
blCalcMode Mode used in calculation of baseline data:
• 0 = previous days,
• 1= previous same day of the week
blMode Baseline mode
• 1 = under
• 2 = over
• 3 = band
blTime Duration of baseline violation.
blTrap Indicates whether the baseline threshold generates a trap.
• 0 = no
• 1 = yes
blUpper Number of standard deviations used as the maximum value for the computation of the upper control limit. The upper control limit is the top of what is considered the normal range.
blLower Number of standard deviations used as the maximum value for the computation of the lower control limit. The lower control limit is the bottom of what is considered the normal range.
Column Description
170 IBM Tivoli Netcool Performance Manager: DataMart Configuration Guide

Chapter 8: Configuring Thresholds
Adding a Threshold
This section explains how to add the following types of thresholds using the Add Threshold window:
• burst (static threshold because you set the value)
• period (static threshold because you set the value)
• baseline
To add a new threshold, follow these steps:
1. With the Threshold tab displayed in the Resource Editor, choose Add from the Edit menu.
The Add Threshold window appears.
IBM Tivoli Netcool Performance Manager: DataMart Configuration Guide 171

Chapter 8: Configuring Thresholds
Choosing Metrics
You need to choose the metric to which you want to apply the threshold. Use this for all three types of thresholds.
To choose metrics, follow these steps:
1. Click Browse to access the Formula Selector appears:
172 IBM Tivoli Netcool Performance Manager: DataMart Configuration Guide

Chapter 8: Configuring Thresholds
2. Navigate to the metric (formula) you want to by expanding the folders in the left pane and clicking the folder name to display metrics (formulas) in the right pane. For example:
IBM Tivoli Netcool Performance Manager: DataMart Configuration Guide 173

Chapter 8: Configuring Thresholds
3. Click the formula name to highlight it and while holding down the left mouse button, drag the formula name to the metric text box. For example:
Hold down left mouse buttonto drag and drop formula name here.
174 IBM Tivoli Netcool Performance Manager: DataMart Configuration Guide

Chapter 8: Configuring Thresholds
The formula name, along with the entire path, appears. For example:
See Using the Formula Selector on page 137 for additional information about the Formula Selector.
Applying Thresholds to a Group of Subelements
You can choose to apply the threshold to a group of resources at different granularity levels. You can apply the threshold to the top group in the grouping tree, to any of the leaves or sub-leaves. Or, you can choose not to apply the threshold to any group, by leaving the text box blank because you want to apply the threshold to any subelement containing the metric you have chosen or to just a specific subelement by adding its name to the subelement text box.
If you are applying a group- and subelement-specific threshold, you need to identify the leaf-level group that contains the resource and apply the threshold to that group.
To choose the group using the Resource Editor:
1. Put the focus on the Resource Editor window, while leaving the Add Threshold window open.
2. In the Resource Editor, click the Sub-Element Group tab.
IBM Tivoli Netcool Performance Manager: DataMart Configuration Guide 175

Chapter 8: Configuring Thresholds
3. Click the + sign next to SUB-ELEMENTS in the left pane to expand it. The list of all subelement groups appears in the left pane. For example:
4. Navigate to the formula group you want to choose. For example, navigate to the High Speed Interfaces (>=100 Mbps) group under the All Technologies group.
176 IBM Tivoli Netcool Performance Manager: DataMart Configuration Guide

Chapter 8: Configuring Thresholds
5. Highlight the group name and hold down the left mouse button while dragging the group name to the Group textbox in the Add Threshold window. For example:
Hold down left mouse buttonto drag and drop subelementgroup name here.
From here you can add a specific subelement name from the group or you can leave the Sub-Element text box blank to apply the threshold to all subelements belonging to the group, that contain the specified metric.
IBM Tivoli Netcool Performance Manager: DataMart Configuration Guide 177

Chapter 8: Configuring Thresholds
Specifying Subelements
You can specify the subelement to which you want to apply a threshold. If you do not specify a group for that subelement, the threshold is applied to that subelement, in each group to which it belongs.
To choose a subelement using the Resource Editor:
1. Put the focus on the Resource Editor window, while leaving the Add Threshold window open.
2. In the Resource Editor, click the Sub-Element Group tab.
3. Click the + sign next to SUB-ELEMENTS in the left pane to expand it. The list of all subelement groups appears in the left pane.
4. Navigate to the subelement that you want to apply the threshold. For example, navigate to the list of subelements belonging to the sub-leaf group called ethernetCsmacd.
5. Click the sub-leaf group’s name to display the list of subelements in the right pane. For example:
6. Click the subelement name in the right pane to highlight it.
178 IBM Tivoli Netcool Performance Manager: DataMart Configuration Guide

Chapter 8: Configuring Thresholds
7. Holding down the right mouse button, drag the subelement name to the Sub-Element textbox in the Add Threshold window. For example:
Hold down right mouse buttonto drag and drop subelement here.
8. Release the right mouse button. The subelement name appears in the textbox. For example:
9. Click Apply to finalize your choices. The following message appears:
IBM Tivoli Netcool Performance Manager: DataMart Configuration Guide 179

Chapter 8: Configuring Thresholds
10. Click Close to clear the message or click Details to open the Details section of the message box. For example:
From here you can configure the static and baseline thresholds.
180 IBM Tivoli Netcool Performance Manager: DataMart Configuration Guide

Chapter 8: Configuring Thresholds
Configuring Burst or Period Thresholds
This section explains how to configure burst and period thresholds. These thresholds are considered static thresholds because you set the value for them using the configuration dialog box. You also define how you want the threshold to act.
Configuring Thresholds
To configure a burst or period threshold, follow these steps:
1. From the Add Threshold Window, click Static Threshold. The following window appears:
IBM Tivoli Netcool Performance Manager: DataMart Configuration Guide 181

Chapter 8: Configuring Thresholds
Configuring Mode
You need to configure the mode you want to apply to your burst and/or period threshold.
To configure the mode, follow these steps:
1. Configure the mode you want to apply to the static threshold (burst or period.) The following table lists the configuration options:
• Band: detect violations when they go outside a range (or band) between two threshold values
• Over: detect violations when they exceed threshold values
• Under: detect violations when they fall short of threshold values
• Standard
• Normalized
• Scaled
2. Click Apply.
Option Definition Values
Effective date Currently not used by Tivoli Netcool Performance Manager.
Threshold is effective immediately after creation or update.
Do not edit this value.
Mode Mode of the threshold Click the down arrow to access the list of values:
Statistic mode Indicate which statistic you want used to calculate threshold information.
Click the down arrow to access the list of statistics.
Calculation mode
Calculation method to use to determine the maximum percentage over burst and period threshold values
Click the down arrow to access the list of the three different ways of calculating this value.
Calculation value Activated when you select Scaled for the Calculation mode. Value used for calculating the percentage over or under the threshold.
Enter the number you want to use for the calculation.
182 IBM Tivoli Netcool Performance Manager: DataMart Configuration Guide

Chapter 8: Configuring Thresholds
Configuring Maximum Percent Over for Burst and Period Thresholds
When configuring the burst and period thresholds, you need to enter a value that represents the maximum percent over a threshold level. This section provides a brief overview of the maximum percent over calculation.
For both burst and period thresholds, the values of the maximum percent over fields (DBL_BRST_MAX_PCT_OVER and DBL_PRD_MAX_PCT_OVER) use the following algorithm:
MAX_PCT_OVER = 0
For each metric, mi,
If | mi – Lw | / Lw > MAX_PCT_OVER then
MAX_PCT_OVER = | mi – Lw | / Lw
If | mi – Lc | / Lc > MAX_PCT_OVER then
MAX_PCT_OVER = |mi – Lc|/ Lc
The algorithm differs from simply taking the maximum value of a metric and dividing it by the most severe threshold violation. Depending on the relative values of metrics and threshold levels, it is possible that the maximum percent over will be obtained from a metric that is not the largest metric value.
Configuring Burst Values
To configure burst values, follow these steps:
1. In Static Threshold, click the Burst tab. The following dialog box appears:
IBM Tivoli Netcool Performance Manager: DataMart Configuration Guide 183

Chapter 8: Configuring Thresholds
2. Click Enabled Threshold to activate the configuration options.
Note: You can disable a threshold but retain the configuration values by clearing the Enabled Threshold box and clicking Apply. The threshold is disabled immediately for all Tivoli Netcool Performance Manager modules except the CME. For the CME, the action takes effect with the hourly reload. If you want to reuse this threshold with the same values, you click Enabled Threshold, check the values, and click Apply.
3. Enter the values you want for the burst threshold. The following table lists the configuration options:
4. Click Apply.
Option Definition Values
Warning Level Level of the warning threshold. The metric value must be greater than this value to trigger a threshold violation.
Enter a double-precision floating point number with up to six digits to the right of the decimal point.
Critical Level Level of the critical threshold. The metric value must be greater than this value to trigger a threshold violation.
Enter a double-precision floating point number with up to six digits to the right of the decimal point.
Event generation
Indicates whether Tivoli Netcool Performance Manager should generate an event when threshold violation occurs at warning and/or critical levels (if you have entered a value in the Warning Level and Critical Level fields.)
Click the down arrow to display the values. Choose yes if you want to generate an event when a threshold violation occurs.
Warning time Maximum duration for exceeding Warning threshold level. Refer to Configuring Maximum Percent Over for Burst and Period Thresholds on page 183.
Enter the number of seconds as an integer.
Critical time Maximum duration for exceeding Critical threshold level. Refer to Configuring Maximum Percent Over for Burst and Period Thresholds on page 183.
Enter the number of seconds as an integer.
184 IBM Tivoli Netcool Performance Manager: DataMart Configuration Guide

Chapter 8: Configuring Thresholds
Configuring Period Values
To configure period values, follow these steps:
1. In Static Threshold, click the Period tab. The following dialog box appears:
2. Click Enabled Threshold to activate the configuration options.
Note: You can disable a threshold but retain the configuration values by clearing the Enabled Threshold box and clicking Apply. The threshold is disabled immediately for all Tivoli Netcool Performance Manager modules except the CME. For the CME, the action takes effect with the hourly reload. If you want to reuse this threshold with the same values, you click Enabled Threshold, check the values, and click Apply.
3. Enter the values you want for the period threshold. The following table lists the configuration options:
Option Definition Values
Warning Level Level of the warning threshold. The metric value must be greater than this value to trigger a threshold violation.
Enter a double-precision floating point number with up to six digits to the right of the decimal point.
IBM Tivoli Netcool Performance Manager: DataMart Configuration Guide 185

Chapter 8: Configuring Thresholds
4. Click Apply.
Critical Level Level of the warning threshold. The metric value must be greater than this value to trigger a threshold violation.
Enter a double-precision floating point number with up to six digits to the right of the decimal point.
Event generation
Indicates whether Tivoli Netcool Performance Manager should generate an event when threshold violation occurs at warning and/or critical levels (if you have entered a value in the Warning Level and Critical Level fields.)
Click the down arrow to display the values. Choose yes if you want to generate an event when a threshold violation occurs.
Warning time Maximum duration for exceeding Warning threshold level. Refer to Configuring Maximum Percent Over for Burst and Period Thresholds on page 183.
Enter the number of seconds as an integer.
Critical time Maximum duration for exceeding Critical threshold level. Refer to Configuring Maximum Percent Over for Burst and Period Thresholds on page 183.
Enter the number of seconds as an integer.
Period Definition
Defines the period for which you want threshold violations reported.
Click the down arrow to display the values. Choose the period for which you want threshold violations reported. If you choose All, violations for all periods are reported.
186 IBM Tivoli Netcool Performance Manager: DataMart Configuration Guide

Chapter 8: Configuring Thresholds
Configuring Baseline Thresholds
This section explains how to configure baseline thresholds. Unlike burst and period thresholds, you do not statically define the baseline, it dynamically adapts to historical data.
To configure a baseline threshold, follow these steps:
1. From the Add Threshold Window, click Baseline Threshold. The following window appears:
2. Click Enabled Threshold to activate the configuration options.
Note: You can disable a threshold but retain the configuration values by clearing the Enabled Threshold box and clicking Apply. The threshold is disabled immediately for all Tivoli Netcool Performance Manager modules except the CME. For the CME, the action takes effect with the hourly reload. If you want to reuse this threshold with the same values, you click Enabled Threshold, check the values, and click Apply.
IBM Tivoli Netcool Performance Manager: DataMart Configuration Guide 187

Chapter 8: Configuring Thresholds
3. Enter the values you want for the baseline. The following table lists the configuration options:
• PreviousDays: include the previous N days from the specified reporting period in the calculation. For example:
• PrevSameDay: include the N previous same days of the week from the specified reporting period in the calculation. For example:
Option Definition Values
Max # of days Maximum number of days you want to consider for the baseline. This value must be higher than the value you enter for the minimum number of days.
Enter an integer of up to three digits to indicate the maximum number of days.
Min # of days Minimum number of days of data required before the baseline will be calculated. This value must be less than or equal to the Maximum number of days.
Enter an integer of up to three digits to indicate the minimum number of days.
Calculation Indicate which calculation mode you want to use for the baseline.
Click the down arrow to display the values:
If you specify ten days for the reporting period of August 29; the PreviousDays calculation includes the ten previous days:August 19, 20, 21, 22, 23, 24, 25, 26, 27, and 28
If you specify ten days for the reporting period of Friday, August 29; the PrevSameDay calculation includes the same day from the ten previous weeks:Friday June 20, Friday June 27, Friday July 4, Friday, July 11, Friday July 18, Friday July 25, Friday August 1, Friday August 8, Friday August 15, and Friday August 22.
188 IBM Tivoli Netcool Performance Manager: DataMart Configuration Guide

Chapter 8: Configuring Thresholds
4. Enter the values you want for the threshold. The following table lists the configuration options:
• Band: detect violations when they go outside a range (or band) between two threshold values
• Over: detect violations when they exceed threshold values
• Under: detect violations when they fall short of threshold values
5. Click Apply.
Trapping Threshold Violations
The following sections explain how to enable Tivoli Netcool Performance Manager to do the following:
• Trap threshold violations to a log file.
• Trap threshold violations and send them to a specified host or hosts.
Trapping Threshold Violations to the Log File
Once you have configured thresholds, you can enable the trapping of threshold violations to the main log file, proviso.log.
To enable the trapping of threshold violations to the log file, follow these steps:
1. Open an existing Tivoli Netcool Performance Manager topology.
2. Go to the Logical View.
3. Browse to the Complex Metric Engine (CME) folder on the left pane as follows:
Option Definition Values
Sensitivity (upper) Number of standard deviations added to the mean to determine upper threshold level.
Enter an integer with maximum of four digits, with a maximum of two digits to the right of the decimal point.
Sensitivity (lower) Number of standard deviations added to the mean to determine lower threshold level.
Enter an integer with maximum of four digits, with a maximum of two digits to the right of the decimal point.
Permitted time outside baseline
Baseline equivalent of duration for burst thresholds. Refer to
Enter the time limit in minutes, hours, or days. You can use a combination of units such as 1 hour 25 minutes.
Event generation Indicates whether Tivoli Netcool Performance Manager should generate an event when threshold violation occurs.
Click the down arrow to display the values. Choose yes if you want to generate an event when a threshold violation occurs.
Mode Mode of the baseline threshold. Click the down arrow to access the list of values:
IBM Tivoli Netcool Performance Manager: DataMart Configuration Guide 189

Chapter 8: Configuring Thresholds
Netcool/Proviso Topology-> DataChannels -> DataChannel 1 -> Collector 1.1 -> Complex Metric Engine 1.1
4. Go to the Properties tab on the right pane and select the LOG_TRAPS property.
5. Set the value to true (default is false) by selecting the checkbox. This enables the trapping of threshold violations to the log file.
6. Repeat step 2 to 4 for each threshold violations trapping you wish to enable for the DataChannels.
7. Save the topology.
The following is an example of a threshold violation recorded in the proviso.log log file:2005.03.18-13.01.56 UTC CME.2.2-13969 I THRSHEVENT trap log : ProvisoViolationAutoThr 192.168.1.7 200002143::192.168.1.7-2::192.168.1.7-2_If<1001>::192.168.1.7-2_IF: 1001 "340 Mbps" "RMON: VLAN 1"::undef::IETF_IF::AP~Generic~Universal~Throughput~Outbound Throughput (bps)::221002.71518859d::319555.38468416d::1111132812::300::410::::3::15::undef::"3Com"::undef::undef::undef::undef::undef::200004068::2209
Sending Trapped Threshold Violations To Specified Hosts
Once you have configured thresholds, you can configure Tivoli Netcool Performance Manager to send trapped threshold violations to specified hosts, as follows:
• Send trapped threshold violations to up to five hosts at a specified port.
• Include in the trap header the IP address of the element where the violation occurred.
SNMP traps are easily managed and decoded by almost any fault management system. Netcool/Omnibus and Webtop, for example, allow a Webtop user to right-click on an alarm generated by Tivoli Netcool Performance Manager, launching the relevant Tivoli Netcool Performance Manager report.
For more information on integrating Tivoli Netcool Performance Manager with OMNIbus and Webtop, see the IBM Tivoli Netcool Performance Manager: OMNIbus Web GUI/Webtop Integration.
To configure the sending of trapped threshold violations to specified hosts, follow these steps:
1. Open an existing Tivoli Netcool Performance Manager topology.
2. Go to the Logical View.
190 IBM Tivoli Netcool Performance Manager: DataMart Configuration Guide

Chapter 8: Configuring Thresholds
3. Browse to the Complex Metric Engine (CME) folder on the left pane as follows:
Netcool/Proviso Topology -> DataChannels -> DataChannel 1 -> Collector 1.1 -> Complex Metric Engine 1.1
4. Go to the Properties tab on the right pane and select the TRAP_DESTINATION property.
5. Specify the hostname and port number combinations to receive trapped threshold violations. For example,
— localhost:162, or
— 1.1.1.1:162.
6. Select the corresponding TRAP_IPADDRESS_FROM_ELEMENT property.
7. The default value is set to true. This is to include in the trap header the IP address of the element where the threshold violation originated. If this parameter is set to false, the IP address of the CME system that sent the trap is included in the trap header.
8. Save the topology.
IBM Tivoli Netcool Performance Manager: DataMart Configuration Guide 191

Chapter 8: Configuring Thresholds
NOTES
192 IBM Tivoli Netcool Performance Manager: DataMart Configuration Guide

Chapter 9: Managing MIBs
This chapter explains how to use the MIB compiler to compile MIBs and how to use the MIB browser to view MIB files and verify object values. This chapter is made up of the following topics:
Overview
.A MIB file consists of object definitions that manage TCP/IP-based networks. The variables in a MIB are organized in groups, such as System, Interface, or TCP.
MIB Groups
A MIB file contains object definitions, which are typically organized into the following groups:
• System Group (1)
• Interface Group (2)
• AT Group (3)
• IP Group (4)
• ICMP Group (5)
• TCP Group (6)
• UDP Group (7)
• EGP Group (8)
• CMOT Group (9)
• Transmission Group (10)
• SNMP Group (11)
Topic Page
Overview 193
Compiling a MIB 194
Viewing Compiled MIB Files 202
IBM Tivoli Netcool Performance Manager: DataMart Configuration Guide 193

Chapter 9: Managing MIBs
Compiling a MIB
Tivoli Netcool Performance Manager DataMart includes pre-compiled MIB files. You can include additional MIB files by importing them and compiling them into the required Tivoli Netcool Performance Manager DataMart format.
Compiling a MIB makes Tivoli Netcool Performance Manager aware of the MIB object identifiers and their values. The compile process occurs in three phases, all of which are transparent to the user:
• Phase one creates an intermediary frozen MIB format.
• Phase two creates the OID format required by Tivoli Netcool Performance Manager DataMart.
• Phase three compiles the MIB, as well as all dependant MIBs.
Important: A MIB is compiled only when both the frozen and OID formats exist.
The results of the compilation are stored in the $PVMHOME/mibs directory in the following sub-directories:
• frozen
• oid
• src
To compile a MIB, follow these steps:
1. On the server where DataMart is installed, enter the following command to bring up the DataMart application:
$PVMHONE/bin/pvm &
The DataMart application appears, as shown in the following figure:
Figure 3: DataMart Application
2. Click Metric->Mib Compiler, as highlighted in Figure 3. The MIB Compiler appears, as shown in the following figure:
194 IBM Tivoli Netcool Performance Manager: DataMart Configuration Guide

Chapter 9: Managing MIBs
Figure 4: MIB Compiler.
3. In the display pane, highlighted in Figure 4, click the MIB directory to select an entire tree or branch, or drill-down to a specific MIB or MIBs that you want to compile.
4. (Optional) If the MIB you want to compile is not in the list displayed in the MIB Compiler, you can copy it to the appropriate directory by selecting Import File... from the File menu.
The MIB Compiler: Import dialog box appears, as shown in the following figure:.
4-a. Navigate to where the MIB file is located.
4-b. Highlight the MIB filename to select it and click Open. The file format for a MIB is typically .mib, .asn, or .txt.
If you want to compile more that one MIB file, do the following:
IBM Tivoli Netcool Performance Manager: DataMart Configuration Guide 195

Chapter 9: Managing MIBs
* Select a directory name to compile all MIB files in the directory
* Select several consecutive MIB files by clicking the filename for the first MIB file, then clicking the additional names while holding down the Shift key
* Select several non-consecutive MIB files by clicking each name while holding down the Ctrl key
A message like the following appears indicating the destination for the copied file.
4-c. Click Yes to continue the import process. The file is copied to the specified directory and the imported MIB appears in the tree view of MIB files in the left display pane of the MIB Compiler.
5. To begin the compilation, click the Compile button, highlighted in the following figure:
A progress indicator displays the status of the compilation and a messages appear in the Traces pane, as shown, highlighted, in the following figure:
196 IBM Tivoli Netcool Performance Manager: DataMart Configuration Guide

Chapter 9: Managing MIBs
.
Compiled MIB filesare listed in blue
Non-compiled MIBfiles are listed in red
Note: The Traces pane displays compilation warning messages in blue and error messages in red.
Printing or Saving Trace Information
You can print the compile trace information or save it to a file.
To print or save the trace information, follow these steps:
1. Right-click the mouse in the Traces area to access a pop-up menu with the following options.
— Reset - clears the Trace area
— Save - lets you print the trace information or save it to a file.
IBM Tivoli Netcool Performance Manager: DataMart Configuration Guide 197

Chapter 9: Managing MIBs
2. Choose Save and the following appears.
Printing Trace Information
To print trace information, follow these steps:
1. Select a printer from the drop down list.
2. Edit the print command if you want to print in a specific format.
3. Increase or decrease number of copies by clicking the up and down arrows.
4. Click OK to print.
Saving Trace Information
To save trace information, follow these steps:
1. Click the To file: option.
2. Enter the path to where you want to store the file or click Browse.
3. Click OK to save the information.
Deleting a MIB
If for whatever reason you decide to delete a MIB, you can do so by following these steps:
1. Log on as pvuser to the system where DataMart is installed.
2. Change your working directory to $PVMHOME/datamart/mibs.
3. Using the rm command, delete whatever MIB files you no longer want from the DataMart server filesystem.
Note: In some cases the MIB file may be located in the src sub-directory.
4. In order to permanently remove the MIB files, you must also delete them from the database by resyncing the database with the files on disk.
To resync the database with the MIB files on disk, enter the following command:
$PVMHOME/bin/dbRep checkin mibs -r $PVMHOME/mibs -m "*” –dodelete t
For example, if you removed the MIB agent-mib.mib from the $PVMHOME/datamart/mibs/src directory and then ran the $PVMHOME/bin/dbRep command, you would see output like the following:
198 IBM Tivoli Netcool Performance Manager: DataMart Configuration Guide

Chapter 9: Managing MIBs
[[email protected]:/opt/datamart/mibs/src] rm agent-mib.mib
[[email protected]:/opt/datamart/mibs/src] dbRep checkin mibs -r $PVMHOME/mibs -m "*" -dodelete t
load cached catalog '.catalog' for '/opt/datamart/mibs/' ... ok [catalog has 2713 entrie(s)].
update catalog from disk '/opt/datamart/mibs/' ... ok, [catalog has 2712 entrie(s)].
deleting 'src/agent-mib.mib' in database ... ok.
save cached catalog '.catalog' for '/opt/datamart/mibs/' ... ok.
[[email protected]:/opt/datamart/mibs/src]
IBM Tivoli Netcool Performance Manager: DataMart Configuration Guide 199

Chapter 9: Managing MIBs
Viewing MIB File Source
You can view the MIB file source
To view MIB file source, follow these steps:
1. Click the MIB filename in the navigation and selection pane.
2. Choose View from the MIB menu to display the source. The contents of a sample MIB file appear below.
3. You can locate specific information by entering text in the Find text box and clicking Forward or Backward to search through the file.
4. Click Close to exit.
200 IBM Tivoli Netcool Performance Manager: DataMart Configuration Guide
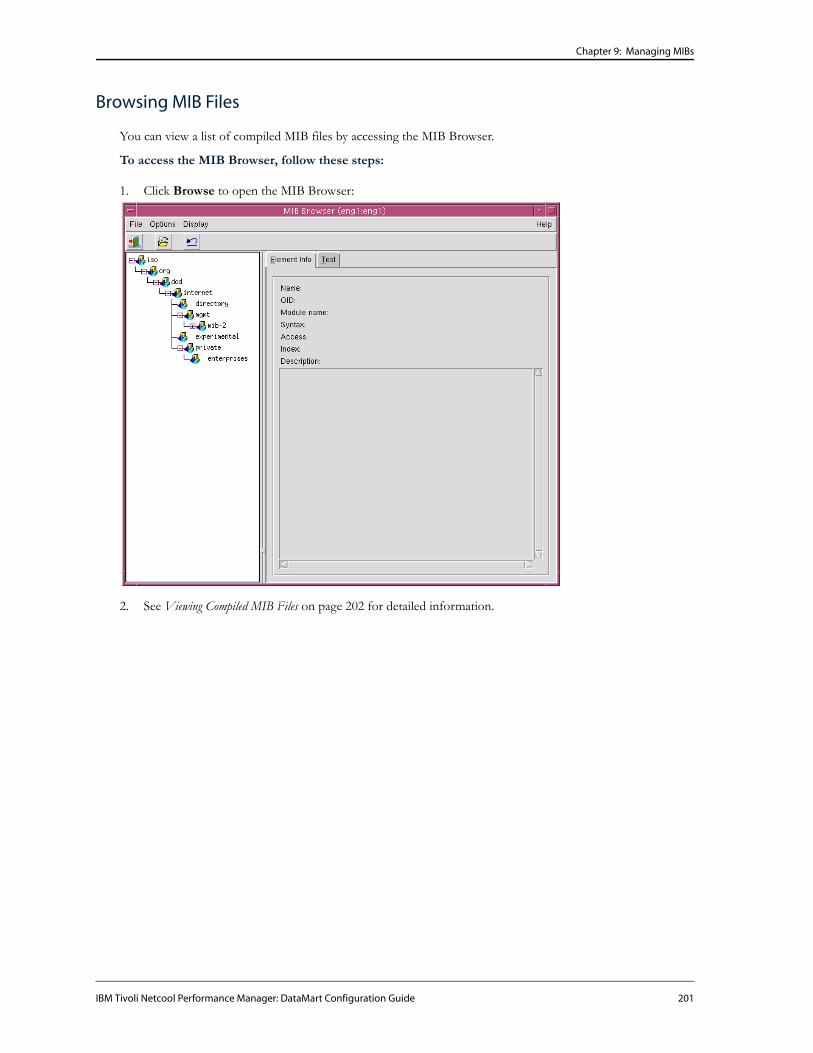
Chapter 9: Managing MIBs
Browsing MIB Files
You can view a list of compiled MIB files by accessing the MIB Browser.
To access the MIB Browser, follow these steps:
1. Click Browse to open the MIB Browser:
2. See Viewing Compiled MIB Files on page 202 for detailed information.
IBM Tivoli Netcool Performance Manager: DataMart Configuration Guide 201

Chapter 9: Managing MIBs
Viewing Compiled MIB Files
The MIB Browser lets you view a list of compiled MIB files in either tree format or in group/table format. You can then choose files from the list to review element information or to verify object values.
To view compiled MIB files, follow these steps:
1. Choose MIB Browser in the Metric tab. The MIB Browser dialog box appears listing compiled MIB files in tree format
.
Navigation andselection zone
202 IBM Tivoli Netcool Performance Manager: DataMart Configuration Guide

Chapter 9: Managing MIBs
2. Select the Group/Table item from the Options menu to change the display. In this format, all MIB files link directly to the iso root and are separated into either objects contained in groups or objects contained in tables.
IBM Tivoli Netcool Performance Manager: DataMart Configuration Guide 203

Chapter 9: Managing MIBs
Finding MIB Files
You can quickly locate a specific MIB object in the navigation and selection pane.
To find an item, follow these steps:
1. Place cursor in navigation and selection pane.
2. Right-click mouse button. The following pop-up menu appears.
3. Enter the object name of the item you want to find and click OK.
4. If the search finds more than one item, the following dialog box appears.
5. Click the line containing item you want and click OK.
The cursor moves to that item in the tree and the Find Choices dialog box closes.
204 IBM Tivoli Netcool Performance Manager: DataMart Configuration Guide

Chapter 9: Managing MIBs
Loading MIB Files
You can temporarily load MIB files into the MIB Browser to review element information or to verify object values.
To load MIB files, follow these steps:
1. Select Load from the File menu. The MIB Selector dialog box appears.
2. Click a folder to display subfolders.
3. Click a subfolder to display a list of MIB files.
4. Click the name to select the MIB file and click OK.
The selected MIB file, and all its dependencies, appears in the navigation and selection pane. When you exit the MIB Browser, the MIB file is removed from the display.
Viewing Element Information
You can view specific element information about the MIB file.
To view element information, follow these steps:
1. Click the name of the MIB file you want to select.
IBM Tivoli Netcool Performance Manager: DataMart Configuration Guide 205

Chapter 9: Managing MIBs
2. Click the Element Info tab in the MIB Browser dialog box. The information for the selected object appears in the Element Info tab. For example.
• Name is the textual identifier of the object.
• OID is the numeric identifier in dot-notation format.
• Module name are the names of the modules that define the selected MIB node. A MIB can include other MIBs, either directly or indirectly.
• Syntax identifies the abstract data structure corresponding to the object type, using ASN.1 constructs.
• Access is one of the following:
– Read-only
– Read-Write
– Write-only
– non-accessible
• Index is a list of MIB names that are used as a key in a conceptual table. No names appear if the MIB node does not correspond to a MIB table.
• Description is a textual description of the meaning of the object type.
206 IBM Tivoli Netcool Performance Manager: DataMart Configuration Guide
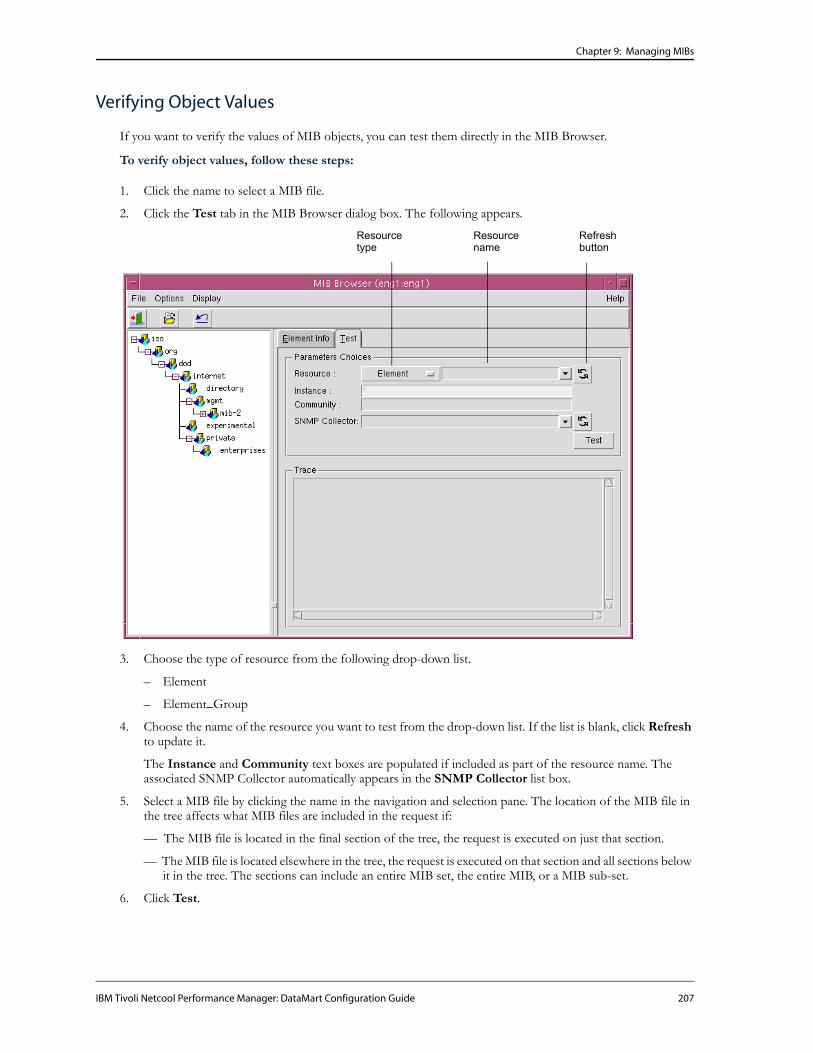
Chapter 9: Managing MIBs
Verifying Object Values
If you want to verify the values of MIB objects, you can test them directly in the MIB Browser.
To verify object values, follow these steps:
1. Click the name to select a MIB file.
2. Click the Test tab in the MIB Browser dialog box. The following appears.
Resourcetype
Resourcename
Refreshbutton
3. Choose the type of resource from the following drop-down list.
– Element
– Element_Group
4. Choose the name of the resource you want to test from the drop-down list. If the list is blank, click Refresh to update it.
The Instance and Community text boxes are populated if included as part of the resource name. The associated SNMP Collector automatically appears in the SNMP Collector list box.
5. Select a MIB file by clicking the name in the navigation and selection pane. The location of the MIB file in the tree affects what MIB files are included in the request if:
— The MIB file is located in the final section of the tree, the request is executed on just that section.
— The MIB file is located elsewhere in the tree, the request is executed on that section and all sections below it in the tree. The sections can include an entire MIB set, the entire MIB, or a MIB sub-set.
6. Click Test.
IBM Tivoli Netcool Performance Manager: DataMart Configuration Guide 207

Chapter 9: Managing MIBs
The Trace area displays the results of the test request. For example:
The results include:
— Request parameters
— MIB files selected
— Results of request
7. Right-click the mouse in the Trace area to access a pop-up menu with the following options:
— Reset - clears the Trace area
— Save - lets you print the trace information or save it to a file.
8. Choose Save and the following dialog box appears.
208 IBM Tivoli Netcool Performance Manager: DataMart Configuration Guide

Chapter 9: Managing MIBs
Printing Trace Information
To print trace information, follow these steps:
1. Select a printer from the drop down list.
2. Edit the print command if you want to print in a specific format.
3. Increase or decrease number of copies by clicking the up and down arrows.
4. Click OK to print.
Saving Trace Information
To save trace information, follow these steps:
1. Click the To file: option.
2. Enter the path to where you want to store the file or click Browse.
3. Click OK to save the information.
IBM Tivoli Netcool Performance Manager: DataMart Configuration Guide 209

Chapter 9: Managing MIBs
NOTES
210 IBM Tivoli Netcool Performance Manager: DataMart Configuration Guide

Glossary
ANS.1
Abstract Syntax Notation One is OSI language for describing data types independent of particular computer structures and representation techniques.
ARP
The Address Resolution Protocol is used to bind an IP address to a MAC address.
ATM
Asynchronous Transfer Mode
availability
The percentage of time during a given interval that a network object or interface is available to perform its function. Availability is measured by a poller. The poller tracks how long an element or sub-element is unavailable and the percentage of time that it is available. Tivoli Netcool Performance Manager DataMart lets you monitor end-to-end network availability.
bandwidth
A measure of the capacity of a communications link.
bps
Bit per Second is a measurement that expresses the speed at which data is transferred between computers.
bridge
A device that connects one physical section of a network to another, often providing isolation.
broadcast
A packet destined for all hosts on a network.
burst rate
A circuit data transmission rate above the Committed Information Rate (CIR) that can be used to increase data throughput if it is available.
collector
The collector stores data for monitoring elements and sub-elements on your network. Tivoli Netcool Performance Manager DataMart enables the collection, consolidation, storage and archiving of critical network performance and service analysis data. This data can be integrated into Tivoli Netcool Performance Manager DataView or the reporting tool of your choice.
Committed Information Rate (CIR)
The specified amount of guaranteed bandwidth (measured in bits per second) on a Frame Relay service. Typically, when purchasing a Frame Relay service, a company can specify the CIR level they want. The Frame Relay network vendor guarantees that frames not exceeding this level will be delivered. It is possible that additional traffic might also be delivered, but it is not guaranteed. See also burst rate.
IBM Tivoli Netcool Performance Manager: DataMart Configuration Guide 211

daemon
A process that executes a program automatically in background mode when the system is initially started.
Dashboard
A real-time graphic display of one or more formulas or MIB objects on one or more hosts.
Data Link Connection Identifier (DLCI)
Frame relay allows users to segment physical ports into multiple logical interfaces. Each of these logical interfaces is identified by its DLCI.
default
An operation or value that the system or application assumes unless you make an explicit choice.
delay (also known as latency)
A measurement from one end of a network or device to another. Higher latency indicates longer delays.
discovery
Lets you analyze your network and gather information about TCP/IP network elements and sub-elements and how they are interconnected.
Domain Name Service (DNS)
The system that translates between internet IP addresses and internet host names.
Dynamic Host Configuration Protocol (DHCP)
A protocol that provides dynamic IP address allocation and automatic IP configuration.
element
An addressable, managed node or host.
exception
An exception is an event that is not considered normal and requires your immediate attention. For example, router outages or network response time failures.
formula
A set of mathematical instructions and SNMP queries.
frame relay
A packet-oriented communication method for connecting computer systems on WANs. Frame Relay is digital-data-communications protocol provided by a carrier. Connections into a frame relay network require a router and a line from the customer site to a carrier’s frame relay port entry.
group
Customized, virtual association that contains one or more network elements.
hop
A hop represents a transmission of a data packet through a router in a network of interconnected segments or subnetworks. In many networks, there are many routers connecting many segments, thus forming a number of paths that a packet can travel to get to its destination. A measure of this path is the hop count, or the number of routers the packet must pass through to get to its destination.
hub
A common connection point for devices in a network. Hubs are commonly used to connect segments of a LAN. A hub contains multiple ports. When a packet arrives at one port, it is copied to the other ports so that all segments of the LAN can see all packets.
212 IBM Tivoli Netcool Performance Manager: DataMart Configuration Guide

HyperText Markup Language (HTML)
Used for developing Web documents.
HyperText Transfer Protocol (HTTP)
A protocol that allows Web clients to retrieve information from Web servers.
Internet Control Message Protocol (ICMP)
Used to handle error and control messages sent when datagrams are discarded or systems are congested. Part of the IP protocol.
interface
The network connection between two systems or devices.
Internet
A collection of autonomous systems interconnected by bridges, routers, or gateways.
Inventory profile
Lets you define your network inventory. You can create different profiles for different resources in your network.
Inventory Tool
Provides you with a report of network elements and sub-elements on your network.
IP
Internet Protocol is a communications protocol that allows computers of any make to communicate when running IP software.
IP address
An identifier for a computer or device on an IP network. Networks using the IP protocol route messages based on the IP address of the destination. The format of an IP address is a 32-bit numeric address written as four numbers separated by periods. Each number can be zero to 255. For example, 1.160.10.240.
KB
Kilobyte is a data unit of 1,024 bytes.
latency
Measures the time it takes for a packet to travel from one point to another point and back.
Local Area Network (LAN)
A computer network that is limited to a small geographic area. For example, an office building.
MAC
The Media Access Control protocol governs the method by which a station can access a network.
Management Information Base (MIB)
A data repository used by an SNMP agent to store management data about a managed object. All MIB information is defined in ASN.1 format. MIB variables are organized in groups such as system and interfaces. An SNMP agent manages only the part of the MIB that the MIB references.
Meta-Data
Control information about the collected data. Tivoli Netcool Performance Manager uses meta data to describe resources, collection and aggregation schedules, and MIBs.
IBM Tivoli Netcool Performance Manager: DataMart Configuration Guide 213
Metric
The result of a formula applied to resources. These results are displayed in the reports viewed through a Web browser.
Metric-Data
Data collected on resources that is (optionally) transformed by formulas, imported, or summarized by an aggregation policy.
millisecond
One thousandth of a second.
network
A system of computers, hardware, and software that is connected over which data, files, and messages can be transmitted and end users communicate. Networks can be local or wide area. Network users can share the same data and application files, send messages between individual workstations, and protect files with an extensive security system.
network administrator
The person who installs, configures, and deploys Tivoli Netcool Performance Manager on an enterprise network. This includes creating and managing users profiles and assigning rights and privileges.
network monitoring system
An integrated set of software that measures and analyzes communications-related parameters in a network.
network traffic
The data that flows on a communications device or system.
NIS
Network Information Service is a protocol for administering network-wide databases.
node
The endpoint of a network connection or a junction common to two or more lines in a network. Nodes can be processors, controllers, or workstations.
NOC
Network Operations Center
Open Database Connectivity (ODBC)
ODBC is a specification designed to give users access to a variety of multiple desktop databases and file formats.
OSI
The Open Systems Interconnection model is a layered architecture plan that standardizes levels of service and type of interaction for computers exchanging information through a network.)
packet
Also known as a frame, single unit of data transmitted over a packet-switching network. A packet contains source and destination address in addition to the data.
peak
The highest level or greatest degree as represented in graphical reports.
Permanent Virtual Circuits (PVC)
A pathway through a packet-switched or cell-switched network.
214 IBM Tivoli Netcool Performance Manager: DataMart Configuration Guide

PID
Protocol Identifier.
PING
(Packet INternet Groper) a utility to determine whether a specific IP address is accessible. A source IP device sends a packet to a destination address and waits for a reply.
port
A physical connection on a network device.
probe
A packet sent to the remote end of a network. The probe requests an acknowledgment from end nodes.
profile
See Inventory profile.
Properties
Any attribute or characteristic that defines a resource more precisely and provides additional information on it. Properties can be customer attributes and technical attributes including:
— Customer name for which the resource is deployed
— VPN
— IP address
— Interface name
— Site
— Class of service (Silver, Gold, Platinum)
— Geographical properties (city, building, floor)
— Customer properties (division, business department, branch office)
— Service properties (applications)
— SLA value (thresholds, burst threshold, availability threshold, CIR, and SLA contract type)
protocol
A standard set of rules by which network elements trade information to communicate including the format, timing, sequencing, or error checking.
Quality of Service (QOS)
A guaranteed throughput level from the provider to its customers.
Read-Only mode
Provides only viewing access to Tivoli Netcool Performance Manager DataMart modules. You cannot make modifications to any module in “read-only” mode. The Read-Only icon is as follows:
repeater
A device that lets you extend the length of your network by amplifying and repeating the information it receives.
IBM Tivoli Netcool Performance Manager: DataMart Configuration Guide 215

resource
A type of physical or logical object managed by the Tivoli Netcool Performance Manager system. Any managed physical interface or port is a resource, any managed logical circuit is also resource. For example, a Frame Relay DLCI, an ATM PVC, and a CE-CE itinerary (VPN Customer Edge). Any object from which Tivoli Netcool Performance Manager can get identification (a name and a label) and related metrics can be modeled in the DataMart, using the resource concept.
rights
User privileges assigned by the network administrator for access to Tivoli Netcool Performance Manager.
report
A formatted and organized presentation of data.
response time
The amount of time that takes one endpoint to respond to a request from another endpoint on a network.
router
The equipment that receives an internet packet and sends it to the next machine in the destination path.
segment
A protocol data unit consisting of part of a stream of bytes being sent between two machines.
server
A computer that runs services. Also refers to a piece of hardware or software that provides access to information requested from it.
Service Level Agreement (SLA)
is a contractual guarantee that stipulates the specified minimum level of network capacity and service support that a customer will receive. An SLA establishes realistic expectations for consistent service delivery and articulates compensatory measure in the case of service delivery failure.
You can develop an aggressive SLA, both internally and externally, that delivers priority, availability, and bandwidth required by business applications.
Service Level Management (SLM)
provides the measurement and evaluation of network performance against business metrics. A comprehensive flexible SLM plan that monitors performance effectively can result in increased user satisfaction.
Simple Network Management Protocol (SNMP)
A communications protocol used to control and monitor devices on a network. An SNMP agent manages parts of a MIB.
SMI
Structure of Management Information (RFC 1155) specifies rules used to define managed objects in a MIB. See also MIB.
SNMP Availability
is the percentage of time during a given interval that a network object or interface is available to perform its function. Availability is measured by a poller. The poller tracks how long an element or sub-element is unavailable and the percentage of time that it is available. Tivoli Netcool Performance Manager DataMart helps you increase end-to-end network availability.
216 IBM Tivoli Netcool Performance Manager: DataMart Configuration Guide

SNMP Response Time
is the amount of time that takes one endpoint to respond to a request from another endpoint on a network. Tivoli Netcool Performance Manager DataMart helps you improve response time.
SNMP trap
An SNMP trap lets you forward one or more exceptions for a network object to a designated computer on your network. The destination computer needs to have a third-party packet capturing software program installed. You use this program to view the exception message.
SNMP Utilization
is the percentage of bandwidth that an element or sub-element is in use during a given period of time. For example, 30% to 40% signifies a low utilization and 80 to 90% signifies a high utilization.
Sub-Element
A sub-component of an element, such as a port, interface, virtual circuits, user, or a DLCI.
subnet
A portion of a network that shares a common address component. On IP networks, subnets are defined as all devices whose IP addresses have the same prefix. For example, all devices with IP addresses that start with 100.100.100. would be part of the same subnet. IP networks are divided using a subnet mask.
subnet mask
A 32-bit value that distinguishes the network ID from the host ID of an IP address.
switch
A device that filters and forwards packets between LAN or WAN segments. Switches operate at the data link layer (layer 2) of the OSI Reference Model and therefore support any packet protocol. LANs that use switches to join segments are called switched LANs or, in the case of Ethernet networks, switched Ethernet LANs.
target
The object to which a formula applies
threshold
A value that is compared against metrics to determine if the metrics exceed or drop below a critical limit.
traceroute
A utility that traces a packet from source IP to destination IP address, showing how many hops the packet requires to reach the host and how long each hop takes.
traffic
See network traffic.
TCP
Transmission Control Protocol is a layer 4 protocol that provides a level of connection-oriented reliability to an IP network.
URL
Uniform Resource Locator is the addressing system used in the Web that can reference any type of file on the Internet, enabling a Web client to access that file.
utilization
The percentage of time that a network object or interface is in use for a given period of time.
IBM Tivoli Netcool Performance Manager: DataMart Configuration Guide 217

VLAN
A virtual LAN is a group of devices on one or more LANs that are configured so that they can communicate as if they were attached to the same wire, when if fact, they are located on a number of different LAN segments.
volume
The number of bits that flowed through a network interface over a period of time.
Web browser
A software program that lets you view and access HTML documents. For example, Internet Explorer and Netscape Navigator.
Wide Area Network (WAN)
A network of geographically dispersed computers.
Write mode
Provides you with full access to Tivoli Netcool Performance Manager DataMart modules. You can make modification to any module in “write” mode. The write mode icon is as follows:
218 IBM Tivoli Netcool Performance Manager: DataMart Configuration Guide

NOTES
IBM Tivoli Netcool Performance Manager: DataMart Configuration Guide 219

220 IBM Tivoli Netcool Performance Manager: DataMart Configuration Guide

Index
A
access rights for users and groups 17adding
a group 14a new user 12
aggregate functions 133args.dat 59ARP Query 29automatic grouping 25, 41, 42
B
Bulk Collectorconfiguring an inventory 55directories and files 61importing files 59inventory 58inventory file sets 59
bulk fileelement resources 62format examples 62inventory arguments 62sub-element resources 62
C
calendarsconfiguring 103, 168customizing 105daily 108deleting 111monthly 110selector 111weekly 108
commandspollinv and pollprofile 60
comments in formulas 130conditions 70Configuration tab 7configuring
a network inventory 21calendars 103, 168data collection request 92users and groups 11
creatinga custom formula 115a group 14a user 11
Creq24 190cron table 60customizing calendars 105
D
daily calendar 108data collection request
configuring 92SNMP
data collection request 92Data Manager tab 7DataMart
copyright information for tools 229deleting
a calendar 111a group 16profiles 44
DIM declaration 122discovery 25, 41, 42
E
element file 48element.dat 59enabling
trapping of threshold violations 189error messages in formulas 153
F
file formatsfor grouping rules 79for inventory 47
float 117formulas
aggregate functions 133comments 130copying 139creating a custom formula 115definition 114
IBM Tivoli Netcool Performance Manager: DataMart Configuration Guide 221

Index
deleting 139DIM declaration 122distribution function 133filter functions 133finding 138functions 116modifying 120OIDINST 125OIDVAL 124renaming 139rules 122SNMP-specific functions 132SysObjId 155temporary variables 130testing 118
functions 67
G
granting rights to users and groups 17grouping rules
conditions 70copying 73creating 66deleting 74example 80example of nested conditions 83exporting 78file format 79importing 78moving 73operators and functions 67saving test results 72static text 77syntax 77testing 71using 71using a text editor 78variables 77viewing database information 75viewing properties 76
groupscreating 14deleting 16rights 17
H
HP OpenView 27
I
importingbulk files 59
invariants 47inventory
configuring 22element file 48file formats 47importing from DNS 27importing from NIS 27invariants 47opening the Inventory Tool Wizard 23ping interval 35profile 23reloading collectors 44running a profile 42specifying IP addresses 28specifying object types 34specifying SNMP community names 32, 35sub-element file 48
inventory_subelement.txt 154IP addresses 28
L
login name for a user 13
M
Metric tab 7MIB Browser 201MIBS
compiling 194viewing a MIB tree structure 202
modifying a formula 120Monitor tab 8monthly calendar 110
N
navigating in DataMart 7nested condition 83nested variable 82network inventory see inventorynew user
adding 12
222 IBM Tivoli Netcool Performance Manager: DataMart Configuration Guide

Index
O
OIDINST 125OIDVAL 124operators and functions 67
P
ping interval 35ping window configuration 35pollinv command 60
polling frequency 60pollprofile command 60profile 23
deleting 44running 42
R
reloading collectors 44Resource tab 8rights 17root user 12rules see grouping rulesrunning a profile 42
S
SCOTTY Stackcopyright information 229
sendingtrapped threshold violations to host 190
setup utilitiesrights 18
SNMP 116SNMP community names 32, 35SNMP configuration
read community 29timeouts and tries 29write community 29
startingDataMart after minimal deployment installation 1
string 117sub-element file 48subelement.dat 59synchronization 25, 41, 42syntax
grouping rules 77sysObjectID 154SysObjId 155
T
temporary variables 130testing
formulas 118grouping rules 71
time out 35
U
userscreating a user 11deleting 13rights 17root 12
V
variable 86
W
weekly calendar 108writing formulas 140
X
Xwpickcopyright information 231
IBM Tivoli Netcool Performance Manager: DataMart Configuration Guide 223

Index
224 IBM Tivoli Netcool Performance Manager: DataMart Configuration Guide

Notices
This information was developed for products and services offered in the U.S.A. IBM may not offer the products, services, or features discussed in this document in other countries. Consult your local IBM representative for information about the products and services currently available in your area. Any reference to an IBM product, program, or service is not intended to state or imply that only that IBM product, program, or service may be used. Any functionally equivalent product, program, or service that does not infringe any IBM intellectual property right may be used instead. However, it is the user’s responsibility to evaluate and verify the operation of any non-IBM product, program, or service.
IBM may have patents or pending patent applications covering subject matter described in this document. The furnishing of this document does not give you any license to these patents. You can send license inquiries, in writing, to:
IBM Director of Licensing IBM Corporation North Castle Drive Armonk, NY 10504-1785 U.S.A.
For license inquiries regarding double-byte (DBCS) information, contact the IBM Intellectual Property Department in your country or send inquiries, in writing, to:
Intellectual Property Licensing Legal and Intellectual Property Law IBM Japan Ltd. 1623-14, Shimotsuruma, Yamato-shi Kanagawa 242-8502 Japan.
The following paragraph does not apply to the United Kingdom or any other country where such provisions are inconsistent with local law:
INTERNATIONAL BUSINESS MACHINES CORPORATION PROVIDES THIS PUBLICATION "AS IS" WITHOUT WARRANTY OF ANY KIND, EITHER EXPRESS OR IMPLIED, INCLUDING, BUT NOT LIMITED TO, THE IMPLIED WARRANTIES OF NON-INFRINGEMENT, MERCHANTABILITY OR FITNESS FOR A PARTICULAR PURPOSE.
Some states do not allow disclaimer of express or implied warranties in certain transactions, therefore, this statement might not apply to you.
This information could include technical inaccuracies or typographical errors. Changes are periodically made to the information herein; these changes will be incorporated in new editions of the publication. IBM may make improvements and/or changes in the product(s) and/or the program(s) described in this publication at any time without notice.
Any references in this information to non-IBM Web sites are provided for convenience only and do not in any manner serve as an endorsement of those Web sites. The materials at those Web sites are not part of the materials for this IBM product and use of those Web sites is at your own risk.
IBM may use or distribute any of the information you supply in any way it believes appropriate without incurring any obligation to you.
Licensees of this program who wish to have information about it for the purpose of enabling: (i) the exchange of information between independently created programs and other programs (including this one) and (ii) the mutual use of the information which has been exchanged, should contact:
IBM Tivoli Netcool Performance Manager: DataMart Configuration Guide 225
IBM Corporation 2Z4A/101 11400 Burnet Road Austin, TX 78758 U.S.A.
Such information may be available, subject to appropriate terms and conditions, including in some cases payment of a fee.
The licensed program described in this document and all licensed material available for it are provided by IBM under terms of the IBM Customer Agreement, IBM International Program License Agreement or any equivalent agreement between us.
Any performance data contained herein was determined in a controlled environment. Therefore, the results obtained in other operating environments may vary significantly. Some measurements may have been made on development-level systems and there is no guarantee that these measurements will be the same on generally available systems. Furthermore, some measurement may have been estimated through extrapolation. Actual results may vary. Users of this document should verify the applicable data for their specific environment.
Information concerning non-IBM products was obtained from the suppliers of those products, their published announcements or other publicly available sources. IBM has not tested those products and cannot confirm the accuracy of performance, compatibility or any other claims related to non-IBM products. Questions on the capabilities of non-IBM products should be addressed to the suppliers of those products.
All statements regarding IBM’s future direction or intent are subject to change or withdrawal without notice, and represent goals and objectives only.
This information is for planning purposes only. The information herein is subject to change before the products described become available.
This information contains examples of data and reports used in daily business operations. To illustrate them as completely as possible, the examples include the names of individuals, companies, brands, and products. All of these names are fictitious and any similarity to the names and addresses used by an actual business enterprise is entirely coincidental.
COPYRIGHT LICENSE:
This information contains sample application programs in source language, which illustrate programming techniques on various operating systems. You may copy, modify, and distribute these sample programs in any form without payment to IBM, for the purposes of developing, using, marketing or distributing application programs conforming to the application programming interface for the operating system for which the sample programs are written. These examples have not been thoroughly tested under all conditions. IBM, therefore, cannot guarantee or imply reliability, serviceability, or function of these programs. You may copy, modify, and distribute these sample programs in any form without payment to IBM for the purposes of developing, using, marketing, or distributing application programs conforming to IBM's application programming interfaces.
If you are viewing this information in softcopy form, the photographs and color illustrations might not appear.
Trademarks
IBM, the IBM logo, and ibm.com are trademarks or registered trademarks of International Business Machines Corp., registered in many jurisdictions worldwide. Other product and service names might be trademarks of IBM or other companies. A current list of IBM trademarks is available on the Web at “Copyright and trademark information” at www.ibm.com/legal/copytrade.shtml.
Intel is a registered trademark of Intel Corporation or its subsidiaries in the United States, other countries, or both.
Linux is a trademark of Linus Torvalds in the United States, other countries, or both.
226 IBM Tivoli Netcool Performance Manager: DataMart Configuration Guide

Microsoft and Windows are registered trademarks of Microsoft Corporation in the United States, other countries, or both.
UNIX is a registered trademark of The Open Group in the United States and other countries.
Other product, and service names may be trademarks or service marks of others.
Java and all Java-based trademarks and logos are trademarks or registered trademarks of Sun Microsystems, Inc. in the United States, other countries, or both.
IBM Tivoli Netcool Performance Manager: DataMart Configuration Guide 227

228 IBM Tivoli Netcool Performance Manager: DataMart Configuration Guide

Additional Copyright Information
The following copyright information is for software used by Tivoli Netcool Performance Manager.
Tcl 8.3.3, Combat/TCL 0.7.3, Combat/TCL 0.7.5, TclX 8.3, TK 8.3.3
This software is copyrighted by the Regents of the University of California, Sun Microsystems, Inc., Scriptics Corporation, and other parties. The following terms apply to all files associated with the software unless explicitly disclaimed in individual files.
The authors hereby grant permission to use, copy, modify, distribute, and license this software and its documentation for any purpose, provided that existing copyright notices are retained in all copies and that this notice is included verbatim in any distributions. No written agreement, license, or royalty fee is required for any of the authorized uses. Modifications to this software may be copyrighted by their authors and need not follow the licensing terms described here, provided that the new terms are clearly indicated on the first page of each file where they apply.
IN NO EVENT SHALL THE AUTHORS OR DISTRIBUTORS BE LIABLE TO ANY PARTY FOR DIRECT, INDIRECT, SPECIAL, INCIDENTAL, OR CONSEQUENTIAL DAMAGES ARISING OUT OF THE USE OF THIS SOFTWARE, ITS DOCUMENTATION, OR ANY DERIVATIVES THEREOF, EVEN IF THE AUTHORS HAVE BEEN ADVISED OF THE POSSIBILITY OF SUCH DAMAGE.
THE AUTHORS AND DISTRIBUTORS SPECIFICALLY DISCLAIM ANY WARRANTIES, INCLUDING, BUT NOT LIMITED TO, THE IMPLIED WARRANTIES OF MERCHANTABILITY, FITNESS FOR A PARTICULAR PURPOSE, AND NON-INFRINGEMENT. THIS SOFTWARE IS PROVIDED ON AN "AS IS" BASIS, AND THE AUTHORS AND DISTRIBUTORS HAVE NO OBLIGATION TO PROVIDE MAINTENANCE, SUPPORT, UPDATES, ENHANCEMENTS, OR MODIFICATIONS.
GOVERNMENT USE: If you are acquiring this software on behalf of the U.S. government, the Government shall have only "Restricted Rights" in the software and related documentation as defined in the Federal Acquisition Regulations (FARs) in Clause 52.227.19 (c) (2). If you are acquiring the software on behalf of the Department of Defense, the software shall be classified as "Commercial Computer Software" and the Government shall have only "Restricted Rights" as defined in Clause 252.227-7013 (c) (1) of DFARs. Notwithstanding the foregoing, the authors grant the U.S. Government and others acting in its behalf permission to use and distribute the software in accordance with the terms specified in this license.
SCOTTY Stack
This software is copyrighted by Juergen Schoenwaelder, the Technical University of Braunschweig, the University of Twente, and other parties. The following terms apply to all files associated with the software unless explicitly disclaimed in individual files.
The authors hereby grant permission to use, copy, modify, distribute, and license this software and its documentation for any purpose, provided that existing copyright notices are retained in all copies and that this notice is included verbatim in any distributions. No written agreement, license, or royalty fee is required for any of the authorized uses. Modifications to this software may be copyrighted by their authors and need not follow the licensing terms described here, provided that the new terms are clearly indicated on the first page of each file where they apply.
IN NO EVENT SHALL THE AUTHORS OR DISTRIBUTORS BE LIABLE TO ANY PARTY FOR DIRECT, INDIRECT, SPECIAL, INCIDENTAL, OR CONSEQUENTIAL DAMAGES ARISING OUT OF THE USE OF THIS SOFTWARE, ITS DOCUMENTATION, OR ANY DERIVATIVES THEREOF, EVEN IF THE AUTHORS HAVE BEEN ADVISED OF THE POSSIBILITY OF SUCH DAMAGE.
THE AUTHORS AND DISTRIBUTORS SPECIFICALLY DISCLAIM ANY WARRANTIES, INCLUDING, BUT NOT LIMITED TO, THE IMPLIED WARRANTIES OF MERCHANTABILITY, FITNESS FOR A PARTICULAR PURPOSE, AND NON-INFRINGEMENT. THIS SOFTWARE IS PROVIDED ON AN “AS IS” BASIS, AND THE AUTHORS AND DISTRIBUTORS HAVE NO OBLIGATION TO PROVIDE MAINTENANCE, SUPPORT, UPDATES, ENHANCEMENTS, OR MODIFICATIONS.
IBM Tivoli Netcool Performance Manager: DataMart Configuration Guide 229

Various copyrights apply to this package, listed in 3 separate parts below. Please make sure that you include all the parts. Up until 2001, the project was based at UC Davis, and the first part covers all code written during this time. From 2001 onwards, the project has been based at SourceForge, and Networks Associates Technology, Inc hold the copyright on behalf of the wider Net-SNMP community, covering all derivative work done since then. An additional copyright section has been added as Part 3 below also under a BSD license for the work contributed by Cambridge Broadband Ltd. to the project since 2001.
Part 1: CMU/UCD copyright notice: (BSD like)
Copyright © 1989, 1991, 1992 by Carnegie Mellon University
Derivative Work - 1996, 1998-2000
Copyright © 1996, 1998-2000 The Regents of the University of California
All Rights Reserved
Permission to use, copy, modify and distribute this software and its documentation for any purpose and without fee is hereby granted, provided that the above copyright notice appears in all copies and that both that copyright notice and this permission notice appear in supporting documentation, and that the name of CMU and The Regents of the University of California not be used in advertising or publicity pertaining to distribution of the software without specific written permission.
CMU AND THE REGENTS OF THE UNIVERSITY OF CALIFORNIA DISCLAIM ALL WARRANTIES WITH REGARD TO THIS SOFTWARE, INCLUDING ALL IMPLIED WARRANTIES OF MERCHANTABILITY AND FITNESS. IN NO EVENT SHALL CMU OR THE REGENTS OF THE UNIVERSITY OF CALIFORNIA BE LIABLE FOR ANY SPECIAL, INDIRECT OR CONSEQUENTIAL DAMAGES OR ANY DAMAGES WHATSOEVER RESULTING FROM THE LOSS OF USE, DATA OR PROFITS, WHETHER IN AN ACTION OF CONTRACT, NEGLIGENCE OR OTHER TORTIOUS ACTION, ARISING OUT OF OR IN CONNECTION WITH THE USE OR PERFORMANCE OF THIS SOFTWARE.
Part 2: Networks Associates Technology, Inc copyright notice (BSD)
Copyright © 2001, Networks Associates Technology, Inc
All rights reserved.
Redistribution and use in source and binary forms, with or without modification, are permitted provided that the following conditions are met:
• Redistributions of source code must retain the above copyright notice, this list of conditions and the following disclaimer.• Redistributions in binary form must reproduce the above copyright notice, this list of conditions and the following disclaimer
in the documentation and/or other materials provided with the distribution.• Neither the name of the NAI Labs nor the names of its contributors may be used to endorse or promote products derived
from this software without specific prior written permission.THIS SOFTWARE IS PROVIDED BY THE COPYRIGHT HOLDERS AND CONTRIBUTORS “AS IS” AND ANY EXPRESS OR IMPLIED WARRANTIES, INCLUDING, BUT NOT LIMITED TO, THE IMPLIED WARRANTIES OF MERCHANTABILITY AND FITNESS FOR A PARTICULAR PURPOSE ARE DISCLAIMED. IN NO EVENT SHALL THE COPYRIGHT HOLDERS OR CONTRIBUTORS BE LIABLE FOR ANY DIRECT, INDIRECT, INCIDENTAL, SPECIAL, EXEMPLARY, OR CONSEQUENTIAL DAMAGES (INCLUDING, BUT NOT LIMITED TO, PROCUREMENT OF SUBSTITUTE GOODS OR SERVICES; LOSS OF USE, DATA, OR PROFITS; OR BUSINESS INTERRUPTION) HOWEVER CAUSED AND ON ANY THEORY OF LIABILITY, WHETHER IN CONTRACT, STRICT LIABILITY, OR TORT (INCLUDING NEGLIGENCE OR OTHERWISE) ARISING IN ANY WAY OUT OF THE USE OF THIS SOFTWARE, EVEN IF ADVISED OF THE POSSIBILITY OF SUCH DAMAGE.
Part 3: Cambridge Broadband Ltd. copyright notice (BSD)
Portions of this code are copyright © 2001, Cambridge Broadband Ltd.
All rights reserved.
Redistribution and use in source and binary forms, with or without modification, are permitted provided that the following conditions are met:
• Redistributions of source code must retain the above copyright notice, this list of conditions and the following disclaimer.• Redistributions in binary form must reproduce the above copyright notice, this list of conditions and the following disclaimer
in the documentation and/or other materials provided with the distribution.• The name of Cambridge Broadband Ltd. may not be used to endorse or promote products derived from this software without
specific prior written permission.
230 IBM Tivoli Netcool Performance Manager: DataMart Configuration Guide

THIS SOFTWARE IS PROVIDED BY THE COPYRIGHT HOLDER “AS IS” AND ANY EXPRESS OR IMPLIED WARRANTIES, INCLUDING, BUT NOT LIMITED TO, THE IMPLIED WARRANTIES OF MERCHANTABILITY AND FITNESS FOR A PARTICULAR PURPOSE ARE DISCLAIMED. IN NO EVENT SHALL THE COPYRIGHT HOLDER BE LIABLE FOR ANY DIRECT, INDIRECT, INCIDENTAL, SPECIAL, EXEMPLARY, OR CONSEQUENTIAL DAMAGES (INCLUDING, BUT NOT LIMITED TO, PROCUREMENT OF SUBSTITUTE GOODS OR SERVICES; LOSS OF USE, DATA, OR PROFITS; OR BUSINESS INTERRUPTION) HOWEVER CAUSED AND ON ANY THEORY OF LIABILITY, WHETHER IN CONTRACT, STRICT LIABILITY, OR TORT (INCLUDING NEGLIGENCE OR OTHERWISE) ARISING IN ANY WAY OUT OF THE USE OF THIS SOFTWARE, EVEN IF ADVISED OF THE POSSIBILITY OF SUCH DAMAGE.
BLT 2.4u
Portions (c) 1993 AT&T, (c) 1993 - 1998 Lucent Technologies, (c) 1994-1998 Sun Microsystems, Inc., and (c) 1987-1993 The Regents of the University of California.
Permission to use, copy, modify and distribute this software and its documentation for any purpose and without fee is hereby granted, provided that the above copyright notice appears in all copies and that both that copyright notice and this permission notice appear in supporting documentation, and that the names of AT&T, Lucent Technologies Inc., Sun Microsystems, Inc. and The Regents of the University of California not be used in advertising or publicity pertaining to distribution of the software without specific written permission.
THE COPYRIGHT HOLDERS AND OTHER CONTRIBUTORS DISCLAIM ALL WARRANTIES WITH REGARD TO THIS SOFTWARE, INCLUDING ALL IMPLIED WARRANTIES OF MERCHANTABILITY AND FITNESS. IN NO EVENT SHALL THE COPYRIGHT HOLDERS OR OTHER CONTRIBUTORS BE LIABLE FOR ANY SPECIAL, INDIRECT OR CONSEQUENTIAL DAMAGES OR ANY DAMAGES WHATSOEVER RESULTING FROM THE LOSS OF USE, DATA OR PROFITS, WHETHER IN AN ACTION OF CONTRACT, NEGLIGENCE OR OTHER TORTIOUS ACTION, ARISING OUT OF OR IN CONNECTION WITH THE USE OR PERFORMANCE OF THIS SOFTWARE.
CMU-SNMP 1.14
CMU/UCD copyright notice: (BSD like) Copyright 1989, 1991, 1992 by Carnegie Mellon University
Derivative Work - 1996, 1998-2000 Copyright 1996, 1998-2000 The Regents of the University of California
All Rights Reserved
Permission to use, copy, modify and distribute this software and its documentation for any purpose and without fee is hereby granted, provided that the above copyright notice appears in all copies and that both that copyright notice and this permission notice appear in supporting documentation, and that the name of CMU and The Regents of the University of California not be used in advertising or publicity pertaining to distribution of the software without specific written permission.
CMU AND THE REGENTS OF THE UNIVERSITY OF CALIFORNIA DISCLAIM ALL WARRANTIES WITH REGARD TO THIS SOFTWARE, INCLUDING ALL IMPLIED WARRANTIES OF MERCHANTABILITY AND FITNESS. IN NO EVENT SHALL CMU OR THE REGENTS OF THE UNIVERSITY OF CALIFORNIA BE LIABLE FOR ANY SPECIAL, INDIRECT OR CONSEQUENTIAL DAMAGES OR ANY DAMAGES WHATSOEVER RESULTING FROM THE LOSS OF USE, DATA OR PROFITS, WHETHER IN AN ACTION OF CONTRACT, NEGLIGENCE OR OTHER TORTIOUS ACTION, ARISING OUT OF OR IN CONNECTION WITH THE USE OR PERFORMANCE OF THIS SOFTWARE.
Scotty 2.8, incrTCL 3.0, [incr TCL] 3.2
Portions Copyright (c) 1987-1994 The Regents of the University of California. Copyright (c) 1994-1995 Sun Microsystems, Inc.
This software is copyrighted by the Regents of the University of California, Sun Microsystems, Inc., and other parties. The following terms apply to all files associated with the software unless explicitly disclaimed in individual files.
IBM Tivoli Netcool Performance Manager: DataMart Configuration Guide 231

The authors hereby grant permission to use, copy, modify, distribute, and license this software and its documentation for any purpose, provided that existing copyright notices are retained in all copies and that this notice is included verbatim in any distributions. No written agreement, license, or royalty fee is required for any of the authorized uses. Modifications to this software may be copyrighted by their authors and need not follow the licensing terms described here, provided that the new terms are clearly indicated on the first page of each file where they apply.
IN NO EVENT SHALL THE AUTHORS OR DISTRIBUTORS BE LIABLE TO ANY PARTY FOR DIRECT, INDIRECT, SPECIAL, INCIDENTAL, OR CONSEQUENTIAL DAMAGES ARISING OUT OF THE USE OF THIS SOFTWARE, ITS DOCUMENTATION, OR ANY DERIVATIVES THEREOF, EVEN IF THE AUTHORS HAVE BEEN ADVISED OF THE POSSIBILITY OF SUCH DAMAGE.
THE AUTHORS AND DISTRIBUTORS SPECIFICALLY DISCLAIM ANY WARRANTIES, INCLUDING, BUT NOT LIMITED TO, THE IMPLIED WARRANTIES OF MERCHANTABILITY, FITNESS FOR A PARTICULAR PURPOSE, AND NON-INFRINGEMENT. THIS SOFTWARE IS PROVIDED ON AN "AS IS" BASIS, AND THE AUTHORS AND DISTRIBUTORS HAVE NO OBLIGATION TO PROVIDE MAINTENANCE, SUPPORT, UPDATES, ENHANCEMENTS, OR MODIFICATIONS.
RESTRICTED RIGHTS: Use, duplication or disclosure by the government is subject to the restrictions as set forth in subparagraph (c) (1) (ii) of the Rights in Technical Data and Computer Software Clause as DFARS 252.227-7013 and FAR 52.227-19.
Portions Copyright (c) 1993-1998 Lucent Technologies, Inc.
Permission to use, copy, modify, and distribute this software and its documentation for any purpose and without fee is hereby granted, provided that the above copyright notice appear in all copies and that both that the copyright notice and warranty disclaimer appear in supporting documentation, and that the names of Lucent Technologies any of their entities not be used in advertising or publicity pertaining to distribution of the software without specific, written prior permission.
Lucent disclaims all warranties with regard to this software, including all implied warranties of merchantability and fitness. In no event shall Lucent be liable for any special, indirect or consequential damages or any damages whatsoever resulting from loss of use, data or profits, whether in an action of contract, negligence or other tortuous action, arising out of or in connection with the use or performance of this software.
UCD SNMP 4.2.5
Portions Copyright 1989, 1991, 1992 by Carnegie Mellon University. Derivative Work - 1996, 1998-2000, Copyright 1996, 1998-2000 The Regents of the University of California All Rights Reserved
Permission to use, copy, modify and distribute this software and its documentation for any purpose and without fee is hereby granted, provided that the above copyright notice appears in all copies and that both that copyright notice and this permission notice appear in supporting documentation, and that the name of CMU and The Regents of the University of California not be used in advertising or publicity pertaining to distribution of the software without specific written permission.
CMU AND THE REGENTS OF THE UNIVERSITY OF CALIFORNIA DISCLAIM ALL WARRANTIES WITH REGARD TO THIS SOFTWARE, INCLUDING ALL IMPLIED WARRANTIES OF MERCHANTABILITY AND FITNESS. IN NO EVENT SHALL CMU OR THE REGENTS OF THE UNIVERSITY OF CALIFORNIA BE LIABLE FOR ANY SPECIAL, INDIRECT OR CONSEQUENTIAL DAMAGES OR ANY DAMAGES WHATSOEVER RESULTING FROM THE LOSS OF USE, DATA OR PROFITS, WHETHER IN AN ACTION OF CONTRACT, NEGLIGENCE OR OTHER TORTIOUS ACTION, ARISING OUT OF OR IN CONNECTION WITH THE USE OR PERFORMANCE OF THIS SOFTWARE.
Portions Copyright: (c) 2001-2003, Networks Associates Technology, Inc, (c) 2001-2003, Cambridge Broadband Ltd, (c) 2003-2005, Sparta, Inc., (c) 2004, Cisco, Inc and Information Network Center of Beijing University of Posts and Telecommunications, (c) Fabasoft R&D Software GmbH & Co KG, 2003 [email protected]. All rights reserved.
Redistribution and use in source and binary forms, with or without modification, are permitted provided that the following conditions are met:
1. Redistributions of source code must retain the above copyright notice, this list of conditions and the following disclaimer.
2. Redistributions in binary form must reproduce the above copyright notice, this list of conditions and the following disclaimer in the documentation and/or other materials provided with the distribution.
3. Neither the names of Networks Associates Technology, Inc, Cambridge Broadband Ltd., Sparta, Inc., Cisco, Inc, Beijing University of Posts and Telecommunications, Fabasoft R&D Software GmbH & Co KG or any of its subsidiaries, brand or product
232 IBM Tivoli Netcool Performance Manager: DataMart Configuration Guide

names, nor the names of their contributors may be used to endorse or promote products derived from this software without specific prior written permission.
THIS SOFTWARE IS PROVIDED BY THE COPYRIGHT HOLDERS AND CONTRIBUTORS ``AS IS'' AND ANY EXPRESS OR IMPLIED WARRANTIES, INCLUDING, BUT NOT LIMITED TO, THE IMPLIED WARRANTIES OF MERCHANTABILITY AND FITNESS FOR A PARTICULAR PURPOSE ARE DISCLAIMED. IN NO EVENT SHALL THE COPYRIGHT HOLDERS OR CONTRIBUTORS BE LIABLE FOR ANY DIRECT, INDIRECT, INCIDENTAL, SPECIAL, EXEMPLARY, OR CONSEQUENTIAL DAMAGES (INCLUDING, BUT NOT LIMITED TO, PROCUREMENT OF SUBSTITUTE GOODS OR SERVICES; LOSS OF USE, DATA, OR PROFITS; OR BUSINESS INTERRUPTION) HOWEVER CAUSED AND ON ANY THEORY OF LIABILITY, WHETHER IN CONTRACT, STRICT LIABILITY, OR TORT (INCLUDING NEGLIGENCE OR OTHERWISE) ARISING IN ANY WAY OUT OF THE USE OF THIS SOFTWARE, EVEN IF ADVISED OF THE POSSIBILITY OF SUCH DAMAGE.
JDOM 1.0
Copyright (C) 2000-2004 Jason Hunter & Brett McLaughlin. All rights reserved.
Redistribution and use in source and binary forms, with or without modification, are permitted provided that the following conditions are met:
1. Redistributions of source code must retain the above copyright notice, this list of conditions, and the following disclaimer.
2. Redistributions in binary form must reproduce the above copyright notice, this list of conditions, and the disclaimer that follows these conditions in the documentation and/or other materials provided with the distribution.
3. The name "JDOM" must not be used to endorse or promote products derived from this software without prior written permission. For written permission, please contact <request_AT_jdom_DOT_org>.
4. Products derived from this software may not be called "JDOM", nor may "JDOM" appear in their name, without prior written permission from the JDOM Project Management <request_AT_jdom_DOT_org>.
In addition, we request (but do not require) that you include in the end-user documentation provided with the redistribution and/or in the software itself an acknowledgement equivalent to the following:
"This product includes software developed by the JDOM Project (http://www.jdom.org/)." Alternatively, the acknowledgment may be graphical using the logos available at http://www.jdom.org/images/logos.
THIS SOFTWARE IS PROVIDED ``AS IS'' AND ANY EXPRESSED OR IMPLIED WARRANTIES, INCLUDING, BUT NOT LIMITED TO, THE IMPLIED WARRANTIES OF MERCHANTABILITY AND FITNESS FOR A PARTICULAR PURPOSE ARE DISCLAIMED. IN NO EVENT SHALL THE JDOM AUTHORS OR THE PROJECT CONTRIBUTORS BE LIABLE FOR ANY DIRECT, INDIRECT, INCIDENTAL, SPECIAL, EXEMPLARY, OR CONSEQUENTIAL DAMAGES (INCLUDING, BUT NOT LIMITED TO, PROCUREMENT OF SUBSTITUTE GOODS OR SERVICES; LOSS OF USE, DATA, OR PROFITS; OR BUSINESS INTERRUPTION) HOWEVER CAUSED AND ON ANY THEORY OF LIABILITY, WHETHER IN CONTRACT, STRICT LIABILITY, OR TORT (INCLUDING NEGLIGENCE OR OTHERWISE) ARISING IN ANY WAY OUT OF THE USE OF THIS SOFTWARE, EVEN IF ADVISED OF THE POSSIBILITY OF SUCH DAMAGE.
This software consists of voluntary contributions made by many individuals on behalf of the JDOM Project and was originally created by Jason Hunter <jhunter_AT_jdom_DOT_org> and Brett McLaughlin <brett_AT_jdom_DOT_org>. For more information on the JDOM Project, please see <http://www.jdom.org/>.
Regex 1.1a
Copyright (C) 1996, 1999 Vassili Bykov. It is provided to the Smalltalk community in hope it will be useful.
1. This license applies to the package as a whole, as well as to any component of it. By performing any of the activities described below, you accept the terms of this agreement.
2. The software is provided free of charge, and ``as is'', in hope that it will be useful, with ABSOLUTELY NO WARRANTY. The entire risk and all responsibility for the use of the software is with you. Under no circumstances the author may be held responsible
IBM Tivoli Netcool Performance Manager: DataMart Configuration Guide 233

for loss of data, loss of profit, or any other damage resulting directly or indirectly from the use of the software, even if the damage is caused by defects in the software.
3. You may use this software in any applications you build.
4. You may distribute this software provided that the software documentation and copyright notices are included and intact.
5. You may create and distribute modified versions of the software, such as ports to other Smalltalk dialects or derived work, provided that:
a. any modified version is expressly marked as such and is not misrepresented as the original software;
b. credit is given to the original software in the source code and documentation of the derived work;
c. the copyright notice at the top of this document accompanies copyright notices of any modified version.
234 IBM Tivoli Netcool Performance Manager: DataMart Configuration Guide

235 IBM Tivoli Netcool Performance Manager: DataMart Configuration Guide

Printed in the USA.
IBM®