Embed Size (px)
Citation preview

Tivoli Module Builder User’s Guide
Version 2.3
February 28, 2000

Tivoli Module Builder User’s Guide Copyright NoticeCopyright © 2000 by Tivoli Systems Inc., an IBM Company, including this documentation and all software. All rights reserved. May only be used pursuant to a Tivoli Systems Software License Agreement or Addendum for Tivoli Products to IBM Customer or License Agreement. No part of this publication may be reproduced, transmitted, transcribed, stored in a retrieval system, or translated into any computer language, in any form or by any means, electronic, mechanical, magnetic, optical, chemical, manual, or otherwise, without prior written permission of Tivoli Systems. Tivoli Systems grants you limited permission to make hardcopy or other reproductions of any machine-readable documentation for your own use, provided that each such reproduction shall carry the Tivoli Systems copyright notice. No other rights under copyright are granted without prior written permission of Tivoli Systems. The document is not intended for production and is furnished “as is” without warranty of any kind. All warranties on this document are hereby disclaimed including the warranties of merchantability and fitness for a particular purpose.
Note to U.S. Government Users—Documentation related to restricted rights—Use, duplication or disclosure is subject to restrictions set forth in GSA ADP Schedule Contract with IBM Corporation.
TrademarksThe following product names are trademarks of Tivoli Systems or IBM Corporation: AIX, IBM, OS/2, RS/6000, Tivoli Management Environment, TME 10, Tivoli Global Enterprise Manager, TME 10 Distributed Monitoring, Tivoli Distributed Monitoring, TME 10 Enterprise Console, Tivoli Enterprise Console, TME 10 Software Distribution, Tivoli Software Distribution, TME 10 Framework, Tivoli Management Framework, Tivoli Module Builder, Tivoli Module Designer, and Tivoli Ready QuickStart.
Microsoft, Windows, Windows NT, and the Windows logo are trademarks or registered trademarks of Microsoft Corporation.
UNIX is a registered trademark in the United States and other countries licensed exclusively through X/Open Company Limited.
Java and all Java-based trademarks or logos are trademarks of Sun Microsystems, Inc.
Other company, product, and service names mentioned in this document may be trademarks or servicemarks of others.
NoticeReferences in this publication to Tivoli Systems or IBM products, programs, or services do not imply that they will be available in all countries in which Tivoli Systems or IBM operates. Any reference to these products, programs, or services is not intended to imply that only Tivoli Systems or IBM products, programs, or services can be used. Subject to Tivoli Systems’ or IBM’s valid intellectual property or other legally protectable right, any functionally equivalent product, program, or service can be used instead of the referenced product, program, or service. The evaluation and verification of operation in conjunction with other products, except those expressly designated by Tivoli Systems or IBM, are the responsibility of the user.
Tivoli Systems or IBM may have patents or pending patent applications covering subject matter in this document. The furnishing of this document does not give you any license to these patents. You can send license inquiries, in writing, to the IBM Director of Licensing, IBM Corporation, North Castle Drive, Armonk, New York 10504-1785, U.S.A.
Portions copyright 1996 Shafir, Inc.

Tivoli Module Builder User’s Guide iii
Tivoli Module Builder User’s Guide
Preface................................................................................................................... xi
Part I—Understanding the Tivoli Module Builder
Chapter 1—Overview .................................................. 1-1Application and Business Systems Management ............................................... 1-2
Management Data ...................................................................................... 1-2
Defining an Application for Tivoli Enterprise Software............................ 1-3
Defining a Business System for Tivoli Enterprise Software...................... 1-4
Base Modules...................................................................................................... 1-5
Modules for Team Tivoli Certification............................................................... 1-5
Plus Modules .............................................................................................. 1-6
Tivoli GEM Modules ................................................................................. 1-6
Understanding the Tivoli Module Builder .......................................................... 1-7
Tivoli Module Builder Features ................................................................. 1-7
Tree View Hierarchy and Tabs.......................................................... 1-8
Tivoli Module Designer..................................................................... 1-9
Generate Process................................................................................ 1-9
Build Process ................................................................................... 1-10
Workflow for Creating Modules .............................................................. 1-10
Chapter 2—Getting Started ........................................ 2-1Launching the Tivoli Module Builder ................................................................ 2-2
Creating the Project............................................................................................. 2-3
Adding a Module to the Project .......................................................................... 2-4
iv Version 2.3
Adding and Importing Components into a Module ............................................ 2-6
Adding an AMS Component...................................................................... 2-7
Importing a Component Description File (CDF) ..................................... 2-11
Editing Application Data .................................................................................. 2-13
Modules with a Single Component .......................................................... 2-14
Modules with More than One Component............................................... 2-14
Editing Component Data with the Tivoli Module Designer............................. 2-16
Launching from the Module Level .......................................................... 2-17
Launching from the Component Level .................................................... 2-18
Launching from Lower-level Objects ...................................................... 2-20
Generating the Module and Other Objects ....................................................... 2-21
Editing the Generated Scripts ........................................................................... 2-22
Testing the Scripts ............................................................................................ 2-24
Editing Test Data Files............................................................................. 2-25
Running Tests .......................................................................................... 2-26
Building the Install Image for Modules............................................................ 2-26
Chapter 3—Variables and Settings ........................... 3-1Editing Settings................................................................................................... 3-2
Installation and Configuration Settings...................................................... 3-2
Tivoli Management Agent (TMA) Support Settings ................................. 3-4
General TMA Settings....................................................................... 3-5
Logfile Adapter Settings for TMA Endpoints................................... 3-8
Editing GDF and CDF Variables........................................................................ 3-9
GDF Variables ......................................................................................... 3-10
CDF Variables.......................................................................................... 3-11
Overriding Variables for Generated Files......................................................... 3-13

Tivoli Module Builder User’s Guide v
Using Variables to Lock Generated Files ......................................................... 3-13
Locking .dsl, .csl, and .tll Files................................................................. 3-13
Locking Before and After Scripts ............................................................ 3-14
Chapter 4—Script Stubs and Skeleton Files ............ 4-1Tivoli Management Agent (TMA) Enablement ................................................. 4-2
Editing the Default Skeleton Files ...................................................................... 4-2
Creating New Skeleton Files .............................................................................. 4-4
Specifying Skeletons for Generating Scripts ...................................................... 4-4
Chapter 5—Merging Component Description Files . 5-1
Chapter 6—Importing Monitors ................................. 6-1Importing Monitors from an MCSL File ............................................................ 6-1
Understanding the Import Process ............................................................. 6-2
Importing the MCSL File ........................................................................... 6-2
Error Messages ........................................................................................... 6-4
Importing Monitors from a Component Description File................................... 6-5
Chapter 7—National Language Support for Modules........................................................................ 7-1Message Catalog Tab Page ................................................................................. 7-2
Message and Message Catalog Files................................................................... 7-4
Enabling the Module for NLS Support ............................................................... 7-4
Reusing Translated Message Files...................................................................... 7-7
Chapter 8—Installing and Uninstalling Modules...... 8-1Specifying the Tivoli Installation Directory ....................................................... 8-1
Installing Modules with the Tivoli Module Builder ........................................... 8-3
Incrementally Installing Tasks, Monitors, and File Packages ............................ 8-5

vi Version 2.3
Uninstalling Modules.......................................................................................... 8-9
Uninstalling with the Tivoli Module Builder............................................. 8-9
Uninstalling from the Command Line ..................................................... 8-11
Base and Tivoli GEM Modules....................................................... 8-11
Plus Modules ................................................................................... 8-12
Tivoli Ready QuickStart Modules................................................... 8-12
Using the winstall Command .......................................................... 8-13
Part II—Base Modules
Chapter 9—Introduction to Base Modules ............... 9-1Defining Component Data .................................................................................. 9-2
Specifying Before and After Installation Scripts................................................ 9-5
Specifying Before Install Scripts ............................................................... 9-6
Specifying After Install Scripts.................................................................. 9-6
Base Modules in the Tivoli Environment ........................................................... 9-7
Chapter 10—Installation Options ............................ 10-1
Chapter 11—Operational Tasks............................... 11-1
Chapter 12—File Packages ...................................... 12-1
Chapter 13—Monitors............................................... 13-1Using the Predefined Monitors ......................................................................... 13-2
Creating a Monitor............................................................................................ 13-2
Creating a Monitor Instance ............................................................................. 13-7

Tivoli Module Builder User’s Guide vii
Part III—Team Tivoli Plus Modules
Chapter 14—Introduction to Plus Modules............. 14-1Loading the Plus Module Template .................................................................. 14-2
Using the “Empty” Plus Module Template ...................................................... 14-3
Importing Previous Versions of a Plus Module................................................ 14-4
Importing a Plus Module.......................................................................... 14-4
Implementing Imported Monitors ............................................................ 14-6
Importing the About ApplicationName Task........................................... 14-6
Using the Plus Template.................................................................. 14-7
Using an AMS Component.............................................................. 14-8
Plus Module Component Types........................................................................ 14-9
Icons for <App Name>........................................................................... 14-10
Launch <App Name>............................................................................. 14-10
Set Install Options for <App Name>...................................................... 14-11
Subscribers of <App Name>.................................................................. 14-11
Endpoint Subscribers of <App Name> .................................................. 14-11
Plus Configuration for <App Name>..................................................... 14-11
Administrative Tasks for <App Name>................................................. 14-12
Ancillary Filepack for <App Name> ..................................................... 14-12
Server Filepack Distribution for <App Name>...................................... 14-12
Client Filepack Distribution for <App Name> ...................................... 14-12
Indicators for <App Name> Monitors.................................................... 14-12
Universal Monitors................................................................................. 14-13
Monitors for <App Name>..................................................................... 14-13
TEC Configuration for <App Name> .................................................... 14-13

viii Version 2.3
Logfile Adapter Configuration for <App Name> .................................. 14-13
Hidden Tasks for <App Name> ............................................................. 14-13
Component Definition Categories .................................................................. 14-14
Location Definitions .............................................................................. 14-15
File List .................................................................................................. 14-16
Installation Programs ............................................................................. 14-16
Installation Dependencies ...................................................................... 14-16
Operational Tasks .................................................................................. 14-16
Synchronous Monitors ........................................................................... 14-16
Management Tool Extensions................................................................ 14-17
Plus Modules in the Tivoli Environment........................................................ 14-18
Activating the Plus Module’s Features........................................................... 14-20
Chapter 15—Application Icons ................................ 15-1Prerequisites...................................................................................................... 15-2
Editing the Application Icons Component ....................................................... 15-3
Chapter 16—Application Launch............................. 16-1Prerequisites...................................................................................................... 16-2
Editing the Application Launch Component ................................................... 16-3
Chapter 17—Install Options ..................................... 17-1Prerequisites...................................................................................................... 17-2
Editing the Install Options Component ........................................................... 17-3
Chapter 18—Plus Configuration.............................. 18-1Prerequisites...................................................................................................... 18-2
Editing the Plus Configuration Component ..................................................... 18-3

Tivoli Module Builder User’s Guide ix
Chapter 19—Subscription Lists............................... 19-1Prerequisites ...................................................................................................... 19-2
Editing the Subscription List Component......................................................... 19-3
Chapter 20—Endpoint Subscription List ................ 20-1Prerequisites ...................................................................................................... 20-2
Editing the Endpoint Subscription List Component ......................................... 20-3
Chapter 21—Administrative Tasks .......................... 21-1Prerequisites ...................................................................................................... 21-2
Editing the Administrative Tasks Component ................................................. 21-3
Chapter 22—File Packages ...................................... 22-1Prerequisites ...................................................................................................... 22-3
Editing the File Package Component ............................................................... 22-3
Chapter 23—Indicator Collections........................... 23-1Prerequisites ...................................................................................................... 23-2
Editing the Indicator Collection Component ................................................... 23-3
Chapter 24—Monitors ............................................... 24-1Prerequisites ...................................................................................................... 24-3
Editing the Monitors Component ..................................................................... 24-3
Creating a New Monitor ................................................................................. 24-14
Creating a Monitor Instance............................................................................ 24-20
Using Additional Predefined Monitors........................................................... 24-29
x Version 2.3
Chapter 25—Tivoli Enterprise Console Configuration............................................................. 25-1Prerequisites...................................................................................................... 25-3
Editing the TEC Configuration Component .................................................... 25-3
Chapter 26—Logfile Adapter Configuration ........... 26-1Prerequisites...................................................................................................... 26-3
Editing the Logfile Adapter Configuration Component .................................. 26-4
Chapter 27—Hidden Tasks....................................... 27-1Prerequisites...................................................................................................... 27-2
Editing the Hidden Tasks Component ............................................................. 27-2
Chapter 28—Enabling Plus Modules for Tivoli GEM.................................................................. 28-1Excluding the Unnecessary Plus Components ................................................. 28-2
Linking the Tivoli GEM and Plus Modules ..................................................... 28-2
Glossary
Preface
Tivoli Module Builder User’s Guide xi
Preface The Tivoli Module Builder User’s Guide describes how to use the Tivoli Module Builder to create modules that manage an application in the Tivoli Enterprise software environment. The Tivoli Module Builder provides the base facilities and templates for defining an application’s management requirements and building this information, along with the scripts, programs, and files required to implement the management function, into a Tivoli install image.
The following sections describe the types of management modules that can be created with the Tivoli Module Builder.
Base ModulesA base module describes an application’s management requirements for the Tivoli management software tools. This information, along with the scripts and programs that implement the management functions, is built into a Tivoli install image.
Plus Modules Plus modules are required for certification by Team Tivoli. A Plus module provides a high-level integration of an application with the Tivoli management software tools. The application’s management information, along with the scripts and programs for integrating the application with the Tivoli environment, is built into a Tivoli install image.
Tivoli Global Enterprise Manager Modules Tivoli Global Enterprise Manager (Tivoli GEM) modules are also required for certification by Team Tivoli. These modules enable an application to be managed in the context of a business system with Tivoli GEM. The module’s management information, along with the scripts and programs that implement the management functions, is built into a Tivoli install image.

Preface
xii Version 2.3
What’s New in This Guide The overall organization of this guide remains the same as the previous release. New information has been added, however, to document features new to the Tivoli Module Builder Version 2.3. Some of the terminology in this guide, particularly that relating to Tivoli GEM modules, has also changed.
The following list describes changes to this guide:
■ The screenshots have been changed to reflect changes in the Tivoli Module Builders graphical user interface (GUI).
■ Changes have been made to Chapter 2, “Getting Started” and Chapter 8, “Installing and Uninstalling Modules” to reflect that while you can build modules at the project level, you can only install a single module at a time.
■ Changes have been made to the section “Editing Application Data” on page 2-13 to reflect changes in the procedure for specifying CDF variables for a module with a single component. The notes that appear in Chapters 9 through 13 also reflect this change.
■ Changes have been made to the section “Uninstalling from the Command Line” on page 8-11 to provide information on the location of uninstall scripts.
■ Changes have been made to Chapter 11, “Operational Tasks” and Chapter 21, “Administrative Tasks” to document how to assign a Tivoli administrator role to a task.
■ The title of Chapter 6, “Importing Monitors” has been changed from “Importing Monitors from an MCSL File.” A section titled “Importing Monitors from a Component Description File” has also been added to this chapter.
■ Chapter 5, “Merging Component Description Files” has been added.
■ Chapter 7, “National Language Support for Modules” has been added.
■ Chapter 20, “Endpoint Subscription List” has been added.

Preface
Tivoli Module Builder User’s Guide xiii
■ References to the Tivoli Partners Association have been changed to Team Tivoli.
■ References to the Tivoli Global Enterprise Manager Instrumentation Guide have been changed to the Tivoli Global Enterprise Manager Business System Enablement Guide or to the Tivoli Global Enterprise Manager Advanced Business System Enablement Guide.
■ References to Tivoli GEM instrumentation have been changed to enablement.
Who Should Read This Guide Developers who create management modules are the target audience for this guide.
Users of this guide should have knowledge of the following:
■ The management requirements and features of the application for which you intend to build a management module. For example, you should understand those aspects of the application that are prone to failure or whose function can be facilitated by the Tivoli management software tools. You should also be familiar with the managed application’s administrative tasks as well as any logfiles or application programming interfaces (APIs) that the managed application offers for retrieving status and performance data.
■ Shell programming.
■ The Application Management Specification (AMS).
■ The Tivoli Enterprise software environment, including Tivoli Management Framework, Tivoli Software Distribution, Tivoli Distributed Monitoring, and Tivoli Enterprise Console. (See “Prerequisite and Related Documentation” on page xiii.)
Prerequisite and Related Documentation Management modules interact with various management tools in the Tivoli environment. You can refer to the documentation for these

Preface
xiv Version 2.3
tools when creating a management module. In particular, this guide contains references to the following documentation:
■ For information on creating a Tivoli GEM module, see the Tivoli Global Enterprise Manager Business System Enablement Guide and the Tivoli Global Enterprise Manager Advanced Business System Enablement Guide. For other information on Tivoli GEM, see the Tivoli Global Enterprise Manager Installation and User’s Guide and Tivoli Global Enterprise Manager Troubleshooting located at http://www.tivoli.com/support/Prodman/html/AB.html
■ For information on installing the Tivoli Management Framework, see the Tivoli Management Framework documentation.
■ For information on using the command line interface, see the Tivoli Management Framework documentation.
■ For information on modifying Collection Specification Language (CSL) files (for monitor collections) see the Tivoli Distributed Monitoring User’s Guide and the Tivoli Distributed Monitoring MCSL Developer’s Guide.
■ For information on creating BAROC and rules files, refer to the Tivoli Enterprise Console User’s Guide, the Tivoli Enterprise Console Rule Builder’s Guide, and the Tivoli Enterprise Console Adapters Guide.
■ For information on creating the format file, refer to the Tivoli Enterprise Console Adapters Guide and the Tivoli Enterprise Console User’s Guide.
■ For information on developing modules to be used with the Tivoli management agent, see the Application Development for the Lightweight Client Framework.
■ For information on new features in the Tivoli Module Builder Version 2.2, see the Tivoli Module Builder Release Notes Version 2.2.
■ The Tivoli Module Builder uses file types defined in the Application Management Specification (AMS). For more information on these files, and on requirements for defining the

Preface
Tivoli Module Builder User’s Guide xv
management requirements of applications and business systems, download the AMS from the Tivoli Web site at www.tivoli.com/products/index/ams.
Note: Tivoli is in the process of changing product names. Products referenced in this manual may still be available under their old names, for example, TME 10 Enterprise Console instead of Tivoli Enterprise Console.
What This Guide ContainsThe Tivoli Module Builder User’s Guide contains the following sections:
■ Part I — “Understanding the Tivoli Module Builder”
• Chapter 1, “Overview”Provides conceptual information for understanding applications and business systems management and for using the Tivoli Module Builder to create a management module.
• Chapter 2, “Getting Started”Provides a workflow of the basic tasks required to create a base module. This chapter includes information on the graphical user interface (GUI) features that assist you in completing these tasks.
• Chapter 3, “Variables and Settings”Describes different types of variables used by modules, how to edit variables, and how to use variables to lock generated files to keep them from being overwritten.
• Chapter 4, “Script Stubs and Skeleton Files”Describes how script stubs are generated using skeleton files. This chapter also describes how to edit skeleton files, create new ones, and specify which skeleton file is to be used when generating a script.

Preface
xvi Version 2.3
• Chapter 5, “Merging Component Description Files”Describes how to merge two CDFs using the Tivoli Module Designer.
• Chapter 6, “Importing Monitors”Describes how to import monitors from a Monitoring Collection Specification Language (MCSL) file into a module’s component using the Tivoli Module Designer.
• Chapter 7, “National Language Support for Modules”Describes the functions provided by the Tivoli Module Builder for National Language Support (NLS) enabled modules.
• Chapter 8, “Installing and Uninstalling Modules”Describes how to install and uninstall modules using the Tivoli Module Builder.
■ Part II — “Base Modules”
• Chapter 9, “Introduction to Base Modules”Introduces base modules and provides information on editing the base module components as well as the objects that appear on the Tivoli desktop after base module installation.
• Chapter 10, “Installation Options”Describes how to specify information that the module’s user must supply when installing the base module. The user is prompted for the information you specify during the base module’s installation.
• Chapter 11, “Operational Tasks”Describes how to create administrative tasks that can be run from the base module (and incorporated into the Tivoli Management Framework task library) to manage an application.
• Chapter 12, “File Packages”Describes how to create file packages for the centralized

Preface
Tivoli Module Builder User’s Guide xvii
distribution of the managed application to multiple machines and platforms.
• Chapter 13, “Monitors”Describes how to create monitors that can track the status of an application’s crucial resources and generate events in response to status changes.
■ Part III — “Team Tivoli Plus Modules”
• Chapter 14, “Introduction to Plus Modules”Introduces the Plus template provided with the Tivoli Module Builder. This chapter describes how to load the Plus template, the component types provided with the Plus template, and the categories of information that you specify to complete a component definition.
• Chapter 15, “Application Icons”Describes how to specify an application’s icon for the Plus module and the application’s launch task.
• Chapter 16, “Application Launch”Describes how to create a task for launching an application. This task can specify multiple entry points for launching the application.
• Chapter 17, “Install Options”Describes how to specify a task that runs when installing an application so that the module’s user can specify site-specific information, such as machine names or database types.
• Chapter 18, “Plus Configuration”Describes how to specify a Plus configuration task that can be run during and after Plus module installation. Additional tasks, such as displaying information about an application or creating additional subscription lists may also be specified.
• Chapter 19, “Subscription Lists”Describes how to create a subscription list of the managed nodes associated with the managed application. For
Preface
xviii Version 2.3
example, a subscription list can be used to run a task on, or distribute a file package to, multiple nodes.
• Chapter 20, “Endpoint Subscription List”Describes how to create a subscription list of Tivoli Management Agent (TMA) endpoints instead of managed nodes.
• Chapter 21, “Administrative Tasks”Describes how to create administrative tasks that can be run from the Plus module (and incorporated into the Tivoli Management Framework task library) to manage an application.
• Chapter 22, “File Packages”Describes how to create file packages for the centralized distribution of the managed application to multiple machines and platforms.
• Chapter 23, “Indicator Collections”Describes how to create an indicator collection for displaying the status of an application’s monitors.
• Chapter 24, “Monitors”Describes how to create monitors that can track the status of an application’s crucial resources and generate events in response to status changes.
• Chapter 25, “Tivoli Enterprise Console Configuration”Describes how to create the configuration task required to integrate an application’s custom monitors with the Tivoli Enterprise Console.
• Chapter 26, “Logfile Adapter Configuration”Describes how to create the configuration task required to integrate an application’s logfile with the Tivoli Enterprise Console logfile adapter.
• Chapter 27, “Hidden Tasks”Describes how to define tasks that are run in response to specific events. These tasks are understood by the Tivoli

Preface
Tivoli Module Builder User’s Guide xix
management software tools, but are not visible to the user of the Plus module.
• Chapter 28, “Enabling Plus Modules for Tivoli GEM”Describes how to link a Tivoli GEM module to a Plus module so that the combined management features of both modules can be built into a single Tivoli install image.
• “Glossary”Defines terms particular to the Application Management Specification (AMS) and the Tivoli Module Builder.
Typeface Conventions The guide uses several typeface conventions for special terms and actions. These conventions have the following meaning:
Bold Commands, keywords, file names, authorization roles, URLs, or other information that you must use literally appear in bold. The names or titles of screen objects also appear in bold.
Italics Variables and values that you must provide appear in italics. Words and phrases that are emphasized also appear in italics.
Bold Italics New terms appear in bold italics when they are defined in the text.
Monospace Code examples, output, and system messages appear in a monospace font.
Contacting Customer SupportIf you encounter difficulties with any Tivoli products, you can enter http://www.support.tivoli.com to view the Tivoli Support home page. After you link to and submit the customer registration form, you will be able to access many customer support services on the Web.
Use the following phone numbers to contact customer support in the United States: the Tivoli number is 1-800-848-6548 (1-800-TIVOLI8) and the IBM number is 1-800-237-5511 (press or

Preface
xx Version 2.3
say 8 after you reach this number). Both of these numbers direct your call to the Tivoli Customer Support Call Center.
We are very interested in hearing from you about your experience with Tivoli products and documentation. We welcome your suggestions for improvements. If you have comments or suggestions about this documentation, please send e-mail to [email protected].

Tivoli Module Builder User’s Guide
Part I—Understanding the Tivoli Module Builder
This section contains chapters that introduce concepts associated with application and business systems management as well as using the Tivoli Module Builder to create management modules.
Chapter 1—Overview .................................................. 1-1Application and Business Systems Management ............................................... 1-2
Base Modules...................................................................................................... 1-5
Modules for Team Tivoli Certification............................................................... 1-5
Understanding the Tivoli Module Builder .......................................................... 1-7
Chapter 2—Getting Started ........................................ 2-1Launching the Tivoli Module Builder ................................................................ 2-2
Creating the Project............................................................................................. 2-3
Adding a Module to the Project .......................................................................... 2-4
Adding and Importing Components into a Module ............................................ 2-6
Editing Application Data .................................................................................. 2-13
Editing Component Data with the Tivoli Module Designer ............................. 2-16
Generating the Module and Other Objects ....................................................... 2-21
Editing the Generated Scripts ........................................................................... 2-22
Testing the Scripts............................................................................................. 2-24
Building the Install Image for Modules ............................................................ 2-26
Understanding the Tivoli Module Builder
Version 2.3
Chapter 3—Variables and Settings ........................... 3-1Editing Settings................................................................................................... 3-2
Editing GDF and CDF Variables........................................................................ 3-9
Overriding Variables for Generated Files......................................................... 3-13
Using Variables to Lock Generated Files ......................................................... 3-13
Chapter 4—Script Stubs and Skeleton Files ............ 4-1Tivoli Management Agent (TMA) Enablement ................................................. 4-2
Editing the Default Skeleton Files ...................................................................... 4-2
Creating New Skeleton Files .............................................................................. 4-4
Specifying Skeletons for Generating Scripts ...................................................... 4-4
Chapter 5—Merging Component Description Files . 5-1
Chapter 6—Importing Monitors ................................. 6-1Importing Monitors from an MCSL File ............................................................ 6-1
Importing Monitors from a Component Description File................................... 6-5
Chapter 7—National Language Support for Modules........................................................................ 7-1Message Catalog Tab Page ................................................................................. 7-2
Message and Message Catalog Files .................................................................. 7-4
Enabling the Module for NLS Support............................................................... 7-4
Reusing Translated Message Files...................................................................... 7-7
Chapter 8—Installing and Uninstalling Modules...... 8-1Specifying the Tivoli Installation Directory ....................................................... 8-1
Installing Modules with the Tivoli Module Builder ........................................... 8-3
Incrementally Installing Tasks, Monitors, and File Packages ............................ 8-5
Uninstalling Modules.......................................................................................... 8-9

Tivoli Module Builder User’s Guide 1–1
Overview
1Overview
Application and business systems management is a fundamental activity in systems administration. Systems administration requires maintaining the availability of applications running on multiple platforms and at geographically diverse locations. System administrators rely on management tools, such as the Tivoli management software tools, to maintain an application’s availability from a central point of control.
The Tivoli management software tools can distribute, install, monitor, provide event correlation and security, run tasks, and provide other management for applications and business systems. Using these tools, you can monitor the efficiency of an application’s transactions as well as build a topology view of multiple applications that shows how the applications are communicating with each other. Through these functions, the Tivoli management software tools provide a view of the overall availability of an application or business system as well as the ability to avoid or correct error conditions.
To provide application and business systems management, the Tivoli management software tools require information that describes applications and their relationships. For example, monitoring an application’s availability requires information about the system resources, such as daemons and disk space, that are crucial to the application’s functioning. A system administrator could provide this information by manually instructing each management tool for each application to be managed. It is much more efficient, however, to provide this information in a machine-readable format. The Tivoli
1

Application and Business Systems Management
1–2 Version 2.3
Module Builder creates the data in a format—referred to as a module—that can be directly imported and interpreted by the Tivoli management software tools. The Tivoli Module Builder provides a graphical user interface (GUI), called the Tivoli Module Designer, for defining applications and business systems.
Application and Business Systems Management Application management includes monitoring system resources and initiating tasks to manage the application. Through monitoring and tasks, the Tivoli management software tools can take preventive action to avoid application failure or take corrective action once a failure has occurred.
In addition to the management needs of an individual application, critical business functions often depend on the interaction of many different applications and system resources. For example, an airline ticketing system can require maintaining machines with client/server and mainframe functions, different operating systems, databases, middleware applications, and various end-user applications, some of which may be Internet-based. The interdependencies of these applications and resources constitute a business system. Rather than managing the specific needs of an individual application, it is often more useful to understand the interactions and interdependencies of the multiple applications and resources that comprise a business system.
Management Data Management data provides information about an application or business system. This information describes the management needs of an application as well as the files associated with the application such as configuration scripts and programs that execute maintenance tasks. This information also describes the role the application plays in a business system.
Management data conveys such information as the following:
■ Name and version of the application
■ Types and versions of target platforms

Application and Business Systems Management
Tivoli Module Builder User’s Guide 1–3
Overview
■ Requirements for different platform operating systems
■ Relationship the application has to other applications
■ How the application fits into a business system
■ Paths and names of source files that make up the application
■ Paths of destination directories on targets
■ Configuration scripts that run before or after the distribution
■ Maintenance scripts and programs that perform tasks for operational control
■ Resources that require monitoring and thresholds that indicate an error condition
The Tivoli Module Builder enables you to define the managed application’s management data.
Defining an Application for Tivoli Enterprise Software The Tivoli Module Builder uses application and business system description files that conform to the Application Management Specification (AMS). The AMS is an innovation founded on the Management Information Format (MIF). (See “Prerequisite and Related Documentation” on page xiii for information on downloading the AMS.)
The MIF is an open standard developed by the Desktop Management Task Force (DMTF), which is a consortium of industry leaders such as IBM, Microsoft Corporation, Hewlett-Packard, and Intel Corporation. The goal of the DMTF is to define standardized syntax for data that describes how to manage the hardware and software components of desktop computers.
The AMS describes groups of management data that can be used to define an application or business system. These groups of information are then applied to a software component to describe the management needs of the component. The AMS defines a software component as an individually deployable unit of an application that runs on a single platform. The management information for each software component is contained in a component description file (CDF).

Application and Business Systems Management
1–4 Version 2.3
The Tivoli Module Builder uses the same management information groups as the AMS. When generating a module, the management information for a software component is also contained in a CDF.
Defining a Business System for Tivoli Enterprise Software
In addition to defining the management needs of individual applications, a business system definition organizes related applications into business components and business subsystems to provide common management at different levels.
Note: Base and Plus modules do not provide business systems management. To manage an application in the context of a business system, refer to the Tivoli Global Enterprise Manager Business System Enablement Guide and the Tivoli Global Enterprise Manager Advanced Business System Enablement Guide for information on creating a Tivoli GEM module.
While the CDF is associated with an application definition, a business system definition generates files, known generically as business description files (BDFs). The following list describes the basic elements of a business system definition and the files generated for each element.
■ Business system components. A business system component describes the role a particular application plays in the context of the business system. The information for a business system component is generated into a business system component description file (BCDF). For example, if the business system is for an airline ticketing system, you might create a BCDF for a pricing database and another BCDF for the flight schedule database. You could also have separate BCDFs for the client, server, and middleware applications.
■ Business system mapping. The business system mapping identifies or “maps” the software components that are to be included in a business system component. This mapping is done by referencing a software component’s CDF. For example, the CDF that defines a server component could be mapped to a

Base Modules
Tivoli Module Builder User’s Guide 1–5
Overview
BCDF for servers. The information for business system mapping is generated into a business system mapping description file (BMDF).
■ Business subsystems. Business subsystems organize business system components into groups based on a common function to provide a higher level of management. The information for a business subsystem is generated into a business subsystem description file (BSSDF). In an airline ticketing business system, for example, a flight scheduling subsystem might include BCDFs for all of the client, server, database, and middleware applications that handle flight scheduling.
■ Business system. Information pertaining to the entire business system is generated into a business system description file (BSDF). This is the highest level of the business system definition. It identifies the overall business system, such as an airline ticketing system, to which the application is associated.
Base Modules A base module describes basic management capabilities that enable a particular application to be managed in the Tivoli environment. Base modules use AMS formats to describe monitors and tasks for managing an application and the files to be distributed with the application. This management information, including the corresponding scripts and programs, is built into a Tivoli install image.
Modules for Team Tivoli Certification Team Tivoli has a certification program for Plus and Tivoli GEM modules. Plus modules provide applications management with the Tivoli management software tools, while the Tivoli GEM modules provide additional features for managing an application in the context of a business system.
To achieve certification, Plus and Tivoli GEM modules must have particular management features and meet other program requirements. In addition to these features, Plus modules are required

Modules for Team Tivoli Certification
1–6 Version 2.3
to be enabled for Tivoli GEM, so that the combined applications management and business systems management features of both modules can be built into a single Tivoli install image.
Information on creating a Plus module is provided in Part III —, “Team Tivoli Plus Modules.” For information on creating a Tivoli GEM module, see the Tivoli Global Enterprise Manager Business System Enablement Guide and the Tivoli Global Enterprise Manager Advanced Business System Enablement Guide.
Plus Modules Plus modules integrate an application with the Tivoli management software tools. Through this integration, a Plus module customizes the Tivoli applications management capabilities for use with a particular application. In addition to customized and comprehensive applications management, Plus modules provide a common interface and in some cases, enable data sharing with the Tivoli management software tools. The specific integration points, which include tasks, monitors, file distribution, and event management, are described in AMS format. This management information, along with the corresponding scripts and programs, are built into a Tivoli install image.
When installed, Plus modules create a Plus icon on the Tivoli desktop. This icon accesses the dialogs and other features for all installed Plus modules, thus avoiding the need to access the Plus management functions separately from each Tivoli management software tool.
Tivoli GEM Modules A Tivoli GEM module describes the basic management capabilities that enable a particular application to be managed with the Tivoli GEM product. A Tivoli GEM module describes the tasks and monitors that Tivoli GEM requires to build topology views for business systems management. These tasks and monitors are described in AMS format. This information, along with the corresponding scripts and programs, is built into a Tivoli install image. Because Tivoli GEM provides business systems management, a Tivoli GEM module describes the role an application plays in a
Understanding the Tivoli Module Builder
Tivoli Module Builder User’s Guide 1–7
Overview
business system. For example, the Tivoli GEM module can associate an application’s CDF with a BCDF.
The Tivoli Module Builder provides the Tivoli Ready QuickStart wizard to assist you in building a Tivoli GEM module. Using the Tivoli Ready QuickStart wizard, you can choose predefined task, monitor, and discovery enablers. These enablers implement the management functions of the Tivoli GEM module. The Tivoli Ready QuickStart wizard also provides a simplified workflow for defining modules. Tivoli GEM modules built with the wizard can be further customized with advanced business systems management features using the Tivoli Module Builder. The Tivoli Ready QuickStart wizard can be launched by selecting QuickStart.bat on the Windows NT Start menu or by running QuickStart.bat or quickstart.sh.
For more information on the Tivoli Ready QuickStart wizard, see the Tivoli Global Enterprise Manager Business System Enablement Guide.
For information on creating a Tivoli GEM module using the Tivoli Module Builder, refer to the Tivoli Global Enterprise Manager Advanced Business System Enablement Guide.
The term enablement refers to the management information, scripts, and programs that manage an application with Tivoli GEM.
Understanding the Tivoli Module BuilderThe Tivoli Module Builder enables you to create a module of information that, when installed in the Tivoli environment, supplies Tivoli management software tools with management data as well as the scripts and programs for implementing management functions. The Tivoli Module Builder has features for defining the application’s management requirements, generating the module, editing the scripts, and building the module into a Tivoli install image.
Tivoli Module Builder Features When launched, the Tivoli Module Builder displays a tree view hierarchy for organizing your modules and projects as well as tabs with features for generating and building the module.

Understanding the Tivoli Module Builder
1–8 Version 2.3
Tree View Hierarchy and Tabs
The Tivoli Module Builder’s workspace is divided into left and right panes. The left pane displays the tree view hierarchy, which contains icons representing your projects and modules. As you add modules and other features to a project, additional icons are displayed in the tree view hierarchy that represent these objects. The different levels of the hierarchy are connected by a little box or “tree control button” that contains a plus (+) or minus (-) symbol. You click the tree control button to expand or contract the tree view.
The tree view hierarchy enables you to organize your work. You could, for example, have related modules organized within the same project. You could then build and test each individual module or build and test them simultaneously at the project level. Information, such as variable settings, that is applied at the project level is also inherited by lower-level objects in the hierarchy. Likewise, you can build at different levels of the hierarchy. The resulting Tivoli install image contains the object that you built and all lower-level objects in the hierarchy.
At the highest level of the tree view hierarchy is the default object named Projects, which is displayed at all times. Individual projects are the next level of the hierarchy, followed by modules. You can add projects and modules to the hierarchy using the Create menu. Depending on the item that you have selected in the tree view hierarchy, the Create menu only enables you to add an object that is appropriate for the next level of the hierarchy.
When you first add an object (for example, a project or a module) to the tree view hierarchy, the object will have a default name, such as NewProject or NewModule. You can change these default names using a selected object’s General tab.
The levels in the tree view hierarchy correspond to the Projects directory structure. (The default location of the Projects directory is /module_dev/Projects.) The Projects directory is created during installation. When you add a project to the tree view hierarchy, a subdirectory with the project name you specified is created in the Projects directory. These subdirectories contain the files and additional subdirectories associated with your project. For example,

Understanding the Tivoli Module Builder
Tivoli Module Builder User’s Guide 1–9
Overview
the default location for your project’s files and script stubs generated during the build process are located in the Projects/Project_Name directory.
The right pane of the Tivoli Module Builder workspace displays the tabs for specifying the properties of the object selected in the tree view hierarchy. Selecting a tab displays the tab page which has fields for defining specific information for the selected object in the tree view hierarchy.
Tivoli Module Designer
The Tivoli Module Designer is a graphical utility for defining management information for applications and business systems. The Tivoli Module Designer displays categories of information with tab pages for entering specific details. For example, in the operational tasks category, you can supply a name for the task, a name and location for the file that executes the task, arguments, and so on.
The Tivoli Module Designer is automatically launched from the Tivoli Module Builder when required to edit a component or other object in the tree view hierarchy. When building a module, you do not need to launch the Tivoli Module Designer as a separate utility. If you wish to launch the Tivoli Module Designer separately, however, you can do so with the Designer.bat script on a Windows NT system. On a UNIX system, you can run the Designer.sh script.
Generate Process
The generate process creates a CDF for each component that you have defined with the Tivoli Module Designer. If you specified a script or program name with the Tivoli Module Designer, then the generated CDF file also references the script or program name that you have specified. For each script or program referenced in a CDF, the generate process creates a script stub that contains header information and code required by Tivoli management software tools. These script stubs can be edited with application-specific code and their functionality tested. The generate process also creates other files, such as Dialog Specification Language (DSL) files, Task Library Language (TLL) files, the format file for logfile adapter

Understanding the Tivoli Module Builder
1–10 Version 2.3
configuration, and makefiles with lists of other files that must be built.
Build Process
The build environment has a directory structure that mirrors the tree view hierarchy displayed in the Tivoli Module Builder workspace. The build process builds a Tivoli install image. Because you can run the build process at the different levels of the tree view hierarchy, the Tivoli install image can consist of a single or multiple modules. When the image contains multiple modules, the system administrator will have the choice of installing all modules or only selected ones.
Workflow for Creating Modules The basic workflow for creating a module is as follows:
■ Launch the Tivoli Module Builder. Launching the Tivoli Module Builder is discussed in “Launching the Tivoli Module Builder” on page 2-2.
■ Create a project. Features for creating a project are discussed in “Tree View Hierarchy and Tabs” on page 1-8 and “Creating the Project” on page 2-3.
■ Add a module to the project. Features for creating modules are discussed in “Adding a Module to the Project” on page 2-4.
■ Add an AMS component to or load a template into the module. Information on adding an AMS component or importing a CDF is discussed in “Adding and Importing Components into a Module” on page 2-6. For information on loading the Plus module template, see “Loading the Plus Module Template” on page 14-2. For information on loading templates for the Tivoli GEM module, see the Tivoli Global Enterprise Manager Business System Enablement Guide and the Tivoli Global Enterprise Manager Advanced Business System Enablement Guide.
■ Define the application data for the module. The application data is discussed in “Editing Application Data” on page 2-13.

Understanding the Tivoli Module Builder
Tivoli Module Builder User’s Guide 1–11
Overview
■ Define the management information for the software component. The utility for defining management information is discussed in “Tivoli Module Designer” on page 1-9.
■ Generate the CDF and associated scripts and files. Features for generating the module are discussed in “Tivoli Module Builder Features” on page 1-7.
■ Edit the generated files and build the module. Features for building the module are discussed in “Tivoli Module Builder Features” on page 1-7.
Understanding the Tivoli Module Builder
1–12 Version 2.3

Tivoli Module Builder User’s Guide 2–1
Gettin
g S
tarted
2Getting Started
The following sections describe the basic tasks for building a module. Specific information for editing base and Plus module components are provided in Part II — “Base Modules” and Part III — “Team Tivoli Plus Modules.”
When building a module, you create a project and add a module to the project. You then add a component to the module and edit the component with the management information required for the application. The management information includes the application’s tasks, monitors, the files to be distributed, and so forth. Depending on the module type, you can import a generic AMS component or load a template that is designed for a specific type of module. For example, Plus modules and Tivoli GEM modules require their own templates.
When you edit a component, you provide the name of the scripts or programs that implement the management functions described in the component. For example, a component describing a backup and restore task would reference the name of the program that is run when executing the task. The generate process generates a script stub with the program name you specified. You can edit the script stub with application-specific code to implement the task.
Generating the module also creates a component description file (CDF) for each component in the module. The CDFs contain the module’s management information and references to the scripts and programs. Building the module builds the management information and the scripts and programs into a Tivoli install image.
2

Launching the Tivoli Module Builder
2–2 Version 2.3
The following sections describe the workflow for creating a module.
Launching the Tivoli Module BuilderOn Windows NT, you can launch the Tivoli Module Builder from the Start menu or from the Tivoli Module Builder shortcut on the Windows NT desktop. You can also use the Builder.bat script to launch the Tivoli Module Builder.
On a UNIX system, you can launch the Tivoli Module Builder with the Builder.sh script.
The Builder.bat and Builder.sh scripts reside in the Tivoli Module Builder installation directory.
Launching the Tivoli Module Builder displays the Tivoli Module Builder window, which has a tree view hierarchy and tabs for creating and managing your projects.
The following screenshot shows the Tivoli Module Builder window as it first appears before user-created projects or modules have been added to the tree view hierarchy. (For information on the tree view

Creating the Project
Tivoli Module Builder User’s Guide 2–3
Gettin
g S
tarted
hierarchy and the tabs displayed in the Tivoli Module Builder window, see “Tree View Hierarchy and Tabs” on page 1-8.)
Creating the Project All work in the Tivoli Module Builder must be done in a project. Use the Create menu in the Tivoli Module Builder window to create a project. A project can contain a single or multiple modules. A project can also be used as a method of organizing a set of related modules. For example, you can run the generate and build processes at either the project or module level. Building at the project level produces separately installable images for each module contained in the project. These images can be placed on a CDROM and installed using the Tivoli desktop or the winstall command.
The variables set at the project level will also be inherited by the modules, although this inheritance can be overwritten at the module level.

Adding a Module to the Project
2–4 Version 2.3
Use the following steps to create a project:
1. Launch the Tivoli Module Builder using one of the methods described in “Launching the Tivoli Module Builder” on page 2-2.
2. Select the Create –> Project menu option to add a project to the Tivoli Module Builder tree view hierarchy.
3. (Optional). Change the project’s name by editing the Name field on the project’s General tab page. When ready, click the Apply button next to the Name field.
Continue with “Adding a Module to the Project” on page 2-4.
Adding a Module to the Project You can add one or more modules to a project. At least one module is required, however, as AMS components and templates must reside in a module object in the Tivoli Module Builder tree view hierarchy.
Adding a Module to the Project
Tivoli Module Builder User’s Guide 2–5
Gettin
g S
tarted
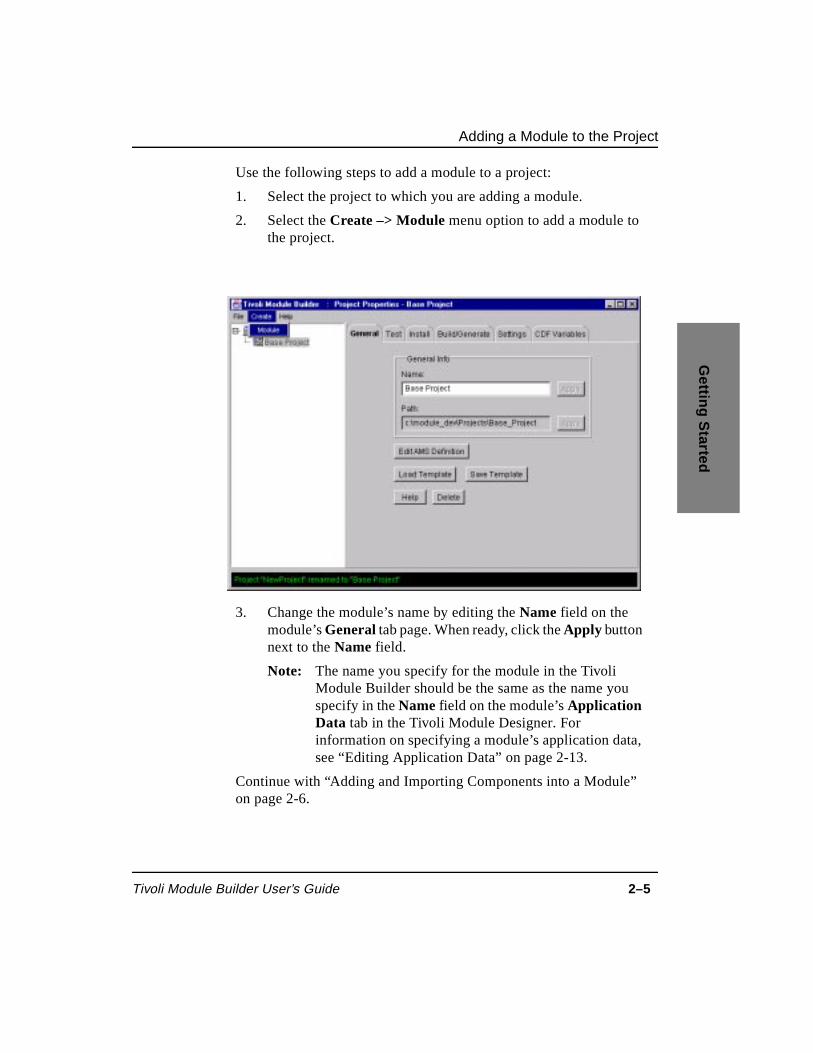
Use the following steps to add a module to a project:
1. Select the project to which you are adding a module.
2. Select the Create –> Module menu option to add a module to the project.
3. Change the module’s name by editing the Name field on the module’s General tab page. When ready, click the Apply button next to the Name field.
Note: The name you specify for the module in the Tivoli Module Builder should be the same as the name you specify in the Name field on the module’s Application Data tab in the Tivoli Module Designer. For information on specifying a module’s application data, see “Editing Application Data” on page 2-13.
Continue with “Adding and Importing Components into a Module” on page 2-6.

Adding and Importing Components into a Module
2–6 Version 2.3
Adding and Importing Components into a Module The module’s features are defined by editing the module’s components. The information for each component is generated in a CDF. For base modules, the Tivoli Module Builder provides a generic AMS component that can be added and then edited.
You can also import a CDF from an existing module, modify this component, and regenerate the CDF.
Note: The Tivoli Module Builder has templates for creating Plus and Tivoli GEM modules. For information on loading a Plus template, see “Loading the Plus Module Template” on page 14-2. For information on loading the Tivoli GEM templates, see the Tivoli Global Enterprise Manager Business System Enablement Guide and the Tivoli Global Enterprise Manager Advanced Business System Enablement Guide.

Adding and Importing Components into a Module
Tivoli Module Builder User’s Guide 2–7
Gettin
g S
tarted
Adding an AMS Component You can add one or more AMS components to a module.
Use the following steps to add an AMS component to a module:
1. Select the module to which you are adding an AMS component.
2. Select the Create –> AMS Component menu option to add an AMS component to the module.

Adding and Importing Components into a Module
2–8 Version 2.3
Adding an AMS component to a module automatically launches the Tivoli Module Designer window with the Component Data tab page displayed. The Tivoli Module Designer enables you to edit the AMS component.
Note: If the Specify a Browser and its location for viewing help dialog is displayed, enter the path to the browser that you wish to use to display the online help in the Tivoli Module Designer and click the Ok button.
For information on editing the component, continue with “Editing Component Data with the Tivoli Module Designer” on page 2-16.
Adding and Importing Components into a Module
Tivoli Module Builder User’s Guide 2–9
Gettin
g S
tarted
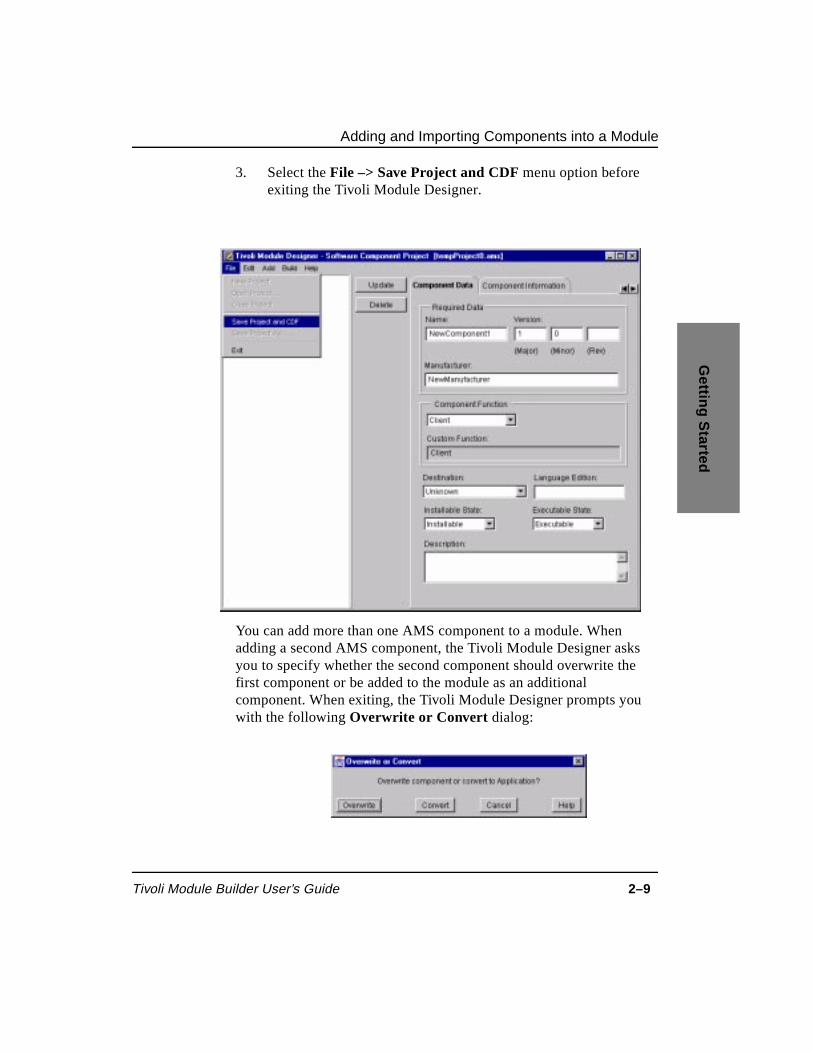
3. Select the File –> Save Project and CDF menu option before exiting the Tivoli Module Designer.
You can add more than one AMS component to a module. When adding a second AMS component, the Tivoli Module Designer asks you to specify whether the second component should overwrite the first component or be added to the module as an additional component. When exiting, the Tivoli Module Designer prompts you with the following Overwrite or Convert dialog:

Adding and Importing Components into a Module
2–10 Version 2.3
When you select Overwrite, the second AMS component overwrites the first one, leaving your module with only a single component. When you select Convert, the AMS component is added to the module as an additional component without overwriting the first component. Because a module with more than one component is considered an application in the Tivoli Module Designer, the Tivoli Module Designer creates an application level for your module when you select the Convert button. You can select the application in the Tivoli Module Designer tree view hierarchy and specify data that applies to all components in the application. For information on specifying application data, see “Editing Application Data” on page 2-13.
If the module already has at least two components, you will not be prompted with the Overwrite or Convert dialog when adding additional components.

Adding and Importing Components into a Module
Tivoli Module Builder User’s Guide 2–11
Gettin
g S
tarted
Importing a Component Description File (CDF) You can import a previously generated CDF into the module. For example, you may wish to import a CDF from a completed module in order to reuse portions of the component description. You can also import a module’s application object file (.aof). When importing an .aof file, all CDFs referenced in the .aof file are imported.
When importing CDFs (or an .aof), you can choose whether or not to import the source files (scripts and programs) referenced by the CDFs. By default, the source files are imported unless you deselect the Import Source Files check box on the module’s General tab page.

Adding and Importing Components into a Module
2–12 Version 2.3
Use the following steps to import a CDF:
1. Select the module into which you are importing a CDF.
Note: If you do not wish to import the scripts and programs referenced by the CDF, deselect the Import Source Files check box.
2. Click the Import AMS Component Definitions button. This action displays the Open dialog for locating the files on your system.

Editing Application Data
Tivoli Module Builder User’s Guide 2–13
Gettin
g S
tarted
Note: Because the Tivoli Module Builder is a Java-based application, the exact title of certain dialogs, such as the Open dialog, may be different on different platforms.
3. Use the Open dialog to locate the directory where the CDF is located.
4. Select the CDF and click the Open button. The CDF is imported into your module’s directory structure under the /Module_dev/Projects directory.
If you are importing source files, a Specify import directory dialog is displayed. This dialog enables you to specify the source directory that contains the scripts and programs referenced in the CDF that you are importing.
To specify the source directory, click the Browse button and then use the Open dialog to locate the directory.
If you choose not to import the source files, click the Skip button. In this case, the Tivoli Module Builder will import only the CDF.
The files are imported into the <Module_Name>/src directory.
After you have imported the CDF, continue with “Editing Component Data with the Tivoli Module Designer” on page 2-16. For information on specifying application data, see “Editing Application Data” on page 2-13.
Editing Application Data The application data provides general information about the module, such as the name of the module when installed in the Tivoli environment. This information is also used by the module’s generated scripts and other files.
When specifying the application data, you are setting the module’s CDF or GDF variables. You can view the values assigned to the CDF or GDF variables on the CDF Variables tab in the Tivoli Module Builder. The values for these variables can only be edited in the Tivoli Module Designer, however, and not on the CDF Variables tab in the Tivoli Module Builder. If you do not specify values using the Tivoli

Editing Application Data
2–14 Version 2.3
Module Designer, then the Tivoli Module Builder uses the default values to specify the CDF GDF variables. For more information on CDF and GDF variables, see “Editing GDF and CDF Variables” on page 3-9.
The procedure you use to specify the application data is different for modules with a single component and modules with more than one component.
Modules with a Single Component Modules with a single component do not display an Application Data tab in the Tivoli Module Designer. For this reason, application information, such as the module’s name when installed, is specified using the Component Data tab in the Tivoli Module Designer. For information on editing the Component Data tab, see “Defining Component Data” on page 9-2.
Modules with More than One Component For modules with more than one component, you specify the application data or GDF variables on the Application Data tab page in the Tivoli Module Designer.
Use the following steps to specify the application data or GDF variables for a module with more than one component:
1. Select the module for which you are specifying the application data or GDF variables in the Tivoli Module Builder tree view hierarchy.
2. Press the Edit AMS Definition button on the project or module’s General tab. This action launches the Tivoli Module Designer with the Application Data tab displayed. The following screenshot shows the Application Data tab for a Plus module. In this screenshot, the Tivoli Module Designer was

Editing Application Data
Tivoli Module Builder User’s Guide 2–15
Gettin
g S
tarted
launched from the module level and the Plus template has been loaded into the Plus module.
3. Complete the following fields on the Application Data tab:
NameEnter the name of the module. The name you enter is the name of the module as it appears on the Tivoli desktop.
Note: It is recommended that the name you specify in this field be the same as the module’s name in the Tivoli Module Builder’s tree view hierarchy.
VersionUse these fields to specify the version of the module. You can change the version in these fields to keep track of code changes. Specify the version in the following format: a major version number, a minor version number, and a revision indicator. The major and minor numbers are required. The revision indicator is

Editing Component Data with the Tivoli Module Designer
2–16 Version 2.3
optional. After MIF parsing is complete, the elements in this format appear as follows: MajorNumber.MinorNumberRevisionIndicator. For example, 4.52A or 1.1.3.
ManufacturerEnter the name of the application’s manufacturer and other helpful information such as information for contacting customer support. When you generate the module, the src/<ModuleType>product-info.sh file contains the information specified in this field. In Plus modules, this information is displayed by double-clicking on an “about this module” icon. For other modules, you can write a script that references the manufacturer information in the src/<ModuleType>product-info.sh file in order to display this information to the module’s user.
Description This field only applies to Plus modules. Enter useful information for understanding the function of the module. This information is the help text for the module’s icon. This information is also displayed by double-clicking on an “about this module” icon.
4. Click on the Update button. You can now return to the Tivoli Module Builder by selecting the File –> Save Project menu option and then exiting the Tivoli Module Designer.
Editing Component Data with the Tivoli Module Designer
The Tivoli Module Designer enables you to edit the module’s components. When you edit a component, you define the management information required by the Tivoli management software tools to perform particular management tasks. For example, you can edit a component for distributing file packages or running operational tasks. The following sections describe how to launch the Tivoli Module Designer for component editing. For specific information on editing components for base and Plus modules, see Part II — “Base Modules” and Part III — “Team Tivoli Plus Modules.” For information on editing components for Tivoli GEM

Editing Component Data with the Tivoli Module Designer
Tivoli Module Builder User’s Guide 2–17
Gettin
g S
tarted
modules, see the Tivoli Global Enterprise Manager Business System Enablement Guide and the Tivoli Global Enterprise Manager Advanced Business System Enablement Guide.
You can launch the Tivoli Module Designer from different levels in the Tivoli Module Builder tree view hierarchy. The following sections describe the launch options.
Launching from the Module Level When you launch the Tivoli Module Designer from the module level, all components in the module are displayed in the Tivoli Module Designer tree view hierarchy. This enables you to access all of the module’s components for editing without having to exit and relaunch the Tivoli Module Designer.

Editing Component Data with the Tivoli Module Designer
2–18 Version 2.3
Use the following steps to launch from the module level:
1. Select the module in the Tivoli Module Builder tree view hierarchy.
2. Click the Edit AMS Definition button on the General tab page.
Launching from the Component Level When you launch the Tivoli Module Designer from the component level, the component you have selected in the Tivoli Module Builder tree view hierarchy is highlighted. You may choose to launch the
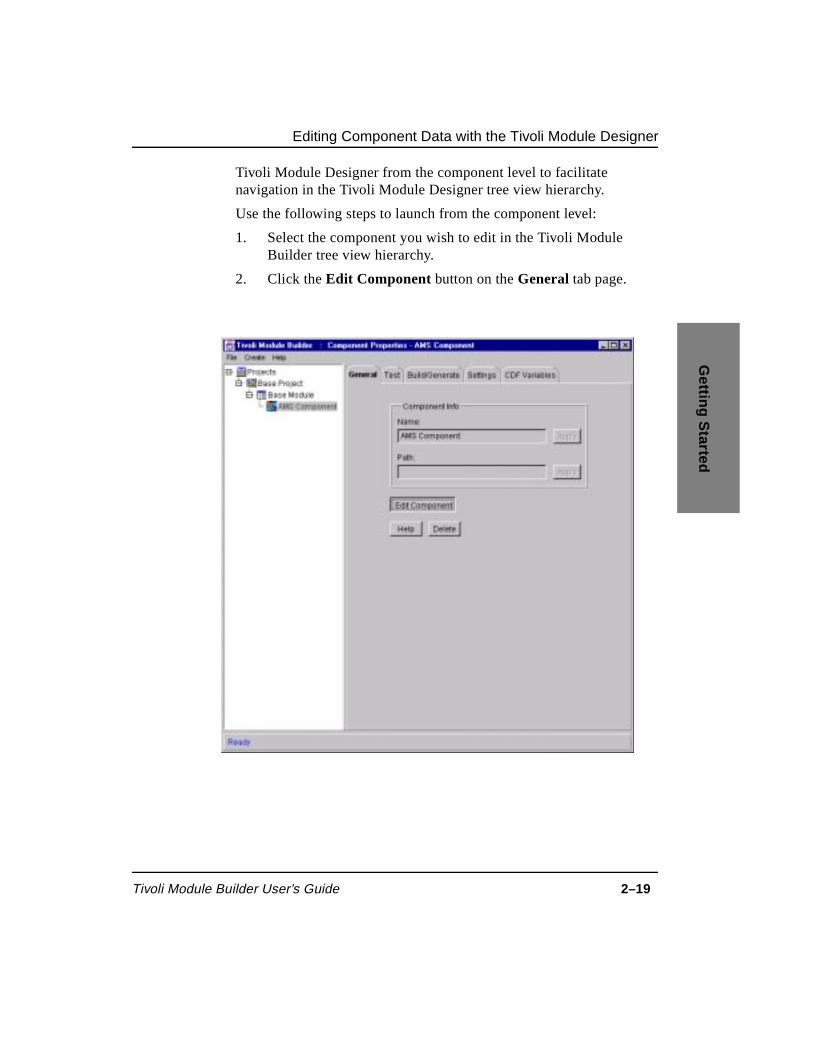
Editing Component Data with the Tivoli Module Designer
Tivoli Module Builder User’s Guide 2–19
Gettin
g S
tarted
Tivoli Module Designer from the component level to facilitate navigation in the Tivoli Module Designer tree view hierarchy.
Use the following steps to launch from the component level:
1. Select the component you wish to edit in the Tivoli Module Builder tree view hierarchy.
2. Click the Edit Component button on the General tab page.

Editing Component Data with the Tivoli Module Designer
2–20 Version 2.3
Launching from Lower-level Objects If you have already edited a component or imported a previously defined CDF, you may have specific instances defined for the component definition categories. For example, if the component has a “start server” task defined in the operational tasks category, then a “start server” instance has been created for this category. These instances are displayed in the Tivoli Module Builder tree view hierarchy. Launching the Tivoli Module Designer from an instance displays the specific tab for editing the instance. You may choose this option if you have already edited the component and only need to make changes to a particular instance.
Use the following steps to launch from the instance level:
1. Select the instance you wish to edit in the Tivoli Module Builder tree view hierarchy.
2. Click the Edit AMS Definition button on the General tab page.

Generating the Module and Other Objects
Tivoli Module Builder User’s Guide 2–21
Gettin
g S
tarted
Generating the Module and Other Objects The generate process generates the CDFs for each component as well as script stubs for all programs referenced in the CDFs. The generated CDFs are located in your module’s directory. Generated script stubs and their test cases are generated in src and test subdirectories.
You can initiate the generate process using the Generate button on an object’s Build/Generate tab page in the Tivoli Module Builder. You can generate files at any level of the tree view hierarchy. If you have files that you do not wish to be overwritten by the generate process, you can “lock” the file with the Locked check box on the Build/Generate tab page associated with that file.
Note: The build process also generates those files that have been modified since they were last generated. For information on the build process, see “Building the Install Image for Modules” on page 2-26.
Use the following steps to generate the module or other objects:
1. (Optional). If this is the first time you are generating a module, skip to step 2 on page 2-22.
Determine whether to protect any lower-level objects (such as modules or files) from being overwritten. For example, you may have completed a module and not wish to overwrite it when it is generated at the project level.
Use the following steps to protect an object from being overwritten:
a. Select the object in the Tivoli Module Builder tree view hierarchy.
b.
c. Select the Build/Generate tab.
d. Select the Locked check box.
Editing the Generated Scripts
2–22 Version 2.3
You can also lock files that are not visible in the tree view hierarchy. These files include .dsl, .csl, and .tll files. For information on locking these files, see “Using Variables to Lock Generated Files” on page 3-13.
2. Select the module or other object in the Tivoli Module Builder tree view hierarchy that you wish to generate.
3. Select the Build/Generate tab.
4. Click the Generate button.
The Build/Generate tab page displays status messages for the generate process. To save these messages to a file, click the Save Output button and use the Save As dialog to specify the output file.
Note: The Tivoli Module Builder is a Java-based application. Java has certain text field size limitations that may prevent the full text of the status message from being displayed. In this case, the end of the output is displayed along with a message stating that the status message has been truncated. To view the complete output, save the output to a file and then view the file with an editor.
Continue with “Editing the Generated Scripts” on page 2-22.
Editing the Generated Scripts Scripts are generated for all scripts and programs referenced in the CDFs. These scripts are located in the <Module_Name>/src directory. Edit these scripts with the application-specific code required to implement the desired management function. Editing a script requires selecting the script’s object in the Tivoli Module Builder tree view hierarchy and using the Edit button to open the file for editing.
You can edit the generated script or the default skeleton file used to generate the script stub. For information on editing a skeleton file, see Chapter 4, “Script Stubs and Skeleton Files.”
Notes:
• You can prevent a script from being overwritten during the generate process by locking the script after you have edited

Editing the Generated Scripts
Tivoli Module Builder User’s Guide 2–23
Gettin
g S
tarted
it. For more information on locking a script, see “Generating the Module and Other Objects” on page 2-21.
• Files referenced in the CDF’s file list (used for file distribution) are only generated if they already exist in the <ModuleName>/src directory. If you have specified a file in the file list but have not created this file in the <ModuleName>/src directory, the file will not be generated.
When you have finished editing the scripts, continue with “Building the Install Image for Modules” on page 2-26.
Use the following steps to edit a script:
1. Select the script’s object in the Tivoli Module Builder tree view hierarchy.
2. Click the Edit button on the script’s General tab page. This action opens the script in a command window for editing with vi or another editor.
3. Insert the managed application’s code into the script.
Editing a script causes the Locked check box to be automatically selected on the script’s Build/Generate tab page. This prevents the

Testing the Scripts
2–24 Version 2.3
edited script from being overwritten the next time you generate the file.
You may wish to save the edited script as a new skeleton so that your modifications will be present during all subsequent generations of the script. To save the script as a skeleton, click the Save As Skeleton button on the General tab page and then use the Save As dialog to specify the skeleton file. For information on specifying which skeleton is used to generate a script, see “Specifying Skeletons for Generating Scripts” on page 4-4.
You can also edit the default skeleton files that generate the script stubs. For information on editing the default skeleton files, see “Editing the Default Skeleton Files” on page 4-2.
Testing the Scripts The Tivoli Module Builder can create test data files for testing the scripts and programs referenced by the CDFs. You can edit the test data files to create the test cases. The test data files are located in the <ModuleName>/test directory.

Testing the Scripts
Tivoli Module Builder User’s Guide 2–25
Gettin
g S
tarted
Features for editing the test data files and running tests are located on the script’s Test tab page.
Editing Test Data FilesYou can open a command window for editing a test data file. (If using Windows NT, use the bash shell provided with the Tivoli Module Builder to edit files.) The test data file explains the format you are to use when editing the file to create a test case. If you have not previously generated the script or program, the script or program will be generated after you have edited the test data file.

Building the Install Image for Modules
2–26 Version 2.3
Use the following steps to edit a test data file:
1. Select the script that you wish to test in the Tivoli Module Builder tree view hierarchy.
2. Select the Test tab.
3. Select the Testable check box on the Test tab page.
4. Click the Edit Test Data button.
Running TestsAfter generating and editing the test data file, you can test the script or program. If you have not previously generated the script or program, the script or program is generated after you have run the test.
Use the following steps to run a test:
1. Select the script that you wish to test in the Tivoli Module Builder tree view hierarchy.
2. Select the Test tab.
3. Select the Testable check box on the Test tab page.
4. Click the Run Tests button.
The Test tab page displays the status messages generated by the test.
Note: The Tivoli Module Builder is a Java-based application. Java has certain text field size limitations that may prevent the full text of the status message from being displayed. In this case, the end of the output is displayed along with a message stating that the status message has been truncated. To view the complete output, save the output to a file and then view the file with an editor.
Building the Install Image for ModulesYou can run the build process on projects and modules. When building at the module level, the module’s install image resides in the <ModuleName>/images directory. When building at the project level, the separately installable images for each module included in the project reside in the <ProjectName>/images directory.

Building the Install Image for Modules
Tivoli Module Builder User’s Guide 2–27
Gettin
g S
tarted
You can also build an install image that enables the tasks, monitors, and file packages to be installed and uninstalled incrementally. This option is useful if you wish to install and test only a particular feature of the module, such as file packages, without installing the entire module. If you enable incremental installation, then the module can be incrementally installed from the Tivoli Module Builder or the Tivoli desktop.
The build process automatically regenerates unlocked files that have been modified since they were last generated. If you wish to view the status messages produced by the generate process during a build, save the output using the Save Output button on the Build/Generate tab page.

Building the Install Image for Modules
2–28 Version 2.3
Use the following steps to build a module or project:
1. Select the project or module in the Tivoli Module Builder tree view hierarchy.
2. Select the Build/Generate tab.
3. (Optional). Select the Enable Incremental Install/Uninstall Options check box to build an image that enables tasks, monitors, and file packages to be installed and uninstalled separately.
4. Click the Build button.
Status messages from the build process are displayed on the Build/Generate tab page.
Building the Install Image for Modules
Tivoli Module Builder User’s Guide 2–29
Gettin
g S
tarted
Note: The Tivoli Module Builder is a Java-based application. Java has certain text field size limitations that may prevent the full text of the status message from being displayed. In this case, the end of the output is displayed along with a message stating that the status message has been truncated. To view the complete output, save the output to a file and then view the file with an editor.

Building the Install Image for Modules
2–30 Version 2.3

Tivoli Module Builder User’s Guide 3–1
Variab
les and
Settin
gs
3Variables and Settings
Modules and other objects in the Tivoli Module Builder tree view hierarchy can use variables. These variables indicate information defined in the component description files (CDFs) or perform other functions, such as indicating the type of module or controlling the processing that occurs when installing the module into the Tivoli environment.
Variables and their values are determined by the following sources.
Settings Tab Variables You can supply the variable and its value using a selected object’s Settings tab in the Tivoli Module Builder. Plus and Tivoli GEM modules have required variables. These variables are imported when the Plus or a Tivoli GEM template is loaded into the Tivoli Module Builder. You can view the variables for the Plus and Tivoli GEM modules on the Tivoli Module Builder Settings tab after importing the appropriate template.
CDF or Component Data Tab Variables The variable and its value are specified in the CDF. The values for these CDF variables match the field values that you specify on the Component Data tab page when editing a component with the Tivoli Module Designer. You can override the variable and its value using a selected object’s Settings tab page.
3
Editing Settings
3–2 Version 2.3
GDF or Application Data Tab Variables The variable and its value are specified in the global description file (GDF). The values for these GDF variables match the field values that you specify on the Application Data tab page when editing a module at the application level with the Tivoli Module Designer. You can override the variable and its value using a selected object’s Settings tab page.
Any variable specified for an object automatically applies to all lower-level objects in the hierarchy, unless the variable is overridden at a lower level. When generating files, the Tivoli Module Builder reads the variable settings starting from the lowest level of the hierarchy. This means that any variable you specify using an object’s Settings tab page automatically overrides the same variable that is specified at a higher level. Modified variables are applied to skeleton files at generate time.
Editing Settings Most objects in the Tivoli Module Builder tree view hierarchy have a Settings tab that enables you to specify variables not defined by a CDF or a GDF. When you use the Settings tab page, specify the variable in the Variable field and the value for the variable in the Value field.
Note: For information on the LOCALES and I18N_ENABLED settings used to enable a module for National Language Support (NLS), see Chapter 7, “National Language Support for Modules.”
Installation and Configuration Settings The following describes some of the settings that can be applied to modules. The skeleton files use these variables for module installation and configuration. If you import a Plus or Tivoli GEM template, all required variables for a Plus or Tivoli GEM module are automatically imported.

Editing Settings
Tivoli Module Builder User’s Guide 3–3
Variab
les and
Settin
gs
Variable Purpose and Default Value
USE_TLL This setting tells the installation to compile .tll files instead of using wcrttask. The default value is true.
CPP_PATH This setting defaults to the location of the CPP (C preprocessor) executable in your path. This default setting can be overridden.
MODULE_TYPE This optional setting indicates the type of module. Examples of possible values are PLUS and GEM.
PRODDIR This setting should be the full path location of the module binaries. The default is $BINDIR/../generic_unix/!ProdDir!/The value of ProdDir is built using the value of <MODULE_TYPE>proddirfileformat from the Projects.state file. If the MODULE_TYPE setting has not been specified, the Projects.state file uses MODULE as the value for MODULE_TYPE.
USE_TSUNAMI_NAMES When set to true, this setting indicates that the Tivoli 3.6 object naming conventions should be used. These naming conventions are required for the winstruct command to locate and refer to the module’s objects. For more information on the Tivoli 3.6 object naming conventions, see “Base Modules in the Tivoli Environment” on page 9-7. To disable the Tivoli 3.6 naming conventions and use the simple object names instead, set this variable to false.
USE_SPECIAL_PRFMGR_NAMES This setting indicates that Tivoli 3.6 names should be truncated for profile managers. The default value is true.
REPLACE_TASK_LIBS When set to false, this setting indicates that wtll should augment instead of replace existing task libraries. The default value is true.

Editing Settings
3–4 Version 2.3
ADMIN_TAG This setting constructs Tivoli 3.6 object names. The default setting is Default.
DM_VERSION This setting determines which Plus BAROC files and rule bases to use for Tivoli Enterprise Console configuration. This value should reflect the version of Tivoli Distributed Monitoring that is currently installed (for example, it may be set to 2.5 if that is the installed version). The default value is 3.5.
TaskRoles This setting indicates the authorization role that is assigned to the user role field for all base module tasks. The default value is super.
SNTID_USER This setting indicates the user ID values for Tivoli Distributed Monitoring monitors in the base module. These values are specified in the call to the wsetsntid command. The default value is 0.
SNTID_GROUP This setting indicates the group ID values for Tivoli Distributed Monitoring monitors in the base module. These values are specified in the call to the wsetsntid command. The default value is 0.
INSTALL_OPT_1_IS_PATH_PREFIX This setting is used as a path prefix (for example, a drive letter) for configuring file packages. If this value is false, this setting has no special meaning to the install process that is provided for base modules. The default value is false.
If you have a Plus module, the Settings tab page displays variables associated with the Plus module. These variables should not be changed.
Tivoli Management Agent (TMA) Support Settings The following describes the module settings that support TMA enablement. Skeleton files use these variables for module installation on a TMA endpoint. Importing a Plus or Tivoli GEM template

Editing Settings
Tivoli Module Builder User’s Guide 3–5
Variab
les and
Settin
gs
automatically imports all required TMA variables for a Plus or Tivoli GEM module.
Notes:
• A dataless profile manager can be subscribed to a regular (non-dataless) profile manager. As a result, TMA endpoints and managed nodes can be subscribed to a regular profile manager.
• In addition to the application launch icon, a task icon is created on the Plus module desktop for each task specified in the application launch component. This task icon launches the application on TMA endpoints. You can disable the creation of the task icon by selecting the module in the Tivoli Module Builder and selecting the Settings tab. On the Settings tab page, enter LAUNCH_ICONS_ONLY in the Variable field and true in the Value field. Press the Apply button and the Save Settings button.
• The Create Subscriber List task on the Plus module desktop allows the Plus module’s user to create custom subscription lists (either dataless or regular), and subscribe TMA endpoints.
General TMA Settings
By default, the TMA variables are set to enable TMA support, although these variables and their default values are not displayed on the Settings tab after importing a template. You can, however, use the Settings tab to change the TMA variables to a non-default setting.
Variable Purpose and Default Value
TMA_ENABLED This setting indicates that dependencies for the module should be configured during module installation. If the value for this setting is false, this step is skipped. As a result, installation time is substantially faster. The default value is true. When set to false, the module will not work with TMA.

Editing Settings
3–6 Version 2.3
TMA_DATALESS_PMS This setting indicates that dataless profile managers as well as non-dataless profile managers (the default) should be created for file packages and monitors in base or Tivoli GEM modules. The installed base or Tivoli GEM module includes both dataless and regular (non-dataless) profile managers when the TMA_DATALESS_PMS variable is set to the default value of true.
In Plus modules, this variable indicates that the Endpoint Subscribers of <App Name> component generate a subscription list for TMA endpoints when set to the default value of true. For all other Plus components, the default value of this variable is false.
TMA_EP_TAG This setting designates the tag that is appended to the new dataless profile manager name for the base module. The default value is Endpoint.
TMA_WIN_TOOLS This setting adds new values to the default list of tools. New values are assumed to be standard tool executables with a source location on the gateway under the lcf_bundle/bin/$INTERP/tools directory and a target endpoint location of %TOOLS%. The default value includes the following list of executables:
- awk
- basename
- bash
- bash.cmd
- cat
- chmod
- cp

Editing Settings
Tivoli Module Builder User’s Guide 3–7
Variab
les and
Settin
gs
- cpp
- cut
- date
- diff
- dirname
- expr
- find
- grep
- ls
- make
- mkdir
- mv
- perl
- rm
- sed
- sh
- sleep
- sort
- tar
- touch
- tr
- uname
- wc
- whoami
- win32gnu.dll
TMA_UNIX_TOOLS This setting adds new values to the default list. The default value includes perl.

Editing Settings
3–8 Version 2.3
TMA_PERL_SCRIPTS This setting indicates that new values are standard perl scripts with a source location on the gateway under the lcf_bundle/bin/$INTERP/tools/lib/perl directory and a target endpoint location of %BIN%. The default value is empty.
TMA_LIBS This setting indicates that new values specify a source location relative to lcf_bundle on the gateway, and a target endpoint location of %LIB%. The default value is empty.
TMA_BINS This setting indicates that new values specify a source location relative to lcf_bundle on the gateway, and a target endpoint location of %BIN%. The default value is empty.
TMA_PROD_FILES This setting indicates that new values specify a source location relative to the module binaries, for example, under $PRODDIR on the gateway, and a target endpoint location of %BIN%. The default value is empty.
Logfile Adapter Settings for TMA Endpoints
These settings only apply to the logfile adapter configuration component imported with the Plus template. Running the logfile adapter configuration task on a TMA endpoint requires that the format (.fmt) file be located on the TMA endpoint. You can distribute the .fmt file to a TMA endpoint using Tivoli Software Distribution by including the .fmt file in the file list of client file packages that distribute to TMA endpoints. The logfile adapter configuration task script (config_logadapter.sh) uses a variable to determine the location of the format file on the TMA endpoint. The variable’s value is the same as the destination location of the format file as specified in the client file package’s file list.
Use the following steps to specify the location of the format file on a TMA endpoint for the config_logadapter.sh script. This procedure

Editing GDF and CDF Variables
Tivoli Module Builder User’s Guide 3–9
Variab
les and
Settin
gs
assumes that you have edited the logfile adapter configuration component for Plus modules using information provided in Chapter 26, “Logfile Adapter Configuration.” This procedure also assumes that you have included the format file in the file list of a client file package that distributes to TMA endpoints. For information on editing a file package component for Plus modules, see Chapter 22, “File Packages.”
1. Select the config_logadapter.sh script object in the Tivoli Module Builder tree view hierarchy.
2. Select the Settings tab.
3. Set the variable as follows:
• For a UNIX platform, select the TMA_UNIX_FMT_PATH variable. In the Value field, enter the full path name of the format file. Use the same path as specified for the format file’s destination location in the client file package. Include the format file’s name in the path. Click the Apply button after specifying the Value field.
• For a Windows NT platform, select the TMA_NT_FMT_PATH variable. In the Value field, enter the full path name of the format file. Use the same path as specified for the format file’s destination location in the client file package. Include the format file’s name in the path. Click the Apply button after specifying the Value field.
The skeleton file for the config_logadapter.sh script uses these variables to locate the format file on the TMA endpoint.
4. Click the Save Settings button when you have finished specifying the variable.
Editing GDF and CDF Variables The CDF and GDF variables are displayed on the CDF Variables tab page and cannot be changed with the Tivoli Module Builder. Changing these variables requires launching the Tivoli Module

Editing GDF and CDF Variables
3–10 Version 2.3
Designer and editing the Component Data tab page (for CDF variables) or the Application Data tab page (for GDF variables).
GDF Variables If your module has more than one component, then your module also has a GDF. In this case, you can edit the GDF variables by selecting the module in the Tivoli Module Builder tree view hierarchy and clicking on the Edit AMS Definition button. This action launches the Tivoli Module Designer with the Application Data tab page displayed. The field values on the Application Data tab page match the variable values in the module’s GDF.
For information on editing application data or GDF variables, see “Editing Application Data” on page 2-13.
The following graphic shows an Application Data tab page for a Plus module.
Note: Because Plus modules have more than one component, they always have a GDF.
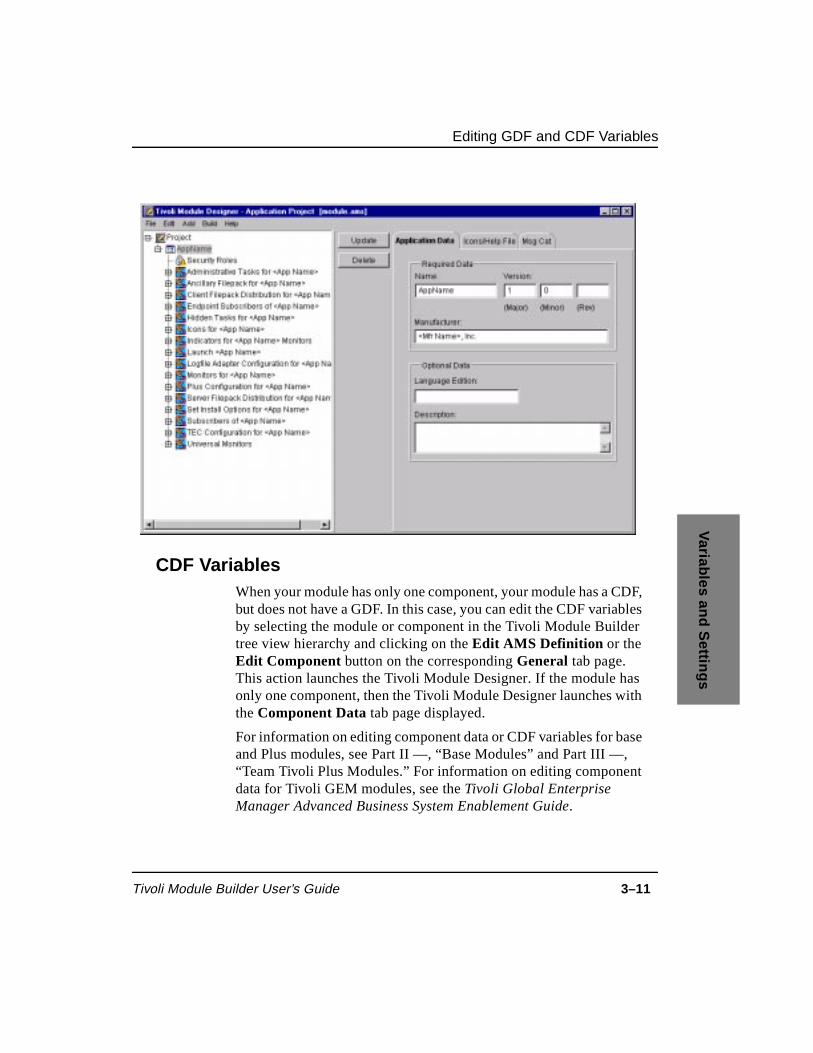
Editing GDF and CDF Variables
Tivoli Module Builder User’s Guide 3–11
Variab
les and
Settin
gs
CDF Variables When your module has only one component, your module has a CDF, but does not have a GDF. In this case, you can edit the CDF variables by selecting the module or component in the Tivoli Module Builder tree view hierarchy and clicking on the Edit AMS Definition or the Edit Component button on the corresponding General tab page. This action launches the Tivoli Module Designer. If the module has only one component, then the Tivoli Module Designer launches with the Component Data tab page displayed.
For information on editing component data or CDF variables for base and Plus modules, see Part II —, “Base Modules” and Part III —, “Team Tivoli Plus Modules.” For information on editing component data for Tivoli GEM modules, see the Tivoli Global Enterprise Manager Advanced Business System Enablement Guide.
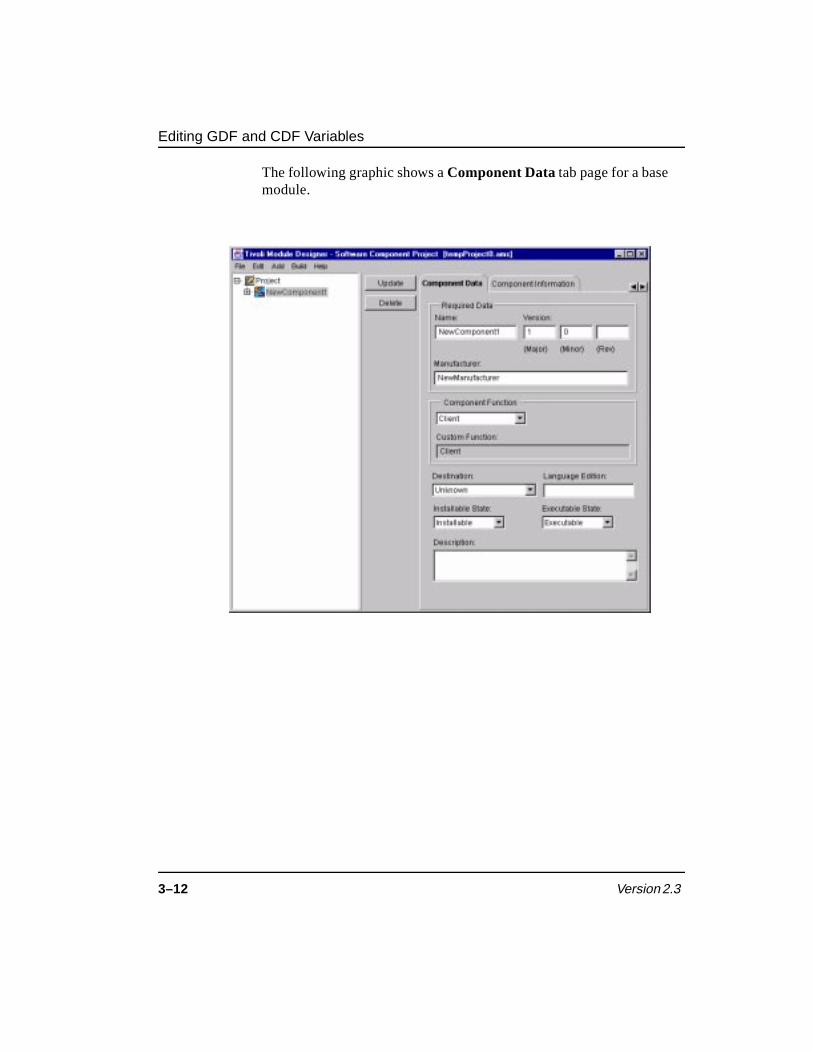
Editing GDF and CDF Variables
3–12 Version 2.3
The following graphic shows a Component Data tab page for a base module.

Overriding Variables for Generated Files
Tivoli Module Builder User’s Guide 3–13
Variab
les and
Settin
gs
Overriding Variables for Generated Files Although CDF and GDF variables are determined by the information specified on the Component Data and Application Data tabs in the Tivoli Module Designer, you can override these variables by editing a generated file’s Settings tab in the Tivoli Module Builder. For example, you could select a generated script in the Tivoli Module Builder tree view hierarchy and specify the variable on the script’s Settings tab. For information on editing the Settings tab, see “Editing Settings” on page 3-2.
Using Variables to Lock Generated Files The generate process generates files associated with the module. Some of these generated files, such as scripts and programs, are added to the Tivoli Module Builder tree view hierarchy. You can prevent these files from being overwritten when subsequently generating the module by selecting the Locked check box on the Build/Generate tab page. Other generated files are not visible in the tree view hierarchy. These files include the Dialog Specification Files (DSL), Collection Specification Language (CSL) files, and the Task Library Language (TLL) files. These generated files are located in the module’s src directory and are identifiable from their .dsl, .csl, and .tll file name extensions. Locking .dsl, .csl, and .tll files from being overwritten requires setting a variable.
You can also lock a module’s before and after scripts.
Locking .dsl, .csl, and .tll Files Use the following steps to lock a .dsl, .csl, and .tll file from being overwritten:
1. Select the module or component for which you are locking the .dsl, csl, or .tll file in the Tivoli Module Builder tree view hierarchy.
2. Select the Settings tab.

Using Variables to Lock Generated Files
3–14 Version 2.3
3. Set the variable as follows:
• A .dsl or .tll file is generated for each component that has an operational task. Operational tasks are defined on the Tivoli Module Designer Operational Tasks tab page. If the component or module has operational tasks, specify the following in the Variable and Value fields on the Settings tab page. Click the Apply button after specifying each field.
Variable Field Value Field
LOCK_DSL true
LOCK_TLL true
Click the Save Settings button when you have finished specifying the variables.
• A .csl file is generated for each component that has a monitor program specified on the Program tab page in the Tivoli Module Designer. If the component or module has a monitor program, specify the following in the Variable and Value fields on the Settings tab page. Click the Apply button after specifying each field.
Variable Field Value Field
LOCK_CSL true
4. Click the Save Settings button when you have finished specifying the variable.
Locking Before and After Scripts Use the following steps to lock a module’s before or after script from being overwritten:
1. Select the module for which you are locking the before or after script in the Tivoli Module Builder tree view hierarchy.
2. Select the Settings tab.

Using Variables to Lock Generated Files
Tivoli Module Builder User’s Guide 3–15
Variab
les and
Settin
gs
3. Set the variable as follows:
• To lock a before script, enter LOCK_BEFORE_SCRIPT in the Variable field and true in the Value field. Click the Apply button after specifying each field.
• To lock an after script, enter LOCK_AFTER_SCRIPT in the Variable field and true in the Value field. Click the Apply button after specifying each field.
4. Click the Save Settings button when you have finished specifying the variable.

Using Variables to Lock Generated Files
3–16 Version 2.3

Tivoli Module Builder User’s Guide 4–1
Scrip
t Stu
bs an
d S
keleton
F
iles
4Script Stubs and Skeleton Files
When completing a component definition, you specify the names of the scripts or programs that implement the component’s function. For example, a Plus module’s application launch component references the program that launches the application. When generating the CDFs for a module, the Tivoli Module Builder generates script or file stubs for each script or program referenced in the CDFs. The Tivoli Module Builder uses skeleton files to generate the script and file stubs. These skeleton files also provide the script and file stubs with code required for implementing the script’s function in the Tivoli environment.
For example, if you have defined a custom monitor for the managed application, then the CDF would reference a program for implementing the monitor. During the generate process, the Tivoli Module Builder can use a Monitoring Collection Specification Language (MCSL) skeleton file to create an MCSL file stub with the name you specified. The MCSL skeleton files provide information such as the script’s header and monitor definition code required by Tivoli management software tools. In the case of a custom monitor, you would also edit the MCSL file stub with the application-specific code required to run the monitor program. Most generated script and file stubs require editing with code specific to an application. The script and file stubs have “placeholders” that indicate where the code should be inserted.
To enable National Language Support (NLS), generated scripts and file stubs use message catalogs instead of hard-coded strings. For
4

Tivoli Management Agent (TMA) Enablement
4–2 Version 2.3
information on making a module NLS-enabled, see Chapter 7, “National Language Support for Modules.”
For information on editing scripts and other generated files, see “Editing the Generated Scripts” on page 2-22. For information on how to lock a script to prevent it from being overwritten during the generate process, see “Generating the Module and Other Objects” on page 2-21.
Tivoli Management Agent (TMA) Enablement By default, the skeleton files support both TMA endpoints as well as managed nodes. The skeleton files have code that enables the module to determine the runtime environment (endpoint or managed node). Based on this determination, the module can use the appropriate environment variables and perform the correct logic. The skeleton files include comments that help you implement scripts for both managed nodes and TMA endpoints. For more information, see the Application Development for the Lightweight Client Framework.
Editing the Default Skeleton Files You can edit the default skeleton files used to generate the script and file stubs.

Editing the Default Skeleton Files
Tivoli Module Builder User’s Guide 4–3
Scrip
t Stu
bs an
d S
keleton
F
iles
Use the following steps to edit a skeleton file:
1. Select the script’s object in the Tivoli Module Builder tree view hierarchy.
2. Click the Edit Skeleton button on the script’s General tab page. This action opens the skeleton file in a command window for editing.
When you edit a default skeleton file provided by the Tivoli Module Builder, the Tivoli Module Builder copies the file to the <ModuleName>/skeletons directory. The copied skeleton file is named in the format <ScriptName>.skel. For example, if you edit a script named test.sh, and the default skeleton for the script is GenericBourneShell.skel, then the copied skeleton file is named:
<ModuleName>/skeletons/test.sh.skel
Your modifications are applied to the copied file so that the default skeleton file remains unchanged. When you edit a script’s skeleton file, the new skeleton file is selected in the Skeleton field on the script’s Build/Generate tab page.
Creating New Skeleton Files
4–4 Version 2.3
Creating New Skeleton Files You can create a new skeleton file by either editing a script or the default skeleton file and then saving your changes in a new file:
Use the following steps to create a new skeleton file:
1. Edit the script or default skeleton file. (See “Editing the Generated Scripts” on page 2-22.)
2. Save the modified script using the Save As Skeleton button.
For information on specifying which skeleton file is used to generate a script, see “Specifying Skeletons for Generating Scripts” on page 4-4.
Specifying Skeletons for Generating ScriptsBy default, the skeleton files provided with the Tivoli Module Builder are used to generate the scripts. After creating new skeleton files, you may wish to specify that a non-default skeleton file be used to generate a script.
Use the following steps to specify a skeleton file:
1. Select the script’s object in the Tivoli Module Builder tree view hierarchy.
2. Select the Build/Generate tab.
3. Specify the path to the skeleton file you wish to use in the Skeleton field on the Build/Generate tab page.
4. Click the Apply button.

Tivoli Module Builder User’s Guide 5–1
Merg
ing
Co
mp
on
ent
Descrip
tion
Files
5Merging Component Description Files
You can merge a CDF file into a component using the Tivoli Module Designer. Once you have merged a component, instances of tasks, monitors, and other items defined in the merged component are displayed in the Tivoli Module Designer’s tree view hierarchy. You can edit these merged items by selecting them in the tree view hierarchy and editing their definitions on the Tivoli Module Designer’s tab pages and fields.
Use the following steps to merge a CDF:
1. Select the module that contains the component into which you are merging the CDF in the Tivoli Module Builder tree view hierarchy.
2. Launch the Tivoli Module Designer by clicking the Edit AMS Definition or the Edit Component button.
3. Select the component into which you are merging the CDF in the Tivoli Module Designer tree view hierarchy.
Note: The merge function in the Tivoli Module Designer is not active until you select a component in the tree view hierarchy.
5

5–2 Version 2.3
4. Select the Add –> Merge CDF... pulldown menu option. This action displays the Merge CDFs dialog.
5. Click the Browse... button to display the Open dialog.
Note: Because the Tivoli Module Builder is a Java-based application, the exact title of certain dialogs, such as the Open dialog, may be different on different platforms.
6. Use the Open dialog to locate the directory where the CDF is located.
7. Select the CDF and click the Open button. This action displays the Merge CDFs dialog with the CDF you specified displayed in the Filename field.
8. Click the OK button on the Merge CDFs dialog.
After you have merged the CDF into a component, the component contains definitions for all categories defined in the component as well as the merged CDF.

Tivoli Module Builder User’s Guide 6–1
Imp
ortin
g M
on
itors
6Importing Monitors
You may wish to import previously defined monitors into your module. For example, you may wish to import one of the Tivoli Distributed Monitoring predefined monitor collections or monitors from a CDF provided with the Tivoli Module Builder. You may also wish to import a monitor collection or monitors from a CDF that you have used with another module.
Importing Monitors from an MCSL FileAll monitors installed in the Tivoli environment must be contained in a monitor collection. A Monitor Collection Specification Language (MCSL) file defines the monitor collection. When you define monitors for a component, the generate process creates an MCSL file for the monitors that you have defined. The MCSL file is named in the following format:
CollectionName.csl
If you are using the predefined monitors provided with the Tivoli Module Builder, the generated .csl file contains the code required to implement the monitors. If you define custom monitors, however, you need to provide the code to implement the monitors. You can also import an MCSL file containing custom monitors that you have already defined for another module. Importing the MCSL file avoids the work of redefining the monitors in the new module and writing new code to implement them.
6

Importing Monitors from an MCSL File
6–2 Version 2.3
Understanding the Import Process You can import an MCSL file using the Tivoli Module Designer. MCSL files must be imported at the component level. The MCSL parser extracts the monitor’s information from the MCSL file and adds the information to the component into which you are importing the monitor. After the MCSL file is imported, the monitor definitions are included in the CDF file generated for the component.
MCSL files are often embedded with the scripts required to implement the monitors. The MCSL parser extracts these scripts and places them in a subdirectory of the directory where the MCSL file is located. This subdirectory is named after the monitor collection.
If a monitor being imported has the same name as a monitor that is already defined in the component, then the MCSL parser appends an integer (starting with 2) to the imported monitor’s name.
Similarly, when a location definition is specified during the import process, and the location definition has an index that is already being used by the component, the index of the location definition being imported is changed to one that is not in use. The location definition index referenced by the imported monitors is also changed to the new value.
Importing the MCSL File Use the following steps to import an MCSL (.csl) file into a component:
1. Select the component into which you are importing the MCSL (.csl) file in the Tivoli Module Builder tree view hierarchy.
2. Click on the Edit Component button on the component’s General tab page to launch the Tivoli Module Designer.
3. Select the platform for the component from the Destination drop-down list on the Component Data tab page.
Note: A .csl file may contain monitor definitions for different platforms. You need to specify the correct platform so that the proper information is extracted when importing the .csl file.

Importing Monitors from an MCSL File
Tivoli Module Builder User’s Guide 6–3
Imp
ortin
g M
on
itors
4. Select the Add –> Import From File... menu option to display the Import From File dialog.
5. Click the Browse... button on the Import From File dialog. The browse feature displays the Choose a File dialog that enables you to locate the file that you want to import.
6. Select the .csl file that you want to import and click the Open button to return to the Import From File dialog. If prompted, select Keep Changes.
7. Click OK to display the Specify MCSL Interp dialog. The interpreter type refers to the platform on which the monitors will run. The Specify MCSL Interp dialog displays the platform that the Tivoli Module Designer assumes to be the appropriate platform for the imported monitors. If necessary, specify the correct platform type. If you do not want the Tivoli Module Designer to display the Specify MCSL Interp dialog again, select the Always Let TMD determine interp check box.
8. Click OK to complete the import process.
After the import process has completed, you can select the component in the Tivoli Module Designer to view the monitors that have been imported.
Note: If you receive an error message during this procedure stating that the system cannot find the CPP, you need to specify the full path to the CPP in the Tivoli Module Builder. Do the following to specify the full path to the CPP:
1. Select the Projects object in the Tivoli Module Builder tree view hierarchy.
2. Select the C/C++ tab page.
3. Select the C Binaries variable.
4. Enter the full path to the CPP in the Value field. For example, on an AIX platform, you might enter /module_dev/aix4-rl/gnu/cpp.
5. Click the Apply button.

Importing Monitors from an MCSL File
6–4 Version 2.3
Error Messages If the import process encounters problems with the .csl file, error messages describing the problems are displayed in the MCSL File Import Errors window. The following list describes some of the most frequently encountered errors:
■ <MCSLFileName>:<IncludeFileName>: No such file or directory
The monitors were only partially imported into the component. The MCSL file called for another file with a #include directive. The #include file could not be found.
■ Unterminated character constant
This message is harmless. The monitors were imported into the component. To import an MCSL file, the Tivoli Module Designer uses the C preprocessor to resolve #includes and #defines in the MCSL file. The C preprocessor encountered a line with shell script code embedded in it. If the shell script code cannot be interpreted by the C preprocessor, this error message is displayed.
■ Warning: incomplete message macro on line <LineNumber>
The monitors were only partially imported into the component. The MCSL file called for another file with a #include directive. This include file was not found.
■ Could not get a temporary file for processing
The monitors were not imported into the component. To preprocess the MCSL file, the Tivoli Module Designer uses temporary working files located in the same directory as the MCSL file. Each time an MCSL file is imported, two temporary files are created and used, then deleted. If unforeseen circumstances prevent these files from being deleted at the end of processing, then too many temporary files can be present in the directory. These temporary files are named in the format tempfile#.tiv and tempfile#.tiv2 where # is a number between one and twenty. Delete these temporary files so that the MCSL files can be processed.

Importing Monitors from a Component Description File
Tivoli Module Builder User’s Guide 6–5
Imp
ortin
g M
on
itors
■ The following temporary file(s) cannot be deleted: <FileNames>
These temporary files must be deleted
The monitors were imported into the component. Delete the temporary files from the directory where the MCSL file is located. These temporary files are named in the format tempfile#.tiv and tempfile#.tiv2 where # is a number between one and twenty.
■ *** PARSE ERROR ***File: <FileName>Near token <Data> online <LineNumber>starting in column <ColumnNumber>
A serious error was encountered with the MCSL file that prevented the Tivoli Module Designer from importing the file. The line numbers and column positions may not coincide with the error location in the MCSL file if the #define and #include files have already been added to the temporary file being parsed. Look for the given token in the MCSL file and examine the file for errors. This error message is also displayed if the file you are trying to import is not an MCSL file.
Importing Monitors from a Component Description File
You can import monitors from a CDF into a module using the Tivoli Module Designer.
Use the following steps to import monitors from a CDF:
1. Select the module that contains the component into which you are importing the monitors in the Tivoli Module Builder tree view hierarchy.
2. Launch the Tivoli Module Designer by clicking the Edit AMS Definition or the Edit Component button.
3. Select the component into which you are importing the monitors in the Tivoli Module Designer tree view hierarchy.

Importing Monitors from a Component Description File
6–6 Version 2.3
Note: The import monitors function in the Tivoli Module Designer is not active until you select a component in the tree view hierarchy.
4. Select the Add –> Import Monitors from CDF... pulldown menu option. This action displays the Import Synchronous Monitor Definitions From File dialog.
5. Click the Browse... button to display the Open dialog.
Note: Because the Tivoli Module Builder is a Java-based application, the exact title of certain dialogs, such as the Open dialog, may be different on different platforms.
6. Use the Open dialog to locate the monitor CDFs in the module_dev/ToolKit/cdfs/monitor_collections directory.
7. Select the CDF and click the Open button. This action displays the Import Synchronous Monitor Definitions From File dialog with the CDF you specified displayed in the Filename field.

Importing Monitors from a Component Description File
Tivoli Module Builder User’s Guide 6–7
Imp
ortin
g M
on
itors
8. Click the OK button on the Import Synchronous Monitor Definitions From File dialog. This action displays a Select Monitors to Import dialog.
9. Select the monitors you wish to import and click the OK button. This action adds the monitors that you have selected to the component’s Synchronous Monitors component definition category in the tree view hierarchy. You can select the imported monitors in the tree view hierarchy and create instances of them using the Tivoli Module Designer tab pages. For more information on creating a monitor instance, see “Creating a Monitor Instance” on page 13-7.

Importing Monitors from a Component Description File
6–8 Version 2.3

Tivoli Module Builder User’s Guide 7–1
Natio
nal L
ang
uag
e S
up
po
rt for M
od
ules
7National Language Support for Modules
When defining a software component, some of the information you specify is visible to the user after the module is installed. For example, the name of a monitor or a file package is visible when accessing the module through the Tivoli desktop. The Tivoli Module Builder Version 2.3 provides message catalogs for translating text that is visible once the module is installed.
When defining a component with the Tivoli Module Designer, the Tivoli Module Designer generates translatable information into message (.msg) files. Only those component attributes that are visible to the module’s user are generated into a message file. Other attributes, such as path names, file formats, or internal names recognizable only by a management tool or operating system are not made available for translation.
The Tivoli Module Designer displays a Msg Cat tab page for those attributes which may be translated. You do not need to specify the field values on a Msg Cat tab page, because the Tivoli Module Designer automatically supplies these values based on the information you define for the component.
Note: If you do not want to generate .msg files for the component attributes that are visible to the module’s user or to display the Msg Cat tab page in the Tivoli Module Designer, set the I18N_ENABLED variable to false. By default, the I18N_ENABLED variable is set to true. To change this
7

Message Catalog Tab Page
7–2 Version 2.3
setting, select the module in the Tivoli Module Builder and select the Settings tab. On the Settings tab page, enter I18N_ENABLED in the Variable field and false in the Value field. Press the Apply buttons and the Save Settings button.
The Tivoli Module Builder also generates message files for certain items, such as wording on pop-up dialogs, that are not specified in the Tivoli Module Designer. Specifically, the Tivoli Module Builder generates message files for text defined in Dialog Specification Language (.dsl) files, Task Library Language (.tll) files, and Monitoring Collection Specification Language (.csl) files.
Note: The Tivoli Module Builder generates .msg files for items not specified in the Tivoli Module Designer regardless of whether the I18N_ENABLED variable is set to true or false.
Message Catalog Tab Page The following is an example of a Msg Cat tab page. In this example, an operational task named Start_Server has been defined for a base module. This task has a description which reads This task reboots the server. This translatable information was specified by the module developer on the Operational Tasks and the Desc tab pages. When the task instance is selected in the Tivoli Module Designer’s tree view

Message Catalog Tab Page
Tivoli Module Builder User’s Guide 7–3
Natio
nal L
ang
uag
e S
up
po
rt for M
od
ules
hierarchy, the translatable information is displayed on the Msg Cat tab page.
Each translatable attribute has a set of Value, Key, # (number), and File fields on the Msg Cat tab page. These fields serve the following functions:
Field Description
Value This field displays the translatable text that you specified as a field value on another tab page.
Key This field provides a symbolic identifier for the translatable text. The key also uniquely identifies a translatable field entry in the message catalog. The

Message and Message Catalog Files
7–4 Version 2.3
Tivoli Module Designer automatically generates a value for this field.
# This field provides a numeric identifier for the translatable text. This number is used to uniquely identify a translatable text entry in the message catalog. The Tivoli Module Designer automatically generates a value for this field.
File This field displays the name of the message (.msg) file containing the value, key, and # (number) data for a particular translatable text field. The Tivoli Module Designer automatically generates a value for this field.
Message and Message Catalog Files The File field on the Msg Cat tab page displays the name of the message (.msg) file containing the translatable text. These files are located in the following directory after you have selected the File –> Save Project or the Build –> AMS 2.0 –> MIF Description Files... pulldown menu option:
/module_dev/Projects/<ProjectName>/<ModuleName>/msg_files
When building the module, the Tivoli Module Builder copies the .msg files from the msg_files directory into the module’s src directory. The Tivoli Module Builder also generates message files for translating text specified in the .dsl, .tll, and .csl files into the src directory.
Subsequently, the build process generates message catalog (.cat) files from the .msg files and places them in the module’s export/msg_cat/C directory. Because the .cat files are in the export directory tree, they are included in the AMP generated by the Tivoli Module Builder as well as the module’s Tivoli install image.
Enabling the Module for NLS Support Enabling a module for NLS support requires specifying the LOCALES variable on the module’s Settings tab in the Tivoli

Enabling the Module for NLS Support
Tivoli Module Builder User’s Guide 7–5
Natio
nal L
ang
uag
e S
up
po
rt for M
od
ules
Module Builder. This variable can be set to specify the languages supported by the Tivoli management software tools.
To enable a module for NLS support:
1. Select the module in the Tivoli Module Builder tree view hierarchy.
2. Select the Settings tab.
3. Specify LOCALES in the Variable field on the Settings tab page and press the Apply button.
4. Enter the appropriate value for each language for which the module requires translation in the Value field. The following indicates the Tivoli-supported languages and the corresponding value to be entered in the Value field.

Enabling the Module for NLS Support
7–6 Version 2.3
Supported Language Value
German de
Spanish es
French fr
Italian it
Japanese ja
Korean ko
Brazilian Portuguese pt_BR
Simplified Chinese zh_CN
You can specify more than one language in the Value field. To do so, use a space to separate each value. For example, if you wish to specify German, French, and Simplified Chinese, you would enter de fr zh_CN in the Value field.
Press the Apply buttons and Save Settings button when completed.
5. Generate and build the module.
The build process creates the message files as described in “Message and Message Catalog Files” on page 7-4. The build process also creates a directory for each language that you specified in the Value field on the Settings tab. These language directories are located under src/msg_cat/<Language>.
6. Translate (or send to a translation center) all of the message files in the src/msg_cat/<Language> directories.
7. Place the translated files (one set of files for each language) into the appropriate src/msg_cat/<Language> directory for each language.
8. Build the module again. After building the module, the module’s install image contains the translated message images, which include the message catalog (.cat) files. The translated message images can be installed using the Tivoli patch install process. There is one patch for each Tivoli-supported language that you specified with the LOCALES variable.

Reusing Translated Message Files
Tivoli Module Builder User’s Guide 7–7
Natio
nal L
ang
uag
e S
up
po
rt for M
od
ules
Reusing Translated Message Files After translating a module’s message files, you may find that you have translated message files that you wish to reuse when building new modules. The Msg Cat tab page in the Tivoli Module Designer contains a Browse... button for each translatable attribute or text string. You can use this browser to identify a message (.msg) file that you wish to be associated with the text string displayed in the Value field. The .msg file that you identify is copied to the module’s msg_files directory. Use a text editor to view the .msg file and identify the key and # (number) data that you should enter into the Key and # fields on the Msg Cat tab page.

Reusing Translated Message Files
7–8 Version 2.3

Tivoli Module Builder User’s Guide 8–1
Installin
g an
d U
nin
stalling
M
od
ules
8Installing and Uninstalling Modules
You can install modules into the Tivoli environment using the Tivoli Module Builder, the Tivoli desktop, or the winstall command.
Note: Installing a module requires the Tivoli Management Framework.
If the module’s install image enables incremental installation, then you can install and uninstall the module’s tasks, monitors, and file packages separately.
If you are installing from the Tivoli Module Builder, then specify the Tivoli installation directory.
Modules can also be uninstalled using the Tivoli Module Builder or the command line interface.
Specifying the Tivoli Installation Directory When installing modules from the Tivoli Module Builder, it is necessary to specify the path to the Tivoli installation directory. This procedure assumes that the Tivoli Management Framework is already installed. (For information on installing the Tivoli Management Framework, see the Tivoli Management Framework documentation.)
8

Specifying the Tivoli Installation Directory
8–2 Version 2.3
Use the following steps to specify the path to the Tivoli installation directory:
1. Select the Projects object. This is the highest-level object in the Tivoli Module Builder tree view hierarchy.
2. Select the Tivoli tab.
3. Select the Tivoli Install Directory variable from the Variables List.
4. Enter the path to the Tivoli installation directory (where the Tivoli Management Framework is installed) in the Value field. For example, if you have a Tivoli installation directory on the c drive, you would enter:
c:/Tivoli
5. Click the Apply button.

Installing Modules with the Tivoli Module Builder
Tivoli Module Builder User’s Guide 8–3
Installin
g an
d U
nin
stalling
M
od
ules
Installing Modules with the Tivoli Module BuilderThe following installation procedure assumes that you have installed the Tivoli Management Framework and specified the path to the Tivoli installation directory (see “Specifying the Tivoli Installation Directory” on page 8-1.)
Note: Refer to the Tivoli Management Framework documentation for information on installing the Tivoli Management Framework and on using the winstall command to install a product.

Installing Modules with the Tivoli Module Builder
8–4 Version 2.3
Use the following steps to install a module from the Tivoli Module Builder:
1. Select the module in the Tivoli Module Builder tree view hierarchy.
2. Select the Install tab.
3. Enter the name of the target node (machine) in the Managed Node List field. If entering more than one machine name, separate the names with spaces. Click the Apply button when ready.

Incrementally Installing Tasks, Monitors, and File Packages
Tivoli Module Builder User’s Guide 8–5
Installin
g an
d U
nin
stalling
M
od
ules
4. (Optional). Specify any arguments required by the installation process in the Custom Install Options field. If there is more than one argument, separate them with spaces. Specify the arguments using the following format:
ArgumentName=Value
For example, if you specified DRIVE_LETTER and DATABASE_TYPE as install options, then you might enter the following in the Custom Install Options field:
DRIVE_LETTER=c: DATABASE_TYPE=sybase
Note: For base modules, ArgumentName is the value that you specified in the Value field on the module’s Settings tab page when specifying the module’s installation options. This value was specified in step 4 of the procedure on page 10-4.
For Plus modules, ArgumentName is either the default label or a label that you specified in step 6 on page 17-8.
5. Click the Install button.
Note: For the Install button to be active, specify the Tivoli installation directory. For information on specifying the Tivoli installation directory, see “Specifying the Tivoli Installation Directory” on page 8-1.
Incrementally Installing Tasks, Monitors, and File Packages
An incremental installation enables you to install only a particular feature, such as the module’s tasks, monitors, or file packages. This is particularly useful for module developers who want to test a particular feature without incurring a lengthier installation required for the entire module.
Note: Incremental installation and testing is a convenient means of verifying particular features of the module, but should not substitute for full product testing.
To install a module incrementally, you must have an install image that enables incremental installation. The following procedure assumes

Incrementally Installing Tasks, Monitors, and File Packages
8–6 Version 2.3
that you selected the Enable Incremental Install/Uninstall Options check box on the Build/Generate tab page when you built the install image. For more information on building install images, see “Building the Install Image for Modules” on page 2-26.
The following procedure also assumes that you have installed the Tivoli Management Framework (for information on installing the Tivoli Management Framework, see the Tivoli Management Framework documentation) and specified the path to the Tivoli installation directory (see “Specifying the Tivoli Installation Directory” on page 8-1.)
For information on using the Tivoli desktop or the winstall command to install a product, see the Tivoli Management Framework documentation.

Incrementally Installing Tasks, Monitors, and File Packages
Tivoli Module Builder User’s Guide 8–7
Installin
g an
d U
nin
stalling
M
od
ules
Use the following steps to incrementally install a module’s tasks, monitors, and file packages:
1. Select the module in the Tivoli Module Builder tree view hierarchy.
2. Select the Install tab.
3. Enter the name of the target node (machine) in the Managed Node List field. If entering more than one machine name, separate the names with spaces. Click the Apply button after you have entered the machine names.

Incrementally Installing Tasks, Monitors, and File Packages
8–8 Version 2.3
4. (Optional). Specify any arguments required by the installation process in the Custom Install Options field. If there is more than one argument, separate them with spaces. Specify the arguments using the following format:
ArgumentName=Value
For example, if you specified DRIVE_LETTER and DATABASE_TYPE as install options, then you might enter the following in the Custom Install Options field:
DRIVE_LETTER=c DATABASE_TYPE=SQL
Note: For base modules, ArgumentName is the value you specified in the Value field on the module’s Settings tab page when specifying the module’s installation options. This value was specified in step 4 of the procedure on page 10-4.
For Plus modules, ArgumentName is either the default label or a label that you specified in step 6 on page 17-8.
5. Select the check boxes (Tasks, Monitors, or Filepacks) for the features that you want to incrementally install. If you want to install the entire module, select the All check box.
Note: For the Tasks, Monitors, and Filepacks check boxes to be active, you should have selected the Enable Incremental Install/Uninstall Options check box on the Build/Generate tab page when you built the install image. For more information on building install images, see “Building the Install Image for Modules” on page 2-26.
6. Click the Install button.
Note: For the Install button to be active, specify the Tivoli installation directory. For information on specifying the Tivoli installation directory, see “Specifying the Tivoli Installation Directory” on page 8-1.

Uninstalling Modules
Tivoli Module Builder User’s Guide 8–9
Installin
g an
d U
nin
stalling
M
od
ules
Uninstalling Modules The uninstall process removes the objects added to the Tivoli desktop as a result of installing the module. The uninstall process also removes tag files created during the module’s installation so that new binaries and message catalogs can be installed. The uninstall process does not remove files or objects created after the module’s installation.
The module’s after installation script provides the uninstall function. The after install script uses the product-info.sh file to identify the module’s objects that should be removed from the Tivoli desktop. This script can be invoked from the Tivoli Module Builder or the command line.
Uninstalling with the Tivoli Module Builder In order to uninstall a module from the Tivoli Module Builder, or to uninstall only the module’s tasks, monitors, or file packages, the module must have an install image that enables incremental installation. This means that when the module was built, the Enable Incremental Install/Uninstall Options check box must have been selected on the Build/Generate tab page. For more information on building install images, see “Building the Install Image for Modules” on page 2-26.
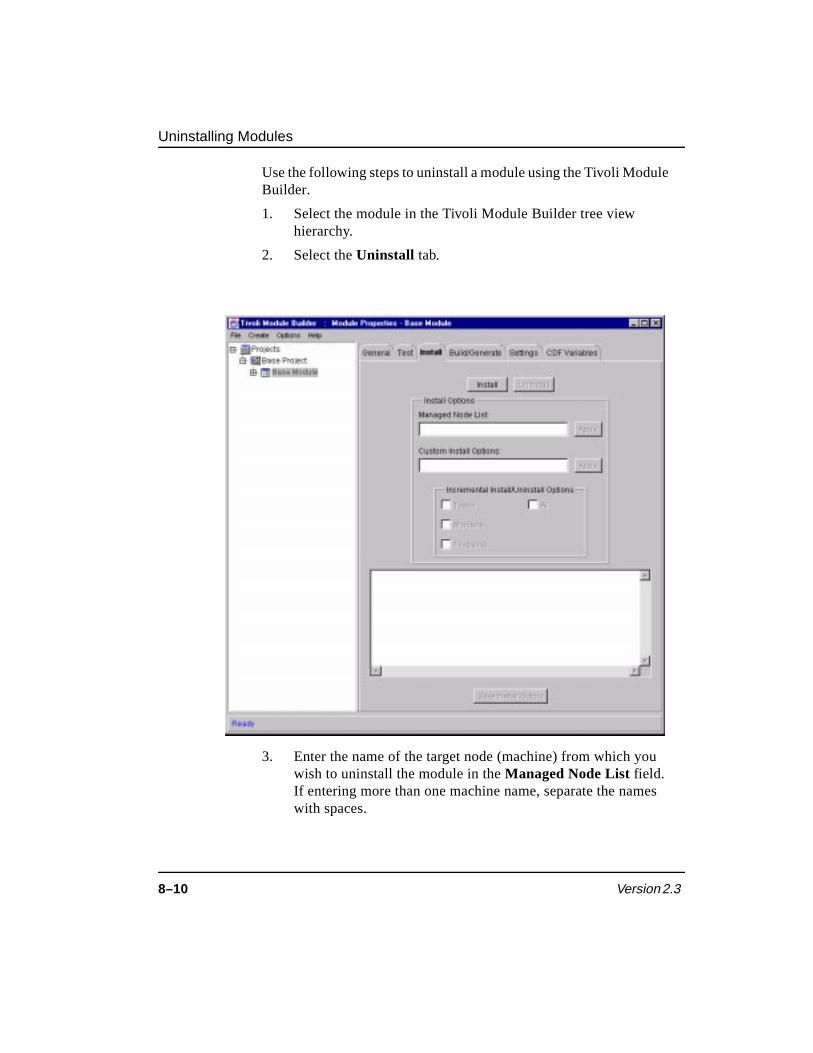
Uninstalling Modules
8–10 Version 2.3
Use the following steps to uninstall a module using the Tivoli Module Builder.
1. Select the module in the Tivoli Module Builder tree view hierarchy.
2. Select the Uninstall tab.
3. Enter the name of the target node (machine) from which you wish to uninstall the module in the Managed Node List field. If entering more than one machine name, separate the names with spaces.
Uninstalling Modules
Tivoli Module Builder User’s Guide 8–11
Installin
g an
d U
nin
stalling
M
od
ules
4. (Optional). Select the check boxes (Tasks, Monitors, or Filepacks) for the features you wish to uninstall. This option enables you to uninstall particular features, such as file packages, without uninstalling the entire module.
Note: To uninstall only a module’s tasks, monitors, or file packages, the module must have an install image that enables incremental installation. This means that when the module was built, you selected the Enable Incremental Install/Uninstall Options check box on the Build/Generate tab page. For more information on building install images, see “Building the Install Image for Modules” on page 2-26.
5. Click the Uninstall button.
Uninstalling from the Command LineThe following sections describe how to uninstall the different types of modules that you can build with the Tivoli Module Builder. You can also use the winstall command to uninstall a module that has been enabled for an incremental installation.
Base and Tivoli GEM Modules
To uninstall a base or Tivoli GEM module from the command line, enter the following:
<after_install.sh> –u
where <after_install.sh> is the name you specified for the after install script in “Specifying After Install Scripts” on page 9-6. This name is displayed on the module’s General tab page in the After Install field. Entering the <after_install.sh> –u command uninstalls the module from the managed node on which this command is run.
If the base or Tivoli GEM module is installed on the Tivoli Management Region (TMR) server, the <after_install.sh> script resides at the following location:
$BINDIR/../generic_unix/<ModuleType>/images/<Manufacturer>/<AppName>/<Version>/<ComponentManufacturer>/<ComponentProduct>/<ComponentVersion>/<after_install.sh>

Uninstalling Modules
8–12 Version 2.3
If the base or Tivoli GEM module is installed on the same machine as the Tivoli Module Builder, the <after_install.sh> script resides at the following location:
module_dev/Projects/<Project>/<Module>/src/<after_install.sh>
Plus Modules
Plus modules provide a PLUSuninstall.sh script for uninstalling the module. The PLUSuninstall.sh script uses the PLUSproduct-info.sh file as an argument. To uninstall a Plus module from the command line, enter the following:
PLUSuninstall.sh $BINDIR/../generic_unix/TME/PLUS/<AppName>/PLUSproduct-info.sh
If the Plus module is installed on the TMR server, the PLUSuninstall.sh script resides at the following location:
$BINDIR/../generic_unix/TME/PLUS/LINK/PLUSuninstall.sh
If the Plus module is installed on the same machine as the Tivoli Module Builder, the PLUSuninstall.sh script resides at the following location:
module_dev/ToolKit/Link/export/bin/generic_unix/TME/PLUS/LINK/PLUSuninstall.sh
A readme file providing information on the PLUSuninstall.sh script also resides at the same location as the PLUSuninstall.sh script. The name of this readme file is PLUSuninstall.sh.README.
Tivoli Ready QuickStart Modules
If the module was built with the Tivoli Ready QuickStart wizard, it can be uninstalled with the QsAfter.sh script. In this case, enter the following at the command line to uninstall a Tivoli Ready QuickStart module:
QsAfter.sh -u

Uninstalling Modules
Tivoli Module Builder User’s Guide 8–13
Installin
g an
d U
nin
stalling
M
od
ules
If the Tivoli Ready QuickStart module is installed on the Tivoli Management Region (TMR) server, the QsAfter.sh script resides at the following location:
$BINDIR/../generic_unix/<ModuleType>/images/<Manufacturer>/<AppName>/<Version>/<ComponentManufacturer>/<ComponentProduct>/<ComponentVersion>/QsAfter.sh
If the Tivoli Ready QuickStart module is installed on the same machine as the Tivoli Module Builder, the QsAfter.sh script resides at the following location:
module_dev/Projects/<Project>/<Module>/src/QsAfter.sh
Using the winstall Command
If you have enabled the incremental install and uninstall feature (located on the Tivoli Module Builder Build/Generate tab page), you can also uninstall the module using the winstall command. To use the winstall command to uninstall a module, enter the following:
winstall -c <cdrom_path> -i <AppName>.IND \UNINSTALL=1 DOTASKS=1 DOMONS=1 DOFPS=1
where:
-c <cdrom_path> Specifies the full path name of the CD-ROM image.
-i <AppName>.IND Specifies the name of the index file located in the <ModuleName>/images/<AppName>.image directory.
DOTASKS=1 Specifies that the module’s tasks are to be removed. This item is optional and can be omitted if you do not wish to uninstall the module’s tasks.
DOMONS=1 Specifies that the module’s monitors are to be removed. This item is optional and can be omitted if you do not wish to uninstall the module’s monitors.

Uninstalling Modules
8–14 Version 2.3
DOFPS=1 Specifies that the module’s file packages are to be removed. This item is optional and can be omitted if you do not wish to uninstall the module’s file packages.

Tivoli Module Builder User’s Guide
Part II—Base Modules
This section contains chapters that describe how to create a base module.
Chapter 9—Introduction to Base Modules................ 9-1Defining Component Data .................................................................................. 9-2
Specifying Before and After Installation Scripts ................................................ 9-5
Base Modules in the Tivoli Environment ........................................................... 9-7
Chapter 10—Installation Options............................. 10-1
Chapter 11—Operational Tasks ............................... 11-1
Chapter 12—File Packages ...................................... 12-1
Chapter 13—Monitors ............................................... 13-1Using the Predefined Monitors ......................................................................... 13-2
Creating a Monitor ............................................................................................ 13-2
Creating a Monitor Instance.............................................................................. 13-7
Base Modules
Version 2.3

Tivoli Module Builder User’s Guide 9–1
Intro
du
ction
to B
ase M
od
ules
9Introduction to Base Modules
Base modules enable you to define an application’s management requirements and build this information, along with the management scripts and programs, into a Tivoli install image. Unlike modules required for certification with Team Tivoli, base modules are not required to have particular features. You can design the base module with the number of components and features that best suit your development style and application needs.
Defining the management requirements of an application requires identifying the application’s components and then specifying the management requirements for each component. An application component is a portion of the application that performs a particular function and resides on a particular platform. For example, you can break an application into its client, server, and database functions, and then define a component for each platform on which these functions run.
When you define an application component, you specify the component’s management requirements. The Tivoli Module Designer displays these requirements as separate categories of information. The component definition categories that apply to base modules are the following:
■ File Lists. This category specifies the files required by the component. For example, the file list can specify the files that will be distributed to a target system.
9

Defining Component Data
9–2 Version 2.3
■ Installation Dependencies. This category specifies the criteria that must be met before a component can be installed and successfully run on a target system. For example, an installation dependency can check for sufficient disk space.
■ Operational Tasks. This category specifies those tasks that are run by the module’s user. For example, an operational task can run a backup and restore program or generate a database report.
■ Synchronous Monitors. This category specifies the monitors and monitor instances that will periodically check the status of the managed application’s critical resources. A monitor identifies the type of resource to be monitored. The monitor instance identifies the specific resource. For example, you can specify a monitor that checks the amount of free space in a directory. You could then specify several monitor instances, each one monitoring the free space in a different directory.
By defining the component definition categories, you determine the base module’s management features. You do not have to define all categories for a component. The build process uses the information you specify to create tasks, monitors, and file packages that execute or distribute according to the parameters that you have provided.
Defining a component also requires specifying general information, such as the component’s name, version, and manufacturer.
The remaining chapters in this part of the guide describe how to define file distribution (file lists), installation dependencies, operational tasks, and synchronous monitors for a component.
Defining Component Data A base module requires that general information, such as name, version, and manufacturer, be defined for all components in the module. This information should uniquely identify each component.
Note: If the module has more than one component, then the module’s application data must also be defined. For information on defining the module’s application data, see “Editing Application Data” on page 2-13.
Defining Component Data
Tivoli Module Builder User’s Guide 9–3
Intro
du
ction
to B
ase M
od
ules
This procedure assumes that you have done the following:
■ Created a project as described in “Creating the Project” on page 2-3.
■ Added a module to the project as described in “Adding a Module to the Project” on page 2-4.
■ Added an AMS component to the module as described in “Adding an AMS Component” on page 2-7 or imported a CDF as described in “Importing a Component Description File (CDF)” on page 2-11.
Adding an AMS component to a module automatically launches the Tivoli Module Designer. If the Tivoli Module Designer is not already launched, then launch it now using the procedure described in “Launching from the Component Level” on page 2-18.

Defining Component Data
9–4 Version 2.3
Use the following steps to define the component data:
1. Select the component in the Tivoli Module Designer to display the Component Data tab page.
2. Use the Component Data tab page to specify general information required to identify the component. The combined values of the Name, Version, and Manufacturer fields should be unique for each component in the module. When defining more than one component, it is sufficient to change the value of just one of these fields to ensure a unique combination.
For additional information on editing the Component Data tab page fields, refer to the online help.
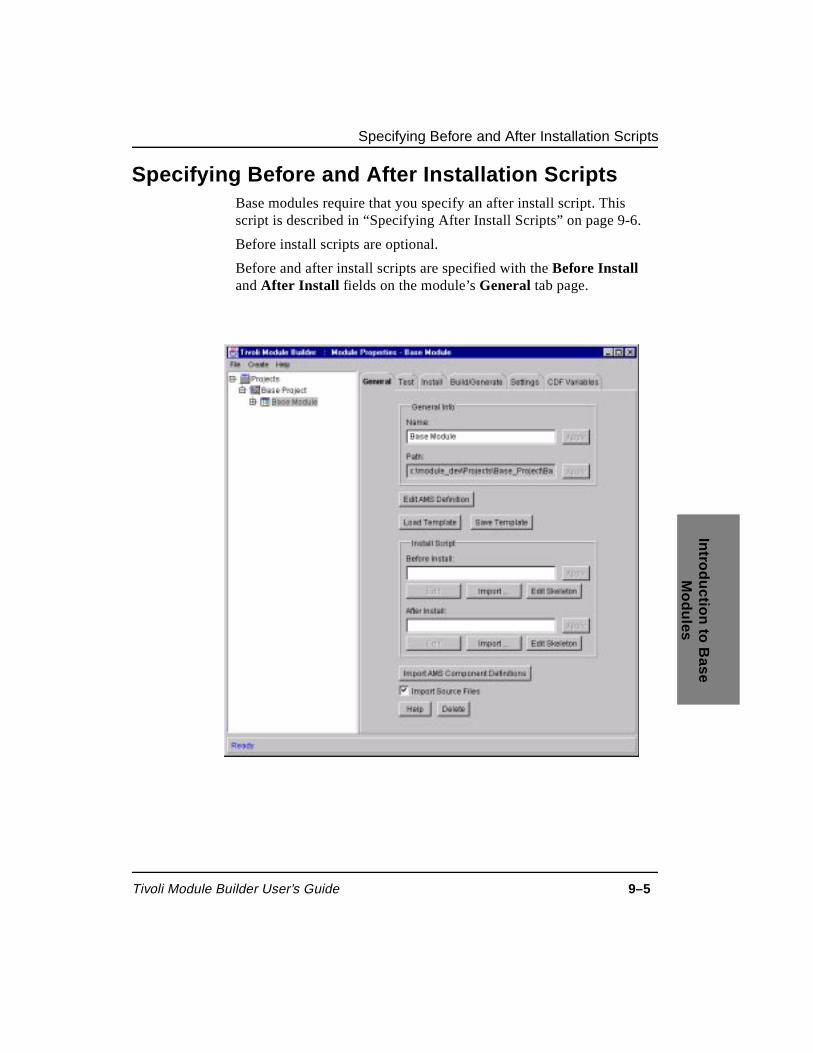
Specifying Before and After Installation Scripts
Tivoli Module Builder User’s Guide 9–5
Intro
du
ction
to B
ase M
od
ules
Specifying Before and After Installation ScriptsBase modules require that you specify an after install script. This script is described in “Specifying After Install Scripts” on page 9-6.
Before install scripts are optional.
Before and after install scripts are specified with the Before Install and After Install fields on the module’s General tab page.
Specifying Before and After Installation Scripts
9–6 Version 2.3
Specifying Before Install Scripts You can specify a before install script for the base module. For example, you may want to have a before install script that verifies that the target node supports the managed application or whether there is enough disk space to install the module. The generate process generates a script stub for the before install script. You need to edit the script stub with the necessary code. The generated script stub is located in the <Module>/src directory.
Use the following steps to specify the before install script:
1. Select the module in the Tivoli Module Builder tree view hierarchy.
2. Specify a simple file name in the Before Install field.
3. Click the Apply button.
Specifying After Install Scripts Base modules require an after install script that runs after the base module’s files have been installed in the Tivoli environment. This script creates and configures the module’s policy region and other objects displayed on the Tivoli desktop. (For a description of these objects, see “Base Modules in the Tivoli Environment” on page 9-7.)
For the after install script to be generated, you need to specify a name for the after install script. The generated script is complete and does not require modification. The generated script stub is located in the <Module>/src directory.
Use the following steps to specify the after install script:
1. Select the module in the Tivoli Module Builder tree view hierarchy.
2. Specify a simple file name in the After Install field on the General tab page.

Base Modules in the Tivoli Environment
Tivoli Module Builder User’s Guide 9–7
Intro
du
ction
to B
ase M
od
ules
Note: The after install section of the General tab page includes an Import and an Edit Skeleton button. Because the generate process generates a complete after install script, it is generally not necessary to either import a script or edit the after install script’s skeleton file.
3. Click the Apply button.
Continue with “Generating the Module and Other Objects” on page 2-21.
Base Modules in the Tivoli Environment The base module is installed into the Tivoli environment using the standard Tivoli management software installation process. The installation process creates a policy region on the Tivoli desktop. This policy region is named in the following default format:
Applications_<MachineName>-region
This policy region contains an additional policy region for each installed base module. The module-level policy region is named in the following format:
PR_<ApplicationName>_Default_<MachineName>-region
The contents of the module-level policy region vary according to the number of components in the base module and the items defined in each component. When defined in a component, the following items are added to the module-level policy region.
■ Profile Manager. A profile manager is created for the monitors and file lists defined in the component. The profile manager is named in the following format:
PM_<ProductName>_<ProductVersion>_ Default_ \<ComponentName>_<ComponentVersion>_<RegionName>
For monitors, the profile manager contains a Tivoli Distributed Monitoring profile. The profile is named in the following format:
SN_<ProductName>_<ProductVersion>_ Default_ \<ComponentName>_<ComponentVersion>_<RegionName>

Base Modules in the Tivoli Environment
9–8 Version 2.3
For file lists, the profile manager contains a file package. The file package is named in the following format:
FP_<ProductName>_<ProductVersion>_ Default_ \<ComponentName>_<ComponentVersion>_<RegionName>
■ Task Library. A task library is created for all operational tasks defined in the component. The task library is named in the following format:
TL_<ProductName>_<ProductVersion>_ Default_ \<ComponentName>_<ComponentVersion>_<RegionName>
■ Dependency Task Library. A dependency task library is created for the tasks that check for the custom dependencies. The dependency task library is named in the following format:
DP_<ProductName>_<ProductVersion>_ Default_ \<ComponentName>_<ComponentVersion>_<RegionName>
Note: These are the default naming conventions used by the winstruct command in the Tivoli 3.6 environment. To change the default Tivoli 3.6 naming conventions, select an object in the Tivoli Module Builder tree view hierarchy and edit (or add) the USE_TSUNAMI_NAMES variable on the object’s Settings tab. For more information on editing variables, see “Editing Settings” on page 3-2.
Tivoli Module Builder User’s Guide 10–1
Installatio
n O
ptio
ns
10Installation Options
The base module may require user-supplied information to function properly in the user’s environment. For example, the user may need to specify a database type, drive name, user name and password, or other environment-specific information. Installation options enable you to specify information that the user must provide during the module’s installation.
When specifying the base module’s installation options, use the Variable field on the modules’s Settings tab page to create INSTALL_OPT_Number variables. For each variable, specify a value in the Value field that identifies the information the user must supply. If you have created these variables and their values, the base module’s installation process prompts the user for the information that you have specified.
This procedure assumes that you have done the following:
■ Created a project as described in “Creating the Project” on page 2-3.
■ Added a module to the project as described in “Adding a Module to the Project” on page 2-4.
■ Added an AMS component to the module as described in “Adding an AMS Component” on page 2-7 or imported a CDF as described in “Importing a Component Description File (CDF)” on page 2-11.
10
10–2 Version 2.3
Adding an AMS component to a module automatically launches the Tivoli Module Designer. If the Tivoli Module Designer is not already launched, then launch it now using the procedure described in “Launching from the Component Level” on page 2-18.
■ Defined the component data for the AMS component as defined in “Defining Component Data” on page 9-2.
Note: If the module has more than one component, then the module’s application data must also be defined. For information on defining the module’s application data, see “Editing Application Data” on page 2-13.

Tivoli Module Builder User’s Guide 10–3
Installatio
n O
ptio
ns
Use the following steps to specify installation options for the base module:
1. Select the module in the Tivoli Module Builder tree view hierarchy.
2. Select the Settings tab.
3. Enter INSTALL_OPT_Number in the Variable field and click the Apply button. For the first variable, enter INSTALL_OPT_1. For additional variables, enter INSTALL_OPT_2, INSTALL_OPT_3 and so forth.
After entering the variables in the Variable field and clicking the Apply button, the variables are displayed in the Variables List.

10–4 Version 2.3
4. Specify a value for the variable in the Value field and click the Apply button. The value you enter is the prompt that requests the user for the required information during the module’s installation process. For example, the value might be Database_Type or Drive_Letter. If the value contains more than one word, separate the words with an underscore (_). You can used mixed upper- and lower-case when specifying the value.
When specifying a value, the variable that the value applies to should be displayed in the Variable field. If it is not, select the variable in the Variables List box to display it in the Variables field.
5. Click the Save Settings button when you have specified all the values.

Tivoli Module Builder User’s Guide 11–1
Op
eration
al Tasks
11Operational Tasks
You can specify the operational tasks that the module’s user will run to manage the component. For example, you can specify tasks for database maintenance, resource management, starting and stopping servers, and so forth.
11

11–2 Version 2.3
The following graphic shows a component that has been expanded to display the component definition categories. The operational tasks category is selected.
This procedure assumes that you have done the following:
■ Created a project as described in “Creating the Project” on page 2-3.
■ Added a module to the project as described in “Adding a Module to the Project” on page 2-4.
■ Added an AMS component to the module as described in “Adding an AMS Component” on page 2-7 or imported a CDF as described in “Importing a Component Description File (CDF)” on page 2-11.

Tivoli Module Builder User’s Guide 11–3
Op
eration
al Tasks
Adding an AMS component to a module automatically launches the Tivoli Module Designer. If the Tivoli Module Designer is not already launched, then launch it now using the procedure described in “Launching from the Component Level” on page 2-18.
■ Defined the component data for the AMS component as defined in “Defining Component Data” on page 9-2.
Note: If the module has more than one component, then the module’s application data must also be defined. For information on defining the module’s application data, see “Editing Application Data” on page 2-13.
Use the following steps to specify operational tasks:
1. If you have not already done so, expand the component definition categories by clicking the + symbol next to the component that you want to edit.
2. Select the Operational Task category. The Operational Tasks tab page enables you to specify tasks for managing the component. Complete this tab page once for each task you wish to define. The CDF generated for this component definition references each of the tasks you specify.
Generating the base module produces a script stub for each script or program specified in the task definition. You must edit these stubs with the scripts for running the task.
Complete the following required fields:
Task NameEnter a description of what the task does. Examples of task names are Start_Servers or Print_Runtime Statistics_Report. The name must be alphanumeric (a–z, A–Z, 0–9, plus underscores). Spaces are not allowed.
Program NameEnter the name of the program or script that is invoked by the task. The name must be alphanumeric (a–z, A–Z, 0–9, plus underscores). Spaces are not allowed. Generating the base module produces a script stub with this name. The script stub has a placeholder for inserting the managed application’s script.

11–4 Version 2.3
Label Enter the arguments expected by the program in the Label field and click the Add button to add the argument to the Arguments list.
Click the <Add button when you have completed the previous steps. This action displays the task you have just defined under the Operational Tasks category. If you need to edit the task, you can simply select it to redisplay the Operational Tasks tab page with your definitions.
To specify another operational task, repeat this step.
3. Specify the Tivoli administrator role required to run each task that you defined in step 2 of this procedure. The Tivoli administrator roles assign different levels of authority required for running management tasks in the Tivoli environment.
Use the following steps to assign the Tivoli administrator role required to run a task:
a. Select the task instance in the tree view hierarchy.
b. Select the Tivoli Roles tab page.
c. Select one or more of the Tivoli administrator roles displayed on the Tivoli Roles tab page.

Tivoli Module Builder User’s Guide 11–5
Op
eration
al Tasks
d. Click the Update button.
For additional information on editing an operational tasks component, refer to the online help.

11–6 Version 2.3

Tivoli Module Builder User’s Guide 12–1
File P
ackages
12File Packages
You can define a component’s file distribution information by specifying the file list. When specifying the file list, you have the option of also specifying location definitions and installation programs. The Tivoli management software tools use the information you specify to create file packages for distributing this component to target machines using Tivoli Software Distribution.
12

12–2 Version 2.3
The following graphic shows a component that has been expanded to display the component definition categories. The categories that can be specified for file distribution are highlighted.
This procedure assumes that you have done the following:
■ Created a project as described in “Creating the Project” on page 2-3.
■ Added a module to the project as described in “Adding a Module to the Project” on page 2-4.
■ Added an AMS component to the module as described in “Adding an AMS Component” on page 2-7 or imported a CDF

Tivoli Module Builder User’s Guide 12–3
File P
ackages
as described in “Importing a Component Description File (CDF)” on page 2-11.
Adding an AMS component to a module automatically launches the Tivoli Module Designer. If the Tivoli Module Designer is not already launched, then launch it now using the procedure described in “Launching from the Component Level” on page 2-18.
■ Defined the component data for the AMS component as defined in “Defining Component Data” on page 9-2.
Note: If the module has more than one component, then the module’s application data must also be defined. For information on defining the module’s application data, see “Editing Application Data” on page 2-13.
Use the following steps to specify file distribution:
1. If you have not already done so, expand the component definition categories by clicking the + symbol next to the component that you want to edit.
2. (Optional). Select the Location Definitions category. The Location Definitions tab page enables you to define symbolic names for directories associated with this component. After completing this tab page, click the <Add button.
Complete the following fields:
Symbolic NameUse the Symbolic Name drop-down list to select the symbolic name that you want to define. If you want to define a symbolic name not on this list, select <User Defined>.
The Symbolic Name drop-down list displays a list of possible symbolic directory names that you can define for this software component. After you have defined a symbolic directory name, use the symbolic name throughout the software component definition. The symbolic directories that you define here will appear on the symbolic name drop-down lists of other tab pages.

12–4 Version 2.3
Source Location Enter the symbolic name for the source directory. This is the directory on the target machine from which the files will be distributed.
Note: It is recommended that you define the Product Base Location symbolic name with the value of /!<ModuleType>proddirfileformat!/ in the Source Location field. The <ModuleType> portion of this value may be set to PLUS, GEM, or left empty. When the module is built, this symbolic name indicates the directory containing the module’s binaries. After the Product Base Location symbolic name is defined, it is the appropriate value to use when indicating the source location for files and programs when defining file lists, operational tasks, and synchronous monitors.
3. (Optional). Select the File List category. The File List tab page enables you to define the files (such as installation binaries) that will be distributed with the component.
Complete the following required fields on the File List tab page. You can specify these fields more than once to include different files. After completing this tab page, click the <Add button.
File NameEnter the names of those files to be distributed. You can specify a file name, a path to a file, or a directory. When using a simple file name, use the Source Location fields to specify the directories where the file is located.
Note: You can also specify a directory in the File Name field. If there are certain files in a directory that you wish to exclude, you can exclude these files by inserting an ampersand (&) before the file name in the File Name field.

Tivoli Module Builder User’s Guide 12–5
File P
ackages
Source Location Use the Symbolic Name drop-down list to select a symbolic name for the source location of the file. The symbolic names that you have defined with the Location Definitions category appear on this drop-down list.
Destination Location Use the Symbolic Name drop-down list to select a symbolic name for the destination location of the file. The symbolic names that you have defined with the Location Definitions category appear on this drop-down list.
Refer to the online help for additional information.
4. (Optional). Select the Installation Programs category. The Installation Programs tab page enables you to define programs, such as before and after installation scripts, that run when the file list members of the component are installed. After completing this tab page, click the <Add button.
Complete the following required fields:
Program FunctionUse this drop-down list to select the scripts or programs associated with installing or removing the file list members of the component. These programs run on each target machine during the installation process.
Program File NameEnter the file name of the program associated with installing or removing the file list members of the component.
For additional information on editing a file package component, refer to the online help.

12–6 Version 2.3

Tivoli Module Builder User’s Guide 13–1
Mo
nito
rs
13Monitors
Monitors maintain an application by monitoring those resources that are crucial to an application’s continued operation. These resources might include daemons, the application server, directory free space, and so forth. You can also specify that a task be run in response to changes in a resource’s status. For example, you can define a monitor that checks whether the application’s server is up or down, and that initiates a restart server task when the server fails.
Defining a monitor is a two-stage process:
1. Create the monitor. The monitor identifies the type of resource being monitored. For example, you can define a file size monitor. The procedure for creating a monitor is described in “Creating a Monitor” on page 13-2.
2. Create the monitor instance. A monitor instance identifies the specific name of the resource and its threshold levels. For example, an instance of a file size monitor would identify the name of the file and the size at which the file reaches a normal, severe, or critical status. The procedure for creating a monitor instance is described in “Creating a Monitor Instance” on page 13-7.
In addition to creating a monitor, you can use one of the predefined monitors provided with the Tivoli Module Builder.
13

Using the Predefined Monitors
13–2 Version 2.3
Using the Predefined Monitors The Tivoli Module Builder provides a tar file that contains the predefined monitors provided with Tivoli Distributed Monitoring. You can untar (or unzip) this file and import the monitors as a CDF into your module. You can then edit the CDF to create instances of the predefined monitors.
Use the following steps to use the predefined monitors:
1. Untar (or unzip) the following file:
\module_dev\ToolKit\cdfs\monitor_collections\cdfcollection.tar
This file contains the predefined Tivoli Distributed Monitoring monitors in tarred format. Untarring (or unzipping) this file creates a directory structure containing various monitoring collections.
2. Use the Tivoli Module Builder to import a CDF with the predefined monitors. Use the procedure described in “Importing Monitors from a Component Description File” on page 6-5 to complete this step. The CDFs with predefined monitors are located in the following directory:
\module_dev\ToolKit\cdfs\monitor_collections\<category>\<CDF_Name>
3. Select the imported component (CDF) and launch the Tivoli Module Designer using the procedure described in “Launching from the Component Level” on page 2-18.
4. Create instances of the predefined monitors as needed using the procedure described in “Creating a Monitor Instance” on page 13-7.
Creating a Monitor This procedure assumes that you have done the following:
■ Created a project as described in “Creating the Project” on page 2-3.
■ Added a module to the project as described in “Adding a Module to the Project” on page 2-4.

Creating a Monitor
Tivoli Module Builder User’s Guide 13–3
Mo
nito
rs
■ Added an AMS component to the module as described in “Adding an AMS Component” on page 2-7 or imported a CDF as described in “Importing a Component Description File (CDF)” on page 2-11.
Adding an AMS component to a module automatically launches the Tivoli Module Designer. If the Tivoli Module Designer is not already launched, then launch it now using the procedure described in “Launching from the Component Level” on page 2-18.
■ Defined the component data for the AMS component as defined in “Defining Component Data” on page 9-2.
Note: If the module has more than one component, then the module’s application data must also be defined. For information on defining the module’s application data, see “Editing Application Data” on page 2-13.

Creating a Monitor
13–4 Version 2.3
The following graphic shows a component that has been expanded to display the component definition categories. The Synchronous Monitors category is selected.
Use the following steps to create a monitor:
1. If you have not already done so, expand the component definition categories by clicking the + symbol next to the component that you want to edit.
2. Select the Synchronous Monitors category. The Synchronous Monitors tab page enables you to specify a monitor for a particular type of resource.

Creating a Monitor
Tivoli Module Builder User’s Guide 13–5
Mo
nito
rs
Complete the following fields:
Monitor NameEnter the name that you want to appear in the monitor definition list. This name should reflect the information provided by the monitor, such as daemon status. This name needs to be unique within this component, but does not need to be unique across components. The name must be alphabetic (cannot include numbers, spaces, underscores, or other special characters).
Event ClassIn the User Defined field, enter the event class that applies to the events that this monitor sends to the Tivoli Enterprise Console. The Tivoli Enterprise Console requires that event classes be in the form of a valid BAROC class name (alphanumeric characters starting in upper case and including an underscore). For example, an event class may be specified as Sample_TraceStatus.
3. Click the Program tab. The Program tab page specifies the name of the program that runs the monitor. Generating the base module produces a .csl file for monitor collections that are not one of the Tivoli Distributed Monitoring predefined monitor collections. The .csl file contains the names of the programs that you have specified for the monitors defined in this component. There is one .csl file for each monitor collection. Modify the generated .csl file with the command line invocations for each monitor instance.
Refer to the Tivoli Distributed Monitoring User’s Guide and the Tivoli Distributed Monitoring MCSL Developer’s Guide for information on modifying the .csl files. When the base module is installed, the .csl file imports the monitor definitions into Tivoli Distributed Monitoring.
Note: When editing a .csl file, do not change the name of the monitor collection as shown in the .csl file’s Collection field.

Creating a Monitor
13–6 Version 2.3
Complete the following fields:
Program Name Enter the name of the program that runs the monitor. The name must be alphabetic (cannot include numbers, spaces, underscores, or other special characters). When the module is generated, the monitor implementations are placed in the <ModuleName>/src directory. Provide a script for each monitor implementation.
Note: If you are using a predefined monitor, the Program Name field will have a default value that specifies both a monitoring collection and the monitor program. The default value has the following format:
<CollectionName>/<ProgramName>
Label Enter the arguments that the program requires in the Label field and click the Add button to move the argument to the Arguments list box. Do this for all arguments that the program requires. When you create an instance of this monitor, you will specify a value for each of these arguments. Because these values can vary according to the specific resource being monitored, they are specified when creating the monitor instance and not the monitor.
Run Program EveryUse these fields to specify the frequency with which this monitor should check the status of the monitored resource. When specifying this frequency, take into consideration how often the value is updated by the application, how quickly an administrator needs to know about the situation being monitored, and the overhead associated with running the monitor program. For example, you may want to specify that the monitor run every minute in the case of a resource, such as a daemon, whose failure will immediately cause the application to be unavailable. You may want to specify a longer interval for those resources that require more time to reach a critical status.
4. Click the Return Type tab. The Return Type tab page has fields for specifying the monitor program’s return values.
Creating a Monitor Instance
Tivoli Module Builder User’s Guide 13–7
Mo
nito
rs
Return TypeSpecify whether the monitor program should write its standard output as numeric data or strings (character data). This specification determines the type of thresholds that can be set for this monitor. Numeric data can have thresholds set in terms of a numeric comparison. For example, this type of threshold can indicate that a daemon count is equal to 1 or greater than 1. String data can have thresholds set in terms of a character comparison. For example, this type of threshold may indicate that a tracing facility is OFF or that the value for a resource is not UP or contains ERROR.
Return Unit(Optional). Use the User Defined field to specify the type of units returned by this monitor. For example, you could specify that the return units be megabytes, kilobytes, or a percentage.
5. Click the Add button when you have completed the previous steps. The new monitor that you just created is displayed under the Synchronous Monitors category. To run this monitor, define an instance of this monitor for a particular resource. For information on defining a monitor instance, see “Creating a Monitor Instance” on page 13-7.
Creating a Monitor Instance A monitor instance can only be created for a monitor that has already been defined. You can either create a new monitor or use one of the predefined monitors provided with the Tivoli Module Builder. If you do not yet have a monitor, refer to “Creating a Monitor” on page 13-2 or “Using the Predefined Monitors” on page 13-2.
The following graphic shows a component that has been expanded to display the component definition categories. A file size monitor has

Creating a Monitor Instance
13–8 Version 2.3
already been defined for the component. The file size monitor has been selected in preparation for creating an instance of this monitor.
This procedure assumes that you have done the following:
■ Created a project as described in “Creating the Project” on page 2-3.
■ Added a module to the project as described in “Adding a Module to the Project” on page 2-4.
■ Added an AMS component to the module as described in “Adding an AMS Component” on page 2-7 or imported a CDF as described in “Importing a Component Description File (CDF)” on page 2-11.

Creating a Monitor Instance
Tivoli Module Builder User’s Guide 13–9
Mo
nito
rs
Adding an AMS component to a module automatically launches the Tivoli Module Designer. If the Tivoli Module Designer is not already launched, then launch it now using the procedure described in “Launching from the Component Level” on page 2-18.
Use the following steps to create a monitor instance:
1. If you have not already done so, display the component definition categories by clicking on the “component tree button” (box containing the + symbol) next to the component you are editing. This action expands the component display.
2. Expand the Synchronous Monitors category so that all defined monitors are displayed.
3. Select the monitor for which you are creating an instance and click the Instance button. This action creates an “empty” instance of the monitor you selected.
4. Select the newly created instance to display the Arguments tab page. The Argument Name list box on the Arguments tab page displays the arguments that you defined for the monitor program in step 3 on page 13-5. If you are creating an instance for a predefined monitor, then the Argument Name list box displays any default arguments required by the predefined monitor.
For each argument, enter the appropriate value in the Argument Value field. Click the Update button when finished.
5. Click the <Threshold button. This action creates a threshold item below the monitor instance.
6. Select the threshold item for the monitor instance to display the Thresholds tab page. This tab page has fields for specifying the additional instance information.
7. Specify the following fields on the Thresholds tab page:
Severity Use the Severity drop-down list to select the severity level of the event that is sent to the Tivoli Enterprise Console when the monitored resource reaches the specified threshold.
Creating a Monitor Instance
13–10 Version 2.3
ConditionUse the Condition drop-down list to select the relational operator for the threshold. This operator determines how the monitor uses the specified threshold to determine a resource’s status. For example, the monitor can assess a resource’s status by checking whether it is greater than or changes from or crosses above the specified threshold. The operator that you specify from the Condition drop-down list should be consistent with the return type that you specified on the Return Type tab page in step 4 on page 13-6. For example, if the return type is String, you could not specify Greater than on the Condition drop-down list since Greater than assumes that the return type is Numeric.
Event Threshold Enter the value for the threshold.
Send event when conditions met Select this box if you want the monitor to send an event to the Tivoli Enterprise Console when the threshold is met.
8. Click the Response tab. On the Response tab page you can specify that a task be run in response to a change in a monitor’s status. For example, you could specify that a task be run to restart a failed daemon.
Complete these fields as necessary.
Available TasksThe Available Tasks drop-down list displays the operational tasks that you have defined for this component. If you need to define an operational task, see Chapter 11, “Operational Tasks.”
ArgumentThe arguments required by the task selected with the Available Tasks drop-down list are displayed in the Argument list box.
Argument ValueEnter the value for each argument required by the task.
9. Click the Update button to set your changes.

Tivoli Module Builder User’s Guide
Part III—Team Tivoli Plus Modules
This section contains chapters that describe how to create a Plus module for Team Tivoli certification. For information on creating a Tivoli Global Enterprise Manager module, see the Tivoli Global Enterprise Manager Business System Enablement Guide and the Tivoli Global Enterprise Manager Advanced Business System Enablement Guide.
Chapter 14—Introduction to Plus Modules............. 14-1Loading the Plus Module Template .................................................................. 14-2
Using the “Empty” Plus Module Template ...................................................... 14-3
Importing Previous Versions of a Plus Module................................................ 14-4
Plus Module Component Types........................................................................ 14-9
Component Definition Categories .................................................................. 14-14
Plus Modules in the Tivoli Environment ........................................................ 14-18
Activating the Plus Module’s Features ........................................................... 14-20
Chapter 15—Application Icons ................................ 15-1Prerequisites ...................................................................................................... 15-2
Editing the Application Icons Component........................................................ 15-3
Chapter 16—Application Launch............................. 16-1Prerequisites ...................................................................................................... 16-2
Editing the Application Launch Component ................................................... 16-3

Team Tivoli Plus Modules
Version 2.3
Chapter 17—Install Options ..................................... 17-1Prerequisites...................................................................................................... 17-2
Editing the Install Options Component ........................................................... 17-3
Chapter 18—Plus Configuration.............................. 18-1Prerequisites...................................................................................................... 18-2
Editing the Plus Configuration Component ..................................................... 18-3
Chapter 19—Subscription Lists............................... 19-1Prerequisites...................................................................................................... 19-2
Editing the Subscription List Component......................................................... 19-3
Chapter 20—Endpoint Subscription List ................ 20-1Prerequisites...................................................................................................... 20-2
Editing the Endpoint Subscription List Component ......................................... 20-3
Chapter 21—Administrative Tasks.......................... 21-1Prerequisites...................................................................................................... 21-2
Editing the Administrative Tasks Component ................................................. 21-3
Chapter 22—File Packages ...................................... 22-1Prerequisites...................................................................................................... 22-3
Editing the File Package Component .............................................................. 22-3
Chapter 23—Indicator Collections .......................... 23-1Prerequisites...................................................................................................... 23-2
Editing the Indicator Collection Component ................................................... 23-3
Chapter 24—Monitors............................................... 24-1Prerequisites...................................................................................................... 24-3
Editing the Monitors Component .................................................................... 24-3

Team Tivoli Plus Modules
Tivoli Module Builder User’s Guide
Creating a New Monitor ................................................................................. 24-14
Creating a Monitor Instance............................................................................ 24-20
Using Additional Predefined Monitors........................................................... 24-29
Chapter 25—Tivoli Enterprise Console Configuration............................................................. 25-1Prerequisites ...................................................................................................... 25-3
Editing the TEC Configuration Component .................................................... 25-3
Chapter 26—Logfile Adapter Configuration ........... 26-1Prerequisites ...................................................................................................... 26-3
Editing the Logfile Adapter Configuration Component .................................. 26-4
Chapter 27—Hidden Tasks....................................... 27-1Prerequisites ...................................................................................................... 27-2
Editing the Hidden Tasks Component ............................................................. 27-2
Chapter 28—Enabling Plus Modules for Tivoli GEM.................................................................. 28-1Excluding the Unnecessary Plus Components.................................................. 28-2
Linking the Tivoli GEM and Plus Modules...................................................... 28-2

Team Tivoli Plus Modules
Version 2.3
Tivoli Module Builder User’s Guide 14–1
Intro
du
ction
to P
lus
Mo
du
les
14Introduction to Plus Modules
Plus modules have features, such as tasks and monitors, that manage an application in the Tivoli environment. Unlike base modules, Plus modules must have specific features to be certified by Team Tivoli. Each of these features is defined in a component description file (CDF) that also references the scripts and programs required to implement the feature. A Plus module can have multiple CDFs, each defining a specific feature. Plus components do not have a single platform limitation. In other words, the scripts and programs used to implement the component’s function should accommodate all required platforms.
The Tivoli Module Builder provides a template to assist you in defining the Plus module’s components. The Plus template provides one or more “component types” for each of the Plus module features. Some of the component types have predefined instances of items such as operational tasks and installation dependencies that would commonly be defined for an application.
14
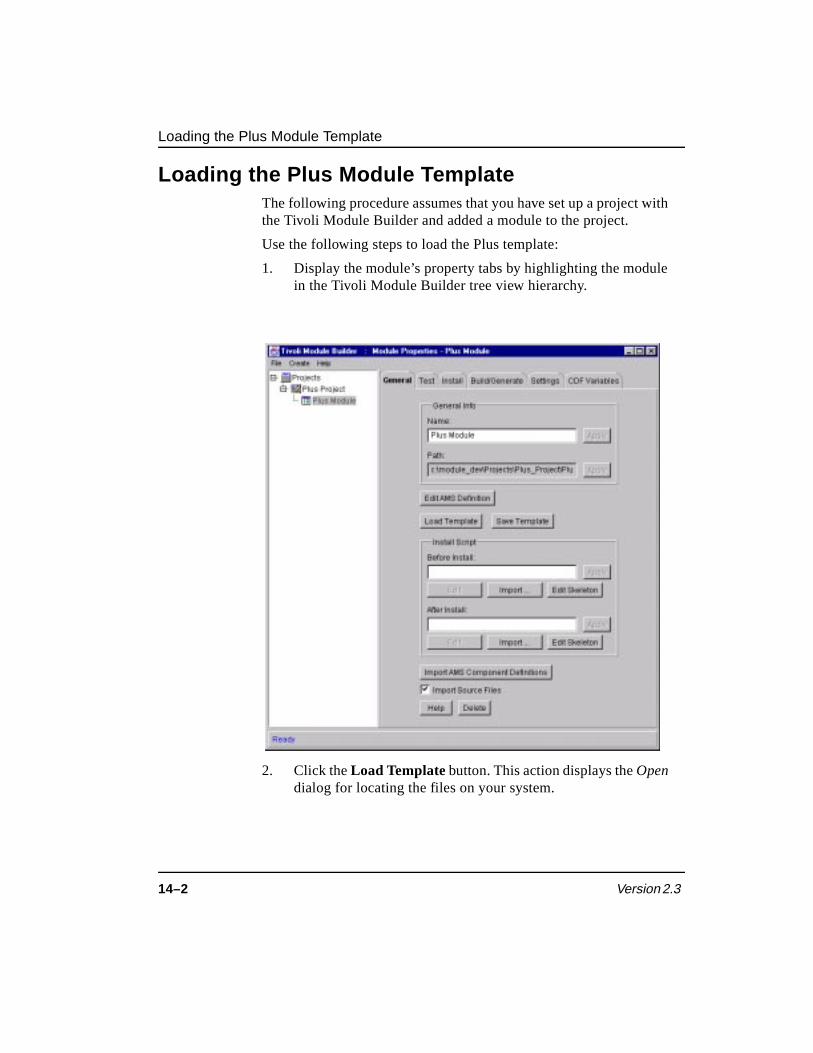
Loading the Plus Module Template
14–2 Version 2.3
Loading the Plus Module Template The following procedure assumes that you have set up a project with the Tivoli Module Builder and added a module to the project.
Use the following steps to load the Plus template:
1. Display the module’s property tabs by highlighting the module in the Tivoli Module Builder tree view hierarchy.
2. Click the Load Template button. This action displays the Open dialog for locating the files on your system.

Using the “Empty” Plus Module Template
Tivoli Module Builder User’s Guide 14–3
Intro
du
ction
to P
lus
Mo
du
les
Note: Because the Tivoli Module Builder is a Java-based application, the exact title of certain dialogs, such as the Open dialog, may be different on different platforms.
3. Use the Open dialog to locate the directory where the Plus template is located. The default location for this template is the following:
/module_dev/Toolkit/templates/Module/PlusModule.v2_3.template
4. Select the PlusModule.v2_3.template file and click the Open button. The Plus template will be imported into your module’s directory structure under the /module_dev/Projects directory.
When importing the Plus template, the Tivoli Module Builder creates an src directory, test directory, and a skeletons directory. The src directory contains the programs and scripts referenced in the Plus template CDFs. The test directory contains the test cases for testing the program and script files. This directory is empty until you actually run the test. The skeletons directory contains the skeleton files used to generate the script stubs.
Using the “Empty” Plus Module Template When you import the PlusModule.v2_3.template Plus template, you are importing Plus components as well as the appropriate specifications for the variables and after install script required by Plus modules. Importing the variable and after install script specifications saves you a significant amount of time, as you do not need to make these specifications manually.
You may wish to import only the variable and after install script specifications, however, without actually importing Plus components. For example, you may wish to create a module and import a CDF or AOF from a previous version of a Plus module. Since importing a CDF or AOF will not set the appropriate variables and after install script, you need another means of specifying this information automatically. For this reason, the Tivoli Module Builder provides an empty Plus template. Loading this template automatically sets the appropriate variable and after install script specifications without loading components. Loading the template also imports the

Importing Previous Versions of a Plus Module
14–4 Version 2.3
skeleton files used by the current version of the Tivoli Module Builder.
The default location for this template is the following:
/module_dev/Toolkit/templates/Module/PlusModuleEmpty.v2_3.template
You can load this template using the same procedure described in “Loading the Plus Module Template” on page 14-2.
Note: Even though the PlusModuleEmpty.v2_3.template Plus template has no components, it is predefined to be an application. You need to specify the application data for a module that has the PlusModuleEmpty.v2_3.template Plus template loaded. For information on specifying application data, see “Editing Application Data” on page 2-13.
Importing Previous Versions of a Plus Module You can import a previous version of a Plus module into the Tivoli Module Builder. Importing a Plus module entails importing the module’s CDFs or application object file (.aof). When importing an .aof file, all CDFs referenced in the .aof file are imported as well. You can also import the module’s source files (shell scripts and programs) by selecting the Import Source Files check box on the module’s General tab page.
When importing a Plus module, the Monitor Collection Specification Language (MCSL) or .csl file for monitor collections and the About ApplicationName task require special activity in order to be imported properly. The following sections describe how to import the module, implement imported monitors, and import the About ApplicationName task.
Importing a Plus ModulePlus modules have particular requirements for an after install script and for variable settings. To ensure that the variables and after install script are specified correctly, the following procedure imports the PlusModuleEmpty.v2_3.template Plus template. Importing the PlusModuleEmpty.v2_3.template Plus template also ensures that the module has the correct skeleton files used by the current version

Importing Previous Versions of a Plus Module
Tivoli Module Builder User’s Guide 14–5
Intro
du
ction
to P
lus
Mo
du
les
of the Tivoli Module Builder. Components are not imported with the PlusModuleEmpty.v2_3.template Plus template.
In addition to importing the PlusModuleEmpty.v2_3.template Plus template, the following procedure also describes how to import a Plus module’s CDFs or .aof file.
Use the following steps to import a Plus module:
1. Create a project in the Tivoli Module Builder tree view hierarchy using the procedure described in “Creating the Project” on page 2-3 and then continue with the next step of this procedure.
2. Add a module to the project using the procedure described in “Adding a Module to the Project” on page 2-4 and then continue with the next step of this procedure.
3. Import the module’s CDFs or .aof file using the procedure described in “Importing a Component Description File (CDF)” on page 2-11 and then continue with the next step of this procedure.
4. Load the PlusModuleEmpty.v2_3.template Plus template into the module using the procedure described in “Loading the Plus Module Template” on page 14-2. The default location for this template is the following:
/module_dev/Toolkit/templates/Module/PlusModuleEmpty.v2_3.template
Loading the PlusModuleEmpty.v2_3.template Plus template imports the Plus variable settings and the after install script specification. You can view the imported variable settings by selecting the module in the Tivoli Module Builder tree view hierarchy and selecting the Settings tab. The specification for the after install script is displayed in the After Install field on the module’s General tab.
5. Generate and build the module using the procedure described in “Building the Install Image for Modules” on page 2-26. The build process automatically generates the module before building the Tivoli install image.
In order for a previous version of the Plus module to be imported correctly, special activity may be required to import the Monitor

Importing Previous Versions of a Plus Module
14–6 Version 2.3
Collection Specification Language (MCSL or .csl file for monitor collections) and the About ApplicationName task. For information on this activity, see “Implementing Imported Monitors” on page 14-6 and “Importing the About ApplicationName Task” on page 14-6.
Implementing Imported Monitors When importing a previous version of a Plus module, the import process does not import the module’s generated Monitoring Collection Specification Language or .csl file. After you have imported the module, you need to generate the module in order to generate a .csl file. Previous versions of a .csl file may contain scripts for implementing the monitors. You need to create the scripts referenced in the .csl file for implementing the monitors and place these scripts in the Plus module’s src directory.
Note: The .csl files generated with the current version of the Tivoli Module Builder reference the scripts rather than embedding the script’s code in the .csl file. It is a good idea to place the scripts in the src directory rather than embedding them in the .csl file so that these scripts can be imported into other modules if necessary. If you want to lock these scripts, use the Locked checkbox on the script’s Build/Generate tab.
For information on creating scripts for monitor implementations, refer to the Tivoli Distributed Monitoring MCSL Developer’s Guide.
Importing the About ApplicationName TaskPlus modules may include a task named About_ApplicationName. Running this task displays a dialog containing information about the Plus module. When importing a previous version of a Plus module, the import process does not import this task.
In the current version of the Tivoli Module Builder, the About_ApplicationName task is part of the Plus configuration component that is included with the PlusModule.v2_3.template Plus template. The Plus configuration component also includes the Create_Subscriber_List task and the Plus_Configuration task.
In order for the imported module to have an About_ApplicationName task, you need to either import the CDF for this task from the

Importing Previous Versions of a Plus Module
Tivoli Module Builder User’s Guide 14–7
Intro
du
ction
to P
lus
Mo
du
les
PlusModule.v2_3.template Plus template or import an AMS component and modify it with the specifications for a Plus component. In either case, you need to generate the About_ApplicationName task’s script using the PLUSabout_task.sh.skel skeleton file provided with the current version of the Tivoli Module Builder.
The following sections describe both methods for adding an About_ApplicationName task to a module.
Using the Plus Template
If you have a module that needs an About_ApplicationName task, you can import the CDF for the About_ApplicationName task from the Plus configuration component included with the PlusModule.v2_3.template Plus template. The advantage of this method is that the Plus configuration component also includes the Create_Subscriber_List task and the Plus_Configuration task.
Use the following steps to import the About_ApplicationName task using the Plus template. This procedure assumes that you have already imported a module that does not include the About_ApplicationName task using the procedure described in “Importing a Plus Module” on page 14-4.
1. Create a project in the Tivoli Module Builder tree view hierarchy using the procedure described in “Creating the Project” on page 2-3. You can also use the same project as the one that contains the imported module. Continue with the next step of this procedure.
2. Add a module to the project using the procedure described in “Adding a Module to the Project” on page 2-4 and then continue with the next step of this procedure.
3. Load the PlusModule.v2_3.template Plus template into the module created in step 2 using the procedure described in “Loading the Plus Module Template” on page 14-2.
4. Select the imported module (the one without the About_ApplicationName task) in the Tivoli Module Builder tree view hierarchy.

Importing Previous Versions of a Plus Module
14–8 Version 2.3
5. Import the C9_Plus_Config.cdf file from the module created in step 2 (the one that has the Plus template loaded into it) using the procedure described in “Importing a Component Description File (CDF)” on page 2-11. The C9_Plus_Config.cdf file is located in the <ModuleName> directory where <ModuleName> is the module created in step 2. Importing the C9_Plus_Config.cdf file adds the Plus configuration component to your module. If the system displays a Specify directory to import referenced source files? dialog, click the Skip button.
After importing the Plus configuration component, you may wish to edit the component using the information provided in Chapter 18, “Plus Configuration.”
Using an AMS Component
In the current version of the Tivoli Module Builder, the Plus configuration component contains the About_ApplicationName task. If you have a module that needs an About_ApplicationName task, you can import an AMS component into the module and then modify the AMS component so that it functions as a Plus configuration component.
Use the following procedure to create a Plus configuration component that includes an About_ApplicationName task by importing an AMS component. This procedure assumes that you have already imported a module that does not include the About_ApplicationName task using the procedure described in “Importing a Plus Module” on page 14-4.
1. Select the imported module that needs an About_ApplicationName task in the Tivoli Module Builder tree view hierarchy.
2. Add an AMS component to the module by selecting the Create –> AMS Component menu option. Adding and AMS component automatically launches the Tivoli Module Designer with the Component Data tab displayed.
3. Edit the Component Data tab with the information required for a Plus configuration component using the information in step 3

Plus Module Component Types
Tivoli Module Builder User’s Guide 14–9
Intro
du
ction
to P
lus
Mo
du
les
on page 18-4 to help you. Be sure that you select <Custom Function> from the Component Function drop-down list and specify Plus Configuration in the Custom Function field.
4. Expand the component’s display and select the Operational Tasks category to display the Operational Tasks tab. Edit the Operational Tasks tab to define an About_ApplicationName task using the information in step 6 on page 18-8 to help you. Be sure to specify the _about.sh script in the Program Name field. The script _about.sh script implements the About_ApplicationName task.
5. Select the File –> Save Project and CDF menu option and exit the Tivoli Module Designer when ready.
6. Select the script object (the script that implements the About_ApplicationName task) in the Tivoli Module Builder tree view hierarchy.
7. Specify that the PLUSabout_task.sh.skel skeleton file be used to generate the script using the procedure described in “Specifying Skeletons for Generating Scripts” on page 4-4. The default location for this skeleton file is the following:
/module_dev/ToolKit/skeletons/PLUSabout_task.sh.skel
Plus Module Component Types The Plus module component types are described in this section. When you define each component, you give the component a specific name. The procedure for importing the Plus template is described in “Loading the Plus Module Template” on page 14-2.
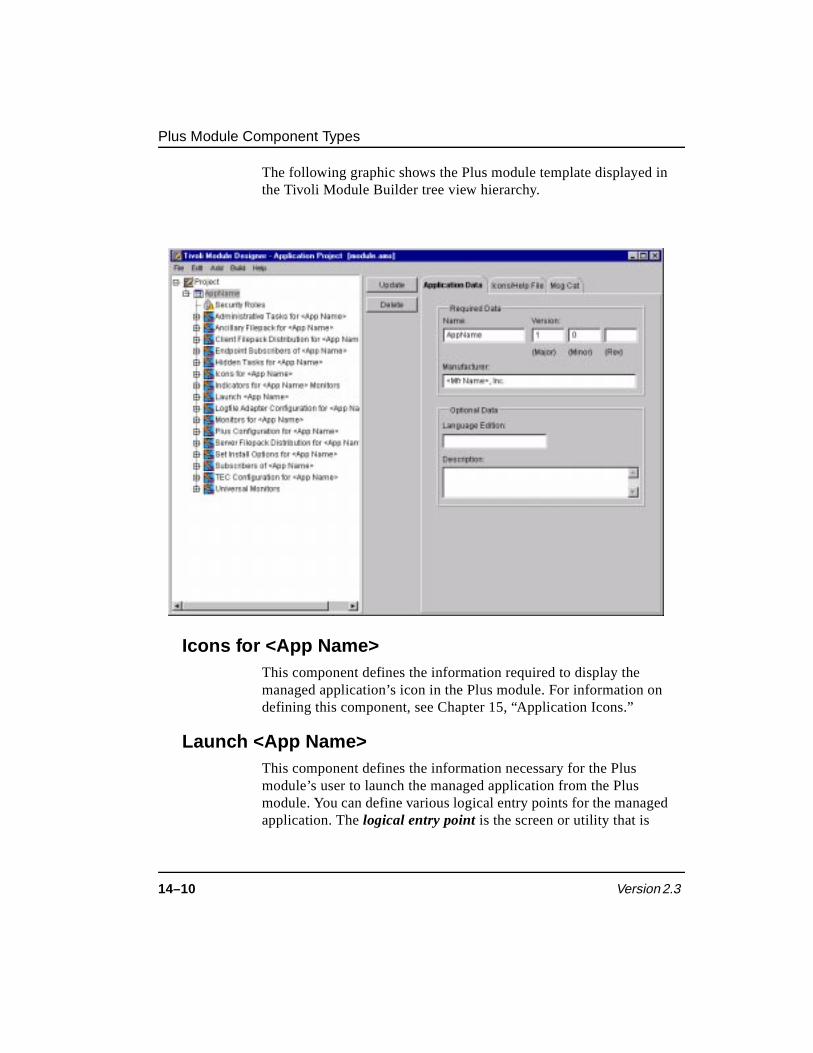
Plus Module Component Types
14–10 Version 2.3
The following graphic shows the Plus module template displayed in the Tivoli Module Builder tree view hierarchy.
Icons for <App Name>This component defines the information required to display the managed application’s icon in the Plus module. For information on defining this component, see Chapter 15, “Application Icons.”
Launch <App Name> This component defines the information necessary for the Plus module’s user to launch the managed application from the Plus module. You can define various logical entry points for the managed application. The logical entry point is the screen or utility that is

Plus Module Component Types
Tivoli Module Builder User’s Guide 14–11
Intro
du
ction
to P
lus
Mo
du
les
displayed when the user launches the application. For information on defining this component, see Chapter 16, “Application Launch.”
Set Install Options for <App Name> This component defines the installation options task. An installation options task prompts the Plus module’s user for site-specific information that is required for the Plus module to manage a particular application. For example, if the managed application has a database, the user may need to specify the database type when installing the Plus module. For information on defining this component, see Chapter 17, “Install Options.”
Subscribers of <App Name> This component defines a subscription list that is to be included in the module. It also identifies a script that, when run on a node during module installation, determines whether that node should be added to the subscription list. The resulting subscription list contains a list of profile managers and machines that are to be the recipient of a particular activity, such as a distribution and installation. You can define multiple subscription lists for a module. For information on defining this component, see Chapter 19, “Subscription Lists.”
Endpoint Subscribers of <App Name>This component defines a subscription list for Tivoli Management Agent (TMA) endpoints that is to be included in the module. Since the Plus module cannot be installed on TMA endpoints, the resulting endpoint subscription list is created dataless without a list of profile managers and machines. You can add endpoints to this subscription list after the Plus module is installed on the Tivoli Management Region (TMR) server. For information on defining this component, see “Chapter 21, Endpoint Subscription List.”
Plus Configuration for <App Name> This component defines a configuration task that runs during the Plus module’s installation. The Plus module’s user can also run the configuration task at any time after installation on selected

Plus Module Component Types
14–12 Version 2.3
subscribers. For information on defining this component, see Chapter 18, “Plus Configuration.”
Administrative Tasks for <App Name> This component identifies the managed application’s tasks that the Plus module’s user may want to run and manage from the Plus module. For information on defining this component, see Chapter 21, “Administrative Tasks.”
Ancillary Filepack for <App Name> This component defines the information necessary for creating an ancillary file package. The ancillary file package is one that is “nested” or included in another file package. For information on defining this component, see Chapter 22, “File Packages.”
Server Filepack Distribution for <App Name> This component defines the information necessary for using a Tivoli Software Distribution file package to distribute and install the managed application’s server onto multiple machines and platforms. For information on defining this component, see Chapter 22, “File Packages.”
Client Filepack Distribution for <App Name> This component defines the information necessary for using a Tivoli Software Distribution file package to distribute and install the managed application’s client onto multiple machines and platforms. For information on defining this component, see Chapter 22, “File Packages.”
Indicators for <App Name> Monitors This component defines the indicator collection that reports the status of the managed application’s monitored resources. For information on defining this component, see Chapter 23, “Indicator Collections.”

Plus Module Component Types
Tivoli Module Builder User’s Guide 14–13
Intro
du
ction
to P
lus
Mo
du
les
Universal Monitors This component defines specific instances and thresholds for the predefined universal monitors provided with the Tivoli Module Builder. The universal monitors are those that run on both UNIX and Windows NT platforms. For information on defining this component, see Chapter 24, “Monitors.”
Monitors for <App Name> This component defines specific instances and thresholds for the managed application’s custom monitors (some predefined monitors are also included with this component). For information on defining this component, see Chapter 24, “Monitors.”
TEC Configuration for <App Name> This component configures the Tivoli Enterprise Console to read and respond to events that it receives. For example, when you have custom monitors, the Tivoli Enterprise Console will need to be configured to receive events forwarded by the custom monitors. For information on defining this component, see Chapter 25, “Tivoli Enterprise Console Configuration.”
Logfile Adapter Configuration for <App Name> This component configures the Tivoli Enterprise Console logfile adapter to read the managed application’s events and forward them to the Tivoli Enterprise Console. For information on defining this component, see Chapter 26, “Logfile Adapter Configuration.”
Hidden Tasks for <App Name> This component defines the hidden tasks that are to be included in the module. Hidden tasks are automatically initiated in response to specific conditions, but are not directly initiated by the Plus module’s user. For information on defining this component, see Chapter 27, “Hidden Tasks.”
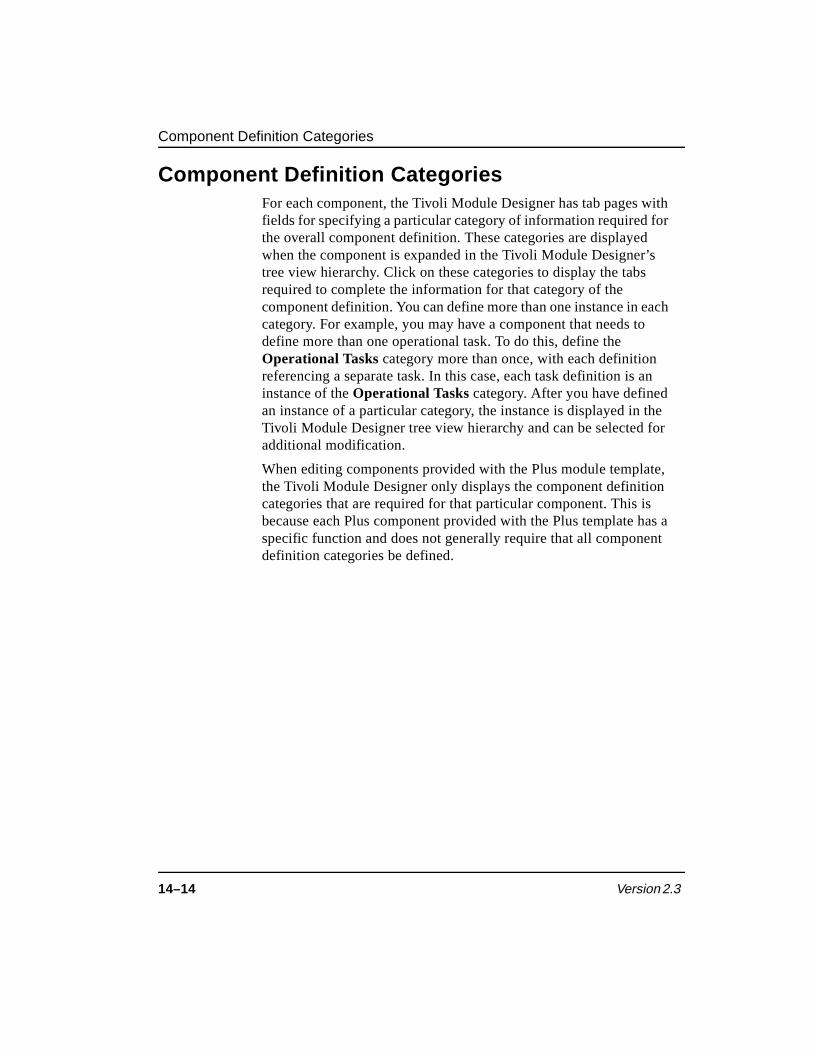
Component Definition Categories
14–14 Version 2.3
Component Definition Categories For each component, the Tivoli Module Designer has tab pages with fields for specifying a particular category of information required for the overall component definition. These categories are displayed when the component is expanded in the Tivoli Module Designer’s tree view hierarchy. Click on these categories to display the tabs required to complete the information for that category of the component definition. You can define more than one instance in each category. For example, you may have a component that needs to define more than one operational task. To do this, define the Operational Tasks category more than once, with each definition referencing a separate task. In this case, each task definition is an instance of the Operational Tasks category. After you have defined an instance of a particular category, the instance is displayed in the Tivoli Module Designer tree view hierarchy and can be selected for additional modification.
When editing components provided with the Plus module template, the Tivoli Module Designer only displays the component definition categories that are required for that particular component. This is because each Plus component provided with the Plus template has a specific function and does not generally require that all component definition categories be defined.
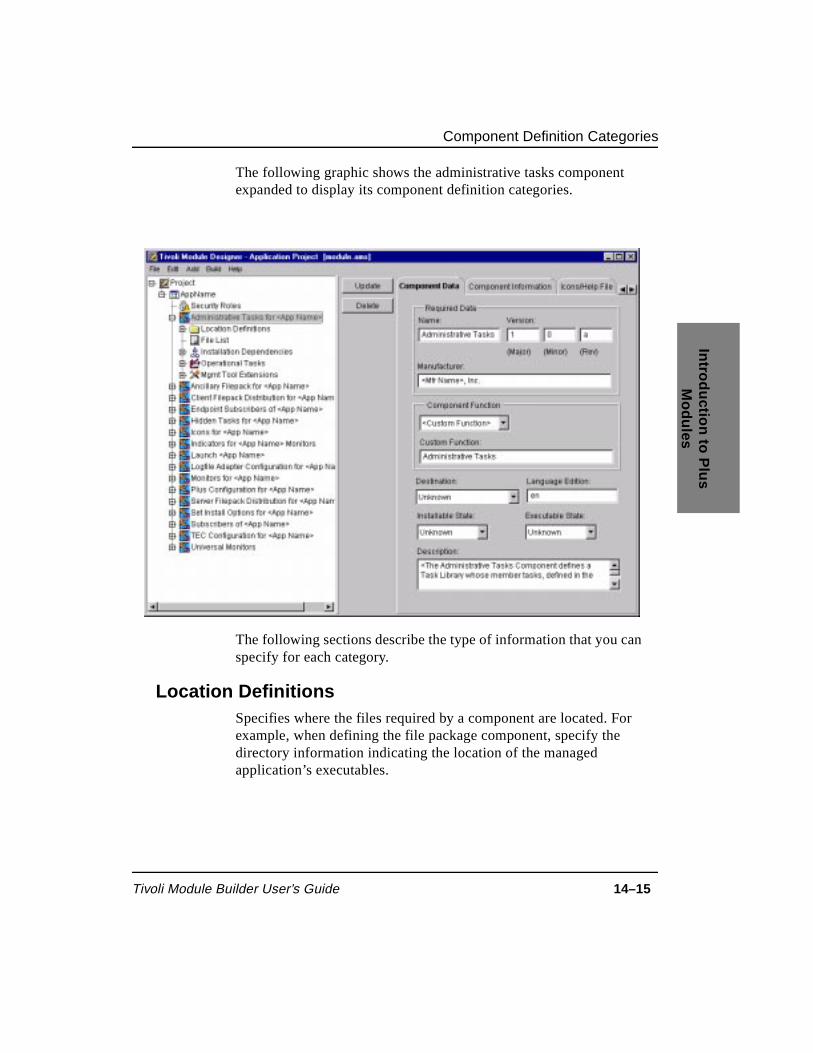
Component Definition Categories
Tivoli Module Builder User’s Guide 14–15
Intro
du
ction
to P
lus
Mo
du
les
The following graphic shows the administrative tasks component expanded to display its component definition categories.
The following sections describe the type of information that you can specify for each category.
Location Definitions Specifies where the files required by a component are located. For example, when defining the file package component, specify the directory information indicating the location of the managed application’s executables.

Component Definition Categories
14–16 Version 2.3
File List Specifies the files that can be distributed to a target system or scripts that are run when a component’s particular function is initiated. For example, the managed application’s .xpm files (used to display the application icon) are specified in the file list. Usually, only a simple file name is required for the file list, although a directory can also be specified.
Installation Programs Specifies the programs (such as before and after installation scripts) associated with installing or removing the software component’s files. These programs run on each target machine during the installation process. They are loaded from a distribution server rather than a CD-ROM.
Installation DependenciesSpecifies the criteria that must be met before a component’s files can be installed. Some of the components in the Plus template have predefined instances of the installation dependencies.
Operational Tasks Specifies the tasks that are initiated by the Plus module’s user or Tivoli software. For example, an operational task may be one of the managed application’s tasks run by the user or a hidden event correlation task initiated by the Tivoli Enterprise Console. The task definition includes the task name, script location, and any arguments that the user must supply to run the task.
Synchronous MonitorsSpecifies the monitors and monitor instances that will periodically check the status of the managed application’s critical resources. You need to define the monitor type, which identifies the type of resource being monitored (for example, directory free space), and specific instances of each monitor. An instance of a monitor identifies the specific name of the resource and its threshold levels. For example, a foo instance of the directory free space monitor checks the available

Component Definition Categories
Tivoli Module Builder User’s Guide 14–17
Intro
du
ction
to P
lus
Mo
du
les
free space in the foo directory. A threshold is the point where a resource’s status changes from one significant level to another. In the case of the example foo instance, a threshold may be set to less than 2 MB. You can specify that a task be run in response to changes in a resource’s status.
When you define a monitor component, you are creating a monitor collection that contains one or more monitors (and the monitor instances). You can create a monitor collection using the predefined monitors provided with the Tivoli Module Builder or create a monitor collection containing custom monitors for the managed application.
Management Tool ExtensionsThe management tool extensions category specifies information about a software component that is intended for a particular management tool. For example, all component types in the Plus template have a predefined management tool extensions instance that associates the component with the Tivoli Plus module.
Additional management tool extension instances specify the relationship that a component may have to another component. For example, when defining a monitor collection, you may want to identify the indicator collection that is associated with the monitor collection. (An indicator collection displays the status of the monitors with which it is associated.)

Plus Modules in the Tivoli Environment
14–18 Version 2.3
Plus Modules in the Tivoli Environment The following sections depict an example installation of a Plus module.
After the administrator installs the module using the standard Tivoli management software installation process, a TivoliPlus icon is displayed on the Tivoli desktop. The TivoliPlus icon is a collection for Plus modules. When additional Plus modules are installed, they will be added to this collection.
Double-click the TivoliPlus icon to display the TivoliPlus window, which has an icon for each Plus module that is installed. In the following example, only the <App Name> Plus for Tivoli icon is displayed in the TivoliPlus window.
To open a Plus module, double-click the module’s icon. This action displays a window containing the icons for activating the module’s features. The icons, their menu options, and the tasks they run are

Plus Modules in the Tivoli Environment
Tivoli Module Builder User’s Guide 14–19
Intro
du
ction
to P
lus
Mo
du
les
defined with the Tivoli Module Designer as described in later chapters in this guide.

Activating the Plus Module’s Features
14–20 Version 2.3
Activating the Plus Module’s Features To activate the Plus module’s features, double-click on their respective icons. In some cases, the system’s default response is to run a task without prompting for further information. In other cases, a pop-up dialog prompts the user for additional information. Each icon also has a pop-up menu with options for running or customizing the task’s execution.

Tivoli Module Builder User’s Guide 15–1
Ap
plicatio
n Ico
ns
15Application Icons
When defining the application icons component, you define the bitmaps that display that managed application’s icon in the Plus module. The managed application’s icon has two functions in the Plus module:
■ Plus Module Icon. The Plus module is represented by the managed application’s icon with the Plus symbol superimposed over it. This icon is located in the Plus module’s TivoliPlus window along with the icons for other modules. Open the module by double-clicking this icon or selecting the Open... option from this icon’s pop-up menu. The following is an example of a Plus module icon with the icon’s pop-up menu displayed.
15

Prerequisites
15–2 Version 2.3
■ Application Launch Icon. This icon is included with the other icons in the Plus module’s collection, but does not have a Plus symbol superimposed over it. The user can double-click this icon or select one of the application’s logical entry points from the icon’s pop-up menu to launch the application. The following is an example of an application launch icon. In this example, a sample application is installed on a server named aharrison and the logical entry points on this icon’s pop-up menu are displayed.
Prerequisites The procedure for editing the application icon component assumes that you are using the Plus template to define the application icons. This procedure also assumes that you have done the following:
■ Created a project as described in “Creating the Project” on page 2-3.
■ Added a module to the project as described in “Adding a Module to the Project” on page 2-4.
■ Loaded the Plus template into the module as described in “Loading the Plus Module Template” on page 14-2.
■ Defined the Plus module’s application data as described in “Editing Application Data” on page 2-13.

Editing the Application Icons Component
Tivoli Module Builder User’s Guide 15–3
Ap
plicatio
n Ico
ns
When you have completed these activities, continue with “Editing the Application Icons Component” on page 15-3.
Editing the Application Icons Component Use the following procedure to define the application icons. In this procedure, only the Component Data and File List categories require definition. When completing this procedure, you will define two bitmap (or .xpm) files for displaying the Plus module icon and the application launch icon.
This procedure only discusses the required fields in the Tivoli Module Designer. Information specific to the application icons component is noted in these field descriptions. General field information, including the optional fields, is provided in the online help.
1. Select the module into which you have imported the Plus template in the Tivoli Module Builder tree view hierarchy and click the Edit AMS Definition button on the General tab page. This action launches the Tivoli Module Designer so that you can edit the Plus module’s component. You can also select one of the Plus template components and click the Edit Component button to launch the Tivoli Module Designer.
2. Select the Icons for <App Name> component in the Tivoli Module Designer tree view hierarchy. This action displays the Component Data tab page.

Editing the Application Icons Component
15–4 Version 2.3
3. Use the Component Data tab page to specify general information required to identify the component. This information includes the name, version, and manufacturer of the component. The combined values of the Name, Version, and Manufacturer fields form a unit of information that must be unique across all components in a module. When defining more than one component, it is sufficient to change the value of just one of these fields to ensure a unique combination.

Editing the Application Icons Component
Tivoli Module Builder User’s Guide 15–5
Ap
plicatio
n Ico
ns
The generate and build process for Plus modules assumes that the Plus components are capable of running on more than one platform. This means that each script referenced by the component must accommodate all platforms on which the component is to run. If the component is to run on more than one platform, then the optional Destination field should specify Unknown.
Complete the following required fields on the Component Data tab page.
NameEnter a name for the component. For example, you might enter <ApplicationName> Icons.
VersionUse these fields to specify the version of the component. You can change the version in these fields to keep track of changes when updating a component. Specify the version in the following format: a major version number, a minor version number, and a revision indicator. The major and minor numbers are required. The revision indicator is optional. After Management Information Format (MIF) parsing is complete, the elements in this format appear as follows: MajorNumber.MinorNumber.RevisionIndicator. For example, 4.52.A or 1.1.3.
ManufacturerEnter the name of the manufacturer for this software component.
Component Function
These fields identify the component’s type or function. The only valid selection from the Component Function drop-down list is <Custom Function> and the only valid entry in the Custom Function field is Application Icons.
When you have completed the Component Data fields, click the Update button. The Tivoli Module Designer displays the name that you have specified for this component in the tree view hierarchy.

Editing the Application Icons Component
15–6 Version 2.3
4. Expand the Icons for <App Name> component to display the component definition categories.
5. Select the File List category. The File List tab page enables you to specify the icon or bitmap files for the managed application’s icons. When defining the application icons component using the Plus template, two file list instances have been predefined for you. The default names for these instances are Standard.xpm and StandardPlus.xpm. The Standard.xpm instance is the file for the application launch icon bitmap.
The StandardPlus.xpm instance is the file for the module’s icon bitmap. This icon is overlaid with the Plus symbol because it represents the Plus module for the managed application. The Plus symbol is provided in this file.
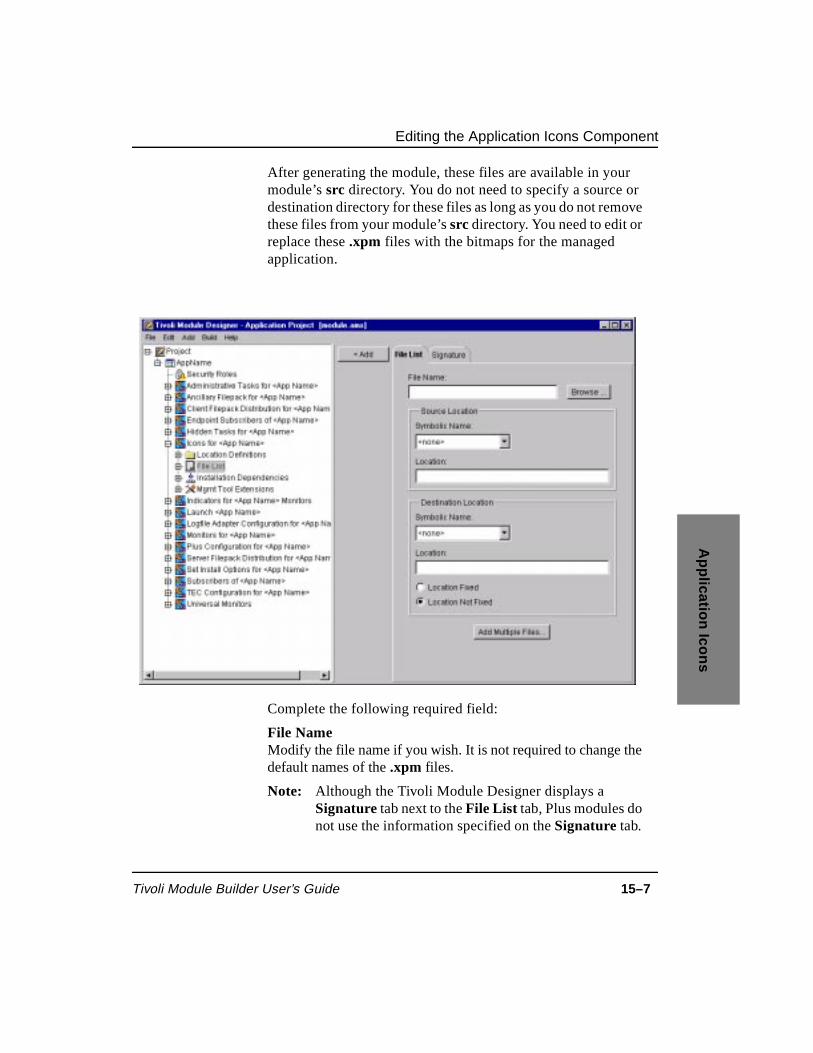
Editing the Application Icons Component
Tivoli Module Builder User’s Guide 15–7
Ap
plicatio
n Ico
ns
After generating the module, these files are available in your module’s src directory. You do not need to specify a source or destination directory for these files as long as you do not remove these files from your module’s src directory. You need to edit or replace these .xpm files with the bitmaps for the managed application.
Complete the following required field:
File NameModify the file name if you wish. It is not required to change the default names of the .xpm files.
Note: Although the Tivoli Module Designer displays a Signature tab next to the File List tab, Plus modules do not use the information specified on the Signature tab.

Editing the Application Icons Component
15–8 Version 2.3
Each Plus component type has a predefined Mgmt Tool Extensions instance that associates the component with the Plus module. The default management tool name for this instance is TIVOLI_PLUS_3_0. Its default variable name is MODULE_TYPE with a value of PLUS. This predefined instance should not be deleted or its values changed.
Tivoli Module Builder User’s Guide 16–1
Ap
plicatio
n L
aun
ch
16Application Launch
The Plus module displays the managed application’s launch icon using the bitmap you specified for the application icons component. (See Chapter 15, “Application Icons” and step 5 on page 15-6 for more information.)
The application launch icon has a pop-up menu with options for launching the managed application at specific logical entry points. A logical entry point is a screen or utility that the Plus module’s user is likely to want displayed when launching the application. For example, you can define a logical entry point that enables the Plus module’s user to browse the log files created by the managed application.
You can configure the module so that when it is installed, an application launch icon is provided for each server on which the managed application is installed. The icon name has the following format: ApplicationName@ServerName. The following is an example of an application launch icon for a server named aharrison.
16

Prerequisites
16–2 Version 2.3
The logical entry points on the icon’s pop-up menu are also displayed.
The application launch component specifies the information necessary to create the application launch icon and to launch the application at the specified logical entry points. This information includes the location of the application’s executables and the name for the application launch icon.
Prerequisites The procedure for editing the application launch component assumes that you are using the Plus template to define the application launch. This procedure also assumes that you have done the following:
■ Created a project as described in “Creating the Project” on page 2-3.
■ Added a module to the project as described in “Adding a Module to the Project” on page 2-4.
■ Loaded the Plus template into the module as described in “Loading the Plus Module Template” on page 14-2.
■ Defined the Plus module’s application data as described in “Editing Application Data” on page 2-13.

Editing the Application Launch Component
Tivoli Module Builder User’s Guide 16–3
Ap
plicatio
n L
aun
ch
When you have completed these activities, continue with “Editing the Application Launch Component” on page 16-3.
Editing the Application Launch Component Use the following procedure to define the application launch icon and its pop-up menu options. In this procedure, only the Component Data and Operational Task options require definition. When this procedure is complete, you will have defined the application launch icon’s name, menu items, and the programs that run when the Plus user selects the icon’s menu options.
Some applications may require that more than one application launch icon be specified. For example, an application may have functions that are only available on a server and other functions that are only available on a client. In this case, the following procedure should be completed twice: once for launching the application from the server and once for launching the application from a client.
This procedure only discusses the required fields in the Tivoli Module Designer. Information specific to the application launch component is noted in these field descriptions. General field information, including the optional fields, is provided in the online help.

Editing the Application Launch Component
16–4 Version 2.3
1. Select the module into which you have imported the Plus template in the Tivoli Module Builder tree view hierarchy and click the Edit AMS Definition button on the General tab page. This action launches the Tivoli Module Designer so that you can edit the Plus module’s component. You can also select one of the Plus template components and click the Edit Component button in order to launch the Tivoli Module Designer.
2. Select the Launch <App Name> component in the Tivoli Module Designer tree view hierarchy. This action displays the Component Data tab page.
3. Use the Component Data tab page to specify general information required to identify the component. This information includes the name, version, and manufacturer of the
Editing the Application Launch Component
Tivoli Module Builder User’s Guide 16–5
Ap
plicatio
n L
aun
ch
component. The combined values of the Name, Version, and Manufacturer fields form a unit of information that must be unique across all components in a module. When defining more than one component, it is sufficient to change the value of just one of these fields to ensure a unique combination.
The generate and build process for Plus modules assumes that the Plus components are capable of running on more than one platform. This means that each script referenced by the component must accommodate all platforms on which the component is to run. If the component is to run on more than one platform, then the optional Destination field should specify Unknown.
Complete the following required fields on the Component Data tab page.
NameEnter a name for the component. Because the name you enter is the title for the managed application’s launch icon, enter a name that identifies the managed application. This name can contain any printable characters including embedded spaces.
VersionUse these fields to specify the version of the component. You can change the version in these fields to keep track of changes when updating a component. Specify the version in the following format: a major version number, a minor version number, and a revision indicator. The major and minor numbers are required. The revision indicator is optional. After MIF parsing is complete, the elements in this format appear as follows: MajorNumber.MinorNumber.RevisionIndicator. For example, 4.52.A or 1.1.3.
ManufacturerEnter the name of the manufacturer for this software component.
Component Function
These fields identify the component’s type or function. The only valid selection from the Component Function drop-down list is <Custom Function> and the only valid entry in the Custom Function field is Application Launch.
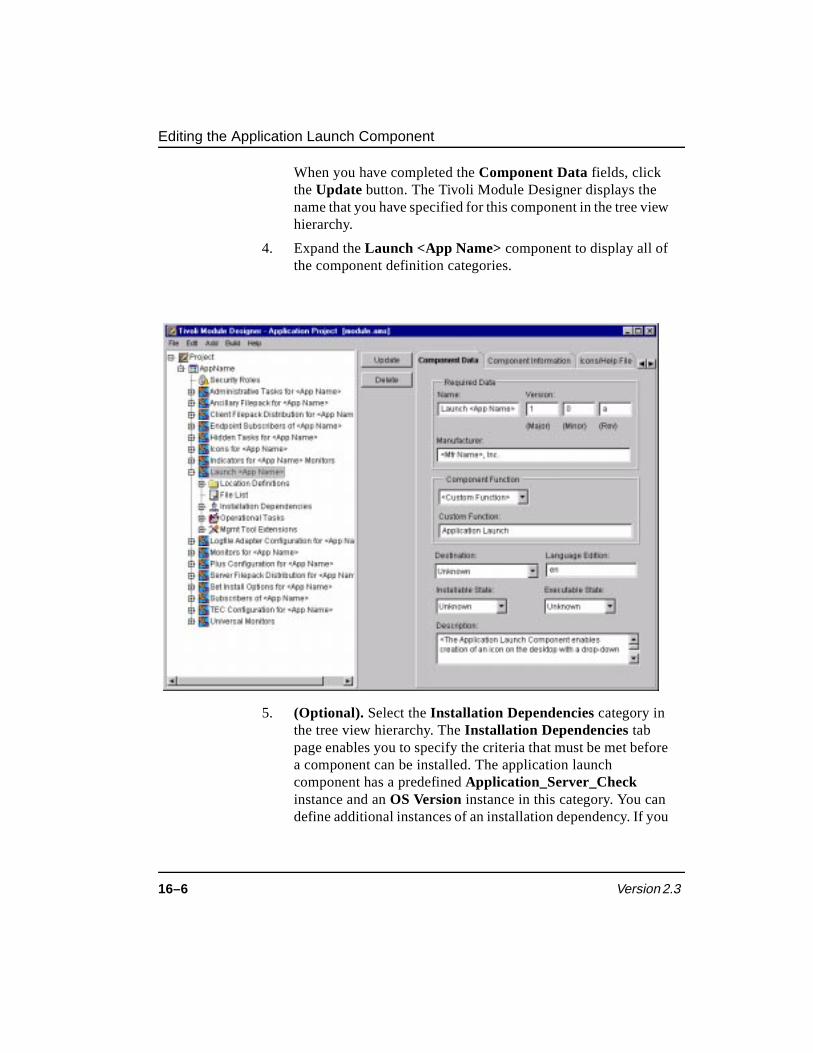
Editing the Application Launch Component
16–6 Version 2.3
When you have completed the Component Data fields, click the Update button. The Tivoli Module Designer displays the name that you have specified for this component in the tree view hierarchy.
4. Expand the Launch <App Name> component to display all of the component definition categories.
5. (Optional). Select the Installation Dependencies category in the tree view hierarchy. The Installation Dependencies tab page enables you to specify the criteria that must be met before a component can be installed. The application launch component has a predefined Application_Server_Check instance and an OS Version instance in this category. You can define additional instances of an installation dependency. If you

Editing the Application Launch Component
Tivoli Module Builder User’s Guide 16–7
Ap
plicatio
n L
aun
ch
are not defining an installation dependency, continue with step 6 on page 16-8.
Complete the following required fields:
Dependency TypeUse the Dependency Type drop-down list to select the type of criteria that must be met before a component can be installed. For an application launch component, you would typically specify a custom dependency for determining whether an application launch icon should be created for a particular node.
Note: The Tivoli Module Builder only supports custom dependencies. For this reason, you should only select <Custom Dependency> from this drop-down list.

Editing the Application Launch Component
16–8 Version 2.3
Dependency NameEnter a description of the custom dependency. Examples of dependency names are Required_Disk_Space or OS_Version. The name must be alphanumeric (a–z, A–Z, 0–9, plus underscores). Spaces are not allowed.
Program NameEnter the name of the program or script that checks for the dependency. The name must be alphanumeric (a–z, A–Z, 0–9, plus underscores). Spaces are not allowed. Generating the Plus module produces a script stub with this name. The script stub has a placeholder for inserting the managed application’s script.
Click the <Add button when you are ready. This action displays the installation dependency that you have just defined under the Installation Dependencies category. If you need to edit the installation dependency, you can simply select it to redisplay the Installation Dependencies tab page with your definitions.
6. Select the Operational Tasks category displayed in the tree view hierarchy. The Operational Tasks tab page enables you to define the application launch icon’s menu items. Complete this tab page once for each menu item you wish to define. The

Editing the Application Launch Component
Tivoli Module Builder User’s Guide 16–9
Ap
plicatio
n L
aun
ch
component description file (CDF) generated for this component will reference each of the tasks that you specify.
Complete the following required fields:
Task NameEnter the task name. The name that you enter will be a menu option on the launch icon’s menu in the Plus module. The name must be alphanumeric (a–z, A–Z, 0–9, plus underscores). Spaces are not allowed.

Editing the Application Launch Component
16–10 Version 2.3
Program NameEnter the name of the program that launches the managed application. The name must be alphanumeric (a–z, A–Z, 0–9, plus underscores). Spaces are not allowed. Generating the Plus module produces a script stub with this name. The script stub has a placeholder for inserting the managed application’s script.
Note: By default, an application launch and a task icon are created on the Plus module desktop for each task specified for the application launch component. The application launch icon launches the application on managed nodes. The task icon launches the application on TMA endpoints. You can disable the creation of the task icon by selecting the module in the Tivoli Module Builder and selecting the Settings tab. On the Settings tab page, enter LAUNCH_ICONS_ONLY in the Variable field and true in the Value field. Press the Apply buttons and the Save Settings button.
Each Plus component type has a predefined Mgmt Tool Extensions instance that associates the component with the Plus module. The default management tool name for this instance is TIVOLI_PLUS_3_0. Its default variable name is MODULE_TYPE with a value of PLUS. This predefined instance should not be deleted or its values changed.

Tivoli Module Builder User’s Guide 17–1
Install O
ptio
ns
17Install Options
When managing certain applications, the Plus module may require that the user provide environment-specific information so that the Plus module can function in the user’s environment. Examples of such information are machine names and database types. To obtain this environment-specific information, you can define the install options component for the Plus module. When installing the Plus module, the user will be prompted for the information you have defined for this component.
The user can change the installation information after the module is installed. If you define the install options component, the Plus module will have an install options icon. This icon defines a single task that enables the user to change the installation information for the node on which the module is installed. The user can run this task as necessary after the Plus module’s installation. The install options task displays a dialog that prompts the user for the necessary information.
The following is an example of an install options task icon. This task icon is similar to the application launch icon and identifies the machine name on which the module is installed. In the following
17

Prerequisites
17–2 Version 2.3
example, the Plus module is installed on a machine named aharrison.
Prerequisites The procedure for editing the install options component assumes that you are using the Plus template to define an installation options task. This procedure also assumes that you have done the following:
■ Created a project as described in “Creating the Project” on page 2-3.
■ Added a module to the project as described in “Adding a Module to the Project” on page 2-4.
■ Loaded the Plus template into the module as described in “Loading the Plus Module Template” on page 14-2.
■ Defined the Plus module’s application data as described in “Editing Application Data” on page 2-13.
When you have completed these activities, continue with “Editing the Install Options Component” on page 17-3.

Editing the Install Options Component
Tivoli Module Builder User’s Guide 17–3
Install O
ptio
ns
Editing the Install Options Component Use the following procedure to edit an install options task. When defining the install options component, only the Component Data element requires specification.
This procedure only discusses the required fields in the Tivoli Module Designer. Information specific to the install options component is noted in these field descriptions. General field information, including the optional fields, is provided in the online help.

Editing the Install Options Component
17–4 Version 2.3
1. Select the module into which you have imported the Plus template in the Tivoli Module Builder tree view hierarchy and click the Edit AMS Definition button on the General tab page. This action launches the Tivoli Module Designer so that you can edit the Plus module’s component. You can also select one of the Plus template components and click the Edit Component button in order to launch the Tivoli Module Designer.
2. Select the Set Install Options for <App Name> component in the Tivoli Module Designer tree view hierarchy. This action displays the Component Data tab page.
3. Use the Component Data tab page to specify general information required to identify the component. This information includes the name, version, and manufacturer of the

Editing the Install Options Component
Tivoli Module Builder User’s Guide 17–5
Install O
ptio
ns
component. The combined values of the Name, Version, and Manufacturer fields form a unit of information that must be unique across all components in a module. When defining more than one component, it is sufficient to change the value of just one of these fields to ensure a unique combination.
The generate and build process for Plus modules assume that the Plus components are capable of running on more than one platform. This means that each script referenced by the component must be able to accommodate all platforms on which the component is to run. If the component is to run on more than one platform, then the optional Destination field should specify Unknown.
Complete the following required fields on the Component Data tab page.
NameEnter a name for the component. Because the name you enter is the title for the install options task icon, enter a name that identifies the managed application. This name can contain any printable characters including embedded spaces.
VersionUse these fields to specify the version of the component. You can change the version in these fields to keep track of changes when updating a component. Specify the version in the following format: a major version number, a minor version number, and a revision indicator. The major and minor numbers are required. The revision indicator is optional. After MIF parsing is complete, the elements in this format appear as follows: MajorNumber.MinorNumber.RevisionIndicator. For example, 4.52.A or 1.1.3.
ManufacturerEnter the name of the manufacturer for this software component.
Component Function
These fields identify the component’s type or function. The only valid selection from the drop-down list is <Custom Function> and the only valid entry in the Custom Function field is Application Launch.

Editing the Install Options Component
17–6 Version 2.3
When you are ready, click the Update button. The Tivoli Module Designer displays the name that you have specified for this component in the tree view hierarchy.
4. Click the Set Install Options for <App Name> component’s “tree control button” (the box containing the + symbol). This action displays all of the component definition categories.
5. (Optional). Select the Installation Dependencies category. The Installation Dependencies tab page enables you to specify the criteria that must be met before a component’s files can be installed. The install options component has a predefined Application_Server_Check instance in this category that you can edit or replace with a reference to your own script that determines whether or not application configuration options
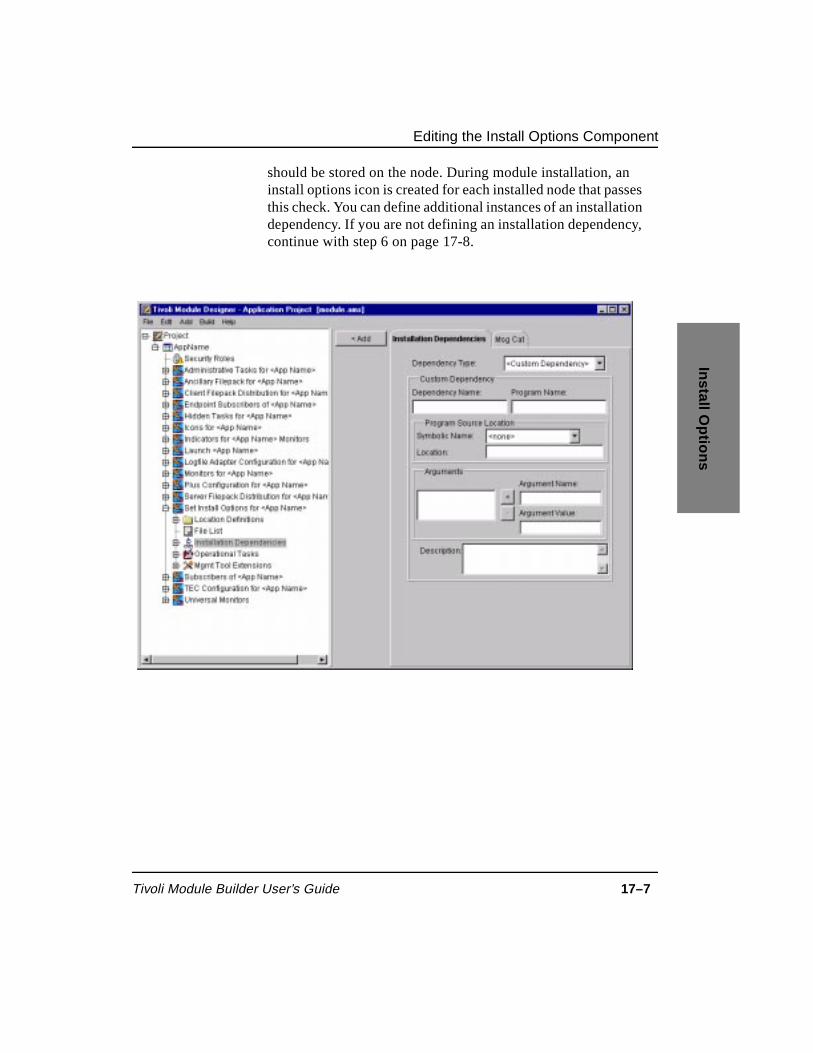
Editing the Install Options Component
Tivoli Module Builder User’s Guide 17–7
Install O
ptio
ns
should be stored on the node. During module installation, an install options icon is created for each installed node that passes this check. You can define additional instances of an installation dependency. If you are not defining an installation dependency, continue with step 6 on page 17-8.

Editing the Install Options Component
17–8 Version 2.3
Complete the following required fields:
Dependency TypeUse the Dependency Type drop-down list to select the type of criteria that must be met before a component can be installed.
Note: The Tivoli Module Builder only supports custom dependencies. For this reason, you should only select <Custom Dependency> from this drop-down list.
Dependency NameEnter a description of the custom dependency. Examples of dependency names are Required_Disk_Space or OS_Version. The name must be alphanumeric (a–z, A–Z, 0–9, plus underscores). Spaces are not allowed.
Program NameEnter the name of the program or script that checks for the dependency. The name must be alphanumeric (a–z, A–Z, 0–9, plus underscores). Spaces are not allowed. Generating the Plus module produces a script stub with this name. The script stub has a placeholder for inserting the managed application’s script.
Click the <Add button when you are ready. This action displays the installation dependency instance that you have just defined under the Installation Dependencies category. If you need to edit the installation dependency, select the instance to redisplay the Installation Dependencies tab page and edit the instance as needed.
6. Select the Operational Tasks category. The Operational Tasks tab page enables you to specify a task that the user can run after installing the Plus module in the event that the options set during installation need to be changed. The install options component has a predefined Product_Install operational task instance. The script stub generated for the predefined Product_Install operational task instance contains special logic for saving configuration information on a particular node. For this reason, the Plus module only recognizes the predefined Product_Install operational task instance for this component. You should not create additional instances, although you can modify the argument labels for the Product_Install instance or

Editing the Install Options Component
Tivoli Module Builder User’s Guide 17–9
Install O
ptio
ns
add additional argument labels. You can also modify the generated script stub for the Product_Install instance to perform additional configuration on the node.
Each Plus component type has a predefined Mgmt Tool Extensions instance that associates the component with the Plus module. The default management tool name for this instance is TIVOLI_PLUS_3_0. Its default variable name is MODULE_TYPE with a value of PLUS. This predefined instance should not be deleted or its values changed.

Editing the Install Options Component
17–10 Version 2.3

Tivoli Module Builder User’s Guide 18–1
Plu
s Co
nfig
uratio
n
18Plus Configuration
The Plus configuration component includes a Plus configuration task that can be run during the Plus module’s installation. This task can also be run after installation on nodes included in a subscription list. Although the Plus configuration task is similar to the install options task, it allows the user more flexibility in specifying the nodes on which the task will run.
The Plus configuration component also enables you to specify operational tasks that would not normally be associated with one of the other components. For example, the Plus configuration component has a predefined operational task instance for displaying information (such as version information) about the application.
18

Prerequisites
18–2 Version 2.3
The following is an example of a Plus configuration task icon.
Prerequisites The procedure for editing the Plus configuration component assumes that you are using the Plus template to define a Plus configuration task. This procedure also assumes that you have done the following:
■ Created a project as described in “Creating the Project” on page 2-3.
■ Added a module to the project as described in “Adding a Module to the Project” on page 2-4.
■ Loaded the Plus template into the module as described in “Loading the Plus Module Template” on page 14-2.
■ Defined the Plus module’s application data as described in “Editing Application Data” on page 2-13.
When you have completed these activities, continue with “Editing the Plus Configuration Component” on page 18-3.

Editing the Plus Configuration Component
Tivoli Module Builder User’s Guide 18–3
Plu
s Co
nfig
uratio
n
Editing the Plus Configuration Component Use the following procedure to edit a Plus configuration task. When defining the Plus configuration component, the Component Data and Operational Tasks elements require specification.
This procedure only discusses the required fields in the Tivoli Module Designer. Information specific to the Plus configuration component is noted in these field descriptions. General field information, including the optional fields, is provided in the online help.

Editing the Plus Configuration Component
18–4 Version 2.3
1. Select the module into which you have imported the Plus template in the Tivoli Module Builder tree view hierarchy and click the Edit AMS Definition button on the General tab page. This action launches the Tivoli Module Designer so that you can edit the Plus module’s component. You can also select one of the Plus template components and click the Edit Component button in order to launch the Tivoli Module Designer.
2. Select the Plus Configuration for <App Name> component in the Tivoli Module Designer tree view hierarchy. This action displays the Component Data tab page.
3. Use the Component Data tab page to specify general information required to identify the component. This information includes the name, version, and manufacturer of the

Editing the Plus Configuration Component
Tivoli Module Builder User’s Guide 18–5
Plu
s Co
nfig
uratio
n
component. The combined values of the Name, Version, and Manufacturer fields form a unit of information that must be unique across all components in a module. When defining more than one component, it is sufficient to change the value of just one of these fields to ensure a unique combination.
The generate and build process for Plus modules assume that the Plus components are capable of running on more than one platform. This means that each script referenced by the component must be able to accommodate all platforms on which the component is to run. If the component is to run on more than one platform, then the optional Destination field should specify Unknown.
Complete the following required fields on the Component Data tab page.
NameEnter a name for the component. Because the name you enter is the title for the Plus configuration task icon, enter a name that identifies the managed application. This name can contain any printable characters including embedded spaces.
VersionUse these fields to specify the version of the component. You can change the version in these fields to keep track of changes when updating a component. Specify the version in the following format: a major version number, a minor version number, and a revision indicator. The major and minor numbers are required. The revision indicator is optional. After MIF parsing is complete, the elements in this format appear as follows: MajorNumber.MinorNumber.RevisionIndicator. For example, 4.52.A or 1.1.3.
ManufacturerEnter the name of the manufacturer for this software component.
Component Function
These fields identify the component’s type or function. The only valid selection from the Component Function drop-down list is <Custom Function> and the only valid entry in the Custom Function field is Plus Configuration.

Editing the Plus Configuration Component
18–6 Version 2.3
When you are ready, click the Update button. The Tivoli Module Designer displays the name that you have specified for this component in the tree view hierarchy.
4. Expand the Plus Configuration for <App Name> component to display the component definition categories.

Editing the Plus Configuration Component
Tivoli Module Builder User’s Guide 18–7
Plu
s Co
nfig
uratio
n
5. (Optional). Select the Installation Dependencies category. The Installation Dependencies tab page enables you to specify the criteria that must be met before a component’s files can be installed. The Plus configuration component has predefined instances of the installation dependencies. You can define additional instances of an installation dependency. If you are not defining an installation dependency, continue with step 6 on page 18-8.
Complete the following required fields:
Dependency TypeUse the Dependency Type drop-down list to select the type of criteria that must be met before a component can be installed.

Editing the Plus Configuration Component
18–8 Version 2.3
Note: The Tivoli Module Builder only supports custom dependencies. For this reason, you should only select <Custom Dependency> from this drop-down list.
Dependency NameEnter a description of the custom dependency. Examples of dependency names are Required_Disk_Space or OS_Version. The name must be alphanumeric (a–z, A–Z, 0–9, plus underscores). Spaces are not allowed.
Program NameEnter the name of the program or script that checks for the dependency. The name must be alphanumeric (a–z, A–Z, 0–9, plus underscores). Spaces are not allowed. Generating the Plus module produces a script stub with this name. The script stub has a placeholder for inserting the managed application’s script.
Click the <Add button when you are ready. This action displays the installation dependency that you have just defined under the Installation Dependencies category. If you need to edit the installation dependency, you can simply select it to redisplay the Installation Dependencies tab page with your definitions.
6. Select the Operational Tasks category. The Operational Tasks tab page enables you to specify configuration tasks that can be run during and after the Plus module’s installation. The Plus configuration component has a predefined Plus_Configuration task instance. The Plus configuration component also has a predefined Create_Subscriber_List task instance and an About_AppName instance. The Create_Subscriber_List instance specifies a task for creating a custom subscription list (either dataless or regular) that can be used by tasks, file packages and monitors in the installed module. The About_AppName instance specifies a task that displays information about the application. You can modify these predefined instances and create additional operational task instances.
Complete this tab page once for each task you wish to define. The component description file (CDF) generated for this component definition will reference each of the tasks you specify.

Editing the Plus Configuration Component
Tivoli Module Builder User’s Guide 18–9
Plu
s Co
nfig
uratio
n
Generating the Plus module produces a script stub for each script or program specified in the task definition. You must edit these stubs with the scripts for running the task.
Complete the following required fields:
Task NameEnter a description of what the task does. The name that you enter is the title for the task icon displayed in the Plus module. Examples of task (or task icon) names are <ApplicationName>_Setup, or <ApplicationName>_Configuration. The name must be alphanumeric (a–z, A–Z, 0–9, plus underscores). Spaces are not allowed.

Editing the Plus Configuration Component
18–10 Version 2.3
Program NameEnter the name of the program that is invoked by the task. The name must be alphanumeric (a–z, A–Z, 0–9, plus underscores). Spaces are not allowed. Generating the Plus module produces a script stub with this name. The script stub has a placeholder for inserting the managed application’s script.
Note: If you want the Plus configuration task to run during the module’s installation, the program should be named PLUSconfig.sh.
Click the <Add button when you are ready. This action displays the task you have just defined under the Operational Tasks category. If you need to edit the task, you can simply select it to redisplay the Operational Tasks tab page with your definitions.
To specify another operational task, repeat this step.

Editing the Plus Configuration Component
Tivoli Module Builder User’s Guide 18–11
Plu
s Co
nfig
uratio
n
7. Select the Mgmt Tools Extensions category. The Plus configuration component has default TIVOLI_PLUS_3_0 instances in this category.
The default instances associate the Plus configuration component with the module or with another component. The following describes the default management tool extension instances. The default instances are identified by the value in the Variable Name field.
MODULE_TYPE This instance associates the Plus configuration component with the Plus module. This default instance should not be changed.

Editing the Plus Configuration Component
18–12 Version 2.3
SUBSCRIPTION_LIST This instance associates the Plus configuration component with a subscription list. You should edit this instance’s Variable Value field with the component name of the subscription list.
The following describes how to complete the fields on the Mgmt Tool Extensions tab page should you create additional instances in this category.
Tool NameEnter TIVOLI_PLUS_3_0 in this field. This value is required in order to be compatible with the Version 3.0 Plus modules generated by the current version of the Tivoli Module Builder.
Data TypeSelect the String radio button.
Variable NameEnter SUBSCRIPTION_LIST in this field.
Variable ValueThis field identifies the component to which you are establishing a relationship. Enter the value displayed in the Name field of the related component’s Component Data tab page. For example, entering Subscribers of <Application Name> in this field indicates that the Plus configuration component should be distributed to the nodes that subscribe to the component named Subscribers of <Application Name>.

Tivoli Module Builder User’s Guide 19–1
Su
bscrip
tion
Lists
19Subscription Lists
The Plus module includes a default subscription list, which contains a list of profile managers and machines that are to be the recipient of a particular activity, such as a distribution, installation, or the execution of a task. The machines included in a particular default subscription list have a related function. For example, the Plus module may have a server subscription list containing the names of the managed application’s servers and a client subscription list containing the names of the managed application’s clients.
The subscription lists provide an efficient method for specifying the machine on which a task should run, and facilitate running a task on multiple machines at the same time. The Plus module user can modify the execution characteristics of a task so that the task can run on non-default subscription lists as well as on specific nodes. The Plus module user can also modify the default subscription list. The
19

Prerequisites
19–2 Version 2.3
following is an example of the subscription list icon for a sample application. The option on the icon’s pop-up menu is also displayed.
Prerequisites The procedure for editing the subscription list component assumes that you are using the Plus template to define a subscription list. This procedure also assumes that you have done the following:
■ Created a project as described in “Creating the Project” on page 2-3.
■ Added a module to the project as described in “Adding a Module to the Project” on page 2-4.
■ Loaded the Plus template into the module as described in “Loading the Plus Module Template” on page 14-2.
■ Defined the Plus module’s application data as described in “Editing Application Data” on page 2-13.
When you have completed these activities, continue with “Editing the Subscription List Component” on page 19-3.

Editing the Subscription List Component
Tivoli Module Builder User’s Guide 19–3
Su
bscrip
tion
Lists
Editing the Subscription List Component Use the following procedure to define a subscription list. When the Plus module is installed in the Tivoli environment, the subscription lists contain site-specific machine names. Because it is impossible to know these machine names in advance, you must have a rule that defines the machines that should be added to a particular subscription list. For example, you may have a rule for identifying the server machines that are to be added to the server subscription list. You may also have another rule for adding machines to a client subscription list. These rules are applied when the Plus module is installed on each machine by running a script specified as an installation dependency. Complete this procedure once for each subscription list you wish to define.
In this procedure, the Component Data option requires definition. If you have more than one subscription list, then the Installation Dependency option also requires definition in order to determine which machines are added to which list.
This procedure only discusses the required fields in the Tivoli Module Designer. Information specific to the subscription list component is noted in these field descriptions. General field information, including the optional fields, is provided in the online help.

Editing the Subscription List Component
19–4 Version 2.3
1. Select the module into which you have imported the Plus template in the Tivoli Module Builder tree view hierarchy and click the Edit AMS Definition button on the General tab page. This action launches the Tivoli Module Designer so that you can edit the Plus module’s component. You can also select one of the Plus template components and click the Edit Component button in order to launch the Tivoli Module Designer.
2. Select the Subscribers of <App Name> component in the Tivoli Module Designer tree view hierarchy. This action displays the Component Data tab page.
3. Use the Component Data tab page to specify general information required to identify the component. This information includes the name, version, and manufacturer of the

Editing the Subscription List Component
Tivoli Module Builder User’s Guide 19–5
Su
bscrip
tion
Lists
component. The combined values of the Name, Version, and Manufacturer fields form a unit of information that must be unique across all components in a module. When defining more than one component, it is sufficient to change the value of just one of these fields to ensure a unique combination.
The generate and build process for Plus modules assume that the Plus components are capable of running on more than one platform. This means that each script referenced by the component must be able to accommodate all platforms on which the component is to run. If the component is to run on more than one platform, then the optional Destination field should specify Unknown.
Complete the following required fields on the Component Data tab page.
NameEnter a name for the component. Because the name you enter is the title for the subscription list icon, enter a name that identifies the subscription list. This name can contain any printable characters including embedded spaces.
VersionUse these fields to specify the version of the component. You can change the version in these fields to keep track of changes when updating a component. Specify the version in the following format: a major version number, a minor version number, and a revision indicator. The major and minor numbers are required. The revision indicator is optional. After MIF parsing is complete, the elements in this format appear as follows: MajorNumber.MinorNumber.RevisionIndicator. For example, 4.52.A or 1.1.3.
ManufacturerEnter the name of the manufacturer for this software component.
Component Function
These fields identify the component’s type or function. The only valid selection from the Component Function drop-down list is <Custom Function> and the only valid entry in the Custom Function field is Subscription List.

Editing the Subscription List Component
19–6 Version 2.3
When you are ready, click the Update button. The Tivoli Module Designer displays the name that you have specified for this component in the tree view hierarchy.
4. Expand the Subscribers of <App Name> component to display the component definition categories.
5. (Optional). Select the Installation Dependencies category. The Installation Dependencies tab page enables you to specify the criteria that must be met before a component can be installed. The subscription list component has a default Application_Client_Check installation dependency instance for adding the managed application’s clients to the subscription list. This default instance provides an example that you may wish to use, or you can create new instances of the installation
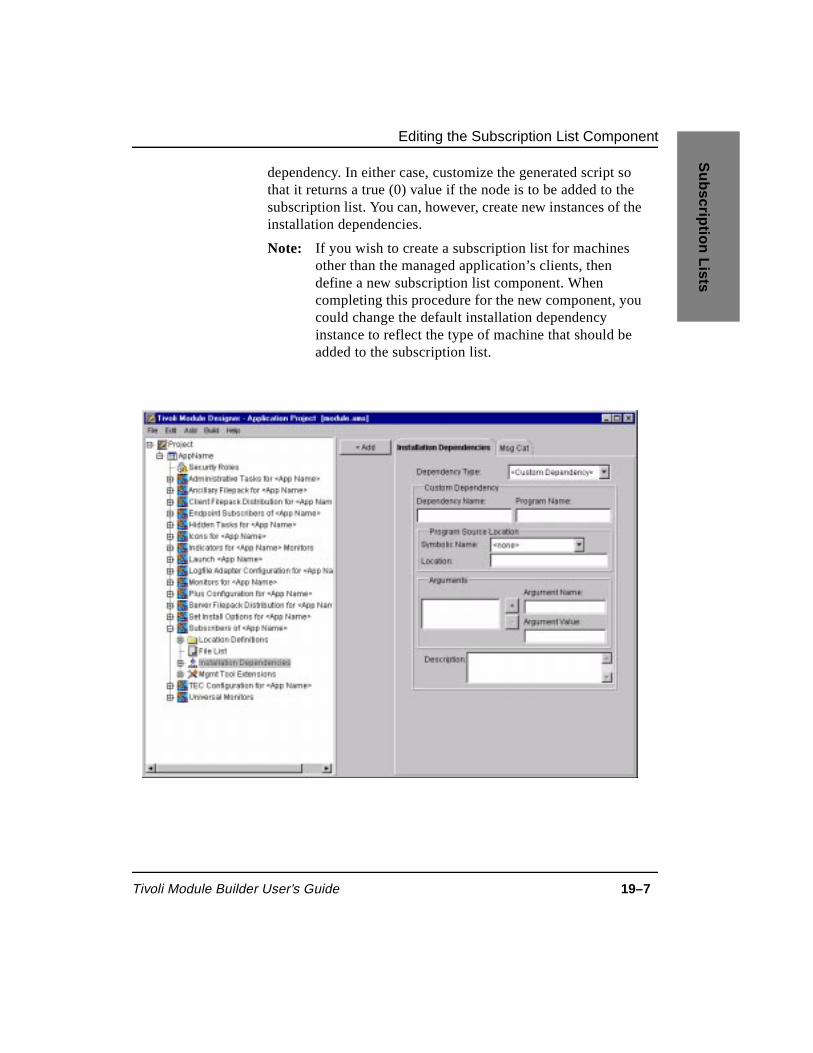
Editing the Subscription List Component
Tivoli Module Builder User’s Guide 19–7
Su
bscrip
tion
Lists
dependency. In either case, customize the generated script so that it returns a true (0) value if the node is to be added to the subscription list. You can, however, create new instances of the installation dependencies.
Note: If you wish to create a subscription list for machines other than the managed application’s clients, then define a new subscription list component. When completing this procedure for the new component, you could change the default installation dependency instance to reflect the type of machine that should be added to the subscription list.
Editing the Subscription List Component
19–8 Version 2.3
Complete the following required fields:
Dependency TypeUse the Dependency Type drop-down list to select the type of criteria that must be met before a component can be installed.
Note: The Tivoli Module Builder only supports custom dependencies. For this reason, you should only select <Custom Dependency> from this drop-down list.
Dependency NameEnter a description of the custom dependency. Examples of dependency names are Required_Disk_Space or OS_Version. The name must be alphanumeric (a–z, A–Z, 0–9, plus underscores). Spaces are not allowed.
Program NameEnter the name of the program or script that checks for the dependency. The name must be alphanumeric (a–z, A–Z, 0–9, plus underscores). Spaces are not allowed. Generating the Plus module produces a script stub with this name. The script stub has a placeholder for inserting the managed application’s script.
Click the <Add button when you are ready. This action displays the installation dependency that you have just defined under the Installation Dependencies category. If you need to edit the installation dependency, you can simply select it to redisplay the Installation Dependencies tab page with your definitions.
Each Plus component type has a predefined Mgmt Tool Extensions instance that associates the component with the Plus module. The default management tool name for this instance is TIVOLI_PLUS_3_0. Its default variable name is MODULE_TYPE with a value of PLUS. This predefined instance should not be deleted or its values changed.

Tivoli Module Builder User’s Guide 20–1
En
dp
oin
t Su
bscrip
tion
L
ist
20Endpoint Subscription List
The Plus module includes an endpoint subscription list for Tivoli Management Agent (TMA) endpoints. This Endpoint Subscribers of <App Name> subscription list is required in a Tivoli environment with TMA endpoints since the Subscribers of <App Name> subscription list (see Chapter 19, “Subscription Lists”) cannot have TMA endpoints as targets. Using the Endpoint Subscribers of <App Name> subscription list, the Plus module user can distribute file packages and execute other activity on TMA endpoints.
The endpoint subscription list is also a subscriber to the Subscribers of <App Name> subscription list. Therefore, when the Plus module user distributes to the Subscribers of <App Name> subscription list, TMA endpoints as well as managed nodes are included in the distribution.
After the Plus module is installed on the Tivoli Management Region (TMR) server, the Plus module user must define the TMA endpoints to be managed by the Plus module.
20
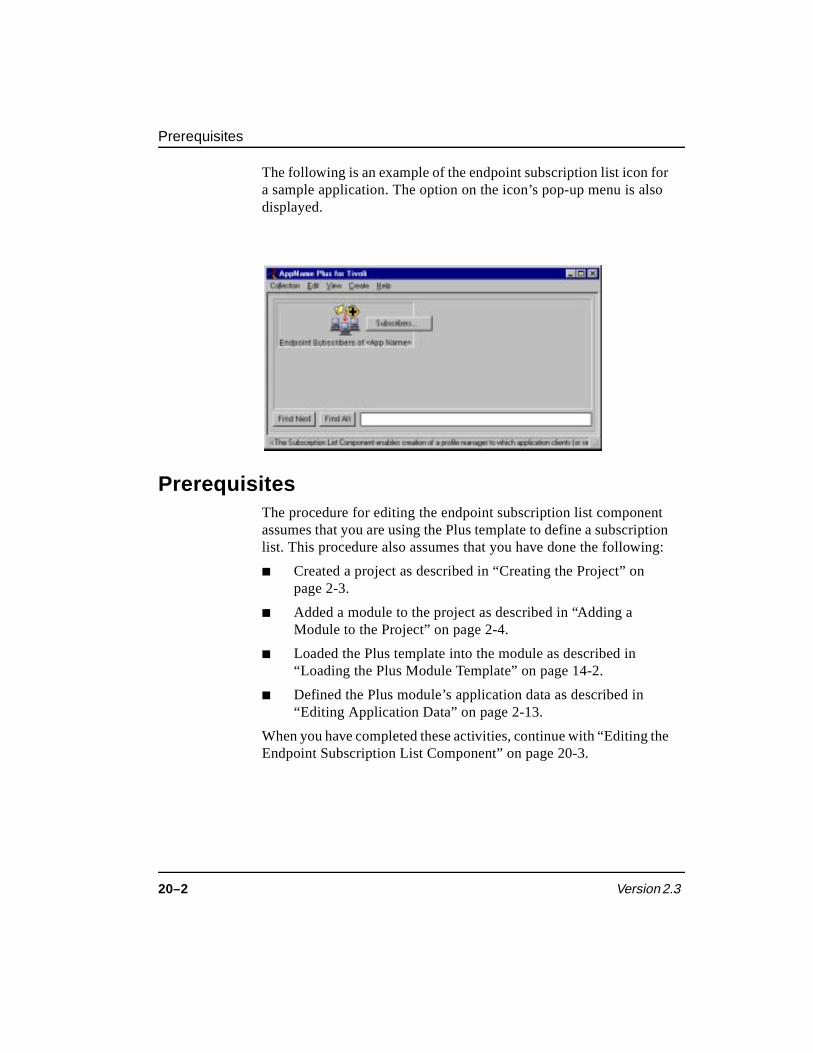
Prerequisites
20–2 Version 2.3
The following is an example of the endpoint subscription list icon for a sample application. The option on the icon’s pop-up menu is also displayed.
Prerequisites The procedure for editing the endpoint subscription list component assumes that you are using the Plus template to define a subscription list. This procedure also assumes that you have done the following:
■ Created a project as described in “Creating the Project” on page 2-3.
■ Added a module to the project as described in “Adding a Module to the Project” on page 2-4.
■ Loaded the Plus template into the module as described in “Loading the Plus Module Template” on page 14-2.
■ Defined the Plus module’s application data as described in “Editing Application Data” on page 2-13.
When you have completed these activities, continue with “Editing the Endpoint Subscription List Component” on page 20-3.

Editing the Endpoint Subscription List Component
Tivoli Module Builder User’s Guide 20–3
En
dp
oin
t Su
bscrip
tion
L
ist
Editing the Endpoint Subscription List Component
Use the following procedure to define an endpoint subscription list. When the Plus module is installed in the Tivoli environment, the endpoint subscription list will be dataless. Plus module users can add endpoints by clicking on the Endpoint Subscribers of <App Name> icon to display the Subscribers window.
In this procedure, the Component Data option requires definition. If you have more than one subscription list, the Installation Dependency option also requires definition in order to determine which machines are added to which list.
This procedure only discusses the required fields in the Tivoli Module Designer. Information specific to the endpoint subscription list component is noted in these field descriptions. General field information, including the optional fields, is provided in the online help.

Editing the Endpoint Subscription List Component
20–4 Version 2.3
1. Select the module into which you have imported the Plus template in the Tivoli Module Builder tree view hierarchy and click the Edit AMS Definition button on the General tab page. This action launches the Tivoli Module Designer so that you can edit the Plus module’s component. You can also select one of the Plus template components and click the Edit Component button in order to launch the Tivoli Module Designer.
2. Select the Endpoint Subscribers of <App Name> component in the Tivoli Module Designer tree view hierarchy. This action displays the Component Data tab page.
3. Use the Component Data tab page to specify general information required to identify the component. This information

Editing the Endpoint Subscription List Component
Tivoli Module Builder User’s Guide 20–5
En
dp
oin
t Su
bscrip
tion
L
ist
includes the name, version, and manufacturer of the component. The combined values of the Name, Version, and Manufacturer fields form a unit of information that must be unique across all components in a module. When defining more than one component, it is sufficient to change the value of just one of these fields to ensure a unique combination.
The generate and build process for Plus modules assume that the Plus components are capable of running on more than one platform. This means that each script referenced by the component must be able to accommodate all platforms on which the component is to run. If the component is to run on more than one platform, then the optional Destination field should specify Unknown.
Complete the following required fields on the Component Data tab page.
NameEnter a name for the component. Because the name you enter is the title for the subscription list icon, enter a name that identifies the endpoint subscription list. This name can contain any printable characters including embedded spaces.
VersionUse these fields to specify the version of the component. You can change the version in these fields to keep track of changes when updating a component. Specify the version in the following format: a major version number, a minor version number, and a revision indicator. The major and minor numbers are required. The revision indicator is optional. After MIF parsing is complete, the elements in this format appear as follows: MajorNumber.MinorNumber.RevisionIndicator. For example, 4.52.A or 1.1.3.
ManufacturerEnter the name of the manufacturer for this software component.

Editing the Endpoint Subscription List Component
20–6 Version 2.3
Component Function
These fields identify the component’s type or function. The only valid selection from the Component Function drop-down list is <Custom Function> and the only valid entry in the Custom Function field is Subscription List.
When you are ready, click the Update button. The Tivoli Module Designer displays the name that you have specified for this component in the tree view hierarchy.
4. Expand the Endpoint Subscribers of <App Name> component to display the component definition categories.
5. (Optional). Select the Installation Dependencies category. The Installation Dependencies tab page enables you to specify the
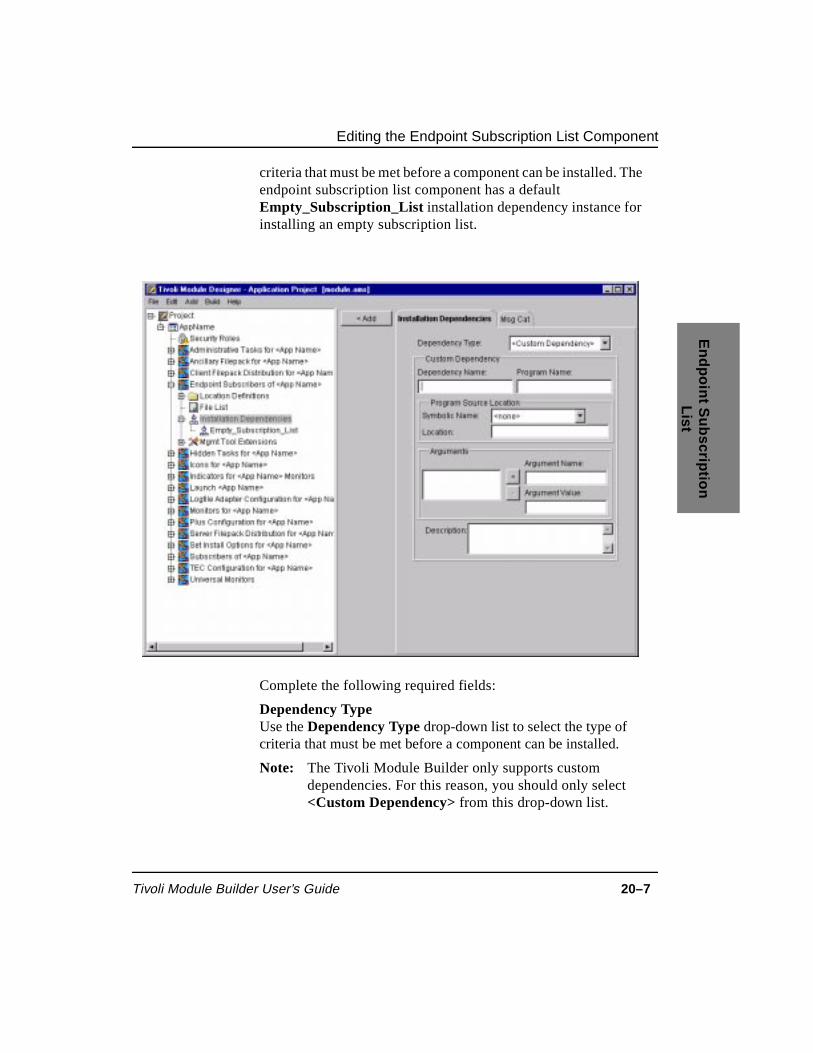
Editing the Endpoint Subscription List Component
Tivoli Module Builder User’s Guide 20–7
En
dp
oin
t Su
bscrip
tion
L
ist
criteria that must be met before a component can be installed. The endpoint subscription list component has a default Empty_Subscription_List installation dependency instance for installing an empty subscription list.
Complete the following required fields:
Dependency TypeUse the Dependency Type drop-down list to select the type of criteria that must be met before a component can be installed.
Note: The Tivoli Module Builder only supports custom dependencies. For this reason, you should only select <Custom Dependency> from this drop-down list.
Editing the Endpoint Subscription List Component
20–8 Version 2.3
Dependency NameEnter a description of the custom dependency. Examples of dependency names are Required_Disk_Space or OS_Version. The name must be alphanumeric (a–z, A–Z, 0–9, plus underscores). Spaces are not allowed.
Program NameEnter the name of the program or script that checks for the dependency. The name must be alphanumeric (a–z, A–Z, 0–9, plus underscores). Spaces are not allowed. Generating the Plus module produces a script stub with this name. The script stub has a placeholder for inserting the managed application’s script.
Click the <Add button when you are ready. This action displays the installation dependency that you have just defined under the Installation Dependencies category. If you need to edit the installation dependency, you can simply select it to redisplay the Installation Dependencies tab page with your definitions.
Each Plus component type has a predefined Mgmt Tool Extensions instance that associates the component with the Plus module. The default management tool name for this instance is TIVOLI_PLUS_3_0. Its default variable name is MODULE_TYPE with a value of PLUS. The Endpoint Subscribers of <App Name> component has an additional TIVOLI_PLUS_3_0 instance. This instance has a default variable name of TMA_DATALESS_PMS with a value of true. These predefined instances should not be deleted or their values changed.

Tivoli Module Builder User’s Guide 21–1
Ad
min
istrative Tasks
21Administrative Tasks
The managed application may have various tasks or jobs that the Plus module’s user may want to execute and manage from the Plus module. For example, the managed application may generate reports, run system checks, or perform other tasks that can be executed from the module. After a subscription list has been associated with a task, the module’s user can execute the task on multiple machines and platforms by double-clicking on the task’s icon. The module’s user can also specify the execution characteristics of the task, such as the machines on which the task will run, where the task’s output will be displayed, and whether the tasks will run in parallel on all machines or be staged in groups of machines.
21

Prerequisites
21–2 Version 2.3
The following is an example of a task icon for a sample application. The options on the icon’s pop-up menu are also displayed.
The task collection defined by the administrative tasks component identifies the application tasks that are to be run and managed from the module. When defining this component, you provide the name of the task program that is to be executed from the module and the arguments that the module’s user must supply to run the task.
Prerequisites The procedure for editing the administrative tasks component assumes that you are using the Plus template to define administrative tasks. This procedure also assumes that you have done the following:
■ Created a project as described in “Creating the Project” on page 2-3.
■ Added a module to the project as described in “Adding a Module to the Project” on page 2-4.
■ Loaded the Plus template into the module as described in “Loading the Plus Module Template” on page 14-2.

Editing the Administrative Tasks Component
Tivoli Module Builder User’s Guide 21–3
Ad
min
istrative Tasks
■ Defined the Plus module’s application data as described in “Editing Application Data” on page 2-13.
When you have completed these activities, continue with “Editing the Administrative Tasks Component” on page 21-3.
Editing the Administrative Tasks Component Use the following procedure to edit a task. When completing this procedure, you will first define the task collection with the Component Data tab page. You will then add tasks to the task collection with the Operational Tasks tab page. Once you have created the task collection, you can assign all tasks in the collection a default subscription list with the Mgmt Tools Extension tab page. (The Plus module’s user will be able to modify a task’s execution targets if they wish.)
When installing the module, a task library is created for this component. This task library is populated with the tasks defined in this component.
You may wish to have more than one task collection in your module. For example, the managed application may have tasks that require different subscription lists. These tasks would be in different task collections. To create an additional task collection, define another administrative tasks component.
This procedure only discusses the required fields in the Tivoli Module Designer. Information specific to the administrative tasks component is noted in these field descriptions. General field information, including the optional fields, is provided in the online help.

Editing the Administrative Tasks Component
21–4 Version 2.3
1. Select the module into which you have imported the Plus template in the Tivoli Module Builder tree view hierarchy and click the Edit AMS Definition button on the General tab page. This action launches the Tivoli Module Designer so that you can edit the Plus module’s component. You can also select one of the Plus template components and click the Edit Component button in order to launch the Tivoli Module Designer.
2. Select the Administrative Tasks for <App Name> component in the Tivoli Module Designer tree view hierarchy. This action displays the Component Data tab page.
3. Use the Component Data tab page to specify general information required to identify the component. This information includes the name, version, and manufacturer of the

Editing the Administrative Tasks Component
Tivoli Module Builder User’s Guide 21–5
Ad
min
istrative Tasks
component. The combined values of the Name, Version, and Manufacturer fields form a unit of information that must be unique across all components in a module. When defining more than one component, it is sufficient to change the value of just one of these fields to ensure a unique combination.
The generate and build process for Plus modules assume that the Plus components are capable of running on more than one platform. This means that each script referenced by the component must be able to accommodate all platforms on which the component is to run. If the component is to run on more than one platform, then the optional Destination field should specify Unknown.
Complete the following required fields on the Component Data tab page.
NameEnter a name for the task library. The name you enter should represent all tasks that are to be included in this library. This name can contain any printable characters including embedded spaces.
VersionUse these fields to specify the version of the component. You can change the version in these fields to keep track of changes when updating a component. Specify the version in the following format: a major version number, a minor version number, and a revision indicator. The major and minor numbers are required. The revision indicator is optional. After MIF parsing is complete, the elements in this format appear as follows: MajorNumber.MinorNumber.RevisionIndicator. For example, 4.52.A or 1.1.3.
ManufacturerEnter the name of the manufacturer for this software component.
Component Function
These fields identify the component’s type or function. The only valid selection from the Component Function drop-down list is <Custom Function> and the only valid entry in the Custom Function field is Administrative Tasks.

Editing the Administrative Tasks Component
21–6 Version 2.3
When you are ready, click the Update button. The Tivoli Module Designer displays the name that you have specified for this component in the tree view hierarchy.
4. Expand the Administrative Tasks for <App Name> component to display the component definition categories.
5. (Optional). Select the Installation Dependencies category. The tab page in this category enables you to specify the criteria that must be met before a component’s files can be installed. If

Editing the Administrative Tasks Component
Tivoli Module Builder User’s Guide 21–7
Ad
min
istrative Tasks
you are not defining an installation dependency, continue with step 6 on page 21-8.
Complete the following required fields:
Dependency TypeUse the Dependency Type drop-down list to select the type of criteria that must be met before a component can be installed. Since the administrative tasks are installed on a Tivoli Management Region (TMR) server, you would specify a custom dependency for a script that returns a value of true (0) if a node is a TMR server.
Note: The Tivoli Module Builder only supports custom dependencies. For this reason, you should only select <Custom Dependency> from this drop-down list.

Editing the Administrative Tasks Component
21–8 Version 2.3
Dependency NameEnter a description of the custom dependency. An example of a dependency name is TMR_Server_Check. The name must be alphanumeric (a–z, A–Z, 0–9, plus underscores). Spaces are not allowed.
Program NameEnter the name of the program or script that checks for the dependency. The name must be alphanumeric (a–z, A–Z, 0–9, plus underscores). Spaces are not allowed. Generating the Plus module produces a script stub with this name. The script stub has a placeholder for inserting the managed application’s script.
Click the <Add button when you are ready. This action displays the installation dependency that you have just defined under the Installation Dependencies category. If you need to edit the installation dependency, you can simply select it to redisplay the Installation Dependencies tab page with your definitions.
6. Select the Operational Tasks category. The Operational Tasks tab page enables you to specify an administrative task. Complete this tab page once for each task you wish to define. The component description file (CDF) generated for this component definition will reference each of the tasks you specify. If you do not define any tasks, the Plus module’s task library will be empty.

Editing the Administrative Tasks Component
Tivoli Module Builder User’s Guide 21–9
Ad
min
istrative Tasks
Generating the Plus module produces a script stub for each script or program specified in the task definition. You must edit these stubs with the scripts for running the task.
Complete the following required fields:
Task NameEnter a description of what the task does. The information that you enter is the title for the task icon displayed in the Plus module. Examples of task (or task icon) names are Start_Servers or Print_Runtime Statistics_Report. The name must be alphanumeric (a–z, A–Z, 0–9, plus underscores). Spaces are not allowed.

Editing the Administrative Tasks Component
21–10 Version 2.3
Program NameEnter the name of the program or script that is invoked by the task. The name must be alphanumeric (a–z, A–Z, 0–9, plus underscores). Spaces are not allowed. Generating the Plus module produces a script stub with this name. The script stub has a placeholder for inserting the managed application’s script.
Label Enter any arguments expected by the program in the Label field and click the Add button to add the argument to the Arguments list box.
Click the <Add button when you are ready. This action displays the task you have just defined under the Operational Tasks category. If you need to edit the task, you can simply select it to redisplay the Operational Tasks tab page with your definitions.
To specify another operational task, repeat this step.
7. Specify the Tivoli administrator role required to run each task that you defined in step 6 of this procedure. The Tivoli administrator roles assign different levels of authority required for running management tasks in the Tivoli environment.
Use the following steps to assign the Tivoli administrator role required to run a task:
a. Select the task instance in the tree view hierarchy.
b. Select the Tivoli Roles tab page.
c. Select one or more of the Tivoli administrator roles displayed on the Tivoli Roles tab page.

Editing the Administrative Tasks Component
Tivoli Module Builder User’s Guide 21–11
Ad
min
istrative Tasks
d. Click the Update button.
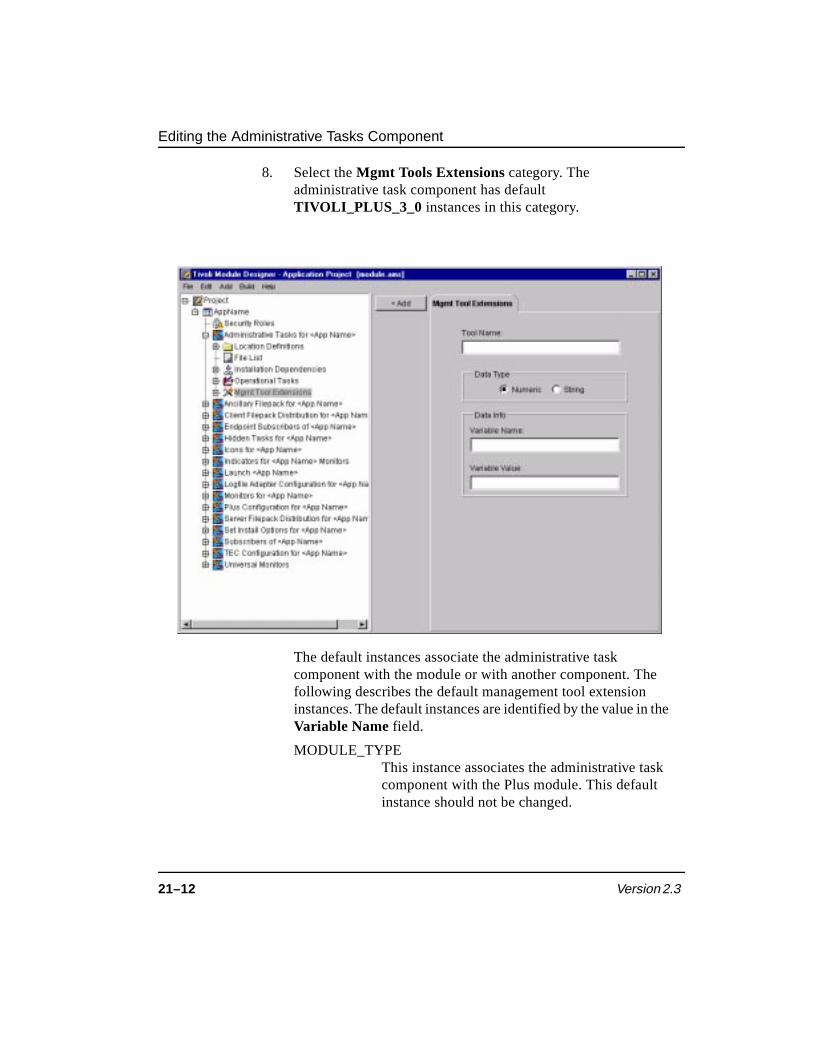
Editing the Administrative Tasks Component
21–12 Version 2.3
8. Select the Mgmt Tools Extensions category. The administrative task component has default TIVOLI_PLUS_3_0 instances in this category.
The default instances associate the administrative task component with the module or with another component. The following describes the default management tool extension instances. The default instances are identified by the value in the Variable Name field.
MODULE_TYPE This instance associates the administrative task component with the Plus module. This default instance should not be changed.
Editing the Administrative Tasks Component
Tivoli Module Builder User’s Guide 21–13
Ad
min
istrative Tasks
SUBSCRIPTION_LIST This instance associates the administrative task component with a subscription list. You should edit this instance’s Variable Value field with the component name of the subscription list.
The following describes how to complete the fields on the Mgmt Tool Extensions tab page should you create additional instances in this category.
Tool NameEnter TIVOLI_PLUS_3_0 in this field. This value is required in order to be compatible with the Version 3.0 Plus modules generated by the current version of the Tivoli Module Builder.
Data TypeSelect the String radio button.
Variable NameEnter SUBSCRIPTION_LIST in this field.
Variable ValueThis field identifies the component to which you are establishing a relationship. Enter the value displayed in the Name field of the related component’s Component Data tab page. For example, entering Subscribers of <Application Name> in this field indicates that the administrative tasks component should be distributed to the nodes that subscribe to the component named Subscribers of <Application Name>.

Editing the Administrative Tasks Component
21–14 Version 2.3

Tivoli Module Builder User’s Guide 22–1
File P
ackages
22File Packages
File packages contain the information necessary to distribute and install the managed application on multiple machines and platforms with Tivoli Software Distribution. Because the user typically has to provide information specific to the distribution and installation of an application at a particular site, the module provides a setup task for configuring a file package instead of complete file packages. The setup task utilizes a “prewritten” file package that provides basic information required by Tivoli Software Distribution. When the user runs this setup task, pop-up dialogs appear prompting for the user-supplied information. The following is an example of a file
22

22–2 Version 2.3
package setup icon for a sample application. The options on the icon’s pop-up menu are also displayed.
When you define the file package component, you are specifying the information necessary to create a file package setup task in the module. You will specify this component for each portion of the managed application that will be distributed and installed. For example, if you have both a client and server application, then you can specify a file package setup task for both of these applications.
This component also specifies the files required for the managed application’s installation as well as the default source directory for the installation binaries and the default destination directory on the target machines. When defining this component, you specify the arguments that the user supplies as well as the name of the program that executes when the user runs the file package setup task.
It is not necessary to specify a setup task in a file package component. If none is specified, the file package is created when the module is installed, based on the information in the component description file (CDF). If a setup task is specified, the file package is not created at install time. Instead, it is created as a result of running the setup task. A typical example of a file package that does not have a setup task is one that is intended to be nested by other file packages. The setup task

Prerequisites
Tivoli Module Builder User’s Guide 22–3
File P
ackages
of another file package component may refer to the nested file package. An example of a nested file package is the Ancillary Filepack for <App Name> component in the template.
Prerequisites The procedure for editing the file package component assumes that you are using the Plus template to define file packages. This procedure also assumes that you have done the following:
■ Created a project as described in “Creating the Project” on page 2-3.
■ Added a module to the project as described in “Adding a Module to the Project” on page 2-4.
■ Loaded the Plus template into the module as described in “Loading the Plus Module Template” on page 14-2.
■ Defined the Plus module’s application data as described in “Editing Application Data” on page 2-13.
When you have completed these activities, continue with “Editing the File Package Component” on page 22-3.
Editing the File Package Component Use the following procedure to define a file package. When defining the file package component, the Component Data, and Operational Task options require definition.
This procedure only discusses the required fields in the Tivoli Module Designer. Information specific to the file package component is noted in these field descriptions. General field information, including the optional fields, is provided in the online help.

Editing the File Package Component
22–4 Version 2.3
1. Select the module into which you have imported the Plus template in the Tivoli Module Builder tree view hierarchy and click the Edit AMS Definition button on the General tab page. This action launches the Tivoli Module Designer so that you can edit the Plus module’s component. You can also select one of the Plus template components and click the Edit Component button in order to launch the Tivoli Module Designer.
2. Select one of the file package components in the Tivoli Module Designer tree view hierarchy. This action displays the Component Data tab page for the file package you selected.
3. Use the Component Data tab page to specify general information required to identify the component. This information includes the name, version, and manufacturer of the

Editing the File Package Component
Tivoli Module Builder User’s Guide 22–5
File P
ackages
component. The combined values of the Name, Version, and Manufacturer fields form a unit of information that must be unique across all components in a module. When defining more than one component, it is sufficient to change the value of just one of these fields to ensure a unique combination.
The generate and build process for Plus modules assume that the Plus components are capable of running on more than one platform. This means that each script referenced by the component must be able to accommodate all platforms on which the component is to run. If the component is to run on more than one platform, then the optional Destination field should specify Unknown.
Complete the following required fields on the Component Data tab page.
NameEnter a name for the component. Because the name you enter will be the title of the Plus module icon that distributes the file package, enter a name descriptive of the file distribution. This name can contain any printable characters including embedded spaces.
Note: Nested file packages do not have icons in the installed Plus module.
VersionUse these fields to specify the version of the component. You can change the version in these fields to keep track of changes when updating a component. Specify the version in the following format: a major version number, a minor version number, and a revision indicator. The major and minor numbers are required. The revision indicator is optional. After MIF parsing is complete, the elements in this format appear as follows: MajorNumber.MinorNumber.RevisionIndicator. For example, 4.52.A or 1.1.3.
ManufacturerEnter the name of the manufacturer for this software component.
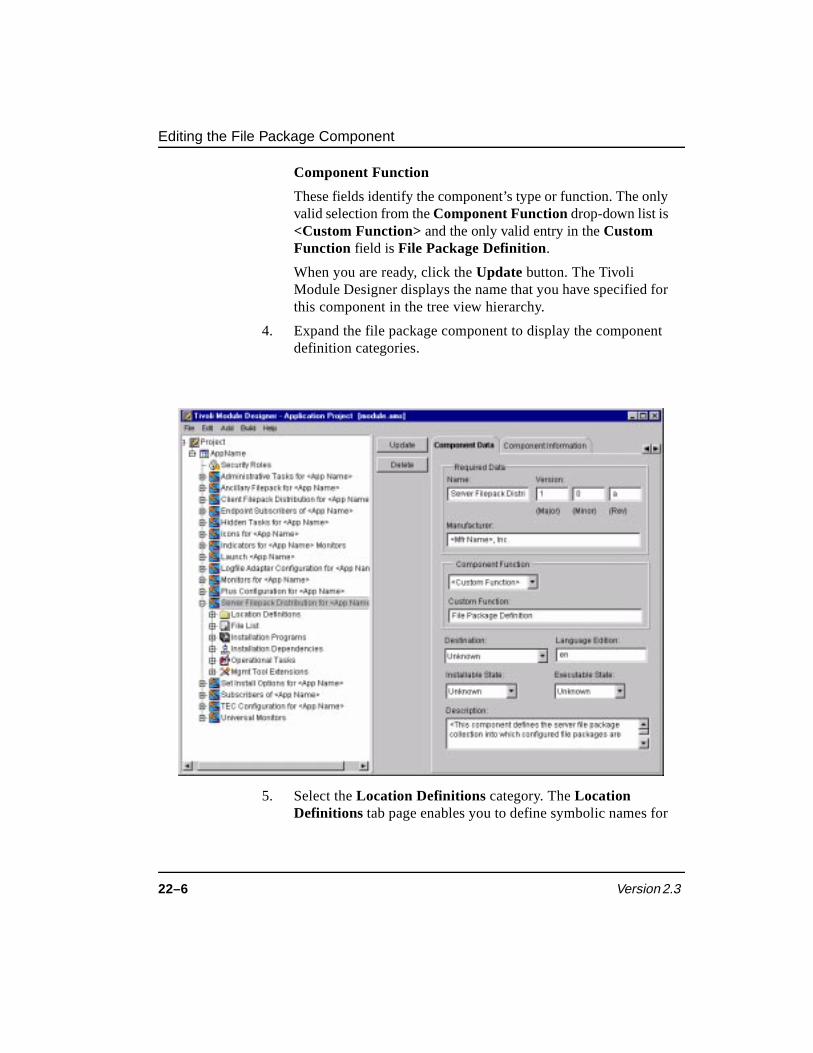
Editing the File Package Component
22–6 Version 2.3
Component Function
These fields identify the component’s type or function. The only valid selection from the Component Function drop-down list is <Custom Function> and the only valid entry in the Custom Function field is File Package Definition.
When you are ready, click the Update button. The Tivoli Module Designer displays the name that you have specified for this component in the tree view hierarchy.
4. Expand the file package component to display the component definition categories.
5. Select the Location Definitions category. The Location Definitions tab page enables you to define symbolic names for

Editing the File Package Component
Tivoli Module Builder User’s Guide 22–7
File P
ackages
directories associated with this component. If you are not defining location definitions, continue with step 6 on page 22-8.
Note: The logfile adapter configuration task for Plus modules requires that the format (.fmt) file be included in the client file packages that distribute to TMA endpoints. When adding a location definition for the format file, select <User Defined> from the Symbolic Name list and specify the full path name to the format file (not including the file name) in the Destination Location field.

Editing the File Package Component
22–8 Version 2.3
Complete the following required fields:
Symbolic NameUse the Symbolic Name menu to select the symbolic name that you wish to define. If you wish to define a symbolic name not on this list, select <User Defined>.
The Symbolic Name menu displays a list of possible symbolic directory names that you can define for this software component. Once you have defined a symbolic directory name, you should use the symbolic name throughout the software component definition. The symbolic directories that you define here will appear on the symbolic name menus of other tab pages.
6. (Optional). Select the File List category. The File List tab page enables you to define the files (such as installation binaries) that will be distributed and installed with the file package. Each of the file package components provided with the Plus template

Editing the File Package Component
Tivoli Module Builder User’s Guide 22–9
File P
ackages
have predefined file list instances. You can modify these predefined instances or create new ones.
Complete the following required fields on the File List tab page. You can specify these fields more than once to include different files. After completing this tab page, click the <Add button.
Note: The logfile adapter configuration task for Plus modules requires that the format (.fmt) file be included in the client file packages that distribute to TMA endpoints. When adding the format file to the file list, specify the format file’s name in the File Name field and then select the destination location from the Symbolic Name drop-down menu.

Editing the File Package Component
22–10 Version 2.3
File NameEnter the names of those files (installation binaries) required for a file package to successfully distribute and initiate the application’s installation process. You can specify a file name, a path to a file, or a directory. When using a simple file name, use the Source Location fields to specify the directories where the file is located.
Note: You can also specify a directory in the File Name field. If there are certain files in a directory that you wish to exclude, you can exclude these files by inserting an ampersand (&) before the file name in the File Name field.
Source Location Use the Symbolic Name drop-down list to select a symbolic name for the source location of the file. The symbolic names that you have defined with the Location Definitions category appear on this drop-down list.
Destination Location Use the Symbolic Name drop-down list to select a symbolic name for the destination location of the file. The symbolic names that you have defined with the Location Definitions category appear on this drop-down list.
Note: Although the Tivoli Module Designer displays a Signature tab next to the File List tab, Plus modules do not use the information specified on the Signature tab.
7. (Optional). Select the Installation Dependencies category. The Installation Dependencies tab page enables you to specify the criteria that must be met before a component’s files can be installed. The file package components provided with the Plus template have predefined instances of the installation dependencies. You can create additional installation

Editing the File Package Component
Tivoli Module Builder User’s Guide 22–11
File P
ackages
dependencies. If you are not defining an installation dependency, continue with step 8 on page 22-12.
Complete the following required fields:
Dependency TypeUse the Dependency Type drop-down list to select the type of criteria that must be met before a component can be installed. Since the file package setup tasks and the ancillary (nested) file packages are only created when the Plus module is installed on a Tivoli Management Region (TMR) server, you would specify a custom dependency script that returns a “true” (0) value if the node is a TMR server.

Editing the File Package Component
22–12 Version 2.3
Note: The Tivoli Module Builder only supports custom dependencies. For this reason, you should only select <Custom Dependency> from this drop-down list.
Dependency NameEnter a description of the custom dependency. Examples of dependency names are Required_Disk_Space or OS_Version. The name must be alphanumeric (a–z, A–Z, 0–9, plus underscores). Spaces are not allowed.
Program NameEnter the name of the program or script that checks for the dependency. The name must be alphanumeric (a–z, A–Z, 0–9, plus underscores). Spaces are not allowed. Generating the Plus module produces a script stub with this name. The script stub has a placeholder for inserting the managed application’s script.
Click the <Add button when you are ready. This action displays the installation dependency that you have just defined under the Installation Dependencies category. If you need to edit the installation dependency, you can simply select it to redisplay the Installation Dependencies tab page with your definitions.
8. (Optional). Select the Installation Programs category. The Installation Programs tab page enables you to define programs, such as configuration scripts, that run when the

Editing the File Package Component
Tivoli Module Builder User’s Guide 22–13
File P
ackages
managed application is installed. If you are not defining an installation program, continue with step 9 on page 22-14.
Complete the following required fields:
Program FunctionUse the menu in this field to select the type of script or program to be associated with installing or removing the file list members of the component. These programs run on each target machine during the installation process.
Program File NameEnter the file name of the program associated with installing or removing the file list members of the component.

Editing the File Package Component
22–14 Version 2.3
9. Select the Operational Tasks category. The Operational Tasks tab page enables you to specify a file package setup task with arguments that the user supplies to configure a specific instance of the file package. You might create more than one setup task to serve different functions. For example, you might have different setup tasks for file packages that distribute to UNIX platforms and Windows platforms. The Plus module’s user may also complete the same setup task more than once to create different file packages. For example, the user might complete a UNIX setup task more than once to create file packages for the different brands of UNIX. The file packages generated by the setup task are distributed with the icon specified in the Component Name field on the Component Data tab page.
The Plus template provides file package component types with predefined file package setup tasks. These tasks vary depending on which type of file package component (for example, client or server) you are defining. A default implementation of the scripts for these setup tasks are also provided. You may find that the predefined setup tasks are sufficient for the managed application. If you wish to create additional tasks, you can do so using the default task as a model. When creating additional tasks, be sure that the script name in the Program Name field is unique for each task.

Editing the File Package Component
Tivoli Module Builder User’s Guide 22–15
File P
ackages
Complete the following required fields:
Task NameEnter a description of what the task does. The information that you enter is the title for this task icon in the module. Examples of task (or task icon) names are Setup_UNIX_Server_Install or Setup_Windows_Client_Distribution. The name must be alphanumeric (a–z, A–Z, 0–9, plus underscores). Spaces are not allowed.
Program NameEnter the name of the program that implements the file package configuration. This name must be unique. The name must be alphanumeric (a–z, A–Z, 0–9, plus underscores). Spaces are not allowed. Generating the Plus module produces a script with the

Editing the File Package Component
22–16 Version 2.3
name specified in this field. This script contains a default header that sets up the environment for file package distribution. When the user runs this script (by double-clicking on the icon with the name specified in the Task Name field), the script generates a file package.
Label Enter a descriptive name for any arguments that the program expects the user to provide in the Label field and click the Add button to move the argument to the Arguments list box. You can use the predefined operational task instance for an example of the arguments that should be supplied. Examples of arguments include interpreter, source host, source staging, and so forth.
Add any additional arguments required by the program.
When the Plus user runs this task, a pop-up dialog box will prompt the user for the arguments you specify. The argument descriptions you provide here are the field names for this dialog box. Be sure to provide a name that accurately describes the value the module’s user must enter.
If you specify an argument, a Dialog Specification Language (ProgramName.dsl) file is created when you generate the module. This file defines the dialog box that prompts the user for the argument. You can modify this file or overwrite it with a new one.

Editing the File Package Component
Tivoli Module Builder User’s Guide 22–17
File P
ackages
10. Select the Mgmt Tools Extensions category. Each file package component has one or more default TIVOLI_PLUS_3_0 instances in this category.
The default instances associate the file package component with the module or with another component. The following describes the default management tool extension instances. The default instances are identified by the value in the Variable Name field.
MODULE_TYPE This instance associates the file package component with the Plus module. This default instance should not be changed.
SUBSCRIPTION_LIST This instance associates the file package
Editing the File Package Component
22–18 Version 2.3
component with a subscription list. You should edit this instance’s Variable Value field with the component name of the subscription list. Only client and server file packages have this instance.
NESTED_FILEPACK This instance identifies the ancillary file package that is to be nested in a client or server file package. You should edit this instance’s Variable Value field with the component name of the ancillary file package. Only client and server file packages have this instance.
The following describes how to complete the fields on the Mgmt Tool Extensions tab page should you create additional instances in this category.
Tool NameEnter TIVOLI_PLUS_3_0 in this field. This value is required in order to be compatible with the Version 3.0 Plus modules generated by the current version of the Tivoli Module Builder.
Data TypeSelect the String radio button.
Variable NameEnter SUBSCRIPTION_LIST or NESTED_FILEPACK in this field.
Variable ValueThis field identifies the component to which you are establishing a relationship. Enter the value displayed in the Name field of the related component’s Component Data tab page. For example, entering Subscribers of <Application Name> in this field indicates that the file package component should be distributed to the nodes that subscribe to the component named Subscribers of <Application Name>.

Tivoli Module Builder User’s Guide 23–1
Ind
icator C
ollectio
ns
23Indicator Collections
The indicator collection receives and displays the status of the monitored resources. This collection is represented in the Plus module by an icon that displays a group of thermometers. Opening the collection displays individual thermometers; each thermometer indicates the status of a particular monitored resource. As the status of a monitored resource becomes more urgent, the temperature on the indicator collection’s thermometers rises. This enables the user to see at a glance that a monitored resource has changed to an urgent status. The user can open the indicator collection to see the actual status of the monitored resources. For each resource, the indicators report the most urgent status received within a recent time frame. The monitor reports are organized so that the most urgent status level appears at the top of the report.
23

Prerequisites
23–2 Version 2.3
The following is an example of an indicator collection icon for a sample application. The option on the icon’s pop-up menu is also displayed.
Prerequisites The procedure for editing the indicator collection component assumes that you are using the Plus template to define an indicator collection. This procedure also assumes that you have done the following:
■ Created a project as described in “Creating the Project” on page 2-3.
■ Added a module to the project as described in “Adding a Module to the Project” on page 2-4.
■ Loaded the Plus template into the module as described in “Loading the Plus Module Template” on page 14-2.
■ Defined the Plus module’s application data as described in “Editing Application Data” on page 2-13.
When you have completed these activities, continue with “Editing the Indicator Collection Component” on page 23-3.
Editing the Indicator Collection Component
Tivoli Module Builder User’s Guide 23–3
Ind
icator C
ollectio
ns
Editing the Indicator Collection Component Use the following procedure to define an indicator collection. In this procedure, only the Component Data option requires definition.
This procedure only discusses the required fields in the Tivoli Module Designer. Information specific to the indicator collection component is noted in these field descriptions. General field information, including the optional fields, is provided in the online help.
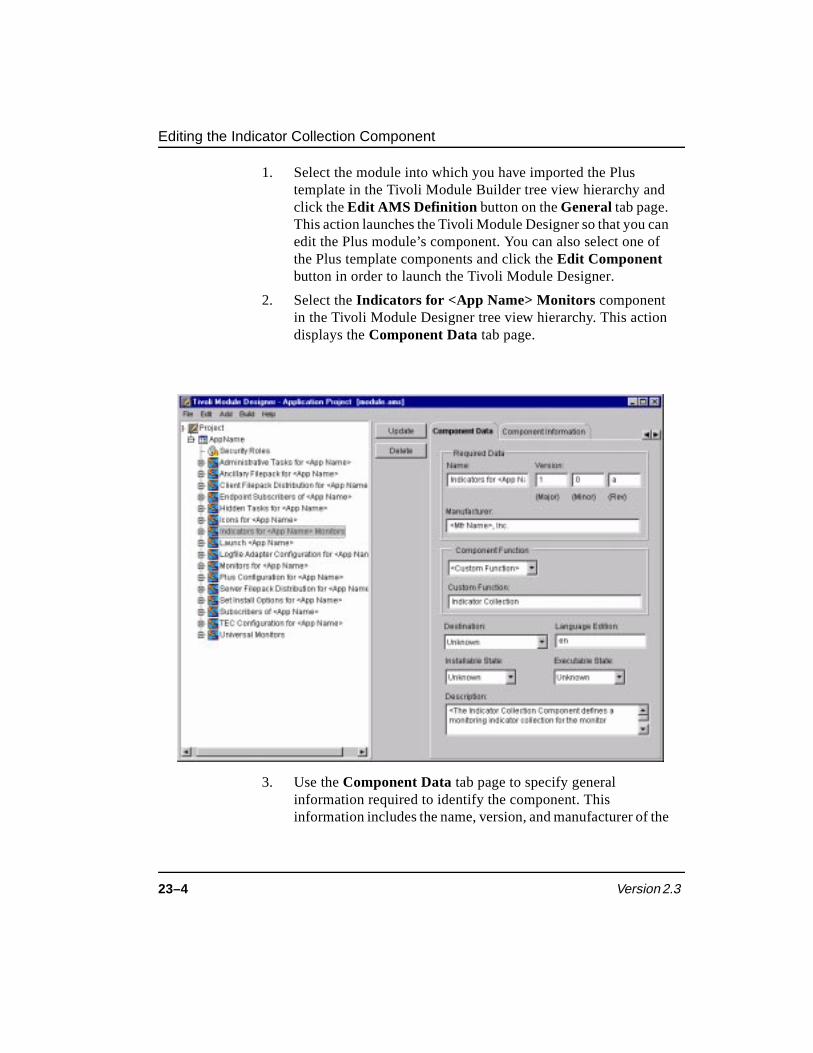
Editing the Indicator Collection Component
23–4 Version 2.3
1. Select the module into which you have imported the Plus template in the Tivoli Module Builder tree view hierarchy and click the Edit AMS Definition button on the General tab page. This action launches the Tivoli Module Designer so that you can edit the Plus module’s component. You can also select one of the Plus template components and click the Edit Component button in order to launch the Tivoli Module Designer.
2. Select the Indicators for <App Name> Monitors component in the Tivoli Module Designer tree view hierarchy. This action displays the Component Data tab page.
3. Use the Component Data tab page to specify general information required to identify the component. This information includes the name, version, and manufacturer of the
Editing the Indicator Collection Component
Tivoli Module Builder User’s Guide 23–5
Ind
icator C
ollectio
ns
component. The combined values of the Name, Version, and Manufacturer fields form a unit of information that must be unique across all components in a module. When defining more than one component, it is sufficient to change the value of just one of these fields to ensure a unique combination.
The generate and build process for Plus modules assume that the Plus components are capable of running on more than one platform. This means that each script referenced by the component must be able to accommodate all platforms on which the component is to run. If the component is to run on more than one platform, then the optional Destination field should specify Unknown.
Complete the following required fields on the Component Data tab page.
NameEnter a name for the component. Because the name you enter is the title for the Tivoli Distributed Monitoring indicator collection icon, enter a name that identifies the indicator collection. This name can contain any printable characters including embedded spaces.
VersionUse these fields to specify the version of the component. You can change the version in these fields to keep track of changes when updating a component. Specify the version in the following format: a major version number, a minor version number, and a revision indicator. The major and minor numbers are required. The revision indicator is optional. After MIF parsing is complete, the elements in this format appear as follows: MajorNumber.MinorNumber.RevisionIndicator. For example, 4.52.A or 1.1.3.
ManufacturerEnter the name of the manufacturer for this software component.

Editing the Indicator Collection Component
23–6 Version 2.3
Component Function These fields identify the component’s type or function. The only valid selection from the Component Function drop-down list is <Custom Function> and the only valid entry in the Custom Function field is Indicator Collection.
When you are ready, click the Update button. The Tivoli Module Designer displays the name that you have specified for this component in the tree view hierarchy.
4. Expand the Indicators for <App Name> component to display the component definition categories.
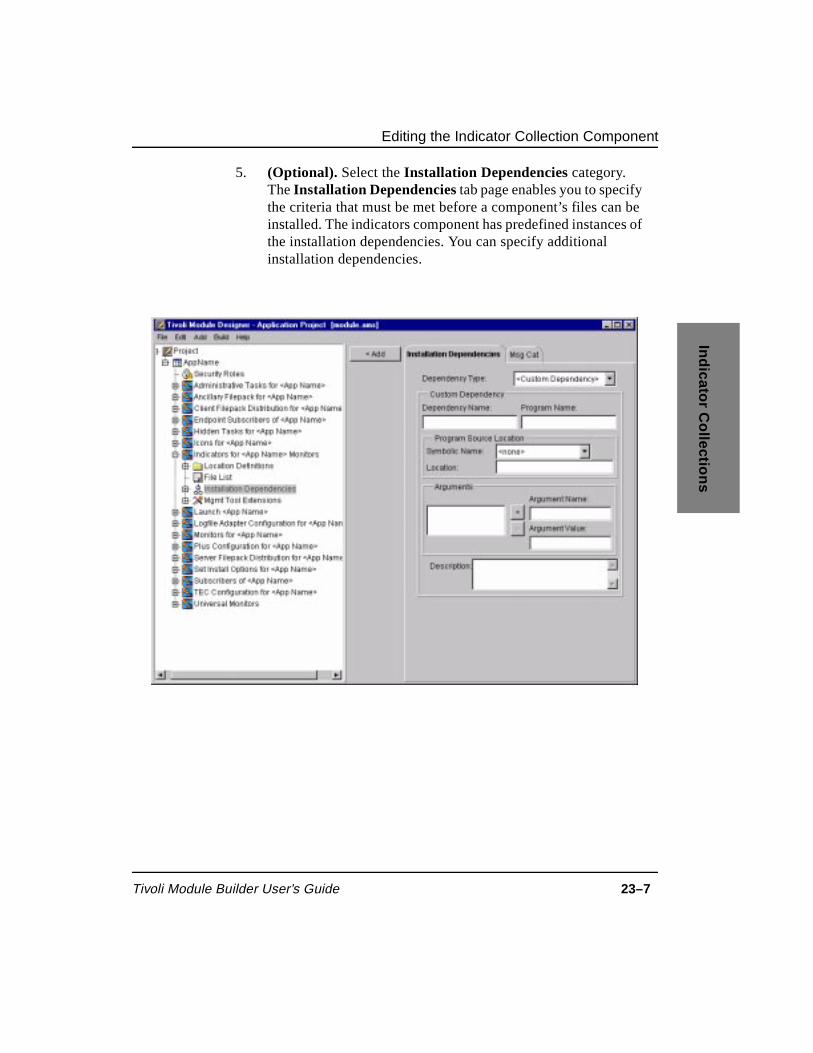
Editing the Indicator Collection Component
Tivoli Module Builder User’s Guide 23–7
Ind
icator C
ollectio
ns
5. (Optional). Select the Installation Dependencies category. The Installation Dependencies tab page enables you to specify the criteria that must be met before a component’s files can be installed. The indicators component has predefined instances of the installation dependencies. You can specify additional installation dependencies.

Editing the Indicator Collection Component
23–8 Version 2.3
Complete the following required fields:
Dependency TypeUse the Dependency Type drop-down list to select the type of criteria that must be met before a component can be installed. Since the indicator collection is installed on a Tivoli Management Region (TMR) server, you would specify a custom dependency for a script that returns a value of “true” (0) if a node is a TMR server.
Note: The Tivoli Module Builder only supports custom dependencies. For this reason, you should only select <Custom Dependency> from this drop-down list.
Dependency NameEnter a description of the custom dependency. Examples of dependency names are Required_Disk_Space or OS_Version. The name must be alphanumeric (a–z, A–Z, 0–9, plus underscores). Spaces are not allowed.
Program NameEnter the name of the program or script that checks for the dependency. The name must be alphanumeric (a–z, A–Z, 0–9, plus underscores). Spaces are not allowed. Generating the Plus module produces a script stub with this name. The script stub has a placeholder for inserting the managed application’s script.
Click the <Add button when you are ready. This action displays the installation dependency that you have just defined under the Installation Dependencies category. If you need to edit the installation dependency, you can simply select it to redisplay the Installation Dependencies tab page with your definitions.
Each Plus component type has a predefined Mgmt Tool Extensions instance that associates the component with the Plus module. The default management tool name for this instance is TIVOLI_PLUS_3_0. Its default variable name is MODULE_TYPE with a value of PLUS. This predefined instance should not be deleted or its values changed.

Tivoli Module Builder User’s Guide 24–1
Mo
nito
rs
24Monitors
Tivoli Distributed Monitoring has a set of predefined monitors for monitoring resources for UNIX and Windows NT applications. Each instance of these monitors checks the status of a specific resource and runs at a specific frequency. The status report for a monitored resource can be viewed with the Tivoli Distributed Monitoring indicator collection. When the status of a monitored resource reaches a predefined threshold, the monitor can initiate a task or forward an event to the Tivoli Enterprise Console. For example, you can have a monitor instance that checks the size of a logfile and runs every 15 minutes. When the logfile size increases above 2,000 KB, Tivoli Distributed Monitoring sends an event to the Tivoli Enterprise Console.
In the module, the monitor collection is represented by an icon. Selecting the Properties... option from the icon’s pop-up menu displays the monitors included in the collection. The following is an
24

24–2 Version 2.3
example of a monitor collection icon for a sample application. The options on the icon’s pop-up menu are also displayed.
The Plus template includes a universal monitors component which has common monitors that run on both Windows NT and UNIX platforms. You can use the universal monitors component to define application-specific instances of the universal monitors. The Tivoli Module Builder provides additional predefined monitors that can be imported as a CDF into the Plus module. For information on using these additional predefined monitors, see “Using Additional Predefined Monitors” on page 24-29.
The Plus template also includes a Monitors for <App Name> component. This component enables you to specify custom monitors for items that are not included with the predefined monitors.
Defining a monitor instance includes specifying the name of the resource to be monitored, the thresholds for the monitored resource, and the frequency with which the monitor is to run. If the monitor is to send events to the Tivoli Enterprise Console, then specify an event classification.

Prerequisites
Tivoli Module Builder User’s Guide 24–3
Mo
nito
rs
Prerequisites The procedure for editing the monitors component assumes that you are using the Plus template to define monitors and their instances. This procedure also assumes that you have done the following:
■ Created a project as described in “Creating the Project” on page 2-3.
■ Added a module to the project as described in “Adding a Module to the Project” on page 2-4.
■ Loaded the Plus template into the module as described in “Loading the Plus Module Template” on page 14-2.
■ Defined the Plus module’s application data as described in “Editing Application Data” on page 2-13.
When you have completed these activities, continue with “Editing the Monitors Component” on page 24-3.
Editing the Monitors Component Use the following procedure to define a monitor. When completing this procedure, the Component Data, Synchronous Monitors, and Component Relationship options require definition.
This procedure only discusses the required fields in the Tivoli Module Designer. Information specific to the monitors component is noted in these field descriptions. General field information, including the optional fields, is provided in the online help.
1. Select the module into which you have imported the Plus template in the Tivoli Module Builder tree view hierarchy and click the Edit AMS Definition button on the General tab page. This action launches the Tivoli Module Designer so that you can edit the Plus module’s component. You can also select one of the Plus template components and click the Edit Component button in order to launch the Tivoli Module Designer.
2. Select one of the monitor components in the Tivoli Module Designer tree view hierarchy. This action displays the
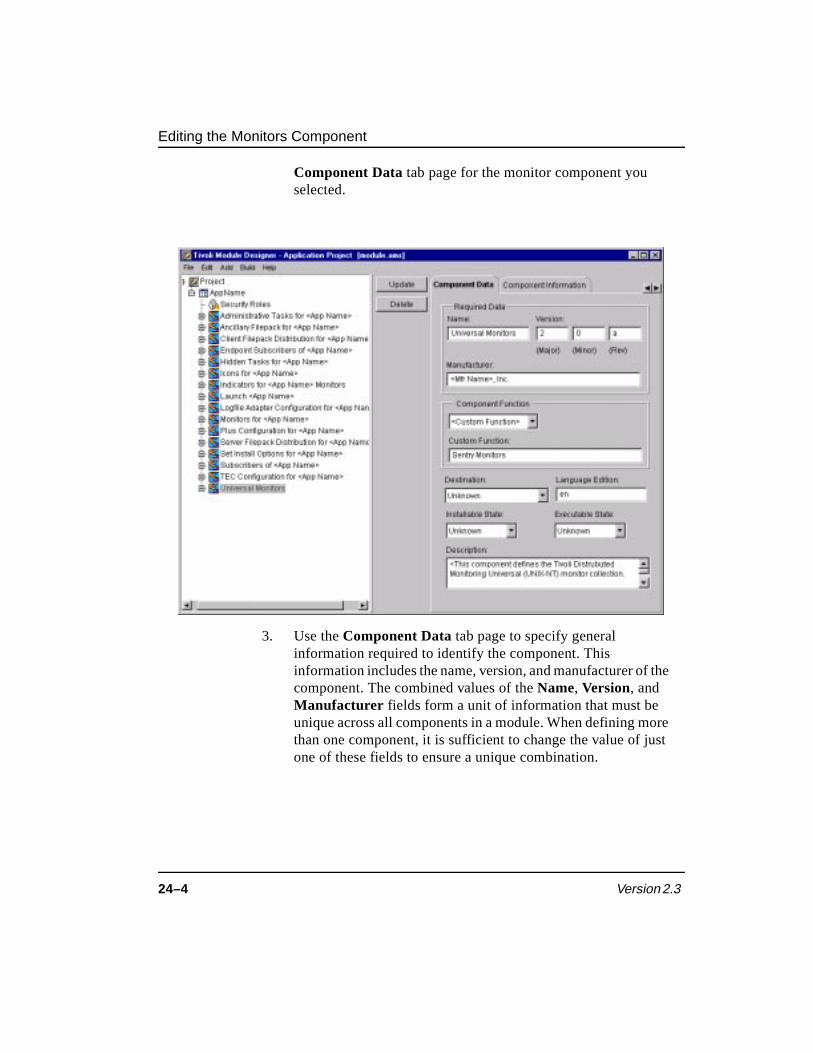
Editing the Monitors Component
24–4 Version 2.3
Component Data tab page for the monitor component you selected.
3. Use the Component Data tab page to specify general information required to identify the component. This information includes the name, version, and manufacturer of the component. The combined values of the Name, Version, and Manufacturer fields form a unit of information that must be unique across all components in a module. When defining more than one component, it is sufficient to change the value of just one of these fields to ensure a unique combination.

Editing the Monitors Component
Tivoli Module Builder User’s Guide 24–5
Mo
nito
rs
The generate and build process for Plus modules assume that the Plus components are capable of running on more than one platform. This means that each script referenced by the component must be able to accommodate all platforms on which the component is to run. If the component is to run on more than one platform, then the optional Destination field should specify Unknown.
Complete the following required fields on the Component Data tab page.
NameEnter a name for the monitor component. The name you enter will be the name of the monitor collection icon in the Plus module. This name can contain any printable characters including embedded spaces.
VersionUse these fields to specify the version of the component. You can change the version in these fields to keep track of changes when updating a component. Specify the version in the following format: a major version number, a minor version number, and a revision indicator. The major and minor numbers are required. The revision indicator is optional. After MIF parsing is complete, the elements in this format appear as follows: MajorNumber.MinorNumber.RevisionIndicator. For example, 4.52.A or 1.1.3.
ManufacturerEnter the name of the manufacturer for this software component.
Component Function
These fields identify the component’s type or function. The only valid selection from the Component Function drop-down list is <Custom Function> and the only valid entry in the Custom Function field is Sentry Monitors.
When you are ready, click the Update button. The Tivoli Module Designer displays the name that you have specified for this component in the tree view hierarchy.

Editing the Monitors Component
24–6 Version 2.3
4. Expand the monitor component to display the component definition categories.
5. (Optional). Select the Installation Dependencies category. The Installation Dependencies tab page enables you to specify the criteria that must be met before a component’s files can be

Editing the Monitors Component
Tivoli Module Builder User’s Guide 24–7
Mo
nito
rs
installed. If you are not defining an installation dependency, continue with step 6 on page 24-8.
Complete the following required fields:
Dependency TypeUse the Dependency Type drop-down list to select the type of criteria that must be met before a component can be installed.
Monitor collections and monitor instances are created when the module is installed on a Tivoli Management Region (TMR) server. Plus modules have an internal mechanism for verifying their installation on a TMR server. Installing multiple Plus modules on the same TMR server does not result in multiple monitor collections. Multiple monitor collections can result, however, from installing more than one Plus module on a node

Editing the Monitors Component
24–8 Version 2.3
other than a TMR server. For this reason, you may wish to write a custom dependency that checks for existing monitor collections if the Plus module is to be installed on a node other than the TMR server.
Note: The Tivoli Module Builder only supports custom dependencies. For this reason, you should only select <Custom Dependency> from this drop-down list.
Dependency NameEnter a description of the custom dependency. Examples of dependency names are Required_Disk_Space or OS_Version. The name must be alphanumeric (a–z, A–Z, 0–9, plus underscores). Spaces are not allowed.
Program NameEnter the name of the program or script that checks for the dependency. The name must be alphanumeric (a–z, A–Z, 0–9, plus underscores). Spaces are not allowed. Generating the Plus module produces a script stub with this name. The script stub has a placeholder for inserting the managed application’s script.
Click the <Add button when you are ready. This action displays the installation dependency that you have just defined under the Installation Dependencies category. If you need to edit the installation dependency, you can simply select it to redisplay the Installation Dependencies tab page with your definitions.
6. Select the Operational Tasks category. The Operational Tasks tab page enables you to specify a task that can be initiated by a monitor instance in response to a change in the status of a monitored resource. The operational tasks that you define are available to you on the Available Tasks menu on the Response dialog when you define instances of the monitors. For information on defining a monitor instance, see “Creating a Monitor Instance” on page 24-20.
Complete this tab page once for each task you wish to define. The component description file (CDF) generated for this component definition will reference each of the tasks you specify.
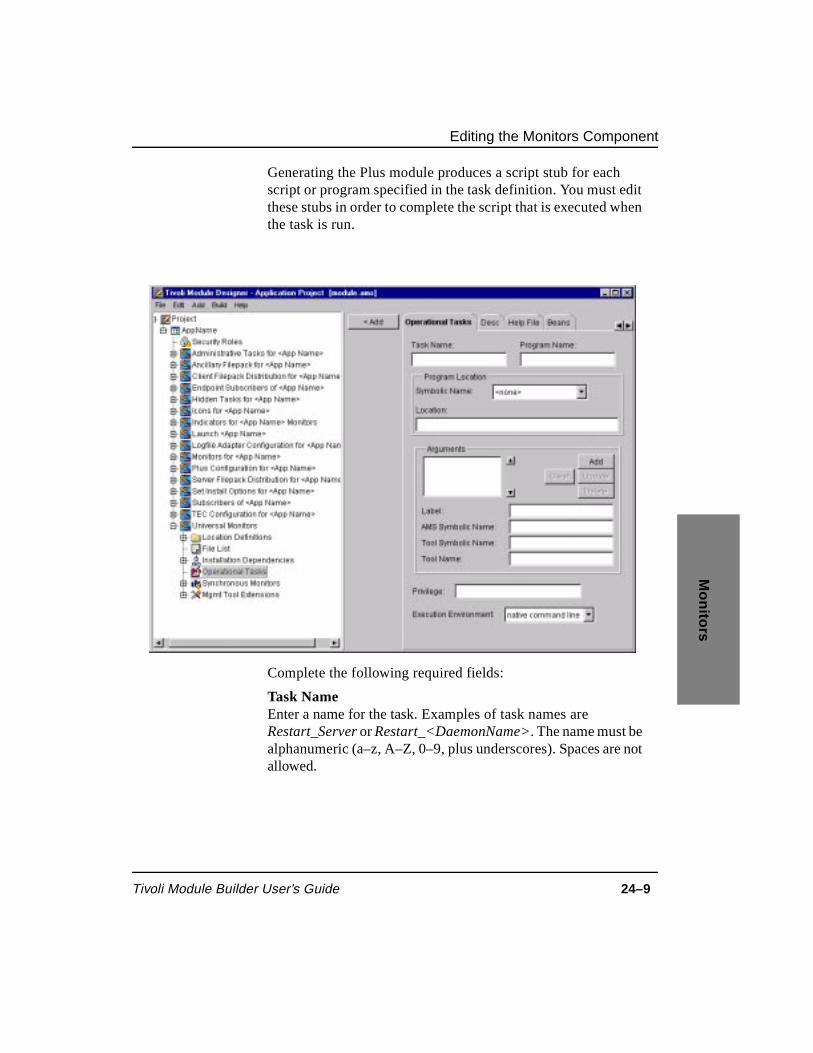
Editing the Monitors Component
Tivoli Module Builder User’s Guide 24–9
Mo
nito
rs
Generating the Plus module produces a script stub for each script or program specified in the task definition. You must edit these stubs in order to complete the script that is executed when the task is run.
Complete the following required fields:
Task NameEnter a name for the task. Examples of task names are Restart_Server or Restart_<DaemonName>. The name must be alphanumeric (a–z, A–Z, 0–9, plus underscores). Spaces are not allowed.

Editing the Monitors Component
24–10 Version 2.3
Program NameEnter the name of the program that runs the task. The name must be alphanumeric (a–z, A–Z, 0–9, plus underscores). Spaces are not allowed. Generating the Plus module produces a script stub with this name. The script stub has a placeholder for inserting the managed application’s script for running this task.
Label Enter any arguments expected by the program in the Label field and click the Add button to add the argument to the Arguments list box.
Click the <Add button when you are ready. This action displays the task you have just defined under the Operational Tasks category. If you need to edit the task, you can simply select it to redisplay the Operational Tasks tab page with your definitions.
To specify another operational task, repeat this step.
7. Select the Synchronous Monitors category displayed to the left of the component’s tabs. This action displays the Synchronous tab page. The Tivoli Module Builder provides predefined monitors with each monitor component. These predefined monitors are displayed under the Synchronous Monitors category.
Each monitor defines a type of resource to be monitored. Monitoring the actual resource, however, requires creating an instance of the appropriate monitor. For example, monitoring the size of a file requires creating an instance of the File size monitor and then defining the instance to monitor the specific file. Define at least one instance for every monitor that you wish to use.
You can use the Synchronous tab page to create a new monitor or you can select a predefined monitor. The procedure for creating a new monitor is under “Creating a New Monitor” on page 24-14. Once you have a monitor that you wish to use, create an instance of the monitor. The procedure for creating a

Editing the Monitors Component
Tivoli Module Builder User’s Guide 24–11
Mo
nito
rs
monitor instance is under “Creating a Monitor Instance” on page 24-20. Once you have created the necessary monitors and their instances, return to this procedure and continue with the next step.
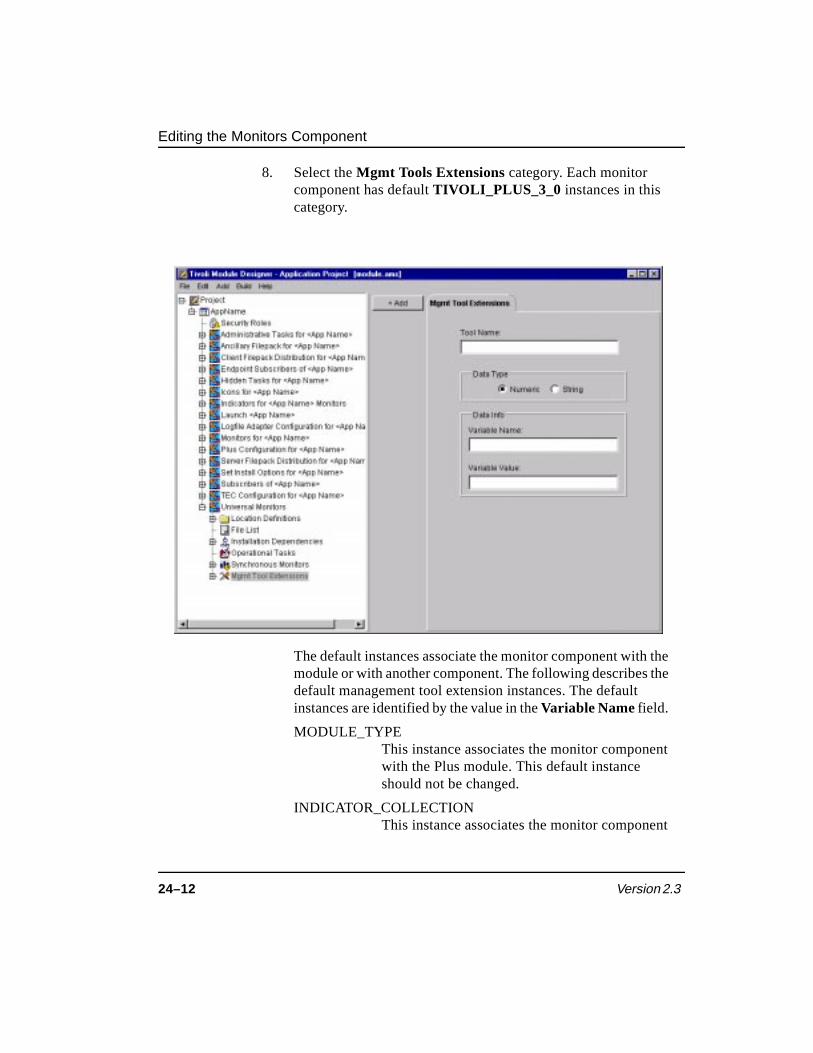
Editing the Monitors Component
24–12 Version 2.3
8. Select the Mgmt Tools Extensions category. Each monitor component has default TIVOLI_PLUS_3_0 instances in this category.
The default instances associate the monitor component with the module or with another component. The following describes the default management tool extension instances. The default instances are identified by the value in the Variable Name field.
MODULE_TYPE This instance associates the monitor component with the Plus module. This default instance should not be changed.
INDICATOR_COLLECTION This instance associates the monitor component
Editing the Monitors Component
Tivoli Module Builder User’s Guide 24–13
Mo
nito
rs
with an indicator collection. In the Plus module, the indicator collection displays the status of the monitors that you have defined for this monitors component. You should edit this instance’s Variable Value field with the component name of the indicator collection.
SUBSCRIPTION_LIST This instance associates the monitor component with a subscription list. After the Plus module is installed, the user distributes the monitors. The monitors are distributed to the subscription list specified here. You should edit this instance’s Variable Value field with the component name of the subscription list.
The following describes how to complete the fields on the Mgmt Tool Extensions tab page should you create additional instances in this category.
Tool NameEnter TIVOLI_PLUS_3_0 in this field. This value is required in order to be compatible with the Version 3.0 Plus modules generated by the current version of the Tivoli Module Builder.
Data TypeSelect the String radio button.
Variable NameEnter SUBSCRIPTION_LIST or INDICATOR_COLLECTION in this field.
Variable ValueThis field identifies the component to which you are establishing a relationship. Enter the value displayed in the Name field of the related component’s Component Data tab page. For example, entering Subscribers of <Application Name> in this field indicates that the monitors should be distributed to the nodes that subscribe to the component named Subscribers of <Application Name>.
Creating a New Monitor
24–14 Version 2.3
Creating a New Monitor This procedure describes how to create a new monitor. After you have created a monitor, you need to define an instance of the monitor for each resource to be monitored.
For conceptual information on monitors and their instances, see the information at the beginning of this chapter as well as step 7 on page 24-10. For procedural information on the activity required to define the monitors component before actually creating a new monitor, see “Editing the Monitors Component” on page 24-3.
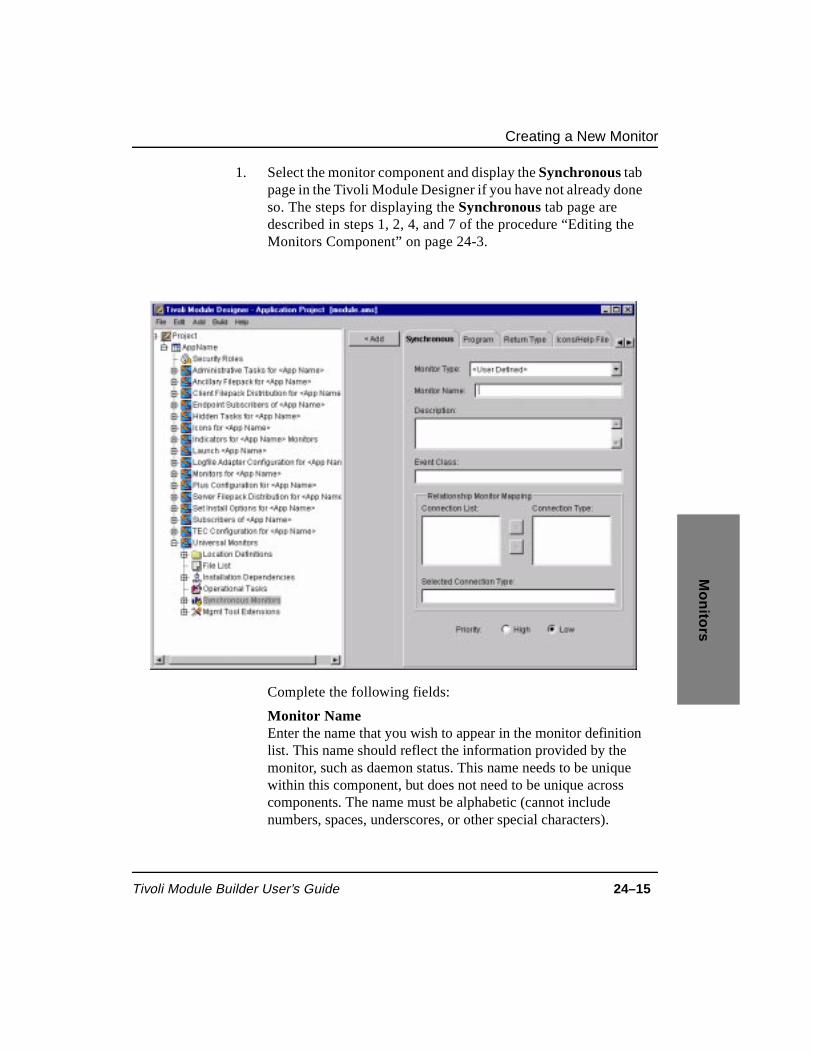
Creating a New Monitor
Tivoli Module Builder User’s Guide 24–15
Mo
nito
rs
1. Select the monitor component and display the Synchronous tab page in the Tivoli Module Designer if you have not already done so. The steps for displaying the Synchronous tab page are described in steps 1, 2, 4, and 7 of the procedure “Editing the Monitors Component” on page 24-3.
Complete the following fields:
Monitor NameEnter the name that you wish to appear in the monitor definition list. This name should reflect the information provided by the monitor, such as daemon status. This name needs to be unique within this component, but does not need to be unique across components. The name must be alphabetic (cannot include numbers, spaces, underscores, or other special characters).

Creating a New Monitor
24–16 Version 2.3
Event ClassIn the User Defined field, enter the event class that applies to the events that this monitor sends to the Tivoli Enterprise Console. The Tivoli Enterprise Console requires that event classes be in the form of a valid BAROC class name (alphanumeric characters starting in upper case and including an underscore). For example, an event class may be specified as Sample_TraceStatus.
2. Click the Program tab. The Program tab page specifies the name of the program that runs the monitor. Generating the Plus module produces a .csl file. The .csl file contains the names of the programs that you have specified for the monitors defined in this component. There is one .csl file for each monitor collection. Modify the generated .csl file with the command line invocations for each monitor instance. Refer to the Tivoli Distributed Monitoring User’s Guide and the Tivoli Distributed Monitoring MCSL Developer’s Guide for information on modifying the .csl files. When the Plus module is installed, the .csl file is compiled in order to import the monitor definitions into Tivoli Distributed Monitoring.

Creating a New Monitor
Tivoli Module Builder User’s Guide 24–17
Mo
nito
rs
Note: When editing a .csl file, do not change the name of the monitor collection as shown in the .csl file’s Collection field.
Complete the following fields:
Program Name Enter the name of the program that runs the monitor. The name must be alphabetic (cannot include numbers, spaces, underscores, or other special characters). When the module is generated, the monitor implementations are placed in the <ModuleName>/src directory. Provide a script for each monitor implementation.

Creating a New Monitor
24–18 Version 2.3
Note: If you are using a predefined monitor, the Program Name field will have a default value that specifies both a monitoring collection and the monitor program. The default value has the following format:
<CollectionName>/<ProgramName>
Label Enter any arguments that the program requires in the Label field and click the Add button to move the argument to the Arguments list. Do this for all arguments that the program requires. When you create an instance of this monitor, you will specify a value for each of these arguments. Because these values may vary according to the specific resource being monitored, they are specified when creating the monitor instance and not the monitor.
Run Program EveryUse these two fields to specify the frequency with which this monitor should check the status of the monitored resource. When specifying this frequency, take into consideration how often the value is updated by the application, how quickly an administrator needs to know about the situation being monitored, and the overhead associated with running the monitor program. For example, you may wish to specify that the monitor run every minute in the case of a resource, such as a daemon, whose failure will immediately cause the application to be unavailable. You may wish to specify a longer interval for those resources that require more time to reach a critical status.
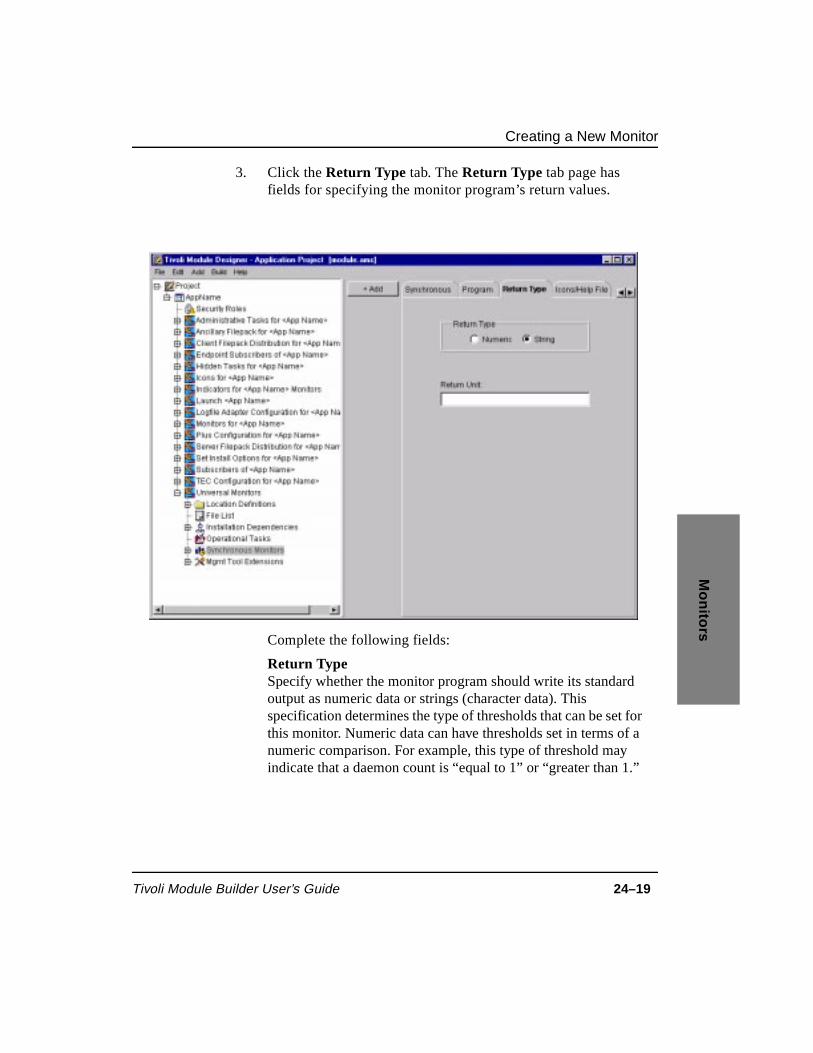
Creating a New Monitor
Tivoli Module Builder User’s Guide 24–19
Mo
nito
rs
3. Click the Return Type tab. The Return Type tab page has fields for specifying the monitor program’s return values.
Complete the following fields:
Return TypeSpecify whether the monitor program should write its standard output as numeric data or strings (character data). This specification determines the type of thresholds that can be set for this monitor. Numeric data can have thresholds set in terms of a numeric comparison. For example, this type of threshold may indicate that a daemon count is “equal to 1” or “greater than 1.”

Creating a Monitor Instance
24–20 Version 2.3
String data can have thresholds set in terms of a character comparison. For example, this type of threshold may indicate that a tracing facility is “OFF” or that the value for a resource is not “UP” or contains “ERROR.”
Return Unit(Optional). Use the User Defined field to specify the type of units returned by this monitor. For example, you could specify that the return units be megabytes, kilobytes, or a percentage.
4. Click the Add button when you are finished. The new monitor that you just created is displayed under the Synchronous Monitors category. In order to run this monitor, you need to define an instance of this monitor for a particular resource. For information on defining a monitor instance, see “Creating a Monitor Instance” on page 24-20.
Creating a Monitor Instance This procedure describes how to define an instance of a monitor. To have a monitor instance, you must first create the monitor or use one of the predefined monitors. The following procedure assumes that you have the Synchronous tab page displayed.
For procedural information on creating a new monitor, see “Creating a New Monitor” on page 24-14. For conceptual information on monitors and their instances, see the information at the beginning of this chapter as well as step 7 on page 24-10. For procedural information on the activity required to define the monitors component before actually defining a monitor instance, see the procedure starting on “Editing the Monitors Component” on page 24-3.
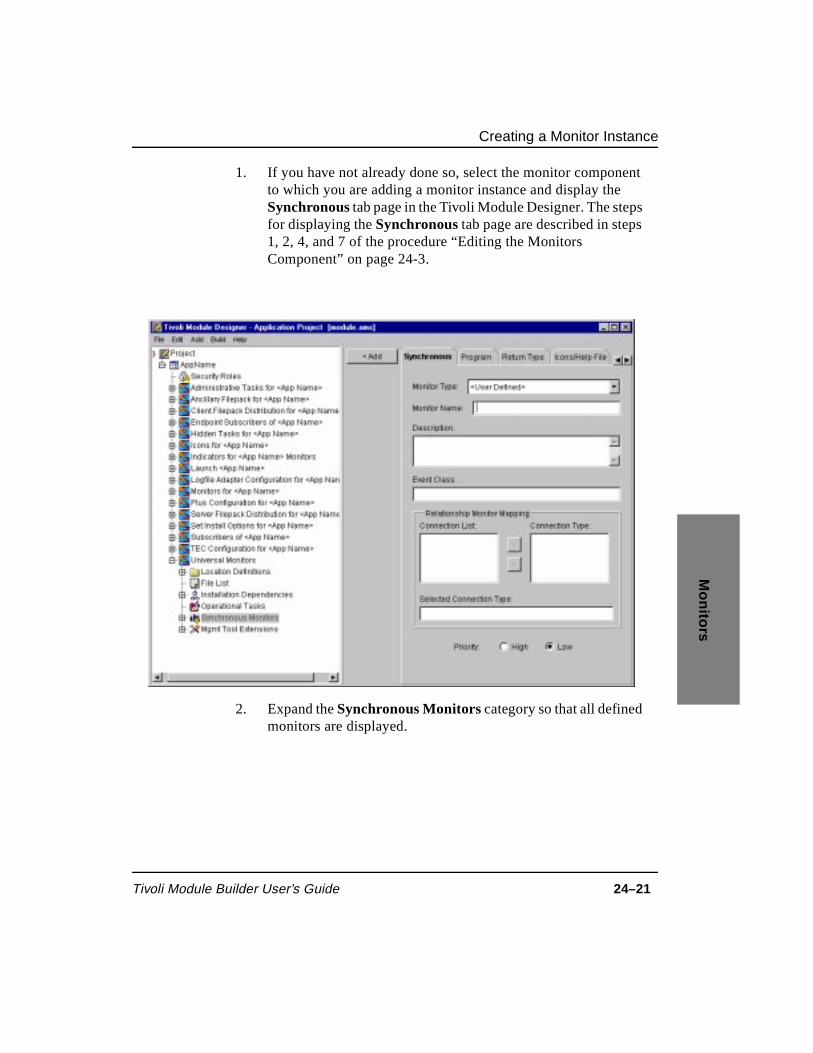
Creating a Monitor Instance
Tivoli Module Builder User’s Guide 24–21
Mo
nito
rs
1. If you have not already done so, select the monitor component to which you are adding a monitor instance and display the Synchronous tab page in the Tivoli Module Designer. The steps for displaying the Synchronous tab page are described in steps 1, 2, 4, and 7 of the procedure “Editing the Monitors Component” on page 24-3.
2. Expand the Synchronous Monitors category so that all defined monitors are displayed.

Creating a Monitor Instance
24–22 Version 2.3
The following graphic shows the predefined monitors for the Universal Monitors component.
3. Select the monitor for which you are creating an instance and click the Instance button. This action creates an “empty” instance of the monitor you selected.

Creating a Monitor Instance
Tivoli Module Builder User’s Guide 24–23
Mo
nito
rs
The following graphic shows an instance that has been created for the file size monitor.
4. Select the newly created instance to display the Arguments tab page. The Argument Name list box on this tab page displays the arguments that you defined for the monitor program in step 2 on page 24-16. If you are creating an instance for a predefined monitor, then the Argument Name list box displays any default arguments required by the predefined monitor.

Creating a Monitor Instance
24–24 Version 2.3
For each argument, enter the appropriate value in the Argument Value field. Click the Update button when finished.

Creating a Monitor Instance
Tivoli Module Builder User’s Guide 24–25
Mo
nito
rs
5. Click the <Threshold button. This action creates a threshold item below the monitor instance.

Creating a Monitor Instance
24–26 Version 2.3
6. Select the threshold item for the monitor instance to display the Thresholds tab page. This tab page has fields for specifying the additional instance information.
7. Specify the following fields on the Thresholds tab page.
Severity Use the Severity drop-down list to select the severity level of the event that is sent to the Tivoli Enterprise Console when the monitored resource reaches the specified threshold.
ConditionUse the Condition drop-down list to select the relational operator for the threshold. This operator determines how the monitor uses the specified threshold to determine a resource’s status. For example, the monitor may assess a resource’s status by checking

Creating a Monitor Instance
Tivoli Module Builder User’s Guide 24–27
Mo
nito
rs
whether it is greater than or changes from or crosses above the specified threshold. The value you specify with the Condition drop-down list should be consistent with the return type you specified on the Return Type tab page in step 3 on page 24-19. For example, if the return type is String, you could not specify Greater than with the Condition drop-down list since Greater than assumes that the return type is Numeric.
Event Threshold Enter the value for the threshold.
Send event when conditions met Select this box if you want the monitor to send an event to the Tivoli Enterprise Console when the threshold is met.
8. Click the Response tab. The Response tab page has fields for specifying that a task be run in response to a change in a monitor’s status. (For example, you can specify that a task be run to restart a failed daemon.)
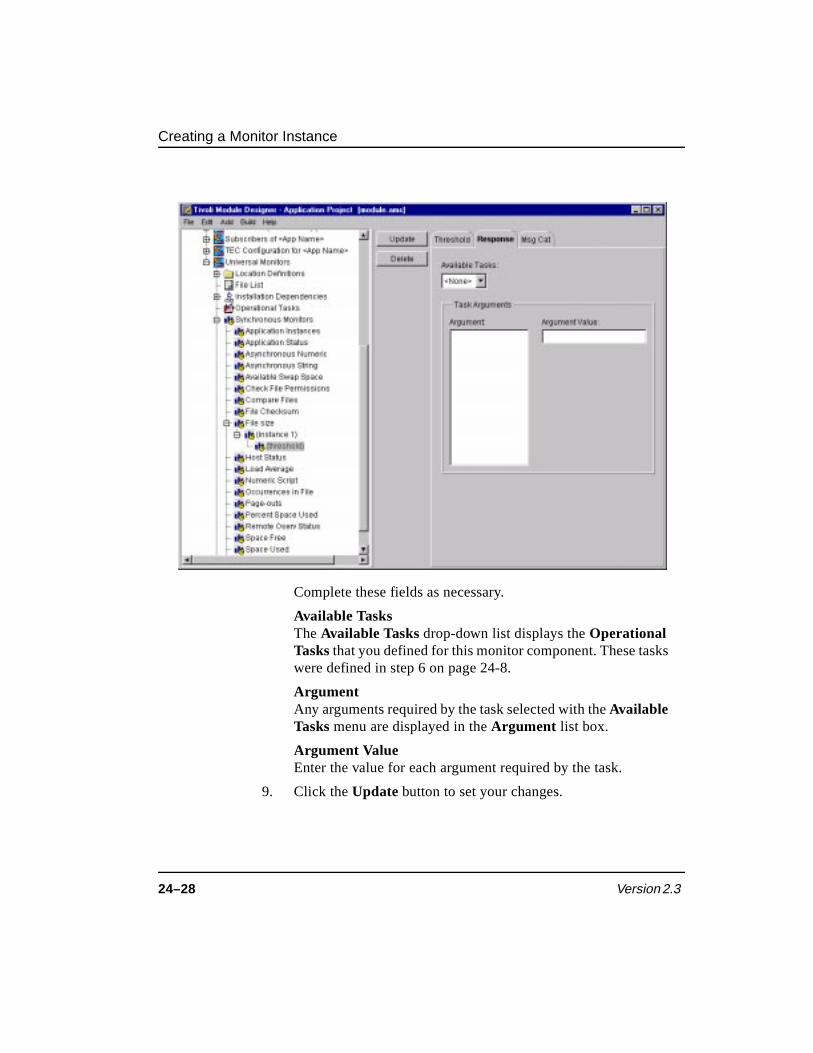
Creating a Monitor Instance
24–28 Version 2.3
Complete these fields as necessary.
Available TasksThe Available Tasks drop-down list displays the Operational Tasks that you defined for this monitor component. These tasks were defined in step 6 on page 24-8.
ArgumentAny arguments required by the task selected with the Available Tasks menu are displayed in the Argument list box.
Argument ValueEnter the value for each argument required by the task.
9. Click the Update button to set your changes.

Using Additional Predefined Monitors
Tivoli Module Builder User’s Guide 24–29
Mo
nito
rs
Using Additional Predefined Monitors The Tivoli Module Builder provides predefined monitors in addition to the monitors provided by the universal monitors component included in the Plus template. These predefined monitors are the same monitors provided with Tivoli Distributed Monitoring. When you first install the Tivoli Module Builder, the additional predefined monitors are in a tar file. You can untar (or unzip) this file and import the predefined monitors as a CDF into your Plus module. After importing the monitors, you can use the Tivoli Module Designer to create application-specific instances of the additional predefined monitors.
The following steps describe the activities required to use the additional predefined monitors and reference the procedures that provide specific instruction.
1. Untar (or unzip) the following file:
\module_dev\ToolKit\cdfs\monitor_collections\cdfcollection.tar
This file contains the predefined Tivoli Distributed Monitoring monitors in tarred format. Untarring (or unzipping) this file creates a directory structure containing various monitoring collections.
2. Use the Tivoli Module Builder to import a CDF with the predefined monitors. Use the procedure described in “Importing Monitors from a Component Description File” on page 6-5 to complete this step. The CDFs with predefined monitors are located in the following directory:
\module_dev\ToolKit\cdfs\monitor_collections\<category>\<CDF_Name>
3. Select the imported component (CDF) and launch the Tivoli Module Designer using the procedure described in “Launching from the Component Level” on page 2-18. You can also launch the Tivoli Module Designer from the module level as described in “Launching from the Module Level” on page 2-17.
4. Create instances of the predefined monitors as needed using the procedure described in “Creating a Monitor Instance” on page 24-20.

Using Additional Predefined Monitors
24–30 Version 2.3
Tivoli Module Builder User’s Guide 25–1
Tivo
li En
terprise C
on
sole
Co
nfig
uratio
n
25Tivoli Enterprise Console Configuration
To identify the appropriate response for handling an event, the Tivoli Enterprise Console (TEC) event server matches the events it receives against a rule base. Events may be generated by the monitors that come with Tivoli Distributed Monitoring or by an application.
The Tivoli Enterprise Console has predefined event correlation rules for handling events generated by the monitors that come with Tivoli Distributed Monitoring. If you create custom monitors for the managed application, however, you will need to create the class definitions and event correlation rules required by the Tivoli Enterprise Console to handle these events. These class definitions and event correlation rules are contained in .baroc files (class definitions) and .rls files (event correlation rules). For information on creating the .baroc and .rls files, refer to the Tivoli Enterprise Console User’s Guide and the Tivoli Enterprise Console Rule Builder’s Guide.
25

25–2 Version 2.3
When integrating the managed application’s custom monitors with the Tivoli Enterprise Console, you will do the following:
1. Create a Basic Recorder of Objects in C (BAROC) file with the class definition for each custom event and a rules file with an event correlation rule for each custom event. The BAROC file’s name must end in a .baroc extension and the rules file’s name must end in a .rls extension. (A .rb extension may optionally be used for the rules file.)
2. Complete the procedure in this section for defining the Tivoli Enterprise Console configuration component. When completing this procedure, specify an instance of the File List element for the .baroc file and another instance for the .rls file. The module can have more than one .baroc and .rls file. Be sure to specify an instance for each file to be included in the module.
After you generate the module after completing the component definitions, the location of the .baroc and .rls files are forwarded to the setup script.
The following is an example of an event server configuration task for a sample application. The options on the icon’s pop-up menu are also displayed.

Prerequisites
Tivoli Module Builder User’s Guide 25–3
Tivo
li En
terprise C
on
sole
Co
nfig
uratio
n
Prerequisites The procedure for editing the TEC configuration component assumes that you are using the Plus template to define the TEC configuration component. This procedure also assumes that you have done the following:
■ Created a project as described in “Creating the Project” on page 2-3.
■ Added a module to the project as described in “Adding a Module to the Project” on page 2-4.
■ Loaded the Plus template into the module as described in “Loading the Plus Module Template” on page 14-2.
■ Defined the Plus module’s application data as described in “Editing Application Data” on page 2-13.
When you have completed these activities, continue with “Editing the TEC Configuration Component” on page 25-3.
Editing the TEC Configuration Component Use the following procedure to define the Tivoli Enterprise Console configuration task. When defining the Tivoli Enterprise Console configuration component, the Component Data, File List, and Operational Tasks options require definition.
This procedure only discusses the required fields in the Tivoli Module Designer. Information specific to the TEC configuration component is noted in these field descriptions. General field information, including the optional fields, is provided in the online help.

Editing the TEC Configuration Component
25–4 Version 2.3
1. Select the module into which you have imported the Plus template in the Tivoli Module Builder tree view hierarchy and click the Edit AMS Definition button on the General tab page. This action launches the Tivoli Module Designer so that you can edit the Plus module’s component. You can also select one of the Plus template components and click the Edit Component button in order to launch the Tivoli Module Designer.
2. Select the TEC Configuration for <App Name> component in the Tivoli Module Designer tree view hierarchy. This action displays the Component Data tab page.
3. Use the Component Data tab page to specify general information required to identify the component. This information includes the name, version, and manufacturer of the

Editing the TEC Configuration Component
Tivoli Module Builder User’s Guide 25–5
Tivo
li En
terprise C
on
sole
Co
nfig
uratio
n
component. The combined values of the Name, Version, and Manufacturer fields form a unit of information that must be unique across all components in a module. When defining more than one component, it is sufficient to change the value of just one of these fields to ensure a unique combination.
The generate and build process for Plus modules assume that the Plus components are capable of running on more than one platform. This means that each script referenced by the component must be able to accommodate all platforms on which the component is to run. If the component is to run on more than one platform, then the optional Destination field should specify Unknown.
Complete the following required fields on the Component Data tab page.
NameEnter a name for the component. Because the name you enter is the title for the event server setup task icon, enter a name that identifies the Tivoli Enterprise Console configuration function of the icon. This name can contain any printable characters including embedded spaces.
VersionUse these fields to specify the version of the component. You can change the version in these fields to keep track of changes when updating a component. Specify the version in the following format: a major version number, a minor version number, and a revision indicator. The major and minor numbers are required. The revision indicator is optional. After MIF parsing is complete, the elements in this format appear as follows: MajorNumber.MinorNumber.RevisionIndicator. For example, 4.52.A or 1.1.3.
ManufacturerEnter the name of the manufacturer for this software component.

Editing the TEC Configuration Component
25–6 Version 2.3
Component Function
These fields identify the component’s type or function. The only valid selection from the Component Function drop-down list is <Custom Function> and the only valid entry in the Custom Function field is TEC Configuration.
When you are ready, click the Update button. The Tivoli Module Designer displays the name that you have specified for this component in the tree view hierarchy.
4. Expand the TEC Configuration for <App Name> component to display the component definition categories.
5. Select the File List tab. The File List tab page enables you to specify the .baroc and .rls files for the managed application’s

Editing the TEC Configuration Component
Tivoli Module Builder User’s Guide 25–7
Tivo
li En
terprise C
on
sole
Co
nfig
uratio
n
event classes and rules. Specifying these files with the File List tab page ensures that the managed application’s event classes and rules are loaded into the Tivoli Enterprise Console event server when the event server is configured for the Plus module. When you define the TEC configuration component using the Plus template, a predefined file list instance for the rules (.rls) is provided for you. Create another instance for the .baroc file.

Editing the TEC Configuration Component
25–8 Version 2.3
Complete the following required fields:
File NameEnter the names of those files (.baroc or .rls files) required to translate events or provide event correlation for the managed application. You can specify either a full path or a simple file name. When using a simple file name, use the Source Locations fields to specify the directories where the file is located.
Source Location Use the Symbolic Name drop-down list to select a symbolic name for the location of the file. The symbolic names that you have defined with the Location Definitions category appear on this drop-down list.
Note: Although the Tivoli Module Designer displays a Signature tab next to the File List tab, Plus modules do not use the information specified on the Signature tab.
6. (Optional). Select the Installation Dependencies category. The Installation Dependencies tab page enables you to specify the criteria that must be met before a component’s files can be
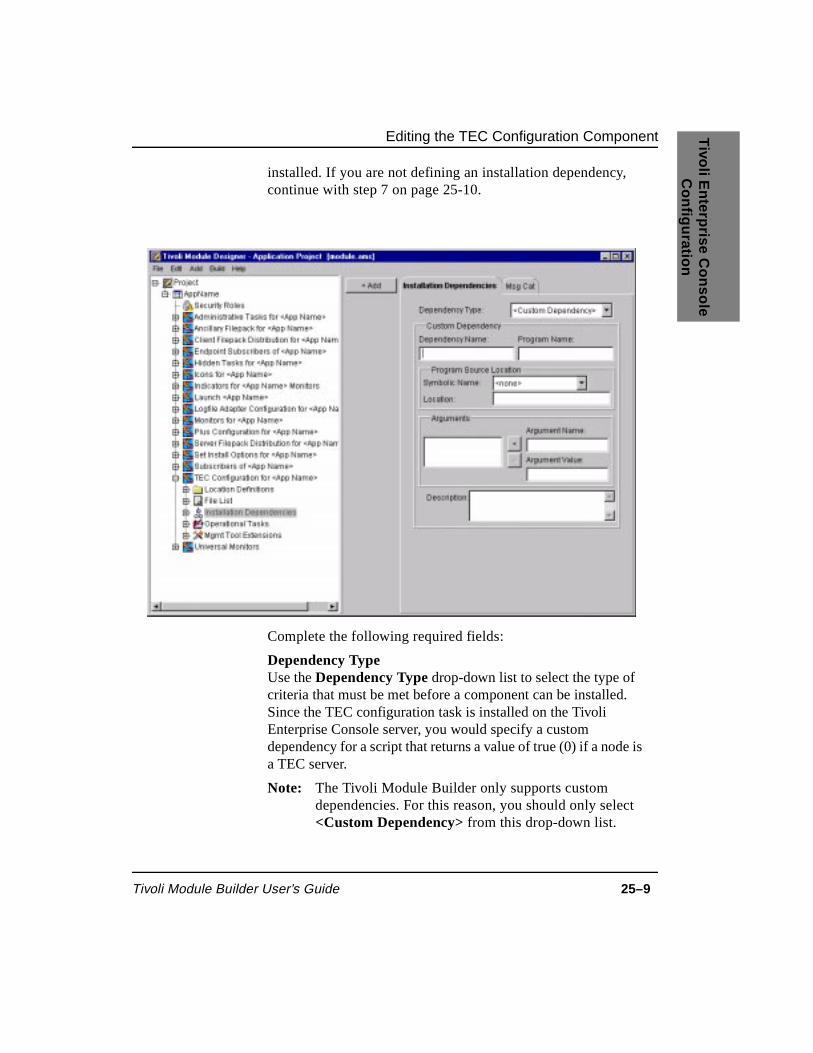
Editing the TEC Configuration Component
Tivoli Module Builder User’s Guide 25–9
Tivo
li En
terprise C
on
sole
Co
nfig
uratio
n
installed. If you are not defining an installation dependency, continue with step 7 on page 25-10.
Complete the following required fields:
Dependency TypeUse the Dependency Type drop-down list to select the type of criteria that must be met before a component can be installed. Since the TEC configuration task is installed on the Tivoli Enterprise Console server, you would specify a custom dependency for a script that returns a value of true (0) if a node is a TEC server.
Note: The Tivoli Module Builder only supports custom dependencies. For this reason, you should only select <Custom Dependency> from this drop-down list.

Editing the TEC Configuration Component
25–10 Version 2.3
Dependency NameEnter a description of the custom dependency. Examples of dependency names are Required_Disk_Space or OS_Version. The name must be alphanumeric (a–z, A–Z, 0–9, plus underscores). Spaces are not allowed.
Program NameEnter the name of the program or script that checks for the dependency. The name must be alphanumeric (a–z, A–Z, 0–9, plus underscores). Spaces are not allowed. Generating the Plus module produces a script stub with this name. The script stub has a placeholder for inserting the managed application’s script.
Click the <Add button when you are ready. This action displays the installation dependency that you have just defined under the Installation Dependencies category. If you need to edit the installation dependency, you can simply select it to redisplay the Installation Dependencies tab page with your definitions.
7. (Optional). Select the Operational Tasks category. The Operational Tasks tab page enables you to define a task for loading the managed applications event classes and rules into the Tivoli Enterprise Console event server. Since loading these files is a standard process, the Tivoli Module Builder provides a predefined operational task instance and a default script for implementing this task. The default script is named Setup_TEC_Event_Server_for_AppName. This script has several default arguments. In most cases, the default script is sufficient, which means you will not have to make any changes to the Operational Tasks tab page or the Setup_TEC_Event_Server_for_AppName script. If the managed application needs a customized script, you can review

Editing the TEC Configuration Component
Tivoli Module Builder User’s Guide 25–11
Tivo
li En
terprise C
on
sole
Co
nfig
uratio
n
the Setup_TEC_Event_Server_for_AppName script as an example.
If you need to define a custom configuration script, complete the following fields:
Task NameEnter a description of what the task does. The information that you enter is the title for this task icon in the module. An example of a task (or task icon) name is Setup_TEC_EventServer_for_Sample. The name must be alphanumeric (a–z, A–Z, 0–9, plus underscores). Spaces are not allowed.

Editing the TEC Configuration Component
25–12 Version 2.3
Program NameEnter the name of the program that implements the Tivoli Enterprise Console configuration. The name must be alphanumeric (a–z, A–Z, 0–9, plus underscores). Spaces are not allowed.
Argument Name(Optional). Enter a descriptive label for any arguments (for example, the rule base name) that the program expects the user to provide and click the Add button. Do this for all arguments required by the program.
When the user runs this program, a pop-up dialog box will prompt the user for the arguments you specify. The argument labels that you provide here are the field names for this dialog box. If you are using a custom script, be sure to provide argument labels that accurately describe the values the module’s user must enter.
When you specify an argument, a Dialog Specification Language (ProgramName.dsl) file is created when you generate the module. This file defines the dialog box that prompts the user for the argument. You can modify this file or overwrite it with a new one.
Each Plus component type has a predefined Mgmt Tool Extensions instance that associates the component with the Plus module. The default management tool name for this instance is TIVOLI_PLUS_3_0. Its default variable name is MODULE_TYPE with a value of PLUS. This predefined instance should not be deleted or its values changed.

Tivoli Module Builder User’s Guide 26–1
Lo
gfile A
dap
ter C
on
figu
ration
26Logfile Adapter Configuration
The managed application’s events need to be translated into a form readable by the Tivoli Enterprise Console (TEC). If the managed application records its events in a flat ASCII logfile (with a single event per line), then these events can be handled by the Tivoli Enterprise Console logfile adapter.
Configuring the logfile adapter to handle these events requires creating a .fmt file (format file). The format file defines string formats that may match strings that are output to the managed application’s flat ASCII logfile. The logfile adapter uses this format file to scan the logfile for the relevant events and translates these events into a form readable by the Tivoli Enterprise Console. These events are then forwarded to the TEC server.
Note: If the managed application’s events are not recorded in a flat ASCII logfile, then build a new logfile adapter to handle these events.
26

26–2 Version 2.3
When integrating the managed application’s custom monitors with the Tivoli Enterprise Console, you will do the following:
1. Create a format file with the rules for translating the managed application’s events into a form readable by the event server. The format file’s name must end in a .fmt extension. For more information on creating the format file, refer to the Tivoli Enterprise Console Adapter’s Guide and the Tivoli Enterprise Console User’s Guide.
2. Complete the procedure in this section for defining the logfile adapter component. When completing this procedure, specify the .fmt file that you have created on the File List tab page. If the managed application’s logfile does not have a default location, then specify an argument for the logfile’s location on the Operational Task tab page.
3. Add the .fmt file to the client file package that distributes to TMA endpoints. Adding the .fmt file to a client file package requires creating a location definition for the .fmt file and adding the file to the file package’s file list. For information on creating file packages, see Chapter 22, “File Packages.”
4. Specify the TMA_UNIX_FMT_PATH or the TMA_NT_FMT_PATH variable for the logfile adapter configuration task before generating and building the module. For information on these variables, see “Logfile Adapter Settings for TMA Endpoints” on page 3-8.
After completing the component definitions and generating the module, the location of the .fmt file is available to the setup script. If you specified an argument for the logfile’s location, then the user will be prompted to specify this location by a pop-up dialog when running the setup task.
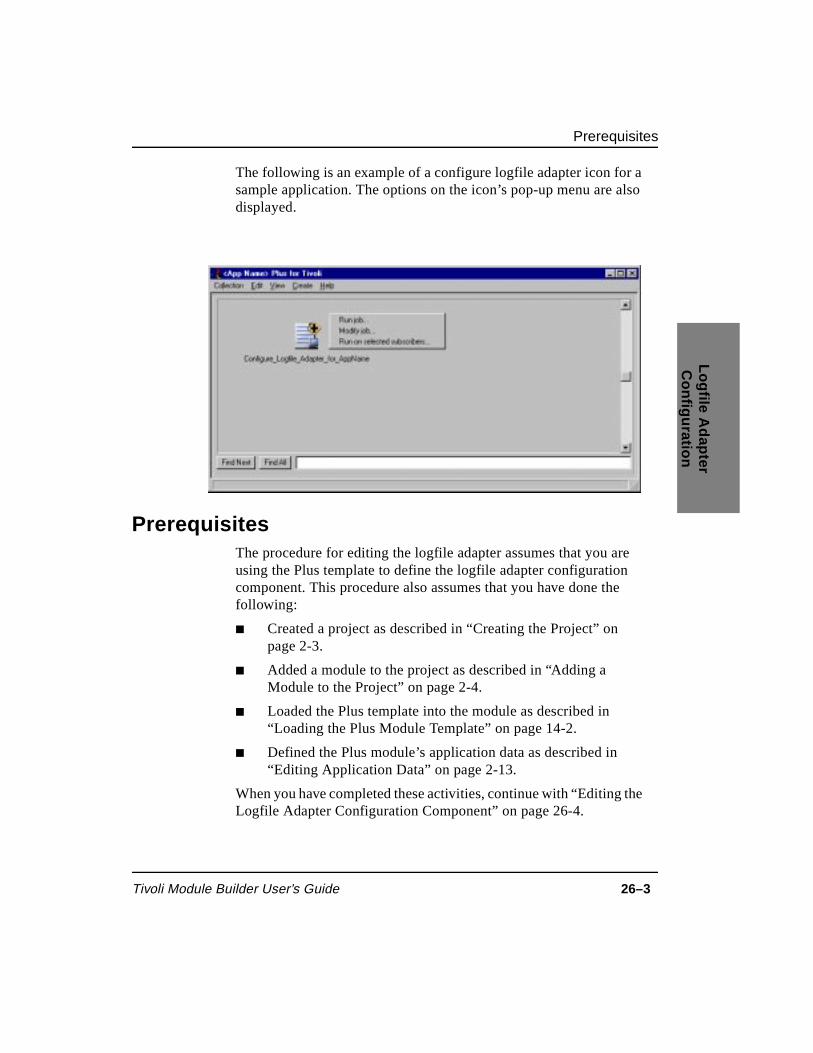
Prerequisites
Tivoli Module Builder User’s Guide 26–3
Lo
gfile A
dap
ter C
on
figu
ration
The following is an example of a configure logfile adapter icon for a sample application. The options on the icon’s pop-up menu are also displayed.
Prerequisites The procedure for editing the logfile adapter assumes that you are using the Plus template to define the logfile adapter configuration component. This procedure also assumes that you have done the following:
■ Created a project as described in “Creating the Project” on page 2-3.
■ Added a module to the project as described in “Adding a Module to the Project” on page 2-4.
■ Loaded the Plus template into the module as described in “Loading the Plus Module Template” on page 14-2.
■ Defined the Plus module’s application data as described in “Editing Application Data” on page 2-13.
When you have completed these activities, continue with “Editing the Logfile Adapter Configuration Component” on page 26-4.

Editing the Logfile Adapter Configuration Component
26–4 Version 2.3
Editing the Logfile Adapter Configuration Component
Use the following procedure to define the Logfile Adapter Configuration for <App Name> component. When defining the logfile adapter configuration component, the Component Data and Operational Tasks options require definition.
This procedure only discusses the required fields in the Tivoli Module Designer. Information specific to the logfile adapter configuration component is noted in these field descriptions. General field information, including the optional fields, is provided in the online help.
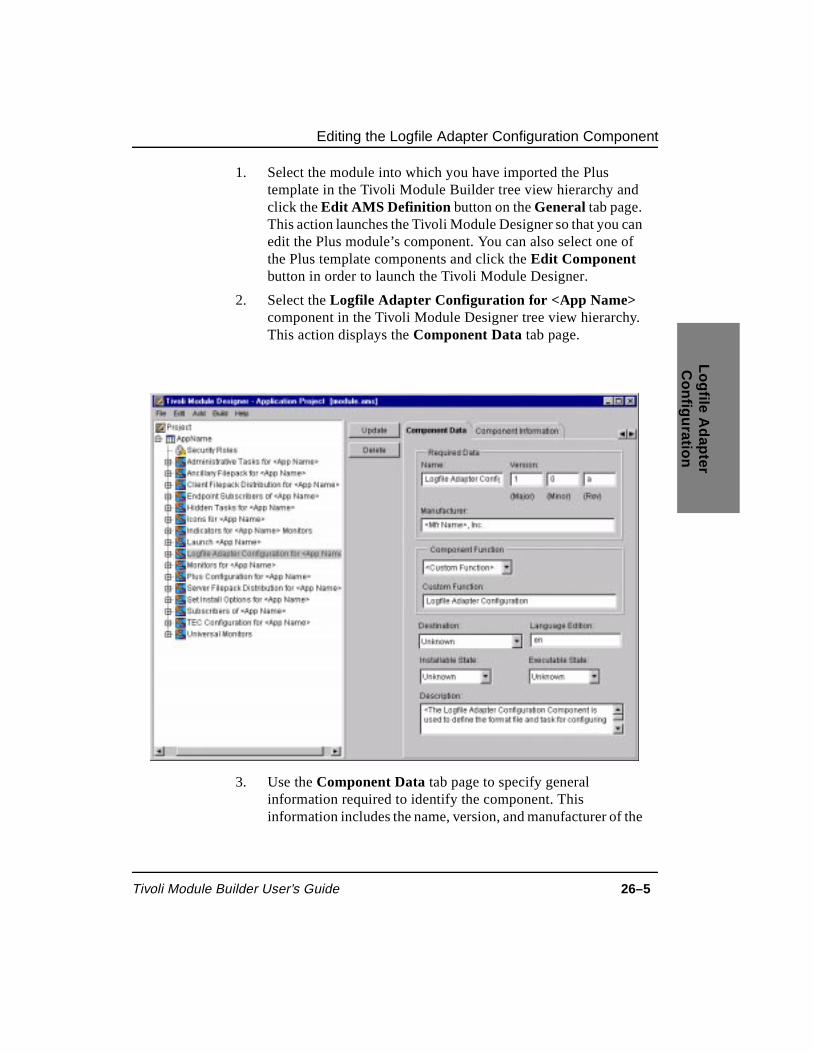
Editing the Logfile Adapter Configuration Component
Tivoli Module Builder User’s Guide 26–5
Lo
gfile A
dap
ter C
on
figu
ration
1. Select the module into which you have imported the Plus template in the Tivoli Module Builder tree view hierarchy and click the Edit AMS Definition button on the General tab page. This action launches the Tivoli Module Designer so that you can edit the Plus module’s component. You can also select one of the Plus template components and click the Edit Component button in order to launch the Tivoli Module Designer.
2. Select the Logfile Adapter Configuration for <App Name> component in the Tivoli Module Designer tree view hierarchy. This action displays the Component Data tab page.
3. Use the Component Data tab page to specify general information required to identify the component. This information includes the name, version, and manufacturer of the

Editing the Logfile Adapter Configuration Component
26–6 Version 2.3
component. The combined values of the Name, Version, and Manufacturer fields form a unit of information that must be unique across all components in a module. When defining more than one component, it is sufficient to change the value of just one of these fields to ensure a unique combination.
The generate and build process for Plus modules assume that the Plus components are capable of running on more than one platform. This means that each script referenced by the component must be able to accommodate all platforms on which the component is to run. If the component is to run on more than one platform, then the optional Destination field should specify Unknown.
Complete the following required fields on the Component Data tab page.
NameEnter a name for the component. This name can contain any printable characters including embedded spaces.
VersionUse these fields to specify the version of the logfile adapter configuration component. You can change the version in these fields to keep track of code changes. Specify the version in the following format: a major version number, a minor version number, and a revision indicator. The major and minor numbers are required. The revision indicator is optional. After MIF parsing is complete, the elements in this format appear as follows: MajorNumber.MinorNumber.RevisionIndicator. For example, 4.52.A or 1.1.3.
ManufacturerEnter the name of the manufacturer for this software component.
Component FunctionThese fields identify the component’s type or function. The only valid selection from the Component Function drop-down list is <Custom Function> and the only valid entry in the Custom Function field is Logfile Adapter Configuration.

Editing the Logfile Adapter Configuration Component
Tivoli Module Builder User’s Guide 26–7
Lo
gfile A
dap
ter C
on
figu
ration
When you are ready, click the Update button. The Tivoli Module Designer displays the name that you have specified for this component in the tree view hierarchy.
4. Expand the Logfile Adapter Configuration for <App Name> component to display the component definition categories.

Editing the Logfile Adapter Configuration Component
26–8 Version 2.3
5. (Optional). Select the File List category. The File List tab page enables you to specify the managed application’s format (.fmt) file.
Complete the following required fields:
File NameEnter the name of the managed application’s format (.fmt) file.
Source Location Use the Symbolic Name drop-down list to select a symbolic name for the location of the format file. The symbolic names that you have defined with the Location Definitions category appear on this drop-down list.

Editing the Logfile Adapter Configuration Component
Tivoli Module Builder User’s Guide 26–9
Lo
gfile A
dap
ter C
on
figu
ration
6. (Optional). Select the Installation Dependencies category. The Installation Dependencies tab page enables you to specify the criteria that must be met before a component’s files can be installed. If you are not defining an installation dependency, continue with step 7 on page 26-11.
Complete the following required fields:
Dependency TypeUse the Dependency Type drop-down list to select the type of criteria that must be met before a component can be installed.
Note: The Tivoli Module Builder only supports custom dependencies. For this reason, you should only select <Custom Dependency> from this drop-down list.

Editing the Logfile Adapter Configuration Component
26–10 Version 2.3
Dependency NameEnter a description of the custom dependency. Examples of dependency names are Required_Disk_Space or OS_Version. The name must be alphanumeric (a–z, A–Z, 0–9, plus underscores). Spaces are not allowed.
Program NameEnter the name of the program or script that checks for the dependency. The name must be alphanumeric (a–z, A–Z, 0–9, plus underscores). Spaces are not allowed. Generating the Plus module produces a script stub with this name. The script stub has a placeholder for inserting the managed application’s script.
Click the <Add button when you are ready. This action displays the installation dependency that you have just defined under the Installation Dependencies category. If you need to edit the installation dependency, you can simply select it to redisplay the Installation Dependencies tab page with your definitions.

Editing the Logfile Adapter Configuration Component
Tivoli Module Builder User’s Guide 26–11
Lo
gfile A
dap
ter C
on
figu
ration
7. Select the Operational Tasks category. The Operational Tasks tab page enables you to define the logfile adapter configuration task.
Complete the following required fields:
Task Name Enter a description of what the task does. The information that you enter is the title for the configure logfile adapter task in the module. An example of a task (or task icon) name is Configure_Logfile_Adapter. The name must be alphanumeric (a–z, A–Z, 0–9, plus underscores). Spaces are not allowed.

Editing the Logfile Adapter Configuration Component
26–12 Version 2.3
Program NameEnter the name of the program that runs the configure logfile adapter task. The name must be alphanumeric (a–z, A–Z, 0–9, plus underscores). Spaces are not allowed.
8. Select the Mgmt Tools Extensions category. The logfile adapter configuration component has default TIVOLI_PLUS_3_0 instances in this category.
The default instances associate the logfile adapter configuration component with the module or with another component. The following describes the default management tool extension instances. The default instances are identified by the value in the Variable Name field.

Editing the Logfile Adapter Configuration Component
Tivoli Module Builder User’s Guide 26–13
Lo
gfile A
dap
ter C
on
figu
ration
MODULE_TYPE This instance associates the logfile adapter configuration component with the Plus module. This default instance should not be changed.
SUBSCRIPTION_LIST This instance associates the logfile adapter configuration component with a subscription list. You should edit this instance’s Variable Value field with the component name of the subscription list.
The following describes how to complete the fields on the Mgmt Tool Extensions tab page should you create additional instances in this category.
Tool NameEnter TIVOLI_PLUS_3_0 in this field. This value is required in order to be compatible with the Version 3.0 Plus modules generated by the current version of the Tivoli Module Builder.
Data TypeSelect the String radio button.
Variable NameEnter SUBSCRIPTION_LIST in this field.
Variable ValueThis field identifies the component to which you are establishing a relationship. Enter the value displayed in the Name field of the related component’s Component Data tab page. For example, entering Subscribers of <Application Name> in this field indicates that the logfile adapter configuration component should be distributed to the nodes that subscribe to the component named Subscribers of <Application Name>.

Editing the Logfile Adapter Configuration Component
26–14 Version 2.3

Tivoli Module Builder User’s Guide 27–1
Hid
den
Tasks
27Hidden Tasks
A module may include hidden tasks that are automatically initiated in response to specific conditions, but are not directly initiated by the module’s user. Hidden tasks do not have an icon or any other visibility in the module. Hidden tasks are generally associated with the automated actions or event correlation provided by the Tivoli Enterprise Console. The correlation rules for a particular event may specify that a task be run automatically. For example, the correlation rule for a failed daemon may specify that the daemon process be reinitiated.
27

Prerequisites
27–2 Version 2.3
Prerequisites The procedure for editing the hidden tasks component assumes that you are using the Plus template to define hidden tasks. This procedure also assumes that you have done the following:
■ Created a project as described in “Creating the Project” on page 2-3.
■ Added a module to the project as described in “Adding a Module to the Project” on page 2-4.
■ Loaded the Plus template into the module as described in “Loading the Plus Module Template” on page 14-2.
■ Defined the Plus module’s application data as described in “Editing Application Data” on page 2-13.
When you have completed these activities, continue with “Editing the Hidden Tasks Component” on page 27-2.
Editing the Hidden Tasks Component Use the following procedure to define a hidden task. When defining the hidden tasks component, the Component Data and Operational Tasks options require definition.
This procedure only discusses the required fields in the Tivoli Module Designer. Information specific to the hidden tasks component is noted in these field descriptions. General field information, including the optional fields, is provided in the online help.

Editing the Hidden Tasks Component
Tivoli Module Builder User’s Guide 27–3
Hid
den
Tasks
1. Select the module into which you have imported the Plus template in the Tivoli Module Builder tree view hierarchy and click the Edit AMS Definition button on the General tab page. This action launches the Tivoli Module Designer so that you can edit the Plus module’s component. You can also select one of the Plus template components and click the Edit Component button in order to launch the Tivoli Module Designer.
2. Select the Hidden Tasks for <App Name> component in the Tivoli Module Designer tree view hierarchy. This action displays the Component Data tab page.
3. Use the Component Data tab page to specify general information required to identify the component. This information includes the name, version, and manufacturer of the

Editing the Hidden Tasks Component
27–4 Version 2.3
component. The combined values of the Name, Version, and Manufacturer fields form a unit of information that must be unique across all components in a module. When defining more than one component, it is sufficient to change the value of just one of these fields to ensure a unique combination.
The generate and build process for Plus modules assume that the Plus components are capable of running on more than one platform. This means that each script referenced by the component must be able to accommodate all platforms on which the component is to run. If the component is to run on more than one platform, then the optional Destination field should specify Unknown.
Complete the following required fields on the Component Data tab page.
NameEnter a name. This name should categorize all of the hidden tasks that you specify with the Plus template. This name can contain any printable characters including embedded spaces.
VersionUse these fields to specify the version of the component. You can change the version in these fields to keep track of changes when updating a component. Specify the version in the following format: a major version number, a minor version number, and a revision indicator. The major and minor numbers are required. The revision indicator is optional. After MIF parsing is complete, the elements in this format appear as follows: MajorNumber.MinorNumber.RevisionIndicator. For example, 4.52.A or 1.1.3.
ManufacturerEnter the name of the manufacturer for this software component.
Component FunctionThese fields identify the component’s type or function. The only valid selection from the Component Function drop-down list is <Custom Function> and the only valid entry in the Custom Function field is Hidden Tasks.
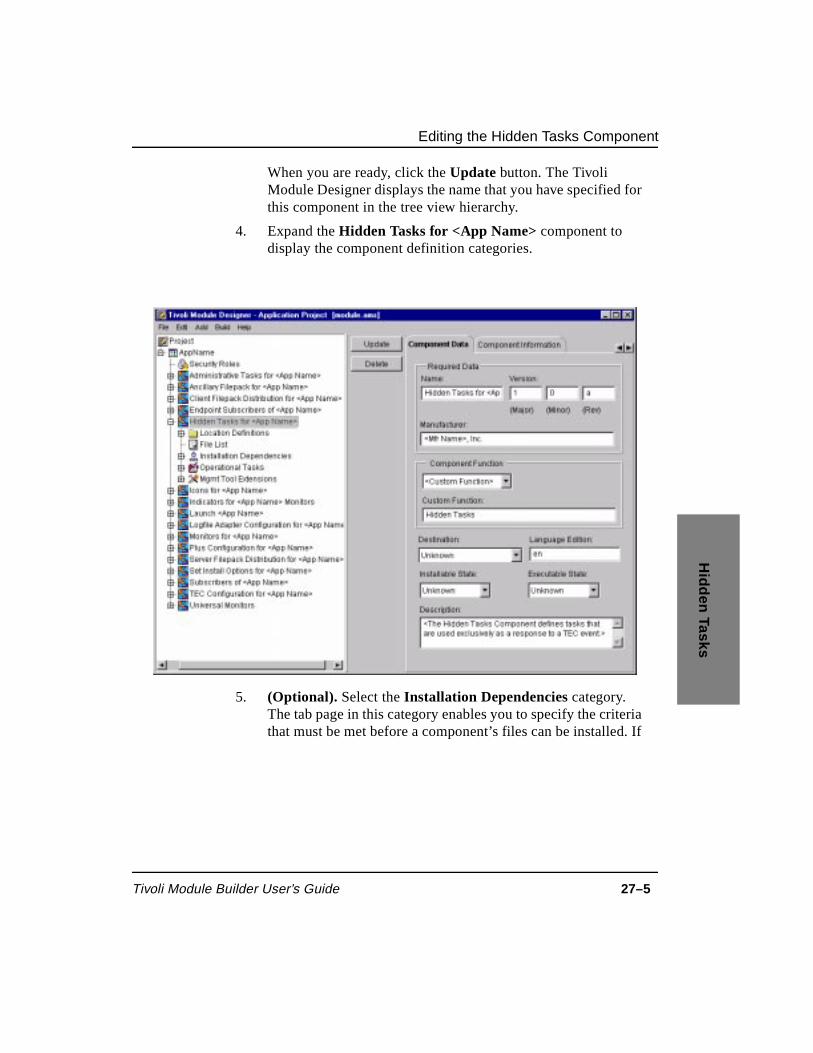
Editing the Hidden Tasks Component
Tivoli Module Builder User’s Guide 27–5
Hid
den
Tasks
When you are ready, click the Update button. The Tivoli Module Designer displays the name that you have specified for this component in the tree view hierarchy.
4. Expand the Hidden Tasks for <App Name> component to display the component definition categories.
5. (Optional). Select the Installation Dependencies category. The tab page in this category enables you to specify the criteria that must be met before a component’s files can be installed. If

Editing the Hidden Tasks Component
27–6 Version 2.3
you are not defining an installation dependency, continue with step 6 on page 27-7.
Complete the following required fields:
Dependency TypeUse the Dependency Type drop-down list to select the type of criteria that must be met before a component can be installed. For a hidden tasks component, you would typically specify a custom dependency for a script that returns a value of true (0) if a node is a Tivoli Enterprise Console server.
Note: The Tivoli Module Builder only supports custom dependencies. For this reason, you should only select <Custom Dependency> from this drop-down list.
Editing the Hidden Tasks Component
Tivoli Module Builder User’s Guide 27–7
Hid
den
Tasks
Dependency NameEnter a description of the custom dependency. Examples of dependency names are Required_Disk_Space or OS_Version. The name must be alphanumeric (a–z, A–Z, 0–9, plus underscores). Spaces are not allowed.
Program NameEnter the name of the program or script that checks for the dependency. The name must be alphanumeric (a–z, A–Z, 0–9, plus underscores). Spaces are not allowed. Generating the Plus module produces a script stub with this name. The script stub has a placeholder for inserting the managed application’s script.
Click the <Add button when you are ready. This action displays the installation dependency that you have just defined under the Installation Dependencies category. If you need to edit the installation dependency, you can simply select it to redisplay the Installation Dependencies tab page with your definitions.
6. Select the Operational Tasks category. The Operational Tasks tab page enables you to specify a hidden task. Complete this tab page once for each task you wish to define. The component description file (CDF) generated for this component definition will reference each of the tasks you specify.
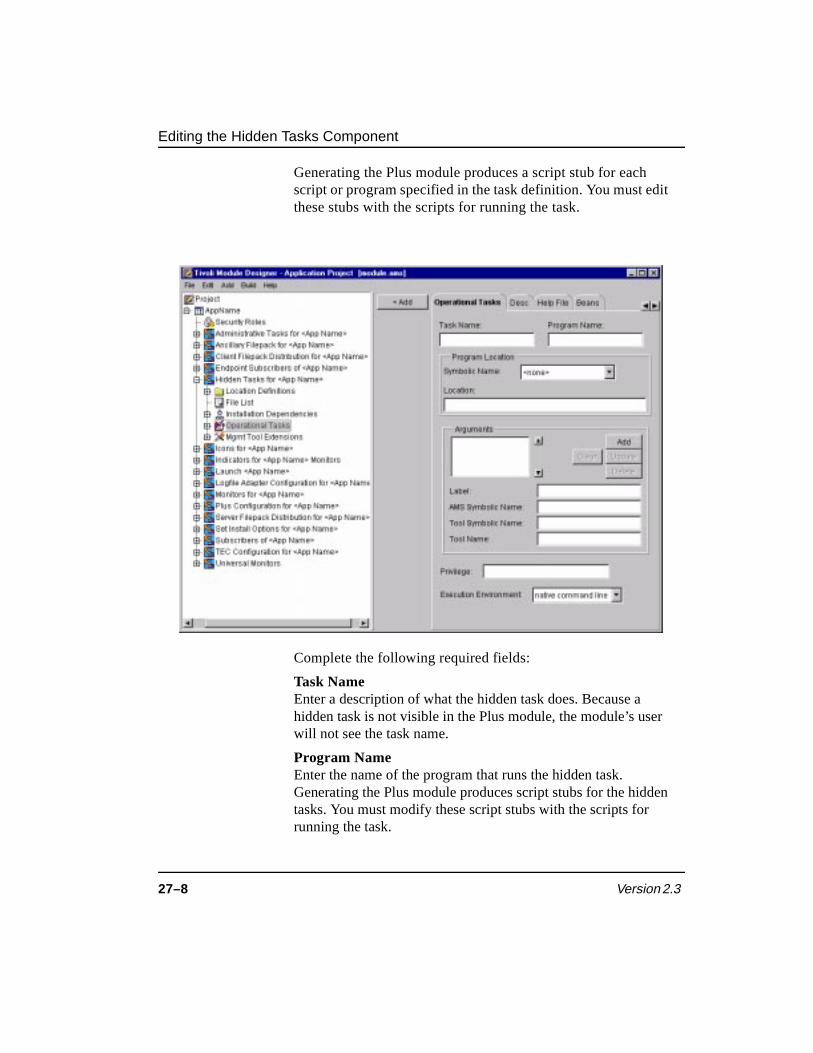
Editing the Hidden Tasks Component
27–8 Version 2.3
Generating the Plus module produces a script stub for each script or program specified in the task definition. You must edit these stubs with the scripts for running the task.
Complete the following required fields:
Task Name Enter a description of what the hidden task does. Because a hidden task is not visible in the Plus module, the module’s user will not see the task name.
Program NameEnter the name of the program that runs the hidden task. Generating the Plus module produces script stubs for the hidden tasks. You must modify these script stubs with the scripts for running the task.
Editing the Hidden Tasks Component
Tivoli Module Builder User’s Guide 27–9
Hid
den
Tasks
Each Plus component type has a predefined Mgmt Tool Extensions instance that associates the component with the Plus module. The default management tool name for this instance is TIVOLI_PLUS_3_0. Its default variable name is MODULE_TYPE with a value of PLUS. This predefined instance should not be deleted or its values changed.

Editing the Hidden Tasks Component
27–10 Version 2.3
Tivoli Module Builder User’s Guide 28–1
En
ablin
g P
lus M
od
ules fo
r T
ivoli G
EM
28Enabling Plus Modules for Tivoli GEM
Enabling a Plus module for Tivoli GEM requires linking the Plus and Tivoli GEM modules so that the combined management features of both modules can be built into a single Tivoli install image. When linking a Tivoli GEM module to a Plus module, the Plus tasks and monitors can only be used to manage a single instance of an application on a particular node. If management of multiple application instances on a particular node is required, then the code for the Plus tasks and monitors should be added directly to the Tivoli GEM module’s template and generated as part of the Tivoli GEM module. (For information on the Tivoli GEM module template, see the Tivoli Global Enterprise Manager Business System Enablement Guide and the Tivoli Global Enterprise Manager Advanced Business System Enablement Guide.)
Linking a Tivoli GEM module to a Plus module involves creating the two modules separately and then linking the two modules by setting a variable for the Tivoli GEM module in the Tivoli Module Builder. Generating the linked Tivoli GEM module produces a component description file (CDF) that contains the management information for both modules.
After generating the combined CDF and completing the business system mapping, you can build the Tivoli GEM module into a Tivoli install image that contains the definitions for all tasks and monitors specified in both the Tivoli GEM module and the Plus module. (For
28
Excluding the Unnecessary Plus Components
28–2 Version 2.3
information on business system mapping, see the Tivoli Global Enterprise Manager Business System Enablement Guide and the Tivoli Global Enterprise Manager Advanced Business System Enablement Guide.)
When linking a Tivoli GEM module to a Plus module, only the Plus module’s tasks and monitors should be in the combined module. For this reason, you should exclude all Plus components other than the tasks and monitors from the combined module.
The following sections describe how to exclude unnecessary Plus components and link a Tivoli GEM module to a Plus module.
Excluding the Unnecessary Plus Components Use the following steps to exclude a Plus component from the combined module:
1. Select the Plus component to be excluded in the Tivoli Module Builder tree view hierarchy.
2. Display the component’s Settings tab.
3. Specify IGNORE_ON_MERGE in the Variable field on the Settings tab and click on the Apply button.
4. Specify true in the Value field on the Settings tab and click on the Apply button.
5. Click on the Save Settings button.
Linking the Tivoli GEM and Plus Modules Use the following procedure to link a Tivoli GEM module with a Plus module. This procedure assumes that you have already created the Tivoli GEM module and the Plus module. This procedure also assumes that you have excluded all Plus components except the tasks and monitors.
1. Select the Tivoli GEM module in the Tivoli Module Builder tree view hierarchy to display its property tabs.
2. Select the Settings tab.

Linking the Tivoli GEM and Plus Modules
Tivoli Module Builder User’s Guide 28–3
En
ablin
g P
lus M
od
ules fo
r T
ivoli G
EM
3. Enter LINKED_MODULES in the Variable field and click on the Apply button.
4. Enter the name of the Plus module to which you are linking the Tivoli GEM module in the Value field and click on the Apply button. If the module to which you are linking is not in the same project as the Tivoli GEM module, then specify both the project name and the module name. Use a colon to separate the project and module names as shown in the following:
<Project_Name>:<Plus_Module_Name>
5. Press the Save Settings button.
6. Generate the Tivoli GEM module by selecting the Tivoli GEM module’s Build/Generate tab and pressing the Generate button. This action generates the combined management information, tasks, and monitors from the Tivoli GEM module and the Plus module into a single CDF. This CDF is located in the same directory as the Tivoli GEM module, and is named in the following format:
<Tivoli_GEM_Module_Name>_merged.cdf
7. Use the Tivoli Module Designer to map the merged CDF to the business system project for the Tivoli GEM module. Completing this activity requires the following steps:
a. Launch the Tivoli Module Designer using the Tivoli Module Designer icon on the desktop or the Designer.bat or Designer.sh executables.
b. Open the business system project.
c. Select the business system component to which you wish to map the merged CDF.
d. Select Business System Mapping –> Import Component from the Add pull-down menu to add a business system mapping to the business system component.
Use the browse feature on the Import Component dialog to locate the merged CDF. The file that you select will be displayed in the Filename field. Press the OK button when ready.

Linking the Tivoli GEM and Plus Modules
28–4 Version 2.3
Importing a CDF maps it to the selected business system component.
e. Generate the business system files by selecting the Build –> AMS 2.0 –> Description Files... option. This action displays the Build Description Files dialog box.
Enter the path to the Tivoli Module Builder project directory that contains the Tivoli GEM module in the Location field.
Click on the Ok button when ready.
f. Save the business system project with the File —> Save Project pull-down menu option and exit the Tivoli Module Designer when you are ready.
8. Select the Tivoli GEM module in the Tivoli Module Builder tree view hierarchy to display its property tabs.
9. Select the Build/Generate tab.
10. Build the Tivoli GEM module by pressing the Build button.
When you build the Tivoli GEM module, the Tivoli GEM module and the Plus module are built into a single Tivoli install image.

Tivoli Module Builder User’s Guide Glossary–1
Glossary
This glossary defines terms associated with the Tivoli Module Builder and related technologies.
A
AMS
See “Application Management Specification (AMS).”
application
A collection of software components used to perform specific types of user-oriented work on a computer.
application component
See “component.”
application management
Application management is the set of activities required to maintain an application throughout the application life cycle, which includes deployment, installation, daily monitoring and maintenance, and updates.
Application Management Specification (AMS)
A specification that presents a standard for managing applications. The Application Management Specification was developed in collaboration with the Tivoli Partners and Tivoli customers to address the problems associated with multitiered applications.
application object file (AOF)
An application object file (AOF) is an ASCII text file that contains the names of the Global Description File (GDF) and the Component Description Files (CDF) that make up the application. This file is used by the Tivoli Module Builder to keep track of which components

Glossary–2 Version 2.3
make up an application. See also “Global Description File” and “Component Description File.”
argument
An argument is a user-supplied value that is passed to a task or monitor. Arguments are passed in to the programs so that one program can behave slightly differently without being rewritten. See also “argument label.”
argument label
The argument label is a field on the pop-up dialog box that prompts the user for a value the user must supply to a program at execution time. See also “argument.”
asynchronous monitor
In Tivoli Distributed Monitoring, a monitor that receives data in an unsolicited event and interprets the data immediately. Contrast with synchronous monitor.
B
BAROC
Basic Recorder of Objects in C (BAROC) is a hierarchy of classes that define how events are generated by any event generator.
base module
A base module uses AMS formats to describe monitors, tasks, and other management functions which allow an application to be managed with the Tivoli environment. A base module provides an application’s management information and scripts in a Tivoli install image.
business system component description file (BCDF)
In the context of the Application Management Specification (AMS), a business system component description file contains information about a business system component. See also “business system component.”

Tivoli Module Builder User’s Guide Glossary–3
business description file (BDF)
A business description file (BDF) refers to any of the set of files that define a business system.
business subsystem
A business subsystem organizes business system components into groups based on a common function. See also “business subsystem description file (BSSDF).”
business subsystem description file (BSSDF)
In the context of the Application Management Specification (AMS), a business subsystem description file contains information about a business subsystem. See also “business subsystem.”
business system
A business system refers to the interactions and interdependencies of multiple applications and resources which together implement a single business function, such as electronic mail, Web banking, or airline ticketing. See also “business system description file (BSDF).”
business system description file (BSDF)
In the context of the Application Management Specification (AMS), a business system description file contains information pertaining to the entire business system. See also “business system.”
business system component
A business system component describes the role an application plays in a business system. See also “business system component description file (BCDF).”
business system description file
In the context of the Application Management Specification (AMS), a business system description file contains information pertaining to the entire business system.

Glossary–4 Version 2.3
business system mapping
The business system mapping identifies or “maps” the software components that are to be included in a business system component. See also “business system mapping description file (BMDF).”
business system mapping description file (BMDF)
In the context of the Application Management Specification (AMS), a business system mapping description file contains the business system mapping information. See also “business system mapping.”
C
component
An application component is a part of an application that resides on a particular platform and fulfills a particular application function. Each component is identified by a name, textual description, and version identifier. A component can contain any combination of executables, data files, libraries, scripts, and so forth.
Each version and supported platform type for a particular piece of application functionality should be represented as a separate component. See also “component function.”
component description file (CDF)
In the context of the Application Management Specification (AMS), a component description file contains information about a specific component in a management-ready application. Each management-ready application can contain multiple components, each of which is represented by one component description file.
component function
The component function refers to the role that the component plays within the application, for example, client or server. See also “component.”
component version
The component version is composed of a major version number, minor version number, and a revision indicator. The standard

Tivoli Module Builder User’s Guide Glossary–5
representation for a component version is that the major and minor version are numeric, and an alphabetic or numeric designation is used for the revision indicator. The major and minor numbers are required. The revision indicator is optional. See also “component.”
D
dependency
A dependency is a condition that must be met prior to attempting to distribute or install software on a target system. The inability of administrators to obtain accurate information about the various dependencies of a client/server application is one of the most frequently heard reasons that deployment of distributed applications is so difficult. The Tivoli Module Designer supports a number of predefined dependency types and also allows the user to define additional types.
dependency types
The following standard dependency types are predefined by the Tivoli Module Designer:
Required memory - How many Mbytes of RAM are required to run this component?
Required disk space - How many Mbytes of free disk space are required for this component?
Required swap space - How many Mbytes of swap space are required for this component?
File existence - Check that a particular file is on the target system.
File version - Check that a particular version of a particular file is on the target system.
File excluded - Check that a particular file is not on the target system.
OS version - Check that the operating system version is at the correct level.

Glossary–6 Version 2.3
.INI file entry - Check that a particular entry exists in a specified .ini file (Windows).
.INI file entry excluded - Check that an entry does not exist in a .ini file (Windows).
Registry entry - Check that an entry exists in the registry (Windows 95 and NT).
Registry entry excluded - Check that an entry does not exist in the registry (Windows 95 and NT).
Desktop Management Task Force (DMTF)
An alliance of computer and software vendors that was convened to define streamlined management of the diverse operating systems commonly found in an enterprise.
destination directory
When distributing software, the destination directory is the location on the target system where the files are placed when the software component is distributed. See also “Source Directory.”
directory
Directories must be specified in a number of places in the Tivoli Module Designer. This term refers to that portion of the file name up to but not including the actual file itself. Throughout the Tivoli Module Designer, directories are seen as both a symbolic name and as a path. You can define a directory or create a new user defined directory in any dialog by selecting an unassigned symbolic name from the symbolic name list. The Path field will then be available for you to enter the actual path. See also “symbolic name.”
DMTF
See Desktop Management Task Force.
E
enable
To make functional.

Tivoli Module Builder User’s Guide Glossary–7
event classification
An event classification is a type or class of event that is triggered in response to a change in the status of a monitored resource. An event classification may be interpreted differently depending on the monitoring system being used.
F
file list
The file list is simply a list of the files that make up a software component. It includes the file name, a source directory, and a target directory. This list should include all files that are part of the component.
file name
File names can be either full or relative path names to a file. A full path name will be one that begins at the root file system (UNIX) or at the drive specified (Windows). In general, it is more desirable to use relative path names for files in the Tivoli Module Designer and to allow the administrator to adjust the entire directory structure at run time. Full path names should be avoided unless it is necessary for that exact path to be used for the application to function.
G
global description file (GDF)
The global description file (GDF) is a Management Information Format (MIF) file that contains the information that identifies the application at the highest level. It is used primarily for reference as most of the key management information exists at the component level.

Glossary–8 Version 2.3
I
installation program
Installation programs make a software component that has been distributed to a target system operational. There are several points in the software distribution/installation process where it may be necessary to run a program or script in order to successfully install a software component.
Before Install - These programs are executed prior to beginning distribution of a software component after dependencies have been checked. A failure in the before install stops the distribution.
After Install - These programs are executed after successful distribution of a software component.
On Commit - In some cases, it may be desirable to have a totally separate offline process where installation is done separately from the distribution. It may also be desirable to perform some sort of verification after installation and before sending a “successful installation notice” that the installation is complete. In either of these cases, a separate commit operation allows a program to be executed.
On Error - These programs are executed if there is a non-zero return code from any of the other installation programs. This can be used to automatically remove an aborted installation and restore a backup.
Before Remove - These programs are executed prior to removing a software component from a host where it had previously been installed. The removal process itself is assumed to remove all files that are part of the software component from the target system.
After Remove - These programs are executed after removing a software component from a host where it had previously been installed.
L
logical entry point
An application’s logical entry point is a particular utility or screen that the user may wish to be displayed when launching the application.

Tivoli Module Builder User’s Guide Glossary–9
M
management data
Management data describes the specific management requirements of applications and business systems.
Management Information Format (MIF)
The Desktop Management Interface (DMI) specification that defines the syntax for describing management information about the hardware and software components that can be installed on a computer system.
maximum version
The maximum version refers to the highest version number of a related component that will function properly with the component being described. The maximum version number should be checked by the management system prior to trying to establish a connection between the two related components.
MIF
See Management Information Format.
minimum version
The minimum version refers to the lowest version number of a related component that will function properly with the component being described. The minimum version number should be checked by the management system prior to trying to establish a connection between the two related components.
monitor
Software that monitors specific applications or the systems on which the applications rely. Monitors typically monitor information such as available disk space or application errors and compare the information to defined thresholds. When thresholds are exceeded, either system
Glossary–10 Version 2.3
or network administrators can be notified, or an automated response can be performed.
Monitoring Collection Specification Language (MCSL)
A proprietary programming language that belongs to Tivoli Systems, Inc. and is used to define monitoring collections for Tivoli Distributed Monitoring.
P
path
The route that an operating system follows to locate a file; the storage location of a file. A fully qualified path lists the drive identifier, the directory name, the subdirectory name (if any), and the file name with its associated extension.
platform
Platform refers to the operating system that underlies a particular software component. The platform can be chosen from a predefined list that is supported by the Tivoli Module Designer.
Plus module
A Plus module is one of the requirements for certification by Team Tivoli. Plus modules are built from a Plus template provided with the Tivoli Module Builder and have particular features, such as application launch, a minimum number of tasks and monitors, and integration with the Tivoli Enterprise Console. The Plus module’s management information and scripts are built into a Tivoli install image. All Plus module functions are contained in a special icon on the Tivoli desktop. See also “Tivoli GEM module.”
polling interval
The polling interval is the period of time that elapses between iterations of running a synchronous monitor. For example, the polling interval for a monitored resource may be every five minutes.

Tivoli Module Builder User’s Guide Glossary–11
Q
query program
The query program points to a program that runs on a component in order to report back on a connection to a related component. This program must return the hostname where the related component is located as its standard output. For example, if you are building the client component for an application, you may wish to specify that the client can return the database server to which it is connected by running program “foo”.
R
relationship
A relationship expresses a connection between two components of an application. Most relationships can be regarded as client to server relationships. Typically, relationships are either statically configured where some configuration entry needs to be made (most often on the client side) or dynamic where the client can be queried to return the name of the server.
return type
The return type of a synchronous monitor refers to the returned value that the program sends back as standard output and is one of the following values:
Integer - The monitor program returns an integer value as standard output. This integer can be checked by the administrator using a numeric comparison.
String - The monitor program returns a character string as standard output. This value can be checked by the administrator using string comparison.
Event - When the monitor program detects a condition, it sends an event of a particular class instead of returning a value. A return type of event does not have a variable threshold that the administrator can configure.

Glossary–12 Version 2.3
The description and value description should correspond to the return type so that the administrator understands the units being measured by the monitoring program. For example, a description of “disk space used,” a value description of “kilobytes,” and a return type of “integer” would make sense for a disk space monitoring program. See also “synchronous monitor.”
S
script stub
A script stub is generated by the Tivoli Module Builder for all programs referenced in a component description file (CDF). Script stubs contain header information and code required by the Tivoli management software tools. Script stubs can be edited with application-specific code.
software component
See “component.”
source directory
The source directory is used in distributing and installing software components. Typically, software components are distributed from some sort of a central warehouse or software depot. The files may be stored on that central system in a completely different directory structure than where they need to be installed in order to function properly. The source directory points to the directory on that central system where a particular file can be located.
It is recommended that symbolic names be used for source and target directories so that an administrator can configure these more readily at run time rather than having to change absolute path names. See also “destination directory” and “symbolic name.”
symbolic name
The symbolic name for a directory is a logical location for a set of related files. By using symbolic names for directories, it is possible for the application component to be more readily reconfigured by the administrator. The Tivoli Module Designer provides a list of

Tivoli Module Builder User’s Guide Glossary–13
predefined symbolic names. Additional symbolic names can be defined by the user.
synchronous monitor
In Tivoli Distributed Monitoring, a monitor that monitors resources on a periodic basis (most monitors are synchronous). Contrast with asynchronous monitor.
T
target platform
The target platform for a software component describes the hardware and operating system on which the component will run.
task
In the Tivoli environment, the definition of an action that must be routinely performed on various managed nodes throughout the network. A task defines the executables to be run when the task is executed, the authorization role required to execute the task, and the user or group name under which the task will execute.
Task Library Language (TLL)
In the Tivoli environment, a programming language used to define a task library. The TLL definition can be used to copy a task library from one installation to another. The TLL also allows the arguments for each task to be described such that graphical user interface (GUI) tools can interpret them and present an interface for operators who want to create the tasks.
Tivoli GEM module
A Tivoli GEM module is one of the requirements for certification by Team Tivoli. Tivoli GEM modules are built from templates provided with the Tivoli Module Builder and have features for managing an application with the Tivoli Global Enterprise Manager (Tivoli GEM).

Glossary–14 Version 2.3
Tivoli GEM modules provide tasks and monitors for managing an application in the context of a business system. The module’s management information and scripts are built into a Tivoli install image. See also “Plus module.”
Tivoli Module Builder
The Tivoli Module Builder enables you to define the management requirements of applications and business systems and build this information, along with the scripts and programs that implement management functions, into a Tivoli install image.
Tivoli Module Designer
The Tivoli Module Designer is a utility provided with the Tivoli Module Builder. The Tivoli Module Designer enables you to define the management requirements of applications and business systems in an AMS format. See also “Application Management Specification (AMS).”
Tivoli Global Enterprise Manager
A Tivoli product that allows system administrators to graphically monitor, control, and configure applications residing in distributed and host (S/390) environments and to use the concept of business systems management to organize related components, thereby providing a business perspective for management decisions. Tivoli GEM gives information technology staff a logical view of the computing environment; this view shows, at a glance, the status of the multiple applications that comprise the enterprise's business system, including application components, the relationships among and between components, and the flow of data between the applications. By providing this view from a business perspective, Tivoli GEM enables system administrators to quickly make determinations about the business impact of any component failure. Addressing technology problems from the business perspective greatly improves the effectiveness of system administrators and provides a higher level of service to users.

Tivoli Module Builder User’s Guide Index–1
Index
Symbols.aof files 2-11.cat files 7-4.csl files 3-13, 6-1, 7-4.dsl files 1-9, 3-13, 7-4.msg files 7-1, 7-4.tll files 1-9, 3-13, 7-4
AADMIN_TAG variable 3-4administrative tasks 14-12, 21-1after install scripts 9-5, 14-3AMS
component 2-7downloading xiiiexplained 1-3
ancillary file packages 14-12, 22-1AOF
see Application Object Fileapplication data 2-13application icons
defining 15-1template 14-10
application launch iconsdefining 16-1template 14-10
Application Management Specificationsee AMS
Application Object File 2-11applications management 1-2
BBAROC files 25-2base modules
after install scripts 9-5before install scripts 9-5components 9-2file packages 12-1in Tivoli environment 9-7installation options 10-1introduction 9-1monitors 13-1operational tasks 11-1
BCDF files 1-4before install scripts 9-5BMDF files 1-4BSDF files 1-5BSSDF files 1-5business subsystems 1-5business system components 1-4business system mapping 1-4business systems
defining for Tivoli GEM 1-4description files 1-5files for 1-4managing 1-2
button, tree control 1-8
CCDF variables 3-1, 3-11CDFs
explanation of 1-3merging 5-1
certification 1-5client file packages 14-12, 22-1Collection Specification Files 3-13component description files 1-3

Index–2 Version 2.3
componentsAMS 2-7categories
file list 14-16installation dependency 14-16installation programs 14-16location definitions 14-15management extensions 14-17operational task definition 14-16synchronous monitors 14-16tree format 14-14
definingadministrative tasks 21-1application icons 15-1application launch icons 16-1endpoint subscription lists 20-1file packages 22-1hidden tasks 27-1indicator collections 23-1install options 17-1logfile adapter configuration 26-4monitors 24-1Plus configuration 18-1subscription lists 19-1, 20-1Tivoli Enterprise Console
configuration 25-3merging 5-1templates
administrative tasks 14-12ancillary file packages 14-12application icons 14-10application launch icons 14-10client file packages 14-12hidden tasks 14-13indicator collections 14-12list of generic names 14-9logfile adapter configuration
14-13monitors 14-13
server file packages 14-12TEC configuration 14-13universal monitors 14-13
configuringfile packages 9-1, 22-1Tivoli Enterprise Console 25-3
conventions, typographical xixCPP_PATH variable 3-3custom monitors 25-1
Ddefining
componentsadministrative tasks 21-1application icons 15-1application launch icons 16-1endpoint subscription lists 20-1file packages 22-1hidden tasks 27-1indicator collections 23-1install options 17-1logfile adapter configuration 26-4monitors 24-1Plus configuration 18-1subscription lists 19-1, 20-1Tivoli Enterprise Console
configuration 25-3Dialog Specification Files 3-13distribution, software 12-1, 22-1DM_VERSION variable 3-4DMTF
see Desktop Management Task Forcedownloading
AMS xiii
Tivoli Module Builder User’s Guide Index–3
Eenablement 1-7enabling
for Tivoli GEM 28-1endpoint subscription list template 14-11event management 25-1
Ffile packages
defining for base 9-1defining for Plus 22-1
files.aof 2-11.cat 7-4.csl 3-13, 6-1, 7-4.dsl 1-9, 3-13, 7-4.msg 7-1, 7-4.tll 1-9, 3-13, 7-4application object 2-11BCDF 1-4BMDF 1-4BSDF 1-5BSSDF 1-5CDF 1-3, 1-4MCSL
definition 6-1importing 6-2
message 7-1, 7-4message catalog 7-4
GGDF variables 2-13, 3-2, 3-10
Hhidden tasks
defining 27-1template 14-13
hierarchy, tree view 1-8
II18N_ENABLED variable 7-1icons
application launch 15-2, 16-1install options 17-2Plus configuration 18-2Plus module 15-1subscription lists 19-2, 20-2TEC setup 25-2TivoliPlus 14-18
importingcomponent description files 2-11MCSL files 6-2monitors
from CDF files 6-5from MCSL files 6-1
Plus modules 14-4indicator collection
defining 23-1template 14-12
indicator collections 23-1install options
defining for base 10-1defining for Plus 17-1
INSTALL_OPT_1_IS_PATH_PREFIX variable 3-4
Llanguages, Tivoli supported 7-6linking modules 28-2

Index–4 Version 2.3
loadingPlus template 14-2Tivoli GEM template 2-6
LOCALESvariable 7-4
LOCK_AFTER_SCRIPT variable 3-15LOCK_BEFORE_SCRIPT variable 3-15LOCK_CSL variable 3-14LOCK_DSL variable 3-14LOCK_TLL variable 3-14locking
.csl files 3-13
.dsl files 3-13
.tll files 3-13after scripts 3-14before scripts 3-14
logfile adapter configurationdefining 26-1template 14-13
logfile adapter variables 3-8
Mmanagement data 1-2Management Information Format 1-3managing
applications 1-2business systems 1-2events 25-1
MCSL files 6-1merging
CDFs 5-1components 5-1
message catalog files 7-4message files 7-1, 7-4MIF
see Management Information FormatMODULE_TYPE variable 3-3
modulesbase 1-5certification 1-5installing 8-3installing incrementally 8-5linking 28-2NLS enablement 7-4uninstalling 8-9workflow 1-10
monitoring, resources 13-1, 24-1monitors
defining 24-1importing 6-1template 14-13
NNational Language Support
enabling modules 7-4overview 7-1supported languages 7-6
NLSsee National Language Support
Oobject hierarchy 1-8operational tasks 11-1overriding variables 3-13
PPlus empty template 14-3Plus module icon 15-1Plus modules 23-1
activating features 14-20after install scripts 14-3application icons 15-1

Tivoli Module Builder User’s Guide Index–5
application launch 16-1components 14-9configuration 18-1empty template 14-3endpoint subscription list 20-1file packages 22-1hidden tasks 27-1importing 14-4in Tivoli environment 14-18installation options 17-1introduction 1-6, 14-1loading template 14-2logfile adapter configuration 26-1monitors 24-1subscription list 19-1TEC configuration 25-1template 14-9Tivoli GEM enablement 28-1
Plus template 14-2prerequisites
documentation xiiifor Tivoli Module Builder users xiii
proceduresbuilding a logfile adapter 26-2creating class definitions 25-2creating event correlation rules 25-2defining a subscription list 19-3, 20-3defining an indicator collection 23-3defining application icons 15-3defining the application launch icon
16-3editing administrative tasks component
21-3editing file package component 22-3editing hidden tasks component 27-2editing install options component 17-3editing monitor component 24-3editing Plus configuration component
18-3importing Plus modules 14-4installing modules 8-3
installing modules incrementally 8-5uninstalling modules 8-9
PRODDIR variable 3-3
RREPLACE_TASK_LIBS
variable 3-3resource monitoring 13-1, 24-1
Sserver file packages 14-12, 22-1set install options
defining 17-1template 14-11
settings 3-1CDF 3-11configuration 3-2GDF 3-10installation 3-2logfile adapter 3-8TMA 3-4
SNTID_GROUP variable 3-4SNTID_USER variable 3-4software components 1-3software distribution 12-1, 22-1subscription lists
defining 19-1, 20-1template 14-11
Ttab pages 1-9tabs 1-9task administration 21-1Task Library Language Files 3-13TaskRoles variable 3-4

Index–6 Version 2.3
tasks, operational 11-1Team Tivoli 1-5TEC configuration
defining 25-3template 14-13
TEC setup icondefining 25-1template 14-13
templatesAMS component 2-7Plus empty 14-3Plus module 14-2
Tivoliadministrator role 11-4, 21-10desktop window 14-18Enterprise Console
configuring 25-1setting up class definitions 25-1setting up event rules 25-1
GEM enablement 28-1GEM modules 1-6Module Builder
launching 2-2understanding 1-7– 2-2workflow 1-10
Module Builder window 2-3Module Designer 1-9Ready QuickStart 1-7supported languages 7-6
TivoliPlus icon 14-18TivoliPlus window 14-18TMA settings 3-4TMA_BINS variable 3-8TMA_DATALESS_PMS variable 3-6TMA_ENABLED variable 3-5TMA_EP_TAG variable 3-6TMA_LIBS variable 3-8TMA_NT_FMT_PATH variable 3-9TMA_PERL_SCRIPTS variable 3-8TMA_PROD_FILES variable 3-8
TMA_UNIX_FMT_PATH variable 3-9TMA_UNIX_TOOLS variable 3-7TMA_WIN_TOOLS variable 3-6tree control button 1-8tree view hierarchy 1-8typographical conventions xix
Uuniversal monitors 14-13UNIX monitors 24-1UNIX-NT monitors 24-1USE_SPECIAL_PRFMGR_NAMES
variable 3-3USE_TLL variable 3-3USE_TSUNAMI_NAMES variable 3-3
Vvariables 3-1
ADMIN_TAG 3-4CDF 2-13, 3-11CPP_PATH 3-3DM_VERSION 3-4GDF 2-13, 3-10I18N_ENABLED 7-1INSTALL_OPT_1_IS_PATH_PREFIX
3-4LOCALES 7-4LOCK_AFTER_SCRIPT 3-15LOCK_BEFORE_SCRIPT 3-15LOCK_CSL 3-14LOCK_DSL 3-14LOCK_TLL 3-14locking with 3-13logfile adapter 3-8MODULE_TYPE 3-3overriding 3-13PRODDIR 3-3
Tivoli Module Builder User’s Guide Index–7
REPLACE_TASK_LIBS 3-3SNTID_GROUP 3-4SNTID_USER 3-4TaskRoles 3-4TMA_BINS 3-8TMA_DATALESS_PMS 3-6TMA_Enabled 3-5TMA_EP_TAG 3-6TMA_LIBS 3-8TMA_NT_FMT_PATH 3-9TMA_PERL_SCRIPTS 3-8TMA_PROD_FILES 3-8TMA_UNIX_FMT_PATH 3-9TMA_UNIX_TOOLS 3-7TMA_WIN_TOOLS 3-6USE_SPECIAL_PRFMGR_NAMES
3-3USE_TLL 3-3USE_TSUNAMI_NAMES 3-3
Wweb sites
AMS xiiicustomer support xix
windowsTivoli desktop 14-18Tivoli Module Builder 2-3TivoliPlus 14-18
workflow, for modules 1-10workspace, object hierarchy 1-8

Index–8 Version 2.3