Embed Size (px)
Citation preview

2
PrecautionsLocationUsing the unit in the following locations can result in a malfunction.
• In direct sunlight• Locations of extreme temperature or humidity• Excessively dusty or dirty locations• Locations of excessive vibration• Close to magnetic fields
Power supplyBe sure to turn the power switch to OFF when the unit is not in use. Remove the battery in order to prevent it from leaking when the unit is not in use for extended periods.
Interference with other electrical devicesRadios and televisions placed nearby may experi-ence reception interference. Operate this unit at a suitable distance from radios and televisions.
HandlingTo avoid breakage, do not apply excessive force to the switches or controls.
CareIf the exterior becomes dirty, wipe it with a clean, dry cloth. Do not use liquid cleaners such as benzene or thinner, or cleaning compounds or flammable polishes.
Keep this manualAfter reading this manual, please keep it for later reference.
Keeping foreign matter out of your equipmentNever set any container with liquid in it near this equipment. If liquid gets into the equipment, it could cause a breakdown, fire, or electrical shock. Be careful not to let metal objects get into the equipment.
3
THE FCC REGULATION WARNING (for USA)
This equipment has been tested and found to comply with the limits for a Class B digital device, pursu-ant to Part 15 of the FCC Rules. These limits are designed to provide reasonable protection against harmful interference in a residential installation. This equipment generates, uses, and can radiate radio frequency energy and, if not installed and used in accordance with the instructions, may cause harmful interference to radio communications. However, there is no guarantee that interference will not occur in a particular installation. If this equipment does cause harmful interference to radio or television reception, which can be determined by turning the equipment off and on, the user is encouraged to try to correct the interference by one or more of the following measures:● Reorient or relocate the receiving antenna.● Increase the separation between the equipment and receiver.● Connect the equipment into an outlet on a circuit different from that to which the receiver is con-
nected.● Consult the dealer or an experienced radio/TV technician for help.Unauthorized changes or modification to this system can void the user’s authority to operate this equipment.
4
Notice regarding disposal (EU only)
When this “crossed-out wheeled bin” symbol is displayed on the product, owner’s manual, battery, or battery package, it signifies that when you wish to dispose of this product, manu-al, package or battery you must do so in an approved manner. Do not discard this product, manual, package
or battery along with ordinary household waste. Disposing in the correct manner will prevent harm to human health and potential damage to the environment. Since the correct method of disposal will depend on the applicable laws and regulations in your locality, please contact your local administrative body for details. If the battery contains heavy metals in excess of the regulated amount, a chemical symbol is displayed below the “crossed-out wheeled bin” symbol on the battery or battery package.
IMPORTANT NOTICE TO CONSUMERS
This product has been manufactured accord-ing to strict specifications and voltage require-ments that are applicable in the country in which it is intended that this product should be used. If you have purchased this product via the internet, through mail order, and/or via a telephone sale, you must verify that this product is intended to be used in the country in which you reside.WARNING: Use of this product in any country other than that for which it is intended could be dangerous and could invalidate the manu-facturer’s or distributor’s warranty. Please also retain your receipt as proof of purchase otherwise your product may be disqualified from the manufacturer’s or distributor’s war-ranty.
All product names and company names are the trademarks or registered trademarks of their respective owners.
5
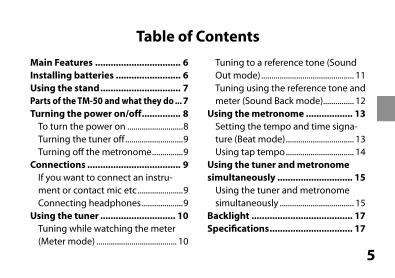
Table of Contents
Main Features ................................. 6Installing batteries ......................... 6Using the stand ............................... 7Parts of the TM-50 and what they do ... 7Turning the power on/off ............... 8
To turn the power on ...........................8Turning the tuner off ............................9Turning off the metronome ...............9
Connections .................................... 9If you want to connect an instru-ment or contact mic etc ......................9Connecting headphones ....................9
Using the tuner ............................. 10Tuning while watching the meter (Meter mode) ....................................... 10
Tuning to a reference tone (Sound Out mode) ............................................. 11Tuning using the reference tone and meter (Sound Back mode)............... 12
Using the metronome .................. 13Setting the tempo and time signa-ture (Beat mode) ................................. 13Using tap tempo ................................. 14
Using the tuner and metronome simultaneously ............................. 15
Using the tuner and metronome simultaneously .................................... 15
Backlight ....................................... 17Specifications ................................ 17
6
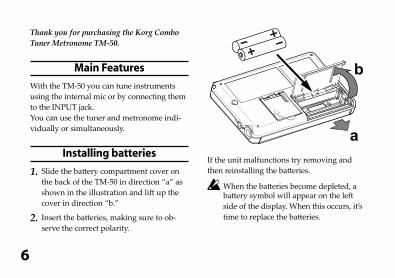
Thank you for purchasing the Korg Combo Tuner Metronome TM-50.
Main Features
With the TM-50 you can tune instruments using the internal mic or by connecting them to the INPUT jack.You can use the tuner and metronome indi-vidually or simultaneously.
Installing batteries
1. Slide the battery compartment cover on the back of the TM-50 in direction “a” as shown in the illustration and lift up the cover in direction “b.”
2. Insert the batteries, making sure to ob-serve the correct polarity.
If the unit malfunctions try removing and then reinstalling the batteries.
When the batteries become depleted, a battery symbol will appear on the left side of the display. When this occurs, it’s time to replace the batteries.
7
Using the stand
You can use the stand provided on the back of the TM-50 to tilt it back at an angle for easy viewing.
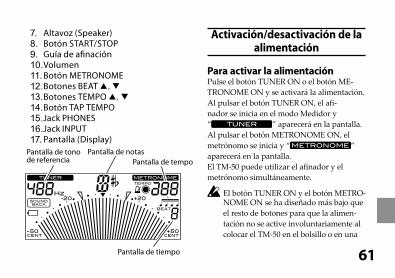
Parts of the TM-50 and what they do
9
1
2
34
5 6 7 8
10 11
1213
14
15
16
17
1. TUNER ON button2. CALIB/NOTE p, q buttons3. SOUND button4. SOUND BACK button5. Backlight button6. Mic
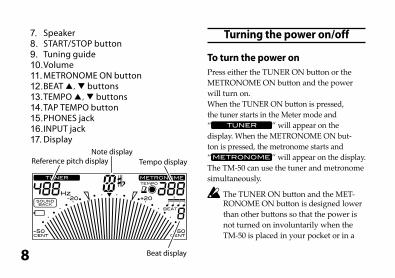
8
7. Speaker8. START/STOP button9. Tuning guide10.Volume11.METRONOME ON button12.BEAT p, q buttons13.TEMPO p, q buttons14.TAP TEMPO button15.PHONES jack16.INPUT jack17.Display
Reference pitch displayNote display
Tempo display
Beat display
Turning the power on/off
To turn the power onPress either the TUNER ON button or the METRONOME ON button and the power will turn on.When the TUNER ON button is pressed, the tuner starts in the Meter mode and “ ” will appear on the display. When the METRONOME ON but-ton is pressed, the metronome starts and “ ” will appear on the display.The TM-50 can use the tuner and metronome simultaneously.
The TUNER ON button and the MET-RONOME ON button is designed lower than other buttons so that the power is not turned on involuntarily when the TM-50 is placed in your pocket or in a
9
bag. To turn the device on or off, push in the power button.
Turning the tuner offWhen the tuner is in use, press the TUNER ON button to turn off the power. The tuner will also turn off automatically if it’s not in use for twenty minutes.
Turning off the metronomeWhen the metronome is in use, press the METRONOME ON button to turn off the power. The metronome will also turn off au-tomatically if not in use for twenty minutes.
Connections
If you want to connect an instrument or contact mic etcIf you want to tune an instrument with a
pickup, such as an electric guitar, connect a cable to your instrument, and plug the cable into the TM-50’s INPUT jack.
The INPUT jack is only for a 1/4" mono cable. Stereo (TRS) cables cannot be used.
If you want to tune your instrument using a Korg contact mic (separately sold), plug the contact mic into the TM-50’s INPUT jack.
If a device is not connected to the INPUT jack, tuning will be performed by the internal mic.
Connecting headphonesYou can connect headphones with a 1/8" mini-plug to the PHONES jack.When plugged in, no sound will be heard from the speaker. Use the volume control to adjust the volume of the headphones output.
10
Using the tuner
Tuning while watching the meter (Meter mode)
1. Connect your instrument cable or contact mic to the TM-50’s INPUT jack.
If a device is not connected to the INPUT jack, tuning will be performed by the internal mic.
2. Press the TUNER ON button.“ ” will appear at the top of the display and the calibration (refer-ence pitch) will be displayed below that.
3. To change the calibration, press the CALIB/NOTE p or q button.The calibration value increases and decreases in units of 1 Hz. By pressing and holding these buttons, you can increase or
decrease the value continuously. This set-ting is stored even when the power is off.
4. Play a single note on your instrument.The closest note to the input sound will appear in the center of the display. Tune your instrument to the correct pitch, so that the desired note name appears.
If you’re using the internal mic, place your instrument as close as possible to the mic so that extraneous sound is not picked up while tuning.
5. While playing a single note on your instrument, tune your instrument so that the tip of the meter indicates “q” and the center indicator of the tuning guide is lit up.The left tuning guide indicator will light up if the pitch of your instrument is flat, and the right indicator will light up if the

11
pitch is sharp.If you want to tune a just major third above or a minor third above a certain note, use the “ ” (-13.7 cent) or “ ” (+15.6 cent) marks on the meter.
Tuning to a just major third above or a minor third aboveIf you want to tune to a just major third above A (0 cent), tune your instrument so that the note name indicator shows C and the meter is at “ ”.If you want to tune to a minor third above A (0 cent), tune your instrument so that the note name indicator shows C and the meter is at “ ”.
Tuning to a reference tone (Sound Out mode)
1. Press the TUNER ON button.You will enter the Meter mode.
2. Press the SOUND button to select Sound Out mode.The reference tone is output from the PHONES jack or speakers. Use the vol-ume control to adjust the output volume.
3. Press the CALIB/NOTE p or q button to select the note.The output reference tone changes as fol-lows.C(C3) n C♯ n D n E♭ n E n F n F♯ n G n G♯ n A n B♭ n B n C(C4) ... C(C6) n C(C3)...
This setting is stored even when the power is off.
4. Tune the instrument according to the reference tone.
5. Press the SOUND button again to return to the Meter mode.If connected to either the INPUT jack or the PHONES jack, the Meter mode will
12
start simultaneously and you can tune your instrument while viewing the meter.
Tuning using the reference tone and meter (Sound Back mode)This function can be used when you are connected to either the INPUT jack or the PHONES jack (or both).
1. Press the TUNER ON button.You will enter the Meter mode.
2. Press the SOUND BACK button to enter the Sound Back mode.In the Sound Back mode, the reference tone that’s closest to the tone of the input instrument is output. Use the volume control to adjust the volume.“ ” will appear on the display.If headphones are connected to the PHONES jack, the input sound from the internal
mic or INPUT jack will be received and the reference tone will be output from the headphones.If nothing is connected to the PHONES jack, the input sound from the INPUT jack is received and the reference tone is output from the speakers.
If both the PHONES jack and the INPUT jack are not connected, the Sound Back mode will not function.
3. Tune the instrument using the reference tone and meter.
4. If the SOUND BACK button is pressed again, you will return to the Meter mode.
13
Using the metronome
Setting the tempo and time signature
1. Press the METRONOME ON button.The pendulum of the metronome will ap-pear on the display and “” will appear above it.
2. Press the TEMPO p or q button to set the tempo.Press and hold the TEMPO p and q buttons simultaneously for 1 second to switch between Pendulum Step (pendu-lum of a mechanical metronome) and Full Step. If Pendulum Step is selected, “ ” will appear on the display.After selecting “PENDULUM STEP” or “FULL STEP”, press the TEMPO p, q buttons to set the tempo. This setting is
remembered even when the power is off.
If you’ve selected “PENDULUM STEP”Pressing the TEMPO p or q button will increase or decrease the tempo value by 1 step. The value will change continuously if you hold down the button.30 n 32 n 34 ... 88 n 92 n 96 ... 232 n 240 n 252 n 30 ...
If you’ve selected “FULL STEP”Pressing the TEMPO p or q button will increase or decrease the tempo value by 1 step. The value will change continuously if you hold down the button.30 n 31 n 32 ... 250 n 251 n 252 n 30 ...
3. Press the START/STOP button to start the metronome.The metronome pendulum will swing from left to right according to the tempo and the TAP TEMPO button will blink according to the tempo also.
14
4. If you want to change the time signature, press the BEAT p or q buttons to make your selection.The time signature will change as follows.Press the BEAT p or q buttons: n 0 n1 ... 9 (9 beats) n (Duplet) n (Triplet) n (Triplet without the center beat) n
(Quadruplet) n (Quadruplet without the center beat) n 0 ...
5. Play along with the metronome tempo.
6. To stop the metronome, press the START/STOP button.
Using tap tempoThe tap tempo that you input will be dis-played as a BPM (Beats Per Minute) value.
1. Press the METRONOME ON button.The pendulum of the metronome will appear on the display and “ ” will appear above it.
2. Press the TAP TEMPO button several times at regular intervals at the tempo that you want.The TM-50 detects the interval used when pressing the button and displays it as a BPM (Beats Per Minute) value, and it will be set as the tempo.While the tempo is detected, “ ” will appear on the display.When the BPM that has been detected by the tap tempo is less than 30, “Lo” will appear on the display and the tempo will be set at “30.”If the BPM detected by the tap tempo ex-ceeds 252, “Hi” will appear on the display and the tempo will be set at “252.”
3. Press the START/STOP button to start the metronome.The metronome pendulum will swing from left to right according to the tempo
15
and the TAP TEMPO button will blink accordingly.
The tap tempo can also be input while the metronome is in use.
4. Play according to the tempo.
5. To stop the metronome, press the START/STOP button.
Using the tuner and metronome simultaneously
The TM-50 lets you use the tuner and metro-nome simultaneously.For more details on tuner and metronome op-eration, please refer to the “Using the tuner” and “Using the metronome sections.”
Using the tuner and metronome simultaneouslyFor example, if you’re playing along with the metronome and you notice that your instru-ment is not tuned correctly, you can leave the metronome running while you tune.
Proceed as follows.
1. Press the METRONOME ON button.
2. Press the START/STOP button to start the metronome.If necessary, specify the tempo and time signature etc.
To set the tempo: use the TEMPO p, q buttons.To set the time signature: use the BEAT p, q buttons.
When using the tuner and metro-nome simultaneously, you can’t select
16
“triplets”, “triplets without the center beat”, “quadruplets” or “quadruplets without the center beats” as the time signature.
3. Press the TUNER ON button to enter Meter mode.The display will show the tuning meter.The tempo of the metronome tempo is indicated by the blinking of the TAP TEMPO button.
If you want to tune in Sound Out mode, you should then press the SOUND but-ton. To tune in the Sound Back mode, press the SOUND BACK button.
Tuning in Meter modeWhen you play a single note on your in-strument, the display will show the name of the note that is closest to the pitch that you played. Tune your instrument while watching the meter and the tuning guide.
Tuning in Sound Out modeTune your instrument to the pitch that you hear.
Tuning in Sound Back modeUsing the tone, tuning meter and tuning guide, adjust your instrument.
4. After tuning is complete, press the TUNER ON button and METRONOME ON button respectively to turn off the tuner and metronome.
17
Backlight
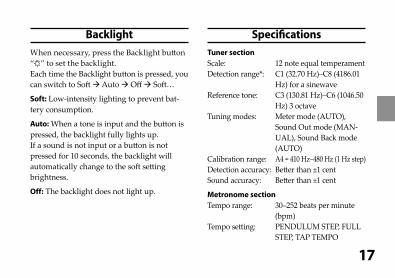
When necessary, press the Backlight button “ ” to set the backlight.Each time the Backlight button is pressed, you can switch to Soft Auto Off Soft…
Soft: Low-intensity lighting to prevent bat-tery consumption.
Auto: When a tone is input and the button is pressed, the backlight fully lights up.If a sound is not input or a button is not pressed for 10 seconds, the backlight will automatically change to the soft setting brightness.
Off: The backlight does not light up.
Specifications
Tuner sectionScale: 12 note equal temperamentDetection range*: C1 (32.70 Hz)–C8 (4186.01
Hz) for a sinewaveReference tone: C3 (130.81 Hz)–C6 (1046.50
Hz) 3 octaveTuning modes: Meter mode (AUTO),
Sound Out mode (MAN-UAL), Sound Back mode (AUTO)
Calibration range: A4 = 410 Hz–480 Hz (1 Hz step)Detection accuracy: Better than ±1 centSound accuracy: Better than ±1 cent
Metronome sectionTempo range: 30–252 beats per minute
(bpm)Tempo setting: PENDULUM STEP, FULL
STEP, TAP TEMPO
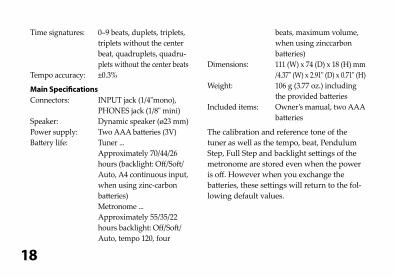
18
Time signatures: 0–9 beats, duplets, triplets, triplets without the center beat, quadruplets, quadru-plets without the center beats
Tempo accuracy: ±0.3%
Main SpecificationsConnectors: INPUT jack (1/4"mono),
PHONES jack (1/8" mini)Speaker: Dynamic speaker (ø23 mm)Power supply: Two AAA batteries (3V)Battery life: Tuner ... Approximately 70/44/26
hours (backlight: Off/Soft/Auto, A4 continuous input, when using zinc-carbon batteries)
Metronome ... Approximately 55/35/22
hours backlight: Off/Soft/Auto, tempo 120, four
beats, maximum volume, when using zinccarbon batteries)
Dimensions: 111 (W) x 74 (D) x 18 (H) mm /4.37" (W) x 2.91" (D) x 0.71" (H)
Weight: 106 g (3.77 oz.) including the provided batteries
Included items: Owner’s manual, two AAA batteries
The calibration and reference tone of the tuner as well as the tempo, beat, Pendulum Step, Full Step and backlight settings of the metronome are stored even when the power is off. However when you exchange the batteries, these settings will return to the fol-lowing default values.
19
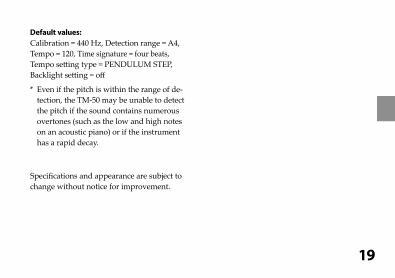
Default values:Calibration = 440 Hz, Detection range = A4, Tempo = 120, Time signature = four beats, Tempo setting type = PENDULUM STEP, Backlight setting = off
* Even if the pitch is within the range of de-tection, the TM-50 may be unable to detect the pitch if the sound contains numerous overtones (such as the low and high notes on an acoustic piano) or if the instrument has a rapid decay.
Specifications and appearance are subject to change without notice for improvement.
20
PrécautionsEmplacementL’utilisation de cet instrument dans les endroits suivants peut en entraîner le mauvais fonctionne-ment.
• En plein soleil• Endroits très chauds ou très humides• Endroits sales ou fort poussiéreux• Endroits soumis à de fortes vibrations• A proximité de champs magnétiques
AlimentationLorsque vous n’utilisez pas l’appareil, n’oubliez pas de le mettre hors tension. Retirez les piles pour éviter toute fuite lorsque l’appareil ne sera pas utilisé pendant de longues périodes de temps.
Interférences avec d’autres appareils électriquesLes postes de radio et de télévision situés à proximité peuvent par conséquent souffrir d’interférences à la réception. Veuillez dès lors faire fonctionner cet appareil à une distance
raisonnable de postes de radio et de télévision.
ManiementPour éviter de les endommager, manipulez les commandes et les boutons de cet instrument avec soin.
EntretienLorsque l’instrument se salit, nettoyez-le avec un chiffon propre et sec. Ne vous servez pas d’agents de nettoyage liquides tels que du benzène ou du diluant, voire des produits inflammables.
Conservez ce manuelAprès avoir lu ce manuel, veuillez le conserver soigneusement pour toute référence ultérieure.
Evitez toute intrusion d’objets ou de liquideNe placez jamais de récipient contenant du liquide près de l’instrument. Si le liquide se renverse ou coule, il risque de provoquer des dommages, un court-circuit ou une électrocution.Veillez à ne pas laisser tomber des objets métal-liques dans le boîtier (trombones, par ex.).
21
Note concernant les dispositions
(Seulement EU)
Quand un symbole avec une poubelle barrée d’une croix apparait sur le produit, le mode d’emploi, les piles ou le pack de piles, cela signifie que ce produit, manuel ou piles doit être déposé chez un représentant compétent, et non pas dans une poubelle ou toute autre déchetterie
conventionnelle. Disposer de cette manière, de prévenir les dommages pour la santé humaine et les dommages potentiels pour l’environnement. La bonne méthode d’élimination dépendra des lois et règlements applicables dans votre localité, s’il vous plaît, contactez votre organisme administratif pour plus de détails. Si la pile contient des métaux lourds au-delà du seuil réglementé, un symbole chimique est affiché en dessous du symbole de la poubelle barrée d’une croix sur la pile ou le pack de piles.
REMARQUE IMPORTANTE POUR LES CLIENTS
Ce produit a été fabriqué suivant des spéci-fications sévères et des besoins en tension applicables dans le pays où ce produit doit être utilisé. Si vous avez acheté ce produit via l’internet, par vente par correspondance ou/et vente par téléphone, vous devez vérifier que ce produit est bien utilisable dans le pays où vous résidez.ATTENTION: L’utilisation de ce produit dans un pays autre que celui pour lequel il a été conçu peut être dangereuse et annulera la garantie du fabricant ou du distributeur. Conservez bien votre récépissé qui est la preuve de votre achat, faute de quoi votre produit ne risque de ne plus être couvert par la garantie du fabricant ou du distributeur.
Tous les noms de produits et de sociétés sont des marques commerciales ou déposées de leur détenteur respectif.
22
Sommaire
Caractéristiques principales ................ 23Installation des piles ............................ 23Utiliser le pied ....................................... 24Parties du TM-50 et leurs fonctions .... 24Mise sous/hors tension ........................ 25
Mise sous tension.........................................25
Pour mettre l’accordeur hors tension ...26
Pour mettre le métronome hors tension ...26
Raccordements ..................................... 26Si vous souhaitez raccorder un instrument
ou un microphone de contact, etc ..........26
Connexion du casque .................................27
Utilisation de l’accordeur ..................... 27Accord tout en regardant le compteur
(mode Compteur) ........................................27
Accord sur une note de référence (mode
Son) ...................................................................28
Accorder votre instrument avec la note
de référence et le compteur (mode
retour son). .....................................................29
Utilisation du métronome ................... 30Réglage du tempo et de la signature
rythmique .......................................................30
Entrée du tempo tap ...................................31
Utilisation simultanée de l’accordeur et du métronome ...................................... 33
Utilisation simultanée de l’accordeur et
du métronome ..............................................33
Rétro-éclairage ..................................... 35Spécifications ........................................ 35
23
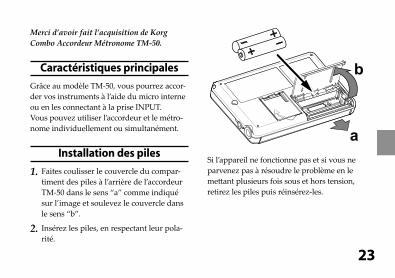
Merci d’avoir fait l’acquisition de Korg Combo Accordeur Métronome TM-50.
Caractéristiques principales
Grâce au modèle TM-50, vous pourrez accor-der vos instruments à l’aide du micro interne ou en les connectant à la prise INPUT.Vous pouvez utiliser l’accordeur et le métro-nome individuellement ou simultanément.
Installation des piles
1. Faites coulisser le couvercle du compar-timent des piles à l’arrière de l’accordeur TM-50 dans le sens “a” comme indiqué sur l’image et soulevez le couvercle dans le sens “b”.
2. Insérez les piles, en respectant leur pola-rité.
Si l’appareil ne fonctionne pas et si vous ne parvenez pas à résoudre le problème en le mettant plusieurs fois sous et hors tension, retirez les piles puis réinsérez-les.
24
Quand les piles sont usées, un symbole de pile apparaît à gauche à l’écran. Rempla-cez alors les piles aussi vite que possible.
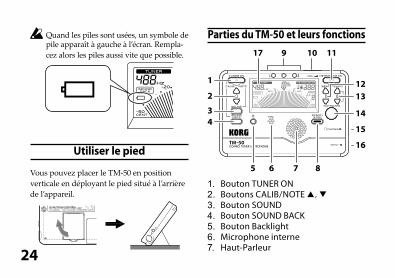
Utiliser le pied
Vous pouvez placer le TM-50 en position verticale en déployant le pied situé à l’arrière de l’appareil.
Parties du TM-50 et leurs fonctions
9
1
2
34
5 6 7 8
10 11
1213
14
15
16
17
1. Bouton TUNER ON2. Boutons CALIB/NOTE p, q3. Bouton SOUND4. Bouton SOUND BACK5. Bouton Backlight6. Microphone interne7. Haut-Parleur
25
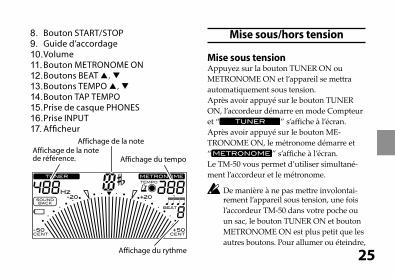
8. Bouton START/STOP9. Guide d’accordage10.Volume11.Bouton METRONOME ON12.Boutons BEAT p, q13.Boutons TEMPO p, q14.Bouton TAP TEMPO15.Prise de casque PHONES16.Prise INPUT17.Afficheur
Affichage de la note de référence.
Affichage de la note
Affichage du tempo
Affichage du rythme
Mise sous/hors tension
Mise sous tensionAppuyez sur la bouton TUNER ON ou METRONOME ON et l’appareil se mettra automatiquement sous tension.Après avoir appuyé sur le bouton TUNER ON, l’accordeur démarre en mode Compteur et “ ” s’affiche à l’écran. Après avoir appuyé sur le bouton ME-TRONOME ON, le métronome démarre et “ ” s’affiche à l’écran.Le TM-50 vous permet d’utiliser simultané-ment l’accordeur et le métronome.
De manière à ne pas mettre involontai-rement l’appareil sous tension, une fois l’accordeur TM-50 dans votre poche ou un sac, le bouton TUNER ON et bouton METRONOME ON est plus petit que les autres boutons. Pour allumer ou éteindre,
26
appuyez sur le bouton d’alimentation.
Pour mettre l’accordeur hors tensionPendant le fonctionnement de l’accordeur, appuyez sur la bouton TUNER ON pour le mettre hors tension. L’accordeur se mettra aussi automatiquement hors tension si vous ne l’utilisez pas pendant vingt minutes.
Pour mettre le métronome hors tensionPendant le fonctionnement du métronome, appuyez sur la bouton METRONOME ON pour le mettre hors tension. Le métronome se mettra aussi automatiquement hors tension si vous ne l’utilisez pas pendant vingt minutes..
Raccordements
Si vous souhaitez raccorder un instrument ou un microphone de contact, etcSi vous souhaitez accorder un instrument avec micro, comme une guitare électrique, raccor-dez un câble à votre instrument et branchez le câble sur la prise INPUT du TM-50.
La prise INPUT est seulement conçue pour un câble monophonique 1/4". Les câbles stéréo (TRS) ne peuvent pas être utilisés.
Si vous souhaitez accorder votre instrument à l’aide du Contact Microphone Korg vendu séparément, branchez le microphone de contact sur la prise INPUT du TM-50.
Si un périphérique n’est pas connecté à la
27
prise INPUT, l’accordage s’effectuera par le biais du micro interne.
Connexion du casqueVous pouvez raccorder un casque avec minijack 1/8" à la prise PHONES. Lorsque le casque est branché le son du haut-parleur est coupé. Utilisez la commande de volume pour régler le volume du casque.
Utilisation de l’accordeur
Accord tout en regardant le compteur (mode Compteur)
1. Branchez le câble de votre instrument ou le microphone de contact sur la prise INPUT du TM-50.
Si un périphérique n’est pas connecté à la prise INPUT, l’accordage s’effec-tuera par le biais du micro interne.
2. Appuyez sur le bouton TUNER ON.“ ” s’affichera en haut de l’écran et le calibrage (note de référence) s’affichera en dessous.
3. Pour changer le calibrage, appuyez sur le bouton CALIB/NOTE p ou q.La valeur de calibrage augmente et diminue par unité de 1 Hz. En appuyant et en maintenant ces boutons, vous augmenterez ou diminuerez de façon ininterrompue les valeurs. Ce réglage sera enregistré même si l’appareil est mis hors tension.
4. Jouez une note unique sur votre instru-ment.La note se rapprochant le plus du son d’entrée s’affichera au centre de l’écran. Accordez correctement votre instrument de telle manière que la note souhaitée apparaisse.
28
Si vous utilisez le microphone interne, disposez votre instrument aussi près que possible du microphone afin que les sons extérieurs ne puissent pas être captés pendant l’accord.
5. Tout en jouant une note unique sur votre instrument, accordez celui-ci de telle manière que la pointe de l’aiguille du compteur indique “q” et que la diode de contrôle centrale s’allume.La diode à gauche s’allumera si votre instrument produit un bémol et celle de droite s’il produit un dièse.Si vous souhaitez accorder une tierce majeure pure ou une tierce mineure pure au-dessus d’une certaine note, utilisez les repères “ ” (-13.7 cents) ou “ ” (+15.6 cents) du compteur.
Accord sur une tierce majeure pure ou une tierce mineure pure au-dessusSi vous souhaitez effectuer l’accord sur une tierce majeure pure au-dessus de A (0 cent), accordez votre instrument de telle façon que l’indicateur de note affiche C et le compteur indique “ ”.Si vous souhaitez effectuer l’accord sur une tierce mineure audessus de A (0 cent), accordez votre instrument de telle façon que l’indicateur de note affiche C le compteur indique “ ”.
Accord sur une note de référence (mode Son)
1. Appuyez sur la bouton TUNER ON.Vous passerez en mode Compteur.
2. Appuyez sur le bouton SOUND pour sélectionner le mode Son.La note de référence est diffusée par les
29
haut-parleurs ou via la prise PHONES. Utilisez la commande Volume pour régler le volume de sortie.
3. Appuyez sur le bouton CALIB/NOTE p ou q pour sélectionner la note.La note de référence diffusée est ainsi modifiée.C(C3) n C♯ n D n E♭ n E n F n F♯ n G n G♯ n A n B♭ n B n C(C4) ... C(C6) n C(C3)...
Ce réglage sera enregistré même si l’appa-reil est mis hors tension.
4. Accordez votre instrument en fonction de la note de référence.
5. Appuyez de nouveau sur le bouton SOUND pour revenir au mode Comp-teur.Si vous connectez un instrument soit à la prise INPUT soit à la prise PHONES, le mode Compteur s’affichera automatique-
ment et vous pourrez accorder votre ins-trument tout en visualisant le compteur.
Accorder votre instrument avec la note de référence et le compteur (mode retour son).Vous pouvez utiliser cette fonction en connec-tant votre instrument à la prise INPUT ou la prise PHONES (ou les deux).
1. Appuyez sur le bouton TUNER ON.Vous passerez en mode Compteur.
2. Appuyez sur le bouton SOUND BACK pour entrer dans le mode Retour son.Dans ce mode, la note de référence se rapprochant le plus de la note provenant de l’instrument est diffusée. Utilisez la commande Volume pour régler le volume.“ ” s’affichera à l’écran.Si un casque est connecté à la prise
30
PHONES, le son d’entrée du micro interne ou de la prise INPUT sera reçu et la note de référence diffusée à partir du casque.Si aucun périphérique n’est connecté à la prise PHONES, le son d’entrée de la prise INPUT sera reçu et la note de référence diffusée dans les haut-parleurs.
Si aucun périphérique n’est connecté à la prise PHONES et à la prise INPUT, le mode Retour son (Sound back) ne fonctionnera pas.
3. Accordez votre instrument à l’aide de la note de référence et du compteur.
4. Si vous appuyez une nouvelle fois sur le bouton SOUND BACK, vous reviendrez au mode Compteur.
Utilisation du métronome
Réglage du tempo et de la signature rythmique
1. Appuyez sur le bouton METRONOME ON.Le pendule du métronome s’affichera à l’écran et la mention “ ” au dessus du pendule.
2. Appuyez sur la touche TEMPO p ou q pour régler le tempo.Appuyez et maintenez simultanément les boutons p et q du TEMPO pendant 1 se-conde pour alterner entre le Pas pendulaire (pendule d’un métronome mécanique) et le Pas complet. Si le Pas pendulaire est sélectionné, “ ” s’affichera à l’écran.Après avoir sélectionné “PAS PENDU-LAIRE” ou “PAS COMPLET”, appuyez sur la bouton TEMPO p ou q pour régler
31
le tempo. Ce réglage reste mémorisé même après la mise hors tension de l’appareil.
Si vous avez sélectionné “PAS PENDULAIRE”Appuyez sur la bouton TEMPO p ou q pour augmenter ou diminuer la valeur du tempo d’un pas. La valeur changera conti-nuellement si vous maintenez la touche.
30 n 32 n 34 ... 88 n 92 n 96 ... 232 n 240 n 252 n 30 ...
Si vous avez sélectionné “PAS COMPLET”Appuyez sur la bouton TEMPO p ou q pour augmenter ou diminuer la valeur du tempo d’un pas. La valeur changera conti-nuellement si vous maintenez la touche.
30 n 31 n 32 ... 250 n 251 n 252 n 30 ...
3. Appuyez sur le bouton START/STOP pour lancer le métronome.
Le pendule du métronome se balancera de gauche à droite selon le tempo et le bouton TAP TEMPO (Réglage du tempo) clignotera selon le rythme.
4. Si vous souhaitez changer la signature rythmique, appuyez sur la bouton BEAT/TAP p ou q. La signature rythmique changera comme suit.Appuyez sur le bouton BEAT p ou q: 0 n 1 ... 9 (9 temps) n (duolet) n
(triolet) n (triolet sans temps du milieu) n (quadriolet) n (quadriolet sans temps du milieu) n 0 ...
5. Jouez en suivant le tempo du métronome.
6. Pour arrêter le métronome, appuyez sur le bouton START/STOP.
Entrée du tempo tapLe tempo tap entré sera affiché sous la forme
32
d’un nombre de BPM (battements par minute).
1. Appuyez sur la bouton METRONOME ON.Le pendule du métronome s’affichera à l’écran et la mention “ ” au dessus du pendule.
2. Appuyez plusieurs fois sur le Bouton TAP TEMPO à intervalles réguliers.Le TM-50 détecte l’intervalle utilisé quand vous appuyez sur le bouton et l’affiche sous forme de temps par minute (BPM) qui sera défini comme le tempo.Une fois le tempo détecté, “ ” s’affichera à l’écran.Si le temps détecté par le réglage du tempo est inférieur à 30 temps par mi-nute, “Lo” s’affichera à l’écran et le tempo sera défini sur “30.”Si le temps détecté par le réglage du tempo est supérieur à 252 temps par mi-
nute, “Hi” s’affichera à l’écran et le tempo sera défini sur “252.”
3. Appuyez sur le bouton START/STOP pour démarrer le métronome.Le pendule du métronome se balancera de gauche à droite selon le tempo et le bouton TAP TEMPO (Réglage du tempo) clignotera selon le rythme.
Vous pouvez également utiliser le réglage du tempo si le métronome est en cours d’utilisation.
4. Jouez une note conformément au tempo.
5. Pour arrêter le métronome, appuyez sur le bouton START/ STOP.
33
Utilisation simultanée de l’accordeur et du métronome
Le TM-50 vous permet d’utiliser simultané-ment l’accordeur et le métronome.Pour les détails sur le fonctionnement de l’accordeur et celui du métronome, reportez-vous à “Utilisation de l’accordeur” et “Utilisa-tion du métronome”.
Utilisation simultanée de l’accordeur et du métronomePar exemple, si vous jouez en vous accompa-gnant du métronome et remarquez que votre instrument n’est pas accordé correctement, vous pourrez laisser le métronome fonction-ner pendant l’accord.
Procédez de la manière suivante.
1. Appuyez sur le bouton METRONOME ON.
2. Appuyez sur le bouton START/STOP pour lancer le métronome.Si nécessaire, spécifiez le tempo et la signature rythmique, etc.
Pour régler le tempo: Bouton TEMPO p ou q.Pour régler la signature rythmique: Bou-ton BEAT p ou q.
Lorsque vous utilisez simultanément l’accordeur et le métronome, vous ne pouvez pas sélectionner “triolets”, “triolets avec omission du battement du milieu”, “quartolets” ou “quarto-lets avec omission des battements du milieu” comme signature rythmique.
34
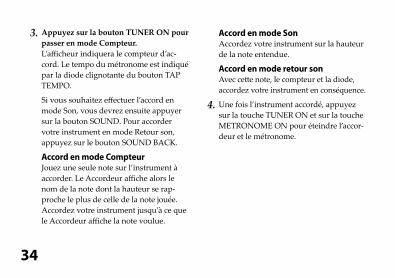
3. Appuyez sur la bouton TUNER ON pour passer en mode Compteur.L’afficheur indiquera le compteur d’ac-cord. Le tempo du métronome est indiqué par la diode clignotante du bouton TAP TEMPO.
Si vous souhaitez effectuer l’accord en mode Son, vous devrez ensuite appuyer sur la bouton SOUND. Pour accorder votre instrument en mode Retour son, appuyez sur le bouton SOUND BACK.
Accord en mode CompteurJouez une seule note sur l’instrument à accorder. Le Accordeur affiche alors le nom de la note dont la hauteur se rap-proche le plus de celle de la note jouée. Accordez votre instrument jusqu’à ce que le Accordeur affiche la note voulue.
Accord en mode SonAccordez votre instrument sur la hauteur de la note entendue.
Accord en mode retour sonAvec cette note, le compteur et la diode, accordez votre instrument en conséquence.
4. Une fois l’instrument accordé, appuyez sur la touche TUNER ON et sur la touche METRONOME ON pour éteindre l’accor-deur et le métronome.
35
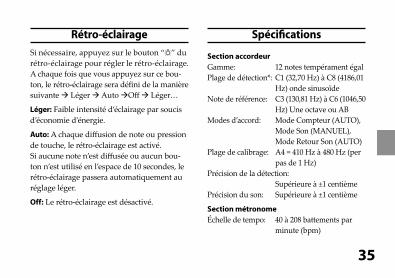
Rétro-éclairage
Si nécessaire, appuyez sur le bouton “ ” du rétro-éclairage pour régler le rétro-éclairage.A chaque fois que vous appuyez sur ce bou-ton, le rétro-éclairage sera défini de la manière suivante Léger Auto Off Léger…
Léger: Faible intensité d’éclairage par soucis d’économie d’énergie.
Auto: A chaque diffusion de note ou pression de touche, le rétro-éclairage est activé.Si aucune note n’est diffusée ou aucun bou-ton n’est utilisé en l’espace de 10 secondes, le rétro-éclairage passera automatiquement au réglage léger.
Off: Le rétro-éclairage est désactivé.
Spécifications
Section accordeurGamme: 12 notes tempérament égalPlage de détection*: C1 (32,70 Hz) à C8 (4186,01
Hz) onde sinusoïdeNote de référence: C3 (130,81 Hz) à C6 (1046,50
Hz) Une octave ou ABModes d’accord: Mode Compteur (AUTO), Mode Son (MANUEL), Mode Retour Son (AUTO)Plage de calibrage: A4 = 410 Hz à 480 Hz (per
pas de 1 Hz)Précision de la détection: Supérieure à ±1 centièmePrécision du son: Supérieure à ±1 centième
Section métronomeÉchelle de tempo: 40 à 208 battements par
minute (bpm)
36
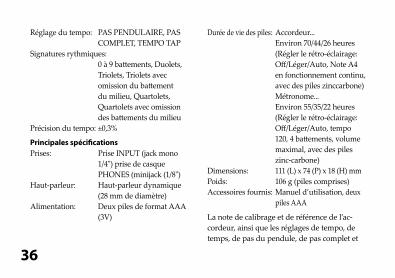
Réglage du tempo: PAS PENDULAIRE, PAS COMPLET, TEMPO TAP
Signatures rythmiques: 0 à 9 battements, Duolets,
Triolets, Triolets avec omission du battement du milieu, Quartolets, Quartolets avec omission des battements du milieu
Précision du tempo: ±0,3%
Principales spécificationsPrises: Prise INPUT (jack mono
1/4") prise de casque PHONES (minijack (1/8")
Haut-parleur: Haut-parleur dynamique (28 mm de diamètre)
Alimentation: Deux piles de format AAA (3V)
Durée de vie des piles: Accordeur... Environ 70/44/26 heures
(Régler le rétro-éclairage: Off/Léger/Auto, Note A4 en fonctionnement continu, avec des piles zinccarbone)
Métronome... Environ 55/35/22 heures
(Régler le rétro-éclairage: Off/Léger/Auto, tempo 120, 4 battements, volume maximal, avec des piles zinc-carbone)
Dimensions: 111 (L) x 74 (P) x 18 (H) mmPoids: 106 g (piles comprises)Accessoires fournis: Manuel d’utilisation, deux
piles AAA
La note de calibrage et de référence de l’ac-cordeur, ainsi que les réglages de tempo, de temps, de pas du pendule, de pas complet et
37
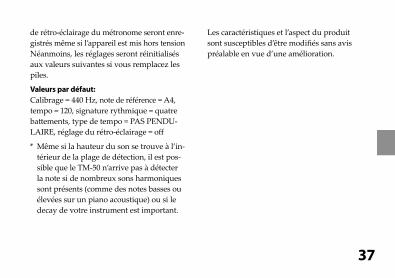
de rétro-éclairage du métronome seront enre-gistrés même si l’appareil est mis hors tensionNéanmoins, les réglages seront réinitialisés aux valeurs suivantes si vous remplacez les piles.
Valeurs par défaut:Calibrage = 440 Hz, note de référence = A4, tempo = 120, signature rythmique = quatre battements, type de tempo = PAS PENDU-LAIRE, réglage du rétro-éclairage = off
* Même si la hauteur du son se trouve à l’in-térieur de la plage de détection, il est pos-sible que le TM-50 n’arrive pas à détecter la note si de nombreux sons harmoniques sont présents (comme des notes basses ou élevées sur un piano acoustique) ou si le decay de votre instrument est important.
Les caractéristiques et l’aspect du produit sont susceptibles d’être modifiés sans avis préalable en vue d’une amélioration.
38
VorsichtsmaßnahmenAufstellungsortVermeiden Sie das Aufstellen des Geräts an Orten, an denen.
• es direkter Sonneneinstrahlung ausgesetzt ist;• hohe Feuchtigkeit oder Extremtemperaturen
auftreten können;• Staub oder Schmutz in großen Mengen vor-
handen sind;• das Gerät Erschütterungen ausgesetzt sein kann.• in der Nähe eines Magnetfeldes.
StromversorgungStellen Sie den Netzschalter auf OFF, wenn das Gerät nicht benutzt wird. Wenn Sie das Gerät über einen längeren Zeitraum nicht benutzen, nehmen Sie die Batterien heraus, damit sie nicht auslaufen.
Störeinflüsse auf andere ElektrogeräteDieser kann bei in der Nähe aufgestellten Rund-funkempfängern oder Fernsehgeräten Empfangs-störungen hervorrufen. Betreiben Sie solche Geräte nur in einem geeigneten Abstand von
diesem Erzeugnis.
BedienungVermeiden Sie bei der Bedienung von Schaltern und Reglern unangemessenen Kraftaufwand.
ReinigungBei auftretender Verschmutzung können Sie das Gehäuse mit einem trockenen, sauberen Tuch abwischen. Verwenden Sie keinerlei Flüssi-greiniger wie beispielsweise Reinigungsbenzin, Verdünnungs- oder Spülmittel. Verwenden Sie niemals brennbare Reiniger.
BedienungsanleitungBewahren Sie diese Bedienungsanleitung gut auf, falls Sie sie später noch einmal benötigen.
Flüssigkeiten und FremdkörperStellen Sie niemals Behältnisse mit Flüssigkeiten in der Nähe des Geräts auf. Wenn Flüssigkeit in das Gerät gelangt, können Beschädigung des Ge-räts, Feuer oder ein elek-trischer Schlag die Folge sein. Beachten Sie, daß keinerlei Fremdkörper in das Gerät gelangen.
39
Hinweis zur Entsorgung (Nur EU)
Wenn Sie das Symbol mit der „durchgekreuzten Mülltonne�g auf Ihrem Produkt, der dazugehörigen Bedienungsanleitung, der Batterie oder der Verpackung sehen, müssen Sie das Produkt in der vorgeschriebe-nen Art und Weise entsorgen um Schäden an der menschlichen
Gesundheit und der Umwelt zu vermeiden. Batterien oder Akkus, die Schadstoffe enthalten, sind auch mit dem Symbol einer durchgekreuzten Mülltonne gekennzeichnet. In der Nähe zum Mülltonnensymbol befindet sich die chemische Bezeichnung des Schadstoffes.
WICHTIGER HINWEIS FÜR KUNDEN
Dieses Produkt wurde unter strenger Beach-tung von Spezifikationen und Spannungsan-forderungen hergestellt, die im Bestim-mungsland gelten. Wenn Sie dieses Produkt über das Internet, per Postversand und/oder mit telefonischer Bestellung gekauft haben, müssen Sie bestätigen, dass dieses Produkt für Ihr Wohngebiet ausgelegt ist.WARNUNG: Verwendung dieses Produkts in einem anderen Land als dem, für das es bestimmt ist, verwendet wird, kann gefährlich sein und die Garantie des Herstellers oder Importeurs hinfällig lassen werden. Bitte be-wahren Sie diese Quittung als Kaufbeleg auf, da andernfalls das Produkt von der Garantie des Herstellers oder Importeurs ausgeschlos-sen werden kann.
Alle Produkt- und Firmennamen sind Waren-zeichen oder eingetragene Warenzeichen der betreffenden Eigentümer.
40
Inhaltsübersicht
Die wichtigsten Funktionen......... 41Einsetzen der Batterien ................ 41Verwendung des Ständers ........... 42Teile des TM-50 und ihre Funktionen ...42Ein- und Ausschalten .................... 43
Einschalten des Geräts...................... 43Ausschalten des Stimmgeräts........ 44Ausschalten des Metronoms .......... 44
Anschlüsse .................................... 44Wenn Sie eine Verbindung mit einem Instrument oder Kontaktmik-rofon usw. herstellen wollen ........... 44Anschluss von Kopfhörern .............. 45
Verwendung des Stimmgeräts .... 45Stimmen unter Beobachtung der
Messanzeige (Messmodus) ............. 45Stimmen auf einen Referenzton (Ton-Ausgabe-Modus) ...................... 46Stimmen mithilfe des Referenztons und der Messanzeige (Sound Back-Modus) ...47
Verwenden des Metronoms ......... 49Einstellen von Tempo und Taktbe-zeichnung (Taktschlagmodus) ...... 49Eingabe des Tap-Tempos ................. 50
Gleichzeitige Verwendung des Stimmgeräts und Metronoms ..... 51
Gleichzeitige Verwendung des Stimmgeräts und Metronoms ....... 52
Hintergrundbeleuchtung ............ 53Technische Daten .......................... 54
41
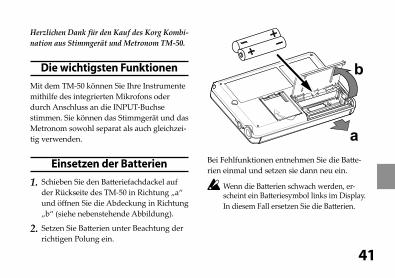
Herzlichen Dank für den Kauf des Korg Kombi-nation aus Stimmgerät und Metronom TM-50.
Die wichtigsten Funktionen
Mit dem TM-50 können Sie Ihre Instrumente mithilfe des integrierten Mikrofons oder durch Anschluss an die INPUT-Buchse stimmen. Sie können das Stimmgerät und das Metronom sowohl separat als auch gleichzei-tig verwenden.
Einsetzen der Batterien
1. Schieben Sie den Batteriefachdackel auf der Rückseite des TM-50 in Richtung „a“ und öffnen Sie die Abdeckung in Richtung „b“ (siehe nebenstehende Abbildung).
2. Setzen Sie Batterien unter Beachtung der richtigen Polung ein.
Bei Fehlfunktionen entnehmen Sie die Batte-rien einmal und setzen sie dann neu ein.
Wenn die Batterien schwach werden, er-scheint ein Batteriesymbol links im Display. In diesem Fall ersetzen Sie die Batterien.
42
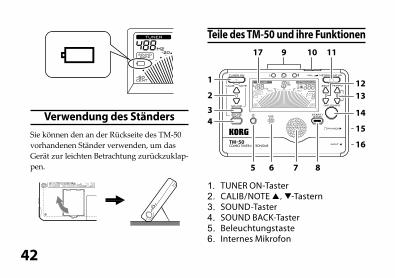
Verwendung des Ständers
Sie können den an der Rückseite des TM-50 vorhandenen Ständer verwenden, um das Gerät zur leichten Betrachtung zurückzuklap-pen.
Teile des TM-50 und ihre Funktionen
9
1
2
34
5 6 7 8
10 11
1213
14
15
16
17
1. TUNER ON-Taster2. CALIB/NOTE p, q-Tastern3. SOUND-Taster4. SOUND BACK-Taster5. Beleuchtungstaste6. Internes Mikrofon
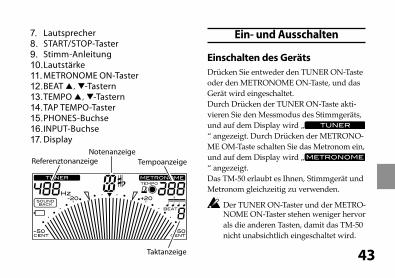
43
7. Lautsprecher8. START/STOP-Taster9. Stimm-Anleitung10.Lautstärke11.METRONOME ON-Taster12.BEAT p, q-Tastern13.TEMPO p, q-Tastern14.TAP TEMPO-Taster15.PHONES-Buchse16.INPUT-Buchse17.Display
ReferenztonanzeigeNotenanzeige
Tempoanzeige
Taktanzeige
Ein- und Ausschalten
Einschalten des GerätsDrücken Sie entweder den TUNER ON-Taste oder den METRONOME ON-Taste, und das Gerät wird eingeschaltet.Durch Drücken der TUNER ON-Taste akti-vieren Sie den Messmodus des Stimmgeräts, und auf dem Display wird „“ angezeigt. Durch Drücken der METRONO-ME OM-Taste schalten Sie das Metronom ein, und auf dem Display wird „“ angezeigt.Das TM-50 erlaubt es Ihnen, Stimmgerät und Metronom gleichzeitig zu verwenden.
Der TUNER ON-Taster und der METRO-NOME ON-Taster stehen weniger hervor als die anderen Tasten, damit das TM-50 nicht unabsichtlich eingeschaltet wird.
44
Drücken Sie zum Ein- und Ausschalten des Geräts die Einschalttaste.
Ausschalten des StimmgerätsWenn das Stimmgerät arbeitet, drücken Sie den TUNER ON-Taster, um das Stimmgerät auszuschalten. Das Stimmgerät schaltet auch automatisch aus, wenn es zwanzig Minuten lang nicht verwendet wird.
Ausschalten des MetronomsWenn das Metronom arbeitet, drücken Sie den METRONOME ON-Taster, um das Met-ronom auszuschalten. Das Metronom schaltet auch automatisch aus, wenn es zwanzig Minuten lang nicht verwendet wird.
Anschlüsse
Wenn Sie eine Verbindung mit einem Instrument oder Kontakt-mikrofon usw. herstellen wollenWenn Sie ein Instrument mit einem Pickup, wie eine elektrische Gitarre, stimmen wollen dann schließen Sie ein Kabel an Ihr Instru-ment an und stecken das Kabel in die INPUT-Buchse des TM-50.
Die INPUT-Buchse ist nur für 1/4-Zoll-Monokabel geeignet. Stereokabel (TRS) können nicht verwendet werden.
Wenn Sie ein Instrument mit getrennt erhältlichen Korg Kontaktmikrofon stimmen wollen, stecken Sie das Kontaktmikrofon in die INPUT-Buchse des TM-50.
Wenn das Instrument nicht an die INPUT-Buchse angeschlossen wird, kann
45
es mithilfe des integrierten Mikrofons gestimmt werden.
Anschluss von KopfhörernSie können 1/8-Zoll-Ministecker-Ohrhörer an die PHONES-Buchse anschließen. Wenn ein-gesteckt, kommt kein Ton vom Lautsprecher.Verwenden Sie den Lautstärkeregler zum Einstellen der Lautstärke der Kopfhörern.
Verwendung des Stimmgeräts
Stimmen unter Beobachtung der Messanzeige (Messmodus)
1. Schließen Sie Ihr Instrumentenkabel oder Kontaktmikrofon an die INPUT-Buchse des TM-50 an.
Wenn das Instrument nicht an die INPUT-Buchse angeschlossen wird,
kann es mithilfe des integrierten Mikrofons gestimmt werden.
2. Drücken Sie die TUNER ON-Taste.Im oberen Teil des Displays erscheint „ “, und darunter wird die Kalibrierung (Referenzton) angezeigt.
3. Um die Kalibrierung zu ändern, drücken Sie die Taste CALIB/NOTE p oder q.Der Kalibrierungswert erhöht oder verrin-gert sich um jeweils 1 Hz. Sie können den Wert fortlaufend erhöhen oder verringern, indem Sie diese Tasten gedrückt halten. Diese Einstellung bleibt gespeichert, auch wenn das Gerät ausgeschaltet wird.
4. Spielen Sie eine einzelne Note auf Ihrem Instrument.Die Note, die der gespielten Note am nächsten ist, wird in der Mitte des Displays angezeigt. Stimmen Sie das
46
Instrument auf die korrekte Tonhöhe, so dass der gewünschte Notenname erscheint.
Wenn Sie das interne Mikrofon ver-wenden, bringen Sie das Instrument so nahe wie möglich zum Mikrofon, so dass keine Außengeräusche beim Stimmvorgang eingefangen werden.
5. Während Sie eine einzelne Note auf Ihrem Instrument spielen, stimmen Sie Ihr Instrument so, dass die Spitze der Messanzeige „q“ anzeigt, und die Mittenanzeige an der Stimmführung leuchtet.Die linke Stimmanzeige leuchtet auf, wenn die Tonlage des Instruments Moll ist, und die rechte Anzeige leuchtet auf, wenn die Tonlage Dur ist.Wenn Sie eine genaue große Terz oder eine kleine Terz über einer bestimmten
Note stimmen wollen, verwenden Sie die Markierungen „ “ (-13,7 Cent) oder „ “ (+15,6 Cent) in der Messanzeige.
Stimmen zu einer genauen großen Terz oder einer kleinen Terz nach obenWenn Sie eine reine große Terz über A (0 Cent) abstimmen wollen, stimmen Sie Ihr In-strument so, dass die Notennamen-Anzeige C anzeigt und die Messanzeige bei „ “ ist.Wenn Sie eine kleine Terz über A (0 Cent) abstimmen wollen, stimmen Sie Ihr Instru-ment so, dass die Notennamen-Anzeige C anzeigt und die Messanzeige bei „ “ ist.
Stimmen auf einen Referenzton (Ton-Ausgabe-Modus)
1. Drücken Sie die TUNER ON-Taste.Sie schalten den Messmodus des Stimm-geräts ein.
47
2. Drücken Sie die SOUND-Taste, um den Ton-Ausgabe-Modus zu wählen.Der Referenzton wird entweder über die Kopfhörer (wenn an die PHONES-Buchse angeschlossen) oder über die Lautsprecher wiedergegeben. Stellen Sie die Wiedergabelautstärke mithilfe des Lautstärkereglers ein.
3. Wählen Sie die gewünschte Note mithil-fe der Taste CALIB/NOTE p oder q.Der wiedergegebene Referenzton ändert sich nach folgendem Schema:C(C3) n C♯ n D n E♭ n E n F n F♯ n G n G♯ n A n B♭ n B n C(C4) ... C(C6) n C(C3)...
Diese Einstellung bleibt gespeichert, auch wenn das Gerät ausgeschaltet wird.
4. Stimmen Sie Ihr Instrument gemäß dem Referenzton.
5. Drücken Sie die SOUND-Taste erneut, um zum Messmodus zurückzukehren.Wenn Sie das Instrument an die INPUT-Buchse oder die Kopfhörer an die PHONES-Buchse anschließen, wird der Messmodus gestartet, und Sie können Ihr Instrument mithilfe der Messskala stimmen.
Stimmen mithilfe des Referenz-tons und der Messanzeige (Sound Back-Modus)Mithilfe dieser Funktion können Sie Ihr Instrument stimmen, wenn entweder das Instrument an die INPUT-Buchse oder die Kopfhörer an die PHONES-Buchse (oder beide) angeschlossen sind.
1. Drücken Sie die TUNER ON-Taste.Damit schalten Sie den Messmodus des Stimmgeräts ein.
48
2. Drücken Sie die SOUND BACK-Taste, um den Sound Back-Modus zu aktivie-ren.Beim Sound Back-Modus wird der Referenzton wiedergegeben, der dem gespielten Ton am nächsten kommt. Stellen Sie die Lautstärke mithilfe des Lautstärkereglers ein.Auf dem Display wird „ “ ange-zeigt.Wenn Kopfhörer an die PHONES-Buchse angeschlossen sind, wird der gespielte Ton über das integrierte Mikrofon oder über die INPUT-Buchse empfangen und der Refe-renzton über die Kopfhörer wiedergegeben.Wenn keine Kopfhörer an die PHONES-Buchse angeschlossen sind, wird der gespielte Ton über die INPUT-Buchse empfangen und der Referenzton über die Lautsprecher wiedergegeben.
Wenn weder die Kopfhörer an die PHONES-Buchse noch das Instru-ment an die INPUT-Buchse ange-schlossen sind, kann der Sound Back-Modus nicht durchgeführt werden.
3. Stimmen Sie Ihr Instrument mithilfe des Referenztons und der Messanzeige.
4. Wenn Sie die SOUND BACK-Taste erneut drücken, kehren Sie in den Mess-modus zurück.
49
Verwenden des Metronoms
Einstellen von Tempo und Taktbe-zeichnung
1. Drücken Sie die METRONOME ON-Taste.Das Pendel des Metronoms erscheint auf dem Display und darüber wird „ “ angezeigt.
2. Drücken Sie zum Einstellen des Tempos die Taste TEMPO p oder q.Halten Sie die Tasten TEMPO p und q gleichzeitig 1 Sekunde lang gedrückt, um zwischen Pendel-Metronom-Schritt (Pendel wie bei einem mechanischen Me-tronom) und ganzem Schritt umzuschal-ten. Wenn Sie Pendel-Metronom-Schritt gewählt haben, erscheint “ ” auf dem Display.
Nachdem Sie „PENDEL-METRONOM SCHRITT“ oder „GANZER SCHRITT“ gewählt haben, drücken Sie die Taste TEMPO p oder q zum Einstellen des Tempos. Diese Einstellung wird auch bewahrt, wenn das Gerät ausgeschaltet ist.
Wenn Sie „PENDEL-METRONOM SCHRITT“ gewählt habenDurch Drücken der Taste TEMPO p bzw.q wird der Tempowert um einen Schritt erhöht bzw. verringert. Sie können den Wert fortlaufend erhöhen oder verringern, indem Sie die entsprechende Taste gedrückt halten.
30 n 32 n 34 ... 88 n 92 n 96 ... 232 n 240 n 252 n 30 ...
Wenn Sie „GANZER SCHRITT“ ge-wählt habenDurch Drücken der Taste TEMPO p bzw. q wird der Tempowert um einen Schritt
50
erhöht bzw. verringert. Sie können den Wert fortlaufend erhöhen oder verrin-gern, indem Sie die entsprechende Taste gedrückt halten.
30 n 31 n 32 ... 250 n 251 n 252 n 30 ...
3. Drücken Sie die START/STOP-Taste zum Starten des Metronoms.Das Metronompendel schwingt im festge-legten Tempo von links nach rechts, und die TAP TEMPO-Taste blinkt gemäß dem Takt.
4. Wenn Sie die Taktbezeichnung ändern wollen, drücken Sie die Taste BEAT p oder q, um die Wahl vorzunehmen. Die Taktbezeichnung ändert sich wie folgt.Die Taktbezeichnung ändert sich wie folgt.Drücken Sie die Taste BEAT p oder q: 0 n1 ... 9 (9 Takte) n (Duole) n
(Triole) n (Triole ohne Mittentakt-schlag) n (Quartole) n (Quar-tole ohne Mittentaktschlag) n 0 ...
5. Spielen Sie zusammen mit dem Metro-nomtempo.
6. Zum Stoppen des Metronoms drücken Sie die START/STOP-Taste.
Eingabe des Tap-TemposDas eingegebene Tap-Tempo wird als BPM (Taktschläge/Minute) angezeigt.
1. Drücken Sie die METRONOME ON-Taste..Das Pendel des Metronoms erscheint auf dem Display und darüber wird „ “ angezeigt.
51
2. Drücken Sie die TAP TEMPO-Taste mehrmals in regelmäßigen Abständen.Das TM-50 erkennt das beim Drücken der Taste verwendete Intervall und stellt es als Tempo ein. Das Intervall wird als BPM (Taktschläge pro Minute) angezeigt.Wenn das Tempo ermittelt wird, erscheint “ ” auf dem Display.Wenn der von der Tap Tempo-Funktion ermittelte BPM-Wert weniger als 30 beträgt, wird „Lo“ auf dem Display ange-zeigt und das Tempo auf „30“ eingestellt.Wenn der von der Tap Tempo-Funktion ermittelte BPM-Wert mehr als 252 beträgt, wird „Hi“ auf dem Display angezeigt und das Tempo auf „252“ eingestellt.
3. Drücken Sie die START/STOP-Taste, um das Metronom zu starten.Das Metronompendel schwingt im festge-legten Tempo von links nach rechts, und
die TAP TEMPO-Taste blinkt gemäß dem Takt.
Das Tap-Tempo kann eingegeben werden, wenn das Metronom ver-wendet wird.
4. Spielen Sie Ihr Instrument gemäß dem Tempo.
5. Drücken Sie die START/STOP-Taste, um das Metronom zu beenden.
Gleichzeitige Verwendung des Stimmgeräts und Metronoms
Das TM-50 erlaubt es Ihnen, Stimmgerät und Metronom gleichzeitig zu verwenden.Einzelheiten zum Stimmgerät-Betrieb und Metronom-Betrieb siehe „Verwendung des Stimmgeräts“ und „Verwendung des Metro-noms“.

52
Gleichzeitige Verwendung des Stimmgeräts und MetronomsWenn Sie zum Beispiel zum Metronom spielen und feststellen, dass Ihr Instrument nicht richtig gestimmt ist, können Sie das Metronom weiter laufen lassen, während Sie das Instrument stimmen.
Verfahren Sie wie folgt.
1. Drücken Sie die METRONOME ON-Taste.
2. Drücken Sie die START/STOP-Taste zum Starten des Metronoms.Wenn erforderlich, legen Sie Tempo und Taktbezeichnung usw. fest.
So legen Sie das Tempo fest: Tastern TEM-PO p oder q.
So legen Sie die Taktbezeichnung fest: Tastern BEAT p oder q.
Bei gleichzeitiger Verwendung von Stimmgerät und Metronom können Sie nicht „Triole“, „Triole ohne Mitten-taktschlagg“, „Quartole“, „Quartole ohne Mittentaktschlag“ als Taktbe-zeichnung wählen.
3. Drücken Sie die Taste TUNER ON zum Einschalten des Messmodus.Das Display zeigt die Stimmanzeige an.Das Tempo des Metronoms wird durch das Blinken der TAP TEMPO-Taste angezeigt.Wenn Sie den Ton-Ausgabe-Modus einschalten wollen, müssen Sie die Taste SOUND drücken.Um zum Sound Back-Modus zu wechseln, drücken Sie die SOUND BACK-Taste.
Stimmen im MessmodusWenn Sie eine einzelne Note auf Ihrem Instrument spielen, zeigt das Display den Namen der Note, die der gespielten
53
Tonlage am nächsten liegt. Stimmen Sie Ihr Instrument unter Beobachtung des Messgeräts und der Stimmanleitung
Stimmen im Ton-Ausgabe-ModusStimmen Sie Ihr Instrument auf die gehörte Tonhöhe.
Sound-Back-ModusStimmen Sie Ihr Instrument mithilfe des Tons, der Messskala und der Stimmanzeige.
4. Drücken Sie nach dem Stimmen Ihres In-struments die TUNER ON-Taste bzw. die METRONOME ON-Taste, um das Stimm-gerät bzw. das Metronom auszuschalten.
Hintergrundbeleuchtung
Drücken Sie bei Bedarf die Beleuchtungs-taste „ “, um die Hintergrundbeleuchtung einzustellen.
Mit jedem Tastendruck verändert sich die Hintergrundbeleuchtung gemäß folgendem Schema: Soft Auto Aus Soft …
Soft: Geringe Leuchtstärke zum Schonen der Batterie.
Auto: Wenn ein Ton gespielt wird oder eine Taste gedrückt wird, wird die Hintergrund-beleuchtung vollständig aktiviert.Wenn 10 Sekunden lang kein Ton gespielt oder keine Taste gedrückt wird, verringert sich die Beleuchtungsstärke automatisch.
Aus: Die Hintergrundbeleuchtung ist deakti-viert.

54
Technische Daten
Stimmgerät-SektionSkala: 12 Noten gleichschwebende
StimmungErkennungsbereich*: C1 (32,0 Hz) ~ C8 (4186,01 Hz)
für eine SinuswelleReferenzton: C3 (130,81 Hz) ~ C6 (1046,50
Hz) 3 OktaveStimmen-Modi: Messmodus (AUTO),
Ton-Ausgabe-Modus (MANUAL), Sound-Back-Modus (AUTO)
Kalibrierungsbereich: A4 = 410 Hz ~ 480 Hz (in 1 Hz-Schritten)
Messgenauigkeit: Besser als ±1 CentKlanggenauigkeit: Besser als ±1 Cent
Metronom-SektionTempo-Bereich: 30 ~ 252 Taktschläge/
Minute (bpm)
Tempo-Einstellung: PENDEL-METRONOM SCHRITT, GANZER SCHRITT, TAP-TEMPOS
Taktbezeichnungen: 0 ~ 9 Takte, Duole, Triole, Triole ohne Mittentaktschlag, Quartole, Quartole ohne Mittentaktschlag
Tempogenauigkeit: ±0,3%
Wichtigste technische DatenAnschlüsse: INPUT-Buchse (1/4 Zoll
Mono), PHONES-Buchse (1/8 Zoll Mini)
Lautsprecher: Dynamischer Lautsprecher (ø 23 mm)
Stromversorgung: Zwei AAA-Batterien (R03, Micro) (3 V)
Batterielebensdauer: Stimmgerät ... Ca. 70/44/26 Stunden (Hin-
tergrundbeleuchtung: Aus/Soft/Auto, A4 kontinuierlicher

55
Eingang, bei Verwendung von Zink-Kohle-Batterien)
Metronom ... Ca. 55/35/22 Stunden
(Hintergrundbeleuchtung: Aus/Soft/Auto, Tempo 120, vier Taktschläge, maximale Lautstärke, bei Verwendung von Zink-Kohle-Batterien)
Abmessungen: 111 (T) x 74 (B) x 18 (H) mmGewicht: 106 g (einschließlich Batte-
rien)Lieferumfang: Bedienungshandbuch,
zwei AAA-Batterien (R03, Micro)
Die Kalibrierung und der Referenzton des Stimmgeräts sowie die Einstellungen für Tem-po, Takt, Pendel-Metronom-Schritt/ganzer Schritt und Rückbeleuchtung des Metronoms bleiben gespeichert, auch wenn das Gerät aus-
geschaltet wird. Wenn Sie aber die Batterien ersetzen, werden diese Einstellungen auf die folgenden Vorgabewerte zurückgesetzt.
Vorgabewerte:Kalibrierung = 440 Hz, Referenzton = A4, Die Einstellungen für Tempo, Taktbezeichnung und Tempoeinstellungstyp, Hintergrundbe-leuchtung einzustellen = aus
* Auch wenn die Tonhöhe innerhalb des Er-kennungsbereichs ist, kann das TM-50 nicht in der Lage sein, die Tonhöhe zu erkennen, wenn der Klang zahlreiche Obertöne (z.B. die niedrigen oder hohen Noten auf einem akustischen Klavier) hat oder das Instru-ment sehr schnelles Abklingen aufweist.
Änderungen der technischen Daten und des Designs ohne vorherige Ankündigung vorbehalten.
56
PrecaucionesUbicaciónEl uso de la unidad en las siguientes ubicaciones puede dar como resultado un mal funcionamien-to:
• Expuesto a la luz directa del sol• Zonas de extremada temperatura o humedad• Zonas con exceso de suciedad o polvo• Zonas con excesiva vibración• Cercano a campos magnéticos
Fuente de alimentaciónApague la unidad cuando no la use la batería. Re-tire las baterías si no va a usar la unidad durante un tiempo largo.
Interferencias con otros aparatosLas radios y televisores situados cerca pueden experimentar interferencias en la recepción. Opere este dispositivo a una distancia prudencial de radios y televisores.
ManejoPara evitar una rotura, no aplique excesiva fuerza a los conmutadores o controles.
CuidadoSi exterior se ensucia, límpiese con un trapo seco. No use líquidos limpiadores como disolvente, ni compuestos inflamables.
Guarde este manualDespués de leer este manual, guárdelo para futuras consultas.
Mantenga los elementos externos aleja-dos del equipoNunca coloque ningún recipiente con líquido cer-ca de este equipo, podría causar un cortocircuito, fuero o descarga eléctrica. Cuide de que no caiga ningún objeto metálico dentro del equipo.
57
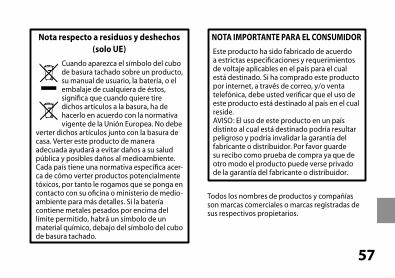
Nota respecto a residuos y deshechos (solo UE)
Cuando aparezca el símbolo del cubo de basura tachado sobre un producto, su manual de usuario, la batería, o el embalaje de cualquiera de éstos, significa que cuando quiere tire dichos artículos a la basura, ha de hacerlo en acuerdo con la normativa vigente de la Unión Europea. No debe
verter dichos artículos junto con la basura de casa. Verter este producto de manera adecuada ayudará a evitar daños a su salud pública y posibles daños al medioambiente. Cada país tiene una normativa específica acer-ca de cómo verter productos potencialmente tóxicos, por tanto le rogamos que se ponga en contacto con su oficina o ministerio de medio-ambiente para más detalles. Si la batería contiene metales pesados por encima del límite permitido, habrá un símbolo de un material químico, debajo del símbolo del cubo de basura tachado.
NOTA IMPORTANTE PARA EL CONSUMIDOR
Este producto ha sido fabricado de acuerdo a estrictas especificaciones y requerimientos de voltaje aplicables en el país para el cual está destinado. Si ha comprado este producto por internet, a través de correo, y/o venta telefónica, debe usted verificar que el uso de este producto está destinado al país en el cual reside.AVISO: El uso de este producto en un país distinto al cual está destinado podría resultar peligroso y podría invalidar la garantía del fabricante o distribuidor. Por favor guarde su recibo como prueba de compra ya que de otro modo el producto puede verse privado de la garantía del fabricante o distribuidor.
Todos los nombres de productos y compañías son marcas comerciales o marcas registradas de sus respectivos propietarios.
58
Índice
Características generales ............. 59Instalar las baterías ...................... 59Uso del soporte ............................. 60Partes del TM-50 y sus funciones 60Activación/desactivación de la alimentación ................................. 61
Para activar la alimentación ............ 61Desactivación del afinador ............. 62Desactivación del metrónomo ...... 62
Conexiones .................................... 62Si desea conectar un instrumento o un micrófono de contacto, etc. ...... 62Conexión de auriculares .................. 63
Uso del afinador ............................ 63Afinación mientras se observa el
medidor ................................................. 63Afinación a un tono de referencia (modo Salida de sonido) .................. 64Afinación utilizando el medidor y el tono de referencia (modo Regreso de sonido) 65
Uso del metrónomo ...................... 66Ajuste del tempo y de la marca de tiempo (modo Tiempo) .................... 66IIntroducción de la marcación del tempo ... 67
Uso del afinador y del metrónomo simultáneamente ......................... 68
Uso del afinador y del metrónomo simultáneamente ............................... 68
Luz de fondo ................................. 70Especificaciones ............................ 71
59
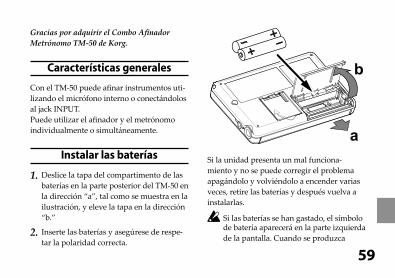
Gracias por adquirir el Combo Afinador Metrónomo TM-50 de Korg.
Características generales
Con el TM-50 puede afinar instrumentos uti-lizando el micrófono interno o conectándolos al jack INPUT.Puede utilizar el afinador y el metrónomo individualmente o simultáneamente.
Instalar las baterías
1. Deslice la tapa del compartimento de las baterías en la parte posterior del TM-50 en la dirección “a”, tal como se muestra en la ilustración, y eleve la tapa en la dirección “b.”
2. Inserte las baterías y asegúrese de respe-tar la polaridad correcta.
Si la unidad presenta un mal funciona-miento y no se puede corregir el problema apagándolo y volviéndolo a encender varias veces, retire las baterías y después vuelva a instalarlas.
Si las baterías se han gastado, el símbolo de batería aparecerá en la parte izquierda de la pantalla. Cuando se produzca
60
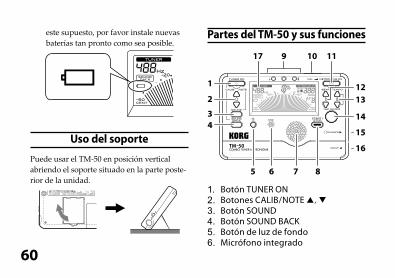
este supuesto, por favor instale nuevas baterías tan pronto como sea posible.
Uso del soporte
Puede usar el TM-50 en posición vertical abriendo el soporte situado en la parte poste-rior de la unidad.
Partes del TM-50 y sus funciones
9
1
2
34
5 6 7 8
10 11
1213
14
15
16
17
1. Botón TUNER ON2. Botones CALIB/NOTE p, q3. Botón SOUND4. Botón SOUND BACK5. Botón de luz de fondo6. Micrófono integrado
61
7. Altavoz (Speaker)8. Botón START/STOP9. Guía de afinación10.Volumen11.Botón METRONOME12.Botones BEAT p, q13.Botones TEMPO p, q14.Botón TAP TEMPO15.Jack PHONES16.Jack INPUT17.Pantalla (Display)
Pantalla de tono de referencia
Pantalla de notasPantalla de tempo
Pantalla de tiempo
Activación/desactivación de la alimentación
Para activar la alimentaciónPulse el botón TUNER ON o el botón ME-TRONOME ON y se activará la alimentación.Al pulsar el botón TUNER ON, el afi-nador se inicia en el modo Medidor y “ ” aparecerá en la pantalla.Al pulsar el botón METRONOME ON, el metrónomo se inicia y “ ” aparecerá en la pantalla.El TM-50 puede utilizar el afinador y el metrónomo simultáneamente.
El botón TUNER ON y el botón METRO-NOME ON se ha diseñado más bajo que el resto de botones para que la alimen-tación no se active involuntariamente al colocar el TM-50 en el bolsillo o en una
62
bolsa. Para activar o desactivar el disposi-tivo, presione el botón de alimentación.
Desactivación del afinadorCon el afinador encendido, pulse el botón TUNER ON para desactivar la alimentación. El afinador también se desactivará auto-máticamente si no se utiliza durante veinte minutos.
Desactivación del metrónomoCon el metrónomo encendido, pulse el botón METRONOME ON para desactivar la alimentación. El metrónomo también se desactivará automáticamente si no se utiliza durante veinte minutos.
Conexiones
Si desea conectar un instrumento o un micrófono de contacto, etc.Si desea afinar un instrumento con una pastilla, como una guitarra eléctrica, conecte un cable al instrumento y enchufe el cable al jack INPUT del TM-50.
El jack INPUT solo se utiliza para un cable mono de 1/4". Los cables estéreo (TRS) no se pueden utilizar.
Si desea afinar el instrumento utilizando un micrófono de contacto de Korg (se vende por separado), enchufe el micrófono de contacto en el jack INPUT del TM-50.
Si no hay ningún dispositivo conectado al jack INPUT, la afinación se realizará mediante el micrófono interno.
63
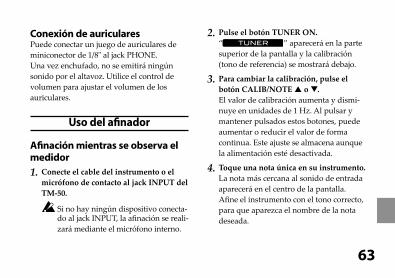
Conexión de auricularesPuede conectar un juego de auriculares de miniconector de 1/8" al jack PHONE.Una vez enchufado, no se emitirá ningún sonido por el altavoz. Utilice el control de volumen para ajustar el volumen de los auriculares.
Uso del afinador
Afinación mientras se observa el medidor
1. Conecte el cable del instrumento o el micrófono de contacto al jack INPUT del TM-50.
Si no hay ningún dispositivo conecta-do al jack INPUT, la afinación se reali-zará mediante el micrófono interno.
2. Pulse el botón TUNER ON.“ ” aparecerá en la parte superior de la pantalla y la calibración (tono de referencia) se mostrará debajo.
3. Para cambiar la calibración, pulse el botón CALIB/NOTE p o q.El valor de calibración aumenta y dismi-nuye en unidades de 1 Hz. Al pulsar y mantener pulsados estos botones, puede aumentar o reducir el valor de forma continua. Este ajuste se almacena aunque la alimentación esté desactivada.
4. Toque una nota única en su instrumento.La nota más cercana al sonido de entrada aparecerá en el centro de la pantalla. Afine el instrumento con el tono correcto, para que aparezca el nombre de la nota deseada.
64
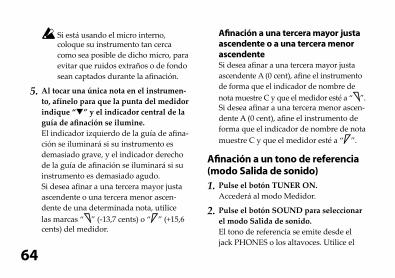
Si está usando el micro interno, coloque su instrumento tan cerca como sea posible de dicho micro, para evitar que ruidos extraños o de fondo sean captados durante la afinación.
5. Al tocar una única nota en el instrumen-to, afínelo para que la punta del medidor indique “q” y el indicador central de la guía de afinación se ilumine.El indicador izquierdo de la guía de afina-ción se iluminará si su instrumento es demasiado grave, y el indicador derecho de la guía de afinación se iluminará si su instrumento es demasiado agudo.Si desea afinar a una tercera mayor justa ascendente o una tercera menor ascen-dente de una determinada nota, utilice las marcas “ ” (-13,7 cents) o “ ” (+15,6 cents) del medidor.
Afinación a una tercera mayor justa ascendente o a una tercera menor ascendenteSi desea afinar a una tercera mayor justa ascendente A (0 cent), afine el instrumento de forma que el indicador de nombre de nota muestre C y que el medidor esté a “ ”.Si desea afinar a una tercera menor ascen-dente A (0 cent), afine el instrumento de forma que el indicador de nombre de nota muestre C y que el medidor esté a “ ”.
Afinación a un tono de referencia (modo Salida de sonido)
1. Pulse el botón TUNER ON.Accederá al modo Medidor.
2. Pulse el botón SOUND para seleccionar el modo Salida de sonido.El tono de referencia se emite desde el jack PHONES o los altavoces. Utilice el

65
control de volumen para ajustar el volu-men de salida.
3. Pulse el botón CALIB/NOTE p o q para seleccionar la nota.El tono de referencia de salida cambia de la siguiente forma.C(C3) n C♯ n D n E♭ n E n F n F♯ n G n G♯ n A n B♭ n B n C(C4) ... C(C6) n C(C3)...
Este ajuste se almacena aunque la alimen-tación esté desactivada.
4. Afine el instrumento según el tono de referencia.
5. Pulse de nuevo el botón SOUND para regresar al modo Medidor.Si está conectado al jack INPUT o al jack PHONES, el modo Medidor se iniciará simultáneamente y podrá afinar el instru-mento mientras visualiza el medidor.
Afinación utilizando el medidor y el tono de referencia (modo Regre-so de sonido)Esta función se puede utilizar cuando está conectado al jack INPUT o al jack PHONES (o a ambos).
1. Pulse el botón TUNER ON.Accederá al modo Medidor.
2. Pulse el botón SOUND BACK para acceder al modo Regreso de sonido.En el modo Regreso de sonido, se emite el tono de referencia más cercano al tono del instrumento de entrada. Utilice el control de volumen para ajustar el volumen.“ ” aparecerá en la pantalla.Si los auriculares están conectados al jack PHONES, el sonido de entrada procedente del micrófono interno o del jack INPUT se recibirá y el tono de referencia se emitirá
66
desde los auriculares.Si no hay nada conectado al jack PHO-NES, el sonido de entrada procedente del jack INPUT se recibe y el tono de referencia se emite desde los altavoces.
Si ni el jack PHONES ni el jack INPUT no están conectados, el modo Regreso de sonido no funcionará.
3. Afine el instrumento utilizando el medi-dor y el tono de referencia.
4. Si se vuelve a pulsar el botón SOUND BACK, regresará al modo Medidor.
Uso del metrónomo
Ajuste del tempo y de la marca de tiempo
1. Pulse el botón METRONOME ON.
El péndulo del metrónomo aparecerá en la pantalla y “ ” aparece-rá encima.
2. Pulse el botón TEMPO p o q para definir el tempo.Pulse y mantenga pulsados los botones TEMPO p y q simultáneamente durante 1 segundo para cambiar entre Paso de péndulo (péndulo de un metrónomo mecánico) o Paso completo.Si se selecciona Paso de péndulo, “ ” aparecerá en la pantalla.Tras seleccionar “PASO DE PÉNDULO” o “PASO COMPLETO”, pulse los botones TEMPO p, q para definir el tempo. Este ajuste se recuerda aunque la alimentación esté desactivada.
Si ha seleccionado “PASO DE PÉNDULO”Al pulsar el botón TEMPO p o q aumentará o se reducirá el valor de tempo en 1 paso. El
67
valor cambiará continuamente si mantiene pulsado el botón.
30 n 32 n 34 ... 88 n 92 n 96 ... 232 n 240 n 252 n 30 ...
Si ha seleccionado “PASO COMPLETO”Al pulsar el botón TEMPO p o q aumen-tará o se reducirá el valor de tempo en 1 paso. El valor cambiará continuamente si mantiene pulsado el botón.
30 n 31 n 32 ... 250 n 251 n 252 n 30 ...
3. Pulse el botón START/STOP para iniciar el metrónomo.El péndulo del metrónomo oscilará de izquierda a derecha según el tempo y el botón TAP TEMPO parpadeará en función del tiempo.
4. Si desea cambiar la marca de tiempo, pulse los botones BEAT p o q para realizar la selección.
La marca de tiempo cambiará de la siguiente forma.Pulse los botones BEAT p o q: 0 n1 ... 9 (9 tiempos) n (Dosillo) n (Tresillo) n (Tresillo sin el tiempo central) n
(Cuatrillo) n (Cuatrillo sin el tiempo central) n 0 ...
5. Toque al ritmo del tempo del metrónomo.
6. Para detener el metrónomo, pulse el botón START/STOP.
IIntroducción de la marcación del tempoLa marcación del tempo que introduzca se mos-trará como un valor BPM (Tiempos por minuto).
1. Pulse el botón METRONOME ONEl péndulo del metrónomo aparecerá en la pantalla y “ ” aparecerá encima.
68
2. Pulse el botón TAP TEMPO varias veces a intervalos regulares.El TM-50 detecta el intervalo utilizado al pulsar el botón, lo muestra como un valor BPM (Tiempos por minuto) y lo definirá como el tempo. Cuando se detecta el tempo, “ ” aparece-rá en la pantalla.Cuando el BPM que ha detectado la marcación del tempo es menor que 30, “Lo” aparecerá en la pantalla y el tempo se definirá en “30”.Si el BPM detectado por la marcación del tempo supera 252, “Hi” aparecerá en la pantalla y el tempo se definirá en “252”.
3. Pulse el botón START/STOP para iniciar el metrónomo.El péndulo del metrónomo oscilará de iz-quierda a derecha según el tempo y el botón TAP TEMPO parpadeará en consecuencia.
La marcación del tempo también se puede introducir con el metrónomo en uso.
4. Toque siguiendo el tempo.
5. Para detener el metrónomo, pulse el botón START/STOP.
Uso del afinador y del metrónomo simultáneamente
El TM-50 le permite utilizar el afinador y el metrónomo simultáneamente.Para obtener detalles sobre el funcionamiento del afinador y del metrónomo, consulte las secciones “Uso del afinador” y “Uso del metrónomo”.
Uso del afinador y del metrónomo simultáneamentePor ejemplo, si toca siguiendo el ritmo del
69
metrónomo y nota que el instrumento no está afinado correctamente, puede dejar el metróno-mo funcionando mientras realiza la afinación.
Realice los pasos siguientes.
1. Pulse el botón METRONOME ON.
2. Pulse el botón START/STOP para iniciar el metrónomo.En caso necesario, especifique el tempo, la marca de tiempo, etc.
Para definir el tempo: utilice los botones TEMPO p, q.
Para definir la marca de tiempo: utilice los botones BEAT p, q.
Si utiliza el afinador y el metrónomo simultáneamente, no puede seleccio-nar “tresillos”, “tresillos sin el tiempo central”, “cuatrillos” o “cuatrillos sin los tiempos centrales” como la marca de tiempo.
3. Pulse el botón TUNER ON para acceder al modo Medidor.En la pantalla se mostrará el medidor de afinación. El tempo del metrónomo se indica mediante el parpadeo del botón TAP TEMPO.Si desea afinar en modo Salida de sonido, debería pulsar el botón SOUND.Para afinar en el modo Regreso de sonido, pulse el botón SOUND BACK.
Afinación en el modo MedidorCuando toca una sola nota en el instru-mento, en la pantalla se muestra el nom-bre de la nota más cercana al tono que ha tocado. Afine el instrumento mientras observa el medidor y la guía de afinación.
Afinación en el modo Salida de sonidoAfine el instrumento según el tono que escuche.
70
Afinación en el modo Regreso de sonidoUtilizando el tono, el medidor de afinación y la guía de afinación, ajuste el instrumento.
4. Una vez finalizada la afinación, pulse el botón TUNER ON y el botón METRONO-ME ON, respectivamente, para desactivar el afinador y el metrónomo.
Luz de fondo
En caso necesario, pulse el botón de luz de fondo “ ” para definir la luz de fondo.Cada vez que pulse el botón de luz de fondo, podrá alternar entre Suave Auto Desacti-vada Suave…
Suave: iluminación de baja intensidad para evitar el consumo de las baterías
Auto: cuando se introduce un tono y se pulsa el botón, la luz de fondo de ilumina por completo. Si no se introduce un sonido o no se pulsa un botón durante 10 segundos, la luz de fondo cambiará automáticamente al brillo de ajuste suave.
Desactivada: la luz de fondo no se ilumina.
71
Especificaciones
Sección del afinadorTemperamento: 12-notas, temperamento igualRango de detección*: C1 (32,70 Hz)–C8 (4186,01 Hz)
para una onda sunisoidalTonos de Referencia: C3 (130,81 Hz)–C6 (1046,50
Hz) 3 de octavaModos de afinación: Modo Medidor (AUTO),
modo Salida de sonido (MANUAL), modo Regreso de sonido (AUTO)
Intervalo de calibración: A4 = 410 Hz–480 Hz (1 Hz step)Precisión de medición: Dentro de ±1centésimaPrecisión del sonido: Dentro de ±1centésima
Sección del metrónomoIntervalo de tempo: 30–252 tiempos por minuto
(bpm)Ajuste de tempo: PASO DE PÉNDULO,
PASO COMPLETO, MAR-
CACIÓN DEL TEMPOMarcas de tiempo: 0–9 tiempos, dosillos, tresi-
llos, tresillos sin el tiempo central, cuatrillos, cuatrillos sin los tiempos centrales
Precisión de tempo: ±0,3%
Especificaciones principalesConectores: Jack INPUT (1/4" mono),
jack PHONES (1/8" mini)Altavoz: Altavoz dinámico (23 mm
de diámetro)Alimentación: Dos baterías AAA (3V)Vida útil de las baterías: Afinador... Aproximadamente 70/44/26
horas (luz de fondo: Desac-tivada/Auto/Suave, entrada continua de A4, si se utilizan baterías de carbón-zinc)
Metrónomo...
72
Aproximadamente 55/35/22 horas (luz de fondo: Desactivada/Auto/Suave, tempo: 120, cuatro tiempos, volumen máximo, si se utili-zan baterías de carbón-zinc)
Dimensiones (Anch. x Prof. x Alt.): 111 x 74 x 18 mmPeso: 106 g incluidas las baterías
suministradasElementos incluidos: Manual de usuario; baterias
AAA (x2)La calibración y el tono de referencia del afi-nador así como los ajustes de tempo, tiempo, Paso de péndulo, Paso completo y luz de fondo del metrónomo se almacenan aunque la alimentación esté desactivada.Sin embargo, cuando se cambian las baterías, estos ajustes regresarán a los valores por defecto siguientes.
Valores por defecto:Calibración = 440 Hz, intervalo de detección = A4, tempo = 120, marca de tiempo = cuatro tiempos, tipo de ajuste de tempo = PENDULUM STEP, ajuste de luz de fondo = desactivada
* Aunque el tono se encuentre dentro del intervalo de detección, puede que el TM-50 no sea capaz de detectar el tono si el sonido contiene numerosos armónicos superiores (como las notas bajas y altas de un piano acústico) o si el instrumento tiene una desactivación rápida.
Las especificaciones y el aspecto están sujetas a cambios sin previo aviso por mejora.