Embed Size (px)
Citation preview
Installation Guide
TruckMate Integration 10/2014
1
TMW Asset Maintenance
TMT Fleet Maintenance – Windows TruckMate Installation Guide
Installation Guide
TruckMate Integration 10/2014
2
Table of Contents TruckMate Interface ................................................................................................................................ 3
TruckMate TMT Fleet Maintenance Interface ........................................................................................... 4
TruckMate Installation from TruckMate Side ........................................................................................... 6 System Components .............................................................................................................................. 6 TMW Service Host .................................................................................................................................. 7
Repeatable Jobs .............................................................................................................................. 8 One Time Jobs ................................................................................................................................. 8
Properties ............................................................................................................................................... 9 The General Options Tab............................................................................................................... 10 The Asset Map Tab ........................................................................................................................ 11 The Unit Type Map Tab ................................................................................................................. 12 The Status Map Tab ....................................................................................................................... 13 The GL Map Tab ............................................................................................................................ 14
Data Transfer Example ......................................................................................................................... 14
TruckMate Installation Guide from TMT Fleet Maintenance Side ........................................................ 18 Requirements ....................................................................................................................................... 18 Installing the TruckMate Interface-Socket Server ................................................................................ 18 TMT Fleet Maintenance Accounting Export Program .......................................................................... 23
Requirements ................................................................................................................................. 23 Launching ....................................................................................................................................... 23 Accounting Export Parameters ...................................................................................................... 24 Parameter Descriptions.................................................................................................................. 24 Execution Examples ....................................................................................................................... 25 Log File........................................................................................................................................... 25 Export Vendor General Ledger Expenses on PO .......................................................................... 25 Schedule Jobs ................................................................................................................................ 26 Installation without TMT Fleet Maintenance .................................................................................. 30
Troubleshooting the TruckMate TMT Fleet Maintenance Interface ..................................................... 31
Installation Guide
TruckMate Integration 10/2014
3
TruckMate Interface
TMW Systems' TruckMate core functionality gives you the tools to run your business smarter and more efficiently - from Customer Service to Dispatch, Auto Rating to Billing. With the TMT Fleet Maintenance interface the two products share information to create a more comprehensive package that will boost your performance.
Benefits
Streamline Processes
Eliminate Double Data Entry
Improved Data Integrity
Installation Guide
TruckMate Integration 10/2014
4
TruckMate TMT Fleet Maintenance Interface
The TruckMate TMT Fleet Maintenance Interface allows for communication between the 2 products. The following integration points will be communicated:
New assets added in TruckMate are detected by the interface and automatically added to the TMT Fleet Maintenance database. Also, when new assets are loaded into the TMT Fleet Maintenance system they are transferred automatically to the TruckMate database.
Meter readings are transferred from TruckMate to the TMT Fleet Maintenance which will drive the Preventive Maintenance scheduling for your equipment.
When equipment assets are moved in the TruckMate system the location of the asset is updated in TMT Fleet Maintenance.
All TMT Fleet Maintenance orders are passed directly to the TruckMate accounting system. Purchase Orders are passed to Accounts Payable, Repair Invoices are passed to Accounts Receivable, and Repair Order costs are passed to the General Ledger.
TruckMate pulls a list of work pending Repair Orders from the TMT Fleet Maintenance program so the dispatch operations are aware of work that needs to be performed and can more easily route the equipment to a shop for repairs.
The TruckMate TMT Fleet Maintenance interface takes planned PMs, Repair Orders, Work Pending and Out of Service status and sends them to TruckMate. The interface does this by polling the units status and reporting it back to TruckMate. The three statuses are:
Active - this means that the unit has no plans, work pending, or repair orders open for it. The unit is free to be dispatch in TruckMate.
In-shop - this status indicates that the unit has an open Repair Order and is currently being worked on. This unit cannot be dispatched in TruckMate.
Plan - this status indicates that a Plan has been created in Shop Planner. The plan can be for a PM or Repair Order, when the plan is created it will create a Special Event in TruckMate.
Installation Guide
TruckMate Integration 10/2014
5
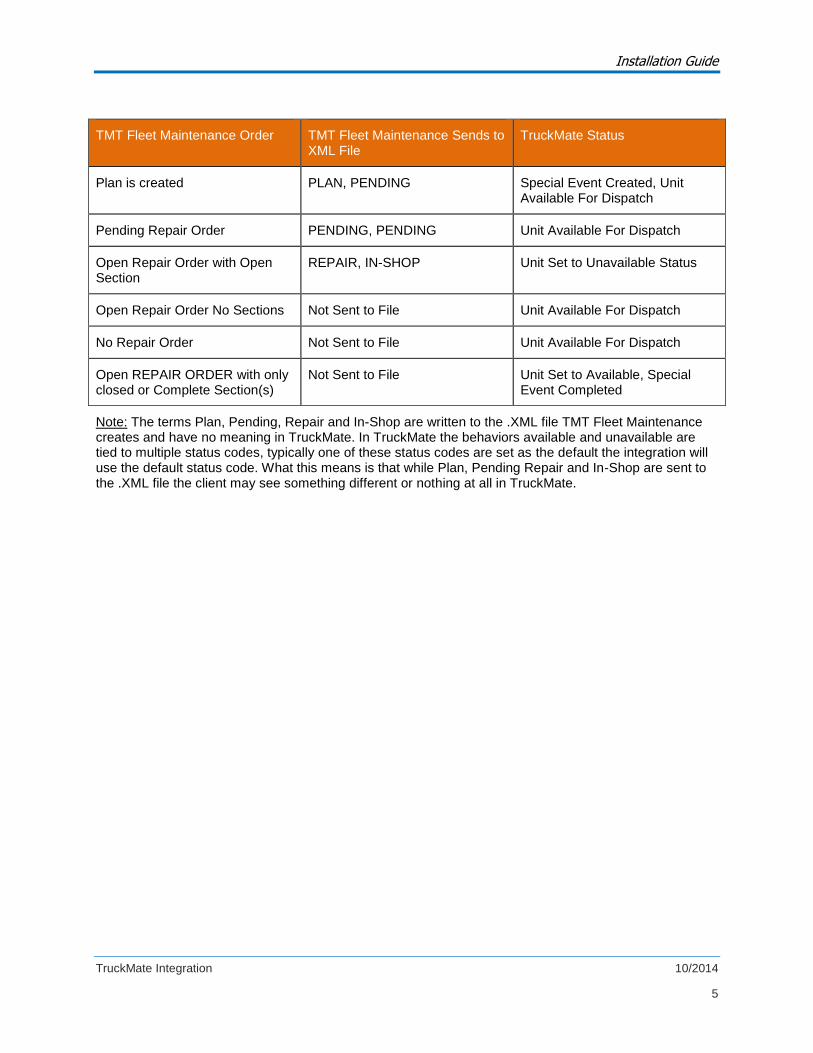
TMT Fleet Maintenance Order TMT Fleet Maintenance Sends to XML File
TruckMate Status
Plan is created PLAN, PENDING Special Event Created, Unit Available For Dispatch
Pending Repair Order PENDING, PENDING Unit Available For Dispatch
Open Repair Order with Open Section
REPAIR, IN-SHOP Unit Set to Unavailable Status
Open Repair Order No Sections Not Sent to File Unit Available For Dispatch
No Repair Order Not Sent to File Unit Available For Dispatch
Open REPAIR ORDER with only closed or Complete Section(s)
Not Sent to File Unit Set to Available, Special Event Completed
Note: The terms Plan, Pending, Repair and In-Shop are written to the .XML file TMT Fleet Maintenance creates and have no meaning in TruckMate. In TruckMate the behaviors available and unavailable are tied to multiple status codes, typically one of these status codes are set as the default the integration will use the default status code. What this means is that while Plan, Pending Repair and In-Shop are sent to the .XML file the client may see something different or nothing at all in TruckMate.
Installation Guide
TruckMate Integration 10/2014
6
TruckMate Installation from TruckMate Side
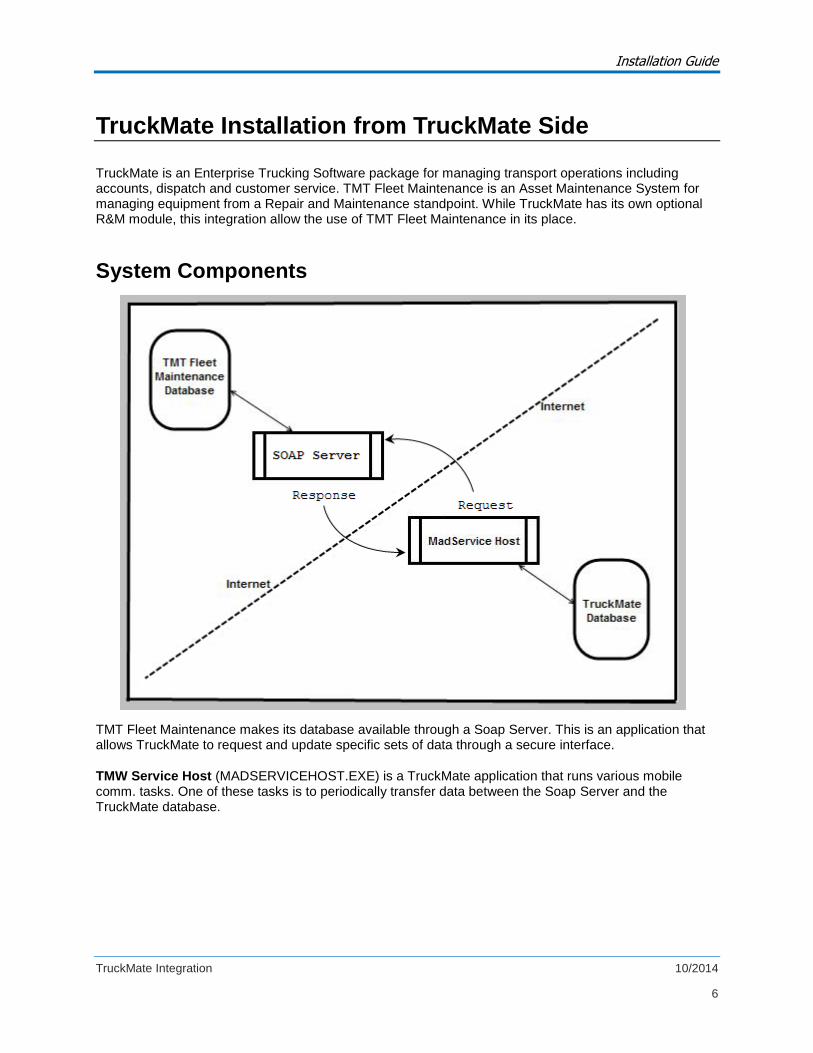
TruckMate is an Enterprise Trucking Software package for managing transport operations including accounts, dispatch and customer service. TMT Fleet Maintenance is an Asset Maintenance System for managing equipment from a Repair and Maintenance standpoint. While TruckMate has its own optional R&M module, this integration allow the use of TMT Fleet Maintenance in its place.
System Components
TMT Fleet Maintenance makes its database available through a Soap Server. This is an application that allows TruckMate to request and update specific sets of data through a secure interface.
TMW Service Host (MADSERVICEHOST.EXE) is a TruckMate application that runs various mobile comm. tasks. One of these tasks is to periodically transfer data between the Soap Server and the TruckMate database.

Installation Guide
TruckMate Integration 10/2014
7
TMW Service Host
Show me
The MadServiceHost contains a number of process threads that run independently. Each thread can autonomously perform its assigned tasks according to a specified schedule. In our case, that means we can periodically poll the TMT Fleet Maintenance system for data.
Show me
Installation Guide
TruckMate Integration 10/2014
8
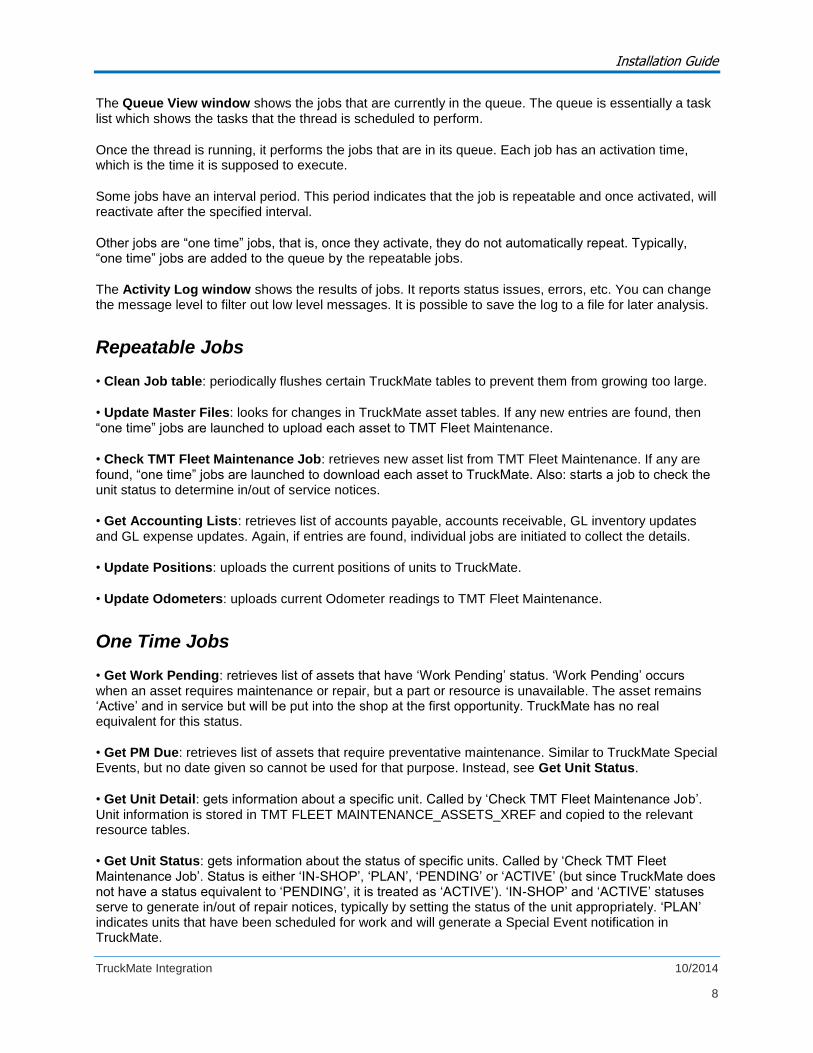
The Queue View window shows the jobs that are currently in the queue. The queue is essentially a task list which shows the tasks that the thread is scheduled to perform.
Once the thread is running, it performs the jobs that are in its queue. Each job has an activation time, which is the time it is supposed to execute.
Some jobs have an interval period. This period indicates that the job is repeatable and once activated, will reactivate after the specified interval.
Other jobs are “one time” jobs, that is, once they activate, they do not automatically repeat. Typically, “one time” jobs are added to the queue by the repeatable jobs.
The Activity Log window shows the results of jobs. It reports status issues, errors, etc. You can change the message level to filter out low level messages. It is possible to save the log to a file for later analysis.
Repeatable Jobs
• Clean Job table: periodically flushes certain TruckMate tables to prevent them from growing too large.
• Update Master Files: looks for changes in TruckMate asset tables. If any new entries are found, then “one time” jobs are launched to upload each asset to TMT Fleet Maintenance.
• Check TMT Fleet Maintenance Job: retrieves new asset list from TMT Fleet Maintenance. If any are found, “one time” jobs are launched to download each asset to TruckMate. Also: starts a job to check the unit status to determine in/out of service notices.
• Get Accounting Lists: retrieves list of accounts payable, accounts receivable, GL inventory updates and GL expense updates. Again, if entries are found, individual jobs are initiated to collect the details.
• Update Positions: uploads the current positions of units to TruckMate.
• Update Odometers: uploads current Odometer readings to TMT Fleet Maintenance.
One Time Jobs
• Get Work Pending: retrieves list of assets that have ‘Work Pending’ status. ‘Work Pending’ occurs when an asset requires maintenance or repair, but a part or resource is unavailable. The asset remains ‘Active’ and in service but will be put into the shop at the first opportunity. TruckMate has no real equivalent for this status.
• Get PM Due: retrieves list of assets that require preventative maintenance. Similar to TruckMate Special Events, but no date given so cannot be used for that purpose. Instead, see Get Unit Status.
• Get Unit Detail: gets information about a specific unit. Called by ‘Check TMT Fleet Maintenance Job’. Unit information is stored in TMT FLEET MAINTENANCE_ASSETS_XREF and copied to the relevant resource tables.
• Get Unit Status: gets information about the status of specific units. Called by ‘Check TMT Fleet Maintenance Job’. Status is either ‘IN-SHOP’, ‘PLAN’, ‘PENDING’ or ‘ACTIVE’ (but since TruckMate does not have a status equivalent to ‘PENDING’, it is treated as ‘ACTIVE’). ‘IN-SHOP’ and ‘ACTIVE’ statuses serve to generate in/out of repair notices, typically by setting the status of the unit appropriately. ‘PLAN’ indicates units that have been scheduled for work and will generate a Special Event notification in TruckMate.
Installation Guide
TruckMate Integration 10/2014
9
• Sync Master: uploads information about a specific asset to TMT Fleet Maintenance. Called by ‘Update Master Files’. As well as uploading to TMT Fleet Maintenance, asset is also directly added to TMT FLEET MAINTENANCE_ASSETS_XREF to prevent it from being downloaded later by ‘Get Unit Detail’.
• Get Account Detail: gets information about individual accounting transactions. Called by ‘Get Accounting Lists’. GL Expense and GL Inventory adjustments are copied to the GL_TRANS table. AP Invoice adjustments are copied to AP_BILL and AP_BILL_EXP tables. AR Invoice adjustments are (by default) converted into Freight Bills (FBs) and stored in TLORDER. However, this process is controlled by a stored procedure (SP) so it could be rewritten to store the AR invoice in one of the RM tables.
• Set Meters: this is a general purpose job that sets a particular metric for a specific asset. For example, it is used by ‘Update Odometer’ to export odometer readings to TMT Fleet Maintenance.
• Set Physical Status: sets the status of assets, including Location. Called by ‘Update Positions’.
• Get Meters: Reverse of ‘Set Meters’. Not currently used.
• Get Unit XRef: retrieve list of units with both TruckMate and TMT Fleet Maintenance IDs. Not currently used.
• Get Shop XRef: retrieve list of shops with both TruckMate and TMT Fleet Maintenance IDs. Not currently used.
• Get Physical Location: retrieves location of assets from TMT Fleet Maintenance tables. Not currently used.
Properties
The TMT Fleet Maintenance/TruckMate interface can be implemented on a customer-specific basis. Not all of the data in TruckMate needs to be exported to TMT Fleet Maintenance, and vice versa. In addition, each company has unique needs as to what table fields match. To accommodate these requirements, the interface provides a Properties window that allows setup, including table mapping. To access it, right click on the TMT Fleet Maintenance Module on the main TMW Service Host form and select ‘Properties’.
Note: Properties are only available if the process is stopped.
Installation Guide
TruckMate Integration 10/2014
10
The General Options Tab
Show me
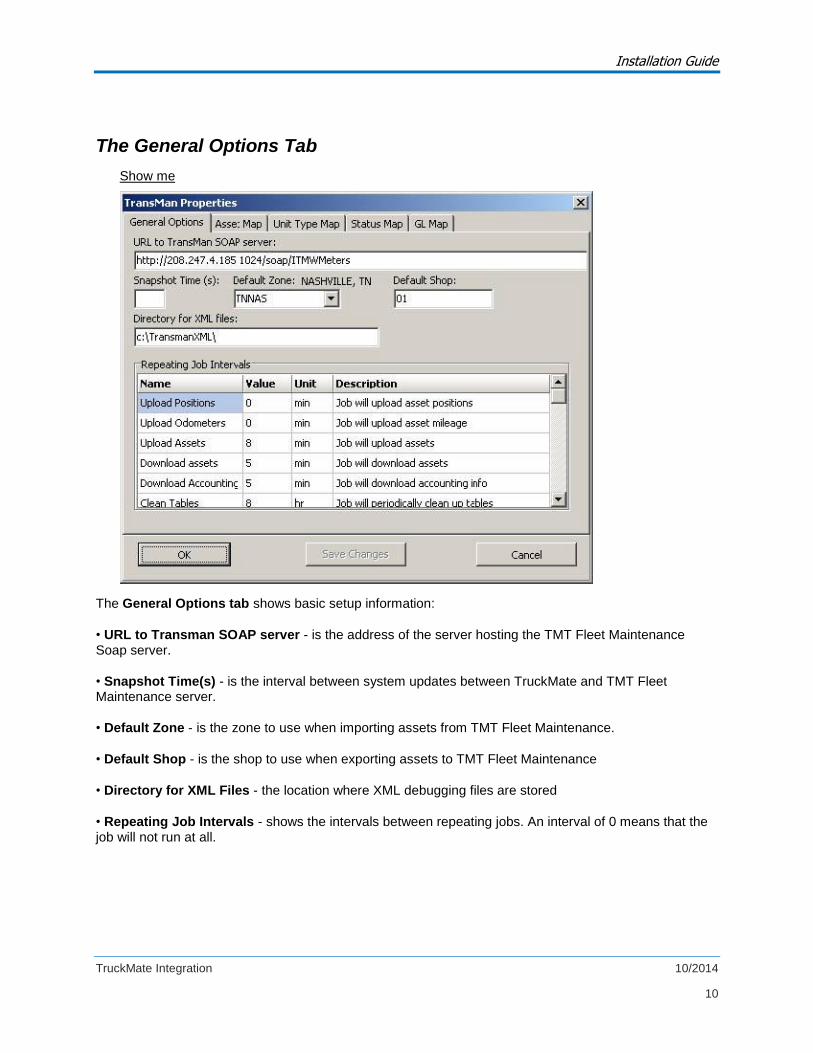
The General Options tab shows basic setup information:
• URL to Transman SOAP server - is the address of the server hosting the TMT Fleet Maintenance Soap server.
• Snapshot Time(s) - is the interval between system updates between TruckMate and TMT Fleet Maintenance server.
• Default Zone - is the zone to use when importing assets from TMT Fleet Maintenance.
• Default Shop - is the shop to use when exporting assets to TMT Fleet Maintenance
• Directory for XML Files - the location where XML debugging files are stored
• Repeating Job Intervals - shows the intervals between repeating jobs. An interval of 0 means that the job will not run at all.
Installation Guide
TruckMate Integration 10/2014
11
The Asset Map Tab
Show me
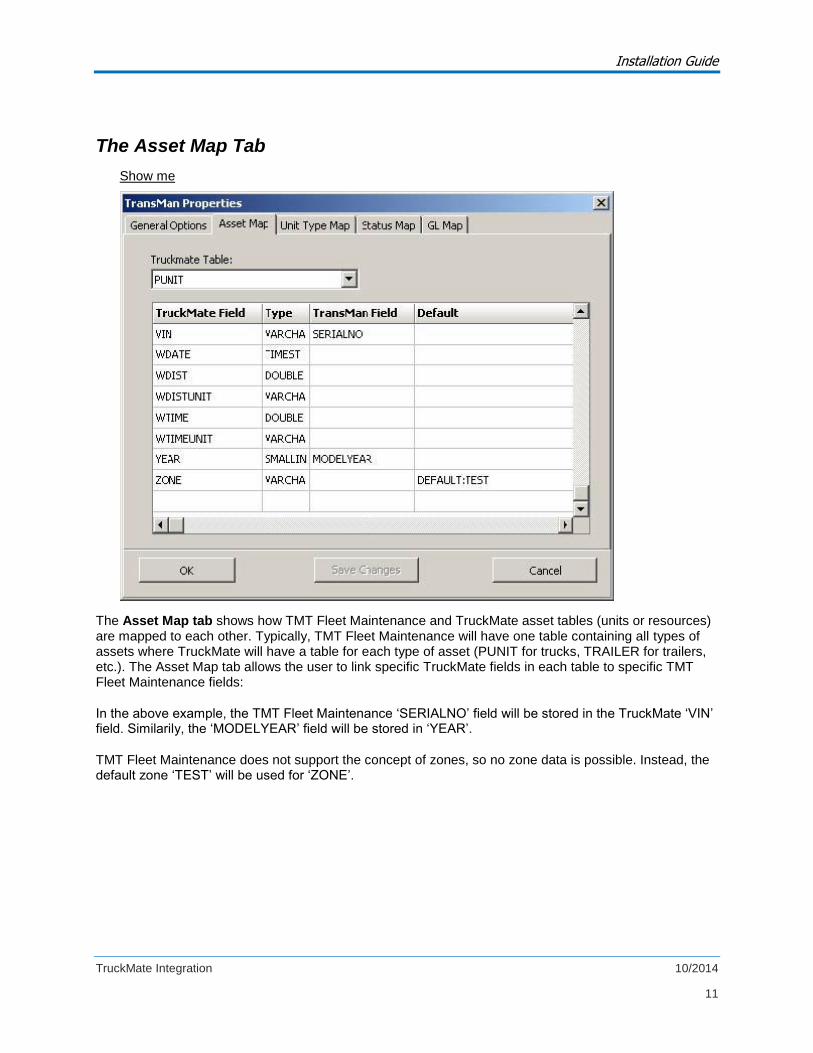
The Asset Map tab shows how TMT Fleet Maintenance and TruckMate asset tables (units or resources) are mapped to each other. Typically, TMT Fleet Maintenance will have one table containing all types of assets where TruckMate will have a table for each type of asset (PUNIT for trucks, TRAILER for trailers, etc.). The Asset Map tab allows the user to link specific TruckMate fields in each table to specific TMT Fleet Maintenance fields:
In the above example, the TMT Fleet Maintenance ‘SERIALNO’ field will be stored in the TruckMate ‘VIN’ field. Similarily, the ‘MODELYEAR’ field will be stored in ‘YEAR’.
TMT Fleet Maintenance does not support the concept of zones, so no zone data is possible. Instead, the default zone ‘TEST’ will be used for ‘ZONE’.
Installation Guide
TruckMate Integration 10/2014
12
The Unit Type Map Tab
Show me
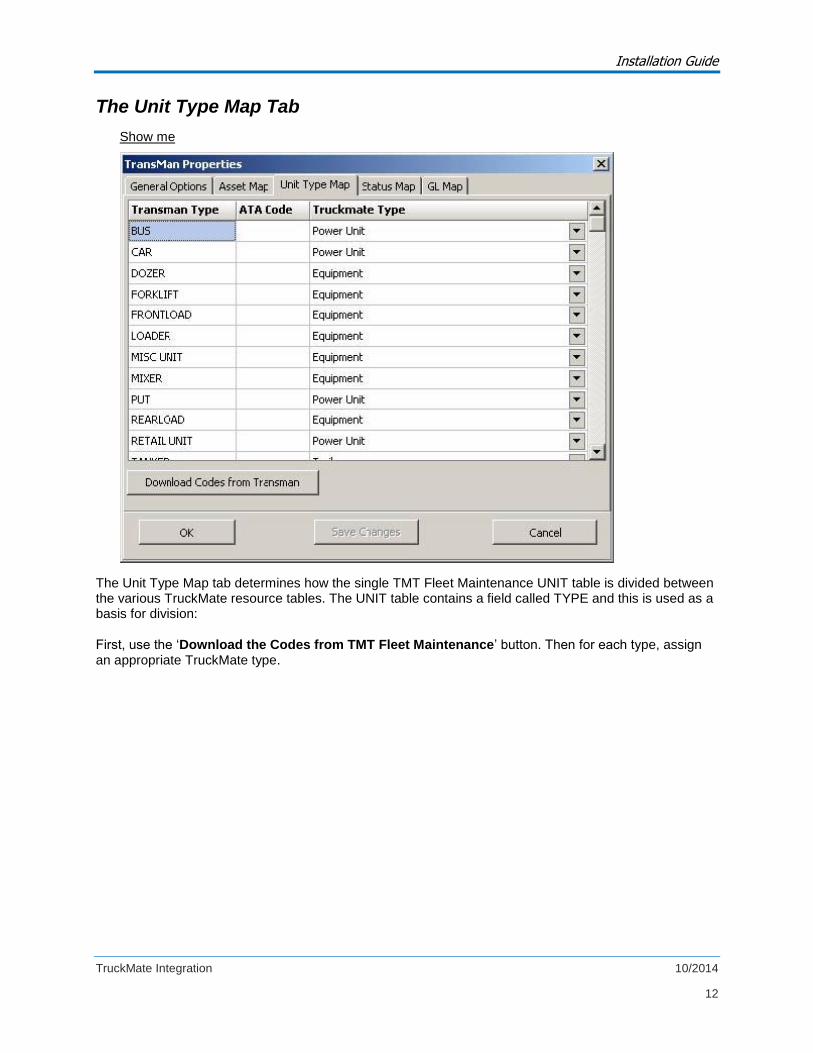
The Unit Type Map tab determines how the single TMT Fleet Maintenance UNIT table is divided between the various TruckMate resource tables. The UNIT table contains a field called TYPE and this is used as a basis for division:
First, use the ‘Download the Codes from TMT Fleet Maintenance’ button. Then for each type, assign an appropriate TruckMate type.
Installation Guide
TruckMate Integration 10/2014
13
The Status Map Tab
Show me
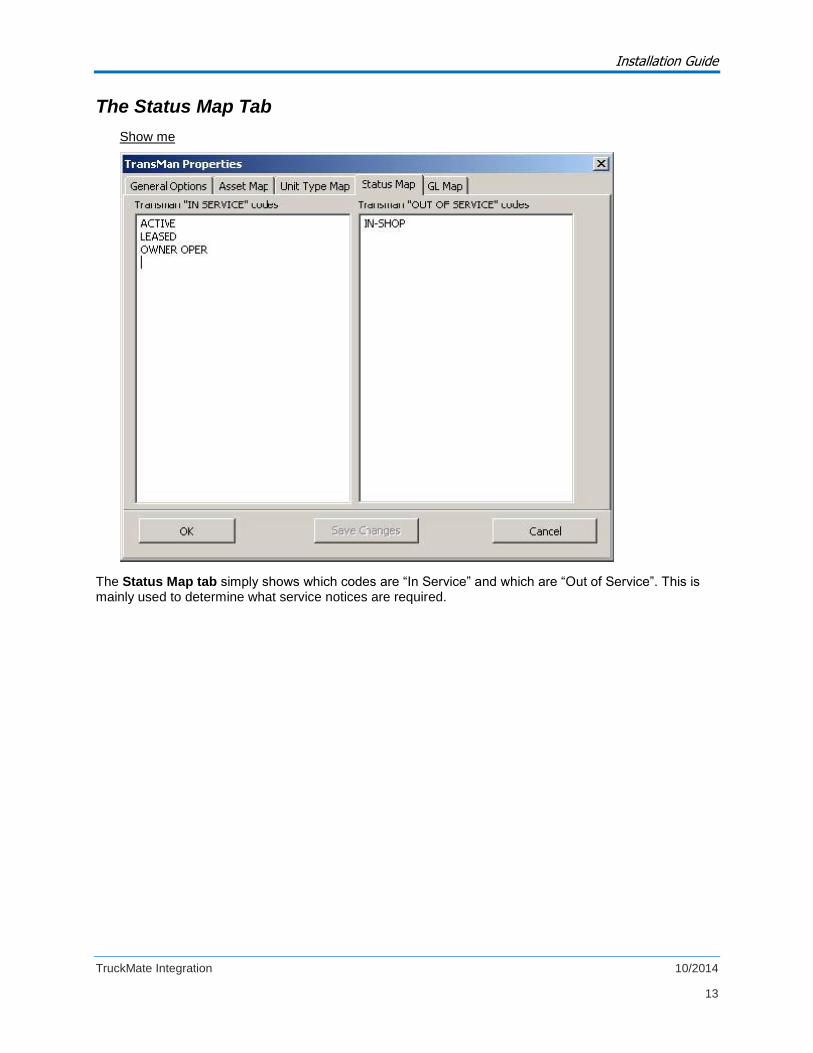
The Status Map tab simply shows which codes are “In Service” and which are “Out of Service”. This is mainly used to determine what service notices are required.
Installation Guide
TruckMate Integration 10/2014
14
The GL Map Tab
Show me
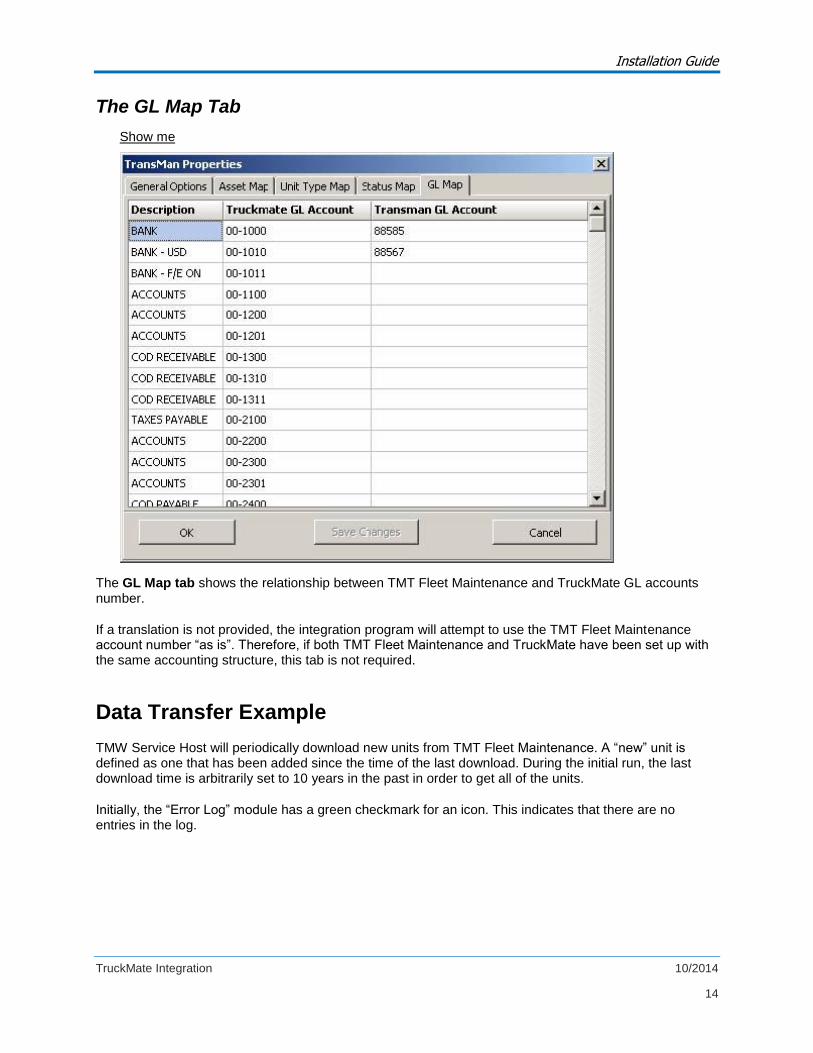
The GL Map tab shows the relationship between TMT Fleet Maintenance and TruckMate GL accounts number.
If a translation is not provided, the integration program will attempt to use the TMT Fleet Maintenance account number “as is”. Therefore, if both TMT Fleet Maintenance and TruckMate have been set up with the same accounting structure, this tab is not required.
Data Transfer Example
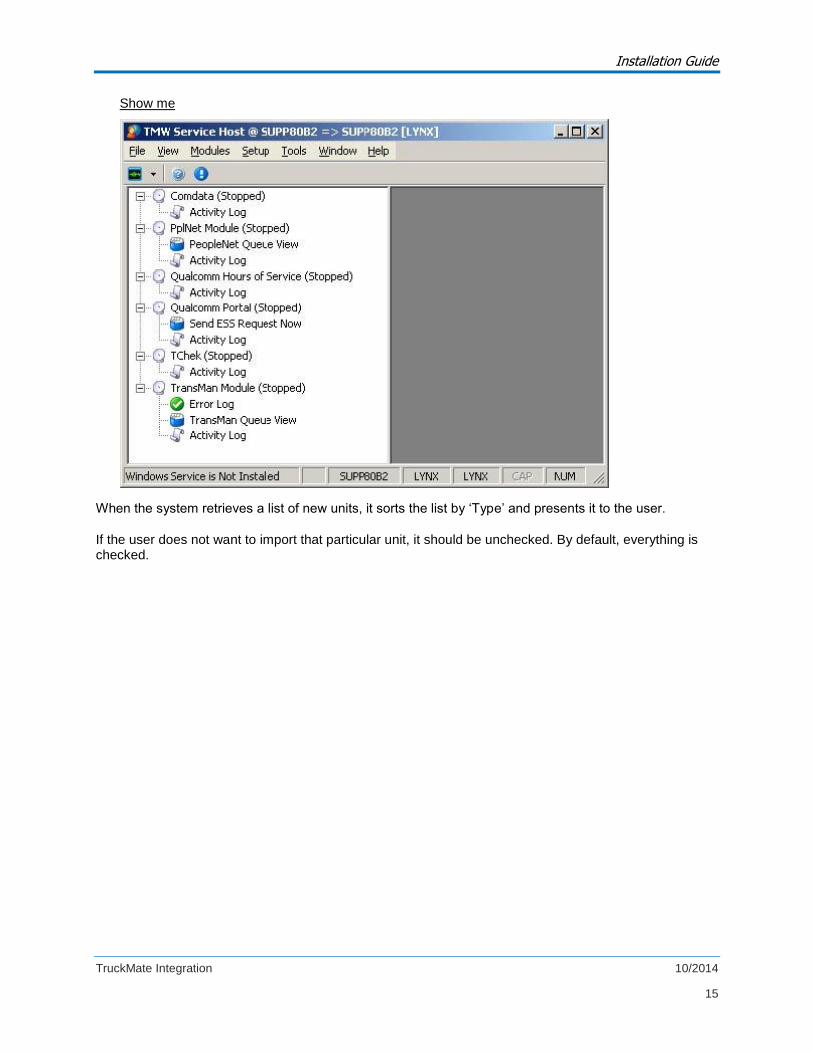
TMW Service Host will periodically download new units from TMT Fleet Maintenance. A “new” unit is defined as one that has been added since the time of the last download. During the initial run, the last download time is arbitrarily set to 10 years in the past in order to get all of the units.
Initially, the “Error Log” module has a green checkmark for an icon. This indicates that there are no entries in the log.
Installation Guide
TruckMate Integration 10/2014
15
Show me
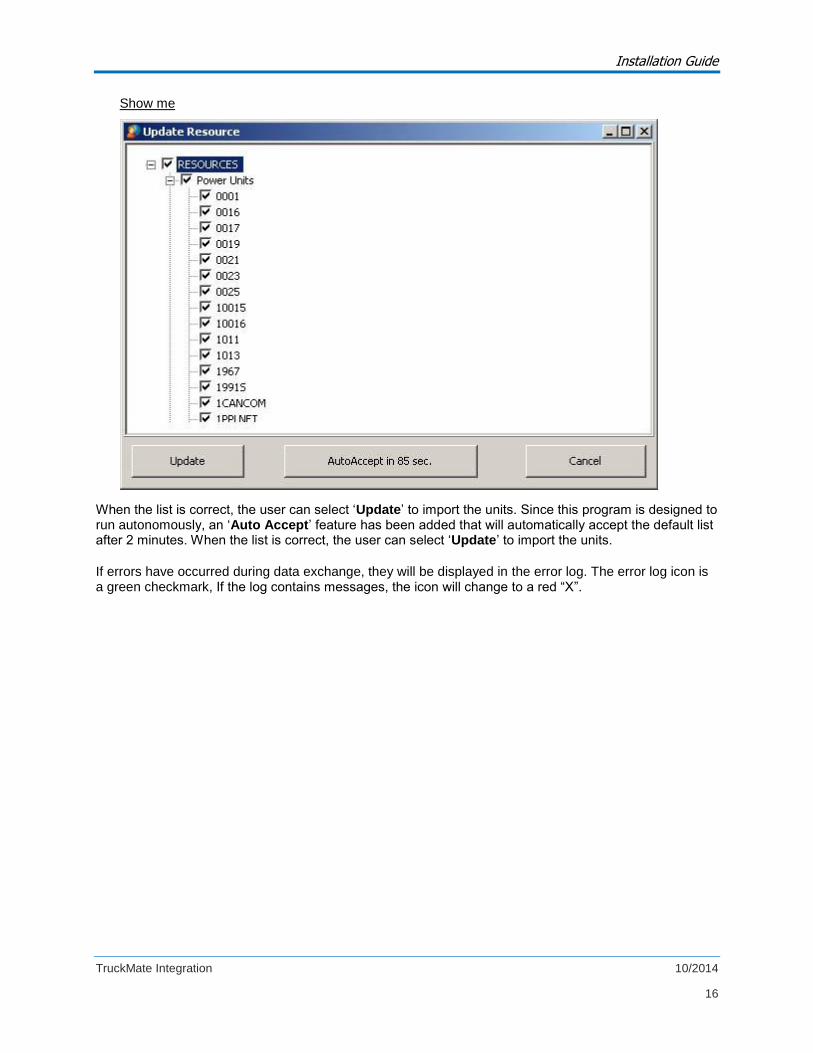
When the system retrieves a list of new units, it sorts the list by ‘Type’ and presents it to the user.
If the user does not want to import that particular unit, it should be unchecked. By default, everything is checked.
Installation Guide
TruckMate Integration 10/2014
16
Show me
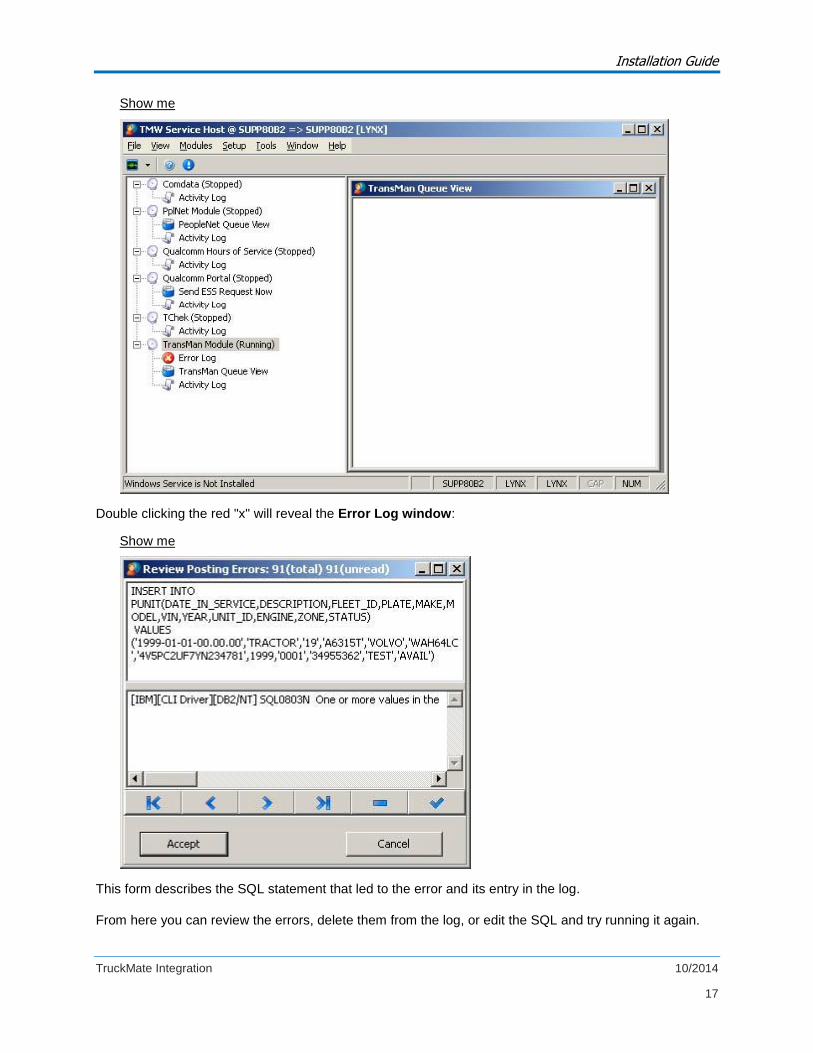
When the list is correct, the user can select ‘Update’ to import the units. Since this program is designed to run autonomously, an ‘Auto Accept’ feature has been added that will automatically accept the default list after 2 minutes. When the list is correct, the user can select ‘Update’ to import the units.
If errors have occurred during data exchange, they will be displayed in the error log. The error log icon is a green checkmark, If the log contains messages, the icon will change to a red “X”.
Installation Guide
TruckMate Integration 10/2014
17
Show me
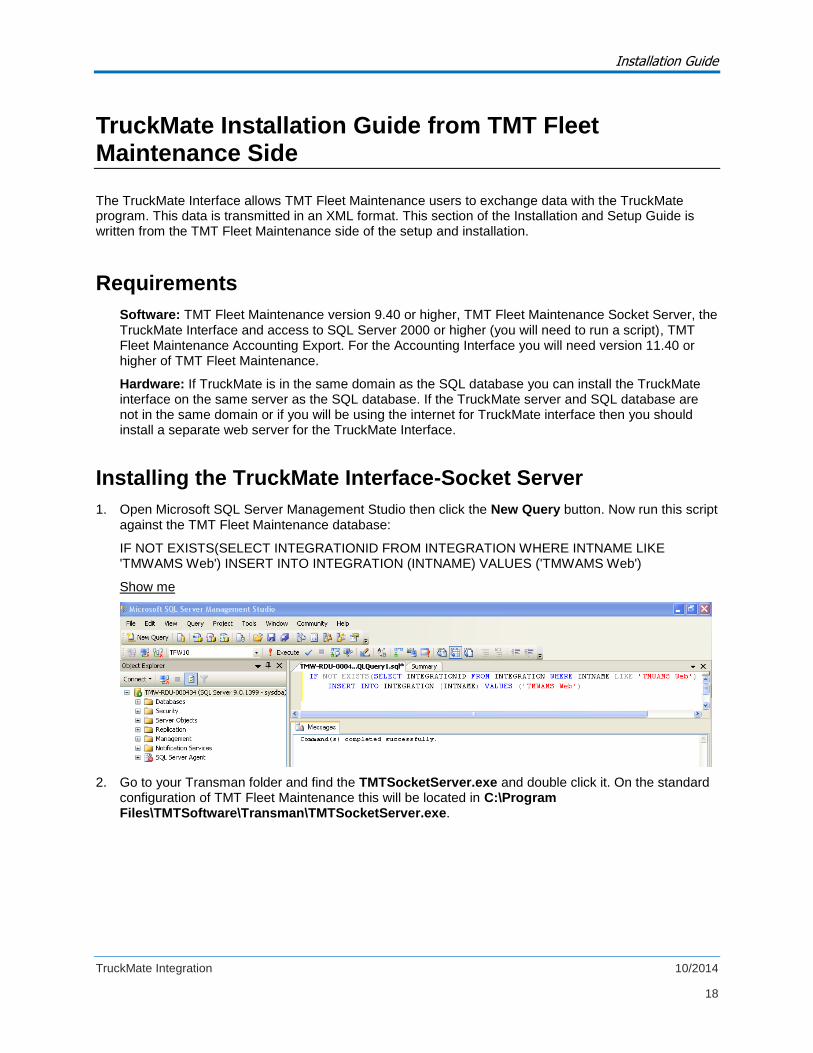
Double clicking the red "x" will reveal the Error Log window:
Show me
This form describes the SQL statement that led to the error and its entry in the log.
From here you can review the errors, delete them from the log, or edit the SQL and try running it again.
Installation Guide
TruckMate Integration 10/2014
18
TruckMate Installation Guide from TMT Fleet Maintenance Side
The TruckMate Interface allows TMT Fleet Maintenance users to exchange data with the TruckMate program. This data is transmitted in an XML format. This section of the Installation and Setup Guide is written from the TMT Fleet Maintenance side of the setup and installation.
Requirements
Software: TMT Fleet Maintenance version 9.40 or higher, TMT Fleet Maintenance Socket Server, the TruckMate Interface and access to SQL Server 2000 or higher (you will need to run a script), TMT Fleet Maintenance Accounting Export. For the Accounting Interface you will need version 11.40 or higher of TMT Fleet Maintenance.
Hardware: If TruckMate is in the same domain as the SQL database you can install the TruckMate interface on the same server as the SQL database. If the TruckMate server and SQL database are not in the same domain or if you will be using the internet for TruckMate interface then you should install a separate web server for the TruckMate Interface.
Installing the TruckMate Interface-Socket Server
1. Open Microsoft SQL Server Management Studio then click the New Query button. Now run this script against the TMT Fleet Maintenance database:
IF NOT EXISTS(SELECT INTEGRATIONID FROM INTEGRATION WHERE INTNAME LIKE 'TMWAMS Web') INSERT INTO INTEGRATION (INTNAME) VALUES ('TMWAMS Web')
Show me
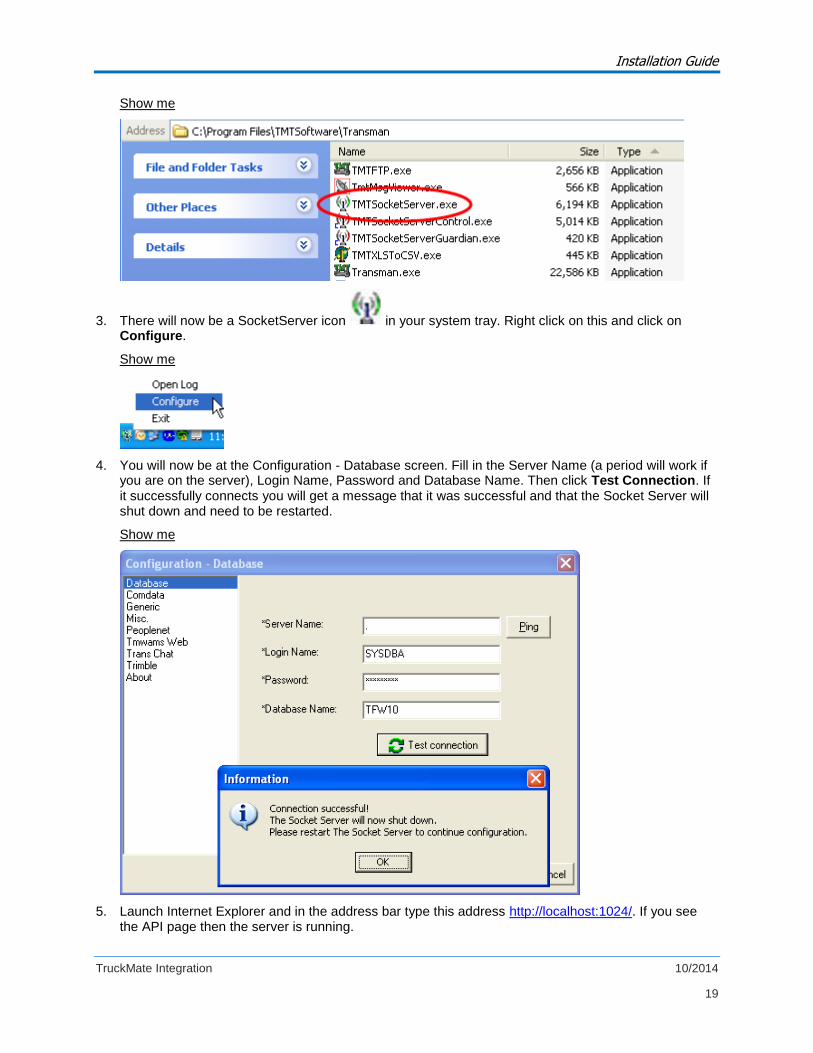
2. Go to your Transman folder and find the TMTSocketServer.exe and double click it. On the standard configuration of TMT Fleet Maintenance this will be located in C:\Program Files\TMTSoftware\Transman\TMTSocketServer.exe.
Installation Guide
TruckMate Integration 10/2014
19
Show me
3. There will now be a SocketServer icon in your system tray. Right click on this and click on Configure.
Show me
4. You will now be at the Configuration - Database screen. Fill in the Server Name (a period will work if you are on the server), Login Name, Password and Database Name. Then click Test Connection. If it successfully connects you will get a message that it was successful and that the Socket Server will shut down and need to be restarted.
Show me
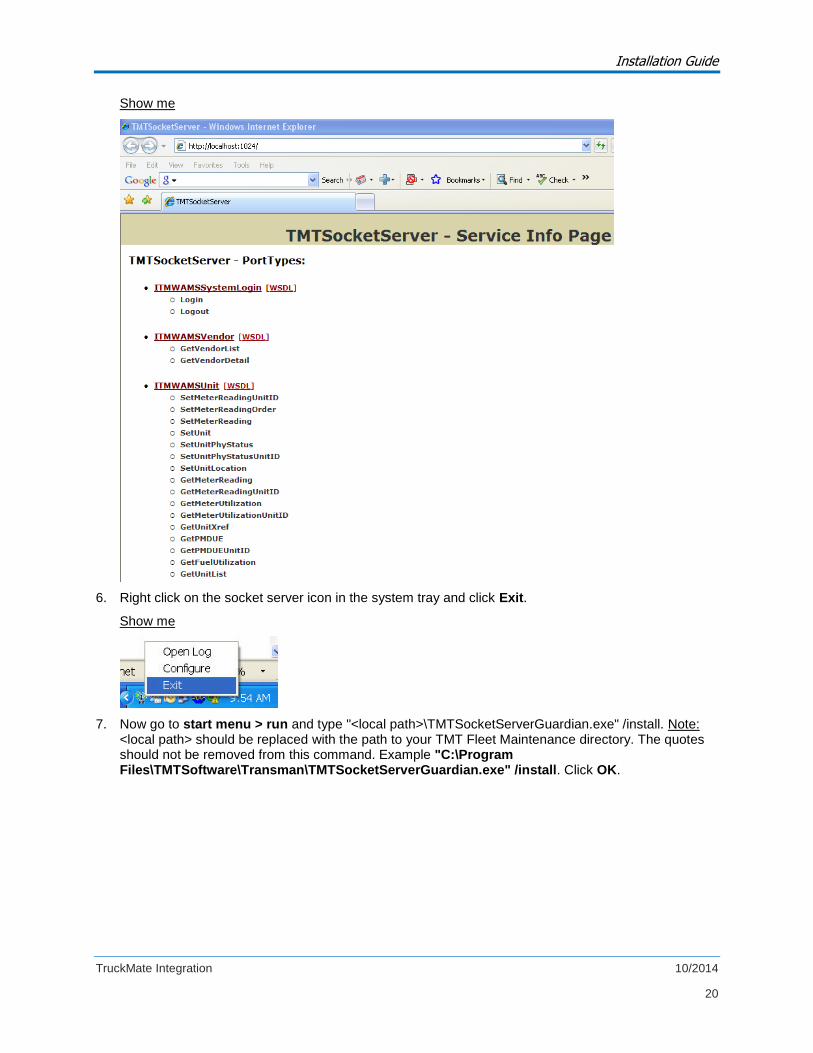
5. Launch Internet Explorer and in the address bar type this address http://localhost:1024/. If you see the API page then the server is running.
Installation Guide
TruckMate Integration 10/2014
20
Show me
6. Right click on the socket server icon in the system tray and click Exit.
Show me
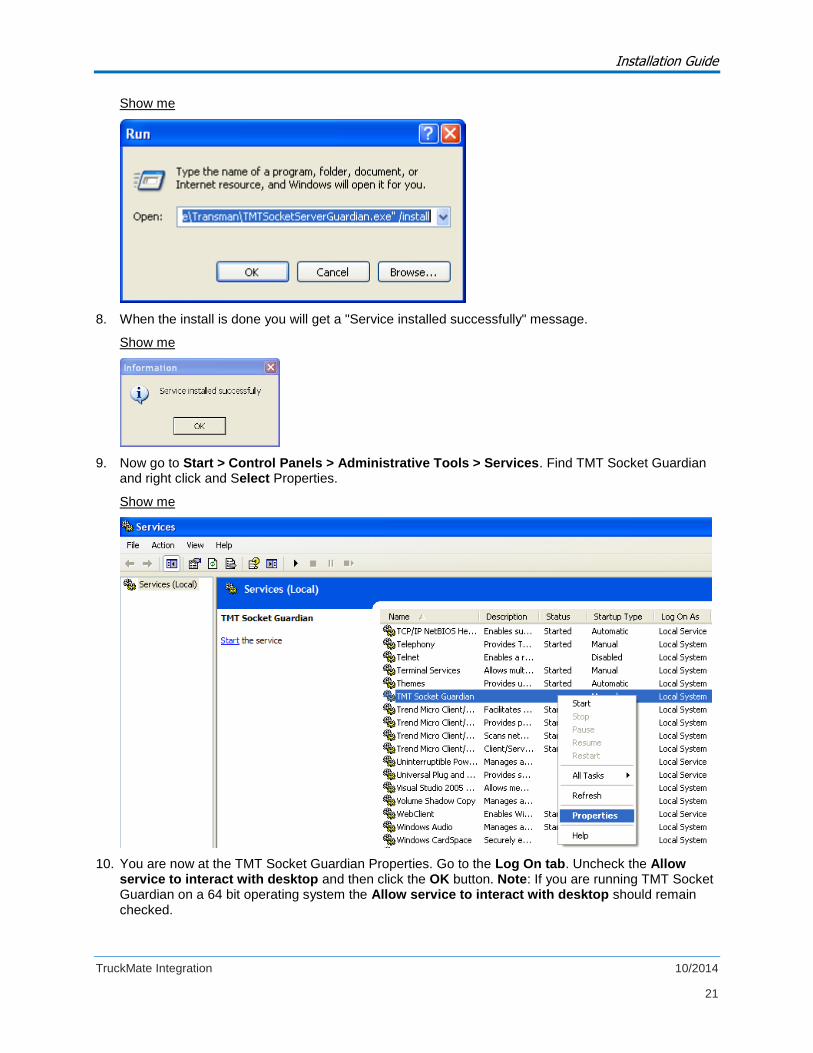
7. Now go to start menu > run and type "<local path>\TMTSocketServerGuardian.exe" /install. Note: <local path> should be replaced with the path to your TMT Fleet Maintenance directory. The quotes should not be removed from this command. Example "C:\Program Files\TMTSoftware\Transman\TMTSocketServerGuardian.exe" /install. Click OK.
Installation Guide
TruckMate Integration 10/2014
21
Show me
8. When the install is done you will get a "Service installed successfully" message.
Show me
9. Now go to Start > Control Panels > Administrative Tools > Services. Find TMT Socket Guardian and right click and Select Properties.
Show me
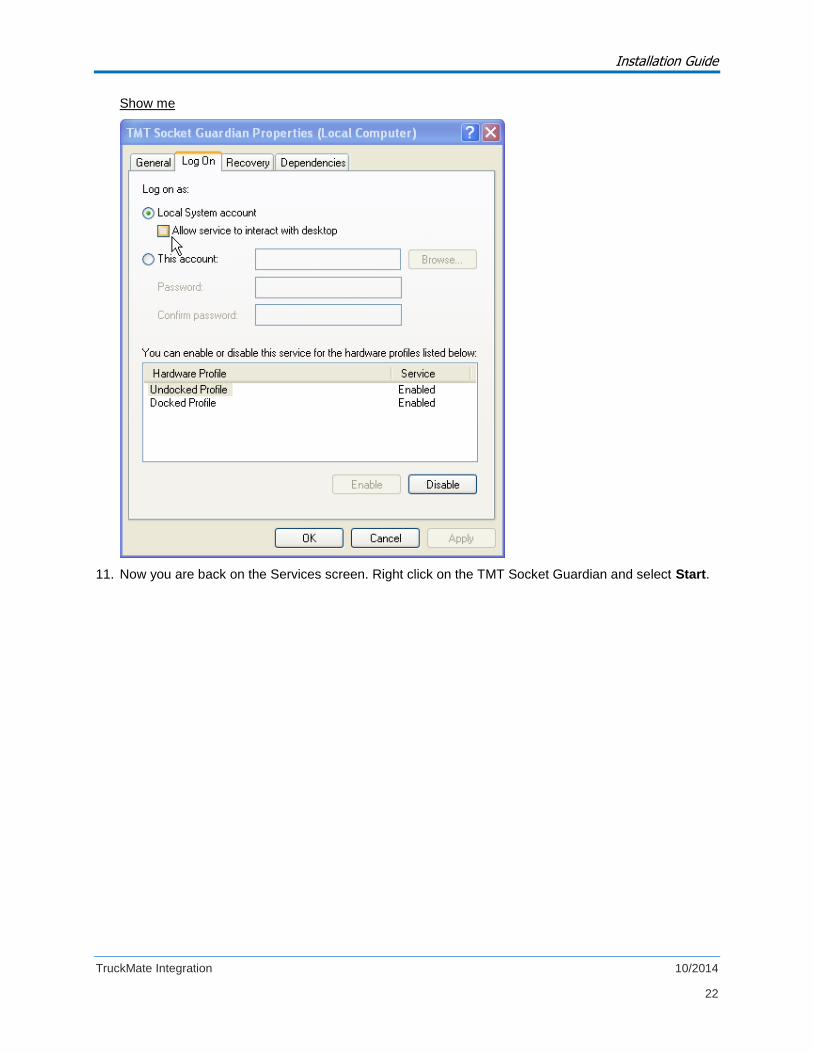
10. You are now at the TMT Socket Guardian Properties. Go to the Log On tab. Uncheck the Allow service to interact with desktop and then click the OK button. Note: If you are running TMT Socket Guardian on a 64 bit operating system the Allow service to interact with desktop should remain checked.
Installation Guide
TruckMate Integration 10/2014
22
Show me
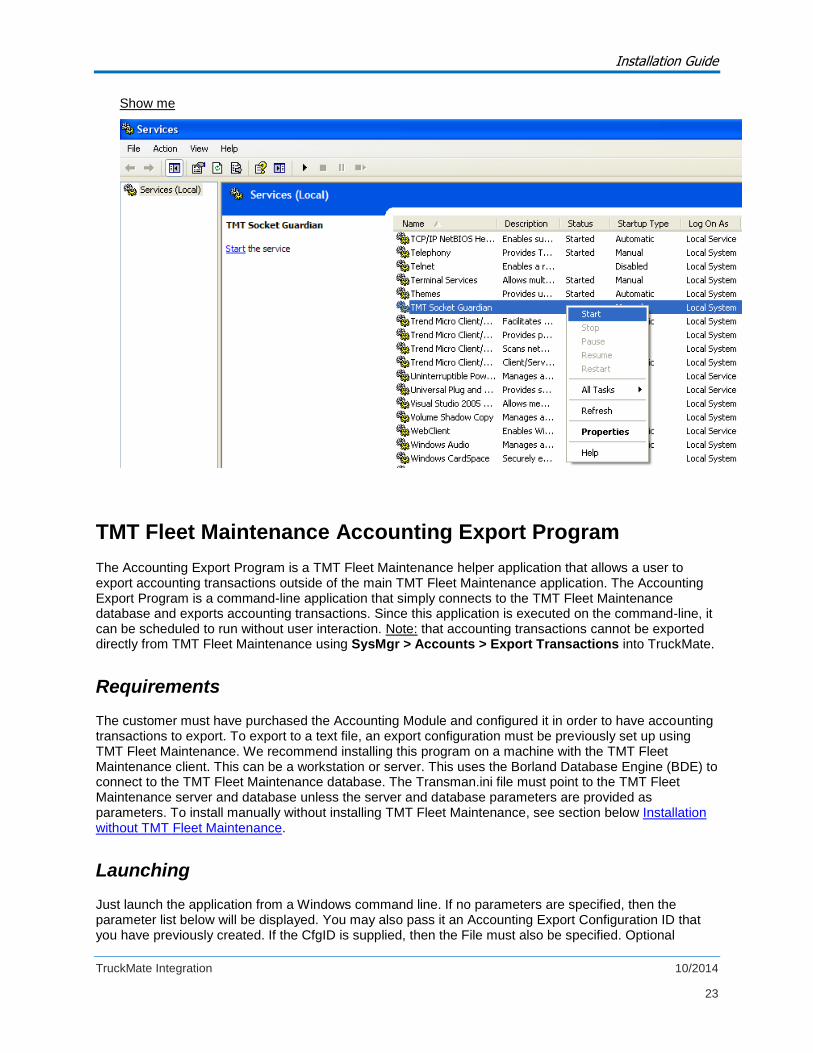
11. Now you are back on the Services screen. Right click on the TMT Socket Guardian and select Start.
Installation Guide
TruckMate Integration 10/2014
23
Show me
TMT Fleet Maintenance Accounting Export Program
The Accounting Export Program is a TMT Fleet Maintenance helper application that allows a user to export accounting transactions outside of the main TMT Fleet Maintenance application. The Accounting Export Program is a command-line application that simply connects to the TMT Fleet Maintenance database and exports accounting transactions. Since this application is executed on the command-line, it can be scheduled to run without user interaction. Note: that accounting transactions cannot be exported directly from TMT Fleet Maintenance using SysMgr > Accounts > Export Transactions into TruckMate.
Requirements
The customer must have purchased the Accounting Module and configured it in order to have accounting transactions to export. To export to a text file, an export configuration must be previously set up using TMT Fleet Maintenance. We recommend installing this program on a machine with the TMT Fleet Maintenance client. This can be a workstation or server. This uses the Borland Database Engine (BDE) to connect to the TMT Fleet Maintenance database. The Transman.ini file must point to the TMT Fleet Maintenance server and database unless the server and database parameters are provided as parameters. To install manually without installing TMT Fleet Maintenance, see section below Installation without TMT Fleet Maintenance.
Launching
Just launch the application from a Windows command line. If no parameters are specified, then the parameter list below will be displayed. You may also pass it an Accounting Export Configuration ID that you have previously created. If the CfgID is supplied, then the File must also be specified. Optional
Installation Guide
TruckMate Integration 10/2014
24
parameters will be used if they are formatted correctly. It will validate all parameters and output error messages to the screen and log file.
Accounting Export Parameters
Usage(1) - export to table:
SRVR:server DBNAME:db NTAUTH AcctType
Parameters:
- SRVR: "SRVR:" followed by server overrides Transman.ini
- DBNAME: "DBNAME:" followed by database overrides Transman.ini
- NTAUTH "NTAUTH" use NT Authentication instead of user and pw
- *UName Transman UserID, omit if using NTAUTH
- *Pword User Password, omit if using NTAUTH
- *AcctType ("GL", "AP", "AR")
All parameters must be in the specified order.
* denotes required fields.
Parameter Descriptions
SRVR: “SRVR:” plus the server name will override the Transman.ini server
DBNAME: “DBNAME:” plus the database name will override the Transman.ini database
NTAUTH “NTAUTH” Use NT Authentication instead of username and password
*Uname Transman UserID, do not use if using NTAUTH
*Pword User Password, do not use if using NTAUTH
*AcctType Type of transaction to export (“GL”,”AP”,”AR”)
where GL is General Ledger, AP is Accounts Payable, and AR is
Accounts Receivable
*Denotes required. Required parameters must be specified and must be in the order designated.
Case is not important except for password. Parameters containing spaces must be surrounded with double quotes. If provided, SRVR, DBNAME, and NTAUTH must be the first parameters. If overriding the server and database in the Transman.ini file, both the server and database parameters must be specified.
If using NT Authentication, the user that executes the program must be granted access to the TMT Fleet Maintenance database and granted the TFWUser role. This would be best done by creating a Windows
Installation Guide
TruckMate Integration 10/2014
25
domain group and granting that group access to TMT Fleet Maintenance. Also the username and password would not be specified. To use NT Authentication, the client machine must be configured according to the instructions in NT Authentication Using the Borland Database Engine.doc.
Execution Examples
The following is an example of how to execute AccountingExport.exe providing parameters.
Export to Tables
Use user, password, and override server and database
AccountingExport.exe SRVR:myserver DBNAME:TFW myuser mypassword gl
Use NT Authentication and override server and database:
AccountingExport.exe SRVR:myserver DBNAME:TFW NTAUTH gl
Log File
The program will create an application log called AccountingExport.log. The log will store the time of the export start and completion. All error messages will be written to the log. The log file is written in the same directory as the AccountingExport program.
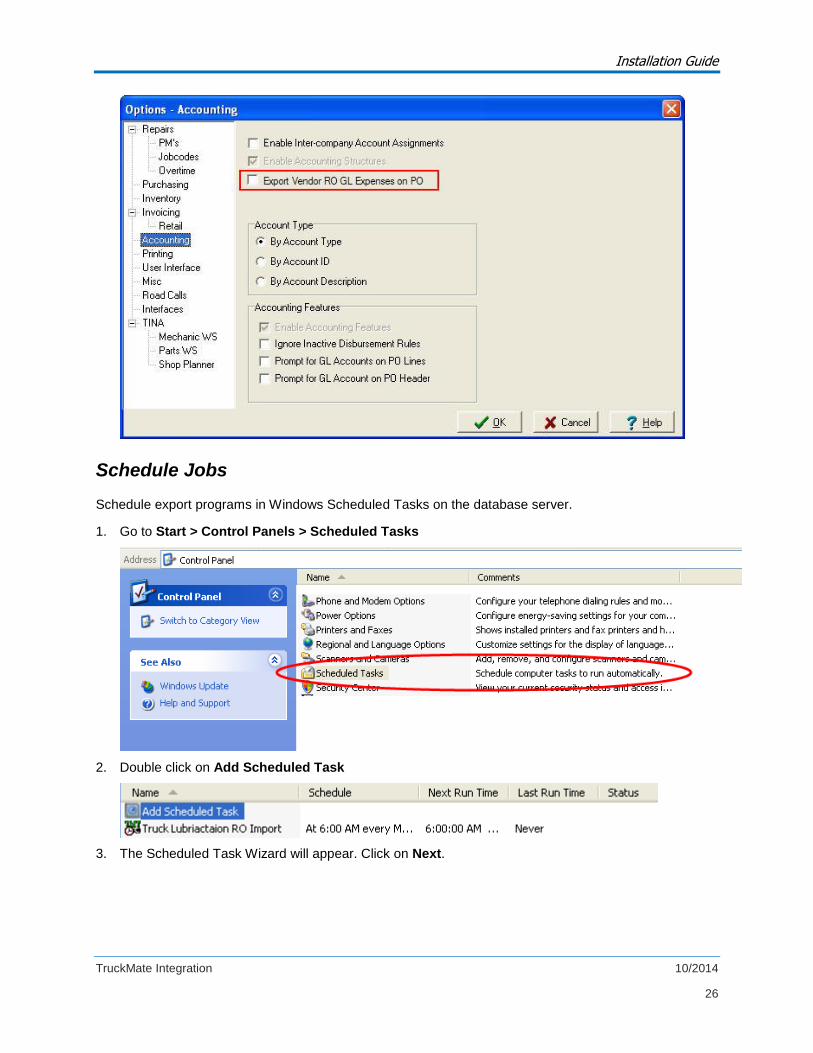
Export Vendor General Ledger Expenses on PO
The Truckmate interface allows Vendor ROs to be handled one of two ways based on the option Export Vendor RO GL Expenses on PO. This option can be found in SysMgr > Options > Accounting.
If the option is unchecked, the RO debits and credits will be exported with General Ledger and the PO debits and credits will be exported with Accounts Payable. If the option is checked, the credit accounts from the PO and the debit accounts from the RO will be exported through the Accounts Payable export. All non-vendor lines will be exported normally from the Repair Order with the General Ledger. It is imperative that the disbursement rules for Vendor RO ROs and Vendor RO POs are setup based on the option you have selected.
Note: Once this option is checked, it will become disabled and cannot be unchecked.
TMT Fleet Maintenance added this as an option with version 11.40. In order for this option to work you will need to install version 10.1.4.9 or higher of the Madservicehost.exe in TruckMate version 10.1. If you are running 10.2 of TruckMate you will need to have version 10.2.3.7 or higher of the Madservicehost.exe installed.
Installation Guide
TruckMate Integration 10/2014
26
Schedule Jobs
Schedule export programs in Windows Scheduled Tasks on the database server.
1. Go to Start > Control Panels > Scheduled Tasks
2. Double click on Add Scheduled Task
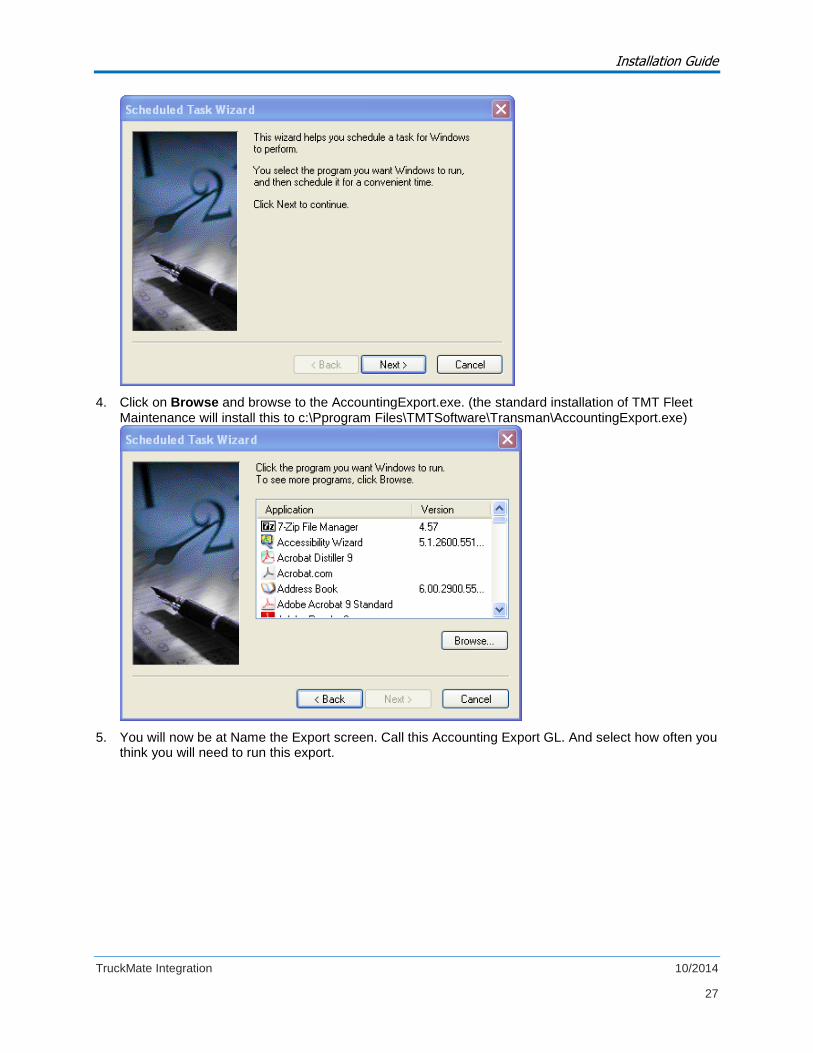
3. The Scheduled Task Wizard will appear. Click on Next.
Installation Guide
TruckMate Integration 10/2014
27
4. Click on Browse and browse to the AccountingExport.exe. (the standard installation of TMT Fleet Maintenance will install this to c:\Pprogram Files\TMTSoftware\Transman\AccountingExport.exe)
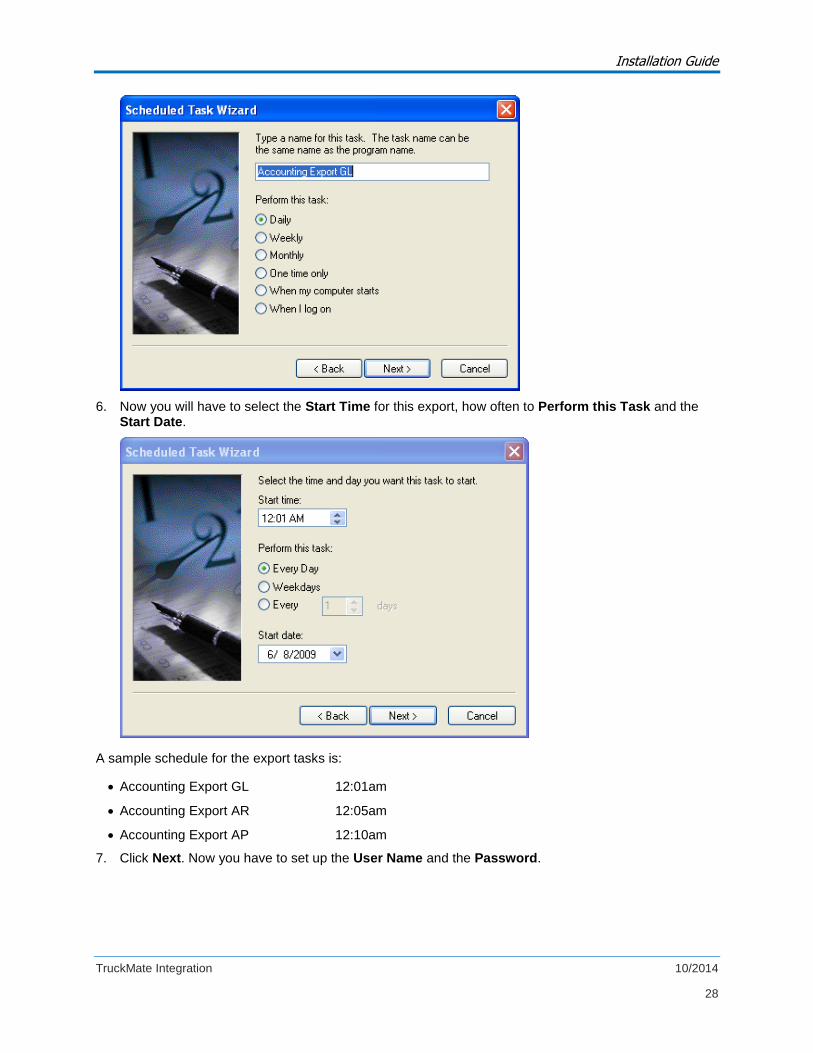
5. You will now be at Name the Export screen. Call this Accounting Export GL. And select how often you think you will need to run this export.
Installation Guide
TruckMate Integration 10/2014
28
6. Now you will have to select the Start Time for this export, how often to Perform this Task and the Start Date.
A sample schedule for the export tasks is:
Accounting Export GL 12:01am
Accounting Export AR 12:05am
Accounting Export AP 12:10am
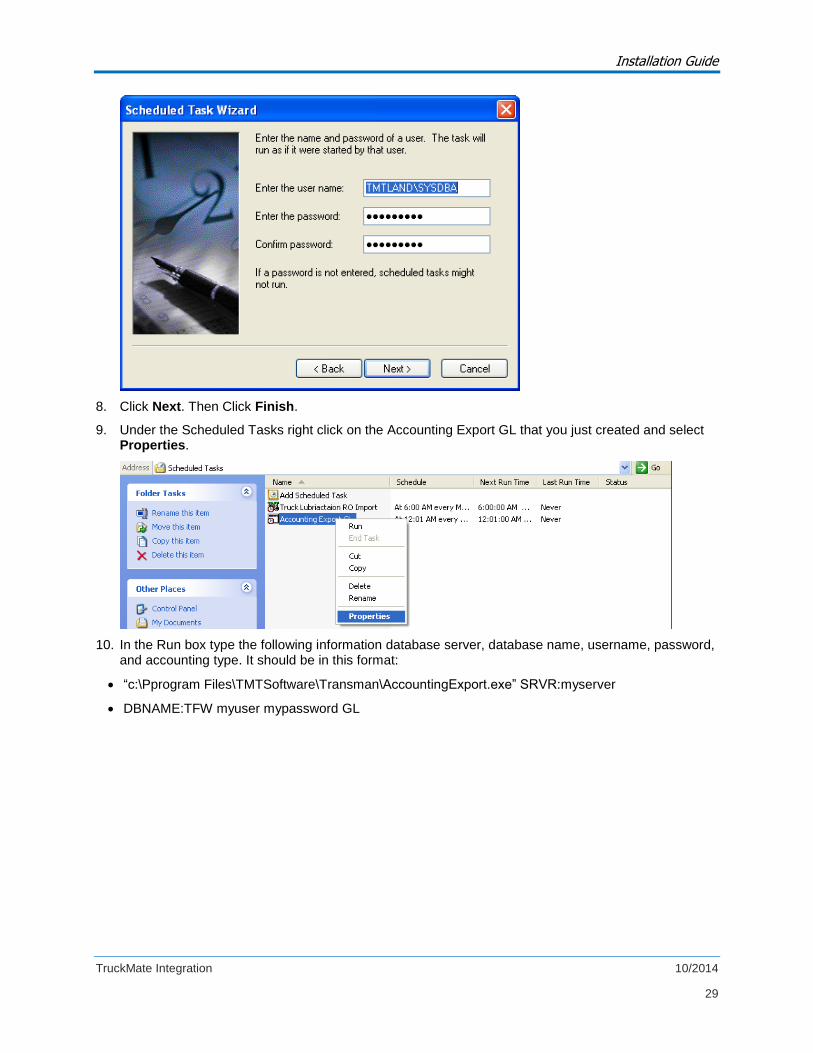
7. Click Next. Now you have to set up the User Name and the Password.
Installation Guide
TruckMate Integration 10/2014
29
8. Click Next. Then Click Finish.
9. Under the Scheduled Tasks right click on the Accounting Export GL that you just created and select Properties.
10. In the Run box type the following information database server, database name, username, password, and accounting type. It should be in this format:
“c:\Pprogram Files\TMTSoftware\Transman\AccountingExport.exe” SRVR:myserver
DBNAME:TFW myuser mypassword GL
Installation Guide
TruckMate Integration 10/2014
30
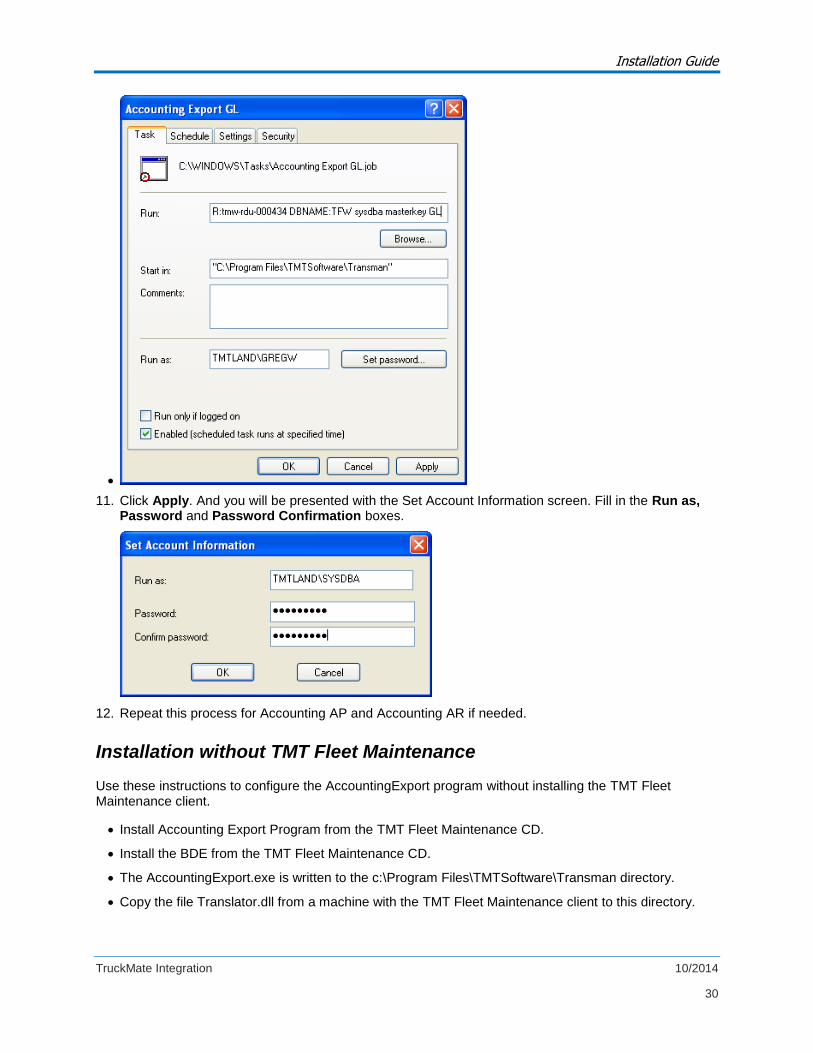
11. Click Apply. And you will be presented with the Set Account Information screen. Fill in the Run as, Password and Password Confirmation boxes.
12. Repeat this process for Accounting AP and Accounting AR if needed.
Installation without TMT Fleet Maintenance
Use these instructions to configure the AccountingExport program without installing the TMT Fleet Maintenance client.
Install Accounting Export Program from the TMT Fleet Maintenance CD.
Install the BDE from the TMT Fleet Maintenance CD.
The AccountingExport.exe is written to the c:\Program Files\TMTSoftware\Transman directory.
Copy the file Translator.dll from a machine with the TMT Fleet Maintenance client to this directory.
Installation Guide
TruckMate Integration 10/2014
31
Troubleshooting the TruckMate TMT Fleet Maintenance Interface
1. What is the status of the order? If you are expecting a PO to be sent from TMT Fleet Maintenance to TruckMate and the PO is not closed it will not be sent, but if you are expecting a PM to be shown as due and it does not it could because a RO was opened for that unit with the PM on it.
2. If you are expecting something to be sent to accounting and it does not go, look in the Sysmgr > Accounts > Export Preview. If the item is there check for any errors. You will also want to find out how often the interface runs and when it ran last to see if it should have already been sent to TruckMate. The Integration_Audit table tracks all communications between TMT Fleet Maintenance and TruckMate. If a transaction is in the log as sent then TMT Fleet Maintenance sent it to TruckMate, if it is marked as received then it was sent from TruckMate to TMT Fleet Maintenance. Jobs sent from TruckMate can have parameters such as all new units created since a specific date. Make sure that the parameters are not preventing the information from being sent to TruckMate.