Embed Size (px)
Citation preview

IRDAI
BROKER REGISTRATION
AND LICENSING
User Manual

Broker User Manual Version History
Version 9.0/23-Jan-13 i
Version history
Version No. Date of Release Prepared by (L&T side)
Approved by (L&T side)
Approved by (IRDA - User department)
1.0 17-Dec-2012 Komal Khatri Namrata Singhal
2.0 24-Dec-2012 Komal Khatri Tinaz Bhathena
3.0 28-Dec-2012 Komal Khatri Namrata Singhal
4.0 31-Dec-2012 Komal Khatri U Jayanti
5.0 2-Jan-2013 Komal Khatri Namrata Singhal
6.0 3-Jan-2013 Komal Khatri Gargi Talegaonkar
7.0 9-Jan-2013 Komal Khatri Gargi Talegaonkar
8.0 17-Jan-2013 Komal Khatri Namrata Singhal
9.0 23-Jan-2013 Komal Khatri Tinaz Bhathena, Namrata Singhal

Broker User Manual Table of Contents
Version 9.0/23-Dec-13 ii
Table of Contents
Prerequisites ................................................................................................................... 1 Introduction to BAP Portal ............................................................................................... 2
Role of a Broker .............................................................................................................. 3 Overview ......................................................................................................................... 4 Broker Registration.......................................................................................................... 5
To register on the portal: .............................................................................................. 5 Login Process ................................................................................................................. 9
To access the portal: ................................................................................................... 9 Points to Remember...................................................................................................... 11
Retrieve Credentials ...................................................................................................... 12 Retrieve Master ID: .................................................................................................... 12
User Profile for Master ID .............................................................................................. 17 User Profile for Sub Login ID ......................................................................................... 20
Register Digital Signature is displayed in User Profile of Directors only. ................... 22 Description of the menu tabs for Master IDs ................................................................. 23
Description of the menu tabs for Sub ID ........................................................................ 24 Digital Signature ............................................................................................................ 25
Option 1 - Uploading the digital signature through the BAP portal: ............................ 25
Option 2 - Importing the digital signature on your browser: ....................................... 28 Creating Sub IDs ........................................................................................................... 30
Updating a Sub ID ......................................................................................................... 32
Deleting a Sub ID .......................................................................................................... 34
Broker Licensing ........................................................................................................... 36 New License .................................................................................................................. 37 Applicant Details ........................................................................................................... 40
Organization Structure .................................................................................................. 42 Business Information ..................................................................................................... 47
Financial Information ..................................................................................................... 49 Other Information .......................................................................................................... 53 Upload Documents ........................................................................................................ 55
Declaration .................................................................................................................... 57 Undertaking ................................................................................................................... 58 Print View ...................................................................................................................... 61 Renewal License ........................................................................................................... 68
Prerequisite for License Renewal .............................................................................. 68 Conditions for Late Renewal ...................................................................................... 69 To apply for license renewal: ..................................................................................... 69
Applicant Details ........................................................................................................... 72 Organization Structure .................................................................................................. 74
Business Information ..................................................................................................... 78 Financial Information ..................................................................................................... 80 Other Information .......................................................................................................... 84 Upload Documents ........................................................................................................ 85

Broker User Manual Table of Contents
Version 9.0/23-Jan-13 iii
To view Upload Documents screen: .......................................................................... 85 To upload documents: ............................................................................................... 86
Declaration .................................................................................................................... 87
Undertaking ................................................................................................................... 88 Print view ....................................................................................................................... 91
To view Print view screen: ......................................................................................... 91 To submit Renew License Application: ...................................................................... 94
Duplicate License .......................................................................................................... 98
Changes During Licensing Period ............................................................................... 103 To view Changes in licensing screen: ...................................................................... 104
Information on opening/closing branches, change of registration/branch office .......... 106 Transfer of shares, increase in paid up capital/change in holding company conversion .................................................................................................................................... 109 Induction of new directors/cessation of existing directors, approval for appointment of directors in international bodies ................................................................................... 113 Change in Principal Officer/key management personnel............................................. 116 Information on particulars of persons responsible for soliciting and procuring broking business ...................................................................................................................... 119 Standing arrangement with Insurance Company and hospitals .................................. 122
Change in Name/Organization Structure ..................................................................... 124 Information/Approval for investment funds .................................................................. 126 Transfer of shares, increase in paid up capital/change in holding company/conversion of company ...................................................................................................................... 127 Removal of lien on FD after making fresh FD ............................................................. 131
Voluntary surrender of License ................................................................................... 134 Approval for opening representative offices abroad .................................................... 136
Other Representations by brokers on matter of License ............................................. 137 Miscellaneous ............................................................................................................. 138
Changes in licensing Category .................................................................................... 140 To apply for a Change in License Category: ............................................................ 140
Pay Annual Fees ......................................................................................................... 143 Pay Annual Fees: .................................................................................................... 143
View License Details ................................................................................................... 147 View Application Status ............................................................................................... 148 Pending for Clarification .............................................................................................. 150 Returns ........................................................................................................................ 153
Quarterly Returns ........................................................................................................ 156 Business Data for Brokers ........................................................................................... 157 Business Data for Insurance Brokers (Life) ................................................................. 162
Business Data for Insurance Brokers (Non Life) ......................................................... 164 Claims Data for Insurance Brokers ............................................................................. 166 Annual Returns ........................................................................................................... 170 Reinsurance Balances Outstanding ............................................................................ 171 Cash Flow Statement for Insurance Brokers ............................................................... 173 Security screening proceedings for reinsurance broking ............................................. 177

Broker User Manual Table of Contents
Version 9.0/23-Jan-13 iv
Financial Statement of each insurance broker-Profit and Loss Statement .................. 179 Balance Sheet of Insurance brokers ........................................................................... 184 Audit Arrangement for Insurance Broker ..................................................................... 188
Insurance Bank Accounts of Insurance Brokers .......................................................... 190 Details of Group Companies of a Insurance Broker .................................................... 192 Spread of Business during the Year Ending ................................................................ 194 Professional Indemnity Insurance In Force As At ........................................................ 196 Half Yearly ................................................................................................................... 198
Financial Data for Insurance Brokers .......................................................................... 199 Assistance on Filling Returns ...................................................................................... 202 Pay Penalty ................................................................................................................. 245 Error Handling ............................................................................................................. 248
Frequently Asked Questions ....................................................................................... 252 Glossary ...................................................................................................................... 254
Index ........................................................................................................................... 258

Broker User Manual List of Figures
Version 9.0 v
List of Figures Figure 1: User Registration Screen ................................................................................. 6 Figure 2: Registration Confirmation Screen .................................................................... 8
Figure 3: Duplicate User Error Message ......................................................................... 8 Figure 4: IRDA BAP Portal Login Screen ........................................................................ 9 Figure 5: Change Password Screen.............................................................................. 10 Figure 6: Log Off Confirmation Dialog Box .................................................................... 10 Figure 7: Retrieve User ID/Password Selection ............................................................ 12
Figure 8: Retrieve Master/Organization ID Options ....................................................... 12 Figure 9: User ID Retrieval Confirmation Message ....................................................... 13 Figure 10: Retrieve User ID/Password Selection .......................................................... 13 Figure 11: Retrieval Sub Login ID ................................................................................. 14
Figure 12: User ID Retrieval Confirmation Message ..................................................... 14 Figure 13: Retrieve Password Options .......................................................................... 14
Figure 14: Additional Retrieve Password Options ......................................................... 15 Figure 15: Retrieve Password Process ......................................................................... 15
Figure 16: Retrieve Password Process ......................................................................... 16 Figure 17: Incorrect retrieval information error message ............................................... 16 Figure 18: User Profile Screen for Master ID ................................................................ 17
Figure 19: User Profile - Change Password screen ...................................................... 18 Figure 20: Password Change Confirmation Message ................................................... 18
Figure 21: Update User Profile Screen .......................................................................... 19 Figure 22: User Profile Update Confirmation Message ................................................. 19 Figure 23: Updating Security Question and Answer ...................................................... 20
Figure 24: User Profile Screen for Sub Login ID ........................................................... 20
Figure 25: User Profile - Change Password screen ...................................................... 21 Figure 26: Password Change confirmation message .................................................... 21 Figure 27: Update User Profile screen .......................................................................... 22
Figure 28: User Profile Update Confirmation Message ................................................. 22 Figure 29: User Profile screen ....................................................................................... 26
Figure 30: Web Signer dialog box ................................................................................. 26 Figure 31: Password required dialog box ...................................................................... 27
Figure 32: Web Signer dialog box displaying the uploaded signature ........................... 27 Figure 33: Password required dialog box ...................................................................... 28 Figure 34: Web Signer dialog box displaying the uploaded signature ........................... 29 Figure 35: Create Sub ID Screen .................................................................................. 30 Figure 36: Sub ID Creation Confirmation Screen .......................................................... 31
Figure 37: Update/Delete Sub ID Screen ...................................................................... 32 Figure 38: Update Sub ID Screen ................................................................................. 33
Figure 39: Successful Updation Acknowledgement Dialog Box .................................... 33 Figure 40: Update/Delete Sub ID Screen ...................................................................... 34 Figure 41: Delete Sub ID Screen .................................................................................. 34 Figure 42: Message Pre-Deletion .................................................................................. 35 Figure 43: User Confirmation Screen ............................................................................ 37 Figure 44: Confirmation Message box ........................................................................... 37 Figure 45: New License Application Screen .................................................................. 38

Broker User Manual List of Figures
Version 9.0 vi
Figure 46: Applicant Details Screen .............................................................................. 41 Figure 47: Organization Structure Screen ..................................................................... 43 Figure 48: Business Information Screen ....................................................................... 47
Figure 49: Financial Information Screen ........................................................................ 50 Figure 50: Other Information Screen ............................................................................. 53 Figure 51: Upload Documents Screen .......................................................................... 56 Figure 52: Declaration Screen ....................................................................................... 57 Figure 53: Undertaking Screen ..................................................................................... 58
Figure 54: Print View Screen ......................................................................................... 63 Figure 55: User Confirmation Message for Payment .................................................... 64 Figure 56: Make Payment screen ................................................................................. 64 Figure 57: Demand Draft Details screen ....................................................................... 65
Figure 58: NEFT/RTGS Details screen ......................................................................... 65 Figure 59: Form Submitted Successfully Notification .................................................... 66
Figure 60: Form Submitted Successfully Notification .................................................... 66 Figure 61: Renewal warning message when attempting to renew 3 months before ..... 68 Figure 62: Renewal warning message when attempting to renew 3 Years before ........ 69
Figure 63: Renew License Screen ................................................................................ 70 Figure 64: Applicant Details Screen .............................................................................. 73
Figure 65: Organization Structure Screen ..................................................................... 75 Figure 66: Business Information Screen ....................................................................... 78 Figure 67: Financial Information Screen ........................................................................ 81
Figure 68: Other Information Screen ............................................................................. 84 Figure 69: Upload Documents Screen .......................................................................... 86
Figure 70: Declaration Screen ....................................................................................... 87 Figure 71: Undertaking Screen ..................................................................................... 88
Figure 72: Print View Screen ......................................................................................... 94 Figure 73: User Confirmation message for Renewal License ....................................... 94
Figure 74: Make Payment Screen ................................................................................. 94 Figure 75: Demand Draft Details screen ....................................................................... 95 Figure 76: NEFT/RTGS Details screen ......................................................................... 95 Figure 77: Confirmation Message for Make Payment ................................................... 96
Figure 78: Form Submitted Successfully Notification .................................................... 96 Figure 79: Duplicate License Screen ............................................................................ 98 Figure 80: Make Payment screen ................................................................................. 99 Figure 81: Demand Draft Details screen ..................................................................... 100
Figure 82: NEFT/RTGS Details screen ....................................................................... 100 Figure 83: Confirmation Message for Make Payment ................................................. 101 Figure 84: Form Submitted Successfully Notification .................................................. 101
Figure 85: User Confirmation Message ....................................................................... 104 Figure 86: Changes during Licensing Period Screen .................................................. 104 Figure 87: Particulars of registered/branch office Screen ............................................ 106 Figure 88: Transfer of shares, increase in paid up capital/ change in holding company/ conversation Screen.................................................................................................... 109 Figure 89: Board of Director Details Screen ................................................................ 113

Broker User Manual List of Figures
Version 9.0 vii
Figure 90: Management Details Screen ...................................................................... 116 Figure 91: Particulars of persons responsible for soliciting and procuring of Insurance or reinsurance business Screen ...................................................................................... 119
Figure 92: Standing arrangements with other insurance brokers or service providers Screen ......................................................................................................................... 122 Figure 93: Change in Name/organization structure Screen ......................................... 124 Figure 94: Information/Approval for investment of funds Screen ................................. 126 Figure 95: Capital Structure and Shareholder details Screen ..................................... 128
Figure 96: Fixed Deposit Details Screen ..................................................................... 131 Figure 97: Voluntary surrender of license Screen ....................................................... 134 Figure 98: Approval for opening representative offices abroad Screen ....................... 136 Figure 99: Other representations by brokers on matter of License Screen ................. 137
Figure 100: Miscellaneous Screen .............................................................................. 138 Figure 101: Changes in license Category Screen ....................................................... 140
Figure 102: Deletion/ Degradation of Category Screen ............................................... 141 Figure 103: Pay Annual Fees Screen.......................................................................... 143 Figure 104: Make Payment Screen ............................................................................. 144
Figure 105: Demand Draft Details screen ................................................................... 144 Figure 106: NEFT/RTGS Details screen ..................................................................... 145
Figure 107: View license Details Screen ..................................................................... 147 Figure 108: View Application Status Screen ............................................................... 148 Figure 109: URN for Pending for Clarification Screen ................................................. 150
Figure 110: Pending for Clarification Screen ............................................................... 151 Figure 111: User Confirmation Message ..................................................................... 151
Figure 112: Returns Screen ........................................................................................ 153 Figure 113: Submit Forms Returns Screen ................................................................. 155
Figure 114: User Confirmation Message ..................................................................... 155 Figure 115: Quarterly Returns Screen......................................................................... 156
Figure 116: Business Data for Brokers Screen ........................................................... 158 Figure 117: User Confirmation Message ..................................................................... 161 Figure 118: Business Data for Insurance Brokers (Life) Screen ................................. 162 Figure 119: User Confirmation Message ..................................................................... 163
Figure 120: Business Data for Non Life Screen .......................................................... 164 Figure 121: User Confirmation Message ..................................................................... 165 Figure 122: Claims Data for Insurance Broker Screen ................................................ 167 Figure 123: User Confirmation Message ..................................................................... 169
Figure 124: Annual Returns Screen ............................................................................ 170 Figure 125: Reinsurance Balance Outstanding Screen............................................... 171 Figure 126: User Confirmation Message ..................................................................... 172
Figure 127: Cash Flow Statement Screen ................................................................... 174 Figure 128: User Confirmation Message ..................................................................... 176 Figure 129: Security screening proceedings Screen ................................................... 177 Figure 130: User Confirmation Message ..................................................................... 178 Figure 131: Profit and Loss Statement Screen ............................................................ 180 Figure 132: User Confirmation Message ..................................................................... 182

Broker User Manual List of Figures
Version 9.0 viii
Figure 133: Balance Sheet Screen ............................................................................. 185 Figure 134: User Confirmation Message ..................................................................... 187 Figure 135: Audit Arrangements Screen ..................................................................... 188
Figure 136: User Confirmation Message ..................................................................... 189 Figure 137: Insurance Bank Accounts Screen ............................................................ 190 Figure 138: User Confirmation Message ..................................................................... 191 Figure 139: Details of Group companies for an Insurance Broker Screen .................. 192 Figure 140: User Confirmation Message ..................................................................... 193
Figure 141: Spread of Business during the Year Ending Return Screen..................... 194 Figure 142: User Confirmation Message ..................................................................... 195 Figure 143: Professional Indemnity Insurance In Force As At Returns Screen ........... 196 Figure 144: User Confirmation Message ..................................................................... 197
Figure 145: Half Yearly Returns Screen ...................................................................... 198 Figure 146: Half Yearly Returns Screen ...................................................................... 200
Figure 147: User Confirmation Message ..................................................................... 201 Figure 148: Pay Penalty Screen .................................................................................. 245 Figure 149: Total Amount Displayed in the Pay Penalty Screen ................................. 246
Figure 150: Make Payment Screen ............................................................................. 246 Figure 151: Demand Draft Details Screen ................................................................... 246
Figure 152: NEFT/RTGS Details screen ..................................................................... 247

Broker User Manual Prerequisites
Version 9.0 1
Prerequisites
In order to access the BAP Portal and to perform activities, the below mentioned hardware and software infrastructure is required
Field Description
Hardware - Personal Computer / Laptop
Processor Intel processors Pentium 4 / i3 / i5 / i7 @ 1GHz or above
RAM 1 GB RAM or above (minimum 1GB recommended)
Hard Disk 80 GB or above HDD
Ethernet Card 10 / 100 Mbps
Printer Laser Jet
Software
Operating System
Windows XP (with Service Pack2), Windows Vista, Windows 7, Mac OS v 10.5
Office Utility MS - Office 2003 or above
Browsers Internet Explorer 6.0 / 7.0 / 8.0, Apple Safari 5.0 (recommended Internet Explorer 8.0 )
Java Runtime JRE 1.7 Update 72
Adobe Acrobat Reader
9.0 version

Broker User Manual Introduction to BAP Portal
Version 9.0 2
Introduction to BAP Portal
IRDA has taken an initiative of automation for facilitation of various activities that need to be undertaken by Insurance companies, surveyors, brokers and Third Party Administrators (TPA) for regulatory compliance. This program is called the ‘Business Analytics Project’ or BAP as referred to henceforth. In the current technology driven environment, this portal delivers ease of use and uniformity in routine activities like online filing of returns, submitting applications for enrollment, new license, renewals and other changes to existing licenses. This application also supports on-line clarification of queries, and provides notifications, reminders and alerts for adherence to timelines. This initiative will ensure good communication between insurance players and IRDA. Standardized and timely collection of industry data will help IRDA in efficient supervision of insurance operations, monitoring and tracking for the development of the insurance industry in India.

Broker User Manual Role of a Broker
Version 9.0 3
Role of a Broker
Brokers are intermediaries between the prospective customers and insurers. In order to ensure that insurance and reinsurance business is transacted along proper lines, there are set out rules of conduct and licensing procedures to be followed. All brokers operating in the insurance market need to be duly licensed by IRDA and also need to submit periodic returns reporting details of the operations. This project aims at automating the licensing process and the submission of returns by the Brokers, the details for which follow.

Broker User Manual Overview
Version 9.0 4
Overview
The BAP Portal allows smooth registration of Corporate Broker. The Corporate Broker can then perform following activities:
Retrieve User id and Passwords.
Creation of Sub Login ID’s for - Employee - Authorized Signatory
Updating and deleting the Sub IDs. BAP Portal allows the end user to perform the following activities:
Apply for New License.
Apply for Renewal License.
Apply for Duplicate License.
Apply for Changes during licensing period.
Apply for Change in license category.
View License Details
View license application status.
View license applications pending for clarification.
Submission of Returns.
Pay Penalty.
Any designated personnel can fill the form; however the submission of the forms is done by Authorized Signatory only.

Broker User Manual Broker Registration
Version 9.0 5
Broker Registration
For getting licensed by IRDAI & to work as a Broker, user has to first fill an online ‘New User’ registration form available on IRDA BAP Portal.
To register on the portal:
1. Open a browser and enter the address: www.irdabap.gov.in. The IRDA BAP portal home page is displayed.
2. Click Register. The User Registration screen is displayed. 3. From User Type drop down list, select Corporate. 4. From User Role drop down list, select Broker. The Corporate Registration
screen is displayed. All mandatory fields on the form are marked with an asterisk (*).
Broker User Manual Broker Registration
Version 9.0 6
Figure 1: User Registration Screen
The fields in the Corporate Broker Registration Screen are explained in the following table:
Field Description
New User Registration
Organization Name
Enter the name of organization.
Corporate PAN No.
Enter corporate PAN card number. (Format: AAAAA1111A)
Applicant Type Select either Company or Partnership Firm by selecting radio-button.
Registered Office Address
Address1 Enter the first line of the address.

Broker User Manual Broker Registration
Version 9.0 7
Field Description
Address2 Enter the second line of the address.
Address3 Enter the third line of the address.
Country This displays the country name. By default, India is displayed.
State Select state from the drop-down list.
District Select district from the drop-down list. List of districts will come on the basis of state selected.
City Select city from the drop-down list. List of cities will come on the basis of district selected.
Region Select region from the drop-down list.
Pin Code Enter the pin code number. It has to be 6 digit number only.
Contact Details
E mail ID Enter the Email ID.
Alternate E mail ID
Enter the alternate e mail ID.
Contact Person Enter the Contact Person from your organization
Contact Number Enter the contact number
Registration Details
Registration Number
Enter the organization’s registration number. It has to be 21 digits number only.
Date of Registration
Enter the organizations date of registration.
Security Question
Security Question
Select security question from the drop-down list.
Security Answer Enter answer for the selected security question. Please note down security question and answer as these will help to retrieve the user ID/password in case you forget them.
Verification Code
Enter Verification Code
Enter case-sensitive verification code as displayed in captcha.

Broker User Manual Broker Registration
Version 9.0 8
5. Enter the relevant information and click Submit. An Acknowledgement dialog
box is displayed along with your User ID, notifying that the registration is successful.
Figure 2: Registration Confirmation Screen
6. Click OK. The user ID and password are sent to the registered email ID.
7. After registration is done in the portal, end user can create sub ids for 2 authorized signatories and 1 employee of the organization.
If end user tries to create multiple accounts by entering same registration number, a "User already exists" error message is displayed.
Figure 3: Duplicate User Error Message

Broker User Manual Login Process
Version 9.0 9
Login Process
To access the portal:
To access the BAP portal, user will have to login by entering valid credentials.
1. Open a browser and enter the address: www.irdabap.gov.in. The IRDA BAP
portal home page is displayed. 2. Click Login. The IRDA BAP portal login screen is displayed.
Figure 4: IRDA BAP Portal Login Screen
3. In User field, enter the user ID. 4. In Password field, enter password. 5. Click Log On. User Profile will be displayed, along with registered name on the
screen. 6. The Change Password screen is displayed if user is logged in for the first time
or if current password is in use for 90 days or more. Otherwise, the User Profile page is displayed.

Broker User Manual Login Process
Version 9.0 10
Figure 5: Change Password Screen
Follow the below steps to Change Password: 1. In Old Password field, enter your current password. 2. In New Password field, enter your new password. 3. In Confirm Password field, re-enter your new password. 4. Click Change. Click Cancel to go back to the login screen.
To Log Off from the portal:
1. Click Log Off. A log off confirmation dialog box is displayed.
Figure 6: Log off Confirmation Dialog Box
2. Click "Yes" to log out. Else, Click "No" to go back to the previous screen.

Broker User Manual Points to Remember
Version 9.0 11
Points to Remember
For User ID:
If user is not logged in to portal for 3 months or more, the user ID will be de-activated.
If user is registered on portal but has not filled up or submitted any application form for 3 months, the ID will be de-activated.
If user is registered on the portal and filled up application form but has not made fee payment, the User ID will be de-activated at the end of 3 month period.
If user does not respond within 3 months (in spite of repeated reminders) to clarifications/documents sought by IRDA on the new license application submitted earlier, the user ID will be locked at end of 3 month period.
An email notification will be sent to user’s registered email ID 3 days before the 3-month period ends, after which user ID will be de-activated.
For Password:
The BAP Portal account will be locked after user makes 3 unsuccessful attempts to log into the portal.
In case of password change, the new password must be different from the last five passwords.

Broker User Manual Retrieve Credentials
Version 9.0 12
Retrieve Credentials
If user forgets the BAP login credentials, user can retrieve them using Retrieve User ID/ Password option.
Retrieve Master ID:
1. On the IRDA BAP portal login screen, click Forgot Password/User ID. The
Retrieve User ID/Password screen is displayed.
Figure 7: Retrieve User ID/Password Selection
2. In Retrieve Type, select User ID. Additional fields are displayed. 3. From User Type drop-down list, select Corporate. 4. From Corporate Type, select Broker. 5. From Retrieve, select the type of ID that user wants to retrieve.
6. In Retrieve, click Master/Organization ID. Additional fields are displayed.
7. In the Registration Number field, enter the corporate registration number.
Figure 8: Retrieve Master/Organization ID Options

Broker User Manual Retrieve Credentials
Version 9.0 13
8. Click Retrieve User ID. An Acknowledgement dialog box is displayed notifying that the user ID has been sent to registered email ID.
Figure 9: User ID Retrieval Confirmation Message
9. Click OK. The User ID is sent to your registered email ID.
Retrieve Sub Login ID
1. On the IRDA BAP portal login screen, click Forgot User Id / Password. The Retrieve User ID/Password screen is displayed.
Figure 10: Retrieve User ID/Password Selection
2. In Retrieve Type, click User ID. Additional fields are displayed.
3. From User Type drop-down list, select Corporate.
4. From Corporate Type drop-down list, select Broker.
5. In Retrieve, click Sub Login ID. Additional fields are displayed.
6. In the Master ID field, enter the Master ID.
7. In the Registered Sub Login ID, enter registered E-mail ID.

Broker User Manual Retrieve Credentials
Version 9.0 14
Figure 11: Retrieval Sub Login ID
8. Click Retrieve User ID. Acknowledgement dialog box is displayed notifying that user ID has been sent to registered email ID.
Figure 12: User ID Retrieval Confirmation Message
9. Click OK. The User ID is sent to registered email ID.
To Retrieve Password:
1. On the IRDA BAP portal login screen, click Forgot User Id / Password. The Retrieve User ID/Password screen is displayed.
2. In Retrieval Type, select Password. Additional fields are displayed.
Figure 13: Retrieve Password Options

Broker User Manual Retrieve Credentials
Version 9.0 15
3. In User ID field, enter user ID.
4. Click Submit. additional fields are displayed.
Figure 14: Additional Retrieve Password Options
5. From Security Question drop-down list, select the question that is selected while registration.
6. In Security Answer field, enter the answer to the security question.
Figure 15: Retrieve Password Process 7. Click Retrieve Password. Acknowledgement message dialog box is displayed,
notifying that new password has been sent to the registered Email ID.

Broker User Manual Retrieve Credentials
Version 9.0 16
Figure 16: Retrieve Password Process
8. Click OK. The password is sent to the registered email ID.
If user enters incorrect retrieval information, an error message is displayed.
Figure 17: Incorrect retrieval information error message

Broker User Manual User Profile for Master ID
Version 9.0 17
User Profile for Master ID
When user you logs into the portal, the User Profile screen is displayed. On this screen, user can change password and update profile.
Figure 18: User Profile Screen for Master ID
To Change Password:
1. On the User Profile screen, click Change Password. The Change Password screen is displayed.

Broker User Manual User Profile for Master ID
Version 9.0 18
Figure 19: User Profile - Change Password screen
2. In Old Password field, enter the current password. 3. In New Password field, enter the new password.
4. In Confirm New Password field, re-enter the new password.
5. Click Change Password. Acknowledgement dialog box is displayed notifying that your password has been changed successfully. Click OK
Figure 20: Password Change Confirmation Message
To Update User Profile:
1. On the User Profile screen, click Update User Profile. The Update User Profile screen is displayed. Through this screen, user can only update the contact details.

Broker User Manual User Profile for Master ID
Version 9.0 19
Figure 21: Update User Profile Screen
2. Click Submit. An Acknowledgement dialog box is displayed notifying that the profile has been successfully updated.
Figure 22: User Profile Update Confirmation Message
3. Click OK.

Broker User Manual User Profile for Sub Login ID
Version 9.0 20
User Profile for Sub Login ID
When user log into the portal using broker sub ID, the User Profile screen is displayed.
1. On this screen, user has to first enter the security question and answer.
Figure 23: Updating Security Question and Answer
2. Click Submit.
Figure 24: User Profile Screen for Sub Login ID

Broker User Manual User Profile for Sub Login ID
Version 9.0 21
On this screen, user can change password and update the profile. User also needs to upload the digital signature from this page.
To Change Password:
1. On the User Profile screen, click Change Password. The Change Password screen is displayed.
Figure 25: User Profile - Change Password screen
2. In Old Password field, enter the current password. 3. In New Password field, enter the new password.
4. In Confirm New Password field, re-enter the new password.
5. Click Change Password. Acknowledgement dialog box is displayed notifying that the password has been changed successfully.
Figure 26: Password Change confirmation message
6. Click OK.
To Update User Profile:
1. On the User Profile screen, click Update User Profile. The Update User Profile screen is displayed. Through this screen user can only update the security question and answer.

Broker User Manual User Profile for Sub Login ID
Version 9.0 22
Figure 27: Update User Profile screen
2. Click Submit. Acknowledgement dialog box is displayed notifying that user profile has been successfully updated.
Figure 28: User Profile Update Confirmation Message
3. Click OK.
Register Digital Signature is displayed in User Profile of Directors only.
Broker User Manual Description of the menu tabs for Master IDs
Version 9.0 23
Description of the menu tabs for Master IDs
The Master ID screen contains the following menu tabs: 1. Create Sub ID – User can create sub ids for employees and authorized
signatories of the company. User is allowed to create sub ids for 2 authorized signatories and 1 employee.
2. Update/ Delete Sub ID – User can update the designation, email id and
contact number of any of the authorized signatories and employees. At the same time user can also delete any of the authorized signatories / employee IDs created on the portal.

Broker User Manual Description of the menu tabs for Sub ID
Version 9.0 24
Description of the menu tabs for Sub ID
The Sub ID screen contains the following menu tabs:
1. Licensing - Allows user to apply for a new license, renew license, duplicate license, changes during licensing period, change in license category and pay annual fees.
2. Returns: Allows user you to submit returns that include information related to the business conducted by firm during the financial year.
3. View Application Status - Allows user to track the status of the submitted applications.
4. View License Details- Allows user to view the status and other information related to License.
5. Pending for clarification - Allows user to upload additional documents and provide clarification required by IRDAI during processing of applications.
6. Pay Penalty: Allows user to view and pay the penalties imposed on the user you by IRDA.

Broker User Manual Digital Signature
Version 9.0 25
Digital Signature
In Digital Signature, user needs to register the digital signature that user wants to use for their corporate Broker. User can obtain the digital signature from several companies/authorities/agencies that provide them. There are two options by which user can register the digital signature.
Option 1: Uploading the digital signature through the BAP portal - In this option user can upload the digital signature through BAP portal and then register it. Then, whenever user needs to attach the signature, user will have to upload the signature again.
Option 2: Importing the digital signature on your browser - In this option, user can upload the digital signature in any browser and then register it. Then, whenever user wants to attach the signature, user just needs to click the Attach Digital Signature button and select the signature that user has imported on the browser.
Option 1 - Uploading the digital signature through the BAP portal:
1. On the User Profile screen, click Register Digital Signature. The Web Signer dialog box opens.

Broker User Manual Digital Signature
Version 9.0 26
Figure 29: User Profile screen
Figure 30: Web Signer dialog box

Broker User Manual Digital Signature
Version 9.0 27
2. Click P12/PFX tab.
3. Click Browse to search for the digital signature and click OK to upload it. The Password Required dialog box is displayed.
Figure 31: Password required dialog box
4. Enter the password provided by the digital signature provider and click OK. The details of the uploaded digital signature are displayed in a table.
Figure 32: Web Signer dialog box displaying the uploaded signature
5. Select the signature from the table and click Sign. Again, the Password Required dialog box is displayed.
6. Enter the password provided by the digital signature provider and click OK.

Broker User Manual Digital Signature
Version 9.0 28
Figure 33: Password required dialog box
The Web Signer dialog box closes and a success message is displayed in the User Profile screen notifying that the digital signature is successfully uploaded.
If user registers the signature through this option, then, whenever user wants to attach digital signature for any form, user will have to go through the entire process.
Option 2 - Importing the digital signature on your browser:
1. Double click the digital signature certificate. The Certificate Import Wizard opens.
2. Click “Next” twice. The wizard asks user you for password of the digital signature.
3. Enter the password and click “Next” twice.
4. Click Finish.
5. Login to the BAP portal.
6. On the User Profile screen, click Register Digital Signature. The Web Signer dialog box opens. The available signatures are displayed in a table.

Broker User Manual Digital Signature
Version 9.0 29
Figure 34: Web Signer dialog box displaying the uploaded signature
7. Select the signature that user wants to register and click Sign. Now, whenever user wants to attach the digital signature for any form, user will have to click the Attach Digital Signature button and then select the desired sign.
For importing the digital signature on the browser, system must havee the following installed:
Java Runtime Environment 1.6 and above
Internet Explorer 7 and above

Broker User Manual Creating Sub IDs
Version 9.0 30
Creating Sub IDs
As a Corporate Broker, user you can create 3 sub login IDs on the BAP Portal, using the Master ID. Two of the created sub IDs are for 2 authorized signatories who can digitally sign the applications and returns, and third sub ID is for the employee.
Creating a New Sub ID
1. Click Create Sub ID. 2. The create sub id screen will open. All mandatory fields on the form are marked
with an asterisk (*)
Figure 35: Create Sub ID Screen
The details on Create Sub ID screen are explained in the following table:
Field Description
First Name Enter First Name of the authorized signatory /employee.
Middle Name Enter Middle Name of the authorized signatory /employee.
Last Name Enter Last Name of the authorized signatory /employee.
Designation Select the designation for which sub ID is to be created
PAN Number Enter PAN number of the authorized signatory / employee
Email ID Enter email Id of the authorized signatory/ employee
Date of Birth Enter Date of Birth of the authorized signatory /employee

Broker User Manual Creating Sub IDs
Version 9.0 31
Contact Number Enter Contact number of the authorized signatory /employee
3. Click Create ID. An Acknowledgement dialog box is displayed along with the
User ID details, notifying that the registration is successful.
Figure 36: Sub ID Creation Confirmation Screen
4. Click OK. 5. Click Cancel will take user to the previous page without saving any information
filled on this page. 6. Clicking on Clear will clear all contents filled on this screen.
User is allowed to create only 3 sub ids. Please delete all existing sub ids which are not required anymore so as to create new sub IDs.

Broker User Manual Updating a Sub ID
Version 9.0 32
Updating a Sub ID
User can update the details of the sub IDs created as well.
Updating a Sub ID
1. Click Update Sub ID link.
Figure 37: Update/Delete Sub ID Screen
2. Select the User Id to be updated and Click Update to view Update/Delete ID Screen.

Broker User Manual Updating a Sub ID
Version 9.0 33
Figure 38: Update Sub ID Screen
3. User can update the Designation, Email ID and Contact Number for the Sub ID created.
4. Click Update ID. An acknowledgement message will be displayed on screen.
Figure 39: Successful Updation Acknowledgement Dialog Box
5. Click OK 6. Click Cancel will take the user to the previous page without saving any
information filled on this page.

Broker User Manual Deleting a Sub ID
Version 9.0 34
Deleting a Sub ID
You can delete the details of the sub ID’s created as well.
To Delete Sub ID:
1. Click on Update/Delete Sub ID. List of all the created Sub IDs will be displayed
Figure 40: Update/Delete Sub ID Screen
2. Select the Sub ID which is to be deleted and click on Delete. A Confirmation dialog box is displayed.
Figure 41: Delete Sub ID Screen 3. A confirmation Message will be displayed, with Yes and No button.

Broker User Manual Deleting a Sub ID
Version 9.0 35
Figure 42: Message Pre-Deletion
4. If user wants to proceed with deleting the user account then Click “Yes” else
click “No”.
5. If user clicks “Yes”, the sub ID will be deleted. If user clicks “No”, user will be
taken back to Update/ Delete sub id screen.
6. Click Cancel will take user to the previous page without saving any
information filled on this page.

Broker User Manual Broker Licensing
Version 9.0 36
Broker Licensing
If user wants to become a corporate Broker, then user needs to register his Company in the portal. During the new license application process, user has to enter details of the broker employed in the Company, the directors of the firm, upload the necessary documents and pay the required fee. After IRDAI approves your request, it issues user a separate license. User is also required to renew the license periodically. As per IRDAI regulations, corporate brokers are required to renew their license every three years. User can also apply for changes in the license details. Broker can apply for license in any one of the following categories:
1. Direct Life 2. Direct Non-Life 3. Direct (Life & Non-Life) 4. Composite (Non-Life) 5. Composite (Both) 6. Reinsurance Broker
As per IRDA regulations, brokers are required to renew their licence every three years. Licensing comprises of the following sections:
1. New License 2. Renew License 3. Duplicate License 4. Changes during Licensing Period 5. Changes in Licensing Category 6. Pay Annual Fees

Broker User Manual New License
Version 9.0 37
New License
In order to obtain a new corporate broker license, user has to fill and submit an application form to IRDAI along with the scanned copies of the supporting documents. The employee can only save the form in draft mode and cannot submit the form. Submissions can only be done by authorized signatories of the firm. When one of the authorized signatories submit the form, it must be signed by other authorized signatory also before it goes to IRDAI for approval. IRDAI reviews and validates the application and then approves, rejects or closes it.
To apply for a New License:
1. Click 'Broker' 2. Click New Licensing. 3. User will get a confirmation box saying "Please confirm that you have gone
through all information regarding broker regulations on IRDA site (www.irdabap.gov.in)".
Figure 43: User Confirmation Screen
4. If user clicks “Yes”, user will get Applicant Details screen.
5. If user clicks No, a message box is displayed stating that user needs to go through the broker regulations before proceeding to the licensing process.
Figure 44: Confirmation Message box

Broker User Manual Licensing
Version 9.0 38
Figure 45: New License Application Screen
6. The Broker New Licensing form will open on screen. Please note that all fields
marked with asterisks (*) on the screen are compulsory.
The New License application consists of the following sections:
Applicant Details
Organization Structure
Business Information
Financial Information
Other Information, if any
Upload Documents
Declaration
Undertaking
Print View

Broker User Manual Licensing
Version 9.0 39
The buttons available in the New License application are explained below:
Button Description
Attach Digital Signature
Click to attach digital signature to the license application
Submit After the declaration check box is selected, click Submit to submit the application. (Submit gets enabled only after the attachment of Digital Signature by both the directors)
Cancel Click to return to the home page. This action will also clear all the information entered without saving it.
Save as Draft Click to save all the data entered in the form. User You can use this option if they want to submit the form at a later time.
View Submitted Form
Click to view the submitted New License Application in read only mode.
Print Click to print the submitted New License Application
Clear Click to clear the data entered.
Previous Click to go to previous section.
Next Click to go to the next section.
The digital signature of the both the authorized signatures of the firm are required for the successful submission of the form

Broker User Manual Applicant Details
Version 9.0 40
Applicant Details
The Applicant Details screen displays address details and communication details of the organization.
To view Applicant Details screen
1. Click Broker tab. 2. Click New Licensing tab. 3. User will get a confirmation box saying "Please confirm that you have gone
through all information regarding broker regulations on IRDA site (www.irda.gov.in)".
4. If user you click “Yes”, Applicant Details screen will appear.

Broker User Manual Licensing
Version 9.0 41
Figure 46: Applicant Details Screen 5. If user clicks “No”, a new window is opened which navigates user you to the IRDAI
website where user can view the broker regulations. 6. Applicant Details screen will allow the user to select Broker Category. 7. Select appropriate broker category in the 'Insurance Broker' field.
Other than 'Insurance Broker' all other fields on the Applicant Details screen are read only.
Back (Changes in License Category)

Broker User Manual Organization Structure
Version 9.0 42
Organization Structure
In Organizational structure, user has you need to mention details regarding shareholders, directors, partners, proprietors, bankers, auditors and activities associated with the company.
To view Organizational Structure screen:
On the Applicant Details screen, click “Next”. The Organization Structure screen is displayed. All mandatory fields on the form are marked with an asterisk (*).

Broker User Manual Licensing
Version 9.0 43
Figure 47: Organization Structure Screen

Broker User Manual Licensing
Version 9.0 44
The fields in Organizational Structure screen are described in the following table.
Field Description
Organization Structure
Status of applicant Select one of the following status that is applicable:
Individual/ Sole Proprietor
Partnership
Company
Co. operative society
Others
Stock exchange Enter the name of stock exchange with which the company is listed. If not, mention “Not Applicable”.
Latest share price Enter latest share price of the company here.
Date and Place of Incorporation
Date Enter date of incorporation here.
Place Enter place of incorporation here.
Scope of Business as described in Memorandum of Association
Enter scope of business as described in Memorandum of Association. Details entered should be exactly same as provided to IRDAI.
Shareholder Details
Shareholding as on date Enter date on which we are recording shareholding details
Name of the shareholder Enter name of the shareholder.
Number of shares Against each shareholder, mention the number of shares.
Percentage of total paid up capital of the company
Enter percentage of total paid up capital of the company.
Foreign holding Select 'Yes' if shareholder has a foreign holding. Otherwise, ‘No’.
Particulars of Directors/ Partners/ Proprietors
Name Enter name of the directors/ partners/ proprietors.
Qualification Enter qualifications of directors/ partners/ proprietors.
Experience in insurance Enter experience in insurance broking of directors/

Broker User Manual Licensing
Version 9.0 45
broking partners/ proprietors.
Share in applicant firm/company
Enter share in applicant firm/company of directors/ partners/ proprietors.
Directorship in other companies
Enter number of companies that the Directors/ Partners/ Proprietors holds directorship
Name of activities carried out by the associated company/concerns
Name of the company or the firm
Enter name of the associated company.
Address Enter address of the associated company.
Type of activity handled Enter type of activity handled by the associated company.
Nature and interest of applicant company
Enter nature and interest of the applicant company.
Whether any one or more persons of the associate
Companies/ concerns are interested in the applicant's business.
If one or more persons of the associate
Company / concerns are interested in the applicant's business, then select 'Yes' else select 'No'
Name and Address of the Principal bankers of the applicant
Name of the Banker Enter name of the principal banker.
Address Line 1 Enter first line of the principal banker’s address.
Address Line 2 Enter second line of the principal banker’s address.
Address Line 3 Enter third line of the principal banker’s address.
Country This field displays the country. By default, India is displayed.
State Enter state of the principal banker
District Enter district of the principal banker
City Enter city of the principal banker
Pin code Enter pin code of the principal banker
Name and Address of the Statutory Auditor of the applicant
Name of the Statutory Auditor
Enter name of Statutory Auditor

Broker User Manual Licensing
Version 9.0 46
Address Line 1 Enter first line of the Statutory Auditor’s address
Address Line 2 Enter second line address of the Statutory Auditor’s address
Address Line 3 Enter third line of the Statutory Auditor’s address
Country India is displayed by default
State Select state from the drop-down list.
District Select district from the drop-down list. List of districts will come on the basis of state selected.
City Select city from the drop-down list. List of cities will come on the basis of district selected.
Pin code Enter pin code of the Statutory Auditor
Back (Changes in License Category)

Broker User Manual Licensing
Version 9.0 47
Business Information
In Business Information, user needs to mention details regarding key management personnel, infrastructure, manpower and experience in the relevant industry etc.
To view Business Information screen:
On the Organization Structure screen, click Next. The Business Information screen is displayed. All mandatory fields on the form are marked with an asterisk (*)
Figure 48: Business Information Screen The fields in Business Information screen are described in the following table.
Field Description
Particulars of key management personnel
Name Enter name of the management personnel.

Broker User Manual Licensing
Version 9.0 48
Field Description
Qualification Enter educational qualification of the management personnel.
Experience with particular reference to Insurance Broking
Enter number of years of experience as insurance broker of the management personnel
Date of appointment Enter date of appointment of management personnel to the current job.
Functional areas Enter functional areas relevant to the management personnel.
Details of infrastructure like office space, equipment and manpower available with the applicant
Enter details of infrastructure like office space, equipment and manpower available with the applicant
Details of experience in insurance broking/insurance consulting/risk management and other services
Enter details of experience in insurance broking/insurance consulting/risk management and other services
Any other information considered relevant to the nature of services rendered by the applicant
Enter any other information considered relevant to the nature of services rendered by the applicant
Back (Changes in License Category)

Broker User Manual Financial Information
Version 9.0 49
Financial Information
In Financial Information, you need to mention details such as capital structure, deployment of resources, and major source of income, income and profit before tax, dividends, etc.
To view Financial Information screen:
On the Business Information screen, click Next. The Financial Information screen is displayed. All mandatory fields on the form are marked with an asterisk (*)

Broker User Manual Licensing
Version 9.0 50
Figure 49: Financial Information Screen The fields in Financial Information screen are described in the following table.
Field Description
Capital Structure
Capital Structure Lists different capitals under the capital structure of the

Broker User Manual Licensing
Version 9.0 51
Field Description
company. This includes: Authorized Capital, Issue Capital, Paid-up Capital, Free reserves, and Paid up + free reserves.
Year prior to preceding year
Field is disabled by default for New License only
Preceding year Field is disabled by default for New License only
Current year Enter the capital amount in the current year
Deployment of resources
Particulars Lists the different financial resources available with the organization
Year prior to preceding year
Field is disabled by default for New License only
Preceding year Field is disabled by default for New License only
Current year Enter the financial value of the respective resource in the current year
Major source of income
Particulars Lists down the possible income streams of the applicant
Year prior to preceding year
Field is disabled by default for New License only
Preceding year Field is disabled by default for New License only
Re numeration received as percentage of premium
Enter Re numeration received as percentage of premium
Income and Profit before tax
Particulars Income Enter values such as category of income/ expenses or profit before taxes
Year prior to preceding year
Field is disabled by default for New License only
Preceding year Field is disabled by default for New License only
Current year Enter income from the respective income stream for the current year.
Dividends

Broker User Manual Licensing
Version 9.0 52
Field Description
Particulars Lists the dividends in terms of amount and percentage
Year prior to preceding year
Field is disabled by default for New License only
Preceding year Field is disabled by default for New License only
Current year Enter the dividends amount for the current year.
Back (Changes in License Category)

Broker User Manual Other Information
Version 9.0 53
Other Information
In Other Information, you need to mention details such as Details of all settled and pending disputes and economic offences if any.
To view Other Information screens:
On the Financial Information screen, click Next. The Other Information screen is displayed. All mandatory fields on the form are marked with an asterisk (*)
Figure 50: Other Information Screen
The fields in Other Information screen are described in the following table.
Field Description
Details of all settled and pending disputes
Nature of dispute Enter the nature of dispute
Name of the party Enter the name of the party with whom the applicant is in dispute with

Broker User Manual Licensing
Version 9.0 54
Field Description
Pending/settled Select either pending or settled
Details, if any of any economic offences by the
applicant/ proprietor or any of the Partners/
Directors, or key managerial Personnel in the last three years
Enter Details, if any of any economic offences by the
applicant/ proprietor or any of the Partners/
Directors, or key managerial Personnel in the last three year
Back (Changes in License Category)

Broker User Manual Upload Documents
Version 9.0 55
Upload Documents
In Upload Documents, you need to upload the necessary documents for the
successful submission of the New License application
View Upload Documents screen:
On the Other Information screen, click Next. The Upload Documents screen is displayed. All mandatory fields on the form are marked with an asterisk (*).

Broker User Manual Licensing
Version 9.0 56
Figure 51: Upload Documents Screen
To Upload Documents:
1. Under Documents required, click Browse to search for the corresponding
Document. 2. Click Upload File to upload the corresponding document. The name of the
uploaded document appears beside the Upload File button. Back (Changes in License Category)

Broker User Manual Declaration
Version 9.0 57
Declaration
Declaration section has 2 parts namely Fee Payment and Declaration. The Fee Payment part will specify the amount of fees to be paid by the Broker to obtain this license. The Declarations part will specify important points that the user is expected to read and agree to before proceeding.
Figure 52: Declaration Screen Back (Changes in License Category)

Broker User Manual Undertaking
Version 9.0 58
Undertaking
In this section, you need to provide information such as if any person related to the applicant has been denied license in the past. If yes then specify the relationship with the applicant. Other information such as list of employees who will be responsible for soliciting and procuring Insurance business and details of the fixed deposit for renewal of license will also be mentioned here.
To View Under taking screen:
On the Declaration screen, click Next. The Undertaking screen is displayed. All mandatory fields on the form are marked with an asterisk (*)
Figure 53: Undertaking Screen
Broker User Manual Licensing
Version 9.0 59
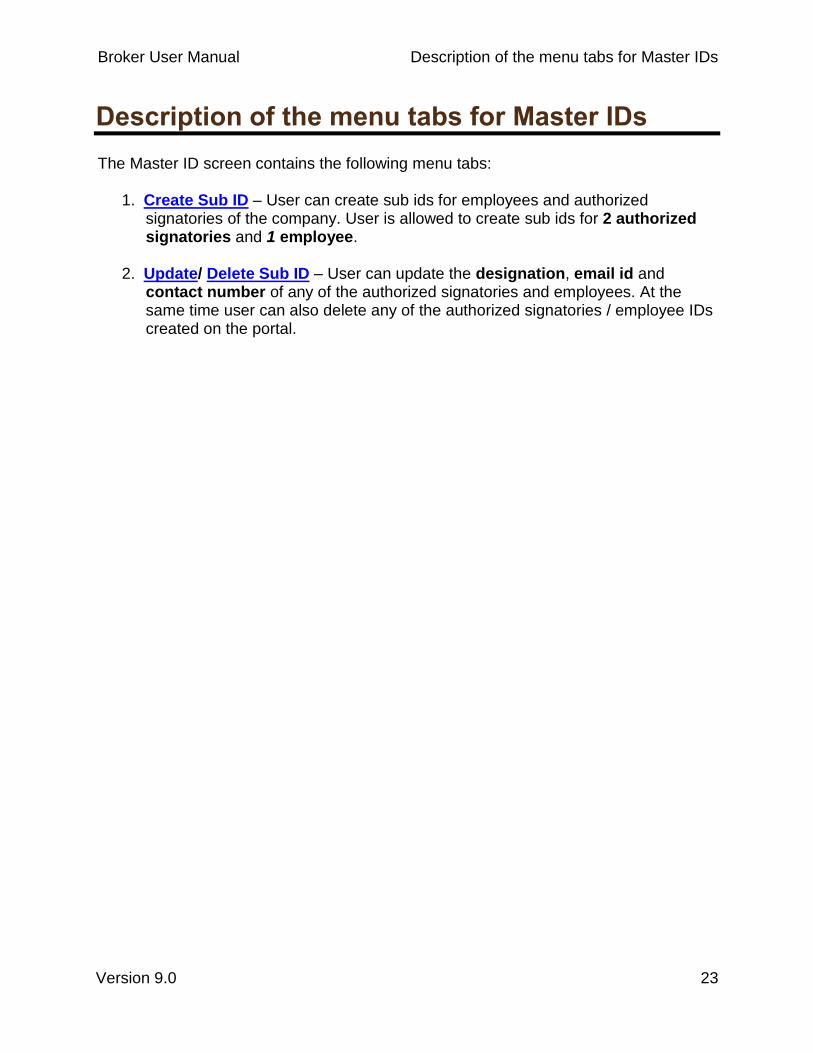
The fields in undertaking screen are described in the following table.
Field Description
Whether any person related to applicant has been refused for the License in the Past or Not.
Select either 'Yes' or 'No'
Person Related to applicant
Name of the person Enter name of the person related (If a person related to the applicant has been denied license in the past )
Relationship with the applicant Enter relationship with the applicant (If a person related to the applicant has been denied license in the past )
Qualification and Experience details of the Principal Officer of the applicant
Name Enter name of the principal officer of the applicant
Address Enter address of the principal officer of the applicant
Qualification Enter qualification of the principal officer of the applicant
Prior Experience Enter years of prior experience of the principal officer of the applicant
Previous Employment Enter previous employment of the principal officer of the applicant
Employment Details Enter employment details the principal officer of the applicant
List of employees who will be responsible for soliciting and procuring insurance business
Name Enter name of the employee who will be responsible for soliciting and procuring insurance business
Address Enter address of the employee who will be responsible for soliciting and procuring insurance business
Designation Enter designation of the employee who will be responsible for soliciting and procuring insurance business

Broker User Manual Licensing
Version 9.0 60
Field Description
Qualification Enter qualification of the employee who will be responsible for soliciting and procuring insurance business
Details of Responsibilities Enter responsibilities of the employee who will be responsible for soliciting and procuring insurance business
Details of the fixed deposit for renewal of license
Name of the Bank Enter name of the bank in which the applicant has a fixed deposit
F. D Number Enter fixed deposit number
Address Enter address of the bank in which the applicant has a fixed deposit
Amount held in deposit Enter amount held in the fixed deposit
Percentage to Initial Capital Enter Percentage to Initial Capital
Maturity Date Enter maturity date of the fixed deposit
Back (Changes in License Category)

Broker User Manual Print View
Version 9.0 61
Print View
In Print View, validate and confirm the information submitted by you in the application, in order to proceed with the submission.
To view Print View screen:
On the Undertaking screen, click Next. The Print View screen is displayed. All mandatory fields on the form are marked with an asterisk (*)

Broker User Manual Licensing
Version 9.0 62

Broker User Manual Licensing
Version 9.0 63
Figure 54: Print View Screen

Broker User Manual Licensing
Version 9.0 64
To submit New License Application:
1. On the Print view screen, select the Declaration check box.
2. Click Attach Digital Signature button. If you have uploaded the digital signature through the BAP portal, then you need to upload it again. Otherwise, if you have imported the signature on your web browser, then it will be attached as soon as you click on button. See the Digital Signature topic for more details.
3. Click Submit. The User Confirmation Message dialog box is displayed.
Figure 55: User Confirmation Message for Payment
4. Click yes to proceed to payment. The Make Payment screen is displayed
Figure 56: Make Payment screen
5. Select the desired payment type and click Go to make payment through that type. The different payment types are explained below.
Payment through DD - Select this payment type if you want to make your payment through demand draft. You need to create the demand draft first and then enter its details in this payment type.

Broker User Manual Licensing
Version 9.0 65
Figure 57: Demand Draft Details screen
The fields in this payment type are explained in the following table.
Field Description
Instrument number Enter the demand draft number.
Amount to be paid (Rs.)
The amount payable is displayed by default.
Bank Name Enter the name of the bank from which you created the demand draft.
Amount of Instrument (Rs.)
Enter the amount of the demand draft.
Instrument Date Select the date when you created the demand draft.
Payment through NEFT/RTGS - Select this payment type if you want to make your payment through NEFT/RTGS. For this payment type, you need to make payment to IRDA through NEFT/RTGS and then enter the payment details in this payment type.
Figure 58: NEFT/RTGS Details screen
The fields in this payment type are explained in the following table.
Field Description
Acknowledgement No.
Enter the acknowledgement number received after making the online payment.

Broker User Manual Licensing
Version 9.0 66
Field Description
Amount to be paid (Rs.)
The amount payable is displayed by default.
Bank Name Enter the name of the bank through which you made the payment.
Enter your IFSC code Enter the IFSC code of your bank branch.
Date of Payment Select the date when you made the payment.
Enter your Account Number
Enter your bank account number.
Amount of Payment (Rs.)
Enter the amount of the payment made.
6. Enter the necessary details for the selected payment type and click Submit. Transaction ID is generated; Click OK to complete payment process.
Figure 59: Form Submitted Successfully Notification
7. On OK, an Acknowledgement dialog box is displayed containing the Unique Reference Number (URN).
Figure 60: Form Submitted Successfully Notification
8. Click OK.

Broker User Manual Licensing
Version 9.0 67
This completes the New License application process. After you successfully submit the form, it is sent to IRDA. The action taken by IRDA on the form is conveyed to you in the form of E mail notifications. Back (Changes in License Category)

Broker User Manual Renewal License
Version 9.0 68
Renewal License
Each Insurance Broker license has a validity period after which the license expires if it is not renewed. As per IRDA regulations, you need to renew your Insurance Broker license every three years. IRDA sends you a remainder emails 3 months before the license expiration. These reminders are sent at interval of 1 month each informing you to renew your license before expiry. You are also required to pay the required renewal license fee. There are certain prerequisite and conditions that you need to remember while renewing your license. In order to obtain a Renewal license, you need to fill and submit an application form to IRDA along with the scanned copies of the supporting documents. The Data entry operator can only save the form in the draft mode and cannot submit the form. Submissions can only be done by the directors of the firm. When one of the directors submits the form, it must be signed by the other director also before it goes to IRDA for approval. IRDA then reviews and validates the application and then approves rejects or closes it.
Prerequisite for License Renewal
You can renew your license 90 days before the date of expiration. If you apply for renewal three months before the license expiry date, a warning message is displayed.
Figure 61: Renewal warning message when attempting to renew 3 months before from the date of expiry
You cannot renew the application, 3 Years before the License Expiration Date. If you apply for renewal, a warning message is displayed.

Broker User Manual Licensing
Version 9.0 69
Figure 62: Renewal warning message when attempting to renew 3 Years before from the date of expiry
Conditions for Late Renewal
Condition Description
Renew License application submitted one month or more before License expiry date
Renewal fee of Rs 1000
Renew License application submitted within less than thirty days before License expiry date
Renewal fee of Rs 1000 and late Fee of
Rs 100
Renew License application submitted after License Expiry date
Renewal Fee of Rs 1000 and Late Fee of Rs 750
To apply for license renewal:
1. Click Broker tab.
2. Click Renew License link. The License Renewal screen is displayed.

Broker User Manual Licensing
Version 9.0 70
Figure 63: Renew License Screen
3. The License Renewal form comprises of the following sections:
Applicant Details
Organization Structure
Business Information
Financial Information
Other Information
Upload Documents
Declaration
Undertaking
Print View
4. The buttons available in the License Renewal form are explained in the following table.
Button Description
Attach Digital Signature
Click to attach digital signature to the license application.
Submit Click to submit the application form once you have selected the declaration check box. (Submit button will be enabled only after attachment of digital signature by both the directors).
Cancel Click to return to the home page. This action will also clear all the information entered without saving it.
View Submitted Form
Click to view the submitted form in read-only mode.
Print Click to print the License Renewal form.

Broker User Manual Licensing
Version 9.0 71
Clear Click to clear the information entered.
Back Click to go to previous section.
Next Click to go to next section.
If you renew your license after it has expired, then, a warning message is displayed notifying that your license has expired and it also displays the amount of the late and renewal fee that you need to pay.

Broker User Manual Applicant Details
Version 9.0 72
Applicant Details
The Applicant Details screen displays address details and communication details of the organization.
To view Applicant Details screen
1. Click Broker tab. 2. Click Renewal Licensing tab. 3. You will get a confirmation box saying "Please confirm that you have gone
through all information regarding broker regulations on IRDA site (www.irdabap.gov.in)".
4. If you click “Yes”, you will get Applicant Details screen.

Broker User Manual Licensing
Version 9.0 73
Figure 64: Applicant Details Screen
5. If you click “No”, a new window is opened which navigates you to the IRDA website
where you can view the Broker regulations. 6. All fields are pre-populated in this section. Hence, you can click “Next” to go to next
screen.

Broker User Manual Organization Structure
Version 9.0 74
Organization Structure
In Organizational structure, you need to mention details regarding shareholders, directors, partners, proprietors, bankers, auditors and activities associated with the company.
To view Organizational Structure screen:
On the Applicant Details screen, click “Next”. The Organization Structure screen is displayed. All mandatory fields on the form are marked with an asterisk (*).

Broker User Manual Licensing
Version 9.0 75
Figure 65: Organization Structure Screen The fields in Organizational Structure screen are described in the following table.
Field Description

Broker User Manual Licensing
Version 9.0 76
Shareholder Details
Name of the share holder Enter name of the share holder here
Number of shares Enter number of shares with the share holder
Percentage of total paid up capital of the company
Enter Percentage of total paid up capital of the company
Foreign holding Select 'Yes' if the shareholder has a foreign holding and 'No' otherwise
Particulars of Directors/ Partners/ Proprietors
Name Enter name of the Directors/ Partners/ Proprietors
Qualification Enter qualification of Directors/ Partners/ Proprietors
Experience in insurance broking Enter Experience in insurance broking of Directors/ Partners/ Proprietors
Share in applicant firm/company Enter Share in applicant firm/company of Directors/ Partners/ Proprietors
Directorship in other companies Enter the number of companies that the Directors/ Partners/ Proprietors holds Directorship
Name of activities carried out by the associated company/concerns
Name of the company or the firm Enter name of the associated company
Address Enter Address of the associated company
Type of activity handled Enter type of activity handled by the associated company
Nature and interest of applicant company
Enter nature and interest of the applicant company
Whether any one or more persons of the associate
Companies/ concerns are interested in the applicant's business.
If one or more persons of the associate
companies/ concerns are interested in the applicant's business then select 'Yes' else select 'No'
Name and Address of the Principal bankers of the applicant
Name of the Banker Enter name of the principal banker

Broker User Manual Licensing
Version 9.0 77
Address Line 1 Enter first line of the principal banker’s address
Address Line 2 Enter second line of the principal banker’s address
Address Line 3 Enter third line of the principal banker’s address
Country India is displayed by default
State Enter state of the principal banker
District Enter district of the principal banker
City Enter city of the principal banker
Pin code Enter pin code of the principal banker
Name and Address of the Statutory Auditor of the applicant
Name of the Statutory Auditor Enter name of Statutory Auditor
Address Line 1 Enter first line of the Statutory Auditor’s address
Address Line 2 Enter second line of the Statutory Auditor’s address
Address Line 3 Enter third line of the Statutory Auditor’s address
Country India is displayed by default
State Enter state of the Statutory Auditor
District Enter district of the Statutory Auditor
City Enter city of the Statutory Auditor
Pin code Enter pin code of the Statutory Auditor

Broker User Manual Business Information
Version 9.0 78
Business Information
In Business Information, you need to mention details regarding key management personnel, infrastructure, manpower, and experience in the relevant industry etc.
To view Business Information screen:
On the Organization Structure screen, click Next. The Business Information screen is displayed. All mandatory fields on the form are marked with an asterisk (*)
Figure 66: Business Information Screen

Broker User Manual Licensing
Version 9.0 79
The fields in Business Information screen are described in the following table.
Field Description
Business handled during the last three years with Insurers and list of reinsurers
Name Enter name of the Insurer
Amount Enter the Amount handled during the last three years
Percentage of total premium handled by the broker
Enter the percentage of total premium handled by the broker
Service Rendered Enter the service rendered during the last three years

Broker User Manual Financial Information
Version 9.0 80
Financial Information
In Financial Information, you need to mention details such as Capital structure, deployment of resources, major source of income, income and profit before tax, dividends etc
To view Financial Information screen:
On the Business Information screen, click Next . The Financial Information screen
is displayed. All mandatory fields on the form are marked with an asterisk (*).

Broker User Manual Licensing
Version 9.0 81
Figure 67: Financial Information Screen

Broker User Manual Licensing
Version 9.0 82
The fields in Financial Information screen are described in the following table.
Field Description
Capital Structure
Capital Structure Lists different capitals under the capital structure of the company. This includes: Authorized Capital, Issue Capital,
Paid-up Capital, Free reserves, Paid up+ free reserves.
Year prior to preceding year
Enter the capital amount in the year prior to preceding year (Field is pre-populated with preceding year values)
Preceding year Enter the capital amount in the preceding year
Current year Enter the capital amount in the current year
Deployment of resources
Particulars lists the different financial resources available with the organization
Year prior to preceding year
Enter the financial value of the respective resource in the year prior to preceding year. (Field is pre-populated with preceding year values)
Preceding year Enter the financial value of the respective resource in the preceding year
Current year Enter the financial value of the respective resource in the current year
Major source of income
Particulars lists down the possible income streams of the applicant
Year prior to preceding year
Enter income from the respective income stream for the year prior to preceding year. (Field is pre-populated with preceding year values)
Preceding year Enter income from the respective income stream for the preceding year
Re numeration received as percentage of premium
Enter Re numeration received as percentage of premium
Income and Profit before tax
Particulars Income Enter values such as category of income/ expenses or profit before taxes

Broker User Manual Licensing
Version 9.0 83
Field Description
Year prior to preceding year
Enter income from the respective income stream for the year prior to preceding year. (Field is pre-populated with preceding year values)
Preceding year Enter income from the respective income stream for the preceding year
Current year Enter income from the respective income stream for the current year.
Dividends
Particulars lists the dividends in terms of amount and percentage
Year prior to preceding year
Enter dividend details for year prior to preceding year. (Field is pre-populated with preceding year values)
Preceding year Enter dividend details for preceding year
Current year Enter dividend details for current year

Broker User Manual Other Information
Version 9.0 84
Other Information
In Other Information, you need to mention details such as Details of all settled and pending disputes and economic offences if any.
To view Other Information screens:
On the Financial Information screen, click Next. The Other Information screen is displayed. All mandatory fields on the form are marked with an asterisk (*)
Figure 68: Other Information Screen All fields pre-populated in this section. Click “Next” to go to Upload Documents Section

Broker User Manual Upload Documents
Version 9.0 85
Upload Documents
In Upload Documents, you need to upload the necessary documents for the successful submission of the Renewal License application.
To view Upload Documents screen:
On the Other Information screen click Next, Upload document screen gets displayed. All mandatory fields on the form are marked with an asterisk (*).

Broker User Manual Upload Documents
Version 9.0 86
Figure 69: Upload Documents Screen
To upload documents:
1. Under Check list for documents to be attached, click Browse to search for the corresponding document.
2. Click Upload to upload the corresponding document. The name of the uploaded document appears next to the Upload button.

Broker User Manual Declaration
Version 9.0 87
Declaration
Declaration section has 2 parts namely Fee Payment and Declaration. The Fee Payment part will specify the amount of fees to be paid by the Broker to obtain this license. The Declarations part will specify important points that the user is expected to read and agree to before proceeding.
Figure 70: Declaration Screen

Broker User Manual Undertaking
Version 9.0 88
Undertaking
In this section, you need to provide information such as if any person related to the applicant has been denied license in the past. If yes then what is his relationship with the applicant. Other information such as list of employees who will be responsible for soliciting and procuring Insurance business and details of the fixed deposit for renewal of license will also be mentioned here.
To View Under taking screen:
On the Declaration screen, click Next. The Undertaking screen is displayed. All mandatory fields on the form are marked with an asterisk (*)
Figure 71: Undertaking Screen

Broker User Manual Undertaking
Version 9.0 89
The fields in undertaking screen are described in the following table.
Field Description
Whether any person related to applicant has been refused for the License in the Past or Not.
Select either 'Yes' or 'No'
Person Related to applicant
Name of the person Enter name of the person related (If a person related to the applicant has been denied license in the past )
Relationship with the applicant Enter relationship with the applicant (If a person related to the applicant has been denied license in the past )
Qualification and Experience details of the Principal Officer of the applicant
Name Enter name of the principal officer of the applicant
Address Enter address of the principal officer of the applicant
Qualification Enter qualification of the principal officer of the applicant
Prior Experience Enter years of prior experience of the principal officer of the applicant
Previous Employment Enter previous employment of the principal officer of the applicant
Employment Details Enter employment details the principal officer of the applicant
List of employees who will be responsible for soliciting and procuring insurance business
Name Enter name of the employee who will be responsible for soliciting and procuring insurance business
Address Enter address of the employee who will be responsible for soliciting and procuring insurance business
Designation Enter designation of the employee who will be responsible for soliciting and procuring insurance business

Broker User Manual Undertaking
Version 9.0 90
Field Description
Qualification Enter qualification of the employee who will be responsible for soliciting and procuring insurance business
Details of Responsibilities Enter responsibilities of the employee who will be responsible for soliciting and procuring insurance business
Details of the fixed deposit for renewal of license
Name of the Bank Enter name of the bank in which the applicant has a fixed deposit
F. D Number Enter fixed deposit number
Address Enter address of the bank in which the applicant has a fixed deposit
Amount held in deposit Enter amount held in the fixed deposit
Percentage to Initial Capital Enter Percentage to Initial Capital
Maturity Date Enter maturity date of the fixed deposit

Broker User Manual Print view
Version 9.0 91
Print view
In Print view, validate and confirm the information that you have entered previously in the application, in order to proceed with the submission.
To view Print view screen:
On the Upload Documents screen, click. Next. The Form Preview screen is displayed.

Broker User Manual Print view
Version 9.0 92

Broker User Manual Print view
Version 9.0 93

Broker User Manual Print view
Version 9.0 94
Figure 72: Print View Screen
To submit Renew License Application:
1. On the Print view screen, select the Declaration check box.
2. Click Attach Digital Signature button. If you have uploaded the digital signature through the BAP portal, then you need to upload it again. Otherwise, if you have imported the signature on your web browser, then it will be attached as soon as you click the button. See the Digital Signature topic for more details.
3. Click Submit. The User Confirmation Message dialog box is displayed.
Figure 73: User Confirmation message for Renewal License
4. Click Yes to proceed to payment. The Make Payment screen is displayed.
Figure 74: Make Payment Screen
5. Select the desired payment type and click Go to make payment through that type.

Broker User Manual Print view
Version 9.0 95
6. The different payment types are explained below.
Payment through DD - Select this payment type if you want to make your payment through demand draft. You need to create the demand draft first and then enter its details in this payment type.
Figure 75: Demand Draft Details screen
The fields in this payment type are explained in the following table.
Field Description
Instrument number Enter the demand draft number.
Amount to be paid (Rs.)
The amount payable is displayed by default.
Bank Name Enter the name of the bank from which you created the demand draft.
Amount of Instrument (Rs.)
Enter the amount of the demand draft.
Instrument Date Select the date when you created the demand draft.
Payment through NEFT/RTGS - Select this payment type if you want to make your payment through NEFT/RTGS. For this payment type, you need to make payment to IRDA through NEFT/RTGS and then enter the payment details in this payment type.
Figure 76: NEFT/RTGS Details screen
The fields in this payment type are explained in the following table.

Broker User Manual Print view
Version 9.0 96
Field Description
Acknowledgement No.
Enter the acknowledgement number received after making the online payment.
Amount to be paid (Rs.)
The amount payable is displayed by default.
Bank Name Enter the name of the bank through which you made the payment.
Enter your IFSC code Enter the IFSC code of your bank branch.
Date of Payment Select the date when you made the payment.
Enter your Account Number
Enter your bank account number.
Amount of Payment (Rs.)
Enter the amount of the payment made.
7. Enter the necessary details for the selected payment type and click Submit.
8. Transaction ID is generated on click of submit button. Click OK to complete the payment process.
Figure 77: Confirmation Message for Make Payment
9. An Acknowledgement dialog box is displayed containing the Unique Reference Number (URN).
Figure 78: Form Submitted Successfully Notification

Broker User Manual Print view
Version 9.0 97
10. Click OK.
If your renew license request is rejected, IRDA sends you an email notification stating the reason for rejection

Broker User Manual Duplicate License
Version 9.0 98
Duplicate License
In Duplicate License, you can apply for a duplicate license if your license has been lost, destroyed.
To view Duplicate License screen:
1. Click Broker tab. 2. Click Licensing tab. 3. On the Licensing screen, click Duplicate License. The Duplicate License
screen is displayed. It contains the license number and the expiry date of your license. All the mandatory fields are marked with an asterisk (*).
Figure 79: Duplicate License Screen
The buttons available on the Duplicate License Application are explained in the following table.
Button Description
Attach Digital Signature
Click to attach digital signature to the license application.

Broker User Manual Licensing
Version 9.0 99
Submit Click to submit the application form once you have selected the declaration check box. (Submit button will be enabled only after attachment of digital signature by one of the directors).
Cancel Click to return to the home page. This action will also clear all the information entered without saving it.
Save as Draft Click to save all the data entered in the form. You can use this option if you want to submit the form at a later time.
View Submitted Form
Click to view the submitted New License Application in read-only mode.
Print Click to print the New License Application.
Clear Click to clear the data entered.
To apply for a Duplicate License:
1. On the Duplicate License screen, select the reason and enter the details of the circumstances for which you are applying a duplicate licence.
2. Select declaration check box. 3. Click Attach Digital Signature button. If you have uploaded the digital signature
through the BAP portal, then you need to upload it again. Otherwise, if you have imported the signature on your web browser, then it will be attached as soon as you click the button. See the Digital Signature topic for more details.
4. Click Submit. The User Confirmation Message dialog box is displayed. System displays fees of Rs. 1,000 to be paid on the form. This same amount of fees is charged from applicant’s card/bank via e-payment option during application form submission.
5. The Make Payment screen is displayed.
Figure 80: Make Payment screen

Broker User Manual Licensing
Version 9.0 100
Select the desired payment type and click Go to make payment through that type.
The different payment types are explained below.
Payment through DD - Select this payment type if you want to make your payment through demand draft. You need to create the demand draft first and then enter its details in this payment type.
Figure 81: Demand Draft Details screen
The fields in this payment type are explained in the following table.
Field Description
Instrument number Enter the demand draft number.
Amount to be paid (Rs.)
The amount payable is displayed by default.
Bank Name Enter the name of the bank from which you created the demand draft.
Amount of Instrument (Rs.)
Enter the amount of the demand draft.
Instrument Date Select the date when you created the demand draft.
Payment through NEFT/RTGS - Select this payment type if you want to make your payment through NEFT/RTGS. For this payment type, you need to make payment to IRDA through NEFT/RTGS and then enter the payment details in this payment type.
Figure 82: NEFT/RTGS Details screen
The fields in this payment type are explained in the following table.

Broker User Manual Licensing
Version 9.0 101
Field Description
Acknowledgement No.
Enter the acknowledgement number received after making the online payment.
Amount to be paid (Rs.)
The amount payable is displayed by default.
Bank Name Enter the name of the bank through which you made the payment.
Enter your IFSC code Enter the IFSC code of your bank branch.
Date of Payment Select the date when you made the payment.
Enter your Account Number
Enter your bank account number.
Amount of Payment (Rs.)
Enter the amount of the payment made.
6. Enter the necessary details for the selected payment type and click Submit.
7. Transaction ID is generated. Click OK to complete the payment process.
Figure 83: Confirmation Message for Make Payment
8. An Acknowledgement dialog box is displayed containing the Unique Reference Number (URN).
Figure 84: Form Submitted Successfully Notification
9. Click OK.
Broker User Manual Licensing
Version 9.0 102
For ‘Duplicate License’, the digital signature of one of the directors is required for submitting the application form.
After you submit the application, an E mail notification is sent to you informing that your application has been submitted to IRDA.

Broker User Manual Changes During Licensing Period
Version 9.0 103
Changes During Licensing Period
Post issuance of license, a broker might want to change/update certain information that it provided to IRDA during new/renewal license application. All such information can be provided by broker to IRDA anytime during the year. In “Changes during Licensing Period”, one can update/modify the details using ‘For Information and ‘For Approval’ Category. In the “for information” type the changes can directly be made in the license .However the later requires approval from IRDA before any changes are reflected in the license.
The ‘For information’ type includes:
Information on opening/closing branches, change of registered/branch offices
Transfer of shares, increase in paid up capital/ change in holding company/conversation
Induction of new directors/cessation of existing directors, approval for appointment of director in international bodies
Change in principal officer/key management personnel
Information on particulars of persons responsible for soliciting and procuring broking business
Standing arrangement with Insurance companies and hospitals
Change in name/organization structure
Information/approval for investment of funds
The ‘For Approval’ type includes:
Transfer of shares, increase in paid up capital/change in holding company/conversion of company [Cumulative shareholding after increase 5% or more]
Removal of lien on FD after making fresh FD
Voluntary surrender of license
Approval for opening representative offices abroad
Other representations by brokers on matters of license
Miscellaneous

Broker User Manual Changes During Licensing Period
Version 9.0 104
To view Changes in licensing screen:
1. Click 'Broker' tab. 2. Click Changes during Licensing period. A confirmation will be displayed.
Figure 85: User Confirmation Message
3. If you click “Yes”, you will get the screen shown below. 4. If you click “No”, a new window is opened which navigates you to the IRDA
website where you can view the Broker regulations. 5. The Changes during licensing period screen will appear. All the mandatory fields
in the selected modification type are marked with an asterisk (*).
Figure 86: Changes during Licensing Period Screen
6. The screen is divided into two parts
For Information - Changes that are just for information of IRDA
Request for Approval- Changes that require approval from IRDA

Broker User Manual Changes During Licensing Period
Version 9.0 105
7. Select the appropriate option from the ' For Information' and 'Request for Approval' list to go to the required page.
The buttons available on the different forms available under the ‘changes in license’ tab are explained in the following table
Field Description
Attach Digital Signature
Click to attach digital signature to the application forms.
Submit Click to submit the application form once you have selected the declaration check box. (Submit button will be enabled only after attachment of digital signature by the directors).
Cancel Click to return to the home page. This also clears any entered data.
Save as Draft Click to save all the data entered in the form. You can use this option if you want to submit the form at a later time.
View Submitted Form
Click to view the submitted New License Application in read only mode.
Print Click to print the submitted New License Application
Clear Click to clear the data entered.

Broker User Manual For Information Category
Version 9.0 106
Information on opening/closing branches, change of registration/branch office
1. On Changes in Licensing screen, select Information on opening/closing branches, change of registered/branch office.
Figure 87: Particulars of registered/branch office Screen
The fields on this screen are described in the following table.
Field Description
Branch Office Details
Address of Office Enter Address of Branch Office
Area Type Select the Area Type of the Branch Office whether Rural/ Urban or Semi Urban
State Enter State of Branch Office
District Enter District of Branch Office
City Enter City of Branch Office

Broker User Manual For Information Category
Version 9.0 107
Person in charge Enter Person in charge of Branch Office
No of broking staff Enter the No of broking staff that will be present at the branch office
No of other staff Enter no of other staff (non broking) present at the branch office
Date of Opening of office Enter the date of opening of this branch office
Whether in Operation or not (Yes/No)
Enter whether the branch office is in operation or not
Date of Closure Enter the date of closure of the branch office if any
Registered Office Details
Address of Office Enter the Address of Registered office
Area Type Select the Area Type of the Registered Office whether Rural/ Urban or Semi Urban
State Enter State of the Registered Office
Activities Enter activities performed in this registered office
Person in charge Enter person in charge of this registered office
No of broking staff Enter the No of broking staff that will be present at the registered office
No of other staff Enter no of other staff (non broking) present at the registered office
Whether a head office (Yes/ No)
Enter whether the registered office is the head office or not
Whether in operation or not
Enter whether the registered office is in operation or not
Upload Documents
Document Proof Enter the Document proof here
2. Make the required changes in your registered office address or add opening /closing details of your office branch.
3. Select the declaration check box.
4. Click Attach Digital Signature button. If you have uploaded the digital signature through the BAP portal, then you need to upload it again. Otherwise, if you have

Broker User Manual For Information Category
Version 9.0 108
imported the signature on your web browser, then it will be attached as soon as you click on button. See the Digital Signature topic for more details
5. Click Submit. The User Confirmation Message dialog box is displayed.
6. Click “Yes” to submit the form. An Acknowledgement dialog box is displayed with an Application Reference Number.
7. Click OK.

Broker User Manual For Information Category
Version 9.0 109
Transfer of shares, increase in paid up capital/change in holding company conversion
1. On Changes in Licensing screen, select Transfer of shares, increase in paid up capital/ change in holding company/conversation
Figure 88: Transfer of shares, increase in paid up capital/ change in holding company/ conversation Screen

Broker User Manual For Information Category
Version 9.0 110
The fields on this screen are described in the following table.
Field Description
Capital Structure
Amount Enter Amount against each type of capital
FDI Details
Shareholder Name Enter the Shareholder Name
Total equity share capital Enter Total Equity Share Capital
% Holding Enter % Holding
Shareholder Details
Category of Shareholder (Foreign Direct/ Foreign Indirect/Indian)
Enter the Category of Shareholder whether Foreign Direct or Foreign Indirect or Indian
Name of Shareholder Enter the Name of Shareholder
Address of Shareholder Enter the Address of Shareholder
Business or Profession Enter the Business or Profession of Shareholder
Shareholder Unique ID (Indian: PAN No) (Foreign: Tax ID)
Enter Shareholder Unique ID. If Indian enter PAN No. If Foreign enter Tax ID
Shareholding as at end of reporting period (number)
Enter number of shares as at end of reporting period
Shareholding as at end of reporting period (amount)
Enter Shareholding amount as at end of reporting period
Date of changes in shareholding during the period
Enter Date of changes in shareholding during the period
Particulars of changes in shareholding during the period
Enter Particulars of changes in shareholding during the period
Loans and Advances to the broker firm
Enter Loans and Advances to the broker firm
Other Investments in the broker firm Enter Other Investments in the broker firm
Initial Subscribers of MOA
Name of the Subscriber Enter Name of the Subscriber
Address of the subscriber Enter address of the subscriber

Broker User Manual For Information Category
Version 9.0 111
Business or Profession Enter Business or Profession of the subscriber
Shareholder Unique ID (Indian: PAN No) (Foreign: Tax ID)
Enter Shareholder Unique ID. If Indian enter PAN No. If Foreign enter Tax ID
Shareholding as at end of reporting period (number)
Enter number of shares as at end of reporting period
Shareholding as at end of reporting period (amount)
Enter Shareholding amount as at end of reporting period
Date of changes in shareholding during the period
Enter Date of changes in shareholding during the period
Particulars of changes in shareholding during the period
Enter Particulars of changes in shareholding during the period
Loans and Advances to the broker firm
Enter Loans and Advances to the broker firm
Other Investments in the broker firm Enter Other Investments in the broker firm
Associate Company Wise
Name of the Associate Enter Name of the Associate
Address of the associate Enter address of the associate
Business or Profession Enter Business or Profession of the associate
Shareholder Unique ID (Indian: PAN No) (Foreign: Tax ID)
Enter Shareholder Unique ID. If Indian enter PAN No. If Foreign enter Tax ID
Shareholding as at end of reporting period (number)
Enter number of shares as at end of reporting period
Shareholding as at end of reporting period (amount)
Enter Shareholding amount as at end of reporting period
Date of changes in shareholding during the period
Enter Date of changes in shareholding during the period
Particulars of changes in shareholding during the period
Enter Particulars of changes in shareholding during the period
Regulatory Body Enter the name of the regulatory body
2. Make the required changes in capital Structure, FDI Details, Shareholder details,
Initial Subscribers of MOA, Associate Company Wise.
3. Select the declaration check box.
4. Click Attach Digital Signature button. If you have uploaded the digital signature through the BAP portal, then you need to upload it again. Otherwise, if you have
Broker User Manual For Information Category
Version 9.0 112
imported the signature on your web browser, then it will be attached as soon as you click on button. See the Digital Signature topic for more details
5. Click Submit. The User Confirmation Message dialog box is displayed.
6. Click “Yes” to submit the form. An Acknowledgement dialog box is displayed with an Application Reference Number. Click OK.

Broker User Manual For Information Category
Version 9.0 113
Induction of new directors/cessation of existing directors, approval for appointment of directors in international bodies
1. On Changes in Licensing screen, select Induction of new directors/cessation of existing directors, approval for appointment of director in international bodies
Figure 89: Board of Director Details Screen The fields on this screen are described in the following table.
Field Description
Details of Board of Directors/ Principal Officer
Name of the person Enter Name of the Board of Directors/

Broker User Manual For Information Category
Version 9.0 114
Principal Officer
PAN No Enter PAN No of the Board of Directors/ Principal Officer
Address (Street, House) Enter Street, House of the Board of Directors/ Principal Officer
State Enter State of the Board of Directors/ Principal Officer
District Enter District of the Board of Directors/ Principal Officer
City Enter City of the Board of Directors/ Principal Officer
Pin Code Enter Pin Code of the Board of Directors/ Principal Officer
Profession Enter Profession of the Board of Directors/ Principal Officer
Appointment/ Cessation Date Enter Appointment/ Cessation Date of the Board of Directors/ Principal Officer
Designation if holding position Enter designation of the Board of Directors/ Principal Officer
Particulars of changes during the period since the last report
Enter Particulars of changes during the period since last report
Details of Directorship in other entities(if any)
Enter Details of Directorship in other entities of the Board of Directors/ Principal Officer
Declarations
I am not suffering from any of the disqualifications specified under sub-section (5) of section 42D of the Insurance Act 1938
If you are not suffering from any of the disqualifications specified under sub-section (5) of section 42D of the Insurance Act 1938 then select ‘Yes’ else select ‘No’
I am not holding Agency/Surveyor/ BROKER license
If you are not holding Agency/Surveyor/ BROKER license select ‘Yes’ else select ‘No’
I do not hold directorship/employment in/or represent any other Insurance related entity
If you do not hold directorship/employment in/or represent any other Insurance related entity then select ‘Yes’ else select ‘No’
I have filed FORM - 32 with ROC If you have filed FORM - 32 with ROC select ‘Yes’ else select ‘No’
Upload Documents

Broker User Manual For Information Category
Version 9.0 115
Form 32 with ROC Upload the Form 32 with ROC document
Board resolution Upload Board resolution of the Board of Directors/ Principal Officer
Curriculum Vitae (CV) Upload Curriculum Vitae (CV) of the Board of Directors/ Principal Officer
Broker exam certificate Upload Broker exam certificate of the Board of Directors/ Principal Officer
Attach scanned copy of affidavit Upload Attach scanned copy of affidavit of the Board of Directors/ Principal Officer
2. Make the required changes in Details of Board of Directors/ Principal Officer.
3. Upload the required documents. Select the declaration check box.
4. Click Attach Digital Signature button. If you have uploaded the digital signature through the BAP portal, then you need to upload it again. Otherwise, if you have imported the signature on your web browser, then it will be attached as soon as you click on button. See the Digital Signature topic for more details
5. Click Submit. The User Confirmation Message dialog box is displayed.
6. Click “Yes” to submit the form. An Acknowledgement dialog box is displayed with an Application Reference Number.
7. Click OK.

Broker User Manual For Information Category
Version 9.0 116
Change in Principal Officer/key management personnel
1. On Changes in Licensing screen, select Change in Principal Officer/key management personnel
Figure 90: Management Details Screen
The fields on this screen are described in the following table.
Field Description
Person in charge of Management
Name of the person Enter Name of Person in charge of Management
Address (Street, House) Enter Street, House of Person in charge of Management

Broker User Manual For Information Category
Version 9.0 117
State Enter State of Person in charge of Management
District Enter District of Person in charge of Management
City Enter City of Person in charge of Management
Pin Code Enter Pin Code of Person in charge of Management
Designation and nature of functions Enter Designation and nature of functions of Person in charge of Management
Qualification and experience including Insurance experience
Enter Qualification and experience including Insurance experience of Person in charge of Management
Insurance experience Enter Insurance experience of Person in charge of Management
Nature and duration of training received
Enter Nature and duration of training received of Person in charge of Management
Particulars of changes during the period
Enter Particulars of changes during the period of Person in charge of Management
Declarations
I am not suffering from any of the disqualifications specified under sub-section (5) of section 42D of the Insurance Act 1938
If you are not suffering from any of the disqualifications specified under sub-section (5) of section 42D of the Insurance Act 1938 then select ‘Yes’ else select ‘No’
I am not holding Agency/Surveyor/ BROKER license
If you are not holding Agency/Surveyor/BROKER license select ‘Yes’ else select ‘No’
I do not hold directorship/employment in/or represent any other Insurance related entity
If you do not hold directorship/employment in/or represent any other Insurance related entity then select ‘Yes’ else select ‘No’
I have filed FORM - 32 with ROC If you have filed FORM - 32 with ROC select ‘Yes’ else select ‘No’
Upload Documents
Board resolution Upload Board resolution of Person in charge of Management
Curriculum Vitae (CV) Upload Curriculum Vitae (CV) of Person in charge of Management

Broker User Manual For Information Category
Version 9.0 118
Broker exam certificate Upload Broker exam certificate of Person in charge of Management
Attach scanned copy of affidavit Upload Attach scanned copy of affidavit of Person in charge of Management
2. Make the required changes in Person in charge of Management Details.
3. Upload the required documents. Select the declaration check box.
4. Click Attach Digital Signature button. If you have uploaded the digital signature through the BAP portal, then you need to upload it again. Otherwise, if you have imported the signature on your web browser, then it will be attached as soon as you click on button. See the Digital Signature topic for more details
5. Click Submit. The User Confirmation Message dialog box is displayed.
6. Click “Yes” to submit the form. An Acknowledgement dialog box is displayed with an Application Reference Number.
7. Click OK.

Broker User Manual For Information Category
Version 9.0 119
Information on particulars of persons responsible for soliciting and procuring broking business
1. On Changes in Licensing screen, select Information on particulars of
persons responsible for soliciting and procuring broking business
Figure 91: Particulars of persons responsible for soliciting and procuring of Insurance or reinsurance business Screen
The fields on this screen are described in the following table.
Field Description
Insurance Business
Name Enter Name of Person responsible for soliciting and procuring insurance business
Address Enter Address of Person responsible for soliciting and procuring insurance business
General Qualification Enter General Qualification of Person responsible for

Broker User Manual For Information Category
Version 9.0 120
soliciting and procuring insurance business
Insurance Qualification Enter Insurance Qualification of Person responsible for soliciting and procuring insurance business
Insurance Experience Enter Insurance Experience of Person responsible for soliciting and procuring insurance business
Insurance Broker exam- year of passing
Enter year of passing of Insurance Broker exam of Person responsible for soliciting and procuring insurance business
Training received (direct/composite)
Enter training received by Person responsible for soliciting and procuring insurance business
Classes of Businesses handled
Enter Classes of businesses handled by Person responsible for soliciting and procuring insurance business
Designation and functions Enter Designation and Functions of Person responsible for soliciting and procuring insurance business
Particulars of changes during the period
Enter Particulars of changes during the period of Person responsible for soliciting and procuring insurance business
Reinsurance Business
Name Enter Name of Person responsible for soliciting and procuring reinsurance business
Address Enter Address of Person responsible for soliciting and procuring reinsurance business
General Qualification Enter General Qualification of Person responsible for soliciting and procuring reinsurance business
Insurance Qualification Enter Insurance Qualification of Person responsible for soliciting and procuring reinsurance business
Insurance Experience Enter Insurance Experience of Person responsible for soliciting and procuring reinsurance business
Insurance Broker exam- year of passing
Enter year of passing of Insurance Broker exam of Person responsible for soliciting and procuring reinsurance business
Training received (direct/composite)
Enter training received by Person responsible for soliciting and procuring reinsurance business
Classes of Businesses handled
Enter Classes of businesses handled by Person responsible for soliciting and procuring reinsurance business
Designation and functions Enter Designation and Functions of Person responsible for soliciting and procuring reinsurance business

Broker User Manual For Information Category
Version 9.0 121
Particulars of changes during the period
Enter Particulars of changes during the period of Person responsible for soliciting and procuring reinsurance business
Upload Documents
Name of the persons Upload document with the Name of the persons responsible for soliciting and procuring broking business
Broker exam Passing Certificate number
Upload document with Broker exam Passing Certificate number of the persons responsible for soliciting and procuring broking business
2. Make the required changes in Insurance Business, Reinsurance Business.
3. Upload the required documents. Select the declaration check box.
4. Click Attach Digital Signature button. If you have uploaded the digital signature through the BAP portal, then you need to upload it again. Otherwise, if you have imported the signature on your web browser, then it will be attached as soon as you click on button. See the Digital Signature topic for more details
5. Click Submit. The User Confirmation Message dialog box is displayed.
6. Click “Yes” to submit the form. An Acknowledgement dialog box is displayed with an Application Reference Number.
7. Click OK.

Broker User Manual For Information Category
Version 9.0 122
Standing arrangement with Insurance Company and hospitals
1. On Changes in Licensing screen, select Standing arrangement with Insurance Company and hospitals
Figure 92: Standing arrangements with other insurance brokers or service providers Screen
The fields on this screen are described in the following table.
Field Description
Standing Arrangements Details
Name Enter Name of the insurance broker or service provider with whom you have a standing arrangement
Address Enter Address of the insurance broker or service provider with whom you have a standing arrangement
Particulars of Arrangement
Enter Particulars of Arrangement with the insurance broker or service provider with whom you have a standing arrangement
Any Agreement entered into with others
If the insurance broker or service provider with whom you have a standing arrangement has entered into an agreement with others then select ‘Yes’ else select ‘No’

Broker User Manual For Information Category
Version 9.0 123
Whether service provider is/ are from group companies
If service provider is/ are from group companies select ‘Yes’ else select ‘No’
Basis of remuneration Enter basics of remuneration entered with the insurance broker or service provider with whom you have a standing arrangement
Amount paid during latest financial year
Enter amount paid during latest financial year to the insurance broker or service provider with whom you have a standing arrangement
2. Make the required changes in Standing Arrangements Details.
3. Select the declaration check box.
4. Click Attach Digital Signature button. If you have uploaded the digital signature through the BAP portal, then you need to upload it again. Otherwise, if you have imported the signature on your web browser, then it will be attached as soon as you click on button. See the Digital Signature topic for more details
5. Click Submit. The User Confirmation Message dialog box is displayed.
6. Click “Yes” to submit the form. An Acknowledgement dialog box is displayed with an Application Reference Number.
7. Click OK.

Broker User Manual For Information Category
Version 9.0 124
Change in Name/Organization Structure
1. On Changes in Licensing screen, select Change in Name/Organization Structure
Figure 93: Change in Name/organization structure Screen
The fields on this screen are described in the following table.
Field Description
Organization Details
Changed Organization Name Enter the changed name of the organization here
Upload Documents
ROC Documents Upload ROC Document here
Original License Enter Original license document here
Remarks Enter Remarks here
2. Make the required changes in Organization Details.
3. Upload the required documents. Select the declaration check box.

Broker User Manual For Information Category
Version 9.0 125
4. Click Attach Digital Signature button. If you have uploaded the digital signature through the BAP portal, then you need to upload it again. Otherwise, if you have imported the signature on your web browser, then it will be attached as soon as you click on button. See the Digital Signature topic for more details
5. Click Submit. The User Confirmation Message dialog box is displayed.
6. Click “Yes” to submit the form. An Acknowledgement dialog box is displayed with an Application Reference Number.
7. Click OK.
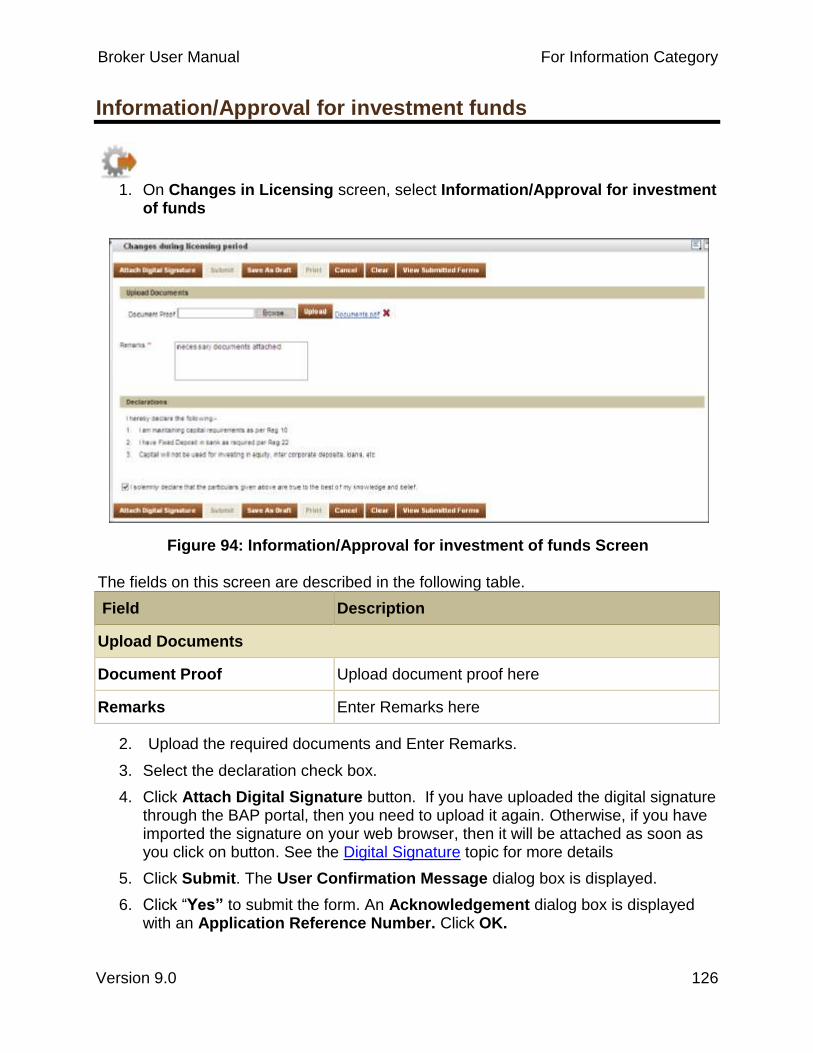
Broker User Manual For Information Category
Version 9.0 126
Information/Approval for investment funds
1. On Changes in Licensing screen, select Information/Approval for investment
of funds
Figure 94: Information/Approval for investment of funds Screen
The fields on this screen are described in the following table.
Field Description
Upload Documents
Document Proof Upload document proof here
Remarks Enter Remarks here
2. Upload the required documents and Enter Remarks.
3. Select the declaration check box.
4. Click Attach Digital Signature button. If you have uploaded the digital signature through the BAP portal, then you need to upload it again. Otherwise, if you have imported the signature on your web browser, then it will be attached as soon as you click on button. See the Digital Signature topic for more details
5. Click Submit. The User Confirmation Message dialog box is displayed.
6. Click “Yes” to submit the form. An Acknowledgement dialog box is displayed with an Application Reference Number. Click OK.

Broker User Manual For Approval Category
Version 9.0 127
Transfer of shares, increase in paid up capital/change in holding company/conversion of company
1. On Changes in Licensing screen, select Transfer of shares, increase paid up
capital/change in holding company/conversion of company

Broker User Manual For Approval Category
Version 9.0 128
Figure 95: Capital Structure and Shareholder details Screen
The fields on this screen are described in the following table.
Field Description
Capital Structure
Amount Enter Amount against each type of capital

Broker User Manual For Approval Category
Version 9.0 129
FDI Details
Shareholder Name Enter the Shareholder Name
Total equity share capital Enter Total Equity Share Capital
% Holding Enter % Holding
Shareholder Details
Category of Shareholder (Foreign Direct/ Foreign Indirect/Indian)
Enter the Category of Shareholder whether Foreign Direct or Foreign Indirect or Indian
Name of Shareholder Enter the Name of Shareholder
Address of Shareholder Enter the Address of Shareholder
Business or Profession Enter the Business or Profession of Shareholder
Shareholder Unique ID (Indian: PAN No) (Foreign: Tax ID)
Enter Shareholder Unique ID. If Indian enter PAN No. If Foreign enter Tax ID
Shareholding as at end of reporting period (number)
Enter number of shares as at end of reporting period
Shareholding as at end of reporting period (amount)
Enter Shareholding amount as at end of reporting period
Date of changes in shareholding during the period
Enter Date of changes in shareholding during the period
Particulars of changes in shareholding during the period
Enter Particulars of changes in shareholding during the period
Loans and Advances to the broker firm
Enter Loans and Advances to the broker firm
Other Investments in the broker firm Enter Other Investments in the broker firm
Initial Subscribers of MOA
Name of the Subscriber Enter Name of the Subscriber
Address of the subscriber Enter address of the subscriber
Business or Profession Enter Business or Profession of the subscriber
Shareholder Unique ID (Indian: PAN No) (Foreign: Tax ID)
Enter Shareholder Unique ID. If Indian enter PAN No. If Foreign enter Tax ID
Shareholding as at end of reporting period (number)
Enter number of shares as at end of reporting period

Broker User Manual For Approval Category
Version 9.0 130
Shareholding as at end of reporting period (amount)
Enter Shareholding amount as at end of reporting period
Date of changes in shareholding during the period
Enter Date of changes in shareholding during the period
Particulars of changes in shareholding during the period
Enter Particulars of changes in shareholding during the period
Loans and Advances to the broker firm
Enter Loans and Advances to the broker firm
Other Investments in the broker firm Enter Other Investments in the broker firm
Associate Company Wise
Name of the Associate Enter Name of the Associate
Address of the associate Enter address of the associate
Business or Profession Enter Business or Profession of the associate
Shareholder Unique ID (Indian: PAN No) (Foreign: Tax ID)
Enter Shareholder Unique ID. If Indian enter PAN No. If Foreign enter Tax ID
Shareholding as at end of reporting period (number)
Enter number of shares as at end of reporting period
Shareholding as at end of reporting period (amount)
Enter Shareholding amount as at end of reporting period
Date of changes in shareholding during the period
Enter Date of changes in shareholding during the period
Particulars of changes in shareholding during the period
Enter Particulars of changes in shareholding during the period
Regulatory Body Enter the name of the regulatory body
2. Make the required changes in Capital Structure, FDI Details, Shareholder
Details, Initial Subscribers of MOA, and Associate Company Wise.
3. Select the declaration check box.
4. Click Attach Digital Signature button. If you have uploaded the digital signature through the BAP portal, then you need to upload it again. Otherwise, if you have imported the signature on your web browser, then it will be attached as soon as you click on button. See the Digital Signature topic for more details
5. Click Submit. The User Confirmation Message dialog box is displayed.
6. Click “Yes” to submit the form. An Acknowledgement dialog box is displayed with an Application Reference Number. Click OK.

Broker User Manual For Approval Category
Version 9.0 131
Removal of lien on FD after making fresh FD
1. On Changes in Licensing screen, select Removal of lien on FD after making
fresh FD
Figure 96: Fixed Deposit Details Screen
The fields on this screen are described in the following table.
Field Description
Fixed Deposit Details
Name of the Bank Enter Name of the bank in which broker has an FD
Address Enter Address of the bank in which broker has an FD
FD Number Enter FD Number
Amount held in deposit Enter Amount held in FD
FD Start Date Enter FD start date

Broker User Manual For Approval Category
Version 9.0 132
FD End Date Enter FD end date
FD Amount to Initial Capital Ratio Enter FD Amount to Initial Capital Ratio
Declarations
Confirmation that Lien is marked in favor of IRDA
If Lien is marked in favor of IRDA select ‘Yes’ else select ‘No’
Letter obtained from bank stating that the principal amount shall not be released without permission of authority
If Letter obtained from bank stating that the principal amount shall not be released without permission of authority select ‘Yes’ else select ‘No’
Whether FD is kept in scheduled bank?
If FD is kept in scheduled bank select ‘Yes’ else select ‘No’
Whether license period covered, if not then undertaking given to maintain FD throughout the license period?
If license period covered, if not then undertaking given to maintain FD throughout the license period then select ‘Yes’ else select ‘No’
Whether covered by regulation 2 (1) (J)(V)?
If by regulation 2 (1) (J)(V) is covered select ‘yes’ else select ‘No’
I am maintaining capital requirements as per Reg 10
If you are maintaining capital requirements as per Reg 10 select ‘Yes’ else select ‘No’
I have Fixed Deposit in bank as required per Reg 22
If you have Fixed Deposit in bank as required per Reg 22 select ‘Yes’ else select ‘No’
Capital will not be used for investing in equity, inter corporate deposits, loans, etc
If Capital will not be used for investing in equity, inter corporate deposits, loans, etc select ‘Yes’ else select ‘No’
Upload Documents
Capital will not be used for investing in equity, inter corporate deposits, loans, etc
Upload Capital will not be used for investing in equity, inter corporate deposits, loans, etc here
2. Make the required changes in Fixed Deposit Details.
3. Upload the required documents. Select the declaration check box.
4. Click Attach Digital Signature button. If you have uploaded the digital signature through the BAP portal, then you need to upload it again. Otherwise, if you have imported the signature on your web browser, then it will be attached as soon as you click on button. See the Digital Signature topic for more details
5. Click Submit. The User Confirmation Message dialog box is displayed.

Broker User Manual For Approval Category
Version 9.0 133
6. Click “Yes” to submit the form. An Acknowledgement dialog box is displayed with an Application Reference Number.
7. Click OK.

Broker User Manual For Approval Category
Version 9.0 134
Voluntary surrender of License
1. On Changes in Licensing screen, select Voluntary surrender of license
Figure 97: Voluntary surrender of license Screen
The fields on this screen are described in the following table.
Field Description
Upload Documents
Board resolution Upload Board resolution document here
Confirmation of cessation of business Upload confirmation of cessation document here
Original License Upload copy of original license here
All existing contract details (to be served for 6 months or arrangements to be made for transfer of business)
Upload all existing contract detail documents here
Data of pending claims, grievances, and their status (as per format of FORM L)
Upload all data related to pending claims, grievances, and their status
Remarks Enter Remarks here

Broker User Manual For Approval Category
Version 9.0 135
2. Upload the required documents. Enter Remarks.
3. Select the declaration check box.
4. Click Attach Digital Signature button. If you have uploaded the digital signature through the BAP portal, then you need to upload it again. Otherwise, if you have imported the signature on your web browser, then it will be attached as soon as you click on button. See the Digital Signature topic for more details
5. Click Submit. The User Confirmation Message dialog box is displayed.
6. Click “Yes” to submit the form. An Acknowledgement dialog box is displayed with an Application Reference Number.
7. Click OK.
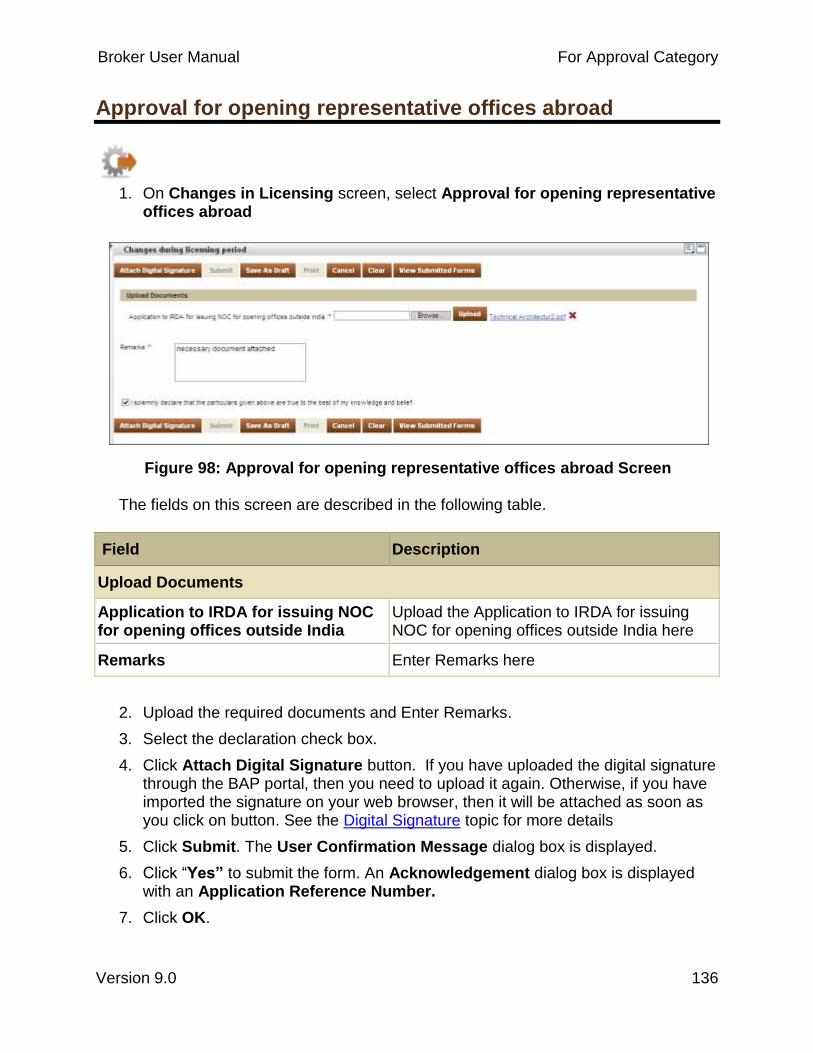
Broker User Manual For Approval Category
Version 9.0 136
Approval for opening representative offices abroad
1. On Changes in Licensing screen, select Approval for opening representative
offices abroad
Figure 98: Approval for opening representative offices abroad Screen The fields on this screen are described in the following table.
Field Description
Upload Documents
Application to IRDA for issuing NOC for opening offices outside India
Upload the Application to IRDA for issuing NOC for opening offices outside India here
Remarks Enter Remarks here
2. Upload the required documents and Enter Remarks.
3. Select the declaration check box.
4. Click Attach Digital Signature button. If you have uploaded the digital signature through the BAP portal, then you need to upload it again. Otherwise, if you have imported the signature on your web browser, then it will be attached as soon as you click on button. See the Digital Signature topic for more details
5. Click Submit. The User Confirmation Message dialog box is displayed.
6. Click “Yes” to submit the form. An Acknowledgement dialog box is displayed with an Application Reference Number.
7. Click OK.

Broker User Manual For Approval Category
Version 9.0 137
Other Representations by brokers on matter of License
1. On Changes in Licensing screen, select Other representations by brokers on
matter of License
Figure 99: Other representations by brokers on matter of License Screen The fields on this screen are described in the following table.
Field Description
Upload Documents
Other representations by brokers for license
Upload the Other representations by brokers for license document here
Remarks Enter Remarks here
2. Upload the required Documents and Enter Remarks.
3. Select the declaration check box.
4. Click Attach Digital Signature button. If you have uploaded the digital signature through the BAP portal, then you need to upload it again. Otherwise, if you have imported the signature on your web browser, then it will be attached as soon as you click on button. See the Digital Signature topic for more details
5. Click Submit. The User Confirmation Message dialog box is displayed.
6. Click “Yes” to submit the form. An Acknowledgement dialog box is displayed with an Application Reference Number.
7. Click OK.
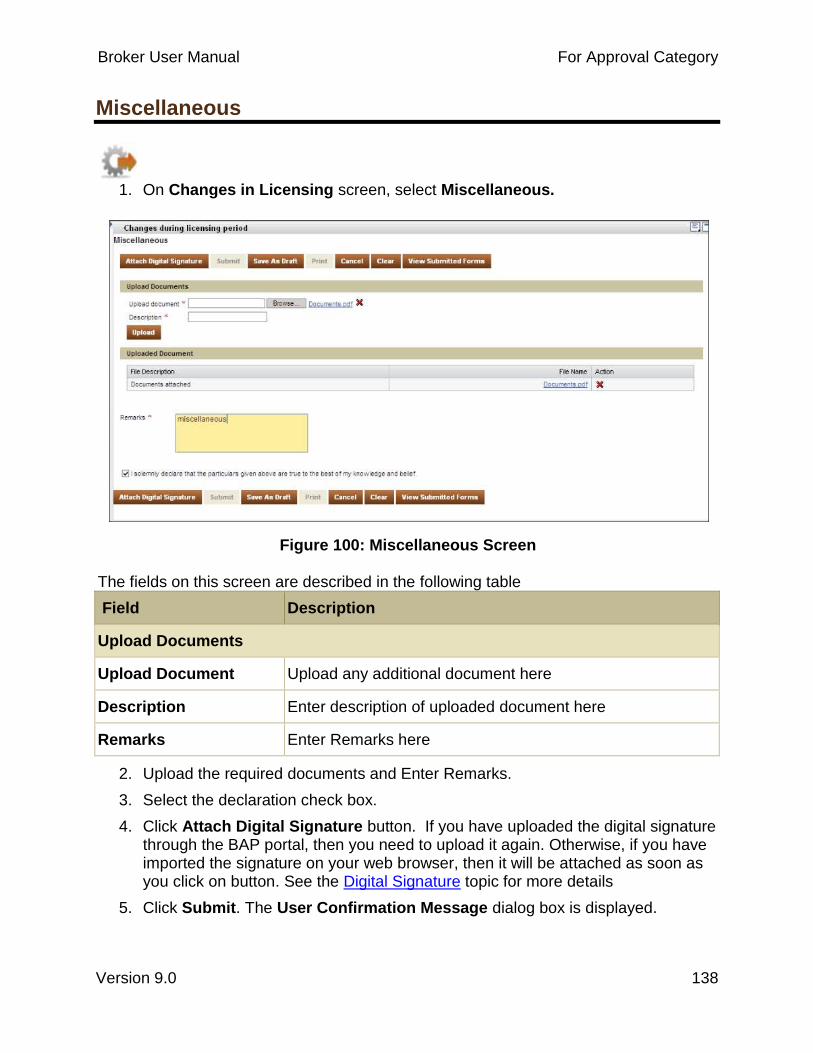
Broker User Manual For Approval Category
Version 9.0 138
Miscellaneous
1. On Changes in Licensing screen, select Miscellaneous.
Figure 100: Miscellaneous Screen
The fields on this screen are described in the following table
Field Description
Upload Documents
Upload Document Upload any additional document here
Description Enter description of uploaded document here
Remarks Enter Remarks here
2. Upload the required documents and Enter Remarks.
3. Select the declaration check box.
4. Click Attach Digital Signature button. If you have uploaded the digital signature through the BAP portal, then you need to upload it again. Otherwise, if you have imported the signature on your web browser, then it will be attached as soon as you click on button. See the Digital Signature topic for more details
5. Click Submit. The User Confirmation Message dialog box is displayed.

Broker User Manual For Approval Category
Version 9.0 139
6. Click “Yes” to submit the form. An Acknowledgement dialog box is displayed with an Application Reference Number.
7. Click OK.

Broker User Manual Changes in licensing Category
Version 9.0 140
Changes in licensing Category
In order to obtain a new corporate Insurance Broker license with changed license category, you need to fill and submit an application form to IRDA along with the scanned copies of the supporting documents. When one of the directors submits the form, it must be signed by the other director also before it goes to IRDA for approval. IRDA then reviews and validates the application and then approves, rejects or closes it.
To apply for a Change in License Category:
1. Click 'Broker' tab. 2. ‘License Eligibility Criteria’ is displayed showing basic information (like broker
category, application guidelines and fees, etc) and a link to Broker regulations on IRDA website.
3. Click Licensing tab. 4. Select ‘Change in License Category’ option. 5. You will get a confirmation box saying "Please confirm that you have gone
through all information regarding broker regulations on IRDA site ( www.irdabap.gov.in)
6. If you click “Yes”, you will get Change in License Category Screen.
Figure 101: Changes in license Category Screen
7. If you click No, a new window is opened which navigates you to the IRDA
website where you can view the Broker regulations. 8. If you select the Change type as Addition Of Category or Up gradation Of
Category, then following sections will be displayed:

Broker User Manual Changes in licensing Category
Version 9.0 141
Applicant Details
Organization Structure
Business Information
Financial Information
Other Information, if any
Upload Documents
Declaration
Undertaking
Print View
9. If you select the Change type as Degradation of Category or Deletion of Category then a screen to upload the necessary documents will open. Select the desired Category Applied for and Click Upload button to upload the required documents.
Figure 102: Deletion/ Degradation of Category Screen
The buttons available in the Change in License Category- Application Form are explained below.
Button Description
Attach Digital Signature
Click to attach digital signature to the application form

Broker User Manual Changes in licensing Category
Version 9.0 142
Submit Click to submit the application form once you have selected
the declaration check box. (Submit gets enabled only after the
attachment of digital signature by the directors).
Cancel Click to stop the application processing and return to the home
page. This action will also clear all the information entered
without saving it.
Save as Draft Click to save all the data entered in the form. You can use this
option if you want to submit the form at a later time.
View Submitted Form
Click to view the submitted New License Application in read
only mode.
Print Click to print the submitted New License Application
Clear Click to clear the data entered.
Data Entry Operator can only fill the forms and Director can submit the forms.

Broker User Manual Pay Annual Fees
Version 9.0 143
Pay Annual Fees
This form captures the details of annual fees to be paid with details such as payment amount, due date, etc.
Pay Annual Fees:
1. C lick Broker tab. 2. Select Licensing and Pay Annual Fees menu. Annual Fees Data Internal
Form is displayed. 3. Select the Year for which the Annual Fees needs to be submitted.
Figure 103: Pay Annual Fees Screen
The fields in the screen are described in the following table. All mandatory fields on the form are marked with an asterisk (*)
Field Description
Brokerage Income Enter Brokerage Income
Annual Fees to be Paid Enter Annual Fees to be Paid

Broker User Manual Pay Annual Fees
Version 9.0 144
(based on Broker category)
Date of finalization of accounts
Enter Date of Finalization of accounts
Fee Payment Due Date
(c+15 days) or 30th Sept whichever is earlier
Enter Fee Payment Date
Whether certificate from an auditor is attached (Yes/No)
Select either "Yes" or "No". If “Yes”, Attach the Certificate from an Auditor document along with the application.
4. Select the declaration statement and Click Submit button. 5. Acknowledgement message will be displayed. Click OK. 6. Make Payment Screen will be displayed on click of "Make Payment" button.
Figure 104: Make Payment Screen
7. Select the desired payment type and click Go to make payment through that
type. The different payment types are explained below:
Payment through DD - Select this payment type if you want to make your
payment through demand draft. You need to create the demand draft first and
then enter its details in this payment type.
Figure 105: Demand Draft Details screen

Broker User Manual Pay Annual Fees
Version 9.0 145
The fields in this payment type are explained in the following table.
Field Description
Instrument number Enter the demand draft number.
Amount to be paid (Rs.)
The amount payable is displayed by default.
Bank Name Enter the name of the bank from which you created the
demand draft.
Amount of Instrument (Rs.)
Enter the amount of the demand draft.
Instrument Date Select the date when you created the demand draft.
Payment through NEFT/RTGS - Select this payment type if you want to
make your payment through NEFT/RTGS. For this payment type, you need to
make payment to IRDA through NEFT/RTGS and then enter the payment
details in this payment type.
Figure 106: NEFT/RTGS Details screen
The fields in this payment type are explained in the following table.
Field Description
Acknowledgement No.
Enter the acknowledgement number received after
making the online payment.
Amount to be paid (Rs.)
The amount payable is displayed by default.
Bank Name Enter the name of the bank through which you made
the payment.
Enter your IFSC code Enter the IFSC code of your bank branch.

Broker User Manual Pay Annual Fees
Version 9.0 146
Date of Payment Select the date when you made the payment.
Enter your Account Number
Enter your bank account number.
Amount of Payment (Rs.)
Enter the amount of the payment made.
7. Enter the necessary details for the selected payment type and click Submit. 8. An Acknowledgement dialog box is displayed containing the Unique Reference
Number (URN). 9. Click OK.
The buttons available on the screen are explained in the following table.
Field Description
Fill Form Click to fill the Internal form
View Submitted Form Click to view the submitted forms in read only mode.
Edit Submitted Form Click to edit the submitted forms in the current bunch.
Submit Click to Submit the completed form
Save as Draft Click to save all the data entered in the form. You can use this option if you want to submit the form at a later time.
Print Click to get a printed document
Clear Click to clear the data entered.
Cancel Click to stop the application processing. This will clear any entered data.
Make Payment Click to go to Payment Screen

Broker User Manual View License Details
Version 9.0 147
View License Details
In View License Details, you can view your license number, broker name, categories in which you hold a license, effective date, expiry date, address, principle officers details, directors details and share holding pattern.
To view License Details screen:
1. Click Broker tab. 2. Click Licensing tab. 3. On the Licensing screen, click View License. The View License screen is
displayed. You can view your license details like license number, status, Broker Name, License Category, effective date, expiry date and address, Director’s Details, Shareholders Pattern.
Figure 107: View license Details Screen
All the information displayed is in read-only mode.

Broker User Manual View Application Status
Version 9.0 148
View Application Status
Whenever you submit any application to IRDA, it follows a defined process for application processing. Depending on the action taken by IRDA on the application, the status of the application keeps changing. Through View Application Status you can view the status of the License application.
To View Applications Status:
1. Click Broker tab. 2. Click View Application Status tab. The View Application Status screen is
displayed.
Figure 108: View Application Status Screen
3. The status of the application is displayed in Application Status column. The different statuses of the application are explained in the following table.
Status Stage
Application submitted Application submitted by you
Under process Application under process by IRDA.
Application approved Post approval of application by IRDA

Broker User Manual View Application Status
Version 9.0 149
Documents/ Information Awaited Additional information/documents required by IRDA on the submitted application
Application closed Post closure of application by IRDA
Application rejected Post rejection of application by IRDA
License Issued Post license issuance by IRDA
Approval Withdrawn Post withdraw of approval by IRDA from approved application
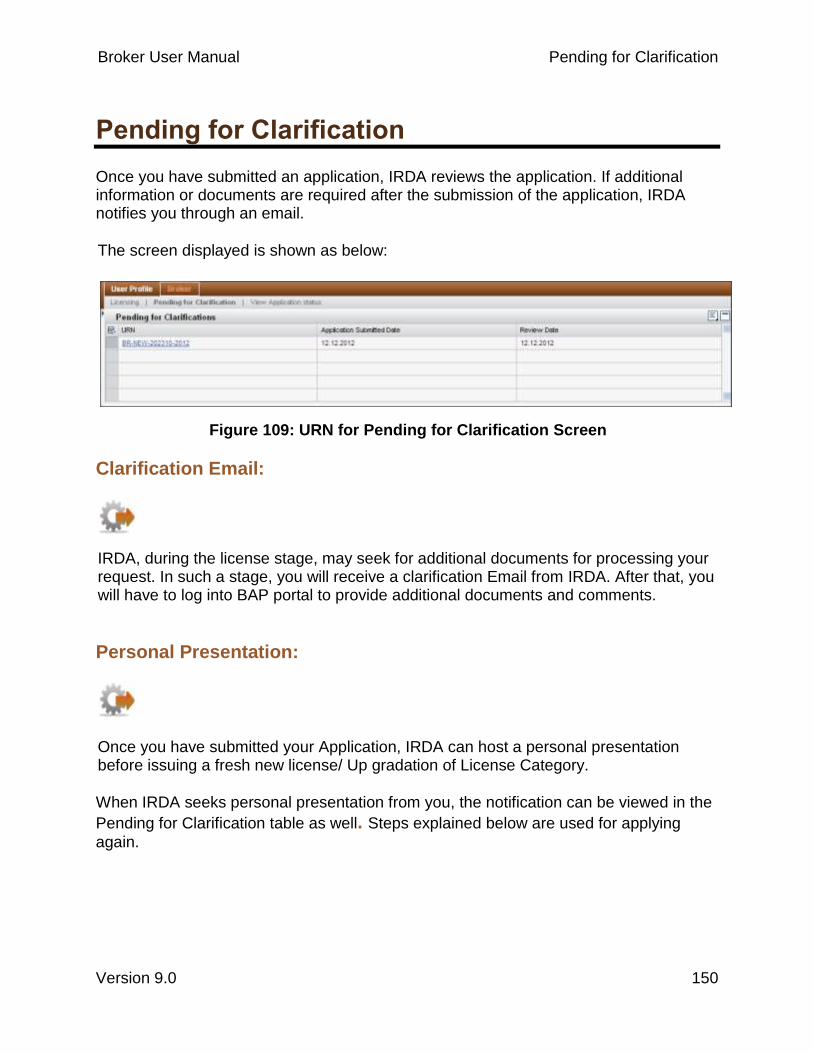
Broker User Manual Pending for Clarification
Version 9.0 150
Pending for Clarification
Once you have submitted an application, IRDA reviews the application. If additional information or documents are required after the submission of the application, IRDA notifies you through an email.
The screen displayed is shown as below:
Figure 109: URN for Pending for Clarification Screen
Clarification Email:
IRDA, during the license stage, may seek for additional documents for processing your request. In such a stage, you will receive a clarification Email from IRDA. After that, you will have to log into BAP portal to provide additional documents and comments.
Personal Presentation:
Once you have submitted your Application, IRDA can host a personal presentation before issuing a fresh new license/ Up gradation of License Category.
When IRDA seeks personal presentation from you, the notification can be viewed in the
Pending for Clarification table as well. Steps explained below are used for applying
again.

Broker User Manual Pending for Clarification
Version 9.0 151
To View Pending for Clarifications:
1. Click Broker tab. 2. Click Pending for Clarification tab. The Pending for Clarification screen is
displayed. 3. Click the Unique Reference Number (URN) to view the pending clarifications
for that application. The application screen is displayed. 4. In Remarks by Applicant field, provide additional information required by IRDA. 5. Attach additional documents using Upload file button, if required by IRDA.
Browse button is used to search the documents that are to be attached along with the application.
6. Click Submit. The User Confirmation Message dialog box will be displayed.
Figure 110: Pending for Clarification Screen
7. Click Yes. An Acknowledgement dialog box is displayed notifying that the clarification is submitted.
Figure 111: User Confirmation Message
8. Click OK.

Broker User Manual Pending for Clarification
Version 9.0 152
Reminder Email:
IRDA sends you a reminder Email when it does not receive any response within seven business days of sending the clarification Email. IRDA sends you three reminder Emails after sending the clarification Email.
Closure of Application Email:
If IRDA does not receive any response from you after sending the reminder Email, it closes the application. On closure of the application, IRDA notifies you through Email.

Broker User Manual Returns
Version 9.0 153
Returns
As a licensed broker, you are expected to submit business data required by IRDA. Some data might be required by IRDA on a quarterly basis, some on a half yearly basis and some on a yearly basis. On the BAP portal, these forms to be submitted to IRDA are segregated under quarterly, half yearly and yearly menu tabs. The Data entry operator can only save the form in the draft mode and cannot submit the form. Submissions can only be done by the directors of the firm. Both the Directors need to sign before the disclosures can be submitted.
To Fill Returns:
1. Click Brokers tab. 2. Click Returns tab. 3. Select the appropriate time period for which you want to submit returns
(quarterly/ half yearly/ yearly). Returns screen will be displayed.
Figure 112: Returns Screen
The buttons available and their use, in the Returns screens above are explained below in the table:
Buttons Description
Fill Forms Click to fill forms for the particular periods
Submit Forms Click to submit all forms under the current bunch.
View Submitted Click to view the submitted forms in read only mode.

Broker User Manual Returns
Version 9.0 154
Buttons Description
Form
Edit Submitted Forms
Click to edit the submitted forms in the current bunch.
Save Click to Save the filled form
Cancel Click to stop the application processing. This will clear any entered data.
Save as Draft Click to save all the data entered in the form. You can use this option if you want to submit the form at a later time.
Clear Click to clear the data entered.
Upload Form Broker will be able to upload monthly figures in the prescribed .csv format
Download Form
Form will be exported in .csv format (with built in validations), and can be saved locally
The screen also displays 3 legends with different colors representing the status of the Returns. The colors depicted are as below:
Legends Description
Green Completely filled /saved forms have green color
As below:
Red Blank Forms have Red color
As below:
Yellow Partially filled forms have yellow color
As below:
For Filling Returns:
Fill all the Forms under a particular Return Category (Quarterly, Annual, and Half Yearly) and then submit together by clicking "Submit Forms" button, as the forms must be submitted together.

Broker User Manual Returns
Version 9.0 155
For Submitting Returns: Click Submit Forms button to submit all the forms under the current bunch.
Attach Digital Signature button is displayed; you can attach the digital signature by clicking on Attach Digital Signature button.
Figure 113: Submit Forms Returns Screen
Both the directors must attach digital signature before submitting the forms.
On submitting the entire bunch of a particular Return category (Quarterly, Yearly, Half Yearly), URN will be generated.
Note down the URN for future references.
Figure 114: User Confirmation Message
Once the returns are submitted, you cannot edit the details and the return bunch is locked. To unlock the forms/ returns, Contact IRDA and request for unlocking the desired returns

Broker User Manual Quarterly Returns
Version 9.0 156
Quarterly Returns
To fill Quarterly returns
1. Click Brokers. 2. Click Returns 3. Click Quarterly. Select the Quarter and Year. 4. Click Fill Forms Button. The status of the form (Completed form, In progress
form or Blank form) is displayed and a link is provided to the form.
Figure 115: Quarterly Returns Screen
5. Click on the respective form whose return is to be filled.

Broker User Manual Quarterly Returns
Version 9.0 157
Business Data for Brokers
This form captures broker wise and client wise business data for brokers.
To fill Business Data for Brokers
1. Click Broker tab.
2. Click Returns tab. 3. Click Quarterly tab. Select the Quarter & year for which the returns need to be
filled. 4. Click Fill Forms.
5. Click Business Data for Brokers link, the respective return form is displayed.

Broker User Manual Quarterly Returns
Version 9.0 158
Figure 116: Business Data for Brokers Screen
The fields on the screen are explained in the following table
Field Description
Insurer Wise Business Figures – Non – Life
Name of Insurers
Enter Name of Insurers

Broker User Manual Quarterly Returns
Version 9.0 159
Field Description
No of policies
Enter No of Policies for Marine Hull, Marine Cargo, Motor, fire, Engineering, health, Liability, Misc
Premium Enter Premium for Marine Hull, Marine Cargo, Motor, fire, Engineering, health, Liability, Misc
Total No of Policies
Enter total number of policies
Total Premium
Enter Total Premium
Insurer wise premium figures –Life
Name of Insurers
Enter Name of Insurers
No of policies
Enter No of Policies for Life, Health, Pension , Annuity for Linked and Non Linked policies
Premium Enter Premium for Life, Health, Pension , Annuity for Linked and Non Linked policies
Total No of Policies
Enter total number of policies
Total Premium
Enter Total Premium
Insurer wise Premium – Life –(For Riders)
Name of Insurers
Enter Name of Insurers
No of policies
Enter No of Policies for Health + Sickness, Accident + Disability, Term, Other (PWB)for Linked and Non Linked policies
Premium Enter Premium for Health + Sickness, Accident + Disability, Term, Other (PWB)for Linked and Non Linked policies for Linked and Non Linked policies
Total No of Policies
Enter total number of policies
Total Premium
Enter Total Premium
Client Wise Business Data (Based on Premium serviced) - Top 10 Clients (Non-Life)
Client Name Enter Name of the Client
No of Enter No of Policies for Marine Hull, Marine Cargo, Motor, fire,

Broker User Manual Quarterly Returns
Version 9.0 160
Field Description
policies Engineering, health, Liability, Misc
Premium Enter Premium for Marine Hull, Marine Cargo, Motor, fire, Engineering, health, Liability, Misc
Total No of Policies
Enter total number of policies
Total Premium
Enter Total Premium
Client Wise Business Data (Based on Premium serviced) - Top 10 Clients (Life)
Client Name Enter Name of the Client
No of policies
Enter No of Policies for Life, Health, Pension , Annuity for Linked and Non Linked policies
Premium Enter Premium for Life, Health, Pension , Annuity for Linked and Non Linked policies
Total No of Policies
Enter total number of policies
Total Premium
Enter Total Premium
Client Wise Business Data (Based on Premium serviced) - Top 10 Clients (Life - Riders)
Client Name Enter Name of the Client
No of policies
Enter No of Policies for Health + Sickness, Accident + Disability, Term, Other (PWB)for Linked and Non Linked policies for Linked and Non Linked policies
Premium Enter Premium for Health + Sickness, Accident + Disability, Term, Other (PWB)for Linked and Non Linked policies for Linked and Non Linked policies
Total No of Policies
Enter total number of policies
Total Premium
Enter Total Premium
6. Fill in the entire form and click Save. The Acknowledgement message box is displayed

Broker User Manual Quarterly Returns
Version 9.0 161
Figure 117: User Confirmation Message
7. To download the template of the form click Download form. A template Form 10.csv will be opened in a.csv format. Fill in the template and save the file on your local machine.
8. Click Upload Form .Browse the saved file and click Ok. Your Business Data details will be uploaded.
9. Click Save.

Broker User Manual Quarterly Returns
Version 9.0 162
Business Data for Insurance Brokers (Life)
This form captures new business data for life Insurers. The form captures information for Individual and Group Business
To fill Business Data for Insurance Brokers (Life Insurers)
1. Click Broker tab.
2. Click Returns tab. 3. Click Quarterly tab. Select the Quarter & year for which the returns need to be
filled. 4. Click Fill Forms.
5. Click Business Data for Insurance Brokers (Life) link, the respective return
form is displayed.
Figure 118: Business Data for Insurance Brokers (Life) Screen
The fields on the screen are explained in the following table

Broker User Manual Quarterly Returns
Version 9.0 163
Field Description
Life Business
No of policies Enter No of policies for Individual Business
Premium Amount Enter Premium amount for Individual Business
Brokerage Income Enter brokerage Income for Individual Business
No Of Lives Covered Enter No of Lives covered in Group Business
Premium Amount Enter Premium amount for Group Business
Brokerage Income Enter brokerage Income for Group Business
6. Fill in the entire form and click Save. The Acknowledgement message box is displayed
Figure 119: User Confirmation Message
7. To download the template of the form click Download form. A template Form.10.1.csv will be opened in a csv format. Fill in the template and save the file on your local machine.
8. Click Upload Form .Browse the saved file and click Ok. Your Business Data details will be uploaded.
9. Click Save.

Broker User Manual Quarterly Returns
Version 9.0 164
Business Data for Insurance Brokers (Non Life)
This form captures new business data for Non Life Insurers
To fill Business Data for Brokers (Non Life Insurers)
1. Click Broker tab.
2. Click Returns tab. 3. Click Quarterly tab. Select the Quarter & year for which the returns need to be
filled. 4. Click Fill Forms.
5. Click Business Data for Brokers (Non Life) link, the respective return form is
displayed.
Figure 120: Business Data for Non Life Screen
The fields on the screen are explained in the following table
Field Description
Non Life Business
No of policies Enter No of policies for Motor, Health, Engineering, Marine Cargo, Misc, Liability, Fire, Marine Hull

Broker User Manual Quarterly Returns
Version 9.0 165
Premium Amount Enter Premium for Motor, Health, Engineering, Marine Cargo, Misc, Liability, Fire, Marine Hull
Brokerage Income Enter brokerage Income for Motor, Health, Engineering, Marine Cargo, Misc, Liability, Fire, Marine Hull
6. Fill in the entire form and click Save. The Acknowledgement message box is displayed
Figure 121: User Confirmation Message
7. To download the template of the form click Download form. A template Form.10.2.csv will be opened in a csv format. Fill in the template and save the file on your local machine.
8. Click Upload Form .Browse the saved file and click Ok. Your Business Data details will be uploaded.
9. Click Save.

Broker User Manual Quarterly Returns
Version 9.0 166
Claims Data for Insurance Brokers
This form captures the details of the claims for a broker.
To fill Claims Data for Insurance Brokers
1. Click Broker tab.
2. Click Returns tab. 3. Click Quarterly tab. Select the Quarter & year for which the returns need to be
filled. 4. Click Fill Forms.
5. Click Claims Data for Insurance Brokers link; the respective return form is
displayed.

Broker User Manual Quarterly Returns
Version 9.0 167
Figure 122: Claims Data for Insurance Broker Screen
The fields on the screen are explained in the following table
Field Description
Claims Details
Please state every event that has come to the company’s notice where the company may become liable to pay damages or compensation to
Enter every event that has come to the company’s notice where the company may become liable to pay damages or compensation to clients,

Broker User Manual Quarterly Returns
Version 9.0 168
Field Description
clients, whether covered by the professional indemnity policy or not, giving the following information
whether covered by the professional indemnity policy or not, giving the following information
Date of period of occurrence Enter Date of period of occurrence
Name of client concerned Enter Name of client concerned
Nature of event likely to give rise to a claim
Enter Nature of event likely to give rise to a claim
Brief description of basis of claim Enter Brief description of basis of claim
Intimated or estimated amount of claim
Enter Intimated or estimated amount of claim
Whether covered by professional indeminty policy
If Whether event is covered by professional indeminty policy enter ‘Yes’ else enter ‘ No’
Amount provided by the broker in its books for the claim
Enter Amount provided by the broker in its books for the claim
Present status of claim Select status of Claim to be either ‘Open’ or ‘Closed’
Claims Movement
Number of Claims Enter Number of Claims
Claims Amount Enter Claims Amount
Ageing of pending claims
Number of Claims Enter Number of Claims
Claims Amount Enter Claims Amount
Major Claims Pending - Above 1 Crore
Name of the client Enter Name of the Client
Policy Number Enter Policy Number
Claim Amount Enter Claims amount
Date of Loss Enter Date of Loss

Broker User Manual Quarterly Returns
Version 9.0 169
6. Fill in the entire form and click Save. The Acknowledgement message box is displayed
Figure 123: User Confirmation Message
7. To download the template of the form click Download form. A template Form12.csv will be opened in a csv format. Fill in the template and save the file on your local machine.
8. Click Upload Form .Browse the saved file and click Ok. Your Claims Data details will be uploaded.
9. Click Save.

Broker User Manual Annual Returns
Version 9.0 170
Annual Returns
To fill Annual returns
1. Click Brokers 2. Click Returns 3. Click Annual Returns tab. 4. Select Year value from the drop down menu of Year. 5. Click Fill Form buttons. . The status of the form (Completed form, In progress
form or Blank form) is displayed and a link is provided to the form.
Figure 124: Annual Returns Screen
6. Click on the respective form whose return is to be filled.

Broker User Manual Annual Returns
Version 9.0 171
Reinsurance Balances Outstanding
This form will capture information regarding your reinsurance balances outstanding.
To fill Reinsurance Balances Outstanding
1. Click Broker tab.
2. Click Returns tab. 3. Click Annual returns tab. Select the year for which the returns need to be filled. 4. Click Fill Forms.
5. Click Reinsurance Balances Outstanding link, the respective return form is
displayed.
Figure 125: Reinsurance Balance Outstanding Screen
The fields on the screen are explained in the following table
Field Description
Amount outstanding for the period of
Enter amount outstanding for the period of 0-3 months, 3-6 months, 6-12 months, Over 12 Months and Total amount outstanding
6. Fill in the entire form and click Save. The Acknowledgement message box is displayed

Broker User Manual Annual Returns
Version 9.0 172
Figure 126: User Confirmation Message
7. To download the template of the form click Download form. A template Form13.csv will be opened in a .csv format. Fill in the template and save the file on your local machine.
8. Click Upload Form .Browse the saved file and click Ok. Your Reinsurance Balance Outstanding details will be uploaded.
9. Click Save.

Broker User Manual Annual Returns
Version 9.0 173
Cash Flow Statement for Insurance Brokers
This form will capture information regarding cash flows of your company.
To fill Cash Flow Statement for Insurance Brokers
1. Click Broker tab.
2. Click Returns tab. 3. Click Annual returns tab. Select the year for which the returns need to be filled. 4. Click Fill Forms.
5. Click Cash flow Statement for Insurance Brokers link, the respective return
form is displayed.

Broker User Manual Annual Returns
Version 9.0 174
Figure 127: Cash Flow Statement Screen
The fields on the screen are explained in the following table
Field Description
Cash Flow from Operating Activities
Brokerage Receipts Enter Brokerage Receipts
Reinsurance Receipts Enter Reinsurance Receipts
Other Receipts/ Payments Enter Other Receipts/ Payments
Realizations from Sundry Debitors Enter Realizations from Sundry Debitors

Broker User Manual Annual Returns
Version 9.0 175
Field Description
Payment towards expenses Enter Payment towards expenses
Payments of tax deducted at source Enter Payments of tax deductions at source
Payments to Sundry Creditors Enter Payments to Sundry Creditors
Payments of other advances Enter Payments of other advances
Cash Flow from Investing Activities
Purchase of Investments Enter Purchase of Investments
Sale of Investments Enter Sale of Investments
Purchase of Fixed Assets Enter Purchase of Fixed Assets
Sale of Fixed Assets Enter Sale of Fixed Assets
Income received on investments Enter Income received on investments
Expenses relating to investments Enter Expenses relating to investments
Cash Flow from investing activities
Proceeds from issue of share capital Enter Proceeds from issue of share capital
Proceeds from borrowing Enter Proceeds from borrowing
Repayments from borrowings Enter Repayments from borrowings
Interests/ dividends paid Enter Interests/ dividends paid
Cash & Bank Balance (Beginning of Financial Year)
Cash in Hand Enter Cash in Hand
Balance in current accounts Enter Balance in current accounts
Cash & Bank balance (End of Financial Year)
Cash in Hand Enter Cash in Hand
Balance in current accounts Enter Balance in current accounts
6. Fill in the entire form and click Save. The Acknowledgement message box is displayed

Broker User Manual Annual Returns
Version 9.0 176
Figure 128: User Confirmation Message
7. To download the template of the form click Download form. A template Broker_Annl_Form_4_1.csv will be opened in a csv format. Fill in the template and save the file on your local machine.
8. Click Upload Form .Browse the saved file and click Ok. Your Cash Flow Statement details will be uploaded.
9. Click Save.

Broker User Manual Annual Returns
Version 9.0 177
Security screening proceedings for reinsurance broking
This form captures the details of the security screening proceedings for reinsurance broking.
To fill Security screening proceedings for reinsurance broking
1. Click Broker tab.
2. Click Returns tab. 3. Click Annual Returns tab. Select the year for which the returns need to be filled. 4. Click Fill Forms.
5. Click Security screening proceeding for reinsurance broking link, the
respective return form is displayed.
Figure 129: Security screening proceedings Screen
The fields on the screen are explained in the following table
Field Description
Please state the security screening procedures adopted in the brokers office and the person responsible to approve the securities to be used by the broker, and in particular, stating
Enter the security screening procedures adopted in your office and the person responsible to approve the securities to be used by you, and in particular, stating

Broker User Manual Annual Returns
Version 9.0 178
Field Description
Whether the broker obtains and reviews the annual accounts of reinsurers used by it, ( Yes / No)
If you obtain and review the annual accounts of reinsurers enter ‘Yes’ else enter ‘No’
( If answered 'Yes' for previous column)
Who within the organization is responsible for this function?
Enter who within your organization is responsible for obtaining and reviewing the annual accounts of reinsurers
Procedure followed by the broker to keep abreast of developments in the international markets
Enter Procedure followed by you to keep abreast of developments in the international markets
6. Fill in the entire form and click Save. The Acknowledgement message box is
displayed
Figure 130: User Confirmation Message
7. To download the template of the form click Download form. A template Form14.csv will be opened in a .csv format. Fill in the template and save the file on your local machine.
8. Click Upload Form .Browse the saved file and click Ok. Your Security screening proceedings details will be uploaded.
9. Click Save.

Broker User Manual Annual Returns
Version 9.0 179
Financial Statement of each insurance broker-Profit and Loss Statement
This form is used to capture the profit and loss statement details of your business.
To fill Profit and Loss Statement
1. Click Broker tab.
2. Click Returns tab. 3. Click Annual Returns tab Select the year for which the returns need to be filled. 4. Click Fill Forms.
5. Click Financial Statement of each insurance broker-Profit and Loss
Statement link, the respective return form is displayed.

Broker User Manual Annual Returns
Version 9.0 180
Figure 131: Profit and Loss Statement Screen
The fields on the screen are explained in the following table
Field Description
Income
Brokerage Enter Brokerage amount
Other Business Income Enter Other Business Income
Particulars of Income Enter Particulars of Income
Broker User Manual Annual Returns
Version 9.0 181
Amount received during the year
Enter Amount received during the year
Basis of remuneration Enter Basis of remuneration
Explanatory Note Enter Explanatory Note
Investment Income Enter Investment Income
Other miscellaneous income Enter Other miscellaneous income
Particulars of Income Enter Particulars of Income
Amount received during the year
Enter Amount received during the year
Explanatory Note Enter Explanatory Note
Expenses
Staff Salaries and Expenses Enter Staff Salaries and Expenses
Directors Fees and Other Remuneration
Enter Directors Fees and Other Remuneration
Payments for Business Procurement
Enter Payments for Business Procurement
Name and relationship to the payee
Enter Name and relationship to the payee
Amount paid Enter Amount paid
Basis of Payment Enter Basis of Payment
Rents, Rates and Taxes Enter Rents, Rates and Taxes
Maintenance and Repairs Enter Maintenance and Repairs
Printing and Stationary Enter Printing and Stationary
Communication Expenses Enter Communication Expenses
Legal and Professional Expenses
Enter Legal and Professional Expenses
Advertisement and Publicity Enter Advertisement and Publicity
Auditors' Fees and Expenses Enter Auditors' Fees and Expenses
Interest and Bank Charges Enter Interest and Bank Charges

Broker User Manual Annual Returns
Version 9.0 182
Depreciation Enter Depreciation
Other Expenses Enter Other Expenses
Payments for business procurement
Enter Payments for business procurement
Profit before tax Enter Profit before tax
Loss before tax Enter Loss before tax
Provision for taxation
Current Tax Enter Current Tax
Deferred Tax Enter Deferred Tax
Appropriations
Balance at the Beginning of the Year
Enter Balance at the Beginning of the Year
Interim Dividends Paid During the Year
Enter Interim Dividends Paid During the Year
Proposed Final Dividend Enter Proposed Final Dividend
Dividend Distribution on Tax Enter Dividend Distribution on Tax
Transfer to Reserves/Other Accounts
Enter Transfer to Reserves/Other Accounts
6. Fill in the entire form and click Save. The Acknowledgement message box is displayed
Figure 132: User Confirmation Message
7. To download the template of the form click Download form. A template Broker_Annl_Form_3.csv will be opened in a .csv format. Fill in the template and save the file on your local machine.

Broker User Manual Annual Returns
Version 9.0 183
8. Click Upload Form .Browse the saved file and click Ok. Your Financial Statement of each insurance broker-Profit and Loss Statement details will be uploaded.
9. Click Save.

Broker User Manual Annual Returns
Version 9.0 184
Balance Sheet of Insurance brokers
This form is used to capture your balance sheet details.
To fill Balance Sheet of Insurance Brokers
1. Click Broker tab.
2. Click Returns tab. 3. Click Annual Returns tab. Select the year for which the returns need to be filled. 4. Click Fill Forms.
5. Click Balance Sheet of Insurance Brokers link, the respective return form is
displayed.

Broker User Manual Annual Returns
Version 9.0 185
Figure 133: Balance Sheet Screen
The fields on the screen are explained in the following table
Field Description
Sources of fund
Share Capital
Authorized Enter Authorized Share Capital
Subscribed Enter Subscribed Share Capital

Broker User Manual Annual Returns
Version 9.0 186
Called Up Enter Called Up Share Capital
(Less Calls unpaid) Enter (Less Calls unpaid) Share Capital
(Add shares forfeited) Enter (Add shares forfeited) Share Capital
(Less par values of share bought back)
Enter (Less par values of share bought back) Share Capital
Less Preliminary Expenses Enter Less Preliminary Expenses Share Capital
Reserves and Surplus Enter Reserves and Surplus Share Capital
Current liabilities and provisions
Enter Current liabilities and provisions Share Capital
Application of funds
Regulation 22 deposit Enter Regulation 22 deposit
Government securities Enter Government securities
Other approved securities Enter Other approved securities
Shares Enter Shares
Debentures Enter Debentures
Bank Deposits Enter Bank Deposits
Others Enter Others
Loans Enter Loans
Name of institution/ individual Enter Name of institution/ individual
Purpose of Loan Enter Purpose of Loan
Amount of Loan Enter Amount of Loan
Amount outstanding as on 31st March
Enter Amount outstanding as on 31st March
To shareholders, directors, officers
Enter To shareholders, directors, officers
To Other- secured loan Enter To Other- secured loan
To Other unsecured Enter To Other unsecured
Fixed Assets Enter Fixed Assets

Broker User Manual Annual Returns
Version 9.0 187
Current Assets Enter Current Assets
Debit balance in Profit and Loss
Enter Debit balance in Profit and Loss
Contingent liabilities Enter Contingent liabilities
Details of Contingent Liabilities Enter Details of Contingent Liabilities
Major Remarks/Observation of Auditor
Enter Major Remarks/Observation of Auditor
6. Fill in the entire form and click Save. The Acknowledgement message box is displayed
Figure 134: User Confirmation Message
7. To download the template of the form click Download form. A template Broker_Annl_Form_4.csv will be opened in a .csv format. Fill in the template and save the file on your local machine.
8. Click Upload Form .Browse the saved file and click Ok. Your Balance Sheet of Insurance Brokers details will be uploaded.
9. Click Save.

Broker User Manual Annual Returns
Version 9.0 188
Audit Arrangement for Insurance Broker
This form will capture your audit arrangement details.
To fill Audit Arrangement for Insurance Broker
1. Click Broker tab.
2. Click Returns tab. 3. Click Annual Returns tab. Select the year for which the returns need to be filled. 4. Click Fill Forms.
5. Click Audit Arrangement for Insurance Broker link, the respective return form
is displayed.
Figure 135: Audit Arrangements Screen
The fields on the screen are explained in the following table
Field Description
Audit Arrangements for a broker
Name of the Statutory Auditor Enter Name of the Statutory Auditor
Address of the Statutory Auditor
Enter Address of the Statutory Auditor
Name of partner responsible for audit of the broker
Enter Name of partner responsible for audit of the broker
Name of Internal Auditor (refer Regulation 27)
Enter Name of Internal Auditor

Broker User Manual Annual Returns
Version 9.0 189
Address of Internal Auditor Enter Address of Internal Auditor
Qualifications Enter Qualifications of Internal Auditor
Experience Enter Experience of Internal Auditor
If an employee, to whom does the internal auditor report?
Enter the Name of the concerned Internal Auditor
Particulars of changes, if any, during the reporting period
Enter the particulars of changes occurred during the reporting period (if any)
6. Fill in the entire form and click Save. The Acknowledgement message box is displayed
Figure 136: User Confirmation Message
7. To download the template of the form click Download form. A template Form7.csv will be opened in a .csv format. Fill in the template and save the file on your local machine.
8. Click Upload Form .Browse the saved file and click Ok. Your Audit Arrangement for Insurance Broker details will be uploaded.
9. Click Save.

Broker User Manual Annual Returns
Version 9.0 190
Insurance Bank Accounts of Insurance Brokers
This form will capture details regarding your bank accounts
To fill Insurance Bank Accounts of Insurance Broker
1. Click Broker tab.
2. Click Returns tab. 3. Click Annual Returns tab. Select the year for which the returns need to be filled. 4. Click Fill Forms.
5. Click Insurance Bank Accounts of Insurance Broker link, the respective return
form is displayed.
Figure 137: Insurance Bank Accounts Screen
The fields on the screen are explained in the following table
Field Description
Insurance Bank Accounts of Brokers
Name of Bank Enter Name of Bank
Address of bank Enter Address of Bank
Account Type Enter Account Type
Account Number Enter Account Number
Purpose of Account Enter Purpose of Account

Broker User Manual Annual Returns
Version 9.0 191
Whether Reg 23(2) ( C ) complied with
(Yes/No)
If Reg 23(2) ( C ) complied with select ‘Yes’ else select ‘No’
Balance in account as at end of reporting year
Enter the Balance amount in account at end of reporting year
6. Fill in the entire form and click Save. The Acknowledgement message box is displayed
Figure 138: User Confirmation Message
7. To download the template of the form click Download form. A template Form11.csv will be opened in a .csv format. Fill in the template and save the file on your local machine.
8. Click Upload Form .Browse the saved file and click Ok. Your Insurance Bank Accounts details will be uploaded.
9. Click Save.

Broker User Manual Annual Returns
Version 9.0 192
Details of Group Companies of a Insurance Broker
This form will capture the standing arrangements list of all group companies attached with you.
To fill Details of Group Companies of a Insurance Broker
1. Click Broker tab.
2. Click Returns tab. 3. Click Annual Returns tab. Select the year for which the returns need to be filled. 4. Click Fill Forms.
5. Click Details of Group Companies of a Insurance Broker link, the respective
return form is displayed.
Figure 139: Details of Group companies for an Insurance Broker Screen
The fields on the screen are explained in the following table
Field Description
Details of group Companies for a Broker
Name of Concern Enter Name of Company attached with the broker
Shareholders Unique ID
(Indian : PAN No) (Foreign : Tax ID)
Enter Shareholders Unique ID of company attached with the broker

Broker User Manual Annual Returns
Version 9.0 193
Address Enter Address of the company attached with the broker
Type of activity handled Enter Type of activity handled by company attached with the broker
Nature of Interest of Promoter/ Director
Enter Nature of Interest of Promoter/ Director of company attached with the broker
Nature Of interest with applicant company
Enter Nature Of interest with applicant company of company attached with the broker
6. Fill in the entire form and click Save. The Acknowledgement message box is displayed
Figure 140: User Confirmation Message
7. To download the template of the form click Download form. A template Form16.csv will be opened in a .csv format. Fill in the template and save the file on your local machine.
8. Click Upload Form .Browse the saved file and click Ok. Your Details of Group Companies of a Insurance Broker details will be uploaded.
9. Click Save.

Broker User Manual Annual Returns
Version 9.0 194
Spread of Business during the Year Ending
This form captures the details related to the name of the client and premium on direct insurance booked for the client and premium on reinsurance broking in respect of the client’s business.
To fill Spread of Business during the Year Ending Returns:
1. Click Broker tab.
2. Click Returns tab. 3. Click Annual returns tab. Select the year and Broker for which the returns need
to be filled. 4. Click Fill Forms.
5. Click Spread of Business during the Year Ending link, the respective return
form is displayed.
Figure 141: Spread of Business during the Year Ending Return Screen

Broker User Manual Annual Returns
Version 9.0 195
The fields on the screen are explained in the following table
Field Description
Name of the Client Enter Name of the Client
Premium on Direct Insurance Booked for the Client
Enter the Premium values for Fire, Marine and Miscellaneous
Premium On Reinsurance Broking In Respect Of That Client's Business
Enter the Premium values for Fire, Marine and Miscellaneous
6. Fill in the entire form and click Save. The Acknowledgement message box is displayed
Figure 142: User Confirmation Message
7. To download the template of the form click Download form. A template form H.csv will be opened in a .csv format. Fill in the template and save the file on your local machine.
8. Click Upload Form .Browse the saved file and click Ok. Your Spread of Business during the Year Ending details will be uploaded.
9. Click Save.

Broker User Manual Annual Returns
Version 9.0 196
Professional Indemnity Insurance In Force As At
This form captures the details related to the name of the insurer providing PI cover, policy number, period of insurance and the sum insured To fill Professional Indemnity Insurance In Force As At returns:
1. Click Broker tab.
2. Click Returns tab. 3. Click Annual returns tab. Select the year and Broker for which the returns need
to be filled. 4. Click Fill Forms
5. Click Professional Indemnity Insurance In Force As At link, the respective
return form is displayed.
Figure 143: Professional Indemnity Insurance In Force As At Returns Screen
The fields on the screen are explained in the following table
Field Description
Name of Insurer providing PI Cover
Enter Name of Insurer providing PI Cover
Policy No/Endorsement No. Enter the Policy/ Endorsement No
Period of Insurance: (From Enter ‘From’ date of Period of Insurance

Broker User Manual Annual Returns
Version 9.0 197
Date)
Period of Insurance: (To Date)
Enter ‘To’ date of Period of Insurance
Sums Insured: Per Event
(AOA)
Enter Sums Insured (AOA)
Sums Insured: In Aggregate for the Policy Period
(AOY)
Enter Sums Insured (AOY)
Basis of Indemnity
(On claims made basis or on loss occurring basis)
Enter the basis of Indemnity
Deductible Enter the deductible value
Premium for the cover Enter the Premium for the cover
Whether requirements for the Regulation 24, sub-regulation (4) and (5) are complied with?
(Yes/No)
Select either ‘Yes’ or ‘No ‘
Please State The Relevant Percentages
Enter the Relevant Percentages
6. Fill in the entire form and click Save. The Acknowledgement message box is displayed
Figure 144: User Confirmation Message
7. To download the template of the form click Download form. A template Formk.csv will be opened in a .csv format. Fill in the template and save the file on your local machine.
8. Click Upload Form .Browse the saved file and click Ok. Your Professional Indemnity Insurance In Force As At details will be uploaded.
9. Click Save.

Broker User Manual Half Yearly
Version 9.0 198
Half Yearly
To fill Half Yearly returns
1. Login into the system as a director 2. Click Brokers 3. Click Returns 4. Click Half Yearly Returns Tab. 5. Select Six Months Value & Year from the drop down menu. 6. Click Fill Forms button. The status of the form (Completed form, In progress
form or Blank form) is displayed and a link is provided to the form.
Figure 145: Half Yearly Returns Screen
5. Click on the respective form whose return is to be filled.

Broker User Manual Half Yearly
Version 9.0 199
Financial Data for Insurance Brokers
This form is used to capture financial data of your firm
To fill Details of Outstanding Claims returns
1. Click Broker tab.
2. Click Returns tab. 3. Click Half Yearly tab Select the Six Months and year for which the returns need
to be filled. 4. Click Fill Forms.
5. Click Financial Data for Insurance Brokers link, the respective return form is
displayed.
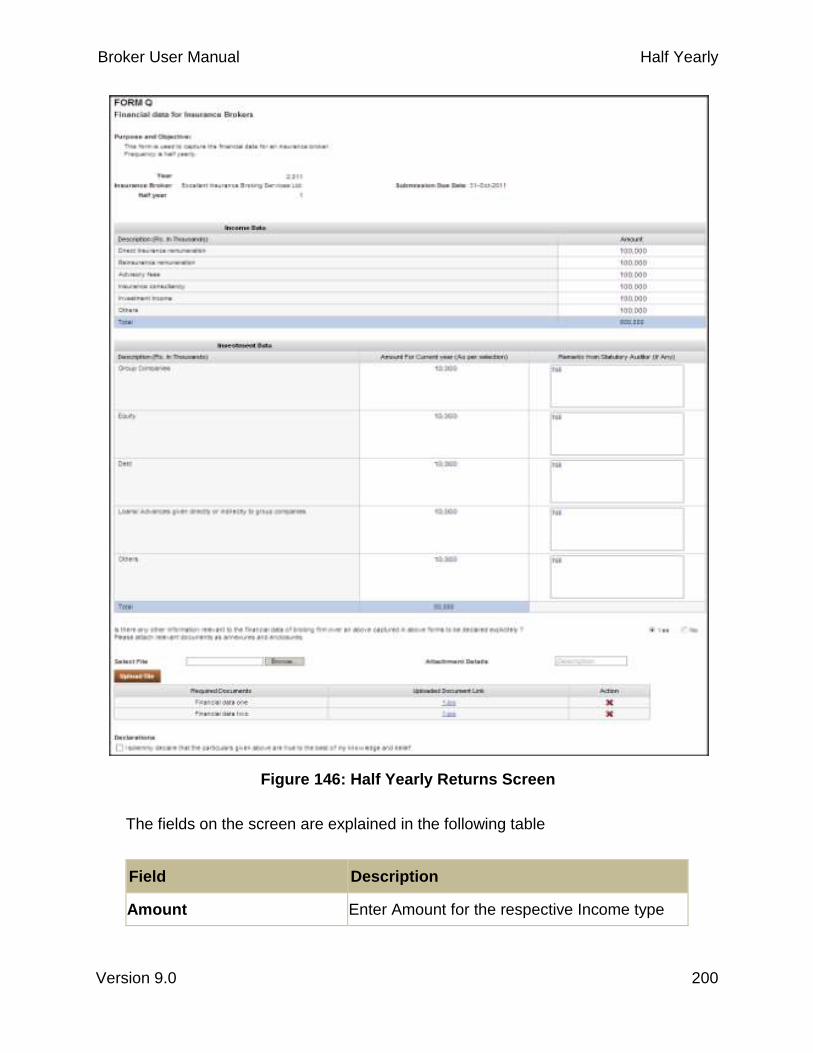
Broker User Manual Half Yearly
Version 9.0 200
Figure 146: Half Yearly Returns Screen
The fields on the screen are explained in the following table
Field Description
Amount Enter Amount for the respective Income type

Broker User Manual Half Yearly
Version 9.0 201
Amount for current year (as per selection)
Enter Amount for current year as per respective Investment Type
Remarks from statutory Auditor (if any)
Enter Remarks from statutory Auditor as per respective Investment Type
Is there any other information relevant to the financial data of broking firm over an above captured in above forms to be declared explicitly?
Select either Yes or No to provide more information by attaching files.
Select File Attach any additional documents here
Attachment Details Enter details of the attached documents here.
6. Fill in the entire form and click Save. The Acknowledgement message box is displayed
Figure 147: User Confirmation Message
7. To download the template of the form click Download form. A template Form5.csv will be opened in a .csv format. Fill in the template and save the file on your local machine.
8. Click Upload Form .Browse the saved file and click Ok. Your Financial Data for Insurance Brokers details will be uploaded.
9. Click Save.

Broker User manual Assistance on Filling Returns
Version 9.0 202
Assistance on Filling Returns
Form S- Business Data for Insurance Brokers:
The below table provides guidelines for Data Submission of Form S returns (Quarterly Returns).
Field Details Data Type Field Object Values
Year Integer
Disabled Text box
Year would be auto populated.
Quarter
Integer
Disabled Text box
Quarter would be auto populated.
Insurance Broker Varchar
Disabled Text box
Broker Name would be auto populated
Submitted On Date
Disabled Text box
Submitted on would be auto populated after form has been submitted
Submission Due Date
Date
Disabled Text box
Submission due date would be auto populated as the form is opened
Insurer Wise Business Figures- Non Life
Name of Insurers
Integer
Combo Box
The dropdown should have Insurer names Licensed by IRDA.
No of policies (For Marine Hull,
Marine Cargo,
Integer
Text Box
The value entered here would be the No. of policies

Broker User Manual Assistance on Filling Returns
Version 9.0 203
Field Details Data Type Field Object Values
Motor, fire, Engineering, health, Liability, Misc.)_
Premium (For Marine Hull,
Marine Cargo, Motor, fire, Engineering, health, Liability, Misc. )
Decimal
Text Box
The value entered here would be the premium amount
Total No of Policies
Integer
Disabled Text Box
Derived field by system, by adding all the number of policies in the row.
Total Premium
Decimal
Disabled Text Box
Derived field by system, by adding all the premium amounts in the row.
Insurerwise Premium Figures-Life
Name of Insurers
Integer
Combo Box
The dropdown should have Insurer names Licensed by IRDA.
No of policies (For Marine Hull,
Marine Cargo, Motor, fire,
Integer
Text Box
The value entered here would be the No. of policies in integer

Broker User Manual Assistance on Filling Returns
Version 9.0 204
Field Details Data Type Field Object Values
Engineering, health, Liability, Misc.)
Premium (For Marine Hull, Marine Cargo, Motor, fire, Engineering, health, Liability, Misc. )
Decimal
Text Box
The value entered here would be the premium amount
Total No of Policies
Integer
Disabled Text Box
Derived field by system, by adding all the number of policies in the row.
Total Premium
Decimal
Disabled Text Box
Derived field by system, by adding all the premium amounts in the row.
Insurerwise Premium –Life- (For Riders)
Name of Insurers
Integer
Combo Box
The dropdown should have Insurer names licensed by IRDA.
No of policies (For Health +
Sickness, Accident + Disability,
Integer
Text Box
The value entered here would be the No. of policies

Broker User Manual Assistance on Filling Returns
Version 9.0 205
Field Details Data Type Field Object Values
Term, Other (PWB)for Linked and Non Linked policies
)
Premium (For Health +
Sickness, Accident + Disability, Term, Other (PWB)for Linked and Non Linked policies
)
Decimal
Text Box
The value entered here would be the premium amount.
Total No of Policies
Integer
Text Box
Derived field by system, by adding all the number of policies in the row.
Total Premium
Decimal
Text Box
Derived field by system, by adding all the premium amounts in the row.
Client Wise Business Data (Based on Premium serviced) - Top 10 Clients (Non-Life)
Client Name
Varchar
Text Box
The value entered here would be the Client Name
No of policies (For Marine Hull,
Integer
Text Box
The value entered here

Broker User Manual Assistance on Filling Returns
Version 9.0 206
Field Details Data Type Field Object Values
Marine Cargo, Motor, fire, Engineering, health, Liability, Misc. )
would be the No. of policies.
Premium (For Marine Hull, Marine Cargo, Motor, fire, Engineering, health, Liability, Misc. )
Decimal
Text Box
The value entered here would be the premium amount.
Total No of Policies
Integer
Disabled Text Box
Derived field by system, by adding all the number of policies in the row.
Total Premium
Decimal
Disabled Text Box
Derived field by system, by adding all the premium amounts in the row.
Client Wise Business Data (Based on Premium serviced) - Top 10 Clients
(Life - Riders)
Client Name
Varchar
Text Box
The value entered here would be the Client Name
No of policies (For Marine Hull,
Marine
Integer
Text Box
The value entered here would be the

Broker User Manual Assistance on Filling Returns
Version 9.0 207
Field Details Data Type Field Object Values
Cargo, Motor, fire, Engineering, health, Liability, Misc. )
No. of policies.
Premium (For Marine Hull, Marine Cargo, Motor, fire, Engineering, health, Liability, Misc. )
Decimal
Text Box
The value entered here would be the premium amount.
Total No of Policies
Integer
Disabled Text Box
Derived field by system, by adding all the number of policies in the row.
Total Premium
Decimal
Disabled Text Box
Derived field by system, by adding all the premium amounts in the row.
Form S- Business Date for Insurance Brokers (Life Insurers):
The below table provides guidelines for Data Submission of Form S (Life) Returns (Quarterly Returns).
Field Details Data Type Field Object Values
Year Integer
Disabled Text box
Year would be auto populated.

Broker User Manual Assistance on Filling Returns
Version 9.0 208
Field Details Data Type Field Object Values
Quarter
Integer
Disabled Text box
Quarter would be auto populated.
Insurance Broker Varchar
Disabled Text box
Broker Name would be auto populated
Submitted On Date
Disabled Text box
Submitted on would be auto populated after form has been submitted
Submission Due Date
Date
Disabled Text box
Submission due date would be auto populated as the form is opened
Individual Business (For: Linked - Life, Health, Pension, Annuity, Non linked - Life, Health, Pension, Annuity, Riders- Health and sickness , accident and disability , term and others PWB)
No. of policies
Integer
Text Box
Enter the No. of policies.
Premium Amount
Decimal
Text Box
Enter the Premium amount.
Brokerage Income
Decimal
Text Box
Enter the Brokerage Income.
Brokerage %
Decimal
Disabled Text Box
Derived field by system, by calculating the brokerage percentage.

Broker User Manual Assistance on Filling Returns
Version 9.0 209
Field Details Data Type Field Object Values
Group Business (For: Linked- Life, Health, Pension, Annuity, Non linked- Life, Health, Pension, Annuity, Riders- Life, Health, Pension, Annuity)
No. of policies
Integer
Text Box
Enter the No. of policies.
Premium Amount
Decimal
Text Box
Enter the Premium amount.
Brokerage Income
Decimal
Text Box
Enter the Brokerage Income.
Brokerage %
Decimal
Disabled Text Box
Derived field by system, by calculating the brokerage percentage.
Form S- Business Date for Insurance Brokers (Non Life Insurers):
The below table provides guidelines for Data Submission of Form S (Non Life) Returns (Quarterly Returns).
Field Details Data Type Field Object Values
Year Integer
Disabled Text box
Year would be auto populated.
Quarter
Integer
Disabled Text box
Quarter would be auto populated.
Insurance Broker Varchar
Disabled Text box
Broker Name would be auto populated

Broker User Manual Assistance on Filling Returns
Version 9.0 210
Field Details Data Type Field Object Values
Submitted On
Date
Disabled Text box
Submitted on would be auto populated after form has been submitted
Submission Due Date
Date
Disabled Text box
Submission due date would be auto populated as the form is opened
Line Of Business( Motor, Health, Engineering ,Marine Cargo, Misc, Liability, Fire, Marine Hull)
No. of policies
Integer
Text Box
Enter the No. of policies.
Premium Amount
Decimal
Text Box
Enter the Premium amount.
Brokerage Income
Decimal
Text Box
Enter the Brokerage Income.
Brokerage %
Decimal
Disabled Text Box
Derived by system, by calculating the brokerage percentage.
Form L-Claims Data for Insurance Broker:
The below table provides guidelines for Data Submission of Form S (Life) Returns (Quarterly Returns).
Field Details Data Type Field Object Values

Broker User Manual Assistance on Filling Returns
Version 9.0 211
Field Details Data Type Field Object Values
Year Integer
Disabled Text box
Year would be auto populated.
Quarter
Integer
Disabled Text box
Quarter would be auto populated.
Insurance Broker Varchar
Disabled Text box
Broker Name would be auto populated
Submitted On Date
Disabled Text box
Submitted on would be auto populated after form has been submitted
Submission Due Date Date
Disabled Text box
Submission due date would be auto populated as the form is opened
Claims Details
Please state every event that has come to the company’s notice where the company may become liable to pay damages or compensation to clients, whether covered by the professional indemnity policy or not, giving the following information
Varchar
Text box
Enter the event as required by the field.
Date of period of occurrence.
Date
Date Type
Select the required date from the dropdown.

Broker User Manual Assistance on Filling Returns
Version 9.0 212
Field Details Data Type Field Object Values
Name of client concerned
VarChar
Text box
Enter the name of client.
Nature of event likely to give rise to a claim
VarChar
Text box
Enter the nature of event.
Brief description of basis of claim
VarChar
Text box
Enter the brief description.
Whether covered by professional indemnity policy:
Boolean
Combo box
If covered by professional indemnity policy then enter ‘Yes’ else enter ‘No’.
Amount provided by the broker in its books for the claim
Decimal
Text box
Enter the amount provided by the broker
Present status of claim
VarChar
Combo Box
The status can be either selected as "open" or "closed".
Aging of Pending Claims
Pending for up to 1 month(number of claims)
Integer
Text box
Enter the number of claims, pending for up to 1 month.
Pending for up to 1 month(claims amount)
Decimal
Text box
Enter the claims amount, pending for up to 1 month.
Pending for greater than 1 month and up to 3 months(number of claims)
Integer
Text box
Enter the number of claims, pending for greater than 1 month and up to 3 months.

Broker User Manual Assistance on Filling Returns
Version 9.0 213
Field Details Data Type Field Object Values
Pending for greater than 1 month and up to 3 months(claims amount)
Decimal
Text box
Enter the claims amount, pending for greater than 1 month and up to 3 months.
Pending for greater than 3 months and up to 6 months(number of claims)
Integer
Text box
Enter the number of claims, pending for greater than 3 months and up to 6 months.
Pending for greater than 3 months and up to 6 months(claims amount)
Decimal
Text box
Enter the claims amount, pending for greater than 3 months and up to 6 months.
Pending for greater than 6 months and up to 12 months(number of claims)
Integer
Text box
Enter the number of claims, pending for greater than 6 months and up to 12 months
Pending for greater than 6 months and up to 12 months(claims amount)
Decimal
Text box
Enter the claims amount, pending for greater than 6 months and up to 12 months
Pending for more than 1 year(number of claims)
Integer
Text box
Enter the number of claims, pending for more than 1 year.
Pending for more than 1 year(claims amount)
Decimal
Text box
Enter the claims amount, pending for more than 1 year.
Total Pending (number of claims)
Integer
Disabled Text box
The total pending number of claims will be derived and auto populated by the system.

Broker User Manual Assistance on Filling Returns
Version 9.0 214
Field Details Data Type Field Object Values
Total Pending(claims amount)
Decimal
Disabled Text box
The total pending claims amount will be derived and auto populated by the system.
Aging of Settled Claims
Settled for up to 1 month(number of claims)
Integer
Text box Enter the number of claims, Settled for up to 1 month.
Settled for up to 1 month(claims amount)
Decimal
Text box Enter the claims amount, Settled for up to 1 month.
Settled for greater than 1 month and up to 3 months(number of claims)
Integer
Text box Enter the number of claims, Settled for greater than 1 month and up to 3 months.
Settled for greater than 1 month and up to 3 months(claims amount)
Decimal
Text box Enter the claims amount, Settled for greater than 1 month and up to 3 months.
Settled for greater than 3 months and up to 6 months(number of claims)
Integer
Text box
Enter the number of claims, Settled for greater than 3 months and up to 6 months.
Settled for greater than 3 months and up to 6 months(claims amount)
Decimal
Text box
Enter the claims amount, Settled for greater than 3 months and up to 6 months.
Settled for greater than 6 months and up to 12 months(number of claims)
Integer
Text box
Enter the number of claims, Settled for greater than 6 months and up to 12

Broker User Manual Assistance on Filling Returns
Version 9.0 215
Field Details Data Type Field Object Values
months.
Settled for greater than 6 months and up to 12 months(claims amount)
Decimal
Text box
Enter the claims amount, Settled for greater than 6 months and up to 12 months
Settled for more than 1 years (number of claims)
Integer
Text box
Enter the number of claims, Settled for more than 1 year.
Settled for more than 1 years(claims amount)
Decimal
Text box
Enter the claims amount, Settled for more than 1 year.
Total Settled(number of claims)
Integer
Disabled Text box
The total settled number of claims will be derived and auto populated by the system.
Total Settled(claims amount)
Decimal
Disabled Text box
The total settled claims amount will be derived and auto populated by the system.
Major Claims Pending - Above 1 Crore
Name of Client
VarChar
Text box
Enter the Name of Client.
Policy No
Integer
Text box
Enter the Policy No.
Claim Amount
Decimal
Text Box Enter the Claims Amount
Date of loss
Date
Date Type
Select the required date from the dropdown.

Broker User Manual Assistance on Filling Returns
Version 9.0 216
Form M- Reinsurance Balances Outstanding:
The below table provides guidelines for Data Submission of Form M Returns (Annual Returns).
Field Details Data Type Field Object Values
Year Integer
Disabled Text Box
Year would be auto populated
Broker Varchar
Disabled Text Box
Broker Name would be auto populated
Submitted On Date
Disabled Text Box
Submitted on would be auto populated after form has been submitted
Submission Due Date
Date
Disabled Text Box
Submission due date would be auto populated as the form is opened
Amount outstanding for a Period of:
Due to ceding companies (0-3 Months)
Decimal
Text Box
Enter the amount outstanding due to ceding companies for 0-3 Months
Due to ceding companies (3-6 Months)
Decimal
Text Box
Enter the amount outstanding due to ceding companies for 3-6 Months
Due to ceding companies (6-12 Months)
Decimal
Text Box
Enter the amount outstanding due to ceding companies for 6-12 Months
Due to ceding companies (Over 12 Months)
Decimal
Text Box
Enter the amount outstanding due to ceding companies for

Broker User Manual Assistance on Filling Returns
Version 9.0 217
Field Details Data Type Field Object Values
Over 12 Months
Due to ceding companies (Total)
Decimal
Disabled Text Box
Derived field by system, by adding all the amounts outstanding in this row.
Due to reinsurers (0-3 Months)
Decimal
Text Box
Enter the amount outstanding due to reinsurers for 0-3 Months
Due to reinsurers (3-6 Months)
Decimal
Text Box
Enter the amount outstanding due to reinsurers for 3-6 Months
Due to reinsurers (6-12 Months)
Decimal
Text Box
Enter the amount outstanding due to reinsurers for 6-12 Months
Due to reinsurers (Over 12 Months)
Decimal
Text Box
Enter the amount outstanding due to reinsurers for over 12 Months
Due to reinsurers (Total)
Decimal
Disabled Text Box
Derived field by system, by adding all the amounts outstanding in this row.
Due from ceding companies (0-3 Months)
Decimal Text Box
Enter the amount outstanding due from ceding companies for 0-3 Months
Due from ceding companies (3-6 Months)
Decimal Text Box
Enter the amount outstanding due from ceding companies for 3-6 Months

Broker User Manual Assistance on Filling Returns
Version 9.0 218
Field Details Data Type Field Object Values
Due from ceding companies (6-12 Months)
Decimal Text Box
Enter the amount outstanding due from ceding companies for 6-12 Months.
Due from ceding companies (Over 12 Months)
Decimal Text Box
Enter the amount outstanding due from ceding companies for Over 12 Months.
Due from ceding companies (Total)
Decimal Disabled Text Box
Derived field by system, by adding all the amounts outstanding in the row.
Due from Reinsurers (0-3Months)
Decimal
Text Box
Enter the amount outstanding due from Reinsurers for 0-3 Months.
Due from Reinsurers (3-6 Months)
Decimal
Text Box
Enter the amount outstanding due from Reinsurers for 3-6 Months.
Due from Reinsurers (6-12 Months)
Decimal
Text Box
Enter the amount outstanding due from Reinsurers for 6-12 Months.
Due from Reinsurers (Over 12 Months)
Decimal
Text Box
Enter the amount outstanding due from Reinsurers for Over 12 Months.
Due from Reinsurers (Total)
Decimal
Disabled Text Box
Derived field by system, by adding all the amounts outstanding in the row.

Broker User Manual Assistance on Filling Returns
Version 9.0 219
Field Details Data Type Field Object Values
Cash Flow Statement for Insurance Brokers:
The below table provides guidelines for Data Submission of Cash Flow Statement Returns (Annual Returns).
Field Details Data Type Field Object Values
Year Integer
Disabled Text Box
Year would be auto populated
Broker Varchar
Disabled Text Box
Broker Name would be auto populated
Submitted On Date
Disabled Text Box
Submitted on would be auto populated after form has been submitted
Submission Due Date
Date
Disabled Text Box
Submission due date would be auto populated as the form is opened
CASH FLOW FROM OPERATING ACTIVITIES:
Brokerage Receipts Decimal
Text Box
Enter the Brokerage Receipts amount.
Reinsurance Receipts
Decimal
Text Box
Enter the Reinsurance Receipts amount.
Other Receipts/Payments
Decimal
Text Box
Enter Other Receipts/Payments amount.

Broker User Manual Assistance on Filling Returns
Version 9.0 220
Field Details Data Type Field Object Values
Realizations from Sundry Debitors
Decimal
Text Box
Enter the Realizations from Sundry Debitors amount.
Payment towards Expenses
Decimal
Text Box
Enter the Payment towards Expenses amount.
Payments of Tax Deducted at Source
Decimal
Text Box
Enter the Payments of Tax Deducted at Source amount.
Payments to Sundry Creditors
Decimal
Text Box
Enter the Payments to Sundry Creditors amount.
Payments Of Other Advances
Decimal
Text Box
Enter the Payments Of Other Advances amount.
Net Cash From Operating Activities
Decimal
Disabled Text Box
Derived field by system and auto populated by calculating net cash from operating activities.
CASH FLOW FROM INVESTING ACTIVITIES
Purchase Of Investments
Decimal
Text Box
Enter the Purchase Of Investments amount.
Sale Of Investments
Decimal
Text Box
Enter the Sale Of Investments amount.
Purchases Of Fixed Assets
Decimal
Text Box
Enter the Purchases Of Fixed Assets amount.
Sale Of Fixed Assets Decimal
Text Box
Enter the Sale Of Fixed Assets amount.

Broker User Manual Assistance on Filling Returns
Version 9.0 221
Field Details Data Type Field Object Values
Income Received On Investments
Decimal
Text Box
Enter the Income Received On Investments amount.
Expenses Relating To Investments
Decimal
Text Box
Enter Expenses Relating To Investments amount.
Net Cash From Investing Activities
Decimal
Disabled Text Box
Derived field by system and auto populated by calculating net cash from investing activities.
CASH FLOW FROM FINANCING ACTIVITIES
Proceeds from issue of Share Capital
Decimal
Text Box
Enter the Proceeds from issue of share Capital amount.
Proceeds from borrowings
Decimal
Text Box
Enter the proceeds from borrowings amount.
Repayment of borrowings
Decimal
Text Box
Enter the repayment of borrowings amount.
Interest/Dividends paid
Decimal
Text Box
Enter the Interest/Dividends paid amount.
Net Cash From Financing Activities
Decimal
Disabled Text Box
Derived field by system and auto populated by calculating net cash from financing activities.
Net Increase / (Decrease) In Cash And Cash Equivalents
Decimal
Disabled Text Box
Derived field by system and calculates the net increase or decrease in cash.

Broker User Manual Assistance on Filling Returns
Version 9.0 222
Field Details Data Type Field Object Values
Cash & Bank Balance (Beginning of Financial Year)
Cash In Hand Decimal
Text Box
Enter the Cash In Hand amount for Cash & Bank Balance (Beginning of Financial Year).
Balance In Current Accounts
Decimal
Text Box
Enter the Balance In Current Accounts amount for Cash & Bank Balance (Beginning of Financial Year).
Cash & Bank Balance (End of Financial Year)
Cash In Hand Decimal
Text Box
Enter the Cash In Hand amount for Cash & Bank Balance (end of Financial Year).
Balance In Current Accounts
Decimal
Text Box
Enter the Interest/Dividends paid amount for Cash & Bank Balance (end of Financial Year).
Particulars
Sr No. Numeric Text Box
Enter the serial number
Particulars Varchar Text Box
Enter the particulars
Value in INR Decimal Text Box
Enter the Value in INR
Number
Decimal Text Box
Enter the Number

Broker User Manual Assistance on Filling Returns
Version 9.0 223
Form N- Security screening proceedings for reinsurance broking:
The below table provides guidelines for Data Submission of Form N Returns (Annual Returns).
Field Details Data Type Field Object Values
Year Integer
Disabled Text Box
Year would be auto populated.
Broker Varchar
Disabled Text Box
Broker Name would be auto populated.
Submitted On Date
Disabled Text Box
Submitted on would be auto populated after form has been submitted.
Submission Due Date Date
Text box
Submission due date would be auto populated as the form is opened.
Please state the security screening procedures adopted in the brokers office and the person responsible to approve the securities to be used by the broker
Varchar
Text box
Enter the security screening procedures adopted in your office and the person responsible to approve the securities.
Whether the broker obtains and reviews the annual accounts of
Varchar
Combo Box
If you obtain and review the annual accounts of

Broker User Manual Assistance on Filling Returns
Version 9.0 224
Field Details Data Type Field Object Values
reinsurers used by it
reinsurers enter ‘Yes’ else enter ‘No’.
( If answered 'Yes' for previous column) Who within the organization is responsible for this function?
Varchar
Text box
Enter who within your organization is responsible for obtaining and reviewing the annual accounts of reinsurers.
Procedure followed by the broker to keep abreast of developments in the international markets:
Varchar
Text box
Enter Procedure followed by you to keep abreast of developments in the international markets
Financial Statement for each insurance broker- Profit and Loss Statement:
The below table provides guidelines for Data Submission of Financial Statement- Profit and Loss Returns (Annual Returns).
Field Details Data Type Field Object Values

Broker User Manual Assistance on Filling Returns
Version 9.0 225
Field Details Data Type Field Object Values
Year Integer
Disabled Text Box
Year would be auto populated
Broker Varchar
Disabled Text Box
Broker Name would be auto populated
Submitted On Date
Disabled Text Box
Submitted on would be auto populated after form has been submitted
Submission Due Date
Date
Disabled Text Box
Submission due date would be auto populated as the form is opened
Income
Brokerage Decimal Text Box
Enter the Brokerage Income
Other Business Income *
Decimal Text Box
Enter the other Business Income
Particulars of income
VarChar Text Box
Enter the particulars of income
Amount received during the year
Decimal Text Box
Enter the amount received during the year
Basis of remuneration
VarChar Text Box
Enter the basis of remuneration
Explanatory note VarChar Text Box
Enter the explanatory note
Investment Income Decimal Text Box
Enter the investment Income
Other Miscellaneous Income *
Decimal Text Box
Enter the other Miscellaneous Income

Broker User Manual Assistance on Filling Returns
Version 9.0 226
Field Details Data Type Field Object Values
Particulars of income
VarChar Text Box
Enter the Particulars of income
Amount received during the year
Decimal Text Box
Enter the Amount received during the year
Explanatory note VarChar Text Box
Enter the Explanatory note
Total Decimal Disabled Textbox
Derived field by system, by adding all the amounts in this column.
Expenses
Staff Salaries and Expenses
Decimal Text Box
Enter the staff salaries and expenses
Directors Fees and Other Remuneration
Decimal Text Box
Enter the directors Fees and Other Remuneration
Payments for Business Procurement *
Decimal Text Box
Enter the payments for Business Procurement
Name and relationship of the payee
VarChar Text Box
Enter the name and relationship of the payee
Amount paid Decimal Text Box
Enter the Amount paid expenses
Basis of payment VarChar Text Box
Enter the Basis of payment expenses
Rents, Rates and Taxes
Decimal Text Box
Enter the Rents ,Rates and Taxes expenses

Broker User Manual Assistance on Filling Returns
Version 9.0 227
Field Details Data Type Field Object Values
Maintenance and Repairs
Decimal Text Box
Enter the Maintenance and Repairs expenses
Printing and Stationary
Decimal Text Box
Enter the Printing and Stationary expenses
Communication Expenses
Decimal Text Box
Enter the Communication Expenses
Legal and Professional Expenses
Decimal Text Box
Enter the Legal and Professional Expenses
Advertisement and Publicity
Decimal Text Box
Enter the Advertisement and Publicity expenses
Auditors' Fees and Expenses
Decimal Text Box
Enter the Auditors' Fees and Expenses
Interest and Bank Charges
Decimal Text Box
Enter the Interest and Bank Charges expenses
Depreciation Decimal Text Box
Enter the Depreciation expenses
Other Expenses
Decimal
Text Box
Enter the Other Expenses
Other Approved Securities
Decimal Text Box
Enter the Other Approved Securities expenses
Total(B) Decimal Disabled Textbox
Derived field by system, by adding all the amounts in this column.

Broker User Manual Assistance on Filling Returns
Version 9.0 228
Field Details Data Type Field Object Values
Profit Before Tax Decimal Disabled Textbox
Derived field by system, and will be populated if the income is greater than the expenses.
Loss Before Tax Decimal Disabled Textbox
Derived field by system, and will be populated if the expenses are greater than the income.
Provision for Taxation
Current Tax Decimal Text Box
Enter the Current Tax
Deferred Tax Decimal Text Box
Enter the Deferred Tax
Profit After Tax Decimal Disabled Textbox
Derived field by system, and will be populated if the amount before tax additions is greater than the amount after tax additions.
Loss After Tax Decimal Disabled Textbox
Derived field by system, and will be populated if the amount after tax additions is greater than the amount before tax additions.
Appropriations
Balance at the Beginning of the Year
Decimal Text Box
Enter the Balance at the Beginning of the Year

Broker User Manual Assistance on Filling Returns
Version 9.0 229
Field Details Data Type Field Object Values
Interim Dividends Paid During the Year
Decimal Text Box
Enter the Interim Dividends Paid During the Year
Proposed Final Dividend
Decimal Text Box
Enter the Proposed Final Dividend
Dividend Distribution on Tax
Decimal Text Box
Enter the Dividend Distribution on Tax
Transfer to Reserves/Other Accounts
Decimal
Text Box
Enter the Transfer to Reserves/Other Accounts
Profit Carried to Balance Sheet
Decimal Disabled Textbox
Derived field by system, and will be populated if there is an overall profit.
Loss Carried to Balance Sheet
Decimal Disabled Textbox
Derived field by system, and will be populated if there is an overall loss.
Particulars
Serial No. Numeric Text Box
Enter the value for the serial number.
Particulars Varchar Text Box
Enter the particulars and details
Value in INR Decimal Text Box
Enter the Value in INR
Number
Decimal Text Box
Enter the Number

Broker User Manual Assistance on Filling Returns
Version 9.0 230
Balance Sheet of Insurance Brokers:
The below table provides guidelines for Data Submission of Balance Sheet Returns (Annual Returns).
Field Details Data Type Field Object Values
Year Integer
Disabled Text Box
Year would be auto populated
Broker Varchar
Disabled Text Box
Broker Name would be auto populated
Submitted On Date
Disabled Text Box
Submitted on would be auto populated after form has been submitted
Submission Due Date Date
Disabled Text Box
Submission due date would be auto populated as the form is opened
Sources of Fund
Authorized Decimal Text Box
Enter Authorized capital amount
Subscribed Decimal Text Box
Enter Subscribed capital amount
Called Up Decimal Text Box
Enter Called Up capital amount
(Less Calls Unpaid) Decimal
Text Box
Enter (Less Calls Unpaid) capital amount
(Add Shares Forfeited)
Decimal
Text Box
Enter (Add Shares Forfeited) capital amount
(Less Par Value of Shares Bought Back)
Decimal
Text Box
Enter (Less Par Value of Shares Bought Back)

Broker User Manual Assistance on Filling Returns
Version 9.0 231
Field Details Data Type Field Object Values
capital amount.
Less Preliminary Expenses
Decimal
Text Box
Enter Less Preliminary Expenses amount.
Total (F) Decimal
Disabled Text Box
Derived field by system, by adding all the amounts in this column.
Reserves and Surplus
Decimal Text Box
Enter Reserves and Surplus amount.
Sub Total
Decimal Disabled Text Box
Derived field by system, by adding all the amounts in this column
Borrowings Decimal Text Box Enter Borrowing amount
Name of borrower VarChar
Text Box Enter the name of borrower
Amount Borrowed Decimal
Text Box
Enter the amount Borrowed
Amount Outstanding as on 31st March
Decimal
Text Box
Enter the amount Outstanding as on 31st March
Current Liabilities and Provisions
Decimal
Text Box Enter Current Liabilities and Provisions amount.
Total (A) Decimal
Disabled Text Box
Derived field by system, by adding all the amounts in this column.
Application of Funds
Regulation 22 Deposit Decimal Text Box
Enter Regulation 22 Deposit amount
Investment
Government Securities
Decimal Text Box
Enter Government Securities (investment)

Broker User Manual Assistance on Filling Returns
Version 9.0 232
Field Details Data Type Field Object Values
amount
Other Approved Securities
Decimal Text Box
Enter Other Approved Securities (investment) amount
Approved Investment
Shares Decimal
Text Box
Enter Shares (approved investment) amount.
Debentures Decimal
Text Box
Enter Debentures (approved investment) amount.
Bank Deposits Decimal
Text Box
Enter Bank Deposits (approved investment) amount.
Others Decimal
Text Box
Enter Others (approved investment) amount.
Loans Decimal Text Box Enter Loans amount.
Name of institution/Individual
VarChar
Text Box
Enter Name of institution/Individual for Loan.
Purpose of loan VarChar
Text Box
Enter the purpose for loan.
Amount of loan Decimal
Text Box
Enter the Amount of loan.
Amount Outstanding as on 31st March
Decimal
Text Box
Enter Amount Outstanding as on 31st March value for loans.
To Shareholders, Directors, Officers
Decimal
Text Box
Enter Shareholders, Directors, Officers

Broker User Manual Assistance on Filling Returns
Version 9.0 233
Field Details Data Type Field Object Values
(approved investment) amount.
To Others-Secured Loan
Decimal
Text Box
Enter Others-Secured Loan (approved investment) amount.
To Others-Unsecured Decimal
Text Box
Enter Others-Unsecured (approved investment) amount.
Fixed Assets Decimal
Text Box
Enter Fixed Assets (approved investment) amount.
Current Assets Decimal
Text Box
Enter Current Assets (approved investment) amount.
Debit Balance in Profit and Loss A
Decimal
Text Box
Enter Debit Balance in Profit and Loss A (approved investment) amount.
Total (B) Decimal
Disabled Text Box
Derived field by system, by adding all the amounts in this column.
Contingent Liabilities Decimal
Text Box
Enter Contingent Liabilities amount.
Details of contingent liabilities
VarChar
Text Box
Enter the Details of contingent liabilities.
Major Remarks/Observation of Auditor Report requiring rectification of any deficiencies
VarChar
Text Box
Enter the remarks/ observation of Auditor Report requiring rectification of any deficiencies.
Particulars

Broker User Manual Assistance on Filling Returns
Version 9.0 234
Field Details Data Type Field Object Values
Serial No.
Numeric Text Box
The value entered here would be serial no.
Particulars Varchar Text Box
Enter the particulars
Value in INR Decimal Text Box
Enter the Value in INR
Number
Decimal Text Box
Enter the Number
Form D- Audit Arrangements for an Insurance Broker:
The below table provides guidelines for Data Submission of Form D Returns (Annual Returns).
Field Details Data Type Field Object Values
Year Integer
Disabled Text Box
Year would be auto populated
Broker Varchar
Disabled Text Box
Broker Name would be auto populated
Submitted On Date
Disabled Text Box
Submitted on would be auto populated after form has been submitted
Submission Due Date
Date
Disabled Text Box
Submission due date would be auto populated as the form is opened
Name of the Statutory Auditor
Varchar Textbox Enter the Name of the Statutory Auditor

Broker User Manual Assistance on Filling Returns
Version 9.0 235
Field Details Data Type Field Object Values
Address of the Statutory Auditor
Varchar Text box Enter the address of the Statutory Auditor
Name of partner responsible for audit of the broker
Varchar Textbox Enter the name of partner responsible for audit of the broker
Name of Internal Auditor (refer Regulation 27)
Varchar Text box Enter the name of Internal Auditor (refer Regulation 27)
Address of Internal Auditor
Varchar Text box Enter the address of Internal Auditor
Qualifications Varchar Textbox Enter the Qualifications
Experience
Varchar
Textbox
Enter the Experience
If an employee, to whom does the internal auditor report?
Varchar
Textbox
Enter the details for ‘If an employee, to whom does the internal auditor report?’
Particulars of changes, if any, during the reporting period
Varchar
Textbox
Enter the value for Particulars of changes, if any, during the reporting period.
Form J- Insurance Bank Accounts of Insurance Brokers:
The below table provides guidelines for Data Submission of Form J Returns (Annual Returns).
Field Details Data Type Field Object Values

Broker User Manual Assistance on Filling Returns
Version 9.0 236
Field Details Data Type Field Object Values
Year Integer
Disabled Text Box
Year would be auto populated
Broker Varchar
Disabled Text Box
Broker Name would be auto populated
Submitted On Date
Disabled Text Box
Submitted on would be auto populated after form has been submitted
Submission Due Date
Date
Disabled Text Box
Submission due date would be auto populated as the form is opened
Name of Bank
Boolean
Combo Box
Select Name of Bank from the values available in the dropdown.
Address of Bank
Varchar
Text box
Enter the address of Bank
Account Type
Boolean
Combo Box
Select the account type from the dropdown as either Current or Savings.
Bank A/C No.
Varchar
Text box
Enter the Bank account number.
Purpose of Account
Varchar
Text box
Enter the purpose of account.
Whether Reg 23(2) ( C ) complied with
Boolean
Combo Box
Select ‘whether registered 23(2) (C) complied with’

Broker User Manual Assistance on Filling Returns
Version 9.0 237
Field Details Data Type Field Object Values
as either Yes or No.
Balance in account as at end of reporting period
Decimal
Textbox
Enter the balance in account as at the end of reporting period
Form T- Details of Group companies for an Insurance Broker:
The below table provides guidelines for Data Submission of Form T Returns (Annual Returns) .
Field Details Data Type Field Object Values
Name of Concern Varchar Text box Enter the name of Concern.
Shareholders Unique ID (Indian : PAN No) (Foreign : Tax ID)
Varchar
Text box
Enter the Shareholders Unique ID.
Address
Varchar
Text box
Enter the address.
Type of activity handled
Varchar
Text box Enter the type of activity handled.
Nature of Interest of Promoter/ Director
Varchar
Text box
Enter the nature of interest of Promoter/ Director of the group company
Nature Of interest with applicant company
Varchar
Text box
Enter the nature of interest of the group company with the applicant

Broker User Manual Assistance on Filling Returns
Version 9.0 238
Field Details Data Type Field Object Values
company.
Details of Group companies for a broker
Name of Concern Varchar Text box Enter the name of Concern.
Shareholders Unique ID (Indian : PAN No) (Foreign : Tax ID)
Varchar
Text box
Enter the Shareholders Unique ID.
Address
Varchar
Text box
Enter the address.
Type of activity handled
Varchar
Text box Enter the type of activity handled.
Nature of Interest of Promoter/ Director
Varchar
Text box
Enter the nature of interest of Promoter/ Director of the group company
Nature Of interest with applicant company
Varchar
Text box
Enter the nature of interest of the group company with the applicant company.
Form H- Spread of Business during the year ending- (Regulation 20):
The below table provides guidelines for Data Submission of Form H Returns (Annual Returns).
Field Details Data Type Field Object
Values

Broker User Manual Assistance on Filling Returns
Version 9.0 239
Field Details Data Type Field Object
Values
Year Integer
Disabled Text box
Year would be auto populated.
Insurance Broker Integer
Disabled Text box
Broker Name would be auto populated
Submitted On Date
Disabled Text box
Submitted on would be auto populated after form has been submitted
Submission Due Date Date
Disabled Text box
Submission due date would be auto populated as the form is opened
Name of Client
Varchar
Text Box
Enter the name of Client.
Premium On Direct Insurance Booked for the Client
Fire
Decimal
Text Box
Enter the Premium amount for fire.
Marine
Decimal
Text Box
Enter the premium amount for Marine.
Miscellaneous
Decimal
Text Box
Enter the premium amount for Miscellaneous.
Premium On Reinsurance Broking In Respect Of That Client's Business
Fire
Decimal
Text Box
Enter the Premium amount for fire.
Marine
Decimal
Text Box
Enter the premium amount for Marine.

Broker User Manual Assistance on Filling Returns
Version 9.0 240
Field Details Data Type Field Object
Values
Miscellaneous
Decimal
Text Box
Enter the premium amount for Miscellaneous.
Total Of All Clients
Decimal
Disabled Text box
Derived by system, by adding all the values in the respective columns.
Form K- Professional Indemnity Insurance in force as at (Year):
The below table provides guidelines for Data Submission of Form K Returns (Annual Returns).
Field Details Data Type Field Object Values
Year Integer
Disabled Text box
Year would be auto populated.
Insurance Broker Integer
Disabled Text box
Broker Name would be auto populated
Submitted On Date
Disabled Text box
Submitted on would be auto populated after form has been submitted
Submission Due Date
Date
Disabled Text box
Submission due date would be auto populated as the form is opened
Name of Insurer providing PI Cover
VarChar
Combo Box
Enter the Name of Insurer providing PI Cover.

Broker User Manual Assistance on Filling Returns
Version 9.0 241
Field Details Data Type Field Object Values
Policy No/Endorsement No.
VarChar
Text Box
Enter the Policy No/Endorsement No.
Period of Insurance: (From Date)
Date
Text box- calendar option
Enter the Period of Insurance: (From Date).
Period of Insurance: (To Date)
Date
Text box- calendar option
Enter the Period of Insurance: (To Date).
Sums Insured: Per Event (AOA)
Decimal
Text Box
Enter the Sums Insured: Per Event (AOA).
Sums Insured: In Aggregate for the Policy Period (AOY)
Decimal
Text Box
Enter the Sums Insured: In Aggregate for the Policy Period (AOY).
Basis of Indemnity (On claims made basis or on loss occurring basis)
Decimal
Text Box
Enter the Basis of Indemnity.
Deductible:
Decimal
Text Box
Enter the Deductible
Premium for the cover:
Decimal
Text Box
Enter the Premium for the cover.

Broker User Manual Assistance on Filling Returns
Version 9.0 242
Field Details Data Type Field Object Values
Whether requirements for the Regulation 24, sub-regulation (4) and (5) are complied with? (Yes/No)
VarChar
Combo Box
If Requirements are complied with then enter ‘Yes’ else enter ‘No’.
Please State The Relevant Percentages
Decimal
Text Box
Enter the relevant percentage.
Form Q- Financial data for Insurance Brokers:
The below table provides guidelines for Data Submission of Form Q Returns (Half Yearly Returns).
Field Details Data Type Field Object
Values
Year Integer
Disabled Text box
Year would be auto populated.
Half Year
Integer
Disabled Text box
Half Year would be auto populated.
Insurance Broker Varchar
Disabled Text box
Broker Name would be auto populated
Submitted On Date
Disabled Text box
Submitted on would be auto populated after form has been submitted
Submission Due Date Date
Disabled Text box
Submission due date would be auto populated as the form is opened
Income Data
Direct Insurance Decimal Text Box Enter the amount for

Broker User Manual Assistance on Filling Returns
Version 9.0 243
Field Details Data Type Field Object
Values
remuneration
Direct Insurance remuneration
Reinsurance remuneration
Decimal
Text Box
Enter the amount for Reinsurance remuneration
Advisory fees
Decimal
Text Box
Enter the amount for Advisory fees
Insurance consultancy Decimal
Text Box
Enter the amount for Insurance consultancy
Investment Income
Decimal
Text Box
Enter the amount for Investment Income
Others Decimal
Text Box
Enter the amount for Others.
Investment Data
Group Companies (Amount For Current year (As per selection))
Decimal
Text Box
Enter the amount for Group Companies (For Current year (As per selection))
Group Companies (Remarks from Statutory Auditor (if Any))
Varchar
Text Box
Enter the remarks from Statutory Auditor for Group Companies (For Current year)
Equity(Amount For Current year (As per selection))
Decimal
Text Box
Enter the Equity(Amount For Current year (As per selection))
Equity(Remarks from Statutory Auditor (if Any))
Varchar
Text Box
Enter the remarks for Equity from Statutory Auditor.
Debt(Amount For Current year (As per selection))
Decimal
Text Box
Enter the amount for Group Companies (For Current year (As per selection))
Debt(Remarks from Varchar Text Box Enter the remarks

Broker User Manual Assistance on Filling Returns
Version 9.0 244
Field Details Data Type Field Object
Values
Statutory Auditor (if Any))
from Statutory Auditor for Debt.
Loans/ Advances given directly or indirectly to group companies(Amount For Current year (As per selection))
Decimal
Text Box Enter the amount for Loans/ Advances given directly or indirectly to group companies (For Current year (As per selection)).
Loans/ Advances given directly or indirectly to group companies(Remarks from Statutory Auditor (if Any))
Varchar
Text Box Enter the remarks from Statutory Auditor for Loans/ Advances given directly or indirectly to group companies.
Others(Amount For Current year (As per selection))
Decimal
Text Box Enter the amount for others(For Current year (As per selection))
Others (Remarks from Statutory Auditor (if Any))
Varchar
Text Box
Enter the remarks from Statutory Auditor for Others
Total
Decimal
Disabled Text Box
Derived field by system, by adding all the amounts for current year in this column.

Broker User manual Pay Penalty
Version 9.0 245
Pay Penalty
IRDA may levy a penalty on you if you are found guilty of misconduct or there is delay in submission of your returns. In Pay Penalty, you need to pay the penalty amount imposed on you.
To pay the penalty amount:
1. Click Broker tab.
2. Click Pay Penalty. The Pay Penalty screen is displayed containing the list of penalties that you need to pay.
Figure 148: Pay Penalty Screen
The fields in the Pay Penalty screen are explained in the following table.
Field Description
Penalty Id Displays the id of the penalty imposed.
Amount Displays the amount of the penalty imposed.
Penalty Details
Click the View Penalty Details link to view details of the penalty imposed.
3. Click the check box icon corresponding to the penalties that you want to pay.

Broker User Manual Pay Penalty
Version 9.0 246
Figure 149: Total Amount Displayed in the Pay Penalty Screen
4. The total amount that you have selected to pay is displayed in the Total Amount field.
5. Click Make Payment. The Make Payment screen is displayed.
Figure 150: Make Payment Screen
6. Select the desired payment type and click Go to make payment through that type. The different payment types are explained below.
Payment through DD - Select this payment type if you want to make your payment through demand draft. You need to create the demand draft first and then enter its details in this payment type. The fields in this payment type are explained in the following table.
Figure 151: Demand Draft Details Screen
Field Description
Instrument number Enter the demand draft number.
Amount to be paid (Rs.) The amount payable is displayed by default.

Broker User Manual Pay Penalty
Version 9.0 247
Bank Name Enter the name of the bank from which you created the demand draft.
Amount of Instrument (Rs.) Enter the amount of the demand draft.
Instrument Date Select the date when you drew the demand draft.
Payment through NEFT/RTGS - Select this payment type if you want to make your payment through NEFT/RTGS. For this payment type, you need to make payment to IRDA through NEFT/RTGS and then enter the payment details in this payment type. The fields in this payment type are explained in the following table.
Figure 152: NEFT/RTGS Details screen
Field Description
Acknowledgement No. Enter the acknowledgement number received after making the online payment.
Amount to be paid (Rs.) The amount payable is displayed by default.
Bank Name Enter the name of the bank through which you made the payment.
Enter your IFSC code Enter the IFSC code of your bank branch.
Date of Payment Select the date when you made the payment.
Enter your Account Number
Enter your bank account number.
Amount of Payment (Rs.) Enter the amount of the payment made.
7. Enter the necessary details for the selected payment type and click Submit. An Acknowledgement dialog box is displayed containing the Unique Reference Number (URN).
8. Click OK.

Broker User Manual Error Handling
Version 9.0 248
Error Handling
The below table provides a list of Error messages displayed during invalid/wrong submission of details in New License, Duplicate License, Renewal license, Changes in Licensing Category, Returns applications.
Application Scenario Message Type
New License/Change in License Category
Data not entered in Input fields
Field is Mandatory Input field
Pin code Please enter proper pin code value
Input field
Date Selection Cannot be a date from future
Date/Calendar field
Date Selection Date cannot be Past or Present Date
Date/Calendar field
Add director details
Enter at least two director details
Table data
File not uploaded
Upload file for xyz File Upload
Add shareholder details with foreign holding exceeding 26%
Total foreign holding paid up capital cannot exceed 26%
Table Data
Paid up capital for Organization's Capital structure not matching business rule(minimum capital required for Broker category)
Paid up capital cannot be less than xyz (amount)
Input field
If following condition is not satisfied "Authorized capital>Issue capital>Paid up capital" for
Capital amount <xyz> cannot be less than or equal to <abc> for given year
Input field

Broker User Manual Error Handling
Version 9.0 249
Capital structure
Fixed Deposit Details If FD amount entered is not proper
FD amount should be minimum 20% of paid up capital
Input field
Uploading files file should be of type .PDF or .DOC
File upload
Uploading files File size exceeded File upload
Date selection From Date cannot be after To Date
Date/Calendar field
Date selection Date of processing cannot be future date
Date/Calendar field
Renewal license
Data not entered in input fields
Field is mandatory Input field
Paid up capital for Organization's Capital structure not matching business rule(minimum capital required for Broker category)
Paid up capital cannot be less than xyz (amount)
Input field
If following condition is not satisfied "Authorized capital>Issue capital>Paid up capital" for Capital structure
If following condition is not satisfied "Authorized capital>Issue capital>Paid up capital" for Capital structure
Input field
Uploading document
file size is greater than 3 MB , please upload a file less than 3 MB
File upload
File not uploaded
Upload file for xyz File upload
Data not entered in Input fields
Field is mandatory Input field

Broker User Manual Error Handling
Version 9.0 250
Uploading files file should be of type .PDF or .DOC
File Upload
Duplicate License
Data not entered in Input fields
Field is Mandatory Input field
Uploading files file should be of type .JPEG or .GIF
File Uplaod
Uploading documents
file size is greater than 3 MB , please upload a file less than 3 MB
File Upload
Data not selected from the dropdown
Field is Mandatory Drop Down By Key
Input fields left blank
Field is Mandatory Input field
User Selects Future date
Date should not be greater than the present date
Date/Calendar
User is not able to enter more characters in the input field
No error Message will be displayed
Input field
User tries to upload without specifying the file path
Please browse and select a file to upload
File Upload
User tries to upload without specifying the attachment details
Please provide Attachment Details
Input field
Mandatory fields not entered
Field is Mandatory.
Input field
Data other than numeric values entered for numeric input fields
Enter a numeric value instead of ""
Input field
Clicking on View/Print
No Submitted Returns Found
NA

Broker User Manual Error Handling
Version 9.0 251
Returns
Submitted forms, Edit Submitted forms when no
submitted returns exist for that period
For This Period
Trying to fill returns of a future period before filling in the current period
You cannot proceed with this until pending returns are submitted
NA
Trying to submit returns for a period when all the forms are not filled
Some of the forms belonging to this bunch are not yet filled
NA
Click on Upload form button->do not select a document->click on upload
Please check the data entered.
File Upload

Broker User manual Frequently Asked Questions
Version 9.0 252
Frequently Asked Questions
1) What happens if my Master ID (Corporate Broker) is deleted?
If your account is deleted, then you have to re-register yourself in the portal.
2) How to login into portal, if I Forget My Password? Use Forgot Password/ Change Password link on Login Page to retrieve your password. (Forgot Password/Change Password) An Email will be sent to you on successful updations, use the information provided in mail to login again.
3) How to login into portal, after 3 failed attempts?
On 3 failed attempts of login, the account gets locked. Contact IRDA to unlock the Account.
4) Can I create any number of Sub IDs (Directors and Employees) for my
organization? No, you can create maximum of 3 Sub IDs: 2 Directors, 1 Employee Sub ID. To Create New Sub IDs, one of these IDs must be deleted. (Description of Menu Tabs )
5) What is difference between Broker Director and employee roles? Broker Director and employee are the Sub IDs created by Corporate Broker.
A Broker Director can fill the License Applications & Returns (Quarterly, Annual, Half yearly). He can attach Digital Signature to the Authorized Applications. He can submit the Applications & Returns as well.
Employee can only enter/ Fill the License Application forms & Returns. He can submit the applications & Returns only after Digital Signature is signed by Authorized Directors.
6) How do I update Organization address & Name? You can update various details of Organization addresses, Name, Miscellaneous Details using Changes during Licensing period. (Changes during Licensing Period )

Broker User manual Frequently Asked Questions
Version 9.0 253
7) What is the difference between View submitted forms and View application status? View Submitted forms button is used only to view the already submitted Returns & applications (New, Duplicate, and Renewal).
View Application Status shows various Application statuses for the applications. (View Application Status)
8) What is the difference between View Application Status and View License Details? View Application Status is used to view Approved, Pending and Closed Applications. (View Application Status)
View License Details displays various details of License No., Category, and Status. (View License Details)
9) How can I Submit additional Documents, when more Clarifications are asked by IRDA? You can submit additional information and documents through “Pending for Clarification”. (Pending for Clarification)
10) What options are available to make Payment?
You can Make Payment by two means. They are: Demand Draft, NEFT/RTGS Details options. You can use Credit card, Debit Card for making these payments. (Pay Annual Fees)
11) How would Brokers receive acknowledgement regarding their applications and returns? An Email Notification will be sent to you on Submission of Applications and Returns.
You will also receive notifications and Emails on approval, issuance of Licenses, Pending for clarification or on Delay in submission of any application.
12) How can I track my Payment details for Penalty? Use Pay Penalty to make payment for Penalty. (Pay Penalty )

Broker User manual Glossary
Version 9.0 254
Glossary
A
Audit An official inspection of an individual's or organization's accounts, typically by an independent body Auditor A person who conducts an audit Account locked A scenario in which a user has made three unsuccessful attempts to login to the portal
B
Broker One that acts as an agent for others, as in negotiating contracts, purchases, or sales in return for a fee or commission. Indemnity Insurance An insurance policy that aims to protect business owners and employees when they are found to be at fault for a specific event such as misjudgment BAP Acronym is Business Analytics Project Brokerage Income A fee or commission charged by a broker. Balance Sheet A financial statement that summarizes a company's assets, liabilities and shareholders' equity at a specific point in time
C
Capital Capital refers to sums of money or assets put to productive use.

Broker User Manual Glossary
Version 9.0 255
Claims Legal demand or assertion by a claimant for compensation, payment, or reimbursement for a loss under a contract, or an injury due to negligence
D
Direct Insurance Non-life (general) insurance in which an insurer is directly responsible to the insured, without involving a reinsurer
Dividend A sum of money paid regularly (typically quarterly) by a company to its shareholders out of its profits (or reserves). Debentures An unsecured loan certificate issued by a company, backed by general credit rather than by specified assets
F
FDI Foreign direct investment; investment by a company in a country other than that in which the company is based
I
Insurance Institute of India Insurance Institute of India conducts training and exams for insurance professionals in India. Its objective is to promote insurance education and training in the country. It ensures quality in the profession of surveyors by regular up gradation of professional excellence through training programs and seminars. IRDA Insurance Regulatory and Development Authority of India is the apex body that regulates the insurance industry in India.

Broker User Manual Glossary
Version 9.0 256
L
Life Insurance Insurance that pays out a sum of money either on the death of the insured person or after a set period.
M
Master ID Master ID is the Registered Corporate Broker ID, which can be used to create 3 Sub IDs further. They are 2 Director ID, 1 Employee ID.
O
Outstanding Amount Outstanding refers to the amount owed.
P
Premium An amount to be paid for an insurance policy Policies A contract on Insurance Pending clarification Applicants need to provide clarifications and attach additional documents as required by IRDA during application processing.
R
Reinsurance Reinsurance is insurance that is purchased by an insurance company (the "ceding company" or "cedent" under the arrangement) from one or more other insurance companies (the "reinsurer") as a means of risk management Reminder Email A set of E mails sent by IRDA to the users on their registered Email ID when any action is required from them

Broker User Manual Glossary
Version 9.0 257
Remuneration Money paid for work or a service. Retrieve credentials A process through which the user can retrieve their login credentials by entering mandatory information.
S
Shareholder An owner of shares in a company Share Capital. Share capital or capital stock (US English)[1] refers to the portion of a company's equity that has been obtained (or will be obtained) by trading stock to a shareholder for cash or an equivalent item of capital value SS LC SS LC (Secondary School Leaving Certificate) is the certificate received after completion of secondary schooling (10th Grade). Sub ID Director and Employee IDs created by the Corporate Broker (Master ID) are called as Sub IDs.
U
URN / Unique Reference Number The unique reference number that is generated when users successfully submit any application to IRDA

Broker User Manual Index
Version 9.0 258
Index
A
Annual Returns ................................ 145 Applicant Details ................................ 37
B
Business Information .......................... 44
C
Changes during Licensing Period ...... 84 Create Sub ID .................................... 26
D
Declaration ......................................... 55 Delete Sub ID ..................................... 30 Duplicate License ............................... 79
F
FAQs ................................................ 173 Financial Information .................... 47, 67 For Approval ..................................... 105 For Information ................................... 87
G
Glossary ........................... 175, 179, 183
H
Half Yearly ........................................ 166
L
Login Process ...................................... 8
N
New License ....................................... 34
O
Organization Struture ......................... 39 Other Information ............................... 51
P
Pending for Clarification ................... 126 Print View ........................................... 59
Q
Quarterly Returns ............................. 132
R
Register ................................................ 4 Registration .......................................... 4 Renewal License ................................ 64 Retrieve Password ............................. 12 Retrieve User ID ............................. 8, 11 Returns ............................................. 129
U
Undertaking ........................................ 56 Update Sub ID .................................... 28 Update User Profile ............................ 20 Upload Documents ............................. 53 User Profile ........................................ 14
V
View Application Status .................... 124 View License Details ........................ 123