Embed Size (px)
Citation preview
1
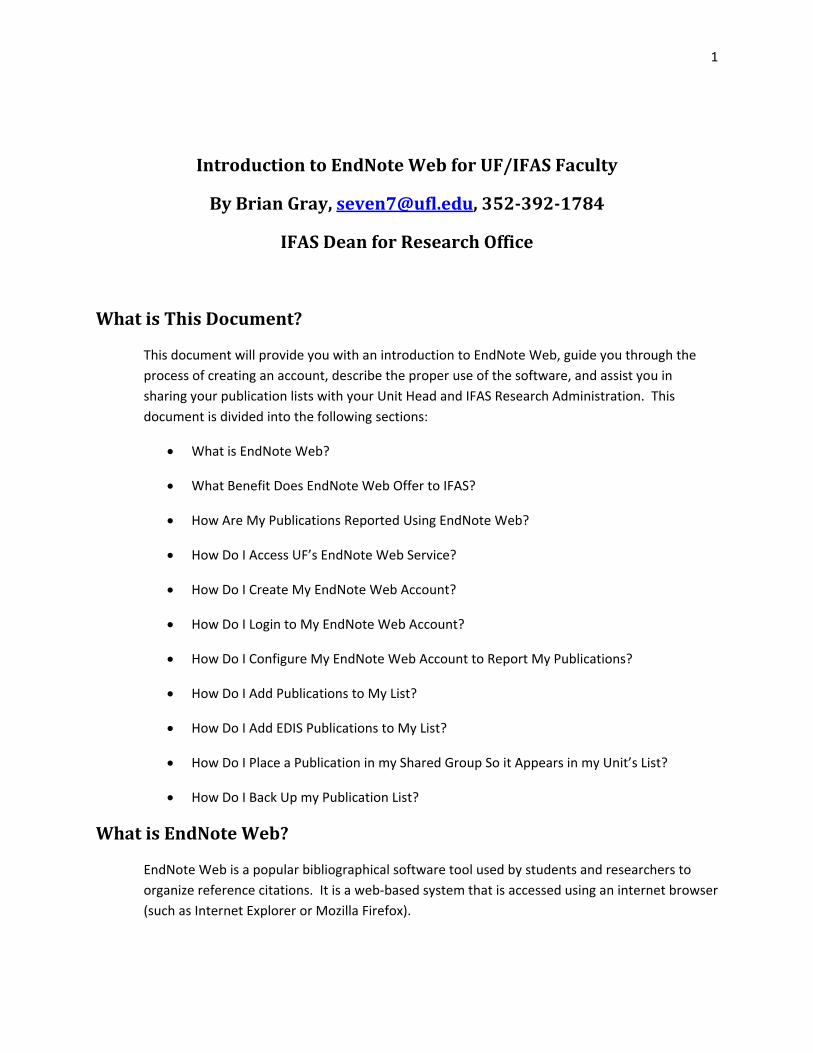
Introduction to EndNote Web for UF/IFAS Faculty
By Brian Gray, [email protected], 3523921784
IFAS Dean for Research Office
What is This Document?
This document will provide you with an introduction to EndNote Web, guide you through the process of creating an account, describe the proper use of the software, and assist you in sharing your publication lists with your Unit Head and IFAS Research Administration. This document is divided into the following sections:
• What is EndNote Web?
• What Benefit Does EndNote Web Offer to IFAS?
• How Are My Publications Reported Using EndNote Web?
• How Do I Access UF’s EndNote Web Service?
• How Do I Create My EndNote Web Account?
• How Do I Login to My EndNote Web Account?
• How Do I Configure My EndNote Web Account to Report My Publications?
• How Do I Add Publications to My List?
• How Do I Add EDIS Publications to My List?
• How Do I Place a Publication in my Shared Group So it Appears in my Unit’s List?
• How Do I Back Up my Publication List?
What is EndNote Web?
EndNote Web is a popular bibliographical software tool used by students and researchers to organize reference citations. It is a web‐based system that is accessed using an internet browser (such as Internet Explorer or Mozilla Firefox).
2
EndNote Web provides users with the ability to build lists of publications in a streamlined, user‐friendly environment. Publication lists are created by manually entering publication information or by importing publication data from popular databases. These publication lists can then be checked for duplicates and shared with other EndNote Web accounts.
What Benefit Does EndNote Web Offer to IFAS?
EndNote Web is a popular, well‐supported, and user‐friendly software solution for building, storing, and sharing lists of publications. EndNote Web provides facilities for generating lists of publications at the faculty, unit, and college level. This makes it ideal for IFAS as the accurate reporting of publication production is of considerable importance and mandatory for federal reporting.
EndNote Web offers some unique benefits to our faculty. Namely, the EndNote Web interface is user‐friendly and makes the process of recording their publications much easier than in the past. In many cases, it also allows publication information to be imported from various online databases, freeing faculty from manually entering the details of their publications.
How Are My Publications Reported Using EndNote Web?
EndNote Web provides some very useful functionality that makes sharing lists of publications very easy to accomplish. This allows faculty to build a list of their publications using their own EndNote Web account, share this list with their respective unit account, which then shares a complete unit list with an IFAS‐wide administrative account.
How Do I Access UF’s EndNote Web Service?
The University of Florida’s EndNote Web implementation is maintained by the George A. Smathers Libraries. It can be accessed by clicking the “Endnote Web Login” link on the library’s EndNote Web site at http://web.uflib.ufl.edu/endnoteweb.html or by navigating to EndNote Web directly at http://www.myendnoteweb.com/. These web addresses should be bookmarked for easy access in the future.
UF’s EndNote Web system can only be accessed from computers on the UF network. No extra action is required by users connecting to EndNote Web from computers on campus. Those planning to access EndNote Web from an off‐campus location, however, will need to utilize a remote connection to the UF network, such as the UF Virtual Private Network (VPN). You can read more about the UF VPN at the following location: http://net‐services.ufl.edu/provided_services/vpn/.
How Do I Create My EndNote Web Account?

3
EndNote Web accounts are created on a per‐email address basis. Your email address will serve as your user name when creating your account and when logging into the EndNote Web system. To begin the account creation process, direct your web browser to the EndNote Web login page: http://www.myendnoteweb.com/. You will be presented with the login form pictured below in Figure 1:
Figure 1 – EndNote Web Login Form
Begin the sign up process by clicking the “Sign Up” link as pictured above. You will then be asked to provide some information in the form pictured in Figure 2 below:
Form 2 – EndNote Web User Registration Form
Complete the required fields, but use extra care when providing your response to the email address fields. The email address you provide here will be used as your username when logging into the system. Any notification emails generated by EndNote Web will also be sent to this address. Once you’ve completed the sign up form, click the “I Agree” button to confirm your responses and create your EndNote Web account.
How Do I Login to My EndNote Web Account?

4
To login to your newly created account, direct your web browser to the EndNote Web login page: http://www.myendnoteweb.com/. You will be presented with the login form pictured in Figure 1 above. Log in using your email address and the password you selected when creating your account.
Upon logging into EndNote Web for the first time, you will be presented with the “Getting Started” page pictured below in Figure 3:
Figure 3 – The EndNote Web Welcome Screen
How Do I Configure My EndNote Web Account to Report My Publications?
Before you can begin building a list of your publications, you’ll need to create a group that is shared with your unit and will be used to store your citations. EndNote Web groups are sets of citations stored together, and can be thought of much the same as folders in Windows. All publications that you’d like to be reported to your unit and to administration must be stored in your shared publication group. To create your shared group, begin by selecting the “Organize” option from the EndNote Web main menu as indicated by the pointer seen below in Figure 4.
Figure 4 – Selecting the Organize Option
Once you have opened the Organize area of EndNote Web’s interface, you will be presented with the interface pictured below in Figure 5.

5
Figure 5 – The Organize / Manage My Groups Interface
You’ll now need to indicate that you’d like to create a new group by clicking the “New Group” button as highlighted by the pointer in Figure 5. EndNote Web will then ask you to provide a name for your new group of citations. It is recommended that you include your name or some other uniquely identifiable description in the name of your group as pictured below in Figure 6.
Figure 6 – Naming Your Shared Group
Your unit’s EndNote Web administrator works with the shared publications groups of all the faculty and staff in your unit. Having the ability to determine the owner of each shared group is extremely important. By uniquely identifying your group, you make it clear to your EndNote Web administrator that this group contains your publications. Once you provide a name for your group and click the “OK” button, EndNote Web will create your group. Your new group will now be listed under the “Manage My Groups” interface as pictured below in Figure 7.
Figure 7 – A Newly Created Group
Now that you’ve created a group to store your publications, you need to share it with your unit’s EndNote Web administrator. To share your new group, click the check box under the “Share” column, as indicated by the pointer in Figure 7 above.

6
EndNote Web will proceed to flag your group as shared, and will indicate this by placing a small share symbol next to its name in as pictured below in Figure 8.
Figure 8 – A Shared Publication Group
The final step required to properly share your publication list is to give your unit’s EndNote Web administrator permission to access your shared group. This will allow him or her to view and report your publication list. To give your administrator permission to view your shared publication group, click the “Manage Sharing” button indicated by the pointer in Figure 8 above.
You will now be provided with a list of people who currently have access to view your shared group. As you have not yet allowed any EndNote Web accounts permission to view your shared group, the list is currently empty. To add your unit’s EndNote Web administrator, click the “Start sharing this group.” link indicated by the pointer in Figure 9.
Figure 9 – The EndNote Web Share Management Interface
After clicking the “Start sharing this group.” link, you will now be presented with the “Add E‐mail Addresses” interface as pictured in Figure 10 below. This screen allows you to list the email addresses of any EndNote Web accounts with whom you wish to share your publication group.

7
Figure 10 – The Add E‐Mail Interface
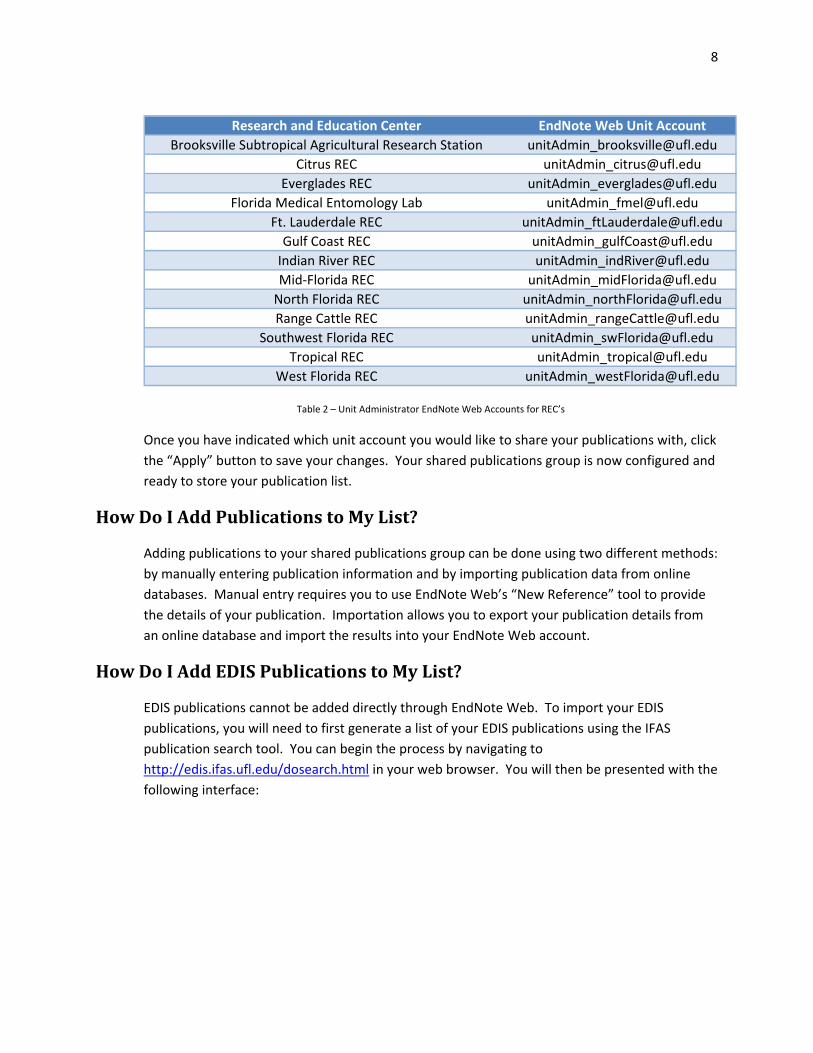
Type the email address of your unit’s EndNote Web Administrator into the text box. You can determine the email address for your unit by consulting Tables 1 and 2 below.
Department/School EndNote Web Unit AccountAgricultural and Biological Engineering [email protected]
Agricultural Education and Communication [email protected] [email protected]
Animal Sciences [email protected] and Nematology [email protected] Horticulture [email protected]
Family, Youth, and Community Sciences [email protected] and Resource Economics [email protected]
Food Science and Human Nutrition [email protected] Sciences [email protected]
Microbiology and Cell Science [email protected] Pathology [email protected]
Sch. of Forest Resources and Conservation [email protected]. of Natural Resources and Environment [email protected]
Soil and Water Science [email protected] [email protected]
Veterinary Medicine [email protected] Ecology and Conservation [email protected]
Table 1 – Unit Administrator EndNote Web Accounts for IFAS Departments and Schools
8
Research and Education Center EndNote Web Unit AccountBrooksville Subtropical Agricultural Research Station [email protected]
Citrus REC [email protected] REC [email protected]
Florida Medical Entomology Lab [email protected]. Lauderdale REC [email protected] Coast REC [email protected] River REC [email protected]‐Florida REC [email protected] Florida REC [email protected] Cattle REC [email protected]
Southwest Florida REC [email protected] REC [email protected]
West Florida REC [email protected]
Table 2 – Unit Administrator EndNote Web Accounts for REC’s
Once you have indicated which unit account you would like to share your publications with, click the “Apply” button to save your changes. Your shared publications group is now configured and ready to store your publication list.
How Do I Add Publications to My List?
Adding publications to your shared publications group can be done using two different methods: by manually entering publication information and by importing publication data from online databases. Manual entry requires you to use EndNote Web’s “New Reference” tool to provide the details of your publication. Importation allows you to export your publication details from an online database and import the results into your EndNote Web account.
How Do I Add EDIS Publications to My List?
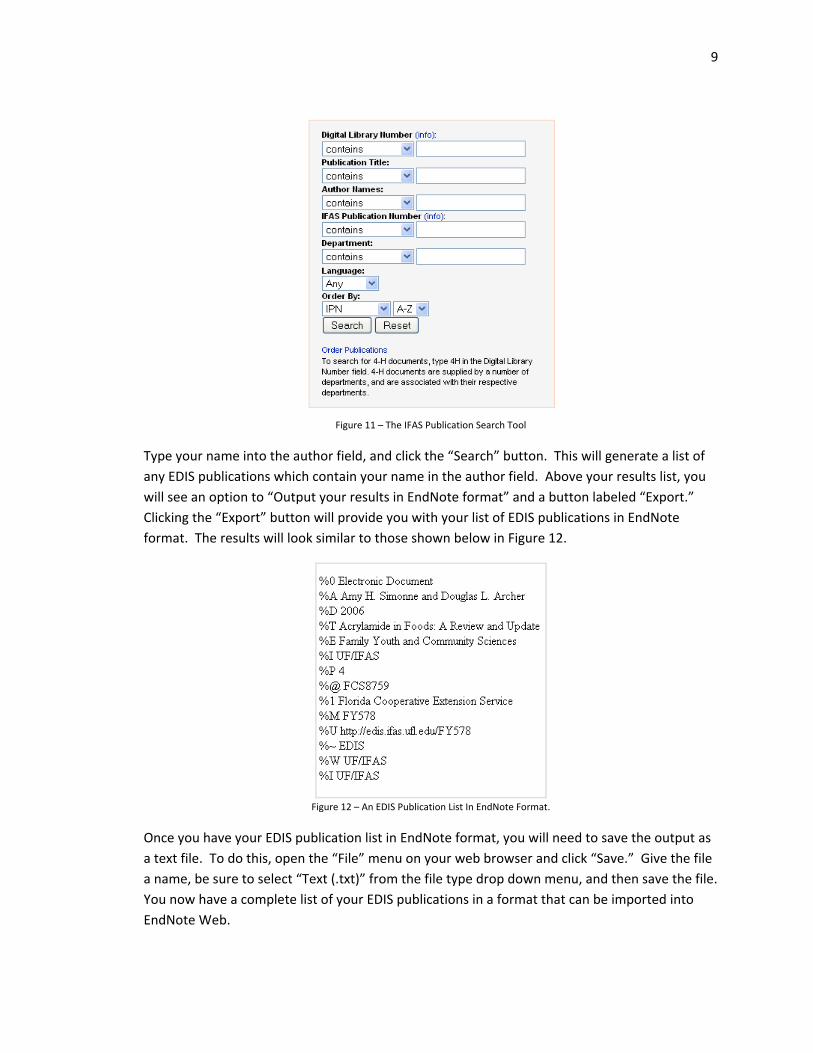
EDIS publications cannot be added directly through EndNote Web. To import your EDIS publications, you will need to first generate a list of your EDIS publications using the IFAS publication search tool. You can begin the process by navigating to http://edis.ifas.ufl.edu/dosearch.html in your web browser. You will then be presented with the following interface:
9
Figure 11 – The IFAS Publication Search Tool
Type your name into the author field, and click the “Search” button. This will generate a list of any EDIS publications which contain your name in the author field. Above your results list, you will see an option to “Output your results in EndNote format” and a button labeled “Export.” Clicking the “Export” button will provide you with your list of EDIS publications in EndNote format. The results will look similar to those shown below in Figure 12.
Figure 12 – An EDIS Publication List In EndNote Format.
Once you have your EDIS publication list in EndNote format, you will need to save the output as a text file. To do this, open the “File” menu on your web browser and click “Save.” Give the file a name, be sure to select “Text (.txt)” from the file type drop down menu, and then save the file. You now have a complete list of your EDIS publications in a format that can be imported into EndNote Web.

10
To begin the import process, log into your EndNote Web account using the method described earlier in this document. After you have logged in successfully, select the “Collect” option from the EndNote Web main menu. Then click on the “Import References” option from the following menu. You will be presented with the EndNote Web import interface pictured below in Figure 13.
Figure 13 – The EndNote Web Import References Interface.
To import your EDIS publication list, begin by clicking the “Browse” button. You will then be asked to select the text file you created in the previous step. Next, select “EndNote Import” from the filter list. Finally, use the last drop down selection to determine which folder you would like to import your EDIS publications into. When properly completed, the result should look similar to that pictured in Figure 14.
Figure 14 – The EndNote Web Import References Interface Completed.
The EDIS publications listed in your file will now be added to the EndNote Web folder you specified. These can now be edited, moved, or otherwise managed just as you would any other reference.
How Do I Place a Publication in my Shared Group So It Appears In My Unit’s List?
11
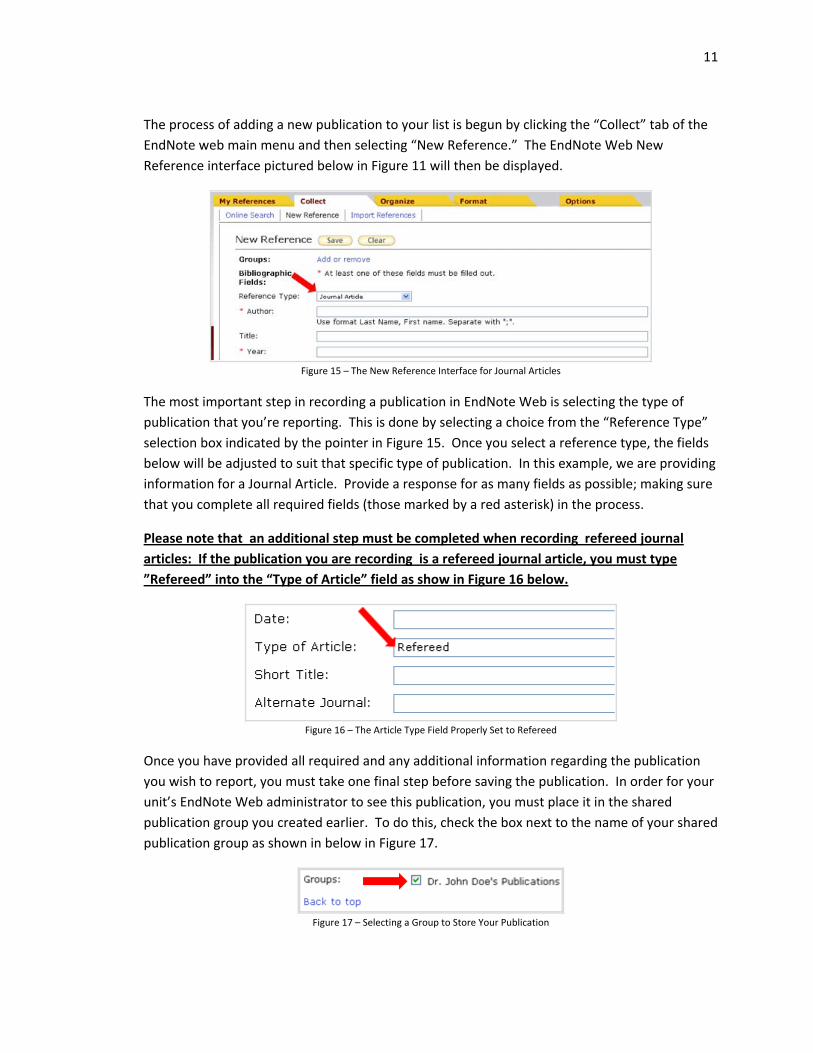
The process of adding a new publication to your list is begun by clicking the “Collect” tab of the EndNote web main menu and then selecting “New Reference.” The EndNote Web New Reference interface pictured below in Figure 11 will then be displayed.
Figure 15 – The New Reference Interface for Journal Articles
The most important step in recording a publication in EndNote Web is selecting the type of publication that you’re reporting. This is done by selecting a choice from the “Reference Type” selection box indicated by the pointer in Figure 15. Once you select a reference type, the fields below will be adjusted to suit that specific type of publication. In this example, we are providing information for a Journal Article. Provide a response for as many fields as possible; making sure that you complete all required fields (those marked by a red asterisk) in the process.
Please note that an additional step must be completed when recording refereed journal articles: If the publication you are recording is a refereed journal article, you must type ”Refereed” into the “Type of Article” field as show in Figure 16 below.
Figure 16 – The Article Type Field Properly Set to Refereed
Once you have provided all required and any additional information regarding the publication you wish to report, you must take one final step before saving the publication. In order for your unit’s EndNote Web administrator to see this publication, you must place it in the shared publication group you created earlier. To do this, check the box next to the name of your shared publication group as shown in below in Figure 17.
Figure 17 – Selecting a Group to Store Your Publication
12
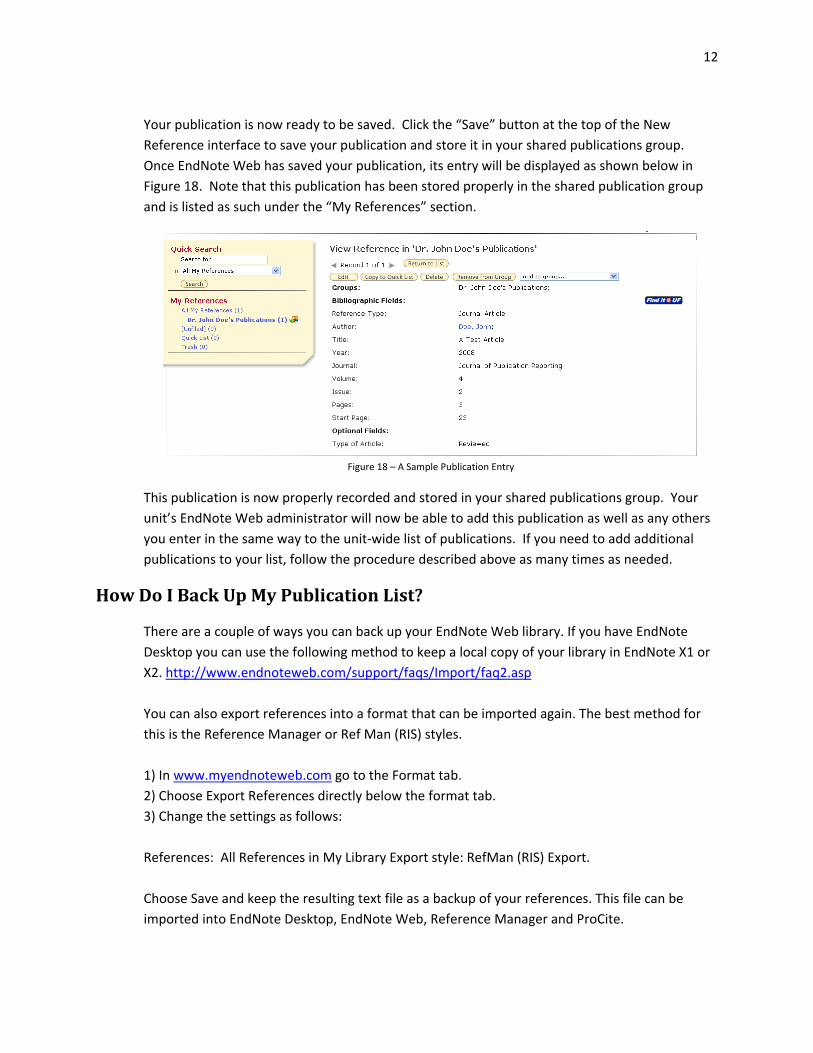
Your publication is now ready to be saved. Click the “Save” button at the top of the New Reference interface to save your publication and store it in your shared publications group. Once EndNote Web has saved your publication, its entry will be displayed as shown below in Figure 18. Note that this publication has been stored properly in the shared publication group and is listed as such under the “My References” section.
Figure 18 – A Sample Publication Entry
This publication is now properly recorded and stored in your shared publications group. Your unit’s EndNote Web administrator will now be able to add this publication as well as any others you enter in the same way to the unit‐wide list of publications. If you need to add additional publications to your list, follow the procedure described above as many times as needed.
How Do I Back Up My Publication List?
There are a couple of ways you can back up your EndNote Web library. If you have EndNote Desktop you can use the following method to keep a local copy of your library in EndNote X1 or X2. http://www.endnoteweb.com/support/faqs/Import/faq2.asp You can also export references into a format that can be imported again. The best method for this is the Reference Manager or Ref Man (RIS) styles. 1) In www.myendnoteweb.com go to the Format tab. 2) Choose Export References directly below the format tab. 3) Change the settings as follows: References: All References in My Library Export style: RefMan (RIS) Export. Choose Save and keep the resulting text file as a backup of your references. This file can be imported into EndNote Desktop, EndNote Web, Reference Manager and ProCite.