Embed Size (px)
Citation preview

TO THE GATES The Historical RUSSIAN CAMPAIGN
By Robert B. Allred and Robert E. AlIred
Robert Brad Alfred it one of the first gerenation of wargamers, entering the hobby during the ‘60s to which most of us trace our Avalon Hill roots. His son, Robert Earl Allred, surely owes his interes t in the hobby to his father influence. Together, they prove a rare example of the best method for curbing the “greying of the hobby” we hear so much about—the invaluable opportunity of a parent to pass along his love and understanding of wargaming to his (or her) children.
War games are more than just recreational activities; they also serve to illustrate—and even, to a certain extent, recreate—a historical situation and impart the lessons to be learned by students of military science and history. One of the primary reasons the elder author of this piece became interested in Avalon Hill wargames was to learn something of the actual conditions and development of the situation as it affected such varied clashes as Gettysburg, D-Day and the Battle of the Bulge; the younger has taken up the tradition by becoming involved in board wargaming during its cuirrent, much more sophisticated, phase. We will together attempt to throw some light onto the historical situation as it pertains to the opening moves for Avalon Hill’s excellent simulation THE RUSSIAN CAMPAIGN.
The broad facts of the launching of Operacion Barbarossa are well known; the three million German and allied Axis troops attacked the two million troop of the Soviet Union. The gigantic offensive opened at 3:45 AM on 22 June 1941—about six weeks late (which was indeed six weeks too late). What the following will illustrate, for those interested in simulation of the historical opening moves of the attack through the medium of TRC, are not only the failure to effectively use superior forces on the part of the Axis, but also that, contrary to popular belief, the Soviet Array did in fact manage to extricate most of its formations and maintain a somewhat continuous front, anchoring its flanks along the coasts and in the Pripyet Marshes of western Russia, Poland and the Ukraine. These feats were accomplished in spite of the loss of almost a million men in two pockets around Minsk and Smolensk alone, and in spite of the repeated breaching and overrunning of parts of the front by the Wehrmacht. Stalin and STAVKA made full use of that staunch tenacity and stubborness which has allowed the peoples of the 15 Soviet republics and the “autonomous” regions of the USSR to endure and persevere—not only through the terrible war during the campaign, but through more than seven decades of communism.
Our description of the beginning of Barbarossa will rely on the historical set-up and campaign rules of THE RUSSIAN CAMPAIGN, and hope to also show that any winning strategy for the Axis player will in fact encompass the OKH (Oberkommando des Heeres ) plan for the destruc tion of the Red Army. Of course, Axis players of the game are blessed by being able to avoid Hitler’s catastrophic interference which, despite intuitive insights and strokes of
genius, became a “strategy ” of defeat. We will carry the action through the third Axis turn. Consider this a sort of “historical” Series Replay, with critique.
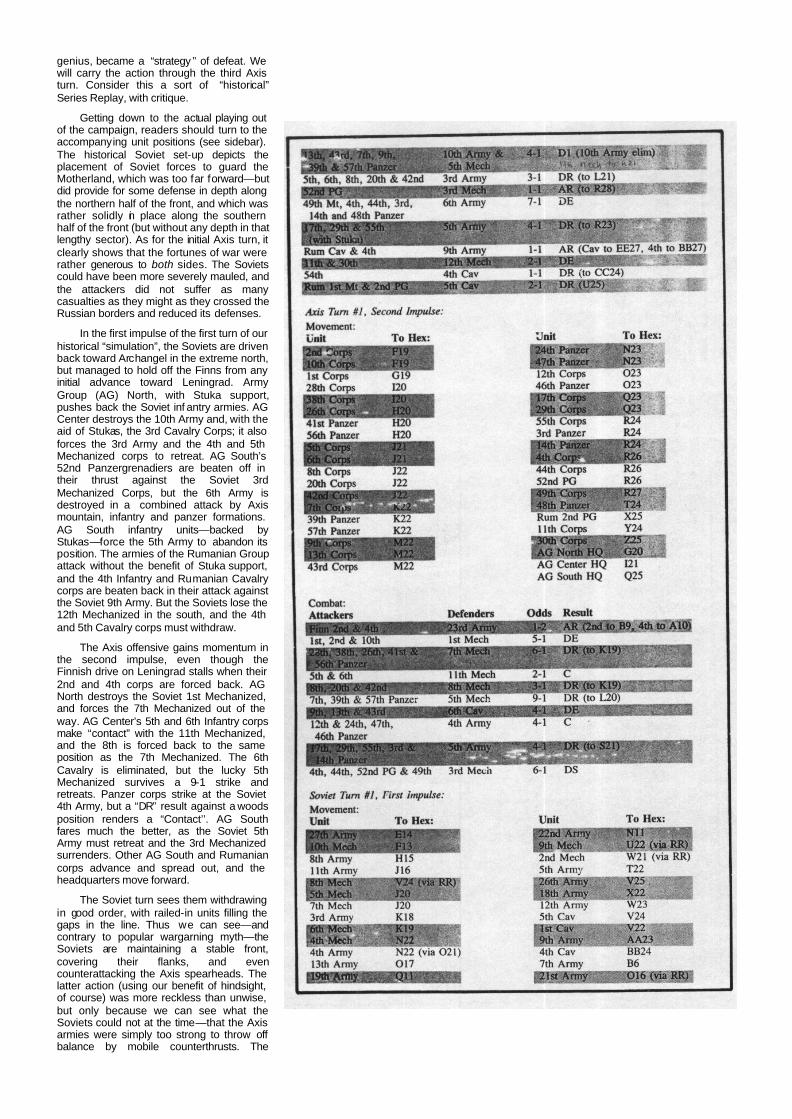
Getting down to the actual playing out of the campaign, readers should turn to the accompanying unit positions (see sidebar). The historical Soviet set-up depicts the placement of Soviet forces to guard the Motherland, which was too far forward—but did provide for some defense in depth along the northern half of the front, and which was rather solidly in place along the southern half of the front (but without any depth in that lengthy sector). As for the initial Axis turn, it clearly shows that the fortunes of war were rather generous to both sides. The Soviets could have been more severely mauled, and the attackers did not suffer as many casualties as they might as they crossed the Russian borders and reduced its defenses.
In the first impulse of the first turn of our historical “simulation”, the Soviets are driven back toward Archangel in the extreme north, but managed to hold off the Finns from any initial advance toward Leningrad. Army Group (AG) North, with Stuka support, pushes back the Soviet inf antry armies. AG Center destroys the 10th Army and, with the aid of Stukas, the 3rd Cavalry Corps; it also forces the 3rd Army and the 4th and 5th Mechanized corps to retreat. AG South’s 52nd Panzergrenadiers are beaten off in their thrust against the Soviet 3rd Mechanized Corps, but the 6th Army is destroyed in a combined attack by Axis mountain, infantry and panzer formations. AG South infantry units—backed by Stukas—force the 5th Army to abandon its position. The armies of the Rumanian Group attack without the benefit of Stuka support, and the 4th Infantry and Rumanian Cavalry corps are beaten back in their attack against the Soviet 9th Army. But the Soviets lose the 12th Mechanized in the south, and the 4th and 5th Cavalry corps must withdraw.
The Axis offensive gains momentum in the second impulse, even though the Finnish drive on Leningrad stalls when their 2nd and 4th corps are forced back. AG North destroys the Soviet 1st Mechanized, and forces the 7th Mechanized out of the way. AG Center’s 5th and 6th Infantry corps make “contact” with the 11th Mechanized, and the 8th is forced back to the same position as the 7th Mechanized. The 6th Cavalry is eliminated, but the lucky 5th Mechanized survives a 9-1 strike and retreats. Panzer corps strike at the Soviet 4th Army, but a “DR” result against a woods position renders a “Contact’’. AG South fares much the better, as the Soviet 5th Army must retreat and the 3rd Mechanized surrenders. Other AG South and Rumanian corps advance and spread out, and the headquarters move forward.
The Soviet turn sees them withdrawing in good order, with railed-in units filling the gaps in the line. Thus we can see—and contrary to popular wargarning myth—the Soviets are maintaining a stable front, covering their flanks, and even counterattacking the Axis spearheads. The latter action (using our benefit of hindsight, of course) was more reckless than unwise, but only because we can see what the Soviets could not at the time—that the Axis armies were simply too strong to throw off balance by mobile counterthrusts. The

results of these disastrous attacks were predictable: the elimination of the 4th, 5th, 7th and 11th Mechanized corps and the retreat of the 4th Army . The catastrophic results underscored the inadequacy of Soviet tactics and equipment during the early stages of the war (but that’s the subject for another game system). In the second impulse, the Soviet player manages to throw away the 6th, 8th and 9th Mechanized corps in more futile counterattacks. But he has also thinly maintained his front in the north and center, while extricating the Kiev covering force from the border area and holding the extreme flank along the coasts (after filling some major gaps in the southern half of the front).
In the second turn, the Axis offensive gathers speed as the steamroller continues to pulverize the Soviet front. This turn’s moves demonstrate the strength of the Axis formations and positioning, and the “correctness” of OKH’s strategy thus far. Shown for all is the effec tiveness of an attack at overwhelming odds, forcing the defender to surrender and negating his zones of control (ZOC) so that other Axis units can move through unimpeded. AG Center’s 5th, 6th, 7th, 9th, 13th, 20th, 42nd and 43rd corps, with Stuka support, annihilate the Soviet 3rd Army in an “automatic victory” that allows the unhindered movement of other Axis units. AG Center’s panzer corps go on to destroy the Soviet 4th and 13th armies; and the 21st Army is forced back.
In other action, the Finns are able to eliminate the Soviet 7th and 23rd armies, but suffer the loss of their own 2nd and 7th corps. AG North destroys the 8th and 11th armies (the latter attack with Stuka support), but loses the 2nd and 38th corps. AG South’s 48th Panzer Corps receives air support to eliminate the Soviet 5th cavalry. Combined infantry and mountain units, along with the Rumanian mountain corps, gather to overwhelm the 26th Army, but the German 4th Corps is lost in the “exchange”. The Rumanian Group’s 11th and 30th corps and the Rumanian Army’s 2nd PG Corps unite to eliminate the 12th Army.
So, as the situation has developed, the Finns have knocked out the entire Soviet border force there, AG North has sliced through the Baltic Military District, Group Center has swept over the Western Military District (arid forced the surrender of the 3rd Army), AG South has reduced the Kiev Military District’s forces to one infantry army and one light armored corps, and the Rumanian force has knocked out the Odessa Military District’s a armor. The Minsk and Leningrad garrisons are depleted, and the roads to Leningrad and Moscow are wide open, with only relatively minor stumbling blocks in the way
As the second impulse of the second Axis turn unfolds, the situation rapidly deteriorates for the Soviets in the north, but the Axis drive falters in the south. AG North’s 1st and 10th corps attack the Soviet 27th Army; the Soviet unit and the 10th Corps are eliminated in the “exchange”. North’s 26th Corps, 41st and 56th Panzer corps attack and destroy the 10th Mechanized, with the loss of the 26th in another “exchange”. AG Center’s 24th and

47th Panzer corps attack and eliminate the 21st Army.
AG South’s 17th, 29th, 55th corps and 48th Panzer all attack the 5th Army, pushing it back. The 3rd and 14th Panzer corps attack the 1st Cavalry, but the 3rd is lost in the “exchange” (the result of cumulative tank losses thus far I guess). The 52nd PanzerGrenadier Corps moved one hex beyond the legal maximum (an error not noticed at the time of this first game) to assist the Rumanian 2nd PG Corps in an attack on the Soviet 2nd Mechanized. The Rumanian panzergrenadiers were sacrificed in the “exchange”. The Rumanian Group’s 11th and 30th move into “contact” with the 18th Army. The 54th Corps and 40th Panzer Corps force the 9th Army to retreat.
By now it should be no surprise that the high command of the Wehrmacht was elated; it would take another five months before their hopes of a victory in 1941 were to be dashed. As for the Soviet side, virtual all of the mechanized corps had been thrown away in futile counterattacks against Axis formations that were just too powerful to knock back. As far as our simulation is concerned (some isolated and far-f iung armies are not represented), the Soviet forces have been reduced to five regular armies and but two cav alry corps. However, the prodigious Soviet replacement capacity now comes into play. But prior to that moment—the arrival of literally hordes of fresh Red Army troops —it is time for the Axis player to savor the view of a mapboard that is practicaily denuded of Soviet counters. It is easy to see why most of the world leaders at the time had just about written-off the Soviet Union as a viable member of the anti-Axis alliance.
Now, for the Soviet second turn. On the first impulse, the arriving replacements include the 27th Army at Leningrad, the 20th and 21st armies and 3rd and 5th Cavalry corps at Moscow. The 16th Army arrive from the east, by railroads via Saratov to the front. The 3rd and 5th Cavalry corps likewise are railed to the almost non-existent front lines, as are the 20th and 21st armies. On the Leningrad front the 7th Army moves out of the city. Elsewhere the 4th cavalry Corps and the 9th, 18th and 22nd armies reposition themselves. The sole Soviet counterattack this time is the 5th Army’s strike against the exposed 52nd PG Corps, which results in a “Contact”.
The second impulse sees the 24th Army arrive at Moscow and the 40th Army at Kursk, The 5th Army’s push against the 52nd results in an offensive retreat. Thus we see that—again contrary to popular belief—Stalin and STAVKA have been able (if just barely) to re-establish the front in August 1941. The central sector, from Bryansk to Kiev, was the least insecure; but the extremne south, and the areas in front of Leningrad and Moscow were in desperately weak condition.
It has come time to see how the German high command was interfered with not without good reason, howev er. German intelligence was convinced that very strong Soviet forces were lurking in the sector between Kiev and Bryansk. and that a massive counterattack against AG South was in the offing. The result was the colossal bIunder of attacking away from the nerve-center of Stalin’s Russia—Moscow.
The drive from Moscow towards the Don Basin certainly disrupted Soviet industry, but led to the failure to take out the keystone of Soviet Russia. There were political considerations, of course, as contact with Germany’s allies (real or imagined) in the Ukraine, Kazakhstan, Armenia and the Volga German colonies were pursued. But, the failure to maintain the immediate objective—Moscow—in the pursuit of the more esoteric, and eventually unattainable, goals of southern Russian and Persian oil fields, the opening of an overland route to Turkey and the Middle East, and a subsequent link-up with Japan, sent the German Army far afield.
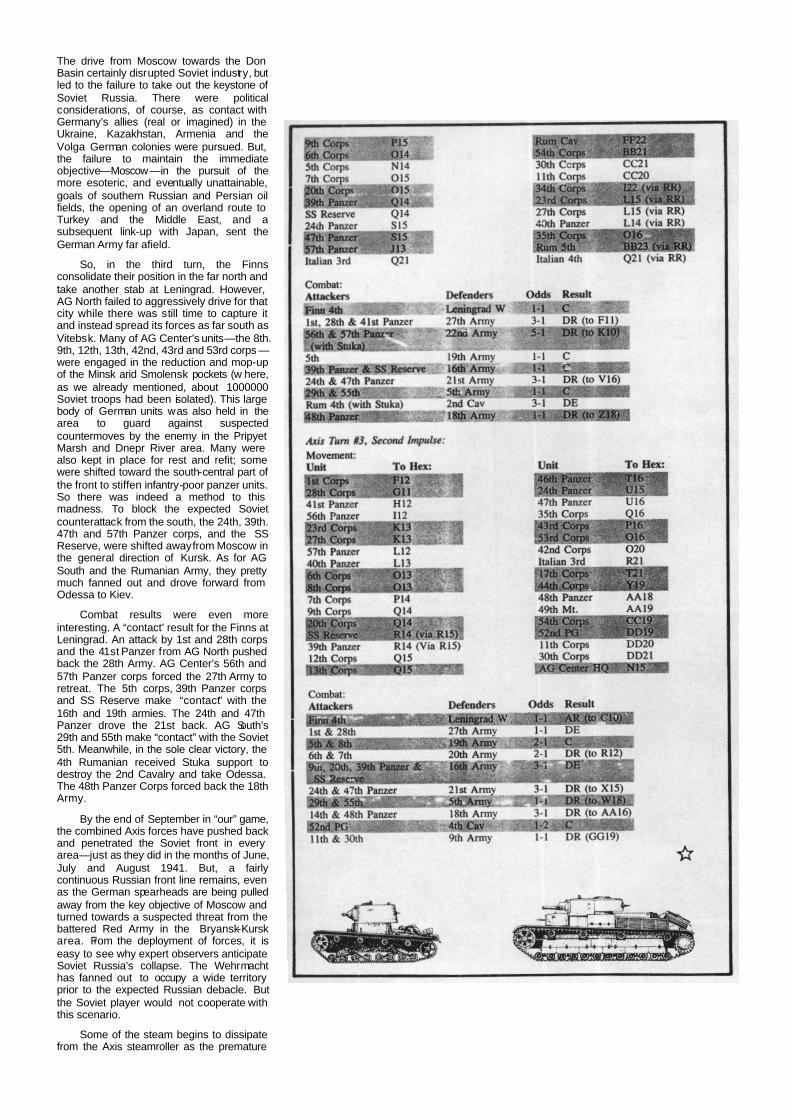
So, in the third turn, the Finns consolidate their position in the far north and take another stab at Leningrad. However, AG North failed to aggressively drive for that city while there was still time to capture it and instead spread its forces as far south as Vitebsk. Many of AG Center’s units—the 8th. 9th, 12th, 13th, 42nd, 43rd and 53rd corps —were engaged in the reduction and mop-up of the Minsk arid Smolensk pockets (w here, as we already mentioned, about 1000000 Soviet troops had been isolated). This large body of German units was also held in the area to guard against suspected countermoves by the enemy in the Pripyet Marsh and Dnepr River area. Many were also kept in place for rest and refit; some were shifted toward the south-central part of the front to stiffen infantry-poor panzer units. So there was indeed a method to this madness. To block the expected Soviet counterattack from the south, the 24th, 39th. 47th and 57th Panzer corps, and the SS Reserve, were shifted away from Moscow in the general direction of Kursk. As for AG South and the Rumanian Army, they pretty much fanned out and drove forward from Odessa to Kiev.
Combat results were even more interesting. A “contact’ result for the Finns at Leningrad. An attack by 1st and 28th corps and the 41st Panzer from AG North pushed back the 28th Army. AG Center’s 56th and 57th Panzer corps forced the 27th Army to retreat. The 5th corps, 39th Panzer corps and SS Reserve make “contact” with the 16th and 19th armies. The 24th and 47th Panzer drove the 21st back. AG South’s 29th and 55th make “contact” with the Soviet 5th. Meanwhile, in the sole clear victory, the 4th Rumanian received Stuka support to destroy the 2nd Cavalry and take Odessa. The 48th Panzer Corps forced back the 18th Army.
By the end of September in “our” game, the combined Axis forces have pushed back and penetrated the Soviet front in every area—just as they did in the months of June, July and August 1941. But, a fairly continuous Russian front line remains, even as the German spearheads are being pulled away from the key objective of Moscow and turned towards a suspected threat from the battered Red Army in the Bryansk-Kursk area. From the deployment of forces, it is easy to see why expert observers anticipate Soviet Russia’s collapse. The Wehrmacht has fanned out to occupy a wide territory prior to the expected Russian debacle. But the Soviet player would not cooperate with this scenario.
Some of the steam begins to dissipate from the Axis steamroller as the premature
Options to Play a Historical Game
To re-create the historical conditions of the actual campaign in the game, use all of the “Play Balance” optional rules, except the final one (26.8). Instead of using this rule, refer to the historical Weather Chart under optional rule 26.6. Two excellent game variants to include for a historical rec reation of the actual campaign in the “But What if…” (by Richard Hamblen, the game’s developer, on page 9 in the 3rd edition ruleboot) are: the inclusion of the artillery corps (I), and the unlimited Black Sea invasions (II). (In the actual campaign, numerous small invasions were accomplished, including a German counter-landing behind the beachhead of a Soviet landing.)
When invoking these options and variants, putting them to the best use will reflect the multiplying effect of “combined arms” actions—that is, the cumulative weight of stukas, panzers, panzergrenadiers, infantry, artillery and sea movement for the Axis, and the use of paratroop, partisan, armor, cavalry, infantry and artillery units (and sea movement) for the Soviet player. These diverse elements do not merely add up to a greater sum, but in effect multiply the factors of the forces involved to enhance combat effectiveness.
Using the above, and the historical set-up as described in the other accompanying sidebar, a reflection of the real-life campaign for history buffs, military scientists or curious game players an be accomplished.
anticipation of victory dulled the senses, and as the losses to Axis formations caused them to lose strength and mobility. The arrival of October 1941 brings the end of the dry season, so the second impulse of the third turn in our recreation of Barbarossa has “Light Mud” for the weather conditions.
In the second half of the Axis turn the Finns are driven off in yet another attack on Leningrad. AG North’s 1st and 28th corps attack the hapless 27th Army and destroy it, while the group’s other units continue a slow advance and shift a bit to the south (to cover for AG Center as it shifts southward too). At AG Center, the 5th and 8th corps make “contact” with the 19th Army, the 6th and 7th corps drive back the 20th, the 9th and 20th along with the 39th Panzer Corps and SS Reserve attack and eliminate the newly-arrived 16th Army. The 24th and 47th Panzer corps continue their single-minded drive away from Moscow, as they together attack and overrun the 21st Army.
AG South’s 29th and 55th corps push against the tough 5th Army and force it to retreat again. The 14th and 48th Panzer corps attack and push back the 18th Army, while the 52nd Panzergrernadiers makes contact with the Russian 4th Cavalry Corps in Dnepropetrovsk. The 11th and 20h corps force a retreat upon the 9th Army. All the other Axis units spread out and drive forward across empty spaces, but not to their full potential as the German player consolidates his gains in the face of an expected Soviet capitulation—a vain hope.
With our perfect 20-20 hindsight, wargamers have the luxury of learning from the successes and failures of others. The opening Axis offensive proceeded quite well, in spite of some outcomes that can be equated with rather unlucky die rolls, until the third (Sept 1941) turn The essential problem was Hitle’s preoccupation with the flank of Army Group Center, which brought him to divert the main thrust of his effort toward the south. This player’s impatience drove him to seize Kiev and Kursk, to push for Kharkov and Dnepropetrovsk, in order to secure the Ukrine and enter the Don basin, so as to move down towards Persia, before the main objective—Moscow—was occupied. Thus, his powerful panzer formations were diverted at the very time when they could have entered the Soviet capital.
There is a famous entrepreneur who advises those looking to “get ahead” to study what poor people do… and then avoid that course of action. The same rule can be applied to wargaming. Winners look at what losers have done, and then avoid that course of action. Take a good look at how Hitler managed to blunder his way out of success—and don’t do that!
The real irony is that the German High Command, including Hitler, had earlier decided that the “high road” to Moscow was the best chance for success in their RUSSIAN CAMPAIGN; and we certainly agree. (The “high road” to Moscow passes north of Minsk, between Smolensk and Vitebsk, and just south of the Moldai hills centered on hex K10.) All available forces and reinforcements must be thrown into this corridor in a drive straight for the heart of the Soviet Union. The Moldai hills and the forests nearby must be cleared of enemy units, and river crossings made north and northeast of the capital (through Kalinin and
toward Gorki). Once the capital is partially surrounded, there is a reasonable chance for a suc cessfuI assault. With Moscow in Axis hands, Leningrad can be made to wither on the vine, and the majority of the Axis strength can be thrown into the next battles in the east and the south.
With all this in mind, it is imperative that AG Center’s forces not be frittered away helping AG North or AG South. In fact, groups North and South need only advance far enough to help cover AG Center’s flanks. Some of AG South’s forces an try to knock out the Soviet industrial capacity (represented by the Worker units), while all available reserves are sent to AG Center.
The key objective is Moscow. The occupation of Moscow by the Red Army allows it to win the civil war against the Whites, and the Axis occupation of the city will have the same result provided the Axis player pursues victory judiciously after seizing the heart of the Soviet Union. This can be done by a strategy of “defeat in detail” of the remaining Russian units by holding the enemy units in one area with adequate forces while concentrating superior forces against a part of the remaining Red Army. So, it can never be emphasized too strongly: seize Moscow, and an Axis victory is a real possibility In THE RUSSIAN CAMPAIGN.