Embed Size (px)
Citation preview
TomaGrade
User Guide
Beta Version Draft
About the system:
TomaGrade is an online digital system for grading and manage exams.
With TomaGrade you can check scanned assignments and exams with computer
from anywhere at any time.
The user can grade, leave comments, and manage the exams workflow in an
intuitive, secure and friendly way.
The system built out of many years of experience working with the best academic
institutions and understanding their needs.
The system is updated constantly, for any questions or suggestions please contact us at: [email protected]
How to use the guide:
The guide is built from number of chapters, the main subject is checking the exams.
every chapter contains subtopics that include explanations for different in tools and
functions the system.
You can go straight to the subject that you need by clicking on the name of the
subject in the contents list or from the bookmarks in the program that you are using
For you convenience the name of the subject appears at beginning of every page.
How to enter the system:
Please enter Google chrome browser and insert the web address that was given
to you. Enter the user name and password provided by your system administrator.
Technological requirements:
TomaGrade is an online system, there is no requirement to install it in your
computer. The use of the system is through internet browser.
For now we recommend to enter the system with Google chrome browser
2
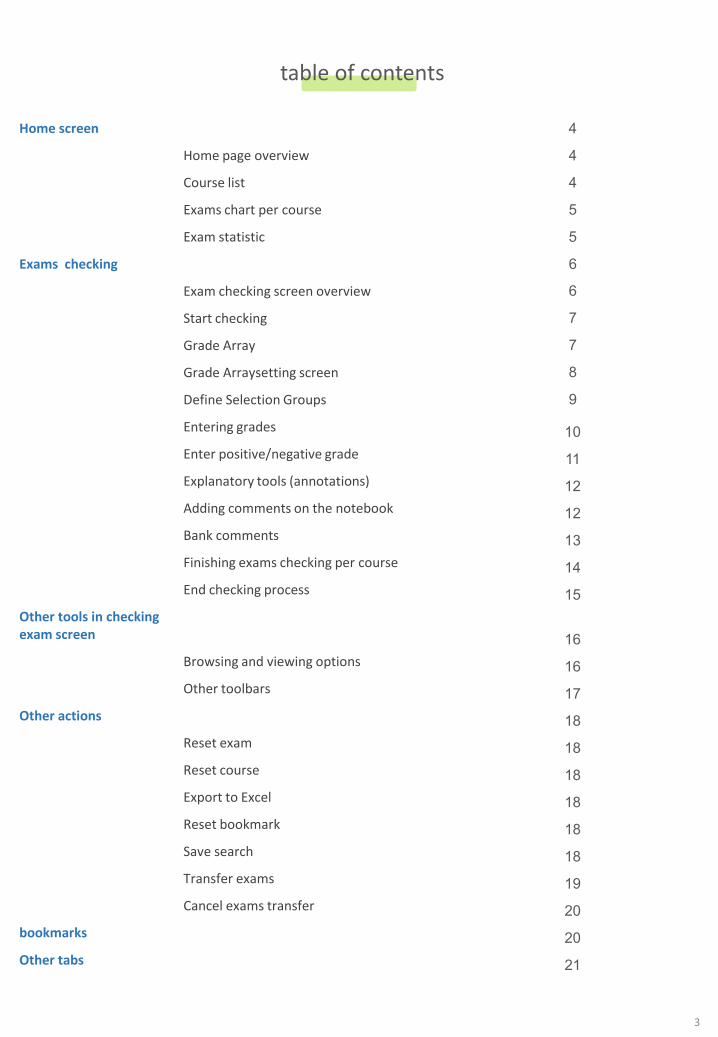
4 Home screen
4 Home page overview
4 Course list
5 Exams chart per course
5 Exam statistic
6 Exams checking
6 Exam checking screen overview
7 Start checking
7 Grade Array
8 Grade Arraysetting screen
9 Define Selection Groups
10 Entering grades
11 Enter positive/negative grade
12 Explanatory tools (annotations)
12 Adding comments on the notebook
13 Bank comments
14 Finishing exams checking per course
15 End checking process
16
Other tools in checking exam screen
16 Browsing and viewing options
17 Other toolbars
18 Other actions
18 Reset exam
18 Reset course
18 Export to Excel
18 Reset bookmark
18 Save search
19 Transfer exams
20 Cancel exams transfer
20 bookmarks
21 Other tabs
table of contents
3
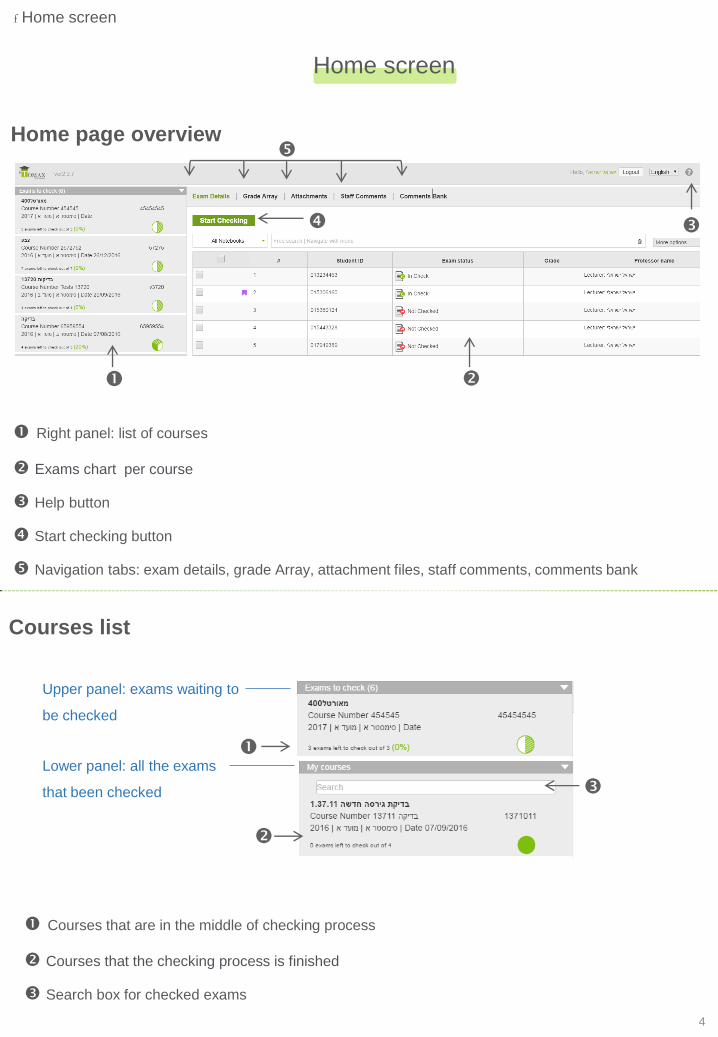
Right panel: list of courses
Exams chart per course
Help button
Start checking button
Navigation tabs: exam details, grade Array, attachment files, staff comments, comments bank
Home screen
Courses list
Upper panel: exams waiting to
be checked
Lower panel: all the exams
that been checked
Courses that are in the middle of checking process
Courses that the checking process is finished
Search box for checked exams
Home page overview
4
f Home screen
f Home screen
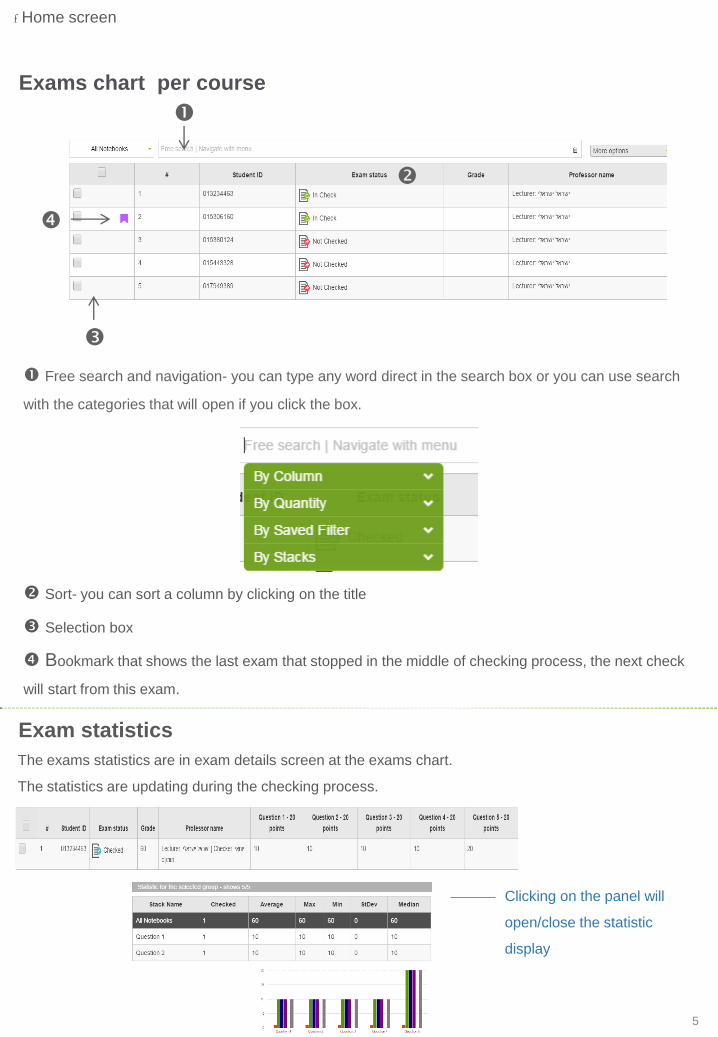
Exams chart per course
Free search and navigation- you can type any word direct in the search box or you can use search
with the categories that will open if you click the box.
Sort- you can sort a column by clicking on the title
Selection box
Bookmark that shows the last exam that stopped in the middle of checking process, the next check
will start from this exam.
Exam statistics
The exams statistics are in exam details screen at the exams chart.
The statistics are updating during the checking process.
Clicking on the panel will
open/close the statistic
display
5
Exam checking
f Exam checking
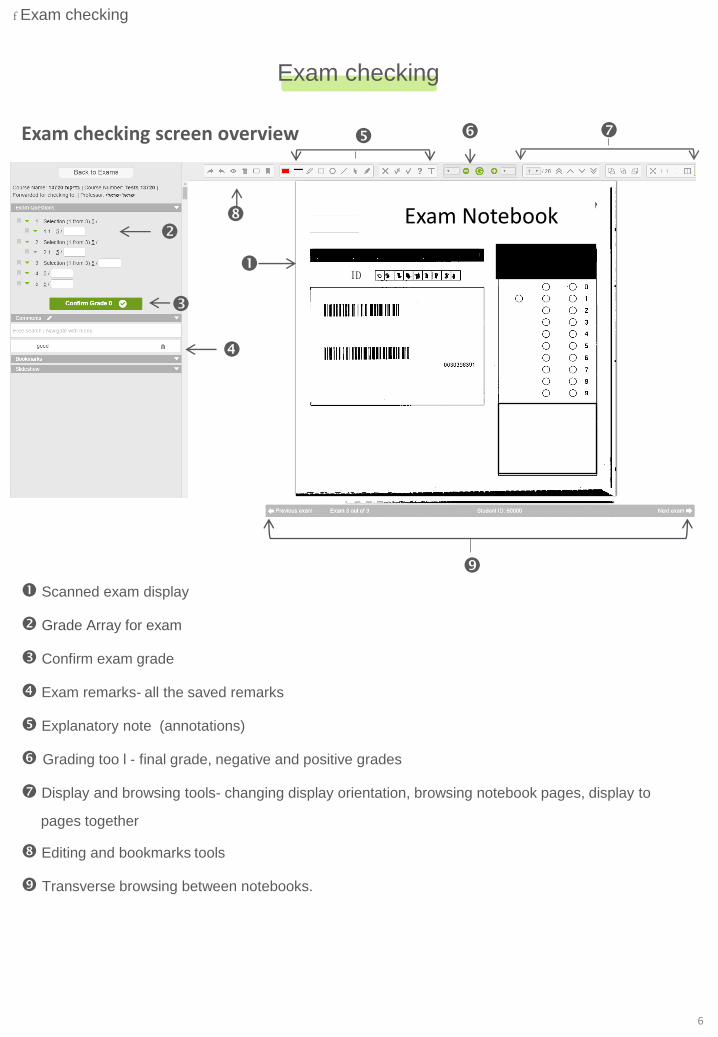
Exam checking screen overview
Scanned exam display
Grade Array for exam
Confirm exam grade
Exam remarks- all the saved remarks
Explanatory note (annotations)
Grading too l - final grade, negative and positive grades
Display and browsing tools- changing display orientation, browsing notebook pages, display to
pages together
Editing and bookmarks tools
Transverse browsing between notebooks.
6
Exam Notebook
ID
1. Choose the course you want in the right panel at the home screen
2. After choosing the course under “exam details” you will see all the notebooks that are
assigned to this course
3. Press on “start checking” button, checking exam screen will open
4. If a few notebooks were chosen the checking will start from the first notebook till the last
one.
If non of the notebooks were chosen, the first notebook in the list of the exams that you
didn’t check yet.
f Exams checking
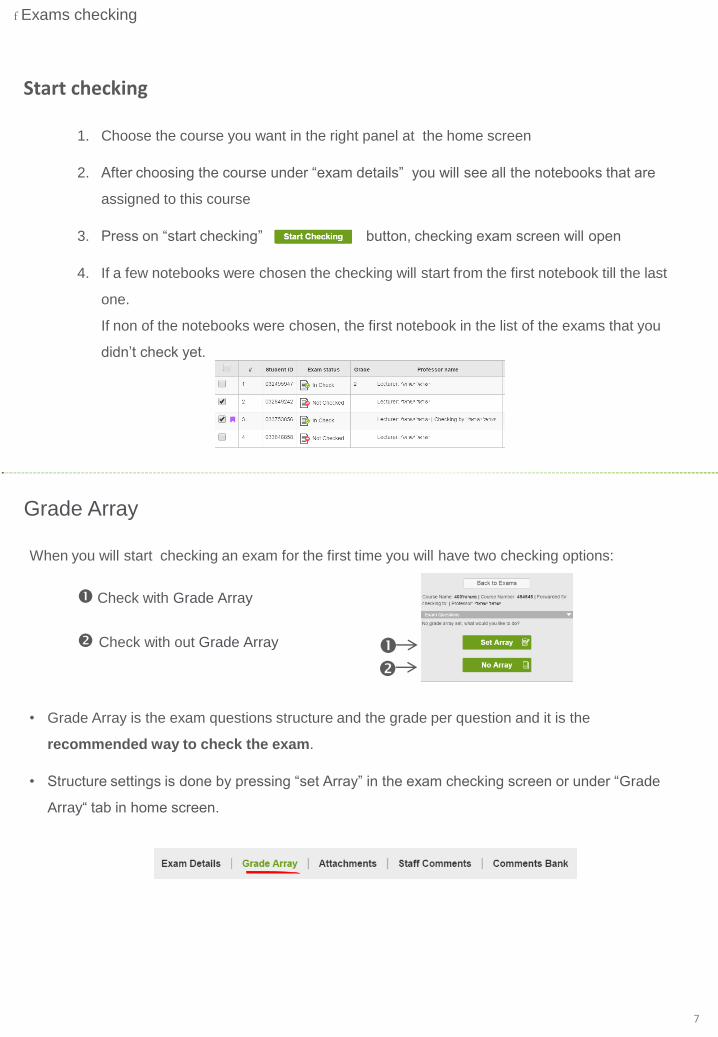
Start checking
Grade Array
When you will start checking an exam for the first time you will have two checking options:
Check with Grade Array
Check with out Grade Array
• Grade Array is the exam questions structure and the grade per question and it is the
recommended way to check the exam.
• Structure settings is done by pressing “set Array” in the exam checking screen or under “Grade
Array“ tab in home screen.
7
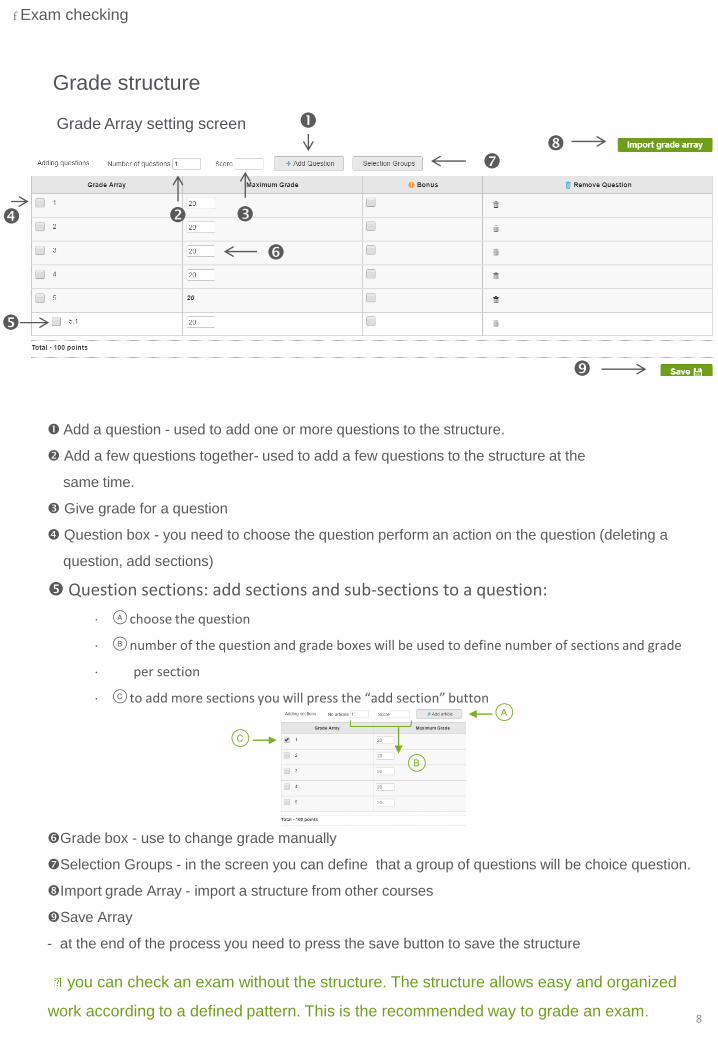
Grade Array setting screen
Add a question - used to add one or more questions to the structure.
Add a few questions together- used to add a few questions to the structure at the
same time.
Give grade for a question
Question box - you need to choose the question perform an action on the question (deleting a
question, add sections)
Question sections: add sections and sub-sections to a question:
choose the question
number of the question and grade boxes will be used to define number of sections and grade
per section
to add more sections you will press the “add section” button
Grade box - use to change grade manually
Selection Groups - in the screen you can define that a group of questions will be choice question.
Import grade Array - import a structure from other courses
Save Array
- at the end of the process you need to press the save button to save the structure
you can check an exam without the structure. The structure allows easy and organized
work according to a defined pattern. This is the recommended way to grade an exam.
Grade structure
8
f Exam checking

1. Press “Selection Groups” in the Grade Array screen and choose “create Selection Group"
2. Choose the type of the choice – questions, sections or sub-sections.
3. Choose the questions you want to add by pressing
4. After choosing the questions you need to define the number of questions you need to answer
from the group of questions, and press confirmation button .
5. After you define the groups of Selection Groups you can see them in the Grade Array and at the
grade general summary.
6. You need to press “save” so the Selection Groups group will be saved in the grade Array.
Define Selection Groups :
When you create a few
groups of Selection Groups
you need to define the
lower levels first
You can add a few
groups of Selection
Groups
9
f Exam checking
Grade Array
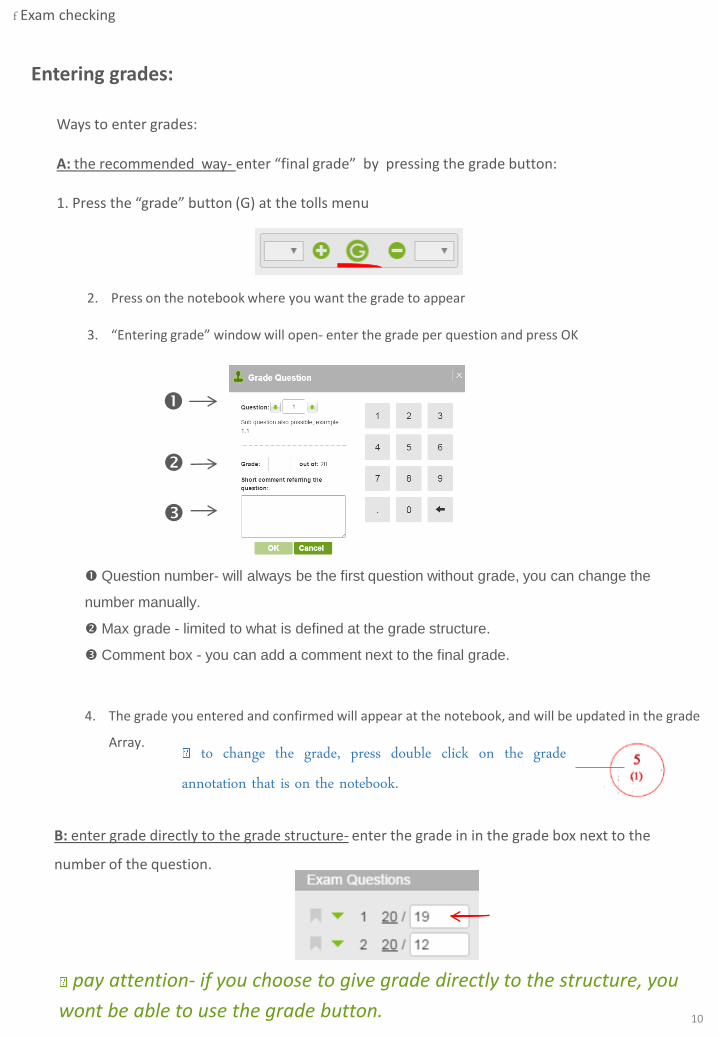
Entering grades:
Ways to enter grades:
A: the recommended way- enter “final grade” by pressing the grade button:
1. Press the “grade” button (G) at the tolls menu
pay attention- if you choose to give grade directly to the structure, you
wont be able to use the grade button.
2. Press on the notebook where you want the grade to appear
3. “Entering grade” window will open- enter the grade per question and press OK
Question number- will always be the first question without grade, you can change the
number manually.
Max grade - limited to what is defined at the grade structure.
Comment box - you can add a comment next to the final grade.
4. The grade you entered and confirmed will appear at the notebook, and will be updated in the grade
Array. to change the grade, press double click on the grade annotation that is on the notebook.
10
B: enter grade directly to the grade structure- enter the grade in in the grade box next to the
number of the question.
f Exam checking
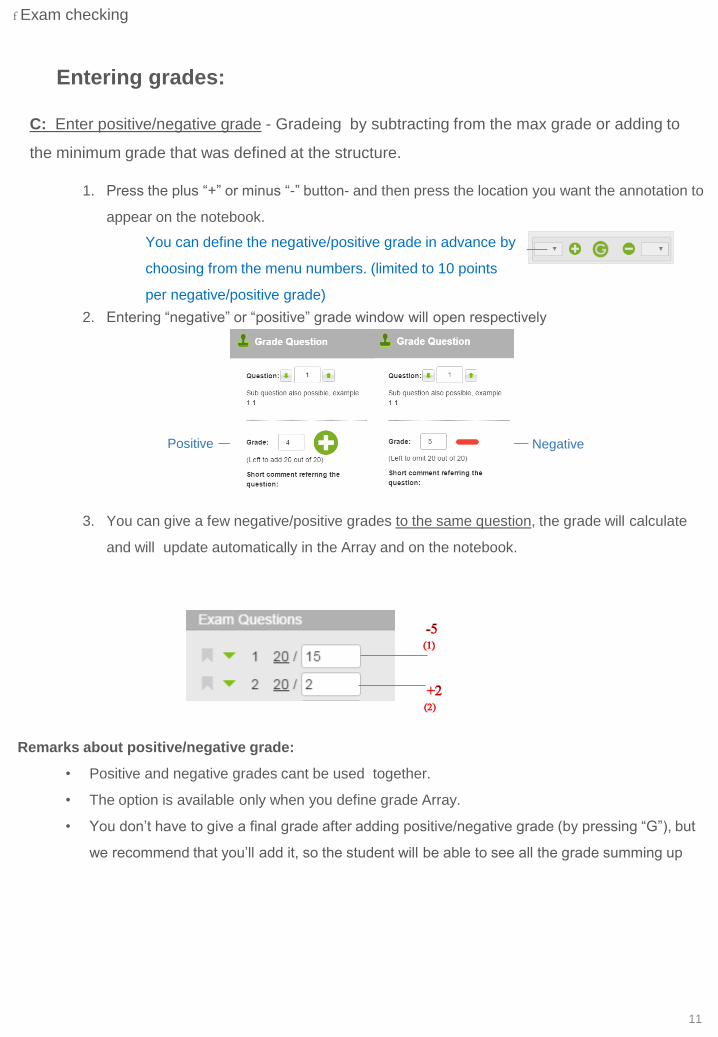
C: Enter positive/negative grade - Gradeing by subtracting from the max grade or adding to
the minimum grade that was defined at the structure.
1. Press the plus “+” or minus “-” button- and then press the location you want the annotation to
appear on the notebook.
You can define the negative/positive grade in advance by
choosing from the menu numbers. (limited to 10 points
per negative/positive grade)
2. Entering “negative” or “positive” grade window will open respectively
Positive Negative
Remarks about positive/negative grade:
• Positive and negative grades cant be used together.
• The option is available only when you define grade Array.
• You don’t have to give a final grade after adding positive/negative grade (by pressing “G”), but
we recommend that you’ll add it, so the student will be able to see all the grade summing up
3. You can give a few negative/positive grades to the same question, the grade will calculate
and will update automatically in the Array and on the notebook.
11
f Exam checking
Entering grades:
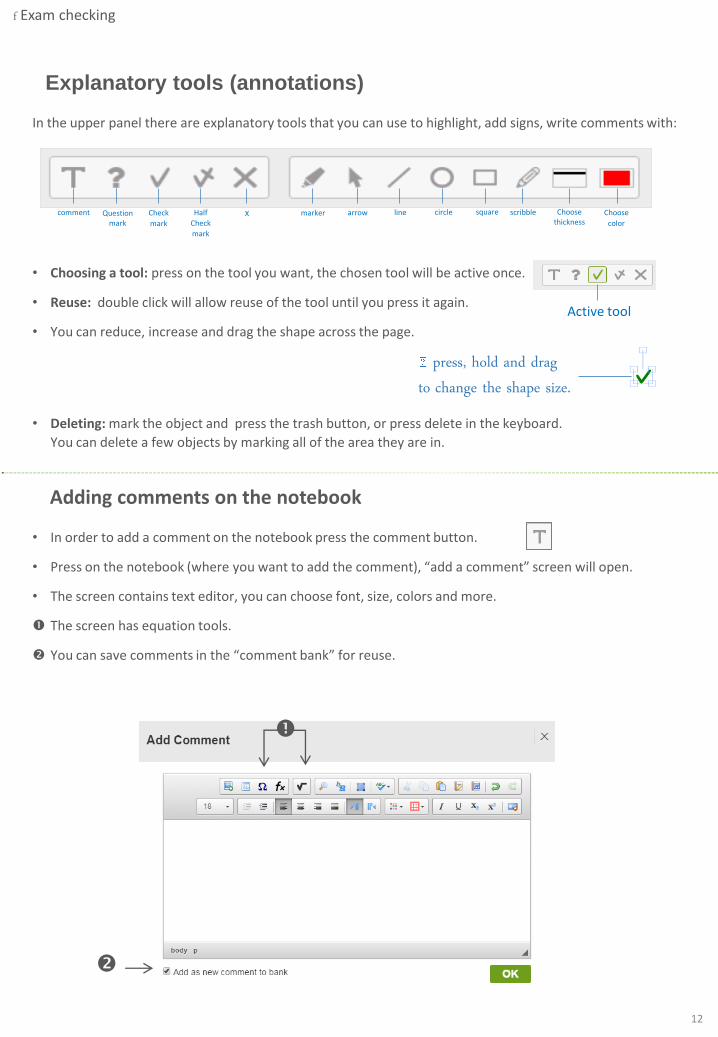
In the upper panel there are explanatory tools that you can use to highlight, add signs, write comments with:
Choose
color
Check
mark
scribble comment square circle line arrow marker X Half
Check
mark
Question mark
Choose thickness
• Choosing a tool: press on the tool you want, the chosen tool will be active once.
• Reuse: double click will allow reuse of the tool until you press it again.
• You can reduce, increase and drag the shape across the page.
Active tool
press, hold and drag to change the shape size. • Deleting: mark the object and press the trash button, or press delete in the keyboard.
You can delete a few objects by marking all of the area they are in.
Adding comments on the notebook
• In order to add a comment on the notebook press the comment button.
• Press on the notebook (where you want to add the comment), “add a comment” screen will open.
• The screen contains text editor, you can choose font, size, colors and more.
The screen has equation tools.
You can save comments in the “comment bank” for reuse.
Explanatory tools (annotations)
12
f Exam checking
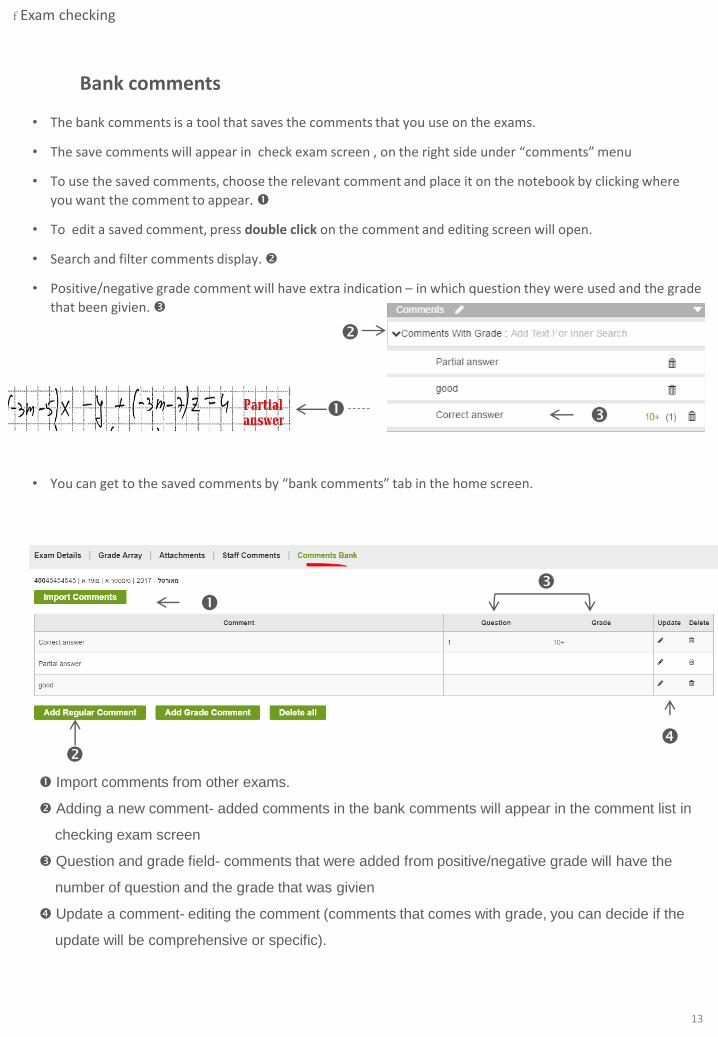
Bank comments
• The bank comments is a tool that saves the comments that you use on the exams.
• The save comments will appear in check exam screen , on the right side under “comments” menu
• To use the saved comments, choose the relevant comment and place it on the notebook by clicking where
you want the comment to appear.
• To edit a saved comment, press double click on the comment and editing screen will open.
• Search and filter comments display.
• Positive/negative grade comment will have extra indication – in which question they were used and the grade
that been givien.
• You can get to the saved comments by “bank comments” tab in the home screen.
Import comments from other exams.
Adding a new comment- added comments in the bank comments will appear in the comment list in
checking exam screen
Question and grade field- comments that were added from positive/negative grade will have the
number of question and the grade that was givien
Update a comment- editing the comment (comments that comes with grade, you can decide if the
update will be comprehensive or specific).
13
f Exam checking
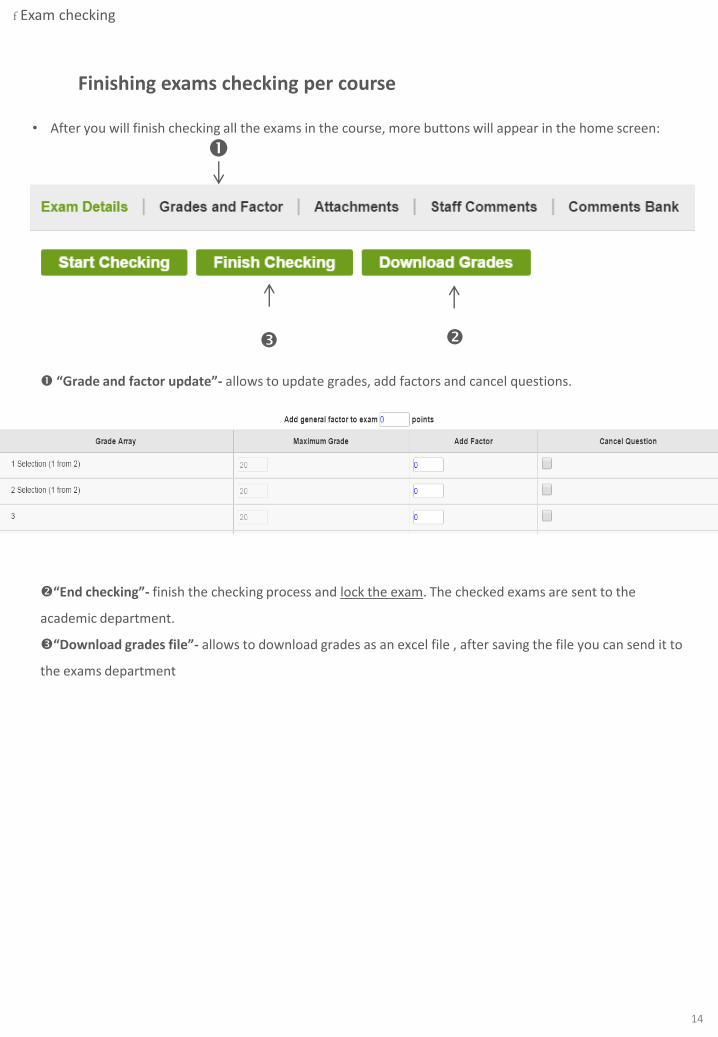
Finishing exams checking per course
• After you will finish checking all the exams in the course, more buttons will appear in the home screen:
“Grade and factor update”- allows to update grades, add factors and cancel questions.
“End checking”- finish the checking process and lock the exam. The checked exams are sent to the
academic department.
“Download grades file”- allows to download grades as an excel file , after saving the file you can send it to
the exams department
14
f Exam checking
End checking process
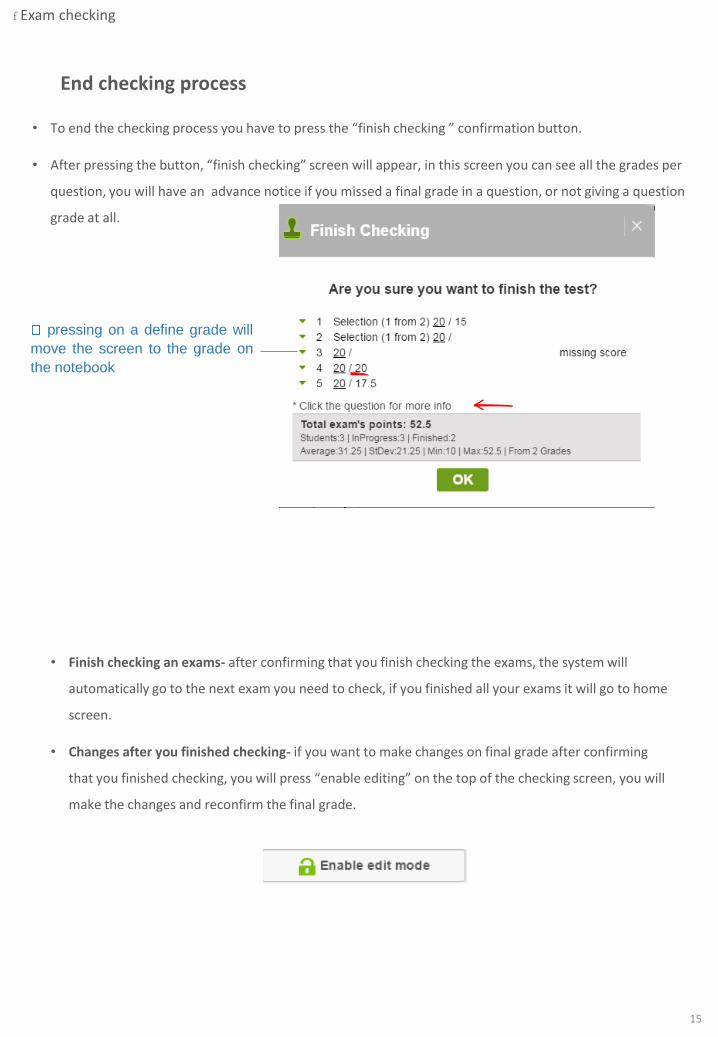
• To end the checking process you have to press the “finish checking ” confirmation button.
• After pressing the button, “finish checking” screen will appear, in this screen you can see all the grades per
question, you will have an advance notice if you missed a final grade in a question, or not giving a question
grade at all.
pressing on a define grade will
move the screen to the grade on
the notebook
• Finish checking an exams- after confirming that you finish checking the exams, the system will
automatically go to the next exam you need to check, if you finished all your exams it will go to home
screen.
• Changes after you finished checking- if you want to make changes on final grade after confirming
that you finished checking, you will press “enable editing” on the top of the checking screen, you will
make the changes and reconfirm the final grade.
15
f Exam checking
f Other tools in checking exam screen
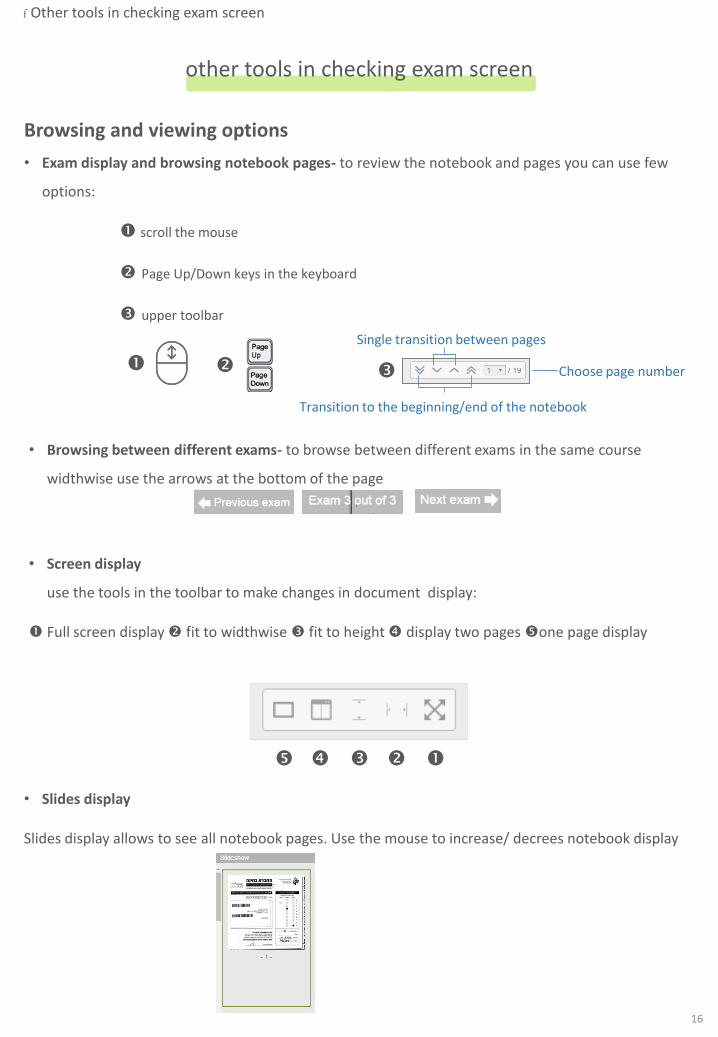
Browsing and viewing options
• Exam display and browsing notebook pages- to review the notebook and pages you can use few
options:
scroll the mouse
Page Up/Down keys in the keyboard
upper toolbar
• Browsing between different exams- to browse between different exams in the same course
widthwise use the arrows at the bottom of the page
• Screen display
use the tools in the toolbar to make changes in document display:
Full screen display fit to widthwise fit to height display two pages one page display
Transition to the beginning/end of the notebook
Single transition between pages
Choose page number
• Slides display
Slides display allows to see all notebook pages. Use the mouse to increase/ decrees notebook display
other tools in checking exam screen
16

Other toolbars
Cancel action (Ctrl+Z in the keyboard)/ redo action (Cntl+Y)
Display other pages- allows to see another exam or attachment in a new tab at the browser. Pressing the
button will open a new tab with a menu – from the menu choose the exam you want
Trash- deleting annotations from document (mark them first)
Cursor- return the marking tools to default
Bookmark- adding a bookmark will allow to return to where you placed the bookmark easily.
1. press the button and then the place you want the bookmark to be in.
2. A window will open, you will write the bookmarks menu an press o.k.
3. The bookmark will appear as an icon and will add to the bookmark list under bookmarks menu.
4. You will be able to go back to the bookmark place by pressing it in bookmarks menu.
17
f Other tools in checking exam screen

Other actions menu
f Other actions
Other actions menu is in the exam details tab, some of the actions are in the checking exam screen like “enable
editing”, “confirm end of checking process, and some are only in the exam details menu.
Reset exam
• Mark the exam on exam list, choose “reset exam” out of the menu, after
confirming, all the grades/comments and annotations in the exam will be deleted
Reset course
• Reset course action will delete all the checking details of the exams at the course,
including grades, comments, annotations and Grade Arrayfor the exam
Export to excel
• Allows to export grades details to Excel
Reset bookmark
• The action resets the bookmark on the last exam checked
Save filter
• The action allows to save search and filters in the exams table. Give a name to the search and press save
search.
• After saving the filter , you can choose it from the filter menu in the toolbar.
18
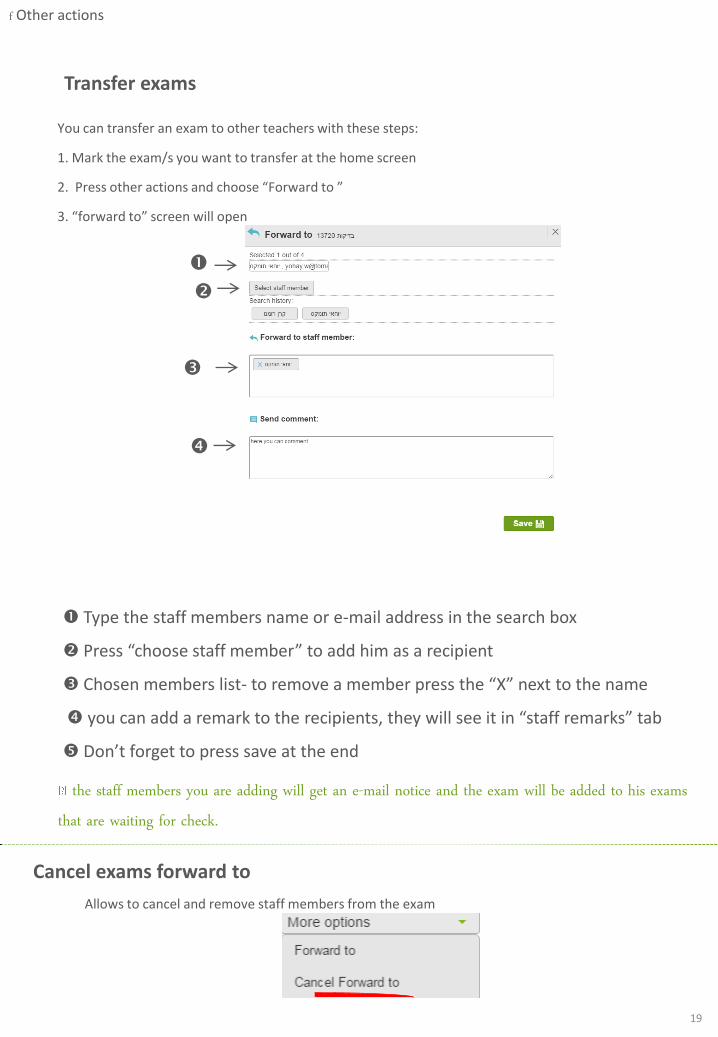
You can transfer an exam to other teachers with these steps:
1. Mark the exam/s you want to transfer at the home screen
2. Press other actions and choose “Forward to ”
3. “forward to” screen will open
Type the staff members name or e-mail address in the search box
Press “choose staff member” to add him as a recipient
Chosen members list- to remove a member press the “X” next to the name
you can add a remark to the recipients, they will see it in “staff remarks” tab
Don’t forget to press save at the end
the staff members you are adding will get an e-mail notice and the exam will be added to his exams that are waiting for check.
Transfer exams
Cancel exams forward to
Allows to cancel and remove staff members from the exam
19
f Other actions
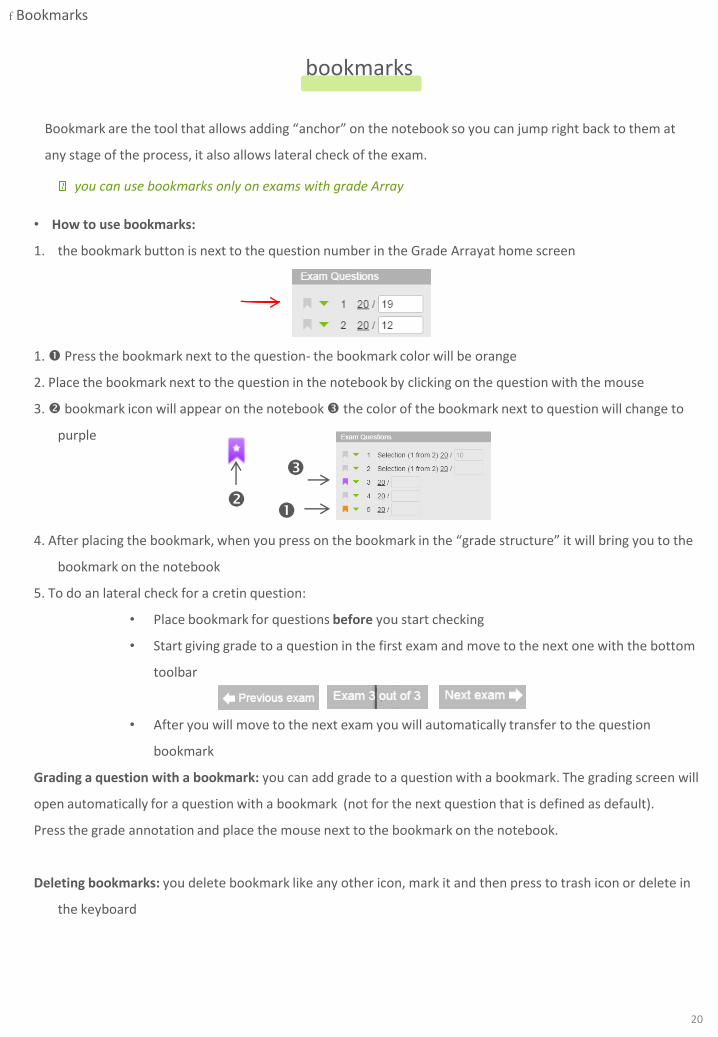
Bookmark are the tool that allows adding “anchor” on the notebook so you can jump right back to them at
any stage of the process, it also allows lateral check of the exam.
• How to use bookmarks:
1. the bookmark button is next to the question number in the Grade Arrayat home screen
1. Press the bookmark next to the question- the bookmark color will be orange
2. Place the bookmark next to the question in the notebook by clicking on the question with the mouse
3. bookmark icon will appear on the notebook the color of the bookmark next to question will change to
purple
4. After placing the bookmark, when you press on the bookmark in the “grade structure” it will bring you to the
bookmark on the notebook
5. To do an lateral check for a cretin question:
• Place bookmark for questions before you start checking
• Start giving grade to a question in the first exam and move to the next one with the bottom
toolbar
• After you will move to the next exam you will automatically transfer to the question
bookmark
Grading a question with a bookmark: you can add grade to a question with a bookmark. The grading screen will
open automatically for a question with a bookmark (not for the next question that is defined as default).
Press the grade annotation and place the mouse next to the bookmark on the notebook.
Deleting bookmarks: you delete bookmark like any other icon, mark it and then press to trash icon or delete in
the keyboard
bookmarks
you can use bookmarks only on exams with grade Array
20
f Bookmarks
Other tabs
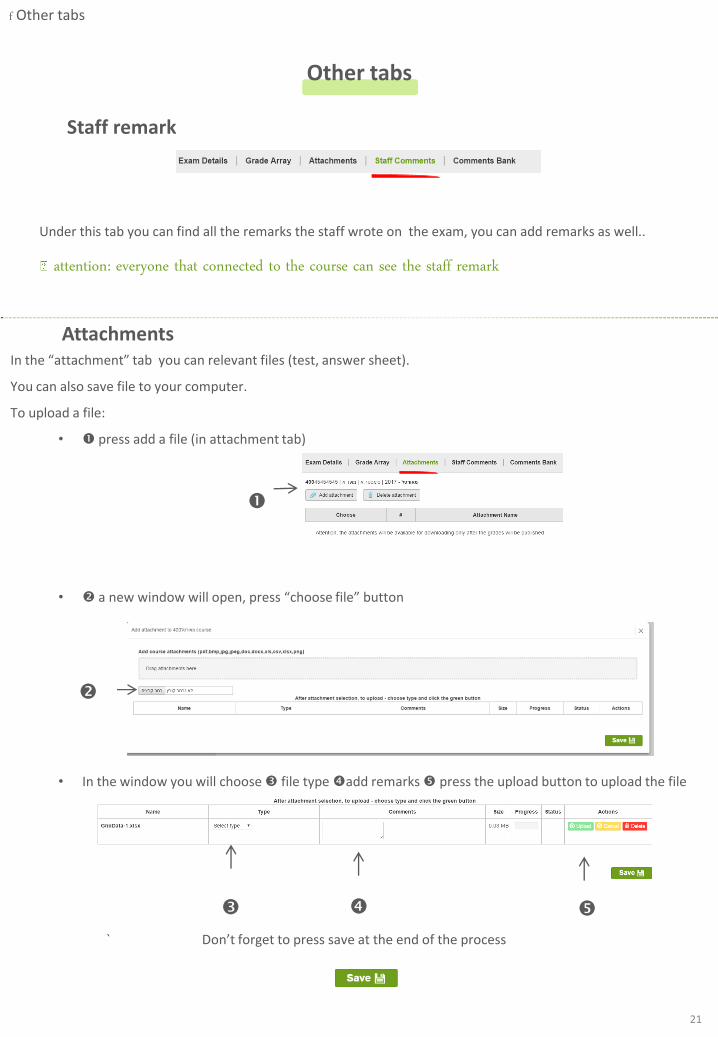
Staff remark
Under this tab you can find all the remarks the staff wrote on the exam, you can add remarks as well..
attention: everyone that connected to the course can see the staff remark
Attachments In the “attachment” tab you can relevant files (test, answer sheet).
You can also save file to your computer.
To upload a file:
• press add a file (in attachment tab)
• a new window will open, press “choose file” button
• In the window you will choose file type add remarks press the upload button to upload the file
` Don’t forget to press save at the end of the process
21
f Other tabs

www.Tomax.co.il Tomax Scanning Solutions Ltd 2016 All rights reserved