Embed Size (px)
Citation preview
Installation and GettingStarted Guide
Published by Toon Boom Animation Inc.Corporate Headquarters7 Laurier Avenue EastMontreal, QuebecCanada H2T 1E4Tel: (514) 278-8666Fax: (514) 278-2666www.toonboom.com
DisclaimerThe content of this manual is covered by a specific limited warranty and exclusions and limit of liability under the applicable License Agreement as
supplemented by the special terms and conditions for Adobe®Flash® File Format (SWF). Please refer to the License Agreement and to those special terms and conditions for details.The content of this manual is the property of Toon Boom Animation Inc. and is copyrighted. Any reproduction in whole or in part is strictly prohibited. For additional copies of this manual, please contact Toon Boom Animation Inc. at the Corporate Headquarters address.Copyright © 2007 by Toon Boom Animation Inc. All rights reserved.
TrademarksToon Boom Storyboard is a trademark owned by Toon Boom Animation Inc. All other trademarks are the property of their respective owners.
CreditsDocumentation Development: Peter CawthorneContent Development and Art: Lindsay Brown, Tania Gray
Publication DateMay 2007
1
Contents
Welcome to Toon Boom Storyboard .........................2Introduction............................................................................. 2Check Your System Requirements .......................................... 3
Minimum Mac OS X system requirements......................... 3Minimum Windows system requirements.......................... 3
Installation ............................................................................... 3Licence Key ........................................................................ 3Installing on Mac ................................................................ 4Installing on Windows ........................................................ 4
Preparing To Create Your Storyboard .................................... 4Getting Started ....................................................................... 5
Launching Toon Boom Storyboard.................................... 6Creating Your Storyboard.................................................. 7Storyboard Layouts ............................................................ 8Text .................................................................................... 9Drawings and Images......................................................... 10
Drawing directly in Storyboard ...................................... 10Importing images ........................................................... 11Reusing Images .............................................................. 12Reordering Layers .......................................................... 12
Transitions .......................................................................... 13Adding Transitions ......................................................... 13
Camera............................................................................... 14Adding a Camera Guide ................................................ 14Creating Camera Moves ................................................ 15
Exporting your Storyboard ................................................ 15Documentation........................................................................ 16
Toon Boom Storyboard User Guide .............................. 16Integrated Help.............................................................. 16
Welcome to Toon Boom StoryboardToon Boom Storyboard is the leading storyboarding system for visual storytelling, perfectly suited to traditional and paperless methods. Truly completing the production pipeline, Storyboard helps you take an idea and translate it into a visual story that will become a complete production, whether animated or live-action.
Introduction Storyboard's easy-to-use and intuitive interface means that you will be performing basic operations almost immediately (create or import a drawing, add or delete panels) and more complex procedures within the shortest time.
Here are a few highlights of the Toon Boom Storyboard solution:• A flexible layer-based panel display • A complete set of drawing tools, including the pressure-
sensitive Brush tool when using a digital graphic tablet and pen
• Built-in library with more than 100 elements, such as major director’s actions and effects
• Customizable caption fields to insert fully searchable textual content, such as scene descriptions and comments
• Import and export capabilities, PDF, PSD, SWF, AI, JPG, TGA, PNG file formatting.
2
Check Your System RequirementsToon Boom Storyboard supports Windows and Mac OS X. Your hardware must meet these minimum requirements to run it.
Minimum Mac OS X system requirements• OS: Mac OS X v10.4 • PowerPC G5 and Intel• 512 MB of Ram (Minimum), 1 GB (Recommended)• 226 MB of available hard disk space for the software• Video card fully supporting OpenGL with 128 MB of RAM• Monitor supporting 1280 x1024 resolution• Wacom tablet for drawing (Optional)
Minimum Windows system requirements • OS: Microsoft Windows Vista, XP and TabletPC • 2 GHz Intel Pentium 4 processor (Recommended)• 512 MB of Ram (Minimum), 1 GB (Recommended)• 133 MB of available hard disk space for the software• Video card fully supporting OpenGL with 128 MB of RAM• Monitor supporting 1280 x1024 resolution • Wacom tablet for drawing (Optional)
InstallationInstallling Toon Boom Storyboard is simple to do.
Licence Key The first time you run Toon Boom Storyboard you will be asked to enter the licence key provide when you purchased the software. This will validate the software as a legally authorized version and activate it for use.
3
Installing on MacTo install Toon Boom Storyboard on a computer running the Mac OS X operating system, follow these simple instructions:1. Insert the CD-ROM into your computer.2. Double-click the Mac OSX folder to open the installation
package.3. Double-click the installation package (an MPKG file) to
launch the installation program.4. Follow the onscreen instructions.
Installing on WindowsTo install Toon Boom Storyboard on a computer running the Windows operating system, follow these simple instructions:1. Insert the CD-ROM into your computer.
If the installation package does not open automatically, use Windows Explorer to locate and open the folder in your CD-ROM drive. Double-click the executable file (EXE file) to launch the installation program.
2. Follow the onscreen instructions.
Now that you have installed Storyboard, you want to start using it. But how do you use Toon Boom Storyboard to get the most productivity in the shortest amount of time? User Guide: How To Use Storyboard
Preparing To Create Your StoryboardWe know that you want to get started as quickly as possible, so read this section and refer to the cross references mentioned here for further information. Soon you will be storyboarding as if it is second nature to you.
Before you even think about creating a storyboard project, consider the factors that will affect your storyboard project and your final production.
4
• The ScriptComplete a script or screenplay to the best of your ability before creating a storyboard.
• The StructureBreak down your script into smaller components to produce a more manageable structure to work with.
• The DeliveryAssume the viewer’s role for a moment, and try to determine how your project will be best viewed in its final medium.
All of these aspects are critical to the efficient production of a quality storyboard. Doing the preparation work at this stage will save you time and money. User Guide: First Steps
There are three recommended steps when preparing your storyboard project.
• Script Analysis and Breakdown• Shot Evaluation• Shot List Creation
Following these steps will help you to develop a clear vision of how you want your production to look, feel and flow. Anyone viewing your storyboard should be able to follow its story in a clear, logical manner by looking at the textual and visual information.User Guide: Storyboard Basics
Getting Started When Toon Boom Storyboard is launched, you must begin by creating a storyboard.
Data for each storyboard is stored in a file folder that you must name when you first create it. Once you open a new or existing project, you will be able to work on it in the Toon Boom Storyboard interface.
5
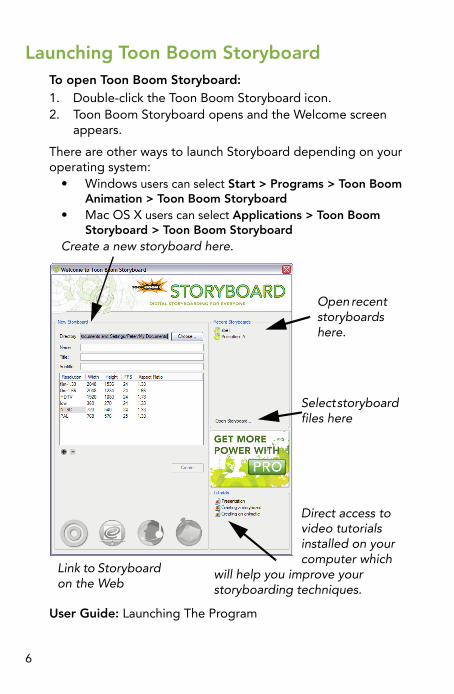
Launching Toon Boom StoryboardTo open Toon Boom Storyboard:1. Double-click the Toon Boom Storyboard icon.2. Toon Boom Storyboard opens and the Welcome screen
appears.
There are other ways to launch Storyboard depending on your operating system:
• Windows users can select Start > Programs > Toon Boom Animation > Toon Boom Storyboard
• Mac OS X users can select Applications > Toon Boom Storyboard > Toon Boom Storyboard
User Guide: Launching The Program
Select storyboard files here
Create a new storyboard here.
Open recent storyboards here.
Direct access to video tutorials installed on your computer which
will help you improve your storyboarding techniques.
Link to Storyboard on the Web
6
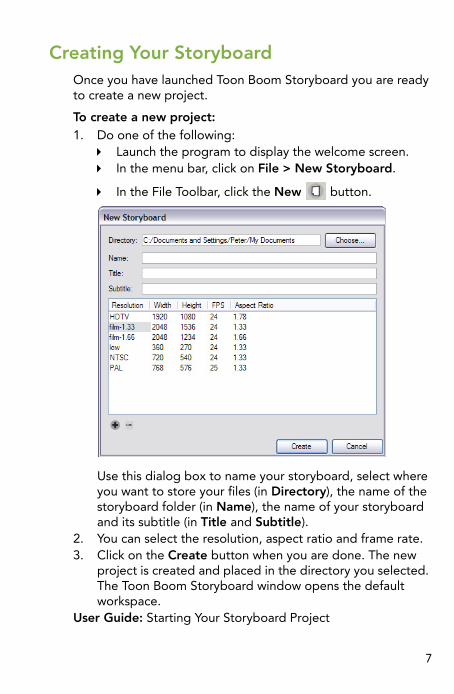
Creating Your StoryboardOnce you have launched Toon Boom Storyboard you are ready to create a new project.
To create a new project:1. Do one of the following:
Launch the program to display the welcome screen.In the menu bar, click on File > New Storyboard.
In the File Toolbar, click the New button.
Use this dialog box to name your storyboard, select where you want to store your files (in Directory), the name of the storyboard folder (in Name), the name of your storyboard and its subtitle (in Title and Subtitle).
2. You can select the resolution, aspect ratio and frame rate.3. Click on the Create button when you are done. The new
project is created and placed in the directory you selected. The Toon Boom Storyboard window opens the default workspace.
User Guide: Starting Your Storyboard Project
7
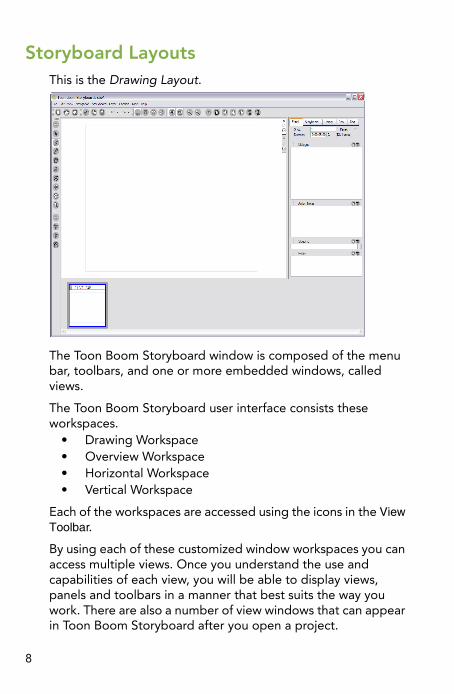
Storyboard LayoutsThis is the Drawing Layout.
The Toon Boom Storyboard window is composed of the menu bar, toolbars, and one or more embedded windows, called views.
The Toon Boom Storyboard user interface consists these workspaces.
• Drawing Workspace• Overview Workspace• Horizontal Workspace• Vertical Workspace
Each of the workspaces are accessed using the icons in the View Toolbar.
By using each of these customized window workspaces you can access multiple views. Once you understand the use and capabilities of each view, you will be able to display views, panels and toolbars in a manner that best suits the way you work. There are also a number of view windows that can appear in Toon Boom Storyboard after you open a project.
8
They are:• Drawing View• Panel View
User Guide: The Storyboard WindowUser Guide: Managing Your Window Workspace
TextIn many cases you will start your storyboard creation by consulting a script. In Toon Boom Storyboard you do this by adding text from a file into a caption field.
To add your script from a file into a caption field:1. Click the Storyboard tab.2. Do one of the following:
Click the Script caption field to enter notes in the caption.
Click the menu button of the Script caption and select Import Caption.
Use the dialog box that opens to select and open the TXT file with the text you want to insert in the caption. The text is automatically placed into the caption you selected.
You can use the same method to add text to any of the following text fields in the Panel tab:
• Dialogue• Action Notes• Slugging• Notes
All of these fields can be renamed using the Rename Caption command. User Guide: Working With Text
9

Drawings and ImagesNow that you know how to load your script into Toon Boom Storyboard you can start creating some images.
There are three ways to put images into Storyboard:• Drawing directly in Storyboard• Importing images• Re-using images stored in the Library
Toon Boom Storyboard organizes images in the following way:• Panels represent a shot or a part of the shot• A shot is the period of time between when the camera is
turned on then off • Panels or shots can be added using the Add Panel or the
Add Shot button.• When you add a new shot, Storyboard gives a number to
it. If you want to rename the shot, edit the Shot field using the Panel Tab.
When you import an image, you are adding artwork to one of the panels layers. By default, each panel has two layers, a background (BG) and a foreground layer (A).
As you add layers, they are automatically assigned letters in alphabetical order, but they can be renamed manually. Images imported as layers are added at the bottom (behind) but layers added using the add layer command are added at the top (in front).They are also placed behind the other layers in the panel.
Working on multiple layers increases the reusability of your drawing as you move from shot to shot or scene to scene. Each layer or part of a layer can be dragged from the selected shot into any other shot reducing drawing time.User Guide: Working With Storyboard PanelsUser Guide: Working With Layers
Drawing directly in Storyboard
You can use your mouse or a graphic tablet and pen to draw your story. The drawing tools in Toon Boom Storyboard resemble standard drawing tools used in many graphic and animation
10
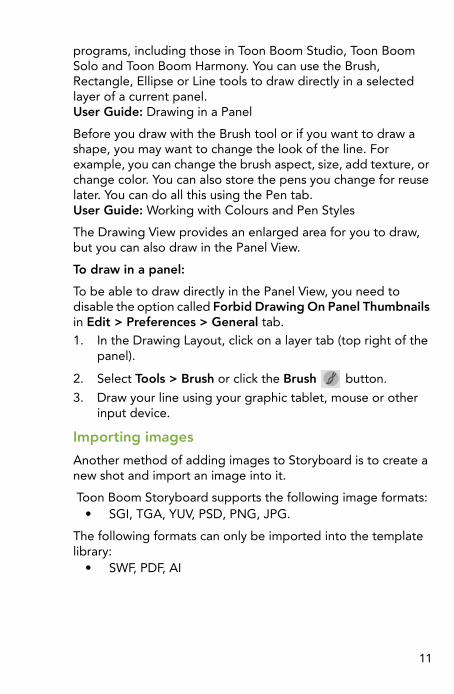
programs, including those in Toon Boom Studio, Toon Boom Solo and Toon Boom Harmony. You can use the Brush, Rectangle, Ellipse or Line tools to draw directly in a selected layer of a current panel.User Guide: Drawing in a Panel
Before you draw with the Brush tool or if you want to draw a shape, you may want to change the look of the line. For example, you can change the brush aspect, size, add texture, or change color. You can also store the pens you change for reuse later. You can do all this using the Pen tab. User Guide: Working with Colours and Pen Styles
The Drawing View provides an enlarged area for you to draw, but you can also draw in the Panel View.
To draw in a panel:
To be able to draw directly in the Panel View, you need to disable the option called Forbid Drawing On Panel Thumbnails in Edit > Preferences > General tab.1. In the Drawing Layout, click on a layer tab (top right of the
panel).
2. Select Tools > Brush or click the Brush button.
3. Draw your line using your graphic tablet, mouse or other input device.
Importing images
Another method of adding images to Storyboard is to create a new shot and import an image into it.
Toon Boom Storyboard supports the following image formats:• SGI, TGA, YUV, PSD, PNG, JPG.
The following formats can only be imported into the template library:
• SWF, PDF, AI
11

To import an image directly into your storyboard:1. Do one of the following:
Select Layer > Import Images as Layers.Select Storyboard > Import Images as Shots.
The Choose Images Files dialog box opens.2. Select the file and click the Open button. The image is
imported into a new layer or new shot in Storyboard.
Reusing Images
You can reuse drawings from other panels throughout your storyboard by cutting or copying, then pasting. You can also copy layers of drawing objects and transformations to other panels.
To copy a layer to another panel:1. Click the tab of the layer you want to copy.2. Drag the tab to another panel:
Drop it in the panel’s drawing area to make it the topmost layer.Drop it in the tabs at a specific tab position to place it in a specific layer order.
The template library allows you to access stored images (as well as SWF files) and reuse them in your storyboard.
To use templates in your storyboard:1. In the Tool Properties, click the Library Tab.2. Select a template to use in your storyboard:3. Drag the item to the location where you want to use it.
Select a drawing and drag it to the panel to add it as a layer.
If your template was a drawing that was originally composed of multiple layers, select Tools > Convert Template to Drawing if you want to edit the new layer.
Reordering Layers
If you want to reorder your layers you can drag and drop them to change the viewing order or copy a layer from one panel to
12
another. When you have a background which does not change between shots, just copy the background layer and paste it into the new panel.
Layers can be repositioned. They can be brought closer to the front or the back in the layering order. If you want to have a character move to the back of a shot, you can click on the character’s layer tab and drag it lower on the tab order.
To change the display order of a layer:1. Click the tab of the layer you want to move.2. Drag the tab up or down. A black bar will indicate the tab’s
(and the layer’s) new position.
TransitionsBy default, transitions between scenes are defined as cuts—the action in the panel at the end of a scene finishes and immediately displays the next scene—but transitions that are more gradual can be represented in the storyboard.
Adding Transitions
To add a transition:1. Select the panel before the scene transition you want to
add.2. Do one of the following:
Select Storyboard > Add Transition.
In the Storyboard Toolbar, press Add Transition button.
A transition is added between scenes. By default, the transition
is a wipe . A transition can be changed to a dissolve , by selecting the transition, and either double-clicking it or changing its type in the Panel tab.
You can delete a wipe or dissolve transition at any time and restore it to a cut.
13

CameraThe script or shot list may describe a camera move to be included in a panel. In Toon Boom Storyboard, you can easily add a visual guide representing a camera movement using the Camera Transform tool.
Once a camera guide has been added to a panel, you can change the start and end positions of the camera to define its movement.
User Guide: Working With the Camera
Adding a Camera Guide
By default each panel has a static camera frame view. To add camera motion (pan, zoom or tilt) you first need to add a camera guide.
To add a camera guide to a panel:1. Select the panel to which you want to add the camera
guide.2. Do one of the following:
Select Tools > Camera Transform.
Press the Camera Transform button in the Tools
Toolbar.
The camera guide is displayed at its default position.
14
User Guide: Adding a Camera Move
Creating Camera Moves
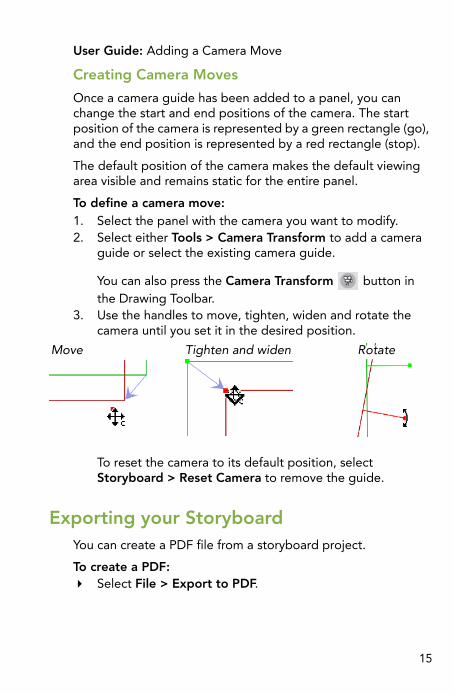
Once a camera guide has been added to a panel, you can change the start and end positions of the camera. The start position of the camera is represented by a green rectangle (go), and the end position is represented by a red rectangle (stop).
The default position of the camera makes the default viewing area visible and remains static for the entire panel.
To define a camera move:1. Select the panel with the camera you want to modify.2. Select either Tools > Camera Transform to add a camera
guide or select the existing camera guide.
You can also press the Camera Transform button in the Drawing Toolbar.
3. Use the handles to move, tighten, widen and rotate the camera until you set it in the desired position.
To reset the camera to its default position, select Storyboard > Reset Camera to remove the guide.
Exporting your StoryboardYou can create a PDF file from a storyboard project.
To create a PDF:Select File > Export to PDF.
RotateTighten and widenMove
15
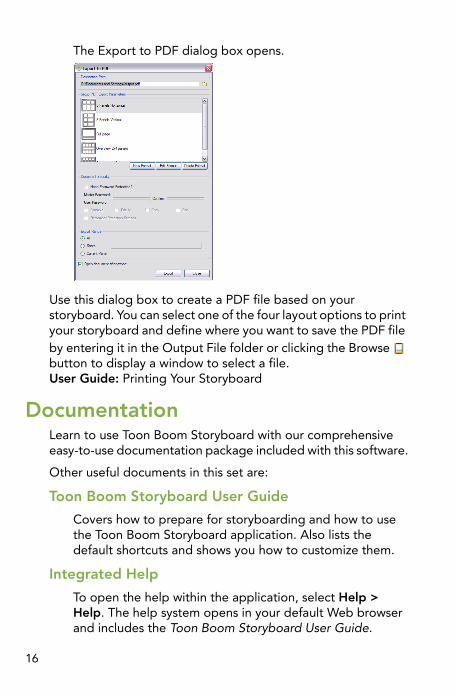
The Export to PDF dialog box opens.
Use this dialog box to create a PDF file based on your storyboard. You can select one of the four layout options to print your storyboard and define where you want to save the PDF file by entering it in the Output File folder or clicking the Browse button to display a window to select a file.User Guide: Printing Your Storyboard
DocumentationLearn to use Toon Boom Storyboard with our comprehensive easy-to-use documentation package included with this software.
Other useful documents in this set are:
Toon Boom Storyboard User Guide
Covers how to prepare for storyboarding and how to use the Toon Boom Storyboard application. Also lists the default shortcuts and shows you how to customize them.
Integrated Help
To open the help within the application, select Help > Help. The help system opens in your default Web browser and includes the Toon Boom Storyboard User Guide.
16


![Flowchart Based Storyboard System for Authoring … › uploadfile › 2014 › 0711 › 20140711050259591.pdfstoryboard systems have been developed such as Toon-boom [6], Storyboard-that](https://img.pdfslide.net/doc/110x75/5f0d52807e708231d439c638/flowchart-based-storyboard-system-for-authoring-a-uploadfile-a-2014-a-0711.jpg)