Embed Size (px)
Citation preview
© 2016 Craig Clarkstone. All rights reseved
Parkjet
Construction Guide
By Craig Clarkstone
TornadoPanavia
Tornado History Designers Notes
Page 1Tornado
As a child of the 80's The Tornado was Britains main fighter and it inspired me to really wanted to become a fast jet pilot. I sadly I grew too tall, and then needed glasses, so I knew I would never get there, so I gave up my dream of being a Tornado pilot.
Having built and sadly lost my scratchbuilt Steve Shumate F-14 Tomcat. I wanted to build another swing wing plane I then realised I could take the concept of Steve’s excellent swing wing mechanism and make a Tornado. 30 years later and I can finally say I finally made it as a Tornado Pilot!!
The design flies really docile with the wings outspread, when tucked in it gives an insane roll rate, so choose your expo and throws carefully. Also, ensure that your pushrods don’t flex as sadly mine did and caused a minor crash! (repaired)
Although not quite as as agile as my Typhoon design, The variable wing and the aerodynamic effects offer much to enjoy. It's a nice plane to fly, and really gives that familiar shape in the air.
Why not experiment with some drop fuel tanks?
If you enjoy this design please help me to fund my next project and send a donation for $10 to Paypal address :-
Thank you! and happy flying.
(c) 2014 Craig Clarkstone. All rights reserved. The design is free for non-commercial use only.
Craig :)
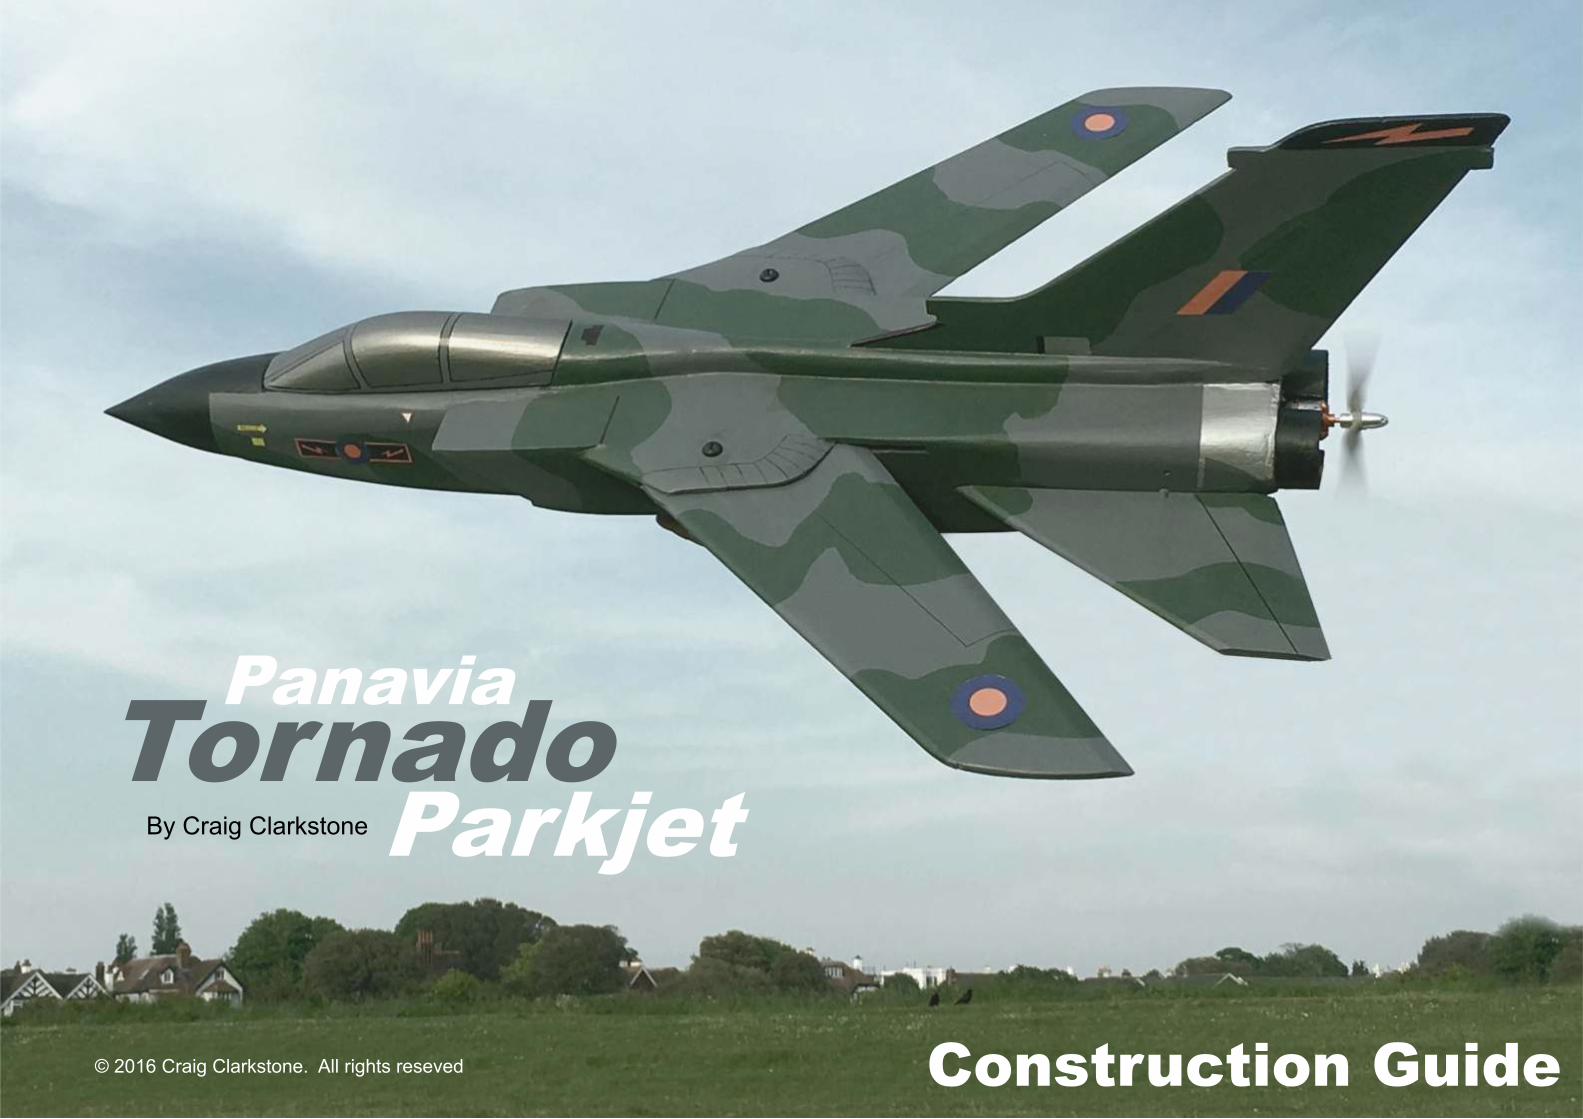
The Panavia Tornado is a family of twin-engine, variable-sweep wing multirole combat aircraft, which was jointly developed and manufactured by Italy, the United Kingdom, and West Germany.
There are three primary Tornado variants: the Tornado IDS (interdictor/strike) fighter-bomber, the suppression of enemy air defences Tornado ECR (electronic combat/reconnaissance) and the Tornado ADV (air defence variant) interceptor aircraft.
The Tornado was developed and built by Panavia Aircraft GmbH, a tri-national consortium consisting of British Aerospace (previously British Aircraft Corporation), MBB of West Germany, and Aeritalia of Italy. It first flew on 14 August 1974 and was introduced into service in 1979–1980. Due to its multirole nature, it was able to replace several different fleets of aircraft in the adopting air forces. The Royal Saudi Air Force (RSAF) became the only export operator of the Tornado in addition to the three original partner nations. A tri-nation training and evaluation unit operating from RAF Cottesmore, the Tri-National Tornado Training Establishment, maintained a level of international co-operation beyond the production stage.
The Tornado was used by the Royal Air Force (RAF), Italian Air Force and RSAF during the 1991 Gulf War, in which the Tornado conducted many low-altitude penetrating strike missions. The Tornados of various operators were also used in conflicts in the former Yugoslavia during the Bosnian War and Kosovo War, the Iraq War, Libya during the Libyan civil war, as well as smaller roles in Afghanistan, Yemen, and Syria. Including all variants, 992 aircraft were built.

Construction
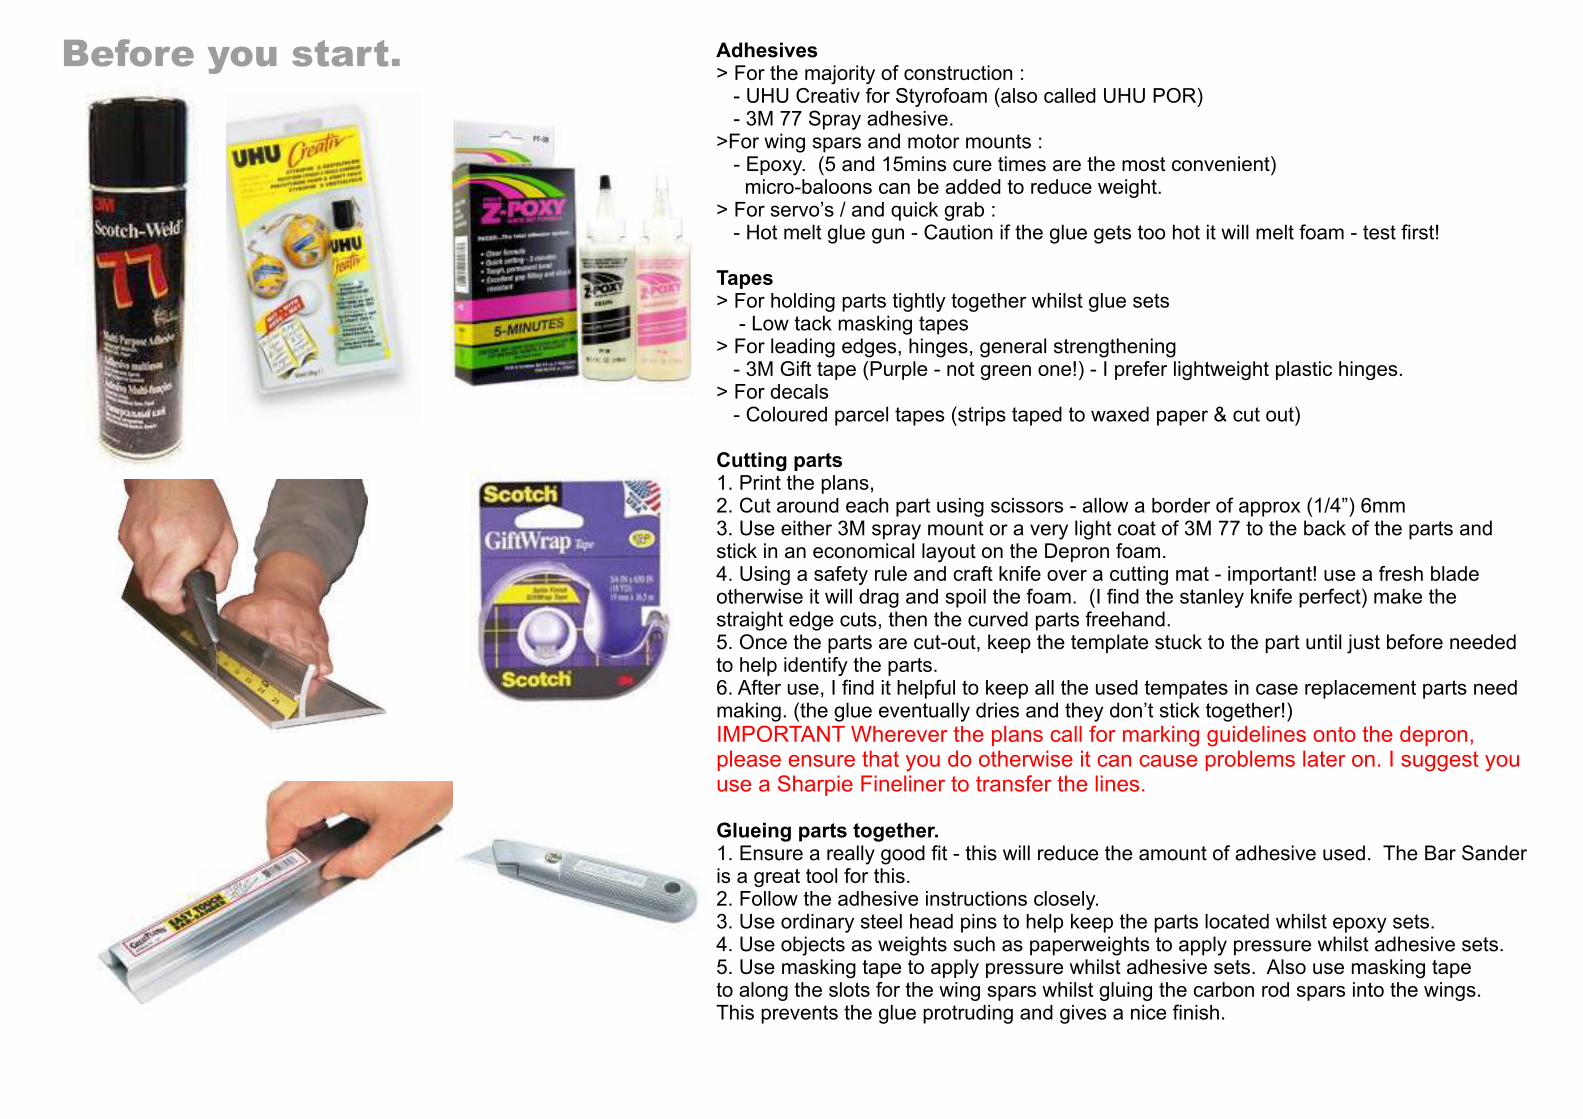
Adhesives> For the majority of construction : - UHU Creativ for Styrofoam (also called UHU POR) - 3M 77 Spray adhesive.>For wing spars and motor mounts : - Epoxy. (5 and 15mins cure times are the most convenient) micro-baloons can be added to reduce weight.> For servo’s / and quick grab : - Hot melt glue gun - Caution if the glue gets too hot it will melt foam - test first!
Tapes> For holding parts tightly together whilst glue sets - Low tack masking tapes> For leading edges, hinges, general strengthening - 3M Gift tape (Purple - not green one!) - I prefer lightweight plastic hinges.> For decals - Coloured parcel tapes (strips taped to waxed paper & cut out)
Cutting parts1. Print the plans, 2. Cut around each part using scissors - allow a border of approx (1/4”) 6mm 3. Use either 3M spray mount or a very light coat of 3M 77 to the back of the parts and stick in an economical layout on the Depron foam.4. Using a safety rule and craft knife over a cutting mat - important! use a fresh blade otherwise it will drag and spoil the foam. (I find the stanley knife perfect) make the straight edge cuts, then the curved parts freehand.5. Once the parts are cut-out, keep the template stuck to the part until just before needed to help identify the parts.6. After use, I find it helpful to keep all the used tempates in case replacement parts need making. (the glue eventually dries and they don’t stick together!)
Glueing parts together.1. Ensure a really good fit - this will reduce the amount of adhesive used. The Bar Sander is a great tool for this. 2. Follow the adhesive instructions closely. 3. Use ordinary steel head pins to help keep the parts located whilst epoxy sets.4. Use objects as weights such as paperweights to apply pressure whilst adhesive sets.5. Use masking tape to apply pressure whilst adhesive sets. Also use masking tapeto along the slots for the wing spars whilst gluing the carbon rod spars into the wings. This prevents the glue protruding and gives a nice finish.
IMPORTANT Wherever the plans call for marking guidelines onto the depron, please ensure that you do otherwise it can cause problems later on. I suggest you use a Sharpie Fineliner to transfer the lines.
Before you start.
Page 4
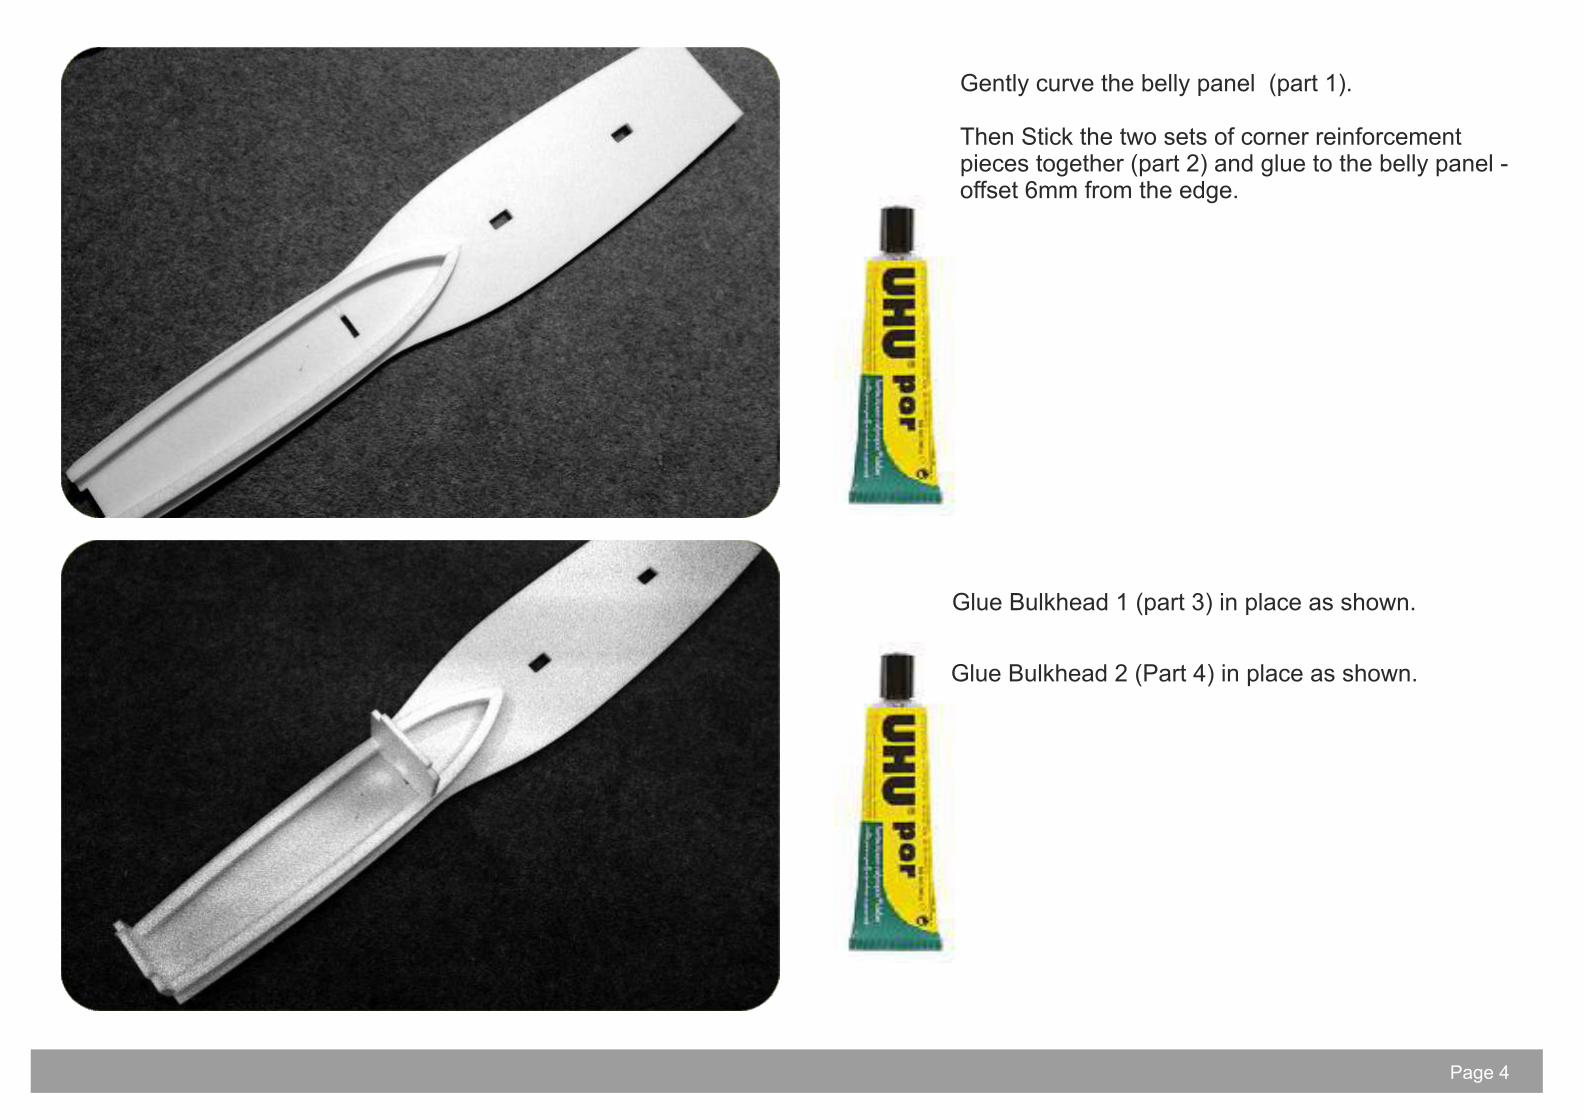
Glue Bulkhead 1 (part 3) in place as shown.
Gently curve the belly panel (part 1).
Then Stick the two sets of corner reinforcement pieces together (part 2) and glue to the belly panel - offset 6mm from the edge.
Glue Bulkhead 2 (Part 4) in place as shown.
Page 5
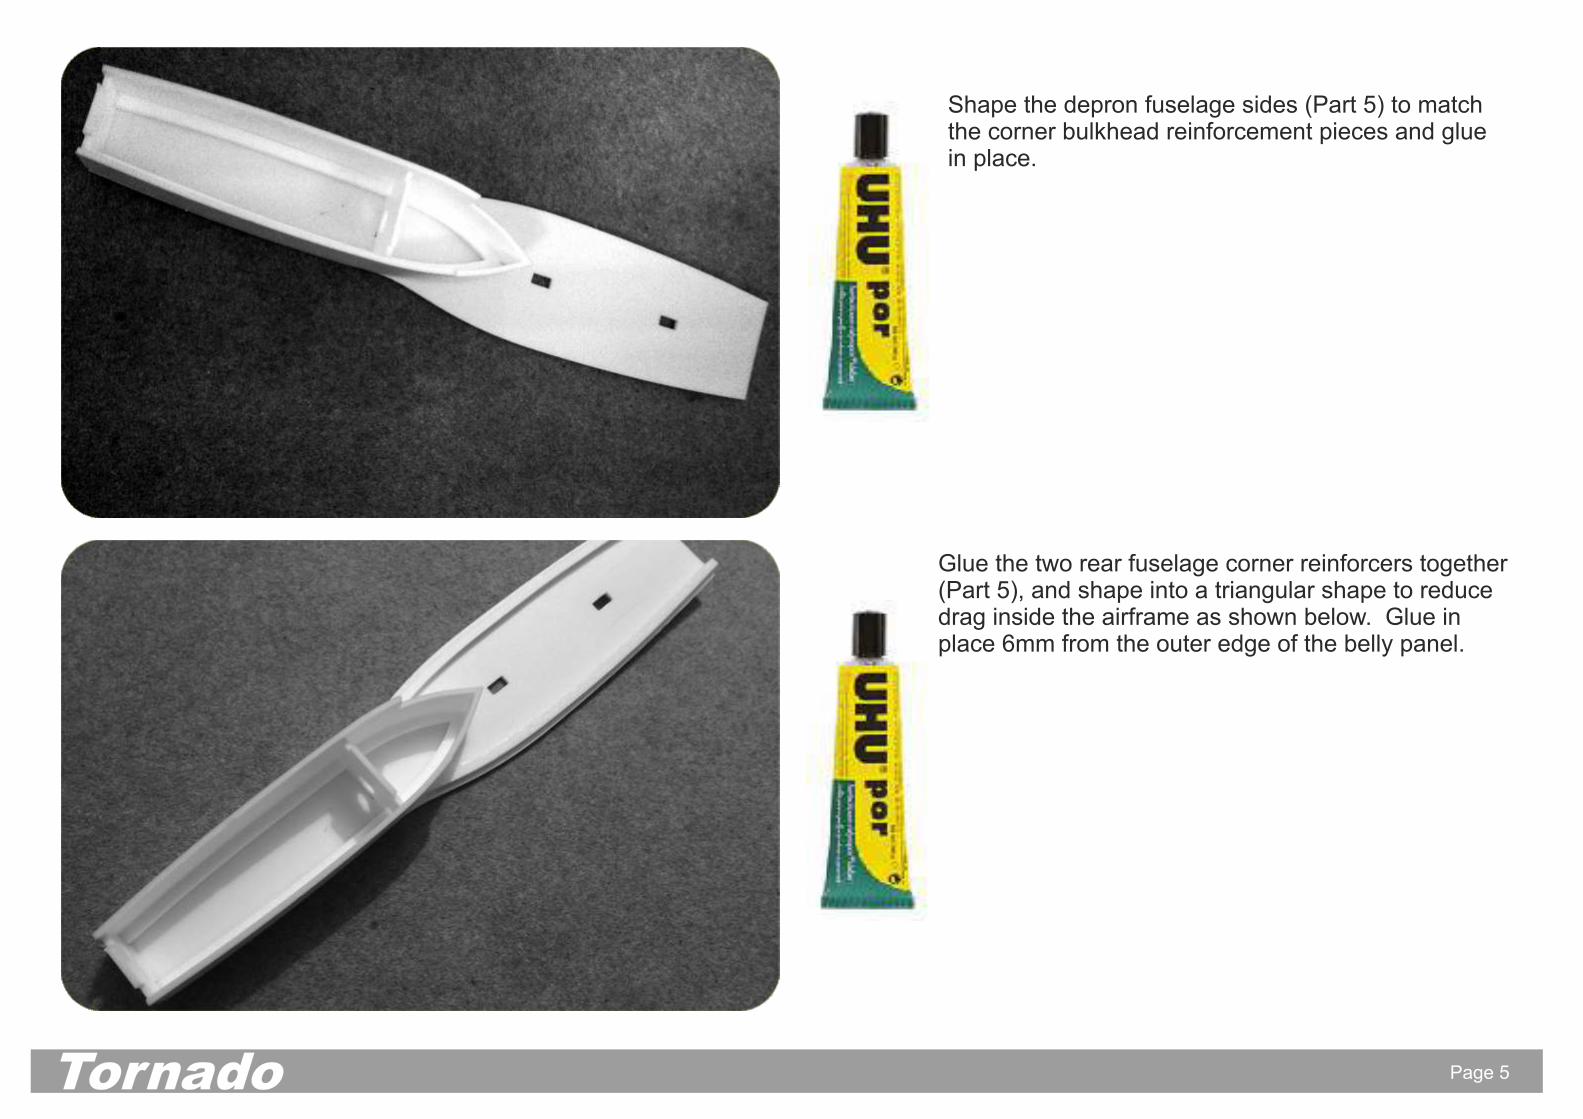
Shape the depron fuselage sides (Part 5) to match the corner bulkhead reinforcement pieces and glue in place.
Tornado
Glue the two rear fuselage corner reinforcers together (Part 5), and shape into a triangular shape to reduce drag inside the airframe as shown below. Glue in place 6mm from the outer edge of the belly panel.
Page 6
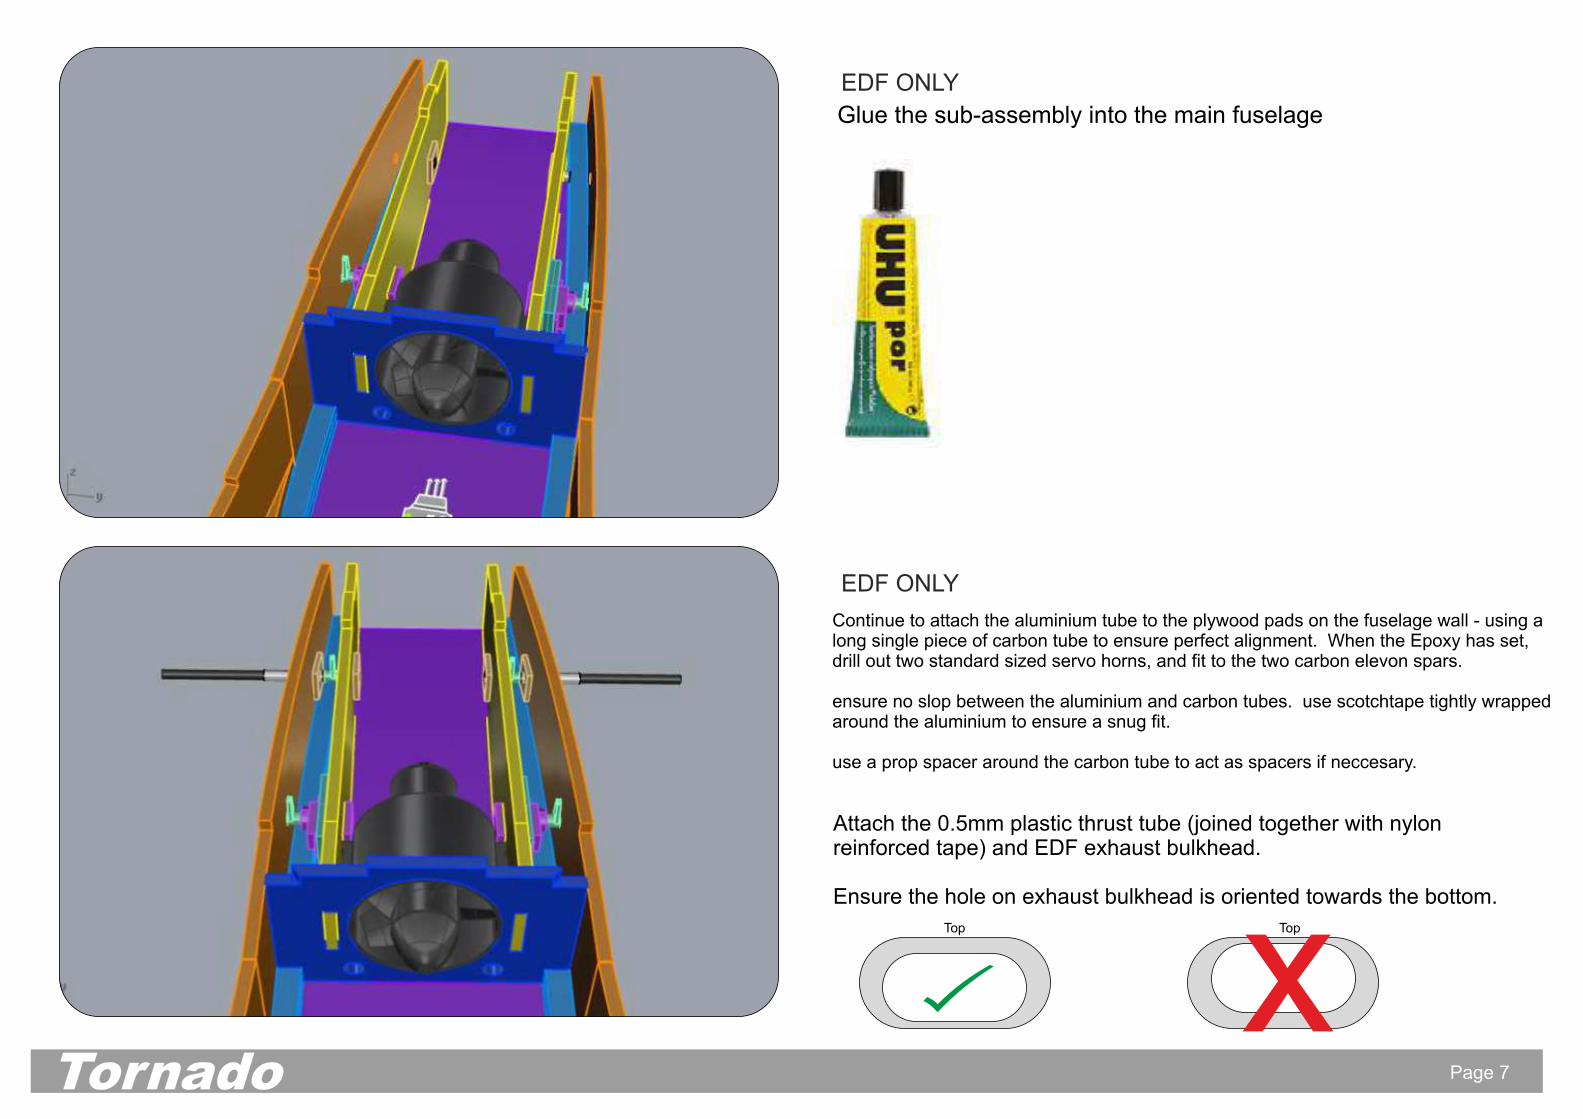
EDF ONLY
Tornado
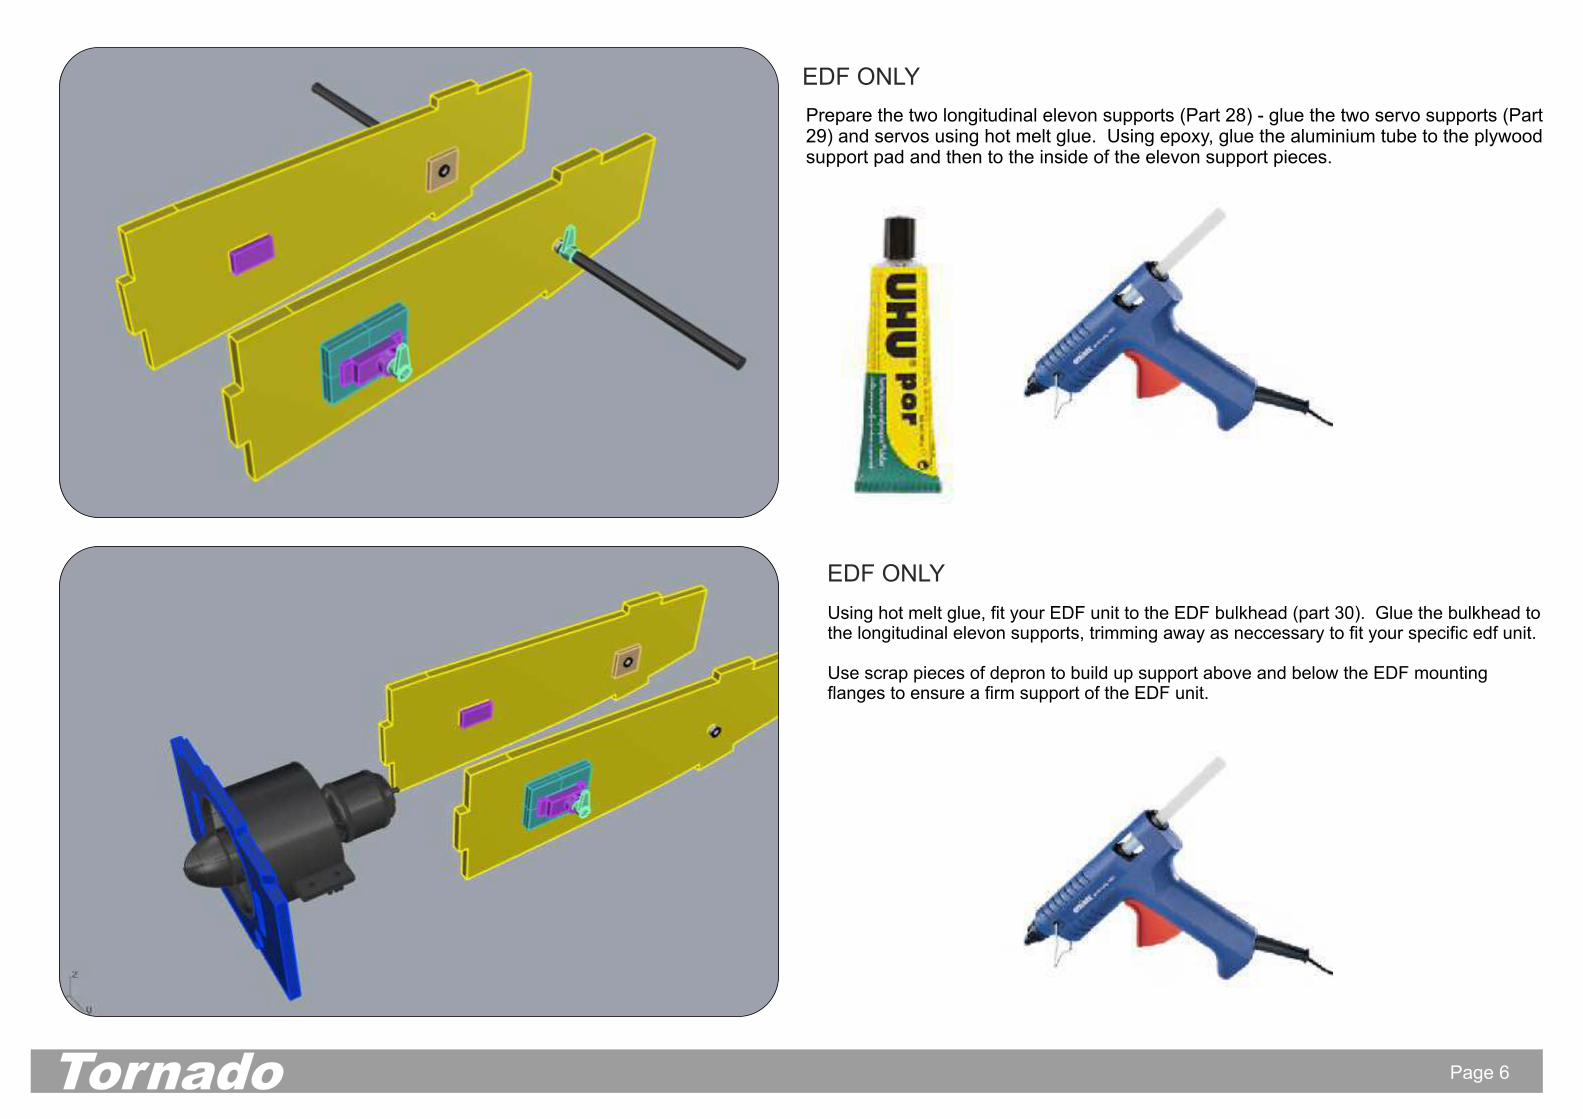
Prepare the two longitudinal elevon supports (Part 28) - glue the two servo supports (Part 29) and servos using hot melt glue. Using epoxy, glue the aluminium tube to the plywood support pad and then to the inside of the elevon support pieces.
Using hot melt glue, fit your EDF unit to the EDF bulkhead (part 30). Glue the bulkhead to the longitudinal elevon supports, trimming away as neccessary to fit your specific edf unit.
Use scrap pieces of depron to build up support above and below the EDF mounting flanges to ensure a firm support of the EDF unit.
EDF ONLY
Page 7
EDF ONLY
Tornado
EDF ONLY
Glue the sub-assembly into the main fuselage
Continue to attach the aluminium tube to the plywood pads on the fuselage wall - using a long single piece of carbon tube to ensure perfect alignment. When the Epoxy has set, drill out two standard sized servo horns, and fit to the two carbon elevon spars.
ensure no slop between the aluminium and carbon tubes. use scotchtape tightly wrapped around the aluminium to ensure a snug fit.
use a prop spacer around the carbon tube to act as spacers if neccesary.
Attach the 0.5mm plastic thrust tube (joined together with nylon reinforced tape) and EDF exhaust bulkhead.
Ensure the hole on exhaust bulkhead is oriented towards the bottom.
Top Top
x
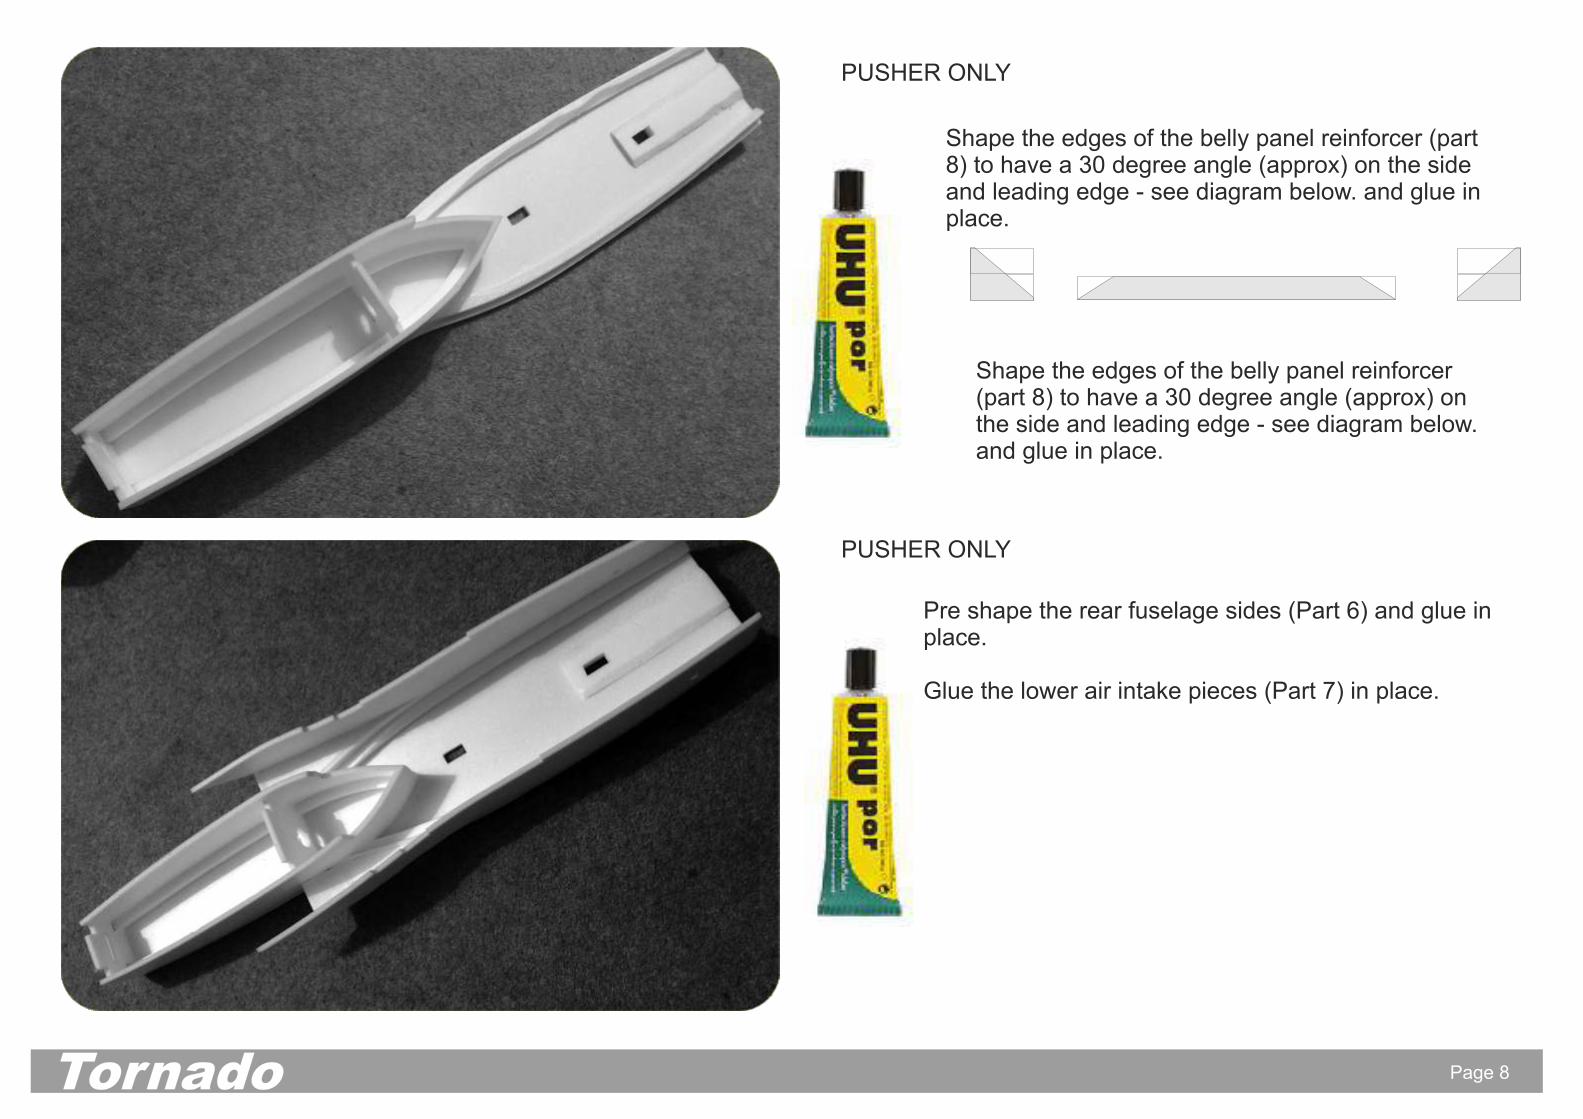
Shape the edges of the belly panel reinforcer (part 8) to have a 30 degree angle (approx) on the side and leading edge - see diagram below. and glue in place.
Page 8
Pre shape the rear fuselage sides (Part 6) and glue in place.
Glue the lower air intake pieces (Part 7) in place.
Tornado
Shape the edges of the belly panel reinforcer (part 8) to have a 30 degree angle (approx) on the side and leading edge - see diagram below. and glue in place.
PUSHER ONLY
PUSHER ONLY
Page 9Tornado
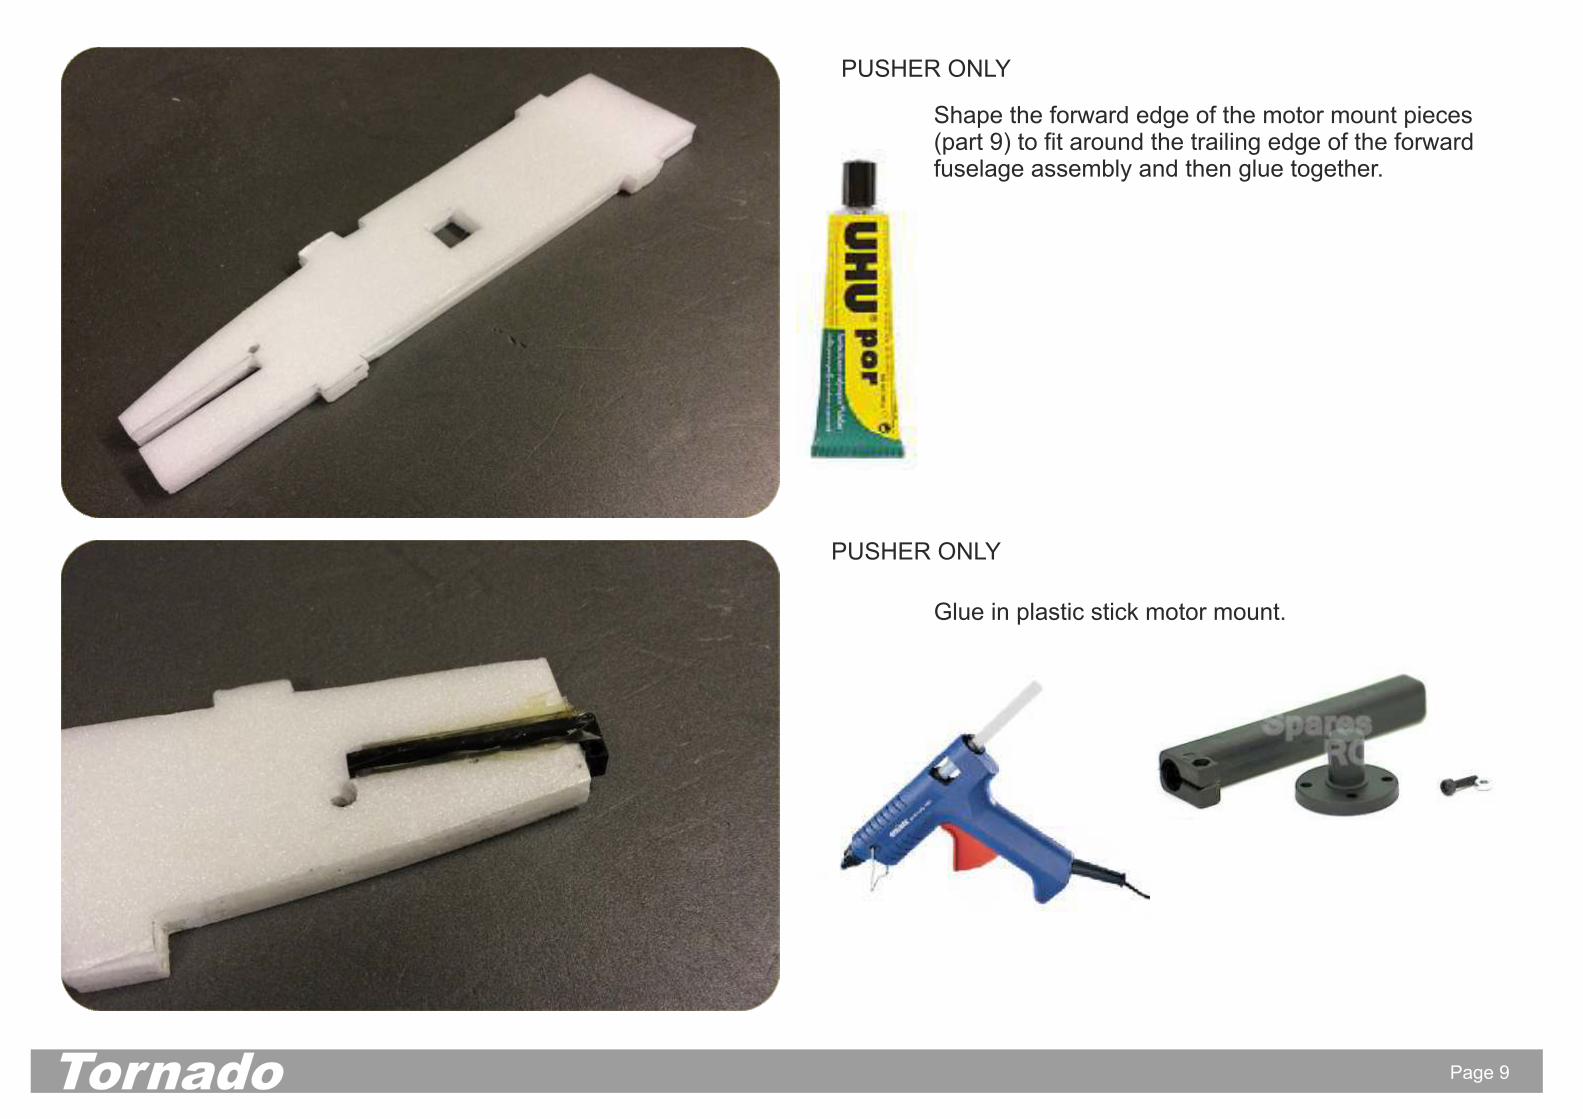
Shape the forward edge of the motor mount pieces (part 9) to fit around the trailing edge of the forward fuselage assembly and then glue together.
Glue in plastic stick motor mount.
PUSHER ONLY
PUSHER ONLY
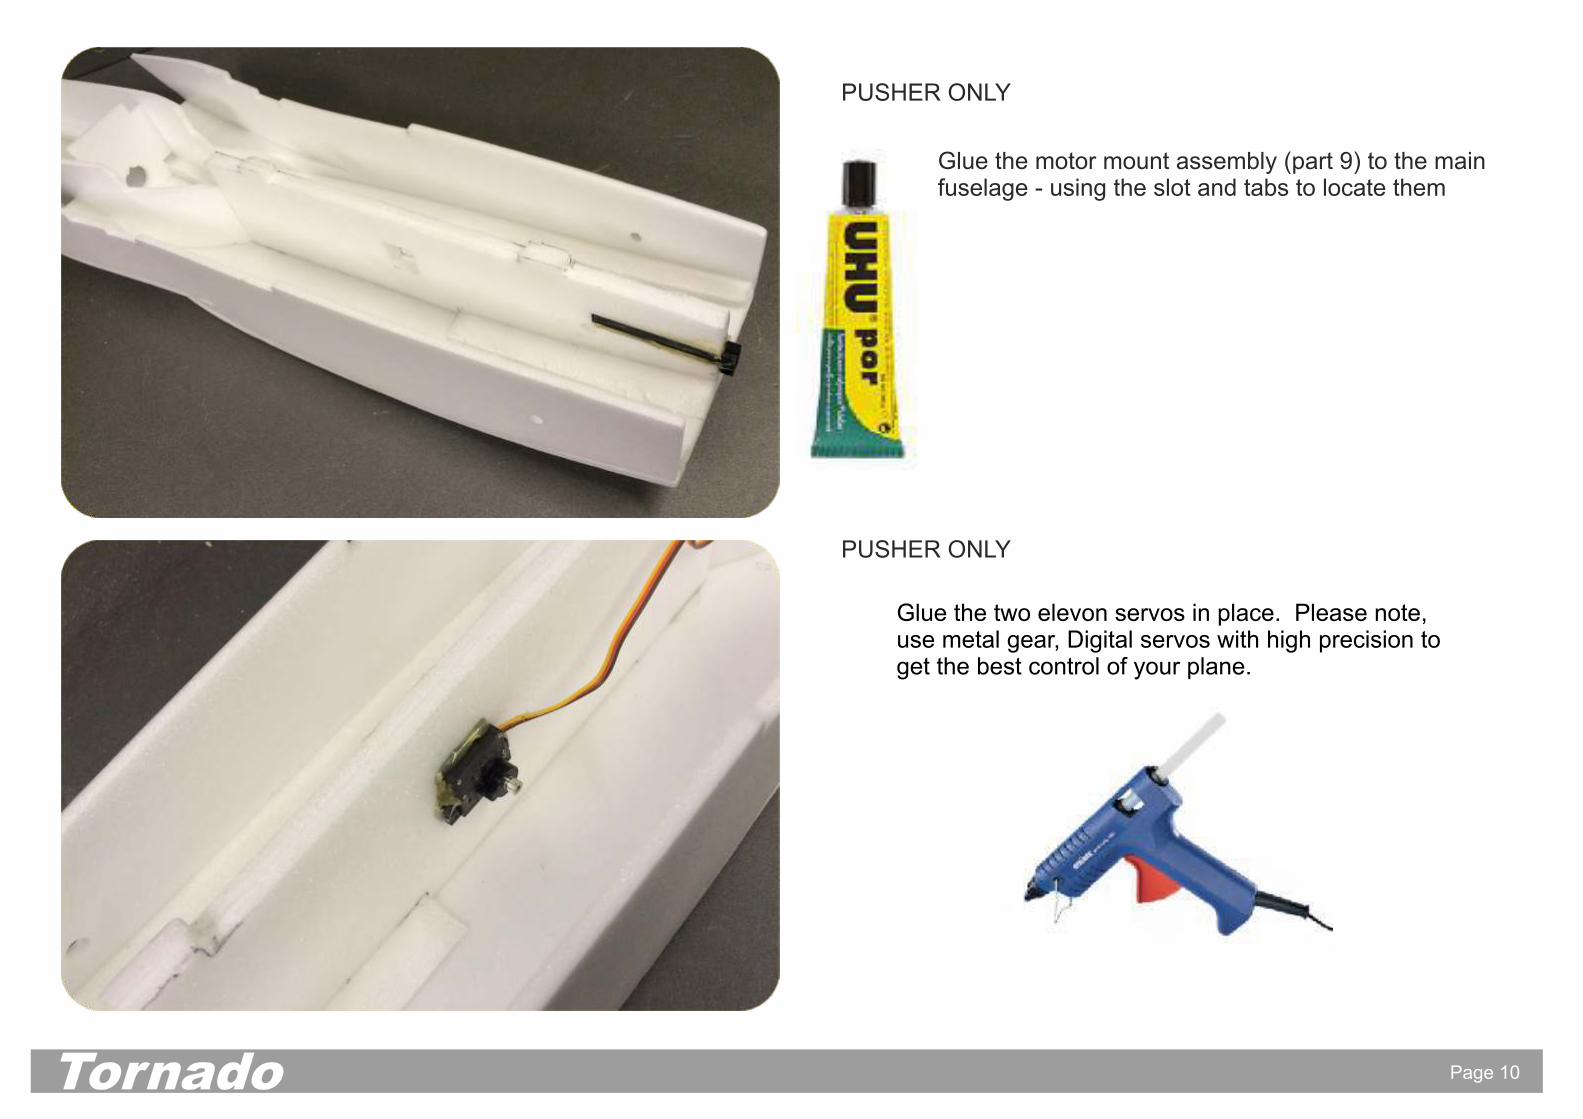
Glue the two elevon servos in place. Please note, use metal gear, Digital servos with high precision to get the best control of your plane.
Page 10Tornado
Glue the motor mount assembly (part 9) to the main fuselage - using the slot and tabs to locate them
PUSHER ONLY
PUSHER ONLY
Page 11Tornado
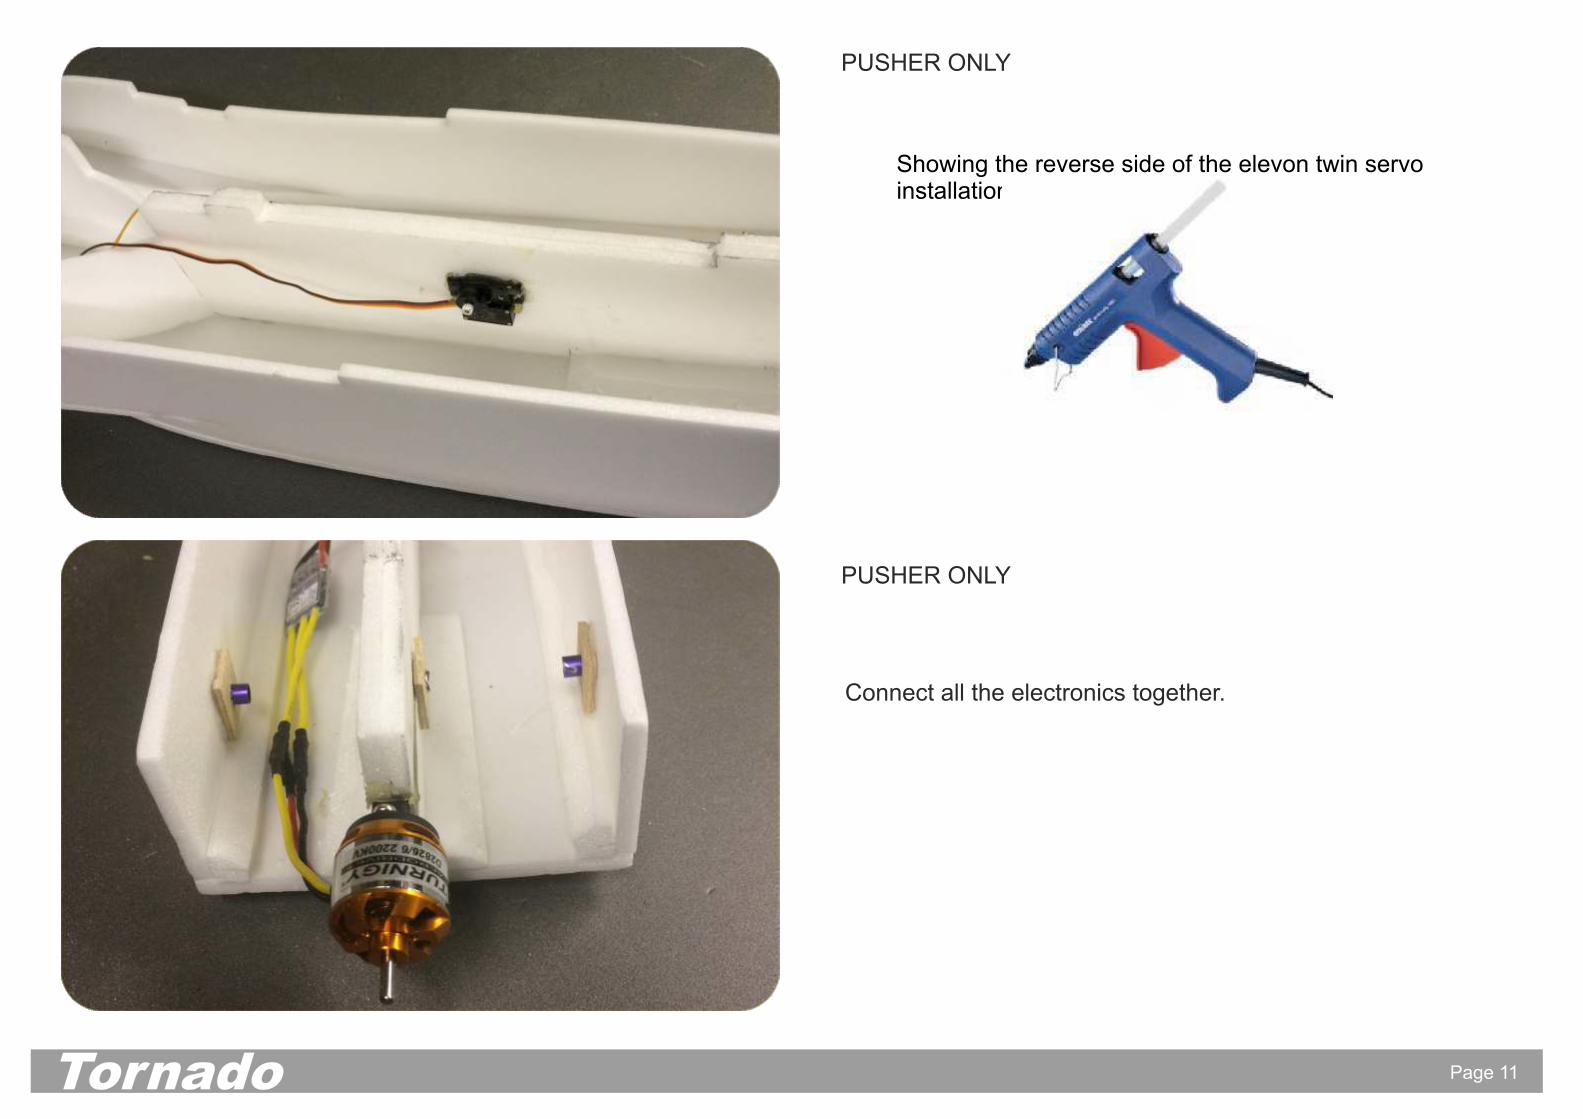
Showing the reverse side of the elevon twin servo installation
Connect all the electronics together.
PUSHER ONLY
PUSHER ONLY
Page 12Tornado
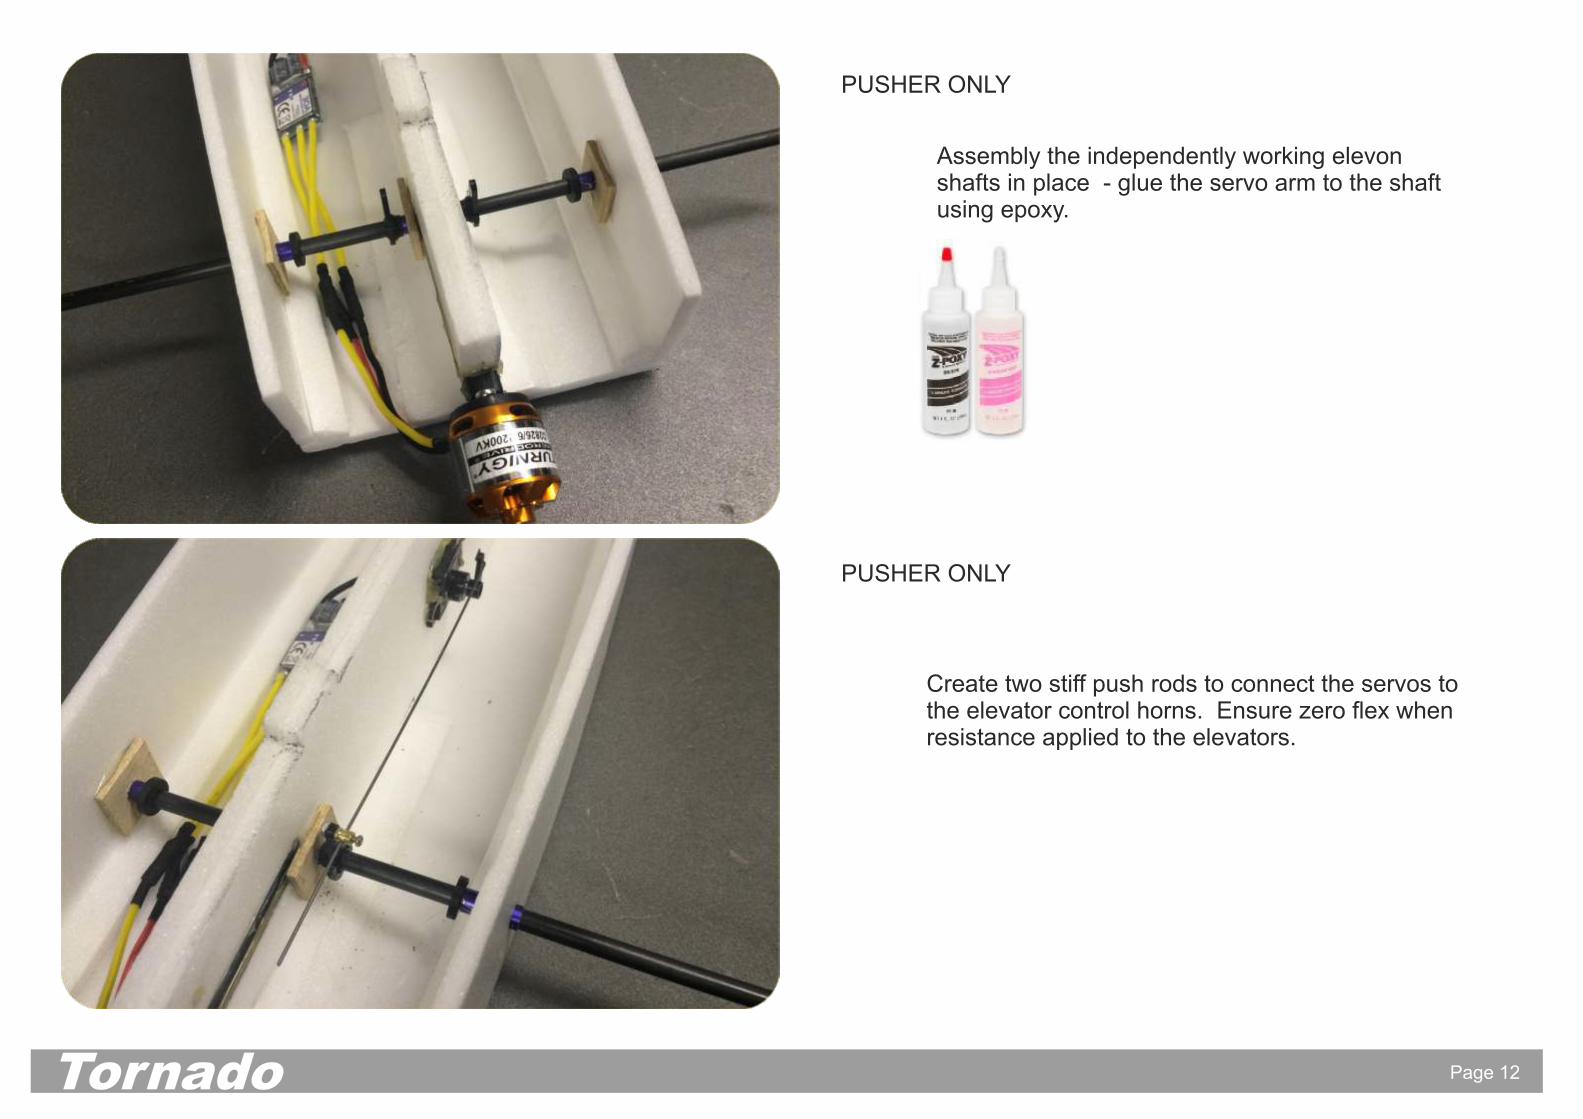
Create two stiff push rods to connect the servos to the elevator control horns. Ensure zero flex when resistance applied to the elevators.
Assembly the independently working elevon shafts in place - glue the servo arm to the shaft using epoxy.
PUSHER ONLY
PUSHER ONLY

Page 13Tornado
Assemble the Canopy (Part 20)
Sand to shape.
Create a 3mm lite ply lip at the front end, and 2 rare earth magnets at the rear end..
depron spacer3mm lite plytongue
Magnets
Page 14
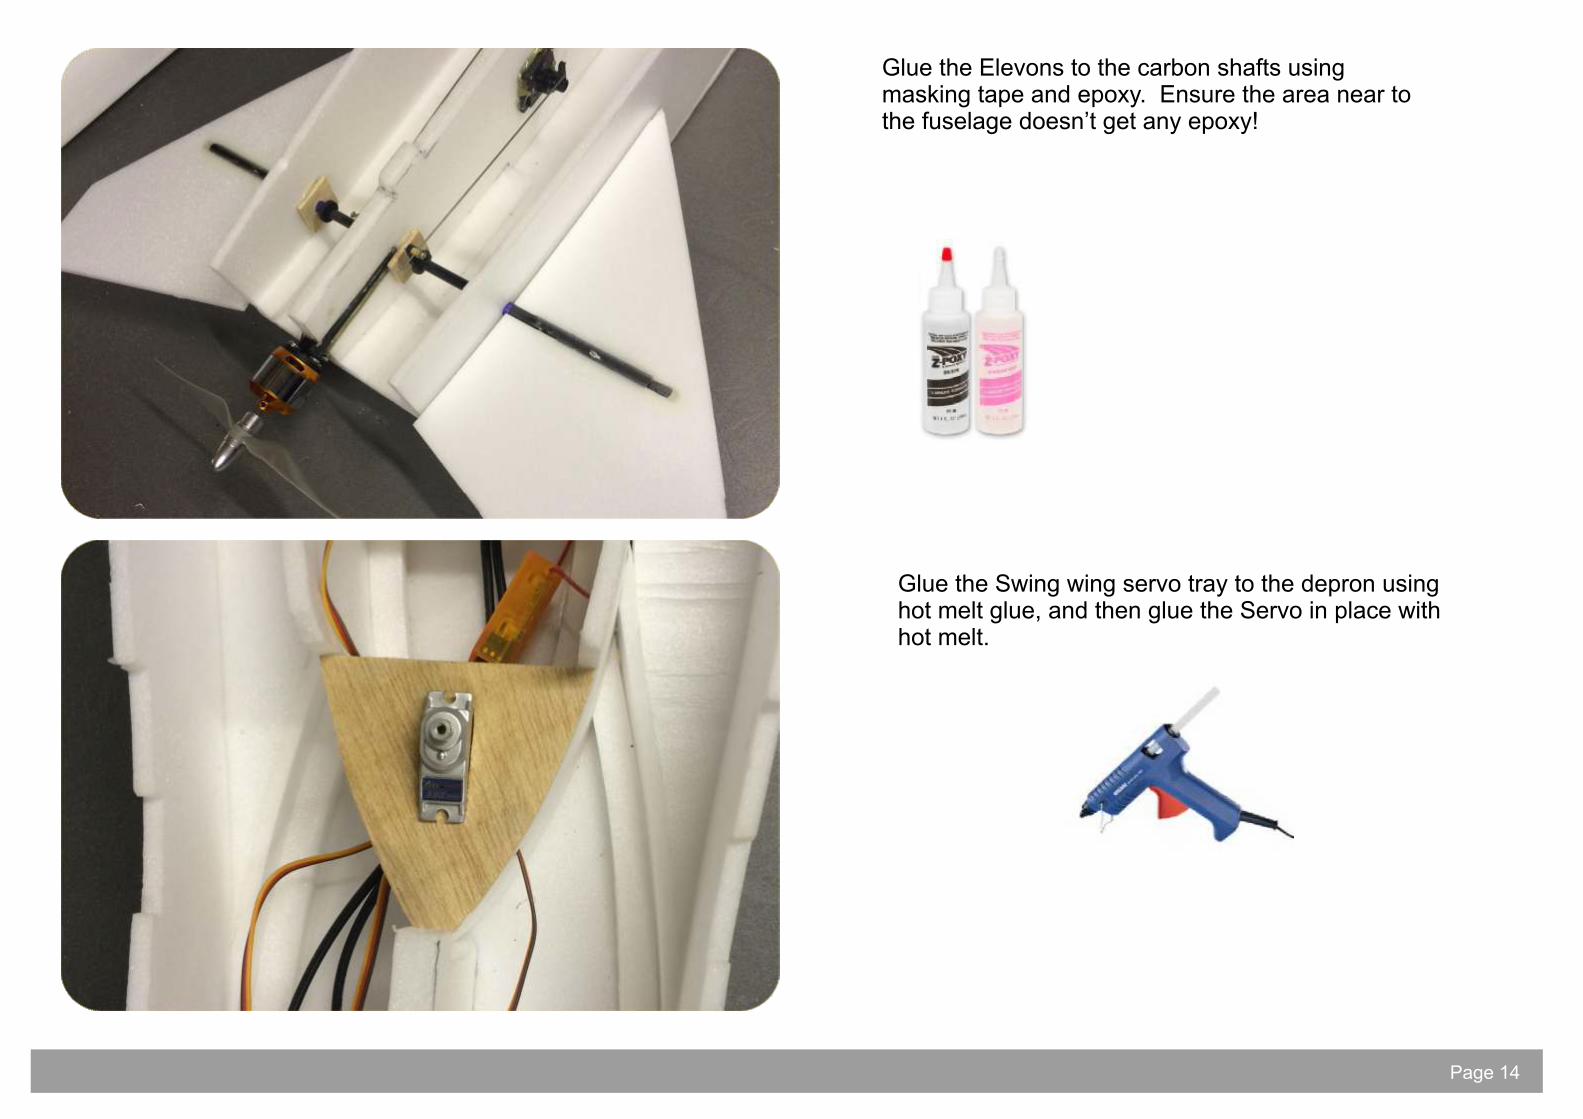
Glue the Swing wing servo tray to the depron using hot melt glue, and then glue the Servo in place with hot melt.
Glue the Elevons to the carbon shafts using masking tape and epoxy. Ensure the area near to the fuselage doesn’t get any epoxy!
Page 15
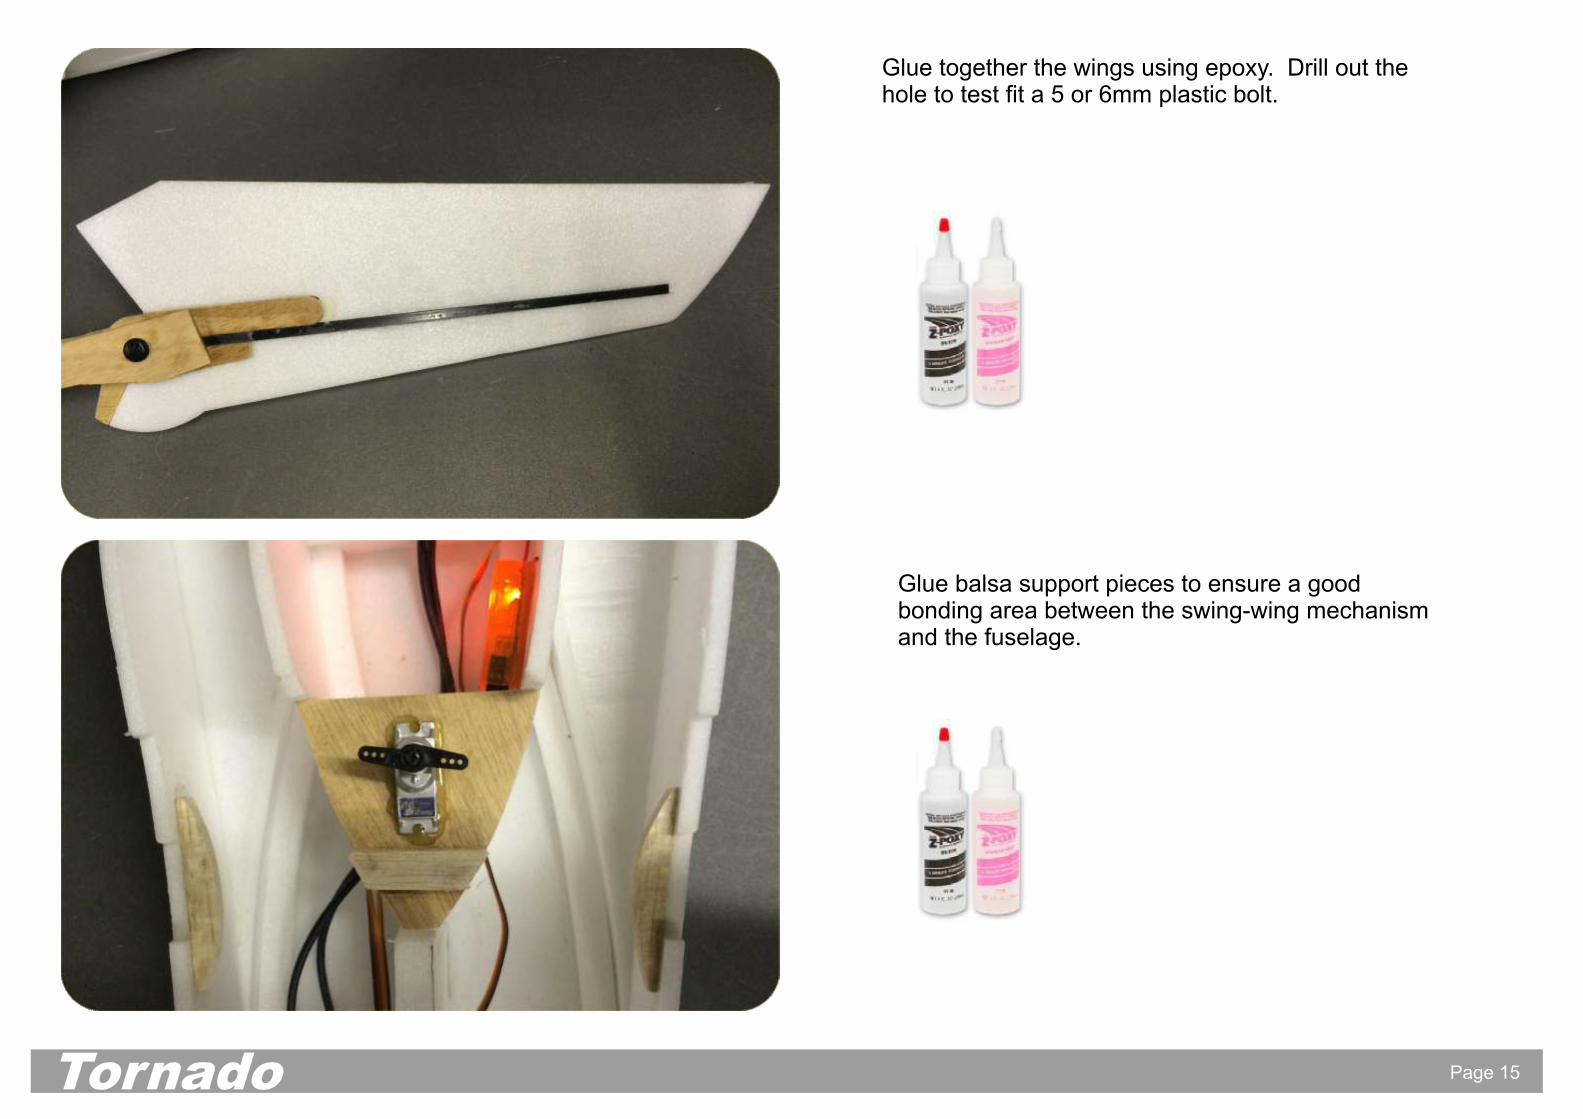
Glue balsa support pieces to ensure a good bonding area between the swing-wing mechanism and the fuselage.
Glue together the wings using epoxy. Drill out the hole to test fit a 5 or 6mm plastic bolt.
Tornado
Page 16
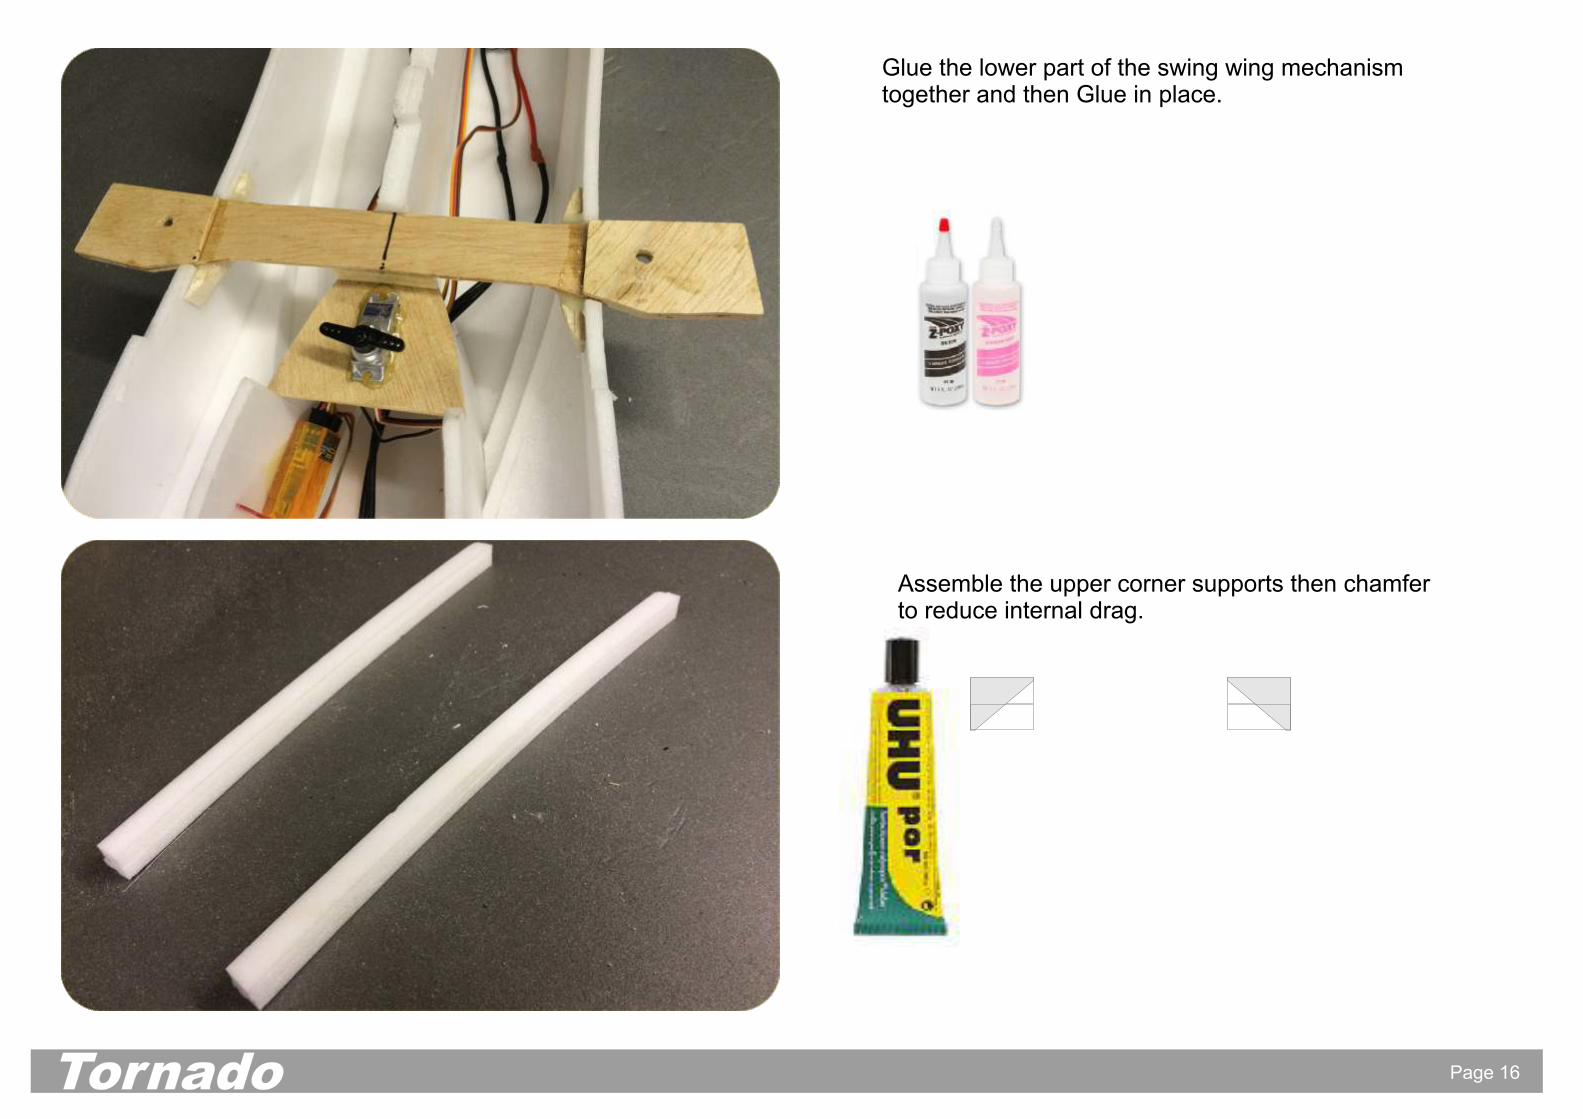
Assemble the upper corner supports then chamfer to reduce internal drag.
Tornado
Glue the lower part of the swing wing mechanism together and then Glue in place.
Page 17
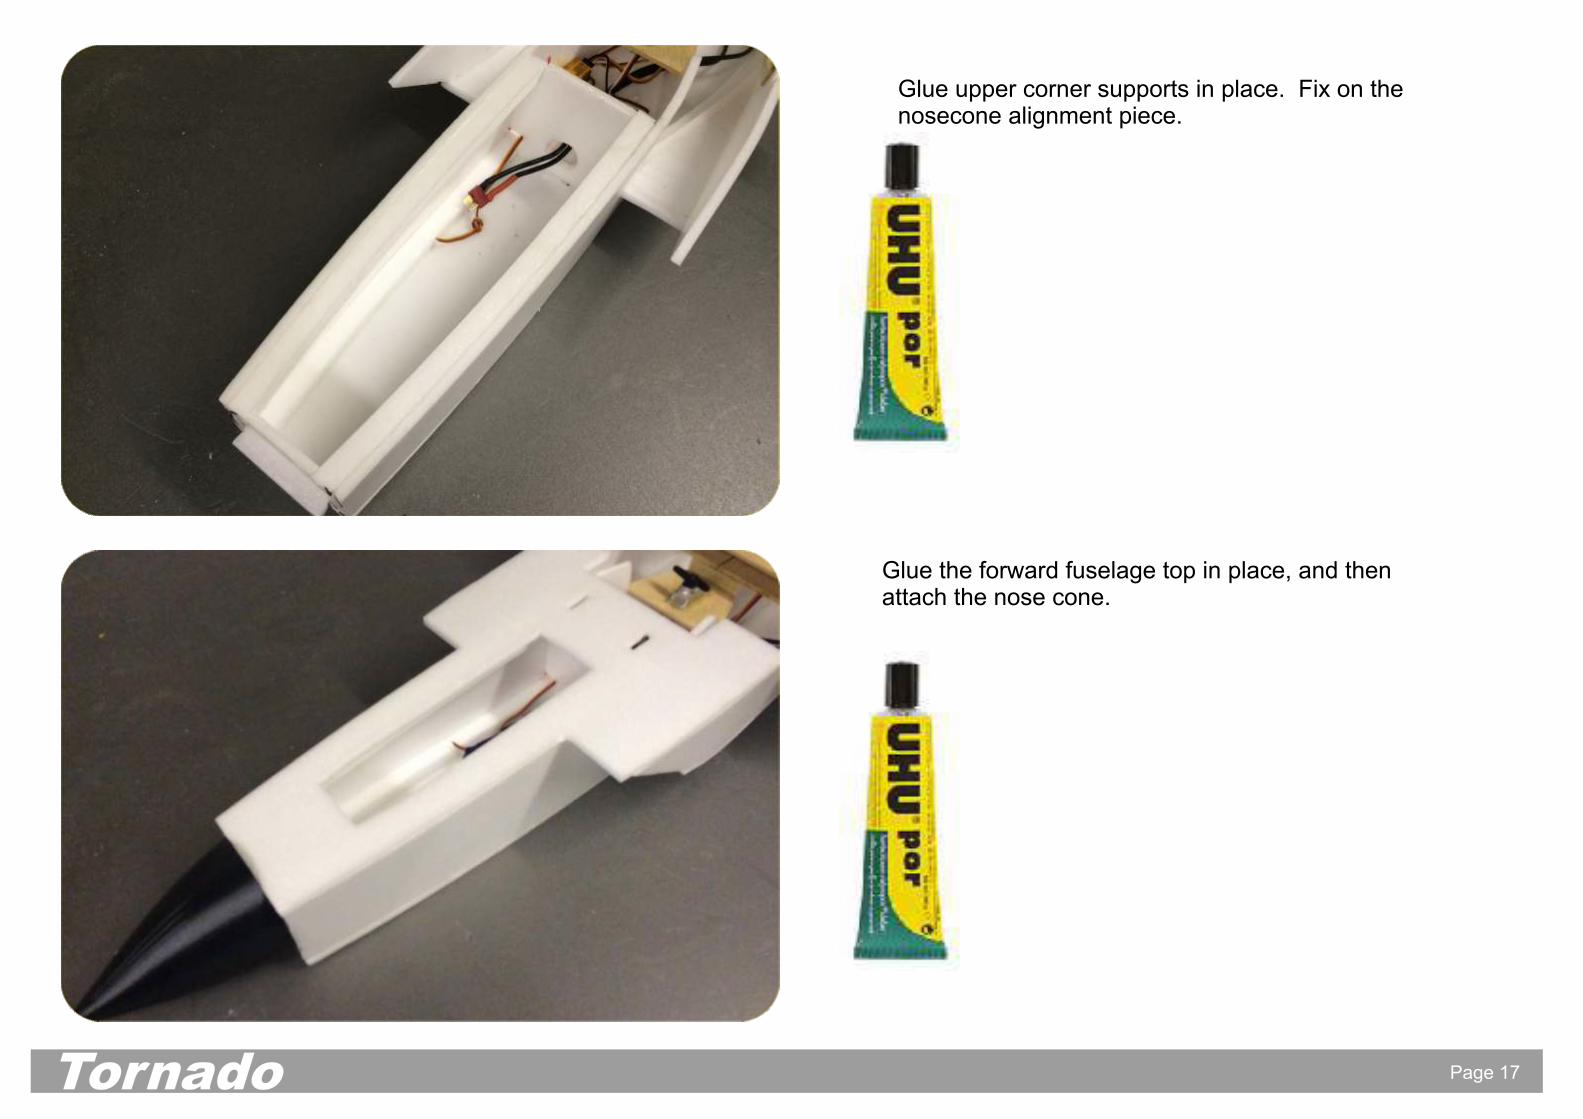
Glue upper corner supports in place. Fix on the nosecone alignment piece.
Tornado
Glue the forward fuselage top in place, and then attach the nose cone.
Page 18
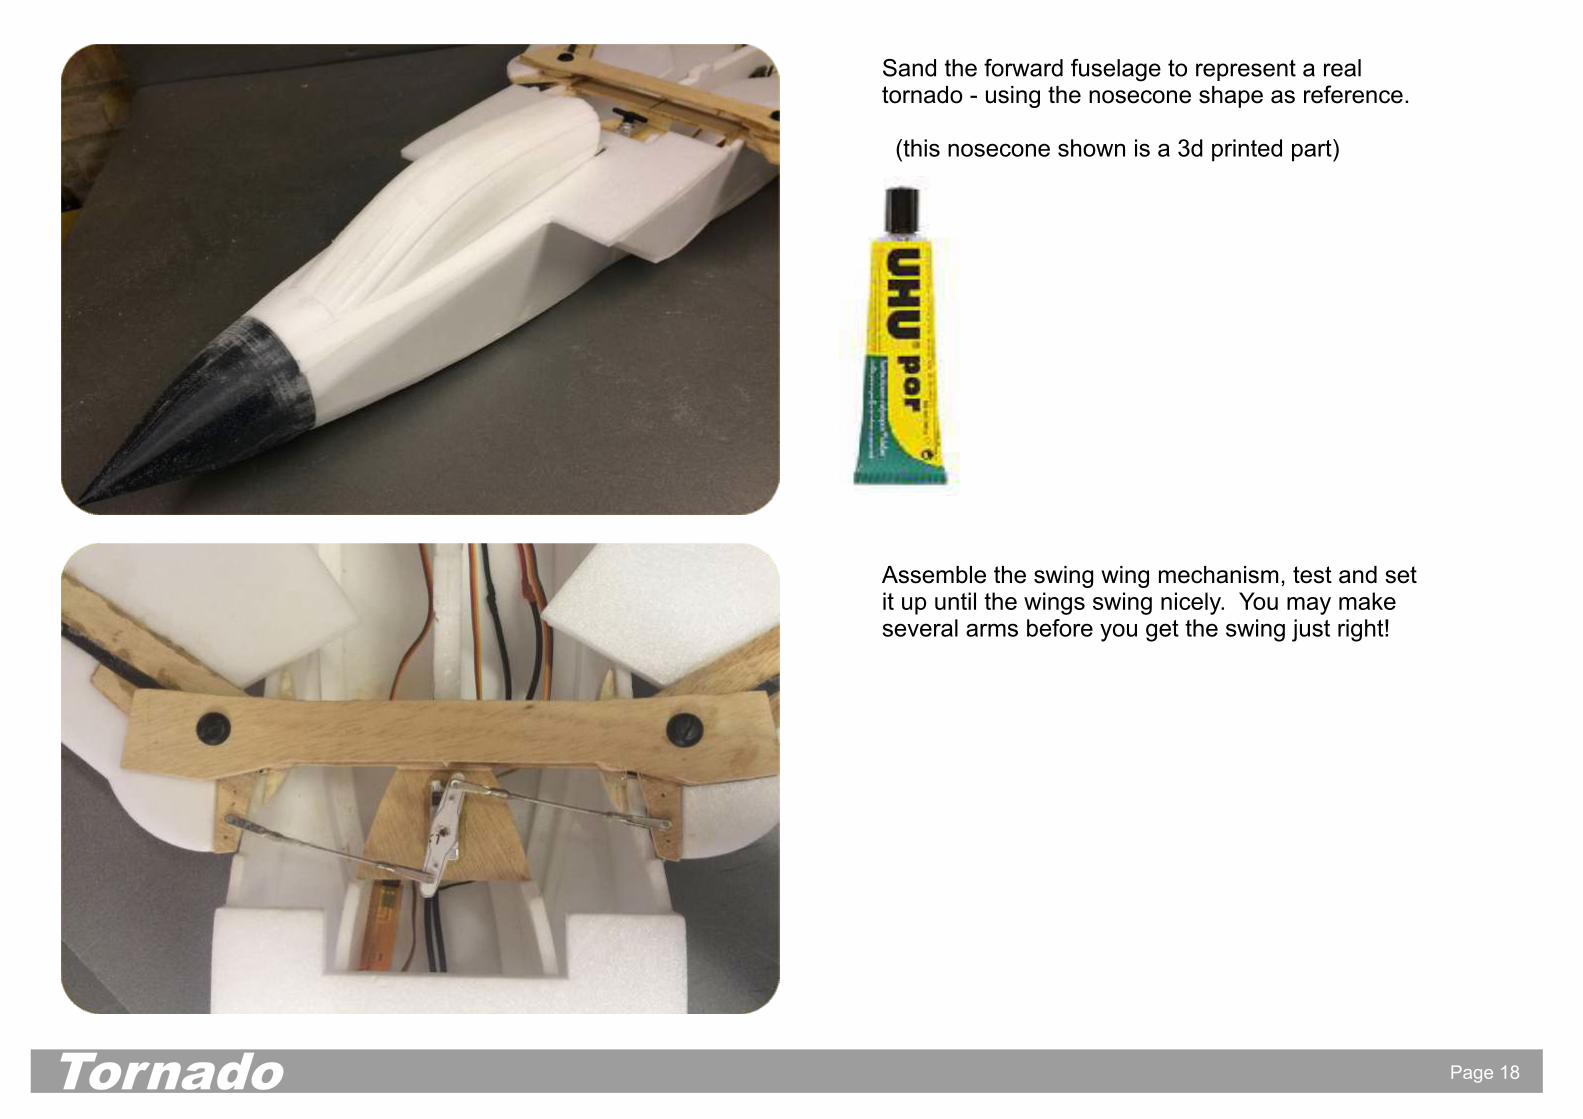
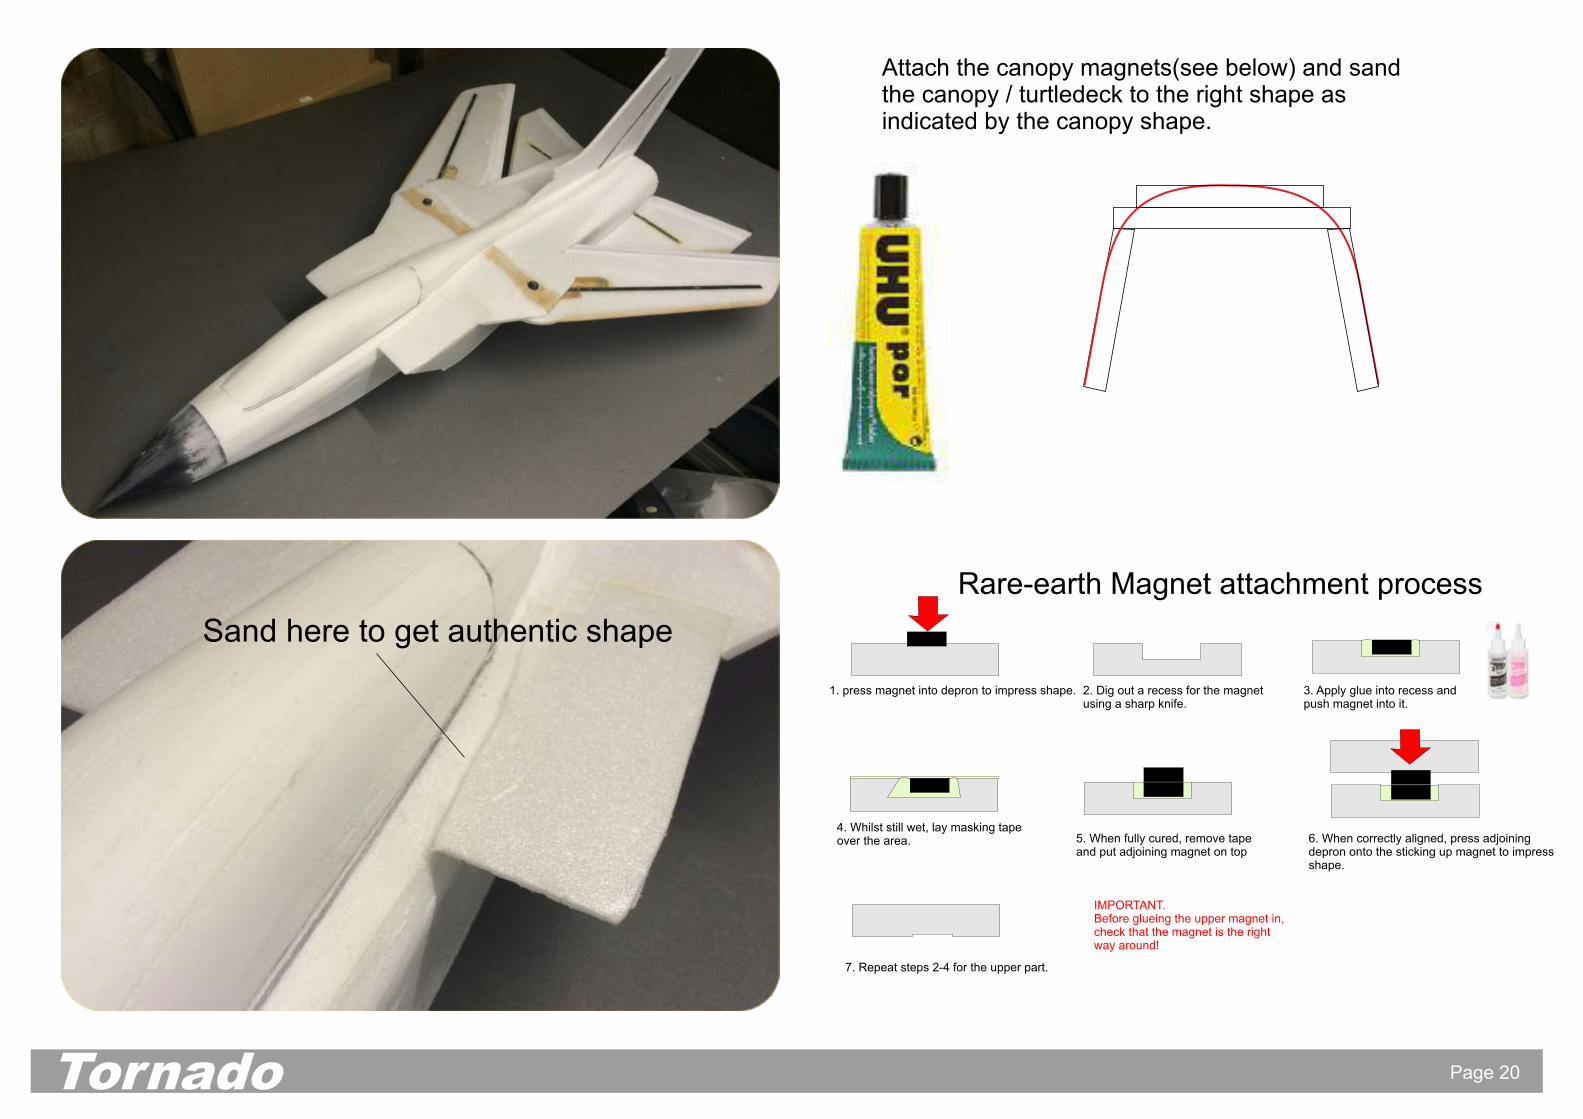
Sand the forward fuselage to represent a real tornado - using the nosecone shape as reference.
(this nosecone shown is a 3d printed part)
Tornado
Assemble the swing wing mechanism, test and set it up until the wings swing nicely. You may make several arms before you get the swing just right!

Page 19Tornado
Glue in 6mm carbon tube into the vertical stabiliser.
Once the mechanism is working smoothly, Glue the upper fuselage top pieces on, and the vertical stabiliser.
Assemble together and glue the turtledeck onto the main assembly.
Page 20
Attach the canopy magnets(see below) and sand the canopy / turtledeck to the right shape as indicated by the canopy shape.
Tornado
1. press magnet into depron to impress shape. 2. Dig out a recess for the magnetusing a sharp knife.
3. Apply glue into recess andpush magnet into it.
5. When fully cured, remove tapeand put adjoining magnet on top
6. When correctly aligned, press adjoining depron onto the sticking up magnet to impress shape.
7. Repeat steps 2-4 for the upper part.
Rare-earth Magnet attachment process
4. Whilst still wet, lay masking tapeover the area.
IMPORTANT.Before glueing the upper magnet in, check that the magnet is the right way around!
Sand here to get authentic shape
Page 21
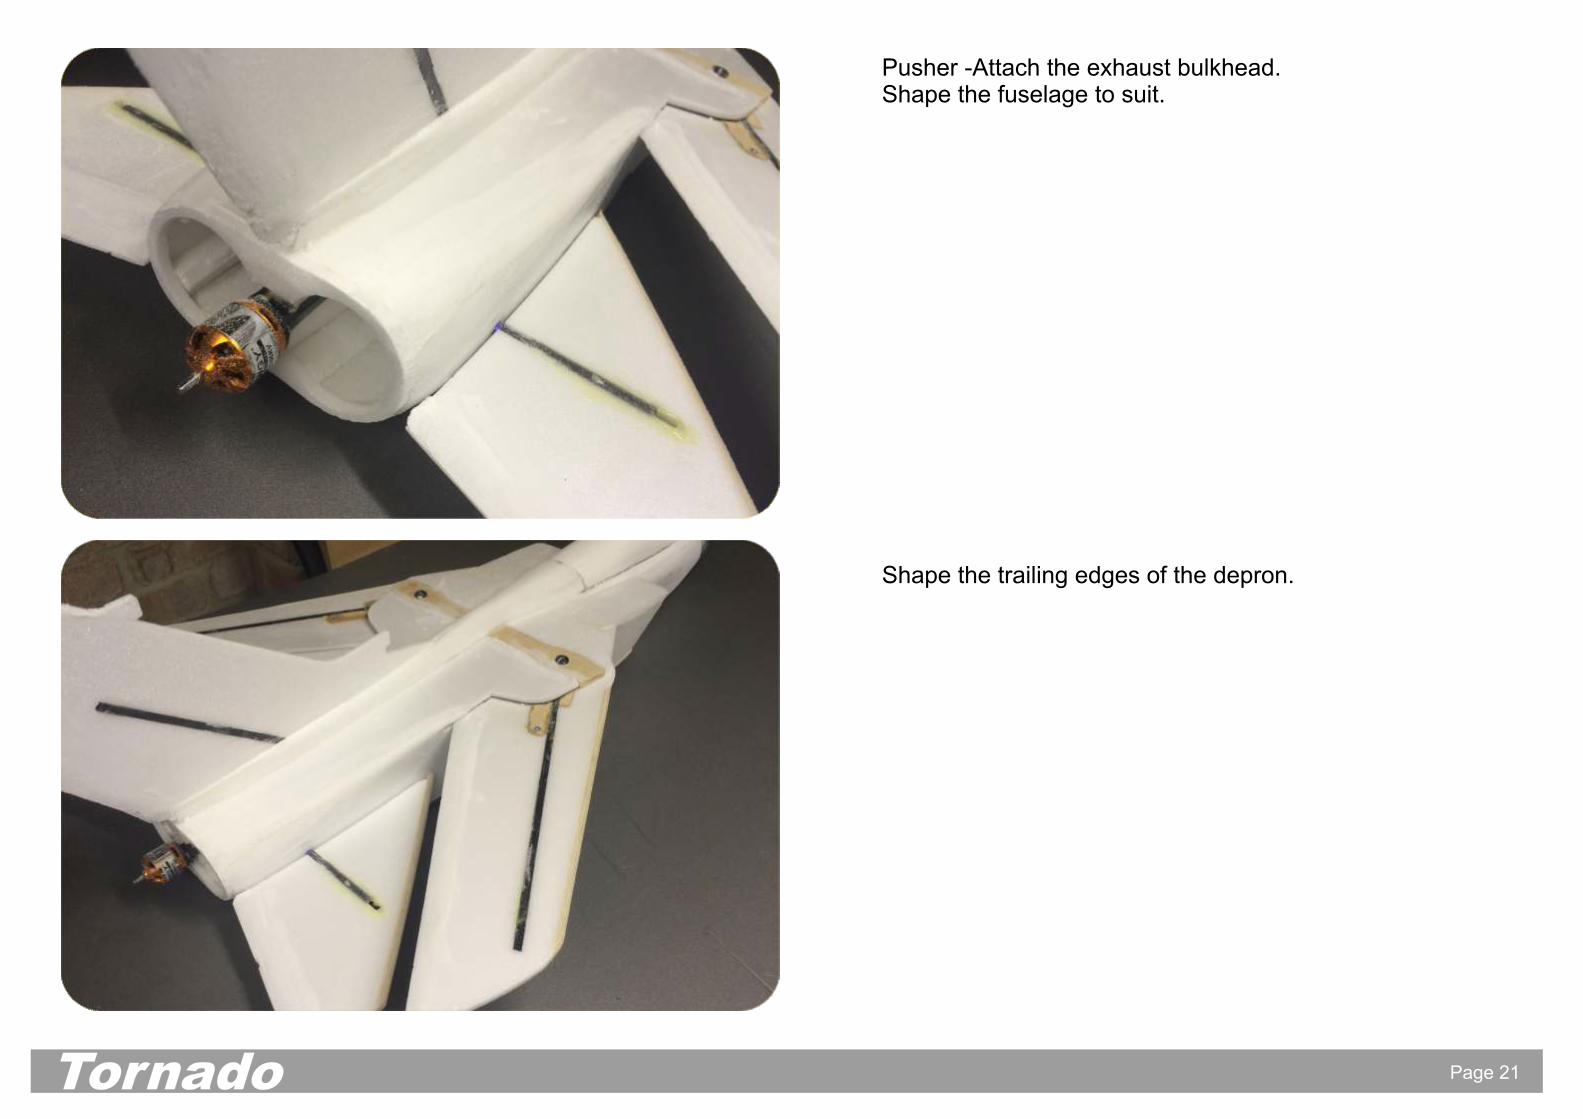
Pusher -Attach the exhaust bulkhead.Shape the fuselage to suit.
Shape the trailing edges of the depron.
Tornado
Page 22
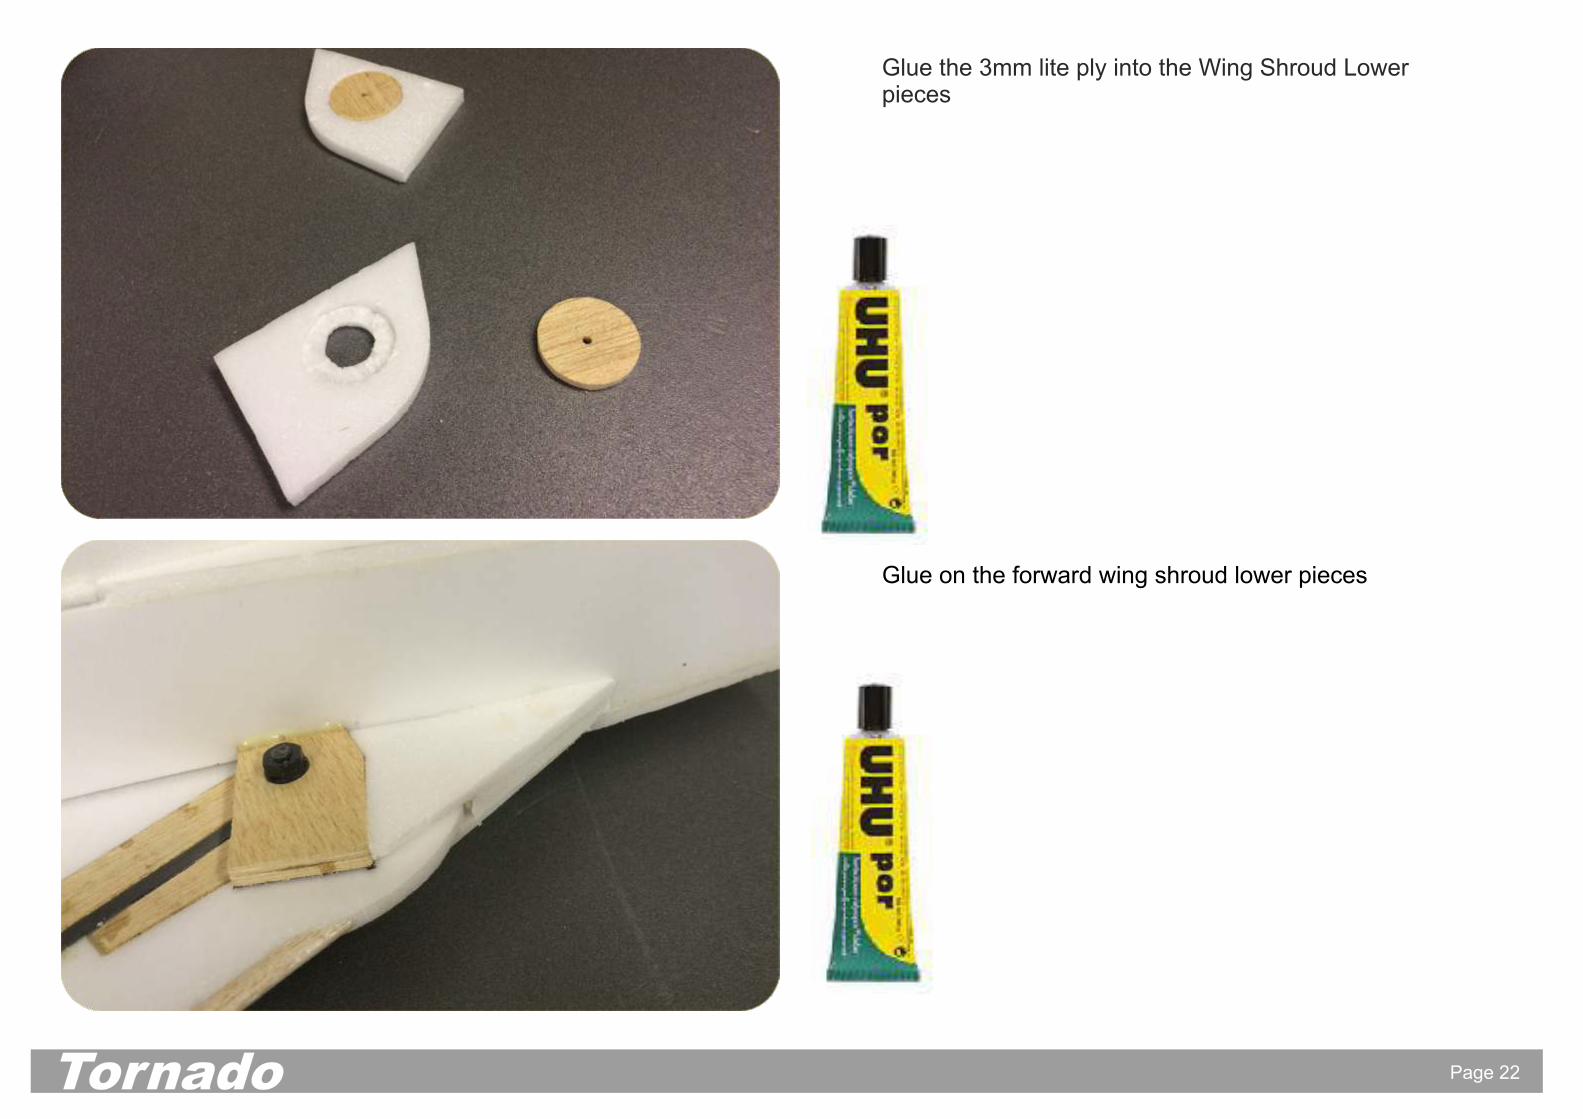
Glue the 3mm lite ply into the Wing Shroud Lower pieces
Glue on the forward wing shroud lower pieces
Tornado
Page 23
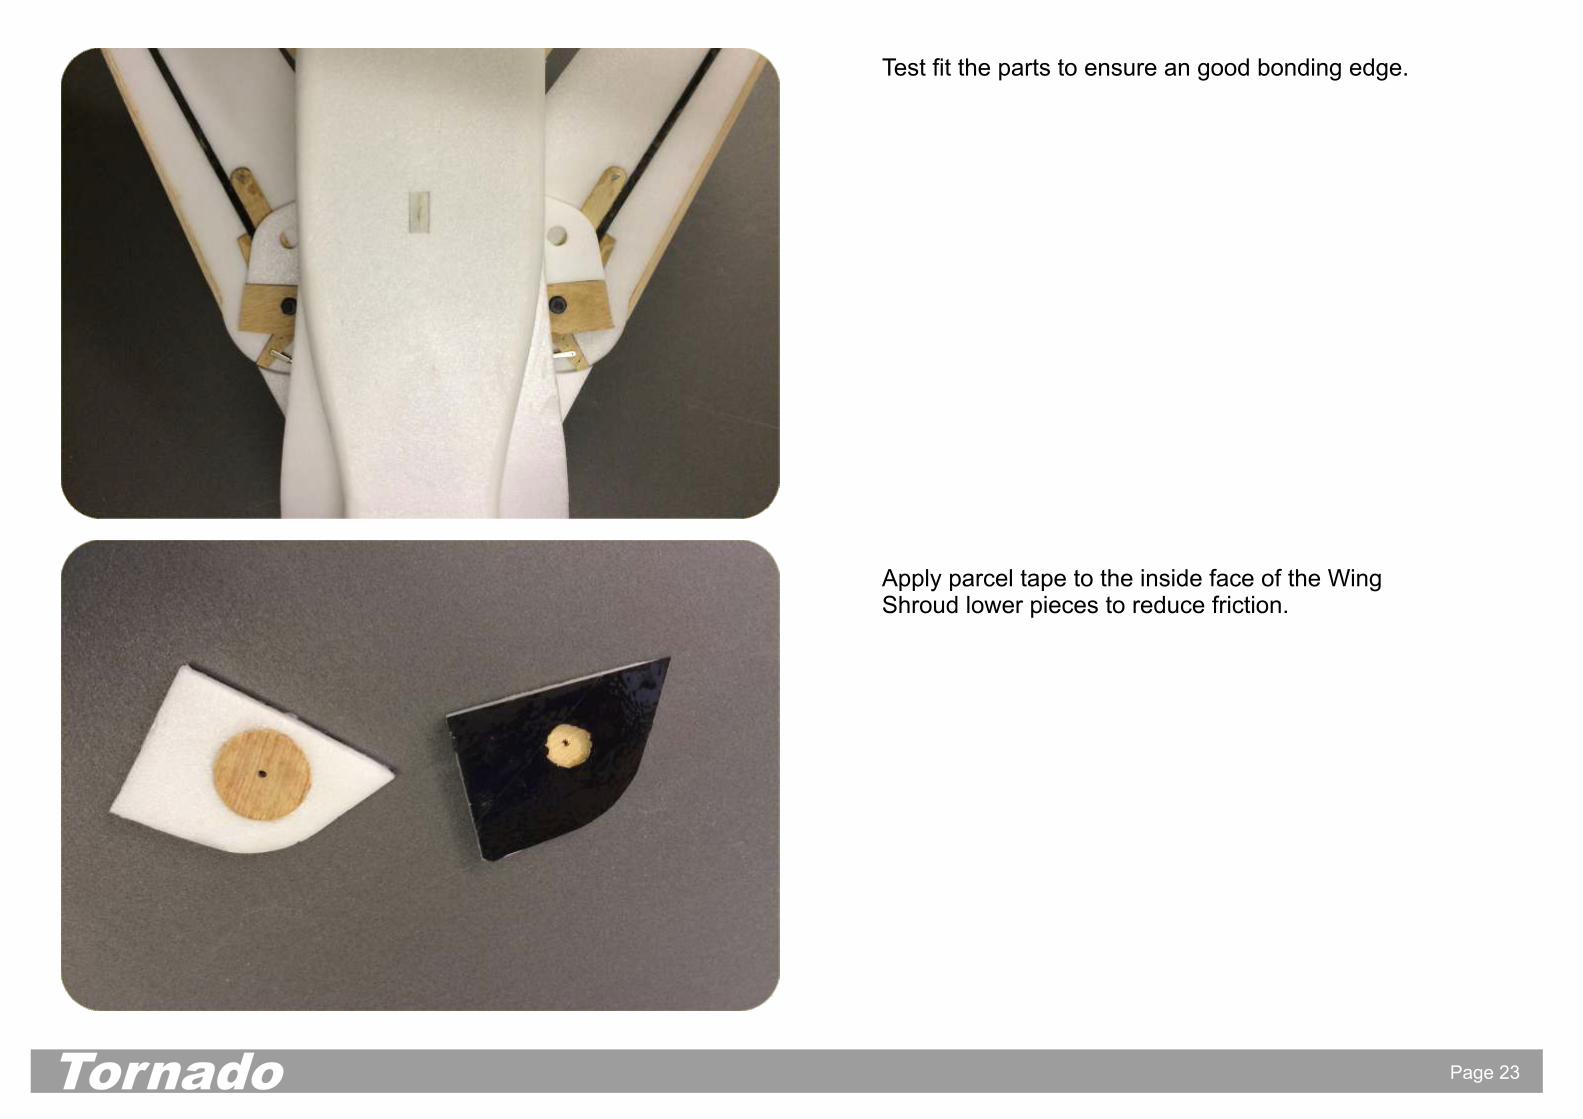
Test fit the parts to ensure an good bonding edge.
Apply parcel tape to the inside face of the Wing Shroud lower pieces to reduce friction.
Tornado
Page 24
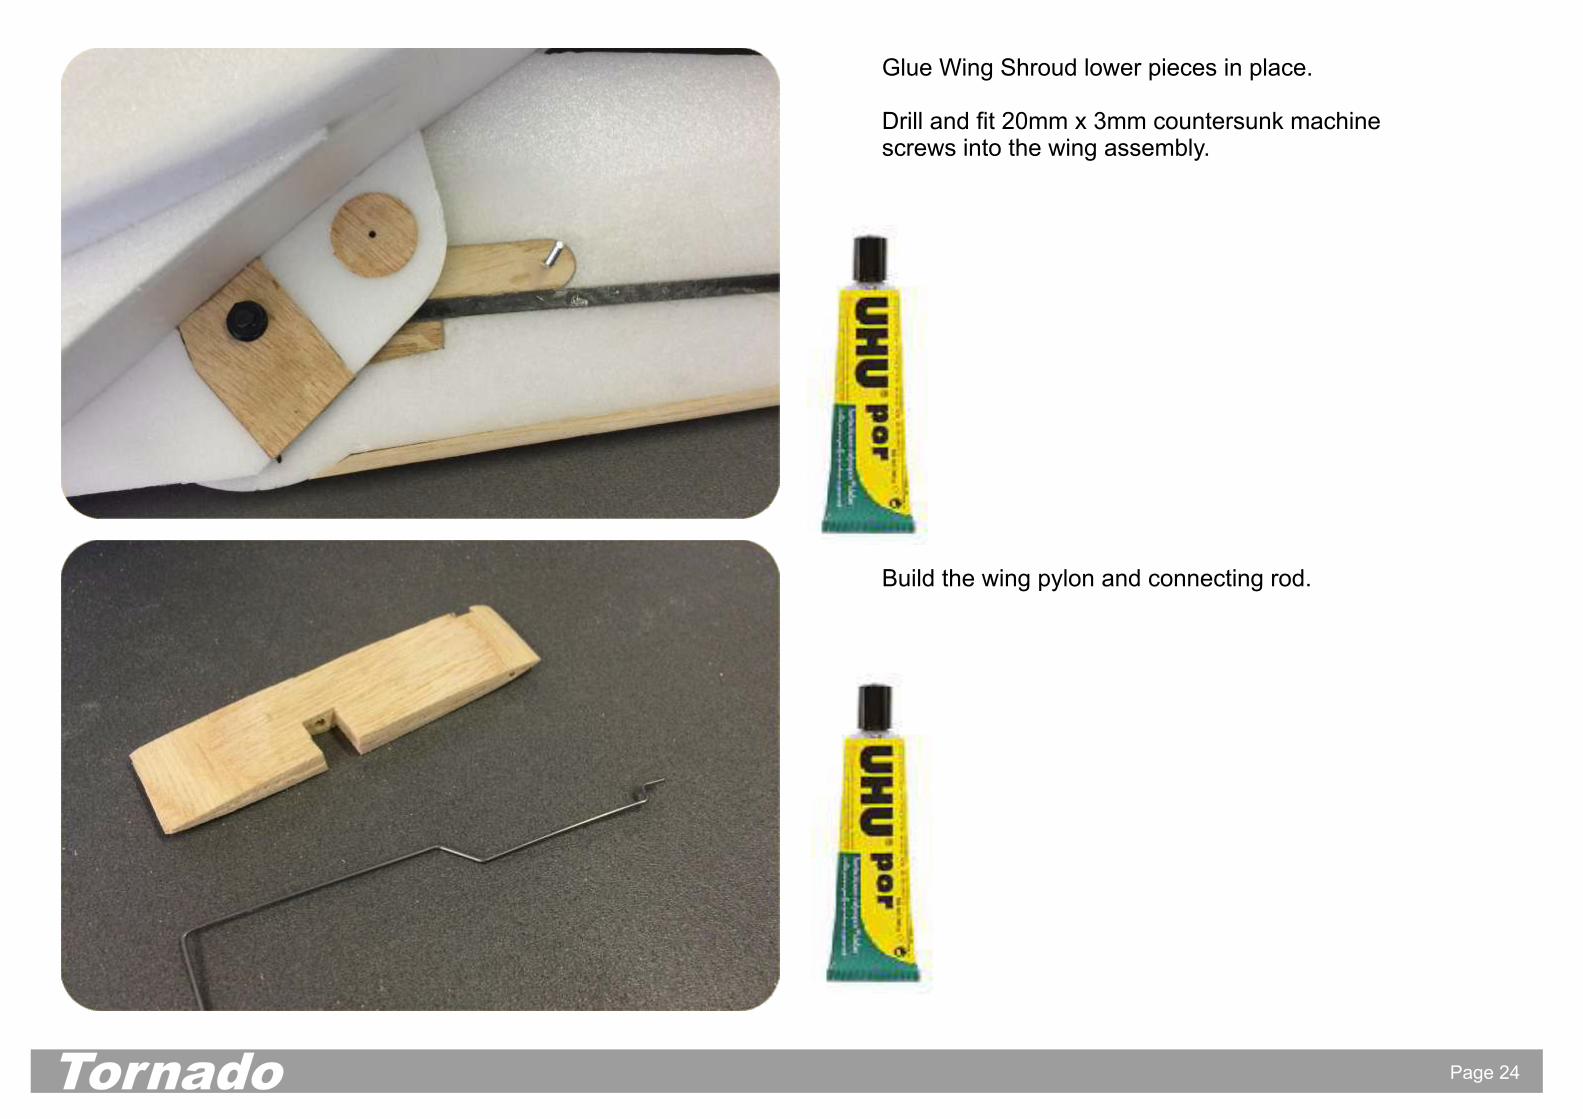
Glue Wing Shroud lower pieces in place.
Drill and fit 20mm x 3mm countersunk machine screws into the wing assembly.
Tornado
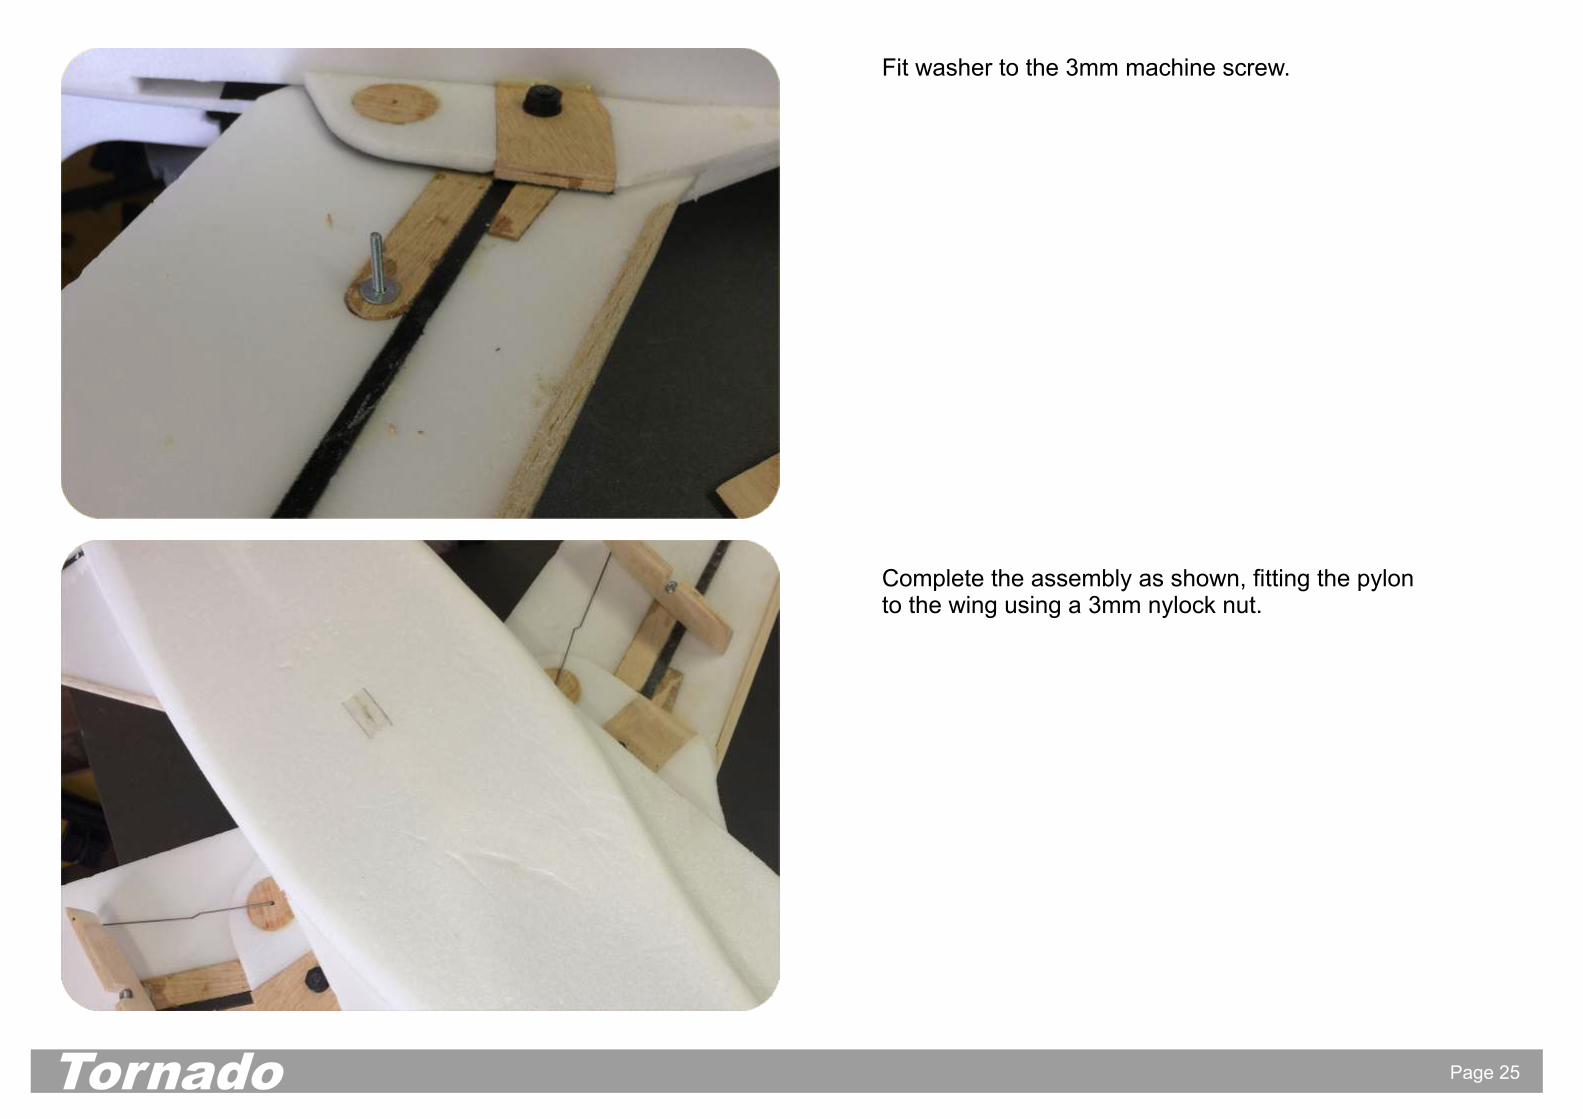
Build the wing pylon and connecting rod.
Page 25
Fit washer to the 3mm machine screw.
Tornado
Complete the assembly as shown, fitting the pylon to the wing using a 3mm nylock nut.
Page 26
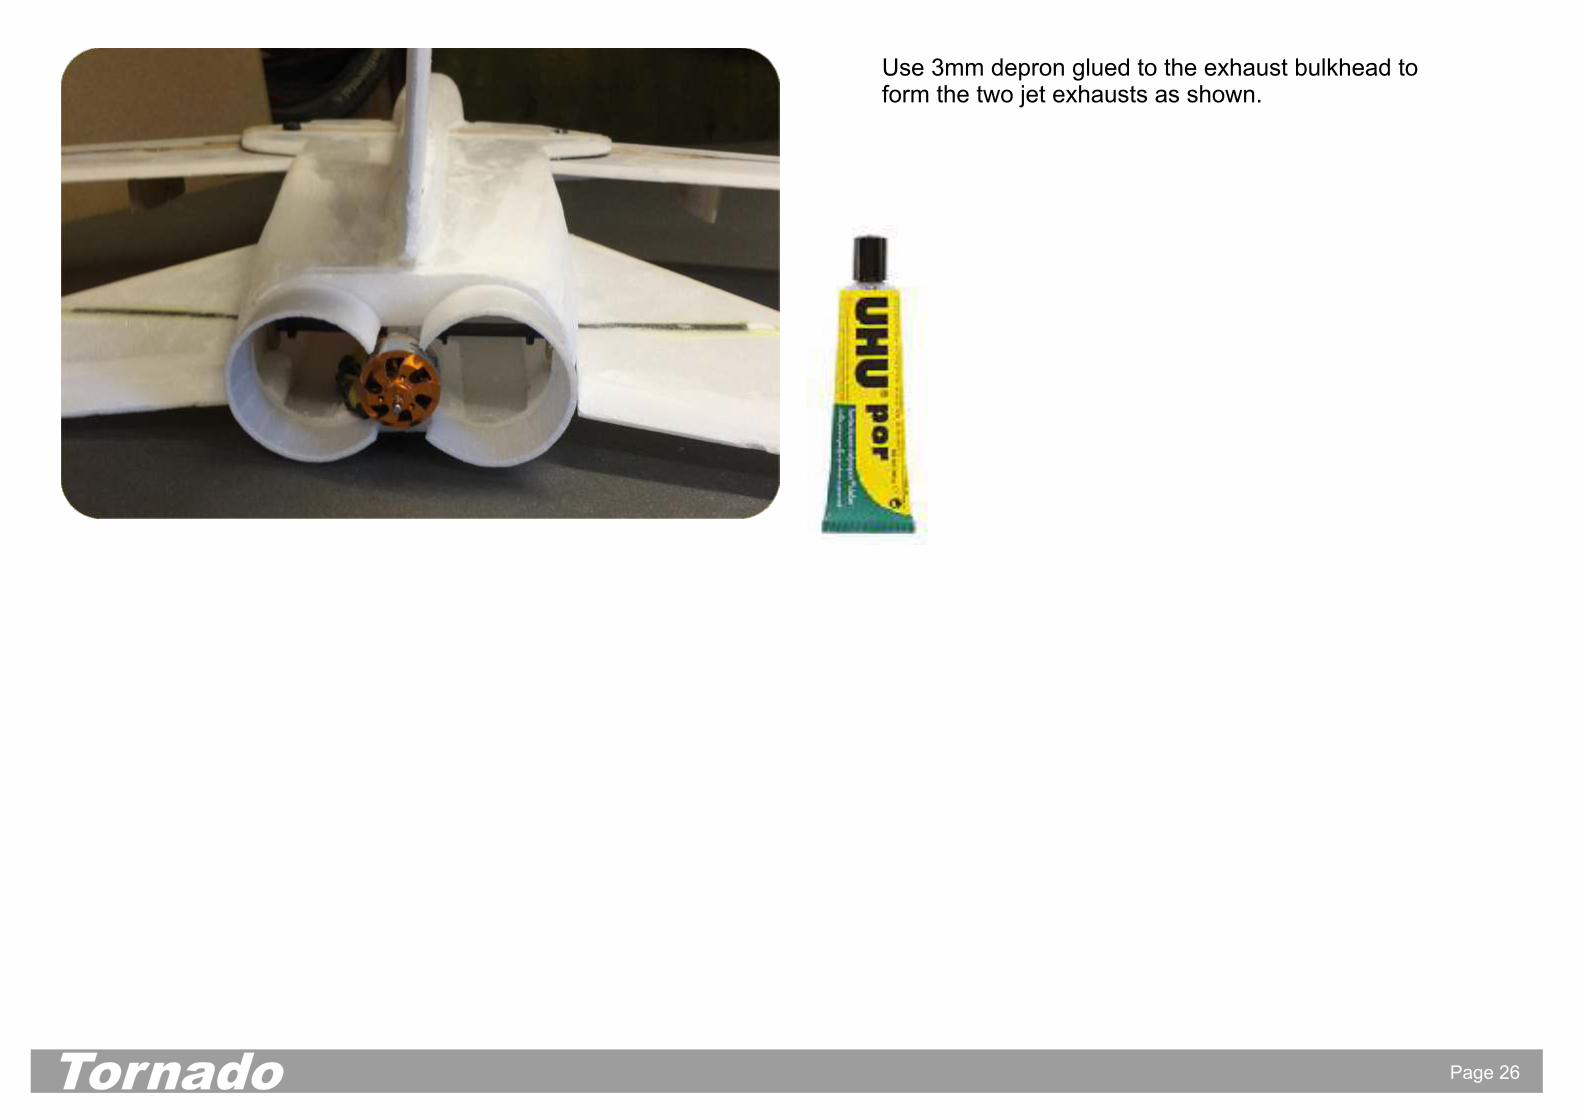
Use 3mm depron glued to the exhaust bulkhead to form the two jet exhausts as shown.
Tornado
Page 27
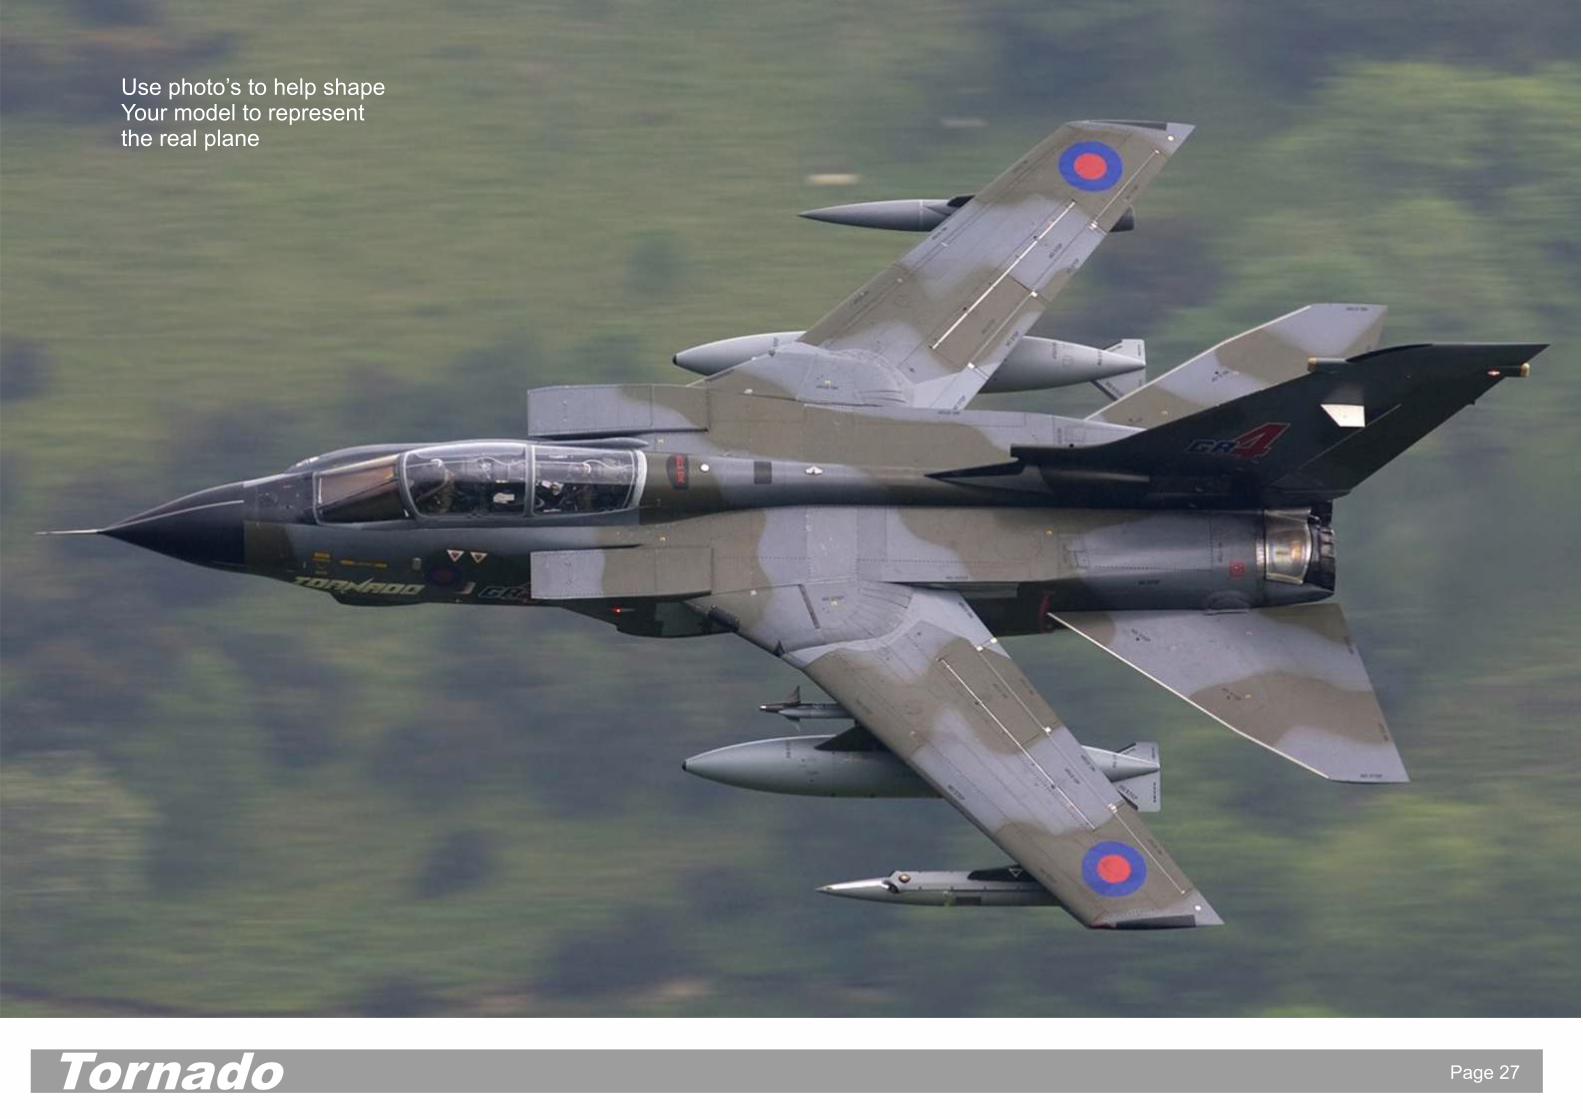
Use photo’s to help shape Your model to representthe real plane
Tornado