Embed Size (px)
DESCRIPTION
TortoiseSVN Subversion Cookbook Oracle
Citation preview

ISBN: 978-1-906434-97-7
TortoiseSVN and Subversion Cookbook
By Michael Sorens
I
TortoiseSVN and Subversion Cookbook
By Michael Sorens
First published by Simple Talk Publishing 2013
II
Copyright Michael Sorens 2013
ISBN: 978-1-906434-97-7
The right of Michael Sorens to be identified as the author of this work has been asserted by him in
accordance with the Copyright, Designs and Patents Act 1988.
All rights reserved. No part of this publication may be reproduced, stored or introduced into a retrieval
system, or transmitted, in any form, or by any means (electronic, mechanical, photocopying, recording
or otherwise) without the prior written consent of the publisher. Any person who does any unauthorized
act in relation to this publication may be liable to criminal prosecution and civil claims for damages.
This book is sold subject to the condition that it shall not, by way of trade or otherwise, be lent, re-sold,
hired out, or otherwise circulated without the publisher's prior consent in any form other than that in
which it is published and without a similar condition including this condition being imposed on the
subsequent publisher.
Editor: Andrew Clarke
Technical Review: William Brewer
Cover Image: Andy Martin
Contents
III
Contents Contents III
Foreword VIII
Introduction X
Chapter 1: The Basics 1
Meta-Recipes 1
Should you use source control? ................................................................................................... 1
Which source control system should you select? ......................................................................... 1
What will you get from reading this? ........................................................................................... 3
Initial Concepts 3
Checking out a working copy ....................................................................................................... 3
Working well with others ............................................................................................................ 4
Coping with a multi-user environment: the merge ...................................................................... 5
Handling multiple edits to the same line of a file: conflicts .......................................................... 6
The Art of the Commit 9
Understanding the two-stage process of Subversion ................................................................... 9
Grouping your files for reducing commit clutter: the change list ............................................... 10
Determining what to commit together: the change set ............................................................. 10
Committing in a huge project .................................................................................................... 12
Managing several unrelated changes ........................................................................................ 12
Chapter 2: File Operations and Subversion Filtering 15
File Operations and Subversion Filtering 15
Adding a file or folder to source control .................................................................................... 17
Deleting a file or folder from source control .............................................................................. 18
Moving or copying a file ............................................................................................................ 19
Contents
IV
Renaming a file ......................................................................................................................... 21
Filtering and Selection 23
Determining what to keep in source control.............................................................................. 23
Ignoring files locally and/or globally and what's the difference.................................................. 24
Ignoring files in a single directory .............................................................................................. 26
Ignoring files throughout your working copy ............................................................................. 26
Chapter 3: In, Out, and Around 29
Putting Things In 29
Setting up a new repository ...................................................................................................... 29
Grafting a subtree or importing a whole tree into a repository .................................................. 31
Taking Things Out 32
Copying a working copy without the .svn files ........................................................................... 32
Converting a working copy to an unversioned tree .................................................................... 33
Unversioning specific files ......................................................................................................... 34
Unversioning all files of a specific type (or other criteria) .......................................................... 34
Removing your working copy .................................................................................................... 34
Doing a sparse checkout ........................................................................................................... 35
Repository Concerns 36
Deploying Subversion for a single-user installation .................................................................... 36
Reconnecting to a relocated repository ..................................................................................... 36
Chapter 4: Sharing Common Code 37
Reusing common code 37
Connection Point (Local path) 39
Target Address (URL) 40
Revision numbers 43
Bug with file scheme 44
Chapter 5: Instrumenting Files with Version Information 46
Contents
V
Enabling keyword substitution in a file 47
Inserting the author, the revision, or other keywords when committing 48
Automatically enabling keyword expansion in new files 49
Keeping your keyword expansions to fixed widths 50
Finding keyword anomalies 51
Troubleshooting why keyword expansion fails 56
Chapter 6: Snapshots 58
Managing Labels 60
Labeling the latest revision as a release ..................................................................................... 60
Labeling an earlier revision as a release..................................................................................... 61
Labeling by bits and pieces ........................................................................................................ 61
Moving a Tag ............................................................................................................................ 61
Adjusting your World View with Labels and Revisions 62
Restoring your environment to a labeled revision ..................................................................... 62
Restoring your environment to an unlabeled revision ............................................................... 63
Understanding the difference between switch and update ....................................................... 63
Understanding the difference between revert and update ........................................................ 64
Returning to the present from a previous revision .................................................................... 64
Chapter 7: Managing Revisions 65
Working Copies and Revisions 65
Identifying the current revision ................................................................................................. 65
Determining if a working copy is up to date .............................................................................. 69
Understanding mixed revisions and current revision ................................................................. 71
Working on two copies of the same revision at the same time .................................................. 74
Working on two different revisions at the same time ................................................................ 74
Selective Updating and Notification 74
Refreshing selected files from the repository ............................................................................ 74
Contents
VI
Receiving notification when selected files are updated .............................................................. 75
Receiving notification when any file is updated ......................................................................... 75
Key points of Commit Monitor: 76
Chapter 8: Log Messages 77
Justifying requiring log messages .............................................................................................. 77
Making log messages required .................................................................................................. 78
Finding commits with empty messages ..................................................................................... 78
Making log messages editable ................................................................................................... 79
Editing a log message ................................................................................................................ 79
Linking log messages to your bug tracking system ..................................................................... 80
Linking log messages to your bug tracking system (Setup) ......................................................... 82
Linking log messages to other log messages .............................................................................. 85
Chapter 9: Server, Repository, and Statistics 87
Setting up a Subversion server 87
Single User ................................................................................................................................ 87
Single User or Small Installation ................................................................................................ 87
Large Installation ...................................................................................................................... 88
Browsing your repository with TortoiseSVN 92
Browsing your repository with a web browser 93
Viewing Subversion Statistics 95
Chapter 10: Extending the reach of Subversion 98
Introduction 98
Enter Source Control for Oracle 98
Subversion Commands 100
SVN Commit............................................................................................................................ 101
SVN Check for Modifications and SVN Update ......................................................................... 102
SVN Show Log ......................................................................................................................... 103

Contents
VII
SVN Diff .................................................................................................................................. 106
SVN Resolve ............................................................................................................................ 106
Other Considerations 108
Foreword
VIII
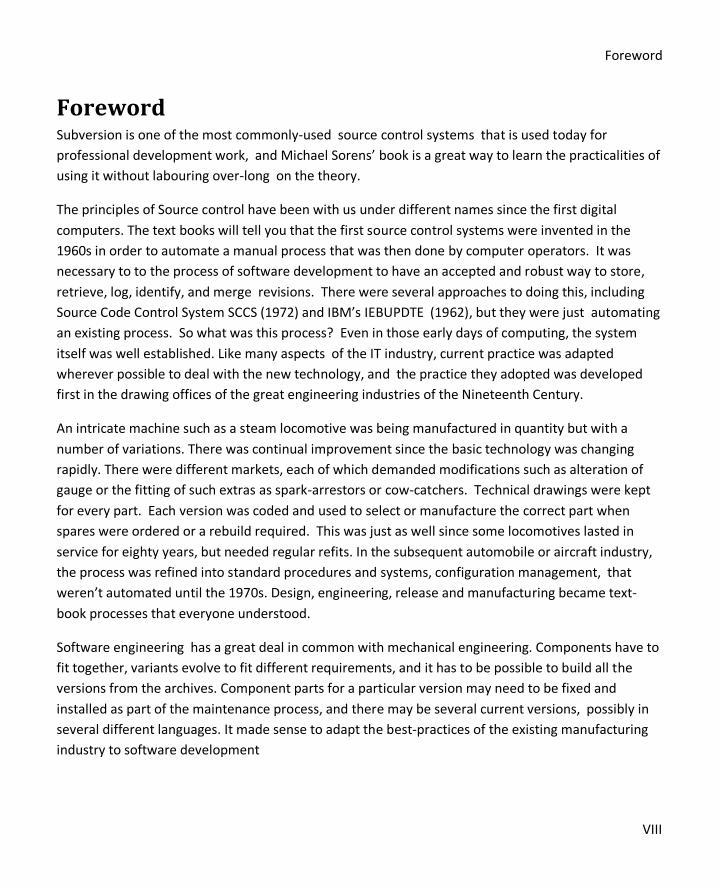
Foreword Subversion is one of the most commonly-used source control systems that is used today for
professional development work, and Michael Sorens’ book is a great way to learn the practicalities of
using it without labouring over-long on the theory.
The principles of Source control have been with us under different names since the first digital
computers. The text books will tell you that the first source control systems were invented in the
1960s in order to automate a manual process that was then done by computer operators. It was
necessary to to the process of software development to have an accepted and robust way to store,
retrieve, log, identify, and merge revisions. There were several approaches to doing this, including
Source Code Control System SCCS (1972) and IBM’s IEBUPDTE (1962), but they were just automating
an existing process. So what was this process? Even in those early days of computing, the system
itself was well established. Like many aspects of the IT industry, current practice was adapted
wherever possible to deal with the new technology, and the practice they adopted was developed
first in the drawing offices of the great engineering industries of the Nineteenth Century.
An intricate machine such as a steam locomotive was being manufactured in quantity but with a
number of variations. There was continual improvement since the basic technology was changing
rapidly. There were different markets, each of which demanded modifications such as alteration of
gauge or the fitting of such extras as spark-arrestors or cow-catchers. Technical drawings were kept
for every part. Each version was coded and used to select or manufacture the correct part when
spares were ordered or a rebuild required. This was just as well since some locomotives lasted in
service for eighty years, but needed regular refits. In the subsequent automobile or aircraft industry,
the process was refined into standard procedures and systems, configuration management, that
weren’t automated until the 1970s. Design, engineering, release and manufacturing became text-
book processes that everyone understood.
Software engineering has a great deal in common with mechanical engineering. Components have to
fit together, variants evolve to fit different requirements, and it has to be possible to build all the
versions from the archives. Component parts for a particular version may need to be fixed and
installed as part of the maintenance process, and there may be several current versions, possibly in
several different languages. It made sense to adapt the best-practices of the existing manufacturing
industry to software development
Foreword
IX
The variants of the original SCCS were replaced by Revision Control System (RCS) in 1982. This was a
very limited system that could only deal with a single file. It was replaced by CVS and PRCS. One of
the more popular proprietary systems for use in the late eighties and early nineties was PVCS
SubVersion ended the domination of the once-ubiquitous CVS source-control system, by
maintaining the old ‘lock’ method of preventing two concurrent users from editing the same file and
thereby knocking heads, but at the same time legitimised the ‘merge’. This made it easier to do
team-working, and to implement branching and tagging. It still remains the most widely –used
system for source-controlling software.
A good working knowledge of Subversion is essential for a professional programmer, even now that
distributed version control has become more fashionable. This is why Michael’s book is so useful. It
allows the practitioner to do what is necessary to develop software without demanding too much in
the way of intellectual involvement in an abstruse and occasionally-frustrating technology. His work
has released us from subservience to Subversion .
Phil Factor 2013
Introduction
X
Introduction Readers of Simple-Talk.com may find the contents of this book familiar. I started writing a series on
TortoiseSVN and Subversion for Simple-Talk.com a bit over a year ago. Part 11 was just published
so—you can do the math, of course—new installments have been appearing every 4 to 6 weeks on
average. Due to reader support and encouragement, the editors at Simple-Talk.com thought it
worthwhile to compile everything published to date into the compendium you now have in front of
you. (By the way, check back on my article list on Simple-Talk.com now and again; I have several
more chapters in the works.)
Both TortoiseSVN and Subversion have very good reference books available from the people who
write the software. So why another Subversion book? This book is, like the title says, a cookbook
rather than a reference. It is literally a collection of recipes; it is designed to help you do things you
already know how to do better or faster, as well as to do things you never knew you could do with
TortoiseSVN or Subversion. And if you are new to Subversion or—heaven forbid!—new to source
control completely, this book will give you a good perspective on what Subversion as a source control
solution has to offer. That is not to say that Subversion is the best choice for source control, primarily
because there is no “best” choice to fit everyone. You need to decide what is best for your situation
starting with the choice of centralized vs. distributed source control discussed in Chapter 1.
Thanks to the great team at Red Gate Software for their foresight in providing the resources of
Simple-Talk.com to the community. Thanks also to my diligent editor, Andrew Clarke, for keeping me
from wandering too far afield and making my words resonate more strongly. Last but not least,
thanks to you, dear reader, for helping to make this book a reality.
~~Michael Sorens
April 2013
Chapter 1: The Basics
1
Chapter 1: The Basics
Meta-Recipes
Should you use source control?
“Yes”.
No equivocation. No conditions. No ifs, ands, or buts: Just ‘Yes’.
More often than not in computing, black and white answers dissolve to shades of grey on closer inspection:
Not so with the question of whether to use source control. No matter the size of your development team, you
should use source control. StackOverflow offers a wealth of supporting material if you need to convince
yourself, your manager, or your colleagues. Here are a few of the more poignant comments from Is
Subversion (Version Control) Necessary For A Small Development Group (1-2 programmers)? on
StackOverflow:
Version control is only necessary where the number of programmers is > 0. – Murph
Version Control is the most important tool that a programmer has, even more important
than the actual programming languages. – David Lambert
Not having some sort of source control is pure insanity. – 17 of 26
These statements serve to illustrate how overwhelmingly clear the answer to the question is. The discussion
for ‘Why should my team adopt source control?’, on the other hand, gives you page after page of
reasons why the answer is clear, including multiple-release support, rollback capability, diagnostic capability,
traceability, backups, and more. And as several posts point out, you are probably already using source control
even if you have not installed a source control system. Saving a copy of your work folder
as work_save or work_bak or work-05-21-2011 is source control, just not very good source control!
To be fair, I also urge you to take a look at Good excuses NOT to use version control. You will get quite a
chuckle from the posts there, I assure you!
Which source control system should you select?
Obviously I think Subversion is a great system, otherwise I would not have invested the time and energy in
writing what you are reading; but it is not necessarily the best choice for you. If you know what specific
Chapter 1: The Basics
2
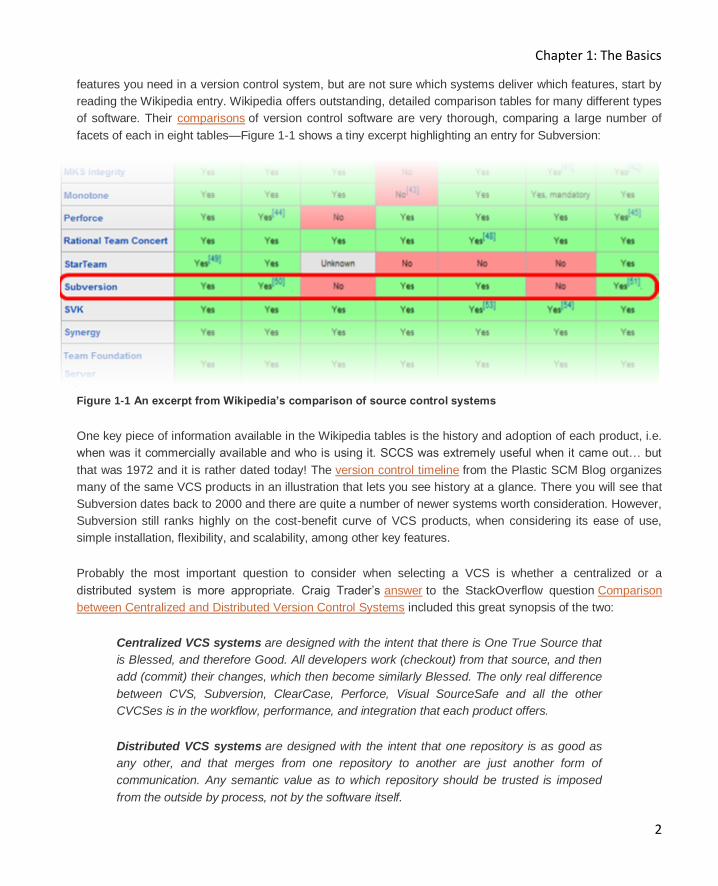
features you need in a version control system, but are not sure which systems deliver which features, start by
reading the Wikipedia entry. Wikipedia offers outstanding, detailed comparison tables for many different types
of software. Their comparisons of version control software are very thorough, comparing a large number of
facets of each in eight tables—Figure 1-1 shows a tiny excerpt highlighting an entry for Subversion:
Figure 1-1 An excerpt from Wikipedia’s comparison of source control systems
One key piece of information available in the Wikipedia tables is the history and adoption of each product, i.e.
when was it commercially available and who is using it. SCCS was extremely useful when it came out… but
that was 1972 and it is rather dated today! The version control timeline from the Plastic SCM Blog organizes
many of the same VCS products in an illustration that lets you see history at a glance. There you will see that
Subversion dates back to 2000 and there are quite a number of newer systems worth consideration. However,
Subversion still ranks highly on the cost-benefit curve of VCS products, when considering its ease of use,
simple installation, flexibility, and scalability, among other key features.
Probably the most important question to consider when selecting a VCS is whether a centralized or a
distributed system is more appropriate. Craig Trader’s answer to the StackOverflow question Comparison
between Centralized and Distributed Version Control Systems included this great synopsis of the two:
Centralized VCS systems are designed with the intent that there is One True Source that
is Blessed, and therefore Good. All developers work (checkout) from that source, and then
add (commit) their changes, which then become similarly Blessed. The only real difference
between CVS, Subversion, ClearCase, Perforce, Visual SourceSafe and all the other
CVCSes is in the workflow, performance, and integration that each product offers.
Distributed VCS systems are designed with the intent that one repository is as good as
any other, and that merges from one repository to another are just another form of
communication. Any semantic value as to which repository should be trusted is imposed
from the outside by process, not by the software itself.
Chapter 1: The Basics
3
A later response to the same question shows that Subversion is the major player in the former category and
Mercurial in the latter. So if you think a centralized VCS might be a good fit, you may find the recipes in this
cookbook to be quite handy!
What will you get from reading this?
What you will find is a collection of practical recipes to help you navigate through the occasionally subtle
complexities of source control with Subversion. The title mentions both Subversion and TortoiseSVN because,
though Subversion is the foundation, the main focus is on using the elegant, clean, interface of TortoiseSVN.
To be sure, though, there are some recipes that discuss operations from both a GUI perspective and from the
standpoint of Subversion’s command line. There are even some recipes that dive deep into command line
territory supplemented by PowerShell scripts to allow you to tease great things out of Subversion. Later
chapters cover other tools that supplement TortoiseSVN and Subversion; tools such as AnkhSVN for
integrating Subversion into Visual Studio and SQL Source Control or Source Control for Oracle for easily
keeping your database in Subversion source control.
There are two other outstanding resources you should refer to in your explorations of Subversion:
O’Reilly’s Version Control with Subversion, available free at the link provided, and the TortoiseSVN Manual,
which is a great reference for the GUI application. This cookbook does not replace either of those; indeed, you
will find copious references to both of those (hereinafter referred to as the Subversion book and
the TortoiseSVN book, respectively). The issue is that both of those are primarily references; this cookbook
takes a different perspective, focusing on the tasks you need to accomplish and helping you do so efficiently
and effectively.
Subversion is reasonably easy to use from the command line; however, the graphical front end provided by
TortoiseSVN makes it downright simple to use for most day-to-day tasks. So why the two voluminous
reference books I’ve mentioned as well as the cookbook you are now reading? As with many things, the
practice is not just a bit more complicated than the theory but when you truly need to appreciate all aspects of
the problem, it is a lot more. This cookbook brings theory and practice together into a cohesive whole;
consider this the GUI of the Subversion references!
Initial Concepts
Checking out a working copy
To start working on a project in Subversion you first checkout the project to your local machine creating
a working copy. Unlike some source control systems, Subversion uses a non-locking strategy. With
a locking strategy, when you checkout a file it is locked, preventing other users from editing the same file.
Once you complete your modifications you commit it back to the repository, releasing the lock. Subversion, on
the other hand, allows simultaneous editing of a file: your checkout is completely transparent to other users on
your project.
Chapter 1: The Basics
4
To perform a checkout, simply use Windows Explorer (or equivalent), to select a directory where you wish to
load the files, open the context menu, and select SVN Checkout. Note that a checkout is a one-time
operation: you check out to an ordinary, non-Subversion-aware directory. If you try to checkout to an existing
Subversion-aware directory, you cannot: the checkout command will not be on your context menu. (Thanks to
the question TortoiseSVN Missing Checkout from Context Menu on StackOverflow.)
The checkout dialog, by default, checks out the entire subtree rooted at the repository URL you specify.
However, you can selectively checkout a subset if you do not want to pull down an entire project.
See Checking out a Working Copy in the TortoiseSVN book for details on specifying checkout depth.
Working well with others
Once you have checked out your project, you are free to edit whatever files in the project you need for a
particular task. When you have completed the task you commit the file or files back to the repository (SVN
Commit). The commit operation publishes your local changes to the repository, at which point they are
exposed to other users of your project.
If you are the only developer on a project then that is all you need to do. In the real world, however, other
people are also making changes to the repository at the same time as you. Furthermore, except in the very
rare case where you have just checked out the project for the first time and made a quick edit, time will have
passed between your initial checkout and the point at which you need to begin editing a file. Because of
commits from other users in the meantime, you are likely to have a stale copy (point 1 in Figure 1-2). To
ensure that you are always working on a current version of a file, use the SVN Update command to freshen
your working copy immediately before you begin (point 2).
“Never do a commit in isolation;
treat [SVN update/manually verify/SVN commit] as an atomic operation.”
You should also use SVN Update periodically as you work (red arrows), assuming your edits span some
considerable period of time. As you reach appropriate milestones you may want to release your work to your
project members via SVN Commit. But before you do, you should again ensure that your copy is not stale.
That is, you should perform an SVN Update to merge in any changes that other developers may have
committed while you were working on your changes (point 3). Once you have done the update you must then
confirm that any merged changes do not interfere with any of your pending changes and then commit your
changes (point 4). Good practice dictates you abide by this cardinal rule: Never do a commit in isolation;
treat [SVN update/manually verify/SVN commit] as an atomic operation.
Chapter 1: The Basics
5
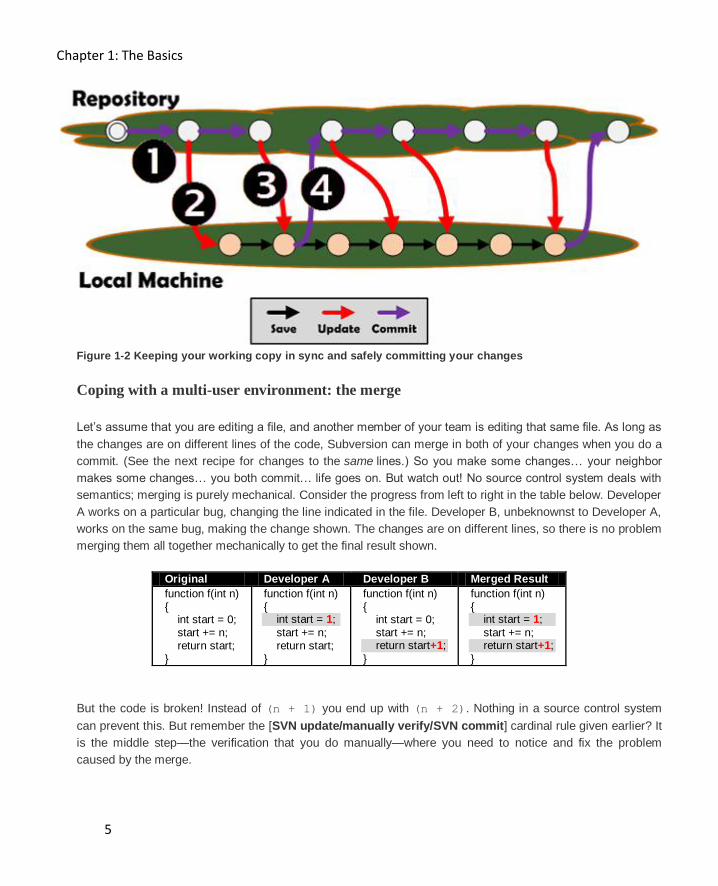
Figure 1-2 Keeping your working copy in sync and safely committing your changes
Coping with a multi-user environment: the merge
Let’s assume that you are editing a file, and another member of your team is editing that same file. As long as
the changes are on different lines of the code, Subversion can merge in both of your changes when you do a
commit. (See the next recipe for changes to the same lines.) So you make some changes… your neighbor
makes some changes… you both commit… life goes on. But watch out! No source control system deals with
semantics; merging is purely mechanical. Consider the progress from left to right in the table below. Developer
A works on a particular bug, changing the line indicated in the file. Developer B, unbeknownst to Developer A,
works on the same bug, making the change shown. The changes are on different lines, so there is no problem
merging them all together mechanically to get the final result shown.
Original Developer A Developer B Merged Result
function f(int n) { int start = 0; start += n; return start; }
function f(int n) { int start = 1;
start += n; return start; }
function f(int n) { int start = 0; start += n; return start+1;
}
function f(int n) { int start = 1;
start += n; return start+1;
}
But the code is broken! Instead of (n + 1) you end up with (n + 2). Nothing in a source control system
can prevent this. But remember the [SVN update/manually verify/SVN commit] cardinal rule given earlier? It
is the middle step—the verification that you do manually—where you need to notice and fix the problem
caused by the merge.
Chapter 1: The Basics
6
(Thanks to the question Why did TortoiseSVN merge a file and not conflict it? on StackOverflow for
inspiration.)
Handling multiple edits to the same line of a file: conflicts
If you are editing a file that another team member is editing, then you have the potential for conflicts. As the
previous recipe showed, if you and your neighbor are working on unrelated lines in the file, you can both
commit your changes without conflict, though you need to be careful to ensure the code semantics are not
corrupted. If you are working on one or more lines in common, the first person to commit will sail through
unscathed (point 1 in figure 1-3). The second person who attempts to commit receives a warning that the file is
out of date and an update is required before you can commit (point 2). Finally, when you do the update, it
reports a conflict on the file (point 3).
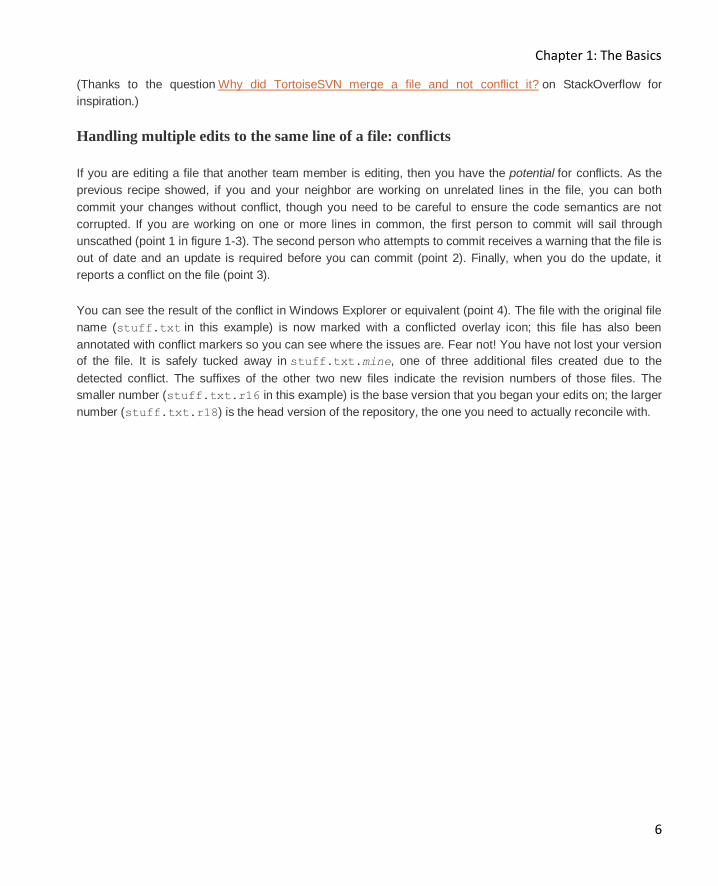
You can see the result of the conflict in Windows Explorer or equivalent (point 4). The file with the original file
name (stuff.txt in this example) is now marked with a conflicted overlay icon; this file has also been
annotated with conflict markers so you can see where the issues are. Fear not! You have not lost your version
of the file. It is safely tucked away in stuff.txt.mine, one of three additional files created due to the
detected conflict. The suffixes of the other two new files indicate the revision numbers of those files. The
smaller number (stuff.txt.r16 in this example) is the base version that you began your edits on; the larger
number (stuff.txt.r18) is the head version of the repository, the one you need to actually reconcile with.

Chapter 1: The Basics
7
Chapter 1: The Basics
8
Figure 1-3 Multiple editors on the same portion of a file. (1) First committer succeeds. (2) Second commit
attempt fails. (3) Updating to sync with first commit reveals a conflict requiring manual resolution(4).
In order to reconcile the difference, you need to open the context menu on the conflicted file (stuff.txt) and
select TortoiseSVN >> Edit Conflicts. This launches either TortoiseMerge or your custom-configured
merging tool. Once you manually examine and resolve each difference, save the file, then
execute TortoiseSVN >> Resolved… to open the Resolve dialog. You can then just select the OK button
since you have already resolved the issues.
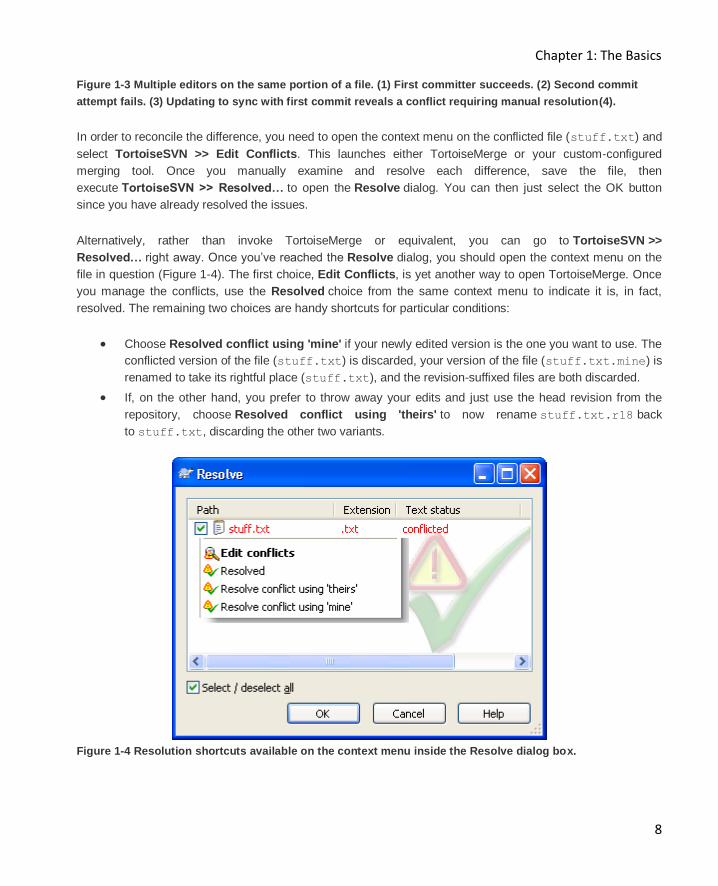
Alternatively, rather than invoke TortoiseMerge or equivalent, you can go to TortoiseSVN >>
Resolved… right away. Once you’ve reached the Resolve dialog, you should open the context menu on the
file in question (Figure 1-4). The first choice, Edit Conflicts, is yet another way to open TortoiseMerge. Once
you manage the conflicts, use the Resolved choice from the same context menu to indicate it is, in fact,
resolved. The remaining two choices are handy shortcuts for particular conditions:
Choose Resolved conflict using 'mine' if your newly edited version is the one you want to use. The
conflicted version of the file (stuff.txt) is discarded, your version of the file (stuff.txt.mine) is
renamed to take its rightful place (stuff.txt), and the revision-suffixed files are both discarded.
If, on the other hand, you prefer to throw away your edits and just use the head revision from the
repository, choose Resolved conflict using 'theirs' to now rename stuff.txt.r18 back
to stuff.txt, discarding the other two variants.
Figure 1-4 Resolution shortcuts available on the context menu inside the Resolve dialog box.
Chapter 1: The Basics
9
See File Conflicts in the TortoiseSVN book for more on files. Tree conflicts are much more involved; the
TortoiseSVN book presents exhaustive detail on those so no need to repeat it here.
The Art of the Commit
Understanding the two-stage process of Subversion
Unless you are working directly in the repository browser, everything in Subversion is a two-stage
process: first you make changes in your working copy; then you publish those changes to the repository. This
becomes immediately obvious if I use the example of editing a single file.
“Outside of the repository browser, everything in Subversion is a two-stage process: first you make
changes in your working copy; then you publish those changes to the repository.”
In your editor you make changes to a file and save the file. Saving is not the same as committing to
Subversion. In order for the world to see your changes, you must perform a second step of committing your
file. In other words you edit, and then you commit. Both steps are noticed by Subversion: if you look at your file
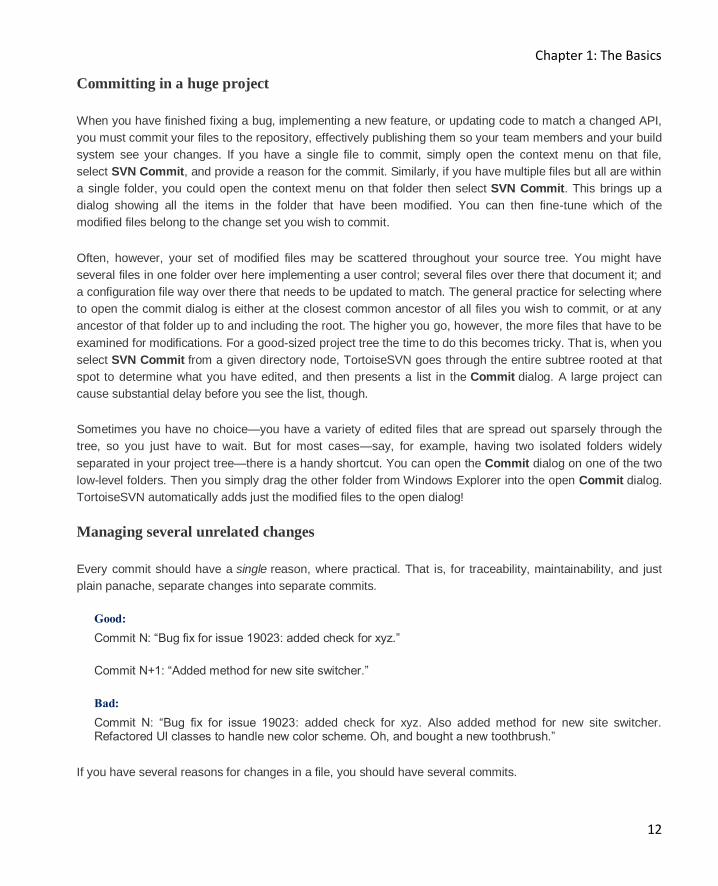
in Windows Explorer or equivalent, you’ll see that Subversion marks your file as current before your
edit, tainted after you edit, and current again once you commit (Figure 1-5).
Figure 1-5 The Subversion Two-Step: Perform an action on your working copy and the icon overlay changes
from current to out-of-date. Committing brings the working copy of this object back to current.
This two-stage process doesn’t just apply to editing files but to any file operations including adding, deleting,
moving, changing properties, etc. That is, you add a file to Subversion then you commit. Or you delete a file
from Subversion then you commit. It’s important to realize that operations like editing, adding, deleting,
moving, and so forth are local ones. This has two important repercussions: you can cancel or revert any such
Chapter 1: The Basics
10
operation without touching the repository, and you can assemble a change set incrementally. See the
recipe Determining what to commit together: the change set for more on change sets.
Grouping your files for reducing commit clutter: the change list
If you are working on several unrelated tasks at once, you’ll see that all of your changed files appear, by
default, intermixed in one long list when you open either the Commit dialog or the Check for
Modifications dialog. TortoiseSVN provides change lists to help reduce or eliminate this clutter by letting you
create logical file groupings. These groupings exist on your local machine only; they are completely
transparent to the repository. The groupings may be temporary (the default) or permanent; to get the latter you
need to check the Keep changelists option at the bottom of the dialog.
To create a change list, select one or more files inside the Commit dialog or the Check for
Modifications dialog; open the context menu, and select the Move to Changelist menu choice. To start a
new change list, select the<new changelist> choice. To add to an existing one, simply choose its name.
There is one changelist provided by default, called ignore-on-commit. Normally when you open
the Commit dialog, TortoiseSVN automatically selects all files that have been modified. Any files that you
have added to the ignore-on-commit change list, however, will not be selected by default. They are still listed
and still have associated checkboxes, so you are free to add them in if desired. This change list, though, is for
those types of files that may frequently change but you do not want to commit every time (user configuration
files, for example).
See Change Lists in the TortoiseSVN book for further details.
Determining what to commit together: the change set
A change list, as described in the previous recipe, is a Subversion-specific term. A change set, on the other
hand, is not specific to Subversion but rather applies to source control systems in general. To couch it in
Subversion terminology: a change set is a collection of changes comprising a single commit resulting in a new
revision to the repository.
How many files should be in a change set? Just enough. Each commit should have a reason.
“Each Subversion revision should exist for a unique reason; a committed log message should be used only
once… build a change set consisting of all files connected to a single reason and commit them together.”
Chapter 1: The Basics
11
Collect all files that you modified because of reason R and commit them as a single change set. That is, do not
commit changes in one folder with reason R followed by another commit for changes in another folder with
reason R just because they are in separate folders. Each Subversion revision should exist for a unique
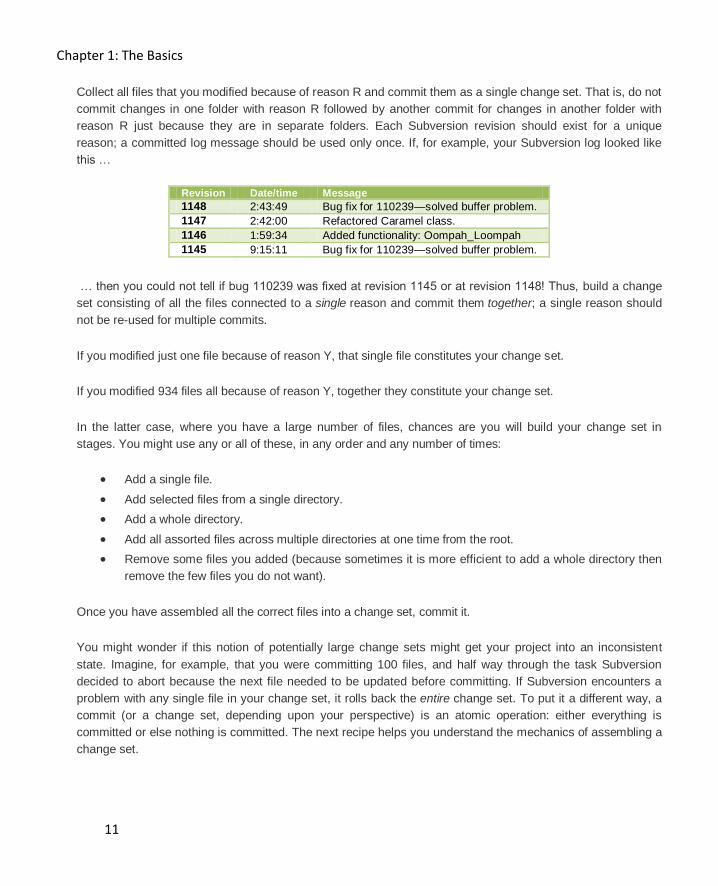
reason; a committed log message should be used only once. If, for example, your Subversion log looked like
this …
Revision Date/time Message
1148 2:43:49 Bug fix for 110239—solved buffer problem.
1147 2:42:00 Refactored Caramel class.
1146 1:59:34 Added functionality: Oompah_Loompah
1145 9:15:11 Bug fix for 110239—solved buffer problem.
… then you could not tell if bug 110239 was fixed at revision 1145 or at revision 1148! Thus, build a change
set consisting of all the files connected to a single reason and commit them together; a single reason should
not be re-used for multiple commits.
If you modified just one file because of reason Y, that single file constitutes your change set.
If you modified 934 files all because of reason Y, together they constitute your change set.
In the latter case, where you have a large number of files, chances are you will build your change set in
stages. You might use any or all of these, in any order and any number of times:
Add a single file.
Add selected files from a single directory.
Add a whole directory.
Add all assorted files across multiple directories at one time from the root.
Remove some files you added (because sometimes it is more efficient to add a whole directory then
remove the few files you do not want).
Once you have assembled all the correct files into a change set, commit it.
You might wonder if this notion of potentially large change sets might get your project into an inconsistent
state. Imagine, for example, that you were committing 100 files, and half way through the task Subversion
decided to abort because the next file needed to be updated before committing. If Subversion encounters a
problem with any single file in your change set, it rolls back the entire change set. To put it a different way, a
commit (or a change set, depending upon your perspective) is an atomic operation: either everything is
committed or else nothing is committed. The next recipe helps you understand the mechanics of assembling a
change set.
Chapter 1: The Basics
12
Committing in a huge project
When you have finished fixing a bug, implementing a new feature, or updating code to match a changed API,
you must commit your files to the repository, effectively publishing them so your team members and your build
system see your changes. If you have a single file to commit, simply open the context menu on that file,
select SVN Commit, and provide a reason for the commit. Similarly, if you have multiple files but all are within
a single folder, you could open the context menu on that folder then select SVN Commit. This brings up a
dialog showing all the items in the folder that have been modified. You can then fine-tune which of the
modified files belong to the change set you wish to commit.
Often, however, your set of modified files may be scattered throughout your source tree. You might have
several files in one folder over here implementing a user control; several files over there that document it; and
a configuration file way over there that needs to be updated to match. The general practice for selecting where
to open the commit dialog is either at the closest common ancestor of all files you wish to commit, or at any
ancestor of that folder up to and including the root. The higher you go, however, the more files that have to be
examined for modifications. For a good-sized project tree the time to do this becomes tricky. That is, when you
select SVN Commit from a given directory node, TortoiseSVN goes through the entire subtree rooted at that
spot to determine what you have edited, and then presents a list in the Commit dialog. A large project can
cause substantial delay before you see the list, though.
Sometimes you have no choice—you have a variety of edited files that are spread out sparsely through the
tree, so you just have to wait. But for most cases—say, for example, having two isolated folders widely
separated in your project tree—there is a handy shortcut. You can open the Commit dialog on one of the two
low-level folders. Then you simply drag the other folder from Windows Explorer into the open Commit dialog.
TortoiseSVN automatically adds just the modified files to the open dialog!
Managing several unrelated changes
Every commit should have a single reason, where practical. That is, for traceability, maintainability, and just
plain panache, separate changes into separate commits.
Good:
Commit N: “Bug fix for issue 19023: added check for xyz.”
Commit N+1: “Added method for new site switcher.”
Bad:
Commit N: “Bug fix for issue 19023: added check for xyz. Also added method for new site switcher. Refactored UI classes to handle new color scheme. Oh, and bought a new toothbrush.”
If you have several reasons for changes in a file, you should have several commits.
Chapter 1: The Basics
13
There are two ways of achieving this.
1. Do your development work on one change at a time. Check it in as each change is done. This gives
you a neat and tidy log that is easy to review when you need to.
2. In the heat of development, though, that is not always possible or practical. If you do end up with
multiple unrelated changes, consider committing a file incrementally(!), described next.
An incremental commit involves several steps. Start by doing a quick review of your file to determine how
many unrelated fixes/updates are in the file. Note that any single fix may involve an arbitrary number of non-
adjacent pieces of code. After saving a copy of your current version of the file, revert the file to the last
repository version. Use a merge tool (e.g. WinMerge) to select all the changes from the first fix you have
identified and merge those code sections into the freshly reverted file. Figure 1-6 shows an example (using
plain text rather than code) of the file at this stage. Commit the file, entering the single reason for the commit.
Repeat overlaying each successive change and committing with a single reason, until your file is restored to
your finished copy with all of your changes.

Chapter 1: The Basics
14
Figure 1-6 Incremental Commits: Revert your file to the last repository version then successively apply each
change and commit. The left panel shows three color-coded changes in non-contiguous regions; the right
panel shows the file after reverting then applying just the first change (blue), ready for the first commit.
Both of these suggestions take extra effort. Cleanly isolated, single-reason commits are not always achievable
in practice, but I find that by just being aware of the notion, my commits become more organized.

Chapter 2: File Operations and Subversion Filtering
15
Chapter 2: File Operations and Subversion Filtering
This chapter begins with recipes on managing files: adding, deleting, renaming, and moving, all from a
Subversion perspective. The second major section focuses on adding files, providing tools and techniques for
determining what to include in source control and how to quickly and efficiently filter out the "noise".
File Operations and Subversion Filtering
TortoiseSVN adds Subversion-awareness to Windows Explorer (or equivalent) by the addition of cleverly
implemented context menus. In fact, context menus constitute almost the entirety of the user interface for
TortoiseSVN. Enigmatically, TortoiseSVN installs a shortcut in your start menu simply labeled “TortoiseSVN”.
But if you select it all you get is the pop-up in Figure 2-1.
Figure 2-1 The informative pop-up displayed if you attempt to overtly execute TortoiseSVN
In practice, TortoiseSVN actually exists as a duality. You can work locally where your operations fall under the
two-stage process documented in Chapter 1 (see Understanding the two-stage process of Subversion). Thus,
moving, copying, renaming, adding, etc., done in Windows Explorer, are not published until you do a commit
to synchronize your local changes with the repository. Or you can work in the repository, done with the
repository browser (repo-browser for short), where each operation is committed as you perform it. (Though
you have a safeguard: you are prompted for a commit reason each time and you can cancel the operation if
you wish.)
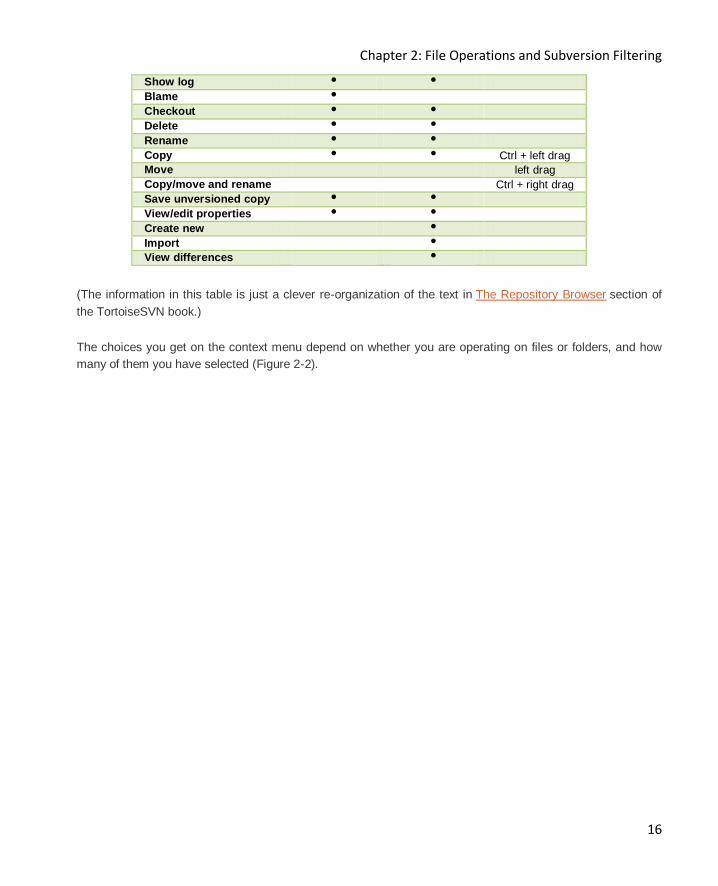
The repo-browser looks quite similar to Windows Explorer except you are operating on the repository. And
there are no toolbars. You perform any of the operations shown below either by context menu or by drag-and-
drop, as indicated:
Action Context menu (file)
Context menu (folder)
Drag-and-drop (file or folder)
Open •
Edit •
Chapter 2: File Operations and Subversion Filtering
16
Show log • •
Blame •
Checkout • •
Delete • •
Rename • •
Copy • • Ctrl + left drag
Move left drag
Copy/move and rename Ctrl + right drag
Save unversioned copy • •
View/edit properties • •
Create new •
Import •
View differences •
(The information in this table is just a clever re-organization of the text in The Repository Browser section of
the TortoiseSVN book.)
The choices you get on the context menu depend on whether you are operating on files or folders, and how
many of them you have selected (Figure 2-2).

Chapter 2: File Operations and Subversion Filtering
17
Figure 2-2 All the context menu permutations depending upon, well, context.
Adding a file or folder to source control
You can add files or folders in a number of ways.
If your files are within a versioned directory then you just select the files, open the context menu, and
select SVN Add.
If your files are outside your working copy tree, then drag them with the right mouse button and select SVN
Copy and add files to this WC from the resulting context menu. Note that, as of version 1.6, this works only
for files, not for folders. If you try this with a folder you will get an error stating Access is denied. In version 1.7,
Chapter 2: File Operations and Subversion Filtering
18
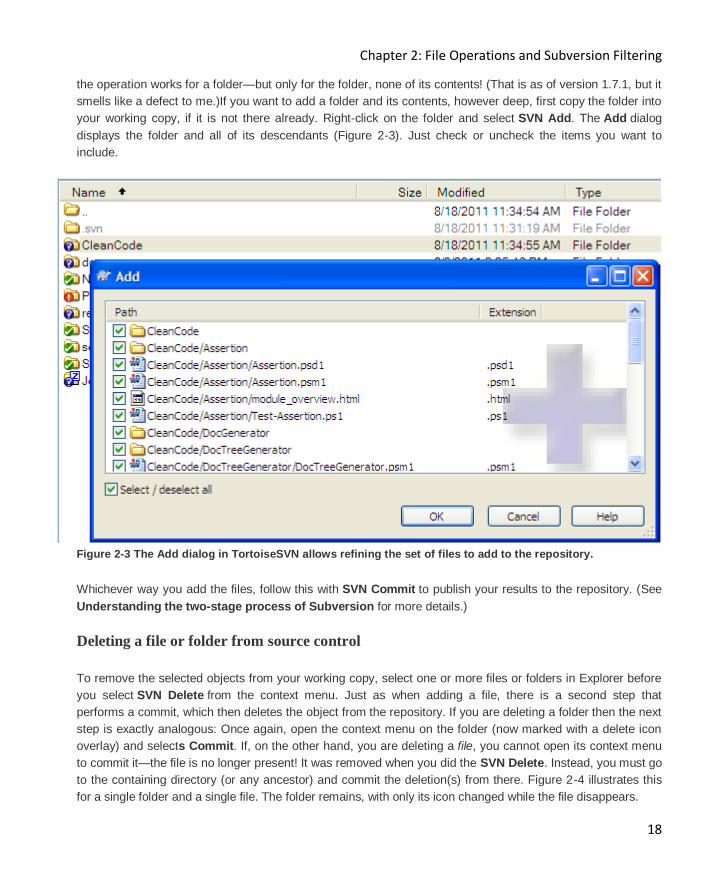
the operation works for a folder—but only for the folder, none of its contents! (That is as of version 1.7.1, but it
smells like a defect to me.)If you want to add a folder and its contents, however deep, first copy the folder into
your working copy, if it is not there already. Right-click on the folder and select SVN Add. The Add dialog
displays the folder and all of its descendants (Figure 2-3). Just check or uncheck the items you want to
include.
Figure 2-3 The Add dialog in TortoiseSVN allows refining the set of files to add to the repository.
Whichever way you add the files, follow this with SVN Commit to publish your results to the repository. (See
Understanding the two-stage process of Subversion for more details.)
Deleting a file or folder from source control
To remove the selected objects from your working copy, select one or more files or folders in Explorer before
you select SVN Delete from the context menu. Just as when adding a file, there is a second step that
performs a commit, which then deletes the object from the repository. If you are deleting a folder then the next
step is exactly analogous: Once again, open the context menu on the folder (now marked with a delete icon
overlay) and selects Commit. If, on the other hand, you are deleting a file, you cannot open its context menu
to commit it—the file is no longer present! It was removed when you did the SVN Delete. Instead, you must go
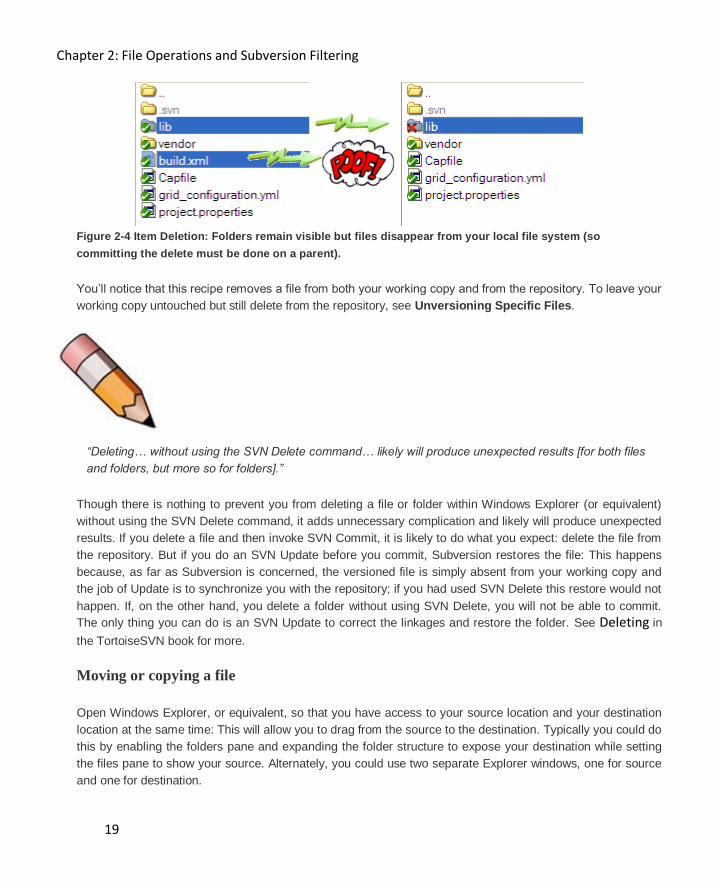
to the containing directory (or any ancestor) and commit the deletion(s) from there. Figure 2-4 illustrates this
for a single folder and a single file. The folder remains, with only its icon changed while the file disappears.
Chapter 2: File Operations and Subversion Filtering
19
Figure 2-4 Item Deletion: Folders remain visible but files disappear from your local file system (so
committing the delete must be done on a parent).
You’ll notice that this recipe removes a file from both your working copy and from the repository. To leave your
working copy untouched but still delete from the repository, see Unversioning Specific Files.
“Deleting… without using the SVN Delete command… likely will produce unexpected results [for both files
and folders, but more so for folders].”
Though there is nothing to prevent you from deleting a file or folder within Windows Explorer (or equivalent)
without using the SVN Delete command, it adds unnecessary complication and likely will produce unexpected
results. If you delete a file and then invoke SVN Commit, it is likely to do what you expect: delete the file from
the repository. But if you do an SVN Update before you commit, Subversion restores the file: This happens
because, as far as Subversion is concerned, the versioned file is simply absent from your working copy and
the job of Update is to synchronize you with the repository; if you had used SVN Delete this restore would not
happen. If, on the other hand, you delete a folder without using SVN Delete, you will not be able to commit.
The only thing you can do is an SVN Update to correct the linkages and restore the folder. See Deleting in
the TortoiseSVN book for more.
Moving or copying a file
Open Windows Explorer, or equivalent, so that you have access to your source location and your destination
location at the same time: This will allow you to drag from the source to the destination. Typically you could do
this by enabling the folders pane and expanding the folder structure to expose your destination while setting
the files pane to show your source. Alternately, you could use two separate Explorer windows, one for source
and one for destination.
Chapter 2: File Operations and Subversion Filtering
20
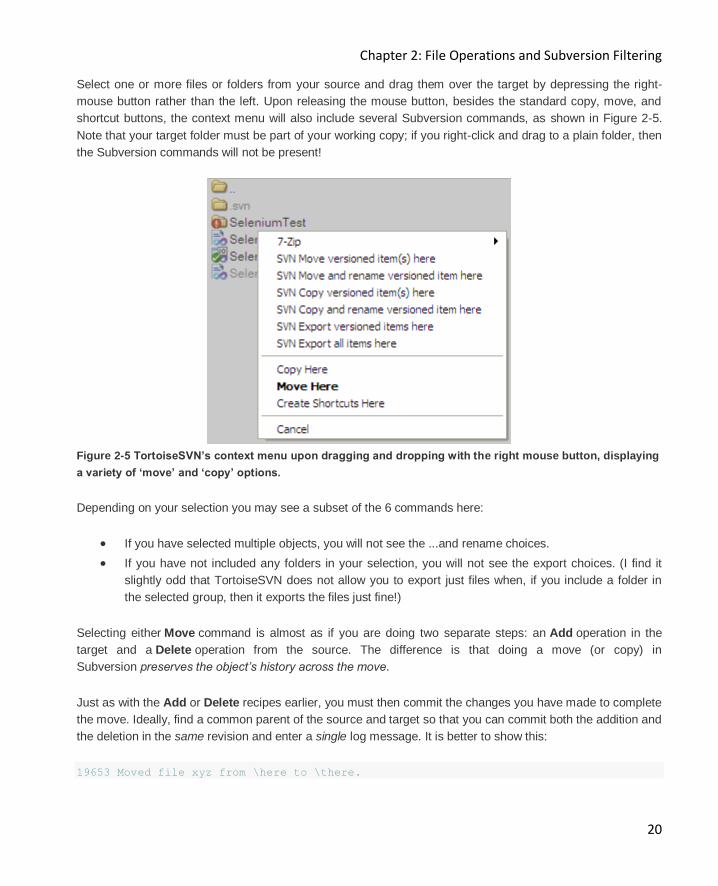
Select one or more files or folders from your source and drag them over the target by depressing the right-
mouse button rather than the left. Upon releasing the mouse button, besides the standard copy, move, and
shortcut buttons, the context menu will also include several Subversion commands, as shown in Figure 2-5.
Note that your target folder must be part of your working copy; if you right-click and drag to a plain folder, then
the Subversion commands will not be present!
Figure 2-5 TortoiseSVN’s context menu upon dragging and dropping with the right mouse button, displaying
a variety of ‘move’ and ‘copy’ options.
Depending on your selection you may see a subset of the 6 commands here:
If you have selected multiple objects, you will not see the ...and rename choices.
If you have not included any folders in your selection, you will not see the export choices. (I find it
slightly odd that TortoiseSVN does not allow you to export just files when, if you include a folder in
the selected group, then it exports the files just fine!)
Selecting either Move command is almost as if you are doing two separate steps: an Add operation in the
target and a Delete operation from the source. The difference is that doing a move (or copy) in
Subversion preserves the object’s history across the move.
Just as with the Add or Delete recipes earlier, you must then commit the changes you have made to complete
the move. Ideally, find a common parent of the source and target so that you can commit both the addition and
the deletion in the same revision and enter a single log message. It is better to show this:
19653 Moved file xyz from \here to \there.
Chapter 2: File Operations and Subversion Filtering
21
…than this:
119653 Deleted file xyz from \here as part of a move.
19654 Added file xyz to \there as part of a move.
You can also move or copy files in your working copy with traditional cut-and-paste. As described at
Copying/Moving/Renaming Files and Folders in the TortoiseSVN book, use the standard
Windows Cut (or Copy) command to put the items on the clipboard, then open the context menu in your
destination folder and select TortoiseSVN >> Paste to move (or copy) the items. You should not use the
standard Windows Paste command here; it will paste the file but not as a Subversion-aware file.
One caveat: do not use SVN Move on a folder referencing an external object; that would delete the external
object from its parent repository. Rather, in this case use standard Windows operations to move the file, then
adjust its svn:externals property.
Renaming a file
Normally you can just use SVN Rename on the context menu. This is analogous to the Move command
described in the Moving or Copying a file recipe. It is almost as if you are doing two separate steps: an Add
operation with the new name and a Delete operation of the old name. The difference is that doing a rename in
Subversion preserves the object’s history across the rename. Because there are two portions—a delete and
an add—it is imperative that you commit on the parent folder (or above) rather than just committing the newly
added file. Otherwise, you leave the supposedly deleted file still present in the repository and thus still present
to everyone else on your team.
“Because there are two portions [to a move or a rename]—a delete and an add— it is imperative that you
commit on the parent folder … rather than just committing the newly added file.”
If you want to move the file to a different directory in addition to renaming it, you can do this in one step as
detailed in the Moving or Copying a file recipe using the SVN Move and Rename command.
For the special case of renaming where you are in reality only changing the case of one or more letters, your
operating system determines what you need to do. On a case-sensitive system (e.g. Linux) there is no
complication so you can use the standard SVN Rename from the context menu. On a case-insensitive system
such as Windows, however, you must use the repo-browser. First make sure the file is committed to the
Chapter 2: File Operations and Subversion Filtering
22
repository. Then open the repo-browser and rename the file there. Close the repo-browser and do an SVN
Update to refresh your working copy with the new casing. (See the info from the TortoiseSVN FAQ.)
As with deleting, moving, and copying, a rename of a file should be done with TortoiseSVN commands. Not
only does this preserve the history as mentioned above, but it saves you several steps. If you rename outside
of TortoiseSVN you would then have to SVN Add the “new” file, commit that, plus commit the deletion of the
now obsolete “old” file. An IDE that is properly integrated with Subversion will likely do a proper rename. But
some IDEs will probably allow you to rename files but they will be plain renames, not Subversion-aware
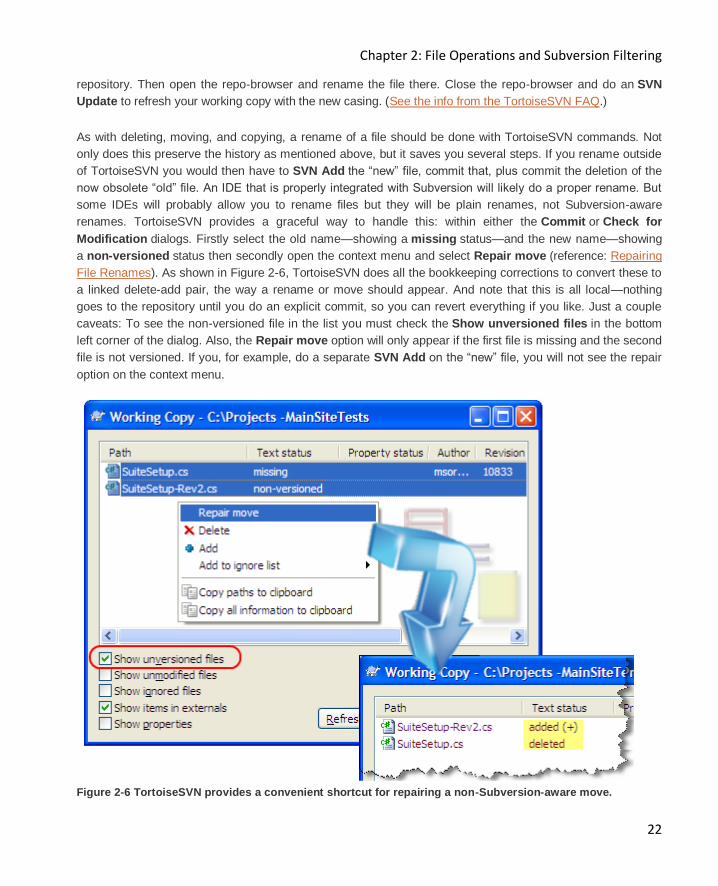
renames. TortoiseSVN provides a graceful way to handle this: within either the Commit or Check for
Modification dialogs. Firstly select the old name—showing a missing status—and the new name—showing
a non-versioned status then secondly open the context menu and select Repair move (reference: Repairing
File Renames). As shown in Figure 2-6, TortoiseSVN does all the bookkeeping corrections to convert these to
a linked delete-add pair, the way a rename or move should appear. And note that this is all local—nothing
goes to the repository until you do an explicit commit, so you can revert everything if you like. Just a couple
caveats: To see the non-versioned file in the list you must check the Show unversioned files in the bottom
left corner of the dialog. Also, the Repair move option will only appear if the first file is missing and the second
file is not versioned. If you, for example, do a separate SVN Add on the “new” file, you will not see the repair
option on the context menu.
Figure 2-6 TortoiseSVN provides a convenient shortcut for repairing a non-Subversion-aware move.
Chapter 2: File Operations and Subversion Filtering
23
Filtering and Selection
Determining what to keep in source control
The question of what files to add to your repository is hotly debated and will not be resolved anytime soon.
Nonetheless, here is a general guideline:
Include everything to recreate a given release but no more.
That is, you should include enough items in source control so that you are able to do a clean checkout from
your repository and successfully rebuild your project. By being overly parsimonious with your inclusions, you
may make it impossible to revert to an earlier release.
Translating the above straightforward guideline into practice makes it seem a bit less straightforward:
1. Include all the source code files written by you (or other team members). If, for example, you are
developing in C# with Visual Studio then include all the *.cs files included in your solution/project.
2. Include files that are generated by your IDE at design-time. For example, when creating a WinForms
form in Visual Studio called MainForm, you will create MainForm.cs and the IDE will spawn an
associated MainForm.designer.cs that should also be included in source control.
“…you should include enough items in source control so that you are able to do a clean checkout from
your repository and successfully rebuild your project. Overly parsimonious inclusions may make reverting
to an earlier release impossible.”
3. Exclude those files that are generated at compile-time. A Visual Studio project, for example, puts all
compiler-generated files in two presumably binary directories, obj and bin. Anything under those
directories should be excluded.
4. It is worth repeating the last point for a special case: exclude files generated at compile-time even if
they are source files! A WPF project in Visual Studio, for example, where you have a XAML
file IntroForm.xaml that spawns an associated IntroForm.g.i.cs, which is technically a
source code file. This file is created in the obj directory, though, a good indicator that you should not
include it in source control.
5. Include third-party libraries. If you have source to your third-party libraries, treat it as if it was your
source, and follow point (1). If you do not have source, include the third-party binaries. Point (3)
Chapter 2: File Operations and Subversion Filtering
24
indicates you should not include your own binaries, but it is quite appropriate to include third-party
binaries.
6. Include or exclude IDE settings files on a case-by-case basis.
o A Visual Studio solution, for example, consists of two settings files, name.sln (solution) and
name.suo (solution user options). The name.sln file is an XML file that specifies what
constitutes your project and is absolutely vital to be included. The latter is a binary file that
records ephemeral settings including breakpoints and so forth. You can safely delete the file at
any time (when the solution is closed!) and it will be automatically recreated the next time you
open the .sln file. The .suo file should not be included in source control both because of its
dynamic nature and more importantly because your copy will surely differ from your team
member’s copy and, if you commit it to your repository, you will overwrite your neighbor’s
settings with your settings the next time he/she does an SVN Update.
o For a perspective on the Eclipse IDE, see the StackOverflow question Do you keep your project
files under version control? that discusses things like .project, .classpath, and more. The
contributor VonC makes a particularly salient point that IDE settings “…often includes static
code analysis rules which are vitally important to enforce consistently…”
o Do not include files which contain absolute paths because those paths will assuredly vary
between team members. If you find you need to include such a file see if there is a way to use
relative paths instead.
o Avoid including files personal preferences such as tab size, color schemes of your IDE
windows, and so forth. In Visual Studio, this includes files with a *.user suffix. As mentioned
above, these types of files will cause problems for other team members.
7. Include your build tools. This recommendation is controversial, but as you are likely very well aware
a new version of a tool can sometimes break your build. The conservative approach to guarantee the
ability to recreate a release suggests including the build tools.
8. Review the StackOverflow question What to put under version control? and its tendrils for more ideas
and a healthy debate on the controversies.
Subversion has a powerful facility for ignoring files once you decide they are extraneous. See the next few
recipes.
Ignoring files locally and/or globally and what's the difference
TortoiseSVN Settings affect your private view with the global ignore pattern (global to all your working
copies, not global in the sense of affecting your other team members). Thus, the global ignore pattern always
applies to all folders you have checked out. The global ignore pattern is a set of file or folder name patterns
(i.e. no paths!) separated by spaces. Specific names may be used as well as wildcard syntax. See Global
ignore pattern and Pattern in the TortoiseSVN book for more. As a way to jumpstart the task of defining your
global ignore pattern, here are a couple technology-specific guidelines: see the StackOverflow question Best
general SVN Ignore Pattern for.NET projects or What should I configure SVN to ignore in my Delphi
projects? for, well, Delphi projects.
Chapter 2: File Operations and Subversion Filtering
25
When you update your ‘global ignore’ pattern and close the settings dialog you will probably expect it to just
work, of course, meaning that the objects in question should no longer have the unknown icon overlay (a
question mark) but should now have no icon overlay. The first thing you will notice is that the icon overlays still
appear in Windows Explorer. You might naturally assume then that the objects were not correctly specified in
the ‘global ignore’ list but, that is not the case. TortoiseSVN has honored your request where it counts (just not
with the icon overlays), in that you will not see the objects you that indicated should be ignored if you open
the Commit dialog or the Check for Modifications dialog and select show unversioned files. TortoiseSVN
will eventually re-sync the icon overlays to be correct as well. If you want to give that little nudge, though, you
should execute TortoiseSVN >> Clean Up on the parent directory to resynchronize your icon overlays so it
will show you the same information as the other dialogs I’ve already mentioned.
The second method of ignoring objects is via the ignore list property of each folder. In contrast to the global
ignore list affecting everything on your local machine privately, this affects the public view—what your team
members see, but it applies to a single, specific file or folder.
To muddle the distinction just a bit, at the time you define the ignore list you can choose to apply it to just the
current folder or (recursively) to the current folder plus all child folders. Either way, you may elect to target a
specific file or a file pattern (specifying all files with a particular extension).
It is important to be aware that ignoring files is only relevant to unversioned files. To put that another way,
ignoring files is a one-time event at the time that you add a file. Ignoring Unversioned Items in the Subversion
book describes this succinctly:
“Subversion's support for ignorable file patterns extends only to the one-time process of adding
unversioned files and directories to version control. Once an object is under Subversion's control, the
ignore pattern mechanisms no longer apply to it. In other words, don't expect Subversion to avoid
committing changes you've made to a versioned file simply because that file's name matches an
ignore pattern—Subversion always notices all of its versioned objects.”
See Ignoring Files and Directories in the TortoiseSVN book for more information.
So what should be global to you (‘global ignore’ pattern) and what should be global to your team (‘published
ignore’ lists) ? In theory, a file that every team member has—but should always ignore—should be on a
‘published ignore’ list. That way, you never have to worry about a new team member coming along and
forgetting to configure his/her settings correctly and thus inadvertently committing such a file. Except, of
course, that when you add a new directory to source control you have to remember to add the ‘ignore’
property to that directory since ignore rules are directory-specific (e.g. for something like thumbs.db, which
could potentially be created by the OS in any directory). You might want to be extra-cautious and ignore
certain file extensions with both ignore mechanisms.

Chapter 2: File Operations and Subversion Filtering
26
Ignoring files in a single directory
TortoiseSVN provides a convenience menu command to add either a specific file or all files with a certain
extension: TortoiseSVN >> Add to Ignore List >> file.ext or *.ext. Invoking that command modifies the
Subversion properties of the parent directory. (Like all Subversion commands, this affects your working copy
only. You must then commit the parent to publish those changes to the repository.)
Ignoring files throughout your working copy
In order to ignore, for example, all files in your working copy tree ending with .bak, you would modify
Subversion properties just like in the previous recipe, but you do it through a different route, and you apply it to
more than one directory simultaneously.
Open the subversion properties (TortoiseSVN >> Properties) of the root of the subtree that you wish to
affect. This may be your working copy root if you want to apply the change throughout your entire working
copy. Add or edit an entry for the svn:ignore keyword. Figure 2-7 shows an example where I have specified
to ignore an obj subfolder as well as all files with a .user or .bak extension.
Figure 2-7 The TortoiseSVN Properties menu item reveals the current properties set on a particular file or
folder.
The secret, though, is in the specification--when you define the patterns to ignore, select the recursive choice
as indicated in Figure 2-8.

Chapter 2: File Operations and Subversion Filtering
27
Figure 2-8 Apply an svn:ignore filter to every child folder when you enable the recursive checkbox indicated.
Unfortunately, there is one catch to this method: In my example, I had previously specified to
ignore obj and*.user and I was adding just the *.bak pattern. When I apply recursively, it does not apply
just the change (*.bak) but everything in the svn:ignore keyword (obj, *.user, and *.bak) to all
subfolders. At first glance, that seems perhaps a bit cumbersome but not necessarily harmful. But wait! It can,
in fact, be detrimental—if you have already established svn:ignore values on one or more child objects. The
recursive action in the above dialog does not add to any existing svn:ignore values–it replaces them! Say,
for example, your target root is C:\one\two and you want to ignore *.bak files. But if you are already
ignoring *.tmp files in C:\one\two\three, the recursive application wipes out the
existing svn:ignore value on C:\one\two\three and replaces it with the new set which, in this case,
is *.bak.
You can use the following PowerShell script to report any child folders that have non-empty ignore lists:
Import-Module CleanCode/EnhancedChildItem
Get-EnhancedChildItem . -Recurse -ContainersOnly -Svn |
% {
if ($p = (svn propget svn:ignore $_.FullName))
{
$_.FullName + " => " + $p
}
}

Chapter 2: File Operations and Subversion Filtering
28
This script uses a module from my open-source CleanCode PowerShell library that adds useful options
to Get-ChildItem. You can select just the folders that are under Subversion source control so the code in the
(implicit) loop merely has to check for existing svn:ignore values.
Chapter 3: In, Out, and Around
29
Chapter 3: In, Out, and Around
This chapter now turns to file macro-management. Akin to the economic analogy of macro-economics dealing with forces that drive the economy as a whole, recipes in this chapter consider repositories and projects.
Refer to the Subversion book and the TortoiseSVN book for further reading as needed, and as directed in the recipes below.
There are only two key terms you need to know to get the most from this chapter (from Basic Concepts in the TortoiseSVN book):
The repository is Subversion’s “central database which contains all your version-controlled files with their complete history.”
Your working copy is what you have checked out from the repository onto your local machine, regardless of whether this is the whole tree or a single folder, on the trunk or on a branch. Also see What is a working copy on StackOverflow to really get a grasp on this, if you haven’t already.
Furthermore, at the time of writing release 1.7 of Subversion (and the corresponding TortoiseSVN 1.7) is still fresh, barely a couple weeks in the wild. So starting with this chapter, I point out some notable improvements with this new release, where applicable.
Putting Things In
Setting up a new repository
You rarely need to set up a repository: Even when one is required, your system administrator is likely to want to do it. However, I am sure you will agree it is a crucial step so it would be remiss of me to omit a reference to this topic, however brief. Creating a repository is as simple as invoking the TortoiseSVN >> Create Repository here command (see Repository Creation in the TortoiseSVN book). It immediately starts to get a bit more involved though: your next step is to decide on your repository layout, i.e.do you want trunk, branches, and tags to be the absolute top-level in the repository, or do you want to subsume them within each project (see Repository Layout in the TortoiseSVN book).
Version 1.6
You must create the structure yourself.
Version 1.7
With version 1.7, TortoiseSVN will now add your trunk, branches, and tags directory structure for you, if
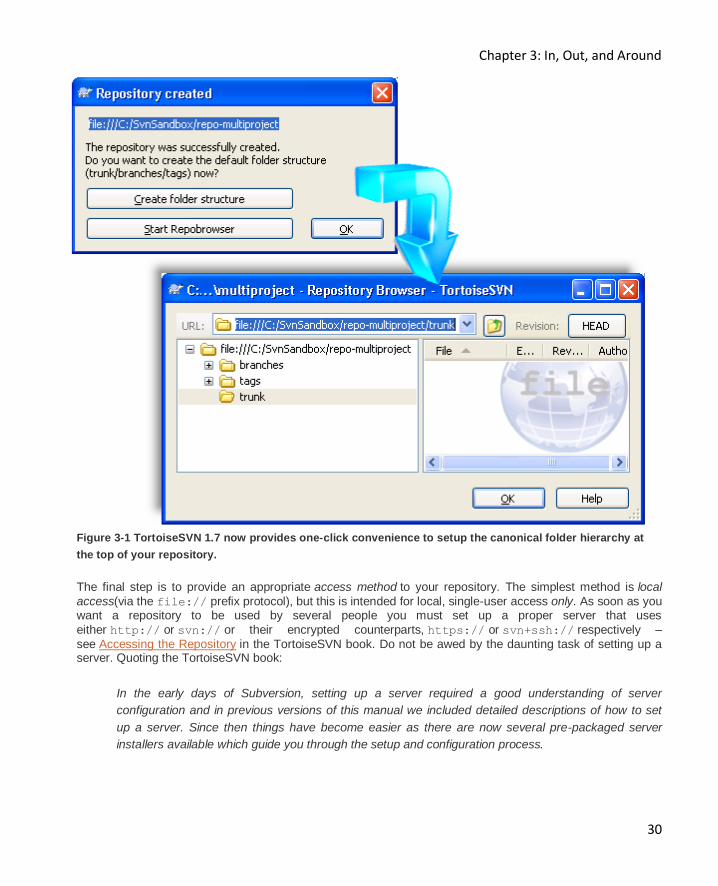
you so wish. Select Create folder structure (see Figure 3-1) and the three standard folders are generated automatically, saving you several steps.
Chapter 3: In, Out, and Around
30
Figure 3-1 TortoiseSVN 1.7 now provides one-click convenience to setup the canonical folder hierarchy at
the top of your repository.
The final step is to provide an appropriate access method to your repository. The simplest method is local
access(via the file:// prefix protocol), but this is intended for local, single-user access only. As soon as you want a repository to be used by several people you must set up a proper server that uses
either http:// or svn:// or their encrypted counterparts, https:// or svn+ssh:// respectively –
see Accessing the Repository in the TortoiseSVN book. Do not be awed by the daunting task of setting up a server. Quoting the TortoiseSVN book:
In the early days of Subversion, setting up a server required a good understanding of server
configuration and in previous versions of this manual we included detailed descriptions of how to set
up a server. Since then things have become easier as there are now several pre-packaged server
installers available which guide you through the setup and configuration process.
Chapter 3: In, Out, and Around
31
Grafting a subtree or importing a whole tree into a repository
Whether you want to start a whole project tree entirely, or just add a subtree to an existing project, the steps are essentially the same. In the case of a new project, you have to be familiar with the repository layout, though: unless your system administrator has set them up you will need to create the top-
level trunk, branches, and tags folders for the new project before proceeding with this recipe. See
the Setting up a new repository recipe for more.
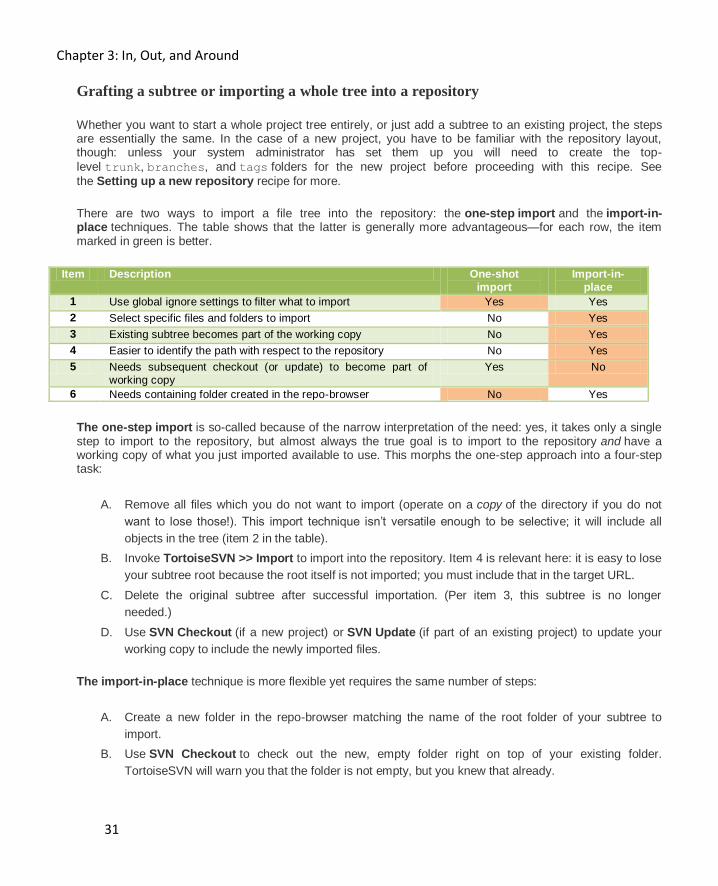
There are two ways to import a file tree into the repository: the one-step import and the import-in-place techniques. The table shows that the latter is generally more advantageous—for each row, the item marked in green is better.
Item Description One-shot import
Import-in-place
1 Use global ignore settings to filter what to import Yes Yes
2 Select specific files and folders to import No Yes
3 Existing subtree becomes part of the working copy No Yes
4 Easier to identify the path with respect to the repository No Yes
5 Needs subsequent checkout (or update) to become part of working copy
Yes No
6 Needs containing folder created in the repo-browser No Yes
The one-step import is so-called because of the narrow interpretation of the need: yes, it takes only a single step to import to the repository, but almost always the true goal is to import to the repository and have a working copy of what you just imported available to use. This morphs the one-step approach into a four-step task:
A. Remove all files which you do not want to import (operate on a copy of the directory if you do not
want to lose those!). This import technique isn’t versatile enough to be selective; it will include all
objects in the tree (item 2 in the table).
B. Invoke TortoiseSVN >> Import to import into the repository. Item 4 is relevant here: it is easy to lose
your subtree root because the root itself is not imported; you must include that in the target URL.
C. Delete the original subtree after successful importation. (Per item 3, this subtree is no longer
needed.)
D. Use SVN Checkout (if a new project) or SVN Update (if part of an existing project) to update your
working copy to include the newly imported files.
The import-in-place technique is more flexible yet requires the same number of steps:
A. Create a new folder in the repo-browser matching the name of the root folder of your subtree to
import.
B. Use SVN Checkout to check out the new, empty folder right on top of your existing folder.
TortoiseSVN will warn you that the folder is not empty, but you knew that already.
Chapter 3: In, Out, and Around
32
C. Finally, invoke SVN Add on the newly versioned folder. The Add dialog lists all the unversioned
objects, allowing you to select or deselect what you wish.
D. Commit everything you have added.
See Importing Data Into A Repository in the TortoiseSVN book for more detail.
Taking Things Out
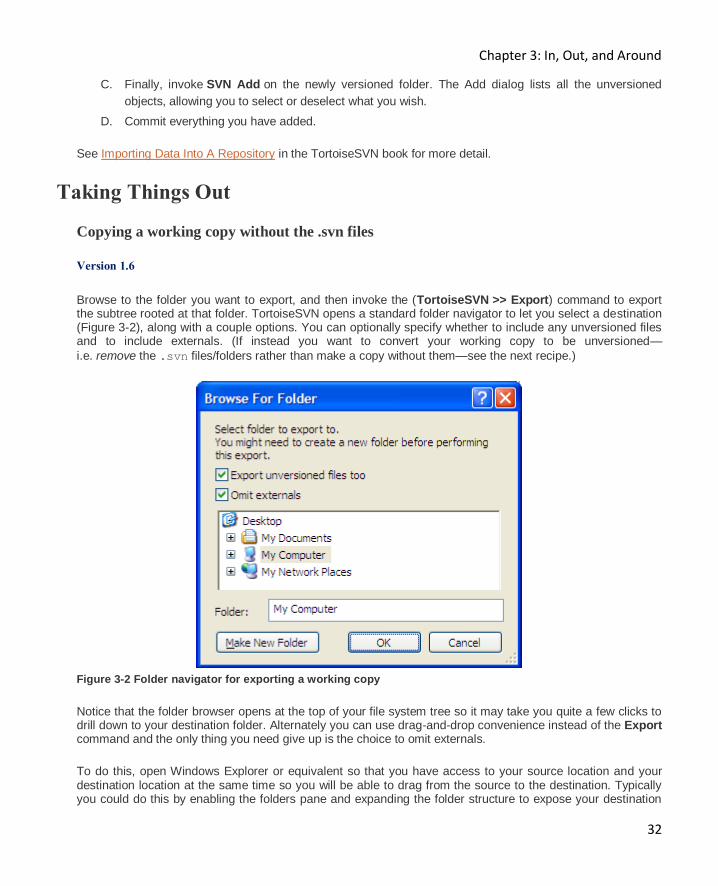
Copying a working copy without the .svn files
Version 1.6
Browse to the folder you want to export, and then invoke the (TortoiseSVN >> Export) command to export the subtree rooted at that folder. TortoiseSVN opens a standard folder navigator to let you select a destination (Figure 3-2), along with a couple options. You can optionally specify whether to include any unversioned files and to include externals. (If instead you want to convert your working copy to be unversioned—
i.e. remove the .svn files/folders rather than make a copy without them—see the next recipe.)
Figure 3-2 Folder navigator for exporting a working copy
Notice that the folder browser opens at the top of your file system tree so it may take you quite a few clicks to drill down to your destination folder. Alternately you can use drag-and-drop convenience instead of the Export command and the only thing you need give up is the choice to omit externals.
To do this, open Windows Explorer or equivalent so that you have access to your source location and your destination location at the same time so you will be able to drag from the source to the destination. Typically you could do this by enabling the folders pane and expanding the folder structure to expose your destination
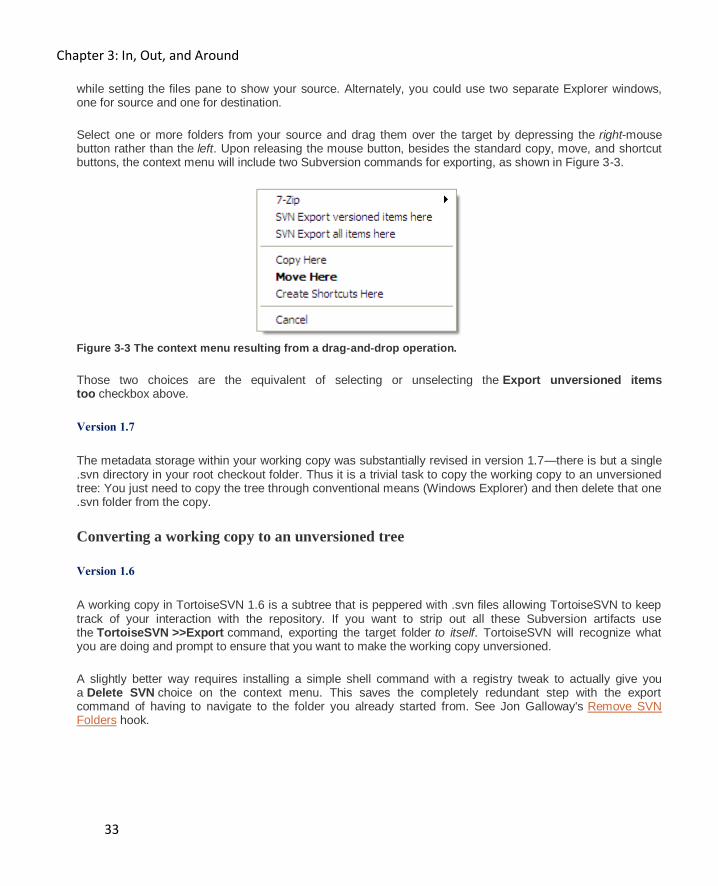
Chapter 3: In, Out, and Around
33
while setting the files pane to show your source. Alternately, you could use two separate Explorer windows, one for source and one for destination.
Select one or more folders from your source and drag them over the target by depressing the right-mouse button rather than the left. Upon releasing the mouse button, besides the standard copy, move, and shortcut buttons, the context menu will include two Subversion commands for exporting, as shown in Figure 3-3.
Figure 3-3 The context menu resulting from a drag-and-drop operation.
Those two choices are the equivalent of selecting or unselecting the Export unversioned items too checkbox above.
Version 1.7
The metadata storage within your working copy was substantially revised in version 1.7—there is but a single .svn directory in your root checkout folder. Thus it is a trivial task to copy the working copy to an unversioned tree: You just need to copy the tree through conventional means (Windows Explorer) and then delete that one .svn folder from the copy.
Converting a working copy to an unversioned tree
Version 1.6
A working copy in TortoiseSVN 1.6 is a subtree that is peppered with .svn files allowing TortoiseSVN to keep track of your interaction with the repository. If you want to strip out all these Subversion artifacts use the TortoiseSVN >>Export command, exporting the target folder to itself. TortoiseSVN will recognize what you are doing and prompt to ensure that you want to make the working copy unversioned.
A slightly better way requires installing a simple shell command with a registry tweak to actually give you a Delete SVN choice on the context menu. This saves the completely redundant step with the export command of having to navigate to the folder you already started from. See Jon Galloway's Remove SVN Folders hook.
Chapter 3: In, Out, and Around
34
Version 1.7
The metadata storage within your working copy was substantially revised in version 1.7—there is but a single .svn directory in your root checkout folder. Thus it is trivial to convert the working copy to an unversioned tree by simply deleting that one .svn folder.
Unversioning specific files
There are two easy ways to unversion a file, i.e. to delete it from the repository but to keep your local copy. The first method does only that; the second method has a side effect of modifying your ignore list.
Method 1: Select the files in Windows Explorer. Hold down Shift as you right-click to open up the context menu. When you open TortoiseSVN’s menu, it reveals additional commands on this extended version, including Delete (keep local). (See Ignore files which are already versioned in the TortoiseSVN book.)
Method 2: Select the files in Windows Explorer. Select TortoiseSVN >> Delete and add to ignore list >> file.ext or*.ext. (Note that in version 1.6 it was Delete and add to ignore list.)
Whichever leaf action you choose, the specific file you started with is marked for deletion from the repository. Once you commit the deletion, the file will remain in place, but now be unversioned. The side effect of this command is that it updates the svn-ignore list of the parent directory, with either the specific file name, or the file's extension. Once this change is committed, the now-unversioned file will be ignored by TortoiseSVN, showing no icon overlay.
Note that the svn-ignore list applies only to unversioned files; thus, if you selected to ignore by extension and you have other versioned files in the same directory with the same extension, they will be unaffected by the ignore directive. Any new files you create with the extension will be ignored by TortoiseSVN.
Unversioning all files of a specific type (or other criteria)
This recipe is essentially the same as the last, except for the first step. Instead of just opening Explorer, do a search in explorer to find all the files of interest. Select all ‘found’ files (Control-A) then proceed as above. Here, the TortoiseSVN leaf choice will say "Delete and ignore n items by name" and "Delete and ignore n items by extension". Upon selecting it, all n files will be marked for deletion and the parent directory of each will have an entry added to its svn-ignore list. Thanks to this StackOverflow question for inspiration for this recipe.
Removing your working copy
Sometimes you just want to start over. Or sometimes (though rarely:-) you actually finish something and want to cleanse the project from your disk to make room for the next one. Cleaning out/erasing/removing/eradicating (pick your favorite term) your working copy—all the files you checked out and worked on from Subversion—is about the easiest task to do in all of Subversion because it does not require the use of anything in Subversion! So here is the entire recipe:
Just delete the file tree from your disk with Windows Explorer or equivalent.
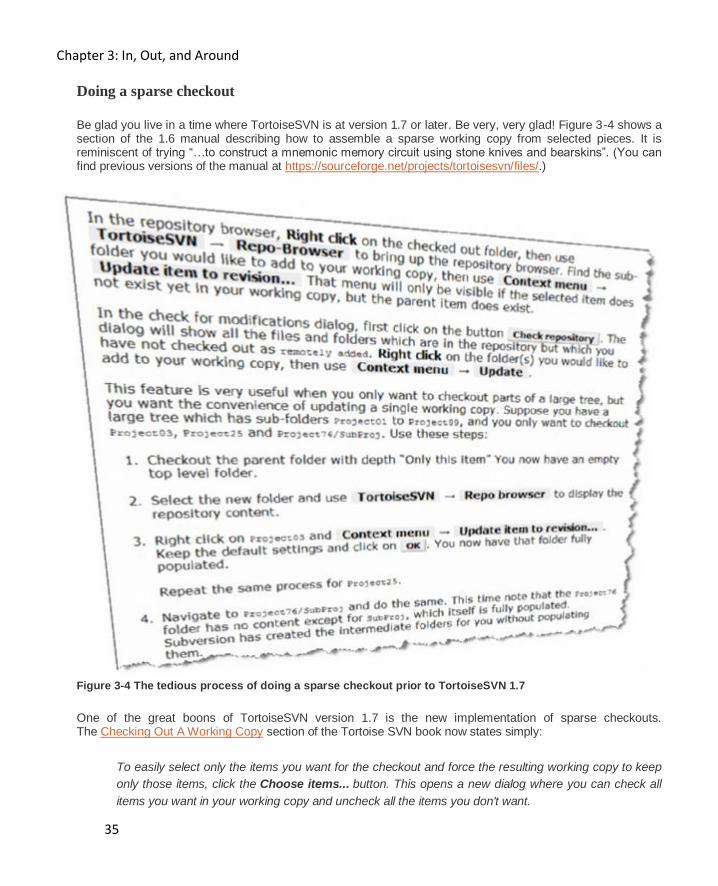
Chapter 3: In, Out, and Around
35
Doing a sparse checkout
Be glad you live in a time where TortoiseSVN is at version 1.7 or later. Be very, very glad! Figure 3-4 shows a section of the 1.6 manual describing how to assemble a sparse working copy from selected pieces. It is reminiscent of trying “…to construct a mnemonic memory circuit using stone knives and bearskins”. (You can find previous versions of the manual at https://sourceforge.net/projects/tortoisesvn/files/.)
Figure 3-4 The tedious process of doing a sparse checkout prior to TortoiseSVN 1.7
One of the great boons of TortoiseSVN version 1.7 is the new implementation of sparse checkouts. The Checking Out A Working Copy section of the Tortoise SVN book now states simply:
To easily select only the items you want for the checkout and force the resulting working copy to keep
only those items, click the Choose items... button. This opens a new dialog where you can check all
items you want in your working copy and uncheck all the items you don't want.
Chapter 3: In, Out, and Around
36
The Choose items… button is not particularly prominent, being in about the middle of the Checkout dialog. But what it lacks in prominence in makes up for in power! It opens a secondary dialog containing your file tree arranged hierarchically, with every file and folder having an adjacent checkbox to enable or disable it. Note that deselecting a folder will also deselect everything below it hierarchically, while selecting a folder selects just that individual folder. This makes it easy to prune subtrees out. But be careful! If you accidentally deselect some parent folder, this can wipe out a whole slew of choices you may have set up below that.
Repository Concerns
Deploying Subversion for a single-user installation
As discussed in the introduction to Chapter 1, version control is just as useful for a single-user environment as it is for a large team. Setting up a Subversion or TortoiseSVN installation for a single-user environment, though, can be done more simply than a multi-user environment. For example, you do not actually need to set
up a server for your Subversion repository; you could just use the file:// protocol to access the repository on your local machine and you do not have to set up a server. See either TortoiseSVN for the single user or, for command-line use, Single-User Subversion. Both of those articles are quite ancient in Internet time but the basics they cover are still valid. Please note, however, that the non-server implementation approach, while
possible, is not necessarily the best choice because you get no security with the file:// protocol and you have uncontrolled access to the Subversion database (allowing avenues for corruption). For small installations—including single user—consider running the svnserve server included with the Subversion distribution. And, as of TortoiseSVN 1.7, now included with TortoiseSVN as well! Svnserve is a lightweight, standalone Subversion server designed for situations where you do not need the full might of an Apache server. Also see the thorough discussion on the finer points of the svnserve server by David W. in his answer to this StackOverflow post.
Reconnecting to a relocated repository
TortoiseSVN offers a Relocate command that is available on the context menu – regrettably. It is regrettable in that it appears mixed in with Branch, Switch, Export, and Add, all commands that you are likely to use on a regular or at least an occasional basis. But Relocate is a command to be used quite rarely; indeed, you may never need to use it. Here are a few common scenarios that you might think could be handled by Relocate, but they are not:
If you want to connect to a new repository, i.e. a different one than one you have previously been
working in, simply do a clean checkout from the new repository. Full stop.
If you want to switch to a different branch or directory within your current repository tree, use
the TortoiseSVN >> Switch command. Full stop.
If you want to relocate your working copy, either do a clean checkout to a new local file location or
move your existing subtree with Windows Explorer. Full stop.
You should only be continuing to read this recipe if the address to your repository has changed, whether it is the IP address, the protocol (e.g. http vs. https); or the root path. In such cases, you want to redirect your existing working copy to point to the new location of the repository on the server. Use the TortoiseSVN >> Relocate command to do this. All you have to specify is the new URL. See Relocating a working copy in the TortoiseSVN book.
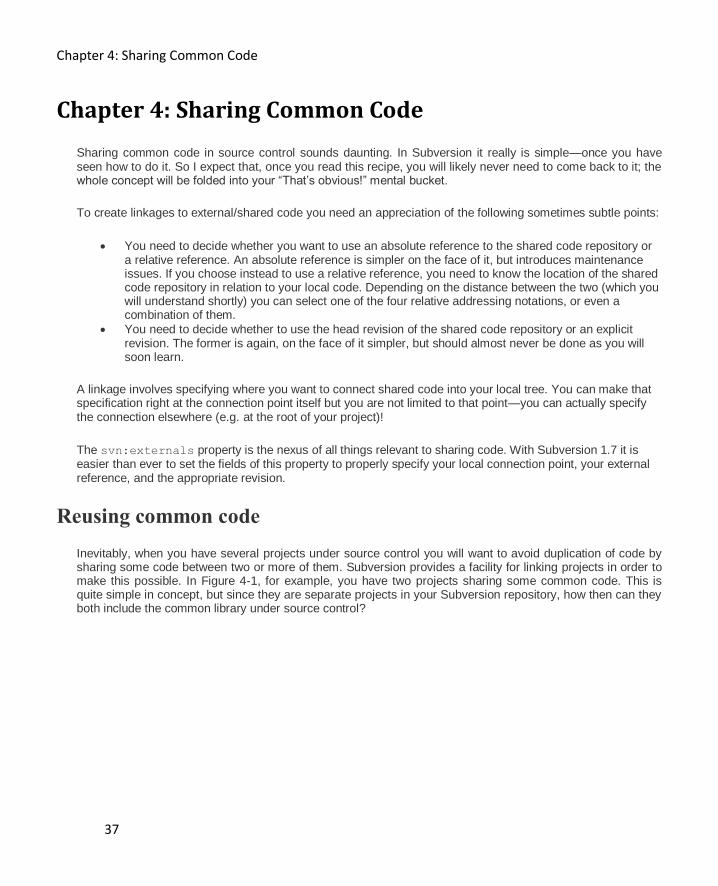
Chapter 4: Sharing Common Code
37
Chapter 4: Sharing Common Code
Sharing common code in source control sounds daunting. In Subversion it really is simple—once you have seen how to do it. So I expect that, once you read this recipe, you will likely never need to come back to it; the whole concept will be folded into your “That’s obvious!” mental bucket.
To create linkages to external/shared code you need an appreciation of the following sometimes subtle points:
You need to decide whether you want to use an absolute reference to the shared code repository or a relative reference. An absolute reference is simpler on the face of it, but introduces maintenance issues. If you choose instead to use a relative reference, you need to know the location of the shared code repository in relation to your local code. Depending on the distance between the two (which you will understand shortly) you can select one of the four relative addressing notations, or even a combination of them.
You need to decide whether to use the head revision of the shared code repository or an explicit revision. The former is again, on the face of it simpler, but should almost never be done as you will soon learn.
A linkage involves specifying where you want to connect shared code into your local tree. You can make that specification right at the connection point itself but you are not limited to that point—you can actually specify the connection elsewhere (e.g. at the root of your project)!
The svn:externals property is the nexus of all things relevant to sharing code. With Subversion 1.7 it is easier than ever to set the fields of this property to properly specify your local connection point, your external reference, and the appropriate revision.
Reusing common code
Inevitably, when you have several projects under source control you will want to avoid duplication of code by sharing some code between two or more of them. Subversion provides a facility for linking projects in order to make this possible. In Figure 4-1, for example, you have two projects sharing some common code. This is quite simple in concept, but since they are separate projects in your Subversion repository, how then can they both include the common library under source control?
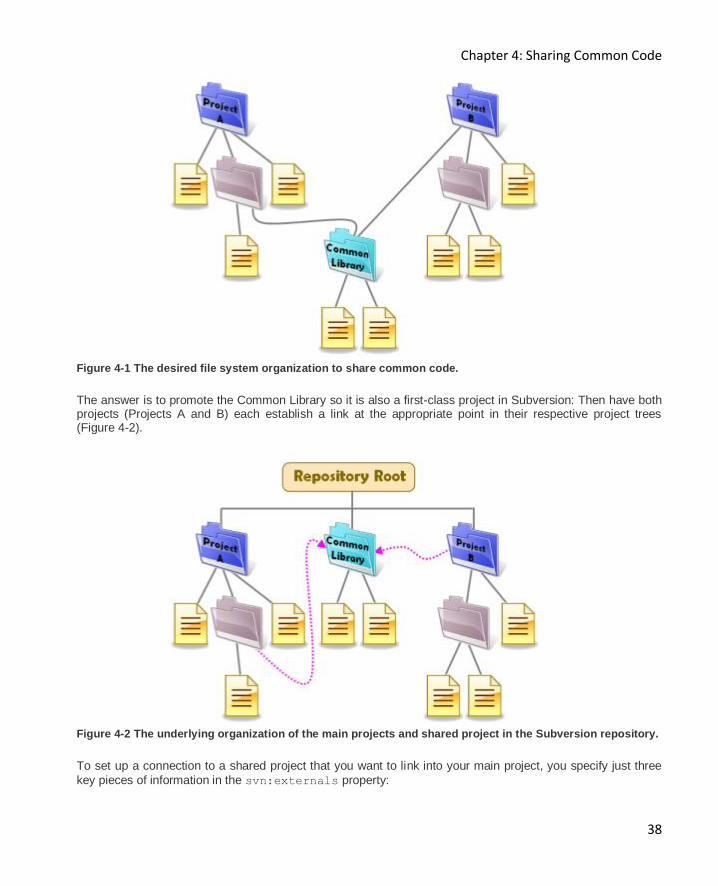
Chapter 4: Sharing Common Code
38
Figure 4-1 The desired file system organization to share common code.
The answer is to promote the Common Library so it is also a first-class project in Subversion: Then have both projects (Projects A and B) each establish a link at the appropriate point in their respective project trees (Figure 4-2).
Figure 4-2 The underlying organization of the main projects and shared project in the Subversion repository.
To set up a connection to a shared project that you want to link into your main project, you specify just three
key pieces of information in the svn:externals property:
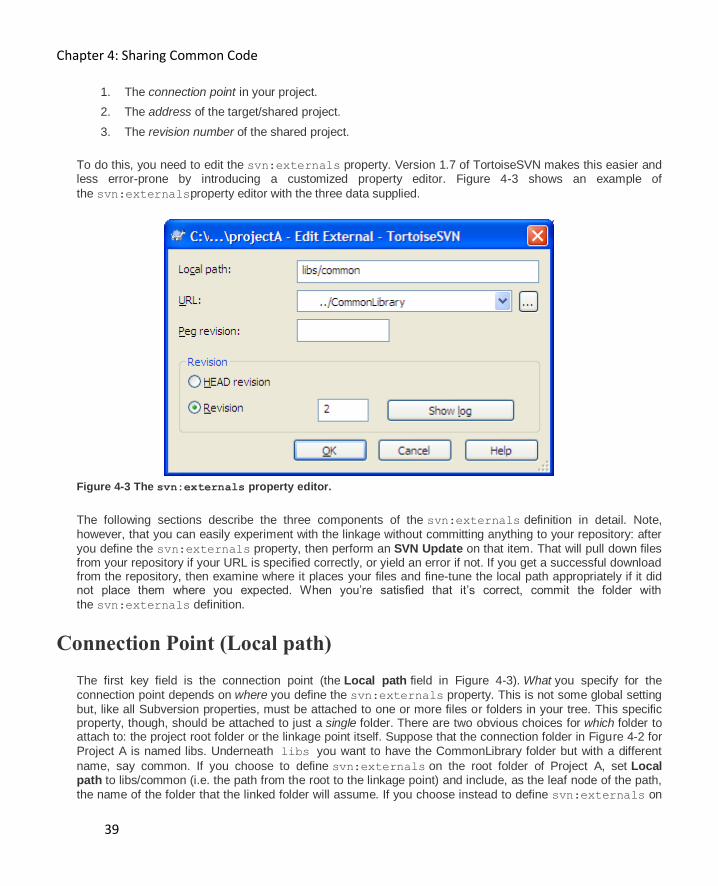
Chapter 4: Sharing Common Code
39
1. The connection point in your project.
2. The address of the target/shared project.
3. The revision number of the shared project.
To do this, you need to edit the svn:externals property. Version 1.7 of TortoiseSVN makes this easier and less error-prone by introducing a customized property editor. Figure 4-3 shows an example of
the svn:externalsproperty editor with the three data supplied.
Figure 4-3 The svn:externals property editor.
The following sections describe the three components of the svn:externals definition in detail. Note,
however, that you can easily experiment with the linkage without committing anything to your repository: after
you define the svn:externals property, then perform an SVN Update on that item. That will pull down files from your repository if your URL is specified correctly, or yield an error if not. If you get a successful download from the repository, then examine where it places your files and fine-tune the local path appropriately if it did not place them where you expected. When you’re satisfied that it’s correct, commit the folder with
the svn:externals definition.
Connection Point (Local path)
The first key field is the connection point (the Local path field in Figure 4-3). What you specify for the
connection point depends on where you define the svn:externals property. This is not some global setting
but, like all Subversion properties, must be attached to one or more files or folders in your tree. This specific property, though, should be attached to just a single folder. There are two obvious choices for which folder to attach to: the project root folder or the linkage point itself. Suppose that the connection folder in Figure 4-2 for
Project A is named libs. Underneath libs you want to have the CommonLibrary folder but with a different
name, say common. If you choose to define svn:externals on the root folder of Project A, set Local path to libs/common (i.e. the path from the root to the linkage point) and include, as the leaf node of the path,
the name of the folder that the linked folder will assume. If you choose instead to define svn:externals on
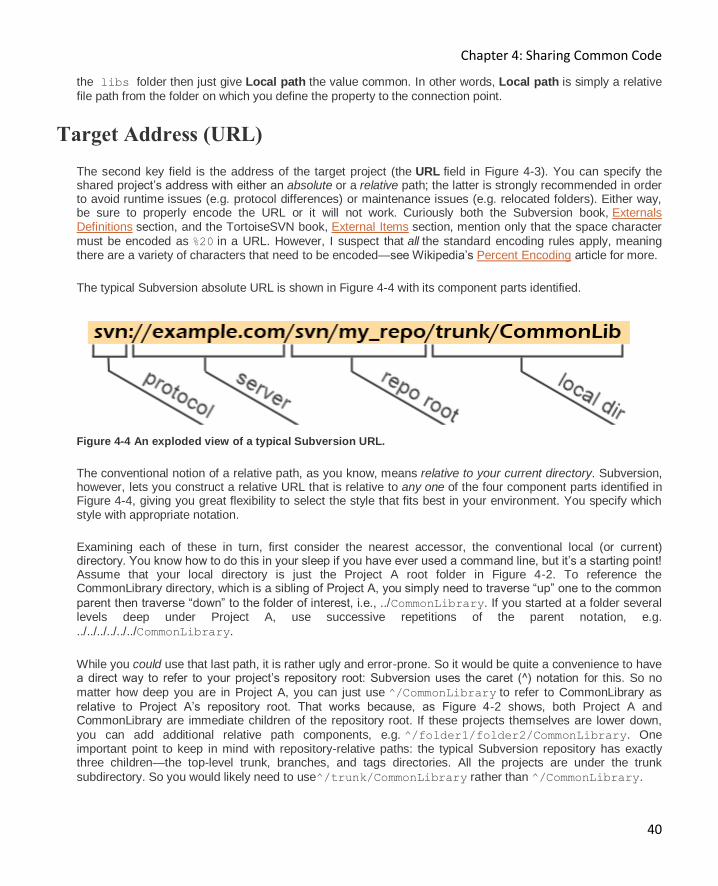
Chapter 4: Sharing Common Code
40
the libs folder then just give Local path the value common. In other words, Local path is simply a relative
file path from the folder on which you define the property to the connection point.
Target Address (URL)
The second key field is the address of the target project (the URL field in Figure 4-3). You can specify the shared project’s address with either an absolute or a relative path; the latter is strongly recommended in order to avoid runtime issues (e.g. protocol differences) or maintenance issues (e.g. relocated folders). Either way, be sure to properly encode the URL or it will not work. Curiously both the Subversion book, Externals Definitions section, and the TortoiseSVN book, External Items section, mention only that the space character
must be encoded as %20 in a URL. However, I suspect that all the standard encoding rules apply, meaning there are a variety of characters that need to be encoded—see Wikipedia’s Percent Encoding article for more.
The typical Subversion absolute URL is shown in Figure 4-4 with its component parts identified.
Figure 4-4 An exploded view of a typical Subversion URL.
The conventional notion of a relative path, as you know, means relative to your current directory. Subversion, however, lets you construct a relative URL that is relative to any one of the four component parts identified in Figure 4-4, giving you great flexibility to select the style that fits best in your environment. You specify which style with appropriate notation.
Examining each of these in turn, first consider the nearest accessor, the conventional local (or current) directory. You know how to do this in your sleep if you have ever used a command line, but it’s a starting point! Assume that your local directory is just the Project A root folder in Figure 4-2. To reference the CommonLibrary directory, which is a sibling of Project A, you simply need to traverse “up” one to the common
parent then traverse “down” to the folder of interest, i.e., ../CommonLibrary. If you started at a folder several levels deep under Project A, use successive repetitions of the parent notation, e.g.
../../../../../../CommonLibrary.
While you could use that last path, it is rather ugly and error-prone. So it would be quite a convenience to have a direct way to refer to your project’s repository root: Subversion uses the caret (^) notation for this. So no
matter how deep you are in Project A, you can just use ^/CommonLibrary to refer to CommonLibrary as
relative to Project A’s repository root. That works because, as Figure 4-2 shows, both Project A and CommonLibrary are immediate children of the repository root. If these projects themselves are lower down,
you can add additional relative path components, e.g. ^/folder1/folder2/CommonLibrary. One important point to keep in mind with repository-relative paths: the typical Subversion repository has exactly three children—the top-level trunk, branches, and tags directories. All the projects are under the trunk
subdirectory. So you would likely need to use^/trunk/CommonLibrary rather than ^/CommonLibrary.
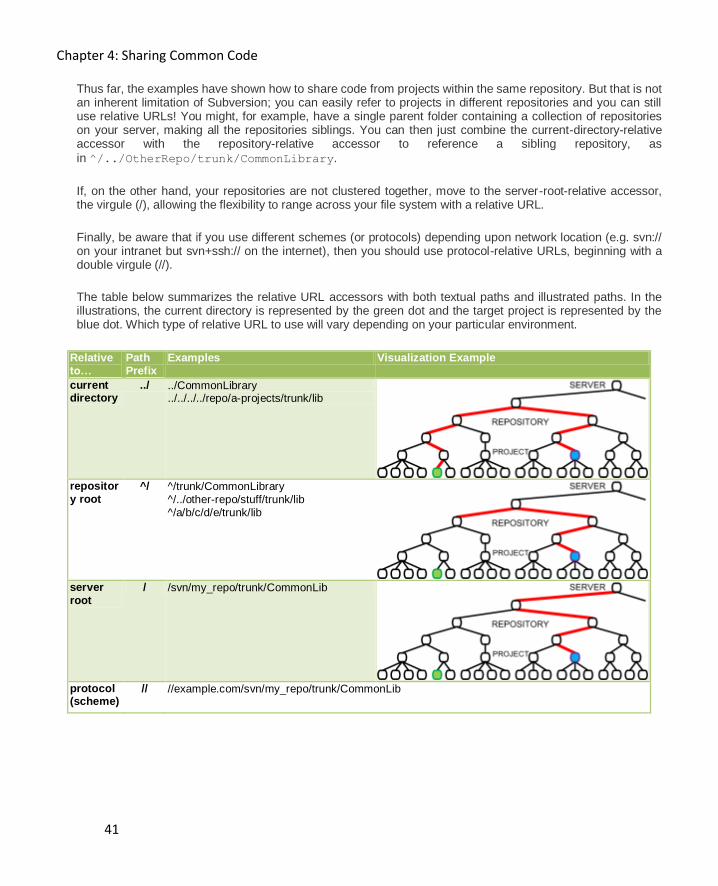
Chapter 4: Sharing Common Code
41
Thus far, the examples have shown how to share code from projects within the same repository. But that is not an inherent limitation of Subversion; you can easily refer to projects in different repositories and you can still use relative URLs! You might, for example, have a single parent folder containing a collection of repositories on your server, making all the repositories siblings. You can then just combine the current-directory-relative accessor with the repository-relative accessor to reference a sibling repository, as
in ^/../OtherRepo/trunk/CommonLibrary.
If, on the other hand, your repositories are not clustered together, move to the server-root-relative accessor, the virgule (/), allowing the flexibility to range across your file system with a relative URL.
Finally, be aware that if you use different schemes (or protocols) depending upon network location (e.g. svn:// on your intranet but svn+ssh:// on the internet), then you should use protocol-relative URLs, beginning with a double virgule (//).
The table below summarizes the relative URL accessors with both textual paths and illustrated paths. In the illustrations, the current directory is represented by the green dot and the target project is represented by the blue dot. Which type of relative URL to use will vary depending on your particular environment.
Relative to…
Path Prefix
Examples Visualization Example
current directory
../ ../CommonLibrary ../../../../repo/a-projects/trunk/lib
repositor
y root
^/ ^/trunk/CommonLibrary
^/../other-repo/stuff/trunk/lib ^/a/b/c/d/e/trunk/lib
server
root
/ /svn/my_repo/trunk/CommonLib
protocol (scheme)
// //example.com/svn/my_repo/trunk/CommonLib
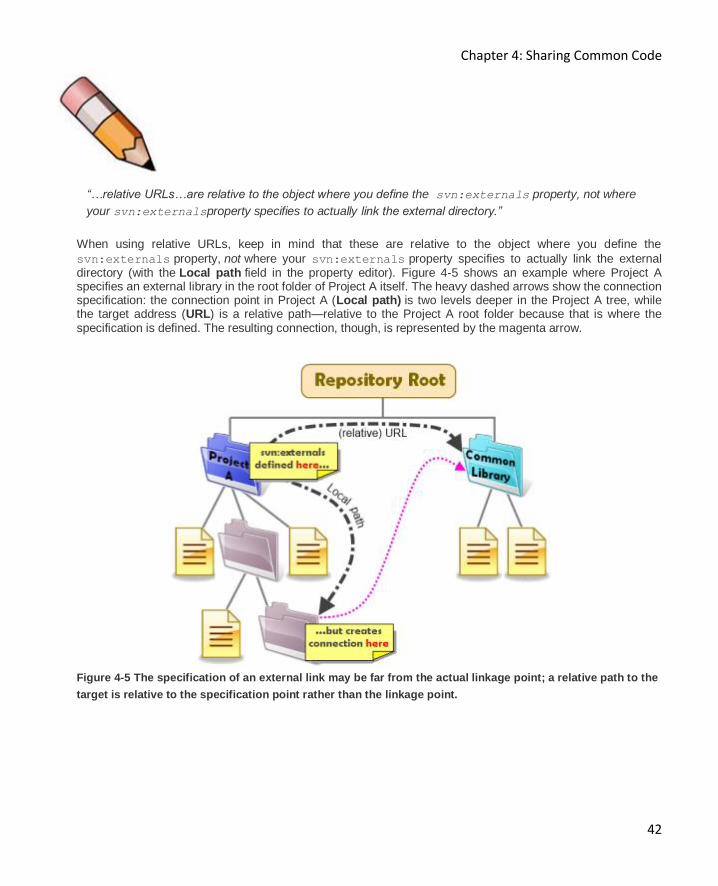
Chapter 4: Sharing Common Code
42
“…relative URLs…are relative to the object where you define the svn:externals property, not where
your svn:externalsproperty specifies to actually link the external directory.”
When using relative URLs, keep in mind that these are relative to the object where you define the
svn:externals property, not where your svn:externals property specifies to actually link the external directory (with the Local path field in the property editor). Figure 4-5 shows an example where Project A specifies an external library in the root folder of Project A itself. The heavy dashed arrows show the connection specification: the connection point in Project A (Local path) is two levels deeper in the Project A tree, while the target address (URL) is a relative path—relative to the Project A root folder because that is where the specification is defined. The resulting connection, though, is represented by the magenta arrow.
Figure 4-5 The specification of an external link may be far from the actual linkage point; a relative path to the
target is relative to the specification point rather than the linkage point.
Chapter 4: Sharing Common Code
43
Revision numbers
“You code to a specific revision of the shared library so you must explicitly define that revision in the
svn:externals linkage.
The third key field is the revision of the target project (the Revision field in Figure 4-3). Note in the figure that you could select either the head revision or a specific revision. Never choose the head revision; it is a bad idea to even have it available as a choice in the dialog. Why? Think of this shared code as a single package with a revision number, just like some other single DLL or other third-party library you use in your project. You cannot
just use any version of thingamabob.DLL with your code; you code against a specific release. If the supplier
releases an update to their DLL you do not just blindly plug it in: you review it for any API updates and breaking changes and test for runtime differences, then choose a convenient time when to make a change to a new release of the library. The situation is exactly analogous here. You code to a specific revision of the
shared library so you must explicitly define that revision in the svn:externals linkage. The Subversion book makes the case for an explicit revision so well that the TortoiseSVN book simply repeats it:
… you get to decide when to pull down a different snapshot of external information, and exactly which
snapshot to pull. Besides avoiding the surprise of getting changes to third-party repositories that you
might not have any control over, using explicit revision numbers also means that as you backdate your
working copy to a previous revision, your externals definitions will also revert to the way they looked in
that previous revision, which in turn means that the external working copies will be updated to match
the way they looked back when your repository was at that previous revision. For software projects,
this could be the difference between a successful and a failed build of an older snapshot of your
complex codebase.
In other words, you want to be in control of when your third-party code changes even if that third party code is still your code but from a different, shared project. The second part of that exposition is perhaps even more significant. If you ever need to go back to a previous release, your code will still work because you have explicit versions on your shared code. Consider the fictitious Remplissage product as an example to illustrate this. Assume you have had three releases of the product, cleverly labeled versions 1.0, 2.0, and 3.0. The table below shows the Subversion revision of your local code base associated with each label. Your product also includes a shared library that you keep in a separate repository and, per the advice given here, you specified explicit revision numbers when you linked in the shared code.
Release Label Local Code Revision External Code Revision
Remplissage 1.0 1932 431
Remplissage 2.0 2456 431
Remplissage 3.0 2601 509
Chapter 4: Sharing Common Code
44
Say you have just completed and labeled Remplissage 3.0. But you have received a bug report on release 2.0, which you are naturally still supporting. So you revert to the revision associated with release 2.0 (revision
2456 from the table). Because your svn:externals included revision numbers your code automatically rolls
back the shared code from revision 509 to revision 431 as well!
To my mind, it would be even better if TortoiseSVN could be redesigned to let you specify a tag name or a revision number. In development, you could easily be working with unfinished shared code so that the shared code would not be officially released, and so would not necessarily have been given a tag. However, when you are finished, or at least ready to release to production, it would be nice to be able to reference the shared code library by its tag rather than just its revision number. As it stands, you need to take the extra step to cross-reference a tag name to a revision number and then plug in the revision number in
the svn:externals property editor.
Bug with file scheme
As I was assembling this recipe I came across a subtle defect. In order to test scenarios, I used a local
repository with the file scheme, which uses this canonical URL format: file://host/path (see File URI scheme on Wikipedia). You may omit the host (implicitly specifying localhost) but you must keep all the
virgules, yielding three contiguous virgules: file:///path. The svn:externals property editor is actually
three dialogs deep from the context menu, shown at the top of Figure 4-6. You can specify a file scheme as shown, accept the choices to close the dialog and return to the second-level dialog that now shows all of the possibly multiple values with one per line (middle of Figure 4-6). Accept the values there to return to the first-level dialog, showing all Subversion properties, one per line (bottom of the figure). That works fine the first time you add an entry using the file scheme. But I found that when I went back in to edit
the svn:externals property—regardless of whether I touched the entry using the file scheme or not—TortoiseSVN erroneously alters the three virgules to two virgules!
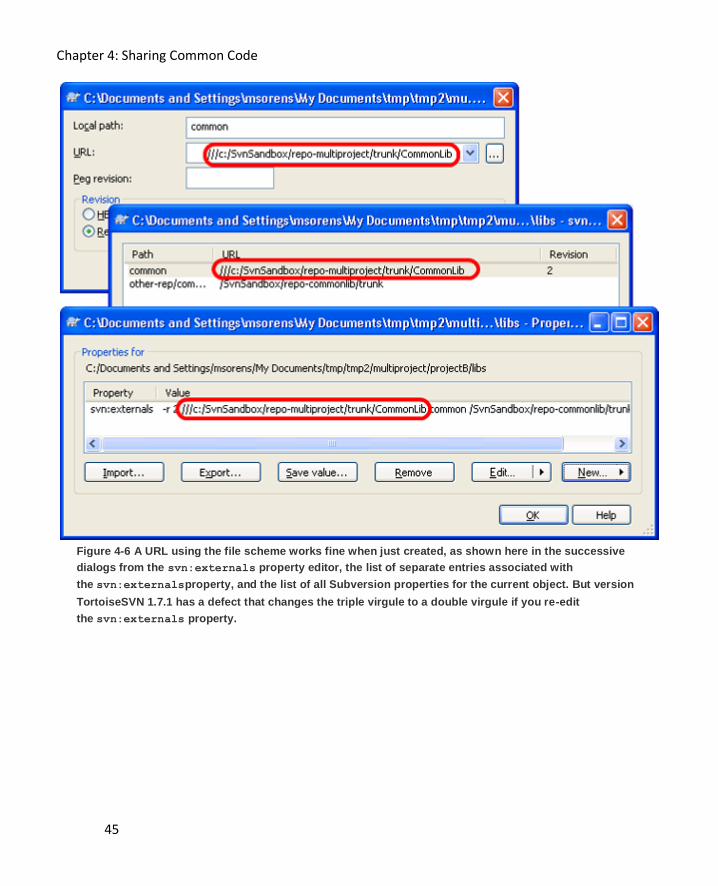
Chapter 4: Sharing Common Code
45
Figure 4-6 A URL using the file scheme works fine when just created, as shown here in the successive
dialogs from the svn:externals property editor, the list of separate entries associated with
the svn:externalsproperty, and the list of all Subversion properties for the current object. But version
TortoiseSVN 1.7.1 has a defect that changes the triple virgule to a double virgule if you re-edit
the svn:externals property.
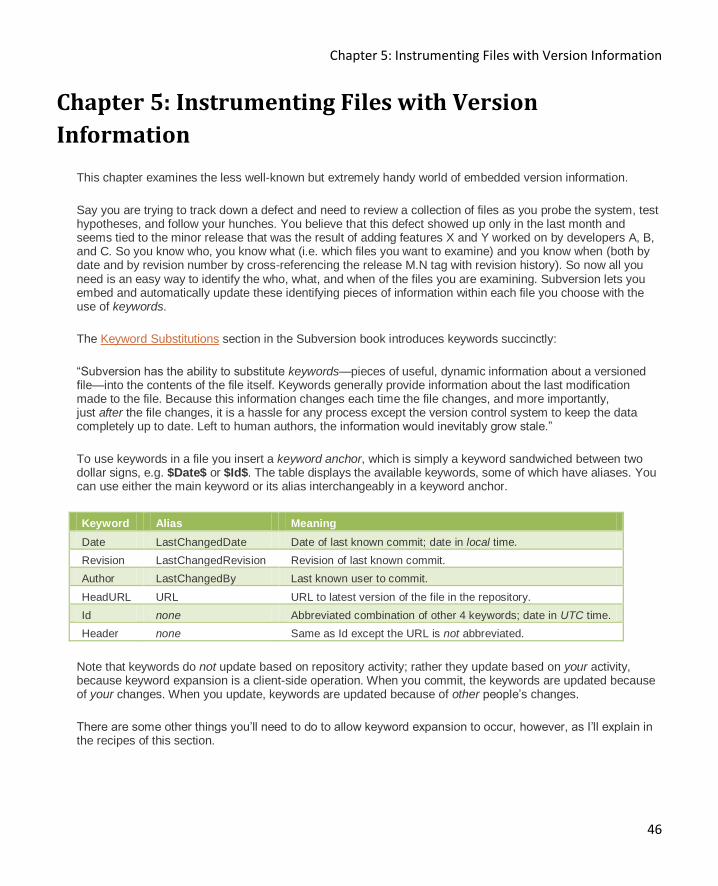
Chapter 5: Instrumenting Files with Version Information
46
Chapter 5: Instrumenting Files with Version
Information
This chapter examines the less well-known but extremely handy world of embedded version information.
Say you are trying to track down a defect and need to review a collection of files as you probe the system, test hypotheses, and follow your hunches. You believe that this defect showed up only in the last month and seems tied to the minor release that was the result of adding features X and Y worked on by developers A, B, and C. So you know who, you know what (i.e. which files you want to examine) and you know when (both by date and by revision number by cross-referencing the release M.N tag with revision history). So now all you need is an easy way to identify the who, what, and when of the files you are examining. Subversion lets you embed and automatically update these identifying pieces of information within each file you choose with the use of keywords.
The Keyword Substitutions section in the Subversion book introduces keywords succinctly:
“Subversion has the ability to substitute keywords—pieces of useful, dynamic information about a versioned file—into the contents of the file itself. Keywords generally provide information about the last modification made to the file. Because this information changes each time the file changes, and more importantly, just after the file changes, it is a hassle for any process except the version control system to keep the data completely up to date. Left to human authors, the information would inevitably grow stale.”
To use keywords in a file you insert a keyword anchor, which is simply a keyword sandwiched between two dollar signs, e.g. $Date$ or $Id$. The table displays the available keywords, some of which have aliases. You can use either the main keyword or its alias interchangeably in a keyword anchor.
Keyword Alias Meaning
Date LastChangedDate Date of last known commit; date in local time.
Revision LastChangedRevision Revision of last known commit.
Author LastChangedBy Last known user to commit.
HeadURL URL URL to latest version of the file in the repository.
Id none Abbreviated combination of other 4 keywords; date in UTC time.
Header none Same as Id except the URL is not abbreviated.
Note that keywords do not update based on repository activity; rather they update based on your activity, because keyword expansion is a client-side operation. When you commit, the keywords are updated because of your changes. When you update, keywords are updated because of other people’s changes.
There are some other things you’ll need to do to allow keyword expansion to occur, however, as I’ll explain in the recipes of this section.

Chapter 5: Instrumenting Files with Version Information
47
Enabling keyword substitution in a file
Keyword substitution happens only in those files where you have specifically enabled it using
the svn:keywords property. You can manually enable it on a file by setting the Subversion properties of that file. To do this, open the TortoiseSVN properties panel from the context menu either with TortoiseSVN >> Properties or with Properties >> Subversion >> Properties and create, or edit, the property there.
Alternately, as with most Subversion properties, if you set svn:keywords on a folder you can apply it recursively to every file within that folder. In version 1.6 you must manually select the ‘Apply property recursively’ checkbox in the property editor. Version 1.7 has streamlined the process: it automatically checks the ‘Apply property recursively’ checkbox for folders and unchecks it for files. Technically
the svn:keywords property does not apply to folders at all, only to files. Thus, when you apply
the svn:keywords property to a folder, you might think nothing happens if the folder is small enough. TortoiseSVN applies the property to all child files but not to the folder itself, and it is the folder’s property list that you are looking at once you apply the property. TortoiseSVN shows a progress box as it processes all the children but again, for a small folder, you might not even notice it.
A third approach to setting svn:keywords on a file is the proper, lazy approach: let the system do it for you when you add a file to source control. See the Automatically enabling keyword expansion in new files recipe.
The value you provide to the svn:keywords property is simply a list of one or more keywords (see the table in the introduction). In version 1.6 you are on your own with supplying this list. One great feature of Version 1.7
is the custom property editors for each Subversion property. For the svn:keywords property you are given a list of the available keywords and you simply check the ones you want to include. Upon closing the property editor your definition appears in the list of Subversion properties (Figure 5-1).
Figure 5-1 A Subversion property list showing the svn:keywords property. Any of the keywords listed may
be actively substituted in the file to which these properties are attached.
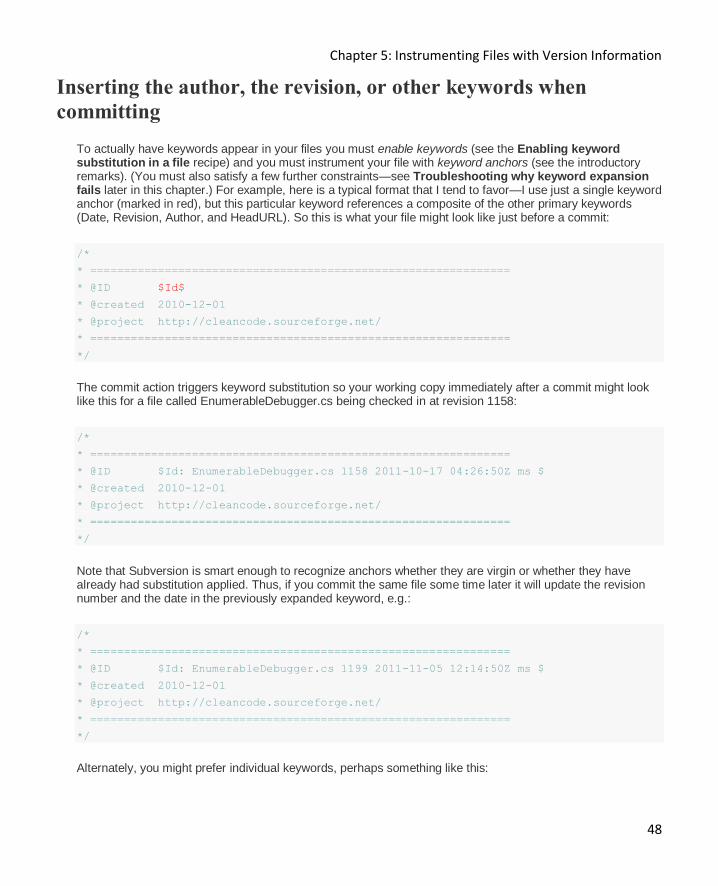
Chapter 5: Instrumenting Files with Version Information
48
Inserting the author, the revision, or other keywords when
committing
To actually have keywords appear in your files you must enable keywords (see the Enabling keyword substitution in a file recipe) and you must instrument your file with keyword anchors (see the introductory remarks). (You must also satisfy a few further constraints—see Troubleshooting why keyword expansion fails later in this chapter.) For example, here is a typical format that I tend to favor—I use just a single keyword anchor (marked in red), but this particular keyword references a composite of the other primary keywords (Date, Revision, Author, and HeadURL). So this is what your file might look like just before a commit:
/*
* ==============================================================
* @ID $Id$
* @created 2010-12-01
* @project http://cleancode.sourceforge.net/
* ==============================================================
*/
The commit action triggers keyword substitution so your working copy immediately after a commit might look like this for a file called EnumerableDebugger.cs being checked in at revision 1158:
/*
* ==============================================================
* @ID $Id: EnumerableDebugger.cs 1158 2011-10-17 04:26:50Z ms $
* @created 2010-12-01
* @project http://cleancode.sourceforge.net/
* ==============================================================
*/
Note that Subversion is smart enough to recognize anchors whether they are virgin or whether they have already had substitution applied. Thus, if you commit the same file some time later it will update the revision number and the date in the previously expanded keyword, e.g.:
/*
* ==============================================================
* @ID $Id: EnumerableDebugger.cs 1199 2011-11-05 12:14:50Z ms $
* @created 2010-12-01
* @project http://cleancode.sourceforge.net/
* ==============================================================
*/
Alternately, you might prefer individual keywords, perhaps something like this:
Chapter 5: Instrumenting Files with Version Information
49
########################################################################
# Revision $Revision$
# Last Revised $Date$
# Author $Author$
# File $HeadURL$
########################################################################
And note that you may use either keywords or aliases (as presented in the table in the introductory remarks), so this is equivalent:
########################################################################
# Revision $LastChangedRevision$
# Last Revised $LastChangedDate$
# Author $LastChangedBy$
# File $HeadURL$
########################################################################
However you choose to organize your keyword anchors, typically you put them in some commented preamble to your file.
Automatically enabling keyword expansion in new files
It would be quite a hassle if, every time you add a new file to the repository, you have to manually edit its Subversion properties to enable keyword substitution (as detailed in the Enabling keyword substitution in a file recipe). Fortunately, TortoiseSVN—well, Subversion really—lets you enable keyword substitution in newly added files automatically with some simple, one-time setup.
"TortoiseSVN… lets you enable keyword substitution in newly added files automatically with some simple,
one-time setup."
First, locate your Subversion configuration file in one of your Window’s ApplicationData directories. To find just
the right one examine $Env:APPDATA from PowerShell (or $APPDATA from DOS). The full path to the
configuration file is $Env:APPDATA\Subversion\config.
Second, search for the enable-auto-props property and make sure it is set to yes. This is the master switch for enabling automatic property attachment to new files. Once the master switch is turned on, then you can enable groups of files specified by extension.
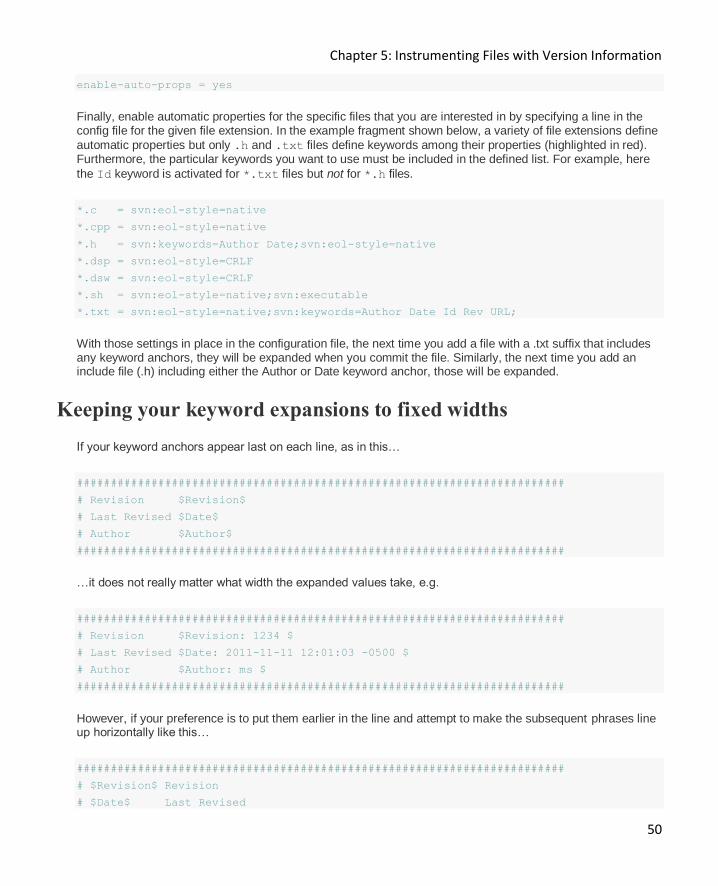
Chapter 5: Instrumenting Files with Version Information
50
enable-auto-props = yes
Finally, enable automatic properties for the specific files that you are interested in by specifying a line in the config file for the given file extension. In the example fragment shown below, a variety of file extensions define
automatic properties but only .h and .txt files define keywords among their properties (highlighted in red). Furthermore, the particular keywords you want to use must be included in the defined list. For example, here
the Id keyword is activated for *.txt files but not for *.h files.
*.c = svn:eol-style=native
*.cpp = svn:eol-style=native
*.h = svn:keywords=Author Date;svn:eol-style=native
*.dsp = svn:eol-style=CRLF
*.dsw = svn:eol-style=CRLF
*.sh = svn:eol-style=native;svn:executable
*.txt = svn:eol-style=native;svn:keywords=Author Date Id Rev URL;
With those settings in place in the configuration file, the next time you add a file with a .txt suffix that includes any keyword anchors, they will be expanded when you commit the file. Similarly, the next time you add an include file (.h) including either the Author or Date keyword anchor, those will be expanded.
Keeping your keyword expansions to fixed widths
If your keyword anchors appear last on each line, as in this…
########################################################################
# Revision $Revision$
# Last Revised $Date$
# Author $Author$
########################################################################
…it does not really matter what width the expanded values take, e.g.
########################################################################
# Revision $Revision: 1234 $
# Last Revised $Date: 2011-11-11 12:01:03 -0500 $
# Author $Author: ms $
########################################################################
However, if your preference is to put them earlier in the line and attempt to make the subsequent phrases line up horizontally like this…
########################################################################
# $Revision$ Revision
# $Date$ Last Revised
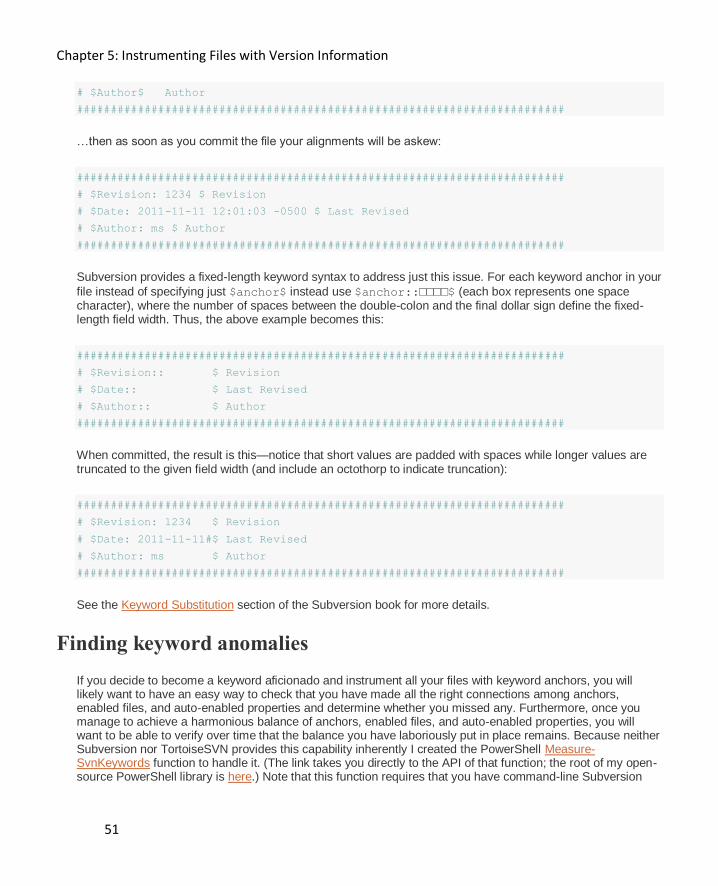
Chapter 5: Instrumenting Files with Version Information
51
# $Author$ Author
########################################################################
…then as soon as you commit the file your alignments will be askew:
########################################################################
# $Revision: 1234 $ Revision
# $Date: 2011-11-11 12:01:03 -0500 $ Last Revised
# $Author: ms $ Author
########################################################################
Subversion provides a fixed-length keyword syntax to address just this issue. For each keyword anchor in your
file instead of specifying just $anchor$ instead use $anchor::□□□□$ (each box represents one space character), where the number of spaces between the double-colon and the final dollar sign define the fixed-length field width. Thus, the above example becomes this:
########################################################################
# $Revision:: $ Revision
# $Date:: $ Last Revised
# $Author:: $ Author
########################################################################
When committed, the result is this—notice that short values are padded with spaces while longer values are truncated to the given field width (and include an octothorp to indicate truncation):
########################################################################
# $Revision: 1234 $ Revision
# $Date: 2011-11-11#$ Last Revised
# $Author: ms $ Author
########################################################################
See the Keyword Substitution section of the Subversion book for more details.
Finding keyword anomalies
If you decide to become a keyword aficionado and instrument all your files with keyword anchors, you will likely want to have an easy way to check that you have made all the right connections among anchors, enabled files, and auto-enabled properties and determine whether you missed any. Furthermore, once you manage to achieve a harmonious balance of anchors, enabled files, and auto-enabled properties, you will want to be able to verify over time that the balance you have laboriously put in place remains. Because neither Subversion nor TortoiseSVN provides this capability inherently I created the PowerShell Measure-SvnKeywords function to handle it. (The link takes you directly to the API of that function; the root of my open-source PowerShell library is here.) Note that this function requires that you have command-line Subversion
Chapter 5: Instrumenting Files with Version Information
52
available, not just TortoiseSVN. (But if you are using TortoiseSVN 1.7 or later, it includes the command-line executables in the installation!)
"Measure-SvnKeywords… lets you easily see where you are missing keyword anchors or, conversely,
where you have keyword anchors but did not enable keyword expansion."
Measure-SvnKeywords reports a variety of statistics on keywords and keyword-related anomalies, letting you easily see where you are missing keyword anchors or, conversely, where you have keyword anchors but did not enable keyword expansion. It even gives you information to determine if there are other files where you might want to add keywords. Think of it as being primarily designed to answer these two questions:
Do you have files with keyword anchors that do not have keyword expansion enabled?
Do you have files with keyword expansion enabled that do not use keyword anchors?
Here is the calling signature of the function:
Measure-SvnKeywords
[[-Path] <String[]>]
[-Include <String[]>]
[-Exclude <String[]>]
[-Recurse]<br />
[-ExcludeTree <String[]>]
[-EnableKeywords]
The first four parameters are quite standard; you will find them behaving identically to those in the standard Get-ChildItem cmdlet, for example. The penultimate parameter, ExcludeTree, is semi-standard, in that it operates the same as it does in Get-EnhancedChildItem (also from my open-source library). That parameter extends the capability of Get-ChildItem to let you prune whole subtrees, quite a useful capability! The final parameter, EnableKeywords, lets you actually go beyond just measuring Subversion keywords and update them! I’ll say more on that shortly.
Measure-SvnKeywords generates a report of a variety of keyword-related statistics on the set of files you specify. It can take some time to run, though: it takes perhaps a full minute to process a couple thousand files in my working copy. Because of the non-instantaneous run time, it makes use of the standard Write-Progress cmdlet to provide feedback during execution; this flexible cmdlet adapts to its environment—see Figure 5-2. Running inside the PowerGUI Script Editor, it displays a first-class pop-up progress monitor (left side of the figure). Inside a plain, text-oriented PowerShell window, it displays an ASCII rendition of a progress bar (right side of the figure).
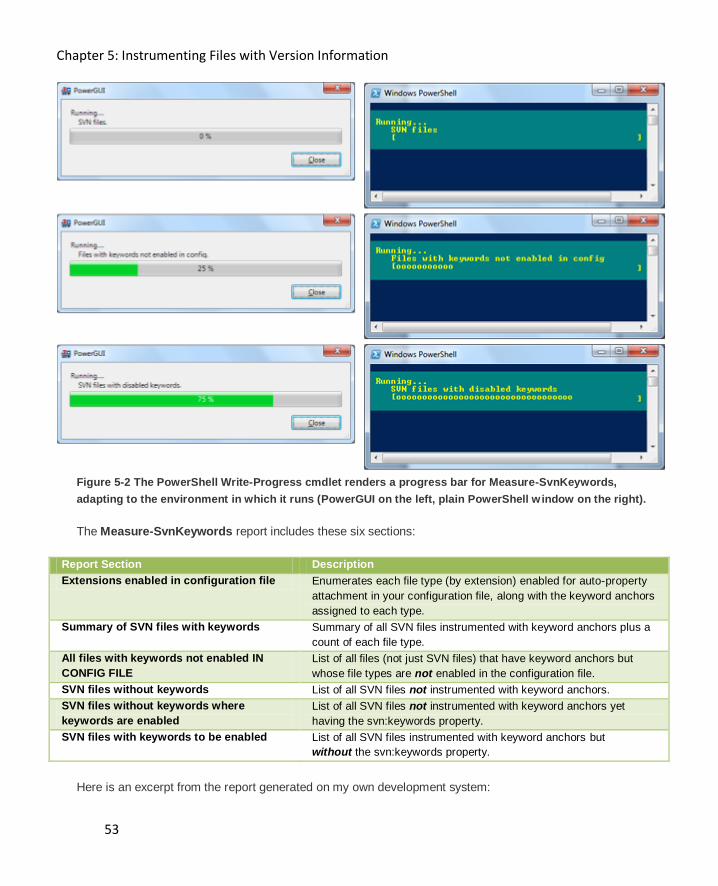
Chapter 5: Instrumenting Files with Version Information
53
Figure 5-2 The PowerShell Write-Progress cmdlet renders a progress bar for Measure-SvnKeywords,
adapting to the environment in which it runs (PowerGUI on the left, plain PowerShell window on the right).
The Measure-SvnKeywords report includes these six sections:
Report Section Description
Extensions enabled in configuration file Enumerates each file type (by extension) enabled for auto-property
attachment in your configuration file, along with the keyword anchors
assigned to each type.
Summary of SVN files with keywords Summary of all SVN files instrumented with keyword anchors plus a
count of each file type.
All files with keywords not enabled IN
CONFIG FILE
List of all files (not just SVN files) that have keyword anchors but
whose file types are not enabled in the configuration file.
SVN files without keywords List of all SVN files not instrumented with keyword anchors.
SVN files without keywords where
keywords are enabled
List of all SVN files not instrumented with keyword anchors yet
having the svn:keywords property.
SVN files with keywords to be enabled List of all SVN files instrumented with keyword anchors but
without the svn:keywords property.
Here is an excerpt from the report generated on my own development system:
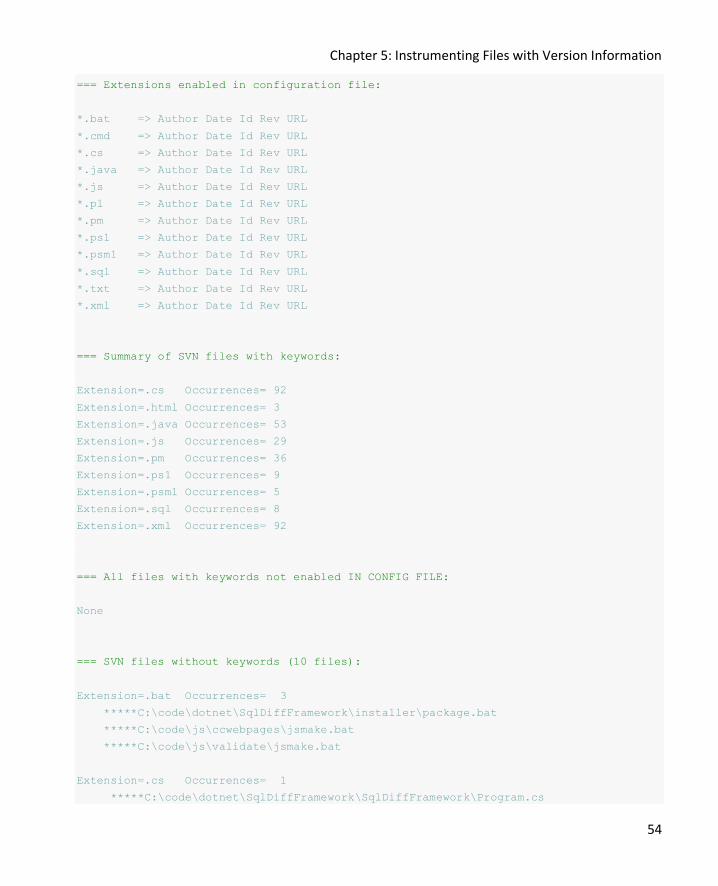
Chapter 5: Instrumenting Files with Version Information
54
=== Extensions enabled in configuration file:
*.bat => Author Date Id Rev URL
*.cmd => Author Date Id Rev URL
*.cs => Author Date Id Rev URL
*.java => Author Date Id Rev URL
*.js => Author Date Id Rev URL
*.pl => Author Date Id Rev URL
*.pm => Author Date Id Rev URL
*.ps1 => Author Date Id Rev URL
*.psm1 => Author Date Id Rev URL
*.sql => Author Date Id Rev URL
*.txt => Author Date Id Rev URL
*.xml => Author Date Id Rev URL
=== Summary of SVN files with keywords:
Extension=.cs Occurrences= 92
Extension=.html Occurrences= 3
Extension=.java Occurrences= 53
Extension=.js Occurrences= 29
Extension=.pm Occurrences= 36
Extension=.ps1 Occurrences= 9
Extension=.psm1 Occurrences= 5
Extension=.sql Occurrences= 8
Extension=.xml Occurrences= 92
=== All files with keywords not enabled IN CONFIG FILE:
None
=== SVN files without keywords (10 files):
Extension=.bat Occurrences= 3
*****C:\code\dotnet\SqlDiffFramework\installer\package.bat
*****C:\code\js\ccwebpages\jsmake.bat
*****C:\code\js\validate\jsmake.bat
Extension=.cs Occurrences= 1
*****C:\code\dotnet\SqlDiffFramework\SqlDiffFramework\Program.cs
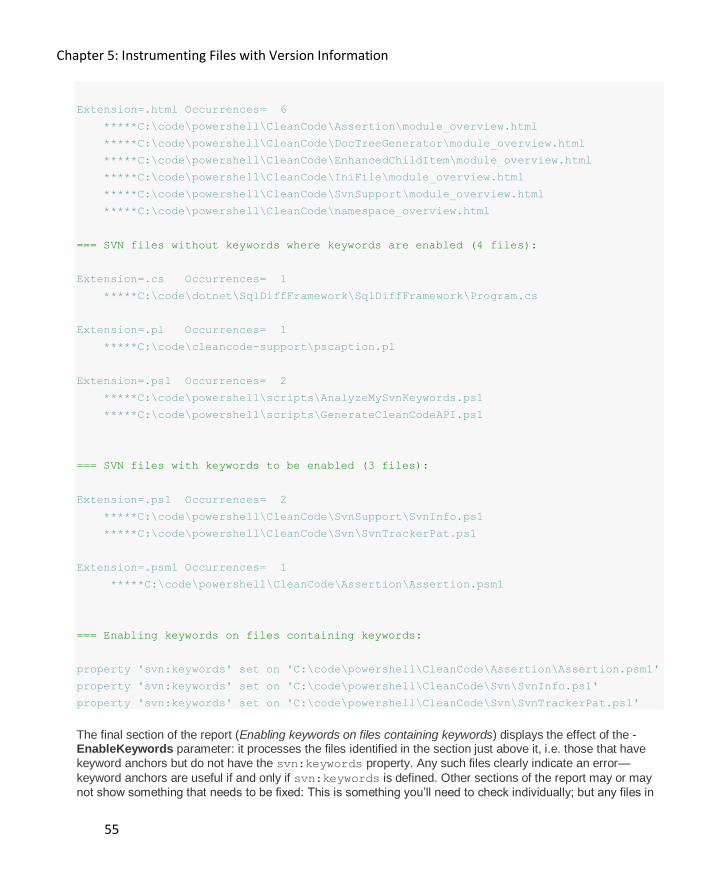
Chapter 5: Instrumenting Files with Version Information
55
Extension=.html Occurrences= 6
*****C:\code\powershell\CleanCode\Assertion\module_overview.html
*****C:\code\powershell\CleanCode\DocTreeGenerator\module_overview.html
*****C:\code\powershell\CleanCode\EnhancedChildItem\module_overview.html
*****C:\code\powershell\CleanCode\IniFile\module_overview.html
*****C:\code\powershell\CleanCode\SvnSupport\module_overview.html
*****C:\code\powershell\CleanCode\namespace_overview.html
=== SVN files without keywords where keywords are enabled (4 files):
Extension=.cs Occurrences= 1
*****C:\code\dotnet\SqlDiffFramework\SqlDiffFramework\Program.cs
Extension=.pl Occurrences= 1
*****C:\code\cleancode-support\pscaption.pl
Extension=.ps1 Occurrences= 2
*****C:\code\powershell\scripts\AnalyzeMySvnKeywords.ps1
*****C:\code\powershell\scripts\GenerateCleanCodeAPI.ps1
=== SVN files with keywords to be enabled (3 files):
Extension=.ps1 Occurrences= 2
*****C:\code\powershell\CleanCode\SvnSupport\SvnInfo.ps1
*****C:\code\powershell\CleanCode\Svn\SvnTrackerPat.ps1
Extension=.psm1 Occurrences= 1
*****C:\code\powershell\CleanCode\Assertion\Assertion.psm1
=== Enabling keywords on files containing keywords:
property 'svn:keywords' set on 'C:\code\powershell\CleanCode\Assertion\Assertion.psm1'
property 'svn:keywords' set on 'C:\code\powershell\CleanCode\Svn\SvnInfo.ps1'
property 'svn:keywords' set on 'C:\code\powershell\CleanCode\Svn\SvnTrackerPat.ps1'
The final section of the report (Enabling keywords on files containing keywords) displays the effect of the -EnableKeywords parameter: it processes the files identified in the section just above it, i.e. those that have
keyword anchors but do not have the svn:keywords property. Any such files clearly indicate an error—
keyword anchors are useful if and only if svn:keywords is defined. Other sections of the report may or may
not show something that needs to be fixed: This is something you’ll need to check individually; but any files in
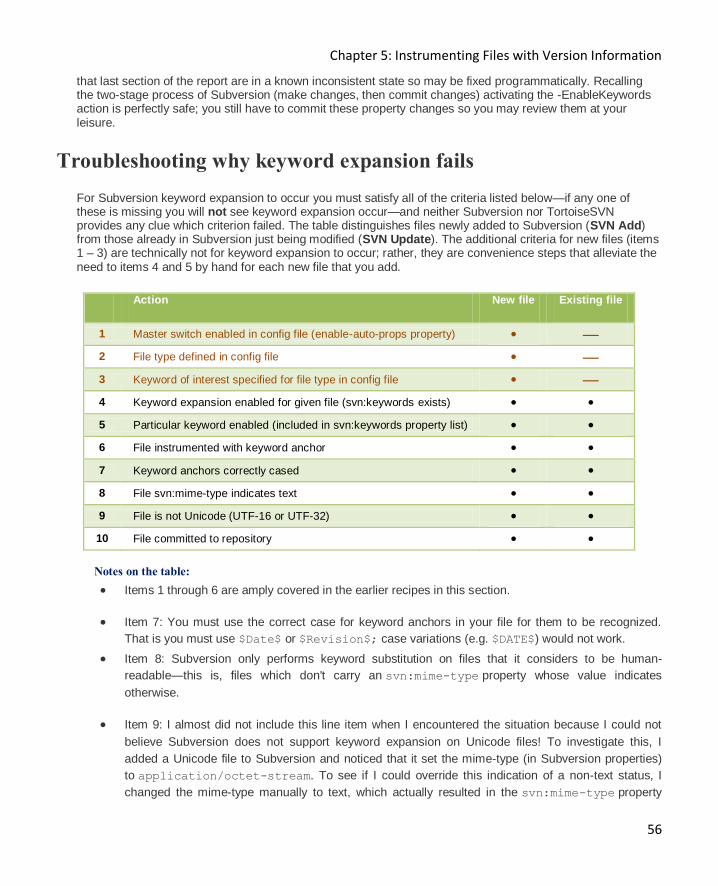
Chapter 5: Instrumenting Files with Version Information
56
that last section of the report are in a known inconsistent state so may be fixed programmatically. Recalling the two-stage process of Subversion (make changes, then commit changes) activating the -EnableKeywords action is perfectly safe; you still have to commit these property changes so you may review them at your leisure.
Troubleshooting why keyword expansion fails
For Subversion keyword expansion to occur you must satisfy all of the criteria listed below—if any one of these is missing you will not see keyword expansion occur—and neither Subversion nor TortoiseSVN provides any clue which criterion failed. The table distinguishes files newly added to Subversion (SVN Add) from those already in Subversion just being modified (SVN Update). The additional criteria for new files (items 1 – 3) are technically not for keyword expansion to occur; rather, they are convenience steps that alleviate the need to items 4 and 5 by hand for each new file that you add.
Action New file Existing file
1 Master switch enabled in config file (enable-auto-props property) • —
2 File type defined in config file • —
3 Keyword of interest specified for file type in config file • —
4 Keyword expansion enabled for given file (svn:keywords exists) • • 5 Particular keyword enabled (included in svn:keywords property list) • • 6 File instrumented with keyword anchor • • 7 Keyword anchors correctly cased • • 8 File svn:mime-type indicates text • • 9 File is not Unicode (UTF-16 or UTF-32) • • 10 File committed to repository • •
Notes on the table:
Items 1 through 6 are amply covered in the earlier recipes in this section.
Item 7: You must use the correct case for keyword anchors in your file for them to be recognized.
That is you must use $Date$ or $Revision$; case variations (e.g. $DATE$) would not work.
Item 8: Subversion only performs keyword substitution on files that it considers to be human-
readable—this is, files which don't carry an svn:mime-type property whose value indicates
otherwise.
Item 9: I almost did not include this line item when I encountered the situation because I could not
believe Subversion does not support keyword expansion on Unicode files! To investigate this, I
added a Unicode file to Subversion and noticed that it set the mime-type (in Subversion properties)
to application/octet-stream. To see if I could override this indication of a non-text status, I
changed the mime-type manually to text, which actually resulted in the svn:mime-type property
Chapter 5: Instrumenting Files with Version Information
57
being deleted from the properties list (since text is the default presumably). I committed the file to the
repository then added a keyword anchor and committed again. The keyword anchor
was not expanded. This issue, as it turns out, is really a sub-category of item 8: Subversion simply
does not provide support for Unicode files as text, so it does not expand keywords. This is
an outstanding defect.
I found one other symptom related to this (item 9): I tried to assign the svn:eol-style property a
value of native but TortoiseSVN refused saying the file has inconsistent line endings; in reality, it
appears to be simply because it does not realize it is text. To confirm, I converted my file from
Unicode to ASCII and then the keywords expanded upon commit.
"Keyword expansion … occurs only when you initiate an SVN Update or SVN Commit, i.e. at the time you
synchronize your working copy with the repository."
Item 10: This last item—committing your file—seems so innocuous but you should take a moment to
consider the implications. Keyword expansion from virgin anchors or, perhaps more insidiously,
keyword update from previous expanded anchors, occurs only when you initiate an SVN
Update or SVN Commit, i.e. at the time you synchronize your working copy with the repository. That
is, keyword expansion is strictly a client-side operation. As the Subversion book states, “…your client
‘knows’ only about changes that have occurred in the repository when you update your working copy
to include those changes. If you never update your working copy, your keywords will never expand to
different values even if those versioned files are being changed regularly in the repository. [my
emphasis]” So SVN Update will trigger keyword expansion, as will SVN Commit: both of these
operations synchronize your working copy with the repository.
Chapter 6: Snapshots
58
Chapter 6: Snapshots
Once you have done your testing and tweaking and are ready to deliver your code to production, perhaps the most important thing you need to do (besides actually delivering the code) is to know what you are delivering. You must be able to come back in an hour, a month, or a year and be able to examine, diagnose, tweak, compile, or recreate the exact same release you just delivered. Taking such a snapshot in source control lingo is called tagging in some systems (including Subversion) and labeling in others. Regardless of the name, the concept of a snapshot is a central tenet – indeed, possibly the central tenet – of source control: a snapshot allows you to shift your world view to restore an arbitrary build or environment.
"Because there is only a single, global current revision number in Subversion, every commit creates a
snapshot …by definition."
In Subversion, taking snapshots is easy. In fact, because there is only a single, global current revision number in Subversion, every commit creates a snapshot of the filesystem by definition. Assuming you write on a post-it that revision 58329 in your Subversion repository corresponds to your latest release of WhizBang version 5.1, you could come back anytime in the future and use the TortoiseSVN >> Update to Revision command to recreate the world as it existed in revision 58329. But that is rather unpalatable; a much more savory approach is to associate a tag (e.g. “WhizBang 5.1”) with a revision (58329 in this example) within Subversion itself. Then, instead of having to remember the association, you use the TortoiseSVN >> Switch command to switch to the tag name. As an example, consider the revision graph of a portion of my open-source libraries in Figure 6-1. Starting from the bottom you can observe that revision 847 has been tagged with Release 0_9_31. If you move upward looking for similar tags (i.e. /tags/Release_x_x_x) you will find 0_9_32 and 0_9_33 consecutively, then jump up and over to the right a bit to find 1_0_0 when I did a major release. Finally at the top is 1_00_01, a minor release. Also notice that I have a different product, SqlDiffFramework, first appearing at revision 1021, which goes through a couple minor revisions as well. Finally, second from the top (at revision 970) I have a tag that is not for a product but rather just for a notable milestone, my last revision using Visual Studio 2008 before switching to Visual Studio 2010. So you can add tags for whatever is of use to you, be it releases, milestones, builds, etc.
The leftmost column in the graph—the grey rectangles—represent the mainline of code. The rectangles with rounded corners represent tags. Each tag, being a snapshot of the mainline, is tied back to a specific revision in the mainline. So, for example, Release 0_9_32 ties to revision 887. But curiously the tag itself has its own revision (891 in this example)! The reason is that tags are committed just like any other file; since every commit is associated with a new global revision number, each tag must then have its own unique revision. You can add multiple tags to a mainline revision—you can find a couple examples of this in the illustration. Each tag will have its own unique revision number though each is associated to the same mainline revision number.
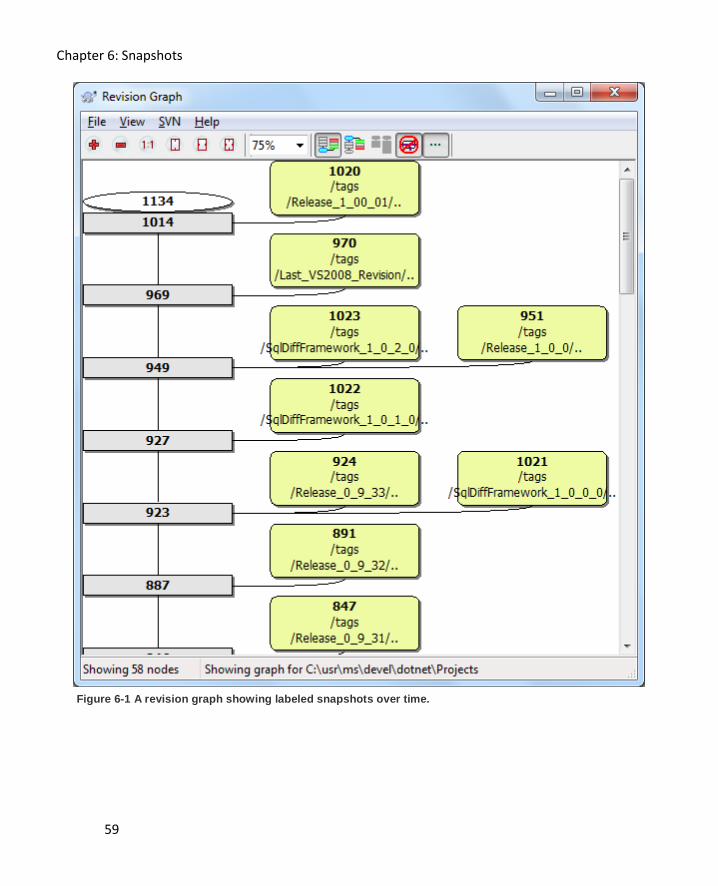
Chapter 6: Snapshots
59
Figure 6-1 A revision graph showing labeled snapshots over time.
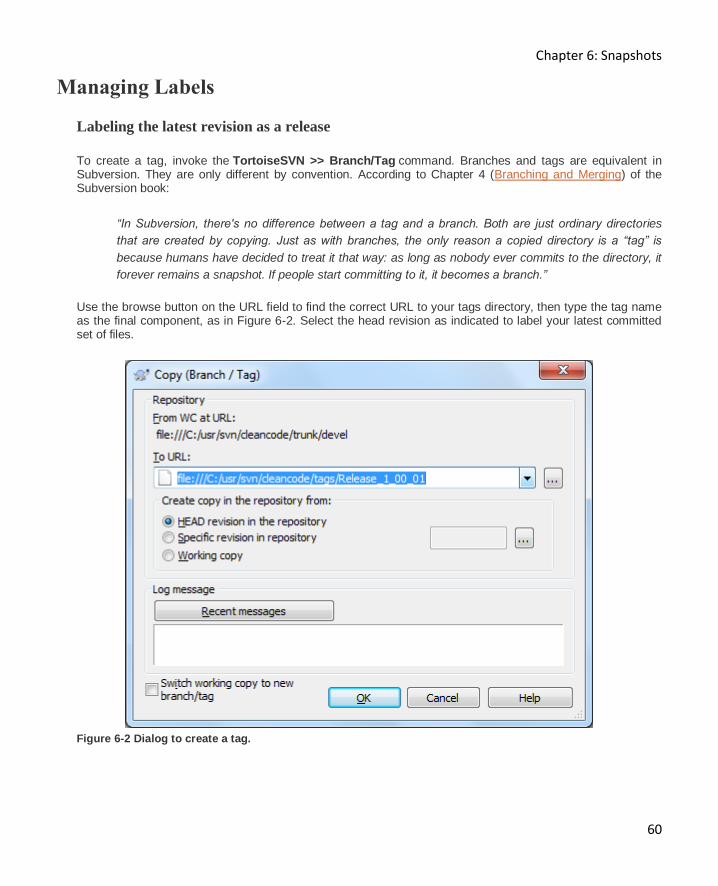
Chapter 6: Snapshots
60
Managing Labels
Labeling the latest revision as a release
To create a tag, invoke the TortoiseSVN >> Branch/Tag command. Branches and tags are equivalent in Subversion. They are only different by convention. According to Chapter 4 (Branching and Merging) of the Subversion book:
“In Subversion, there's no difference between a tag and a branch. Both are just ordinary directories
that are created by copying. Just as with branches, the only reason a copied directory is a “tag” is
because humans have decided to treat it that way: as long as nobody ever commits to the directory, it
forever remains a snapshot. If people start committing to it, it becomes a branch.”
Use the browse button on the URL field to find the correct URL to your tags directory, then type the tag name as the final component, as in Figure 6-2. Select the head revision as indicated to label your latest committed set of files.
Figure 6-2 Dialog to create a tag.
Chapter 6: Snapshots
61
Labeling an earlier revision as a release
Depending on your methodology you might tag your release immediately (in which case you need only tag the head revision as detailed in the Labeling the latest revision as a release recipe) or you might wait until you are sure the release is stable before tagging it. In the interim, however, your colleagues may have made other, unrelated, commits to your repository; so tagging the head revision is no longer an option. But you can just as easily tag some previous revision.
To create a tag, invoke the Branch/Tag command. (Branches and tags are equivalent in Subversion. See Labeling the latest revision as a release for more.) Use the browse button on the URL field to find the correct URL to your tags directory, then type the tag name as the final component, as in Figure 6-2. Select a specific revision number to label. If you know it, just type it in. If you do not, press the browse button to open the log viewer, letting you browse for what you need. Select the appropriate version in the log viewer; TortoiseSVN shows a check mark on the one you select. When you close out the dialog by pressing OK, it copies the selected version number into the original dialog.
Labeling by bits and pieces
The previous two recipes explained the process of applying a simple tag, where all files were at the same revision. But Subversion has the flexibility to apply a complex tag where different files or folders are at different revisions or even if they have local modifications. The procedure to do this is virtually the same as the last two recipes, with one prerequisite. Before invoking the Branch/Tag command, configure your environment with the various revisions and local modifications that you want to snapshot. Open the Branch/Tag dialog as before and select your tag name but, this time, select the Working Copy option in the dialog.
Moving a Tag
Consider this scenario: you finish your code, test thoroughly, and release to production. Your final flourish is to create a snapshot/label the release as “version_2.0.0” in the repository so that you can quickly and easily restore your environment to this release at any time in the future. Invoke the TortoiseSVN >> Branch/Tag command to create the tag. Great; it’s a wrap. But then a day passes and a customer reports a minor problem that, you determine, requires only the slightest tweak of a configuration file. You update the file, commit it to Subversion, and release to production. You still consider this version 2.0.0 but now your label is stale: if you restore your working copy to the “version_2.0.0” tag it will be wrong because it will not include this configuration file tweak. Realizing this, you just want to move the label so it also includes this configuration file change. There is no command to move a tag but it is almost that simple: in the repository browser delete the tag, which is simply a folder. Then back in Windows Explorer, recreate the tag with the standard TortoiseSVN >> Branch/Tag command. Before you invoke the command, however, you need to consider whether you are tagging a single revision or a mix of revisions—see the earlier recipes in this section once you make this determination.
"Before you blithely move a tag… consider whether you should."
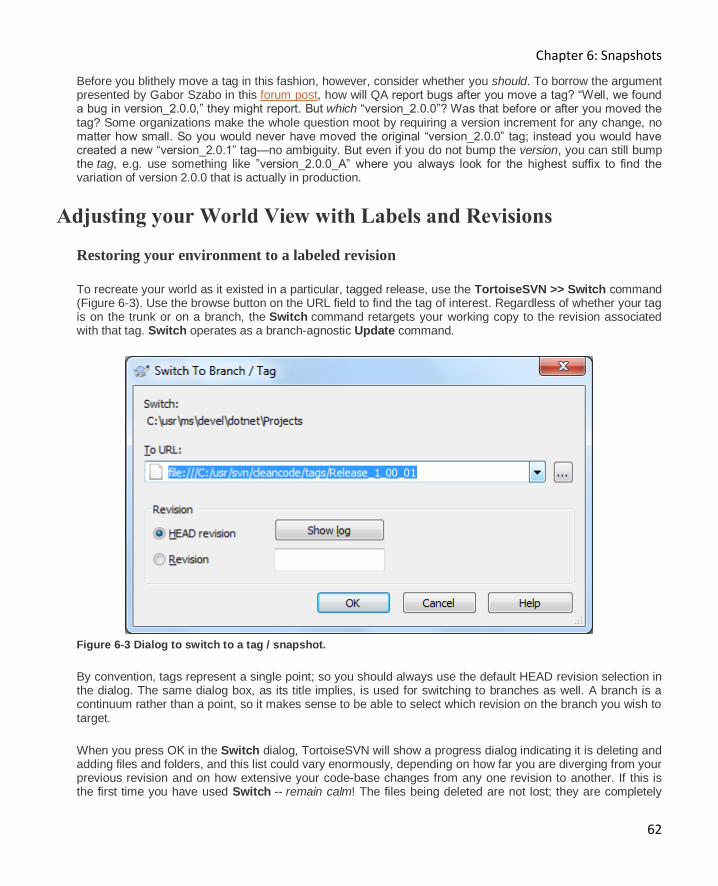
Chapter 6: Snapshots
62
Before you blithely move a tag in this fashion, however, consider whether you should. To borrow the argument presented by Gabor Szabo in this forum post, how will QA report bugs after you move a tag? “Well, we found a bug in version_2.0.0,” they might report. But which “version_2.0.0”? Was that before or after you moved the tag? Some organizations make the whole question moot by requiring a version increment for any change, no matter how small. So you would never have moved the original “version_2.0.0” tag; instead you would have created a new “version_2.0.1” tag—no ambiguity. But even if you do not bump the version, you can still bump the tag, e.g. use something like ”version_2.0.0_A” where you always look for the highest suffix to find the variation of version 2.0.0 that is actually in production.
Adjusting your World View with Labels and Revisions
Restoring your environment to a labeled revision
To recreate your world as it existed in a particular, tagged release, use the TortoiseSVN >> Switch command (Figure 6-3). Use the browse button on the URL field to find the tag of interest. Regardless of whether your tag is on the trunk or on a branch, the Switch command retargets your working copy to the revision associated with that tag. Switch operates as a branch-agnostic Update command.
Figure 6-3 Dialog to switch to a tag / snapshot.
By convention, tags represent a single point; so you should always use the default HEAD revision selection in the dialog. The same dialog box, as its title implies, is used for switching to branches as well. A branch is a continuum rather than a point, so it makes sense to be able to select which revision on the branch you wish to target.
When you press OK in the Switch dialog, TortoiseSVN will show a progress dialog indicating it is deleting and adding files and folders, and this list could vary enormously, depending on how far you are diverging from your previous revision and on how extensive your code-base changes from any one revision to another. If this is the first time you have used Switch -- remain calm! The files being deleted are not lost; they are completely
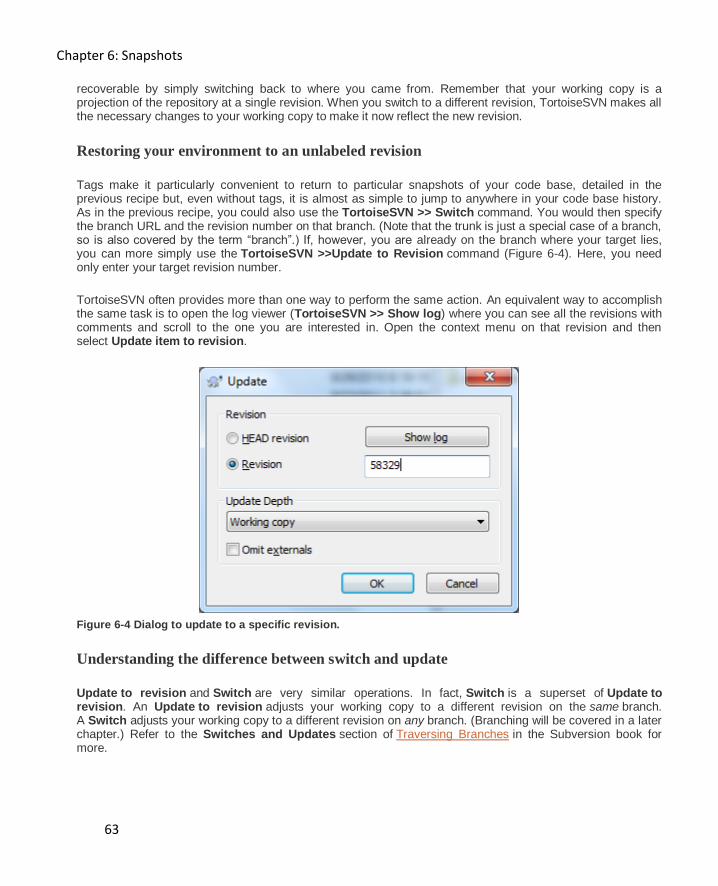
Chapter 6: Snapshots
63
recoverable by simply switching back to where you came from. Remember that your working copy is a projection of the repository at a single revision. When you switch to a different revision, TortoiseSVN makes all the necessary changes to your working copy to make it now reflect the new revision.
Restoring your environment to an unlabeled revision
Tags make it particularly convenient to return to particular snapshots of your code base, detailed in the previous recipe but, even without tags, it is almost as simple to jump to anywhere in your code base history. As in the previous recipe, you could also use the TortoiseSVN >> Switch command. You would then specify the branch URL and the revision number on that branch. (Note that the trunk is just a special case of a branch, so is also covered by the term “branch”.) If, however, you are already on the branch where your target lies, you can more simply use the TortoiseSVN >>Update to Revision command (Figure 6-4). Here, you need only enter your target revision number.
TortoiseSVN often provides more than one way to perform the same action. An equivalent way to accomplish the same task is to open the log viewer (TortoiseSVN >> Show log) where you can see all the revisions with comments and scroll to the one you are interested in. Open the context menu on that revision and then select Update item to revision.
Figure 6-4 Dialog to update to a specific revision.
Understanding the difference between switch and update
Update to revision and Switch are very similar operations. In fact, Switch is a superset of Update to revision. An Update to revision adjusts your working copy to a different revision on the same branch. A Switch adjusts your working copy to a different revision on any branch. (Branching will be covered in a later chapter.) Refer to the Switches and Updates section of Traversing Branches in the Subversion book for more.
Chapter 6: Snapshots
64
Understanding the difference between revert and update
"Update to revision actually takes you back in time to a previous revision. Revert modifies your current
working copy to make it look exactly like a previous revision."
As several recipes above have shown, an Update to revision operation changes your world view. If your head revision is 29322 and you update it to 11043 then you have essentially travelled back in time. As far as your working copy, everything is as it was the instant after revision 11043 was committed, whether that was a month ago or five years ago. And just as all the movies warn, do not tamper with the past! When you update to a previous revision or tag, you must think of yourself as just an observer visiting the past—do not edit any files or attempt to commit them. But what if that is just what you need to do? That is, you want to back up to a previous release and start off a new branch of development from that point. This is where the Revert command comes in. Update to revision actually takes you back in time to a previous revision. Revert modifies your current working copy to make it look exactly like a previous revision. With Revert, you are free to edit the files in your working copy, create a branch, or whatever else you like. And just like any other modification to your working copy, commit the changes if you wish to make them permanent.
Study the difference between Revert and Update to revision until it becomes second nature. Knowing which one you need when you want to get something accomplished will end up saving you time in the long run. It is, in that sense, just like learning the alphabet. There is nothing magical about “A” and “B” and “C”; you just needed to learn their ordering, pronunciation, and use. Same thing here. Why is one called Update and the other Revert? The definition of either word could be stretched to encompass either purpose; they are what they are so learn them. One thing that may help appreciate the difference: first, start with an up-to-date working copy (Check for modifications should show no files modified.) After you do an Update to revision, invoke Check for modifications again and it should still show no files modified. But after a Revert then Check for modifications should list some files that need to be committed.
Returning to the present from a previous revision
The previous two recipes have explained how to move back in time to an arbitrary point. Once you have travelled back in time, however, it is important to be able to return to the present! But this is something you already know and use every day – the simple SVN Update command. SVN Update, as you may have surmised, is just the degenerate case of SVN Update to revision where the target revision is the head revision.
Chapter 7: Managing Revisions
65
Chapter 7: Managing Revisions
Revisions are, in a sense, the heart and soul of source control. This chapter explains how to identify your reference point (amongst revisions and branches) as well as how to change it to maximum advantage.
Working Copies and Revisions
Identifying the current revision
To paraphrase a famous quote: in order to get to where you want to go it helps to know where you are. In Subversion terms, that translates to: what is your current (or base or working copy) revision? The Subversion book defines this as: "The revision number of an item in a working copy. If the item has been locally modified, this refers to the way the item appears without those local modifications."
To identify your current revision, then, you must answer the further question, current revision of what? Each file or folder in your working copy has its own notion of current revision. So first take a look at Figure 7-1 illustrating three techniques (there are yet a couple others) for finding the current revision:
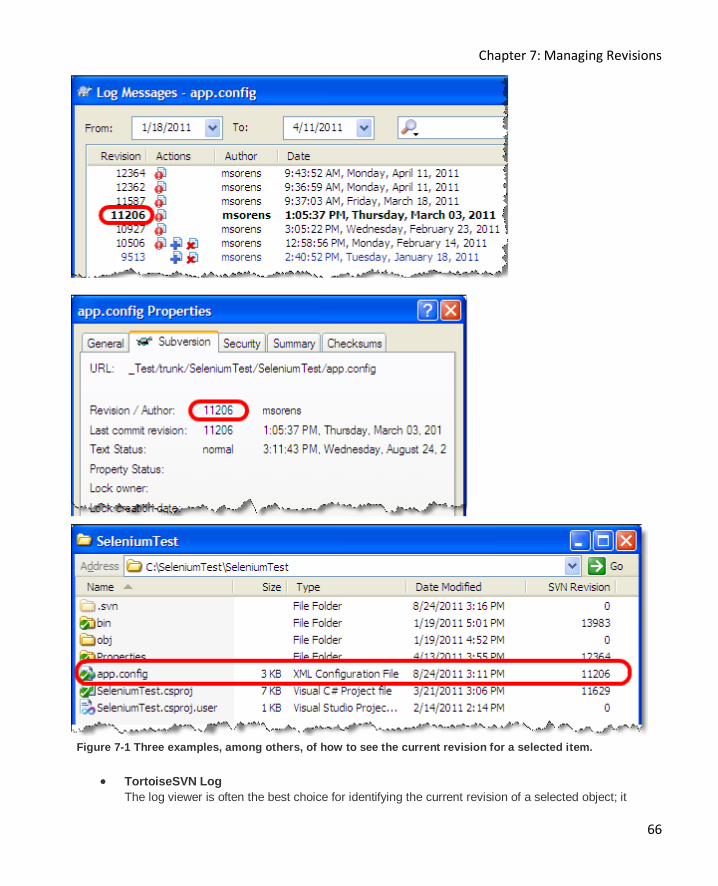
Chapter 7: Managing Revisions
66
Figure 7-1 Three examples, among others, of how to see the current revision for a selected item.
TortoiseSVN Log
The log viewer is often the best choice for identifying the current revision of a selected object; it
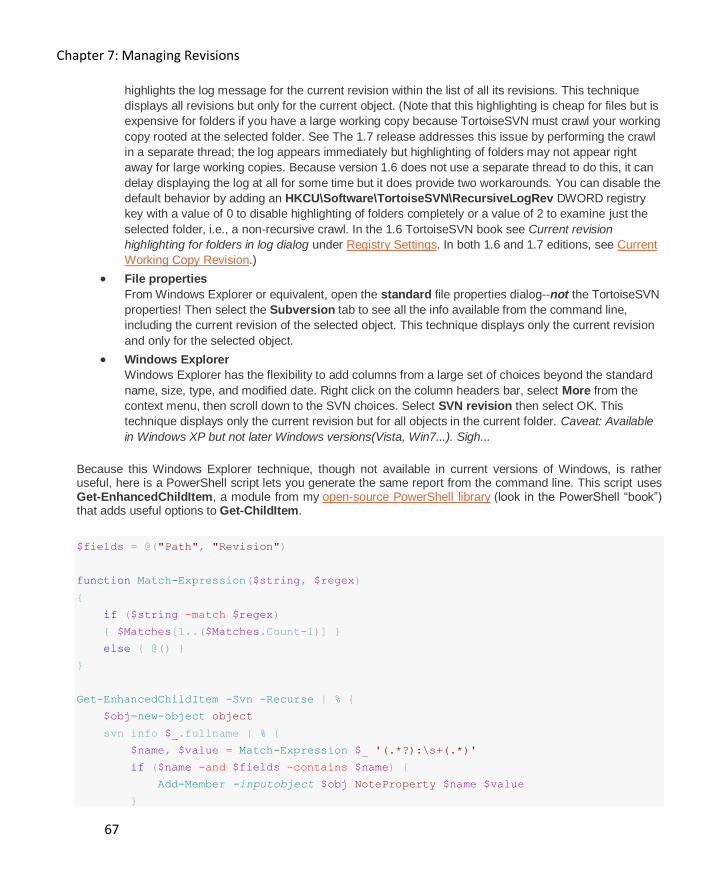
Chapter 7: Managing Revisions
67
highlights the log message for the current revision within the list of all its revisions. This technique
displays all revisions but only for the current object. (Note that this highlighting is cheap for files but is
expensive for folders if you have a large working copy because TortoiseSVN must crawl your working
copy rooted at the selected folder. See The 1.7 release addresses this issue by performing the crawl
in a separate thread; the log appears immediately but highlighting of folders may not appear right
away for large working copies. Because version 1.6 does not use a separate thread to do this, it can
delay displaying the log at all for some time but it does provide two workarounds. You can disable the
default behavior by adding an HKCU\Software\TortoiseSVN\RecursiveLogRev DWORD registry
key with a value of 0 to disable highlighting of folders completely or a value of 2 to examine just the
selected folder, i.e., a non-recursive crawl. In the 1.6 TortoiseSVN book see Current revision
highlighting for folders in log dialog under Registry Settings. In both 1.6 and 1.7 editions, see Current
Working Copy Revision.)
File properties
From Windows Explorer or equivalent, open the standard file properties dialog--not the TortoiseSVN
properties! Then select the Subversion tab to see all the info available from the command line,
including the current revision of the selected object. This technique displays only the current revision
and only for the selected object.
Windows Explorer
Windows Explorer has the flexibility to add columns from a large set of choices beyond the standard
name, size, type, and modified date. Right click on the column headers bar, select More from the
context menu, then scroll down to the SVN choices. Select SVN revision then select OK. This
technique displays only the current revision but for all objects in the current folder. Caveat: Available
in Windows XP but not later Windows versions(Vista, Win7...). Sigh...
Because this Windows Explorer technique, though not available in current versions of Windows, is rather useful, here is a PowerShell script lets you generate the same report from the command line. This script uses Get-EnhancedChildItem, a module from my open-source PowerShell library (look in the PowerShell “book”) that adds useful options to Get-ChildItem.
$fields = @("Path", "Revision")
function Match-Expression($string, $regex)
{
if ($string -match $regex)
{ $Matches[1..($Matches.Count-1)] }
else { @() }
}
Get-EnhancedChildItem -Svn -Recurse | % {
$obj=new-object object
svn info $_.fullname | % {
$name, $value = Match-Expression $_ '(.*?):\s+(.*)'
if ($name -and $fields -contains $name) {
Add-Member -inputobject $obj NoteProperty $name $value
}
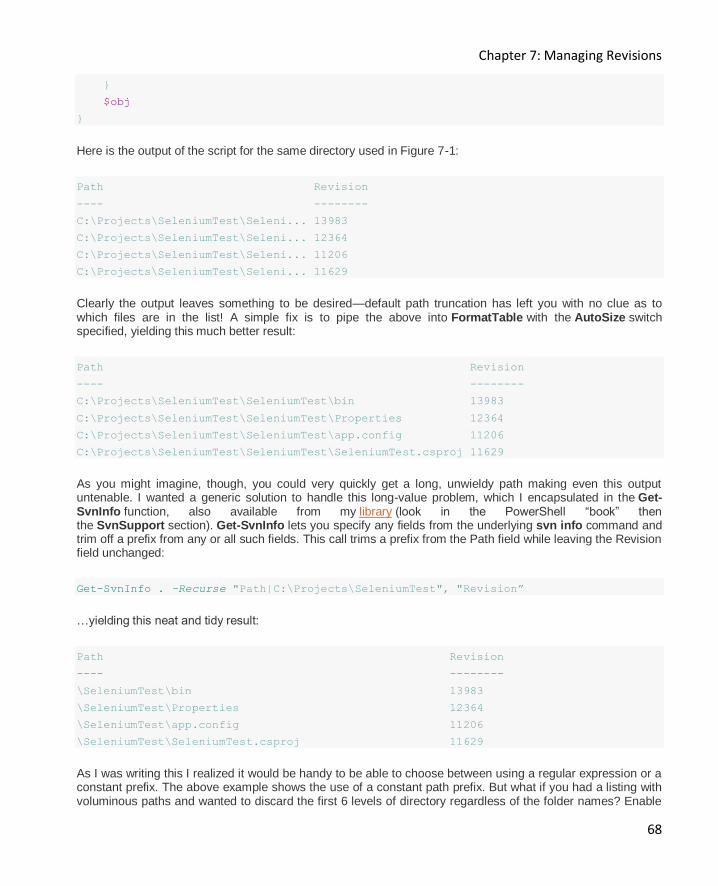
Chapter 7: Managing Revisions
68
}
$obj
}
Here is the output of the script for the same directory used in Figure 7-1:
Path Revision
---- --------
C:\Projects\SeleniumTest\Seleni... 13983
C:\Projects\SeleniumTest\Seleni... 12364
C:\Projects\SeleniumTest\Seleni... 11206
C:\Projects\SeleniumTest\Seleni... 11629
Clearly the output leaves something to be desired—default path truncation has left you with no clue as to which files are in the list! A simple fix is to pipe the above into FormatTable with the AutoSize switch specified, yielding this much better result:
Path Revision
---- --------
C:\Projects\SeleniumTest\SeleniumTest\bin 13983
C:\Projects\SeleniumTest\SeleniumTest\Properties 12364
C:\Projects\SeleniumTest\SeleniumTest\app.config 11206
C:\Projects\SeleniumTest\SeleniumTest\SeleniumTest.csproj 11629
As you might imagine, though, you could very quickly get a long, unwieldy path making even this output untenable. I wanted a generic solution to handle this long-value problem, which I encapsulated in the Get-SvnInfo function, also available from my library (look in the PowerShell “book” then the SvnSupport section). Get-SvnInfo lets you specify any fields from the underlying svn info command and trim off a prefix from any or all such fields. This call trims a prefix from the Path field while leaving the Revision field unchanged:
Get-SvnInfo . –Recurse "Path|C:\Projects\SeleniumTest", "Revision”
…yielding this neat and tidy result:
Path Revision
---- --------
\SeleniumTest\bin 13983
\SeleniumTest\Properties 12364
\SeleniumTest\app.config 11206
\SeleniumTest\SeleniumTest.csproj 11629
As I was writing this I realized it would be handy to be able to choose between using a regular expression or a constant prefix. The above example shows the use of a constant path prefix. But what if you had a listing with voluminous paths and wanted to discard the first 6 levels of directory regardless of the folder names? Enable
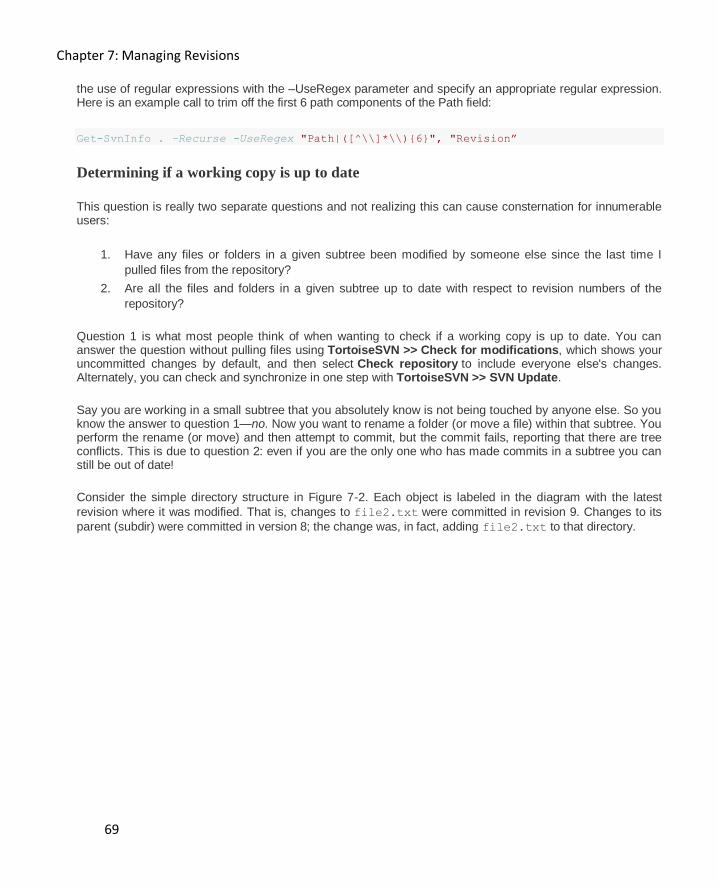
Chapter 7: Managing Revisions
69
the use of regular expressions with the –UseRegex parameter and specify an appropriate regular expression. Here is an example call to trim off the first 6 path components of the Path field:
Get-SvnInfo . –Recurse -UseRegex "Path|([^\\]*\\){6}", "Revision”
Determining if a working copy is up to date
This question is really two separate questions and not realizing this can cause consternation for innumerable users:
1. Have any files or folders in a given subtree been modified by someone else since the last time I
pulled files from the repository?
2. Are all the files and folders in a given subtree up to date with respect to revision numbers of the
repository?
Question 1 is what most people think of when wanting to check if a working copy is up to date. You can answer the question without pulling files using TortoiseSVN >> Check for modifications, which shows your uncommitted changes by default, and then select Check repository to include everyone else's changes. Alternately, you can check and synchronize in one step with TortoiseSVN >> SVN Update.
Say you are working in a small subtree that you absolutely know is not being touched by anyone else. So you know the answer to question 1—no. Now you want to rename a folder (or move a file) within that subtree. You perform the rename (or move) and then attempt to commit, but the commit fails, reporting that there are tree conflicts. This is due to question 2: even if you are the only one who has made commits in a subtree you can still be out of date!
Consider the simple directory structure in Figure 7-2. Each object is labeled in the diagram with the latest
revision where it was modified. That is, changes to file2.txt were committed in revision 9. Changes to its
parent (subdir) were committed in version 8; the change was, in fact, adding file2.txt to that directory.
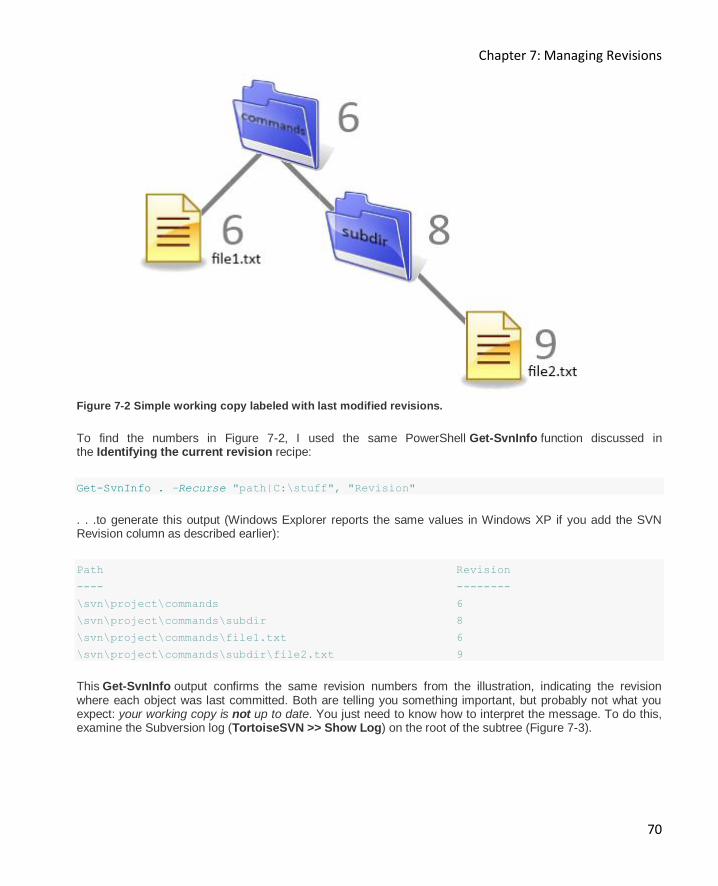
Chapter 7: Managing Revisions
70
Figure 7-2 Simple working copy labeled with last modified revisions.
To find the numbers in Figure 7-2, I used the same PowerShell Get-SvnInfo function discussed in the Identifying the current revision recipe:
Get-SvnInfo . –Recurse "path|C:\stuff", "Revision"
. . .to generate this output (Windows Explorer reports the same values in Windows XP if you add the SVN Revision column as described earlier):
Path Revision
---- --------
\svn\project\commands 6
\svn\project\commands\subdir 8
\svn\project\commands\file1.txt 6
\svn\project\commands\subdir\file2.txt 9
This Get-SvnInfo output confirms the same revision numbers from the illustration, indicating the revision where each object was last committed. Both are telling you something important, but probably not what you expect: your working copy is not up to date. You just need to know how to interpret the message. To do this, examine the Subversion log (TortoiseSVN >> Show Log) on the root of the subtree (Figure 7-3).
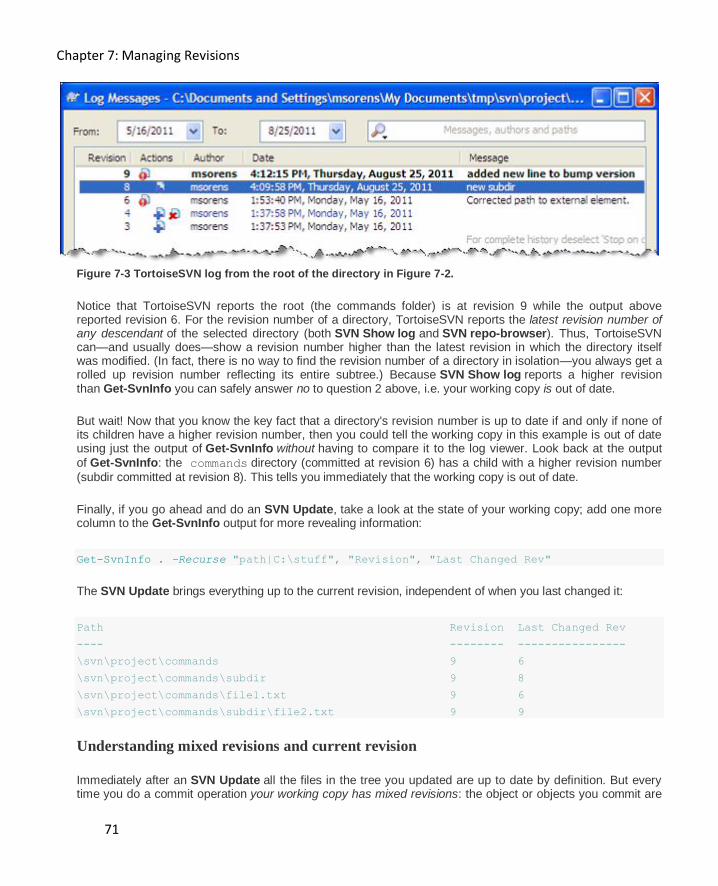
Chapter 7: Managing Revisions
71
Figure 7-3 TortoiseSVN log from the root of the directory in Figure 7-2.
Notice that TortoiseSVN reports the root (the commands folder) is at revision 9 while the output above reported revision 6. For the revision number of a directory, TortoiseSVN reports the latest revision number of any descendant of the selected directory (both SVN Show log and SVN repo-browser). Thus, TortoiseSVN can—and usually does—show a revision number higher than the latest revision in which the directory itself was modified. (In fact, there is no way to find the revision number of a directory in isolation—you always get a rolled up revision number reflecting its entire subtree.) Because SVN Show log reports a higher revision than Get-SvnInfo you can safely answer no to question 2 above, i.e. your working copy is out of date.
But wait! Now that you know the key fact that a directory's revision number is up to date if and only if none of its children have a higher revision number, then you could tell the working copy in this example is out of date using just the output of Get-SvnInfo without having to compare it to the log viewer. Look back at the output
of Get-SvnInfo: the commands directory (committed at revision 6) has a child with a higher revision number
(subdir committed at revision 8). This tells you immediately that the working copy is out of date.
Finally, if you go ahead and do an SVN Update, take a look at the state of your working copy; add one more column to the Get-SvnInfo output for more revealing information:
Get-SvnInfo . –Recurse "path|C:\stuff", "Revision", "Last Changed Rev"
The SVN Update brings everything up to the current revision, independent of when you last changed it:
Path Revision Last Changed Rev
---- -------- ----------------
\svn\project\commands 9 6
\svn\project\commands\subdir 9 8
\svn\project\commands\file1.txt 9 6
\svn\project\commands\subdir\file2.txt 9 9
Understanding mixed revisions and current revision
Immediately after an SVN Update all the files in the tree you updated are up to date by definition. But every time you do a commit operation your working copy has mixed revisions: the object or objects you commit are
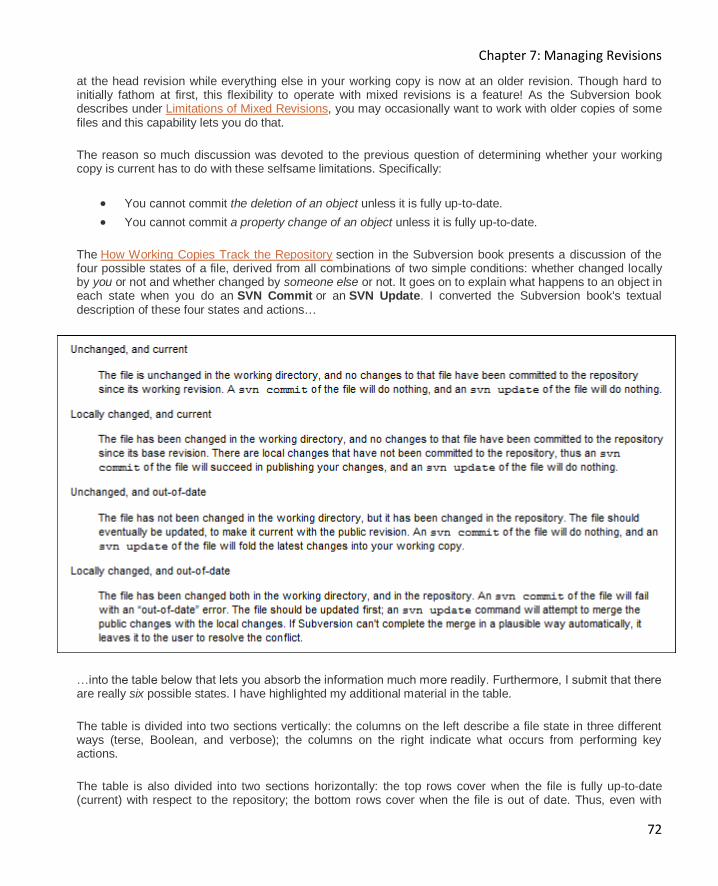
Chapter 7: Managing Revisions
72
at the head revision while everything else in your working copy is now at an older revision. Though hard to initially fathom at first, this flexibility to operate with mixed revisions is a feature! As the Subversion book describes under Limitations of Mixed Revisions, you may occasionally want to work with older copies of some files and this capability lets you do that.
The reason so much discussion was devoted to the previous question of determining whether your working copy is current has to do with these selfsame limitations. Specifically:
You cannot commit the deletion of an object unless it is fully up-to-date.
You cannot commit a property change of an object unless it is fully up-to-date.
The How Working Copies Track the Repository section in the Subversion book presents a discussion of the four possible states of a file, derived from all combinations of two simple conditions: whether changed locally by you or not and whether changed by someone else or not. It goes on to explain what happens to an object in each state when you do an SVN Commit or an SVN Update. I converted the Subversion book's textual description of these four states and actions…
…into the table below that lets you absorb the information much more readily. Furthermore, I submit that there are really six possible states. I have highlighted my additional material in the table.
The table is divided into two sections vertically: the columns on the left describe a file state in three different ways (terse, Boolean, and verbose); the columns on the right indicate what occurs from performing key actions.
The table is also divided into two sections horizontally: the top rows cover when the file is fully up-to-date (current) with respect to the repository; the bottom rows cover when the file is out of date. Thus, even with
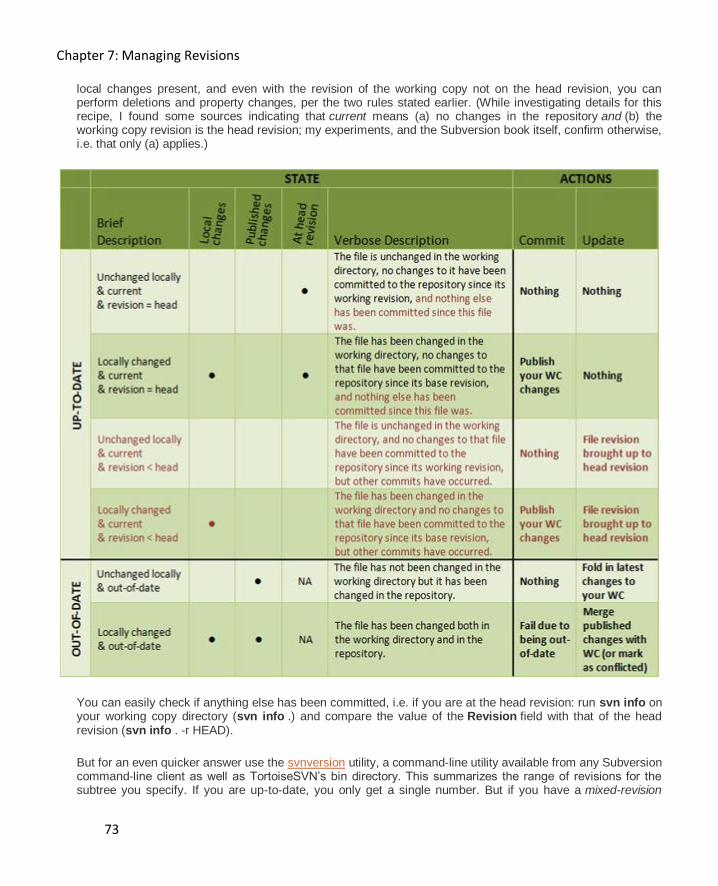
Chapter 7: Managing Revisions
73
local changes present, and even with the revision of the working copy not on the head revision, you can perform deletions and property changes, per the two rules stated earlier. (While investigating details for this recipe, I found some sources indicating that current means (a) no changes in the repository and (b) the working copy revision is the head revision; my experiments, and the Subversion book itself, confirm otherwise, i.e. that only (a) applies.)
You can easily check if anything else has been committed, i.e. if you are at the head revision: run svn info on your working copy directory (svn info .) and compare the value of the Revision field with that of the head revision (svn info . -r HEAD).
But for an even quicker answer use the svnversion utility, a command-line utility available from any Subversion command-line client as well as TortoiseSVN’s bin directory. This summarizes the range of revisions for the subtree you specify. If you are up-to-date, you only get a single number. But if you have a mixed-revision
Chapter 7: Managing Revisions
74
working copy, as in the example, it shows the whole range, e.g. “1034:1039” to indicate something is as low as 1034 and something else as high as 1039. Furthermore, svnversion indicates whether you have any modifications in your working copy as well as whether you are on a branch. And it does all this not just on one line but typically in 15 characters or less!
Working on two copies of the same revision at the same time
Say you want to work on two new product features that are not related. Unrelated is promising—perhaps you could just edit the appropriate files in your working copy—but features being unrelated does not at all guarantee that the set of files related to them will not overlap. A much cleaner approach is to have two completely separate sets of files, i.e. two working copies. Since a working copy is just a checkout of a repository to an arbitrary folder on your machine, there is no reason you cannot do two separate checkouts to create two separate working copies. That way, you are guaranteed that work on one feature will not interfere with work on the other.
To get two separate copies you actually have two choices: do two separate checkouts as indicated above or, if you have not started work on either new feature yet, just copy your existing working copy with Windows Explorer. The latter would likely be faster if you have a huge repository.
Working on two different revisions at the same time
You can apply the same principals from the previous recipe to this recipe, just a bit more generically: checkout one working copy at revision A and a second working copy at revision B. (A real application of this might be while you are hard at work on new features you also need to investigate a newly discovered bug in production from an earlier revision.) This dual checkout again guarantees a clean separation.
There is one drawback to this approach, though: you might accidentally start editing in one working copy when you meant to work in another working copy. An approach to remove this drawback is to work with a single working copy by context switching, i.e. switch from revision A to revision B and back, as needed, with the TortoiseSVN >> Switch command as discussed in the Restoring your environment to an unlabeled revision recipe in chapter 6. Another recipe in that chapter, Understanding the difference between revert and update, warns to never edit when you use Update or Switch but there is a key difference in the current situation. Here you will be switching between head revisions of two different branches; it is always acceptable to edit the head revision of a branch so in this case editing after a Switch is perfectly sane and safe.
Selective Updating and Notification
Refreshing selected files from the repository
Normally you synchronize your working copy with the latest changes in your repository with the TortoiseSVN >> Update command. Applying this command on any folder in Windows Explorer updates everything in that folder or lower. If you want to synchronize changes to several specific files without merging in changes to all other files at the same time, you can also invoke the TortoiseSVN >> Update command to one or more files. Of course, they would have to be in the same folder if you are using Windows Explorer.
That works for simple cases, but you need an alternate approach if you need to update files across multiple folders, or even to update files that do not yet exist in your working copy (i.e. new files added by a colleague). Identify an ancestor folder of all the files you are interested in and invoke the TortoiseSVN >> Check for
Chapter 7: Managing Revisions
75
Modifications command. Select the Check repository button to tell TortoiseSVN to identify what is new or changed by your colleagues. That will give you a list of all files with changes across folder boundaries. Finally, select the specific files you want to update locally within the Check for Modifications dialog and invoke the Update command from the context menu on any one of them.
Another handy technique to see a new file (assuming you know the file name) is to use the svn cat command, as in:
svn cat http://Your SvnServer/repo-dir/trunk/path1/path2/…/filename
Redirect that console output into a file of the same name if you want to store it.
Receiving notification when selected files are updated
The previous recipe showed how to update specific files. It would be nice to be able to know when those files change, though, so you do not have to manually check (i.e. a push rather than a pull approach). Unfortunately for selected files you have to do some setup; there is no automatic technique or tool for this. I found a simple strategy for this by William Leara in this Stack Overflow post: define a post-commit hook script to trigger an action on any commit by anyone on your team. In the script use the svnlook utility with something like this:
svnlook changed -r%REV% %REPOS% | <find_or_grep> <filename>
That is, pipe the output of svnlook into a filter to identify the specific file or files of interest. Then, as William continues, if the filter returns a result, your file is among those in the change set, so your script should take an appropriate action (e.g. sending an email).
Clearly a lot of work to do this, but see the next recipe for a much simpler approach to a similar issue.
Receiving notification when any file is updated
Contrary to the complications of the previous recipe if you are willing to tolerate notification when any file is committed (or more fine-grained, when any files by specific users are committed) there is a simple answer. Commit Monitor is a handy utility developed by the creator of TortoiseSVN, Stefan Küng. With simple configuration—naming a project and providing a URL to its repository—Commit Monitor behaves much like your email program, checking periodically (at an interval you select) for new commits and notifying you via your system tray. Figure 7-4 shows the main window. I have overlaid the context menu available on any project in the figure to show some of the functionality.
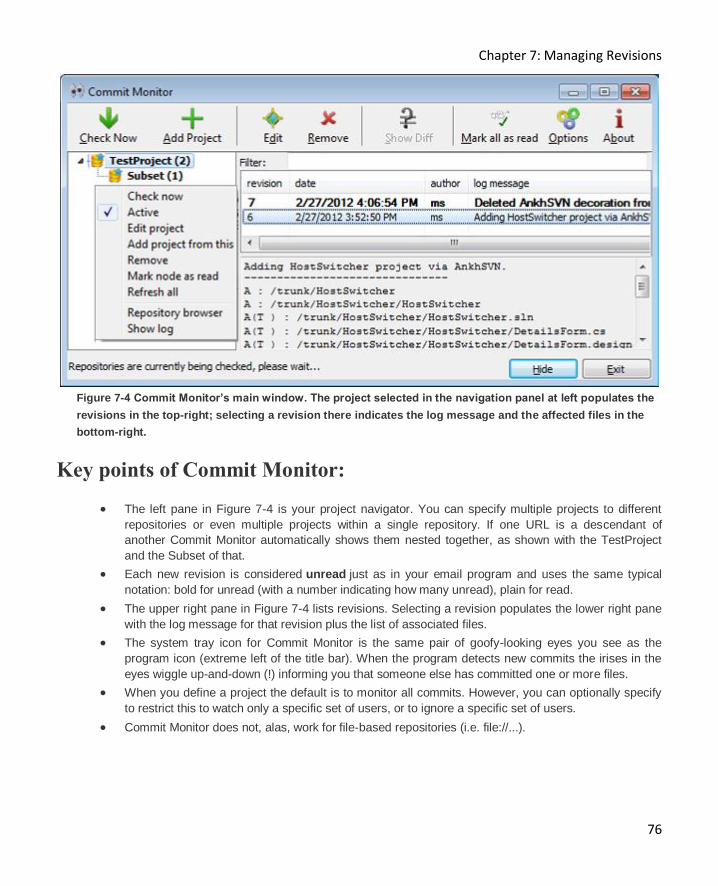
Chapter 7: Managing Revisions
76
Figure 7-4 Commit Monitor’s main window. The project selected in the navigation panel at left populates the
revisions in the top-right; selecting a revision there indicates the log message and the affected files in the
bottom-right.
Key points of Commit Monitor:
The left pane in Figure 7-4 is your project navigator. You can specify multiple projects to different
repositories or even multiple projects within a single repository. If one URL is a descendant of
another Commit Monitor automatically shows them nested together, as shown with the TestProject
and the Subset of that.
Each new revision is considered unread just as in your email program and uses the same typical
notation: bold for unread (with a number indicating how many unread), plain for read.
The upper right pane in Figure 7-4 lists revisions. Selecting a revision populates the lower right pane
with the log message for that revision plus the list of associated files.
The system tray icon for Commit Monitor is the same pair of goofy-looking eyes you see as the
program icon (extreme left of the title bar). When the program detects new commits the irises in the
eyes wiggle up-and-down (!) informing you that someone else has committed one or more files.
When you define a project the default is to monitor all commits. However, you can optionally specify
to restrict this to watch only a specific set of users, or to ignore a specific set of users.
Commit Monitor does not, alas, work for file-based repositories (i.e. file://...).
Chapter 8: Log Messages
77
Chapter 8: Log Messages
Log messages are the written history of your project. They communicate what was done and when. This chapter explains how to take full advantage of the capabilities of the Subversion log message.
Justifying requiring log messages
Good software practice dictates that you should always have a reason to commit a file. I would argue that it is almost a tautology: if you do not have a reason to commit a file, why would you commit it? It is, thus, little burden to require you to provide that reason when you do the commit. Other developers should at least have a hint as to why something was changed; also official process audits (ISO 9001 et al) would typically require this. And, oh yes, you might want to know in one terse remark why you committed that file once the memory has faded.
Another good reason for explaining why the commit took place is that the act forces you to consciously review what you are committing. For me, this is the most useful point, so I warm to Justin Ethier's comments on the StackOverflow question ‘What is the use of commit messages?’ "Even if I remember what I have changed, I will often do a quick ‘diff’ of a file before checking it in. I will briefly read it all over again to make sure that there are no ‘typos’, that I changed everything I meant to, etc. This is a simple way to review your code for those minor bugs that would otherwise find their way into your code."
“[P]roviding a commit reason... forces you to consciously review what you are committing.”
Given that the policy of commenting a commit is good, what is going to stop you from doing so? Among the reasons for omitting comments, the most common, I believe, is that the developer simply forgot. If so, then make log messages a requirement.
But requiring comments is by no means a panacea. There is no way to mandate good comments—your diligence and professionalism are still required for that. A little bit of context goes a long way. Thus, try to avoid phrases like this:
Fixed.(What was fixed?)
Passed.(What passed?)
Messy code.(You are checking in messy code? Really?)
Instead, use something like these comments at a minimum that, though still short, provide some context:
Chapter 8: Log Messages
78
Fixed account template bug.
Vendor NUnit test now passes.
Tidied up per Resharper.
For more best practices, see Write Meaningful Commit Messages in Anders Sandvig's excellent article Best Practices for Version Control.
Making log messages required
To require log messages you need to obtain and install a pre-commit hook script. This particular hook runs as soon as you press the OK button in the commit dialog box. Actually, by pressing the button, you invoke a three-phase process; the pre-commit phase, the actual commit, and the post-commit phase. The pre-commit hook script runs, obviously, in the pre-commit phase. Thus, if the hook script decides the commit is not valid (due to, for example, no log message being entered) it can roll back the commit. (For more details, see the repository hook section in the Subversion book.)
Obtaining the pre-commit hook script is a simple matter: the Windows version (from Philibert Perusse) is available on the StackOverflow post Common Types of Subversion Hooks. And you already have the Unix/Linux version in your Subversion repository hooks directory. (A couple other Windows variations are available here and here.)
Installing the hook script is almost as easy. You must have access to your repository (or talk to your system admin). Then just copy the script into the hooks subdirectory in the repository. The hooks directory comes pre-populated with templates for a variety of hooks. The pre-commit.tmpl is a template containing the Unix/Linux version, together with instructions for the Windows version. If you want to explore more about these hooks but do not have access to the repository, just create your own dummy repository (TortoiseSVN >> Create repository here) and look in the hooks subfolder it generates.
The above discussion describes how to implement a server-side hook script. TortoiseSVN also supports
requiring log messages by means of the client-side project property tsvn:logminsize. However, while you can do this, it does not mean you should do it. Client-side enforcement, to my mind, is tantamount to no enforcement: it simply does not make sense because it then merely becomes voluntary compliance at the discretion of each team member, rather than enforcement.
Finding commits with empty messages
If you have implemented the recipe to require log messages you should never again have empty messages. But there may be empty ones lurking from before you started requiring them! Prolific StackOverflow contributor manojlds offered a clever way to find these within TortoiseSVN in this StackOverflow post. Open the log message viewer and in the search box set the search type to just messages, enable regular expressions, and enter !^.+$ to search for messages without non-empty lines (see Figure 8-1).

Chapter 8: Log Messages
79
Figure 8-1 Search for empty log messages in TortoiseSVN with this regular expression
Making log messages editable
Commit messages, being unversioned properties, have no history. Because there is no trace of its previous value when you modify one of them, Subversion defaults to disallowing, or preventing, such changes, but it provides hooks to allow you to enable it. You need to obtain and install a pre-revprop-change hook script to override the default behavior of disallowing the change.
Obtaining the pre-revprop-change hook script is a simple matter: the Windows version (from Philibert Perusse) is available on the StackOverflow post Common Types of Subversion Hooks. And you already have the Unix/Linux version in your Subversion repository hooks directory. (For an instantly available version, though, see this StackOverflow post.)
Installing the hook script is almost as easy. You must have access to your repository (or talk to your system admin). Then just copy the script into the hooks subdirectory in the repository. The hooks directory comes pre-populated with templates for a variety of hooks. The pre-revprop-change.tmpl is a template containing the Unix/Linux version, plus instructions for the Windows version. (If you want to explore more about these hooks but do not have access to the repository, just create your own dummy repository (TortoiseSVN >> Create repository here) and look in the hooks subfolder it generates.)
Editing a log message
There are a variety of reasons to edit a log message: to correct a ‘typo’, to add some missing information, or to correct a (someone else's?) gaff. Whatever the reason, it is a simple matter—once you have enabled editing! See the previous recipe for that. After editing has been enabled, open the log viewer for the object containing the log message you wish to edit (TortoiseSVN >> Show Log). Right-click the log message and select Edit log message. This opens a simple text window with the existing message. Make your changes and save it. If the pre-revprop-change hook is correctly in place, the operation succeeds; otherwise TortoiseSVN will let you know it cannot save your change.
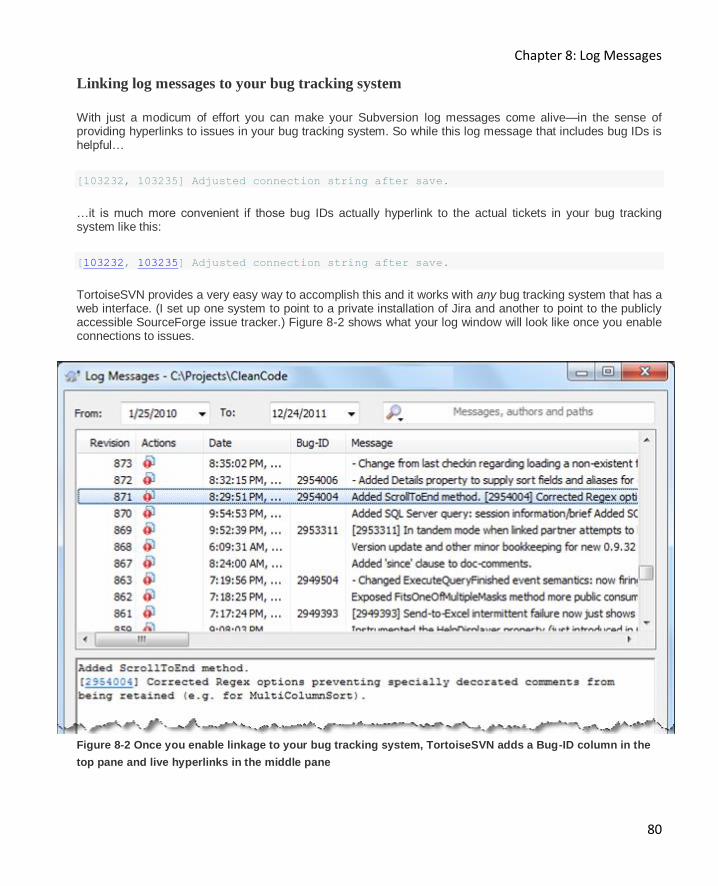
Chapter 8: Log Messages
80
Linking log messages to your bug tracking system
With just a modicum of effort you can make your Subversion log messages come alive—in the sense of providing hyperlinks to issues in your bug tracking system. So while this log message that includes bug IDs is helpful…
[103232, 103235] Adjusted connection string after save.
…it is much more convenient if those bug IDs actually hyperlink to the actual tickets in your bug tracking system like this:
[103232, 103235] Adjusted connection string after save.
TortoiseSVN provides a very easy way to accomplish this and it works with any bug tracking system that has a web interface. (I set up one system to point to a private installation of Jira and another to point to the publicly accessible SourceForge issue tracker.) Figure 8-2 shows what your log window will look like once you enable connections to issues.
Figure 8-2 Once you enable linkage to your bug tracking system, TortoiseSVN adds a Bug-ID column in the
top pane and live hyperlinks in the middle pane
Chapter 8: Log Messages
81
First, notice the Bug-ID column that is auto-populated from whatever was typed in the log message when you delineate a bug with your predefined format. (On my system I like the bug IDs to be enclosed in square brackets.) Second, notice the log detail (the lower pane in the figure). As you know, this displays the full log message of the selected revision from the top pane. Here the bug-IDs are now hyperlinks. Clicking on each takes you directly to the specified ticket in your issue tracker (in your default browser).
No additional effort is required to create these links other than to be sure to put those bug IDs in the log message into the correct format. Furthermore, if you have been using the same standard format previously (without the convenience of links) it is automatically retroactive: once you or your admin configures Subversion for this (see next recipe), all of your prior entries will also automatically display these links.
“No additional effort is required to create [bug-tracking] links… [and] it is automatically retroactive: once
you configure Subversion… all of your prior entries will also automatically displays these links. ”
The previous paragraph included the deceptively comforting phrase “…in the correct format.” But just what is the correct format? That is determined either by your system administrator, or by you and your development team. My example above showed bug IDs in square brackets. That is by no means a standard nor a predefined convention; it is simply my personal preference that I have setup on my system. So, to know what to type, you need to either know what your team uses by way of oral traditions, or you need to examine the TortoiseSVN property that specifies the format.
TortoiseSVN provides a couple different ways to let you specify this format. I prefer the method that uses regular expressions which, though a bit more complicated, provides much more expressive power. So with this
method, the format is defined by a regular expression contained in the bugtraq:logregex property of the current folder. If it isn’t there, the property is automatically inherited by child folders unless explicitly overridden. So traverse up the file tree until you find the closest ancestor that does define the property to see what it is.
I developed a handy PowerShell cmdlet (Get-IssueTrackerLogPattern) to let you skip the work and find the correct pattern for you. This cmdlet is available free from my open-source PowerShell library. You need to
load its containing module (Import-Module CleanCode/SvnSupport) then just execute Get-
IssueTrackerLogPattern <directory> (or omit the argument to check the current directory). Get-
IssueTrackerLogPattern reports the format for the specified file or folder by walking up the tree until it
finds the closest parent having the bugtraq:logregex pattern defined. If it crawls to the working copy root
finding no pattern, it reports -none-. You can even use the common -Verbose parameter to display the
treewalk if so desired.
My favorite format, which requires square brackets as delimiters and accepts numbers intermixed with commas, whitespace and the “and” conjunction, is defined by this rather abstruse
regex: \[(\s*(,|,?\s*and\s+)?\s*\d+)+\]. Unless you “eat regular expressions for lunch” you may
find that daunting. But it does not matter because of TortoiseSVN’s handy dynamic regex recognizer: when
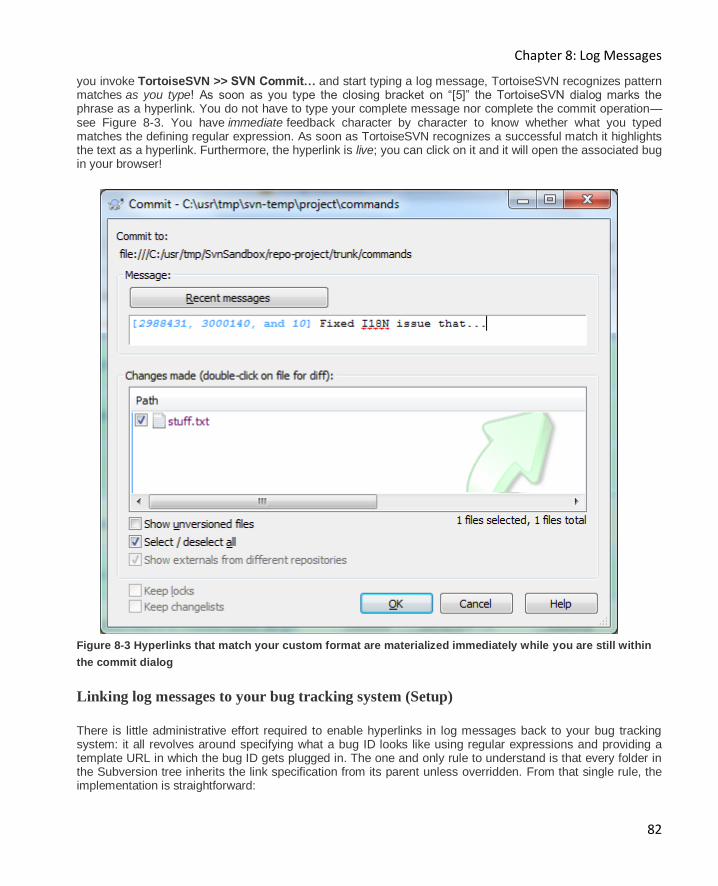
Chapter 8: Log Messages
82
you invoke TortoiseSVN >> SVN Commit… and start typing a log message, TortoiseSVN recognizes pattern matches as you type! As soon as you type the closing bracket on “[5]” the TortoiseSVN dialog marks the phrase as a hyperlink. You do not have to type your complete message nor complete the commit operation—see Figure 8-3. You have immediate feedback character by character to know whether what you typed matches the defining regular expression. As soon as TortoiseSVN recognizes a successful match it highlights the text as a hyperlink. Furthermore, the hyperlink is live; you can click on it and it will open the associated bug in your browser!
Figure 8-3 Hyperlinks that match your custom format are materialized immediately while you are still within
the commit dialog
Linking log messages to your bug tracking system (Setup)
There is little administrative effort required to enable hyperlinks in log messages back to your bug tracking system: it all revolves around specifying what a bug ID looks like using regular expressions and providing a template URL in which the bug ID gets plugged in. The one and only rule to understand is that every folder in the Subversion tree inherits the link specification from its parent unless overridden. From that single rule, the implementation is straightforward:
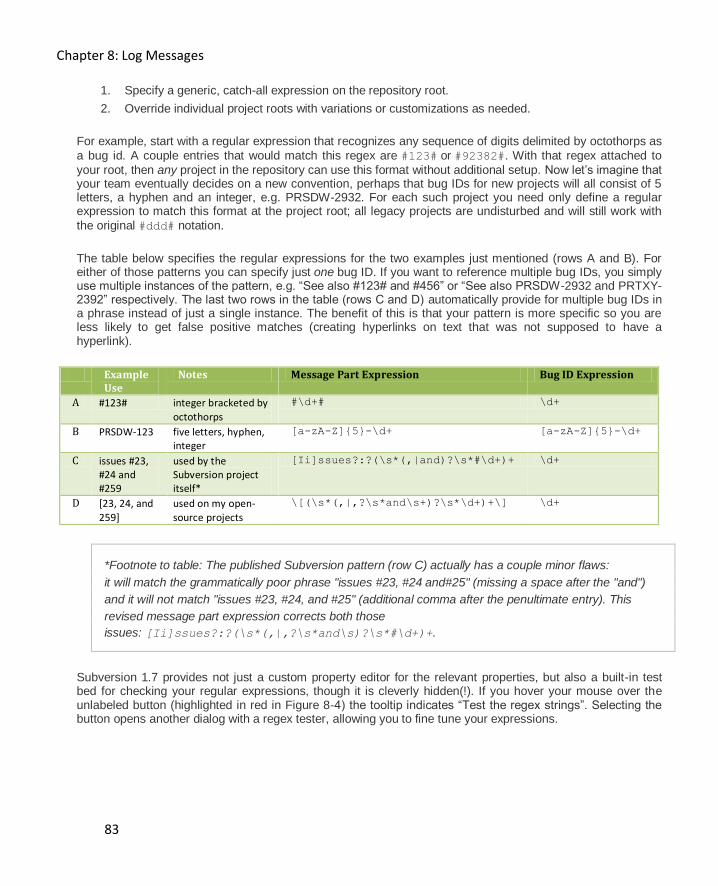
Chapter 8: Log Messages
83
1. Specify a generic, catch-all expression on the repository root.
2. Override individual project roots with variations or customizations as needed.
For example, start with a regular expression that recognizes any sequence of digits delimited by octothorps as
a bug id. A couple entries that would match this regex are #123# or #92382#. With that regex attached to
your root, then any project in the repository can use this format without additional setup. Now let’s imagine that your team eventually decides on a new convention, perhaps that bug IDs for new projects will all consist of 5 letters, a hyphen and an integer, e.g. PRSDW-2932. For each such project you need only define a regular expression to match this format at the project root; all legacy projects are undisturbed and will still work with
the original #ddd# notation.
The table below specifies the regular expressions for the two examples just mentioned (rows A and B). For either of those patterns you can specify just one bug ID. If you want to reference multiple bug IDs, you simply use multiple instances of the pattern, e.g. “See also #123# and #456” or “See also PRSDW-2932 and PRTXY-2392” respectively. The last two rows in the table (rows C and D) automatically provide for multiple bug IDs in a phrase instead of just a single instance. The benefit of this is that your pattern is more specific so you are less likely to get false positive matches (creating hyperlinks on text that was not supposed to have a hyperlink).
Example Use
Notes Message Part Expression Bug ID Expression
A #123# integer bracketed by
octothorps
#\d+# \d+
B PRSDW-123 five letters, hyphen, integer
[a-zA-Z]{5}-\d+ [a-zA-Z]{5}-\d+
C issues #23, #24 and #259
used by the Subversion project itself*
[Ii]ssues?:?(\s*(,|and)?\s*#\d+)+ \d+
D [23, 24, and
259]
used on my open-
source projects
\[(\s*(,|,?\s*and\s+)?\s*\d+)+\] \d+
*Footnote to table: The published Subversion pattern (row C) actually has a couple minor flaws:
it will match the grammatically poor phrase "issues #23, #24 and#25" (missing a space after the "and")
and it will not match "issues #23, #24, and #25" (additional comma after the penultimate entry). This
revised message part expression corrects both those
issues: [Ii]ssues?:?(\s*(,|,?\s*and\s)?\s*#\d+)+.
Subversion 1.7 provides not just a custom property editor for the relevant properties, but also a built-in test bed for checking your regular expressions, though it is cleverly hidden(!). If you hover your mouse over the unlabeled button (highlighted in red in Figure 8-4) the tooltip indicates “Test the regex strings”. Selecting the button opens another dialog with a regex tester, allowing you to fine tune your expressions.
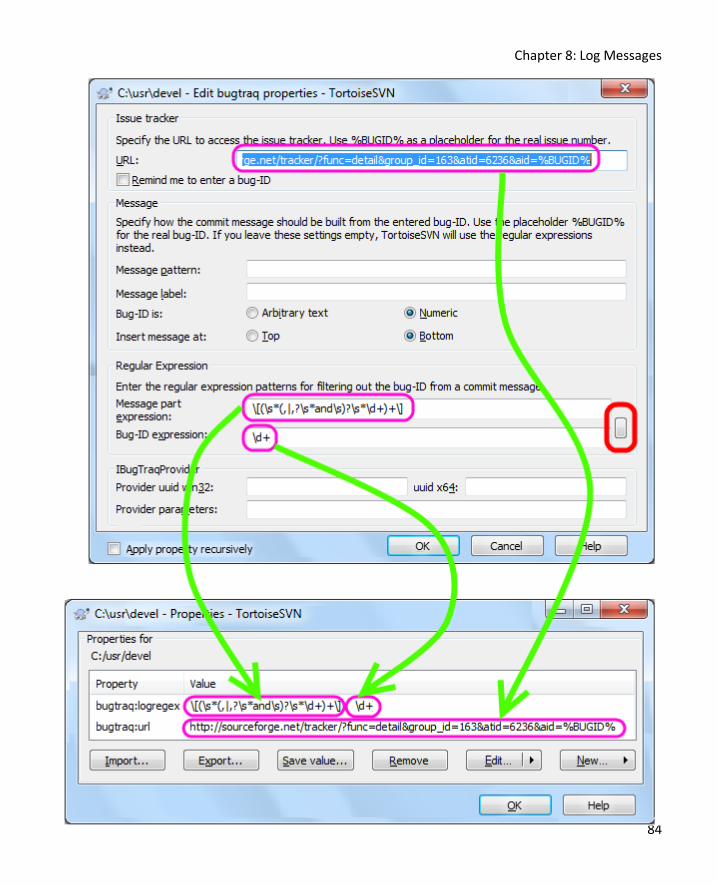
Chapter 8: Log Messages
84
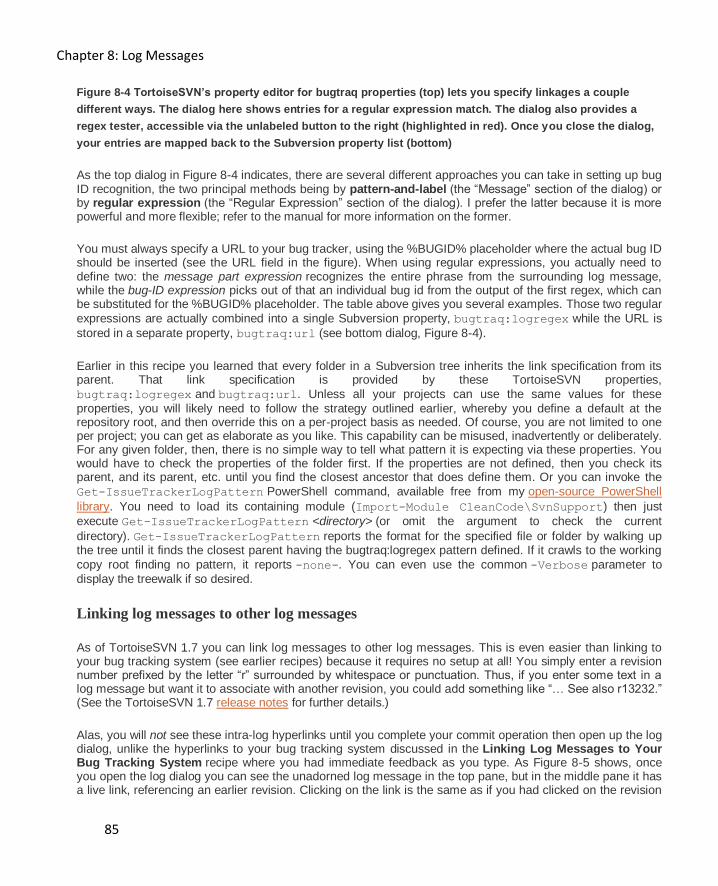
Chapter 8: Log Messages
85
Figure 8-4 TortoiseSVN’s property editor for bugtraq properties (top) lets you specify linkages a couple
different ways. The dialog here shows entries for a regular expression match. The dialog also provides a
regex tester, accessible via the unlabeled button to the right (highlighted in red). Once you close the dialog,
your entries are mapped back to the Subversion property list (bottom)
As the top dialog in Figure 8-4 indicates, there are several different approaches you can take in setting up bug ID recognition, the two principal methods being by pattern-and-label (the “Message” section of the dialog) or by regular expression (the “Regular Expression” section of the dialog). I prefer the latter because it is more powerful and more flexible; refer to the manual for more information on the former.
You must always specify a URL to your bug tracker, using the %BUGID% placeholder where the actual bug ID should be inserted (see the URL field in the figure). When using regular expressions, you actually need to define two: the message part expression recognizes the entire phrase from the surrounding log message, while the bug-ID expression picks out of that an individual bug id from the output of the first regex, which can be substituted for the %BUGID% placeholder. The table above gives you several examples. Those two regular
expressions are actually combined into a single Subversion property, bugtraq:logregex while the URL is
stored in a separate property, bugtraq:url (see bottom dialog, Figure 8-4).
Earlier in this recipe you learned that every folder in a Subversion tree inherits the link specification from its parent. That link specification is provided by these TortoiseSVN properties,
bugtraq:logregex and bugtraq:url. Unless all your projects can use the same values for these
properties, you will likely need to follow the strategy outlined earlier, whereby you define a default at the repository root, and then override this on a per-project basis as needed. Of course, you are not limited to one per project; you can get as elaborate as you like. This capability can be misused, inadvertently or deliberately. For any given folder, then, there is no simple way to tell what pattern it is expecting via these properties. You would have to check the properties of the folder first. If the properties are not defined, then you check its parent, and its parent, etc. until you find the closest ancestor that does define them. Or you can invoke the
Get-IssueTrackerLogPattern PowerShell command, available free from my open-source PowerShell
library. You need to load its containing module (Import-Module CleanCode\SvnSupport) then just
execute Get-IssueTrackerLogPattern <directory> (or omit the argument to check the current
directory). Get-IssueTrackerLogPattern reports the format for the specified file or folder by walking up the tree until it finds the closest parent having the bugtraq:logregex pattern defined. If it crawls to the working
copy root finding no pattern, it reports -none-. You can even use the common -Verbose parameter to
display the treewalk if so desired.
Linking log messages to other log messages
As of TortoiseSVN 1.7 you can link log messages to other log messages. This is even easier than linking to your bug tracking system (see earlier recipes) because it requires no setup at all! You simply enter a revision number prefixed by the letter “r” surrounded by whitespace or punctuation. Thus, if you enter some text in a log message but want it to associate with another revision, you could add something like “… See also r13232.” (See the TortoiseSVN 1.7 release notes for further details.)
Alas, you will not see these intra-log hyperlinks until you complete your commit operation then open up the log dialog, unlike the hyperlinks to your bug tracking system discussed in the Linking Log Messages to Your Bug Tracking System recipe where you had immediate feedback as you type. As Figure 8-5 shows, once you open the log dialog you can see the unadorned log message in the top pane, but in the middle pane it has a live link, referencing an earlier revision. Clicking on the link is the same as if you had clicked on the revision
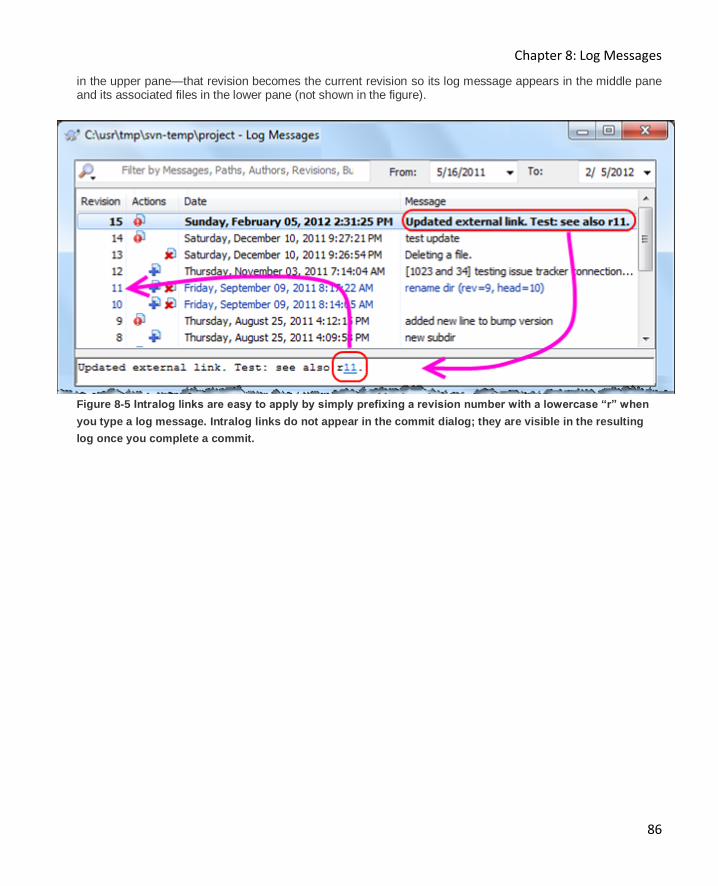
Chapter 8: Log Messages
86
in the upper pane—that revision becomes the current revision so its log message appears in the middle pane and its associated files in the lower pane (not shown in the figure).
Figure 8-5 Intralog links are easy to apply by simply prefixing a revision number with a lowercase “r” when
you type a log message. Intralog links do not appear in the commit dialog; they are visible in the resulting
log once you complete a commit.

Chapter 9: Server, Repository, and Statistics
87
Chapter 9: Server, Repository, and Statistics
This chapter describes how to set up a production Subversion server, browse your repository once in place, and view a wealth of statistics about your repository and its usage.
Setting up a Subversion server
In chapter 3 I wrote two recipes Setting up a new repository and Deploying Subversion for a single-user installation. These recipes showed how simple it is to set up a new repository, then went on to touch some of the fine points of setting up a server. This recipe goes further into the detail.
Single User
It is worth repeating a paragraph from this recipe:
‘For a single-user environment, you do not actually need to set up a server for your Subversion
repository; you could just use the file:// protocol to access the repository on your local machine.
(See either TortoiseSVN for the single user or, for command-line use, Single-User Subversion.) Both of
those articles are quite ancient in Internet time but the basics they cover are still valid. Please note,
however, that the non-server implementation approach, while possible, is not necessarily the best
choice because you get no security with the file:// protocol and you have uncontrolled access to
the Subversion database (allowing avenues for corruption).’
Single User or Small Installation
I think that the best approach is to run the svnserve server that is included with the Subversion distribution and, as of TortoiseSVN 1.7, now included with TortoiseSVN as well! Svnserve is a lightweight, standalone Subversion server designed for situations where you do not need the full might of an Apache server. in support of this, you can read the thorough discussion on finer points of the svnserve server by David W. In his answer to this StackOverflow post. With svnserve you use the familiar svn:// protocol to access your
repository, thereby gaining the benefit of a controlled interface to your repository. You have a couple of choices for security control as well, as detailed in the svnserve reference above.
The table below compares and contrasts the approaches given so far (file:, svn:,
and svn+ssh: protocols) along with the Apache server (http: and https: protocols). This table is my
interpretation of the pros and cons discussed in Choosing a Server Configuration in the Subversion book.
Attribute No server svnserve svnserve over SSH Apache HTTP server
Setup None Easy Moderate Complex
Accounts None No system accounts needed on server
Leverage existing SSH accounts
No system accounts needed on server
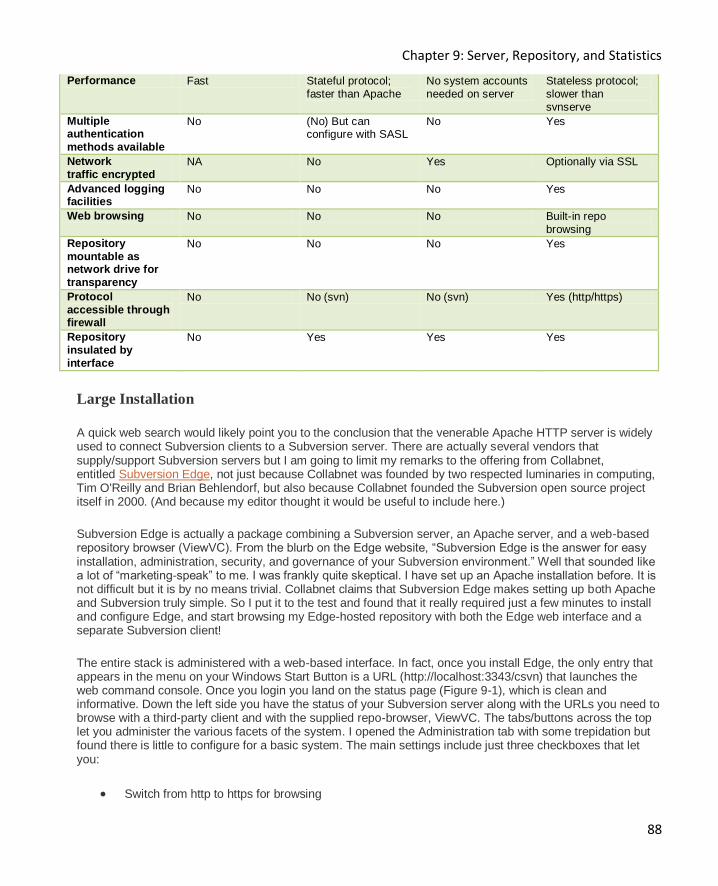
Chapter 9: Server, Repository, and Statistics
88
Performance Fast Stateful protocol; faster than Apache
No system accounts needed on server
Stateless protocol; slower than svnserve
Multiple authentication methods available
No (No) But can configure with SASL
No Yes
Network traffic encrypted
NA No Yes Optionally via SSL
Advanced logging facilities
No No No Yes
Web browsing No No No Built-in repo
browsing
Repository mountable as network drive for transparency
No No No Yes
Protocol accessible through firewall
No No (svn) No (svn) Yes (http/https)
Repository insulated by interface
No Yes Yes Yes
Large Installation
A quick web search would likely point you to the conclusion that the venerable Apache HTTP server is widely used to connect Subversion clients to a Subversion server. There are actually several vendors that supply/support Subversion servers but I am going to limit my remarks to the offering from Collabnet, entitled Subversion Edge, not just because Collabnet was founded by two respected luminaries in computing, Tim O'Reilly and Brian Behlendorf, but also because Collabnet founded the Subversion open source project itself in 2000. (And because my editor thought it would be useful to include here.)
Subversion Edge is actually a package combining a Subversion server, an Apache server, and a web-based repository browser (ViewVC). From the blurb on the Edge website, “Subversion Edge is the answer for easy installation, administration, security, and governance of your Subversion environment.” Well that sounded like a lot of “marketing-speak” to me. I was frankly quite skeptical. I have set up an Apache installation before. It is not difficult but it is by no means trivial. Collabnet claims that Subversion Edge makes setting up both Apache and Subversion truly simple. So I put it to the test and found that it really required just a few minutes to install and configure Edge, and start browsing my Edge-hosted repository with both the Edge web interface and a separate Subversion client!
The entire stack is administered with a web-based interface. In fact, once you install Edge, the only entry that appears in the menu on your Windows Start Button is a URL (http://localhost:3343/csvn) that launches the web command console. Once you login you land on the status page (Figure 9-1), which is clean and informative. Down the left side you have the status of your Subversion server along with the URLs you need to browse with a third-party client and with the supplied repo-browser, ViewVC. The tabs/buttons across the top let you administer the various facets of the system. I opened the Administration tab with some trepidation but found there is little to configure for a basic system. The main settings include just three checkboxes that let you:
Switch from http to https for browsing

Chapter 9: Server, Repository, and Statistics
89
Switch from http to https for the command console
Auto-start Subversion when you launch the command console
The last is superfluous in a Windows environment; both Subversion and Apache servers, installed as Windows services, are configured to auto-started on boot.
Figure 9-1 The Subversion Edge status page provides a URL for your repository for use with other clients as
well as a URL to invoke the supplied ViewVC browser interface to your repository.
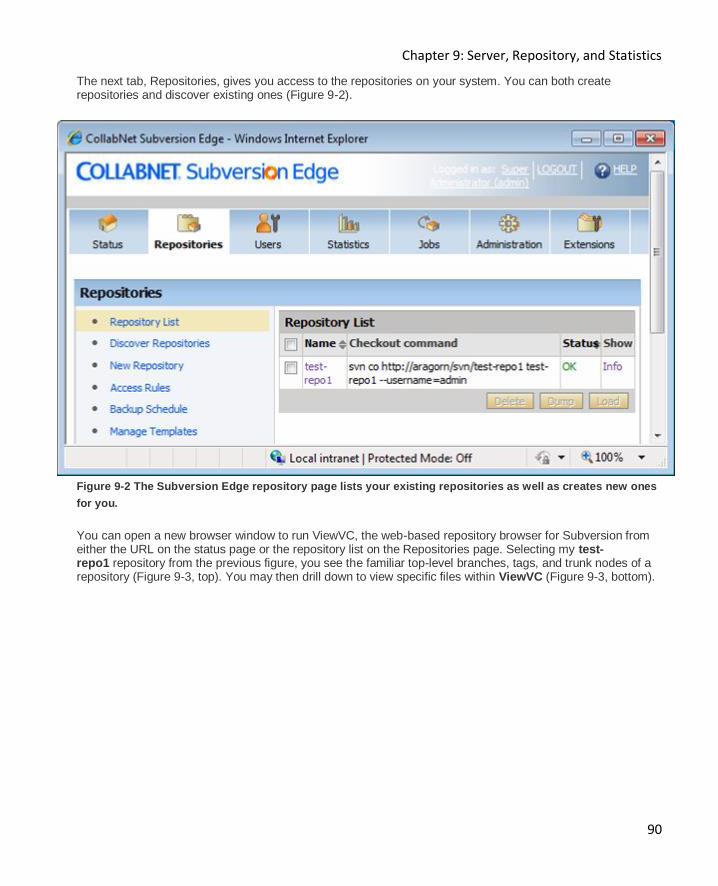
Chapter 9: Server, Repository, and Statistics
90
The next tab, Repositories, gives you access to the repositories on your system. You can both create repositories and discover existing ones (Figure 9-2).
Figure 9-2 The Subversion Edge repository page lists your existing repositories as well as creates new ones
for you.
You can open a new browser window to run ViewVC, the web-based repository browser for Subversion from either the URL on the status page or the repository list on the Repositories page. Selecting my test-repo1 repository from the previous figure, you see the familiar top-level branches, tags, and trunk nodes of a repository (Figure 9-3, top). You may then drill down to view specific files within ViewVC (Figure 9-3, bottom).
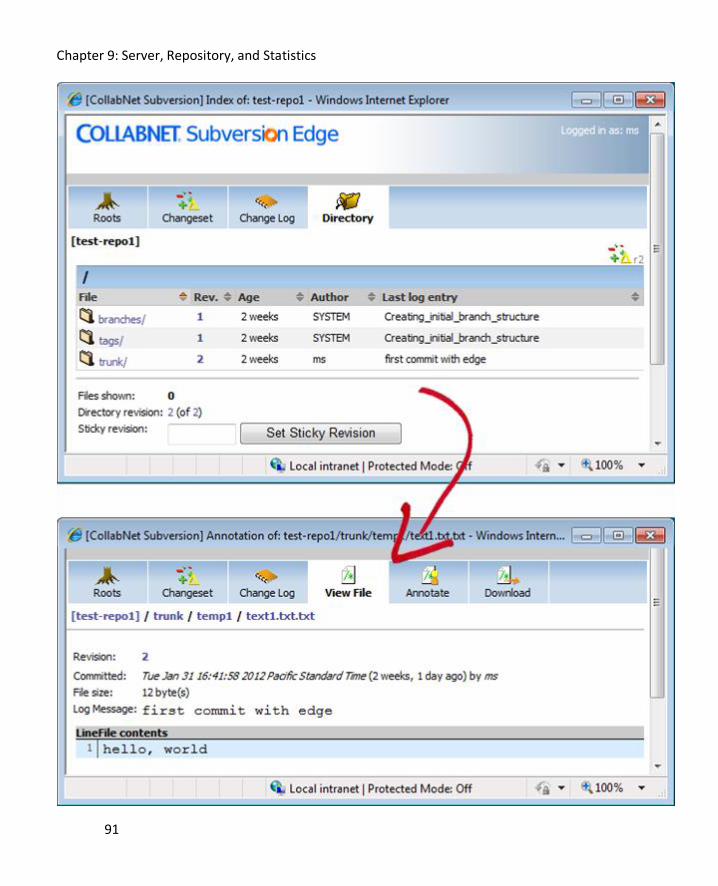
Chapter 9: Server, Repository, and Statistics
91
Chapter 9: Server, Repository, and Statistics
92
Figure 9-3 The browser-based repository-browser works much like TortoiseSVN’s repository browser, letting
you view the log, contents, and annotated (blamed) contents for a file.
While the web-based repo-browser is handy, it is just a repo-browser rather than a full client. It lets you browse directories and files, and view log entries (i.e. history), but that is about the extent of its capabilities. You still need a desktop client to do any real work. I was able to connect both TortoiseSVN and Subversion’s command line client using the URL supplied on the Status page (Figure 9-1) without incident.
Browsing your repository with TortoiseSVN
Typically, you use your working copy to do your day-to-day work, updating frequently and committing as needed. Your working copy is private to you; each person on your team has their own working copy. All of you draw from the same central repository. Occasionally you may want more direct access to the repository. The most common reason for this is to browse through a repository without checking out the files it contains. For large projects with a huge amount of files the time to checkout might be substantial; if you are looking for something specific it could be much faster to browse the repository and just grab the one or few files you may actually need.
TortoiseSVN comes with a repository browser that is accessed, as everything else, through the context menu of a given file or folder (TortoiseSVN >> Repo-browser). This repo-browser provides a Windows Explorer-like GUI to navigate through your source controlled projects. At first glance, though, it appears to have almost no functionality other than a tree navigation pane on the left. But wait—this is TortoiseSVN remember!—and everything works from context menus. Inside the repo-browser everything still works from context menus. Figure 9-4 shows a portion of the context menu for a selected folder. The list of actions includes those for file maintenance (add, rename, delete) but note that Show log and Revision graph appear here just like in Windows Explorer, and both of those give you full access to the rich differencing and reviewing tools of TortoiseSVN.

Chapter 9: Server, Repository, and Statistics
93
Figure 9-4 TortoiseSVN’s repository browser also provides access to the full power of TortoiseSVN via
context menus just like within Windows Explorer.
Browsing your repository with a web browser
If you do not have TortoiseSVN installed you can still browse your repository provided it uses a standard browser protocol—http or https. (So repository URLs using the svn: protocol, for example, do not lend themselves to this recipe.) With no additional support, your Subversion web server can generate web pages that let you walk through the tree hierarchy of your repository. The pages are plain, very plain. They remind me of web pages from the last century! But you can easily enhance the output. The recipe Setting up a Subversion Server showed a web application to do this very thing—ViewVC—integrated into the one-click installation of Collabnet’s Subversion Edge. As shown in Figure 9-3, you get a much enhanced view of your repository complete with buttons to view the log, annotate a file with authorship, or to download a given file. Since the indicated recipe already covered ViewVC, I need add nothing here.
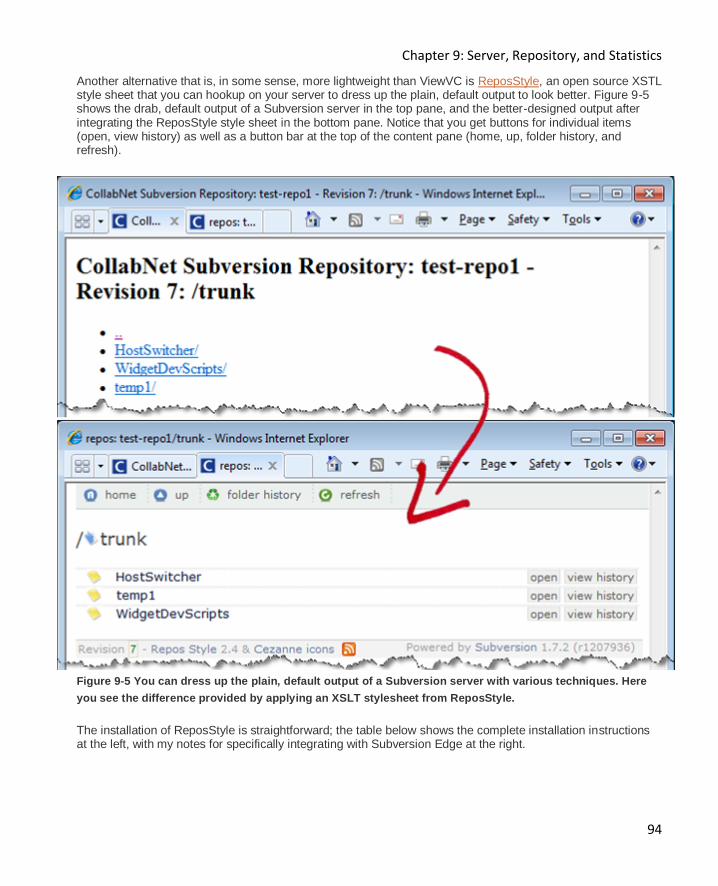
Chapter 9: Server, Repository, and Statistics
94
Another alternative that is, in some sense, more lightweight than ViewVC is ReposStyle, an open source XSTL style sheet that you can hookup on your server to dress up the plain, default output to look better. Figure 9-5 shows the drab, default output of a Subversion server in the top pane, and the better-designed output after integrating the ReposStyle style sheet in the bottom pane. Notice that you get buttons for individual items (open, view history) as well as a button bar at the top of the content pane (home, up, folder history, and refresh).
Figure 9-5 You can dress up the plain, default output of a Subversion server with various techniques. Here
you see the difference provided by applying an XSLT stylesheet from ReposStyle.
The installation of ReposStyle is straightforward; the table below shows the complete installation instructions at the left, with my notes for specifically integrating with Subversion Edge at the right.
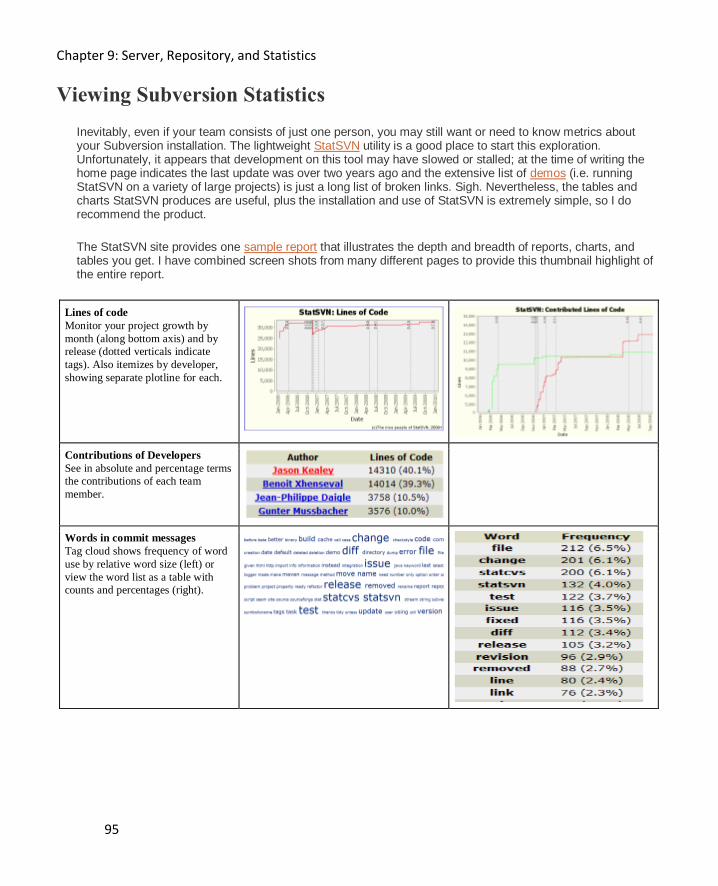
Chapter 9: Server, Repository, and Statistics
95
Viewing Subversion Statistics
Inevitably, even if your team consists of just one person, you may still want or need to know metrics about your Subversion installation. The lightweight StatSVN utility is a good place to start this exploration. Unfortunately, it appears that development on this tool may have slowed or stalled; at the time of writing the home page indicates the last update was over two years ago and the extensive list of demos (i.e. running StatSVN on a variety of large projects) is just a long list of broken links. Sigh. Nevertheless, the tables and charts StatSVN produces are useful, plus the installation and use of StatSVN is extremely simple, so I do recommend the product.
The StatSVN site provides one sample report that illustrates the depth and breadth of reports, charts, and tables you get. I have combined screen shots from many different pages to provide this thumbnail highlight of the entire report.
Lines of code
Monitor your project growth by
month (along bottom axis) and by
release (dotted verticals indicate
tags). Also itemizes by developer,
showing separate plotline for each.
Contributions of Developers
See in absolute and percentage terms
the contributions of each team
member.
Words in commit messages
Tag cloud shows frequency of word
use by relative word size (left) or
view the word list as a table with
counts and percentages (right).
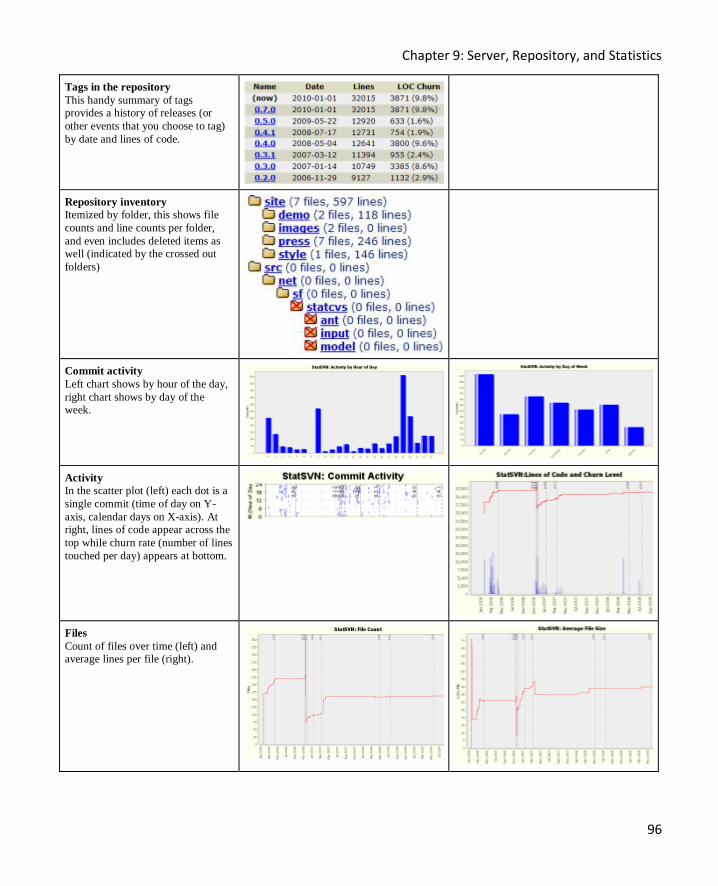
Chapter 9: Server, Repository, and Statistics
96
Tags in the repository
This handy summary of tags
provides a history of releases (or
other events that you choose to tag)
by date and lines of code.
Repository inventory
Itemized by folder, this shows file
counts and line counts per folder,
and even includes deleted items as
well (indicated by the crossed out
folders)
Commit activity
Left chart shows by hour of the day,
right chart shows by day of the
week.
Activity
In the scatter plot (left) each dot is a
single commit (time of day on Y-
axis, calendar days on X-axis). At
right, lines of code appear across the
top while churn rate (number of lines
touched per day) appears at bottom.
Files
Count of files over time (left) and
average lines per file (right).
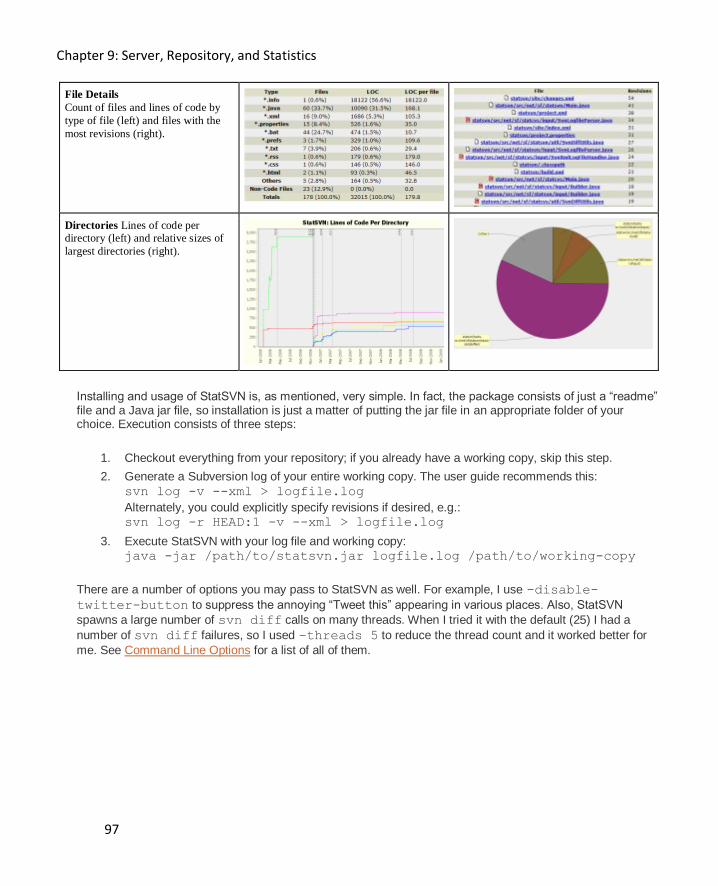
Chapter 9: Server, Repository, and Statistics
97
File Details
Count of files and lines of code by
type of file (left) and files with the
most revisions (right).
Directories Lines of code per
directory (left) and relative sizes of
largest directories (right).
Installing and usage of StatSVN is, as mentioned, very simple. In fact, the package consists of just a “readme” file and a Java jar file, so installation is just a matter of putting the jar file in an appropriate folder of your choice. Execution consists of three steps:
1. Checkout everything from your repository; if you already have a working copy, skip this step.
2. Generate a Subversion log of your entire working copy. The user guide recommends this:
svn log -v --xml > logfile.log
Alternately, you could explicitly specify revisions if desired, e.g.:
svn log -r HEAD:1 -v --xml > logfile.log
3. Execute StatSVN with your log file and working copy:
java -jar /path/to/statsvn.jar logfile.log /path/to/working-copy
There are a number of options you may pass to StatSVN as well. For example, I use -disable-
twitter-button to suppress the annoying “Tweet this” appearing in various places. Also, StatSVN
spawns a large number of svn diff calls on many threads. When I tried it with the default (25) I had a
number of svn diff failures, so I used –threads 5 to reduce the thread count and it worked better for
me. See Command Line Options for a list of all of them.
Chapter 10: Extending the reach of Subversion
98
Chapter 10: Extending the reach of Subversion
Introduction
The first time you consider it, it may seem a strange idea to put a database into source control but, on reflection, it makes sense. The reason to do so is the same reason that you put anything else in source control: to be able to revert to previous releases with minimal effort. Imagine that, after you release version 1.0 of your product, you put it in a new feature for version 2.0 that requires you to add a couple of new columns to a few tables and perhaps delete a couple of columns from some others. Once you make these changes to your database, then you can never revert to release 1.0 because the database is now broken from the perspective of the 1.0 codebase. In order to maintain the integrity of each revision in source control, you not only can but you must include your database schema in source control so as to be sure of deploying both application and database in sync.
As to how to put a database in source control, it is easier than you might think, because you are not storing the data contained in the database but only the structure or metadata of the data, i.e. the Data Definition Language (DDL) statements that are used to define the database tables, triggers, views, procedures and functions. You will normally also want to keep the Data Control Language (DCL) statements that define who can access what. Your data does not belong in source control just as, for example, certain files in Visual Studio that store your personal preferences do not belong in source control. In the latter case, those settings belong exclusively to you. In the database case, the number or content of records in your tables has no bearing on the current revision of your software.
Since the database metadata can easily be represented in code, it can be easily maintained under source control. But versioning the database code is only half the issue; you also have to keep this DDL in sync with your actual database. Subversion (or indeed any source control system) is designed to handle only the former. One possibility is the manual approach: whenever you need to revert to a different revision, you first revert the code using TortoiseSVN/Subversion then you drop the changed tables and run the correct DDL to recreate them. Of course, draconian action like that has the unfortunate side effect of losing all your data! There are likely other manual schemes you can devise for source-controlling your schemas, but like most software bookkeeping, it pays to automate whenever possible, and source control is no exception!
Enter Source Control for Oracle
Source Control for Oracle (SoCO) is the latest offering from Red Gate in the source control arena. Just as their SQL Source Control was a breakthrough for managing source control for SQL Server databases, Source Control for Oracle now provides similar automation and power for the Oracle world. SoCO, in contrast to SQL Source Control, is a standalone application, meaning you can use it in conjunction with any SQL editor. You create a project in the application by specifying a database connection, one or more schemas, and a source control type and location..
Once your project is established:
Any database changes appear on the Check In tab; commit them to source control with the Check In button.
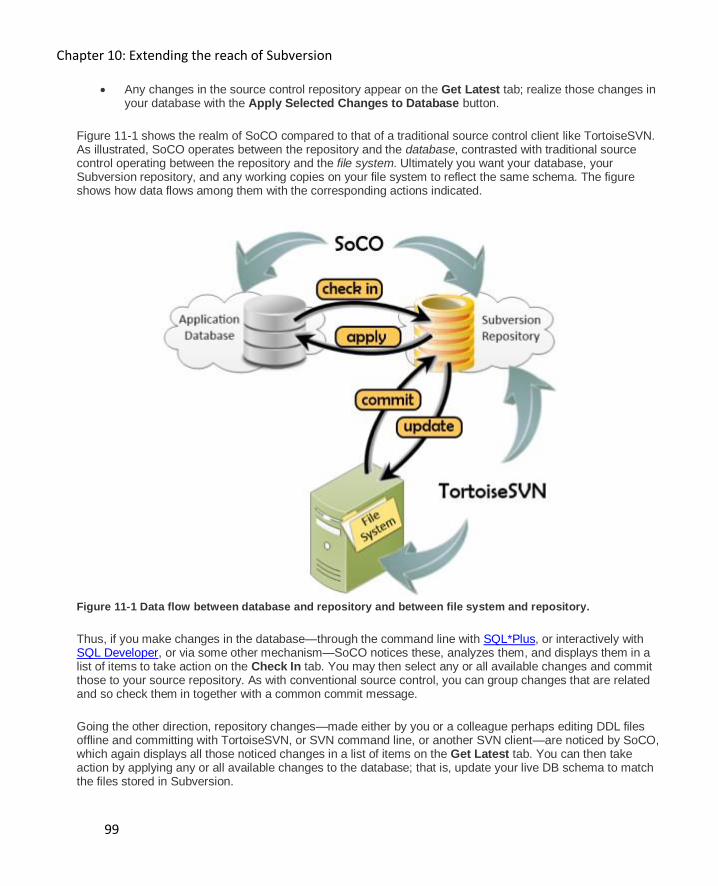
Chapter 10: Extending the reach of Subversion
99
Any changes in the source control repository appear on the Get Latest tab; realize those changes in your database with the Apply Selected Changes to Database button.
Figure 11-1 shows the realm of SoCO compared to that of a traditional source control client like TortoiseSVN. As illustrated, SoCO operates between the repository and the database, contrasted with traditional source control operating between the repository and the file system. Ultimately you want your database, your Subversion repository, and any working copies on your file system to reflect the same schema. The figure shows how data flows among them with the corresponding actions indicated.
Figure 11-1 Data flow between database and repository and between file system and repository.
Thus, if you make changes in the database—through the command line with SQL*Plus, or interactively with SQL Developer, or via some other mechanism—SoCO notices these, analyzes them, and displays them in a list of items to take action on the Check In tab. You may then select any or all available changes and commit those to your source repository. As with conventional source control, you can group changes that are related and so check them in together with a common commit message.
Going the other direction, repository changes—made either by you or a colleague perhaps editing DDL files offline and committing with TortoiseSVN, or SVN command line, or another SVN client—are noticed by SoCO, which again displays all those noticed changes in a list of items on the Get Latest tab. You can then take action by applying any or all available changes to the database; that is, update your live DB schema to match the files stored in Subversion.

Chapter 10: Extending the reach of Subversion
100
Subversion Commands
SoCO’s user interface provides just a small subset of those that are available from TortoiseSVN, but the Pareto principle applies in that the available commands cover 80% of what you need to do. On a day-to-day basis, perhaps even more. When you do need to do something not covered by SoCO’s capabilities, you can always use TortoiseSVN’s assorted GUI tools or the SVN command line tools.
Here are the commands implemented by SoCO with their TortoiseSVN equivalents:
TortoiseSVN Source Control for Oracle
SVN Check for Modifications Get Latest tab
SVN Update Apply selected changes to database button on Get Latest tab
SVN Commit Check In button on Check In tab
SVN Show Log History tab
SVN Diff Automatic on each tab
SVN Resolve Resolve Conflict on context menu on Get Latest or Check In tabs
SoCO polls your database every 60 seconds. This polling interval is configurable by setting the <PollingInterval> element in the configuration file (%localappdata%\Red Gate\Source Control for Oracle 1\ConnectionStore.xml) to the number of milliseconds (default is 60000, i.e. 60 seconds).
When changes are discovered, they automatically populate the Check in tab so you can then commit them to source control. SoCO does not, however, automatically report changes in the other direction, i.e. changes in your repository. You can check this any time, though, with the Refresh button on the Get latest tab. This is analogous, if not exactly symmetrical, to how TortoiseSVN operates. TortoiseSVN automatically monitors your file system, updating icon overlays on changed files from a green check mark to a red exclamation point or vice versa. In the other direction, TortoiseSVN similarly requires you to do a manual SVN Update (or SVN Check for Modifications if you prefer to separate the check operation from the pull operation) to see what has been changed in the repository.
Because SoCO separates the check for modifications from the actual pull operation, it adds a convenience: whenever it notices database changes during its regular scan it will, in fact, automatically poll source control as well.
The next few sections detail the commands to use SoCO. Once you open a project in SoCO the interface consists simply of a stylized Windows title bar, a project name, and the three main operation tabs: Get latest, Check in, and History (see Figure 11-2).
For details on setting up a Source Control for Oracle project, see the wallchart accompanying this chapter as well as the getting started guide from Red Gate on their website.
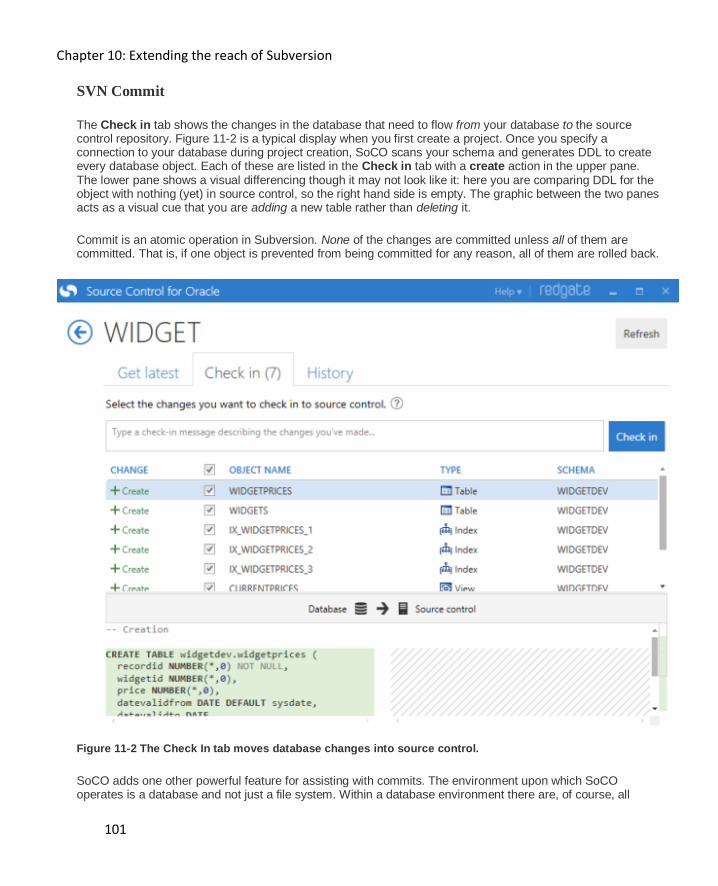
Chapter 10: Extending the reach of Subversion
101
SVN Commit
The Check in tab shows the changes in the database that need to flow from your database to the source control repository. Figure 11-2 is a typical display when you first create a project. Once you specify a connection to your database during project creation, SoCO scans your schema and generates DDL to create every database object. Each of these are listed in the Check in tab with a create action in the upper pane. The lower pane shows a visual differencing though it may not look like it: here you are comparing DDL for the object with nothing (yet) in source control, so the right hand side is empty. The graphic between the two panes acts as a visual cue that you are adding a new table rather than deleting it.
Commit is an atomic operation in Subversion. None of the changes are committed unless all of them are committed. That is, if one object is prevented from being committed for any reason, all of them are rolled back.
Figure 11-2 The Check In tab moves database changes into source control.
SoCO adds one other powerful feature for assisting with commits. The environment upon which SoCO operates is a database and not just a file system. Within a database environment there are, of course, all
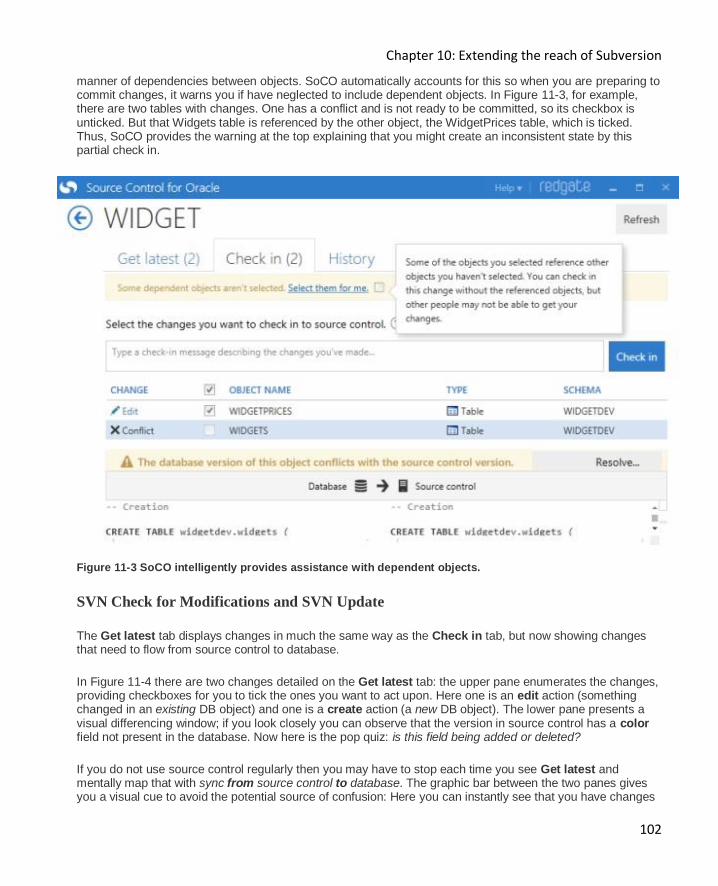
Chapter 10: Extending the reach of Subversion
102
manner of dependencies between objects. SoCO automatically accounts for this so when you are preparing to commit changes, it warns you if have neglected to include dependent objects. In Figure 11-3, for example, there are two tables with changes. One has a conflict and is not ready to be committed, so its checkbox is unticked. But that Widgets table is referenced by the other object, the WidgetPrices table, which is ticked. Thus, SoCO provides the warning at the top explaining that you might create an inconsistent state by this partial check in.
Figure 11-3 SoCO intelligently provides assistance with dependent objects.
SVN Check for Modifications and SVN Update
The Get latest tab displays changes in much the same way as the Check in tab, but now showing changes that need to flow from source control to database.
In Figure 11-4 there are two changes detailed on the Get latest tab: the upper pane enumerates the changes, providing checkboxes for you to tick the ones you want to act upon. Here one is an edit action (something changed in an existing DB object) and one is a create action (a new DB object). The lower pane presents a visual differencing window; if you look closely you can observe that the version in source control has a color field not present in the database. Now here is the pop quiz: is this field being added or deleted?
If you do not use source control regularly then you may have to stop each time you see Get latest and mentally map that with sync from source control to database. The graphic bar between the two panes gives you a visual cue to avoid the potential source of confusion: Here you can instantly see that you have changes
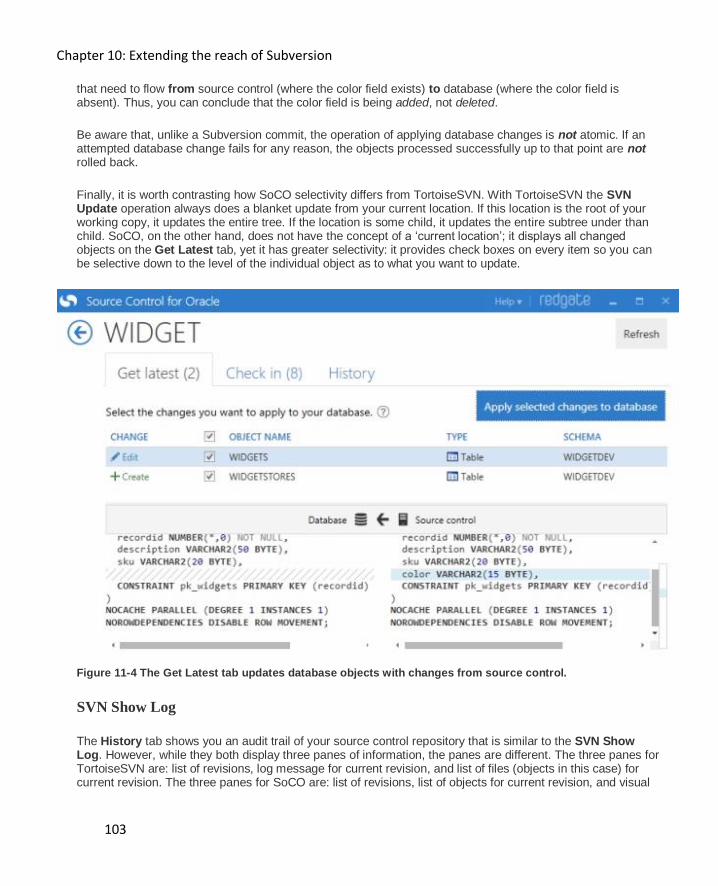
Chapter 10: Extending the reach of Subversion
103
that need to flow from source control (where the color field exists) to database (where the color field is absent). Thus, you can conclude that the color field is being added, not deleted.
Be aware that, unlike a Subversion commit, the operation of applying database changes is not atomic. If an attempted database change fails for any reason, the objects processed successfully up to that point are not rolled back.
Finally, it is worth contrasting how SoCO selectivity differs from TortoiseSVN. With TortoiseSVN the SVN Update operation always does a blanket update from your current location. If this location is the root of your working copy, it updates the entire tree. If the location is some child, it updates the entire subtree under than child. SoCO, on the other hand, does not have the concept of a ‘current location’; it displays all changed objects on the Get Latest tab, yet it has greater selectivity: it provides check boxes on every item so you can be selective down to the level of the individual object as to what you want to update.
Figure 11-4 The Get Latest tab updates database objects with changes from source control.
SVN Show Log
The History tab shows you an audit trail of your source control repository that is similar to the SVN Show Log. However, while they both display three panes of information, the panes are different. The three panes for TortoiseSVN are: list of revisions, log message for current revision, and list of files (objects in this case) for current revision. The three panes for SoCO are: list of revisions, list of objects for current revision, and visual

Chapter 10: Extending the reach of Subversion
104
difference for current object. Thus, with SoCO, you can quickly switch between viewing differences for each object just by selecting a different one in the middle pane. (see Figure 11-5).
The difference pane always compares the selected revision with the previous revision, i.e. revision n with revision n minus 1. SoCO gives you a visual cue to indicate this with the before and after indicators at the top of the difference pane.
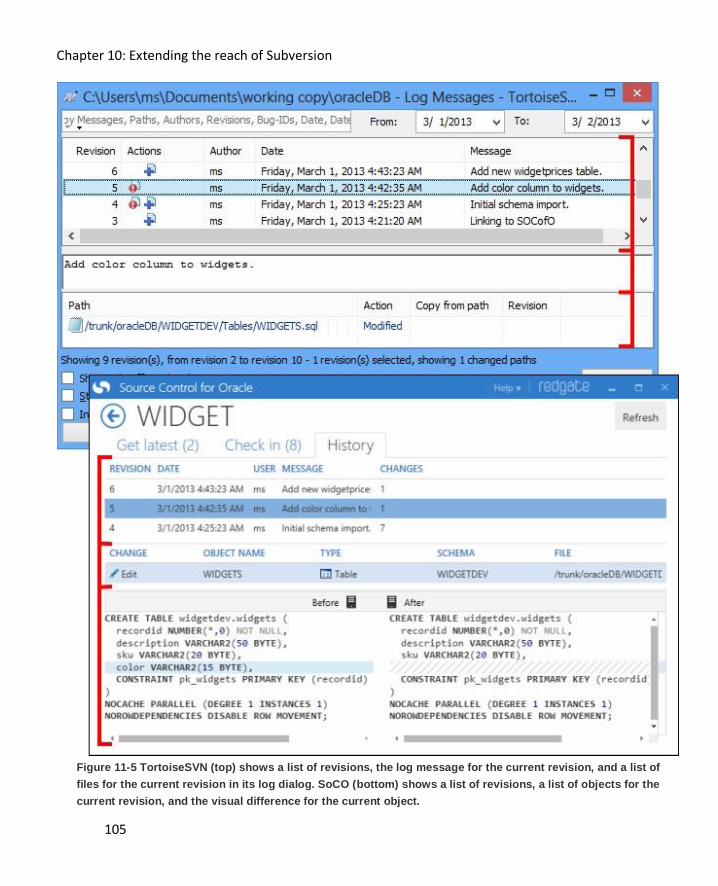
Chapter 10: Extending the reach of Subversion
105
Figure 11-5 TortoiseSVN (top) shows a list of revisions, the log message for the current revision, and a list of
files for the current revision in its log dialog. SoCO (bottom) shows a list of revisions, a list of objects for the
current revision, and the visual difference for the current object.
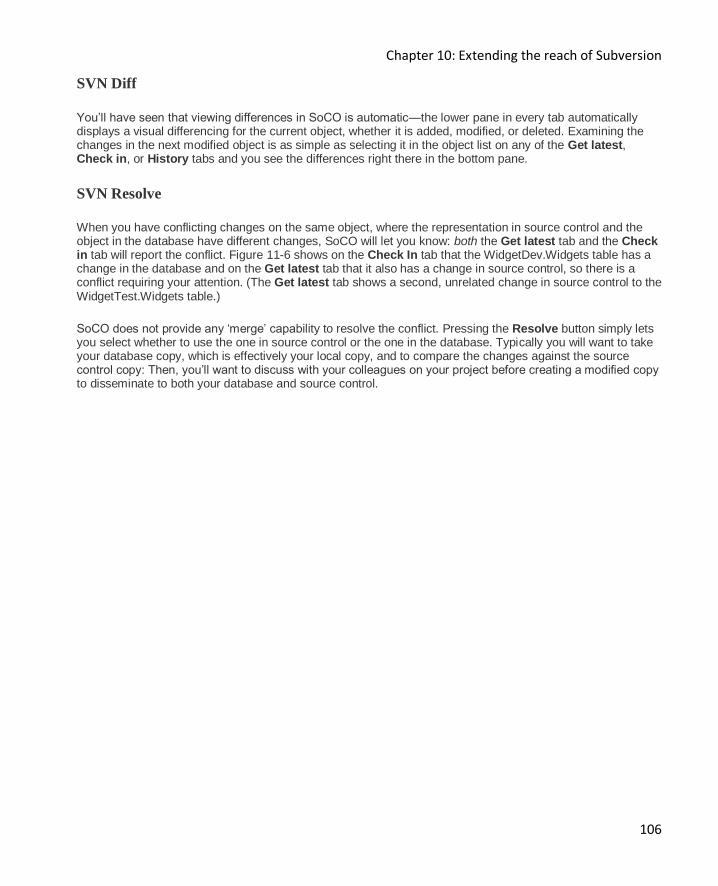
Chapter 10: Extending the reach of Subversion
106
SVN Diff
You’ll have seen that viewing differences in SoCO is automatic—the lower pane in every tab automatically displays a visual differencing for the current object, whether it is added, modified, or deleted. Examining the changes in the next modified object is as simple as selecting it in the object list on any of the Get latest, Check in, or History tabs and you see the differences right there in the bottom pane.
SVN Resolve
When you have conflicting changes on the same object, where the representation in source control and the object in the database have different changes, SoCO will let you know: both the Get latest tab and the Check in tab will report the conflict. Figure 11-6 shows on the Check In tab that the WidgetDev.Widgets table has a change in the database and on the Get latest tab that it also has a change in source control, so there is a conflict requiring your attention. (The Get latest tab shows a second, unrelated change in source control to the WidgetTest.Widgets table.)
SoCO does not provide any ‘merge’ capability to resolve the conflict. Pressing the Resolve button simply lets you select whether to use the one in source control or the one in the database. Typically you will want to take your database copy, which is effectively your local copy, and to compare the changes against the source control copy: Then, you’ll want to discuss with your colleagues on your project before creating a modified copy to disseminate to both your database and source control.
Chapter 10: Extending the reach of Subversion
107
Figure 11-6 A conflict appears on both the Check in tab and the Get Latest Tab.
Chapter 10: Extending the reach of Subversion
108
Other Considerations
SoCO does not yet provide a mechanism for reverting to a previous revision. However, there is a workaround:
1) Checkout (or update) a working copy in TortoiseSVN to your file system. 2) Revert to the revision desired within TortoiseSVN. This gives you that target revision, but just in your
modified working copy. 3) Commit all the resultant changes in TortoiseSVN, effectively rolling back your repository with that earlier
revision now in the HEAD position, the only place SoCO can see it. 4) Finally, return to the Get Latest tab in SoCO. It should report the reversion as new changes; apply those
changes to the database.
Note that, depending on your environment, you might not have the option of “polluting” your trunk like this. You might need to be a bit more elaborate, doing the revert operation on a branch then creating a new SoCO project pointing at that branch.
Chapter 5 covers the Subversion keyword feature extensively. Alas, SoCO does not support keyword expansion and in fact causes problems for any database files you have instrumented with keywords (commonly stored procedures). If, for example, you commit a file with an $Id$ place holder, the commit causes Subversion to update that with an appropriate value but SoCO then considers that a change to the file. The only workaround at present is to remove the keyword place-holders from database files

Oracle Toolsfrom Red Gate Software
Pricing and information about Red Gate tools are correct at the time of
going to print. For the latest information and pricing on all Red Gate's
tools, visit www.red-gate.com
"What a fantastic product! This really is the best tool possible to make database upgrades between different environments."João Lopes IT Consultant, Novabase
Deployment Suite for Oracle
Schema Compare for Oracle
Quickly and clearly see differences in schema objects and table data across
instances of your database
Generate error-free scripts to update schema and table data changes
Source control database code easily
Automate tasks with the command line,
and Include in your build system for
continuous integration
Identify differences between your largest environments within minutes –
smaller schemas take seconds to compare
Eliminate mistakes migrating database changes from dev, to test, to production
Compare multiple schemas
Deploy databases from source control "Red Gate's Schema Compare is by far the best schema comparison tool on the market. It now takes just 45 seconds for me to compare 6,000 objects in different instances of my database. This used to take 45 minutes in Oracle SQL Developer!"David Cardona Technical Services Manager, Rostima
Compare, deploy and source-control Oracle databases
The fast way to compare and deploy Oracle schemas
28-day trial at www.red-gate.com/oracle
"With Data Compare for Oracle, we can easily compare the data in two different database builds and generate the synchronization script. It's going save at least an hour of development time each week – and stop me going grey so quickly!"David Hart Senior Application Developer, T2 Systems
Data Compare for Oracle
Source Control for Oracle
Save time comparing and synchronizing data
Copy lookup data from development databases to staging or production
Troubleshoot and resolve errors caused by differences in data
Generate SQL scripts to update one
database with the contents of another
Remove the need for complex solutions to script out database objects
and check them into source control
Checking in changes is as simple as writing a log message and clicking
a button
Store a complete history of every object
checked in
Compare each object in the database with
source control side-by-side
Enable easy setup of dedicated
environments
"Source Control for Oracle is a huge time saver for me and for teams that I work with. It doesn't remove the need to version control, but it takes the tedious steps out of the picture. I am blown away!"Lewis Cunningham Database Architect, Oracle ACE
Director
Database diff tool for Oracle table data
Enables easy database source control with SVN & TFS
28-day trial at www.red-gate.com/oracle