Embed Size (px)
Citation preview
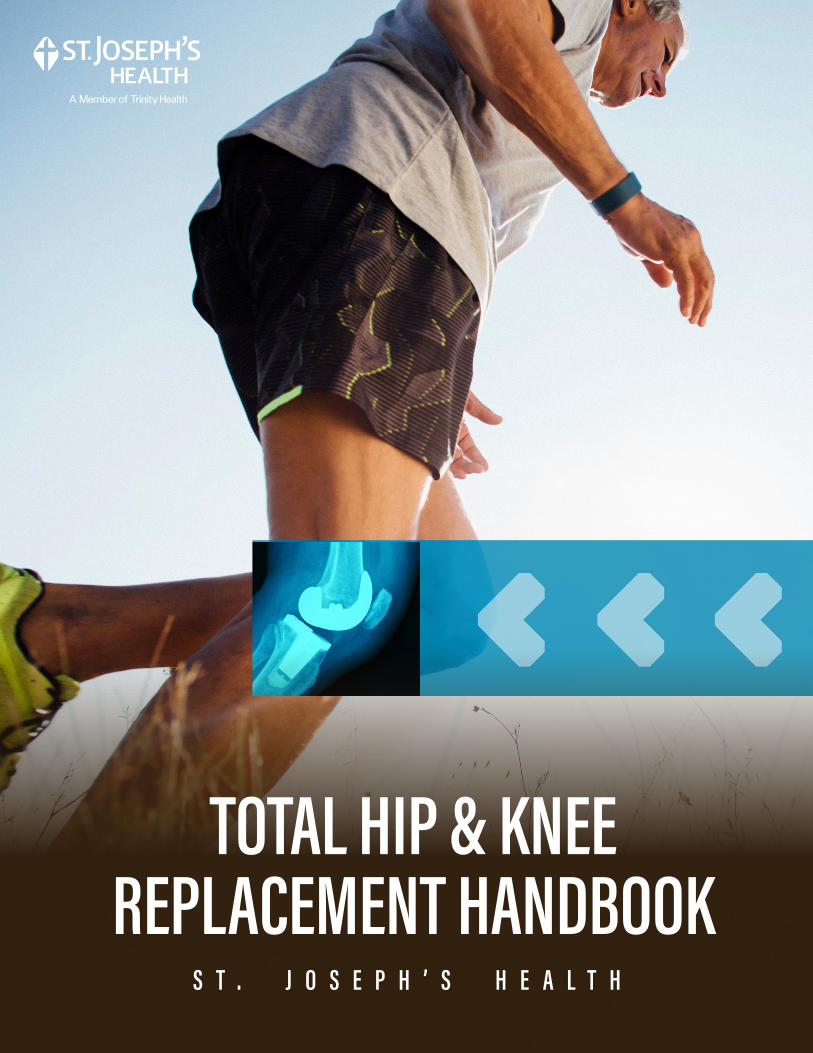
TOTAL HIP & KNEE REPLACEMENT HANDBOOK
S T . J O S E P H ’ S H E A L T H
TOTAL HIP AND KNEE REPL ACEMENT
2
ContentsIntroduction
Part 1: Prepare for Your Surgery• Important Dates and Times
• Hospital Checklist
• Prepare Your Home
• Prepare Yourself
Part 2: Your Hospital Stay • Before and After Your Surgery
Part 3: Activity, Hip Precautions and Exercises• Hip Precautions
• Activity/Exercises
Part 4: Tips for Home/Discharge• Planning For Your Discharge
• How to Go From One Place to Another
• How to Get Dressed
• Helpful Homemaking Tips
• Adaptive Equipment You May Need
• Returning Home after Hip Replacement
• Managing Your Pain
• A Copy of Your Discharge Instructions
Part 5: Frequently Asked Questions
Part 6: Resources• Phone Numbers
PG 1
PG 7
PG 9
PG 11
PG 15
PG 21
PG 22
TOTAL HIP AND KNEE REPL ACEMENT
3
WelcomeThank you for choosing St. Joseph’s Health for your joint replacement surgery. You are about to become a member of an elite group of people who have received a new joint from the hospital that does more joint replacements than any other in Upstate New York. We are very proud of our reputation in achieving successful results. The care activities you will receive are aimed at achieving these optimal results.
Our team is here to help you achieve the best results from your operation. The most important person on this team is you.
About this Book:We encourage you and your family to read this book and refer to it often. This book will help you:
• Know what to expect• Prepare for your surgery• Prepare your home• Learn about your hospital stay• Learn exercises and activity• Prepare for discharge and recovery
Talk to your doctor or other knowledgeable members of your health care team if you have questions or concerns. We hope that the written materials provided will help to answer many of the questions that you may have.
TOTAL HIP AND KNEE REPL ACEMENT
4
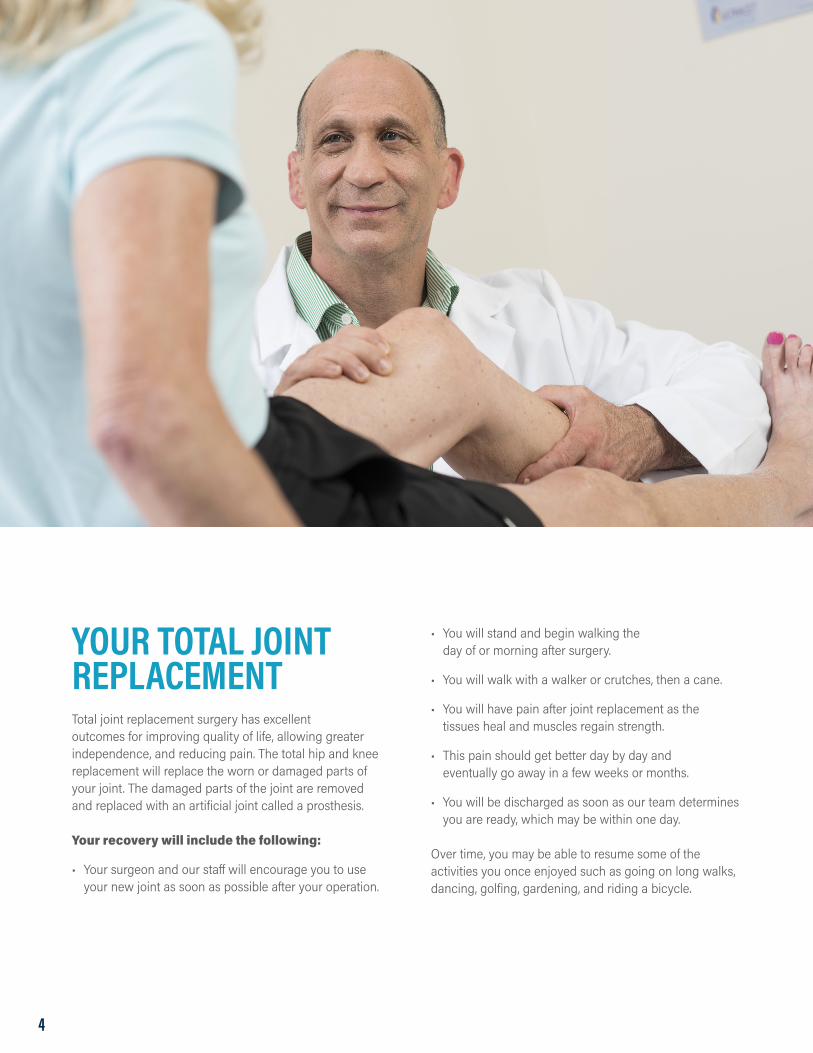
YOUR TOTAL JOINT REPLACEMENTTotal joint replacement surgery has excellent outcomes for improving quality of life, allowing greater independence, and reducing pain. The total hip and knee replacement will replace the worn or damaged parts of your joint. The damaged parts of the joint are removed and replaced with an artificial joint called a prosthesis.
Your recovery will include the following:
• Your surgeon and our staff will encourage you to use your new joint as soon as possible after your operation.
• You will stand and begin walking the day of or morning after surgery.
• You will walk with a walker or crutches, then a cane.
• You will have pain after joint replacement as the tissues heal and muscles regain strength.
• This pain should get better day by day and eventually go away in a few weeks or months.
• You will be discharged as soon as our team determines you are ready, which may be within one day.
Over time, you may be able to resume some of the activities you once enjoyed such as going on long walks, dancing, golfing, gardening, and riding a bicycle.
TOTAL HIP AND KNEE REPL ACEMENT
5
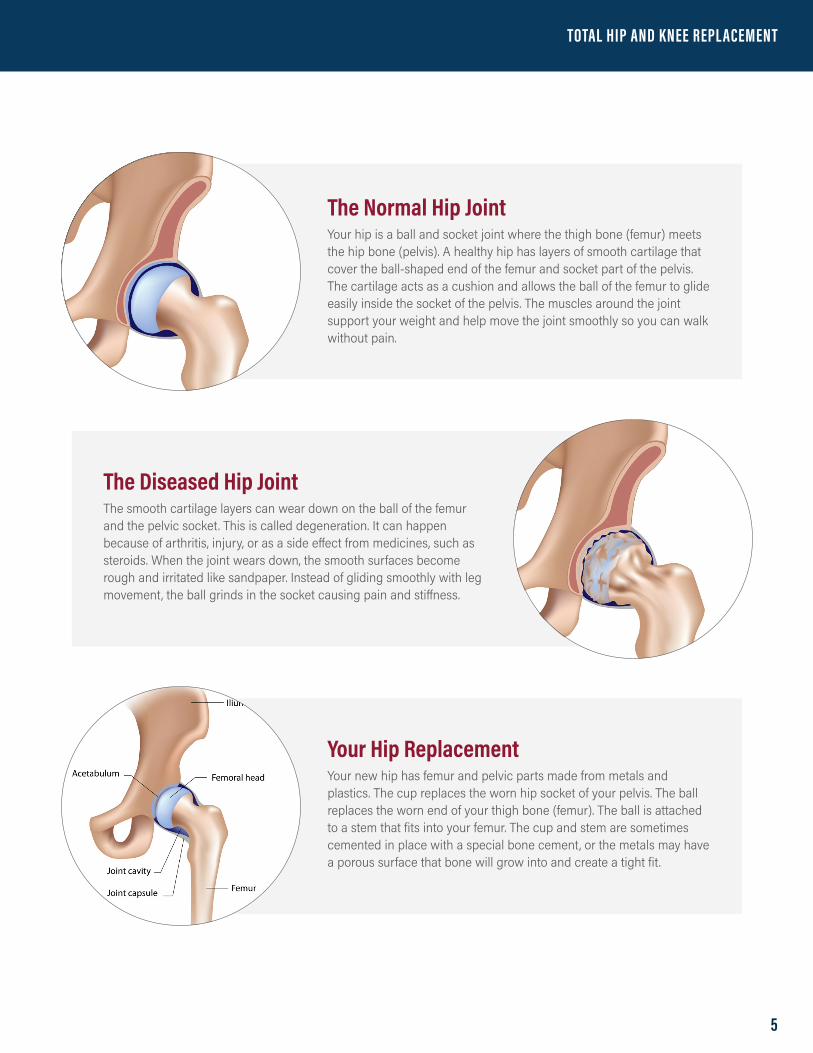
The Normal Hip JointYour hip is a ball and socket joint where the thigh bone (femur) meets the hip bone (pelvis). A healthy hip has layers of smooth cartilage that cover the ball-shaped end of the femur and socket part of the pelvis. The cartilage acts as a cushion and allows the ball of the femur to glide easily inside the socket of the pelvis. The muscles around the joint support your weight and help move the joint smoothly so you can walk without pain.
The Diseased Hip Joint The smooth cartilage layers can wear down on the ball of the femur and the pelvic socket. This is called degeneration. It can happen because of arthritis, injury, or as a side effect from medicines, such as steroids. When the joint wears down, the smooth surfaces become rough and irritated like sandpaper. Instead of gliding smoothly with leg movement, the ball grinds in the socket causing pain and stiffness.
Your Hip Replacement Your new hip has femur and pelvic parts made from metals and plastics. The cup replaces the worn hip socket of your pelvis. The ball replaces the worn end of your thigh bone (femur). The ball is attached to a stem that fits into your femur. The cup and stem are sometimes cemented in place with a special bone cement, or the metals may have a porous surface that bone will grow into and create a tight fit.
TOTAL HIP AND KNEE REPL ACEMENT
6
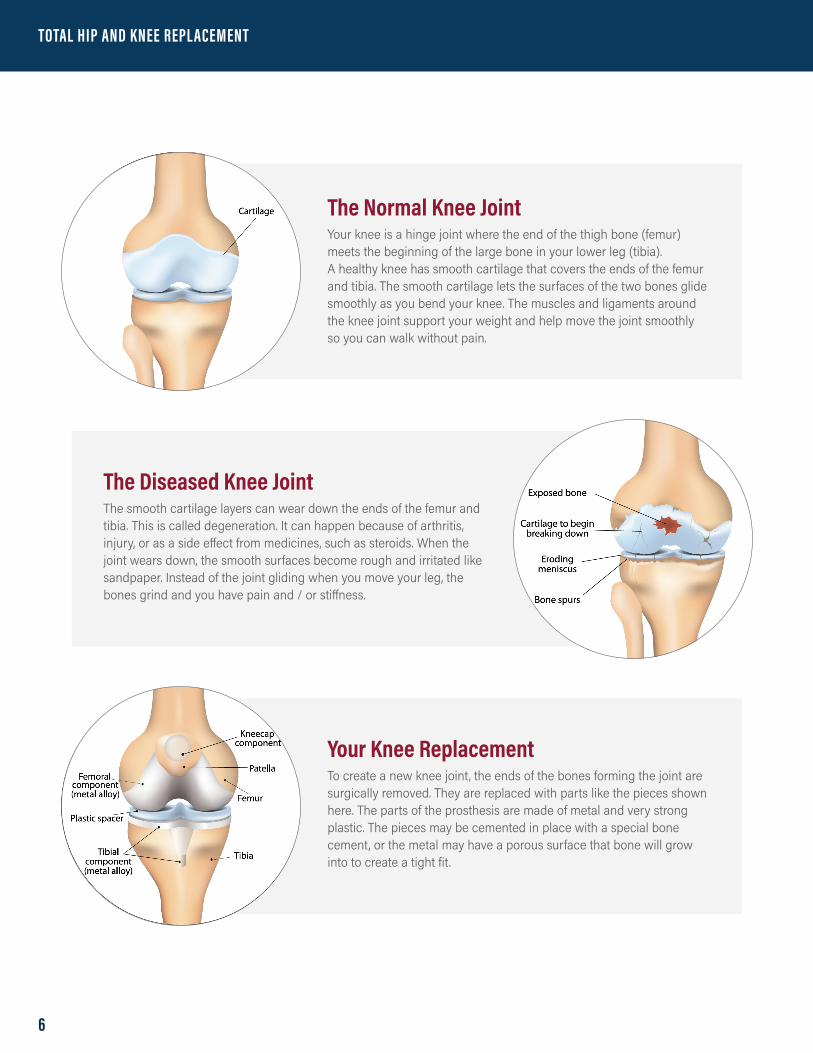
The Normal Knee JointYour knee is a hinge joint where the end of the thigh bone (femur) meets the beginning of the large bone in your lower leg (tibia). A healthy knee has smooth cartilage that covers the ends of the femur and tibia. The smooth cartilage lets the surfaces of the two bones glide smoothly as you bend your knee. The muscles and ligaments around the knee joint support your weight and help move the joint smoothly so you can walk without pain.
The Diseased Knee Joint The smooth cartilage layers can wear down the ends of the femur and tibia. This is called degeneration. It can happen because of arthritis, injury, or as a side effect from medicines, such as steroids. When the joint wears down, the smooth surfaces become rough and irritated like sandpaper. Instead of the joint gliding when you move your leg, the bones grind and you have pain and / or stiffness.
Your Knee Replacement To create a new knee joint, the ends of the bones forming the joint are surgically removed. They are replaced with parts like the pieces shown here. The parts of the prosthesis are made of metal and very strong plastic. The pieces may be cemented in place with a special bone cement, or the metal may have a porous surface that bone will grow into to create a tight fit.
TOTAL HIP AND KNEE REPL ACEMENT
7
PART 1: Prepare for Your Surgery St. Joseph’s Health will call you on the evening before your surgery (Monday surgery patients will be called Friday). If you have not received a phone call by 7:30 P.M., please call 315-448-6439 and ask to speak with a nurse. The time of your surgery is not finalized until 5:00 P.M. the business day before and is, up until that point, subject to change. During this phone call you will receive instructions about eating food and drinking liquids on the day of surgery. Please see
“Preparing for Surgery Checklist” below.
• On the day of surgery please arrive on time.
• Please arrive at the Laurel Street entrance of the hospital.
• You will be directed to the Pre-Induction Unit.
Preparing for Surgery Checklist Follow the instructions discussed on the
telephone about eating food and drinking liquids on the day of surgery.
Stop blood thinners and anti-inflammatory (NSAIDs) medicines if directed to do so (see instructions from Pre-Admission Testing).
Take medications on the morning of surgery (if instructed to do so).
Please bring the following with you to the hospital; your family will need to hold on to your personal belongings while you are in the operating room:
Health Care Proxy form if you have not already given it to us
Eye glasses, dentures, hearing aid, personal toiletries if you prefer to use your own
Supportive rubber soled shoes, or sneakers
if you have them, to wear home. No backless footwear. You may use these in Physical Therapy (PT). Most of the time you will wear the slipper socks that the hospital supplies
Loose fitting clothes, shorts, or sweat suit to wear in PT (no jeans)
A credit card may be needed to purchase equipment for home
Limit valuables brought to the hospital
Prepare Your HomeGet furniture and equipment ready before you come in for your surgery.
• Make a path through your furniture wide enough for a walker (about 3 feet).
– Take all throw rugs, clutter, and telephone wires out of this path. Make sure this path is not on waxed or slippery floors.
• Plan to keep your dog or cat away from you while you are walking, as they are a trip hazard.
• You will be taught how to climb stairs while in Physical Therapy at the hospital. Plan on limiting use of stairs when you return home. Over time, you can increase stair climbing based on your tolerance.
• It may be easier to have your bed on the first floor if there is no bathroom upstairs, or you could consider getting a commode as an alternative.
• If your bathroom door is not wide enough to get a walker through you may need a commode.
• Freeze prepared meals or buy frozen meals that can be cooked in the microwave. If friends are looking for some ways to help they can bring over meals.
• Place your clothes at waist level – either on a counter or a high drawer.
TOTAL HIP AND KNEE REPL ACEMENT
8
Consider Equipment You May Need• Some communities have equipment “lending closets”
if you want to check on this. Otherwise, please check with your insurance company regarding coverage of these items; many are not covered by insurance.
• We can provide a walker, raised toilet seat, or a hip kit to your room upon discharge if you need them. A credit card, or checking account information, will be required at this time.
– Adapt Health requires a payment plan at time of service. Your payment method will be charged after they receive payment from insurance. You will be notified by e-mail of your responsibility before your account is debited.
• Put a purse or a bike basket on your walker to carry supplies like your water bottle, insulated cup with a lid, cordless phone, snacks, or TV remote. This will help keep both of your hands free to use the walker properly.
• A night light for bathroom trips.
• A firm chair with arm rest.
– The seat should be high enough to touch above the back of your knee.
– You may need to place a pillow or pad on the seat to make it high enough. This will make it easier to sit down and get up from the chair.
Prepare Yourself• Ask a family member or friend to assist you for the first
week or two. This does not have to be 24 hours a day.
• Plan on wearing loose fitting clothing and comfortable rubber sole shoes such as sneakers.
• Complete scheduled Pre-Admission Testing (PAT) appointment (about 2 weeks prior to surgery).
• Use Hibiclens soap as directed before, during, and after your hospitalization
• Attend a Total Joint Replacement class.
– You will be given the current class schedule during your surgical consultation appointment.
– If you cannot attend and are interested in alternative options you can request instructions for accessing an online presentation during your PAT appointment.
• Eat as healthy as possible with the appropriate servings of fruits, vegetables, protein, whole grains, low fat dairy, and iron rich foods.
• Review exercise section of this book.
• Attend Physical Therapy as directed by your surgeon.
• Stop smoking at least two weeks before surgery.
– New York State Smokers’ Quitline phone number is 1-866-697-8487 (1-866-NY QUITS). They also have a website.
TOTAL HIP AND KNEE REPL ACEMENT
9
PART 2: Your Hospital StayDay of SurgeryBEFORE SURGERY:
• You will change into a hospital gown.
• An intravenous line (IV) will be inserted into a vein in your hand or arm. This will be connected to IV fluid to keep you hydrated.
• Your surgical area will be scrubbed with a cleansing soap.
• You may receive medicines such as antibiotics, antacids, pain medications, and/or medications for nausea.
• You will be taken to the Operating Room approximately 1 hour before your scheduled time.
THE OPERATING ROOM:
• You will first be brought to the “pre-induction” or “holding area.” Here your Anesthesiologist will talk with you about the type of anesthesia for your surgery. A spinal may be placed in your lower back for pain control/anesthesia.
• You will then be brought to the Operating Room for your surgery.
• After surgery you will be taken to recover in the Post Anesthesia Care Unit (PACU) where you will stay until you are ready to go to your room.
• You will be in these areas for 3-4 hours total.
EQUIPMENT:
• Oxygen is given through a nasal cannula in your nose, or a mask on your nose and mouth.
• An intravenous line will be placed in your arm with fluid running. We can also use this for pain medication if needed.
• Foot pumps are placed on your feet to help circulation and prevent blood clots.
• Compression stockings (TEDs) are placed on your lower legs to decrease swelling and prevent blood clots.
• Your nurses will explain any additional equipment you may have, such as a urinary catheter or a wound drain.
VISITING HOURS AND SURGICAL WAITING ROOM:
• St. Joseph’s Health is committed to the safety of our patients, visitors, and colleagues. Please visit sjhsyr.org for the most up to date visitation guidelines or reach out to your RN Patient Navigator.
Daily Routine at the Hospital• Use incentive spirometer 10 times every hour while
awake to prevent respiratory complications.
• Order meals when you want them through Room Service.
• Drink plenty of fluids.
• Bathe yourself, ask a nurse for assistance as needed.
• Use pain management options.
• Walk with a walker several times a day with staff assistance as needed.
• Cold therapy: Ice Gel Packs will be changed routinely on the operative joint to help with comfort and swelling.
• Wear compression stockings and foot pumps to prevent blood clots and swelling.
PHYSICAL THERAPY (PT):
• PT will get you out of bed and walking the day of or morning after your surgery.
• Exercise is very important! Perform as directed by PT.
• PT group class 2 times per day.
• Ask for pain medication before PT if desired.
TOTAL HIP AND KNEE REPL ACEMENT
10
PAIN CONTROL OPTIONS:
• We use various oral medications.
– This may be adjusted based on your specific need.
– Notify your nurse if you have spasms, can’t sleep, or have uncontrolled pain. There are more therapies and orders that can be used.
• Mobility
• Complementary Therapies:
– Music
– Healing Touch
– Imagery
• Car transfer training with PT
• Stair training with PT.
• Hip Replacement Patients: Hip Precautions based on the surgical approach.
OCCUPATIONAL THERAPY (OT):
• If deemed necessary by your surgeon, OT will:
• – Teach you strategies to bath and get dressed.
• – Help you function as safely and independently as possible at home.
• See page 21 for examples of equipment.
CLINICAL CARE MANAGEMENT (CCM):
• A CCM will visit to discuss your plan for discharge.
• You will be discharged as soon as our team determines you are ready, which may be within one day.
• Discuss discharge questions or concerns with the healthcare team.
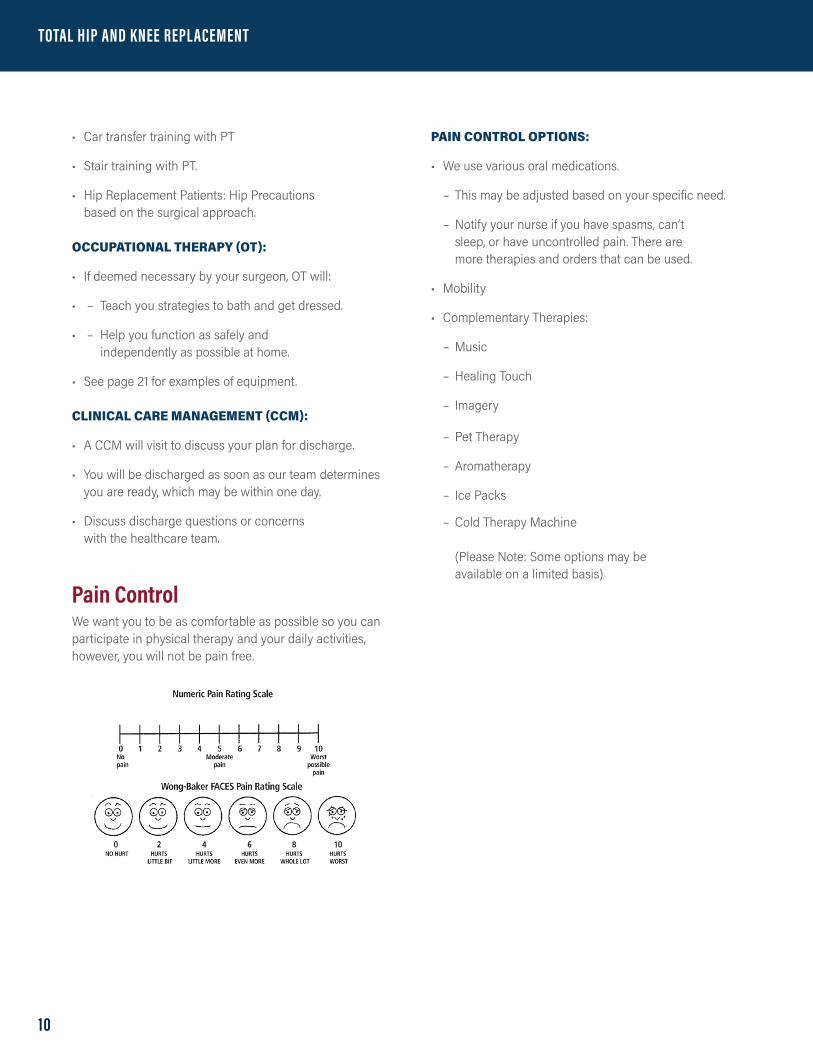
Pain ControlWe want you to be as comfortable as possible so you can participate in physical therapy and your daily activities, however, you will not be pain free.
– Pet Therapy
– Aromatherapy
– Ice Packs
– Cold Therapy Machine (Please Note: Some options may be available on a limited basis)
TOTAL HIP AND KNEE REPL ACEMENT
11
PART 3: ActivityThe information in this section will help you understand your recovery and care at home. Regaining strength and motion after joint replacement surgery is dependent on you. The exercises described in the next few pages will help you recover, helping you to return to your daily activities quicker. You may need your coach to help you with these exercises at first. These exercises can also be done on your non-operative side to help you regain overall strength and balance.
It is a good idea to become familiar with the exercises. If you have Physical Therapy before surgery, you can ask the therapist whether you should be doing any of these.
Hip Replacement Patients: Posterior Hip PrecautionsPatients who have the Posterior Surgical Approach will need to follow hip precautions for 3 weeks, unless otherwise instructed by your surgeon. These are limits to protect your new hip joint from sliding out of place and dislocating, while giving the muscles time to heal. Your doctor or physical therapist will tell you if you need to follow these precautions.
AVOID FLEXION WITH INTERNAL ROTATION:
• Do not turn the toes of your surgical leg inward while your hip is bent with your knees higher than your hip.
Weight Bearing StatusBased on the surgery performed and what happens during your surgery, your physician will decide after surgery how much weight you can put on your surgical leg. This is called your Weight Bearing Status (WB Status). This may change throughout your hospital stay and your recovery from joint replacement surgery.
After surgery, you will need the extra support of an assistive device like a walker, crutches, or a cane. Most surgeries require the support of a walker and your surgeon may decide that you need to use a walker for a few weeks after surgery.
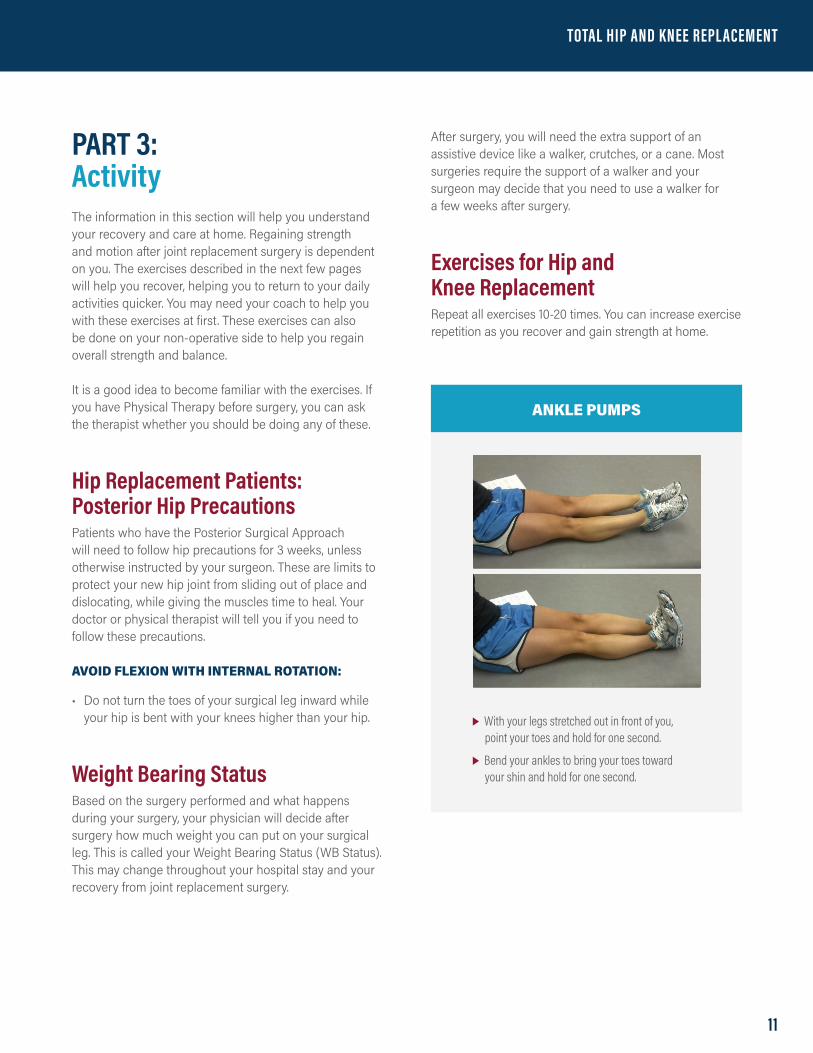
Exercises for Hip and Knee ReplacementRepeat all exercises 10-20 times. You can increase exercise repetition as you recover and gain strength at home.
ANKLE PUMPS
With your legs stretched out in front of you, point your toes and hold for one second.
Bend your ankles to bring your toes toward your shin and hold for one second.
TOTAL HIP AND KNEE REPL ACEMENT
12
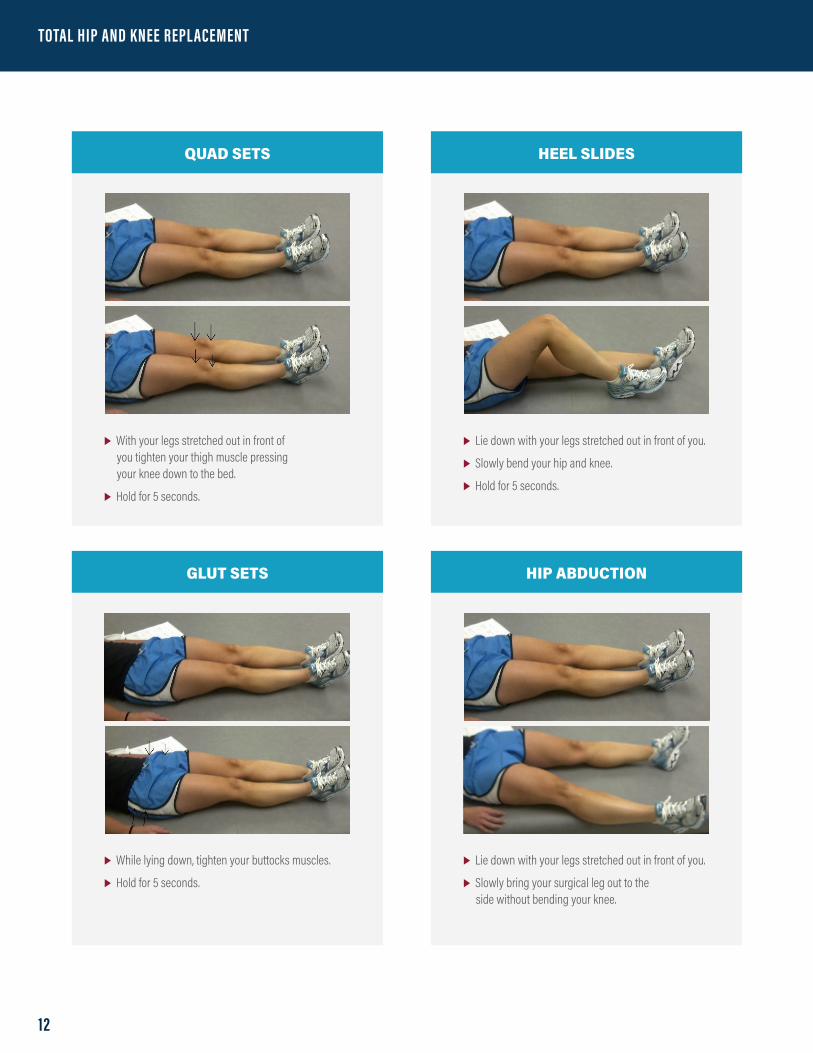
QUAD SETS HEEL SLIDES
GLUT SETS HIP ABDUCTION
With your legs stretched out in front of you tighten your thigh muscle pressing your knee down to the bed.
Hold for 5 seconds.
Lie down with your legs stretched out in front of you.
Slowly bend your hip and knee.
Hold for 5 seconds.
While lying down, tighten your buttocks muscles.
Hold for 5 seconds.
Lie down with your legs stretched out in front of you.
Slowly bring your surgical leg out to the side without bending your knee.
TOTAL HIP AND KNEE REPL ACEMENT
13
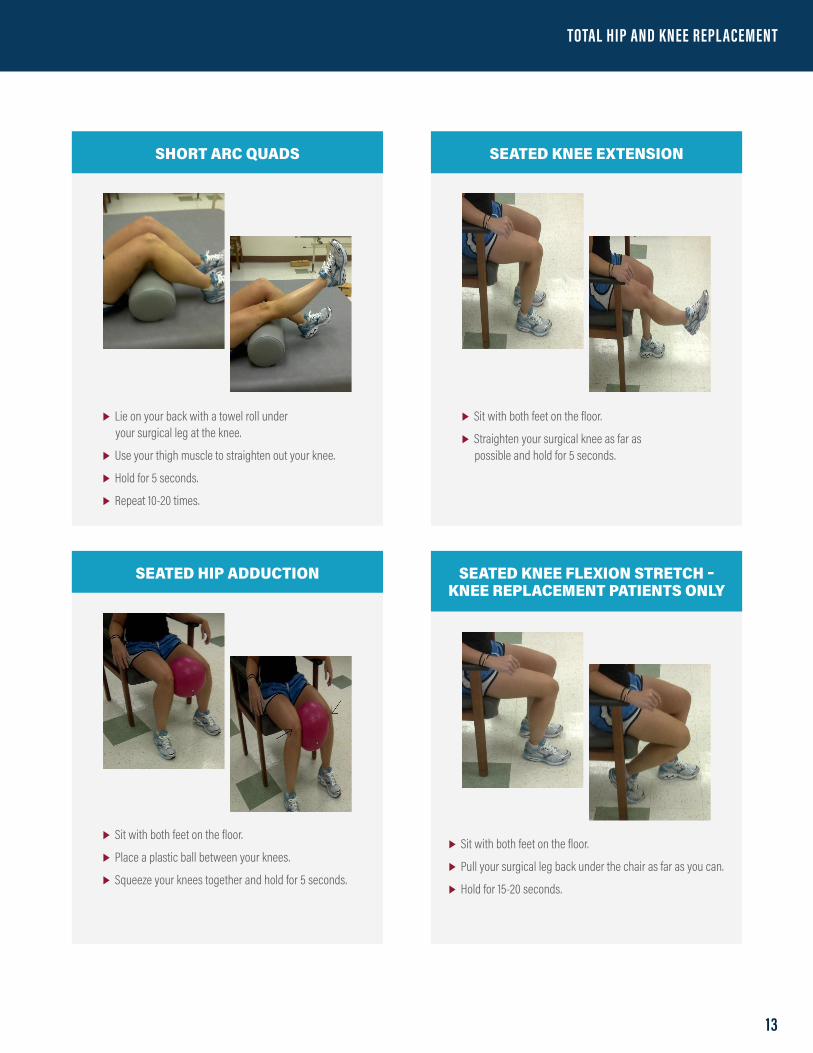
SHORT ARC QUADS SEATED KNEE EXTENSION
SEATED HIP ADDUCTION SEATED KNEE FLEXION STRETCH – KNEE REPLACEMENT PATIENTS ONLY
Lie on your back with a towel roll under your surgical leg at the knee.
Use your thigh muscle to straighten out your knee.
Hold for 5 seconds.
Repeat 10-20 times.
Sit with both feet on the floor.
Straighten your surgical knee as far as possible and hold for 5 seconds.
Sit with both feet on the floor.
Place a plastic ball between your knees.
Squeeze your knees together and hold for 5 seconds.
Sit with both feet on the floor.
Pull your surgical leg back under the chair as far as you can.
Hold for 15-20 seconds.
TOTAL HIP AND KNEE REPL ACEMENT
14
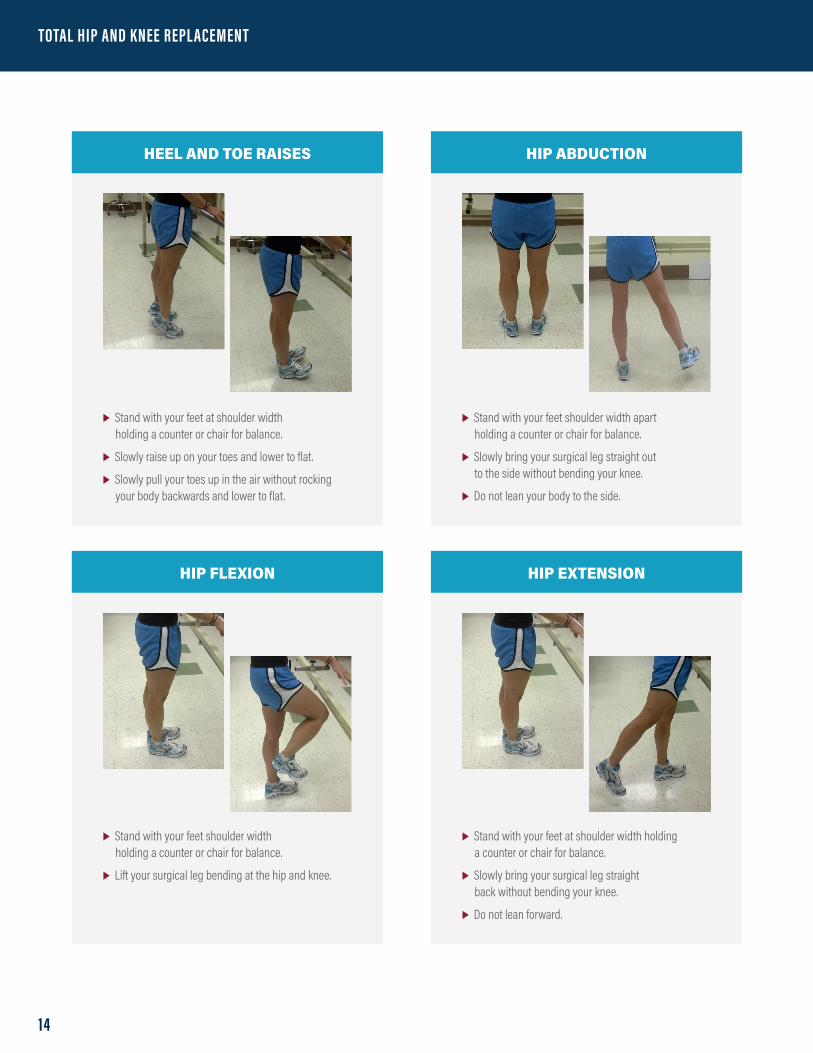
HEEL AND TOE RAISES HIP ABDUCTION
HIP FLEXION HIP EXTENSION
Stand with your feet at shoulder width holding a counter or chair for balance.
Slowly raise up on your toes and lower to flat.
Slowly pull your toes up in the air without rocking your body backwards and lower to flat.
Stand with your feet shoulder width apart holding a counter or chair for balance.
Slowly bring your surgical leg straight out to the side without bending your knee.
Do not lean your body to the side.
Stand with your feet shoulder width holding a counter or chair for balance.
Lift your surgical leg bending at the hip and knee.
Stand with your feet at shoulder width holding a counter or chair for balance.
Slowly bring your surgical leg straight back without bending your knee.
Do not lean forward.
TOTAL HIP AND KNEE REPL ACEMENT
15
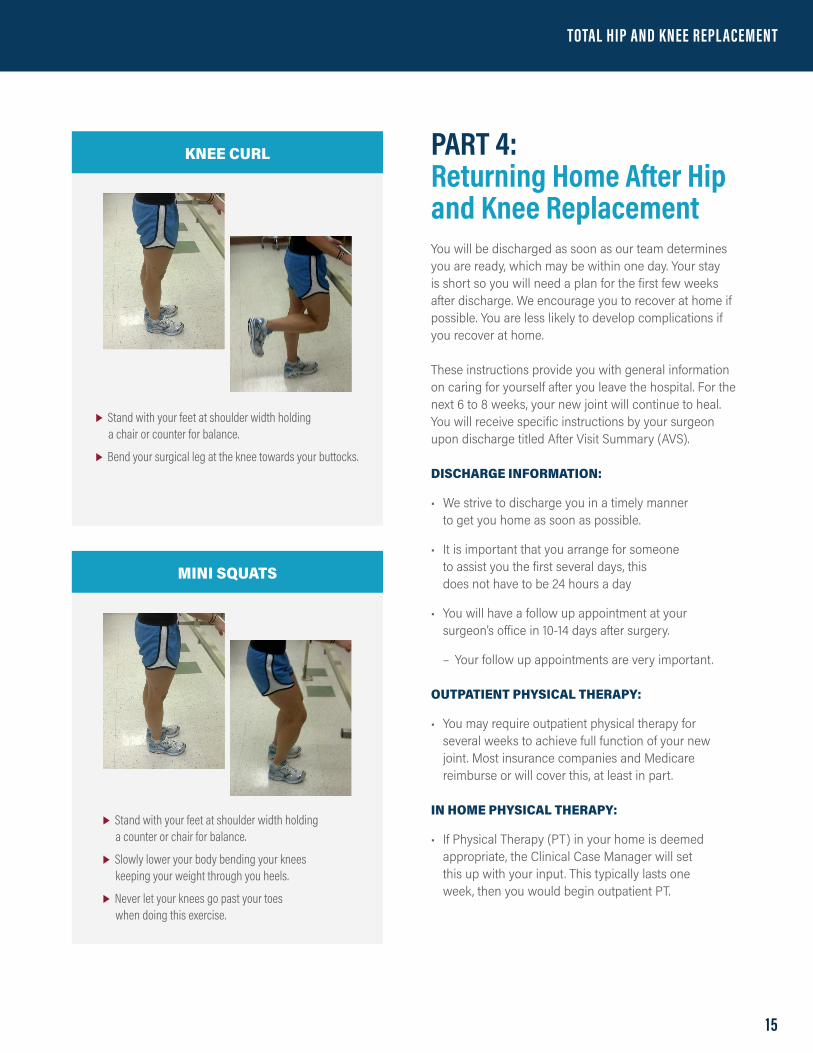
KNEE CURL
MINI SQUATS
Stand with your feet at shoulder width holding a chair or counter for balance.
Bend your surgical leg at the knee towards your buttocks.
Stand with your feet at shoulder width holding a counter or chair for balance.
Slowly lower your body bending your knees keeping your weight through you heels.
Never let your knees go past your toes when doing this exercise.
PART 4:Returning Home After Hip and Knee ReplacementYou will be discharged as soon as our team determines you are ready, which may be within one day. Your stay is short so you will need a plan for the first few weeks after discharge. We encourage you to recover at home if possible. You are less likely to develop complications if you recover at home.
These instructions provide you with general information on caring for yourself after you leave the hospital. For the next 6 to 8 weeks, your new joint will continue to heal. You will receive specific instructions by your surgeon upon discharge titled After Visit Summary (AVS).
DISCHARGE INFORMATION:
• We strive to discharge you in a timely manner to get you home as soon as possible.
• It is important that you arrange for someone to assist you the first several days, this does not have to be 24 hours a day
• You will have a follow up appointment at your surgeon’s office in 10-14 days after surgery.
– Your follow up appointments are very important.
OUTPATIENT PHYSICAL THERAPY:
• You may require outpatient physical therapy for several weeks to achieve full function of your new joint. Most insurance companies and Medicare reimburse or will cover this, at least in part.
IN HOME PHYSICAL THERAPY:
• If Physical Therapy (PT) in your home is deemed appropriate, the Clinical Case Manager will set this up with your input. This typically lasts one week, then you would begin outpatient PT.
TOTAL HIP AND KNEE REPL ACEMENT
16
SHORT TERM REHABILITATION AT AN AREA NURSING HOME:
• In special circumstances a short term rehab facility may be appropriate. You must qualify according to Medicare or your insurance company’s guidelines in order to go to short term rehabilitation. Please note, living alone is not enough to qualify for short term rehabilitation. Your insurance company will need to authorize short term rehabilitation depending on your physical needs.
Getting Around at HomeCHAIR OR TOILET/COMMODE:
• Do not sit longer than one hour at a time. Get up often, walk, and change your position. Sitting for long periods may lead to stiffness, swelling, and blood clots.
• Remember to keep your affected leg out in front of you at all times. You may bend your knee as tolerated.
• To sit down, back up to the seat until you can feel the back of your knees touching the chair with your affected leg is out in front of you. Reach back for the armrests. Sit down slowly.
• To stand up, move forward in the seat. Push up to standing using the armrests. Once standing, grasp the walker handles.
• If you are using a raised toilet seat, keep one hand on the walker while reaching back for the edge of the raised seat with the other hand. Get your balance before grabbing the walker when you stand up.
CAR:
• Place a plastic trash bag or pillow on the car seat to help you get in and out of the seat, this will ease movement.
• Get in the front passenger seat with the seat pushed back as far as possible and semi-reclined.
• Use the same technique you did getting in and out of the chair.
• Take care not to bump your head. Remember to keep your affected leg out in front of you at all times.
• Lift your legs one at a time into the car. Use your strap to help lift your affected leg into the car.
• To get out of the car, lift your legs one at a time out of the car using a strap to lift your affected leg if you need to. Stand up like you would to get out of a chair.
• If you are riding in a car, stop every hour and get out of the car to stretch.
• Do your ankle pumping exercises while you are riding in the car.
• Do not drive a car (typically 4-6 weeks) until cleared by your surgeon.
BED:
• A strap will help you lift your affected leg on and off the bed.
• Sit down about one-third of the way down the bed. Do this as if sitting in a chair.
• Lift your legs one at a time onto the bed as you are lying down. When moving in bed, try to move your body as a whole, keeping your legs apart.
• To get out of bed, move your legs off the bed as you slide your body toward the edge of the bed. Stand up just like getting out of a chair.
AIR TRAVEL:
• Air travel is restricted for the first 6 weeks after surgery. For the first year after your joint replacement, use these precautions to protect your new joint and reduce your risk of complications:
– When booking your flight, notify the airline you have a total joint in place.
– Be sure to tell the officers at the security check points that you have had a total joint replacement.
– Request assistance to travel through the airport, as necessary.

TOTAL HIP AND KNEE REPL ACEMENT
17
– Wear your compression stockings during any flight, if you were instructed to wear them post-operatively.
– Stand frequently and do your ankle pumping exercises during the flight as you are able.
WALKING:
• Make sure that you keep the proper weight bearing on your affected leg. Your doctor and/or physical therapist will tell you how much weight you can put on your leg.
• Do not pivot on your affected leg. Take small steps to turn.
• Do not walk without walker or crutches until your doctor tells you that it is allowed. You may feel you can do without these devices, but remember that healing is occurring and it takes time. Use of an assistive device protects the healing of your joint.
• Walk often on level ground and go outdoors if weather permits or choose a large indoor area such as a shopping mall.
SHOWER OR TUB TRANSFERS:
• Depending on the style of shower (tub versus walk-in), there are several strategies for getting into the shower. In addition, you may want grab bars or a shower chair. Your therapist can educate you on the safest strategies depending on the setup of your bathroom and individual needs.
RESUMING SEXUAL ACTIVITY:
• Many patients and their partners have a great deal of anxiety about resuming sexual activity after a total joint replacement.
• Knee Replacement
– After knee surgery you may return to sexual activity as soon as you feel able.
• Hip Replacement
– You may resume sexual activity in about four to six weeks after surgery which will allow time for the skin and muscles to heal. However, if you have had
no problems after surgery and have little to no pain, you may resume sexual activity at an earlier time.
– If interested you may ask your physical therapist for a handout which explains safe positions. Keep in mind if you have hip precautions these should be followed in all activities.
– Your partner should know if you have hip precautions and should understand the effects of those motions.
LONG TERM FITNESS:
• Physical activity is encouraged as you recover from your joint replacement surgery. This will help to restore normal function to your joint and allow you to perform everyday activities without pain.
– Do not participate in sports or high impact activities without your doctor’s approval.
– Keep in mind that excess stress on your new joint can lead to wear and tear of your implant.
• Try to stay within a healthy weight range. Excess weight on your joint should be avoided.
TOTAL HIP AND KNEE REPL ACEMENT
18
HELPFUL HOMEMAKING TIPS:
• Put a purse or a bike basket on your walker to carry supplies like your water bottle, insulated cup with a lid, cordless phone, snacks, or TV remote. This will help keep both your hands free to use the walker properly.
• Put hot liquids in containers with covers. An insulated cup with a lid works well.
• Slide objects along the countertops, instead of carrying them.
• If you have a cart with wheels at home, use this to move supplies (i.e. laundry, dishes, food, etc.) from one place to another. This can be placed in front of your wheeled walker, keeping your hands free to use your wheeled walker safely.
• Sit on a high stool when preparing meals or doing work at a countertop.
• Use a reacher to pick up objects from the floor. Do not bend down to pick them up.
• Use adhesive back Velcro® to attach the reacher to the walker. The reacher will fit very well on the front leg of your walker.
GETTING DRESSED:
Please remember these points when you are getting dressed:
• Make sure that you do not bend over too far or twist your affected leg when you are getting dressed.
• When putting on pants or underwear, dress your affected leg first.
• When taking off pants or underwear, undress the affected leg last.
• Wear supportive slip-on shoes with a back or shoes with elastic shoelaces to make it easier to put them on and take them off.
MEDICATIONS:
• You will have prescriptions sent to your pharmacy for medicines you will need at home if you were not taking them before your surgery.
• The nurses will review your medications with you and instruct you what to take and will discuss which prescriptions are new.
• Start taking any medicines you were taking before surgery unless the discharge instructions say otherwise.
• Do not take any herbal medications until follow up visit (fish oil, glucosamine, etc.), unless otherwise directed.
ACETAMINOPHEN:
• DO NOT take more than a total of 4 grams (4000 milligrams) of acetaminophen (Tylenol) in a 24 hour period. Some pain medications have Tylenol in them, it is important to know this when you are calculating your daily dose of Tylenol. Check with your doctor or pharmacist to be sure.
• Aim to wean off of narcotic pain meds as soon as possible (oxycodone, hydrocodone, etc.). You may combine or supplement narcotics with Tylenol routinely or as needed during your recovery.
ANTICOAGULATION MEDICINES (BLOOD THINNERS):
• Most patients will leave the hospital with an order for an anticoagulant medicine.
• You will be at risk for blood clots for several weeks following surgery.
• Anticoagulants slow down the process of blood clotting. Using controlled amounts of medicine reduces the risk of blood clot formation. This medicine is usually taken for up to 6 weeks.
• If you get cut, apply pressure to the site and call your doctor if the bleeding won’t stop.
• Avoid razors, use an electric shaver.
NON-STEROIDAL ANTI-INFLAMMATORY DRUGS (NSAIDS):
• Do not take any non-steroidal anti-inflammatory drugs (NSAIDs) including ibuprofen (also known as Advil and Motrin) or Naproxen (Aleve) until follow up visit, unless otherwise instructed by your doctor.
TOTAL HIP AND KNEE REPL ACEMENT
19
• Aspirin and other arthritis medicines are also anticoagulants.
• Two anticoagulants should not be combined without a doctor’s approval.
Pain ControlCOLD THERAPY:
• Gel packs can be left on for up to 3 hours as needed for discomfort or swelling. Use a barrier, such as a pillow case or other clean fabric, between the ice pack holder or wrap and your skin. For cold therapy machines, use as directed.
PAIN MEDICATIONS:
• Take pain medication when needed, as prescribed by your surgeon.
• Consider taking your pain medication before you exercise. This will help to ease any pain you may feel when you exercise. You should feel a little better every day as you get stronger and your body heals.
• Don’t wait until the discomfort is intolerable to take medication.
• It may be helpful to keep a written record of when you take your pain medicine (include the time, medication, and amount).
• As you have less discomfort, start to decrease how many pain pills you are taking and how often you are taking them. Eventually, you will no longer need pain medication.
• Do not drink alcohol or drive while taking pain medication.
• If you have new pain or swelling that is different from the pain you had in the hospital, please let your doctor and/or physical therapist know.
Preventing ComplicationsCONSTIPATION:
• Pain pills can cause constipation.
• To prevent constipation:
– Increase fluids
– Increase fiber (fruits/vegetables/bran)
– Prunes and/or prune juice
– Increase walking
• Stool softeners will make it easier to have a bowel movement without the laxative effect.
• You may use an over-the-counter laxative, if needed.
INFECTION:
• Hand washing is the best way to prevent the spread of infection.
– Wash your hands after using the restroom, coughing, or sneezing and before meals.
• Proper care of your incision can help prevent infection.
• Eating a healthy diet can also help prevent infection and promote healing.
• Use chlorhexidine soap for bathing as directed after discharge.
INCISION CARE:
• It is important to check your dressing/incision every day.
• You will receive instructions about your dressing on the After Visit Summary (AVS).
• Once your dressing is off:
– Wash your hands before touching the incision if you have to touch the incision for any reason.
– Wash your incision and the skin around it gently with soap and water.
– Pat incision dry with a clean towel.
– Do not rub a towel over your incision
– No tub baths, avoid swimming pools and hot tubs until incision is completely healed (about 3 weeks).
TOTAL HIP AND KNEE REPL ACEMENT
20
– Do not use any creams, lotions, ointments, or alcohol on or near your incision.
– Keep fresh incision covered, if you are going to be around pets or small children.
– Avoid smoking while the incision is in the healing phase.
– If you have diabetes, better management of your blood glucose levels will help with wound healing.
SWELLING:
• Swelling is common following total joint replacement. Some people have swelling while still in the hospital. Others may notice it once they are home and become more active. Areas most likely to become swollen are the foot, ankle, knee, and thigh.
• To prevent swelling, elevate your feet higher than heart level while you are lying down. Your toes should be higher than your nose. Do not place pillows under bent knees. If your swelling does not decrease after sleeping all night and elevating your legs during the day, please call your doctor’s office.
• You may have white elastic stockings to help reduce swelling. Please wear the stockings during the day and remove them at night. Wash the stockings regularly with soap and water and hang them to dry during the night.
DENTAL PROCEDURES/OTHER PROCEDURES:
• No dental procedures for 6 weeks (includes teeth cleaning).
• For dental procedures, other surgeries, or any test/procedure where bleeding may occur (cardiac catheterization, biopsy, etc.), it is recommended that you take antibiotics prior to the procedure.
• Your surgeon or dentist can provide the prescription.
• You will be given a card to show your dentist/doctor about the need for antibiotics.
CALL 911 FOR ANY OF THE FOLLOWING:
• Chest pain or sudden shortness of breath
CALL YOUR SURGEON FOR ANY OF THE FOLLOWING:
• Temperature > 101° F
• Increased redness, swelling, or drainage from or around your incision
• Pain not relieved by pain medication
• Nausea or vomiting
• Edges of the wound start to separate
• Coldness of the leg
• Severe calf pain
• Leg turns pale or blue in color
• Tingling or numbness
• Questions or concerns
CALL YOUR MEDICAL DOCTOR FOR ANY OF THE FOLLOWING:
• Weight gain
• Cold Symptoms
• Fatigue
• Gradual worsening of existing health issues (i.e. heart, lungs)
QUESTIONS:
It is very important to your physician that you are kept informed. Please bring any questions or concerns to the attention of your nurse or physician assistants so that your concerns can be addressed.
TOTAL HIP AND KNEE REPL ACEMENT
2 1
Adaptive Equipment for Joint ReplacementsBelow are examples of equipment that you may need. Our rehabilitation team will help you determine what you need.
• Long Shoe Horn
• Dressing Stick
• Sock-aide
• Long Sponge
• Reacher
• Raised Toilet Seat
• Commode
• Tub Transfer Bench
• Shower Chair
PART 5: Frequently Asked QuestionsHow long will I be in the hospital?
You will be discharged as soon as our team determines you are ready, which may be within one day.
How long will I be in the operative area?
You will first be brought to the “pre-induction” or “holding area” about one hour. The surgery takes about one hour. You will be in the Post Anesthesia Care Unit for one to two hours. The total time is about four hours.
How soon will I be walking?
You will start to walk on the day of your surgery or the next morning with the help of a physical therapist and/or nurse.
How long will I need to use my wheeled walker or crutches?
You will use your wheeled walker or crutches two to four weeks after surgery, though this varies patient to patient.
When can I put all my weight on my leg?
Your surgeon will tell you when you can put more weight on your leg.
How long do I have to follow hip precautions?
Your surgeon will tell you how long you have to follow your hip precautions. About three weeks.
When can I lie on my operated side?
You should not lie on your operated side for the first 3-4 weeks after surgery due to circulation and precaution risks.
When can I take a shower?
Unless otherwise instructed by your surgeon, you can take a shower when you get home. Depending on which dressing is applied, you may need to cover the dressing that is over your incision with Glad Press’ N Seal®.
How long does it take to recover from joint replacement surgery?
This varies person to person. Short-term recovery takes about 6-12 weeks and long-term recovery could take up to 6 months or longer.
When can I drive?
You should discuss this at your follow up appointment at the surgeon’s office. Do not drive for 4-6 weeks, unless otherwise instructed by your surgeon. Your surgeon will discuss this with you at your follow up appointment.
When can I go back to work?
You can go back to work in three to eight weeks depending on what your job is.

TOTAL HIP AND KNEE REPL ACEMENT
2 2
ResourcesPhone Numbers:Syracuse Orthopedic Specialists: 315-251-3100
Pre-Admission Testing: 315-703-5108
St. Joseph’s Hospital Main Number: 315-448-5111
Pre-induction Unit: 315-448-6439
Orthopedic Patient Navigator:
– Stephanie Kelly | 315-726-9169 | [email protected]
Orthopedic and Spine Care at St. Joseph’s Health:
– Nursing Units 4-1/4-2: 315-448-5410
– Nursing Unit 4-7: 315-448-5470
St. Joseph’s Outpatient Physical Therapy:
– Northeast Medical Center: 315-329-2550
Physical Medicine and Rehab (Physical and Occupational Therapy): 315-448-6251
Smoking Cessation NYS Quitline:
– 1-866-NY QUITS
– 1-866-697-8487
Websites: St. Joseph’s Health (SJH): www.sjhsyr.org
SJH Orthopedic and Spine Care: www.sjortho.org
SJH Total Joint Replacement Education: www.sjhsyr.org
– Type “total joint replacement education” in search box, then enter.

TOTAL HIP AND KNEE REPL ACEMENT
23
Thank you!Thank you for choosing St. Joseph’s Health for your joint replacement needs. We hope that this book serves as a helpful reference for you as you prepare for and recover from your surgery. Please do not hesitate to ask our experienced team of surgeons, physician assistants, nurses, rehabilitation specialists and other team members if you have any additional questions.
Ask to speak to a Nurse Leader or any of our nurses and let us know how we are doing. We welcome your feedback.