Embed Size (px)
Citation preview

Oxymat A/S * Fasanvej 18-20 * DK- 3200 Helsinge
www.oxymat.com * [email protected] * Service Hotline +45 5050 5868
1
Touch Screen Manual for
Siemens Simatic
Version: 20141017
Valid for Siemens simatic 7” colour touch
screen

Oxymat A/S * Fasanvej 18-20 * DK- 3200 Helsinge
www.oxymat.com * [email protected] * Service Hotline +45 5050 5868
2
Contents
1. General safety precautions ..................................................................................................................................... 3
2. Home screen ............................................................................................................................................................. 4
3. Operation screen ...................................................................................................................................................... 6
3.1. Product purity ....................................................................................................................................................................... 7
3.2. Product tank pressure .......................................................................................................................................................... 7
3.3. CO, CO2 ............................................................................................................................................................................... 7
3.4. Product flow .......................................................................................................................................................................... 8
3.5. Start generator ..................................................................................................................................................................... 8
3.6. Start in service mode ............................................................................................................................................................ 8
4. General setup ........................................................................................................................................................... 9
5. PSA process ........................................................................................................................................................... 10
6. Alarm screen ........................................................................................................................................................... 11
6.1. History screen .................................................................................................................................................................... 12
6.2. Alarm list ............................................................................................................................................................................. 13
7. User settings ........................................................................................................................................................... 15
7.1. Pressure and purge settings .............................................................................................................................................. 15
7.2. Pressure stop / restart ........................................................................................................................................................ 15
7.3. Purge settings .................................................................................................................................................................... 16
7.4. Oxymat mode ..................................................................................................................................................................... 16
7.5. Nitromat mode .................................................................................................................................................................... 16
7.6. Pressure / purity alarm settings .......................................................................................................................................... 16
7.7. Process settings ................................................................................................................................................................. 17
7.8. Log on to change data ........................................................................................................................................................ 21
8. Advanced settings.................................................................................................................................................. 23
8.1. Logging ............................................................................................................................................................................... 23
8.2. Service mode: .................................................................................................................................................................... 23
8.3. Auto start after power failure: ............................................................................................................................................. 23
9. SMS alarms and control ......................................................................................................................................... 24
10. Service ..................................................................................................................................................................... 25
11. Trends ..................................................................................................................................................................... 26

Oxymat A/S * Fasanvej 18-20 * DK- 3200 Helsinge
www.oxymat.com * [email protected] * Service Hotline +45 5050 5868
3
1. General safety precautions
The screen can be damaged if you press to hard or if you strike it with a hard or
pointed object.
The operating temperature shall be between 0°C to +50°C and humidity must not
exceed 85% RH (relative humidity). Otherwise the screen may malfunction or
operating life shortens.
Do not use in areas with large temperature fluctuations. This can cause
condensation inside the screen.
Do not let water, other liquids, metal or charged particles enter into the screen. This
can create an electrical shock.
Do not use the screen in direct sunlight. The UV rays can cause damage to the
screen. Nor in very dusty/dirty environments.
To avoid impreciseness keep the screen away from large shocks and excessive
vibration.
Do not use paint thinner or organic solvents to clean the screen.
Temperature higher or lower than recommended can cause irreversible damage to
data.
Warning:
Warning:
Warning:
Warning:
Warning:
Warning:
Warning:
Warning:

Oxymat A/S * Fasanvej 18-20 * DK- 3200 Helsinge
www.oxymat.com * [email protected] * Service Hotline +45 5050 5868
4
2. Home screen
The home screen is an all-first screen for the system. It has five touch-buttons (black font on green background) where you can decide the next level. On information bar you can see one alarm touch-button (black font on red background when alarm is indicated) where you can find out current alarms and history of alarms and other buttons (black font on blue background), which give information about date/time, PSA system/status and information about user login.
Picture 1. Home Screen
Picture 2. Functional buttons
PSA Operation. Starting, stopping and
shows process values
PSA Process. Shows information about generator status and
gives an overview of the generator, hour counter
PSA Settings, Settings for the generator
PSA Trends, Trends for values of pressure and purity
(of nitrogen or oxygen) per unit of time
PSA Service
Information bar
Home screen give
main information
about purity,
pressure in product
tank
Flashing alarm
button warns to
the existing alarm

Oxymat A/S * Fasanvej 18-20 * DK- 3200 Helsinge
www.oxymat.com * [email protected] * Service Hotline +45 5050 5868
5
Picture 3. Top screen information
On Information bar the operator is able to adjust the time/date. Here can you see status of PSA generator and what the user is log in, because advanced control allows the system to work with individual users.
Picture 4. Home screen
PSA Alarm, Alarm list for the
generator, some alarm is active
Shows date and time
Information about PSA
system and purge status
Log in. Some users have the
right to set generator
No alarm is active. After pressing button the
user can see the alarm list
On information bar
the operator is able
to adjust the
time/date

Oxymat A/S * Fasanvej 18-20 * DK- 3200 Helsinge
www.oxymat.com * [email protected] * Service Hotline +45 5050 5868
6
3. Operation screen
Home -> Operation
Go to the operation screen by pressing the operation button on home screen. From here the generator can be operated.
Picture 5. Operation screen
When the sensors are ready, the PSA can be started.
Picture 6. Operation screen information
Start the generator by pressing this button.
Indicate product purity in
the product tank.
Indicate pressure in
the product tank.
Indicate pressure in the
generator columns.
Information bar
When the PSA is powered
up the first time or if there
has been a power failure,
the oxygen, nitrogen
sensor will need to heat
up to measure correct. As
long they are doing that,
the readings can be
incorrect. The heading
period is depending on the
type of sensor connected.
Indicate

Oxymat A/S * Fasanvej 18-20 * DK- 3200 Helsinge
www.oxymat.com * [email protected] * Service Hotline +45 5050 5868
7
Picture 7. Start/Stop button
Picture 8. Operation screen nr.2
3.1. Product purity
Indicate the purity in the product tank. If purge function is implemented, then the purity controls how the purge valves are positioned. See Purge settings for further information.
3.2. Product tank pressure
Indicate the pressure in the product tank. When the pressure reaches the ‘Pressure Stop’ setting, the generator will go into stand-by mode until the pressure has dropped to ‘Pressure Restart’ setting. It happens when Service mode is not active. See pressure settings for further information.
3.3. CO, CO2
Indicate concentration of CO, CO2 in product.
Stop the PSA by pressing this button.

Oxymat A/S * Fasanvej 18-20 * DK- 3200 Helsinge
www.oxymat.com * [email protected] * Service Hotline +45 5050 5868
8
3.4. Product flow
The flow is only indication and is based on the pressure change in the product tank.
3.5. Start generator
It is possible to start the PSA when no critical or high level alarms are active. Go to Operation and press “Start” button to start PSA. Small box appears with question: „Start generator? “ To stop generator press stop button. Again small box appears with question: „ Stop generator? “. It is not possible to restart during the stopping sequence. The text “Stopping” is shown on the Information bar. (see picture 7.)
3.6. Start in service mode
It is possible to start the PSA in service mode when no critical alarms are active. Go to Settings > Advanced and press “Service mode” ON. To stop service mode, press button OFF. Than start/stop generator as is described above (Start generator). It is not possible to restart during the stopping sequence (the text “Stopping”) is shown on the Information bar. It is possible to switch service mode during running generator. To start service mode the operator must log in as superuser. Note that the pressure stop/restart function, high and low alarms are bypassed in service mode.

Oxymat A/S * Fasanvej 18-20 * DK- 3200 Helsinge
www.oxymat.com * [email protected] * Service Hotline +45 5050 5868
9
4. General setup
Open the general setup by pressing the settings button on home screen, then the general button. The system is prepared for multiple languages. Home -> Settings -> General
Picture 9. General settings
Picture 10. Restart window to switch language
For successful language change
the HMI must be restart.
Language
selection
Selection type of
PSA generator
Selection model
of PSA generator
Selection serial
number of PSA
generator

Oxymat A/S * Fasanvej 18-20 * DK- 3200 Helsinge
www.oxymat.com * [email protected] * Service Hotline +45 5050 5868
10
5. PSA process Open the process screen by pressing the settings button on home screen, then the process button. Home -> Settings -> Process
Picture 11. PSA process
From here you are able to see the pressure in the columns, pressure in the product tank and test the drain system for the air buffer tank. Advisable to test drain system by pressing test drain button before start PSA generator. So eliminate malfunctioning drain system. Debug information give the overview about PSA main sequences and remaining time of currently running step. PSA Hour counter indicates the total operating hours the generator has been running.
Test drain system
for air buffer tank
Indicate column
pressure and
pressure in the
product tank.
Information about
PSA sequences.
Operating hours

Oxymat A/S * Fasanvej 18-20 * DK- 3200 Helsinge
www.oxymat.com * [email protected] * Service Hotline +45 5050 5868
11
6. Alarm screen
Open the alarm screen by pressing the settings button on home screen, then the process button. Go to the alarm screen by pressing the alarm button. Home -> Settings -> Alarm
Picture 12. Alarm list screen
From here you are able to see all the alarms/events. The alarms are indicated with different colours, according to status.
Here you can see
overview of the alarms
in chronological order
Clear alarms
Go to history
If there is audio, visual
alarm, this button
stops audio alarm.

Oxymat A/S * Fasanvej 18-20 * DK- 3200 Helsinge
www.oxymat.com * [email protected] * Service Hotline +45 5050 5868
12
6.1. History screen
Home -> Settings -> Alarm -> History From here you are able to see all the alarms/events in a history of alarms. The alarms are indicated with different colours, according to status.
Picture 13. History of Alarms
RED – Critical alarm is active. Stops generator immediately Date and trigger time is indicated on the line.
ORANGE – High level alarm is active. Stops generator after sequence. Date and trigger time is indicated on the line.
YELLOW – Low level alarm message. No PSA stop only indicative. A date and trigger time/time stamp when acknowledged is indicated on the line.
GREEN – Alarm is cleared. Alarm is known only in history.
Picture 14. Explanation of alarm colours
Back button

Oxymat A/S * Fasanvej 18-20 * DK- 3200 Helsinge
www.oxymat.com * [email protected] * Service Hotline +45 5050 5868
13
6.2. Alarm list
The alarms are divided into the groups defined by a letter and the operator action for each alarm is defined by a number. Alarm type: XY A: Quick stop. B: Quick stop with equalization of PSA. C: Stop after PSA sequence. D: No stops only indicative. Y=0 No acknowledge of the alarm is necessary. When the situation that caused the alarm disappears the system will react as if the alarm is acknowledged and gone. This can be used at minor alarms that do not cause any harm. Y=1 Acknowledgment is required to reset the alarm. D: Message. Not action taken by the control C: Low level alarm. PSA will stop after sequence. B: High level alarm. PSA will stop instantly and equalize A: High level alarm. PSA will stop instantly.

Oxymat A/S * Fasanvej 18-20 * DK- 3200 Helsinge
www.oxymat.com * [email protected] * Service Hotline +45 5050 5868
14
Group: Alarm Text: Description: Possible reasons:
D1 Purity alarm Low purity detected at sample point
Overflow
C1 Purity stop alarm Very low purity detected at sample point
Overflow
D1 Low pressure alarm Low pressure in product tank Overflow or PSA generator is stopped
C1 UPS running on battery UPS controller reports battery supply active
Missing or unstable power supply
D1 UPS battery replace UPS controller reports failure on battery
Old or damaged battery
D0 Alarm on air dryer Fault signal from air dryer detected. Look on dryer control for information.
Fault on air dryer
D0 Alarm on air pack Fault signal from air pack detected. Look on air pack control for information.
Fault on air pack
D0 Alarm Column 1 Low pressure. See note below
Low pressure in column 1. Only active in stop mode.
Possible leak or PSA stopped before the PSA cycle was completed
D0 Alarm Column 2 Low pressure. See note below
Low pressure in column 2. Only active in stop mode.
Possible leak or PSA stopped before the PSA cycle was completed
A1 Emergency stop Emergency stop is activated Emergency stop button is activated
D1 Broken wire C11 Pressure sensor PT070.1 (pressure in column 1) error
Sensor fault or cable disconnected
D1 Broken wire C12 Pressure sensor PT070.2 (pressure in column 2) error
Sensor fault or cable disconnected
C1 Broken wire AT1001 Oxygen sensor AT1001 (oxygen level in product tank) error
Sensor fault or cable disconnected
C1 Broken wire PT1001 Pressure sensor PT1001 (pressure in product tank) error
Sensor fault or cable disconnected
Table 1. Alarm list If SMS is enabled, then alarms are sent to SMS users in the following format: Serial no: Alarm text translated to active language (timestamp) action Ex.: “N2012045: Alarm Column 2 Low pressure (13.12.2012 – 17:13) Active”

Oxymat A/S * Fasanvej 18-20 * DK- 3200 Helsinge
www.oxymat.com * [email protected] * Service Hotline +45 5050 5868
15
7. User settings
7.1. Pressure and purge settings
Home -> Settings -> Settings Press settings button on home screen then press settings button. Here can you see users setting PSA generator – pressure and purge settings. Settings values are pre-set from Oxymat personal.
(Protected by user password. Password is required for changing data)
Picture 15. Settings screen
7.2. Pressure stop / restart
The generator will automatically stop and start according to the pressure setting. This function is only working when service mode is not active. When the pressure reaches the pressure stop level, then the PSA goes into stand-by mode and wait for the pressure to drop below the pressure restart level. Then the PSA will start again automatically. The standby mode will be cancelled if purge valve is opened.
Stop/restart pressure in
product tank
Start/Stop purge: Level of
oxygen where purge is
start/stop.
Actual status for purge
function
Minimum pressure in
product tank before
activating purge valve.

Oxymat A/S * Fasanvej 18-20 * DK- 3200 Helsinge
www.oxymat.com * [email protected] * Service Hotline +45 5050 5868
16
Picture 16. Automatical stop and start procedure
7.3. Purge settings
When purge function is activated, works is two different ways depending on the type of generator, and is designed to prevent low purity product to be delivered to either the product tank or to the delivery line, depending on the physical position of the purge valves (before or after product tank).
7.4. Oxymat mode
If the purity reading drops below the “Start purge” value and the pressure in the product tank is above “Min Purge Pressure” then the purge function opens the purge valve and closes the delivery valve. The system automatically calculates the purity and pressure levels where the delivery valve is opened again.
7.5. Nitromat mode
If the purity reading exceeds the “Start purge” value and the pressure in the product tank is above “Min Purge Pressure” then the purge function opens the purge valve and closes the delivery valve.
7.6. Pressure / purity alarm settings
Home -> Settings -> Alarm Press settings button on home screen or on operation screen then press alarm button.
Time
Stop level
Restart level
Pressure in product
vessel (P)
PSA running
PSA Stand by
Oxymat A/S * Fasanvej 18-20 * DK- 3200 Helsinge
www.oxymat.com * [email protected] * Service Hotline +45 5050 5868
17
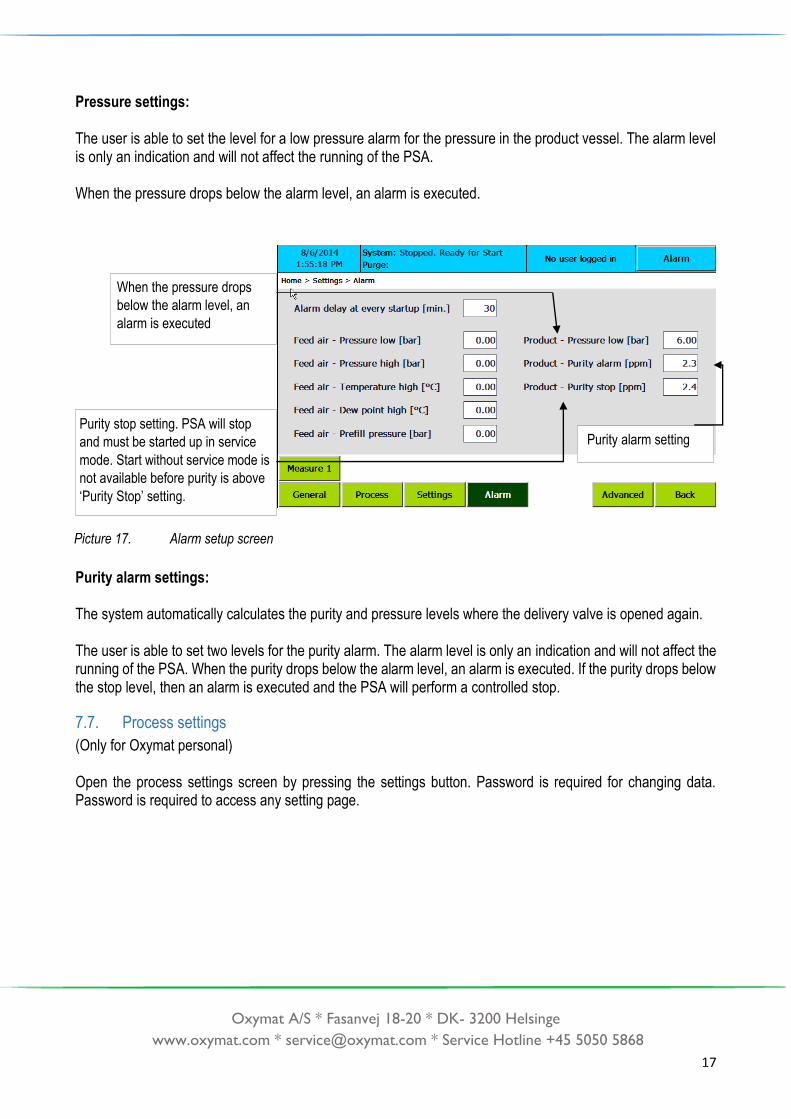
Pressure settings: The user is able to set the level for a low pressure alarm for the pressure in the product vessel. The alarm level is only an indication and will not affect the running of the PSA. When the pressure drops below the alarm level, an alarm is executed.
Picture 17. Alarm setup screen
Purity alarm settings: The system automatically calculates the purity and pressure levels where the delivery valve is opened again. The user is able to set two levels for the purity alarm. The alarm level is only an indication and will not affect the running of the PSA. When the purity drops below the alarm level, an alarm is executed. If the purity drops below the stop level, then an alarm is executed and the PSA will perform a controlled stop.
7.7. Process settings
(Only for Oxymat personal) Open the process settings screen by pressing the settings button. Password is required for changing data. Password is required to access any setting page.
When the pressure drops
below the alarm level, an
alarm is executed
Purity alarm setting Purity stop setting. PSA will stop
and must be started up in service
mode. Start without service mode is
not available before purity is above
‘Purity Stop’ setting.

Oxymat A/S * Fasanvej 18-20 * DK- 3200 Helsinge
www.oxymat.com * [email protected] * Service Hotline +45 5050 5868
18
Oxygen PSA generator
Home -> Settings -> Process
Picture 18. Oxygen PSA Process setup screen
Nitrogen PSA generator
Home -> Settings -> Process
Picture 19. Nitrogen PSA process setup screen
The process time values are controlling the basic functionality of the PSA. Process settings are pre-set during test generator by test engineer and only with permission from Oxymat can be changed. Oxygen PSA generator process screen contains the settings:
It´s required super
user to log on to
change this data.
It´s required super
user to log on to
change this data.

Oxymat A/S * Fasanvej 18-20 * DK- 3200 Helsinge
www.oxymat.com * [email protected] * Service Hotline +45 5050 5868
19
Nitrogen PSA generator process screen contains settings:
Process screen contains drain setting together for oxygen, nitrogen generators:
Cycle / inlet time
Equalizing time
Exhaust time in sec.
Cycle / inlet time
Equalizing time 1/2
Delivery time
Controlled purge
Close time for drain
valve in min. Open time for drain
valve in sec. It is possible to drain system, when PSA is
stoped. Then press “Use drain in stop mode”
ON and choice proper Drain interval and
Drain time.

Oxymat A/S * Fasanvej 18-20 * DK- 3200 Helsinge
www.oxymat.com * [email protected] * Service Hotline +45 5050 5868
20
The drain test can be activated from the test button on PSA Process. This example uses the drain valve operation with 3 min interval and 5 sec open time for drain valve. The drain function always starts with an open period.
Picture 20. Drain valve operation process
time
Drain open
Drain closed
Drain valve
5 s. 3 min

Oxymat A/S * Fasanvej 18-20 * DK- 3200 Helsinge
www.oxymat.com * [email protected] * Service Hotline +45 5050 5868
21
7.8. Log on to change data
As default 3 levels are implemented: guest, user, super user. Advanced user control can be activated for strict access control and allows the system to work with individual users and levels.
Picture 21. Login screen
It´s required to log on operators for changing same data in 3 access levels. For log in for guest is not required password. For log in for user is required password: 4021. For log in for super user is required password: ****. Guest has access for control of PSA generator:
1. Start / stop generator. 2. SMS. Operator can add phone and name for recipient of PSA generator alarms. 3. Change language in general setup.

Oxymat A/S * Fasanvej 18-20 * DK- 3200 Helsinge
www.oxymat.com * [email protected] * Service Hotline +45 5050 5868
22
User has access for change these parameters: 1. Settings:
Pressure stop [bar]
Pressure restart [bar]
Purge function ON/OFF a) Purge start [%] b) Purge stop [%] c) Min. purge pressure [bar]
2. Alarm
Low pressure product [bar]
Purity alarm [bar]
Purity stop [%] 3. SMS. Operator can add phone and name for recipient of alarms of PSA generator and test message 4. Advanced
Logging Super user has access for change these parameters: 1. General
Generator type
Model
Serial type 2. Process
Process times
Drain Interval/time 3. Smart delivery (only for Oxygen generator) 4. Advanced
Service mode ON/OFF
Autostart after power failure

Oxymat A/S * Fasanvej 18-20 * DK- 3200 Helsinge
www.oxymat.com * [email protected] * Service Hotline +45 5050 5868
23
8. Advanced settings Home -> Settings -> Advanced
8.1. Logging
(Activated by Oxymat) If the customer´s request is will be available full logging to SD-card of all measured values.
8.2. Service mode:
When no critical alarms are active, is possible to start the PSA in service mode. Consider that the pressure stop/restart function, high and low alarms are bypassed in service mode.
Picture 22. Advanced setup screen
8.3. Auto start after power failure:
This feature allows the control to start automatically after power failure. When the power is recovered, then a special “recover” sequence is started and the control will try to start again. The attempt will only be executed if the system was running in auto mode when the power was lost.
To stop service
mode, press button
OFF. When no high
alarms are active, is
possible to start the
PSA in service mode.

Oxymat A/S * Fasanvej 18-20 * DK- 3200 Helsinge
www.oxymat.com * [email protected] * Service Hotline +45 5050 5868
24
9. SMS alarms and control Home -> Settings -> SMS
Before first using insert unlocked SIM card. It is possible sends a text message containing alarm information to any cell phones, but extended with SMS control. System can receive a text message containing control information.
Picture 23. SMS control and alarm screen
Test message: It is possible to send a test message to a recipient. Simply select a user by pressing the user name. The selected user is indicated by an orange background. Press the green Test button to send a test message to the user. Note: You need to be logged in as minimum “User” to use the buttons.
Picture 24. Test message screen
List of recipient for
receiving sms
containing alarm

Oxymat A/S * Fasanvej 18-20 * DK- 3200 Helsinge
www.oxymat.com * [email protected] * Service Hotline +45 5050 5868
25
Delete user: Press the red ”Delete” button to delete the selected user. SMS commands: Users in the user list are able to send SMS commands to Siemens Simatic.
Command Explanation
#status The response from intelliControl will be: Product purity: xx.x Product pressure: yy.y System: zzzzzzzzzzzzzzzzzzzzzzzzz xx.x will show actual O2 level yy.y will show actual pressure in product vessel zzzzzzzz shows the status text ex. Reast for start.
#start This command will try to start the system. Response will be “#start command executed”.
#stop This command will try to stop the system. Response will be “stop command executed”.
#reset This command will reset alarms. Response will be “#reset command executed”.
Table 2. SMS command description
10. Service Open the service screen by pressing the settings button. It is possible to control time for service inspection by pre-set value on the service screen [hours].
Picture 25. Service inspection overview

Oxymat A/S * Fasanvej 18-20 * DK- 3200 Helsinge
www.oxymat.com * [email protected] * Service Hotline +45 5050 5868
26
11. Trends
Home -> Trends
Go to the trends screens by pressing the trends button. Here you can choose trend of pressure [bar] or purity [% /ppm O2] Pressure in both columns and in the product tank is shown in the same trends window. Purity is shown in the other trends window.
Picture 26. Pressure, Purity trends window
Shows pressure
trends
Shows purity
trend
Changeable min /
max for limits for
trend.

Oxymat A/S * Fasanvej 18-20 * DK- 3200 Helsinge
www.oxymat.com * [email protected] * Service Hotline +45 5050 5868
27
Picture 27. Adjusting vertical axis
On these screens the operator can see an overview of the pressures or purity. The vertical axis can be adjusted by the operator. When the operator presses max. or min. value on the scale, an input box appears. Now the operator can enter a value for the scale. Advanced keyboard has a calculator and other elements.
The vertical axis
can be adjusted
by the operator

Oxymat A/S * Fasanvej 18-20 * DK- 3200 Helsinge
www.oxymat.com * [email protected] * Service Hotline +45 5050 5868
28