Embed Size (px)
Citation preview

...touch the difference
Version 1.2 (2013/03/08) ● © 2013 by Raidsonic Technology GmbH1
1. Besondere Eigenschaften KSK-3201 RF
Extrem flache, kabellose Super-Mini-Tastatur mit integriertem Trackball• Weitreichende und zuverlässige 2,4 GHz Funkübertragung bis ca. 7 m Entfernung zum PC• Integrierter 8 mm großer Laser-Trackball mit Mausfunktion und zwei Maustasten• Modernes Design mit flachen Notebook-Tasten und einer Oberflächen-Textur wie gebürstetes Metall• 12 Multifunktionstasten für Pairing, Play/ Pause, Stopp, Rückwärts, Vorwärts, Mediaplayer, Mail, Internet, • Stumm, Leiser, Lauter & Sleep-ModusVolle Funktionalität einer Tastatur mit Full-Size-Layout • Besonders leiser und spürbarer Anschlag durch hochwertige X-Type-Membrantechnologie • Status-LED für Pairing und „Battery low“ <2,2 V mit unterschiedlicher Blink-Frequenz• Inkl. USB-Empfangsstecker im rückseitigen Batteriefach• Plug & Play-Installation, kein spezieller Treiber notwendig• Optimal für Digital Living Rooms (HTPC), mobile Anwendungen sowie für Navi-Konfigurationen, • Schulungs-, Konferenz- und Präsentationsräume etc.
2. Technische Eigenschaften KSK-3201 RFAnzahl Tasten:Bauart:Zu erwartende Lebensdauer:Betätigung:Druckpunkt:Übertragungsfrequenz:
Bauart des Trackballs:Effektive Funkreichweite:Batterietyp:Spannungsversorgung:Stromaufnahme ca.:
Temperatur:
Feuchtigkeit:Lieferumfang:Farbe:Zertifiziert:Kompatibilität:
84 (83-87 abhängig von der Länderversion) X-Type-Membrantechnologieca. 5 Mio. Anschläge / Taste; ca. 1 Mio. für die Maustasten1,7 ±0,3 mm (Gesamtweg)55 ±15 g2,405~2,475 GHz, GFSK, 71 Kanäle mit je 216 IDs(mögliche Anzahl von Tastaturen in einem “Raum”)ø 8 mm, Laser-Abtastung, 400 dpica. 7 m2× AAA 1.5 V Tastatur: 3 VDC ±5 % Receiver: +5 VDC ±5 %Tastatur Betrieb: 6 mA Receiver: 60 mA Tastatur Standby: <1 mA Tastatur Sleep-Modus: 200 µA Betrieb: 0 °C bis +40 °C Lagerung: –30 °C bis +65 °CBetrieb und Lagerung: 0 % bis 95 % rel.Tastatur, USB-Empfangsstecker, 1 Paar Batterien, BedienungsanleitungSchwarz metallicCE, FCC, WEEE/RoHS, REACHXP / Vista / Windows7
Haftungsausschlusserklärung des HerstellersFür Informationen in diesem Dokument behält sich der Hersteller Änderungen ohne Mitteilung vor und geht keinerlei Verpflichtungen ein. Durch dieses Dokument wird, weder ausgedrückt noch angedeutet, keinerlei Garantie oder Erklärung in Bezug auf Qualität, Genauigkeit oder Eignung für einen be-stimmten Zweck übernommen. Der Hersteller behält sich das Recht vor, jederzeit Änderungen zum Inhalt dieses Dokumentes zu machen und/ oder die dazugehörigen Produkte unverbindlich zu ändern ohne Verpflichtung, Personen oder Organisationen über derartige Änderungen in Kenntnis zu setzen. Unter keinen Umständen ist der Hersteller haftbar für direkte, indirekte, spezielle, zufällige oder Folgeschäden, die durch die Nutzung oder Unmög-lichkeit der Nutzung des Produktes oder der Dokumentation entstehen, selbst wenn auf die Möglichkeit solcher Schäden hingewiesen wurde. Dieses Dokument enthält Materialien, die durch Copyright geschützt sind. Alle Rechte sind vorbehalten. Es ist untersagt, diese Bedienungsanleitung oder Teile daraus ohne die schriftliche Einwilligung der Autoren in irgendeiner Form zu vervielfältigen oder zu verbreiten, in welcher Form, zu welchem Zweck und mit welchen Mitteln auch immer. Produktnamen, die in diesem Dokument erwähnt werden, dienen ausschließlich als Verkaufsbezeichnung. Alle Handelsmarken, Produktnamen oder Markennamen, die in diesem Dokument erwähnt werden, sind eingetragenes Eigentum des jeweiligen Inhabers.
3. Besondere Eigenschaften KSK-3201 BT
Extrem flache, kabellose Super-Mini-Tastatur mit integriertem Trackball• Weitreichende und zuverlässige Bluetooth Funkübertragung bis ca. 10 m Entfernung zum PC• Integrierter 8 mm großer Laser-Trackball mit Mausfunktion und zwei Maustasten• Modernes Design mit flachen Notebook-Tasten und einer Oberflächen-Textur wie gebürstetes Metall• 11 Multifunktionstasten für Pairing, Play/ Pause, Stopp, Rückwärts, Vorwärts, Mediaplayer, Mail, Internet, • Stumm, Leiser & LauterVolle Funktionalität einer Tastatur mit Full-Size-Layout • Besonders leiser und spürbarer Anschlag durch hochwertige X-Type-Membrantechnologie • Status-LEDs: blau für Pairing und rot für „Battery low“ <2,3 V• Plug & Play-Installation, kein spezieller Treiber notwendig• Inkl. USB-Bluetooth-Adapter zur Verbindung mit nicht Bluetooth-fähigen Computern• Optimal für Digital Living Rooms (HTPC), mobile Anwendungen sowie für Navi-Konfigurationen, • Schulungs-, Konferenz- und Präsentationsräume etc.
4. Technische Eigenschaften KSK-3201 BTAnzahl Tasten:Bauart:Zu erwartende Lebensdauer:Betätigung:Druckpunkt:Übertragungsfrequenz:
Ausgangsleistung:Bauart des Trackballs:Effektive Funkreichweite:Batterietyp:Spannungsversorgung:Stromaufnahme ca.:
Temperatur:
Feuchtigkeit:Lieferumfang:Farbe:Zertifiziert:
Kompatibilität:
2
84 (83-87 abhängig von der Länderversion) X-Type-Membrantechnologieca. 5 Mio. Anschläge / Taste; ca. 1 Mio. für die Maustasten1,7 ±0,3 mm (Gesamtweg)55 ±15 g2,401 – 2,48 GHz ISM Band, GFSK, 79 Kanäle Frequency Hopping Bluetooth V3.0 EDR / Human Interface Device (HID)0 dBm (Klasse 2)Ø 8 mm, Laser-Abtastung, 400 dpica. 10 m2× AAA 1,5 V 3 VDC ±5 % Betrieb Tastatur: 11,5 mA ±1 mA Betrieb Maus: 28 mA ±2 mA Standby: 3,4 mA (nach 3 Sek.) Sleep-Modus: 202~286 µA ±10 µA Betrieb: 0 °C bis +40 °C Lagerung: –30 °C bis +65 °CBetrieb und Lagerung: 0 % bis 95 % rel.Tastatur, USB-Bluetooth-Adapter KSR-10 BT, 1 Paar Batterien, BedienungsanleitungSchwarz metallicCE, FCC, WEEE/RoHS, REACHXP / Vista / Windows7
Information zur Altbatterie-Entsorgung (Batterieverordnung)Die neue Batterieverordnung verpflichtet Hersteller und Importeure, alle Altbatterien zurückzunehmen, zu sortieren und zu entsorgen. Der Verbraucher ist verpflichtet, verbrauchte Batterien im Handel oder bei einer kommunalen Sammelstelle abzugeben. Die Entsorgung im Hausmüll ist laut Batteriever-ordnung ausdrücklich verboten. Von uns erhaltene Batterien können Sie auch nach Gebrauch zu uns unter der nachstehenden Adresse ausreichend frankiert per Post zurücksenden: Raidsonic Technology GmbH, Kurt-Fischer-Straße 50, D-22926 AhrensburgBatterien, die Schadstoffe enthalten, sind mit dem Symbol einer durchgekreuzten Müll- tonne gekennzeichnet, ähnlich dem Symbol in der Abbildung. Unter dem Mülltonnen- Symbol befindet sich die chemische Bezeichnung des Schadstoffes - „Cd“ für Cadmium. „Pb“ steht für Blei, „Hg“ für Quecksilber.
Bedienungsanleitung KSK-3201 RF/BT
Irrtümer und Auslassungen vorbehalten

...touch the difference
Version 1.2 (2013/03/08) ● © 2013 by Raidsonic Technology GmbH
5. Installation KSK-3201 RF
5.1 System-Voraussetzungen
Diese Tastatur erfordert einen PC mit USB-Anschluss und einem der folgenden Betriebssysteme: Windows XP / Vista / Windows7
Für die Installation der Tastatur unter den o. g. Betriebssystemen benötigen Sie KEINEN speziellen Treiber!
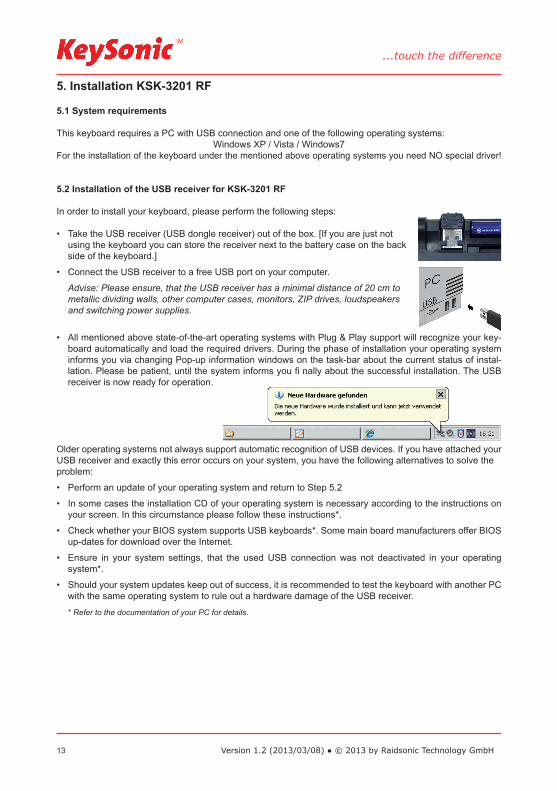
5.2 Installation des USB-Receivers für KSK-3201 RF
Um Ihre Tastatur zu installieren, führen Sie bitte folgende Schritte aus:
Nehmen Sie den USB-Receiver (Empfangsstecker) aus der Verpackung. • [Wenn Sie die Tastaur gerade nicht verwenden kann er neben dem Batteriefach auf der Rückseite der Tastatur aufbewahrt werden.]
Stecken Sie den USB-Receiver an eine freie USB-Buchse• Ihres Rechners.
Hinweis: Bitte gewährleisten Sie, dass der USB-Receiver einen Mindestabstand von 20 cm zu metallischen Trennwänden, anderen Computergehäusen, Monitoren, ZIP-Laufwerken, Lautsprechern und Schaltnetzteilen einhält.
Alle aktuellen Betriebssysteme mit Unterstützung für Plug & Play werden Ihren USB-• Receiver nun auto-matisch erkennen und die erforderlichen Treiber laden. Während der Installationsphase informiert Sie Ihr Betriebssystem mit Hilfe wechselnder Pop-up-Informationsfenster an der Task-Leiste über den aktuellen Installationsstatus. Bitte haben Sie etwas Geduld, bis Sie das System abschließend über die erfolgreiche Installation informiert. Der USB-Receiver ist nun einsatzbereit.
Ältere Betriebssysteme unterstützen nicht immer das automatische Erkennen von USB- oder PS/2-Geräten. Haben Sie den USB-Receiver angeschlossen und macht sich genau dieser Fehler bei Ihnen bemerkbar, so haben Sie folgende Möglichkeiten zur Lösung dieses Problems:
Machen Sie ein Update Ihres Betriebssystems und beginnen wieder mit Schritt 5.2•
In manchen Fällen ist gemäß den Bildschirmanweisungen die Installations-CD Ihres Betriebs• systems er-forderlich. Unter diesen Umständen folgen Sie bitte diesen Anweisungen*.
Kontrollieren Sie, ob Ihr BIOS-System USB-Tastaturen unterstützt*. Manche Hersteller bieten• BIOS-Up-dates im Internet zum Downloaden an.
Stellen Sie in Ihren Systemeinstellungen sicher, dass der verwendete USB-Anschluss nicht• im Betriebs-system deaktiviert wurde*.
Sollten System-Updates erfolglos bleiben, so empfiehlt es sich, die Tastatur mal an einen • anderen PC mit gleichem Betriebssystem zu testen, um ein Hardware-Defekt des USB-Receivers auszuschließen.
* Einzelheiten entnehmen Sie der Dokumentation Ihres PCs.
3
Irrtümer und Auslassungen vorbehalten
Bedienungsanleitung KSK-3201 RF/BT
5.3 Installation der Tastatur KSK-3201 RF
Empfohlene Voraussetzung dazu ist die erfolgreiche Installation des USB-Receivers unter Punkt 5.2.•
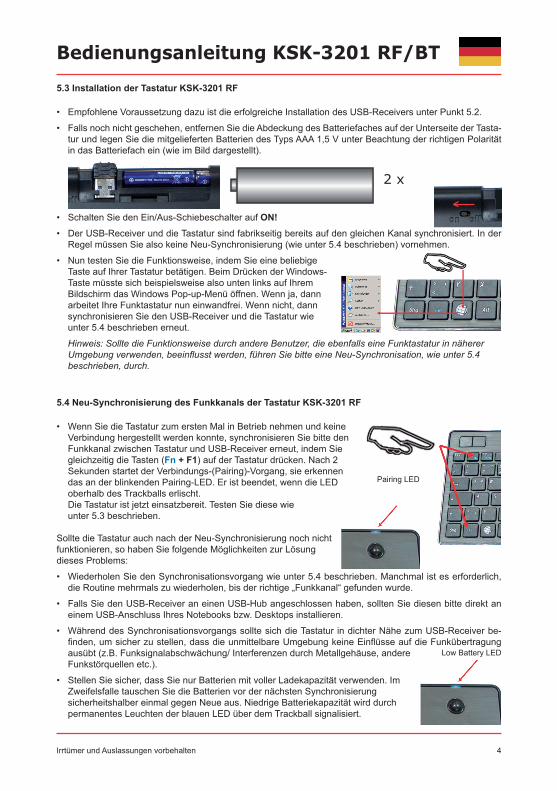
Falls noch nicht geschehen, entfernen Sie die Abdeckung des Batteriefaches auf der Un• terseite der Tasta-tur und legen Sie die mitgelieferten Batterien des Typs AAA 1,5 V unter Beachtung der richtigen Polarität in das Batteriefach ein (wie im Bild dargestellt).
Schalten Sie den Ein/Aus-Schiebeschalter auf • ON!Der USB-Receiver und die Tastatur sind fabrikseitig bereits auf den gleichen Kanal synchro• nisiert. In der Regel müssen Sie also keine Neu-Synchronisierung (wie unter 5.4 beschrieben) vornehmen.
Nun testen Sie die Funktionsweise, indem Sie eine • beliebige Taste auf Ihrer Tastatur betätigen. Beim Drücken der Windows- Taste müsste sich beispielsweise also unten links auf Ihrem Bildschirm das Windows Pop-up-Menü öffnen. Wenn ja, dann arbeitet Ihre Funktastatur nun einwandfrei. Wenn nicht, dann synchronisieren Sie den USB-Receiver und die Tastatur wie unter 5.4 beschrieben erneut.
Hinweis: Sollte die Funktionsweise durch andere Benutzer, die ebenfalls eine Funktastatur in näherer Umgebung verwenden, beeinflusst werden, führen Sie bitte eine Neu-Synchronisation, wie unter 5.4 beschrieben, durch.
5.4 Neu-Synchronisierung des Funkkanals der Tastatur KSK-3201 RF
Wenn Sie die Tastatur zum ersten Mal in Betrieb nehmen und keine • Verbindung hergestellt werden konnte, synchronisieren Sie bitte den Funkkanal zwischen Tastatur und USB-Receiver erneut, indem Sie gleichzeitig die Tasten (Fn + F1) auf der Tastatur drücken. Nach 2 Sekunden startet der Verbindungs-(Pairing)-Vorgang, sie erkennen das an der blinkenden Pairing-LED. Er ist beendet, wenn die LED oberhalb des Trackballs erlischt. Die Tastatur ist jetzt einsatzbereit. Testen Sie diese wie unter 5.3 beschrieben.
Sollte die Tastatur auch nach der Neu-Synchronisierung noch nicht funktionieren, so haben Sie folgende Möglichkeiten zur Lösung dieses Problems:
Wiederholen Sie den Synchronisationsvorgang wie unter 5.4 beschrieben. Manchmal ist es erforderlich, • die Routine mehrmals zu wiederholen, bis der richtige „Funkkanal“ gefunden wurde.
Falls Sie den USB-Receiver an einen USB-Hub angeschlossen haben, sollten Sie diesen bitte direkt an • einem USB-Anschluss Ihres Notebooks bzw. Desktops installieren.
Während des Synchronisationsvorgangs sollte sich die Tastatur in dichter Nähe zum USB-Receiver be-• finden, um sicher zu stellen, dass die unmittelbare Umgebung keine Einflüsse auf die Funkübertragung ausübt (z.B. Funksignalabschwächung/ Interferenzen durch Metallgehäuse, andere Funkstörquellen etc.).
Stellen Sie sicher, dass Sie nur Batterien mit voller Ladekapazität verwenden. Im • Zweifelsfalle tauschen Sie die Batterien vor der nächsten Synchronisierung sicherheitshalber einmal gegen Neue aus. Niedrige Batteriekapazität wird durch permanentes Leuchten der blauen LED über dem Trackball signalisiert.
2 x
Pairing LED
Low Battery LED
4
...touch the difference
Version 1.2 (2013/03/08) ● © 2013 by Raidsonic Technology GmbH
6. Installation KSK-3201 BT
6.1 System-Voraussetzungen
Voraussetzung zur Nutzung der Tastatur ist, dass Ihr Endgerät (PC, Notebook, Tablet, „Handheld“ o.ä.)
hardwareseitig Bluetooth-fähig ist (z.B. durch integriertes Bluetooth-Modul bzw. externen -Adapter)• softwareseitig (Bluetooth) das HID-Profil einwandfrei unterstützt• softwareseitig (Betriebssystem) Standard-Tastaturtreiber mit zugehöriger Länderkennung • einwandfrei unterstützt
Im Folgenden gibt es dafür verschiedene technische Ausgangssituationen:
Endgerät ist hardware- und softwaretechnisch bereits Bluetooth-fähig: • Überspringen Sie den weiteren Text und folgen den Anweisungen unter 6.3
Endgerät ist hardware- und softwaretechnisch nicht Bluetooth-fähig: • Folgen Sie dem weiteren Text
6.2 Installation des mitgelieferten Bluetooth-Adapters für KSK-3201 BT
Um den Bluetooth-Adapter zu installieren, führen Sie bitte folgende Schritte aus:
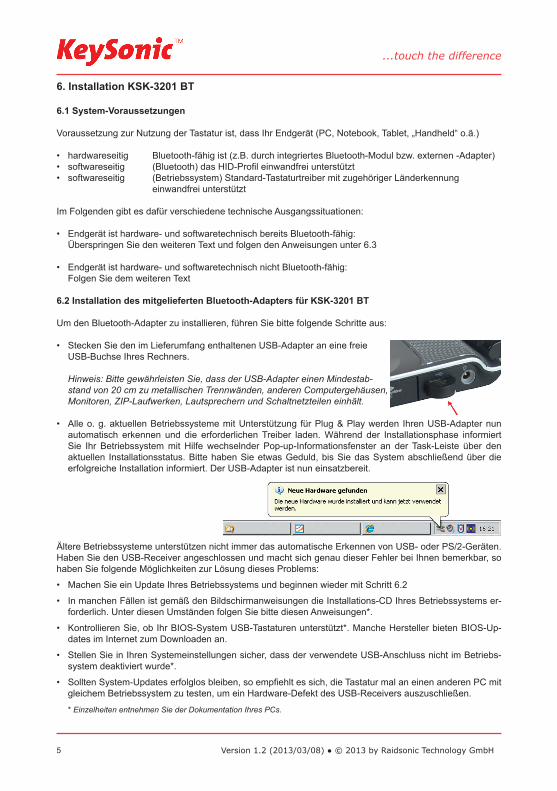
Stecken Sie den im Lieferumfang enthaltenen USB-Adapter an eine freie • USB-Buchse Ihres Rechners.
Hinweis: Bitte gewährleisten Sie, dass der USB-Adapter einen Mindestab- stand von 20 cm zu metallischen Trennwänden, anderen Computergehäusen, Monitoren, ZIP-Laufwerken, Lautsprechern und Schaltnetzteilen einhält.
Alle o. g. aktuellen Betriebssysteme mit Unterstützung für Plug & Play werden Ihren USB-Adapter nun • automatisch erkennen und die erforderlichen Treiber laden. Während der Installationsphase informiert Sie Ihr Betriebssystem mit Hilfe wechselnder Pop-up-Informationsfenster an der Task-Leiste über den aktuellen Installationsstatus. Bitte haben Sie etwas Geduld, bis Sie das System abschließend über die erfolgreiche Installation informiert. Der USB-Adapter ist nun einsatzbereit.
Ältere Betriebssysteme unterstützen nicht immer das automatische Erkennen von USB- oder PS/2-Geräten. Haben Sie den USB-Receiver angeschlossen und macht sich genau dieser Fehler bei Ihnen bemerkbar, so haben Sie folgende Möglichkeiten zur Lösung dieses Problems:
Machen Sie ein Update Ihres Betriebssystems und beginnen wieder mit Schritt 6.2•
In manchen Fällen ist gemäß den Bildschirmanweisungen die Installations-CD Ihres Betriebs• systems er-forderlich. Unter diesen Umständen folgen Sie bitte diesen Anweisungen*.
Kontrollieren Sie, ob Ihr BIOS-System USB-Tastaturen unterstützt*. Manche Hersteller bieten• BIOS-Up-dates im Internet zum Downloaden an.
Stellen Sie in Ihren Systemeinstellungen sicher, dass der verwendete USB-Anschluss nicht• im Betriebs-system deaktiviert wurde*.
Sollten System-Updates erfolglos bleiben, so empfiehlt es sich, die Tastatur mal an einen • anderen PC mit gleichem Betriebssystem zu testen, um ein Hardware-Defekt des USB-Receivers auszuschließen.
* Einzelheiten entnehmen Sie der Dokumentation Ihres PCs.
5
Irrtümer und Auslassungen vorbehalten 6
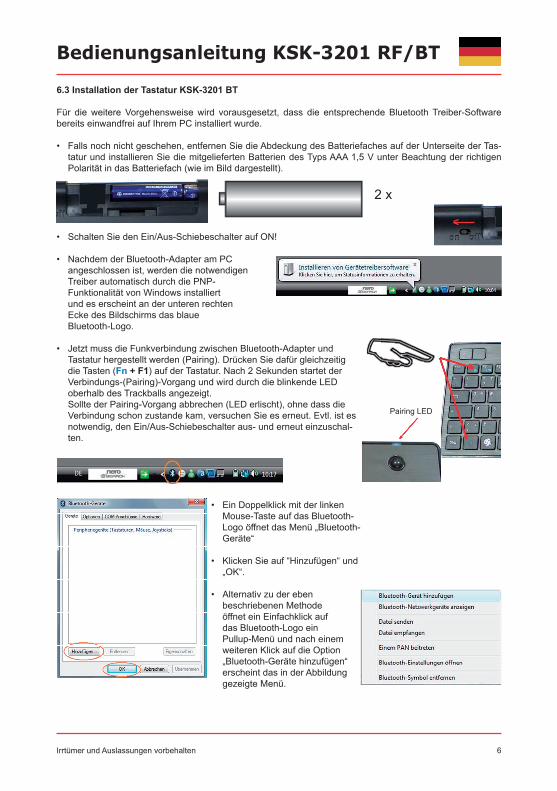
6.3 Installation der Tastatur KSK-3201 BT
Für die weitere Vorgehensweise wird vorausgesetzt, dass die entsprechende Bluetooth Treiber-Software bereits einwandfrei auf Ihrem PC installiert wurde.
Falls noch nicht geschehen, entfernen Sie die Abdeckung des Batteriefaches auf der Unterseite der Tas-• tatur und installieren Sie die mitgelieferten Batterien des Typs AAA 1,5 V unter Beachtung der richtigen Polarität in das Batteriefach (wie im Bild dargestellt).
Schalten Sie den Ein/Aus-Schiebeschalter auf ON!•
Nachdem der Bluetooth-Adapter am PC • angeschlossen ist, werden die notwendigen Treiber automatisch durch die PNP- Funktionalität von Windows installiert und es erscheint an der unteren rechten Ecke des Bildschirms das blaue Bluetooth-Logo.
Jetzt muss die Funkverbindung zwischen Bluetooth-Adapter und • Tastatur hergestellt werden (Pairing). Drücken Sie dafür gleichzeitig die Tasten (Fn + F1) auf der Tastatur. Nach 2 Sekunden startet der Verbindungs-(Pairing)-Vorgang und wird durch die blinkende LED oberhalb des Trackballs angezeigt. Sollte der Pairing-Vorgang abbrechen (LED erlischt), ohne dass die Verbindung schon zustande kam, versuchen Sie es erneut. Evtl. ist es notwendig, den Ein/Aus-Schiebeschalter aus- und erneut einzuschal-ten.
Ein Doppelklick mit der linken • Mouse-Taste auf das Bluetooth-Logo öffnet das Menü „Bluetooth-Geräte“
Klicken Sie auf “Hinzufügen“ und • „OK“.
Alternativ zu der eben • beschriebenen Methode öffnet ein Einfachklick auf das Bluetooth-Logo ein Pullup-Menü und nach einem weiteren Klick auf die Option „Bluetooth-Geräte hinzufügen“ erscheint das in der Abbildung gezeigte Menü.
Bedienungsanleitung KSK-3201 RF/BT
2 x
Pairing LED
...touch the difference
Version 1.2 (2013/03/08) ● © 2013 by Raidsonic Technology GmbH
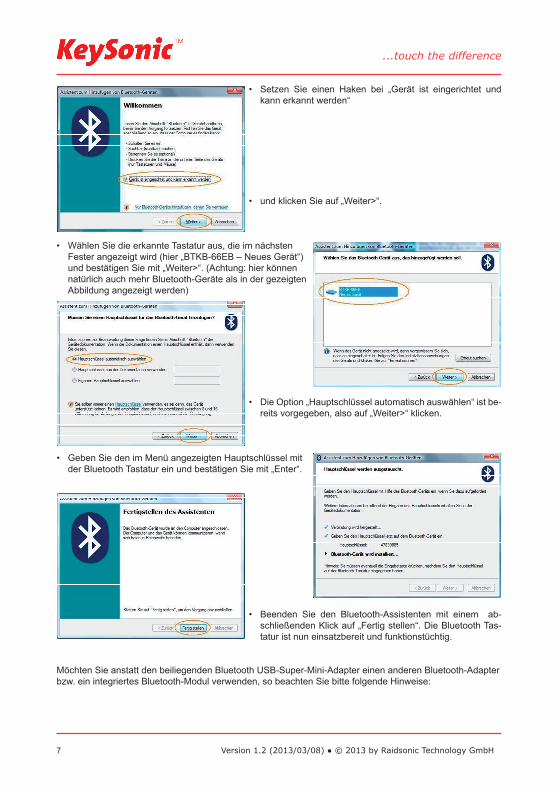
Setzen Sie einen Haken bei „Gerät ist eingerichtet und • kann erkannt werden“
und klicken Sie auf „Weiter>“. •
Wählen Sie die erkannte Tastatur aus, die im nächsten • Fester angezeigt wird (hier „BTKB-66EB – Neues Gerät“) und bestätigen Sie mit „Weiter>“. (Achtung: hier können natürlich auch mehr Bluetooth-Geräte als in der gezeigten Abbildung angezeigt werden)
Die Option „Hauptschlüssel automatisch auswählen“ ist be-• reits vorgegeben, also auf „Weiter>“ klicken.
Geben Sie den im Menü angezeigten Hauptschlüssel mit • der Bluetooth Tastatur ein und bestätigen Sie mit „Enter“.
Beenden Sie den Bluetooth-Assistenten mit einem ab-• schließenden Klick auf „Fertig stellen“. Die Bluetooth Tas-tatur ist nun einsatzbereit und funktionstüchtig.
Möchten Sie anstatt den beiliegenden Bluetooth USB-Super-Mini-Adapter einen anderen Bluetooth-Adapter bzw. ein integriertes Bluetooth-Modul verwenden, so beachten Sie bitte folgende Hinweise:
7

Bedienungsanleitung KSK-3201 RF/BT
Wenn Ihr Rechner unter Windows XP (SP2), Vista oder Windows7 läuft und das IC Ihres Bluetooth-Adap-• ters vom Hersteller CSR kommt, dann verwenden Sie einfach die integrierte und vorinstallierte Microsoft Bluetooth Treiber-Software. Sie brauchen keine weitere oder andere Bluetooth Treiber-Software mehr zu installieren. Möchten Sie, aus welchem Grund auch immer, die Microsoft Bluetooth Treiber-Software nicht verwenden, dann könnten Sie optional auch die Bluetooth Treiber-Software Toshiba oder BlueSoleil (vom Software-Hersteller IVT) installieren.*
Wenn Ihr Rechner unter Windows XP (SP2), Vista oder Windows7 läuft und das IC Ihres Bluetooth-Ad-• apters vom Hersteller ISSC (Integrated System Solution Corp.) kommt, installieren Sie bitte zuerst die Bluetooth Treiber-Software BlueSoleil (IVT).*
Wenn Ihr Rechner unter Windows XP (SP2), Vista oder Windows7 läuft und das IC Ihres Bluetooth-Adap-• ters vom Hersteller Broadcomm kommt, installieren Sie bitte zuerst die Bluetooth Treiber-Software WID-COMM.*
* Einzelheiten hierzu entnehmen Sie der Dokumentation Ihres PCs, Ihres integrierten Bluetooth-Moduls bzw. Bluetooth-Adapters.
Hinweis: Die meisten Bluetooth-Tastaturen können nicht unter BIOS- oder DOS-Umgebungen arbeiten, da der Bluetooth-Adapter nur im HID–Modus (Human Interface Device) funktioniert. Hierzu wäre ein dualer Bluetooth USB-Adap-ter erforderlich, der sowohl den HID– als auch den HCI–Modus (Host Controller Interface) unterstützt.
7. Bedienung der Tastaturen KSK-3201 RF und KSK-3201 BT
Nach erfolgreicher Inbetriebnahme genießen Sie nun bei der Bedienung eine freie und unabhängige Stand-ortwahl bis ca. 7-10 m Entfernung zum PC. Mehr- oder Minderabstand können, wie bereits erwähnt, durch metallische Trennwände, Computergehäuse, Monitore, ZIP-Laufwerke, Lautsprecher, Schaltnetzteile u. v. m., aber auch durch eine unterschiedliche Ladekapazität der Batterien verursacht werden.
7.1. Trackball
Als Mausersatz ist diese Tastatur mit einem Laser-Trackball einschließlich zwei Mausfunktionstasten ausge-stattet. Diese ermöglichen eine komfortable und ergonomische Bedienung des PCs von z. B. einem Sofa aus. Dabei ist die Bedienung des Laser-Trackballs so einfach wie genial.
Bewegen Sie mit dem rechten Daumen sanft die Kugel des • Trackballs, um den Mauszeiger auf dem Bildschirm zu bewe-gen.
Mit den Mausfunktionstasten lassen sich Klick- und Doppelklick• -Funktionen, absolut identisch wie bei einer Maus, ausführen.
Um zu „ziehen“, zeichnen oder zu markieren, müssen Sie die• linke Maustaste mit dem linken Daumen gedrückt halten, um dann mit dem rechten Daumen auf dem Laser-Trackball die Funktion zu vollziehen.
Um die Doppelklick-Geschwindigkeit und die Geschwindigkeit • der Maus-Zeigerbewegungen langsamer oder schneller zu ma-chen, verändern Sie die Einstellungen der Maus-Optionen in Ihrer Systemsteuerung unter Windows*.
Bei Notebooks mit bereits integriertem Touchpad müssen Sie • bei der Verwendung der Tastatur diese internen Steuergeräte deaktivieren, falls es zu Fehlermeldungen oder Funktionsstö-rungen kommt*.
Mit gedrückter • Fn-Taste kann man mit dem Trackball auch auf- und abscrollen.
8Irrtümer und Auslassungen vorbehalten
...touch the difference
Version 1.2 (2013/03/08) ● © 2013 by Raidsonic Technology GmbH
Sollte die Präzision des Mauszeigers nach mehreren Monaten der Anwendung nachlassen, prüfen Sie bitte die installierten Batterien auf ihren Ladezustand. Im Zweifelsfalle tauschen Sie diese gegen Neue aus.
Hinweis: Eine zu geringe Batterie-Kapazität kann auch dafür verantwortlich sein, dass die Reichweite zur Funkfernbedienung des PC beeinträchtigt ist bzw. beim Schreiben vereinzelt Zeichen ausgelassen werden.
7.2 Status-LEDs der Tastaturen (oberhalb des Trackballs)
Low Battery • [gelbe LED (KSK-3201 RF) bzw. rote LED (KSK-3201 BT) - blinkend]Sie zeigt an, dass der Ladezustand der Batterie unter 2,2 Volt (KSK-3201 RF) bzw. 2,3 V (KSK-3201 BT) liegt. Sie blinkt, bis neue Batterien eingesetzt werden oder die Batterie völlig aufgebraucht ist. Auch leuchtet sie nur, wenn sich die Tastatur nicht im Sleep-Modus (Ruhezustand) befindet.
Pairing LED • [gelbe LED (KSK-3201 RF) bzw. blaue LED (KSK-3201 BT) - leuchtend]Sie zeigt an, dass sich die Tastatur im Pairing-Modus befindet (sucht eine RF/Bluetooth-Gegenstelle). Wenn Fn+F1 (Pairing-Taste) gedrückt werden, blinkt die LED, bis eine Gegenstelle gefunden wurde oder der Rechner das Pairing vorher abbricht.
7.3. Betriebs-Modi der Tastaturen
Standby/ Sleep-Modus• Standby: nach 3 Sekunden Sleep-Modus: nach 20 Minuten
Wake up-Modus•Um die Tastatur aus dem Ruhezustand wieder zu aktivieren, drücken Sie eine beliebige Taste auf dem Tastaturfeld inkl. linke oder rechte Mausfunktionstaste. Es kann bis zu 4 Sekunden dauern, bis die Tastatur erwacht.
7.4. Tasten mit doppelten Funktionen
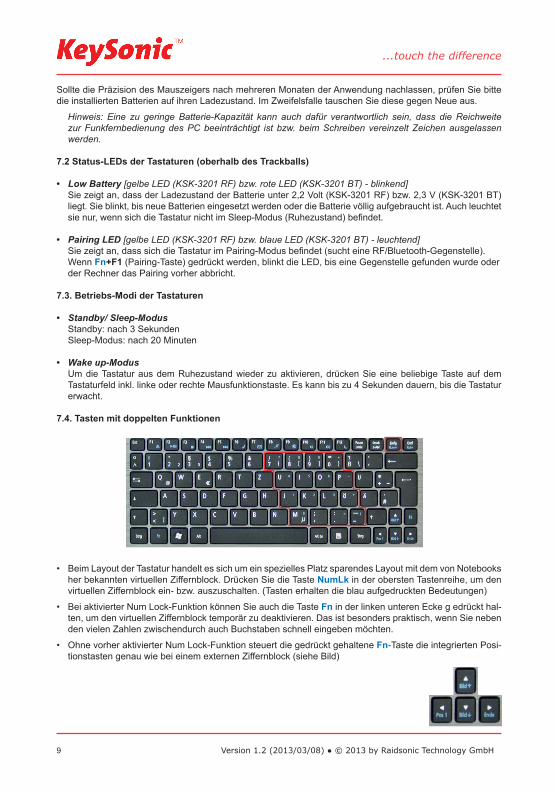
Beim Layout der Tastatur handelt es sich um ein spezielles Platz sparendes Layout mit dem von Notebooks • her bekannten virtuellen Ziffernblock. Drücken Sie die Taste NumLk in der obersten Tastenreihe, um den virtuellen Ziffernblock ein- bzw. auszuschalten. (Tasten erhalten die blau aufgedruckten Bedeutungen)
Bei aktivierter Num Lock-Funktion können Sie auch die Taste • Fn in der linken unteren Ecke g edrückt hal-ten, um den virtuellen Ziffernblock temporär zu deaktivieren. Das ist besonders praktisch, wenn Sie neben den vielen Zahlen zwischendurch auch Buchstaben schnell eingeben möchten.
Ohne vorher aktivierter Num Lock-Funktion steuert die gedrückt gehaltene • Fn-Taste die integrierten Posi-tionstasten genau wie bei einem externen Ziffernblock (siehe Bild)
9

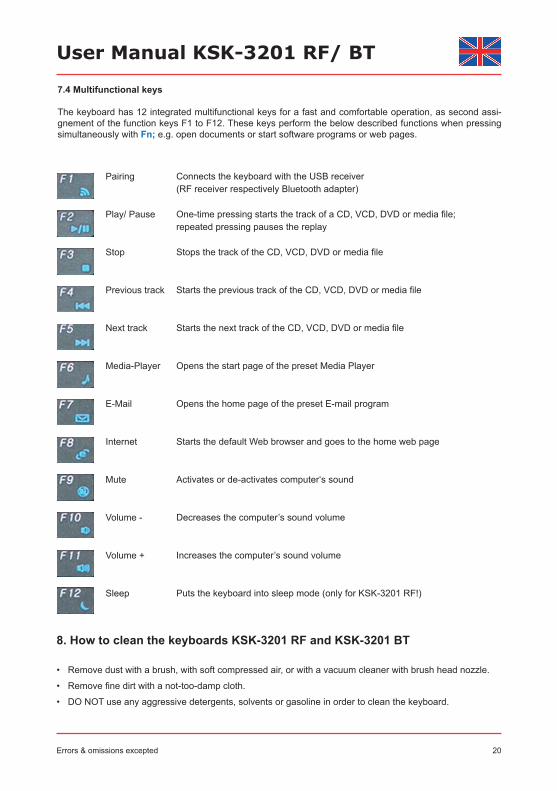
7.4 Multifunktionstasten
Für eine schnelle und komfortable Bedienung ist die Tastatur mit 11 bzw.12 fest definierten Multifunktionstas-ten als Zweitbelegung der Funktionstasten F1 bis F12 ausgestattet. Diese führen beim gleichzeitigen Drü-cken der Taste Fn die unten beschriebenen Funktionen aus, z.B. öffnen Dokumente oder starten Software-Programme bzw. Internet-Seiten.
Pairing
Play/ Pause
Stopp
Rückwärts
Vorwärts
Media-Player
Internet
Stumm
Leiser
Lauter
Sleep
Verbindet die Tastatur mit der Gegenstellle (USB-Empfänger bzw. Bluetooth-Adapter)
Einmaliges Drücken startet den Track der CD, VCD, DVD bzw. Media-Datei; nochmaliges Drücken pausiert die Wiedergabe
Stoppt den Track der CD, VCD, DVD bzw. Media-Datei
Startet den vorigen Track der CD, VCD, DVD bzw. Media-Datei
Startet den nächsten Track der CD, VCD, DVD bzw. Media-Datei
Öffnet die Startseite des voreingestellten Media-Players
Öffnet die Startseite des voreingestellten Email-Programms
Öffnet die Startseite des voreingestellten Internet-Browsers
Aktiviert oder deaktiviert die Stummschaltung
Verringert die Lautstärke
Erhöht die Lautstärke
Versetzt die Tastatur in den Sleep-Modus (nur bei KSK-3201 RF!)
8. Reinigung der Tastaturen KSK-3201 RF und KSK-3201 BT
Staub entfernen Sie mit einem Pinsel, mit sanfter Druckluft oder mit einem Staubsauger mit Bürstenkopf-• düse.
Feinen Schmutz entfernen Sie mit einem nicht allzu feuchten Lappen.•
Verwenden Sie KEINE scharfen Putzmittel, Lösungsmittel oder Benzin zur Reinigung der Tastatur!•
10
Bedienungsanleitung KSK-3201 RF/BT
Irrtümer und Auslassungen vorbehalten

...touch the difference
Version 1.2 (2013/03/08) ● © 2013 by Raidsonic Technology GmbH11
1. Special features KSK-3201 RF
Extremely slim, wireless super-mini keyboard with built-in trackball • Far-ranging and reliable radio-frequency transmission at 2.4 GHz up to approx. 7 m away from the PC• Built-in 8 mm laser trackball with mouse function and two mouse buttons• Modern design with flat notebook keys and a texture of brushed metal• 12 multifunctional keys for Pairing, Play/ Pause, Stop, Backward, Forward, Media player, Mail, Internet, • Mute, Volume down, Volume up and Sleep mode Full functionality of a full-size layout keyboard • Extremely silent stroke and tactile feedback due to high-quality X-Type membrane technology • Status LED for Pairing and Battery low < 2.2 V with different blinking frequency• Plug & Play installation, no special driver necessary• Incl. USB receiver• Optimal for Digital Living-Rooms (HTPC), mobile use as well as for training, conference & presentation • facilities etc.
2. Technical data KSK-3201 RF
Key count:Construction of keyboard:Life expectancy:Switch travel:Pressure point:Transmission frequency:
Construction of trackball:Effective operation distance:Battery type:Power supply:Power consumption (avg.):
Temperature:
Humidity:Content of delivery:Colour:Certified:Compatibility:
84 (83-87 depending on country layout)X-Type membrane technologyapprox. 5 million strokes per key; approx. 1 million for mouse buttons 1.7 ±0.3 mm total run55 ±15 g2.405~2.475 GHz, GFSK, 71 Channels each of 216 IDs (“Channels” to differentiate keyboards in one room)ø 8 mm, Laser scanning, 400 dpiapprox. 7 m2× AAA 1.5 V Keyboard: 3 VDC ±5 % Receiver: +5 VDC ±5 %Keyboard Operating: 6 mA Receiver: 60 mA (max.)Keyboard Standby: <1 mA Keyboard Sleep-Mode: 200 µA Operating: 0 °C up to +40 °C Storage: –30 °C up to +65 °COperating and storage: 0 % up to 95 % RHKeyboard, USB receiver, 1 pair of batteries, user manualBlack CE, FCC, WEEE/RoHS, REACHXP / Vista / Windows7
Manufacturer‘s Disclaimer Statement The information in this document is subject to change without notice and does not represent a commitment on the part of the vendor. No warranty or representation, either expressed or implied, is made with respect to the quality, accuracy or fitness for any particular purpose of this document. The manufacturer reserves the right to make changes to the content of this document and/or the products associated with it at any time without obligation to notify any person or organization of such changes. In no event will the manufacturer be liable for direct, indirect, special, incidental or consequential damages arising out of the use or inability to use this product or documentation, even if advised of the possibility of such damages. This document contains materials protected by copyright. All rights are reserved. No part of this manual may be reproduced or transmitted in any form, by any means or for any purpose without expressed written consent of its authors. Product names appearing in this document are mentioned for identi-fication purchases only. All trademarks, product names or brand names appearing in this document are registered property of their respective owner.

User Manual KSK-3201 RF/ BT
Errors & omissions excepted 12
1. Special features KSK-3201 BT
Extremely slim, wireless super-mini keyboard with built-in trackball • Far-ranging and reliable Bluetooth transmission up to approx. 10 m away from the PC• Built-in 8 mm laser trackball with mouse function and two mouse buttons• Modern design with flat notebook keys and a texture of brushed metal• 11 multifunctional keys for Pairing, Play/ Pause, Stop, Backward, Forward, Media player, Mail, Internet, • Mute, Volume down & up Full functionality of a full-size layout keyboard • Extremely silent stroke and tactile feedback due to high-quality X-Type membrane technology • Status LEDs: blue for Pairing and red for Battery low < 2.3 V• Plug & Play installation, no special driver necessary• Incl. USB Bluetooth adapter to connect keyboard with not Bluetooth enabled computers• Optimal for Digital Living-Rooms (HTPC), mobile use as well as for training, conference & presentation • facilities etc.
2. Technical data KSK-3201 BT
Key count:Construction of keyboard:Life expectancy:Switch travel:Pressure point:Transmission frequency:
Power output:Construction of trackball:Effective operation distance:Battery type:Power supply:Power consumption (avg.):
Temperature:
Humidity:Content of delivery:
Colour:Certified:Compatibility:
Information on disposal of old batteries (Battery Regulation)The new Regulation obliges battery manufacturers and importers to take back, sort and dispose all old batteries. The consumer is obliged to give back used batteries in retail stores or in municipal collection points. The disposal in municipal waste is explicitly prohibited according to Battery Regulation. You can send batteries purchased from us after consumption to the following address via sufficient stamped mail:Raidsonic Technology GmbH, Kurt-Fischer-Straße 50, D-22926 AhrensburgBatteries, which contain pollutants, are marked with the symbol of a crossed-out dustbin, similar to the symbol in the illustration. The chemical description of the pollutant is situated below the symbol of the dustbin. “Cd” stands for Cadmium, “Pb” for Lead, “Hg” for Mercury.
84 (83-87 depending on country version) X-Type membrane technologyapprox. 5 million strokes per key; approx. 1 million for mouse buttons 1.7 ±0.3 mm total run55 ±15 g2.401 – 2.48 GHz ISM Band, GFSK, 79 channels Frequency Hopping Bluetooth V3.0 EDR / Human Interface Device (HID)0 dBm (Class 2)Ø 8 mm, Laser scanning, 400 dpiapprox. 10 m2× AAA 1.5 V 3 VDC ±5 % Operation keyboard: 11.5 mA ±1 mA Operation mouse: 28 mA ±2 mA Standby: 3.4 mA (nach 3 Sek.) Sleep mode: 202~286 µA ±10 µA Operating: 0 °C up to +40 °C Storage: –30 °C up to +65 °COperating and storage: 0 % up to 95 % RHKeyboard, USB Bluetooth adapter KSR-10 BT, 1 pair of batteries, user manualBlack CE, FCC, WEEE/RoHS, REACHXP / Vista / Windows7
...touch the difference
Version 1.2 (2013/03/08) ● © 2013 by Raidsonic Technology GmbH
5. Installation KSK-3201 RF
5.1 System requirements
This keyboard requires a PC with USB connection and one of the following operating systems:Windows XP / Vista / Windows7
For the installation of the keyboard under the mentioned above operating systems you need NO special driver!
5.2 Installation of the USB receiver for KSK-3201 RF
In order to install your keyboard, please perform the following steps:
Take the USB receiver (USB dongle receiver) out of the box. [If you are just not • using the keyboard you can store the receiver next to the battery case on the back side of the keyboard.]
Connect the USB receiver to a free USB port on your computer. •
Advise: Please ensure, that the USB receiver has a minimal distance of 20 cm to metallic dividing walls, other computer cases, monitors, ZIP drives, loudspeakers and switching power supplies.
All mentioned above state-of-the-art operating systems with Plug & Play support will recognize your key-• board automatically and load the required drivers. During the phase of installation your operating system informs you via changing Pop-up information windows on the task-bar about the current status of instal-lation. Please be patient, until the system informs you fi nally about the successful installation. The USB receiver is now ready for operation.
Older operating systems not always support automatic recognition of USB devices. If you have attached your USB receiver and exactly this error occurs on your system, you have the following alternatives to solve theproblem:
Perform an update of your operating system and return to Step 5.2•
In some cases the installation CD of your operating system is necessary according to the instructions on • your screen. In this circumstance please follow these instructions*.
Check whether your BIOS system supports USB keyboards*. Some main board manufacturers offer BIOS• up-dates for download over the Internet.
Ensure in your system settings, that the used USB connection was not deactivated in your operating • system*.
Should your system updates keep out of success, it is recommended to test the keyboard with another PC • with the same operating system to rule out a hardware damage of the USB receiver.
* Refer to the documentation of your PC for details.
13
Errors & omissions excepted
User Manual KSK-3201 RF/ BT
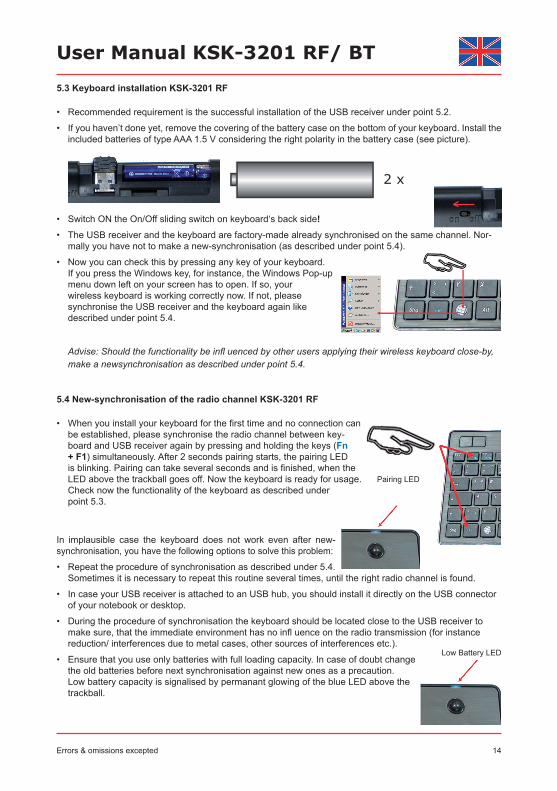
5.3 Keyboard installation KSK-3201 RF
Recommended requirement is the successful installation of the USB receiver under point 5.2.•
If you haven’t done yet, remove the covering of the battery case on the bottom of your keyboard. Install the • included batteries of type AAA 1.5 V considering the right polarity in the battery case (see picture).
Switch ON the On/Off sliding switch on keyboard‘s back side• !The USB receiver and the keyboard are factory-made already synchronised on the same channel. Nor-• mally you have not to make a new-synchronisation (as described under point 5.4).
Now you can check this by pressing any key of your keyboard.• If you press the Windows key, for instance, the Windows Pop-upmenu down left on your screen has to open. If so, yourwireless keyboard is working correctly now. If not, pleasesynchronise the USB receiver and the keyboard again likedescribed under point 5.4.
Advise: Should the functionality be infl uenced by other users applying their wireless keyboard close-by, make a newsynchronisation as described under point 5.4.
5.4 New-synchronisation of the radio channel KSK-3201 RF
When you install your keyboard for the first time and no connection can • be established, please synchronise the radio channel between key-board and USB receiver again by pressing and holding the keys (Fn + F1) simultaneously. After 2 seconds pairing starts, the pairing LED is blinking. Pairing can take several seconds and is finished, when the LED above the trackball goes off. Now the keyboard is ready for usage. Check now the functionality of the keyboard as described under point 5.3.
In implausible case the keyboard does not work even after new- synchronisation, you have the following options to solve this problem:
Repeat the procedure of synchronisation as described under 5.4. • Sometimes it is necessary to repeat this routine several times, until the right radio channel is found.
In case your USB receiver is attached to an USB hub, you should install it directly on the USB connector • of your notebook or desktop.
During the procedure of synchronisation the keyboard should be located close to the USB receiver to • make sure, that the immediate environment has no infl uence on the radio transmission (for instance reduction/ interferences due to metal cases, other sources of interferences etc.).
Ensure that you use only batteries with full loading capacity. In case of doubt change • the old batteries before next synchronisation against new ones as a precaution. Low battery capacity is signalised by permanant glowing of the blue LED above the trackball.
2 x
Pairing LED
Low Battery LED
14
...touch the difference
Version 1.2 (2013/03/08) ● © 2013 by Raidsonic Technology GmbH
6. Installation KSK-3201 BT
6.1 System requirements
Precondition for the use of the keyboard is that your device (PC, notebook, tablet, handheld, etc.)
is hardware-sided Bluetooth-enabled (e.g. by an integrated Bluetooth module or external adapter)• software-sided (Bluetooth) supports faultlessly the HID profile• software-sided (operating system) supports faultlessly standard keyboard drivers with corresponding• country code
Below there are various technical situations:
End device is hardware- and software-technically already Bluetooth-enabled • Skip the further text and follow the instructions under 6.3
End device is hardware- and software-technically not Bluetooth-enabled • Follow the further text
6.2 Installation of the included Bluetooth adapter for KSK-3201 BT
In order to install the Bluetooth adapter, please perform the following steps:
Connect the included USB adapter (KSR-10 BT) to a free USB port on • your computer.
Advise: Please ensure, that the USB adapter has a minimal distanceof 20 cm to metallic dividing walls, other computer cases,monitors, ZIP drives, loudspeakers and switching power supplies.
All mentioned above state-of-the-art operating systems with Plug & Play support will recognize your USB • adapter automatically and load the required drivers. During the phase of installation your operating system informs you via changing Pop-up information windows on the task-bar about the current status of instal-lation. Please be patient, until the system informs you finally about the successful installation. The USB adapter is now ready for operation.
Older operating systems not always support automatic recognition of USB devices. If you have attached • your USB receiver and exactly this error occurs on your system, you have the following alternatives to solve the problem:
Perform an update of your operating system and return to Step 6.2•
In some cases the installation CD of your operating system is necessary according to the instructions on • your screen. In this circumstance please follow these instructions*.
Check whether your BIOS system supports USB keyboards*. Some main board manufacturers offer BIOS • updates for download over the Internet.
Ensure in your system settings, that the used USB connection was not deactivated in your operating • system*.
Should your system-updates keep out of success, it is recommendable to test the keyboard with another • PC with the same operating system to rule out a hardware damage of the USB receiver.
* Refer to the documentation of your PC for details.
15

Errors & omissions excepted 16
6.3 Keyboard installation KSK-3201 BT
Ensure for the further procedure that the used Bluetooth driver software was installed correctly on your PC.
If you haven’t done yet, remove the covering of the battery case on the bottom of your keyboard. Insert the included batteries of type AAA 1.5 V considering the right polarity in the battery case (see picture).
Switch ON the On/Off sliding switch on keyboard‘s back side• !
After connecting the Bluetooth adapter with your• PC, the necessary drivers are installedautomatically by the Windows’ PNP functionalityand the blue Bluetooth logo appears at thebottom right corner of the screen.
Now the radio connection must be established between the Bluetooth • adapter and the keyboard (Pairing). Press the keys (Fn + F1) on your keyboard simultaneously. After 2 seconds pairing starts, the pairing LED is blinking. Pairing can take several seconds and is finished, when the LED above the trackball goes off. Should the pairing process break off (LED goes off) without getting a connection, try it again. Probably, it can be necassary to switch the rear sliding switch off and on again.
A double click with the left mouse • key on the Bluetooth logo opens the menu „Bluetooth devices“.
Click “Add“ and „OK“. •
Alternatively to the just described• method, a single click on theBluetooth logo opens a pull upmenu; and after a further click on the option „add Bluetooth devices“ appears the menu(shown in the picture).
User Manual KSK-3201 RF/ BT
2 x
Pairing LED
...touch the difference
Version 1.2 (2013/03/08) ● © 2013 by Raidsonic Technology GmbH
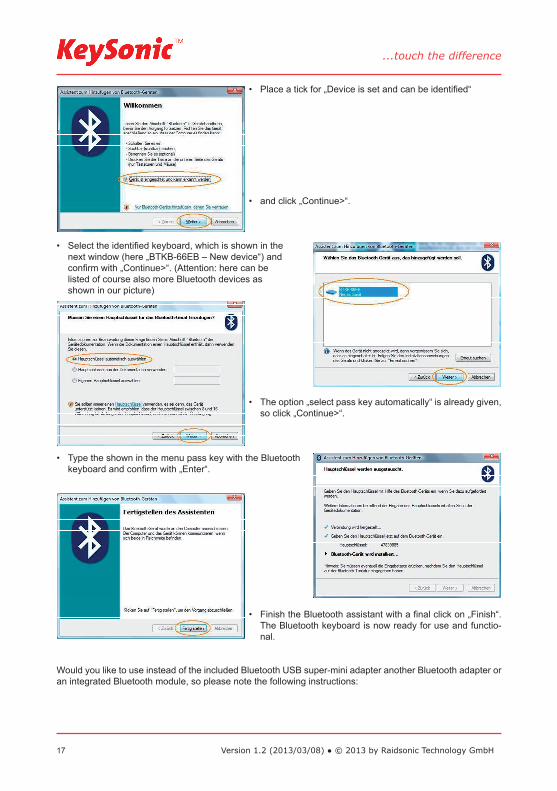
Place a tick for „Device is set and can be identified“ •
and click „Continue>“. •
Select the identified keyboard, which is shown in the• next window (here „BTKB-66EB – New device“) andconfirm with „Continue>“. (Attention: here can belisted of course also more Bluetooth devices asshown in our picture)
The option „select pass key automatically“ is already given, • so click „Continue>“.
Type the shown in the menu pass key with the Bluetooth • keyboard and confirm with „Enter“.
Finish the Bluetooth assistant with a final click on „Finish“. • The Bluetooth keyboard is now ready for use and functio-nal.
Would you like to use instead of the included Bluetooth USB super-mini adapter another Bluetooth adapter or an integrated Bluetooth module, so please note the following instructions:
17

User Manual KSK-3201 RF/ BT
If your PC is running Windows XP (SP2), Vista or Windows7 and the IC of your Bluetooth adapter is from • manufacturer CSR, please use the included and preloaded Microsoft Bluetooth driver software. You do not need to install other Bluetooth driver software. If you do not like to use the Microsoft Bluetooth driver software for any reason, you can install optionally Bluetooth driver software Toshiba or BlueSoleil (from software manufacturer IVT). *
If your PC is running Windows XP (SP2), Vista or Windows7 and the IC of your Bluetooth adapter is from • manufacturer CSR, please first install the Bluetooth driver software Toshiba or BlueSoleil (IVT). *
If your PC is running Windows XP (SP2), Vista or Windows7 and the IC of your Bluetooth adapter is from • manufacturer Broadcomm, please first install the Bluetooth driver software WIDCOMM.*
* For details, see the documentation of your PC, your built-in Bluetooth module or your Bluetooth adapter.
Advice:The most Bluetooth keyboards cannot work under BIOS or DOS environment, because the Bluetooth adapter works only in HID mode (Human Interface Device). For this a dual Bluetooth USB adapter would be necessary, which supports both HID and HCI mode (Host Controller Interface.
7. How to use the keyboards KSK-3201 RF and KSK-3201 BT
After successful launch enjoy now during the operation a free and independent choice of location up to • approx. 7 / 10 m distance to the PC. More or less range can be caused, like mentioned above, by metallic dividing walls, other computer cases, monitors, ZIP drives, loudspeakers, switching power supplies etc., but also by different loading capacity of the batteries.
7.1. Trackball
As a mouse alternative the keyboard is equipped with a Laser Trackball inclusive two mouse function keysallowing comfortable and ergonomic handling of the PC, for instance from a sofa. Thereby the handling of the Trackball is as simple as brilliant.
Move with the right thumb softly the ball of the Trackball to move • the cursor on the screen.
With the mouse function keys click and double click functions, • absolutely identically as with a mouse, can be explained.
In order to „drag“, to draw or to mark, you must keep the left key• with the left thumb pressed to carry out the function then with the right thumb on the Track Ball.
In order to increase or decrease the speed of the Mouse-pointer • movements, change the settings of the mouse options in your system control under Windows*.
Using notebooks with already integrated touchpad you have to• de-activate these intern control devices in case of error messa-ges or malfunctions*.
With pressed down • Fn key it is possible to scroll with the track-ball up and down.
18Errors & omissions excepted
...touch the difference
Version 1.2 (2013/03/08) ● © 2013 by Raidsonic Technology GmbH
Should the precision of the cursor decrease after several months of usage, please check the installed batte-ries for their state. In the case of doubt exchange them for new.
Advise: A too low battery capacity might be responsible for the fact that the operation distance to the radio remote control of the PC is impaired respectively signs are let out sporadically when writing.
7.2 Status LEDs of the keyboards (above the Trackball)
Low Battery • [amber LED (KSK-3201 RF) respectively red LED (KSK-3201 BT) - blinking]It indicates that the battery is below 2.2 Volt (KSK-3201 RF) respectively 2.3 V (KSK-3201 BT). It is blinking, until new battery is installed or the battery is total used up. It is flashing only while the keyboard is not in sleep mode.
Pairing LED • [yellow LED (KSK-3201 RF) / blue LED (KSK-3201 BT) - illuminated]It indicates that the keyboard is in Pairing mode (searching a RF / Bluetooth receiver). When Fn+F1 (Pairing key) are pressed, the LED flashes till a receiver has been found or the relevant computer stops pairing in advance.
7.3. Operating modes of the keyboards
Standby/ Sleep mode• Standby: after 3 seconds Sleep mode: after 20 minutes
Wake up mode•To wake up the keyboard from sleep mode, press any key of the keypad including left or right mouse but-tons. It can take up to 4 Seconds until the keyboard wakes up.
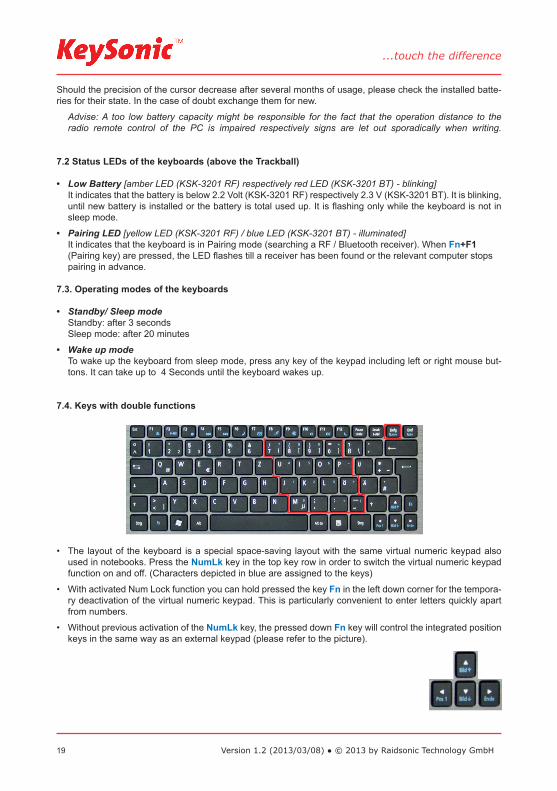
7.4. Keys with double functions
The layout of the keyboard is a special space-saving layout with the same virtual numeric keypad also • used in notebooks. Press the NumLk key in the top key row in order to switch the virtual numeric keypad function on and off. (Characters depicted in blue are assigned to the keys)
With activated Num Lock function you can hold pressed the key • Fn in the left down corner for the tempora-ry deactivation of the virtual numeric keypad. This is particularly convenient to enter letters quickly apart from numbers.
Without previous activation of the • NumLk key, the pressed down Fn key will control the integrated position keys in the same way as an external keypad (please refer to the picture).
19
7.4 Multifunctional keys
The keyboard has 12 integrated multifunctional keys for a fast and comfortable operation, as second assi-gnement of the function keys F1 to F12. These keys perform the below described functions when pressing simultaneously with Fn; e.g. open documents or start software programs or web pages.
Pairing
Play/ Pause
Stop
Previous track
Next track
Media-Player
Internet
Mute
Volume -
Volume +
Sleep
Connects the keyboard with the USB receiver (RF receiver respectively Bluetooth adapter)
One-time pressing starts the track of a CD, VCD, DVD or media file;repeated pressing pauses the replay
Stops the track of the CD, VCD, DVD or media file
Starts the previous track of the CD, VCD, DVD or media file
Starts the next track of the CD, VCD, DVD or media file
Opens the start page of the preset Media Player
Opens the home page of the preset E-mail program
Starts the default Web browser and goes to the home web page
Activates or de-activates computer‘s sound
Decreases the computer’s sound volume
Increases the computer’s sound volume
Puts the keyboard into sleep mode (only for KSK-3201 RF!)
8. How to clean the keyboards KSK-3201 RF and KSK-3201 BT
Remove dust with a brush, with soft compressed air, or with a vacuum cleaner with brush head nozzle.•
Remove fine dirt with a not-too-damp cloth.•
DO NOT use any aggressive detergents, solvents or gasoline in order to clean the keyboard.•
20
User Manual KSK-3201 RF/ BT
Errors & omissions excepted

...touch the difference
Version 1.2 (2013/03/08) ● © 2013 by Raidsonic Technology GmbH21
1. Caractéristiques KSK-3201 RF
Super-mini-clavier sans fil extrêmement plat à Trackball intégré• Transmission radio puissante et fiable à 2.4 GHz jusqu’à env. 7 m autour de l’ordinateur• Trackball Laser intégré de 8 mm avec 2 touches de fonction simulant les boutons d’une souris• Dessin moderne en métal brossé avec touche de type portable• 12 touches multifonctionnelles intégrées : Synchronisation, Démarrer/Pause, Arrêt, Précédent, Suivant, • Sélection Média, Messagerie, Internet, Muette, Volume -/+ et Mode veillePlein fonctionnement d’un clavier à disposition standard• Frappe extrêmement silencieuse et feed-back tactile grâce à la technologie à membranes X-Type dehaute qualité• Diode de synchronisation et de batterie faible <2,2 V avec une fréquence de clignote variable• Installation Plug & Play• Y compris le récepteur USB mini dans le logement des batteries• Application idéale pour : home cinéma, usage mobile, salles de formation, de conférence, de présentation•
2. Technical data KSK-3201 RF
Nombre des touches :Construction :Durée de vie :Actionnement :Point de poussée :Fréquence de transmission radio :
Technologie Trackball :Distance effective :Type de pile :Alimentation :Courant absorbé max. :
Température :
Humidité :Contenu :Couleur :Certifié :Compatibilité :
84 (83-87 selon le pays)Technologie à membranes (X-Type)env. 5 million de frappes par touche1,7 ±0,3 mm pour l’enfoncement55 ±15 g2,405~2,475 GHz, GFSK, 71 canaux chacun avec 216 ID’s(reconnait différents claviers dans une salle)Ø 8 mm, technologie Laser, 400 dpienv. 7 m2× AAA 1.5 V Clavier : 3 VDC ±5 % Récepteur : +5 VDC ±5 %Clavier Utilisation : 6 mA Récepteur : 60 mA (max.)Clavier en stand-by: <1 mA Clavier en veille : 200 µA Utilisation : 0 °C jusqu’à +40 °C Conservation : –30 °C jusqu’à +65 °CUtilisation et conservation : 0 % jusqu’à 95 % RHClavier, récepteur USB, 1 set de piles, manuel d’utilisationNoirCE, FCC, WEEE/RoHS, REACHXP / Vista / Windows7
Clause d’exonération de responsabilité du fabricant Les informations dans ce document peuvent être sujet à changement sans avertissement préalable et ne représente pas un engagement de la part du vendeur. Aucune garantie ou représentation, exprimée ou implicite, n‘est faite en ce qui concerne la qualité, l‘exactitude ou l’apparence pour n‘importe quelle partie de ce document. Le fabricant se réserve le droit, à n’importe quel moment, d’effectuer des changements dans le contenue de ce document et/ou sur les produits associés avec, sans avoir l’obligation de le notifier à des personnes ou des organisations. En aucun cas, le fabricant ne sera tenu responsable des dommages directs, indirects, spéciaux ou consécutifs à l’utilisation ou l’incapacité d’utiliser ce pro-duit ou ce document. Ce document contient des éléments protégés par le Copyright. Tous droits réservés. Aucunes parties de ce docu-ment ne peuvent être reproduite ou transmises sous aucunes formes, moyens ou but sans le consentement écrit de ses auteurs. Le nom des produits apparaissant dans ce document le sont pour l’identification pour la vente seulement. Toutes les marques déposées, les noms de produits ou les noms de marques apparaissant dans ce document sont des marques déposées de leurs propriétaires respectifs.

Manuel d’Utilisation KSK-3201 RF/ BT
Sous réserve d’erreurs ou d’omissions 22
1. Caractéristiques KSK-3201 BT
Super-mini-clavier sans fil extrêmement plat à Trackball intégré• Transmission Bluetooth puissante et fiable jusqu’à env. 10 m éloigné de l’ordinateur• Trackball Laser intégré de 8 mm avec 2 touches de fonction simulant les boutons d’une souris• Dessin moderne en métal brossé avec touche de type portable• 11 touches multifonctionnelles intégrées : Synchronisation, Démarrer/Pause, Arrêt, Précédent, Suivant, • Sélection Média, Messagerie, Internet, Muette et Volume -/+Plein fonctionnement d’un clavier à disposition standard• Frappe extrêmement silencieuse et feed-back tactile grâce à la technologie à membranes X-Type dehaute qualité• Diodes de synchronisation (bleu) et de batterie faible <2,3 V (rouge)• Installation Plug & Play• Y compris l’adaptateur Bluetooth• Application idéale pour : home cinéma, usage mobile, salles de formation, de conférence et de présentation•
2. Technical data KSK-3201 BT
Nombre des touches :Construction :Durée de vie :Actionnement :Point de poussée :Fréquence de transmission radio :Protocole / Profil de transmission :Puissance de sortie :Technologie Trackball :Distance effective :Type de pile :Alimentation :Courant absorbé max. :
Température :
Humidité :Contenu :
Couleur :Certifié :Compatibilité :
Information relative au recyclage des piles usagées. (Règlementation sur les piles)La nouvelle réglementation oblige les fabricants et importateurs à reprendre et gérer toutes les piles usagées. Les consommateurs ont obligations de déposer les piles usagées chez leurs revendeurs ou dans les points de collectes municipaux adéquates. Jeter ses piles dans une décharge municipale est strictement interdit au terme de la réglementation sur les piles. Vous pouvez envoyer vos piles usagées issues de nos produits à l’adresse suivante par pli suffisamment affranchie :Raidsonic Technology GmbH, Kurt-Fischer-Straße 50, D-22926 AhrensburgLes piles contenant des produits polluants sont marquées d’une poubelle barrée, similaire au symbole de l’illustration. La description des polluants peut se trouver en dessous du symbole. « Cd » correspond au Cadmium, « Pb » au plomb et « Hg » pour le mercure.
84 (83-87 selon le pays)Technologie à membranes (X-Type)env. 5 million de frappes par touche1,7 ±0,3 mm pour l’enfoncement55 ±15 g2401 – 2,48 GHz ISM bande, GFSK, 79 voies Frequency HoppingBluetooth V3.0 EDR / Human Interface Device (HID)0 dBm (Classe 2)Ø 8 mm, technologie Laser, 400 dpienv. 10 m2× AAA 1.5 V3 VDC ±5 % Utilisation clavier : 11,5 mA ±1 mA Utilisation souris : 28 mA ±2 mA En stand-by : 3,4 mA (après 3 sec.) En veille : ~286 μA ±10 μA (après 20 minutes) Utilisation : 0 °C jusqu’à +40 °C Conservation : –30 °C jusqu’à +65 °CUtilisation et conservation : 0 % jusqu’à 95 % RHClavier, adaptateur Bluetooth KSR-10 BT, 1 set de piles, manuel d’utilisationNoirCE, FCC, WEEE/RoHS, REACHXP / Vista / Windows7
...touch the difference
Version 1.2 (2013/03/08) ● © 2013 by Raidsonic Technology GmbH
5. Installation KSK-3201 RF
5.1 Demandes au système
Ce clavier demande un PC avec connexion USB et un des systèmes d’exploitation suivants : Windows XP / Vista / Windows7
Pour l‘installation du clavier sous les systèmes d‘exploitation mentionné au-dessus vous n‘avez besoin d‘AUCUN pilote spécial!
5.2 Installation de récepteur USB KSK-3201 RF
Pour installer votre clavier, exécutez les opérations suivantes :
Ouvrez le logement et sortez le récepteur USB. [Quand vous n’utilisez pas le clavier • vous pouvez accrocher le récepteur sur le dos du clavier.]
Connectez le receveur USB à un port USB libre de votre ordinateur.•
Conseils : assurez-vous que le receveur USB a une distance minimale de 200 mm des murs métalliques, autres boîtiers de l‘ordinateur, écrans, disques ZIP, haut-parleur, et alimentations.
Tous systèmes d’exploitation actuels qui supportent Plug & Play reconnaîtront votre clavier automatique-• ment et lanceront les pilotes nécessaires. Pendant la phase de l‘installation, votre logiciel d‘exploitation vous informe de changer les fenêtres instantanées de l‘information sur la barre d‘outils au sujet de l‘état actuel de l‘installation. Veuillez patienter, jusqu‘à la fi n que le système vous informe la fi n de l‘installation. Le receveur USB est maintenant prêt pour l‘opération.
Des logiciels d‘exploitation d‘une version ancienne ne soutiennent pas toujours automatiquement l‘identification de USB ou PS/2. Si vous avez attaché votre récepteur USB et se produit exactement cette erreur sur votre système, vous avez les solutions de rechange suivantes pour résoudre le problème :
Mettez votre système d’exlpoitation à jour er retournez à Pas 5.2•
Dans certains cas, le CD d‘installation de votre logiciel d‘exploitation est indissociablement selon les inst-• ructions sur votre écran. Dans cette circonstance, veuillez suivre ces instructions*.
Vérifier si votre système BIOS soutient le clavier de USB*. Certains fabricants de cartes mères offrent la • mise à jour de BIOS par téléchargement en ligne.
Vérifier sur l‘option du votre système que la connexion USB utilisée n‘est pas désactivée sur votre sys-• tème*.
Si votre système mise à jour n‘arrive toujours pas à installer successivement, nous vous conseillons de • tester le clavier sur un autre PC avec le même système d‘exploitation pour exclure le dommage du récep-teur USB.
* Consultez le documentation de votre PC pour détails.
23
5.3 Installation de clavier KSK-3201 RF
La condition nécessaire pour une utilisation sans fil, est celle d’une installation réussie du récepteur USB • (partie 5.2.)
Si vous ne l’avez pas encore fait, retirez le cache situé dans le logement pour les piles, en bas de votre • clavier derrière. Installer les batteries incluses du type AAA 1,5 V vu la bonne polarité dans la boîte de batterie (voir l‘image).
Mettre l’interrupteur sur ON.•
Le récepteur USB et le clavier sont synchronisés sur le même canal à l‘usine. Normalement, ça vaut pasla • peine de refaire la synchronisation (comme décrit sous point 5.4) .
Vous pouvez vérifier en appuyant sur n‘importe quelle touche • de votre clavier. Si vous appuyez sur la touche de Windows, il doit ouvrir par exemple le menu popup de Windows vers le bas àgau-che sur votre écran. Si oui, votre clavier sans fil fonctionne cor-rectement maintenant. Sinon, veuillez synchroniser le récepteur USB et le clavier encore une fois comme décrit sous le point 5.4 Conseil: Si la fonctionnalité est infl uencée par d‘autres utilisateurs appliquant leur clavier sans fil fermer-par, faire une nouveau-synchronisation comme décrit sous le point 5.4
5.4 Refaire la synchronisation du canal radio KSK-3201 RF
Quand vous démarrez votre clavier pour la première fois et aucune• connexion ne pouvait être établie, il faut donc synchroniser le canalradio entre le clavier et le récepteur USB encore, en appuyant sur lestouches (Fn + F1). Le LED de la connexion (Pairing) commence a clignote deux secondes âpres que la connexion (Pairing) est commencé. La procédure de connexion (Pairing) peut prendre quelques secondes et est finie quand le LED a haut du trackball s’étaient. Le clavier est maintenant prêt pour l‘utilisation.Le vérifier comme décrit sous point 5.3.
Si votre clavier ne fonctionnant toujours pas après la re- synchronisation, vous avez les possibilités suivantes pour résoudrele problème :
Répéter la processus de la synchronisation comme décrit le point 5.4. Parfois il est nécessaire de répéter • plusieurs fois cette routine, jusqu‘à ce que le bon canal du radio ait été trouvé.
Au cas où votre récepteur USB est fixé à un hub d’USB, vous devriez l‘installer directement sur le con-• necteur USB de votre portable ou ordinateur de bureau.
Pendant le procédure de la synchronisation, le clavier devrait être situé près du ré-• cepteur USB pour assurer que l‘environnement proche n‘a aucune influence sur la transmission du radio (par exemple, la diminution / l‘interférence à cause du boîtier en métal et autres sources d‘interférences, etc.).
S‘assurez que vous utilisez seulement des piles en pleine capacité de chargement.• En cas de doute, changer les piles avant prochaines synchronisation comme précau-tion. Batterie faible va être signalisée quand l’LED bleu et constamment illuminé.
2 x
LED de synchronisation
LED d’indication de batterie faible
24Sous réserve d’erreurs ou d’omissions
Manuel d’Utilisation KSK-3201 RF/ BT

...touch the difference
Version 1.2 (2013/03/08) ● © 2013 by Raidsonic Technology GmbH
6. Installation KSK-3201 BT
6.1 Système requis
Les conditions requises pour l’utilisation du clavier à vos périphériques (PC, ordinateur portable, tablette, mobile, etc.) sont les suivantes :
Le matériel est compatible Bluetooth (par adaptateur Bluetooth intégré ou externe)• Le logiciel Bluetooth est pleinement compatible avec les profils HID• Le système d’exploitation supporte pleinement les drivers du clavier avec le code pays correspondant.•
Quelques situations techniques ci-dessous :
Si le Bluetooth est déjà activé sur votre périphérique (hardware et software) : • Allez directement au paragraphe 6.3
Si le Bluetooth n’est pas activé sur votre périphérique (hardware et software) • Suivez les instructions suivantes.
6.2 Installation de l’adaptateur Bluetooth pour KSK-3201 BT
Pour installer votre adaptateur Bluetooth, exécutez les opérations suivants :
Connectez le adaptateur Bluetooth inclut à un port USB libre de votre • ordinateur.
Conseils :assurez-vous que le adaptateur USB soit à une distance minimale de 200 mm de murs métalliques, d’autres ordinateurs, écrans, disquesZIP, haut-parleur, ou alimentations.
Tous les systèmes d’exploitation indiqués au dessus supportent le « Plug & Play » ; Ils reconnaîtront • votre clavier automatiquement et lanceront les pilotes nécessaires. Pendant la phase d’installation, votre ordinateur vous indiquera l’état d’avancement de l’installation de votre adaptateur USB. Veuillez patien-ter, jusqu‘à la fin de l’installation signalé par votre ordinateur. Le adaptateur USB est maintenant prêt à fonctionner.
Les systèmes d’exploitation de génération plus ancienne ne détectent pas toujours de manière automatique la connexion d’un périphérique USB. Si vous avez connecté votre récepteur USB et que celui-ci n’est pas détecté automatiquement, voici les solutions alternatives pour résoudre le problème :
Mettez votre système d’exploitation à jour er retournez à Pas 6.2•
Dans certains cas, le CD d‘installation de votre système d‘exploitation est nécessaire et vous sera deman-• dé à l’écran. Dans cette circonstance, veuillez suivre les instructions*.
Vérifier si votre BIOS supporte bien les périphériques USB*. Certains fabricants de cartes mères offrent les• mises à jour du BIOS par téléchargement en ligne.
Vérifier dans les options de votre système que les ports USB utilisés ne soient pas désactivés sur votre • ordinateur *.
Si votre système mis à jour n‘arrive toujours pas à installer le récepteur USB, nous vous conseillons de • tester le clavier sur un autre PC avec le même système d‘exploitation pour exclure tout dommage lié au récepteur USB.
*Consultez la documentation de votre PC pour plus de détails.
25

26
6.3 Installation de clavier KSK-3201 BT
Vérifiez, pour les procédures ultérieures, que le pilote Bluetooth a été correctement installé sur votre ordi-nateur.
Si vous ne l’avez pas encore fait, retirez le cache situé dans le logement pour les piles, en bas de votre • clavier derrière. Installer les batteries incluses du type AAA 1,5 V vu la bonne polarité dans la boîte de batterie (voir l‘image).
Mettre l’interrupteur sur ON.•
Après avoir connecter l’adaptateur du Bluetooth• (Dongle) à votre PC, les pilotes nécessaires sontautomatiquement installés par la fonctionnalitéPNP de Windows, et le logo bleu du Bluetoothapparaît en bas à droite de l’écran.
Maintenant, une connexion radio doit être établie entre l’adaptateur du • Bluetooth et le clavier (Synchronisation). Appuyez sur les touches (Fn + F1). Le LED de la connexion (Pairing) commence a clignote deux secondes âpres que la connexion (pairing) est commencé. La procédure de connexion (Pairing) peut prendre quelques secondes et est finie quand le LED a haut du trackball s’étaient. Si la procédure de ‘pairing’ c’est arrêté (LED éteint), et la connexion n’est pas finie correctement, essayez des faire le ‘pairing’ de nouveaux. Éventuellement, s’il y en a besoin, utiliser l‘interrupteur ‘on/off’ pour redémarrer le clavier.
Positionnez vous sur le logo du Bluetooth, faites un double click • de la touche gauche de votre souris pour ouvrir le menu « Appareil Bluetooth ».
Cliquez sur « Ajouter » et « Entrée ». •
Avec la méthode décrite précé-• demment, un simple click sur le logo du luetooth fait apparaitre le menu. Et après uelques click sur l’option « Ajouter matériel Blue-tooth » fait apparaitre le menu (voir l’image).
2 x
LED de synchronisation
Sous réserve d’erreurs ou d’omissions
Manuel d’Utilisation KSK-3201 RF/ BT
...touch the difference
Version 1.2 (2013/03/08) ● © 2013 by Raidsonic Technology GmbH
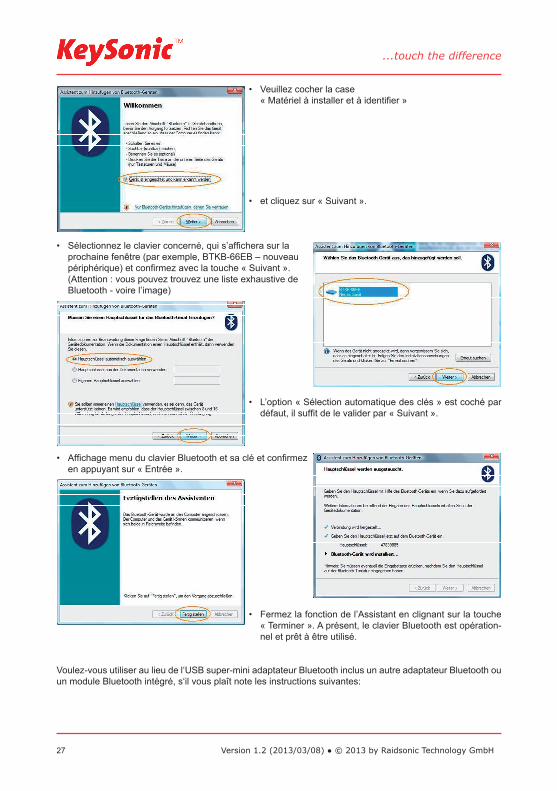
Veuillez cocher la case • « Matériel à installer et à identifier »
et cliquez sur « Suivant ». •
Sélectionnez le clavier concerné, qui s’affichera sur la • prochaine fenêtre (par exemple, BTKB-66EB – nouveau périphérique) et confirmez avec la touche « Suivant ». (Attention : vous pouvez trouvez une liste exhaustive de Bluetooth - voire l’image)
L’option « Sélection automatique des clés » est coché par • défaut, il suffit de le valider par « Suivant ».
Affichage menu du clavier Bluetooth et sa clé et confirmez • en appuyant sur « Entrée ».
Fermez la fonction de l’Assistant en clignant sur la touche • « Terminer ». A présent, le clavier Bluetooth est opération-nel et prêt à être utilisé.
Voulez-vous utiliser au lieu de l‘USB super-mini adaptateur Bluetooth inclus un autre adaptateur Bluetooth ou un module Bluetooth intégré, s‘il vous plaît note les instructions suivantes:
27

Si votre PC utilise Windows XP (SP2), Vista ou Windows7et que le circuit imprimé (IC) de votre adapta-• teur Bluetooth est de marque CSR, veuillez utiliser les pilotes Bluetooth pré-installé de Microsoft. Vous n’avez pas besoin d’installer d’autres pilotes Bluetooth. Si vous ne souhaitez pas utiliser le pilote Bluetooth Microsoft pour une quelconque raison, vous pouvez installer optionnellement les pilotes Toshiba ou Blue-Soleil (de la compagnie IVT). *
Si votre PC utilise Windows XP (SP2), Vista ou Windows7 et que le circuit imprimé (IC) de votre adapta-• teur Bluetooth est de marque CSR, veuillez installer d’abord les pilotes Bluetooth Toshiba ou BlueSoleil (IVT). *
Si votre PC utilise Windows XP (SP2), Vista ou Windows7 et que le circuit imprimé (IC) de votre adaptateur • Bluetooth est de marque Broadcomm, veuillez installer d’abord le pilote Bluetooth WIDCOMM.*
* Pour plus de détails, consultez le manuel de votre PC, du module Bluetooth intégré ou de votre adaptateur Bluetooth.
Recommandation :La plupart des claviers Bluetooth ne peuvent fonctionner sous BIOS ou sous DOS, parce que l‘adaptateurBluetooth fonctionne uniquement en mode HID (Human Interface Device). Pour cela, un double adaptateur USB Bluetooth supportant HID et HCI sera nécessaire (HCI = Host Controller Interface).
7. Utilisation des claviers KSK-3201 RF et KSK-3201 BT
Après la réussite de la synchronisation, la distance de transmission du radio entre le clavier et le récepteurest approximativement de 7-10 m. Plus ou moins de la distance peut être causé, comme ceux que nous avons mentionné au-dessus, par des murs métalliques, d‘autres boîtiers d‘ordinateur, écrans, ZIP drives, haut-parleurs, alimentations chargée, etc., mais aussi par les différentes capacités de chargement des pi-les.
7.1. Trackball
Le clavier est équipé d‘un Trackball Laser avec deux boutons des fonctions du souris comme une sourisalternative, qui permet d‘avoir une manipulation confortable et ergonomique de l‘ordinateur, par exempledans un sofa. Ainsi la manipulation du Trackball est aussi simple que brillante.
Déplacé doucement avec votre pouce droit, la boule du Track-• ball afin de faire bouger le curseur sur votre écran.
Les fonctions clic et double clic sont absolument identiques à • celles d’une souris classique.
Afin de glisser/déplacer, dessiner ou surligner, vous devez • maintenir pressé le bouton gauche d’une souris à l’aide de votre pouce gauche pour utiliser cette fonctionnalité, puis à l’aide de votre pouce droit sur le Trackball laser.
Si vous souhaitez augmenter ou diminuer la vitesse de déplace-• ment du pointeur de votre souris, changez les réglages de celle-ci dans le panneau de configuration de Windows*.
Si vous utilisez un ordinateur portable avec un touchpad intég-• ré, désactivé le dans le pneu interne si vous recevez des mes-sages d’erreur ou des mal fonctions*.
Avec la touche • Fn appuyé vous pouvais y utiliser le ‚Trackball‘ pour feuilleté (faire défiler vers le bas/haut).
28Sous réserve d’erreurs ou d’omissions
Manuel d’Utilisation KSK-3201 RF/ BT
...touch the difference
Version 1.2 (2013/03/08) ● © 2013 by Raidsonic Technology GmbH
Si la précision de la diminution de curseur après plusieurs mois d‘utilisation, s‘il vous plaît, vérifiez les batte-ries installées pour leur état de chargement. En cas des doutes les échangent pour nouveau.
Conseil : Une capacité de batterie trop basse peut être aussi responsable du fait que la distance d‘opération à la télécommande radio de l‘ordinateur soit diminuée respectivement les signes sortant sporadiquementen écrivant.
7.2 Signification des LED d’utilisation (à haut du Trackball)
Low Battery (LED d’indication de batterie faible) •[LED jaune (KSK-3201 RF) ou LED rouge (KSK-3201 BT) - clignotante]Elle est utilisée afin d’indiquer que la batterie est en dessous des 2,2 Volts (KSK-3201 RF) ou 2,3 V (KSK-3201 BT). Elle reste allumée jusqu’au changement de la batterie ou lorsque celle-ci est épuisée. Elle clig-note uniquement lorsque le clavier n’est pas mis en veille.
Pairing-LED (LED de synchronisation) •[LED jaune (KSK-3201 RF) ou LED bleue (KSK-3201 BT) - clignotante]Elle est utilisée afin d’indiquer que le clavier est en phase de synchronisation (recherche de récepteur RF/ Bluetooth). Quand le bouton de synchronisation (Fn+F1) est activé, la LED clignote jusqu‘à ce qu’elle trouve le récepteur ou que la recherche soit stoppée.
7.3. Modes d’utilisation des claviers
Mise en veille• Stand-by: après 3 secondesEn veille: après 20 minutes
Sortie de veille•Afin de sortir le clavier du mode veille, cliquez sur n’importe quelle touche ou les boutons L et R de la sourie. Sortir du mode veille peut prendre jusqu’à quatre secondes.
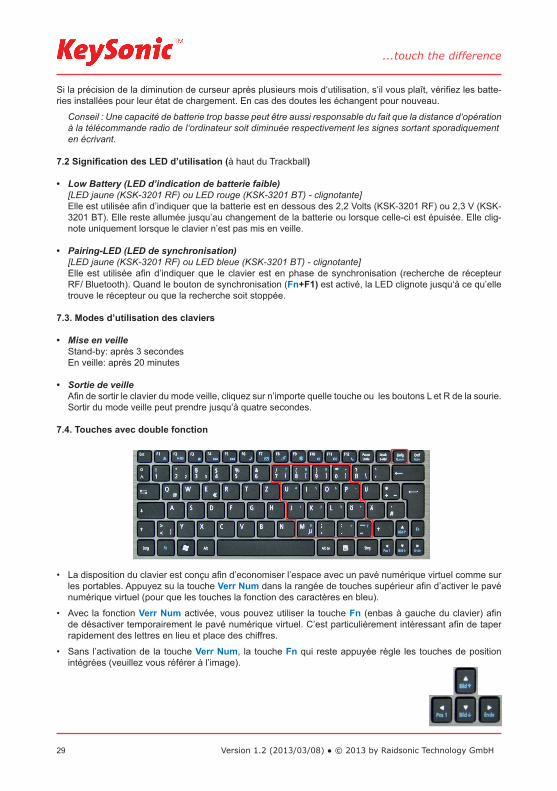
7.4. Touches avec double fonction
La disposition du clavier est conçu afin d’economiser l’espace avec un pavé numérique virtuel comme sur • les portables. Appuyez su la touche Verr Num dans la rangée de touches supérieur afin d’activer le pavé numérique virtuel (pour que les touches la fonction des caractères en bleu).
Avec la fonction • Verr Num activée, vous pouvez utiliser la touche Fn (enbas à gauche du clavier) afin de désactiver temporairement le pavé numérique virtuel. C’est particulièrement intéressant afin de taper rapidement des lettres en lieu et place des chiffres.
Sans l’activation de la touche • Verr Num, la touche Fn qui reste appuyée règle les touches de position intégrées (veuillez vous référer à l’image).
29

7.4 Touches multifonctionnelles
Pour une utilisation rapide et confortable, le clavier est équipé de 12 touches multifonctions, comme fonction secondaire des touches F1 à F12. Les fonctions offertes sont les suivantes : ouvrir un document, lancer unlogiciel ou démarrer une page Internet, etc.. et sont accessibles en pressant simultanément la touche + Fn.
Synchronisation
Play/ Pause
Stop
Précédent
Suivant
Média Player
Internet
Muette
Volume -
Volume +
Mode veille
Synchroniser le clavier avec le récepteur (récepteur RF ou adaptateur Bluetooth)
Une fois appuyer la touche, il lance un CD, VCD, DVD ou les fichiers médias;une pause par réappuyer la même touche
Arrêter le CD, VCD, DVD ou les fichiers medias
Lancer le CD, VCD, DVD précédent ou les fichiers médias
Lancer le CD, VCD, DVD suivant ou les fichiers medias
Ouvrez la page d’accueil des préréglages Média Player
Ouvre la page d‘accueil programmé pour E-mail
Ouvre la page d‘accueil programmé du navigateur d‘Internet
Activer ou désactiver le muet
Diminuer le volume
Augmenter le volume
Placez le clavier en mode veille (seulement KSK-3201 RF!)
8. Nettoyage des claviers KSK-3201 RF et KSK-3201 BT
Ôtez la poussière en utilisant un pinceau, de l’air comprimé doux, ou un aspirateur à buse-brosse.•
Ôtez la saleté en utilisant un chiffon légèrement imbibé d’eau.•
NE PAS utiliser des nettoyants agressifs, des solvants, ou de l’essence pour nettoyer le clavier.•
30Sous réserve d’erreurs ou d’omissions
Manuel d’Utilisation KSK-3201 RF/ BT