Embed Size (px)
Citation preview
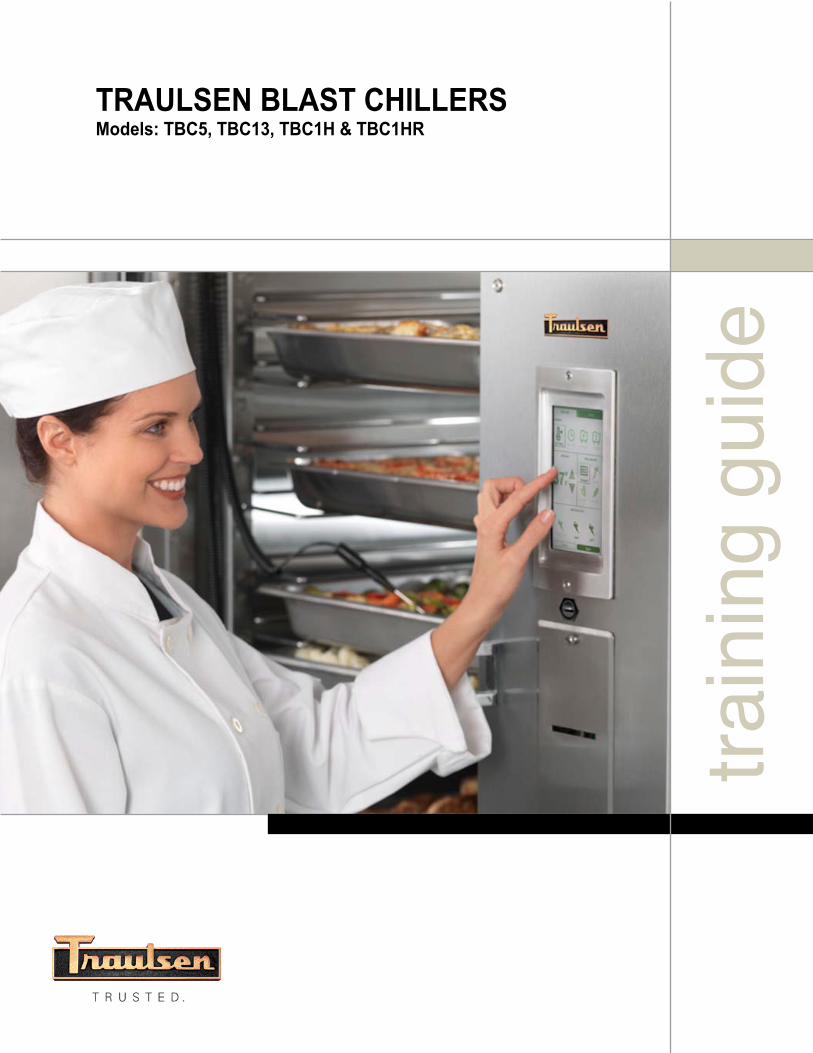
TRAULSEN BLAST CHILLERS
train
ing
guid
e
Models: TBC5, TBC13, TBC1H & TBC1HR
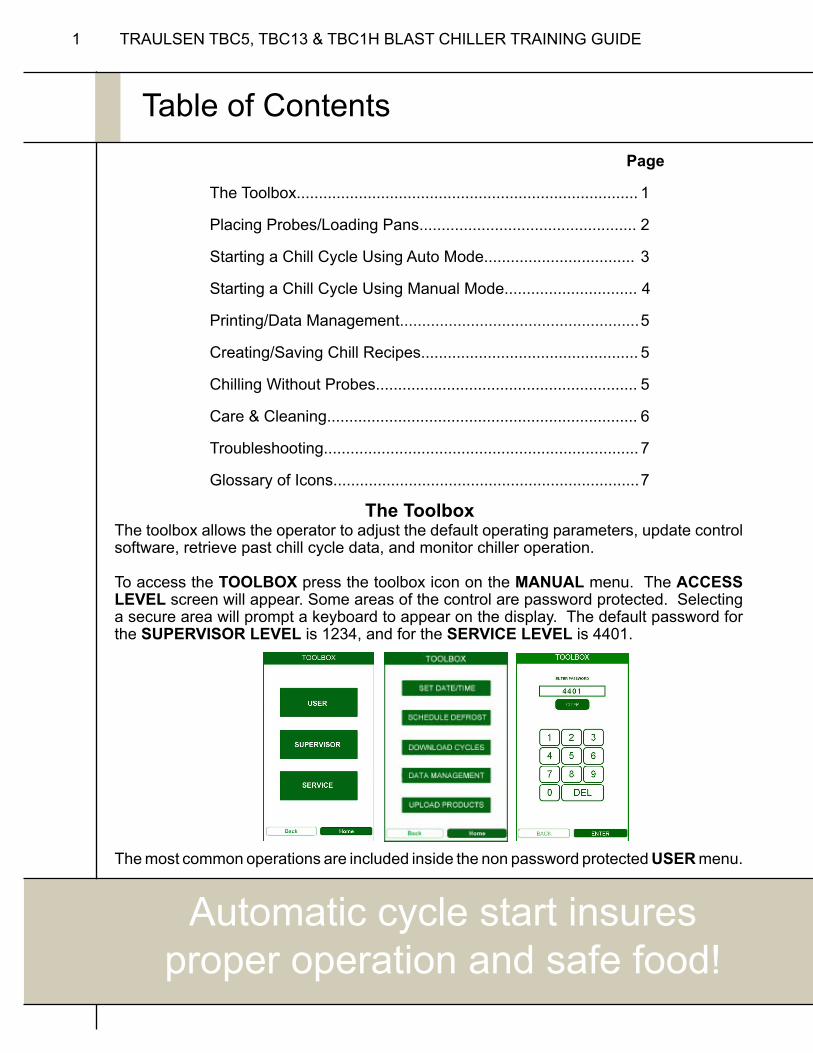
The toolbox allows the operator to adjust the default operating parameters, update control software, retrieve past chill cycle data, and monitor chiller operation.
To access the TOOLBOX press the toolbox icon on the MANUAL menu. The ACCESS LEVEL screen will appear. Some areas of the control are password protected. Selecting a secure area will prompt a keyboard to appear on the display. The default password for the SUPERVISOR LEVEL is 1234, and for the SERVICE LEVEL is 4401.
The most common operations are included inside the non password protected USER menu.
Table of Contents
1 TRAULSEN TBC5, TBC13 & TBC1H BLAST CHILLER TRAINING GUIDE
Automatic cycle start insures proper operation and safe food!
Page
The Toolbox............................................................................. 1
Placing Probes/Loading Pans................................................. 2
Starting a Chill Cycle Using Auto Mode.................................. 3
Starting a Chill Cycle Using Manual Mode.............................. 4
Printing/Data Management...................................................... 5
Creating/Saving Chill Recipes................................................. 5
Chilling Without Probes........................................................... 5
Care & Cleaning...................................................................... 6
Troubleshooting....................................................................... 7
Glossary of Icons..................................................................... 7
The Toolbox
2
Placing Probes/Loading Pans
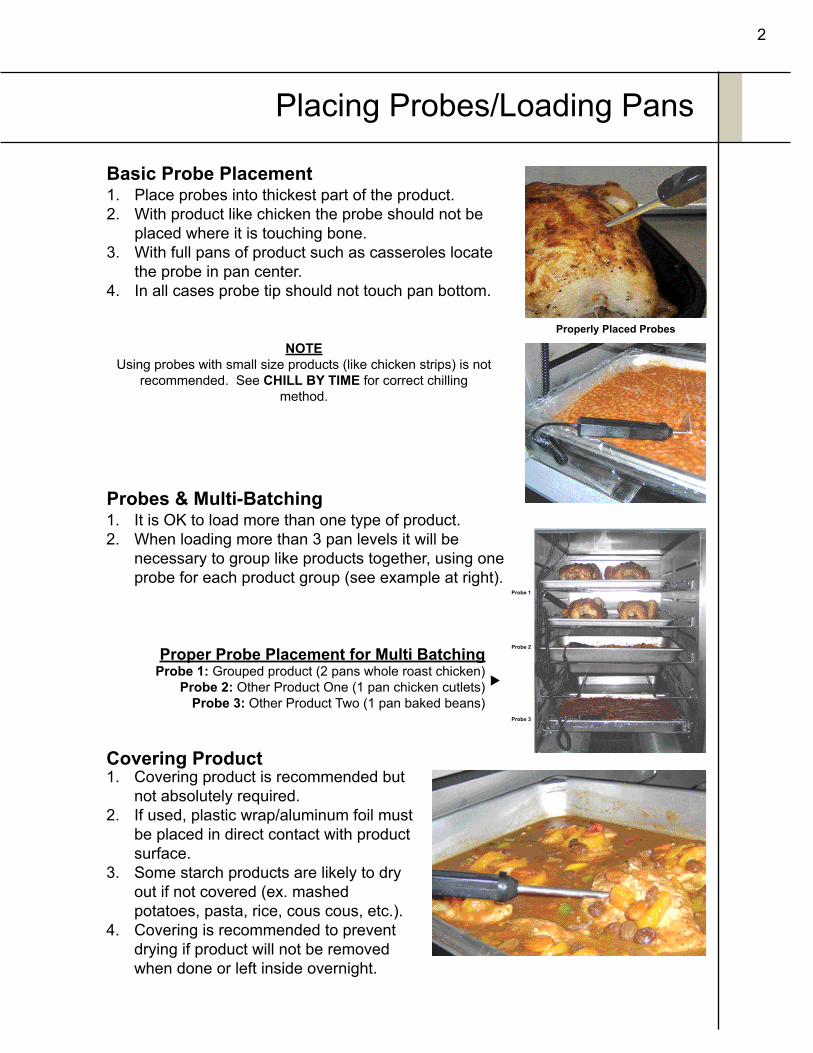
Basic Probe Placement
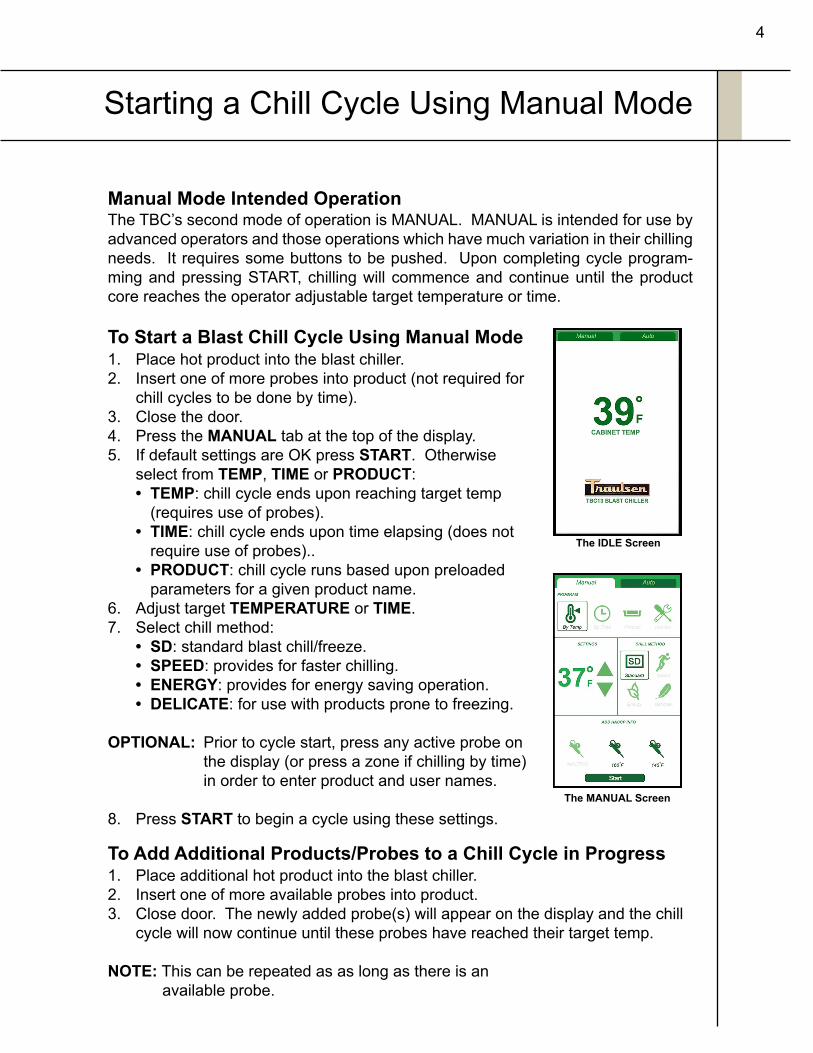
Proper Probe Placement for Multi BatchingProbe 1: Grouped product (2 pans whole roast chicken)
Probe 2: Other Product One (1 pan chicken cutlets)Probe 3: Other Product Two (1 pan baked beans)
Probes & Multi-Batching
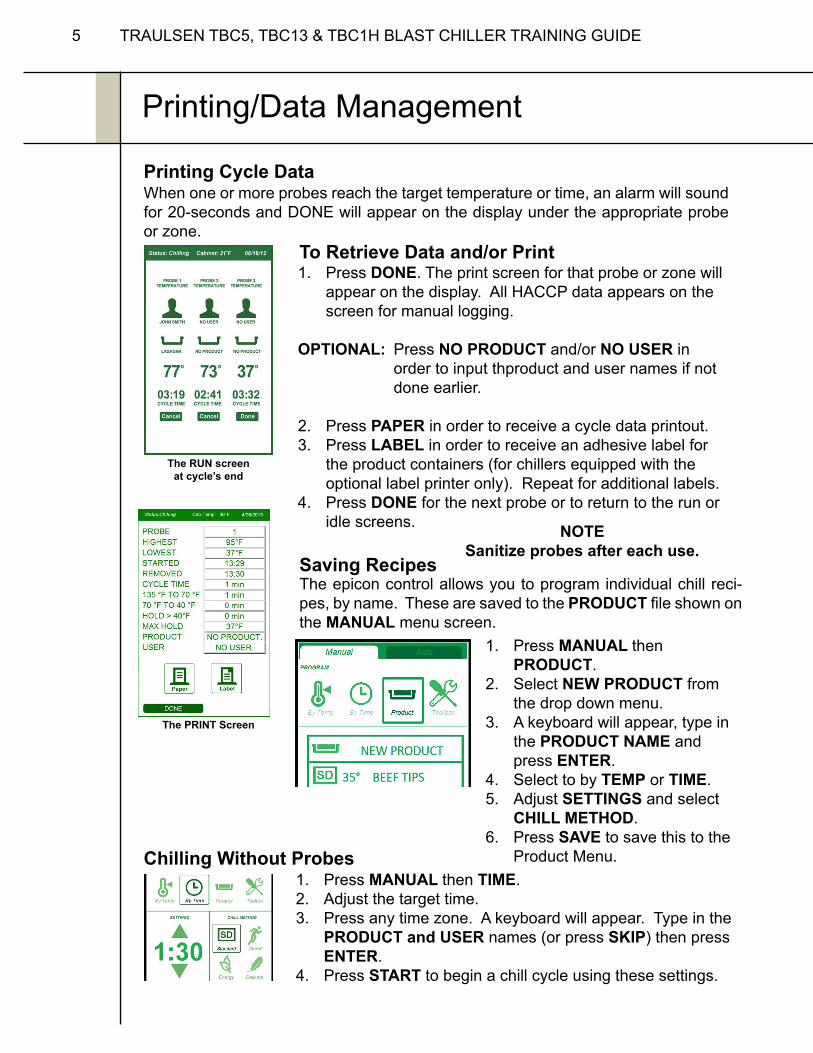
Covering Product
NOTEUsing probes with small size products (like chicken strips) is not
recommended. See CHILL BY TIME for correct chillingmethod.
Properly Placed Probes
Probe 1
Probe 2
Probe 3
1. Place probes into thickest part of the product.2. With product like chicken the probe should not be placed where it is touching bone.3. With full pans of product such as casseroles locate the probe in pan center.4. In all cases probe tip should not touch pan bottom.
1. It is OK to load more than one type of product.2. When loading more than 3 pan levels it will be necessary to group like products together, using one probe for each product group (see example at right).
1. Covering product is recommended but not absolutely required.2. If used, plastic wrap/aluminum foil must be placed in direct contact with product surface.3. Some starch products are likely to dry out if not covered (ex. mashed potatoes, pasta, rice, cous cous, etc.).4. Covering is recommended to prevent drying if product will not be removed when done or left inside overnight.

Starting a Chill Cycle Using Auto Mode
3 TRAULSEN TBC5, TBC13 & TBC1H BLAST CHILLER TRAINING GUIDE
Auto Mode Intended OperationTraulsen’s TBC blast chiller is designed to operate in one of two modes, AUTO and MANUAL. AUTO is intended for use by novice operators and those operations in which there is no variation in chilling needs. It does not require for any buttons to be pushed. Proper placement of the probe into hot product will cause a chill cycle to commence. Chilling will continue until the product core reaches the target tem-perature of 37 degrees F.
To Start a Blast Chill Cycle Using Auto Mode1. Place hot product into the blast chiller.2. Insert one of more probes into product.3. Close the door. The display will begin counting down from 30 and upon time elapsing will commence chilling.
OPTIONAL: Prior to cycle start, press any active probe on the display to enter product and user names from a drop down list.
To Add Additional Products/Probes to a Chill Cycle Already in Progress1. Place additional hot product into the blast chiller.2. Insert one of more probes into product.3. Close door. The newly added probe(s) will appear on the display and the chill cycle will now continue until these probes have reached their target temp.
NOTE: This can be repeated as as long as there is an available probe.
NOTE: Traulsen’s blast chillers are solely intended for blast chilling, and not for use as holding cabinets.
4
Starting a Chill Cycle Using Manual Mode
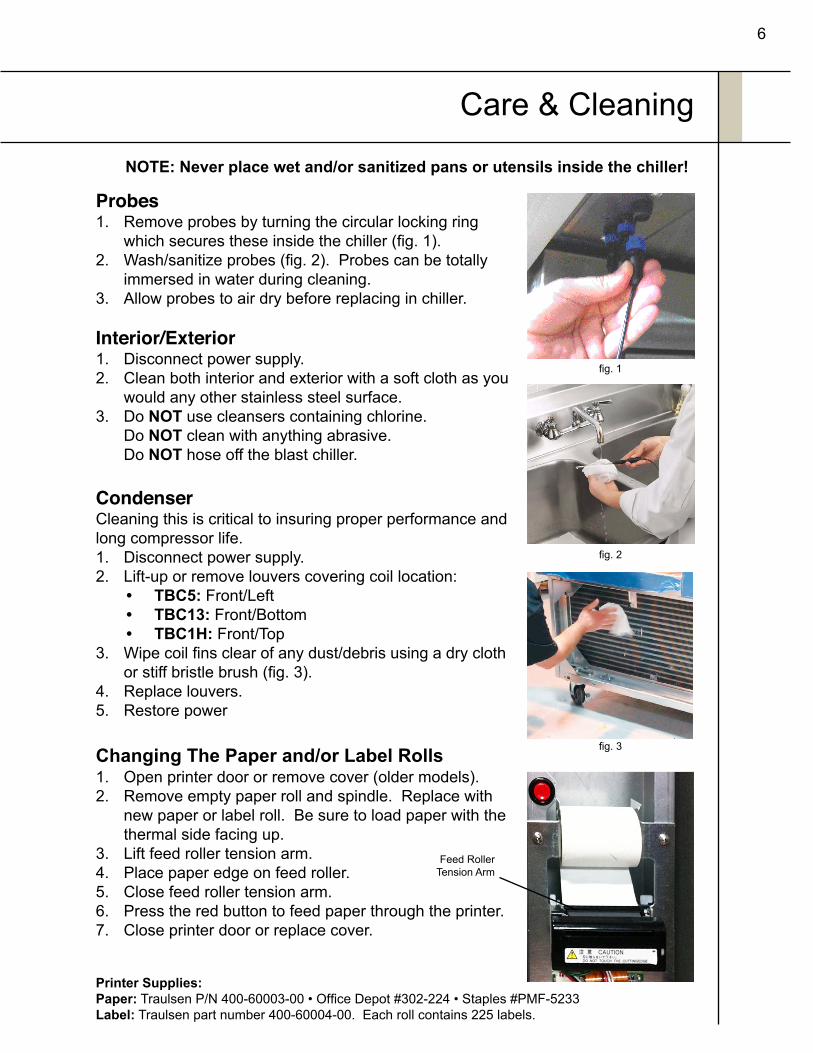
Manual Mode Intended OperationThe TBC’s second mode of operation is MANUAL. MANUAL is intended for use by advanced operators and those operations which have much variation in their chilling needs. It requires some buttons to be pushed. Upon completing cycle program-ming and pressing START, chilling will commence and continue until the product core reaches the operator adjustable target temperature or time.
To Start a Blast Chill Cycle Using Manual Mode1. Place hot product into the blast chiller.2. Insert one of more probes into product (not required for chill cycles to be done by time).3. Close the door.4. Press the MANUAL tab at the top of the display. 5. If default settings are OK press START. Otherwise select from TEMP, TIME or PRODUCT:
• TEMP: chill cycle ends upon reaching target temp (requires use of probes). • TIME: chill cycle ends upon time elapsing (does not require use of probes)..• PRODUCT: chill cycle runs based upon preloaded parameters for a given product name.
6. Adjust target TEMPERATURE or TIME.7. Select chill method:
• SD: standard blast chill/freeze. • SPEED: provides for faster chilling.• ENERGY: provides for energy saving operation.• DELICATE: for use with products prone to freezing.
OPTIONAL: Prior to cycle start, press any active probe on the display (or press a zone if chilling by time) in order to enter product and user names.
8. Press START to begin a cycle using these settings.
1. Place additional hot product into the blast chiller.2. Insert one of more available probes into product. 3. Close door. The newly added probe(s) will appear on the display and the chill cycle will now continue until these probes have reached their target temp.
NOTE: This can be repeated as as long as there is an available probe.
To Add Additional Products/Probes to a Chill Cycle in Progress
The IDLE Screen
The MANUAL Screen
Printing/Data Management
5 TRAULSEN TBC5, TBC13 & TBC1H BLAST CHILLER TRAINING GUIDE
Printing Cycle DataWhen one or more probes reach the target temperature or time, an alarm will sound for 20-seconds and DONE will appear on the display under the appropriate probe or zone.
To Retrieve Data and/or Print1. Press DONE. The print screen for that probe or zone will appear on the display. All HACCP data appears on the screen for manual logging.
OPTIONAL: Press NO PRODUCT and/or NO USER in order to input thproduct and user names if not done earlier.
2. Press PAPER in order to receive a cycle data printout.3. Press LABEL in order to receive an adhesive label for the product containers (for chillers equipped with the optional label printer only). Repeat for additional labels. 4. Press DONE for the next probe or to return to the run or idle screens.
The RUN screen at cycle’s end
The PRINT Screen
Saving RecipesThe epicon control allows you to program individual chill reci-pes, by name. These are saved to the PRODUCT file shown on the MANUAL menu screen.
1. Press MANUAL then PRODUCT. 2. Select NEW PRODUCT from the drop down menu.3. A keyboard will appear, type in the PRODUCT NAME and press ENTER. 4. Select to by TEMP or TIME. 5. Adjust SETTINGS and select CHILL METHOD.6. Press SAVE to save this to the Product Menu.Chilling Without Probes
1. Press MANUAL then TIME. 2. Adjust the target time.3. Press any time zone. A keyboard will appear. Type in the PRODUCT and USER names (or press SKIP) then press ENTER. 4. Press START to begin a chill cycle using these settings.
NOTESanitize probes after each use.
6
Care & Cleaning
Probes
Interior/Exterior
Condenser
fig. 2
fig. 1
Changing The Paper and/or Label Rolls
Printer Supplies: Paper: Traulsen P/N 400-60003-00 • Office Depot #302-224 • Staples #PMF-5233Label: Traulsen part number 400-60004-00. Each roll contains 225 labels.
1. Remove probes by turning the circular locking ring which secures these inside the chiller (fig. 1).2. Wash/sanitize probes (fig. 2). Probes can be totally immersed in water during cleaning.3. Allow probes to air dry before replacing in chiller.
1. Disconnect power supply.2. Clean both interior and exterior with a soft cloth as you would any other stainless steel surface.3. Do NOT use cleansers containing chlorine. Do NOT clean with anything abrasive. Do NOT hose off the blast chiller.
Cleaning this is critical to insuring proper performance and long compressor life. 1. Disconnect power supply.2. Lift-up or remove louvers covering coil location:
• TBC5: Front/Left• TBC13: Front/Bottom• TBC1H: Front/Top
3. Wipe coil fins clear of any dust/debris using a dry cloth or stiff bristle brush (fig. 3).4. Replace louvers.5. Restore power
1. Open printer door or remove cover (older models).2. Remove empty paper roll and spindle. Replace with new paper or label roll. Be sure to load paper with the thermal side facing up.3. Lift feed roller tension arm.4. Place paper edge on feed roller.5. Close feed roller tension arm.6. Press the red button to feed paper through the printer.7. Close printer door or replace cover.
fig. 3
Feed Roller Tension Arm
NOTE: Never place wet and/or sanitized pans or utensils inside the chiller!
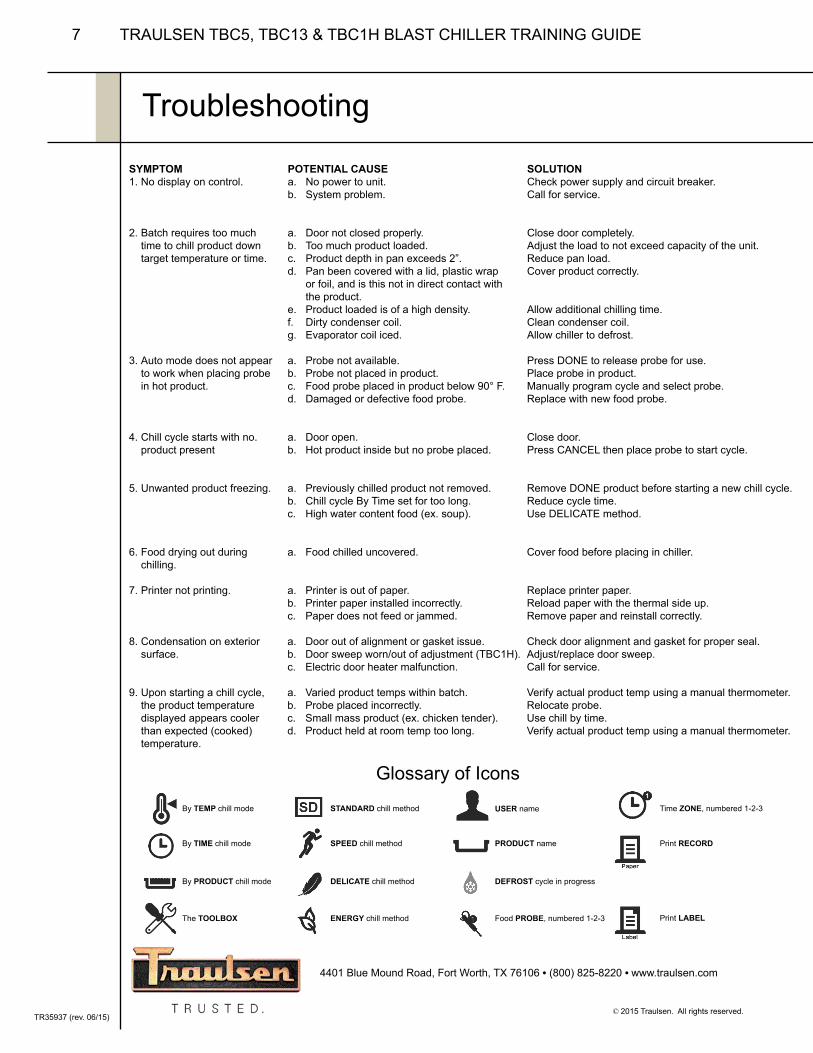
POTENTIAL CAUSE SOLUTIONa. No power to unit. Check power supply and circuit breaker.b. System problem. Call for service.
a. Door not closed properly. Close door completely.b. Too much product loaded. Adjust the load to not exceed capacity of the unit.c. Product depth in pan exceeds 2”. Reduce pan load.d. Pan been covered with a lid, plastic wrap Cover product correctly. or foil, and is this not in direct contact with the product. e. Product loaded is of a high density. Allow additional chilling time.f. Dirty condenser coil. Clean condenser coil.g. Evaporator coil iced. Allow chiller to defrost.
a. Probe not available. Press DONE to release probe for use.b. Probe not placed in product. Place probe in product.c. Food probe placed in product below 90° F. Manually program cycle and select probe.d. Damaged or defective food probe. Replace with new food probe.
a. Door open. Close door. b. Hot product inside but no probe placed. Press CANCEL then place probe to start cycle.
a. Previously chilled product not removed. Remove DONE product before starting a new chill cycle.b. Chill cycle By Time set for too long. Reduce cycle time.c. High water content food (ex. soup). Use DELICATE method.
a. Food chilled uncovered. Cover food before placing in chiller.
a. Printer is out of paper. Replace printer paper. b. Printer paper installed incorrectly. Reload paper with the thermal side up.c. Paper does not feed or jammed. Remove paper and reinstall correctly.
a. Door out of alignment or gasket issue. Check door alignment and gasket for proper seal.b. Door sweep worn/out of adjustment (TBC1H). Adjust/replace door sweep.c. Electric door heater malfunction. Call for service.
a. Varied product temps within batch. Verify actual product temp using a manual thermometer.b. Probe placed incorrectly. Relocate probe.c. Small mass product (ex. chicken tender). Use chill by time.d. Product held at room temp too long. Verify actual product temp using a manual thermometer.
4401 Blue Mound Road, Fort Worth, TX 76106 • (800) 825-8220 • www.traulsen.com
TR35937 (rev. 06/15)
Troubleshooting
7 TRAULSEN TBC5, TBC13 & TBC1H BLAST CHILLER TRAINING GUIDE
© 2015 Traulsen. All rights reserved.
SYMPTOM 1. No display on control.
2. Batch requires too much time to chill product down target temperature or time.
3. Auto mode does not appear to work when placing probe in hot product.
4. Chill cycle starts with no. product present
5. Unwanted product freezing.
6. Food drying out during chilling.
7. Printer not printing.
8. Condensation on exterior surface.
9. Upon starting a chill cycle, the product temperature displayed appears cooler than expected (cooked) temperature.
Print LABELFood PROBE, numbered 1-2-3
By TEMP chill mode
By TIME chill mode
By PRODUCT chill mode
The TOOLBOX
STANDARD chill method
SPEED chill method
DELICATE chill method
PRODUCT name
DEFROST cycle in progress
ENERGY chill method
Time ZONE, numbered 1-2-3USER name
Print RECORD
Glossary of Icons


![OUTDOOR POWER EQUIPMENT · [tbc] tbc-270pfds 20 tbc-270pfs 17 tbc-270s 17 tbc-270sfs 24 tbc-290 18 tbc-290d 20 tbc-290s 18 tbc-340 18 tbc-340d 21 tbc-340ds 21 tbc-340pf 18 tbc-340pfd](https://img.pdfslide.net/doc/110x75/5e2726727836ca4a7e750b4c/outdoor-power-equipment-tbc-tbc-270pfds-20-tbc-270pfs-17-tbc-270s-17-tbc-270sfs.jpg)