Embed Size (px)
Citation preview

8/8nordea.com/cm OR tradefinanceName of document
2015/V1
User Guide
Trade Finance Global
October 2015
Reports Centre

2
Table of Contents 1 Trade Finance Global (TFG) – Reports Centre Overview ............................................................... 4
1.1 Key Features and Benefits ...................................................................................................... 4
1.2 Main Reports Centre Functions ............................................................................................... 4
1.3 TFG Navigation to the Reports Centre .................................................................................... 4
1.4 Reports Centre Main Screen ................................................................................................... 4
1.5 Page Structure ......................................................................................................................... 5
1.5.1 Functional Menu ........................................................................................................... 5
1.5.2 Toolbar .......................................................................................................................... 5
1.5.2.1 To Display Toolbar: ......................................................................................... 5
2 Viewing Incoming Reports ............................................................................................................... 7
3 Creating a Report ............................................................................................................................ 8
3.1 Creating a Report: Definition Tab ............................................................................................ 8
3.2 Editing a Report ....................................................................................................................... 8
3.3 Defining a Report ..................................................................................................................... 9
3.3.1 Adding Report Columns ................................................................................................ 9
3.3.2 Editing the Report Columns Selection ........................................................................ 10
3.3.3 Deleting an Entry ........................................................................................................ 11
3.3.4 Setting Report Criteria: Criteria Tab ........................................................................... 11
3.3.4.1 Report Criteria ............................................................................................... 11
3.3.4.1.1 Adding a Data Set Rule .............................................................. 12
3.3.4.1.2 Editing Data Set Rules ............................................................... 12
3.3.4.1.3 Deleting Data Set Rules ............................................................. 12
3.3.5 Defining Column Priority: Order Tab ........................................................................... 12
3.3.6 Adding Column Sort Priorities ..................................................................................... 13
3.3.7 Editing Column Sort Priorities ..................................................................................... 13
3.3.8 Assigning Authorized Recipients: Assignment Tab .................................................... 14
3.3.9 To Assign Authorized Recipients: ............................................................................... 14
3.3.10 Selecting Delivery Recipients: Delivery Tab .................................................. 15
3.3.11 Selecting Recipients from Groups/Users ...................................................... 15
3.3.12 Editing Recipients .......................................................................................... 15
3.3.13 Deleting Recipients ....................................................................................... 16
3.3.14 Scheduling a Report Delivery: Schedule Tab ................................................ 16
3.4 Report Properties: Settings Tab ............................................................................................ 17
3.4.1 Setting Report General Properties .............................................................................. 17
3.4.2 Setting PDF Properties ............................................................................................... 18
4 Running Reports ............................................................................................................................ 19
4.1 Viewing Report SQL Details .................................................................................................. 19
4.2 Report Outputs ...................................................................................................................... 20
4.2.1 PDF Format ................................................................................................................ 20
4.2.2 CSV Format ................................................................................................................ 21
4.2.3 Excel Format ............................................................................................................... 21
4.2.4 XML Format ................................................................................................................ 21
5 Sending the Report ........................................................................................................................ 21
6 Other Reports Centre Activities ..................................................................................................... 22
6.1 Copying a Report ................................................................................................................... 22

3
6.2 Deleting a Report ................................................................................................................... 23
6.3 Auditing a Report ................................................................................................................... 23
6.4 Deleting Incoming Reports .................................................................................................... 24
7 Profiles ........................................................................................................................................... 25
7.1 To Define a Group/Customer Profile ..................................................................................... 26
7.1.1 To Define Logo and External Recipients per Group: .................................................. 26
7.1.2 To Define Logo and External Recipients per Customer: ............................................ 26
4
1 Trade Finance Global (TFG) – Reports Centre Overview
Reports Centre, located within the Reports Centre, is a Java-based reporting module that is
integrated into TFG and creates ready to generate sophisticated production reports. This tool
combines an easy-to-use design, with dynamic data manipulation. It enables TFG users to develop
sophisticated reports with a simple selection of key fields to build ad hoc or batch-run reports. A
fundamental advantage for TFG users is the flexibility in designing reports.
The users can deliver on-demand reports in multiple formats and distribute through e- mail,
immediate review on the Web, or with instructions to retrieve in a centralized repository for security
purposes. Reports Centre empowers business users with the ability to reshape information in real
time.
1.1 Key Features and Benefits
Enables users to access, consolidate, and analyse critical operational data.
Deliver professional, high quality content reports to support critical business decisions.
Manipulate raw data and create customized versions.
Publish reports with automatic scheduling.
Share access to designated users.
Export reports in PDF, CSV, XLS and XML formats.
Gather up-to-the-minute information.
Reshape reports in real time.
Sort on multiple fields and user-defined filters.
Range limits may be set for each table or file with optional subtotals.
Easy to use tools for formatting and aligning data.
1.2 Main Reports Centre Functions
Create a New Report – Allows the user to generate customized production reports.
View Incoming Reports – Allows the user to view report results sent by other users.
Run a Report – Allows the user to create, view and send a report result that has been created
using Reports Centre.
Delete Incoming Report – Allows the authorized user to clean up irrelevant report results.
1.3 TFG Navigation to the Reports Centre
The Reports Centre is located in the Reports menu of the TFG Navigation Menu.
Figure 1 – TFG Reports Menu
Upon clicking Reports Centre, the Reports Centre Main Window is displayed (Figure 2).
1.4 Reports Centre Main Screen
This topic describes the various menus, toolbars and buttons which are found throughout the Reports
Centre module. It is meant as an overview to acquaint the user with the overall layout of the module.
The Reports Centre main screen includes both a functional menu and a toolbar. Both are available
when navigating throughout the different buttons in Reports Centre and enable users to:
Refresh report data and overview information.
Run, Create New, Save, Copy and Delete entire reports, or specific field information.
Generate scheduled or ad hoc reports.
Input and define the language default setting.
Audit reports.
Purge report depository.

5
1.5 Page Structure
The Reports Centre page structure has the following main components:
Functional Menu
Tabs
Toolbar
Figure 2 – Reports Centre: main screen
Note: The user can define the number of items to be shown on the page. The options include 10, 20
or 30 items per list.
1.5.1 Functional Menu
The Functional Menu allows the user to perform a variety of activities related to the handling of
reports.
Figure 3 – Functional Menu
The Functional Menu consists of the following buttons:
Button Description
About Contains the following version information:
Reports Centre current version
Database current version.
Incoming Contains all Report Results sent to the specific user.
Reports Contains the list of reports available for the user.
Profiles Contains user information, like:
Entity/Group/Customer tree
Address book
Individual logo
Audit Contains the audit trail facility
Log Out Logs the user out of TFG and closes the Reports Centre.
The user is routed to TFG.
1.5.2 Toolbar
The Reports Centre’s creating or editing report screen is organized into tabs so that the user may
easily move from tab to tab (from left to right) to design reports.
1.5.2.1 To Display Toolbar:
1 From the screen tabs, select Reports, the toolbar will appear.

6
Figure 4 – Reports Centre Toolbar
Note: The Reports button must be selected for all the Report icons to be available. If the Incoming
button is selected, only the View Report and Delete options are displayed.
Icon Function
Create Report
Edit Report
Copy Report
Show PDF
Show Excel
Show XML
Show CSV
Run Report
Deliver Report
Refresh
Delete Report
2 Click the Create Report icon,
Or
Select one of the reports and click the Edit Report icon. The buttons are displayed as shown
below:
Figure 5 – Create or Edit Report tabs
Note: The buttons are displayed only when creating or editing a report.
Each successive button guides the users in identifying, selecting and consolidating key operational
data to generate high quality content reports. The buttons also help define presentation and delivery
details.
The users are able to revise or reshape data in real time, providing key flexibility when business
conditions or user needs demand quick turnaround.

7
Generally, users have access to the following buttons:
Button Description
Definition Contains the report view definition, such as the data types displayed in
the report, ordering of the data and the data type for subtotal calculation.
Criteria Contains data restrictions that the report refers to upon Report Results
generation.
Order Is relevant when generating a hardcopy report file
Assignment The supervisor may assign or remove authorized recipients of a report to
a specific user.
Note: This option is available for users with administration rights.
Delivery Define the name and e-mail of the people who will receive the report, as
well as the format of the report.
Note: This option is available for users with administration rights.
Schedule/Properties Contains 3 sections for users to:
Schedule when reports are to be delivered
Define PDF properties.
General Properties of the document.
Note: This option is available for users with administration rights.
Settings Report general and PDF printing properties.
2 Viewing Incoming Reports
When Reports Centre opens, the Incoming Reports screen is displayed. It allows the user to view
reports which have been run by Reports Centre and forwarded by Nordea or another user.
An online review of the report is possible by clicking the Report Title in the Incoming Reports screen.
Figure 6 – Incoming Reports screen
The columns description of the Incoming Reports screen is as follows:
Column Description
Title Title assigned to the Report by the user that sent the report.
User ID User that created and generated the report.
Created Time at which the report was available.
Updated Time at which the report began to be processed.
Format Format in which the report was generated and delivered (PDF, XLS, XML
or CSV).
8
3 Creating a Report
The Reports Centre allows the user to perform a wide array of activities involved in creating a report,
such as:
Creating a Report: Definition Tab
Setting Report Criteria: Criteria Tab
Defining Column Priority: Order Tab
Assigning Authorized Recipients by Supervisor: Assignment Tab
Selecting Delivery Recipients: Delivery Tab
Scheduling a Report Delivery: Schedule Tab
Report Properties: Settings Tab
The user begins the process of report production from the Reports tab and continues from tab to tab
until finished (with the exception of the Assignments button, which is only available to a Bank User).
Figure 7 – Create Report tabs
Note: The appearance of the Definition, Criteria, Schedule/Properties, Assignment and Delivery tabs
depends on selecting the Reports button in the Reports Centre main screen, and choosing a report
from the Reports list.
3.1 Creating a Report: Definition Tab
From the Reports button, the user can create new reports or access previously created reports.
1. In the right upper corner of the Reports Centre window, click the Reports functional menu button.
The toolbar appears (see Error! Reference source not found.).
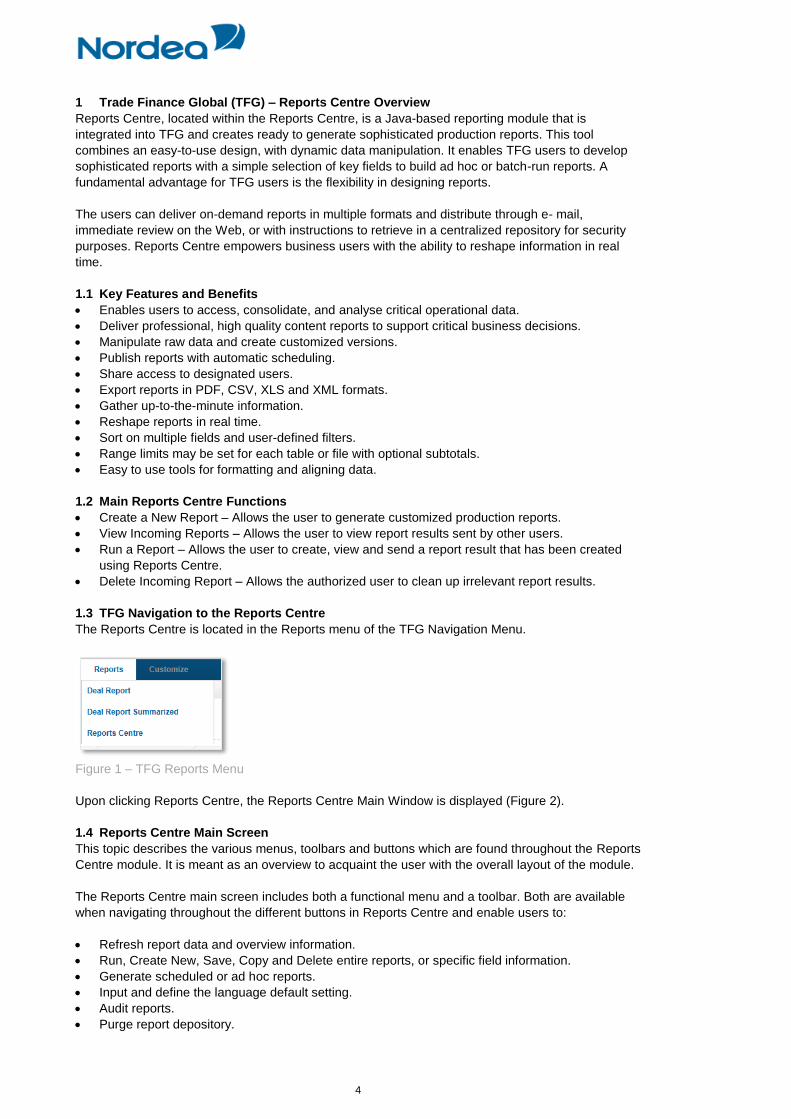
2. In the toolbar, click Create Report .
The New Report window opens.
Figure 8 – Creating a report: New report window
3. In the Report Title field, type a report name.
4. From the Table/Column tree below the Report Title field, select relevant report definitions.
5. Once finished, click the Save button to save the report.
Note: The new created report can be saved only after completing the Definition button.
3.2 Editing a Report
Once a report has been created, the user will see the report listed in the Reports tab.
9
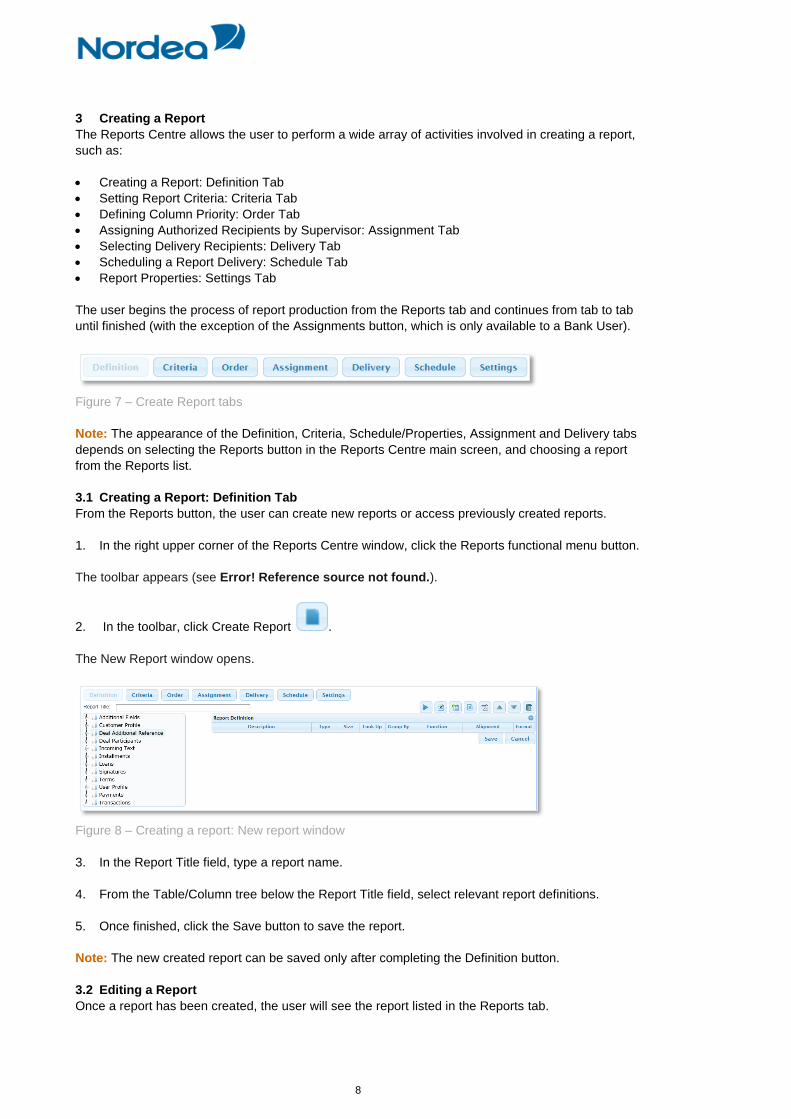
1. Select the report by clicking the Report’s row.
The Reports Centre refreshes all reports and highlights in yellow the user selection.
2. Press the Edit Report icon.
The report opens for editing.
Figure 9 – Edit report
You may edit the following data:
Report Title
Add/remove/change parameters of report definitions.
3. Click Save or continue to other buttons to edit the report details.
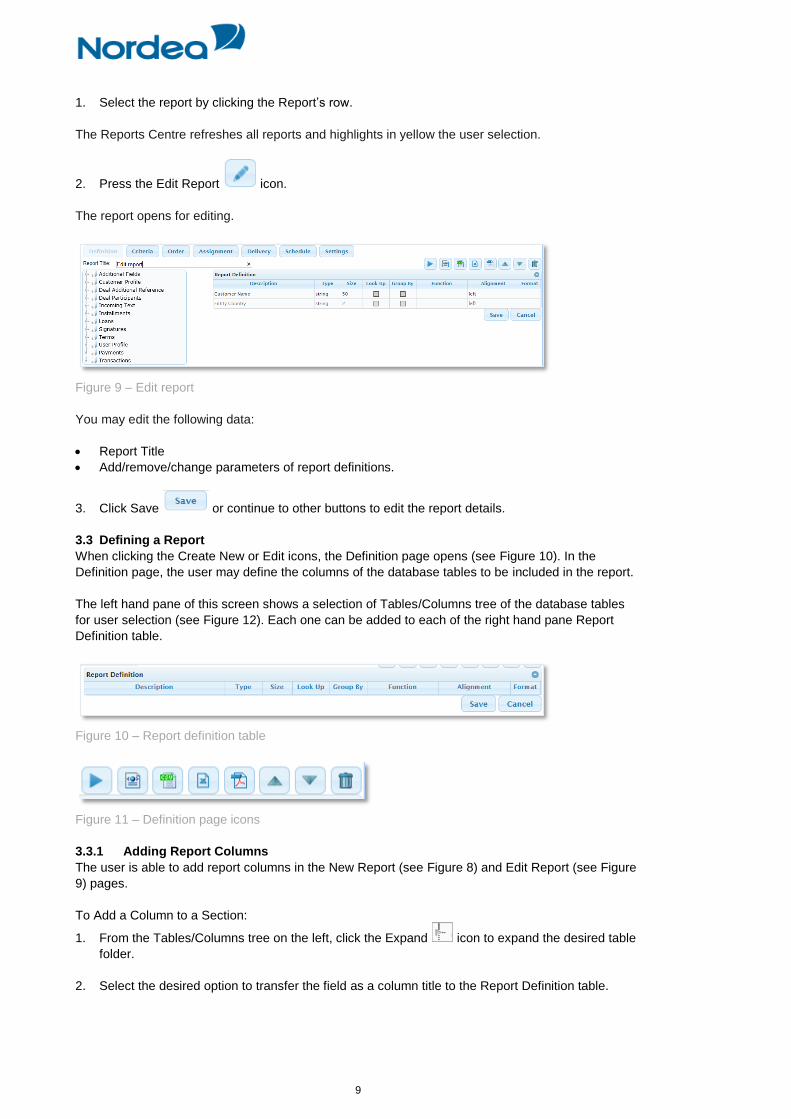
3.3 Defining a Report
When clicking the Create New or Edit icons, the Definition page opens (see Figure 10). In the
Definition page, the user may define the columns of the database tables to be included in the report.
The left hand pane of this screen shows a selection of Tables/Columns tree of the database tables
for user selection (see Figure 12). Each one can be added to each of the right hand pane Report
Definition table.
Figure 10 – Report definition table
Figure 11 – Definition page icons
3.3.1 Adding Report Columns
The user is able to add report columns in the New Report (see Figure 8) and Edit Report (see Figure
9) pages.
To Add a Column to a Section:
1. From the Tables/Columns tree on the left, click the Expand icon to expand the desired table
folder.
2. Select the desired option to transfer the field as a column title to the Report Definition table.

10
Figure 12 – Expanded Table/Columns tree with the Days to Pay option selected
3. Repeat steps 1-2 as desired.
4. Click the Save button to save the changes.
3.3.2 Editing the Report Columns Selection
1. Select the field/column by clicking that row.
Reports Centre highlights the user’s selection.
Figure 13 – Report column available for editing
2. Edit the desired field. All the fields listed are described below:
Up/Down arrows (toolbar) Click to change the order of the columns to be presented in the Report
Results.
Description The column title displayed in the Report Results for this data.
Type Data type (string, amount, date, etc.).
Size Column size in characters.
Look Up An indicator as to whether the value should be displayed as a code or as
an appropriate description.
Group By Determines whether the report is grouped by.
Alignment Alignment of the column values in the Report Results.
Format Format of the field.
3. Click the Save button to save the changes and continue to other tabs for review.

11
3.3.3 Deleting an Entry
The user is able to delete rows in all panes of the Definition button. The Sub Total section entries are
automatically deleted on removing them from the Columns pane. This deletion affects the Report
Results.
The user may delete entries in two ways. Choose the most convenient for you way.
1. Select the field/column by clicking that row.
Reports Centre highlights the selection.
2. On the Reports Centre toolbar, click the Delete icon.
A confirmation request is displayed.
Figure 14 – Delete a column: confirmation request
3. Confirm deletion by clicking Delete.
The column title is deleted.
4. Click the Save button to save the changes and continue to other tabs for review.
3.3.4 Setting Report Criteria: Criteria Tab
Clicking the Criteria button opens the Criteria Screen, which provides users with an easy way to
manipulate the data set within a specific format of instructions. Entries in the Criteria screen allow the
users to limit a report’s record set by specific rules.
Figure 15 – Creating a Report: Criteria tab
3.3.4.1 Report Criteria
Users without IT background are able to easily manipulate data included into the Report Results by
selecting options provided within the dropdown menus.
The Criteria tab column descriptions are as follows:
Column Name Description
Operator Defines the relationship between the previous rows and the selected row
via operators ‘AND’/‘OR’, brackets and a combination of these values.
Field (Table) Dropdown menu with list of all fields previously selected in the
Report Columns of the Definition Button.
Comparison Type Dropdown menu with comparison options.

12
Value Contains the value to compare with.
3.3.4.1.1 Adding a Data Set Rule
1. From the Criteria tree on the left, click the Expand icon to expand the desired table folder.
2. Select the desired option to transfer the criterion.
A new row is displayed in the Report Criteria section.
Figure 16 – New Row in Report Criteria section
3. From the Operator column, determine how this new row will interact with the previous row by
selecting AND/OR from the dropdown menu.
4. From the Comparison Type dropdown menu, select from the desired method of comparison to
further limit your data set.
5. Click the Save button to save the changes and continue to other tabs for review.
6. Repeat or Exit.
3.3.4.1.2 Editing Data Set Rules
1. Select the field/column by clicking that row.
Reports Centre highlights the user’s selection.
2. Edit the desired field.
3. Continue with further edits or new entries.
4. Click the Save button to save the changes and continue to other tabs for review.
3.3.4.1.3 Deleting Data Set Rules
Refer to the procedure, described in Deleting an Entry.
3.3.5 Defining Column Priority: Order Tab
This section allows the user to define data sorting in the Report Results.
Users have the option to define the sorting order (ascending or descending) of the selected columns.
13
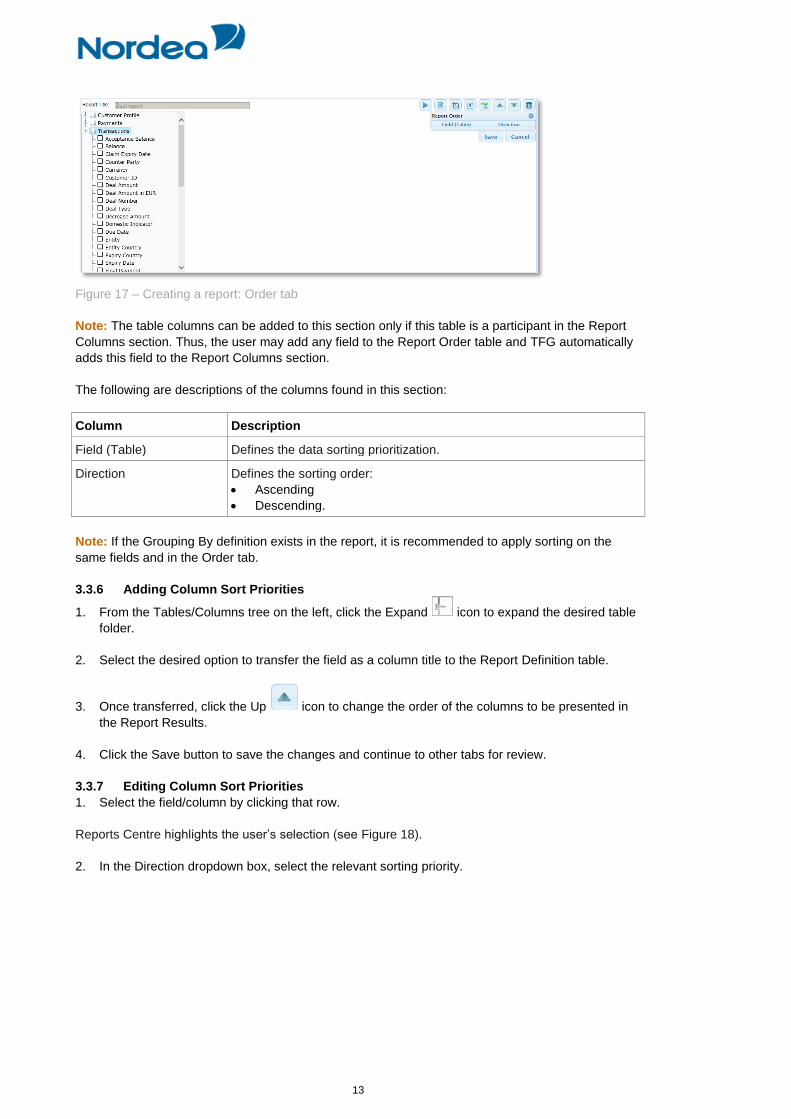
Figure 17 – Creating a report: Order tab
Note: The table columns can be added to this section only if this table is a participant in the Report
Columns section. Thus, the user may add any field to the Report Order table and TFG automatically
adds this field to the Report Columns section.
The following are descriptions of the columns found in this section:
Column Description
Field (Table) Defines the data sorting prioritization.
Direction Defines the sorting order:
Ascending
Descending.
Note: If the Grouping By definition exists in the report, it is recommended to apply sorting on the
same fields and in the Order tab.
3.3.6 Adding Column Sort Priorities
1. From the Tables/Columns tree on the left, click the Expand icon to expand the desired table
folder.
2. Select the desired option to transfer the field as a column title to the Report Definition table.
3. Once transferred, click the Up icon to change the order of the columns to be presented in
the Report Results.
4. Click the Save button to save the changes and continue to other tabs for review.
3.3.7 Editing Column Sort Priorities
1. Select the field/column by clicking that row.
Reports Centre highlights the user’s selection (see Figure 18).
2. In the Direction dropdown box, select the relevant sorting priority.

14
Figure 18 – Defining sorting priority
3. Continue with further edits or new entries.
4. Click the Save button to save the changes and continue to other tabs for review.
3.3.8 Assigning Authorized Recipients: Assignment Tab
The Assignments screen allows the user to assign a report to a group of users or remove the
assignment. The authorization is set on the customer level. Assignment means that this report is
visible for the selected group of users.
The screen consists of the following working areas:
Groups/Customers tree – contains a list of all the groups in this entity. The list of all customers of
each group is shown upon expanding. The supervisor may assign or remove authorized
recipients of a report.
Reports Assignment – contains a list of all customers to whom the report is assigned, organized
per group.
Figure 19 – Assignments Screen
3.3.9 To Assign Authorized Recipients:
Click the desired Groups/Customers
Click the desired folder in the tree in the left hand pane. All names in that folder map into the
Report Assignment table.
Click a specific name in the tree. The name in that folder maps into the Report Assignment table.
Note: When the customer user deletes a report, the other users of this user group lose their
authorization to view the report.
15
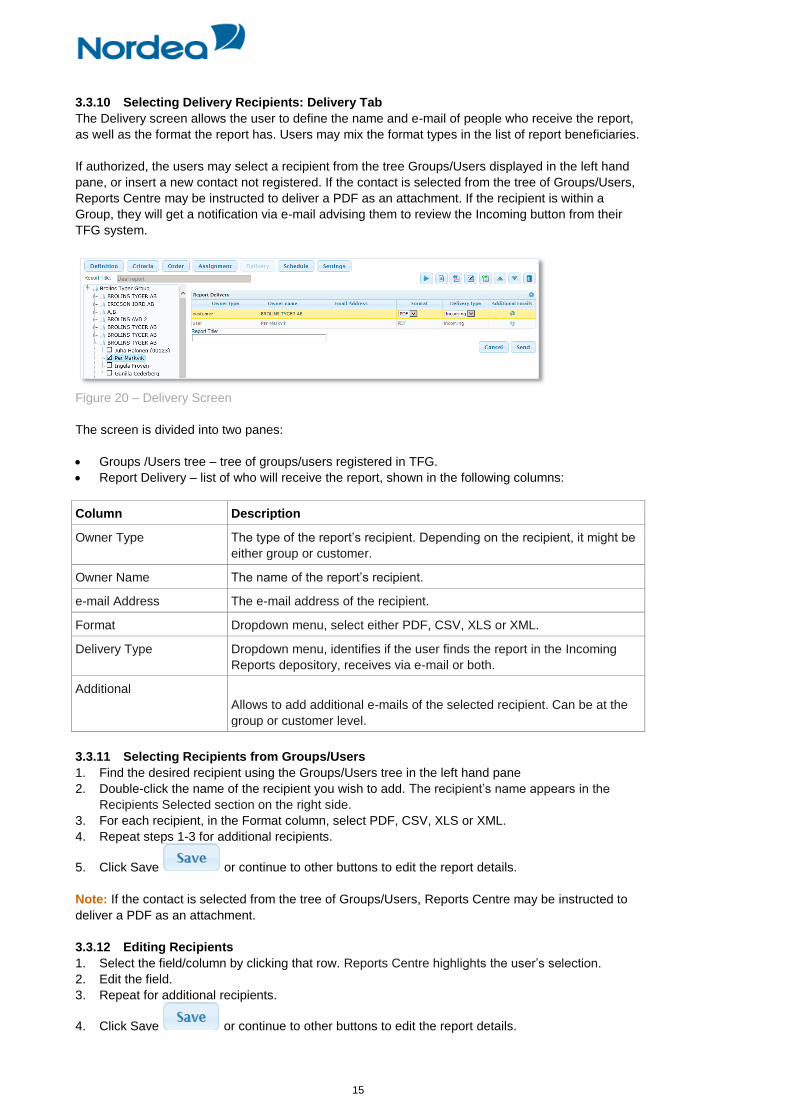
3.3.10 Selecting Delivery Recipients: Delivery Tab
The Delivery screen allows the user to define the name and e-mail of people who receive the report,
as well as the format the report has. Users may mix the format types in the list of report beneficiaries.
If authorized, the users may select a recipient from the tree Groups/Users displayed in the left hand
pane, or insert a new contact not registered. If the contact is selected from the tree of Groups/Users,
Reports Centre may be instructed to deliver a PDF as an attachment. If the recipient is within a
Group, they will get a notification via e-mail advising them to review the Incoming button from their
TFG system.
Figure 20 – Delivery Screen
The screen is divided into two panes:
Groups /Users tree – tree of groups/users registered in TFG.
Report Delivery – list of who will receive the report, shown in the following columns:
Column Description
Owner Type The type of the report’s recipient. Depending on the recipient, it might be
either group or customer.
Owner Name The name of the report’s recipient.
e-mail Address The e-mail address of the recipient.
Format Dropdown menu, select either PDF, CSV, XLS or XML.
Delivery Type Dropdown menu, identifies if the user finds the report in the Incoming
Reports depository, receives via e-mail or both.
Additional
Allows to add additional e-mails of the selected recipient. Can be at the
group or customer level.
3.3.11 Selecting Recipients from Groups/Users
1. Find the desired recipient using the Groups/Users tree in the left hand pane
2. Double-click the name of the recipient you wish to add. The recipient’s name appears in the
Recipients Selected section on the right side.
3. For each recipient, in the Format column, select PDF, CSV, XLS or XML.
4. Repeat steps 1-3 for additional recipients.
5. Click Save or continue to other buttons to edit the report details.
Note: If the contact is selected from the tree of Groups/Users, Reports Centre may be instructed to
deliver a PDF as an attachment.
3.3.12 Editing Recipients
1. Select the field/column by clicking that row. Reports Centre highlights the user’s selection.
2. Edit the field.
3. Repeat for additional recipients.
4. Click Save or continue to other buttons to edit the report details.

16
3.3.13 Deleting Recipients
1. Highlight the row by clicking it.
The row is highlighted and the user is allowed to edit or delete its contents. Multiple rows cannot be
selected for deletion.
2. Click the Delete icon.
A confirmation request is displayed.
3. Confirm deletion by clicking OK.
The column title is deleted.
4. Click Save or continue to other buttons to edit the report details.
3.3.14 Scheduling a Report Delivery: Schedule Tab
Upon clicking the Schedule tab, the Schedule/Properties screen opens.
Users may determine the frequency of report delivery by selecting any of the alternative schedules.
Selection of any one of the alternatives will immediately disable all other options, with the exception
of the ‘Specific Date’ and ‘Time’ rows that work in tandem.
The following fields are found in the Report Schedule work area of the Schedule/Properties screen:
Figure 21 – Schedule window
Column Description
End of Day Checkbox.
Day of Week Dropdown menu with each day of the week listed, including week-ends.

17
Day of Month 1 For scheduling the generation of a report every X days per month.
Available values are from 1 to 31.
Note: If a Month has less than 31 days, and the value 31 is used, the
report will be generated on the last day of the month.
Day of Month 2
Day of Month 3
Day of Month 4
Start of Month Defining report run time checkboxes.
End of Month
Quarterly
Semi-annually
Annually
Specific Date (YYMMDD) Text box. – 8 characters. Works in conjunction with the Time setting.
Time (HH:mm): Text box. Place time in number format
Note: The exact time for all scheduling options, except the combination
of Specific Date and Time fields, can be set in the Reports Centre
property file.
3.4 Report Properties: Settings Tab
Upon clicking the Settings tab, the Report Properties screen opens.
Figure 22 – Report Properties screen
The Report Properties screen contains the following sections:
Report General Properties.
PDF Properties.
3.4.1 Setting Report General Properties
This topic allows the users to define page orientation, size and description for reference purposes.
The following fields are found in the Report General Properties work area of the Settings screen:

18
Figure 23 – Report General Properties work area
Column Description
Orientation Dropdown menu: Portrait, Landscape
Paper Size Dropdown menu: A3, A4, A5, Legal, Letter
Report Description Text box. The user may enter a short description or note that is displayed
in the Incoming Report: Report Comment text field.
3.4.2 Setting PDF Properties
This section provides users with the option of defining PDF page settings, such as page size, margin,
header and font size, Report Results formatting. This is relevant for PDF files only.
The following fields are found in the PDF Properties work area of the Settings screen:
Figure 24 – Report PDF Properties work area
Column Description
Show Grid Lines Presents all data in the grid (table view).
Colour Odd Lines All odd lines are presented on a grey background.
Font Size Determines the size of the Report Result text. The zero value means that
the default value is taken.
Font Determines the font of the Report Results text.
Show Date Determines whether the date of the report run should be displayed in the
top right corner of the Report Result.
Show Time Determines whether the time of the report run should be displayed in the
top right corner of the Report Result.
Show Logo Determines whether the logo should be displayed

19
Logo Width Determines the logo width in the Report Results file.
Logo Height Determines the logo height in the Report Results file.
Note: When the PDF format is used for presenting the report, the logo is included at the top of each
page. The file with the logo should be stored at the location specified by Nordea XML configuration
file. This file is modified to include the logo in the report from the specific location.
The logo can be in a GIF or JPG file format and can be changed only in the implementation phase.
The GIF should be stored as any other GIFs in TFG.
4 Running Reports
Running a report allows the user to create, view and send Report Results that have been created
using Reports Centre.
Running a Report:
1. In the Reports Centre functional menu, click Reports.
2. Click the desired report.
Reports Centre highlights the selection.
3. Click the Run Report icon.
An online review of the report appears in a new window called the Report Results screen.
Figure 25 – Report Results Screen
Note: If the report has been amended but the Save button has not been clicked, the changes will not
be displayed in the report output till Save is clicked.
4. To exit the Report Results screen, click .
TFG returns to the Reports Centre’s main menu.
4.1 Viewing Report SQL Details
When a report has been run, a new window called the Report Results screen is displayed (see
Figure 25).

20
1. Clicking in the left upper corner, opens the Report Details dialog box as shown below:
Figure 26 – Report SQL Details dialog box
This dialog box is divided into two sections:
Report SQL – Displays the SQL commands to retrieve the requested report.
Messages – A short message is displayed if an error occurs. The message source is a database.
Should an error occur, Report Details places the details in the Messages section for the user’s
reference.
2. To exit the Report Results screen, click .
TFG returns to the Reports Centre’s main menu.
4.2 Report Outputs
The Report can be output in several formats:
PDF Format
CSV Format
Excel Format
XML Format
4.2.1 PDF Format
Select the desired report and click .
An online view of PDF reader opens in a new window with the designed report ready for review. The
user may save the report or decide to return to Reports Centre to adjust the contents of the report.
21
4.2.2 CSV Format
Click the Reports button.
The Reports Centre Toolbar is displayed.
Select the desired report and click .
4.2.3 Excel Format
Click the Reports button.
The Reports Centre Toolbar is displayed.
Select the desired report and click .
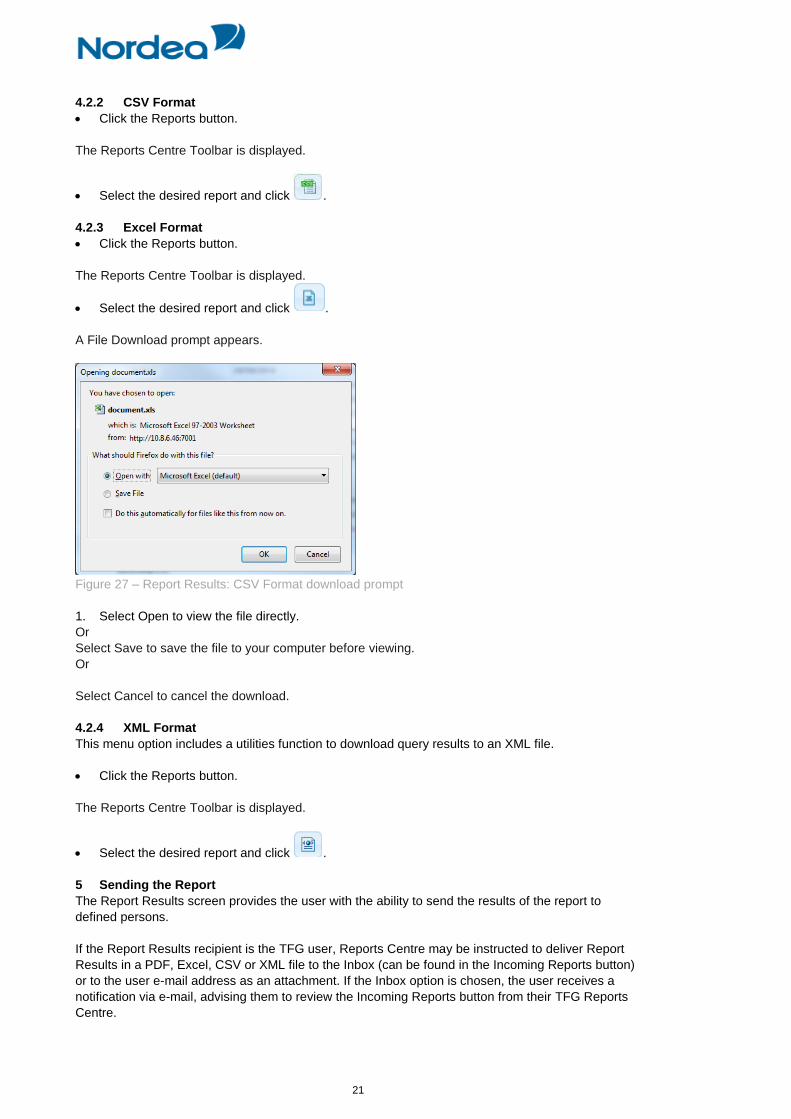
A File Download prompt appears.
Figure 27 – Report Results: CSV Format download prompt
1. Select Open to view the file directly.
Or
Select Save to save the file to your computer before viewing.
Or
Select Cancel to cancel the download.
4.2.4 XML Format
This menu option includes a utilities function to download query results to an XML file.
Click the Reports button.
The Reports Centre Toolbar is displayed.
Select the desired report and click .
5 Sending the Report
The Report Results screen provides the user with the ability to send the results of the report to
defined persons.
If the Report Results recipient is the TFG user, Reports Centre may be instructed to deliver Report
Results in a PDF, Excel, CSV or XML file to the Inbox (can be found in the Incoming Reports button)
or to the user e-mail address as an attachment. If the Inbox option is chosen, the user receives a
notification via e-mail, advising them to review the Incoming Reports button from their TFG Reports
Centre.

22
Each option, Send PDF, Excel, CSV or XML Report, also provides report encryption features, for
greater security in delivery.
1. In the right upper corner of the Reports Centre window, click the Reports functional menu button.
The toolbar appears.
2. In the toolbar, click Deliver Report .
The Report Delivery window opens.
Figure 28 – Adding the report recipients
3. From the tree of Groups/Users in the left-hand pane, select a recipient.
The name automatically appears in the designated field as a recipient.
Column Description
Owner Type The type of the report’s recipient. Depending on the recipient, it might be
either group or customer.
Owner Name The name of the report’s recipient
E-Mail Address The e-mail address of the recipient
Format The report format to be sent to a recipient. Available options:
CSV
Excel
XML
Delivery The delivery method. Available options:
Incoming
Both
Additional Allows to add additional e-mails of the selected recipient. Can be at the
group or customer level.
4. Repeat for additional recipients.
5. Click the button to send a report.
6 Other Reports Centre Activities
Details of other Reports Centre activities include:
Copying a Report
Deleting a Report
Auditing a Report.
6.1 Copying a Report
The Copy function helps users to duplicate an existing Report, and to save and modify it at will.

23
1. Highlight the report to be duplicated from the list in the Reports button.
2. From the toolbar, click the Copy Report icon.
A copy of the selected report is displayed.
Figure 29 – Copied Report
3. Change the title of the new report.
4. Click Save.
A new report title displays in the list of reports.
6.2 Deleting a Report
The Delete function allows users to delete a specific report, depending on the specific needs. Several
confirmation boxes display requesting user approval in order to continue.
Note: When the user deletes a report, the report is not physically deleted from the database. Only
the assignment of the report to the user is deleted.
1. Click the desired report to highlight the row.
2. From the toolbar, click the Delete icon.
A confirmation message displays
Figure 30 – Delete Confirmation Request
3. Click Delete to delete.
The highlighted row is deleted
Note: If you chose to delete a row by mistake, click Cancel to terminate the action.
6.3 Auditing a Report
Auditing a report allows the user to view a detailed description of changes made to a report.

24
1. Access the Report Audit screen by clicking the Audit button from the Reports Centre functional
menu.
The Report Audit screen appears.
Figure 31 – Report Audit Screen
2. The content of the Report Audit screen may be sorted in ascending or descending order by
clicking on any of the following column titles:
Column Description
User ID User responsible for the actions described in the column ‘Message’
Report Title Report subject to change
Time YYYY-MM-DD format
Event Action performed on the report
Message Type of change enacted on the report
6.4 Deleting Incoming Reports
The Delete option provides the user with the ability to purge incoming reports.
1. On the functional menu, click the Incoming button.
The Incoming Reports screen appears (see Figure 32).
2. Click the report you want to delete.
Reports Centre highlights the selected row.
3. If desired, you have the option to purge ALL existing records by selecting the All checkbox.
Figure 32 – Incoming screen with all reports selected
4. If desired, you have the option to delete the reports created on a certain date by clicking the Find
Records icon.

25
The Search dialog is displayed.
Select the relevant criteria, date and click Find.
In the found results, select all reports (see Step 3 above).
5. On the toolbar, click the Delete icon.
Reports Centre requests confirmation.
Figure 33 – Delete report confirmation
6. Click Delete.
Reports are deleted.
7 Profiles
The Profiles functionality is intended to centralize the group/customer relevant information at one
place.
Figure 34 – Defining the group information
The Profiles screen contains the following work areas:
Group/Customer tree on the left
Identification logo and password
Address Book – allows the user to create a list of external recipients of the report results who are
not TFG users. Each list member has a name and e-mail address.
26
7.1 To Define a Group/Customer Profile
Reports Centre allows the user to define the logo and external (not TFG) recipients per group and
per separate customer as well.
7.1.1 To Define Logo and External Recipients per Group:
1. On the functional menu, click the Profiles button.
The defining group information screen appears (see Figure 34).
2. In the Password to encrypt email with field, type password.
3. Upload the logo.
4. Add the relevant report recipients.
5. Click the Save button to save the group profile.
7.1.2 To Define Logo and External Recipients per Customer:
1. On the functional menu, click the Profiles button.
The defining group information screen appears (see Figure 34).
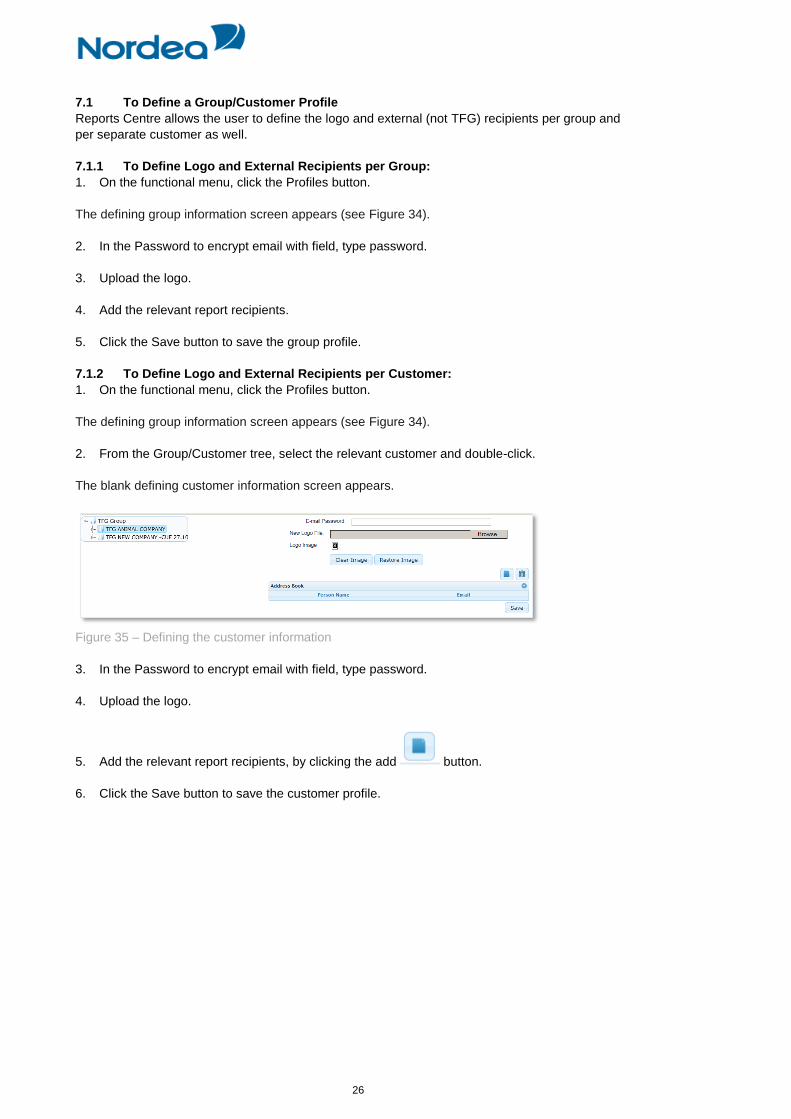
2. From the Group/Customer tree, select the relevant customer and double-click.
The blank defining customer information screen appears.
Figure 35 – Defining the customer information
3. In the Password to encrypt email with field, type password.
4. Upload the logo.
5. Add the relevant report recipients, by clicking the add button.
6. Click the Save button to save the customer profile.